Table of Contents for
Programming Alexa Skills
 Programming Alexa Skills
Published by
O'Reilly Media, Inc., 2019
Programming Alexa Skills
Published by
O'Reilly Media, Inc., 2019
- The Tools You Need and Where to Find Them
- Contents
- Getting Familiar with the Alexa Skills Kit (ASK)
- Pick Your Hosting Platform Carefully
- My City Facts – Designing Your New Skill
- Building the MyCity Facts Skill as an AWS Lambda Function
- Building the MyCity Facts Skill as an ASP.NET Web API Service Hosted in Microsoft Azure
5
Building the MyCity Facts Skill as an AWS Lambda Function
Welcome to chapter 5: Building the MyCity Facts Skill as an AWS Lambda Function. In this chapter, you will take the design for the MyCity Facts skill that we completed in chapter 4 and implement it as an AWS Lambda Function.
After creating and deploying the skill, I’ll cover publishing it for others to enable and use.
Implementing Your Design
You’ve got a complete design for your MyCity Facts skill thanks to the work you did in Chapter 4, so now it’s time to push up your sleeves and create your AWS Lambda Function.
Download the Skill Files
From this point forward, all of the projects in this book can be downloaded from GitHub as a .ZIP file at the following address: http://bit.ly/2yHPsg6 (This file has all of the projects, so you only need to download it once.)
If you’re familiar with Git and GitHub.com, you can also choose to clone or fork the repo into your own workspace. All of the necessary files for the MyCity Facts skill can be found in the AlexaBookRepo project on GitHub, here: http://bit.ly/2yHMcRU, as seen in Figure 5-1.
If you downloaded a local copy, you can extract the files to the location of your choosing. The files for this project are in the AlexaBookRepo-master/MyCityFacts-AWS folder.
In that folder you will find two more folders: /speechAssets and /src. This will be a common theme throughout all of the projects, and most projects you find online. The /speechAssets folder contains the IntentSchema.json and SampleUtterances.txt files, which we informally defined in Chapter 4.

Figure 5-1: The MyCityFacts-AWS GitHub Repo
The /src folder contains the index.js file, which will contain the JSON code used for the AWS Lambda Function.
We’re going to focus on the contents of the /speechAssets folder first, and we’ll come back to the /src folder in a little bit.
IntentSchema.json
Open up the IntentSchema.json file in any text editor (even Notepad) and take a look. There shouldn’t be any surprises in here. All of the intents we defined in Chapter 4 are present in the intents array:
{
"intents": [
{
"intent": "GetMyCityFactIntent", "slots":[]
},
{
"intent": "AMAZON.StopIntent"
},
{
"intent": "AMAZON.CancelIntent"
},
{
"intent": "AMAZON.HelpIntent"
}
]
}
We don’t define any slots for the GetMyCityFactIntent because it doesn’t accept any parameters. It always returns one randomly selected fact from our skill, every time we invoke it.
Regardless of your preferred programming model and language, this JSON array is the format you will always use when you specify the Intent Schema in the Interaction Model tab of the Create a New Alexa Skill workflow on the Alexa Developer Dashboard.
That last part was a bit of a mouthful, but don’t worry, we’re going to walk through all of it shortly, but first we’ll take a look at the other file in the /speechAssets folder: the SampleUtterances.txt file.
SampleUtterances.txt
You guessed it! This file contains all of the sample utterances you came up with in Chapter 4. Your MyCity Facts skill will listen for all of these, plus some built-in phrases as well.
Much like the IntentSchema.json file, this will get pasted into the Interaction Model tab when setting up your skill.
GetMyCityFactIntent Fact
GetMyCityFactIntent Give me a fact.
GetMyCityFactIntent Tell me a fact.
GetMyCityFactIntent Id like a fact.
GetMyCityFactIntent City Fact
GetMyCityFactIntent Give me a city fact.
GetMyCityFactIntent Tell me a city fact.
GetMyCityFactIntent Id like a city fact.
GetMyCityFactIntent Tell me about MyCity.
GetMyCityFactIntent Tell me something.
GetMyCityFactIntent Tell me something about MyCity.
GetMyCityFactIntent Hit me with a fact.
GetMyCityFactIntent Share a fact with me.
GetMyCityFactIntent Share a city fact with me.
GetMyCityFactIntent Surprise me.
AMAZON.HelpIntent What do I do
AMAZON.HelpIntent What
AMAZON.HelpIntent What do I say
AMAZON.HelpIntent How does this work
AMAZON.HelpIntent How do I get a fact
AMAZON.HelpIntent Help me get a city fact.
AMAZON.HelpIntent I dont know what to do.
AMAZON.HelpIntent Directions
AMAZON.HelpIntent Huh
AMAZON.HelpIntent I dont understand.
AMAZON.HelpIntent What am I supposed to say
AMAZON.HelpIntent Help
AMAZON.HelpIntent Is this thing on
AMAZON.StopIntent Stop
AMAZON.StopIntent Quit
AMAZON.StopIntent Exit
AMAZON.StopIntent Finish
AMAZON.StopIntent Im done
AMAZON.StopIntent Shut Up
AMAZON.StopIntent Goodbye
AMAZON.CancelIntent Cancel
AMAZON.CancelIntent Abort
AMAZON.CancelIntent Nevermind
You may have noticed that certain punctuation and special characters have been stripped away. While it’s natural to want to write your sample utterances with proper punctuation, single quotes and question marks will get rejected by the Interaction Model screen when we try to submit.
Now let’s take a look at the /src folder. There’s only one file in there: index.js, which we’ll cover now.
index.js
The index.js file contains all of the code for your AWS Lambda Function. The listing is a little long, so I’ll break it down into more digestible chunks and talk about what we’re doing in each part.
This first block of code sets a reference to the Alexa SDK, and then registers your event handlers, which in this case includes the Alexa LaunchRequest event, and your various Intents which you defined previously.
const Alexa = require('alexa-sdk');
exports.handler = function(event, context, callback) {
var alexa = Alexa.handler(event, context);
alexa.registerHandlers(handlers);
alexa.execute();
};
You will pass in a collection of handlers (defined below) to the registerHandlers() method (above.) This lets Alexa know what Intents to support, and therefore what utterances to listen for. The handlers then specify how to respond to each intent invocation.
var handlers = {
'LaunchRequest': function () {
this.emit('AMAZON.HelpIntent');
},
A LaunchRequest is fired whenever the skill is opened. In this case, we are using that event to trigger the AMAZON.HelpIntent so users know what to do when they invoke your skill.
In JavaScript / Node.js an event can be described as a string with a callback. An event can be emitted one or more times, resulting in execution of the callback function (which in the above example, would be the AMAZON.HelpIntent) for each occurrence of the event.
It’s generally regarded as a good practice to let your handlers call each other (as in the example above) rather than having multiple copies of the same text string floating around. This ensure consistency in responses from Alexa to your users.
If you have any external services that need to be initialized, data to load from elsewhere, etc., the LaunchRequest event is a good place to do so.
'GetMyCityFactIntent': function () {
var say = 'Here is your fact. ' + getRandomMyCityFact();
this.response.speak(say);
this.emit(':responseReady');
},
The above block of code shows the callback function that is executed when the GetNewMyCityFactIntent is invoked (by the user) or emitted (by the LaunchRequest event handler above).
There’s a few things going on in this method. First you are constructing the response string (stored in the say variable) with a standard opening “Here is your fact” followed by a randomly selected fact about your city.
Speaking of which, I’ll cover the GetRandomMyCityFact() function in just a moment.
The response.speak() function accepts a string that can be plain text or formatted with Speech Synthesis Markup Language (SSML) and stores it in the Response object. We’ll dig into SSML more in a later project, but if you’re curious there’s a reference in Appendix B in the back of the book.
Finally, we emit the responseReady event after the response has been built, but before it is returned to the Alexa service. This tells Alexa that the Response object we’ve constructed is ready to go.
The responseReady event also invokes the saveState event automatically. We’re not persisting any state information in this example, so we’ll come back to that in a later chapter.
Next up, we have the built-in intents:
'AMAZON.CancelIntent': function () {
this.emit('AMAZON.StopIntent');
},
'AMAZON.StopIntent': function () {
this.response.speak('Goodbye');
this.emit(':responseReady');
},
Remember how in the design chapter we discussed treating the Stop and Cancel intents as functionally identical? If the user invokes the Cancel intent, we just invoke the Stop intent. This way, we keep redundant code to a minimum and the UI responses remain consistent.
'AMAZON.HelpIntent': function () {
var speechOutput = 'you can ask for a fact by saying, tell me a fact.';
var repromptSpeech = 'Try it! Just say tell me a fact.'
this.emit(':ask', speechOutput, repromptSpeech);
}
};
This time, we’re using two response methods. You’ve already seen response.speak, but we are also emitting an Ask event which waits for the user to say something else after hearing the help message.
If Alexa doesn’t understand that response, she prompts the user again with the reprompt message, which in this case is “Try it! Just say tell me a fact.”
The Help intent doesn’t have to go last in the handlers collection of our AWS Lambda Function, but it’s a good habit to reinforce since we’re putting it last in the IntentSchema (in order to catch any unrecognized commands from the user.)
Next, we have the getRandomMyCityFact() method that we referenced above. This contains the array of MyCity Facts the skill will draw upon.
function getRandomMyCityFact() {
var myFacts = [
'MyCity has a population of 123,456 people, 11 bears, 3
alligators, and 7,134 cats.','MyCity has several popular
attractions, including 3 lakes, 2 mountains, and a 400
acre wildflower sanctuary. On a nice day, you can see
the bears playing among the wildflowers, but dont get
too close.','MyCity was founded in 1873 by settlers who
got lost on their way from Virginia to California and
decided to stay put and make the best of it.','The mayor
of MyCity is YourName Goes Here. This is the 14th
consecutive term for Mayor Here.','MyCity holds a record
in the Guinness Book of World Records for the largest
man-made neon star on top of a mountain.','City Hall has
had three locations since first being constructed in
1902. The first move was due to extensive damage from
the great flood of 1937, and the second move was due to
the needs of the administration outgrowing the previous
facilities. This move occurred in 1992, and City Hall now
resides at the intersection of Hill Street and Mountain
View Blvd.','The summer carnival is MyCitys most popular
event and raises enough money to fund the volunteer fire
department every year.','MyCity is home to 237 pizza
restaurants, 9 fast food establishments, and 1 frozen
banana stand, which is open from the beginning of July to
the end of September.','One of the prettiest places on
Earth, MyCity has four perfect seasons of exactly 3
months each. The leaves change every fall, and winter
offers exactly 22.4 inches of snowfall every year.
Average summer temp is 76.8, every year.','The Mascots
are the official football team of MyCity. This is also
the name of the local baseball team, basketball team, and
soccer team.'
];
This array is fine for our relatively simple MyCity Facts skill, but if you wanted to create something really big, you should consider using a database. This has the added bonus of allowing you to add more and more facts without having to edit and redeploy your skill every time.
Lastly, we have the single line of code that handles the magic of randomly selecting a fact for Alexa to return:
return(myFacts[Math.floor(Math.random() * myFacts.length)]);
}
There’s a few things going on here, so I’ll break it down. Math is a javascript library that contains a bunch of helper methods, including Math.random() and Math.floor().
The Math.random function returns a number between 0 and 1 exclusively (that is, neither 0 nor 1) which you have to multiply by the max number you want to randomize.
In other words, if you wanted a random number from 1 to 20, you would use Math.random() * 20 and if you want it to be a whole number, you must wrap that function with Math.floor (which rounds down to the nearest whole number) so it ends up looking like Math.floor(Math.Random * 20).
This is pretty common in C and Java style languages, but may look weird to any .NET developers reading this book, because they get something a little bit simpler. The statement Random.Next(1, 20) does the same thing as above, returning a whole number ranging from 1 to 20.
Random Number Generators (RNGs) are weird, arcane constructs that return pseudorandom numbers. We call them pseudorandom because achieving True Random is impossible on a computer.
There have been some incredibly long and boring books written on this subject, but the short version is that if a RNG is used long enough, they can present a predictable pattern, which can be problematic for some uses.
As a result, there are numerous incredibly complex RNGs written specifically to try and address such predictability, but for our purposes the Math.random() function will be fine.
In our code, we’re multiplying the random value by facts.length which is a whole number that represents the number of records in our facts array. This is better than hardcoding a number, because as you add more facts to your array, you won’t have to come back and modify this code every time!
Once we have a random number, we use it as the index in our facts array and return a string containing the fact, which gets used in the GetNewMyCityFactIntent defined above.
That covers everything in this project, so now it’s time to create the skill.
Add a New Skill
The next thing you need to do is add a new skill in your Alexa Skills Kit dashboard (located at: http://amzn.to/2qiiCjJ) by clicking the Add a New Skill button as shown in Figure 5-2.
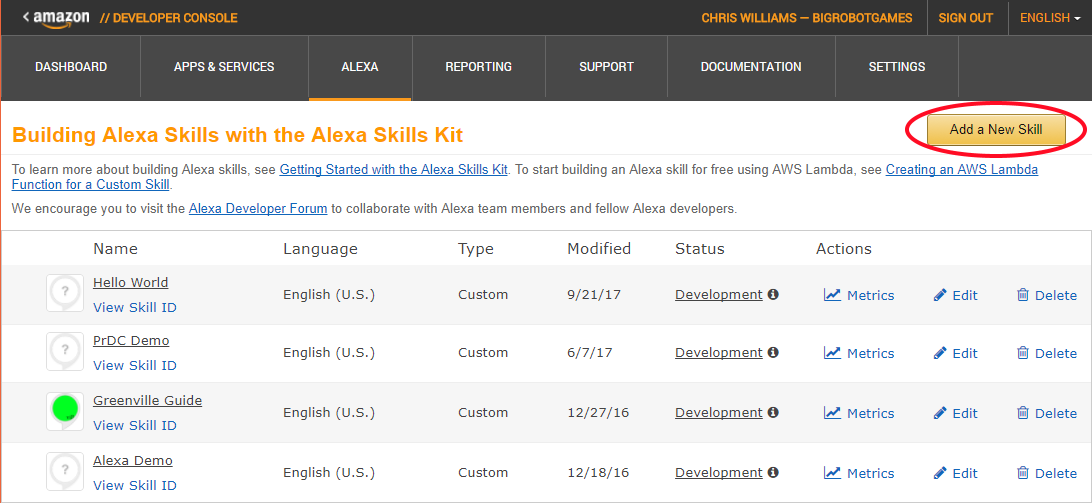
Figure 5-2: Amazon Alexa Skills Kit Dashboard
Skill Information
Assuming you are already logged in, you should now be looking at the Skill Information tab as shown in Figure 5.3.
To begin creating your skill, perform the following steps on this screen:
- In the Skill Type section, select the Custom Interaction Model.
- In the Name field, enter: MyCity Facts
- In the Invocation Name field, enter: MyCity Facts
Invocation Names should be short and easily distinguishable. Amazon recommends using no more than 3 words, and disallows the use of special characters and the words Alexa, Echo or Amazon as part of your invocation name. 1. Accept the default values for the three Global Fields. 2. Click the Save button. 3. Click the Next button to proceed to the Interaction Model screen.
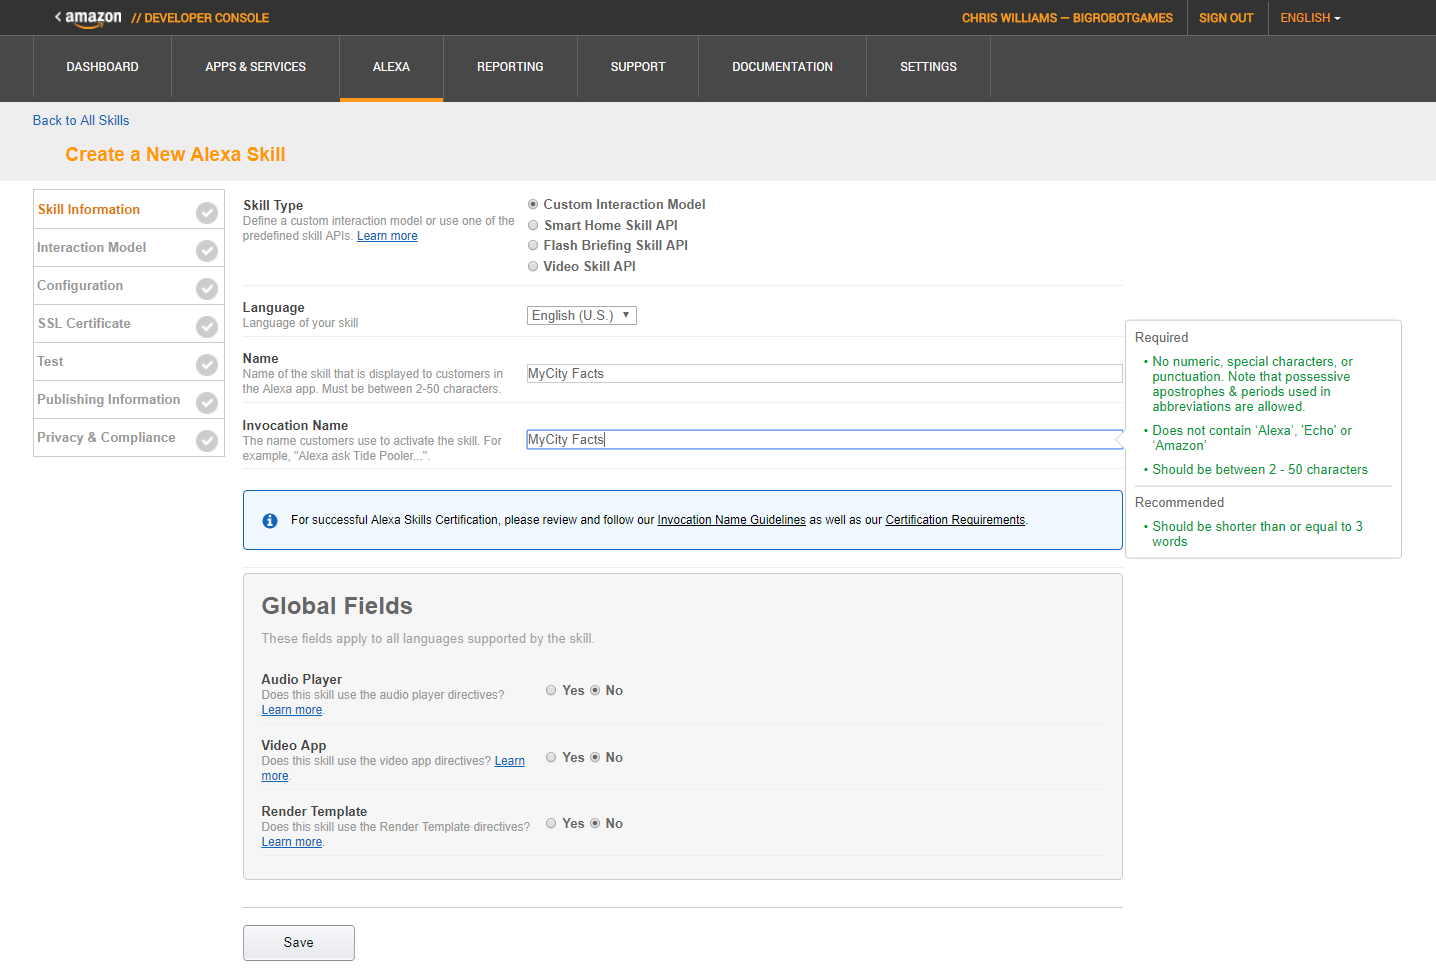
Figure 5-3: The Skill Information Tab
Interaction Model
The next screen is the Interaction Model, which you can see in Figure 5-4. I have omitted the Custom Slot Types from the screenshot.
You will add the contents of your IntentSchema.json and SampleUtterances.txt files on this page.
Perform the following steps:
- Copy the contents of the IntentSchema.json file and paste them into the Intent Schema box.
- Copy the contents of the SampleUtterances.txt file and paste them into the Sample Utterances box.
- Click the Save button.
- Click the Next button to continue to the Configuration screen.
The MyCity Facts skill doesn’t use any Custom Slot Types, so you will skip that section.
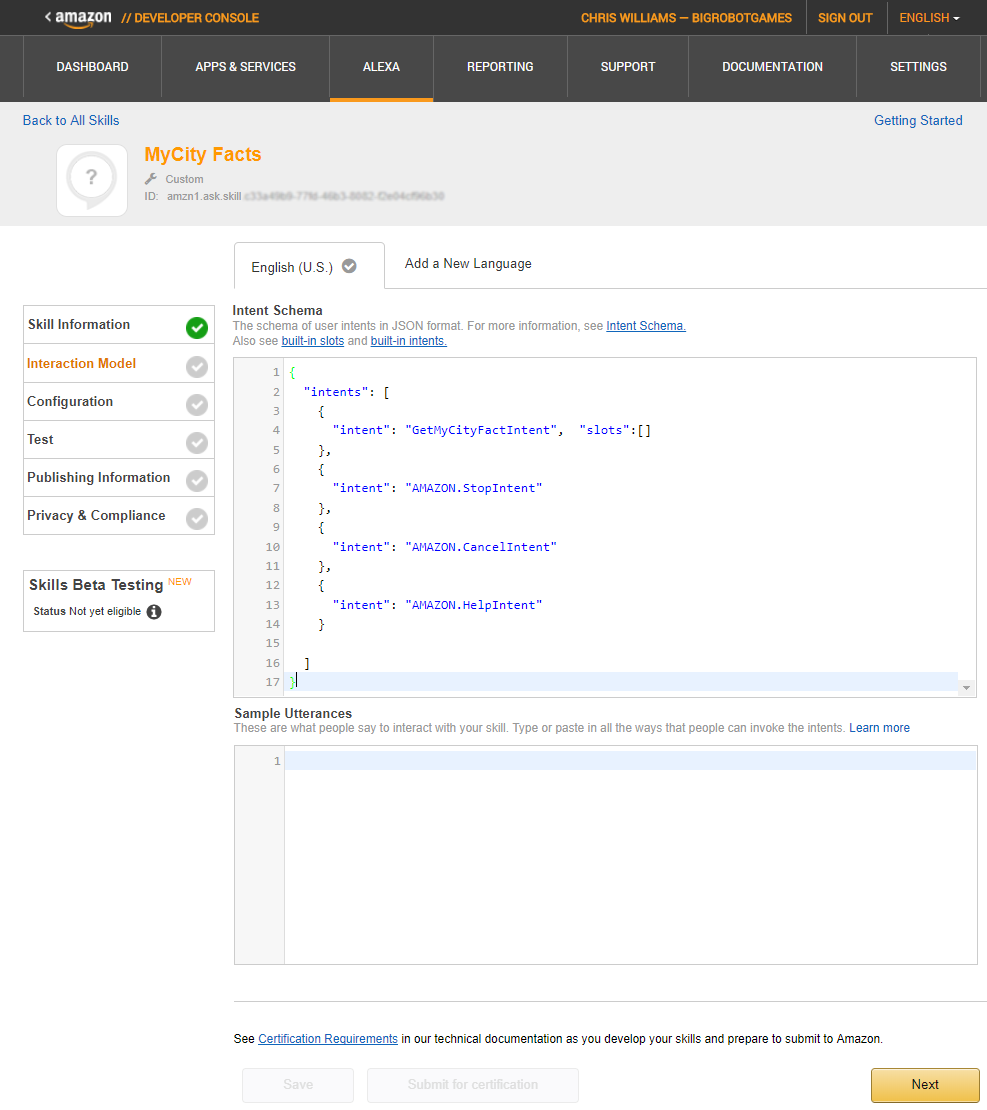
Figure 5-4: The Interaction Model Tab
AWS Lambda Function
After clicking the Next button in the previous section, you should be looking at the Configuration page, but before you can continue forward, you will need an Endpoint address for the AWS Lambda Function that services your skill requests.
You know what that means… It’s time to head over to AWS and create our Lambda Function. Don’t worry, you’ve already saved your progress so far, so it will be there when you come back.
- In your browser, go to aws.amazon.com and sign in to the console.
- Find the Compute section (should be top left), and click the link for Lambda.
You should now be looking at a table (Figure 5-5) containing any Lambda Functions you have previously worked on, including the HelloWorld function you created earlier in this book. 1. Click the Create Function button (top right).
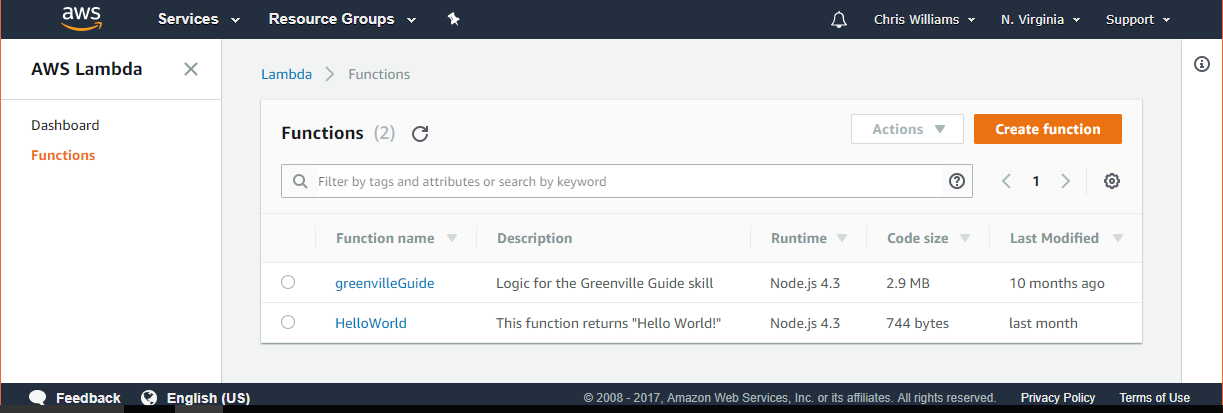
Figure 5-5: Aws Lambda Functions
When creating an AWS Lambda Function, you have the option of coding from scratch or using a Blueprint. Blueprints are sample apps that come preconfigured with an event source and code, and are handy for getting you up and running quickly.
AWS has well over a hundred Blueprints to choose from, but most are not relevant to Alexa Skills development. If you type Alexa in the Blueprints search box and hit enter, you will get back a much smaller list of Alexa Blueprints (as shown in Figure 5-6.)
Take a look at the results. There are a few to choose from, but the first item in the list is the alexa-skill-kit-sdk-factskill, which sounds like a pretty good match for what we’re doing.
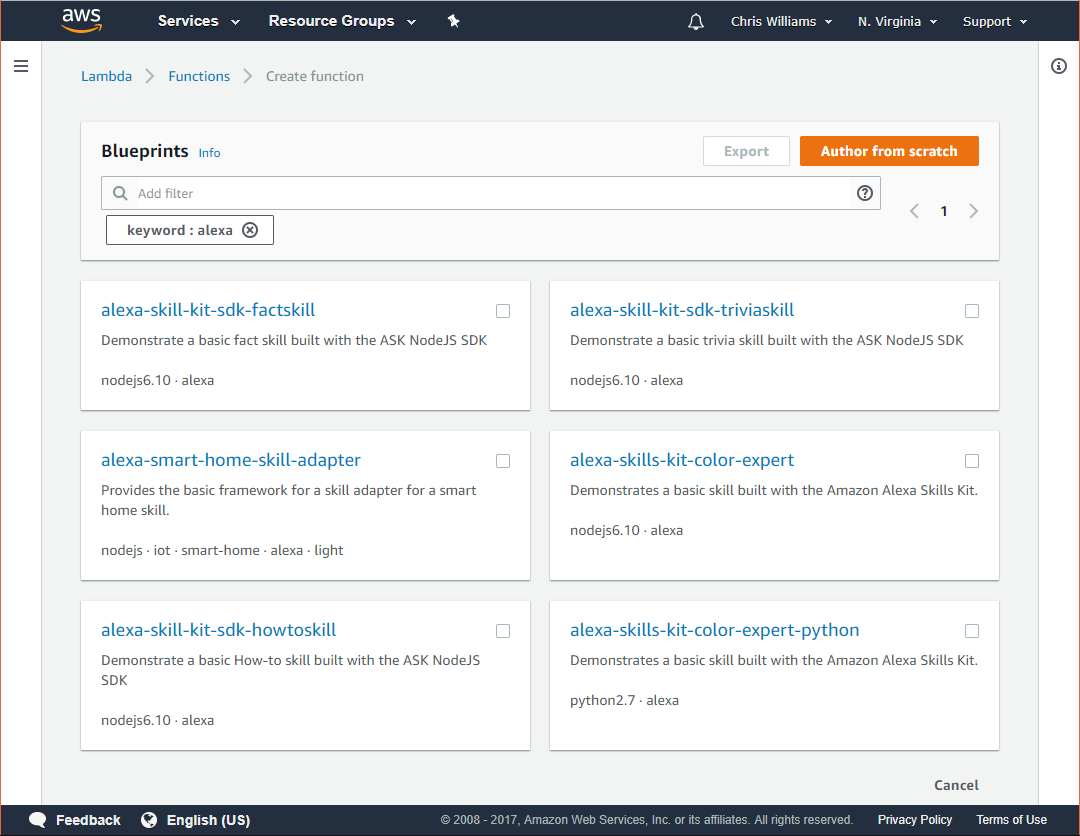
Figure 5-6: AWS Lambda Blueprints for Alexa
Go ahead and click on that one and take a look at what the Blueprint provides you.
I’m not going to reproduce it here, because it’s about 150 lines of code you aren’t going to use on this project, but I want you to take a look at it (and the rest of the Alexa Blueprints) so you know what’s available to you when you’re creating your own projects.
This is a pretty good sample, because it includes content for multiple languages and shows how to select the correct language based on your user’s settings.
Once you’ve gotten a good look at the blueprint, go ahead and click the Previous button at the bottom of the page, to go back to the Create Function page.
- Click the Author From Scratch button (top right of page)
You will be presented with the Basic Information screen (Figure 5-7) where you will give the function a name and set roles.
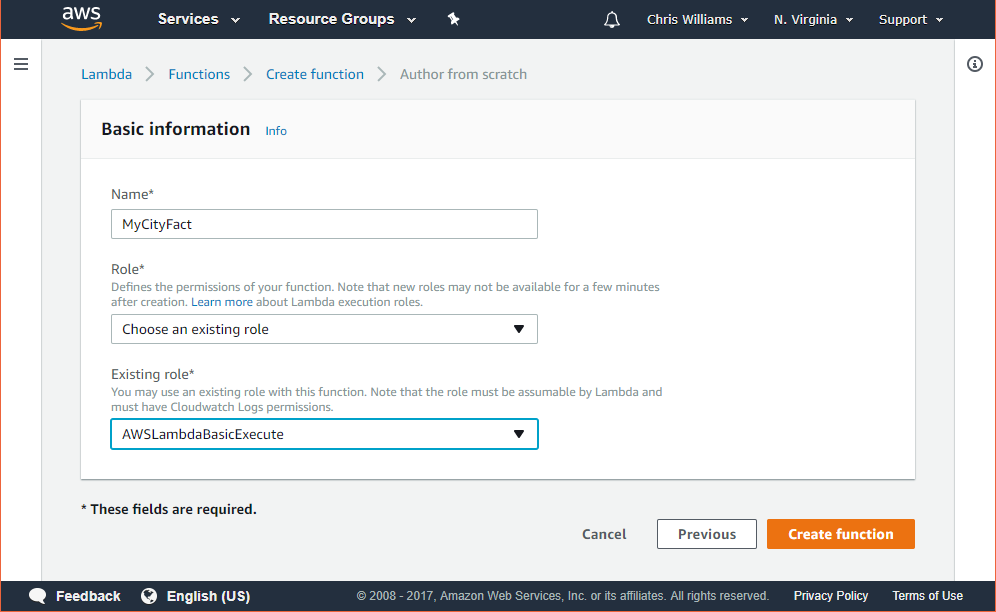
Figure 5-7: AWS Lambda Function Basic Information
- Enter the name for your function. I used MyCityFact, and you can too because this name is unique within your space in AWS.
- If you have been following along, and you created a Lambda Function for the previous project, you can select “Choose an existing role.” from the Role dropdown box and then select the “AWSLambdaBasicExecute” role from the Existing Role dropdown box.
- you don’t have a role available to select, you’ll need to create one so select the “Create new role from template(s)” option, enter a name for your role and then select “Simple Microservice permissions” from the Policy Templates dropdown box.
- Click the Create Function button.
- everything went ok up to this point, you should see a “Congratulations!” message that indicates your function has been successfully created.
- course, it doesn’t do anything… yet, but that’s easy enough to fix. Just head on over to the GitHub repo you downloaded and drill down into the MyCityFacts-AWS/src/ folder and open the index.js file (or view it on GitHub at: http://bit.ly/2yAfsgm).
- Once you’ve opened the file, select and copy all of it.
- Switch back over to the empty AWS Lambda Function screen and delete everything in the text editor, and then paste in your code.
- Click the Save button (top of screen.)
- almost done with this part. Click the Triggers heading at the top of the page so you can add the Alexa Skills Kit as an Event Source for your AWS Lambda Function.
- Click “Add Trigger” and you will see the Add Trigger dialog (Figure 5-8.)

Figure 5-8: The Add Trigger Dialog
- Click the dashed box on the left of the arrow and select “Alexa Skills Kit.”
- Click the Submit button.
- this point, you have a complete AWS Lambda Function, complete with an event trigger.
- you can go back to finish configuring your skill in the Alexa Skills Dashboard, you need to copy the Amazon Resource Name (ARN), which you will paste into the configuration page.
- can find the ARN for this Lambda Function at the top of the page, as shown in Figure 5-9.

Figure 5-9: The ARN (Amazon Resource Name)
- will look like “arn:aws:lambda:us-east-1:xxxxxxxxxxxx:function:MyCityFacts”.
- Select and copy the ARN.
- done with the Lambda Function, so switch back to the Alexa Skills Dashboard, and click on the Configuration section.
Configuration 1. so close to being done. You’ve designed and built your skill, and created the AWS Lambda Function to power it. All that remains is to point your skill to the service and test it out, so let’s get to it. 2. should be looking at the Configuration screen (Figure 5-10). 3. Under the Endpoint section, select AWS Lambda ARN. 4. Paste the ARN you copied from the AWS Lambda Function into the Default textbox. 5. can accept the default values for the rest of the screen. 6. won’t be using geographical regions or linked accounts for this skill. 7. Click the Save button. 8. Click the Next button to proceed to the Test screen. 9. it for the Configuration section. Next up, you’ll test your skill and examine the JSON request and response between your skill and the AWS Lambda Function you created.
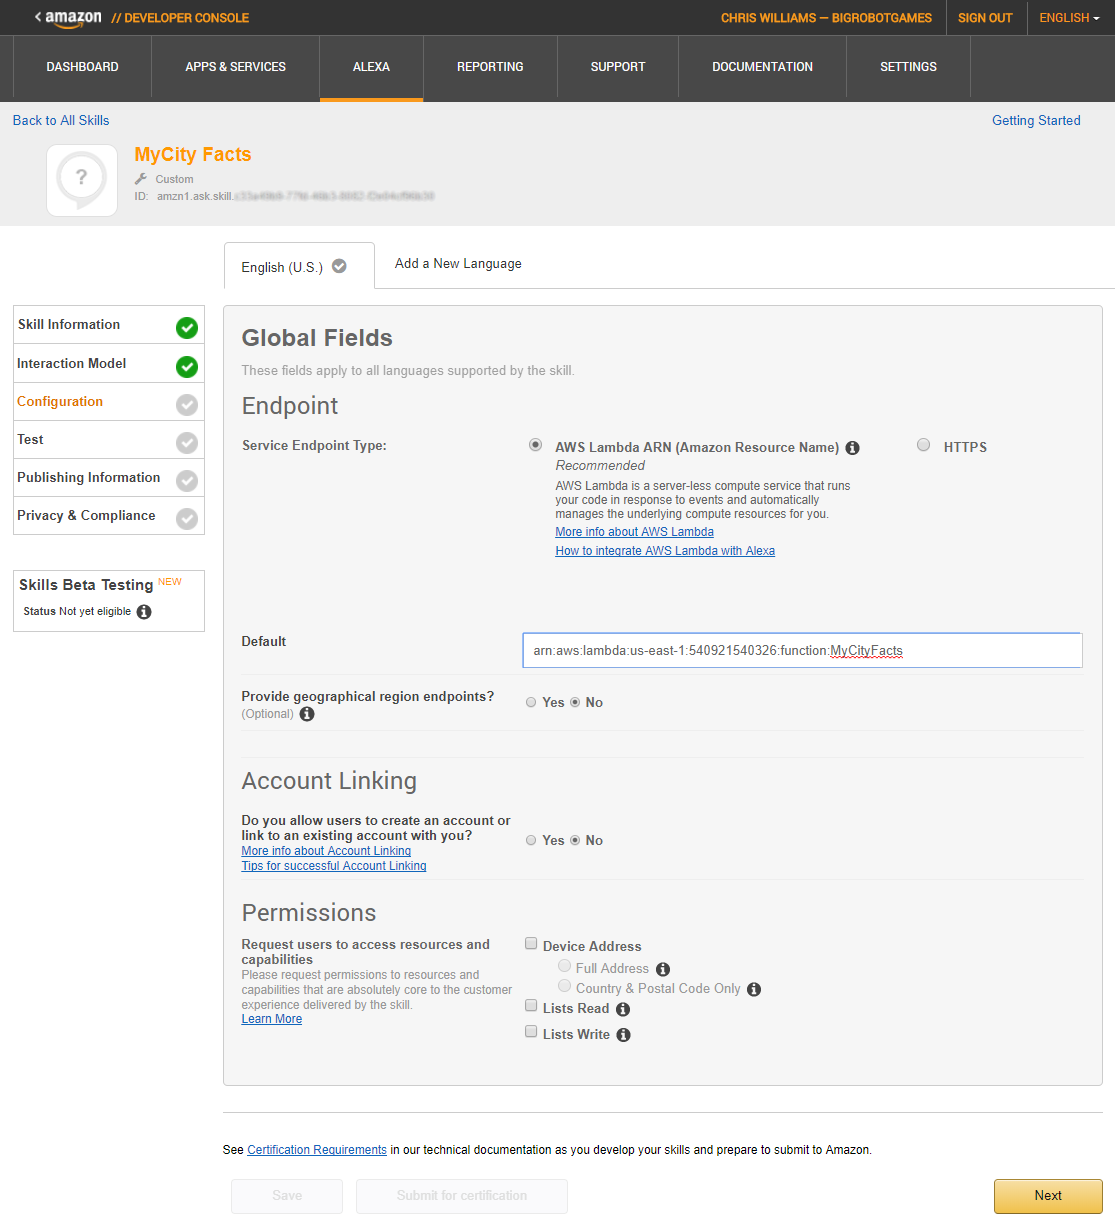
Figure 5-10: The Configuration Screen
Test
The MyCity Facts skill is complete, so let’s test it out.
You should be looking at the Test screen (Figure 5-11) at this point. The first thing you’ll notice is that your Alexa skill is now enabled for testing.
The Voice Simulator is neat, but not particularly useful to us at the moment. Where it’s especially useful is when you’re trying to test out some SSML responses for your skill.
Unfortunately, given how far in the process you have to be in order to get to the Voice Simulator, Amazon Polly (https://aws.amazon.com/polly) is a much better choice for general testing.
In the Service Simulator, you can test sample utterances to invoke your skills and then examine the JSON request and response documents generated by your skill and AWS Lambda Function, respectively.
Try this in the Service Simulator:
- Type: tell me a fact
- Click the Ask MyCity Facts button
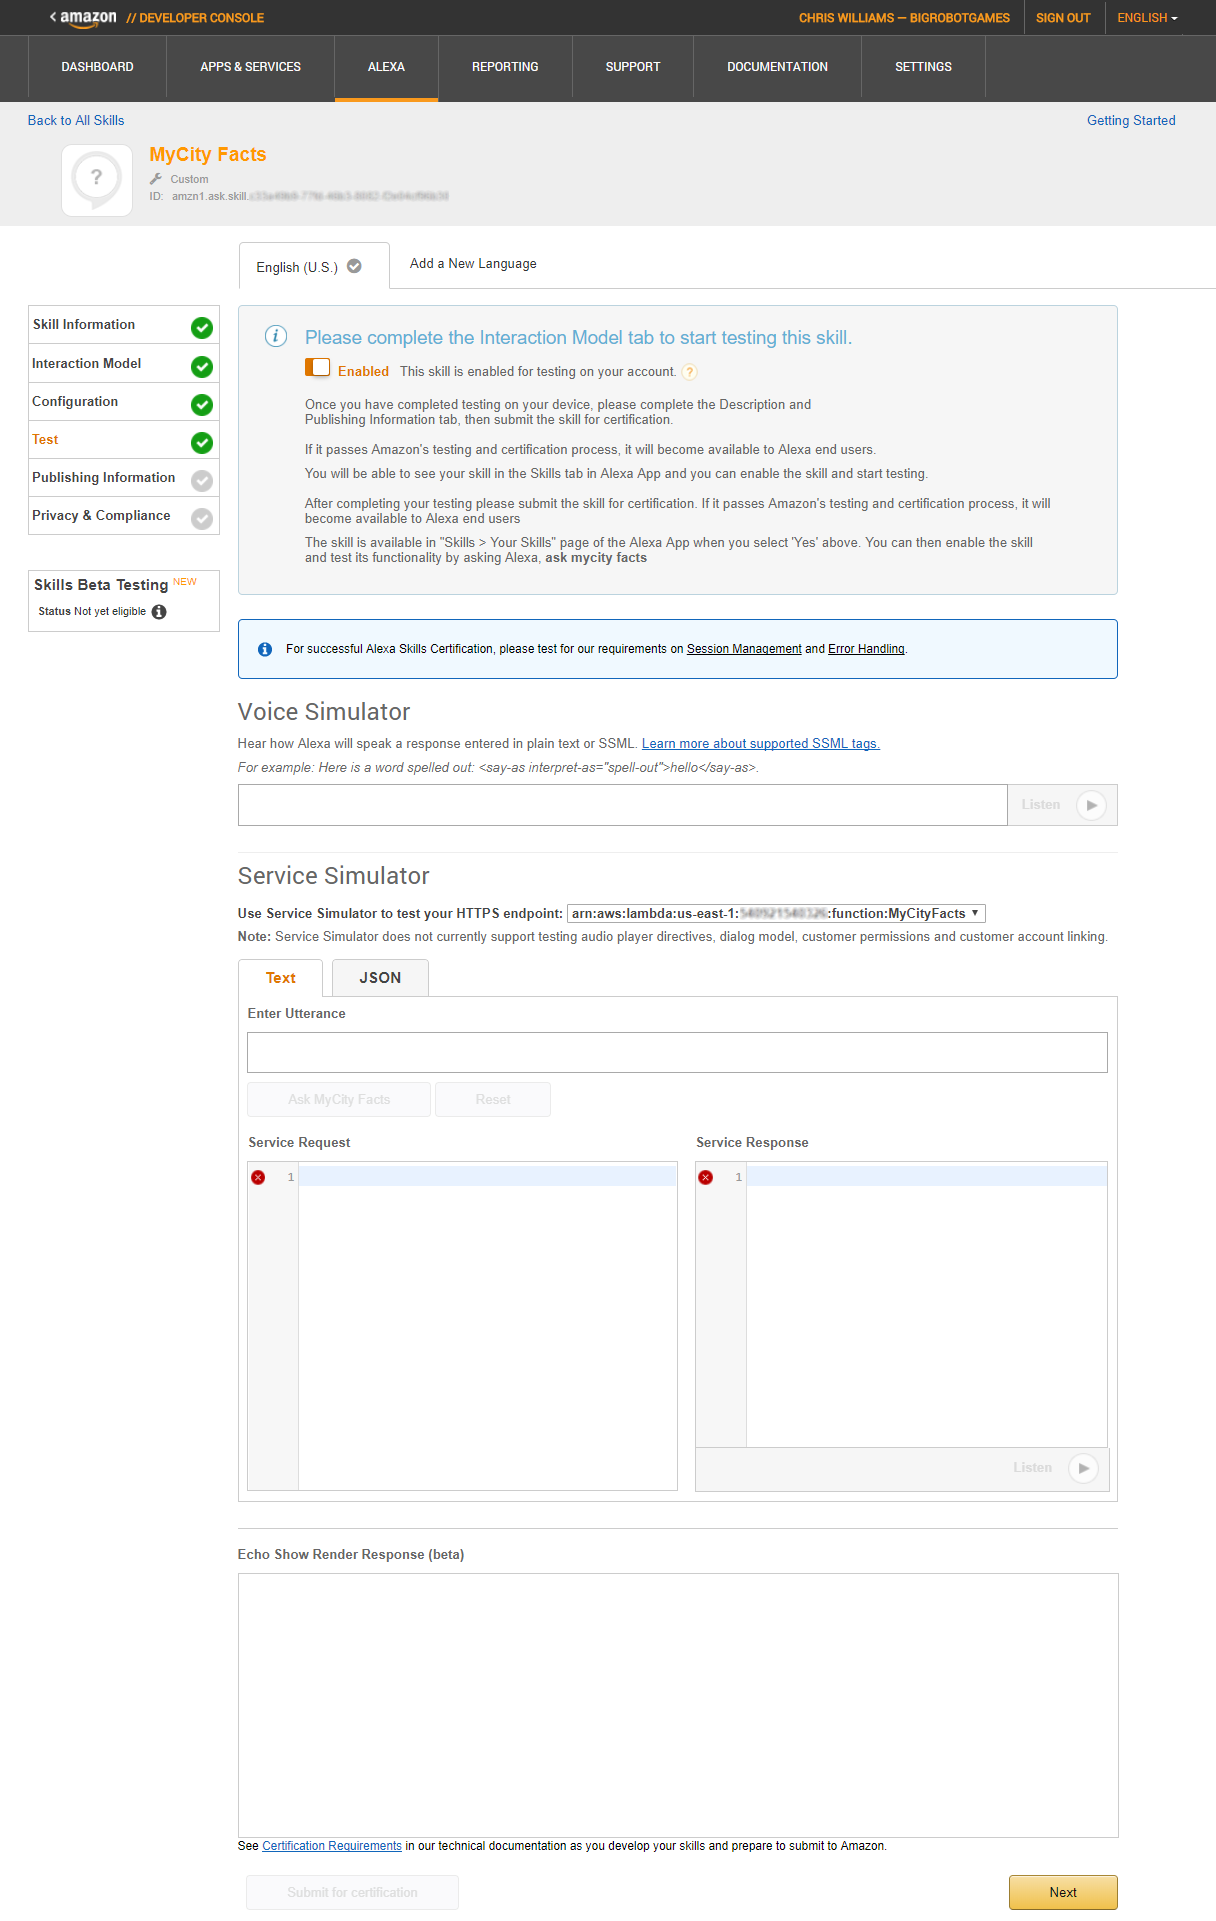
Figure 5-11: The Test Screen
After you click the Ask MyCity Facts button, the Service Request and Service Response boxes will both populate with JSON documents.
The Service Request:
{
"session": {
"new": true,
"sessionId": "SessionId.994568e2-9568-4385-ba5d-499a124d2bd0",
"application": {
"applicationId": "amzn1.ask.skill.xxxxxxxxxxxxxxxxx "
},
"attributes": {},
"user": {
"userId": "amzn1.ask.account. xxxxxxxxxxxxxxxxx "
}
},
"request": {
"type": "IntentRequest",
"requestId": "EdwRequestId.98ea21ea-5846-4679-bf92-5f639ed67685",
"intent": {
"name": "GetMyCityFactIntent",
"slots": {}
},
"locale": "en-US",
"timestamp": "2017-11-08T18:30:44Z"
},
"context": {
"AudioPlayer": {
"playerActivity": "IDLE"
},
"System": {
"application": {
"applicationId": "amzn1.ask.skill.xxxxxxxxxxxxxxxxx "
},
"user": {
"userId": "amzn1.ask.account.xxxxxxxxxxxxxxxxx"
},
"device": {
"supportedInterfaces": {}
}
}
},
"version": "1.0"
}
You’ve got some session information, followed by the request block, which shows the actual intent being invoked, and then the context block, which contains application and user IDs.
The Service Response:
{
"version": "1.0",
"response": {
"outputSpeech": {
"ssml": "<speak> Here is your fact. The summer carnival is MyCitys most popular event and raises enough money to fund the volunteer fire department every year. </speak>",
"type": "SSML"
},
"speechletResponse": {
"outputSpeech": {
"ssml": "<speak> Here is your fact. The summer carnival is MyCitys most popular event and raises enough money to fund the volunteer fire department every year. </speak>"
},
"shouldEndSession": true
}
},
"sessionAttributes": {}
}
Notice that while the request sends info than is absolutely needed, the response is pretty concise, and doesn’t return anything other than the output speech, type, and whether to end the session.
You can also click the listen icon just below the response document and the SSML will be read to you in Alexa’s voice.
Try typing a few of your sample utterances, including the Help requests.
Once you’re finished testing your MyCity Facts skill, click the Next button to continue on to the Publishing Information screen.
Device Testing
If you have an Amazon Echo device handy and connected with the same Amazon account you use for development, you can ask her to give you a MyCity Fact even without publishing the skill.
Try this:
Say “Alexa, open MyCity Facts”
| You can ask for a fact by saying “tell me a fact.” |
|---|
 |
At this point, Alexa will wait for you to say one of the sample utterances you listed for your GetMyCityFactsIntent. If you take too long to respond, Alexa will prompt you again.
| Try it! Just say “tell me a fact.” |
|---|
 |
Once you respond with an invocation, Alexa will randomly select a fact about MyCity for you and respond accordingly.
| MyCity has a population of 123,456 people, 11 bears, 3 alligators, and 7,134 cats. |
|---|
 |
Publishing Information
- with the Hello World skill we worked on previously, I don’t really recommend publishing this skill as-is.
- if you have modified the project and put in facts about your own city, then you should definitely keep reading!
- this point, you should be looking at the Publishing Information screen, as shown in Figure 5-12.
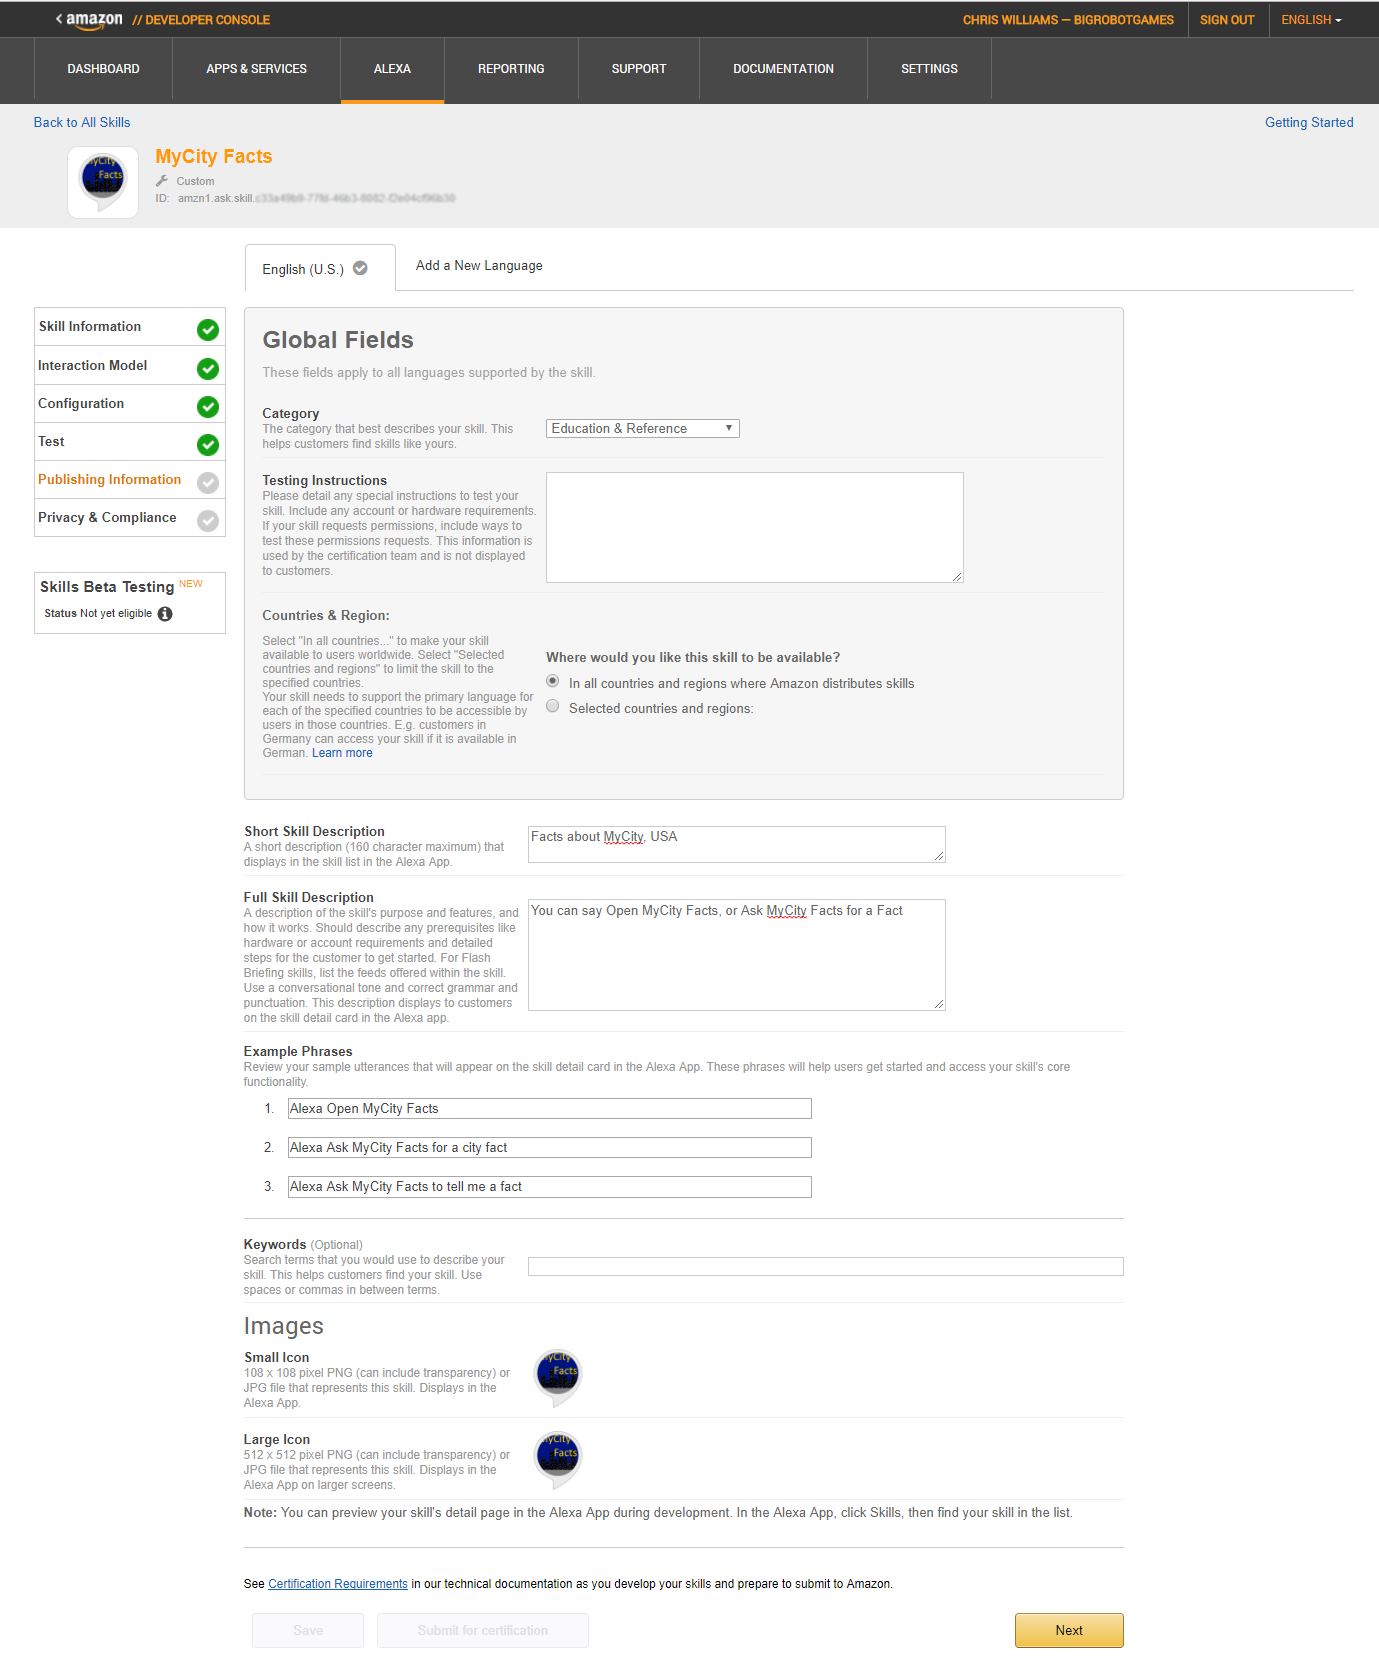
Figure 5-12: Publishing Information
In the Global Fields section, I have selected Education & Reference. There are a number of categories and subcategories to choose from, but I feel this is the best fit for the MyCity Facts skill. Take a moment to look through all of them, and pick the one that most closely matches your skill.
The Testing Instructions section is for any special instructions that a certification tester would need to know about your skill. We don’t have any of those, so just enter NONE in the box.
I have selected for this skill to be available in “all countries and regions where Amazon distributes skills”.
Under Short Skill Description, I have entered “Facts about MyCity, USA.” If you have created a skill based on your own city, you should fill this field in with something similar for your own city.
The Full Skill Description field is for additional information about your skill. This information will be displayed in the Alexa App when your skill is invoked. It should include a brief description, and how to use the skill.
Next, you will enter three Example Phrases for use with your skill. These are like your Sample Utterances from before, except should be prefaced with Alexa, such as “Alexa, open MyCity Facts” or “Alexa, Ask MyCity Facts for a fact.”
You will also need to create small (108x108) and large (512x512) icons for your skill. I used Microsoft Paint for mine, which you can see in Figure 5-13. It only took about a half hour and I think it looks pretty good.

Figure 5-13: Don’t judge me, I’m a developer, not an artist
Once you fill everything in and upload your icon graphics, hit the Save button and the Submit for Certification button will light up, but don’t click it just yet. Click the Next button to proceed to the Privacy & Compliance screen first.
Privacy & Compliance
You’re well on your way to submitting your first skill. One last screen, a few questions, and you’re done. Take a look at the Privacy & Compliance screen, shown in Figure 5-14.
In the Privacy section, select the answers appropriate to your skill. I answered No to all three, and in this example you would too.
Under Compliance, I checked the box allowing Amazon to export this skill into other countries, and I checked No to the advertising question. You are not required to do this, so it’s entirely up to you.
If you have written a Privacy Policy for your skill (let’s assume you haven’t) then you should fill in the Privacy Policy URL to point to wherever you are hosting the information.
Just like the Privacy Policy, if you have written a Terms of Use document for your skill (probably not at this point) then you should fill in the Terms of Use URL to point to that as well.
Hit Save, and then, if you’re ready, hit the Submit for Certification button.
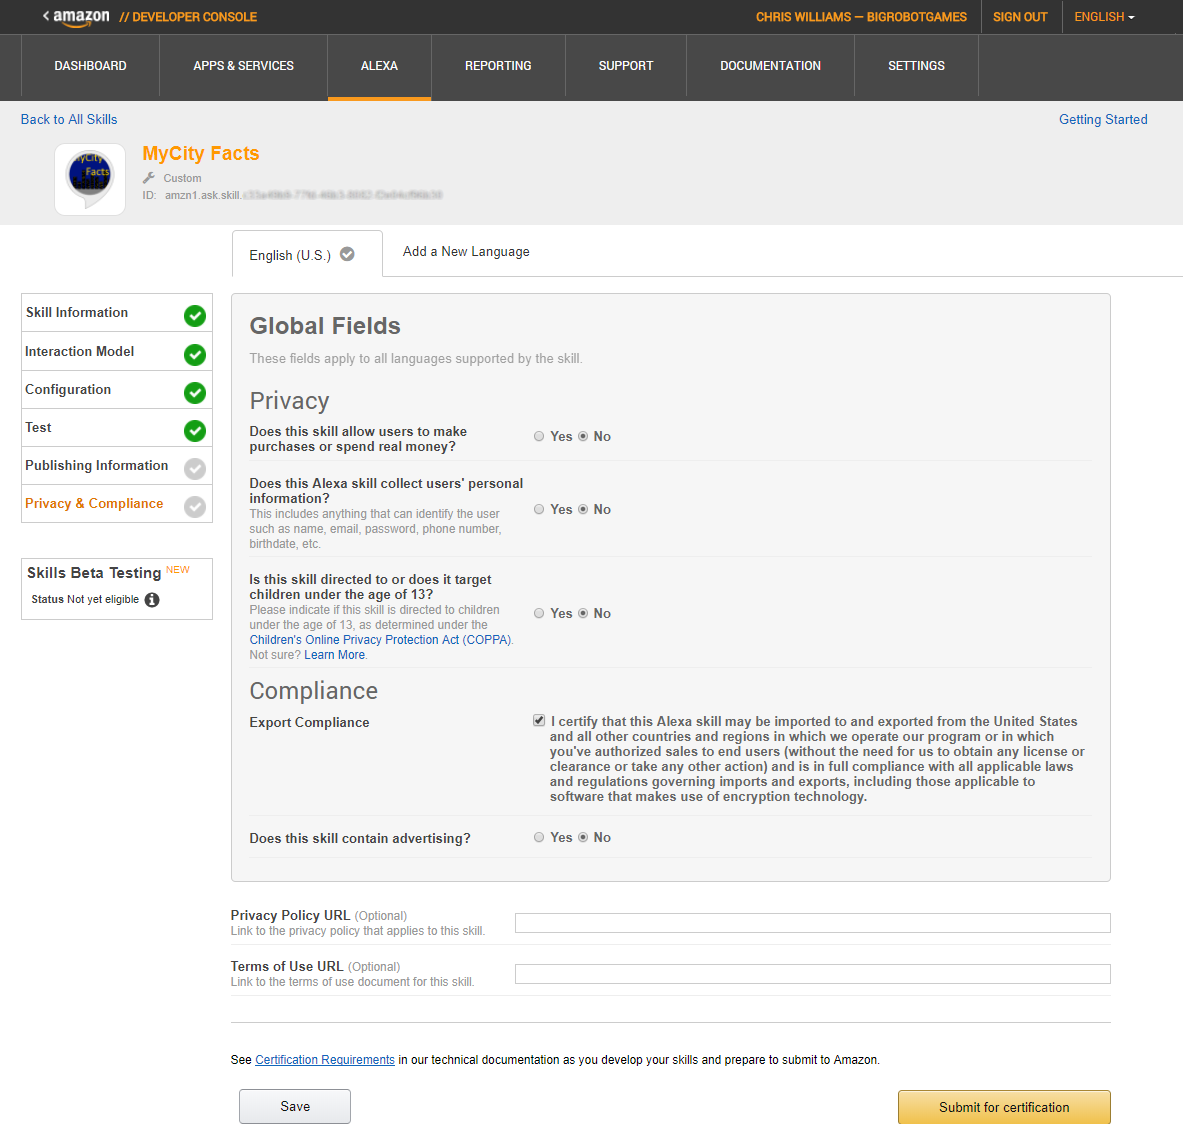
Figure 5-14: The Privacy & Compliance screen
Skill Certification
Congratulations, you’ve submitted your skill for certification! Now you get to wait for an email from the Alexa team.
While your submission is being evaluated, you can’t edit your skill. If you think you’ve made a mistake, or just wish to withdraw your skill from the certification process, there’s a button for that, otherwise you can click the Back to the List of Skills button.
That’s it for this chapter! In the next chapter we’ll build the same skill using Microsoft’s C# .NET and ASP.NET Web API, in Azure.