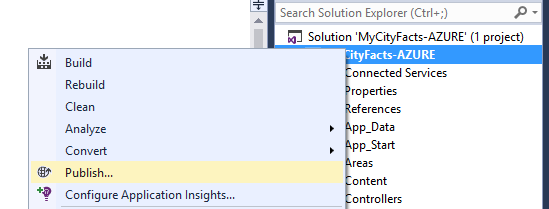
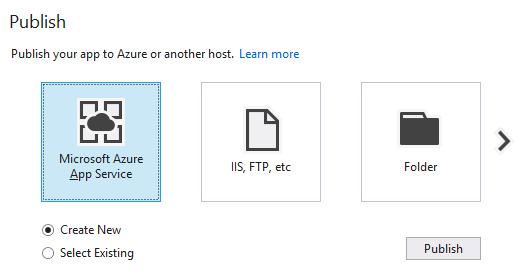
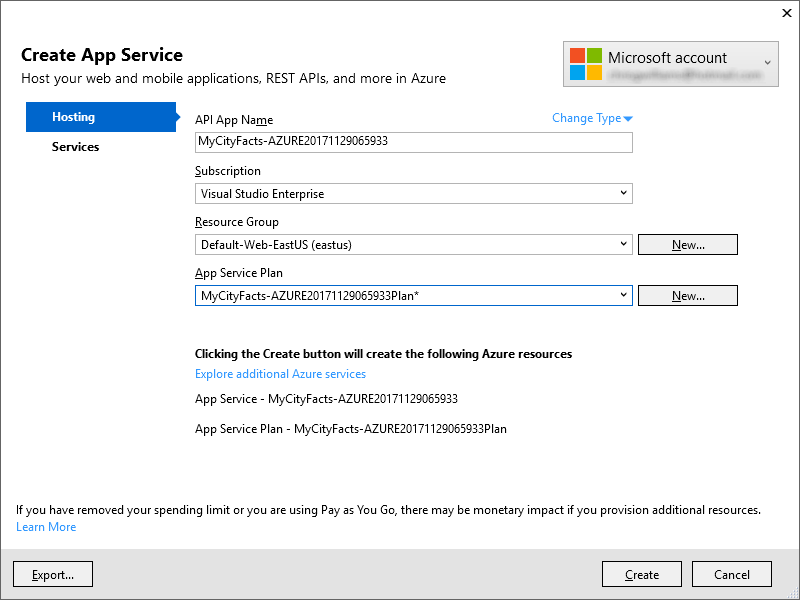
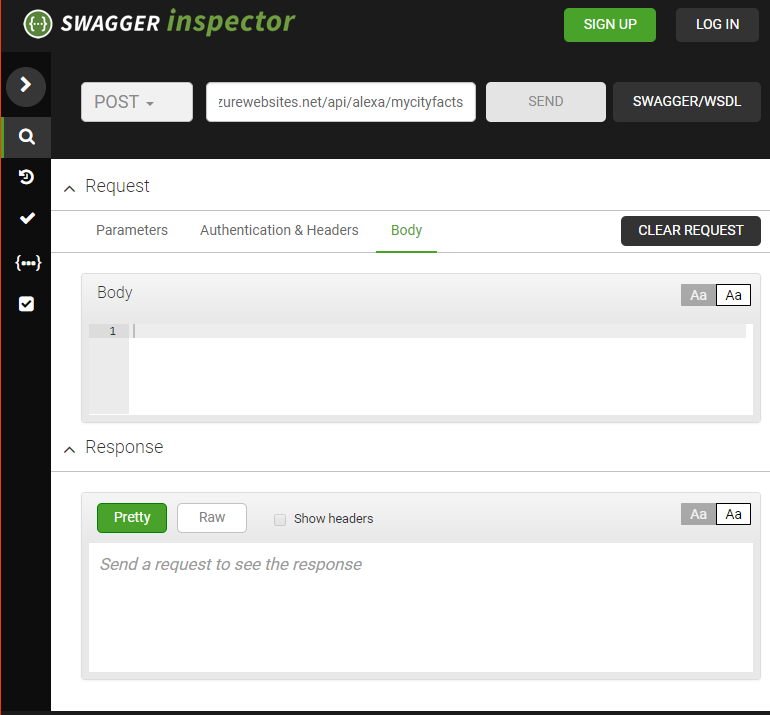
1
The Tools You Need and Where to Find Them
In this chapter, I’ll cover some basic terminology, hopefully clarify any confusion, and then move into getting you up and running with everything you’ll need to start developing Amazon Alexa Skills on your own.
Background Information
The Amazon Echo family of devices is an immensely popular platform, and much more complex than just a “voice controlled speaker” as you may have seen it referred to. As of September 2017, they hold a 70% market share (roughly 19 million devices!!), with Google Home at a distant second (24%), and other devices making up the remainder.
If you are already familiar with the Echo, some of this may be old news to you, but if you’re coming in completely cold then you might have seen the terms Alexa and Echo frequently being used interchangeably online.
The following table will allow us to get on the same page with some basic terms and how they’ll be used in this book.
| Alexa |
This is the personification of the Amazon Echo line of devices, much like Microsoft’s Cortana, and Apple’s Siri. |
| Alexa Skill |
These are built-in capabilities, such as playing music, setting a timer, reporting the weather, as well as 3rd party created functions (over 15,000 at last count) that Alexa knows how to perform. These may include retrieving data from a service, playing games, and more. |
| Alexa Voice Service |
This is the brain behind the pretty voice. Handles voice to text translation, natural language processing, command interpretation, routing (to your skill) and translating text back to voice for the Echo. |
| Amazon Echo |
This is the physical hardware product. Currently there are six Amazon products with varying degrees of Alexa integration. The Echo and Echo Dot are both voice driven, and are essentially the same with the Echo having a more powerful speaker. The Echo Tap and Fire TV devices require a touch to activate, but then respond to voice commands. The two newest devices, Echo Show and Echo Look, offer the same feature set as the rest, plus a video display and selfie cam, respectively. |
| Companion App |
This is Amazon’s app (for Android, iPhone, and Fire devices) that is required to configure the Echo hardware, and can also be used to display additional information / responses from your Alexa skills. A lot of the “value” of this app (in terms of additional skill data) has been incorporated into the Echo Show. |
| Wake Word |
A name that Alexa listens for, followed by a command. The default is “Alexa”, but users can also configure their device to respond to “Amazon”, “Echo”, or my personal favorite: “Computer”. |
Hopefully that helps some. Now let’s move on to getting you up to speed on how it all works.
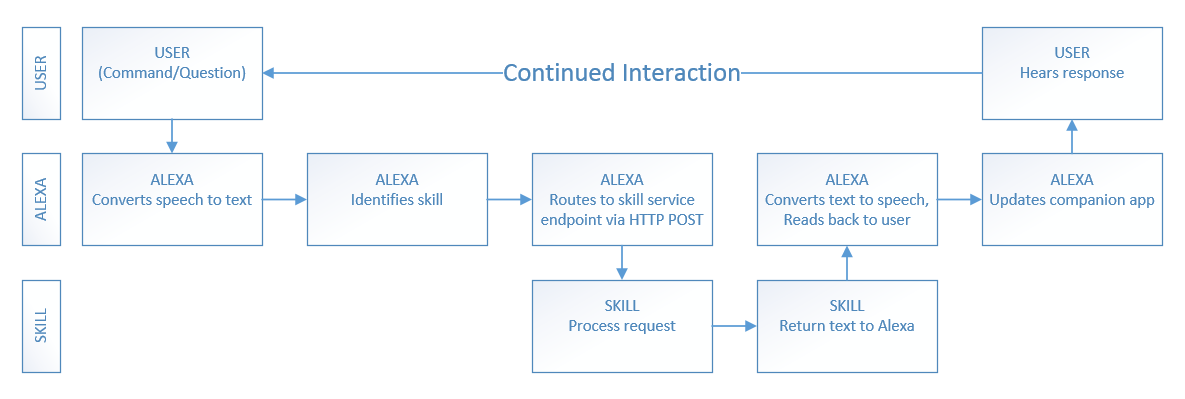
Alexa User Interaction Flow
It begins with you asking Alexa to do something, via your device. The Echo transmits your command to the Alexa Voice Service via the internet. Alexa Voice Service converts the speech to text, parses it, identifies the skill being requested and routes the request to the skill service endpoint. (This could be in AWS Lambda, Azure, or a service you host.)
Once your skill service processes your request and returns a response back to the Alexa Voice Service, the text of your response is converted back to speech and streamed back to the Echo where it is read back to you, and the companion app is updated.
All in all, it looks like Figure 1-1.
Figure 1-1. The Alexa User Interaction Flow
Commands are structured as follows:
Wake Word + Command Verb + Skill Invocation Name + Intent (+ optional slot)
I’ve already covered Wake Words above, so I’ll move on to Command Verbs.
The Alexa Voice Service (we’ll just say Alexa from this point forward) understands a number of command verbs, including: Ask, Begin, Launch, Load, Open, Play, Resume, Run, Start, Talk To, Tell, Turn Off, Set, and Use. This isn’t an exhaustive list, because Alexa is constantly improving and getting smarter.
In addition to command verbs, Alexa understands numerous prepositions, including: About, For, From, If, and To.
The Skill Invocation Name is rather self-explanatory, but just to be thorough, it’s the name of the skill you wish to invoke, i.e. SurfReport, Uber, Timer, or any of the other thousands available.
Intents are how you map the actions your Alexa Skill can perform to the functions that your backend service offers. Slots are optional parameters that get passed into your Intent, allowing you to narrow down the results before you get them. You can invoke skills with or without specific requests (intents.)
If you take this basic command structure and put it all together, you get something like the following:
Alexa + Set + Timer + for + 5 Minutes
Alexa + List + 3 Gas Stations + Near Me
Alexa + Ask + Uber + to Call Me an Uber + SUV + At Work
Alexa + Get + Tomorrow’s + High Tide + From SurfReport
Prior to using any of the custom (3rd party) skills, you must enable them. This can be done in the Alexa app, or by voice command. If you know the name of the skill you wish to use, simply say: Alexa Enable skillname.
Language Variance
As developers, you can (and should) try to accommodate as many different ways of invoking skills as possible, but you don’t have to exhaust every possible permutation of the English language to do so. For example, my mother can be rather verbose, and polite, so she says please when asking Alexa to do something. My teenagers, on the other hand, tend to be a lot less formal.
When my mom says the following, Alexa only hears (i.e. cares about) the words in bold:
Alexa, please play some of Norah Jones’ music for me.
My teenage son says the following, and gets the exact same result:
Alexa! Norah Jones!
There are a number of phrases that Alexa understands and knows to ignore. These include, but aren’t limited to, things like: please, can you, I want, I would like, and for me.
I’ll revisit this concept several times throughout the book as we begin developing different types of skills. For more in-depth information on how Alexa parses voice commands, be sure to also take a look at Appendix A: Designing for Voice Interaction.
Development Environment
The right development environment can make your life much easier.
If you don’t plan on hosting your skills on servers you control (i.e. you plan to use AWS Lambda), then you can literally get away with nothing more than a simple text editor and an internet browser.
If you’re most comfortable working in the Microsoft stack, and want to control how, when and where you publish your skill code, I recommend Visual Studio Community 2017. This is especially good if you’re a student or hobbyist, because it’s free, but you can always use one of the more advanced editions too.
If you don’t plan to use VB.NET or C#, but still want a great and lightweight developer environment, I would encourage you to download Visual Studio Code instead. It runs everywhere, and is smart enough to handle most script languages with ease.
If you’re not running Windows, there’s a version of Visual Studio Code that runs equally well on Mac and Linux, as shown in Figure 1-2, so you don’t have to miss out on all the fun.
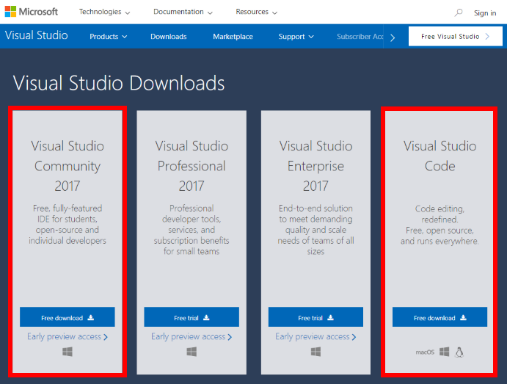
Figure 1-2: Visual Studio Downloads
No matter which editor you decide on, you can download both from here: https://www.visualstudio.com/downloads/
If you aren’t a Microsoft fan, or have a favored environment, odds are you can use your preferred stack too, although you may need multiple tools in order to handle the editing, compiling, publishing parts of the process. That’s beyond the scope of this book, but chances are if you have a favorite process and tools for web development, you’ve already got everything you need anyway.
Optionally, you may want to download and install Node.js. We won’t use it exclusively throughout the book, but we will be referencing the Node.js Alexa Skills Kit Samples in a later chapter. You can find the latest stable Node.js release here: https://nodejs.org/en/download/ as shown in Figure 1-3.
Node.js is one of the most supported languages in the Alexa Skills Kit documentation and samples, so even if you don’t plan on using it to write your own skills, you’ll likely be looking at a lot of it.
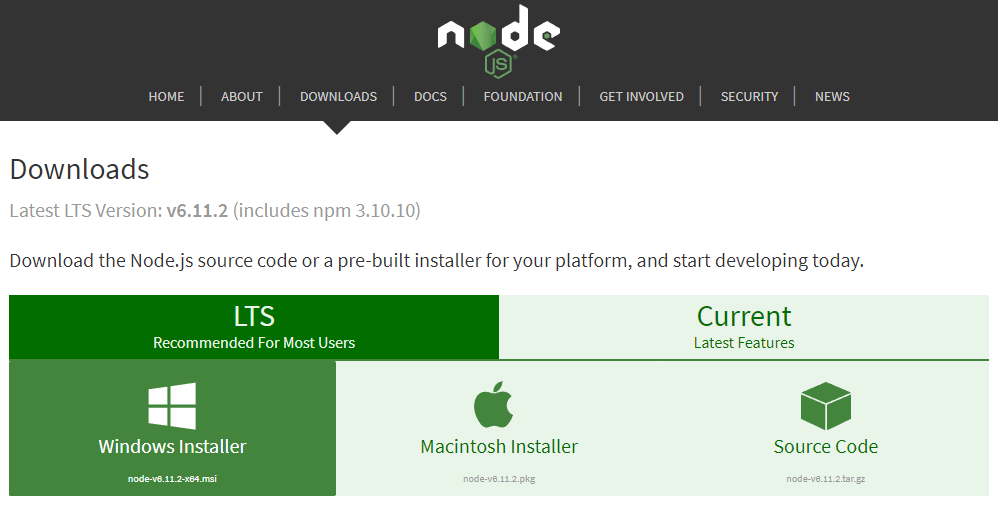
Figure 1-3: Node.js Download Screen
The Amazon Developer Portal
One of the great things about developing Alexa Skills is the variety of supported languages and platforms available to you, the developer.
Aside from your preferred development environment, and optionally Node.js (as mentioned above) nearly everything else you need to develop skills for Alexa can be found in the Alexa section of Amazon’s Developer Portal, which you can find at: https://developer.amazon.com/alexa.
The Alexa section of the developer portal is broken down into three main parts: Alexa Skills Kit (ASK), Alexa Voice Service (AVS), and the Alexa Fund, as shown in Figure 1-4. Don’t be fooled, there’s A LOT of information buried in there. Amazon adds new content constantly, and provides excellent support for the entire family of Echo devices.
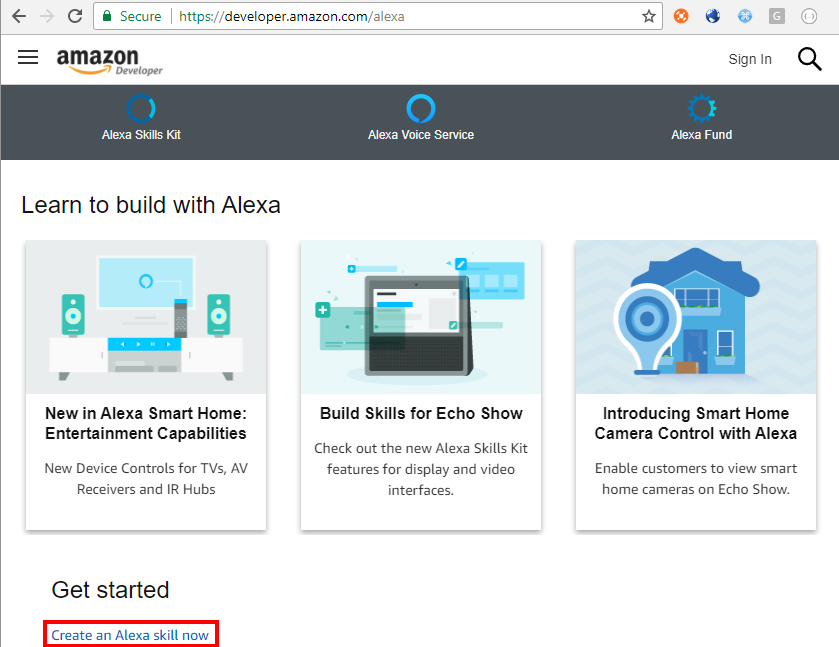
Figure 1-4: The Alexa section of the Amazon Developer Portal.
I’ll cover the Alexa Skills Kit (ASK) in-depth in the next chapter, but we’re going to skim the surface just a little in this chapter so you can get started building your first skill. Before I do that, though, I’m going to shuffle things around for a moment (I know… bear with me) and talk about the other two parts of this section: the Alexa Voice Service (AVS) and the Alexa Fund.
The Alexa Voice Service refers to the cloud-based backend service that is the brain of Alexa. It’s what your Echo device talks to, and serves as the controller that routes commands to the various skills your users will invoke. It’s also how you would integrate support for Alexa into your own connected products, via either AVS API endpoints (over HTTP) or the AVS Device SDK for C++ developers.
In-depth coverage of custom hardware integration with Alexa and AVS is beyond the scope of this work, so I encourage you to dig into the AVS documentation available on the Alexa section of the Developer Portal.
The Alexa Fund is a $100 million pool of venture capital funding intended to promote innovation in voice technology. If you’ve got some ideas about how to improve or create new Alexa capabilities, or new devices that use Alexa, it may be worth your time to talk to them. You can find more information, and links to contact them, under the Alexa Fund heading on the Alexa page.
Ok, with that out of the way, let’s talk briefly about the Alexa Skills Kit (I’ll save the good stuff for chapter 2) and then spend the rest of this chapter building your very first Amazon Alexa skill.
Amazon describes the Alexa Skills Kit (ASK from here on out, for the rest of the book… I promise) as “a collection of self-service APIs, tools, documentation, and code samples that make it fast and easy for you to add skills to Alexa.” This covers voice driven skills, and also includes samples for making video skills for the Echo Show device.
Let’s make a skill!
Making Your First Alexa Skill
Someone once said to me: “Nobody wants to wait 2 or 3 chapters to build something.” So, in the spirit of that, it’s time to push up your sleeves, heat up a Hot Pocket, grab your coffee, and get busy.
We’re going to build a “Hello World!” skill. I know, it’s not sexy, or even particularly exciting, but… it allows me to show you everything you need to get a simple skill up and running without any additional fluff or functionality getting in the way.
You’re going to need an account for the Amazon Developer Portal. You can connect it to your regular Amazon account, or not. Totally up to you. If you already have an account, go ahead and sign in. If you don’t have an account, you’ll be prompted to create one. Don’t worry, it’s free.
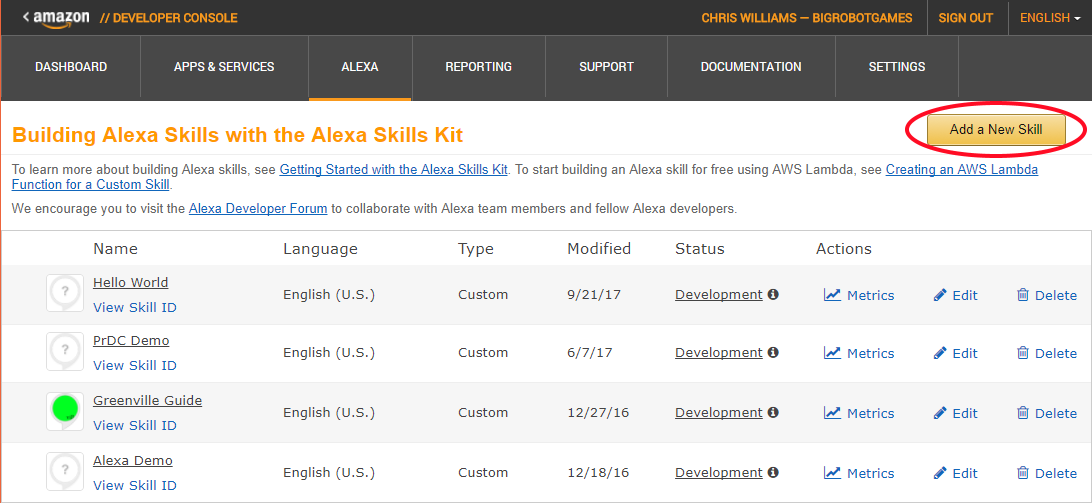
Once you’ve signed in, make sure you’re in the Alexa section, and click the Get Started button under the ASK logo, as shown in Figure 1-5. If you don’t see it, try clicking the Alexa tab in the menu bar near the top of the page. Amazon has a tendency to move things around, but you should be able to spot a “Get Started” button or link somewhere on the page.
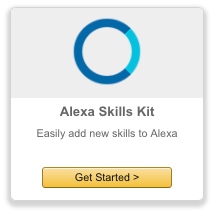
Figure 1-5: The ASK Get Started Button.
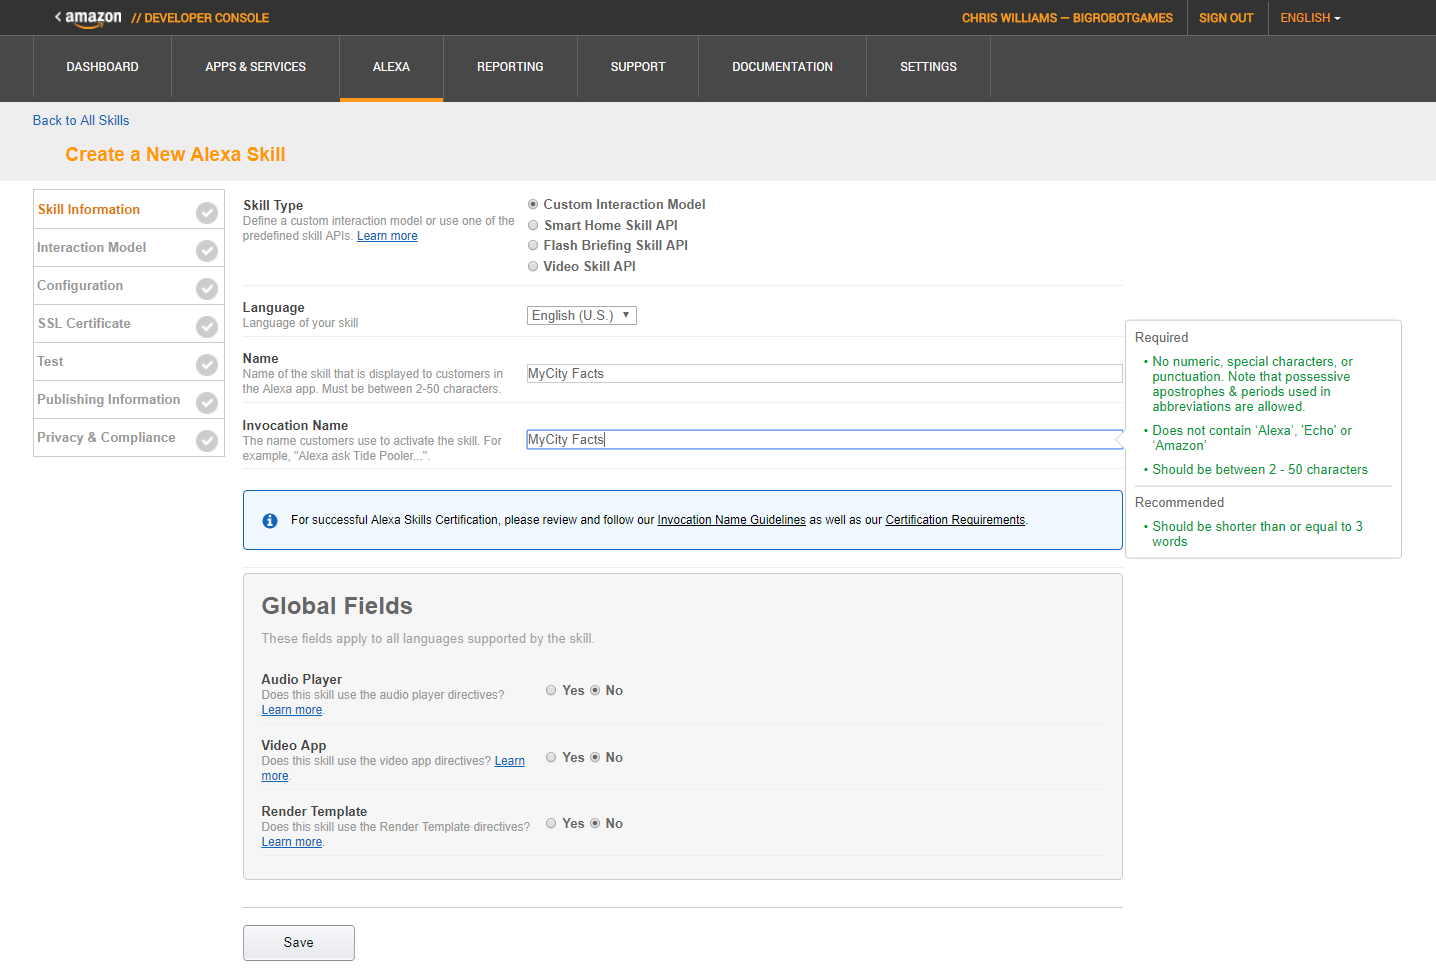
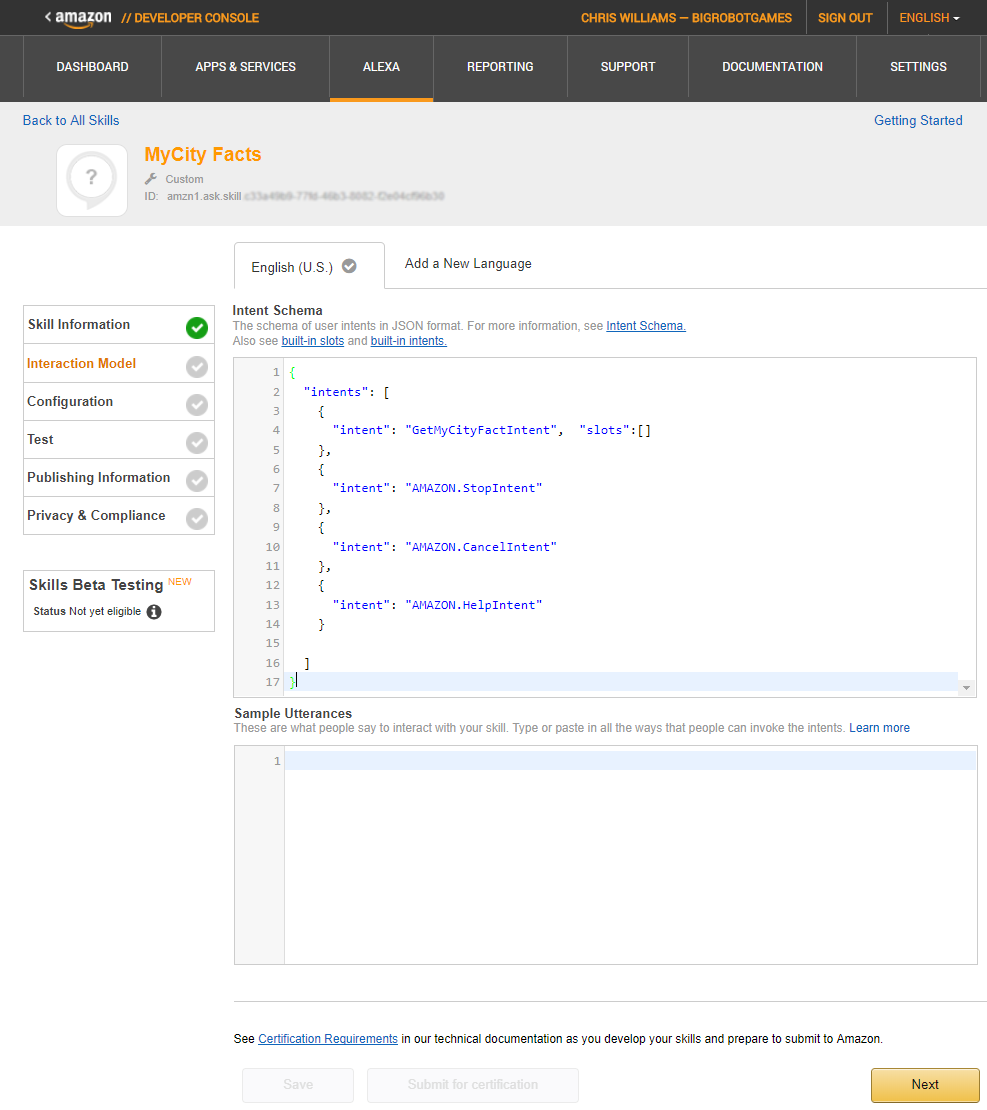
Next, click the “Add A New Skill” button, which will put you into the Skill Information Screen, as seen in Figure 1-6. This is the beginning of a 7 screen workflow that you will need to complete for each skill you create.
For this skill, I am sticking with the default choices of Custom Interaction Model and English (U.S.) language. For the Name and Invocation fields, just call it “Hello World”. Take the defaults in the Global Fields section, and click the Save button.
At this point, the Save button will go away, and a Next button will appear. Before you click it, take a look at the page again and you’ll see the addition of an Application ID field. This is unique to your skill, and you can’t edit it.

Figure 1-6: The Skill Information Screen
Go ahead and click the Next button, and you’ll be presented with the Interaction Model screen, as shown in Figure 1-7. Don’t worry if it’s not an exact match to what’s in the book. Amazon is constantly adding new things to improve the skills development process, so you might see something new when you create your own skill.
I’ve also cropped out the Custom Slot Types section since we won’t be using it for this skill. We’ll make use of it later in the book though, and I’ll talk about it more then.
The two most important things on this screen are the Intent Schema and the Sample Utterances, which I’ll discuss now.
The Intent Schema is a block of JSON code (that’s JavaScript Object Notation, but everyone just pronounces it like the name Jason) that describes the Intents in your Alexa Skill. We covered Intents earlier in this chapter, but if you’ve forgotten, they are the functions your skill knows how to perform. Feel free to flip back a few pages for some examples.
Add this to the Intent Schema box:
{
"intents":
[
{
"intent":"HelloWorldIntent"
},
{
"intent":"AMAZON.HelpIntent"
}
]
}
The HelloWorldIntent will be invoked whenever the user gives one of the Sample Utterances below, and will return the phrase “Hello World!” We’ll get to the actual code behind that Intent in the next section.
The AMAZON.HelpIntent is one of several built-in intents provided by Amazon. We don’t actually have to add it to the schema unless we intend to extend it, but it’s a good habit to get into anyway.
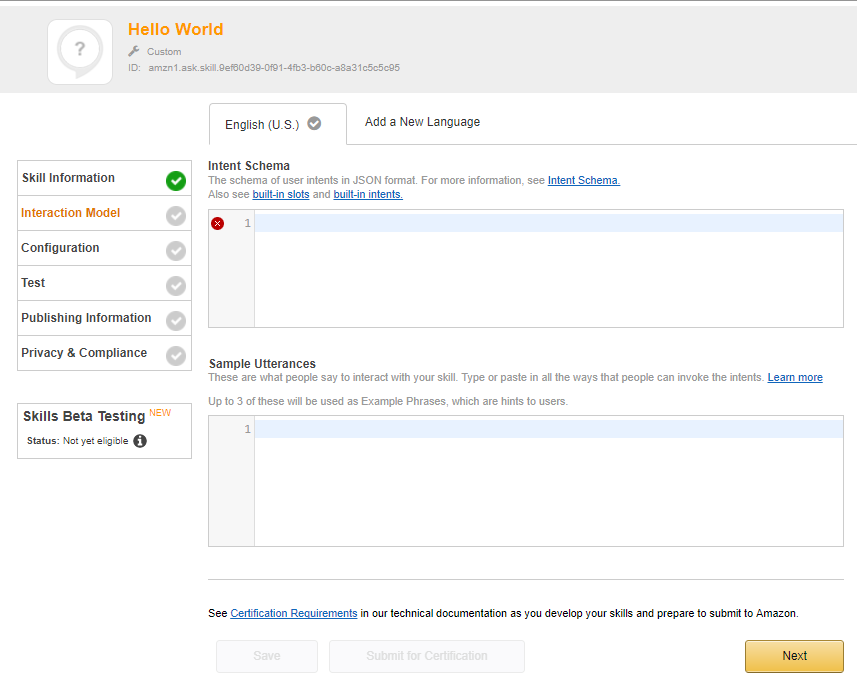
Figure 1-7: The Interaction Model Screen
The Sample Utterances are the phrases Alexa listens for in order to invoke the intents associated with your skill. You can (and should) assign multiple phrases to each Intent.
Add the following to the Sample Utterances box:
HelloWorldIntent say hello
HelloWorldIntent say hello world
HelloWorldIntent hello
You may have noticed, we’re not adding an utterance for the Amazon.HelpIntent. For this example, we don’t really need to, because if Alexa doesn’t understand your utterance, the HelpIntent will be invoked by default.
Once you’ve done this, click the Next button and proceed to the Configuration screen.
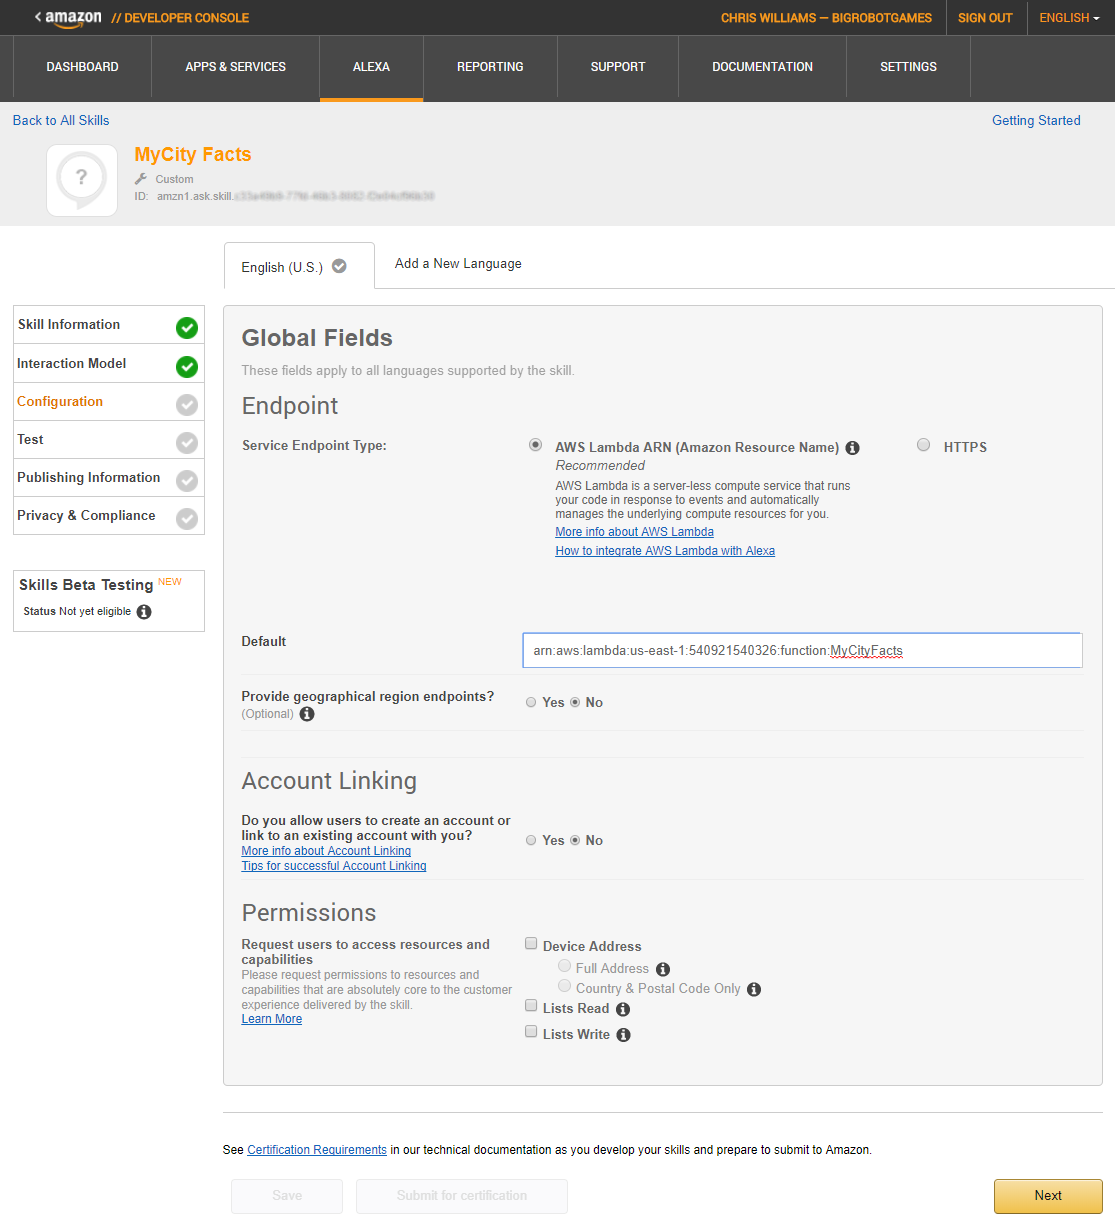
For this skill, you will just take all the defaults, except for the Endpoint Type, as seen in Figure 1-8. Select the AWS Lambda option. We’ll discuss both option in further detail in a later chapter, but for now, we’re going to use AWS Lambda. (AWS stands for Amazon Web Services, in case you were wondering.)
We’re going to create a very simple AWS Lambda Function that returns the phrase “Hello World” whenever the function is called by the HelloWorldIntent.
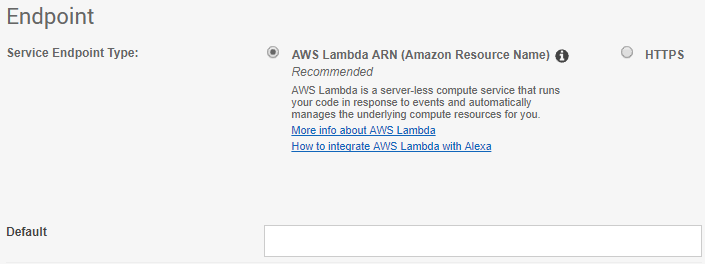
Figure 1-8: Service Endpoint Type and Address
In your browser go to the AWS Management Console (http://aws.amazon.com) and log in. If you don’t already have an account, you’ll need to create one first.
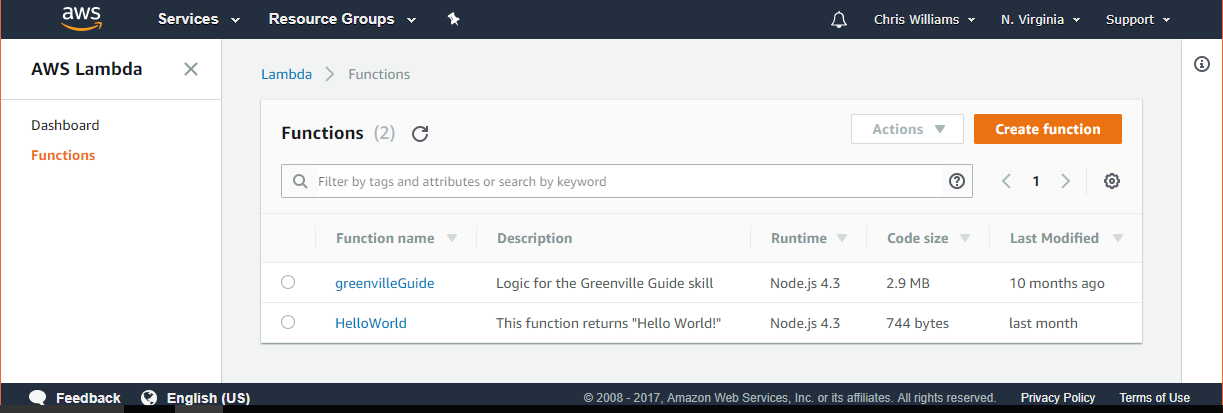
Once you’re in the dashboard, look for the Compute section (Figure 1-9), and find the entry for Lambda. Click on the Lambda link, and then click on the red “Create function” button in the top right of the AWS Lambda Functions screen.
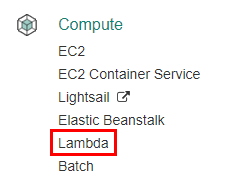
Figure 1-9: AWS Compute Section
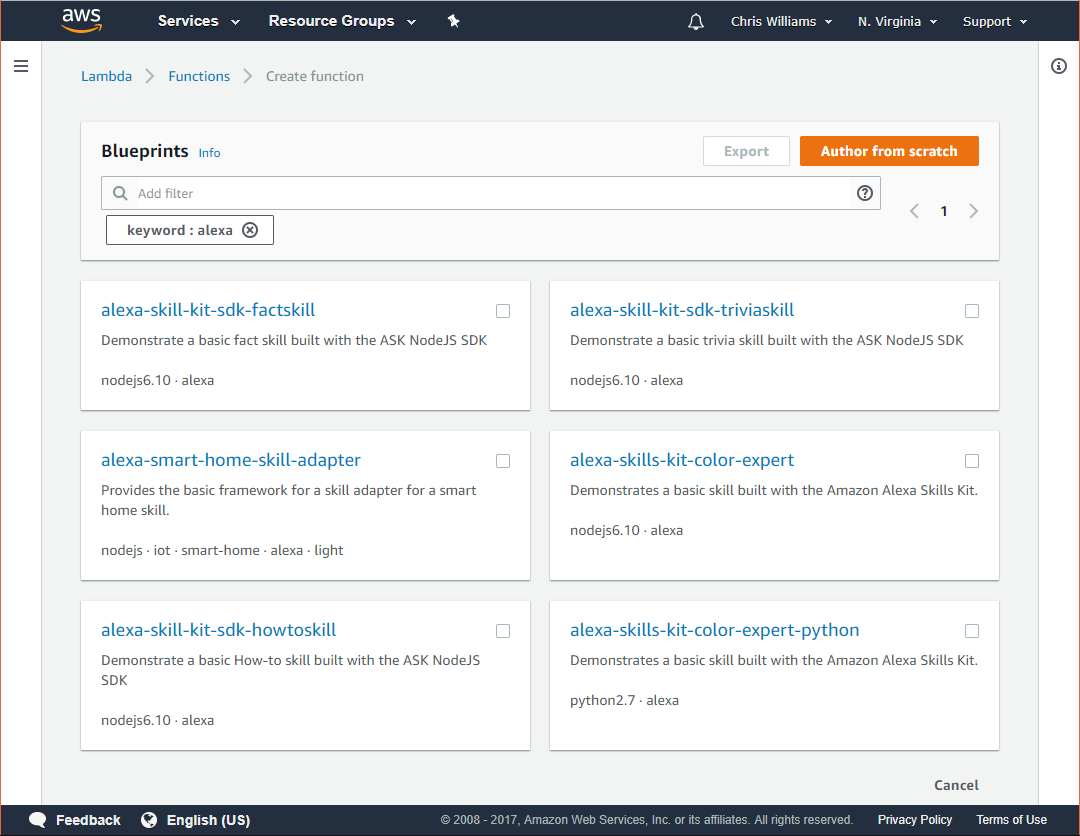
You’ll be asked to select a blueprint, which are templates to help jumpstart the coding process for specific tasks, but you’re going to bypass that for now and click the red “Author from scratch” button.
Next, you’ll be asked to configure triggers for your Lambda function. Click in the empty box (see Figure 1-10) and select “Alexa Skills Kit” from the popup list, and then click the Next button.
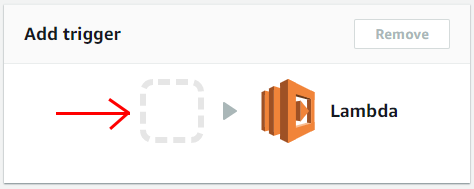
Figure 1-10: Add Trigger
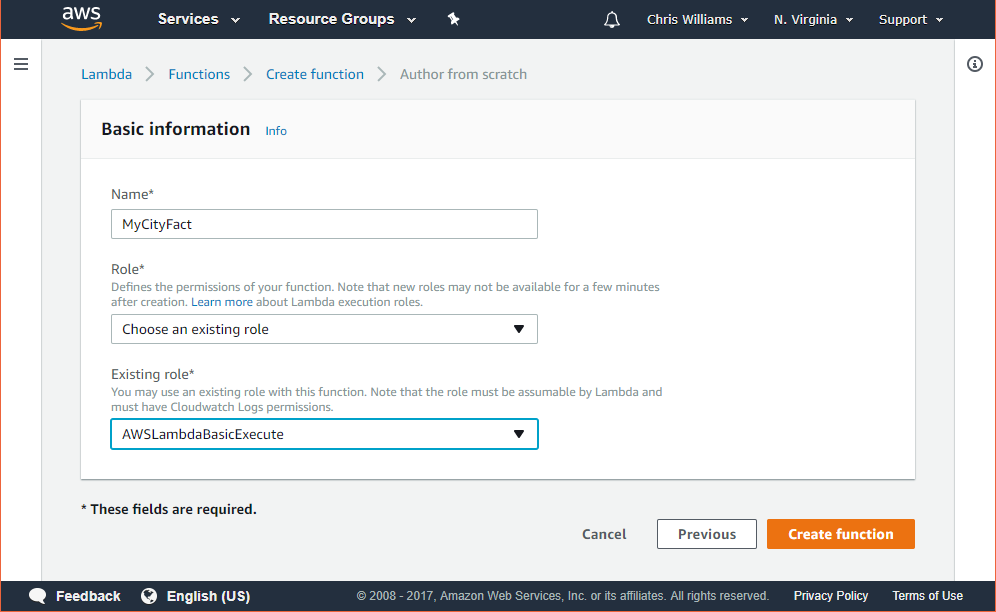
At this point, you should be looking at the Configure Function screen. Fill in the Basic Information section as shown in Figure 1-11. If the runtime is defaulted to a different version of Node.js, that’s ok. It won’t matter for this example.
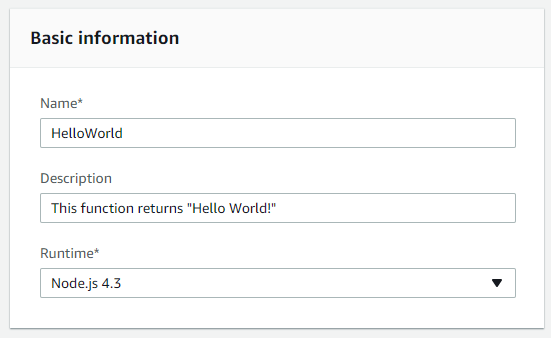
Figure 1-11: Basic Information About Your AWS Lambda Function
Scroll down a little more to the Lambda function code section. You want it to look like the following node.JS code, which I’ll discuss below:
'use strict';
exports.handler = function (event, context, callback) {
if (event.request.type === "LaunchRequest") {
onLaunch(event.request,
event.session,
function callback(sessionAttributes, speechResponse) {
context.succeed(buildResponse(sessionAttributes, speechResponse));
});
} else if (event.request.type === "IntentRequest") {
onIntent(event.request,
event.session,
function callback(sessionAttributes, speechResponse) {
context.succeed(buildResponse(sessionAttributes, speechResponse));
});
}
};
function onLaunch(launchRequest, session, callback) {
var speechOutput = "You can ask me to say Hello World!"
callback(null,
buildSpeechResponse(speechOutput, "", false));
}
function onIntent(intentRequest, session, callback) {
var intent = intentRequest.intent,
intentName = intentRequest.intent.name,
repromptText = "You can ask me to say Hello World!"
if (intentName == 'HelloWorldIntent') {
callback(null,
buildSpeechResponse("Hello World!", repromptText, true));
}
if (intentName == 'AMAZON.HelpIntent') {
callback(null,
buildSpeechResponse(repromptText, "", true));
}
}
function buildSpeechResponse(output, repromptText, endSession) {
return {
outputSpeech: {
type: "PlainText",
text: output
},
card: {
type: "Simple",
title: "Hello World!",
content: output
},
reprompt: {
outputSpeech: {
type: "PlainText",
text: repromptText
}
},
shouldEndSession: endSession
};
}
function buildResponse(sessionAttributes, speechResponse) {
return {
version: "1.0",
sessionAttributes: sessionAttributes,
response: speechResponse
};
}
It seems like there’s a lot going on here, but it’s actually pretty simple. We have two event handlers: LaunchRequest and IntentRequest.
A LaunchRequest fires whenever your skill first launches, and gives you an opportunity to provide your users with some guidance on how to use the skill. If I were to say “Alexa, Open HelloWorld”, then this event would be called.
An IntentRequest fires whenever someone specifies an Intent when calling your skill. So, if I were to say “Alexa, Tell HelloWorld to Say Hello World”, then this is the event that would be called.
The onLaunch and onEvent functions are called when their respective event is received, and they are each responsible for constructing the appropriate message by calling the buildSpeechResponse function.
Finally, the buildSpeechResponse function assembles the JSON response that your Alexa skill is expecting. Without properly constructed JSON, your skill won’t understand the response at all. We’ll talk about a proper JSON response shortly, but first… let’s finish our AWS Lambda Function.
Scroll down further, to the Lambda function handler and role section, and make sure it looks like Figure 1-12. Accept the defaults for everything else.
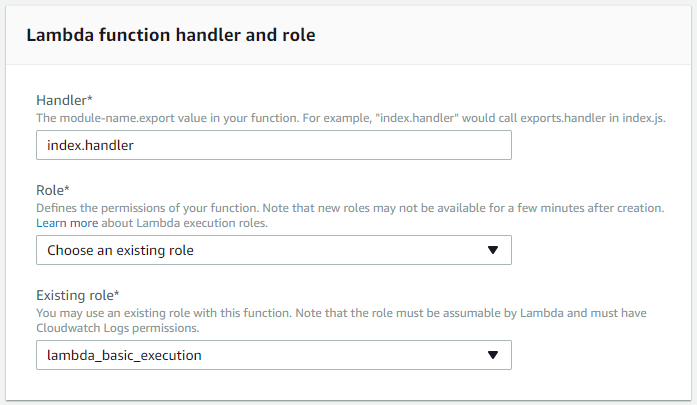
Figure 1-12: Lambda Function Handler and Role
Click the Next button, which will take you to the review screen, make sure everything is right, and then click the Create function button.
Before returning to the Alexa Skills Dashboard, you should be sure to test your new AWS Lambda Function. You can do this by clicking the Test button on the top right of the screen. If all goes well, you should see a message that states “Execution result: succeeded.”
Expand the details section below it to see the result returned by the HelloWorld function, which in this case is the message “Hello World!”
If you’re curious, there is also some useful information about how long it took your function to run, how much memory it used, and below that is some instrumentation (graphs) about the performance of your function.
There’s a chance that you might also get an error message that looks like this: “Cannot read property ‘type’ of undefined.” That’s ok too. I know what you’re thinking, but just humor me for now, and I promise we’ll come back to it.
We’re almost done.
Scroll back up to the top of the page and copy the *AWS Lambda ARN (Amazon Resource Name) that sits right above the test button.
*Yes, that’s actually short for “Amazon Web Services Lambda Amazon Resource Name.” Crazy, huh?
Go back to the Alexa dashboard, Configuration tab, and paste it in the text box under where you selected the AWS Lambda option. Click the Next button to proceed. You should now be on the Test screen. If not, click the Test tab on the left.
I mentioned earlier that we use JSON to send and receive messages between Alexa and your service, whether it’s an AWS Lambda function, or a C# Web API service in Azure, it’s also JSON messaging.
Below is an example of a properly formatted JSON request:
{
"session": {
"new": false,
"sessionId": "SessionId.1762552d-d18c-4a7b-b2b7-c5ba9e5005ed",
"application": {
"applicationId": "amzn1.ask.skill……"
},
"attributes": {},
"user": {
"userId": "amzn1.ask.account………"
}
},
"request": {
"type": "IntentRequest",
"requestId": "EdwRequestId.14bd71ee-a39c-44fd-9de1-883d2d558fd8",
"intent": {
"name": "AMAZON.HelpIntent",
"slots": {}
},
"locale": "en-US",
"timestamp": "2017-09-02T02:58:23Z"
},
"context": {
"System": {
"application": {
"applicationId": "amzn1.ask.skill……"
},
"user": {
"userId": "amzn1.ask.account………"
},
"device": {
"supportedInterfaces": {}
}
}
},
"version": "1.0"
}
In the request block, under intent, you will see the name of the intent being requested, which in this case is the built-in AMAZON.HelpIntent. Your AWS Lambda function reads that value and routes your skill response accordingly. Don’t get overwhelmed, a lot of this is actually generated for you by Alexa.
The response back to Alexa is more concise:
{
"version": "1.0",
"response": {
"outputSpeech": {
"text": "You can ask me to say Hello World!",
"type": "PlainText"
},
"card": {
"content": "You can ask me to say Hello World!",
"title": "Hello World!"
},
"reprompt": {
"outputSpeech": {
"text": "",
"type": "PlainText"
},
"shouldEndSession": true
}
},
"sessionAttributes": {}
}
Since this is coming from your AWS Lambda Function, you’ll be on the hook for this part, but don’t worry. By the time you’re done with this book, you’ll be an old pro at building these.
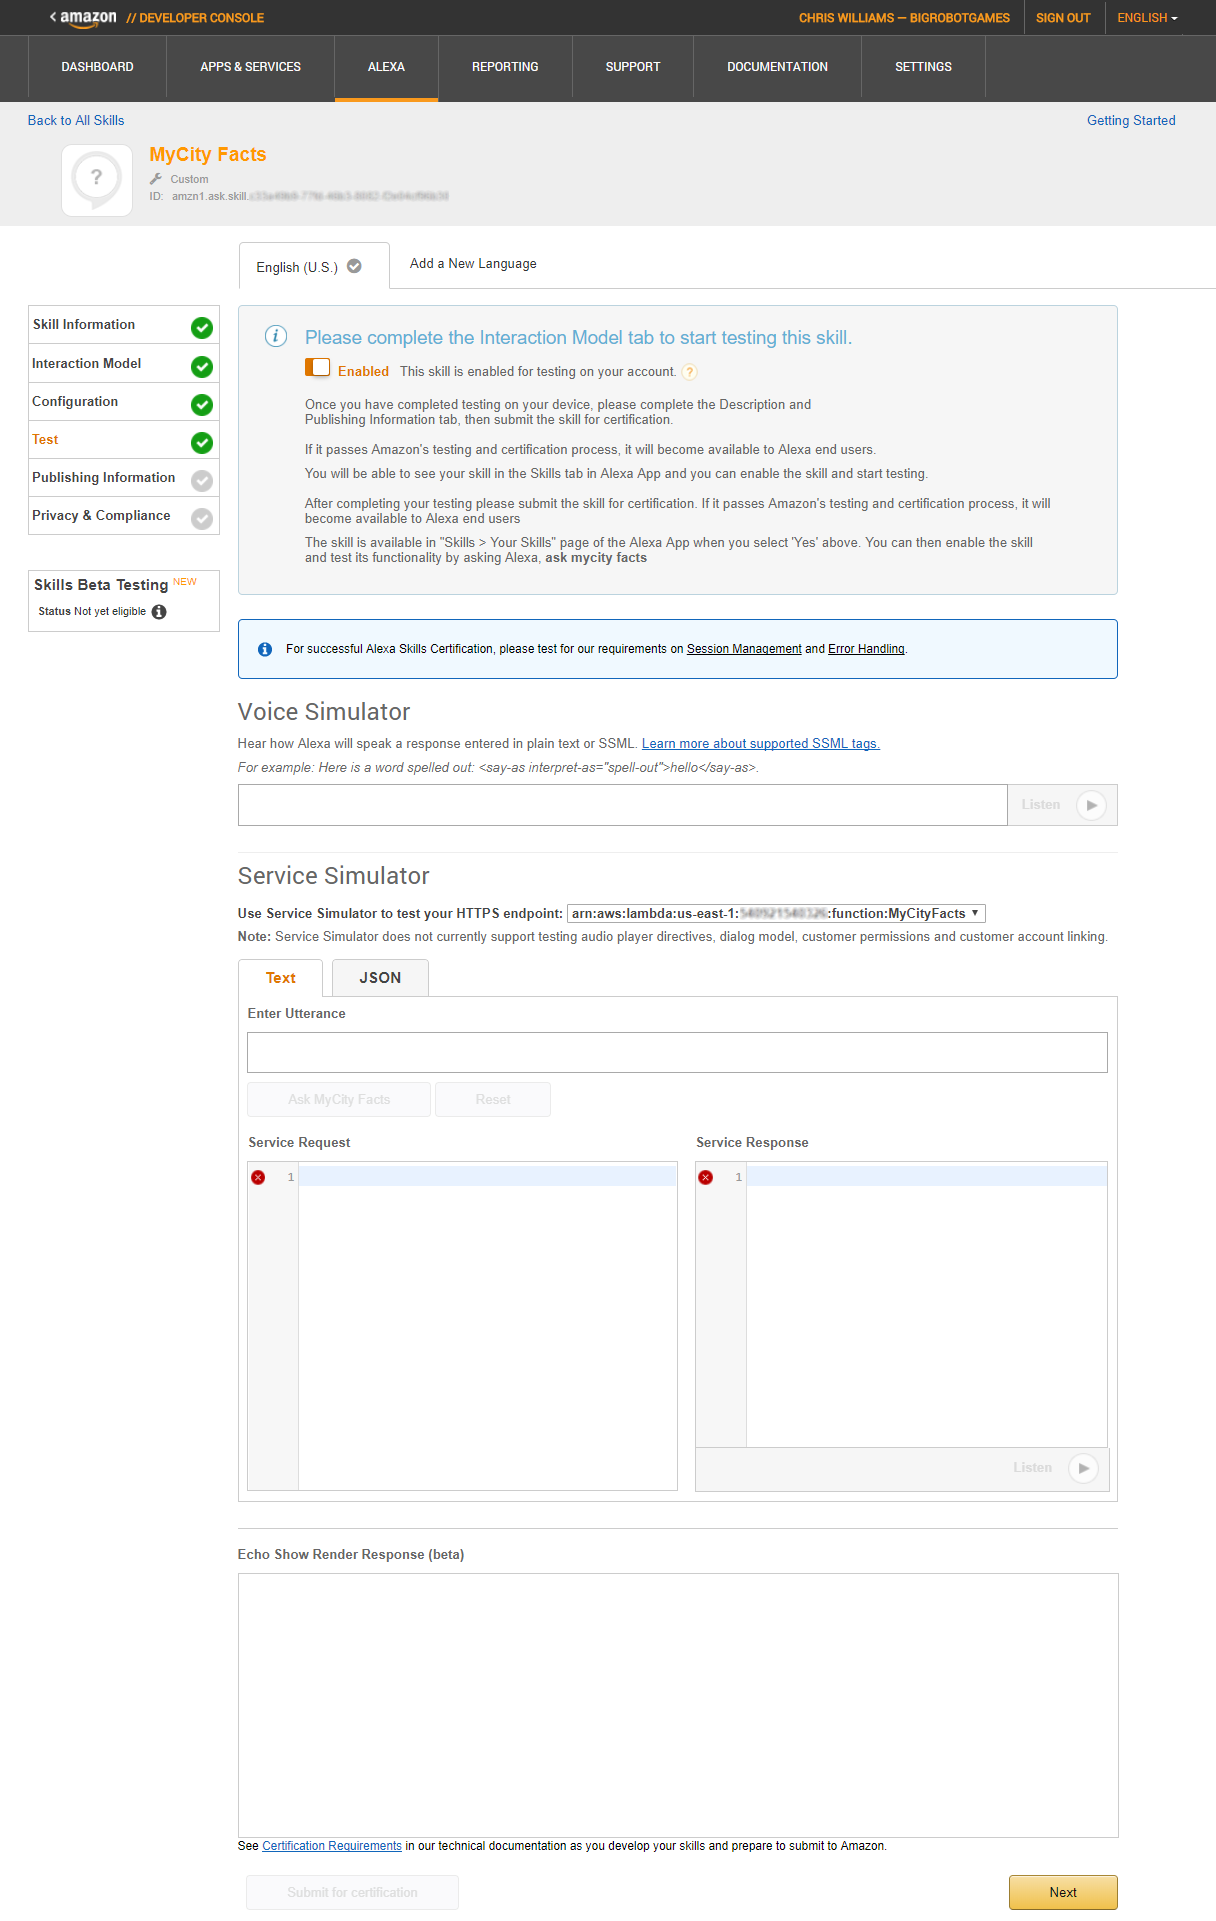
You’ll get to see your skill in action if you scroll down to the Service Simulator section of the page. In the Enter Utterance box, type hello. This will send a request to your AWS Lambda function for the HelloWorldIntent of your HelloWorld skill. You can see the full JSON request in the Service Request box.
Since the phrase “hello” matches one of your sample utterances from earlier, your function knows that your passing in an Intent, and returns some properly formatted JSON, which you can see in the Service Response box.
You can also get Alexa to speak to you by clicking the Listen button below the response.
Congratulations! You did it. You have a working Alexa Skill now.
If you have an Alexa capable device, such as an Echo or Echo Dot, you can say “Alexa Enable HelloWorld Skill” and after a moment, it will be ready for you to use, but nobody else (because you haven’t published it yet.)
Try saying “Alexa Open HelloWorld” and “Alexa Tell HelloWorld to Say Hello.” Pretty exciting stuff.
You’re probably thinking about publishing your new HelloWorld skill now, right? After all, there’s two more screens in that workflow and we haven’t covered them yet. Don’t worry, we’ll come back to those screens in a later chapter.
This is a great place to stop for chapter 1. You’ve learned what tools you need and where to find them, how Alexa Skills work, and you built a simple Alexa Skill and an AWS Lambda Function. Not bad for the first chapter!
We’ve barely scratched the surface of all the cool stuff you can do. In Chapter 2, we’ll dig deeper into the ASK and take a look at what it really has to offer.
2
Getting Familiar with the Alexa Skills Kit (ASK)
The Alexa Skills Kit (ASK) is Amazon’s API for interacting with the Amazon Echo line of devices, and the Alexa Voice Service. This chapter will serve as your guide to the ASK, and will cover the various skill templates available to you.
If you’re not already there, head on over to https://developer.amazon.com/alexa-skills-kit. On this landing page, you’ll see a bunch of information about “What Is an Alexa Skill?”, “What Is the Alexa Skills Kit?”, “Why Should You Build Skills?” and so on. This is all good information, but not why we’re here.
Click on the Learn link near the top of the page and you will see a collection of categories for the various types of skills you can build, as shown in Figure 2-1.
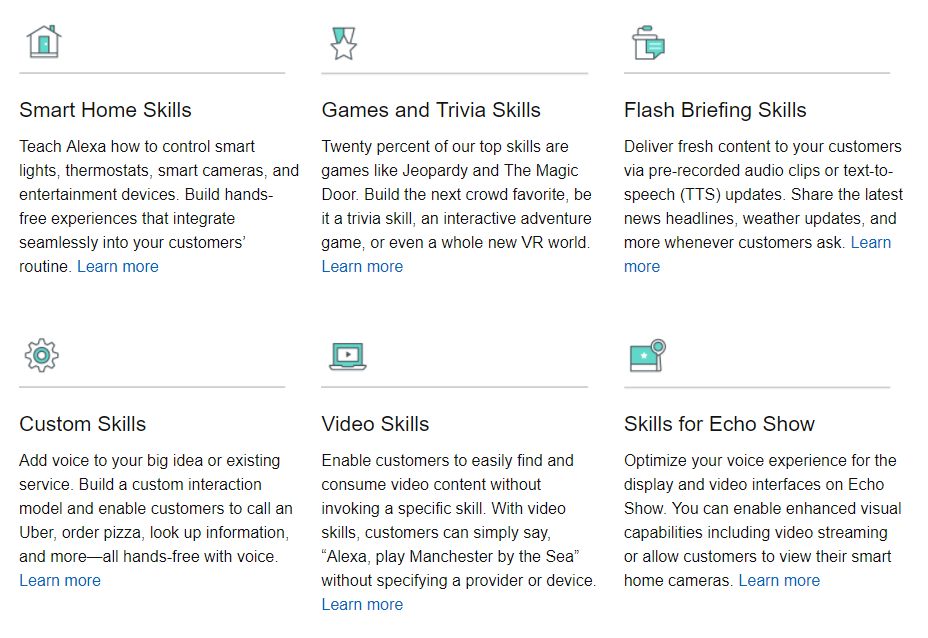
Figure 2-1: The ASK Skills Templates
You’ve already built one custom skill in the previous chapter (surprise!), so I’m going to cover the other types first and then come back to Custom Skills. Don’t worry though, we’ll touch on all of the templates before moving on to Chapter 3.
Smart Home Skills
There are two cases for Smart Home Skill development: you’re either a device manufacturer looking to add voice capabilities to your product, or you’re a developer looking to build skills for connected devices for public or private use. In this book, I’ll focus primarily on the latter case.
Smart Home Skills allow your users to control cloud-connected home automation devices, such as smart thermostats, smart cameras, cloud-enabled lights, smart TVs, and more.
At first glance, these may seem just like Custom Skills, and to the end user there’s not much difference, but the Smart Home Skill API actually makes your job as a developer much easier because it includes a collection of built-in common smart home functions and a specialized workflow that shoulders much of the load when processing user requests. This means you don’t have to design your own voice interaction model, or more specifically, you don’t have to worry about coding for phrases like “Turn on the dining room light” or “Show me the back porch” when creating your own Smart Home Skills.
The API communicates with your skill using a JSON message format, just like with Custom Skills, although the format is a bit different. I’ll cover the message format in detail when you build a Smart Home Skill in Part III of this book.
You can find the Smart Home Skill API Reference here: http://amzn.to/2wxLzay
Game and Trivia Skills
Games account for over 20% of the top Alexa Skills, and the ASK makes it easy for you to create game skills quickly with a variety of templates.
If voice-driven adventure games sound like something you would enjoy working on (or playing), the Interactive Adventure Game Tool is an open source project created and maintained by Amazon that allows you to graphically design the flow of your adventure’s story. You can find the IAG Tool on GitHub at http://bit.ly/2x54myh.
If you’ve spent much time on social media, you’ve likely taken (or at least seen the results of) quizzes of the “Which Harry Potter Character Are You?” or “What Kind Of Dinosaur Am I?” variety. Under the hood, these all run off of a decision tree, and the Decision Tree Skill Template makes it easy to create a skill that allows your users to answer a series of questions to arrive at an answer.
The third game type template I’ll cover is the Trivia Skill Template. This makes it super easy to create a trivia game using the content of your choice. With this kit, you could have a trivia skill up and running on Alexa in under an hour.
I’ll cover all three of these game types in Part VI of this book. In Chapter 17, you’ll build a decision tree skill called “What Kind Of Beer Should I Order?”, Chapter 18 will cover the trivia skill with a fun game called “Who Said It?”, and in Chapter 19 you will create a voice-driven interactive adventure game skill called “Logan’s Quest”.
Flash Briefing Skills
The Flash Briefing Skill API enables you to add your own content feed to Alexa’s daily Flash Briefing.
This can be pre-recorded audio files or text to be read by Alexa to anyone who enables your skill and adds it to their daily Flash Briefing. Once this skill is enabled, there is no voice interaction model beyond the usual Stop, Pause and Resume commands which are part of Alexa’s Flash Briefing functionality.
If you create and provide frequently updated content via JSON or RSS feeds, then this skill will get your content in front of thousands of people every day. You can find the Flash Briefing Skill API documentation at http://amzn.to/2iZGtCB.
I will cover Flash Briefing Skills in more detail, including creating one, in Part IV. In Chapter 11, we will dig into the Flash Briefing Skill API, Chapter 12 will cover designing the skill and creating some content, and in Chapter 13 you’ll create the skill to support your syndicated content: MNN (My News Network).
Video Skills
The Video Skills API is used for creating an interface between your hosted video content and Alexa.
Functionality provided by this API includes searching for and playing content, controlling playback, navigating channels, and inclusion in Alexa’s video catalog.
I will cover Video Skills in more detail in Part V. In Chapter 14, I will cover the Video Skills API and walk through the design and creation of a simple video skill.
Skills for Echo Show
The Echo Show allows you to add image and video capabilities to your Custom Skills, but that’s not all.
All existing Alexa Skills work “out of the box” on the Echo Show and any content provided to the Companion App will also appear onscreen on the Echo Show, but you can take it a step further because the ASK provides visual templates for laying out the user interface of your skill, and gives you the ability to customize the user interaction model.
In addition, the Echo Show offers additional integration with the Smart Home Skill API so you can view your smart camera devices via your Echo Show.
In Part V, I’ll cover best practices for designing skills for voice and touch for use on the Echo Show. In Chapter 15 I will walk you through the design of a new video and touch enabled skill for the Echo Show, and in Chapter 16 we will build it.
Custom Skills
Custom skills are a great way to bring voice interaction to an existing service, or as an integral part of a new product design.
I covered the individual parts of a skill (Intents, Invocation Name, Slots, Utterances, etc.) at a relatively high level in Chapter 1, but there’s more you can do than just voice interaction.
Custom skills can display text and images via the companion app or the Echo Show. If someone uses your skill on an Echo Show, even if it wasn’t designed for it, it will show the same content as the companion app by default.
Additionally, when designing custom skills for the Echo Show, your skill can play video files and respond to touch input. More on that in a bit.
Custom skills can also play MP3 audio files. This enables you to play background music and sound effects as part of your skill, or even provide dramatic audio performances instead of relying on the default Alexa voice to read your content back to the user.
If you have an Alexa, and want to hear something really cool, ask her to “Open the Wayne Investigation.” This popular skill features rich audio and a complex interaction model that puts you in the role of a Gotham City detective trying to solve the murder of Bruce Wayne’s parents.
The “Hello World!” custom skill we built in Chapter 1 is admittedly pretty simple, but it’s fairly easy to add some additional interaction to it. Since we’re going to be exploring the other skill types in more detail in later chapters, let’s modify our custom skill now.
Hello World, Revisited
Currently, the Hello World skill is pretty impersonal, so let’s change it to ask how your day is and wait for a response.
To do this, you’ll need to go back to the developer portal and select your skill, and then go to the Interaction Model screen.
First, you’re going to update the interaction model by adding a pair of Alexa’s built in intents (in bold) to the intent schema section:
{
"intents": [
{
"intent": "HelloWorldIntent"
},
{
"intent": "AMAZON.YesIntent"
},
{
"intent": "AMAZON.NoIntent"
},
{
"intent": "AMAZON.HelpIntent"
}
]
}
Because you’re adding built-in intents, you don’t explicitly need to add sample utterances unless you want to extend them beyond the defaults, but it’s a good practice (and we’ll throw in a couple extra for good measure.)
Add the sample utterances in bold below.
HelloWorldIntent say hello
HelloWorldIntent say hello world
HelloWorldIntent hello
AMAZON.YesIntent Yes
AMAZON.YesIntent Yeah
AMAZON.YesIntent Sure
AMAZON.NoIntent No
AMAZON.NoIntent Nope
AMAZON.NoIntent Not Really
AMAZON.HelpIntent help me
Make sure to click the save button at the bottom of the page. You’re halfway done!
Now you need to log back in to AWS and open up your Hello World lambda function so you can add the code to support the additional intents.
Scroll down until you see the onIntent() function, and add/change the code in bold below:
function onIntent(intentRequest, session, callback) {
var intent = intentRequest.intent,
intentName = intentRequest.intent.name,
repromptText = "Are you having a nice day?";
if (intentName == 'HelloWorldIntent') {
callback(null,
buildSpeechResponse("Hello World! Are you having a nice day?",
repromptText, false));
}
if (intentName == 'AMAZON.YesIntent') {
callback(null,
buildSpeechResponse("I'm so glad.", "", true));
}
if (intentName == 'AMAZON.NoIntent') {
callback(null,
buildSpeechResponse("I'm sorry to hear that. Perhaps it will improve.",
"", true));
}
if (intentName == 'AMAZON.HelpIntent') {
callback(null,
buildSpeechResponse(repromptText, "", true));
}
}
You’re changing the “Hello World!” text to something a bit more interactive, but you’re also changing the endSession parameter of the buildSpeechResponse() method from true to false so that Alexa knows to wait and listen for a response.
You’re also adding support for two more intents: AMAZON.YesIntent and AMAZON.NoIntent. This time you’re setting the endSession parameter to true to let Alexa know she’s done.
Make sure to save your changes, and then you’ll be ready to fire up your skill on Alexa.
Assuming you already enabled the skill when you built it in chapter 1, all you have to do is ask Alexa to open it, and it will automatically run the updated version.
You: Alexa Open Hello World
Alexa: You can ask me to say Hello World!
You: Say Hello World
Alexa: Hello World! Are you having a nice day?
You: Yes
Alexa: I'm so glad.
Try running it a few times and responding with the various sample utterances you added.
This concludes our tour of the various skill types, so now let’s take a look at some other cool features of the ASK that will make your life a lot easier if you plan on creating many skills: the Skill Management API and the Command Line Interface.
Skill Management API
With the Alexa Skill Management API (SMAPI), you can manage your Alexa Skills via RESTful HTTP interfaces, allowing you to programmatically create new skills, update your interaction model, and more. This gives you the ability to create your own build management tools.
The fine folks at Amazon have already created one set of tools for you: the Alexa Skills Kit Command Line Interface (ASK CLI) which allows you to script your build and deployment process instead of having to funnel everything manually through the developer dashboard.
Command Line Interface
The ASK CLI can perform the following functions:
- a new skill project
- skill project to the development stage
- an existing skill into a new project
- SMAPI calls
- and upload AWS Lambda code
In order to use the CLI, you need an Amazon Developer Account (which you should already have) and Node.js which I mentioned in Chapter 1.
If you haven’t downloaded Node.js 4.3 (or higher), go ahead and visit the download page at https://nodejs.org/en/download/ and grab it. You’ll also need the Node Package Manager (NPM), which will install with Node.js.
Once you’ve installed Node.js, you can check your version by typing node --version at a command prompt.
Next you need to install the ASK CLI via NPM. Still got that command prompt open? Awesome! Type this: npm install -g ask-cli
If you’re using Linux, you may need to throw a sudo command in front of that to get it to work, like so: sudo npm install -g ask-cli
After the installation is complete, you’ll need to initialize the CLI once (and provide your Amazon developer credentials) and you’ll be all set.
To initialize the CLI, type ask init at the command prompt. You’ll need to create a new profile, so give it a name and then you’ll be taken to an Amazon login screen to verify your credentials. Once you’ve done that, you can close that browser window.
You might also get a Windows Security Alert (depending on your firewall settings) so be sure to allow access for Node.js.
Now that you’re up and running, I’ll show you how to do a few things:
If you want to see what the ASK CLI has to offer, you can start by typing ask at the command prompt. This will give you a list of supported commands and a brief description of their purpose.
You’ve already run the init command, so to create a new skill from the ASK CLI, you’ll use the new command:
ask new -n skillname --profile profilename --lambda-name lambdaname
All three of these arguments are optional, but at the very least you want to provide a unique skill name. Issuing a new command with no additional information will create a simple hello-world style skill under the default profile in whatever folder you happen to be pointing at, so you may want to create a folder for keeping your projects organized.
For example:
cd c:\
md AlexaSkills
cd AlexaSkills
Now you should be looking at a command prompt like this c:\AlexaSkills>
Go ahead and create your first project from the CLI (you can always delete it later):
ask new -n TestSkill1 --lambda-name TestSkillLambda --profile yourprofilename
A new folder will be created with the same name as your skill. That folder contains a manifest file named skill.json, and two other folders: .ask and models.
The manifest file contains information about your newly created skill, and will be used when deploying your skill to Amazon.
You can open json files with any text editor if you want to take a look, but I’ll include this one below for you.
{
"skillManifest": {
"publishingInformation": {
"locales": {
"en-US": {
"summary": "Sample Short Description",
"examplePhrases": [
"Alexa open hello world",
"Alexa tell hello world I am Jeff",
"Alexa tell hello world my name is Peter"
],
"name": "TestSkill1",
"description": "Sample Full Description"
}
},
"isAvailableWorldwide": true,
"testingInstructions": "Sample Testing Instructions.",
"category": "EDUCATION_AND_REFERENCE",
"distributionCountries": []
},
"apis": {
"custom": {}
},
"manifestVersion": "1.0"
}
}
If you were to look in the Amazon Developer Portal right now, you wouldn’t see this skill listed yet, because the new command only creates a local copy, until you deploy it. (We’ll do that in just a moment.)
Feel free to tweak some of the description values, example phrases, and testing instructions when you generate a new skill project, but be sure to leave the manifestVersion at “1.0”.
Under the .ask folder, you’ll find a config file which looks like the following:
{
"deploy_settings":
{
"default": {
"skill_id": "",
"was_cloned": false
}
}
}
Leave this one alone for now, as it will be modified during the deployment.
Lastly, if you look in the Models folder, you will see a file titled en-US.json, which I have included here:
{
"interactionModel":{
"languageModel":{
"invocationName":"hello world",
"types":[],
"intents":[
{
"name": "AMAZON.CancelIntent",
"samples": []
},
{
"name": "AMAZON.HelpIntent",
"samples": []
},
{
"name": "AMAZON.StopIntent",
"samples": []
},
{
"name":"HelloWorldIntent",
"slots": [],
"samples":[
"hello",
"say hello",
"say hello world"
]
},
{
"name":"MyNameIsIntent",
"slots":[
{
"name":"name",
"type":"AMAZON.US_FIRST_NAME"
}
],
"samples":[
"my name is {name}",
"i am {name}",
"you can call me {name}"
]
}
]
}
}
}
This file shows the various intents in your generated skill, along with the sample utterances. After you deploy your skill, you’ll see this information in the Developer Dashboard.
Now that you’ve examined all of the generated files, it’s time to do a CLI Deploy to your AWS account.
The deploy command looks like this:
ask deploy --no-wait --target target --profile profile --debug
Just like the new command, all of these parameters are optional. The no-wait switch allows you to deploy asynchronously instead of waiting for the skill to build. The target switch allows you to specific which files to deploy (lambda, skill, model, or all) with ‘all’ being the default. Profile lets you provide a profile other than the default to deploy under. The debug switch lets you append a debug message to an error result.
The type of skill you are deploying dictates what files will be uploaded by default:
| Custom Skill |
skill.json, model file, and any AWS Lambda Function code |
| Smart Home Skill |
skill.json and AWS Lambda Function code |
| Flash Briefing Skill |
skill.json |
The first time you deploy a skill, the ASK CLI creates a new skill and lambda function in AWS using the following naming convention:
ask-<skilltype>-<skillname>-<profile>
The lambda function is created with the ask-lambda permission, and an endpoint is generated. The endpoint information is passed back and the skill.json file is updated.
Make sure you’re in the top folder for your skill (the folder that contains your skill.json file) in the command prompt, and type this in:
ask deploy --profile yourprofilename
After the deploy process completes, take a quick look in the config file again, and you’ll see the updated skill ID:
{
"deploy_settings":
{
"default": {
"skill_id": "amzn1.ask.skill.xxxxxxxx-xxxx-xxxx-xxxx-xxxxxxxxxxxx",
"was_cloned": false
}
}
}
In addition to creating skill projects from scratch, you can also clone an existing skill.
ask clone --skill-id skillid --profile profile --debug
If you provide a value for skill-id, the clone command will copy that skill into a new skill. If you do not provide a skill-id, you will be presented with a list of skills to choose from.
Go ahead and give it a shot from your C:\AlexaSkills folder.
cd c:\alexaskills
ask clone --profile yourprofilename
Keep in mind, this doesn’t deploy the clone, it only makes a local copy. You’ll still need to deploy it to AWS for it to show up on the dashboard.
In addition to the three commands I just covered, there’s one more ASK CLI command I’ll cover here, and it’s a doozy. The API command offers up a collection of functions, and to see them all, just type ASK API in your command prompt window.
You’ll notice there’s some overlap with the commands I’ve already shown you, and that’s because they’re just making API calls behind the scenes. Take a look at Figure 2-2 for a complete list.

Figure 2-2: ASK API Commands
For more detailed usage information about any of the ASK CLI commands, you can add a –h switch, like this:
ask api get-model -h
Which gets you a list of parameters and expected values, like Figure 2-3.
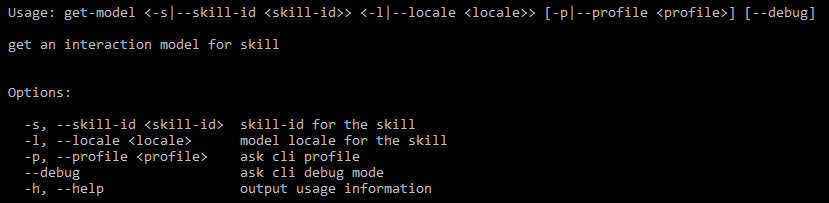 Figure 2-3: The get-model API subcommand*
You can get a list of all of your deployed skills, and their skill-ids, by using the ask api list-skills command.
There’s a lot of power and flexibility here. Being able to create/update and deploy skills as part of a scripted build system is incredibly useful, and there’s more! You can even invoke your skills, test them, and submit them for certification.
You can explore the full set of ASK CLI documentation at this link: http://amzn.to/2fBFe8B
That’s it for this chapter. In Chapter 3, I’ll cover picking your hosting platform, and discuss ways you can host your skill somewhere other than Amazon AWS.
3
Pick Your Hosting Platform Carefully
When designing an Alexa Skill, before you write a single line of code, you need to consider where you want your skill to live and run. In this chapter, I will cover the options and potential benefits of different environments for your skill.
When picking a hosting environment, at a minimum you need to consider the following factors:
- Languages
- Costs
Maintenance
Administration
Are you part of a large company that manages their own internet presence, or maybe you’re a smaller team or even lone-wolf developer? Do you work primarily in a Microsoft shop (Windows, IIS/ASP.NET, SQL Server, C#/VB.NET) or do you prefer the open source LAMP (Linux, Apache, MySQL, Python) stack? Do you have a dedicated IT staff, or are you expected to handle everything yourself?
There are essentially three broad options for hosting environments, so I’ll talk about each of them and drill into the benefits of each.
Cloud
A proper discussion of cloud computing could easily fill an entire book, but for our purposes it comes down to three offerings: Amazon Web Services, Microsoft Azure & Google Cloud. Depending on your requirements, any of these would be suitable environments, so I’ll break down the differences and mention any pros/cons of each.
Amazon Web Services (AWS)
AWS offers serverless computing via AWS Lambda Functions. This means you can build and execute your code without having to worry about server configuration or management.
- Languages: C# (.NET Core), Java, Node.js, Python
- Pay only for compute time. Potentially Free.
- Serverless means not having to deal with server maintenance or configuration
- You can set permissions and roles for your skills via the AWS Dashboard
When used for Alexa Skills, AWS is free for the first million AWS Lambda requests & 750 hours of compute time per month. If you exceed these limits, you “may incur AWS usage charges.”
You can also apply for an additional $200 per month in promotional credits for Alexa Skills here: http://amzn.to/2mNJPsf.
If you’re already familiar with one of the supported languages, not reliant on any Microsoft specific technologies, and like the price tag (FREE!) then AWS is a terrific option for skills development.
Microsoft Azure
If you’re primarily a Microsoft shop, and don’t want the overhead of setting up and managing your own servers, Azure offers a nice integrated pipeline for publishing your skill’s backend service directly from Visual Studio.
Azure Web Apps is a serverless option (much like AWS Lambda) that scales on demand and does not require any server maintenance or configuration.
- Languages: ASP.NET (C#), Node.js, PHP, Python
- Free initially*
- Serverless means not having to deal with server maintenance or configuration
- In addition to serverless, Azure offers full virtual machines in your choice of OS.
*Azure offers a free account that comes with a $200 credit to spend for 30 days, and certain products are free for 12 months. This covers up to a million requests and 400 TB of “resource consumption.” The Azure Free Account FAQ (located here: http://bit.ly/2wnXSHa) shows the most current “free” plan features, and breaks it down pretty well.
If you need support for Microsoft specific products like Active Directory, SQL Server, etc. then Azure may be your only Cloud option for Alexa Skills. I’ll walk you through creating an Azure based Alexa Skill in Chapter 6.
Google Cloud
If JavaScript is your preferred language, and you want easy integrations with Google’s various product APIs, then Google Cloud may be the platform for you.
- Languages: Node.js
- Costs: Free initially*
- Serverless means not having to deal with server maintenance or configuration
- Handled via Cloud Console Web Admin UI
*Google Cloud offers a 12 month free trial that includes $300 in free credit and access to all Google Cloud products, such as the Google Maps API. This covers two million invocations (requests) and 400 TB of compute time per month. Each additional million invocations (per month) is $0.40, so even if your skill is incredibly popular, your monthly charges won’t be terribly high unless you’re pushing a lot of outbound data (which caps at 5GB per month, with a $0.12 per GB charge after that.)
Google Cloud also offers excellent support for microservices and mobile app integration with their Cloud Functions product.
I won’t be specifically covering Google Cloud in this book, but your Node.js based projects should run without any manual conversion necessary. Just make sure to select the HTTPS Service Endpoint Type when providing the address of your skill on the Configuration tab of the ASK Dashboard, as shown in Figure 3-1, below.

Figure 3-1: Configuration Tab of the Alexa Dashboard
As you can see, all three of the big Cloud providers offer a serverless computing option, and all three offer some form of free plan, for at least a year. There really are no wrong choices here. The one you pick depends on which of these providers meets your needs.
Having said that, Amazon has a vested interest in putting (and keeping) your skills in AWS, and regularly offers incentives to Alexa Skills developers.
The next category I’ll cover is Leased Web Hosting, which is the more traditional, typically “flat rate + extras” hosting option.
Leased Web Hosting
Leased web hosting is available in nearly every price and configuration imaginable. Prior to the Cloud, this or self-hosting were your only options. For most small teams (or lone developers), self-hosting isn’t really an option.
Because there are so many hosting options, there’s a lot of flexibility here. You can use any language (even Ruby on Rails) capable of returning a properly formatted JSON message to a request, so the choice of host is entirely based on what language you wish to use and how much you wish to pay (which can vary widely.)
Depending on your host, server configuration and administration may play a bigger role compared to the serverless cloud options listed above. Also, the cheaper web hosts use shared hosting which means you will be competing for bandwidth and processing power with any other services or websites also being hosted on your server. Dedicated server hosting is available, of course, but the monthly price may exceed what you would pay for Cloud hosting.
Generally speaking, the cheaper the host, the more websites and services you’ll be competing with for resources, which can directly impact performance. Hosting companies bet heavily on low traffic for websites, and it’s not unheard of to have 20 or more websites hosted on a single machine. You’re also at their mercy for any special configuration tasks, backup/restore tasks, and some options may simply be unavailable.
Many leased web hosts offer a menu of “extra” services for additional fees. By the time you add a database instance, secure certificate for https support, domain name registration, additional bandwidth, additional storage, etc. you may find that Cloud hosting is a cheaper alternative.
- Languages: All
- Costs: Varies
- Varies
- Varies
While there are certainly some free hosts available, they have little or no guarantee of uptime/availability, offer minimal access to configuration options, and most do not support anything beyond simple websites (no services).
You may be thinking that I’m pushing you towards the Cloud, and you’re right. There’s no question that there are some excellent Web Hosts available, but for ease of use, price, and reliability, cloud computing is really the way to go.
The bottom line here is, if you’re going to used Leased Web Hosting, be sure to get a good one. If your skill is occasionally unavailable or performs poorly it can fail the Alexa Skill certification process or get de-listed if it fails to respond too often.
In the next section, I’ll look at self-hosting options, and discuss the pros and cons associated with going that route.
Self-Hosting
In this context, self-hosting implies complete control over the software, hardware and internet connection responsible for your online presence. This typically involves a pretty substantial investment in hardware, software and staff to maintain it.
- Languages: All
- Costs: Varies
- Varies
- Varies
Much like leased hosting, self-hosting can come in literally in any flavor you want, because you’re doing it yourself. The only limits are what you can afford, and the knowledge of your development and support teams.
SIDE NOTE: If you’re a solo dev, you may be thinking “Hey! I’ve got a blazing fast internet connection, and I can get a fixed IP address for $10 extra per month. I could totally host this on my home computer!” If you’re thinking this, please stop. The average desktop machine isn’t really suitable for running as a server on the internet, and your service will go down every time your machine gets overloaded, or any time you reboot.
If done properly, this is absolutely the most expensive option you could pick. Self-hosting costs can easily run into the tens of thousands of dollars per month, by the time you factor in hardware, server licenses, dedicated internet, IT staff, power, etc. If done poorly, self-hosting could be disastrous.
Of course, if you are developing Alexa Skills on behalf of a company that self-hosts already, go for it. There’s little or no expense beyond the investment of your time.
That’s it for this chapter. While I’ve broken down the pros and cons of each, all of these options are feasible, depending on your situation. In Part II, We’ll start digging deeper into Custom Skills, designing a City Facts skill in Chapter 4, and then building AWS Lambda and Azure Service versions in Chapters 5 and 6, respectively.
4
My City Facts – Designing Your New Skill
Welcome to Part II: Custom Skills! This is where it starts getting really fun, and we build something a lot more useful than the Hello World example from the previous chapters.
In this chapter we will design a new custom skill called MyCity Facts. This skill will allow your users to interact with Alexa to learn interesting and useful facts about an imaginary place called MyCity.
After designing the skill, we’ll walk through the process of building the skill, once as an AWS Lambda Function (Chapter 5) and once as a Service that you can run in your web or cloud hosting environment (Chapter 6).
In chapters 5 and 6, I’ll also cover publishing your skill for others to enable and use.
The Interaction Model
The first step in designing a new skill is defining the interaction model, so let’s do that now.
Amazon provides a handy worksheet for fleshing out your interaction model, as seen in Figure 4-1 below. You can download it at http://amzn.to/2gtTZLb. There’s also a simplified version, available at http://amzn.to/2yDSmoJ.
This worksheet allows you to plan out the voice interaction between your users and Alexa, as well as the intent definitions and any backend services or session information your skill might need.
Figure 4-1: Alexa Dialog Design – Detailed
Define Your Intents
So what does a City Facts Skill do? It provides (hopefully) interesting facts about a city, in this case: MyCity! In order to do this, you’ll need to create an intent that returns some information (a “fact”) to the user.
GetMyCityFactIntent
To do this, we’ll define a GetMyCityFactIntent as part of our interaction model. The sole purpose of this intent is to return a single fact about MyCity. We won’t use any Slots for this one, because it only returns a single fact each time it is called.
Finally, we come up with some Sample Utterances.
| Intent |
GetMyCityFactIntent |
| Slots |
|
|
|
|
| Sample Utterances |
Give me a fact. |
Tell me a fact. |
Give me a city fact. |
I’ve given you a few examples above, but you really want to have at least ten for each intent. It may sound like a lot, but try to think of all the different ways people say the same thing. You want your skill to be easily usable by as many people as possible.
Here’s a quick list off the top of my head:
Fact
Give me a fact.
Tell me a fact.
I’d like a fact.
City Fact
Give me a city fact.
Tell me a city fact.
I’d like a city fact.
Tell me about MyCity.
Tell me something.
Tell me something about MyCity.
Hit me with a fact.
Share a fact with me.
Share a city fact with me.
Surprise me.
You can (and should) always add more sample utterances after you get some feedback on your skill. A good test is getting your friends and family to test it out without being told specifically what to say. Write down their failed attempts. Some of them may surprise you.
Next, we’ll need some “interesting” facts about MyCity. The more facts you can include, the better. Here’s a relatively short list:
MyCity has a population of 123,456 people, 11 bears, 3 alligators, and 7,134 cats.
MyCity has several popular attractions, including 3 lakes, 2 mountains, and a 400 acre wildflower sanctuary. On a nice day, you can see the bears playing among the wildflowers, but don’t get too close.
MyCity was founded in 1873 by settlers who got lost on their way from Virginia to California and decided to stay put and make the best of it.
The mayor of MyCity is YourName Goes Here. This is the 14th consecutive term for Mayor Here.
MyCity holds a record in the Guinness Book of World Records for the “largest man-made neon star on top of a mountain.”
City Hall has had three locations since first being constructed in 1902. The first move was due to extensive damage from the great flood of 1937, and the second move was due to the needs of the administration outgrowing the previous facilities. This move occurred in 1992, and City Hall now resides at the intersection of Hill Street and Mountain View Blvd.
The summer carnival is MyCity’s most popular event and raises enough money to fund the volunteer fire department every year.
MyCity is home to 237 pizza restaurants, 9 fast food establishments, and 1 frozen banana stand, which is open from the beginning of July to the end of September.
One of the prettiest places on Earth, MyCity has four perfect seasons of exactly 3 months each. The leaves change every fall, and winter offers exactly 22.4 inches of snowfall every year. Average summer temp is 76.8, every year.
The Mascots are the official football team of MyCity. This is also the name of the local baseball team, basketball team, and soccer team.
That should be enough “facts” to get our skill up and running and provide a little variety in responses to the end-users.
If you’re planning to build a skill about your own city, you’ll want to replace these with actual information. I recommend checking Wikipedia or your city’s municipal website.
When your users invoke the GetMyCityFactIntent, by asking the skill to “Give me a fact”, Alexa will respond with a randomly selected fact from the list, like so:
| MyCity holds a record in the Guinness Book of World Records for the “largest man-made neon star on top of a mountain.” |
|
The more interesting facts you have, the more use your skill will get, so load it up!
Some of the facts we’ve included may tax the limits of Alexa’s pronunciation skills, but that’s ok. We’ll address it during the implementation phase by using Speech Synthesis Markup Language (SSML) to control how Alexa handles the trickier parts.
You want the MyCity Facts skill to give your users some useful directions, so it’s a good idea to specifically define a Help Intent as part of our Interaction Model.
AMAZON.HelpIntent
As you may recall, the AMAZON.HelpIntent is automatically included, and we can extend it by providing additional sample utterances for invoking it, and use it to respond to the user with a custom help message.
| Intent |
AMAZON.HelpIntent |
| Slots |
|
|
|
|
| Sample Utterances |
What do I do? |
How does this work? |
How do I use this skill? |
Just like the GetMyCityFact intent, you want to have a variety of sample utterances for your AMAZON.HelpIntent. Here’s a longer list of sample help utterances:
What do I do?
What?
What do I say?
How does this work?
How do I get a fact?
Help me get a city fact.
I don’t know what to do.
Directions
Huh?
I don’t understand.
What am I supposed to say?
Help
Is this thing on?
You get the idea. Again, test your skill on some friends and family members and consider updating the list with whatever they say as well.
When your users invoke the AMAZON.HelpIntent, by asking the skill for “Help” or saying “What do I do?” Alexa will respond with a help message, like so:
| You can say tell me a MyCity fact, Help, or Exit. What can I help you with? |
|
Once the user invokes the Help intent, Alexa will wait for a response after speaking the help message. If the user doesn’t say anything after a few seconds, Alexa can prompt the user again:
| What can I help you with? |
|
If the user still doesn’t respond, we can trigger the Stop intent, so let’s take a look at that next.
AMAZON.StopIntent
We don’t have to explicitly add any of the built-in intents, and they do a pretty good job of catching the more common, relevant phrases, but it’s always a good idea to keep them in mind when designing the interaction model for your intent, especially if you want to extend them beyond the defaults.
Let’s add a Stop intent to our interaction model.
| Intent |
AMAZON.StopIntent |
| Slots |
|
|
|
|
| Sample Utterances |
Stop |
Quit |
Exit |
As before, you want to have a variety of sample utterances for your AMAZON.StopIntent. Here’s a longer list of sample utterances for the Stop intent:
Stop
Quit
Exit
Finish
I’m done
Shut Up
Goodbye
The sole purpose of the Stop intent is to end your skill immediately. We’ll provide Alexa with a short, simple message for your users when they invoke the Stop intent:
AMAZON.CancelIntent
Much like the built-in Help and Stop intents, Alexa also has a built-in Cancel intent, called (unsurprisingly) AMAZON.CancelIntent.
| Intent |
AMAZON.CancelIntent |
| Slots |
|
|
|
|
| Sample Utterances |
Cancel |
Abort |
Nevermind |
The Cancel and Stop intents can (and should) both be used to end our MyCity Facts skill. Amazon provides both because their research indicates that users tend to use the words “cancel” and “stop” interchangeably.
You’re probably wondering “Why bother? Why not just offer one intent with multiple sample utterances?” and that’s a great question. Amazon provides both because there are scenarios where the two intents behave differently.
If you are creating a skill that allows users to perform a transaction of some sort, such as updating data, moving money around, making a purchase, calling an Uber, etc... the Cancel intent should be used to interrupt and cancel the transaction without exiting the skill entirely.
If your skill doesn’t need that specific functionality, Amazon’s guidance is for developers to support both anyway and just have the Cancel intent behave identically to the Stop intent.
Since that’s what we’re doing here, your skill will use the same return message as the Stop intent:
We’re done with the design phase, so it’s time to start building the skill. In chapters 5 and 6 I’ll cover two different ways to build the MyCity Facts skill we designed in this chapter.
5
Building the MyCity Facts Skill as an AWS Lambda Function
Welcome to chapter 5: Building the MyCity Facts Skill as an AWS Lambda Function. In this chapter, you will take the design for the MyCity Facts skill that we completed in chapter 4 and implement it as an AWS Lambda Function.
After creating and deploying the skill, I’ll cover publishing it for others to enable and use.
Implementing Your Design
You’ve got a complete design for your MyCity Facts skill thanks to the work you did in Chapter 4, so now it’s time to push up your sleeves and create your AWS Lambda Function.
Download the Skill Files
From this point forward, all of the projects in this book can be downloaded from GitHub as a .ZIP file at the following address: http://bit.ly/2yHPsg6 (This file has all of the projects, so you only need to download it once.)
If you’re familiar with Git and GitHub.com, you can also choose to clone or fork the repo into your own workspace. All of the necessary files for the MyCity Facts skill can be found in the AlexaBookRepo project on GitHub, here: http://bit.ly/2yHMcRU, as seen in Figure 5-1.
If you downloaded a local copy, you can extract the files to the location of your choosing. The files for this project are in the AlexaBookRepo-master/MyCityFacts-AWS folder.
In that folder you will find two more folders: /speechAssets and /src. This will be a common theme throughout all of the projects, and most projects you find online. The /speechAssets folder contains the IntentSchema.json and SampleUtterances.txt files, which we informally defined in Chapter 4.
Figure 5-1: The MyCityFacts-AWS GitHub Repo
The /src folder contains the index.js file, which will contain the JSON code used for the AWS Lambda Function.
We’re going to focus on the contents of the /speechAssets folder first, and we’ll come back to the /src folder in a little bit.
IntentSchema.json
Open up the IntentSchema.json file in any text editor (even Notepad) and take a look. There shouldn’t be any surprises in here. All of the intents we defined in Chapter 4 are present in the intents array:
{
"intents": [
{
"intent": "GetMyCityFactIntent", "slots":[]
},
{
"intent": "AMAZON.StopIntent"
},
{
"intent": "AMAZON.CancelIntent"
},
{
"intent": "AMAZON.HelpIntent"
}
]
}
We don’t define any slots for the GetMyCityFactIntent because it doesn’t accept any parameters. It always returns one randomly selected fact from our skill, every time we invoke it.
Regardless of your preferred programming model and language, this JSON array is the format you will always use when you specify the Intent Schema in the Interaction Model tab of the Create a New Alexa Skill workflow on the Alexa Developer Dashboard.
That last part was a bit of a mouthful, but don’t worry, we’re going to walk through all of it shortly, but first we’ll take a look at the other file in the /speechAssets folder: the SampleUtterances.txt file.
SampleUtterances.txt
You guessed it! This file contains all of the sample utterances you came up with in Chapter 4. Your MyCity Facts skill will listen for all of these, plus some built-in phrases as well.
Much like the IntentSchema.json file, this will get pasted into the Interaction Model tab when setting up your skill.
GetMyCityFactIntent Fact
GetMyCityFactIntent Give me a fact.
GetMyCityFactIntent Tell me a fact.
GetMyCityFactIntent Id like a fact.
GetMyCityFactIntent City Fact
GetMyCityFactIntent Give me a city fact.
GetMyCityFactIntent Tell me a city fact.
GetMyCityFactIntent Id like a city fact.
GetMyCityFactIntent Tell me about MyCity.
GetMyCityFactIntent Tell me something.
GetMyCityFactIntent Tell me something about MyCity.
GetMyCityFactIntent Hit me with a fact.
GetMyCityFactIntent Share a fact with me.
GetMyCityFactIntent Share a city fact with me.
GetMyCityFactIntent Surprise me.
AMAZON.HelpIntent What do I do
AMAZON.HelpIntent What
AMAZON.HelpIntent What do I say
AMAZON.HelpIntent How does this work
AMAZON.HelpIntent How do I get a fact
AMAZON.HelpIntent Help me get a city fact.
AMAZON.HelpIntent I dont know what to do.
AMAZON.HelpIntent Directions
AMAZON.HelpIntent Huh
AMAZON.HelpIntent I dont understand.
AMAZON.HelpIntent What am I supposed to say
AMAZON.HelpIntent Help
AMAZON.HelpIntent Is this thing on
AMAZON.StopIntent Stop
AMAZON.StopIntent Quit
AMAZON.StopIntent Exit
AMAZON.StopIntent Finish
AMAZON.StopIntent Im done
AMAZON.StopIntent Shut Up
AMAZON.StopIntent Goodbye
AMAZON.CancelIntent Cancel
AMAZON.CancelIntent Abort
AMAZON.CancelIntent Nevermind
You may have noticed that certain punctuation and special characters have been stripped away. While it’s natural to want to write your sample utterances with proper punctuation, single quotes and question marks will get rejected by the Interaction Model screen when we try to submit.
Now let’s take a look at the /src folder. There’s only one file in there: index.js, which we’ll cover now.
index.js
The index.js file contains all of the code for your AWS Lambda Function. The listing is a little long, so I’ll break it down into more digestible chunks and talk about what we’re doing in each part.
This first block of code sets a reference to the Alexa SDK, and then registers your event handlers, which in this case includes the Alexa LaunchRequest event, and your various Intents which you defined previously.
const Alexa = require('alexa-sdk');
exports.handler = function(event, context, callback) {
var alexa = Alexa.handler(event, context);
alexa.registerHandlers(handlers);
alexa.execute();
};
You will pass in a collection of handlers (defined below) to the registerHandlers() method (above.) This lets Alexa know what Intents to support, and therefore what utterances to listen for. The handlers then specify how to respond to each intent invocation.
var handlers = {
'LaunchRequest': function () {
this.emit('AMAZON.HelpIntent');
},
A LaunchRequest is fired whenever the skill is opened. In this case, we are using that event to trigger the AMAZON.HelpIntent so users know what to do when they invoke your skill.
In JavaScript / Node.js an event can be described as a string with a callback. An event can be emitted one or more times, resulting in execution of the callback function (which in the above example, would be the AMAZON.HelpIntent) for each occurrence of the event.
It’s generally regarded as a good practice to let your handlers call each other (as in the example above) rather than having multiple copies of the same text string floating around. This ensure consistency in responses from Alexa to your users.
If you have any external services that need to be initialized, data to load from elsewhere, etc., the LaunchRequest event is a good place to do so.
'GetMyCityFactIntent': function () {
var say = 'Here is your fact. ' + getRandomMyCityFact();
this.response.speak(say);
this.emit(':responseReady');
},
The above block of code shows the callback function that is executed when the GetNewMyCityFactIntent is invoked (by the user) or emitted (by the LaunchRequest event handler above).
There’s a few things going on in this method. First you are constructing the response string (stored in the say variable) with a standard opening “Here is your fact” followed by a randomly selected fact about your city.
Speaking of which, I’ll cover the GetRandomMyCityFact() function in just a moment.
The response.speak() function accepts a string that can be plain text or formatted with Speech Synthesis Markup Language (SSML) and stores it in the Response object. We’ll dig into SSML more in a later project, but if you’re curious there’s a reference in Appendix B in the back of the book.
Finally, we emit the responseReady event after the response has been built, but before it is returned to the Alexa service. This tells Alexa that the Response object we’ve constructed is ready to go.
The responseReady event also invokes the saveState event automatically. We’re not persisting any state information in this example, so we’ll come back to that in a later chapter.
Next up, we have the built-in intents:
'AMAZON.CancelIntent': function () {
this.emit('AMAZON.StopIntent');
},
'AMAZON.StopIntent': function () {
this.response.speak('Goodbye');
this.emit(':responseReady');
},
Remember how in the design chapter we discussed treating the Stop and Cancel intents as functionally identical? If the user invokes the Cancel intent, we just invoke the Stop intent. This way, we keep redundant code to a minimum and the UI responses remain consistent.
'AMAZON.HelpIntent': function () {
var speechOutput = 'you can ask for a fact by saying, tell me a fact.';
var repromptSpeech = 'Try it! Just say tell me a fact.'
this.emit(':ask', speechOutput, repromptSpeech);
}
};
This time, we’re using two response methods. You’ve already seen response.speak, but we are also emitting an Ask event which waits for the user to say something else after hearing the help message.
If Alexa doesn’t understand that response, she prompts the user again with the reprompt message, which in this case is “Try it! Just say tell me a fact.”
The Help intent doesn’t have to go last in the handlers collection of our AWS Lambda Function, but it’s a good habit to reinforce since we’re putting it last in the IntentSchema (in order to catch any unrecognized commands from the user.)
Next, we have the getRandomMyCityFact() method that we referenced above. This contains the array of MyCity Facts the skill will draw upon.
function getRandomMyCityFact() {
var myFacts = [
'MyCity has a population of 123,456 people, 11 bears, 3
alligators, and 7,134 cats.','MyCity has several popular
attractions, including 3 lakes, 2 mountains, and a 400
acre wildflower sanctuary. On a nice day, you can see
the bears playing among the wildflowers, but dont get
too close.','MyCity was founded in 1873 by settlers who
got lost on their way from Virginia to California and
decided to stay put and make the best of it.','The mayor
of MyCity is YourName Goes Here. This is the 14th
consecutive term for Mayor Here.','MyCity holds a record
in the Guinness Book of World Records for the largest
man-made neon star on top of a mountain.','City Hall has
had three locations since first being constructed in
1902. The first move was due to extensive damage from
the great flood of 1937, and the second move was due to
the needs of the administration outgrowing the previous
facilities. This move occurred in 1992, and City Hall now
resides at the intersection of Hill Street and Mountain
View Blvd.','The summer carnival is MyCitys most popular
event and raises enough money to fund the volunteer fire
department every year.','MyCity is home to 237 pizza
restaurants, 9 fast food establishments, and 1 frozen
banana stand, which is open from the beginning of July to
the end of September.','One of the prettiest places on
Earth, MyCity has four perfect seasons of exactly 3
months each. The leaves change every fall, and winter
offers exactly 22.4 inches of snowfall every year.
Average summer temp is 76.8, every year.','The Mascots
are the official football team of MyCity. This is also
the name of the local baseball team, basketball team, and
soccer team.'
];
This array is fine for our relatively simple MyCity Facts skill, but if you wanted to create something really big, you should consider using a database. This has the added bonus of allowing you to add more and more facts without having to edit and redeploy your skill every time.
Lastly, we have the single line of code that handles the magic of randomly selecting a fact for Alexa to return:
return(myFacts[Math.floor(Math.random() * myFacts.length)]);
}
There’s a few things going on here, so I’ll break it down. Math is a javascript library that contains a bunch of helper methods, including Math.random() and Math.floor().
The Math.random function returns a number between 0 and 1 exclusively (that is, neither 0 nor 1) which you have to multiply by the max number you want to randomize.
In other words, if you wanted a random number from 1 to 20, you would use Math.random() * 20 and if you want it to be a whole number, you must wrap that function with Math.floor (which rounds down to the nearest whole number) so it ends up looking like Math.floor(Math.Random * 20).
This is pretty common in C and Java style languages, but may look weird to any .NET developers reading this book, because they get something a little bit simpler. The statement Random.Next(1, 20) does the same thing as above, returning a whole number ranging from 1 to 20.
Random Number Generators (RNGs) are weird, arcane constructs that return pseudorandom numbers. We call them pseudorandom because achieving True Random is impossible on a computer.
There have been some incredibly long and boring books written on this subject, but the short version is that if a RNG is used long enough, they can present a predictable pattern, which can be problematic for some uses.
As a result, there are numerous incredibly complex RNGs written specifically to try and address such predictability, but for our purposes the Math.random() function will be fine.
In our code, we’re multiplying the random value by facts.length which is a whole number that represents the number of records in our facts array. This is better than hardcoding a number, because as you add more facts to your array, you won’t have to come back and modify this code every time!
Once we have a random number, we use it as the index in our facts array and return a string containing the fact, which gets used in the GetNewMyCityFactIntent defined above.
That covers everything in this project, so now it’s time to create the skill.
Add a New Skill
The next thing you need to do is add a new skill in your Alexa Skills Kit dashboard (located at: http://amzn.to/2qiiCjJ) by clicking the Add a New Skill button as shown in Figure 5-2.
Figure 5-2: Amazon Alexa Skills Kit Dashboard
Skill Information
Assuming you are already logged in, you should now be looking at the Skill Information tab as shown in Figure 5.3.
To begin creating your skill, perform the following steps on this screen:
- In the Skill Type section, select the Custom Interaction Model.
- In the Name field, enter: MyCity Facts
- In the Invocation Name field, enter: MyCity Facts
Invocation Names should be short and easily distinguishable. Amazon recommends using no more than 3 words, and disallows the use of special characters and the words Alexa, Echo or Amazon as part of your invocation name.
1. Accept the default values for the three Global Fields.
2. Click the Save button.
3. Click the Next button to proceed to the Interaction Model screen.
Figure 5-3: The Skill Information Tab
Interaction Model
The next screen is the Interaction Model, which you can see in Figure 5-4. I have omitted the Custom Slot Types from the screenshot.
You will add the contents of your IntentSchema.json and SampleUtterances.txt files on this page.
Perform the following steps:
- Copy the contents of the IntentSchema.json file and paste them into the Intent Schema box.
- Copy the contents of the SampleUtterances.txt file and paste them into the Sample Utterances box.
- Click the Save button.
- Click the Next button to continue to the Configuration screen.
The MyCity Facts skill doesn’t use any Custom Slot Types, so you will skip that section.
Figure 5-4: The Interaction Model Tab
AWS Lambda Function
After clicking the Next button in the previous section, you should be looking at the Configuration page, but before you can continue forward, you will need an Endpoint address for the AWS Lambda Function that services your skill requests.
You know what that means… It’s time to head over to AWS and create our Lambda Function. Don’t worry, you’ve already saved your progress so far, so it will be there when you come back.
- In your browser, go to aws.amazon.com and sign in to the console.
- Find the Compute section (should be top left), and click the link for Lambda.
You should now be looking at a table (Figure 5-5) containing any Lambda Functions you have previously worked on, including the HelloWorld function you created earlier in this book.
1. Click the Create Function button (top right).
Figure 5-5: Aws Lambda Functions
When creating an AWS Lambda Function, you have the option of coding from scratch or using a Blueprint. Blueprints are sample apps that come preconfigured with an event source and code, and are handy for getting you up and running quickly.
AWS has well over a hundred Blueprints to choose from, but most are not relevant to Alexa Skills development. If you type Alexa in the Blueprints search box and hit enter, you will get back a much smaller list of Alexa Blueprints (as shown in Figure 5-6.)
Take a look at the results. There are a few to choose from, but the first item in the list is the alexa-skill-kit-sdk-factskill, which sounds like a pretty good match for what we’re doing.
Figure 5-6: AWS Lambda Blueprints for Alexa
Go ahead and click on that one and take a look at what the Blueprint provides you.
I’m not going to reproduce it here, because it’s about 150 lines of code you aren’t going to use on this project, but I want you to take a look at it (and the rest of the Alexa Blueprints) so you know what’s available to you when you’re creating your own projects.
This is a pretty good sample, because it includes content for multiple languages and shows how to select the correct language based on your user’s settings.
Once you’ve gotten a good look at the blueprint, go ahead and click the Previous button at the bottom of the page, to go back to the Create Function page.
- Click the Author From Scratch button (top right of page)
You will be presented with the Basic Information screen (Figure 5-7) where you will give the function a name and set roles.
Figure 5-7: AWS Lambda Function Basic Information
- Enter the name for your function. I used MyCityFact, and you can too because this name is unique within your space in AWS.
- If you have been following along, and you created a Lambda Function for the previous project, you can select “Choose an existing role.” from the Role dropdown box and then select the “AWSLambdaBasicExecute” role from the Existing Role dropdown box.
- you don’t have a role available to select, you’ll need to create one so select the “Create new role from template(s)” option, enter a name for your role and then select “Simple Microservice permissions” from the Policy Templates dropdown box.
- Click the Create Function button.
- everything went ok up to this point, you should see a “Congratulations!” message that indicates your function has been successfully created.
- course, it doesn’t do anything… yet, but that’s easy enough to fix. Just head on over to the GitHub repo you downloaded and drill down into the MyCityFacts-AWS/src/ folder and open the index.js file (or view it on GitHub at: http://bit.ly/2yAfsgm).
- Once you’ve opened the file, select and copy all of it.
- Switch back over to the empty AWS Lambda Function screen and delete everything in the text editor, and then paste in your code.
- Click the Save button (top of screen.)
- almost done with this part. Click the Triggers heading at the top of the page so you can add the Alexa Skills Kit as an Event Source for your AWS Lambda Function.
- Click “Add Trigger” and you will see the Add Trigger dialog (Figure 5-8.)

Figure 5-8: The Add Trigger Dialog
- Click the dashed box on the left of the arrow and select “Alexa Skills Kit.”
- Click the Submit button.
- this point, you have a complete AWS Lambda Function, complete with an event trigger.
- you can go back to finish configuring your skill in the Alexa Skills Dashboard, you need to copy the Amazon Resource Name (ARN), which you will paste into the configuration page.
- can find the ARN for this Lambda Function at the top of the page, as shown in Figure 5-9.
Figure 5-9: The ARN (Amazon Resource Name)
- will look like “arn:aws:lambda:us-east-1:xxxxxxxxxxxx:function:MyCityFacts”.
- Select and copy the ARN.
- done with the Lambda Function, so switch back to the Alexa Skills Dashboard, and click on the Configuration section.
Configuration
1. so close to being done. You’ve designed and built your skill, and created the AWS Lambda Function to power it. All that remains is to point your skill to the service and test it out, so let’s get to it.
2. should be looking at the Configuration screen (Figure 5-10).
3. Under the Endpoint section, select AWS Lambda ARN.
4. Paste the ARN you copied from the AWS Lambda Function into the Default textbox.
5. can accept the default values for the rest of the screen.
6. won’t be using geographical regions or linked accounts for this skill.
7. Click the Save button.
8. Click the Next button to proceed to the Test screen.
9. it for the Configuration section. Next up, you’ll test your skill and examine the JSON request and response between your skill and the AWS Lambda Function you created.
Figure 5-10: The Configuration Screen
Test
The MyCity Facts skill is complete, so let’s test it out.
You should be looking at the Test screen (Figure 5-11) at this point. The first thing you’ll notice is that your Alexa skill is now enabled for testing.
The Voice Simulator is neat, but not particularly useful to us at the moment. Where it’s especially useful is when you’re trying to test out some SSML responses for your skill.
Unfortunately, given how far in the process you have to be in order to get to the Voice Simulator, Amazon Polly (https://aws.amazon.com/polly) is a much better choice for general testing.
In the Service Simulator, you can test sample utterances to invoke your skills and then examine the JSON request and response documents generated by your skill and AWS Lambda Function, respectively.
Try this in the Service Simulator:
- Type: tell me a fact
- Click the Ask MyCity Facts button
Figure 5-11: The Test Screen
After you click the Ask MyCity Facts button, the Service Request and Service Response boxes will both populate with JSON documents.
The Service Request:
{
"session": {
"new": true,
"sessionId": "SessionId.994568e2-9568-4385-ba5d-499a124d2bd0",
"application": {
"applicationId": "amzn1.ask.skill.xxxxxxxxxxxxxxxxx "
},
"attributes": {},
"user": {
"userId": "amzn1.ask.account. xxxxxxxxxxxxxxxxx "
}
},
"request": {
"type": "IntentRequest",
"requestId": "EdwRequestId.98ea21ea-5846-4679-bf92-5f639ed67685",
"intent": {
"name": "GetMyCityFactIntent",
"slots": {}
},
"locale": "en-US",
"timestamp": "2017-11-08T18:30:44Z"
},
"context": {
"AudioPlayer": {
"playerActivity": "IDLE"
},
"System": {
"application": {
"applicationId": "amzn1.ask.skill.xxxxxxxxxxxxxxxxx "
},
"user": {
"userId": "amzn1.ask.account.xxxxxxxxxxxxxxxxx"
},
"device": {
"supportedInterfaces": {}
}
}
},
"version": "1.0"
}
You’ve got some session information, followed by the request block, which shows the actual intent being invoked, and then the context block, which contains application and user IDs.
The Service Response:
{
"version": "1.0",
"response": {
"outputSpeech": {
"ssml": "<speak> Here is your fact. The summer carnival is MyCitys most popular event and raises enough money to fund the volunteer fire department every year. </speak>",
"type": "SSML"
},
"speechletResponse": {
"outputSpeech": {
"ssml": "<speak> Here is your fact. The summer carnival is MyCitys most popular event and raises enough money to fund the volunteer fire department every year. </speak>"
},
"shouldEndSession": true
}
},
"sessionAttributes": {}
}
Notice that while the request sends info than is absolutely needed, the response is pretty concise, and doesn’t return anything other than the output speech, type, and whether to end the session.
You can also click the listen icon just below the response document and the SSML will be read to you in Alexa’s voice.
Try typing a few of your sample utterances, including the Help requests.
Once you’re finished testing your MyCity Facts skill, click the Next button to continue on to the Publishing Information screen.
Device Testing
If you have an Amazon Echo device handy and connected with the same Amazon account you use for development, you can ask her to give you a MyCity Fact even without publishing the skill.
Try this:
Say “Alexa, open MyCity Facts”
| You can ask for a fact by saying “tell me a fact.” |
|
At this point, Alexa will wait for you to say one of the sample utterances you listed for your GetMyCityFactsIntent. If you take too long to respond, Alexa will prompt you again.
| Try it! Just say “tell me a fact.” |
|
Once you respond with an invocation, Alexa will randomly select a fact about MyCity for you and respond accordingly.
| MyCity has a population of 123,456 people, 11 bears, 3 alligators, and 7,134 cats. |
|
Publishing Information
- with the Hello World skill we worked on previously, I don’t really recommend publishing this skill as-is.
- if you have modified the project and put in facts about your own city, then you should definitely keep reading!
- this point, you should be looking at the Publishing Information screen, as shown in Figure 5-12.
Figure 5-12: Publishing Information
In the Global Fields section, I have selected Education & Reference. There are a number of categories and subcategories to choose from, but I feel this is the best fit for the MyCity Facts skill. Take a moment to look through all of them, and pick the one that most closely matches your skill.
The Testing Instructions section is for any special instructions that a certification tester would need to know about your skill. We don’t have any of those, so just enter NONE in the box.
I have selected for this skill to be available in “all countries and regions where Amazon distributes skills”.
Under Short Skill Description, I have entered “Facts about MyCity, USA.” If you have created a skill based on your own city, you should fill this field in with something similar for your own city.
The Full Skill Description field is for additional information about your skill. This information will be displayed in the Alexa App when your skill is invoked. It should include a brief description, and how to use the skill.
Next, you will enter three Example Phrases for use with your skill. These are like your Sample Utterances from before, except should be prefaced with Alexa, such as “Alexa, open MyCity Facts” or “Alexa, Ask MyCity Facts for a fact.”
You will also need to create small (108x108) and large (512x512) icons for your skill. I used Microsoft Paint for mine, which you can see in Figure 5-13. It only took about a half hour and I think it looks pretty good.
Figure 5-13: Don’t judge me, I’m a developer, not an artist
Once you fill everything in and upload your icon graphics, hit the Save button and the Submit for Certification button will light up, but don’t click it just yet. Click the Next button to proceed to the Privacy & Compliance screen first.
Privacy & Compliance
You’re well on your way to submitting your first skill. One last screen, a few questions, and you’re done. Take a look at the Privacy & Compliance screen, shown in Figure 5-14.
In the Privacy section, select the answers appropriate to your skill. I answered No to all three, and in this example you would too.
Under Compliance, I checked the box allowing Amazon to export this skill into other countries, and I checked No to the advertising question. You are not required to do this, so it’s entirely up to you.
If you have written a Privacy Policy for your skill (let’s assume you haven’t) then you should fill in the Privacy Policy URL to point to wherever you are hosting the information.
Just like the Privacy Policy, if you have written a Terms of Use document for your skill (probably not at this point) then you should fill in the Terms of Use URL to point to that as well.
Hit Save, and then, if you’re ready, hit the Submit for Certification button.
Figure 5-14: The Privacy & Compliance screen
Skill Certification
Congratulations, you’ve submitted your skill for certification! Now you get to wait for an email from the Alexa team.
While your submission is being evaluated, you can’t edit your skill. If you think you’ve made a mistake, or just wish to withdraw your skill from the certification process, there’s a button for that, otherwise you can click the Back to the List of Skills button.
That’s it for this chapter! In the next chapter we’ll build the same skill using Microsoft’s C# .NET and ASP.NET Web API, in Azure.
6
Building the MyCity Facts Skill as an ASP.NET Web API Service Hosted in Microsoft Azure
Welcome to chapter 6: Building the MyCity Facts Skill as an ASP.NET Web API Service Hosted in Microsoft Azure.
After creating and deploying the skill, I’ll cover publishing it for others to enable and use. If you worked through the previous chapter, you can probably just skin that part.
Implementing Your Design
You created a complete design for your MyCity Facts skill in Chapter 4, and you’ve already created it as an AWS Lambda Function, so this time you will be creating an ASP.NET Web API Service project and then publishing it to Microsoft’s Azure cloud-hosting platform to serve as the backend to your skill.
Download the Skill Files
As mentioned in Chapter 5, the projects in this book can be downloaded from GitHub as a .ZIP file at the following address: http://bit.ly/2yHPsg6 (This file has all of the projects, so you only need to download it once.)
All of the necessary files for the MyCity Facts skill can be found in the AlexaBookRepo project on GitHub, here: http://bit.ly/2AvABF8 (and shown in Figure 6-1.)
If you downloaded a local copy, you can extract the files to the location of your choosing. The files for this project are in the AlexaBookRepo-master/MyCityFacts-AZURE folder.
The architecture for this project significantly different than the previous one. There are a lot more moving parts in this chapter’s solution, so I’m going to walk you through the creation of the project and files, rather just reviewing an existing solution like in the previous chapter.
Figure 6-1: The MyCityFacts-AZURE GitHub Repo
Getting Started
I’m using Microsoft Visual Studio Community 2017 for this project. In addition to being free, it’s an excellent IDE with lots of features, and it makes the deployment to Azure about as close to painless as you can get. If you haven’t already downloaded it, take a look at Chapter 1 for more information on where to find it.
Once you’re up and running in VS2017, perform the following steps to create a new ASP.NET Web API solution.
- Create a new project (File – New – Project)
- Select “ASP.NET Web Application (.NET Framework) – Visual C#” from the New Project dialog (Figure 6-2.) If you can’t find it, make sure you’re looking under the Visual C#/Web templates.
- Give your project a name and a place to live, and then click the OK button.
I usually try to keep all of my projects as close to the root as possible, like: C:\Code\ProjectName or something like that. Saving projects to the desktop can occasionally cause unforeseen issues down the road. When in doubt, let simplicity prevail.
Figure 6-2: The New Project Dialog
I used MyCityFacts-AZURE to distinguish this project from the AWS Lambda-based project in Chapter 5, but you aren’t required to do that.
- Select the Web API template in the next dialog (Figure 6-3) and make sure the MVC and Web API checkboxes are selected, and then click the OK button.
Figure 6-3: New ASP.NET Web Application Dialog
Once you’ve done that, take a sip of your coffee while VS2017 creates your project infrastructure. It’ll only take a few seconds and you’ll be ready to roll.
SpeechAssets
If you’ve been working through the chapters as we go, this should be familiar territory for you. The SpeechAssets folder is where we put the Intent Schema and Sample Utterances files we designed in Chapter 4.
This time, instead of being at the very top of the repo, I’ve put the SpeechAssets folder inside the MyCityFacts-AZURE project.
In the Solution Explorer (Figure 6-4) you can see a complete hierarchy of files in the project.
Figure 6-4: VS2017 Solution Explorer
If you’re working along with the book, you’ll need to add this folder manually.
- Create a SpeechAssets folder under the MyCityFacts-AZURE project for your IntentSchema.json and SampleUtterances.txt files.
- Right-Click on the folder you just created and click Add – Existing Item and navigate to where you downloaded the files from GitHub. Select them and Visual Studio will copy them into the right location in your folder structure and add them to the Solution Explorer.
If you didn’t download the project files, you can easily view them on GitHub and copy/paste the contents into the appropriate file within VS2017. You’ll just need to Add – New Item for each of them (a .json file and a .txt file) inside the SpeechAssets folder.
We’ll come back to these in a bit.
Web API
We’re using the ASP.NET Web API template for this project, and the Model View Controller (MVC) Pattern. This means that to serve requests for our skill, we’ll need a controller.
To add a new controller to this project, do the following:
- Right-click on the Controllers folder in the Solution Explorer window.
- Select Add – Web API Controller Class (v2.1), as shown in Figure 6-5.
- Give it a name. I named mine MyCityFactsController.
Figure 6-5: Adding a New Controller
When you create a new controller in this fashion, VS2017 will automatically do some of the wiring-up behind the scenes for you.
Take a look at your MyCityFactsController class and you’ll see some stubbed out commands: the usual GET, POST, PUT, and DELETE verbs. We won’t be using all of them, but it’s a great that VS2017 gives you a populated class template to work from as a starting point.
using System;
using System.Collections.Generic;
using System.Linq;
using System.Net;
using System.Net.Http;
using System.Web.Http;
namespace MyCityFacts_AZURE.Controllers
{
public class MyCityFactsController : ApiController
{
// GET api/<controller>
public IEnumerable<string> Get()
{
return new string[] { "value1", "value2" };
}
// GET api/<controller>/5
public string Get(int id)
{
return "value";
}
// POST api/<controller>
public void Post([FromBody]string value)
{
}
// PUT api/<controller>/5
public void Put(int id, [FromBody]string value)
{
}
// DELETE api/<controller>/5
public void Delete(int id)
{
}
}
}
There are a couple of approaches you can take when developing an Alexa skill in C#.
Depending on the architectural needs of the skill, you could build a complex highly scalable n-tier enterprise architecture, or at the other end of the spectrum, you could create a lightweight dynamic C# object that returns the JSON response message your skill needs in order to communicate with Alexa.
I’m a big fan of taking the simplest possible approach that meets the needs of your project, so in this chapter we’ll be creating a dynamic C# object which affords us a few benefits: it’s simple, lightweight, and we can format the message in code to look exactly like the JSON message.
Take a look at the following JSON response, which was generated by our AWS Lambda Alexa Skill:
{
"version": "1.0",
"response": {
"outputSpeech": {
"ssml": "<speak> Here is your fact. The summer carnival is
MyCitys most popular event and raises enough money
to fund the volunteer fire department every year.
</speak>",
"type": "SSML"
},
"speechletResponse": {
"outputSpeech": {
"ssml": "<speak> Here is your fact. The summer carnival is
MyCitys most popular event and raises enough money
to fund the volunteer fire department every year.
</speak>"
},
"shouldEndSession": true
}
},
"sessionAttributes": {}
}
Using a dynamic object, the syntax varies a little bit, but we can format the code to look very close to the message we want to send:
return new
{
version = "1.0",
response = new
{
outputSpeech = new
{
type = "SSML",
text = "<speak>Here is your fact. The summer carnival is
MyCitys most popular event and raises enough money
to fund the volunteer fire department every year.
</speak>"
},
card = new
{
type = "Simple",
title = "MyCity Fact",
content = "<speak>Here is your fact. The summer carnival is
MyCitys most popular event and raises enough money
to fund the volunteer fire department every year.
</speak>"
},
shouldEndSession = true
},
sessionAttributes = new {}
};
In this case, I’ve hardcoded the response for example purposes, but in the code you’ll randomly select a MyCity Fact to inject into the dynamic object, and return to Alexa.
In the previous chapter’s AWS Lambda example, AWS handled the responsibility of creating the JSON request and response documents and ensuring compliance with their standards.
Since you will be creating the response manually, you need to be aware of the following size limitations for the JSON response:
- outputSpeech response can’t exceed 8000 characters.
- of the text included in a card can’t exceed 8000 characters. This includes the title, content, text, and image URLs.
- image URL (smallImageUrl or largeImageUrl) can’t exceed 2000 characters.
- token included in an audioItem.stream for the AudioPlayer.Play directive can’t exceed 1024 characters.
- URL included in an audioItem.stream for the AudioPlayer.Play directive can’t exceed 8000 characters.
- total size of your response can’t exceed 24 kilobytes.
If your response exceeds these limits, the Alexa service returns an error at deployment time.
Now that you have an idea of what a proper response should look like, it’s time to jump back in to VS2017 and start working on the controller you created.
To get started, delete all of the code inside the MyCityFactsController class. It should look like this:
using System;
using System.Collections.Generic;
using System.Linq;
using System.Net;
using System.Net.Http;
using System.Web.Http;
namespace MyCityFacts_AZURE.Controllers
{
public class MyCityFactsController : ApiController
{
}
}
We’ll start with defining the array our MyCity Facts will live in. Much like the AWS project in the previous chapter, we’ll also throw in some code to randomly select one fact and return a string.
Get Random Facts
Add the GetRandomFact() method inside your MyCityFactsController class:
private string GetRandomFact()
{
var RNG = new Random();
var Facts = new string[] {
"MyCity has a population of 123,456 people, 11 bears, 3 alligators, and 7,134 cats.",
"MyCity has several popular attractions, including 3 lakes, 2 mountains, and a 400 acre wildflower sanctuary. On a nice day, you can see the bears playing among the wildflowers, but dont get too close.",
"MyCity was founded in 1873 by settlers who got lost on their way from Virginia to California and decided to stay put and make the best of it.",
"The mayor of MyCity is YourName Goes Here. This is the 14th consecutive term for Mayor Here.",
"MyCity holds a record in the Guinness Book of World Records for the largest man-made neon star on top of a mountain.",
"City Hall has had three locations since first being constructed in 1902. The first move was due to extensive damage from the great flood of 1937, and the second move was due to the needs of the administration outgrowing the previous facilities. This move occurred in 1992, and City Hall now resides at the intersection of Hill Street and Mountain View Blvd.",
"The summer carnival is MyCitys most popular event and raises enough money to fund the volunteer fire department every year.",
"MyCity is home to 237 pizza restaurants, 9 fast food establishments, and 1 frozen banana stand, which is open from the beginning of July to the end of September.",
"One of the prettiest places on Earth, MyCity has four perfect seasons of exactly 3 months each. The leaves change every fall, and winter offers exactly 22.4 inches of snowfall every year. Average summer temp is 76.8, every year.",
"The Mascots are the official football team of MyCity. This is also the name of the local baseball team, basketball team, and soccer team."
};
return Facts[RNG.Next(0, Facts.Length - 1)];
}
The array is pretty straightforward code, and we covered the Random function in the previous chapter. So let’s move on.
Intent Dispatcher
The next function we’ll build is a dispatcher to examine the type of Intent being invoked, and respond accordingly. Add the following IntentDispatcher() method to your controller class:
private void IntentDispatcher(dynamic request)
{
var intentName = "";
if (request != null)
{
intentName = (string)request.request.intent.name;
}
This first part takes a look at the incoming request and makes sure it isn’t null before trying to navigate the JSON to get the intent name. Doing so against a null will blow up, so if it is null we just leave intentName as an empty string, and move on to the switch statement below, which knows how to handle it.
switch (intentName)
{
case "GetMyCityFactIntent":
speech = "Here is your fact: " + GetRandomFact();
break;
case "AMAZON.CancelIntent":
case "AMAZON.StopIntent":
speech = "OK";
break;
case "AMAZON.HelpIntent":
default:
speech = "You can ask for a fact by saying, tell me a fact.";
reprompt = "Try it! Just say tell me a fact.";
break;
}
}
This may look a little odd if you aren’t familiar with C#, but we essentially have 3 scenarios here: a fact request, a cancel or stop request, and a help request. The default case is paired up with help so if the service can’t understand your request, it will roll over to the help message.
In the GetMyCityFactIntent case, you’re calling the GetRandomFact() method you just created, and then returning a concatenated string with the message for Alexa.
Now it’s time to build the entry point to the controller.
The Alexa Voice Service requires the response message from your service to be sent as a POST request (not a GET), so that’s what we’ll be doing.
Handle Requests
Add a HandleRequest() method inside your controller class, to handle your incoming requests, and start it off with a call to the IntentDispatcher() method you just created:
[HttpPost, Route("api/alexa/MyCityFacts")]
public dynamic HandleRequest (dynamic request)
{
IntentDispatcher(request);
}
Notice the attributes, just above the method declaration. The [HttpPost] attribute marks this method as returning a POST request to whoever called the service, and the [Route] attribute defines the path by which this method will be called.
I talked a little bit already about returning a dynamic object, which you can see in the return type for this method, but we’re also accepting a dynamic object, so we don’t have to strongly type anything (and because Amazon could change the message at any time.)
Inside your HandleRequest() method, add the following barebones dynamic object:
return new
{
version = "1.0",
response = new
{
outputSpeech = new {},
card = new {},
shouldEndSession = false
},
reprompt = new
{
outputSpeech = new {},
shouldEndSession = false
},
sessionAttributes = new {}
};
It’s mostly empty right now, but we’ll get to that in a moment.
Inside the response object, you have two objects: outputSpeech and card, which contain the content for the voice response and the visual response (for the Echo Show and Alexa phone app), respectively.
The response object also contains the shouldEndSession property which you’ve seen before.
Many Alexa skills are “one and done” type interactions. You’ve seen the type: ask a question, get an answer, the end.
The shouldEndSession property tells Alexa whether or not to keep listening for a response and that’s the key to really opening up the interactive user experience.
Our outputSpeech object will contain two properties: type and text, and the card object will contain three properties: type, title, and content.
Go ahead and update both objects to look like the following:
outputSpeech = new
{
type = "PlainText",
text = speech
},
card = new
{
type = "Simple",
title = "MyCity Fact",
content = speech
},
See the speech variable? That will contain the actual content of the message, which will be returned from the BuildOutSpeech() method (which called the GetRandomFact() method.)
At this point, you’ve got a couple of errors to fix, so let’s address them by defining the speech and reprompt variables up at the top of the MyCityFactsController class, just like this:
public class MyCityFactsController : ApiController
{
String speech = "";
String reprompt = "";
I’m sure you’ve noticed in addition to the top-level response object, there’s also a reprompt object which will contain the secondary message that Alexa will deliver if the user doesn’t respond when prompted.
Update the reprompt object to look like this:
reprompt = new
{
outputSpeech = new
{
type = "PlainText",
text = reprompt
},
shouldEndSession = reprompt.Length > 0 ? false : true
},
One thing you should notice is that both the response and reprompt objects contain a shouldEndSession flag. When reprompting the user, we give them an opportunity to respond by setting this flag to false.
There’s one last thing to do, and that’s to go back to your response object, and update the shouldEndSession flag to look just like the one in the reprompt object:
shouldEndSession = reprompt.Length > 0 ? false : true
This code, and the identical line in the reprompt object, will look to see if the reprompt message actually contains anything, which implies you’ve received a Help Intent request, and then sets the shouldEndSession flag to false (meaning Alexa will wait for a response.)
Wow, we did a lot of stuff, so let’s recap.
You created a Web API project and added a MyCityFactsController.
This controller will accept requests from Alexa and run them through the HandleRequest() method, where they are passed to the Intent Dispatcher to determine the type of intent being invoked.
Then your response message is created and injected into the dynamic JSON message, and finally returned to Alexa.
Fire It Up
In VS2017, go ahead and start your Web API project by clicking the Start button (the green triangle icon) or by hitting F5. The first time you do this, it may take a moment to build and load everything, but eventually you should be staring at a web page with ASP.NET in huge letters at the top.
Click the API link in the black menu bar at the top of the page and you’ll be looking at the ASP.NET Web API Help Page.
Under MyCityFacts you will see the entry for the api/alexa/MyCityFacts POST request. Go ahead and click on that link and you’ll see the Request Information page for the MyCityFacts POST request.
At this point, the code is complete and running, so let’s push it up to Azure for some testing.
Deploying to Azure
In order to publish to Azure, you’ll need an account.
If you don’t have one, you can go to www.azure.com and sign up for one for free, and depending on what promotions they are running at the time, you can usually get the first 12 months free for most of their services.
Once you have an account, you can publish your project directly from VS2017.
In the Solution Explorer, right-click on your project name (NOT the solution name) and select Publish from the context menu, as shown in Figure 6-6.
Figure 6-6: Publishing your Project
In the dialog that follows (Figure 6-7), select the Microsoft Azure App Service icon, and select the Create New radio button before clicking Publish to proceed.
Figure 6-7: Select a Publishing Host
Next you will see the Create App Service dialog (Figure 6-8) where you will:
- Enter your Microsoft account credentials (upper right) if you aren’t already logged in.
Figure 6-8: Create App Service Dialog
- Select API App from the Change Type dropdown.
- Select or Create your resource group and app service plan.
If you just created your Azure account, you’ll need to select your resource group, and create your app service plan. You will want to select a location geographically close to you.
1. Click the Create button.
Make note of the warning message at the bottom of this dialog. Any time you publish a new resource, depending on your plan, there may be a monetary impact. If you just signed up, you shouldn’t have anything to worry about though.
Your App Name and Plan Name will vary a bit from mine, as the number appended is generated from the date and time it’s created.
Once you click the Create button, it can take a few moments. Your project is being built, uploaded to Azure, and then the starting web page is loaded into your default browser.
When the page finishes loading, it should look just like when you ran it in VS2017.
So far, so good? Awesome… let’s keep going and test it out.
Testing
There’s no UI for your controller, but you can get a response by adding /api/alexa/mycityfacts to the end of your Web API Service Address.
You’re going to get an error stating that the requested resource does not support the GET method, which is expected because we only accept POST requests.
Unfortunately, you can’t do a POST call straight from the address bar, so for that we’re going to be using a 3rd party tool called Swagger.
Before you do that, go ahead and grab a copy of the full URL from your address bar (including the /api/alexa/MyCityFacts part.)
Swagger
Swagger is a collection of tools that help you build and test RESTful APIs. You might have heard of Postman, which is a similarly great tool, but I’m going to focus on Swagger. (If you already have Postman, feel free to use that if you prefer.)
We’re going to use the Swagger Inspector (Figure 6-9) to test the controller, so head over to http://inspector.swagger.io to get started. This will allow us to craft a request to send to our controller, and see what gets sent back.
Figure 6-9: The Swagger Inspector
Since the HandleRequest() method is expecting a POST request, make sure the dropdown is set to POST and not GET (the default), otherwise you’ll get the same error message as when you tried to access it via the browser.
Next, paste the URL you copied into Swagger’s address bar (not the browser address bar) and hit the SEND button.
Take a look at the Response box. Click the Pretty button (no, really, that’s what it’s called) if it isn’t already, and you should be looking at a response like this:
{
"version": "1.0",
"response": {
"outputSpeech": {
"type": "PlainText",
"text": "You can ask for a fact by saying, tell me a fact."
},
"card": {
"type": "Simple",
"title": "MyCity Fact",
"content": "You can ask for a fact by saying, tell me a fact."
},
"shouldEndSession": false
},
"reprompt": {
"outputSpeech": {
"type": "PlainText",
"text": "Try it! Just say tell me a fact."
},
"shouldEndSession": false
},
"sessionAttributes": {}
}
This is the desired result when our skill gets a request it doesn’t understand. If you recall, the switch statement shunts anything that doesn’t match an intent into the Help intent. Since we didn’t actually put anything in our request, it was null, and handled accordingly.
To test it further, let’s mock up a simplified request. Click the Body tab on the Request box, paste this in and click the SEND button:
{
"session": {},
"request": {
"type": "IntentRequest",
"intent": {
"name": "AMAZON.HelpIntent",
"slots": {}
}
}
}
You should get the exact same result with AMAZON.HelpIntent as the previous test.
Pretty boring, right? Ok, now try this… in the name field, change the value to each of your other intents and hit the SEND button for each:
AMAZON.StopIntent
AMAZON.CancelIntent
GetMyCityFactIntent
When you get to the last one, click the SEND button a few times and watch your city fact change.
Looks like everything is working as expected, so let’s move on. It’s time to set up your skill in Amazon’s Alexa Dashboard.
There are a couple ways we can approach this next step.
If you worked all the way through Chapter 5, you can opt to just edit your existing skill to point to your Azure service. I’ll cover that first, because it’s super short.
Otherwise, you can skip to the Add a New Skill section and continue from there.
Edit Your Existing Skill
Pull up your existing Alexa skills on the Amazon Developer Console (located at: https://developer.amazon.com/edw/home.html#/skills) and select the skill you wish to edit.
If your skill has been through the certification process and is currently published, you won’t be able to edit it until you click the grey Go to development button at the bottom of the page.
Don’t worry! Clicking the Go to development button on a live skill won’t automatically yank your skill out of production. Even if you make changes and resubmit for certification, the skill will remain live until the new version passes certification and replaces it.
Configuration
Select the Configuration section and update the Endpoint section as follows:
| Service Endpoint Type |
HTTPS |
| Default |
Your Azure Web API URL |
One quick gotcha here: Make sure your URL has HTTPS (not HTTP) at the beginning, or Amazon will give you a very confusing error about the length of your URL and won’t let you proceed.
Test
Since you’ve changed your service, the test tab will become available again, and even though you tested your intents in Swagger, it’s a good idea to test them here as well.
Under the Service Simulator:
| Enter Utterance |
Give Me A Fact |
| Enter Utterance |
Help |
| Enter Utterance |
Stop |
The Service Simulator will display the JSON Request and the corresponding JSON Response from your service. There shouldn’t be any surprises here.
You can also click the Listen button under the Response box to hear Alexa read your response.
Add a New Skill
The next thing you need to do is add a new skill in your Alexa Skills Kit dashboard (located at: http://amzn.to/2qiiCjJ).
I’m not going to walk through every screen step by step again, since I just covered this process in Chapter 5, but I will highlight anything significant.
Skill Information
| Skill Type |
Custom Interaction Model |
| Name |
Azure City Facts |
| Invocation Name |
Azure City Facts |
Invocation Names should be short & easily distinguishable, and Amazon recommends using no more than 3 words, so we’re changing this one up a little to distinguish it from the previous project.
Interaction Model
Add the contents of your IntentSchema.json and SampleUtterances.txt files on this page. They are available in the GitHub repo for this project.
Configuration
| Service Endpoint Type |
HTTPS |
| Default |
Your Azure Web API URL |
Again, make sure your URL has HTTPS (not HTTP) at the beginning, or Amazon will give you a very confusing error about the length of your URL and won’t let you proceed.
SSL Certificate
Here’s something you didn’t have to worry about with AWS. Good news though, you don’t have to worry about it here either, because Azure takes care of it for you.
| Certificate for DEFAULT Endpoint |
OPTION 2: My development endpoint is a sub-domain of a domain that has a wildcard certificate from a trusted certificate authority. |
|
Test
Under the Service Simulator:
| Enter Utterance |
Give Me A Fact |
| Enter Utterance |
Help |
| Enter Utterance |
Stop |
Just like in Chapter 5, the Service Simulator will display the JSON Request and the corresponding JSON Response from your service. We’ve already tested these intents in Swagger, so there shouldn’t be any surprises here.
You can also click the Listen button under the Response box to hear Alexa read your response.
Publishing Information
- don’t really recommend publishing this skill as-is. However, if you have modified the project and put in facts about your own city, then go for it. You might even get some cool Alexa swag, like a hoodie or t-shirt.
- Fields section:
| Category |
Education & Reference |
| Testing Instructions |
none |
| Countries & Region |
In all countries and regions where Amazon distributes skills. |
Description section:
| Short Skill Description |
Facts about MyCity, USA. |
| Full Skill Description |
More info about your skill. |
Example Phrases section:
| Example Phrase 1 |
Alexa Open MyCity Facts |
| Example Phrase 2 |
Alexa Ask MyCity Facts for a Fact |
| Example Phrase 3 |
Alexa Ask MyCity Facts for Help |
You will also need to create and upload small (108x108) and large (512x512) icons for your skill.
Privacy & Compliance
| Does this skill allow users to make purchases or spend real money? |
No |
| Does this Alexa skill collect users’ personal information? |
No |
| Is this skill directed to or does it target children under the age of 13? |
No |
| Export Compliance |
Your choice |
| Does this skill contain advertising? |
No |
Skill Certification
Click the Submit for Certification button. You should receive a response within 12-18 hours.
While your submission is being evaluated, you can’t edit your skill, so if you think you’ve made a mistake, or just wish to withdraw your skill from the certification process, there’s a button for that, otherwise you can click the Back to the List of Skills button.
Device Testing
If you have an Amazon Echo device handy and connected with the same Amazon account you use for development, you can ask her to give you an Azure City Fact even if you didn’t publish the skill.
Try this:
Say “Alexa, open Azure City Facts”
At this point, Alexa will wait for you to say one of the sample utterances you listed for your GetMyCityFactsIntent. If you take too long to respond, Alexa will prompt you again.
Once you respond with an invocation, Alexa will randomly select a fact about MyCity for you and respond accordingly.
That’s it for this chapter! Coming up next is Part III: Home Automation Skills, where we will look at the Smart Home Skill API and design a home automation skill.
1
The Tools You Need and Where to Find Them
In this chapter, I’ll cover some basic terminology, hopefully clarify any confusion, and then move into getting you up and running with everything you’ll need to start developing Amazon Alexa Skills on your own.
Background Information
The Amazon Echo family of devices is an immensely popular platform, and much more complex than just a “voice controlled speaker” as you may have seen it referred to. As of September 2017, they hold a 70% market share (roughly 19 million devices!!), with Google Home at a distant second (24%), and other devices making up the remainder.
If you are already familiar with the Echo, some of this may be old news to you, but if you’re coming in completely cold then you might have seen the terms Alexa and Echo frequently being used interchangeably online.
The following table will allow us to get on the same page with some basic terms and how they’ll be used in this book.
| Alexa |
This is the personification of the Amazon Echo line of devices, much like Microsoft’s Cortana, and Apple’s Siri. |
| Alexa Skill |
These are built-in capabilities, such as playing music, setting a timer, reporting the weather, as well as 3rd party created functions (over 15,000 at last count) that Alexa knows how to perform. These may include retrieving data from a service, playing games, and more. |
| Alexa Voice Service |
This is the brain behind the pretty voice. Handles voice to text translation, natural language processing, command interpretation, routing (to your skill) and translating text back to voice for the Echo. |
| Amazon Echo |
This is the physical hardware product. Currently there are six Amazon products with varying degrees of Alexa integration. The Echo and Echo Dot are both voice driven, and are essentially the same with the Echo having a more powerful speaker. The Echo Tap and Fire TV devices require a touch to activate, but then respond to voice commands. The two newest devices, Echo Show and Echo Look, offer the same feature set as the rest, plus a video display and selfie cam, respectively. |
| Companion App |
This is Amazon’s app (for Android, iPhone, and Fire devices) that is required to configure the Echo hardware, and can also be used to display additional information / responses from your Alexa skills. A lot of the “value” of this app (in terms of additional skill data) has been incorporated into the Echo Show. |
| Wake Word |
A name that Alexa listens for, followed by a command. The default is “Alexa”, but users can also configure their device to respond to “Amazon”, “Echo”, or my personal favorite: “Computer”. |
Hopefully that helps some. Now let’s move on to getting you up to speed on how it all works.
Alexa User Interaction Flow
It begins with you asking Alexa to do something, via your device. The Echo transmits your command to the Alexa Voice Service via the internet. Alexa Voice Service converts the speech to text, parses it, identifies the skill being requested and routes the request to the skill service endpoint. (This could be in AWS Lambda, Azure, or a service you host.)
Once your skill service processes your request and returns a response back to the Alexa Voice Service, the text of your response is converted back to speech and streamed back to the Echo where it is read back to you, and the companion app is updated.
All in all, it looks like Figure 1-1.
Figure 1-1. The Alexa User Interaction Flow
Commands are structured as follows:
Wake Word + Command Verb + Skill Invocation Name + Intent (+ optional slot)
I’ve already covered Wake Words above, so I’ll move on to Command Verbs.
The Alexa Voice Service (we’ll just say Alexa from this point forward) understands a number of command verbs, including: Ask, Begin, Launch, Load, Open, Play, Resume, Run, Start, Talk To, Tell, Turn Off, Set, and Use. This isn’t an exhaustive list, because Alexa is constantly improving and getting smarter.
In addition to command verbs, Alexa understands numerous prepositions, including: About, For, From, If, and To.
The Skill Invocation Name is rather self-explanatory, but just to be thorough, it’s the name of the skill you wish to invoke, i.e. SurfReport, Uber, Timer, or any of the other thousands available.
Intents are how you map the actions your Alexa Skill can perform to the functions that your backend service offers. Slots are optional parameters that get passed into your Intent, allowing you to narrow down the results before you get them. You can invoke skills with or without specific requests (intents.)
If you take this basic command structure and put it all together, you get something like the following:
Alexa + Set + Timer + for + 5 Minutes
Alexa + List + 3 Gas Stations + Near Me
Alexa + Ask + Uber + to Call Me an Uber + SUV + At Work
Alexa + Get + Tomorrow’s + High Tide + From SurfReport
Prior to using any of the custom (3rd party) skills, you must enable them. This can be done in the Alexa app, or by voice command. If you know the name of the skill you wish to use, simply say: Alexa Enable skillname.
Language Variance
As developers, you can (and should) try to accommodate as many different ways of invoking skills as possible, but you don’t have to exhaust every possible permutation of the English language to do so. For example, my mother can be rather verbose, and polite, so she says please when asking Alexa to do something. My teenagers, on the other hand, tend to be a lot less formal.
When my mom says the following, Alexa only hears (i.e. cares about) the words in bold:
Alexa, please play some of Norah Jones’ music for me.
My teenage son says the following, and gets the exact same result:
Alexa! Norah Jones!
There are a number of phrases that Alexa understands and knows to ignore. These include, but aren’t limited to, things like: please, can you, I want, I would like, and for me.
I’ll revisit this concept several times throughout the book as we begin developing different types of skills. For more in-depth information on how Alexa parses voice commands, be sure to also take a look at Appendix A: Designing for Voice Interaction.
Development Environment
The right development environment can make your life much easier.
If you don’t plan on hosting your skills on servers you control (i.e. you plan to use AWS Lambda), then you can literally get away with nothing more than a simple text editor and an internet browser.
If you’re most comfortable working in the Microsoft stack, and want to control how, when and where you publish your skill code, I recommend Visual Studio Community 2017. This is especially good if you’re a student or hobbyist, because it’s free, but you can always use one of the more advanced editions too.
If you don’t plan to use VB.NET or C#, but still want a great and lightweight developer environment, I would encourage you to download Visual Studio Code instead. It runs everywhere, and is smart enough to handle most script languages with ease.
If you’re not running Windows, there’s a version of Visual Studio Code that runs equally well on Mac and Linux, as shown in Figure 1-2, so you don’t have to miss out on all the fun.
Figure 1-2: Visual Studio Downloads
No matter which editor you decide on, you can download both from here: https://www.visualstudio.com/downloads/
If you aren’t a Microsoft fan, or have a favored environment, odds are you can use your preferred stack too, although you may need multiple tools in order to handle the editing, compiling, publishing parts of the process. That’s beyond the scope of this book, but chances are if you have a favorite process and tools for web development, you’ve already got everything you need anyway.
Optionally, you may want to download and install Node.js. We won’t use it exclusively throughout the book, but we will be referencing the Node.js Alexa Skills Kit Samples in a later chapter. You can find the latest stable Node.js release here: https://nodejs.org/en/download/ as shown in Figure 1-3.
Node.js is one of the most supported languages in the Alexa Skills Kit documentation and samples, so even if you don’t plan on using it to write your own skills, you’ll likely be looking at a lot of it.
Figure 1-3: Node.js Download Screen
The Amazon Developer Portal
One of the great things about developing Alexa Skills is the variety of supported languages and platforms available to you, the developer.
Aside from your preferred development environment, and optionally Node.js (as mentioned above) nearly everything else you need to develop skills for Alexa can be found in the Alexa section of Amazon’s Developer Portal, which you can find at: https://developer.amazon.com/alexa.
The Alexa section of the developer portal is broken down into three main parts: Alexa Skills Kit (ASK), Alexa Voice Service (AVS), and the Alexa Fund, as shown in Figure 1-4. Don’t be fooled, there’s A LOT of information buried in there. Amazon adds new content constantly, and provides excellent support for the entire family of Echo devices.
Figure 1-4: The Alexa section of the Amazon Developer Portal.
I’ll cover the Alexa Skills Kit (ASK) in-depth in the next chapter, but we’re going to skim the surface just a little in this chapter so you can get started building your first skill. Before I do that, though, I’m going to shuffle things around for a moment (I know… bear with me) and talk about the other two parts of this section: the Alexa Voice Service (AVS) and the Alexa Fund.
The Alexa Voice Service refers to the cloud-based backend service that is the brain of Alexa. It’s what your Echo device talks to, and serves as the controller that routes commands to the various skills your users will invoke. It’s also how you would integrate support for Alexa into your own connected products, via either AVS API endpoints (over HTTP) or the AVS Device SDK for C++ developers.
In-depth coverage of custom hardware integration with Alexa and AVS is beyond the scope of this work, so I encourage you to dig into the AVS documentation available on the Alexa section of the Developer Portal.
The Alexa Fund is a $100 million pool of venture capital funding intended to promote innovation in voice technology. If you’ve got some ideas about how to improve or create new Alexa capabilities, or new devices that use Alexa, it may be worth your time to talk to them. You can find more information, and links to contact them, under the Alexa Fund heading on the Alexa page.
Ok, with that out of the way, let’s talk briefly about the Alexa Skills Kit (I’ll save the good stuff for chapter 2) and then spend the rest of this chapter building your very first Amazon Alexa skill.
Amazon describes the Alexa Skills Kit (ASK from here on out, for the rest of the book… I promise) as “a collection of self-service APIs, tools, documentation, and code samples that make it fast and easy for you to add skills to Alexa.” This covers voice driven skills, and also includes samples for making video skills for the Echo Show device.
Let’s make a skill!
Making Your First Alexa Skill
Someone once said to me: “Nobody wants to wait 2 or 3 chapters to build something.” So, in the spirit of that, it’s time to push up your sleeves, heat up a Hot Pocket, grab your coffee, and get busy.
We’re going to build a “Hello World!” skill. I know, it’s not sexy, or even particularly exciting, but… it allows me to show you everything you need to get a simple skill up and running without any additional fluff or functionality getting in the way.
You’re going to need an account for the Amazon Developer Portal. You can connect it to your regular Amazon account, or not. Totally up to you. If you already have an account, go ahead and sign in. If you don’t have an account, you’ll be prompted to create one. Don’t worry, it’s free.
Once you’ve signed in, make sure you’re in the Alexa section, and click the Get Started button under the ASK logo, as shown in Figure 1-5. If you don’t see it, try clicking the Alexa tab in the menu bar near the top of the page. Amazon has a tendency to move things around, but you should be able to spot a “Get Started” button or link somewhere on the page.
Figure 1-5: The ASK Get Started Button.
Next, click the “Add A New Skill” button, which will put you into the Skill Information Screen, as seen in Figure 1-6. This is the beginning of a 7 screen workflow that you will need to complete for each skill you create.
For this skill, I am sticking with the default choices of Custom Interaction Model and English (U.S.) language. For the Name and Invocation fields, just call it “Hello World”. Take the defaults in the Global Fields section, and click the Save button.
At this point, the Save button will go away, and a Next button will appear. Before you click it, take a look at the page again and you’ll see the addition of an Application ID field. This is unique to your skill, and you can’t edit it.
Figure 1-6: The Skill Information Screen
Go ahead and click the Next button, and you’ll be presented with the Interaction Model screen, as shown in Figure 1-7. Don’t worry if it’s not an exact match to what’s in the book. Amazon is constantly adding new things to improve the skills development process, so you might see something new when you create your own skill.
I’ve also cropped out the Custom Slot Types section since we won’t be using it for this skill. We’ll make use of it later in the book though, and I’ll talk about it more then.
The two most important things on this screen are the Intent Schema and the Sample Utterances, which I’ll discuss now.
The Intent Schema is a block of JSON code (that’s JavaScript Object Notation, but everyone just pronounces it like the name Jason) that describes the Intents in your Alexa Skill. We covered Intents earlier in this chapter, but if you’ve forgotten, they are the functions your skill knows how to perform. Feel free to flip back a few pages for some examples.
Add this to the Intent Schema box:
{
"intents":
[
{
"intent":"HelloWorldIntent"
},
{
"intent":"AMAZON.HelpIntent"
}
]
}
The HelloWorldIntent will be invoked whenever the user gives one of the Sample Utterances below, and will return the phrase “Hello World!” We’ll get to the actual code behind that Intent in the next section.
The AMAZON.HelpIntent is one of several built-in intents provided by Amazon. We don’t actually have to add it to the schema unless we intend to extend it, but it’s a good habit to get into anyway.
Figure 1-7: The Interaction Model Screen
The Sample Utterances are the phrases Alexa listens for in order to invoke the intents associated with your skill. You can (and should) assign multiple phrases to each Intent.
Add the following to the Sample Utterances box:
HelloWorldIntent say hello
HelloWorldIntent say hello world
HelloWorldIntent hello
You may have noticed, we’re not adding an utterance for the Amazon.HelpIntent. For this example, we don’t really need to, because if Alexa doesn’t understand your utterance, the HelpIntent will be invoked by default.
Once you’ve done this, click the Next button and proceed to the Configuration screen.
For this skill, you will just take all the defaults, except for the Endpoint Type, as seen in Figure 1-8. Select the AWS Lambda option. We’ll discuss both option in further detail in a later chapter, but for now, we’re going to use AWS Lambda. (AWS stands for Amazon Web Services, in case you were wondering.)
We’re going to create a very simple AWS Lambda Function that returns the phrase “Hello World” whenever the function is called by the HelloWorldIntent.
Figure 1-8: Service Endpoint Type and Address
In your browser go to the AWS Management Console (http://aws.amazon.com) and log in. If you don’t already have an account, you’ll need to create one first.
Once you’re in the dashboard, look for the Compute section (Figure 1-9), and find the entry for Lambda. Click on the Lambda link, and then click on the red “Create function” button in the top right of the AWS Lambda Functions screen.
Figure 1-9: AWS Compute Section
You’ll be asked to select a blueprint, which are templates to help jumpstart the coding process for specific tasks, but you’re going to bypass that for now and click the red “Author from scratch” button.
Next, you’ll be asked to configure triggers for your Lambda function. Click in the empty box (see Figure 1-10) and select “Alexa Skills Kit” from the popup list, and then click the Next button.
Figure 1-10: Add Trigger
At this point, you should be looking at the Configure Function screen. Fill in the Basic Information section as shown in Figure 1-11. If the runtime is defaulted to a different version of Node.js, that’s ok. It won’t matter for this example.
Figure 1-11: Basic Information About Your AWS Lambda Function
Scroll down a little more to the Lambda function code section. You want it to look like the following node.JS code, which I’ll discuss below:
'use strict';
exports.handler = function (event, context, callback) {
if (event.request.type === "LaunchRequest") {
onLaunch(event.request,
event.session,
function callback(sessionAttributes, speechResponse) {
context.succeed(buildResponse(sessionAttributes, speechResponse));
});
} else if (event.request.type === "IntentRequest") {
onIntent(event.request,
event.session,
function callback(sessionAttributes, speechResponse) {
context.succeed(buildResponse(sessionAttributes, speechResponse));
});
}
};
function onLaunch(launchRequest, session, callback) {
var speechOutput = "You can ask me to say Hello World!"
callback(null,
buildSpeechResponse(speechOutput, "", false));
}
function onIntent(intentRequest, session, callback) {
var intent = intentRequest.intent,
intentName = intentRequest.intent.name,
repromptText = "You can ask me to say Hello World!"
if (intentName == 'HelloWorldIntent') {
callback(null,
buildSpeechResponse("Hello World!", repromptText, true));
}
if (intentName == 'AMAZON.HelpIntent') {
callback(null,
buildSpeechResponse(repromptText, "", true));
}
}
function buildSpeechResponse(output, repromptText, endSession) {
return {
outputSpeech: {
type: "PlainText",
text: output
},
card: {
type: "Simple",
title: "Hello World!",
content: output
},
reprompt: {
outputSpeech: {
type: "PlainText",
text: repromptText
}
},
shouldEndSession: endSession
};
}
function buildResponse(sessionAttributes, speechResponse) {
return {
version: "1.0",
sessionAttributes: sessionAttributes,
response: speechResponse
};
}
It seems like there’s a lot going on here, but it’s actually pretty simple. We have two event handlers: LaunchRequest and IntentRequest.
A LaunchRequest fires whenever your skill first launches, and gives you an opportunity to provide your users with some guidance on how to use the skill. If I were to say “Alexa, Open HelloWorld”, then this event would be called.
An IntentRequest fires whenever someone specifies an Intent when calling your skill. So, if I were to say “Alexa, Tell HelloWorld to Say Hello World”, then this is the event that would be called.
The onLaunch and onEvent functions are called when their respective event is received, and they are each responsible for constructing the appropriate message by calling the buildSpeechResponse function.
Finally, the buildSpeechResponse function assembles the JSON response that your Alexa skill is expecting. Without properly constructed JSON, your skill won’t understand the response at all. We’ll talk about a proper JSON response shortly, but first… let’s finish our AWS Lambda Function.
Scroll down further, to the Lambda function handler and role section, and make sure it looks like Figure 1-12. Accept the defaults for everything else.
Figure 1-12: Lambda Function Handler and Role
Click the Next button, which will take you to the review screen, make sure everything is right, and then click the Create function button.
Before returning to the Alexa Skills Dashboard, you should be sure to test your new AWS Lambda Function. You can do this by clicking the Test button on the top right of the screen. If all goes well, you should see a message that states “Execution result: succeeded.”
Expand the details section below it to see the result returned by the HelloWorld function, which in this case is the message “Hello World!”
If you’re curious, there is also some useful information about how long it took your function to run, how much memory it used, and below that is some instrumentation (graphs) about the performance of your function.
There’s a chance that you might also get an error message that looks like this: “Cannot read property ‘type’ of undefined.” That’s ok too. I know what you’re thinking, but just humor me for now, and I promise we’ll come back to it.
We’re almost done.
Scroll back up to the top of the page and copy the *AWS Lambda ARN (Amazon Resource Name) that sits right above the test button.
*Yes, that’s actually short for “Amazon Web Services Lambda Amazon Resource Name.” Crazy, huh?
Go back to the Alexa dashboard, Configuration tab, and paste it in the text box under where you selected the AWS Lambda option. Click the Next button to proceed. You should now be on the Test screen. If not, click the Test tab on the left.
I mentioned earlier that we use JSON to send and receive messages between Alexa and your service, whether it’s an AWS Lambda function, or a C# Web API service in Azure, it’s also JSON messaging.
Below is an example of a properly formatted JSON request:
{
"session": {
"new": false,
"sessionId": "SessionId.1762552d-d18c-4a7b-b2b7-c5ba9e5005ed",
"application": {
"applicationId": "amzn1.ask.skill……"
},
"attributes": {},
"user": {
"userId": "amzn1.ask.account………"
}
},
"request": {
"type": "IntentRequest",
"requestId": "EdwRequestId.14bd71ee-a39c-44fd-9de1-883d2d558fd8",
"intent": {
"name": "AMAZON.HelpIntent",
"slots": {}
},
"locale": "en-US",
"timestamp": "2017-09-02T02:58:23Z"
},
"context": {
"System": {
"application": {
"applicationId": "amzn1.ask.skill……"
},
"user": {
"userId": "amzn1.ask.account………"
},
"device": {
"supportedInterfaces": {}
}
}
},
"version": "1.0"
}
In the request block, under intent, you will see the name of the intent being requested, which in this case is the built-in AMAZON.HelpIntent. Your AWS Lambda function reads that value and routes your skill response accordingly. Don’t get overwhelmed, a lot of this is actually generated for you by Alexa.
The response back to Alexa is more concise:
{
"version": "1.0",
"response": {
"outputSpeech": {
"text": "You can ask me to say Hello World!",
"type": "PlainText"
},
"card": {
"content": "You can ask me to say Hello World!",
"title": "Hello World!"
},
"reprompt": {
"outputSpeech": {
"text": "",
"type": "PlainText"
},
"shouldEndSession": true
}
},
"sessionAttributes": {}
}
Since this is coming from your AWS Lambda Function, you’ll be on the hook for this part, but don’t worry. By the time you’re done with this book, you’ll be an old pro at building these.
You’ll get to see your skill in action if you scroll down to the Service Simulator section of the page. In the Enter Utterance box, type hello. This will send a request to your AWS Lambda function for the HelloWorldIntent of your HelloWorld skill. You can see the full JSON request in the Service Request box.
Since the phrase “hello” matches one of your sample utterances from earlier, your function knows that your passing in an Intent, and returns some properly formatted JSON, which you can see in the Service Response box.
You can also get Alexa to speak to you by clicking the Listen button below the response.
Congratulations! You did it. You have a working Alexa Skill now.
If you have an Alexa capable device, such as an Echo or Echo Dot, you can say “Alexa Enable HelloWorld Skill” and after a moment, it will be ready for you to use, but nobody else (because you haven’t published it yet.)
Try saying “Alexa Open HelloWorld” and “Alexa Tell HelloWorld to Say Hello.” Pretty exciting stuff.
You’re probably thinking about publishing your new HelloWorld skill now, right? After all, there’s two more screens in that workflow and we haven’t covered them yet. Don’t worry, we’ll come back to those screens in a later chapter.
This is a great place to stop for chapter 1. You’ve learned what tools you need and where to find them, how Alexa Skills work, and you built a simple Alexa Skill and an AWS Lambda Function. Not bad for the first chapter!
We’ve barely scratched the surface of all the cool stuff you can do. In Chapter 2, we’ll dig deeper into the ASK and take a look at what it really has to offer.
2
Getting Familiar with the Alexa Skills Kit (ASK)
The Alexa Skills Kit (ASK) is Amazon’s API for interacting with the Amazon Echo line of devices, and the Alexa Voice Service. This chapter will serve as your guide to the ASK, and will cover the various skill templates available to you.
If you’re not already there, head on over to https://developer.amazon.com/alexa-skills-kit. On this landing page, you’ll see a bunch of information about “What Is an Alexa Skill?”, “What Is the Alexa Skills Kit?”, “Why Should You Build Skills?” and so on. This is all good information, but not why we’re here.
Click on the Learn link near the top of the page and you will see a collection of categories for the various types of skills you can build, as shown in Figure 2-1.
Figure 2-1: The ASK Skills Templates
You’ve already built one custom skill in the previous chapter (surprise!), so I’m going to cover the other types first and then come back to Custom Skills. Don’t worry though, we’ll touch on all of the templates before moving on to Chapter 3.
Smart Home Skills
There are two cases for Smart Home Skill development: you’re either a device manufacturer looking to add voice capabilities to your product, or you’re a developer looking to build skills for connected devices for public or private use. In this book, I’ll focus primarily on the latter case.
Smart Home Skills allow your users to control cloud-connected home automation devices, such as smart thermostats, smart cameras, cloud-enabled lights, smart TVs, and more.
At first glance, these may seem just like Custom Skills, and to the end user there’s not much difference, but the Smart Home Skill API actually makes your job as a developer much easier because it includes a collection of built-in common smart home functions and a specialized workflow that shoulders much of the load when processing user requests. This means you don’t have to design your own voice interaction model, or more specifically, you don’t have to worry about coding for phrases like “Turn on the dining room light” or “Show me the back porch” when creating your own Smart Home Skills.
The API communicates with your skill using a JSON message format, just like with Custom Skills, although the format is a bit different. I’ll cover the message format in detail when you build a Smart Home Skill in Part III of this book.
You can find the Smart Home Skill API Reference here: http://amzn.to/2wxLzay
Game and Trivia Skills
Games account for over 20% of the top Alexa Skills, and the ASK makes it easy for you to create game skills quickly with a variety of templates.
If voice-driven adventure games sound like something you would enjoy working on (or playing), the Interactive Adventure Game Tool is an open source project created and maintained by Amazon that allows you to graphically design the flow of your adventure’s story. You can find the IAG Tool on GitHub at http://bit.ly/2x54myh.
If you’ve spent much time on social media, you’ve likely taken (or at least seen the results of) quizzes of the “Which Harry Potter Character Are You?” or “What Kind Of Dinosaur Am I?” variety. Under the hood, these all run off of a decision tree, and the Decision Tree Skill Template makes it easy to create a skill that allows your users to answer a series of questions to arrive at an answer.
The third game type template I’ll cover is the Trivia Skill Template. This makes it super easy to create a trivia game using the content of your choice. With this kit, you could have a trivia skill up and running on Alexa in under an hour.
I’ll cover all three of these game types in Part VI of this book. In Chapter 17, you’ll build a decision tree skill called “What Kind Of Beer Should I Order?”, Chapter 18 will cover the trivia skill with a fun game called “Who Said It?”, and in Chapter 19 you will create a voice-driven interactive adventure game skill called “Logan’s Quest”.
Flash Briefing Skills
The Flash Briefing Skill API enables you to add your own content feed to Alexa’s daily Flash Briefing.
This can be pre-recorded audio files or text to be read by Alexa to anyone who enables your skill and adds it to their daily Flash Briefing. Once this skill is enabled, there is no voice interaction model beyond the usual Stop, Pause and Resume commands which are part of Alexa’s Flash Briefing functionality.
If you create and provide frequently updated content via JSON or RSS feeds, then this skill will get your content in front of thousands of people every day. You can find the Flash Briefing Skill API documentation at http://amzn.to/2iZGtCB.
I will cover Flash Briefing Skills in more detail, including creating one, in Part IV. In Chapter 11, we will dig into the Flash Briefing Skill API, Chapter 12 will cover designing the skill and creating some content, and in Chapter 13 you’ll create the skill to support your syndicated content: MNN (My News Network).
Video Skills
The Video Skills API is used for creating an interface between your hosted video content and Alexa.
Functionality provided by this API includes searching for and playing content, controlling playback, navigating channels, and inclusion in Alexa’s video catalog.
I will cover Video Skills in more detail in Part V. In Chapter 14, I will cover the Video Skills API and walk through the design and creation of a simple video skill.
Skills for Echo Show
The Echo Show allows you to add image and video capabilities to your Custom Skills, but that’s not all.
All existing Alexa Skills work “out of the box” on the Echo Show and any content provided to the Companion App will also appear onscreen on the Echo Show, but you can take it a step further because the ASK provides visual templates for laying out the user interface of your skill, and gives you the ability to customize the user interaction model.
In addition, the Echo Show offers additional integration with the Smart Home Skill API so you can view your smart camera devices via your Echo Show.
In Part V, I’ll cover best practices for designing skills for voice and touch for use on the Echo Show. In Chapter 15 I will walk you through the design of a new video and touch enabled skill for the Echo Show, and in Chapter 16 we will build it.
Custom Skills
Custom skills are a great way to bring voice interaction to an existing service, or as an integral part of a new product design.
I covered the individual parts of a skill (Intents, Invocation Name, Slots, Utterances, etc.) at a relatively high level in Chapter 1, but there’s more you can do than just voice interaction.
Custom skills can display text and images via the companion app or the Echo Show. If someone uses your skill on an Echo Show, even if it wasn’t designed for it, it will show the same content as the companion app by default.
Additionally, when designing custom skills for the Echo Show, your skill can play video files and respond to touch input. More on that in a bit.
Custom skills can also play MP3 audio files. This enables you to play background music and sound effects as part of your skill, or even provide dramatic audio performances instead of relying on the default Alexa voice to read your content back to the user.
If you have an Alexa, and want to hear something really cool, ask her to “Open the Wayne Investigation.” This popular skill features rich audio and a complex interaction model that puts you in the role of a Gotham City detective trying to solve the murder of Bruce Wayne’s parents.
The “Hello World!” custom skill we built in Chapter 1 is admittedly pretty simple, but it’s fairly easy to add some additional interaction to it. Since we’re going to be exploring the other skill types in more detail in later chapters, let’s modify our custom skill now.
Hello World, Revisited
Currently, the Hello World skill is pretty impersonal, so let’s change it to ask how your day is and wait for a response.
To do this, you’ll need to go back to the developer portal and select your skill, and then go to the Interaction Model screen.
First, you’re going to update the interaction model by adding a pair of Alexa’s built in intents (in bold) to the intent schema section:
{
"intents": [
{
"intent": "HelloWorldIntent"
},
{
"intent": "AMAZON.YesIntent"
},
{
"intent": "AMAZON.NoIntent"
},
{
"intent": "AMAZON.HelpIntent"
}
]
}
Because you’re adding built-in intents, you don’t explicitly need to add sample utterances unless you want to extend them beyond the defaults, but it’s a good practice (and we’ll throw in a couple extra for good measure.)
Add the sample utterances in bold below.
HelloWorldIntent say hello
HelloWorldIntent say hello world
HelloWorldIntent hello
AMAZON.YesIntent Yes
AMAZON.YesIntent Yeah
AMAZON.YesIntent Sure
AMAZON.NoIntent No
AMAZON.NoIntent Nope
AMAZON.NoIntent Not Really
AMAZON.HelpIntent help me
Make sure to click the save button at the bottom of the page. You’re halfway done!
Now you need to log back in to AWS and open up your Hello World lambda function so you can add the code to support the additional intents.
Scroll down until you see the onIntent() function, and add/change the code in bold below:
function onIntent(intentRequest, session, callback) {
var intent = intentRequest.intent,
intentName = intentRequest.intent.name,
repromptText = "Are you having a nice day?";
if (intentName == 'HelloWorldIntent') {
callback(null,
buildSpeechResponse("Hello World! Are you having a nice day?",
repromptText, false));
}
if (intentName == 'AMAZON.YesIntent') {
callback(null,
buildSpeechResponse("I'm so glad.", "", true));
}
if (intentName == 'AMAZON.NoIntent') {
callback(null,
buildSpeechResponse("I'm sorry to hear that. Perhaps it will improve.",
"", true));
}
if (intentName == 'AMAZON.HelpIntent') {
callback(null,
buildSpeechResponse(repromptText, "", true));
}
}
You’re changing the “Hello World!” text to something a bit more interactive, but you’re also changing the endSession parameter of the buildSpeechResponse() method from true to false so that Alexa knows to wait and listen for a response.
You’re also adding support for two more intents: AMAZON.YesIntent and AMAZON.NoIntent. This time you’re setting the endSession parameter to true to let Alexa know she’s done.
Make sure to save your changes, and then you’ll be ready to fire up your skill on Alexa.
Assuming you already enabled the skill when you built it in chapter 1, all you have to do is ask Alexa to open it, and it will automatically run the updated version.
You: Alexa Open Hello World
Alexa: You can ask me to say Hello World!
You: Say Hello World
Alexa: Hello World! Are you having a nice day?
You: Yes
Alexa: I'm so glad.
Try running it a few times and responding with the various sample utterances you added.
This concludes our tour of the various skill types, so now let’s take a look at some other cool features of the ASK that will make your life a lot easier if you plan on creating many skills: the Skill Management API and the Command Line Interface.
Skill Management API
With the Alexa Skill Management API (SMAPI), you can manage your Alexa Skills via RESTful HTTP interfaces, allowing you to programmatically create new skills, update your interaction model, and more. This gives you the ability to create your own build management tools.
The fine folks at Amazon have already created one set of tools for you: the Alexa Skills Kit Command Line Interface (ASK CLI) which allows you to script your build and deployment process instead of having to funnel everything manually through the developer dashboard.
Command Line Interface
The ASK CLI can perform the following functions:
- a new skill project
- skill project to the development stage
- an existing skill into a new project
- SMAPI calls
- and upload AWS Lambda code
In order to use the CLI, you need an Amazon Developer Account (which you should already have) and Node.js which I mentioned in Chapter 1.
If you haven’t downloaded Node.js 4.3 (or higher), go ahead and visit the download page at https://nodejs.org/en/download/ and grab it. You’ll also need the Node Package Manager (NPM), which will install with Node.js.
Once you’ve installed Node.js, you can check your version by typing node --version at a command prompt.
Next you need to install the ASK CLI via NPM. Still got that command prompt open? Awesome! Type this: npm install -g ask-cli
If you’re using Linux, you may need to throw a sudo command in front of that to get it to work, like so: sudo npm install -g ask-cli
After the installation is complete, you’ll need to initialize the CLI once (and provide your Amazon developer credentials) and you’ll be all set.
To initialize the CLI, type ask init at the command prompt. You’ll need to create a new profile, so give it a name and then you’ll be taken to an Amazon login screen to verify your credentials. Once you’ve done that, you can close that browser window.
You might also get a Windows Security Alert (depending on your firewall settings) so be sure to allow access for Node.js.
Now that you’re up and running, I’ll show you how to do a few things:
If you want to see what the ASK CLI has to offer, you can start by typing ask at the command prompt. This will give you a list of supported commands and a brief description of their purpose.
You’ve already run the init command, so to create a new skill from the ASK CLI, you’ll use the new command:
ask new -n skillname --profile profilename --lambda-name lambdaname
All three of these arguments are optional, but at the very least you want to provide a unique skill name. Issuing a new command with no additional information will create a simple hello-world style skill under the default profile in whatever folder you happen to be pointing at, so you may want to create a folder for keeping your projects organized.
For example:
cd c:\
md AlexaSkills
cd AlexaSkills
Now you should be looking at a command prompt like this c:\AlexaSkills>
Go ahead and create your first project from the CLI (you can always delete it later):
ask new -n TestSkill1 --lambda-name TestSkillLambda --profile yourprofilename
A new folder will be created with the same name as your skill. That folder contains a manifest file named skill.json, and two other folders: .ask and models.
The manifest file contains information about your newly created skill, and will be used when deploying your skill to Amazon.
You can open json files with any text editor if you want to take a look, but I’ll include this one below for you.
{
"skillManifest": {
"publishingInformation": {
"locales": {
"en-US": {
"summary": "Sample Short Description",
"examplePhrases": [
"Alexa open hello world",
"Alexa tell hello world I am Jeff",
"Alexa tell hello world my name is Peter"
],
"name": "TestSkill1",
"description": "Sample Full Description"
}
},
"isAvailableWorldwide": true,
"testingInstructions": "Sample Testing Instructions.",
"category": "EDUCATION_AND_REFERENCE",
"distributionCountries": []
},
"apis": {
"custom": {}
},
"manifestVersion": "1.0"
}
}
If you were to look in the Amazon Developer Portal right now, you wouldn’t see this skill listed yet, because the new command only creates a local copy, until you deploy it. (We’ll do that in just a moment.)
Feel free to tweak some of the description values, example phrases, and testing instructions when you generate a new skill project, but be sure to leave the manifestVersion at “1.0”.
Under the .ask folder, you’ll find a config file which looks like the following:
{
"deploy_settings":
{
"default": {
"skill_id": "",
"was_cloned": false
}
}
}
Leave this one alone for now, as it will be modified during the deployment.
Lastly, if you look in the Models folder, you will see a file titled en-US.json, which I have included here:
{
"interactionModel":{
"languageModel":{
"invocationName":"hello world",
"types":[],
"intents":[
{
"name": "AMAZON.CancelIntent",
"samples": []
},
{
"name": "AMAZON.HelpIntent",
"samples": []
},
{
"name": "AMAZON.StopIntent",
"samples": []
},
{
"name":"HelloWorldIntent",
"slots": [],
"samples":[
"hello",
"say hello",
"say hello world"
]
},
{
"name":"MyNameIsIntent",
"slots":[
{
"name":"name",
"type":"AMAZON.US_FIRST_NAME"
}
],
"samples":[
"my name is {name}",
"i am {name}",
"you can call me {name}"
]
}
]
}
}
}
This file shows the various intents in your generated skill, along with the sample utterances. After you deploy your skill, you’ll see this information in the Developer Dashboard.
Now that you’ve examined all of the generated files, it’s time to do a CLI Deploy to your AWS account.
The deploy command looks like this:
ask deploy --no-wait --target target --profile profile --debug
Just like the new command, all of these parameters are optional. The no-wait switch allows you to deploy asynchronously instead of waiting for the skill to build. The target switch allows you to specific which files to deploy (lambda, skill, model, or all) with ‘all’ being the default. Profile lets you provide a profile other than the default to deploy under. The debug switch lets you append a debug message to an error result.
The type of skill you are deploying dictates what files will be uploaded by default:
| Custom Skill |
skill.json, model file, and any AWS Lambda Function code |
| Smart Home Skill |
skill.json and AWS Lambda Function code |
| Flash Briefing Skill |
skill.json |
The first time you deploy a skill, the ASK CLI creates a new skill and lambda function in AWS using the following naming convention:
ask-<skilltype>-<skillname>-<profile>
The lambda function is created with the ask-lambda permission, and an endpoint is generated. The endpoint information is passed back and the skill.json file is updated.
Make sure you’re in the top folder for your skill (the folder that contains your skill.json file) in the command prompt, and type this in:
ask deploy --profile yourprofilename
After the deploy process completes, take a quick look in the config file again, and you’ll see the updated skill ID:
{
"deploy_settings":
{
"default": {
"skill_id": "amzn1.ask.skill.xxxxxxxx-xxxx-xxxx-xxxx-xxxxxxxxxxxx",
"was_cloned": false
}
}
}
In addition to creating skill projects from scratch, you can also clone an existing skill.
ask clone --skill-id skillid --profile profile --debug
If you provide a value for skill-id, the clone command will copy that skill into a new skill. If you do not provide a skill-id, you will be presented with a list of skills to choose from.
Go ahead and give it a shot from your C:\AlexaSkills folder.
cd c:\alexaskills
ask clone --profile yourprofilename
Keep in mind, this doesn’t deploy the clone, it only makes a local copy. You’ll still need to deploy it to AWS for it to show up on the dashboard.
In addition to the three commands I just covered, there’s one more ASK CLI command I’ll cover here, and it’s a doozy. The API command offers up a collection of functions, and to see them all, just type ASK API in your command prompt window.
You’ll notice there’s some overlap with the commands I’ve already shown you, and that’s because they’re just making API calls behind the scenes. Take a look at Figure 2-2 for a complete list.
Figure 2-2: ASK API Commands
For more detailed usage information about any of the ASK CLI commands, you can add a –h switch, like this:
ask api get-model -h
Which gets you a list of parameters and expected values, like Figure 2-3.
Figure 2-3: The get-model API subcommand*
You can get a list of all of your deployed skills, and their skill-ids, by using the ask api list-skills command.
There’s a lot of power and flexibility here. Being able to create/update and deploy skills as part of a scripted build system is incredibly useful, and there’s more! You can even invoke your skills, test them, and submit them for certification.
You can explore the full set of ASK CLI documentation at this link: http://amzn.to/2fBFe8B
That’s it for this chapter. In Chapter 3, I’ll cover picking your hosting platform, and discuss ways you can host your skill somewhere other than Amazon AWS.
3
Pick Your Hosting Platform Carefully
When designing an Alexa Skill, before you write a single line of code, you need to consider where you want your skill to live and run. In this chapter, I will cover the options and potential benefits of different environments for your skill.
When picking a hosting environment, at a minimum you need to consider the following factors:
- Languages
- Costs
Maintenance
Administration
Are you part of a large company that manages their own internet presence, or maybe you’re a smaller team or even lone-wolf developer? Do you work primarily in a Microsoft shop (Windows, IIS/ASP.NET, SQL Server, C#/VB.NET) or do you prefer the open source LAMP (Linux, Apache, MySQL, Python) stack? Do you have a dedicated IT staff, or are you expected to handle everything yourself?
There are essentially three broad options for hosting environments, so I’ll talk about each of them and drill into the benefits of each.
Cloud
A proper discussion of cloud computing could easily fill an entire book, but for our purposes it comes down to three offerings: Amazon Web Services, Microsoft Azure & Google Cloud. Depending on your requirements, any of these would be suitable environments, so I’ll break down the differences and mention any pros/cons of each.
Amazon Web Services (AWS)
AWS offers serverless computing via AWS Lambda Functions. This means you can build and execute your code without having to worry about server configuration or management.
- Languages: C# (.NET Core), Java, Node.js, Python
- Pay only for compute time. Potentially Free.
- Serverless means not having to deal with server maintenance or configuration
- You can set permissions and roles for your skills via the AWS Dashboard
When used for Alexa Skills, AWS is free for the first million AWS Lambda requests & 750 hours of compute time per month. If you exceed these limits, you “may incur AWS usage charges.”
You can also apply for an additional $200 per month in promotional credits for Alexa Skills here: http://amzn.to/2mNJPsf.
If you’re already familiar with one of the supported languages, not reliant on any Microsoft specific technologies, and like the price tag (FREE!) then AWS is a terrific option for skills development.
Microsoft Azure
If you’re primarily a Microsoft shop, and don’t want the overhead of setting up and managing your own servers, Azure offers a nice integrated pipeline for publishing your skill’s backend service directly from Visual Studio.
Azure Web Apps is a serverless option (much like AWS Lambda) that scales on demand and does not require any server maintenance or configuration.
- Languages: ASP.NET (C#), Node.js, PHP, Python
- Free initially*
- Serverless means not having to deal with server maintenance or configuration
- In addition to serverless, Azure offers full virtual machines in your choice of OS.
*Azure offers a free account that comes with a $200 credit to spend for 30 days, and certain products are free for 12 months. This covers up to a million requests and 400 TB of “resource consumption.” The Azure Free Account FAQ (located here: http://bit.ly/2wnXSHa) shows the most current “free” plan features, and breaks it down pretty well.
If you need support for Microsoft specific products like Active Directory, SQL Server, etc. then Azure may be your only Cloud option for Alexa Skills. I’ll walk you through creating an Azure based Alexa Skill in Chapter 6.
Google Cloud
If JavaScript is your preferred language, and you want easy integrations with Google’s various product APIs, then Google Cloud may be the platform for you.
- Languages: Node.js
- Costs: Free initially*
- Serverless means not having to deal with server maintenance or configuration
- Handled via Cloud Console Web Admin UI
*Google Cloud offers a 12 month free trial that includes $300 in free credit and access to all Google Cloud products, such as the Google Maps API. This covers two million invocations (requests) and 400 TB of compute time per month. Each additional million invocations (per month) is $0.40, so even if your skill is incredibly popular, your monthly charges won’t be terribly high unless you’re pushing a lot of outbound data (which caps at 5GB per month, with a $0.12 per GB charge after that.)
Google Cloud also offers excellent support for microservices and mobile app integration with their Cloud Functions product.
I won’t be specifically covering Google Cloud in this book, but your Node.js based projects should run without any manual conversion necessary. Just make sure to select the HTTPS Service Endpoint Type when providing the address of your skill on the Configuration tab of the ASK Dashboard, as shown in Figure 3-1, below.
Figure 3-1: Configuration Tab of the Alexa Dashboard
As you can see, all three of the big Cloud providers offer a serverless computing option, and all three offer some form of free plan, for at least a year. There really are no wrong choices here. The one you pick depends on which of these providers meets your needs.
Having said that, Amazon has a vested interest in putting (and keeping) your skills in AWS, and regularly offers incentives to Alexa Skills developers.
The next category I’ll cover is Leased Web Hosting, which is the more traditional, typically “flat rate + extras” hosting option.
Leased Web Hosting
Leased web hosting is available in nearly every price and configuration imaginable. Prior to the Cloud, this or self-hosting were your only options. For most small teams (or lone developers), self-hosting isn’t really an option.
Because there are so many hosting options, there’s a lot of flexibility here. You can use any language (even Ruby on Rails) capable of returning a properly formatted JSON message to a request, so the choice of host is entirely based on what language you wish to use and how much you wish to pay (which can vary widely.)
Depending on your host, server configuration and administration may play a bigger role compared to the serverless cloud options listed above. Also, the cheaper web hosts use shared hosting which means you will be competing for bandwidth and processing power with any other services or websites also being hosted on your server. Dedicated server hosting is available, of course, but the monthly price may exceed what you would pay for Cloud hosting.
Generally speaking, the cheaper the host, the more websites and services you’ll be competing with for resources, which can directly impact performance. Hosting companies bet heavily on low traffic for websites, and it’s not unheard of to have 20 or more websites hosted on a single machine. You’re also at their mercy for any special configuration tasks, backup/restore tasks, and some options may simply be unavailable.
Many leased web hosts offer a menu of “extra” services for additional fees. By the time you add a database instance, secure certificate for https support, domain name registration, additional bandwidth, additional storage, etc. you may find that Cloud hosting is a cheaper alternative.
- Languages: All
- Costs: Varies
- Varies
- Varies
While there are certainly some free hosts available, they have little or no guarantee of uptime/availability, offer minimal access to configuration options, and most do not support anything beyond simple websites (no services).
You may be thinking that I’m pushing you towards the Cloud, and you’re right. There’s no question that there are some excellent Web Hosts available, but for ease of use, price, and reliability, cloud computing is really the way to go.
The bottom line here is, if you’re going to used Leased Web Hosting, be sure to get a good one. If your skill is occasionally unavailable or performs poorly it can fail the Alexa Skill certification process or get de-listed if it fails to respond too often.
In the next section, I’ll look at self-hosting options, and discuss the pros and cons associated with going that route.
Self-Hosting
In this context, self-hosting implies complete control over the software, hardware and internet connection responsible for your online presence. This typically involves a pretty substantial investment in hardware, software and staff to maintain it.
- Languages: All
- Costs: Varies
- Varies
- Varies
Much like leased hosting, self-hosting can come in literally in any flavor you want, because you’re doing it yourself. The only limits are what you can afford, and the knowledge of your development and support teams.
SIDE NOTE: If you’re a solo dev, you may be thinking “Hey! I’ve got a blazing fast internet connection, and I can get a fixed IP address for $10 extra per month. I could totally host this on my home computer!” If you’re thinking this, please stop. The average desktop machine isn’t really suitable for running as a server on the internet, and your service will go down every time your machine gets overloaded, or any time you reboot.
If done properly, this is absolutely the most expensive option you could pick. Self-hosting costs can easily run into the tens of thousands of dollars per month, by the time you factor in hardware, server licenses, dedicated internet, IT staff, power, etc. If done poorly, self-hosting could be disastrous.
Of course, if you are developing Alexa Skills on behalf of a company that self-hosts already, go for it. There’s little or no expense beyond the investment of your time.
That’s it for this chapter. While I’ve broken down the pros and cons of each, all of these options are feasible, depending on your situation. In Part II, We’ll start digging deeper into Custom Skills, designing a City Facts skill in Chapter 4, and then building AWS Lambda and Azure Service versions in Chapters 5 and 6, respectively.
4
My City Facts – Designing Your New Skill
Welcome to Part II: Custom Skills! This is where it starts getting really fun, and we build something a lot more useful than the Hello World example from the previous chapters.
In this chapter we will design a new custom skill called MyCity Facts. This skill will allow your users to interact with Alexa to learn interesting and useful facts about an imaginary place called MyCity.
After designing the skill, we’ll walk through the process of building the skill, once as an AWS Lambda Function (Chapter 5) and once as a Service that you can run in your web or cloud hosting environment (Chapter 6).
In chapters 5 and 6, I’ll also cover publishing your skill for others to enable and use.
The Interaction Model
The first step in designing a new skill is defining the interaction model, so let’s do that now.
Amazon provides a handy worksheet for fleshing out your interaction model, as seen in Figure 4-1 below. You can download it at http://amzn.to/2gtTZLb. There’s also a simplified version, available at http://amzn.to/2yDSmoJ.
This worksheet allows you to plan out the voice interaction between your users and Alexa, as well as the intent definitions and any backend services or session information your skill might need.
Figure 4-1: Alexa Dialog Design – Detailed
Define Your Intents
So what does a City Facts Skill do? It provides (hopefully) interesting facts about a city, in this case: MyCity! In order to do this, you’ll need to create an intent that returns some information (a “fact”) to the user.
GetMyCityFactIntent
To do this, we’ll define a GetMyCityFactIntent as part of our interaction model. The sole purpose of this intent is to return a single fact about MyCity. We won’t use any Slots for this one, because it only returns a single fact each time it is called.
Finally, we come up with some Sample Utterances.
| Intent |
GetMyCityFactIntent |
| Slots |
|
|
|
|
| Sample Utterances |
Give me a fact. |
Tell me a fact. |
Give me a city fact. |
I’ve given you a few examples above, but you really want to have at least ten for each intent. It may sound like a lot, but try to think of all the different ways people say the same thing. You want your skill to be easily usable by as many people as possible.
Here’s a quick list off the top of my head:
Fact
Give me a fact.
Tell me a fact.
I’d like a fact.
City Fact
Give me a city fact.
Tell me a city fact.
I’d like a city fact.
Tell me about MyCity.
Tell me something.
Tell me something about MyCity.
Hit me with a fact.
Share a fact with me.
Share a city fact with me.
Surprise me.
You can (and should) always add more sample utterances after you get some feedback on your skill. A good test is getting your friends and family to test it out without being told specifically what to say. Write down their failed attempts. Some of them may surprise you.
Next, we’ll need some “interesting” facts about MyCity. The more facts you can include, the better. Here’s a relatively short list:
MyCity has a population of 123,456 people, 11 bears, 3 alligators, and 7,134 cats.
MyCity has several popular attractions, including 3 lakes, 2 mountains, and a 400 acre wildflower sanctuary. On a nice day, you can see the bears playing among the wildflowers, but don’t get too close.
MyCity was founded in 1873 by settlers who got lost on their way from Virginia to California and decided to stay put and make the best of it.
The mayor of MyCity is YourName Goes Here. This is the 14th consecutive term for Mayor Here.
MyCity holds a record in the Guinness Book of World Records for the “largest man-made neon star on top of a mountain.”
City Hall has had three locations since first being constructed in 1902. The first move was due to extensive damage from the great flood of 1937, and the second move was due to the needs of the administration outgrowing the previous facilities. This move occurred in 1992, and City Hall now resides at the intersection of Hill Street and Mountain View Blvd.
The summer carnival is MyCity’s most popular event and raises enough money to fund the volunteer fire department every year.
MyCity is home to 237 pizza restaurants, 9 fast food establishments, and 1 frozen banana stand, which is open from the beginning of July to the end of September.
One of the prettiest places on Earth, MyCity has four perfect seasons of exactly 3 months each. The leaves change every fall, and winter offers exactly 22.4 inches of snowfall every year. Average summer temp is 76.8, every year.
The Mascots are the official football team of MyCity. This is also the name of the local baseball team, basketball team, and soccer team.
That should be enough “facts” to get our skill up and running and provide a little variety in responses to the end-users.
If you’re planning to build a skill about your own city, you’ll want to replace these with actual information. I recommend checking Wikipedia or your city’s municipal website.
When your users invoke the GetMyCityFactIntent, by asking the skill to “Give me a fact”, Alexa will respond with a randomly selected fact from the list, like so:
| MyCity holds a record in the Guinness Book of World Records for the “largest man-made neon star on top of a mountain.” |
|
The more interesting facts you have, the more use your skill will get, so load it up!
Some of the facts we’ve included may tax the limits of Alexa’s pronunciation skills, but that’s ok. We’ll address it during the implementation phase by using Speech Synthesis Markup Language (SSML) to control how Alexa handles the trickier parts.
You want the MyCity Facts skill to give your users some useful directions, so it’s a good idea to specifically define a Help Intent as part of our Interaction Model.
AMAZON.HelpIntent
As you may recall, the AMAZON.HelpIntent is automatically included, and we can extend it by providing additional sample utterances for invoking it, and use it to respond to the user with a custom help message.
| Intent |
AMAZON.HelpIntent |
| Slots |
|
|
|
|
| Sample Utterances |
What do I do? |
How does this work? |
How do I use this skill? |
Just like the GetMyCityFact intent, you want to have a variety of sample utterances for your AMAZON.HelpIntent. Here’s a longer list of sample help utterances:
What do I do?
What?
What do I say?
How does this work?
How do I get a fact?
Help me get a city fact.
I don’t know what to do.
Directions
Huh?
I don’t understand.
What am I supposed to say?
Help
Is this thing on?
You get the idea. Again, test your skill on some friends and family members and consider updating the list with whatever they say as well.
When your users invoke the AMAZON.HelpIntent, by asking the skill for “Help” or saying “What do I do?” Alexa will respond with a help message, like so:
| You can say tell me a MyCity fact, Help, or Exit. What can I help you with? |
|
Once the user invokes the Help intent, Alexa will wait for a response after speaking the help message. If the user doesn’t say anything after a few seconds, Alexa can prompt the user again:
| What can I help you with? |
|
If the user still doesn’t respond, we can trigger the Stop intent, so let’s take a look at that next.
AMAZON.StopIntent
We don’t have to explicitly add any of the built-in intents, and they do a pretty good job of catching the more common, relevant phrases, but it’s always a good idea to keep them in mind when designing the interaction model for your intent, especially if you want to extend them beyond the defaults.
Let’s add a Stop intent to our interaction model.
| Intent |
AMAZON.StopIntent |
| Slots |
|
|
|
|
| Sample Utterances |
Stop |
Quit |
Exit |
As before, you want to have a variety of sample utterances for your AMAZON.StopIntent. Here’s a longer list of sample utterances for the Stop intent:
Stop
Quit
Exit
Finish
I’m done
Shut Up
Goodbye
The sole purpose of the Stop intent is to end your skill immediately. We’ll provide Alexa with a short, simple message for your users when they invoke the Stop intent:
AMAZON.CancelIntent
Much like the built-in Help and Stop intents, Alexa also has a built-in Cancel intent, called (unsurprisingly) AMAZON.CancelIntent.
| Intent |
AMAZON.CancelIntent |
| Slots |
|
|
|
|
| Sample Utterances |
Cancel |
Abort |
Nevermind |
The Cancel and Stop intents can (and should) both be used to end our MyCity Facts skill. Amazon provides both because their research indicates that users tend to use the words “cancel” and “stop” interchangeably.
You’re probably wondering “Why bother? Why not just offer one intent with multiple sample utterances?” and that’s a great question. Amazon provides both because there are scenarios where the two intents behave differently.
If you are creating a skill that allows users to perform a transaction of some sort, such as updating data, moving money around, making a purchase, calling an Uber, etc... the Cancel intent should be used to interrupt and cancel the transaction without exiting the skill entirely.
If your skill doesn’t need that specific functionality, Amazon’s guidance is for developers to support both anyway and just have the Cancel intent behave identically to the Stop intent.
Since that’s what we’re doing here, your skill will use the same return message as the Stop intent:
We’re done with the design phase, so it’s time to start building the skill. In chapters 5 and 6 I’ll cover two different ways to build the MyCity Facts skill we designed in this chapter.
5
Building the MyCity Facts Skill as an AWS Lambda Function
Welcome to chapter 5: Building the MyCity Facts Skill as an AWS Lambda Function. In this chapter, you will take the design for the MyCity Facts skill that we completed in chapter 4 and implement it as an AWS Lambda Function.
After creating and deploying the skill, I’ll cover publishing it for others to enable and use.
Implementing Your Design
You’ve got a complete design for your MyCity Facts skill thanks to the work you did in Chapter 4, so now it’s time to push up your sleeves and create your AWS Lambda Function.
Download the Skill Files
From this point forward, all of the projects in this book can be downloaded from GitHub as a .ZIP file at the following address: http://bit.ly/2yHPsg6 (This file has all of the projects, so you only need to download it once.)
If you’re familiar with Git and GitHub.com, you can also choose to clone or fork the repo into your own workspace. All of the necessary files for the MyCity Facts skill can be found in the AlexaBookRepo project on GitHub, here: http://bit.ly/2yHMcRU, as seen in Figure 5-1.
If you downloaded a local copy, you can extract the files to the location of your choosing. The files for this project are in the AlexaBookRepo-master/MyCityFacts-AWS folder.
In that folder you will find two more folders: /speechAssets and /src. This will be a common theme throughout all of the projects, and most projects you find online. The /speechAssets folder contains the IntentSchema.json and SampleUtterances.txt files, which we informally defined in Chapter 4.
Figure 5-1: The MyCityFacts-AWS GitHub Repo
The /src folder contains the index.js file, which will contain the JSON code used for the AWS Lambda Function.
We’re going to focus on the contents of the /speechAssets folder first, and we’ll come back to the /src folder in a little bit.
IntentSchema.json
Open up the IntentSchema.json file in any text editor (even Notepad) and take a look. There shouldn’t be any surprises in here. All of the intents we defined in Chapter 4 are present in the intents array:
{
"intents": [
{
"intent": "GetMyCityFactIntent", "slots":[]
},
{
"intent": "AMAZON.StopIntent"
},
{
"intent": "AMAZON.CancelIntent"
},
{
"intent": "AMAZON.HelpIntent"
}
]
}
We don’t define any slots for the GetMyCityFactIntent because it doesn’t accept any parameters. It always returns one randomly selected fact from our skill, every time we invoke it.
Regardless of your preferred programming model and language, this JSON array is the format you will always use when you specify the Intent Schema in the Interaction Model tab of the Create a New Alexa Skill workflow on the Alexa Developer Dashboard.
That last part was a bit of a mouthful, but don’t worry, we’re going to walk through all of it shortly, but first we’ll take a look at the other file in the /speechAssets folder: the SampleUtterances.txt file.
SampleUtterances.txt
You guessed it! This file contains all of the sample utterances you came up with in Chapter 4. Your MyCity Facts skill will listen for all of these, plus some built-in phrases as well.
Much like the IntentSchema.json file, this will get pasted into the Interaction Model tab when setting up your skill.
GetMyCityFactIntent Fact
GetMyCityFactIntent Give me a fact.
GetMyCityFactIntent Tell me a fact.
GetMyCityFactIntent Id like a fact.
GetMyCityFactIntent City Fact
GetMyCityFactIntent Give me a city fact.
GetMyCityFactIntent Tell me a city fact.
GetMyCityFactIntent Id like a city fact.
GetMyCityFactIntent Tell me about MyCity.
GetMyCityFactIntent Tell me something.
GetMyCityFactIntent Tell me something about MyCity.
GetMyCityFactIntent Hit me with a fact.
GetMyCityFactIntent Share a fact with me.
GetMyCityFactIntent Share a city fact with me.
GetMyCityFactIntent Surprise me.
AMAZON.HelpIntent What do I do
AMAZON.HelpIntent What
AMAZON.HelpIntent What do I say
AMAZON.HelpIntent How does this work
AMAZON.HelpIntent How do I get a fact
AMAZON.HelpIntent Help me get a city fact.
AMAZON.HelpIntent I dont know what to do.
AMAZON.HelpIntent Directions
AMAZON.HelpIntent Huh
AMAZON.HelpIntent I dont understand.
AMAZON.HelpIntent What am I supposed to say
AMAZON.HelpIntent Help
AMAZON.HelpIntent Is this thing on
AMAZON.StopIntent Stop
AMAZON.StopIntent Quit
AMAZON.StopIntent Exit
AMAZON.StopIntent Finish
AMAZON.StopIntent Im done
AMAZON.StopIntent Shut Up
AMAZON.StopIntent Goodbye
AMAZON.CancelIntent Cancel
AMAZON.CancelIntent Abort
AMAZON.CancelIntent Nevermind
You may have noticed that certain punctuation and special characters have been stripped away. While it’s natural to want to write your sample utterances with proper punctuation, single quotes and question marks will get rejected by the Interaction Model screen when we try to submit.
Now let’s take a look at the /src folder. There’s only one file in there: index.js, which we’ll cover now.
index.js
The index.js file contains all of the code for your AWS Lambda Function. The listing is a little long, so I’ll break it down into more digestible chunks and talk about what we’re doing in each part.
This first block of code sets a reference to the Alexa SDK, and then registers your event handlers, which in this case includes the Alexa LaunchRequest event, and your various Intents which you defined previously.
const Alexa = require('alexa-sdk');
exports.handler = function(event, context, callback) {
var alexa = Alexa.handler(event, context);
alexa.registerHandlers(handlers);
alexa.execute();
};
You will pass in a collection of handlers (defined below) to the registerHandlers() method (above.) This lets Alexa know what Intents to support, and therefore what utterances to listen for. The handlers then specify how to respond to each intent invocation.
var handlers = {
'LaunchRequest': function () {
this.emit('AMAZON.HelpIntent');
},
A LaunchRequest is fired whenever the skill is opened. In this case, we are using that event to trigger the AMAZON.HelpIntent so users know what to do when they invoke your skill.
In JavaScript / Node.js an event can be described as a string with a callback. An event can be emitted one or more times, resulting in execution of the callback function (which in the above example, would be the AMAZON.HelpIntent) for each occurrence of the event.
It’s generally regarded as a good practice to let your handlers call each other (as in the example above) rather than having multiple copies of the same text string floating around. This ensure consistency in responses from Alexa to your users.
If you have any external services that need to be initialized, data to load from elsewhere, etc., the LaunchRequest event is a good place to do so.
'GetMyCityFactIntent': function () {
var say = 'Here is your fact. ' + getRandomMyCityFact();
this.response.speak(say);
this.emit(':responseReady');
},
The above block of code shows the callback function that is executed when the GetNewMyCityFactIntent is invoked (by the user) or emitted (by the LaunchRequest event handler above).
There’s a few things going on in this method. First you are constructing the response string (stored in the say variable) with a standard opening “Here is your fact” followed by a randomly selected fact about your city.
Speaking of which, I’ll cover the GetRandomMyCityFact() function in just a moment.
The response.speak() function accepts a string that can be plain text or formatted with Speech Synthesis Markup Language (SSML) and stores it in the Response object. We’ll dig into SSML more in a later project, but if you’re curious there’s a reference in Appendix B in the back of the book.
Finally, we emit the responseReady event after the response has been built, but before it is returned to the Alexa service. This tells Alexa that the Response object we’ve constructed is ready to go.
The responseReady event also invokes the saveState event automatically. We’re not persisting any state information in this example, so we’ll come back to that in a later chapter.
Next up, we have the built-in intents:
'AMAZON.CancelIntent': function () {
this.emit('AMAZON.StopIntent');
},
'AMAZON.StopIntent': function () {
this.response.speak('Goodbye');
this.emit(':responseReady');
},
Remember how in the design chapter we discussed treating the Stop and Cancel intents as functionally identical? If the user invokes the Cancel intent, we just invoke the Stop intent. This way, we keep redundant code to a minimum and the UI responses remain consistent.
'AMAZON.HelpIntent': function () {
var speechOutput = 'you can ask for a fact by saying, tell me a fact.';
var repromptSpeech = 'Try it! Just say tell me a fact.'
this.emit(':ask', speechOutput, repromptSpeech);
}
};
This time, we’re using two response methods. You’ve already seen response.speak, but we are also emitting an Ask event which waits for the user to say something else after hearing the help message.
If Alexa doesn’t understand that response, she prompts the user again with the reprompt message, which in this case is “Try it! Just say tell me a fact.”
The Help intent doesn’t have to go last in the handlers collection of our AWS Lambda Function, but it’s a good habit to reinforce since we’re putting it last in the IntentSchema (in order to catch any unrecognized commands from the user.)
Next, we have the getRandomMyCityFact() method that we referenced above. This contains the array of MyCity Facts the skill will draw upon.
function getRandomMyCityFact() {
var myFacts = [
'MyCity has a population of 123,456 people, 11 bears, 3
alligators, and 7,134 cats.','MyCity has several popular
attractions, including 3 lakes, 2 mountains, and a 400
acre wildflower sanctuary. On a nice day, you can see
the bears playing among the wildflowers, but dont get
too close.','MyCity was founded in 1873 by settlers who
got lost on their way from Virginia to California and
decided to stay put and make the best of it.','The mayor
of MyCity is YourName Goes Here. This is the 14th
consecutive term for Mayor Here.','MyCity holds a record
in the Guinness Book of World Records for the largest
man-made neon star on top of a mountain.','City Hall has
had three locations since first being constructed in
1902. The first move was due to extensive damage from
the great flood of 1937, and the second move was due to
the needs of the administration outgrowing the previous
facilities. This move occurred in 1992, and City Hall now
resides at the intersection of Hill Street and Mountain
View Blvd.','The summer carnival is MyCitys most popular
event and raises enough money to fund the volunteer fire
department every year.','MyCity is home to 237 pizza
restaurants, 9 fast food establishments, and 1 frozen
banana stand, which is open from the beginning of July to
the end of September.','One of the prettiest places on
Earth, MyCity has four perfect seasons of exactly 3
months each. The leaves change every fall, and winter
offers exactly 22.4 inches of snowfall every year.
Average summer temp is 76.8, every year.','The Mascots
are the official football team of MyCity. This is also
the name of the local baseball team, basketball team, and
soccer team.'
];
This array is fine for our relatively simple MyCity Facts skill, but if you wanted to create something really big, you should consider using a database. This has the added bonus of allowing you to add more and more facts without having to edit and redeploy your skill every time.
Lastly, we have the single line of code that handles the magic of randomly selecting a fact for Alexa to return:
return(myFacts[Math.floor(Math.random() * myFacts.length)]);
}
There’s a few things going on here, so I’ll break it down. Math is a javascript library that contains a bunch of helper methods, including Math.random() and Math.floor().
The Math.random function returns a number between 0 and 1 exclusively (that is, neither 0 nor 1) which you have to multiply by the max number you want to randomize.
In other words, if you wanted a random number from 1 to 20, you would use Math.random() * 20 and if you want it to be a whole number, you must wrap that function with Math.floor (which rounds down to the nearest whole number) so it ends up looking like Math.floor(Math.Random * 20).
This is pretty common in C and Java style languages, but may look weird to any .NET developers reading this book, because they get something a little bit simpler. The statement Random.Next(1, 20) does the same thing as above, returning a whole number ranging from 1 to 20.
Random Number Generators (RNGs) are weird, arcane constructs that return pseudorandom numbers. We call them pseudorandom because achieving True Random is impossible on a computer.
There have been some incredibly long and boring books written on this subject, but the short version is that if a RNG is used long enough, they can present a predictable pattern, which can be problematic for some uses.
As a result, there are numerous incredibly complex RNGs written specifically to try and address such predictability, but for our purposes the Math.random() function will be fine.
In our code, we’re multiplying the random value by facts.length which is a whole number that represents the number of records in our facts array. This is better than hardcoding a number, because as you add more facts to your array, you won’t have to come back and modify this code every time!
Once we have a random number, we use it as the index in our facts array and return a string containing the fact, which gets used in the GetNewMyCityFactIntent defined above.
That covers everything in this project, so now it’s time to create the skill.
Add a New Skill
The next thing you need to do is add a new skill in your Alexa Skills Kit dashboard (located at: http://amzn.to/2qiiCjJ) by clicking the Add a New Skill button as shown in Figure 5-2.
Figure 5-2: Amazon Alexa Skills Kit Dashboard
Skill Information
Assuming you are already logged in, you should now be looking at the Skill Information tab as shown in Figure 5.3.
To begin creating your skill, perform the following steps on this screen:
- In the Skill Type section, select the Custom Interaction Model.
- In the Name field, enter: MyCity Facts
- In the Invocation Name field, enter: MyCity Facts
Invocation Names should be short and easily distinguishable. Amazon recommends using no more than 3 words, and disallows the use of special characters and the words Alexa, Echo or Amazon as part of your invocation name.
1. Accept the default values for the three Global Fields.
2. Click the Save button.
3. Click the Next button to proceed to the Interaction Model screen.
Figure 5-3: The Skill Information Tab
Interaction Model
The next screen is the Interaction Model, which you can see in Figure 5-4. I have omitted the Custom Slot Types from the screenshot.
You will add the contents of your IntentSchema.json and SampleUtterances.txt files on this page.
Perform the following steps:
- Copy the contents of the IntentSchema.json file and paste them into the Intent Schema box.
- Copy the contents of the SampleUtterances.txt file and paste them into the Sample Utterances box.
- Click the Save button.
- Click the Next button to continue to the Configuration screen.
The MyCity Facts skill doesn’t use any Custom Slot Types, so you will skip that section.
Figure 5-4: The Interaction Model Tab
AWS Lambda Function
After clicking the Next button in the previous section, you should be looking at the Configuration page, but before you can continue forward, you will need an Endpoint address for the AWS Lambda Function that services your skill requests.
You know what that means… It’s time to head over to AWS and create our Lambda Function. Don’t worry, you’ve already saved your progress so far, so it will be there when you come back.
- In your browser, go to aws.amazon.com and sign in to the console.
- Find the Compute section (should be top left), and click the link for Lambda.
You should now be looking at a table (Figure 5-5) containing any Lambda Functions you have previously worked on, including the HelloWorld function you created earlier in this book.
1. Click the Create Function button (top right).
Figure 5-5: Aws Lambda Functions
When creating an AWS Lambda Function, you have the option of coding from scratch or using a Blueprint. Blueprints are sample apps that come preconfigured with an event source and code, and are handy for getting you up and running quickly.
AWS has well over a hundred Blueprints to choose from, but most are not relevant to Alexa Skills development. If you type Alexa in the Blueprints search box and hit enter, you will get back a much smaller list of Alexa Blueprints (as shown in Figure 5-6.)
Take a look at the results. There are a few to choose from, but the first item in the list is the alexa-skill-kit-sdk-factskill, which sounds like a pretty good match for what we’re doing.
Figure 5-6: AWS Lambda Blueprints for Alexa
Go ahead and click on that one and take a look at what the Blueprint provides you.
I’m not going to reproduce it here, because it’s about 150 lines of code you aren’t going to use on this project, but I want you to take a look at it (and the rest of the Alexa Blueprints) so you know what’s available to you when you’re creating your own projects.
This is a pretty good sample, because it includes content for multiple languages and shows how to select the correct language based on your user’s settings.
Once you’ve gotten a good look at the blueprint, go ahead and click the Previous button at the bottom of the page, to go back to the Create Function page.
- Click the Author From Scratch button (top right of page)
You will be presented with the Basic Information screen (Figure 5-7) where you will give the function a name and set roles.
Figure 5-7: AWS Lambda Function Basic Information
- Enter the name for your function. I used MyCityFact, and you can too because this name is unique within your space in AWS.
- If you have been following along, and you created a Lambda Function for the previous project, you can select “Choose an existing role.” from the Role dropdown box and then select the “AWSLambdaBasicExecute” role from the Existing Role dropdown box.
- you don’t have a role available to select, you’ll need to create one so select the “Create new role from template(s)” option, enter a name for your role and then select “Simple Microservice permissions” from the Policy Templates dropdown box.
- Click the Create Function button.
- everything went ok up to this point, you should see a “Congratulations!” message that indicates your function has been successfully created.
- course, it doesn’t do anything… yet, but that’s easy enough to fix. Just head on over to the GitHub repo you downloaded and drill down into the MyCityFacts-AWS/src/ folder and open the index.js file (or view it on GitHub at: http://bit.ly/2yAfsgm).
- Once you’ve opened the file, select and copy all of it.
- Switch back over to the empty AWS Lambda Function screen and delete everything in the text editor, and then paste in your code.
- Click the Save button (top of screen.)
- almost done with this part. Click the Triggers heading at the top of the page so you can add the Alexa Skills Kit as an Event Source for your AWS Lambda Function.
- Click “Add Trigger” and you will see the Add Trigger dialog (Figure 5-8.)
Figure 5-8: The Add Trigger Dialog
- Click the dashed box on the left of the arrow and select “Alexa Skills Kit.”
- Click the Submit button.
- this point, you have a complete AWS Lambda Function, complete with an event trigger.
- you can go back to finish configuring your skill in the Alexa Skills Dashboard, you need to copy the Amazon Resource Name (ARN), which you will paste into the configuration page.
- can find the ARN for this Lambda Function at the top of the page, as shown in Figure 5-9.
Figure 5-9: The ARN (Amazon Resource Name)
- will look like “arn:aws:lambda:us-east-1:xxxxxxxxxxxx:function:MyCityFacts”.
- Select and copy the ARN.
- done with the Lambda Function, so switch back to the Alexa Skills Dashboard, and click on the Configuration section.
Configuration
1. so close to being done. You’ve designed and built your skill, and created the AWS Lambda Function to power it. All that remains is to point your skill to the service and test it out, so let’s get to it.
2. should be looking at the Configuration screen (Figure 5-10).
3. Under the Endpoint section, select AWS Lambda ARN.
4. Paste the ARN you copied from the AWS Lambda Function into the Default textbox.
5. can accept the default values for the rest of the screen.
6. won’t be using geographical regions or linked accounts for this skill.
7. Click the Save button.
8. Click the Next button to proceed to the Test screen.
9. it for the Configuration section. Next up, you’ll test your skill and examine the JSON request and response between your skill and the AWS Lambda Function you created.
Figure 5-10: The Configuration Screen
Test
The MyCity Facts skill is complete, so let’s test it out.
You should be looking at the Test screen (Figure 5-11) at this point. The first thing you’ll notice is that your Alexa skill is now enabled for testing.
The Voice Simulator is neat, but not particularly useful to us at the moment. Where it’s especially useful is when you’re trying to test out some SSML responses for your skill.
Unfortunately, given how far in the process you have to be in order to get to the Voice Simulator, Amazon Polly (https://aws.amazon.com/polly) is a much better choice for general testing.
In the Service Simulator, you can test sample utterances to invoke your skills and then examine the JSON request and response documents generated by your skill and AWS Lambda Function, respectively.
Try this in the Service Simulator:
- Type: tell me a fact
- Click the Ask MyCity Facts button
Figure 5-11: The Test Screen
After you click the Ask MyCity Facts button, the Service Request and Service Response boxes will both populate with JSON documents.
The Service Request:
{
"session": {
"new": true,
"sessionId": "SessionId.994568e2-9568-4385-ba5d-499a124d2bd0",
"application": {
"applicationId": "amzn1.ask.skill.xxxxxxxxxxxxxxxxx "
},
"attributes": {},
"user": {
"userId": "amzn1.ask.account. xxxxxxxxxxxxxxxxx "
}
},
"request": {
"type": "IntentRequest",
"requestId": "EdwRequestId.98ea21ea-5846-4679-bf92-5f639ed67685",
"intent": {
"name": "GetMyCityFactIntent",
"slots": {}
},
"locale": "en-US",
"timestamp": "2017-11-08T18:30:44Z"
},
"context": {
"AudioPlayer": {
"playerActivity": "IDLE"
},
"System": {
"application": {
"applicationId": "amzn1.ask.skill.xxxxxxxxxxxxxxxxx "
},
"user": {
"userId": "amzn1.ask.account.xxxxxxxxxxxxxxxxx"
},
"device": {
"supportedInterfaces": {}
}
}
},
"version": "1.0"
}
You’ve got some session information, followed by the request block, which shows the actual intent being invoked, and then the context block, which contains application and user IDs.
The Service Response:
{
"version": "1.0",
"response": {
"outputSpeech": {
"ssml": "<speak> Here is your fact. The summer carnival is MyCitys most popular event and raises enough money to fund the volunteer fire department every year. </speak>",
"type": "SSML"
},
"speechletResponse": {
"outputSpeech": {
"ssml": "<speak> Here is your fact. The summer carnival is MyCitys most popular event and raises enough money to fund the volunteer fire department every year. </speak>"
},
"shouldEndSession": true
}
},
"sessionAttributes": {}
}
Notice that while the request sends info than is absolutely needed, the response is pretty concise, and doesn’t return anything other than the output speech, type, and whether to end the session.
You can also click the listen icon just below the response document and the SSML will be read to you in Alexa’s voice.
Try typing a few of your sample utterances, including the Help requests.
Once you’re finished testing your MyCity Facts skill, click the Next button to continue on to the Publishing Information screen.
Device Testing
If you have an Amazon Echo device handy and connected with the same Amazon account you use for development, you can ask her to give you a MyCity Fact even without publishing the skill.
Try this:
Say “Alexa, open MyCity Facts”
| You can ask for a fact by saying “tell me a fact.” |
|
At this point, Alexa will wait for you to say one of the sample utterances you listed for your GetMyCityFactsIntent. If you take too long to respond, Alexa will prompt you again.
| Try it! Just say “tell me a fact.” |
|
Once you respond with an invocation, Alexa will randomly select a fact about MyCity for you and respond accordingly.
| MyCity has a population of 123,456 people, 11 bears, 3 alligators, and 7,134 cats. |
|
Publishing Information
- with the Hello World skill we worked on previously, I don’t really recommend publishing this skill as-is.
- if you have modified the project and put in facts about your own city, then you should definitely keep reading!
- this point, you should be looking at the Publishing Information screen, as shown in Figure 5-12.
Figure 5-12: Publishing Information
In the Global Fields section, I have selected Education & Reference. There are a number of categories and subcategories to choose from, but I feel this is the best fit for the MyCity Facts skill. Take a moment to look through all of them, and pick the one that most closely matches your skill.
The Testing Instructions section is for any special instructions that a certification tester would need to know about your skill. We don’t have any of those, so just enter NONE in the box.
I have selected for this skill to be available in “all countries and regions where Amazon distributes skills”.
Under Short Skill Description, I have entered “Facts about MyCity, USA.” If you have created a skill based on your own city, you should fill this field in with something similar for your own city.
The Full Skill Description field is for additional information about your skill. This information will be displayed in the Alexa App when your skill is invoked. It should include a brief description, and how to use the skill.
Next, you will enter three Example Phrases for use with your skill. These are like your Sample Utterances from before, except should be prefaced with Alexa, such as “Alexa, open MyCity Facts” or “Alexa, Ask MyCity Facts for a fact.”
You will also need to create small (108x108) and large (512x512) icons for your skill. I used Microsoft Paint for mine, which you can see in Figure 5-13. It only took about a half hour and I think it looks pretty good.
Figure 5-13: Don’t judge me, I’m a developer, not an artist
Once you fill everything in and upload your icon graphics, hit the Save button and the Submit for Certification button will light up, but don’t click it just yet. Click the Next button to proceed to the Privacy & Compliance screen first.
Privacy & Compliance
You’re well on your way to submitting your first skill. One last screen, a few questions, and you’re done. Take a look at the Privacy & Compliance screen, shown in Figure 5-14.
In the Privacy section, select the answers appropriate to your skill. I answered No to all three, and in this example you would too.
Under Compliance, I checked the box allowing Amazon to export this skill into other countries, and I checked No to the advertising question. You are not required to do this, so it’s entirely up to you.
If you have written a Privacy Policy for your skill (let’s assume you haven’t) then you should fill in the Privacy Policy URL to point to wherever you are hosting the information.
Just like the Privacy Policy, if you have written a Terms of Use document for your skill (probably not at this point) then you should fill in the Terms of Use URL to point to that as well.
Hit Save, and then, if you’re ready, hit the Submit for Certification button.
Figure 5-14: The Privacy & Compliance screen
Skill Certification
Congratulations, you’ve submitted your skill for certification! Now you get to wait for an email from the Alexa team.
While your submission is being evaluated, you can’t edit your skill. If you think you’ve made a mistake, or just wish to withdraw your skill from the certification process, there’s a button for that, otherwise you can click the Back to the List of Skills button.
That’s it for this chapter! In the next chapter we’ll build the same skill using Microsoft’s C# .NET and ASP.NET Web API, in Azure.
6
Building the MyCity Facts Skill as an ASP.NET Web API Service Hosted in Microsoft Azure
Welcome to chapter 6: Building the MyCity Facts Skill as an ASP.NET Web API Service Hosted in Microsoft Azure.
After creating and deploying the skill, I’ll cover publishing it for others to enable and use. If you worked through the previous chapter, you can probably just skin that part.
Implementing Your Design
You created a complete design for your MyCity Facts skill in Chapter 4, and you’ve already created it as an AWS Lambda Function, so this time you will be creating an ASP.NET Web API Service project and then publishing it to Microsoft’s Azure cloud-hosting platform to serve as the backend to your skill.
Download the Skill Files
As mentioned in Chapter 5, the projects in this book can be downloaded from GitHub as a .ZIP file at the following address: http://bit.ly/2yHPsg6 (This file has all of the projects, so you only need to download it once.)
All of the necessary files for the MyCity Facts skill can be found in the AlexaBookRepo project on GitHub, here: http://bit.ly/2AvABF8 (and shown in Figure 6-1.)
If you downloaded a local copy, you can extract the files to the location of your choosing. The files for this project are in the AlexaBookRepo-master/MyCityFacts-AZURE folder.
The architecture for this project significantly different than the previous one. There are a lot more moving parts in this chapter’s solution, so I’m going to walk you through the creation of the project and files, rather just reviewing an existing solution like in the previous chapter.
Figure 6-1: The MyCityFacts-AZURE GitHub Repo
Getting Started
I’m using Microsoft Visual Studio Community 2017 for this project. In addition to being free, it’s an excellent IDE with lots of features, and it makes the deployment to Azure about as close to painless as you can get. If you haven’t already downloaded it, take a look at Chapter 1 for more information on where to find it.
Once you’re up and running in VS2017, perform the following steps to create a new ASP.NET Web API solution.
- Create a new project (File – New – Project)
- Select “ASP.NET Web Application (.NET Framework) – Visual C#” from the New Project dialog (Figure 6-2.) If you can’t find it, make sure you’re looking under the Visual C#/Web templates.
- Give your project a name and a place to live, and then click the OK button.
I usually try to keep all of my projects as close to the root as possible, like: C:\Code\ProjectName or something like that. Saving projects to the desktop can occasionally cause unforeseen issues down the road. When in doubt, let simplicity prevail.
Figure 6-2: The New Project Dialog
I used MyCityFacts-AZURE to distinguish this project from the AWS Lambda-based project in Chapter 5, but you aren’t required to do that.
- Select the Web API template in the next dialog (Figure 6-3) and make sure the MVC and Web API checkboxes are selected, and then click the OK button.
Figure 6-3: New ASP.NET Web Application Dialog
Once you’ve done that, take a sip of your coffee while VS2017 creates your project infrastructure. It’ll only take a few seconds and you’ll be ready to roll.
SpeechAssets
If you’ve been working through the chapters as we go, this should be familiar territory for you. The SpeechAssets folder is where we put the Intent Schema and Sample Utterances files we designed in Chapter 4.
This time, instead of being at the very top of the repo, I’ve put the SpeechAssets folder inside the MyCityFacts-AZURE project.
In the Solution Explorer (Figure 6-4) you can see a complete hierarchy of files in the project.
Figure 6-4: VS2017 Solution Explorer
If you’re working along with the book, you’ll need to add this folder manually.
- Create a SpeechAssets folder under the MyCityFacts-AZURE project for your IntentSchema.json and SampleUtterances.txt files.
- Right-Click on the folder you just created and click Add – Existing Item and navigate to where you downloaded the files from GitHub. Select them and Visual Studio will copy them into the right location in your folder structure and add them to the Solution Explorer.
If you didn’t download the project files, you can easily view them on GitHub and copy/paste the contents into the appropriate file within VS2017. You’ll just need to Add – New Item for each of them (a .json file and a .txt file) inside the SpeechAssets folder.
We’ll come back to these in a bit.
Web API
We’re using the ASP.NET Web API template for this project, and the Model View Controller (MVC) Pattern. This means that to serve requests for our skill, we’ll need a controller.
To add a new controller to this project, do the following:
- Right-click on the Controllers folder in the Solution Explorer window.
- Select Add – Web API Controller Class (v2.1), as shown in Figure 6-5.
- Give it a name. I named mine MyCityFactsController.
Figure 6-5: Adding a New Controller
When you create a new controller in this fashion, VS2017 will automatically do some of the wiring-up behind the scenes for you.
Take a look at your MyCityFactsController class and you’ll see some stubbed out commands: the usual GET, POST, PUT, and DELETE verbs. We won’t be using all of them, but it’s a great that VS2017 gives you a populated class template to work from as a starting point.
using System;
using System.Collections.Generic;
using System.Linq;
using System.Net;
using System.Net.Http;
using System.Web.Http;
namespace MyCityFacts_AZURE.Controllers
{
public class MyCityFactsController : ApiController
{
// GET api/<controller>
public IEnumerable<string> Get()
{
return new string[] { "value1", "value2" };
}
// GET api/<controller>/5
public string Get(int id)
{
return "value";
}
// POST api/<controller>
public void Post([FromBody]string value)
{
}
// PUT api/<controller>/5
public void Put(int id, [FromBody]string value)
{
}
// DELETE api/<controller>/5
public void Delete(int id)
{
}
}
}
There are a couple of approaches you can take when developing an Alexa skill in C#.
Depending on the architectural needs of the skill, you could build a complex highly scalable n-tier enterprise architecture, or at the other end of the spectrum, you could create a lightweight dynamic C# object that returns the JSON response message your skill needs in order to communicate with Alexa.
I’m a big fan of taking the simplest possible approach that meets the needs of your project, so in this chapter we’ll be creating a dynamic C# object which affords us a few benefits: it’s simple, lightweight, and we can format the message in code to look exactly like the JSON message.
Take a look at the following JSON response, which was generated by our AWS Lambda Alexa Skill:
{
"version": "1.0",
"response": {
"outputSpeech": {
"ssml": "<speak> Here is your fact. The summer carnival is
MyCitys most popular event and raises enough money
to fund the volunteer fire department every year.
</speak>",
"type": "SSML"
},
"speechletResponse": {
"outputSpeech": {
"ssml": "<speak> Here is your fact. The summer carnival is
MyCitys most popular event and raises enough money
to fund the volunteer fire department every year.
</speak>"
},
"shouldEndSession": true
}
},
"sessionAttributes": {}
}
Using a dynamic object, the syntax varies a little bit, but we can format the code to look very close to the message we want to send:
return new
{
version = "1.0",
response = new
{
outputSpeech = new
{
type = "SSML",
text = "<speak>Here is your fact. The summer carnival is
MyCitys most popular event and raises enough money
to fund the volunteer fire department every year.
</speak>"
},
card = new
{
type = "Simple",
title = "MyCity Fact",
content = "<speak>Here is your fact. The summer carnival is
MyCitys most popular event and raises enough money
to fund the volunteer fire department every year.
</speak>"
},
shouldEndSession = true
},
sessionAttributes = new {}
};
In this case, I’ve hardcoded the response for example purposes, but in the code you’ll randomly select a MyCity Fact to inject into the dynamic object, and return to Alexa.
In the previous chapter’s AWS Lambda example, AWS handled the responsibility of creating the JSON request and response documents and ensuring compliance with their standards.
Since you will be creating the response manually, you need to be aware of the following size limitations for the JSON response:
- outputSpeech response can’t exceed 8000 characters.
- of the text included in a card can’t exceed 8000 characters. This includes the title, content, text, and image URLs.
- image URL (smallImageUrl or largeImageUrl) can’t exceed 2000 characters.
- token included in an audioItem.stream for the AudioPlayer.Play directive can’t exceed 1024 characters.
- URL included in an audioItem.stream for the AudioPlayer.Play directive can’t exceed 8000 characters.
- total size of your response can’t exceed 24 kilobytes.
If your response exceeds these limits, the Alexa service returns an error at deployment time.
Now that you have an idea of what a proper response should look like, it’s time to jump back in to VS2017 and start working on the controller you created.
To get started, delete all of the code inside the MyCityFactsController class. It should look like this:
using System;
using System.Collections.Generic;
using System.Linq;
using System.Net;
using System.Net.Http;
using System.Web.Http;
namespace MyCityFacts_AZURE.Controllers
{
public class MyCityFactsController : ApiController
{
}
}
We’ll start with defining the array our MyCity Facts will live in. Much like the AWS project in the previous chapter, we’ll also throw in some code to randomly select one fact and return a string.
Get Random Facts
Add the GetRandomFact() method inside your MyCityFactsController class:
private string GetRandomFact()
{
var RNG = new Random();
var Facts = new string[] {
"MyCity has a population of 123,456 people, 11 bears, 3 alligators, and 7,134 cats.",
"MyCity has several popular attractions, including 3 lakes, 2 mountains, and a 400 acre wildflower sanctuary. On a nice day, you can see the bears playing among the wildflowers, but dont get too close.",
"MyCity was founded in 1873 by settlers who got lost on their way from Virginia to California and decided to stay put and make the best of it.",
"The mayor of MyCity is YourName Goes Here. This is the 14th consecutive term for Mayor Here.",
"MyCity holds a record in the Guinness Book of World Records for the largest man-made neon star on top of a mountain.",
"City Hall has had three locations since first being constructed in 1902. The first move was due to extensive damage from the great flood of 1937, and the second move was due to the needs of the administration outgrowing the previous facilities. This move occurred in 1992, and City Hall now resides at the intersection of Hill Street and Mountain View Blvd.",
"The summer carnival is MyCitys most popular event and raises enough money to fund the volunteer fire department every year.",
"MyCity is home to 237 pizza restaurants, 9 fast food establishments, and 1 frozen banana stand, which is open from the beginning of July to the end of September.",
"One of the prettiest places on Earth, MyCity has four perfect seasons of exactly 3 months each. The leaves change every fall, and winter offers exactly 22.4 inches of snowfall every year. Average summer temp is 76.8, every year.",
"The Mascots are the official football team of MyCity. This is also the name of the local baseball team, basketball team, and soccer team."
};
return Facts[RNG.Next(0, Facts.Length - 1)];
}
The array is pretty straightforward code, and we covered the Random function in the previous chapter. So let’s move on.
Intent Dispatcher
The next function we’ll build is a dispatcher to examine the type of Intent being invoked, and respond accordingly. Add the following IntentDispatcher() method to your controller class:
private void IntentDispatcher(dynamic request)
{
var intentName = "";
if (request != null)
{
intentName = (string)request.request.intent.name;
}
This first part takes a look at the incoming request and makes sure it isn’t null before trying to navigate the JSON to get the intent name. Doing so against a null will blow up, so if it is null we just leave intentName as an empty string, and move on to the switch statement below, which knows how to handle it.
switch (intentName)
{
case "GetMyCityFactIntent":
speech = "Here is your fact: " + GetRandomFact();
break;
case "AMAZON.CancelIntent":
case "AMAZON.StopIntent":
speech = "OK";
break;
case "AMAZON.HelpIntent":
default:
speech = "You can ask for a fact by saying, tell me a fact.";
reprompt = "Try it! Just say tell me a fact.";
break;
}
}
This may look a little odd if you aren’t familiar with C#, but we essentially have 3 scenarios here: a fact request, a cancel or stop request, and a help request. The default case is paired up with help so if the service can’t understand your request, it will roll over to the help message.
In the GetMyCityFactIntent case, you’re calling the GetRandomFact() method you just created, and then returning a concatenated string with the message for Alexa.
Now it’s time to build the entry point to the controller.
The Alexa Voice Service requires the response message from your service to be sent as a POST request (not a GET), so that’s what we’ll be doing.
Handle Requests
Add a HandleRequest() method inside your controller class, to handle your incoming requests, and start it off with a call to the IntentDispatcher() method you just created:
[HttpPost, Route("api/alexa/MyCityFacts")]
public dynamic HandleRequest (dynamic request)
{
IntentDispatcher(request);
}
Notice the attributes, just above the method declaration. The [HttpPost] attribute marks this method as returning a POST request to whoever called the service, and the [Route] attribute defines the path by which this method will be called.
I talked a little bit already about returning a dynamic object, which you can see in the return type for this method, but we’re also accepting a dynamic object, so we don’t have to strongly type anything (and because Amazon could change the message at any time.)
Inside your HandleRequest() method, add the following barebones dynamic object:
return new
{
version = "1.0",
response = new
{
outputSpeech = new {},
card = new {},
shouldEndSession = false
},
reprompt = new
{
outputSpeech = new {},
shouldEndSession = false
},
sessionAttributes = new {}
};
It’s mostly empty right now, but we’ll get to that in a moment.
Inside the response object, you have two objects: outputSpeech and card, which contain the content for the voice response and the visual response (for the Echo Show and Alexa phone app), respectively.
The response object also contains the shouldEndSession property which you’ve seen before.
Many Alexa skills are “one and done” type interactions. You’ve seen the type: ask a question, get an answer, the end.
The shouldEndSession property tells Alexa whether or not to keep listening for a response and that’s the key to really opening up the interactive user experience.
Our outputSpeech object will contain two properties: type and text, and the card object will contain three properties: type, title, and content.
Go ahead and update both objects to look like the following:
outputSpeech = new
{
type = "PlainText",
text = speech
},
card = new
{
type = "Simple",
title = "MyCity Fact",
content = speech
},
See the speech variable? That will contain the actual content of the message, which will be returned from the BuildOutSpeech() method (which called the GetRandomFact() method.)
At this point, you’ve got a couple of errors to fix, so let’s address them by defining the speech and reprompt variables up at the top of the MyCityFactsController class, just like this:
public class MyCityFactsController : ApiController
{
String speech = "";
String reprompt = "";
I’m sure you’ve noticed in addition to the top-level response object, there’s also a reprompt object which will contain the secondary message that Alexa will deliver if the user doesn’t respond when prompted.
Update the reprompt object to look like this:
reprompt = new
{
outputSpeech = new
{
type = "PlainText",
text = reprompt
},
shouldEndSession = reprompt.Length > 0 ? false : true
},
One thing you should notice is that both the response and reprompt objects contain a shouldEndSession flag. When reprompting the user, we give them an opportunity to respond by setting this flag to false.
There’s one last thing to do, and that’s to go back to your response object, and update the shouldEndSession flag to look just like the one in the reprompt object:
shouldEndSession = reprompt.Length > 0 ? false : true
This code, and the identical line in the reprompt object, will look to see if the reprompt message actually contains anything, which implies you’ve received a Help Intent request, and then sets the shouldEndSession flag to false (meaning Alexa will wait for a response.)
Wow, we did a lot of stuff, so let’s recap.
You created a Web API project and added a MyCityFactsController.
This controller will accept requests from Alexa and run them through the HandleRequest() method, where they are passed to the Intent Dispatcher to determine the type of intent being invoked.
Then your response message is created and injected into the dynamic JSON message, and finally returned to Alexa.
Fire It Up
In VS2017, go ahead and start your Web API project by clicking the Start button (the green triangle icon) or by hitting F5. The first time you do this, it may take a moment to build and load everything, but eventually you should be staring at a web page with ASP.NET in huge letters at the top.
Click the API link in the black menu bar at the top of the page and you’ll be looking at the ASP.NET Web API Help Page.
Under MyCityFacts you will see the entry for the api/alexa/MyCityFacts POST request. Go ahead and click on that link and you’ll see the Request Information page for the MyCityFacts POST request.
At this point, the code is complete and running, so let’s push it up to Azure for some testing.
Deploying to Azure
In order to publish to Azure, you’ll need an account.
If you don’t have one, you can go to www.azure.com and sign up for one for free, and depending on what promotions they are running at the time, you can usually get the first 12 months free for most of their services.
Once you have an account, you can publish your project directly from VS2017.
In the Solution Explorer, right-click on your project name (NOT the solution name) and select Publish from the context menu, as shown in Figure 6-6.
Figure 6-6: Publishing your Project
In the dialog that follows (Figure 6-7), select the Microsoft Azure App Service icon, and select the Create New radio button before clicking Publish to proceed.
Figure 6-7: Select a Publishing Host
Next you will see the Create App Service dialog (Figure 6-8) where you will:
- Enter your Microsoft account credentials (upper right) if you aren’t already logged in.
Figure 6-8: Create App Service Dialog
- Select API App from the Change Type dropdown.
- Select or Create your resource group and app service plan.
If you just created your Azure account, you’ll need to select your resource group, and create your app service plan. You will want to select a location geographically close to you.
1. Click the Create button.
Make note of the warning message at the bottom of this dialog. Any time you publish a new resource, depending on your plan, there may be a monetary impact. If you just signed up, you shouldn’t have anything to worry about though.
Your App Name and Plan Name will vary a bit from mine, as the number appended is generated from the date and time it’s created.
Once you click the Create button, it can take a few moments. Your project is being built, uploaded to Azure, and then the starting web page is loaded into your default browser.
When the page finishes loading, it should look just like when you ran it in VS2017.
So far, so good? Awesome… let’s keep going and test it out.
Testing
There’s no UI for your controller, but you can get a response by adding /api/alexa/mycityfacts to the end of your Web API Service Address.
You’re going to get an error stating that the requested resource does not support the GET method, which is expected because we only accept POST requests.
Unfortunately, you can’t do a POST call straight from the address bar, so for that we’re going to be using a 3rd party tool called Swagger.
Before you do that, go ahead and grab a copy of the full URL from your address bar (including the /api/alexa/MyCityFacts part.)
Swagger
Swagger is a collection of tools that help you build and test RESTful APIs. You might have heard of Postman, which is a similarly great tool, but I’m going to focus on Swagger. (If you already have Postman, feel free to use that if you prefer.)
We’re going to use the Swagger Inspector (Figure 6-9) to test the controller, so head over to http://inspector.swagger.io to get started. This will allow us to craft a request to send to our controller, and see what gets sent back.
Figure 6-9: The Swagger Inspector
Since the HandleRequest() method is expecting a POST request, make sure the dropdown is set to POST and not GET (the default), otherwise you’ll get the same error message as when you tried to access it via the browser.
Next, paste the URL you copied into Swagger’s address bar (not the browser address bar) and hit the SEND button.
Take a look at the Response box. Click the Pretty button (no, really, that’s what it’s called) if it isn’t already, and you should be looking at a response like this:
{
"version": "1.0",
"response": {
"outputSpeech": {
"type": "PlainText",
"text": "You can ask for a fact by saying, tell me a fact."
},
"card": {
"type": "Simple",
"title": "MyCity Fact",
"content": "You can ask for a fact by saying, tell me a fact."
},
"shouldEndSession": false
},
"reprompt": {
"outputSpeech": {
"type": "PlainText",
"text": "Try it! Just say tell me a fact."
},
"shouldEndSession": false
},
"sessionAttributes": {}
}
This is the desired result when our skill gets a request it doesn’t understand. If you recall, the switch statement shunts anything that doesn’t match an intent into the Help intent. Since we didn’t actually put anything in our request, it was null, and handled accordingly.
To test it further, let’s mock up a simplified request. Click the Body tab on the Request box, paste this in and click the SEND button:
{
"session": {},
"request": {
"type": "IntentRequest",
"intent": {
"name": "AMAZON.HelpIntent",
"slots": {}
}
}
}
You should get the exact same result with AMAZON.HelpIntent as the previous test.
Pretty boring, right? Ok, now try this… in the name field, change the value to each of your other intents and hit the SEND button for each:
AMAZON.StopIntent
AMAZON.CancelIntent
GetMyCityFactIntent
When you get to the last one, click the SEND button a few times and watch your city fact change.
Looks like everything is working as expected, so let’s move on. It’s time to set up your skill in Amazon’s Alexa Dashboard.
There are a couple ways we can approach this next step.
If you worked all the way through Chapter 5, you can opt to just edit your existing skill to point to your Azure service. I’ll cover that first, because it’s super short.
Otherwise, you can skip to the Add a New Skill section and continue from there.
Edit Your Existing Skill
Pull up your existing Alexa skills on the Amazon Developer Console (located at: https://developer.amazon.com/edw/home.html#/skills) and select the skill you wish to edit.
If your skill has been through the certification process and is currently published, you won’t be able to edit it until you click the grey Go to development button at the bottom of the page.
Don’t worry! Clicking the Go to development button on a live skill won’t automatically yank your skill out of production. Even if you make changes and resubmit for certification, the skill will remain live until the new version passes certification and replaces it.
Configuration
Select the Configuration section and update the Endpoint section as follows:
| Service Endpoint Type |
HTTPS |
| Default |
Your Azure Web API URL |
One quick gotcha here: Make sure your URL has HTTPS (not HTTP) at the beginning, or Amazon will give you a very confusing error about the length of your URL and won’t let you proceed.
Test
Since you’ve changed your service, the test tab will become available again, and even though you tested your intents in Swagger, it’s a good idea to test them here as well.
Under the Service Simulator:
| Enter Utterance |
Give Me A Fact |
| Enter Utterance |
Help |
| Enter Utterance |
Stop |
The Service Simulator will display the JSON Request and the corresponding JSON Response from your service. There shouldn’t be any surprises here.
You can also click the Listen button under the Response box to hear Alexa read your response.
Add a New Skill
The next thing you need to do is add a new skill in your Alexa Skills Kit dashboard (located at: http://amzn.to/2qiiCjJ).
I’m not going to walk through every screen step by step again, since I just covered this process in Chapter 5, but I will highlight anything significant.
Skill Information
| Skill Type |
Custom Interaction Model |
| Name |
Azure City Facts |
| Invocation Name |
Azure City Facts |
Invocation Names should be short & easily distinguishable, and Amazon recommends using no more than 3 words, so we’re changing this one up a little to distinguish it from the previous project.
Interaction Model
Add the contents of your IntentSchema.json and SampleUtterances.txt files on this page. They are available in the GitHub repo for this project.
Configuration
| Service Endpoint Type |
HTTPS |
| Default |
Your Azure Web API URL |
Again, make sure your URL has HTTPS (not HTTP) at the beginning, or Amazon will give you a very confusing error about the length of your URL and won’t let you proceed.
SSL Certificate
Here’s something you didn’t have to worry about with AWS. Good news though, you don’t have to worry about it here either, because Azure takes care of it for you.
| Certificate for DEFAULT Endpoint |
OPTION 2: My development endpoint is a sub-domain of a domain that has a wildcard certificate from a trusted certificate authority. |
|
Test
Under the Service Simulator:
| Enter Utterance |
Give Me A Fact |
| Enter Utterance |
Help |
| Enter Utterance |
Stop |
Just like in Chapter 5, the Service Simulator will display the JSON Request and the corresponding JSON Response from your service. We’ve already tested these intents in Swagger, so there shouldn’t be any surprises here.
You can also click the Listen button under the Response box to hear Alexa read your response.
Publishing Information
- don’t really recommend publishing this skill as-is. However, if you have modified the project and put in facts about your own city, then go for it. You might even get some cool Alexa swag, like a hoodie or t-shirt.
- Fields section:
| Category |
Education & Reference |
| Testing Instructions |
none |
| Countries & Region |
In all countries and regions where Amazon distributes skills. |
Description section:
| Short Skill Description |
Facts about MyCity, USA. |
| Full Skill Description |
More info about your skill. |
Example Phrases section:
| Example Phrase 1 |
Alexa Open MyCity Facts |
| Example Phrase 2 |
Alexa Ask MyCity Facts for a Fact |
| Example Phrase 3 |
Alexa Ask MyCity Facts for Help |
You will also need to create and upload small (108x108) and large (512x512) icons for your skill.
Privacy & Compliance
| Does this skill allow users to make purchases or spend real money? |
No |
| Does this Alexa skill collect users’ personal information? |
No |
| Is this skill directed to or does it target children under the age of 13? |
No |
| Export Compliance |
Your choice |
| Does this skill contain advertising? |
No |
Skill Certification
Click the Submit for Certification button. You should receive a response within 12-18 hours.
While your submission is being evaluated, you can’t edit your skill, so if you think you’ve made a mistake, or just wish to withdraw your skill from the certification process, there’s a button for that, otherwise you can click the Back to the List of Skills button.
Device Testing
If you have an Amazon Echo device handy and connected with the same Amazon account you use for development, you can ask her to give you an Azure City Fact even if you didn’t publish the skill.
Try this:
Say “Alexa, open Azure City Facts”
At this point, Alexa will wait for you to say one of the sample utterances you listed for your GetMyCityFactsIntent. If you take too long to respond, Alexa will prompt you again.
Once you respond with an invocation, Alexa will randomly select a fact about MyCity for you and respond accordingly.
That’s it for this chapter! Coming up next is Part III: Home Automation Skills, where we will look at the Smart Home Skill API and design a home automation skill.