Table of Contents for
Learning PHP
 Learning PHP
Published by
O'Reilly Media, Inc., 2016
Learning PHP
Published by
O'Reilly Media, Inc., 2016
- nav
- Cover
- Learning PHP
- Learning PHP
- Dedication
- Preface
- 1. Orientation and First Steps
- 2. Data: Working with Text and Numbers
- 3. Logic: Making Decisions and Repeating Yourself
- 4. Groups of Data: Working with Arrays
- 5. Groups of Logic: Functions and Files
- 6. Data and Logic Together: Working with Objects
- 7. Exchanging Information with Users: Making Web Forms
- 8. Remembering Information: Databases
- 9. Working with Files
- 10. Remembering Users: Cookies and Sessions
- 11. Talking to Other Websites and Services
- 12. Debugging
- 13. Testing: Ensuring Your Program Does the Right Thing
- 14. Software Engineering Practices You Should Be Aware Of
- 15. Handling Dates and Times
- 16. Package Management
- 17. Sending Email
- 18. Frameworks
- 19. Command-Line PHP
- 20. Internationalization and Localization
- A. Installing and Configuring the PHP Engine
- B. Answers to Exercises
- Index
- About the Author
- Colophon
Chapter 10. Remembering Users: Cookies and Sessions
A web server is a lot like a clerk at a busy deli full of pushy customers. The customers at the deli shout requests: “I want a half pound of corned beef!” and “Give me a pound of pastrami, sliced thin!” The clerk scurries around slicing and wrapping to satisfy the requests. Web clients electronically shout requests (“Give me /catalog/yak.php!” or “Here’s a form submission for you!”), and the server, with the PHP engine’s help, electronically scurries around constructing responses to satisfy the requests.
The deli clerk has an advantage that the web server doesn’t, though: a memory. She naturally ties together all the requests that come from a particular customer. The PHP engine and the web server can’t do that without some extra steps. That’s where cookies come in.
A cookie identifies a particular web client to the web server and PHP engine. Each time a web client makes a request, it sends the cookie along with the request. The engine reads the cookie and figures out that a particular request is coming from the same web client that made previous requests, which were accompanied by the same cookie.
If deli customers were faced with a memory-deprived clerk, they’d have to adopt the same strategy. Their requests for service would look like this:
- “I’m customer 56 and I want a half pound of corned beef.”
- “I’m customer 29 and I want three knishes.”
- “I’m customer 56 and I want two pounds of pastrami.”
- “I’m customer 77 and I’m returning this rye bread—it’s stale.”
- “I’m customer 29 and I want a salami.”
The “I’m customer so-and-so” part of the requests is the cookie. It gives the clerk what she needs to be able to link a particular customer’s requests together.
A cookie has a name (such as “customer”) and a value (such as “77” or “ronald”). The following section shows you how to work with individual cookies in your programs: setting them, reading them, and deleting them.
One cookie is best at keeping track of one piece of information. Often, you need to keep track of more about a user (such as the contents of that user’s shopping cart). Using multiple cookies for this is cumbersome. PHP’s session capabilities solve this problem.
A session uses a cookie to distinguish users from one another and makes it easy to keep a temporary pile of data for each user on the server. This data persists across requests. On one request, you can add a variable to a user’s session (such as putting something into the shopping cart). On a subsequent request, you can retrieve what’s in the session (such as on the order checkout page when you need to list everything in the cart). “Activating Sessions” describes how to get started with sessions, and “Storing and Retrieving Information” provides the details on working with sessions.
Working with Cookies
To set a
cookie, use the
setcookie() function. This tells a web client to
remember a cookie name and value and send them back to the server on
subsequent requests. Example 10-1 sets a cookie named
userid to the value ralph.
Example 10-1. Setting a cookie
setcookie('userid','ralph');
To read a previously set cookie from your PHP program, use the
$_COOKIE auto-global
array. Example 10-2 prints the value of the
userid cookie.
Example 10-2. Printing a cookie value
'Hello, '.$_COOKIE['userid'];
The value for a cookie that you provide to setcookie() can be a string or a number. It can’t be
an array or more complicated data structure.
Tip
The setcookie() function URL-encodes the cookie value before sending it to the web client. This means that a space is turned into a +, and everything else other than letters, digits, underscores, hyphens, and periods is turned into a percent sign followed by its ASCII value in hexadecimal. If you don’t want PHP to monkey with your cookie value, use setrawcookie() instead of setcookie(). However, with setrawcookie(), your cookie value cannot contain =, ,, ;, or any whitespace.
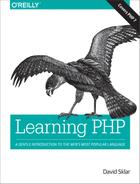
When you call setcookie(), the response that the
PHP engine generates to send back to the web client includes a
special header that tells the web client about the new cookie. On
subsequent requests, the web client sends that cookie name and value
back to the server. This two-step conversation is illustrated in
Figure 10-1.
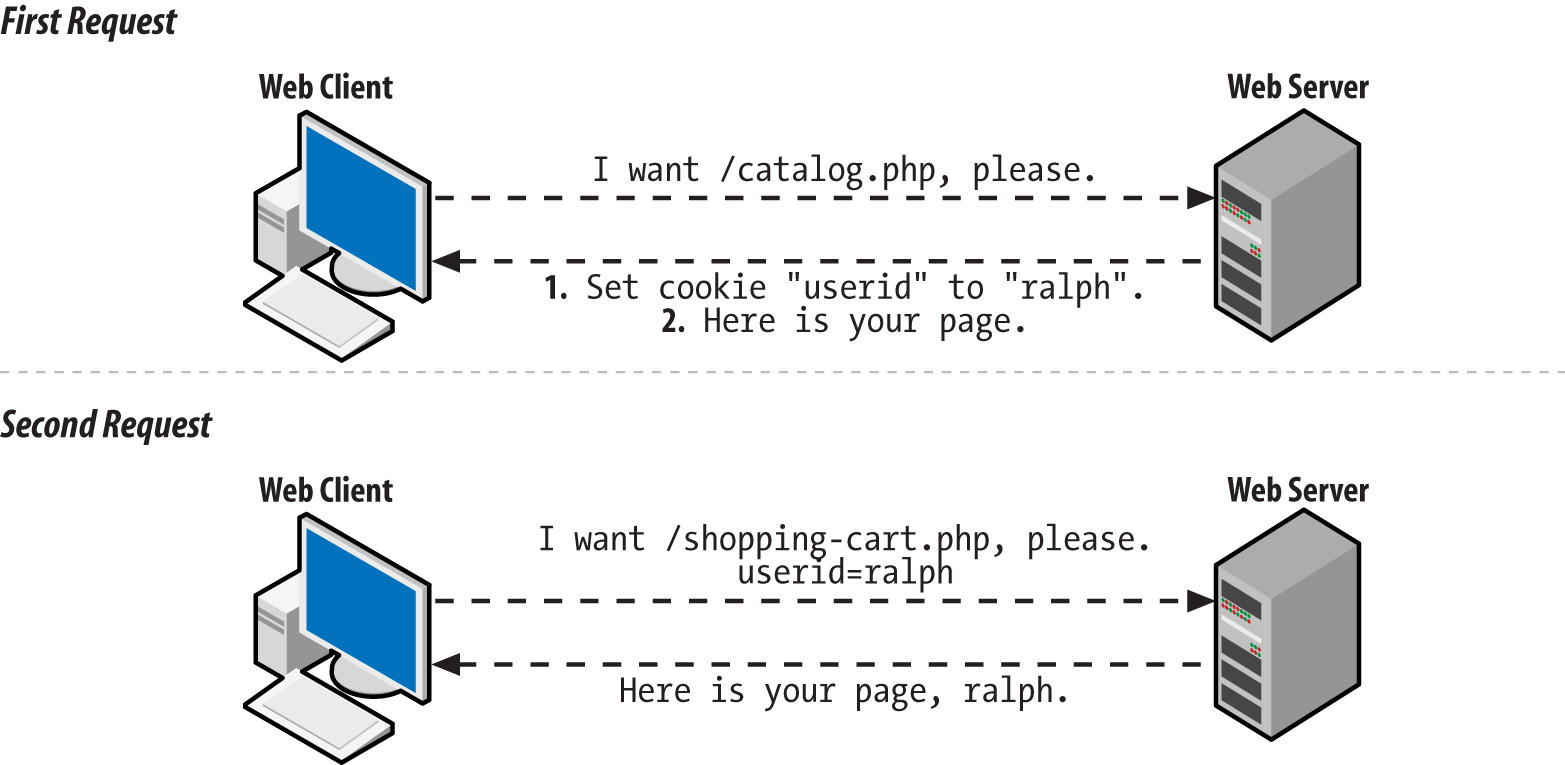
Figure 10-1. Client and server communication when setting a cookie
Usually, you must call setcookie() before the
page generates any output. This means that setcookie() must come before any print statements.
It also means that there can’t be any text before
the <?php start tag in the page that comes
before the setcookie() function. Later in this
chapter, “Why setcookie() and session_start() Want to Be at the Top of the Page” explains why
this requirement exists, and how, in some cases, you can get around
it.
Example 10-3 shows
the correct way to put a
setcookie() call at the top of your page.
Example 10-3. Starting a page with setcookie()
<?phpsetcookie('userid','ralph');?><html><head><title>Page with cookies</title><head><body>This page sets a cookie properly, because the PHP blockwith setcookie() in it comes before all of the HTML.</body></html>
Cookies show up in $_COOKIE only when the web
client sends them along with the request. This means that a name and
value do not appear in $_COOKIE immediately after
you call setcookie(). Only after that
cookie-setting response is digested by the web client does the client
know about the cookie. And only after the client sends the cookie
back on a subsequent request does it appear in
$_COOKIE.
The default lifetime for a
cookie
is the lifetime of the web
client. When you quit Safari or Firefox, the cookie is
deleted. To make a cookie live longer (or expire sooner), use the third
argument to
setcookie(). This is an optional cookie expiration time. Example 10-4 shows some cookies with different expiration
times.
Example 10-4. Setting cookie expiration
// The cookie expires one hour from nowsetcookie('short-userid','ralph',time()+60*60);// The cookie expires one day from nowsetcookie('longer-userid','ralph',time()+60*60*24);// The cookie expires at noon on October 1, 2019$d=newDateTime("2019-10-01 12:00:00");setcookie('much-longer-userid','ralph',$d->format('U'));
The cookie expiration time needs to be given to setcookie() expressed as the number of seconds elapsed since midnight
on January 1, 1970. Two things make coming up with appropriate expiration values easier: time() and the U format character of DateTime::format().1 The time() function returns the current number of
elapsed seconds since January 1, 1970 (the Unix “epoch”). So, if you want the cookie
expiration time to be a certain number of seconds from now, add that
value to what time() returns. There are 60
seconds in a minute and 60 minutes in an hour, so 60*60 is the number
of seconds in an hour. That makes time() + 60*60
equal to the “elapsed seconds”
value for an hour from now. Similarly, 60*60*24 is the number of
seconds in a day, so time() + 60*60*24 is the
“elapsed seconds” value for a day
from now.
The U format character of DateTime::format() tells you the “elapsed seconds” value for the point in time represented by a DateTime object.
Setting a cookie with a specific expiration time makes the cookie last even if the web client exits and restarts.
Aside from expiration time, there are a few other cookie parameters that are helpful to adjust: the path, the domain, and two security-related parameters.
Normally, cookies are only sent back with requests for pages in the
same directory (or below) as the page that set the cookie. A cookie
set by http://www.example.com/buy.php is sent
back with all requests to the server www.example.com, because
buy.php is in the top-level directory of the web
server. A cookie set by
http://www.example.com/catalog/list.php is sent
back with other requests in the catalog directory,
such as http://www.example.com/catalog/search.php. It
is also sent back with requests for pages in subdirectories of
catalog, such as
http://www.example.com/catalog/detailed/search.php.
But it is not sent back with requests for pages above or outside the
catalog directory, such as
http://www.example.com/sell.php or
http://www.example.com/users/profile.php.
The
part of the URL after the hostname (such
as /buy.php,
/catalog/list.php, or
/users/profile.php) is called the
path. To tell the web client to match against a
different path when determining whether to send a cookie to the
server, provide that path as the fourth argument to
setcookie(). The most flexible path to provide is
/, which means “send this cookie
back with all requests to the server.” Example 10-5 sets a cookie with the path set to
/.
Example 10-5. Setting the cookie path
setcookie('short-userid','ralph',0,'/');
In Example 10-5, the
expiration time argument
to setcookie() is 0. This tells the setcookie() method to use
the default expiration time (when the web client exits) for the
cookie. When you specify a path to setcookie(),
you have to fill in something for the expiration time argument. It
can be a specific time value (such as time() +
60*60), or it can be 0 to use the default expiration time.
Setting the path to something other than / is a
good idea if you are on a shared server and all of your pages are
under a specific directory. For example, if your web space is under
http://students.example.edu/~alice/, then you
should set the cookie path to /~alice/, as shown
in Example 10-6.
Example 10-6. Setting the cookie path to a specific directory
setcookie('short-userid','ralph',0,'/~alice/');
With a cookie path of /~alice/, the
short-userid cookie is sent with a request to
http://students.example.edu/~alice/search.php,
but not with requests to other students’ web pages
such as
http://students.example.edu/~bob/sneaky.php or
http://students.example.edu/~charlie/search.php.
The next argument that affects which requests the web client decides
to send a particular cookie with is the domain. The default behavior
is to send cookies only with requests to the same host that set the
cookie. If http://www.example.com/login.php set
a cookie, then that cookie is sent back with other requests to the server
www.example.com—but not with requests to
shop.example.com,
www.yahoo.com, or
www.example.org.
You can alter this behavior slightly. A
fifth argument to setcookie() tells the web client to send
the cookie with requests that have a hostname whose end matches the
argument. The most common use of this feature is to set the cookie
domain to something like .example.com (the period
at the beginning is important for older web clients). This tells the web client that the
cookie should accompany future requests to www.example.com,
shop.example.com, testing.development.example.com, and any other
server name that ends in .example.com. Example 10-7 shows how to set a cookie like this.
Example 10-7. Setting the cookie domain
setcookie('short-userid','ralph',0,'/','.example.com');
The cookie in Example 10-7 expires when the web
client exits and is sent with requests in any directory (because the
path is /) on any server whose name ends with
.example.com.
The path that you provide to setcookie() must
match the end of the name of your server. If your PHP programs are
hosted on the server students.example.edu, you
can’t supply .yahoo.com as a
cookie path and have the cookie you set sent back to all servers in
the yahoo.com domain. You can, however, specify
.example.edu as a cookie domain to have your
cookie sent with all requests to any server in the
example.edu domain.
The last two optional arguments to setcookie() affect a cookie’s security settings. A value of true for the sixth argument to setcookie() tells a web client to only return the cookie over a secure connection—one where the URL begins with https. It is still your responsibility to make sure to only call setcookie() like this when the request to the page executing setcookie() is done over a secure connection. But this instructs the client not to send the cookie back over a subsequent request to an insecure URL.
Finally, a value of true for the seventh argument to setcookie() tells the web client that this cookie is an HttpOnly cookie. An HttpOnly cookie gets sent back and forth between client and server as usual, but it is not accessible by client-side JavaScript. This can provide some protection from cross-site scripting attacks (described in “HTML and JavaScript”). Example 10-8 shows a cookie that expires in 24 hours, has no path or domain restrictions, should only be sent back over a secure connection, and is not available to client-side JavaScript.
To delete a cookie, call setcookie()
with the name of the cookie you want to delete and the empty string
as the cookie value, as shown in Example 10-9.
Example 10-9. Deleting a cookie
setcookie('short-userid','');
If you’ve set a cookie with nondefault values for an expiration time, path, or domain, you must provide those same values again when you delete the cookie in order for the cookie to be deleted properly.
Most of the time, cookies you set will be fine with the default values for expiration time, path, or domain. But understanding how these values can be changed helps you understand how PHP’s session behavior can be customized.
Activating Sessions
Sessions, by default, use a cookie called PHPSESSID. When you start a session on a page, the
PHP engine checks for the presence of this cookie and sets it if
it doesn’t exist. The value of the
PHPSESSID cookie is a random alphanumeric string.
Each web client gets a different session ID. The session ID in the
PHPSESSID cookie identifies that web client
uniquely to the server. That lets the engine maintain separate
piles of data for each web client.
The conversation between the web client and the server when starting up a session is illustrated in Figure 10-2.
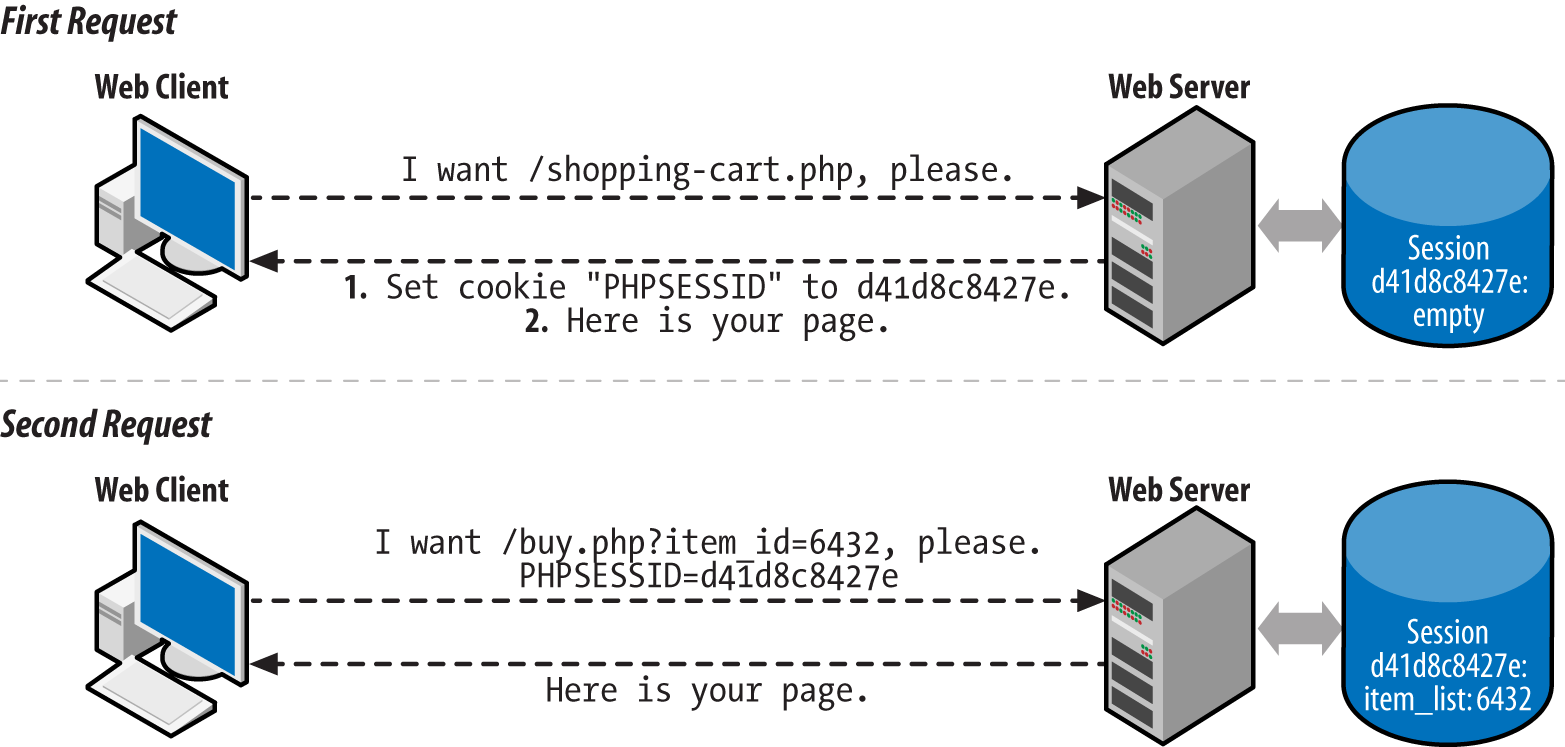
Figure 10-2. Client and server communication when starting a session
To use a session in a page, call
session_start() at the beginning of your script. Like setcookie(), this function must be called before any output is sent.
If you want to use sessions in all your pages, set the configuration
directive session.auto_start
to On. Appendix A explains
how to change configuration settings. Once you do that,
there’s no need to call session_start() in each page.
Storing and Retrieving Information
Session data is stored in the
$_SESSION auto-global
array. Read and change elements of that array to manipulate the
session data. Example 10-10 shows a page counter that
uses the $_SESSION array to keep track of how many
times a user has looked at the page.
Example 10-10. Counting page accesses with a session
session_start();if(isset($_SESSION['count'])){$_SESSION['count']=$_SESSION['count']+1;}else{$_SESSION['count']=1;}"You've looked at this page ".$_SESSION['count'].' times.';
The first time a user accesses the page in Example 10-10, no
PHPSESSID cookie is sent by the
user’s web client to the server. The
session_start() function creates a new session
for the user and sends a PHPSESSID cookie with the
new session ID in it. When the session is created, the
$_SESSION array starts out empty. So, the code checks for a count key in the $_SESSION array. If
it’s there, then the value is incremented. If not, it’s set to 1 to
mark the first visit. The
print statement outputs:
You've looked at this page 1 times.
At the end of the request, the information in
$_SESSION is saved into a file on the web server
associated with the appropriate session ID.
The next time the user accesses the page, the web client sends the
PHPSESSID cookie. The session_start() function sees the session ID in the cookie and loads the
file that contains the saved session information associated with that
session ID. In this case, that saved information just says that
$_SESSION['count'] is 1. Next,
$_SESSION['count'] is incremented to 2 and
You've looked at this page 2 times. is printed.
Again, at the end of the request, the contents of
$_SESSION (now with
$_SESSION['count'] equal to 2) are saved to a
file.
The PHP engine keeps track of the contents of
$_SESSION separately for each session ID. When
your program is running, $_SESSION contains the
saved data for one session only—the active session
corresponding to the ID that was sent in the
PHPSESSID cookie. Each user’s
PHPSESSID cookie has a different value.
As long as you call session_start() at the top of
a page (or if session.auto_start is On), you have
access to a user’s session data in your page. The
$_SESSION array is a way of sharing information
between pages.
Example 10-11 is a complete program that displays a
form in which a user picks a dish and a quantity. That dish and
quantity are added to the
session variable order.
Example 10-11. Saving form data in a session
require'FormHelper.php';session_start();$main_dishes=array('cuke'=>'Braised Sea Cucumber','stomach'=>"Sauteed Pig's Stomach",'tripe'=>'Sauteed Tripe with Wine Sauce','taro'=>'Stewed Pork with Taro','giblets'=>'Baked Giblets with Salt','abalone'=>'Abalone with Marrow and Duck Feet');if($_SERVER['REQUEST_METHOD']=='POST'){list($errors,$input)=validate_form();if($errors){show_form($errors);}else{process_form($input);}}else{show_form();}functionshow_form($errors=array()){// No defaults of our own, so nothing to pass to the// FormHelper constructor$form=newFormHelper();// Build up the error HTML to use laterif($errors){$errorHtml='<ul><li>';$errorHtml.=implode('</li><li>',$errors);$errorHtml.='</li></ul>';}else{$errorHtml='';}// This form is small, so we'll just print out its components// here<<<_FORM_<form method="POST" action="{$form->encode($_SERVER['PHP_SELF'])}">$errorHtmlDish: {$form->select($GLOBALS['main_dishes'],['name' => 'dish'])} <br/>Quantity: {$form->input('text',['name' => 'quantity'])} <br/>{$form->input('submit',['value' => 'Order'])}</form>_FORM_;}functionvalidate_form(){$input=array();$errors=array();// The dish selected in the menu must be valid$input['dish']=$_POST['dish']??'';if(!array_key_exists($input['dish'],$GLOBALS['main_dishes'])){$errors[]='Please select a valid dish.';}$input['quantity']=filter_input(INPUT_POST,'quantity',FILTER_VALIDATE_INT,array('options'=>array('min_range'=>1)));if(($input['quantity']===false)||($input['quantity']===null)){$errors[]='Please enter a quantity.';}returnarray($errors,$input);}functionprocess_form($input){$_SESSION['order'][]=array('dish'=>$input['dish'],'quantity'=>$input['quantity']);'Thank you for your order.';}
The form-handling code in Example 10-11 is mostly
familiar. As in Examples 8-28 and 8-53, the form-element-printing helper class is loaded from the FormHelper.php file. The
show_form(),
validate_form(), and
process_form() functions display, validate, and process the form data.
Where Example 10-11 takes advantage of sessions,
however, is in process_form(). Each time the form
is submitted with valid data, an element is added to the
$_SESSION['order'] array. Session data
isn’t restricted to strings and numbers, like cookies. You can treat $_SESSION like any
other array. The syntax $_SESSION['order'][ ] says, “Treat $_SESSION['order'] as an
array and add a new element onto its end.” In this
case, what’s being added to the end of
$_SESSION['order'] is a two-element array
containing information about the dish and quantity that were
submitted in the form.
The program in Example 10-12 prints a list of dishes that have been ordered by accessing the information that’s been stored in the session by Example 10-11.
Example 10-12. Printing session data
session_start();$main_dishes=array('cuke'=>'Braised Sea Cucumber','stomach'=>"Sauteed Pig's Stomach",'tripe'=>'Sauteed Tripe with Wine Sauce','taro'=>'Stewed Pork with Taro','giblets'=>'Baked Giblets with Salt','abalone'=>'Abalone with Marrow and Duck Feet');if(isset($_SESSION['order'])&&(count($_SESSION['order'])>0)){'<ul>';foreach($_SESSION['order']as$order){$dish_name=$main_dishes[$order['dish']];"<li>$order[quantity]of$dish_name</li>";}"</ul>";}else{"You haven't ordered anything.";}
Example 10-12 has access to the data stored in the
session by Example 10-11. It treats
$_SESSION['order'] as an array: if there are
elements in the array (because count() returns
a positive number), then it iterates through the array with
foreach() and prints out a list element for each
dish that has been ordered.
Configuring Sessions
Sessions work just fine with no additional tweaking. Turn them on with
the session_start() function or the
session.auto_start configuration directive, and
the $_SESSION array is there for your enjoyment.
However, if you’re more particular about how you
want sessions to function, there are a few helpful settings that can
be changed.
Session data sticks around as long as the session is accessed at least once every 24 minutes. This is fine for most applications. Sessions aren’t meant to be a permanent data store for user information—that’s what the database is for. Sessions are for keeping track of recent user activity to make the browsing experience smoother.
Some situations may need a shorter session length, however. If you’re developing a financial application, you may want to allow only 5 or 10 minutes of idle time to reduce the chance that an unattended computer can be used by an unauthorized person. Conversely, if your application doesn’t work with critical data and you have easily distracted users, you may want to set the session length to longer than 24 minutes.
The session.gc_maxlifetime
configuration directive
controls how much idle time
is allowed between requests to keep a session active.
Its default value is 1440—there are 1,440
seconds in 24 minutes. You can change
session.gc_maxlifetime in your server
configuration or by calling the
ini_set()
function from your program. If you use ini_set(),
you must call it before session_start(). Example 10-13 shows how to use ini_set()
to change the allowable session idle time to 10 minutes.
Example 10-13. Changing the allowable session idle time
ini_set('session.gc_maxlifetime',600);// 600 seconds == 10 minutessession_start();
Expired sessions don’t actually get wiped out
instantly after 24 minutes elapse. Here’s how it
really works: at the beginning of any request that uses sessions
(because the page calls session_start(), or
session.auto_start is On), there is a 1% chance
that the PHP engine scans through all of the sessions on the
server and deletes any that are expired. “A 1%
chance” sounds awfully unpredictable for a computer
program. It is. But that randomness makes things more efficient. On a
busy site, searching for expired sessions to destroy at the beginning
of every request would consume too much server power.
You’re not stuck with that 1% chance if
you’d like expired sessions to be removed more
promptly. The session.gc_probability
configuration directive controls the percent chance that the
“erase old sessions” routine runs
at the start of a request. To have that happen on every request, set
it to 100. Like with session.gc_maxlifetime, if
you use ini_set() to change the value of
session.gc_probability, you need to do it before
session_start(). Example 10-14
demonstrates how to change session.gc_probability with
ini_set().
Example 10-14. Changing the expired session cleanup probability
ini_set('session.gc_probability',100);// 100% : clean up on every requestsession_start();
If you are activating sessions with the
session.auto_start
configuration directive and you want to change the value of session.gc_maxlifetime or session.gc_probability, you can’t
use ini_set() to change those values—you
have to do it in your server configuration.
The cookie used to store a user’s session ID can have its properties adjusted via configuration parameters as well. The properties you can adjust mirror the tweaks you can make to a regular cookie via the different arguments to setcookie() (except for the cookie value, of course). Table 10-1 describes the different cookie configuration parameters.
| Configuration parameter | Default value | Description |
|---|---|---|
session.name | PHPSESSID | Name of the cookie. Letters and numbers only, with at least one letter. |
session.cookie_lifetime | 0 | Seconds-since-1970 timestamp when the cookie should expire. 0 means “when the browser exits.” |
session.cookie_path | / | URL path prefix that must match for the cookie to be sent. |
session.cookie_domain | None | Domain suffix that must match for the cookie to be sent. No value means the cookie is sent back only to the full hostname that sent it. |
session.cookie_secure | Off | Set to On to have the cookie only sent back with HTTPS URLs. |
session.cookie_httponly | Off | Set to On to tell browsers to prevent JavaScript from reading the cookie. |
Login and User Identification
A session establishes an anonymous relationship with a particular user. Requiring users to log in to your website lets them tell you who they are. The login process typically requires users to provide you with two pieces of information: one that identifies them (a username or an email address) and one that proves that they are who they say they are (a secret password).
Once a user is logged in, he can access private data, submit message board posts with his name attached, or do anything else that the general public isn’t allowed to do.
Adding user login on top of sessions has five parts:
- Displaying a form asking for a username and password
- Checking the form submission
- Adding the username to the session (if the submitted password is correct)
- Looking for the username in the session to do user-specific tasks
- Removing the username from the session when the user logs out
The first three steps are handled in the context of regular form
processing. The validate_form()
function gets the responsibility of checking to make sure that the
supplied username and password are acceptable. The process_form()
function adds the username to the session. Example 10-15 displays a login form and adds the username to
the session if the login is successful.
Example 10-15. Displaying a login form
require'FormHelper.php';session_start();if($_SERVER['REQUEST_METHOD']=='POST'){list($errors,$input)=validate_form();if($errors){show_form($errors);}else{process_form($input);}}else{show_form();}functionshow_form($errors=array()){// No defaults of our own, so nothing to pass to the// FormHelper constructor$form=newFormHelper();// Build up the error HTML to use laterif($errors){$errorHtml='<ul><li>';$errorHtml.=implode('</li><li>',$errors);$errorHtml.='</li></ul>';}else{$errorHtml='';}// This form is small, so we'll just print out its components// here<<<_FORM_<form method="POST" action="{$form->encode($_SERVER['PHP_SELF'])}">$errorHtmlUsername: {$form->input('text', ['name' => 'username'])} <br/>Password: {$form->input('password', ['name' => 'password'])} <br/>{$form->input('submit', ['value' => 'Log In'])}</form>_FORM_;}functionvalidate_form(){$input=array();$errors=array();// Some sample usernames and passwords$users=array('alice'=>'dog123','bob'=>'my^pwd','charlie'=>'**fun**');// Make sure username is valid$input['username']=$_POST['username']??'';if(!array_key_exists($input['username'],$users)){$errors[]='Please enter a valid username and password.';}// The else clause means we avoid checking the password if an invalid// username is enteredelse{// See if password is correct$saved_password=$users[$input['username']];$submitted_password=$_POST['password']??'';if($saved_password!=$submitted_password){$errors[]='Please enter a valid username and password.';}}returnarray($errors,$input);}functionprocess_form($input){// Add the username to the session$_SESSION['username']=$input['username'];"Welcome,$_SESSION[username]";}?>
Figure 10-3 shows the form that Example 10-15 displays, Figure 10-4 shows what happens when an incorrect password is entered, and Figure 10-5 shows what happens when a correct password is entered.
Figure 10-3. Login form
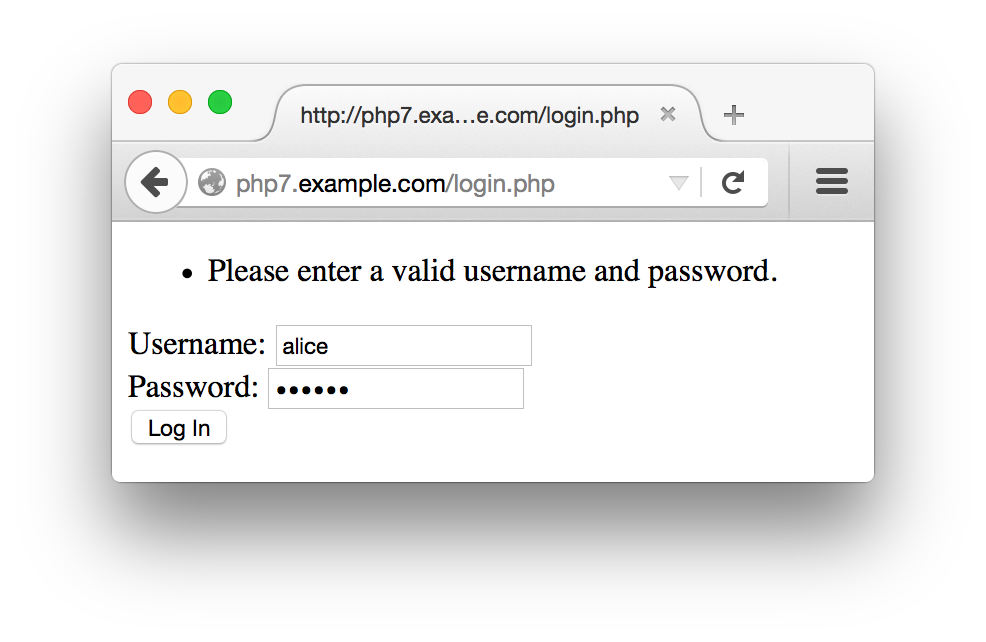
Figure 10-4. Unsuccessful login
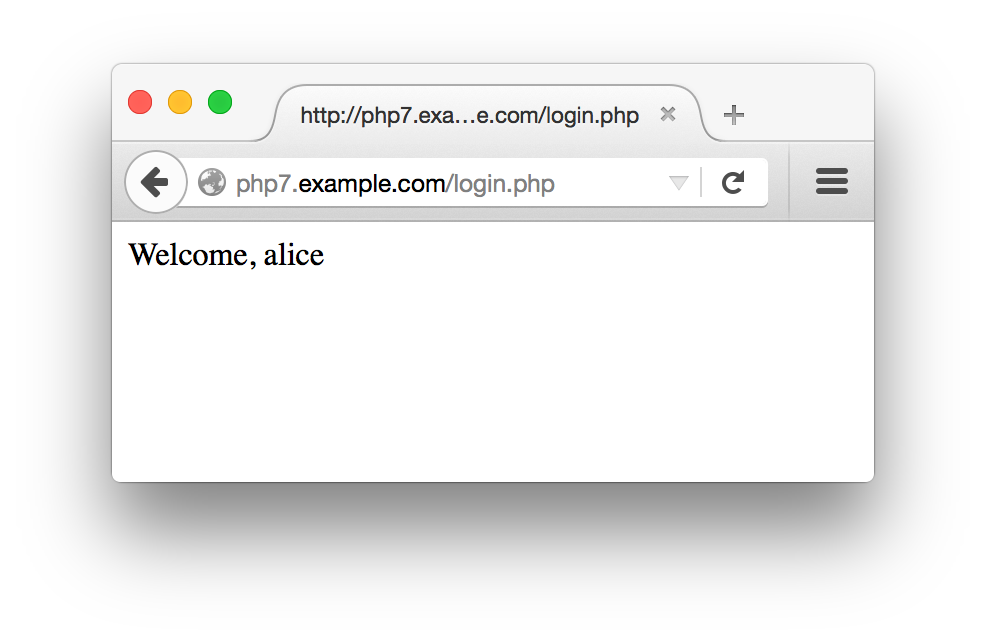
Figure 10-5. Successful login
In Example 10-15, validate_form()
checks two things: whether a valid username is entered and whether
the correct password was supplied for that username. Note that the
same error message is added to the $errors array in
either case. If you use different error messages for a missing
username (such as “Username not found”) and bad passwords (such as
“Password doesn’t match”), you provide helpful information for someone
trying to guess a valid username and password. Once this attacker
stumbles on a valid username, she sees the “Password doesn’t match”
error message instead of the “Username not found” message. She then
knows that she’s working with a real username and has to guess the
password only. When the error messages are the same in both cases, all
the attacker knows is that something about the username/password
combination she tried is not correct.
If the username is valid and the right password is submitted,
validate_form() returns no errors. When this
happens, tge process_form() function is called. This function adds the submitted
username ($input['username']) to the session and
prints out a welcome message for the user. This makes the username
available in the session for other pages to use. Example 10-16 demonstrates how to check for a username in
the session in another page.
Example 10-16. Doing something special for a logged-in user
<?phpsession_start();if(array_key_exists('username',$_SESSION)){"Hello,$_SESSION[username].";}else{'Howdy, stranger.';}?>
The only way a username element can be added to
the $_SESSION array is by your program. So if
it’s there, you know that a user has logged in
successfully.
The validate_form() function in Example 10-15 uses a sample array of usernames and passwords called $users.
Storing passwords without hashing them is a bad
idea. If the list of unhashed passwords is compromised, then an
attacker can log in as any user. Storing hashed passwords prevents
an attacker from getting the actual passwords even if she gets the
list of hashed passwords, because there’s no way
to go from the hashed password back to the plain password
she’d have to enter to log in. Operating systems
that require you to log in with a password use this same technique.
A better validate_form() function is shown in
Example 10-17. The $users array in this version of the function contains passwords that have been hashed with
PHP’s password_hash() function. Because the passwords are stored as hashed strings, they can’t be compared directly with the plain password that the user enters. Instead, the submitted password in $input['password'] is checked by the password_verify() function. This function uses the information in the saved hashed password to produce a hash of the submitted password in the same way. If the two hashes match, then the user has submitted the correct password and password_verify() returns true.
Example 10-17. Using hashed passwords
functionvalidate_form(){$input=array();$errors=array();// Sample users with hashed passwords$users=array('alice'=>'$2y$10$N47IXmT8C.sKUFXs1EBS9uJRuVV8bWxwqubcvNqYP9vcFmlSWEAbq','bob'=>'$2y$10$qCczYRc7S0llVRESMqUkGeWQT4V4OQ2qkSyhnxO0c.fk.LulKwUwW','charlie'=>'$2y$10$nKfkdviOBONrzZkRq5pAgOCbaTFiFI6O2xFka9yzXpEBRAXMW5mYi');// Make sure username is validif(!array_key_exists($_POST['username'],$users)){$errors[]='Please enter a valid username and password.';}else{// See if password is correct$saved_password=$users[$input['username']];$submitted_password=$_POST['password']??'';if(!password_verify($submitted_password,$saved_password)){$errors[]='Please enter a valid username and password.';}}returnarray($errors,$input);}
Using password_hash() and password_verify() ensures that the passwords are hashed in a sufficiently secure manner and gives you the ability to strengthen that hash in the future if necessary. If you’re interested in more details about how they work, read the password_hash and password_verify pages in the online PHP Manual, or see Recipe
18.7 of PHP Cookbook, by David Sklar and Adam
Trachtenberg (O’Reilly).
Caution
The password_hash()and password_verify() functions are available in PHP 5.5.0 and later. If you’re using an earlier version of PHP, use the password_compat library, which provides versions of these functions.
Putting an array of users and passwords inside
validate_form()
makes these examples self-contained. However, more typically, your
usernames and passwords are stored in a database table. Example 10-18 is a version of validate_form() that retrieves the
username and hashed
password from a database. It
assumes that a database connection has already been set up outside
the function and is available in the global variable
$db.
Example 10-18. Retrieving a username and password from a database
functionvalidate_form(){global$db;$input=array();$errors=array();// This gets set to true only if the submitted password matches$password_ok=false;$input['username']=$_POST['username']??'';$submitted_password=$_POST['password']??'';$stmt=$db->prepare('SELECT password FROM users WHERE username = ?');$stmt->execute($input['username']);$row=$stmt->fetch();// If there's no row, then the username didn't match any rowsif($row){$password_ok=password_verify($submitted_password,$row[0]);}if(!$password_ok){$errors[]='Please enter a valid username and password.';}returnarray($errors,$input);}
The query that
prepare() and execute() send to the database returns the hashed password for the user identified in $input['username']. If the username supplied doesn’t match any rows in the database, then
$row is false. If a row is returned, then password_verify() checks the submitted password against the hashed password retrieved from the database. Only if there is a row returned and the row contains a correct hashed password does $password_ok get set to true. Otherwise, an error message is added to the $errors array.
Just like with any other array, use unset() to remove a key and value from $_SESSION. This is how to log out a user. Example 10-19 shows a logout page.
Example 10-19. Logging out
session_start();unset($_SESSION['username']);'Bye-bye.';
When the $_SESSION array is saved at the end of the request
that calls unset(), the
username element isn’t included
in the saved data. The next time that session’s data
is loaded into $_SESSION, there is no
username element, and the user is once again anonymous.
Why setcookie() and session_start() Want to Be at the Top of the Page
When a
web server sends a response
to a web client, most of that response is the HTML document that the
browser renders into a web page on your screen: the soup of tags and
text that Safari or Firefox formats into tables or changes
the color or size of. But before that HTML is a section of the
response that contains headers. These
don’t get displayed on your screen but are commands
or information from the server for the web client. The headers say
things such as “this page was generated at
such-and-such a time,” “please
don’t cache this page,” or the
one that’s relevant here, “please
remember that the cookie named userid has the
value ralph.”
All of the headers in the response from the web server to the web client have to be at the beginning of the response, before the response body, which is the HTML that controls what the browser actually displays. Once some of the body is sent—even one line—no more headers can be sent.
Functions such as setcookie() and
session_start() add headers to the response. In
order for the added headers to be sent properly, they must be added
before any output starts. That’s why they must be
called before any print statements or any HTML
appearing outside <?php ?> PHP tags.
If any output has been sent before
setcookie() or session_start() is called, the PHP engine prints an error message
that looks like this:
Warning: Cannot modify header information - headers already sent by
(output started at /www/htdocs/catalog.php:2)
in /www/htdocs/catalog.php on line 4
This means that line 4 of catalog.php called a function that sends a header, but something was already printed by line 2 of catalog.php.
If you see the “headers already
sent” error message, scrutinize your code for errant
output. Make sure there are no print statements before you call
setcookie() or session_start(). Check that there is nothing before the first
<?php start tag in the page. Also, check
that there is nothing outside the <?php and
?> tags in any included or required
files—even blank lines.
An alternative to hunting down mischievous blank lines in your files
is to use output buffering. This tells the
PHP engine to wait to send
any output until it’s finished
processing the whole request. Then, it sends any headers that have
been set, followed by all the regular output. To enable output
buffering, set the output_buffering
configuration directive to On in your server
configuration. Web clients will have to wait a few additional milliseconds
to get the page content from your server, but you’ll save megaseconds
by not having to fix your code to have all output happen after calls to
setcookie() or session_start().
With output buffering turned on, you can mix print
statements, cookie and session functions, HTML outside of
<?php and ?> tags, and
regular PHP code without getting the “headers
already sent” error. The program in Example 10-20 works only when output buffering is turned on.
Without it, the HTML printed before the <?php
start tag triggers the sending of headers, which prevents
setcookie() from working properly.
Example 10-20. A program that needs output buffering to work
<html><head>ChooseYourSiteVersion</head><body><?phpsetcookie('seen_intro',1);?><a href="/basic.php">Basic</a>or<a href="/advanced.php">Advanced</a></body></html>
Chapter Summary
This chapter covered:
- Understanding why cookies are necessary to identify a particular web browser to a web server
- Setting a cookie in a PHP program
- Reading a cookie value in a PHP program
- Modifying cookie parameters such as expiration time, path, and domain
- Deleting a cookie in a PHP program
- Turning on sessions from a PHP program or in the PHP engine configuration
- Storing information in a session
- Reading information from a session
- Saving form data in a session
- Removing information from a session
- Configuring session expiration and cleanup
- Displaying, validating, and processing a validation form
- Using hashed passwords
-
Understanding why
setcookie()andsession_start()must be called before anything is printed
Exercises
- Make a web page that uses a cookie to keep track of how many times a user has viewed the page. The first time a particular user looks at the page, it should print something like “Number of views: 1.” The second time the user looks at the page, it should print “Number of views: 2,” and so on.
- Modify the web page from the first exercise so that it prints out a special message on the 5th, 10th, and 15th times the user looks at the page. Also modify it so that on the 20th time the user looks at the page, it deletes the cookie and the page count starts over.
-
Write a PHP program that displays a form for a user to pick his
favorite color from a list of colors. Make another page whose
background color is set to the color that the user picks in the form.
Store the color value in
$_SESSIONso that both pages can access it. - Write a PHP program that displays an order form. The order form should list six products. Next to each product name there should be a text box into which a user can enter how many of that product she wants to order. When the form is submitted, the submitted form data should be saved into the session. Make another page that displays the contents of the saved order, a link back to the order form page, and a Check Out button. If the link back to the order form page is clicked, the order form page should be displayed with the saved order quantities from the session in the text boxes. When the Check Out button is clicked, the order should be cleared from the session.
1 Chapter 15 has more detail about time() and DateTime.