Table of Contents for
Learning PHP
 Learning PHP
Published by
O'Reilly Media, Inc., 2016
Learning PHP
Published by
O'Reilly Media, Inc., 2016
- nav
- Cover
- Learning PHP
- Learning PHP
- Dedication
- Preface
- 1. Orientation and First Steps
- 2. Data: Working with Text and Numbers
- 3. Logic: Making Decisions and Repeating Yourself
- 4. Groups of Data: Working with Arrays
- 5. Groups of Logic: Functions and Files
- 6. Data and Logic Together: Working with Objects
- 7. Exchanging Information with Users: Making Web Forms
- 8. Remembering Information: Databases
- 9. Working with Files
- 10. Remembering Users: Cookies and Sessions
- 11. Talking to Other Websites and Services
- 12. Debugging
- 13. Testing: Ensuring Your Program Does the Right Thing
- 14. Software Engineering Practices You Should Be Aware Of
- 15. Handling Dates and Times
- 16. Package Management
- 17. Sending Email
- 18. Frameworks
- 19. Command-Line PHP
- 20. Internationalization and Localization
- A. Installing and Configuring the PHP Engine
- B. Answers to Exercises
- Index
- About the Author
- Colophon
Appendix A. Installing and Configuring the PHP Engine
If you want to write some PHP programs, you need a PHP engine to turn them from punctuation-studded text files into actual interactive web pages. The easiest way to get up and running with PHP is to sign up with a cheap or free web-hosting provider that offers PHP—but you can run the PHP engine on your own computer, too.
Using PHP with a Web-Hosting Provider
If you already have an account with a web-hosting provider, you probably have access to a PHP-enabled server. These days, it is the odd web-hosting provider that doesn’t have PHP support. Usually, hosting providers configure their servers so that files whose names end in .php are treated as PHP programs. To see whether your hosted website supports PHP, first save the file in Example A-1 on your server as phptest.php.
Example A-1. PHP test program
<?php"PHP enabled";?>
Load the file in your browser by visiting the URL for your site
(e.g., http://www.example.com/phptest.php). If
you see just the message PHP enabled, then your
website host supports PHP. If you see the entire contents of the
page (<?php print "PHP
enabled"; ?>), then your
hosting provider probably doesn’t support PHP. Check
with them, however, to make sure that they haven’t
turned on PHP for a different file extension or made some other
nonstandard configuration choice.
Installing the PHP Engine
Installing the PHP engine on your own computer is a good idea if you don’t have an account with a hosting provider, or you just want to experiment with PHP without exposing your programs to the entire Internet. If you’re not using a hosting provider and want to install the PHP engine on your own computer, follow the instructions in this section. After you’ve installed the engine, you’ll be able to run your own PHP programs.
Installing the PHP engine is a matter of downloading some files and putting them in the right places on your computer. You may also need to configure your web server so that it knows about PHP. This section contains instructions on how to do this for computers running Linux and OS X, and also includes some references for how to install PHP on Windows. If you get stuck, check out the php.net installation FAQ.
Installing on OS X
OS X comes with PHP 5.5 installed. However, to install a newer version of PHP and be able to easily manage add-ons and extensions, you’ll want to install your own PHP engine using the Homebrew package manager. Homebrew helps you install OS X programs and the libraries those programs depend on.
First, install Homebrew if you don’t already have it installed. Visit http://brew.sh/ for all the nitty-gritty details, or just type the following into a Terminal prompt (on a single line):
ruby -e "$(curl -fsSL
https://raw.githubusercontent.com/Homebrew/install/master/install)"
If that’s too much to type, visit the Homebrew site, from which you can copy the command to the clipboard and paste it into Terminal.
Once Homebrew is installed, you need to tell it where to find the latest and greatest PHP. Run these commands to do so:
brew tap homebrew/dupes
brew tap homebrew/versions
brew tap homebrew/homebrew-php
Then, to install PHP 7, run brew install php70. That’s it!
At the end of installation, Homebrew prints out a bunch of stuff about configuring your setup. Pay attention to those instructions, since you need to follow them to tell your Mac’s copy of the Apache web server where to find PHP.
Homebrew includes a number of extensions (including intl and mbstring, used in Chapter 20), but also offers other PHP extensions for installation. Run brew search php70- to see a list of extension packages. Installing one of those extensions and its dependent libraries is as easy as running brew install with the extension package name. For example, brew install php70-gmp installs the GMP (GNU Multiple Precision) extension for doing arbitrary-precision math with huge numbers.
Justin Hileman has more details on installing PHP with Homebrew.
Installing on Linux
Most Linux distributions come with PHP already installed or with
binary PHP packages that you can install. For example, if you’re using Fedora Linux, use yum to install the php package. If you’re using Ubuntu, use apt-get to install the package. The most up-to-date PHP 5 package is php5, and at the time of writing, an official php7 package is not available yet. A well-supported PHP 7 package for Ubuntu is available from an alternate source. First, run sudo add-apt-repository ppa:ondrej/php and sudo apt-get update, and then you can install the php7.0 package with apt-get.
If those packages are out of date, you can build PHP yourself. Download the Current Stable .tar.gz package. From a shell prompt, uncompress and unpack the archive:
gunzip php-7.0.5.tar.gz
tar xvf php-7.0.5.tar
This creates a directory, php-7.0.5, that contains the PHP engine source code. Read the file INSTALL at the top level of the source code directory for detailed installation instructions. There is also an overview of PHP installation on Linux and Unix on php.net, as well as instructions for installing PHP with Apache 2.0.
Installing on Windows
Installing PHP on Windows is a little different than on OS X or Linux. The assumptions that the PHP engine can make about the things it needs when it’s being installed are different, as well as the tools that might be available for it to compile itself.
Fortunately, there are several good all-in-one packages that combine PHP, Apache, and MySQL for Windows. These include WampServer, the Bitnami WAMP Stack, and Apache Friends XAMPP.
Microsoft maintains a website devoted to running PHP with IIS. Additionally, the official PHP For Windows website has different versions of PHP for Windows available for download.
Modifying PHP Configuration Directives
Earlier chapters in the book mention various PHP configuration directives. These are settings that affect the behavior of the PHP engine, such as how errors are reported, where the PHP engine looks for included files and extensions, and much more.
Read this section when you encounter a configuration directive you
want to alter or are curious about how you can tweak the PHP
engine’s settings (whether you are using PHP on
your own computer or with a hosting provider). For example, changing
the output_buffering
directive (as discussed in “Why setcookie() and session_start() Want to Be at the Top of the Page”)
makes your life much easier if you are working with cookies and
sessions.
The values of configuration directives can be changed in a few places: in the PHP engine’s php.ini configuration file, in Apache’s httpd.conf or .htaccess configuration files, and in your PHP programs. Not all configuration directives can be changed in all places. If you can edit your php.ini or httpd.conf file, it’s easiest to set PHP configuration directives there. But if you can’t change those files because of server permissions, then you can still change some settings in your PHP programs.
If your web server talks to the PHP engine using CGI or FastCGI, you can also set configuration directives in .user.ini files. In PHP 5.3.0 and later, the PHP engine looks for a file called .user.ini in the same directory as the PHP program it’s running. If the PHP program is inside the web server’s document root, the PHP engine also looks in the program’s parent directory, and that directory’s parent, and so on, up to the document root. The syntax for .user.ini files is the same as for the main php.ini file.
The php.ini file holds systemwide configuration
for the PHP engine. When the web server process starts up, the
PHP engine reads the php.ini file and
adjusts its configuration accordingly. To find the location of your
system’s php.ini file, examine
the output from the
phpinfo() function. This function prints a report of the PHP
engine’s configuration. The tiny program in
Example A-2 produces a page that looks like the one
in Figure A-1.
Example A-2. Getting configuration details with phpinfo()
<?phpphpinfo();?>
In Figure A-1, the sixth line
(Configuration File (php.ini) Path) shows that the
php.ini file is located at /php7/etc/php.ini. Your
php.ini file may be in a different place.
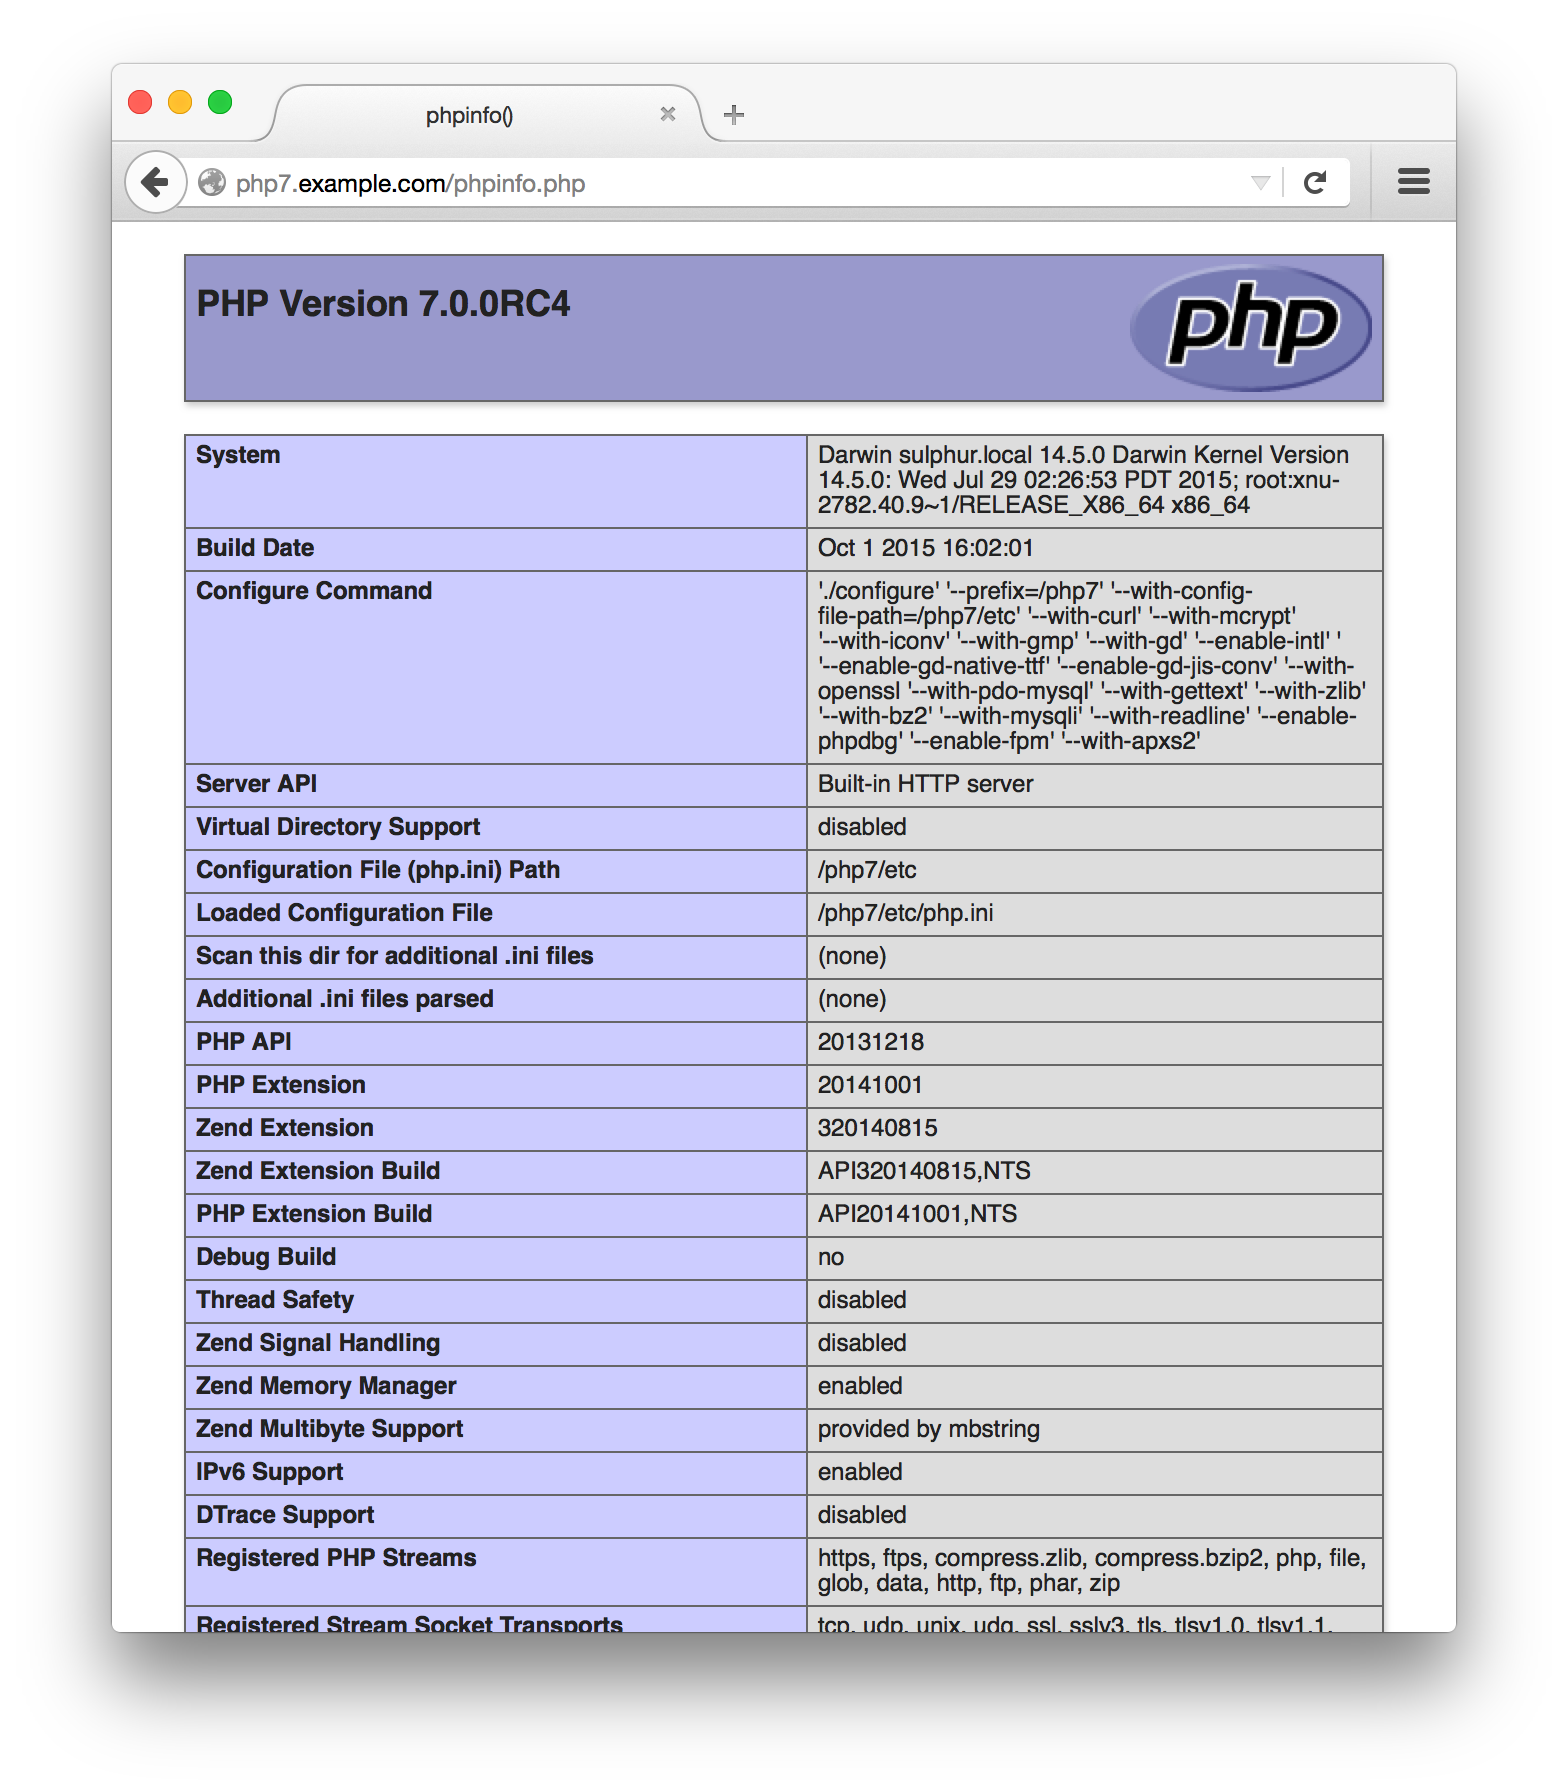
Figure A-1. Output of phpinfo()
In the php.ini file, lines that begin with a
semicolon (;) are comments. Lines that set values
for configuration directives look like those shown in Example A-3.
Example A-3. Sample lines in php.ini
; How to specify directories on Unix: forward slash for a separator
; and a colon between the directory names
include_path = ".:/usr/local/lib/php/includes"

; How to specify directories on Windows: backslash for a separator
; and a semicolon between the directory names
; Windows: "\path1;\path2"
include_path = ".;c:\php\includes"

; Report all errors except notices
error_reporting = E_ALL & ~E_NOTICE

; Record errors in the error log
log_errors = On

; An uploaded file can't be more than 2 megabytes
upload_max_filesize = 2M

; Sessions expire after 1440 seconds
session.gc_maxlifetime = 1440
The error_reporting
configuration directive is set by combining built-in constants with
logical operators. For example, the
line error_reporting = E_ALL & ~E_NOTICE sets
error_reporting to E_ALL but
not E_NOTICE. The operators you can use are
& (“and”), | (“either ... or”), and ~
(“not”). So, to the PHP engine, E_ALL & ~E_NOTICE means
E_ALL and not E_NOTICE. You may
find it easier to read “and not” as “but not,” as in E_ALL but not E_NOTICE. The setting E_ALL | E_NOTICE means either E_ALL or E_NOTICE.
When setting a configuration directive whose value is a number (such
as upload_max_filesize), you can use M (for megabyte) or K (for kilobyte) at the end of the number to multiply by 1,048,576 or 1,024. Setting
upload_max_filesize=2M is the same as setting
upload_max_filesize=2097152.
There are 1,048,576 bytes in a megabyte, and 2,097,152 = 2 *
1,048,576.
To change a configuration directive in Apache’s httpd.conf or .htaccess file, you must use a slightly different syntax, shown in Example A-4.
Example A-4. Sample PHP configuration lines in httpd.conf
; How to specify directories on Unix: forward slash for a separator
; and a colon between the directory names
php_value include_path ".:/usr/local/lib/php/includes"

; How to specify directories on Windows: backslash for a separator
; and a semicolon between the directory names
; Windows: "\path1;\path2"
php_value include_path ".;c:\php\includes"

; Report all errors but notices
php_value error_reporting "E_ALL & ~E_NOTICE"

; Record errors in the error log
php_flag log_errors On

; An uploaded file can't be more than 2 megabytes
php_value upload_max_filesize 2M

; Sessions expire after 1440 seconds
php_value session.gc_maxlifetime 1440
The php_flag and php_value
words in Example A-4 tell Apache that the rest of
the line is a PHP configuration directive. After
php_flag, put the name of the configuration
directive and then On or Off.
After php_value, put the name of the directive and
then its value. If the value has spaces in it (such as E_ALL
& ~E_NOTICE), you must put it in quotes. There is no
equals sign between the name of the configuration directive and the
value.
To change a configuration directive from within a PHP program, use
the ini_set()
function. Example A-5 sets
error_reporting from within a PHP program.
Example A-5. Changing a configuration directive with ini_set()
ini_set('error_reporting',E_ALL & ~E_NOTICE);
The first argument to ini_set() is the name of
the configuration directive to set. The second argument is the value
to which you want to set the configuration directive. For
error_reporting, that value is the same logical
expression as you’d put in
php.ini. For configuration directives whose
values are strings or integers, pass the string or integer to
ini_set(). For configuration directives whose
values are On or Off, pass 1 (for
On) or 0 (for Off) to
ini_set().
To find the value of a configuration directive from within a program,
use ini_get(
). Pass
it the name of the configuration directive, and it returns the value.
This is useful for adding a directory to the
include_path, as shown in Example A-6.
Example A-6. Changing include_path with ini_get() and ini_set()
// These lines add /home/ireneo/php to the end of the include_path
$include_path = ini_get('include_path');
ini_set('include_path',$include_path . ':/home/ireneo/php');
As mentioned earlier, not all configuration directives can be set in
all places. There are some configuration directives that cannot be
set from within your PHP programs. These are directives that the PHP
engine must know about before it starts reading your program,
such as output_buffering. The
output_buffering directive makes a change to the
engine’s behavior that must be active before
the engine gets a look at your program, so you
can’t set output_buffering with
ini_set(). In addition, some configuration
directives are prohibited from being set in Apache
.htaccess files and some from being set in the
Apache httpd.conf file. All configuration
directives can be set in the php.ini file.
The PHP Manual has a big list of all the configuration directives and the contexts in which they can be changed. Some useful configuration directives to know about are listed in Table A-1.
| Directive | Recommended value | Description |
|---|---|---|
allow_url_fopen |
On |
Whether to allow functions such as file_get_contents() to work with URLs in addition to local files. |
auto_append_file |
Set this to a filename to have the PHP code in that file run after the PHP engine runs a program. This is useful for printing out a common page footer. | |
auto_prepend_file |
Set this to a filename to have the PHP code in that file run before the PHP engine runs a program. This is useful for defining functions or including files that you use in your entire site. | |
date.timezone |
UTC |
The PHP engine needs a default timezone set before you call any date or time functions. Using UTC, as discussed in “Working with Timezones”, makes many time-related tasks easier. |
display_errors |
On for debugging, Off for
production |
When this is on, the PHP engine prints errors as part of your program output. |
error_reporting |
E_ALL |
This controls what kinds of errors the PHP engine reports. See “Controlling Where Errors Appear”. |
extension |
Each extension line in
php.ini loads a PHP extension. The extension
library must be present on your system to load it. |
|
extension_dir |
The directory the PHP engine looks in to find extensions
specified by the extension directive. |
|
file_uploads |
On |
Whether to allow file uploads via forms. |
include_path |
A list of directories that the PHP engine looks in for files loaded
via include, require,
include_once, and require_once. |
|
log_errors |
On |
When this is on, the PHP engine puts program errors in the web server error log. |
output_buffering |
On |
When this is on, the PHP engine waits until your script runs before it sends HTTP headers, making it easier to use cookies and sessions. See “Why setcookie() and session_start() Want to Be at the Top of the Page” in Chapter 10. |
session.auto_start |
On (if you’re using sessions) |
When this is on, the PHP engine starts a session at the
beginning of each page, so you don’t have to call
session_start(). |
session.gc_maxlifetime |
1440 |
The number of seconds that a
session should last. The default value of 1440 is fine for most
applications. |
session.gc_probability |
1 |
The likelihood (out of 100) that expired sessions are cleaned up at
the beginning of any request. The default value of 1 is fine for most
applications. |
short_open_tag |
Off |
When this is on, you can start a PHP block with
<? as well as <?php.
Since not all servers are configured to accept short tags,
it’s good practice to leave this off and always use
the <?php
start tag. |
track_errors |
On for debugging, Off for
production |
When this is on, the PHP engine stores an error message in the
global variable $php_errormsg when it encounters a
problem. See “Checking for Errors”. |
upload_max_filesize |
2M |
The maximum permitted size for a file uploaded via a form. Unless you are building an application that requires users to upload very large files, don’t increase this value. Lots of large uploaded files can clog your server. |
Appendix Summary
This appendix covered:
- Using PHP with a web-hosting provider
- Installing the PHP engine on OS X, Linux, or Windows
-
Using
phpinfo()to see the PHP engine’s configuration - Understanding the structure of the php.ini configuration file
- Configuring the PHP engine in the httpd.conf configuration file
-
Reading and writing configuration directive values with
ini_get()andini_set() - Using common configuration directives