Table of Contents for
Learning PHP
 Learning PHP
Published by
O'Reilly Media, Inc., 2016
Learning PHP
Published by
O'Reilly Media, Inc., 2016
- nav
- Cover
- Learning PHP
- Learning PHP
- Dedication
- Preface
- 1. Orientation and First Steps
- 2. Data: Working with Text and Numbers
- 3. Logic: Making Decisions and Repeating Yourself
- 4. Groups of Data: Working with Arrays
- 5. Groups of Logic: Functions and Files
- 6. Data and Logic Together: Working with Objects
- 7. Exchanging Information with Users: Making Web Forms
- 8. Remembering Information: Databases
- 9. Working with Files
- 10. Remembering Users: Cookies and Sessions
- 11. Talking to Other Websites and Services
- 12. Debugging
- 13. Testing: Ensuring Your Program Does the Right Thing
- 14. Software Engineering Practices You Should Be Aware Of
- 15. Handling Dates and Times
- 16. Package Management
- 17. Sending Email
- 18. Frameworks
- 19. Command-Line PHP
- 20. Internationalization and Localization
- A. Installing and Configuring the PHP Engine
- B. Answers to Exercises
- Index
- About the Author
- Colophon
Chapter 7. Exchanging Information with Users: Making Web Forms
Form processing is an essential component of almost any web application. Forms are how users communicate with your server: signing up for a new account, searching a forum for all the posts about a particular subject, retrieving a lost password, finding a nearby restaurant or shoemaker, or buying a book.
Using a form in a PHP program is a two-step activity. Step one is to display the form. This involves constructing HTML that has tags for the appropriate user-interface elements in it, such as text boxes, checkboxes, and buttons. If you’re not familiar with the HTML required to create forms, the “HTML Forms” chapter in Elisabeth Robson and Eric Freeman’s Head First HTML and CSS (O’Reilly) is a good place to start.
When a user sees a page with a form in it, she inputs the requested information into the form and then clicks a button or hits Enter to send the form information back to your server. Processing that submitted form information is step two of the operation.
Example 7-1 is a page that says “Hello” to a user. If the page is loaded in response to a form submission, then it displays a greeting. Otherwise, the page displays a form with which a user can submit her name.
Example 7-1. Saying “Hello”
if('POST'==$_SERVER['REQUEST_METHOD']){"Hello, ".$_POST['my_name'];}else{<<<_HTML_<form method="post" action="$_SERVER[PHP_SELF]">Your name: <input type="text" name="my_name" ><br><input type="submit" value="Say Hello"></form>_HTML_;}
Remember the client and server communication picture from Chapter 1? Figure 7-1 shows the client and server communication necessary to display and process the form in Example 7-1. The first request-and-response pair causes the browser to display the form. In the second request-and-response pair, the server processes the submitted form data and the browser displays the results.
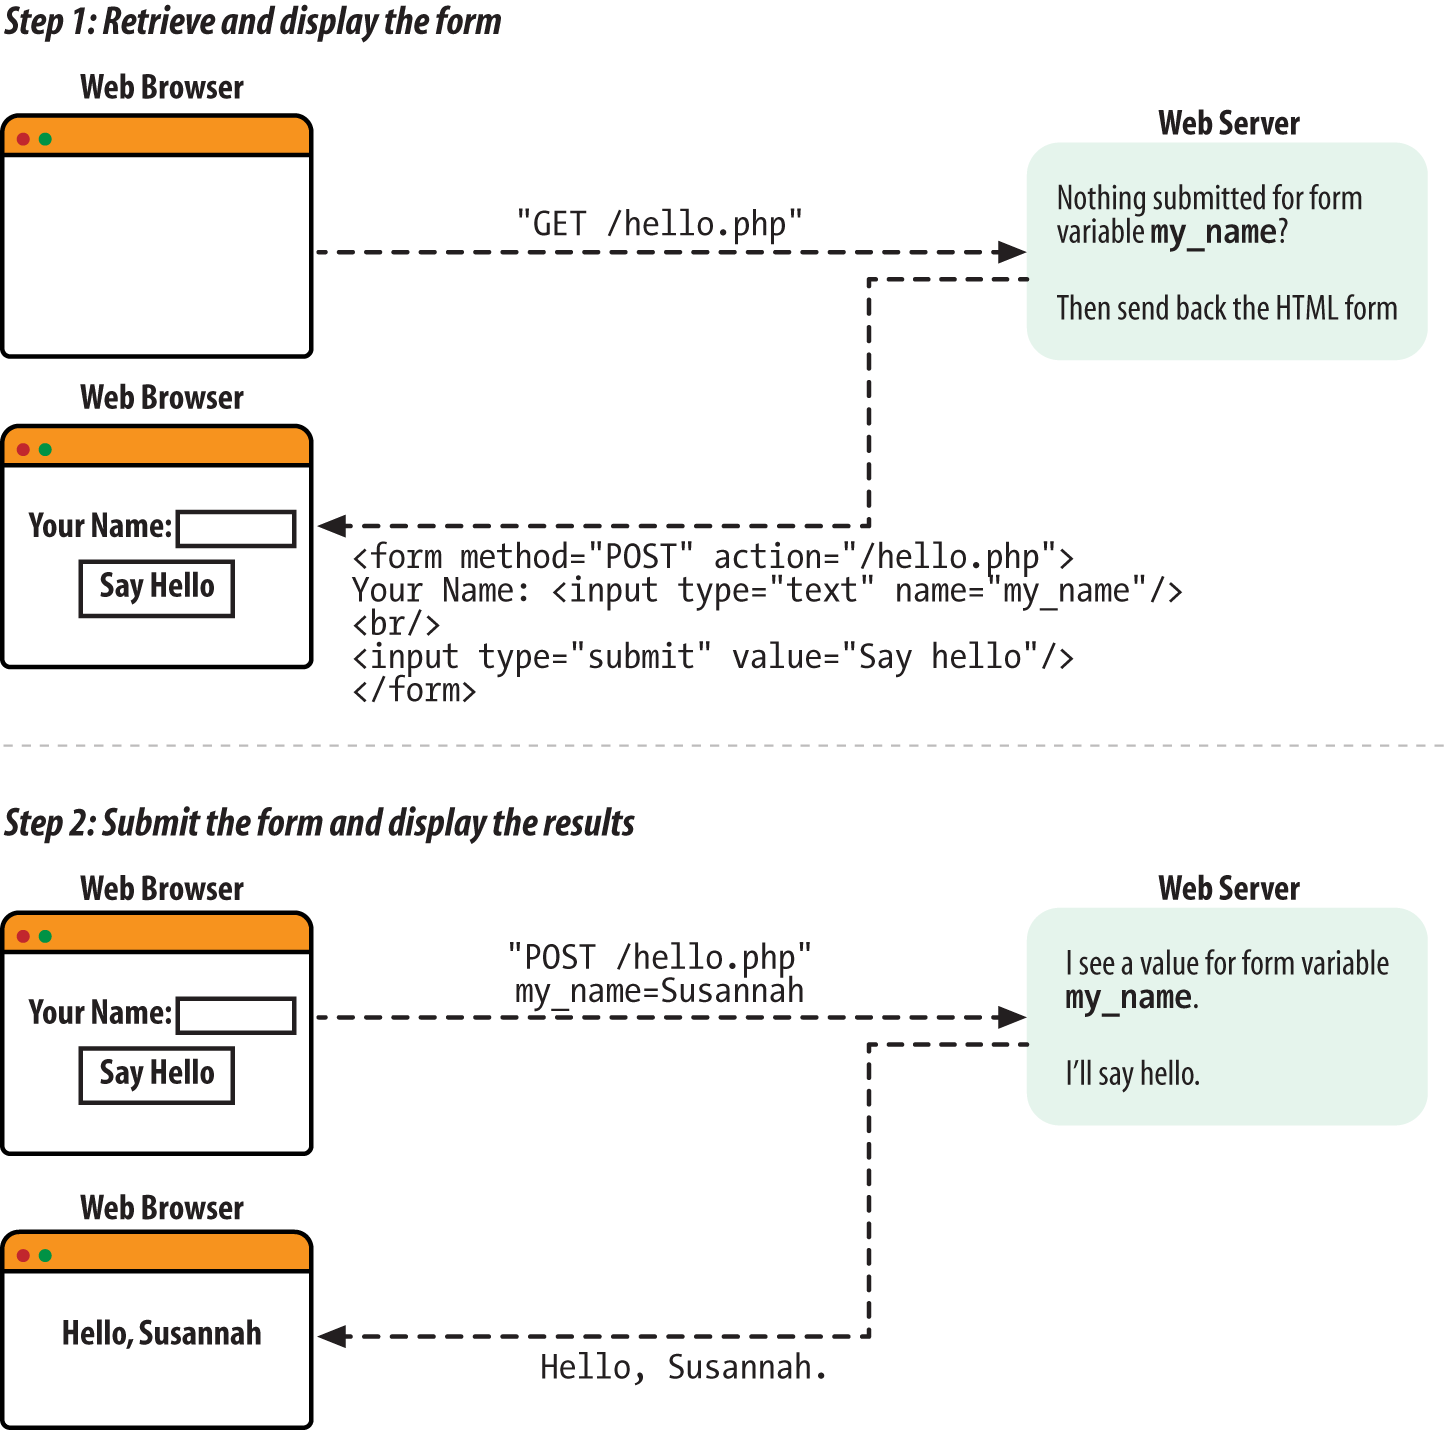
Figure 7-1. Displaying and processing a simple form
The response to the first request is some HTML for a form. Figure 7-2 shows what the browser displays when it receives that response.
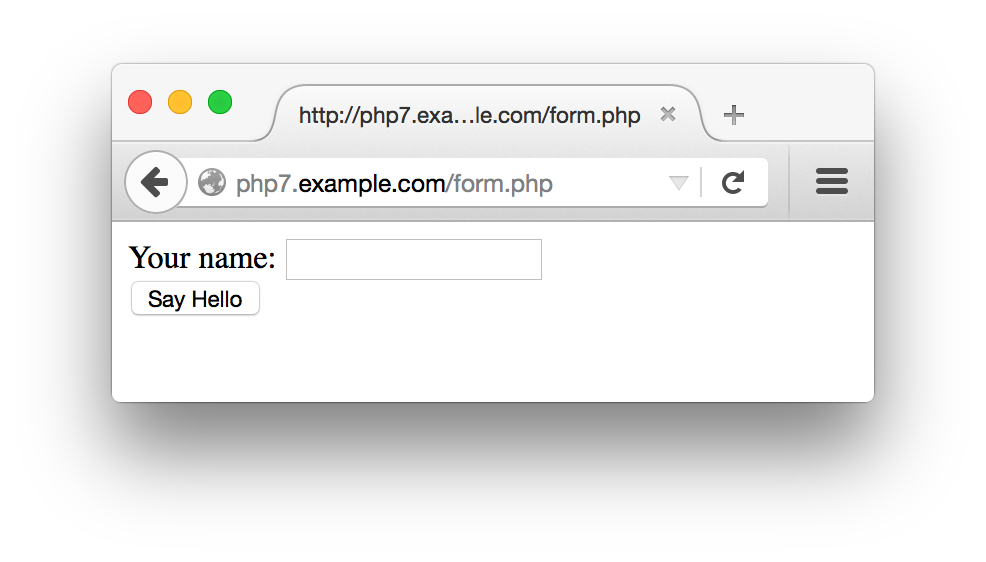
Figure 7-2. A simple form
The response to the second request is the result of processing the
submitted form data. Figure 7-3 shows
the output when the form is submitted with Susannah typed in the text box.
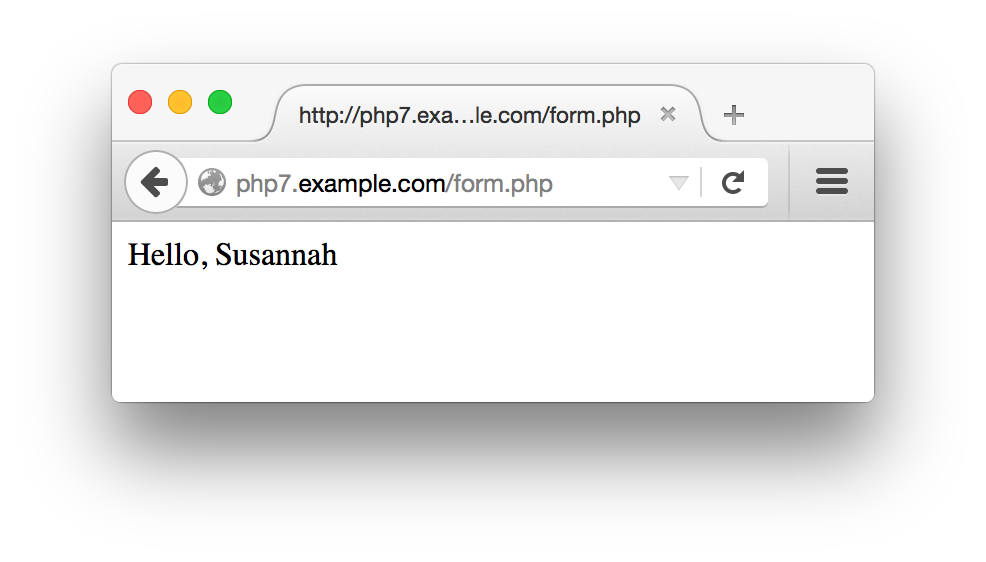
Figure 7-3. The form, submitted
The pattern in Example 7-1 of “if form data has been submitted, process it; otherwise, print out a form” is common in simple programs. When you’re building a basic form, putting the code to display the form and the code to process the form in the same page makes it easier to keep the form and its associated logic in sync. As we get to more complicated forms later in this chapter, we’ll split out the form to separate the display and the processing logic into separate files.
The form submission is sent back to the same URL that was used to
request the form in the first place. This is because of the special
variable that is the value of the
action attribute in the
<form> tag:
$_SERVER['PHP_SELF']. The
$_SERVER auto-global
array
holds a variety of information about your server and the current
request the PHP engine is processing. The
PHP_SELF element of $_SERVER
holds the pathname part of the current request’s
URL. For example, if a PHP script is accessed at
http://www.example.com/store/catalog.php,
$_SERVER['PHP_SELF'] is
/store/catalog.php1 in that page.
The simple form also makes use of $_SERVER['REQUEST_METHOD']. This array element is the HTTP method that the web browser used to request the current page. For regular web pages, it is almost always either GET or POST. A GET usually means a regular page retrieval and a POST is a form submission. The value of $_SERVER['REQUEST_METHOD'] is always uppercase, no matter how the value of the action attribute in the <form> tag is written.
So, testing whether $_SERVER['REQUEST_METHOD'] is POST lets us check whether the form was submitted or it was a regular page request.
The $_POST
array is
an auto-global variable that holds submitted form data. The keys in
$_POST are the form element names, and the
corresponding values in $_POST are the values of
the form elements. Typing your name into the text box in Example 7-1 and clicking the submit button makes the value
of $_POST['my_name'] whatever you typed into the
text box because the name attribute of the text
box is my_name.
The structure of Example 7-1 is the kernel of the
form processing material in this chapter. However, it has a flaw:
printing unmodified external input—as print
"Hello, ". $_POST['my_name'];
does with the value of the my_name form
parameter—is dangerous. Data that comes from outside of your
program, such as a submitted form parameter, can contain embedded
HTML or JavaScript. “HTML and JavaScript” explains how to make your program safer by cleaning up external input.
The rest of this chapter provides details about the various aspects of form handling. “Accessing Form Parameters” dives into the specifics of handling different kinds of form input, such as form parameters that can submit multiple values. “Form Processing with Functions” lays out a flexible, function-based structure for working with forms that simplifies some form maintenance tasks. This function-based structure also lets you check the submitted form data to make sure it doesn’t contain anything unexpected. “Validating Data” explains the different ways you can check submitted form data. “Displaying Default Values” demonstrates how to supply default values for form elements and preserve user-entered values when you redisplay a form. Finally, “Putting It All Together” shows a complete form that incorporates everything in the chapter: function-based organization, validation and display of error messages, defaults and preserving user input, and processing submitted data.
Useful Server Variables
In addition to PHP_SELF and REQUEST_METHOD, the
$_SERVER auto-global
array contains a number of useful elements that provide information
on the web server and the current request. Table 7-1 lists some of them.
| Element | Example | Description |
|---|---|---|
QUERY_STRING |
category=kitchen&price=5 |
The part of the URL after the question mark where the URL parameters live. The example query string shown is for the URL http://www.example.com/catalog/store.php?category=kitchen&price=5. |
PATH_INFO |
/browse |
Extra path information tacked onto the end of the URL after a slash.
This is a way to pass information to a script without using the query
string. The example PATH_INFO shown is for the URL
http://www.example.com/catalog/store.php/browse. |
SERVER_NAME |
www.example.com |
The name of the website on which the PHP engine is running. If the web server hosts many different virtual domains, this is the name of the particular virtual domain that is being accessed. |
DOCUMENT_ROOT |
/usr/local/htdocs |
The directory on the web server computer that holds the documents available on the website. If the document root is /usr/local/htdocs for the website http://www.example.com, then a request for http://www.example.com/catalog/store.php corresponds to the file /usr/local/htdocs/catalog/store.php. |
REMOTE_ADDR |
175.56.28.3 |
The IP address of the user making the request to your web server. |
REMOTE_HOST |
pool0560.cvx.dialup.verizon.net |
If your web server is configured to translate user IP addresses into hostnames, this is the hostname of the user making the request to your web server. Because this address-to-name translation is relatively expensive (in terms of computational time), most web servers do not do it. |
HTTP_REFERERa |
http://shop.oreilly.com/product/0636920029335.do |
If someone clicked on a link to reach the current URL,
HTTP_REFERER contains the URL of the page that
contained the link. This value can be faked, so
don’t use it as your sole criterion for giving access
to private web pages. It can, however, be useful for finding out
who’s linking to you. |
HTTP_USER_AGENT |
Mozilla/5.0 (Macintosh; Intel Mac OS X 10.10; rv:37.0) Gecko/20100101 Firefox/37.0 |
The web browser that retrieved the page. The example value is the
signature of Firefox 37 running on OS X. Like with
HTTP_REFERER, this value can be faked, but is
useful for analysis. |
a
The correct spelling is | ||
Accessing Form Parameters
At the
beginning
of every request, the PHP engine sets up some auto-global arrays
that contain the values of any parameters submitted in a form or
passed in the URL. URL and form parameters from GET method forms are
put into $_GET. Form parameters
from POST method forms are put into $_POST.
The URL
http://www.example.com/catalog.php?product_id=21&category=fryingpan
puts two values into $_GET:
$_GET['product_id']is set to21$_GET['category']is set tofryingpan
Submitting the form in Example 7-2 causes the same values to be put into
$_POST, assuming 21 is entered
in the text box and Frying Pan is selected from
the menu.
Example 7-2. A two-element form
<formmethod="POST"action="catalog.php"><inputtype="text"name="product_id"><selectname="category"><optionvalue="ovenmitt">Pot Holder</option><optionvalue="fryingpan">Frying Pan</option><optionvalue="torch">Kitchen Torch</option></select><inputtype="submit"name="submit"></form>
Example 7-3 incorporates the form in Example 7-2 into a complete PHP program that prints the
appropriate values from $_POST after displaying
the form. Because the action attribute of the
<form> tag in Example 7-3
is catalog.php, you need to save the program in a
file called catalog.php on your web server. If you
save it in a file with a different name, adjust the
action attribute accordingly.
Example 7-3. Printing submitted form parameters
<formmethod="POST"action="catalog.php"><inputtype="text"name="product_id"><selectname="category"><optionvalue="ovenmitt">PotHolder</option><optionvalue="fryingpan">FryingPan</option><optionvalue="torch">KitchenTorch</option></select><inputtype="submit"name="submit"></form>Herearethesubmittedvalues:product_id:<?php$_POST['product_id']??''?><br/>category:<?php$_POST['category']??''?>
To avoid a warning message from PHP when no POST variables have been submitted, Example 7-3 uses ??, the null coalesce operator.
The code $_POST['product_id'] ?? '' evaluates to whatever’s in $_POST['product_id'] if there’s something there, or the empty string ('') otherwise. Without it, you’d see messages like PHP Notice: Undefined index: product_id when the page is retrieved by the GET method and no POST variables have been set up.
Warning
The null coalesce operator was introduced in PHP 7. If you’re using an older version of PHP, use isset() instead:
if(isset($_POST['product_id'])){$_POST['product_id'];}
A form element that can have multiple values needs
to have a name that ends in []. This tells the PHP engine to
treat the multiple values as
array elements. The
<select> menu in Example 7-4 has its submitted values put into
$_POST['lunch'].
Example 7-4. Multiple-valued form elements
<formmethod="POST"action="eat.php"><selectname="lunch[]"multiple><optionvalue="pork">BBQ Pork Bun</option><optionvalue="chicken">Chicken Bun</option><optionvalue="lotus">Lotus Seed Bun</option><optionvalue="bean">Bean Paste Bun</option><optionvalue="nest">Bird-Nest Bun</option></select><inputtype="submit"name="submit"></form>
If the form in Example 7-4 is submitted with
Chicken Bun and
Bird-Nest Bun selected, then
$_POST['lunch'] becomes a two-element array, with
element values chicken and
nest. Access these values using the regular
multidimensional array syntax. Example 7-5
incorporates the form from Example 7-4 into a
complete program that prints out each value selected in the menu.
(The same rule applies here to the filename and the
action attribute. Save the code in Example 7-5 in a file called eat.php
or adjust the action attribute of the
<form> tag to the correct filename.)
Example 7-5. Accessing multiple submitted values
<formmethod="POST"action="eat.php"><selectname="lunch[]"multiple><optionvalue="pork">BBQPorkBun</option><optionvalue="chicken">ChickenBun</option><optionvalue="lotus">LotusSeedBun</option><optionvalue="bean">BeanPasteBun</option><optionvalue="nest">Bird-NestBun</option></select><inputtype="submit"name="submit"></form>Selectedbuns:<br/><?phpif(isset($_POST['lunch'])){foreach($_POST['lunch']as$choice){"You want a$choicebun. <br/>";}}?>
With Chicken Bun and Bird-Nest
Bun selected in the menu, Example 7-5
prints (after the form):
Selected buns:
You want a chicken bun.
You want a nest bun.
You can think of a form element named lunch[] as
translating into the following PHP code when the form is submitted
(assuming the submitted values for the form element are
chicken and nest):
$_POST['lunch'][]='chicken';$_POST['lunch'][]='nest';
As you saw in Example 4-6, this syntax adds an element to the end of an array.
Form Processing with Functions
The basic form in Example 7-1 can be made more flexible by putting the display code and the processing code in separate functions. Example 7-6 is a version of Example 7-1 with functions.
Example 7-6. Saying “Hello” with functions
// Logic to do the right thing based on// the request methodif($_SERVER['REQUEST_METHOD']=='POST'){process_form();}else{show_form();}// Do something when the form is submittedfunctionprocess_form(){"Hello, ".$_POST['my_name'];}// Display the formfunctionshow_form(){<<<_HTML_<form method="POST" action="$_SERVER[PHP_SELF]">Your name: <input type="text" name="my_name"><br/><input type="submit" value="Say Hello"></form>_HTML_;}
To change the form or what happens when it’s
submitted, change the body of process_form() or show_form().
Breaking up the form processing and display into functions also makes it easy to add a data validation stage. Data validation, covered in detail in “Validating Data”, is an essential part of any web application that accepts input from a form. Data should be validated after a form is submitted, but before it is processed. Example 7-7 adds a validation function to Example 7-6.
Example 7-7. Validating form data
// Logic to do the right thing based on// the request methodif($_SERVER['REQUEST_METHOD']=='POST'){if(validate_form()){process_form();}else{show_form();}}else{show_form();}// Do something when the form is submittedfunctionprocess_form(){"Hello, ".$_POST['my_name'];}// Display the formfunctionshow_form(){<<<_HTML_<form method="POST" action="$_SERVER[PHP_SELF]">Your name: <input type="text" name="my_name"><br/><input type="submit" value="Say Hello"></form>_HTML_;}// Check the form datafunctionvalidate_form(){// Is my_name at least 3 characters long?if(strlen($_POST['my_name'])<3){returnfalse;}else{returntrue;}}
The validate_form() function in Example 7-7 returns
false if $_POST['my_name'] is
less than three characters long, and returns true
otherwise. At the top of the page, validate_form() is called when the form is submitted. If it returns
true, then process_form() is
called. Otherwise, show_form() is
called. This means that if you submit the form with a name
that’s at least three characters long, such as
Bob or Bartholomew, the same
thing happens as in previous examples: a Hello,
Bob or Hello, Bartholomew
message is displayed. If you submit a short name such as
BJ or leave the text box blank, then
validate_form() returns false
and process_form() is never called. Instead
show_form() is called and the form is
redisplayed.
Example 7-7 doesn’t tell you
what’s wrong if you enter a name that
doesn’t pass the test in validate_form(). Ideally, when someone submits data that fails a
validation test, you should explain the error when you redisplay the
form and, if appropriate, redisplay the value entered inside the
appropriate form element. The following section shows you how to display
error messages, and “Displaying Default Values” explains how to safely
redisplay user-entered values.
Validating Data
Data validation is one of the most important parts of a web application. Weird, wrong, and damaging data shows up where you least expect it. Users can be careless, malicious, and fabulously more creative (often accidentally) than you may ever imagine when you are designing your application. Even a a Clockwork Orange–style forced viewing of a filmstrip on the dangers of unvalidated data would not over-emphasize how crucial it is that you stringently validate any piece of data coming into your application from an external source. Some of these external sources are obvious: most of the input to your application is probably coming from a web form. But there are lots of other ways data can flow into your programs as well: databases that you share with other people or applications, web services and remote servers, even URLs and their parameters.
As mentioned earlier, Example 7-7 doesn’t indicate what’s wrong with the form if the check in validate_form()
fails. Example 7-8 alters validate_form() and show_form() to manipulate and
print an array of possible error messages.
Example 7-8. Displaying error messages with the form
// Logic to do the right thing based on// the request methodif($_SERVER['REQUEST_METHOD']=='POST'){// If validate_form() returns errors, pass them to show_form()if($form_errors=validate_form()){show_form($form_errors);}else{process_form();}}else{show_form();}// Do something when the form is submittedfunctionprocess_form(){"Hello, ".$_POST['my_name'];}// Display the formfunctionshow_form($errors=){// If some errors were passed in, print them outif($errors){'Please correct these errors: <ul><li>';implode('</li><li>',$errors);'</li></ul>';}<<<_HTML_<form method="POST" action="$_SERVER[PHP_SELF]">Your name: <input type="text" name="my_name"><br/><input type="submit" value="Say Hello"></form>_HTML_;}// Check the form datafunctionvalidate_form(){// Start with an empty array of error messages$errors=array();// Add an error message if the name is too shortif(strlen($_POST['my_name'])<3){$errors[]='Your name must be at least 3 letters long.';}// Return the (possibly empty) array of error messagesreturn$errors;}
The code in Example 7-8 takes advantage of the fact
that an empty array evaluates to false. The line
if ($form_errors = validate_form()) decides whether to call show_form()
again and pass it the error array, or to call process_form(). The array that validate_form()
returns is assigned to $form_errors. The truth
value of the if() test expression is the result
of that assignment, which, as you saw in “Understanding true and false”, is the value being
assigned. So, the if() test expression is
true if $form_errors has some
elements in it, and false if
$form_errors is empty. If validate_form() encounters no errors, then the array it returns is empty.
It is a good idea to do validation checks on all of the form elements
in one pass, instead of redisplaying the form immediately when you
find a single element that isn’t valid. A user
should find out all of his errors when he submits a form instead of
having to submit the form over and over again, with a new error message
revealed on each submission. The validate_form()
function in Example 7-8 does this by adding an
element to $errors for each problem with a form
element. Then, show_form() prints out a list of
the error messages.
The validation methods shown here all go inside the
validate_form() function. If a form element
doesn’t pass the test, then a message is added to
the $errors array.
Required Elements
To make sure something has been entered into a required element,
check the element’s length with
strlen(), as in Example 7-9.
Example 7-9. Verifying a required element
if(strlen($_POST['email'])==0){$errors[]="You must enter an email address.";}
It is important to use strlen() when checking a
required element instead of testing the value itself in an
if() statement. A test such as if (!
$_POST['quantity']) treats a value that evaluates to
false as an error. Using strlen() lets users enter a value such as 0
into a required element.
Numeric or String Elements
To ensure that a submitted value is an integer or floating-point
number, use filter_input() function with an appropriate filter. With filter_input, you tell PHP what kind of input to operate on, the name of the submitted value in the input, and what rule you want the value to conform to. The FILTER_VALIDATE_INT and FILTER_VALIDATE_FLOAT filters check for integers and floating-point numbers, respectively.
Example 7-10 shows the integer filter in use.
Example 7-10. Filtering integer input
$ok=filter_input(INPUT_POST,'age',FILTER_VALIDATE_INT);if(is_null($ok)||($ok===false)){$errors[]='Please enter a valid age.';}
In Example 7-10, filter_input(INPUT_POST, 'age', FILTER_VALIDATE_INT) tells the PHP engine to examine submitted form data (INPUT_POST), specifically the form field named age, and check it against the integer validation filter (FILTER_VALIDATE_INT). The filter_input() function gets told where to look (INPUT_POST) and what field to check (age) rather than being given an entry in an array such as $_POST['age'] so that it can properly handle missing values and avoid being confused if your PHP program changes values in $_POST.
If filter_input() sees that the specified input element is valid, it returns the value. If the specified input element is missing, it returns null. If the specified input element is present but not valid according to the filter, the function returns false. In the if() test expression in Example 7-10, $ok is compared to false with === (three equals signs). This is called the identity operator. It compares values and evaluates to true if the two values are the same and have the same type. As you saw in Example 3-11, when you compare two values of different types (such as string and integer, or integer and boolean), the PHP engine may change the type of the values to compare them. In this case, if the value of the submitted input was 0, which is a valid integer, $ok would be 0. Then the regular equality comparison between $ok and false would be true, since 0 evaluates to false. With the identity operator, the comparison is false, because the types don’t match.
This means that the $errors array gets an error message added to it if the age form element is either not present (is_null($ok)) or not an integer ($ok === false).
Filtering floating-point numbers works similarly, as shown in Example 7-11.
Example 7-11. Filtering floating-point input
$ok=filter_input(INPUT_POST,'price',FILTER_VALIDATE_FLOAT);if(is_null($ok)||($ok===false)){$errors[]='Please enter a valid price.';}
When validating elements (particularly string elements), it is often
helpful to remove leading and trailing whitespace with the
trim() function. You can combine this with the
strlen() test for required elements to disallow
an entry of just whitespace characters. The combination of trim() and strlen() is shown in Example 7-12.
Example 7-12. Combining trim() and strlen()
if(strlen(trim($_POST['name']))==0){$errors[]="Your name is required.";}
All URL and submitted form data arrives at the PHP engine as strings. The filter_input() function, if given a numeric filter (and a valid value), returns the value converted to an integer or floating-point number. Like working with a whitespace-trimmed string, using these converted values rather than $_POST directly is often convenient in your program. A good way to accomplish that is to have your validation function build an array of converted values to work with. This is shown in Example 7-13.
Example 7-13. Building an array of modified input data
functionvalidate_form(){$errors=array();$input=array();$input['age']=filter_input(INPUT_POST,'age',FILTER_VALIDATE_INT);if(is_null($input['age'])||($input['age']===false)){$errors[]='Please enter a valid age.';}$input['price']=filter_input(INPUT_POST,'price',FILTER_VALIDATE_FLOAT);if(is_null($input['price'])||($input['price']===false)){$errors[]='Please enter a valid price.';}// Use the null coalesce operator in case $_POST['name'] isn't set$input['name']=trim($_POST['name']??'');if(strlen($input['name'])==0){$errors[]="Your name is required.";}returnarray($errors,$input);}
The validate_form() function in Example 7-13 builds up the $input array, putting values into it as they are checked. It also builds up the $errors array if there are any problems. Having created both arrays, it needs to return both so that the rest of the program can use $input, not just $errors. To do that, it bundles them up into a two-element array and returns that.
If validate_form() is returning both input and errors, the code calling it must be modified to take that into account. Example 7-14 shows a modified version of the beginning of Example 7-8 that handles both arrays returned from validate_form().
Example 7-14. Handling errors and modified input data
// Logic to do the right thing based on the request methodif($_SERVER['REQUEST_METHOD']=='POST'){// If validate_form() returns errors, pass them to show_form()list($form_errors,$input)=validate_form();if($form_errors){show_form($form_errors);}else{process_form($input);}}else{show_form();}
In Example 7-14, the list() construct is used to destructure the return value from validate_form(). Because we know that validate_form() will always return an array with two elements (the first element is the possibly empty array of error messages and the second element is the array of modified input data), list($form_errors, $input) tells the PHP engine to put the first element of that returned array into the $form_errors variable and the second element into $input. Having those separate arrays in separate variables makes the code easier to read.
Once the returned arrays are properly handled, the logic is similar. If the $errors array is not empty, then show_form() is called with the $errors array as an argument. Otherwise, the form processing function is called. One slight difference is that now the form processing function is passed the array of modified input values to use. This means that process_form() should now refer to $input['my_name'] rather than $_POST['my_name'] to find values to print.
Number Ranges
To check whether an integer falls within a certain range, use the min_range and max_range options of the FILTER_VALIDATE_INT filter. The options get passed as a fourth argument to filter_input(), as shown in Example 7-15.
Example 7-15. Checking an integer range
$input['age']=filter_input(INPUT_POST,'age',FILTER_VALIDATE_INT,array('options'=>array('min_range'=>18,'max_range'=>65)));if(is_null($input['age'])||($input['age']===false)){$errors[]='Please enter a valid age between 18 and 65.';}
Notice that the array of options and their values are not themselves the fourth argument to filter_input(). That argument is a one-element array with a key of options and a value of the actual array of options and their values.
The FILTER_VALIDATE_FLOAT filter doesn’t support the min_range and max_range options, so you need to do the comparisons yourself:
$input['price']=filter_input(INPUT_POST,'price',FILTER_VALIDATE_FLOAT);if(is_null($input['price'])||($input['price']===false)||($input['price']<10.00)||($input['price']>50.00)){$errors[]='Please enter a valid price between $10 and $50.';}
To test a date range, convert the submitted date
value into a DateTime object and then check that its value is
appropriate (for more information on DateTime objects and the checkdate() functions
used in Example 7-16, see Chapter 15). Because DateTime objects encapsulate all the bits of information necessary to represent a point in time, you don’t have to do anything special when using a
range that spans a month or year boundary. Example 7-16 checks to see whether a supplied date is less
than six months old.
Example 7-16. Checking a date range
// Make a DateTime object for 6 months ago$range_start=newDateTime('6 months ago');// Make a DateTime object for right now$range_end=newDateTime();// 4-digit year is in $_POST['year']// 2-digit month is in $_POST['month']// 2-digit day is is $_POST['day']$input['year']=filter_input(INPUT_POST,'year',FILTER_VALIDATE_INT,array('options'=>array('min_range'=>1900,'max_range'=>2100)));$input['month']=filter_input(INPUT_POST,'month',FILTER_VALIDATE_INT,array('options'=>array('min_range'=>1,'max_range'=>12)));$input['day']=filter_input(INPUT_POST,'day',FILTER_VALIDATE_INT,array('options'=>array('min_range'=>1,'max_range'=>31)));// No need to use === to compare to false since 0 is not a valid// choice for year, month, or day. checkdate() makes sure that// the number of days is valid for the given month and year.if($input['year']&&input['month']&&input['day']&&checkdate($input['month'],$input['day'],$input['year'])){$submitted_date=newDateTime(strtotime($input['year'].'-'.$input['month'].'-'.$input['day']));if(($range_start>$submitted_date)||($range_end<$submitted_date)){$errors[]='Please choose a date less than six months old.';}}else{// This happens if someone omits one of the form parameters or submits// something like February 31.$errors[]='Please enter a valid date.';}
Email Addresses
Checking an email address is arguably the most common form validation task. There is, however, no perfect one-step way to make sure an email address is valid, since “valid” could mean different things depending on your goal. If you truly want to make sure that someone is giving you a working email address, and that the person providing it controls that address, you need to do two things. First, when the email address is submitted, send a message containing a random string to that address. In the message, tell the user to submit the random string in a form on your site. Or, you can include a URL in the message that the user can just click on, which has the code embedded into it. If the code is submitted (or the URL is clicked on), then you know that the person who received the message and controls the email address submitted it to your site (or at least is aware of and approves of the submission).
If you don’t want to go to all the trouble of
verifying the email address with a separate message, there is still an easy
syntax check you can do in your form validation code to weed
out mistyped addresses. The FILTER_VALIDATE_EMAIL filter checks strings against the rules for valid email addresses, as shown in Example 7-17.
Example 7-17. Checking the syntax of an email address
$input['email']=filter_input(INPUT_POST,'email',FILTER_VALIDATE_EMAIL);if(!$input['email']){$errors[]='Please enter a valid email address';}
In Example 7-17, the simpler validity check if (! $input['email']) is fine because any submitted strings that would evaluate to false (such as the empty string or 0) are also invalid email addresses.
<select> Menus
When you use a <select> menu in a form, you need to ensure that
the submitted value for the menu element is one of the permitted
choices in the menu. Although a user can’t submit an
off-menu value using a mainstream, well-behaved browser such as
Firefox or Chrome, an attacker can construct a request
containing any arbitrary value without using a browser.
To simplify display and validation of
<select> menus, put the menu choices in an
array. Then, iterate through that array to display the
<select> menu inside the
show_form()
function. Use the same array in
validate_form() to
check the submitted value. Example 7-18 shows how to
display a <select> menu with this technique.
Example 7-18. Displaying a <select> menu
$sweets=array('Sesame Seed Puff','Coconut Milk Gelatin Square','Brown Sugar Cake','Sweet Rice and Meat');functiongenerate_options($options){$html='';foreach($optionsas$option){$html.="<option>$option</option>\n";}return$html;}// Display the formfunctionshow_form(){$sweets=generate_options($GLOBALS['sweets']);<<<_HTML_<form method="post" action="$_SERVER[PHP_SELF]">Your Order: <select name="order">$sweets</select><br/><input type="submit" value="Order"></form>_HTML_;}
The HTML that show_form() in Example 7-18 prints is:
<formmethod="post"action="order.php">Your Order:<selectname="order"><option>Sesame Seed Puff</option><option>Coconut Milk Gelatin Square</option><option>Brown Sugar Cake</option><option>Sweet Rice and Meat</option></select><br/><inputtype="submit"value="Order"></form>
Inside validate_form(), use the array of
<select> menu options like this:
$input['order']=$_POST['order'];if(!in_array($input['order'],$GLOBALS['sweets'])){$errors[]='Please choose a valid order.';}
If you want a <select> menu with different
displayed choices and option values, you need to use a more
complicated array. Each array element key is a value attribute for
one option. The corresponding array element value is the displayed
choice for that option. In Example 7-19, the option
values are puff, square,
cake, and ricemeat. The
displayed choices are Sesame Seed Puff,
Coconut Milk Gelatin Square,
Brown Sugar
Cake, and Sweet Rice and Meat.
Example 7-19. A <select> menu with different choices and values
$sweets=array('puff'=>'Sesame Seed Puff','square'=>'Coconut Milk Gelatin Square','cake'=>'Brown Sugar Cake','ricemeat'=>'Sweet Rice and Meat');functiongenerate_options_with_value($options){$html='';foreach($optionsas$value=>$option){$html.="<option value=\"$value\">$option</option>\n";}return$html;}// Display the formfunctionshow_form(){$sweets=generate_options_with_value($GLOBALS['sweets']);<<<_HTML_<form method="post" action="$_SERVER[PHP_SELF]">Your Order: <select name="order">$sweets</select><br/><input type="submit" value="Order"></form>_HTML_;}
The form displayed by Example 7-19 is as follows:
<formmethod="post"action="order.php">Your Order:<selectname="order"><optionvalue="puff">Sesame Seed Puff</option><optionvalue="square">Coconut Milk Gelatin Square</option><optionvalue="cake">Brown Sugar Cake</option><optionvalue="ricemeat">Sweet Rice and Meat</option></select><br/><inputtype="submit"value="Order"></form>
The submitted value for the <select> menu in
Example 7-19 should be puff,
square, cake, or
ricemeat. Example 7-20 shows how
to verify this in validate_form().
Example 7-20. Checking a <select> menu submission value
$input['order']=$_POST['order'];if(!array_key_exists($input['order'],$GLOBALS['sweets'])){$errors[]='Please choose a valid order.';}
HTML and JavaScript
Submitted form data that contains HTML or JavaScript can cause big
problems. Consider a simple blog application that lets users submit
comments on a blog post page and then displays a list of those
comments below the blog post. If users behave nicely and enter only
comments containing plain text, the page remains benign. One user
submits Cool page! I like how you list the
different ways to cook fish. When you come along to browse
the page, that’s what you see.
The situation is more complicated when the submissions are
not just plain text. If an enthusiastic user submits This
page <b>rules!!!!</b> as a comment, and it is
redisplayed verbatim by the application, then you see
rules!!!! in bold when you browse the page.
Your web browser can’t tell the difference between
HTML tags that come from the application itself (perhaps
laying out the comments in a table or a list) and HTML tags that
happen to be embedded in the comments that the application is printing.
Although seeing bold text instead of plain text is a minor annoyance,
displaying unfiltered user input leaves the application open to giving
you a much larger headache. Instead of
<b></b> tags, one
user’s submission could contain a malformed or
unclosed tag (such as <a href=" with no ending
" or >) that prevents your
browser from displaying the page properly. Even worse, that
submission could contain JavaScript code that, when executed by your
web browser as you look at the page, does nasty stuff such as
send a copy of your cookies to a stranger’s email
box or surreptitiously redirect you to another web page.
The application acts as a facilitator, letting a malicious user upload some HTML or JavaScript that is later run by an unwitting user’s browser. This kind of problem is called a cross-site scripting attack because the poorly written blog application allows code from one source (the malicious user) to masquerade as coming from another place (the application hosting the comments).
To prevent cross-site scripting attacks in your programs, never
display unmodified external input. Either remove suspicious parts
(such as HTML tags) or encode special characters so that browsers
don’t act on embedded HTML or JavaScript. PHP gives
you two functions that make these tasks simple. The
strip_tags()
function removes HTML tags from a string, and the
htmlentities()
function encodes special HTML characters.
Example 7-21 demonstrates strip_tags().
Example 7-21. Stripping HTML tags from a string
// Remove HTML from comments$comments=strip_tags($_POST['comments']);// Now it's OK to print $comments$comments;
If $_POST['comments'] contains
I<b>love</b>sweet<divclass="fancy">rice</div>&tea.
then Example 7-21 prints:
I love sweet rice & tea.
All HTML tags and their attributes
are removed, but the plain text between the tags is left intact. The strip_tags() function is very convenient, but it behaves poorly with mismatched < and > characters. For example, it turns I <3 Monkeys into I . It starts stripping once it sees that < and never stops because there’s no corresponding <.
Encoding instead of stripping the tags often gives better results. Example 7-22 demonstrates encoding with htmlentities().
Example 7-22. Encoding HTML entities in a string
$comments=htmlentities($_POST['comments']);// Now it's OK to print $comments$comments;
If $_POST['comments'] contains
I<b>love</b>sweet<divclass="fancy">rice</div>&tea
then Example 7-22 prints:
I <b>love</b> sweet <div class="fancy
">rice</div> & tea.
The characters that have a special meaning in HTML
(<, >,
&, and ") have been changed
into their entity equivalents:
-
<to< -
>to> -
&to& -
" to
"
When a browser sees <, it prints out a
< character instead of thinking
“OK, here comes an HTML tag.” This
is the same idea (but with a different syntax) as escaping a
" or $ character inside a
double-quoted string, as you saw in “Text”. Figure 7-4 shows what the output of Example 7-22 looks like in a web browser.
In most applications, you should use htmlentities() to
sanitize
external input. This
function doesn’t throw away any content, and it also
protects against cross-site scripting attacks. A discussion board
where users post messages, for example, about HTML
(“What does the <div> tag
do?”) or algebra (“If x<y, is
2x>z?”) wouldn’t be very useful
if those posts were run through strip_tags(). The
questions would be printed as “What does the tag
do?” and “If
xz?”
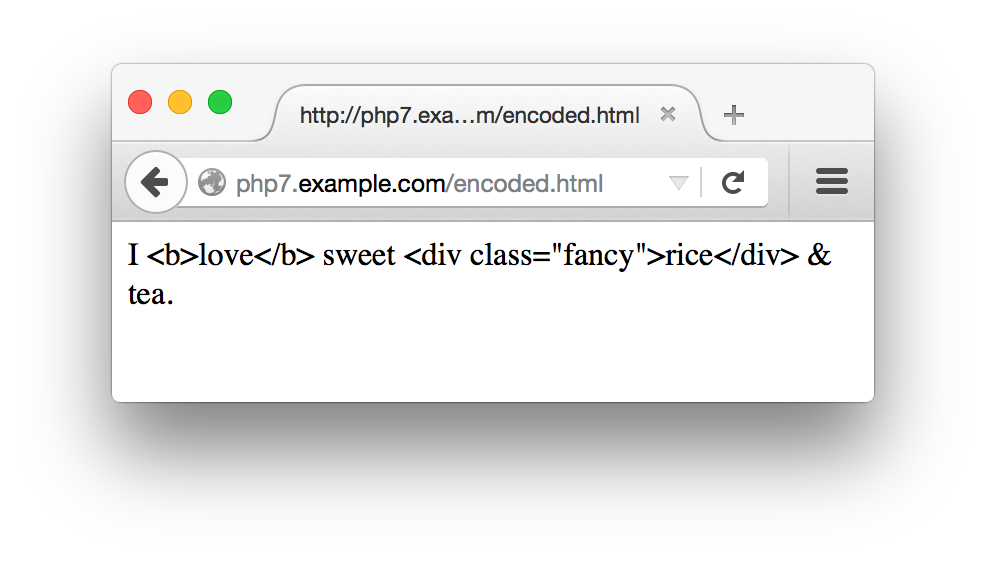
Figure 7-4. Displaying entity-encoded text
Beyond Syntax
Most of the validation strategies discussed in this chapter so far
check the syntax of a submitted value. They make sure that
what’s submitted matches a certain format. However,
sometimes you want to make sure that a submitted value has not just
the correct syntax, but an acceptable meaning as well. The
<select> menu validation does this. Instead
of just assuring that the submitted value is a string, it matches it
against a specific array of values. The
confirmation-message strategy for
checking email addresses is another example of checking for more than
syntax. If you ensure only that a submitted email address has the
correct form, a mischievous user can provide an address such as
president@whitehouse.gov that almost certainly
doesn’t belong to her. The confirmation message
makes sure that the meaning of the address—i.e.,
“this email address belongs to the user providing
it”—is correct.
Displaying Default Values
Sometimes,
you want to display a form
with a value already in a text box or with preselected checkboxes, radio
buttons, or <select> menu items.
Additionally, when you redisplay a form because of an error, it is
helpful to preserve any information that a user has already entered.
Example 7-23 shows the code to do this. It belongs at
the beginning of show_form() and makes
$defaults the array of values to use with the form
elements.
Example 7-23. Building an array of defaults
if($_SERVER['REQUEST_METHOD']=='POST'){$defaults=$_POST;}else{$defaults=array('delivery'=>'yes','size'=>'medium','main_dish'=>array('taro','tripe'),'sweet'=>'cake');}
If $_SERVER['REQUEST_METHOD'] is POST, that means the form has been submitted. In that case, the
defaults should come from whatever the user submitted. Otherwise, you can
set your own defaults. For most form parameters, the default is a
string or a number. For form elements that can have more than one
value, such as the multivalued <select> menu
main_dish, the default value is an array.
After setting the defaults, provide the appropriate value from
$defaults when printing out the HTML tag for the
form element. Remember to encode the defaults with
htmlentities() when necessary
in order to prevent cross-site scripting attacks. Because of the
structure of the HTML tags, you need to treat text boxes,
<select> menus, text areas, and
checkboxes/radio buttons differently.
For text boxes, set the value
attribute of the <input> tag to the
appropriate element of $defaults. Example 7-24 shows how to do this.
Example 7-24. Setting a default value in a text box
'<input type="text" name="my_name" value="'.htmlentities($defaults['my_name']).'">';
For multiline text areas, put the entity-encoded
value between the <textarea> and
</textarea> tags, as shown in Example 7-25.
Example 7-25. Setting a default value in a multiline text area
'<textarea name="comments">';htmlentities($defaults['comments']);'</textarea>';
For <select> menus,
add a check to the loop that prints out the
<option> tags so that it prints a
selected attribute when appropriate.
Example 7-26 contains the code to do this for a
single-valued <select> menu.
Example 7-26. Setting a default value in a <select> menu
$sweets=array('puff'=>'Sesame Seed Puff','square'=>'Coconut Milk Gelatin Square','cake'=>'Brown Sugar Cake','ricemeat'=>'Sweet Rice and Meat');'<select name="sweet">';// > is the option value, $label is what's displayedforeach($sweetsas$option=>$label){'<option value="'.$option.'"';if($option==$defaults['sweet']){' selected';}">$label</option>\n";}'</select>';
To set defaults for a multivalued <select>
menu, you need to convert the array of defaults into an associative
array in which each key is a choice that should be selected. Then,
print the selected attribute for the
options found in that associative array. Example 7-27
demonstrates how to do this.
Example 7-27. Setting defaults in a multivalued <select> menu
$main_dishes=array('cuke'=>'Braised Sea Cucumber','stomach'=>"Sauteed Pig's Stomach",'tripe'=>'Sauteed Tripe with Wine Sauce','taro'=>'Stewed Pork with Taro','giblets'=>'Baked Giblets with Salt','abalone'=>'Abalone with Marrow and Duck Feet');'<select name="main_dish[]" multiple>';$selected_options=array();foreach($defaults['main_dish']as$option){$selected_options[$option]=true;}// print out the <option> tagsforeach($main_dishesas$option=>$label){'<option value="'.htmlentities($option).'"';if(array_key_exists($option,$selected_options)){' selected';}'>'.htmlentities($label).'</option>';"\n";}'</select>';
For checkboxes and radio
buttons, add a checked attribute to the
<input> tag. The syntax for checkboxes and
radio buttons is identical except for the type
attribute. Example 7-28 prints a default-aware
checkbox named delivery and three
default-aware radio buttons, each named size and
each with a different value.
Example 7-28. Setting defaults for checkboxes and radio buttons
'<input type="checkbox" name="delivery" value="yes"';if($defaults['delivery']=='yes'){' checked';}'> Delivery?';$checkbox_options=array('small'=>'Small','medium'=>'Medium','large'=>'Large');foreach($checkbox_optionsas$value=>$label){'<input type="radio" name="size" value="'.$value.'"';if($defaults['size']==$value){' checked';}">$label";}
Putting It All Together
Turning the humble web form into a feature-packed application with data validation, printing default values, and processing the submitted results might seem like an intimidating task. To ease your burden, this section contains a complete example of a program that does it all:
- Displaying a form, including default values
- Validating the submitted data
- Redisplaying the form with error messages and preserved user input if the submitted data isn’t valid
- Processing the submitted data if it is valid
The do-it-all example relies on a class containing some helper functions to simplify form element display and processing. This class is listed in Example 7-29.
Example 7-29. Form element display helper class
classFormHelper{protected$values=array();publicfunction__construct($values=array()){if($_SERVER['REQUEST_METHOD']=='POST'){$this->values=$_POST;}else{$this->values=$values;}}publicfunctioninput($type,$attributes=array(),$isMultiple=false){$attributes['type']=$type;if(($type=='radio')||($type=='checkbox')){if($this->isOptionSelected($attributes['name']??null,$attributes['value']??null)){$attributes['checked']=true;}}return$this->tag('input',$attributes,$isMultiple);}publicfunctionselect($options,$attributes=array()){$multiple=$attributes['multiple']??false;return$this->start('select',$attributes,$multiple).$this->options($attributes['name']??null,$options).$this->end('select');}publicfunctiontextarea($attributes=array()){$name=$attributes['name']??null;$value=$this->values[$name]??'';return$this->start('textarea',$attributes).htmlentities($value).$this->end('textarea');}publicfunctiontag($tag,$attributes=array(),$isMultiple=false){return"<$tag{$this->attributes($attributes,$isMultiple)}/>";}publicfunctionstart($tag,$attributes=array(),$isMultiple=false){// <select> and <textarea> tags don't get value attributes on them$valueAttribute=(!(($tag=='select')||($tag=='textarea')));$attrs=$this->attributes($attributes,$isMultiple,$valueAttribute);return"<$tag$attrs>";}publicfunctionend($tag){return"</$tag>";}protectedfunctionattributes($attributes,$isMultiple,$valueAttribute=true){$tmp=array();// If this tag could include a value attribute and it// has a name and there's an entry for the name// in the values array, then set a value attributeif($valueAttribute&&isset($attributes['name'])&&array_key_exists($attributes['name'],$this->values)){$attributes['value']=$this->values[$attributes['name']];}foreach($attributesas$k=>$v){// True boolean value means boolean attributeif(is_bool($v)){if($v){$tmp[]=$this->encode($k);}}// Otherwise k=velse{$value=$this->encode($v);// If this is an element that might have multiple values,// tack [] onto its nameif($isMultiple&&($k=='name')){$value.='[]';}$tmp[]="$k=\"$value\"";}}returnimplode(' ',$tmp);}protectedfunctionoptions($name,$options){$tmp=array();foreach($optionsas$k=>$v){$s="<option value=\"{$this->encode($k)}\"";if($this->isOptionSelected($name,$k)){$s.=' selected';}$s.=">{$this->encode($v)}</option>";$tmp[]=$s;}returnimplode('',$tmp);}protectedfunctionisOptionSelected($name,$value){// If there's no entry for $name in the values array,// then this option can't be selectedif(!isset($this->values[$name])){returnfalse;}// If the entry for $name in the values array is itself// an array, check if $value is in that arrayelseif(is_array($this->values[$name])){returnin_array($value,$this->values[$name]);}// Otherwise, compare $value to the entry for $name// in the values arrayelse{return$value==$this->values[$name];}}publicfunctionencode($s){returnhtmlentities($s);}}
Methods in Example 7-29 incorporate the appropriate logic discussed in “Displaying Default Values” for particular kinds of form elements. Because the form code in Example 7-30 has a number of different elements, it’s easier to put the element display code in functions that are called repeatedly than to duplicate the code each time you need to print a particular element.
The FormHelper constructor should be passed an associative array of default values for arguments. If the request method is not POST, it uses this array to figure out appropriate defaults. Otherwise, it uses the submitted data as the basis for defaults.
FormHelper’s input() method generates appropriate HTML for any <input/> element. Its required first argument is the type of the element (such as submit, radio, or text). The optional second argument is an associative array of element attributes (such as ['name' => 'meal']). The optional third argument should be true if you’re generating HTML for an element that can have multiple values, such as a checkbox.
The select() method generates HTML for a <select> menu. Its first argument is an array of options for the menu and its optional second argument is an associative array of attributes for the <select> tag. For a multivalued <select> menu, make sure to include 'multiple' => true in the array of attributes passed as the second argument.
The textarea() method generates HTML for a <textarea>. It just takes a single argument: an associative array of attributes for the tag.
Those three methods should take care of the majority of your form display needs, but in case you need other tags or special treatment, you can use the tag(), start(), and end() methods.
The tag() method produces HTML for an entire self-closing HTML tag such as <input/>. Its arguments are the name of the tag, an optional array of attributes, and true if the tag can accept multiple values. The input() method uses tag() to actually generate the proper HTML.
The start() and end() methods are for elements with separate start and end tags. The start() method generates the element start tag, accepting the familiar trio of tag name, attributes, and multiple flag as arguments. The end() method just accepts a tag name for an argument and returns the closing tag HTML. For example, if you’re using an HTML tag such as <fieldset>, you could call start('fieldset',['name' => 'adjustments']), then emit HTML that should be inside the field set, then call end('fieldset').
The rest of the class is devoted to methods that help to generate the HTML and are not meant to be called from outside the class. The attributes() method formats a set of attributes to be appropriately included inside an HTML tag. Using the defaults set up in the object, it inserts an appropriate value attribute when necessary. It also takes care of appending [] to the element name if the element can accept multiple values and assures that all attribute values are appropriately encoded with HTML entities.
The options() method handles formatting the <option> tags for a <select> menu. With the help of isOptionSelected(), it figures out which options should be marked as selected and does proper HTML entity encoding.
The encode() method is a wrapper for PHP’s built-in htmlentities() method. It’s public so that other code can use it to make your entity encoding consistent.
The code in Example 7-30 relies on the FormHelper class
and displays a short food-ordering form. When the form is submitted
correctly, it shows the results in the browser and emails them to an
address defined in process_form()
(presumably to the chef, so he can start preparing your order).
Because the code jumps in and out of PHP mode, it includes the <?php start tag at the beginning of the example and the
?> closing tag at the end to make things
clearer.
Example 7-30. A complete form: display with defaults, validation, and processing
<?php// This assumes FormHelper.php is in the same directory as// this file.require'FormHelper.php';// Set up the arrays of choices in the select menus.// These are needed in display_form(), validate_form(),// and process_form(), so they are declared in the global scope.$sweets=array('puff'=>'Sesame Seed Puff','square'=>'Coconut Milk Gelatin Square','cake'=>'Brown Sugar Cake','ricemeat'=>'Sweet Rice and Meat');$main_dishes=array('cuke'=>'Braised Sea Cucumber','stomach'=>"Sauteed Pig's Stomach",'tripe'=>'Sauteed Tripe with Wine Sauce','taro'=>'Stewed Pork with Taro','giblets'=>'Baked Giblets with Salt','abalone'=>'Abalone with Marrow and Duck Feet');// The main page logic:// - If the form is submitted, validate and then process or redisplay// - If it's not submitted, displayif($_SERVER['REQUEST_METHOD']=='POST'){// If validate_form() returns errors, pass them to show_form()list($errors,$input)=validate_form();if($errors){show_form($errors);}else{// The submitted data is valid, so process itprocess_form($input);}}else{// The form wasn't submitted, so displayshow_form();}functionshow_form($errors=array()){$defaults=array('delivery'=>'yes','size'=>'medium');// Set up the $form object with proper defaults$form=newFormHelper($defaults);// All the HTML and form display is in a separate file for clarityinclude'complete-form.php';}functionvalidate_form(){$input=array();$errors=array();// name is required$input['name']=trim($_POST['name']??'');if(!strlen($input['name'])){$errors[]='Please enter your name.';}// size is required$input['size']=$_POST['size']??'';if(!in_array($input['size'],['small','medium','large'])){$errors[]='Please select a size.';}// sweet is required$input['sweet']=$_POST['sweet']??'';if(!array_key_exists($input['sweet'],$GLOBALS['sweets'])){$errors[]='Please select a valid sweet item.';}// exactly two main dishes required$input['main_dish']=$_POST['main_dish']??array();if(count($input['main_dish'])!=2){$errors[]='Please select exactly two main dishes.';}else{// we know there are two main dishes selected, so make sure they are// both validif(!(array_key_exists($input['main_dish'][0],$GLOBALS['main_dishes'])&&array_key_exists($input['main_dish'][1],$GLOBALS['main_dishes']))){$errors[]='Please select exactly two valid main dishes.';}}// if delivery is checked, then comments must contain something$input['delivery']=$_POST['delivery']??'no';$input['comments']=trim($_POST['comments']??'');if(($input['delivery']=='yes')&&(!strlen($input['comments']))){$errors[]='Please enter your address for delivery.';}returnarray($errors,$input);}functionprocess_form($input){// look up the full names of the sweet and the main dishes in// the $GLOBALS['sweets'] and $GLOBALS['main_dishes'] arrays$sweet=$GLOBALS['sweets'][$input['sweet']];$main_dish_1=$GLOBALS['main_dishes'][$input['main_dish'][0]];$main_dish_2=$GLOBALS['main_dishes'][$input['main_dish'][1]];if(isset($input['delivery'])&&($input['delivery']=='yes')){$delivery='do';}else{$delivery='do not';}// build up the text of the order message$message=<<<_ORDER_Thankyouforyourorder,{$input['name']}.Yourequestedthe{$input['size']}sizeof$sweet,$main_dish_1,and$main_dish_2.You$deliverywantdelivery._ORDER_;if(strlen(trim($input['comments']))){$message.='Your comments: '.$input['comments'];}// send the message to the chef('chef@restaurant.example.com','New Order',$message);// print the message, but encode any HTML entities// and turn newlines into <br/> tagsnl2br(htmlentities($message,ENT_HTML5));}?>
There are four parts to the code in Example 7-30: the
code in the global scope at the top of the example, the
show_form() function, the validate_form() function, and the process_form()
function.
The global scope code does three things. The first is that it loads the FormHelper class from its separate file. Then, it sets up two
arrays that describe the choices in the form’s two
<select> menus. Because these arrays are
used by each of the show_form(),
validate_form(), and process_form() functions, they need to be defined in the global scope.
The global code’s last task is to process the
if() statement that decides what to do: display,
validate, or process the form.
Displaying the form is accomplished by
show_form().
First, the function makes $defaults an array of
default values. This array is passed to FormHelper’s constructor, so the $form object uses the right default values. Then, show_form() hands off control to another file, complete-form.php, which contains the actual HTML and PHP code to display the form. Putting the HTML in a separate file for a big program like this makes it easier to digest everything and also easier for the two files to be changed independently. The contents of complete-form.php are shown in Example 7-31.
Example 7-31. PHP and HTML generating a form
<formmethod="POST"action="<?=$form->encode($_SERVER['PHP_SELF']) ?>"><table><?phpif($errors){?><tr><td>You need to correct the following errors:</td><td><ul><?phpforeach($errorsas$error){?><li><?=$form->encode($error)?></li><?php}?></ul></td><?php}?><tr><td>Your Name:</td><td><?=$form->input('text',['name'=>'name'])?></td></tr><tr><td>Size:</td><td><?=$form->input('radio',['name'=>'size','value'=>'small'])?>Small <br/><?=$form->input('radio',['name'=>'size','value'=>'medium'])?>Medium <br/><?=$form->input('radio',['name'=>'size','value'=>'large'])?>Large <br/></td></tr><tr><td>Pick one sweet item:</td><td><?=$form->select($GLOBALS['sweets'],['name'=>'sweet'])?></td></tr><tr><td>Pick two main dishes:</td><td><?=$form->select($GLOBALS['main_dishes'],['name'=>'main_dish','multiple'=>true])?></td></tr><tr><td>Do you want your order delivered?</td><td><?=$form->input('checkbox',['name'=>'delivery','value'=>'yes'])?>Yes </td></tr><tr><td>Enter any special instructions.<br/>If you want your order delivered, put your address here:</td><td><?=$form->textarea(['name'=>'comments'])?></td></tr><tr><td colspan="2" align="center"><?=$form->input('submit',['value'=>'Order'])?></td></tr></table></form>
The code in complete-form.php executes as if it were part of the show_form() function. This means that local variables in the function, such as $errors and $form, are available in complete-form.php. Like all included files, complete-form.php starts outside of any PHP tags, so it can print some plain HTML and then jump into PHP mode when it needs to call methods or use PHP logic. The code here uses the special short echo tag (<?=) as a concise way to display the results of various method calls. Starting a PHP block with <?= means exactly the same thing as starting a PHP block with <php echo. Since our various FormHelper methods return HTML that should be displayed, this makes a handy way to build up the HTML for the form.
Back in the main file, the validate_form() function
builds an array of error messages if the submitted form data doesn’t
meet appropriate criteria. Note that the checks for
size, sweet, and
main_dish don’t just look to see
whether something was submitted for those parameters, but also that what was submitted is a valid value for the particular
parameter. For size, this means that the submitted
value must be small, medium, or
large. For sweet and
main_dish, this means that the submitted values
must be keys in the global $sweets or
$main_dishes arrays. Even though the form contains
default values, it’s still a good idea to validate
the input. Someone trying to break into your website could bypass a
regular web browser and construct a request with an arbitrary value
that isn’t a legitimate choice for the
<select> menu or radio button set.
Lastly, process_form()
takes action when the form is submitted with valid data. It builds a
string, $message, that contains a description of
the submitted order. Then it emails $message to
chef@restaurant.example.com and prints it. The
built-in mail() function sends the email message. Before
printing $message,
process_form() passes it through two functions.
The first is htmlentities(),
which, as you’ve already seen, encodes any special
characters as HTML entities. The second is nl2br(), which turns any newlines in $message
into HTML <br> tags. Turning newlines into
<br> tags makes the line breaks in the
message display properly in a web browser.
Chapter Summary
This chapter covered:
- Understanding the conversation between the web browser and web server that displays a form, processes the submitted form parameters, and then displays a result
-
Making the connection between the
<form>tag’sactionattribute and the URL to which form parameters are submitted -
Using values from the
$_SERVERauto-global array -
Accessing submitted form parameters in the
$_GETand$_POSTauto-global arrays - Accessing multivalued submitted form parameters
-
Using the
show_form(),validate_form(), andprocess_form()functions to modularize form handling - Displaying error messages with a form
-
Validating form elements: required elements, integers, floating-point
numbers, strings, date ranges, email addresses, and
<select>menus - Defanging or removing submitted HTML and JavaScript before displaying it
- Displaying default values for form elements
- Using helper functions to display form elements
Exercises
-
What does
$_POSTlook like when the following form is submitted with the third option in theBraised Noodlesmenu selected, the first and last options in theSweetmenu selected, and4entered into the text box?<formmethod="POST"action="order.php">Braised Noodles with:<selectname="noodle"><option>crab meat</option><option>mushroom</option><option>barbecued pork</option><option>shredded ginger and green onion</option></select><br/>Sweet:<selectname="sweet[]"multiple><optionvalue="puff">Sesame Seed Puff<optionvalue="square">Coconut Milk Gelatin Square<optionvalue="cake">Brown Sugar Cake<optionvalue="ricemeat">Sweet Rice and Meat</select><br/>Sweet Quantity:<inputtype="text"name="sweet_q"><br/><inputtype="submit"name="submit"value="Order"></form> -
Write a
process_form()function that prints out all submitted form parameters and their values. You can assume that form parameters have only scalar values. -
Write a program that does basic arithmetic. Display a form with text
box inputs for two operands and a
<select>menu to choose an operation: addition, subtraction, multiplication, or division. Validate the inputs to make sure that they are numeric and appropriate for the chosen operation. The processing function should display the operands, the operator, and the result. For example, if the operands are 4 and 2 and the operation is multiplication, the processing function should display something like4 * 2 = 8. - Write a program that displays, validates, and processes a form for entering information about a package to be shipped. The form should contain inputs for the from and to addresses for the package, dimensions of the package, and weight of the package. The validation should check (at least) that the package weighs no more than 150 pounds and that no dimension of the package is more than 36 inches. You can assume that the addresses entered on the form are both US addresses, but you should check that a valid state and a zip code with valid syntax are entered. The processing function in your program should print out the information about the package in an organized, formatted report.
-
(Optional) Modify your
process_form()function that enumerates all submitted form parameters and their values so that it correctly handles submitted form parameters that have array values. Remember, those array values could themselves contain arrays.
1 As discussed in
Example 4-19, the array element
$_SERVER['PHP_SELF'] goes in the here document
without quotes around the key for its value to be interpolated
properly.