In previous chapters, you’ve seen a plethora of tools that are designed to support a well-managed project. Unit testing, documentation, build, and version control are all fantastically useful. But tools, and testing in particular, can be bothersome.
Even if your tests only take a few minutes to run, you’re often too focused on coding to bother with them. Not only that, but you have clients and colleagues waiting for new features. The temptation to keep on coding is always there. But bugs are much easier to fix close to the time they are hatched. That’s because you’re more likely to know which change caused the problem and are better able to come up with a quick fix.
In this chapter, I introduce Continuous Integration, a practice that automates test and build, and brings together the tools and techniques you’ve encountered in recent chapters.
This chapter will cover these topics:
Defining Continuous Integration
Preparing a project for CI
Looking at Jenkins: a CI server
Customizing Jenkins for PHP projects with specialized plug-ins
What Is Continuous Integration?
In the bad old days, integration was something you did after you’d finished the fun stuff. It was also the stage at which you realized how much work you still had to do. Integration is the process by which all of the parts of your project are bundled up into packages that can be shipped and deployed. It’s not glamorous, and it’s actually hard.
Integration is tied up also with QA. You can’t ship a product if it isn’t fit for purpose. That means tests. Lots of tests. If you haven’t been testing much prior to the integration stage, it probably also means nasty surprises. Lots of them.
You know from Chapter 18 that it’s best practice to test early and often. You know from Chapters 15 and 19 that you should design with deployment in mind right from the start. Most of us accept that this is the ideal, but how often does the reality match up?
If you practice test-oriented development (a term I prefer to test-first development, because it better reflects the reality of most good projects I’ve seen), then the writing of tests is less hard than you might think. After all, you write tests as you code anyway. Every time you develop a component, you create code fragments, perhaps at the bottom of the class file, that instantiate objects and call their methods. If you gather up those throwaway scraps of code, written to put your component through its paces during development, you’ve got yourself a test case. Stick them into a class and add them to your suite.
Oddly, it’s often the running of tests that people avoid. Over time, tests take longer to run. Failures related to known issues creep in, making it hard to diagnose new problems. Also, you suspect someone else committed code that broke the tests, and you don’t have time to hold up your own work while you fix issues that are someone else’s fault. Better to run a couple of tests related to your work than the whole suite.
Failing to run tests, and therefore to fix the problems that they could reveal, makes issues harder and harder to address. The biggest overhead in hunting for bugs is usually the diagnosis and not the cure. Very often, a fix can be applied in a matter of minutes, set against perhaps hours searching for the reason a test failed. If a test fails within minutes or hours of a commit, however, you’re more likely to know where to look for the problem.
Software build suffers from a similar problem. If you don’t install your project often, you’re likely to find that, although everything runs fine on your development box, an installed instance falls over with an obscure error message. The longer you’ve gone between builds, the more obscure the reason for the failure will likely be to you.
It’s often something simple: an undeclared dependency upon a library on your system, or some class files you failed to check in. These are easy to fix if you’re on hand. But what if a build failure occurs when you’re out the office? Whichever unlucky team member gets the job of building and releasing the project won’t know about your setup and won’t have easy access to those missing files.
Integration issues are magnified by the number of people involved in a project. You may like and respect all of your team members, but we all know that they are much more likely than you are to leave tests unrun. And then they commit a week’s work of development at 4 p.m. on Friday, just as you’re about to declare the project good-to-go for a release.
Continuous Integration (CI) reduces some of these problems by automating the build and test process.
CI is both a set of practices and tools. As a practice, it requires frequent commits of project code (at least daily). With each commit, tests should be run and any packages should be built. You’ve already seen some of the tools required for CI, in particular PHPUnit and Phing. Individual tools aren’t enough, however. A higher-level system is required to coordinate and automate the process.
Without the higher system, a CI server, it’s likely that the practice of CI will simply succumb to our natural tendency to skip the chores. After all, we’d rather be coding.
Having a system like this in place offers clear benefits. First, your project gets built and tested frequently. That’s the ultimate aim and good of CI. That it’s automated, however, adds two further dimensions. The test and build happens in a different thread to that of development. It happens behind the scenes and doesn’t require that you stop work to run tests. Also, as with testing, CI encourages good design. In order for it to be possible to automate installation in a remote location, you’re forced to consider ease of installation from the start.
I don’t know how many times I’ve come across projects where the installation procedure was an arcane secret known only to a few developers. “You mean you didn’t set up the URL rewriting?” asks one old hand with barely concealed contempt. “Honestly, the rewrite rules are in the Wiki, you know. Just paste them into the Apache config file.” Developing with CI in mind means making systems easier to test and install. This might mean a little more work up front, but it makes our lives easier down the line. Much easier.
So, to start off, I’m going to lay down some of that expensive groundwork. In fact, you’ll find that in most of the sections to come, you’ve encountered these preparatory steps already.
Preparing a Project for CI
First of all, of course, I need a project to integrate continuously. Now, I’m a lazy soul, so I’ll look for some code that comes with tests already written. The obvious candidate is the project I created in Chapter 18 to illustrate PHPUnit. I’m going to name it userthing, because it’s a thing, with a User object in it.
First of all, here is a breakdown of my project directory:
$ find src/ test/src/src/persistsrc/persist/UserStore.phpsrc/utilsrc/util/Validator.phpsrc/domainsrc/domain/User.phptest/test/persisttest/persist/UserStoreTest.phptest/utiltest/util/ValidatorTest.php
As you can see, I’ve tidied up the structure a little, adding some package directories. Within the code, I’ve supported the package structure with the use of namespaces.
Now that I have a project, I should add it to a version-control system.
CI and Version Control
Version control is essential for CI. A CI system needs to acquire the most recent version of a project without human intervention (at least once things have been set up).
For this example, I’ll use a repository I set up on BitBucket. I’ll configure code on my local development machine, add and commit it, and then push to the remote server:
$ cd path/to/userthing$ git init$ git remote add origin git@bitbucket.org:getinstance/userthing.git$ git add build.xml composer.json src/ test/$ git commit -m 'initial commit'$ git push -u origin master
I navigated to my development directory and initialized it. Then I added the origin remote, to which I pushed the code. I like to confirm that everything is working by performing a fresh clone:
$ git clone git@bitbucket.org:getinstance/userthing.gitCloning into 'userthing'...X11 forwarding request failed on channel 0remote: Counting objects: 16, done.remote: Compressing objects: 100% (11/11), done.remote: Total 16 (delta 0), reused 0 (delta 0)Receiving objects: 100% (16/16), done.
Checking connectivity… done. Now I have a userthing repository and a local clone.Time to automate build and test.
Phing
We encountered Phing in Chapter 19. Here is one way to install the tool:
$ sudo pear channel-discover pear.phing.info$ sudo pear install phing/phing
I’ll use Composer for this, however. Here’s the require-dev directive in my composer.json file:
"require-dev": {"phing/phing": "2.*"}
I will be using this essential build tool as the glue for my project’s CI environment, so I run this install on the server I intend to use for testing (or, of course, you could try this out on virtual server using Vagrant and VirtualBox). I will define targets for building and testing the code and for running the various other quality assurance tools you will meet in this chapter.
Note
Be sure to check the output of PEAR when installing a package. You may encounter error messages that prompt you to acquire dependencies before your target can be installed. The pear application is helpful and will tell you exactly what you need to do in order to install dependencies, but it is easy to miss the fact that more work is required on your part if you don’t check the application’s command-line output.
Let’s build a sample task:
<project name="userthing" default="build" basedir="."><property name="build" value="./build" /><property name="test" value="./test" /><property name="src" value="./src" /><property name="version" value="1.1.1" /><target name="build"><mkdir dir="${build}" /><copy todir="${build}/src"><fileset dir="${src}"></fileset></copy><copy todir="${build}/test"><fileset dir="${test}"></fileset></copy></target><target name="clean"><delete dir="${build}" /></target><!-- ... --></project>
I set up four properties. build refers to the directory in which I might assemble my files before generating a package. test points to the test directory. src refers to the source directory. version defines the version number for the package.
The build target copies the src and test directories into the build environment. In a more complex project, I might also perform transformations, generate configuration files, and assemble binary assets at this stage. This target is the project’s default.
The clean target removes the build directory and anything it contains. Let’s run a build:
$ vendor/bin/phingBuildfile: /var/popp/src/ch21/build.xmluserthing > build:[mkdir] Created dir: /var/popp/src/ch21/build[copy] Created 4 empty directories in /var/popp/src/ch21/build/src[copy] Copying 3 files to /var/popp/src/ch21/build/src[copy] Created 3 empty directories in /var/popp/src/ch21/build/test[copy] Copying 2 files to /var/popp/src/ch21/build/testBUILD FINISHEDTotal time: 1.8206 second
Unit Tests
Unit tests are the key to continuous integration. It’s no good successfully building a project that contains broken code. I covered unit testing with PHPUnit in Chapter 18. If you’re reading out of order, however, you’ll want to install this invaluable tool before proceeding. Here is one way to install PHPUnit globally:
$ wget https://phar.phpunit.de/phpunit.phar$ chmod 755 phpunit.phar$ sudo mv phpunit.phar /usr/local/bin/phpunit
You can also install PHPUnit with Composer:
"require-dev": {"phing/phing": "2.*","phpunit/phpunit": "5.4.*"}
Again, this is the approach I’ll take for my example. Because PHPUnit will be installed under the vendor/ directory, my development directory will remain independent of the wider system.
I’ve separated my test directory from the rest of my source code, so I’ll need to set up my autoload rules so that PHP can locate all the system’s classes during testing. Here’s my complete composer.json:
{"require-dev": {"phing/phing": "2.*","phpunit/phpunit": "5.4.*"},"autoload": {"psr-4": {"userthing\\": ["src/", "test/"]}}
Also in Chapter 18, I wrote tests for a version of the userthing code I’ll be working with in this chapter. Here I run them once again (from within the src directory), to make sure my reorganization has not broken anything new:
$ vendor/bin/phpunit test/PHPUnit 5.4.6 by Sebastian Bergmann and contributors....... 6 / 6 (100%)Time: 378 ms, Memory: 4.00MBOK (6 tests, 5 assertions)
So this confirms that my tests work. However, I would like to invoke them with Phing.
Phing provides an exec task which we might use to invoke the phpunit command. However, it’s always best to use a specialized tool if there’s one available. There is a built-in task for this job:
<target name="test" depends="build"><phpunit bootstrap="vendor/autoload.php" printsummary="true"><formatter type="plain" usefile="false"/><batchtest><fileset dir="${test}"><include name="**/*Test.php"/></fileset></batchtest></phpunit></target>
Because these are unit tests and not functional tests, we can run them against the local src/ directory rather than requiring an installed instance (with a functioning database or web server). Among many other attributes, the phpunit task accepts a printsummary attribute, which causes an overview of the test process to be output.
Much of this task’s functionality is configured using nested elements. The formatter element manages the way that test information is generated. In this case, I have opted to output basic human-readable data. batchtest lets you define multiple test files using the nested fileset element.
Note
The phpunit task is highly configurable. The Phing manual provides full documentation at https://www.phing.info/docs/guide/stable/PHPUnitTask.html .
Here, I run the tests with Phing:
$ vendor/bin/phing testBuildfile: /var/poppch21/build.xmluserthing > build:userthing > test:[phpunit] Testsuite: userthing\persist\UserStoreTest[phpunit] Tests run: 4, Failures: 0, Errors: 0, Incomplete: 0, Skipped: 0, Time elapsed: 0.01105 s[phpunit] Testsuite: userthing\util\ValidatorTest[phpunit] Tests run: 2, Failures: 0, Errors: 0, Incomplete: 0, Skipped: 0, Time elapsed: 0.00864 s[phpunit] Total tests run: 6, Failures: 0, Errors: 0, Incomplete: 0, Skipped: 0, Time elapsed: 0.02641 sBUILD FINISHEDTotal time: 0.5815 secondsBUILD FINISHEDTotal time: 1.0921 second
Documentation
Transparency is one of the principles of CI. When you’re looking at a build in a Continuous Integration environment, therefore, it’s important to be able to check that the documentation is up-to-date, and covers the most recent classes and methods. You can install phpDocumentor with PEAR like this:
$ pear channel-discover pear.phpdoc.org$ pear install phpdoc/phpdocumentor
Or, once again, you can use Composer:
"require-dev": {"phing/phing": "2.*","phpunit/phpunit": "5.4.*","phpdocumentor/phpdocumentor": "2.*"}
I’d better invoke the tool just to be sure, this time from the build directory:
$ ./vendor/bin/phpdoc --directory=src --target=docs --title=userthing This generates some pretty bare documentation. Once it’s published on a CI server, I’m sure to be shamed into writing some real inline documentation.
Once again, I want to add this to my build.xml document. There is a task named phpdoc2 that is designed to integrate with PHPDocumentor:
<target name="doc" depends="build"><mkdir dir="reports/docs" /><phpdoc2 title="API Documentation" destdir="reports/docs"><fileset dir="${src}"><include name="**/*.php" /></fileset></phpdoc2></target>
Again, my doc target depends upon the build target. I create the reports/docs output directory, and then invoke the phpdoc2 task. phpdoc2 accepts a nested fileset element, which specifies the files to document.
Note
The full documentation for PhpDocumentor2Task is available at https://www.phing.info/docs/guide/stable/PhpDocumentor2Task.html .
Code Coverage
It’s no good relying on tests if they don’t apply to the code you have written. PHPUnit includes the ability to report on code coverage . Here’s an extract from PHPUnit’s usage information:
--coverage-html <dir> Generate code coverage report in HTML format.--coverage-clover <file> Write code coverage data in Clover XML format.
In order to use this feature, you must have the Xdebug extension installed. You can find more about this at http://pecl.php.net/package/Xdebug (installation information is at http://xdebug.org/docs/install ). You may also be able to install directly using your Linux distribution’s package-management system. This should work for you in Fedora, for example:
$ yum install php-pecl-xdebug Or, if you’re using a version-specific repository, you might do something like this:
$ sudo yum -y install php70w-pecl-xdebug Here I run PHPUnit from the src/ directory with code coverage enabled:
$ ./vendor/bin/phpunit --whitelist src/ --coverage-html coverage testPHPUnit 5.4.6 by Sebastian Bergmann and contributors....... 6 / 6 (100%)Time: 1.84 seconds, Memory: 6.00MBOK (6 tests, 5 assertions)Generating code coverage report in HTML format ... done
Now you can see the report in your browser (see Figure 21-1).
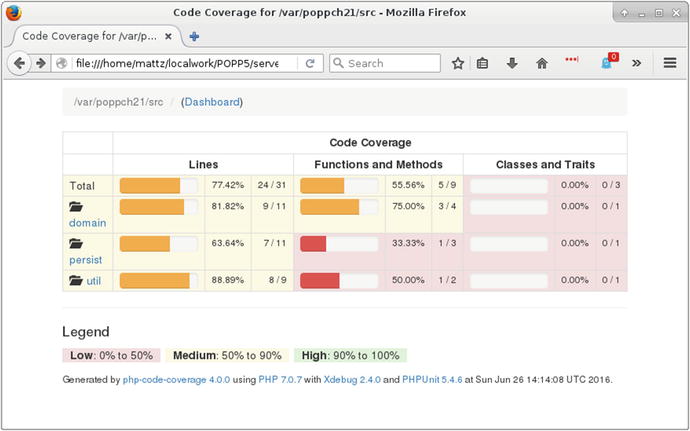
Figure 21-1. The code coverage report
It’s important to note that achieving full coverage is not the same as adequately testing a system. On the other hand, it’s good to know about any gaps in your tests. As you can see from Figure 21-2, I’ve still got some work to do.
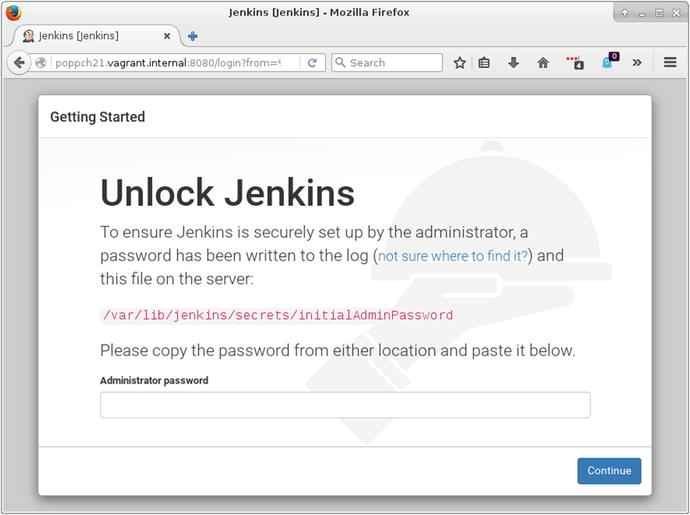
Figure 21-2. The install screen
Having confirmed that I can check coverage from the command line, I need to add this functionality to my build document:
<target name="citest" depends="build"><mkdir dir="reports/coverage" /><coverage-setup database="reports/coverage.db"><fileset dir="${src}"><include name="**/*.php"/></fileset></coverage-setup><phpunit codecoverage="true" bootstrap="vendor/autoload.php" printsummary="true"><formatter type="plain" usefile="false"/><formatter type="xml" outfile="testreport.xml" todir="reports" /><formatter type="clover" outfile="cloverreport.xml" todir="reports" /><batchtest><fileset dir="${test}"><include name="**/*Test.php"/></fileset></batchtest></phpunit><coverage-report outfile="reports/coverage.xml"><report todir="reports/coverage" /></coverage-report></target>
I have created a new task named citest. Much of it is a reproduction of the test task you have already seen.
I start by creating a reports directory and a coverage subdirectory.
I use the coverage-setup task to provide configuration information for the coverage feature. I specify where raw coverage data should be stored using the database attribute. The nested fileset element defines the files that should be subject to coverage analysis.
I have added two formatter elements to the phpunit task. The formatter of type xmlwill generate a file named testreport.xml, which will contain the test results. The clover formatter will generate coverage information, also in XML format. Finally, in the citest target, I deploy the coverage-report task. This takes existing coverage information, generates a new XML file, and then outputs an HTML report.
Note
The CoverageReportTask element is documented at https://www.phing.info/docs/guide/stable/CoverageReportTask.html .
Coding Standards
I discussed coding standards at length in Chapter 16. Although it can be annoying to have your individual style cramped by a shared standard, it can make a project easier to work with for the wider team. For that reason, many teams enforce a standard. It’s hard to enforce this by eye, however, so it makes sense to automate the process.
Once again, I will use Composer. This time I’ll be configuring it to install PHP_CodeSniffer :
"require-dev": {"phing/phing": "2.*","phpunit/phpunit": "5.4.*","phpdocumentor/phpdocumentor": "2.*","squizlabs/php_codesniffer": "2.*"}
Now I will apply the PSR2 coding standard to my code:
$ vendor/bin/phpcs—standard=PSR2 src/util/Validator.phpFILE: /var/poppch21/src/util/Validator.php----------------------------------------------------------------------FOUND 6 ERRORS AFFECTING 4 LINES----------------------------------------------------------------------8 | ERROR | [x] Opening brace of a class must be on the line after| | the definition11 | ERROR | [ ] Visibility must be declared on method "__construct"11 | ERROR | [x] Opening brace should be on a new line15 | ERROR | [ ] Visibility must be declared on method| | "validateUser"15 | ERROR | [x] Opening brace should be on a new line26 | ERROR | [x] Function closing brace must go on the next line| | following the body; found 1 blank lines before| | brace----------------------------------------------------------------------PHPCBF CAN FIX THE 4 MARKED SNIFF VIOLATIONS AUTOMATICALLY----------------------------------------------------------------------Time: 358ms; Memory: 4Mb
Clearly, I need to clean up my code a little!
One benefit of an automated tool is its impersonal nature. If your team does decide to impose a set of coding conventions, it’s arguably better having a humorless script correcting your style than a humorless coworker doing the same thing.
As you might expect by now, I would like to add a CodeSniffer target to my build file:
<target name="sniff" depends="build"><phpcodesniffer standard="PSR2"><fileset dir="src"><include name="**/*.php"/></fileset><formatter type="checkstyle" outfile="reports/checkstyle.xml"/></phpcodesniffer></target>
The phpcodesniffer task will do this job for me. I use the standard attribute to specify PSR2 rules. I define the files to check using the nested fileset element. I define a formatter element with a checkstyle type attribute. This will generate an XML file in the reports directory.
So I have a lot of useful tools that I can use to monitor my project. Of course, left to myself I’d soon lose interest in running them, even with my useful Phing build file. In fact, I’d probably revert to the old idea of an integration phase, and pull out the tools only when I’m close to a release, by which time their effectiveness as early-warning systems will be irrelevant. What I need is a CI server to run the tools for me.
Jenkins (formerly named Hudson) is an open source-continuous integration server. Although it is written in Java, Jenkins is easy to use with PHP tools. That’s because the continuous-integration server stands outside of the projects it builds, kicking off and monitoring the results of various commands. Jenkins also integrates well with PHP because it is designed to support plug-ins, and there is a highly active developer community working to extend the server’s core functionality.
Note
Why Jenkins? Jenkins is very easy to use and extend. It is well established, and it has an active user community. It’s free and open source. Plug-ins that support integration with PHP (and that includes most build and test tools you might think of) are available. There are many CI server solutions out there, however. A previous version of this book focused on CruiseControl ( http://cruisecontrol.sourceforge.net/ ), and this remains a good option.
Installing Jenkins
Jenkins is a Java system, so you will need to have Java installed. How you go about this will vary from system to system. On a Fedora distribution you might do something like this:
$ yum install java-1.7.0 Otherwise, you can get Java directly from www.java.com .
You can confirm that you have Java by running it from the command line:
$ java -versionjava version "1.7.0_101"OpenJDK Runtime Environment (rhel-2.6.6.4.el6_8-x86_64 u101-b00)OpenJDK 64-Bit Server VM (build 24.95-b01, mixed mode)
You can get Jenkins from the project homepage at http://jenkins-ci.org/ . It can be installed via a Java Web Archive (WAR) file, or there are native packages for most distributions, all linked from the homepage. I will use the Fedora option:
$ wget -O /etc/yum.repos.d/jenkins.repo http://pkg.jenkins-ci.org/redhat/jenkins.repo$ rpm --import http://pkg.jenkins-ci.org/redhat/jenkins-ci.org.key$ yum install jenkins
The Jenkins site provides installation instructions for most distributions.
Once Jenkins is installed you could run it directly via Java like this:
$ sudo java -jar /usr/lib/jenkins/jenkins.war However, you may run in to trouble later on if you do this. It’s almost certainly better to use a startup script, which will run Jenkins as the jenkins user. In the case of Fedora, you can start Jenkins like this:
$ service jenkins start You can also find a generic startup script at https://wiki.jenkins-ci.org/display/JENKINS/JenkinsLinuxStartupScript .
By default, Jenkins runs on port 8080, so you can find out whether you’re ready to proceed by firing up your browser and visiting http://yourhost:8080/. You should see something like the screen in Figure 21-2.
The instructions in Figure 21-2 are pretty self-explanatory. I grab the password from /var/lib/jenkins/secrets/initialAdminPassword and enter it into the box provided. Then I’m presented with a choice: install with popular plug-ins or pick my own? I opt for the most popular plug-ins, which I know will get me support for Git among other things. If you want a slim system, you might choose to select only those plug-ins you need. After that it’s time to create a user name and password before finishing up installation.
Installing Jenkins Plug-ins
Jenkins is highly customizable, and I will need quite a few plug-ins to integrate with the features I have described so far in this chapter. From within the Jenkins web interface, I click on Manage Jenkins and then Manage Plugins. Beneath the Available tab, I find a long list. I select the checkboxes in the Install column for all plug-ins that I wish to add to Jenkins.
Table 21-1 describes the plug-ins that I will be using.
Table 21-1. Some Jenkins Plug-ins
Plug-in | Description |
|---|---|
Git Plug-in | Allows interaction with Git repositories |
xUnit Plug-in | Integration with the xUnit family of tools including PHPUnit |
Phing Plug-in | Invoke Phing targets |
Clover PHP Plug-in | Accesses clover XML file and HTML files generated by PHPUnit and generates report |
HTML Publisher Plug-in | Integrates HTML reports. Used for PHPDocumentor output |
Checkstyle Plug-in | Accesses the XML file generated by PHPCodeSniffer and generates report |
You can see the Jenkins plug-in page in Figure 21-3.
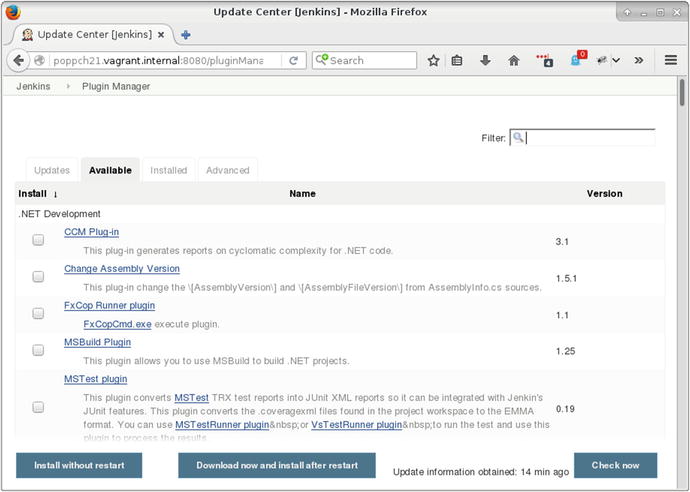
Figure 21-3. The Jenkins plug-in screen
Having installed these plug-ins, I’m almost ready to create and configure my project.
Setting up the Git Public Key
Before I can use the Git plug-in, I need to ensure that I have access to a Git repository. In Chapter 17 I described the process of generating a public key in order to access a remote Git repository. We need to repeat this process here. But where does Jenkins call home?
This location is configurable, but naturally Jenkins will clue you in. I click on Manage Jenkins and then Configure System. I find Jenkins’ home directory listed there. Of course, I could also check the /etc/passwd file for information relating to the jenkins user. In my case, the directory is /var/lib/jenkins.
Now I need to configure an SSH directory:
$ sudo su jenkins -s /bin/bash$ cd ∼$ mkdir .ssh$ chmod 0700 .ssh$ ssh-keygen
I switch to the jenkins user, specifying the shell to use (because shell access may be deactivated by default). I change to this user’s home directory. The ssh-keygen command generates the SSH keys. When prompted for a password, I just hit Return, so Jenkins will be authenticated by its key only. I make sure that the file generated at .ssh/id_rsa is neither world- nor group-readable:
$ chmod 0600 .ssh/id_rsa Now I can acquire the public key from .ssh/id_rsa.pub and add it to my remote Git repository. See Chapter 17 for more on that.
I’m not quite there yet. I need to ensure that my Git server is an SSH known host. I can combine setting this up with a command-line test of my Git configuration. I make sure I’m still logged in as the jenkins user when I do this:
$ cd /tmp$ git clone git@bitbucket.org:getinstance/userthing.git
I am prompted to confirm my Git host, and it’s then added to the jenkins user’s .ssh/known_hosts file. This prevents Jenkins from tripping over later when it makes its Git connection.
Installing a Project
From the Jenkins dashboard page, I click on New Item. From this new screen I can, at last, create my userthing project. You can see the setup screen in Figure 21-4.

Figure 21-4. The project setup screen
I chose Freestyle project and hit OK. That leads me to the project configuration screen. My first order of business is to link up with the remote Git repository. I choose the Git radio button in the Source Code Manager section and add my repository. You can see this in Figure 21-5.
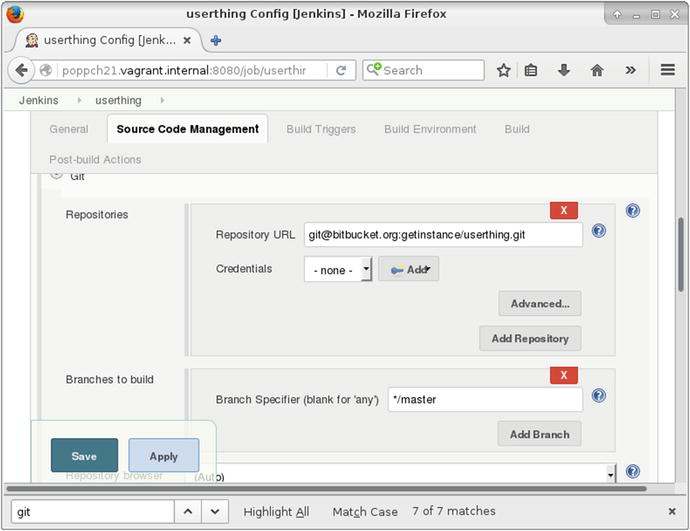
Figure 21-5. Setting up the version-control repository
If all has gone well, I should be able to access my source code. I can check that by saving and choosing Build from the dashboard page. In order to see some meaningful action, however, I should also set up Phing. This is simple if you’ve installed Phing centrally. If you’re using Composer, however, things are just a little more complicated. You must tell Jenkins where to find the Phing executable. You can do this by choosing Manage Jenkins from the main menu, and then Global Tool Configuration. Because I have installed the Phing plug-in, I will find a configuration area for the tool there. In Figure 21-6, I add the path to the phing script’s location (or at least to the location it will end up once Composer has been run).
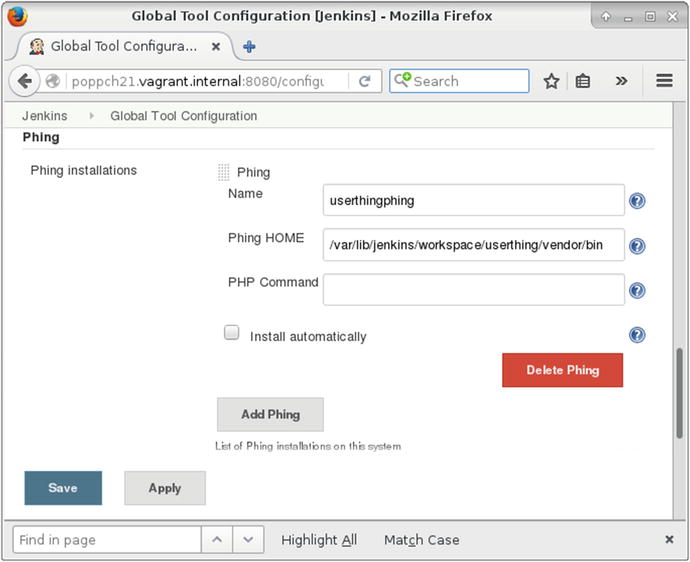
Figure 21-6. Specifying Phing’s location
With that step complete I can configure Phing for my project. I return to the userthing project area and the Configure menu. I scroll to the Build section and choose two items from the Add build step pulldown. First, I choose Execute shell. I need to make sure that Jenkins runs composer install, or none of the tools my project depends upon will be installed. Figure 21-7 shows the configuration.
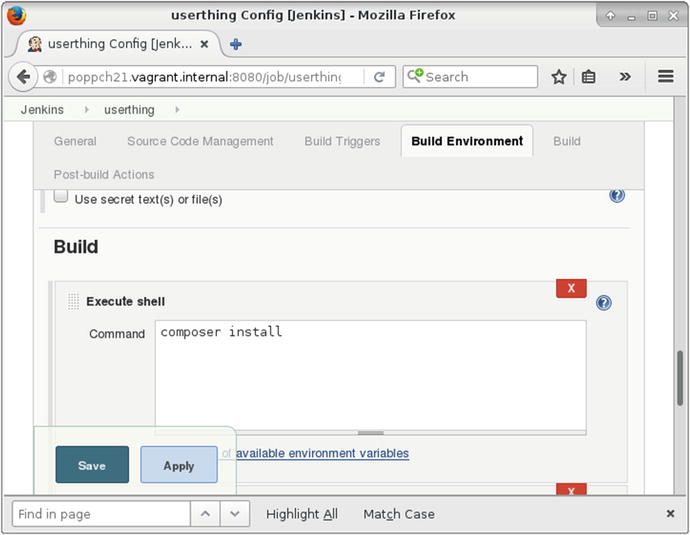
Figure 21-7. Setting up shell execution
The next item I choose from the Add build step pulldown is Invoke Phing targets. Here can I add my Phing targets to the text field. You can see this step in Figure 21-8.
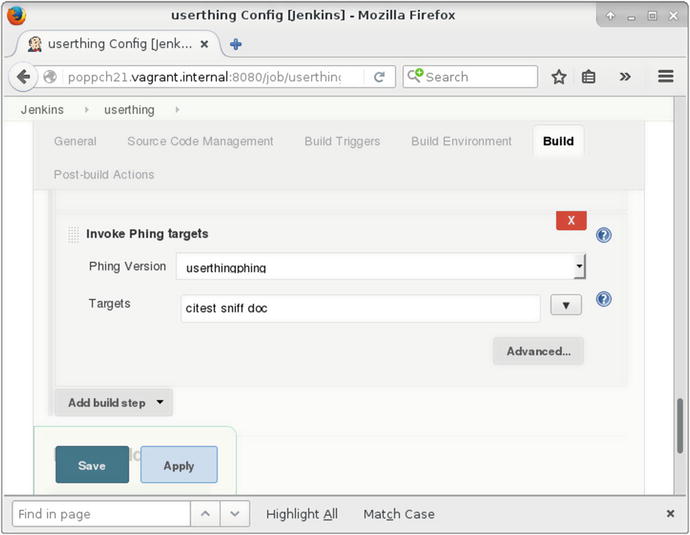
Figure 21-8. Configuring Phing
Running the First Build
I save the configuration screen and click Build Now to run the build and test process. This is the moment of truth! A build link should appear in the Build History area of the screen. I click on that, and then on Console Output to confirm that the build went ahead as hoped. You can see the output (albeit from a later build) in Figure 21-9.

Figure 21-9. Console output
Jenkins checks the userthing code out from the Git server, and runs all the build and test targets.
Configuring the Reports
Thanks to my build file, Phing saves reports into the build/reports directory and documentation into build/docs. The plug-ins that I activated can be configured from the Add post-build action pulldown in the project-configuration screen.
Figure 21-10 shows some of these configuration items.

Figure 21-10. Configuring report plug-in items
Rather than subject you to screenshot after screenshot, it will be clearer to compress the configuration items into a table. Table 21-2 shows some post-build action fields and the corresponding values I set up in my Phing build file.
Table 21-2. Report configuration
Configuration item | Phing Task | Field | Value |
|---|---|---|---|
Publish Checkstyle analysis results | phpcodesniffer | Checkstyle results | reports/checkstyle.xml |
Publish Clover PHP Coverage Report | phpunit | Clover XML Location | reports/cloverreport.xml |
Clover HTML report directory | reports/clovercoverage/ | ||
Publish HTML reports | phpdoc2 | HTML directory to archive | reports/docs |
Index page[s] | index.html | ||
Publish Junit test result report | phpunit | Test report XMLs | reports/testreport.xml |
E-mail Notification | Recipients | someone@somemail.com |
You encountered all of the configuration values in Table 21-2 as I constructed the project’s build file. All, that is, apart from the last. The E-mail Notification field allows you to define a list of developers who will all receive notifications when a build fails.
With all that set up, I can return to the project screen and run another build. Figure 21-11 shows my newly enhanced output.
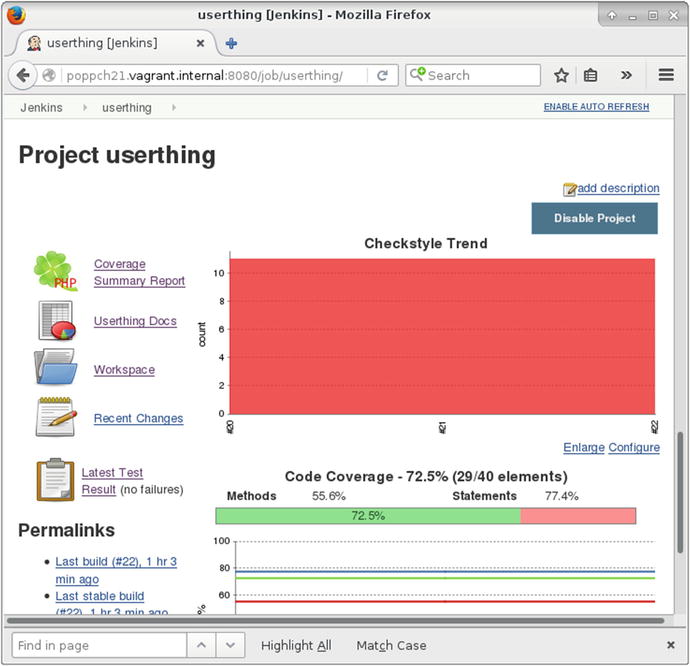
Figure 21-11. The Project screen showing trend information
Over time, the project screen will plot trends for test performance, coverage, and style compliance. There are also links to the latest API Documentation, detailed test results, and full coverage information.
Triggering Builds
All of this rich information is almost useless if someone in your team must remember to kick off each build with a manual click. Naturally, Jenkins provides mechanisms by which builds can be automatically triggered.
You can set Jenkins to build at fixed intervals or to poll the version-control repository, again at specified intervals. Intervals can be set using cron format, which provides fine, although somewhat arcane, control over scheduling. Luckily, Jenkins provides good online help for the format, and there are simple aliases if you don’t require precision scheduling. The aliases include @hourly, @midnight, @daily, @weekly, and @monthly. In Figure 21-12, I configure the build to run once daily, or every time the repository changes, based upon a poll for changes that should take place once an hour.
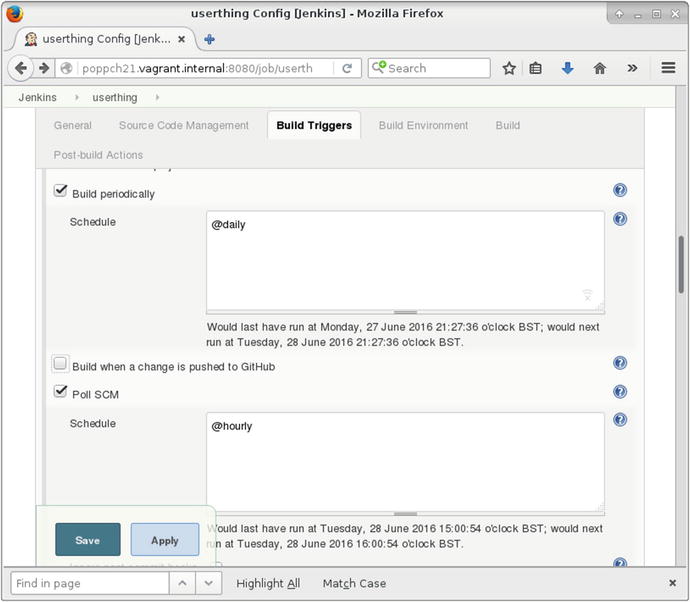
Figure 21-12. Scheduling builds
Test Failures
So far everything seems to be going well, even if userthing won’t be winning any code-compliance badges any time soon. But tests succeed when they fail, so I’d better break something to make sure that Jenkins reports on it.
Here is a part of a class named Validate in the namespace userthing\util:
public function validateUser(string $mail, string $pass): boolean{// make it always failreturn false;$user = $this->store->getUser($mail);if (is_null($user)) {return null;}if ($user->getPass() == $pass) {return true;}$this->store->notifyPasswordFailure($mail);return false;}
See how I’ve sabotaged the method? As it now stands, validateUser()will always return false.
Here’s the test that should choke on that. It’s in test/util/ValidatorTest.php:
public function testValidateCorrectPass(){$this->assertTrue($this->validator->validateUser("bob@example.com", "12345"),"Expecting successful validation");}
Having made my change, all I need do is commit, and wait. Sure enough, before long, the project status shows a build marked by a yellow icon. Once I click on the build link, I find more details. You can see the screen in Figure 21-13.
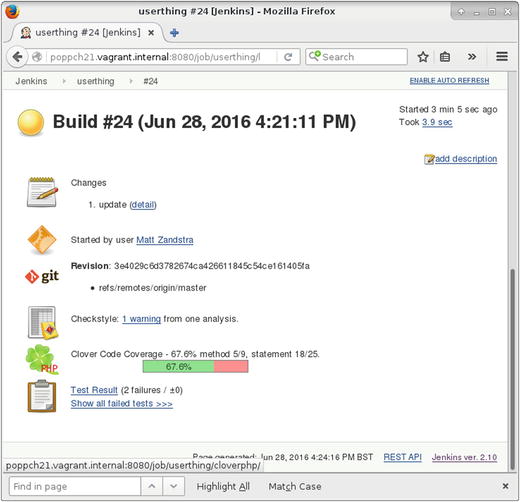
Figure 21-13. The Unstable Build
Summary
In this chapter, I brought together many of the tools that you have seen in previous chapters and glued them in place with Jenkins. I prepared a small project for CI, applying a range of tools including PHPUnit (both for testing and code coverage), PHP_CodeSniffer, phpDocumentor, and Git. Then I set up Jenkins and showed you how to add a project to the system. I put the system through its paces and, finally, showed you how to extend Jenkins so that it can bug you with e-mails, and test both build and installation.