Where do you run your code?
Maybe you have a development environment you have honed to perfection with a favorite editor and any number of useful development tools. Of course, your perfect set up for writing code is probably very different from the best system on which to run it. And that’s a challenge that Vagrant can help you with. Using Vagrant you get to work on your local machine and run your code on a system that’s all but identical to your production server. In this chapter I will show you how. We will cover the following:
Basic set up: From installation to choosing your first box
Logging in: Investigating your virtual machine with ssh
Mounting host directories: Editing code on your host machine and having it available transparently in your Vagrant box
Provisioning: Writing a script to install packages and configure Apache and MySQL
Set a hostname: Configuring your box so that you can access it using a custom hostname
The Problem
As always, let’s spend a little time defining the problem space. It is relatively easy, these days, to configure a LAMP stack on most desktop or laptop computers. Even so, a personal computer is unlikely to match your production environment. Is it running the same version of PHP? What about Apache and MySQL? If you’re using Elasticsearch, you may need to consider Java, too. The list soon grows. Developing against one set of tools on a particular platform can sometimes be problematic if your production stack is significantly different.
You might give up and shift your development to a remote machine—there are plenty of cloud vendors who will allow you to spin up a box quickly. But that’s not a free option, and, depending upon your editor of choice, a remote system may not integrate well with the development tools you wish to use.
So it may be worth the effort of matching the packages on your computer as closely as possible with those installed on the production system. The match won’t be perfect, but perhaps it will be good enough, and you’ll probably catch most issues on the staging server.
What happens, though, when you begin work on a second project with radically different requirements? We have seen that Composer does a great job of keeping dependencies separate, but there are still global packages like PHP, MySQL, and Apache to keep in line.
Note
If you decide to develop on remote systems, I recommend making the effort to learn how to use the vim editor. Despite its quirks, it is extremely powerful, and you can be 99% certain that either vim or its more basic ancestor vi will available on any Unix-like system you encounter.
Virtualization is a potential solution, and a good one. It can be a pain installing an operating system, though, and there can be considerable configuration hassles.
If only there were a tool that made creating a production-like development environment on a local machine really simple. OK, it’s obvious that now I’m going to say that just such a tool exists. Well, one does. It’s called Vagrant, and it is truly amazing.
A Little Setup
It is tempting to say that Vagrant gives you a development environment with a single command. That can be true—but you do have to install the requisite software first. Given that, and a configuration file that you can check out from your project’s version-control repository, launching a new environment truly can involve a single command.
Let’s get started with the setup first. Vagrant requires a virtualization platform. It supports several, but I will use VirtualBox . My host machine runs Fedora, but you can install VirtualBox on any Linux distribution and on OSX or Windows. You can find the download page at https://www.virtualbox.org/wiki/Downloads , together with instructions for your platform.
Once you have VirtualBox installed, you’ll need Vagrant, of course. The download page is at https://www.vagrantup.com/downloads.html . Once we have installed these applications, our next task will be to choose the box we’ll run our code on.
Choosing and Installing a Vagrant Box
Probably the easiest way to acquire a Vagrant box is to use the search interface at https://atlas.hashicorp.com/search . Since many production systems run CentOS, that’s what I will look for. You can see the fruits of my research in Figure 20-1.
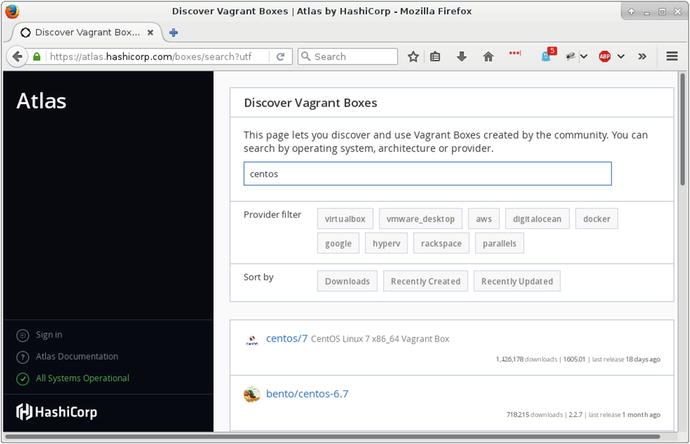
Figure 20-1. Searching for a Vagrant box
CentOS 6.7 looks about right for my needs. I now have enough information to get a Vagrant environment running. Usually when you run Vagrant, it will read a configuration file named Vagrantfile—but since I am starting from scratch, I need to ask Vagrant to generate one:
$ vagrant init bento/centos-6.7A 'Vagrantfile' has been placed in this directory. You are nowready to 'vagrant up' your first virtual environment! Please readthe comments in the Vagrantfile as well as documentation on'vagrantup.com' for more information on using Vagrant.
As you can see, I pass Vagrant the name of the box I want to work with, and it uses this information to generate some minimal configuration.
If I open up the generated Vagrantfile document , I can see this (among much other boilerplate):
# Every Vagrant development environment requires a box. You can search for# boxes at https://atlas.hashicorp.com/search.config.vm.box = "bento/centos-6.7"
At this point, I have only gotten as far as generating configuration. Next, I must run the all-important vagrant up command. If you work with Vagrant often, you will soon find this command very familiar. It kicks off your Vagrant session by downloading and provisioning your new box (if necessary), then booting it:
$ vagrant up Because I am running this command for the first time with the bento/centos-6.7 virtual machine, Vagrant starts by downloading the box:
Bringing machine 'default' up with 'virtualbox' provider...==> default: Box 'bento/centos-6.7' could not be found. Attempting to find and install...default: Box Provider: virtualboxdefault: Box Version: >= 0==> default: Loading metadata for box 'bento/centos-6.7'default: URL: https://atlas.hashicorp.com/bento/centos-6.7==> default: Adding box 'bento/centos-6.7' (v2.2.7) for provider: virtualboxdefault: Downloading: https://atlas.hashicorp.com/bento/boxes/centos-6.7/versions/2.2.7/providers/virtualbox.box==> default: Successfully added box 'bento/centos-6.7' (v2.2.7) for 'virtualbox'!
Vagrant stores the box (under ∼/.vagrant.d/boxes/ if you are running Linux) so that you won’t have to download it again on your system—even if you run multiple virtual machines. Then it configures and boots the machine (it provides lots of detail as it does so). Once it has finished running, I can test it out by logging in to my new machine:
$ vagrant ssh$ pwd/home/vagrant$ cat /etc/redhat-releaseCentOS release 6.7 (Final)
We’re in! So what have we won? Well, we have access to a machine that somewhat resembles our production environment. Anything else? Quite a lot, in fact. I said earlier that I would like to edit files on my local machine but run them in a production-like space. Let’s set that up.
Mounting Local Directories on the Vagrant Box
Let’s put some sample files together. I ran my first vagrant init and vagrant up commands in a directory I named infrastructure. I will resurrect the webwoo project I used in Chapter 18 (a cut down version of the system I developed for Chapter 12). Putting all that together, my development environment looks a little like this:
ch20/infrastructure/Vagrantfilewebwoo/AddVenue.phpindex.phpMain.phpAddSpace.php
Our challenge is to set up the environment so that we can work with webwoo files locally, but run them transparently using a stack installed on the CentOS box. Depending upon our configuration, Vagrant will attempt to mount directories on the host machine within the guest box. In fact, Vagrant has already mounted one directory for us. Let’s check it out:
$ vagrant sshLast login: Tue Jul 5 15:36:19 2016 from 10.0.2.2$ ls -a /vagrant. .. .vagrant Vagrantfile
So Vagrant has mounted the infrastructure directory as /vagrant on the box. That will come in handy when we write a script to provision the box. For now, though, let’s focus on mounting the webwoo directory. We can do this by editing Vagrantfile:
config.vm.synced_folder "../webwoo", "/var/www/poppch20"So with this directive, I am telling Vagrant to mount the webwoo directory on the guest box at /var/www/poppch20. In order to see that in effect, I need to reboot the box. There’s a new command for this (which should be run on the host system and not within the virtual machine):
$ vagrant reload The virtual machine shuts down and reboots cleanly. Vagrant mounts the infrastructure (/vagrant)and webwoo (/var/www/poppch20) directories. Here’s an extract from the command’s output:
==> default: Mounting shared folders...default: /vagrant => /home/mattz/ch20/infrastructuredefault: /var/www/poppch20 => /home/mattz/ch20/webwoo
I can log in quickly to confirm that /var/www/poppch20 is in place:
$ vagrant sshLast login: Thu Jul 7 15:25:16 2016 from 10.0.2.2$ ls /var/www/poppch20/AddSpace.php AddVenue.php index.php Main.php
So now I can run a sexy IDE on my local machine and have the changes it makes transparently available on the guest box!
Of course, placing files on a CentOS VM is not the same as running the system. A typical Vagrant box comes without too much pre-installed. The assumption is that the developer will want to customize the environment according to need and circumstance.
The next stage is to provision our box.
Provisioning
Once again, provisioning is directed by the Vagrantfile document . Vagrant supports several tools designed for provisioning machines, including chef ( https://www.chef.io/chef/ ), puppet ( https://puppet.com ), and ansible ( https://www.ansible.com ). They’re all worth investigating. For the purposes of this example, though, I’m going to use a good old-fashioned shell script.
Once again I begin with Vagrantfile:
config.vm.provision "shell", path: "setup.sh"This should be reasonably clear. I’m telling Vagrant to use a shell script to provision my box, and I specify setup.sh as the script which should be executed.
What you put in your shell script depends upon your requirements, of course. I’m going to begin by setting t couple of variables, and installing some packages:
#!/bin/bashVAGRANTDIR=/vagrantSERVERDIR=/var/www/poppch20/sudo rpm -Uvh https://mirror.webtatic.com/yum/el6/latest.rpmsudo yum install -y patchsudo yum install -y vimsudo yum -q -y install mysql-serversudo yum -q -y install httpd;sudo yum -q -y install php70wsudo yum -q -y install php70w-mysqlsudo yum -q -y install php70w-xmlsudo yum -q -y install php70w-dom
PHP 7 is not available by default on CentOS 6. However, installing a yum repository from webtatic.com provides access to a package named php70w and a stack of related extensions. I write my script to a file named setup.sh which I place in the infrastructure directory alongside Vagrantfile.
Now, how do I kick off the provisioning process? If the config.vm.provision directive and the setup.sh script had both been in place when I ran vagrant up, then the provisioning would have been automatic. As it is, I’ll now need to run it manually:
$ vagrant provision This will spew an awful lot of information onto your terminal as the setup.sh script is run within the Vagrant box. Let’s see if it worked:
$ vagrant ssh$ php -vPHP 7.0.7 (cli) (built: May 28 2016 08:26:36) ( NTS )Copyright (c) 1997-2016 The PHP GroupZend Engine v3.0.0, Copyright (c) 1998-2016 Zend Technologies
Setting Up the Web Server
Of course, even with MySQL and Apache installed, the system is not ready to be run. First of all, we should configure Apache. The easiest way to do this is to create a configuration file that can be copied into Apache’s conf.d directory. Let’s call the file poppch20.conf, and drop it into the infrastructure directory:
NameVirtualHost *:80<VirtualHost *:80>ServerAdmin matt@getinstance.comDocumentRoot /var/www/poppch20ServerName poppch20.vagrant.internalErrorLog logs/poppch20-error_logCustomLog logs/poppch20-access_log common</VirtualHost><Directory /var/www/poppch20>AllowOverride all</Directory>
I’ll return to that hostname a little later. Leaving aside that tantalizing detail, this is enough to tell Apache about our /var/www/poppch20 directory and to set up logging. Of course, I’ll also have to update setup.sh to copy the configuration file at provision time:
sudo cp $VAGRANTDIR/poppch20.conf /etc/httpd/conf.d/sudo service httpd restartsudo /sbin/chkconfig httpd on
I copy the configuration file into place and restart the web server so that the configuration is picked up. I also run chkconfigto ensure that the server will be started at boot time.
After making this change, I can re-run this script:
$ vagrant provision It’s important to note that those parts of the set up script we previously covered will also be re-run. When you create a provisioning script, you must design it so it can be executed repeatedly without serious repercussions. Luckily, Yum detects that my specified packages have already been installed and grumbles harmlessly, in part because I take the precaution of passing it -q flag, which keeps the complaints relatively muted.
Setting Up MySQL
For many applications you’ll need to make sure that a database is available and ready for connections. Here’s a simple addition to my setup script:
sudo service mysqld start/usr/bin/mysqladmin -s -u root password 'vagrant' || echo "** unable to create pass - probably already done"echo "CREATE DATABASE IF NOT EXISTS poppch20_vagrant" | mysql -u root -pvagrant# install data here if needed#echo "GRANT ALL PRIVILEGES ON poppch20_vagrant.* TO'vagrant'@'localhost' IDENTIFIED BY 'vagrant'WITH GRANT OPTION" | mysql -u root -pvagrantecho "FLUSH PRIVILEGES" | mysql -u root -pvagrantsudo /sbin/chkconfig mysqld on
I start MySQL . Then I run the mysqladmin command to create a root password. This will fail after the first run because the password will already be set, so I use the -s flag to suppress error messages and print a message of my own if the command fails. Then I create a database, a user, and a password. Finally, I run chkconfig to ensure that the MySQL daemon will start at boot time.
With that in place, I can provision again, and then test my database:
$ vagrant provision# much output$ vagrant ssh$ mysql -uvagrant -pvagrant poppch20_vagrantWelcome to the MySQL monitor. Commands end with ; or \g.Your MySQL connection id is 9Server version: 5.1.73 Source distributionCopyright (c) 2000, 2013, Oracle and/or its affiliates. All rights reserved.Oracle is a registered trademark of Oracle Corporation and/or itsaffiliates. Other names may be trademarks of their respectiveowners.Type 'help;' or '\h' for help. Type '\c' to clear the current input statement.mysql>
We now have a running database and a web server. It’s time to see the code in action.
Configuring a Host Name
We have logged in to our new production-like development environment several times, so networking is more or less taken care of. Even though I’ve configured a web server, I’ve yet to use it. That’s because we still need to support a hostname for our VM. So let’s add one to Vagrantfile:
config.vm.hostname = "poppch20.vagrant.internal"config.vm.network :private_network, ip: "192.168.33.148"
I invent a hostname and use the config.vm.hostname directive to add it. I also configure private networking with config.vm.network, assigning a static IP address. You should use private address space for this—an unused IP address beginning with 192.168 should work.
Because this is an invented hostname, we must configure our operating system to handle the resolution. On a Unix-like system that means editing a system file, /etc/hosts. In this case, I would add the following:
192.168.33.148 poppch20.vagrant.internalNot overly onerous, but we are working towards a one-command install for our team, so it would be good to have a way of automating this step. Fortunately, Vagrant supports plug-ins, and the hostmanager plug-in does exactly what we need.
You can see what plug-ins are installed with this command:
$ vagrant plugin listvagrant-login (1.0.1, system)vagrant-share (1.1.5, system)
To add a plug-in, you simply run the vagrant plugin install command:
$ vagrant plugin install vagrant-hostmanagerInstalling the 'vagrant-hostmanager' plugin. This can take a few minutes...Installed the plugin 'vagrant-hostmanager (1.8.2)'!
Then you can explicitly tell the plug-in to update /etc/hosts, like this:
$ vagrant hostmanager[default] Updating /etc/hosts file...
In order to make this process automatic for our team members, we should explicitly enable hostmanger in Vagrantfile:
config.hostmanager.enabled = trueWith the configuration changes in place, we should run vagrant reload in order to apply them. Then it’s the moment of truth! Will our system run in the browser? As you can see in Figure 20-2, the system should work just fine.
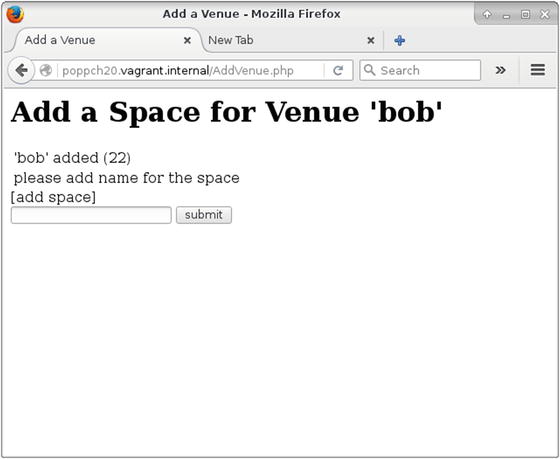
Figure 20-2. Accessing a configured system on a Vagrant box
Wrapping It Up
So we have gone from nothing to a fully working development environment. Given that it took a chapter’s worth of effort to get here, it might seem like a bit of a cheat to say that Vagrant is quick and easy. There are two answers to that. First, once you have done this a few times, it becomes a pretty simple matter to spin up yet another Vagrant setup—certainly much easier than trying to juggle multiple dependency stacks by hand.
More importantly, though, the real speed and efficiency gain does not lie with the person who sets Vagrant up. Imagine a new developer coming in to your project expecting days' worth of downloads, configuration file edits, and wiki-clicking. Imagine telling her, “Install Vagrant and VirtualBox. Check out the code. From the infrastructure directory, run 'vagrant up'.” And that’s it! Compare that with some of the painful onboarding processes you have experienced or heard described.
Of course, we’ve only scratched the surface in this chapter. As you need to configure Vagrant to do more for you, the official site at https://www.vagrantup.com will provide you with all the support you need.
Table 20-1 provides a quick reminder of the Vagrant commands we encountered in this chapter.
Table 20-1. Some Vagrant Commands
Command | Description |
|---|---|
vagrant up | Boot the virtual machine and provision if not yet provisioned |
vagrant reload | Halt the system and bring it back up |
vagrant plugin list | List the installed plug-ins |
vagrant plugin install <plugin-name> | Install a plug-in |
vagrant provision | Run the provision step again (useful if you have updated provision scripts) |
vagrant halt | Gracefully shut down the virtual machine |
vagrant init | Create a new Vagrantfile document |
vagrant destroy | Destroy the virtual machine. Don’t worry, you can always start again with vagrant up! |
Summary
In this chapter, I introduced Vagrant, the application that lets you work in a production-like development environment without sacrificing your authoring tools. I covered installation, the choosing of a distribution, and initial setup—including mounting your development directories. Once we had a virtual machine to play with, I moved on to the provisioning process—covering package installation, as well as database and web server configuration. Finally, I looked at hostname management, and I showed our system working in the browser!