
All disasters have their tipping point, the moment at which order finally breaks down and events simply spiral out of control. Do you ever find yourself in projects like that? Are you able to spot that crucial moment?
Perhaps it’s when you make “just a couple of changes” and find that you have brought everything crashing down around you (and, even worse, you’re not quite sure how to get back to the point of stability you have just destroyed). It could be when you realize that three members of your team have been working on the same set of classes and merrily saving over each other’s work. Or perhaps it’s when you discover that a bug fix that you have implemented twice has somehow disappeared from the codebase yet again. Wouldn’t it be nice if there were a tool to help you manage collaborative working, allowing you to take snapshots of your projects, roll them back if necessary, and then to merge multiple strands of development? In this chapter, we look at Git, a tool that does all that, and more.
This chapter will cover the following aspects of working with Git:
Basic configuration: Exploring some tips for setting up Git
Importing: Starting a new project
Committing changes: Saving your work to the repository
Updating: Merging other people’s work with your own
Branching: Maintaining parallel strands of development
Why Use Version Control?
If it hasn’t already, version control will change your life (if only your life as a developer). How many times have you reached a stable moment in a project, drawn a breath, and plunged onward into development chaos once again? How easy was it to revert to the stable version when it came time to demonstrate your work in progress? Of course, you may have saved a snapshot of your project when it reached a stable moment, probably by duplicating your development directory. Now imagine that your colleague is working on the same codebase. Perhaps he has saved a stable copy of the code as you have. The difference is that his copy is a snapshot of his work, not yours. Of course, he has a messy development directory, too. So you have four versions of your project to coordinate. Now imagine a project with four programmers and a web UI developer. You’re looking pale. Perhaps you would like to lie down?
Git exists exclusively to address this problem. Using Git, all of your developers can clone their own copies of the codebase from a central repository. Whenever they reach a stable point in their code, they can pull the latest code from the server and merge it with their own recent work. When they are ready, and after they have fixed any conflicts, they can push their new stable synthesis back into the shared repository.
Git is a distributed version-control system. This means that, once they have acquired a branch, users commit to their own local repository without the need for a network connection. There are a number of benefits to this. It means that day-to-day operations are faster, and that you can work easily on planes and trains and in automobiles. Ultimately, however, you can share an authoritative repository with your teammates.
The fact that each developer can merge her work into a central repository means that reconciling multiple strands of development is made vastly easier. Even better, you can check out versions of your codebase based on a date or a label. So when your code reaches a stable point, suitable for showing to a client as work in progress, for example, you can tag that with an arbitrary label. You can then use that tag to check out the correct codebase when your client swoops into your office looking to impress an investor.
Wait! There’s more! You can also manage multiple strands of development at the same time. If this sounds needlessly complicated, imagine a mature project. You have already shipped the first version, and you’re well into development of version 2. Does version 1.n go away in the meantime? Of course not. Your users are spotting bugs and requesting enhancements all the time. You may be months away from shipping version 2, so where do you make and test the changes? Git lets you maintain distinct branches of the codebase. So you might create a bug-fix branch of your version 1.n for development on the current production code. At key points, this branch can be merged back into the version 2 code (the trunk), so that your new release can benefit from improvements to version 1.n.
Note
Git is not the only version-control system available. You might also like to look into Subversion ( http://subversion.apache.org/ ) or Mercurial ( http://mercurial.selenic.com/ ). This chapter is necessarily a brief introduction to a large topic. Luckily, however, Pro Git by Scott Chacon (Apress, 2014) covers the topic with depth and clarity. Not only that, but a web version is available online at https://git-scm.com/book/en/v2 .
Let’s get on and look at some of these features in practice.
Getting Git
If you are working with a Unix-like operating system (such as Linux or FreeBSD), you may already have Git installed and ready to use.
Note
I show commands that are input at the command line in bold to distinguish them from any output they may produce.
Try typing this from the command line:
$ git help You should see some usage information that will confirm that you are ready to get started. If you do not already have Git, you should consult your distribution’s documentation. You will almost certainly have access to a simple installation mechanism such as Yum or Apt, or you can acquire Git directly from http://git-scm.com/downloads .
Note
Throughout this chapter, I denote command line input by displaying it in bold text. A dollar sign ($) represents the command prompt.
Using an Online Git Repository
You may have noticed by now that this book often goes it alone. I almost never argue that you should reinvent the wheel; rather, you should at least get a sense of what goes into wheel construction before buying one ready-made. For this reason, I’ll be covering the mechanics of setting up and maintaining your own central git repository in the next section. Let’s get real, though. You’ll almost certainly use a specialized host to manage your repositories. There are a number of these to choose from, though the biggest players are probably Bitbucket ( https://bitbucket.org ) and GitHub ( https://github.org ).
So, which should you choose? As a rule of thumb, GitHub is probably the standard for open source products. Startups often opt for Bitbucket because it offers free private repositories and only charges as your team grows. That seems like a good deal; after all, if your team is growing, then you’ve probably either secured funding or you’re seeing some revenue. If that’s true, then well done, you!
More or less on the basis of a coin toss, I’ll sign up with GitHub for my project. Figure 17-1 shows my next decision, which is between a public or private repository. I’ll opt for a public project (because I’m a cheapskate).
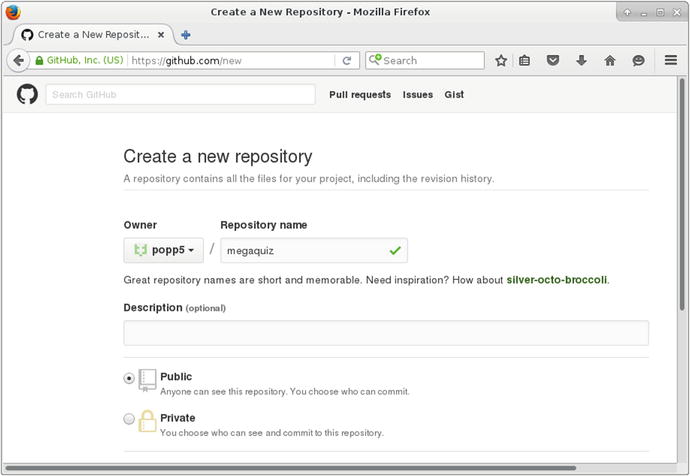
Figure 17-1. Getting started with a GitHub project
At this point, GitHub offers some helpful instructions for importing my project. You can see those in Figure 17-2.
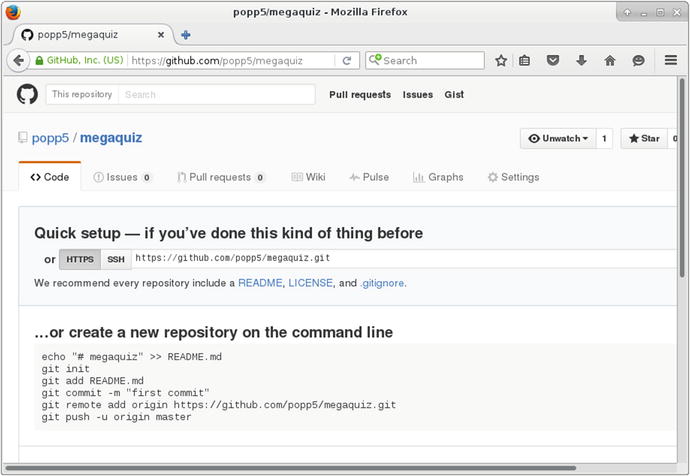
Figure 17-2. GitHub’s import instructions
I’m not ready to run those commands yet, though. GitHub needs to be able to validate me when I push files to the server. In order to do that, it requires my public key. I describe one way of generating such a key in the next section, “Configuring a Git Server.” Once I have a public key, I can add it from the SSH and GPG keys link in GitHub’s User Settings screen.
You can see GitHub’s settings screen for SSH and GPG keys in Figure 17-3.
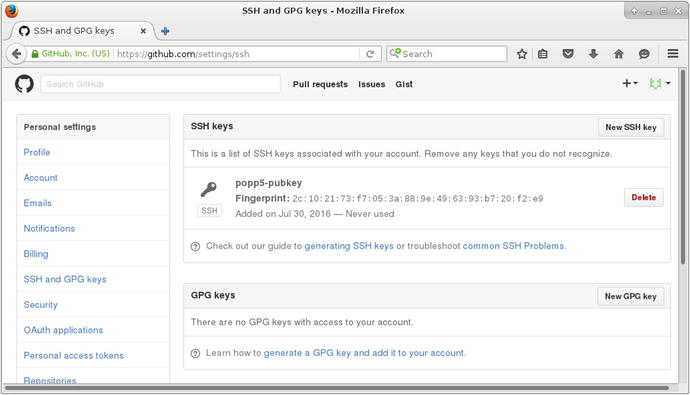
Figure 17-3. Adding an SSH key
Now I’m ready to start adding files to my repository. Before we get into that, though, we should step back and spend some time following the do-it-yourself route.
Configuring a Git Server
Git is different from traditional version-control systems in two key ways. First, under the hood, it stores snapshots of files, rather than the changes made to files between commits. Second, and more obviously to the user, it operates locally to your system until you choose to push to or pull from a remote repository. This means that you are not dependent on an Internet connection to get on with your work.
You do not need a single remote repository in order to work with Git; but in practice, it almost always makes sense to have a shared source of authority if you are working with a team.
In this section, I look at the steps needed to get a remote Git server up and running. I assume root access to a Linux machine.
Creating the Remote Repository
In order to create a Git repository, I must first create a containing directory. I log into a freshly provisioned remote server via SSH. I am going to create my repository under /var/git. Generally speaking, only the root user can create and modify directories there, so I run the following command using sudo:
$ sudo mkdir -p /var/git/megaquiz$ cd /var/git/megaquiz/
I create /var/git, a parent directory for my repositories, and a subdirectory for a sample project called megaquiz. Now I can prepare the directory itself:
$ sudo git init --bareInitialized empty Git repository in /var/git/megaquiz/
The --bare flag tells Git to initialize a repository without a working directory. Git will complain if you try to push to a repository that has not been created in this way.
At the moment, only the root user can mess around under /var/git. I can change this by creating a user and a group named git and making it the directory’s owner:
$ sudo adduser git$ sudo chown -R git:git /var/git
Preparing the Repository for Local Users
Although this is a designated remote server, I should also ensure that local users can commit to the repository. If you’re not careful, this can cause ownership and permissions issues (especially if users with sudo privileges push code).
$ sudo chmod -R g+rws /var/git This gives members of the git group write access to /var/git and causes all files and directories created here to take on the git group. Now, as long as I ensure that they are members of the git group, local users will be able to write to the repository. Not only that, any files created will be writable by other members of the group.
You can add a local user to the git group like this:
$ sudo usermod -aG git bob Now user bob is a member of the git group.
Providing Access to Users
The owner of the bob user mentioned in the previous section can log into the server and interact with the repository from his shell. Generally, though, you won’t want to provide shell access to all your users. In any case, most users will prefer to take advantage of Git’s distributed nature and to work locally with their cloned data.
One way to grant a user SSH access is via public-key authentication. To do this, you first need to acquire the user’s public SSH key. The user may already have this—on a Linux machine, he will probably find the key in the configuration directory, .ssh, in a file named id_rsa.pub. Otherwise, he can easily generate a new key. On a Unix-like machine, this is a matter of running the ssh-keygen command and copying the value that it generates:
$ ssh-keygen$ cat .ssh/id_rsa.pub
As the repository administrator, I will have asked you for a copy of this key. Once I have it, I must add it to the git user’s SSH set up on the repository server. This is merely a matter of pasting the public key into the .ssh/authorized_keys file. I may need to create the .ssh configuration directory for the first key I set up (I am running these commands from the git user’s home directory):
$ mkdir .ssh$ chmod 0700 .ssh# create authorized_keys file and paste in the user's key:$ vi .ssh/authorized_keys$ chmod 0700 .ssh/authorized_keys
Note
A common cause of SSH access failure is the creation of configuration files with overly liberal permissions. The SSH configuration environment should be readable and writable to the account’s owner, only. Pro OpenSSH by Michael Stahnke (Apress, 2005) covers SSH comprehensively.
Closing Down Shell Access for the git User
No server should be any more open than it needs to be. You may want to enable your user to access Git commands, but probably not much more.
You can see the shell associated with a user on a Linux server by looking at the file, /etc/passwd. Here is the relevant line for the git account on my remote server:
git:x:1001:1001::/home/git:/bin/bashGit provides a special shell, named git-shell, that restricts the user to selected commands only. I can enable this program for logins by editing /etc/passwd:
git:x:1001:1001::/home/git:/usr/bin/git-shellNow, if I attempt to log in via SSH, I’m told the score and logged out:
$ ssh git@poppch17.vagrant.internalLast login: Sat Jul 30 11:58:27 2016 from 192.168.33.1fatal: What do you think I am? A shell?Connection to poppch17.vagrant.internal closed.
Beginning a Project
Now that I have a remote Git server and access to it from my local account, it’s time to add my work in progress to the repository at /var/git/megaquiz.
Before I start, I take a good look at my files and directories, and remove any temporary items I might find. Failure to do this is a common annoyance. Temporary items to watch for include automatically generated files such as composer packages, build directories, installer logs, and so on.
Note
You can specify files and patterns to ignore by placing a file named .gitignore in your repository. On a Linux system, the man gitignore command should provide examples of filename wildcarding that you can amend to exclude the various lock files and temporary directories created by your build processes, editors, and IDEs. This text is also available online at http://git-scm.com/docs/gitignore .
Before I go any further, I should register my identity with Git—this makes it easier to track who did what in the repository:
$ git config --global user.name "matt z"$ git config --global user.email "matt@getinstance.com"
Now that I have established my personal details and ensured that my project is clean, I can set it up and push its code to the server:
$ cd megaquiz$ git initInitialized empty Git repository in /home/mattz/work/megaquiz/.git/
Now it’s time to add my files:
$ git add . Git is now tracking all the files and directories under megaquiz. Tracked files can be in three states: unmodified, modified, or staged. You can check this by running the command, git status:
$ git statusOn branch masterInitial commitChanges to be committed:(use "git rm --cached <file>..." to unstage)On branch masterInitial commitChanges to be committed:(use "git rm --cached <file>..." to unstage)new file: command/Command.phpnew file: command/CommandContext.phpnew file: command/FeedbackCommand.phpnew file: command/LoginCommand.phpnew file: main.phpnew file: quizobjects/User.phpnew file: quiztools/AccessManager.phpnew file: quiztools/ReceiverFactory.php
Thanks to my previous git add command, all my files are staged for commit. I can go ahead now and execute the commit command:
$ git commit -m 'my first commit'[master (root-commit) f147d21] my first commit8 files changed, 235 insertions(+)create mode 100755 command/Command.phpcreate mode 100755 command/CommandContext.phpcreate mode 100755 command/FeedbackCommand.phpcreate mode 100755 command/LoginCommand.phpcreate mode 100755 main.phpcreate mode 100755 quizobjects/User.phpcreate mode 100755 quiztools/AccessManager.phpcreate mode 100644 quiztools/ReceiverFactory.php
I add a message via the -m flag. If I omitted this, then Git would launch an editor that I can use to add my check-in message.
If you are accustomed to version-control systems such as CVS and Subversion, you might think that we’re done. And although I could happily continue editing, adding, committing, and branching from here, there is an additional stage I need to consider if I want to share this code using a central repository. As we will see later on in the chapter, Git allows us to manage multiple project branches. Thanks to this feature, I can maintain a branch for each release, but also keep my bleeding-edge risky development safely out of my production code. When we start out, Git sets up a single branch named master. I can confirm the state of my branches with the command, git branch:
$ git branch -a* master
The -a flag specifies that Git should show us all branches (the default is to omit the remote ones). And the output shows the master branch.
In fact, I have done nothing yet to associate my local repository with the remote server. It’s time to put that right:
$ git remote add origin git@poppch17.vagrant.internal:/var/git/megaquiz This command is disappointingly quiet, given the work that it has done. In fact, it is the equivalent of telling Git to “associate the nickname origin with the given server location. Furthermore, set up a tracking relationship between the local branch master and a remote equivalent.”
To confirm all of this, I check with Git that the remote handle origin has been set up:
$ git remote -vorigin git@poppch17.vagrant.internal:/var/git/megaquiz (fetch)origin git@poppch17.vagrant.internal:/var/git/megaquiz (push)
Of course, if you used a service like GitHub, you would use your equivalent of the git remote add step shown in Figure 17-2. In my case, that looks like this:
$ git remote add origin git@github.com:popp5/megaquiz.git I still haven’t sent any actual files to my Git server, however, so that’s my next step:
$ git push origin masterCounting objects: 12, done.Delta compression using up to 2 threads.Compressing objects: 100% (9/9), done.Writing objects: 100% (12/12), 2.65 KiB, done.Total 12 (delta 1), reused 0 (delta 0)To git@poppch17.vagrant.internal:/var/git/megaquiz* [new branch] master -> master
Now I can run the git branch command again to confirm that the remote version of the master branch has appeared:
$ git branch -a* masterremotes/origin/master
Note
I have established what is called a tracking branch. This is a local branch that is associated with a remote twin.
Cloning the Repository
For the purposes of this chapter, I have invented a team member named Bob. Bob is working with me on the MegaQuiz project. Naturally, he wants his own version of the code. I have already added his public key to the Git server, so he is good to go. In the parallel world of GitHub, I have invited Bob to join my project, and he has added his own public key to his account. The effect is the same; Bob can acquire the repository using the command, git clone:
$ git clone git@github.com:popp5/megaquiz.gitremote: Counting objects: 14, done.remote: Compressing objects: 100% (12/12), done.remote: Total 14 (delta 1), reused 14 (delta 1), pack-reused 0Receiving objects: 100% (14/14), done.Resolving deltas: 100% (1/1), done.
Now both of us can develop locally and, when we’re ready, share our code with one another.
Updating and Committing
Bob is, of course, a fine and talented fellow. Except, that is, for one common and highly annoying trait: he cannot leave other people’s code alone.
Bob is smart and inquisitive, easily excited by shiny new avenues of development, and he’s keen to help optimize new code. As a result, everywhere I turn, I seem to see the hand of Bob. Bob has added to my documentation , and he has implemented an idea I mentioned over coffee. I may have to kill Bob. In the meantime, however, I must handle the fact that the code on which I am working needs to be merged with Bob’s input.
Here’s a file called quizobjects/User.php. At the moment, it contains nothing but the barest of bones:
namespace popp\ch17\megaquiz\quizobjects;class User{}
I have decided to add some documentation. I begin by adding a file comment to my version of the file:
namespace popp\ch17\megaquiz\quizobjects;/*** @license http://www.example.com Borsetshire Open License* @package quizobjects*/class User{}
Remember that a file can have three states: unmodified, modified, and staged. The User.php file has now moved from unmodified to modified. I can see this with the git status command:
$ git statusOn branch masterYour branch is up-to-date with 'origin/master'.Changes not staged for commit:(use "git add <file>..." to update what will be committed)(use "git checkout -- <file>..." to discard changes in working directory)modified: quizobjects/User.phpno changes added to commit (use "git add" and/or "git commit -a")
User.php has been modified, but not yet staged for commit. I can change this state using the command, git add:
$ git add quizobjects/User.php$ git statusOn branch masterYour branch is up-to-date with 'origin/master'.Changes to be committed:(use "git reset HEAD <file>..." to unstage)modified: quizobjects/User.php
Now I am ready to commit:
$ git commit -m'added documentation' quizobjects/User.php[master 97472c4] added documentation1 file changed, 5 insertions(+)
A Git commit only affects my local repository. If I am sure that the world is ready for my change, I must push my code to the remote repository:
$ git push origin masterCounting objects: 6, done.Delta compression using up to 4 threads.Compressing objects: 100% (5/5), done.Writing objects: 100% (6/6), 670 bytes | 0 bytes/s, done.Total 6 (delta 2), reused 0 (delta 0)To git@github.com:popp5/megaquiz.git715fc2f..04d75b4 master -> master
Meanwhile, working in his own sandbox, Bob is keen as ever, and he has created a class comment:
namespace popp\ch17\megaquiz\quizobjects;/*** @package quizobjects*/class User{}
Now it’s Bob’s turn to add, commit, and push. Because the adding and committing parts of this are so commonly run together, Git allows you to combine them into a single command:
$ git commit -a -m'my great documentation'[master 161c6c5] my great documentation1 files changed, 4 insertions(+), 0 deletions(-)
So we now have two distinct versions of User.php. There’s the version I just pushed to the remote repository, and there is Bob’s version, committed, but not yet pushed. Let’s see what happens when Bob tries to push his local version to the remote repository:
$ git push origin masterTo git@github.com:popp5/megaquiz.git! [rejected] master -> master (non-fast-forward)error: failed to push some refs to 'git@github.com:popp5/megaquiz.git'To prevent you from losing history, non-fast-forward updates were rejectedMerge the remote changes before pushing again. See the 'Note aboutfast-forwards' section of 'git push --help' for details.
As you can see, Git won’t let you push if there’s an update to apply. Bob must first pull down my version of the User.php file:
$ git pull origin masterremote: Counting objects: 6, done.remote: Compressing objects: 100% (3/3), done.remote: Total 6 (delta 2), reused 6 (delta 2), pack-reused 0Unpacking objects: 100% (6/6), done.From github.com:popp5/megaquiz* branch master -> FETCH_HEADAuto-merging quizobjects/User.phpCONFLICT (content): Merge conflict in quizobjects/User.phpAutomatic merge failed; fix conflicts and then commit the result.
Git will happily merge data from two sources into to the same file, so long as the changes don’t overlap. Git has no means of handling changes that affect the same lines. How can it decide what is to have priority? Should the repository overwrite Bob’s changes, or the other way around? Should both changes coexist? Which should go first? Git has no choice but to report a conflict and let Bob sort out the problem.
Here’s what Bob sees when he opens the file:
namespace popp\ch17\megaquiz\quizobjects;/**<<<<<<< HEAD=======* @license http://www.example.com Borsetshire Open License>>>>>>> 04d75b41c8d972438bd803042f1117e12d2869eb* @package quizobjects*/class User{}
Git includes both Bob’s comment and the conflicting changes, together with metadata that tells him which part originates where. The conflicting information is separated by a line of equals signs. Bob’s input is signaled by a line of less-than symbols followed by "HEAD". The remote changes are included on the other side of the divide.
Now that Bob has identified the conflict, he can edit the file to fix the collision:
namespace popp\ch17\megaquiz\quizobjects;/*** @license http://www.example.com Borsetshire Open License* @package quizobjects*/class User{}
Next, Bob resolves the conflict by staging the file:
$ git add quizobjects/User.php$ git commit -m'documentation merged'[master 89e5e46] documentation merged
And now, finally, he can push to the remote repository:
$ git push origin master Adding and Removing Files and Directories
Projects change shape as they develop. Version-control software must take account of this, allowing users to add new files and remove deadwood that would otherwise get in the way.
Adding a File
You have seen the add subcommand many times already. I used it during my project setup to add my code to the empty megaquiz repository, and subsequently, to stage files for commit. By running git add on an untracked file or directory, you ask Git to track it—and stage it for commit. Here I add a document called Question.php to the project:
$ touch quizobjects/Question.php$ git add quizobjects/Question.php
In a real-world situation, I would probably start out by adding some content to Question.php. Here, I confine myself to creating an empty file using the standard touch command. Once I have added a document, I must still invoke the commit subcommand to complete the addition:
$ git commit -m'initial checkin'[master 02cf67c] initial checkin1 file changed, 0 insertions(+), 0 deletions(-)create mode 100644 quizobjects/Question.php
Question.php is now in the local repository.
Removing a File
Should I discover that I have been too hasty and need to remove the document, it should come as no surprise to learn that I can use a subcommand called rm:
$ git rm quizobjects/Question.phprm 'quizobjects/Question.php'
Once again, a commit is required to finish the job. As usual, I can confirm this by running git status:
$ git statusOn branch masterYour branch is ahead of 'origin/master' by 1 commit.(use "git push" to publish your local commits)Changes to be committed:(use "git reset HEAD <file>..." to unstage)deleted: quizobjects/Question.php$ git commit -m'removed Question'[master fd4d64e] removed Question1 file changed, 0 insertions(+), 0 deletions(-)delete mode 100644 quizobjects/Question.php
Adding a Directory
You can also add and remove directories with add and rm. Let’s say Bob wants to make a new directory available:
$ mkdir resources$ touch resources/blah.gif$ git add resources/$ git statusOn branch masterYour branch is ahead of 'origin/master' by 2 commits.(use "git push" to publish your local commits)Changes to be committed:(use "git reset HEAD <file>..." to unstage)new file: resources/blah.gif
Notice how the contents of resources are added automatically to the repository. Now Bob can commit and then push the whole lot to the remote repository in the usual way.
Removing Directories
As you might expect, you can remove directories with the rm subcommand. In this situation, however, I must tell Git that I wish it to remove the directory's contents by passing an -r flag to the subcommand. Here, I profoundly disagree with Bob’s decision to add a resources directory:
$ git rm -r resources/rm 'resources/blah.gif'
Tagging a Release
All being well, a project will eventually reach a state of readiness, and you will want to ship it or deploy it. Whenever you make a release, you should leave a bookmark in your repository, so that you can always revisit the code at that point. As you might expect, you can create a tag in your code with the git tag command:
$ git tag -a 'version1.0' -m 'release 1.0' You can see the tags associated with your repository by running git tag with no arguments:
$ git tagversion1.0
We have been working locally up until this point. In order to get the tag onto the remote repository, we must use the --tags flag with the git push subcommand:
$ git push origin --tagsCounting objects: 1, done.Writing objects: 100% (1/1), 168 bytes | 0 bytes/s, done.Total 1 (delta 0), reused 0 (delta 0)To git@github.com:popp5/megaquiz.git* [new tag] version1.0 -> version1.0
Using the --tags flag causes all local tags to be pushed to the remote repository.
Of course, any action you take on a GitHub repo can be tracked on the site. You can see my release tag in Figure 17-4.
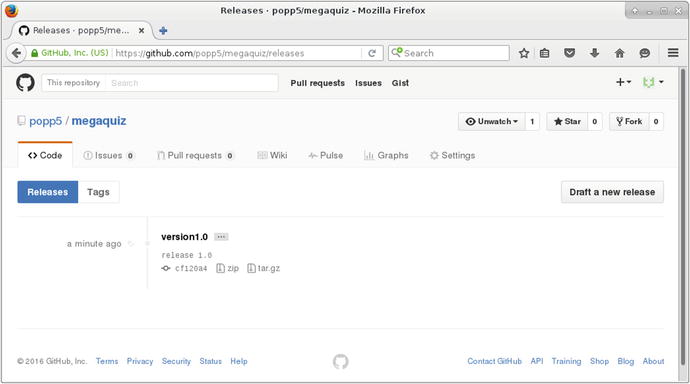
Figure 17-4. Viewing a tag on GitHub
Once you can bookmark your code with a tag, it makes sense to wonder how you might go about revisiting old releases. For this, however, you should first spend some time looking at branching—something at which Git is particularly good.
Branching a Project
Once my project has been released, I can pack it away and wander off to do something new, right? After all, it was so elegantly written that bugs are an impossibility, not to mention so thoroughly specified that no user could possibly require any new features!
Meanwhile, back in the real world, I must continue to work with the codebase on at least two levels. Bug reports should be trickling in right about now, and the wish list for version 1.2.0 will be swelling with demands for fantastic new features. How do I reconcile these forces? I need to fix the bugs as they are reported, and I need to push on with primary development. I could fix the bugs as part of development and release everything in one go, when the next version is stable. But then users may have a long wait before they see any problems addressed. This is plainly unacceptable. On the other hand, I could release as I go. In that scenario, I risk shipping broken code. Clearly, I need two strands to my development. I will continue to add new and risky features to the project’s main branch (often called the trunk), but I should now create a branch for my new release on which I can add only bug fixes.
Note
This way of managing branches is by no means the only game in town. Developers argue constantly about the best way of organizing branches and managing releases and bug fixes. One of the most popular approaches is git-flow (neatly described at http://danielkummer.github.io/git-flow-cheatsheet/ ). Under this practice, master is the release branch. New code goes on a develop branch, and it’s merged to master at release time. Each unit of active development has its own feature branch, which gets merged into develop when stable.
I can both create and switch to a new branch using the git checkout command. First, let’s take a quick look at the state of my branches :
$ git branch -a* masterremotes/origin/master
As you can see, I have a single branch: master, and its remote equivalent. Now, I will create and switch to a new branch:
$ git checkout -b megaquiz-branch1.0Switched to a new branch 'megaquiz-branch1.0'
To track my use of branches I will use a particular file as an example, command/FeedbackCommand.php. It seems that I created my bug fix branch just in time. Users have started to report that they are unable to use the feedback mechanism in the system. I locate the bug:
//...$result = $msgSystem->despatch($email, $msg, $topic);if (! $user) {$this->context->setError($msgSystem->getError());//...
I should, in fact, be testing $result and not $user. Here is my edit:
//...$result = $msgSystem->dispatch($email, $msg, $topic);if (! $result) {$this->context->setError($msgSystem->getError());//...
Because I am working on the branch megaquiz-branch1.0, I can commit this change:
$ git add command/FeedbackCommand.php$ git commit -m'bugfix'[megaquiz-branch1.0 d69dfc1] bugfix1 file changed, 1 insertion(+), 1 deletion(-)
Of course, this commit is local. I need to use the git push command to get the branch onto the remote repository:
$ git push origin megaquiz-branch1.0Counting objects: 4, done.Delta compression using up to 4 threads.Compressing objects: 100% (4/4), done.Writing objects: 100% (4/4), 440 bytes | 0 bytes/s, done.Total 4 (delta 2), reused 0 (delta 0)To git@github.com:popp5/megaquiz.git* [new branch] megaquiz-branch1.0 -> megaquiz-branch1.0
Now, what about Bob? He will inevitably want to pitch in and fix some bugs. First, he invokes git pull, which helpfully tells him about the new branch (and my recent other activities):
$ git pullremote: Counting objects: 11, done.remote: Compressing objects: 100% (7/7), done.remote: Total 11 (delta 4), reused 11 (delta 4), pack-reused 0Unpacking objects: 100% (11/11), done.From github.com:popp5/megaquizf6ab532..cf120a4 master -> origin/master* [new branch] megaquiz-branch1.0 -> origin/megaquiz-branch1.0* [new tag] version1.0 -> version1.0Updating f6ab532..cf120a4Fast-forward0 files changed, 0 insertions(+), 0 deletions(-)delete mode 100644 resources/blah.gif
Now Bob can switch to a local branch which will track the remote one:
$ git checkout megaquiz-branch1.0Branch megaquiz-branch1.0 set up to track remote branch megaquiz-branch1.0 from origin.Switched to a new branch 'megaquiz-branch1.0'
Bob is good to go now. He can add and commit his own fixes; and when he pushes, they will end up on the remote branch.
Meanwhile, I would like to add some bleeding-edge enhancements on the trunk—that is, my master branch. Let’s look again at the state of my branches from the perspective of my local repository:
$ git branch -amaster* megaquiz-branch1.0remotes/origin/masterremotes/origin/megaquiz-branch1.0
I can switch to an existing branch by invoking git checkout:
$ git checkout masterSwitched to branch 'master'Your branch is up-to-date with 'origin/master'.
When I look now at command/FeedbackCommand.php, I see that my bug fix has magically disappeared. Of course, it’s still stored under megaquiz-branch1.0. Later, I can merge the fix into the master branch, so there’s no need to worry. Instead, I can focus on adding new code:
class FeedbackCommand extends Command{public function execute(CommandContext $context){// new development// goes here$msgSystem = ReceiverFactory::getMessageSystem();$email = $context->get('email');// ...
All I have done here is to add a comment to simulate an addition to the code. I can now commit and push this:
$ git commit -am'new development on master'$ git push origin master
So I now have parallel branches. Of course, sooner or later, I will want my master branch to benefit from the bug fixes that I have committed on megaquiz-branch1.0.
I can do this on the command line, but first let’s pause to look at a feature supported by GitHub and similar services like BitBucket. The pull request (often abbreviated to PR) allows me to request a code review before merging a branch. So before magaquiz-branch1.0 hits master, I can ask Bob to check my work. As you can see in Figure 17-5, GitHub detects the branch and gives me the opportunity to issue my pull request.
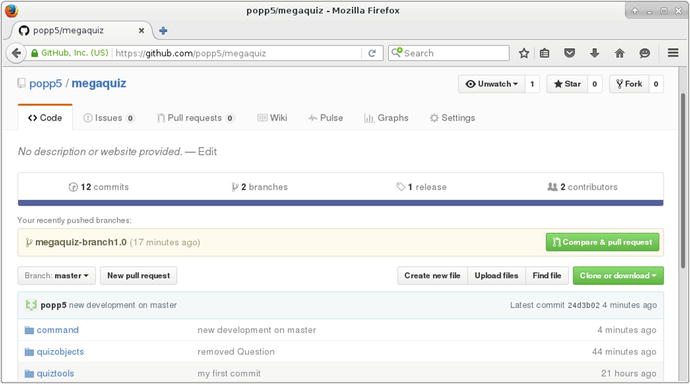
Figure 17-5. GitHub makes issuing pull requests easy
I hit the button and add a comment before submitting the pull request. You can see the result of that in Figure 17-6.
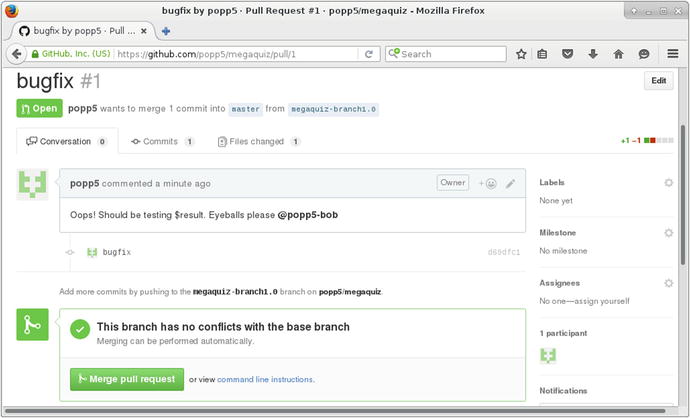
Figure 17-6. Issuing the pull request
Now Bob can examine my changes and add any comments he may have. GitHub shows him exactly what has changed. You can see Bob’s comment in Figure 17-7.
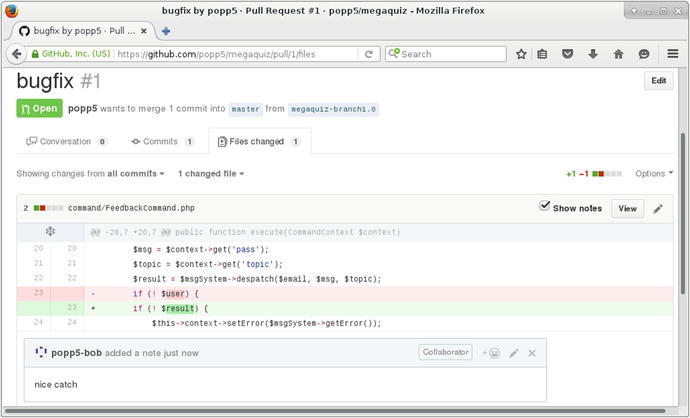
Figure 17-7. The changes covered by a pull request
Once Bob approves my pull request, I can merge directly from the browser, or I can return to the command line. This is pretty easy. Git provides a subcommand named merge:
$ git checkout masterAlready on 'master'Your branch is up-to-date with 'origin/master'.
In fact, I’m already on the master branch—but it can’t hurt to be sure. Now I perform the actual merge:
$ git merge megaquiz-branch1.0Auto-merging command/FeedbackCommand.phpMerge made by the 'recursive' strategy.command/FeedbackCommand.php | 2 +-1 file changed, 1 insertion(+), 1 deletion(-)
Note
To merge or not to merge? The choice is not always as straightforward as it might seem. In some cases, for example, your bug fix may be the kind of temporary work that is supplanted by a more thorough refactoring on the trunk, or it may no longer apply due to a change in specification. This is necessarily a judgment call. Most teams I have worked in, however, tend to merge to the trunk where possible, while keeping work on the branch to the bare minimum. New features for us generally appear on the trunk and find their way quickly to users through a “release early and often” policy.
Now, when I look at the version of FeedbackCommandin the trunk, I confirm that all changes have been merged:
public function execute(CommandContext $context){// new development// goes here$msgSystem = ReceiverFactory::getMessageSystem();$email = $context->get('email');$msg = $context->get('pass');$topic = $context->get('topic');$result = $msgSystem->despatch($email, $msg, $topic);if (! $result) {$this->context->setError($msgSystem->getError());return false;}
The execute() method now includes both my simulated trunk development and the bug fix.
I created a branch when I first “released” MegaQuiz version 1.0 and that’s what we have been working with. Remember, however, that I also created a tag at that stage. I promised at the time that I would show you how to access the tag. In fact, you’ve already seen how. You can create a local branch based on the tag in just the same way that Bob set up his local version of our bug fix branch. The difference is that this new branch is entirely fresh. It does not track an existing remote branch:
$ git checkout -b new-version1.0-branch version1.0Switched to a new branch 'new-version1.0-branch'
However, now that I have this new branch, I can push it and share it just as you have seen.
Summary
Git comprises an enormous number of tools, each with a daunting range of options and capabilities. I can only hope to provide a brief introduction in the space available. Nonetheless, if you only use the features that I have covered in this chapter, you should see the benefit in your own work, whether through protection against data loss or improvements in collaborative working.
In this chapter, we took a tour through the basics of Git. I looked briefly at configuration before importing a project. I checked out, committed, and updated code, and then showed you how to tag and export a release. I ended the chapter with a brief look at branches, demonstrating their usefulness in maintaining concurrent development and bug-fix strands in a project.
There is one issue that I have glossed over here, to some extent. We established the principle that developers should check out their own versions of a project. On the whole, however, projects will not run in place. In order to test their changes, developers need to deploy code locally. Sometimes, this is as simple as copying over a few directories. More often, however, deployment must address a whole range of configuration issues. In the next chapter, we will look at some techniques for automating this process.