Programmers aspire to produce reusable code. This is one of the great goals in object-oriented coding. We like to abstract useful functionality from the messiness of specific context, turning a particular solution into a tool that can be used again and again. To come at this from another angle, if programmers love the reusable, they hate duplication. By creating libraries that can be reapplied, programmers avoid the need to implement similar solutions across multiple projects.
Even if we avoid duplication in our own code, though, there is a wider issue. For every tool you create, how many other programmers have implemented the same solution? This is wasted effort on an epic scale: wouldn’t it be much more sensible for programmers to collaborate and to focus their energies on making a single tool better, rather than producing hundreds of variations on a theme?
In order to do this, we need to get our hands on existing libraries. But then the packages we need will likely require other libraries in order to do their work. So we need a tool which can handle downloading and installing packages, as well as manage their dependencies. That is where Composer comes in; it does all this, and more besides.
This chapter will cover several key issues:
Installation: Downloading and setting up Composer
Requirements: Using composer.json to get packages
Versions: Specifying versions so as to get the latest code without breaking your system
Packagist: Configuring your code for public access
Private repositories: Leveraging Composer using a private repository
What Is Composer?
Strictly speaking, Composer is a dependency manager, rather than a package manger. This, it seems, is because it handles component relationships on a local basis, rather than centrally as Yum and Apt do. If you think that this is an overly fine distinction, you could be right. However we define it, Composer allows you to specify packages. It downloads them to a local directory (vendor), finds and downloads all dependencies, and then makes all this code available to your project via an autoloader.
As always, we need to begin by getting the tool.
Installing Composer
You can download Composer at https://getcomposer.org/download/ . You will find an installer mechanism there, but the phar file should suit most purposes:
$ wget https://getcomposer.org/download/1.2.0/composer.phar .$ chmod 755 composer.phar$ sudo mv composer.phar /usr/bin/composer
I download the archive and run chmod to ensure that it is executable. Then I copy it into a central location so that I can run it easily from anywhere in my system. Now I can test the command:
$ composer --versionComposer version 1.2.0 2016-07-19 01:28:52
Installing a (Set of) Package(s)
Why did I do that funky bit with the brackets? Because packages inevitably beget packages—sometimes a lot of packages.
Let’s begin with a library that stands alone, though. Imagine that we’re building an application which needs to communicate with Twitter. A little bit of research leads me to the abraham/twitteroath package. In order to install this, I need to generate a JSON file named composer.json, and then define a require element:
{"require": {"abraham/twitteroauth": "0.6.*"}}
I begin with a directory that is empty apart from the composer.json file. Once I run a Composer command, though, we’ll see a change:
$ composer installLoading composer repositories with package informationUpdating dependencies (including require-dev)- Installing abraham/twitteroauth (0.6.4)Downloading: 100%Writing lock fileGenerating autoload files
So what has been generated? Let’s take a look:
$ lscomposer.json composer.lock vendor
Composer installs packages into vendor/. It also generates a file named composer.lock. This specifies the exact versions of all packages installed. If you’re using version control, you should commit this file. If another developer runs composer install with a composer.lock file present, package versions will be installed on her system exactly as specified. In this way, the team can stay in sync with one another, and you can be sure that your production environment exactly matches the development and test environments. You can override the lockfile by running this snippet:
composer updateThis will generate a new lock file. Typically, you will run this to keep current with new package versions (if you are using wildcards, as I have, or ranges).
Installing a Package from the Command Line
As you have seen, I can create the composer.json file using an editor. But you can also have Composer do it for you. This is particularly useful if you need to kick off with a single package. When you invoke composer require on the command line, Composer will download the specified package and install it into vendor/ for you. It will also generate a composer.json file, which you can then edit and extend:
$ composer require abraham/twitteroauthUsing version ^0.6.4 for abraham/twitteroauth./composer.json has been createdLoading composer repositories with package informationUpdating dependencies (including require-dev)- Installing abraham/twitteroauth (0.6.4)Loading from cacheWriting lock fileGenerating autoload files
Versions
Composer is designed to support semantic versioning. In essence, this involves defining a package’s version with three numbers, separated by dots: major, minor, and patch. If you fix a bug, add no functionality, and do not break backwards compatibility, you should increment the patch number. If you add new functionality, but do not break backwards compatibility, you should increment the middle minor number. If your new version breaks backwards compatibility (in other words, if client code would break if this new version were suddenly switched in), then you should increment the first major version number.
Note
You can read more about the semantic versioning convention at https://semver.org .
You should bear this in mind when specifying versions in your composer.json file: if you are too liberal in your ranges or wild cards, you may find that your system breaks on update.
Table 16-1 shows some of the ways that you can specify versions with Composer.
Table 16-1. Composer and Package Versions
Type | Example | Notes |
|---|---|---|
Exact | 1.2.2 | Only install the given version |
Wildcard | 1.2.* | Install the exact specified numbers, but find latest available version matching the wildcard |
Range | 1.0.0 - 1.1.7 | Install a version no lower than the first number and no higher than the last number |
Comparison | >1.2.0 <=1.2.2 | Use <, <=, >, and >= to specify complex ranges. You can combine these directives with a space (equivalent to “and”) or with || to specify “or”. |
Tilde (major version) | ∼1.3 | The given number is the minimum, and the final number specified can increase. So for ∼1.3, 1.3 is the minimum and there can be no match at 2.0.0 or above |
Caret | ^1.3 | Will match up to, but not including, the next breaking change. So while ∼1.3.1 will not match at 1.4 and above, ^1.3.1 will match from 1.3.1 up to, but not including, 2.0.0. This is generally the most useful shortcut |
require-dev
Very often you need packages during development that are unnecessary in a production context. You will want to run tests locally, for example, but you are unlikely to need PHPUnit available on your public site.
Composer addresses this by supporting a separate require-develement. You can add packages here, just as you can for the require element:
{"require-dev": {"phpunit/phpunit": "*"},"require": {"abraham/twitteroauth": "0.6.*","ext-xml": "*"}}
Now, when we run composer install, PHPUnit and all sorts of dependent packages are downloaded and installed:
$ composer installLoading composer repositories with package informationUpdating dependencies (including require-dev)- Installing abraham/twitteroauth (0.6.4)Loading from cache- Installing symfony/yaml (v3.1.3)Downloading: 100%- Installing sebastian/version (2.0.0)Downloading: 100%....- Installing phpspec/prophecy (v1.6.1)Downloading: 100%- Installing myclabs/deep-copy (1.5.1)Loading from cache- Installing phpunit/phpunit (5.5.0)Downloading: 100%sebastian/global-state suggests installing ext-uopz (*)phpunit/phpunit-mock-objects suggests installing ext-soap (*)phpunit/php-code-coverage suggests installing ext-xdebug (>=2.4.0)phpunit/phpunit suggests installing phpunit/php-invoker (∼1.1)Writing lock fileGenerating autoload files
If you’re installing in a production context, however, you can pass the --no-dev flag to composer install, and Composer will download only those packages specified in the require element:
$ composer install --no-devLoading composer repositories with package informationUpdating dependencies- Installing abraham/twitteroauth (0.6.4)Loading from cacheWriting lock fileGenerating autoload files
Note
When you run the composer install command, Composer creates a file named composer.lock. This records the exact version of every file you installed under vendor/. If you run composer install with a composer.lock file present alongside composer.json, Composer will fetch the package versions it has recorded if they are not present. This is useful because you can commit a composer.lock file to your version-control repository and be sure that your team will download the same versions of all the packages you have installed. If you need to override composer.lock, either to get the latest versions of packages or because you have changed composer.json, you should run composer update to override the lock file.
Composer and Autoload
We covered autoloading in some detail in Chapter 15. For the sake of completeness however, it is worth looking at it briefly. Composer generates a file named autoload.php, which handles class loading for the packages it downloads. You can also leverage this functionality for your own code by including autoload.php (usually with require_once()). Once you have done this, any class you declare in your system will be found automatically when accessed in your code, so long as your directories and filenames mirror your namespaces and class names.
In other words, a class named popp5/megaquiz/command/CommandContext must be placed in a file named CommandContext.php in the popp5/megaquiz/command/ directory.
If you want to mix things up (perhaps by omitting a redundant leading directory or two, or by adding a test directory to the search path), then you can use the autoload element to map a namespace to your file structure, like this:
"autoload": {"psr-4": {"popp5\\megaquiz\\": ["src", "test"]}}
Now, so long as autoload.php is included, my classes are easily discoverable. Thanks to my autoload configuration, the popp5/megaquiz/command/CommandContext class will now be found in src/command/CommandContext.php. Not only that, but because I have referenced more than one target (test as well as src), I can also create test classes that belong to the popp5\megaquiz\ namespace under the test/ directory.
Turn to the “PSR-4 Autoloading” section in Chapter 15 to follow a more in-depth example.
Creating Your Own Package
If you have worked with PEAR in the past, you might expect a section on creating a package here to involve an entirely new package file. In fact, we’ve already been creating a package throughout this chapter. We just have to add some more information, and then find a way to make our code available to others.
Adding Package Information
You really do not have to add that much information to make a viable package, but you absolutely need a name, so that your package can be found. I’m also going to include the description and authors elements, as well as to create a fake product named megaquiz which you will find popping up in other chapters occasionally:
"name": "popp5/megaquiz","description": "a truly mega quiz","authors": [{"name": "matt zandstra","email": "matt@getinstance.com"}],
These fields should be mostly self-explanatory. The exception might be that leading namespace—popp5, in this case—which is separated from the actual package name by a forward slash. This is known as the vendor name. As you might expect, the vendor name becomes a top-level directory under vendor/ when your package is installed. This is often the organization name used by the package owner in Github or Bitbucket.
With all that in place, you are ready to commit your package to your version control host of choice. If you’re not sure what that involves, you can learn a lot more about this subject in Chapter 17.
Note
Composer supports a version field, but it is considered better practice to use a tag in Git to track your package’s version. Composer will automatically recognize this.
Remember that you should not push the vendor directory (at least not usually—there are some arguable exceptions to that rule). However, it is often a good idea to track the generated composer.lock file alongside composer.json.
Platform Packages
Although you cannot use Composer to install system-wide packages, you can specify system-wide requirements, so that your package will only install in a system which is ready for it.
A platform package is specified with a single key, though in a couple of cases the key is further broken down by type, using a dash. I list the available types in Table 16-2 .
Table 16-2. Platform Packages
Type | Example | Description |
|---|---|---|
PHP | "php": "7.*" | The PHP version |
Extension | "ext-xml": ">2" | The PHP extension |
Library | "lib-iconv": "∼2" | A system library used by PHP |
HHVM | "hhvm": "∼2" | An HHVM version (HHVM is a virtual machine that supports an extended version of PHP) |
Let’s try it out:
{"require": {"abraham/twitteroauth": "0.6.*","ext-xml": "*","ext-gd": "*"}}
In the preceding code, I specify that my package requires the xml and gd extensions. Now it’s time to run update:
$ composer updateLoading composer repositories with package informationUpdating dependencies (including require-dev)Your requirements could not be resolved to an installable set of packages.Problem 1- The requested PHP extension ext-gd * is missing from your system. Install or enable PHP's gd extension.
It looks as though I was set up for XML; however, GD, an image manipulation package, is not installed on my system, so Composer throws an error.
Distribution Through Packagist
If you’ve been working through this chapter, you might have wondered where the packages we have been installing actually come from. It feels a lot like magic, but (as you might expect) there is a package repository behind the scenes. It is called Packagist, and it can be found at https://packagist.org . So long as your code can be found in a public git repository, it can be made available through Packagist.
Let’s give it a shot. I have pushed my megaquiz project to Github, so now I need to tell Packagist about my repository. Once I have signed up, I simply add the URL of my repository. You can see this in Figure 16-1.
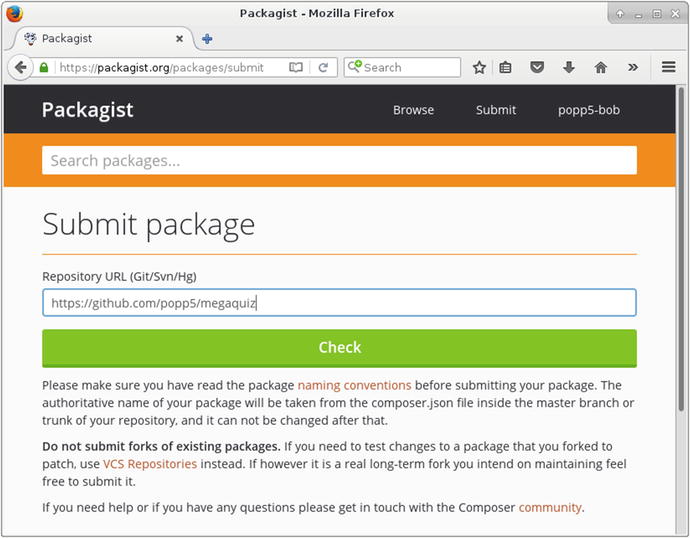
Figure 16-1. Adding a package to Packagist
Once I’ve added megaquiz, Packagist locates the repository, checks the composer.json file, and displays a control panel. You can see that in Figure 16-2.
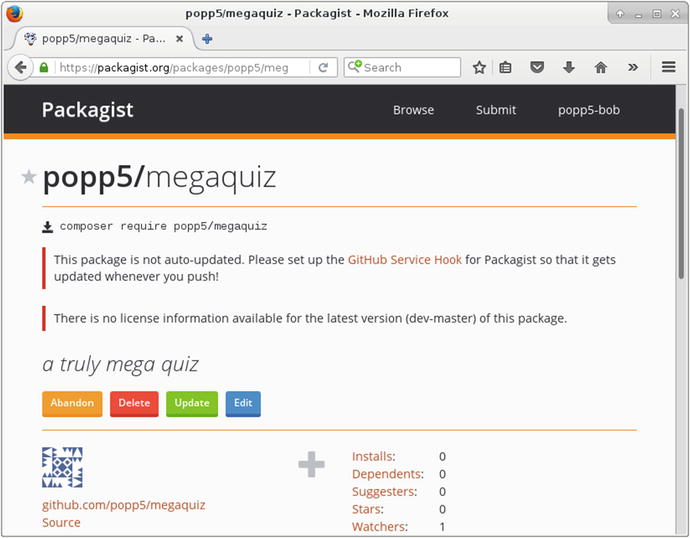
Figure 16-2. The package control panel
Packagist tells me that I have not set license information. I can fix this at any time by adding a license element to the composer.json file:
"license": "Apache-2.0",Packagist has also failed to find any version information. I’ll fix this by adding a tag to the Github repository:
$ git tag -a '1.0.1' -m '1.0.1'$ git push –tags
Note
If you think I’m cheating by skimming over this Git stuff, you’re right. I cover both Git and Github in some detail in Chapter 17.
Now Packagist knows about my version number. You can confirm that in Figure 16-3.
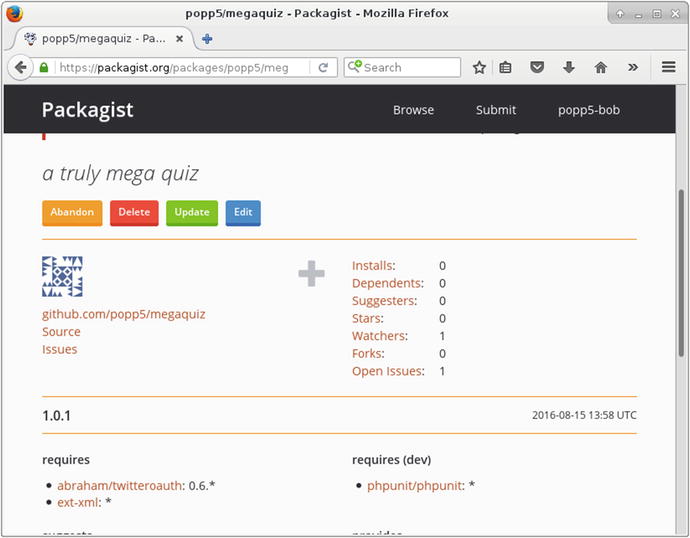
Figure 16-3. Packagist knows the version
Now, anyone can include megaquiz from another package. Here is a minimal composer.json file :
{"require": {"popp5/megaquiz": "*"}}
I specify the vendor name and the package name. Riskily, I am happy to accept any version at all. Let’s go ahead and install :
$ composer installLoading composer repositories with package informationInstalling dependencies (including require-dev)- Installing abraham/twitteroauth (0.6.4)Loading from cache- Installing popp5/megaquiz (1.0.1)Downloading: 100%Writing lock fileGenerating autoload files
Notice that the dependencies I specified when I set up megaquiz are also downloaded.
Keeping it private
Of course, you don’t always want to publish your code to the world. Sometimes you need to share only with a smaller set of authorized users.
Here is a private package named getinstance/api_util that I use for internal projects:
{"name": "getinstance/api_util","description": "core getinstance api code","authors": [{"name": "matt zandstra","email": "matt@getinstance.com"}],"require": {"silex/silex": "∼1.3","bshaffer/oauth2-server-php": "∼1.8"},"require-dev": {"phpunit/phpunit": "∼4.3.0"},"autoload": {"psr-4": {"getinstance\\api_util\\": ["src" , "test/functional"]}}}
This is hosted in a private Bitbucket repository, so it’s not available via Packagist. So how would I include it in a project? I simply need to tell Composer where to look. I can do this by creating or adding to the repositories element:
{"repositories": [{"type": "vcs","url": "git@bitbucket.org:getinstance/api_util.git"}],"require": {"popp5/megaquiz": "*","getinstance/api_util": "v1.0.3"}}
So now, so long as I have access to getinstance/api_util, I can install both my private package and megaquiz at once:
$ composer installLoading composer repositories with package informationInstalling dependencies (including require-dev)- Installing abraham/twitteroauth (0.6.4)Loading from cache- Installing popp5/megaquiz (1.0.1)Loading from cache...- Installing silex/silex (v1.3.5)Loading from cache- Installing getinstance/api_util (v1.0.3)Cloning 3cf2988875b824936e6421d0810ceea90b76d139...Writing lock fileGenerating autoload files
Summary
You should leave this chapter with a sense of how easy it is to leverage Composer packages to add power to your projects. Through the composer.json file, you can also make your code accessible to other users, whether publicly by using Packagist or by specifying your own repository. This approach automates dependency downloads for your users and allows third-party packages to use yours without the need for bundling.