Mastering C++ Multithreading
A comprehensive guide to developing effective multithreading applications in C++
![]()
BIRMINGHAM - MUMBAI
![]()
BIRMINGHAM - MUMBAI
Copyright © 2017 Packt Publishing
All rights reserved. No part of this book may be reproduced, stored in a retrieval system, or transmitted in any form or by any means, without the prior written permission of the publisher, except in the case of brief quotations embedded in critical articles or reviews.
Every effort has been made in the preparation of this book to ensure the accuracy of the information presented. However, the information contained in this book is sold without warranty, either express or implied. Neither the author, nor Packt Publishing, and its dealers and distributors will be held liable for any damages caused or alleged to be caused directly or indirectly by this book.
Packt Publishing has endeavored to provide trademark information about all of the companies and products mentioned in this book by the appropriate use of capitals. However, Packt Publishing cannot guarantee the accuracy of this information.
First published: July 2017
Production reference: 1270717
ISBN 978-1-78712-170-6
|
Author Maya Posch |
Copy Editor Sonia Mathur |
|
Reviewer Louis E. Mauget |
Project Coordinator Vaidehi Sawant |
|
Commissioning Editor Aaron Lazar |
Proofreader Safis Editing |
|
Acquisition Editor Chaitanya Nair |
Indexer Francy Puthiry |
|
Content Development Editor Rohit Kumar Singh |
Graphics Abhinash Sahu |
|
Technical Editors Ketan Kamble |
Production Coordinator Nilesh Mohite |
Maya Posch is a software engineer by trade and a self-professed electronics, robotics, and AI nut, running her own software development company, Nyanko, with her good friend, Trevor Purdy, where she works on various game development projects and some non-game projects. Apart from this, she does various freelance jobs for companies around the globe. You can visit her LinkedIn profile for more work-related details.
Aside from writing software, she likes to play with equations and write novels, such as her awesome reimagining of the story of the Nintendo classic, Legend of Zelda: Ocarina of Time, and the survival-horror novel she recently started, Viral Desire. You can check out her Scribd profile for a full listing of her writings.
Maya is also interested in biochemistry, robotics, and reverse-engineering of the human body. To know more about her, visit her blog, Artificial Human. If there's anything she doesn't lack, it has to be sheer ambition, it seems.
Louis E. Mauget learned to program a long time ago at the Michigan State University as a physics major learning to use software in designing a cyclotron. Later, he worked for 34 years at IBM. He went on to work for several consulting firms, including a long-term engagement with the railroad industry. He is currently consulting for Keyhole Software at Leawood, Kansas.
Lou has coded in C++, Java, JavaScript, Python, and newer languages, as each was conceived. His current interests include reactive functional programming, containers, Node JS, NoSQL, geospatial systems, mobile, and so on, in any new language or framework.
He occasionally blogs about software technology for Keyhole Software. He has coauthored three computer books and authored two IBM DeveloperWorks XML tutorials and a WebSphere Journal LDAP tutorial. Lou co-wrote several J2EE certification tests for IBM. He has also worked as a reviewer for Packt Publishing and others.
For support files and downloads related to your book, please visit www.PacktPub.com.
Did you know that Packt offers eBook versions of every book published, with PDF and ePub files available? You can upgrade to the eBook version at www.PacktPub.com and as a print book customer, you are entitled to a discount on the eBook copy. Get in touch with us at service@packtpub.com for more details.
At www.PacktPub.com, you can also read a collection of free technical articles, sign up for a range of free newsletters and receive exclusive discounts and offers on Packt books and eBooks.
![]()
Get the most in-demand software skills with Mapt. Mapt gives you full access to all Packt books and video courses, as well as industry-leading tools to help you plan your personal development and advance your career.
Thanks for purchasing this Packt book. At Packt, quality is at the heart of our editorial process. To help us improve, please leave us an honest review on this book's Amazon page at https://www.amazon.com/dp/1787121704.
If you'd like to join our team of regular reviewers, you can e-mail us at customerreviews@packtpub.com. We award our regular reviewers with free eBooks and videos in exchange for their valuable feedback. Help us be relentless in improving our products!
Multithreaded applications execute multiple threads in a single processor environment, to achieve. Filled with practical examples, this book will help you become a master at writing robust concurrent and parallel applications in C++. In this book, you will delve into the fundamentals of multithreading and concurrency and find out how to implement them. While doing so, you will explore atomic operations to optimize code performance and also apply concurrency to both distributed computing and GPGPU processing.
Chapter 1, Revisiting Multithreading, summarizes multithreading in C++, revisiting all the concepts you should already be familiar with and going through a basic example of multithreading using the native threading support added in the 2011 revision of C++.
Chapter 2, Multithreading Implementation on the Processor and OS, builds upon the fundamentals provided by the hardware implementations discussed in the preceding chapter, showing how OSes have used the capabilities to their advantage and made them available to applications. It also discusses how processes and threads are allowed to use the memory and processor in order to prevent applications and threads from interfering with each other.
Chapter 3, C++ Multithreading APIs, explores the wide variety of multithreading APIs available as OS-level APIs (for example, Win32 and POSIX) or as provided by a framework (for example, Boost, Qt, and POCO). It briefly runs through each API, listing the differences compared to the others as well as the advantages and disadvantages it may have for your application.
Chapter 4, Thread Synchronization and Communication, takes the topics learned in the previous chapters and explores an advanced multithreading implementation implemented using C++ 14's native threading API, which allows multiple threads to communicate without any thread-safety issues. It also covers the differences between the many types of synchronization mechanisms, including mutexes, locks, and condition variables.
Chapter 5, Native C++ Threads and Primitives, includes threads, concurrency, local storage, as well as thread-safety supported by this API. Building upon the example in the preceding chapter, it discusses and explores extending and optimizing thread-safty using the features offered by the full feature set in C++ 11 and C++ 14.
Chapter 6, Debugging Multithreaded Code, teaches you how to use tools such as Valgrind (Memcheck, DRD, Helgrind, and so on) to analyze the multithreaded performance of an application, find hotspots, and resolve or prevent issues resulting from concurrent access.
Chapter 7, Best Practices, covers common pitfalls and gotchas and how to spot them before they come back to haunt you. It also explores a number of common and less common scenarios using examples.
Chapter 8, Atomic Operations – Working with the Hardware, covers atomic operations in detail: what they are and how they are best used. Compiler support is looked at across CPU architectures and an evaluation is made of when it is worth to invest time in implementing atomic operations in your code. It also looks at how such optimizations will limit the portability of your code.
Chapter 9, Multithreading with Distributed Computing, takes many of the lessons learned in the preceding chapters and applies them on a multi-system, cluster-level scale. Using an OpenMPI-based example, it shows how multithreading can be done across multiple systems, such as the nodes in a computer cluster.
Chapter 10, Multithreading with GPGPU, shows the use of multithreading in GPGPU applications (for example, CUDA and OpenCL). Using an OpenCL-based example, a basic multithreaded application is explored that can execute tasks in parallel. This chapter takes lessons learned in the preceding chapters and applies them to processing on video cards and derived hardware (for example, rack-mounted vector processor hardware).
To follow the instructions in this book, you will need any OS (Windows, Linux, or macOS) and any C++ compiler installed on your systems.
This book is for intermediate C++ developers who wish to extend their knowledge of multithreading and concurrent processing. You should have basic experience with multithreading and be comfortable using C++ development toolchains on the command line.
In this book, you will find a number of text styles that distinguish between different kinds of information. Here are some examples of these styles and an explanation of their meaning.
Code words in text, database table names, folder names, filenames, file extensions, pathnames, dummy URLs, user input, and Twitter handles are shown as follows: "The randGen() method takes two parameters, defining the range of the returned value:"
A block of code is set as follows:
cout_mtx.lock();
 cout << "Thread " << tid << " adding " << rval << ". New value: " << val << ".\n";
 cout_mtx.unlock();

 values_mtx.lock();
 values.push_back(val);
 values_mtx.unlock();
}
When we wish to draw your attention to a particular part of a code block, the relevant lines or items are set in bold:
cout_mtx.lock();
 cout << "Thread " << tid << " adding " << rval << ". New value: " << val << ".\n";
 cout_mtx.unlock();

 values_mtx.lock();
 values.push_back(val);
 values_mtx.unlock();
}
Any command-line input or output is written as follows:
$ make
g++ -o ch01_mt_example -std=c++11 ch01_mt_example.cpp
New terms and important words are shown in bold. Words that you see on the screen, for example, in menus or dialog boxes, appear in the text.
Feedback from our readers is always welcome. Let us know what you think about this book-what you liked or disliked. Reader feedback is important for us as it helps us develop titles that you will really get the most out of. To send us general feedback, simply e-mail feedback@packtpub.com, and mention the book's title in the subject of your message. If there is a topic that you have expertise in and you are interested in either writing or contributing to a book, see our author guide at www.packtpub.com/authors.
You can download the example code files for this book from your account at http://www.packtpub.com. If you purchased this book elsewhere, you can visit http://www.packtpub.com/support and register to have the files e-mailed directly to you. You can download the code files by following these steps:
Once the file is downloaded, please make sure that you unzip or extract the folder using the latest version of:
The code bundle for the book is also hosted on GitHub at https://github.com/PacktPublishing/Mastering-CPP-Multithreading. We also have other code bundles from our rich catalog of books and videos available at https://github.com/PacktPublishing/. Check them out!
Although we have taken every care to ensure the accuracy of our content, mistakes do happen. If you find a mistake in one of our books-maybe a mistake in the text or the code-we would be grateful if you could report this to us. By doing so, you can save other readers from frustration and help us improve subsequent versions of this book. If you find any errata, please report them by visiting http://www.packtpub.com/submit-errata, selecting your book, clicking on the Errata Submission Form link, and entering the details of your errata. Once your errata are verified, your submission will be accepted and the errata will be uploaded to our website or added to any list of existing errata under the Errata section of that title. To view the previously submitted errata, go to https://www.packtpub.com/books/content/support and enter the name of the book in the search field. The required information will appear under the Errata section.
Piracy of copyrighted material on the Internet is an ongoing problem across all media. At Packt, we take the protection of our copyright and licenses very seriously. If you come across any illegal copies of our works in any form on the Internet, please provide us with the location address or website name immediately so that we can pursue a remedy. Please contact us at copyright@packtpub.com with a link to the suspected pirated material. We appreciate your help in protecting our authors and our ability to bring you valuable content.
If you have a problem with any aspect of this book, you can contact us at questions@packtpub.com, and we will do our best to address the problem.
Chances are that if you're reading this book, you have already done some multithreaded programming in C++, or, possibly, other languages. This chapter is meant to recap the topic purely from a C++ point of view, going through a basic multithreaded application, while also covering the tools we'll be using throughout the book. At the end of this chapter, you will have all the knowledge and information needed to proceed with the further chapters.
Topics covered in this chapter include the following:
During the course of this book, we'll be assuming the use of a GCC-based toolchain (GCC or MinGW on Windows). If you wish to use alternative toolchains (clang, MSVC, ICC, and so on), please consult the documentation provided with these for compatible commands.
To compile the examples provided in this book, makefiles will be used. For those unfamiliar with makefiles, they are a simple but powerful text-based format used with the make tool for automating build tasks including compiling source code and adjusting the build environment. First released in 1977, make remains among the most popular build automation tools today.
Familiarity with the command line (Bash or equivalent) is assumed, with MSYS2 (Bash on Windows) recommended for those using Windows.
In its most basic form, a multithreaded application consists of a singular process with two or more threads. These threads can be used in a variety of ways; for example, to allow the process to respond to events in an asynchronous manner by using one thread per incoming event or type of event, or to speed up the processing of data by splitting the work across multiple threads.
Examples of asynchronous responses to events include the processing of the graphical user interface (GUI) and network events on separate threads so that neither type of event has to wait on the other, or can block events from being responded to in time. Generally, a single thread performs a single task, such as the processing of GUI or network events, or the processing of data.
For this basic example, the application will start with a singular thread, which will then launch a number of threads, and wait for them to finish. Each of these new threads will perform its own task before finishing.

Let's start with the includes and global variables for our application:
#include <iostream>
#include <thread>
#include <mutex>
#include <vector>
#include <random>

using namespace std;

// --- Globals
mutex values_mtx;
mutex cout_mtx;
vector<int> values;
Both the I/O stream and vector headers should be familiar to anyone who has ever used C++: the former is here used for the standard output (cout), and the vector for storing a sequence of values.
The random header is new in c++11, and as the name suggests, it offers classes and methods for generating random sequences. We use it here to make our threads do something interesting.
Finally, the thread and mutex includes are the core of our multithreaded application; they provide the basic means for creating threads, and allow for thread-safe interactions between them.
Moving on, we create two mutexes: one for the global vector and one for cout, since the latter is not thread-safe.
Next we create the main function as follows:
int main() {
    values.push_back(42);
We push a fixed value onto the vector instance; this one will be used by the threads we create in a moment:
    thread tr1(threadFnc, 1);
    thread tr2(threadFnc, 2);
    thread tr3(threadFnc, 3);
    thread tr4(threadFnc, 4);
We create new threads, and provide them with the name of the method to use, passing along any parameters--in this case, just a single integer:
    tr1.join();
    tr2.join();
    tr3.join();
    tr4.join();
Next, we wait for each thread to finish before we continue by calling join() on each thread instance:
    cout << "Input: " << values[0] << ", Result 1: " << values[1] << ", Result 2: " << values[2] << ", Result 3: " << values[3] << ", Result 4: " << values[4] << "\n";


    return 1;
}
At this point, we expect that each thread has done whatever it's supposed to do, and added the result to the vector, which we then read out and show the user.
Of course, this shows almost nothing of what really happens in the application, mostly just the essential simplicity of using threads. Next, let's see what happens inside this method that we pass to each thread instance:
void threadFnc(int tid) {
    cout_mtx.lock();
    cout << "Starting thread " << tid << ".\n";
    cout_mtx.unlock();
In the preceding code, we can see that the integer parameter being passed to the thread method is a thread identifier. To indicate that the thread is starting, a message containing the thread identifier is output. Since we're using a non-thread-safe method for this, we use the cout_mtx mutex instance to do this safely, ensuring that just one thread can write to cout at any time:
    values_mtx.lock();
    int val = values[0];
    values_mtx.unlock();
When we obtain the initial value set in the vector, we copy it to a local variable so that we can immediately release the mutex for the vector to enable other threads to use the vector:
    int rval = randGen(0, 10);
    val += rval;
These last two lines contain the essence of what the threads created do: they take the initial value, and add a randomly generated value to it. The randGen() method takes two parameters, defining the range of the returned value:
    cout_mtx.lock();
    cout << "Thread " << tid << " adding " << rval << ". New value: " << val << ".\n";
    cout_mtx.unlock();

    values_mtx.lock();
    values.push_back(val);
    values_mtx.unlock();
}
Finally, we (safely) log a message informing the user of the result of this action before adding the new value to the vector. In both cases, we use the respective mutex to ensure that there can be no overlap when accessing the resource with any of the other threads.
Once the method reaches this point, the thread containing it will terminate, and the main thread will have one less thread to wait for to rejoin. The joining of a thread basically means that it stops existing, usually with a return value passed to the thread which created the thread. This can happen explicitly, with the main thread waiting for the child thread to finish, or in the background.
Lastly, we'll take a look at the randGen() method. Here we can see some multithreaded specific additions as well:
int randGen(const int& min, const int& max) {
    static thread_local mt19937 generator(hash<thread::id>()(this_thread::get_id()));
    uniform_int_distribution<int> distribution(min, max);
    return distribution(generator)
}
This preceding method takes a minimum and maximum value as explained earlier, which limits the range of the random numbers this method can return. At its core, it uses a mt19937-based generator, which employs a 32-bit Mersenne Twister algorithm with a state size of 19937 bits. This is a common and appropriate choice for most applications.
Of note here is the use of the thread_local keyword. What this means is that even though it is defined as a static variable, its scope will be limited to the thread using it. Every thread will thus create its own generator instance, which is important when using the random number API in the STL.
A hash of the internal thread identifier is used as a seed for the generator. This ensures that each thread gets a fairly unique seed for its generator instance, allowing for better random number sequences.
Finally, we create a new uniform_int_distribution instance using the provided minimum and maximum limits, and use it together with the generator instance to generate the random number which we return.
In order to compile the code described earlier, one could use an IDE, or type the command on the command line. As mentioned in the beginning of this chapter, we'll be using makefiles for the examples in this book. The big advantages of this are that one does not have to repeatedly type in the same extensive command, and it is portable to any system which supports make.
Further advantages include being able to have previous generated artifacts removed automatically and to only compile those source files which have changed, along with a detailed control over build steps.
The makefile for this example is rather basic:
GCC := g++

OUTPUT := ch01_mt_example
SOURCES := $(wildcard *.cpp)
CCFLAGS := -std=c++11 -pthread

all: $(OUTPUT)

$(OUTPUT):
    $(GCC) -o $(OUTPUT) $(CCFLAGS) $(SOURCES)

clean:
    rm $(OUTPUT)

.PHONY: all
From the top down, we first define the compiler that we'll use (g++), set the name of the output binary (the .exe extension on Windows will be post-fixed automatically), followed by the gathering of the sources and any important compiler flags.
The wildcard feature allows one to collect the names of all files matching the string following it in one go without having to define the name of each source file in the folder individually.
For the compiler flags, we're only really interested in enabling the c++11 features, for which GCC still requires one to supply this compiler flag.
For the all method, we just tell make to run g++ with the supplied information. Next we define a simple clean method which just removes the produced binary, and finally, we tell make to not interpret any folder or file named all in the folder, but to use the internal method with the .PHONY section.
When we run this makefile, we see the following command-line output:
$ make
g++ -o ch01_mt_example -std=c++11 ch01_mt_example.cpp
Afterwards, we find an executable file called ch01_mt_example (with the .exe extension attached on Windows) in the same folder. Executing this binary will result in a command-line output akin to the following:
$ ./ch01_mt_example.exe

Starting thread 1.

Thread 1 adding 8. New value: 50.

Starting thread 2.

Thread 2 adding 2. New value: 44.

Starting thread 3.

Starting thread 4.

Thread 3 adding 0. New value: 42.

Thread 4 adding 8. New value: 50.

Input: 42, Result 1: 50, Result 2: 44, Result 3: 42, Result 4: 50
What one can see here already is the somewhat asynchronous nature of threads and their output. While threads 1 and 2 appear to run synchronously, starting and quitting seemingly in order, threads 3 and 4 clearly run asynchronously as both start simultaneously before logging their action. For this reason, and especially in longer-running threads, it's virtually impossible to say in which order the log output and results will be returned.
While we use a simple vector to collect the results of the threads, there is no saying whether Result 1 truly originates from the thread which we assigned ID 1 in the beginning. If we need this information, we need to extend the data we return by using an information structure with details on the processing thread or similar.
One could, for example, use struct like this:
struct result {
    int tid;
    int result;
};
The vector would then be changed to contain result instances rather than integer instances. One could pass the initial integer value directly to the thread as part of its parameters, or pass it via some other way.
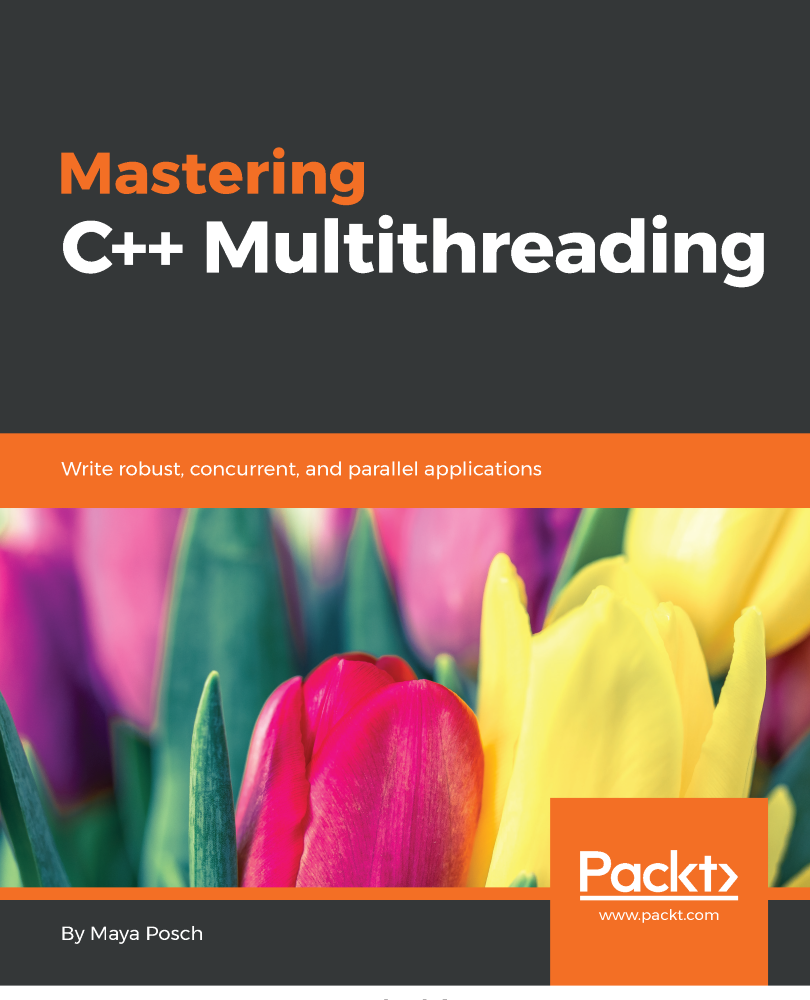
The example in this chapter is primarily useful for applications where data or tasks have to be handled in parallel. For the earlier mentioned use case of a GUI-based application with business logic and network-related features, the basic setup of a main application, which launches the required threads, would remain the same. However, instead of having each thread to be the same, each would be a completely different method.
For this type of application, the thread layout would look like this:
As the graphic shows, the main thread would launch the GUI, network, and business logic thread, with the latter communicating with the network thread to send and receive data. The business logic thread would also receive user input from the GUI thread, and send updates back to be displayed on the GUI.
In this chapter, we went over the basics of a multithreaded application in C++ using the native threading API. We looked at how to have multiple threads perform a task in parallel, and also explored how to properly use the random number API in the STL within a multithreaded application.
In the next chapter, we'll discuss how multithreading is implemented both in hardware and in operating systems. We'll see how this implementation differs per processor architecture and operating system, and how this affects our multithreaded application.
The foundation of any multithreaded application is formed by the implementation of the required features by the hardware of the processor, as well as by the way these features are translated into an API for use by applications by the operating system. An understanding of this foundation is crucial for developing an intuitive understanding of how to best implement a multithreaded application.
This chapter looks at how hardware and operating systems have evolved over the years to arrive at the current implementations and APIs as they are in use today. It shows how the example code of the previous chapter ultimately translates into commands to the processor and related hardware.
Topics covered in this chapter include the following:
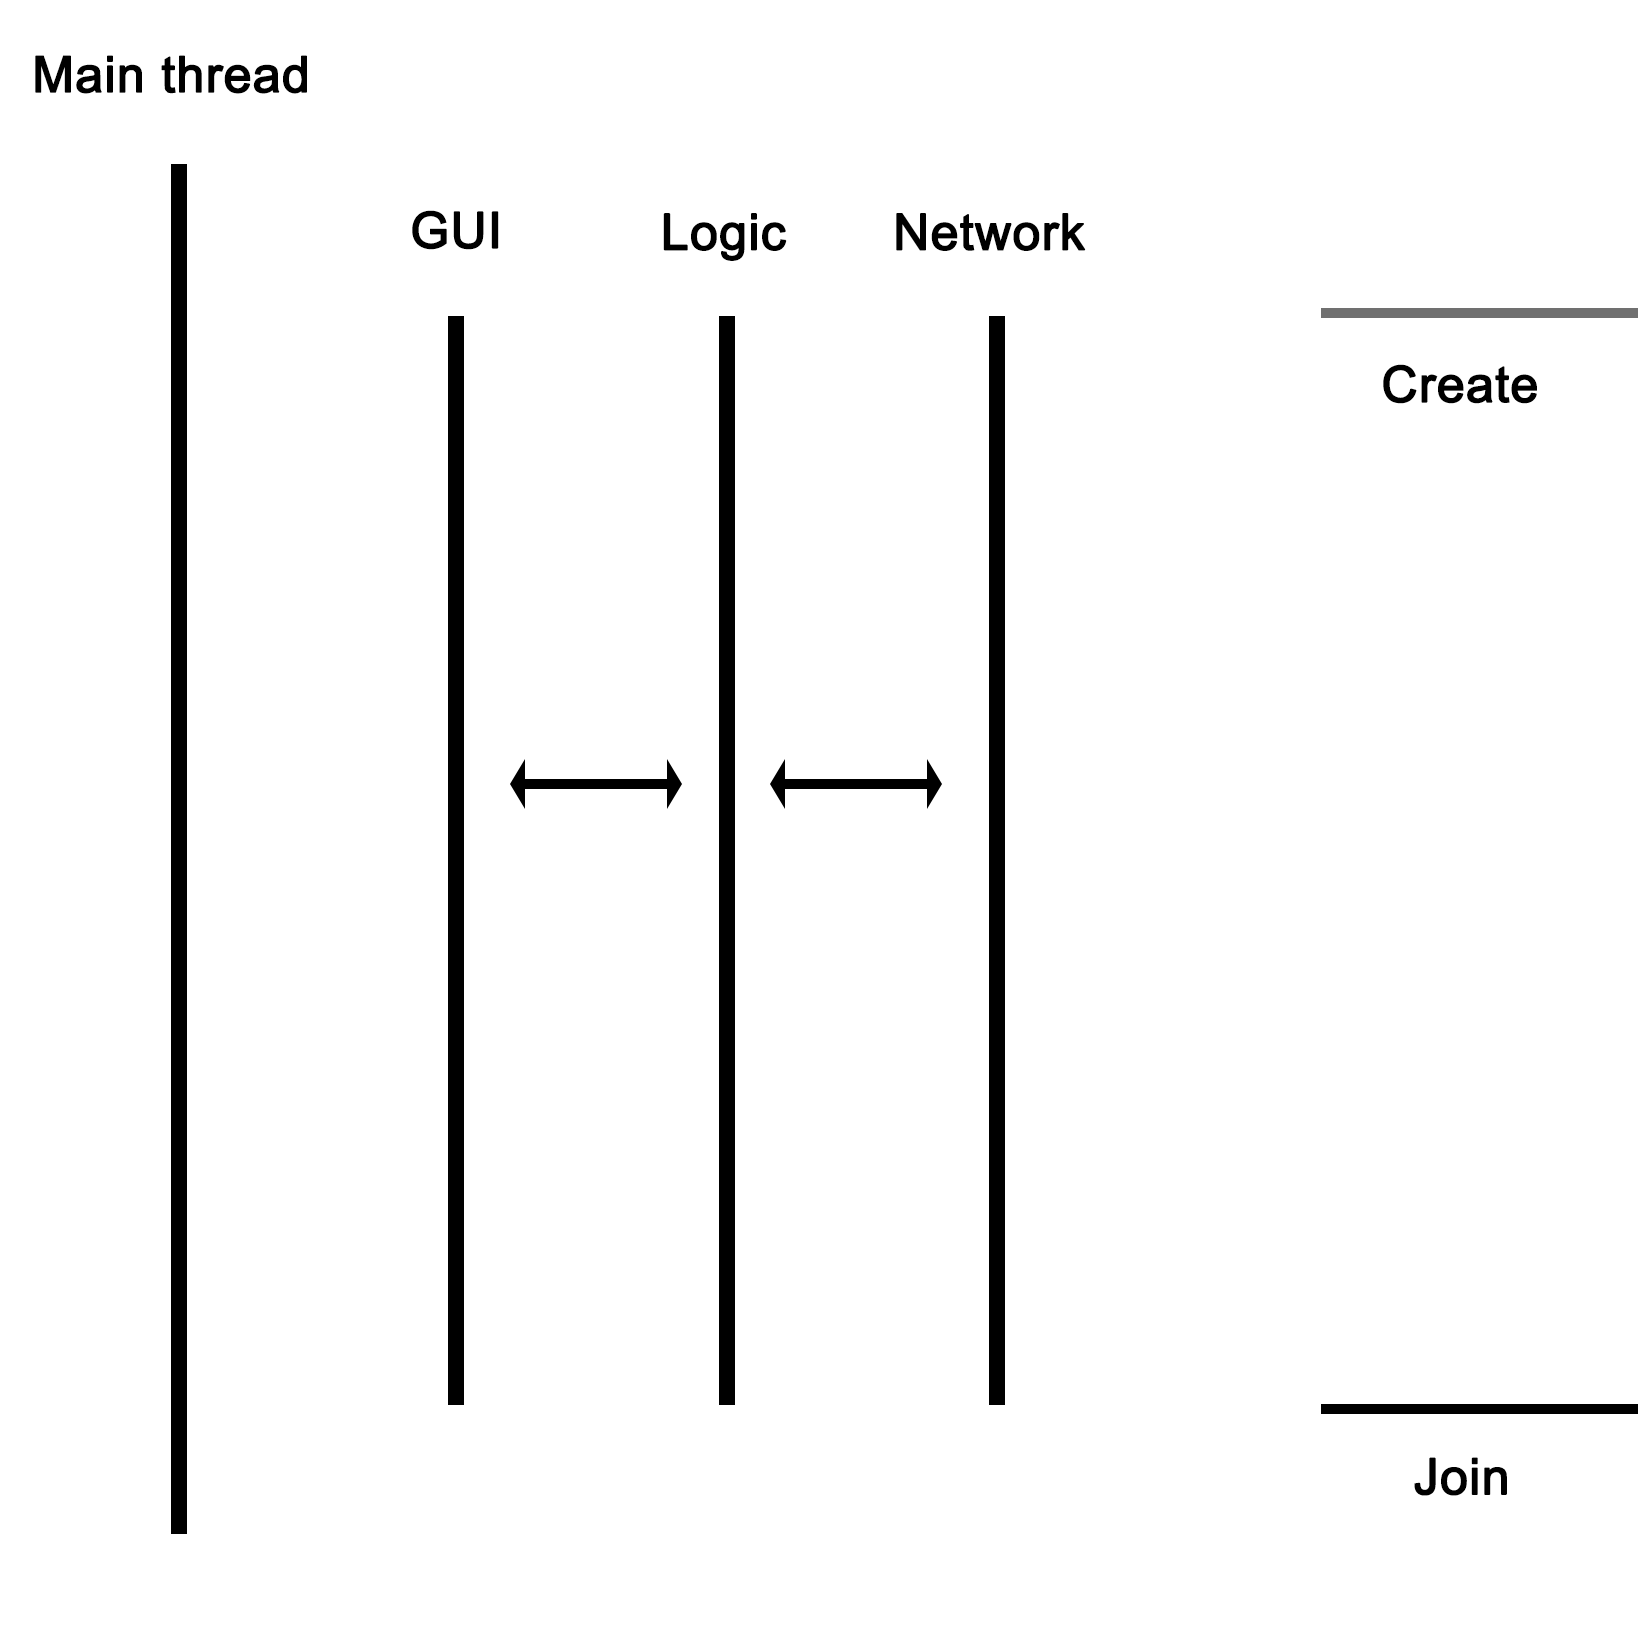
Essentially, to the operating system (OS), a process consists of one or more threads, each thread processing its own state and variables. One would regard this as a hierarchical configuration, with the OS as the foundation, providing support for the running of (user) processes. Each of these processes then consists of one or more threads. Communication between processes is handled by inter-process communication (IPC), which is provided by the operating system.
In a graphical view, this looks like the following:
Each process within the OS has its own state, with each thread in a process having its own state as well as the relative to the other threads within that same process. While IPC allows processes to communicate with each other, threads can communicate with other threads within the process in a variety of ways, which we'll explore in more depth in upcoming chapters. This generally involves some kind of shared memory between threads.
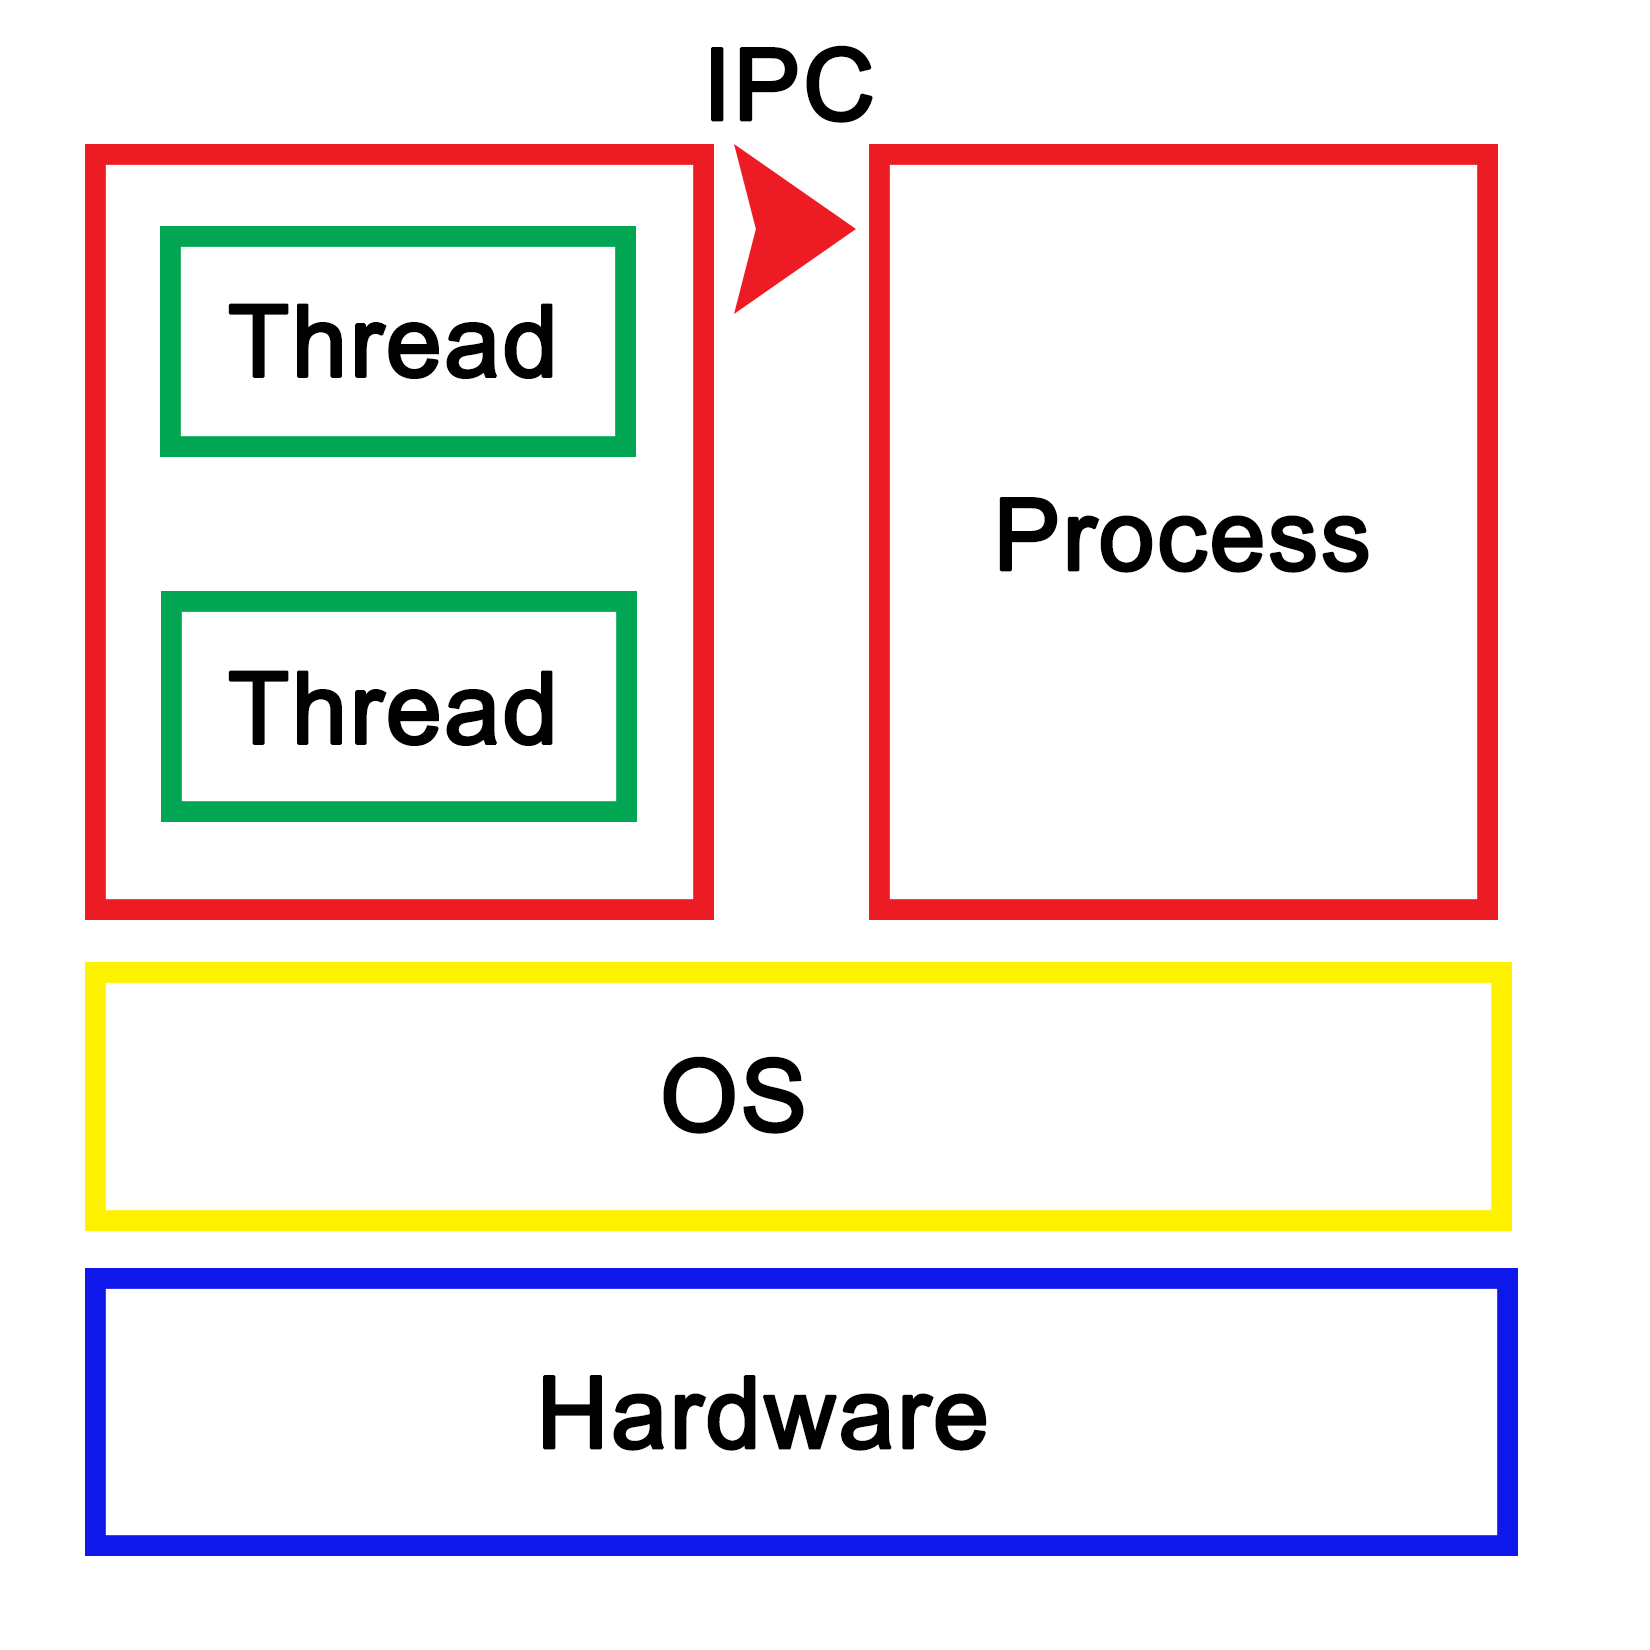
An application is loaded from binary data in a specific executable format such as, for example, Executable and Linkable Format (ELF) which is generally used on Linux and many other operating systems. With ELF binaries, the following number of sections should always be present:
The .bss section is, essentially, allocated with uninitialized memory including empty arrays which thus do not take up any space in the binary, as it makes no sense to store rows of pure zeroes in the executable. Similarly, there is the .data section with initialized data. This contains global tables, variables, and the like. Finally, the .rodata section is like .data, but it is, as the name suggests, read-only. It contains things such as hardcoded strings.
In the .text section, we find the actual application instructions (code) which will be executed by the processor. The whole of this will get loaded by the operating system, thus creating a process. The layout of such a process looks like the following diagram:
This is what a process looks like when launched from an ELF-format binary, though the final format in memory is roughly the same in basically any OS, including for a Windows process launched from a PE-format binary. Each of the sections in the binary are loaded into their respective sections, with the BSS section allocated to the specified size. The .text section is loaded along with the other sections, and its initial instruction is executed once this is done, which starts the process.
In system languages such as C++, one can see how variables and other program state information within such a process are stored both on the stack (variables exist within the scope) and heap (using the new operator). The stack is a section of memory (one allocated per thread), the size of which depends on the operating system and its configuration. One can generally also set the stack size programmatically when creating a new thread.
In an operating system, a process consists of a block of memory addresses, the size of which is constant and limited by the size of its memory pointers. For a 32-bit OS, this would limit this block to 4 GB. Within this virtual memory space, the OS allocates a basic stack and heap, both of which can grow until all memory addresses have been exhausted, and further attempts by the process to allocate more memory will be denied.
The stack is a concept both for the operating system and for the hardware. In essence, it's a collection (stack) of so-called stack frames, each of which is composed of variables, instructions, and other data relevant to the execution frame of a task.
In hardware terms, the stack is part of the task (x86) or process state (ARM), which is how the processor defines an execution instance (program or thread). This hardware-defined entity contains the entire state of a singular thread of execution. See the following sections for further details on this.
A task is defined as follows in the Intel IA-32 System Programming guide, Volume 3A:
"A task is a unit of work that a processor can dispatch, execute, and suspend. It can be used to execute a program, a task or process, an operating-system service utility, an interrupt or exception handler, or a kernel or executive utility."
"The IA-32 architecture provides a mechanism for saving the state of a task, for dispatching tasks for execution, and for switching from one task to another. When operating in protected mode, all processor execution takes place from within a task. Even simple systems must define at least one task. More complex systems can use the processor's task management facilities to support multitasking applications."
This excerpt from the IA-32 (Intel x86) manual summarizes how the hardware supports and implements support for operating systems, processes, and the switching between these processes.
It's important to realize here that, to the processor, there's no such thing as a process or thread. All it knows of are threads of execution, defined as a series of instructions. These instructions are loaded into memory somewhere, and the current position in these instructions is kept track of along with the variable data (variables) being created, as the application is executed within the data section of the process.
Each task also runs within a hardware-defined protection ring, with the OS's tasks generally running on ring 0, and user tasks on ring 3. Rings 1 and 2 are rarely used except for specific use cases with modern OSes on the x86 architecture. These rings are privilege-levels enforced by the hardware and allow for example for the strict separation of kernel and user-level tasks.
The task structure for both 32-bit and 64-bit tasks are quite similar in concept. The official name for it is the Task State Structure (TSS). It has the following layout for 32-bit x86 CPUs:
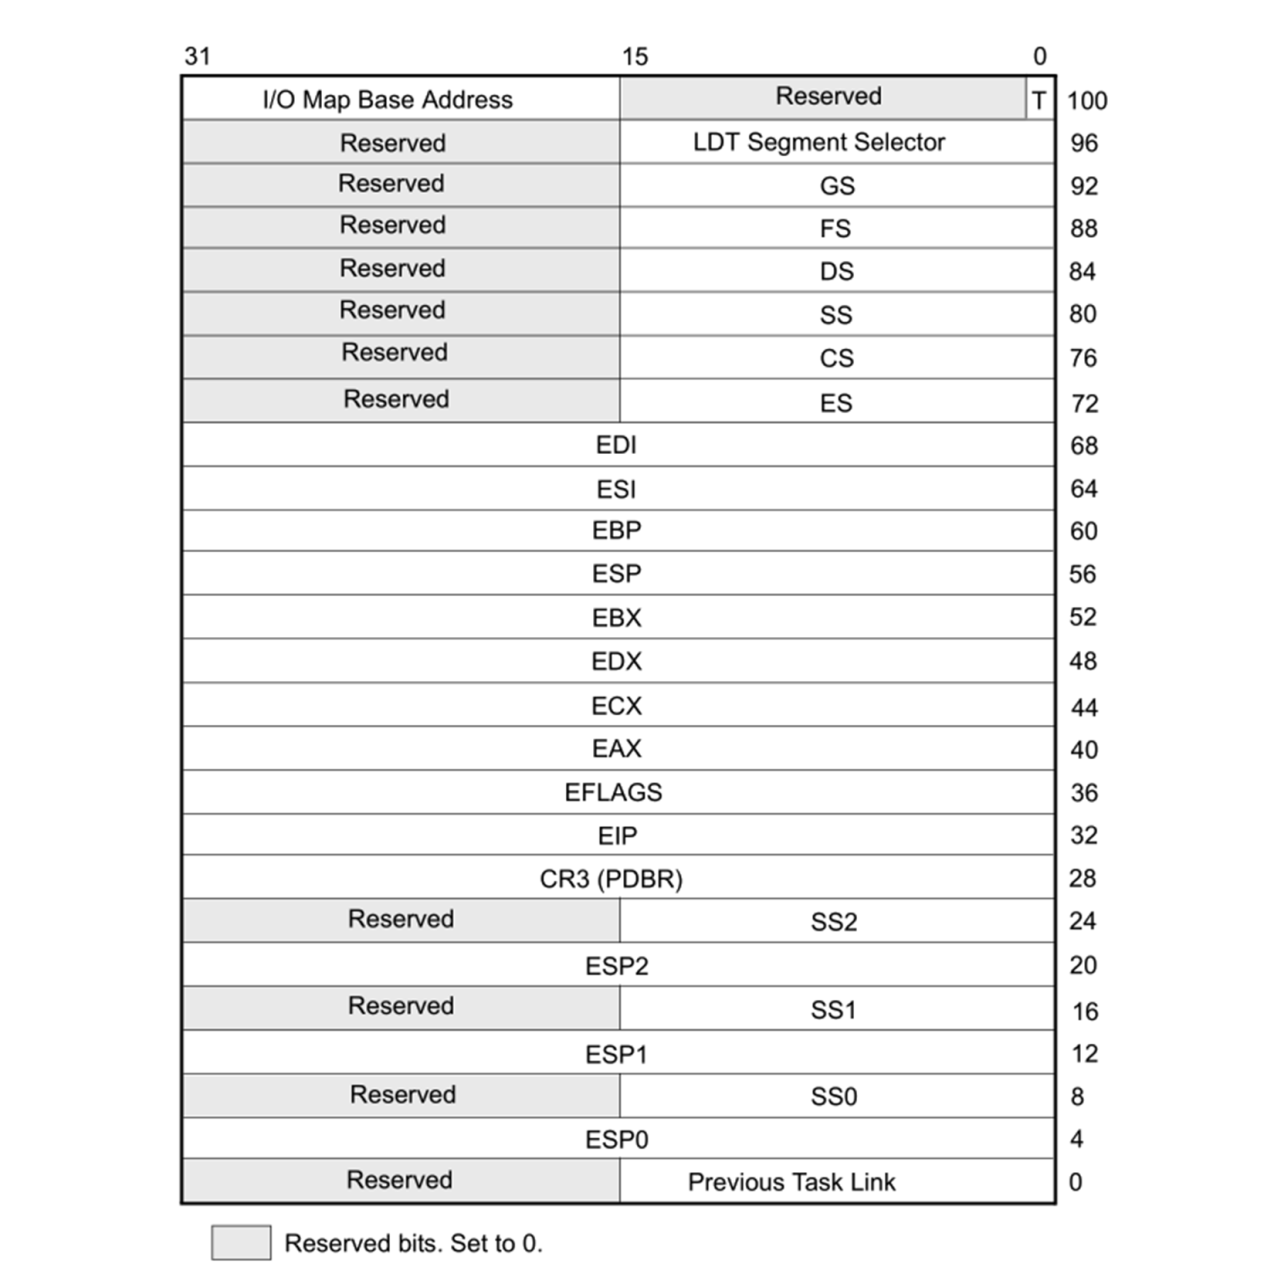
Following are the firlds:
For 64-bit x86_64 CPUs, the TSS layout looks somewhat different, since hardware-based task switching is not supported in this mode:
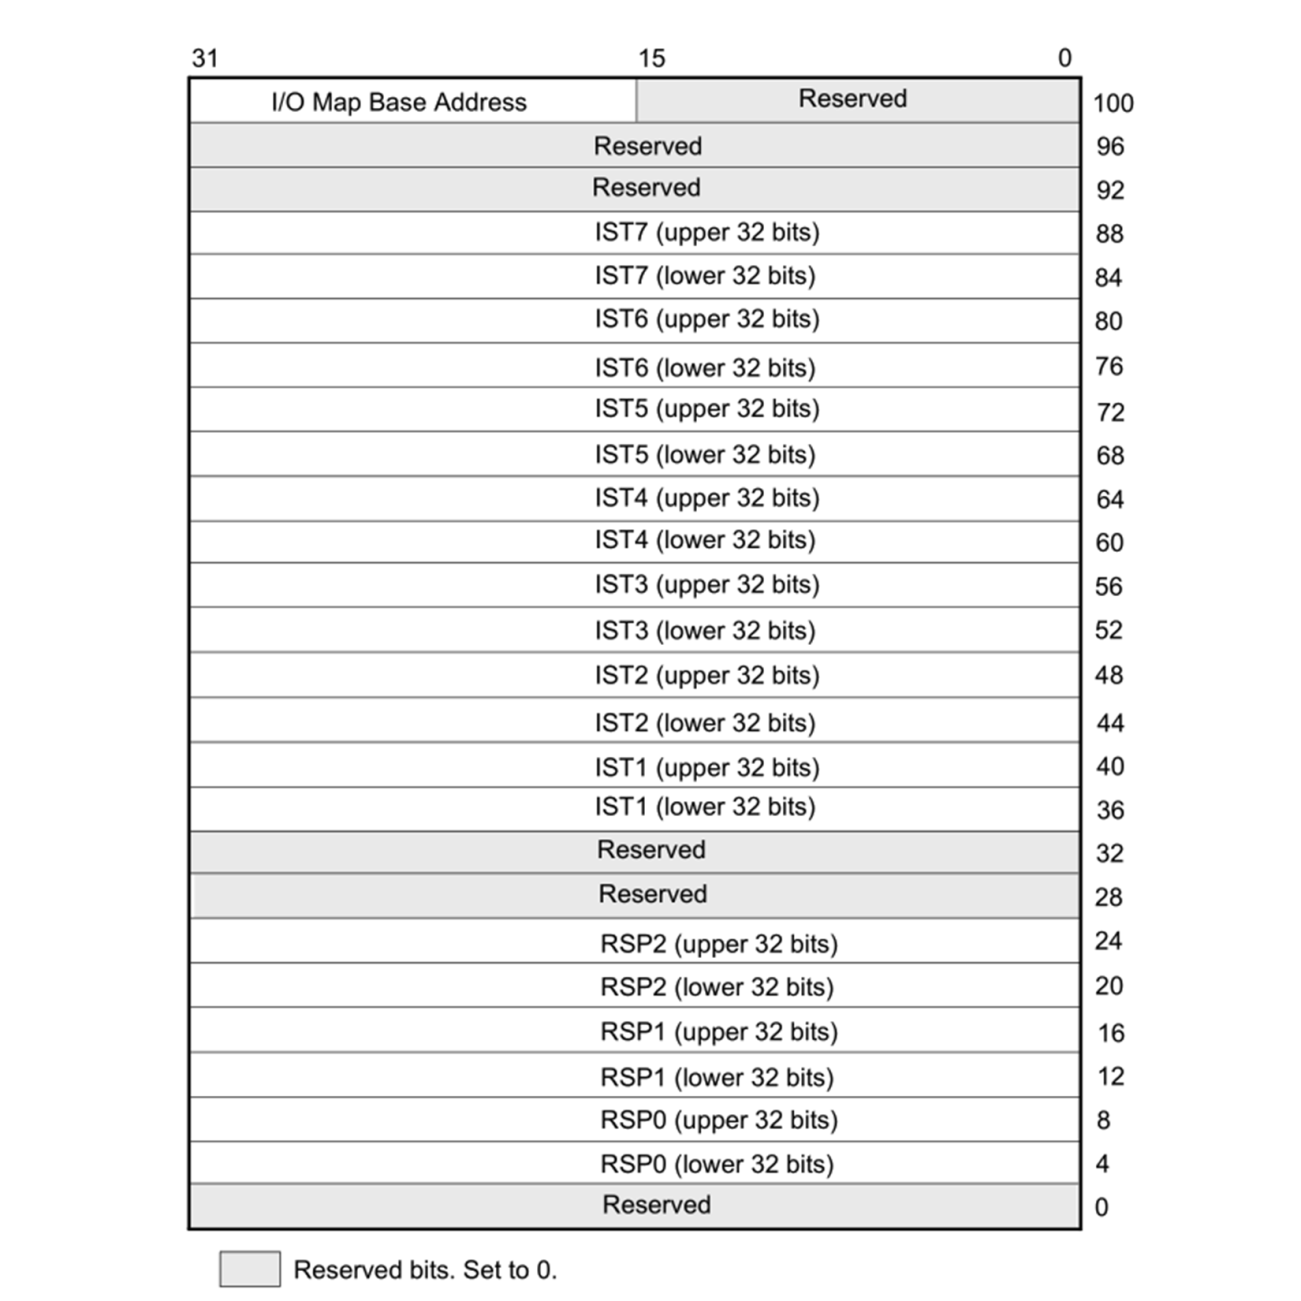
Here, we have similar relevant fields, just with different names:
Even though on x86 in 32-bit mode, the CPU supports hardware-based switching between tasks, most operating systems will use just a single TSS structure per CPU regardless of the mode, and do the actual switching between tasks in software. This is partially due to efficiency reasons (swapping out only pointers which change), partially due to features which are only possible this way, such as measuring CPU time used by a process/thread, and to adjust the priority of a thread or process. Doing it in software also simplifies the portability of code between 64-bit and 32-bit systems, since the former do not support hardware-based task switching.
During a software-based task switch (usually via an interrupt), the ESP/RSP, and so on are stored in memory and replaced with the values for the next scheduled task. This means that once execution resumes, the TSS structure will now have the Stack Pointer (SP), segment pointer(s), register contents, and all other details of the new task.
The source of the interrupt can be based in hardware or software. A hardware interrupt is usually used by devices to signal to the CPU that they require attention by the OS. The act of calling a hardware interrupt is called an Interrupt Request, or IRQ.
A software interrupt can be due to an exceptional condition in the CPU itself, or as a feature of the CPU's instruction set. The action of switching tasks by the OS's kernel is also performed by triggering a software interrupt.
In ARM architectures, applications usually run in the unprivileged Exception Level 0 (EL0) level, which is comparable to ring 3 on x86 architectures, and the OS kernel in EL1. The ARMv7 (AArch32, 32-bit) architecture has the SP in the general purpose register 13. For ARMv8 (AArch64, 64-bit), a dedicated SP register is implemented for each exception level: SP_EL0, SP_EL1, and so on.
For task state, the ARM architecture uses Program State Register (PSR) instances for the Current Program State Register (CPSR) or the Saved Program State Register (SPSR) program state's registers. The PSR is part of the Process State (PSTATE), which is an abstraction of the process state information.
While the ARM architecture is significantly different from the x86 architecture, when using software-based task switching, the basic principle does not change: save the current task's SP, register state, and put the next task's detail in there instead before resuming processing.
As we saw in the preceding sections, the stack together with the CPU registers define a task. As mentioned earlier, this stack consists of stack frames, each of which defines the (local) variables, parameters, data, and instructions for that particular instance of task execution. Of note is that although the stack and stack frames are primarily a software concept, it is an essential feature of any modern OS, with hardware support in many CPU instruction sets. Graphically, it can be be visualized like the following:
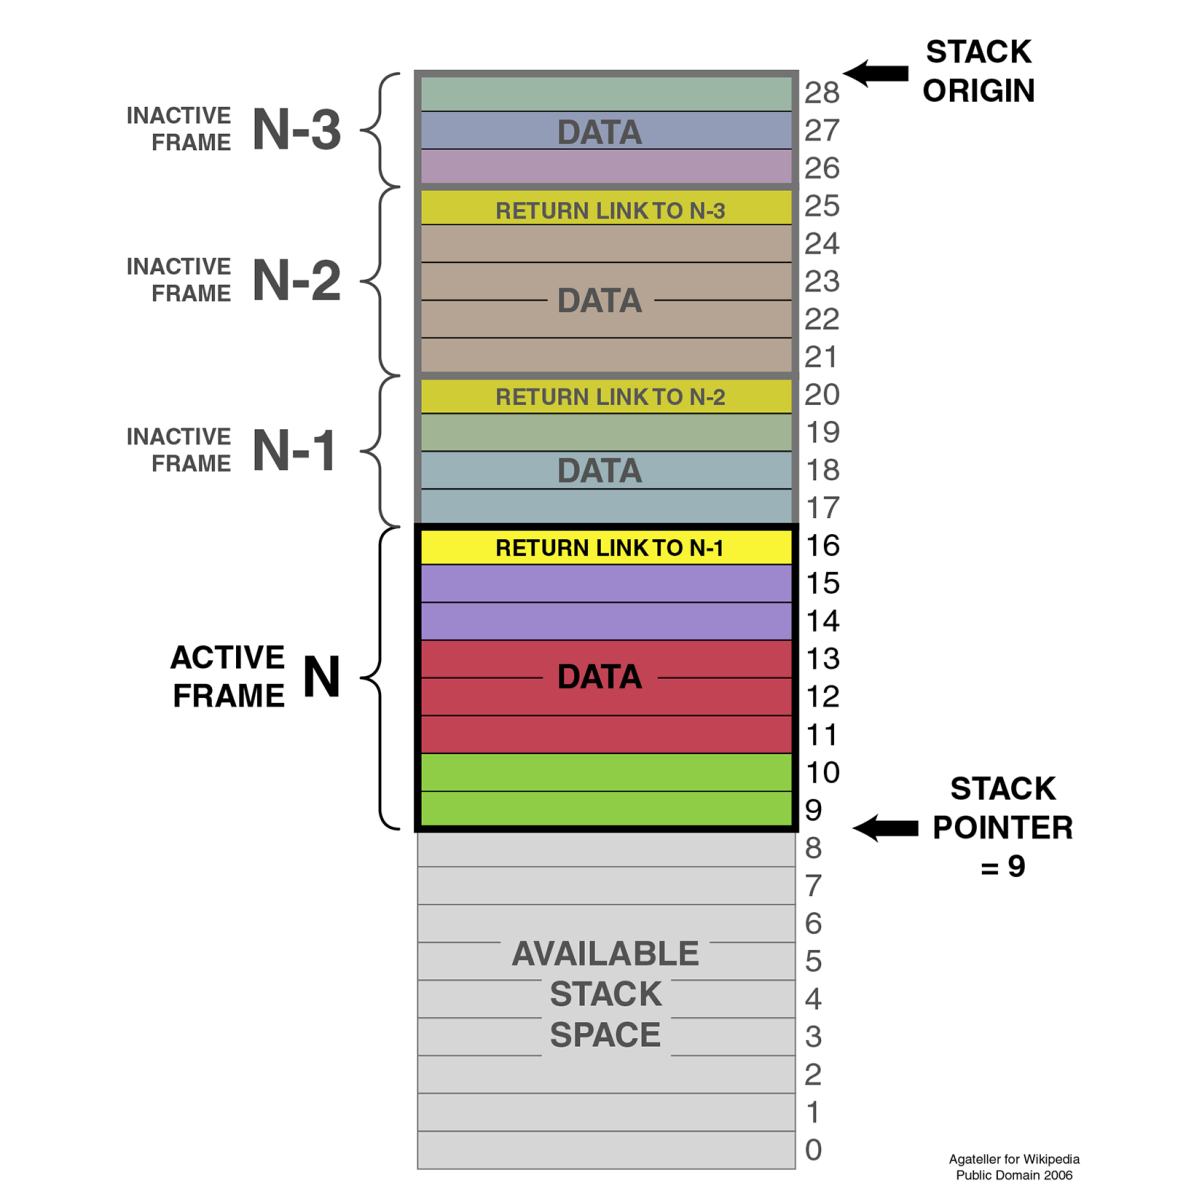
The SP (ESP on x86) points to the top of the stack, with another pointer (Extended Base Pointer (EBP) for x86). Each frame contains a reference to the preceding frame (caller return address), as set by the OS.
When using a debugger with one's C++ application, this is basically what one sees when requesting the backtrack--the individual frames of the stack showing the initial stack frame leading up until the current frame. Here, one can examine each individual frame's details.
Over the past decades, a lot of different terms related to the way tasks are processed by a computer have been coined and come into common use. Many of these are also used interchangeably, correctly or not. An example of this is multithreading in comparison with multiprocessing.
Here, the latter means running one task per processor in a system with multiple physical processors, while the former means running multiple tasks on a singular processor simultaneously, thus giving the illusion that they are all being executed simultaneously:

Another interesting distinction between multiprocessing and multitasking is that the latter uses time-slices in order to run multiple threads on a single processor core. This is different from multithreading in the sense that in a multitasking system, no tasks will ever run in a concurrent fashion on the same CPU core, though tasks can still be interrupted.
The concept of a process and a shared memory space between the threads contained within the said process is at the very core of multithreaded systems from a software perspective. Though the hardware is often not aware of this--seeing just a single task to the OS. However, such a multithreaded process contains two or many more threads. Each of these threads then perform its own series of tasks.
In other implementations, such as Intel's Hyper-Threading (HT) on x86 processors, this multithreading is implemented in the hardware itself, where it's commonly referred to as SMT (see the section Simultaneous multithreading (SMT) for details). When HT is enabled, each physical CPU core is presented to the OS as being two cores. The hardware itself will then attempt to execute the tasks assigned to these so-called virtual cores concurrently, scheduling operations which can use different elements of a processing core at the same time. In practice, this can give a noticeable boost in performance without the operating system or application requiring any type of optimization.
The OS can of course still do its own scheduling to further optimize the execution of task, since the hardware is not aware of many details about the instructions it is executing.
Having HT enabled looks like this in the visual format:
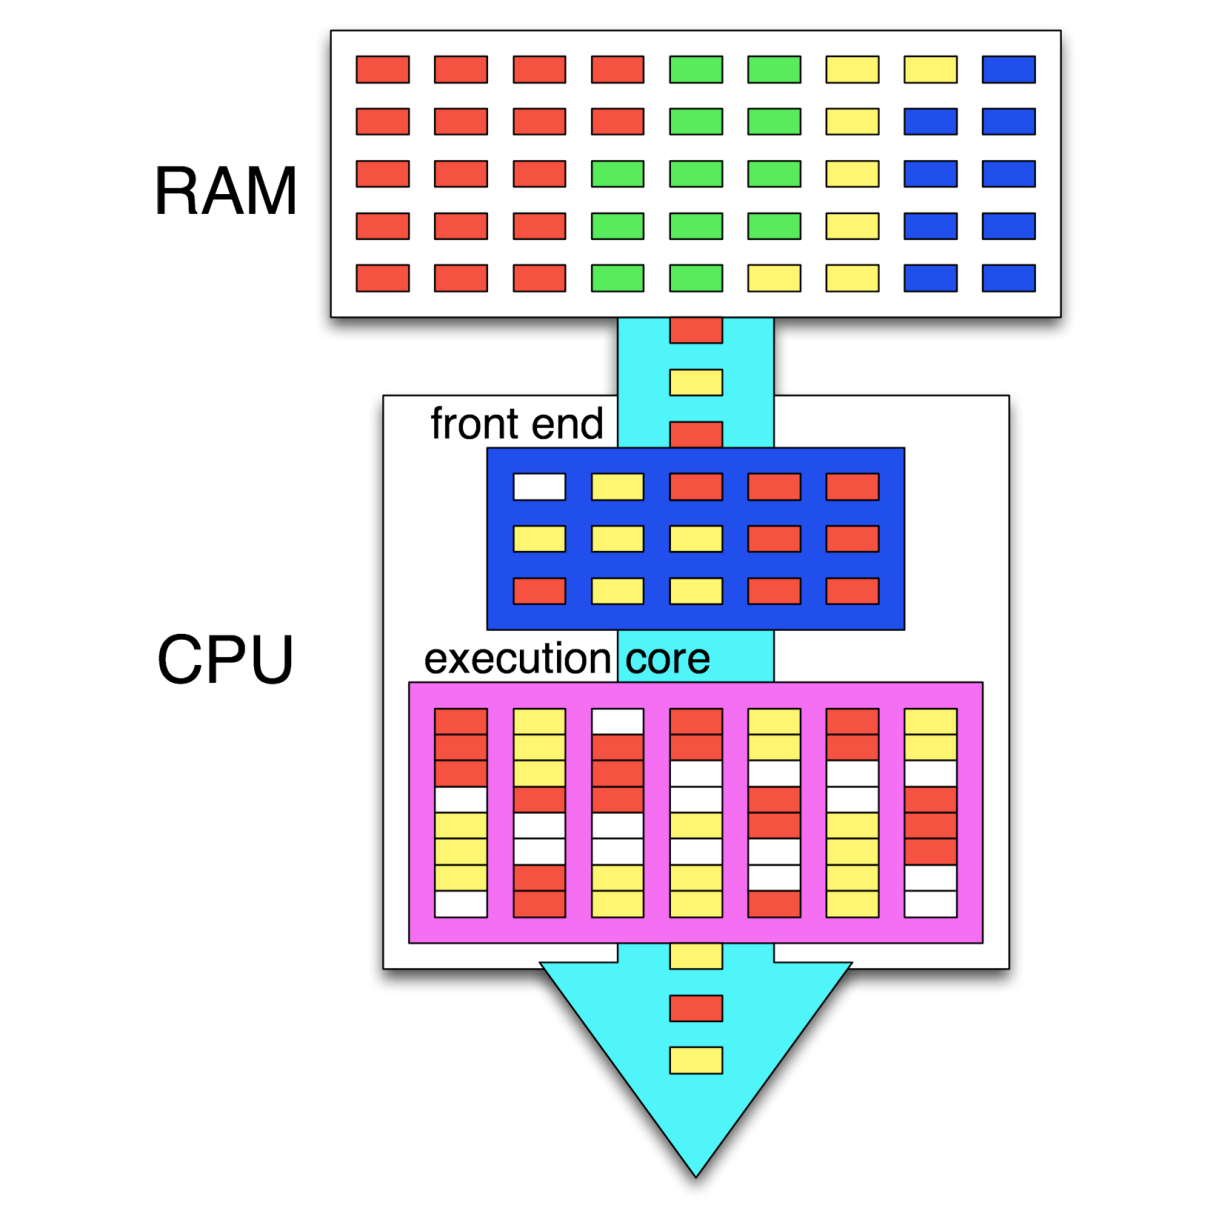
In this preceding graphic, we see the instructions of four different tasks in memory (RAM). Out of these, two tasks (threads) are being executed simultaneously, with the CPU's scheduler (in the frontend) attempting to schedule the instructions so that as many instructions as possible can be executed in parallel. Where this is not possible, so-called pipeline bubbles (in white) appear where the execution hardware is idle.
Together with internal CPU optimizations, this leads to a very high throughput of instructions, also called Instructions Per Second (IPC). Instead of the GHz rating of a CPU, this IPC number is generally far more significant for determining the sheer performance of a CPU.
Different types of computer architecture are classified using a system which was first proposed by Michael J. Flynn, back in 1966. This classification system knows four categories, defining the capabilities of the processing hardware in terms of the number of input and output streams:
An important thing to note with these categories is that they are all defined in terms of multiprocessing, meaning that they refer to the intrinsic capabilities of the hardware. Using software techniques, virtually any method can be approximated on even a regular SISD-style architecture. This is, however, part of multithreading.
Over the past decades, many systems were created which contained multiple processing units. These can be broadly divided into Symmetric Multiprocessing (SMP) and Asymmetric Multiprocessing (AMP) systems.
AMP's main defining feature is that a second processor is attached as a peripheral to the primary CPU. This means that it cannot run control software, but only user applications. This approach has also been used to connect CPUs using a different architecture to allow one to, for example, run x86 applications on an Amiga, 68k-based system.
With an SMP system, each of the CPUs are peers having access to the same hardware resources, and set up in a cooperative fashion. Initially, SMP systems involved multiple physical CPUs, but later, multiple processor cores got integrated on a single CPU die:
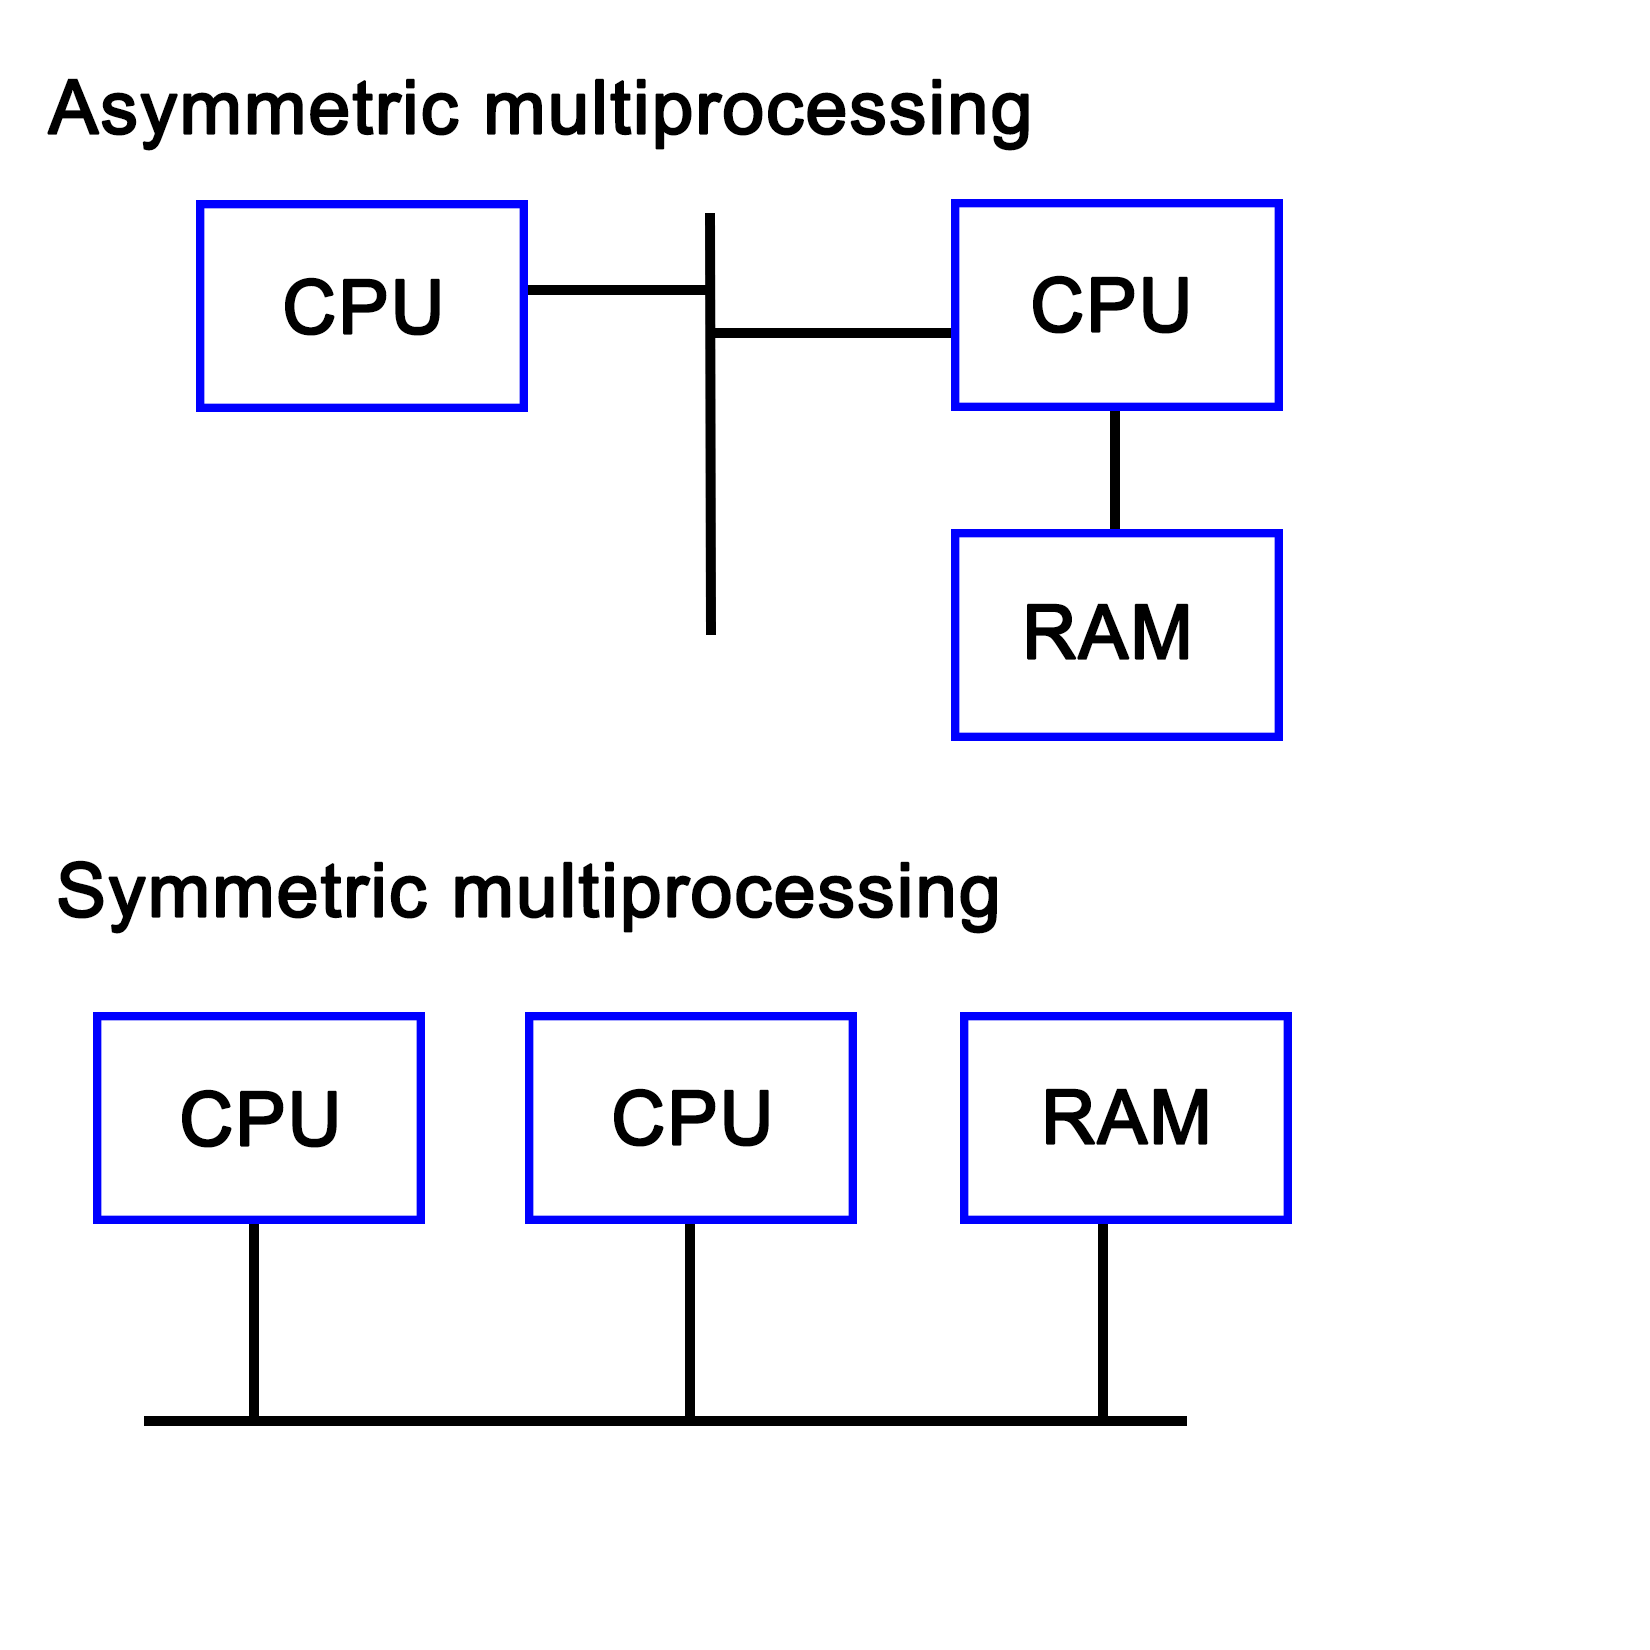
With the proliferation of multi-core CPUs, SMP is the most common type of processing outside of embedded development, where uniprocessing (single core, single processor) is still very common.
Technically, the sound, network, and graphic processors in a system can be considered to be asymmetric processors related to the CPU. With an increase in General Purpose GPU (GPGPU) processing, AMP is becoming more relevant.
A multiprocessing system does not necessarily have to be implemented within a single system, but can also consist of multiple systems which are connected in a network. Such a cluster is then called a loosely coupled multiprocessing system. We cover distributing computing in Chapter 9, Multithreading with Distributed Computing.
This is in contrast with a tightly coupled multiprocessing system, whereby the system is integrated on a single printed circuit board (PCB), using the same low-level, high-speed bus or similar.
Virtually any modern system combines multiprocessing with multithreading, courtesy of multi-core CPUs, which combine two or more processing cores on a single processor die. What this means for an operating system is that it has to schedule tasks both across multiple processing cores while also scheduling them on specific cores in order to extract maximum performance.
This is the area of task schedulers, which we will look at in a moment. Suffice it to say that this is a topic worthy of its own book.
Like multiprocessing, there is not a single implementation, but two main ones. The main distinction between these is the maximum number of threads the processor can execute concurrently during a single cycle. The main goal of a multithreading implementation is to get as close to 100% utilization of the processor hardware as reasonably possible. Multithreading utilizes both thread-level and process-level parallelism to accomplish this goal.
The are two types of multithreading, which we will cover in the following sections.
Also known as super-threading, the main subtypes for temporal multithreading (TMT) are coarse-grained and fine-grained (or interleaved). The former switches rapidly between different tasks, saving the context of each before switching to another task's context. The latter type switches tasks with each cycle, resulting in a CPU pipeline containing instructions from various tasks from which the term interleaved is derived.
The fine-grained type is implemented in barrel processors. They have an advantage over x86 and other architectures that they can guarantee specific timing (useful for hard real-time embedded systems) in addition to being less complex to implement due to assumptions that one can make.
SMT is implemented on superscalar CPUs (implementing instruction-level parallelism), which include the x86 and ARM architectures. The defining characteristic of SMT is also indicated by its name, specifically, its ability to execute multiple threads in parallel, per core.
Generally, two threads per core is common, but some designs support up to eight concurrent threads per core. The main advantage of this is being able to share resources among threads, with an obvious disadvantage of conflicting needs by multiple threads, which has to be managed. Another advantage is that it makes the resulting CPU more energy efficient due to a lack of hardware resource duplication.
Intel's HT technology is essentially Intel's SMT implementation, providing a basic two thread SMT engine starting with some Pentium 4 CPUs in 2002.
A number of task-scheduling algorithms exist, each focusing on a different goal. Some may seek to maximize throughput, others minimize latency, while others may seek to maximize response time. Which scheduler is the optimal choice solely depends on the application the system is being used for.
For desktop systems, the scheduler is generally kept as general-purpose as possible, usually prioritizing foreground applications over background applications in order to give the user the best possible desktop experience.
For embedded systems, especially in real-time, industrial applications would instead seek to guarantee timing. This allows processes to be executed at exactly the right time, which is crucial in, for example, driving machinery, robotics, or chemical processes where a delay of even a few milliseconds could be costly or even fatal.
The scheduler type is also dependent on the multitasking state of the OS--a cooperative multitasking system would not be able to provide many guarantees about when it can switch out a running process for another one, as this depends on when the active process yields.
With a preemptive scheduler, processes are switched without them being aware of it, allowing the scheduler more control over when processes run at which time points.
Windows NT-based OSes (Windows NT, 2000, XP, and so on) use what is called a multilevel feedback queue, featuring 32 priority levels. This type of priority scheduler allows one to prioritize tasks over other tasks, allowing one to fine-tune the resulting experience.
Linux originally (kernel 2.4) also used a multilevel feedback queue-based priority scheduler like Windows NT with an O(n) scheduler. With version 2.6, this was replaced with an O(1) scheduler, allowing processes to be scheduled within a constant amount of time. Starting with Linux kernel 2.6.23, the default scheduler is the Completely Fair Scheduler (CFS), which ensures that all tasks get a comparable share of CPU time.
The type of scheduling algorithm used for a number of commonly used or well-known OSes is listed in this table:
|
Operating System |
Preemption |
Algorithm |
|
Amiga OS |
Yes |
Prioritized round-robin scheduling |
|
FreeBSD |
Yes |
Multilevel feedback queue |
|
Linux kernel before 2.6.0 |
Yes |
Multilevel feedback queue |
|
Linux kernel 2.6.0-2.6.23 |
Yes |
O(1) scheduler |
|
Linux kernel after 2.6.23 |
Yes |
Completely Fair Scheduler |
|
classic Mac OS pre-9 |
None |
Cooperative scheduler |
|
Mac OS 9 |
Some |
Preemptive scheduler for MP tasks, and cooperative for processes and threads |
|
OS X/macOS |
Yes |
Multilevel feedback queue |
|
NetBSD |
Yes |
Multilevel feedback queue |
|
Solaris |
Yes |
Multilevel feedback queue |
|
Windows 3.1x |
None |
Cooperative scheduler |
|
Windows 95, 98, Me |
Half |
Preemptive scheduler for 32-bit processes, and cooperative for 16-bit processes |
|
Windows NT (including 2000, XP, Vista, 7, and Server) |
Yes |
Multilevel feedback queue |
(Source: https://en.wikipedia.org/wiki/Scheduling_(computing))
The preemptive column indicates whether the scheduler is preemptive or not, with the next column providing further details. As one can see, preemptive schedulers are very common, and used by all modern desktop operating systems.
In the demonstration code of Chapter 1, Revisiting Multithreading, we looked at a simple c++11 application which used four threads to perform some processing. In this section, we will look at the same application, but from a hardware and OS perspective.
When we look at the start of the code in the main function, we see that we create a data structure containing a single (integer) value:
int main() {
    values.push_back(42);
After the OS creates a new task and associated stack structure, an instance of a vector data structure (customized for integer types) is allocated on the stack. The size of this was specified in the binary file's global data section (BSS for ELF).
When the application's execution is started using its entry function (main() by default), the data structure is modified to contain the new integer value.
Next, we create four threads, providing each with some initial data:
    thread tr1(threadFnc, 1);
    thread tr2(threadFnc, 2);
    thread tr3(threadFnc, 3);
    thread tr4(threadFnc, 4);
For the OS, this means creating new data structures, and allocating a stack for each new thread. For the hardware, this initially does not change anything if no hardware-based task switching is used.
At this point, the OS's scheduler and the CPU can combine to execute this set of tasks (threads) as efficiently and quickly as possible, employing features of the hardware including SMP, SMT, and so on.
After this, the main thread waits until the other threads stop executing:
    tr1.join();
    tr2.join();
    tr3.join();
    tr4.join();
These are blocking calls, which mark the main thread as being blocked until these four threads (tasks) finish executing. At this point, the OS's scheduler will resume execution of the main thread.
In each newly created thread, we first output a string on the standard output, making sure that we lock the mutex to ensure synchronous access:
void threadFnc(int tid) {
    cout_mtx.lock();
    cout << "Starting thread " << tid << ".\n";
    cout_mtx.unlock();
A mutex, in essence, is a singular value being stored on the stack of heap, which then is accessed using an atomic operation. This means that some form of hardware support is required. Using this, a task can check whether it is allowed to proceed yet, or has to wait and try again.
In this last particular piece of code, this mutex lock allows us to output on the standard C++ output stream without other threads interfering.
After this, we copy the initial value in the vector to a local variable, again ensuring that it's done synchronously:
    values_mtx.lock();
    int val = values[0];
    values_mtx.unlock();
The same thing happens here, except now the mutex lock allows us to read the first value in the vector without risking another thread accessing or even changing it while we use it.
This is followed by the generating of a random number as follows:
    int rval = randGen(0, 10);
    val += rval;
This uses the randGen() method, which is as follows:
int randGen(const int& min, const int& max) {
    static thread_local mt19937 generator(hash<thread::id>() (this_thread::get_id()));
    uniform_int_distribution<int> distribution(min, max);
    return distribution(generator);
}
This method is interesting due to its use of a thread-local variable. Thread-local storage is a section of a thread's memory which is specific to it, and used for global variables, which, nevertheless, have to remain limited to that specific thread.
This is very useful for a static variable like the one used here. That the generator instance is static is because we do not want to reinitialize it every single time we use this method, yet we do not want to share this instance across all threads. By using a thread-local, static instance, we can accomplish both goals. A static instance is created and used, but separately for each thread.
The Thread function then ends with the same series of mutexes being locked, and the new value being copied to the array.
    cout_mtx.lock();
    cout << "Thread " << tid << " adding " << rval << ". New value: " << val << ".\n";
    cout_mtx.unlock();

    values_mtx.lock();
    values.push_back(val);
    values_mtx.unlock();
}
Here we see the same synchronous access to the standard output stream, followed by synchronous access to the values data structure.
Mutual exclusion is the principle which underlies thread-safe access of data within a multithreaded application. One can implement this both in hardware and software. The mutual exclusion (mutex) is the most elementary form of this functionality in most implementations.
The simplest hardware-based implementation on a uniprocessor (single processor core), non-SMT system is to disable interrupts, and thus, prevent the task from being changed. More commonly, a so-called busy-wait principle is employed. This is the basic principle behind a mutex--due to how the processor fetches data, only one task can obtain and read/write an atomic value in the shared memory, meaning, a variable sized the same (or smaller) as the CPU's registers. This is further detailed in Chapter 8, Atomic Operations - Working with the Hardware.
When our code tries to lock a mutex, what this does is read the value of such an atomic section of memory, and try to set it to its locked value. Since this is a single operation, only one task can change the value at any given time. Other tasks will have to wait until they can gain access in this busy-wait cycle, as shown in this diagram:
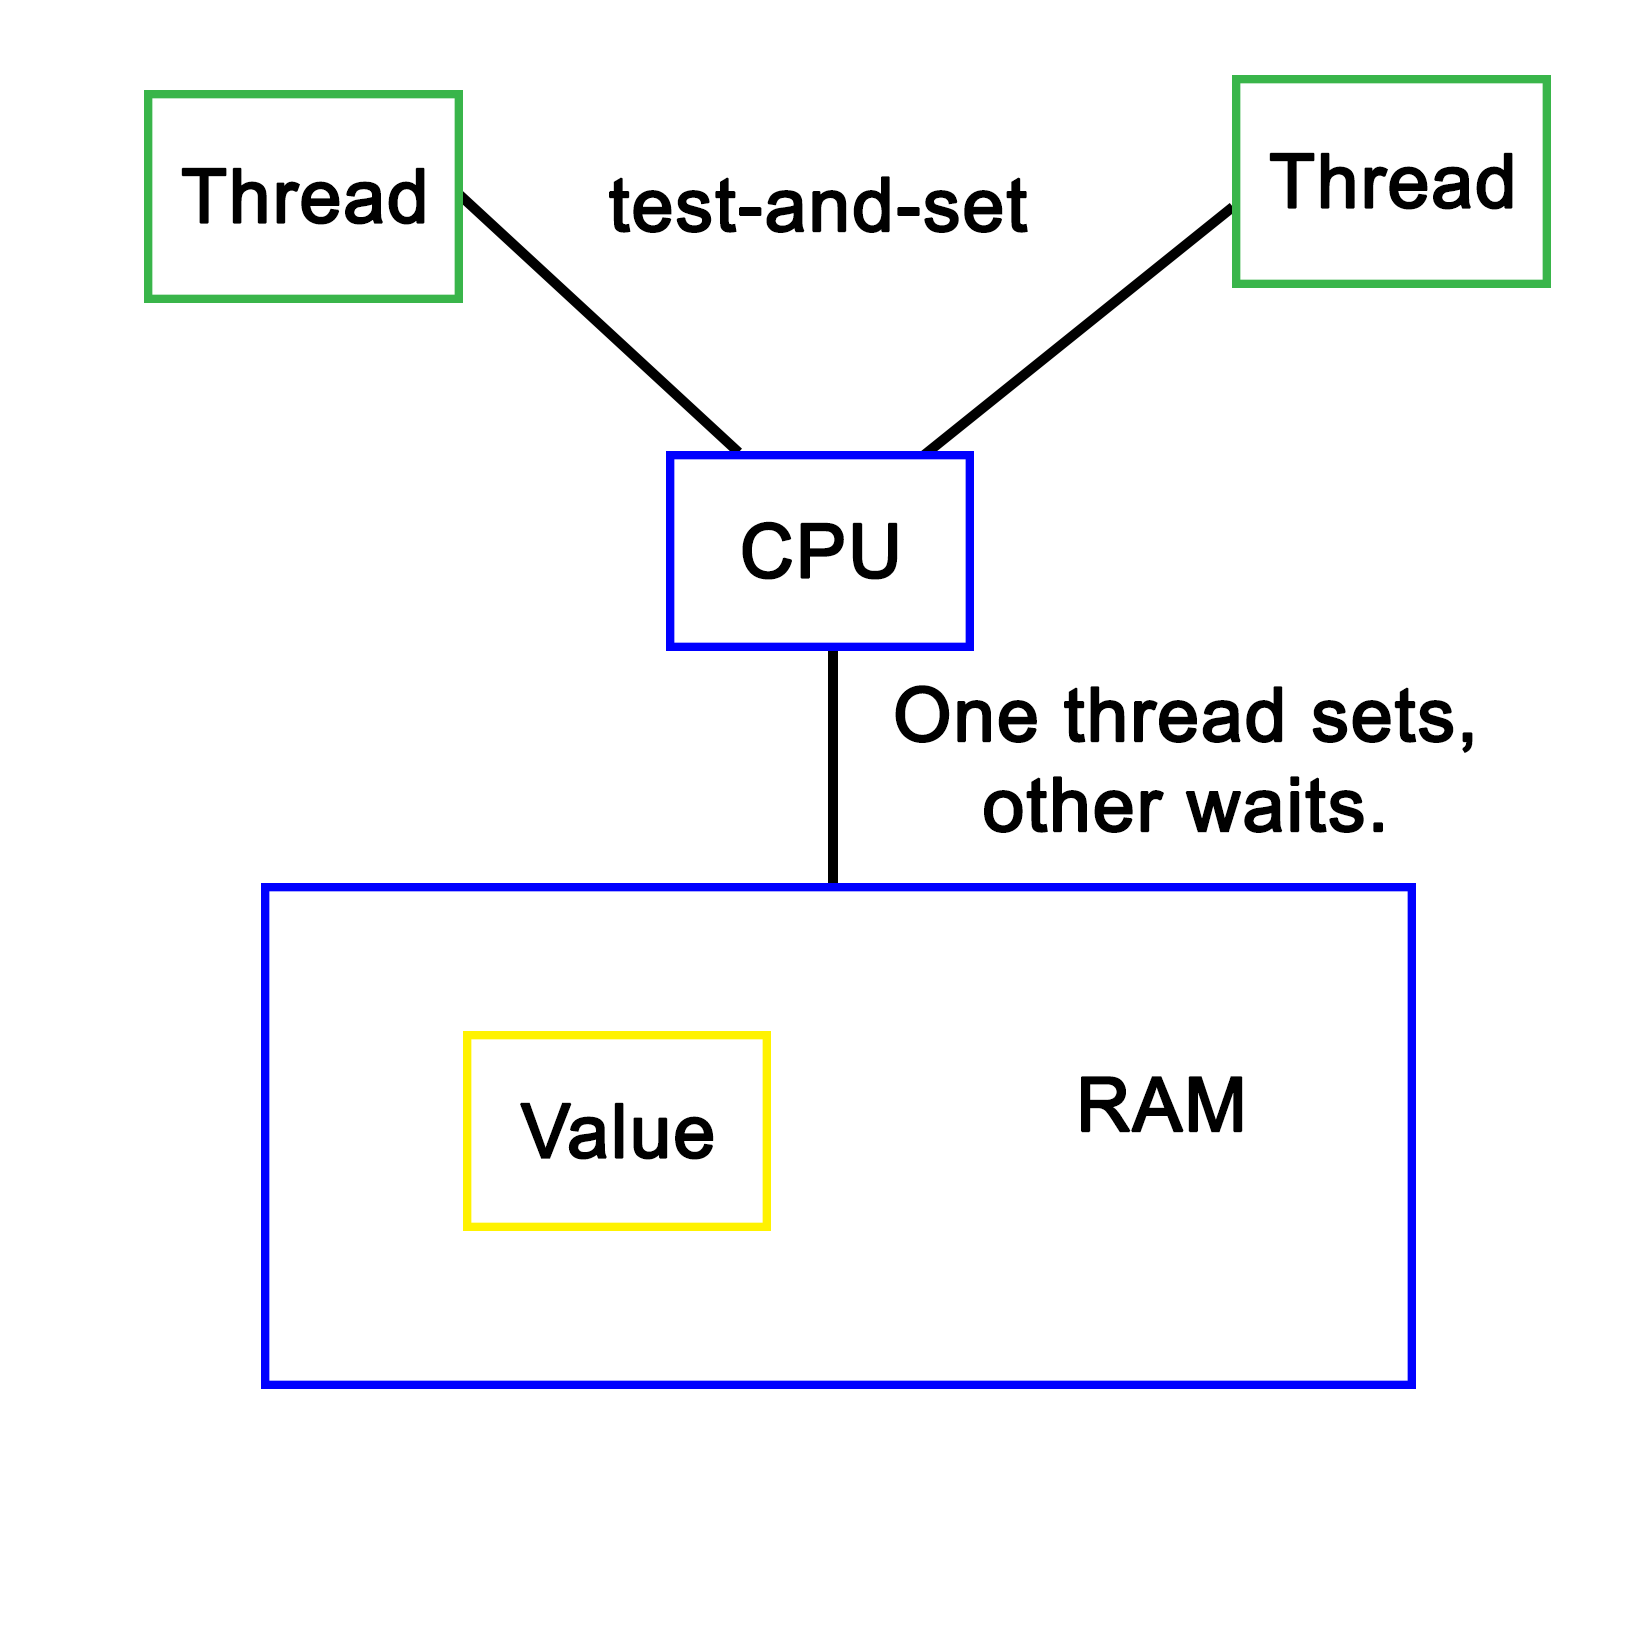
Software-defined mutual exclusion implementations are all based on busy-waiting. An example is Dekker's algorithm, which defines a system in which two processes can synchronize, employing busy-wait to wait for the other process to leave the critical section.
The pseudocode for this algorithm is as follows:
    variables
        wants_to_enter : array of 2 booleans
        turn : integer

    wants_to_enter[0] ← false
    wants_to_enter[1] ← false
    turn ← 0 // or 1
p0:
    wants_to_enter[0] ← true
    while wants_to_enter[1] {
        if turn ≠ 0 {
            wants_to_enter[0] ← false
            while turn ≠ 0 {
                // busy wait
            }
            wants_to_enter[0] ← true
        }
    }
    // critical section
    ...
    turn ← 1
    wants_to_enter[0] ← false
    // remainder section
p1:
    wants_to_enter[1] ← true
    while wants_to_enter[0] {
        if turn ≠ 1 {
            wants_to_enter[1] ← false
            while turn ≠ 1 {
                // busy wait
            }
            wants_to_enter[1] ← true
        }
    }
    // critical section
    ...
    turn ← 0
    wants_to_enter[1] ← false
    // remainder section
(Referenced from: https://en.wikipedia.org/wiki/Dekker's_algorithm)
In this preceding algorithm, processes indicate the intent to enter a critical section, checking whether it's their turn (using the process ID), then setting their intent to enter the section to false after they have entered it. Only once a process has set its intent to enter to true again will it enter the critical section again. If it wishes to enter, but turn does not match its process ID, it'll busy-wait until the condition becomes true.
A major disadvantage of software-based mutual exclusion algorithms is that they only work if out-of-order (OoO) execution of code is disabled. OoO means that the hardware actively reorders incoming instructions in order to optimize their execution, thus changing their order. Since these algorithms require that various steps are executed in order, they no longer work on OoO processors.
In this chapter, we saw how processes and threads are implemented both in operating systems and in hardware. We also looked at various configurations of processor hardware and elements of operating systems involved in scheduling to see how they provide various types of task processing.
Finally, we took the multithreaded program example of the previous chapter, and ran through it again, this time considering what happens in the OS and processor while it is being executed.
In the next chapter, we will take a look at the various multithreading APIs being offered via OS and library-based implementations, along with examples comparing these APIs.
While C++ has a native multithreading implementation in the Standard Template Library (STL), OS-level and framework-based multithreading APIs are still very common. Examples of these APIs include Windows and POSIX (Portable Operating System Interface) threads, and those provided by the Qt, Boost, and POCO libraries.
This chapter takes a detailed look at the features provided by each of these APIs, as well as the similarities and differences between each of them. Finally, we'll look at common usage scenarios using example code.
Topics covered by this chapter include the following:
Before the C++ 2011 (C++11) standard, many different threading implementations were developed, many of which are limited to a specific software platform. Some of these are still relevant today, such as Windows threads. Others have been superseded by standards, of which POSIX Threads (Pthreads) has become the de facto standard on UNIX-like OSes. This includes Linux-based and BSD-based OS, as well as OS X (macOS) and Solaris.
Many libraries were developed to make cross-platform development easier. Although Pthreads helps to make UNIX-like OS more or less compatible one of the prerequisites to make software portable across all major operating systems, a generic threading API is needed. This is why libraries such as Boost, POCO, and Qt were created. Applications can use these and rely on the library to handle any differences between platforms.
Pthreads were first defined in the POSIX.1c standard (Threads extensions, IEEE Std 1003.1c-1995) from 1995 as an extension to the POSIX standard. At the time, UNIX had been chosen as a manufacturer-neutral interface, with POSIX unifying the various APIs among them.
Despite this standardization effort, differences still exist in Pthread implementations between OS's which implement it (for example, between Linux and OS X), courtesy of non-portable extensions (marked with _np in the method name).
For the pthread_setname_np method, the Linux implementation takes two parameters, allowing one to set the name of a thread other than the current thread. On OS X (since 10.6), this method only takes one parameter, allowing one to set the name of the current thread only. If portability is a concern, one has to be mindful of such differences.
After 1997, the POSIX standard revisions were managed by the Austin Joint Working Group. These revisions merge the threads extension into the main standard. The current revision is 7, also known as POSIX.1-2008 and IEEE Std 1003.1, 2013 edition--with a free copy of the standard available online.
OS's can be certified to conform to the POSIX standard. Currently, these are as mentioned in this table:
| Name | Developer | Since version | Architecture(s) (current) | Notes |
|
AIX |
IBM |
5L |
POWER |
Server OS |
|
HP-UX |
Hewlett-Packard |
11i v3 |
PA-RISC, IA-64 (Itanium) |
Server OS |
|
IRIX |
Silicon Graphics (SGI) |
6 |
MIPS |
Discontinued |
|
Inspur K-UX |
Inspur |
2 |
X86_64, |
Linux based |
|
Integrity |
Green Hills Software |
5 |
ARM, XScale, Blackfin, Freescale Coldfire, MIPS, PowerPC, x86. |
Real-time OS |
|
OS X/MacOS |
Apple |
10.5 (Leopard) |
X86_64 |
Desktop OS |
|
QNX Neutrino |
BlackBerry |
1 |
Intel 8088, x86, MIPS, PowerPC, SH-4, ARM, StrongARM, XScale |
Real-time, embedded OS |
|
Solaris |
Sun/Oracle |
2.5 |
SPARC, IA-32 (<11), x86_64, PowerPC (2.5.1) |
Server OS |
|
Tru64 |
DEC, HP, IBM, Compaq |
5.1B-4 |
Alpha |
Discontinued |
|
UnixWare |
Novell, SCO, Xinuos |
7.1.3 |
x86 |
Server OS |
Other operating systems are mostly compliant. The following are examples of the same:
| Name | Platform | Notes |
|
Android |
ARM, x86, MIPS |
Linux based. Bionic C-library. |
|
BeOS (Haiku) |
IA-32, ARM, x64_64 |
Limited to GCC 2.x for x86. |
|
Darwin |
PowerPC, x86, ARM |
Uses the open source components on which macOS is based. |
|
FreeBSD |
IA-32, x86_64, sparc64, PowerPC, ARM, MIPS, and so on |
Essentially POSIX compliant. One can rely on documented POSIX behavior. More strict on compliance than Linux, in general. |
|
Linux |
Alpha, ARC, ARM, AVR32, Blackfin, H8/300, Itanium, m68k, Microblaze, MIPS, Nios II, OpenRISC, PA-RISC, PowerPC, s390, S+core, SuperH, SPARC, x86, Xtensa, and so on |
Some Linux distributions (see previous table) are certified as being POSIX compliant. This does not imply that every Linux distribution is POSIX compliant. Some tools and libraries may differ from the standard. For Pthreads, this may mean that the behavior is sometimes different between Linux distributions (different scheduler, and so on) as well as compared to other OS's implementing Pthreads. |
|
MINIX 3 |
IA-32, ARM |
Conforms to POSIX specification standard 3 (SUSv3, 2004). |
|
NetBSD |
Alpha, ARM, PA-RISC, 68k, MIPS, PowerPC, SH3, SPARC, RISC-V, VAX, x86, and so on |
Almost fully compatible with POSX.1 (1990), and mostly compliant with POSIX.2 (1992). |
|
Nuclear RTOS |
ARM, MIPS, PowerPC, Nios II, MicroBlaze, SuperH, and so on |
Proprietary RTOS from Mentor Graphics aimed at embedded applications. |
|
NuttX |
ARM, AVR, AVR32, HCS12, SuperH, Z80, and so on |
Light-weight RTOS, scalable from 8 to 32-bit systems with strong focus on POSIX compliance. |
|
OpenBSD |
Alpha, x86_64, ARM, PA-RISC, IA-32, MIPS, PowerPC, SPARC, and so on |
Forked from NetBSD in 1995. Similar POSIX support. |
|
OpenSolaris/illumos |
IA-32, x86_64, SPARC, ARM |
Compliant with the commercial Solaris releases being certified compatible. |
|
VxWorks |
ARM, SH-4, x86, x86_64, MIPS, PowerPC |
POSIX compliant, with certification for user-mode execution environment. |
From this it should be obvious that it's not a clear matter of following the POSIX specification, and being able to count on one's code compiling on each of these platforms. Each platform will also have its own set of extensions to the standard for features which were omitted in the standard, but are still desirable. Pthreads are, however, widely used by Linux, BSD, and similar software.
It's also possible to use the POSIX APIs in a limited fashion using, for example, the following:
| Name | Compliance |
|
Cygwin |
Mostly complete. Provides a full runtime environment for a POSIX application, which can be distributed as a normal Windows application. |
|
MinGW |
With MinGW-w64 (a redevelopment of MinGW), Pthreads support is fairly complete, though some functionality may be absent. |
|
Windows Subsystem for Linux |
WSL is a Windows 10 feature, which allows a Ubuntu Linux 14.04 (64-bit) image's tools and utilities to run natively on top of it though not those using GUI features or missing kernel features. Otherwise, it offers similar compliance as Linux. This feature currently requires that one runs the Windows 10 Anniversary Update and install WSL by hand using instructions provided by Microsoft. |
POSIX on Windows is generally not recommended. Unless there are good reasons to use POSIX (large existing code base, for example), it's far easier to use one of the cross-platform APIs (covered later in this chapter), which smooth away any platform issues.
In the following sections, we'll look at the features offered by the Pthreads API.
These are all the functions which start with either pthread_ or pthread_attr_. These functions all apply to threads themselves and their attribute objects.
The basic use of threads with Pthreads looks like the following:
#include <pthread.h>
#include <stdlib.h>

#define NUM_THREADS     5
The main Pthreads header is pthread.h. This gives access to everything but semaphores (covered later in this section). We also define a constant for the number of threads we wish to start here:
void* worker(void* arg) {
    int value = *((int*) arg);

    // More business logic.

    return 0;
}
We define a simple Worker function, which we'll pass to the new thread in a moment. For demonstration and debugging purposes one could first add a simple cout or printf-based bit of business logic to print out the value sent to the new thread.
Next, we define the main function as follows:
int main(int argc, char** argv) {
    pthread_t threads[NUM_THREADS];
    int thread_args[NUM_THREADS];
    int result_code;

    for (unsigned int i = 0; i < NUM_THREADS; ++i) {
        thread_args[i] = i;
        result_code = pthread_create(&threads[i], 0, worker, (void*) &thread_args[i]);
    }
We create all of the threads in a loop in the preceding function. Each thread instance gets a thread ID assigned (first argument) when created in addition to a result code (zero on success) returned by the pthread_create() function. The thread ID is the handle to reference the thread in future calls.
The second argument to the function is a pthread_attr_t structure instance, or 0 if none. This allows for configuration characteristics of the new thread, such as the initial stack size. When zero is passed, default parameters are used, which differ per platform and configuration.
The third parameter is a pointer to the function which the new thread will start with. This function pointer is defined as a function which returns a pointer to void data (that is, custom data), and accepts a pointer to void data. Here, the data being passed to the new thread as an argument is the thread ID:
    for (int i = 0; i < NUM_THREADS; ++i) {
        result_code = pthread_join(threads[i], 0);
    }

    exit(0);
}
Next, we wait for each worker thread to finish using the pthread_join() function. This function takes two parameters, the ID of the thread to wait for, and a buffer for the return value of the Worker function (or zero).
Other functions to manage threads are as follows:
Beyond this, there are the pthread_attr_* functions to manipulate and obtain information about a pthread_attr_t structure.
These are functions prefixed with either pthread_mutex_ or pthread_mutexattr_. They apply to mutexes and their attribute objects.
Mutexes in Pthreads can be initialized, destroyed, locked, and unlocked. They can also have their behavior customized using a pthread_mutexattr_t structure, which has its corresponding pthread_mutexattr_* functions for initializing and destroying an attribute on it.
A basic use of a Pthread mutex using static initialization looks as follows:
static pthread_mutex_t func_mutex = PTHREAD_MUTEX_INITIALIZER;

void func() {
    pthread_mutex_lock(&func_mutex);

    // Do something that's not thread-safe.

    pthread_mutex_unlock(&func_mutex);
}
In this last bit of code, we use the PTHREAD_MUTEX_INITIALIZER macro, which initializes the mutex for us without having to type out the code for it every time. In comparison to other APIs, one has to manually initialize and destroy mutexes, though the use of macros helps somewhat.
After this, we lock and unlock the mutex. There's also the pthread_mutex_trylock() function, which is like the regular lock version, but which will return immediately if the referenced mutex is already locked instead of waiting for it to be unlocked.
In this example, the mutex is not explicitly destroyed. This is, however, a part of normal memory management in a Pthreads-based application.
These are functions which are prefixed with either pthread_cond_ or pthread_condattr_. They apply to condition variables and their attribute objects.
Condition variables in Pthreads follow the same pattern of having an initialization and a destroy function in addition to having the same for managing a pthread_condattr_t attribution structure.
This example covers basic usage of Pthreads condition variables:
#include <pthread.h>
#include <stdlib.h>
#include <unistd.h>

   #define COUNT_TRIGGER 10
   #define COUNT_LIMIT 12

   int count = 0;
   int thread_ids[3] = {0,1,2};
   pthread_mutex_t count_mutex;
   pthread_cond_t count_cv;
In the preceding code, we get the standard headers, and define a count trigger and limit, whose purpose will become clear in a moment. We also define a few global variables: a count variable, the IDs for the threads we wish to create, as well as a mutex and condition variable:
void* add_count(void* t)  {
    int tid = (long) t;
    for (int i = 0; i < COUNT_TRIGGER; ++i) {
        pthread_mutex_lock(&count_mutex);
        count++;
        if (count == COUNT_LIMIT) {
            pthread_cond_signal(&count_cv);
        }

        pthread_mutex_unlock(&count_mutex);
        sleep(1);
    }

    pthread_exit(0);
}
This preceding function, essentially, just adds to the global counter variable after obtaining exclusive access to it with the count_mutex. It also checks whether the count trigger value has been reached. If it has, it will signal the condition variable.
To give the second thread, which also runs this function, a chance to get the mutex, we sleep for 1 second in each cycle of the loop:
void* watch_count(void* t) {
    int tid = (int) t;

    pthread_mutex_lock(&count_mutex);
    if (count < COUNT_LIMIT) {
        pthread_cond_wait(&count_cv, &count_mutex);
    }

    pthread_mutex_unlock(&count_mutex);
    pthread_exit(0);
}
In this second function, we lock the global mutex before checking whether we have reached the count limit yet. This is our insurance in case the thread running this function does not get called before the count reaches the limit.
Otherwise, we wait on the condition variable providing the condition variable and locked mutex. Once signaled, we unlock the global mutex, and exit the thread.
A point to note here is that this example does not account for spurious wake-ups. Pthreads condition variables are susceptible to such wake-ups which necessitate one to use a loop and check whether some kind of condition has been met:
int main (int argc, char* argv[]) {
    int tid1 = 1, tid2 = 2, tid3 = 3;
    pthread_t threads[3];
    pthread_attr_t attr;

    pthread_mutex_init(&count_mutex, 0);
    pthread_cond_init (&count_cv, 0);

    pthread_attr_init(&attr);
    pthread_attr_setdetachstate(&attr, PTHREAD_CREATE_JOINABLE);
    pthread_create(&threads[0], &attr, watch_count, (void *) tid1);
    pthread_create(&threads[1], &attr, add_count, (void *) tid2);
    pthread_create(&threads[2], &attr, add_count, (void *) tid3);

    for (int i = 0; i < 3; ++i) {
        pthread_join(threads[i], 0);
    }

    pthread_attr_destroy(&attr);
    pthread_mutex_destroy(&count_mutex);
    pthread_cond_destroy(&count_cv);
    return 0;
}
Finally, in the main function, we create the three threads, with two running the function which adds to the counter, and the third running the function which waits to have its condition variable signaled.
In this method, we also initialize the global mutex and condition variable. The threads we create further have the "joinable" attribute explicitly set.
Finally, we wait for each thread to finish, after which we clean up, destroying the attribute structure instance, mutex, and condition variable before exiting.
Using the pthread_cond_broadcast() function, it's further possible to signal all threads which are waiting for a condition variable instead of merely the first one in the queue. This enables one to use condition variables more elegantly with some applications, such as where one has a lot of worker threads waiting for new dataset to arrive without having to notify every thread individually.
Functions which implement synchronization are prefixed with pthread_rwlock_ or pthread_barrier_. These implement read/write locks and synchronization barriers.
A read/write lock (rwlock) is very similar to a mutex, except that it has the additional feature of allowing infinite threads to read simultaneously, while only restricting write access to a singular thread.
Using rwlock is very similar to using a mutex:
#include <pthread.h>
int pthread_rwlock_init(pthread_rwlock_t* rwlock, const pthread_rwlockattr_t* attr);
pthread_rwlock_t rwlock = PTHREAD_RWLOCK_INITIALIZER;
In the last code, we include the same general header, and either use the initialization function, or the generic macro. The interesting part is when we lock rwlock, which can be done for just read-only access:
int pthread_rwlock_rdlock(pthread_rwlock_t* rwlock);
int pthread_rwlock_tryrdlock(pthread_rwlock_t* rwlock);
Here, the second variation returns immediately if the lock has been locked already. One can also lock it for write access as follows:
int pthread_rwlock_wrlock(pthread_rwlock_t* rwlock);
int pthread_rwlock_trywrlock(pthread_rwlock_t * rwlock);
These functions work basically the same, except that only one writer is allowed at any given time, whereas multiple readers can obtain a read-only lock.
Barriers are another concept with Pthreads. These are synchronization objects which act like a barrier for a number of threads. All of these have to reach the barrier before any of them can proceed past it. In the barrier initialization function, the thread count is specified. Only once all of these threads have called the barrier object using the pthread_barrier_wait() function will they continue executing.
Semaphores were, as mentioned earlier, not part of the original Pthreads extension to the POSIX specification. They are declared in the semaphore.h header for this reason.
In essence, semaphores are simple integers, generally used as a resource count. To make them thread-safe, atomic operations (check and lock) are used. POSIX semaphores support the initializing, destroying, incrementing and decrementing of a semaphore as well as waiting for the semaphore to reach a non-zero value.
With Pthreads, TLS is accomplished using keys and methods to set thread-specific data:
pthread_key_t global_var_key;

void* worker(void* arg) {
    int *p = new int;
    *p = 1;
    pthread_setspecific(global_var_key, p);
    int* global_spec_var = (int*) pthread_getspecific(global_var_key);
    *global_spec_var += 1;
    pthread_setspecific(global_var_key, 0);
    delete p;
    pthread_exit(0);
}
In the worker thread, we allocate a new integer on the heap, and set the global key to its own value. After increasing the global variable by 1, its value will be 2, regardless of what the other threads do. We can set the global variable to 0 once we're done with it for this thread, and delete the allocated value:
int main(void) {
    pthread_t threads[5];

    pthread_key_create(&global_var_key, 0);
    for (int i = 0; i < 5; ++i)
        pthread_create(&threads[i],0,worker,0);
    for (int i = 0; i < 5; ++i) {
        pthread_join(threads[i], 0);
    }
    return 0;
}
A global key is set and used to reference the TLS variable, yet each of the threads we create can set its own value for this key.
While a thread can create its own keys, this method of handling TLS is fairly involved compared to the other APIs we're looking at in this chapter.
Relative to Pthreads, Windows threads are limited to Windows operating systems and similar (for example ReactOS, and other OS's using Wine). This provides a fairly consistent implementation, easily defined by the Windows version that the support corresponds to.
Prior to Windows Vista, threading support missed features such as condition variables, while having features not found in Pthreads. Depending on one's perspective, having to use the countless "type def" types defined by the Windows headers can be a bother as well.
A basic example of using Windows threads, as adapted from the official MSDN documentation sample code, looks like this:
#include <windows.h>
#include <tchar.h>
#include <strsafe.h>

#define MAX_THREADS 3
#define BUF_SIZE 255
After including a series of Windows-specific headers for the thread functions, character strings, and more, we define the number of threads we wish to create as well as the size of the message buffer in the Worker function.
We also define a struct type (passed by void pointer: LPVOID) to contain the sample data we pass to each worker thread:
typedef struct MyData {
 int val1;
 int val2;
} MYDATA, *PMYDATA;

DWORD WINAPI worker(LPVOID lpParam) {
    HANDLE hStdout = GetStdHandle(STD_OUTPUT_HANDLE);
    if (hStdout == INVALID_HANDLE_VALUE) {
        return 1;
    }

    PMYDATA pDataArray =  (PMYDATA) lpParam;

    TCHAR msgBuf[BUF_SIZE];
    size_t cchStringSize;
    DWORD dwChars;
    StringCchPrintf(msgBuf, BUF_SIZE, TEXT("Parameters = %d, %dn"),
    pDataArray->val1, pDataArray->val2);
    StringCchLength(msgBuf, BUF_SIZE, &cchStringSize);
    WriteConsole(hStdout, msgBuf, (DWORD) cchStringSize, &dwChars, NULL);

    return 0;
}
In the Worker function, we cast the provided parameter to our custom struct type before using it to print its values to a string, which we output on the console.
We also validate that there's an active standard output (console or similar). The functions used to print the string are all thread safe.
void errorHandler(LPTSTR lpszFunction) {
    LPVOID lpMsgBuf;
    LPVOID lpDisplayBuf;
    DWORD dw = GetLastError();

    FormatMessage(
        FORMAT_MESSAGE_ALLOCATE_BUFFER |
        FORMAT_MESSAGE_FROM_SYSTEM |
        FORMAT_MESSAGE_IGNORE_INSERTS,
        NULL,
        dw,
        MAKELANGID(LANG_NEUTRAL, SUBLANG_DEFAULT),
        (LPTSTR) &lpMsgBuf,
        0, NULL);

        lpDisplayBuf = (LPVOID) LocalAlloc(LMEM_ZEROINIT,
        (lstrlen((LPCTSTR) lpMsgBuf) + lstrlen((LPCTSTR) lpszFunction) + 40) * sizeof(TCHAR));
        StringCchPrintf((LPTSTR)lpDisplayBuf,
        LocalSize(lpDisplayBuf) / sizeof(TCHAR),
        TEXT("%s failed with error %d: %s"),
        lpszFunction, dw, lpMsgBuf);
        MessageBox(NULL, (LPCTSTR) lpDisplayBuf, TEXT("Error"), MB_OK);

        LocalFree(lpMsgBuf);
        LocalFree(lpDisplayBuf);
}
Here, an error handler function is defined, which obtains the system error message for the last error code. After obtaining the code for the last error, the error message to be output is formatted, and shown in a message box. Finally, the allocated memory buffers are freed.
Finally, the main function is as follows:
int _tmain() {
         PMYDATA pDataArray[MAX_THREADS];
         DWORD dwThreadIdArray[MAX_THREADS];
         HANDLE hThreadArray[MAX_THREADS];
         for (int i = 0; i < MAX_THREADS; ++i) {
               pDataArray[i] = (PMYDATA) HeapAlloc(GetProcessHeap(),
                           HEAP_ZERO_MEMORY, sizeof(MYDATA));                     if (pDataArray[i] == 0) {
                           ExitProcess(2);
             }
             pDataArray[i]->val1 = i;
             pDataArray[i]->val2 = i+100;
             hThreadArray[i] = CreateThread(
                  NULL,          // default security attributes
                  0,             // use default stack size
                  worker,        // thread function name
                  pDataArray[i], // argument to thread function
                  0,             // use default creation flags
                  &dwThreadIdArray[i]);// returns the thread identifier
             if (hThreadArray[i] == 0) {
                         errorHandler(TEXT("CreateThread"));
                         ExitProcess(3);
             }
   }
         WaitForMultipleObjects(MAX_THREADS, hThreadArray, TRUE, INFINITE);
         for (int i = 0; i < MAX_THREADS; ++i) {
               CloseHandle(hThreadArray[i]);
               if (pDataArray[i] != 0) {
                           HeapFree(GetProcessHeap(), 0, pDataArray[i]);
               }
         }
         return 0;
}
In the main function, we create our threads in a loop, allocate memory for thread data, and generate unique data for each thread before starting the thread. Each thread instance is passed its own unique parameters.
After this, we wait for the threads to finish and rejoin. This is essentially the same as calling the join function on singular threads with Pthreads--only here, a single function call suffices.
Finally, each thread handle is closed, and we clean up the memory we allocated earlier.
Advanced thread management with Windows threads includes jobs, fibers, and thread pools. Jobs essentially allow one to link multiple threads together into a singular unit, enabling one to change properties and the status of all these threads in one go.
Fibers are light-weight threads, which run within the context of the thread which creates them. The creating thread is expected to schedule these fibers itself. Fibers also have Fiber Local Storage (FLS) akin to TLS.
Finally, the Windows threads API provides a Thread Pool API, allowing one to easily use such a thread pool in one's application. Each process is also provided with a default thread pool.
With Windows threads, mutual exclusion and synchronization can be accomplished using critical sections, mutexes, semaphores, slim reader/writer (SRW) locks, barriers, and variations.
Synchronization objects include the following:
| Name | Description |
| Event | Allows for signaling of events between threads and processes using named objects. |
| Mutex | Used for inter-thread and process synchronization to coordinate access to shared resources. |
| Semaphore | Standard semaphore counter object, used for inter-thread and process synchronization. |
| Waitable timer | Timer object usable by multiple processes with multiple usage modes. |
| Critical section | Critical sections are essentially mutexes which are limited to a single process, which makes them faster than using a mutex due to lack of kernel space calls. |
| Slim reader/writer lock | SRWs are akin to read/write locks in Pthreads, allowing multiple readers or a single writer thread to access a shared resource. |
| Interlocked variable access | Allows for atomic access to a range of variables which are otherwise not guaranteed to be atomic. This enables threads to share a variable without having to use mutexes. |
The implementation of condition variables with Windows threads is fairly straightforward. It uses a critical section (CRITICAL_SECTION) and condition variable (CONDITION_VARIABLE) along with the condition variable functions to wait for a specific condition variable, or to signal it.
Thread local storage (TLS) with Windows threads is similar to Pthreads in that a central key (TLS index) has to be created first after which individual threads can use that global index to store and retrieve local values.
Like with Pthreads, this involves a similar amount of manual memory management, as the TLS value has to be allocated and deleted by hand.
Boost threads is a relatively small part of the Boost collection of libraries. It was, however, used as the basis for what became the multithreading implementation in C++11, similar to how other Boost libraries ultimately made it, fully or partially, into new C++ standards. Refer to the C++ threads section in this chapter for details on the multithreading API.
Features missing in the C++11 standard, which are available in Boost threads, include the following:
Unless one absolutely needs such features, or if one cannot use a compiler which supports the C++11 standard (including STL threads), there is little reason to use Boost threads over the C++11 implementation.
Since Boost provides wrappers around native OS features, using native C++ threads would likely reduce overhead depending on the quality of the STL implementation.
Qt is a relatively high-level framework, which also reflects in its multithreading API. Another defining feature of Qt is that it wraps its own code (QApplication and QMainWindow) along with the use of a meta-compiler (qmake) to implement its signal-slot architecture and other defining features of the framework.
As a result, Qt's threading support cannot be added into existing code as-is, but requires one to adapt one's code to fit the framework.
A QThread class in Qt is not a thread, but an extensive wrapper around a thread instance, which adds signal-slot communication, runtime support, and other features. This is reflected in the basic usage of a QThread, as shown in the following code:
class Worker : public QObject {
    Q_OBJECT

    public:
        Worker();
        ~Worker();

    public slots:
        void process();

    signals:
        void finished();
        void error(QString err);

    private:
};
This preceding code is a basic Worker class, which will contain our business logic. It derives from the QObject class, which also allows us to use signal-slot and other intrinsic QObject features. Signal-slot architecture at its core is simply a way for listeners to register on (connect to) signals declared by QObject-derived classes, allowing for cross-module, cross-thread and asynchronous communication.
It has a single, which can be called to start processing, and two signals--one to signal completion, and one to signal an error.
The implementation would look like the following:
Worker::Worker() { }
Worker::~Worker() { }

void Worker::process() {
    qDebug("Hello World!");
    emit finished();
}
The constructor could be extended to include parameters. Any heap-allocated variables (using malloc or new) must be allocated in the process() method, and not in the constructor due to the thread context the Worker instance will be operating in, as we will see in a moment.
To create a new QThread, we would use the following setup:
QThread* thread = new QThread;
Worker* worker = new Worker();
worker->moveToThread(thread);
connect(worker, SIGNAL(error(QString)), this, SLOT(errorString(QString)));
connect(thread, SIGNAL(started()), worker, SLOT(process()));
connect(worker, SIGNAL(finished()), thread, SLOT(quit()));
connect(worker, SIGNAL(finished()), worker, SLOT(deleteLater()));
connect(thread, SIGNAL(finished()), thread, SLOT(deleteLater()));
thread->start();
The basic procedure is to create a new QThread instance on the heap (so it won't go out of scope) along with a heap-allocated instance of our Worker class. This new worker would then be moved to the new thread instance using its moveToThread() method.
Next, one will connect the various signals to relevant slots including our own finished() and error() signals. The started() signal from the thread instance would be connected to the slot on our worker which will start it.
Most importantly, one has to connect some kind of completion signal from the worker to the quit() and deleteLater() slots on the thread. The finished() signal from the thread will then be connected to the deleteLater() slot on the worker. This will ensure that both the thread and worker instances are cleaned up when the worker is done.
Qt offers thread pools. These require one to inherit from the QRunnable class, and implement the run() function. An instance of this custom class is then passed to the start method of the thread pool (global default pool, or a new one). The life cycle of this worker is then handled by the thread pool.
Qt offers the following synchronization objects:
These should be fairly self-explanatory. Another nice feature of Qt's signal-slot architecture is that these also allow one to communicate asynchronously between threads without having to concern oneself with the low-level implementation details.
The QtConcurrent namespace contains high-level API aimed at making writing multithreading applications possible without having to concern oneself with the low-level details.
Functions include concurrent filtering and mapping algorithms as well as a method to allow running a function in a separate thread. All of these return a QFuture instance, which contains the result of an asynchronous operation.
Qt offers TLS through its QThreadStorage class. Memory management of pointer type values is handled by it. Generally, one would set some kind of data structure as a TLS value to store more than one value per thread, as described, for example, in the QThreadStorage class documentation:
QThreadStorage<QCache<QString, SomeClass> > caches;

void cacheObject(const QString &key, SomeClass* object) {
    caches.localData().insert(key, object);
}

void removeFromCache(const QString &key) {
    if (!caches.hasLocalData()) { return; }

    caches.localData().remove(key);
}
The POCO library is a fairly lightweight wrapper around operating system functionality. It does not require a C++11 compatible compiler or any kind of pre-compiling or meta-compiling.
The Thread class is a simple wrapper around an OS-level thread. It takes Worker class instances which inherit from the Runnable class. The official documentation provides a basic example of this as follows:
#include "Poco/Thread.h"
#include "Poco/Runnable.h"
#include <iostream>

class HelloRunnable: public Poco::Runnable {
    virtual void run() {
        std::cout << "Hello, world!" << std::endl;
    }
};

int main(int argc, char** argv) {
    HelloRunnable runnable;
    Poco::Thread thread;
    thread.start(runnable);
    thread.join();
    return 0;
}
This preceding code is a very simple "Hello world" example with a worker which only outputs a string via the standard output. The thread instance is allocated on the stack, and kept within the scope of the entry function waiting for the worker to finish using the join() function.
With many of its thread functions, POCO is quite reminiscent of Pthreads, though it does deviate significantly on points such as configuring a thread and other objects. Being a C++ library, it sets properties using class methods rather than filling in a struct and passing it as a parameter.
POCO provides a default thread pool with 16 threads. This number can be changed dynamically. Like with regular threads, a thread pool requires one to pass a Worker class instance which inherits from the Runnable class:
#include "Poco/ThreadPool.h"
#include "Poco/Runnable.h"
#include <iostream>

class HelloRunnable: public Poco::Runnable {
    virtual void run() {
        std::cout << "Hello, world!" << std::endl;
    }
};

int main(int argc, char** argv) {
    HelloRunnable runnable;
    Poco::ThreadPool::defaultPool().start(runnable);
    Poco::ThreadPool::defaultPool().joinAll();
    return 0;
}
The worker instance is added to the thread pool, which runs it. The thread pool cleans up threads which have been idle for a certain time when we add another worker instance, change the capacity, or call joinAll(). As a result, the single worker thread will join, and with no active threads left, the application exits.
With POCO, TLS is implemented as a class template, allowing one to use it with almost any type.
As detailed by the official documentation:
#include "Poco/Thread.h"
#include "Poco/Runnable.h"
#include "Poco/ThreadLocal.h"
#include <iostream>

class Counter: public Poco::Runnable {
    void run() {
        static Poco::ThreadLocal<int> tls;
        for (*tls = 0; *tls < 10; ++(*tls)) {
            std::cout << *tls << std::endl;
        }
    }
};

int main(int argc, char** argv) {
    Counter counter1;
    Counter counter2;
    Poco::Thread t1;
    Poco::Thread t2;
    t1.start(counter1);
    t2.start(counter2);
    t1.join();
    t2.join();
    return 0;
}
In this preceding worker example, we create a static TLS variable using the ThreadLocal class template, and define it to contain an integer.
Because we define it as static, it will only be created once per thread. In order to use our TLS variable, we can use either the arrow (->) or asterisk (*) operator to access its value. In this example, we increase the TLS value once per cycle of the for loop until the limit has been reached.
This example demonstrates that both threads will generate their own series of 10 integers, counting through the same numbers without affecting each other.
The synchronization primitives offered by POCO are listed as follows:
Noticeable here is the FastMutex class. This is generally a non-recursive mutex type, except on Windows, where it is recursive. This means one should generally assume either type to be recursive in the sense that the same mutex can be locked multiple times by the same thread.
One can also use mutexes with the ScopedLock class, which ensures that a mutex which it encapsulates is released at the end of the current scope.
Events are akin to Windows events, except that they are limited to a single process. They form the basis of condition variables in POCO.
POCO condition variables function much in the same way as they do with Pthreads and others, except that they are not subject to spurious wake-ups. Normally condition variables are subject to these random wake-ups for optimization reasons. By not having to deal with explicitly having to check whether its condition was met or not upon a condition variable wait returning less burden is placed on the developer.
The native multithreading support in C++ is covered extensively in Chapter 5, Native C++ Threads and Primitives.
As mentioned earlier in the Boost section of this chapter, the C++ multithreading support is heavily based on the Boost threads API, using virtually the same headers and names. The API itself is again reminiscent of Pthreads, though with significant differences when it comes to, for example, condition variables.
Upcoming chapters will use the C++ threading support exclusively for examples.
Of the APIs covered in this chapter, only the Qt multithreading API can be considered to be truly high level. Although the other APIs (including C++11) have some higher-level concepts including thread pools and asynchronous runners which do not require one to use threads directly, Qt offers a full-blown signal-slot architecture, which makes inter-thread communication exceptionally easy.
As covered in this chapter, this ease also comes with a cost, namely, that of having to develop one's application to fit the Qt framework. This may not be acceptable depending on the project.
Which of these APIs is the right one depends on one's requirements. It is, however, relatively fair to say that using straight Pthreads, Windows threads, and kin does not make a lot of sense when one can use APIs such as C++11 threads, POCO, and so on, which ease the development process with no significant reduction in performance while also gaining extensive portability across platforms.
All the APIs are at least somewhat comparable at their core in what they offer in features.
In this chapter, we looked in some detail at a number of the more popular multithreading APIs and frameworks, putting them next to each other to get an idea of their strengths and weaknesses. We went through a number of examples showing how to implement basic functionality using each of these APIs.
In the next chapter, we will look in detail at how to synchronize threads and communicate between them.
While, generally, threads are used to work on a task more or less independently from other threads, there are many occasions where one would want to pass data between threads, or even control other threads, such as from a central task scheduler thread. This chapter looks at how such tasks are accomplished with the C++11 threading API.
Topics covered in this chapter include the following:
The central problem with concurrency is that of ensuring safe access to shared resources even when communicating between threads. There is also the issue of threads being able to communicate and synchronize themselves.
What makes multithreaded programming such a challenge is to be able to keep track of each interaction between threads, and to ensure that each and every form of access is secured while not falling into the trap of deadlocks and data races.
In this chapter, we will look at a fairly complex example involving a task scheduler. This is a form of high-concurrency, high-throughput situation where many different requirements come together with many potential traps, as we will see in a moment.
A good example of multithreading with a significant amount of synchronization and communication between threads is the scheduling of tasks. Here, the goal is to accept incoming tasks and assign them to work threads as quickly as possible.
In this scenario, a number of different approaches are possible. Often one has worker threads running in an active loop, constantly polling a central queue for new tasks. Disadvantages of this approach include wasting of processor cycles on the said polling, and the congestion which forms at the synchronization mechanism used, generally a mutex. Furthermore, this active polling approach scales very poorly when the number of worker threads increase.
Ideally, each worker thread would wait idly until it is needed again. To accomplish this, we have to approach the problem from the other side: not from the perspective of the worker threads, but from that of the queue. Much like the scheduler of an operating system, it is the scheduler which is aware of both the tasks which require processing as well as the available worker threads.
In this approach, a central scheduler instance would accept new tasks and actively assign them to worker threads. The said scheduler instance may also manage these worker threads, such as their number and priority, depending on the number of incoming tasks and the type of task or other properties.
At its core, our scheduler or dispatcher is quite simple, functioning like a queue with all of the scheduling logic built into it, as seen in the following diagram:
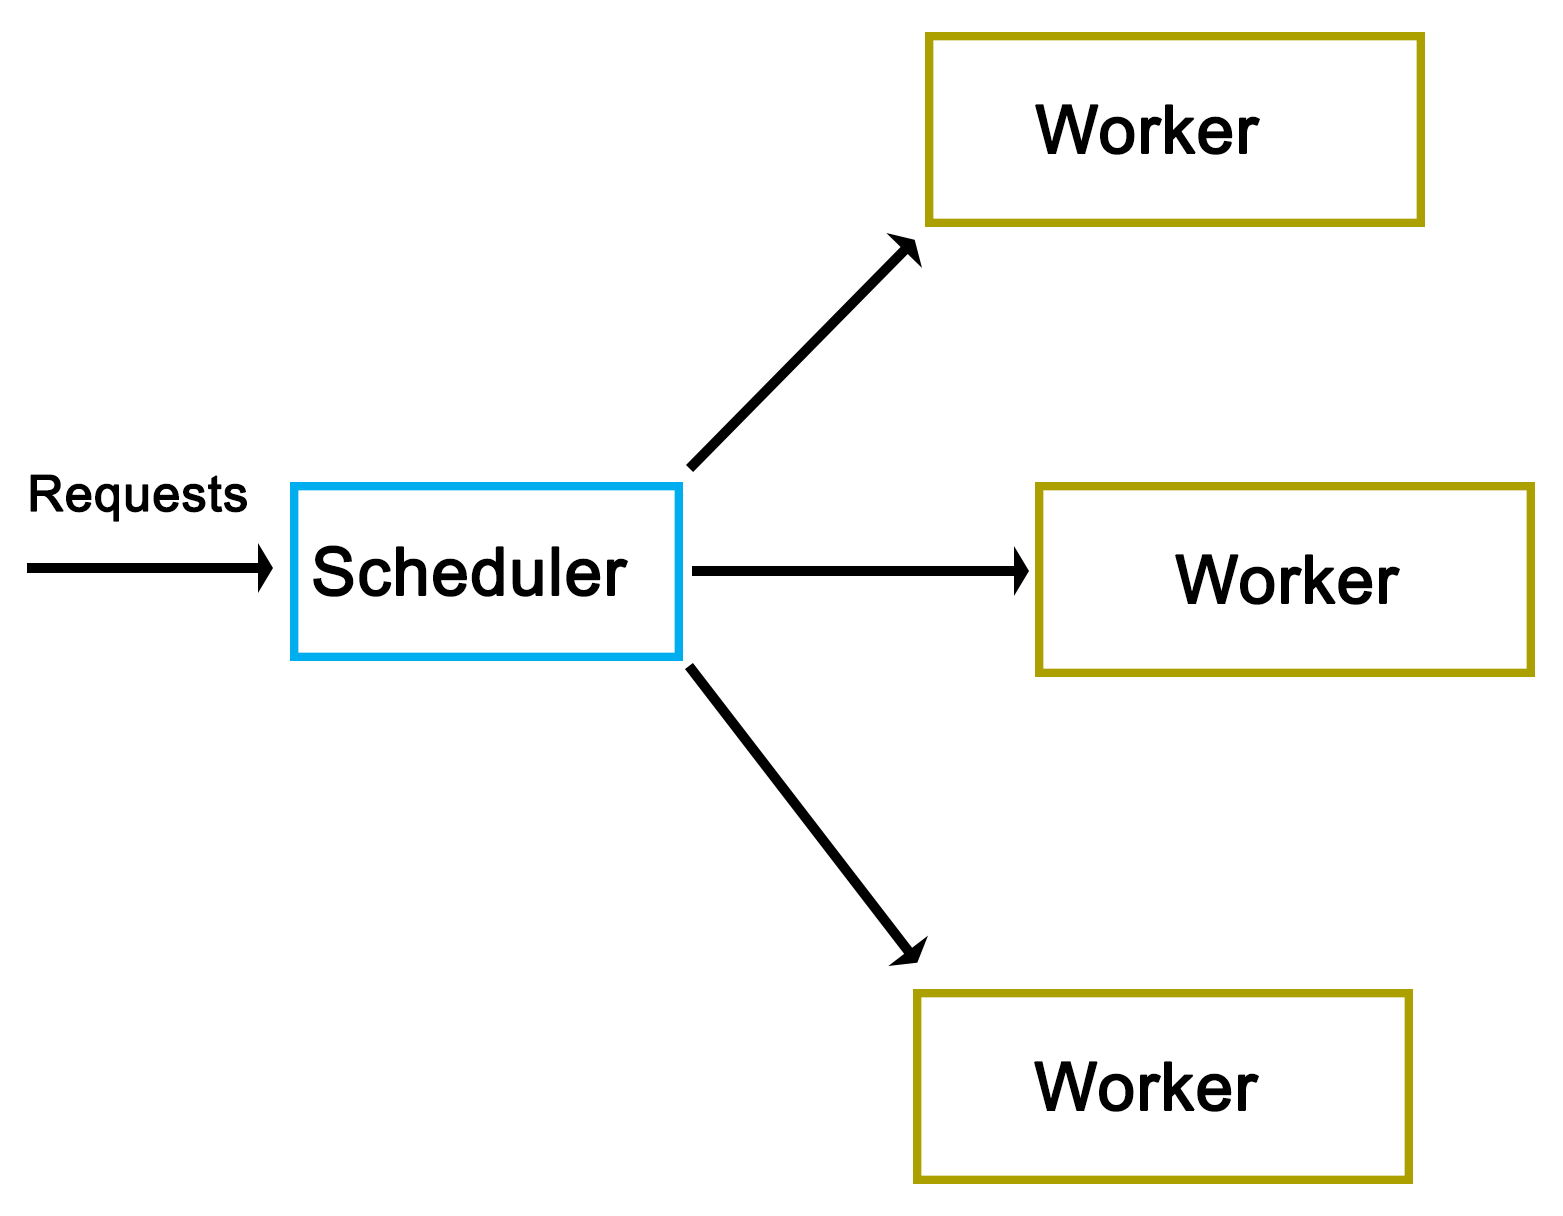
As one can see from the preceding high-level view, there really isn't much to it. However, as we'll see in a moment, the actual implementation does have a number of complications.
As is usual, we start off with the main function, contained in main.cpp:
#include "dispatcher.h"
#include "request.h"

#include <iostream>
#include <string>
#include <csignal>
#include <thread>
#include <chrono>

using namespace std;

sig_atomic_t signal_caught = 0;
mutex logMutex;
The custom headers we include are those for our dispatcher implementation, as well as the request class that we'll use.
Globally, we define an atomic variable to be used with the signal handler, as well as a mutex which will synchronize the output (on the standard output) from our logging method:
void sigint_handler(int sig) {
    signal_caught = 1;
}
Our signal handler function (for SIGINT signals) simply sets the global atomic variable that we defined earlier:
void logFnc(string text) {
    logMutex.lock();
    cout << text << "\n";
    logMutex.unlock();
}
In our logging function, we use the global mutex to ensure that writing to the standard output is synchronized:
int main() {
    signal(SIGINT, &sigint_handler);
    Dispatcher::init(10);
In the main function, we install the signal handler for SIGINT to allow us to interrupt the execution of the application. We also call the static init() function on the Dispatcher class to initialize it:
    cout << "Initialised.\n";
        int cycles = 0;
    Request* rq = 0;
    while (!signal_caught && cycles < 50) {
        rq = new Request();
        rq->setValue(cycles);
        rq->setOutput(&logFnc);
        Dispatcher::addRequest(rq);
        cycles++;
    }
Next, we set up the loop in which we will create new requests. In each cycle, we create a new Request instance, and use its setValue() function to set an integer value (current cycle number). We also set our logging function on the request instance before adding this new request to Dispatcher using its static addRequest() function.
This loop will continue until the maximum number of cycles have been reached, or SIGINT has been signaled using Ctrl+C or similar:
        this_thread::sleep_for(chrono::seconds(5));
        Dispatcher::stop();
    cout << "Clean-up done.\n";
    return 0;
}
Finally, we wait for 5 seconds using the thread's sleep_for() function, and the chrono::seconds() function from the chrono STL header.
We also call the stop() function on Dispatcher before returning.
A request for Dispatcher always derives from the pure virtual AbstractRequest class:
#pragma once
#ifndef ABSTRACT_REQUEST_H
#define ABSTRACT_REQUEST_H

class AbstractRequest {
    //
    public:
    virtual void setValue(int value) = 0;
    virtual void process() = 0;
    virtual void finish() = 0;
};
#endif
This AbstractRequest class defines an API with three functions, which a deriving class always has to implement. Out of these, the process() and finish() functions are the most generic and likely to be used in any practical implementation. The setValue() function is specific to this demonstration implementation, and would likely be adapted or extended to fit a real-life scenario.
The advantage of using an abstract class as the basis for a request is that it allows the Dispatcher class to handle many different types of requests as long as they all adhere to this same basic API.
Using this abstract interface, we implement a basic Request class as follows:
#pragma once
#ifndef REQUEST_H
#define REQUEST_H

#include "abstract_request.h"

#include <string>

using namespace std;

typedef void (*logFunction)(string text);

class Request : public AbstractRequest {
    int value;
    logFunction outFnc;
    public:    void setValue(int value) { this->value = value; }
    void setOutput(logFunction fnc) { outFnc = fnc; }
    void process();
    void finish();
};
#endif
In its header file, we first define the function pointer's format. After this, we implement the request API, and add the setOutput() function to the base API, which accepts a function pointer for logging. Both setter functions merely assign the provided parameter to their respective private class members.
Next, the class function implementations are given as follows:
#include "request.h"
void Request::process() {
    outFnc("Starting processing request " + std::to_string(value) + "...");
    //
}
void Request::finish() {
    outFnc("Finished request " + std::to_string(value));
}
Both of these implementations are very basic; they merely use the function pointer to output a string indicating the status of the worker thread.
In a practical implementation, one would add the business logic to the process() function with the finish() function containing any functionality to finish up a request such as writing a map into a string.
Next is the Worker class. This contains the logic which will be called by Dispatcher in order to process a request.
#pragma once
#ifndef WORKER_H
#define WORKER_H

#include "abstract_request.h"

#include <condition_variable>
#include <mutex>

using namespace std;

class Worker {
    condition_variable cv;
    mutex mtx;
    unique_lock<mutex> ulock;
    AbstractRequest* request;
    bool running;
    bool ready;
    public:
    Worker() { running = true; ready = false; ulock = unique_lock<mutex>(mtx); }
    void run();
    void stop() { running = false; }
    void setRequest(AbstractRequest* request) { this->request = request; ready = true; }
    void getCondition(condition_variable* &cv);
};
#endif
Whereas the adding of a request to Dispatcher does not require any special logic, the Worker class does require the use of condition variables to synchronize itself with the dispatcher. For the C++11 threads API, this requires a condition variable, a mutex, and a unique lock.
The unique lock encapsulates the mutex, and will ultimately be used with the condition variable as we will see in a moment.
Beyond this, we define methods to start and stop the worker, to set a new request for processing, and to obtain access to its internal condition variable.
Moving on, the rest of the implementation is written as follows:
#include "worker.h"
#include "dispatcher.h"

#include <chrono>

using namespace std;

void Worker::getCondition(condition_variable* &cv) {
    cv = &(this)->cv;
}

void Worker::run() {
    while (running) {
        if (ready) {
            ready = false;
            request->process();
            request->finish();
        }
        if (Dispatcher::addWorker(this)) {
            // Use the ready loop to deal with spurious wake-ups.
            while (!ready && running) {
                if (cv.wait_for(ulock, chrono::seconds(1)) == cv_status::timeout) {
                    // We timed out, but we keep waiting unless
                    // the worker is
                    // stopped by the dispatcher.
                }
            }
        }
    }
}
Beyond the getter function for the condition variable, we define the run() function, which dispatcher will run for each worker thread upon starting it.
Its main loop merely checks that the stop() function hasn't been called yet, which would have set the running Boolean value to false, and ended the work thread. This is used by Dispatcher when shutting down, allowing it to terminate the worker threads. Since Boolean values are generally atomic, setting and checking can be done simultaneously without risk or requiring a mutex.
Moving on, the check of the ready variable is to ensure that a request is actually waiting when the thread is first run. On the first run of the worker thread, no request will be waiting, and thus, attempting to process one would result in a crash. Upon Dispatcher setting a new request, this Boolean variable will be set to true.
If a request is waiting, the ready variable will be set to false again, after which the request instance will have its process() and finish() functions called. This will run the business logic of the request on the worker thread's thread, and finalize it.
Finally, the worker thread adds itself to the dispatcher using its static addWorker() function. This function will return false if no new request is available, and cause the worker thread to wait until a new request has become available. Otherwise, the worker thread will continue with the processing of the new request that Dispatcher will have set on it.
If asked to wait, we enter a new loop. This loop will ensure that when the condition variable is woken up, it is because we got signaled by Dispatcher (ready variable set to true), and not because of a spurious wake-up.
Last of all, we enter the actual wait() function of the condition variable using the unique lock instance we created before along with a timeout. If a timeout occurs, we can either terminate the thread, or keep waiting. Here, we choose to do nothing and just re-enter the waiting loop.
As the last item, we have the Dispatcher class itself:
    #pragma once
    #ifndef DISPATCHER_H
    #define DISPATCHER_H

    #include "abstract_request.h"
    #include "worker.h"

    #include <queue>
    #include <mutex>
    #include <thread>
    #include <vector>

    using namespace std;

    class Dispatcher {
        static queue<AbstractRequest*> requests;
        static queue<Worker*> workers;
        static mutex requestsMutex;
        static mutex workersMutex;
        static vector<Worker*> allWorkers;
        static vector<thread*> threads;
        public:
        static bool init(int workers);
        static bool stop();
        static void addRequest(AbstractRequest* request);
        static bool addWorker(Worker* worker);
     };
     #endif
Most of this will look familiar. As you will have surmised by now, this is a fully static class.
Moving on, its implementation is as follows:
    #include "dispatcher.h"

    #include <iostream>
    using namespace std;

    queue<AbstractRequest*> Dispatcher::requests;
    queue<Worker*> Dispatcher::workers;
    mutex Dispatcher::requestsMutex;
    mutex Dispatcher::workersMutex;
    vector<Worker*> Dispatcher::allWorkers;
    vector<thread*> Dispatcher::threads;

    bool Dispatcher::init(int workers) {
        thread* t = 0;
        Worker* w = 0;
        for (int i = 0; i < workers; ++i) {
            w = new Worker;
            allWorkers.push_back(w);
            t = new thread(&Worker::run, w);
            threads.push_back(t);
        }
   return true;
 }
After setting up the static class members, the init() function is defined. It starts the specified number of worker threads keeping a reference to each worker and thread instance in their respective vector data structures:
    bool Dispatcher::stop() {
        for (int i = 0; i < allWorkers.size(); ++i) {
            allWorkers[i]->stop();
        }
            cout << "Stopped workers.\n";
            for (int j = 0; j < threads.size(); ++j) {
            threads[j]->join();
                    cout << "Joined threads.\n";
        }
    }
In the stop() function, each worker instance has its stop() function called. This will cause each worker thread to terminate, as we saw earlier in the Worker class description.
Finally, we wait for each thread to join (that is, finish) prior to returning:
    void Dispatcher::addRequest(AbstractRequest* request) {
        workersMutex.lock();
        if (!workers.empty()) {
            Worker* worker = workers.front();
            worker->setRequest(request);
            condition_variable* cv;
            worker->getCondition(cv);
            cv->notify_one();
            workers.pop();
            workersMutex.unlock();
        }
        else {
            workersMutex.unlock();
            requestsMutex.lock();
            requests.push(request);
            requestsMutex.unlock();
        }
    }
The addRequest() function is where things get interesting. In this function, a new request is added. What happens next depends on whether a worker thread is waiting for a new request or not. If no worker thread is waiting (worker queue is empty), the request is added to the request queue.
The use of mutexes ensures that the access to these queues occurs safely, as the worker threads will simultaneously try to access both queues as well.
An important gotcha to note here is the possibility of a deadlock. That is, a situation where two threads will hold the lock on a resource, with the second thread waiting for the first one to release its lock before releasing its own. Every situation where more than one mutex is used in a single scope holds this potential.
In this function, the potential for a deadlock lies in releasing of the lock on the workers mutex, and when the lock on the requests mutex is obtained. In the case that this function holds the workers mutex and tries to obtain the requests lock (when no worker thread is available), there is a chance that another thread holds the requests mutex (looking for new requests to handle) while simultaneously trying to obtain the workers mutex (finding no requests and adding itself to the workers queue).
The solution here is simple: release a mutex before obtaining the next one. In the situation where one feels that more than one mutex lock has to be held, it is paramount to examine and test one's code for potential deadlocks. In this particular situation, the workers mutex lock is explicitly released when it is no longer needed, or before the requests mutex lock is obtained, thus preventing a deadlock.
Another important aspect of this particular section of code is the way it signals a worker thread. As one can see in the first section of the if/else block, when the workers queue is not empty, a worker is fetched from the queue, has the request set on it, and then has its condition variable referenced and signaled, or notified.
Internally, the condition variable uses the mutex we handed it before in the Worker class definition to guarantee only atomic access to it. When the notify_one() function (generally called signal() in other APIs) is called on the condition variable, it will notify the first thread in the queue of threads waiting for the condition variable to return and continue.
In the Worker class run() function, we would be waiting for this notification event. Upon receiving it, the worker thread would continue and process the new request. The thread reference will then be removed from the queue until it adds itself again once it is done processing the request:
    bool Dispatcher::addWorker(Worker* worker) {
        bool wait = true;
        requestsMutex.lock();
        if (!requests.empty()) {
            AbstractRequest* request = requests.front();
            worker->setRequest(request);
            requests.pop();
            wait = false;
            requestsMutex.unlock();
        }
        else {
            requestsMutex.unlock();
            workersMutex.lock();
            workers.push(worker);
            workersMutex.unlock();
        }
            return wait;
    }
With this last function, a worker thread will add itself to the queue once it is done processing a request. It is similar to the earlier function in that the incoming worker is first actively matched with any request which may be waiting in the request queue. If none are available, the worker is added to the worker queue.
It is important to note here that we return a Boolean value which indicates whether the calling thread should wait for a new request, or whether it already has received a new request while trying to add itself to the queue.
While this code is less complex than that of the previous function, it still holds the same potential deadlock issue due to the handling of two mutexes within the same scope. Here, too, we first release the mutex we hold before obtaining the next one.
The makefile for this Dispatcher example is very basic again--it gathers all C++ source files in the current folder, and compiles them into a binary using g++:
    GCC := g++

    OUTPUT := dispatcher_demo
    SOURCES := $(wildcard *.cpp)
    CCFLAGS := -std=c++11 -g3

    all: $(OUTPUT)
        $(OUTPUT):
        $(GCC) -o $(OUTPUT) $(CCFLAGS) $(SOURCES)
        clean:
        rm $(OUTPUT)
        .PHONY: all
After compiling the application, running it produces the following output for the 50 total requests:
    $ ./dispatcher_demo.exe
    Initialised.
    Starting processing request 1...
    Starting processing request 2...
    Finished request 1
    Starting processing request 3...
    Finished request 3
    Starting processing request 6...
    Finished request 6
    Starting processing request 8...
    Finished request 8
    Starting processing request 9...
    Finished request 9
    Finished request 2
    Starting processing request 11...
    Finished request 11
    Starting processing request 12...
    Finished request 12
    Starting processing request 13...
    Finished request 13
    Starting processing request 14...
    Finished request 14
    Starting processing request 7...
    Starting processing request 10...
    Starting processing request 15...
    Finished request 7
    Finished request 15
    Finished request 10
    Starting processing request 16...
    Finished request 16
    Starting processing request 17...
    Starting processing request 18...
    Starting processing request 0...
At this point, we can already clearly see that even with each request taking almost no time to process, the requests are clearly being executed in parallel. The first request (request 0) only starts being processed after the sixteenth request, while the second request already finishes after the ninth request, long before this.
The factors which determine which thread, and thus, which request is processed first depends on the OS scheduler and hardware-based scheduling as described in chapter 2, Multithreading Implementation on the Processor and OS. This clearly shows just how few assumptions can be made about how a multithreaded application will be executed even on a single platform.
    Starting processing request 5...
    Finished request 5
    Starting processing request 20...
    Finished request 18
    Finished request 20
    Starting processing request 21...
    Starting processing request 4...
    Finished request 21
    Finished request 4
In the preceding code, the fourth and fifth requests also finish in a rather delayed fashion.
    Starting processing request 23...
    Starting processing request 24...
    Starting processing request 22...
    Finished request 24
    Finished request 23
    Finished request 22
    Starting processing request 26...
    Starting processing request 25...
    Starting processing request 28...
    Finished request 26
    Starting processing request 27...
    Finished request 28
    Finished request 27
    Starting processing request 29...
    Starting processing request 30...
    Finished request 30
    Finished request 29
    Finished request 17
    Finished request 25
    Starting processing request 19...
    Finished request 0
At this point, the first request finally finishes. This may indicate that the initialization time for the first request will always be delayed as compared to the successive requests. Running the application multiple times can confirm this. It's important that if the order of processing is relevant, this randomness does not negatively affect one's application.
    Starting processing request 33...
    Starting processing request 35...
    Finished request 33
    Finished request 35
    Starting processing request 37...
    Starting processing request 38...
    Finished request 37
    Finished request 38
    Starting processing request 39...
    Starting processing request 40...
    Starting processing request 36...
    Starting processing request 31...
    Finished request 40
    Finished request 39
    Starting processing request 32...
    Starting processing request 41...
    Finished request 32
    Finished request 41
    Starting processing request 42...
    Finished request 31
    Starting processing request 44...
    Finished request 36
    Finished request 42
    Starting processing request 45...
    Finished request 44
    Starting processing request 47...
    Starting processing request 48...
    Finished request 48
    Starting processing request 43...
    Finished request 47
    Finished request 43
    Finished request 19
    Starting processing request 34...
    Finished request 34
    Starting processing request 46...
    Starting processing request 49...
    Finished request 46
    Finished request 49
    Finished request 45
Request 19 also became fairly delayed, showing once again just how unpredictable a multithreaded application can be. If we were processing a large dataset in parallel here, with chunks of data in each request, we might have to pause at some points to account for these delays, as otherwise, our output cache might grow too large.
As doing so would negatively affect an application's performance, one might have to look at low-level optimizations, as well as the scheduling of threads on specific processor cores in order to prevent this from happening.
    Stopped workers.
    Joined threads.
    Joined threads.
    Joined threads.
    Joined threads.
    Joined threads.
    Joined threads.
    Joined threads.
    Joined threads.
    Joined threads.
    Joined threads.
    Clean-up done.
All 10 worker threads which were launched in the beginning terminate here as we call the stop() function of the Dispatcher.
In the example given in this chapter, we saw how to share information between threads in addition to synchronizing threads--this in the form of the requests we passed from the main thread into the dispatcher from which each request gets passed on to a different thread.
The essential idea behind the sharing of data between threads is that the data to be shared exists somewhere in a way which is accessible to two threads or more. After this, we have to ensure that only one thread can modify the data, and that the data does not get modified while it's being read. Generally, we would use mutexes or similar to ensure this.
Read-write locks are a possible optimization here, because they allow multiple threads to read simultaneously from a single data source. If one has an application in which multiple worker threads read the same information repeatedly, it would be more efficient to use read-write locks than basic mutexes, because the attempts to read the data will not block the other threads.
A read-write lock can thus be used as a more advanced version of a mutex, namely, as one which adapts its behavior to the type of access. Internally, it builds on mutexes (or semaphores) and condition variables.
First available via the Boost library and introduced natively with C++11, shared pointers are an abstraction of memory management using reference counting for heap-allocated instances. They are partially thread-safe in that creating multiple shared pointer instances can be created, but the referenced object itself is not thread-safe.
Depending on the application, this may suffice, however. To make them properly thread-safe, one can use atomics. We will look at this in more detail in Chapter 8, Atomic Operations - Working with the Hardware.
In this chapter, we looked at how to pass data between threads in a safe manner as part of a fairly complex scheduler implementation. We also looked at the resulting asynchronous processing of the said scheduler, and considered some potential alternatives and optimizations for passing data between threads.
At this point, you should be able to safely pass data between threads, as well as synchronize access to other shared resources.
In the next chapter, we will look at native C++ threading and the primitives API.
Starting with the 2011 revision of the C++ standard, a multithreading API is officially part of the C++ Standard Template Library (STL). This means that threads, thread primitives, and synchronization mechanisms are available to any new C++ application without the need to install a third-party library, or to rely on the operating system's APIs.
This chapter looks at the multithreading features available in this native API up to the features added by the 2014 standard. A number of examples will be shown to use these features in detail.
Topics in this chapter include the following:
In Chapter 3, C++ Multithreading APIs, we looked at the various APIs that are available to us when developing a multithreaded C++ application. In Chapter 4, Thread Synchronization and Communication, we implemented a multithreaded scheduler application using the native C++ threading API.
By including the <thread> header from the STL, we gain access to the std::thread class with facilities for mutual exclusion (mutex, and so on) provided by further headers. This API is, essentially, the same as the multithreading API from Boost.Thread, the main differences being more control over threads (join with timeout, thread groups, and thread interruption), and a number of additional lock types implemented on top of primitives such as mutexes and condition variables.
In general, Boost.Thread should be used as a fall back for when C++11 support isn't present, or when these additional Boost.Thread features are a requirement of one's application, and not easily added otherwise. Since Boost.Thread builds upon the available (native) threading support, it's also likely to add overhead as compared to the C++11 STL implementation.
The 2011 revision to the C++ standard (commonly referred to as C++11) adds a wide range of new features, the most crucial one being the addition of native multithreading support, which adds the ability to create, manage, and use threads within C++ without the use of third-party libraries.
This standard standardizes the memory model for the core language to allow multiple threads to coexist as well as enables features such as thread-local storage. Initial support was added in the C++03 standard, but the C++11 standard is the first to make full use of this.
As noted earlier, the actual threading API itself is implemented in the STL. One of the goals for the C++11 (C++0x) standard was to have as many of the new features as possible in the STL, and not as part of the core language. As a result, in order to use threads, mutexes, and kin, one has to first include the relevant STL header.
The standards committee which worked on the new multithreading API each had their own sets of goals, and as a result, a few features which were desired by some did not make it into the final standard. This includes features such as terminating another thread, or thread cancellation, which was strongly opposed by the POSIX representatives on account of canceling threads likely to cause issues with resource clean-up in the thread being destroyed.
Following are the features provided by this API implementation:
In a moment, we will look at detailed examples of each of these features. First we will see what the next revisions of the C++ standard have added to this initial set.
The 2014 standard adds the following features to the standard library:
Both of these are defined in the <shared_mutex> STL header. Since locks are based on mutexes, a shared lock is, therefore, reliant on a shared mutex.
The 2017 standard adds another set of features to the standard library, namely:
Here, a scoped lock is a mutex wrapper providing an RAII-style mechanism to own a mutex for the duration of a scoped block.
In the STL, we find the following header organization, and their provided functionality:
| Header | Provides |
| <thread> | The std::thread class. Methods under std::this_thread namespace:
|
| <mutex> | Classes:
|
| <shared_mutex> | Classes:
|
| <future> | Classes:
|
| <condition_variable> | Classes:
|
In the preceding table, we can see the functionality provided by each header along with the features introduced with the 2014 and 2017 standards. In the following sections, we will take a detailed look at each function and class.
The thread class is the core of the entire threading API; it wraps the underlying operating system's threads, and provides the functionality we need to start and stop threads.
This functionality is made accessible by including the <thread> header.
Upon creating a thread it is started immediately:
#include <thread>

void worker() {
   // Business logic.
}

int main () {
   std::thread t(worker);
   return 0;
}
This preceding code would start the thread to then immediately terminate the application, because we are not waiting for the new thread to finish executing.
To do this properly, we need to wait for the thread to finish, or rejoin as follows:
#include <thread>

void worker() {
   // Business logic.
}

int main () {
   std::thread t(worker);
   t.join();
   return 0;
}
This last code would execute, wait for the new thread to finish, and then return.
It's also possible to pass parameters to a new thread. These parameter values have to be move constructible, which means that it's a type which has a move or copy constructor (called for rvalue references). In practice, this is the case for all basic types and most (user-defined) classes:
#include <thread>
#include <string>

void worker(int n, std::string t) {
   // Business logic.
}

int main () {
   std::string s = "Test";
   int i = 1;
   std::thread t(worker, i, s);
   t.join();
   return 0;
}
In this preceding code, we pass an integer and string to the thread function. This function will receive copies of both variables. When passing references or pointers, things get more complicated with life cycle issues, data races, and such becoming a potential problem.
Any value returned by the function passed to the thread class constructor is ignored. To return information to the thread which created the new thread, one has to use inter-thread synchronization mechanisms (like mutexes) and some kind of a shared variable.
The 2011 standard adds std::move to the <utility> header. Using this template method, one can move resources between objects. This means that it can also move thread instances:
#include <thread>
#include <string>
#include <utility>

void worker(int n, string t) {
   // Business logic.
}

int main () {
   std::string s = "Test";
   std::thread t0(worker, 1, s);
   std::thread t1(std::move(t0));
   t1.join();
   return 0;
}
In this version of the code, we create a thread before moving it to another thread. Thread 0 thus ceases to exist (since it instantly finishes), and the execution of the thread function resumes in the new thread that we create.
As a result of this, we do not have to wait for the first thread to re join, but only for the second one.
Each thread has an identifier associated with it. This ID, or handle, is a unique identifier provided by the STL implementation. It can be obtained by calling the get_id() function of the thread class instance, or by calling std::this_thread::get_id() to get the ID of the thread calling the function:
#include <iostream>
 #include <thread>
 #include <chrono>
 #include <mutex>

 std::mutex display_mutex;

 void worker() {
     std::thread::id this_id = std::this_thread::get_id();

     display_mutex.lock();
     std::cout << "thread " << this_id << " sleeping...\n";
     display_mutex.unlock();

     std::this_thread::sleep_for(std::chrono::seconds(1));
 }

 int main() {
    std::thread t1(worker);
    std::thread::id t1_id = t1.get_id();

    std::thread t2(worker);
    std::thread::id t2_id = t2.get_id();

    display_mutex.lock();
    std::cout << "t1's id: " << t1_id << "\n";
    std::cout << "t2's id: " << t2_id << "\n";
    display_mutex.unlock();

    t1.join();
    t2.join();

    return 0;
 }
This code would produce output similar to this:
t1's id: 2
t2's id: 3
thread 2 sleeping...
thread 3 sleeping...
Here, one sees that the internal thread ID is an integer (std::thread::id type), relative to the initial thread (ID 1). This is comparable to most native thread IDs such as those for POSIX. These can also be obtained using native_handle(). That function will return whatever is the underlying native thread handle. It is particularly useful when one wishes to use a very specific PThread or Win32 thread functionality that's not available in the STL implementation.
It's possible to delay the execution of a thread (sleep) using either of two methods. One is sleep_for(), which delays execution by at least the specified duration, but possibly longer:
#include <iostream>
#include <chrono>
#include <thread>
        using namespace std::chrono_literals;

        typedef std::chrono::time_point<std::chrono::high_resolution_clock> timepoint;
int main() {
         std::cout << "Starting sleep.\n";

         timepoint start = std::chrono::high_resolution_clock::now();

         std::this_thread::sleep_for(2s);

         timepoint end = std::chrono::high_resolution_clock::now();
         std::chrono::duration<double, std::milli> elapsed = end -
         start;
         std::cout << "Slept for: " << elapsed.count() << " ms\n";
}
This preceding code shows how to sleep for roughly 2 seconds, measuring the exact duration using a counter with the highest precision possible on the current OS.
Note that we are able to specify the number of seconds directly, with the seconds post-fix. This is a C++14 feature that got added to the <chrono> header. For the C++11 version, one has to create an instance of std::chrono::seconds and pass it to the sleep_for() function.
The other method is sleep_until(), which takes a single parameter of type std::chrono::time_point<Clock, Duration>. Using this function, one can set a thread to sleep until the specified time point has been reached. Due to the operating system's scheduling priorities, this wake-up time might not be the exact time as specified.
One can indicate to the OS that the current thread can be rescheduled so that other threads can run instead. For this, one uses the std::this_thread::yield() function. The exact result of this function depends on the underlying OS implementation and its scheduler. In the case of a FIFO scheduler, it's likely that the calling thread will be put at the back of the queue.
This is a highly specialized function, with special use cases. It should not be used without first validating its effect on the application's performance.
After starting a thread, one can call detach() on the thread object. This effectively detaches the new thread from the calling thread, meaning that the former will continue executing even after the calling thread has exited.
Using swap(), either as a standalone method or as function of a thread instance, one can exchange the underlying thread handles of thread objects:
#include <iostream>
#include <thread>
#include <chrono>

void worker() {
   std::this_thread::sleep_for(std::chrono::seconds(1));
}

int main() {
         std::thread t1(worker);
         std::thread t2(worker);

         std::cout << "thread 1 id: " << t1.get_id() << "\n";
         std::cout << "thread 2 id: " << t2.get_id() << "\n";

         std::swap(t1, t2);

         std::cout << "Swapping threads..." << "\n";

         std::cout << "thread 1 id: " << t1.get_id() << "\n";
         std::cout << "thread 2 id: " << t2.get_id() << "\n";

         t1.swap(t2);

         std::cout << "Swapping threads..." << "\n";

         std::cout << "thread 1 id: " << t1.get_id() << "\n";
         std::cout << "thread 2 id: " << t2.get_id() << "\n";

         t1.join();
         t2.join();
}
The possible output from this code might look like the following:
thread 1 id: 2
thread 2 id: 3
Swapping threads...
thread 1 id: 3
thread 2 id: 2
Swapping threads...
thread 1 id: 2
thread 2 id: 3
The effect of this is that the state of each thread is swapped with that of the other thread, essentially exchanging their identities.
The <mutex> header contains multiple types of mutexes and locks. The mutex type is the most commonly used type, and provides the basic lock/unlock functionality without any further complications.
At its core, the goal of a mutex is to exclude the possibility of simultaneous access so as to prevent data corruption, and to prevent crashes due to the use of non-thread-safe routines.
An example of where one would need to use a mutex is the following code:
#include <iostream>
#include <thread>

void worker(int i) {
         std::cout << "Outputting this from thread number: " << i << "\n";
}

int main() {
         std::thread t1(worker, 1);
         std::thread t2(worker, 2);

         t1.join();
   t2.join();

   return 0;
}
If one were to try and run this preceding code as-is, one would notice that the text output from both threads would be mashed together instead of being output one after the other. The reason for this is that the standard output (whether C or C++-style) is not thread-safe. Though the application will not crash, the output will be a jumble.
The fix for this is simple, and is given as follows:
#include <iostream>
#include <thread>
#include <mutex>

std::mutex globalMutex;

void worker(int i) {
   globalMutex.lock();
         std::cout << "Outputting this from thread number: " << i << "\n";
   globalMutex.unlock();
}

int main() {
         std::thread t1(worker, 1);
         std::thread t2(worker, 2);

         t1.join();
   t2.join();

   return 0;
}
In this situation, each thread would first need to obtain access to the mutex object. Since only one thread can have access to the mutex object, the other thread will end up waiting for the first thread to finish writing to the standard output, and the two strings will appear one after the other, as intended.
It's possible to not want the thread to block and wait for the mutex object to become available: for example, when one just wants to know whether a request is already being handled by another thread, and there's no use in waiting for it to finish.
For this, a mutex comes with the try_lock() function which does exactly that.
In the following example, we can see two threads trying to increment the same counter, but with one incrementing its own counter whenever it fails to immediately obtain access to the shared counter:
#include <chrono>
#include <mutex>
#include <thread>
#include <iostream>

std::chrono::milliseconds interval(50);

std::mutex mutex;
int shared_counter = 0;
int exclusive_counter = 0;

void worker0() {
   std::this_thread::sleep_for(interval);

         while (true) {
               if (mutex.try_lock()) {
                     std::cout << "Shared (" << job_shared << ")\n";
                     mutex.unlock();
                     return;
               }
         else {
                     ++exclusive_counter;
                           std::cout << "Exclusive (" << exclusive_counter << ")\n";
                           std::this_thread::sleep_for(interval);
               }
         }
}

void worker1() {
   mutex.lock();
         std::this_thread::sleep_for(10 * interval);
         ++shared_counter;
         mutex.unlock();
}

int main() {
         std::thread t1(worker0);
         std::thread t2(worker1);

         t1.join();
         t2.join();
}
Both threads in this preceding example run a different worker function, yet both have in common the fact that they sleep for a period of time, and try to acquire the mutex for the shared counter when they wake up. If they do, they'll increase the counter, but only the first worker will output this fact.
The first worker also logs when it did not get the shared counter, but only increased its exclusive counter. The resulting output might look something like this:
Exclusive (1)
Exclusive (2)
Exclusive (3)
Shared (1)
Exclusive (4)
A timed mutex is a regular mutex type, but with a number of added functions which give one control over the time period during which it should be attempted to obtain the lock, that is, try_lock_for and try_lock_until.
The former tries to obtain the lock during the specified time period (std::chrono object) before returning the result (true or false). The latter will wait until a specific point in the future before returning the result.
The use of these functions mostly lies in offering a middle path between the blocking (lock) and non-blocking (try_lock) methods of the regular mutex. One may want to wait for a number of tasks using only a single thread without knowing when a task will become available, or a task may expire at a certain point in time at which waiting for it makes no sense any more.
A lock guard is a simple mutex wrapper, which handles the obtaining of a lock on the mutex object as well as its release when the lock guard goes out of scope. This is a helpful mechanism to ensure that one does not forget to release a mutex lock, and to help reduce clutter in one's code when one has to release the same mutex in multiple locations.
While refactoring of, for example, big if/else blocks can reduce the instances in which the release of a mutex lock is required, it's much easier to just use this lock guard wrapper and not worry about such details:
#include <thread>
#include <mutex>
#include <iostream>

int counter = 0;
std::mutex counter_mutex;

void worker() {
         std::lock_guard<std::mutex> lock(counter_mutex);
   if (counter == 1) { counter += 10; }
   else if (counter >= 10) { counter += 15; }
   else if (counter >= 50) { return; }
         else { ++counter; }

   std::cout << std::this_thread::get_id() << ": " << counter << '\n';
}

int main() {
    std::cout << __func__ << ": " << counter << '\n';

    std::thread t1(worker);
    std::thread t2(worker);

    t1.join();
    t2.join();

    std::cout << __func__ << ": " << counter << '\n';
}
In the preceding example, we see that we have a small if/else block with one condition leading to the worker function immediately returning. Without a lock guard, we would have to make sure that we also unlocked the mutex in this condition before returning from the function.
With the lock guard, however, we do not have to worry about such details, which allows us to focus on the business logic instead of worrying about mutex management.
The unique lock is a general-purpose mutex wrapper. It's similar to the timed mutex, but with additional features, primary of which is the concept of ownership. Unlike other lock types, a unique lock does not necessarily own the mutex it wraps if it contains any at all. Mutexes can be transferred between unique lock instances along with ownership of the said mutexes using the swap() function.
Whether a unique lock instance has ownership of its mutex, and whether it's locked or not, is first determined when creating the lock, as can be seen with its constructors. For example:
std::mutex m1, m2, m3;
std::unique_lock<std::mutex> lock1(m1, std::defer_lock);
std::unique_lock<std::mutex> lock2(m2, std::try_lock);
std::unique_lock<std::mutex> lock3(m3, std::adopt_lock);
The first constructor in the last code does not lock the assigned mutex (defers). The second attempts to lock the mutex using try_lock(). Finally, the third constructor assumes that it already owns the provided mutex.
In addition to these, other constructors allow the functionality of a timed mutex. That is, it will wait for a time period until a time point has been reached, or until the lock has been acquired.
Finally, the association between the lock and the mutex is broken by using the release() function, and a pointer is returned to the mutex object. The caller is then responsible for the releasing of any remaining locks on the mutex and for the further handling of it.
This type of lock isn't one which one will tend to use very often on its own, as it's extremely generic. Most of the other types of mutexes and locks are significantly less complex, and likely to fulfil all the needs in 99% of all cases. The complexity of a unique lock is, thus, both a benefit and a risk.
It is, however, commonly used by other parts of the C++11 threading API, such as condition variables, as we will see in a moment.
One area where a unique lock may be useful is as a scoped lock, allowing one to use scoped locks without having to rely on the native scoped locks in the C++17 standard. See this example:
#include <mutex>
std::mutex my_mutex
int count = 0;
int function() {
         std::unique_lock<mutex> lock(my_mutex);
   count++;
}
As we enter the function, we create a new unique_lock with the global mutex instance. The mutex is locked at this point, after which we can perform any critical operations.
When the function scope ends, the destructor of the unique_lock is called, which results in the mutex getting unlocked again.
First introduced in the 2017 standard, the scoped lock is a mutex wrapper which obtains access to (locks) the provided mutex, and ensures it is unlocked when the scoped lock goes out of scope. It differs from a lock guard in that it is a wrapper for not one, but multiple mutexes.
This can be useful when one deals with multiple mutexes in a single scope. One reason to use a scoped lock is to avoid accidentally introducing deadlocks and other unpleasant complications with, for example, one mutex being locked by the scoped lock, another lock still being waited upon, and another thread instance having the exactly opposite situation.
One property of a scoped lock is that it tries to avoid such a situation, theoretically making this type of lock deadlock-safe.
The recursive mutex is another subtype of mutex. Even though it has exactly the same functions as a regular mutex, it allows the calling thread, which initially locked the mutex, to lock the same mutex repeatedly. By doing this, the mutex doesn't become available for other threads until the owning thread has unlocked the mutex as many times as it has locked it.
One good reason to use a recursive mutex is for example when using recursive functions. With a regular mutex one would need to invent some kind of entry point which would lock the mutex before entering the recursive function.
With a recursive mutex, each iteration of the recursive function would lock the recursive mutex again, and upon finishing one iteration, it would unlock the mutex. As a result the mutex would be unlocked and unlocked the same number of times.
A potential complication hereby is that the maximum number of times that a recursive mutex can be locked is not defined in the standard. When the implementation's limit has been reached, a std::system_error will be thrown if one tries to lock it, or false is returned when using the non-blocking try_lock function.
The recursive timed mutex is, as the name suggests, an amalgamation of the functionality of the timed mutex and recursive mutex. As a result, it allows one to recursively lock the mutex using a timed conditional function.
Although this adds challenges to ensuring that the mutex is unlocked as many times as the thread locks it, it nevertheless offers possibilities for more complex algorithms such as the aforementioned task-handlers.
The <shared_mutex> header was first added with the 2014 standard, by adding the shared_timed_mutex class. With the 2017 standard, the shared_mutex class was also added.
The shared mutex header has been present since C++17. In addition to the usual mutual exclusive access, this mutex class adds the ability to provide shared access to the mutex. This allows one to, for example, provide read access to a resource by multiple threads, while a writing thread would still be able to gain exclusive access. This is similar to the read-write locks of Pthreads.
The functions added to this mutex type are the following:
The use of this mutex's share functionality should be fairly self-explanatory. A theoretically infinite number of readers can gain read access to the mutex, while ensuring that only a single thread can write to the resource at any time.
This header has been present since C++14. It adds shared locking functionality to the timed mutex with these functions:
This class is essentially an amalgamation of the shared mutex and timed mutex, as the name suggests. The interesting thing here is that it was added to the standard before the more basic shared mutex.
In essence, a condition variable provides a mechanism through which a thread's execution can be controlled by another thread. This is done by having a shared variable which a thread will wait for until signaled by another thread. It is an essential part of the scheduler implementation we looked at in Chapter 4, Thread Synchronization and Communication.
For the C++11 API, condition variables and their associated functionality are defined in the <condition_variable> header.
The basic usage of a condition variable can be summarized from that scheduler's code in Chapter 4, Thread Synchronization and Communication.
 #include "abstract_request.h"

 #include <condition_variable>
 #include <mutex>

using namespace std;


 class Worker {
    condition_variable cv;
    mutex mtx;
    unique_lock<mutex> ulock;
    AbstractRequest* request;
    bool running;
    bool ready;
    public:
    Worker() { running = true; ready = false; ulock = unique_lock<mutex>(mtx); }
    void run();
    void stop() { running = false; }
    void setRequest(AbstractRequest* request) { this->request = request; ready = true; }
    void getCondition(condition_variable* &cv);
 };
In the constructor, as defined in the preceding Worker class declaration, we see the way a condition variable in the C++11 API is initialized. The steps are listed as follows:
#include <chrono>
using namespace std;
void Worker::run() {
    while (running) {
        if (ready) {
            ready = false;
            request->process();
            request->finish();
        }
        if (Dispatcher::addWorker(this)) {
            while (!ready && running) {
                if (cv.wait_for(ulock, chrono::seconds(1)) ==
                cv_status::timeout) {
                    // We timed out, but we keep waiting unless the
                    worker is
                    // stopped by the dispatcher.
                }
            }
        }
    }
}
Here, we use the wait_for() function of the condition variable, and pass both the unique lock instance we created earlier and the amount of time which we want to wait for. Here we wait for 1 second. If we time out on this wait, we are free to re-enter the wait (as is done here) in a continuous loop, or continue execution.
It's also possible to perform a blocking wait using the simple wait() function, or wait until a certain point in time with wait_for().
As noted, when we first looked at this code, the reason why this worker's code uses the ready Boolean variable is to check that it was really another thread which signaled the condition variable, and not just a spurious wake-up. It's an unfortunate complication of most condition variable implementations--including the C++11 one--that they are susceptible to this.
As a result of these random wake-up events, it is necessary to have some way to ensure that we really did wake up intentionally. In the scheduler code, this is done by having the thread which wakes up the worker thread also set a Boolean value which the worker thread can wake up.
Whether we timed out, or were notified, or suffered a spurious wake-up can be checked with the cv_status enumeration. This enumeration knows these two possible conditions:
The signaling, or notifying, itself is quite straightforward:
void Dispatcher::addRequest(AbstractRequest* request) {
    workersMutex.lock();
    if (!workers.empty()) {
          Worker* worker = workers.front();
          worker->setRequest(request);
          condition_variable* cv;
          worker->getCondition(cv);
          cv->notify_one();
          workers.pop();
          workersMutex.unlock();
    }
    else {
          workersMutex.unlock();
          requestsMutex.lock();
          requests.push(request);
          requestsMutex.unlock();
    }
          }
In this preceding function from the Dispatcher class, we attempt to obtain an available worker thread instance. If found, we obtain a reference to the worker thread's condition variable as follows:
void Worker::getCondition(condition_variable* &cv) {
    cv = &(this)->cv;
 }
Setting the new request on the worker thread also changes the value of the ready variable to true, allowing the worker to check that it is indeed allowed to continue.
Finally, the condition variable is notified that any threads which are waiting on it can now continue using notify_one(). This particular function will signal the first thread in the FIFO queue for this condition variable to continue. Here, only one thread will ever be notified, but if there are multiple threads waiting for the same condition variable, the calling of notify_all() will allow all threads in the FIFO queue to continue.
The condition_variable_any class is a generalization of the condition_variable class. It differs from the latter in that it allows for other mutual exclusion mechanisms to be used beyond unique_lock<mutex>. The only requirement is that the lock used meets the BasicLockable requirements, meaning that it provides a lock() and unlock() function.
The std::notify_all_at_thread_exit() function allows a (detached) thread to notify other threads that it has completely finished, and is in the process of having all objects within its scope (thread-local) destroyed. It functions by moving the provided lock to internal storage before signaling the provided condition variable.
The result is exactly as if the lock was unlocked and notify_all() was called on the condition variable.
A basic (non-functional) example can be given as follows:
#include <mutex>
#include <thread>
#include <condition_variable>
using namespace std;

mutex m;
condition_variable cv;
bool ready = false;
ThreadLocal result;

void worker() {
   unique_lock<mutex> ulock(m);
   result = thread_local_method();
         ready = true;
         std::notify_all_at_thread_exit(cv, std::move(ulock));
}

int main() {
         thread t(worker);
         t.detach();

         // Do work here.

         unique_lock<std::mutex> ulock(m);
         while(!ready) {
               cv.wait(ulock);
         }

         // Process result
}
Here, the worker thread executes a method which creates thread-local objects. It's therefore essential that the main thread waits for the detached worker thread to finish first. If the latter isn't done yet when the main thread finishes its tasks, it will enter a wait using the global condition variable. In the worker thread, std::notify_all_at_thread_exit() is called after setting the ready Boolean.
What this accomplishes is twofold. After calling the function, no more threads are allowed to wait on the condition variable. It also allows the main thread to wait for the result of the detached worker thread to become available.
The last part of the C++11 thread support API is defined in <future>. It offers a range of classes, which implement more high-level multithreading concepts aimed more at easy asynchronous processing rather than the implementation of a multithreaded architecture.
Here we have to distinguish two concepts: that of a future and that of a promise. The former is the end result (the future product) that'll be used by a reader/consumer. The latter is what the writer/producer uses.
A basic example of a future would be:
#include <iostream>
#include <future>
#include <chrono>

bool is_prime (int x) {
  for (int i = 2; i < x; ++i) if (x%i==0) return false;
  return true;
}

int main () {
  std::future<bool> fut = std::async (is_prime, 444444443);
  std::cout << "Checking, please wait";
  std::chrono::milliseconds span(100);
  while (fut.wait_for(span) == std::future_status::timeout) {               std::cout << '.' << std::flush;
   }

  bool x = fut.get();
  std::cout << "\n444444443 " << (x?"is":"is not") << " prime.\n";
  return 0;
}
This code asynchronously calls a function, passing it a parameter (potential prime number). It then enters an active loop while it waits for the future it received from the asynchronous function call to finish. It sets a 100 ms timeout on its wait function.
Once the future finishes (not returning a timeout on the wait function), we obtain the resulting value, in this case telling us that the value we provided the function with is in fact a prime number.
In the async section of this chapter, we will look a bit more at asynchronous function calls.
A promise allows one to transfer states between threads. For example:
#include <iostream>
#include <functional>
#include <thread>
#include <future>

void print_int (std::future<int>& fut) {
  int x = fut.get();
  std::cout << "value: " << x << '\n';
}

int main () {
  std::promise<int> prom;
  std::future<int> fut = prom.get_future();
  std::thread th1 (print_int, std::ref(fut));
  prom.set_value (10);
  th1.join();
  return 0;
This preceding code uses a promise instance passed to a worker thread to transfer a value to the other thread, in this case an integer. The new thread waits for the future we created from the promise, and which it received from the main thread to complete.
The promise is completed when we set the value on the promise. This completes the future and finishes the worker thread.
In this particular example, we use a blocking wait on the future object, but one can also use wait_for() and wait_until(), to wait for a time period or a point in time respectively, as we saw in the previous example for a future.
A shared_future is just like a regular future object, but can be copied, which allows multiple threads to read its results.
Creating a shared_future is similar to a regular future.
std::promise<void> promise1;
std::shared_future<void> sFuture(promise1.get_future());
The biggest difference is that the regular future is passed to its constructor.
After this, all threads which have access to the future object can wait for it, and obtain its value. This can also be used to signal threads in a way similar to condition variables.
A packaged_task is a wrapper for any callable target (function, bind, lambda, or other function object). It allows for asynchronous execution with the result available in a future object. It is similar to std::function, but automatically transfers its results to a future object.
For example:
#include <iostream>
#include <future>
#include <chrono>
#include <thread>

using namespace std;

int countdown (int from, int to) {
   for (int i = from; i != to; --i) {
         cout << i << '\n';
         this_thread::sleep_for(chrono::seconds(1));
   }

   cout << "Finished countdown.\n";
   return from - to;
}

int main () {
   packaged_task<int(int, int)> task(countdown);
   future<int> result = task.get_future();
   thread t (std::move(task), 10, 0);

   //  Other logic.

   int value = result.get();

   cout << "The countdown lasted for " << value << " seconds.\n";

   t.join();
   return 0;
}
This preceding code implements a simple countdown feature, counting down from 10 to 0. After creating the task and obtaining a reference to its future object, we push it onto a thread along with the parameters of the worker function.
The result from the countdown worker thread becomes available as soon as it finishes. We can use the future object's waiting functions here the same way as for a promise.
A more straightforward version of promise and packaged_task can be found in std::async(). This is a simple function, which takes a callable object (function, bind, lambda, and similar) along with any parameters for it, and returns a future object.
The following is a basic example of the async() function:
#include <iostream>
#include <future>

using namespace std;

bool is_prime (int x) {
   cout << "Calculating prime...\n";
   for (int i = 2; i < x; ++i) {
         if (x % i == 0) {
               return false;
         }
   }

   return true;
}

int main () {
   future<bool> pFuture = std::async (is_prime, 343321);

   cout << "Checking whether 343321 is a prime number.\n";

   // Wait for future object to be ready.

   bool result = pFuture.get();
   if (result) {
         cout << "Prime found.\n";
   }
   else {
         cout << "No prime found.\n";
   }

   return 0;
}
The worker function in the preceding code determines whether a provided integer is a prime number or not. As we can see, the resulting code is a lot more simple than with a packaged_task or promise.
In addition to the basic version of std::async(), there is a second version which allows one to specify the launch policy as its first argument. This is a bitmask value of type std::launch with the following possible values:
* launch::async
* launch::deferred
The async flag means that a new thread and execution context for the worker function is created immediately. The deferred flag means that this is postponed until wait() or get() is called on the future object. Specifying both flags causes the function to choose the method automatically depending on the current system situation.
The std::async() version, without explicitly specified bitmask values, defaults to the latter, automatic method.
With multithreading, the use of atomics is also very important. The C++11 STL offers an <atomic> header for this reason. This topic is covered extensively in Chapter 8, Atomic Operations - Working with the Hardware.
In this chapter, we explored the entirety of the multithreading support in the C++11 API, along with the features added in C++14 and C++17.
We saw how to use each feature using descriptions and example code. We can now use the native C++ multithreading API to implement multithreaded, thread-safe code as well as use the asynchronous execution features in order to speed up and execute functions in parallel.
In the next chapter, we will take a look at the inevitable next step in the implementation of multithreaded code: debugging and validating of the resulting application.
Ideally, one's code would work properly the first time around, and contain no hidden bugs that are waiting to crash the application, corrupt data, or cause other issues. Realistically, this is, of course, impossible. Thus it is that tools were developed which make it easy to examine and debug multithreaded applications.
In this chapter, we will look at a number of them including a regular debugger as well as some of the tools which are part of the Valgrind suite, specifically, Helgrind and DRD. We will also look at profiling a multithreaded application in order to find hotspots and potential issues in its design.
Topics covered in this chapter include the following:
Ideally, one would test and validate one's code every time one has reached a certain milestone, whether it's for a singular module, a number of modules, or the application as a whole. It's important to ascertain that the assumptions one makes match up with the ultimate functionality.
Especially, with multithreaded code, there's a large element of coincidence in that a particular error state is not guaranteed to be reached during each run of the application. Signs of an improperly implemented multithreaded application may result in symptoms such as seemingly random crashes.
Likely the first hint one will get that something isn't correct is when the application crashes, and one is left with a core dump. This is a file which contains the memory content of the application at the time when it crashed, including the stack.
This core dump can be used in almost the same fashion as running a debugger with the running process. It is particularly useful to examine the location in the code at which we crashed, and in which thread. We can also examine memory contents this way.
One of the best indicators that one is dealing with a multithreading issue is when the application never crashes in the same location (different stack trace), or when it always crashes around a point where one performs mutual exclusion operations, such as manipulating a global data structure.
To start off, we'll first take a more in-depth look at using a debugger for diagnosing and debugging before diving into the Valgrind suite of tools.
Of all the questions a developer may have, the question of why did my application just crash? is probably among the most important. This is also one of the questions which are most easily answered with a debugger. Regardless of whether one is live debugging a process, or analyzing the core dump of a crashed process, the debugger can (hopefully) generate a back trace, also known as a stack trace. This trace contains a chronological list of all the functions which were called since the application was started as one would find them on the stack (see Chapter 2, Multithreading Implementation on the Processor and OS, for details on how a stack works).
The last few entries of this back trace will thus show us in which part of the code things went wrong. If the debug information was compiled into the binary, or provided to the debugger, we can also see the code at that line along with the names of the variables.
Even better, since we're looking at the stack frames, we can also examine the variables within that stack frame. This means the parameters passed to the function along with any local variables and their values.
In order to have the debug information (symbols) available, one has to compile the source code with the appropriate compiler flags set. For GCC, one can select a host of debug information levels and types. Most commonly, one would use the -g flag with an integer specifying the debug level attached, as follows:
This flag instructs GCC to generate debug information in the native format for the OS. One can also use different flags to generate the debug information in a specific format; however, this is not necessary for use with GCC's debugger (GDB) as well as with the Valgrind tools.
Both GDB and Valgrind will use this debug information. While it's technically possible to use both without having the debug information available, that's best left as an exercise for truly desperate times.
One of the most commonly used debuggers for C-based and C++-based code is the GNU Debugger, or GDB for short. In the following example, we'll use this debugger due to it being both widely used and freely available. Originally written in 1986, it's now used with a wide variety of programming languages, and has become the most commonly used debugger, both in personal and professional use.
The most elemental interface for GDB is a command-line shell, but it can be used with graphical frontends, which also include a number of IDEs such as Qt Creator, Dev-C++, and Code::Blocks. These frontends and IDEs can make it easier and more intuitive to manage breakpoints, set up watch variables, and perform other common operations. Their use is, however, not required.
On Linux and BSD distributions, gdb is easily installed from a package, just as it is on Windows with MSYS2 and similar UNIX-like environments. For OS X/MacOS, one may have to install gdb using a third-party package manager such as Homebrew.
Since gdb is not normally code signed on MacOS, it cannot gain the system-level access it requires for normal operation. Here one can either run gdb as root (not recommended), or follow a tutorial relevant to your version of MacOS.
As mentioned earlier, there are two ways to use a debugger, either by starting the application from within the debugger (or attaching to the running process), or by loading a core dump file. Within the debugging session, one can either interrupt the running process (with Ctrl+C, which sends the SIGINT signal), or load the debug symbols for the loaded core dump. After this, we can examine the active threads in this frame:
Thread 1 received signal SIGINT, Interrupt.
0x00007fff8a3fff72 in mach_msg_trap () from /usr/lib/system/libsystem_kernel.dylib
(gdb) info threads
Id   Target Id         Frame
* 1    Thread 0x1703 of process 72492 0x00007fff8a3fff72 in mach_msg_trap () from /usr/lib/system/libsystem_kernel.dylib
3    Thread 0x1a03 of process 72492 0x00007fff8a406efa in kevent_qos () from /usr/lib/system/libsystem_kernel.dylib
10   Thread 0x2063 of process 72492 0x00007fff8a3fff72 in mach_msg_trap () from /usr/lib/system/libsystem_kernel.dylibs
14   Thread 0x1e0f of process 72492 0x00007fff8a405d3e in __pselect () from /usr/lib/system/libsystem_kernel.dylib
(gdb) c
Continuing.
In the preceding code, we can see how after sending the SIGINT signal to the application (a Qt-based application running on OS X), we request the list of all threads which exist at this point in time along with their thread number, ID, and the function which they are currently executing. This also shows clearly which threads are likely waiting based on the latter information, as is often the case of a graphical user interface application like this one. Here we also see that the thread which is currently active in the application as marked by the asterisk in front of its number (thread 1).
We can also switch between threads at will by using the thread <ID> command, and move up and down between a thread's stack frames. This allows us to examine every aspect of individual threads.
When full debug information is available, one would generally also see the exact line of code that a thread is executing. This means that during the development stage of an application, it makes sense to have as much debug information available as possible to make debugging much easier.
For the dispatcher code we looked at in Chapter 4, Threading Synchronization and Communication, we can set a breakpoint to allow us to examine the active threads as well:
$ gdb dispatcher_demo.exe
GNU gdb (GDB) 7.9
Copyright (C) 2015 Free Software Foundation, Inc.
Reading symbols from dispatcher_demo.exe...done.
(gdb) break main.cpp:67
Breakpoint 1 at 0x4017af: file main.cpp, line 67.
(gdb) run
Starting program: dispatcher_demo.exe
[New Thread 10264.0x2a90]
[New Thread 10264.0x2bac]
[New Thread 10264.0x2914]
[New Thread 10264.0x1b80]
[New Thread 10264.0x213c]
[New Thread 10264.0x2228]
[New Thread 10264.0x2338]
[New Thread 10264.0x270c]
[New Thread 10264.0x14ac]
[New Thread 10264.0x24f8]
[New Thread 10264.0x1a90]
As we can see in the above command line output, we start GDB with the name of the application we wish to debug as a parameter, here from a Bash shell under Windows. After this, we can set a breakpoint here, using the filename of the source file and the line we wish to break at after the (gdb) of the gdb command line input. We select the first line after the loop in which the requests get sent to the dispatcher, then run the application. This is followed by the list of the new threads which are being created by the dispatcher, as reported by GDB.
Next, we wait until the breakpoint is hit:
Breakpoint 1, main () at main.cpp:67
67              this_thread::sleep_for(chrono::seconds(5));
(gdb) info threads
Id   Target Id         Frame
11   Thread 10264.0x1a90 0x00000000775ec2ea in ntdll!ZwWaitForMultipleObjects () from /c/Windows/SYSTEM32/ntdll.dll
10   Thread 10264.0x24f8 0x00000000775ec2ea in ntdll!ZwWaitForMultipleObjects () from /c/Windows/SYSTEM32/ntdll.dll
9    Thread 10264.0x14ac 0x00000000775ec2ea in ntdll!ZwWaitForMultipleObjects () from /c/Windows/SYSTEM32/ntdll.dll
8    Thread 10264.0x270c 0x00000000775ec2ea in ntdll!ZwWaitForMultipleObjects () from /c/Windows/SYSTEM32/ntdll.dll
7    Thread 10264.0x2338 0x00000000775ec2ea in ntdll!ZwWaitForMultipleObjects () from /c/Windows/SYSTEM32/ntdll.dll
6    Thread 10264.0x2228 0x00000000775ec2ea in ntdll!ZwWaitForMultipleObjects () from /c/Windows/SYSTEM32/ntdll.dll
5    Thread 10264.0x213c 0x00000000775ec2ea in ntdll!ZwWaitForMultipleObjects () from /c/Windows/SYSTEM32/ntdll.dll
4    Thread 10264.0x1b80 0x0000000064942eaf in ?? () from /mingw64/bin/libwinpthread-1.dll
3    Thread 10264.0x2914 0x00000000775c2385 in ntdll!LdrUnloadDll () from /c/Windows/SYSTEM32/ntdll.dll
2    Thread 10264.0x2bac 0x00000000775c2385 in ntdll!LdrUnloadDll () from /c/Windows/SYSTEM32/ntdll.dll
* 1    Thread 10264.0x2a90 main () at main.cpp:67
(gdb) bt
#0  main () at main.cpp:67
(gdb) c
Continuing.
Upon reaching the breakpoint, an info threads command lists the active threads. Here we can clearly see the use of condition variables where a thread is waiting in ntdll!ZwWaitForMultipleObjects(). As covered in Chapter 3, C++ Multithreading APIs, this is part of the condition variable implementation on Windows using its native multithreading API.
When we create a back trace (bt command), we see that the current stack for thread 1 (the current thread) is just one frame, only for the main method, since we didn't call into another function from this starting point at this line.
During normal application execution, such as with the GUI application we looked at earlier, sending SIGINT to the application can also be followed by the command to create a back trace like this:
Thread 1 received signal SIGINT, Interrupt.
0x00007fff8a3fff72 in mach_msg_trap () from /usr/lib/system/libsystem_kernel.dylib
(gdb) bt
#0  0x00007fff8a3fff72 in mach_msg_trap () from /usr/lib/system/libsystem_kernel.dylib
#1  0x00007fff8a3ff3b3 in mach_msg () from /usr/lib/system/libsystem_kernel.dylib
#2  0x00007fff99f37124 in __CFRunLoopServiceMachPort () from /System/Library/Frameworks/CoreFoundation.framework/Versions/A/CoreFoundation
#3  0x00007fff99f365ec in __CFRunLoopRun () from /System/Library/Frameworks/CoreFoundation.framework/Versions/A/CoreFoundation
#4  0x00007fff99f35e38 in CFRunLoopRunSpecific () from /System/Library/Frameworks/CoreFoundation.framework/Versions/A/CoreFoundation
#5  0x00007fff97b73935 in RunCurrentEventLoopInMode ()
from /System/Library/Frameworks/Carbon.framework/Versions/A/Frameworks/HIToolbox.framework/Versions/A/HIToolbox
#6  0x00007fff97b7376f in ReceiveNextEventCommon ()
from /System/Library/Frameworks/Carbon.framework/Versions/A/Frameworks/HIToolbox.framework/Versions/A/HIToolbox
#7  0x00007fff97b735af in _BlockUntilNextEventMatchingListInModeWithFilter ()
from /System/Library/Frameworks/Carbon.framework/Versions/A/Frameworks/HIToolbox.framework/Versions/A/HIToolbox
#8  0x00007fff9ed3cdf6 in _DPSNextEvent () from /System/Library/Frameworks/AppKit.framework/Versions/C/AppKit
#9  0x00007fff9ed3c226 in -[NSApplication _nextEventMatchingEventMask:untilDate:inMode:dequeue:] ()
from /System/Library/Frameworks/AppKit.framework/Versions/C/AppKit
#10 0x00007fff9ed30d80 in -[NSApplication run] () from /System/Library/Frameworks/AppKit.framework/Versions/C/AppKit
#11 0x0000000102a25143 in qt_plugin_instance () from /usr/local/Cellar/qt/5.8.0_1/plugins/platforms/libqcocoa.dylib
#12 0x0000000100cd3811 in QEventLoop::exec(QFlags<QEventLoop::ProcessEventsFlag>) () from /usr/local/opt/qt5/lib/QtCore.framework/Versions/5/QtCore
#13 0x0000000100cd80a7 in QCoreApplication::exec() () from /usr/local/opt/qt5/lib/QtCore.framework/Versions/5/QtCore
#14 0x0000000100003956 in main (argc=<optimized out>, argv=<optimized out>) at main.cpp:10
(gdb) c
Continuing.
In this preceding code, we can see the execution of thread ID 1 from its creation, through the entry point (main). Each subsequent function call is added to the stack. When a function finishes, it is removed from the stack. This is both a benefit and a disadvantage. While it does keep the back trace nice and clean, it also means that the history of what happened before the last function call is no longer there.
If we create a back trace with a core dump file, not having this historical information can be very annoying, and possibly make one start on a wild goose chase as one tries to narrow down the presumed cause of a crash. This means that a certain level of experience is required for successful debugging.
In case of a crashed application, the debugger will start us on the thread which suffered the crash. Often, this is the thread with the problematic code, but it could be that the real fault lies with code executed by another thread, or even the unsafe use of variables. If one thread were to change the information that another thread is currently reading, the latter thread could end up with garbage data. The result of this could be a crash, or even worse--corruption, later in the application.
The worst-case scenario consists of the stack getting overwritten by, for example, a wild pointer. In this case, a buffer or similar on the stack gets written past its limit, thus erasing parts of the stack by filling it with new data. This is a buffer overflow, and can both lead to the application crashing, or the (malicious) exploitation of the application.
Although the value of a debugger is hard to dismiss, there are times when one needs a different type of tool to answer questions about things such as memory usage, leaks, and to diagnose or prevent threading issues. This is where tools such as those which are part of the Valgrind suite of dynamic analysis tools can be of great help. As a framework for building dynamic analysis tools, the Valgrind distribution currently contains the following tools which are of interest to us:
Memcheck is a memory error detector, which allows us to discover memory leaks, illegal reads and writes, as well as allocation, deallocation, and similar memory-related issues.
Helgrind and DRD are both thread error detectors. This basically means that they will attempt to detect any multithreading issues such as data races and incorrect use of mutexes. Where they differ is that Helgrind can detect locking order violations, and DRD supports detached threads, while also using less memory than Helgrind.
A major limitation with dynamic analysis tools is that they require tight integration with the host operating system. This is the primary reason why Valgrind is focused on POSIX threads, and does not currently work on Windows.
The Valgrind website (at http://valgrind.org/info/platforms.html) describes the issue as follows:
Basically, this means that Windows applications can be debugged with Valgrind under Linux with some difficulty, but using Windows as the OS won't happen any time soon.
Valgrind does work on OS X/macOS, starting with OS X 10.8 (Mountain Lion). Support for the latest version of macOS may be somewhat incomplete due to changes made by Apple, however. As with the Linux version of Valgrind, it's generally best to always use the latest version of Valgrind. As with gdb, use the distro's package manager, or a third-party one like Homebrew on MacOS.
Alternatives to the Valgrind tools on Windows and other platforms include the ones listed in the following table:
|
Name |
Type |
Platforms |
License |
|
Dr. Memory |
Memory checker |
All major platforms |
Open source |
|
gperftools (Google) |
Heap, CPU, and call profiler |
Linux (x86) |
Open source |
|
Visual Leak Detector |
Memory checker |
Windows (Visual Studio) |
Open Source |
|
Intel Inspector |
Memory and thread debugger |
Windows, Linux |
Proprietary |
|
PurifyPlus |
Memory, performance |
Windows, Linux |
Proprietary |
|
Parasoft Insure++ |
Memory and thread debugger |
Windows, Solaris, Linux, AIX |
Proprietary |
Memcheck is the default Valgrind tool when no other tool is specified in the parameters to its executable. Memcheck itself is a memory error detector capable of detecting the following types of issues:
Using a debugger or a simple task manager, it's practically impossible to detect issues such as the ones given in the preceding list. The value of Memcheck lies in being able to detect and fix issues early in development, which otherwise can lead to corrupted data and mysterious crashes.
Using Memcheck is fairly easy. If we take the demo application we created in Chapter 4, Thread Synchronization and Communication, we know that normally we start it using this:
$ ./dispatcher_demo
To run Valgrind with the default Memcheck tool while also logging the resulting output to a log file, we would start it as follows:
$ valgrind --log-file=dispatcher.log --read-var-info=yes --leak-check=full ./dispatcher_demo
With the preceding command, we will log Memcheck's output to a file called dispatcher.log, and also enable the full checking of memory leaks, including detailed reporting of where these leaks occur, using the available debug information in the binary. By also reading the variable information (--read-var-info=yes), we get even more detailed information on where a memory leak occurred.
One cannot log to a file, but unless it's a very simple application, the produced output from Valgrind will likely be so much that it probably won't fit into the terminal buffer. Having the output as a file allows one to use it as a reference later as well as search it using more advanced tools than what the terminal usually provides.
After running this, we can examine the produced log file's contents as follows:
==5764== Memcheck, a memory error detector
==5764== Copyright (C) 2002-2015, and GNU GPL'd, by Julian Seward et al.
==5764== Using Valgrind-3.11.0 and LibVEX; rerun with -h for copyright info
==5764== Command: ./dispatcher_demo
==5764== Parent PID: 2838
==5764==
==5764==
==5764== HEAP SUMMARY:
==5764==     in use at exit: 75,184 bytes in 71 blocks
==5764==   total heap usage: 260 allocs, 189 frees, 88,678 bytes allocated
==5764==
==5764== 80 bytes in 10 blocks are definitely lost in loss record 1 of 5
==5764==    at 0x4C2E0EF: operator new(unsigned long) (in /usr/lib/valgrind/vgpreload_memcheck-amd64-linux.so)
==5764==    by 0x402EFD: Dispatcher::init(int) (dispatcher.cpp:40)
==5764==    by 0x409300: main (main.cpp:51)
==5764==
==5764== 960 bytes in 40 blocks are definitely lost in loss record 3 of 5
==5764==    at 0x4C2E0EF: operator new(unsigned long) (in /usr/lib/valgrind/vgpreload_memcheck-amd64-linux.so)
==5764==    by 0x409338: main (main.cpp:60)
==5764==
==5764== 1,440 (1,200 direct, 240 indirect) bytes in 10 blocks are definitely lost in loss record 4 of 5
==5764==    at 0x4C2E0EF: operator new(unsigned long) (in /usr/lib/valgrind/vgpreload_memcheck-amd64-linux.so)
==5764==    by 0x402EBB: Dispatcher::init(int) (dispatcher.cpp:38)
==5764==    by 0x409300: main (main.cpp:51)
==5764==
==5764== LEAK SUMMARY:
==5764==    definitely lost: 2,240 bytes in 60 blocks
==5764==    indirectly lost: 240 bytes in 10 blocks
==5764==      possibly lost: 0 bytes in 0 blocks
==5764==    still reachable: 72,704 bytes in 1 blocks
==5764==         suppressed: 0 bytes in 0 blocks
==5764== Reachable blocks (those to which a pointer was found) are not shown.
==5764== To see them, rerun with: --leak-check=full --show-leak-kinds=all
==5764==
==5764== For counts of detected and suppressed errors, rerun with: -v
==5764== ERROR SUMMARY: 3 errors from 3 contexts (suppressed: 0 from 0)
Here we can see that we have a total of three memory leaks. Two are from allocations in the dispatcher class on lines 38 and 40:
w = new Worker;
And the other one is this:
t = new thread(&Worker::run, w);
We also see a leak from an allocation at line 60 in main.cpp:
rq = new Request();
Although there is nothing wrong with these allocations themselves, if we trace them during the application life cycle, we notice that we never call delete on these objects. If we were to fix these memory leaks, we would need to delete those Request instances once we're done with them, and clean up the Worker and thread instances in the destructor of the dispatcher class.
Since in this demo application the entire application is terminated and cleaned up by the OS at the end of its run, this is not really a concern. For an application where the same dispatcher is used in a way where new requests are being generated and added constantly, while possibly also dynamically scaling the number of worker threads, this would, however, be a real concern. In this situation, care would have to be taken that such memory leaks are resolved.
Memcheck can detect a wide range of memory-related issues. The following sections summarize these errors and their meanings.
These errors are usually reported in the following format:
Invalid read of size <bytes>
at 0x<memory address>: (location)
by 0x<memory address>: (location)
by 0x<memory address>: (location)
Address 0x<memory address> <error description>
The first line in the preceding error message tells one whether it was an invalid read or write access. The next few lines will be a back trace detailing the location (and possibly, the line in the source file) from which the invalid read or write was performed, and from where that code was called.
Finally, the last line will detail the type of illegal access that occurred, such as the reading of an already freed block of memory.
This type of error is indicative of writing into or reading from a section of memory which one should not have access to. This can happen because one accesses a wild pointer (that is, referencing a random memory address), or due to an earlier issue in the code which caused a wrong memory address to be calculated, or a memory boundary not being respected, and reading past the bounds of an array or similar.
Usually, when this type of error is reported, it should be taken highly seriously, as it indicates a fundamental issue which can lead not only to data corruption and crashes, but also to bugs which can be exploited by others.
In short, this is the issue where a variable's value is used without the said variable having been assigned a value. At this point, it's likely that these contents are just whichever bytes were in that part of RAM which just got allocated. As a result, this can lead to unpredictable behavior whenever these contents are used or accessed.
When encountered, Memcheck will throw errors similar to these:
$ valgrind --read-var-info=yes --leak-check=full ./unval
==6822== Memcheck, a memory error detector
==6822== Copyright (C) 2002-2015, and GNU GPL'd, by Julian Seward et al.
==6822== Using Valgrind-3.11.0 and LibVEX; rerun with -h for copyright info
==6822== Command: ./unval
==6822==
==6822== Conditional jump or move depends on uninitialised value(s)
==6822==    at 0x4E87B83: vfprintf (vfprintf.c:1631)
==6822==    by 0x4E8F898: printf (printf.c:33)
==6822==    by 0x400541: main (unval.cpp:6)
==6822==
==6822== Use of uninitialised value of size 8
==6822==    at 0x4E8476B: _itoa_word (_itoa.c:179)
==6822==    by 0x4E8812C: vfprintf (vfprintf.c:1631)
==6822==    by 0x4E8F898: printf (printf.c:33)
==6822==    by 0x400541: main (unval.cpp:6)
==6822==
==6822== Conditional jump or move depends on uninitialised value(s)
==6822==    at 0x4E84775: _itoa_word (_itoa.c:179)
==6822==    by 0x4E8812C: vfprintf (vfprintf.c:1631)
==6822==    by 0x4E8F898: printf (printf.c:33)
==6822==    by 0x400541: main (unval.cpp:6)
==6822==
==6822== Conditional jump or move depends on uninitialised value(s)
==6822==    at 0x4E881AF: vfprintf (vfprintf.c:1631)
==6822==    by 0x4E8F898: printf (printf.c:33)
==6822==    by 0x400541: main (unval.cpp:6)
==6822==
==6822== Conditional jump or move depends on uninitialised value(s)
==6822==    at 0x4E87C59: vfprintf (vfprintf.c:1631)
==6822==    by 0x4E8F898: printf (printf.c:33)
==6822==    by 0x400541: main (unval.cpp:6)
==6822==
==6822== Conditional jump or move depends on uninitialised value(s)
==6822==    at 0x4E8841A: vfprintf (vfprintf.c:1631)
==6822==    by 0x4E8F898: printf (printf.c:33)
==6822==    by 0x400541: main (unval.cpp:6)
==6822==
==6822== Conditional jump or move depends on uninitialised value(s)
==6822==    at 0x4E87CAB: vfprintf (vfprintf.c:1631)
==6822==    by 0x4E8F898: printf (printf.c:33)
==6822==    by 0x400541: main (unval.cpp:6)
==6822==
==6822== Conditional jump or move depends on uninitialised value(s)
==6822==    at 0x4E87CE2: vfprintf (vfprintf.c:1631)
==6822==    by 0x4E8F898: printf (printf.c:33)
==6822==    by 0x400541: main (unval.cpp:6)
==6822==
==6822==
==6822== HEAP SUMMARY:
==6822==     in use at exit: 0 bytes in 0 blocks
==6822==   total heap usage: 1 allocs, 1 frees, 1,024 bytes allocated
==6822==
==6822== All heap blocks were freed -- no leaks are possible
==6822==
==6822== For counts of detected and suppressed errors, rerun with: -v
==6822== Use --track-origins=yes to see where uninitialised values come from
==6822== ERROR SUMMARY: 8 errors from 8 contexts (suppressed: 0 from 0)
This particular series of errors was caused by the following small bit of code:
#include <cstring>
 #include <cstdio>

 int main() {
    int x;
    printf ("x = %d\n", x);
    return 0;
 }
As we can see in the preceding code, we never initialize our variable, which would be set to just any random value. If one is lucky, it'll be set to zero, or an equally (hopefully) harmless value. This code shows just how any of our uninitialized variables enter into library code.
Whether or not the use of uninitialized variables is harmful is hard to say, and depends heavily on the type of variable and the affected code. It is, however, far easier to simply assign a safe, default value than it is to hunt down and debug mysterious issues which may be caused (at random) by an uninitialized variable.
For additional information on where an uninitialized variable originates, one can pass the -track-origins=yes flag to Memcheck. This will tell it to keep more information per variable, which will make the tracking down of this type of issue much easier.
Whenever a function is called, it's possible that uninitialized values are passed as parameters, or even pointers to a buffer which is unaddressable. In either case, Memcheck will log this:
$ valgrind --read-var-info=yes --leak-check=full ./unsyscall
==6848== Memcheck, a memory error detector
==6848== Copyright (C) 2002-2015, and GNU GPL'd, by Julian Seward et al.
==6848== Using Valgrind-3.11.0 and LibVEX; rerun with -h for copyright info
==6848== Command: ./unsyscall
==6848==
==6848== Syscall param write(buf) points to uninitialised byte(s)
==6848==    at 0x4F306E0: __write_nocancel (syscall-template.S:84)
==6848==    by 0x4005EF: main (unsyscall.cpp:7)
==6848==  Address 0x5203040 is 0 bytes inside a block of size 10 alloc'd
==6848==    at 0x4C2DB8F: malloc (in /usr/lib/valgrind/vgpreload_memcheck-amd64-linux.so)
==6848==    by 0x4005C7: main (unsyscall.cpp:5)
==6848==
==6848== Syscall param exit_group(status) contains uninitialised byte(s)
==6848==    at 0x4F05B98: _Exit (_exit.c:31)
==6848==    by 0x4E73FAA: __run_exit_handlers (exit.c:97)
==6848==    by 0x4E74044: exit (exit.c:104)
==6848==    by 0x4005FC: main (unsyscall.cpp:8)
==6848==
==6848==
==6848== HEAP SUMMARY:
==6848==     in use at exit: 14 bytes in 2 blocks
==6848==   total heap usage: 2 allocs, 0 frees, 14 bytes allocated
==6848==
==6848== LEAK SUMMARY:
==6848==    definitely lost: 0 bytes in 0 blocks
==6848==    indirectly lost: 0 bytes in 0 blocks
==6848==      possibly lost: 0 bytes in 0 blocks
==6848==    still reachable: 14 bytes in 2 blocks
==6848==         suppressed: 0 bytes in 0 blocks
==6848== Reachable blocks (those to which a pointer was found) are not shown.
==6848== To see them, rerun with: --leak-check=full --show-leak-kinds=all
==6848==
==6848== For counts of detected and suppressed errors, rerun with: -v
==6848== Use --track-origins=yes to see where uninitialised values come from
==6848== ERROR SUMMARY: 2 errors from 2 contexts (suppressed: 0 from 0)
The preceding log was generated by this code:
#include <cstdlib>
 #include <unistd.h>

 int main() {
    char* arr  = (char*) malloc(10);
    int*  arr2 = (int*) malloc(sizeof(int));
    write(1, arr, 10 );
    exit(arr2[0]);
 }
Much like the general use of uninitialized values as detailed in the previous section, the passing of uninitialized, or otherwise dodgy, parameters is, at the very least, risky, and in the worst case, a source of crashes, data corruption, or worse.
An illegal free or delete is usually an attempt to repeatedly call free() or delete() on an already deallocated block of memory. While not necessarily harmful, this would be indicative of bad design, and would absolutely have to be fixed.
It can also occur when one tries to free a memory block using a pointer which does not point to the beginning of that memory block. This is one of the primary reasons why one should never perform pointer arithmetic on the original pointer one obtains from a call to malloc() or new(), but use a copy instead.
Allocation and deallocation of memory blocks should always be performed using matching functions. This means that when we allocate using C-style functions, we deallocate with the matching function from the same API. The same is true for C++-style allocation and deallocation.
Briefly, this means the following:
Mixing these up won't necessarily cause problems, but doing so is undefined behavior. The latter type of allocating and deallocating is specific to arrays. Not using delete[] for an array that was allocated with new[] likely leads to a memory leak, or worse.
This type of error indicates that the pointers passed for a source and destination memory block overlap (based on expected size). The result of this type of bug is usually a form of corruption or system crash.
For memory allocation functions, Memcheck validates whether the arguments passed to them actually make sense. One example of this would be the passing of a negative size, or if it would far exceed a reasonable allocation size: for example, an allocation request for a petabyte of memory. Most likely, these values would be the result of a faulty calculation earlier in the code.
Memcheck would report this error like in this example from the Memcheck manual:
==32233== Argument 'size' of function malloc has a fishy (possibly negative) value: -3
==32233==    at 0x4C2CFA7: malloc (vg_replace_malloc.c:298)
==32233==    by 0x400555: foo (fishy.c:15)
==32233==    by 0x400583: main (fishy.c:23)
Here it was attempted to pass the value of -3 to malloc, which obviously doesn't make a lot of sense. Since this is obviously a nonsensical operation, it's indicative of a serious bug in the code.
The most important thing to keep in mind for Memcheck's reporting of memory leaks is that a lot of reported leaks may in fact not be leaks. This is reflected in the way Memcheck reports any potential issues it finds, which is as follows:
Of the three possible report types, the Definitely lost type is the only one where it is absolutely certain that the memory block in question is no longer reachable, with no pointer or reference remaining, which makes it impossible for the application to ever free the memory.
In case of the Indirectly lost type, we did not lose the pointer to these memory blocks themselves, but, the pointer to a structure which refers to these blocks instead. This could, for example, occur when we directly lose access to the root node of a data structure (such as a red/black or binary tree). As a result, we also lose the ability to access any of the child nodes.
Finally, Possibly lost is the catch-all type where Memcheck isn't entirely certain whether there is still a reference to the memory block. This can happen where interior pointers exist, such as in the case of particular types of array allocations. It can also occur through the use of multiple inheritance, where a C++ object uses self-reference.
As mentioned earlier in the basic use section for Memcheck, it's advisable to always run Memcheck with --leak-check=full specified to get detailed information on exactly where a memory leak was found.
The purpose of Helgrind is to detect issues with synchronization implementations within a multithreaded application. It can detect wrongful use of POSIX threads, potential deadlock issues due to wrong locking order as well as data races--the reading or writing of data without thread synchronization.
We start Helgrind on our application in the following manner:
$ valgrind --tool=helgrind --read-var-info=yes --log-file=dispatcher_helgrind.log ./dispatcher_demo
Similar to running Memcheck, this will run the application and log all generated output to a log file, while explicitly using all available debugging information in the binary.
After running the application, we examine the generated log file:
==6417== Helgrind, a thread error detector
==6417== Copyright (C) 2007-2015, and GNU GPL'd, by OpenWorks LLP et al.
==6417== Using Valgrind-3.11.0 and LibVEX; rerun with -h for copyright info
==6417== Command: ./dispatcher_demo
==6417== Parent PID: 2838
==6417==
==6417== ---Thread-Announcement------------------------------------------
==6417==
==6417== Thread #1 is the program's root thread
After the initial basic information about the application and the Valgrind version, we are informed that the root thread has been created:
==6417==
==6417== ---Thread-Announcement------------------------------------------
==6417==
==6417== Thread #2 was created
==6417==    at 0x56FB7EE: clone (clone.S:74)
==6417==    by 0x53DE149: create_thread (createthread.c:102)
==6417==    by 0x53DFE83: pthread_create@@GLIBC_2.2.5 (pthread_create.c:679)
==6417==    by 0x4C34BB7: ??? (in /usr/lib/valgrind/vgpreload_helgrind-amd64-linux.so)
==6417==    by 0x4EF8DC2: std::thread::_M_start_thread(std::shared_ptr<std::thread::_Impl_base>, void (*)()) (in /usr/lib/x86_64-linux-gnu/libstdc++.so.6.0.21)
==6417==    by 0x403AD7: std::thread::thread<void (Worker::*)(), Worker*&>(void (Worker::*&&)(), Worker*&) (thread:137)
==6417==    by 0x4030E6: Dispatcher::init(int) (dispatcher.cpp:40)
==6417==    by 0x4090A0: main (main.cpp:51)
==6417==
==6417== ----------------------------------------------------------------
The first thread is created by the dispatcher and logged. Next we get the first warning:
==6417==
==6417==  Lock at 0x60F4A0 was first observed
==6417==    at 0x4C321BC: ??? (in /usr/lib/valgrind/vgpreload_helgrind-amd64-linux.so)
==6417==    by 0x401CD1: __gthread_mutex_lock(pthread_mutex_t*) (gthr-default.h:748)
==6417==    by 0x402103: std::mutex::lock() (mutex:135)
==6417==    by 0x40337E: Dispatcher::addWorker(Worker*) (dispatcher.cpp:108)
==6417==    by 0x401DF9: Worker::run() (worker.cpp:49)
==6417==    by 0x408FA4: void std::_Mem_fn_base<void (Worker::*)(), true>::operator()<, void>(Worker*) const (in /media/sf_Projects/Cerflet/dispatcher/dispatcher_demo)
==6417==    by 0x408F38: void std::_Bind_simple<std::_Mem_fn<void (Worker::*)()> (Worker*)>::_M_invoke<0ul>(std::_Index_tuple<0ul>) (functional:1531)
==6417==    by 0x408E3F: std::_Bind_simple<std::_Mem_fn<void (Worker::*)()> (Worker*)>::operator()() (functional:1520)
==6417==    by 0x408D47: std::thread::_Impl<std::_Bind_simple<std::_Mem_fn<void (Worker::*)()> (Worker*)> >::_M_run() (thread:115)
==6417==    by 0x4EF8C7F: ??? (in /usr/lib/x86_64-linux-gnu/libstdc++.so.6.0.21)
==6417==    by 0x4C34DB6: ??? (in /usr/lib/valgrind/vgpreload_helgrind-amd64-linux.so)
==6417==    by 0x53DF6B9: start_thread (pthread_create.c:333)
==6417==  Address 0x60f4a0 is 0 bytes inside data symbol "_ZN10Dispatcher12workersMutexE"
==6417==
==6417== Possible data race during write of size 1 at 0x5CD9261 by thread #1
==6417== Locks held: 1, at address 0x60F4A0
==6417==    at 0x403650: Worker::setRequest(AbstractRequest*) (worker.h:38)
==6417==    by 0x403253: Dispatcher::addRequest(AbstractRequest*) (dispatcher.cpp:70)
==6417==    by 0x409132: main (main.cpp:63)
==6417==
==6417== This conflicts with a previous read of size 1 by thread #2
==6417== Locks held: none
==6417==    at 0x401E02: Worker::run() (worker.cpp:51)
==6417==    by 0x408FA4: void std::_Mem_fn_base<void (Worker::*)(), true>::operator()<, void>(Worker*) const (in /media/sf_Projects/Cerflet/dispatcher/dispatcher_demo)
==6417==    by 0x408F38: void std::_Bind_simple<std::_Mem_fn<void (Worker::*)()> (Worker*)>::_M_invoke<0ul>(std::_Index_tuple<0ul>) (functional:1531)
==6417==    by 0x408E3F: std::_Bind_simple<std::_Mem_fn<void (Worker::*)()> (Worker*)>::operator()() (functional:1520)
==6417==    by 0x408D47: std::thread::_Impl<std::_Bind_simple<std::_Mem_fn<void (Worker::*)()> (Worker*)> >::_M_run() (thread:115)
==6417==    by 0x4EF8C7F: ??? (in /usr/lib/x86_64-linux-gnu/libstdc++.so.6.0.21)
==6417==    by 0x4C34DB6: ??? (in /usr/lib/valgrind/vgpreload_helgrind-amd64-linux.so)
==6417==    by 0x53DF6B9: start_thread (pthread_create.c:333)
==6417==  Address 0x5cd9261 is 97 bytes inside a block of size 104 alloc'd
==6417==    at 0x4C2F50F: operator new(unsigned long) (in /usr/lib/valgrind/vgpreload_helgrind-amd64-linux.so)
==6417==    by 0x40308F: Dispatcher::init(int) (dispatcher.cpp:38)
==6417==    by 0x4090A0: main (main.cpp:51)
==6417==  Block was alloc'd by thread #1
==6417==
==6417== ----------------------------------------------------------------
In the preceding warning, we are being told by Helgrind about a conflicting read of size 1 between thread IDs 1 and 2. Since the C++11 threading API uses a fair amount of templates, the trace can be somewhat hard to read. The essence is found in these lines:
==6417==    at 0x403650: Worker::setRequest(AbstractRequest*) (worker.h:38)
==6417==    at 0x401E02: Worker::run() (worker.cpp:51)
This corresponds to the following lines of code:
void setRequest(AbstractRequest* request) { this->request = request; ready = true; }
while (!ready && running) {
The only variable of size 1 in these lines of code is the Boolean variable ready. Since this is a Boolean variable, we know that it is an atomic operation (see Chapter 8, Atomic Operations - Working with the Hardware, for details). As a result, we can ignore this warning.
Next, we get another warning for this thread:
==6417== Possible data race during write of size 1 at 0x5CD9260 by thread #1
==6417== Locks held: none
==6417==    at 0x40362C: Worker::stop() (worker.h:37)
==6417==    by 0x403184: Dispatcher::stop() (dispatcher.cpp:50)
==6417==    by 0x409163: main (main.cpp:70)
==6417==
==6417== This conflicts with a previous read of size 1 by thread #2 ==6417== Locks held: none
==6417==    at 0x401E0E: Worker::run() (worker.cpp:51)
==6417==    by 0x408FA4: void std::_Mem_fn_base<void (Worker::*)(), true>::operator()<, void>(Worker*) const (in /media/sf_Projects/Cerflet/dispatcher/dispatcher_demo)
==6417==    by 0x408F38: void std::_Bind_simple<std::_Mem_fn<void (Worker::*)()> (Worker*)>::_M_invoke<0ul>(std::_Index_tuple<0ul>) (functional:1531)
==6417==    by 0x408E3F: std::_Bind_simple<std::_Mem_fn<void (Worker::*)()> (Worker*)>::operator()() (functional:1520)
==6417==    by 0x408D47: std::thread::_Impl<std::_Bind_simple<std::_Mem_fn<void (Worker::*)()> (Worker*)> >::_M_run() (thread:115)
==6417==    by 0x4EF8C7F: ??? (in /usr/lib/x86_64-linux-gnu/libstdc++.so.6.0.21)
==6417==    by 0x4C34DB6: ??? (in /usr/lib/valgrind/vgpreload_helgrind-amd64-linux.so)
==6417==    by 0x53DF6B9: start_thread (pthread_create.c:333)
==6417==  Address 0x5cd9260 is 96 bytes inside a block of size 104 alloc'd
==6417==    at 0x4C2F50F: operator new(unsigned long) (in /usr/lib/valgrind/vgpreload_helgrind-amd64-linux.so)
==6417==    by 0x40308F: Dispatcher::init(int) (dispatcher.cpp:38)
==6417==    by 0x4090A0: main (main.cpp:51)
==6417==  Block was alloc'd by thread #1
Similar to the first warning, this also refers to a Boolean variable--here, the running variable in the Worker instance. Since this is also an atomic operation, we can again ignore this warning.
Following this warning, we get a repeat of these warnings for other threads. We also see this warning repeated a number of times:
==6417==  Lock at 0x60F540 was first observed
==6417==    at 0x4C321BC: ??? (in /usr/lib/valgrind/vgpreload_helgrind-amd64-linux.so)
==6417==    by 0x401CD1: __gthread_mutex_lock(pthread_mutex_t*) (gthr-default.h:748)
==6417==    by 0x402103: std::mutex::lock() (mutex:135)
==6417==    by 0x409044: logFnc(std::__cxx11::basic_string<char, std::char_traits<char>, std::allocator<char> >) (main.cpp:40)
==6417==    by 0x40283E: Request::process() (request.cpp:19)
==6417==    by 0x401DCE: Worker::run() (worker.cpp:44)
==6417==    by 0x408FA4: void std::_Mem_fn_base<void (Worker::*)(), true>::operator()<, void>(Worker*) const (in /media/sf_Projects/Cerflet/dispatcher/dispatcher_demo)
==6417==    by 0x408F38: void std::_Bind_simple<std::_Mem_fn<void (Worker::*)()> (Worker*)>::_M_invoke<0ul>(std::_Index_tuple<0ul>) (functional:1531)
==6417==    by 0x408E3F: std::_Bind_simple<std::_Mem_fn<void (Worker::*)()> (Worker*)>::operator()() (functional:1520)
==6417==    by 0x408D47: std::thread::_Impl<std::_Bind_simple<std::_Mem_fn<void (Worker::*)()> (Worker*)> >::_M_run() (thread:115)
==6417==    by 0x4EF8C7F: ??? (in /usr/lib/x86_64-linux-gnu/libstdc++.so.6.0.21)
==6417==    by 0x4C34DB6: ??? (in /usr/lib/valgrind/vgpreload_helgrind-amd64-linux.so)
==6417==  Address 0x60f540 is 0 bytes inside data symbol "logMutex"
==6417==
==6417== Possible data race during read of size 8 at 0x60F238 by thread #1
==6417== Locks held: none
==6417==    at 0x4F4ED6F: std::basic_ostream<char, std::char_traits<char> >& std::__ostream_insert<char, std::char_traits<char> >(std::basic_ostream<char, std::char_traits<char> >&, char const*, long) (in /usr/lib/x86_64-linux-gnu/libstdc++.so.6.0.21)
==6417==    by 0x4F4F236: std::basic_ostream<char, std::char_traits<char> >& std::operator<< <std::char_traits<char> >(std::basic_ostream<char, std::char_traits<char> >&, char const*) (in /usr/lib/x86_64-linux-gnu/libstdc++.so.6.0.21)
==6417==    by 0x403199: Dispatcher::stop() (dispatcher.cpp:53)
==6417==    by 0x409163: main (main.cpp:70)
==6417==
==6417== This conflicts with a previous write of size 8 by thread #7
==6417== Locks held: 1, at address 0x60F540
==6417==    at 0x4F4EE25: std::basic_ostream<char, std::char_traits<char> >& std::__ostream_insert<char, std::char_traits<char> >(std::basic_ostream<char, std::char_traits<char> >&, char const*, long) (in /usr/lib/x86_64-linux-gnu/libstdc++.so.6.0.21)
==6417==    by 0x409055: logFnc(std::__cxx11::basic_string<char, std::char_traits<char>, std::allocator<char> >) (main.cpp:41)
==6417==    by 0x402916: Request::finish() (request.cpp:27)
==6417==    by 0x401DED: Worker::run() (worker.cpp:45)
==6417==    by 0x408FA4: void std::_Mem_fn_base<void (Worker::*)(), true>::operator()<, void>(Worker*) const (in /media/sf_Projects/Cerflet/dispatcher/dispatcher_demo)
==6417==    by 0x408F38: void std::_Bind_simple<std::_Mem_fn<void (Worker::*)()> (Worker*)>::_M_invoke<0ul>(std::_Index_tuple<0ul>) (functional:1531)
==6417==    by 0x408E3F: std::_Bind_simple<std::_Mem_fn<void (Worker::*)()> (Worker*)>::operator()() (functional:1520)
==6417==    by 0x408D47: std::thread::_Impl<std::_Bind_simple<std::_Mem_fn<void (Worker::*)()> (Worker*)> >::_M_run() (thread:115)
==6417==  Address 0x60f238 is 24 bytes inside data symbol "_ZSt4cout@@GLIBCXX_3.4"
This warning is triggered by not having the use of standard output synchronized between threads. Even though the logging function of this demo application uses a mutex to synchronize the text logged by worker threads, we also write to standard output in an unsafe manner in a few locations.
This is relatively easy to fix by using a central, thread-safe logging function. Even though it's unlikely to cause any stability issues, it will very likely cause any logging output to end up as a garbled, unusable mess.
Helgrind detects a large number of errors involving the pthreads API, as summarized by its manual, and listed next:
In addition to this, if Helgrind itself does not detect an error, but the pthreads library itself returns an error for each function which Helgrind intercepts, an error is reported by Helgrind as well.
Lock order detection uses the assumption that once a series of locks have been accessed in a particular order, that is the order in which they will always be used. Imagine, for example, a resource that's guarded by two locks. As we saw with the dispatcher demonstration from Chapter 4, Thread Synchronization and Communication, we use two mutexes in its Dispatcher class, one to manage access to the worker threads, and one to the request instances.
In the correct implementation of that code, we always make sure to unlock one mutex before we attempt to obtain the other, as there's a chance that another thread already has obtained access to that second mutex, and attempts to obtain access to the first, thus creating a deadlock situation.
While useful, it is important to realize that there are some areas where this detection algorithm is, as of yet, imperfect. This is mostly apparent with the use of, for example, condition variables, which naturally uses a locking order that tends to get reported by Helgrind as wrong.
The take-away message here is that one has to examine these log messages and judge their merit, but unlike straight misuse of the multithreading API, whether or not the reported issue is a false-positive or not is far less clear-cut.
In essence, a data race is when two more threads attempt to read or write to the same resource without any synchronization mechanism in place. Here, only a concurrent read and write, or two simultaneous writes, are actually harmful; therefore, only these two types of access get reported.
In an earlier section on basic Helgrind usage, we saw some examples of this type of error in the log. There it concerned the simultaneous writing and reading of a variable. As we also covered in that section, Helgrind does not concern itself with whether a write or read was atomic, but merely reports a potential issue.
Much like with lock order problems, this again means that one has to judge each data race report on its merit, as many will likely be false-positives.
DRD is very similar to Helgrind, in that it also detects issues with threading and synchronization in the application. The main ways in which DRD differs from Helgrind are the following:
Generally, one wants to run both DRD and Helgrind to compare the output from both with each other. Since a lot of potential issues are highly non-deterministic, using both tools generally helps to pinpoint the most serious issues.
Starting DRD is very similar to starting the other tools--we just have to specify our desired tool like this:
$ valgrind --tool=drd --log-file=dispatcher_drd.log --read-var-info=yes ./dispatcher_demo
After the application finishes, we examine the generated log file's contents.
==6576== drd, a thread error detector
==6576== Copyright (C) 2006-2015, and GNU GPL'd, by Bart Van Assche.
==6576== Using Valgrind-3.11.0 and LibVEX; rerun with -h for copyright info
==6576== Command: ./dispatcher_demo
==6576== Parent PID: 2838
==6576==
==6576== Conflicting store by thread 1 at 0x05ce51b1 size 1
==6576==    at 0x403650: Worker::setRequest(AbstractRequest*) (worker.h:38)
==6576==    by 0x403253: Dispatcher::addRequest(AbstractRequest*) (dispatcher.cpp:70)
==6576==    by 0x409132: main (main.cpp:63)
==6576== Address 0x5ce51b1 is at offset 97 from 0x5ce5150. Allocation context:
==6576==    at 0x4C3150F: operator new(unsigned long) (in /usr/lib/valgrind/vgpreload_drd-amd64-linux.so)
==6576==    by 0x40308F: Dispatcher::init(int) (dispatcher.cpp:38)
==6576==    by 0x4090A0: main (main.cpp:51)
==6576== Other segment start (thread 2)
==6576==    at 0x4C3818C: pthread_mutex_unlock (in /usr/lib/valgrind/vgpreload_drd-amd64-linux.so)
==6576==    by 0x401D00: __gthread_mutex_unlock(pthread_mutex_t*) (gthr-default.h:778)
==6576==    by 0x402131: std::mutex::unlock() (mutex:153)
==6576==    by 0x403399: Dispatcher::addWorker(Worker*) (dispatcher.cpp:110)
==6576==    by 0x401DF9: Worker::run() (worker.cpp:49)
==6576==    by 0x408FA4: void std::_Mem_fn_base<void (Worker::*)(), true>::operator()<, void>(Worker*) const (in /media/sf_Projects/Cerflet/dispatcher/dispatcher_demo)
==6576==    by 0x408F38: void std::_Bind_simple<std::_Mem_fn<void (Worker::*)()> (Worker*)>::_M_invoke<0ul>(std::_Index_tuple<0ul>) (functional:1531)
==6576==    by 0x408E3F: std::_Bind_simple<std::_Mem_fn<void (Worker::*)()> (Worker*)>::operator()() (functional:1520)
==6576==    by 0x408D47: std::thread::_Impl<std::_Bind_simple<std::_Mem_fn<void (Worker::*)()> (Worker*)> >::_M_run() (thread:115)
==6576==    by 0x4F04C7F: ??? (in /usr/lib/x86_64-linux-gnu/libstdc++.so.6.0.21)
==6576==    by 0x4C3458B: ??? (in /usr/lib/valgrind/vgpreload_drd-amd64-linux.so)
==6576==    by 0x53EB6B9: start_thread (pthread_create.c:333)
==6576== Other segment end (thread 2)
==6576==    at 0x4C3725B: pthread_mutex_lock (in /usr/lib/valgrind/vgpreload_drd-amd64-linux.so)
==6576==    by 0x401CD1: __gthread_mutex_lock(pthread_mutex_t*) (gthr-default.h:748)
==6576==    by 0x402103: std::mutex::lock() (mutex:135)
==6576==    by 0x4023F8: std::unique_lock<std::mutex>::lock() (mutex:485)
==6576==    by 0x40219D: std::unique_lock<std::mutex>::unique_lock(std::mutex&) (mutex:415)
==6576==    by 0x401E33: Worker::run() (worker.cpp:52)
==6576==    by 0x408FA4: void std::_Mem_fn_base<void (Worker::*)(), true>::operator()<, void>(Worker*) const (in /media/sf_Projects/Cerflet/dispatcher/dispatcher_demo)
==6576==    by 0x408F38: void std::_Bind_simple<std::_Mem_fn<void (Worker::*)()> (Worker*)>::_M_invoke<0ul>(std::_Index_tuple<0ul>) (functional:1531)
==6576==    by 0x408E3F: std::_Bind_simple<std::_Mem_fn<void (Worker::*)()> (Worker*)>::operator()() (functional:1520)
==6576==    by 0x408D47: std::thread::_Impl<std::_Bind_simple<std::_Mem_fn<void (Worker::*)()> (Worker*)> >::_M_run() (thread:115)
==6576==    by 0x4F04C7F: ??? (in /usr/lib/x86_64-linux-gnu/libstdc++.so.6.0.21)
==6576==    by 0x4C3458B: ??? (in /usr/lib/valgrind/vgpreload_drd-amd64-linux.so)
The preceding summary basically repeats what we saw with the Helgrind log. We see the same data race report (conflicting store), which we can safely ignore due to atomics. For this particular code at least, the use of DRD did not add anything we didn't already know from using Helgrind.
Regardless, it's always a good idea to use both tools just in case one tools spots something which the other didn't.
DRD will detect the following errors:
For the third point, this list of errors detected by DRD, according to its manual, is very similar to that of Helgrind:
As mentioned earlier, helpful here is the fact that DRD also supports detached threads. Whether locking order checks are important depends on one's application.
The DRD manual contains this section on C++11 threads support.
If you want to use the c++11 class std::thread you will need to do the following to annotate the std::shared_ptr<> objects used in the implementation of that class:
    #include <valgrind/drd.h>
    #define _GLIBCXX_SYNCHRONIZATION_HAPPENS_BEFORE(addr)
    ANNOTATE_HAPPENS_BEFORE(addr)
    #define _GLIBCXX_SYNCHRONIZATION_HAPPENS_AFTER(addr)
    ANNOTATE_HAPPENS_AFTER(addr)
One might see a lot of false positives when using DRD with an application that uses the C++11 threads API, which would be fixed by the preceding fix.
However, when using GCC 5.4 and Valgrind 3.11 (possibly, using older versions too) this issue does not seem to be present any more. It is, however, something to keep in mind when one suddenly sees a lot of false positives in one's DRD output while using the C++11 threads API.
In this chapter, we took a look at how to approach the debugging of multithreaded applications. We explored the basics of using a debugger in a multithreaded context. Next, we saw how to use three tools in the Valgrind framework, which can assist us in tracking down multithreading and other crucial issues.
At this point, we can take applications written using the information in the preceding chapters and analyze them for any issues which should be fixed including memory leaks and improper use of synchronization mechanisms.
In the next chapter, we will take all that we have learned, and look at some best practices when it comes to multithreaded programming and developing in general.
As with most things, it's best to avoid making mistakes rather than correcting them afterwards. This chapter looks at a number of common mistakes and design issues with multithreaded applications, and shows ways to avoid the common - and less common - issues.
Topics in this chapter include:
In the preceding chapters, we have seen a variety of potential issues which can occur when writing multithreaded code. These range from the obvious ones, such as two threads not being able to write to the same location at the same time, to the more subtle, such as incorrect usage of a mutex.
There are also many issues with elements which aren't directly part of multithreaded code, yet which can nevertheless cause seemingly random crashes and other frustrating issues. One example of this is static initialization of variables. In the following sections, we'll be looking at all of these issues and many more, as well as ways to prevent ever having to deal with them.
As with many things in life, they are interesting experiences, but you generally do not care to repeat them.
A deadlock is described pretty succinctly by its name already. It occurs when two or more processes attempt to gain access to a resource which the other is holding, while that other thread is simultaneously waiting to gain access to a resource which it is holding.
For example:
In this situation, we assume that the thread will be able to gain access to each resource at some point, while the opposite is true, thanks to each thread holding on to the resource which the other thread needs.
Visualized, this deadlock process would look like this:

This makes it clear that two basic rules when it comes to preventing deadlocks are:
We saw a real-life example of this in Chapter 4, Thread Synchronization and Communication, when we looked at the dispatcher demonstration code. This code involves two mutexes, to safe-guard access to two data structures:
void Dispatcher::addRequest(AbstractRequest* request) {
    workersMutex.lock();
    if (!workers.empty()) {
          Worker* worker = workers.front();
          worker->setRequest(request);
          condition_variable* cv;
          mutex* mtx;
          worker->getCondition(cv);
          worker->getMutex(mtx);
          unique_lock<mutex> lock(*mtx);
          cv->notify_one();
          workers.pop();
          workersMutex.unlock();
    }
    else {
          workersMutex.unlock();
          requestsMutex.lock();
          requests.push(request);
          requestsMutex.unlock();
    }
 }
The mutexes here are the workersMutex and requestsMutex variables. We can clearly see how at no point do we hold onto a mutex before trying to obtain access to the other one. We explicitly lock the workersMutex at the beginning of the method, so that we can safely check whether the workers data structure is empty or not.
If it's not empty, we hand the new request to a worker. Then, as we are done with the workers, data structure, we release the mutex. At this point, we retain zero mutexes. Nothing too complex here, as we just use a single mutex.
The interesting thing is in the else statement, for when there is no waiting worker and we need to obtain the second mutex. As we enter this scope, we retain one mutex. We could just attempt to obtain the requestsMutex and assume that it will work, yet this may deadlock, for this simple reason:
bool Dispatcher::addWorker(Worker* worker) {
    bool wait = true;
    requestsMutex.lock();
    if (!requests.empty()) {
          AbstractRequest* request = requests.front();
          worker->setRequest(request);
          requests.pop();
          wait = false;
          requestsMutex.unlock();
    }
    else {
          requestsMutex.unlock();
          workersMutex.lock();
          workers.push(worker);
          workersMutex.unlock();
    }
          return wait;
 }
The accompanying function to the earlier preceding function we see also uses these two mutexes. Worse, this function runs in a separate thread. As a result, when the first function holds the workersMutex as it tries to obtain the requestsMutex, with this second function simultaneously holding the latter, while trying to obtain the former, we hit a deadlock.
In the functions, as we see them here, however, both rules have been implemented successfully; we never hold more than one lock at a time, and we release any locks we hold as soon as we can. This can be seen in both else cases, where as we enter them, we first release any locks we do not need any more.
As in either case, we do not need to check respectively, the workers or requests data structures any more; we can release the relevant lock before we do anything else. This results in the following visualization:
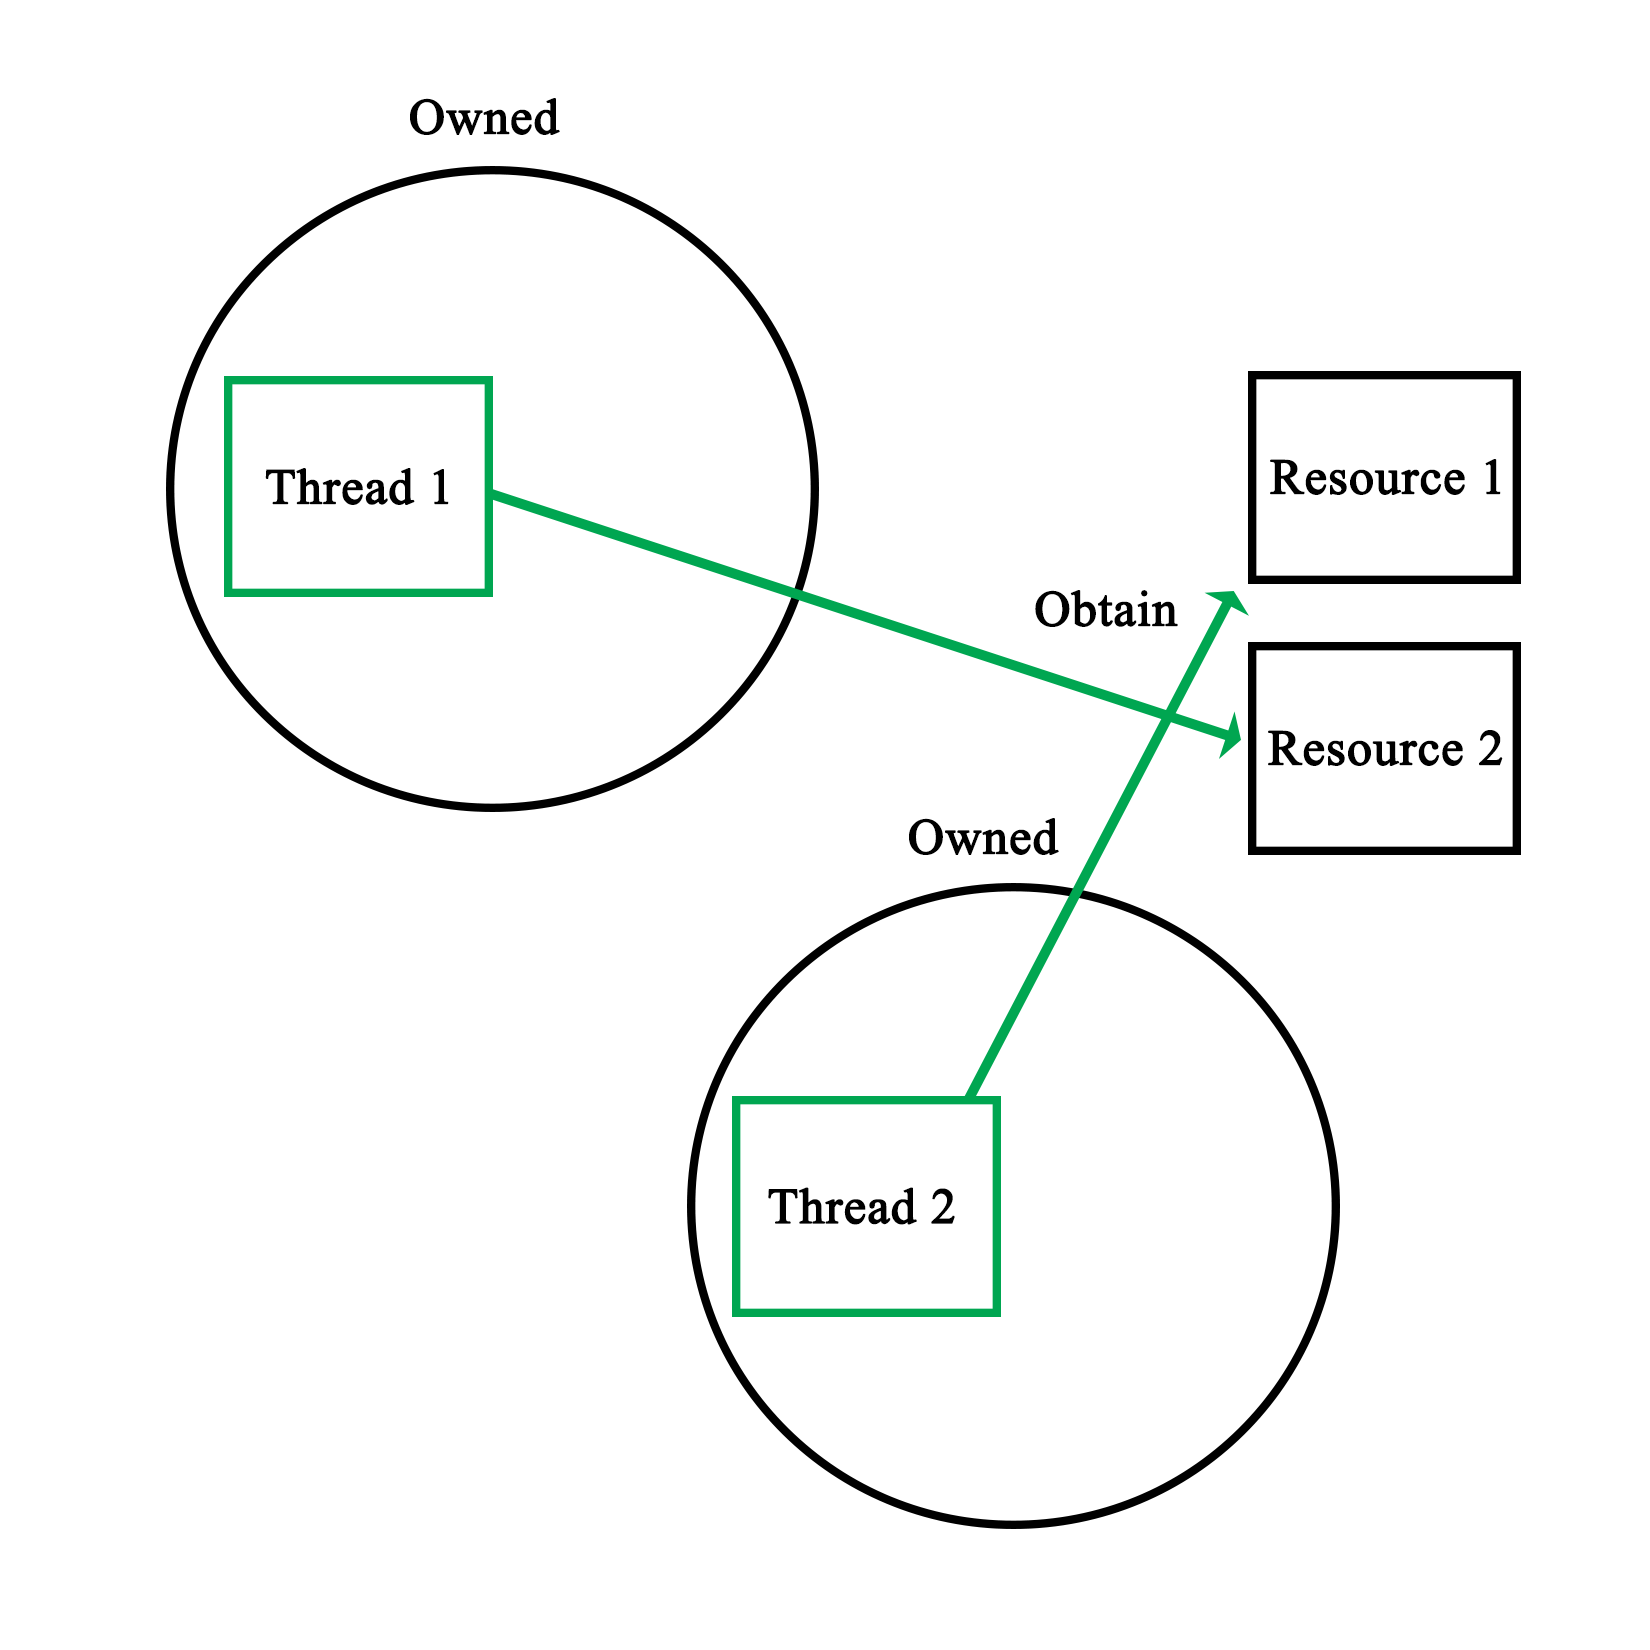
It is of course possible that we may need to use data contained in two or more data structures or variables; data which is used by other threads simultaneously. It may be difficult to ensure that there is no chance of a deadlock in the resulting code.
Here, one may want to consider using temporary variables or similar. By locking the mutex, copying the relevant data, and immediately releasing the lock, there is no chance of deadlock with that mutex. Even if one has to write back results to the data structure, this can be done in a separate action.
This adds two more rules in preventing deadlocks:
A data race, also known as a race condition, occurs when two or more threads attempt to write to the same shared memory simultaneously. As a result, the state of the shared memory during and at the end of the sequence of instructions executed by each thread is by definition, non-deterministic.
As we saw in Chapter 6, Debugging Multithreaded Code, data races are reported quite often by tools used to debug multi-threaded applications. For example:
    ==6984== Possible data race during write of size 1 at 0x5CD9260 by thread #1
 ==6984== Locks held: none
 ==6984==    at 0x40362C: Worker::stop() (worker.h:37)
 ==6984==    by 0x403184: Dispatcher::stop() (dispatcher.cpp:50)
 ==6984==    by 0x409163: main (main.cpp:70)
 ==6984==
 ==6984== This conflicts with a previous read of size 1 by thread #2
 ==6984== Locks held: none
 ==6984==    at 0x401E0E: Worker::run() (worker.cpp:51)
 ==6984==    by 0x408FA4: void std::_Mem_fn_base<void (Worker::*)(), true>::operator()<, void>(Worker*) const (in /media/sf_Projects/Cerflet/dispatcher/dispatcher_demo)
 ==6984==    by 0x408F38: void std::_Bind_simple<std::_Mem_fn<void (Worker::*)()> (Worker*)>::_M_invoke<0ul>(std::_Index_tuple<0ul>) (functional:1531)
 ==6984==    by 0x408E3F: std::_Bind_simple<std::_Mem_fn<void (Worker::*)()> (Worker*)>::operator()() (functional:1520)
 ==6984==    by 0x408D47: std::thread::_Impl<std::_Bind_simple<std::_Mem_fn<void (Worker::*)()> (Worker*)> >::_M_run() (thread:115)
 ==6984==    by 0x4EF8C7F: ??? (in /usr/lib/x86_64-linux-gnu/libstdc++.so.6.0.21)
 ==6984==    by 0x4C34DB6: ??? (in /usr/lib/valgrind/vgpreload_helgrind-amd64-linux.so)
 ==6984==    by 0x53DF6B9: start_thread (pthread_create.c:333)
 ==6984==  Address 0x5cd9260 is 96 bytes inside a block of size 104 alloc'd
 ==6984==    at 0x4C2F50F: operator new(unsigned long) (in /usr/lib/valgrind/vgpreload_helgrind-amd64-linux.so)
 ==6984==    by 0x40308F: Dispatcher::init(int) (dispatcher.cpp:38)
 ==6984==    by 0x4090A0: main (main.cpp:51)
 ==6984==  Block was alloc'd by thread #1
The code which generated the preceding warning was the following:
bool Dispatcher::stop() {
    for (int i = 0; i < allWorkers.size(); ++i) {
          allWorkers[i]->stop();
    }
          cout << "Stopped workers.\n";
          for (int j = 0; j < threads.size(); ++j) {
          threads[j]->join();
                      cout << "Joined threads.\n";
    }
 }
Consider this code in the Worker instance:
void stop() { running = false; }
We also have:
void Worker::run() {
    while (running) {
          if (ready) {
                ready = false;
                request->process();
                request->finish();
          }
                      if (Dispatcher::addWorker(this)) {
                while (!ready && running) {
                      unique_lock<mutex> ulock(mtx);
                      if (cv.wait_for(ulock, chrono::seconds(1)) == cv_status::timeout) {
                      }
                }
          }
    }
 }
Here, running is a Boolean variable that is being set to false (writing to it from one thread), signaling the worker thread that it should terminate its waiting loop, where reading the Boolean variable is done from a different process, the main thread versus the worker thread:
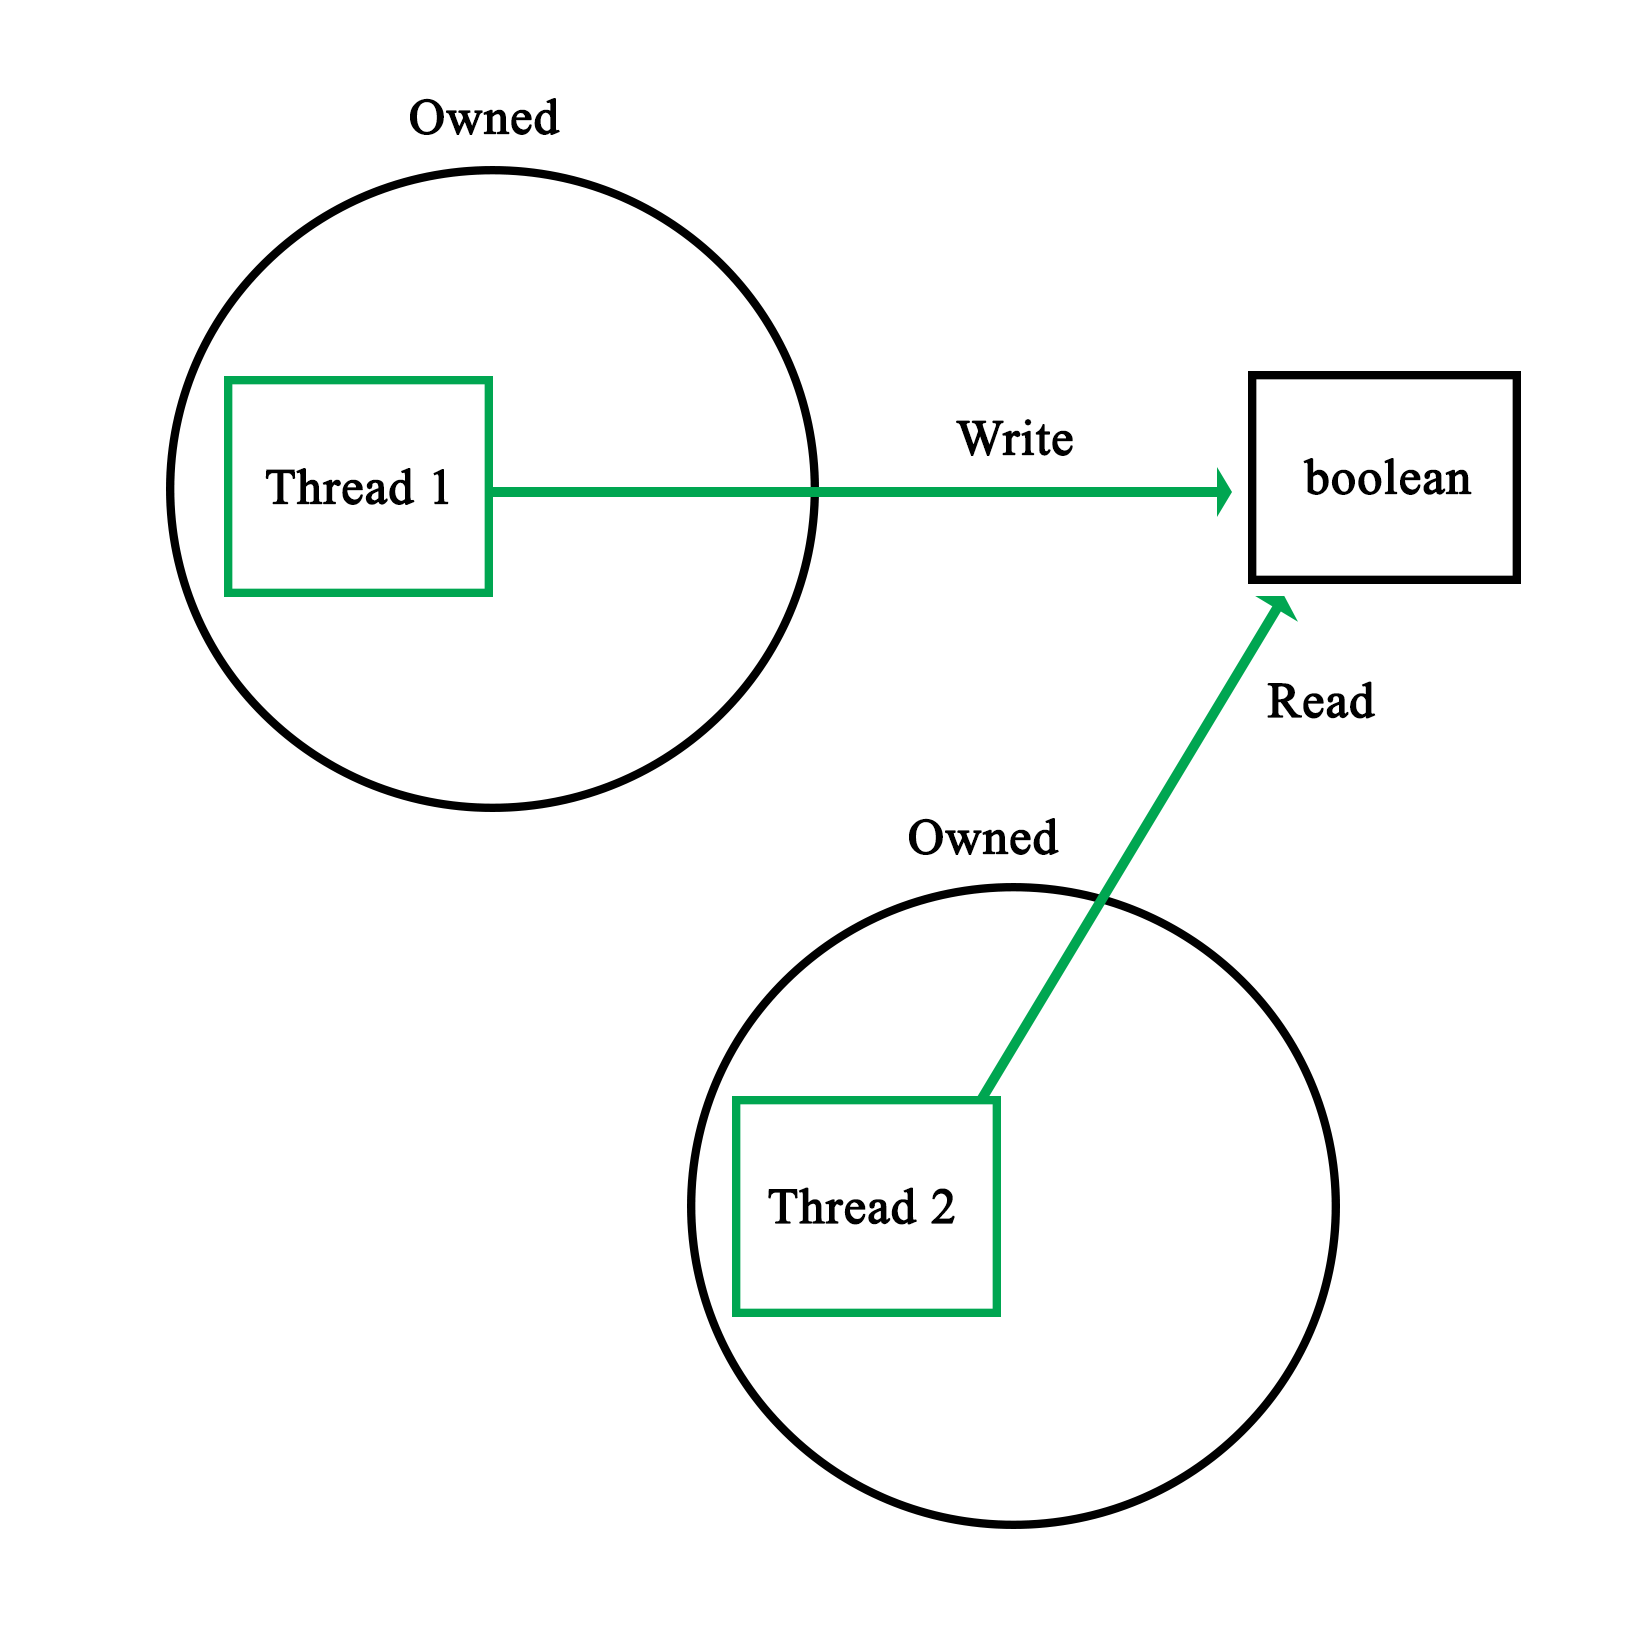
This particular example's warning was due to a Boolean variable being simultaneously written and read. Naturally, the reason why this specific situation is safe has to do with atomics, as explained in detail in Chapter 8, Atomic Operations - Working with the Hardware.
The reason why even an operation like this is potentially risky is because the reading operation may occur while the variable is still in the process of being updated. In the case of, for example, a 32-bit integer, depending on the hardware architecture, updating this variable might be done in one operation, or multiple. In the latter case, the reading operation might read an intermediate value with unpredictable results:
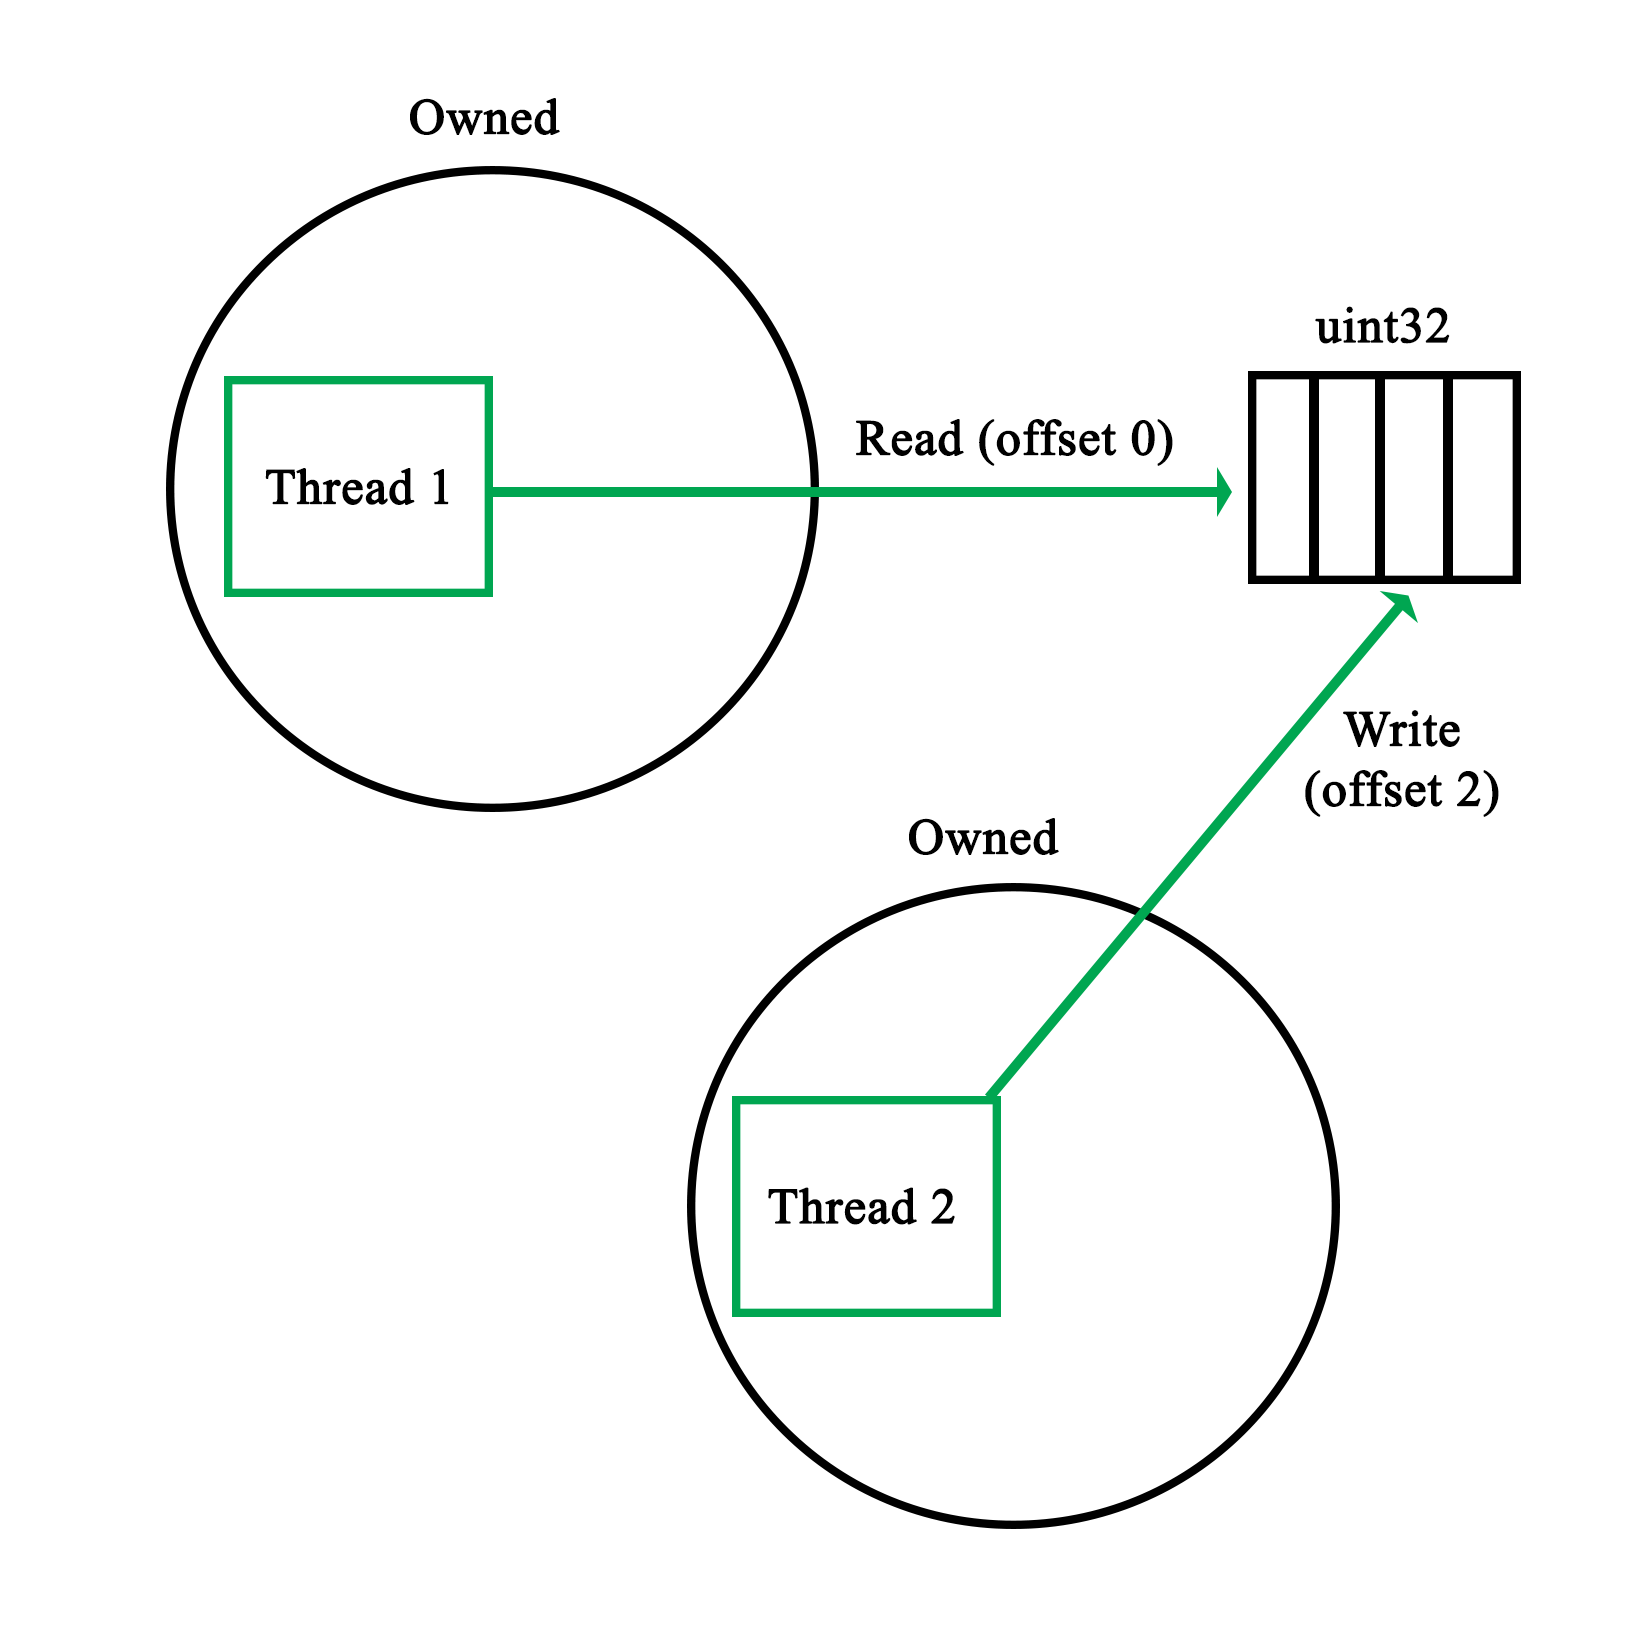
A more comical situation occurs when multiple threads write to a standard with out using, for example, cout. As this stream is not thread-safe, the resulting output stream will contain bits and pieces of the input streams, from whenever either of the threads got a chance to write:
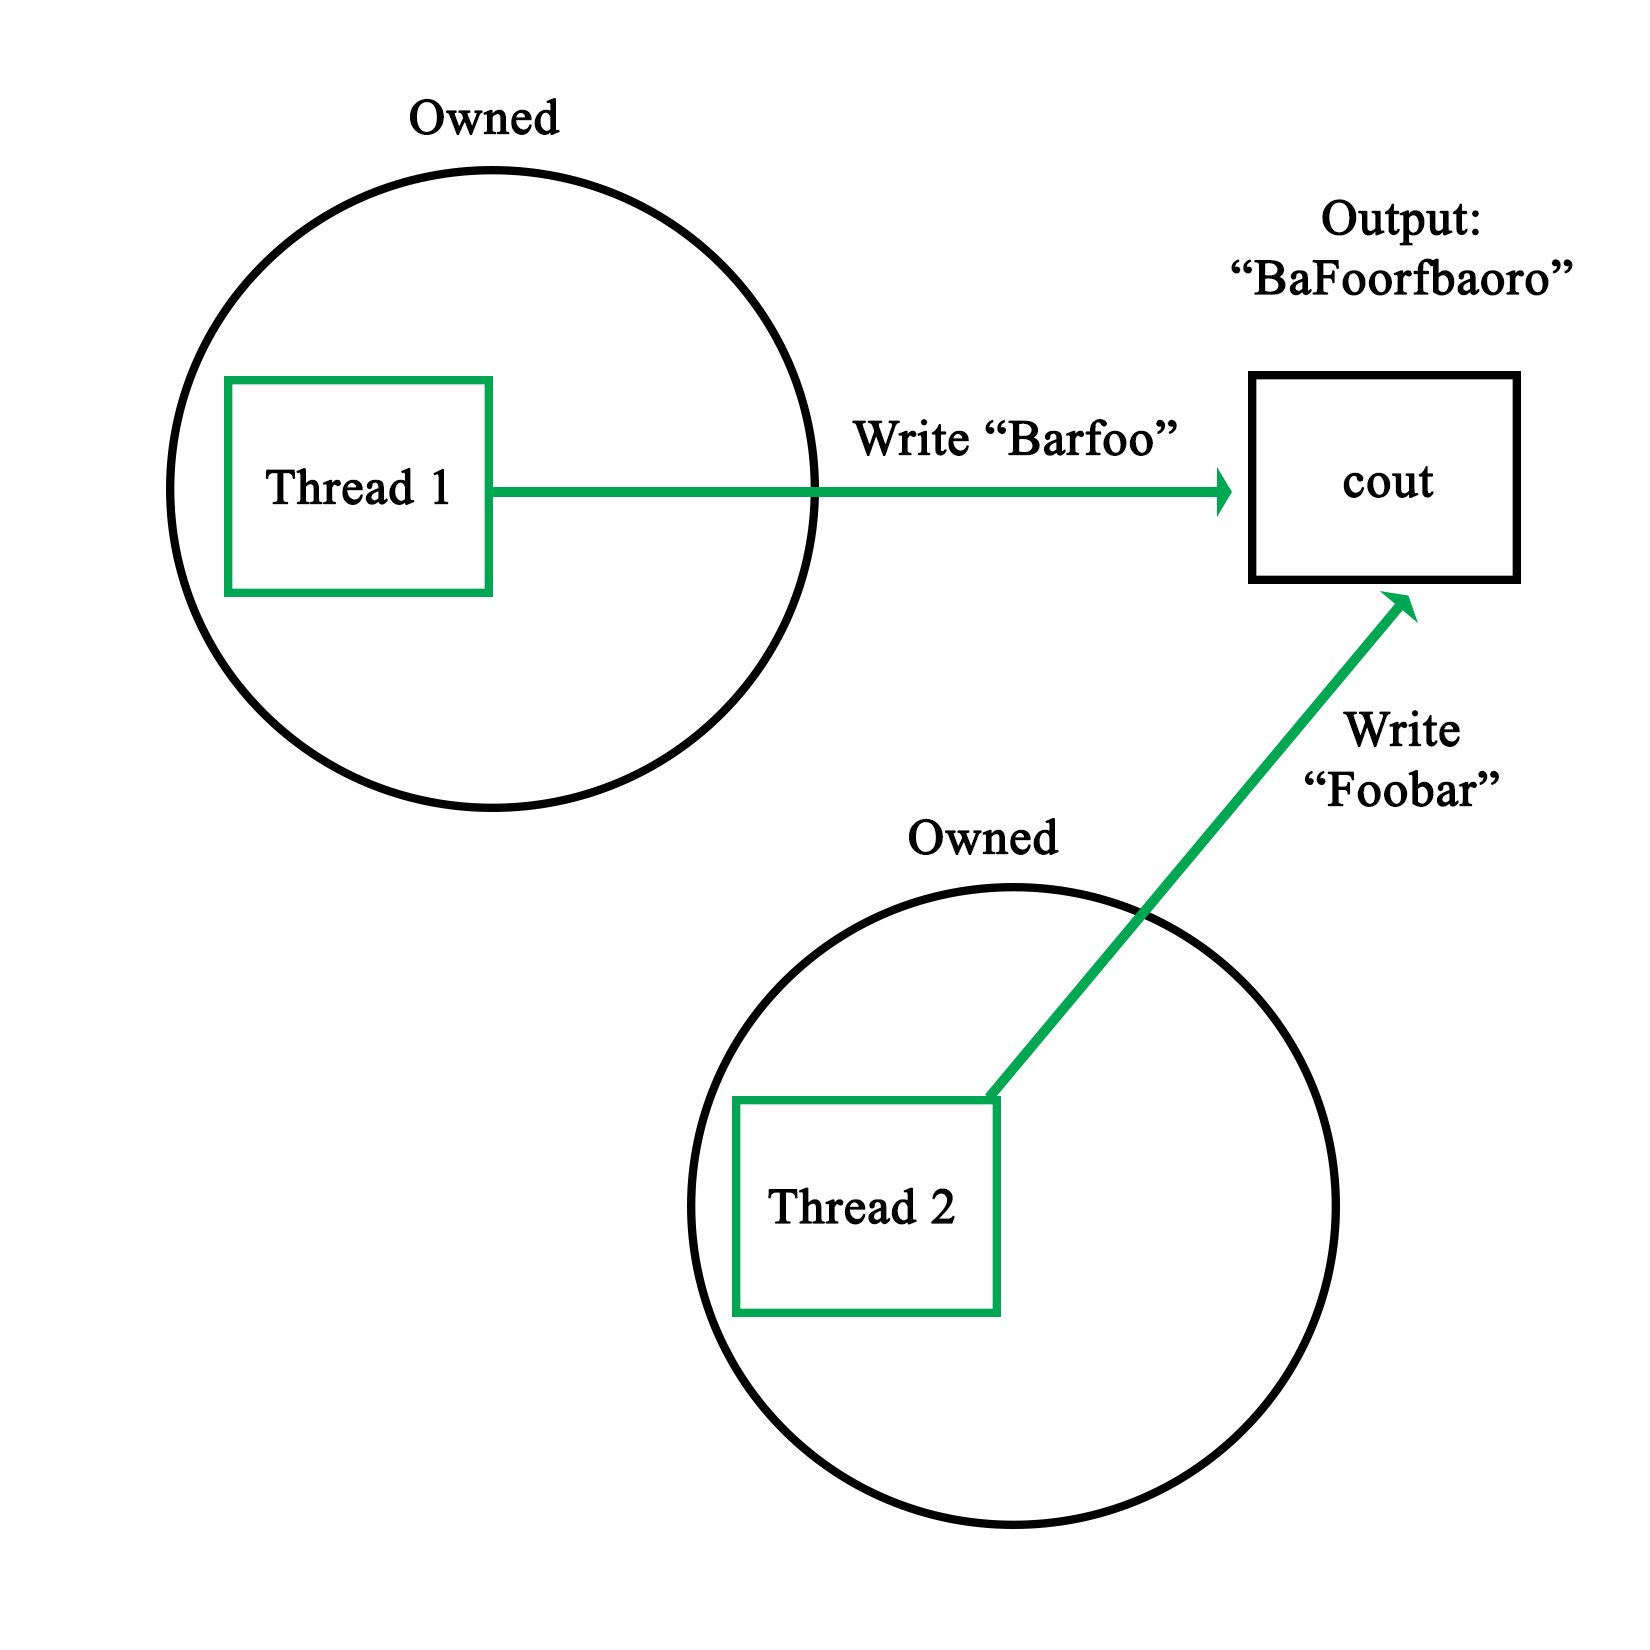
The basic rules to prevent data races thus are:
This essentially means that any write or read has to be thread-safe. If one writes to shared memory, no other thread should be able to write to it at the same time. Similarly, when we read from a shared resource, we need to ensure that, at most, only other threads are also reading the shared resource.
This level of mutual exclusion is naturally accomplished by mutexes as we have seen in the preceding chapters, with a refinement offered in read-write locks, which allows for simultaneous readers while having writes as fully mutually exclusive events.
Of course, there are also gotchas with mutexes, as we will see in the following section.
Mutexes form the basis of practically all forms of mutual exclusion APIs. At their core, they seem extremely simple, only one thread can own a mutex, with other threads neatly waiting in a queue until they can obtain the lock on the mutex.
One might even picture this process as follows:
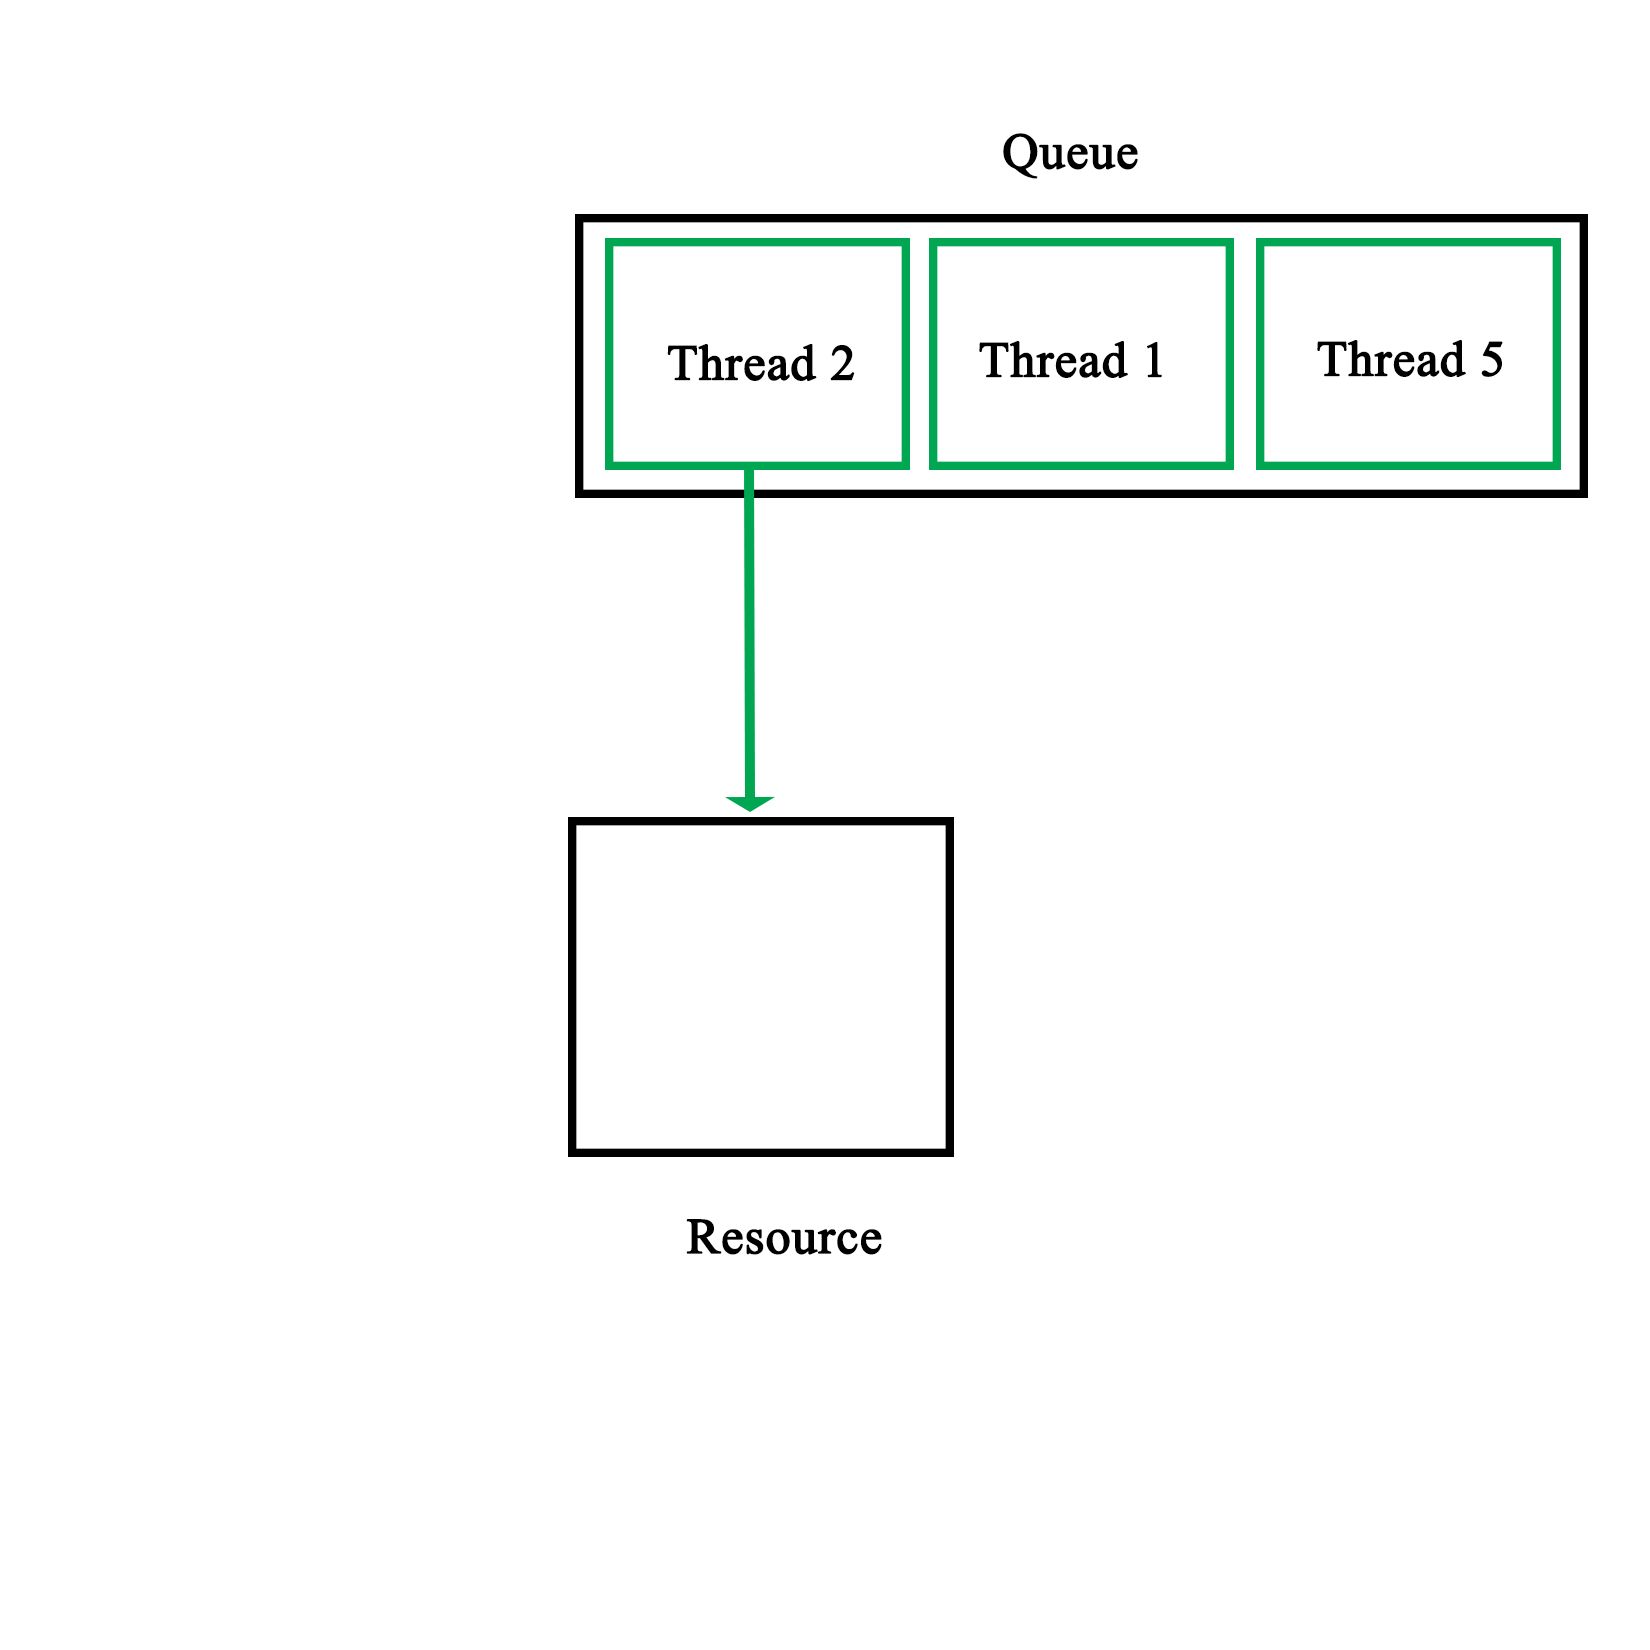
The reality is of course less pretty, mostly owing to the practical limitations imposed on us by the hardware. One obvious limitation is that synchronization primitives aren't free. Even though they are implemented in the hardware, it takes multiple calls to make them work.
The two most common ways to implement mutexes in the hardware is to use either the test-and-set (TAS) or compare-and-swap (CAS) CPU features.
Test-and-set is usually implemented as two assembly-level instructions, which are executed autonomously, meaning that they cannot be interrupted. The first instruction tests whether a certain memory area is set to a 1 or zero. The second instruction is executed only when the value is a zero (false). This means that the mutex was not locked yet. The second instruction thus sets the memory area to a 1, locking the mutex.
In pseudo-code, this would look like this:
bool TAS(bool lock) {
   if (lock) {
         return true;
   }
   else {
         lock = true;
         return false;
   }
}
Compare-and-swap is a lesser used variation on this, which performs a comparison operation on a memory location and a given value, only replacing the contents of that memory location if the first two match:
bool CAS(int* p, int old, int new) {
   if (*p != old) {
               return false;
         }

   *p = new;
         return true;
}
In either case, one would have to actively repeat either function until a positive value is returned:
volatile bool lock = false;

 void critical() {
     while (TAS(&lock) == false);
     // Critical section
     lock = 0;
 }
Here, a simple while loop is used to constantly poll the memory area (marked as volatile to prevent possibly problematic compiler optimizations). Generally, an algorithm is used for this which slowly reduces the rate at which it is being polled. This is to reduce the amount of pressure on the processor and memory systems.
This makes it clear that the use of a mutex is not free, but that each thread which waits for a mutex lock actively uses resources. As a result, the general rules here are:
As we saw earlier in the section on mutexes, there are some issues to keep in mind when using mutexes. Naturally these also apply when using locks and other mechanisms based on mutexes, even if some of these issues are smoothed over by these APIs.
One of the things one may get confused about when first using multithreading APIs is what the actual difference is between the different synchronization types. As we covered earlier in this chapter, mutexes underlie virtually all synchronization mechanisms, merely differing in the way that they use mutexes to implement the provided functionality.
The important thing here is that they are not distinct synchronization mechanisms, but merely specializations of the basic mutex type. Whether one would use a regular mutex, a read/write lock, a semaphore - or even something as esoteric as a reentrant (recursive) mutex or lock - depends fully on the particular problem which one is trying to solve.
For the scheduler, we first encountered in Chapter 4, Thread Aynchronization and Communication, we used regular mutexes to protect the data structures containing the queued worker threads and requests. Since any access of either data structure would likely not only involve reading actions, but also the manipulation of the structure, it would not make sense there to use read/write locks. Similarly, recursive locks would not serve any purpose over the humble mutex.
For each synchronization problem, one therefore has to ask the following questions:
It's therefore attractive to go for a complex type, but generally it's best to stick with the simpler type which fulfills all the requirements. When it comes to debugging one's implementation, precious time can be saved over a fancier implementation.
Recently it has become popular to advise against the use of threads, instead advocating the use of other asynchronous processing mechanisms, such as promise. The reasons behind this are that the use of threads and the synchronization involved is complex and error-prone. Often one just wants to run a task in parallel and not concern oneself with how the result is obtained.
For simple tasks which would run only briefly, this can certainly make sense. The main advantage of a thread-based implementation will always be that one can fully customize its behavior. With a promise, one sends in a task to run and at the end, one gets the result out of a future instance. This is convenient for simple tasks, but obviously does not cover a lot of situations.
The best approach here is to first learn threads and synchronization mechanisms well, along with their limitations. Only after that does it really make sense to consider whether one wishes to use a promise, packaged_task, or a full-blown thread.
Another major consideration with these fancier, future-based APIs is that they are heavily template-based, which can make the debugging and troubleshooting of any issues which may occur significantly less easy than when using the more straightforward and low-level APIs.
Static variables are variables which are declared only once, essentially existing in a global scope, though potentially only shared between instances of a particular class. It's also possible to have classes which are completely static:
class Foo {
   static std::map<int, std::string> strings;
   static std::string oneString;

public:
   static void init(int a, std::string b, std::string c) {
         strings.insert(std::pair<int, std::string>(a, b));
         oneString = c;
   }
};


std::map<int, std::string> Foo::strings;
std::string Foo::oneString;
As we can see here, static variables along with static functions seem like a very simple, yet powerful concept. While at its core this is true, there's a major issue which will catch the unwary when it comes to static variables and the initialization of classes. This is in the form of initialization order.
Imagine what happens if we wish to use the preceding class from another class' static initialization, like this:
class Bar {
   static std::string name;
   static std::string initName();

public:
   void init();
};

// Static initializations.
std::string Bar::name = Bar::initName();

std::string Bar::initName() {
   Foo::init(1, "A", "B");
   return "Bar";
}
While this may seem like it would work fine, adding the first string to the class' map structure with the integer as key means there is a very good chance that this code will crash. The reason for this is simple, there is no guarantee that Foo::string is initialized at the point when we call Foo::init(). Trying to use an uninitialized map structure will thus lead to an exception.
In short, the initialization order of static variables is basically random, leading to non-deterministic behavior if this is not taken into account.
The solution to this problem is fairly simple. Basically, the goal is to make the initialization of more complex static variables explicit instead of implicit like in the preceding example. For this we modify the Foo class:
class Foo {
   static std::map<int, std::string>& strings();
   static std::string oneString;

public:
   static void init(int a, std::string b, std::string c) {
         static std::map<int, std::string> stringsStatic = Foo::strings();
         stringsStatic.insert(std::pair<int, std::string>(a, b));
         oneString = c;
   }
};


std::string Foo::oneString;


std::map<int, std::string>& Foo::strings() {
   static std::map<int, std::string>* stringsStatic = new std::map<int, std::string>();
   return *stringsStatic;
}
Starting at the top, we see that we no longer define the static map directly. Instead, we have a private function with the same name. This function's implementation is found at the bottom of this sample code. In it, we have a static pointer to a map structure with the familiar map definition.
When this function is called, a new map is created when there's no instance yet, due to it being a static variable. In the modified init() function, we see that we call the strings() function to obtain a reference to this instance. This is the explicit initialization part, as calling the function will always ensure that the map structure is initialized before we use it, solving the earlier problem we had.
We also see a small optimization here: the stringsStatic variable we create is also static, meaning that we will only ever call the strings() function once. This makes repeated function calls unnecessary and regains the speed we would have had with the previous simple--but unstable--implementation.
The essential rule with static variable initialization is thus, always use explicit initialization for non-trivial static variables.
In this chapter, we looked at a number of good practices and rules to keep in mind when writing multithreaded code, along with some general advice. At this point, one should be able to avoid some of the bigger pitfalls and major sources of confusion when writing such code.
In the next chapter, we will be looking at how to use the underlying hardware to our advantage with atomic operations, along with the <atomics> header that was also introduced with C++11.
A lot of optimization and thread-safety depends on one's understanding of the underlying hardware: from aligned memory access on some architectures, to knowing which data sizes and thus C++ types can be safely addressed without performance penalties or the need for mutexes and similar.
This chapter looks at how one can make use of the characteristics of a number of processor architectures in order to, for example, prevent the use of mutexes where atomic operations would prevent any access conflicts regardless. Compiler-specific extensions such as those in GCC are also examined.
Topics in this chapter include:
Briefly put, an atomic operation is an operation which the processor can execute with a single instruction. This makes it atomic in the sense that nothing (barring interrupts) can interfere with it, or change any variables or data it may be using.
Applications include guaranteeing the order of instruction execution, lock-free implementations, and related uses where instruction execution order and memory access guarantees are important.
Before the 2011 C++ standard, the access to such atomic operations as provided by the processor was only provided by the compiler, using extensions.
For Microsoft's MSVC compiler there are the interlocked functions, as summarized from the MSDN documentation, starting with the adding features:
|
Interlocked function |
Description |
|
InterlockedAdd |
Performs an atomic addition operation on the specified LONG values. |
|
InterlockedAddAcquire |
Performs an atomic addition operation on the specified LONG values. The operation is performed with acquire memory ordering semantics. |
|
InterlockedAddRelease |
Performs an atomic addition operation on the specified LONG values. The operation is performed with release memory ordering semantics. |
|
InterlockedAddNoFence |
Performs an atomic addition operation on the specified LONG values. The operation is performed atomically, but without using memory barriers (covered in this chapter). |
These are the 32-bit versions of this feature. There are also 64-bit versions of this and other methods in the API. Atomic functions tend to be focused on a specific variable type, but variations in this API have been left out of this summary to keep it brief.
We can also see the acquire and release variations. These provide the guarantee that the respective read or write access will be protected from memory reordering (on a hardware level) with any subsequent read or write operation. Finally, the no fence variation (also known as a memory barrier) performs the operation without the use of any memory barriers.
Normally CPUs perform instructions (including memory reads and writes) out of order to optimize performance. Since this type of behavior is not always desirable, memory barriers were added to prevent this instruction reordering.
Next is the atomic AND feature:
|
Interlocked function |
Description |
|
InterlockedAnd |
Performs an atomic AND operation on the specified LONG values. |
|
InterlockedAndAcquire |
Performs an atomic AND operation on the specified LONG values. The operation is performed with acquire memory ordering semantics. |
|
InterlockedAndRelease |
Performs an atomic AND operation on the specified LONG values. The operation is performed with release memory ordering semantics. |
|
InterlockedAndNoFence |
Performs an atomic AND operation on the specified LONG values. The operation is performed atomically, but without using memory barriers. |
The bit-test features are as follows:
|
Interlocked function |
Description |
|
InterlockedBitTestAndComplement |
Tests the specified bit of the specified LONG value and complements it. |
|
InterlockedBitTestAndResetAcquire |
Tests the specified bit of the specified LONG value and sets it to 0. The operation is atomic, and it is performed with acquire memory ordering semantics. |
|
InterlockedBitTestAndResetRelease |
Tests the specified bit of the specified LONG value and sets it to 0. The operation is atomic, and it is performed using memory release semantics. |
|
InterlockedBitTestAndSetAcquire |
Tests the specified bit of the specified LONG value and sets it to 1. The operation is atomic, and it is performed with acquire memory ordering semantics. |
|
InterlockedBitTestAndSetRelease |
Tests the specified bit of the specified LONG value and sets it to 1. The operation is atomic, and it is performed with release memory ordering semantics. |
|
InterlockedBitTestAndReset |
Tests the specified bit of the specified LONG value and sets it to 0. |
|
InterlockedBitTestAndSet |
Tests the specified bit of the specified LONG value and sets it to 1. |
The comparison features can be listed as shown:
|
Interlocked function |
Description |
|
InterlockedCompareExchange |
Performs an atomic compare-and-exchange operation on the specified values. The function compares two specified 32-bit values and exchanges with another 32-bit value based on the outcome of the comparison. |
|
InterlockedCompareExchangeAcquire |
Performs an atomic compare-and-exchange operation on the specified values. The function compares two specified 32-bit values and exchanges with another 32-bit value based on the outcome of the comparison. The operation is performed with acquire memory ordering semantics. |
|
InterlockedCompareExchangeRelease |
Performs an atomic compare-and-exchange operation on the specified values. The function compares two specified 32-bit values and exchanges with another 32-bit value based on the outcome of the comparison. The exchange is performed with release memory ordering semantics. |
|
InterlockedCompareExchangeNoFence |
Performs an atomic compare-and-exchange operation on the specified values. The function compares two specified 32-bit values and exchanges with another 32-bit value based on the outcome of the comparison. The operation is performed atomically, but without using memory barriers. |
|
InterlockedCompareExchangePointer |
Performs an atomic compare-and-exchange operation on the specified pointer values. The function compares two specified pointer values and exchanges with another pointer value based on the outcome of the comparison. |
|
InterlockedCompareExchangePointerAcquire |
Performs an atomic compare-and-exchange operation on the specified pointer values. The function compares two specified pointer values and exchanges with another pointer value based on the outcome of the comparison. The operation is performed with acquire memory ordering semantics. |
|
InterlockedCompareExchangePointerRelease |
Performs an atomic compare-and-exchange operation on the specified pointer values. The function compares two specified pointer values and exchanges with another pointer value based on the outcome of the comparison. The operation is performed with release memory ordering semantics. |
|
InterlockedCompareExchangePointerNoFence |
Performs an atomic compare-and-exchange operation on the specified values. The function compares two specified pointer values and exchanges with another pointer value based on the outcome of the comparison. The operation is performed atomically, but without using memory barriers |
The decrement features are:
|
Interlocked function |
Description |
|
InterlockedDecrement |
Decrements (decreases by one) the value of the specified 32-bit variable as an atomic operation. |
|
InterlockedDecrementAcquire |
Decrements (decreases by one) the value of the specified 32-bit variable as an atomic operation. The operation is performed with acquire memory ordering semantics. |
|
InterlockedDecrementRelease |
Decrements (decreases by one) the value of the specified 32-bit variable as an atomic operation. The operation is performed with release memory ordering semantics. |
|
InterlockedDecrementNoFence |
Decrements (decreases by one) the value of the specified 32-bit variable as an atomic operation. The operation is performed atomically, but without using memory barriers. |
The exchange (swap) features are:
|
Interlocked function |
Description |
|
InterlockedExchange |
Sets a 32-bit variable to the specified value as an atomic operation. |
|
InterlockedExchangeAcquire |
Sets a 32-bit variable to the specified value as an atomic operation. The operation is performed with acquire memory ordering semantics. |
|
InterlockedExchangeNoFence |
Sets a 32-bit variable to the specified value as an atomic operation. The operation is performed atomically, but without using memory barriers. |
|
InterlockedExchangePointer |
Atomically exchanges a pair of pointer values. |
|
InterlockedExchangePointerAcquire |
Atomically exchanges a pair of pointer values. The operation is performed with acquire memory ordering semantics. |
|
InterlockedExchangePointerNoFence |
Atomically exchanges a pair of addresses. The operation is performed atomically, but without using memory barriers. |
|
InterlockedExchangeSubtract |
Performs an atomic subtraction of two values. |
|
InterlockedExchangeAdd |
Performs an atomic addition of two 32-bit values. |
|
InterlockedExchangeAddAcquire |
Performs an atomic addition of two 32-bit values. The operation is performed with acquire memory ordering semantics. |
|
InterlockedExchangeAddRelease |
Performs an atomic addition of two 32-bit values. The operation is performed with release memory ordering semantics. |
|
InterlockedExchangeAddNoFence |
Performs an atomic addition of two 32-bit values. The operation is performed atomically, but without using memory barriers. |
The increment features are:
|
Interlocked function |
Description |
|
InterlockedIncrement |
Increments (increases by one) the value of the specified 32-bit variable as an atomic operation. |
|
InterlockedIncrementAcquire |
Increments (increases by one) the value of the specified 32-bit variable as an atomic operation. The operation is performed using acquire memory ordering semantics. |
|
InterlockedIncrementRelease |
Increments (increases by one) the value of the specified 32-bit variable as an atomic operation. The operation is performed using release memory ordering semantics. |
|
InterlockedIncrementNoFence |
Increments (increases by one) the value of the specified 32-bit variable as an atomic operation. The operation is performed atomically, but without using memory barriers. |
The OR feature:
|
Interlocked function |
Description |
|
InterlockedOr |
Performs an atomic OR operation on the specified LONG values. |
|
InterlockedOrAcquire |
Performs an atomic OR operation on the specified LONG values. The operation is performed with acquire memory ordering semantics. |
|
InterlockedOrRelease |
Performs an atomic OR operation on the specified LONG values. The operation is performed with release memory ordering semantics. |
|
InterlockedOrNoFence |
Performs an atomic OR operation on the specified LONG values. The operation is performed atomically, but without using memory barriers. |
Finally, the exclusive OR (XOR) features are:
|
Interlocked function |
Description |
|
InterlockedXor |
Performs an atomic XOR operation on the specified LONG values. |
|
InterlockedXorAcquire |
Performs an atomic XOR operation on the specified LONG values. The operation is performed with acquire memory ordering semantics. |
|
InterlockedXorRelease |
Performs an atomic XOR operation on the specified LONG values. The operation is performed with release memory ordering semantics. |
|
InterlockedXorNoFence |
Performs an atomic XOR operation on the specified LONG values. The operation is performed atomically, but without using memory barriers. |
Like Visual C++, GCC also comes with a set of built-in atomic functions. These differ based on the underlying architecture that the GCC version and the standard library one uses. Since GCC is used on a considerably larger number of platforms and operating systems than VC++, this is definitely a big factor when considering portability.
For example, not every built-in atomic function provided on the x86 platform will be available on ARM, partially due to architectural differences, including variations of the specific ARM architecture. For example, ARMv6, ARMv7, or the current ARMv8, along with the Thumb instruction set, and so on.
Before the C++11 standard, GCC used __sync-prefixed extensions for atomics:
type __sync_fetch_and_add (type *ptr, type value, ...)
type __sync_fetch_and_sub (type *ptr, type value, ...)
type __sync_fetch_and_or (type *ptr, type value, ...)
type __sync_fetch_and_and (type *ptr, type value, ...)
type __sync_fetch_and_xor (type *ptr, type value, ...)
type __sync_fetch_and_nand (type *ptr, type value, ...)
These operations fetch a value from memory and perform the specified operation on it, returning the value that was in memory. These all use a memory barrier.
type __sync_add_and_fetch (type *ptr, type value, ...)
type __sync_sub_and_fetch (type *ptr, type value, ...)
type __sync_or_and_fetch (type *ptr, type value, ...)
type __sync_and_and_fetch (type *ptr, type value, ...)
type __sync_xor_and_fetch (type *ptr, type value, ...)
type __sync_nand_and_fetch (type *ptr, type value, ...)
These operations are similar to the first set, except they return the new value after the specified operation.
bool __sync_bool_compare_and_swap (type *ptr, type oldval, type newval, ...)
type __sync_val_compare_and_swap (type *ptr, type oldval, type newval, ...)
These comparison operations will write the new value if the old value matches the provided value. The Boolean variation returns true if the new value has been written.
__sync_synchronize (...)
This function creates a full memory barrier.
type __sync_lock_test_and_set (type *ptr, type value, ...)
This method is actually an exchange operation unlike what the name suggests. It updates the pointer value and returns the previous value. This uses not a full memory barrier, but an acquire barrier, meaning that it does not release the barrier.
void __sync_lock_release (type *ptr, ...)
This function releases the barrier obtained by the previous method.
To adapt to the C++11 memory model, GCC added the __atomic built-in methods, which also changes the API considerably:
type __atomic_load_n (type *ptr, int memorder)
void __atomic_load (type *ptr, type *ret, int memorder)
void __atomic_store_n (type *ptr, type val, int memorder)
void __atomic_store (type *ptr, type *val, int memorder)
type __atomic_exchange_n (type *ptr, type val, int memorder)
void __atomic_exchange (type *ptr, type *val, type *ret, int memorder)
bool __atomic_compare_exchange_n (type *ptr, type *expected, type desired, bool weak, int success_memorder, int failure_memorder)
bool __atomic_compare_exchange (type *ptr, type *expected, type *desired, bool weak, int success_memorder, int failure_memorder)
First are the generic load, store, and exchange functions. They are fairly self-explanatory. Load functions read a value in memory, store functions store a value in memory, and exchange functions swap the existing value with a new value. Compare and exchange functions make the swapping conditional.
type __atomic_add_fetch (type *ptr, type val, int memorder)
type __atomic_sub_fetch (type *ptr, type val, int memorder)
type __atomic_and_fetch (type *ptr, type val, int memorder)
type __atomic_xor_fetch (type *ptr, type val, int memorder)
type __atomic_or_fetch (type *ptr, type val, int memorder)
type __atomic_nand_fetch (type *ptr, type val, int memorder)
These functions are essentially the same as in the old API, returning the result of the specific operation.
type __atomic_fetch_add (type *ptr, type val, int memorder)
type __atomic_fetch_sub (type *ptr, type val, int memorder)
type __atomic_fetch_and (type *ptr, type val, int memorder)
type __atomic_fetch_xor (type *ptr, type val, int memorder)
type __atomic_fetch_or (type *ptr, type val, int memorder)
type __atomic_fetch_nand (type *ptr, type val, int memorder)
And again, the same functions, updated for the new API. These return the original value (fetch before operation).
bool __atomic_test_and_set (void *ptr, int memorder)
Unlike the similarly named function in the old API, this function performs a real test and set operation instead of the exchange operation of the old API's function, which still requires one to release the memory barrier afterwards. The test is for some defined value.
void __atomic_clear (bool *ptr, int memorder)
This function clears the pointer address, setting it to 0.
void __atomic_thread_fence (int memorder)
A synchronization memory barrier (fence) between threads can be created using this function.
void __atomic_signal_fence (int memorder)
This function creates a memory barrier between a thread and signal handlers within that same thread.
bool __atomic_always_lock_free (size_t size, void *ptr)
The function checks whether objects of the specified size will always create lock-free atomic instructions for the current processor architecture.
bool __atomic_is_lock_free (size_t size, void *ptr)
This is essentially the same as the previous function.
Memory barriers (fences) are not always used in the C++11 memory model for atomic operations. In the GCC built-in atomics API, this is reflected in the memorder parameter in its functions. The possible values for this map directly to the values in the C++11 atomics API:
The preceding list was copied from the GCC manual's chapter on atomics for GCC 7.1. Along with the comments in that chapter, it makes it quite clear that trade-offs were made when implementing both the C++11 atomics support within its memory model and in the compiler's implementation.
Since atomics rely on the underlying hardware support, there will never be a single piece of code using atomics that will work across a wide variety of architectures.
There are many more compiler toolchains for C/C++ than just VC++ and GCC, of course, including the Intel Compiler Collection (ICC) and other, usually proprietary tools.. These all have their own collection of built-in atomic functions. Fortunately, thanks to the C++11 standard, we now have a fully portable standard for atomics between compilers. Generally, this means that outside of very specific use cases (or maintenance of existing code), one would use the C++ standard over compiler-specific extensions.
In order to use the native C++11 atomics features, all one has to do is include the <atomic> header. This makes available the atomic class, which uses templates to adapt itself to the required type, with a large number of predefined typedefs:
|
Typedef name |
Full specialization |
|
std::atomic_bool |
std::atomic<bool> |
|
std::atomic_char |
std::atomic<char> |
|
std::atomic_schar |
std::atomic<signed char> |
|
std::atomic_uchar |
std::atomic<unsigned char> |
|
std::atomic_short |
std::atomic<short> |
|
std::atomic_ushort |
std::atomic<unsigned short> |
|
std::atomic_int |
std::atomic<int> |
|
std::atomic_uint |
std::atomic<unsigned int> |
|
std::atomic_long |
std::atomic<long> |
|
std::atomic_ulong |
std::atomic<unsigned long> |
|
std::atomic_llong |
std::atomic<long long> |
|
std::atomic_ullong |
std::atomic<unsigned long long> |
|
std::atomic_char16_t |
std::atomic<char16_t> |
|
std::atomic_char32_t |
std::atomic<char32_t> |
|
std::atomic_wchar_t |
std::atomic<wchar_t> |
|
std::atomic_int8_t |
std::atomic<std::int8_t> |
|
std::atomic_uint8_t |
std::atomic<std::uint8_t> |
|
std::atomic_int16_t |
std::atomic<std::int16_t> |
|
std::atomic_uint16_t |
std::atomic<std::uint16_t> |
|
std::atomic_int32_t |
std::atomic<std::int32_t> |
|
std::atomic_uint32_t |
std::atomic<std::uint32_t> |
|
std::atomic_int64_t |
std::atomic<std::int64_t> |
|
std::atomic_uint64_t |
std::atomic<std::uint64_t> |
|
std::atomic_int_least8_t |
std::atomic<std::int_least8_t> |
|
std::atomic_uint_least8_t |
std::atomic<std::uint_least8_t> |
|
std::atomic_int_least16_t |
std::atomic<std::int_least16_t> |
|
std::atomic_uint_least16_t |
std::atomic<std::uint_least16_t> |
|
std::atomic_int_least32_t |
std::atomic<std::int_least32_t> |
|
std::atomic_uint_least32_t |
std::atomic<std::uint_least32_t> |
|
std::atomic_int_least64_t |
std::atomic<std::int_least64_t> |
|
std::atomic_uint_least64_t |
std::atomic<std::uint_least64_t> |
|
std::atomic_int_fast8_t |
std::atomic<std::int_fast8_t> |
|
std::atomic_uint_fast8_t |
std::atomic<std::uint_fast8_t> |
|
std::atomic_int_fast16_t |
std::atomic<std::int_fast16_t> |
|
std::atomic_uint_fast16_t |
std::atomic<std::uint_fast16_t> |
|
std::atomic_int_fast32_t |
std::atomic<std::int_fast32_t> |
|
std::atomic_uint_fast32_t |
std::atomic<std::uint_fast32_t> |
|
std::atomic_int_fast64_t |
std::atomic<std::int_fast64_t> |
|
std::atomic_uint_fast64_t |
std::atomic<std::uint_fast64_t> |
|
std::atomic_intptr_t |
std::atomic<std::intptr_t> |
|
std::atomic_uintptr_t |
std::atomic<std::uintptr_t> |
|
std::atomic_size_t |
std::atomic<std::size_t> |
|
std::atomic_ptrdiff_t |
std::atomic<std::ptrdiff_t> |
|
std::atomic_intmax_t |
std::atomic<std::intmax_t> |
|
std::atomic_uintmax_t |
std::atomic<std::uintmax_t> |
This atomic class defines the following generic functions:
|
Function |
Description |
|
operator= |
Assigns a value to an atomic object. |
|
is_lock_free |
Returns true if the atomic object is lock-free. |
|
store |
Replaces the value of the atomic object with a non-atomic argument, atomically. |
|
load |
Atomically obtains the value of the atomic object. |
|
operator T |
Loads a value from an atomic object. |
|
exchange |
Atomically replaces the value of the object with the new value and returns the old value. |
|
compare_exchange_weak compare_exchange_strong |
Atomically compares the value of the object and swaps values if equal, or else returns the current value. |
With the C++17 update, the is_always_lock_free constant is added. This allows one to inquire whether the type is always lock-free.
Finally, we have the specialized atomic functions:
|
Function |
Description |
|
fetch_add |
Atomically adds the argument to the value stored in the atomic object and returns the old value. |
|
fetch_sub |
Atomically subtracts the argument from the value stored in the atomic object and returns the old value. |
|
fetch_and |
Atomically performs bitwise AND between the argument and the value of the atomic object and returns the old value. |
|
fetch_or |
Atomically performs bitwise OR between the argument and the value of the atomic object and returns the old value. |
|
fetch_xor |
Atomically performs bitwise XOR between the argument and the value of the atomic object and returns the old value. |
|
operator++ operator++(int) operator-- operator--(int) |
Increments or decrements the atomic value by one. |
|
operator+= operator-= operator&= operator|= operator^= |
Adds, subtracts, or performs a bitwise AND, OR, XOR operation with the atomic value. |
A basic example using fetch_add would look like this:
#include <iostream>
#include <thread>
#include <atomic>

std::atomic<long long> count;
void worker() {
         count.fetch_add(1, std::memory_order_relaxed);
}

int main() {
         std::thread t1(worker);
         std::thread t2(worker);
         std::thread t3(worker);
         std::thread t4(worker);
         std::thread t5(worker);

         t1.join();
         t2.join();
         t3.join();
         t4.join();
         t5.join();

         std::cout << "Count value:" << count << '\n';
}
The result of this example code would be 5. As we can see here, we can implement a basic counter this way with atomics, instead of having to use any mutexes or similar in order to provide thread synchronization.
In addition to the atomic class, there are also a number of template-based functions defined in the <atomic> header which we can use in a manner more akin to the compiler's built-in atomic functions:
|
Function |
Description |
|
atomic_is_lock_free |
Checks whether the atomic type's operations are lock-free. |
|
atomic_storeatomic_store_explicit |
Atomically replaces the value of the atomic object with a non-atomic argument. |
|
atomic_load atomic_load_explicit |
Atomically obtains the value stored in an atomic object. |
|
atomic_exchange atomic_exchange_explicit |
Atomically replaces the value of the atomic object with a non-atomic argument and returns the old value of atomic. |
|
atomic_compare_exchange_weak atomic_compare_exchange_weak_explicit atomic_compare_exchange_strong atomic_compare_exchange_strong_explicit |
Atomically compares the value of the atomic object with a non-atomic argument and performs an atomic exchange if equal or atomic load if not. |
|
atomic_fetch_add atomic_fetch_add_explicit |
Adds a non-atomic value to an atomic object and obtains the previous value of atomic. |
|
atomic_fetch_sub atomic_fetch_sub_explicit |
Subtracts a non-atomic value from an atomic object and obtains the previous value of atomic. |
|
atomic_fetch_and atomic_fetch_and_explicit |
Replaces the atomic object with the result of logical AND with a non-atomic argument and obtains the previous value of the atomic. |
|
atomic_fetch_or atomic_fetch_or_explicit |
Replaces the atomic object with the result of logical OR with a non-atomic argument and obtains the previous value of atomic. |
|
atomic_fetch_xor atomic_fetch_xor_explicit |
Replaces the atomic object with the result of logical XOR with a non-atomic argument and obtains the previous value of atomic. |
|
atomic_flag_test_and_set atomic_flag_test_and_set_explicit |
Atomically sets the flag to true and returns its previous value. |
|
atomic_flag_clear atomic_flag_clear_explicit |
Atomically sets the value of the flag to false. |
|
atomic_init |
Non-atomic initialization of a default-constructed atomic object. |
|
kill_dependency |
Removes the specified object from the std::memory_order_consume dependency tree. |
|
atomic_thread_fence |
Generic memory order-dependent fence synchronization primitive. |
|
atomic_signal_fence |
Fence between a thread and a signal handler executed in the same thread. |
The difference between the regular and explicit functions is that the latter allows one to actually set the memory order to use. The former always uses memory_order_seq_cst as the memory order.
In this example using atomic_fetch_sub, an indexed container is processed by multiple threads concurrently, without the use of locks:
#include <string>
#include <thread>
#include <vector>
#include <iostream>
#include <atomic>
#include <numeric>

const int N = 10000;
std::atomic<int> cnt;
std::vector<int> data(N);

void reader(int id) {
         for (;;) {
               int idx = atomic_fetch_sub_explicit(&cnt, 1, std::memory_order_relaxed);
               if (idx >= 0) {
                           std::cout << "reader " << std::to_string(id) << " processed item "
                                       << std::to_string(data[idx]) << '\n';
               }
         else {
                           std::cout << "reader " << std::to_string(id) << " done.\n";
                           break;
               }
         }
}

int main() {
         std::iota(data.begin(), data.end(), 1);
         cnt = data.size() - 1;

         std::vector<std::thread> v;
         for (int n = 0; n < 10; ++n) {
               v.emplace_back(reader, n);
         }

         for (std::thread& t : v) {
               t.join();
         }
}
This example code uses a vector filled with integers of size N as the data source, filling it with 1s. The atomic counter object is set to the size of the data vector. After this, 10 threads are created (initialized in place using the vector's emplace_back C++11 feature), which run the reader function.
In that function, we read the current value of the index counter from memory using the atomic_fetch_sub_explicit function, which allows us to use the memory_order_relaxed memory order. This function also subtracts the value we pass from this old value, counting the index down by 1.
So long as the index number we obtain this way is higher or equal to zero, the function continues, otherwise it will quit. Once all the threads have finished, the application exits.
std::atomic_flag is an atomic Boolean type. Unlike the other specializations of the atomic class, it is guaranteed to be lock-free. It does not however, offer any load or store operations.
Instead, it offers the assignment operator, and functions to either clear, or test_and_set the flag. The former thereby sets the flag to false, and the latter will test and set it to true.
This property is defined as an enumeration in the <atomic> header:
enum memory_order {
    memory_order_relaxed,
    memory_order_consume,
    memory_order_acquire,
    memory_order_release,
    memory_order_acq_rel,
    memory_order_seq_cst
};
In the GCC section, we already touched briefly on the topic of memory order. As mentioned there, this is one of the parts where the characteristics of the underlying hardware architecture surface somewhat.
Basically, memory order determines how non-atomic memory accesses are to be ordered (memory access order) around an atomic operation. What this affects is how different threads will see the data in memory as they're executing their instructions:
|
Enum |
Description |
|
memory_order_relaxed |
Relaxed operation: there are no synchronization or ordering constraints imposed on other reads or writes, only this operation's atomicity is guaranteed. |
|
memory_order_consume |
A load operation with this memory order performs a consume operation on the affected memory location: no reads or writes in the current thread dependent on the value currently loaded can be reordered before this load. Writes to data-dependent variables in other threads that release the same atomic variable are visible in the current thread. On most platforms, this affects compiler optimizations only. |
|
memory_order_acquire |
A load operation with this memory order performs the acquire operation on the affected memory location: no reads or writes in the current thread can be reordered before this load. All writes in other threads that release the same atomic variable are visible in the current thread. |
|
memory_order_release |
A store operation with this memory order performs the release operation: no reads or writes in the current thread can be reordered after this store. All writes in the current thread are visible in other threads that acquire the same atomic variable and writes that carry a dependency into the atomic variable become visible in other threads that consume the same atomic. |
|
memory_order_acq_rel |
A read-modify-write operation with this memory order is both an acquire operation and a release operation. No memory reads or writes in the current thread can be reordered before or after this store. All writes in other threads that release the same atomic variable are visible before the modification and the modification is visible in other threads that acquire the same atomic variable. |
|
memory_order_seq_cst |
Any operation with this memory order is both an acquire operation and a release operation, plus a single total order exists in which all threads observe all modifications in the same order. |
With relaxed memory ordering, no order is enforced among concurrent memory accesses. All that this type of ordering guarantees is atomicity and modification order.
A typical use for this type of ordering is for counters, whether incrementing--or decrementing, as we saw earlier in the example code in the previous section.
If an atomic store in thread A is tagged memory_order_release and an atomic load in thread B from the same variable is tagged memory_order_acquire, all memory writes (non-atomic and relaxed atomic) that happened before the atomic store from the point of view of thread A, become visible side-effects in thread B. That is, once the atomic load has been completed, thread B is guaranteed to see everything thread A wrote to memory.
This type of operation is automatic on so-called strongly ordered architectures, including x86, SPARC, and POWER. Weakly-ordered architectures, such as ARM, PowerPC, and Itanium, will require the use of memory barriers here.
Typical applications of this type of memory ordering include mutual exclusion mechanisms, such as a mutex or atomic spinlock.
If an atomic store in thread A is tagged memory_order_release and an atomic load in thread B from the same variable is tagged memory_order_consume, all memory writes (non-atomic and relaxed atomic) that are dependency-ordered before the atomic store from the point of view of thread A, become visible side-effects within those operations in thread B into which the load operation carries dependency. That is, once the atomic load has been completed, those operators and functions in thread B that use the value obtained from the load are guaranteed to see what thread A wrote to memory.
This type of ordering is automatic on virtually all architectures. The only major exception is the (obsolete) Alpha architecture. A typical use case for this type of ordering would be read access to data that rarely gets changed.
Atomic operations tagged memory_order_seq_cst not only order memory the same way as release/acquire ordering (everything that happened before a store in one thread becomes a visible side effect in the thread that did a load), but also establishes a single total modification order of all atomic operations that are so tagged.
This type of ordering may be necessary for situations where all consumers must observe the changes being made by other threads in exactly the same order. It requires full memory barriers as a consequence on multi-core or multi-CPU systems.
As a result of such a complex setup, this type of ordering is significantly slower than the other types. It also requires that every single atomic operation has to be tagged with this type of memory ordering, or the sequential ordering will be lost.
The volatile keyword is probably quite familiar to anyone who has ever written complex multithreaded code. Its basic use is to tell the compiler that the relevant variable should always be loaded from memory, never making assumptions about its value. It also ensures that the compiler will not make any aggressive optimizations to the variable.
For multithreaded applications, it is generally ineffective, however, its use is discouraged. The main issue with the volatile specification is that it does not define a multithreaded memory model, meaning that the result of this keyword may not be deterministic across platforms, CPUs and even toolchains.
Within the area of atomics, this keyword is not required, and in fact is unlikely to be helpful. To guarantee that one obtains the current version of a variable that is shared between multiple CPU cores and their caches, one would have to use an operation like atomic_compare_exchange_strong, atomic_fetch_add, or atomic_exchange to let the hardware fetch the correct and current value.
For multithreaded code, it is recommended to not use the volatile keyword and use atomics instead, to guarantee proper behavior.
In this chapter, we looked at atomic operations and exactly how they are integrated into compilers to allow one's code to work as closely with the underlying hardware as possible. The reader will now be familiar with the types of atomic operations, the use of a memory barrier (fencing), as well as the various types of memory ordering and their implications.
The reader is now capable of using atomic operations in their own code to accomplish lock-free designs and to make proper use of the C++11 memory model.
In the next chapter, we will take everything we have learned so far and move away from CPUs, instead taking a look at GPGPU, the general-purpose processing of data on video cards (GPUs).
Distributed computing was one of the original applications of multithreaded programming. Back when every personal computer just contained a single processor with a single core, government and research institutions, as well as some companies would have multi-processor systems, often in the form of clusters. These would be capable of multithreaded processing; by splitting tasks across processors, they could speed up various tasks, including simulations, rendering of CGI movies, and the like.
Nowadays virtually every desktop-level or better system has more than a single processor core, and assembling a number of systems together into a cluster is very easy, using cheap Ethernet wiring. Combined with frameworks such as OpenMP and Open MPI, it's quite easy to expand a C++ based (multithreaded) application to run on a distributed system.
Topics in this chapter include:
When it comes to processing large datasets in parallel, it would be ideal if one could take the data, chop it up into lots of small parts, and push it to a lot of threads, thus significantly shortening the total time spent processing the said data.
The idea behind distributed computing is exactly this: on each node in a distributed system one or more instances of our application run, whereby this application can either be single or multithreaded. Due to the overhead of inter-process communication, it's generally more efficient to use a multithreaded application, as well as due to other possible optimizations--courtesy of resource sharing.
If one already has a multithreaded application ready to use, then one can move straight to using MPI to make it work on a distributed system. Otherwise, OpenMP is a compiler extension (for C/C++ and Fortran) which can make it relatively painless to make an application multithreaded without refactoring.
To do this, OpenMP allows one to mark a common code segment, to be executed on all slave threads. A master thread creates a number of slave threads which will concurrently process that same code segment. A basic Hello World OpenMP application looks like this:
/******************************************************************************
 * FILE: omp_hello.c
 * DESCRIPTION:
 *   OpenMP Example - Hello World - C/C++ Version
 *   In this simple example, the master thread forks a parallel region.
 *   All threads in the team obtain their unique thread number and print it.
 *   The master thread only prints the total number of threads.  Two OpenMP
 *   library routines are used to obtain the number of threads and each
 *   thread's number.
 * AUTHOR: Blaise Barney  5/99
 * LAST REVISED: 04/06/05
 ******************************************************************************/
 #include <omp.h>
 #include <stdio.h>
 #include <stdlib.h>

 int main (int argc, char *argv[])  {
    int nthreads, tid;

    /* Fork a team of threads giving them their own copies of variables */
 #pragma omp parallel private(nthreads, tid) {
          /* Obtain thread number */
          tid = omp_get_thread_num();
          printf("Hello World from thread = %d\n", tid);

          /* Only master thread does this */
          if (tid == 0) {
                nthreads = omp_get_num_threads();
                printf("Number of threads = %d\n", nthreads);
                }

    }  /* All threads join master thread and disband */
}
What one can easily tell from this basic sample is that OpenMP provides a C based API through the <omp.h> header. We can also see the section that will be executed by each thread, as marked by a #pragma omp preprocessor macro.
The advantage of OpenMP over the examples of multithreaded code which we saw in the preceding chapters, is the ease with which a section of code can be marked as being multithreaded without having to make any actual code changes. The obvious limitation that comes with this is that every thread instance will execute the exact same code and further optimization options are limited.
In order to schedule the execution of code on specific nodes, MPI (Message Passing Interface) is commonly used. Open MPI is a free library implementation of this, and used by many high-ranking supercomputers. MPICH is another popular implementation.
MPI itself is defined as a communication protocol for the programming of parallel computers. It is currently at its third revision (MPI-3).
In summary, MPI offers the following basic concepts:
Of these, MPI-IO, dynamic process management, and one-sided communication are MPI-2 features. Migration from MPI-1 based code and the incompatibility of dynamic process management with some setups, along with many applications not requiring MPI-2 features, means that uptake of MPI-2 has been relatively slow.
The initial implementation of MPI was MPICH, by Argonne National Laboratory (ANL) and Mississippi State University. It is currently one of the most popular implementations, used as the foundation for MPI implementations, including those by IBM (Blue Gene), Intel, QLogic, Cray, Myricom, Microsoft, Ohio State University (MVAPICH), and others.
Another very common implementation is Open MPI, which was formed out of the merger of three MPI implementations:
These, along with the PACX-MPI team at the University of Stuttgart, are the founding members of the Open MPI team. One of the primary goals of Open MPI is to create a high-quality, open source MPI-3 implementation.
MPI implementations are mandated to support C and Fortran. C/C++ and Fortran along with assembly support is very common, along with bindings for other languages.
Regardless of the implementation chosen, the resulting API will always match the official MPI standard, differing only by the MPI version that the library one has picked supports. All MPI-1 (revision 1.3) features should be supported by any MPI implementation, however.
This means that the canonical Hello World (as, for example, found on the MPI Tutorial site: http://mpitutorial.com/tutorials/mpi-hello-world/) for MPI should work regardless of which library one picks:
#include <mpi.h>
#include <stdio.h>

int main(int argc, char** argv) {
         // Initialize the MPI environment
         MPI_Init(NULL, NULL);

         // Get the number of processes
         int world_size;
         MPI_Comm_size(MPI_COMM_WORLD, &world_size);

         // Get the rank of the process
         int world_rank;
         MPI_Comm_rank(MPI_COMM_WORLD, &world_rank);

         // Get the name of the processor
         char processor_name[MPI_MAX_PROCESSOR_NAME];
         int name_len;
         MPI_Get_processor_name(processor_name, &name_len);

         // Print off a hello world message
         printf("Hello world from processor %s, rank %d"
                     " out of %d processors\n",
                     processor_name, world_rank, world_size);

         // Finalize the MPI environment.
         MPI_Finalize();
}
When reading through this basic example of an MPI-based application, it's important to be familiar with the terms used with MPI, in particular:
In this Hello World example, we can see that we include the <mpi.h> header. This MPI header will always be the same, regardless of the implementation we use.
Initializing the MPI environment requires a single call to MPI_Init(), which can take two parameters, both of which are optional at this point.
Getting the size of the world (meaning, number of processes available) is the next step. This is done using MPI_Comm_size(), which takes the MPI_COMM_WORLD global variable (defined by MPI for our use) and updates the second parameter with the number of processes in that world.
The rank we then obtain is essentially the unique ID assigned to this process by MPI. Obtaining this UID is performed with MPI_Comm_rank(). Again, this takes the MPI_COMM_WORLD variable as the first parameter and returns our numeric rank as the second parameter. This rank is useful for self-identification and communication between processes.
Obtaining the name of the specific piece of hardware on which one is running can also be useful, particularly for diagnostic purposes. For this we can call MPI_Get_processor_name(). The returned string will be of a globally defined maximum length and will identify the hardware in some manner. The exact format of this string is implementation defined.
Finally, we print out the information we gathered and clean up the MPI environment before terminating the application.
In order to compile an MPI application, the mpicc compiler wrapper is used. This executable should be part of whichever MPI implementation has been installed.
Using it is, however, identical to how one would use, for example, GCC:
$ mpicc -o mpi_hello_world mpi_hello_world.c
This can be compared to:
$ gcc mpi_hello_world.c -lmsmpi -o mpi_hello_world
This would compile and link our Hello World example into a binary, ready to be executed. Executing this binary is, however, not done by starting it directly, but instead a launcher is used, like this:
    $ mpiexec.exe -n 4 mpi_hello_world.exe
    Hello world from processor Generic_PC, rank 0 out of 4 processors
    Hello world from processor Generic_PC, rank 2 out of 4 processors
    Hello world from processor Generic_PC, rank 1 out of 4 processors
    Hello world from processor Generic_PC, rank 3 out of 4 processors
The preceding output is from Open MPI running inside a Bash shell on a Windows system. As we can see, we launch four processes in total (4 ranks). The processor name is reported as the hostname for each process ("PC").
The binary to launch MPI applications with is called mpiexec or mpirun, or orterun. These are synonyms for the same binary, though not all implementations will have all synonyms. For Open MPI, all three are present and one can use any of these.
The systems an MPI based or similar application will run on consist of multiple independent systems (nodes), each of which is connected to the others using some kind of network interface. For high-end applications, these tend to be custom nodes with high-speed, low-latency interconnects. At the other end of the spectrum are so-called Beowulf and similar type clusters, made out of standard (desktop) computers and usually connected using regular Ethernet.
At the time of writing, the fastest supercomputer (according to the TOP500 listing) is the Sunway TaihuLight supercomputer at the National Supercomputing Center in Wuxi, China. It uses a total of 40,960 Chinese-designed SW26010 manycore RISC architecture-based CPUs, with 256 cores per CPU (divided in 4 64-core groups), along with four management cores. The term manycore refers to a specialized CPU design which focuses more on explicit parallelism as opposed to the single-thread and general-purpose focus of most CPU cores. This type of CPU is similar to a GPU architecture and vector processors in general.
Each of these nodes contains a single SW26010 along with 32 GB of DDR3 memory. They are connected via a PCIe 3.0-based network, itself consisting of a three-level hierarchy: the central switching network (for supernodes), the supernode network (connecting all 256 nodes in a supernode), and the resource network, which provides access to I/O and other resource services. The bandwidth for this network between individual nodes is 12 GB/second, with a latency of about 1 microsecond.
The following graphic (from "The Sunway TaihuLight Supercomputer: System and Applications", DOI: 10.1007/s11432-016-5588-7) provides a visual overview of this system:
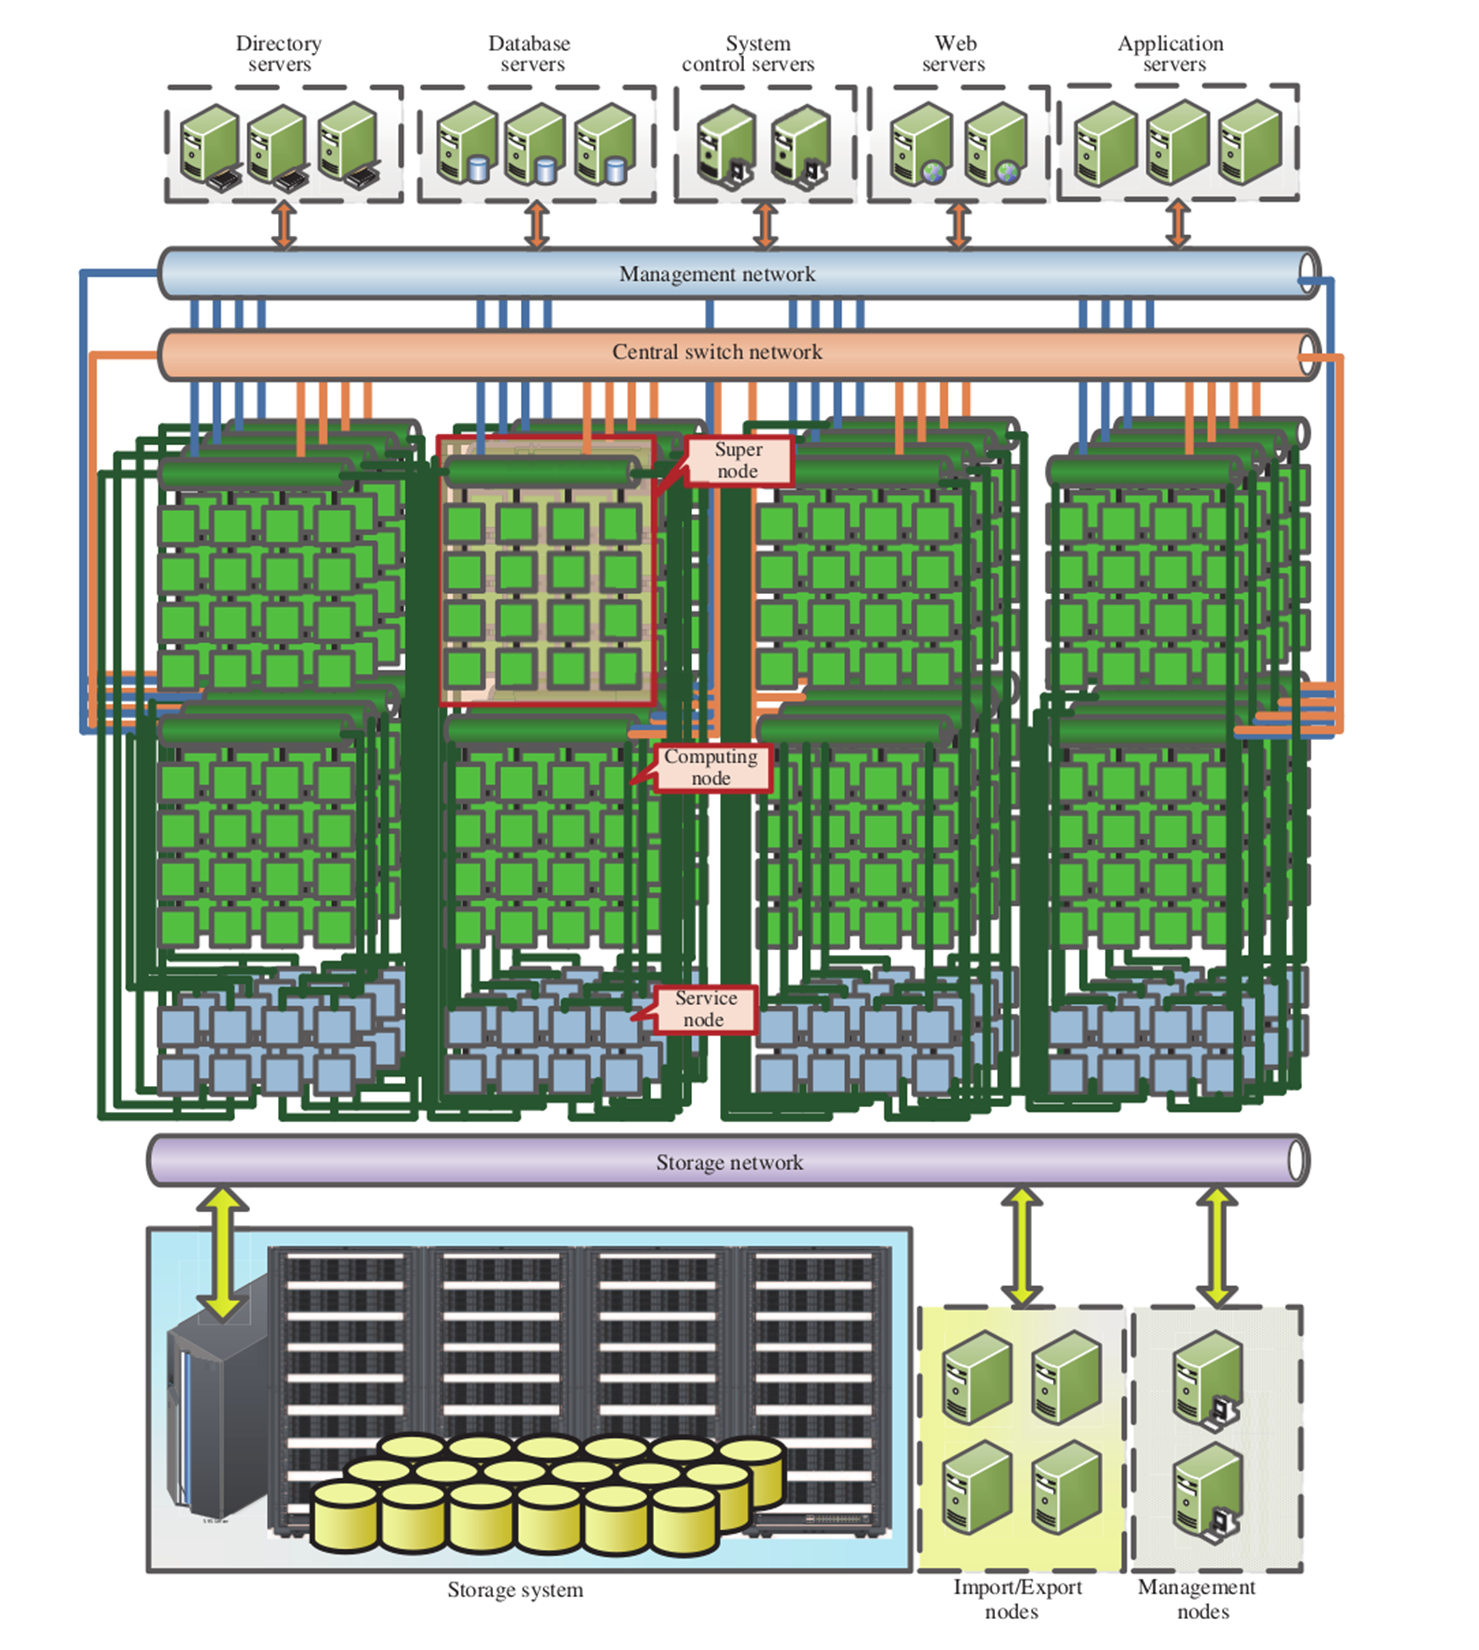
For situations where the budget does not allow for such an elaborate and highly customized system, or where the specific tasks do not warrant such an approach, there always remains the "Beowulf" approach. A Beowulf cluster is a term used to refer to a distributed computing system constructed out of common computer systems. These can be Intel or AMD-based x86 systems, with ARM-based processors now becoming popular.
It's generally helpful to have each node in a cluster to be roughly identical to the other nodes. Although it's possible to have an asymmetric cluster, management and job scheduling becomes much easier when one can make broad assumptions about each node.
At the very least, one would want to match the processor architecture, with a base level of CPU extensions, such as SSE2/3 and perhaps AVX and kin, common across all nodes. Doing this would allow one to use the same compiled binary across the nodes, along with the same algorithms, massively simplifying the deployment of jobs and the maintenance of the code base.
For the network between the nodes, Ethernet is a very popular option, delivering communication times measured in tens to hundreds of microseconds, while costing only a fraction of faster options. Usually each node would be connected to a single Ethernet network, as in this graphic:
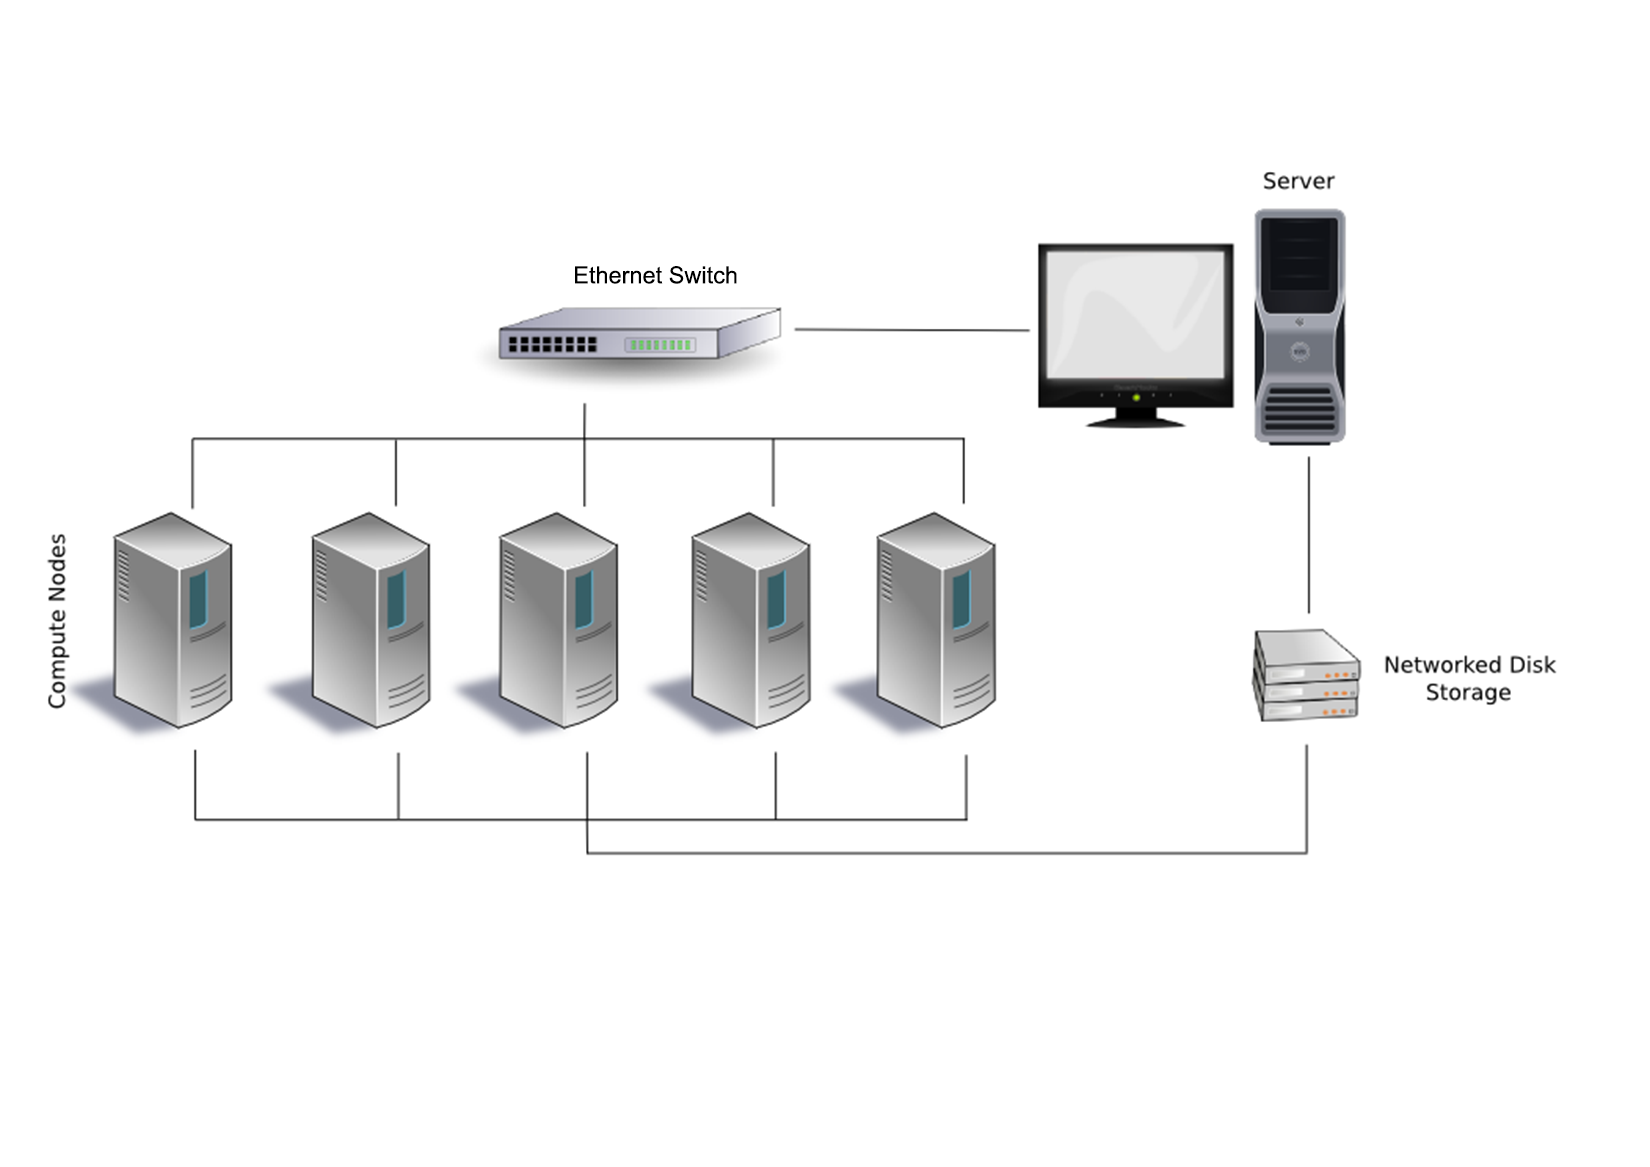
There is also the option to add a second or even third Ethernet link to each or specific nodes to give them access to files, I/O, and other resources, without having to compete with bandwidth on the primary network layer. For very large clusters, one could consider an approach such as that used with the Sunway TaihuLight and many other supercomputers: splitting nodes up into supernodes, each with their own inter-node network. This would allow one to optimize traffic on the network by limiting it to only associated nodes.
An example of such an optimized Beowulf cluster would look like this:
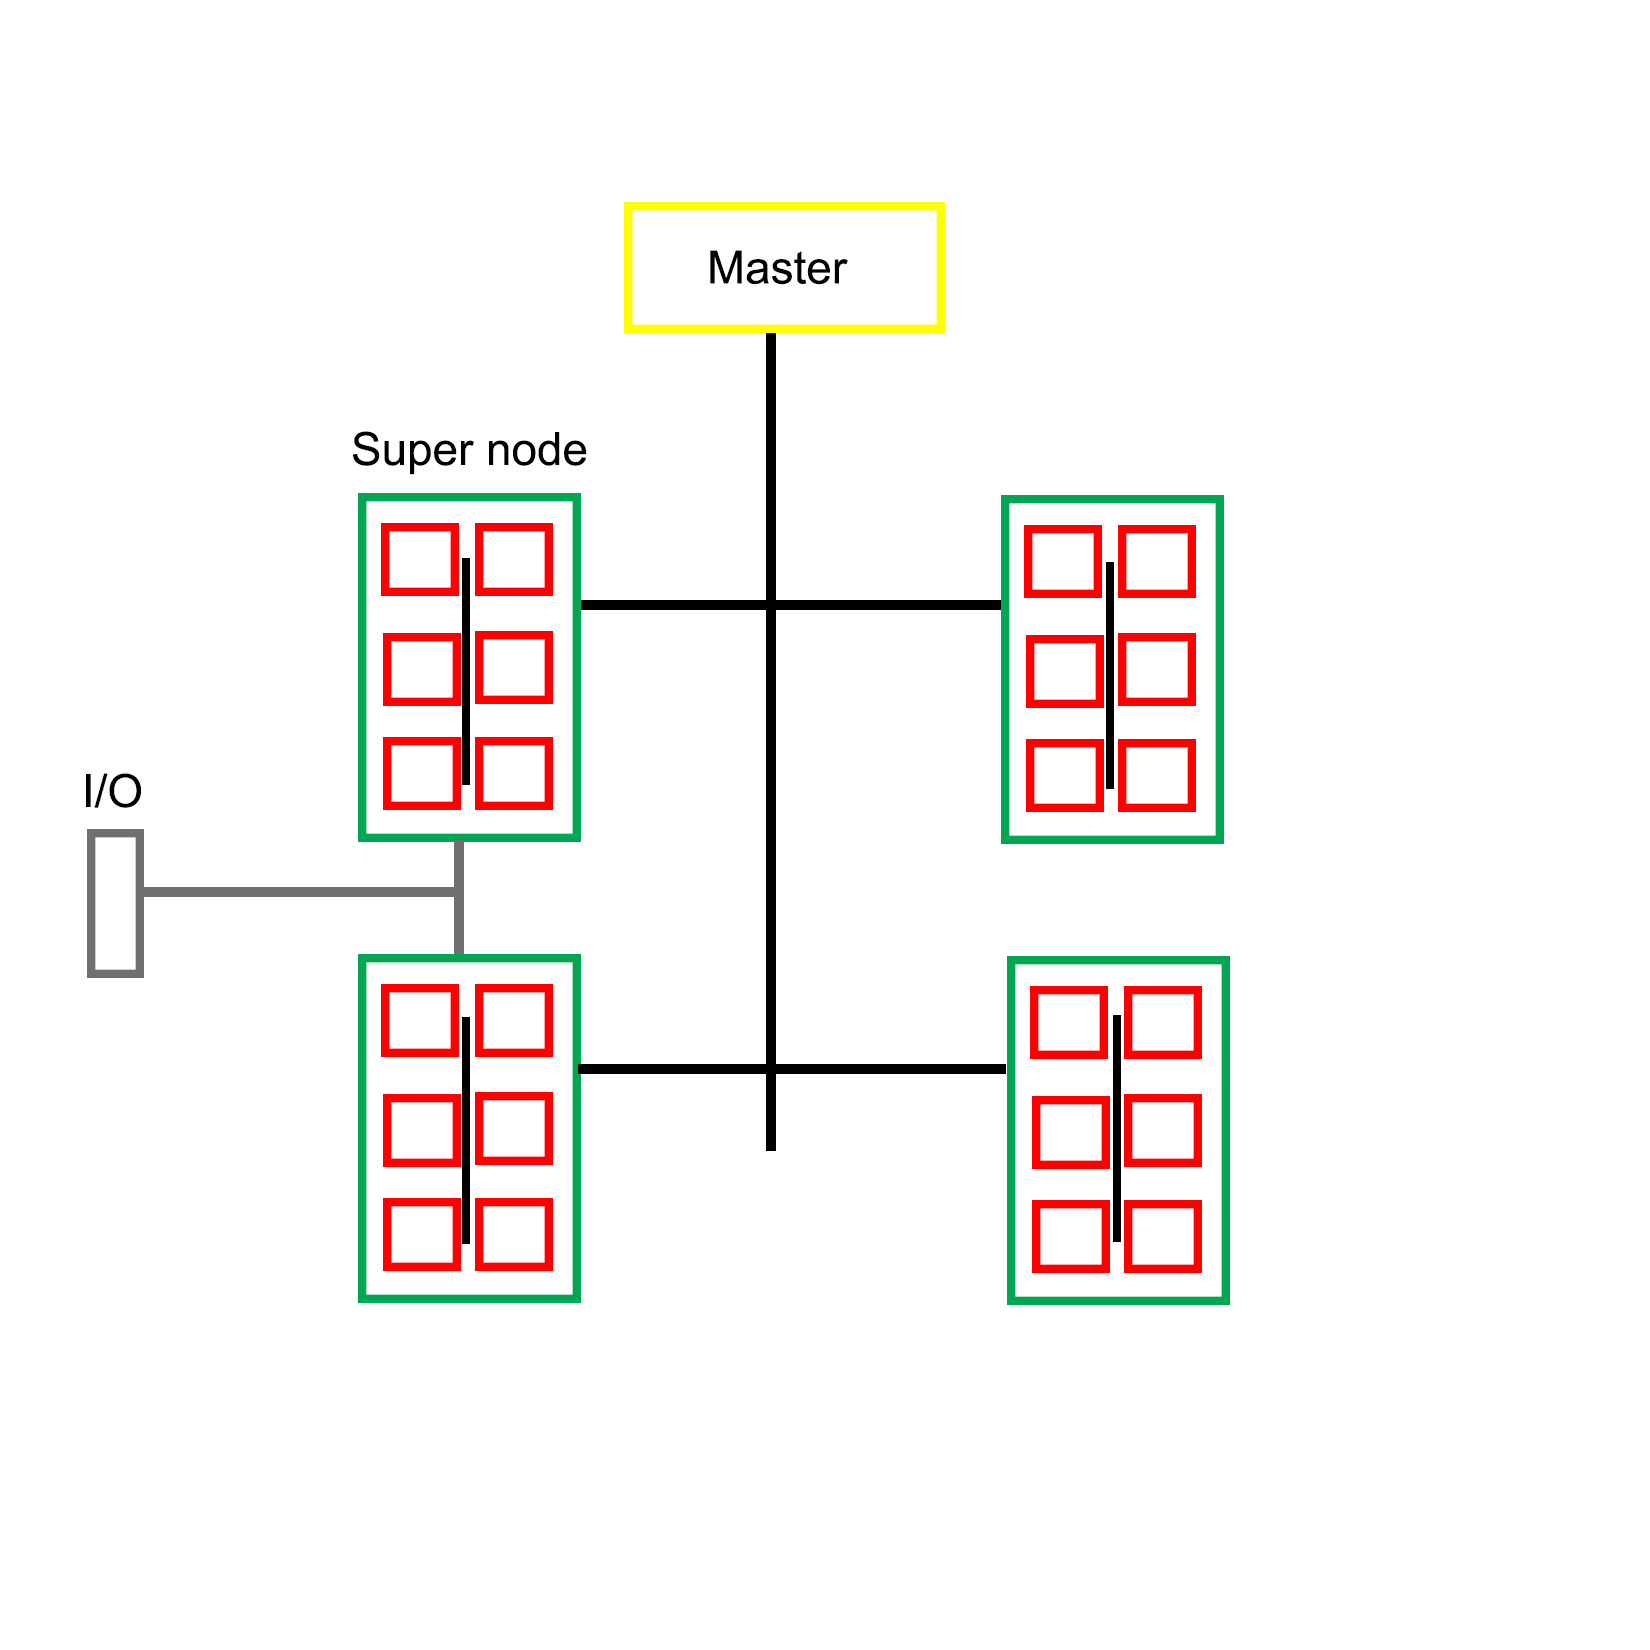
Clearly there is a wide range of possible configurations with MPI-based clusters, utilizing custom, off-the-shelf, or a combination of both types of hardware. The intended purpose of the cluster often determines the most optimal layout for a specific cluster, such as running simulations, or the processing of large datasets. Each type of job presents its own set of limitations and requirements, which is also reflected in the software implementation.
For the remainder of this chapter, we will focus on Open MPI. In order to get a working development environment for Open MPI, one will have to install its headers and library files, along with its supporting tools and binaries.
On Linux and BSD distributions with a package management system, it's quite easy: simply install the Open MPI package and everything should be set up and configured, ready to be used. Consult the manual for one's specific distribution, to see how to search for and install specific packages.
On Debian-based distributions, one would use:
$ sudo apt-get install openmpi-bin openmpi-doc libopenmpi-dev
The preceding command would install the Open MPI binaries, documentation, and development headers. The last two packages can be omitted on compute nodes.
On Windows things get slightly complex, mostly because of the dominating presence of Visual C++ and the accompanying compiler toolchain. If one wishes to use the same development environment as on Linux or BSD, using MinGW, one has to take some additional steps.
The easiest to use and most up to date MinGW environment is MSYS2, which provides a Bash shell along with most of the tools one would be familiar with under Linux and BSD. It also features the Pacman package manager, as known from the Linux Arch distribution. Using this, it's easy to install the requisite packages for Open MPI development.
After installing the MSYS2 environment from https://msys2.github.io/, install the MinGW toolchain:
$ pacman -S base-devel mingw-w64-x86_64-toolchain
This assumes that the 64-bit version of MSYS2 was installed. For the 32-bit version, select i686 instead of x86_64. After installing these packages, we will have both MinGW and the basic development tools installed. In order to use them, start a new shell using the MinGW 64-bit postfix in the name, either via the shortcut in the start menu, or by using the executable file in the MSYS2 install folder.
With MinGW ready, it's time to install MS-MPI version 7.x. This is Microsoft's implementation of MPI and the easiest way to use MPI on Windows. It's an implementation of the MPI-2 specification and mostly compatible with the MPICH2 reference implementation. Since MS-MPI libraries are not compatible between versions, we use this specific version.
Though version 7 of MS-MPI has been archived, it can still be downloaded via the Microsoft Download Center at https://www.microsoft.com/en-us/download/details.aspx?id=49926.
MS-MPI version 7 comes with two installers, msmpisdk.msi and MSMpiSetup.exe. Both need to be installed. Afterwards, we should be able to open a new MSYS2 shell and find the following environment variable set up:
    $ printenv | grep "WIN\|MSMPI"
    MSMPI_INC=D:\Dev\MicrosoftSDKs\MPI\Include\
    MSMPI_LIB32=D:\Dev\MicrosoftSDKs\MPI\Lib\x86\
    MSMPI_LIB64=D:\Dev\MicrosoftSDKs\MPI\Lib\x64\
    WINDIR=C:\Windows
This output for the printenv command shows that the MS-MPI SDK and runtime was properly installed. Next, we need to convert the static library from the Visual C++ LIB format to the MinGW A format:
    $ mkdir ~/msmpi
    $ cd ~/msmpi
    $ cp "$MSMPI_LIB64/msmpi.lib" .
    $ cp "$WINDIR/system32/msmpi.dll" .
    $ gendef msmpi.dll
    $ dlltool -d msmpi.def -D msmpi.dll -l libmsmpi.a
    $ cp libmsmpi.a /mingw64/lib/.
We first copy the original LIB file into a new temporary folder in our home folder, along with the runtime DLL. Next, we use the gendef tool on the DLL in order to create the definitions which we will need in order to convert it to a new format.
This last step is done with dlltool, which takes the definitions file along with the DLL and outputs a static library file which is compatible with MinGW. This file we then copy to a location where MinGW can find it later when linking.
Next, we need to copy the MPI header:
$ cp "$MSMPI_INC/mpi.h" .
After copying this header file, we must open it and locate the section that starts with:
typedef __int64 MPI_Aint
Immediately above that line, we need to add the following line:
#include <stdint.h>
This include adds the definition for __int64, which we will need for the code to compile correctly.
Finally, copy the header file to the MinGW include folder:
$ cp mpi.h /mingw64/include
With this we have the libraries and headers all in place for MPI development with MinGW. allowing us to compile and run the earlier Hello World example, and continue with the rest of this chapter.
In order to distribute MPI jobs across the nodes in a cluster, one has to either specify these nodes as a parameter to the mpirun/mpiexec command or make use of a host file. This host file contains the names of the nodes on the network which will be available for a run, along with the number of available slots on the host.
A prerequisite for running MPI applications on a remote node is that the MPI runtime is installed on that node, and that password-less access has been configured for that node. This means that so long as the master node has the SSH keys installed, it can log into each of these nodes in order to launch the MPI application on it.
After installing MPI on a node, the next step is to set up password-less SSH access for the master node. This requires the SSH server to be installed on the node (part of the ssh package on Debian-based distributions). After this we need to generate and install the SSH key.
One way to easily do this is by having a common user on the master node and other nodes, and using an NFS network share or similar to mount the user folder on the master node on the compute nodes. This way all nodes would have the same SSH key and known hosts file. One disadvantage of this approach is the lack of security. For an internet-connected cluster, this would not be a very good approach.
It is, however, a definitely good idea to run the job on each node as the same user to prevent any possible permission issues, especially when using files and other resources. With the common user account created on each node, and with the SSH key generated, we can transfer the public key to the node using the following command:
$ ssh-copy-id mpiuser@node1
Alternatively, we can copy the public key into the authorized_keys file on the node system while we are setting it up. If creating and configuring a large number of nodes, it would make sense to use an image to copy onto each node's system drive, use a setup script, or possibly boot from an image through PXE boot.
With this step completed, the master node can now log into each compute node in order to run jobs.
As mentioned earlier, in order to run a job on other nodes, we need to specify these nodes. The easiest way to do this is to create a file containing the names of the compute nodes we wish to use, along with optional parameters.
To allow us to use names for the nodes instead of IP addresses, we have to modify the operating system's host file first: for example, /etc/hosts on Linux:
    192.168.0.1 master
    192.168.0.2 node0
    192.168.0.3 node1
Next we create a new file which will be the host file for use with MPI:
    master
    node0
    node1
With this configuration, a job would be executed on both compute nodes, as well as the master node. We can take the master node out of this file to prevent this.
Without any optional parameter provided, the MPI runtime will use all available processors on the node. If it is desirable, we can limit this number:
    node0 slots=2
    node1 slots=4
Assuming that both nodes are quad-core CPUs, this would mean that only half the cores on node0 would be used, and all of them on node1.
Running an MPI job across multiple MPI nodes is basically the same as executing it only locally, as in the example earlier in this chapter:
$ mpirun --hostfile my_hostfile hello_mpi_world
This command would tell the MPI launcher to use a host file called my_hostfile and run a copy of the specified MPI application on each processor of each node found in that host file.
In addition to using a manual command and host files to create and start jobs on specific nodes, there are also cluster scheduler applications. These generally involve the running of a daemon process on each node as well as the master node. Using the provided tools, one can then manage resources and jobs, scheduling allocation and keeping track of job status.
One of the most popular cluster management scheduler's is SLURM, which short for Simple Linux Utility for Resource management (though now renamed to Slurm Workload Manager with the website at https://slurm.schedmd.com/). It is commonly used by supercomputers as well as many computer clusters. Its primary functions consist out of:
The setting up of a cluster scheduler is not required for a basic cluster operation, but can be very useful for larger clusters, when running multiple jobs simultaneously, or when having multiple users of the cluster wishing to run their own job.
At this point, we have a functional MPI cluster, which can be used to execute MPI-based applications (and others, as well) in a parallel fashion. While for some tasks it might be okay to just send dozens or hundreds of processes on their merry way and wait for them to finish, very often it is crucial that these parallel processes are able to communicate with each other.
This is where the true meaning of MPI (being "Message Passing Interface") comes into play. Within the hierarchy created by an MPI job, processes can communicate and share data in a variety of ways. Most fundamentally, they can share and receive messages.
An MPI message has the following properties:
The sender and receiver should be fairly obvious. The message tag is a numeric ID which the sender can set and which the receiver can use to filter messages, to, for example, allow for the prioritizing of specific messages. The data type determines the type of information contained in the message.
The send and receive functions look like this:
int MPI_Send(
         void* data,
         int count,
         MPI_Datatype datatype,
         int destination,
         int tag,
         MPI_Comm communicator)

int MPI_Recv(
         void* data,
         int count,
         MPI_Datatype datatype,
         int source,
         int tag,
         MPI_Comm communicator,
         MPI_Status* status)
An interesting thing to note here is that the count parameter in the send function indicates the number of elements that the function will be sending, whereas the same parameter in the receive function indicates the maximum number of elements that this thread will accept.
The communicator refers to the MPI communicator instance being used, and the receive function contains a final parameter which can be used to check the status of the MPI message.
MPI defines a number of basic types, which one can use directly:
|
MPI datatype |
C equivalent |
|
MPI_SHORT |
short int |
|
MPI_INT |
int |
|
MPI_LONG |
long int |
|
MPI_LONG_LONG |
long long int |
|
MPI_UNSIGNED_CHAR |
unsigned char |
|
MPI_UNSIGNED_SHORT |
unsigned short int |
|
MPI_UNSIGNED |
unsigned int |
|
MPI_UNSIGNED_LONG |
unsigned long int |
|
MPI_UNSIGNED_LONG_LONG |
unsigned long long int |
|
MPI_FLOAT |
float |
|
MPI_DOUBLE |
double |
|
MPI_LONG_DOUBLE |
long double |
|
MPI_BYTE |
char |
MPI guarantees that when using these types, the receiving side will always get the message data in the format it expects, regardless of endianness and other platform-related issues.
In addition to these basic formats, one can also create new MPI data types. These use a number of MPI functions, including MPI_Type_create_struct:
int MPI_Type_create_struct(
   int count,
   int array_of_blocklengths[],
         const MPI_Aint array_of_displacements[],
   const MPI_Datatype array_of_types[],
         MPI_Datatype *newtype)
With this function, one can create an MPI type that contains a struct, to be passed just like a basic MPI data type:
#include <cstdio>
#include <cstdlib>
#include <mpi.h>
#include <cstddef>

struct car {
        int shifts;
        int topSpeed;
};

int main(int argc, char **argv) {
         const int tag = 13;
         int size, rank;

         MPI_Init(&argc, &argv);
         MPI_Comm_size(MPI_COMM_WORLD, &size);

         if (size < 2) {
               fprintf(stderr,"Requires at least two processes.\n");
               MPI_Abort(MPI_COMM_WORLD, 1);
         }

         const int nitems = 2;
         int blocklengths[2] = {1,1};
   MPI_Datatype types[2] = {MPI_INT, MPI_INT};
         MPI_Datatype mpi_car_type;
         MPI_Aint offsets[2];

         offsets[0] = offsetof(car, shifts);
         offsets[1] = offsetof(car, topSpeed);

         MPI_Type_create_struct(nitems, blocklengths, offsets, types, &mpi_car_type);
         MPI_Type_commit(&mpi_car_type);

         MPI_Comm_rank(MPI_COMM_WORLD, &rank);
         if (rank == 0) {
               car send;
               send.shifts = 4;
               send.topSpeed = 100;

               const int dest = 1;

         MPI_Send(&send, 1, mpi_car_type, dest, tag, MPI_COMM_WORLD);

               printf("Rank %d: sent structure car\n", rank);
         }

   if (rank == 1) {
               MPI_Status status;
               const int src = 0;

         car recv;

         MPI_Recv(&recv, 1, mpi_car_type, src, tag, MPI_COMM_WORLD, &status);
         printf("Rank %d: Received: shifts = %d topSpeed = %d\n", rank, recv.shifts, recv.topSpeed);
    }

    MPI_Type_free(&mpi_car_type);
    MPI_Finalize();

         return 0;
}
Here we see how a new MPI data type called mpi_car_type is defined and used to message between two processes. To create a struct type like this, we need to define the number of items in the struct, the number of elements in each block, their byte displacement, and their basic MPI types.
A simple example of MPI communication is the sending of a single value from one process to another. In order to do this, one needs to use the following listed code and run the compiled binary to start at least two processes. It does not matter whether these processes run locally or on two compute nodes.
The following code was gratefully borrowed from http://mpitutorial.com/tutorials/mpi-hello-world/:
#include <mpi.h>
#include <stdio.h>
#include <stdlib.h>

int main(int argc, char** argv) {
   // Initialize the MPI environment.
   MPI_Init(NULL, NULL);

   // Find out rank, size.
   int world_rank;
   MPI_Comm_rank(MPI_COMM_WORLD, &world_rank);
   int world_size;
   MPI_Comm_size(MPI_COMM_WORLD, &world_size);

   // We are assuming at least 2 processes for this task.
   if (world_size < 2) {
               fprintf(stderr, "World size must be greater than 1 for %s.\n", argv[0]);
               MPI_Abort(MPI_COMM_WORLD, 1);
   }

   int number;
   if (world_rank == 0) {
         // If we are rank 0, set the number to -1 and send it to process 1.
               number = -1;
               MPI_Send(&number, 1, MPI_INT, 1, 0, MPI_COMM_WORLD);
   }
   else if (world_rank == 1) {
               MPI_Recv(&number, 1, MPI_INT, 0, 0,
                           MPI_COMM_WORLD,
                           MPI_STATUS_IGNORE);
               printf("Process 1 received number %d from process 0.\n", number);
   }

   MPI_Finalize();
}
There isn't a lot to this code. We work through the usual MPI initialization, followed by a check to ensure that our world size is at least two processes large.
The process with rank 0 will then send an MPI message of data type MPI_INT and value -1. The process with rank 1 will wait to receive this message. The receiving process specifies for MPI_Status MPI_STATUS_IGNORE to indicate that the process will not be checking the status of the message. This is a useful optimization technique.
Finally, the expected output is the following:
    $ mpirun -n 2 ./send_recv_demo
    Process 1 received number -1 from process 0
Here we start the compiled demo code with a total of two processes. The output shows that the second process received the MPI message from the first process, with the correct value.
For advanced MPI communication, one would use the MPI_Status field to obtain more information about a message. One can use MPI_Probe to discover a message's size before accepting it with MPI_Recv. This can be useful for situations where it is not known beforehand what the size of a message will be.
Broadcasting a message means that all processes in the world will receive it. This simplifies the broadcast function relative to the send function:
int MPI_Bcast(
   void *buffer,
   int count,
   MPI_Datatype datatype,
         int root,
   MPI_Comm comm)
The receiving processes would simply use a normal MPI_Recv function. All that the broadcast function does is optimize the sending of many messages using an algorithm that uses multiple network links simultaneously, instead of just one.
Scattering is very similar to broadcasting a message, with one very important distinction: instead of sending the same data in each message, instead it sends a different part of an array to each recipient. Its function definition looks as follows:
int MPI_Scatter(
         void* send_data,
         int send_count,
         MPI_Datatype send_datatype,
         void* recv_data,
         int recv_count,
         MPI_Datatype recv_datatype,
         int root,
         MPI_Comm communicator)
Each receiving process will get the same data type, but we can specify how many items will be sent to each process (send_count). This function is used on both the sending and receiving side, with the latter only having to define the last set of parameters relating to receiving data, with the world rank of the root process and the relevant communicator being provided.
Gathering is the inverse of scattering. Here multiple processes will send data that ends up at a single process, with this data sorted by the rank of the process which sent it. Its function definition looks as follows:
int MPI_Gather(
         void* send_data,
         int send_count,
         MPI_Datatype send_datatype,
         void* recv_data,
         int recv_count,
         MPI_Datatype recv_datatype,
         int root,
         MPI_Comm communicator)
One may notice that this function looks very similar to the scatter function. This is because it works basically the same way, only this time around the sending nodes have to all fill in the parameters related to sending the data, while the receiving process has to fill in the parameters related to receiving data.
It is important to note here that the recv_count parameter relates to the amount of data received from each sending process, not the size in total.
There exist further specializations of these two basic functions, but these will not be covered here.
One might think that it would be easiest to use MPI to allocate one instance of the MPI application to a single CPU core on each cluster node, and this would be true. It would, however, not be the fastest solution.
Although for communication between processes across a network MPI is likely the best choice in this context, within a single system (single or multi-CPU system) using multithreading makes a lot of sense.
The main reason for this is simply that communication between threads is significantly faster than inter-process communication, especially when using a generalized communication layer such as MPI.
One could write an application that uses MPI to communicate across the cluster's network, whereby one allocates one instance of the application to each MPI node. The application itself would detect the number of CPU cores on that system, and create one thread for each core. Hybrid MPI, as it's often called, is therefore commonly used, for the advantages it provides:
Implementing this can be done the way we have seen in previous chapters, by using the multithreading features found in C++11 and successive versions. The other option is to use OpenMP, as we saw at the very beginning of this chapter.
The obvious advantage of using OpenMP is that it takes very little effort from the developer's side. If all that one needs is to get more instances of the same routine running, all it takes is are the small modifications to mark the code to be used for the worker threads.
For example:
#include <stdio.h>
#include <mpi.h>
#include <omp.h>

int main(int argc, char *argv[]) {
  int numprocs, rank, len;
  char procname[MPI_MAX_PROCESSOR_NAME];
  int tnum = 0, tc = 1;

  MPI_Init(&argc, &argv);
  MPI_Comm_size(MPI_COMM_WORLD, &numprocs);
  MPI_Comm_rank(MPI_COMM_WORLD, &rank);
  MPI_Get_processor_name(procname, &len);

  #pragma omp parallel default(shared) private(tnum, tc) {
      np = omp_get_num_threads();
      tnum = omp_get_thread_num();
      printf("Thread %d out of %d from process %d out of %d on %s\n",
      tnum, tc, rank, numprocs, procname);
  }

  MPI_Finalize();
}
The above code combines an OpenMP application with MPI. To compile it we would run for example:
$ mpicc -openmp hellohybrid.c -o hellohybrid
Next, to run the application, we would use mpirun or equivalent:
$ export OMP_NUM_THREADS=8
$ mpirun -np 2 --hostfile my_hostfile -x OMP_NUM_THREADS ./hellohybrid
The mpirun command would run two MPI processes using the hellohybrid binary, passing the environment variable we exported with the -x flag to each new process. The value contained in that variable will then be used by the OpenMP runtime to create that number of threads.
Assuming we have at least two MPI nodes in our MPI host file, we would end up with two MPI processes across two nodes, each of which running eight threads, which would fit a quad-core CPU with Hyper-Threading or an octo-core CPU.
When writing MPI-based applications and executing them on either a multi-core CPU or cluster, the issues one may encounter are very much the same as those we already came across with the multithreaded code in the preceding chapters.
However, an additional worry with MPI is that one relies on the availability of network resources. Since a send buffer used for an MPI_Send call cannot be reclaimed until the network stack can process the buffer, and this call is a blocking type, sending lots of small messages can lead to one process waiting for another, which in turn is waiting for a call to complete.
This type of deadlock should be kept in mind when designing the messaging structure of an MPI application. One can, for example, ensure that there are no send calls building up on one side, which would lead to such a scenario. Providing feedback messages on, queue depth and similar could be used to the ease pressure.
MPI also contains a synchronization mechanism using a so-called barrier. This is meant to be used between MPI processes to allow them to synchronize on for example a task. Using an MPI barrier (MPI_Barrier) call is similarly problematic as a mutex in that if an MPI process does not manage to get synchronized, everything will hang at this point.
In this chapter, we looked in some detail at the MPI standard, along with a number of its implementations, specifically Open MPI, and we looked at how to set up a cluster. We also saw how to use OpenMP to easily add multithreading to existing codes.
At this point, the reader should be capable of setting up a basic Beowulf or similar cluster, configuring it for MPI, and running basic MPI applications on it. How to communicate between MPI processes and how to define custom data types should be known. In addition, the reader will be aware of the potential pitfalls when programming for MPI.
In the next chapter, we will take all our knowledge of the preceding chapters and see how we can combine it in the final chapter, as we look at general-purpose computing on videocards (GPGPU).
A fairly recent development has been to use video cards (GPUs) for general purpose computing (GPGPU). Using frameworks such as CUDA and OpenCL, it is possible to speed up, for example, the processing of large datasets in parallel in medical, military, and scientific applications. In this chapter, we will look at how this is done with C++ and OpenCL, and how to integrate such a feature into a multithreaded application in C++.
Topics in this chapter include:
In Chapter 9, Multithreading with Distributed Computing, we looked at running the same task across a number of compute nodes in a cluster system. The main goal of such a setup is to process data in a highly parallel fashion, theoretically speeding up said processing relative to a single system with fewer CPU cores.
GPGPU (General Purpose Computing on Graphics Processing Units) is in some ways similar to this, but with one major difference: while a compute cluster with only regular CPUs is good at scalar tasks--meaning performing one task on one single set of data (SISD)--GPUs are vector processors that excel at SIMD (Single Input, Multiple Data) tasks.
Essentially, this means that one can send a large dataset to a GPU, along with a single task description, and the GPU will proceed to execute that same task on parts of that data in parallel on its hundreds or thousands of cores. One can thus regard a GPU as a very specialized kind of cluster:
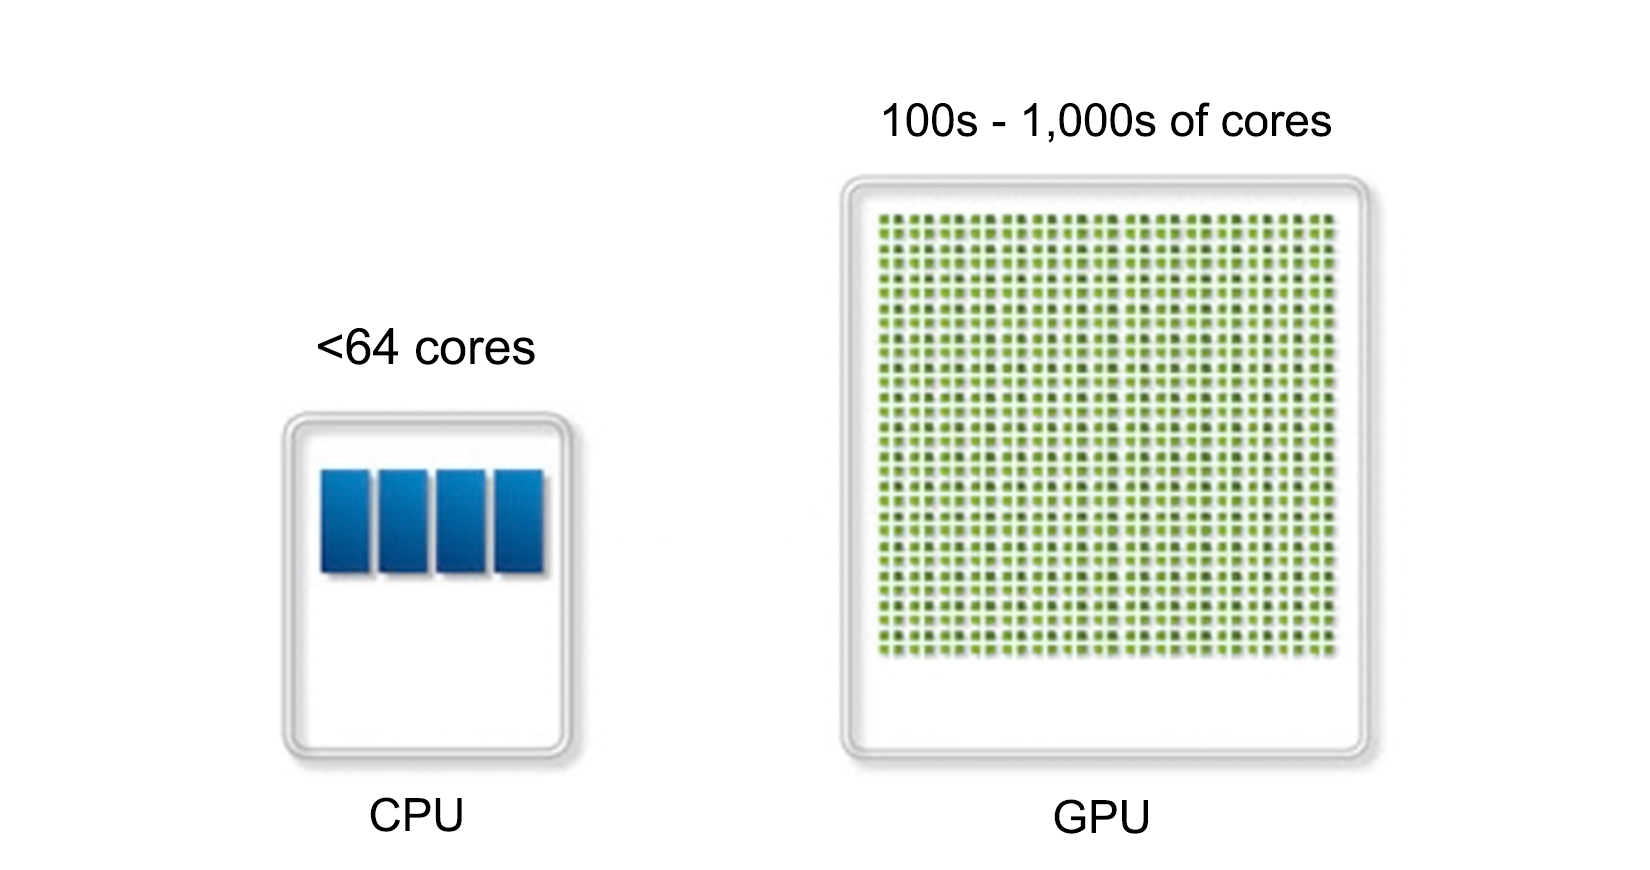
When the concept of GPGPU was first coined (around 2001), the most common way to write GPGPU programs was using GLSL (OpenGL Shading Language) and similar shader languages. Since these shader languages were already aimed at the processing of SIMD tasks (image and scene data), adapting them for more generic tasks was fairly straightforward.
Since that time, a number of more specialized implementations have appeared:
|
Name |
Since |
Owner |
Notes |
|
CUDA |
2006 |
NVidia |
This is proprietary and only runs on NVidia GPUs |
|
Close to Metal |
2006 |
ATi/AMD |
This was abandoned in favor of OpenCL |
|
DirectCompute |
2008 |
Microsoft |
This is released with DX11, runs on DX10 GPUs, and is limited to Windows platforms |
|
OpenCL |
2009 |
Khronos Group |
This is open standard and available across AMD, Intel, and NVidia GPUs on all mainstream platforms, as well as mobile platforms |
Of the various current GPGPU implementations, OpenCL is by far the most interesting GPGPU API due to the absence of limitations. It is available for virtually all mainstream GPUs and platforms, even enjoying support on select mobile platforms.
Another distinguishing feature of OpenCL is that it's not limited to just GPGPU either. As part of its name (Open Computing Language), it abstracts a system into the so-called compute devices, each with their own capabilities. GPGPU is the most common application, but this feature makes it fairly easy to test implementations on a CPU first, for easy debugging.
One possible disadvantage of OpenCL is that it employs a high level of abstraction for memory and hardware details, which can negatively affect performance, even as it increases the portability of the code.
In the rest of this chapter, we will focus on OpenCL.
Many programs incorporate OpenCL-based code in order to speed up operations. These include programs aimed at graphics processing, as well as 3D modelling and CAD, audio and video processing. Some examples are:
Further acceleration of certain operations is found in office applications including LibreOffice Calc and Microsoft Excel.
Perhaps more importantly, OpenCL is also commonly used for scientific computing and cryptography, including BOINC and GROMACS as well as many other libraries and programs.
Since the release of the OpenCL specification on December 8, 2008, there have so far been five updates, bringing it up to version 2.2. Important changes with these releases are mentioned next.
The first public release was released by Apple as part of the macOS X Snow Leopard release on August 28, 2009.
Together with this release, AMD announced that it would support OpenCL and retire its own Close to Metal (CtM) framework. NVidia, RapidMind, and IBM also added support for OpenCL to their own frameworks.
The OpenCL 1.1 specification was ratified by the Khronos Group on June 14, 2010. It adds additional functionality for parallel programming and performance, including the following:
The OpenCL 1.2 version was released on November 15, 2011. Its most significant features include the following:
The OpenCL2.0 version was released on November 18, 2013. This release has the following significant changes or additions:
The OpenCL 2.1 revision to the 2.0 standard was released on November 16, 2015. The most notable thing about this release was the introduction of the OpenCL C++ kernel language, such as how the OpenCL language originally was based on C with extensions, the C++ version is based on a subset of C++14, with backwards compatibility for the C kernel language.
Updates to the OpenCL API include the following:
Standard Portable Intermediate Representation (SPIR) and its successor, SPIR-V, are a way to provide device-independent binaries for use across OpenCL devices.
On May 16, 2017, what is now the current release of OpenCL was released. According to the Khronos Group, it includes the following changes:
Regardless of which platform and GPU you have, the most important part of doing OpenCL development is to obtain the OpenCL runtime for one's GPU from its manufacturer. Here, AMD, Intel, and NVidia all provide an SDK for all mainstream platforms. For NVidia, OpenCL support is included in the CUDA SDK.
Along with the GPU vendor's SDK, one can also find details on their website on which GPUs are supported by this SDK.
After installing the vendor's GPGPU SDK using the provided instructions, we still need to download the OpenCL headers. Unlike the shared library and runtime file provided by the vendor, these headers are generic and will work with any OpenCL implementation.
For Debian-based distributions, simply execute the following command line:
$ sudo apt-get install opencl-headers
For other distributions, the package may be called the same, or something different. Consult the manual for one's distribution on how to find out the package name.
After installing the SDK and OpenCL headers, we are ready to compile our first OpenCL applications.
On Windows, we can choose between developing with Visual Studio (Visual C++) or with the Windows port of GCC (MinGW). To stay consistent with the Linux version, we will be using MinGW along with MSYS2. This means that we'll have the same compiler toolchain and same Bash shell and utilities, along with the Pacman package manager.
After installing the vendor's GPGPU SDK, as described previously, simply execute the following command line in an MSYS2 shell in order to install the OpenCL headers:
$ pacman -S mingw64/mingw-w64-x86_64-opencl-headers
Or, execute the following command line when using the 32-bit version of MinGW:
mingw32/mingw-w64-i686-opencl-headers
With this, the OpenCL headers are in place. We now just have to make sure that the MinGW linker can find OpenCL library. With the NVidia CUDA SDK, you can use the CUDA_PATH environment variable for this, or browse the install location of the SDK and copy the appropriate OpenCL LIB file from there to the MinGW lib folder, making sure not to mix the 32-bit and 64-bit files.
With the shared library now also in place, we can compile the OpenCL applications.
Starting with OS X 10.7, an OpenCL runtime is provided with the OS. After installing XCode for the development headers and libraries, one can immediately start with OpenCL development.
A common example of a GPGPU application is one which calculates the Fast Fourier Transform (FFT). This algorithm is commonly used for audio processing and similar, allowing you to transform, for example, from the time domain to the frequency domain for analysis purposes.
What it does is apply a divide and conquer approach to a dataset, in order to calculate the DFT (Discrete Fourier Transform). It does this by splitting the input sequence into a fixed, small number of smaller subsequences, computing their DFT, and assembling these outputs in order to compose the final sequence.
This is fairly advanced mathematics, but suffice it to say that what makes it so ideal for GPGPU is that it's a highly-parallel algorithm, employing the subdivision of data in order to speed up the calculating of the DFT, as visualized in this graphic:
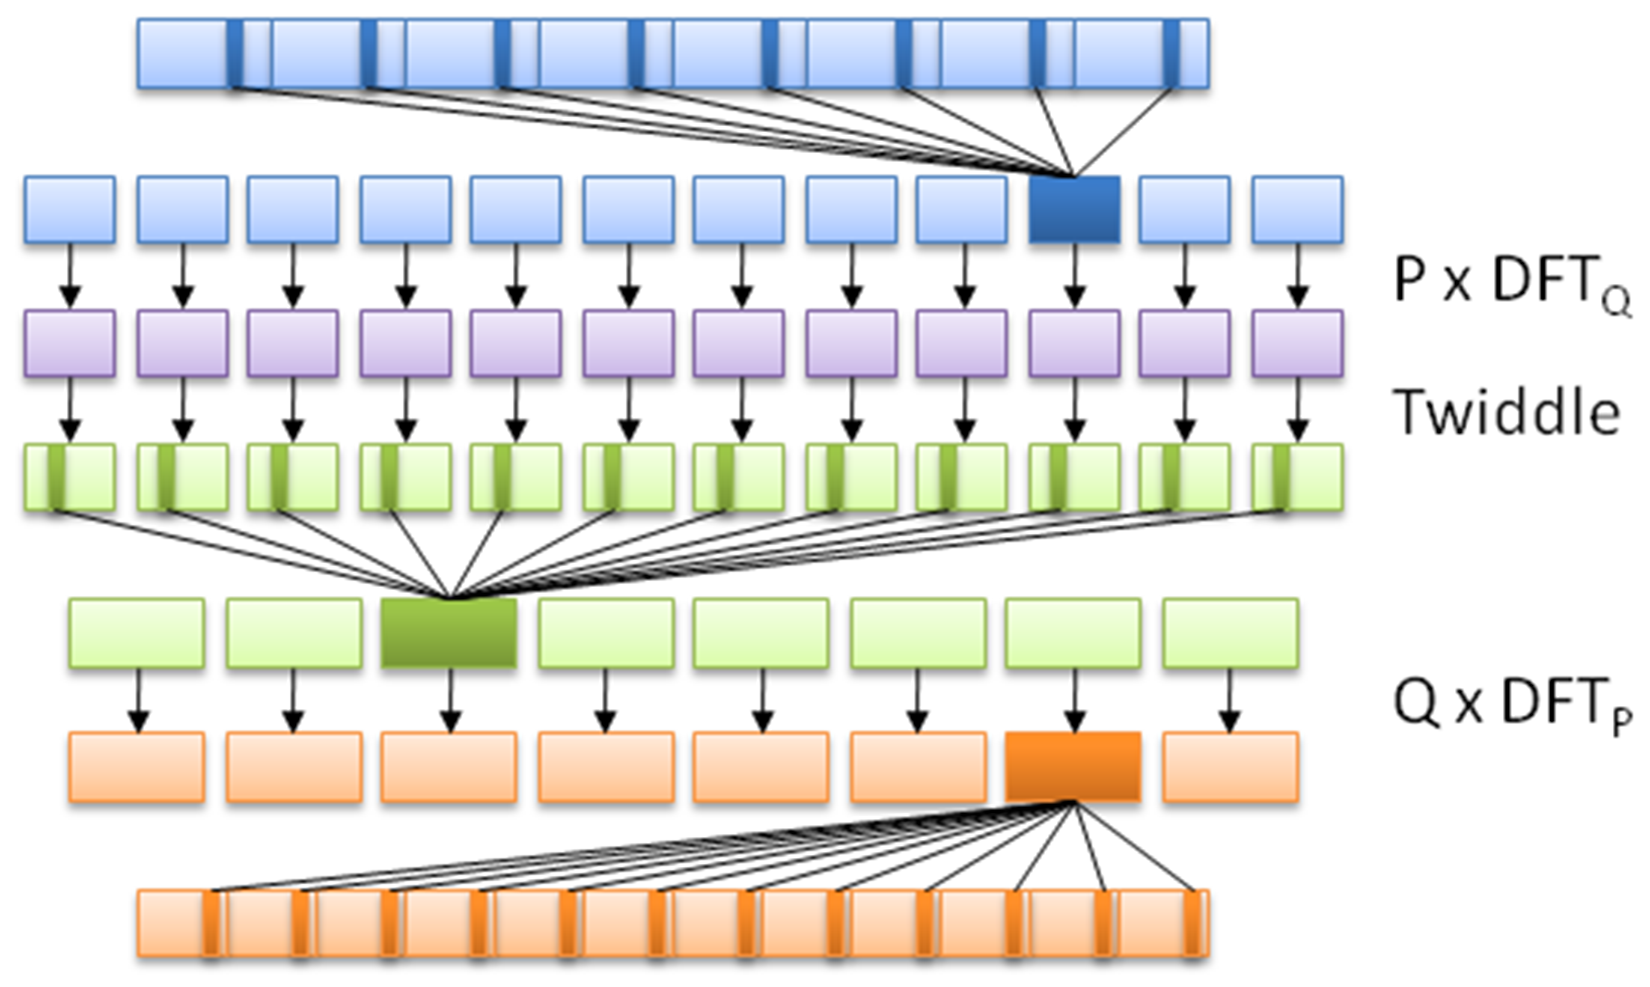
Each OpenCL application consists of at least two parts: the C++ code that sets up and configures the OpenCL instance, and the actual OpenCL code, also known as a kernel, such as this one based on the FFT demonstration example from Wikipedia:
// This kernel computes FFT of length 1024.
// The 1024 length FFT is decomposed into calls to a radix 16 function,
// another radix 16 function and then a radix 4 function
 __kernel void fft1D_1024 (__global float2 *in,
                     __global float2 *out,
                     __local float *sMemx,
                     __local float *sMemy) {
          int tid = get_local_id(0);
          int blockIdx = get_group_id(0) * 1024 + tid;
          float2 data[16];

          // starting index of data to/from global memory
          in = in + blockIdx;  out = out + blockIdx;

          globalLoads(data, in, 64); // coalesced global reads
          fftRadix16Pass(data);      // in-place radix-16 pass
          twiddleFactorMul(data, tid, 1024, 0);

          // local shuffle using local memory
          localShuffle(data, sMemx, sMemy, tid, (((tid & 15) * 65) + (tid >> 4)));
          fftRadix16Pass(data);               // in-place radix-16 pass
          twiddleFactorMul(data, tid, 64, 4); // twiddle factor multiplication

          localShuffle(data, sMemx, sMemy, tid, (((tid >> 4) * 64) + (tid & 15)));

          // four radix-4 function calls
          fftRadix4Pass(data);      // radix-4 function number 1
          fftRadix4Pass(data + 4);  // radix-4 function number 2
          fftRadix4Pass(data + 8);  // radix-4 function number 3
          fftRadix4Pass(data + 12); // radix-4 function number 4

          // coalesced global writes
    globalStores(data, out, 64);
 }
This OpenCL kernel shows that, like the GLSL shader language, OpenCL's kernel language is essentially C with a number of extensions. Although one could use the OpenCL C++ kernel language, this one is only available since OpenCL 2.1 (2015), and as a result, support and examples for it are less common than the C kernel language.
Next is the C++ application, using which, we run the preceding OpenCL kernel:
#include <cstdio>
 #include <ctime>
 #include "CL\opencl.h"

 #define NUM_ENTRIES 1024

 int main() { // (int argc, const char * argv[]) {
    const char* KernelSource = "fft1D_1024_kernel_src.cl";
As we can see here, there's only one header we have to include in order to gain access to the OpenCL functions. We also specify the name of the file that contains the source for our OpenCL kernel. Since each OpenCL device is likely a different architecture, the kernel is compiled for the target device when we load it:
          const cl_uint num = 1;
    clGetDeviceIDs(0, CL_DEVICE_TYPE_GPU, 0, 0, (cl_uint*) num);

   cl_device_id devices[1];
    clGetDeviceIDs(0, CL_DEVICE_TYPE_GPU, num, devices, 0);
Next, we have to obtain a list of OpenCL devices we can use, filtering it by GPUs:
    cl_context context = clCreateContextFromType(0, CL_DEVICE_TYPE_GPU,
                                                   0, 0, 0);
We then create an OpenCL context using the GPU devices we found. The context manages the resources on a range of devices:
    clGetDeviceIDs(0, CL_DEVICE_TYPE_DEFAULT, 1, devices, 0);
    cl_command_queue queue = clCreateCommandQueue(context, devices[0], 0, 0);
Finally, we will create the command queue that will contain the commands to be executed on the OpenCL devices:
    cl_mem memobjs[] = { clCreateBuffer(context, CL_MEM_READ_ONLY | CL_MEM_COPY_HOST_PTR, sizeof(float) * 2 * NUM_ENTRIES, 0, 0),
   clCreateBuffer(context, CL_MEM_READ_WRITE, sizeof(float) * 2 * NUM_ENTRIES, 0, 0) };
In order to communicate with devices, we need to allocate buffer objects that will contain the data we will copy to their memory. Here, we will allocate two buffers, one to read and one to write:
cl_program program = clCreateProgramWithSource(context, 1, (const char **)& KernelSource, 0, 0);
We have now got the data on the device, but still need to load the kernel on it. For this, we will create a kernel using the OpenCL kernel source we looked at earlier, using the filename we defined earlier:
clBuildProgram(program, 0, 0, 0, 0, 0);
Next, we will compile the source as follows:
cl_kernel kernel = clCreateKernel(program, "fft1D_1024", 0);
Finally, we will create the actual kernel from the binary we created:
    size_t local_work_size[1] = { 256 };

    clSetKernelArg(kernel, 0, sizeof(cl_mem), (void *) &memobjs[0]);
    clSetKernelArg(kernel, 1, sizeof(cl_mem), (void *) &memobjs[1]);
    clSetKernelArg(kernel, 2, sizeof(float) * (local_work_size[0] + 1) * 16, 0);
    clSetKernelArg(kernel, 3, sizeof(float) * (local_work_size[0] + 1) * 16, 0);
In order to pass arguments to our kernel, we have to set them here. Here, we will add pointers to our buffers and dimensions of the work size as follows:
    size_t global_work_size[1] = { 256 };
          global_work_size[0] = NUM_ENTRIES;
    local_work_size[0]  =  64;  // Nvidia: 192 or 256
    clEnqueueNDRangeKernel(queue, kernel, 1, 0, global_work_size, local_work_size, 0, 0, 0);
Now we can set the work item dimensions and execute the kernel. Here, we will use a kernel execution method that allows us to define the size of the work group:
          cl_mem C = clCreateBuffer(context, CL_MEM_WRITE_ONLY, (size), 0, &ret);
                      cl_int ret = clEnqueueReadBuffer(queue, memobjs[1], CL_TRUE, 0, sizeof(float) * 2 * NUM_ENTRIES, C, 0, 0, 0);
After executing the kernel, we wish to read back the resulting information. For this, we tell OpenCL to copy the assigned write buffer we passed as a kernel argument into a newly assigned buffer. We are now free to use the data in this buffer as we see fit.
However, in this example, we will not use the data:
    clReleaseMemObject(memobjs[0]);
    clReleaseMemObject(memobjs[1]);
   clReleaseCommandQueue(queue);
   clReleaseKernel(kernel);
   clReleaseProgram(program);
   clReleaseContext(context);
   free(C);
 }
Finally, we free the resources we allocated and exit.
When using a CPU, one has to deal with a number of memory hierarchies, in the form of the main memory (slowest), to CPU caches (faster), and CPU registers (fastest). A GPU is much the same, in that, one has to deal with a memory hierarchy that can significantly impact the speed of one's applications.
Fastest on a GPU is also the register (or private) memory, of which we have quite a bit more than on the average CPU. After this, we get local memory, which is a memory shared by a number of processing elements. Slowest on the GPU itself is the memory data cache, also called texture memory. This is a memory on the card that is usually referred to as Video RAM (VRAM) and uses a high-bandwidth, but a relatively high-latency memory such as GDDR5.
The absolute slowest is using the host system's memory (system RAM), as this has to travel across the PCIe bus and through various other subsystems in order to transfer any data. Relative to on-device memory systems, host-device communication is best called 'glacial'.
For AMD, Nvidia, and similar dedicated GPU devices, the memory architecture can be visualized like this:
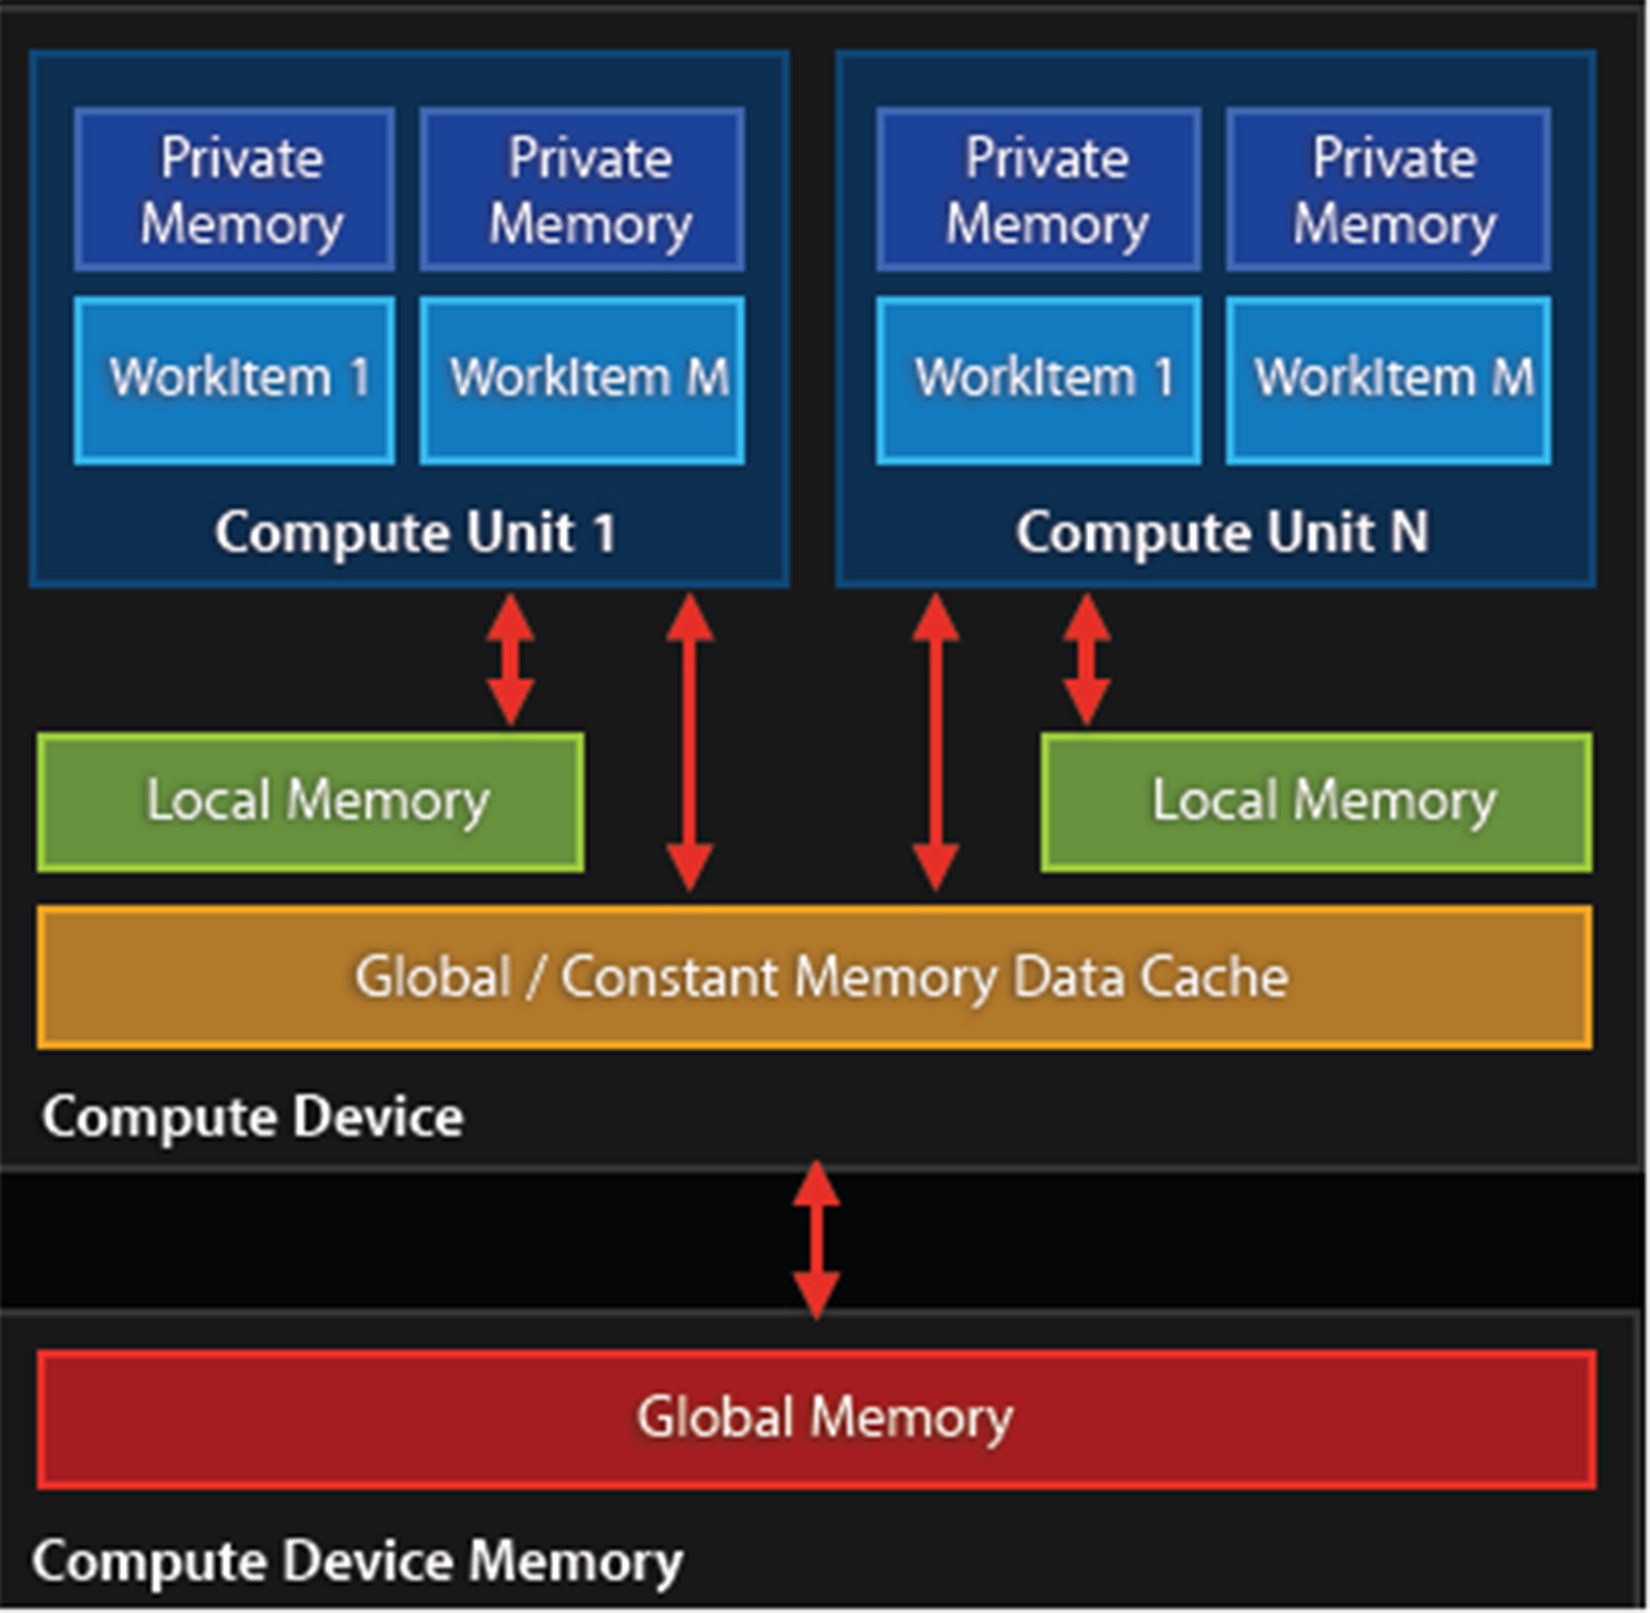
Because of this memory layout, it is advisable to transfer any data in large blocks, and to use asynchronous transfers if possible. Ideally, the kernel would run on the GPU core and have the data streamed to it to avoid any latencies.
Combining multithreaded code with GPGPU can be much easier than trying to manage a parallel application running on an MPI cluster. This is mostly due to the following workflow:
As this is an asynchronous process, one can treat this as a fire-and-forget operation, merely having a single thread dedicated to monitoring the process of the active kernels.
The biggest challenge in terms of multithreading and GPGPU applications lies not with the host-based application, but with the GPGPU kernel or shader program running on the GPU, as it has to coordinate memory management and processing between both local and distant processing units, determine which memory systems to use depending on the type of data without causing problems elsewhere in the processing.
This is a delicate process involving a lot of trial and error, profiling and optimizations. One memory copy optimization or use of an asynchronous operation instead of a synchronous one may cut processing time from many hours to just a couple. A good understanding of the memory systems is crucial to preventing data starvation and similar issues.
Since GPGPU is generally used to accelerate tasks of significant duration (minutes to hours, or longer), it is probably best regarded from a multithreading perspective as a common worker thread, albeit with a few important complications, mostly in the form of latency.
As we touched upon in the earlier section on GPU memory management, it is highly preferable to use the memory closest to the GPU's processing units first, as they are the fastest. Fastest here mostly means that they have less latency, meaning the time taken to request information from the memory and receiving the response.
The exact latency will differ per GPU, but as an example, for Nvidia's Kepler (Tesla K20) architecture, one can expect a latency of:
These measurements are all on the CPU itself. For the PCIe bus one would have to expect something on the order of multiple milliseconds per transfer once one starts to transfer multi-megabyte buffers. To fill for example the GPU's memory with a gigabyte-sized buffer could take a considerable amount of time.
For a simple round-trip over the PCIe bus one would measure the latency in microseconds, which for a GPU core running at 1+ GHz would seem like an eternity. This basically defines why communication between the host and GPU should be absolutely minimal and highly optimized.
A common mistake with GPGPU applications is reading the result buffer before the processing has finished. After transferring the buffer to the device and executing the kernel, one has to insert synchronization points to signal the host that it has finished processing. These generally should be implemented using asynchronous methods.
As we just covered in the section on latency, it's important to keep in mind the potentially very large delays between a request and response, depending on the memory sub-system or bus. Failure to do so may cause weird glitches, freezes and crashes, as well as data corruption and an application which will seemingly wait forever.
It is crucial to profile a GPGPU application to get a good idea of what the GPU utilization is, and whether the process flow is anywhere near being optimal.
The biggest challenge with GPGPU applications is that of debugging a kernel. CUDA comes with a simulator for this reason, which allows one to run and debug a kernel on a CPU. OpenCL allows one to run a kernel on a CPU without modification, although this may not get the exact same behavior (and bugs) as when run on a specific GPU device.
A slightly more advanced method involves the use of a dedicated debugger such as Nvidia's Nsight, which comes in versions both for Visual Studio (https://developer.nvidia.com/nvidia-nsight-visual-studio-edition) and Eclipse (https://developer.nvidia.com/nsight-eclipse-edition).
According to the marketing blurb on the Nsight website:
The following screenshot shows an active CUDA debug session:
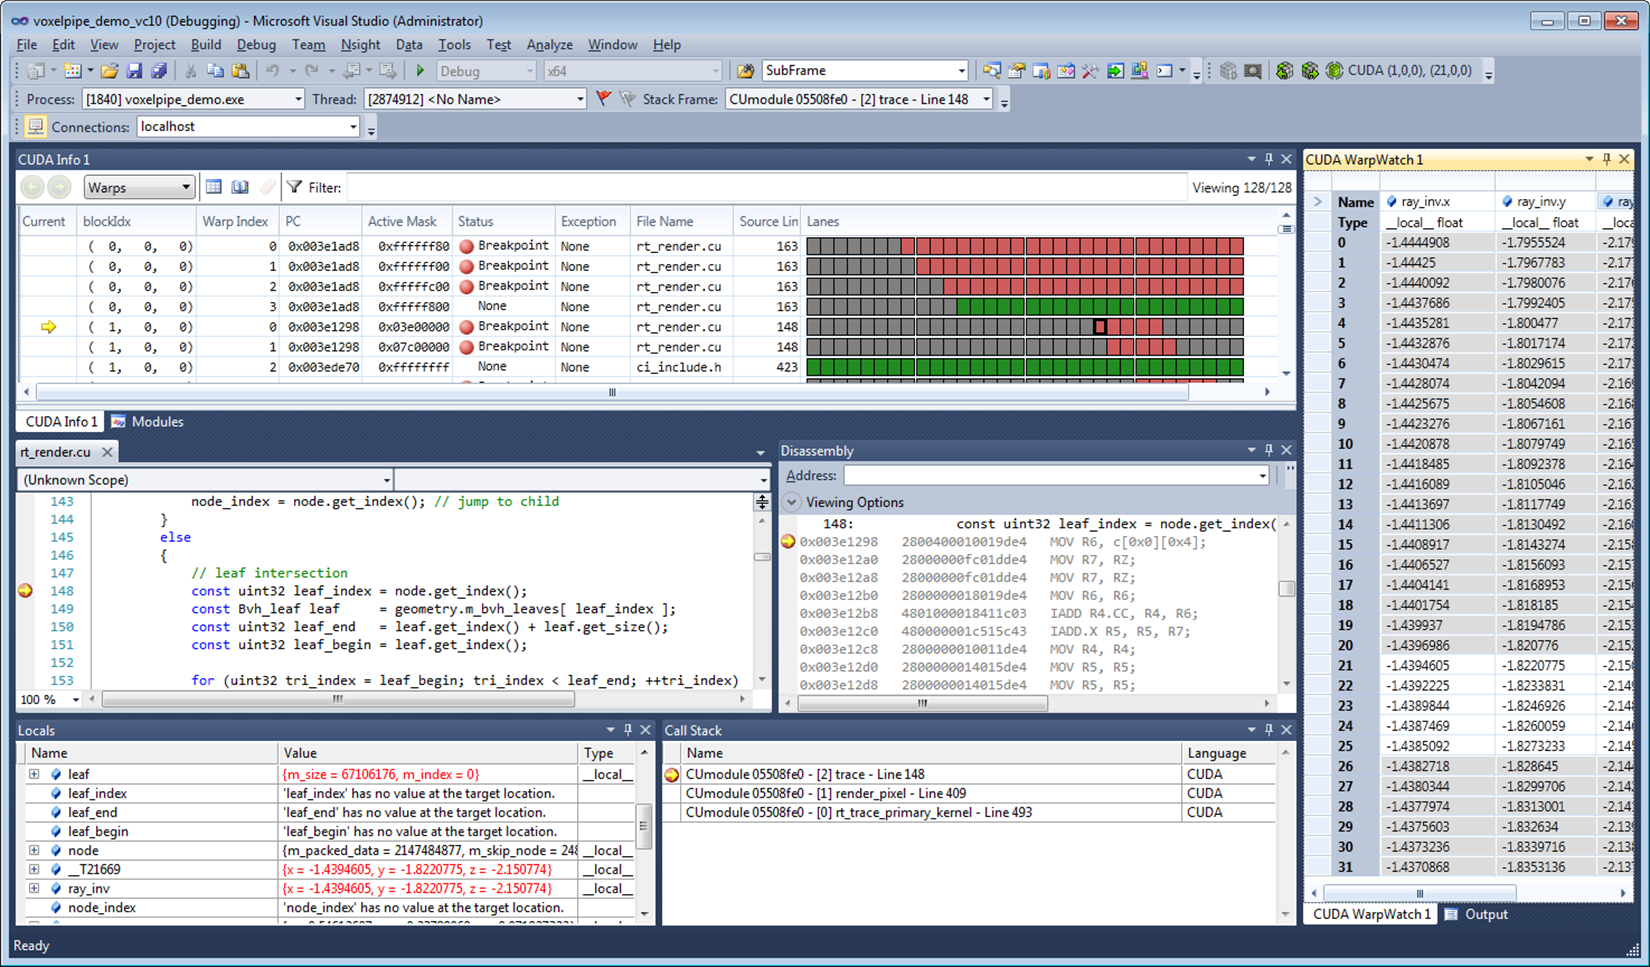
A big advantage of such a debugger tool is that it allows one to monitor, profile and optimize one's GPGPU application by identifying bottlenecks and potential problems.
In this chapter, we looked at how to integrate GPGPU processing into a C++ application in the form of OpenCL. We also looked at the GPU memory hierarchy and how this impacts performance, especially in terms of host-device communication.
You should now be familiar with GPGPU implementations and concepts, along with how to create an OpenCL application, and how to compile and run it. How to avoid common mistakes should also be known.
As this is the final chapter of this book, it is hoped that all major questions have been answered, and that the preceding chapters, along with this one, have been informative and helpful in some fashion.
Moving on from this book, the reader may be interested in pursuing any of the topics covered in more detail, for which many resources are available both online and offline. The topic of multithreading and related areas is very large and touches upon many applications, from business to scientific, artistic and personal applications
The reader may want to set up a Beowulf cluster of tehir own, or focus on GPGPU, or combine the two. Maybe there is a complex application they have wanted to write for a while, or perhaps just have fun with programming.
![]()
BIRMINGHAM - MUMBAI
Copyright © 2017 Packt Publishing
All rights reserved. No part of this book may be reproduced, stored in a retrieval system, or transmitted in any form or by any means, without the prior written permission of the publisher, except in the case of brief quotations embedded in critical articles or reviews.
Every effort has been made in the preparation of this book to ensure the accuracy of the information presented. However, the information contained in this book is sold without warranty, either express or implied. Neither the author, nor Packt Publishing, and its dealers and distributors will be held liable for any damages caused or alleged to be caused directly or indirectly by this book.
Packt Publishing has endeavored to provide trademark information about all of the companies and products mentioned in this book by the appropriate use of capitals. However, Packt Publishing cannot guarantee the accuracy of this information.
First published: July 2017
Production reference: 1270717
ISBN 978-1-78712-170-6
|
Author Maya Posch |
Copy Editor Sonia Mathur |
|
Reviewer Louis E. Mauget |
Project Coordinator Vaidehi Sawant |
|
Commissioning Editor Aaron Lazar |
Proofreader Safis Editing |
|
Acquisition Editor Chaitanya Nair |
Indexer Francy Puthiry |
|
Content Development Editor Rohit Kumar Singh |
Graphics Abhinash Sahu |
|
Technical Editors Ketan Kamble |
Production Coordinator Nilesh Mohite |
Maya Posch is a software engineer by trade and a self-professed electronics, robotics, and AI nut, running her own software development company, Nyanko, with her good friend, Trevor Purdy, where she works on various game development projects and some non-game projects. Apart from this, she does various freelance jobs for companies around the globe. You can visit her LinkedIn profile for more work-related details.
Aside from writing software, she likes to play with equations and write novels, such as her awesome reimagining of the story of the Nintendo classic, Legend of Zelda: Ocarina of Time, and the survival-horror novel she recently started, Viral Desire. You can check out her Scribd profile for a full listing of her writings.
Maya is also interested in biochemistry, robotics, and reverse-engineering of the human body. To know more about her, visit her blog, Artificial Human. If there's anything she doesn't lack, it has to be sheer ambition, it seems.
Louis E. Mauget learned to program a long time ago at the Michigan State University as a physics major learning to use software in designing a cyclotron. Later, he worked for 34 years at IBM. He went on to work for several consulting firms, including a long-term engagement with the railroad industry. He is currently consulting for Keyhole Software at Leawood, Kansas.
Lou has coded in C++, Java, JavaScript, Python, and newer languages, as each was conceived. His current interests include reactive functional programming, containers, Node JS, NoSQL, geospatial systems, mobile, and so on, in any new language or framework.
He occasionally blogs about software technology for Keyhole Software. He has coauthored three computer books and authored two IBM DeveloperWorks XML tutorials and a WebSphere Journal LDAP tutorial. Lou co-wrote several J2EE certification tests for IBM. He has also worked as a reviewer for Packt Publishing and others.
For support files and downloads related to your book, please visit www.PacktPub.com.
Did you know that Packt offers eBook versions of every book published, with PDF and ePub files available? You can upgrade to the eBook version at www.PacktPub.com and as a print book customer, you are entitled to a discount on the eBook copy. Get in touch with us at service@packtpub.com for more details.
At www.PacktPub.com, you can also read a collection of free technical articles, sign up for a range of free newsletters and receive exclusive discounts and offers on Packt books and eBooks.
![]()
Get the most in-demand software skills with Mapt. Mapt gives you full access to all Packt books and video courses, as well as industry-leading tools to help you plan your personal development and advance your career.
Thanks for purchasing this Packt book. At Packt, quality is at the heart of our editorial process. To help us improve, please leave us an honest review on this book's Amazon page at https://www.amazon.com/dp/1787121704.
If you'd like to join our team of regular reviewers, you can e-mail us at customerreviews@packtpub.com. We award our regular reviewers with free eBooks and videos in exchange for their valuable feedback. Help us be relentless in improving our products!
Multithreaded applications execute multiple threads in a single processor environment, to achieve. Filled with practical examples, this book will help you become a master at writing robust concurrent and parallel applications in C++. In this book, you will delve into the fundamentals of multithreading and concurrency and find out how to implement them. While doing so, you will explore atomic operations to optimize code performance and also apply concurrency to both distributed computing and GPGPU processing.
Chapter 1, Revisiting Multithreading, summarizes multithreading in C++, revisiting all the concepts you should already be familiar with and going through a basic example of multithreading using the native threading support added in the 2011 revision of C++.
Chapter 2, Multithreading Implementation on the Processor and OS, builds upon the fundamentals provided by the hardware implementations discussed in the preceding chapter, showing how OSes have used the capabilities to their advantage and made them available to applications. It also discusses how processes and threads are allowed to use the memory and processor in order to prevent applications and threads from interfering with each other.
Chapter 3, C++ Multithreading APIs, explores the wide variety of multithreading APIs available as OS-level APIs (for example, Win32 and POSIX) or as provided by a framework (for example, Boost, Qt, and POCO). It briefly runs through each API, listing the differences compared to the others as well as the advantages and disadvantages it may have for your application.
Chapter 4, Thread Synchronization and Communication, takes the topics learned in the previous chapters and explores an advanced multithreading implementation implemented using C++ 14's native threading API, which allows multiple threads to communicate without any thread-safety issues. It also covers the differences between the many types of synchronization mechanisms, including mutexes, locks, and condition variables.
Chapter 5, Native C++ Threads and Primitives, includes threads, concurrency, local storage, as well as thread-safety supported by this API. Building upon the example in the preceding chapter, it discusses and explores extending and optimizing thread-safty using the features offered by the full feature set in C++ 11 and C++ 14.
Chapter 6, Debugging Multithreaded Code, teaches you how to use tools such as Valgrind (Memcheck, DRD, Helgrind, and so on) to analyze the multithreaded performance of an application, find hotspots, and resolve or prevent issues resulting from concurrent access.
Chapter 7, Best Practices, covers common pitfalls and gotchas and how to spot them before they come back to haunt you. It also explores a number of common and less common scenarios using examples.
Chapter 8, Atomic Operations – Working with the Hardware, covers atomic operations in detail: what they are and how they are best used. Compiler support is looked at across CPU architectures and an evaluation is made of when it is worth to invest time in implementing atomic operations in your code. It also looks at how such optimizations will limit the portability of your code.
Chapter 9, Multithreading with Distributed Computing, takes many of the lessons learned in the preceding chapters and applies them on a multi-system, cluster-level scale. Using an OpenMPI-based example, it shows how multithreading can be done across multiple systems, such as the nodes in a computer cluster.
Chapter 10, Multithreading with GPGPU, shows the use of multithreading in GPGPU applications (for example, CUDA and OpenCL). Using an OpenCL-based example, a basic multithreaded application is explored that can execute tasks in parallel. This chapter takes lessons learned in the preceding chapters and applies them to processing on video cards and derived hardware (for example, rack-mounted vector processor hardware).
To follow the instructions in this book, you will need any OS (Windows, Linux, or macOS) and any C++ compiler installed on your systems.
This book is for intermediate C++ developers who wish to extend their knowledge of multithreading and concurrent processing. You should have basic experience with multithreading and be comfortable using C++ development toolchains on the command line.
In this book, you will find a number of text styles that distinguish between different kinds of information. Here are some examples of these styles and an explanation of their meaning.
Code words in text, database table names, folder names, filenames, file extensions, pathnames, dummy URLs, user input, and Twitter handles are shown as follows: "The randGen() method takes two parameters, defining the range of the returned value:"
A block of code is set as follows:
cout_mtx.lock();
 cout << "Thread " << tid << " adding " << rval << ". New value: " << val << ".\n";
 cout_mtx.unlock();

 values_mtx.lock();
 values.push_back(val);
 values_mtx.unlock();
}
When we wish to draw your attention to a particular part of a code block, the relevant lines or items are set in bold:
cout_mtx.lock();
 cout << "Thread " << tid << " adding " << rval << ". New value: " << val << ".\n";
 cout_mtx.unlock();

 values_mtx.lock();
 values.push_back(val);
 values_mtx.unlock();
}
Any command-line input or output is written as follows:
$ make
g++ -o ch01_mt_example -std=c++11 ch01_mt_example.cpp
New terms and important words are shown in bold. Words that you see on the screen, for example, in menus or dialog boxes, appear in the text.
Feedback from our readers is always welcome. Let us know what you think about this book-what you liked or disliked. Reader feedback is important for us as it helps us develop titles that you will really get the most out of. To send us general feedback, simply e-mail feedback@packtpub.com, and mention the book's title in the subject of your message. If there is a topic that you have expertise in and you are interested in either writing or contributing to a book, see our author guide at www.packtpub.com/authors.
You can download the example code files for this book from your account at http://www.packtpub.com. If you purchased this book elsewhere, you can visit http://www.packtpub.com/support and register to have the files e-mailed directly to you. You can download the code files by following these steps:
Once the file is downloaded, please make sure that you unzip or extract the folder using the latest version of:
The code bundle for the book is also hosted on GitHub at https://github.com/PacktPublishing/Mastering-CPP-Multithreading. We also have other code bundles from our rich catalog of books and videos available at https://github.com/PacktPublishing/. Check them out!
Although we have taken every care to ensure the accuracy of our content, mistakes do happen. If you find a mistake in one of our books-maybe a mistake in the text or the code-we would be grateful if you could report this to us. By doing so, you can save other readers from frustration and help us improve subsequent versions of this book. If you find any errata, please report them by visiting http://www.packtpub.com/submit-errata, selecting your book, clicking on the Errata Submission Form link, and entering the details of your errata. Once your errata are verified, your submission will be accepted and the errata will be uploaded to our website or added to any list of existing errata under the Errata section of that title. To view the previously submitted errata, go to https://www.packtpub.com/books/content/support and enter the name of the book in the search field. The required information will appear under the Errata section.
Piracy of copyrighted material on the Internet is an ongoing problem across all media. At Packt, we take the protection of our copyright and licenses very seriously. If you come across any illegal copies of our works in any form on the Internet, please provide us with the location address or website name immediately so that we can pursue a remedy. Please contact us at copyright@packtpub.com with a link to the suspected pirated material. We appreciate your help in protecting our authors and our ability to bring you valuable content.
If you have a problem with any aspect of this book, you can contact us at questions@packtpub.com, and we will do our best to address the problem.
Chances are that if you're reading this book, you have already done some multithreaded programming in C++, or, possibly, other languages. This chapter is meant to recap the topic purely from a C++ point of view, going through a basic multithreaded application, while also covering the tools we'll be using throughout the book. At the end of this chapter, you will have all the knowledge and information needed to proceed with the further chapters.
Topics covered in this chapter include the following:
During the course of this book, we'll be assuming the use of a GCC-based toolchain (GCC or MinGW on Windows). If you wish to use alternative toolchains (clang, MSVC, ICC, and so on), please consult the documentation provided with these for compatible commands.
To compile the examples provided in this book, makefiles will be used. For those unfamiliar with makefiles, they are a simple but powerful text-based format used with the make tool for automating build tasks including compiling source code and adjusting the build environment. First released in 1977, make remains among the most popular build automation tools today.
Familiarity with the command line (Bash or equivalent) is assumed, with MSYS2 (Bash on Windows) recommended for those using Windows.
In its most basic form, a multithreaded application consists of a singular process with two or more threads. These threads can be used in a variety of ways; for example, to allow the process to respond to events in an asynchronous manner by using one thread per incoming event or type of event, or to speed up the processing of data by splitting the work across multiple threads.
Examples of asynchronous responses to events include the processing of the graphical user interface (GUI) and network events on separate threads so that neither type of event has to wait on the other, or can block events from being responded to in time. Generally, a single thread performs a single task, such as the processing of GUI or network events, or the processing of data.
For this basic example, the application will start with a singular thread, which will then launch a number of threads, and wait for them to finish. Each of these new threads will perform its own task before finishing.
Let's start with the includes and global variables for our application:
#include <iostream>
#include <thread>
#include <mutex>
#include <vector>
#include <random>

using namespace std;

// --- Globals
mutex values_mtx;
mutex cout_mtx;
vector<int> values;
Both the I/O stream and vector headers should be familiar to anyone who has ever used C++: the former is here used for the standard output (cout), and the vector for storing a sequence of values.
The random header is new in c++11, and as the name suggests, it offers classes and methods for generating random sequences. We use it here to make our threads do something interesting.
Finally, the thread and mutex includes are the core of our multithreaded application; they provide the basic means for creating threads, and allow for thread-safe interactions between them.
Moving on, we create two mutexes: one for the global vector and one for cout, since the latter is not thread-safe.
Next we create the main function as follows:
int main() {
    values.push_back(42);
We push a fixed value onto the vector instance; this one will be used by the threads we create in a moment:
    thread tr1(threadFnc, 1);
    thread tr2(threadFnc, 2);
    thread tr3(threadFnc, 3);
    thread tr4(threadFnc, 4);
We create new threads, and provide them with the name of the method to use, passing along any parameters--in this case, just a single integer:
    tr1.join();
    tr2.join();
    tr3.join();
    tr4.join();
Next, we wait for each thread to finish before we continue by calling join() on each thread instance:
    cout << "Input: " << values[0] << ", Result 1: " << values[1] << ", Result 2: " << values[2] << ", Result 3: " << values[3] << ", Result 4: " << values[4] << "\n";


    return 1;
}
At this point, we expect that each thread has done whatever it's supposed to do, and added the result to the vector, which we then read out and show the user.
Of course, this shows almost nothing of what really happens in the application, mostly just the essential simplicity of using threads. Next, let's see what happens inside this method that we pass to each thread instance:
void threadFnc(int tid) {
    cout_mtx.lock();
    cout << "Starting thread " << tid << ".\n";
    cout_mtx.unlock();
In the preceding code, we can see that the integer parameter being passed to the thread method is a thread identifier. To indicate that the thread is starting, a message containing the thread identifier is output. Since we're using a non-thread-safe method for this, we use the cout_mtx mutex instance to do this safely, ensuring that just one thread can write to cout at any time:
    values_mtx.lock();
    int val = values[0];
    values_mtx.unlock();
When we obtain the initial value set in the vector, we copy it to a local variable so that we can immediately release the mutex for the vector to enable other threads to use the vector:
    int rval = randGen(0, 10);
    val += rval;
These last two lines contain the essence of what the threads created do: they take the initial value, and add a randomly generated value to it. The randGen() method takes two parameters, defining the range of the returned value:
    cout_mtx.lock();
    cout << "Thread " << tid << " adding " << rval << ". New value: " << val << ".\n";
    cout_mtx.unlock();

    values_mtx.lock();
    values.push_back(val);
    values_mtx.unlock();
}
Finally, we (safely) log a message informing the user of the result of this action before adding the new value to the vector. In both cases, we use the respective mutex to ensure that there can be no overlap when accessing the resource with any of the other threads.
Once the method reaches this point, the thread containing it will terminate, and the main thread will have one less thread to wait for to rejoin. The joining of a thread basically means that it stops existing, usually with a return value passed to the thread which created the thread. This can happen explicitly, with the main thread waiting for the child thread to finish, or in the background.
Lastly, we'll take a look at the randGen() method. Here we can see some multithreaded specific additions as well:
int randGen(const int& min, const int& max) {
    static thread_local mt19937 generator(hash<thread::id>()(this_thread::get_id()));
    uniform_int_distribution<int> distribution(min, max);
    return distribution(generator)
}
This preceding method takes a minimum and maximum value as explained earlier, which limits the range of the random numbers this method can return. At its core, it uses a mt19937-based generator, which employs a 32-bit Mersenne Twister algorithm with a state size of 19937 bits. This is a common and appropriate choice for most applications.
Of note here is the use of the thread_local keyword. What this means is that even though it is defined as a static variable, its scope will be limited to the thread using it. Every thread will thus create its own generator instance, which is important when using the random number API in the STL.
A hash of the internal thread identifier is used as a seed for the generator. This ensures that each thread gets a fairly unique seed for its generator instance, allowing for better random number sequences.
Finally, we create a new uniform_int_distribution instance using the provided minimum and maximum limits, and use it together with the generator instance to generate the random number which we return.
In order to compile the code described earlier, one could use an IDE, or type the command on the command line. As mentioned in the beginning of this chapter, we'll be using makefiles for the examples in this book. The big advantages of this are that one does not have to repeatedly type in the same extensive command, and it is portable to any system which supports make.
Further advantages include being able to have previous generated artifacts removed automatically and to only compile those source files which have changed, along with a detailed control over build steps.
The makefile for this example is rather basic:
GCC := g++

OUTPUT := ch01_mt_example
SOURCES := $(wildcard *.cpp)
CCFLAGS := -std=c++11 -pthread

all: $(OUTPUT)

$(OUTPUT):
    $(GCC) -o $(OUTPUT) $(CCFLAGS) $(SOURCES)

clean:
    rm $(OUTPUT)

.PHONY: all
From the top down, we first define the compiler that we'll use (g++), set the name of the output binary (the .exe extension on Windows will be post-fixed automatically), followed by the gathering of the sources and any important compiler flags.
The wildcard feature allows one to collect the names of all files matching the string following it in one go without having to define the name of each source file in the folder individually.
For the compiler flags, we're only really interested in enabling the c++11 features, for which GCC still requires one to supply this compiler flag.
For the all method, we just tell make to run g++ with the supplied information. Next we define a simple clean method which just removes the produced binary, and finally, we tell make to not interpret any folder or file named all in the folder, but to use the internal method with the .PHONY section.
When we run this makefile, we see the following command-line output:
$ make
g++ -o ch01_mt_example -std=c++11 ch01_mt_example.cpp
Afterwards, we find an executable file called ch01_mt_example (with the .exe extension attached on Windows) in the same folder. Executing this binary will result in a command-line output akin to the following:
$ ./ch01_mt_example.exe

Starting thread 1.

Thread 1 adding 8. New value: 50.

Starting thread 2.

Thread 2 adding 2. New value: 44.

Starting thread 3.

Starting thread 4.

Thread 3 adding 0. New value: 42.

Thread 4 adding 8. New value: 50.

Input: 42, Result 1: 50, Result 2: 44, Result 3: 42, Result 4: 50
What one can see here already is the somewhat asynchronous nature of threads and their output. While threads 1 and 2 appear to run synchronously, starting and quitting seemingly in order, threads 3 and 4 clearly run asynchronously as both start simultaneously before logging their action. For this reason, and especially in longer-running threads, it's virtually impossible to say in which order the log output and results will be returned.
While we use a simple vector to collect the results of the threads, there is no saying whether Result 1 truly originates from the thread which we assigned ID 1 in the beginning. If we need this information, we need to extend the data we return by using an information structure with details on the processing thread or similar.
One could, for example, use struct like this:
struct result {
    int tid;
    int result;
};
The vector would then be changed to contain result instances rather than integer instances. One could pass the initial integer value directly to the thread as part of its parameters, or pass it via some other way.
The example in this chapter is primarily useful for applications where data or tasks have to be handled in parallel. For the earlier mentioned use case of a GUI-based application with business logic and network-related features, the basic setup of a main application, which launches the required threads, would remain the same. However, instead of having each thread to be the same, each would be a completely different method.
For this type of application, the thread layout would look like this:
As the graphic shows, the main thread would launch the GUI, network, and business logic thread, with the latter communicating with the network thread to send and receive data. The business logic thread would also receive user input from the GUI thread, and send updates back to be displayed on the GUI.
In this chapter, we went over the basics of a multithreaded application in C++ using the native threading API. We looked at how to have multiple threads perform a task in parallel, and also explored how to properly use the random number API in the STL within a multithreaded application.
In the next chapter, we'll discuss how multithreading is implemented both in hardware and in operating systems. We'll see how this implementation differs per processor architecture and operating system, and how this affects our multithreaded application.
The foundation of any multithreaded application is formed by the implementation of the required features by the hardware of the processor, as well as by the way these features are translated into an API for use by applications by the operating system. An understanding of this foundation is crucial for developing an intuitive understanding of how to best implement a multithreaded application.
This chapter looks at how hardware and operating systems have evolved over the years to arrive at the current implementations and APIs as they are in use today. It shows how the example code of the previous chapter ultimately translates into commands to the processor and related hardware.
Topics covered in this chapter include the following:
Essentially, to the operating system (OS), a process consists of one or more threads, each thread processing its own state and variables. One would regard this as a hierarchical configuration, with the OS as the foundation, providing support for the running of (user) processes. Each of these processes then consists of one or more threads. Communication between processes is handled by inter-process communication (IPC), which is provided by the operating system.
In a graphical view, this looks like the following:
Each process within the OS has its own state, with each thread in a process having its own state as well as the relative to the other threads within that same process. While IPC allows processes to communicate with each other, threads can communicate with other threads within the process in a variety of ways, which we'll explore in more depth in upcoming chapters. This generally involves some kind of shared memory between threads.
An application is loaded from binary data in a specific executable format such as, for example, Executable and Linkable Format (ELF) which is generally used on Linux and many other operating systems. With ELF binaries, the following number of sections should always be present:
The .bss section is, essentially, allocated with uninitialized memory including empty arrays which thus do not take up any space in the binary, as it makes no sense to store rows of pure zeroes in the executable. Similarly, there is the .data section with initialized data. This contains global tables, variables, and the like. Finally, the .rodata section is like .data, but it is, as the name suggests, read-only. It contains things such as hardcoded strings.
In the .text section, we find the actual application instructions (code) which will be executed by the processor. The whole of this will get loaded by the operating system, thus creating a process. The layout of such a process looks like the following diagram:
This is what a process looks like when launched from an ELF-format binary, though the final format in memory is roughly the same in basically any OS, including for a Windows process launched from a PE-format binary. Each of the sections in the binary are loaded into their respective sections, with the BSS section allocated to the specified size. The .text section is loaded along with the other sections, and its initial instruction is executed once this is done, which starts the process.
In system languages such as C++, one can see how variables and other program state information within such a process are stored both on the stack (variables exist within the scope) and heap (using the new operator). The stack is a section of memory (one allocated per thread), the size of which depends on the operating system and its configuration. One can generally also set the stack size programmatically when creating a new thread.
In an operating system, a process consists of a block of memory addresses, the size of which is constant and limited by the size of its memory pointers. For a 32-bit OS, this would limit this block to 4 GB. Within this virtual memory space, the OS allocates a basic stack and heap, both of which can grow until all memory addresses have been exhausted, and further attempts by the process to allocate more memory will be denied.
The stack is a concept both for the operating system and for the hardware. In essence, it's a collection (stack) of so-called stack frames, each of which is composed of variables, instructions, and other data relevant to the execution frame of a task.
In hardware terms, the stack is part of the task (x86) or process state (ARM), which is how the processor defines an execution instance (program or thread). This hardware-defined entity contains the entire state of a singular thread of execution. See the following sections for further details on this.
A task is defined as follows in the Intel IA-32 System Programming guide, Volume 3A:
"A task is a unit of work that a processor can dispatch, execute, and suspend. It can be used to execute a program, a task or process, an operating-system service utility, an interrupt or exception handler, or a kernel or executive utility."
"The IA-32 architecture provides a mechanism for saving the state of a task, for dispatching tasks for execution, and for switching from one task to another. When operating in protected mode, all processor execution takes place from within a task. Even simple systems must define at least one task. More complex systems can use the processor's task management facilities to support multitasking applications."
This excerpt from the IA-32 (Intel x86) manual summarizes how the hardware supports and implements support for operating systems, processes, and the switching between these processes.
It's important to realize here that, to the processor, there's no such thing as a process or thread. All it knows of are threads of execution, defined as a series of instructions. These instructions are loaded into memory somewhere, and the current position in these instructions is kept track of along with the variable data (variables) being created, as the application is executed within the data section of the process.
Each task also runs within a hardware-defined protection ring, with the OS's tasks generally running on ring 0, and user tasks on ring 3. Rings 1 and 2 are rarely used except for specific use cases with modern OSes on the x86 architecture. These rings are privilege-levels enforced by the hardware and allow for example for the strict separation of kernel and user-level tasks.
The task structure for both 32-bit and 64-bit tasks are quite similar in concept. The official name for it is the Task State Structure (TSS). It has the following layout for 32-bit x86 CPUs:
Following are the firlds:
For 64-bit x86_64 CPUs, the TSS layout looks somewhat different, since hardware-based task switching is not supported in this mode:
Here, we have similar relevant fields, just with different names:
Even though on x86 in 32-bit mode, the CPU supports hardware-based switching between tasks, most operating systems will use just a single TSS structure per CPU regardless of the mode, and do the actual switching between tasks in software. This is partially due to efficiency reasons (swapping out only pointers which change), partially due to features which are only possible this way, such as measuring CPU time used by a process/thread, and to adjust the priority of a thread or process. Doing it in software also simplifies the portability of code between 64-bit and 32-bit systems, since the former do not support hardware-based task switching.
During a software-based task switch (usually via an interrupt), the ESP/RSP, and so on are stored in memory and replaced with the values for the next scheduled task. This means that once execution resumes, the TSS structure will now have the Stack Pointer (SP), segment pointer(s), register contents, and all other details of the new task.
The source of the interrupt can be based in hardware or software. A hardware interrupt is usually used by devices to signal to the CPU that they require attention by the OS. The act of calling a hardware interrupt is called an Interrupt Request, or IRQ.
A software interrupt can be due to an exceptional condition in the CPU itself, or as a feature of the CPU's instruction set. The action of switching tasks by the OS's kernel is also performed by triggering a software interrupt.
In ARM architectures, applications usually run in the unprivileged Exception Level 0 (EL0) level, which is comparable to ring 3 on x86 architectures, and the OS kernel in EL1. The ARMv7 (AArch32, 32-bit) architecture has the SP in the general purpose register 13. For ARMv8 (AArch64, 64-bit), a dedicated SP register is implemented for each exception level: SP_EL0, SP_EL1, and so on.
For task state, the ARM architecture uses Program State Register (PSR) instances for the Current Program State Register (CPSR) or the Saved Program State Register (SPSR) program state's registers. The PSR is part of the Process State (PSTATE), which is an abstraction of the process state information.
While the ARM architecture is significantly different from the x86 architecture, when using software-based task switching, the basic principle does not change: save the current task's SP, register state, and put the next task's detail in there instead before resuming processing.
As we saw in the preceding sections, the stack together with the CPU registers define a task. As mentioned earlier, this stack consists of stack frames, each of which defines the (local) variables, parameters, data, and instructions for that particular instance of task execution. Of note is that although the stack and stack frames are primarily a software concept, it is an essential feature of any modern OS, with hardware support in many CPU instruction sets. Graphically, it can be be visualized like the following:
The SP (ESP on x86) points to the top of the stack, with another pointer (Extended Base Pointer (EBP) for x86). Each frame contains a reference to the preceding frame (caller return address), as set by the OS.
When using a debugger with one's C++ application, this is basically what one sees when requesting the backtrack--the individual frames of the stack showing the initial stack frame leading up until the current frame. Here, one can examine each individual frame's details.
Over the past decades, a lot of different terms related to the way tasks are processed by a computer have been coined and come into common use. Many of these are also used interchangeably, correctly or not. An example of this is multithreading in comparison with multiprocessing.
Here, the latter means running one task per processor in a system with multiple physical processors, while the former means running multiple tasks on a singular processor simultaneously, thus giving the illusion that they are all being executed simultaneously:
Another interesting distinction between multiprocessing and multitasking is that the latter uses time-slices in order to run multiple threads on a single processor core. This is different from multithreading in the sense that in a multitasking system, no tasks will ever run in a concurrent fashion on the same CPU core, though tasks can still be interrupted.
The concept of a process and a shared memory space between the threads contained within the said process is at the very core of multithreaded systems from a software perspective. Though the hardware is often not aware of this--seeing just a single task to the OS. However, such a multithreaded process contains two or many more threads. Each of these threads then perform its own series of tasks.
In other implementations, such as Intel's Hyper-Threading (HT) on x86 processors, this multithreading is implemented in the hardware itself, where it's commonly referred to as SMT (see the section Simultaneous multithreading (SMT) for details). When HT is enabled, each physical CPU core is presented to the OS as being two cores. The hardware itself will then attempt to execute the tasks assigned to these so-called virtual cores concurrently, scheduling operations which can use different elements of a processing core at the same time. In practice, this can give a noticeable boost in performance without the operating system or application requiring any type of optimization.
The OS can of course still do its own scheduling to further optimize the execution of task, since the hardware is not aware of many details about the instructions it is executing.
Having HT enabled looks like this in the visual format:
In this preceding graphic, we see the instructions of four different tasks in memory (RAM). Out of these, two tasks (threads) are being executed simultaneously, with the CPU's scheduler (in the frontend) attempting to schedule the instructions so that as many instructions as possible can be executed in parallel. Where this is not possible, so-called pipeline bubbles (in white) appear where the execution hardware is idle.
Together with internal CPU optimizations, this leads to a very high throughput of instructions, also called Instructions Per Second (IPC). Instead of the GHz rating of a CPU, this IPC number is generally far more significant for determining the sheer performance of a CPU.
Different types of computer architecture are classified using a system which was first proposed by Michael J. Flynn, back in 1966. This classification system knows four categories, defining the capabilities of the processing hardware in terms of the number of input and output streams:
An important thing to note with these categories is that they are all defined in terms of multiprocessing, meaning that they refer to the intrinsic capabilities of the hardware. Using software techniques, virtually any method can be approximated on even a regular SISD-style architecture. This is, however, part of multithreading.
Over the past decades, many systems were created which contained multiple processing units. These can be broadly divided into Symmetric Multiprocessing (SMP) and Asymmetric Multiprocessing (AMP) systems.
AMP's main defining feature is that a second processor is attached as a peripheral to the primary CPU. This means that it cannot run control software, but only user applications. This approach has also been used to connect CPUs using a different architecture to allow one to, for example, run x86 applications on an Amiga, 68k-based system.
With an SMP system, each of the CPUs are peers having access to the same hardware resources, and set up in a cooperative fashion. Initially, SMP systems involved multiple physical CPUs, but later, multiple processor cores got integrated on a single CPU die:
With the proliferation of multi-core CPUs, SMP is the most common type of processing outside of embedded development, where uniprocessing (single core, single processor) is still very common.
Technically, the sound, network, and graphic processors in a system can be considered to be asymmetric processors related to the CPU. With an increase in General Purpose GPU (GPGPU) processing, AMP is becoming more relevant.
A multiprocessing system does not necessarily have to be implemented within a single system, but can also consist of multiple systems which are connected in a network. Such a cluster is then called a loosely coupled multiprocessing system. We cover distributing computing in Chapter 9, Multithreading with Distributed Computing.
This is in contrast with a tightly coupled multiprocessing system, whereby the system is integrated on a single printed circuit board (PCB), using the same low-level, high-speed bus or similar.
Virtually any modern system combines multiprocessing with multithreading, courtesy of multi-core CPUs, which combine two or more processing cores on a single processor die. What this means for an operating system is that it has to schedule tasks both across multiple processing cores while also scheduling them on specific cores in order to extract maximum performance.
This is the area of task schedulers, which we will look at in a moment. Suffice it to say that this is a topic worthy of its own book.
Like multiprocessing, there is not a single implementation, but two main ones. The main distinction between these is the maximum number of threads the processor can execute concurrently during a single cycle. The main goal of a multithreading implementation is to get as close to 100% utilization of the processor hardware as reasonably possible. Multithreading utilizes both thread-level and process-level parallelism to accomplish this goal.
The are two types of multithreading, which we will cover in the following sections.
Also known as super-threading, the main subtypes for temporal multithreading (TMT) are coarse-grained and fine-grained (or interleaved). The former switches rapidly between different tasks, saving the context of each before switching to another task's context. The latter type switches tasks with each cycle, resulting in a CPU pipeline containing instructions from various tasks from which the term interleaved is derived.
The fine-grained type is implemented in barrel processors. They have an advantage over x86 and other architectures that they can guarantee specific timing (useful for hard real-time embedded systems) in addition to being less complex to implement due to assumptions that one can make.
SMT is implemented on superscalar CPUs (implementing instruction-level parallelism), which include the x86 and ARM architectures. The defining characteristic of SMT is also indicated by its name, specifically, its ability to execute multiple threads in parallel, per core.
Generally, two threads per core is common, but some designs support up to eight concurrent threads per core. The main advantage of this is being able to share resources among threads, with an obvious disadvantage of conflicting needs by multiple threads, which has to be managed. Another advantage is that it makes the resulting CPU more energy efficient due to a lack of hardware resource duplication.
Intel's HT technology is essentially Intel's SMT implementation, providing a basic two thread SMT engine starting with some Pentium 4 CPUs in 2002.
A number of task-scheduling algorithms exist, each focusing on a different goal. Some may seek to maximize throughput, others minimize latency, while others may seek to maximize response time. Which scheduler is the optimal choice solely depends on the application the system is being used for.
For desktop systems, the scheduler is generally kept as general-purpose as possible, usually prioritizing foreground applications over background applications in order to give the user the best possible desktop experience.
For embedded systems, especially in real-time, industrial applications would instead seek to guarantee timing. This allows processes to be executed at exactly the right time, which is crucial in, for example, driving machinery, robotics, or chemical processes where a delay of even a few milliseconds could be costly or even fatal.
The scheduler type is also dependent on the multitasking state of the OS--a cooperative multitasking system would not be able to provide many guarantees about when it can switch out a running process for another one, as this depends on when the active process yields.
With a preemptive scheduler, processes are switched without them being aware of it, allowing the scheduler more control over when processes run at which time points.
Windows NT-based OSes (Windows NT, 2000, XP, and so on) use what is called a multilevel feedback queue, featuring 32 priority levels. This type of priority scheduler allows one to prioritize tasks over other tasks, allowing one to fine-tune the resulting experience.
Linux originally (kernel 2.4) also used a multilevel feedback queue-based priority scheduler like Windows NT with an O(n) scheduler. With version 2.6, this was replaced with an O(1) scheduler, allowing processes to be scheduled within a constant amount of time. Starting with Linux kernel 2.6.23, the default scheduler is the Completely Fair Scheduler (CFS), which ensures that all tasks get a comparable share of CPU time.
The type of scheduling algorithm used for a number of commonly used or well-known OSes is listed in this table:
|
Operating System |
Preemption |
Algorithm |
|
Amiga OS |
Yes |
Prioritized round-robin scheduling |
|
FreeBSD |
Yes |
Multilevel feedback queue |
|
Linux kernel before 2.6.0 |
Yes |
Multilevel feedback queue |
|
Linux kernel 2.6.0-2.6.23 |
Yes |
O(1) scheduler |
|
Linux kernel after 2.6.23 |
Yes |
Completely Fair Scheduler |
|
classic Mac OS pre-9 |
None |
Cooperative scheduler |
|
Mac OS 9 |
Some |
Preemptive scheduler for MP tasks, and cooperative for processes and threads |
|
OS X/macOS |
Yes |
Multilevel feedback queue |
|
NetBSD |
Yes |
Multilevel feedback queue |
|
Solaris |
Yes |
Multilevel feedback queue |
|
Windows 3.1x |
None |
Cooperative scheduler |
|
Windows 95, 98, Me |
Half |
Preemptive scheduler for 32-bit processes, and cooperative for 16-bit processes |
|
Windows NT (including 2000, XP, Vista, 7, and Server) |
Yes |
Multilevel feedback queue |
(Source: https://en.wikipedia.org/wiki/Scheduling_(computing))
The preemptive column indicates whether the scheduler is preemptive or not, with the next column providing further details. As one can see, preemptive schedulers are very common, and used by all modern desktop operating systems.
In the demonstration code of Chapter 1, Revisiting Multithreading, we looked at a simple c++11 application which used four threads to perform some processing. In this section, we will look at the same application, but from a hardware and OS perspective.
When we look at the start of the code in the main function, we see that we create a data structure containing a single (integer) value:
int main() {
    values.push_back(42);
After the OS creates a new task and associated stack structure, an instance of a vector data structure (customized for integer types) is allocated on the stack. The size of this was specified in the binary file's global data section (BSS for ELF).
When the application's execution is started using its entry function (main() by default), the data structure is modified to contain the new integer value.
Next, we create four threads, providing each with some initial data:
    thread tr1(threadFnc, 1);
    thread tr2(threadFnc, 2);
    thread tr3(threadFnc, 3);
    thread tr4(threadFnc, 4);
For the OS, this means creating new data structures, and allocating a stack for each new thread. For the hardware, this initially does not change anything if no hardware-based task switching is used.
At this point, the OS's scheduler and the CPU can combine to execute this set of tasks (threads) as efficiently and quickly as possible, employing features of the hardware including SMP, SMT, and so on.
After this, the main thread waits until the other threads stop executing:
    tr1.join();
    tr2.join();
    tr3.join();
    tr4.join();
These are blocking calls, which mark the main thread as being blocked until these four threads (tasks) finish executing. At this point, the OS's scheduler will resume execution of the main thread.
In each newly created thread, we first output a string on the standard output, making sure that we lock the mutex to ensure synchronous access:
void threadFnc(int tid) {
    cout_mtx.lock();
    cout << "Starting thread " << tid << ".\n";
    cout_mtx.unlock();
A mutex, in essence, is a singular value being stored on the stack of heap, which then is accessed using an atomic operation. This means that some form of hardware support is required. Using this, a task can check whether it is allowed to proceed yet, or has to wait and try again.
In this last particular piece of code, this mutex lock allows us to output on the standard C++ output stream without other threads interfering.
After this, we copy the initial value in the vector to a local variable, again ensuring that it's done synchronously:
    values_mtx.lock();
    int val = values[0];
    values_mtx.unlock();
The same thing happens here, except now the mutex lock allows us to read the first value in the vector without risking another thread accessing or even changing it while we use it.
This is followed by the generating of a random number as follows:
    int rval = randGen(0, 10);
    val += rval;
This uses the randGen() method, which is as follows:
int randGen(const int& min, const int& max) {
    static thread_local mt19937 generator(hash<thread::id>() (this_thread::get_id()));
    uniform_int_distribution<int> distribution(min, max);
    return distribution(generator);
}
This method is interesting due to its use of a thread-local variable. Thread-local storage is a section of a thread's memory which is specific to it, and used for global variables, which, nevertheless, have to remain limited to that specific thread.
This is very useful for a static variable like the one used here. That the generator instance is static is because we do not want to reinitialize it every single time we use this method, yet we do not want to share this instance across all threads. By using a thread-local, static instance, we can accomplish both goals. A static instance is created and used, but separately for each thread.
The Thread function then ends with the same series of mutexes being locked, and the new value being copied to the array.
    cout_mtx.lock();
    cout << "Thread " << tid << " adding " << rval << ". New value: " << val << ".\n";
    cout_mtx.unlock();

    values_mtx.lock();
    values.push_back(val);
    values_mtx.unlock();
}
Here we see the same synchronous access to the standard output stream, followed by synchronous access to the values data structure.
Mutual exclusion is the principle which underlies thread-safe access of data within a multithreaded application. One can implement this both in hardware and software. The mutual exclusion (mutex) is the most elementary form of this functionality in most implementations.
The simplest hardware-based implementation on a uniprocessor (single processor core), non-SMT system is to disable interrupts, and thus, prevent the task from being changed. More commonly, a so-called busy-wait principle is employed. This is the basic principle behind a mutex--due to how the processor fetches data, only one task can obtain and read/write an atomic value in the shared memory, meaning, a variable sized the same (or smaller) as the CPU's registers. This is further detailed in Chapter 8, Atomic Operations - Working with the Hardware.
When our code tries to lock a mutex, what this does is read the value of such an atomic section of memory, and try to set it to its locked value. Since this is a single operation, only one task can change the value at any given time. Other tasks will have to wait until they can gain access in this busy-wait cycle, as shown in this diagram:
Software-defined mutual exclusion implementations are all based on busy-waiting. An example is Dekker's algorithm, which defines a system in which two processes can synchronize, employing busy-wait to wait for the other process to leave the critical section.
The pseudocode for this algorithm is as follows:
    variables
        wants_to_enter : array of 2 booleans
        turn : integer

    wants_to_enter[0] ← false
    wants_to_enter[1] ← false
    turn ← 0 // or 1
p0:
    wants_to_enter[0] ← true
    while wants_to_enter[1] {
        if turn ≠ 0 {
            wants_to_enter[0] ← false
            while turn ≠ 0 {
                // busy wait
            }
            wants_to_enter[0] ← true
        }
    }
    // critical section
    ...
    turn ← 1
    wants_to_enter[0] ← false
    // remainder section
p1:
    wants_to_enter[1] ← true
    while wants_to_enter[0] {
        if turn ≠ 1 {
            wants_to_enter[1] ← false
            while turn ≠ 1 {
                // busy wait
            }
            wants_to_enter[1] ← true
        }
    }
    // critical section
    ...
    turn ← 0
    wants_to_enter[1] ← false
    // remainder section
(Referenced from: https://en.wikipedia.org/wiki/Dekker's_algorithm)
In this preceding algorithm, processes indicate the intent to enter a critical section, checking whether it's their turn (using the process ID), then setting their intent to enter the section to false after they have entered it. Only once a process has set its intent to enter to true again will it enter the critical section again. If it wishes to enter, but turn does not match its process ID, it'll busy-wait until the condition becomes true.
A major disadvantage of software-based mutual exclusion algorithms is that they only work if out-of-order (OoO) execution of code is disabled. OoO means that the hardware actively reorders incoming instructions in order to optimize their execution, thus changing their order. Since these algorithms require that various steps are executed in order, they no longer work on OoO processors.
In this chapter, we saw how processes and threads are implemented both in operating systems and in hardware. We also looked at various configurations of processor hardware and elements of operating systems involved in scheduling to see how they provide various types of task processing.
Finally, we took the multithreaded program example of the previous chapter, and ran through it again, this time considering what happens in the OS and processor while it is being executed.
In the next chapter, we will take a look at the various multithreading APIs being offered via OS and library-based implementations, along with examples comparing these APIs.
While C++ has a native multithreading implementation in the Standard Template Library (STL), OS-level and framework-based multithreading APIs are still very common. Examples of these APIs include Windows and POSIX (Portable Operating System Interface) threads, and those provided by the Qt, Boost, and POCO libraries.
This chapter takes a detailed look at the features provided by each of these APIs, as well as the similarities and differences between each of them. Finally, we'll look at common usage scenarios using example code.
Topics covered by this chapter include the following:
Before the C++ 2011 (C++11) standard, many different threading implementations were developed, many of which are limited to a specific software platform. Some of these are still relevant today, such as Windows threads. Others have been superseded by standards, of which POSIX Threads (Pthreads) has become the de facto standard on UNIX-like OSes. This includes Linux-based and BSD-based OS, as well as OS X (macOS) and Solaris.
Many libraries were developed to make cross-platform development easier. Although Pthreads helps to make UNIX-like OS more or less compatible one of the prerequisites to make software portable across all major operating systems, a generic threading API is needed. This is why libraries such as Boost, POCO, and Qt were created. Applications can use these and rely on the library to handle any differences between platforms.
Pthreads were first defined in the POSIX.1c standard (Threads extensions, IEEE Std 1003.1c-1995) from 1995 as an extension to the POSIX standard. At the time, UNIX had been chosen as a manufacturer-neutral interface, with POSIX unifying the various APIs among them.
Despite this standardization effort, differences still exist in Pthread implementations between OS's which implement it (for example, between Linux and OS X), courtesy of non-portable extensions (marked with _np in the method name).
For the pthread_setname_np method, the Linux implementation takes two parameters, allowing one to set the name of a thread other than the current thread. On OS X (since 10.6), this method only takes one parameter, allowing one to set the name of the current thread only. If portability is a concern, one has to be mindful of such differences.
After 1997, the POSIX standard revisions were managed by the Austin Joint Working Group. These revisions merge the threads extension into the main standard. The current revision is 7, also known as POSIX.1-2008 and IEEE Std 1003.1, 2013 edition--with a free copy of the standard available online.
OS's can be certified to conform to the POSIX standard. Currently, these are as mentioned in this table:
| Name | Developer | Since version | Architecture(s) (current) | Notes |
|
AIX |
IBM |
5L |
POWER |
Server OS |
|
HP-UX |
Hewlett-Packard |
11i v3 |
PA-RISC, IA-64 (Itanium) |
Server OS |
|
IRIX |
Silicon Graphics (SGI) |
6 |
MIPS |
Discontinued |
|
Inspur K-UX |
Inspur |
2 |
X86_64, |
Linux based |
|
Integrity |
Green Hills Software |
5 |
ARM, XScale, Blackfin, Freescale Coldfire, MIPS, PowerPC, x86. |
Real-time OS |
|
OS X/MacOS |
Apple |
10.5 (Leopard) |
X86_64 |
Desktop OS |
|
QNX Neutrino |
BlackBerry |
1 |
Intel 8088, x86, MIPS, PowerPC, SH-4, ARM, StrongARM, XScale |
Real-time, embedded OS |
|
Solaris |
Sun/Oracle |
2.5 |
SPARC, IA-32 (<11), x86_64, PowerPC (2.5.1) |
Server OS |
|
Tru64 |
DEC, HP, IBM, Compaq |
5.1B-4 |
Alpha |
Discontinued |
|
UnixWare |
Novell, SCO, Xinuos |
7.1.3 |
x86 |
Server OS |
Other operating systems are mostly compliant. The following are examples of the same:
| Name | Platform | Notes |
|
Android |
ARM, x86, MIPS |
Linux based. Bionic C-library. |
|
BeOS (Haiku) |
IA-32, ARM, x64_64 |
Limited to GCC 2.x for x86. |
|
Darwin |
PowerPC, x86, ARM |
Uses the open source components on which macOS is based. |
|
FreeBSD |
IA-32, x86_64, sparc64, PowerPC, ARM, MIPS, and so on |
Essentially POSIX compliant. One can rely on documented POSIX behavior. More strict on compliance than Linux, in general. |
|
Linux |
Alpha, ARC, ARM, AVR32, Blackfin, H8/300, Itanium, m68k, Microblaze, MIPS, Nios II, OpenRISC, PA-RISC, PowerPC, s390, S+core, SuperH, SPARC, x86, Xtensa, and so on |
Some Linux distributions (see previous table) are certified as being POSIX compliant. This does not imply that every Linux distribution is POSIX compliant. Some tools and libraries may differ from the standard. For Pthreads, this may mean that the behavior is sometimes different between Linux distributions (different scheduler, and so on) as well as compared to other OS's implementing Pthreads. |
|
MINIX 3 |
IA-32, ARM |
Conforms to POSIX specification standard 3 (SUSv3, 2004). |
|
NetBSD |
Alpha, ARM, PA-RISC, 68k, MIPS, PowerPC, SH3, SPARC, RISC-V, VAX, x86, and so on |
Almost fully compatible with POSX.1 (1990), and mostly compliant with POSIX.2 (1992). |
|
Nuclear RTOS |
ARM, MIPS, PowerPC, Nios II, MicroBlaze, SuperH, and so on |
Proprietary RTOS from Mentor Graphics aimed at embedded applications. |
|
NuttX |
ARM, AVR, AVR32, HCS12, SuperH, Z80, and so on |
Light-weight RTOS, scalable from 8 to 32-bit systems with strong focus on POSIX compliance. |
|
OpenBSD |
Alpha, x86_64, ARM, PA-RISC, IA-32, MIPS, PowerPC, SPARC, and so on |
Forked from NetBSD in 1995. Similar POSIX support. |
|
OpenSolaris/illumos |
IA-32, x86_64, SPARC, ARM |
Compliant with the commercial Solaris releases being certified compatible. |
|
VxWorks |
ARM, SH-4, x86, x86_64, MIPS, PowerPC |
POSIX compliant, with certification for user-mode execution environment. |
From this it should be obvious that it's not a clear matter of following the POSIX specification, and being able to count on one's code compiling on each of these platforms. Each platform will also have its own set of extensions to the standard for features which were omitted in the standard, but are still desirable. Pthreads are, however, widely used by Linux, BSD, and similar software.
It's also possible to use the POSIX APIs in a limited fashion using, for example, the following:
| Name | Compliance |
|
Cygwin |
Mostly complete. Provides a full runtime environment for a POSIX application, which can be distributed as a normal Windows application. |
|
MinGW |
With MinGW-w64 (a redevelopment of MinGW), Pthreads support is fairly complete, though some functionality may be absent. |
|
Windows Subsystem for Linux |
WSL is a Windows 10 feature, which allows a Ubuntu Linux 14.04 (64-bit) image's tools and utilities to run natively on top of it though not those using GUI features or missing kernel features. Otherwise, it offers similar compliance as Linux. This feature currently requires that one runs the Windows 10 Anniversary Update and install WSL by hand using instructions provided by Microsoft. |
POSIX on Windows is generally not recommended. Unless there are good reasons to use POSIX (large existing code base, for example), it's far easier to use one of the cross-platform APIs (covered later in this chapter), which smooth away any platform issues.
In the following sections, we'll look at the features offered by the Pthreads API.
These are all the functions which start with either pthread_ or pthread_attr_. These functions all apply to threads themselves and their attribute objects.
The basic use of threads with Pthreads looks like the following:
#include <pthread.h>
#include <stdlib.h>

#define NUM_THREADS     5
The main Pthreads header is pthread.h. This gives access to everything but semaphores (covered later in this section). We also define a constant for the number of threads we wish to start here:
void* worker(void* arg) {
    int value = *((int*) arg);

    // More business logic.

    return 0;
}
We define a simple Worker function, which we'll pass to the new thread in a moment. For demonstration and debugging purposes one could first add a simple cout or printf-based bit of business logic to print out the value sent to the new thread.
Next, we define the main function as follows:
int main(int argc, char** argv) {
pthread_t threads[NUM_THREADS];
int thread_args[NUM_THREADS];
int result_code;
for (unsigned int i = 0; i < NUM_THREADS; ++i) {
thread_args[i] = i;
result_code = pthread_create(&threads[i], 0, worker, (void*) &thread_args[i]);
}
We create all of the threads in a loop in the preceding function. Each thread instance gets a thread ID assigned (first argument) when created in addition to a result code (zero on success) returned by the pthread_create() function. The thread ID is the handle to reference the thread in future calls.
The second argument to the function is a pthread_attr_t structure instance, or 0 if none. This allows for configuration characteristics of the new thread, such as the initial stack size. When zero is passed, default parameters are used, which differ per platform and configuration.
The third parameter is a pointer to the function which the new thread will start with. This function pointer is defined as a function which returns a pointer to void data (that is, custom data), and accepts a pointer to void data. Here, the data being passed to the new thread as an argument is the thread ID:
for (int i = 0; i < NUM_THREADS; ++i) {
result_code = pthread_join(threads[i], 0);
}
exit(0);
}
Next, we wait for each worker thread to finish using the pthread_join() function. This function takes two parameters, the ID of the thread to wait for, and a buffer for the return value of the Worker function (or zero).
Other functions to manage threads are as follows:
Beyond this, there are the pthread_attr_* functions to manipulate and obtain information about a pthread_attr_t structure.
These are functions prefixed with either pthread_mutex_ or pthread_mutexattr_. They apply to mutexes and their attribute objects.
Mutexes in Pthreads can be initialized, destroyed, locked, and unlocked. They can also have their behavior customized using a pthread_mutexattr_t structure, which has its corresponding pthread_mutexattr_* functions for initializing and destroying an attribute on it.
A basic use of a Pthread mutex using static initialization looks as follows:
static pthread_mutex_t func_mutex = PTHREAD_MUTEX_INITIALIZER;
void func() {
pthread_mutex_lock(&func_mutex);
// Do something that's not thread-safe.
pthread_mutex_unlock(&func_mutex);
}
In this last bit of code, we use the PTHREAD_MUTEX_INITIALIZER macro, which initializes the mutex for us without having to type out the code for it every time. In comparison to other APIs, one has to manually initialize and destroy mutexes, though the use of macros helps somewhat.
After this, we lock and unlock the mutex. There's also the pthread_mutex_trylock() function, which is like the regular lock version, but which will return immediately if the referenced mutex is already locked instead of waiting for it to be unlocked.
In this example, the mutex is not explicitly destroyed. This is, however, a part of normal memory management in a Pthreads-based application.
These are functions which are prefixed with either pthread_cond_ or pthread_condattr_. They apply to condition variables and their attribute objects.
Condition variables in Pthreads follow the same pattern of having an initialization and a destroy function in addition to having the same for managing a pthread_condattr_t attribution structure.
This example covers basic usage of Pthreads condition variables:
#include <pthread.h>
#include <stdlib.h>
#include <unistd.h>
#define COUNT_TRIGGER 10
#define COUNT_LIMIT 12
int count = 0;
int thread_ids[3] = {0,1,2};
pthread_mutex_t count_mutex;
pthread_cond_t count_cv;
In the preceding code, we get the standard headers, and define a count trigger and limit, whose purpose will become clear in a moment. We also define a few global variables: a count variable, the IDs for the threads we wish to create, as well as a mutex and condition variable:
void* add_count(void* t) {
int tid = (long) t;
for (int i = 0; i < COUNT_TRIGGER; ++i) {
pthread_mutex_lock(&count_mutex);
count++;
if (count == COUNT_LIMIT) {
pthread_cond_signal(&count_cv);
}
pthread_mutex_unlock(&count_mutex);
sleep(1);
}
pthread_exit(0);
}
This preceding function, essentially, just adds to the global counter variable after obtaining exclusive access to it with the count_mutex. It also checks whether the count trigger value has been reached. If it has, it will signal the condition variable.
To give the second thread, which also runs this function, a chance to get the mutex, we sleep for 1 second in each cycle of the loop:
void* watch_count(void* t) {
int tid = (int) t;
pthread_mutex_lock(&count_mutex);
if (count < COUNT_LIMIT) {
pthread_cond_wait(&count_cv, &count_mutex);
}
pthread_mutex_unlock(&count_mutex);
pthread_exit(0);
}
In this second function, we lock the global mutex before checking whether we have reached the count limit yet. This is our insurance in case the thread running this function does not get called before the count reaches the limit.
Otherwise, we wait on the condition variable providing the condition variable and locked mutex. Once signaled, we unlock the global mutex, and exit the thread.
A point to note here is that this example does not account for spurious wake-ups. Pthreads condition variables are susceptible to such wake-ups which necessitate one to use a loop and check whether some kind of condition has been met:
int main (int argc, char* argv[]) {
int tid1 = 1, tid2 = 2, tid3 = 3;
pthread_t threads[3];
pthread_attr_t attr;
pthread_mutex_init(&count_mutex, 0);
pthread_cond_init (&count_cv, 0);
pthread_attr_init(&attr);
pthread_attr_setdetachstate(&attr, PTHREAD_CREATE_JOINABLE);
pthread_create(&threads[0], &attr, watch_count, (void *) tid1);
pthread_create(&threads[1], &attr, add_count, (void *) tid2);
pthread_create(&threads[2], &attr, add_count, (void *) tid3);
for (int i = 0; i < 3; ++i) {
pthread_join(threads[i], 0);
}
pthread_attr_destroy(&attr);
pthread_mutex_destroy(&count_mutex);
pthread_cond_destroy(&count_cv);
return 0;
}
Finally, in the main function, we create the three threads, with two running the function which adds to the counter, and the third running the function which waits to have its condition variable signaled.
In this method, we also initialize the global mutex and condition variable. The threads we create further have the "joinable" attribute explicitly set.
Finally, we wait for each thread to finish, after which we clean up, destroying the attribute structure instance, mutex, and condition variable before exiting.
Using the pthread_cond_broadcast() function, it's further possible to signal all threads which are waiting for a condition variable instead of merely the first one in the queue. This enables one to use condition variables more elegantly with some applications, such as where one has a lot of worker threads waiting for new dataset to arrive without having to notify every thread individually.
Functions which implement synchronization are prefixed with pthread_rwlock_ or pthread_barrier_. These implement read/write locks and synchronization barriers.
A read/write lock (rwlock) is very similar to a mutex, except that it has the additional feature of allowing infinite threads to read simultaneously, while only restricting write access to a singular thread.
Using rwlock is very similar to using a mutex:
#include <pthread.h>
int pthread_rwlock_init(pthread_rwlock_t* rwlock, const pthread_rwlockattr_t* attr);
pthread_rwlock_t rwlock = PTHREAD_RWLOCK_INITIALIZER;
In the last code, we include the same general header, and either use the initialization function, or the generic macro. The interesting part is when we lock rwlock, which can be done for just read-only access:
int pthread_rwlock_rdlock(pthread_rwlock_t* rwlock);
int pthread_rwlock_tryrdlock(pthread_rwlock_t* rwlock);
Here, the second variation returns immediately if the lock has been locked already. One can also lock it for write access as follows:
int pthread_rwlock_wrlock(pthread_rwlock_t* rwlock);
int pthread_rwlock_trywrlock(pthread_rwlock_t * rwlock);
These functions work basically the same, except that only one writer is allowed at any given time, whereas multiple readers can obtain a read-only lock.
Barriers are another concept with Pthreads. These are synchronization objects which act like a barrier for a number of threads. All of these have to reach the barrier before any of them can proceed past it. In the barrier initialization function, the thread count is specified. Only once all of these threads have called the barrier object using the pthread_barrier_wait() function will they continue executing.
Semaphores were, as mentioned earlier, not part of the original Pthreads extension to the POSIX specification. They are declared in the semaphore.h header for this reason.
In essence, semaphores are simple integers, generally used as a resource count. To make them thread-safe, atomic operations (check and lock) are used. POSIX semaphores support the initializing, destroying, incrementing and decrementing of a semaphore as well as waiting for the semaphore to reach a non-zero value.
With Pthreads, TLS is accomplished using keys and methods to set thread-specific data:
pthread_key_t global_var_key;
void* worker(void* arg) {
int *p = new int;
*p = 1;
pthread_setspecific(global_var_key, p);
int* global_spec_var = (int*) pthread_getspecific(global_var_key);
*global_spec_var += 1;
pthread_setspecific(global_var_key, 0);
delete p;
pthread_exit(0);
}
In the worker thread, we allocate a new integer on the heap, and set the global key to its own value. After increasing the global variable by 1, its value will be 2, regardless of what the other threads do. We can set the global variable to 0 once we're done with it for this thread, and delete the allocated value:
int main(void) {
pthread_t threads[5];
pthread_key_create(&global_var_key, 0);
for (int i = 0; i < 5; ++i)
pthread_create(&threads[i],0,worker,0);
for (int i = 0; i < 5; ++i) {
pthread_join(threads[i], 0);
}
return 0;
}
A global key is set and used to reference the TLS variable, yet each of the threads we create can set its own value for this key.
While a thread can create its own keys, this method of handling TLS is fairly involved compared to the other APIs we're looking at in this chapter.
Relative to Pthreads, Windows threads are limited to Windows operating systems and similar (for example ReactOS, and other OS's using Wine). This provides a fairly consistent implementation, easily defined by the Windows version that the support corresponds to.
Prior to Windows Vista, threading support missed features such as condition variables, while having features not found in Pthreads. Depending on one's perspective, having to use the countless "type def" types defined by the Windows headers can be a bother as well.
A basic example of using Windows threads, as adapted from the official MSDN documentation sample code, looks like this:
#include <windows.h>
#include <tchar.h>
#include <strsafe.h>
#define MAX_THREADS 3
#define BUF_SIZE 255
After including a series of Windows-specific headers for the thread functions, character strings, and more, we define the number of threads we wish to create as well as the size of the message buffer in the Worker function.
We also define a struct type (passed by void pointer: LPVOID) to contain the sample data we pass to each worker thread:
typedef struct MyData {
int val1;
int val2;
} MYDATA, *PMYDATA;
DWORD WINAPI worker(LPVOID lpParam) {
HANDLE hStdout = GetStdHandle(STD_OUTPUT_HANDLE);
if (hStdout == INVALID_HANDLE_VALUE) {
return 1;
}
PMYDATA pDataArray = (PMYDATA) lpParam;
TCHAR msgBuf[BUF_SIZE];
size_t cchStringSize;
DWORD dwChars;
StringCchPrintf(msgBuf, BUF_SIZE, TEXT("Parameters = %d, %dn"),
pDataArray->val1, pDataArray->val2);
StringCchLength(msgBuf, BUF_SIZE, &cchStringSize);
WriteConsole(hStdout, msgBuf, (DWORD) cchStringSize, &dwChars, NULL);
return 0;
}
In the Worker function, we cast the provided parameter to our custom struct type before using it to print its values to a string, which we output on the console.
We also validate that there's an active standard output (console or similar). The functions used to print the string are all thread safe.
void errorHandler(LPTSTR lpszFunction) {
LPVOID lpMsgBuf;
LPVOID lpDisplayBuf;
DWORD dw = GetLastError();
FormatMessage(
FORMAT_MESSAGE_ALLOCATE_BUFFER |
FORMAT_MESSAGE_FROM_SYSTEM |
FORMAT_MESSAGE_IGNORE_INSERTS,
NULL,
dw,
MAKELANGID(LANG_NEUTRAL, SUBLANG_DEFAULT),
(LPTSTR) &lpMsgBuf,
0, NULL);
lpDisplayBuf = (LPVOID) LocalAlloc(LMEM_ZEROINIT,
(lstrlen((LPCTSTR) lpMsgBuf) + lstrlen((LPCTSTR) lpszFunction) + 40) * sizeof(TCHAR));
StringCchPrintf((LPTSTR)lpDisplayBuf,
LocalSize(lpDisplayBuf) / sizeof(TCHAR),
TEXT("%s failed with error %d: %s"),
lpszFunction, dw, lpMsgBuf);
MessageBox(NULL, (LPCTSTR) lpDisplayBuf, TEXT("Error"), MB_OK);
LocalFree(lpMsgBuf);
LocalFree(lpDisplayBuf);
}
Here, an error handler function is defined, which obtains the system error message for the last error code. After obtaining the code for the last error, the error message to be output is formatted, and shown in a message box. Finally, the allocated memory buffers are freed.
Finally, the main function is as follows:
int _tmain() {
PMYDATA pDataArray[MAX_THREADS];
DWORD dwThreadIdArray[MAX_THREADS];
HANDLE hThreadArray[MAX_THREADS];
for (int i = 0; i < MAX_THREADS; ++i) {
pDataArray[i] = (PMYDATA) HeapAlloc(GetProcessHeap(),
HEAP_ZERO_MEMORY, sizeof(MYDATA)); if (pDataArray[i] == 0) {
ExitProcess(2);
}
pDataArray[i]->val1 = i;
pDataArray[i]->val2 = i+100;
hThreadArray[i] = CreateThread(
NULL, // default security attributes
0, // use default stack size
worker, // thread function name
pDataArray[i], // argument to thread function
0, // use default creation flags
&dwThreadIdArray[i]);// returns the thread identifier
if (hThreadArray[i] == 0) {
errorHandler(TEXT("CreateThread"));
ExitProcess(3);
}
}
WaitForMultipleObjects(MAX_THREADS, hThreadArray, TRUE, INFINITE);
for (int i = 0; i < MAX_THREADS; ++i) {
CloseHandle(hThreadArray[i]);
if (pDataArray[i] != 0) {
HeapFree(GetProcessHeap(), 0, pDataArray[i]);
}
}
return 0;
}
In the main function, we create our threads in a loop, allocate memory for thread data, and generate unique data for each thread before starting the thread. Each thread instance is passed its own unique parameters.
After this, we wait for the threads to finish and rejoin. This is essentially the same as calling the join function on singular threads with Pthreads--only here, a single function call suffices.
Finally, each thread handle is closed, and we clean up the memory we allocated earlier.
Advanced thread management with Windows threads includes jobs, fibers, and thread pools. Jobs essentially allow one to link multiple threads together into a singular unit, enabling one to change properties and the status of all these threads in one go.
Fibers are light-weight threads, which run within the context of the thread which creates them. The creating thread is expected to schedule these fibers itself. Fibers also have Fiber Local Storage (FLS) akin to TLS.
Finally, the Windows threads API provides a Thread Pool API, allowing one to easily use such a thread pool in one's application. Each process is also provided with a default thread pool.
With Windows threads, mutual exclusion and synchronization can be accomplished using critical sections, mutexes, semaphores, slim reader/writer (SRW) locks, barriers, and variations.
Synchronization objects include the following:
| Name | Description |
| Event | Allows for signaling of events between threads and processes using named objects. |
| Mutex | Used for inter-thread and process synchronization to coordinate access to shared resources. |
| Semaphore | Standard semaphore counter object, used for inter-thread and process synchronization. |
| Waitable timer | Timer object usable by multiple processes with multiple usage modes. |
| Critical section | Critical sections are essentially mutexes which are limited to a single process, which makes them faster than using a mutex due to lack of kernel space calls. |
| Slim reader/writer lock | SRWs are akin to read/write locks in Pthreads, allowing multiple readers or a single writer thread to access a shared resource. |
| Interlocked variable access | Allows for atomic access to a range of variables which are otherwise not guaranteed to be atomic. This enables threads to share a variable without having to use mutexes. |
The implementation of condition variables with Windows threads is fairly straightforward. It uses a critical section (CRITICAL_SECTION) and condition variable (CONDITION_VARIABLE) along with the condition variable functions to wait for a specific condition variable, or to signal it.
Thread local storage (TLS) with Windows threads is similar to Pthreads in that a central key (TLS index) has to be created first after which individual threads can use that global index to store and retrieve local values.
Like with Pthreads, this involves a similar amount of manual memory management, as the TLS value has to be allocated and deleted by hand.
Boost threads is a relatively small part of the Boost collection of libraries. It was, however, used as the basis for what became the multithreading implementation in C++11, similar to how other Boost libraries ultimately made it, fully or partially, into new C++ standards. Refer to the C++ threads section in this chapter for details on the multithreading API.
Features missing in the C++11 standard, which are available in Boost threads, include the following:
Unless one absolutely needs such features, or if one cannot use a compiler which supports the C++11 standard (including STL threads), there is little reason to use Boost threads over the C++11 implementation.
Since Boost provides wrappers around native OS features, using native C++ threads would likely reduce overhead depending on the quality of the STL implementation.
Qt is a relatively high-level framework, which also reflects in its multithreading API. Another defining feature of Qt is that it wraps its own code (QApplication and QMainWindow) along with the use of a meta-compiler (qmake) to implement its signal-slot architecture and other defining features of the framework.
As a result, Qt's threading support cannot be added into existing code as-is, but requires one to adapt one's code to fit the framework.
A QThread class in Qt is not a thread, but an extensive wrapper around a thread instance, which adds signal-slot communication, runtime support, and other features. This is reflected in the basic usage of a QThread, as shown in the following code:
class Worker : public QObject {
Q_OBJECT
public:
Worker();
~Worker();
public slots:
void process();
signals:
void finished();
void error(QString err);
private:
};
This preceding code is a basic Worker class, which will contain our business logic. It derives from the QObject class, which also allows us to use signal-slot and other intrinsic QObject features. Signal-slot architecture at its core is simply a way for listeners to register on (connect to) signals declared by QObject-derived classes, allowing for cross-module, cross-thread and asynchronous communication.
It has a single, which can be called to start processing, and two signals--one to signal completion, and one to signal an error.
The implementation would look like the following:
Worker::Worker() { }
Worker::~Worker() { }
void Worker::process() {
qDebug("Hello World!");
emit finished();
}
The constructor could be extended to include parameters. Any heap-allocated variables (using malloc or new) must be allocated in the process() method, and not in the constructor due to the thread context the Worker instance will be operating in, as we will see in a moment.
To create a new QThread, we would use the following setup:
QThread* thread = new QThread;
Worker* worker = new Worker();
worker->moveToThread(thread);
connect(worker, SIGNAL(error(QString)), this, SLOT(errorString(QString)));
connect(thread, SIGNAL(started()), worker, SLOT(process()));
connect(worker, SIGNAL(finished()), thread, SLOT(quit()));
connect(worker, SIGNAL(finished()), worker, SLOT(deleteLater()));
connect(thread, SIGNAL(finished()), thread, SLOT(deleteLater()));
thread->start();
The basic procedure is to create a new QThread instance on the heap (so it won't go out of scope) along with a heap-allocated instance of our Worker class. This new worker would then be moved to the new thread instance using its moveToThread() method.
Next, one will connect the various signals to relevant slots including our own finished() and error() signals. The started() signal from the thread instance would be connected to the slot on our worker which will start it.
Most importantly, one has to connect some kind of completion signal from the worker to the quit() and deleteLater() slots on the thread. The finished() signal from the thread will then be connected to the deleteLater() slot on the worker. This will ensure that both the thread and worker instances are cleaned up when the worker is done.
Qt offers thread pools. These require one to inherit from the QRunnable class, and implement the run() function. An instance of this custom class is then passed to the start method of the thread pool (global default pool, or a new one). The life cycle of this worker is then handled by the thread pool.
Qt offers the following synchronization objects:
These should be fairly self-explanatory. Another nice feature of Qt's signal-slot architecture is that these also allow one to communicate asynchronously between threads without having to concern oneself with the low-level implementation details.
The QtConcurrent namespace contains high-level API aimed at making writing multithreading applications possible without having to concern oneself with the low-level details.
Functions include concurrent filtering and mapping algorithms as well as a method to allow running a function in a separate thread. All of these return a QFuture instance, which contains the result of an asynchronous operation.
Qt offers TLS through its QThreadStorage class. Memory management of pointer type values is handled by it. Generally, one would set some kind of data structure as a TLS value to store more than one value per thread, as described, for example, in the QThreadStorage class documentation:
QThreadStorage<QCache<QString, SomeClass> > caches;
void cacheObject(const QString &key, SomeClass* object) {
caches.localData().insert(key, object);
}
void removeFromCache(const QString &key) {
if (!caches.hasLocalData()) { return; }
caches.localData().remove(key);
}
The POCO library is a fairly lightweight wrapper around operating system functionality. It does not require a C++11 compatible compiler or any kind of pre-compiling or meta-compiling.
The Thread class is a simple wrapper around an OS-level thread. It takes Worker class instances which inherit from the Runnable class. The official documentation provides a basic example of this as follows:
#include "Poco/Thread.h"
#include "Poco/Runnable.h"
#include <iostream>
class HelloRunnable: public Poco::Runnable {
virtual void run() {
std::cout << "Hello, world!" << std::endl;
}
};
int main(int argc, char** argv) {
HelloRunnable runnable;
Poco::Thread thread;
thread.start(runnable);
thread.join();
return 0;
}
This preceding code is a very simple "Hello world" example with a worker which only outputs a string via the standard output. The thread instance is allocated on the stack, and kept within the scope of the entry function waiting for the worker to finish using the join() function.
With many of its thread functions, POCO is quite reminiscent of Pthreads, though it does deviate significantly on points such as configuring a thread and other objects. Being a C++ library, it sets properties using class methods rather than filling in a struct and passing it as a parameter.
POCO provides a default thread pool with 16 threads. This number can be changed dynamically. Like with regular threads, a thread pool requires one to pass a Worker class instance which inherits from the Runnable class:
#include "Poco/ThreadPool.h"
#include "Poco/Runnable.h"
#include <iostream>
class HelloRunnable: public Poco::Runnable {
virtual void run() {
std::cout << "Hello, world!" << std::endl;
}
};
int main(int argc, char** argv) {
HelloRunnable runnable;
Poco::ThreadPool::defaultPool().start(runnable);
Poco::ThreadPool::defaultPool().joinAll();
return 0;
}
The worker instance is added to the thread pool, which runs it. The thread pool cleans up threads which have been idle for a certain time when we add another worker instance, change the capacity, or call joinAll(). As a result, the single worker thread will join, and with no active threads left, the application exits.
With POCO, TLS is implemented as a class template, allowing one to use it with almost any type.
As detailed by the official documentation:
#include "Poco/Thread.h"
#include "Poco/Runnable.h"
#include "Poco/ThreadLocal.h"
#include <iostream>
class Counter: public Poco::Runnable {
void run() {
static Poco::ThreadLocal<int> tls;
for (*tls = 0; *tls < 10; ++(*tls)) {
std::cout << *tls << std::endl;
}
}
};
int main(int argc, char** argv) {
Counter counter1;
Counter counter2;
Poco::Thread t1;
Poco::Thread t2;
t1.start(counter1);
t2.start(counter2);
t1.join();
t2.join();
return 0;
}
In this preceding worker example, we create a static TLS variable using the ThreadLocal class template, and define it to contain an integer.
Because we define it as static, it will only be created once per thread. In order to use our TLS variable, we can use either the arrow (->) or asterisk (*) operator to access its value. In this example, we increase the TLS value once per cycle of the for loop until the limit has been reached.
This example demonstrates that both threads will generate their own series of 10 integers, counting through the same numbers without affecting each other.
The synchronization primitives offered by POCO are listed as follows:
Noticeable here is the FastMutex class. This is generally a non-recursive mutex type, except on Windows, where it is recursive. This means one should generally assume either type to be recursive in the sense that the same mutex can be locked multiple times by the same thread.
One can also use mutexes with the ScopedLock class, which ensures that a mutex which it encapsulates is released at the end of the current scope.
Events are akin to Windows events, except that they are limited to a single process. They form the basis of condition variables in POCO.
POCO condition variables function much in the same way as they do with Pthreads and others, except that they are not subject to spurious wake-ups. Normally condition variables are subject to these random wake-ups for optimization reasons. By not having to deal with explicitly having to check whether its condition was met or not upon a condition variable wait returning less burden is placed on the developer.
The native multithreading support in C++ is covered extensively in Chapter 5, Native C++ Threads and Primitives.
As mentioned earlier in the Boost section of this chapter, the C++ multithreading support is heavily based on the Boost threads API, using virtually the same headers and names. The API itself is again reminiscent of Pthreads, though with significant differences when it comes to, for example, condition variables.
Upcoming chapters will use the C++ threading support exclusively for examples.
Of the APIs covered in this chapter, only the Qt multithreading API can be considered to be truly high level. Although the other APIs (including C++11) have some higher-level concepts including thread pools and asynchronous runners which do not require one to use threads directly, Qt offers a full-blown signal-slot architecture, which makes inter-thread communication exceptionally easy.
As covered in this chapter, this ease also comes with a cost, namely, that of having to develop one's application to fit the Qt framework. This may not be acceptable depending on the project.
Which of these APIs is the right one depends on one's requirements. It is, however, relatively fair to say that using straight Pthreads, Windows threads, and kin does not make a lot of sense when one can use APIs such as C++11 threads, POCO, and so on, which ease the development process with no significant reduction in performance while also gaining extensive portability across platforms.
All the APIs are at least somewhat comparable at their core in what they offer in features.
In this chapter, we looked in some detail at a number of the more popular multithreading APIs and frameworks, putting them next to each other to get an idea of their strengths and weaknesses. We went through a number of examples showing how to implement basic functionality using each of these APIs.
In the next chapter, we will look in detail at how to synchronize threads and communicate between them.
While, generally, threads are used to work on a task more or less independently from other threads, there are many occasions where one would want to pass data between threads, or even control other threads, such as from a central task scheduler thread. This chapter looks at how such tasks are accomplished with the C++11 threading API.
Topics covered in this chapter include the following:
The central problem with concurrency is that of ensuring safe access to shared resources even when communicating between threads. There is also the issue of threads being able to communicate and synchronize themselves.
What makes multithreaded programming such a challenge is to be able to keep track of each interaction between threads, and to ensure that each and every form of access is secured while not falling into the trap of deadlocks and data races.
In this chapter, we will look at a fairly complex example involving a task scheduler. This is a form of high-concurrency, high-throughput situation where many different requirements come together with many potential traps, as we will see in a moment.
A good example of multithreading with a significant amount of synchronization and communication between threads is the scheduling of tasks. Here, the goal is to accept incoming tasks and assign them to work threads as quickly as possible.
In this scenario, a number of different approaches are possible. Often one has worker threads running in an active loop, constantly polling a central queue for new tasks. Disadvantages of this approach include wasting of processor cycles on the said polling, and the congestion which forms at the synchronization mechanism used, generally a mutex. Furthermore, this active polling approach scales very poorly when the number of worker threads increase.
Ideally, each worker thread would wait idly until it is needed again. To accomplish this, we have to approach the problem from the other side: not from the perspective of the worker threads, but from that of the queue. Much like the scheduler of an operating system, it is the scheduler which is aware of both the tasks which require processing as well as the available worker threads.
In this approach, a central scheduler instance would accept new tasks and actively assign them to worker threads. The said scheduler instance may also manage these worker threads, such as their number and priority, depending on the number of incoming tasks and the type of task or other properties.
At its core, our scheduler or dispatcher is quite simple, functioning like a queue with all of the scheduling logic built into it, as seen in the following diagram:
As one can see from the preceding high-level view, there really isn't much to it. However, as we'll see in a moment, the actual implementation does have a number of complications.
As is usual, we start off with the main function, contained in main.cpp:
#include "dispatcher.h"
#include "request.h"
#include <iostream>
#include <string>
#include <csignal>
#include <thread>
#include <chrono>
using namespace std;
sig_atomic_t signal_caught = 0;
mutex logMutex;
The custom headers we include are those for our dispatcher implementation, as well as the request class that we'll use.
Globally, we define an atomic variable to be used with the signal handler, as well as a mutex which will synchronize the output (on the standard output) from our logging method:
void sigint_handler(int sig) {
signal_caught = 1;
}
Our signal handler function (for SIGINT signals) simply sets the global atomic variable that we defined earlier:
void logFnc(string text) {
logMutex.lock();
cout << text << "\n";
logMutex.unlock();
}
In our logging function, we use the global mutex to ensure that writing to the standard output is synchronized:
int main() {
signal(SIGINT, &sigint_handler);
Dispatcher::init(10);
In the main function, we install the signal handler for SIGINT to allow us to interrupt the execution of the application. We also call the static init() function on the Dispatcher class to initialize it:
cout << "Initialised.\n";
int cycles = 0;
Request* rq = 0;
while (!signal_caught && cycles < 50) {
rq = new Request();
rq->setValue(cycles);
rq->setOutput(&logFnc);
Dispatcher::addRequest(rq);
cycles++;
}
Next, we set up the loop in which we will create new requests. In each cycle, we create a new Request instance, and use its setValue() function to set an integer value (current cycle number). We also set our logging function on the request instance before adding this new request to Dispatcher using its static addRequest() function.
This loop will continue until the maximum number of cycles have been reached, or SIGINT has been signaled using Ctrl+C or similar:
this_thread::sleep_for(chrono::seconds(5));
Dispatcher::stop();
cout << "Clean-up done.\n";
return 0;
}
Finally, we wait for 5 seconds using the thread's sleep_for() function, and the chrono::seconds() function from the chrono STL header.
We also call the stop() function on Dispatcher before returning.
A request for Dispatcher always derives from the pure virtual AbstractRequest class:
#pragma once
#ifndef ABSTRACT_REQUEST_H
#define ABSTRACT_REQUEST_H
class AbstractRequest {
//
public:
virtual void setValue(int value) = 0;
virtual void process() = 0;
virtual void finish() = 0;
};
#endif
This AbstractRequest class defines an API with three functions, which a deriving class always has to implement. Out of these, the process() and finish() functions are the most generic and likely to be used in any practical implementation. The setValue() function is specific to this demonstration implementation, and would likely be adapted or extended to fit a real-life scenario.
The advantage of using an abstract class as the basis for a request is that it allows the Dispatcher class to handle many different types of requests as long as they all adhere to this same basic API.
Using this abstract interface, we implement a basic Request class as follows:
#pragma once
#ifndef REQUEST_H
#define REQUEST_H
#include "abstract_request.h"
#include <string>
using namespace std;
typedef void (*logFunction)(string text);
class Request : public AbstractRequest {
int value;
logFunction outFnc;
public: void setValue(int value) { this->value = value; }
void setOutput(logFunction fnc) { outFnc = fnc; }
void process();
void finish();
};
#endif
In its header file, we first define the function pointer's format. After this, we implement the request API, and add the setOutput() function to the base API, which accepts a function pointer for logging. Both setter functions merely assign the provided parameter to their respective private class members.
Next, the class function implementations are given as follows:
#include "request.h"
void Request::process() {
outFnc("Starting processing request " + std::to_string(value) + "...");
//
}
void Request::finish() {
outFnc("Finished request " + std::to_string(value));
}
Both of these implementations are very basic; they merely use the function pointer to output a string indicating the status of the worker thread.
In a practical implementation, one would add the business logic to the process() function with the finish() function containing any functionality to finish up a request such as writing a map into a string.
Next is the Worker class. This contains the logic which will be called by Dispatcher in order to process a request.
#pragma once
#ifndef WORKER_H
#define WORKER_H
#include "abstract_request.h"
#include <condition_variable>
#include <mutex>
using namespace std;
class Worker {
condition_variable cv;
mutex mtx;
unique_lock<mutex> ulock;
AbstractRequest* request;
bool running;
bool ready;
public:
Worker() { running = true; ready = false; ulock = unique_lock<mutex>(mtx); }
void run();
void stop() { running = false; }
void setRequest(AbstractRequest* request) { this->request = request; ready = true; }
void getCondition(condition_variable* &cv);
};
#endif
Whereas the adding of a request to Dispatcher does not require any special logic, the Worker class does require the use of condition variables to synchronize itself with the dispatcher. For the C++11 threads API, this requires a condition variable, a mutex, and a unique lock.
The unique lock encapsulates the mutex, and will ultimately be used with the condition variable as we will see in a moment.
Beyond this, we define methods to start and stop the worker, to set a new request for processing, and to obtain access to its internal condition variable.
Moving on, the rest of the implementation is written as follows:
#include "worker.h"
#include "dispatcher.h"
#include <chrono>
using namespace std;
void Worker::getCondition(condition_variable* &cv) {
cv = &(this)->cv;
}
void Worker::run() {
while (running) {
if (ready) {
ready = false;
request->process();
request->finish();
}
if (Dispatcher::addWorker(this)) {
// Use the ready loop to deal with spurious wake-ups.
while (!ready && running) {
if (cv.wait_for(ulock, chrono::seconds(1)) == cv_status::timeout) {
// We timed out, but we keep waiting unless
// the worker is
// stopped by the dispatcher.
}
}
}
}
}
Beyond the getter function for the condition variable, we define the run() function, which dispatcher will run for each worker thread upon starting it.
Its main loop merely checks that the stop() function hasn't been called yet, which would have set the running Boolean value to false, and ended the work thread. This is used by Dispatcher when shutting down, allowing it to terminate the worker threads. Since Boolean values are generally atomic, setting and checking can be done simultaneously without risk or requiring a mutex.
Moving on, the check of the ready variable is to ensure that a request is actually waiting when the thread is first run. On the first run of the worker thread, no request will be waiting, and thus, attempting to process one would result in a crash. Upon Dispatcher setting a new request, this Boolean variable will be set to true.
If a request is waiting, the ready variable will be set to false again, after which the request instance will have its process() and finish() functions called. This will run the business logic of the request on the worker thread's thread, and finalize it.
Finally, the worker thread adds itself to the dispatcher using its static addWorker() function. This function will return false if no new request is available, and cause the worker thread to wait until a new request has become available. Otherwise, the worker thread will continue with the processing of the new request that Dispatcher will have set on it.
If asked to wait, we enter a new loop. This loop will ensure that when the condition variable is woken up, it is because we got signaled by Dispatcher (ready variable set to true), and not because of a spurious wake-up.
Last of all, we enter the actual wait() function of the condition variable using the unique lock instance we created before along with a timeout. If a timeout occurs, we can either terminate the thread, or keep waiting. Here, we choose to do nothing and just re-enter the waiting loop.
As the last item, we have the Dispatcher class itself:
#pragma once
#ifndef DISPATCHER_H
#define DISPATCHER_H
#include "abstract_request.h"
#include "worker.h"
#include <queue>
#include <mutex>
#include <thread>
#include <vector>
using namespace std;
class Dispatcher {
static queue<AbstractRequest*> requests;
static queue<Worker*> workers;
static mutex requestsMutex;
static mutex workersMutex;
static vector<Worker*> allWorkers;
static vector<thread*> threads;
public:
static bool init(int workers);
static bool stop();
static void addRequest(AbstractRequest* request);
static bool addWorker(Worker* worker);
};
#endif
Most of this will look familiar. As you will have surmised by now, this is a fully static class.
Moving on, its implementation is as follows:
#include "dispatcher.h"
#include <iostream>
using namespace std;
queue<AbstractRequest*> Dispatcher::requests;
queue<Worker*> Dispatcher::workers;
mutex Dispatcher::requestsMutex;
mutex Dispatcher::workersMutex;
vector<Worker*> Dispatcher::allWorkers;
vector<thread*> Dispatcher::threads;
bool Dispatcher::init(int workers) {
thread* t = 0;
Worker* w = 0;
for (int i = 0; i < workers; ++i) {
w = new Worker;
allWorkers.push_back(w);
t = new thread(&Worker::run, w);
threads.push_back(t);
}
return true;
}
After setting up the static class members, the init() function is defined. It starts the specified number of worker threads keeping a reference to each worker and thread instance in their respective vector data structures:
bool Dispatcher::stop() {
for (int i = 0; i < allWorkers.size(); ++i) {
allWorkers[i]->stop();
}
cout << "Stopped workers.\n";
for (int j = 0; j < threads.size(); ++j) {
threads[j]->join();
cout << "Joined threads.\n";
}
}
In the stop() function, each worker instance has its stop() function called. This will cause each worker thread to terminate, as we saw earlier in the Worker class description.
Finally, we wait for each thread to join (that is, finish) prior to returning:
void Dispatcher::addRequest(AbstractRequest* request) {
workersMutex.lock();
if (!workers.empty()) {
Worker* worker = workers.front();
worker->setRequest(request);
condition_variable* cv;
worker->getCondition(cv);
cv->notify_one();
workers.pop();
workersMutex.unlock();
}
else {
workersMutex.unlock();
requestsMutex.lock();
requests.push(request);
requestsMutex.unlock();
}
}
The addRequest() function is where things get interesting. In this function, a new request is added. What happens next depends on whether a worker thread is waiting for a new request or not. If no worker thread is waiting (worker queue is empty), the request is added to the request queue.
The use of mutexes ensures that the access to these queues occurs safely, as the worker threads will simultaneously try to access both queues as well.
An important gotcha to note here is the possibility of a deadlock. That is, a situation where two threads will hold the lock on a resource, with the second thread waiting for the first one to release its lock before releasing its own. Every situation where more than one mutex is used in a single scope holds this potential.
In this function, the potential for a deadlock lies in releasing of the lock on the workers mutex, and when the lock on the requests mutex is obtained. In the case that this function holds the workers mutex and tries to obtain the requests lock (when no worker thread is available), there is a chance that another thread holds the requests mutex (looking for new requests to handle) while simultaneously trying to obtain the workers mutex (finding no requests and adding itself to the workers queue).
The solution here is simple: release a mutex before obtaining the next one. In the situation where one feels that more than one mutex lock has to be held, it is paramount to examine and test one's code for potential deadlocks. In this particular situation, the workers mutex lock is explicitly released when it is no longer needed, or before the requests mutex lock is obtained, thus preventing a deadlock.
Another important aspect of this particular section of code is the way it signals a worker thread. As one can see in the first section of the if/else block, when the workers queue is not empty, a worker is fetched from the queue, has the request set on it, and then has its condition variable referenced and signaled, or notified.
Internally, the condition variable uses the mutex we handed it before in the Worker class definition to guarantee only atomic access to it. When the notify_one() function (generally called signal() in other APIs) is called on the condition variable, it will notify the first thread in the queue of threads waiting for the condition variable to return and continue.
In the Worker class run() function, we would be waiting for this notification event. Upon receiving it, the worker thread would continue and process the new request. The thread reference will then be removed from the queue until it adds itself again once it is done processing the request:
bool Dispatcher::addWorker(Worker* worker) {
bool wait = true;
requestsMutex.lock();
if (!requests.empty()) {
AbstractRequest* request = requests.front();
worker->setRequest(request);
requests.pop();
wait = false;
requestsMutex.unlock();
}
else {
requestsMutex.unlock();
workersMutex.lock();
workers.push(worker);
workersMutex.unlock();
}
return wait;
}
With this last function, a worker thread will add itself to the queue once it is done processing a request. It is similar to the earlier function in that the incoming worker is first actively matched with any request which may be waiting in the request queue. If none are available, the worker is added to the worker queue.
It is important to note here that we return a Boolean value which indicates whether the calling thread should wait for a new request, or whether it already has received a new request while trying to add itself to the queue.
While this code is less complex than that of the previous function, it still holds the same potential deadlock issue due to the handling of two mutexes within the same scope. Here, too, we first release the mutex we hold before obtaining the next one.
The makefile for this Dispatcher example is very basic again--it gathers all C++ source files in the current folder, and compiles them into a binary using g++:
GCC := g++
OUTPUT := dispatcher_demo
SOURCES := $(wildcard *.cpp)
CCFLAGS := -std=c++11 -g3
all: $(OUTPUT)
$(OUTPUT):
$(GCC) -o $(OUTPUT) $(CCFLAGS) $(SOURCES)
clean:
rm $(OUTPUT)
.PHONY: all
After compiling the application, running it produces the following output for the 50 total requests:
$ ./dispatcher_demo.exe
Initialised.
Starting processing request 1...
Starting processing request 2...
Finished request 1
Starting processing request 3...
Finished request 3
Starting processing request 6...
Finished request 6
Starting processing request 8...
Finished request 8
Starting processing request 9...
Finished request 9
Finished request 2
Starting processing request 11...
Finished request 11
Starting processing request 12...
Finished request 12
Starting processing request 13...
Finished request 13
Starting processing request 14...
Finished request 14
Starting processing request 7...
Starting processing request 10...
Starting processing request 15...
Finished request 7
Finished request 15
Finished request 10
Starting processing request 16...
Finished request 16
Starting processing request 17...
Starting processing request 18...
Starting processing request 0...
At this point, we can already clearly see that even with each request taking almost no time to process, the requests are clearly being executed in parallel. The first request (request 0) only starts being processed after the sixteenth request, while the second request already finishes after the ninth request, long before this.
The factors which determine which thread, and thus, which request is processed first depends on the OS scheduler and hardware-based scheduling as described in chapter 2, Multithreading Implementation on the Processor and OS. This clearly shows just how few assumptions can be made about how a multithreaded application will be executed even on a single platform.
Starting processing request 5...
Finished request 5
Starting processing request 20...
Finished request 18
Finished request 20
Starting processing request 21...
Starting processing request 4...
Finished request 21
Finished request 4
In the preceding code, the fourth and fifth requests also finish in a rather delayed fashion.
Starting processing request 23...
Starting processing request 24...
Starting processing request 22...
Finished request 24
Finished request 23
Finished request 22
Starting processing request 26...
Starting processing request 25...
Starting processing request 28...
Finished request 26
Starting processing request 27...
Finished request 28
Finished request 27
Starting processing request 29...
Starting processing request 30...
Finished request 30
Finished request 29
Finished request 17
Finished request 25
Starting processing request 19...
Finished request 0
At this point, the first request finally finishes. This may indicate that the initialization time for the first request will always be delayed as compared to the successive requests. Running the application multiple times can confirm this. It's important that if the order of processing is relevant, this randomness does not negatively affect one's application.
Starting processing request 33...
Starting processing request 35...
Finished request 33
Finished request 35
Starting processing request 37...
Starting processing request 38...
Finished request 37
Finished request 38
Starting processing request 39...
Starting processing request 40...
Starting processing request 36...
Starting processing request 31...
Finished request 40
Finished request 39
Starting processing request 32...
Starting processing request 41...
Finished request 32
Finished request 41
Starting processing request 42...
Finished request 31
Starting processing request 44...
Finished request 36
Finished request 42
Starting processing request 45...
Finished request 44
Starting processing request 47...
Starting processing request 48...
Finished request 48
Starting processing request 43...
Finished request 47
Finished request 43
Finished request 19
Starting processing request 34...
Finished request 34
Starting processing request 46...
Starting processing request 49...
Finished request 46
Finished request 49
Finished request 45
Request 19 also became fairly delayed, showing once again just how unpredictable a multithreaded application can be. If we were processing a large dataset in parallel here, with chunks of data in each request, we might have to pause at some points to account for these delays, as otherwise, our output cache might grow too large.
As doing so would negatively affect an application's performance, one might have to look at low-level optimizations, as well as the scheduling of threads on specific processor cores in order to prevent this from happening.
Stopped workers.
Joined threads.
Joined threads.
Joined threads.
Joined threads.
Joined threads.
Joined threads.
Joined threads.
Joined threads.
Joined threads.
Joined threads.
Clean-up done.
All 10 worker threads which were launched in the beginning terminate here as we call the stop() function of the Dispatcher.
In the example given in this chapter, we saw how to share information between threads in addition to synchronizing threads--this in the form of the requests we passed from the main thread into the dispatcher from which each request gets passed on to a different thread.
The essential idea behind the sharing of data between threads is that the data to be shared exists somewhere in a way which is accessible to two threads or more. After this, we have to ensure that only one thread can modify the data, and that the data does not get modified while it's being read. Generally, we would use mutexes or similar to ensure this.
Read-write locks are a possible optimization here, because they allow multiple threads to read simultaneously from a single data source. If one has an application in which multiple worker threads read the same information repeatedly, it would be more efficient to use read-write locks than basic mutexes, because the attempts to read the data will not block the other threads.
A read-write lock can thus be used as a more advanced version of a mutex, namely, as one which adapts its behavior to the type of access. Internally, it builds on mutexes (or semaphores) and condition variables.
First available via the Boost library and introduced natively with C++11, shared pointers are an abstraction of memory management using reference counting for heap-allocated instances. They are partially thread-safe in that creating multiple shared pointer instances can be created, but the referenced object itself is not thread-safe.
Depending on the application, this may suffice, however. To make them properly thread-safe, one can use atomics. We will look at this in more detail in Chapter 8, Atomic Operations - Working with the Hardware.
In this chapter, we looked at how to pass data between threads in a safe manner as part of a fairly complex scheduler implementation. We also looked at the resulting asynchronous processing of the said scheduler, and considered some potential alternatives and optimizations for passing data between threads.
At this point, you should be able to safely pass data between threads, as well as synchronize access to other shared resources.
In the next chapter, we will look at native C++ threading and the primitives API.
Starting with the 2011 revision of the C++ standard, a multithreading API is officially part of the C++ Standard Template Library (STL). This means that threads, thread primitives, and synchronization mechanisms are available to any new C++ application without the need to install a third-party library, or to rely on the operating system's APIs.
This chapter looks at the multithreading features available in this native API up to the features added by the 2014 standard. A number of examples will be shown to use these features in detail.
Topics in this chapter include the following:
In Chapter 3, C++ Multithreading APIs, we looked at the various APIs that are available to us when developing a multithreaded C++ application. In Chapter 4, Thread Synchronization and Communication, we implemented a multithreaded scheduler application using the native C++ threading API.
By including the <thread> header from the STL, we gain access to the std::thread class with facilities for mutual exclusion (mutex, and so on) provided by further headers. This API is, essentially, the same as the multithreading API from Boost.Thread, the main differences being more control over threads (join with timeout, thread groups, and thread interruption), and a number of additional lock types implemented on top of primitives such as mutexes and condition variables.
In general, Boost.Thread should be used as a fall back for when C++11 support isn't present, or when these additional Boost.Thread features are a requirement of one's application, and not easily added otherwise. Since Boost.Thread builds upon the available (native) threading support, it's also likely to add overhead as compared to the C++11 STL implementation.
The 2011 revision to the C++ standard (commonly referred to as C++11) adds a wide range of new features, the most crucial one being the addition of native multithreading support, which adds the ability to create, manage, and use threads within C++ without the use of third-party libraries.
This standard standardizes the memory model for the core language to allow multiple threads to coexist as well as enables features such as thread-local storage. Initial support was added in the C++03 standard, but the C++11 standard is the first to make full use of this.
As noted earlier, the actual threading API itself is implemented in the STL. One of the goals for the C++11 (C++0x) standard was to have as many of the new features as possible in the STL, and not as part of the core language. As a result, in order to use threads, mutexes, and kin, one has to first include the relevant STL header.
The standards committee which worked on the new multithreading API each had their own sets of goals, and as a result, a few features which were desired by some did not make it into the final standard. This includes features such as terminating another thread, or thread cancellation, which was strongly opposed by the POSIX representatives on account of canceling threads likely to cause issues with resource clean-up in the thread being destroyed.
Following are the features provided by this API implementation:
In a moment, we will look at detailed examples of each of these features. First we will see what the next revisions of the C++ standard have added to this initial set.
The 2014 standard adds the following features to the standard library:
Both of these are defined in the <shared_mutex> STL header. Since locks are based on mutexes, a shared lock is, therefore, reliant on a shared mutex.
The 2017 standard adds another set of features to the standard library, namely:
Here, a scoped lock is a mutex wrapper providing an RAII-style mechanism to own a mutex for the duration of a scoped block.
In the STL, we find the following header organization, and their provided functionality:
| Header | Provides |
| <thread> | The std::thread class. Methods under std::this_thread namespace:
|
| <mutex> | Classes:
|
| <shared_mutex> | Classes:
|
| <future> | Classes:
|
| <condition_variable> | Classes:
|
In the preceding table, we can see the functionality provided by each header along with the features introduced with the 2014 and 2017 standards. In the following sections, we will take a detailed look at each function and class.
The thread class is the core of the entire threading API; it wraps the underlying operating system's threads, and provides the functionality we need to start and stop threads.
This functionality is made accessible by including the <thread> header.
Upon creating a thread it is started immediately:
#include <thread>
void worker() {
// Business logic.
}
int main () {
std::thread t(worker);
return 0;
}
This preceding code would start the thread to then immediately terminate the application, because we are not waiting for the new thread to finish executing.
To do this properly, we need to wait for the thread to finish, or rejoin as follows:
#include <thread>
void worker() {
// Business logic.
}
int main () {
std::thread t(worker);
t.join();
return 0;
}
This last code would execute, wait for the new thread to finish, and then return.
It's also possible to pass parameters to a new thread. These parameter values have to be move constructible, which means that it's a type which has a move or copy constructor (called for rvalue references). In practice, this is the case for all basic types and most (user-defined) classes:
#include <thread>
#include <string>
void worker(int n, std::string t) {
// Business logic.
}
int main () {
std::string s = "Test";
int i = 1;
std::thread t(worker, i, s);
t.join();
return 0;
}
In this preceding code, we pass an integer and string to the thread function. This function will receive copies of both variables. When passing references or pointers, things get more complicated with life cycle issues, data races, and such becoming a potential problem.
Any value returned by the function passed to the thread class constructor is ignored. To return information to the thread which created the new thread, one has to use inter-thread synchronization mechanisms (like mutexes) and some kind of a shared variable.
The 2011 standard adds std::move to the <utility> header. Using this template method, one can move resources between objects. This means that it can also move thread instances:
#include <thread>
#include <string>
#include <utility>
void worker(int n, string t) {
// Business logic.
}
int main () {
std::string s = "Test";
std::thread t0(worker, 1, s);
std::thread t1(std::move(t0));
t1.join();
return 0;
}
In this version of the code, we create a thread before moving it to another thread. Thread 0 thus ceases to exist (since it instantly finishes), and the execution of the thread function resumes in the new thread that we create.
As a result of this, we do not have to wait for the first thread to re join, but only for the second one.
Each thread has an identifier associated with it. This ID, or handle, is a unique identifier provided by the STL implementation. It can be obtained by calling the get_id() function of the thread class instance, or by calling std::this_thread::get_id() to get the ID of the thread calling the function:
#include <iostream>
#include <thread>
#include <chrono>
#include <mutex>
std::mutex display_mutex;
void worker() {
std::thread::id this_id = std::this_thread::get_id();
display_mutex.lock();
std::cout << "thread " << this_id << " sleeping...\n";
display_mutex.unlock();
std::this_thread::sleep_for(std::chrono::seconds(1));
}
int main() {
std::thread t1(worker);
std::thread::id t1_id = t1.get_id();
std::thread t2(worker);
std::thread::id t2_id = t2.get_id();
display_mutex.lock();
std::cout << "t1's id: " << t1_id << "\n";
std::cout << "t2's id: " << t2_id << "\n";
display_mutex.unlock();
t1.join();
t2.join();
return 0;
}
This code would produce output similar to this:
t1's id: 2
t2's id: 3
thread 2 sleeping...
thread 3 sleeping...
Here, one sees that the internal thread ID is an integer (std::thread::id type), relative to the initial thread (ID 1). This is comparable to most native thread IDs such as those for POSIX. These can also be obtained using native_handle(). That function will return whatever is the underlying native thread handle. It is particularly useful when one wishes to use a very specific PThread or Win32 thread functionality that's not available in the STL implementation.
It's possible to delay the execution of a thread (sleep) using either of two methods. One is sleep_for(), which delays execution by at least the specified duration, but possibly longer:
#include <iostream>
#include <chrono>
#include <thread>
using namespace std::chrono_literals;
typedef std::chrono::time_point<std::chrono::high_resolution_clock> timepoint;
int main() {
std::cout << "Starting sleep.\n";
timepoint start = std::chrono::high_resolution_clock::now();
std::this_thread::sleep_for(2s);
timepoint end = std::chrono::high_resolution_clock::now();
std::chrono::duration<double, std::milli> elapsed = end -
start;
std::cout << "Slept for: " << elapsed.count() << " ms\n";
}
This preceding code shows how to sleep for roughly 2 seconds, measuring the exact duration using a counter with the highest precision possible on the current OS.
Note that we are able to specify the number of seconds directly, with the seconds post-fix. This is a C++14 feature that got added to the <chrono> header. For the C++11 version, one has to create an instance of std::chrono::seconds and pass it to the sleep_for() function.
The other method is sleep_until(), which takes a single parameter of type std::chrono::time_point<Clock, Duration>. Using this function, one can set a thread to sleep until the specified time point has been reached. Due to the operating system's scheduling priorities, this wake-up time might not be the exact time as specified.
One can indicate to the OS that the current thread can be rescheduled so that other threads can run instead. For this, one uses the std::this_thread::yield() function. The exact result of this function depends on the underlying OS implementation and its scheduler. In the case of a FIFO scheduler, it's likely that the calling thread will be put at the back of the queue.
This is a highly specialized function, with special use cases. It should not be used without first validating its effect on the application's performance.
After starting a thread, one can call detach() on the thread object. This effectively detaches the new thread from the calling thread, meaning that the former will continue executing even after the calling thread has exited.
Using swap(), either as a standalone method or as function of a thread instance, one can exchange the underlying thread handles of thread objects:
#include <iostream>
#include <thread>
#include <chrono>
void worker() {
std::this_thread::sleep_for(std::chrono::seconds(1));
}
int main() {
std::thread t1(worker);
std::thread t2(worker);
std::cout << "thread 1 id: " << t1.get_id() << "\n";
std::cout << "thread 2 id: " << t2.get_id() << "\n";
std::swap(t1, t2);
std::cout << "Swapping threads..." << "\n";
std::cout << "thread 1 id: " << t1.get_id() << "\n";
std::cout << "thread 2 id: " << t2.get_id() << "\n";
t1.swap(t2);
std::cout << "Swapping threads..." << "\n";
std::cout << "thread 1 id: " << t1.get_id() << "\n";
std::cout << "thread 2 id: " << t2.get_id() << "\n";
t1.join();
t2.join();
}
The possible output from this code might look like the following:
thread 1 id: 2
thread 2 id: 3
Swapping threads...
thread 1 id: 3
thread 2 id: 2
Swapping threads...
thread 1 id: 2
thread 2 id: 3
The effect of this is that the state of each thread is swapped with that of the other thread, essentially exchanging their identities.
The <mutex> header contains multiple types of mutexes and locks. The mutex type is the most commonly used type, and provides the basic lock/unlock functionality without any further complications.
At its core, the goal of a mutex is to exclude the possibility of simultaneous access so as to prevent data corruption, and to prevent crashes due to the use of non-thread-safe routines.
An example of where one would need to use a mutex is the following code:
#include <iostream>
#include <thread>
void worker(int i) {
std::cout << "Outputting this from thread number: " << i << "\n";
}
int main() {
std::thread t1(worker, 1);
std::thread t2(worker, 2);
t1.join();
t2.join();
return 0;
}
If one were to try and run this preceding code as-is, one would notice that the text output from both threads would be mashed together instead of being output one after the other. The reason for this is that the standard output (whether C or C++-style) is not thread-safe. Though the application will not crash, the output will be a jumble.
The fix for this is simple, and is given as follows:
#include <iostream>
#include <thread>
#include <mutex>
std::mutex globalMutex;
void worker(int i) {
globalMutex.lock();
std::cout << "Outputting this from thread number: " << i << "\n";
globalMutex.unlock();
}
int main() {
std::thread t1(worker, 1);
std::thread t2(worker, 2);
t1.join();
t2.join();
return 0;
}
In this situation, each thread would first need to obtain access to the mutex object. Since only one thread can have access to the mutex object, the other thread will end up waiting for the first thread to finish writing to the standard output, and the two strings will appear one after the other, as intended.
It's possible to not want the thread to block and wait for the mutex object to become available: for example, when one just wants to know whether a request is already being handled by another thread, and there's no use in waiting for it to finish.
For this, a mutex comes with the try_lock() function which does exactly that.
In the following example, we can see two threads trying to increment the same counter, but with one incrementing its own counter whenever it fails to immediately obtain access to the shared counter:
#include <chrono>
#include <mutex>
#include <thread>
#include <iostream>
std::chrono::milliseconds interval(50);
std::mutex mutex;
int shared_counter = 0;
int exclusive_counter = 0;
void worker0() {
std::this_thread::sleep_for(interval);
while (true) {
if (mutex.try_lock()) {
std::cout << "Shared (" << job_shared << ")\n";
mutex.unlock();
return;
}
else {
++exclusive_counter;
std::cout << "Exclusive (" << exclusive_counter << ")\n";
std::this_thread::sleep_for(interval);
}
}
}
void worker1() {
mutex.lock();
std::this_thread::sleep_for(10 * interval);
++shared_counter;
mutex.unlock();
}
int main() {
std::thread t1(worker0);
std::thread t2(worker1);
t1.join();
t2.join();
}
Both threads in this preceding example run a different worker function, yet both have in common the fact that they sleep for a period of time, and try to acquire the mutex for the shared counter when they wake up. If they do, they'll increase the counter, but only the first worker will output this fact.
The first worker also logs when it did not get the shared counter, but only increased its exclusive counter. The resulting output might look something like this:
Exclusive (1)
Exclusive (2)
Exclusive (3)
Shared (1)
Exclusive (4)
A timed mutex is a regular mutex type, but with a number of added functions which give one control over the time period during which it should be attempted to obtain the lock, that is, try_lock_for and try_lock_until.
The former tries to obtain the lock during the specified time period (std::chrono object) before returning the result (true or false). The latter will wait until a specific point in the future before returning the result.
The use of these functions mostly lies in offering a middle path between the blocking (lock) and non-blocking (try_lock) methods of the regular mutex. One may want to wait for a number of tasks using only a single thread without knowing when a task will become available, or a task may expire at a certain point in time at which waiting for it makes no sense any more.
A lock guard is a simple mutex wrapper, which handles the obtaining of a lock on the mutex object as well as its release when the lock guard goes out of scope. This is a helpful mechanism to ensure that one does not forget to release a mutex lock, and to help reduce clutter in one's code when one has to release the same mutex in multiple locations.
While refactoring of, for example, big if/else blocks can reduce the instances in which the release of a mutex lock is required, it's much easier to just use this lock guard wrapper and not worry about such details:
#include <thread>
#include <mutex>
#include <iostream>
int counter = 0;
std::mutex counter_mutex;
void worker() {
std::lock_guard<std::mutex> lock(counter_mutex);
if (counter == 1) { counter += 10; }
else if (counter >= 10) { counter += 15; }
else if (counter >= 50) { return; }
else { ++counter; }
std::cout << std::this_thread::get_id() << ": " << counter << '\n';
}
int main() {
std::cout << __func__ << ": " << counter << '\n';
std::thread t1(worker);
std::thread t2(worker);
t1.join();
t2.join();
std::cout << __func__ << ": " << counter << '\n';
}
In the preceding example, we see that we have a small if/else block with one condition leading to the worker function immediately returning. Without a lock guard, we would have to make sure that we also unlocked the mutex in this condition before returning from the function.
With the lock guard, however, we do not have to worry about such details, which allows us to focus on the business logic instead of worrying about mutex management.
The unique lock is a general-purpose mutex wrapper. It's similar to the timed mutex, but with additional features, primary of which is the concept of ownership. Unlike other lock types, a unique lock does not necessarily own the mutex it wraps if it contains any at all. Mutexes can be transferred between unique lock instances along with ownership of the said mutexes using the swap() function.
Whether a unique lock instance has ownership of its mutex, and whether it's locked or not, is first determined when creating the lock, as can be seen with its constructors. For example:
std::mutex m1, m2, m3;
std::unique_lock<std::mutex> lock1(m1, std::defer_lock);
std::unique_lock<std::mutex> lock2(m2, std::try_lock);
std::unique_lock<std::mutex> lock3(m3, std::adopt_lock);
The first constructor in the last code does not lock the assigned mutex (defers). The second attempts to lock the mutex using try_lock(). Finally, the third constructor assumes that it already owns the provided mutex.
In addition to these, other constructors allow the functionality of a timed mutex. That is, it will wait for a time period until a time point has been reached, or until the lock has been acquired.
Finally, the association between the lock and the mutex is broken by using the release() function, and a pointer is returned to the mutex object. The caller is then responsible for the releasing of any remaining locks on the mutex and for the further handling of it.
This type of lock isn't one which one will tend to use very often on its own, as it's extremely generic. Most of the other types of mutexes and locks are significantly less complex, and likely to fulfil all the needs in 99% of all cases. The complexity of a unique lock is, thus, both a benefit and a risk.
It is, however, commonly used by other parts of the C++11 threading API, such as condition variables, as we will see in a moment.
One area where a unique lock may be useful is as a scoped lock, allowing one to use scoped locks without having to rely on the native scoped locks in the C++17 standard. See this example:
#include <mutex>
std::mutex my_mutex
int count = 0;
int function() {
std::unique_lock<mutex> lock(my_mutex);
count++;
}
As we enter the function, we create a new unique_lock with the global mutex instance. The mutex is locked at this point, after which we can perform any critical operations.
When the function scope ends, the destructor of the unique_lock is called, which results in the mutex getting unlocked again.
First introduced in the 2017 standard, the scoped lock is a mutex wrapper which obtains access to (locks) the provided mutex, and ensures it is unlocked when the scoped lock goes out of scope. It differs from a lock guard in that it is a wrapper for not one, but multiple mutexes.
This can be useful when one deals with multiple mutexes in a single scope. One reason to use a scoped lock is to avoid accidentally introducing deadlocks and other unpleasant complications with, for example, one mutex being locked by the scoped lock, another lock still being waited upon, and another thread instance having the exactly opposite situation.
One property of a scoped lock is that it tries to avoid such a situation, theoretically making this type of lock deadlock-safe.
The recursive mutex is another subtype of mutex. Even though it has exactly the same functions as a regular mutex, it allows the calling thread, which initially locked the mutex, to lock the same mutex repeatedly. By doing this, the mutex doesn't become available for other threads until the owning thread has unlocked the mutex as many times as it has locked it.
One good reason to use a recursive mutex is for example when using recursive functions. With a regular mutex one would need to invent some kind of entry point which would lock the mutex before entering the recursive function.
With a recursive mutex, each iteration of the recursive function would lock the recursive mutex again, and upon finishing one iteration, it would unlock the mutex. As a result the mutex would be unlocked and unlocked the same number of times.
A potential complication hereby is that the maximum number of times that a recursive mutex can be locked is not defined in the standard. When the implementation's limit has been reached, a std::system_error will be thrown if one tries to lock it, or false is returned when using the non-blocking try_lock function.
The recursive timed mutex is, as the name suggests, an amalgamation of the functionality of the timed mutex and recursive mutex. As a result, it allows one to recursively lock the mutex using a timed conditional function.
Although this adds challenges to ensuring that the mutex is unlocked as many times as the thread locks it, it nevertheless offers possibilities for more complex algorithms such as the aforementioned task-handlers.
The <shared_mutex> header was first added with the 2014 standard, by adding the shared_timed_mutex class. With the 2017 standard, the shared_mutex class was also added.
The shared mutex header has been present since C++17. In addition to the usual mutual exclusive access, this mutex class adds the ability to provide shared access to the mutex. This allows one to, for example, provide read access to a resource by multiple threads, while a writing thread would still be able to gain exclusive access. This is similar to the read-write locks of Pthreads.
The functions added to this mutex type are the following:
The use of this mutex's share functionality should be fairly self-explanatory. A theoretically infinite number of readers can gain read access to the mutex, while ensuring that only a single thread can write to the resource at any time.
This header has been present since C++14. It adds shared locking functionality to the timed mutex with these functions:
This class is essentially an amalgamation of the shared mutex and timed mutex, as the name suggests. The interesting thing here is that it was added to the standard before the more basic shared mutex.
In essence, a condition variable provides a mechanism through which a thread's execution can be controlled by another thread. This is done by having a shared variable which a thread will wait for until signaled by another thread. It is an essential part of the scheduler implementation we looked at in Chapter 4, Thread Synchronization and Communication.
For the C++11 API, condition variables and their associated functionality are defined in the <condition_variable> header.
The basic usage of a condition variable can be summarized from that scheduler's code in Chapter 4, Thread Synchronization and Communication.
#include "abstract_request.h"
#include <condition_variable>
#include <mutex>
using namespace std;
class Worker {
condition_variable cv;
mutex mtx;
unique_lock<mutex> ulock;
AbstractRequest* request;
bool running;
bool ready;
public:
Worker() { running = true; ready = false; ulock = unique_lock<mutex>(mtx); }
void run();
void stop() { running = false; }
void setRequest(AbstractRequest* request) { this->request = request; ready = true; }
void getCondition(condition_variable* &cv);
};
In the constructor, as defined in the preceding Worker class declaration, we see the way a condition variable in the C++11 API is initialized. The steps are listed as follows:
#include <chrono>
using namespace std;
void Worker::run() {
while (running) {
if (ready) {
ready = false;
request->process();
request->finish();
}
if (Dispatcher::addWorker(this)) {
while (!ready && running) {
if (cv.wait_for(ulock, chrono::seconds(1)) ==
cv_status::timeout) {
// We timed out, but we keep waiting unless the
worker is
// stopped by the dispatcher.
}
}
}
}
}
Here, we use the wait_for() function of the condition variable, and pass both the unique lock instance we created earlier and the amount of time which we want to wait for. Here we wait for 1 second. If we time out on this wait, we are free to re-enter the wait (as is done here) in a continuous loop, or continue execution.
It's also possible to perform a blocking wait using the simple wait() function, or wait until a certain point in time with wait_for().
As noted, when we first looked at this code, the reason why this worker's code uses the ready Boolean variable is to check that it was really another thread which signaled the condition variable, and not just a spurious wake-up. It's an unfortunate complication of most condition variable implementations--including the C++11 one--that they are susceptible to this.
As a result of these random wake-up events, it is necessary to have some way to ensure that we really did wake up intentionally. In the scheduler code, this is done by having the thread which wakes up the worker thread also set a Boolean value which the worker thread can wake up.
Whether we timed out, or were notified, or suffered a spurious wake-up can be checked with the cv_status enumeration. This enumeration knows these two possible conditions:
The signaling, or notifying, itself is quite straightforward:
void Dispatcher::addRequest(AbstractRequest* request) {
workersMutex.lock();
if (!workers.empty()) {
Worker* worker = workers.front();
worker->setRequest(request);
condition_variable* cv;
worker->getCondition(cv);
cv->notify_one();
workers.pop();
workersMutex.unlock();
}
else {
workersMutex.unlock();
requestsMutex.lock();
requests.push(request);
requestsMutex.unlock();
}
}
In this preceding function from the Dispatcher class, we attempt to obtain an available worker thread instance. If found, we obtain a reference to the worker thread's condition variable as follows:
void Worker::getCondition(condition_variable* &cv) {
cv = &(this)->cv;
}
Setting the new request on the worker thread also changes the value of the ready variable to true, allowing the worker to check that it is indeed allowed to continue.
Finally, the condition variable is notified that any threads which are waiting on it can now continue using notify_one(). This particular function will signal the first thread in the FIFO queue for this condition variable to continue. Here, only one thread will ever be notified, but if there are multiple threads waiting for the same condition variable, the calling of notify_all() will allow all threads in the FIFO queue to continue.
The condition_variable_any class is a generalization of the condition_variable class. It differs from the latter in that it allows for other mutual exclusion mechanisms to be used beyond unique_lock<mutex>. The only requirement is that the lock used meets the BasicLockable requirements, meaning that it provides a lock() and unlock() function.
The std::notify_all_at_thread_exit() function allows a (detached) thread to notify other threads that it has completely finished, and is in the process of having all objects within its scope (thread-local) destroyed. It functions by moving the provided lock to internal storage before signaling the provided condition variable.
The result is exactly as if the lock was unlocked and notify_all() was called on the condition variable.
A basic (non-functional) example can be given as follows:
#include <mutex>
#include <thread>
#include <condition_variable>
using namespace std;
mutex m;
condition_variable cv;
bool ready = false;
ThreadLocal result;
void worker() {
unique_lock<mutex> ulock(m);
result = thread_local_method();
ready = true;
std::notify_all_at_thread_exit(cv, std::move(ulock));
}
int main() {
thread t(worker);
t.detach();
// Do work here.
unique_lock<std::mutex> ulock(m);
while(!ready) {
cv.wait(ulock);
}
// Process result
}
Here, the worker thread executes a method which creates thread-local objects. It's therefore essential that the main thread waits for the detached worker thread to finish first. If the latter isn't done yet when the main thread finishes its tasks, it will enter a wait using the global condition variable. In the worker thread, std::notify_all_at_thread_exit() is called after setting the ready Boolean.
What this accomplishes is twofold. After calling the function, no more threads are allowed to wait on the condition variable. It also allows the main thread to wait for the result of the detached worker thread to become available.
The last part of the C++11 thread support API is defined in <future>. It offers a range of classes, which implement more high-level multithreading concepts aimed more at easy asynchronous processing rather than the implementation of a multithreaded architecture.
Here we have to distinguish two concepts: that of a future and that of a promise. The former is the end result (the future product) that'll be used by a reader/consumer. The latter is what the writer/producer uses.
A basic example of a future would be:
#include <iostream>
#include <future>
#include <chrono>
bool is_prime (int x) {
for (int i = 2; i < x; ++i) if (x%i==0) return false;
return true;
}
int main () {
std::future<bool> fut = std::async (is_prime, 444444443);
std::cout << "Checking, please wait";
std::chrono::milliseconds span(100);
while (fut.wait_for(span) == std::future_status::timeout) { std::cout << '.' << std::flush;
}
bool x = fut.get();
std::cout << "\n444444443 " << (x?"is":"is not") << " prime.\n";
return 0;
}
This code asynchronously calls a function, passing it a parameter (potential prime number). It then enters an active loop while it waits for the future it received from the asynchronous function call to finish. It sets a 100 ms timeout on its wait function.
Once the future finishes (not returning a timeout on the wait function), we obtain the resulting value, in this case telling us that the value we provided the function with is in fact a prime number.
In the async section of this chapter, we will look a bit more at asynchronous function calls.
A promise allows one to transfer states between threads. For example:
#include <iostream>
#include <functional>
#include <thread>
#include <future>
void print_int (std::future<int>& fut) {
int x = fut.get();
std::cout << "value: " << x << '\n';
}
int main () {
std::promise<int> prom;
std::future<int> fut = prom.get_future();
std::thread th1 (print_int, std::ref(fut));
prom.set_value (10);
th1.join();
return 0;
This preceding code uses a promise instance passed to a worker thread to transfer a value to the other thread, in this case an integer. The new thread waits for the future we created from the promise, and which it received from the main thread to complete.
The promise is completed when we set the value on the promise. This completes the future and finishes the worker thread.
In this particular example, we use a blocking wait on the future object, but one can also use wait_for() and wait_until(), to wait for a time period or a point in time respectively, as we saw in the previous example for a future.
A shared_future is just like a regular future object, but can be copied, which allows multiple threads to read its results.
Creating a shared_future is similar to a regular future.
std::promise<void> promise1;
std::shared_future<void> sFuture(promise1.get_future());
The biggest difference is that the regular future is passed to its constructor.
After this, all threads which have access to the future object can wait for it, and obtain its value. This can also be used to signal threads in a way similar to condition variables.
A packaged_task is a wrapper for any callable target (function, bind, lambda, or other function object). It allows for asynchronous execution with the result available in a future object. It is similar to std::function, but automatically transfers its results to a future object.
For example:
#include <iostream>
#include <future>
#include <chrono>
#include <thread>
using namespace std;
int countdown (int from, int to) {
for (int i = from; i != to; --i) {
cout << i << '\n';
this_thread::sleep_for(chrono::seconds(1));
}
cout << "Finished countdown.\n";
return from - to;
}
int main () {
packaged_task<int(int, int)> task(countdown);
future<int> result = task.get_future();
thread t (std::move(task), 10, 0);
// Other logic.
int value = result.get();
cout << "The countdown lasted for " << value << " seconds.\n";
t.join();
return 0;
}
This preceding code implements a simple countdown feature, counting down from 10 to 0. After creating the task and obtaining a reference to its future object, we push it onto a thread along with the parameters of the worker function.
The result from the countdown worker thread becomes available as soon as it finishes. We can use the future object's waiting functions here the same way as for a promise.
A more straightforward version of promise and packaged_task can be found in std::async(). This is a simple function, which takes a callable object (function, bind, lambda, and similar) along with any parameters for it, and returns a future object.
The following is a basic example of the async() function:
#include <iostream>
#include <future>
using namespace std;
bool is_prime (int x) {
cout << "Calculating prime...\n";
for (int i = 2; i < x; ++i) {
if (x % i == 0) {
return false;
}
}
return true;
}
int main () {
future<bool> pFuture = std::async (is_prime, 343321);
cout << "Checking whether 343321 is a prime number.\n";
// Wait for future object to be ready.
bool result = pFuture.get();
if (result) {
cout << "Prime found.\n";
}
else {
cout << "No prime found.\n";
}
return 0;
}
The worker function in the preceding code determines whether a provided integer is a prime number or not. As we can see, the resulting code is a lot more simple than with a packaged_task or promise.
In addition to the basic version of std::async(), there is a second version which allows one to specify the launch policy as its first argument. This is a bitmask value of type std::launch with the following possible values:
* launch::async
* launch::deferred
The async flag means that a new thread and execution context for the worker function is created immediately. The deferred flag means that this is postponed until wait() or get() is called on the future object. Specifying both flags causes the function to choose the method automatically depending on the current system situation.
The std::async() version, without explicitly specified bitmask values, defaults to the latter, automatic method.
With multithreading, the use of atomics is also very important. The C++11 STL offers an <atomic> header for this reason. This topic is covered extensively in Chapter 8, Atomic Operations - Working with the Hardware.
In this chapter, we explored the entirety of the multithreading support in the C++11 API, along with the features added in C++14 and C++17.
We saw how to use each feature using descriptions and example code. We can now use the native C++ multithreading API to implement multithreaded, thread-safe code as well as use the asynchronous execution features in order to speed up and execute functions in parallel.
In the next chapter, we will take a look at the inevitable next step in the implementation of multithreaded code: debugging and validating of the resulting application.
Ideally, one's code would work properly the first time around, and contain no hidden bugs that are waiting to crash the application, corrupt data, or cause other issues. Realistically, this is, of course, impossible. Thus it is that tools were developed which make it easy to examine and debug multithreaded applications.
In this chapter, we will look at a number of them including a regular debugger as well as some of the tools which are part of the Valgrind suite, specifically, Helgrind and DRD. We will also look at profiling a multithreaded application in order to find hotspots and potential issues in its design.
Topics covered in this chapter include the following:
Ideally, one would test and validate one's code every time one has reached a certain milestone, whether it's for a singular module, a number of modules, or the application as a whole. It's important to ascertain that the assumptions one makes match up with the ultimate functionality.
Especially, with multithreaded code, there's a large element of coincidence in that a particular error state is not guaranteed to be reached during each run of the application. Signs of an improperly implemented multithreaded application may result in symptoms such as seemingly random crashes.
Likely the first hint one will get that something isn't correct is when the application crashes, and one is left with a core dump. This is a file which contains the memory content of the application at the time when it crashed, including the stack.
This core dump can be used in almost the same fashion as running a debugger with the running process. It is particularly useful to examine the location in the code at which we crashed, and in which thread. We can also examine memory contents this way.
One of the best indicators that one is dealing with a multithreading issue is when the application never crashes in the same location (different stack trace), or when it always crashes around a point where one performs mutual exclusion operations, such as manipulating a global data structure.
To start off, we'll first take a more in-depth look at using a debugger for diagnosing and debugging before diving into the Valgrind suite of tools.
Of all the questions a developer may have, the question of why did my application just crash? is probably among the most important. This is also one of the questions which are most easily answered with a debugger. Regardless of whether one is live debugging a process, or analyzing the core dump of a crashed process, the debugger can (hopefully) generate a back trace, also known as a stack trace. This trace contains a chronological list of all the functions which were called since the application was started as one would find them on the stack (see Chapter 2, Multithreading Implementation on the Processor and OS, for details on how a stack works).
The last few entries of this back trace will thus show us in which part of the code things went wrong. If the debug information was compiled into the binary, or provided to the debugger, we can also see the code at that line along with the names of the variables.
Even better, since we're looking at the stack frames, we can also examine the variables within that stack frame. This means the parameters passed to the function along with any local variables and their values.
In order to have the debug information (symbols) available, one has to compile the source code with the appropriate compiler flags set. For GCC, one can select a host of debug information levels and types. Most commonly, one would use the -g flag with an integer specifying the debug level attached, as follows:
This flag instructs GCC to generate debug information in the native format for the OS. One can also use different flags to generate the debug information in a specific format; however, this is not necessary for use with GCC's debugger (GDB) as well as with the Valgrind tools.
Both GDB and Valgrind will use this debug information. While it's technically possible to use both without having the debug information available, that's best left as an exercise for truly desperate times.
One of the most commonly used debuggers for C-based and C++-based code is the GNU Debugger, or GDB for short. In the following example, we'll use this debugger due to it being both widely used and freely available. Originally written in 1986, it's now used with a wide variety of programming languages, and has become the most commonly used debugger, both in personal and professional use.
The most elemental interface for GDB is a command-line shell, but it can be used with graphical frontends, which also include a number of IDEs such as Qt Creator, Dev-C++, and Code::Blocks. These frontends and IDEs can make it easier and more intuitive to manage breakpoints, set up watch variables, and perform other common operations. Their use is, however, not required.
On Linux and BSD distributions, gdb is easily installed from a package, just as it is on Windows with MSYS2 and similar UNIX-like environments. For OS X/MacOS, one may have to install gdb using a third-party package manager such as Homebrew.
Since gdb is not normally code signed on MacOS, it cannot gain the system-level access it requires for normal operation. Here one can either run gdb as root (not recommended), or follow a tutorial relevant to your version of MacOS.
As mentioned earlier, there are two ways to use a debugger, either by starting the application from within the debugger (or attaching to the running process), or by loading a core dump file. Within the debugging session, one can either interrupt the running process (with Ctrl+C, which sends the SIGINT signal), or load the debug symbols for the loaded core dump. After this, we can examine the active threads in this frame:
Thread 1 received signal SIGINT, Interrupt.
0x00007fff8a3fff72 in mach_msg_trap () from /usr/lib/system/libsystem_kernel.dylib
(gdb) info threads
Id Target Id Frame
* 1 Thread 0x1703 of process 72492 0x00007fff8a3fff72 in mach_msg_trap () from /usr/lib/system/libsystem_kernel.dylib
3 Thread 0x1a03 of process 72492 0x00007fff8a406efa in kevent_qos () from /usr/lib/system/libsystem_kernel.dylib
10 Thread 0x2063 of process 72492 0x00007fff8a3fff72 in mach_msg_trap () from /usr/lib/system/libsystem_kernel.dylibs
14 Thread 0x1e0f of process 72492 0x00007fff8a405d3e in __pselect () from /usr/lib/system/libsystem_kernel.dylib
(gdb) c
Continuing.
In the preceding code, we can see how after sending the SIGINT signal to the application (a Qt-based application running on OS X), we request the list of all threads which exist at this point in time along with their thread number, ID, and the function which they are currently executing. This also shows clearly which threads are likely waiting based on the latter information, as is often the case of a graphical user interface application like this one. Here we also see that the thread which is currently active in the application as marked by the asterisk in front of its number (thread 1).
We can also switch between threads at will by using the thread <ID> command, and move up and down between a thread's stack frames. This allows us to examine every aspect of individual threads.
When full debug information is available, one would generally also see the exact line of code that a thread is executing. This means that during the development stage of an application, it makes sense to have as much debug information available as possible to make debugging much easier.
For the dispatcher code we looked at in Chapter 4, Threading Synchronization and Communication, we can set a breakpoint to allow us to examine the active threads as well:
$ gdb dispatcher_demo.exe
GNU gdb (GDB) 7.9
Copyright (C) 2015 Free Software Foundation, Inc.
Reading symbols from dispatcher_demo.exe...done.
(gdb) break main.cpp:67
Breakpoint 1 at 0x4017af: file main.cpp, line 67.
(gdb) run
Starting program: dispatcher_demo.exe
[New Thread 10264.0x2a90]
[New Thread 10264.0x2bac]
[New Thread 10264.0x2914]
[New Thread 10264.0x1b80]
[New Thread 10264.0x213c]
[New Thread 10264.0x2228]
[New Thread 10264.0x2338]
[New Thread 10264.0x270c]
[New Thread 10264.0x14ac]
[New Thread 10264.0x24f8]
[New Thread 10264.0x1a90]
As we can see in the above command line output, we start GDB with the name of the application we wish to debug as a parameter, here from a Bash shell under Windows. After this, we can set a breakpoint here, using the filename of the source file and the line we wish to break at after the (gdb) of the gdb command line input. We select the first line after the loop in which the requests get sent to the dispatcher, then run the application. This is followed by the list of the new threads which are being created by the dispatcher, as reported by GDB.
Next, we wait until the breakpoint is hit:
Breakpoint 1, main () at main.cpp:67
67 this_thread::sleep_for(chrono::seconds(5));
(gdb) info threads
Id Target Id Frame
11 Thread 10264.0x1a90 0x00000000775ec2ea in ntdll!ZwWaitForMultipleObjects () from /c/Windows/SYSTEM32/ntdll.dll
10 Thread 10264.0x24f8 0x00000000775ec2ea in ntdll!ZwWaitForMultipleObjects () from /c/Windows/SYSTEM32/ntdll.dll
9 Thread 10264.0x14ac 0x00000000775ec2ea in ntdll!ZwWaitForMultipleObjects () from /c/Windows/SYSTEM32/ntdll.dll
8 Thread 10264.0x270c 0x00000000775ec2ea in ntdll!ZwWaitForMultipleObjects () from /c/Windows/SYSTEM32/ntdll.dll
7 Thread 10264.0x2338 0x00000000775ec2ea in ntdll!ZwWaitForMultipleObjects () from /c/Windows/SYSTEM32/ntdll.dll
6 Thread 10264.0x2228 0x00000000775ec2ea in ntdll!ZwWaitForMultipleObjects () from /c/Windows/SYSTEM32/ntdll.dll
5 Thread 10264.0x213c 0x00000000775ec2ea in ntdll!ZwWaitForMultipleObjects () from /c/Windows/SYSTEM32/ntdll.dll
4 Thread 10264.0x1b80 0x0000000064942eaf in ?? () from /mingw64/bin/libwinpthread-1.dll
3 Thread 10264.0x2914 0x00000000775c2385 in ntdll!LdrUnloadDll () from /c/Windows/SYSTEM32/ntdll.dll
2 Thread 10264.0x2bac 0x00000000775c2385 in ntdll!LdrUnloadDll () from /c/Windows/SYSTEM32/ntdll.dll
* 1 Thread 10264.0x2a90 main () at main.cpp:67
(gdb) bt
#0 main () at main.cpp:67
(gdb) c
Continuing.
Upon reaching the breakpoint, an info threads command lists the active threads. Here we can clearly see the use of condition variables where a thread is waiting in ntdll!ZwWaitForMultipleObjects(). As covered in Chapter 3, C++ Multithreading APIs, this is part of the condition variable implementation on Windows using its native multithreading API.
When we create a back trace (bt command), we see that the current stack for thread 1 (the current thread) is just one frame, only for the main method, since we didn't call into another function from this starting point at this line.
During normal application execution, such as with the GUI application we looked at earlier, sending SIGINT to the application can also be followed by the command to create a back trace like this:
Thread 1 received signal SIGINT, Interrupt.
0x00007fff8a3fff72 in mach_msg_trap () from /usr/lib/system/libsystem_kernel.dylib
(gdb) bt
#0 0x00007fff8a3fff72 in mach_msg_trap () from /usr/lib/system/libsystem_kernel.dylib
#1 0x00007fff8a3ff3b3 in mach_msg () from /usr/lib/system/libsystem_kernel.dylib
#2 0x00007fff99f37124 in __CFRunLoopServiceMachPort () from /System/Library/Frameworks/CoreFoundation.framework/Versions/A/CoreFoundation
#3 0x00007fff99f365ec in __CFRunLoopRun () from /System/Library/Frameworks/CoreFoundation.framework/Versions/A/CoreFoundation
#4 0x00007fff99f35e38 in CFRunLoopRunSpecific () from /System/Library/Frameworks/CoreFoundation.framework/Versions/A/CoreFoundation
#5 0x00007fff97b73935 in RunCurrentEventLoopInMode ()
from /System/Library/Frameworks/Carbon.framework/Versions/A/Frameworks/HIToolbox.framework/Versions/A/HIToolbox
#6 0x00007fff97b7376f in ReceiveNextEventCommon ()
from /System/Library/Frameworks/Carbon.framework/Versions/A/Frameworks/HIToolbox.framework/Versions/A/HIToolbox
#7 0x00007fff97b735af in _BlockUntilNextEventMatchingListInModeWithFilter ()
from /System/Library/Frameworks/Carbon.framework/Versions/A/Frameworks/HIToolbox.framework/Versions/A/HIToolbox
#8 0x00007fff9ed3cdf6 in _DPSNextEvent () from /System/Library/Frameworks/AppKit.framework/Versions/C/AppKit
#9 0x00007fff9ed3c226 in -[NSApplication _nextEventMatchingEventMask:untilDate:inMode:dequeue:] ()
from /System/Library/Frameworks/AppKit.framework/Versions/C/AppKit
#10 0x00007fff9ed30d80 in -[NSApplication run] () from /System/Library/Frameworks/AppKit.framework/Versions/C/AppKit
#11 0x0000000102a25143 in qt_plugin_instance () from /usr/local/Cellar/qt/5.8.0_1/plugins/platforms/libqcocoa.dylib
#12 0x0000000100cd3811 in QEventLoop::exec(QFlags<QEventLoop::ProcessEventsFlag>) () from /usr/local/opt/qt5/lib/QtCore.framework/Versions/5/QtCore
#13 0x0000000100cd80a7 in QCoreApplication::exec() () from /usr/local/opt/qt5/lib/QtCore.framework/Versions/5/QtCore
#14 0x0000000100003956 in main (argc=<optimized out>, argv=<optimized out>) at main.cpp:10
(gdb) c
Continuing.
In this preceding code, we can see the execution of thread ID 1 from its creation, through the entry point (main). Each subsequent function call is added to the stack. When a function finishes, it is removed from the stack. This is both a benefit and a disadvantage. While it does keep the back trace nice and clean, it also means that the history of what happened before the last function call is no longer there.
If we create a back trace with a core dump file, not having this historical information can be very annoying, and possibly make one start on a wild goose chase as one tries to narrow down the presumed cause of a crash. This means that a certain level of experience is required for successful debugging.
In case of a crashed application, the debugger will start us on the thread which suffered the crash. Often, this is the thread with the problematic code, but it could be that the real fault lies with code executed by another thread, or even the unsafe use of variables. If one thread were to change the information that another thread is currently reading, the latter thread could end up with garbage data. The result of this could be a crash, or even worse--corruption, later in the application.
The worst-case scenario consists of the stack getting overwritten by, for example, a wild pointer. In this case, a buffer or similar on the stack gets written past its limit, thus erasing parts of the stack by filling it with new data. This is a buffer overflow, and can both lead to the application crashing, or the (malicious) exploitation of the application.
Although the value of a debugger is hard to dismiss, there are times when one needs a different type of tool to answer questions about things such as memory usage, leaks, and to diagnose or prevent threading issues. This is where tools such as those which are part of the Valgrind suite of dynamic analysis tools can be of great help. As a framework for building dynamic analysis tools, the Valgrind distribution currently contains the following tools which are of interest to us:
Memcheck is a memory error detector, which allows us to discover memory leaks, illegal reads and writes, as well as allocation, deallocation, and similar memory-related issues.
Helgrind and DRD are both thread error detectors. This basically means that they will attempt to detect any multithreading issues such as data races and incorrect use of mutexes. Where they differ is that Helgrind can detect locking order violations, and DRD supports detached threads, while also using less memory than Helgrind.
A major limitation with dynamic analysis tools is that they require tight integration with the host operating system. This is the primary reason why Valgrind is focused on POSIX threads, and does not currently work on Windows.
The Valgrind website (at http://valgrind.org/info/platforms.html) describes the issue as follows:
Basically, this means that Windows applications can be debugged with Valgrind under Linux with some difficulty, but using Windows as the OS won't happen any time soon.
Valgrind does work on OS X/macOS, starting with OS X 10.8 (Mountain Lion). Support for the latest version of macOS may be somewhat incomplete due to changes made by Apple, however. As with the Linux version of Valgrind, it's generally best to always use the latest version of Valgrind. As with gdb, use the distro's package manager, or a third-party one like Homebrew on MacOS.
Alternatives to the Valgrind tools on Windows and other platforms include the ones listed in the following table:
|
Name |
Type |
Platforms |
License |
|
Dr. Memory |
Memory checker |
All major platforms |
Open source |
|
gperftools (Google) |
Heap, CPU, and call profiler |
Linux (x86) |
Open source |
|
Visual Leak Detector |
Memory checker |
Windows (Visual Studio) |
Open Source |
|
Intel Inspector |
Memory and thread debugger |
Windows, Linux |
Proprietary |
|
PurifyPlus |
Memory, performance |
Windows, Linux |
Proprietary |
|
Parasoft Insure++ |
Memory and thread debugger |
Windows, Solaris, Linux, AIX |
Proprietary |
Memcheck is the default Valgrind tool when no other tool is specified in the parameters to its executable. Memcheck itself is a memory error detector capable of detecting the following types of issues:
Using a debugger or a simple task manager, it's practically impossible to detect issues such as the ones given in the preceding list. The value of Memcheck lies in being able to detect and fix issues early in development, which otherwise can lead to corrupted data and mysterious crashes.
Using Memcheck is fairly easy. If we take the demo application we created in Chapter 4, Thread Synchronization and Communication, we know that normally we start it using this:
$ ./dispatcher_demo
To run Valgrind with the default Memcheck tool while also logging the resulting output to a log file, we would start it as follows:
$ valgrind --log-file=dispatcher.log --read-var-info=yes --leak-check=full ./dispatcher_demo
With the preceding command, we will log Memcheck's output to a file called dispatcher.log, and also enable the full checking of memory leaks, including detailed reporting of where these leaks occur, using the available debug information in the binary. By also reading the variable information (--read-var-info=yes), we get even more detailed information on where a memory leak occurred.
One cannot log to a file, but unless it's a very simple application, the produced output from Valgrind will likely be so much that it probably won't fit into the terminal buffer. Having the output as a file allows one to use it as a reference later as well as search it using more advanced tools than what the terminal usually provides.
After running this, we can examine the produced log file's contents as follows:
==5764== Memcheck, a memory error detector
==5764== Copyright (C) 2002-2015, and GNU GPL'd, by Julian Seward et al.
==5764== Using Valgrind-3.11.0 and LibVEX; rerun with -h for copyright info
==5764== Command: ./dispatcher_demo
==5764== Parent PID: 2838
==5764==
==5764==
==5764== HEAP SUMMARY:
==5764== in use at exit: 75,184 bytes in 71 blocks
==5764== total heap usage: 260 allocs, 189 frees, 88,678 bytes allocated
==5764==
==5764== 80 bytes in 10 blocks are definitely lost in loss record 1 of 5
==5764== at 0x4C2E0EF: operator new(unsigned long) (in /usr/lib/valgrind/vgpreload_memcheck-amd64-linux.so)
==5764== by 0x402EFD: Dispatcher::init(int) (dispatcher.cpp:40)
==5764== by 0x409300: main (main.cpp:51)
==5764==
==5764== 960 bytes in 40 blocks are definitely lost in loss record 3 of 5
==5764== at 0x4C2E0EF: operator new(unsigned long) (in /usr/lib/valgrind/vgpreload_memcheck-amd64-linux.so)
==5764== by 0x409338: main (main.cpp:60)
==5764==
==5764== 1,440 (1,200 direct, 240 indirect) bytes in 10 blocks are definitely lost in loss record 4 of 5
==5764== at 0x4C2E0EF: operator new(unsigned long) (in /usr/lib/valgrind/vgpreload_memcheck-amd64-linux.so)
==5764== by 0x402EBB: Dispatcher::init(int) (dispatcher.cpp:38)
==5764== by 0x409300: main (main.cpp:51)
==5764==
==5764== LEAK SUMMARY:
==5764== definitely lost: 2,240 bytes in 60 blocks
==5764== indirectly lost: 240 bytes in 10 blocks
==5764== possibly lost: 0 bytes in 0 blocks
==5764== still reachable: 72,704 bytes in 1 blocks
==5764== suppressed: 0 bytes in 0 blocks
==5764== Reachable blocks (those to which a pointer was found) are not shown.
==5764== To see them, rerun with: --leak-check=full --show-leak-kinds=all
==5764==
==5764== For counts of detected and suppressed errors, rerun with: -v
==5764== ERROR SUMMARY: 3 errors from 3 contexts (suppressed: 0 from 0)
Here we can see that we have a total of three memory leaks. Two are from allocations in the dispatcher class on lines 38 and 40:
w = new Worker;
And the other one is this:
t = new thread(&Worker::run, w);
We also see a leak from an allocation at line 60 in main.cpp:
rq = new Request();
Although there is nothing wrong with these allocations themselves, if we trace them during the application life cycle, we notice that we never call delete on these objects. If we were to fix these memory leaks, we would need to delete those Request instances once we're done with them, and clean up the Worker and thread instances in the destructor of the dispatcher class.
Since in this demo application the entire application is terminated and cleaned up by the OS at the end of its run, this is not really a concern. For an application where the same dispatcher is used in a way where new requests are being generated and added constantly, while possibly also dynamically scaling the number of worker threads, this would, however, be a real concern. In this situation, care would have to be taken that such memory leaks are resolved.
Memcheck can detect a wide range of memory-related issues. The following sections summarize these errors and their meanings.
These errors are usually reported in the following format:
Invalid read of size <bytes>
at 0x<memory address>: (location)
by 0x<memory address>: (location)
by 0x<memory address>: (location)
Address 0x<memory address> <error description>
The first line in the preceding error message tells one whether it was an invalid read or write access. The next few lines will be a back trace detailing the location (and possibly, the line in the source file) from which the invalid read or write was performed, and from where that code was called.
Finally, the last line will detail the type of illegal access that occurred, such as the reading of an already freed block of memory.
This type of error is indicative of writing into or reading from a section of memory which one should not have access to. This can happen because one accesses a wild pointer (that is, referencing a random memory address), or due to an earlier issue in the code which caused a wrong memory address to be calculated, or a memory boundary not being respected, and reading past the bounds of an array or similar.
Usually, when this type of error is reported, it should be taken highly seriously, as it indicates a fundamental issue which can lead not only to data corruption and crashes, but also to bugs which can be exploited by others.
In short, this is the issue where a variable's value is used without the said variable having been assigned a value. At this point, it's likely that these contents are just whichever bytes were in that part of RAM which just got allocated. As a result, this can lead to unpredictable behavior whenever these contents are used or accessed.
When encountered, Memcheck will throw errors similar to these:
$ valgrind --read-var-info=yes --leak-check=full ./unval
==6822== Memcheck, a memory error detector
==6822== Copyright (C) 2002-2015, and GNU GPL'd, by Julian Seward et al.
==6822== Using Valgrind-3.11.0 and LibVEX; rerun with -h for copyright info
==6822== Command: ./unval
==6822==
==6822== Conditional jump or move depends on uninitialised value(s)
==6822== at 0x4E87B83: vfprintf (vfprintf.c:1631)
==6822== by 0x4E8F898: printf (printf.c:33)
==6822== by 0x400541: main (unval.cpp:6)
==6822==
==6822== Use of uninitialised value of size 8
==6822== at 0x4E8476B: _itoa_word (_itoa.c:179)
==6822== by 0x4E8812C: vfprintf (vfprintf.c:1631)
==6822== by 0x4E8F898: printf (printf.c:33)
==6822== by 0x400541: main (unval.cpp:6)
==6822==
==6822== Conditional jump or move depends on uninitialised value(s)
==6822== at 0x4E84775: _itoa_word (_itoa.c:179)
==6822== by 0x4E8812C: vfprintf (vfprintf.c:1631)
==6822== by 0x4E8F898: printf (printf.c:33)
==6822== by 0x400541: main (unval.cpp:6)
==6822==
==6822== Conditional jump or move depends on uninitialised value(s)
==6822== at 0x4E881AF: vfprintf (vfprintf.c:1631)
==6822== by 0x4E8F898: printf (printf.c:33)
==6822== by 0x400541: main (unval.cpp:6)
==6822==
==6822== Conditional jump or move depends on uninitialised value(s)
==6822== at 0x4E87C59: vfprintf (vfprintf.c:1631)
==6822== by 0x4E8F898: printf (printf.c:33)
==6822== by 0x400541: main (unval.cpp:6)
==6822==
==6822== Conditional jump or move depends on uninitialised value(s)
==6822== at 0x4E8841A: vfprintf (vfprintf.c:1631)
==6822== by 0x4E8F898: printf (printf.c:33)
==6822== by 0x400541: main (unval.cpp:6)
==6822==
==6822== Conditional jump or move depends on uninitialised value(s)
==6822== at 0x4E87CAB: vfprintf (vfprintf.c:1631)
==6822== by 0x4E8F898: printf (printf.c:33)
==6822== by 0x400541: main (unval.cpp:6)
==6822==
==6822== Conditional jump or move depends on uninitialised value(s)
==6822== at 0x4E87CE2: vfprintf (vfprintf.c:1631)
==6822== by 0x4E8F898: printf (printf.c:33)
==6822== by 0x400541: main (unval.cpp:6)
==6822==
==6822==
==6822== HEAP SUMMARY:
==6822== in use at exit: 0 bytes in 0 blocks
==6822== total heap usage: 1 allocs, 1 frees, 1,024 bytes allocated
==6822==
==6822== All heap blocks were freed -- no leaks are possible
==6822==
==6822== For counts of detected and suppressed errors, rerun with: -v
==6822== Use --track-origins=yes to see where uninitialised values come from
==6822== ERROR SUMMARY: 8 errors from 8 contexts (suppressed: 0 from 0)
This particular series of errors was caused by the following small bit of code:
#include <cstring>
#include <cstdio>
int main() {
int x;
printf ("x = %d\n", x);
return 0;
}
As we can see in the preceding code, we never initialize our variable, which would be set to just any random value. If one is lucky, it'll be set to zero, or an equally (hopefully) harmless value. This code shows just how any of our uninitialized variables enter into library code.
Whether or not the use of uninitialized variables is harmful is hard to say, and depends heavily on the type of variable and the affected code. It is, however, far easier to simply assign a safe, default value than it is to hunt down and debug mysterious issues which may be caused (at random) by an uninitialized variable.
For additional information on where an uninitialized variable originates, one can pass the -track-origins=yes flag to Memcheck. This will tell it to keep more information per variable, which will make the tracking down of this type of issue much easier.
Whenever a function is called, it's possible that uninitialized values are passed as parameters, or even pointers to a buffer which is unaddressable. In either case, Memcheck will log this:
$ valgrind --read-var-info=yes --leak-check=full ./unsyscall
==6848== Memcheck, a memory error detector
==6848== Copyright (C) 2002-2015, and GNU GPL'd, by Julian Seward et al.
==6848== Using Valgrind-3.11.0 and LibVEX; rerun with -h for copyright info
==6848== Command: ./unsyscall
==6848==
==6848== Syscall param write(buf) points to uninitialised byte(s)
==6848== at 0x4F306E0: __write_nocancel (syscall-template.S:84)
==6848== by 0x4005EF: main (unsyscall.cpp:7)
==6848== Address 0x5203040 is 0 bytes inside a block of size 10 alloc'd
==6848== at 0x4C2DB8F: malloc (in /usr/lib/valgrind/vgpreload_memcheck-amd64-linux.so)
==6848== by 0x4005C7: main (unsyscall.cpp:5)
==6848==
==6848== Syscall param exit_group(status) contains uninitialised byte(s)
==6848== at 0x4F05B98: _Exit (_exit.c:31)
==6848== by 0x4E73FAA: __run_exit_handlers (exit.c:97)
==6848== by 0x4E74044: exit (exit.c:104)
==6848== by 0x4005FC: main (unsyscall.cpp:8)
==6848==
==6848==
==6848== HEAP SUMMARY:
==6848== in use at exit: 14 bytes in 2 blocks
==6848== total heap usage: 2 allocs, 0 frees, 14 bytes allocated
==6848==
==6848== LEAK SUMMARY:
==6848== definitely lost: 0 bytes in 0 blocks
==6848== indirectly lost: 0 bytes in 0 blocks
==6848== possibly lost: 0 bytes in 0 blocks
==6848== still reachable: 14 bytes in 2 blocks
==6848== suppressed: 0 bytes in 0 blocks
==6848== Reachable blocks (those to which a pointer was found) are not shown.
==6848== To see them, rerun with: --leak-check=full --show-leak-kinds=all
==6848==
==6848== For counts of detected and suppressed errors, rerun with: -v
==6848== Use --track-origins=yes to see where uninitialised values come from
==6848== ERROR SUMMARY: 2 errors from 2 contexts (suppressed: 0 from 0)
The preceding log was generated by this code:
#include <cstdlib>
#include <unistd.h>
int main() {
char* arr = (char*) malloc(10);
int* arr2 = (int*) malloc(sizeof(int));
write(1, arr, 10 );
exit(arr2[0]);
}
Much like the general use of uninitialized values as detailed in the previous section, the passing of uninitialized, or otherwise dodgy, parameters is, at the very least, risky, and in the worst case, a source of crashes, data corruption, or worse.
An illegal free or delete is usually an attempt to repeatedly call free() or delete() on an already deallocated block of memory. While not necessarily harmful, this would be indicative of bad design, and would absolutely have to be fixed.
It can also occur when one tries to free a memory block using a pointer which does not point to the beginning of that memory block. This is one of the primary reasons why one should never perform pointer arithmetic on the original pointer one obtains from a call to malloc() or new(), but use a copy instead.
Allocation and deallocation of memory blocks should always be performed using matching functions. This means that when we allocate using C-style functions, we deallocate with the matching function from the same API. The same is true for C++-style allocation and deallocation.
Briefly, this means the following:
Mixing these up won't necessarily cause problems, but doing so is undefined behavior. The latter type of allocating and deallocating is specific to arrays. Not using delete[] for an array that was allocated with new[] likely leads to a memory leak, or worse.
This type of error indicates that the pointers passed for a source and destination memory block overlap (based on expected size). The result of this type of bug is usually a form of corruption or system crash.
For memory allocation functions, Memcheck validates whether the arguments passed to them actually make sense. One example of this would be the passing of a negative size, or if it would far exceed a reasonable allocation size: for example, an allocation request for a petabyte of memory. Most likely, these values would be the result of a faulty calculation earlier in the code.
Memcheck would report this error like in this example from the Memcheck manual:
==32233== Argument 'size' of function malloc has a fishy (possibly negative) value: -3
==32233== at 0x4C2CFA7: malloc (vg_replace_malloc.c:298)
==32233== by 0x400555: foo (fishy.c:15)
==32233== by 0x400583: main (fishy.c:23)
Here it was attempted to pass the value of -3 to malloc, which obviously doesn't make a lot of sense. Since this is obviously a nonsensical operation, it's indicative of a serious bug in the code.
The most important thing to keep in mind for Memcheck's reporting of memory leaks is that a lot of reported leaks may in fact not be leaks. This is reflected in the way Memcheck reports any potential issues it finds, which is as follows:
Of the three possible report types, the Definitely lost type is the only one where it is absolutely certain that the memory block in question is no longer reachable, with no pointer or reference remaining, which makes it impossible for the application to ever free the memory.
In case of the Indirectly lost type, we did not lose the pointer to these memory blocks themselves, but, the pointer to a structure which refers to these blocks instead. This could, for example, occur when we directly lose access to the root node of a data structure (such as a red/black or binary tree). As a result, we also lose the ability to access any of the child nodes.
Finally, Possibly lost is the catch-all type where Memcheck isn't entirely certain whether there is still a reference to the memory block. This can happen where interior pointers exist, such as in the case of particular types of array allocations. It can also occur through the use of multiple inheritance, where a C++ object uses self-reference.
As mentioned earlier in the basic use section for Memcheck, it's advisable to always run Memcheck with --leak-check=full specified to get detailed information on exactly where a memory leak was found.
The purpose of Helgrind is to detect issues with synchronization implementations within a multithreaded application. It can detect wrongful use of POSIX threads, potential deadlock issues due to wrong locking order as well as data races--the reading or writing of data without thread synchronization.
We start Helgrind on our application in the following manner:
$ valgrind --tool=helgrind --read-var-info=yes --log-file=dispatcher_helgrind.log ./dispatcher_demo
Similar to running Memcheck, this will run the application and log all generated output to a log file, while explicitly using all available debugging information in the binary.
After running the application, we examine the generated log file:
==6417== Helgrind, a thread error detector
==6417== Copyright (C) 2007-2015, and GNU GPL'd, by OpenWorks LLP et al.
==6417== Using Valgrind-3.11.0 and LibVEX; rerun with -h for copyright info
==6417== Command: ./dispatcher_demo
==6417== Parent PID: 2838
==6417==
==6417== ---Thread-Announcement------------------------------------------
==6417==
==6417== Thread #1 is the program's root thread
After the initial basic information about the application and the Valgrind version, we are informed that the root thread has been created:
==6417==
==6417== ---Thread-Announcement------------------------------------------
==6417==
==6417== Thread #2 was created
==6417== at 0x56FB7EE: clone (clone.S:74)
==6417== by 0x53DE149: create_thread (createthread.c:102)
==6417== by 0x53DFE83: pthread_create@@GLIBC_2.2.5 (pthread_create.c:679)
==6417== by 0x4C34BB7: ??? (in /usr/lib/valgrind/vgpreload_helgrind-amd64-linux.so)
==6417== by 0x4EF8DC2: std::thread::_M_start_thread(std::shared_ptr<std::thread::_Impl_base>, void (*)()) (in /usr/lib/x86_64-linux-gnu/libstdc++.so.6.0.21)
==6417== by 0x403AD7: std::thread::thread<void (Worker::*)(), Worker*&>(void (Worker::*&&)(), Worker*&) (thread:137)
==6417== by 0x4030E6: Dispatcher::init(int) (dispatcher.cpp:40)
==6417== by 0x4090A0: main (main.cpp:51)
==6417==
==6417== ----------------------------------------------------------------
The first thread is created by the dispatcher and logged. Next we get the first warning:
==6417==
==6417== Lock at 0x60F4A0 was first observed
==6417== at 0x4C321BC: ??? (in /usr/lib/valgrind/vgpreload_helgrind-amd64-linux.so)
==6417== by 0x401CD1: __gthread_mutex_lock(pthread_mutex_t*) (gthr-default.h:748)
==6417== by 0x402103: std::mutex::lock() (mutex:135)
==6417== by 0x40337E: Dispatcher::addWorker(Worker*) (dispatcher.cpp:108)
==6417== by 0x401DF9: Worker::run() (worker.cpp:49)
==6417== by 0x408FA4: void std::_Mem_fn_base<void (Worker::*)(), true>::operator()<, void>(Worker*) const (in /media/sf_Projects/Cerflet/dispatcher/dispatcher_demo)
==6417== by 0x408F38: void std::_Bind_simple<std::_Mem_fn<void (Worker::*)()> (Worker*)>::_M_invoke<0ul>(std::_Index_tuple<0ul>) (functional:1531)
==6417== by 0x408E3F: std::_Bind_simple<std::_Mem_fn<void (Worker::*)()> (Worker*)>::operator()() (functional:1520)
==6417== by 0x408D47: std::thread::_Impl<std::_Bind_simple<std::_Mem_fn<void (Worker::*)()> (Worker*)> >::_M_run() (thread:115)
==6417== by 0x4EF8C7F: ??? (in /usr/lib/x86_64-linux-gnu/libstdc++.so.6.0.21)
==6417== by 0x4C34DB6: ??? (in /usr/lib/valgrind/vgpreload_helgrind-amd64-linux.so)
==6417== by 0x53DF6B9: start_thread (pthread_create.c:333)
==6417== Address 0x60f4a0 is 0 bytes inside data symbol "_ZN10Dispatcher12workersMutexE"
==6417==
==6417== Possible data race during write of size 1 at 0x5CD9261 by thread #1
==6417== Locks held: 1, at address 0x60F4A0
==6417== at 0x403650: Worker::setRequest(AbstractRequest*) (worker.h:38)
==6417== by 0x403253: Dispatcher::addRequest(AbstractRequest*) (dispatcher.cpp:70)
==6417== by 0x409132: main (main.cpp:63)
==6417==
==6417== This conflicts with a previous read of size 1 by thread #2
==6417== Locks held: none
==6417== at 0x401E02: Worker::run() (worker.cpp:51)
==6417== by 0x408FA4: void std::_Mem_fn_base<void (Worker::*)(), true>::operator()<, void>(Worker*) const (in /media/sf_Projects/Cerflet/dispatcher/dispatcher_demo)
==6417== by 0x408F38: void std::_Bind_simple<std::_Mem_fn<void (Worker::*)()> (Worker*)>::_M_invoke<0ul>(std::_Index_tuple<0ul>) (functional:1531)
==6417== by 0x408E3F: std::_Bind_simple<std::_Mem_fn<void (Worker::*)()> (Worker*)>::operator()() (functional:1520)
==6417== by 0x408D47: std::thread::_Impl<std::_Bind_simple<std::_Mem_fn<void (Worker::*)()> (Worker*)> >::_M_run() (thread:115)
==6417== by 0x4EF8C7F: ??? (in /usr/lib/x86_64-linux-gnu/libstdc++.so.6.0.21)
==6417== by 0x4C34DB6: ??? (in /usr/lib/valgrind/vgpreload_helgrind-amd64-linux.so)
==6417== by 0x53DF6B9: start_thread (pthread_create.c:333)
==6417== Address 0x5cd9261 is 97 bytes inside a block of size 104 alloc'd
==6417== at 0x4C2F50F: operator new(unsigned long) (in /usr/lib/valgrind/vgpreload_helgrind-amd64-linux.so)
==6417== by 0x40308F: Dispatcher::init(int) (dispatcher.cpp:38)
==6417== by 0x4090A0: main (main.cpp:51)
==6417== Block was alloc'd by thread #1
==6417==
==6417== ----------------------------------------------------------------
In the preceding warning, we are being told by Helgrind about a conflicting read of size 1 between thread IDs 1 and 2. Since the C++11 threading API uses a fair amount of templates, the trace can be somewhat hard to read. The essence is found in these lines:
==6417== at 0x403650: Worker::setRequest(AbstractRequest*) (worker.h:38)
==6417== at 0x401E02: Worker::run() (worker.cpp:51)
This corresponds to the following lines of code:
void setRequest(AbstractRequest* request) { this->request = request; ready = true; }
while (!ready && running) {
The only variable of size 1 in these lines of code is the Boolean variable ready. Since this is a Boolean variable, we know that it is an atomic operation (see Chapter 8, Atomic Operations - Working with the Hardware, for details). As a result, we can ignore this warning.
Next, we get another warning for this thread:
==6417== Possible data race during write of size 1 at 0x5CD9260 by thread #1
==6417== Locks held: none
==6417== at 0x40362C: Worker::stop() (worker.h:37)
==6417== by 0x403184: Dispatcher::stop() (dispatcher.cpp:50)
==6417== by 0x409163: main (main.cpp:70)
==6417==
==6417== This conflicts with a previous read of size 1 by thread #2 ==6417== Locks held: none
==6417== at 0x401E0E: Worker::run() (worker.cpp:51)
==6417== by 0x408FA4: void std::_Mem_fn_base<void (Worker::*)(), true>::operator()<, void>(Worker*) const (in /media/sf_Projects/Cerflet/dispatcher/dispatcher_demo)
==6417== by 0x408F38: void std::_Bind_simple<std::_Mem_fn<void (Worker::*)()> (Worker*)>::_M_invoke<0ul>(std::_Index_tuple<0ul>) (functional:1531)
==6417== by 0x408E3F: std::_Bind_simple<std::_Mem_fn<void (Worker::*)()> (Worker*)>::operator()() (functional:1520)
==6417== by 0x408D47: std::thread::_Impl<std::_Bind_simple<std::_Mem_fn<void (Worker::*)()> (Worker*)> >::_M_run() (thread:115)
==6417== by 0x4EF8C7F: ??? (in /usr/lib/x86_64-linux-gnu/libstdc++.so.6.0.21)
==6417== by 0x4C34DB6: ??? (in /usr/lib/valgrind/vgpreload_helgrind-amd64-linux.so)
==6417== by 0x53DF6B9: start_thread (pthread_create.c:333)
==6417== Address 0x5cd9260 is 96 bytes inside a block of size 104 alloc'd
==6417== at 0x4C2F50F: operator new(unsigned long) (in /usr/lib/valgrind/vgpreload_helgrind-amd64-linux.so)
==6417== by 0x40308F: Dispatcher::init(int) (dispatcher.cpp:38)
==6417== by 0x4090A0: main (main.cpp:51)
==6417== Block was alloc'd by thread #1
Similar to the first warning, this also refers to a Boolean variable--here, the running variable in the Worker instance. Since this is also an atomic operation, we can again ignore this warning.
Following this warning, we get a repeat of these warnings for other threads. We also see this warning repeated a number of times:
==6417== Lock at 0x60F540 was first observed
==6417== at 0x4C321BC: ??? (in /usr/lib/valgrind/vgpreload_helgrind-amd64-linux.so)
==6417== by 0x401CD1: __gthread_mutex_lock(pthread_mutex_t*) (gthr-default.h:748)
==6417== by 0x402103: std::mutex::lock() (mutex:135)
==6417== by 0x409044: logFnc(std::__cxx11::basic_string<char, std::char_traits<char>, std::allocator<char> >) (main.cpp:40)
==6417== by 0x40283E: Request::process() (request.cpp:19)
==6417== by 0x401DCE: Worker::run() (worker.cpp:44)
==6417== by 0x408FA4: void std::_Mem_fn_base<void (Worker::*)(), true>::operator()<, void>(Worker*) const (in /media/sf_Projects/Cerflet/dispatcher/dispatcher_demo)
==6417== by 0x408F38: void std::_Bind_simple<std::_Mem_fn<void (Worker::*)()> (Worker*)>::_M_invoke<0ul>(std::_Index_tuple<0ul>) (functional:1531)
==6417== by 0x408E3F: std::_Bind_simple<std::_Mem_fn<void (Worker::*)()> (Worker*)>::operator()() (functional:1520)
==6417== by 0x408D47: std::thread::_Impl<std::_Bind_simple<std::_Mem_fn<void (Worker::*)()> (Worker*)> >::_M_run() (thread:115)
==6417== by 0x4EF8C7F: ??? (in /usr/lib/x86_64-linux-gnu/libstdc++.so.6.0.21)
==6417== by 0x4C34DB6: ??? (in /usr/lib/valgrind/vgpreload_helgrind-amd64-linux.so)
==6417== Address 0x60f540 is 0 bytes inside data symbol "logMutex"
==6417==
==6417== Possible data race during read of size 8 at 0x60F238 by thread #1
==6417== Locks held: none
==6417== at 0x4F4ED6F: std::basic_ostream<char, std::char_traits<char> >& std::__ostream_insert<char, std::char_traits<char> >(std::basic_ostream<char, std::char_traits<char> >&, char const*, long) (in /usr/lib/x86_64-linux-gnu/libstdc++.so.6.0.21)
==6417== by 0x4F4F236: std::basic_ostream<char, std::char_traits<char> >& std::operator<< <std::char_traits<char> >(std::basic_ostream<char, std::char_traits<char> >&, char const*) (in /usr/lib/x86_64-linux-gnu/libstdc++.so.6.0.21)
==6417== by 0x403199: Dispatcher::stop() (dispatcher.cpp:53)
==6417== by 0x409163: main (main.cpp:70)
==6417==
==6417== This conflicts with a previous write of size 8 by thread #7
==6417== Locks held: 1, at address 0x60F540
==6417== at 0x4F4EE25: std::basic_ostream<char, std::char_traits<char> >& std::__ostream_insert<char, std::char_traits<char> >(std::basic_ostream<char, std::char_traits<char> >&, char const*, long) (in /usr/lib/x86_64-linux-gnu/libstdc++.so.6.0.21)
==6417== by 0x409055: logFnc(std::__cxx11::basic_string<char, std::char_traits<char>, std::allocator<char> >) (main.cpp:41)
==6417== by 0x402916: Request::finish() (request.cpp:27)
==6417== by 0x401DED: Worker::run() (worker.cpp:45)
==6417== by 0x408FA4: void std::_Mem_fn_base<void (Worker::*)(), true>::operator()<, void>(Worker*) const (in /media/sf_Projects/Cerflet/dispatcher/dispatcher_demo)
==6417== by 0x408F38: void std::_Bind_simple<std::_Mem_fn<void (Worker::*)()> (Worker*)>::_M_invoke<0ul>(std::_Index_tuple<0ul>) (functional:1531)
==6417== by 0x408E3F: std::_Bind_simple<std::_Mem_fn<void (Worker::*)()> (Worker*)>::operator()() (functional:1520)
==6417== by 0x408D47: std::thread::_Impl<std::_Bind_simple<std::_Mem_fn<void (Worker::*)()> (Worker*)> >::_M_run() (thread:115)
==6417== Address 0x60f238 is 24 bytes inside data symbol "_ZSt4cout@@GLIBCXX_3.4"
This warning is triggered by not having the use of standard output synchronized between threads. Even though the logging function of this demo application uses a mutex to synchronize the text logged by worker threads, we also write to standard output in an unsafe manner in a few locations.
This is relatively easy to fix by using a central, thread-safe logging function. Even though it's unlikely to cause any stability issues, it will very likely cause any logging output to end up as a garbled, unusable mess.
Helgrind detects a large number of errors involving the pthreads API, as summarized by its manual, and listed next:
In addition to this, if Helgrind itself does not detect an error, but the pthreads library itself returns an error for each function which Helgrind intercepts, an error is reported by Helgrind as well.
Lock order detection uses the assumption that once a series of locks have been accessed in a particular order, that is the order in which they will always be used. Imagine, for example, a resource that's guarded by two locks. As we saw with the dispatcher demonstration from Chapter 4, Thread Synchronization and Communication, we use two mutexes in its Dispatcher class, one to manage access to the worker threads, and one to the request instances.
In the correct implementation of that code, we always make sure to unlock one mutex before we attempt to obtain the other, as there's a chance that another thread already has obtained access to that second mutex, and attempts to obtain access to the first, thus creating a deadlock situation.
While useful, it is important to realize that there are some areas where this detection algorithm is, as of yet, imperfect. This is mostly apparent with the use of, for example, condition variables, which naturally uses a locking order that tends to get reported by Helgrind as wrong.
The take-away message here is that one has to examine these log messages and judge their merit, but unlike straight misuse of the multithreading API, whether or not the reported issue is a false-positive or not is far less clear-cut.
In essence, a data race is when two more threads attempt to read or write to the same resource without any synchronization mechanism in place. Here, only a concurrent read and write, or two simultaneous writes, are actually harmful; therefore, only these two types of access get reported.
In an earlier section on basic Helgrind usage, we saw some examples of this type of error in the log. There it concerned the simultaneous writing and reading of a variable. As we also covered in that section, Helgrind does not concern itself with whether a write or read was atomic, but merely reports a potential issue.
Much like with lock order problems, this again means that one has to judge each data race report on its merit, as many will likely be false-positives.
DRD is very similar to Helgrind, in that it also detects issues with threading and synchronization in the application. The main ways in which DRD differs from Helgrind are the following:
Generally, one wants to run both DRD and Helgrind to compare the output from both with each other. Since a lot of potential issues are highly non-deterministic, using both tools generally helps to pinpoint the most serious issues.
Starting DRD is very similar to starting the other tools--we just have to specify our desired tool like this:
$ valgrind --tool=drd --log-file=dispatcher_drd.log --read-var-info=yes ./dispatcher_demo
After the application finishes, we examine the generated log file's contents.
==6576== drd, a thread error detector
==6576== Copyright (C) 2006-2015, and GNU GPL'd, by Bart Van Assche.
==6576== Using Valgrind-3.11.0 and LibVEX; rerun with -h for copyright info
==6576== Command: ./dispatcher_demo
==6576== Parent PID: 2838
==6576==
==6576== Conflicting store by thread 1 at 0x05ce51b1 size 1
==6576== at 0x403650: Worker::setRequest(AbstractRequest*) (worker.h:38)
==6576== by 0x403253: Dispatcher::addRequest(AbstractRequest*) (dispatcher.cpp:70)
==6576== by 0x409132: main (main.cpp:63)
==6576== Address 0x5ce51b1 is at offset 97 from 0x5ce5150. Allocation context:
==6576== at 0x4C3150F: operator new(unsigned long) (in /usr/lib/valgrind/vgpreload_drd-amd64-linux.so)
==6576== by 0x40308F: Dispatcher::init(int) (dispatcher.cpp:38)
==6576== by 0x4090A0: main (main.cpp:51)
==6576== Other segment start (thread 2)
==6576== at 0x4C3818C: pthread_mutex_unlock (in /usr/lib/valgrind/vgpreload_drd-amd64-linux.so)
==6576== by 0x401D00: __gthread_mutex_unlock(pthread_mutex_t*) (gthr-default.h:778)
==6576== by 0x402131: std::mutex::unlock() (mutex:153)
==6576== by 0x403399: Dispatcher::addWorker(Worker*) (dispatcher.cpp:110)
==6576== by 0x401DF9: Worker::run() (worker.cpp:49)
==6576== by 0x408FA4: void std::_Mem_fn_base<void (Worker::*)(), true>::operator()<, void>(Worker*) const (in /media/sf_Projects/Cerflet/dispatcher/dispatcher_demo)
==6576== by 0x408F38: void std::_Bind_simple<std::_Mem_fn<void (Worker::*)()> (Worker*)>::_M_invoke<0ul>(std::_Index_tuple<0ul>) (functional:1531)
==6576== by 0x408E3F: std::_Bind_simple<std::_Mem_fn<void (Worker::*)()> (Worker*)>::operator()() (functional:1520)
==6576== by 0x408D47: std::thread::_Impl<std::_Bind_simple<std::_Mem_fn<void (Worker::*)()> (Worker*)> >::_M_run() (thread:115)
==6576== by 0x4F04C7F: ??? (in /usr/lib/x86_64-linux-gnu/libstdc++.so.6.0.21)
==6576== by 0x4C3458B: ??? (in /usr/lib/valgrind/vgpreload_drd-amd64-linux.so)
==6576== by 0x53EB6B9: start_thread (pthread_create.c:333)
==6576== Other segment end (thread 2)
==6576== at 0x4C3725B: pthread_mutex_lock (in /usr/lib/valgrind/vgpreload_drd-amd64-linux.so)
==6576== by 0x401CD1: __gthread_mutex_lock(pthread_mutex_t*) (gthr-default.h:748)
==6576== by 0x402103: std::mutex::lock() (mutex:135)
==6576== by 0x4023F8: std::unique_lock<std::mutex>::lock() (mutex:485)
==6576== by 0x40219D: std::unique_lock<std::mutex>::unique_lock(std::mutex&) (mutex:415)
==6576== by 0x401E33: Worker::run() (worker.cpp:52)
==6576== by 0x408FA4: void std::_Mem_fn_base<void (Worker::*)(), true>::operator()<, void>(Worker*) const (in /media/sf_Projects/Cerflet/dispatcher/dispatcher_demo)
==6576== by 0x408F38: void std::_Bind_simple<std::_Mem_fn<void (Worker::*)()> (Worker*)>::_M_invoke<0ul>(std::_Index_tuple<0ul>) (functional:1531)
==6576== by 0x408E3F: std::_Bind_simple<std::_Mem_fn<void (Worker::*)()> (Worker*)>::operator()() (functional:1520)
==6576== by 0x408D47: std::thread::_Impl<std::_Bind_simple<std::_Mem_fn<void (Worker::*)()> (Worker*)> >::_M_run() (thread:115)
==6576== by 0x4F04C7F: ??? (in /usr/lib/x86_64-linux-gnu/libstdc++.so.6.0.21)
==6576== by 0x4C3458B: ??? (in /usr/lib/valgrind/vgpreload_drd-amd64-linux.so)
The preceding summary basically repeats what we saw with the Helgrind log. We see the same data race report (conflicting store), which we can safely ignore due to atomics. For this particular code at least, the use of DRD did not add anything we didn't already know from using Helgrind.
Regardless, it's always a good idea to use both tools just in case one tools spots something which the other didn't.
DRD will detect the following errors:
For the third point, this list of errors detected by DRD, according to its manual, is very similar to that of Helgrind:
As mentioned earlier, helpful here is the fact that DRD also supports detached threads. Whether locking order checks are important depends on one's application.
The DRD manual contains this section on C++11 threads support.
If you want to use the c++11 class std::thread you will need to do the following to annotate the std::shared_ptr<> objects used in the implementation of that class:
#include <valgrind/drd.h>
#define _GLIBCXX_SYNCHRONIZATION_HAPPENS_BEFORE(addr)
ANNOTATE_HAPPENS_BEFORE(addr)
#define _GLIBCXX_SYNCHRONIZATION_HAPPENS_AFTER(addr)
ANNOTATE_HAPPENS_AFTER(addr)
One might see a lot of false positives when using DRD with an application that uses the C++11 threads API, which would be fixed by the preceding fix.
However, when using GCC 5.4 and Valgrind 3.11 (possibly, using older versions too) this issue does not seem to be present any more. It is, however, something to keep in mind when one suddenly sees a lot of false positives in one's DRD output while using the C++11 threads API.
In this chapter, we took a look at how to approach the debugging of multithreaded applications. We explored the basics of using a debugger in a multithreaded context. Next, we saw how to use three tools in the Valgrind framework, which can assist us in tracking down multithreading and other crucial issues.
At this point, we can take applications written using the information in the preceding chapters and analyze them for any issues which should be fixed including memory leaks and improper use of synchronization mechanisms.
In the next chapter, we will take all that we have learned, and look at some best practices when it comes to multithreaded programming and developing in general.
As with most things, it's best to avoid making mistakes rather than correcting them afterwards. This chapter looks at a number of common mistakes and design issues with multithreaded applications, and shows ways to avoid the common - and less common - issues.
Topics in this chapter include:
In the preceding chapters, we have seen a variety of potential issues which can occur when writing multithreaded code. These range from the obvious ones, such as two threads not being able to write to the same location at the same time, to the more subtle, such as incorrect usage of a mutex.
There are also many issues with elements which aren't directly part of multithreaded code, yet which can nevertheless cause seemingly random crashes and other frustrating issues. One example of this is static initialization of variables. In the following sections, we'll be looking at all of these issues and many more, as well as ways to prevent ever having to deal with them.
As with many things in life, they are interesting experiences, but you generally do not care to repeat them.
A deadlock is described pretty succinctly by its name already. It occurs when two or more processes attempt to gain access to a resource which the other is holding, while that other thread is simultaneously waiting to gain access to a resource which it is holding.
For example:
In this situation, we assume that the thread will be able to gain access to each resource at some point, while the opposite is true, thanks to each thread holding on to the resource which the other thread needs.
Visualized, this deadlock process would look like this:
This makes it clear that two basic rules when it comes to preventing deadlocks are:
We saw a real-life example of this in Chapter 4, Thread Synchronization and Communication, when we looked at the dispatcher demonstration code. This code involves two mutexes, to safe-guard access to two data structures:
void Dispatcher::addRequest(AbstractRequest* request) {
workersMutex.lock();
if (!workers.empty()) {
Worker* worker = workers.front();
worker->setRequest(request);
condition_variable* cv;
mutex* mtx;
worker->getCondition(cv);
worker->getMutex(mtx);
unique_lock<mutex> lock(*mtx);
cv->notify_one();
workers.pop();
workersMutex.unlock();
}
else {
workersMutex.unlock();
requestsMutex.lock();
requests.push(request);
requestsMutex.unlock();
}
}
The mutexes here are the workersMutex and requestsMutex variables. We can clearly see how at no point do we hold onto a mutex before trying to obtain access to the other one. We explicitly lock the workersMutex at the beginning of the method, so that we can safely check whether the workers data structure is empty or not.
If it's not empty, we hand the new request to a worker. Then, as we are done with the workers, data structure, we release the mutex. At this point, we retain zero mutexes. Nothing too complex here, as we just use a single mutex.
The interesting thing is in the else statement, for when there is no waiting worker and we need to obtain the second mutex. As we enter this scope, we retain one mutex. We could just attempt to obtain the requestsMutex and assume that it will work, yet this may deadlock, for this simple reason:
bool Dispatcher::addWorker(Worker* worker) {
bool wait = true;
requestsMutex.lock();
if (!requests.empty()) {
AbstractRequest* request = requests.front();
worker->setRequest(request);
requests.pop();
wait = false;
requestsMutex.unlock();
}
else {
requestsMutex.unlock();
workersMutex.lock();
workers.push(worker);
workersMutex.unlock();
}
return wait;
}
The accompanying function to the earlier preceding function we see also uses these two mutexes. Worse, this function runs in a separate thread. As a result, when the first function holds the workersMutex as it tries to obtain the requestsMutex, with this second function simultaneously holding the latter, while trying to obtain the former, we hit a deadlock.
In the functions, as we see them here, however, both rules have been implemented successfully; we never hold more than one lock at a time, and we release any locks we hold as soon as we can. This can be seen in both else cases, where as we enter them, we first release any locks we do not need any more.
As in either case, we do not need to check respectively, the workers or requests data structures any more; we can release the relevant lock before we do anything else. This results in the following visualization:
It is of course possible that we may need to use data contained in two or more data structures or variables; data which is used by other threads simultaneously. It may be difficult to ensure that there is no chance of a deadlock in the resulting code.
Here, one may want to consider using temporary variables or similar. By locking the mutex, copying the relevant data, and immediately releasing the lock, there is no chance of deadlock with that mutex. Even if one has to write back results to the data structure, this can be done in a separate action.
This adds two more rules in preventing deadlocks:
A data race, also known as a race condition, occurs when two or more threads attempt to write to the same shared memory simultaneously. As a result, the state of the shared memory during and at the end of the sequence of instructions executed by each thread is by definition, non-deterministic.
As we saw in Chapter 6, Debugging Multithreaded Code, data races are reported quite often by tools used to debug multi-threaded applications. For example:
==6984== Possible data race during write of size 1 at 0x5CD9260 by thread #1
==6984== Locks held: none
==6984== at 0x40362C: Worker::stop() (worker.h:37)
==6984== by 0x403184: Dispatcher::stop() (dispatcher.cpp:50)
==6984== by 0x409163: main (main.cpp:70)
==6984==
==6984== This conflicts with a previous read of size 1 by thread #2
==6984== Locks held: none
==6984== at 0x401E0E: Worker::run() (worker.cpp:51)
==6984== by 0x408FA4: void std::_Mem_fn_base<void (Worker::*)(), true>::operator()<, void>(Worker*) const (in /media/sf_Projects/Cerflet/dispatcher/dispatcher_demo)
==6984== by 0x408F38: void std::_Bind_simple<std::_Mem_fn<void (Worker::*)()> (Worker*)>::_M_invoke<0ul>(std::_Index_tuple<0ul>) (functional:1531)
==6984== by 0x408E3F: std::_Bind_simple<std::_Mem_fn<void (Worker::*)()> (Worker*)>::operator()() (functional:1520)
==6984== by 0x408D47: std::thread::_Impl<std::_Bind_simple<std::_Mem_fn<void (Worker::*)()> (Worker*)> >::_M_run() (thread:115)
==6984== by 0x4EF8C7F: ??? (in /usr/lib/x86_64-linux-gnu/libstdc++.so.6.0.21)
==6984== by 0x4C34DB6: ??? (in /usr/lib/valgrind/vgpreload_helgrind-amd64-linux.so)
==6984== by 0x53DF6B9: start_thread (pthread_create.c:333)
==6984== Address 0x5cd9260 is 96 bytes inside a block of size 104 alloc'd
==6984== at 0x4C2F50F: operator new(unsigned long) (in /usr/lib/valgrind/vgpreload_helgrind-amd64-linux.so)
==6984== by 0x40308F: Dispatcher::init(int) (dispatcher.cpp:38)
==6984== by 0x4090A0: main (main.cpp:51)
==6984== Block was alloc'd by thread #1
The code which generated the preceding warning was the following:
bool Dispatcher::stop() {
for (int i = 0; i < allWorkers.size(); ++i) {
allWorkers[i]->stop();
}
cout << "Stopped workers.\n";
for (int j = 0; j < threads.size(); ++j) {
threads[j]->join();
cout << "Joined threads.\n";
}
}
Consider this code in the Worker instance:
void stop() { running = false; }
We also have:
void Worker::run() {
while (running) {
if (ready) {
ready = false;
request->process();
request->finish();
}
if (Dispatcher::addWorker(this)) {
while (!ready && running) {
unique_lock<mutex> ulock(mtx);
if (cv.wait_for(ulock, chrono::seconds(1)) == cv_status::timeout) {
}
}
}
}
}
Here, running is a Boolean variable that is being set to false (writing to it from one thread), signaling the worker thread that it should terminate its waiting loop, where reading the Boolean variable is done from a different process, the main thread versus the worker thread:
This particular example's warning was due to a Boolean variable being simultaneously written and read. Naturally, the reason why this specific situation is safe has to do with atomics, as explained in detail in Chapter 8, Atomic Operations - Working with the Hardware.
The reason why even an operation like this is potentially risky is because the reading operation may occur while the variable is still in the process of being updated. In the case of, for example, a 32-bit integer, depending on the hardware architecture, updating this variable might be done in one operation, or multiple. In the latter case, the reading operation might read an intermediate value with unpredictable results:
A more comical situation occurs when multiple threads write to a standard with out using, for example, cout. As this stream is not thread-safe, the resulting output stream will contain bits and pieces of the input streams, from whenever either of the threads got a chance to write:
The basic rules to prevent data races thus are:
This essentially means that any write or read has to be thread-safe. If one writes to shared memory, no other thread should be able to write to it at the same time. Similarly, when we read from a shared resource, we need to ensure that, at most, only other threads are also reading the shared resource.
This level of mutual exclusion is naturally accomplished by mutexes as we have seen in the preceding chapters, with a refinement offered in read-write locks, which allows for simultaneous readers while having writes as fully mutually exclusive events.
Of course, there are also gotchas with mutexes, as we will see in the following section.
Mutexes form the basis of practically all forms of mutual exclusion APIs. At their core, they seem extremely simple, only one thread can own a mutex, with other threads neatly waiting in a queue until they can obtain the lock on the mutex.
One might even picture this process as follows:
The reality is of course less pretty, mostly owing to the practical limitations imposed on us by the hardware. One obvious limitation is that synchronization primitives aren't free. Even though they are implemented in the hardware, it takes multiple calls to make them work.
The two most common ways to implement mutexes in the hardware is to use either the test-and-set (TAS) or compare-and-swap (CAS) CPU features.
Test-and-set is usually implemented as two assembly-level instructions, which are executed autonomously, meaning that they cannot be interrupted. The first instruction tests whether a certain memory area is set to a 1 or zero. The second instruction is executed only when the value is a zero (false). This means that the mutex was not locked yet. The second instruction thus sets the memory area to a 1, locking the mutex.
In pseudo-code, this would look like this:
bool TAS(bool lock) {
if (lock) {
return true;
}
else {
lock = true;
return false;
}
}
Compare-and-swap is a lesser used variation on this, which performs a comparison operation on a memory location and a given value, only replacing the contents of that memory location if the first two match:
bool CAS(int* p, int old, int new) {
if (*p != old) {
return false;
}
*p = new;
return true;
}
In either case, one would have to actively repeat either function until a positive value is returned:
volatile bool lock = false;
void critical() {
while (TAS(&lock) == false);
// Critical section
lock = 0;
}
Here, a simple while loop is used to constantly poll the memory area (marked as volatile to prevent possibly problematic compiler optimizations). Generally, an algorithm is used for this which slowly reduces the rate at which it is being polled. This is to reduce the amount of pressure on the processor and memory systems.
This makes it clear that the use of a mutex is not free, but that each thread which waits for a mutex lock actively uses resources. As a result, the general rules here are:
As we saw earlier in the section on mutexes, there are some issues to keep in mind when using mutexes. Naturally these also apply when using locks and other mechanisms based on mutexes, even if some of these issues are smoothed over by these APIs.
One of the things one may get confused about when first using multithreading APIs is what the actual difference is between the different synchronization types. As we covered earlier in this chapter, mutexes underlie virtually all synchronization mechanisms, merely differing in the way that they use mutexes to implement the provided functionality.
The important thing here is that they are not distinct synchronization mechanisms, but merely specializations of the basic mutex type. Whether one would use a regular mutex, a read/write lock, a semaphore - or even something as esoteric as a reentrant (recursive) mutex or lock - depends fully on the particular problem which one is trying to solve.
For the scheduler, we first encountered in Chapter 4, Thread Aynchronization and Communication, we used regular mutexes to protect the data structures containing the queued worker threads and requests. Since any access of either data structure would likely not only involve reading actions, but also the manipulation of the structure, it would not make sense there to use read/write locks. Similarly, recursive locks would not serve any purpose over the humble mutex.
For each synchronization problem, one therefore has to ask the following questions:
It's therefore attractive to go for a complex type, but generally it's best to stick with the simpler type which fulfills all the requirements. When it comes to debugging one's implementation, precious time can be saved over a fancier implementation.
Recently it has become popular to advise against the use of threads, instead advocating the use of other asynchronous processing mechanisms, such as promise. The reasons behind this are that the use of threads and the synchronization involved is complex and error-prone. Often one just wants to run a task in parallel and not concern oneself with how the result is obtained.
For simple tasks which would run only briefly, this can certainly make sense. The main advantage of a thread-based implementation will always be that one can fully customize its behavior. With a promise, one sends in a task to run and at the end, one gets the result out of a future instance. This is convenient for simple tasks, but obviously does not cover a lot of situations.
The best approach here is to first learn threads and synchronization mechanisms well, along with their limitations. Only after that does it really make sense to consider whether one wishes to use a promise, packaged_task, or a full-blown thread.
Another major consideration with these fancier, future-based APIs is that they are heavily template-based, which can make the debugging and troubleshooting of any issues which may occur significantly less easy than when using the more straightforward and low-level APIs.
Static variables are variables which are declared only once, essentially existing in a global scope, though potentially only shared between instances of a particular class. It's also possible to have classes which are completely static:
class Foo {
static std::map<int, std::string> strings;
static std::string oneString;
public:
static void init(int a, std::string b, std::string c) {
strings.insert(std::pair<int, std::string>(a, b));
oneString = c;
}
};
std::map<int, std::string> Foo::strings;
std::string Foo::oneString;
As we can see here, static variables along with static functions seem like a very simple, yet powerful concept. While at its core this is true, there's a major issue which will catch the unwary when it comes to static variables and the initialization of classes. This is in the form of initialization order.
Imagine what happens if we wish to use the preceding class from another class' static initialization, like this:
class Bar {
static std::string name;
static std::string initName();
public:
void init();
};
// Static initializations.
std::string Bar::name = Bar::initName();
std::string Bar::initName() {
Foo::init(1, "A", "B");
return "Bar";
}
While this may seem like it would work fine, adding the first string to the class' map structure with the integer as key means there is a very good chance that this code will crash. The reason for this is simple, there is no guarantee that Foo::string is initialized at the point when we call Foo::init(). Trying to use an uninitialized map structure will thus lead to an exception.
In short, the initialization order of static variables is basically random, leading to non-deterministic behavior if this is not taken into account.
The solution to this problem is fairly simple. Basically, the goal is to make the initialization of more complex static variables explicit instead of implicit like in the preceding example. For this we modify the Foo class:
class Foo {
static std::map<int, std::string>& strings();
static std::string oneString;
public:
static void init(int a, std::string b, std::string c) {
static std::map<int, std::string> stringsStatic = Foo::strings();
stringsStatic.insert(std::pair<int, std::string>(a, b));
oneString = c;
}
};
std::string Foo::oneString;
std::map<int, std::string>& Foo::strings() {
static std::map<int, std::string>* stringsStatic = new std::map<int, std::string>();
return *stringsStatic;
}
Starting at the top, we see that we no longer define the static map directly. Instead, we have a private function with the same name. This function's implementation is found at the bottom of this sample code. In it, we have a static pointer to a map structure with the familiar map definition.
When this function is called, a new map is created when there's no instance yet, due to it being a static variable. In the modified init() function, we see that we call the strings() function to obtain a reference to this instance. This is the explicit initialization part, as calling the function will always ensure that the map structure is initialized before we use it, solving the earlier problem we had.
We also see a small optimization here: the stringsStatic variable we create is also static, meaning that we will only ever call the strings() function once. This makes repeated function calls unnecessary and regains the speed we would have had with the previous simple--but unstable--implementation.
The essential rule with static variable initialization is thus, always use explicit initialization for non-trivial static variables.
In this chapter, we looked at a number of good practices and rules to keep in mind when writing multithreaded code, along with some general advice. At this point, one should be able to avoid some of the bigger pitfalls and major sources of confusion when writing such code.
In the next chapter, we will be looking at how to use the underlying hardware to our advantage with atomic operations, along with the <atomics> header that was also introduced with C++11.
A lot of optimization and thread-safety depends on one's understanding of the underlying hardware: from aligned memory access on some architectures, to knowing which data sizes and thus C++ types can be safely addressed without performance penalties or the need for mutexes and similar.
This chapter looks at how one can make use of the characteristics of a number of processor architectures in order to, for example, prevent the use of mutexes where atomic operations would prevent any access conflicts regardless. Compiler-specific extensions such as those in GCC are also examined.
Topics in this chapter include:
Briefly put, an atomic operation is an operation which the processor can execute with a single instruction. This makes it atomic in the sense that nothing (barring interrupts) can interfere with it, or change any variables or data it may be using.
Applications include guaranteeing the order of instruction execution, lock-free implementations, and related uses where instruction execution order and memory access guarantees are important.
Before the 2011 C++ standard, the access to such atomic operations as provided by the processor was only provided by the compiler, using extensions.
For Microsoft's MSVC compiler there are the interlocked functions, as summarized from the MSDN documentation, starting with the adding features:
|
Interlocked function |
Description |
|
InterlockedAdd |
Performs an atomic addition operation on the specified LONG values. |
|
InterlockedAddAcquire |
Performs an atomic addition operation on the specified LONG values. The operation is performed with acquire memory ordering semantics. |
|
InterlockedAddRelease |
Performs an atomic addition operation on the specified LONG values. The operation is performed with release memory ordering semantics. |
|
InterlockedAddNoFence |
Performs an atomic addition operation on the specified LONG values. The operation is performed atomically, but without using memory barriers (covered in this chapter). |
These are the 32-bit versions of this feature. There are also 64-bit versions of this and other methods in the API. Atomic functions tend to be focused on a specific variable type, but variations in this API have been left out of this summary to keep it brief.
We can also see the acquire and release variations. These provide the guarantee that the respective read or write access will be protected from memory reordering (on a hardware level) with any subsequent read or write operation. Finally, the no fence variation (also known as a memory barrier) performs the operation without the use of any memory barriers.
Normally CPUs perform instructions (including memory reads and writes) out of order to optimize performance. Since this type of behavior is not always desirable, memory barriers were added to prevent this instruction reordering.
Next is the atomic AND feature:
|
Interlocked function |
Description |
|
InterlockedAnd |
Performs an atomic AND operation on the specified LONG values. |
|
InterlockedAndAcquire |
Performs an atomic AND operation on the specified LONG values. The operation is performed with acquire memory ordering semantics. |
|
InterlockedAndRelease |
Performs an atomic AND operation on the specified LONG values. The operation is performed with release memory ordering semantics. |
|
InterlockedAndNoFence |
Performs an atomic AND operation on the specified LONG values. The operation is performed atomically, but without using memory barriers. |
The bit-test features are as follows:
|
Interlocked function |
Description |
|
InterlockedBitTestAndComplement |
Tests the specified bit of the specified LONG value and complements it. |
|
InterlockedBitTestAndResetAcquire |
Tests the specified bit of the specified LONG value and sets it to 0. The operation is atomic, and it is performed with acquire memory ordering semantics. |
|
InterlockedBitTestAndResetRelease |
Tests the specified bit of the specified LONG value and sets it to 0. The operation is atomic, and it is performed using memory release semantics. |
|
InterlockedBitTestAndSetAcquire |
Tests the specified bit of the specified LONG value and sets it to 1. The operation is atomic, and it is performed with acquire memory ordering semantics. |
|
InterlockedBitTestAndSetRelease |
Tests the specified bit of the specified LONG value and sets it to 1. The operation is atomic, and it is performed with release memory ordering semantics. |
|
InterlockedBitTestAndReset |
Tests the specified bit of the specified LONG value and sets it to 0. |
|
InterlockedBitTestAndSet |
Tests the specified bit of the specified LONG value and sets it to 1. |
The comparison features can be listed as shown:
|
Interlocked function |
Description |
|
InterlockedCompareExchange |
Performs an atomic compare-and-exchange operation on the specified values. The function compares two specified 32-bit values and exchanges with another 32-bit value based on the outcome of the comparison. |
|
InterlockedCompareExchangeAcquire |
Performs an atomic compare-and-exchange operation on the specified values. The function compares two specified 32-bit values and exchanges with another 32-bit value based on the outcome of the comparison. The operation is performed with acquire memory ordering semantics. |
|
InterlockedCompareExchangeRelease |
Performs an atomic compare-and-exchange operation on the specified values. The function compares two specified 32-bit values and exchanges with another 32-bit value based on the outcome of the comparison. The exchange is performed with release memory ordering semantics. |
|
InterlockedCompareExchangeNoFence |
Performs an atomic compare-and-exchange operation on the specified values. The function compares two specified 32-bit values and exchanges with another 32-bit value based on the outcome of the comparison. The operation is performed atomically, but without using memory barriers. |
|
InterlockedCompareExchangePointer |
Performs an atomic compare-and-exchange operation on the specified pointer values. The function compares two specified pointer values and exchanges with another pointer value based on the outcome of the comparison. |
|
InterlockedCompareExchangePointerAcquire |
Performs an atomic compare-and-exchange operation on the specified pointer values. The function compares two specified pointer values and exchanges with another pointer value based on the outcome of the comparison. The operation is performed with acquire memory ordering semantics. |
|
InterlockedCompareExchangePointerRelease |
Performs an atomic compare-and-exchange operation on the specified pointer values. The function compares two specified pointer values and exchanges with another pointer value based on the outcome of the comparison. The operation is performed with release memory ordering semantics. |
|
InterlockedCompareExchangePointerNoFence |
Performs an atomic compare-and-exchange operation on the specified values. The function compares two specified pointer values and exchanges with another pointer value based on the outcome of the comparison. The operation is performed atomically, but without using memory barriers |
The decrement features are:
|
Interlocked function |
Description |
|
InterlockedDecrement |
Decrements (decreases by one) the value of the specified 32-bit variable as an atomic operation. |
|
InterlockedDecrementAcquire |
Decrements (decreases by one) the value of the specified 32-bit variable as an atomic operation. The operation is performed with acquire memory ordering semantics. |
|
InterlockedDecrementRelease |
Decrements (decreases by one) the value of the specified 32-bit variable as an atomic operation. The operation is performed with release memory ordering semantics. |
|
InterlockedDecrementNoFence |
Decrements (decreases by one) the value of the specified 32-bit variable as an atomic operation. The operation is performed atomically, but without using memory barriers. |
The exchange (swap) features are:
|
Interlocked function |
Description |
|
InterlockedExchange |
Sets a 32-bit variable to the specified value as an atomic operation. |
|
InterlockedExchangeAcquire |
Sets a 32-bit variable to the specified value as an atomic operation. The operation is performed with acquire memory ordering semantics. |
|
InterlockedExchangeNoFence |
Sets a 32-bit variable to the specified value as an atomic operation. The operation is performed atomically, but without using memory barriers. |
|
InterlockedExchangePointer |
Atomically exchanges a pair of pointer values. |
|
InterlockedExchangePointerAcquire |
Atomically exchanges a pair of pointer values. The operation is performed with acquire memory ordering semantics. |
|
InterlockedExchangePointerNoFence |
Atomically exchanges a pair of addresses. The operation is performed atomically, but without using memory barriers. |
|
InterlockedExchangeSubtract |
Performs an atomic subtraction of two values. |
|
InterlockedExchangeAdd |
Performs an atomic addition of two 32-bit values. |
|
InterlockedExchangeAddAcquire |
Performs an atomic addition of two 32-bit values. The operation is performed with acquire memory ordering semantics. |
|
InterlockedExchangeAddRelease |
Performs an atomic addition of two 32-bit values. The operation is performed with release memory ordering semantics. |
|
InterlockedExchangeAddNoFence |
Performs an atomic addition of two 32-bit values. The operation is performed atomically, but without using memory barriers. |
The increment features are:
|
Interlocked function |
Description |
|
InterlockedIncrement |
Increments (increases by one) the value of the specified 32-bit variable as an atomic operation. |
|
InterlockedIncrementAcquire |
Increments (increases by one) the value of the specified 32-bit variable as an atomic operation. The operation is performed using acquire memory ordering semantics. |
|
InterlockedIncrementRelease |
Increments (increases by one) the value of the specified 32-bit variable as an atomic operation. The operation is performed using release memory ordering semantics. |
|
InterlockedIncrementNoFence |
Increments (increases by one) the value of the specified 32-bit variable as an atomic operation. The operation is performed atomically, but without using memory barriers. |
The OR feature:
|
Interlocked function |
Description |
|
InterlockedOr |
Performs an atomic OR operation on the specified LONG values. |
|
InterlockedOrAcquire |
Performs an atomic OR operation on the specified LONG values. The operation is performed with acquire memory ordering semantics. |
|
InterlockedOrRelease |
Performs an atomic OR operation on the specified LONG values. The operation is performed with release memory ordering semantics. |
|
InterlockedOrNoFence |
Performs an atomic OR operation on the specified LONG values. The operation is performed atomically, but without using memory barriers. |
Finally, the exclusive OR (XOR) features are:
|
Interlocked function |
Description |
|
InterlockedXor |
Performs an atomic XOR operation on the specified LONG values. |
|
InterlockedXorAcquire |
Performs an atomic XOR operation on the specified LONG values. The operation is performed with acquire memory ordering semantics. |
|
InterlockedXorRelease |
Performs an atomic XOR operation on the specified LONG values. The operation is performed with release memory ordering semantics. |
|
InterlockedXorNoFence |
Performs an atomic XOR operation on the specified LONG values. The operation is performed atomically, but without using memory barriers. |
Like Visual C++, GCC also comes with a set of built-in atomic functions. These differ based on the underlying architecture that the GCC version and the standard library one uses. Since GCC is used on a considerably larger number of platforms and operating systems than VC++, this is definitely a big factor when considering portability.
For example, not every built-in atomic function provided on the x86 platform will be available on ARM, partially due to architectural differences, including variations of the specific ARM architecture. For example, ARMv6, ARMv7, or the current ARMv8, along with the Thumb instruction set, and so on.
Before the C++11 standard, GCC used __sync-prefixed extensions for atomics:
type __sync_fetch_and_add (type *ptr, type value, ...) type __sync_fetch_and_sub (type *ptr, type value, ...) type __sync_fetch_and_or (type *ptr, type value, ...) type __sync_fetch_and_and (type *ptr, type value, ...) type __sync_fetch_and_xor (type *ptr, type value, ...) type __sync_fetch_and_nand (type *ptr, type value, ...)
These operations fetch a value from memory and perform the specified operation on it, returning the value that was in memory. These all use a memory barrier.
type __sync_add_and_fetch (type *ptr, type value, ...) type __sync_sub_and_fetch (type *ptr, type value, ...) type __sync_or_and_fetch (type *ptr, type value, ...) type __sync_and_and_fetch (type *ptr, type value, ...) type __sync_xor_and_fetch (type *ptr, type value, ...) type __sync_nand_and_fetch (type *ptr, type value, ...)
These operations are similar to the first set, except they return the new value after the specified operation.
bool __sync_bool_compare_and_swap (type *ptr, type oldval, type newval, ...) type __sync_val_compare_and_swap (type *ptr, type oldval, type newval, ...)
These comparison operations will write the new value if the old value matches the provided value. The Boolean variation returns true if the new value has been written.
__sync_synchronize (...)
This function creates a full memory barrier.
type __sync_lock_test_and_set (type *ptr, type value, ...)
This method is actually an exchange operation unlike what the name suggests. It updates the pointer value and returns the previous value. This uses not a full memory barrier, but an acquire barrier, meaning that it does not release the barrier.
void __sync_lock_release (type *ptr, ...)
This function releases the barrier obtained by the previous method.
To adapt to the C++11 memory model, GCC added the __atomic built-in methods, which also changes the API considerably:
type __atomic_load_n (type *ptr, int memorder) void __atomic_load (type *ptr, type *ret, int memorder) void __atomic_store_n (type *ptr, type val, int memorder) void __atomic_store (type *ptr, type *val, int memorder) type __atomic_exchange_n (type *ptr, type val, int memorder) void __atomic_exchange (type *ptr, type *val, type *ret, int memorder) bool __atomic_compare_exchange_n (type *ptr, type *expected, type desired, bool weak, int success_memorder, int failure_memorder) bool __atomic_compare_exchange (type *ptr, type *expected, type *desired, bool weak, int success_memorder, int failure_memorder)
First are the generic load, store, and exchange functions. They are fairly self-explanatory. Load functions read a value in memory, store functions store a value in memory, and exchange functions swap the existing value with a new value. Compare and exchange functions make the swapping conditional.
type __atomic_add_fetch (type *ptr, type val, int memorder) type __atomic_sub_fetch (type *ptr, type val, int memorder) type __atomic_and_fetch (type *ptr, type val, int memorder) type __atomic_xor_fetch (type *ptr, type val, int memorder) type __atomic_or_fetch (type *ptr, type val, int memorder) type __atomic_nand_fetch (type *ptr, type val, int memorder)
These functions are essentially the same as in the old API, returning the result of the specific operation.
type __atomic_fetch_add (type *ptr, type val, int memorder) type __atomic_fetch_sub (type *ptr, type val, int memorder) type __atomic_fetch_and (type *ptr, type val, int memorder) type __atomic_fetch_xor (type *ptr, type val, int memorder) type __atomic_fetch_or (type *ptr, type val, int memorder) type __atomic_fetch_nand (type *ptr, type val, int memorder)
And again, the same functions, updated for the new API. These return the original value (fetch before operation).
bool __atomic_test_and_set (void *ptr, int memorder)
Unlike the similarly named function in the old API, this function performs a real test and set operation instead of the exchange operation of the old API's function, which still requires one to release the memory barrier afterwards. The test is for some defined value.
void __atomic_clear (bool *ptr, int memorder)
This function clears the pointer address, setting it to 0.
void __atomic_thread_fence (int memorder)
A synchronization memory barrier (fence) between threads can be created using this function.
void __atomic_signal_fence (int memorder)
This function creates a memory barrier between a thread and signal handlers within that same thread.
bool __atomic_always_lock_free (size_t size, void *ptr)
The function checks whether objects of the specified size will always create lock-free atomic instructions for the current processor architecture.
bool __atomic_is_lock_free (size_t size, void *ptr)
This is essentially the same as the previous function.
Memory barriers (fences) are not always used in the C++11 memory model for atomic operations. In the GCC built-in atomics API, this is reflected in the memorder parameter in its functions. The possible values for this map directly to the values in the C++11 atomics API:
The preceding list was copied from the GCC manual's chapter on atomics for GCC 7.1. Along with the comments in that chapter, it makes it quite clear that trade-offs were made when implementing both the C++11 atomics support within its memory model and in the compiler's implementation.
Since atomics rely on the underlying hardware support, there will never be a single piece of code using atomics that will work across a wide variety of architectures.
There are many more compiler toolchains for C/C++ than just VC++ and GCC, of course, including the Intel Compiler Collection (ICC) and other, usually proprietary tools.. These all have their own collection of built-in atomic functions. Fortunately, thanks to the C++11 standard, we now have a fully portable standard for atomics between compilers. Generally, this means that outside of very specific use cases (or maintenance of existing code), one would use the C++ standard over compiler-specific extensions.
In order to use the native C++11 atomics features, all one has to do is include the <atomic> header. This makes available the atomic class, which uses templates to adapt itself to the required type, with a large number of predefined typedefs:
|
Typedef name |
Full specialization |
|
std::atomic_bool |
std::atomic<bool> |
|
std::atomic_char |
std::atomic<char> |
|
std::atomic_schar |
std::atomic<signed char> |
|
std::atomic_uchar |
std::atomic<unsigned char> |
|
std::atomic_short |
std::atomic<short> |
|
std::atomic_ushort |
std::atomic<unsigned short> |
|
std::atomic_int |
std::atomic<int> |
|
std::atomic_uint |
std::atomic<unsigned int> |
|
std::atomic_long |
std::atomic<long> |
|
std::atomic_ulong |
std::atomic<unsigned long> |
|
std::atomic_llong |
std::atomic<long long> |
|
std::atomic_ullong |
std::atomic<unsigned long long> |
|
std::atomic_char16_t |
std::atomic<char16_t> |
|
std::atomic_char32_t |
std::atomic<char32_t> |
|
std::atomic_wchar_t |
std::atomic<wchar_t> |
|
std::atomic_int8_t |
std::atomic<std::int8_t> |
|
std::atomic_uint8_t |
std::atomic<std::uint8_t> |
|
std::atomic_int16_t |
std::atomic<std::int16_t> |
|
std::atomic_uint16_t |
std::atomic<std::uint16_t> |
|
std::atomic_int32_t |
std::atomic<std::int32_t> |
|
std::atomic_uint32_t |
std::atomic<std::uint32_t> |
|
std::atomic_int64_t |
std::atomic<std::int64_t> |
|
std::atomic_uint64_t |
std::atomic<std::uint64_t> |
|
std::atomic_int_least8_t |
std::atomic<std::int_least8_t> |
|
std::atomic_uint_least8_t |
std::atomic<std::uint_least8_t> |
|
std::atomic_int_least16_t |
std::atomic<std::int_least16_t> |
|
std::atomic_uint_least16_t |
std::atomic<std::uint_least16_t> |
|
std::atomic_int_least32_t |
std::atomic<std::int_least32_t> |
|
std::atomic_uint_least32_t |
std::atomic<std::uint_least32_t> |
|
std::atomic_int_least64_t |
std::atomic<std::int_least64_t> |
|
std::atomic_uint_least64_t |
std::atomic<std::uint_least64_t> |
|
std::atomic_int_fast8_t |
std::atomic<std::int_fast8_t> |
|
std::atomic_uint_fast8_t |
std::atomic<std::uint_fast8_t> |
|
std::atomic_int_fast16_t |
std::atomic<std::int_fast16_t> |
|
std::atomic_uint_fast16_t |
std::atomic<std::uint_fast16_t> |
|
std::atomic_int_fast32_t |
std::atomic<std::int_fast32_t> |
|
std::atomic_uint_fast32_t |
std::atomic<std::uint_fast32_t> |
|
std::atomic_int_fast64_t |
std::atomic<std::int_fast64_t> |
|
std::atomic_uint_fast64_t |
std::atomic<std::uint_fast64_t> |
|
std::atomic_intptr_t |
std::atomic<std::intptr_t> |
|
std::atomic_uintptr_t |
std::atomic<std::uintptr_t> |
|
std::atomic_size_t |
std::atomic<std::size_t> |
|
std::atomic_ptrdiff_t |
std::atomic<std::ptrdiff_t> |
|
std::atomic_intmax_t |
std::atomic<std::intmax_t> |
|
std::atomic_uintmax_t |
std::atomic<std::uintmax_t> |
This atomic class defines the following generic functions:
|
Function |
Description |
|
operator= |
Assigns a value to an atomic object. |
|
is_lock_free |
Returns true if the atomic object is lock-free. |
|
store |
Replaces the value of the atomic object with a non-atomic argument, atomically. |
|
load |
Atomically obtains the value of the atomic object. |
|
operator T |
Loads a value from an atomic object. |
|
exchange |
Atomically replaces the value of the object with the new value and returns the old value. |
|
compare_exchange_weak compare_exchange_strong |
Atomically compares the value of the object and swaps values if equal, or else returns the current value. |
With the C++17 update, the is_always_lock_free constant is added. This allows one to inquire whether the type is always lock-free.
Finally, we have the specialized atomic functions:
|
Function |
Description |
|
fetch_add |
Atomically adds the argument to the value stored in the atomic object and returns the old value. |
|
fetch_sub |
Atomically subtracts the argument from the value stored in the atomic object and returns the old value. |
|
fetch_and |
Atomically performs bitwise AND between the argument and the value of the atomic object and returns the old value. |
|
fetch_or |
Atomically performs bitwise OR between the argument and the value of the atomic object and returns the old value. |
|
fetch_xor |
Atomically performs bitwise XOR between the argument and the value of the atomic object and returns the old value. |
|
operator++ operator++(int) operator-- operator--(int) |
Increments or decrements the atomic value by one. |
|
operator+= operator-= operator&= operator|= operator^= |
Adds, subtracts, or performs a bitwise AND, OR, XOR operation with the atomic value. |
A basic example using fetch_add would look like this:
#include <iostream>
#include <thread>
#include <atomic>
std::atomic<long long> count;
void worker() {
count.fetch_add(1, std::memory_order_relaxed);
}
int main() {
std::thread t1(worker);
std::thread t2(worker);
std::thread t3(worker);
std::thread t4(worker);
std::thread t5(worker);
t1.join();
t2.join();
t3.join();
t4.join();
t5.join();
std::cout << "Count value:" << count << '\n';
}
The result of this example code would be 5. As we can see here, we can implement a basic counter this way with atomics, instead of having to use any mutexes or similar in order to provide thread synchronization.
In addition to the atomic class, there are also a number of template-based functions defined in the <atomic> header which we can use in a manner more akin to the compiler's built-in atomic functions:
|
Function |
Description |
|
atomic_is_lock_free |
Checks whether the atomic type's operations are lock-free. |
|
atomic_storeatomic_store_explicit |
Atomically replaces the value of the atomic object with a non-atomic argument. |
|
atomic_load atomic_load_explicit |
Atomically obtains the value stored in an atomic object. |
|
atomic_exchange atomic_exchange_explicit |
Atomically replaces the value of the atomic object with a non-atomic argument and returns the old value of atomic. |
|
atomic_compare_exchange_weak atomic_compare_exchange_weak_explicit atomic_compare_exchange_strong atomic_compare_exchange_strong_explicit |
Atomically compares the value of the atomic object with a non-atomic argument and performs an atomic exchange if equal or atomic load if not. |
|
atomic_fetch_add atomic_fetch_add_explicit |
Adds a non-atomic value to an atomic object and obtains the previous value of atomic. |
|
atomic_fetch_sub atomic_fetch_sub_explicit |
Subtracts a non-atomic value from an atomic object and obtains the previous value of atomic. |
|
atomic_fetch_and atomic_fetch_and_explicit |
Replaces the atomic object with the result of logical AND with a non-atomic argument and obtains the previous value of the atomic. |
|
atomic_fetch_or atomic_fetch_or_explicit |
Replaces the atomic object with the result of logical OR with a non-atomic argument and obtains the previous value of atomic. |
|
atomic_fetch_xor atomic_fetch_xor_explicit |
Replaces the atomic object with the result of logical XOR with a non-atomic argument and obtains the previous value of atomic. |
|
atomic_flag_test_and_set atomic_flag_test_and_set_explicit |
Atomically sets the flag to true and returns its previous value. |
|
atomic_flag_clear atomic_flag_clear_explicit |
Atomically sets the value of the flag to false. |
|
atomic_init |
Non-atomic initialization of a default-constructed atomic object. |
|
kill_dependency |
Removes the specified object from the std::memory_order_consume dependency tree. |
|
atomic_thread_fence |
Generic memory order-dependent fence synchronization primitive. |
|
atomic_signal_fence |
Fence between a thread and a signal handler executed in the same thread. |
The difference between the regular and explicit functions is that the latter allows one to actually set the memory order to use. The former always uses memory_order_seq_cst as the memory order.
In this example using atomic_fetch_sub, an indexed container is processed by multiple threads concurrently, without the use of locks:
#include <string>
#include <thread>
#include <vector>
#include <iostream>
#include <atomic>
#include <numeric>
const int N = 10000;
std::atomic<int> cnt;
std::vector<int> data(N);
void reader(int id) {
for (;;) {
int idx = atomic_fetch_sub_explicit(&cnt, 1, std::memory_order_relaxed);
if (idx >= 0) {
std::cout << "reader " << std::to_string(id) << " processed item "
<< std::to_string(data[idx]) << '\n';
}
else {
std::cout << "reader " << std::to_string(id) << " done.\n";
break;
}
}
}
int main() {
std::iota(data.begin(), data.end(), 1);
cnt = data.size() - 1;
std::vector<std::thread> v;
for (int n = 0; n < 10; ++n) {
v.emplace_back(reader, n);
}
for (std::thread& t : v) {
t.join();
}
}
This example code uses a vector filled with integers of size N as the data source, filling it with 1s. The atomic counter object is set to the size of the data vector. After this, 10 threads are created (initialized in place using the vector's emplace_back C++11 feature), which run the reader function.
In that function, we read the current value of the index counter from memory using the atomic_fetch_sub_explicit function, which allows us to use the memory_order_relaxed memory order. This function also subtracts the value we pass from this old value, counting the index down by 1.
So long as the index number we obtain this way is higher or equal to zero, the function continues, otherwise it will quit. Once all the threads have finished, the application exits.
std::atomic_flag is an atomic Boolean type. Unlike the other specializations of the atomic class, it is guaranteed to be lock-free. It does not however, offer any load or store operations.
Instead, it offers the assignment operator, and functions to either clear, or test_and_set the flag. The former thereby sets the flag to false, and the latter will test and set it to true.
This property is defined as an enumeration in the <atomic> header:
enum memory_order {
memory_order_relaxed,
memory_order_consume,
memory_order_acquire,
memory_order_release,
memory_order_acq_rel,
memory_order_seq_cst
};
In the GCC section, we already touched briefly on the topic of memory order. As mentioned there, this is one of the parts where the characteristics of the underlying hardware architecture surface somewhat.
Basically, memory order determines how non-atomic memory accesses are to be ordered (memory access order) around an atomic operation. What this affects is how different threads will see the data in memory as they're executing their instructions:
|
Enum |
Description |
|
memory_order_relaxed |
Relaxed operation: there are no synchronization or ordering constraints imposed on other reads or writes, only this operation's atomicity is guaranteed. |
|
memory_order_consume |
A load operation with this memory order performs a consume operation on the affected memory location: no reads or writes in the current thread dependent on the value currently loaded can be reordered before this load. Writes to data-dependent variables in other threads that release the same atomic variable are visible in the current thread. On most platforms, this affects compiler optimizations only. |
|
memory_order_acquire |
A load operation with this memory order performs the acquire operation on the affected memory location: no reads or writes in the current thread can be reordered before this load. All writes in other threads that release the same atomic variable are visible in the current thread. |
|
memory_order_release |
A store operation with this memory order performs the release operation: no reads or writes in the current thread can be reordered after this store. All writes in the current thread are visible in other threads that acquire the same atomic variable and writes that carry a dependency into the atomic variable become visible in other threads that consume the same atomic. |
|
memory_order_acq_rel |
A read-modify-write operation with this memory order is both an acquire operation and a release operation. No memory reads or writes in the current thread can be reordered before or after this store. All writes in other threads that release the same atomic variable are visible before the modification and the modification is visible in other threads that acquire the same atomic variable. |
|
memory_order_seq_cst |
Any operation with this memory order is both an acquire operation and a release operation, plus a single total order exists in which all threads observe all modifications in the same order. |
With relaxed memory ordering, no order is enforced among concurrent memory accesses. All that this type of ordering guarantees is atomicity and modification order.
A typical use for this type of ordering is for counters, whether incrementing--or decrementing, as we saw earlier in the example code in the previous section.
If an atomic store in thread A is tagged memory_order_release and an atomic load in thread B from the same variable is tagged memory_order_acquire, all memory writes (non-atomic and relaxed atomic) that happened before the atomic store from the point of view of thread A, become visible side-effects in thread B. That is, once the atomic load has been completed, thread B is guaranteed to see everything thread A wrote to memory.
This type of operation is automatic on so-called strongly ordered architectures, including x86, SPARC, and POWER. Weakly-ordered architectures, such as ARM, PowerPC, and Itanium, will require the use of memory barriers here.
Typical applications of this type of memory ordering include mutual exclusion mechanisms, such as a mutex or atomic spinlock.
If an atomic store in thread A is tagged memory_order_release and an atomic load in thread B from the same variable is tagged memory_order_consume, all memory writes (non-atomic and relaxed atomic) that are dependency-ordered before the atomic store from the point of view of thread A, become visible side-effects within those operations in thread B into which the load operation carries dependency. That is, once the atomic load has been completed, those operators and functions in thread B that use the value obtained from the load are guaranteed to see what thread A wrote to memory.
This type of ordering is automatic on virtually all architectures. The only major exception is the (obsolete) Alpha architecture. A typical use case for this type of ordering would be read access to data that rarely gets changed.
Atomic operations tagged memory_order_seq_cst not only order memory the same way as release/acquire ordering (everything that happened before a store in one thread becomes a visible side effect in the thread that did a load), but also establishes a single total modification order of all atomic operations that are so tagged.
This type of ordering may be necessary for situations where all consumers must observe the changes being made by other threads in exactly the same order. It requires full memory barriers as a consequence on multi-core or multi-CPU systems.
As a result of such a complex setup, this type of ordering is significantly slower than the other types. It also requires that every single atomic operation has to be tagged with this type of memory ordering, or the sequential ordering will be lost.
The volatile keyword is probably quite familiar to anyone who has ever written complex multithreaded code. Its basic use is to tell the compiler that the relevant variable should always be loaded from memory, never making assumptions about its value. It also ensures that the compiler will not make any aggressive optimizations to the variable.
For multithreaded applications, it is generally ineffective, however, its use is discouraged. The main issue with the volatile specification is that it does not define a multithreaded memory model, meaning that the result of this keyword may not be deterministic across platforms, CPUs and even toolchains.
Within the area of atomics, this keyword is not required, and in fact is unlikely to be helpful. To guarantee that one obtains the current version of a variable that is shared between multiple CPU cores and their caches, one would have to use an operation like atomic_compare_exchange_strong, atomic_fetch_add, or atomic_exchange to let the hardware fetch the correct and current value.
For multithreaded code, it is recommended to not use the volatile keyword and use atomics instead, to guarantee proper behavior.
In this chapter, we looked at atomic operations and exactly how they are integrated into compilers to allow one's code to work as closely with the underlying hardware as possible. The reader will now be familiar with the types of atomic operations, the use of a memory barrier (fencing), as well as the various types of memory ordering and their implications.
The reader is now capable of using atomic operations in their own code to accomplish lock-free designs and to make proper use of the C++11 memory model.
In the next chapter, we will take everything we have learned so far and move away from CPUs, instead taking a look at GPGPU, the general-purpose processing of data on video cards (GPUs).
Distributed computing was one of the original applications of multithreaded programming. Back when every personal computer just contained a single processor with a single core, government and research institutions, as well as some companies would have multi-processor systems, often in the form of clusters. These would be capable of multithreaded processing; by splitting tasks across processors, they could speed up various tasks, including simulations, rendering of CGI movies, and the like.
Nowadays virtually every desktop-level or better system has more than a single processor core, and assembling a number of systems together into a cluster is very easy, using cheap Ethernet wiring. Combined with frameworks such as OpenMP and Open MPI, it's quite easy to expand a C++ based (multithreaded) application to run on a distributed system.
Topics in this chapter include:
When it comes to processing large datasets in parallel, it would be ideal if one could take the data, chop it up into lots of small parts, and push it to a lot of threads, thus significantly shortening the total time spent processing the said data.
The idea behind distributed computing is exactly this: on each node in a distributed system one or more instances of our application run, whereby this application can either be single or multithreaded. Due to the overhead of inter-process communication, it's generally more efficient to use a multithreaded application, as well as due to other possible optimizations--courtesy of resource sharing.
If one already has a multithreaded application ready to use, then one can move straight to using MPI to make it work on a distributed system. Otherwise, OpenMP is a compiler extension (for C/C++ and Fortran) which can make it relatively painless to make an application multithreaded without refactoring.
To do this, OpenMP allows one to mark a common code segment, to be executed on all slave threads. A master thread creates a number of slave threads which will concurrently process that same code segment. A basic Hello World OpenMP application looks like this:
/******************************************************************************
* FILE: omp_hello.c
* DESCRIPTION:
* OpenMP Example - Hello World - C/C++ Version
* In this simple example, the master thread forks a parallel region.
* All threads in the team obtain their unique thread number and print it.
* The master thread only prints the total number of threads. Two OpenMP
* library routines are used to obtain the number of threads and each
* thread's number.
* AUTHOR: Blaise Barney 5/99
* LAST REVISED: 04/06/05
******************************************************************************/
#include <omp.h>
#include <stdio.h>
#include <stdlib.h>
int main (int argc, char *argv[]) {
int nthreads, tid;
/* Fork a team of threads giving them their own copies of variables */
#pragma omp parallel private(nthreads, tid) {
/* Obtain thread number */
tid = omp_get_thread_num();
printf("Hello World from thread = %d\n", tid);
/* Only master thread does this */
if (tid == 0) {
nthreads = omp_get_num_threads();
printf("Number of threads = %d\n", nthreads);
}
} /* All threads join master thread and disband */ }
What one can easily tell from this basic sample is that OpenMP provides a C based API through the <omp.h> header. We can also see the section that will be executed by each thread, as marked by a #pragma omp preprocessor macro.
The advantage of OpenMP over the examples of multithreaded code which we saw in the preceding chapters, is the ease with which a section of code can be marked as being multithreaded without having to make any actual code changes. The obvious limitation that comes with this is that every thread instance will execute the exact same code and further optimization options are limited.
In order to schedule the execution of code on specific nodes, MPI (Message Passing Interface) is commonly used. Open MPI is a free library implementation of this, and used by many high-ranking supercomputers. MPICH is another popular implementation.
MPI itself is defined as a communication protocol for the programming of parallel computers. It is currently at its third revision (MPI-3).
In summary, MPI offers the following basic concepts:
Of these, MPI-IO, dynamic process management, and one-sided communication are MPI-2 features. Migration from MPI-1 based code and the incompatibility of dynamic process management with some setups, along with many applications not requiring MPI-2 features, means that uptake of MPI-2 has been relatively slow.
The initial implementation of MPI was MPICH, by Argonne National Laboratory (ANL) and Mississippi State University. It is currently one of the most popular implementations, used as the foundation for MPI implementations, including those by IBM (Blue Gene), Intel, QLogic, Cray, Myricom, Microsoft, Ohio State University (MVAPICH), and others.
Another very common implementation is Open MPI, which was formed out of the merger of three MPI implementations:
These, along with the PACX-MPI team at the University of Stuttgart, are the founding members of the Open MPI team. One of the primary goals of Open MPI is to create a high-quality, open source MPI-3 implementation.
MPI implementations are mandated to support C and Fortran. C/C++ and Fortran along with assembly support is very common, along with bindings for other languages.
Regardless of the implementation chosen, the resulting API will always match the official MPI standard, differing only by the MPI version that the library one has picked supports. All MPI-1 (revision 1.3) features should be supported by any MPI implementation, however.
This means that the canonical Hello World (as, for example, found on the MPI Tutorial site: http://mpitutorial.com/tutorials/mpi-hello-world/) for MPI should work regardless of which library one picks:
#include <mpi.h>
#include <stdio.h>
int main(int argc, char** argv) {
// Initialize the MPI environment
MPI_Init(NULL, NULL);
// Get the number of processes
int world_size;
MPI_Comm_size(MPI_COMM_WORLD, &world_size);
// Get the rank of the process
int world_rank;
MPI_Comm_rank(MPI_COMM_WORLD, &world_rank);
// Get the name of the processor
char processor_name[MPI_MAX_PROCESSOR_NAME];
int name_len;
MPI_Get_processor_name(processor_name, &name_len);
// Print off a hello world message
printf("Hello world from processor %s, rank %d"
" out of %d processors\n",
processor_name, world_rank, world_size);
// Finalize the MPI environment.
MPI_Finalize();
}
When reading through this basic example of an MPI-based application, it's important to be familiar with the terms used with MPI, in particular:
In this Hello World example, we can see that we include the <mpi.h> header. This MPI header will always be the same, regardless of the implementation we use.
Initializing the MPI environment requires a single call to MPI_Init(), which can take two parameters, both of which are optional at this point.
Getting the size of the world (meaning, number of processes available) is the next step. This is done using MPI_Comm_size(), which takes the MPI_COMM_WORLD global variable (defined by MPI for our use) and updates the second parameter with the number of processes in that world.
The rank we then obtain is essentially the unique ID assigned to this process by MPI. Obtaining this UID is performed with MPI_Comm_rank(). Again, this takes the MPI_COMM_WORLD variable as the first parameter and returns our numeric rank as the second parameter. This rank is useful for self-identification and communication between processes.
Obtaining the name of the specific piece of hardware on which one is running can also be useful, particularly for diagnostic purposes. For this we can call MPI_Get_processor_name(). The returned string will be of a globally defined maximum length and will identify the hardware in some manner. The exact format of this string is implementation defined.
Finally, we print out the information we gathered and clean up the MPI environment before terminating the application.
In order to compile an MPI application, the mpicc compiler wrapper is used. This executable should be part of whichever MPI implementation has been installed.
Using it is, however, identical to how one would use, for example, GCC:
$ mpicc -o mpi_hello_world mpi_hello_world.c
This can be compared to:
$ gcc mpi_hello_world.c -lmsmpi -o mpi_hello_world
This would compile and link our Hello World example into a binary, ready to be executed. Executing this binary is, however, not done by starting it directly, but instead a launcher is used, like this:
$ mpiexec.exe -n 4 mpi_hello_world.exe
Hello world from processor Generic_PC, rank 0 out of 4 processors
Hello world from processor Generic_PC, rank 2 out of 4 processors
Hello world from processor Generic_PC, rank 1 out of 4 processors
Hello world from processor Generic_PC, rank 3 out of 4 processors
The preceding output is from Open MPI running inside a Bash shell on a Windows system. As we can see, we launch four processes in total (4 ranks). The processor name is reported as the hostname for each process ("PC").
The binary to launch MPI applications with is called mpiexec or mpirun, or orterun. These are synonyms for the same binary, though not all implementations will have all synonyms. For Open MPI, all three are present and one can use any of these.
The systems an MPI based or similar application will run on consist of multiple independent systems (nodes), each of which is connected to the others using some kind of network interface. For high-end applications, these tend to be custom nodes with high-speed, low-latency interconnects. At the other end of the spectrum are so-called Beowulf and similar type clusters, made out of standard (desktop) computers and usually connected using regular Ethernet.
At the time of writing, the fastest supercomputer (according to the TOP500 listing) is the Sunway TaihuLight supercomputer at the National Supercomputing Center in Wuxi, China. It uses a total of 40,960 Chinese-designed SW26010 manycore RISC architecture-based CPUs, with 256 cores per CPU (divided in 4 64-core groups), along with four management cores. The term manycore refers to a specialized CPU design which focuses more on explicit parallelism as opposed to the single-thread and general-purpose focus of most CPU cores. This type of CPU is similar to a GPU architecture and vector processors in general.
Each of these nodes contains a single SW26010 along with 32 GB of DDR3 memory. They are connected via a PCIe 3.0-based network, itself consisting of a three-level hierarchy: the central switching network (for supernodes), the supernode network (connecting all 256 nodes in a supernode), and the resource network, which provides access to I/O and other resource services. The bandwidth for this network between individual nodes is 12 GB/second, with a latency of about 1 microsecond.
The following graphic (from "The Sunway TaihuLight Supercomputer: System and Applications", DOI: 10.1007/s11432-016-5588-7) provides a visual overview of this system:
For situations where the budget does not allow for such an elaborate and highly customized system, or where the specific tasks do not warrant such an approach, there always remains the "Beowulf" approach. A Beowulf cluster is a term used to refer to a distributed computing system constructed out of common computer systems. These can be Intel or AMD-based x86 systems, with ARM-based processors now becoming popular.
It's generally helpful to have each node in a cluster to be roughly identical to the other nodes. Although it's possible to have an asymmetric cluster, management and job scheduling becomes much easier when one can make broad assumptions about each node.
At the very least, one would want to match the processor architecture, with a base level of CPU extensions, such as SSE2/3 and perhaps AVX and kin, common across all nodes. Doing this would allow one to use the same compiled binary across the nodes, along with the same algorithms, massively simplifying the deployment of jobs and the maintenance of the code base.
For the network between the nodes, Ethernet is a very popular option, delivering communication times measured in tens to hundreds of microseconds, while costing only a fraction of faster options. Usually each node would be connected to a single Ethernet network, as in this graphic:
There is also the option to add a second or even third Ethernet link to each or specific nodes to give them access to files, I/O, and other resources, without having to compete with bandwidth on the primary network layer. For very large clusters, one could consider an approach such as that used with the Sunway TaihuLight and many other supercomputers: splitting nodes up into supernodes, each with their own inter-node network. This would allow one to optimize traffic on the network by limiting it to only associated nodes.
An example of such an optimized Beowulf cluster would look like this:
Clearly there is a wide range of possible configurations with MPI-based clusters, utilizing custom, off-the-shelf, or a combination of both types of hardware. The intended purpose of the cluster often determines the most optimal layout for a specific cluster, such as running simulations, or the processing of large datasets. Each type of job presents its own set of limitations and requirements, which is also reflected in the software implementation.
For the remainder of this chapter, we will focus on Open MPI. In order to get a working development environment for Open MPI, one will have to install its headers and library files, along with its supporting tools and binaries.
On Linux and BSD distributions with a package management system, it's quite easy: simply install the Open MPI package and everything should be set up and configured, ready to be used. Consult the manual for one's specific distribution, to see how to search for and install specific packages.
On Debian-based distributions, one would use:
$ sudo apt-get install openmpi-bin openmpi-doc libopenmpi-dev
The preceding command would install the Open MPI binaries, documentation, and development headers. The last two packages can be omitted on compute nodes.
On Windows things get slightly complex, mostly because of the dominating presence of Visual C++ and the accompanying compiler toolchain. If one wishes to use the same development environment as on Linux or BSD, using MinGW, one has to take some additional steps.
The easiest to use and most up to date MinGW environment is MSYS2, which provides a Bash shell along with most of the tools one would be familiar with under Linux and BSD. It also features the Pacman package manager, as known from the Linux Arch distribution. Using this, it's easy to install the requisite packages for Open MPI development.
After installing the MSYS2 environment from https://msys2.github.io/, install the MinGW toolchain:
$ pacman -S base-devel mingw-w64-x86_64-toolchain
This assumes that the 64-bit version of MSYS2 was installed. For the 32-bit version, select i686 instead of x86_64. After installing these packages, we will have both MinGW and the basic development tools installed. In order to use them, start a new shell using the MinGW 64-bit postfix in the name, either via the shortcut in the start menu, or by using the executable file in the MSYS2 install folder.
With MinGW ready, it's time to install MS-MPI version 7.x. This is Microsoft's implementation of MPI and the easiest way to use MPI on Windows. It's an implementation of the MPI-2 specification and mostly compatible with the MPICH2 reference implementation. Since MS-MPI libraries are not compatible between versions, we use this specific version.
Though version 7 of MS-MPI has been archived, it can still be downloaded via the Microsoft Download Center at https://www.microsoft.com/en-us/download/details.aspx?id=49926.
MS-MPI version 7 comes with two installers, msmpisdk.msi and MSMpiSetup.exe. Both need to be installed. Afterwards, we should be able to open a new MSYS2 shell and find the following environment variable set up:
$ printenv | grep "WIN\|MSMPI"
MSMPI_INC=D:\Dev\MicrosoftSDKs\MPI\Include\
MSMPI_LIB32=D:\Dev\MicrosoftSDKs\MPI\Lib\x86\
MSMPI_LIB64=D:\Dev\MicrosoftSDKs\MPI\Lib\x64\
WINDIR=C:\Windows
This output for the printenv command shows that the MS-MPI SDK and runtime was properly installed. Next, we need to convert the static library from the Visual C++ LIB format to the MinGW A format:
$ mkdir ~/msmpi
$ cd ~/msmpi
$ cp "$MSMPI_LIB64/msmpi.lib" .
$ cp "$WINDIR/system32/msmpi.dll" .
$ gendef msmpi.dll
$ dlltool -d msmpi.def -D msmpi.dll -l libmsmpi.a
$ cp libmsmpi.a /mingw64/lib/.
We first copy the original LIB file into a new temporary folder in our home folder, along with the runtime DLL. Next, we use the gendef tool on the DLL in order to create the definitions which we will need in order to convert it to a new format.
This last step is done with dlltool, which takes the definitions file along with the DLL and outputs a static library file which is compatible with MinGW. This file we then copy to a location where MinGW can find it later when linking.
Next, we need to copy the MPI header:
$ cp "$MSMPI_INC/mpi.h" .
After copying this header file, we must open it and locate the section that starts with:
typedef __int64 MPI_Aint
Immediately above that line, we need to add the following line:
#include <stdint.h>
This include adds the definition for __int64, which we will need for the code to compile correctly.
Finally, copy the header file to the MinGW include folder:
$ cp mpi.h /mingw64/include
With this we have the libraries and headers all in place for MPI development with MinGW. allowing us to compile and run the earlier Hello World example, and continue with the rest of this chapter.
In order to distribute MPI jobs across the nodes in a cluster, one has to either specify these nodes as a parameter to the mpirun/mpiexec command or make use of a host file. This host file contains the names of the nodes on the network which will be available for a run, along with the number of available slots on the host.
A prerequisite for running MPI applications on a remote node is that the MPI runtime is installed on that node, and that password-less access has been configured for that node. This means that so long as the master node has the SSH keys installed, it can log into each of these nodes in order to launch the MPI application on it.
After installing MPI on a node, the next step is to set up password-less SSH access for the master node. This requires the SSH server to be installed on the node (part of the ssh package on Debian-based distributions). After this we need to generate and install the SSH key.
One way to easily do this is by having a common user on the master node and other nodes, and using an NFS network share or similar to mount the user folder on the master node on the compute nodes. This way all nodes would have the same SSH key and known hosts file. One disadvantage of this approach is the lack of security. For an internet-connected cluster, this would not be a very good approach.
It is, however, a definitely good idea to run the job on each node as the same user to prevent any possible permission issues, especially when using files and other resources. With the common user account created on each node, and with the SSH key generated, we can transfer the public key to the node using the following command:
$ ssh-copy-id mpiuser@node1
Alternatively, we can copy the public key into the authorized_keys file on the node system while we are setting it up. If creating and configuring a large number of nodes, it would make sense to use an image to copy onto each node's system drive, use a setup script, or possibly boot from an image through PXE boot.
With this step completed, the master node can now log into each compute node in order to run jobs.
As mentioned earlier, in order to run a job on other nodes, we need to specify these nodes. The easiest way to do this is to create a file containing the names of the compute nodes we wish to use, along with optional parameters.
To allow us to use names for the nodes instead of IP addresses, we have to modify the operating system's host file first: for example, /etc/hosts on Linux:
192.168.0.1 master
192.168.0.2 node0
192.168.0.3 node1
Next we create a new file which will be the host file for use with MPI:
master
node0
node1
With this configuration, a job would be executed on both compute nodes, as well as the master node. We can take the master node out of this file to prevent this.
Without any optional parameter provided, the MPI runtime will use all available processors on the node. If it is desirable, we can limit this number:
node0 slots=2
node1 slots=4
Assuming that both nodes are quad-core CPUs, this would mean that only half the cores on node0 would be used, and all of them on node1.
Running an MPI job across multiple MPI nodes is basically the same as executing it only locally, as in the example earlier in this chapter:
$ mpirun --hostfile my_hostfile hello_mpi_world
This command would tell the MPI launcher to use a host file called my_hostfile and run a copy of the specified MPI application on each processor of each node found in that host file.
In addition to using a manual command and host files to create and start jobs on specific nodes, there are also cluster scheduler applications. These generally involve the running of a daemon process on each node as well as the master node. Using the provided tools, one can then manage resources and jobs, scheduling allocation and keeping track of job status.
One of the most popular cluster management scheduler's is SLURM, which short for Simple Linux Utility for Resource management (though now renamed to Slurm Workload Manager with the website at https://slurm.schedmd.com/). It is commonly used by supercomputers as well as many computer clusters. Its primary functions consist out of:
The setting up of a cluster scheduler is not required for a basic cluster operation, but can be very useful for larger clusters, when running multiple jobs simultaneously, or when having multiple users of the cluster wishing to run their own job.
At this point, we have a functional MPI cluster, which can be used to execute MPI-based applications (and others, as well) in a parallel fashion. While for some tasks it might be okay to just send dozens or hundreds of processes on their merry way and wait for them to finish, very often it is crucial that these parallel processes are able to communicate with each other.
This is where the true meaning of MPI (being "Message Passing Interface") comes into play. Within the hierarchy created by an MPI job, processes can communicate and share data in a variety of ways. Most fundamentally, they can share and receive messages.
An MPI message has the following properties:
The sender and receiver should be fairly obvious. The message tag is a numeric ID which the sender can set and which the receiver can use to filter messages, to, for example, allow for the prioritizing of specific messages. The data type determines the type of information contained in the message.
The send and receive functions look like this:
int MPI_Send(
void* data,
int count,
MPI_Datatype datatype,
int destination,
int tag,
MPI_Comm communicator)
int MPI_Recv(
void* data,
int count,
MPI_Datatype datatype,
int source,
int tag,
MPI_Comm communicator,
MPI_Status* status)
An interesting thing to note here is that the count parameter in the send function indicates the number of elements that the function will be sending, whereas the same parameter in the receive function indicates the maximum number of elements that this thread will accept.
The communicator refers to the MPI communicator instance being used, and the receive function contains a final parameter which can be used to check the status of the MPI message.
MPI defines a number of basic types, which one can use directly:
|
MPI datatype |
C equivalent |
|
MPI_SHORT |
short int |
|
MPI_INT |
int |
|
MPI_LONG |
long int |
|
MPI_LONG_LONG |
long long int |
|
MPI_UNSIGNED_CHAR |
unsigned char |
|
MPI_UNSIGNED_SHORT |
unsigned short int |
|
MPI_UNSIGNED |
unsigned int |
|
MPI_UNSIGNED_LONG |
unsigned long int |
|
MPI_UNSIGNED_LONG_LONG |
unsigned long long int |
|
MPI_FLOAT |
float |
|
MPI_DOUBLE |
double |
|
MPI_LONG_DOUBLE |
long double |
|
MPI_BYTE |
char |
MPI guarantees that when using these types, the receiving side will always get the message data in the format it expects, regardless of endianness and other platform-related issues.
In addition to these basic formats, one can also create new MPI data types. These use a number of MPI functions, including MPI_Type_create_struct:
int MPI_Type_create_struct(
int count,
int array_of_blocklengths[],
const MPI_Aint array_of_displacements[],
const MPI_Datatype array_of_types[],
MPI_Datatype *newtype)
With this function, one can create an MPI type that contains a struct, to be passed just like a basic MPI data type:
#include <cstdio>
#include <cstdlib>
#include <mpi.h>
#include <cstddef>
struct car {
int shifts;
int topSpeed;
};
int main(int argc, char **argv) {
const int tag = 13;
int size, rank;
MPI_Init(&argc, &argv);
MPI_Comm_size(MPI_COMM_WORLD, &size);
if (size < 2) {
fprintf(stderr,"Requires at least two processes.\n");
MPI_Abort(MPI_COMM_WORLD, 1);
}
const int nitems = 2;
int blocklengths[2] = {1,1};
MPI_Datatype types[2] = {MPI_INT, MPI_INT};
MPI_Datatype mpi_car_type;
MPI_Aint offsets[2];
offsets[0] = offsetof(car, shifts);
offsets[1] = offsetof(car, topSpeed);
MPI_Type_create_struct(nitems, blocklengths, offsets, types, &mpi_car_type);
MPI_Type_commit(&mpi_car_type);
MPI_Comm_rank(MPI_COMM_WORLD, &rank);
if (rank == 0) {
car send;
send.shifts = 4;
send.topSpeed = 100;
const int dest = 1;
MPI_Send(&send, 1, mpi_car_type, dest, tag, MPI_COMM_WORLD);
printf("Rank %d: sent structure car\n", rank);
}
if (rank == 1) {
MPI_Status status;
const int src = 0;
car recv;
MPI_Recv(&recv, 1, mpi_car_type, src, tag, MPI_COMM_WORLD, &status);
printf("Rank %d: Received: shifts = %d topSpeed = %d\n", rank, recv.shifts, recv.topSpeed);
}
MPI_Type_free(&mpi_car_type);
MPI_Finalize();
return 0;
}
Here we see how a new MPI data type called mpi_car_type is defined and used to message between two processes. To create a struct type like this, we need to define the number of items in the struct, the number of elements in each block, their byte displacement, and their basic MPI types.
A simple example of MPI communication is the sending of a single value from one process to another. In order to do this, one needs to use the following listed code and run the compiled binary to start at least two processes. It does not matter whether these processes run locally or on two compute nodes.
The following code was gratefully borrowed from http://mpitutorial.com/tutorials/mpi-hello-world/:
#include <mpi.h>
#include <stdio.h>
#include <stdlib.h>
int main(int argc, char** argv) {
// Initialize the MPI environment.
MPI_Init(NULL, NULL);
// Find out rank, size.
int world_rank;
MPI_Comm_rank(MPI_COMM_WORLD, &world_rank);
int world_size;
MPI_Comm_size(MPI_COMM_WORLD, &world_size);
// We are assuming at least 2 processes for this task.
if (world_size < 2) {
fprintf(stderr, "World size must be greater than 1 for %s.\n", argv[0]);
MPI_Abort(MPI_COMM_WORLD, 1);
}
int number;
if (world_rank == 0) {
// If we are rank 0, set the number to -1 and send it to process 1.
number = -1;
MPI_Send(&number, 1, MPI_INT, 1, 0, MPI_COMM_WORLD);
}
else if (world_rank == 1) {
MPI_Recv(&number, 1, MPI_INT, 0, 0,
MPI_COMM_WORLD,
MPI_STATUS_IGNORE);
printf("Process 1 received number %d from process 0.\n", number);
}
MPI_Finalize();
}
There isn't a lot to this code. We work through the usual MPI initialization, followed by a check to ensure that our world size is at least two processes large.
The process with rank 0 will then send an MPI message of data type MPI_INT and value -1. The process with rank 1 will wait to receive this message. The receiving process specifies for MPI_Status MPI_STATUS_IGNORE to indicate that the process will not be checking the status of the message. This is a useful optimization technique.
Finally, the expected output is the following:
$ mpirun -n 2 ./send_recv_demo
Process 1 received number -1 from process 0
Here we start the compiled demo code with a total of two processes. The output shows that the second process received the MPI message from the first process, with the correct value.
For advanced MPI communication, one would use the MPI_Status field to obtain more information about a message. One can use MPI_Probe to discover a message's size before accepting it with MPI_Recv. This can be useful for situations where it is not known beforehand what the size of a message will be.
Broadcasting a message means that all processes in the world will receive it. This simplifies the broadcast function relative to the send function:
int MPI_Bcast(
void *buffer,
int count,
MPI_Datatype datatype,
int root,
MPI_Comm comm)
The receiving processes would simply use a normal MPI_Recv function. All that the broadcast function does is optimize the sending of many messages using an algorithm that uses multiple network links simultaneously, instead of just one.
Scattering is very similar to broadcasting a message, with one very important distinction: instead of sending the same data in each message, instead it sends a different part of an array to each recipient. Its function definition looks as follows:
int MPI_Scatter(
void* send_data,
int send_count,
MPI_Datatype send_datatype,
void* recv_data,
int recv_count,
MPI_Datatype recv_datatype,
int root,
MPI_Comm communicator)
Each receiving process will get the same data type, but we can specify how many items will be sent to each process (send_count). This function is used on both the sending and receiving side, with the latter only having to define the last set of parameters relating to receiving data, with the world rank of the root process and the relevant communicator being provided.
Gathering is the inverse of scattering. Here multiple processes will send data that ends up at a single process, with this data sorted by the rank of the process which sent it. Its function definition looks as follows:
int MPI_Gather(
void* send_data,
int send_count,
MPI_Datatype send_datatype,
void* recv_data,
int recv_count,
MPI_Datatype recv_datatype,
int root,
MPI_Comm communicator)
One may notice that this function looks very similar to the scatter function. This is because it works basically the same way, only this time around the sending nodes have to all fill in the parameters related to sending the data, while the receiving process has to fill in the parameters related to receiving data.
It is important to note here that the recv_count parameter relates to the amount of data received from each sending process, not the size in total.
There exist further specializations of these two basic functions, but these will not be covered here.
One might think that it would be easiest to use MPI to allocate one instance of the MPI application to a single CPU core on each cluster node, and this would be true. It would, however, not be the fastest solution.
Although for communication between processes across a network MPI is likely the best choice in this context, within a single system (single or multi-CPU system) using multithreading makes a lot of sense.
The main reason for this is simply that communication between threads is significantly faster than inter-process communication, especially when using a generalized communication layer such as MPI.
One could write an application that uses MPI to communicate across the cluster's network, whereby one allocates one instance of the application to each MPI node. The application itself would detect the number of CPU cores on that system, and create one thread for each core. Hybrid MPI, as it's often called, is therefore commonly used, for the advantages it provides:
Implementing this can be done the way we have seen in previous chapters, by using the multithreading features found in C++11 and successive versions. The other option is to use OpenMP, as we saw at the very beginning of this chapter.
The obvious advantage of using OpenMP is that it takes very little effort from the developer's side. If all that one needs is to get more instances of the same routine running, all it takes is are the small modifications to mark the code to be used for the worker threads.
For example:
#include <stdio.h>
#include <mpi.h>
#include <omp.h>
int main(int argc, char *argv[]) {
int numprocs, rank, len;
char procname[MPI_MAX_PROCESSOR_NAME];
int tnum = 0, tc = 1;
MPI_Init(&argc, &argv);
MPI_Comm_size(MPI_COMM_WORLD, &numprocs);
MPI_Comm_rank(MPI_COMM_WORLD, &rank);
MPI_Get_processor_name(procname, &len);
#pragma omp parallel default(shared) private(tnum, tc) {
np = omp_get_num_threads();
tnum = omp_get_thread_num();
printf("Thread %d out of %d from process %d out of %d on %s\n",
tnum, tc, rank, numprocs, procname);
}
MPI_Finalize();
}
The above code combines an OpenMP application with MPI. To compile it we would run for example:
$ mpicc -openmp hellohybrid.c -o hellohybrid
Next, to run the application, we would use mpirun or equivalent:
$ export OMP_NUM_THREADS=8
$ mpirun -np 2 --hostfile my_hostfile -x OMP_NUM_THREADS ./hellohybrid
The mpirun command would run two MPI processes using the hellohybrid binary, passing the environment variable we exported with the -x flag to each new process. The value contained in that variable will then be used by the OpenMP runtime to create that number of threads.
Assuming we have at least two MPI nodes in our MPI host file, we would end up with two MPI processes across two nodes, each of which running eight threads, which would fit a quad-core CPU with Hyper-Threading or an octo-core CPU.
When writing MPI-based applications and executing them on either a multi-core CPU or cluster, the issues one may encounter are very much the same as those we already came across with the multithreaded code in the preceding chapters.
However, an additional worry with MPI is that one relies on the availability of network resources. Since a send buffer used for an MPI_Send call cannot be reclaimed until the network stack can process the buffer, and this call is a blocking type, sending lots of small messages can lead to one process waiting for another, which in turn is waiting for a call to complete.
This type of deadlock should be kept in mind when designing the messaging structure of an MPI application. One can, for example, ensure that there are no send calls building up on one side, which would lead to such a scenario. Providing feedback messages on, queue depth and similar could be used to the ease pressure.
MPI also contains a synchronization mechanism using a so-called barrier. This is meant to be used between MPI processes to allow them to synchronize on for example a task. Using an MPI barrier (MPI_Barrier) call is similarly problematic as a mutex in that if an MPI process does not manage to get synchronized, everything will hang at this point.
In this chapter, we looked in some detail at the MPI standard, along with a number of its implementations, specifically Open MPI, and we looked at how to set up a cluster. We also saw how to use OpenMP to easily add multithreading to existing codes.
At this point, the reader should be capable of setting up a basic Beowulf or similar cluster, configuring it for MPI, and running basic MPI applications on it. How to communicate between MPI processes and how to define custom data types should be known. In addition, the reader will be aware of the potential pitfalls when programming for MPI.
In the next chapter, we will take all our knowledge of the preceding chapters and see how we can combine it in the final chapter, as we look at general-purpose computing on videocards (GPGPU).
A fairly recent development has been to use video cards (GPUs) for general purpose computing (GPGPU). Using frameworks such as CUDA and OpenCL, it is possible to speed up, for example, the processing of large datasets in parallel in medical, military, and scientific applications. In this chapter, we will look at how this is done with C++ and OpenCL, and how to integrate such a feature into a multithreaded application in C++.
Topics in this chapter include:
In Chapter 9, Multithreading with Distributed Computing, we looked at running the same task across a number of compute nodes in a cluster system. The main goal of such a setup is to process data in a highly parallel fashion, theoretically speeding up said processing relative to a single system with fewer CPU cores.
GPGPU (General Purpose Computing on Graphics Processing Units) is in some ways similar to this, but with one major difference: while a compute cluster with only regular CPUs is good at scalar tasks--meaning performing one task on one single set of data (SISD)--GPUs are vector processors that excel at SIMD (Single Input, Multiple Data) tasks.
Essentially, this means that one can send a large dataset to a GPU, along with a single task description, and the GPU will proceed to execute that same task on parts of that data in parallel on its hundreds or thousands of cores. One can thus regard a GPU as a very specialized kind of cluster:
When the concept of GPGPU was first coined (around 2001), the most common way to write GPGPU programs was using GLSL (OpenGL Shading Language) and similar shader languages. Since these shader languages were already aimed at the processing of SIMD tasks (image and scene data), adapting them for more generic tasks was fairly straightforward.
Since that time, a number of more specialized implementations have appeared:
|
Name |
Since |
Owner |
Notes |
|
CUDA |
2006 |
NVidia |
This is proprietary and only runs on NVidia GPUs |
|
Close to Metal |
2006 |
ATi/AMD |
This was abandoned in favor of OpenCL |
|
DirectCompute |
2008 |
Microsoft |
This is released with DX11, runs on DX10 GPUs, and is limited to Windows platforms |
|
OpenCL |
2009 |
Khronos Group |
This is open standard and available across AMD, Intel, and NVidia GPUs on all mainstream platforms, as well as mobile platforms |
Of the various current GPGPU implementations, OpenCL is by far the most interesting GPGPU API due to the absence of limitations. It is available for virtually all mainstream GPUs and platforms, even enjoying support on select mobile platforms.
Another distinguishing feature of OpenCL is that it's not limited to just GPGPU either. As part of its name (Open Computing Language), it abstracts a system into the so-called compute devices, each with their own capabilities. GPGPU is the most common application, but this feature makes it fairly easy to test implementations on a CPU first, for easy debugging.
One possible disadvantage of OpenCL is that it employs a high level of abstraction for memory and hardware details, which can negatively affect performance, even as it increases the portability of the code.
In the rest of this chapter, we will focus on OpenCL.
Many programs incorporate OpenCL-based code in order to speed up operations. These include programs aimed at graphics processing, as well as 3D modelling and CAD, audio and video processing. Some examples are:
Further acceleration of certain operations is found in office applications including LibreOffice Calc and Microsoft Excel.
Perhaps more importantly, OpenCL is also commonly used for scientific computing and cryptography, including BOINC and GROMACS as well as many other libraries and programs.
Since the release of the OpenCL specification on December 8, 2008, there have so far been five updates, bringing it up to version 2.2. Important changes with these releases are mentioned next.
The first public release was released by Apple as part of the macOS X Snow Leopard release on August 28, 2009.
Together with this release, AMD announced that it would support OpenCL and retire its own Close to Metal (CtM) framework. NVidia, RapidMind, and IBM also added support for OpenCL to their own frameworks.
The OpenCL 1.1 specification was ratified by the Khronos Group on June 14, 2010. It adds additional functionality for parallel programming and performance, including the following:
The OpenCL 1.2 version was released on November 15, 2011. Its most significant features include the following:
The OpenCL2.0 version was released on November 18, 2013. This release has the following significant changes or additions:
The OpenCL 2.1 revision to the 2.0 standard was released on November 16, 2015. The most notable thing about this release was the introduction of the OpenCL C++ kernel language, such as how the OpenCL language originally was based on C with extensions, the C++ version is based on a subset of C++14, with backwards compatibility for the C kernel language.
Updates to the OpenCL API include the following:
Standard Portable Intermediate Representation (SPIR) and its successor, SPIR-V, are a way to provide device-independent binaries for use across OpenCL devices.
On May 16, 2017, what is now the current release of OpenCL was released. According to the Khronos Group, it includes the following changes:
Regardless of which platform and GPU you have, the most important part of doing OpenCL development is to obtain the OpenCL runtime for one's GPU from its manufacturer. Here, AMD, Intel, and NVidia all provide an SDK for all mainstream platforms. For NVidia, OpenCL support is included in the CUDA SDK.
Along with the GPU vendor's SDK, one can also find details on their website on which GPUs are supported by this SDK.
After installing the vendor's GPGPU SDK using the provided instructions, we still need to download the OpenCL headers. Unlike the shared library and runtime file provided by the vendor, these headers are generic and will work with any OpenCL implementation.
For Debian-based distributions, simply execute the following command line:
$ sudo apt-get install opencl-headers
For other distributions, the package may be called the same, or something different. Consult the manual for one's distribution on how to find out the package name.
After installing the SDK and OpenCL headers, we are ready to compile our first OpenCL applications.
On Windows, we can choose between developing with Visual Studio (Visual C++) or with the Windows port of GCC (MinGW). To stay consistent with the Linux version, we will be using MinGW along with MSYS2. This means that we'll have the same compiler toolchain and same Bash shell and utilities, along with the Pacman package manager.
After installing the vendor's GPGPU SDK, as described previously, simply execute the following command line in an MSYS2 shell in order to install the OpenCL headers:
$ pacman -S mingw64/mingw-w64-x86_64-opencl-headers
Or, execute the following command line when using the 32-bit version of MinGW:
mingw32/mingw-w64-i686-opencl-headers
With this, the OpenCL headers are in place. We now just have to make sure that the MinGW linker can find OpenCL library. With the NVidia CUDA SDK, you can use the CUDA_PATH environment variable for this, or browse the install location of the SDK and copy the appropriate OpenCL LIB file from there to the MinGW lib folder, making sure not to mix the 32-bit and 64-bit files.
With the shared library now also in place, we can compile the OpenCL applications.
Starting with OS X 10.7, an OpenCL runtime is provided with the OS. After installing XCode for the development headers and libraries, one can immediately start with OpenCL development.
A common example of a GPGPU application is one which calculates the Fast Fourier Transform (FFT). This algorithm is commonly used for audio processing and similar, allowing you to transform, for example, from the time domain to the frequency domain for analysis purposes.
What it does is apply a divide and conquer approach to a dataset, in order to calculate the DFT (Discrete Fourier Transform). It does this by splitting the input sequence into a fixed, small number of smaller subsequences, computing their DFT, and assembling these outputs in order to compose the final sequence.
This is fairly advanced mathematics, but suffice it to say that what makes it so ideal for GPGPU is that it's a highly-parallel algorithm, employing the subdivision of data in order to speed up the calculating of the DFT, as visualized in this graphic:
Each OpenCL application consists of at least two parts: the C++ code that sets up and configures the OpenCL instance, and the actual OpenCL code, also known as a kernel, such as this one based on the FFT demonstration example from Wikipedia:
// This kernel computes FFT of length 1024. // The 1024 length FFT is decomposed into calls to a radix 16 function, // another radix 16 function and then a radix 4 function
__kernel void fft1D_1024 (__global float2 *in, __global float2 *out, __local float *sMemx, __local float *sMemy) {
int tid = get_local_id(0);
int blockIdx = get_group_id(0) * 1024 + tid;
float2 data[16];
// starting index of data to/from global memory
in = in + blockIdx; out = out + blockIdx;
globalLoads(data, in, 64); // coalesced global reads
fftRadix16Pass(data); // in-place radix-16 pass
twiddleFactorMul(data, tid, 1024, 0);
// local shuffle using local memory
localShuffle(data, sMemx, sMemy, tid, (((tid & 15) * 65) + (tid >> 4)));
fftRadix16Pass(data); // in-place radix-16 pass
twiddleFactorMul(data, tid, 64, 4); // twiddle factor multiplication
localShuffle(data, sMemx, sMemy, tid, (((tid >> 4) * 64) + (tid & 15)));
// four radix-4 function calls
fftRadix4Pass(data); // radix-4 function number 1
fftRadix4Pass(data + 4); // radix-4 function number 2
fftRadix4Pass(data + 8); // radix-4 function number 3
fftRadix4Pass(data + 12); // radix-4 function number 4
// coalesced global writes
globalStores(data, out, 64);
}
This OpenCL kernel shows that, like the GLSL shader language, OpenCL's kernel language is essentially C with a number of extensions. Although one could use the OpenCL C++ kernel language, this one is only available since OpenCL 2.1 (2015), and as a result, support and examples for it are less common than the C kernel language.
Next is the C++ application, using which, we run the preceding OpenCL kernel:
#include <cstdio>
#include <ctime>
#include "CL\opencl.h"
#define NUM_ENTRIES 1024
int main() { // (int argc, const char * argv[]) {
const char* KernelSource = "fft1D_1024_kernel_src.cl";
As we can see here, there's only one header we have to include in order to gain access to the OpenCL functions. We also specify the name of the file that contains the source for our OpenCL kernel. Since each OpenCL device is likely a different architecture, the kernel is compiled for the target device when we load it:
const cl_uint num = 1;
clGetDeviceIDs(0, CL_DEVICE_TYPE_GPU, 0, 0, (cl_uint*) num);
cl_device_id devices[1];
clGetDeviceIDs(0, CL_DEVICE_TYPE_GPU, num, devices, 0);
Next, we have to obtain a list of OpenCL devices we can use, filtering it by GPUs:
cl_context context = clCreateContextFromType(0, CL_DEVICE_TYPE_GPU,
0, 0, 0);
We then create an OpenCL context using the GPU devices we found. The context manages the resources on a range of devices:
clGetDeviceIDs(0, CL_DEVICE_TYPE_DEFAULT, 1, devices, 0);
cl_command_queue queue = clCreateCommandQueue(context, devices[0], 0, 0);
Finally, we will create the command queue that will contain the commands to be executed on the OpenCL devices:
cl_mem memobjs[] = { clCreateBuffer(context, CL_MEM_READ_ONLY | CL_MEM_COPY_HOST_PTR, sizeof(float) * 2 * NUM_ENTRIES, 0, 0),
clCreateBuffer(context, CL_MEM_READ_WRITE, sizeof(float) * 2 * NUM_ENTRIES, 0, 0) };
In order to communicate with devices, we need to allocate buffer objects that will contain the data we will copy to their memory. Here, we will allocate two buffers, one to read and one to write:
cl_program program = clCreateProgramWithSource(context, 1, (const char **)& KernelSource, 0, 0);
We have now got the data on the device, but still need to load the kernel on it. For this, we will create a kernel using the OpenCL kernel source we looked at earlier, using the filename we defined earlier:
clBuildProgram(program, 0, 0, 0, 0, 0);
Next, we will compile the source as follows:
cl_kernel kernel = clCreateKernel(program, "fft1D_1024", 0);
Finally, we will create the actual kernel from the binary we created:
size_t local_work_size[1] = { 256 };
clSetKernelArg(kernel, 0, sizeof(cl_mem), (void *) &memobjs[0]);
clSetKernelArg(kernel, 1, sizeof(cl_mem), (void *) &memobjs[1]);
clSetKernelArg(kernel, 2, sizeof(float) * (local_work_size[0] + 1) * 16, 0);
clSetKernelArg(kernel, 3, sizeof(float) * (local_work_size[0] + 1) * 16, 0);
In order to pass arguments to our kernel, we have to set them here. Here, we will add pointers to our buffers and dimensions of the work size as follows:
size_t global_work_size[1] = { 256 };
global_work_size[0] = NUM_ENTRIES;
local_work_size[0] = 64; // Nvidia: 192 or 256
clEnqueueNDRangeKernel(queue, kernel, 1, 0, global_work_size, local_work_size, 0, 0, 0);
Now we can set the work item dimensions and execute the kernel. Here, we will use a kernel execution method that allows us to define the size of the work group:
cl_mem C = clCreateBuffer(context, CL_MEM_WRITE_ONLY, (size), 0, &ret);
cl_int ret = clEnqueueReadBuffer(queue, memobjs[1], CL_TRUE, 0, sizeof(float) * 2 * NUM_ENTRIES, C, 0, 0, 0);
After executing the kernel, we wish to read back the resulting information. For this, we tell OpenCL to copy the assigned write buffer we passed as a kernel argument into a newly assigned buffer. We are now free to use the data in this buffer as we see fit.
However, in this example, we will not use the data:
clReleaseMemObject(memobjs[0]);
clReleaseMemObject(memobjs[1]);
clReleaseCommandQueue(queue);
clReleaseKernel(kernel);
clReleaseProgram(program);
clReleaseContext(context);
free(C);
}
Finally, we free the resources we allocated and exit.
When using a CPU, one has to deal with a number of memory hierarchies, in the form of the main memory (slowest), to CPU caches (faster), and CPU registers (fastest). A GPU is much the same, in that, one has to deal with a memory hierarchy that can significantly impact the speed of one's applications.
Fastest on a GPU is also the register (or private) memory, of which we have quite a bit more than on the average CPU. After this, we get local memory, which is a memory shared by a number of processing elements. Slowest on the GPU itself is the memory data cache, also called texture memory. This is a memory on the card that is usually referred to as Video RAM (VRAM) and uses a high-bandwidth, but a relatively high-latency memory such as GDDR5.
The absolute slowest is using the host system's memory (system RAM), as this has to travel across the PCIe bus and through various other subsystems in order to transfer any data. Relative to on-device memory systems, host-device communication is best called 'glacial'.
For AMD, Nvidia, and similar dedicated GPU devices, the memory architecture can be visualized like this:
Because of this memory layout, it is advisable to transfer any data in large blocks, and to use asynchronous transfers if possible. Ideally, the kernel would run on the GPU core and have the data streamed to it to avoid any latencies.
Combining multithreaded code with GPGPU can be much easier than trying to manage a parallel application running on an MPI cluster. This is mostly due to the following workflow:
As this is an asynchronous process, one can treat this as a fire-and-forget operation, merely having a single thread dedicated to monitoring the process of the active kernels.
The biggest challenge in terms of multithreading and GPGPU applications lies not with the host-based application, but with the GPGPU kernel or shader program running on the GPU, as it has to coordinate memory management and processing between both local and distant processing units, determine which memory systems to use depending on the type of data without causing problems elsewhere in the processing.
This is a delicate process involving a lot of trial and error, profiling and optimizations. One memory copy optimization or use of an asynchronous operation instead of a synchronous one may cut processing time from many hours to just a couple. A good understanding of the memory systems is crucial to preventing data starvation and similar issues.
Since GPGPU is generally used to accelerate tasks of significant duration (minutes to hours, or longer), it is probably best regarded from a multithreading perspective as a common worker thread, albeit with a few important complications, mostly in the form of latency.
As we touched upon in the earlier section on GPU memory management, it is highly preferable to use the memory closest to the GPU's processing units first, as they are the fastest. Fastest here mostly means that they have less latency, meaning the time taken to request information from the memory and receiving the response.
The exact latency will differ per GPU, but as an example, for Nvidia's Kepler (Tesla K20) architecture, one can expect a latency of:
These measurements are all on the CPU itself. For the PCIe bus one would have to expect something on the order of multiple milliseconds per transfer once one starts to transfer multi-megabyte buffers. To fill for example the GPU's memory with a gigabyte-sized buffer could take a considerable amount of time.
For a simple round-trip over the PCIe bus one would measure the latency in microseconds, which for a GPU core running at 1+ GHz would seem like an eternity. This basically defines why communication between the host and GPU should be absolutely minimal and highly optimized.
A common mistake with GPGPU applications is reading the result buffer before the processing has finished. After transferring the buffer to the device and executing the kernel, one has to insert synchronization points to signal the host that it has finished processing. These generally should be implemented using asynchronous methods.
As we just covered in the section on latency, it's important to keep in mind the potentially very large delays between a request and response, depending on the memory sub-system or bus. Failure to do so may cause weird glitches, freezes and crashes, as well as data corruption and an application which will seemingly wait forever.
It is crucial to profile a GPGPU application to get a good idea of what the GPU utilization is, and whether the process flow is anywhere near being optimal.
The biggest challenge with GPGPU applications is that of debugging a kernel. CUDA comes with a simulator for this reason, which allows one to run and debug a kernel on a CPU. OpenCL allows one to run a kernel on a CPU without modification, although this may not get the exact same behavior (and bugs) as when run on a specific GPU device.
A slightly more advanced method involves the use of a dedicated debugger such as Nvidia's Nsight, which comes in versions both for Visual Studio (https://developer.nvidia.com/nvidia-nsight-visual-studio-edition) and Eclipse (https://developer.nvidia.com/nsight-eclipse-edition).
According to the marketing blurb on the Nsight website:
The following screenshot shows an active CUDA debug session:
A big advantage of such a debugger tool is that it allows one to monitor, profile and optimize one's GPGPU application by identifying bottlenecks and potential problems.
In this chapter, we looked at how to integrate GPGPU processing into a C++ application in the form of OpenCL. We also looked at the GPU memory hierarchy and how this impacts performance, especially in terms of host-device communication.
You should now be familiar with GPGPU implementations and concepts, along with how to create an OpenCL application, and how to compile and run it. How to avoid common mistakes should also be known.
As this is the final chapter of this book, it is hoped that all major questions have been answered, and that the preceding chapters, along with this one, have been informative and helpful in some fashion.
Moving on from this book, the reader may be interested in pursuing any of the topics covered in more detail, for which many resources are available both online and offline. The topic of multithreading and related areas is very large and touches upon many applications, from business to scientific, artistic and personal applications
The reader may want to set up a Beowulf cluster of tehir own, or focus on GPGPU, or combine the two. Maybe there is a complex application they have wanted to write for a while, or perhaps just have fun with programming.