Table of Contents for
Vue.js in Action
 Vue.js in Action
Published by
Manning Publications, 2018
Vue.js in Action
Published by
Manning Publications, 2018
- Cover
- Vue.js in Action
- Copyright
- Brief Table of Contents
- Table of Contents
- Foreword
- Preface
- Acknowledgments
- About this book
- About the author
- About the cover illustration
- Part 1. Getting to know Vue.js
- Chapter 1. Introducing Vue.js
- Chapter 2. The Vue instance
- Part 2. The View and ViewModel
- Chapter 3. Adding interactivity
- Chapter 4. Forms and inputs
- Chapter 5. Conditionals, looping, and lists
- Chapter 6. Working with components
- Chapter 7. Advanced components and routing
- Chapter 8. Transitions and animations
- Chapter 9. Extending Vue
- Part 3. Modeling data, consuming APIs, and testing
- Chapter 10. Vuex
- Chapter 11. Communicating with a server
- Chapter 12. Testing
- A.1. Chrome Developer Tools
- Chapter 2
- Cheat sheet
- Cheat sheet
- Index
- List of Figures
- List of Tables
- List of Listings
Chapter 3. Adding interactivity
- Deriving new output from data with computed properties
- Adding event bindings to the DOM
- Observing data during the update portion of the Vue lifecycle
- Responding to user interaction
- Conditionally rendering markup
Believe it or not, now that we’ve got our first product all wired up, we’re ready to add interaction to our webstore.
Adding interactivity to an application means binding to DOM events, responding to them in application code, and providing feedback to users about what happened because of their actions. Vue creates and manages all the event and data bindings for us, but there are decisions we need to make about how to manipulate data within our application, as well as how to meet user expectations in our interface.
We’ll begin exploring user interaction by letting customers add our single product to a shopping cart, but along the way we’ll also look at how our work fits into the overall picture of a Vue application.
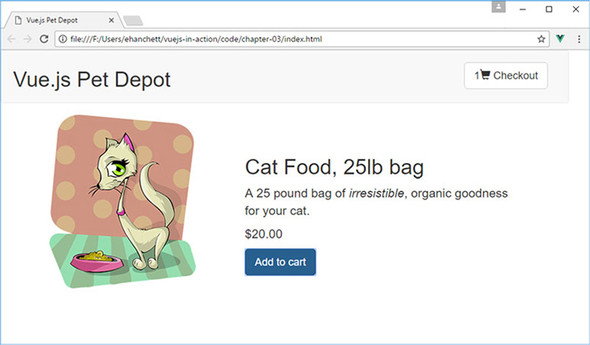
To get a feel for where we’re headed in this chapter, figure 3.1 shows how the application will look when all our work is done.
Figure 3.1. Our product listing with new elements: a shopping cart and an Add to cart button.
3.1. Shopping cart data starts with adding an array
Before we can build any of our super-cool shopping cart functionality, we’ll need a container to hold all those items in our application instance. Fortunately, all we need at this stage is a simple array, onto which we’ll push our products.
I’ve broken up the code into small snippets, similar to the way we did it in the last chapter. You’ll need to add these to your index.html file that you created last chapter to continue the application. You can always download the code for this chapter if needed.
Listing 3.1. All we need is an array: chapter-03/add-array.js
data: {
  sitename: "Vue.js Pet Depot",
  product: {                                                 1
    id: 1001,                                                1
    title: "Cat Food, 25lb bag",                             1
    description: "A 25 pound bag of <em>irresistible</em>,   1
                  organic goodness for your cat.",           1
    price: 2000,                                             1
    image: "assets/images/product-fullsize.png",             1
  },
  cart: []                                                   2
},
...
That gives us our shopping cart . . . done. In all seriousness, though, we’ll get good mileage out of this simple array, but eventually we’ll create a cart component that will manage its contents internally.
Remember
You need to add a comma after product in listing 3.1 before you add the cart array. Forgetting to add one will throw an error in the console and is a common gotcha. (An error I’m well acquainted with!)
3.2. Binding to DOM events
To add interaction to our application, we need to bind elements of the DOM to functions we define in our Vue instance. We can bind an element to any standard DOM event—click, mouseup, keyup, and so on—by using an event binding. Vue takes care of all the wiring under the hood, so we can stay focused on how our application reacts to an event when it occurs.
3.2.1. Event binding basics
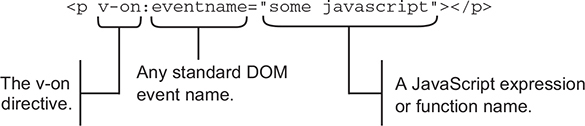
Event bindings use the v-on directive to bind a snippet of JavaScript, or a function, to a DOM element, as shown in figure 3.2. The bound code or function gets executed when the specified DOM event is triggered.
Figure 3.2. The syntax of an event binding.
Here are two common patterns for an event binding’s JavaScript:
- Using a function name, we can bind an event to a function we define in our instance. If we had a binding such as v-on:click="clickHappened", a click on our element would call the function clickHappened.
- We can write inline JavaScript that acts on an exposed property. In this case, the binding might look like v-on:keyup="charactersRemaining -= 1", which would decrease the charactersRemaining property by one.
Each strategy has its place in an application, but first we’re going to look at using a function to handle an event.
Note
An easier shorthand way to write the v-on directive exists. Instead of using v-on, you can replace it with the @ symbol. For example, if you want to use v-on:click="..." you could replace that with @click="..." instead. We’ll use this shorthand later in the book.
3.2.2. Bind an event to the Add to cart button
For a customer to add products to their shopping cart, they need a button. We’ll instruct Vue to bind that button’s click event to a function that handles pushing a product onto the cart array.
Before we add the button to our markup, we should write our function. To do so, we need to add a methods object to our application’s options. After the filters object, add this code. (Don’t forget a comma after the filters object!)
Listing 3.2. The addToCart method: chapter-03/add-to-cart.js
methods: {                                1
  addToCart: function() {                 2
    this.cart.push( this.product.id );    2
  }                                       2
}                                         1
- 1 The methods object contains our new function.
- 2 Defines the addToCart function
For now, adding a product to the cart means pushing the product’s id property from the product data onto the cart array. Keep in mind, you’ll need to add the this keyword to access all data properties.
It may seem simpler to push the entire product object onto our cart array in the code from listing 3.2—this.cart.push( this.product );—but if we did, things would get a bit awkward. JavaScript is neither a pure pass-by-reference language, nor a pure pass-by-copy language, so it takes a bit of practice to know when one or the other will occur.
Pushing the product onto the cart array would push a reference to the product object defined in our data, not a copy. If the product definition in our data changes, perhaps when we retrieve new product data from the server, it might be replaced in the cart or the reference may become undefined.
By pushing the product id onto the cart array instead, we push a copy of the value of our product’s id, not a reference. If the product definition changes, the value(s) in the cart array remain unaltered.
Technically speaking, JavaScript is a call-by-sharing language. You can find a brief explanation of call-by-sharing, and how it compares to other strategies, on Wikipedia at https://en.wikipedia.org/wiki/Evaluation_strategy#Call_by_sharing.
Now we’ve got a function that will add products to our cart so we can go ahead and add button markup. Right after the price markup in our product div, add the button from this listing.
Listing 3.3. A button to add products to the cart: chapter-03/button-product.js
<button class="default"           1
  v-on:click="addToCart">         2
  Add to cart
</button>                         1
- 1 Shows our Add to cart button
- 2 Binds the button’s click event to the addToCart function
Now, when a visitor clicks this button, the addToCart function is called. Time to give it a whirl.
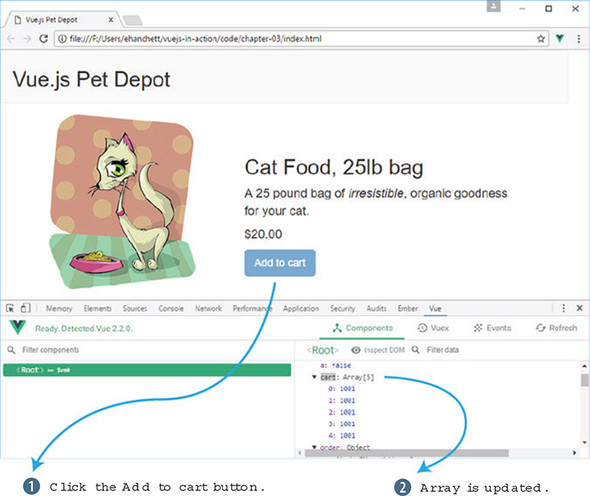
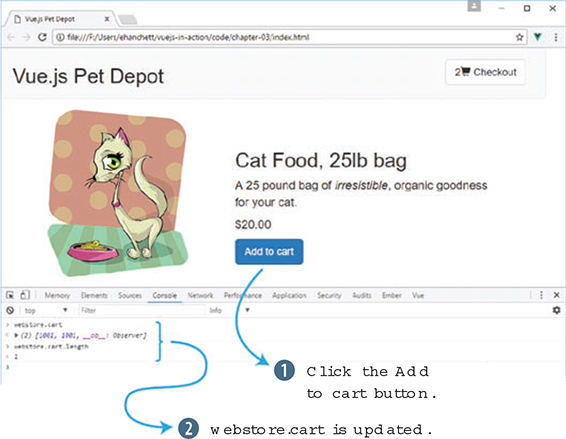
Head over to Chrome, ensure that the console is open, and switch to the Vue tab because we’ll want to peek at the data that’s added to our shopping cart. The cart array should be empty, so if you don’t see Array[0] as shown in figure 3.3, go ahead and reload the page.
Figure 3.3. An empty array is what we should see before any products are added. If it’s not empty, go ahead and reload the page.

Now, click the Add to cart button a few times. Open the vue-devtools pane and click <Root>. You should see the product’s id getting pushed onto the array with each click as seen in figure 3.4.
Figure 3.4. The array fills up as you add items to the cart.
Seeing how many items are in the shopping cart using vue-devtools or the console may be okay for developers, but customers will need feedback in the view itself. Time to add an item counter.
3.3. Adding a cart item button and count
To display the number of items a customer has in the shopping cart, we’ll use a computed property. Computed properties can be bound to the DOM like any other property defined by our instance, but they typically provide functionality to derive new information from the current state of an application. In addition, we’ll add a cart item button that will display our checkout cart.
Before we add an item count to our shopping cart, let’s take a more general look at computed properties and how they work.
3.3.1. When to use a computed property
It might help to think of the properties in the data object as representing data we’d store in a database and computed properties as dynamic values that are used primarily within the context of our view. This may be an overly broad characterization, but it serves as a good first rule of thumb.
Let’s consider a common example of a computed property that displays a user’s full name, as shown in listing 3.4. It makes sense to store someone’s first and last names as separate entities in a database, but it would be redundant and error prone to also store their full name. If the need to display a user’s full name arose, combining the first and last name from existing data is a perfect use case for a computed property.
Listing 3.4. Computing a user’s full name: chapter-03/computed.js
computed: {
  fullName: function() {                                1
    return [this.firstName, this.lastName].join(' ');   1
  }                                                     1
}
- 1 fullName returns the value of a user’s first and last name, joined by a single space.
The result returned by the fullName function is conceptually equivalent to having a fullName property in our data object, which means we can easily bind to it in our markup (see figure 3.5).
Figure 3.5. Combining the user’s first and last name from a dataset into a full name for display.
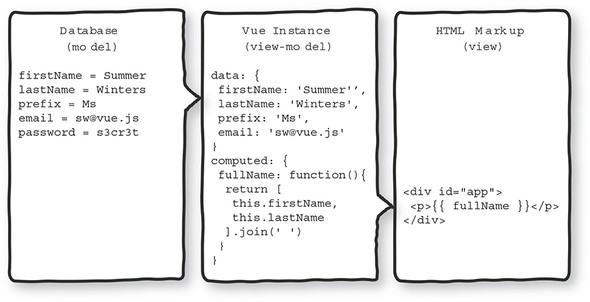
One additional benefit of using computed properties is that we can change the internals of our function to use different or additional data from our application. In figure 3.5, for example, we could use the prefix property to add more formality to a user’s full name.
Using computed properties in this way, we can combine, or otherwise manipulate, any instance data without requiring changes to the backend or the database.
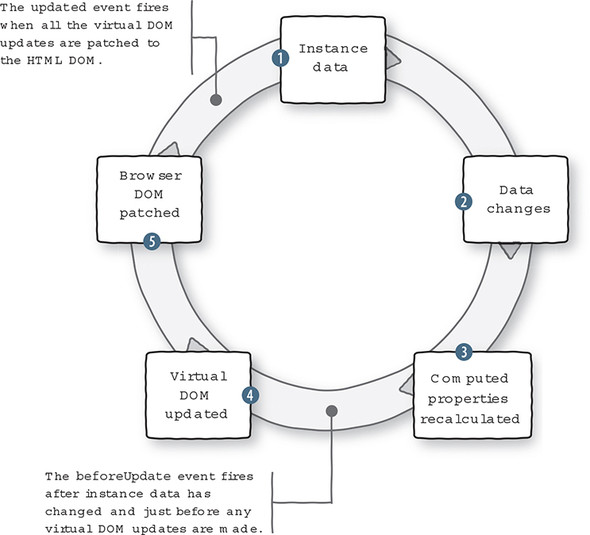
3.3.2. Examining update events with computed properties
Because computed properties are typically calculated using instance data, their return value is updated automatically when the underlying data changes. Any view markup bound to the computed property will therefore update to reflect the new value as well.
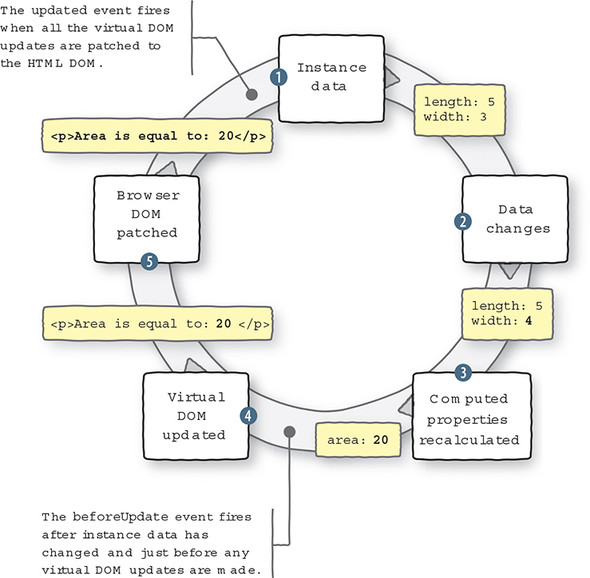
This behavior is at the heart of the update cycle within the greater Vue instance lifecycle. To get a feel for how the update cycle behaves, let’s work through another example of when a computed property is a perfect fit for the job. Consider the task of computing the area of a rectangle, based on its length and width.
Listing 3.5. Computing the area of a rectangle: chapter-03/computed-rect.js
new Vue({
  data: {
    length: 5,                            1
    width: 3                              1
  },
  computed: {
    area: function() {                    2
      return this.length * this.width;    2
    }                                     2
  }
});
- 1 Shows a data object that contains length and width properties
- 2 Shows a computed property that exposes area the same as a data property
The computed property area will have an initial value of 15. Any subsequent change to length or width reactively triggers a series of updates to the application:
- When the value of length or width is changed . . .
- . . . the computed property area is recalculated . . .
- . . . then any markup bound to these properties is updated.
Figure 3.6 shows the update cycle of the application.
Figure 3.6. Changes in an instance’s data trigger a cascade of activity within the update cycle of an application.
We can see the lifecycle in action by using watch functions to observe when the data in an instance changes, and the beforeUpdate lifecycle hook, which should be executed only after the data changes.
Info
A watch function works the same way as a lifecycle hook but is triggered when the data it’s “watching” is updated. We can even create a watch function to observe a computed property.
Listing 3.6 puts our area calculation in the context of a complete application. The application also contains three watch functions that log messages to the console whenever length, width, or area change, and one function to log when the update cycle begins. These functions must be specified in the watch option of the Vue instance for them to work.
Tip
You can find the code for this listing in the samples that accompany this chapter in the file chapter-03/area.html. It’s entirely self-contained, so you can open it directly in Chrome.
Listing 3.6. Computed properties and update event logging: chapter-03/area.html
<html>
<head>
  <title>Calculating Area - Vue.js in Action</title>
  <script src="https://unpkg.com/vue/dist/vue.js"
    type="text/javascript"></script>
</head>
<body>
  <div id="app">
    <p>
      Area is equal to: {{ area }}                           1
    </p>
    <p>
      <button v-on:click="length += 1">Add length</button>   2
      <button v-on:click="width += 1">Add width</button>     2
    </p>
  </div>
  <script type="text/javascript">
    var app = new Vue({
      el: '#app',
      data: {
        length: 5,                                           3
        width: 3                                             3
      },
      computed: {
        area: function() {                                   4
          return this.width * this.length;                   4
        }                                                    4
      },
      watch: {
        length: function(newVal, oldVal) {                   5
          console.log('The old value of length was: '        5
                      + oldVal +                             5
                      '\nThe new value of length is: '       5
                      + newVal);                             5
        },
        width: function(newVal, oldVal) {                    6
          console.log('The old value of width was: '         6
                      + oldVal +                             6
                      '\nThe new value of width is: '        6
                      + newVal);                             6
        },
        area: function(newVal, oldVal) {                     7
          console.log('The old value of area was: '          7
                      + oldVal +                             7
                      '\nThe new value of area is: '         7
                      + newVal);                             7
        }
      },
      beforeUpdate: function() {                             8
        console.log('All those data changes happened '       8
                    + 'before the output gets updated.');    8
      }
    });
  </script>
</body>
</html>
- 1 Lists the data binding that displays the value of area
- 2 Shows the buttons that increase the value of length or width by 1, respectively
- 3 Shows the original values for length and width
- 4 Gives the area computed property
- 5 Shows the function that logs when length changes
- 6 Shows the function that logs when width changes
- 7 Shows the function that logs when area changes
- 8 Lists the beforeUpdate lifecycle hook function
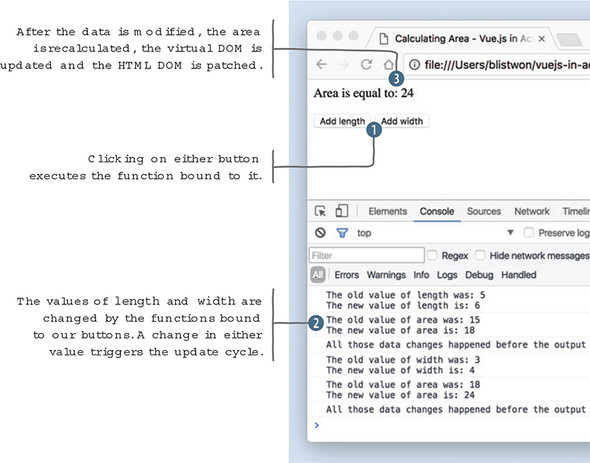
When you load this file in Chrome, you’ll see an initial value for area is 15 as seen in figure 3.7. Be sure the JavaScript console is open, then try clicking the buttons to trigger the update cycle. The console should log messages about the application’s data when the Add length button and Add width button are clicked (see figure 3.8).
Figure 3.7. The initial state of our area calculating application.
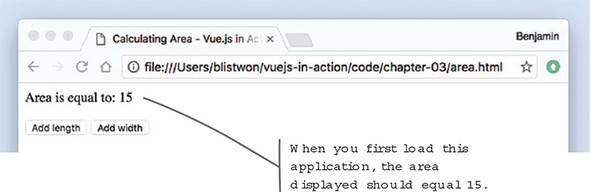
Figure 3.8. Observing our properties changing in response to clicking buttons.
Now that we’ve seen how the application behaves, we can map the data and functions from listing 3.6 onto our diagram of the update cycle in figure 3.9.
Figure 3.9. Changes in an instance’s data trigger a cascade of activity within the update cycle of an application.
One last thing to note, if you remove the {{ area }} binding from the sample code, and reload the page in your browser, you’ll see a difference in the console output when you click either button (see figure 3.10).
Figure 3.10. No update message displays if nothing gets updated.

With no outlet for the computed property, there’s nothing to update, and therefore no reason to enter the update cycle. The beforeUpdate function won’t be executed and the corresponding message won’t be logged to the console.
3.3.3. Displaying a cart item count and testing
Now that we have a good understanding of computed properties, let’s look at our shopping cart example again. Let’s add a computed property to our Vue instance that will display the number of items in the shopping cart, as shown in the following listing. Don’t forget to add a computed object to the options object, so our function will have a place to live.
Listing 3.7. The cartItemCount’s computed property: chapter-03/cart-item-count.js
computed: {                         1
  cartItemCount: function() {       2
    return this.cart.length || '';  2
  }                                 2
},
- 1 Adds a computed object
- 2 Returns a count of items in the cart array
This is a straightforward use of a computed property. We use an existing JavaScript property—length—of an array to retrieve our count, because it’s really not necessary to add our own counting mechanism for the shopping cart.
This is also a good example of why it’s inappropriate to store this kind of data as a property of the data object. Because the value of cartItemCount is the result of user interaction, and not something that came from a database, we wouldn’t expect to see it in our data object.
It’s worth noting that there are times when such an item count might be in the data object. For example, if a user was looking at a “previous orders” page, there might be an item count associated with each order. This is consistent with our thinking so far, because that data would come from the database after an order had been processed and persisted.
Function in place, we’re ready to add a little bit of HTML to our application’s header so that we have a shopping cart and a place to display the item count. Update the markup in the header as shown here.
Listing 3.8. Adding the cart indicator: chapter-03/cart-indicator.html
<header>
  <div class="navbar navbar-default">
    <h1>{{ sitename }}</h1>
  </div>
  <div class="nav navbar-nav navbar-right cart">     1
    <span
class="glyphicon glyphicon-shopping-cart">
{{ cartItemCount }}</span>                           2
  </div>
</header>
- 1 Aligns our cart to the right
- 2 Shows the data binding that displays the computed property
We add a new div element to the header so we have a place for our cart, and we use the cartItemCount binding to display the value of our computed property. The binding is surrounded by a span element, which is used as a style hook to add a cart icon next to our counter. It’s time to test things out.
After reloading the webstore application in Chrome, clicking Add to cart should cause the indicator to increase with each click. You can double-check that the count is correct by examining the cart array in the console once again (see figure 3.11).
Figure 3.11. Observing change in our application’s header and inspecting the cart in the console.
3.4. Adding user affordance to our button
People bring a wide variety of experience and expectation with them when they arrive at a website or use a web application. One of the most fundamental, and deeply ingrained, is that when an interactive element behaves differently than expected, a product can feel broken or disorienting. The idea behind user affordance is to provide visual (or other) cues and feedback to a user that keeps our application consistent with their expectations.
Info
For more information on user affordance and its importance in the experience of digital products, start at the Interaction Design Foundation at http://mng.bz/Xv96.
We now have a button that lets a customer endlessly add a product to their shopping cart. There may be many reasons to limit the number of items a customer can purchase: limited available product, restrictions on per-customer purchases, quantity discounts, and so on. If there’s a limited quantity, then the Add to cart button should become unavailable at some point or otherwise indicate that the action is no longer possible.
To accomplish this task, we need to track our available inventory, compare it against how many instances of a product are in the shopping cart, and act to keep customers from adding more products than there are available. Let’s start with tracking the inventory.
3.4.1. Keeping an eye on inventory
To keep a customer from buying too many of a given product, we’ll need to add a new property to our product object, as shown in the following listing. The availableInventory property will represent how many individual units of a product our store has available.
Listing 3.9. Adding availableInventory to our product: chapter-03/available-inventory.js
data: {
  sitename: "Vue.js Pet Depot",
  product: {
    id: 1001
    title: "Cat Food, 25lb bag",
    description: "A 25 pound bag of <em>irresistible</em>,
                  organic goodness for your cat.",
    price: 2000,
    image: "assets/images/product-fullsize.png",
    availableInventory: 5                           1
  }
  cart: []
}
It’s still necessary to double-check product availability when a purchase is being finalized—in case another customer has purchased one or more of the same product in the middle of a transaction—but we can implement a simple solution in our application to greatly reduce the chance a user will be disappointed later by hiding, or disabling, the Add to cart button.
Warning
Never rely on values from the client when it comes to transactions, financial or otherwise. The backend of your application should always interpret the incoming data as expressing the user’s intent, not reality.
3.4.2. Working with computed properties and inventory
We don’t want to mutate the availableInventory value, because that represents a fixed value that should be updated only by a process that manages actual inventory (something we’ll come back to much later in the book). But we do want to restrict the amount of product a customer can add to their shopping cart based on the value of availableInventory.
To do this, we need a way to keep track of the number of items in a customer’s shopping cart relative to the fixed amount of product available. We’ll use a computed property to perform this calculation in real-time, as a customer adds items to their shopping cart.
Listing 3.10. A computed property for remaining inventory: chapter-03/computed-remaining.js
computed: {
  cartItemCount: function() {
    return this.cart.length || '';
  },
  canAddToCart: function() {                                       1
    return this.product.availableInventory > this.cartItemCount;   2
  }
}
- 1 Uses the canAddToCart computed property
- 2 Compares availableInventory to the number of items already in the cart
Because our code can consume computed properties in the same way as properties of our instance data, we get a chance to leverage one computed property, cartItemCount, within another. Our new computed property checks to see whether the available inventory is greater than the number of items already in the shopping cart. If not, that means the customer has added the maximum number of products to their cart, and we’ll have to act to keep them from adding more.
As you may already be aware, evaluating the truth value of an expression in JavaScript can be a bit tricky. Here’s a quick example you can try in a console for yourself.
When using the non-strict equality operator ==, the integer value 1 compared to the string value "1" evaluates to true. This occurs because JavaScript, attempting to be “helpful,” does a type conversion before the comparison is evaluated. Using the strict equality operator === produces the expected false result.
In our canAddToCart function, we use the greater than operator > to compare two integer values. If we had any doubt about where those values came from, or if they were in fact integers, we could force the conversion using the parseInt method or otherwise ensuring the values are integers.
Much has been written about JavaScript’s type conversions and equality operators, but perhaps the most illuminating reference is this series of diagrams on the topic at https://dorey.github.io/JavaScript-Equality-Table/. Be sure to compare (hah!) the == and === tabs.
3.4.3. v-show directive basics
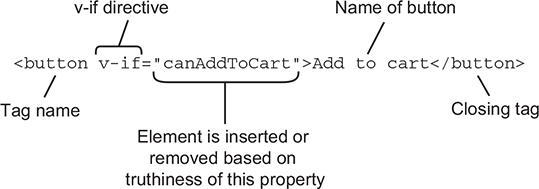
Now that we have a mechanism to determine whether a customer can take the Add to cart action, let’s make the interface respond accordingly. The v-show directive renders markup if, and only if, the specified condition evaluates to true. Adding it to our existing button results in the button being hidden from the DOM if our canAddToCart property returns false, shown here.
Listing 3.11. Button with v-show directive: chapter-03/button-v-show.html
<button class="default"
    v-on:click="addToCart"
    v-show="canAddToCart"         1
    >Add to cart</button>
- 1 The v-show directive is bound to our canAddToCart computed property.
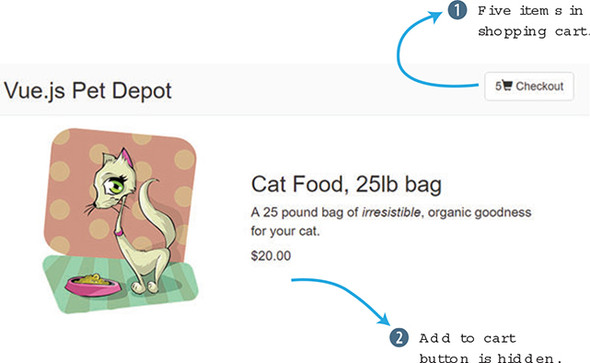
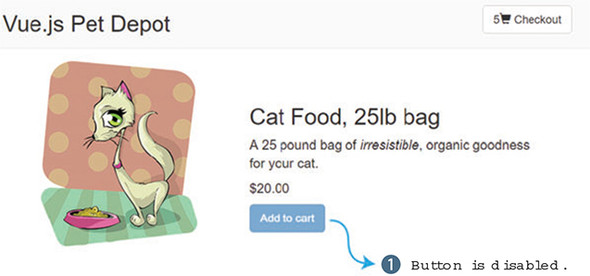
If you reload the application in Chrome and try adding six products to your shopping cart, the button should disappear on the fifth click, because that’s the value of availableInventory as seen in figure 3.12.
Figure 3.12. The Add to cart button is hidden when we exhaust the available inventory.
The v-show directive works a bit differently than other directives we’ve encountered so far. When the expression evaluates to false, Vue sets the element’s display CSS property to none as an inline style. This effectively hides the element (and its contents) from view, though it’s still present in the DOM. If the result of the expression later changes to true, the inline style is removed and the element is once again shown to the user.
Note
One side effect of this behavior is that any inline declaration of display you had will be overwritten. But have no fear, Vue will restore the original value when it removes its own display:none. Still, it’s best to avoid inline styles wherever possible in favor of class definitions in your stylesheet.
One other thing to keep in mind is that the v-show directive is most effective when bound to a single element, rather than several adjacent elements. Here’s an example.
Listing 3.12. Wrapping content for v-show: chapter-03/wrap-content.html
// Avoid this
<p v-show="showMe">Some text</p>           1
<p v-show="showMe">Some more text</p>      1
<p v-show="showMe">Even more text</p>      1

// Prefer this
<div v-show="showMe">                      2
  <p>Some text</p>                        2
  <p>Some more text</p>                   2
  <p>Even more text</p>                   2
</div>                                    2
- 1 Avoid using the v-show directive on adjacent elements.
- 2 Instead, wrap adjacent elements, and use a single v-show directive.
To be clear, it’s okay to use v-show throughout your application wherever you need to. Whenever possible it’s best to aggregate multiple elements that will respond reactively to data, both for better performance and to reduce the chance of forgetting to keep all your elements up-to-date if you make a change. Removing the Add to cart button when inventory is exhausted certainly works, but it’s a bit drastic. Let’s try another way.
3.4.4. Using v-if and v-else to display a disabled button
Removing the Add to cart button certainly keeps a customer from adding too many product instances to the cart, but it’s a bit heavy-handed. It might be more informative to the user to render the button disabled, because that doesn’t disrupt the continuity of the interface as much and it preserves the layout flow.
The v-if and v-else directives are used to display one of two choices based on the truth value of the provided expression. We’ll use canAddToCart as a condition to evaluate, the way we did in the previous example.
In figure 3.13 you can see how the v-if directive works. If the canAddToCart is true the button appears, if not, the button doesn’t appear.
Figure 3.13. Diagram explaining how the v-if directive conditional works.
In this listing we can see how this works with our v-if and v-else directives.
Listing 3.13. Buttons with v-if and v-else directives: chapter-03/v-if-and-v-else.html
<button class="default"         1
    v-on:click="addToCart"      1
    v-if="canAddToCart"         1
    >Add to cart</button>       1

<button class="disabled"        2
    v-else                      2
    >Add to cart</button>       2
- 1 The button is displayed when canAddToCart returns true.
- 2 The button to displayed when canAddToCart is false.
When using v-if and v-else together, we need two elements in our markup, one for when the condition is true and one for when it’s false. Additionally, the two elements need to be listed one directly after the other in the markup for Vue to bind to them correctly.
In listing 3.13 we use two different button elements:
- If canAddToCart returns true, we render our familiar button, with the addToCart event binding, and the default CSS class.
- If canAddToCart returns false, we render a button with no event binding so that it becomes unclickable and with a disabled CSS class so that its appearance changes accordingly.
This time, when you try out the application in Chrome, the button should switch the active button (figure 3.14) to the disabled button once you’ve added five products to the shopping cart.
Figure 3.14. Using v-if and v-else means we can render a disabled button, rather than making it disappear entirely when the inventory is exhausted.
With the v-if and v-else directives, Vue.js removes the element from the DOM (the false condition) and removes it from the other (the true condition). All of this is accomplished as part of a single, simultaneous update to the DOM. Try it out by fiddling with the value of availableInventory in the console and keeping an eye on the display property of these elements.
As with the v-show directive, it’s important to have a single containing element to attach v-if and v-else to, especially with the added criterion that the v-else markup must remain adjacent to the v-if markup, as shown here.
Listing 3.14. Single container elements for v-if and v-else chapter-03/single-container.html
// This won't work
<p v-if="showMe">The if text</p>            1
<p>Some text related to the if text</p>     1
<p v-else>The else text</p>                 1

// Nor will this
<div>                                       2
  <p v-if="showMe">The if text</p>          2
</div>                                      2
<div>                                       2
  <p v-else>The else text</p>               2
</div>                                      2

// Instead, consider grouping
<div v-if="showMe">                         3
  <p>The if text</p>                        3
  <p>Some text related to the if text</p>   3
</div>                                      3
<div v-else>                                3
  <p>The else text</p>                      3
</div>                                      3
- 1 This won’t work; v-if and v-else are broken up by the second paragraph element.
- 2 This won’t work; v-if and v-else are not adjacent in the markup.
- 3 This will work; wrap related content in an element, then bind v-if and v-else to that element.
Keeping all the DOM elements for a given condition within an outer element—used as a grouping container—is the goal here. Later, we’ll explore different strategies that use templates or components to isolate the markup for conditionals, greatly simplifying the amount of markup needed in the main application itself.
3.4.5. Adding the cart item button as a toggle
Let’s add a button for the checkout page. We’ll begin by adding a new method and property to our application.
Listing 3.15. Adding the cart button: chapter-03/cart-button.js
data: {
  showProduct: true,                                        1
...
},
methods: {
...
  showCheckout() {                                          2
       this.showProduct = this.showProduct ? false : true;  3
   },
}
- 1 This property tracks whether to show product page.
- 2 The showCheckout method is triggered after clicking the cart button.
- 3 Shows the ternary operation that toggles between true and false
The new showProduct property will toggle the display of the checkout page. Let’s look at that in more detail. The showCheckout method toggles the showProduct property by using something called a ternary operation in JavaScript. The ternary operator is a shortcut for the if statement and takes three parameters. The first parameter is the condition, in this case, this.showProduct. If it resolves to true, it then returns the first expression, false. Otherwise it returns the last expression, true. The ternary conditional operator is a useful tool to have in your back pocket when you need to create a quick conditional statement.
You may have noticed that the method definition was missing the function() declaration after showCheckout(). ES6, also known as ES2015, allows for a shorter syntax for method definitions. We’ll use this syntax for our method definitions throughout the rest of the book.
We now need to add the button to our view and bind it to a click event.
Listing 3.16. Adding the cart button: chapter-03/add-cart-button.html
 <div class="nav navbar-nav navbar-right cart">
      <button type="button"
          class="btn btn-default btn-lg"
          v-on:click="showCheckout">                1
        <span
class="glyphicon glyphicon-shopping-cart">
{{ cartItemCount}}</span>
   </span>
     Checkout
      </button>
    </div>
- 1 A click event added to button triggers the showCheckout method.
When the button is clicked, the showCheckout method will fire, causing the showProduct method to toggle, or flip, between states. The checkout button is important because we need somewhere to put our checkout information. We’ll look at this more in the next section.
3.4.6. Using v-if to display a checkout page
Our application is limited. It only shows one product on one page. To make it more complete we need another page that displays checkout information. We can do this many different ways. In chapter 7, we’ll learn about components which give us a way to easily break down our application into smaller reusable pieces. This could be one way of adding a checkout page.
Another way is to wrap our view in a v-if directive and bind it to the showProduct property we created earlier. We’ll need to add the v-if directive to the top of index file after the main and div elements, as shown in this listing.
Listing 3.17. Using v-if to display a checkout page: chapter-03/v-if-checkout.html
<main>
  <div class="row product">
    <div v-if="showProduct">       1
...                                2
    </div>
    <div v-else>
                                   3
    </div>
  </div> <!—end of row-->
</main> <!—end of main-->
- 1 v-if directive that will display if showProduct is true.
- 2 Shows the product listing for the view, including the picture of the product and description
- 3 This is where the checkout page will go.
Earlier in the chapter, we created a checkout button. When this button is pressed, the showProduct property will toggle, from true to false, or false to true. This will trigger the v-if directive in listing 3.17. Either the product information that we’ve been creating in this chapter will show, or a blank screen will display with only the top navigation at the top (figure 3.15).
Figure 3.15. View of webstore after checkout button is pressed. Pressing the checkout button again shows the product page.
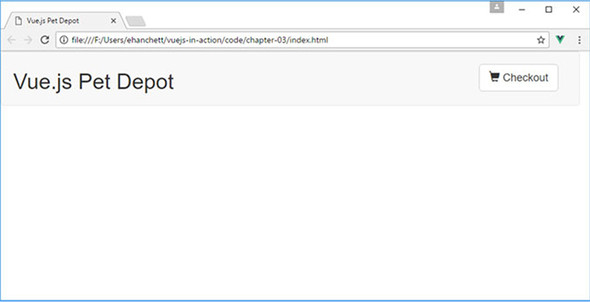
For now, don’t worry about the blank page that we see in figure 3.15. This will be taken care of in the next chapter when we look into different types of input bindings.
3.4.7. Comparing v-show with v-if/v-else
Both techniques—v-show and v-if/v-else—have advantages and disadvantages, for a user and for us as developers. As we know, the v-show directive hides or shows an element using CSS, while the v-if/v-else directive removes the content from the DOM. With that said, understanding when to use one or the other depends mostly on what we’re trying to achieve, so perhaps the best way to compare them is to think about a few use cases for each.
The v-show directive is best suited to scenarios where there’s no “else” case. That is, when you have markup to show if a condition is true and no alternative content to show when it’s false. Here are several possible use cases where v-show is the right choice:
- A message banner for things that are temporal, such as an announcement of a sale or a change in the Terms & Conditions.
- A signup advertisement, or other inducement, when a visitor isn’t logged in.
- Paging elements for lists that run across multiple pages, which would be superfluous if there were only one page.
The v-if and v-else directives are the right choice when one of two chunks of markup should be rendered, but at least one of them should always be showing. If there’s no fallback (else) case, then v-show is more appropriate. Here are several scenarios where v-if and v-else should be used:
- Showing a Log in link for logged out users, versus a Log out link for those who are logged in.
- Rendering conditional sections of a form, such as country-specific address fields based on a selection made by a user. For example, a U.S. address form shows a “state” field, where a Canadian address form shows it as a “province.”
- Search results listings versus placeholder content when no search has been conducted. (We’ll explore an example that adds a third state, using v-else-if, in a later chapter.)
Endless scenarios exist where you’ll need to use one conditional or the other. Perhaps the best way to think about which one fits your needs is to consider whether there’s a fallback, or default, chunk of content you want to display. Next up, we’re going to make our webstore a little more useful to potential customers by offering more than a single bag of cat food.
Exercise
Use your knowledge from this chapter to answer this question:
- Earlier in the chapter we looked at computed properties and methods. What are the differences between them?
See the solution in appendix B.
Summary
- Presenting data that isn’t inside the data object using a computed property.
- Conditionally showing parts of our application with a v-if and v-else directive.
- Adding more functionality to our application with methods.