Table of Contents for
Nim in Action
 Nim in Action
Published by
Manning Publications, 2017
Nim in Action
Published by
Manning Publications, 2017
- Cover
- Nim in Action
- Copyright
- Brief Table of Contents
- Table of Contents
- Preface
- Acknowledgments
- About this Book
- About the Author
- About the Cover Illustration
- Part 1. The basics of Nim
- Chapter 1. Why Nim?
- Chapter 2. Getting started
- Part 2. Nim in practice
- Chapter 3. Writing a chat application
- Chapter 4. A tour through the standard library
- Chapter 5. Package management
- Chapter 6. Parallelism
- Chapter 7. Building a Twitter clone
- Part 3. Advanced concepts
- Chapter 8. Interfacing with other languages
- Chapter 9. Metaprogramming
- Appendix A. Getting help
- Appendix B. Installing Nim
- Nim Reference
- Index
- List of Figures
- List of Tables
- List of Listings
Chapter 5. Package management
This chapter covers
- Understanding how Nimble helps you develop software
- Using Nimble packages to develop software
- Creating Nimble packages and publishing them
Today package managers have a central role in the development of software. This was not always the case; the Comprehensive Perl Archive Network, or CPAN, was one of the first large software repositories to have existed solely for a specific programming language. It consists of over 150,000 modules of Perl code, making it one of the biggest software module repositories from a single programming language. It’s also one of the earliest examples of such a software repository; its success has influenced many others. Today, software repositories exist for just about all programming languages.
A package is an abstract term given to a collection of modules; these modules may form a library or an application. A package manager automates the process of downloading, installing, updating, and removing packages. Libraries contain implementations of different behavior, and can be invoked using a well-defined interface. These implementations are stored and exposed through one or more modules.
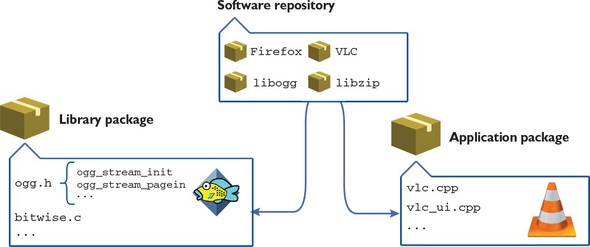
Software repositories distribute a number of different packages, allowing those packages to be freely downloaded. You could download packages manually, but doing so would be tedious. For example, a package may have dependencies: other packages that need to be installed first for the package to work correctly. Package managers ensure that dependencies are correctly installed automatically. Figure 5.1 shows how packages, libraries, applications, and software repositories relate to each other.
Figure 5.1. Comparison between packages, libraries, applications, and software repositories
Most programming languages have at least one package manager; some have multiple. Nim’s package manager is important because it’s a tool that gives you access to the hundreds of open source packages contained in Nim’s package repository.
This chapter provides an overview of Nimble, the Nim package manager, including how to install and create packages. Be sure to also take a look at the Nimble documentation: https://github.com/nim-lang/nimble.
5.1. The Nim package manager
There are many package managers in existence today, but not all of them are designed for the same purpose. Package managers are primarily split into two categories: system-level and application-level.
System-level package managers are typically bundled with the OS. They allow the user to install a popular set of applications and libraries written in many different programming languages. Application-level package managers are more specific; they focus on libraries and applications written in a single programming language.
Imagine you got a brand-new computer, and you’d like to watch some movies on it. One of the most widely used applications for watching video is VLC, but it doesn’t come preinstalled on computers. You can instruct a package manager to install VLC, together with any missing libraries VLC needs to function. A system-level package manager would be perfect for this.
VLC comes with a library called libvlc; this library allows any application to play video with the same accuracy as VLC itself. If you wanted to make use of this library in your Nim application, you’d need a Nim package that implements a Nim interface to that library. Such a package would be installed via an application-level package manager.
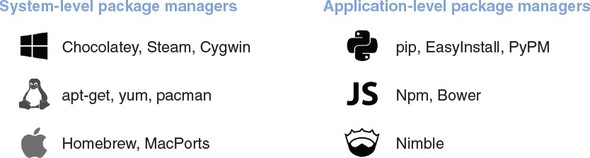
Figure 5.2 shows examples of some common system-level and application-level package managers.
Figure 5.2. System-level vs. application-level package managers
Package managers also differ in the way that they distribute packages. Some distribute packages in the form of binaries, whereas others distribute the source code. In the latter case, the packages must then be compiled on the user’s computer using a compiler.
Nim’s package manager is called Nimble. Nimble is an application-level package manager, and it distributes packages in the form of source code. This is similar to other application-level package managers such as Python’s pip and NodeJS’s npm. Nimble is already being used by many Nim programmers, even though it’s not yet stable and there are still some features missing from it. This section will show you how the current version of Nimble (0.7.2 as of writing) can be used to manage Nim libraries and applications. Keep in mind that Nimble is evolving every day and that some of the things mentioned in this section may change in the future.
5.2. Installing Nimble
The good news is that you most likely have Nimble installed already. Nim installation packages have started to include Nimble since around version 0.15.0, so if you have Nim installed, you should have Nimble installed too.
You can easily check whether this is the case by running nimble -v in the terminal. If you see information about Nimble’s version, you have Nimble installed; if you see something like “command not found: nimble,” you don’t.
Keep in mind that, in order to install packages, Nimble may execute an external application called Git, which you must also have installed and available in your path. For more details, look at the Nimble installation page on GitHub: https://github.com/nim-lang/nimble#installation.
5.3. The nimble command-line tool
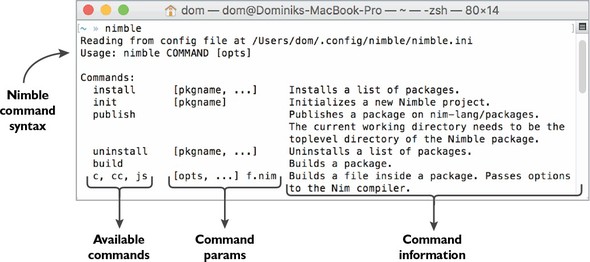
You should now have Nimble installed on your system. Running nimble in a new terminal window should display a list of commands supported by Nimble. Figure 5.3 shows just a few of these.
Figure 5.3. Some commands that Nimble supports
nimble will also show the order in which commands should be passed to Nimble. A single command is written after nimble, separated by a space. After that come the flags and parameters passed to that command, each separated by a space. For example, to search for any packages that relate to Linux, you can execute nimble search linux. You can also specify a --ver flag, which will show you the available versions of each package. Figure 5.4 shows the result of a search for “linux” with the --ver flag.
Figure 5.4. Searching for a “linux” package with version information
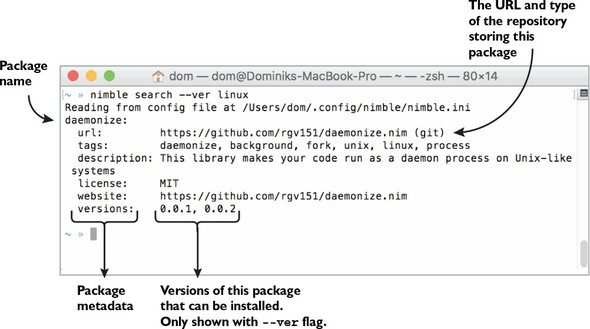
Note the “versions:” followed by a list of two different versions in figure 5.4. Those are the versions of the daemonize package that can be installed.
Nimble’s command-line interface is the primary way of installing, searching for, upgrading, and removing packages. Before I show you how to install packages, though, let’s look at what a package actually is.
5.4. What is a Nimble package?
Software is almost always composed of different types of files, including source code, images, sound, and more. For example, let’s say you’re creating a video game. Video games require a plethora of resources to function, and these need to be bundled together with the game’s executable. A package offers a convenient way to bundle such files together with the software.
In the simplest sense, a minimal Nimble package is a directory containing a .nimble file and one or more Nim modules.
A .nimble file contains metadata about a package. It specifies a package’s name, version, author, dependencies, and more. The .nimble part is just a file extension, and the filename of every .nimble file is the same as the name of the package. The following listing shows a simple example of a .nimble file.
Listing 5.1. MyPkg.nimble
# Package information                                  1
version       = "0.1.0"                                2
author        = "Andreas Rumpf, Dominik Picheta"       3
description   = "Example .nimble file."
license       = "MIT"

# Dependencies
requires "nim >= 0.12.0"                               4
- 1 The name of the package is not specified here; instead, the filename of the .nimble file is used.
- 2 Version strings usually consist of three digits separated by periods, and they follow the semantic versioning specification available at http://semver.org. You can specify as many digits as you want, but other characters aren’t supported.
- 3 Identifies one or more authors who created this package
- 4 Specifies that the package requires at least version 0.12.0 of the Nim compiler to be successfully compiled
The .nimble files use a Nim-based format that supports a subset of Nim’s features. In addition, the format contains some shortcuts for defining information about the package. You can freely define variables, procedures, and more within your .nimble files, and you can even import other modules into them.
Nimble also supports the definition of tasks, as follows:
task test, "Run the packages tests!":
  exec "nim c -r tests/mytest.nim"
Placing this snippet of code at the end of your .nimble file will allow you to execute nimble test to run your package’s tests.
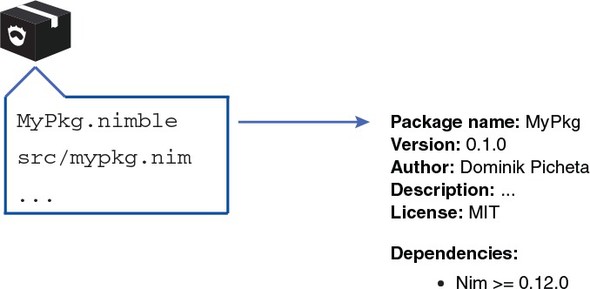
Figure 5.5 shows what the contents of a typical standalone Nimble package look like. The data specified in this MyPkg.nimble file is mandatory, and there are many other options you can specify in a .nimble file as well. I can’t list them all here, but you’ll learn about some of them later in this chapter. For a full list, check out the Nimble documentation on GitHub: https://github.com/nim-lang/nimble#readme.
Figure 5.5. A typical Nimble package
Assuming you have a Nimble package somewhere on your local filesystem, you can easily open a terminal in the directory of that package and execute nimble install. When you do this, Nimble will attempt to install the package contained in the current directory. This is useful for local packages that you’ve created yourself. But what about packages that have been created by other developers? Do you need to download these manually?
Thankfully, the answer to that question is no. As part of the install command, a URL can be specified that points to the package you want to install. Currently, this URL must point to either a Git or Mercurial repository, which brings us to the definition of an external package: one that can be accessed over the internet. An external Nimble package is either a Git or Mercurial repository containing a .nimble file and one or more Nim modules.
Git and Mercurial are examples of distributed version control systems (DVCSs). A DVCS enables a team of software developers to work together on a software project, and by keeping track of the history of each file, it helps deal with situations where two or more developers end up editing the same files.
A repository is where the history of a software project is stored. These repositories can be uploaded to a remote server and then subsequently downloaded using the git or hg command-line tools, for Git and Mercurial, respectively. This allows other developers to work on the project and upload their changes, which you can then download.
After a repository is downloaded, the histories of the files can be explored. You can, for example, see what the state of the repository was a week ago, or back when the repository was first created.
Git and Mercurial repositories may contain additional information, such as tags. Repositories containing Nimble packages must contain a tag that identifies each version of that package. Figure 5.6 shows how an external Nimble package’s content can change between revisions.
Figure 5.6. An external Nimble package’s evolution
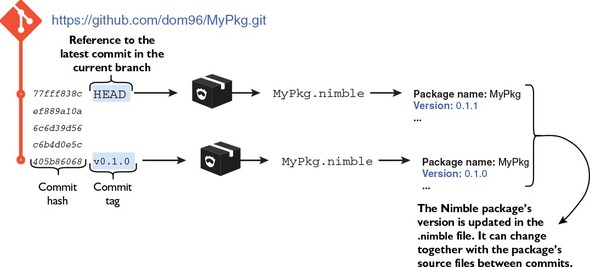
In the previous section, I showed you how the search command works. With the --ver flag, the search command lists the tags of each of the package repositories. Nimble interprets each tag as a version.
Nimble packages are coupled to repositories because most libraries and applications are already stored in repositories. Turning a repository into a Nimble package is easy—the repository just needs a .nimble file. Other package managers store their packages on a single centralized server, which has its advantages; this is something that Nimble will eventually also support.
5.5. Installing Nimble packages
The installation of Nimble packages is likely the most common task that you’ll use Nimble for. You saw an example of the install command in the previous section. This command is the primary means of installing packages.
5.5.1. Using the install command
The install command is powerful. It can do any of the following:
- Install packages on your local filesystem
- Install packages from a specified URL
- Install a package by name
- Install a specific version of a package
- Install multiple packages at once
Installing local packages is simple. Just open a new terminal, cd into the directory of your local package (by typing cd /home/user/MyPkg, for example), and execute nimble install.
To install a package from a URL, open a new terminal and execute nimble install <your_url_here>, replacing the <your_url_here> with the URL of the package you want to install. Currently, the URL must point to a non-empty Git or Mercurial repository.
Nimble saves you the trouble of remembering a bunch of URLs for different packages. A package repository that contains a listing of packages created by the Nim community is available. Nimble downloads this listing, which contains some basic information about each package, such as the package’s URL and name. Remember the search command? It searches through this listing, so any of the packages listed in your search results can be installed by specifying their names after the install command. For example, to install the daemonize package seen in the search results in figure 5.4, execute nimble install daemonize.
A specific version of a package can be installed by using the special @ character after the name of a package. For example, to install version 0.0.1 of the daemonize package, execute nimble install daemonize@0.0.1. Alternatively, instead of a specific version, you can specify a version range. For example, if you want to install the latest version that’s greater than version 0.0.1, you can execute nimble install daemonize@>=0.0.1. Specifying a repository revision is also supported by using the # character after the @ character, such as nimble install daemonize@#b4be443.
Warning: Special characters in shells
Depending on your shell, some of the characters, such as @, >, or =, may be treated as part of the shell’s syntax. You may need to escape them or quote the package name and version like so: nimble install "daemonize@>=0.1.0".
Specifying multiple parameters to the install command will cause Nimble to install more than one package. The parameters just need to be separated by a space.
5.5.2. How does the install command work?
To learn about what the install command does, let’s look at the previous example command: nimble install daemonize. Try executing it now if you haven’t already. You should see output similar to that in figure 5.7.
Figure 5.7. The output of nimble install daemonize
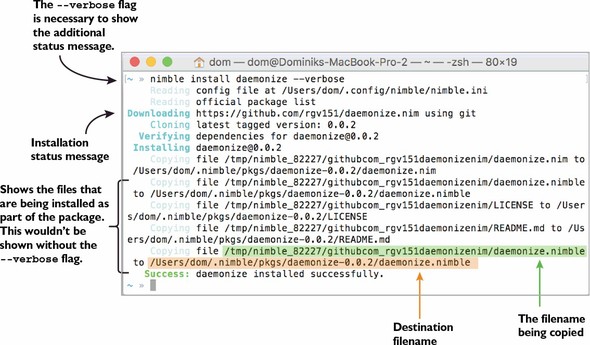
Nimble’s output is currently rather verbose, but it tries to give as much information about the installation as possible. The output that you see in your version of Nimble may be a bit different from figure 5.7, but the key information should remain the same. The messages shown in figure 5.7 show each of the files from the daemonize package being copied into /Users/dom/.nimble/pkgs/daemonize-0.0.2/.
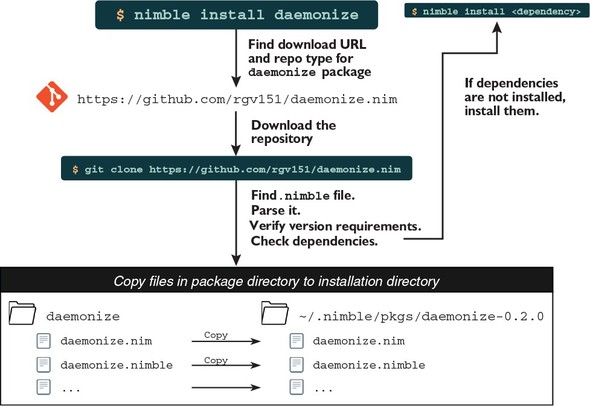
Scroll up in your terminal window, and you’ll see what Nimble does first: it begins downloading the package. But before that, Nimble needs to know where to download the daemonize package from, and it determines this by consulting the package list. Figure 5.8 shows the full installation process and its many subprocesses.
Figure 5.8. The Nimble installation process
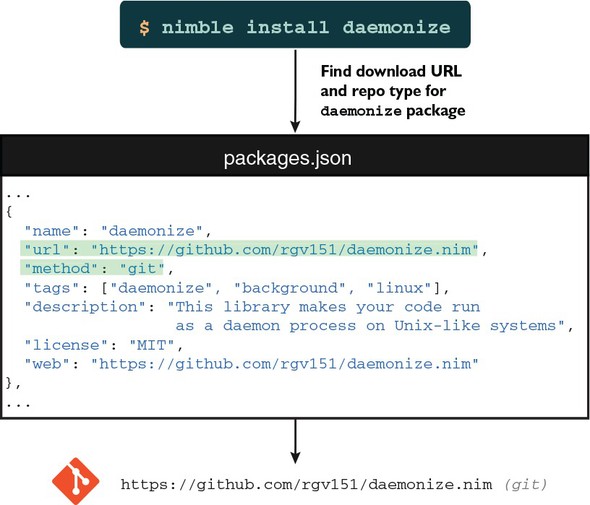
The package list is currently hosted in a Git repository, and it can be accessed on GitHub at the following URL: https://github.com/nim-lang/packages. The package-list repository stores a packages.json file that lists metadata for different packages, including each package’s name, URL, description, and more. Nimble can read this list, find the package you specified on the command line, and retrieve that package’s URL. That way Nimble can determine the location of that package’s repository and can easily download it. Figure 5.9 shows how the daemonize package is found in the packages.json file.
Figure 5.9. Finding information about the daemonize package in the packages.json file
Package lists
The package list stored in https://github.com/nim-lang/packages is the official Nimble package list. As of version 0.7.0, Nimble supports multiple package lists, so you can easily create and use your own package list in conjunction with the official one. The “Configuration” section of the Nimble readme explains how this can be done: https://github.com/nim-lang/nimble#configuration.
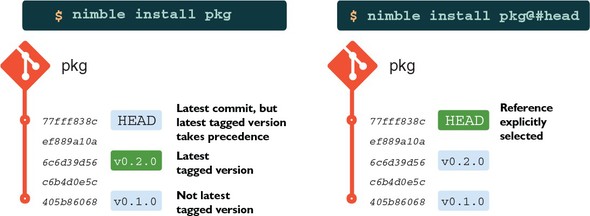
The download is done using either Git or Mercurial. As part of the download process, Nimble parses the tags on the remote repository and determines which satisfies the version requirements specified by the user. If more than one tag satisfies the version requirements, it picks the highest version. Figure 5.10 shows how Nimble decides which commit of a Nimble package to install.
Figure 5.10. How Nimble decides which version of a package to install
Once the download is complete, the package’s .nimble file is read, and Nimble verifies the validity of this file. Before installation can commence, the following must be checked:
- The version field specified in the .nimble file must correspond to the version that was tagged on the repository.
- The files that will be installed must follow a specific directory layout.
- The correct dependencies specified in the .nimble file must be installed.
Those are some of the most common checks that Nimble performs. If the first two fail, they’ll result in an error and the package won’t be installed. Missing dependencies will be installed automatically by Nimble. You’ll learn more about these checks in the next section, where I’ll show you how to create your own Nimble package.
Once the package is successfully validated, the installation commences, and Nimble copies all the files in the package to ~/.nimble/pkgs/pkg-ver, where ver is the version of the package and pkg is the name of the package.
That’s a simple overview of the process involved in installing a Nimble package. This process can become more complicated depending on the options specified in the .nimble file.
5.6. Creating a Nimble package
You’ve likely encountered situations where some functionality in your application could be reused in another application. For example, in chapter 3, you developed a protocol module that defines procedures for encoding and decoding chat messages. You might want that module to be usable in other applications.
The easiest way to do so is to create a package out of that module. Your applications can then add that package as a dependency and use the same module easily.
Creating a Nimble package out of your Nim library or application has a number of advantages, such as making the installation of dependencies much easier and allowing others to use your package as a dependency for their own packages.
Creating a Nimble package is also fairly straightforward. All you need to do is create a .nimble file and you’re good to go. Nimble’s init command makes the creation of this file easy. The command will ask you some questions about the package and will create a .nimble file based on your responses. You’ll likely still need to edit the resulting .nimble file manually to customize the options further, but once you understand what those options do, that’s fairly straightforward.
Once you’ve created a local Nimble package, you might also want to open source it and publish it in Nimble’s package list. To do this, you’ll need to initialize a new Git or Mercurial repository. Later in this chapter, I’ll show you how a Nimble package can be published.
Let’s create a simple Nimble package.
5.6.1. Choosing a name
A package’s name is very important. It needs to be as short as possible and ideally should describe what functionality the package implements.
Package name uniqueness
When picking a package name, it’s a good idea to ensure that it’s unique, especially if you intend to publish it to the Nimble package repository.
You must pick a name that doesn’t contain any hyphens or at symbols (- or @). Those characters are treated uniquely by Nimble, so they’re disallowed in package names.
The package that you’ll create as part of this chapter will implement some very simple procedures for manipulating numbers. You can choose whatever package name you wish, but throughout this chapter I’ll use the name NimbleExample. If you choose a different name, you’ll need to adjust the chapter’s example code accordingly.
To get started, create a NimbleExample directory somewhere on your filesystem. It will contain the Nimble package.
5.6.2. A Nimble package’s directory layout
All Nimble packages must adhere to a specific directory layout. This layout is more important for libraries than applications because an application will be compiled, and in most cases all that needs to be installed will be the application’s executable.
For libraries, the most important rule is to place all modules in a separate directory named after the package. So you need to create another NimbleExample directory inside the NimbleExample directory you’ve already created. Any modules placed inside that directory will be importable with the NimbleExample/ prefix, like this: import NimbleExample/module.
One exception to this rule is that you can place a single module containing the primary functionality of your library in the root directory of your package, but it must share the name of your package. In this case, the module’s filename would be NimbleExample.nim. Figure 5.11 shows what the final directory structure of NimbleExample will look like.
Figure 5.11. The NimbleExample directory layout

For the purposes of this example, create the following math.nim file inside the secondary NimbleExample directory.
Listing 5.2. The math module
proc add*(a, b: int): int = a + b 1
- 1 Defines a new add procedure taking two integers and returning the sum of those two integers. The procedure is exported using the *.
The code in listing 5.2 is pretty straightforward. It defines a new add procedure that adds two integers together. Note the * used to export the procedure; it ensures that the add procedure can be accessed from other modules. Save the code in listing 5.2 as math.nim in the NimbleExample/NimbleExample directory.
There’s an additional convention for modules in a package that are destined to be used only by that package. They should be placed in a private directory, as is the case for the utils module defined in listing 5.3. Create a new directory named private in the NimbleExample/NimbleExample directory, and save the following code as utils.nim in NimbleExample/NimbleExample/private.
Listing 5.3. The utils module
proc mult*(a, b: int): int = a * b 1
- 1 Defines a new mult procedure taking two integers and returning the result when those numbers are multiplied. The procedure is exported using the * that follows its name.
The code in listing 5.4 is a bit more complicated. It imports two modules defined in the NimbleExample package. The first is the math module defined in listing 5.2, and the other is the utils module defined in listing 5.3. Save the code in the following listing as data.nim in the NimbleExample/NimbleExample directory.
Listing 5.4. The data module
import NimbleExample/math               1
import NimbleExample/private/utils      2
let age* = mult(add(15, 5), 2)          3
- 1 Imports the math module from the NimbleExample package
- 2 Imports the private utils module from the NimbleExample package
- 3 Uses the procedures defined in the utils and math modules to calculate the age. The age variable is exported using the *.
The final directory layout should look like what you saw in figure 5.11. Ensure that your local directory layout is the same.
5.6.3. Writing the .nimble file and sorting out dependencies
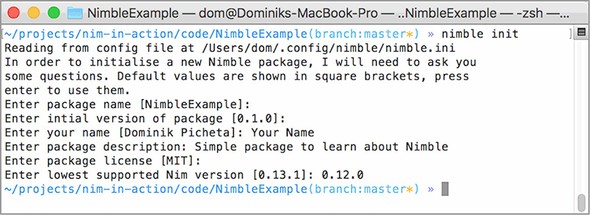
Now that the modules are all in the correct directories, it’s time to create the NimbleExample.nimble file. You can execute nimble init in the outer NimbleExample directory to create this file automatically. Figure 5.12 shows an example of what nimble init asks and the answers needed to generate the NimbleExample.nimble file shown in listing 5.5.
Figure 5.12. The nimble init command
Listing 5.5. The beginnings of NimbleExample.nimble
# Package

version       = "0.1.0"
author        = "Your Name"
description   = "Simple package to learn about Nimble"
license       = "MIT"

# Dependencies

requires "nim >= 0.12.0"
After you execute nimble init or save the contents of listing 5.5 as NimbleExample .nimble, you should be able to execute nimble install. That should successfully install your package!
That’s how simple it is to create a Nimble package. But creating a Nimble package is just a small first step in developing Nimble packages. Packages evolve and requirements change, so how can Nimble help you during development?
For example, while developing a package, you may realize that you need the functionality of another Nim library. In many cases, this library will be a Nimble package. For example, you may want to create a version of add for very large integers—ones bigger than the biggest integer type in Nim’s standard library. The bigints package provides this functionality.
Open the math.nim file in the NimbleExample package, and change it so that its contents are the same as those in the next listing. Changes are highlighted in bold.
Listing 5.6. Using the bigints package in the math module
import bigints  c                                1
proc add*(a, b: int): int = a + b
proc add*(a, b: BigInt): BigInt = a + b          2
- 1 Imports the bigints module from the bigints package. There’s no need to explicitly state the package name and module name.
- 2 Defines an add procedure for the BigInt type defined in the bigints module
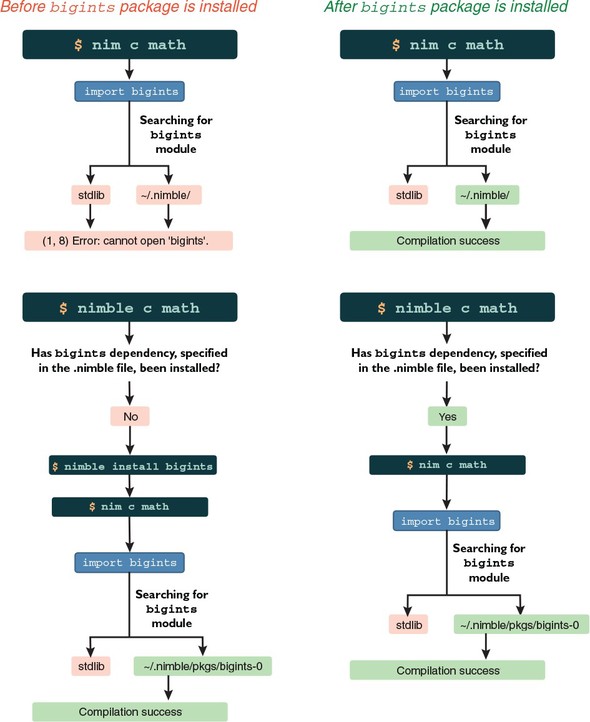
Now try to compile it by executing nim c NimbleExample/math. The compiler should output something similar to “math.nim(1, 8) Error: cannot open ‘bigints’.” This points to the line of code that imports the bigints module. The compilation fails because the bigints package hasn’t been installed. Install it now by executing nimble install bigints and compile NimbleExample/math again. This time the compilation should succeed.
Does this mean that every user of the NimbleExample package will need to install the bigints package manually? Currently, yes. But this is where the dependency specification in the NimbleExample.nimble file comes in—it allows Nimble to install the dependencies automatically.
When compiling any Nim source code using the Nim compiler, every package that you’ve installed using Nimble will be available to that source code. This is why importing the bigints module works as soon as you install the bigints package.
Nimble supports a handy c command that does exactly what the Nim compiler does: it compiles the specified file. Try compiling the math.nim file using Nimble by executing nimble c NimbleExample/math and note the results.
You may be surprised by the failure in execution, but it illustrates the key difference between compiling with the Nim compiler directly, and compiling with Nimble. Nimble doesn’t let you import any modules whose packages you haven’t specified as dependencies in your project’s .nimble file, with the exception of the standard library modules.
By default, when installing a package using Nimble, the package is installed into the current user’s Nimble package store, which is located in ~/.nimble/. Every time you compile a Nim module using the Nim compiler, that module can import any of the modules belonging to any of the packages in Nimble’s package store.
If there are two versions of the same package installed, Nim will use the latest one.
Let’s change the NimbleExample.nimble file so that it includes the bigints package as a dependency. The following listing shows what the NimbleExample.nimble file should now look like, with the differences highlighted in bold.
Listing 5.7. Adding a dependency on the bigints package
# Package

version       = "0.1.0"
author        = "Your Name"
description   = "Simple package to learn about Nimble"
license       = "MIT"

# Dependencies

requires "nim >= 0.12.0", "bigints"
The dependency on bigints in listing 5.7 specifies no requirements on the version of that package. As a result, Nimble will attempt to install the latest tagged version of that library, assuming one isn’t already installed.
Cutting-edge dependencies
Inside your .nimble file’s dependency specification, you can write #head after a package’s name, like this: requires "bigints#head". This will get Nimble to compile your package with the latest revision of that package available. This is similar to specifying @#head when installing packages on the command line, as shown in figure 5.9.
Once you change your NimbleExample.nimble file to match listing 5.7, you should be able to successfully compile the math module using Nimble. Nimble will even automatically install the bigints package for you if it detects that it’s not installed. Figure 5.13 shows the difference between nim c and nimble c, depending on whether the bigints package has been installed.
Figure 5.13. nim c vs. nimble c
You should now have a basic understanding of how Nimble handles dependencies, and you should know how to create more Nimble packages. But there’s one piece of knowledge still missing: the process involved in publishing Nimble packages, which we’ll discuss next.
But before you move on to the next section, here’s a quick challenge. Write some simple tests for your Nimble package inside some of the package’s modules. Remember to put your tests under a when isMainModule: statement; this statement ensures that any code in its body is only executed when the math module is compiled directly. This ensures that tests aren’t executed when the math module is imported in an application. Then, run those tests by using Nimble’s c command. For example, nimble c -r NimbleExample/math, with the -r flag, will run the resulting executable automatically after compilation.
5.7. Publishing Nimble packages
The process of publishing a Nimble package to the official package list is fairly straightforward. But before your package is published, it must first be uploaded to a Git or Mercurial repository hosting service (such as GitHub or Bitbucket) and go through an approval process.
The first thing that you need to do is initialize a Git or Mercurial repository in your package’s directory. We’ll create a Git repository in this example because Git has been more widely adopted, but the choice of repository type doesn’t matter much. It’s mostly a matter of preference.
Version control
The details of distributed version control, Git, and Mercurial are outside the scope of this book. I recommend you read up on these technologies further if you’re not familiar with them.
Before you get started, you’ll need to create an account on http://github.com if you don’t already have one.
After you have an account set up and are logged in, create a new Git repository on GitHub by clicking the New Repository button. If you can’t find such a button, go to this URL: https://github.com/new. You should see something similar to the screenshot in figure 5.14.
Figure 5.14. Creating a new repository on GitHub
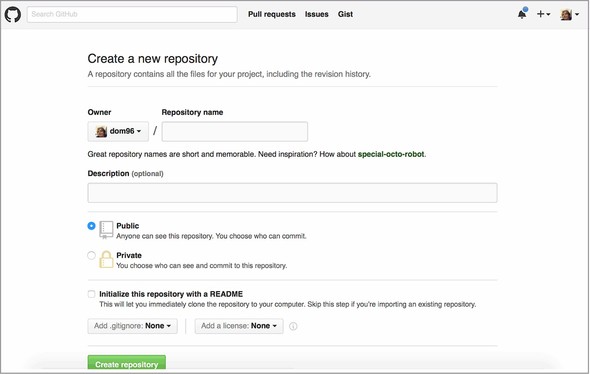
Specify “NimbleExample” as the Repository Name, and then click the green Create Repository button. You’ll be shown another web page that will let you know how to create a repository on the command line. The instructions on the web page are very generic. Listing 5.8 shows commands similar to the ones on the web page but tailored to successfully upload the NimbleExample package to GitHub. Execute these commands now.
Listing 5.8. Commands to upload the NimbleExample package to GitHub
git init git add NimbleExample.nimble NimbleExample/data.nim NimbleExample/math.nim NimbleExample/private/utils.nim git commit -m "first commit" git remote add origin git@github.com:<your-user-name>/NimbleExample.git 1 git push -u origin master
- 1 Remember to change <your-user-name> to your GitHub username
Once you successfully execute those commands, navigating to https://github.com/<your-user-name>/NimbleExample should show you a list of files. These files should include NimbleExample.nimble, the NimbleExample directory, and its contents.
There’s only one thing left to do. The package is public, but Nimble has no way to find it yet because it hasn’t been added to its package list. This means you won’t be able to install it by executing nimble install NimbleExample.
Nimble can make use of multiple package lists, but the official package list at https://github.com/nim-lang/packages is the most widely used. A pull request is created whenever a user wants to add a package to this package list, and once that’s done, the Nim community checks that the package can be added to the package list. Certain aspects of the package are checked, such as the package’s name, to ensure it doesn’t clash with the names of any other packages already on the list.
The pull request can be created manually or with the help of Nimble’s publish command, which creates the pull request for you automatically.
Before publishing a package, it’s a good idea to ensure that it can be installed successfully. Execute nimble install in the package’s directory to verify that it can be installed successfully.
The package is then ready to be published. Execute nimble publish now, and follow the on-screen prompts. The process is somewhat complex as it requires you to create a new GitHub access token for Nimble. But once you do so, it streamlines the process of publishing Nimble packages significantly.
When your package is accepted and is added to the package list, you’ll be able to install it by executing nimble install NimbleExample.
Remember that publishing a Nimble package is only done once. You don’t need to publish the package again when you develop a new version of it. Instead, the version is tagged, as you’ll see in the next section.
5.8. Developing a Nimble package
Software projects are typically given version numbers to identify their state. As software evolves, new developments are marked with increasing version numbers. Nimble packages are no different.
The NimbleExample package began its life as version 0.1.0, and if it continues to be developed, it may someday reach version 1.0 or even 10.3. Versions help the user distinguish and identify different states of your package.
Version information for your package is stored in your package’s .nimble file using the version key. The version must consist of at least one digit, and multiple digits must be separated by periods. A full line specifying the version could look something like version = "1.42.5".
5.8.1. Giving version numbers meaning
The way in which version numbers are assigned and incremented differs. In some cases, the version numbers have little meaning other than signifying that version 1.0 is newer than version 0.5. In others, such as with semantic versioning, the version numbers tell you more about the API compatibility of different versions of software.
Semantic versioning is a convention for specifying a three-part version number: major version, minor version, and patch. The patch is incremented for minor bug fixes and changes that don’t affect the API of the software. The minor version is incremented when backward-compatible additions are made to the software. The major version is incremented when the API of the software changes to something that’s not backward compatible. The full semantic versioning specification is available at http://semver.org.
All Nimble packages should use this convention, so if you aren’t familiar with it, be sure to learn about it.
5.8.2. Storing different versions of a single package
There are some things you need to keep in mind with versioning and Nimble packages.
A local Nimble package that doesn’t have a Git or Mercurial repository associated with it has a specific version associated with it. This is the version in the .nimble file.
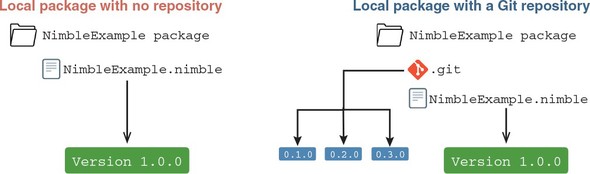
A local Nimble package that does have a Git or Mercurial repository associated with it is the same, but different versions of it can be retrieved because its repository contains a full history of the package. The retrieval must be done manually for local packages, whereas for remote packages, Nimble will automatically retrieve the specified version. All remote Nimble packages are currently stored in such repositories, and they can be downloaded to create a local repository containing each version of the Nimble package. Figure 5.15 shows the difference between a Nimble package with and without a Git repository.
Figure 5.15. Local Nimble package with no repository vs. one with a Git repository
When developing Nimble packages, it’s important to remember one thing: Nimble uses the tags in the Nimble package’s repository to retrieve a certain version.
Whenever you want to release a new version of a package, you need to follow these steps:
- Increment the version number in the .nimble file.
- Commit these changes into your repository; for example, git commit -am "Version 0.1.2".
- Tag the commit you just made, using the new version number as the tag name; for example, git tag v0.1.2.
- Upload the changes to the remote repository, making sure you upload the tags as well; for example, git push origin master --tags.
Performing step 1 first is very important. If the name of the tag doesn’t match the version specified in the .nimble file at the point in history that the tag corresponds to, there will be an inconsistency, and Nimble will refuse to install the package.
The preceding steps for tagging versions are specific to Git. You’ll find that in order to develop Nimble packages, you’ll need at least a basic knowledge of Git or Mercurial.
5.9. Summary
- The Nim package manager is called Nimble.
- A Nimble package is any directory or repository, compressed or otherwise, containing a .nimble file and some Nim source code.
- A .nimble file contains information about a package, including its version, author, dependencies, and more.
- Nimble packages are installed using the nimble install command.
- Nimble packages can be installed from various sources, including the local filesystem, a Git or Mercurial URL, and a curated list of packages identified by name.
- Installing a package by name or from a URL will install the latest tagged version of it; the tip or the HEAD can be installed by appending @#head to the URL or package name.
- A Nimble package can be created using the nimble init command.
- A Nimble package can be published using the nimble publish command.
- New versions of packages are released by incrementing the version number in the .nimble file, creating a new commit, and then tagging it as the new version in Git or Mercurial.