Table of Contents for
Nim in Action
 Nim in Action
Published by
Manning Publications, 2017
Nim in Action
Published by
Manning Publications, 2017
- Cover
- Nim in Action
- Copyright
- Brief Table of Contents
- Table of Contents
- Preface
- Acknowledgments
- About this Book
- About the Author
- About the Cover Illustration
- Part 1. The basics of Nim
- Chapter 1. Why Nim?
- Chapter 2. Getting started
- Part 2. Nim in practice
- Chapter 3. Writing a chat application
- Chapter 4. A tour through the standard library
- Chapter 5. Package management
- Chapter 6. Parallelism
- Chapter 7. Building a Twitter clone
- Part 3. Advanced concepts
- Chapter 8. Interfacing with other languages
- Chapter 9. Metaprogramming
- Appendix A. Getting help
- Appendix B. Installing Nim
- Nim Reference
- Index
- List of Figures
- List of Tables
- List of Listings
Chapter 2. Getting started
This chapter covers
- Understanding Nim basics
- Mastering control flow
- Using collection types
- Handling exceptions
- Defining data types
In this chapter, you’ll learn about Nim’s syntax, procedures, for loops, and other basic aspects of the language. Throughout this chapter, we’ll cover a lot of information to give you a broad taste of the language.
Before you begin, make sure you have Nim installed and that it works on your computer. You’ll also need a text editor to edit Nim code. Take a look at appendix B for instructions on how to install Nim and other related tools.
2.1. Nim syntax
The syntax of a programming language is a set of rules that govern the way programs are written in that language. You’ve already had a small taste of Nim’s syntax in the previous chapter.
Most languages share many similarities in terms of syntax. This is especially true for the C family of languages, which happens to also be the most popular—so much so that four of the most popular programming languages are syntactically heavily inspired by C.[1] Nim aims to be highly readable, so it often uses keywords instead of punctuation. Because of this, the syntax of Nim differs significantly from the C language family; instead, much of it is inspired by Python and Pascal.
According to the TIOBE Index for December 2016, www.tiobe.com/index.php/content/paperinfo/tpci/index.html.
In this section, I’ll teach you the basics of Nim’s syntax. Learning the syntax is a very important first step, as it teaches you the specific ways in which Nim code should be written.
2.1.1. Keywords
Most programming languages have the notion of a keyword, and Nim is no exception. A keyword is a word with a special meaning associated with it when it’s used in a specific context. Because of this, you may not use keywords as identifiers in your source code.
Stropping
You can get around this limitation by using stropping. See section 1.2 to learn more.
As of version 0.12.0, Nim has 70 keywords. This may sound like a lot, but you must remember that you won’t be using most of them. Some of them don’t yet have a meaning and are reserved for future versions of the language; others have minor use cases.
The most commonly used keywords allow you to do the following:
- Specify conditional branches: if, case, of, and when
- Define variables, procedures, and types: var, let, proc, type, and object
- Handle runtime errors in your code: try, except, and finally
You’ll learn exactly what these keywords mean and how to use them in the next sections of this chapter. For a full list of keywords, consult the Nim manual, available at http://nim-lang.org/docs/manual.html#lexical-analysis-identifiers-keywords.
2.1.2. Indentation
Many programmers indent their code to make the program’s structure more apparent. In most programming languages, this isn’t a requirement and serves only as an aid to human readers of the code. In those languages, keywords and punctuation are often used to delimit code blocks. In Nim, just like in Python, the indentation itself is used.
Let’s look at a simple example to demonstrate the difference. The following three code samples written in C, Ruby, and Nim all do the same thing. But note the different ways in which code blocks are delimited.
Listing 2.1. C
if (42 >= 0) {
  printf("42 is greater than 0");
}
Listing 2.2. Ruby
if 42 >= 0
  puts "42 is greater than 0"
end
Listing 2.3. Nim
if 42 >= 0:
  echo "42 is greater than 0"
As you can see, C uses curly brackets to delimit a block of code, Ruby uses the keyword end, and Nim uses indentation. Nim also uses the colon character on the line that precedes the start of the indentation. This is required for the if statement and for many others. But as you continue learning about Nim, you’ll see that the colon isn’t required for all statements that start an indented code block.
Note also the use of the semicolon in listing 2.1. This is required at the end of each line in some programming languages (mostly the C family). It tells the compiler where a line of code ends. This means that a single statement can span multiple lines, or multiple statements can be on the same line. In C, you’d achieve both like this:
printf("The output is: %d",
  0);
printf("Hello"); printf("World");
In Nim, the semicolon is optional and can be used to write two statements on a single line. Spanning a single statement over multiple lines is a bit more complex—you can only split up a statement after punctuation, and the next line must be indented. Here’s an example:
echo("Output: ",          1
  5)
echo(5 +                  1
  5)

echo(5                    2
  + 5)
echo(5 +
5)                        3
- 1 Both of these statements are correct because they’ve been split after the punctuation and the next line has been indented.
- 2 This statement has been incorrectly split before the punctuation.
- 3 This statement has not been correctly indented after the split.
Because indentation is important in Nim, you need to be consistent in its style. The convention states that all Nim code should be indented by two spaces. The Nim compiler currently disallows tabs because the inevitable mixing of spaces and tabs can have detrimental effects, especially in a whitespace-significant programming language.
2.1.3. Comments
Comments in code are important because they allow you to add additional meaning to pieces of code. Comments in Nim are written using the hash character (#). Anything following it will be a comment until the start of a new line. A multiline comment can be created with #[ and ]#, and code can also be disabled by using when false:. Here’s an example:
# Single-line comment
#[
Multiline comment
]#
when false:
  echo("Commented-out code")
The first of the two types of multiline comment can be used to comment out both text and code, whereas the latter should only be used to comment out code. The compiler will still parse the code and ensure that it’s syntactically valid, but it won’t be included in the resulting program. This is because the compiler checks when statements at compile time.
2.2. Nim basics
Now that you have a basic understanding of Nim’s syntax, you have a good foundation for learning some of the semantics of Nim. In this section, you’ll learn some of the essentials that every Nim programmer uses on a daily basis. You’ll learn about the most commonly used static types, the details of mutable and immutable variables, and how to separate commonly used code into standalone units by defining procedures.
2.2.1. Basic types
Nim is a statically typed programming language. This means that each identifier in Nim has a type associated with it at compile time. When you compile your Nim program, the compiler ensures that your code is type safe. If it isn’t, compilation terminates and the compiler outputs an error. This is in contrast to dynamically typed programming languages, such as Ruby, that will only ensure that your code is type safe at runtime.
By convention, type names start with an uppercase letter. Built-in types don’t follow this convention, so it’s easy for you to distinguish between built-in types and user-defined types by checking the first letter of the name. Nim supports many built-in types, including ones for dealing with the C foreign function interface (FFI). I don’t cover all of them here, but they will be covered later in this book.
Foreign function interface
The foreign function interface (FFI) is what allows you to use libraries written in other programming languages. Nim includes types that are native to C and C++, allowing libraries written in those languages to be used.
Most of the built-in types are defined in the system module, which is imported automatically into your source code. When referring to these types in your code, you can qualify them with the module name (for example, system.int), but doing so isn’t necessary. See table 2.1 for a list of the basic types defined in the system module.
Modules
Modules are imported using the import keyword. You’ll learn more about modules later in this book.
Table 2.1. Basic types
|
Type |
Description and uses |
|---|---|
| int | The integer type is the type used for whole numbers; for example, 52. |
| float | The float is the type used for numbers with a decimal point; for example, 2.5. |
| string | The string type is used to store multiple characters. String literals are created by placing multiple characters inside double quotes: "Nim is awesome". |
| bool | The Boolean type stores one of two values, either true or false. |
| char | The character type stores a single ASCII character. Character literals are created by placing a character inside single quotes; for example, 'A'. |
Integer
The integer type represents numerical data without a fractional component; that is, whole numbers. The amount of data this type can store is finite, so there are multiple versions of it in Nim, each suited to different size requirements. The main integer type in Nim is int. It’s the integer type you should be using most in your Nim programs. See table 2.2 for a list of integer types.
Table 2.2. Integer types
An integer literal in Nim can be represented using decimal, octal, hexadecimal, or binary notation.
Listing 2.4. Integer literals
let decimal = 42
let hex = 0x42
let octal = 0o42
let binary = 0b101010
Listing 2.4 defines four integer variables and assigns a different integer literal to each of them, using the four different integer-literal formats.
You’ll note that the type isn’t specified for any of the defined variables. The Nim compiler will infer the correct type based on the integer literal that’s specified. In this case, all variables will have the type int.
The compiler determines which integer type to use by looking at the size of the integer literal. The type is int64 if the integer literal exceeds the 32-bit range; otherwise, it’s int. But what if you want to use a specific integer type for your variable? There are multiple ways to accomplish this:
let a: int16 = 42              1
let b = 42'i8                  2
- 1 int16
- 2 Uses a type suffix to specify the type of the integer literal
Integer size
Explicitly using a small integer type such as int8 may result in a compile-time or, in some cases, a runtime error. Take a look at the ranges in table 2.2 to see what size of integer can fit into which integer type. You should be careful not to attempt to assign an integer that’s bigger or smaller than the type can hold.
Nim supports type suffixes for all integer types, both signed and unsigned. The format is 'iX, where X is the size of the signed integer, and 'uX, where X is the size of the unsigned integer.[2]
See the Nim manual for more on numerical constants: http://nim-lang.org/docs/manual.html#lexical--analysis-numerical-constants.
Floating-point
The floating-point type represents an approximation of numerical data with a fractional component. The main floating-point type in Nim is float, and its size depends on the platform.
Listing 2.5. Float literals
let a = 1'f32
let b = 1.0e19
The compiler will implicitly use the float type for floating-point literals.
You can specify the type of the literal using a type suffix. There are two type suffixes for floats that correspond to the available floating-point types: 'f32 for float32 and 'f64 for float64.
Exponents can also be specified after the number. Variable b in the preceding listing will be equal to 1x10¹⁹ (1 times 10 to the power of 19).
Boolean
The Boolean type represents one of two values: usually a true or false value. In Nim, the Boolean type is called bool.
Listing 2.6. Boolean literals
let a = false
let b = true
The false and true values of a Boolean must begin with a lowercase letter.
Character
The character type represents a single character. In Nim, the character type is called char. It can’t represent UTF-8 characters but instead encodes ASCII characters. Because of this, char is really just a number.
A character literal in Nim is a single character enclosed in quotes. The character may also be an escape sequence introduced by a backward slash (\). Some common character-escape sequences are listed in table 2.3.
Table 2.3. Common character-escape sequences
|
Result |
|
|---|---|
| \r, \c | Carriage return |
| \l | Line feed |
| \t | Tab |
| \\ | Backslash |
| \' | Apostrophe |
| \" | Quotation mark |
Listing 2.7. Character literals
let a = 'A'
let b = '\109'
let c = '\x79'
Unicode
The unicode module contains a Rune type that can hold any unicode character.
Newline escape sequence
The newline escape sequence \n isn’t allowed in a character literal as it may be composed of multiple characters on some platforms. On Windows, it’s \r\l (carriage return followed by line feed), whereas on Linux it’s just \l (line feed). Specify the character you want explicitly, such as '\r' to get a carriage return, or use a string.
String
The string type represents a sequence of characters. In Nim, the string type is called string. It’s a list of characters terminated by '\0'.
The string type also stores its length. A string in Nim can store UTF-8 text, but the unicode module should be used for processing it, such as when you want to change the case of UTF-8 characters in a string.
There are multiple ways to define string literals, such as this:
let text = "The book title is \"Nim in Action\""
When defining string literals this way, certain characters must be escaped in them. For instance, the double-quote character (") should be escaped as \" and the backward-slash character (\) as \\. String literals support the same character-escape sequences that character literals support; see table 2.3 for a good list of the common ones. One major additional escape sequence that string literals support is \n, which produces a newline; the actual characters that are produced depend on the platform.
The need to escape some characters makes some things tedious to write. One example is Windows file paths:
let filepath = "C:\\Program Files\\Nim"
Nim supports raw string literals that don’t require escape sequences. Apart from the double-quote character ("), which still needs to be escaped as "", any character placed in a raw string literal will be stored verbatim in the string. A raw string literal is a string literal preceded by an r:
let filepath = r"C:\Program Files\Nim"
It’s also possible to specify multiline strings using triple-quoted string literals:
let multiLine = """foo
  bar
  baz
"""
echo multiLine
The output for the preceding code looks like this:
foo
  bar
  baz
Triple-quoted string literals are enclosed between three double-quote characters, and these string literals may contain any characters, including the double-quote character, without any escape sequences. The only exception is that your string literal may not repeat the double-quote character three times. There’s no way to include three double-quote characters in a triple-quoted string literal.
The indentation added to the string literal defining the multiLine variable causes leading whitespace to appear at the start of each line. This can be easily fixed by the use of the unindent procedure. It lives in the strutils module, so you must first import it:
import strutils
let multiLine = """foo
  bar
  baz
"""
echo multiLine.unindent
This will produce the following output:
foo
bar
baz
2.2.2. Defining variables and other storage
Storage in Nim is defined using three different keywords. In addition to the let keyword, which you saw in the previous section, you can also define storage using const and var.
let number = 10
By using the let keyword, you’ll be creating what’s known as an immutable variable—a variable that can only be assigned to once. In this case, a new immutable variable named number is created, and the identifier number is bound to the value 10. If you attempt to assign a different value to this variable, your program won’t compile, as in the following numbers.nim example:
let number = 10
number = 4000
The preceding code will produce the following output when compiled:
numbers.nim(2, 1) Error: 'number' cannot be assigned to
Nim also supports mutable variables using the keyword var. Use these if you intend on changing the value of a variable. The previous example can be fixed by replacing the let keyword with the var keyword:
var number = 10
number = 4000
In both examples, the compiler will infer the type of the number variable based on the value assigned to it. In this case, number will be an int. You can specify the type explicitly by writing the type after the variable name and separating it with a colon character (:). By doing this, you can omit the assignment, which is useful when you don’t want to assign a value to the variable when defining it.
var number: int 1
- 1 This will be initialized to 0.
Immutable variables
Immutable variables must be assigned a value when they’re defined because their values can’t change. This includes both const and let defined storage.
A variable’s initial value will always be binary zero. This will manifest in different ways, depending on the type. For example, by default, integers will be 0 and strings will be nil. nil is a special value that signifies the lack of a value for any reference type. You’ll learn more about this later.
The type of a variable can’t change. For example, assigning a string to an int variable will result in a compile-time error, as in this typeMismatch.nim example:
var number = 10
number = "error"
Here’s the error output:
typeMismatch.nim(2, 10) Error: type mismatch: got (string) but expected 'int'
Nim also supports constants. Because the value of a constant is also immutable, constants are similar to immutable variables defined using let. But a Nim constant differs in one important way: its value must be computable at compile time.
Listing 2.8. Constant example
proc fillString(): string =
  result = ""
  echo("Generating string")
  for i in 0 .. 4:
    result.add($i)                  1

const count = fillString()
Procedures
Don’t worry about not understanding the details of procedures in Nim yet. You’ll be introduced to them shortly.
The fillString procedure in listing 2.8 will generate a new string, equal to "01234". The constant count will then be assigned this string.
I added the echo at the top of fillString’s body, in order to show you that it’s executed at compile time. Try compiling the example using Aporia or in a terminal by executing nim c file.nim. You’ll see "Generating string" amongst the output. Running the binary will never display that message because the result of the fillString procedure is embedded in it.
In order to generate the value of the constant, the fillString procedure must be executed at compile time by the Nim compiler. You have to be aware, though, that not all code can be executed at compile time. For example, if a compile-time procedure uses the FFI, you’ll find that the compiler will output an error similar to “Error: cannot ‘importc’ variable at compile time.”
The main benefit of using constants is efficiency. The compiler can compute a value for you at compile time, saving time that would be otherwise spent during runtime. The obvious downside is longer compilation time, but it could also produce a larger executable size. As with many things, you must find the right balance for your use case. Nim gives you the tools, but you must use them responsibly.[3]
With great power comes great responsibility.
You can also specify multiple variable definitions under the same var, let, or const keyword. To do this, add a new line after the keyword and indent the identifier on the next line:
var
  text = "hello"
  number: int = 10
  isTrue = false
The identifier of a variable is its name. It can contain any characters, as long as the name doesn’t begin with a number and doesn’t contain two consecutive underscores. This applies to all identifiers, including procedure and type names. Identifiers can even make use of Unicode characters:
var 火 = "Fire"
let ogień = true
Unlike in many other programming languages, identifiers in Nim are case insensitive with the exception of the first letter of the identifier. This is to help distinguish variable names, which must begin with lowercase letters, from type names, which must begin with uppercase letters.
As you may recall from section 2.1, there are identifiers in Nim that are reserved. Such identifiers are called keywords, and because they have a special meaning, they can’t be used as names for variables, types, or procedures.
In order to get around this limitation, you can either pick a different name or explicitly mark the identifier using backticks (`). The latter approach is called stropping, and here’s how it can be used:
var `var` = "Hello"
echo(`var`)
The var keyword is enclosed in backticks, allowing a variable with that name to be defined.
Identifiers in Nim are also style insensitive. This allows identifiers written in camelCase to be equivalent to identifiers written in snake_case. The way this is accomplished is by ignoring the underscore character in identifiers, so fooBar is equivalent to foo_bar. You’re free to write identifiers in whichever style you prefer, even when they’re defined in a different style. But you’re encouraged to follow Nim’s style conventions, which specify that variables should use camelCase and types should use PascalCase. For more information about Nim’s conventions, take a look at the “Style Guide for Nim Code” on GitHub: https://github.com/nim-lang/Nim/wiki/Style-Guide-for-Nim-Code.
2.2.3. Procedure definitions
Procedures allow you to separate your program into different units of code. These units generally perform a single task, after being given some input data, usually in the form of one or more parameters.
In this section, we’ll explore procedures in Nim. In other programming languages a procedure may be known as a function, method, or subroutine. Each programming language attaches different meanings to these terms, and Nim is no exception. A procedure in Nim can be defined using the proc keyword, followed by the procedure’s name, parameters, optional return type, =, and the procedure body. Figure 2.1 shows the syntax of a Nim procedure definition.
Figure 2.1. The syntax of a Nim procedure definition
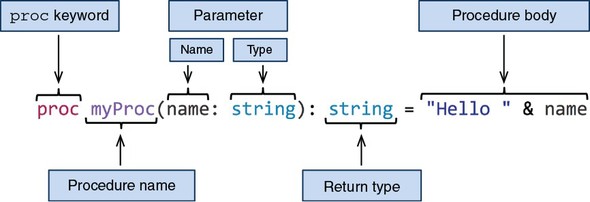
The procedure in figure 2.1 is named myProc and it takes one parameter (name) of type string, and returns a value of type string. The procedure body implicitly returns a concatenation of the string literal "Hello " and the parameter name.
You can call a procedure by writing the name of the procedure followed by parentheses: myProc("Dominik"). Any parameters can be specified inside the parentheses. Calling the myProc procedure with a "Dominik" parameter, as in the preceding example, will cause the string "Hello Dominik" to be returned.
Whenever procedures with a return value are called, their results must be used in some way.
proc myProc(name: string): string = "Hello " & name
myProc("Dominik")
Compiling this example will result in an error: “file.nim(2, 7) Error: value of type ‘string’ has to be discarded.” This error occurs as a result of the value returned by the myProc procedure being implicitly discarded. In most cases, ignoring the result of a procedure is a bug in your code, because the result could describe an error that occurred or give you a piece of vital information. You’ll likely want to do something with the result, such as store it in a variable or pass it to another procedure via a call. In cases where you really don’t want to do anything with the result of a procedure, you can use the discard keyword to tell the compiler to be quiet:
proc myProc(name: string): string = "Hello " & name
discard myProc("Dominik")
The discard keyword simply lets the compiler know that you’re happy to ignore the value that the procedure returns.
Procedures must be defined above the call site. For example, the following code will fail to compile:
myProc()
proc myProc() = echo("Hello World")
For procedures that have a circular dependency, a forward declaration must be used:
proc bar(): int                     1

proc foo(): float = bar().float
proc bar(): int = foo().int
- 1 A forward declaration contains no procedure body, just the procedure’s name, parameters, and return type.
A future version of Nim will likely remove the need for forward declarations and allow procedures to be defined in any order.
When a procedure returns no values, the return type can be omitted. In that case, the procedure is said to return void. The following two examples return no value:
proc noReturn() = echo("Hello")
proc noReturn2(): void = echo("Hello")
It’s idiomatic to avoid writing the redundant void in procedure definitions. The special void type is useful in other contexts, such as generics, which you’ll learn about in chapter 9.
Nim allows you to cut down on unnecessary syntax even further. If your procedure takes no parameters, you can omit the parentheses:
proc noReturn = echo("Hello")
Returning values from procedures
A procedure body can contain multiple statements, separated either by a semicolon or a newline character. In the case where the last expression of a procedure has a non-void value associated with it, that expression will be implicitly returned from that procedure. You can always use the return keyword as the last statement of your procedure if you wish, but doing so is not idiomatic nor necessary. The return keyword is still necessary for early returns from a procedure.
The following code block shows different examples of returning values from procedures:
proc implicit: string =
  "I will be returned"

proc discarded: string =
  discard "I will not be returned"

proc explicit: string =
  return "I will be returned"

proc resultVar: string =
  result = "I will be returned"
proc resultVar2: string =
  result = ""
  result.add("I will be ")
  result.add("returned")

proc resultVar3: string =
  result = "I am the result"
  "I will cause an error"

assert implicit() == "I will be returned"
assert discarded() == nil
assert explicit() == "I will be returned"
assert resultVar() == "I will be returned"
assert resultVar2() == "I will be returned"
# resultVar3 does not compile!
Assert
The code block showing examples of returning values from procedures uses assert to show the output that you should expect when calling each of the defined procedures. You’ll learn more about assert when it comes time to test your code in chapter 3.
Just like a variable’s default value, a procedure’s return value will be binary zero by default. Nim supports a lot of different methods of setting the return value, and you’re free to combine them.
Every procedure with a return type has a result variable declared inside its body implicitly. This result variable is mutable and is of the same type as the procedure’s return type. It can be used just like any other variable; the resultVar and resultVar2 procedures are two examples. You should make use of it whenever you can, instead of defining your own variable and returning it explicitly.
The result variable comes with some restrictions when it’s combined with implicit returns. These restrictions prevent ambiguities. For example, in the resultVar3 procedure, what do you think should be returned: the last expression, or the value that result was assigned? The compiler doesn’t choose for you; it simply shows an error so you can correct the ambiguity.
So far, I’ve been explicitly specifying the return types of procedures. You may recall that this isn’t necessary for variable definition. It’s also possible to ask the compiler to infer the return type of your procedure for you. In order to do this, you need to use the auto type:
proc message(recipient: string): auto =
  "Hello " & recipient

assert message("Dom") == "Hello Dom"
Although this is handy, you should specify the type explicitly whenever possible. Doing so makes it easier for you and others to determine the return type of a procedure, without needing to understand the procedure’s body.
Warning: Type inference
Type inference for procedures is still a bit experimental in Nim. You may find that it’s limited in some circumstances, especially if you’re used to more advanced forms of type inference, such as those found in Haskell or OCaml.
Procedure parameters
A procedure with multiple parameters can be defined by listing the parameters and separating them with the comma character:
proc max(a: int, b: int): int =
  if a > b: a else: b

assert max(5, 10) == 10
You don’t need to repeat the types of parameters if they’re specified consecutively:
proc max(a, b: int): int =
  if a > b: a else: b
Default parameters can be used to ask for arguments that can be optionally specified at the call site. You can introduce default parameters by assigning a value to a parameter using the equals character; the type can also be omitted in that case:
proc genHello(name: string, surname = "Doe"): string =
  "Hello " & name & " " & surname

assert genHello("Peter") == "Hello Peter Doe"                1
assert genHello("Peter", "Smith") == "Hello Peter Smith"     2
- 1 In this case, the default value for the surname argument is used.
- 2 In this case, the default value is overridden with the string literal “Smith”.
A procedure taking a variable number of parameters can be specified using the varargs type:
proc genHello(names: varargs[string]): string =
  result = ""                                                 1
  for name in names:                                          2
    result.add("Hello " & name & "\n")                        3

assert genHello("John", "Bob") == "Hello John\nHello Bob\n"
- 1 Initializes the result variable with a new string
- 2 Iterates through each of the arguments. You’ll learn more about for loops in section 2.4.
- 3 Adds the string “Hello” concatenated with the current argument and a newline character to the result variable
Procedure overloading
Overloading a procedure is a feature that you may not have come across yet, but it’s one that’s commonly used in Nim. Procedure overloading is the ability to define different implementations of procedures with the same name. Each of these procedures shares the same name but accept different parameters. Depending on the arguments passed to the procedure, the appropriate implementation is picked by the compiler.
As an example, consider a getUserCity procedure. It may take two parameters: firstName and lastName.
proc getUserCity(firstName, lastName: string): string =
  case firstName
  of "Damien": return "Tokyo"
  of "Alex": return "New York"
  else: return "Unknown"
Case statements
Case statements might still be new to you. They’ll be explained later in section 2.4.
This kind of procedure may be used to retrieve a person’s city of residence from a database, based on the name specified. You may also wish to offer alternative search criteria—something more unique, such as an ID number. To do this, you can overload the getUserCity procedure like so:
proc getUserCity(userID: int): string =
  case userID
  of 1: return "Tokyo"
  of 2: return "New York"
  else: return "Unknown"
This way, you can reuse the name, but you’re still able to use the different implementations, as shown here:
doAssert getUserCity("Damien", "Lundi") == "Tokyo"
doAssert getUserCity(2) == "New York
Anonymous procedures
Sometimes you may wish to pass procedures as parameters to other procedures. The following listing shows the definition of a new procedure, and how a reference to it can be passed to the filter procedure.
Listing 2.9. Using anonymous procedures
import sequtils
let numbers = @[1, 2, 3, 4, 5, 6]                                1
let odd = filter(numbers, proc (x: int): bool = x mod 2 != 0)    2
assert odd == @[1, 3, 5]                                         3
- 1 Definition of an immutable variable holding a list of numbers
- 2 The filter procedure used to filter out even numbers
- 3 Assertion to show the output
These procedures are called anonymous procedures because there’s no name associated with them. In listing 2.9, the anonymous procedure is highlighted in bold.
The @ symbol
The @ symbol creates a new sequence. You’ll learn more about it in the next section.
The anonymous procedure gets a single parameter, x, of type int. This parameter is one of the items in the numbers sequence. The job of this anonymous procedure is to determine whether that item should be filtered out or whether it should remain. When the procedure returns true, the item isn’t filtered out.
The filter procedure is the one doing the actual filtering. It takes two parameters: a sequence and an anonymous procedure. It then iterates through each item and uses the anonymous procedure it got to see whether it should filter the item out or keep it. The filter procedure then returns a new sequence that includes only the items that the anonymous procedure determined should be kept and not filtered out.
In listing 2.9, the resulting sequence will only contain odd numbers. This is reflected in the anonymous procedure, which checks whether dividing each item by 2 results in a remainder. If a remainder is produced, true is returned because that means the number is odd.
The syntax for anonymous procedures is a bit cumbersome. Thankfully, Nim supports some syntactic sugar for defining anonymous procedures and procedure types. The syntactic sugar isn’t part of the language but is instead defined in the standard library, so to use it you must import the future module. (The syntactic sugar is defined using macros, which you’ll learn about in chapter 9.)
Compare the following code to listing 2.9, and note the differences shown in bold:
import sequtils, future
let numbers = @[1, 2, 3, 4, 5, 6]
let odd = filter(numbers, (x: int) -> bool => x mod 2 != 0)
assert odd == @[1, 3, 5]
The syntactic sugar doesn’t actually make the definition that much shorter, but it does remove some of the noise. It can be shortened further using type inference: x => x mod 2 != 0. But keep in mind that this may not work in some cases. The compiler may not be able to infer the types for your anonymous procedure. In that case, you’ll need to explicitly state the types. The -> symbol is used to specify types.
Documentation
The documentation for each module (available on Nim’s website: http://nim-lang.org/) contains links under each procedure definition to the source code for that procedure. Take a look at it to learn more about the procedures mentioned in this book.
The -> symbol can also be used on its own in place of procedure types. For example, you can use it when defining a procedure that takes another procedure as a parameter.
For example, consider the following code:
proc isValid(x: int, validator: proc (x: int): bool) =
  if validator(x): echo(x, " is valid")
  else: echo(x, " is NOT valid")
It can be rewritten as follows:
import future
proc isValid(x: int, validator: (x: int) -> bool) =
  if validator(x): echo(x, " is valid")
  else: echo(x, " is NOT valid")
The proc keyword can be omitted, and the : is replaced by the -> symbol.
This ends the section on Nim basics. So far, this chapter has been very heavy with information, but don’t worry if you don’t remember everything that you’ve read or you don’t understand some concepts. The next chapter will put these ideas into practice and solidify your knowledge. You can also go back over this section at any time.
2.3. Collection types
Collections such as lists, arrays, sets, and more are incredibly useful. In this section, I’ll talk about the three most commonly used collection types in Nim: the array, seq, and set types.
2.3.1. Arrays
The array type represents a list of a static number of items. This type is similar to C arrays but offers more memory safety, as demonstrated in the following example:
var list: array[3, int]
list[0] = 1
list[1] = 42
assert list[0] == 1
assert list[1] == 42
assert list[2] == 0            1

echo list.repr                 2

echo list[500]                 3
- 1 The array contains three elements. Any elements that have not been set are given a default value.
- 2 This will output [1, 42, 0]. The repr procedure converts any variable into a string, but the resulting string sometimes contains debug information such as the memory address of the variable.
- 3 Compilation will fail with “Error: index out of bounds.”
Arrays are value types, just like int, float, and many others, which means they’re allocated on the stack. This is similar to C arrays, but it differs completely from Java’s arrays, which are reference types and are stored on the heap.
Arrays are static in size, so an array can’t change its size once it’s declared. This is why the compiler can give you an error when you try to access an index outside its bounds. In C, checks for index bounds aren’t made, so it’s possible to access memory that’s outside the bounds of the array.
Nim performs these checks at compile time and at runtime. The runtime checks are performed as long as the --boundsChecks option is not turned off.
Warning: The -d:release flag
Compiling with the -d:release flag will turn the bounds checks off. This will result in higher performance but less safety.
It’s possible to define arrays with a custom range. By default, arrays range from 0 to the number specified in the array type, but you can also specify the lower bound, as in this array of two integers:
var list: array[-10 .. -9, int]
list[-10] = 1
list[-9] = 2
This is useful when your array indices don’t start at 0.
An array constructor can be used to assign a list of items to the array when it’s defined:
var list = ["Hi", "There"]
You can iterate over most collection types using a for loop. Iterating over a collection type will yield a single item from the collection during each iteration. If you prefer to iterate over each index rather than each item, you can access an array’s bounds using the low and high fields and then iterate from the lowest index to the highest:
var list = ["My", "name", "is", "Dominik"]
for item in list:                              1
  echo(item)

for i in list.low .. list.high:                2
  echo(list[i])
- 1 Loops through each item
- 2 Loops through each index
2.3.2. Sequences
Arrays are static in size. You can’t add more items to them; you can only overwrite existing items with new data. This is where Nim’s sequences come in. They’re dynamic in size and can grow to as many items as needed (within the limits of your memory). You’ve already seen a few examples of sequences in the previous section.
Sequences are defined using the seq type:
var list: seq[int] = @[]
list[0] = 1                     1

list.add(1)                     2

assert list[0] == 1
echo list[42]                   3
- 1 Assigns 1 to the first item in the sequence. This will result in an index-out-of-bounds exception at runtime because there are currently no items in the sequence.
- 2 Appends 1 as an item to the list sequence
- 3 Attempts to access an item that doesn’t exist. An index-out-of-bounds exception will be raised.
Sequences are stored on the heap, and as such are garbage collected. This means that they need to be initialized before they’re used, just like strings.
var list: seq[int]
echo(list[0])
Accessing the items of an uninitialized sequence will result in a segmentation fault at runtime. Copy the preceding code into your favorite text editor and save it as segfault.nim. Then compile and run it. If you’re using Aporia, just press F5, or open a terminal and execute nim c -r segfault.nim. You should see that your program crashes with the following output:
Traceback (most recent call last)
segfault.nim(2)          segfault
SIGSEGV: Illegal storage access. (Attempt to read from nil?)
As long as your program isn’t compiled in release mode, any crashes will display a traceback that shows the procedure calls leading up to your program’s crash. In this case, the 2 in the parentheses corresponds to line 2 in the source code, echo(list[0]). This hints that list is nil, and that it must be initialized.
When using the sequence constructor syntax, you must be careful to specify the type of the sequence.
var list = @[]
This example won’t work because the compiler has no way of knowing what type of sequence you want to define. This isn’t a problem when you’re constructing a non-empty sequence: var list = @[4, 8, 15, 16, 23, 42]. In this case, the compiler knows that the sequence type is seq[int].
A sequence can be initialized in two ways: using the sequence constructor syntax (@[]), as in the previous example, and using the newSeq procedure. Each is more or less appropriate, depending on the use case.
The newSeq procedure provides another way to construct a sequence. It also offers an important optimization—you should use it when you know the size of the sequence ahead of time.
var list = newSeq[string](3)
assert list[0] == nil               1
list[0] = "Foo"                     2
list[1] = "Bar"
list[2] = "Baz"
list.add("Lorem")                   3
- 1 The items will exist but will not be initialized.
- 2 You can assign new values to them easily.
- 3 The seq can still grow in size; new items can be added.
The size of the sequence that you specify in the call to newSeq will correspond to the number of items that the new sequence will contain. The items themselves won’t be initialized, and you can still add more items to the sequence if you wish.
Iterating over a sequence is done in the same way as iterating over an array. But although sequences do have low and high fields, it’s more idiomatic to use the len field, which gives you the length of the sequence. The reason for this is that the low field for sequences is always 0.
let list = @[4, 8, 15, 16, 23, 42]
for i in 0 .. <list.len:
  stdout.write($list[i] & " ")
This outputs the following:
4 8 15 16 23 42
The range of iteration is inclusive, so you must subtract 1 from the length of the sequence in order to iterate fewer times. This is achieved by prefixing the length of the sequence with the < operator. You can also simply subtract 1, but using the < operator is more idiomatic.
You’ve already seen an example of manipulating sequences using the filter procedure. You can find more procedures that manipulate sequences in the system and sequtils modules.
2.3.3. Sets
The third collection type that I’ll show you is the set type, which stores a collection of distinct values. A set[int16], for example, stores a distinct collection of integers. But because of the nature of sets, only unique numbers can be stored.
A Nim set’s base type must be an ordinal type, which is a type with values that can be counted. The char type is ordinal because there’s a clear order for its values: A is followed by B, B is followed by C, and so on. A string isn’t an ordinal type because there’s no clear order for a string’s values.
This restriction only applies to the built-in set type. There’s another set type in the sets module called HashSet that supports any type as its base type. But the built-in set type is more efficient and thus should be used whenever possible.
The set type is a value type and so doesn’t need to be initialized.
var collection: set[int16]
assert collection == {}
A set is constructed using {}. A list of values is specified inside the curly brackets, and items are separated by commas.
A set pays no attention to the order of the items that it stores, so you can’t access items in it via an index. Sets are useful for cases where you want to check for the presence of a certain value in a collection—this is where the in keyword comes in.
let collection = {'a', 'x', 'r'}
assert 'a' in collection
Although they’re simple, sets can be used to perform some interesting checks.
let collection = {'a', 'T', 'z'}
let isAllLowerCase = {'A' .. 'Z'} * collection == {}
assert(not isAllLowerCase)
One of the operations that can be performed on sets is the intersection of two sets using the * operator. This returns a new set containing the values that the intersected sets have in common. The preceding example uses this to check whether the collection set contains any uppercase letters. A set constructor can contain ranges of items too: the range 'A' .. 'Z' is deduced by the compiler to contain all the uppercase letters.
Sets are often used in the standard library to represent a collection of unique flags. In other languages such as C, flags may be represented by an integer, which is interpreted as a sequence of Boolean bits. Compared to sets, this approach is very unsafe and often leads to errors.
I encourage you to experiment with these collection types to gain a deeper insight into how they work. You’ll be using these types throughout the book and whenever you write Nim programs.
2.4. Control flow
There are many ways to control the flow of execution in Nim. The most common is the if statement, which you’ve already seen in action in section 2.1.
The if statement is a conditional statement: when its condition is true, its body is executed. Nim’s if statement is similar to the if statement in other languages. It supports multiple “else if” blocks specified using the elif keyword and an “else” block using the else keyword.
if age > 0 and age <= 10:
  echo("You're still a child")
elif age > 10 and age < 18:
  echo("You're a teenager")
else:
  echo("You're an adult")
Switch statements are also supported, although in Nim they’re known as case statements because they begin with the case keyword. They reduce repetition when you need to handle many different conditions.
case variable
of "Arthur", "Zaphod", "Ford":
  echo("Male")
of "Marvin":
  echo("Robot")
of "Trillian":
  echo("Female")
else:
  echo("Unknown")
Where the Nim case statement differs from the ones in other languages is in its lack of fall-through, which is the continuing execution of further case statements until a break keyword is used. Fall-through enables multiple values to match the same code block, but it usually requires a large number of break keywords to be used. Nim still allows multiple values to match the same code block, but it uses a different syntax.
An of branch in a case statement can contain a list of values to be matched, as well as a range, similar to the ranges used in set constructors. For example, matching every number from 0 to 9 can be done like this: of 0 .. 9:.
In Nim, every statement can be an expression. One case where this is useful is when you wish to assign a value depending on a condition:
let ageDesc = if age < 18: "Non-Adult" else: "Adult"
You can use the case statement as an expression in a similar way.
The flow of your program can also be controlled using loops. There are two looping statements in Nim. You’ve already seen examples of the for loop. There’s also a while loop that you can use.
The while loop is the most basic of the looping statements. It consists of a condition that gets evaluated before each loop. If that condition is true, the loop continues.
var i = 0              1
while i < 3:           2
  echo(i)              3
  i.inc                4
- 1 Declares a new mutable variable and assigns it the value 0
- 2 Loops while the variable i is less than 3
- 3 Displays the current value of the variable i
- 4 Increments the i variable (adds 1 to its current value)
This code would output the following:
0
1
2
Just like in other languages, the continue and break keywords allow you to control a loop. The continue keyword will skip the current iteration and restart from the top of the loop body. The break keyword will end the iteration.
You can also nest looping statements, and you may wonder how to break out of multiple loops at once. This can be solved by specifying a label for the break keyword. The label must be defined by the block keyword, and breaking to that label will cause the execution to break out of every loop inside that block.
block label:
  var i = 0
  while true:                        1
    while i < 5:                     2
      if i > 3: break label          3
      i.inc                          4
                                     5
- 1 This loop will iterate forever.
- 2 Loops while variable i is less than 5
- 3 Once i is greater than 3, jumps out of the block named label
- 4 Increments the variable i
- 5 Execution will resume here once break label is called.
Another feature of the block keyword is that it introduces a new scope whenever it’s used.
Nim supports the concept of iterators. These are similar to procedures, but they yield values to their caller multiple times, instead of returning just once. An iterator can be specified in a for statement, and it’s then advanced after each iteration. The value that it yields is available in the body of the for statement.
iterator values(): int =
  var i = 0
  while i < 5:
    yield i
    i.inc

for value in values():
  echo(value)
The preceding example produces the following output:
0
1
2
3
4
There are many general iterators that work on sequences and other collection types, and there are also specific iterators like the walkFiles iterator, which, when given a pattern, iterates over the files in the current directory that match that pattern. For example, to find all the files ending with a .nim extension in the current directory, you’d do something like this:
import os                                  1
for filename in walkFiles("*.nim"):        2
  echo(filename)                           3
- 1 Imports the os module that defines the walkFiles iterator
- 2 Iterates over each filename with the .nim extension
- 3 Displays the filename during each iteration
The for loop in Nim is most similar to the one in Python, as shown in figure 2.2.
Figure 2.2. for loop syntax in Nim

In Python, you can iterate over any object that defines the __iter__ method, and this can be done implicitly without needing to call the __iter__ method in the for loop. Nim supports a similar mechanism:
for item in @[1, 2, 3]:
  echo(item)
Nim will implicitly call an iterator by the name of items. Which specific items iterator will be called depends on the type of the value specified after the in keyword; in this case it’s seq[int].
If an items iterator that matches the type can’t be found, the compilation will fail with a type mismatch error, as in this example:
for i in 5:
  echo i
Here’s the compilation output:
file.nim(1, 10) Error: type mismatch: got (int literal(5))
but expected one of:
system.items(a: array[IX, T])
system.items(E: typedesc[enum])
system.items(s: Slice[items.T])
system.items(a: seq[T])
system.items(a: openarray[T])
system.items(a: string)
system.items(a: set[T])
system.items(a: cstring)
The items iterator is only invoked when you specify one variable in the for loop; a pairs iterator is invoked for two variables. The values that the pairs iterator typically returns are the current iteration index and the current item at that index:
for i, value in @[1, 2, 3]: echo("Value at ", i, ": ", value)
The preceding code will produce this output:
Value at 0: 1
Value at 1: 2
Value at 2: 3
There’s no default name for an iterator yielding three values or more.
2.5. Exception handling
Exceptions are yet another method for controlling flow. Raising an exception will cause the execution of a program to cease until the exception is caught or the program exits.
An exception is an object consisting of a message describing the error that occurred. A new exception is raised using the raise keyword. You can create new exceptions using the newException procedure.
Handling exceptions in Nim is very similar to Python. Exceptions are caught using a try statement, with one or more except branches specifying the exception type to be handled.
One of the most powerful features of Nim is its brilliant tracebacks. When an exception is raised and not caught, your program will display a stack traceback and quit.
Listing 2.10. Raising an exception
proc second() =
  raise newException(IOError, "Somebody set us up the bomb")

proc first() =
  second()

first()
The preceding code will produce the following output:
Traceback (most recent call last)
file.nim(7)              file
file.nim(5)              first
file.nim(2)              second
Error: unhandled exception: Somebody set us up the bomb [IOError]
A traceback gives you a list of events leading up to the crash of your program. It’s a very useful debugging tool. Each line in the traceback is a call to a procedure. The number in parentheses is the line number where the call was made, and the name on the right is the procedure that was called.
These tracebacks will be your best friend throughout your time working with the Nim programming language.
In order to stop your program from crashing, you must handle the exceptions and decide what your program should do when these exceptions occur. You can handle exceptions by wrapping the affected code in a try statement. The top part of a try statement consists of the try keyword, followed by a colon, which is then followed by indented code. The bottom part of a try statement consists of one or more except branches—each except branch matches a specific exception that should be caught. If an except branch omits the exception type, then all exceptions are caught. When an exception is matched, the corresponding except branch’s code is executed.
Listing 2.11. The try statements
try:
                       1
except ErrorType:
                       2
except:
                       3
- 1 Code statements that will be checked for exceptions
- 2 Code statements that will be executed when the code under the try raises an ErrorType exception
- 3 Code statements that will be executed when the code under the try raises another type of exception
Let’s rewrite listing 2.10 to handle the exception by using a try statement.
Listing 2.12. Handling an exception using a try statement
proc second() =
  raise newException(IOError, "Somebody set us up the bomb")          1

proc first() =
  try:                                                                2
    second()
  except:                                                             3
    echo("Cannot perform second action because: " &                   4
      getCurrentExceptionMsg())                                       5

first()
- 1 Raises a new IOError exception
- 2 The try statement will catch any exceptions raised in its body.
- 3 Catches all exceptions
- 4 Displays a message stating that the second action couldn’t be performed and displaying the message of the exception that was caught
- 5 Returns the message of the exception that was just caught
The exception is raised in the second procedure, but because it’s called under the try statement, the exception is caught. The except branch is then executed, leading to the following output:
Cannot perform second action because: Somebody set us up the bomb
You should now know the basics of exception handling in Nim and be able to debug and handle simple exceptions on your own. Exceptions are a very important feature of the Nim programming language, and we’ll continue to discuss them throughout this book.
2.6. User-defined types
The ability to define custom data structures is essential in many programming languages. Defining them in Nim is simple, and although they support some OOP features, their semantics don’t unnecessarily bog you down in any OOP concepts.
Nim features three different kinds of user-defined types: objects, tuples, and enums. This section explains their main differences and use cases.
2.6.1. Objects
A basic object definition in Nim is equivalent to a C struct type and can be passed to C via the FFI. All types are defined under a type section. An object definition can be placed under the type keyword or alongside it. The definition starts with the name of the type, followed by =, the object keyword, a new line, and then an indented list of fields:
type
  Person = object
    name: string
    age: int
A type section can define multiple types, and you should collect related types under it. Just like procedures, types must be defined above the code in which they’re used.
A variable utilizing the Person type can be declared just like any other variable:
var person: Person
You can initialize the Person type using the object construction syntax:
var person = Person(name: "Neo", age: 28)
You can specify all, some, or none of the fields. The type is an object, so its memory will be allocated on the stack. Data types that are stored on the stack can’t be nil in Nim, so this extends to the Person type.
When you’re defining a new variable, you can’t change whether it’s defined on the stack or on the heap. You must change the type definition itself. You can use the ref object keywords to define a data type that will live on the heap.
Types defined with the ref keyword are known as reference types. When an instance of a reference type is passed as a parameter to a procedure, instead of passing the underlying object by value, it’s passed by reference. This allows you to modify the original data stored in the passed variable from inside your procedure. A non-ref type passed as a parameter to a procedure is immutable.
Listing 2.13. Mutable and immutable parameters
type
  PersonObj = object                     1
    name: string
    age: int
  PersonRef = ref PersonObj              2

proc setName(person: PersonObj) =
  person.name = "George"                 3

proc setName(person: PersonRef) =
  person.name = "George"                 4
- 1 When both non-ref and ref types are defined, the convention is to use an Obj suffix for the non-ref name, and a Ref suffix for the ref name.
- 2 In this case, you don’t need to repeat the definition.
- 3 This will fail. You can’t modify a non-ref parameter because it might have been copied before being passed to the procedure. The parameter is said to be immutable.
- 4 This will work because PersonRef is defined as a ref.
The preceding listing gives you a small taste of the behavior that ref and non-ref types exhibit. It also introduces the syntax used to access the fields of an object and to assign new values to these fields.
2.6.2. Tuples
Objects aren’t the only way to define data types. Tuples are similar to objects, with the key difference being that they use structural typing, whereas objects use nominative typing.
The key difference between nominative typing and structural typing is the way in which equivalence of types is determined.
Consider the following example:
type
  Dog = object
    name: string

 Cat = object
   name: string

let dog: Dog = Dog(name: "Fluffy")
let cat: Cat = Cat(name: "Fluffy")

echo(dog == cat)                    1
- 1 Error: type mismatch: got (Dog, Cat)
The compiler gives an error because the Dog and Cat types aren’t equivalent. That’s because they were defined separately with two different names.
Now let’s replace the object with tuple:
type
  Dog = tuple
    name: string

  Cat = tuple
    name: string

let dog: Dog = (name: "Fluffy")
let cat: Cat = (name: "Fluffy")
echo(dog == cat)                    1
1 true
In this case, the compiler is happy to compile this code. The resulting executable displays the message “true,” because the dog and cat variables contain the same data. The compiler doesn’t look at the names of the type; instead, it looks at their structure to determine whether they’re equivalent.
That’s the fundamental difference between tuples and objects.
There are many different ways that tuples can be defined. The two most compact ways are shown here:
type
  Point = tuple[x, y: int]
  Point2 = (int, int)
You’ll note that a tuple doesn’t need to define the names of its fields. As long as the order and type of the values in two tuple types match, their types are considered to be the same.
let pos: Point = (x: 100, y: 50)
doAssert pos == (100, 50)
When a tuple’s fields have no names, you can still access them by using the indexing operator: []. When a name is defined, the fields can be accessed in the same way that object fields can be accessed.
Nim also supports tuple unpacking. A tuple’s fields can be assigned directly to multiple identifiers. Here’s an example:
let pos: Point = (x: 100, y: 50)
let (x, y) = pos                           1
let (left, _) = pos                        2
doAssert x == pos[0]
doAssert y == pos[1]
doAssert left == x
- 1 You can specify any name, as long as the number of fields on the left of the equals sign is the same as the number of fields in the tuple.
- 2 You can use a single underscore (_) in order to discard fields.
Tuples are useful for lightweight types with few fields. They’re most commonly used as a way to return multiple values from procedures.
2.6.3. Enums
An enum or enumerated type is the third and final type that I’ll introduce in this section. Nim enums are very similar to ANSI C’s enums. An enum defines a collection of identifiers that have some meaning attached to them.
In Nim, enums have an order attached to them, which means they’re ordinal types and can be used in case statements and as the base type of sets.
Listing 2.14. Enumerator type
type
  Color = enum
    colRed,
    colGreen,
    colBlue

let color: Color = colRed
Listing 2.14 defines a new Color enum. You’ll note that when specifying the values, you don’t need to prefix them with the name of the enum—I added a prefix to each value to make them a little bit more distinguishable. There’s a pragma called pure that makes it mandatory to prefix each of the enum’s values with the name of that enum, followed by a dot.
type
  Color {.pure.} = enum
    red, green, blue

let color = Color.red
Depending on your use case, you may wish to prefix the enum values manually with something that’s shorter than the enum’s name, or you can let Nim enforce the prefix automatically with the pure pragma.
Pragmas are language constructs that specify how a compiler should process its input. They’re used in Nim fairly often, and depending on their type, they can be applied to the whole file or to a single definition.
You can also define your own pragmas using macros, which you’ll learn more about in chapter 9.
For a list of pragmas, take a look at the Nim manual: http://nim-lang.org/docs/manual.html#pragmas.
Enums can be used to create a collection of meaningful identifiers; they’re most commonly used to denote flags.
This section gave you a small taste of the different ways types can be defined in Nim. Nim’s type system is very powerful, and this was by no means an extensive description of it all. You’ll find out more about Nim’s type system throughout this book. Chapter 9, in particular, will introduce you to generics, which are a very powerful feature of Nim’s type system.
2.7. Summary
- Nim uses indentation to delimit scope and uses # for comments.
- The basic types include int, float, char, string, and bool.
- Mutable and immutable variables can be defined using the var and let keywords, respectively.
- A value assigned to a constant must be computable at compile time.
- Procedures are defined using the proc keyword.
- The result variable is implicitly defined in every procedure with a return type.
- An array stores a constant number of items.
- A sequence can grow dynamically at runtime.
- The flow of your application can be controlled via the if and case statements.
- One or more statements can be executed multiple times with the while statement.
- Collection types can be iterated through using the for statement.
- A try statement can be used to handle exceptions at runtime.
- Multiple different data types can be defined under a single type section.
- Non-reference types can’t be modified from inside a procedure.
- Tuples can be used to return multiple values from a single procedure.