Table of Contents for
Learning OpenWhisk
 Learning OpenWhisk
Published by
O'Reilly Media, Inc., 2019
Learning OpenWhisk
Published by
O'Reilly Media, Inc., 2019
Chapter 3. OpenWhisk CLI and Javascript API
OpenWhisk applications are composed by some “entities” that you can manipulate either using a command line interface or programmatically in javascript code.
The command line interface is the wsk command line tools, that can be used directly on the command line or automated through scripts. You can also use Javascript using an API crafted explicitly for OpenWhisk. They are both external interfaces to the REST API that OpenWhisk exposes. Since they are both two different aspects of the same thing (talking to OpenWhisk) they are both covered in this chapter.
Before we go deeper through the details of the many examples covering design patterns in the next chapters, we need to be familiar with the OpenWhisk API.
The API is used frequently to let multiple actions to collaborate. This chapter is hence a key chapter since the API is critical to writing applications that leverage the specific OpenWhisk features.
We already quickly saw the fundamental entities of OpenWhisk in the practical example in Chapter 2, but here we recap them here for convenience and clarity:
-
Packages: they are a way to grouping actions together, also they provide a base URL that can be used by web applications.
-
Actions: the building blocks of an OpenWhisk application, can be written in any programming language; they receive input and provide an output, both in JSON format.
-
Sequences: actions can be interconnected, where the output of action becomes the input of another, creating, in fact, a sequence.
-
Triggers: they are entry points with a name and can be used to activate multiple actions.
-
Rules: a rule associate a trigger with an action, so when you fire a trigger, then all the associated actions are invoked.
-
Feeds: they are specially crafted actions, implementing a well-defined pattern; its purpose is connecting events provided by a package with triggers defined by a consumer.
The wsk command
Now let’s give an overview of the command line interface of OpenWhisk, namely the command wsk.The wsk command is composed of many commands, each one with many subcommands. The general format is:
wsk <COMMAND> <SUB-COMMAND> <PARAMETERS> <FLAGS>
Note that <PARAMETERS> and <FLAGS> are different for each <SUBCOMMAND>, and for each <COMMAND> there are many subcommands.
The CLI itself is self-documenting and provides help when you do not feed enough parameters to it. Just typing wsk you get the list of the main commands. If you type the wsk command then the subcommand you get the help for that subcommand.
For example, let’s see wsk output (showing the command) and the more frequently used command, action, also showing the more common subcommands, shared with many others:
$ wsk Available Commands: action work with actions activation work with activations package work with packages rule work with rules trigger work with triggers property work with whisk properties namespace work with namespaces list list entities in the current namespace $ wsk action create create a new actionupdate update an existing action
invoke invoke action get get action
delete delete action
list list all action
createavailable for actions, packages, rules and triggersupdateavailable for actions, packages, rules and triggersgetavailable for actions, packages, rules and triggers, and also for activations, namespaces and propertiesdeleteavailable for actions, package, rule and triggers
listavailable for actions, package, rule and triggers, and also for namespace and for everything.
Tip
Remembering that commands are the entities and the subcommands are C.R.U.D. (Create, get/list for Retrieve, Update, Delete) gives you a good mnemonic of how the whole wsk command works. Of course, there are individual cases, but we cover those in the discussion along the chapter.
Subcommands also have flags, some specific for the subcommand. In the rest of the paragraph, we discuss all the subcommands. We provide the details of interesting flags as we meet them.
Configure the wsk command
The wsk command has many “properties” you can configure to access to an OpenWhisk environment. When you use the IBM Cloud, those properties are actually set for you by the ibmcloud main command. If you have a different OpenWhisk deployment, you may need to change the properties manually to access it.
You can see the currently configured properties with:
$ wsk property get Client key whisk auth xxxxx:YYYYY
the API authentication key (replaced in the example with
xxxxx:YYYYY) - your own will be differentthe OpenWhisk host you connect to control OpenWhisk with the CLI - depends on your location
your current namespace (the value
_is a shorthand for you default namespace)
If you install a local OpenWhisk environment, you need to set those properties using wsk property set manually. In particular, you need to set the whisk auth and the whisk host properties with values provided by your local installation.
OpenWhisk Entity Names
Let’s see how we name things. As you may already know, in OpenWhisk we have the following entities with a name:
-
packages
-
actions
-
sequences
-
triggers
-
rules
-
feeds
There are precise naming conventions for them. Furthermore, those conventions are reflected in the structure of the URL used to invoke the various elements of OpenWhisk.
First and before all, each user is placed in a namespace, and everything a user creates, belong to it. It acts as a workspace and also provides a base URL for what a user creates. Credentials for a user allows access to all the resources in its namespace.
For example, when I registered in the IBM Cloud, my namespace was /openwhisk@sciabarra.com_dev/. It is my username followed by _dev (for development).
You can create a namespace in an OpenWhisk installation if you are authorized, otherwise, a namespace is created for you by the system administrator.
Under a namespace you can create triggers, rules, actions and packages, so they will have names like:
-
/openwhisk@sciabarra.com_dev/a-triggger -
/openwhisk@sciabarra.com_dev/a-rule -
/openwhisk@sciabarra.com_dev/a-package -
/openwhisk@sciabarra.com_dev/an-action
When you create a package, you can put in its actions and feeds. So for example below the package a-package you can have:
-
/openwhisk@sciabarra.com_dev/a-package/another-action -
/openwhisk@sciabarra.com_dev/a-package/a-feed
To recap:
-
The general format for entities is:
/namespace/package/entity, but it can be reduced to/namespacke/entity -
Under a
namespaceyou can create triggers, rules, package, and actions but not feeds. -
Under a
packageyou can create actions and feeds, but not triggers, rules, and other packages.
Note
Most of the time you do not need to specify the namespace. If you specify an action as a relative action (not starting with /) it will be placed in your current namespace. Note that the special namespace name of _ means “your current namespace” and the full namespace name automatically replace it.
Define Packages
In OpenWhisk, according to the naming conventions, all the entities are grouped in a namespace. We can put actions under a namespace.
Below a namespace, you can create packages to bundle actions together. A package is useful for two main purposes:
-
group related actions together, to reuse them and share with others
-
provide base a URL to those related actions, useful for actions that refer each other, like in web applications.
However, it is usually convenient to further groups actions. Under a namespace, we can create packages, and put action under them. Packages are hence useful for grouping actions (and feeds, that are just actions too), treating them as a single unit. Furthermore, a package can also include parameters.
Let’s do an example. We can just create a package sample, also providing a parameter, as follows.
$ wsk package create sample -p email michele@sciabarra.com
ok: created package basics
Tip
Parameters of a package are available to all the actions in a package.
Now you can list packages, get`information from packages, `update it (for example with different parameters) and finally delete it.
$ wsk package list
packages
/openwhisk@sciabarra.com_dev/sample                                   private
/openwhisk@sciabarra.com_dev/basics                                   private
/openwhisk@sciabarra.com_dev/contact                                   private
/openwhisk@sciabarra.com_dev/contactdb                                 private
$ wsk package update sample -p email openwhisk@sciabarra.com
ok: updated package sample
$ wsk package get sample -s
package /openwhisk@sciabarra.com_dev/sample: Returns a result based on parameter email
   (parameters: *email)
$ wsk package delete sample
ok: deleted package basics
here we used the parameter
-sto summarize information from the package
Now let’s see another essential function of a package: binding.
OpenWhisk allows to import (or bind) to your namespace, packages from a third party, to customize them for your purposes.
Note
Keep in mind that credentials of a user allow access to all the resources under a namespace. As a result, to bind a package in our namespace has the effect of making it accessible to the other actions in the namespace.
For example, let’s review first the packages available in the IBM cloud. Of course, this cloud includes their solution for everyday needs like databases and message queues. The database available in the IBM Cloud is a scalable version of the popular no-SQL database CouchDB, i.e., Cloudant.
A package for Cloudant is available, as we can see below, and all we need to do to use it is to bind it. In the example below, we use the configuration file cloudant.json. How to retrieve the configuration file is described in Chapter 2.
$ wsk package list /whisk.system packages
We are listing the packages available in the IBM Cloud. I edited and shortened the output for clarity.
We are inspecting the Cloudant package. We are limiting to see only the first two lines, those describing the package.
Note here the required parameters to use the database
we created here the binding to make the database accessible
We are using the file
cloudant.jsonfor the specifyinghost,usernameandpassword, and providing thedbnameon the command line.
Tip
Two common flags, available also for actions, feed and triggers are -p and -P. With -p <name> <value> you can specify a parameter named <name> with value <value>. With the -P you can put some parameters in a JSON file that is assumed to be a map.
Create Actions
The subcommand wsk actions let you manipulate actions.
The more common subcommands are the CRUD actions to list, create, update and delete actions. Let’s demonstrate them with some examples.
We create and use a simple now action for our examples:
function main(args) {
  return { body: Date() }
}
Now, if we want to deploy this simple action in the package basics we do:
$ wsk package update basics
Ensuring we have a
basicspackageCreate the action from the file stored in
basics/now.js
Tip
You could omit the basics and place the action in the namespace and not in a package. We do not advise to do so, however, because gathering your actions in packages is always a good idea to improve modularity and reuse.
Now that the action has been deployed, we can invoke it. The simplest way is to call it as:
$ wsk action invoke basics/now
ok: invoked /_/basics/now with id fec047bc81ff40bc8047bc81ff10bc85
Wait a minute… where is the result? Actually, actions in OpenWhisk are by default asynchronous, so what you get usually is just an id (called activation id) to retrieve the result after the action completed. We discuss activations in detail in the next paragraph.
If we instead we want to see the result immediately, we can provide the flag -r or --result. It blocks until we get an answer. So:
$ wsk action invoke basics/now -r
{
    "body": "Thu Mar 15 2018 14:24:39 GMT+0000 (UTC)"
}
Great. However, what is if want to access that action from the web? We can retrieve an URL with get and --url.
If we leave out the --url we get a complete description of the action in JSON format:
$ wsk action get basics/now --url
https://openwhisk.eu-gb.bluemix.net/api/v1/namespaces/openwhisk%40sciabarra.com_dev/actions/basics/now
$ wsk action get basics/now
{
    "namespace": "openwhisk@sciabarra.com_dev/basics",
    "name": "now",
    "version": "0.0.1",
    "exec": {
        "kind": "nodejs:6",
        "code": "function main(args) {\n  return { body: Date() }\n}\n\n",
        "binary": false
    },
    "annotations": [
        {
            "key": "exec",
            "value": "nodejs:6"
        }
    ],
    "limits": {
        "timeout": 60000,
        "memory": 256,
        "logs": 10
    },
    "publish": false
}
However, if we try to use the URL to run the action we may have a nasty surprise:
$ curl https://openwhisk.eu-gb.bluemix.net/api/v1/namespaces/openwhisk%40sciabarra.com_dev\
    /actions/basics/now
{"error":"The resource requires authentication, which was not supplied with the request",\
    "code":9814}
The fact is: all the actions (and everything else) in OpenWhisk is accessible with a REST API. However, by default, the actions are protected and not accessible without authentication.
However, it is possible to mark an action as publicly accessible with the flag --web true flag when creating or updating it. We call them web actions.
A web action is supposed to produce web output so that you can view with a web browser. There are some other constraints on Web action we discuss later. For now, focus on the fact the answer must have a body property that is rendered as the body of an HTML page.
Now, since our action was not a web one, we must change it. This case is an opportunity to demonstrate how the update command that can change an action. Then we can immediately retrieve its URL and invoke it directly.
$ wsk action update basics/now --web true
ok: updated action basics/now
$ curl $(wsk action get basics/now --url | tail -1)
Thu Mar 15 2018 14:46:56 GMT+0000 (UTC)
We saw the create and update commands for managing actions. We now complete the demonstration of the CRUD commands also showing the list and the delete command:
$ wsk action list basics
actions
/openwhisk@sciabarra.com_dev/basics/now                               private nodejs:6
$ wsk action delete basics/now
ok: deleted action basics/now
$ wsk action list basics
actions
Chain Sequences of Actions
An essential feature of OpenWhisk is the ability to chain action in sequences, creating actions that use, as an input, the output of another action, as shown in Figure Figure 3-1.
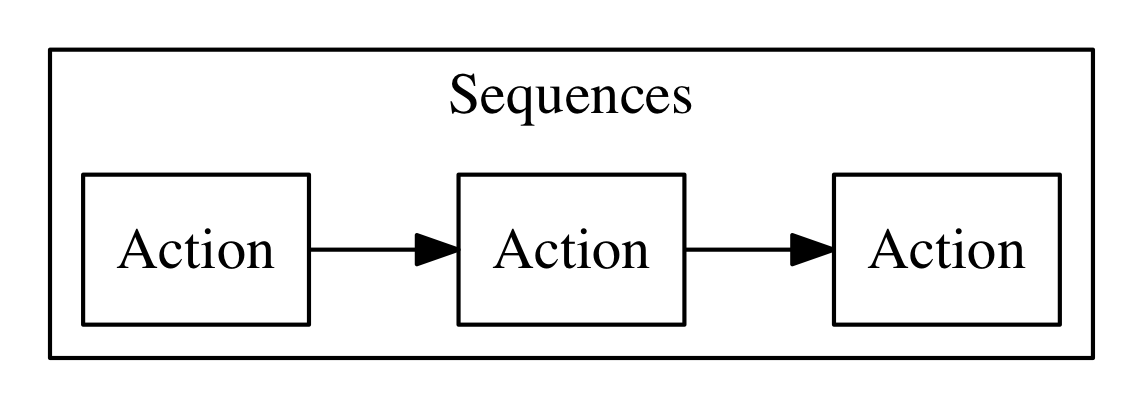
Figure 3-1. Actions chained in a sequence
Let’s do a practical example of a similar action sequence. We implement a word count application, separating it in two actions, put in a sequence. The first action splits the input, that is supposed to be a text file, in “words”, while the second retrieves the words and produce a map as a result. In the map, each word is then shown with its frequency.
Let’s start with the first action, split.js, as follows:
function main(args) {
    let words = args.text.split(' ')
    return {
        "words": words
    }
}
You can deploy and test it, feeding a simple string:
$ wsk action update basics/split basics/split.js
ok: updated action basics/split
$ wsk action invoke basics/split \
  -p text "the pen is on the table" -r \
  | tee save.json
{
    "words": [
        "the",
        "pen",
        "is",
        "on",
        "the",
        "table"
    ]
}
note here we are saving the output in a file
save.json
Now it is time to do the second step, with this count.js actions:
function main(args) {
    let words = args.words
    let map = {}
    let n = 0
    for(word of words) {
       n = map[word]
       map[word] = n ? n+1 : 1
    }
    return map
}
We can now deploy it and check the result, feeding the output of the first action as input:
$ wsk action update basics/count count.js
ok: updated action basics/count
$ wsk action invoke basics/count -P save.json -r
{
    "is": 1,
    "on": 1,
    "pen": 1,
    "table": 1,
    "the": 2
}
Now we have two actions, the second able to take the output of the first as input, we can create a sequence:
wsk action update basics/wordcount \
  --sequence basics/split,basics/count
note here we are specifying a comma-separated list of existing action names
The sequence can be now invoked as a single action, so we can feed the text input and see the result:
$ wsk action invoke basics/wordcount -r -p text  \
"can you can a can as a canner can can a can"
{
    "a": 3,
    "as": 1,
    "can": 6,
    "canner": 1,
    "you": 1
}
Actions including Libraries
In the simplest case, your action is just a single javascript file. However, as we are going to see, very often commonly you have some code you want to share and reuse between actions.
The best way to handle this situation is to have a library of code that you can include for every action and that you deploy with your actions.
Let’s consider this example: a couple of utility functions that format a date in a standard format “YYYY/MM/DD” and time in the standard format “HH:MM:SS”.
function fmtDate(d) {
    let month = '' + (d.getMonth() + 1),
        day = '' + d.getDate(),
        year = d.getFullYear();
    if (month.length < 2) month = '0' + month;
    if (day.length < 2) day = '0' + day;
    return year + "/" + month + "/" + day
}

function fmtTime(d) {
    let hour =  ''+ d.getHours(),
        minute = '' + d.getMinutes()
        second = '' + d.getSeconds()

    if(hour.length < 2) hour = "0"+hour
    if(minute.length < 2) minute = "0"+minute
    if(second.length <2 ) second = "0"+second

    return hour + ":" + minute + ":" + second
}
You may, of course, copy this code in each action file, although it is pretty awkward to maintain. Just consider that when you change the function, you have to change it in all the copies of the functions across multiple files. Of course, there is a better way.
Since actions are executed using NodeJs, you have the standard export/require mechanism available for writing your actions.
As a convention, we are going to place our shared code in a subdirectory named lib, and we treat them as modules.
So you should place the format date-time listing above in a file lib/datetime.js and add at the end the following code:
module.exports = {
    fmtTime: fmtTime,
    fmtDate: fmtDate
}
Now you can use the two functions in one action. For example let consider an action named clock that returns the date if invoked with date=true, the time if invoked with time=true, or both if the date and time parameters are specified.
Our action will starts requiring the library with:
var dt = require("./lib/datetime.js")
This way you can access the two functions as dt.fmtDate and dt.fmtTime. Using those functions, we can easily write the main body, called clock.js:
function main(args) {
  let now = args.millis ? new Date(args.millis) : new Date()
  let res = " "
  if(args.date)
    res = dt.fmtDate(now) + res
  if(args.time)
    res = res + dt.fmtTime(now)
  return {
    body: res
  }
}
exports.main = main
Now, we have to deploy the action, but we also need to include the library. How can we do this in OpenWhisk?
The solution is to deploy not a single file but a zip file that includes all the files we want to run as a single action.
When deploying multiple files, you need either to put your code in a file index.js or to provide a package.json saying which one is the main file.
Let’s perform this procedure with the following commands:
$ cd basics
$ echo '{"main":"clock.js"}' >package.json
$ zip -r clock.zip clock.js package.json lib
  adding: clock.js (deflated 40%)
  adding: package.json (stored 0%)
  adding: lib/ (stored 0%)
  adding: lib/datetime.js (deflated 57%)
$ wsk action update basics/clock clock.zip \
  --kind nodejs:6
ok: updated action basics/clock
creating a zip file with subdirectories, so the
-rswitch is requiredspecifying the runtime we want to use is
nodejs:6
Note
When we deploy an action as a zip file, we have to specify the runtime to use with --kind nodejs:6, because the system is unable to figure out by itself just from the file name.
Let’s test it:
$ wsk action invoke basics/clock -p date true -r
{
    "body": "2018/03/18 "
}
$ wsk action invoke basics/clock -p time true -r
{
    "body": " 15:40:42"
}
Inspect Activations
In the preceding paragraph, we saw when we invoke an action without waiting for the result; we receive as an answer just an invocation id.
This fact brings us to the argument of this paragraph: the subcommand wsk activation to manage the results of invocations.
To explore it, let’s create a simple echo.js file:
function main(args) {
 console.log(args)
 return args
}
Now, let’s deploy and invoke it (with a parameter hello=world) to get the activation id:
$ wsk action create basics/echo echo.js
ok: created action basics/echo
$ wsk action invoke basics/echo -p hello world
ok: invoked /_/basics/echo with id 82deb0ec37524a9e9eb0ec37525a9ef1
As we explained in Chapter 1, when actions are invoked, they are identified by an activation id, used to save and retrieve results and logs from the database.
Now, the long alphanumeric (actually, hexadecimal) identifier displayed is the activation id. We can now use with it the option result to get the result, and logs to get the logs.
$ ID=$(wsk action invoke basics/echo -p hello world \
  | awk '{ print $6}')
$ wsk activation result $ID
{
    "hello": "world"
}
$ wsk activation logs $ID
2018-03-15T18:17:36.551486467Z stdout: { hello: 'world' }
The activation subcommand has another two useful options.
One is list. It will return a list of all the activations in chronological order. Since the list can be very long, it is useful always to use the option --limit <n> to see only the latest <n>:
$ wsk activation list --limit 4
activations
82deb0ec37524a9e9eb0ec37525a9ef1 echo
219bacbdb838449d9bacbdb838149de2 echo
1b75cd02fd1f4782b5cd02fd1f078284 echo
6fa117115aa74f90a117115aa7cf90e0 now
Another useful option (and probably the most useful) is poll. With this option, you can continuously display logs for actions as they happen. It is a handy option for debugging because let you to monitor what is going on in the remote serverless system.
Tip
you can poll for just an action or for all the actions at the same time.
An example of what you can see when you type wsk activation logs basics/echo is shown in Figure [IMAGE TO COME]. We split the terminal into two panels. You can notice in the panel of the terminal that we invoked the action echo twice. The first one was without parameters, while the second one with one parameter. In the other panel, you can see the results.
Manage Triggers and Rules
Now let’s see how to create a trigger.
A trigger is merely a name for an arbitrary event. A trigger by itself does nothing. However with the help of rules, it becomes useful, because when a trigger is activated, it invokes all the associated rules, as shown in Figure Figure 3-2.
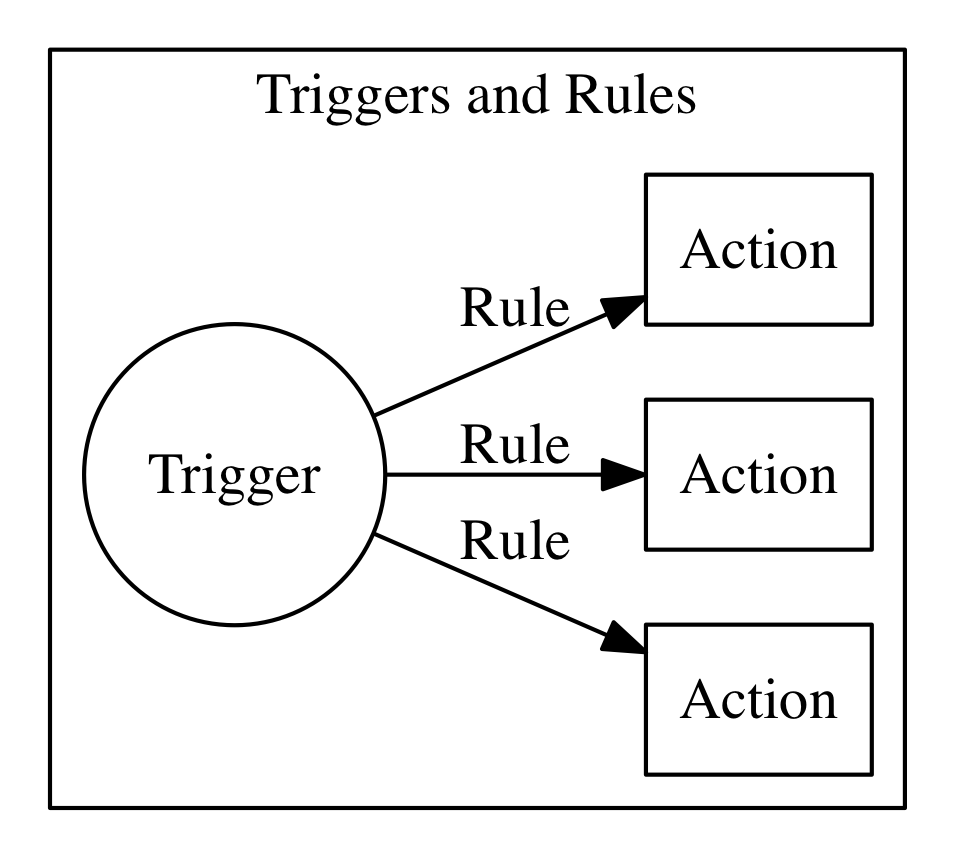
Figure 3-2. Triggers and rules
Let’s build now an example to see what triggers do. We use a simple action that does nothing except logging its activation. We use it to trace what is happening when you activate triggers. Note we start to construct the example now, but we complete it after we introduced rules, in the next paragraph.
So, let’s prepare our example, deploying first a simple log.js actions, that just logs its name:
function main(args) {
 console.log(args.name)
 return {}
}
Then, we deploy it twice, with two different names:
$ wsk action update basics/log-alpha -p name alpha basics/log.js
ok: updated action basics/log-alpha
$ wsk action update basics/log-beta -p name beta basics/log.js
ok: updated action basics/log-alpha
By themselves, those actions do nothing except leaving a trace of their activation in the logs:
$ wsk action invoke basics/log-alpha
invoking the action
log-alphainvoking the action
log-betashowing a list of activations
poll the activations (since 60 seconds, for 20 seconds) to see which activations happened and what they logged
Now we are ready to create a trigger, using the command wsk trigger create as in the listing below.
Note
Of course, there is not only create but also update and delete, and they work as expected, updating and deleting triggers. In the next paragraph, we see also the fire command, that needs you first create rules to do something useful.
$ wsk trigger create basics-alert
ok: created trigger alert
$ wsk trigger list
triggers
/openwhisk@sciabarra.com_dev/basics-alert                                     private
$ wsk trigger get basics-alert
ok: got trigger alert
{
    "namespace": "openwhisk@sciabarra.com_dev",
    "name": "basics-alert",
    "version": "0.0.1",
    "limits": {},
    "publish": false
}
Warning
Triggers are a “namespace level” entity, and you cannot put them in a package.
Associate Triggers to Actions with Rules
Once we have a trigger and some actions we can create rules for the trigger. A rule connects the trigger with an action, so if you fire the trigger, it will invoke the action. Let’s see in practice in the next listing.
Note
As for all the other commands, you can execute list, `update and delete by name.
$ wsk rule create basics-alert-alpha \
       basics-alert basics/log-alpha
ok: created rule basics-alert-alpha
$ wsk trigger fire basics-alert
ok: triggered /_/alert with id 86b8d33f64b845f8b8d33f64b8f5f887
$ wsk activation logs 86b8d33f64b845f8b8d33f64b8f5f887 \
   | jq
{
  "statusCode": 0,
  "success": true,
  "activationId": "b57a1f1dc3414b06ba1f1dc341ab0626",
  "rule": "openwhisk@sciabarra.com_dev/alert-alpha",
  "action": "openwhisk@sciabarra.com_dev/basics/alpha"
}

$ wsk activation logs b57a1f1dc3414b06ba1f1dc341ab0626
2018-03-17T18:10:48.471777977Z stdout: alpha
creating a rule to activate the action
alphawe can now fire the rule, it returns an activation id
let’s inspect the activation id
we piped the output in the
jqutility to make the output more readablein turn the rule enabled an action with this activation id
let’s see what the rule did
A trigger can enable multiple rules, so firing one trigger actually activates multiple actions.
Let’s try this feature in the next listing. However, before starting, let’s open another terminal window and enable polling (with the command wsk activation poll) to see what happens.
$ wsk rule create basics-alert-beta basics-alert basics/log-beta
ok: created rule basics-alert-beta
$ wsk trigger fire basics-alert
ok: triggered /_/basics-alert with id a731a03603bb4183b1a03603bb8183ce
If we check the logs we should see something like this:
$ wsk activation poll Enter Ctrl-c to exit. Polling for activation logs Activation: 'alert' (a731a03603bb4183b1a03603bb8183ce)
The trigger activation invoked 2 actions
This is the log of the first action
This is the log of the second action
Rules can also be enabled and disabled without removing them. As the last example, we try to disable the first rule and fire the trigger again to see what happens. As before, first, we start the log polling to see what happened.
$ wsk rule disable basics-alert-alpha
disabling rule alert-alpha
enabling rule alert-beta (just to be sure)
a quick listing confirms only one active rule
firing the trigger again
Moreover, if we go and check the result, we see this time only the action log-beta was invoked.
$ wsk activation poll
Enter Ctrl-c to exit.
Polling for activation logs

Activation: 'basics-alert' (0f4fa69d910f4c738fa69d910f9c73af)
[
    "{\"statusCode\":0,\"success\":true,\"activationId\":\"a8221c7d7fe94e22a21c7d7fe9ce223c\",\"rule\":\"openwhisk@sciabarra.com_dev/alert-beta\",\"action\":\"openwhisk@sciabarra.com_dev/basics/log-beta\"}",
    "{\"statusCode\":1,\"success\":false,\"rule\":\"openwhisk@sciabarra.com_dev/basics-alert-alpha\",\"error\":\"Rule 'openwhisk@sciabarra.com_dev/basics-alert-alpha' is inactive, action 'openwhisk@sciabarra.com_dev/basics/log-alpha' was not activated.\",\"action\":\"openwhisk@sciabarra.com_dev/basics/log-alpha\"}"
]

Activation: 'log-beta' (a8221c7d7fe94e22a21c7d7fe9ce223c)
[
    "2018-03-18T07:27:14.01530577Z  stdout: beta"
]
Create Feeds
Triggers are useful if someone can enable them. You can fire your triggers in code, as we will see when we examine the API.
However triggers are really there to be invoked by third parties and hook them to our code. This feature is provided by the feed concept.
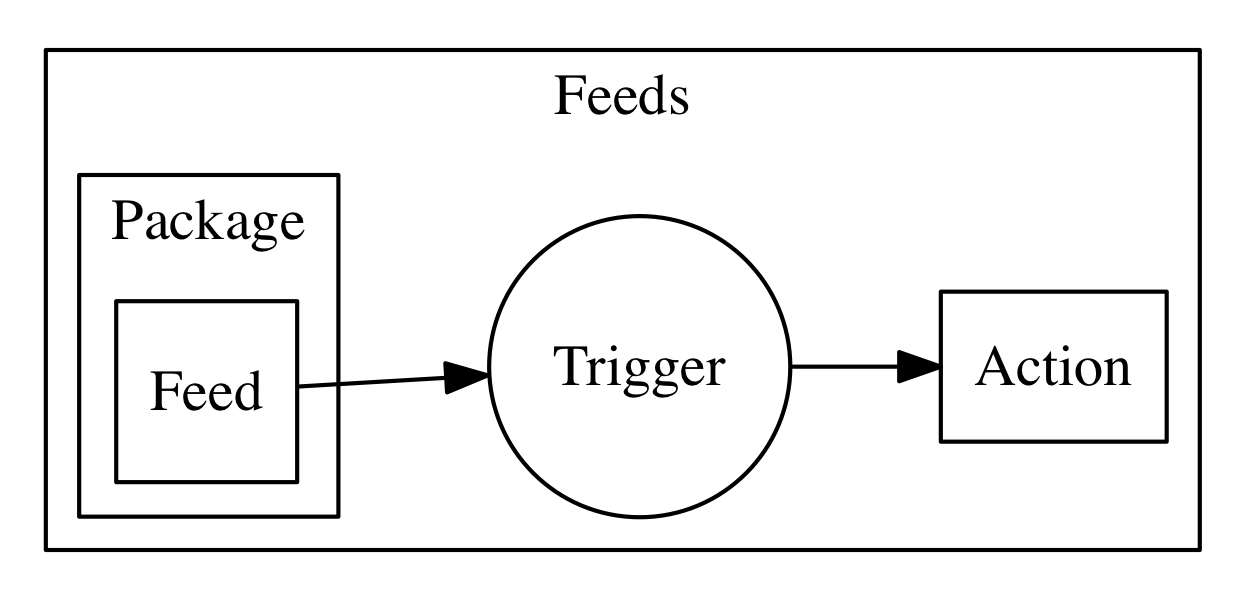
Figure 3-3. Feeds triggering Actions
A feed is actually a pattern, not an API. We will see how to implement it in the example describing the “Observer” pattern.
For now, we see how to hook an existing feed on the command line, creating a trigger invoked periodically.
For this purpose we use the /whisk.system/alarm package. If we inspect it, we see it offers a few actions that can be used as a periodical event source:
$ wsk action list /whisk.system/alarms
actions
/whisk.system/alarms/interval                                          private nodejs:6
/whisk.system/alarms/once                                              private nodejs:6
/whisk.system/alarms/alarm                                             private nodejs:6
The once feed will trigger an event only once, while the interval can provide it based on a fixed schedule. The alarm trigger is the more complex since it uses a cron like expression (that we do not discuss here).
Let’s create a trigger to be executed every minute using interval and associate it to the rule log-alpha. As before, we start first the polling of the logs to see what happens.
$ wsk trigger create basics-interval \ --feed /whisk.system/alarms/interval \
the parameter
--feedconnects the trigger to the feedwe pass a parameter to the feed, saying we want the trigger to be activated every minute
the trigger does nothing until we associate it to action with a rule
If we now wait a couple of minutes this is what we will see in the activation log:
Polling for activation logs:

Activation: 'log-alpha' (0ca4ade11e73498fa4ade11e73a98ff0)
[
    "2018-03-18T08:01:03.046752324Z stdout: alpha"
]

Activation: 'basics-interval' (065c363456b440489c363456b4c04864)
[
    "{\"statusCode\":0,\"success\":true,\"activationId\":\"0ca4ade11e73498fa4ade11e73a98ff0\",\"rule\":\"openwhisk@sciabarra.com_dev/basics-interval-alpha\",\"action\":\"openwhisk@sciabarra.com_dev/basics/log-alpha\"}"
]
Warning
After you do this test, do not forget to remove the trigger or it will stay there forever, consuming actions. You may even end up getting a bill for it!
To remove the trigger and the rule:
$ wsk rule delete basics-interval-alpha
ok: deleted rule interval-alpha
$ wsk trigger delete basics-interval
ok: deleted trigger interval
OpenWhisk Javascript API
We start now exploring the JavaScript API, that most resembles the Command Line Interface. We do not go into the details of the JavaScript language, as there are plenty of sources to learn it in depth.
However, before discussing the API, we need to cover in some detail JavaScript Promises, as the OpenWhisk API is heavily based on them. We do not assume you know them, and they are essential to make easier the use of asynchronous invocation.
Asynchronous invocation
A promise is a way to wrap an asynchronous computation in an object that can be returned as a result for a function invocation.
To understand why we need to do that, let’s consider as an example a simple script that generates a new UUID using the website httpbin.org. We are using here the https NodeJS standard API.
The following code opens a connection to the website, and then define a couple of callbacks to handle the data and error events. In Javascript, providing callbacks is the standard way of handling events that do not happen immediately, but later in the future, the so-called “asynchronous” computations.
var http = require("https")

function uuid(callback) {
   http.get("https://httpbin.org/uuid",
   function(res) {
     res.on('data', (data) =>
        callback(undefined, JSON.parse(data).uuid))
   }).on("error", function(err) {
     callback(err)
   })
}
You can note that this function does not return anything. The user of the function, to retrieve the result and do something with it (for example, print it on the console) have to pass a function, like this:
uuid(function(err, data) {
   if(err) console.log("ERROR:" +err)
   else console.log(data)
})
We can use this code locally with NodeJS, but we cannot deploy it as an action, for the simple reason it does not return anything, while the main action must always expect you return “something”.
In OpenWhisk, the “something” expected for asynchronous computation is a “Promise” object. However, what is a Promise? How you build it? Let’s see the details in the next paragraph.
Introducing Promises
We have just seen an example of an asynchronous computation. This code in the latest listing does not return anything, because the computation is asynchronous. Instead of waiting for the result, we provide a function as a parameter. It will perform our work later, only when the computation finally completes.
In OpenWhisk instead, we cannot do this. We need a way to return the asynchronous computation as a result. So the computation must be wrapped in some object we can return as an answer to the action. The solution for this requirement is called Promise, and the OpenWhisk API is heavily based on it.
A Promise is an object that is returned by a function requiring asynchronous computations. It provides the methods to retrieve the result of this computation when it completes.
Using promises (we are going to see how to create one in the next paragraph) we can keep the advantage of being asynchronous while encapsulating this fact in an object that can be passed around and returned as the result of a function invocation.
It is essential to understand that even with a Promise, the computation is still asynchronous, so the result can be retrieved only when ready because we do not know in advance when the result is going to be available. Furthermore, an asynchronous computation can also fail with an error.
Promises combine a nice way to retrieve result and error management. With the promise-based genuuid that we will see next, extracting the value and managing the erros will be peformed with the following code:
var p = uuid()
p.then(data => console.log(data))
 .catch(err => console.log("ERROR:"+err))
Creating a Promise
Let’s translate the genuuid example to make it Promise based.
Instead of requiring a callback we wrap out asynchronous code in a function block like this:
return new Promise(function(resolve, reject) {
    // ok
    resolve(success)
    // K.O.
    reject(error)
})
wrapper function to create an isolated environment
what to do when you got the result successfully
what to do when you catch an error
It can look a bit twisted, but it makes sense. A function wraps asynchronous code for 3 reasons:
-
create an isolated scope
-
be invoked only when the Promise resolution is required
-
use the arguments to pass to the code block two functions for returning the result and catching errors
So the real work of wrapping the asynchronous behavior is performed by the function. We could at this point return the function, but we still need some work:
-
starting the invocation when needed (
then) -
catching errors (
catch) -
provide our implementation of the
resolve -
provide our implementation of the
reject.
Hence, we further wrap the function in a Promise object and return it as a result. Finally, we have created the standard Promise we described before.
Using a Promise we can now implement our genuuid function. Translating the callback is straightforward:
var http = require("https")

function uuid() {
  return new Promise(function(resolve, reject){
    http.get("https://httpbin.org/uuid",
     function(res) {
      res.on('data', (data) =>
         resolve(JSON.parse(data).uuid))
     }).on("error", function(err) {
         reject(err)
    })
  })
}
wrap the asynchronous code in a Promise
success, we can return the result with
resolvefailure, returning the error with
reject
As you can see the code is similar to the standard way using a callback, except we wrap everything in a function that provides the resolve and reject actions. The function is then used to build a Promise. Most of the implementation of the Promise is standard; only the function must be defined to implement the specific behavior.
Now, using the Promise, we are now able to create an action for OpenWhisk, providing the following main:
function main() {
    return uuid()
      .then( data =>  ({"uuid": data}))
      .catch(err =>   ({"error": err}))
}
Let’s try the code:
$ wsk action update apidemo/promise-genuuid \
      apidemo/promise-genuuid.js
ok: updated action apidemo/promise-genuuid
$ wsk action invoke apidemo/promise-genuuid -r
{
    "uuid": "52a188a9-ff9b-4f3a-b72d-301c26aac2cf"
}
Access OpenWhisk API
To access the OpenWhisk API you use the standard NodeJS require mechanism.
Every action that needs to interact with the system must start with:
var openwhisk = require("openwhisk")
However, the openwhisk object is just a constructor to access the API. You need to construct the actual instances to access the methods of the OpenWhisk API.
var ow = openwhisk()
Hidden in this call there is the actual work of connecting to the API server and starting a dialogue with it. This call is the shortened form of the connection; the long form is actually:
var ow = openwhisk({
 apihost: <your-api-server-host>,
 api_key: <your-api-key>
})
If you use the shortened format, the apihost and apikey are retrieved from two environment variables:
-
__OW_API_HOST -
__OW_API_KEY
When an action is running inside OpenWhisk those environment variables are already set for you, so you can use the initialization without passing them explicitly.
Warning
While you usually require the API in the body of your action, outside of any function, you need to perform this second step inside the main function or any function called by it. It is a knows issue OpenWhisk: environment variables are not yet set when you load the code. They are only when you invoke the main. Hence if you perform the initialization outside of the main is going to fail.
If you want to connect to OpenWhisk from the outside (for example from a client application), you can still use the OpenWhisk API, but you have to either set the environment variables or pass the API host and key explicitly.
Tip
If you are using, for example, the IBM Cloud, you can retrieve your current values with wsk property get.
Overview of the API
The OpenWhisk API provides the same functions available on the command line interface.
Some features are more useful than others for actually writing action code. The most important is, of course:
-
ow.actions
-
ow.triggers
-
ow.activations
We are going to cover those API in details.
There are available many other features that are useful for deploying code. We will not discuss those features here since are needed when you develop your deployment tools. Those other available features are:
-
ow.rules
-
ow.packages
-
ow.feeds
Note
You can find detailed coverage of those other APIs on http://github.com/apache/incubator-openwhisk-client-js in case you may need them.
Invoking Actions
Probably the most critical API function available is invoke. It is used from an action to execute other actions. So it essential to build interaction between various actions and it the backbone of complex applications.
In the simplest case you just do:
var ow = openwhisk()
var pr = ow.actions.invoke("action")
Note however that by default the action invocation is asynchronous. It just returns an activation id, so if you need the results, you have to retrieve them by yourself (if needed - frequently, you do not).
If instead, you have to wait for the execution to complete, you add blocking: true. If you also results, and not just the activations id, you have to add result: true.
So for example you can invoke the promise-genuuid.js action we implemented before from a web action, so that an UUID can be shown from a web page, as follows :
var openwhisk = require("openwhisk")
function main(args) {
    let ow = openwhisk()
    return ow.actions.invoke({
        name: "apidemo/promise-genuuid",
        result: true,
        blocking: true
    }).then(res => ({
         body: "<h1>UUID</h1>\n<pre>"+
        res.uuid+"</pre>"
    })).catch(err => {statusCode: 500})
}
requiring the API
instantiating the API access object
actual action invocation - note we want to use immediately the result
here we get the value returned by the other action
The web action invokes the other action, waits for the result, extract it and builds a simple HTML page. For example:
$ wsk action update apidemo/invoke-genuuid \
we are deploying the action as a web action
we extract the url of the action then use
curlto invoke the urlthe generated uuid, presented as HTML markup
Accessing to OpenWhisk from outside
In this example, you have built the ow object without parameters. Actually, this object is a holder of authentication, but it gets them from environment variables. In this way, an action can invoke another action that belongs to the same users.
However it is possible to use this API also to invoke actions that belong to other users, or you can use it from NodeJS applications running outside of OpenWhisk. In those cases, you have to provide the authentication information explicitly. The general format of the API constructor is
let ow = openwhisk({
   apihost: host,
   api_key: key
}
In the cases you are running from the outside of an action, you have to get apihost and api_key and use them in the API constructor to be able to invoke other actions or triggers. That information can be either retrieved using the wsk property get command or can be read from the environment variables __OW_API_HOST and __OW_API_KEY with an action.
Invoking multiple promises
We learned how to create Promises, and we have seen how to use them for chaining asynchronous operations.
Another important use case to consider, however, is when you have multiple promises. In such a case you may want to wait for all of them to complete.
We could wait for multiple actions with some complex code involving then. Since this use case is frequent enough, it is worth the availability of a standard method: Promise.all(promises).
Within this method call, the promises are an array of Promises (actually, anything satisfying the “iterable” Javascript protocol). As a result, it returns a Promise that completes when all the other promises complete.
You can then retrieve the combined result of all the Promises with a then function, receiving, as a result, an array of the results of the many Promises.
We can now construct an example to demonstrate this feature. We are going to create a Web action consisting in multiple promises (actually multiple invocations). Then we wait for all of them to complete, and finally, we construct a web page concatenating the results. You may notice in the example the use of map, that is probably idiomatic in those cases.
var openwhisk = require("openwhisk")

function main(args) {
    let ow = openwhisk()
    let count = args.n ? args.n : 3;
    let inv = { name: "apidemo/promise-genuuid",
                blocking: true,
                result: true
    }
    let promises = []
    for(let i=0; i< count; i++)
        promises.push(ow.actions.invoke(inv));
    return Promise.all(promises)
      .then(res => ({
            body: "<h1>UUIDs</h1><ul><li>"+
                   res.map(x=>x.uuid).join("</li><li>")+
                   "</li></ul>"
        }))
}
we are reading a parameter from the URL, if not specified it defaults to 3
we are looping, constructing an array of invocations, each one asking for a different uuid
this is the key call: we are waiting for all the promises to complete
the final result is built here, in the form of an array of results, each one being a different UUID. We join them to create a dotted list in HTML.
Now, we can test the invocation and check the results.
$ wsk action update apidemo/invoke-genuuid-list \
Deployment of the action wrapping multiple promises as a web action
Invocation of the new action using curl and extracting the url
The result is now the combination of multiple invocation of the
promise-genuuidaction
Fire Triggers
Now we are going to check discuss how to fire triggers with the API. It is especially useful for implementing feeds, as we show in Chapter 5.
It works pretty much like the actions invocation, except you have to use triggers instead of actions. Also, firing a trigger cannot be blocking, because it can always start multiple actions. Instead, it always returns a list of activation-ids.
Note
An important thing to keep in mind is you may need to fire triggers belonging to other users. Generally, you fire triggers as part of the implementation of a feed. We will see the details in Chapter 5. When you create a trigger and hook it in a feed, you receive from the system, among other parameters, an “api-key”. You have to use this key to invoke those external triggers.
Here is an example of how a proper invocation of how a third party trigger invocation is going to work:
const openwhisk = require('openwhisk')

function fire(trigger, key, args) {
  let ow = openwhisk({ api_key: key })
  return ow.triggers.invoke({
      name: trigger,
      params: args
  })
}
construct an instance of the API passing the
api_keyhere you can perform the invocation
you have always for specify the trigger name
and here some parameters that will be forwarded to the triggered actions
The result of an invocation is a promise that returns a JSON object like this:
{
    "activationId": "a75b8008ad2641189b8008ad26f11835"
}
You can then use the activation id to retrieve the results as explained in the next paragraph.
Now let’s try to deploy and run this code. We need to set up an action activated by a trigger to test it:
$ wsk trigger create apidemo-trigger
Create a trigger
Create an action that the trigger will invoke
Create a rule that connects the trigger to the action
Finally we deploy the action dependent on the trigger
Now everything it is setup: invoking the action apidemo/trigger will activate the action apidemo/clock via a trigger and a rule. You can test opening the poll with wsk activation poll and then invoking:
$ wsk action invoke apidemo/trigger -p time 1
ok: invoked /sciabarra_cloud/apidemo/trigger with id 1c453cc7142c4e19853cc7142c3e1998
$ wsk action invoke apidemo/trigger -p date 1
ok: invoked /sciabarra_cloud/apidemo/trigger with id 3d157c76dfa244ce957c76dfa294cea3
In the activation log, you should see (among other things) the logs emitted by the clock action that was activated in code by trigger example.
Activation: 'clock' (bdc6438e11b34bb686438e11b3cbb67c)
[
    "2018-09-25T17:13:24.584124671Z stdout: 17:13:24"
]
Activation: 'clock' (4fc0889664ad4e1880889664ad5e18e0)
[
    "2018-09-25T17:13:40.667002422Z stdout: 2018/09/25"
]
Inspect Activations
Now, let’s use the API to inspect activations. An activation id is returned by invoking an action or firing a trigger. Once you have this id, you can retrieve the entire record using the ow.activations.get as in the following example (named activation.js:
const openwhisk = require('openwhisk')

function main (args) {
  let ow = openwhisk()
  return ow.activations.get({ name: args.id })
}
As you can see you need to pass the id (as the parameter named name by convention, but also the parameter named id works) to retrieve results, logs or the entire record activation. Let’s try it, first deploying the example and creating an activation id:
$ wsk action create activation activation.js
deploying the activation action
executing a system action to produce the activation id
Now we can use that id to retrieve the activation, that is a pretty complex (and interesting) data structure. Let’s see the results (shortened for clarity):
$ wsk action invoke activation -p id a6d34e7165024c26934e716502fc26cf -r
{
    "activationId": "a6d34e7165024c26934e716502fc26cf",
    "annotations": [
       // annotations removed...
     ],
    "duration": 4,
    "end": 1522237060018,
    "logs": [
        "2018-03-28T11:37:40.016763747Z stdout: hello Mike!"
    ],
    "name": "helloWorld",
    "namespace": "openwhisk@sciabarra.com_dev",
    "publish": false,
    "response": {
        "result": {},
        "status": "success",
        "success": true
    },
    "start": 1522237060014,
    "subject": "openwhisk@sciabarra.com",
    "version": "0.0.62"
}
those are the logs of the action
this is the result of the action
Note
We used here ow.activations.get to get the entire activation record. You can use the same parameters but specify ow.activations.result to get just the result, or ow.activations.logs to retrieve just the logs.
Summary
-
Walked through the intricacies of the OpenWhisk command line interface.
-
Larned the hierarchical structure of the command line, with commands, subcommands, and options.
-
Described naming conventions of Entities in OpenWhisk
-
For actions, saw how to create single file actions, action sequences, and actions comprised of many files collected in a zip file.
-
To ease debugging, saw how to manage activations, to retrieve results and logs
-
Learned about Triggers that can be fired by Feeds, and Rules to associate Triggers to Actions.
-
Introduced asynchronous processing, exploring Javascript Promises in OpenWhisk
-
Learned about action invocations API
-
Learned how to fire a trigger via the API
-
Discussed activations and how to retrieve results in the API