Table of Contents for
Learning OpenWhisk
 Learning OpenWhisk
Published by
O'Reilly Media, Inc., 2019
Learning OpenWhisk
Published by
O'Reilly Media, Inc., 2019
Chapter 2. A Simple Serverless Application
The goal of this chapter is to introduce the development of OpenWhisk applications using JavaScript (and NodeJS) as a programming language, using a command line interface. The reader will get a feeling of how Serverless development works.
For this purpose, we are going to implement step by step a simple application with OpenWisk: a contact form for your website.
You cannot store contacts in your static website; you need some server logic to save them. Furthermore, you may want some logic to validate the data (since the user can disable javascript in their browser) and additionally receive emails notifying of what is going on on the website.
In this introduction to OpenWhisk, we are going to assume our static website is stored on the Amazon AWS Cloud, but we will implement our commenting functions the IBM Cloud, that offers OpenWhisk out of the box.
OpenWhisk is an open source project meant to be cloud-independent, and you can adopt it without being constrained to one single vendor.
Create a Contact Form
Let’s assume we already have a website, built with a static website generator. Creating a site statically was the standard at the beginning of the web. Later, this practice was replaced by the use of a Content Management Systems; however it trendy again today. Indeed, static websites are fast, can be built with the maximum flexibility and there are plenty of tools to create them. Once you have a static site you can publish it on many different platforms offering static publishing. For example, a popular option is AWS S3.
However, usually, not everything in a website can be static. For example, you may need to allow your website visitors to contact you. Of course, you may then want to store the contacts in a database, to manage the data with a CRM application.
Before Serverless environments were available, the only way to enhance a static website with server-side logic was to provision a server, typically a virtual machine, deploy a web server with server-side programming support, then add a database, and finally implement the function you need using a server-side programming language, like PHP or Java.
Today, you can keep your website mostly static and implement a contact form in a Serverless environment, without any need for provisioning any virtual machine, web server or database.
While it may look odd, it is the nature of the Cloud: applications are going to be built with different services available from multiple vendors acting as one large distributed computing environment.
In this book we will use examples of services on AWS Cloud, invoked from the IBM Cloud. Indeed the book is about Apache OpenWhisk, not about the IBM Cloud.
Warning
The implementation that is shown in the example is not the best possible. It is just the simplest that we can do to show a result quickly and give a feeling of how we can do with OpenWhisk without getting lost in many details. Later in the book, we will rework the example to implement it in a more structured way.
The Bash command line is a prerequisite for development
Serverless development is primarily performed at the terminal, using a command line interface (CLI). We are going to use mostly the Unix based CLI and the command line interpreter Bash. In a sense, this is a Unix-centered book. Bash is available out-of-the-box in any Linux based environment and on OSX. It can also be installed on Windows.
Note
On Windows, you can use either a command line environment including Bash like Git for Windows. Note that, despite the name, it is not just Git: it includes a complete Unix-like environment, based on Bash, ported to Windows. Also, on the more recent version of Windows, you may choose to install instead of the Windows Subsystem for Linux (WSL) which even includes a complete Linux distribution like Ubuntu, with Bash of course. It is informally called Bash for windows also it is is a whole Linux OS running within Windows.
In the following examples, we are also going to use Bash widely for (numerous) command line examples. So you need to familiar working with Bash and the command line.
$ pwd/Users/msciab $ ls \
-l # total 16
-rw-r--r--@ 1 msciab staff 1079 24 Feb 09:53 form.js -rw-r--r--@ 1 msciab staff 71 23 Feb 17:18 submit.js
you should type now pwd at the command line
you should type at the terminal both the two lines
this is an example of the output you should expect
Note
In the text, there will be both examples to be typed at the terminal and code snippets. You will identify code you have to type at the terminal (as in point 1 and 2) by the prefix $. In those examples only the code in the line after $ must be typed at the terminal, the rest is the expected output of the command.
Tip
Sometimes long command lines (as in point 2) are split into multiple lines, so you have to type all of them. You will notice when the input spawns for many lines, because lines end with a \.
Register into the IBM Cloud
One central theme of this books is the fact that Apache OpenWhisk is an Open Source product and you can deploy it in any cloud. We will see later in the book how to implement your environment, on-premises or in the cloud of your choice.
However, since Apache OpenWhisk is a project initiated by IBM and then donated to the Apache Foundation, it is available ready to use in the IBM Cloud. Since the OpenWhisk environment is offered for free for development purposes, the simplest way, to begin with, is to create an account there, and use it as our test environment.
Please be aware that since registration procedures and links may change over the time, when you will be reading the book there can be some differences in the actual procedure. So we are not going to delve into too many details describing the description of the registration process. It is pretty simple though, so you should be able to figure out by yourself.
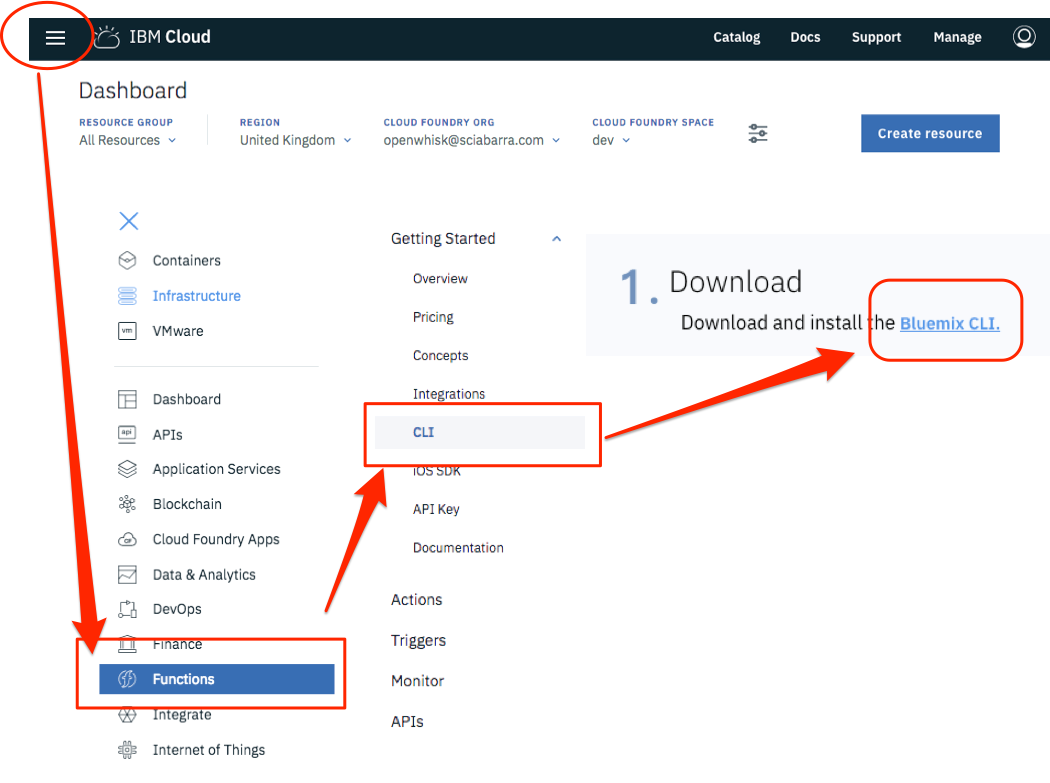
Figure 2-1. Downloading the CLI tools for working with OpenWhisk
At the time of this writing, you can start by going to the URL: http://console.bluemix.net. You can see then a button saying Create a free account.
You can then click there, provide your data and an email address and then activate your account, clicking on the link sent by email. Then you are done, and no credit card is required.
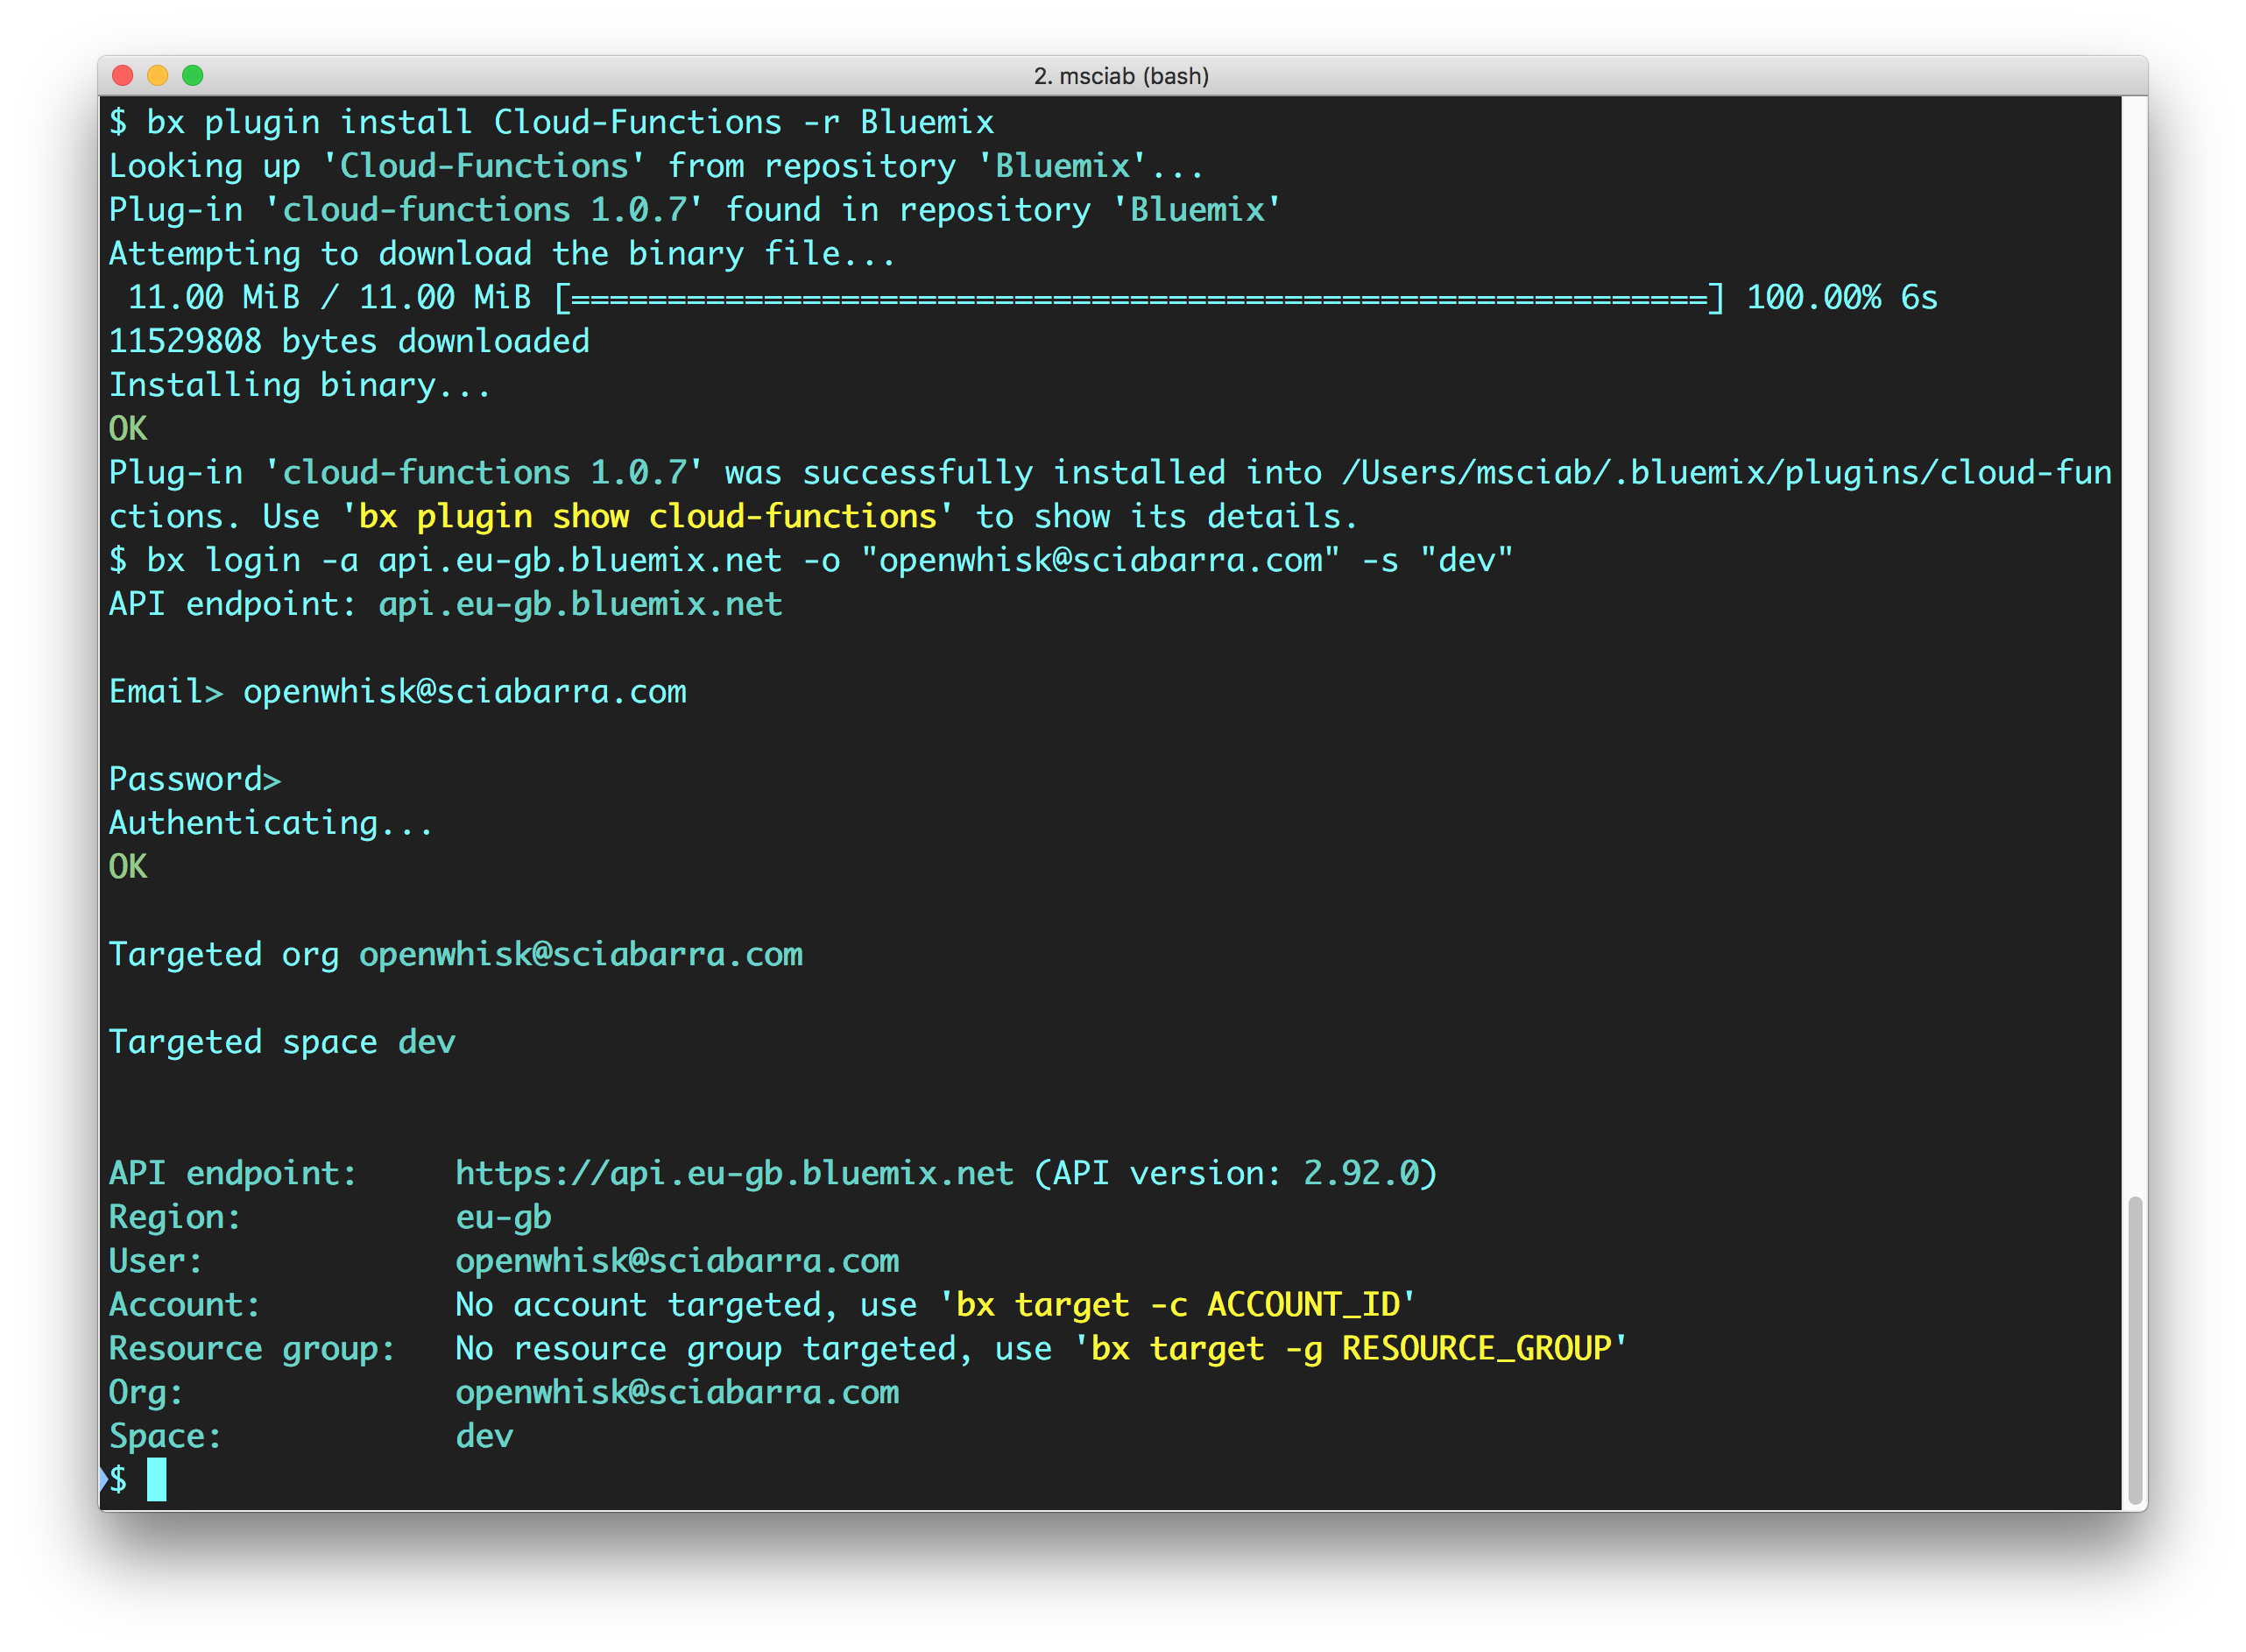
Figure 2-2. Installing the bx tool and the wsk plugin
Please note the most important actions to do after the registrations are:
-
Login to the cloud
-
Download the
bxCLI tool: Figure Figure 2-1 -
Install the CLI (
bx) and the Cloud Functions plugin (wsk): Figure Figure 2-2 -
Login to the Cloud.
To be sure you are ready, run the following command at the terminal check the result. If they match with the listing, then everything is configured correctly!
$ bx wsk action invoke /whisk.system/utils/echo -p message hello --result
{
    "message": "hello"
}
A Form in HTML
Now we are going to create and deploy a simple contact form.
Note
We assume you already installed the bx command line tool with the wsk plugin. We also assume you are using a Unix-like command line environment: for example Linux, OSX or, if you are using Windows, you have already installed a version of Bash on Windows.
Open now a terminal and start Bash and let’s do the first step, creating a package to group our code:
$ wsk package create contact
ok: created package contact
Now we are ready to start coding our application. In the Serverless world you can write some code, then deploy and execute it immediately. This modularity is the essence of the platform.
Note
We are going to call the code we create actions. Action will generally be, at least in this chapter, one single file. There will be an exception when we bundle an action file with some libraries we need, and we deploy them together. In such a case, the action will be deployed as a zip file, composed of many files.
Let’s write our first action. The action is a simple HTML page returned by a javascript function.
function main() {
    return {
        body: `<html><head>
<link href="//maxcdn.bootstrapcdn.com/bootstrap/3.3.0/css/bootstrap.min.css"
      rel="stylesheet" id="bootstrap-css">
</head><body>
 <div id="container">
  <div class="row">
   <div class="col-md-8 col-md-offset-2">
    <h4><strong>Get in Touch</strong></h4>
    <form method="POST" action="submit">
     <div class="form-group">
       <input type="text" name="name"
        class="form-control" placeholder="Name">
     </div>
     <div class="form-group">
        <input type="email" name="email"
         class="form-control" placeholder="E-mail">
     </div>
     <div class="form-group">
        <input type="tel" name="phone"
         class="form-control" placeholder="Phone">
     </div>
     <div class="form-group">
        <textarea  name="message" rows="3"
         class="form-control" placeholder="Message"
         ></textarea>
      </div>
      <button class="btn btn-default" type="submit" name="button">
        Send
      </button>
    </form>
   </div>
  </div>
 </div>
</body></html>`
    }
}
Tip
Note the general structure of the actions: the function is called main, it takes as an input a javascript obj and returns a javascript object. Those objects will be displayed at the terminal in JSON format.
Once you wrote the code, you can deploy it, then retrieve the actual URL you can use to execute the action.
$ wsk action create contact/form form.js --web true ok: created action contact/form
This message confirms the action was created
This is the url where the action is available
Warning
The actual URL returned will be different since it depends on your account and location.
We can now test if the form was deployed correctly just opening the URL with a web browser.
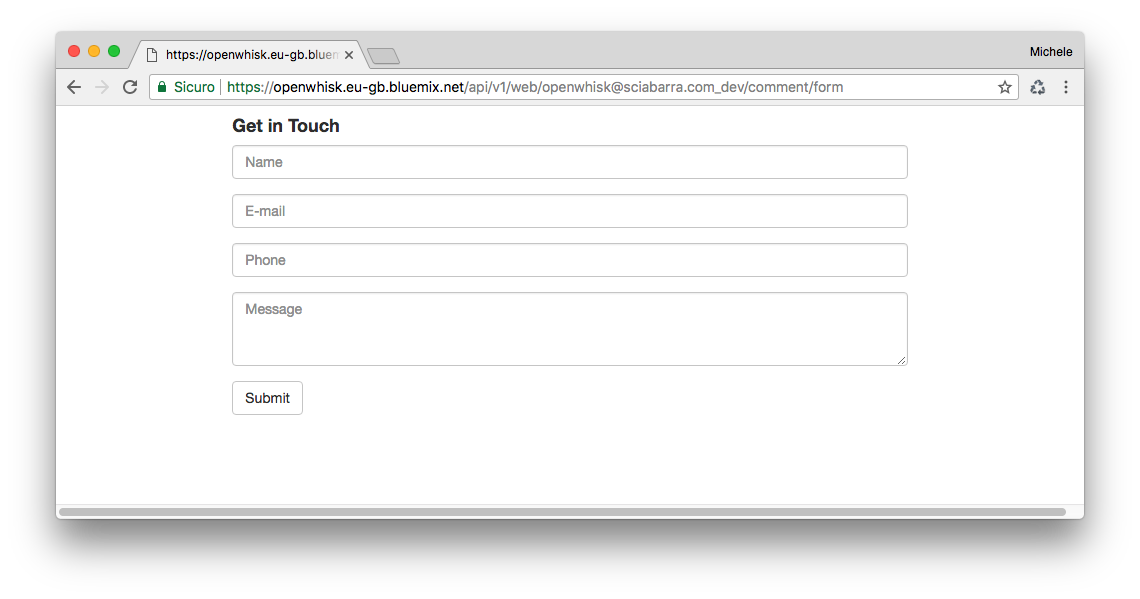
Figure 2-3. The contact form is shown as result of our Web Action
Warning
If you now click on the submit button, you will get an error, because it will try to submit the form to the action command/submit that does not (yet) exists.
{
  "error": "The requested resource does not exist.",
  "code": 3850005
}
Form Validation
After displaying, the next step of the processing is the validation of the data the user submits, before we store them in a database.
We will now create an action called submit.js we discuss step by step. First, let’s “wrap” our code in the main function:
function main(args) {
  message = []
  errors = []
  // TODO: <Form Validation>
  // TODO: <Returning the Result>
}
Insert here the code for validating the form
Insert here the code for returning the result
Note that the action has a similar structure to the preceding, with a main method, now with an explicit parameter args. Let see what happens when you submit the form.
We have a form with some fields: “name”, “email”, “phone”, “message”. On submit, the form data will be encoded, sent to OpenWhisk, that will decode them (we will provide all the details of the processing later in this chapter).
You create a javascript object to process a request using an action. Each key corresponds to a field of the form. This object is passed as the argument of the main function. So our form fields are available to the main function as args.name, arg.email, etc. We can now validate them.
Below we show the code to process the form, adding valid fields to message or any error to errors.
Address Validation
First, let’s check only if the name is provided.
Note
You should add the snippets in this paragraph after <Form Validation>
// validate the name
if(args.name) {
 message.push("name: "+args.name)
} else {
 errors.push("No name provided")
}
Second, let’s validate the email address, checking if it “looks like” an email. We use here a regular expression:
// validate email
var re = /\S+@\S+\.\S+/;
if(args.email && re.test(args.email)) {
   message.push("email: "+args.email)
} else {
  errors.push("Email missing or incorrect.")
}
Third, let’s validate the phone number, checking it has “enough” digits (at least 10):
/// validate the phone
if(args.phone && args.phone.match(/\d/g).length >= 10) {
  message.push("phone: "+args.phone)
} else {
  errors.push("Phone number missing or incorrect.")
}
Finally, let’s add the message text if any:
/// add the message text, optional
if(args.message) {
  message.push("message:
"+args.message)
}
Returning the result
Once we have all the fields validated, we can return the result. There is now a bit of logic: we choose if returning an error message or an acceptance message.
Note
Insert the snippets in this paragraph after <Returning the Result>
// complete the processing
var data = "<pre>"+message.join("\n")+"</pre>"
var errs = "<ul><li>"+errors.join("</li><li>")+"</li></ul>"
if(errors.length) {
  return {
    body: "<h1>Errors!</h1>"+
      data + errs +
      '<br><a href="javascript:window.history.back()">Back</a>'
   }
} else {
   // storing in the database
   // TODO: <Store the message in the database>
   return {
     body: "<h1>Thank you!</h1>"+ data
   }
}
Placeholder to insert code to save data in the database
The action is not complete (we have still to see how to store the data) but we can test this partial code with this command:
$ wsk action create contact/submit submit.js --web true
ok: created action contact/submit
If you now submit the form empty, you will see the message in Figure Figure 2-4 under “Form Rejected”. If we instead provide all the parameters correctly, we will be gratified with the acknowledgment under “Form Accepted”.

Figure 2-4. What the form submit displays
Write in a Database
Now we can focus on database creation, to store our form data. Since we have already an IBM Cloud account, the simplest way is to provision a Cloudant database. For small amounts of data, it is free to use.
Steps to create the database, as shown in Figure Figure 2-5 are pretty simple.
-
Select Catalog
-
Search for Cloudant NoSQL database the click
-
Select the button Create to create a Lite instance
-
Click on Launch to access the administrative interface
-
Click on “Create Database” (not shown in the Figure)
-
Finally, specify
contactas the database name
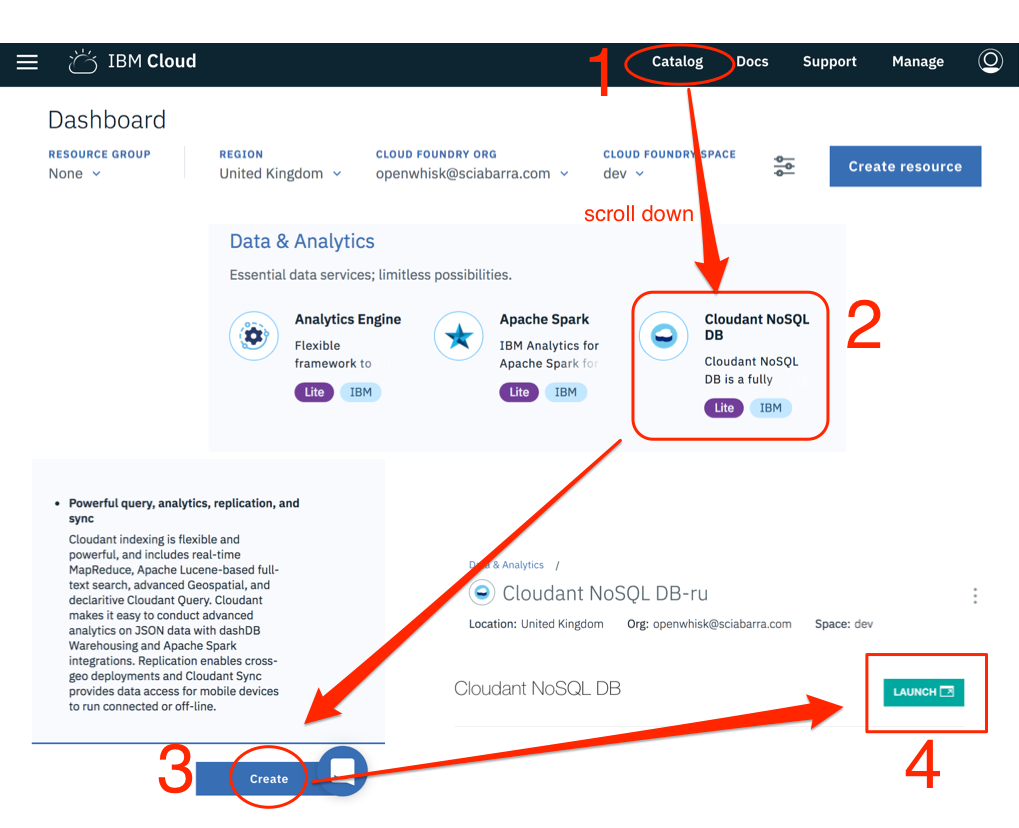
Figure 2-5. Create a Cloudant Database
Now we need to get the credentials to access the database.
You have to go into the menu of the Cloudant service, click on “Service Credentials”, then click on “New Credentials” and finally select “View Credentials”. It will show a JSON file.
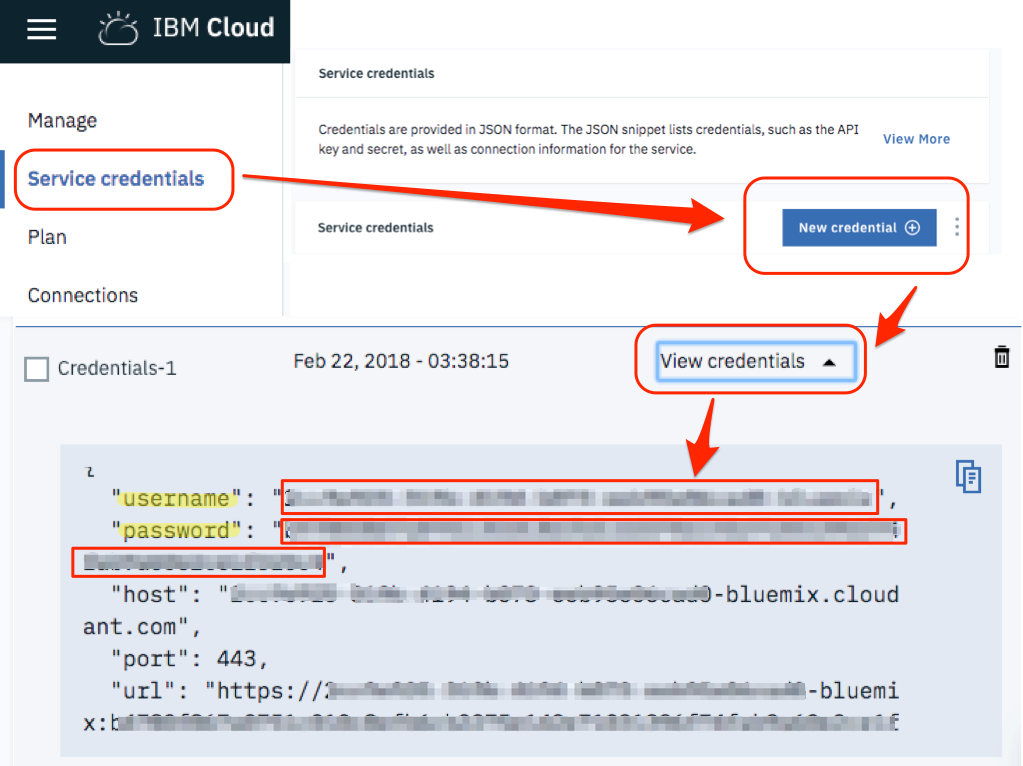
Figure 2-6. Get Cloudant Credentials
You need to extract the values in the fields username and password. You can now use those values at the command line to “bind” the database: This is what you have to type on the terminal.
$ export USER=XXXXpackages /openwhisk@sciabarra.com_dev/contactdb private /openwhisk@sciabarra.com_dev/contact private
copy here the username
copy here the password
create the actual database
now check you will have two packages
Note that after binding you have a new package with some parameters, allowing to read and write in your database. OpenWhisk provides a set of generic packages. We used the command bind to make it specific to write in our database giving username and password.
This package provides many actions we can see listing them (the following output is simplified since the actions are a lot):
$ wsk action list contactdb
/whisk.system/cloudant/write                                           private nodejs:6
/whisk.system/cloudant/read                                            private nodejs:6
Note
Creating the package binding gave you access to multiple databases. But since we need just one, we specified the default database we want to use (using the parameter dbname for the package) and then we explicitly invoked the create-database to be sure that database is created.
Invoking actions
So far we have seen how we can create actions and how to invoke them. Actually, in the first two examples, we have seen one specific kind of actions: web action (you may have noted the --web true flag in the commands). Those are the actions which can be invoked directly, navigating to web URLs or submitting web forms.
However, not all the actions are there to be invoked straight from the web. Many of them execute internal processing and are activated only through some specific APIs.
The actions letting to read and write in the database, those who we just exported from the Cloudant package, are not web actions. They can be invoked however using the command line interface.
In particular, we have to use the wsk action invoke command, passing parameters with the --param options and data in JSON format as a command line argument.
Let verify how it works, writing in the database, by invoking the action directly write, as follows.
$ wsk action invoke contactdb/write \
  --blocking --result --param dbname contactdb \
  --param doc '{"name":"Michele Sciabarra", "email": "michele@sciabarra.com"}'
{
    "id": "fad432c6ea1145e71e99053c0d811475",
    "ok": true,
    "rev": "1-d14ba6a37cfdf34a8b3bb49dd3c0e22a"
}
Note
We used the --blocking option to wait for the result; otherwise, the action will start asynchronously, and we will have to come back later to get the result. Furthermore, we are using the --result option to print the final result. Those options will be discussed in details in the next chapter.
The database replied with a confirmation and some extra information. Most notably, the result includes the id of a new record, that we can use later for retrieving the value.
We can now check the database user interface to see the data we just stored in it. You can select the database, then the id and you can see the data we just inserted in the database in JSON format.
As you can see, to write data in the database you need just a JSON object. So far we wrote data using the command line. Let’s look at how we can do it in code.
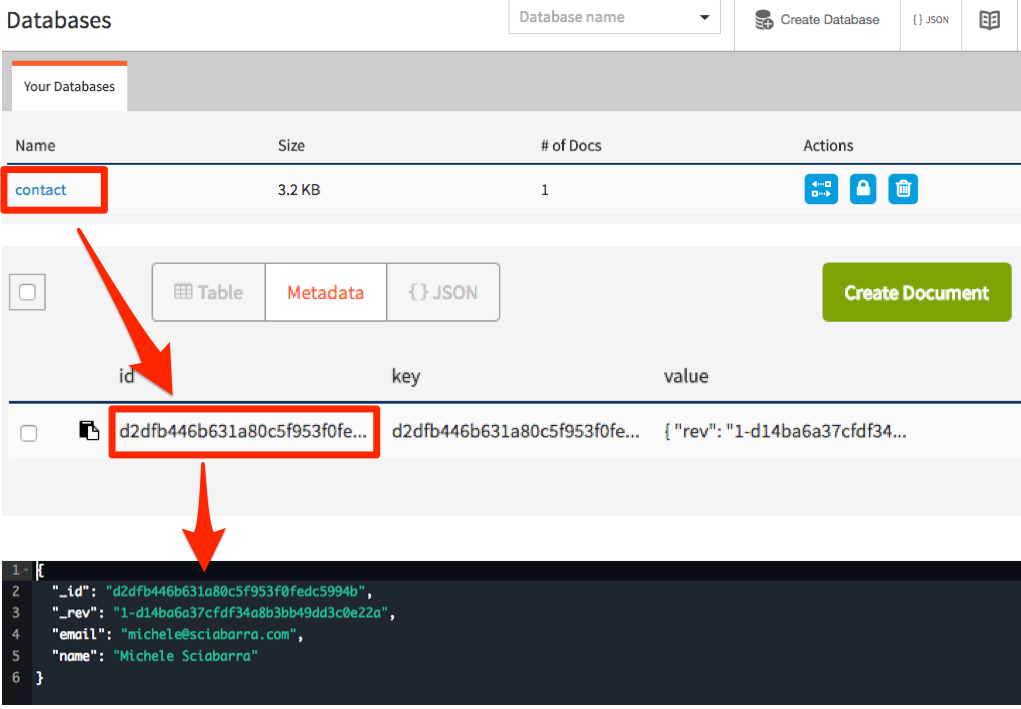
Figure 2-7. How to retrieve data from cloudant
Storing in the database
OpenWhisk includes an API to interact with the rest of the system. Among the possibilities, there is the ability to invoke actions.
We provisioned the database as a package binding. Thus we have now an action available to write in the database. To use it we need to invoke the action from another action. Let see how.
First and before all, we need a:
var openwhisk = require('openwhisk')
to access to the openwhisk API. This code is the entry point to interact with OpenWhisk from within an action.
Now, we can define the function save using the OpenWhisk API to invoke the action to write in the database. The following code should be placed at the beginning of the submit.js:
var openwhisk = require('openwhisk')

function save(doc)  {
  var ow = openwhisk()
  return ow.actions.invoke({
    "name": "/_/contactdb/write",
    "params": {
       "dbname": "contactdb",
       "doc": doc
    }
  })
}
Warning
Currently, you need to add the var ow = openwhisk() inside the body of the main function. It is a documented issue: environment variables used to link the library to the rest of the system, are available only within the main method. So you cannot initialize the variable outside (as you may be tempted to do).
Once the save function is available, you can use it to save data just by creating an appropriate JSON object and pass it as a parameter. Place the following code after <Store the message in the database>:
save({
 "name": args.name,
  "email": args.email,
  "phone": args.phone,
  "message": args.message
})
Note
We “extracted” the arguments instead of just saving the whole args object because it includes other information we do not want to keep.
The code is now complete. We can deploy it, as a web action too, to be executed when the user posts the form:
$ wsk action update contact/submit submit.js --web true
ok: updated action contact/submit
We can now manually test the action from the command line, to check if it writes in the database:
$ wsk action invoke contact/submit -p name Michele -p email \
    michele@sciabarra.com -p phone 1234567890 -r
{
    "body": "<h1>Thank you!</h1><pre>name: Michele
email: michele@sciabarra.com
phone: 1234567890</pre>"
}
Now we can go on and try our form, verifying data are written in the database, as in figure Figure 2-8.
Warning
We do not generally recommend manual testing for your Serverless code. Indeed there will be an entire chapter devoted to how to write automated tests. We are showing manual test here only as a tool to get a feeling of the system, not as a recommendation of how you should write your code.
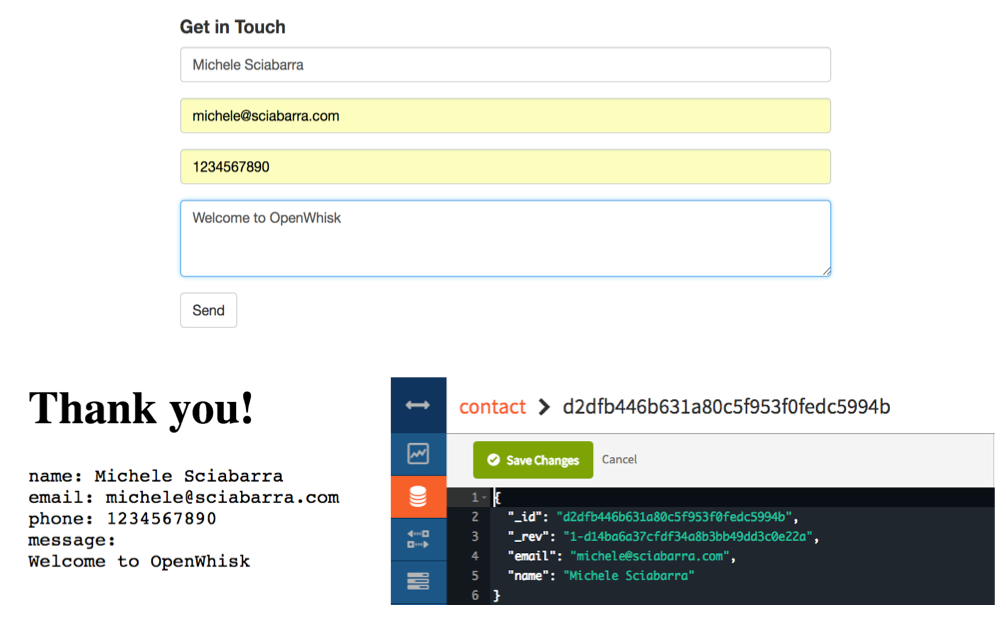
Figure 2-8. Submitting the form and storing the data
Send an Email
Now we add a feature that demonstrates interaction with other systems. In a sense, it is going to be a bit advanced. We are going to send an email when someone uses our contact form. Not just sending emails when a visitor completes the submission, but also we want to be notified even of partial and wrong submissions of the form.
Warning
Sending email is usually done with the SMTP protocol, but since email is generally abused to send spam in all the cloud services, cloud providers usually block SMTP ports; hence it is not usable. In the IBM Cloud which we are using, they are indeed blocked (at least in our tests). This fact is the reason we used a third party service for sending email, a service that provides an HTTP API and a javascript library to use it.
We are going to use the service Mailgun for this purpose. It provides free accounts, allowing for a limited number of emails sent only to selected and validated addresses. It is perfect for our goal.
Configuring Mailgun
To use Mailgun you need to go to the website www.mailgun.com and register for a free account. Once you have set up an account you will get a “sandboxed” account (note the site will ask for a phone number for verification purposes).
Once registered, to retrieve credentials for sending an email (Figure Figure 2-9) you need to:
-
Login in Mailgun
-
Scroll down until you find the Sandbox Domain
-
Click on “Authorized Recipient”
-
Invite the recipient
-
Click on the link in the email received
Once done, you need the following information, as shown in the figure, for writing your script:
-
the sandboxed domain
-
the private API key
-
the authorized recipient address
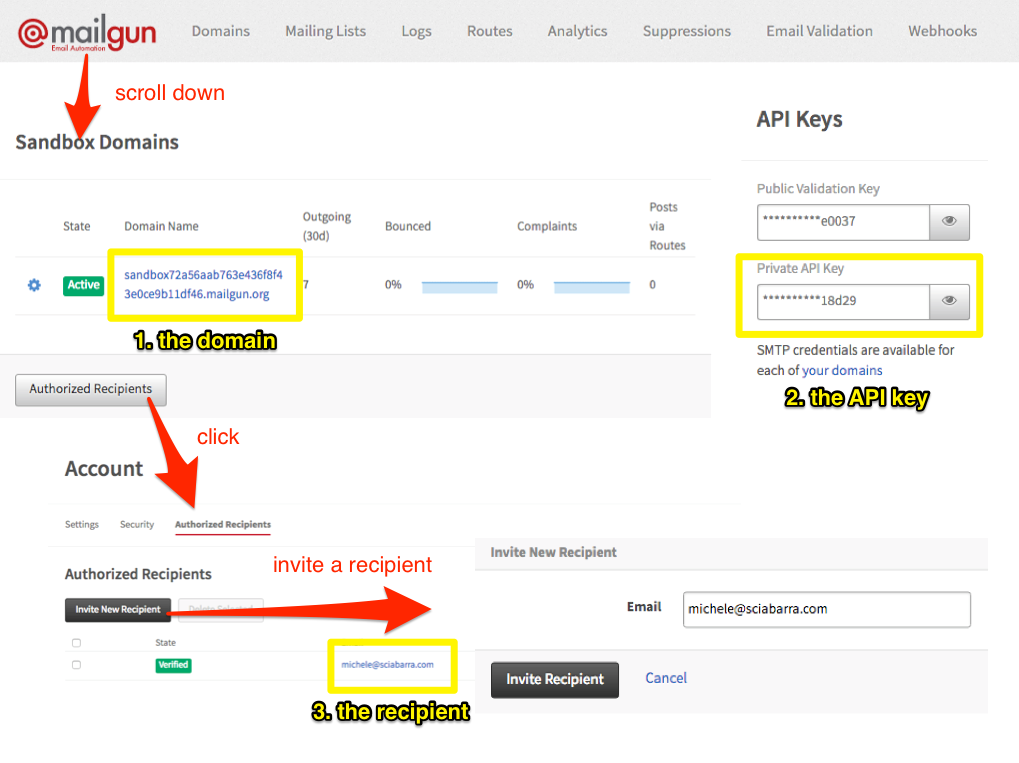
Figure 2-9. How to register in Mailgun
Writing an action for sending email
Now, we can build an action for sending an email. Actually, the purpose of this example is to show how you can create more complex action involving third-party services and libraries.
Hence now preparing this action is a bit more complicated than the actions we have seen before, because we need to use and install an external library then and deploy it together with the action code.
Let start by creating a folder and importing the library mailgun-js with the npm tool. We assume you have installed it, refer to Appendix II for details about the purpose and usage of this tool.
$ mkdir sendmail
$ cd sendmail
$ npm init -y
$ npm install --save mailgun-js
Now we can write a simple action that can send an email and place it in sendmail/index.js. Check the listing with the notes about the information you have to replace with those who collected before when registering to Mailgun.
var mailgun = require("mailgun.js")
var mg = mailgun.client({username: 'api',
        key: 'key-<YOUR-PRIVATE-API-KEY>'})
function main(args) {
  return mg.messages.create(
          '<YOUR-SANDBOX-DOMAIN>.mailgun.org', {
    from: "<YOUR-RECIPIENT-EMAIL>",
    to: ["<YOUR-RECIPIENT-EMAIL>"],
    subject: "[Contact Form]",
    html: args.body
  }).then(function(msg) {
     console.log(msg);
     return args;
  }).catch(function(err) {
     console.log(err);
     return args;
  })
}
replace
key-<YOUR-PRIVATE-API-KEY>with the Private API Keyreplace
<YOUR-SANDBOX-DOMAIN>.mailgun.orgwith the Sandbox Domainreplace
<YOUR-RECIPIENT-EMAIL>with the one that is used both as the sender and the recipientsame as 3
Warning
For simplicity, we placed the keys within the script. Also, this is not a recommended practice. We will see later how we can define parameters for a package and use them for each action, so you do not have to store keys in the code.
We can deploy now the action. Since this time the action is not a single file, but it includes libraries, we have to package everything in a zip file, to deploy them too.
$ zip ../sendmail.zip -r *
$ wsk action update contact/sendmail ../mailgun.zip --kind nodejs:6
ok: updated action contact/sendmail
Note
We are using update here even if the action was not present before. Indeed since update will create the action if it does not exists, we prefer to use just update always to avoid the error create gives if the action was already there. Also, since we place the action in a zip file, we need to specify its type because the command line cannot deduct it from the filename.
We can now test the action invoking it directly:
$ wsk action invoke contact/sendmail -p body "<h1>Hello</h1>" -r
{
    "body": "<h1>Hello</h1>"
}
The action acts as a filter, accepting the input and copying it in the output. We will leverage this behavior to chain the action to the submit.
When invoked, it will return an output, but also it will send an email as a side effect.
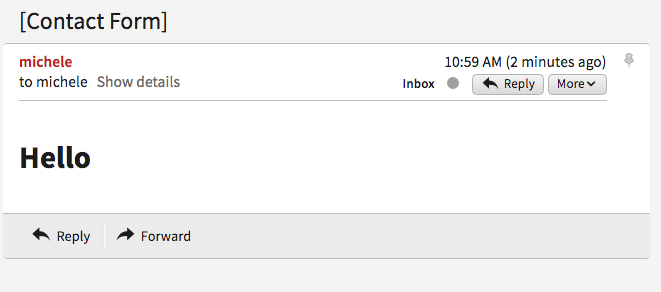
Figure 2-10. The email send by your action in your Inbox
Creating an action sequence
So far we have developed an action that can send an email as a stand-alone action.
However, we designed the action in such a way that it can take the output of the submit action and return it as is. So we can create a pipeline of actions, similar to the Unix shell processing, where the output of a command is used as an input for another command.
We are going to take the output of the sendmail action, use it as the input for the submit action and then return it as the final result of the email submission.
Please note as a side effect; it will send emails for every submission, also for incorrect inputs, so we can know someone is trying to use the form without providing full information.
However, we will store in the database only the fully validated data. Let’s create such a pipeline that is called sequence in OpenWhisk, and then test it.
$ wsk action create contact/submit-sendmail \
  --sequence contact/submit,contact/sendmail \
  --web true
ok: updated action contact/submit-sendmail

$ wsk action invoke contact/submit-sendmail -p name Michele -r
{
    "body": "<h1>Errors!</h1><pre>name: Michele</pre><ul><li>Email missing or incorrect.</li><li>Phone number missing or incorrect.</li></ul><br><a href=\"javascript:window.history.back()\">Back</a>"
}
As a result, we should be receiving an email for each attempt of submitting a form, including partial data from the contact form.
Now we are ready. We can use the complete form including storing in the database and sending the email. But now the form should activate our sequence, not just the submission action. The simplest way is to edit the form.js, replacing the action we are invoking in the form. We should do the following change in form.js:
-<form method="POST" action="submit">
+<form method="POST" action="submit-sendmail">
Note
The change to do in your code is in patch format. We are not going to cover it in detail, but mostly the prefix - means: remove this line, while the prefix + means: add this line. We will use this notation again in the book.
If we now update the action and try it, we will receive an email for each form submission, but the form will be stored in the database only when the data is complete.
Summary
-
Started from scratch with OpenWhisk.
-
Learned how to get an account in a cloud supporting it (the IBM cloud) and download the command line interface.
-
Created a simple HTML form in OpenWhisk
-
Implemented simple form validation logic.
-
Stored results in a NO-SQL database (Cloudant)
-
Connected to a third party service (Mailgun) to send an email.