Developing Open Serverless Solutions
Copyright © 2019 Michele Sciabarrà. All rights reserved.
Printed in the United States of America.
Published by O’Reilly Media, Inc., 1005 Gravenstein Highway North, Sebastopol, CA 95472.
O’Reilly books may be purchased for educational, business, or sales promotional use. Online editions are also available for most titles (http://oreilly.com/safari). For more information, contact our corporate/institutional sales department: 800-998-9938 or corporate@oreilly.com.
See http://oreilly.com/catalog/errata.csp?isbn=9781492046165 for release details.
The O’Reilly logo is a registered trademark of O’Reilly Media, Inc. Learning OpenWhisk, the cover image, and related trade dress are trademarks of O’Reilly Media, Inc.
The views expressed in this work are those of the author, and do not represent the publisher’s views. While the publisher and the author have used good faith efforts to ensure that the information and instructions contained in this work are accurate, the publisher and the author disclaim all responsibility for errors or omissions, including without limitation responsibility for damages resulting from the use of or reliance on this work. Use of the information and instructions contained in this work is at your own risk. If any code samples or other technology this work contains or describes is subject to open source licenses or the intellectual property rights of others, it is your responsibility to ensure that your use thereof complies with such licenses and/or rights.
978-1-492-04610-3
Welcome to the world of Apache OpenWhisk. OpenWhisk is an open source Serverless platform, designed to make easy and fun developing applications in the Cloud.
Serverless does not mean “without the server”, it means “without managing the server”. Indeed we will see how we can build complex applications without having to care of the server (except, of course, when we deploy the platform itself).
A serverless environment is most suitable for a growing class of applications needing processing “in the cloud” that you can split into multiple simple services. It is often referred as a “microservices” architecture.
Typical applications using a Serverless environment are:
services for static or third party websites
voice applications like Amazon Alexa
backends for mobile applications
This chapter is the first of the book, so we start introducing the architecture of OpenWhisk, its, and weaknesses.
Once you have a bird’s eye look to the platform, we can go on, discussing its architecture to explain the underlying magic. We focus on the Serverless Model to give a better understanding of how it works and its constraints. Then we complete the chapter trying to put things in perspective, showing how we got there and its advantages compared with similar architectures already in use: most notably to what is most likely its closest relative: JavaEE.
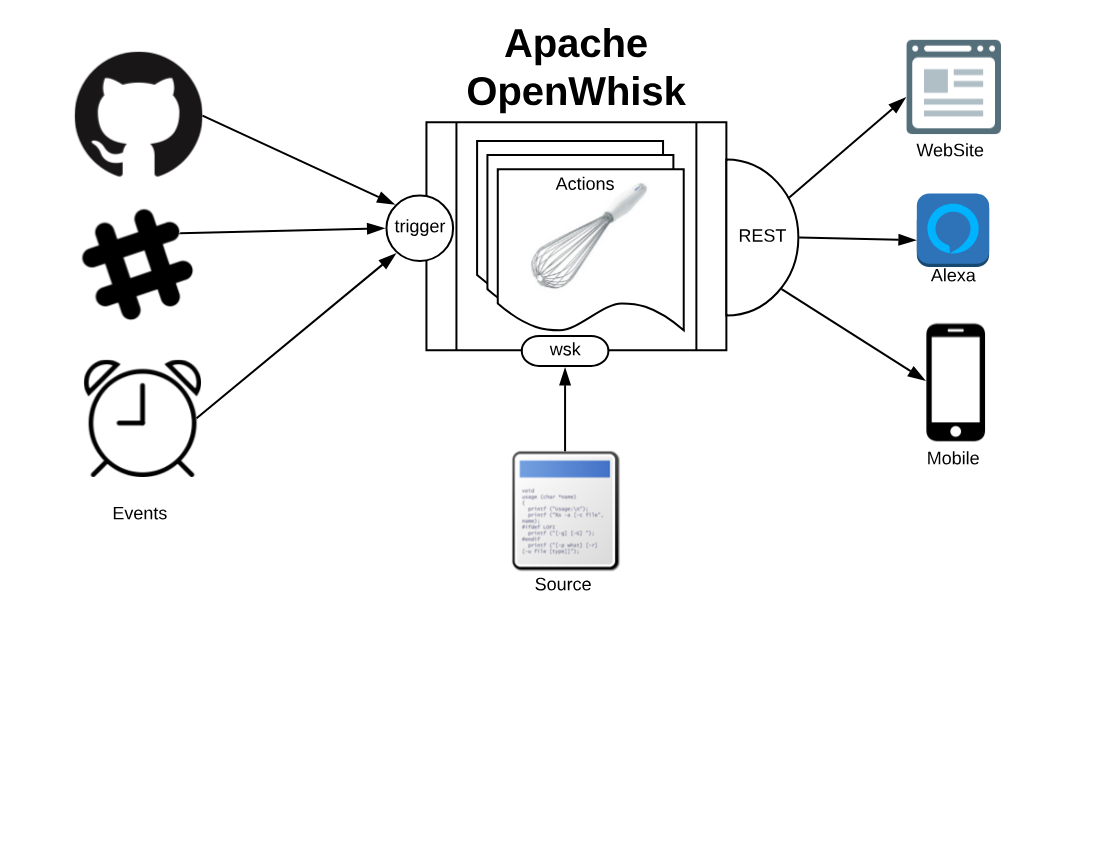
Apache OpenWhisk, shown in Figure Figure 1-1, according to its definition, is a Serverless Open Source Cloud Platform. It works executing functions (called Actions) in response to Events at any scale. Events can be originated by multiple sources, including timers, or websites like Slack or GitHub.
It accepts source code as input, provisioned straight with a command line interface, then delivers services through the web to multiple consumers. Examples of typical consumers are other websites, mobile applications or services based on REST APIs like the voice assistant Amazon Alexa.
Computation in a Serverless environment is generally split in functions. A function is typically a piece of code that will receive input and will provide an output in response. It is important to note that a function is expected to be stateless.
Frequently web applications are stateful. Just think of a shopping cart application for an e-commerce: while you navigate the website, you add your items to the basket, to buy them at the end. You keep a state, the cart.
Being stateful however is an expensive property that limits scalability: you need to provide something to store data. Most importantly, you will need something to synchronize the state between invocations. When your load increase, this “state keeping” infrastructure will limit your ability to grow. If you are stateless, you can usually add more servers.
The OpenWhisk solution, and more widely the solution adopted by Serverless environments is the requirement functions must be stateless. You can keep state, but you will use separate storage designed to scale.
To run functions to perform our computations, the environment will manage the infrastructure and invoke the actions when there is something to do.
In short, “having something to do” is what is called an event. So the developer must code thinking what to do when something happens (a request from the user, a new data is available), and process it quickly. The rest belongs to the cloud environment.
In conclusion, Serverless environments allow you to build your application out of simple stateless functions, or actions as they are called in the context of OpenWhisk, triggered by events. We will see later in this chapter which other constraints those actions must satisfy.
We just saw OpenWhisk from the outside, and now we have an idea of what it does. Now it is time to investigate its architecture, to understand better how it works under the hood.
We will refer to the Figure Figure 1-2, with some numbered markers. In the Figure, the big container (see 1) at the center, is OpenWhisk itself. It acts as a container of actions. We will see later what an action and what the container is.
Actions, as you can see, can be developed in many programming languages. We will discuss the differences among the various options in the next paragraph.
For the architect, you can consider it as an opaque system that executes those actions in response to events.
It is essential to know the “container” will schedule them, creating and destroying actions that are not needed, and it will also scale them, creating duplicates in response to an increase in load.
You can write actions in many programming languages. Probably the more natural to use are interpreted programming languages: like JavaScript (see 2) (actually, Node.js) or Python (see 3). Those programming languages are interpreted and give an immediate feedback since you can execute them without compilation. They are also generally of higher level, hence more comfortable to use (while the drawback is usually they are slower than compiled languages). Since OpenWhisk is a highly responsive system, where you can immediately run your code in the cloud, probably the majority of the developers prefer to use those “interactive” programming languages.
The “default” language for OpenWhisk is indeed Javascript. However other languages are also first class citizen. While Javascript is the more commonly used, nothing in OpenWhisk favors it over other languages.
In addition to purely interpreted (or compiled-on-the-fly languages, as it is correct to say), you can use also pre-compiled interpreted languages, like the languages of the Java family. Java, Scala and Kotlin (see 4) are the more common programming languages of this family. They run on the Java Virtual Machine, and they are distributed not in source form but an intermediate form. The developer must create a “jar” file to run the action. This jar includes the so-called “bytecode” that OpenWhisk will execute when it will be deployed . A Java Virtual Machine is the actual executor of the action.
Finally, in OpenWhisk you can use compiled languages, producing a binary executable that runs on “bare metal” without interpreters or virtual machines. Examples of those binary languages are Swift, Go or the classical C/C++, see (see 5).
OpenWhisk supports out-of-the-box Go and Swift. You need to send the code of an action compiled in Linux elf format for the amd64 processor architecture, so a compilation infrastructure is needed. However today, with the help of Docker, is not complicated to install on any system the necessary toolchain for the compilation.
Finally, you can use in OpenWhisk any arbitrary language or system that can you can package like a Docker image (see 6) and that you can publish on Docker Hub: OpenWhisk allows to retrieve such an image and run it, as long as you follow its conventions. We will discuss this in the chapter devoted to native actions.
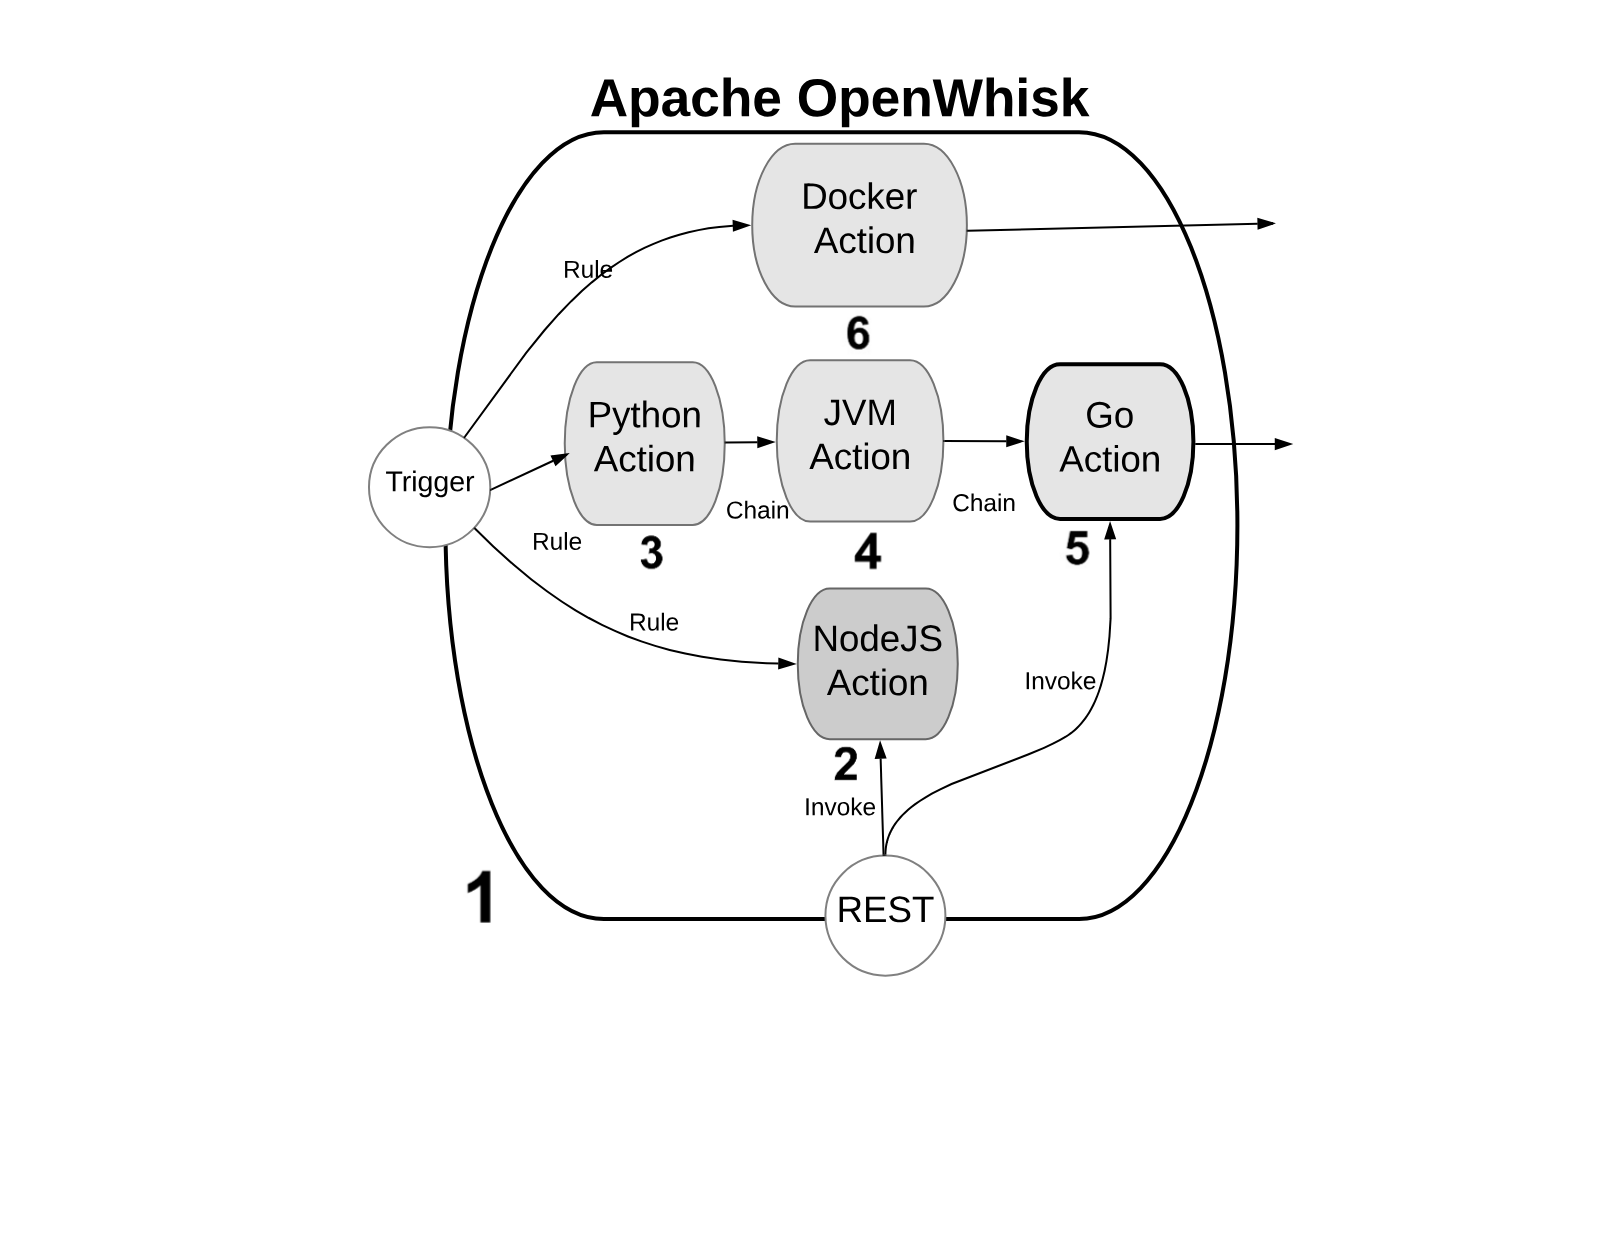
OpenWhisk applications are a collection of actions. We already saw the available type of actions. Now let’s see in Figure Figure 1-3 how they are assembled to build applications.
An action is a piece of code, written in one of the supported programming languages, that you can invoke. On invocation, the action will receive some information as input (see 1).
To standardize parameter passing among multiple programming languages, OpenWhisk uses the widely supported JSON format, since it is pretty simple, and there are libraries to encode and decode this format available basically for every programming language.
The parameters are passed to actions as a JSON string, that the action receives when it starts, and it is expected to process. At the end of the processing, each action must produce its result that is then returned also as a JSON string (see 2).
You can group actions in packages (see 3). A package acts as a unit of distribution. You can share a package with others using bindings. You can also customize a package providing parameters that are different for each binding.
Actions can be combined in many ways. The simplest form of combination is chaining them in sequences (see 4)
Chained actions will use as input the output of the preceding actions. Of course, the first action of a sequence will receive the parameters (in JSON format), and the last action of the sequence will produce the final result, as a JSON string.
However, since not all the flows can be implemented as a linear pipeline of input and output, there is also a way to split the flow of an action in multiple directions.
This feature is implemented using triggers and rules (see 5).
A trigger is merely a named invocation. You can create a trigger, but by itself a trigger does nothing. However, you can then associate the trigger with multiple actions using Rules.
Once you have created the trigger and associated some action with it, you can fire the trigger providing parameters.
Triggers cannot be part of a package. They are something top-level. They can be part of a namespace, however, discussed in the following paragraph.
The connection between actions and triggers is called a feed (see 6). A feed is an ordinary action that must follow an implementation pattern. We will see in the chapter devoted to the design pattern. Essentially it must implement an observer pattern, and be able to activate a trigger when an event happens.
When you create an action that follows the feed pattern (and that can be implemented in many different ways), that action can be marked as a feed in a package. In this case, you can combine a trigger and feed when you deploy the application, to use a feed as a source of events for a trigger (and in turn activate other actions).
Once it is clear what are the components of OpenWhisk, it is time to see what are the actual steps that are performed when it executes an action.
As we can see the process is pretty complicated. We are going to meet some critical components of OpenWhisk. OpenWhisk is “built on the shoulder of giants,” and it uses some widely known and well developed open source projects.
More in detail it includes:
NGINX, a high-performance web server and reverse proxy.
CouchDB, a scalable, document-oriented, NO-SQL Database.
Kafka, a distributed, high performing, publish-subscribe messaging system.
Docker, an environment to manage execution of applications in an efficient but constrained, virtual-machine like environment.
Furthermore, OpenWhisk can be split into some components of its own:
the Controller, managing the execution of actions
the Load Balancer, distributing the load
the Invoker, actually executing the actions
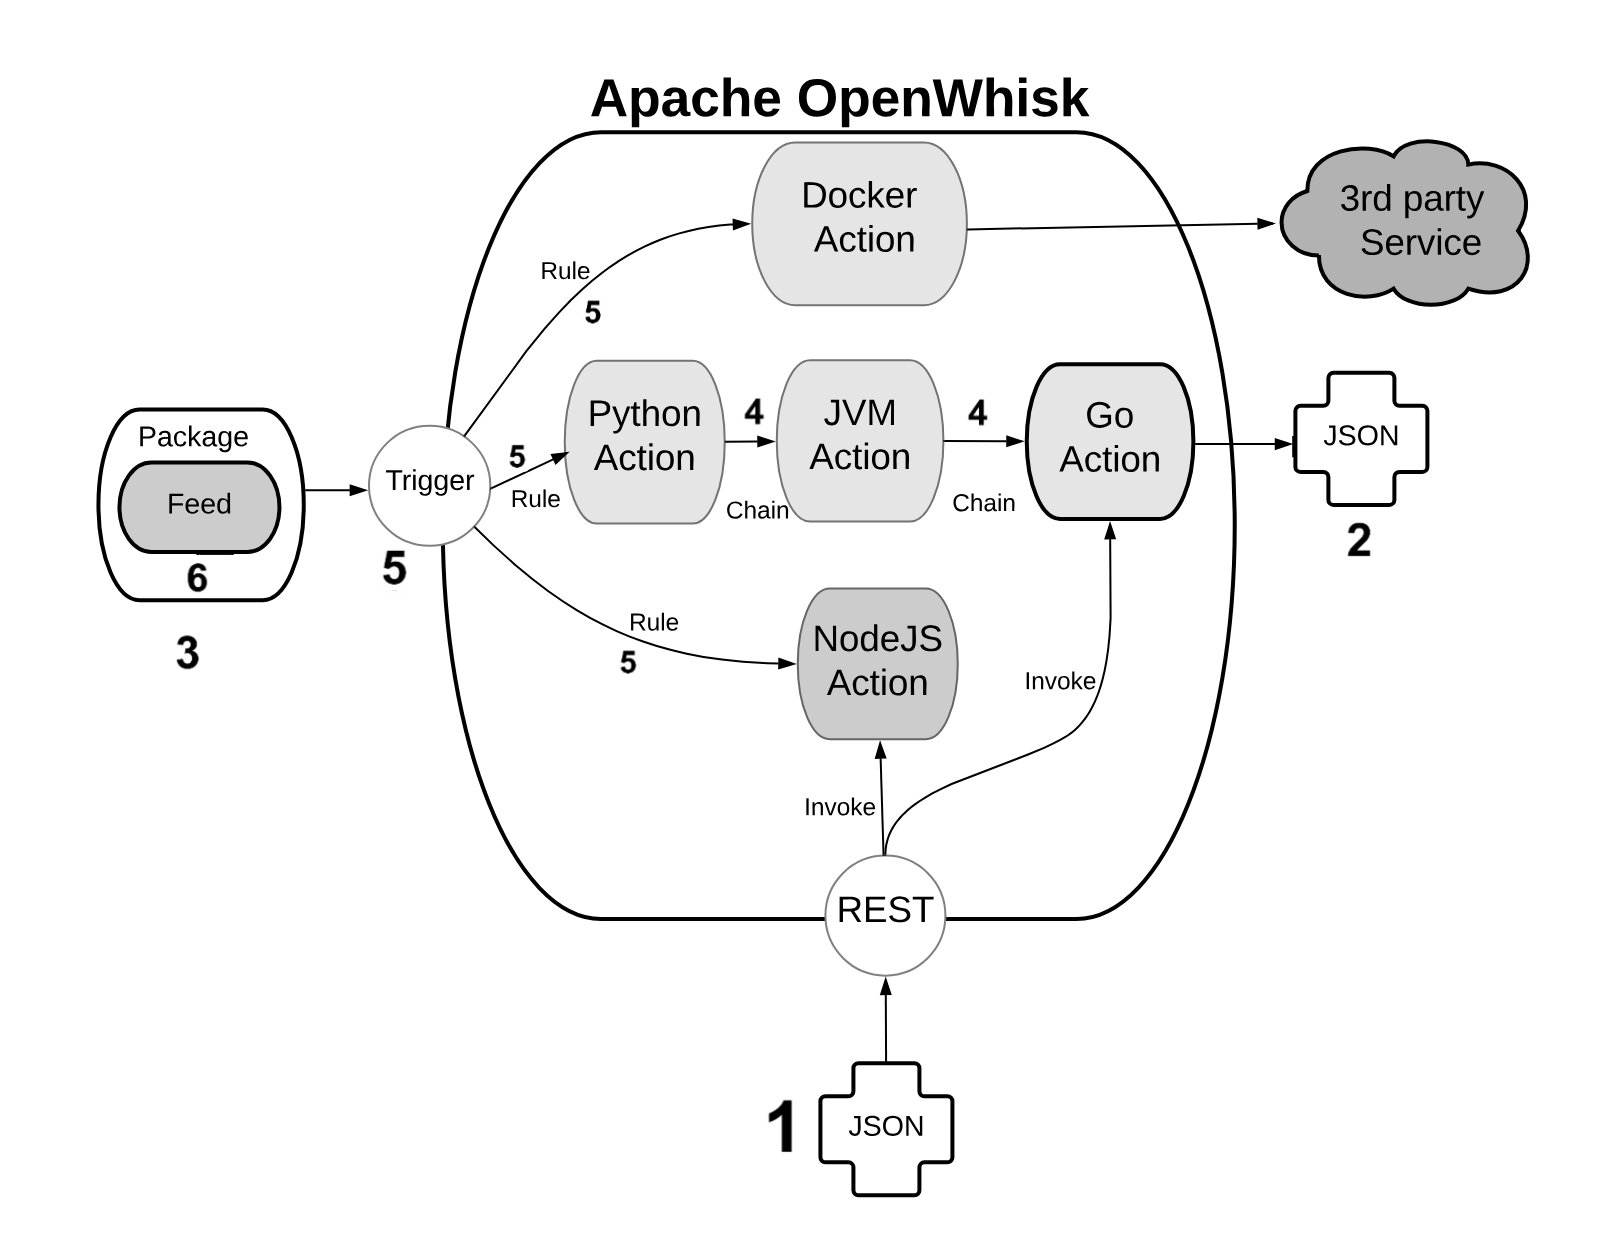
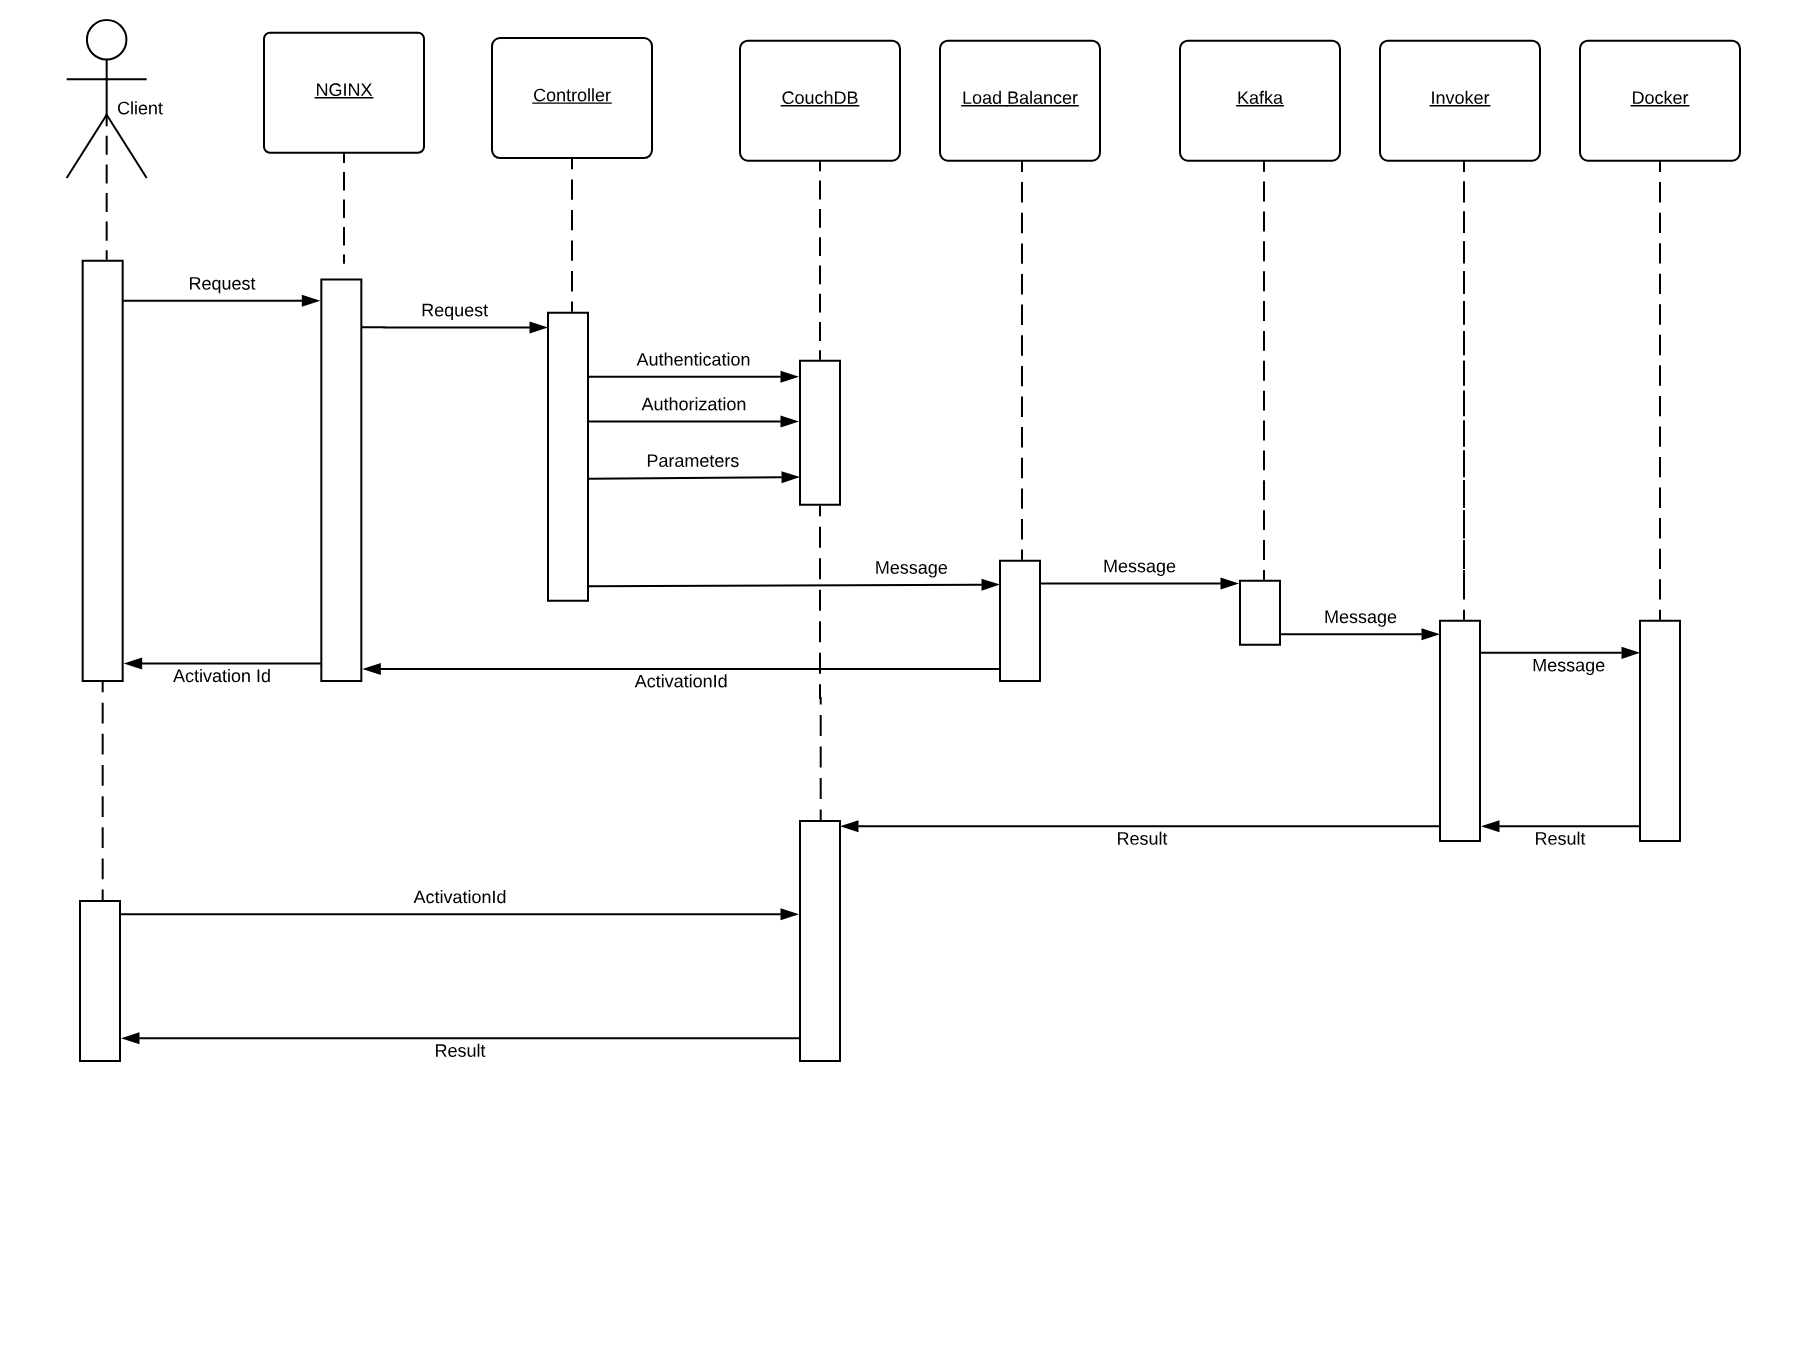
In Figure Figure 1-4 we can see how the whole processing happens. We are going to discuss it in detail, step by step.
Basically, all the processing done in OpenWhisk is asynchronous, so we will go into the details of an asynchronous action invocation. Synchronous execution fires an asynchronous execution and then wait for the result.
Everything starts when an action is invoked. There are different ways to invoke an action:
from the Web, when the action is exposed as Web Action
when another action invokes it through the API
when a trigger is activated and there is a rule to invoke the action
from the Command Line Interface
Let’s call the client the subject who invokes the action. OpenWhisk is a RESTful system, so every invocation is translated in an https call and hits the so-called “edge” node.
The edge is actually the web server and reverse proxy Nginx. The primary purpose of Nginx is implementing support for the “https” secure web protocol. So it deploys all the certificates required for secure processing. Nginx then forwards the requests to the actual internal service component, the Controller.
The Controller, that is implemented in Scala, before effectively executing the action, performs pretty complicated processing.
It needs to be sure it can execute the action. Hence the need to authenticate the requests, verifying if the source of the request is a legitimate subject.
Once the origin of the request has been identified, it needs to be authorized, verifying that the subject has the appropriate permissions.
The request must be enriched with all the default parameters that have been configured. Those parameters, as we will see, are part of the action configuration.
To perform all those steps the Controller consults the database, that in OpenWhisk is CouchDB.
Once validated and enriched, the action is now is ready to be executed, so it is sent to the next component of the processing, the Load Balancer.
Load Balancer job, as its name states, is to balance the load among the various executors in the system, which are called in OpenWhisk Invokers.
We already saw that OpenWhisk executes actions in runtimes, and there are runtimes available for many programming languages. The Load Balancer keeps an eye on all the available instances of the runtime, checks its status and decide which one should be used to serve the new action requested, or if it must create a new instance.
We got to the point where the system is ready to invoke the action. However, you can not just send your action to an Invoker, because it can be busy serving another action. There is also the possibility that an invoker crashed, or even the whole system may have crashed and is restarting.
So, because we are working in a massively parallel environment that is expected to scale, we have to consider the eventuality we do not have the resources available to execute the action immediately. Hence we have to buffer invocations.
The solution for this purpose is using Kafka. Kafka is a high performing “publish and subscribe” messaging system, able to store your requests, keep them waiting until they are ready to be executed. The request is turned in a message, addressed to the invoker the Load Balancer chose for the execution.
Each message sent to an Invoker has an identifier, the ActivationId. Once the message has been queued in Kafka, the ActivationId is sent back as the final answer of the request to the client, and the request completes.
Because as we said the processing is asynchronous, the Client is expected to come back later to check the result of the invocation.
The Invoker is the critical component of OpenWhisk and it is in charge of executing the Actions. Actions are actually executed by the Invoker creating an isolated environment provided by Docker.
Docker can create execution environments (called “Containers”) that resemble an entire operating system, providing everything code written in any programming language needs to run.
In a sense, an environment provided by Docker looks like, as seen by action, to an entire computer for it (just like a Virtual Machine). However, execution within containers is much more efficient than VMs, so they are used in preference to actual emulated environments.
It would be safe to say that, without containers, the entire concept of a Serverless Environment like OpenWhisk executing actions as separate entities, would not have been possible to implement.
Docker actually uses Images as the starting point for creating containers where it executes actions. A runtime is really a Docker image. The Invoker launches a new Image for the chosen runtime then initialize it with the code of the action.
OpenWhisk provides a set of Docker Images including support for the various languages, and the execution logic to accept the initialization: JavaScript, Python, Java, Go, etc.
Once the runtime is up and running, the invoker passes the whole action requests that have been constructed in the processing so far. Also, Invokers will take care of managing and storing logs to facilitate debugging.
Once OpenWhisk completes the processing, it must store the result somewhere. This place is again CouchDB (where also configuration data are stored). Each result of the execution of an action is then associated with the ActivationId, the one that was sent back to the client. Thus the client will be able to retrieve the result of its request querying the database with the id.
As we already said, the processing described so far is asynchronous. This fact means the client will start a request and forget. Well, it will not leave it behind entirely, because it returns an activation id as a result of an invocation. As we have seen so far, the activation id is used to associate the result in the database after the processing.
So, to retrieve the final result, the client will have to perform a request again later, passing the activation id as a parameter. Once the action completes, the result, the logs, and other information are available in the database and can be retrieved.
Synchronous processing is available in addition to the asynchronous one. It primarily works in the same way as the asynchronous, except the client will block waiting for the action to complete and retrieve the result immediately.
The OpenWhisk architecture and its way of operation mandate that, When you develop Serverless applications, you have to abide by some constraints and limitations.
We call those constraints execution model, and we are going to discuss it in detail.
You need to think to your application as decomposed as a set of actions, collaborating each other to reach the purpose of the application.
It is essential to keep in mind that each action, running in a Serverless environment, will be executed within certain limits, and those limits must be considered when designing the application.
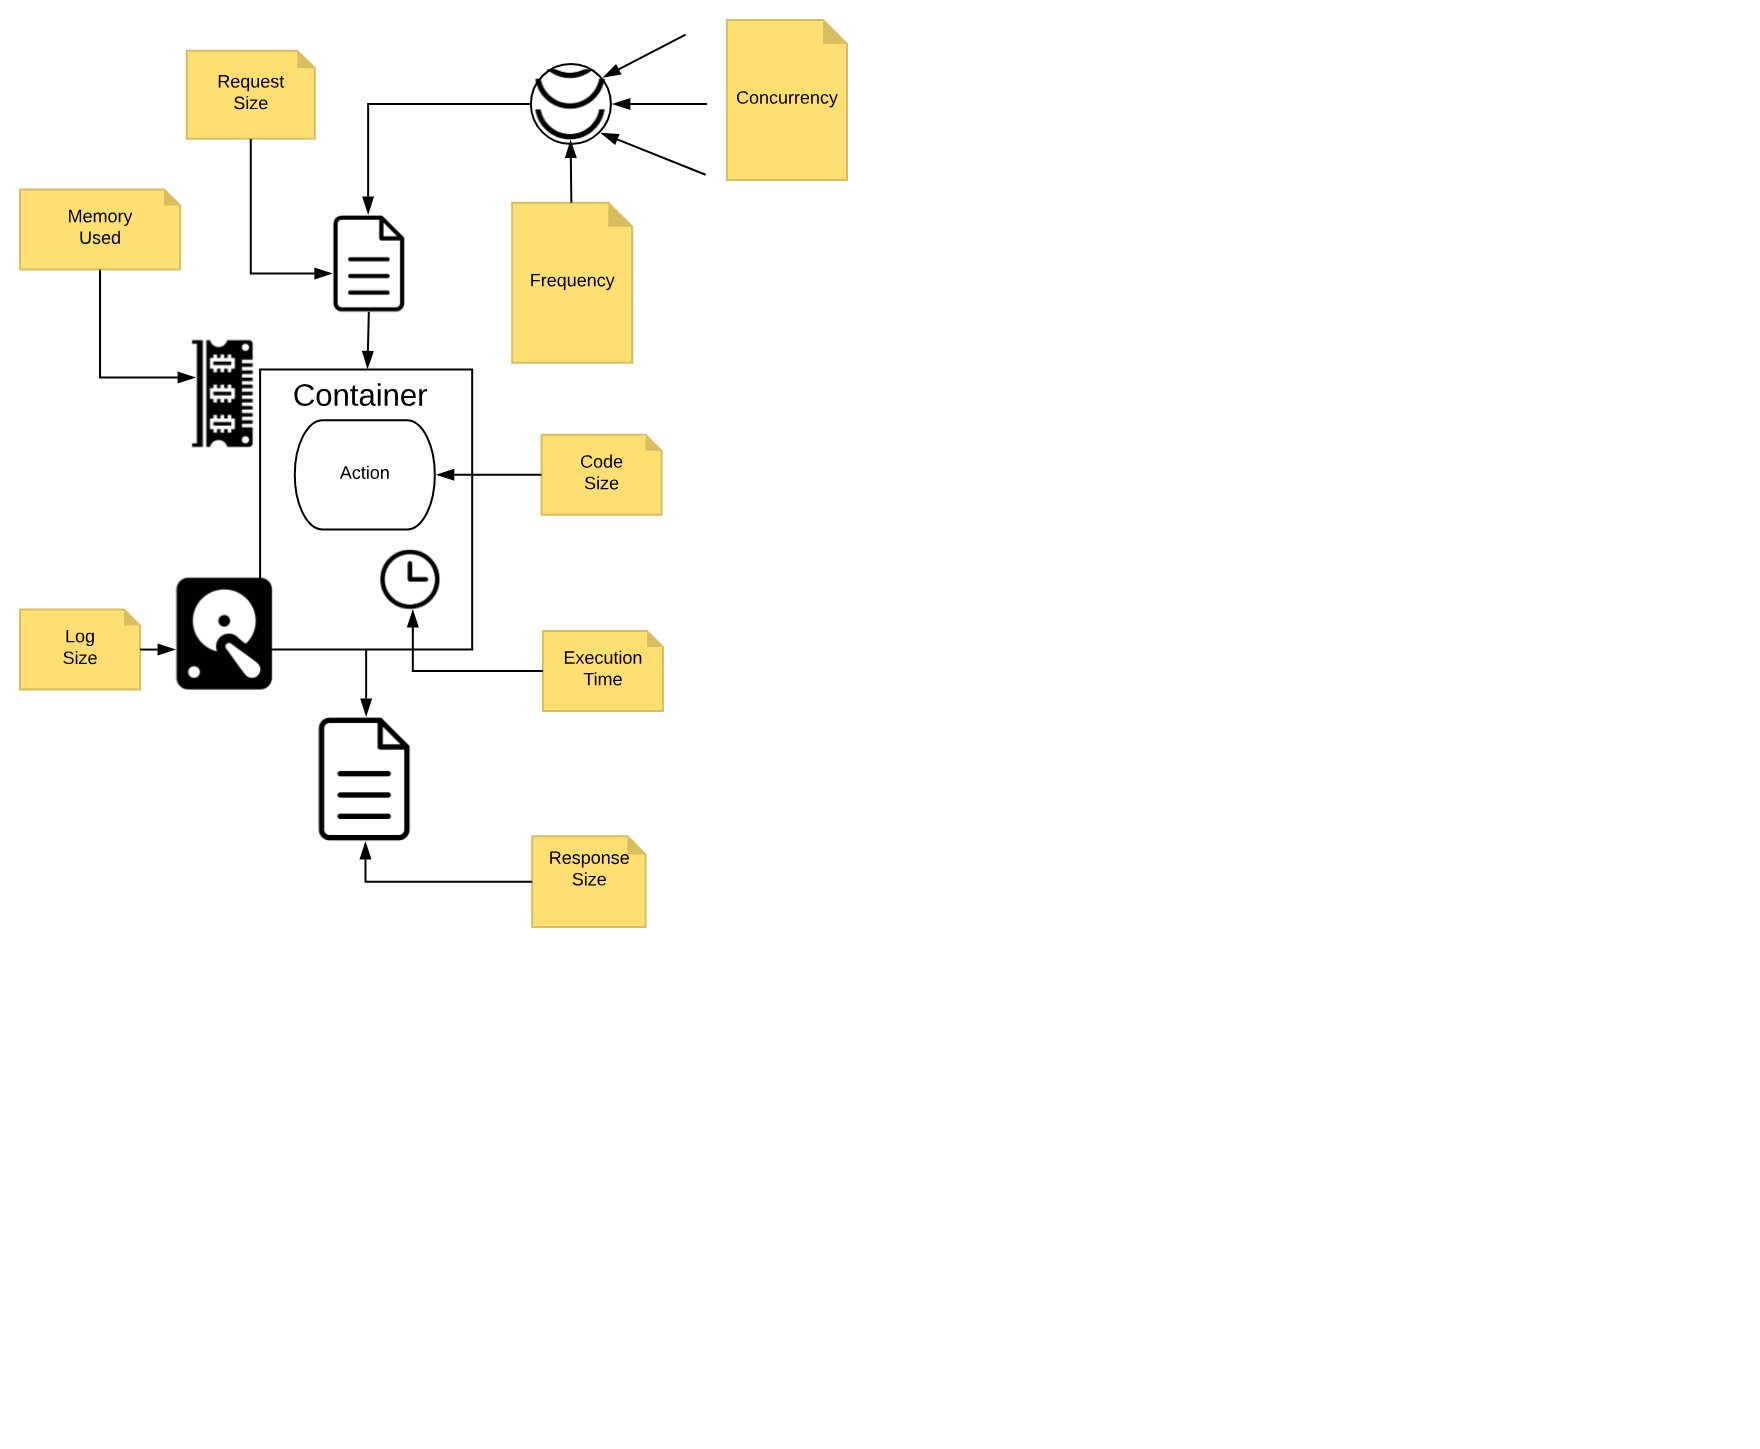
In Figure Figure 1-5 are depicted the significant constraints an action is subject.
All the constraints have some value in term of time or space, either timeout, frequency, memory, size of disk space. Some are configurable; others are hardcoded. The standard values (that can be different according to the particular cloud or installation you are using) are:
execution time: max 1 minute per action (configurable)
memory used: max 256MB per action (configurable)
log size: max 10MB per action (configurable)
code size: max 48MB per action (fixed)
parameters: max 1MB per action (fixed)
result: max 1MB per action (fixed)
Furthermore, there are global constraints:
concurrency: max 100 concurrent activations can be queued at the same time (configurable)
frequency: max 120 activations per minute can be requested (configurable)
Global constraints are actually per namespace. Think to a namespace as the collection of all the OpenWhisk resources assigned to a specific user, so it is practically equivalent to a Serverless application, since it is split into multiple entities.
Let’s discuss more in detail those constraints.
As already mentioned, each action must be a function, invoked with a single input and must produce a single output.
The input is a string in JSON format. The action usually deserializes the string in a data structure, specific to the programming language used for the implementation.
The runtime generally performs the deserialization, so the developer will receive an already parsed data structure.
If you use dynamic languages like Javascript or Python, usually you receive something like a Javascript object or a Python dictionary, that can be efficiently processed using the feature of the programming language.
If you use a more statically typed language like Java or Go, you may need to put more effort in decoding the input. Libraries for performing the decoding task are generally readily available. However, some decoding work may be necessary to map the generally untyped arguments to the typed data structure of the language.
The same holds true for returning the output. It must be a single data structure, the programming language you are using can create, but it must be serialized back in JSON format before being returned. Runtimes also usually take care of serializing data structures back in a string.
Everything in the Serverless environment is activated by events. You cannot have any long running process. It is the system that will invoke actions, only when they are needed.
For example, an event is a user that when is browsing the web opens the URL of a serverless application. In such a case, the action is triggered to serve it.
However, this is only one possible event. Other events include for example a request, maybe originated by another action, that arrives on a message queue.
Also, database management is event-driven. You can perform a query on a database, then wait until an event is triggered when the data arrives.
Other websites can also originate events. For example, you may receive an event:
when someone pushes a commit on GitHub
when a user interacts with Slack and sends a message
when a scheduled alarm is triggered
when an action update a database
etc.
Actions are executed in Docker containers. As a consequence (by Docker design) file system is ephemeral. Once a container terminates, all the data stored on the file system will be removed too.
However, this does not mean you cannot store anything on files when using a function. You can use files for temporary data while executing an application.
Indeed a container can be used multiple times, so for example, if your application needs some data downloaded from the web, an action can download some stuff it makes available to other actions executed in the same container.
What you cannot assume is that the data will stay there forever. At some point in time, either the container will be destroyed or another container will be created to execute the action. In a new container, the data you downloaded in a precedent execution of the action will be no more available.
In short, you can use local storage only as a cache for speed up further actions, but you cannot rely on the fact data you store in a file will persist forever. For long-term persistence, you need to use other means. Typically a database or another form of cloud storage.
It is essential to understand that action must execute in the shortest time possible. As we already mentioned, the execution environment imposes time limits on the execution time of an action. If the action does not terminate within the timeout, it will be aborted. This fact is also true for background actions or threads you may have started.
So you need to be well aware of this behavior and ensure your code will not keep going for an unlimited amount of time, for example when it gets larger input. Instead, you may sometimes need to split the processing into smaller chunks and ensure the execution time of your action will stay within limits.
Also usually the billing charge is time-dependent. If you run your application in a cloud provider supporting OpenWhisk, you are charged for the time your action takes. So faster actions will result in lower cost. When you have millions of actions executed, a few milliseconds speedier action can sum up in significant savings.
Note also that actions are not ordered. You cannot rely on the fact action is invoked before another. If you have action A at time X and action B at time Y, with X < Y, action B can be executed before A.
As a consequence, if the action has a side effect, for example writing in the database, the side effect of action A may be applied later than the action B. Furthermore, there is not even any guarantee that an action will be executed entirely before or after another action. They may overlap in time.
So for example when you write in a database you must be aware that while you are writing in it, and before you have finished, another action may start writing in it too. So you have to provide your transaction support.
The Serverless Architecture looks brand new, however it shares concepts and practices with existing architectures. In a sense, it is an evolution of those historical architectures.
Of course, every architectural decision made in the past has been adapted to emerging technologies, most notably virtualization and containers. Also, the requirements of the Cloud era impose scalability virtually unlimited.
To better understand the genesis and the advantages of the Serverless Architecture, it makes sense to compare OpenWhisk architecture it with another essential historical precedent that is currently in extensive use: the Architecture of Java Enterprise Edition, or JavaEE.
The core idea behind JavaEE was allowing the development of large application out of small, manageable parts. It was a technology designed to help application development for large organizations, using the Java programming language. Hence the name of Java Enterprise Edition.
At the time of the creation of JavaEE, everything was based on the Java programming language, or more specifically, the Java Virtual Machine. Historically, when JavaEE was created Java was the only programming language available for building large, scalable applications (meant to replace C++). Scripting languages like Python were at the time considered toys and not in extensive use.
To facilitate the development of that vast and complex application, JavaEE provided a productive (and complicated) infrastructure of services.
To use them, JavaEE offered many different types of components, each one deployable separately, and many ways to let the various part to communicate with each other.
Those services were put together and made available through the use of Application Server. JavaEE itself was a specification.
The actual implementation was a set of competing products. The most prominent names in the world of application servers that are still in broad use today are Oracle Weblogic and IBM WebSphere.
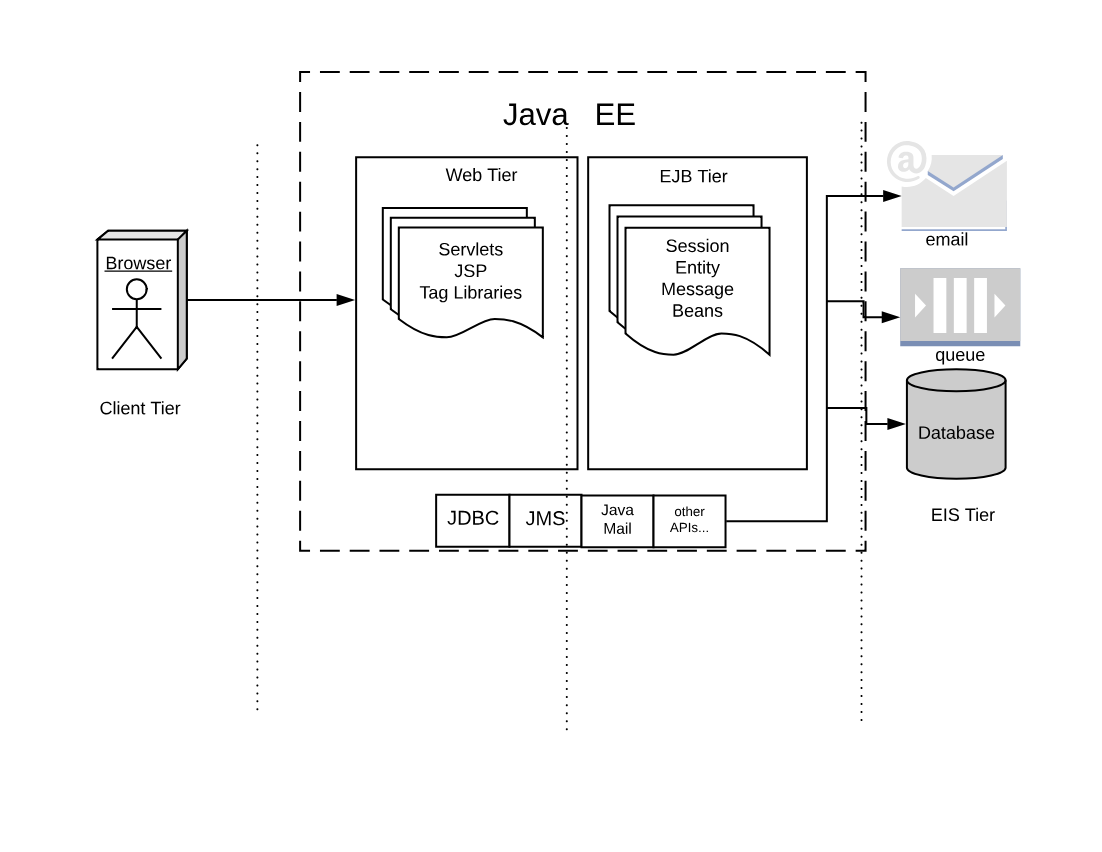
If we look at the classical JavaEE architecture we can quickly identify the following tiers:
The client (front end) tier
The web (back-end) tier
The EJB (business) tier
The EIS (integration) tier
The following ideas characterize it:
Application is split into discrete components, informally called beans.
Components are executed in (Java-based) containers.
Interface to the external world is provided by connectors.
In JavaEE, we have different types of components.
The client tier is expected to implement the application logic at the client level. Historically Java was used to implement applet, small java components that can be downloaded and run in the browser. Javascript, CSS, and HTML nowadays entirely replace those web components
In the web tier, the most crucial kind of components are the servlets. They are further specialized in JSP, tag libraries, etc. Those components define the web user interface at the server level.
The so-called business logic, managing data and connection to other “enterprise systems” is expected to be implemented in the Business Tier using the so-called EJB (Enterprise Java Beans). There were many flavors of EJB, like Entity Beans, Session Beans, Message Beans, etc.
Each component in JavaEE is a set of Java classes that must implement an API. The developer writes those classes and then deliver them to the Application Server, that loads the components and run them in their containers.
Furthermore, application servers also provide a set of connectors to interface the application with the external world, the EIS tier. There were connectors, written for Java, allowing to interface to virtually any resource of interest,
The more common in JavaEE are connectors to:
databases
message queues
email and other communication systems
In the JavaEE world, Application Servers provided the implementation of all the JavaEE specification, and included APIs and connectors, to be a one-stop solution for all the development needs of enterprises.
For many reasons, the architecture of Serverless application and OpenWhisk can be seen as an evolution of JavaEE. Everything starts from the same basic idea: split your application into many small, manageable parts, and provide a system to quickly put together all those pieces.
However, the technological landscape driving the development of Serverless environment is different than the one driving JavaEE development. In our brave new world, we have:
applications are spread among multiple servers in the cloud, requiring virtually infinite scalability
numerous programming languages, including scripting languages, are in extensive use and must be usable
virtual machine and container technologies are available to wrap and control the execution of programs
HTTP can be considered a standard transport protocol
JSON is simple and widely used to be usable as a universal exchange format
Now, let’s compare JavaEE with the OpenWhisk architecture in Figure Figure 1-7. The Figure is intentionally similar to the Figure Figure 1-6, to highlight similarities and differences.
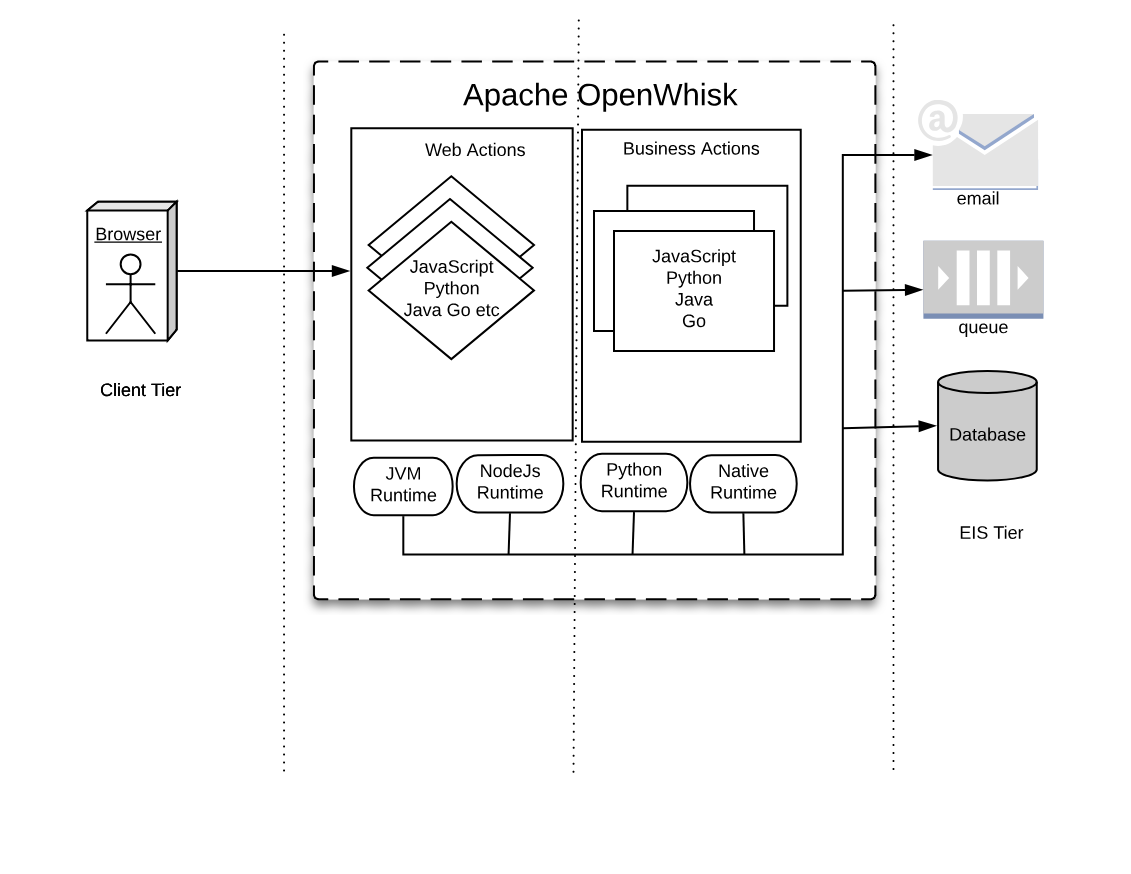
As you can see in the Figure, we can recognize web tier and a business tier also in OpenWhisk, in addition to a client and an integration tier.
While there is not a formal difference between the two tiers, in practice we have actions directly exposed to the web (web actions) and actions that are not.
Web Actions can be considered to be the web tier. Those actions which are meant to serve events, either coming from web actions or triggered by other services in the infrastructure, can be considered “Business Actions,” defining a “Business Tier.”
In JavaEE, everything runs in the Java Virtual Machine, and everything must be coded in Java (or any language that can generate JVM-compatible byte-code).
In OpenWhisk, you can code applications in multiple programming languages. We use their runtimes as equivalents of the Java Virtual Machine. Furthermore, those runtimes are wrapped in Docker containers to provide isolation and control over resource usage.
Hence you can write your components in any (supported) language you like. You are no more confined to write your application solely for the JVM. However, a JVM runtime is available, so you can still use Java and its family of languages if you like.
You can now write your code for the JavaScript Virtual Machine, more commonly referred to as NodeJs .
Under the hood, Nodes it is an adaptation of the V8 Javascript interpreter that powers the Chrome Browser. It is a fast executor of the javascript language, which also does complicated things like compiling on-the-fly to native code.
If you choose to use the Python programming languages, you are also using its interpreter. Python has many available interpreters, one being the move widely used CPython, but there is also other available, like Pypy. The JVM can even execute Python.
Furthermore, you may choose not to use a virtual machine at all, but write your application in a language producing native executables like Swift or Go. In the Serverless world, it is becoming to become a popular choice. As long as you compile your application for Linux and AMD64, you can use it for OpenWhisk.
In JavaEE, you have APIs available to interact with the rest of the world, written in Java itself. Basically, the JavaEE model is , and every interesting resource for writing applications has been adapted to be used by Java.
In OpenWhisk, you have first and before all only one API, available for all the supported programming languages. This API is the OpenWhisk API itself, and it is a RESTful API. You can invoke it over HTTP using JSON as an interchange format.
This API can even be invoked directly just using an HTTP library, reading and writing JSON strings. However, are available wrappers for all the supported programming languages to use it efficiently. This API acts as glue for the various components in OpenWhisk.
All the communication between the different parts in OpenWhisk are performed in JSON over HTTP.
In JavaEE, you have connectors for each external system you want to communicate with, primarily drivers. For example, if you’re going to interact with an Oracle database you need an Oracle JDBC driver, to communicate with IBM DB2 you need a specify DB2 JDBC driver, etc. The same holds true for messaging queues, email, etc.
In OpenWhisk, interaction with other systems is wrapped in packages, that are a collection of actions explicitly written to interact with a particular system. You can use any programming language and available APIs and drivers to communicate with it. So if you have for example a Java driver for a database, you can write a package to interact with it. Those packages act as Connectors.
In the IBM Cloud, there are packages available to communicate with essential services in the cloud. Most notably, we have
the cloud database Cloudant
the Kafka messaging system,
the enterprise chat Slack
many others, some specific to IBM services
You use the Feed mechanism provided by OpenWhisk to hook in those systems.
Finally, in JavaEE, everything is managed by Application Servers. They are “the place” where Enterprise Applications are meant to be deployed.
In a sense, OpenWhisk itself replaces the Application Server concept, providing a cloud-based, multi-node, language agnostic execution service.
Using a serverless engine like OpenWhisk, the cloud becomes a transparent entity where you deploy your code. The environment manages the distribution of application in the Cloud.
The problem becomes not to install your code, but to install correctly OpenWhisk. Each component of OpenWhisk must be then appropriately deployed according to the available resources of the Cloud. The installation of OpenWhisk in Cloud is a complex subject, and we will devote a chapter of the book to discuss it.
For now, we have to say that OpenWhisk by itself runs in Docker containers. However, scaling Docker in a Cloud requires you to manage those Docker containers under some supervisor system called Orchestrators.
There are many Orchestrator available. At this stage, OpenWhisk supports:
Kubernetes, a widely used orchestration system, initially developed by Google
DC/OS, a “cloud” operating system, supporting the management of distributed application and Docker.
The goal of this chapter is to introduce the development of OpenWhisk applications using JavaScript (and NodeJS) as a programming language, using a command line interface. The reader will get a feeling of how Serverless development works.
For this purpose, we are going to implement step by step a simple application with OpenWisk: a contact form for your website.
You cannot store contacts in your static website; you need some server logic to save them. Furthermore, you may want some logic to validate the data (since the user can disable javascript in their browser) and additionally receive emails notifying of what is going on on the website.
In this introduction to OpenWhisk, we are going to assume our static website is stored on the Amazon AWS Cloud, but we will implement our commenting functions the IBM Cloud, that offers OpenWhisk out of the box.
OpenWhisk is an open source project meant to be cloud-independent, and you can adopt it without being constrained to one single vendor.
Let’s assume we already have a website, built with a static website generator. Creating a site statically was the standard at the beginning of the web. Later, this practice was replaced by the use of a Content Management Systems; however it trendy again today. Indeed, static websites are fast, can be built with the maximum flexibility and there are plenty of tools to create them. Once you have a static site you can publish it on many different platforms offering static publishing. For example, a popular option is AWS S3.
However, usually, not everything in a website can be static. For example, you may need to allow your website visitors to contact you. Of course, you may then want to store the contacts in a database, to manage the data with a CRM application.
Before Serverless environments were available, the only way to enhance a static website with server-side logic was to provision a server, typically a virtual machine, deploy a web server with server-side programming support, then add a database, and finally implement the function you need using a server-side programming language, like PHP or Java.
Today, you can keep your website mostly static and implement a contact form in a Serverless environment, without any need for provisioning any virtual machine, web server or database.
While it may look odd, it is the nature of the Cloud: applications are going to be built with different services available from multiple vendors acting as one large distributed computing environment.
In this book we will use examples of services on AWS Cloud, invoked from the IBM Cloud. Indeed the book is about Apache OpenWhisk, not about the IBM Cloud.
The implementation that is shown in the example is not the best possible. It is just the simplest that we can do to show a result quickly and give a feeling of how we can do with OpenWhisk without getting lost in many details. Later in the book, we will rework the example to implement it in a more structured way.
Serverless development is primarily performed at the terminal, using a command line interface (CLI). We are going to use mostly the Unix based CLI and the command line interpreter Bash. In a sense, this is a Unix-centered book. Bash is available out-of-the-box in any Linux based environment and on OSX. It can also be installed on Windows.
On Windows, you can use either a command line environment including Bash like Git for Windows. Note that, despite the name, it is not just Git: it includes a complete Unix-like environment, based on Bash, ported to Windows. Also, on the more recent version of Windows, you may choose to install instead of the Windows Subsystem for Linux (WSL) which even includes a complete Linux distribution like Ubuntu, with Bash of course. It is informally called Bash for windows also it is is a whole Linux OS running within Windows.
In the following examples, we are also going to use Bash widely for (numerous) command line examples. So you need to familiar working with Bash and the command line.
$ pwd/Users/msciab $ ls \
-l # total 16
-rw-r--r--@ 1 msciab staff 1079 24 Feb 09:53 form.js -rw-r--r--@ 1 msciab staff 71 23 Feb 17:18 submit.js
you should type now pwd at the command line
you should type at the terminal both the two lines
this is an example of the output you should expect
In the text, there will be both examples to be typed at the terminal and code snippets. You will identify code you have to type at the terminal (as in point 1 and 2) by the prefix $. In those examples only the code in the line after $ must be typed at the terminal, the rest is the expected output of the command.
Sometimes long command lines (as in point 2) are split into multiple lines, so you have to type all of them. You will notice when the input spawns for many lines, because lines end with a \.
One central theme of this books is the fact that Apache OpenWhisk is an Open Source product and you can deploy it in any cloud. We will see later in the book how to implement your environment, on-premises or in the cloud of your choice.
However, since Apache OpenWhisk is a project initiated by IBM and then donated to the Apache Foundation, it is available ready to use in the IBM Cloud. Since the OpenWhisk environment is offered for free for development purposes, the simplest way, to begin with, is to create an account there, and use it as our test environment.
Please be aware that since registration procedures and links may change over the time, when you will be reading the book there can be some differences in the actual procedure. So we are not going to delve into too many details describing the description of the registration process. It is pretty simple though, so you should be able to figure out by yourself.
At the time of this writing, you can start by going to the URL: http://console.bluemix.net. You can see then a button saying Create a free account.
You can then click there, provide your data and an email address and then activate your account, clicking on the link sent by email. Then you are done, and no credit card is required.
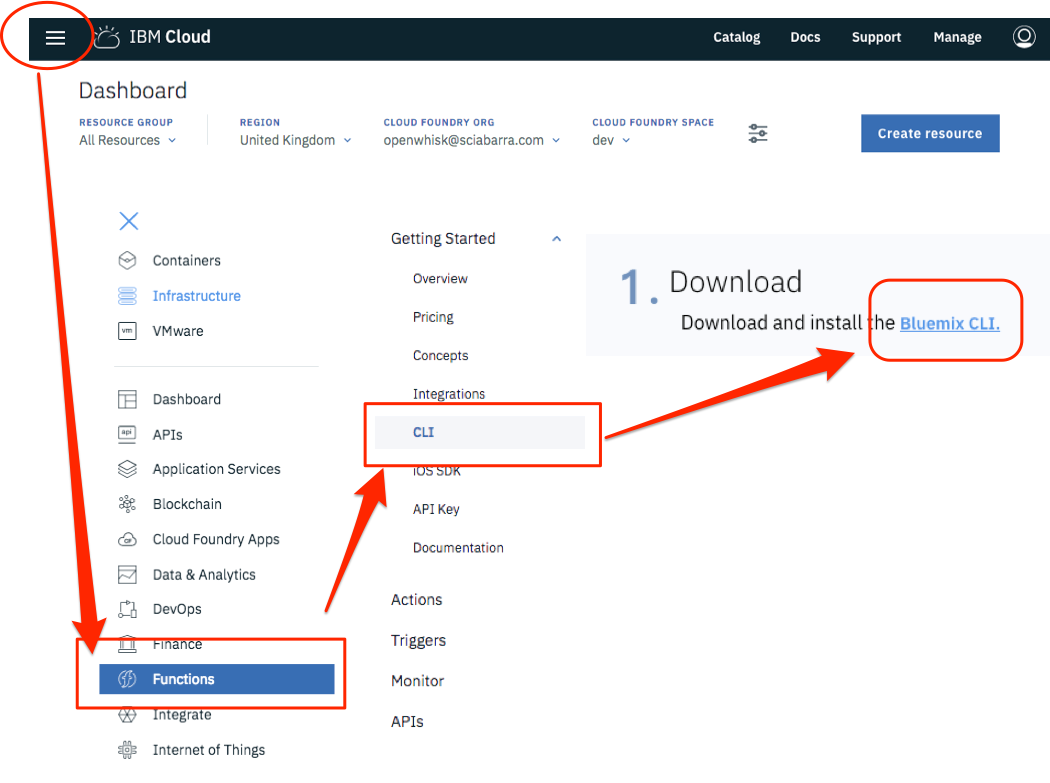
Please note the most important actions to do after the registrations are:
Login to the cloud
Download the bx CLI tool: Figure Figure 2-1
Install the CLI (bx) and the Cloud Functions plugin (wsk): Figure Figure 2-2
Login to the Cloud.
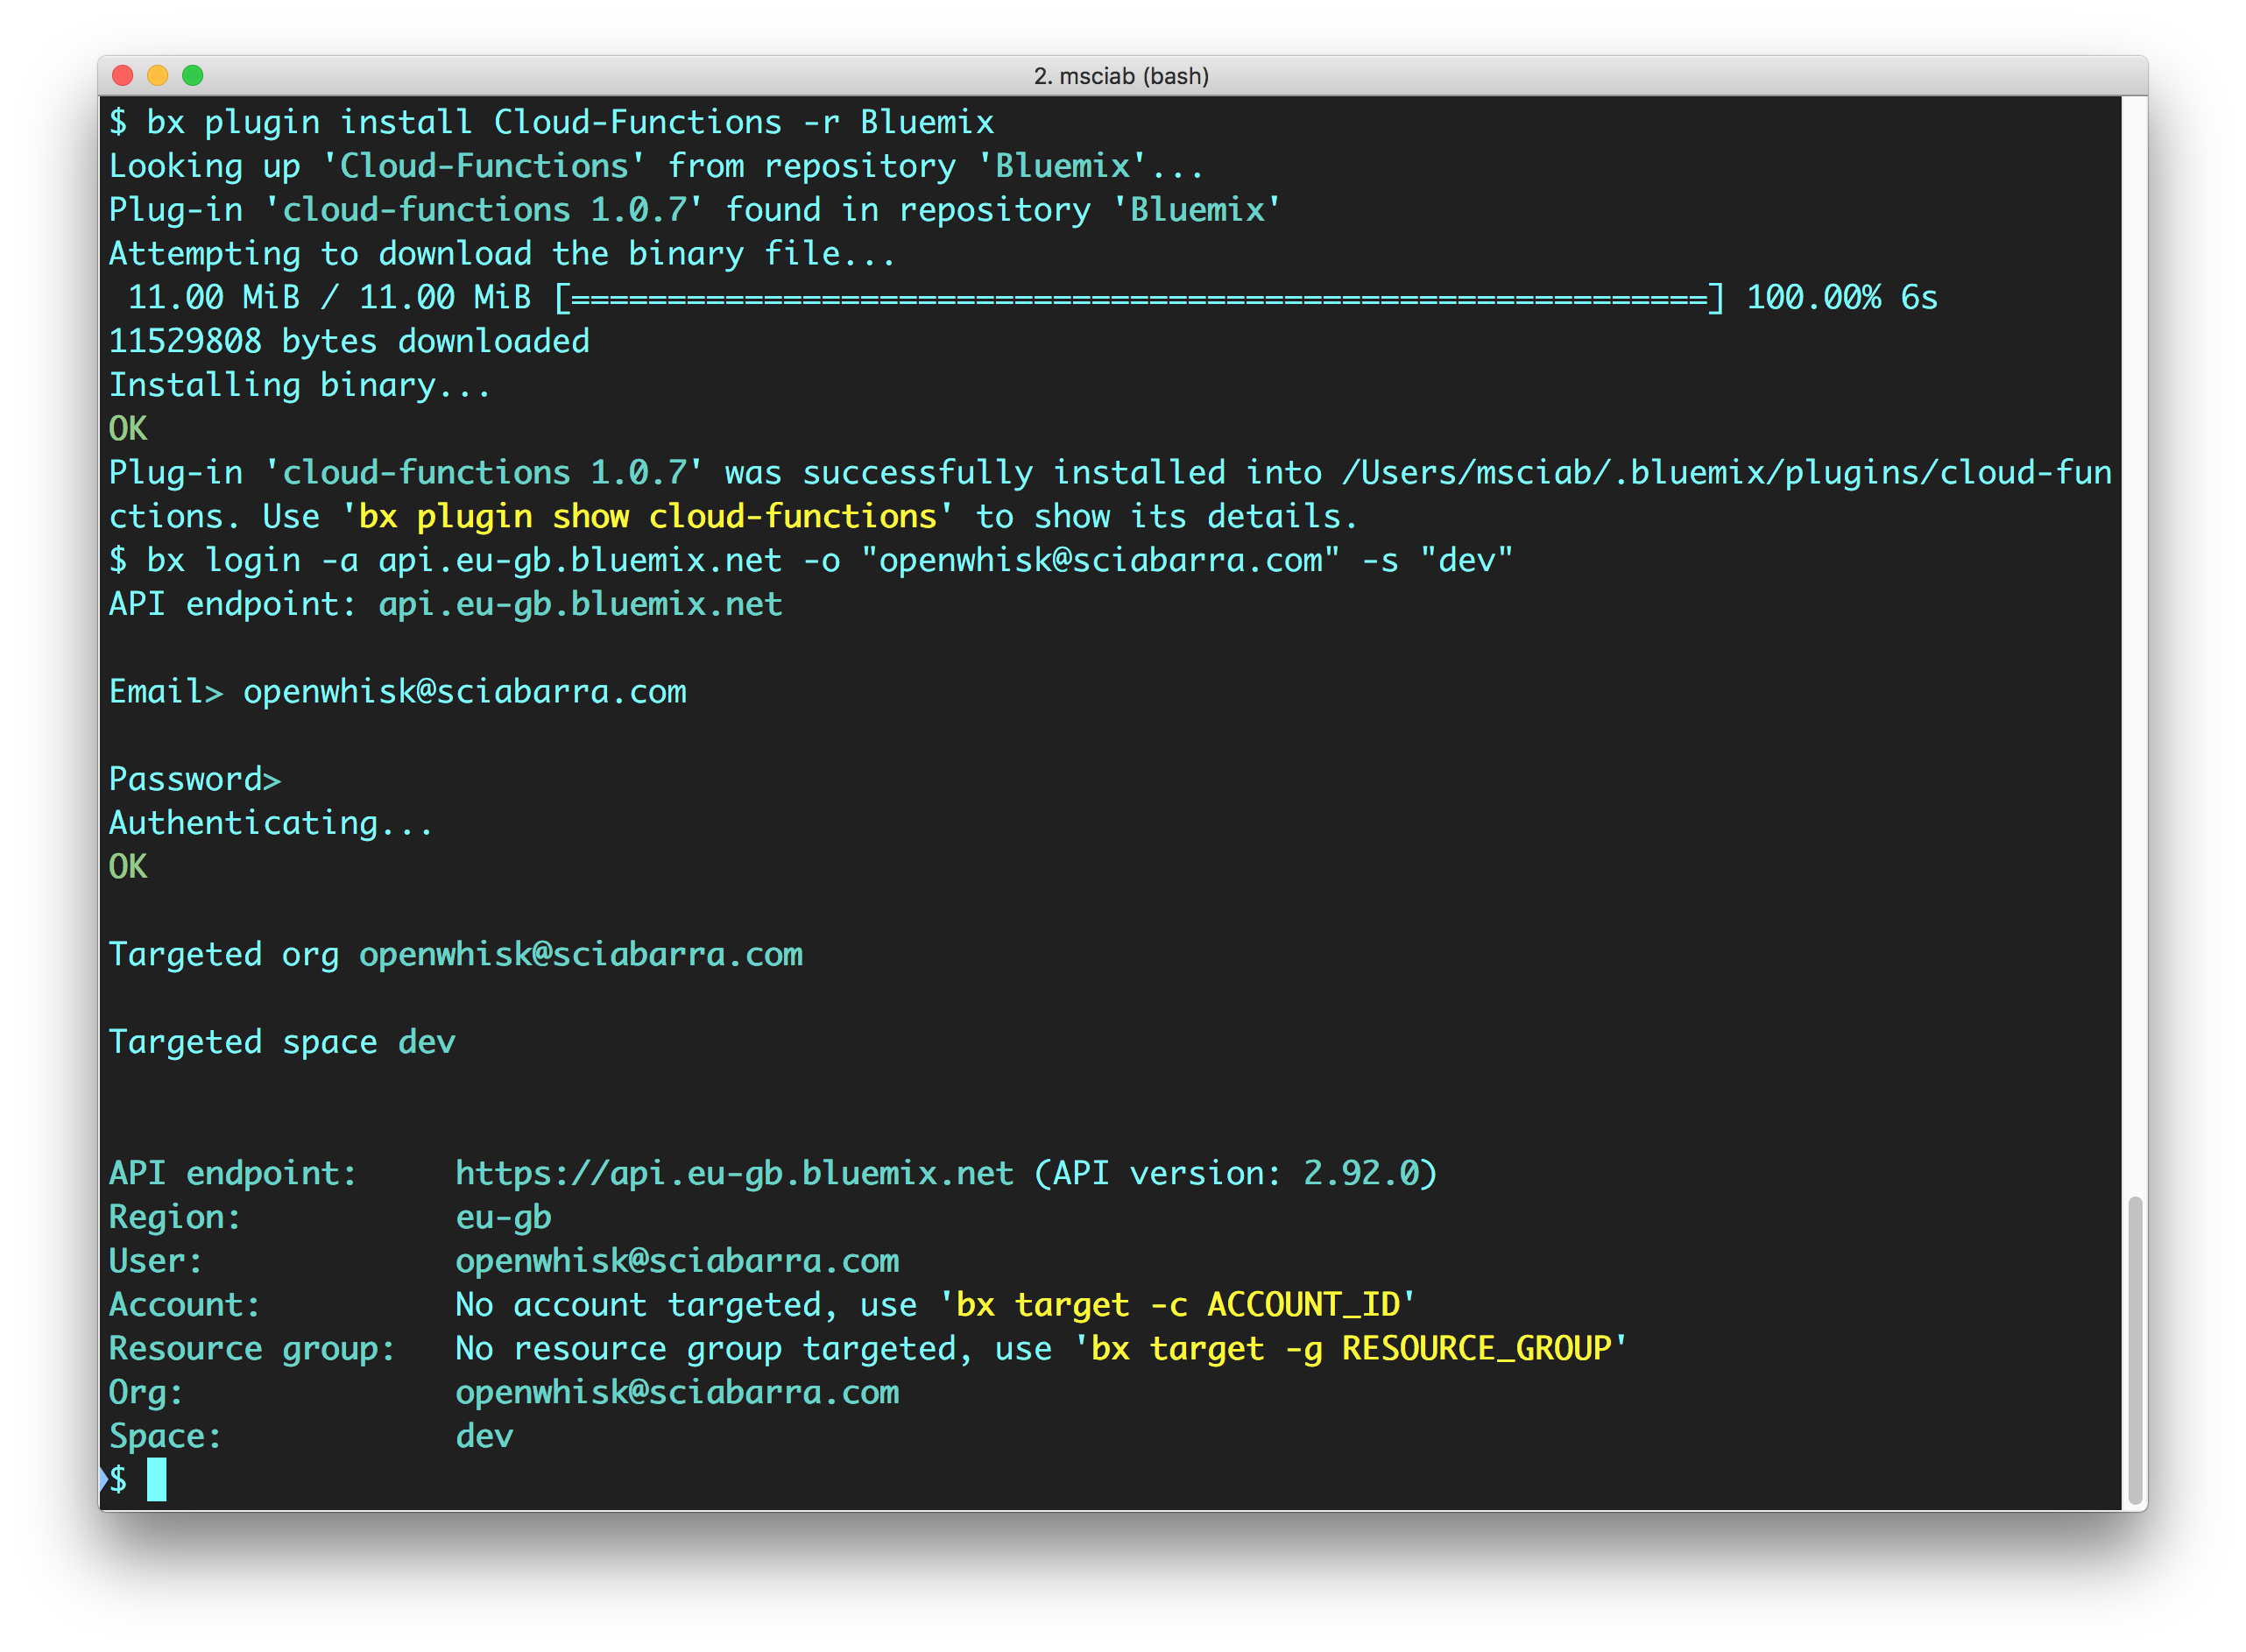
To be sure you are ready, run the following command at the terminal check the result. If they match with the listing, then everything is configured correctly!
$ bx wsk action invoke /whisk.system/utils/echo -p message hello --result
{
    "message": "hello"
}
Now we are going to create and deploy a simple contact form.
We assume you already installed the bx command line tool with the wsk plugin. We also assume you are using a Unix-like command line environment: for example Linux, OSX or, if you are using Windows, you have already installed a version of Bash on Windows.
Open now a terminal and start Bash and let’s do the first step, creating a package to group our code:
$ wsk package create contact
ok: created package contact
Now we are ready to start coding our application. In the Serverless world you can write some code, then deploy and execute it immediately. This modularity is the essence of the platform.
We are going to call the code we create actions. Action will generally be, at least in this chapter, one single file. There will be an exception when we bundle an action file with some libraries we need, and we deploy them together. In such a case, the action will be deployed as a zip file, composed of many files.
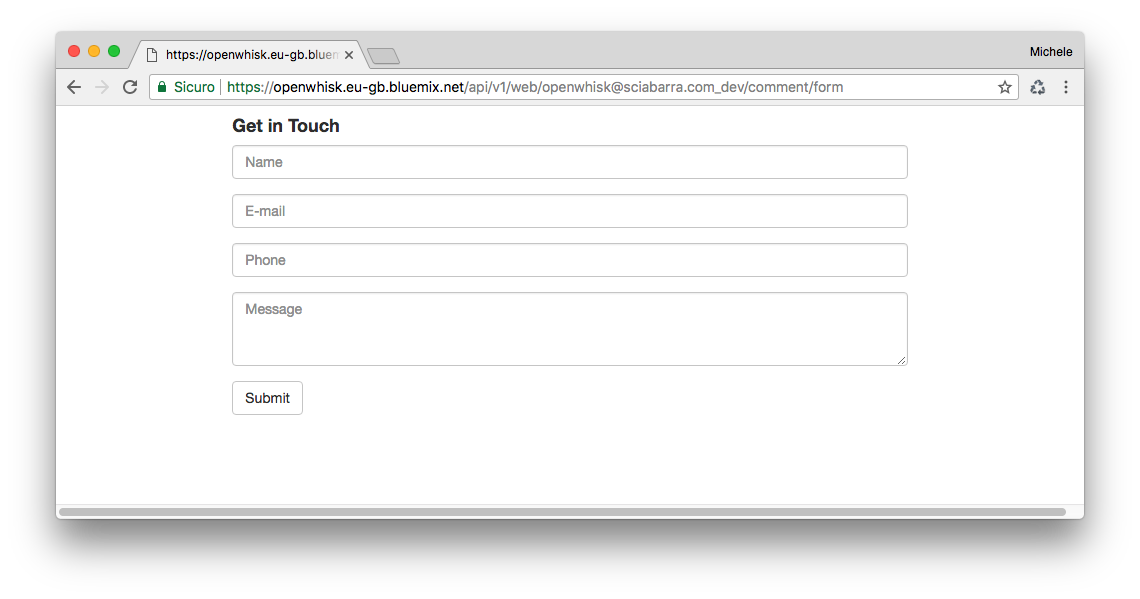
Let’s write our first action. The action is a simple HTML page returned by a javascript function.
function main() {
    return {
        body: `<html><head>
<link href="//maxcdn.bootstrapcdn.com/bootstrap/3.3.0/css/bootstrap.min.css"
      rel="stylesheet" id="bootstrap-css">
</head><body>
 <div id="container">
  <div class="row">
   <div class="col-md-8 col-md-offset-2">
    <h4><strong>Get in Touch</strong></h4>
    <form method="POST" action="submit">
     <div class="form-group">
       <input type="text" name="name"
        class="form-control" placeholder="Name">
     </div>
     <div class="form-group">
        <input type="email" name="email"
         class="form-control" placeholder="E-mail">
     </div>
     <div class="form-group">
        <input type="tel" name="phone"
         class="form-control" placeholder="Phone">
     </div>
     <div class="form-group">
        <textarea  name="message" rows="3"
         class="form-control" placeholder="Message"
         ></textarea>
      </div>
      <button class="btn btn-default" type="submit" name="button">
        Send
      </button>
    </form>
   </div>
  </div>
 </div>
</body></html>`
    }
}
Note the general structure of the actions: the function is called main, it takes as an input a javascript obj and returns a javascript object. Those objects will be displayed at the terminal in JSON format.
Once you wrote the code, you can deploy it, then retrieve the actual URL you can use to execute the action.
$ wsk action create contact/form form.js --web true ok: created action contact/form
This message confirms the action was created
This is the url where the action is available
The actual URL returned will be different since it depends on your account and location.
We can now test if the form was deployed correctly just opening the URL with a web browser.
If you now click on the submit button, you will get an error, because it will try to submit the form to the action command/submit that does not (yet) exists.
{
  "error": "The requested resource does not exist.",
  "code": 3850005
}
After displaying, the next step of the processing is the validation of the data the user submits, before we store them in a database.
We will now create an action called submit.js we discuss step by step. First, let’s “wrap” our code in the main function:
function main(args) {
  message = []
  errors = []
  // TODO: <Form Validation>
  // TODO: <Returning the Result>
}
Insert here the code for validating the form
Insert here the code for returning the result
Note that the action has a similar structure to the preceding, with a main method, now with an explicit parameter args. Let see what happens when you submit the form.
We have a form with some fields: “name”, “email”, “phone”, “message”. On submit, the form data will be encoded, sent to OpenWhisk, that will decode them (we will provide all the details of the processing later in this chapter).
You create a javascript object to process a request using an action. Each key corresponds to a field of the form. This object is passed as the argument of the main function. So our form fields are available to the main function as args.name, arg.email, etc. We can now validate them.
Below we show the code to process the form, adding valid fields to message or any error to errors.
First, let’s check only if the name is provided.
You should add the snippets in this paragraph after <Form Validation>
// validate the name
if(args.name) {
 message.push("name: "+args.name)
} else {
 errors.push("No name provided")
}
Second, let’s validate the email address, checking if it “looks like” an email. We use here a regular expression:
// validate email
var re = /\S+@\S+\.\S+/;
if(args.email && re.test(args.email)) {
   message.push("email: "+args.email)
} else {
  errors.push("Email missing or incorrect.")
}
Third, let’s validate the phone number, checking it has “enough” digits (at least 10):
/// validate the phone
if(args.phone && args.phone.match(/\d/g).length >= 10) {
  message.push("phone: "+args.phone)
} else {
  errors.push("Phone number missing or incorrect.")
}
Finally, let’s add the message text if any:
/// add the message text, optional
if(args.message) {
  message.push("message:
"+args.message)
}
Once we have all the fields validated, we can return the result. There is now a bit of logic: we choose if returning an error message or an acceptance message.
Insert the snippets in this paragraph after <Returning the Result>
// complete the processing
var data = "<pre>"+message.join("\n")+"</pre>"
var errs = "<ul><li>"+errors.join("</li><li>")+"</li></ul>"
if(errors.length) {
  return {
    body: "<h1>Errors!</h1>"+
      data + errs +
      '<br><a href="javascript:window.history.back()">Back</a>'
   }
} else {
   // storing in the database
   // TODO: <Store the message in the database>
   return {
     body: "<h1>Thank you!</h1>"+ data
   }
}
Placeholder to insert code to save data in the database
The action is not complete (we have still to see how to store the data) but we can test this partial code with this command:
$ wsk action create contact/submit submit.js --web true
ok: created action contact/submit
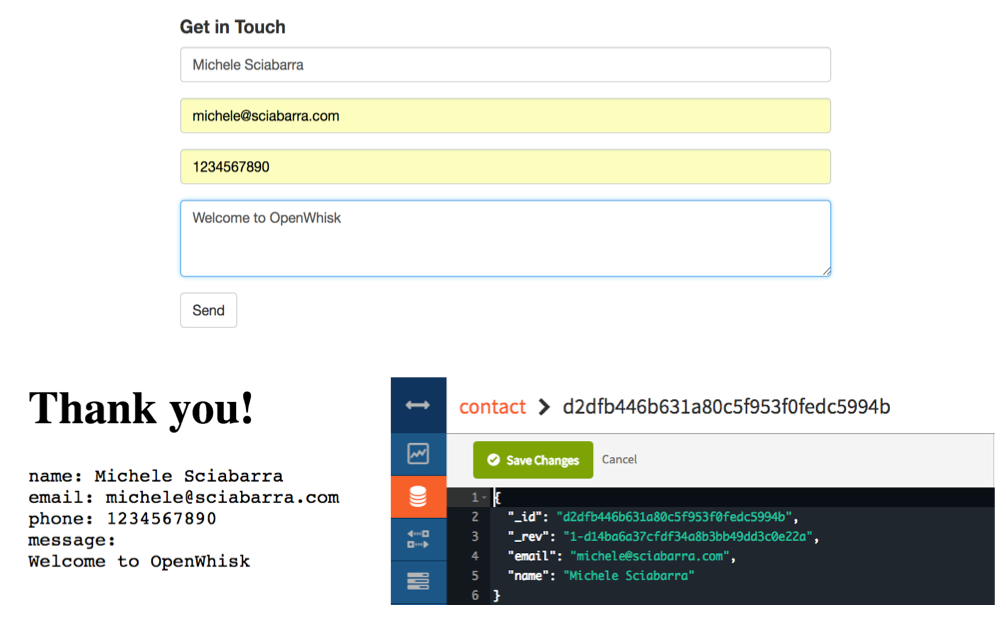
If you now submit the form empty, you will see the message in Figure Figure 2-4 under “Form Rejected”. If we instead provide all the parameters correctly, we will be gratified with the acknowledgment under “Form Accepted”.

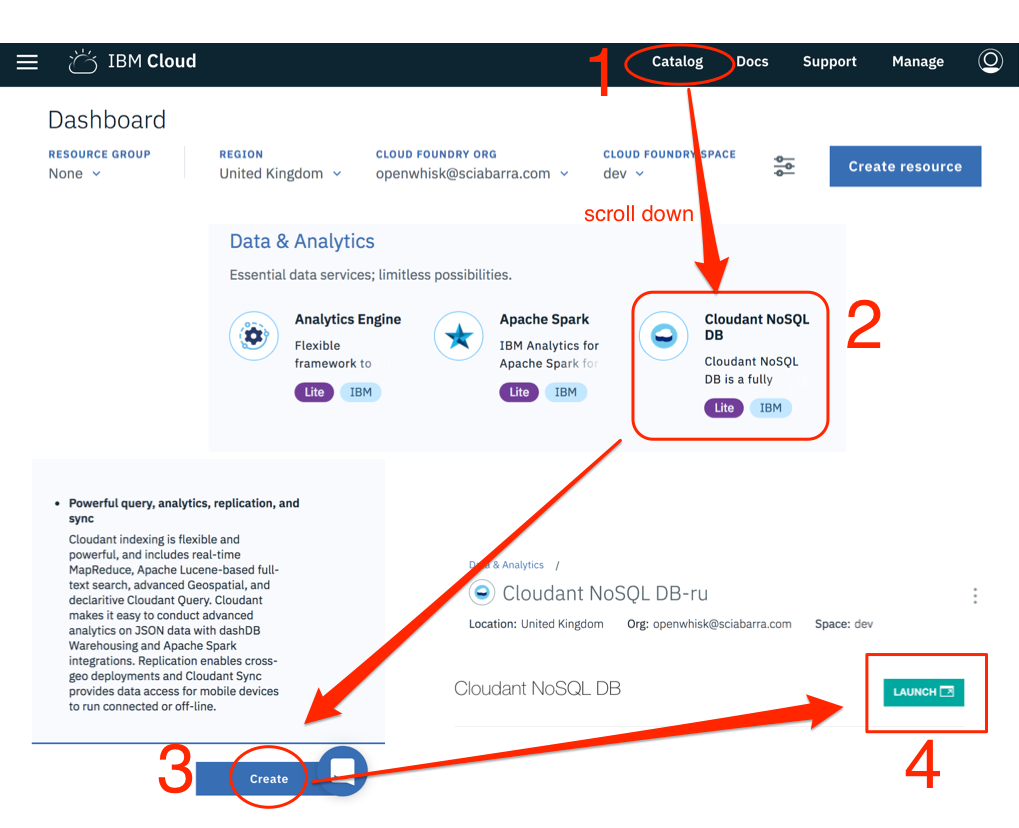
Now we can focus on database creation, to store our form data. Since we have already an IBM Cloud account, the simplest way is to provision a Cloudant database. For small amounts of data, it is free to use.
Steps to create the database, as shown in Figure Figure 2-5 are pretty simple.
Select Catalog
Search for Cloudant NoSQL database the click
Select the button Create to create a Lite instance
Click on Launch to access the administrative interface
Click on “Create Database” (not shown in the Figure)
Finally, specify contact as the database name
Now we need to get the credentials to access the database.
You have to go into the menu of the Cloudant service, click on “Service Credentials”, then click on “New Credentials” and finally select “View Credentials”. It will show a JSON file.
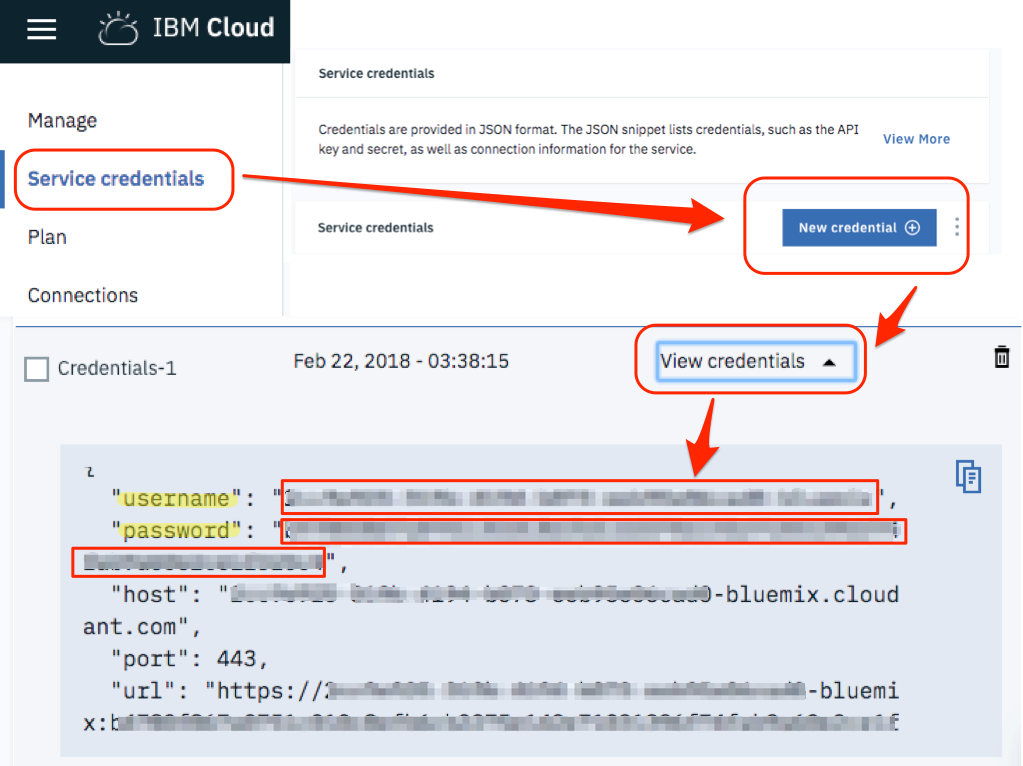
You need to extract the values in the fields username and password. You can now use those values at the command line to “bind” the database: This is what you have to type on the terminal.
$ export USER=XXXXpackages /openwhisk@sciabarra.com_dev/contactdb private /openwhisk@sciabarra.com_dev/contact private
copy here the username
copy here the password
create the actual database
now check you will have two packages
Note that after binding you have a new package with some parameters, allowing to read and write in your database. OpenWhisk provides a set of generic packages. We used the command bind to make it specific to write in our database giving username and password.
This package provides many actions we can see listing them (the following output is simplified since the actions are a lot):
$ wsk action list contactdb
/whisk.system/cloudant/write                                           private nodejs:6
/whisk.system/cloudant/read                                            private nodejs:6
Creating the package binding gave you access to multiple databases. But since we need just one, we specified the default database we want to use (using the parameter dbname for the package) and then we explicitly invoked the create-database to be sure that database is created.
So far we have seen how we can create actions and how to invoke them. Actually, in the first two examples, we have seen one specific kind of actions: web action (you may have noted the --web true flag in the commands). Those are the actions which can be invoked directly, navigating to web URLs or submitting web forms.
However, not all the actions are there to be invoked straight from the web. Many of them execute internal processing and are activated only through some specific APIs.
The actions letting to read and write in the database, those who we just exported from the Cloudant package, are not web actions. They can be invoked however using the command line interface.
In particular, we have to use the wsk action invoke command, passing parameters with the --param options and data in JSON format as a command line argument.
Let verify how it works, writing in the database, by invoking the action directly write, as follows.
$ wsk action invoke contactdb/write \
  --blocking --result --param dbname contactdb \
  --param doc '{"name":"Michele Sciabarra", "email": "michele@sciabarra.com"}'
{
    "id": "fad432c6ea1145e71e99053c0d811475",
    "ok": true,
    "rev": "1-d14ba6a37cfdf34a8b3bb49dd3c0e22a"
}
We used the --blocking option to wait for the result; otherwise, the action will start asynchronously, and we will have to come back later to get the result. Furthermore, we are using the --result option to print the final result. Those options will be discussed in details in the next chapter.
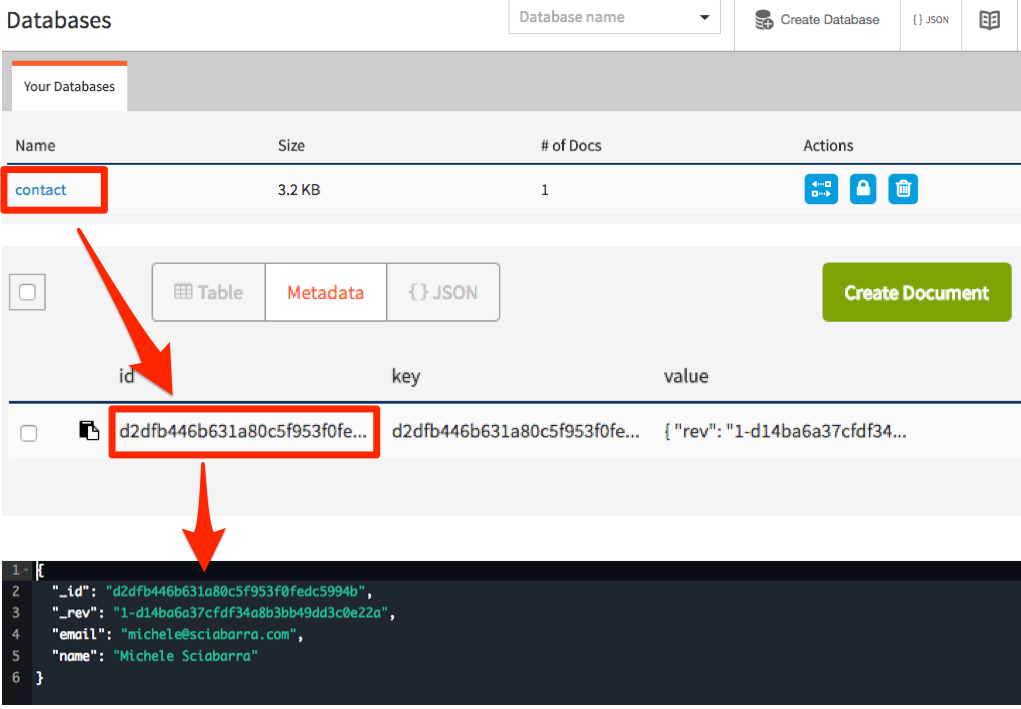
The database replied with a confirmation and some extra information. Most notably, the result includes the id of a new record, that we can use later for retrieving the value.
We can now check the database user interface to see the data we just stored in it. You can select the database, then the id and you can see the data we just inserted in the database in JSON format.
As you can see, to write data in the database you need just a JSON object. So far we wrote data using the command line. Let’s look at how we can do it in code.
OpenWhisk includes an API to interact with the rest of the system. Among the possibilities, there is the ability to invoke actions.
We provisioned the database as a package binding. Thus we have now an action available to write in the database. To use it we need to invoke the action from another action. Let see how.
First and before all, we need a:
var openwhisk = require('openwhisk')
to access to the openwhisk API. This code is the entry point to interact with OpenWhisk from within an action.
Now, we can define the function save using the OpenWhisk API to invoke the action to write in the database. The following code should be placed at the beginning of the submit.js:
var openwhisk = require('openwhisk')

function save(doc)  {
  var ow = openwhisk()
  return ow.actions.invoke({
    "name": "/_/contactdb/write",
    "params": {
       "dbname": "contactdb",
       "doc": doc
    }
  })
}
Currently, you need to add the var ow = openwhisk() inside the body of the main function. It is a documented issue: environment variables used to link the library to the rest of the system, are available only within the main method. So you cannot initialize the variable outside (as you may be tempted to do).
Once the save function is available, you can use it to save data just by creating an appropriate JSON object and pass it as a parameter. Place the following code after <Store the message in the database>:
save({
 "name": args.name,
  "email": args.email,
  "phone": args.phone,
  "message": args.message
})
We “extracted” the arguments instead of just saving the whole args object because it includes other information we do not want to keep.
The code is now complete. We can deploy it, as a web action too, to be executed when the user posts the form:
$ wsk action update contact/submit submit.js --web true
ok: updated action contact/submit
We can now manually test the action from the command line, to check if it writes in the database:
$ wsk action invoke contact/submit -p name Michele -p email \
    michele@sciabarra.com -p phone 1234567890 -r
{
    "body": "<h1>Thank you!</h1><pre>name: Michele
email: michele@sciabarra.com
phone: 1234567890</pre>"
}
Now we can go on and try our form, verifying data are written in the database, as in figure Figure 2-8.
We do not generally recommend manual testing for your Serverless code. Indeed there will be an entire chapter devoted to how to write automated tests. We are showing manual test here only as a tool to get a feeling of the system, not as a recommendation of how you should write your code.
Now we add a feature that demonstrates interaction with other systems. In a sense, it is going to be a bit advanced. We are going to send an email when someone uses our contact form. Not just sending emails when a visitor completes the submission, but also we want to be notified even of partial and wrong submissions of the form.
Sending email is usually done with the SMTP protocol, but since email is generally abused to send spam in all the cloud services, cloud providers usually block SMTP ports; hence it is not usable. In the IBM Cloud which we are using, they are indeed blocked (at least in our tests). This fact is the reason we used a third party service for sending email, a service that provides an HTTP API and a javascript library to use it.
We are going to use the service Mailgun for this purpose. It provides free accounts, allowing for a limited number of emails sent only to selected and validated addresses. It is perfect for our goal.
To use Mailgun you need to go to the website www.mailgun.com and register for a free account. Once you have set up an account you will get a “sandboxed” account (note the site will ask for a phone number for verification purposes).
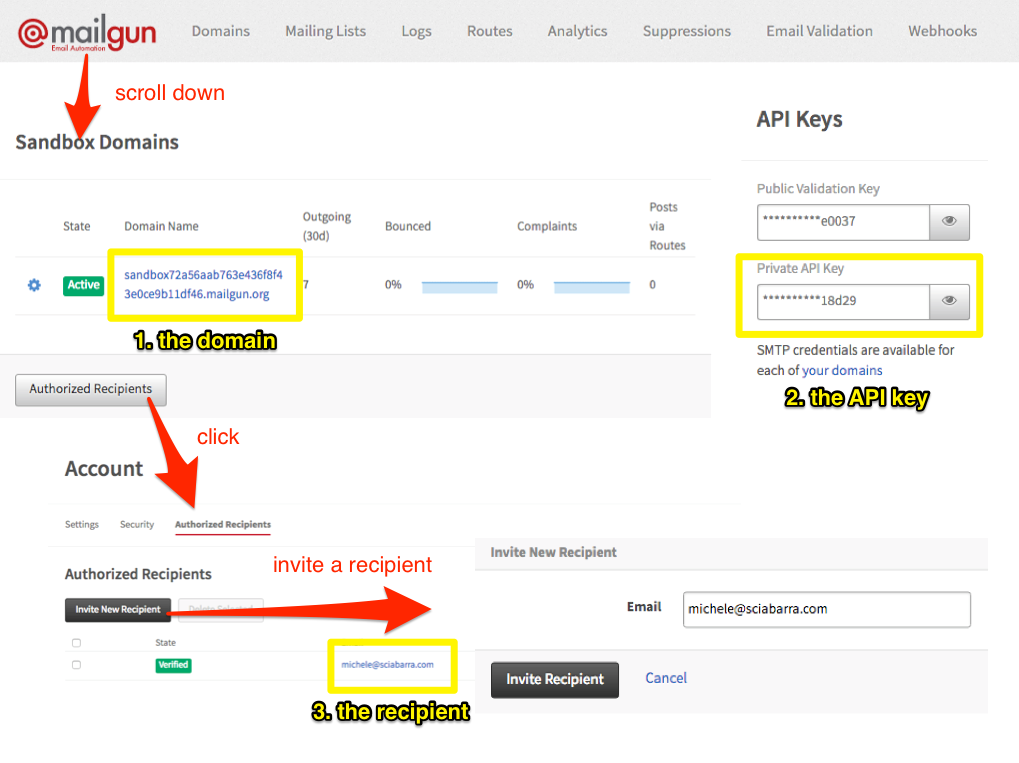
Once registered, to retrieve credentials for sending an email (Figure Figure 2-9) you need to:
Login in Mailgun
Scroll down until you find the Sandbox Domain
Click on “Authorized Recipient”
Invite the recipient
Click on the link in the email received
Once done, you need the following information, as shown in the figure, for writing your script:
the sandboxed domain
the private API key
the authorized recipient address
Now, we can build an action for sending an email. Actually, the purpose of this example is to show how you can create more complex action involving third-party services and libraries.
Hence now preparing this action is a bit more complicated than the actions we have seen before, because we need to use and install an external library then and deploy it together with the action code.
Let start by creating a folder and importing the library mailgun-js with the npm tool. We assume you have installed it, refer to Appendix II for details about the purpose and usage of this tool.
$ mkdir sendmail
$ cd sendmail
$ npm init -y
$ npm install --save mailgun-js
Now we can write a simple action that can send an email and place it in sendmail/index.js. Check the listing with the notes about the information you have to replace with those who collected before when registering to Mailgun.
var mailgun = require("mailgun.js")
var mg = mailgun.client({username: 'api',
        key: 'key-<YOUR-PRIVATE-API-KEY>'})
function main(args) {
  return mg.messages.create(
          '<YOUR-SANDBOX-DOMAIN>.mailgun.org', {
    from: "<YOUR-RECIPIENT-EMAIL>",
    to: ["<YOUR-RECIPIENT-EMAIL>"],
    subject: "[Contact Form]",
    html: args.body
  }).then(function(msg) {
     console.log(msg);
     return args;
  }).catch(function(err) {
     console.log(err);
     return args;
  })
}
replace key-<YOUR-PRIVATE-API-KEY> with the Private API Key
replace <YOUR-SANDBOX-DOMAIN>.mailgun.org with the Sandbox Domain
replace <YOUR-RECIPIENT-EMAIL> with the one that is used both as the sender and the recipient
same as 3
For simplicity, we placed the keys within the script. Also, this is not a recommended practice. We will see later how we can define parameters for a package and use them for each action, so you do not have to store keys in the code.
We can deploy now the action. Since this time the action is not a single file, but it includes libraries, we have to package everything in a zip file, to deploy them too.
$ zip ../sendmail.zip -r *
$ wsk action update contact/sendmail ../mailgun.zip --kind nodejs:6
ok: updated action contact/sendmail
We are using update here even if the action was not present before. Indeed since update will create the action if it does not exists, we prefer to use just update always to avoid the error create gives if the action was already there. Also, since we place the action in a zip file, we need to specify its type because the command line cannot deduct it from the filename.
We can now test the action invoking it directly:
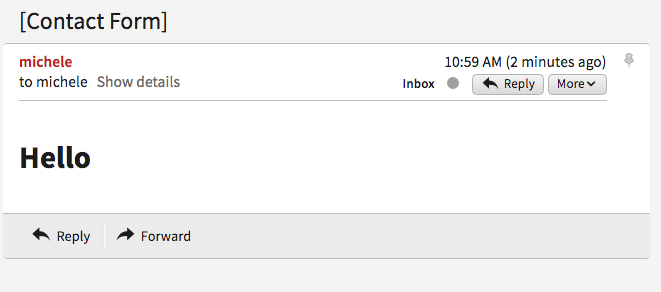
$ wsk action invoke contact/sendmail -p body "<h1>Hello</h1>" -r
{
    "body": "<h1>Hello</h1>"
}
The action acts as a filter, accepting the input and copying it in the output. We will leverage this behavior to chain the action to the submit.
When invoked, it will return an output, but also it will send an email as a side effect.
So far we have developed an action that can send an email as a stand-alone action.
However, we designed the action in such a way that it can take the output of the submit action and return it as is. So we can create a pipeline of actions, similar to the Unix shell processing, where the output of a command is used as an input for another command.
We are going to take the output of the sendmail action, use it as the input for the submit action and then return it as the final result of the email submission.
Please note as a side effect; it will send emails for every submission, also for incorrect inputs, so we can know someone is trying to use the form without providing full information.
However, we will store in the database only the fully validated data. Let’s create such a pipeline that is called sequence in OpenWhisk, and then test it.
$ wsk action create contact/submit-sendmail \
  --sequence contact/submit,contact/sendmail \
  --web true
ok: updated action contact/submit-sendmail

$ wsk action invoke contact/submit-sendmail -p name Michele -r
{
    "body": "<h1>Errors!</h1><pre>name: Michele</pre><ul><li>Email missing or incorrect.</li><li>Phone number missing or incorrect.</li></ul><br><a href=\"javascript:window.history.back()\">Back</a>"
}
As a result, we should be receiving an email for each attempt of submitting a form, including partial data from the contact form.
Now we are ready. We can use the complete form including storing in the database and sending the email. But now the form should activate our sequence, not just the submission action. The simplest way is to edit the form.js, replacing the action we are invoking in the form. We should do the following change in form.js:
-<form method="POST" action="submit">
+<form method="POST" action="submit-sendmail">
The change to do in your code is in patch format. We are not going to cover it in detail, but mostly the prefix - means: remove this line, while the prefix + means: add this line. We will use this notation again in the book.
If we now update the action and try it, we will receive an email for each form submission, but the form will be stored in the database only when the data is complete.
Started from scratch with OpenWhisk.
Learned how to get an account in a cloud supporting it (the IBM cloud) and download the command line interface.
Created a simple HTML form in OpenWhisk
Implemented simple form validation logic.
Stored results in a NO-SQL database (Cloudant)
Connected to a third party service (Mailgun) to send an email.
OpenWhisk applications are composed by some “entities” that you can manipulate either using a command line interface or programmatically in javascript code.
The command line interface is the wsk command line tools, that can be used directly on the command line or automated through scripts. You can also use Javascript using an API crafted explicitly for OpenWhisk. They are both external interfaces to the REST API that OpenWhisk exposes. Since they are both two different aspects of the same thing (talking to OpenWhisk) they are both covered in this chapter.
Before we go deeper through the details of the many examples covering design patterns in the next chapters, we need to be familiar with the OpenWhisk API.
The API is used frequently to let multiple actions to collaborate. This chapter is hence a key chapter since the API is critical to writing applications that leverage the specific OpenWhisk features.
We already quickly saw the fundamental entities of OpenWhisk in the practical example in Chapter 2, but here we recap them here for convenience and clarity:
Packages: they are a way to grouping actions together, also they provide a base URL that can be used by web applications.
Actions: the building blocks of an OpenWhisk application, can be written in any programming language; they receive input and provide an output, both in JSON format.
Sequences: actions can be interconnected, where the output of action becomes the input of another, creating, in fact, a sequence.
Triggers: they are entry points with a name and can be used to activate multiple actions.
Rules: a rule associate a trigger with an action, so when you fire a trigger, then all the associated actions are invoked.
Feeds: they are specially crafted actions, implementing a well-defined pattern; its purpose is connecting events provided by a package with triggers defined by a consumer.
Now let’s give an overview of the command line interface of OpenWhisk, namely the command wsk.The wsk command is composed of many commands, each one with many subcommands. The general format is:
wsk <COMMAND> <SUB-COMMAND> <PARAMETERS> <FLAGS>
Note that <PARAMETERS> and <FLAGS> are different for each <SUBCOMMAND>, and for each <COMMAND> there are many subcommands.
The CLI itself is self-documenting and provides help when you do not feed enough parameters to it. Just typing wsk you get the list of the main commands. If you type the wsk command then the subcommand you get the help for that subcommand.
For example, let’s see wsk output (showing the command) and the more frequently used command, action, also showing the more common subcommands, shared with many others:
$ wsk Available Commands: action work with actions activation work with activations package work with packages rule work with rules trigger work with triggers property work with whisk properties namespace work with namespaces list list entities in the current namespace $ wsk action create create a new action
create available for actions, packages, rules and triggers
update available for actions, packages, rules and triggers
get available for actions, packages, rules and triggers, and also for activations, namespaces and properties
delete available for actions, package, rule and triggers

list available for actions, package, rule and triggers, and also for namespace and for everything.
Remembering that commands are the entities and the subcommands are C.R.U.D. (Create, get/list for Retrieve, Update, Delete) gives you a good mnemonic of how the whole wsk command works. Of course, there are individual cases, but we cover those in the discussion along the chapter.
Subcommands also have flags, some specific for the subcommand. In the rest of the paragraph, we discuss all the subcommands. We provide the details of interesting flags as we meet them.
The wsk command has many “properties” you can configure to access to an OpenWhisk environment. When you use the IBM Cloud, those properties are actually set for you by the ibmcloud main command. If you have a different OpenWhisk deployment, you may need to change the properties manually to access it.
You can see the currently configured properties with:
$ wsk property get Client key whisk auth xxxxx:YYYYY
the API authentication key (replaced in the example with xxxxx:YYYYY) - your own will be different
the OpenWhisk host you connect to control OpenWhisk with the CLI - depends on your location
your current namespace (the value _ is a shorthand for you default namespace)
If you install a local OpenWhisk environment, you need to set those properties using wsk property set manually. In particular, you need to set the whisk auth and the whisk host properties with values provided by your local installation.
Let’s see how we name things. As you may already know, in OpenWhisk we have the following entities with a name:
packages
actions
sequences
triggers
rules
feeds
There are precise naming conventions for them. Furthermore, those conventions are reflected in the structure of the URL used to invoke the various elements of OpenWhisk.
First and before all, each user is placed in a namespace, and everything a user creates, belong to it. It acts as a workspace and also provides a base URL for what a user creates. Credentials for a user allows access to all the resources in its namespace.
For example, when I registered in the IBM Cloud, my namespace was /openwhisk@sciabarra.com_dev/. It is my username followed by _dev (for development).
You can create a namespace in an OpenWhisk installation if you are authorized, otherwise, a namespace is created for you by the system administrator.
Under a namespace you can create triggers, rules, actions and packages, so they will have names like:
/openwhisk@sciabarra.com_dev/a-triggger
/openwhisk@sciabarra.com_dev/a-rule
/openwhisk@sciabarra.com_dev/a-package
/openwhisk@sciabarra.com_dev/an-action
When you create a package, you can put in its actions and feeds. So for example below the package a-package you can have:
/openwhisk@sciabarra.com_dev/a-package/another-action
/openwhisk@sciabarra.com_dev/a-package/a-feed
To recap:
The general format for entities is: /namespace/package/entity, but it can be reduced to /namespacke/entity
Under a namespace you can create triggers, rules, package, and actions but not feeds.
Under a package you can create actions and feeds, but not triggers, rules, and other packages.
Most of the time you do not need to specify the namespace. If you specify an action as a relative action (not starting with /) it will be placed in your current namespace. Note that the special namespace name of _ means “your current namespace” and the full namespace name automatically replace it.
In OpenWhisk, according to the naming conventions, all the entities are grouped in a namespace. We can put actions under a namespace.
Below a namespace, you can create packages to bundle actions together. A package is useful for two main purposes:
group related actions together, to reuse them and share with others
provide base a URL to those related actions, useful for actions that refer each other, like in web applications.
However, it is usually convenient to further groups actions. Under a namespace, we can create packages, and put action under them. Packages are hence useful for grouping actions (and feeds, that are just actions too), treating them as a single unit. Furthermore, a package can also include parameters.
Let’s do an example. We can just create a package sample, also providing a parameter, as follows.
$ wsk package create sample -p email michele@sciabarra.com
ok: created package basics
Parameters of a package are available to all the actions in a package.
Now you can list packages, get`information from packages, `update it (for example with different parameters) and finally delete it.
$ wsk package list
packages
/openwhisk@sciabarra.com_dev/sample                                   private
/openwhisk@sciabarra.com_dev/basics                                   private
/openwhisk@sciabarra.com_dev/contact                                   private
/openwhisk@sciabarra.com_dev/contactdb                                 private
$ wsk package update sample -p email openwhisk@sciabarra.com
ok: updated package sample
$ wsk package get sample -s
package /openwhisk@sciabarra.com_dev/sample: Returns a result based on parameter email
   (parameters: *email)
$ wsk package delete sample
ok: deleted package basics
here we used the parameter -s to summarize information from the package
Now let’s see another essential function of a package: binding.
OpenWhisk allows to import (or bind) to your namespace, packages from a third party, to customize them for your purposes.
Keep in mind that credentials of a user allow access to all the resources under a namespace. As a result, to bind a package in our namespace has the effect of making it accessible to the other actions in the namespace.
For example, let’s review first the packages available in the IBM cloud. Of course, this cloud includes their solution for everyday needs like databases and message queues. The database available in the IBM Cloud is a scalable version of the popular no-SQL database CouchDB, i.e., Cloudant.
A package for Cloudant is available, as we can see below, and all we need to do to use it is to bind it. In the example below, we use the configuration file cloudant.json. How to retrieve the configuration file is described in Chapter 2.
$ wsk package list /whisk.system packages
We are listing the packages available in the IBM Cloud. I edited and shortened the output for clarity.
We are inspecting the Cloudant package. We are limiting to see only the first two lines, those describing the package.
Note here the required parameters to use the database
we created here the binding to make the database accessible
We are using the file cloudant.json for the specifying host, username and password, and providing the dbname on the command line.
Two common flags, available also for actions, feed and triggers are -p and -P. With -p <name> <value> you can specify a parameter named <name> with value <value>. With the -P you can put some parameters in a JSON file that is assumed to be a map.
The subcommand wsk actions let you manipulate actions.
The more common subcommands are the CRUD actions to list, create, update and delete actions. Let’s demonstrate them with some examples.
We create and use a simple now action for our examples:
function main(args) {
  return { body: Date() }
}
Now, if we want to deploy this simple action in the package basics we do:
$ wsk package update basics
Ensuring we have a basics package
Create the action from the file stored in basics/now.js
You could omit the basics and place the action in the namespace and not in a package. We do not advise to do so, however, because gathering your actions in packages is always a good idea to improve modularity and reuse.
Now that the action has been deployed, we can invoke it. The simplest way is to call it as:
$ wsk action invoke basics/now
ok: invoked /_/basics/now with id fec047bc81ff40bc8047bc81ff10bc85
Wait a minute… where is the result? Actually, actions in OpenWhisk are by default asynchronous, so what you get usually is just an id (called activation id) to retrieve the result after the action completed. We discuss activations in detail in the next paragraph.
If we instead we want to see the result immediately, we can provide the flag -r or --result. It blocks until we get an answer. So:
$ wsk action invoke basics/now -r
{
    "body": "Thu Mar 15 2018 14:24:39 GMT+0000 (UTC)"
}
Great. However, what is if want to access that action from the web? We can retrieve an URL with get and --url.
If we leave out the --url we get a complete description of the action in JSON format:
$ wsk action get basics/now --url
https://openwhisk.eu-gb.bluemix.net/api/v1/namespaces/openwhisk%40sciabarra.com_dev/actions/basics/now
$ wsk action get basics/now
{
    "namespace": "openwhisk@sciabarra.com_dev/basics",
    "name": "now",
    "version": "0.0.1",
    "exec": {
        "kind": "nodejs:6",
        "code": "function main(args) {\n  return { body: Date() }\n}\n\n",
        "binary": false
    },
    "annotations": [
        {
            "key": "exec",
            "value": "nodejs:6"
        }
    ],
    "limits": {
        "timeout": 60000,
        "memory": 256,
        "logs": 10
    },
    "publish": false
}
However, if we try to use the URL to run the action we may have a nasty surprise:
$ curl https://openwhisk.eu-gb.bluemix.net/api/v1/namespaces/openwhisk%40sciabarra.com_dev\
    /actions/basics/now
{"error":"The resource requires authentication, which was not supplied with the request",\
    "code":9814}
The fact is: all the actions (and everything else) in OpenWhisk is accessible with a REST API. However, by default, the actions are protected and not accessible without authentication.
However, it is possible to mark an action as publicly accessible with the flag --web true flag when creating or updating it. We call them web actions.
A web action is supposed to produce web output so that you can view with a web browser. There are some other constraints on Web action we discuss later. For now, focus on the fact the answer must have a body property that is rendered as the body of an HTML page.
Now, since our action was not a web one, we must change it. This case is an opportunity to demonstrate how the update command that can change an action. Then we can immediately retrieve its URL and invoke it directly.
$ wsk action update basics/now --web true
ok: updated action basics/now
$ curl $(wsk action get basics/now --url | tail -1)
Thu Mar 15 2018 14:46:56 GMT+0000 (UTC)
We saw the create and update commands for managing actions. We now complete the demonstration of the CRUD commands also showing the list and the delete command:
$ wsk action list basics
actions
/openwhisk@sciabarra.com_dev/basics/now                               private nodejs:6
$ wsk action delete basics/now
ok: deleted action basics/now
$ wsk action list basics
actions
An essential feature of OpenWhisk is the ability to chain action in sequences, creating actions that use, as an input, the output of another action, as shown in Figure Figure 3-1.
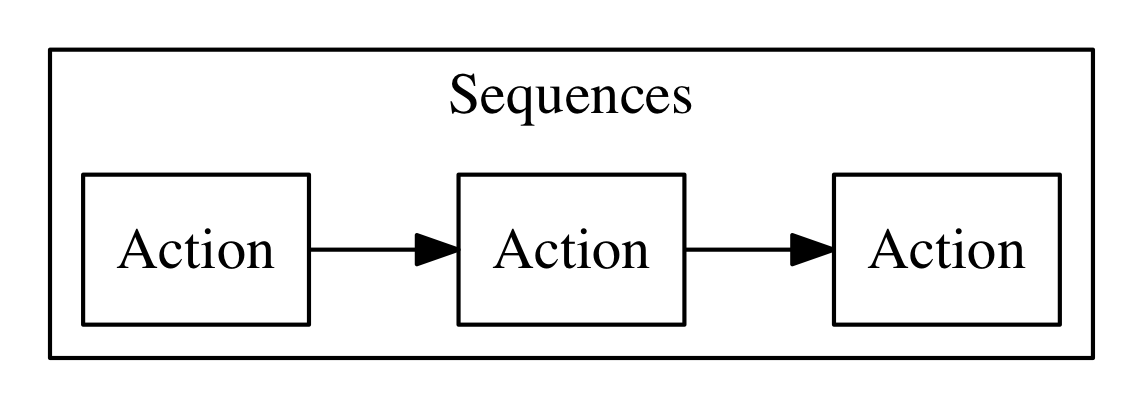
Let’s do a practical example of a similar action sequence. We implement a word count application, separating it in two actions, put in a sequence. The first action splits the input, that is supposed to be a text file, in “words”, while the second retrieves the words and produce a map as a result. In the map, each word is then shown with its frequency.
Let’s start with the first action, split.js, as follows:
function main(args) {
    let words = args.text.split(' ')
    return {
        "words": words
    }
}
You can deploy and test it, feeding a simple string:
$ wsk action update basics/split basics/split.js
ok: updated action basics/split
$ wsk action invoke basics/split \
  -p text "the pen is on the table" -r \
  | tee save.json
{
    "words": [
        "the",
        "pen",
        "is",
        "on",
        "the",
        "table"
    ]
}
note here we are saving the output in a file save.json
Now it is time to do the second step, with this count.js actions:
function main(args) {
    let words = args.words
    let map = {}
    let n = 0
    for(word of words) {
       n = map[word]
       map[word] = n ? n+1 : 1
    }
    return map
}
We can now deploy it and check the result, feeding the output of the first action as input:
$ wsk action update basics/count count.js
ok: updated action basics/count
$ wsk action invoke basics/count -P save.json -r
{
    "is": 1,
    "on": 1,
    "pen": 1,
    "table": 1,
    "the": 2
}
Now we have two actions, the second able to take the output of the first as input, we can create a sequence:
wsk action update basics/wordcount \
  --sequence basics/split,basics/count
note here we are specifying a comma-separated list of existing action names
The sequence can be now invoked as a single action, so we can feed the text input and see the result:
$ wsk action invoke basics/wordcount -r -p text  \
"can you can a can as a canner can can a can"
{
    "a": 3,
    "as": 1,
    "can": 6,
    "canner": 1,
    "you": 1
}
In the simplest case, your action is just a single javascript file. However, as we are going to see, very often commonly you have some code you want to share and reuse between actions.
The best way to handle this situation is to have a library of code that you can include for every action and that you deploy with your actions.
Let’s consider this example: a couple of utility functions that format a date in a standard format “YYYY/MM/DD” and time in the standard format “HH:MM:SS”.
function fmtDate(d) {
    let month = '' + (d.getMonth() + 1),
        day = '' + d.getDate(),
        year = d.getFullYear();
    if (month.length < 2) month = '0' + month;
    if (day.length < 2) day = '0' + day;
    return year + "/" + month + "/" + day
}

function fmtTime(d) {
    let hour =  ''+ d.getHours(),
        minute = '' + d.getMinutes()
        second = '' + d.getSeconds()

    if(hour.length < 2) hour = "0"+hour
    if(minute.length < 2) minute = "0"+minute
    if(second.length <2 ) second = "0"+second

    return hour + ":" + minute + ":" + second
}
You may, of course, copy this code in each action file, although it is pretty awkward to maintain. Just consider that when you change the function, you have to change it in all the copies of the functions across multiple files. Of course, there is a better way.
Since actions are executed using NodeJs, you have the standard export/require mechanism available for writing your actions.
As a convention, we are going to place our shared code in a subdirectory named lib, and we treat them as modules.
So you should place the format date-time listing above in a file lib/datetime.js and add at the end the following code:
module.exports = {
    fmtTime: fmtTime,
    fmtDate: fmtDate
}
Now you can use the two functions in one action. For example let consider an action named clock that returns the date if invoked with date=true, the time if invoked with time=true, or both if the date and time parameters are specified.
Our action will starts requiring the library with:
var dt = require("./lib/datetime.js")
This way you can access the two functions as dt.fmtDate and dt.fmtTime. Using those functions, we can easily write the main body, called clock.js:
function main(args) {
  let now = args.millis ? new Date(args.millis) : new Date()
  let res = " "
  if(args.date)
    res = dt.fmtDate(now) + res
  if(args.time)
    res = res + dt.fmtTime(now)
  return {
    body: res
  }
}
exports.main = main
Now, we have to deploy the action, but we also need to include the library. How can we do this in OpenWhisk?
The solution is to deploy not a single file but a zip file that includes all the files we want to run as a single action.
When deploying multiple files, you need either to put your code in a file index.js or to provide a package.json saying which one is the main file.
Let’s perform this procedure with the following commands:
$ cd basics
$ echo '{"main":"clock.js"}' >package.json
$ zip -r clock.zip clock.js package.json lib
  adding: clock.js (deflated 40%)
  adding: package.json (stored 0%)
  adding: lib/ (stored 0%)
  adding: lib/datetime.js (deflated 57%)
$ wsk action update basics/clock clock.zip \
  --kind nodejs:6
ok: updated action basics/clock
creating a zip file with subdirectories, so the -r switch is required
specifying the runtime we want to use is nodejs:6
When we deploy an action as a zip file, we have to specify the runtime to use with --kind nodejs:6, because the system is unable to figure out by itself just from the file name.
Let’s test it:
$ wsk action invoke basics/clock -p date true -r
{
    "body": "2018/03/18 "
}
$ wsk action invoke basics/clock -p time true -r
{
    "body": " 15:40:42"
}
In the preceding paragraph, we saw when we invoke an action without waiting for the result; we receive as an answer just an invocation id.
This fact brings us to the argument of this paragraph: the subcommand wsk activation to manage the results of invocations.
To explore it, let’s create a simple echo.js file:
function main(args) {
 console.log(args)
 return args
}
Now, let’s deploy and invoke it (with a parameter hello=world) to get the activation id:
$ wsk action create basics/echo echo.js
ok: created action basics/echo
$ wsk action invoke basics/echo -p hello world
ok: invoked /_/basics/echo with id 82deb0ec37524a9e9eb0ec37525a9ef1
As we explained in Chapter 1, when actions are invoked, they are identified by an activation id, used to save and retrieve results and logs from the database.
Now, the long alphanumeric (actually, hexadecimal) identifier displayed is the activation id. We can now use with it the option result to get the result, and logs to get the logs.
$ ID=$(wsk action invoke basics/echo -p hello world \
  | awk '{ print $6}')
$ wsk activation result $ID
{
    "hello": "world"
}
$ wsk activation logs $ID
2018-03-15T18:17:36.551486467Z stdout: { hello: 'world' }
The activation subcommand has another two useful options.
One is list. It will return a list of all the activations in chronological order. Since the list can be very long, it is useful always to use the option --limit <n> to see only the latest <n>:
$ wsk activation list --limit 4
activations
82deb0ec37524a9e9eb0ec37525a9ef1 echo
219bacbdb838449d9bacbdb838149de2 echo
1b75cd02fd1f4782b5cd02fd1f078284 echo
6fa117115aa74f90a117115aa7cf90e0 now
Another useful option (and probably the most useful) is poll. With this option, you can continuously display logs for actions as they happen. It is a handy option for debugging because let you to monitor what is going on in the remote serverless system.
you can poll for just an action or for all the actions at the same time.
An example of what you can see when you type wsk activation logs basics/echo is shown in Figure [IMAGE TO COME]. We split the terminal into two panels. You can notice in the panel of the terminal that we invoked the action echo twice. The first one was without parameters, while the second one with one parameter. In the other panel, you can see the results.
Now let’s see how to create a trigger.
A trigger is merely a name for an arbitrary event. A trigger by itself does nothing. However with the help of rules, it becomes useful, because when a trigger is activated, it invokes all the associated rules, as shown in Figure Figure 3-2.
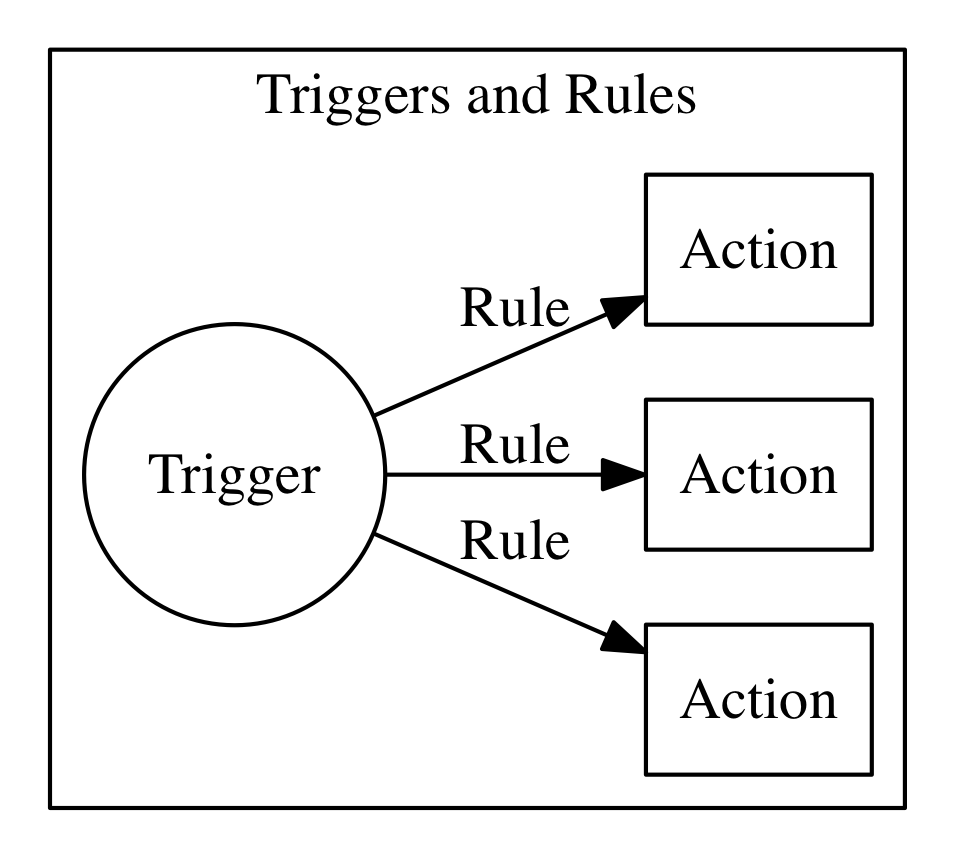
Let’s build now an example to see what triggers do. We use a simple action that does nothing except logging its activation. We use it to trace what is happening when you activate triggers. Note we start to construct the example now, but we complete it after we introduced rules, in the next paragraph.
So, let’s prepare our example, deploying first a simple log.js actions, that just logs its name:
function main(args) {
 console.log(args.name)
 return {}
}
Then, we deploy it twice, with two different names:
$ wsk action update basics/log-alpha -p name alpha basics/log.js
ok: updated action basics/log-alpha
$ wsk action update basics/log-beta -p name beta basics/log.js
ok: updated action basics/log-alpha
By themselves, those actions do nothing except leaving a trace of their activation in the logs:
$ wsk action invoke basics/log-alpha
invoking the action log-alpha
invoking the action log-beta
showing a list of activations
poll the activations (since 60 seconds, for 20 seconds) to see which activations happened and what they logged
Now we are ready to create a trigger, using the command wsk trigger create as in the listing below.
Of course, there is not only create but also update and delete, and they work as expected, updating and deleting triggers. In the next paragraph, we see also the fire command, that needs you first create rules to do something useful.
$ wsk trigger create basics-alert
ok: created trigger alert
$ wsk trigger list
triggers
/openwhisk@sciabarra.com_dev/basics-alert                                     private
$ wsk trigger get basics-alert
ok: got trigger alert
{
    "namespace": "openwhisk@sciabarra.com_dev",
    "name": "basics-alert",
    "version": "0.0.1",
    "limits": {},
    "publish": false
}
Triggers are a “namespace level” entity, and you cannot put them in a package.
Once we have a trigger and some actions we can create rules for the trigger. A rule connects the trigger with an action, so if you fire the trigger, it will invoke the action. Let’s see in practice in the next listing.
As for all the other commands, you can execute list, `update and delete by name.
$ wsk rule create basics-alert-alpha \
       basics-alert basics/log-alpha
ok: created rule basics-alert-alpha
$ wsk trigger fire basics-alert
ok: triggered /_/alert with id 86b8d33f64b845f8b8d33f64b8f5f887
$ wsk activation logs 86b8d33f64b845f8b8d33f64b8f5f887 \
   | jq
{
  "statusCode": 0,
  "success": true,
  "activationId": "b57a1f1dc3414b06ba1f1dc341ab0626",
  "rule": "openwhisk@sciabarra.com_dev/alert-alpha",
  "action": "openwhisk@sciabarra.com_dev/basics/alpha"
}

$ wsk activation logs b57a1f1dc3414b06ba1f1dc341ab0626
2018-03-17T18:10:48.471777977Z stdout: alpha
creating a rule to activate the action alpha
we can now fire the rule, it returns an activation id
let’s inspect the activation id
we piped the output in the jq utility to make the output more readable
in turn the rule enabled an action with this activation id
let’s see what the rule did
A trigger can enable multiple rules, so firing one trigger actually activates multiple actions.
Let’s try this feature in the next listing. However, before starting, let’s open another terminal window and enable polling (with the command wsk activation poll) to see what happens.
$ wsk rule create basics-alert-beta basics-alert basics/log-beta
ok: created rule basics-alert-beta
$ wsk trigger fire basics-alert
ok: triggered /_/basics-alert with id a731a03603bb4183b1a03603bb8183ce
If we check the logs we should see something like this:
$ wsk activation poll Enter Ctrl-c to exit. Polling for activation logs Activation: 'alert' (a731a03603bb4183b1a03603bb8183ce)
The trigger activation invoked 2 actions
This is the log of the first action
This is the log of the second action
Rules can also be enabled and disabled without removing them. As the last example, we try to disable the first rule and fire the trigger again to see what happens. As before, first, we start the log polling to see what happened.
$ wsk rule disable basics-alert-alpha
disabling rule alert-alpha
enabling rule alert-beta (just to be sure)
a quick listing confirms only one active rule
firing the trigger again
Moreover, if we go and check the result, we see this time only the action log-beta was invoked.
$ wsk activation poll
Enter Ctrl-c to exit.
Polling for activation logs

Activation: 'basics-alert' (0f4fa69d910f4c738fa69d910f9c73af)
[
    "{\"statusCode\":0,\"success\":true,\"activationId\":\"a8221c7d7fe94e22a21c7d7fe9ce223c\",\"rule\":\"openwhisk@sciabarra.com_dev/alert-beta\",\"action\":\"openwhisk@sciabarra.com_dev/basics/log-beta\"}",
    "{\"statusCode\":1,\"success\":false,\"rule\":\"openwhisk@sciabarra.com_dev/basics-alert-alpha\",\"error\":\"Rule 'openwhisk@sciabarra.com_dev/basics-alert-alpha' is inactive, action 'openwhisk@sciabarra.com_dev/basics/log-alpha' was not activated.\",\"action\":\"openwhisk@sciabarra.com_dev/basics/log-alpha\"}"
]

Activation: 'log-beta' (a8221c7d7fe94e22a21c7d7fe9ce223c)
[
    "2018-03-18T07:27:14.01530577Z  stdout: beta"
]
Triggers are useful if someone can enable them. You can fire your triggers in code, as we will see when we examine the API.
However triggers are really there to be invoked by third parties and hook them to our code. This feature is provided by the feed concept.
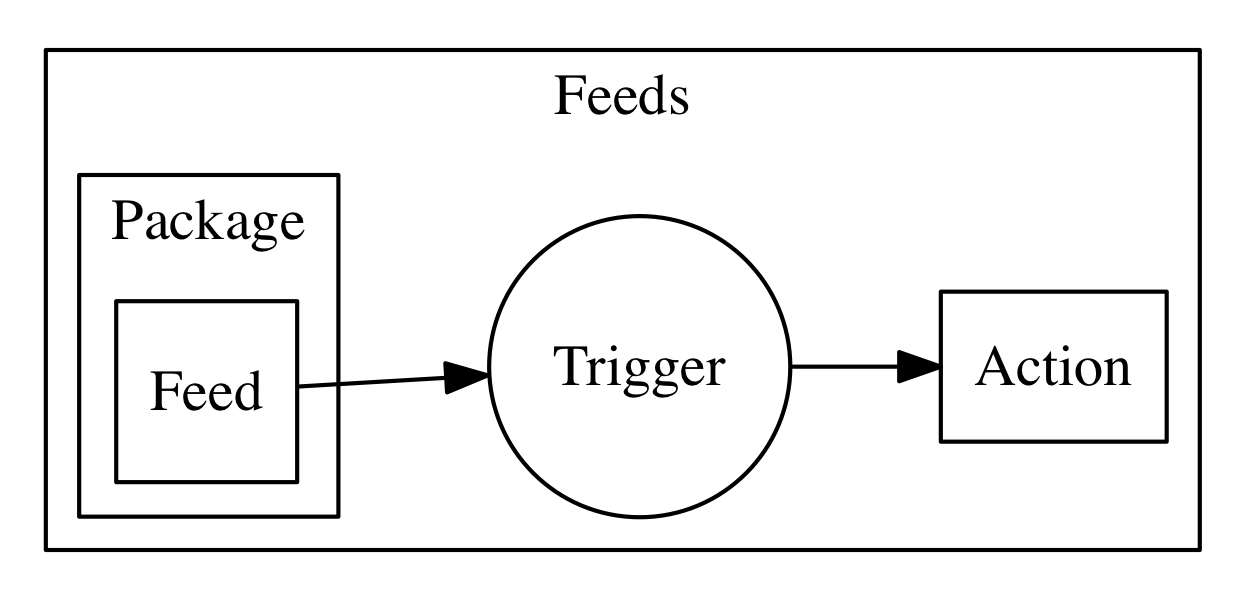
A feed is actually a pattern, not an API. We will see how to implement it in the example describing the “Observer” pattern.
For now, we see how to hook an existing feed on the command line, creating a trigger invoked periodically.
For this purpose we use the /whisk.system/alarm package. If we inspect it, we see it offers a few actions that can be used as a periodical event source:
$ wsk action list /whisk.system/alarms
actions
/whisk.system/alarms/interval                                          private nodejs:6
/whisk.system/alarms/once                                              private nodejs:6
/whisk.system/alarms/alarm                                             private nodejs:6
The once feed will trigger an event only once, while the interval can provide it based on a fixed schedule. The alarm trigger is the more complex since it uses a cron like expression (that we do not discuss here).
Let’s create a trigger to be executed every minute using interval and associate it to the rule log-alpha. As before, we start first the polling of the logs to see what happens.
$ wsk trigger create basics-interval \ --feed /whisk.system/alarms/interval \
the parameter --feed connects the trigger to the feed
we pass a parameter to the feed, saying we want the trigger to be activated every minute
the trigger does nothing until we associate it to action with a rule
If we now wait a couple of minutes this is what we will see in the activation log:
Polling for activation logs:

Activation: 'log-alpha' (0ca4ade11e73498fa4ade11e73a98ff0)
[
    "2018-03-18T08:01:03.046752324Z stdout: alpha"
]

Activation: 'basics-interval' (065c363456b440489c363456b4c04864)
[
    "{\"statusCode\":0,\"success\":true,\"activationId\":\"0ca4ade11e73498fa4ade11e73a98ff0\",\"rule\":\"openwhisk@sciabarra.com_dev/basics-interval-alpha\",\"action\":\"openwhisk@sciabarra.com_dev/basics/log-alpha\"}"
]
After you do this test, do not forget to remove the trigger or it will stay there forever, consuming actions. You may even end up getting a bill for it!
To remove the trigger and the rule:
$ wsk rule delete basics-interval-alpha
ok: deleted rule interval-alpha
$ wsk trigger delete basics-interval
ok: deleted trigger interval
We start now exploring the JavaScript API, that most resembles the Command Line Interface. We do not go into the details of the JavaScript language, as there are plenty of sources to learn it in depth.
However, before discussing the API, we need to cover in some detail JavaScript Promises, as the OpenWhisk API is heavily based on them. We do not assume you know them, and they are essential to make easier the use of asynchronous invocation.
A promise is a way to wrap an asynchronous computation in an object that can be returned as a result for a function invocation.
To understand why we need to do that, let’s consider as an example a simple script that generates a new UUID using the website httpbin.org. We are using here the https NodeJS standard API.
The following code opens a connection to the website, and then define a couple of callbacks to handle the data and error events. In Javascript, providing callbacks is the standard way of handling events that do not happen immediately, but later in the future, the so-called “asynchronous” computations.
var http = require("https")

function uuid(callback) {
   http.get("https://httpbin.org/uuid",
   function(res) {
     res.on('data', (data) =>
        callback(undefined, JSON.parse(data).uuid))
   }).on("error", function(err) {
     callback(err)
   })
}
You can note that this function does not return anything. The user of the function, to retrieve the result and do something with it (for example, print it on the console) have to pass a function, like this:
uuid(function(err, data) {
   if(err) console.log("ERROR:" +err)
   else console.log(data)
})
We can use this code locally with NodeJS, but we cannot deploy it as an action, for the simple reason it does not return anything, while the main action must always expect you return “something”.
In OpenWhisk, the “something” expected for asynchronous computation is a “Promise” object. However, what is a Promise? How you build it? Let’s see the details in the next paragraph.
We have just seen an example of an asynchronous computation. This code in the latest listing does not return anything, because the computation is asynchronous. Instead of waiting for the result, we provide a function as a parameter. It will perform our work later, only when the computation finally completes.
In OpenWhisk instead, we cannot do this. We need a way to return the asynchronous computation as a result. So the computation must be wrapped in some object we can return as an answer to the action. The solution for this requirement is called Promise, and the OpenWhisk API is heavily based on it.
A Promise is an object that is returned by a function requiring asynchronous computations. It provides the methods to retrieve the result of this computation when it completes.
Using promises (we are going to see how to create one in the next paragraph) we can keep the advantage of being asynchronous while encapsulating this fact in an object that can be passed around and returned as the result of a function invocation.
It is essential to understand that even with a Promise, the computation is still asynchronous, so the result can be retrieved only when ready because we do not know in advance when the result is going to be available. Furthermore, an asynchronous computation can also fail with an error.
Promises combine a nice way to retrieve result and error management. With the promise-based genuuid that we will see next, extracting the value and managing the erros will be peformed with the following code:
var p = uuid()
p.then(data => console.log(data))
 .catch(err => console.log("ERROR:"+err))
Let’s translate the genuuid example to make it Promise based.
Instead of requiring a callback we wrap out asynchronous code in a function block like this:
return new Promise(function(resolve, reject) {
    // ok
    resolve(success)
    // K.O.
    reject(error)
})
wrapper function to create an isolated environment
what to do when you got the result successfully
what to do when you catch an error
It can look a bit twisted, but it makes sense. A function wraps asynchronous code for 3 reasons:
create an isolated scope
be invoked only when the Promise resolution is required
use the arguments to pass to the code block two functions for returning the result and catching errors
So the real work of wrapping the asynchronous behavior is performed by the function. We could at this point return the function, but we still need some work:
starting the invocation when needed (then)
catching errors (catch)
provide our implementation of the resolve
provide our implementation of the reject.
Hence, we further wrap the function in a Promise object and return it as a result. Finally, we have created the standard Promise we described before.
Using a Promise we can now implement our genuuid function. Translating the callback is straightforward:
var http = require("https")

function uuid() {
  return new Promise(function(resolve, reject){
    http.get("https://httpbin.org/uuid",
     function(res) {
      res.on('data', (data) =>
         resolve(JSON.parse(data).uuid))
     }).on("error", function(err) {
         reject(err)
    })
  })
}
wrap the asynchronous code in a Promise
success, we can return the result with resolve
failure, returning the error with reject
As you can see the code is similar to the standard way using a callback, except we wrap everything in a function that provides the resolve and reject actions. The function is then used to build a Promise. Most of the implementation of the Promise is standard; only the function must be defined to implement the specific behavior.
Now, using the Promise, we are now able to create an action for OpenWhisk, providing the following main:
function main() {
    return uuid()
      .then( data =>  ({"uuid": data}))
      .catch(err =>   ({"error": err}))
}
Let’s try the code:
$ wsk action update apidemo/promise-genuuid \
      apidemo/promise-genuuid.js
ok: updated action apidemo/promise-genuuid
$ wsk action invoke apidemo/promise-genuuid -r
{
    "uuid": "52a188a9-ff9b-4f3a-b72d-301c26aac2cf"
}
To access the OpenWhisk API you use the standard NodeJS require mechanism.
Every action that needs to interact with the system must start with:
var openwhisk = require("openwhisk")
However, the openwhisk object is just a constructor to access the API. You need to construct the actual instances to access the methods of the OpenWhisk API.
var ow = openwhisk()
Hidden in this call there is the actual work of connecting to the API server and starting a dialogue with it. This call is the shortened form of the connection; the long form is actually:
var ow = openwhisk({
 apihost: <your-api-server-host>,
 api_key: <your-api-key>
})
If you use the shortened format, the apihost and apikey are retrieved from two environment variables:
__OW_API_HOST
__OW_API_KEY
When an action is running inside OpenWhisk those environment variables are already set for you, so you can use the initialization without passing them explicitly.
While you usually require the API in the body of your action, outside of any function, you need to perform this second step inside the main function or any function called by it. It is a knows issue OpenWhisk: environment variables are not yet set when you load the code. They are only when you invoke the main. Hence if you perform the initialization outside of the main is going to fail.
If you want to connect to OpenWhisk from the outside (for example from a client application), you can still use the OpenWhisk API, but you have to either set the environment variables or pass the API host and key explicitly.
If you are using, for example, the IBM Cloud, you can retrieve your current values with wsk property get.
The OpenWhisk API provides the same functions available on the command line interface.
Some features are more useful than others for actually writing action code. The most important is, of course:
ow.actions
ow.triggers
ow.activations
We are going to cover those API in details.
There are available many other features that are useful for deploying code. We will not discuss those features here since are needed when you develop your deployment tools. Those other available features are:
ow.rules
ow.packages
ow.feeds
You can find detailed coverage of those other APIs on http://github.com/apache/incubator-openwhisk-client-js in case you may need them.
Probably the most critical API function available is invoke. It is used from an action to execute other actions. So it essential to build interaction between various actions and it the backbone of complex applications.
In the simplest case you just do:
var ow = openwhisk()
var pr = ow.actions.invoke("action")
Note however that by default the action invocation is asynchronous. It just returns an activation id, so if you need the results, you have to retrieve them by yourself (if needed - frequently, you do not).
If instead, you have to wait for the execution to complete, you add blocking: true. If you also results, and not just the activations id, you have to add result: true.
So for example you can invoke the promise-genuuid.js action we implemented before from a web action, so that an UUID can be shown from a web page, as follows :
var openwhisk = require("openwhisk")
function main(args) {
    let ow = openwhisk()
    return ow.actions.invoke({
        name: "apidemo/promise-genuuid",
        result: true,
        blocking: true
    }).then(res => ({
         body: "<h1>UUID</h1>\n<pre>"+
        res.uuid+"</pre>"
    })).catch(err => {statusCode: 500})
}
requiring the API
instantiating the API access object
actual action invocation - note we want to use immediately the result
here we get the value returned by the other action
The web action invokes the other action, waits for the result, extract it and builds a simple HTML page. For example:
$ wsk action update apidemo/invoke-genuuid \
we are deploying the action as a web action
we extract the url of the action then use curl to invoke the url
the generated uuid, presented as HTML markup
In this example, you have built the ow object without parameters. Actually, this object is a holder of authentication, but it gets them from environment variables. In this way, an action can invoke another action that belongs to the same users.
However it is possible to use this API also to invoke actions that belong to other users, or you can use it from NodeJS applications running outside of OpenWhisk. In those cases, you have to provide the authentication information explicitly. The general format of the API constructor is
let ow = openwhisk({
   apihost: host,
   api_key: key
}
In the cases you are running from the outside of an action, you have to get apihost and api_key and use them in the API constructor to be able to invoke other actions or triggers. That information can be either retrieved using the wsk property get command or can be read from the environment variables __OW_API_HOST and __OW_API_KEY with an action.
We learned how to create Promises, and we have seen how to use them for chaining asynchronous operations.
Another important use case to consider, however, is when you have multiple promises. In such a case you may want to wait for all of them to complete.
We could wait for multiple actions with some complex code involving then. Since this use case is frequent enough, it is worth the availability of a standard method: Promise.all(promises).
Within this method call, the promises are an array of Promises (actually, anything satisfying the “iterable” Javascript protocol). As a result, it returns a Promise that completes when all the other promises complete.
You can then retrieve the combined result of all the Promises with a then function, receiving, as a result, an array of the results of the many Promises.
We can now construct an example to demonstrate this feature. We are going to create a Web action consisting in multiple promises (actually multiple invocations). Then we wait for all of them to complete, and finally, we construct a web page concatenating the results. You may notice in the example the use of map, that is probably idiomatic in those cases.
var openwhisk = require("openwhisk")

function main(args) {
    let ow = openwhisk()
    let count = args.n ? args.n : 3;
    let inv = { name: "apidemo/promise-genuuid",
                blocking: true,
                result: true
    }
    let promises = []
    for(let i=0; i< count; i++)
        promises.push(ow.actions.invoke(inv));
    return Promise.all(promises)
      .then(res => ({
            body: "<h1>UUIDs</h1><ul><li>"+
                   res.map(x=>x.uuid).join("</li><li>")+
                   "</li></ul>"
        }))
}
we are reading a parameter from the URL, if not specified it defaults to 3
we are looping, constructing an array of invocations, each one asking for a different uuid
this is the key call: we are waiting for all the promises to complete
the final result is built here, in the form of an array of results, each one being a different UUID. We join them to create a dotted list in HTML.
Now, we can test the invocation and check the results.
$ wsk action update apidemo/invoke-genuuid-list \
Deployment of the action wrapping multiple promises as a web action
Invocation of the new action using curl and extracting the url
The result is now the combination of multiple invocation of the promise-genuuid action
Now we are going to check discuss how to fire triggers with the API. It is especially useful for implementing feeds, as we show in Chapter 5.
It works pretty much like the actions invocation, except you have to use triggers instead of actions. Also, firing a trigger cannot be blocking, because it can always start multiple actions. Instead, it always returns a list of activation-ids.
An important thing to keep in mind is you may need to fire triggers belonging to other users. Generally, you fire triggers as part of the implementation of a feed. We will see the details in Chapter 5. When you create a trigger and hook it in a feed, you receive from the system, among other parameters, an “api-key”. You have to use this key to invoke those external triggers.
Here is an example of how a proper invocation of how a third party trigger invocation is going to work:
const openwhisk = require('openwhisk')

function fire(trigger, key, args) {
  let ow = openwhisk({ api_key: key })
  return ow.triggers.invoke({
      name: trigger,
      params: args
  })
}
construct an instance of the API passing the api_key
here you can perform the invocation
you have always for specify the trigger name
and here some parameters that will be forwarded to the triggered actions
The result of an invocation is a promise that returns a JSON object like this:
{
    "activationId": "a75b8008ad2641189b8008ad26f11835"
}
You can then use the activation id to retrieve the results as explained in the next paragraph.
Now let’s try to deploy and run this code. We need to set up an action activated by a trigger to test it:
$ wsk trigger create apidemo-trigger
Create a trigger
Create an action that the trigger will invoke
Create a rule that connects the trigger to the action
Finally we deploy the action dependent on the trigger
Now everything it is setup: invoking the action apidemo/trigger will activate the action apidemo/clock via a trigger and a rule. You can test opening the poll with wsk activation poll and then invoking:
$ wsk action invoke apidemo/trigger -p time 1
ok: invoked /sciabarra_cloud/apidemo/trigger with id 1c453cc7142c4e19853cc7142c3e1998
$ wsk action invoke apidemo/trigger -p date 1
ok: invoked /sciabarra_cloud/apidemo/trigger with id 3d157c76dfa244ce957c76dfa294cea3
In the activation log, you should see (among other things) the logs emitted by the clock action that was activated in code by trigger example.
Activation: 'clock' (bdc6438e11b34bb686438e11b3cbb67c)
[
    "2018-09-25T17:13:24.584124671Z stdout: 17:13:24"
]
Activation: 'clock' (4fc0889664ad4e1880889664ad5e18e0)
[
    "2018-09-25T17:13:40.667002422Z stdout: 2018/09/25"
]
Now, let’s use the API to inspect activations. An activation id is returned by invoking an action or firing a trigger. Once you have this id, you can retrieve the entire record using the ow.activations.get as in the following example (named activation.js:
const openwhisk = require('openwhisk')

function main (args) {
  let ow = openwhisk()
  return ow.activations.get({ name: args.id })
}
As you can see you need to pass the id (as the parameter named name by convention, but also the parameter named id works) to retrieve results, logs or the entire record activation. Let’s try it, first deploying the example and creating an activation id:
$ wsk action create activation activation.js
deploying the activation action
executing a system action to produce the activation id
Now we can use that id to retrieve the activation, that is a pretty complex (and interesting) data structure. Let’s see the results (shortened for clarity):
$ wsk action invoke activation -p id a6d34e7165024c26934e716502fc26cf -r
{
    "activationId": "a6d34e7165024c26934e716502fc26cf",
    "annotations": [
       // annotations removed...
     ],
    "duration": 4,
    "end": 1522237060018,
    "logs": [
        "2018-03-28T11:37:40.016763747Z stdout: hello Mike!"
    ],
    "name": "helloWorld",
    "namespace": "openwhisk@sciabarra.com_dev",
    "publish": false,
    "response": {
        "result": {},
        "status": "success",
        "success": true
    },
    "start": 1522237060014,
    "subject": "openwhisk@sciabarra.com",
    "version": "0.0.62"
}
those are the logs of the action
this is the result of the action
We used here ow.activations.get to get the entire activation record. You can use the same parameters but specify ow.activations.result to get just the result, or ow.activations.logs to retrieve just the logs.
Walked through the intricacies of the OpenWhisk command line interface.
Larned the hierarchical structure of the command line, with commands, subcommands, and options.
Described naming conventions of Entities in OpenWhisk
For actions, saw how to create single file actions, action sequences, and actions comprised of many files collected in a zip file.
To ease debugging, saw how to manage activations, to retrieve results and logs
Learned about Triggers that can be fired by Feeds, and Rules to associate Triggers to Actions.
Introduced asynchronous processing, exploring Javascript Promises in OpenWhisk
Learned about action invocations API
Learned how to fire a trigger via the API
Discussed activations and how to retrieve results in the API
Thank you for investing in the Early Release version of this book! Note that “Unit Testing OpenWhisk Applications” is going to be Chapter 6 in the final book.
For newcomers, probably one of the most challenging parts, when it comes to developing with a Serverless environment, is to learn how to test and debug it properly.
Indeed, you develop by deploying your code continuously in the cloud. So, you generally do not have the luxury to be able to debug executing the code step by step with a debugger.
There is an ongoing project to implement a debugger for OpenWhisk, that is a stripped down local environment.
While a debugger can be in some cases useful, we do not feel that having “the whole thing” locally to run tests is the easiest way to debug your code, nor the more advisable. Instead, developers need to learn how to split their application into small pieces and test it locally before sending the code to the cloud.
OpenWhisk has a complex and large architecture, designed to be run in the Cloud, and developers need to live with the fact that in the long run, they will never have the luxury to have a complete cloud in their laptop.
Developers instead have to learn to test their code locally in small pieces, simulating “just enough” of the cloud environment.
Once they tested the application in small pieces, they can assemble it and deploy as a whole. Then you can run some tests against the final result, generally simulating user interaction, to ensure the pieces are working together correctly.
The name for “testing in small parts” is unit testing, while simulating the interaction against the application assembled is called integration testing. In this chapter, we will focus on how to do Unit Testing of OpenWhisk applications.
Luckily there is plenty of unit testing tools. You can use them to run your code in small parts in your local machine, then deploy only when it is tested. Let’s see how in practice.
OpenWhisk applications generally run in the Cloud. You write your code, you deploy it, and then you can run it. However, to run unit tests, you need to be able to run it in your local machine, without deploying in the cloud.
Luckily it is not so hard to make your code run also locally, but you need to prepare the environment carefully to resemble “enough” the execution environment in the cloud.
We are then going to learn how to run those actions locally, to test them. But before all, we will pick a test tool and learn how to writes tests with it.
Our test tool of choice is Jest. First, we download and install it; then we use it to write some tests. We will also learn how to reduce the amount of test code we have to write using Snapshot Testing.
As we already pointed out, there are a lot of test tools available for Javascript and NodeJS. So many that is difficult to make a choice. But since we need to pick one to write our tests, we selected one that we believe it is a right balance between ease of use and completeness.
We ultimately picked Jest, the test tool developed by Facebook as a complement to testing React applications. We are not going to use React in this book, but Jest is independent of React, and it is a good fit for our purposes.
Some Jest features I cannot live without are:
it is straightforward to install
it is pretty fast
it supports snapshot testing
it provides extensive support for “mocking.”
Of course, this does not mean other tools does not have similar features. But we have to settle on someone.
So, assuming you agree with this choice, let’s start installing it. It is not difficult:
$ npm install -g jest
install Jest as a global command
check if jest is now available as a command
Since now we have Jest, we can write a test.
Our first test will check a modified version of the word count action (count.js) we used in chapter 2.
The action we are going to test receives its input as a property text of an object args, split the text in words by itself, then it counts words, returning a table with all the words and a count of the occurrences.
Here is the updated version wordcount.js:
function main(args) {
    let words = args.text.split(" ")
    let map = {}
    let n = 0
    for(word of words) {
       n = map[word]
       map[word] = n ? n+1 : 1
    }
    return map
}
module.exports.main = main
add an export of the function
In OpenWhisk, you can deploy a simple function. It works as long as it as a main function. When you want to use it locally in a test, however, it must be a proper module so a test can import it. So here is an important suggestion:
Always add the line module.exports.main = main at the end of all the actions. Even if it is not necessary in most cases, it is required when you run a test or when you have to deploy the action in a zip file.
We can now write a test for wordcount that we can run with Jest. A test is composed of 3 important parts:
import of the module we want to test with require
declare a test with the function test(<description>, <test-body>) where <description> is a string and <test-body> is a function performing the test
in the body of the test you perform some assertions in the form expect(<expression>).toBe(<value>) or similar (there are many different toXXX methods; we will see next)
We have to write now a wordcount.test.js with the following code:
const wordcount =
      require("./wordcount").main
test('wordcount simple', () => {
    res = wordcount({text: "a b a"})
    expect(res["a"]).toBe(2)
    expect(res["b"]).toBe(1)
})
import the module wordcount.js under test
declare a test
invoke the function
ensure it found two ``a``s
ensure it found one ``b``s
We are ready to run the tests, but before we go on, we need to create a file package.json, as simple as this:
{ "name": "jest-samples" }
If you don’t create a package.json, jest will walk up the directory hierarchy searching for one and will give an error if it cannot find it. Once found, it will assume it is the root directory containing a javascript application and it will look in all the subdirectories searching for files ending in .test.js to search tests in it.
Now you can run the test. You can do it directly using the jest command line from the directory containing all our files:
$ ls
package.json
wordcount.js
wordcount.test.js
$ jest
 PASS  ./wordcount.test.js
  ✓ wordcount simple (3ms)

Test Suites: 1 passed, 1 total
Tests:       1 passed, 1 total
Snapshots:   0 total
Time:        1.341s
Ran all test suites matching /wordcount/i.
Jest started to search for tests, found our wordcount.test.js, loaded it and executed all the test in it, then showed the results.
You usually you do not run jest directly. A best practice is to configure a test command in the package.json, as in the next listing and run it with npm test.
{
  "name": "jest-samples",
  "scripts": {
    "test": "jest"
  }
}
So far we have seen how to run tests in general. Now we focus on actually being able to execute tests locally to unit test them.
In general, actions in OpenWhisk runs under NodeJS, so the same code you can execute in your computer with NodeJS should also work in OpenWhisk, as long as the environment is the same.
You need however to match the environment, so you may need to install locally the same libraries and the same version of NodeJS in use in OpenWhisk.
To match the environment, when you run your tests you need to: * run your tests with the same version of Node * have the same Node Packages installed locally * load code in the same way as OpenWhisk load it * provide the same environment variables that are available in OpenWhisk
Let’s discuss those needs in order.
At the time of this writing, OpenWhisk provides 2 runtimes, one based on NodeJS version 6.14.1 and another based on NodeJS version 8.11.1. In the runtime for 6.14.1 are preinstalled the following packages:
apn@2.1.2 |
async@2.1.4 |
body-parser@1.15.2 |
btoa@1.1.2 |
cheerio@0.22.0 |
cloudant@1.6.2 |
commander@2.9.0 |
consul@0.27.0 |
cookie-parser@1.4.3 |
cradle@0.7.1 |
errorhandler@1.5.0 |
express@4.14.0 |
express-session@1.14.2 |
glob@7.1.1 |
gm@1.23.0 |
lodash@4.17.2 |
log4js@0.6.38 |
iconv-lite@0.4.15 |
marked@0.3.6 |
merge@1.2.0 |
moment@2.17.0 |
mongodb@2.2.11 |
mustache@2.3.0 |
nano@6.2.0 |
node-uuid@1.4.7 |
nodemailer@2.6.4 |
oauth2-server@2.4.1 |
openwhisk@3.14.0 |
pkgcloud@1.4.0 |
process@0.11.9 |
pug@">=2.0.0-beta6 <2.0.1” |
redis@2.6.3 |
request@2.79.0 |
request-promise@4.1.1 |
rimraf@2.5.4 |
semver@5.3.0 |
sendgrid@4.7.1 |
serve-favicon@2.3.2 |
socket.io@1.6.0 |
socket.io-client@1.6.0 |
superagent@3.0.0 |
swagger-tools@0.10.1 |
tmp@0.0.31 |
twilio@2.11.1 |
underscore@1.8.3 |
uuid@3.0.0 |
validator@6.1.0 |
watson-developer-cloud@2.29.0 |
when@3.7.7 |
winston@2.3.0 |
ws@1.1.1 |
xml2js@0.4.17 |
xmlhttprequest@1.8.0 |
yauzl@2.7.0 |
In the environment with the NodeJS 8.11.1 are installed only openwhisk@3.15.0, body-parser@1.18.2 and express@4.16.2.
The best way to prepare the same environment for local testing is to install the same version of NodeJS using the tool nvm , then install locally the same packages that are available in OpenWhisk.
For example, let’s assume you have an application to be run under the NodeJS 6 runtime using the library cheerio for processing HTML. You can recreate the same environment locally using the Node Version Manager NVM as described in https://github.com/creationix/nvm.
Actual installation instructions differ according to your operating system, so we do not provide them here.
Once you have NVM installed, the right version of NodeJS installer, you can install the right environment for testing with the following commands (I redacted the output for simplicity):
$ nvm install v6.14.1
install the version of NodeJS used in OpenWhisk
create a pacakge.json to store package configuration
install locally the cheerio library v0.22.0
An action sent to OpenWhisk is a module, and you can load it with require. In general, OpenWhisk allows to create an action without having to export it if it is a single file, but in this case, you cannot test it locally because require wants that you export the module. Furthermore, if you’re going to test also functions internal to the module, you have to export them, too.
So, for example, let’s reconsider the module for validation of an email in Chapter 3, Strategy Pattern, and let’s rewrite the file email.js it in a form that you can test locally. Also, we make the error messages parametric (we will use this feature in another test later).
const Validator = require("./lib/validator.js")
function checkEmail(input) {
  var re = /\S+@\S+\.\S+/;
  return re.test(input)
}
var errmsg = " does not look like an email"
class EmailValidator extends Validator {
    validator(value) {
        let error = super.validator(value);
        if (error) return error;
        if(checkEmail(value))
            return "";
        return value+errmsg
    }
}
function main(args) {
    if(args.errmsg) {
        errmsg = args.errmsg
        delete args.errmsg
    }
    return new EmailValidator("email").validate(args)
}
module.exports = {
  main: main,
  checkEmail: checkEmail
}
validation logic for the email isolated in a function
here we use the function to validate email
parametric error message
the main function must be exported always
also we want to test the checkEmail
Let’s write the email.test.js, step by step. At the beginning we have to import the two functions we want to test from the module:
const main = require("./email").main
const checkEmail = require("./email").checkEmail
We can then write a test for the checkEmail function:
test("checkEmail", () => {
 expect(
  checkEmail("michele@sciabara.com"))
    .toBe(true)
 expect(
  checkEmail("http://michele.sciabarra.com"))
    .toBe(false)
})
Now we add another test, testing instead the main function, the one we wanted to test in the first place:
test("validate email", () => {
 expect(main({email: "michele@sciabarra.com"})
   .message[0])
   .toBe('email: michele@sciabarra.com')
 expect(main({email:"michele.sciabarra.com"})
   .errors[0])
   .toBe('michele.sciabarra.com does not look like an email')
})
In OpenWhisk you use the OpenWhisk API to interact with other actions. We already discussed in Chapter 3 how you invoke actions, fire triggers, read activations and so on.
When you want to invoke other actions running in the same namespace as the main action, you need to use require("openwhisk") and then you can access the API. At least, this is what happens your application is running inside OpenWhisk.
It is worth to remind that when an action runs inside OpenWhisk, it has access to environment variables containing authentication information that the API use as credentials to execute the invocation.
When your code is running outside OpenWhisk, as it happens when you are running unit tests it, the OpenWhisk API cannot talk with other actions because every request needs authentication. Hence, if you try to run your code outside of OpenWhisk, you will get an error.
We can demonstrate this fact considering a simple action dbread.js, able to read a single record we put in the database with the Contact Form:
const openwhisk = require("openwhisk")
function main(args) {
  let ow = openwhisk()
  return ow.actions.invoke({
    name: "patterndb/read",
    result: true,
    blocking: true,
    params: {
      docid: "michele@sciabarra.com"
    }
  })
}
module.exports.main = main
If we deploy and run the action in OpenWhisk there are no problems:
$ wsk action update dbread dbread.js
ok: updated action dbread
$ wsk action invoke dbread -r
{
    "_id": "michele@sciabarra.com",
    "_rev": "5-011e075095301fcfc350cac66fd17c7e",
    "type": "contact",
    "value": {
        "name": "Michele",
        "phone": "1234567890"
    }
}
However, let’s try to write and run a test dbread.test.js for this simple action:
const main = require("./dbread").main
test("read record", () => {
   main().then(r => expect(r.value.name).toBe("Michele"))
})
If we run the test, the story is a bit different:
$ jest dbread
 FAIL  ./dbread.test.js
  ✕ read record (8ms)

  ● read record

    Invalid constructor options. Missing api_key parameter.

      1 | const openwhisk = require("openwhisk")
      2 | function main(args) {
    > 3 |   let ow = openwhisk()
      4 |   return ow.actions.invoke({
      5 |     name: "patterndb/read",
      6 |     result: true,

      at Client.parse_options (node_modules/openwhisk/lib/client.js:80:13)
      at new Client (node_modules/openwhisk/lib/client.js:60:25)
      at OpenWhisk (node_modules/openwhisk/lib/main.js:15:18)
      at main (dbread.js:3:12)
      at Object.<anonymous>.test (dbread.test.js:5:4)

Test Suites: 1 failed, 1 total
Tests:       1 failed, 1 total
Snapshots:   0 total
Time:        1.021s
Ran all test suites matching /dbread/i.
As we discussed in Chapter 3 when we introduced the API, the OpenWhisk library needs to know the host to contact to perform requests (the API host) and must provide an authentication key to be able to interact with it.
When your application is running in the cloud in OpenWhisk, those keys are available through two environment variables \\__OW_API_HOST and \\__OW_API_KEY. It is the OpenWhisk environment that sets them before executing the code.
When your code is running locally, those variables are not available, unless your test code takes care of setting them. Luckily, it is it pretty easy to provide them locally. Indeed, if you are using the tool wsk and you have configured properly, it stores credentials in a file named .wskprops in the home directory.
Because the format of this is compatible with the syntax of the shell, if you are using bash (as we always assumed you are doing in this book) you can load those environment variables with the following commands:
$ source ~/.wskprops
$ export __OW_API_HOST=$APIHOST
$ export __OW_API_KEY=$APIKEY
Now, with those environment variables set, you can try again to run the test, and this time you will be successful:
$ jest dbread
 PASS  ./dbread.test.js
  ✓ read record (22ms)

Test Suites: 1 passed, 1 total
Tests:       1 passed, 1 total
Snapshots:   0 total
Time:        0.951s, estimated 1s
Ran all test suites matching /dbread/i.
Your local code is using credentials and can contact and interact with the real server to run the test.
This test is not a unit test. It does not run entirely on your local machine. Contacting a real OpenWhisk is a good idea for running integration tests. However, when you write unit tests, you should provide a local implementation that simulates the real servers. We will discuss in detail how to simulate OpenWhisk in the paragraph in this chapter when we introduce mocking.
For simplicity, if you want your enviroment to be properly set when you run the test, we recommend probably to leverage the npm test command to run tests and initialize them properly. You can add the entry in the following listing into your package.json. This way you will be able to run tests with just npm test without having to worry to setup manually the environment variables.
 "scripts": {
    "test": "source $HOME/.wskprops;
 __OW_API_HOST=$APIHOST
 __OW_API_KEY=$AUTH jest"
  },
this is actually one long line split in three lines for typesetting purposes
A common problem, in the test phase, is the burden of having to check results. You may end up to writing a lot of code that the result against the expected values. Luckily, there are techniques (that we are going to see) to reduce the amount of repetitive and pointless code you have to write.
When you test, you decide on a set of data corresponding to the various scenarios you want to verify. Then you write your test, invoking your code against the test data, and check the results. While defining the test data is generally an exciting experience, because you have to think about your code and what it does, verifying that the results are the expected one is typically not an exciting activity.
Jest provides a large number of “matchers” to make easy result verification. Matchers work well when results are small. But sometimes test results are pretty large; hence the code to check the result can be not only dull but also substantial.
There is an alternative to automate this activity, to focus more on checking the results and less on writing repetitive and naive code: snapshot testing.
The idea of snapshot testings is pretty simple: when you run a test the first time, you save the test results in a file. This file is called a “snapshot.” You can then check the result is correct. You do not have to write code, only verify the expected result checking the snapshot.
If the result is correct, you can commit the snapshot into the version control system. When you rerun a test, if there is already a snapshot in place, the test tool will automatically compare the new result of the test with the snapshot. If it is the same, the test passes, otherwise, it fails.
Let’s see snapshot testing in Jest with an example. You implement snapshot testing using the simple matcher called toMatchSnapshot().
We now modify the two tests in the preceding paragraph to use snapshot testing. While the test for checkEmail simply checks if the result is true or false (so there is not any significant advantage in using snapshot testing), the test for validateEmail is a bit more complicated.
Indeed, we wrote a test expressions like this:
expect(main({email: "michele@sciabarra.com"})
   .message[0])
   .toBe('email: michele@sciabarra.com')
expect(main({email: "michele.sciabarra.com"})
   .errors[0])
   .toBe('michele.sciabarra.com does not look like an email')
Here we are taking the test output, extracting some pieces (.message[0] or .errors[0]) to verify only a part of the result.
We could save yourself from the burden of thinking which parts to inspect just writing:
test("validate email with snapshot", () => {
  expect(main({email: "michele@sciabarra.com"})
   .toMatchSnapshot()
  expect(main({email: "michele.sciabarra.com"})
   .toMatchSnapshot()
})
Now, if you run the test, Jest will save the results of the tests. Of course, we should always check that the snapshot is correct. Here is the first execution of the tests, when you create the snapshots:
$ jest email-snap PASS ./email-snap.test.js ✓ validate email with snapshot (7ms) › 2 snapshots written.
running the test creates two snapshots
summary of the snapshots in the test
Jest creates a folder named __snapshots__ to store snapshots; then, for each test, it writes a file named after the filename containing the snapshots:
__snapshots__/email-snap.test.js.snap
This file is human readable, and it was designed e expecting that a human can reads it to be sure the result of the snapshot are as expected.
For example, this is the content of the snapshot file just created:
// Jest Snapshot v1, https://goo.gl/fbAQLP exports[`validate email with snapshot 1`] = `
result of the first test, with a correct email
we produce an array of messages
result of the second test, with a wrong email
we produce an array of errors
Now, once we have verified the snapshot to be correct, all we have to do is to keep it, saving in the version control system. If the snapshot is already present, running again the tests will compare the test execution against the snapshot, as follows:
$ jest email-snap.test.js
 PASS  ./email-snap.test.js
  ✓ validate email with snapshot (7ms)

Test Suites: 1 passed, 1 total
Tests:       1 passed, 1 total
Snapshots:   2 passed, 2 total
Time:        0.876s, estimated 1s
Once a snapshot is in place, Jest will verify the tests always returns the same result. But of course, snapshots cannot be set on stone. It may happen that something change and we will have to update the snapshot. So let’s make now an example of a failed test verified comparing a snapshot, then update that snapshot.
For example, assume we decide that from now we want to consider acceptable only emails having a dot in the username. This example is, of course, non-realistic, made only to add another constraints to fail on purpose some snapshot tests and act as a consequence.
So, we change the regular epression to validate the emails:
before: var re = /\S+@\S+\.\S+/;
after : var re = /\S+\.\S+@\S+\.\S+/;
If we now run the tests, we see they are now failing:
FAIL ./email-snap.test.js
  ✕ validate email with snapshot (17ms)

  ● validate email with snapshot

    expect(value).toMatchSnapshot()

    Received value does not match stored snapshot 1.

    - Snapshot
    + Received

      Object {
        "email": "michele@sciabarra.com",
    -   "errors": Array [],
    -   "message": Array [
    -     "email: michele@sciabarra.com",
    +   "errors": Array [
    +     "michele@sciabarra.com does not look like an email",
        ],
    +   "message": Array [],
      }

      2 |
      3 | test("validate email with snapshot", () => {
    > 4 |     expect(main({email: "michele@sciabarra.com"})).toMatchSnapshot()
      5 |     expect(main({email: "michele.sciabarra.com"})).toMatchSnapshot()
      6 | })
      7 |

      at Object.<anonymous>.test (testing/strategy/email-snap.test.js:4:52)

 › 1 snapshot test failed.
Snapshot Summary
 › 1 snapshot test failed in 1 test suite. Inspect your code changes or re-run \
      jest with `-u` to update them.

Test Suites: 1 failed, 1 total
Tests:       1 failed, 1 total
Snapshots:   1 failed, 1 passed, 2 total
Time:        0.967s, estimated 1s
Ran all test suites matching /email-snap.test.js/i.
We can fix the test replacing the first email:
expect(main({email: "michele.sciabarra@gmail.com"}))
.toMatchSnapshot()
However, if we run the test again, it will still be failing because the snapshot expects a michele@sciabarra.com somewhere.
We need to update the tests using jest -u. The flag -u tells to Jest to discard the current content of the snapshot cache and recreate them.
After updating tests of course, you should check that the new snapshot is correct. Indeed we have now:
 "message": Array [
    "email: michele.sciabarra@gmail.com",
  ],
and the new snapshot is ready to be used for further tests.
For a surprisingly large part of many applications, you can run tests in isolation. However, at some point, while testing your code, you will have to interface with some external entities.
For example, in OpenWhisk development, two commons occurrences are the interaction with other services in http, or invoking the OpenWhisk API, for example, to invoke other actions or activate triggers. It is here where the boundaries of unit testing and integration test starts to blur.
An inexperienced developer would say that is impossible to locally test code that uses external APIs: you need to deploy your code in the real environment actually to see what happens.
This idea is not real. Indeed it is possible to simulate “just enough” of the behavior of an external environment (or of any other system) implementing a local “work-alike” of the remote system. We call this a mock.
In a mock, you generally do not have to provide all the complexities of the remote service: you only deliver some results in response to specific requests.
Simulating external environments by Mocking them is another fundamental testing technique. In our case, Jest explicitly supports mocking providing features to replace libraries with mocks we define.
We will see first how mocking generically works, starting with a simple example simulating an http call.
Afterward, we are going to see in detail how to mock a significant part of the OpenWhisk API, to be able to simulate complex interaction between actions.
The concept behind mocking is pretty simple: you run your code replacing a system you interface with, using a simulation that you can execute locally. The simulation generally runs without connecting to any real system and providing dummy data.
To better understand how it works, and which problem mocking solves, let’s consider a common problem: testing code that executes a remote HTTP call. We are going for this purpose to write a simple action httptime.js, that just return the current time.
However, to make it a case of an action “hard” to test it, the implementation is going to use another action, invoked via http, that will return the date and time in full format, from where our action will extract the time.
We will have to use the NodeJS https module, that is a bit low level; also we need to wrap the call in a Promise, to conform to OpenWhisk requirements. For those reasons the code is a bit more convoluted than we would like it to be. However, since mocking https call is a frequent and important case, it is worth to follow this example in full.
The code in the following listing, implementing an action that returns current time via another action providing date and time, works this way:
wraps everything in a promise, providing a resolve function
opens an http request to an url, provide as a parameter
define event handlers for two events: data and end
collect data as they are received
at the end extract the time with a regular expression
const https = require("https")

function main(args) {
  return new Promise(resolve => {
    let time = ""
    https.get(args.url, (resp) => {
      resp.on('data', (data) => {
        time += data
      })
      resp.on('end', () => {
        var a = /(\d\d:\d\d:\d\d)/.exec(time)
        resolve({body:a[0]})
      })
     })
   })
}
})
})
})
}
wrap everything in a promise
this variable collects the input
use the https module
handle the data event, new data received
collect the data
handle the end event, all data received
this regexp extract the time from the date
return the value extracted
For convenience, let’s test first the real thing, deploying it in OpenWhisk. We need to create also the action service that returns the current time and date.
Note the following commands, that create on the fly an action on the command line and pass its url to our action:
$ CODE="function main() {\
>  return { body: new Date() } }"
$ wsk action update testing/now <(echo $CODE) \
   --kind nodejs:6 --web true
$ URL=$(wsk action get testing/now --url | tail -1)
$ curl $URL
2018-05-02T19:42:34.289Z
store some code in a variable
use a bash feature to create a temporary file
get the url of the newly created action
invoke the action in http
We can now deploy and invoke the action to see if it works:
$ wsk action update testing/httptime httptime.js \
  -p url "$URL" --web true
$ TIMEURL=$(wsk action get testing/httptime --url | tail -1)
$ curl $TIMEURL
20:06:55
The example action we just wrote is a typical example of an action difficult to unit test, for many common reasons:
it invokes a remote service, so to run tests you need to be connected to the internet
you also need to be sure the invoked service is readily available
data returned changes every time, so you cannot compare results with fixed values
Hence we have a is a perfect candidate for testing by mocking the remote service. We need to replace the https call with a mock that will not perform any remote call. Let see how to do it with Jest.
To replace the https module with a mock the following steps are required:
put code that replaces the https modules with your code in a directory called __mocks__
use jest.mock('https') in your test code before importing the module to test
write your test code as if you were using the real service
The location of the __mocks__ folder must be in the same of your packages.json, sibling to the node_modules folder.
The jest.mock call is required only to replace built-in NodeJS modules. In general, modules in the __mocks__ directory will be used automatically as a mock before importing any module from node_modules and will have the priority.
When you perform a require in a jest test, it will load your mocking code instead of the regular code. Since we want to replace the https module, we need to write a __mocks__\https.js mock code.
Now it is time to write the mock code that should replace the https call.
To better understand it, let’s split the description into two steps. At the top level, it works mostly in this way:
https.get(URL, (resp) =>
   resp.on('data', (data) => {

     // COLLECT_DATA

   }

   resp.on('end', () => {

      // COMPLETE_REQUEST

   }

}
The “real” https module receives an object (resp) as a gatherer of event handling functions, that mimic how https works. The protocol https, when performing a request, opens a connection to an URL, then read and return results in multiple chunks. For this reason, you can have multiple calls to the data event executing the code marked as COLLECT_DATA. Hence you need to collect data before analyzing them. When all the data are collected, you get one (and only one) invocation to execute the code marked as COMPLETE_REQUEST.
If we want to emulate this code with a mock, we need to do the following steps:
first create an object that store the event handler
invoke once (or more) the data event handler
invoke once the end event handler
So, the code to gather the events is:
var observer = {
   on(event, fun) {
       observer[event] = fun
    }
}
create an object
define an on function
assign to a field named as the event a function
This code is simple, but is it not so obvious. It defines an object that can register event handlers, and then can invoke them by name, as follows:
observer.on('something', doSomething)

observer.something(1)
So if you pass the observer to the https.get function, you will get being able to invoke the two handlers registered. Code will register resp.on('data', dataFunc) and resp.on('end', endFunc). Afterwards you will invoke just resp.data("some data") and resp.end().
Now that we have our observer, the full mock is much simpler to write.
// observer here, omitted for brevity

function get(url, handler) {

    handler(observer)

    observer.data(url)

    observer.end()

}

module.exports.get = get
it will be invoked as https.get(url, handler)
to fully understand this, review the first listing in this section
important: we are using the URL itself as the value returned by the mocked https call
invoke the end handler
Pay attention to the trick of using the URL as the data returned itself. In short, our mock for an URL https://something will return something! Since the only parameter we are passing to our mock is the url, whose meaning is in our case irrelevant because we are not executing any remote call, it makes sense to use the URL itself as a result.
Now, we can use the our __mock__/https.js to write a test https.test.js:
jest.mock('https')
const main = require('./httptime').main
test('https', () => {
  main({
    url: '2000-01-01T00:00:00.000Z'
  }).then(res => {
    expect(res.body).toBe('00:00:00')
  })
})
enable the mock
import the action locally for test
declare a test
invoke the main, remember we use the URL as the data!
the action returns a promise, so we have to handle it
check the handler extracts the time from the date
To be sure, we try to rerun the test with different data:
test('https2', () => {
  main({ url: '2018-05-02T19:42:34.289Z' })
  .then(res => {
    expect(res.body).toBe('19:42:34')
  })
})
The final result:
$ jest httptime
 PASS  ./httptime.test.js
  ✓ https (5ms)
  ✓ https2 (1ms)

Test Suites: 1 passed, 1 total
Tests:       2 passed, 2 total
Snapshots:   0 total
Time:        1.222s
Ran all test suites matching /httptime/i.
Now that we learned about testing with mocking, we can use it to test OpenWhisk actions using the OpenWhisk API without deploying them. In this paragraph, we are going to see precisely this: how to perform unit testing of actions that are invoking other actions without deploying them.
The OpenWhisk API was covered in Chapter 4. We developed a mocking library that can mock the more frequently used features of OpenWhisk: action invocation and sequences.
The library is not very large, but explaining all the details can take a lot of space, and it is not useful in advancing our knowledge of OpenWhisk. It is mostly an exercise in JavaScript and NodeJS programming.
So we are not going to describe in details its implementation, we only explain how to use it.
The library itself, together with the examples of this book is available on GitHub at this address:
Repo:
http://github.com/openwhisk-in-action/chapter7-debug
Path:
__mocks__/openwhisk.js
To use it in your tests, you need to install Jest then download and place the file openwhisk.js in your __mocks__ folder.
You can then use this mocking library to write and run local unit tests that include action invocations and action sequences.
To use our library, we have to follow some conventions in the layout of our code.
When your application runs in OpenWhisk, you do not have the problem of locating the code when invoking an action. You deploy them with the name you choose, then use this name in the action invocation. It is the OpenWhisk runtime that resolves the names.
When you test your code locally and simulate invocations by mocking, you do not deploy your action code, but you still invoke it by name. So our mocking library must be to locate the actual code locally. It does following some conventions.
To illustrate the conventions it follows, let’s see an example. We write a test that will invoke an action using the OpenWhisk API.
const ow = require('openwhisk')
test("invoke email validation", () => {
    ow()
      .actions.invoke({
        name: "testing/strategy-email",
        params: {
          email: "michele.sciabarra.com"
        }
      }).then(res =>
        expect(res).toMatchSnapshot())
})
initialization of the OpenWhisk library
create the actual invocation instance
perform the invocation
action name
parameters
You must translate the testing/strategy-email name in a file name located in the local filesystem. We use, as the base in the filesystem, the folder with our package.json and node_modules, that is the project root.
By convention, we name our actions according to this structure:
<package>/<prefix>-<action>
Then we expect actions code to be placed in a file named:
<package>/<prefix>/<file>.js
So, when you test locally code invoking the testing/strategy-email action, the mocking library works in this way:
the require("openwhisk") will actually load the __mocks__/openwhisk.js library
the mocking library can locate its position from the __dirname variable, hence find the project root (that is, the parent directory)
using the name of the action, it can now locate the code of the action to invoke: in our case <project-root>/testing/strategy/email.js
There is another essential feature required to complete our simulation for testing.
In OpenWhisk, actions can have additional parameters. Those parameters can be specified when you deploy the action or can be inherited from the package to which the action belongs. When we use our library mocking library, we can simulate those parameters by adding a file with the same name as the action and extension .json.
For example, in our case we have the file testing/strategy/email.json, in the same folder as the email.js with the content:
{
    "errmsg": " is not an email address"
}
The mocking library uses this file, preloading the parameters and passing them as args. Indeed we can check the test has used the parameter errmsg. We need to check the snapshot to see:
$ cat __snapshots__/invoke.test.js.snap
dump on the terminal the snapshot file
the error message produced is the one specified in the email.json file
We can now complete our analysis of the mocking library by describing how to mock a sequence.
In Chapter 5 we saw the pattern “Chain of Responsibility” implemented as a sequence.
A sequence does not have a corresponding action, but it does exist as a deployment declaration only. We can simulate an action sequence with a particular value in the JSON file we use to pass parameters.
For example, let consider a test to a sequence:
test('validate4', () =>
 ow().actions.invoke({
   name: 'testing/chainresp-validate',
   params: {
     name: 'Michele',
     email: 'michele.sciabarra.com',
     phone: '1234567890'
   }
}).then(res => expect(res).toMatchSnapshot()))
There is not a testing/chainresp/validate.js file, but there is a testing/chainresp/validate.json with this content:
{
  "__sequence__": [
    "testing/strategy-name",
    "testing/strategy-email",
    "testing/strategy-phone"
  ]
}
You can now write a test for example as follows:
const ow = require('openwhisk')
test('validate', () =>
  ow().actions
    .invoke({
      name: 'testing/chainresp-validate',
      params: {
        name: 'Michele',
        email: 'michele.sciabarra.com',
        phone: '1234567890'
      }
    })
    .then(res => expect(res).toMatchSnapshot()))
The mocking library then read the __sequence__ property from the validate.json and translate in a sequence of invocations (as it would happen in the real OpenWhisk) allowing to test the result of a chained invocation locally.
We can see that the mocking of the sequence works inspecting the snapshot.
// Jest Snapshot v1, https://goo.gl/fbAQLP
exports[`validate 1`] = `
Object {
  "email": "michele.sciabarra.com",
  "errors": Array [
    "michele.sciabarra.com is not an email address",
  ],
  "message": Array [
    "name: Michele",
    "phone: 1234567890",
  ],
  "name": "Michele",
  "phone": "1234567890",
}
`;
error message defined as a parameter
In this chapter we have seen:
How to use Jest for Testing OpenWhisk Action
How to configure a local OpenWhisk work-alike environment for NodeJS
How to use Snapshot Testing
How to mocking a generic library
How to use an OpenWhisk mocking library
Developing Open Serverless Solutions
Copyright © 2019 Michele Sciabarrà. All rights reserved.
Printed in the United States of America.
Published by O’Reilly Media, Inc., 1005 Gravenstein Highway North, Sebastopol, CA 95472.
O’Reilly books may be purchased for educational, business, or sales promotional use. Online editions are also available for most titles (http://oreilly.com/safari). For more information, contact our corporate/institutional sales department: 800-998-9938 or corporate@oreilly.com.
See http://oreilly.com/catalog/errata.csp?isbn=9781492046165 for release details.
The O’Reilly logo is a registered trademark of O’Reilly Media, Inc. Learning OpenWhisk, the cover image, and related trade dress are trademarks of O’Reilly Media, Inc.
The views expressed in this work are those of the author, and do not represent the publisher’s views. While the publisher and the author have used good faith efforts to ensure that the information and instructions contained in this work are accurate, the publisher and the author disclaim all responsibility for errors or omissions, including without limitation responsibility for damages resulting from the use of or reliance on this work. Use of the information and instructions contained in this work is at your own risk. If any code samples or other technology this work contains or describes is subject to open source licenses or the intellectual property rights of others, it is your responsibility to ensure that your use thereof complies with such licenses and/or rights.
978-1-492-04610-3
Welcome to the world of Apache OpenWhisk. OpenWhisk is an open source Serverless platform, designed to make easy and fun developing applications in the Cloud.
Serverless does not mean “without the server”, it means “without managing the server”. Indeed we will see how we can build complex applications without having to care of the server (except, of course, when we deploy the platform itself).
A serverless environment is most suitable for a growing class of applications needing processing “in the cloud” that you can split into multiple simple services. It is often referred as a “microservices” architecture.
Typical applications using a Serverless environment are:
services for static or third party websites
voice applications like Amazon Alexa
backends for mobile applications
This chapter is the first of the book, so we start introducing the architecture of OpenWhisk, its, and weaknesses.
Once you have a bird’s eye look to the platform, we can go on, discussing its architecture to explain the underlying magic. We focus on the Serverless Model to give a better understanding of how it works and its constraints. Then we complete the chapter trying to put things in perspective, showing how we got there and its advantages compared with similar architectures already in use: most notably to what is most likely its closest relative: JavaEE.
Apache OpenWhisk, shown in Figure Figure 1-1, according to its definition, is a Serverless Open Source Cloud Platform. It works executing functions (called Actions) in response to Events at any scale. Events can be originated by multiple sources, including timers, or websites like Slack or GitHub.
It accepts source code as input, provisioned straight with a command line interface, then delivers services through the web to multiple consumers. Examples of typical consumers are other websites, mobile applications or services based on REST APIs like the voice assistant Amazon Alexa.
Computation in a Serverless environment is generally split in functions. A function is typically a piece of code that will receive input and will provide an output in response. It is important to note that a function is expected to be stateless.
Frequently web applications are stateful. Just think of a shopping cart application for an e-commerce: while you navigate the website, you add your items to the basket, to buy them at the end. You keep a state, the cart.
Being stateful however is an expensive property that limits scalability: you need to provide something to store data. Most importantly, you will need something to synchronize the state between invocations. When your load increase, this “state keeping” infrastructure will limit your ability to grow. If you are stateless, you can usually add more servers.
The OpenWhisk solution, and more widely the solution adopted by Serverless environments is the requirement functions must be stateless. You can keep state, but you will use separate storage designed to scale.
To run functions to perform our computations, the environment will manage the infrastructure and invoke the actions when there is something to do.
In short, “having something to do” is what is called an event. So the developer must code thinking what to do when something happens (a request from the user, a new data is available), and process it quickly. The rest belongs to the cloud environment.
In conclusion, Serverless environments allow you to build your application out of simple stateless functions, or actions as they are called in the context of OpenWhisk, triggered by events. We will see later in this chapter which other constraints those actions must satisfy.
We just saw OpenWhisk from the outside, and now we have an idea of what it does. Now it is time to investigate its architecture, to understand better how it works under the hood.
We will refer to the Figure Figure 1-2, with some numbered markers. In the Figure, the big container (see 1) at the center, is OpenWhisk itself. It acts as a container of actions. We will see later what an action and what the container is.
Actions, as you can see, can be developed in many programming languages. We will discuss the differences among the various options in the next paragraph.
For the architect, you can consider it as an opaque system that executes those actions in response to events.
It is essential to know the “container” will schedule them, creating and destroying actions that are not needed, and it will also scale them, creating duplicates in response to an increase in load.
You can write actions in many programming languages. Probably the more natural to use are interpreted programming languages: like JavaScript (see 2) (actually, Node.js) or Python (see 3). Those programming languages are interpreted and give an immediate feedback since you can execute them without compilation. They are also generally of higher level, hence more comfortable to use (while the drawback is usually they are slower than compiled languages). Since OpenWhisk is a highly responsive system, where you can immediately run your code in the cloud, probably the majority of the developers prefer to use those “interactive” programming languages.
The “default” language for OpenWhisk is indeed Javascript. However other languages are also first class citizen. While Javascript is the more commonly used, nothing in OpenWhisk favors it over other languages.
In addition to purely interpreted (or compiled-on-the-fly languages, as it is correct to say), you can use also pre-compiled interpreted languages, like the languages of the Java family. Java, Scala and Kotlin (see 4) are the more common programming languages of this family. They run on the Java Virtual Machine, and they are distributed not in source form but an intermediate form. The developer must create a “jar” file to run the action. This jar includes the so-called “bytecode” that OpenWhisk will execute when it will be deployed . A Java Virtual Machine is the actual executor of the action.
Finally, in OpenWhisk you can use compiled languages, producing a binary executable that runs on “bare metal” without interpreters or virtual machines. Examples of those binary languages are Swift, Go or the classical C/C++, see (see 5).
OpenWhisk supports out-of-the-box Go and Swift. You need to send the code of an action compiled in Linux elf format for the amd64 processor architecture, so a compilation infrastructure is needed. However today, with the help of Docker, is not complicated to install on any system the necessary toolchain for the compilation.
Finally, you can use in OpenWhisk any arbitrary language or system that can you can package like a Docker image (see 6) and that you can publish on Docker Hub: OpenWhisk allows to retrieve such an image and run it, as long as you follow its conventions. We will discuss this in the chapter devoted to native actions.
OpenWhisk applications are a collection of actions. We already saw the available type of actions. Now let’s see in Figure Figure 1-3 how they are assembled to build applications.
An action is a piece of code, written in one of the supported programming languages, that you can invoke. On invocation, the action will receive some information as input (see 1).
To standardize parameter passing among multiple programming languages, OpenWhisk uses the widely supported JSON format, since it is pretty simple, and there are libraries to encode and decode this format available basically for every programming language.
The parameters are passed to actions as a JSON string, that the action receives when it starts, and it is expected to process. At the end of the processing, each action must produce its result that is then returned also as a JSON string (see 2).
You can group actions in packages (see 3). A package acts as a unit of distribution. You can share a package with others using bindings. You can also customize a package providing parameters that are different for each binding.
Actions can be combined in many ways. The simplest form of combination is chaining them in sequences (see 4)
Chained actions will use as input the output of the preceding actions. Of course, the first action of a sequence will receive the parameters (in JSON format), and the last action of the sequence will produce the final result, as a JSON string.
However, since not all the flows can be implemented as a linear pipeline of input and output, there is also a way to split the flow of an action in multiple directions.
This feature is implemented using triggers and rules (see 5).
A trigger is merely a named invocation. You can create a trigger, but by itself a trigger does nothing. However, you can then associate the trigger with multiple actions using Rules.
Once you have created the trigger and associated some action with it, you can fire the trigger providing parameters.
Triggers cannot be part of a package. They are something top-level. They can be part of a namespace, however, discussed in the following paragraph.
The connection between actions and triggers is called a feed (see 6). A feed is an ordinary action that must follow an implementation pattern. We will see in the chapter devoted to the design pattern. Essentially it must implement an observer pattern, and be able to activate a trigger when an event happens.
When you create an action that follows the feed pattern (and that can be implemented in many different ways), that action can be marked as a feed in a package. In this case, you can combine a trigger and feed when you deploy the application, to use a feed as a source of events for a trigger (and in turn activate other actions).
Once it is clear what are the components of OpenWhisk, it is time to see what are the actual steps that are performed when it executes an action.
As we can see the process is pretty complicated. We are going to meet some critical components of OpenWhisk. OpenWhisk is “built on the shoulder of giants,” and it uses some widely known and well developed open source projects.
More in detail it includes:
NGINX, a high-performance web server and reverse proxy.
CouchDB, a scalable, document-oriented, NO-SQL Database.
Kafka, a distributed, high performing, publish-subscribe messaging system.
Docker, an environment to manage execution of applications in an efficient but constrained, virtual-machine like environment.
Furthermore, OpenWhisk can be split into some components of its own:
the Controller, managing the execution of actions
the Load Balancer, distributing the load
the Invoker, actually executing the actions
In Figure Figure 1-4 we can see how the whole processing happens. We are going to discuss it in detail, step by step.
Basically, all the processing done in OpenWhisk is asynchronous, so we will go into the details of an asynchronous action invocation. Synchronous execution fires an asynchronous execution and then wait for the result.
Everything starts when an action is invoked. There are different ways to invoke an action:
from the Web, when the action is exposed as Web Action
when another action invokes it through the API
when a trigger is activated and there is a rule to invoke the action
from the Command Line Interface
Let’s call the client the subject who invokes the action. OpenWhisk is a RESTful system, so every invocation is translated in an https call and hits the so-called “edge” node.
The edge is actually the web server and reverse proxy Nginx. The primary purpose of Nginx is implementing support for the “https” secure web protocol. So it deploys all the certificates required for secure processing. Nginx then forwards the requests to the actual internal service component, the Controller.
The Controller, that is implemented in Scala, before effectively executing the action, performs pretty complicated processing.
It needs to be sure it can execute the action. Hence the need to authenticate the requests, verifying if the source of the request is a legitimate subject.
Once the origin of the request has been identified, it needs to be authorized, verifying that the subject has the appropriate permissions.
The request must be enriched with all the default parameters that have been configured. Those parameters, as we will see, are part of the action configuration.
To perform all those steps the Controller consults the database, that in OpenWhisk is CouchDB.
Once validated and enriched, the action is now is ready to be executed, so it is sent to the next component of the processing, the Load Balancer.
Load Balancer job, as its name states, is to balance the load among the various executors in the system, which are called in OpenWhisk Invokers.
We already saw that OpenWhisk executes actions in runtimes, and there are runtimes available for many programming languages. The Load Balancer keeps an eye on all the available instances of the runtime, checks its status and decide which one should be used to serve the new action requested, or if it must create a new instance.
We got to the point where the system is ready to invoke the action. However, you can not just send your action to an Invoker, because it can be busy serving another action. There is also the possibility that an invoker crashed, or even the whole system may have crashed and is restarting.
So, because we are working in a massively parallel environment that is expected to scale, we have to consider the eventuality we do not have the resources available to execute the action immediately. Hence we have to buffer invocations.
The solution for this purpose is using Kafka. Kafka is a high performing “publish and subscribe” messaging system, able to store your requests, keep them waiting until they are ready to be executed. The request is turned in a message, addressed to the invoker the Load Balancer chose for the execution.
Each message sent to an Invoker has an identifier, the ActivationId. Once the message has been queued in Kafka, the ActivationId is sent back as the final answer of the request to the client, and the request completes.
Because as we said the processing is asynchronous, the Client is expected to come back later to check the result of the invocation.
The Invoker is the critical component of OpenWhisk and it is in charge of executing the Actions. Actions are actually executed by the Invoker creating an isolated environment provided by Docker.
Docker can create execution environments (called “Containers”) that resemble an entire operating system, providing everything code written in any programming language needs to run.
In a sense, an environment provided by Docker looks like, as seen by action, to an entire computer for it (just like a Virtual Machine). However, execution within containers is much more efficient than VMs, so they are used in preference to actual emulated environments.
It would be safe to say that, without containers, the entire concept of a Serverless Environment like OpenWhisk executing actions as separate entities, would not have been possible to implement.
Docker actually uses Images as the starting point for creating containers where it executes actions. A runtime is really a Docker image. The Invoker launches a new Image for the chosen runtime then initialize it with the code of the action.
OpenWhisk provides a set of Docker Images including support for the various languages, and the execution logic to accept the initialization: JavaScript, Python, Java, Go, etc.
Once the runtime is up and running, the invoker passes the whole action requests that have been constructed in the processing so far. Also, Invokers will take care of managing and storing logs to facilitate debugging.
Once OpenWhisk completes the processing, it must store the result somewhere. This place is again CouchDB (where also configuration data are stored). Each result of the execution of an action is then associated with the ActivationId, the one that was sent back to the client. Thus the client will be able to retrieve the result of its request querying the database with the id.
As we already said, the processing described so far is asynchronous. This fact means the client will start a request and forget. Well, it will not leave it behind entirely, because it returns an activation id as a result of an invocation. As we have seen so far, the activation id is used to associate the result in the database after the processing.
So, to retrieve the final result, the client will have to perform a request again later, passing the activation id as a parameter. Once the action completes, the result, the logs, and other information are available in the database and can be retrieved.
Synchronous processing is available in addition to the asynchronous one. It primarily works in the same way as the asynchronous, except the client will block waiting for the action to complete and retrieve the result immediately.
The OpenWhisk architecture and its way of operation mandate that, When you develop Serverless applications, you have to abide by some constraints and limitations.
We call those constraints execution model, and we are going to discuss it in detail.
You need to think to your application as decomposed as a set of actions, collaborating each other to reach the purpose of the application.
It is essential to keep in mind that each action, running in a Serverless environment, will be executed within certain limits, and those limits must be considered when designing the application.
In Figure Figure 1-5 are depicted the significant constraints an action is subject.
All the constraints have some value in term of time or space, either timeout, frequency, memory, size of disk space. Some are configurable; others are hardcoded. The standard values (that can be different according to the particular cloud or installation you are using) are:
execution time: max 1 minute per action (configurable)
memory used: max 256MB per action (configurable)
log size: max 10MB per action (configurable)
code size: max 48MB per action (fixed)
parameters: max 1MB per action (fixed)
result: max 1MB per action (fixed)
Furthermore, there are global constraints:
concurrency: max 100 concurrent activations can be queued at the same time (configurable)
frequency: max 120 activations per minute can be requested (configurable)
Global constraints are actually per namespace. Think to a namespace as the collection of all the OpenWhisk resources assigned to a specific user, so it is practically equivalent to a Serverless application, since it is split into multiple entities.
Let’s discuss more in detail those constraints.
As already mentioned, each action must be a function, invoked with a single input and must produce a single output.
The input is a string in JSON format. The action usually deserializes the string in a data structure, specific to the programming language used for the implementation.
The runtime generally performs the deserialization, so the developer will receive an already parsed data structure.
If you use dynamic languages like Javascript or Python, usually you receive something like a Javascript object or a Python dictionary, that can be efficiently processed using the feature of the programming language.
If you use a more statically typed language like Java or Go, you may need to put more effort in decoding the input. Libraries for performing the decoding task are generally readily available. However, some decoding work may be necessary to map the generally untyped arguments to the typed data structure of the language.
The same holds true for returning the output. It must be a single data structure, the programming language you are using can create, but it must be serialized back in JSON format before being returned. Runtimes also usually take care of serializing data structures back in a string.
Everything in the Serverless environment is activated by events. You cannot have any long running process. It is the system that will invoke actions, only when they are needed.
For example, an event is a user that when is browsing the web opens the URL of a serverless application. In such a case, the action is triggered to serve it.
However, this is only one possible event. Other events include for example a request, maybe originated by another action, that arrives on a message queue.
Also, database management is event-driven. You can perform a query on a database, then wait until an event is triggered when the data arrives.
Other websites can also originate events. For example, you may receive an event:
when someone pushes a commit on GitHub
when a user interacts with Slack and sends a message
when a scheduled alarm is triggered
when an action update a database
etc.
Actions are executed in Docker containers. As a consequence (by Docker design) file system is ephemeral. Once a container terminates, all the data stored on the file system will be removed too.
However, this does not mean you cannot store anything on files when using a function. You can use files for temporary data while executing an application.
Indeed a container can be used multiple times, so for example, if your application needs some data downloaded from the web, an action can download some stuff it makes available to other actions executed in the same container.
What you cannot assume is that the data will stay there forever. At some point in time, either the container will be destroyed or another container will be created to execute the action. In a new container, the data you downloaded in a precedent execution of the action will be no more available.
In short, you can use local storage only as a cache for speed up further actions, but you cannot rely on the fact data you store in a file will persist forever. For long-term persistence, you need to use other means. Typically a database or another form of cloud storage.
It is essential to understand that action must execute in the shortest time possible. As we already mentioned, the execution environment imposes time limits on the execution time of an action. If the action does not terminate within the timeout, it will be aborted. This fact is also true for background actions or threads you may have started.
So you need to be well aware of this behavior and ensure your code will not keep going for an unlimited amount of time, for example when it gets larger input. Instead, you may sometimes need to split the processing into smaller chunks and ensure the execution time of your action will stay within limits.
Also usually the billing charge is time-dependent. If you run your application in a cloud provider supporting OpenWhisk, you are charged for the time your action takes. So faster actions will result in lower cost. When you have millions of actions executed, a few milliseconds speedier action can sum up in significant savings.
Note also that actions are not ordered. You cannot rely on the fact action is invoked before another. If you have action A at time X and action B at time Y, with X < Y, action B can be executed before A.
As a consequence, if the action has a side effect, for example writing in the database, the side effect of action A may be applied later than the action B. Furthermore, there is not even any guarantee that an action will be executed entirely before or after another action. They may overlap in time.
So for example when you write in a database you must be aware that while you are writing in it, and before you have finished, another action may start writing in it too. So you have to provide your transaction support.
The Serverless Architecture looks brand new, however it shares concepts and practices with existing architectures. In a sense, it is an evolution of those historical architectures.
Of course, every architectural decision made in the past has been adapted to emerging technologies, most notably virtualization and containers. Also, the requirements of the Cloud era impose scalability virtually unlimited.
To better understand the genesis and the advantages of the Serverless Architecture, it makes sense to compare OpenWhisk architecture it with another essential historical precedent that is currently in extensive use: the Architecture of Java Enterprise Edition, or JavaEE.
The core idea behind JavaEE was allowing the development of large application out of small, manageable parts. It was a technology designed to help application development for large organizations, using the Java programming language. Hence the name of Java Enterprise Edition.
At the time of the creation of JavaEE, everything was based on the Java programming language, or more specifically, the Java Virtual Machine. Historically, when JavaEE was created Java was the only programming language available for building large, scalable applications (meant to replace C++). Scripting languages like Python were at the time considered toys and not in extensive use.
To facilitate the development of that vast and complex application, JavaEE provided a productive (and complicated) infrastructure of services.
To use them, JavaEE offered many different types of components, each one deployable separately, and many ways to let the various part to communicate with each other.
Those services were put together and made available through the use of Application Server. JavaEE itself was a specification.
The actual implementation was a set of competing products. The most prominent names in the world of application servers that are still in broad use today are Oracle Weblogic and IBM WebSphere.
If we look at the classical JavaEE architecture we can quickly identify the following tiers:
The client (front end) tier
The web (back-end) tier
The EJB (business) tier
The EIS (integration) tier
The following ideas characterize it:
Application is split into discrete components, informally called beans.
Components are executed in (Java-based) containers.
Interface to the external world is provided by connectors.
In JavaEE, we have different types of components.
The client tier is expected to implement the application logic at the client level. Historically Java was used to implement applet, small java components that can be downloaded and run in the browser. Javascript, CSS, and HTML nowadays entirely replace those web components
In the web tier, the most crucial kind of components are the servlets. They are further specialized in JSP, tag libraries, etc. Those components define the web user interface at the server level.
The so-called business logic, managing data and connection to other “enterprise systems” is expected to be implemented in the Business Tier using the so-called EJB (Enterprise Java Beans). There were many flavors of EJB, like Entity Beans, Session Beans, Message Beans, etc.
Each component in JavaEE is a set of Java classes that must implement an API. The developer writes those classes and then deliver them to the Application Server, that loads the components and run them in their containers.
Furthermore, application servers also provide a set of connectors to interface the application with the external world, the EIS tier. There were connectors, written for Java, allowing to interface to virtually any resource of interest,
The more common in JavaEE are connectors to:
databases
message queues
email and other communication systems
In the JavaEE world, Application Servers provided the implementation of all the JavaEE specification, and included APIs and connectors, to be a one-stop solution for all the development needs of enterprises.
For many reasons, the architecture of Serverless application and OpenWhisk can be seen as an evolution of JavaEE. Everything starts from the same basic idea: split your application into many small, manageable parts, and provide a system to quickly put together all those pieces.
However, the technological landscape driving the development of Serverless environment is different than the one driving JavaEE development. In our brave new world, we have:
applications are spread among multiple servers in the cloud, requiring virtually infinite scalability
numerous programming languages, including scripting languages, are in extensive use and must be usable
virtual machine and container technologies are available to wrap and control the execution of programs
HTTP can be considered a standard transport protocol
JSON is simple and widely used to be usable as a universal exchange format
Now, let’s compare JavaEE with the OpenWhisk architecture in Figure Figure 1-7. The Figure is intentionally similar to the Figure Figure 1-6, to highlight similarities and differences.
As you can see in the Figure, we can recognize web tier and a business tier also in OpenWhisk, in addition to a client and an integration tier.
While there is not a formal difference between the two tiers, in practice we have actions directly exposed to the web (web actions) and actions that are not.
Web Actions can be considered to be the web tier. Those actions which are meant to serve events, either coming from web actions or triggered by other services in the infrastructure, can be considered “Business Actions,” defining a “Business Tier.”
In JavaEE, everything runs in the Java Virtual Machine, and everything must be coded in Java (or any language that can generate JVM-compatible byte-code).
In OpenWhisk, you can code applications in multiple programming languages. We use their runtimes as equivalents of the Java Virtual Machine. Furthermore, those runtimes are wrapped in Docker containers to provide isolation and control over resource usage.
Hence you can write your components in any (supported) language you like. You are no more confined to write your application solely for the JVM. However, a JVM runtime is available, so you can still use Java and its family of languages if you like.
You can now write your code for the JavaScript Virtual Machine, more commonly referred to as NodeJs .
Under the hood, Nodes it is an adaptation of the V8 Javascript interpreter that powers the Chrome Browser. It is a fast executor of the javascript language, which also does complicated things like compiling on-the-fly to native code.
If you choose to use the Python programming languages, you are also using its interpreter. Python has many available interpreters, one being the move widely used CPython, but there is also other available, like Pypy. The JVM can even execute Python.
Furthermore, you may choose not to use a virtual machine at all, but write your application in a language producing native executables like Swift or Go. In the Serverless world, it is becoming to become a popular choice. As long as you compile your application for Linux and AMD64, you can use it for OpenWhisk.
In JavaEE, you have APIs available to interact with the rest of the world, written in Java itself. Basically, the JavaEE model is , and every interesting resource for writing applications has been adapted to be used by Java.
In OpenWhisk, you have first and before all only one API, available for all the supported programming languages. This API is the OpenWhisk API itself, and it is a RESTful API. You can invoke it over HTTP using JSON as an interchange format.
This API can even be invoked directly just using an HTTP library, reading and writing JSON strings. However, are available wrappers for all the supported programming languages to use it efficiently. This API acts as glue for the various components in OpenWhisk.
All the communication between the different parts in OpenWhisk are performed in JSON over HTTP.
In JavaEE, you have connectors for each external system you want to communicate with, primarily drivers. For example, if you’re going to interact with an Oracle database you need an Oracle JDBC driver, to communicate with IBM DB2 you need a specify DB2 JDBC driver, etc. The same holds true for messaging queues, email, etc.
In OpenWhisk, interaction with other systems is wrapped in packages, that are a collection of actions explicitly written to interact with a particular system. You can use any programming language and available APIs and drivers to communicate with it. So if you have for example a Java driver for a database, you can write a package to interact with it. Those packages act as Connectors.
In the IBM Cloud, there are packages available to communicate with essential services in the cloud. Most notably, we have
the cloud database Cloudant
the Kafka messaging system,
the enterprise chat Slack
many others, some specific to IBM services
You use the Feed mechanism provided by OpenWhisk to hook in those systems.
Finally, in JavaEE, everything is managed by Application Servers. They are “the place” where Enterprise Applications are meant to be deployed.
In a sense, OpenWhisk itself replaces the Application Server concept, providing a cloud-based, multi-node, language agnostic execution service.
Using a serverless engine like OpenWhisk, the cloud becomes a transparent entity where you deploy your code. The environment manages the distribution of application in the Cloud.
The problem becomes not to install your code, but to install correctly OpenWhisk. Each component of OpenWhisk must be then appropriately deployed according to the available resources of the Cloud. The installation of OpenWhisk in Cloud is a complex subject, and we will devote a chapter of the book to discuss it.
For now, we have to say that OpenWhisk by itself runs in Docker containers. However, scaling Docker in a Cloud requires you to manage those Docker containers under some supervisor system called Orchestrators.
There are many Orchestrator available. At this stage, OpenWhisk supports:
Kubernetes, a widely used orchestration system, initially developed by Google
DC/OS, a “cloud” operating system, supporting the management of distributed application and Docker.
The goal of this chapter is to introduce the development of OpenWhisk applications using JavaScript (and NodeJS) as a programming language, using a command line interface. The reader will get a feeling of how Serverless development works.
For this purpose, we are going to implement step by step a simple application with OpenWisk: a contact form for your website.
You cannot store contacts in your static website; you need some server logic to save them. Furthermore, you may want some logic to validate the data (since the user can disable javascript in their browser) and additionally receive emails notifying of what is going on on the website.
In this introduction to OpenWhisk, we are going to assume our static website is stored on the Amazon AWS Cloud, but we will implement our commenting functions the IBM Cloud, that offers OpenWhisk out of the box.
OpenWhisk is an open source project meant to be cloud-independent, and you can adopt it without being constrained to one single vendor.
Let’s assume we already have a website, built with a static website generator. Creating a site statically was the standard at the beginning of the web. Later, this practice was replaced by the use of a Content Management Systems; however it trendy again today. Indeed, static websites are fast, can be built with the maximum flexibility and there are plenty of tools to create them. Once you have a static site you can publish it on many different platforms offering static publishing. For example, a popular option is AWS S3.
However, usually, not everything in a website can be static. For example, you may need to allow your website visitors to contact you. Of course, you may then want to store the contacts in a database, to manage the data with a CRM application.
Before Serverless environments were available, the only way to enhance a static website with server-side logic was to provision a server, typically a virtual machine, deploy a web server with server-side programming support, then add a database, and finally implement the function you need using a server-side programming language, like PHP or Java.
Today, you can keep your website mostly static and implement a contact form in a Serverless environment, without any need for provisioning any virtual machine, web server or database.
While it may look odd, it is the nature of the Cloud: applications are going to be built with different services available from multiple vendors acting as one large distributed computing environment.
In this book we will use examples of services on AWS Cloud, invoked from the IBM Cloud. Indeed the book is about Apache OpenWhisk, not about the IBM Cloud.
The implementation that is shown in the example is not the best possible. It is just the simplest that we can do to show a result quickly and give a feeling of how we can do with OpenWhisk without getting lost in many details. Later in the book, we will rework the example to implement it in a more structured way.
Serverless development is primarily performed at the terminal, using a command line interface (CLI). We are going to use mostly the Unix based CLI and the command line interpreter Bash. In a sense, this is a Unix-centered book. Bash is available out-of-the-box in any Linux based environment and on OSX. It can also be installed on Windows.
On Windows, you can use either a command line environment including Bash like Git for Windows. Note that, despite the name, it is not just Git: it includes a complete Unix-like environment, based on Bash, ported to Windows. Also, on the more recent version of Windows, you may choose to install instead of the Windows Subsystem for Linux (WSL) which even includes a complete Linux distribution like Ubuntu, with Bash of course. It is informally called Bash for windows also it is is a whole Linux OS running within Windows.
In the following examples, we are also going to use Bash widely for (numerous) command line examples. So you need to familiar working with Bash and the command line.
$ pwd
you should type now pwd at the command line
you should type at the terminal both the two lines
this is an example of the output you should expect
In the text, there will be both examples to be typed at the terminal and code snippets. You will identify code you have to type at the terminal (as in point 1 and 2) by the prefix $. In those examples only the code in the line after $ must be typed at the terminal, the rest is the expected output of the command.
Sometimes long command lines (as in point 2) are split into multiple lines, so you have to type all of them. You will notice when the input spawns for many lines, because lines end with a \.
One central theme of this books is the fact that Apache OpenWhisk is an Open Source product and you can deploy it in any cloud. We will see later in the book how to implement your environment, on-premises or in the cloud of your choice.
However, since Apache OpenWhisk is a project initiated by IBM and then donated to the Apache Foundation, it is available ready to use in the IBM Cloud. Since the OpenWhisk environment is offered for free for development purposes, the simplest way, to begin with, is to create an account there, and use it as our test environment.
Please be aware that since registration procedures and links may change over the time, when you will be reading the book there can be some differences in the actual procedure. So we are not going to delve into too many details describing the description of the registration process. It is pretty simple though, so you should be able to figure out by yourself.
At the time of this writing, you can start by going to the URL: http://console.bluemix.net. You can see then a button saying Create a free account.
You can then click there, provide your data and an email address and then activate your account, clicking on the link sent by email. Then you are done, and no credit card is required.
Please note the most important actions to do after the registrations are:
Login to the cloud
Download the bx CLI tool: Figure Figure 2-1
Install the CLI (bx) and the Cloud Functions plugin (wsk): Figure Figure 2-2
Login to the Cloud.
To be sure you are ready, run the following command at the terminal check the result. If they match with the listing, then everything is configured correctly!
$ bx wsk action invoke /whisk.system/utils/echo -p message hello --result
{
    "message": "hello"
}
Now we are going to create and deploy a simple contact form.
We assume you already installed the bx command line tool with the wsk plugin. We also assume you are using a Unix-like command line environment: for example Linux, OSX or, if you are using Windows, you have already installed a version of Bash on Windows.
Open now a terminal and start Bash and let’s do the first step, creating a package to group our code:
$ wsk package create contact
ok: created package contact
Now we are ready to start coding our application. In the Serverless world you can write some code, then deploy and execute it immediately. This modularity is the essence of the platform.
We are going to call the code we create actions. Action will generally be, at least in this chapter, one single file. There will be an exception when we bundle an action file with some libraries we need, and we deploy them together. In such a case, the action will be deployed as a zip file, composed of many files.
Let’s write our first action. The action is a simple HTML page returned by a javascript function.
function main() {
    return {
        body: `<html><head>
<link href="//maxcdn.bootstrapcdn.com/bootstrap/3.3.0/css/bootstrap.min.css"
      rel="stylesheet" id="bootstrap-css">
</head><body>
 <div id="container">
  <div class="row">
   <div class="col-md-8 col-md-offset-2">
    <h4><strong>Get in Touch</strong></h4>
    <form method="POST" action="submit">
     <div class="form-group">
       <input type="text" name="name"
        class="form-control" placeholder="Name">
     </div>
     <div class="form-group">
        <input type="email" name="email"
         class="form-control" placeholder="E-mail">
     </div>
     <div class="form-group">
        <input type="tel" name="phone"
         class="form-control" placeholder="Phone">
     </div>
     <div class="form-group">
        <textarea  name="message" rows="3"
         class="form-control" placeholder="Message"
         ></textarea>
      </div>
      <button class="btn btn-default" type="submit" name="button">
        Send
      </button>
    </form>
   </div>
  </div>
 </div>
</body></html>`
    }
}
Note the general structure of the actions: the function is called main, it takes as an input a javascript obj and returns a javascript object. Those objects will be displayed at the terminal in JSON format.
Once you wrote the code, you can deploy it, then retrieve the actual URL you can use to execute the action.
$ wsk action create contact/form form.js --web true ok: created action contact/form
This message confirms the action was created
This is the url where the action is available
The actual URL returned will be different since it depends on your account and location.
We can now test if the form was deployed correctly just opening the URL with a web browser.
If you now click on the submit button, you will get an error, because it will try to submit the form to the action command/submit that does not (yet) exists.
{
  "error": "The requested resource does not exist.",
  "code": 3850005
}
After displaying, the next step of the processing is the validation of the data the user submits, before we store them in a database.
We will now create an action called submit.js we discuss step by step. First, let’s “wrap” our code in the main function:
function main(args) {
  message = []
  errors = []
  // TODO: <Form Validation>
  // TODO: <Returning the Result>
}
Insert here the code for validating the form
Insert here the code for returning the result
Note that the action has a similar structure to the preceding, with a main method, now with an explicit parameter args. Let see what happens when you submit the form.
We have a form with some fields: “name”, “email”, “phone”, “message”. On submit, the form data will be encoded, sent to OpenWhisk, that will decode them (we will provide all the details of the processing later in this chapter).
You create a javascript object to process a request using an action. Each key corresponds to a field of the form. This object is passed as the argument of the main function. So our form fields are available to the main function as args.name, arg.email, etc. We can now validate them.
Below we show the code to process the form, adding valid fields to message or any error to errors.
First, let’s check only if the name is provided.
You should add the snippets in this paragraph after <Form Validation>
// validate the name
if(args.name) {
 message.push("name: "+args.name)
} else {
 errors.push("No name provided")
}
Second, let’s validate the email address, checking if it “looks like” an email. We use here a regular expression:
// validate email
var re = /\S+@\S+\.\S+/;
if(args.email && re.test(args.email)) {
   message.push("email: "+args.email)
} else {
  errors.push("Email missing or incorrect.")
}
Third, let’s validate the phone number, checking it has “enough” digits (at least 10):
/// validate the phone
if(args.phone && args.phone.match(/\d/g).length >= 10) {
  message.push("phone: "+args.phone)
} else {
  errors.push("Phone number missing or incorrect.")
}
Finally, let’s add the message text if any:
/// add the message text, optional
if(args.message) {
  message.push("message:
"+args.message)
}
Once we have all the fields validated, we can return the result. There is now a bit of logic: we choose if returning an error message or an acceptance message.
Insert the snippets in this paragraph after <Returning the Result>
// complete the processing
var data = "<pre>"+message.join("\n")+"</pre>"
var errs = "<ul><li>"+errors.join("</li><li>")+"</li></ul>"
if(errors.length) {
  return {
    body: "<h1>Errors!</h1>"+
      data + errs +
      '<br><a href="javascript:window.history.back()">Back</a>'
   }
} else {
   // storing in the database
   // TODO: <Store the message in the database>
   return {
     body: "<h1>Thank you!</h1>"+ data
   }
}
Placeholder to insert code to save data in the database
The action is not complete (we have still to see how to store the data) but we can test this partial code with this command:
$ wsk action create contact/submit submit.js --web true
ok: created action contact/submit
If you now submit the form empty, you will see the message in Figure Figure 2-4 under “Form Rejected”. If we instead provide all the parameters correctly, we will be gratified with the acknowledgment under “Form Accepted”.
Now we can focus on database creation, to store our form data. Since we have already an IBM Cloud account, the simplest way is to provision a Cloudant database. For small amounts of data, it is free to use.
Steps to create the database, as shown in Figure Figure 2-5 are pretty simple.
Select Catalog
Search for Cloudant NoSQL database the click
Select the button Create to create a Lite instance
Click on Launch to access the administrative interface
Click on “Create Database” (not shown in the Figure)
Finally, specify contact as the database name
Now we need to get the credentials to access the database.
You have to go into the menu of the Cloudant service, click on “Service Credentials”, then click on “New Credentials” and finally select “View Credentials”. It will show a JSON file.
You need to extract the values in the fields username and password. You can now use those values at the command line to “bind” the database: This is what you have to type on the terminal.
$ export USER=XXXX
copy here the username
copy here the password
create the actual database
now check you will have two packages
Note that after binding you have a new package with some parameters, allowing to read and write in your database. OpenWhisk provides a set of generic packages. We used the command bind to make it specific to write in our database giving username and password.
This package provides many actions we can see listing them (the following output is simplified since the actions are a lot):
$ wsk action list contactdb
/whisk.system/cloudant/write                                           private nodejs:6
/whisk.system/cloudant/read                                            private nodejs:6
Creating the package binding gave you access to multiple databases. But since we need just one, we specified the default database we want to use (using the parameter dbname for the package) and then we explicitly invoked the create-database to be sure that database is created.
So far we have seen how we can create actions and how to invoke them. Actually, in the first two examples, we have seen one specific kind of actions: web action (you may have noted the --web true flag in the commands). Those are the actions which can be invoked directly, navigating to web URLs or submitting web forms.
However, not all the actions are there to be invoked straight from the web. Many of them execute internal processing and are activated only through some specific APIs.
The actions letting to read and write in the database, those who we just exported from the Cloudant package, are not web actions. They can be invoked however using the command line interface.
In particular, we have to use the wsk action invoke command, passing parameters with the --param options and data in JSON format as a command line argument.
Let verify how it works, writing in the database, by invoking the action directly write, as follows.
$ wsk action invoke contactdb/write \
  --blocking --result --param dbname contactdb \
  --param doc '{"name":"Michele Sciabarra", "email": "michele@sciabarra.com"}'
{
    "id": "fad432c6ea1145e71e99053c0d811475",
    "ok": true,
    "rev": "1-d14ba6a37cfdf34a8b3bb49dd3c0e22a"
}
We used the --blocking option to wait for the result; otherwise, the action will start asynchronously, and we will have to come back later to get the result. Furthermore, we are using the --result option to print the final result. Those options will be discussed in details in the next chapter.
The database replied with a confirmation and some extra information. Most notably, the result includes the id of a new record, that we can use later for retrieving the value.
We can now check the database user interface to see the data we just stored in it. You can select the database, then the id and you can see the data we just inserted in the database in JSON format.
As you can see, to write data in the database you need just a JSON object. So far we wrote data using the command line. Let’s look at how we can do it in code.
OpenWhisk includes an API to interact with the rest of the system. Among the possibilities, there is the ability to invoke actions.
We provisioned the database as a package binding. Thus we have now an action available to write in the database. To use it we need to invoke the action from another action. Let see how.
First and before all, we need a:
var openwhisk = require('openwhisk')
to access to the openwhisk API. This code is the entry point to interact with OpenWhisk from within an action.
Now, we can define the function save using the OpenWhisk API to invoke the action to write in the database. The following code should be placed at the beginning of the submit.js:
var openwhisk = require('openwhisk')

function save(doc)  {
  var ow = openwhisk()
  return ow.actions.invoke({
    "name": "/_/contactdb/write",
    "params": {
       "dbname": "contactdb",
       "doc": doc
    }
  })
}
Currently, you need to add the var ow = openwhisk() inside the body of the main function. It is a documented issue: environment variables used to link the library to the rest of the system, are available only within the main method. So you cannot initialize the variable outside (as you may be tempted to do).
Once the save function is available, you can use it to save data just by creating an appropriate JSON object and pass it as a parameter. Place the following code after <Store the message in the database>:
save({
 "name": args.name,
  "email": args.email,
  "phone": args.phone,
  "message": args.message
})
We “extracted” the arguments instead of just saving the whole args object because it includes other information we do not want to keep.
The code is now complete. We can deploy it, as a web action too, to be executed when the user posts the form:
$ wsk action update contact/submit submit.js --web true
ok: updated action contact/submit
We can now manually test the action from the command line, to check if it writes in the database:
$ wsk action invoke contact/submit -p name Michele -p email \
    michele@sciabarra.com -p phone 1234567890 -r
{
    "body": "<h1>Thank you!</h1><pre>name: Michele
email: michele@sciabarra.com
phone: 1234567890</pre>"
}
Now we can go on and try our form, verifying data are written in the database, as in figure Figure 2-8.
We do not generally recommend manual testing for your Serverless code. Indeed there will be an entire chapter devoted to how to write automated tests. We are showing manual test here only as a tool to get a feeling of the system, not as a recommendation of how you should write your code.
Now we add a feature that demonstrates interaction with other systems. In a sense, it is going to be a bit advanced. We are going to send an email when someone uses our contact form. Not just sending emails when a visitor completes the submission, but also we want to be notified even of partial and wrong submissions of the form.
Sending email is usually done with the SMTP protocol, but since email is generally abused to send spam in all the cloud services, cloud providers usually block SMTP ports; hence it is not usable. In the IBM Cloud which we are using, they are indeed blocked (at least in our tests). This fact is the reason we used a third party service for sending email, a service that provides an HTTP API and a javascript library to use it.
We are going to use the service Mailgun for this purpose. It provides free accounts, allowing for a limited number of emails sent only to selected and validated addresses. It is perfect for our goal.
To use Mailgun you need to go to the website www.mailgun.com and register for a free account. Once you have set up an account you will get a “sandboxed” account (note the site will ask for a phone number for verification purposes).
Once registered, to retrieve credentials for sending an email (Figure Figure 2-9) you need to:
Login in Mailgun
Scroll down until you find the Sandbox Domain
Click on “Authorized Recipient”
Invite the recipient
Click on the link in the email received
Once done, you need the following information, as shown in the figure, for writing your script:
the sandboxed domain
the private API key
the authorized recipient address
Now, we can build an action for sending an email. Actually, the purpose of this example is to show how you can create more complex action involving third-party services and libraries.
Hence now preparing this action is a bit more complicated than the actions we have seen before, because we need to use and install an external library then and deploy it together with the action code.
Let start by creating a folder and importing the library mailgun-js with the npm tool. We assume you have installed it, refer to Appendix II for details about the purpose and usage of this tool.
$ mkdir sendmail
$ cd sendmail
$ npm init -y
$ npm install --save mailgun-js
Now we can write a simple action that can send an email and place it in sendmail/index.js. Check the listing with the notes about the information you have to replace with those who collected before when registering to Mailgun.
var mailgun = require("mailgun.js")
var mg = mailgun.client({username: 'api',
        key: 'key-<YOUR-PRIVATE-API-KEY>'})
function main(args) {
  return mg.messages.create(
          '<YOUR-SANDBOX-DOMAIN>.mailgun.org', {
    from: "<YOUR-RECIPIENT-EMAIL>",
    to: ["<YOUR-RECIPIENT-EMAIL>"],
    subject: "[Contact Form]",
    html: args.body
  }).then(function(msg) {
     console.log(msg);
     return args;
  }).catch(function(err) {
     console.log(err);
     return args;
  })
}
replace key-<YOUR-PRIVATE-API-KEY> with the Private API Key
replace <YOUR-SANDBOX-DOMAIN>.mailgun.org with the Sandbox Domain
replace <YOUR-RECIPIENT-EMAIL> with the one that is used both as the sender and the recipient
same as 3
For simplicity, we placed the keys within the script. Also, this is not a recommended practice. We will see later how we can define parameters for a package and use them for each action, so you do not have to store keys in the code.
We can deploy now the action. Since this time the action is not a single file, but it includes libraries, we have to package everything in a zip file, to deploy them too.
$ zip ../sendmail.zip -r *
$ wsk action update contact/sendmail ../mailgun.zip --kind nodejs:6
ok: updated action contact/sendmail
We are using update here even if the action was not present before. Indeed since update will create the action if it does not exists, we prefer to use just update always to avoid the error create gives if the action was already there. Also, since we place the action in a zip file, we need to specify its type because the command line cannot deduct it from the filename.
We can now test the action invoking it directly:
$ wsk action invoke contact/sendmail -p body "<h1>Hello</h1>" -r
{
    "body": "<h1>Hello</h1>"
}
The action acts as a filter, accepting the input and copying it in the output. We will leverage this behavior to chain the action to the submit.
When invoked, it will return an output, but also it will send an email as a side effect.
So far we have developed an action that can send an email as a stand-alone action.
However, we designed the action in such a way that it can take the output of the submit action and return it as is. So we can create a pipeline of actions, similar to the Unix shell processing, where the output of a command is used as an input for another command.
We are going to take the output of the sendmail action, use it as the input for the submit action and then return it as the final result of the email submission.
Please note as a side effect; it will send emails for every submission, also for incorrect inputs, so we can know someone is trying to use the form without providing full information.
However, we will store in the database only the fully validated data. Let’s create such a pipeline that is called sequence in OpenWhisk, and then test it.
$ wsk action create contact/submit-sendmail \
  --sequence contact/submit,contact/sendmail \
  --web true
ok: updated action contact/submit-sendmail

$ wsk action invoke contact/submit-sendmail -p name Michele -r
{
    "body": "<h1>Errors!</h1><pre>name: Michele</pre><ul><li>Email missing or incorrect.</li><li>Phone number missing or incorrect.</li></ul><br><a href=\"javascript:window.history.back()\">Back</a>"
}
As a result, we should be receiving an email for each attempt of submitting a form, including partial data from the contact form.
Now we are ready. We can use the complete form including storing in the database and sending the email. But now the form should activate our sequence, not just the submission action. The simplest way is to edit the form.js, replacing the action we are invoking in the form. We should do the following change in form.js:
-<form method="POST" action="submit">
+<form method="POST" action="submit-sendmail">
The change to do in your code is in patch format. We are not going to cover it in detail, but mostly the prefix - means: remove this line, while the prefix + means: add this line. We will use this notation again in the book.
If we now update the action and try it, we will receive an email for each form submission, but the form will be stored in the database only when the data is complete.
Started from scratch with OpenWhisk.
Learned how to get an account in a cloud supporting it (the IBM cloud) and download the command line interface.
Created a simple HTML form in OpenWhisk
Implemented simple form validation logic.
Stored results in a NO-SQL database (Cloudant)
Connected to a third party service (Mailgun) to send an email.
OpenWhisk applications are composed by some “entities” that you can manipulate either using a command line interface or programmatically in javascript code.
The command line interface is the wsk command line tools, that can be used directly on the command line or automated through scripts. You can also use Javascript using an API crafted explicitly for OpenWhisk. They are both external interfaces to the REST API that OpenWhisk exposes. Since they are both two different aspects of the same thing (talking to OpenWhisk) they are both covered in this chapter.
Before we go deeper through the details of the many examples covering design patterns in the next chapters, we need to be familiar with the OpenWhisk API.
The API is used frequently to let multiple actions to collaborate. This chapter is hence a key chapter since the API is critical to writing applications that leverage the specific OpenWhisk features.
We already quickly saw the fundamental entities of OpenWhisk in the practical example in Chapter 2, but here we recap them here for convenience and clarity:
Packages: they are a way to grouping actions together, also they provide a base URL that can be used by web applications.
Actions: the building blocks of an OpenWhisk application, can be written in any programming language; they receive input and provide an output, both in JSON format.
Sequences: actions can be interconnected, where the output of action becomes the input of another, creating, in fact, a sequence.
Triggers: they are entry points with a name and can be used to activate multiple actions.
Rules: a rule associate a trigger with an action, so when you fire a trigger, then all the associated actions are invoked.
Feeds: they are specially crafted actions, implementing a well-defined pattern; its purpose is connecting events provided by a package with triggers defined by a consumer.
Now let’s give an overview of the command line interface of OpenWhisk, namely the command wsk.The wsk command is composed of many commands, each one with many subcommands. The general format is:
wsk <COMMAND> <SUB-COMMAND> <PARAMETERS> <FLAGS>
Note that <PARAMETERS> and <FLAGS> are different for each <SUBCOMMAND>, and for each <COMMAND> there are many subcommands.
The CLI itself is self-documenting and provides help when you do not feed enough parameters to it. Just typing wsk you get the list of the main commands. If you type the wsk command then the subcommand you get the help for that subcommand.
For example, let’s see wsk output (showing the command) and the more frequently used command, action, also showing the more common subcommands, shared with many others:
$ wsk Available Commands: action work with actions activation work with activations package work with packages rule work with rules trigger work with triggers property work with whisk properties namespace work with namespaces list list entities in the current namespace $ wsk action create create a new action
create available for actions, packages, rules and triggers
update available for actions, packages, rules and triggers
get available for actions, packages, rules and triggers, and also for activations, namespaces and properties
delete available for actions, package, rule and triggers
list available for actions, package, rule and triggers, and also for namespace and for everything.
Remembering that commands are the entities and the subcommands are C.R.U.D. (Create, get/list for Retrieve, Update, Delete) gives you a good mnemonic of how the whole wsk command works. Of course, there are individual cases, but we cover those in the discussion along the chapter.
Subcommands also have flags, some specific for the subcommand. In the rest of the paragraph, we discuss all the subcommands. We provide the details of interesting flags as we meet them.
The wsk command has many “properties” you can configure to access to an OpenWhisk environment. When you use the IBM Cloud, those properties are actually set for you by the ibmcloud main command. If you have a different OpenWhisk deployment, you may need to change the properties manually to access it.
You can see the currently configured properties with:
$ wsk property get Client key whisk auth xxxxx:YYYYY
the API authentication key (replaced in the example with xxxxx:YYYYY) - your own will be different
the OpenWhisk host you connect to control OpenWhisk with the CLI - depends on your location
your current namespace (the value _ is a shorthand for you default namespace)
If you install a local OpenWhisk environment, you need to set those properties using wsk property set manually. In particular, you need to set the whisk auth and the whisk host properties with values provided by your local installation.
Let’s see how we name things. As you may already know, in OpenWhisk we have the following entities with a name:
packages
actions
sequences
triggers
rules
feeds
There are precise naming conventions for them. Furthermore, those conventions are reflected in the structure of the URL used to invoke the various elements of OpenWhisk.
First and before all, each user is placed in a namespace, and everything a user creates, belong to it. It acts as a workspace and also provides a base URL for what a user creates. Credentials for a user allows access to all the resources in its namespace.
For example, when I registered in the IBM Cloud, my namespace was /openwhisk@sciabarra.com_dev/. It is my username followed by _dev (for development).
You can create a namespace in an OpenWhisk installation if you are authorized, otherwise, a namespace is created for you by the system administrator.
Under a namespace you can create triggers, rules, actions and packages, so they will have names like:
/openwhisk@sciabarra.com_dev/a-triggger
/openwhisk@sciabarra.com_dev/a-rule
/openwhisk@sciabarra.com_dev/a-package
/openwhisk@sciabarra.com_dev/an-action
When you create a package, you can put in its actions and feeds. So for example below the package a-package you can have:
/openwhisk@sciabarra.com_dev/a-package/another-action
/openwhisk@sciabarra.com_dev/a-package/a-feed
To recap:
The general format for entities is: /namespace/package/entity, but it can be reduced to /namespacke/entity
Under a namespace you can create triggers, rules, package, and actions but not feeds.
Under a package you can create actions and feeds, but not triggers, rules, and other packages.
Most of the time you do not need to specify the namespace. If you specify an action as a relative action (not starting with /) it will be placed in your current namespace. Note that the special namespace name of _ means “your current namespace” and the full namespace name automatically replace it.
In OpenWhisk, according to the naming conventions, all the entities are grouped in a namespace. We can put actions under a namespace.
Below a namespace, you can create packages to bundle actions together. A package is useful for two main purposes:
group related actions together, to reuse them and share with others
provide base a URL to those related actions, useful for actions that refer each other, like in web applications.
However, it is usually convenient to further groups actions. Under a namespace, we can create packages, and put action under them. Packages are hence useful for grouping actions (and feeds, that are just actions too), treating them as a single unit. Furthermore, a package can also include parameters.
Let’s do an example. We can just create a package sample, also providing a parameter, as follows.
$ wsk package create sample -p email michele@sciabarra.com
ok: created package basics
Parameters of a package are available to all the actions in a package.
Now you can list packages, get`information from packages, `update it (for example with different parameters) and finally delete it.
$ wsk package list
packages
/openwhisk@sciabarra.com_dev/sample                                   private
/openwhisk@sciabarra.com_dev/basics                                   private
/openwhisk@sciabarra.com_dev/contact                                   private
/openwhisk@sciabarra.com_dev/contactdb                                 private
$ wsk package update sample -p email openwhisk@sciabarra.com
ok: updated package sample
$ wsk package get sample -s
package /openwhisk@sciabarra.com_dev/sample: Returns a result based on parameter email
   (parameters: *email)
$ wsk package delete sample
ok: deleted package basics
here we used the parameter -s to summarize information from the package
Now let’s see another essential function of a package: binding.
OpenWhisk allows to import (or bind) to your namespace, packages from a third party, to customize them for your purposes.
Keep in mind that credentials of a user allow access to all the resources under a namespace. As a result, to bind a package in our namespace has the effect of making it accessible to the other actions in the namespace.
For example, let’s review first the packages available in the IBM cloud. Of course, this cloud includes their solution for everyday needs like databases and message queues. The database available in the IBM Cloud is a scalable version of the popular no-SQL database CouchDB, i.e., Cloudant.
A package for Cloudant is available, as we can see below, and all we need to do to use it is to bind it. In the example below, we use the configuration file cloudant.json. How to retrieve the configuration file is described in Chapter 2.
$ wsk package list /whisk.system packages
We are listing the packages available in the IBM Cloud. I edited and shortened the output for clarity.
We are inspecting the Cloudant package. We are limiting to see only the first two lines, those describing the package.
Note here the required parameters to use the database
we created here the binding to make the database accessible
We are using the file cloudant.json for the specifying host, username and password, and providing the dbname on the command line.
Two common flags, available also for actions, feed and triggers are -p and -P. With -p <name> <value> you can specify a parameter named <name> with value <value>. With the -P you can put some parameters in a JSON file that is assumed to be a map.
The subcommand wsk actions let you manipulate actions.
The more common subcommands are the CRUD actions to list, create, update and delete actions. Let’s demonstrate them with some examples.
We create and use a simple now action for our examples:
function main(args) {
  return { body: Date() }
}
Now, if we want to deploy this simple action in the package basics we do:
$ wsk package update basics
Ensuring we have a basics package
Create the action from the file stored in basics/now.js
You could omit the basics and place the action in the namespace and not in a package. We do not advise to do so, however, because gathering your actions in packages is always a good idea to improve modularity and reuse.
Now that the action has been deployed, we can invoke it. The simplest way is to call it as:
$ wsk action invoke basics/now
ok: invoked /_/basics/now with id fec047bc81ff40bc8047bc81ff10bc85
Wait a minute… where is the result? Actually, actions in OpenWhisk are by default asynchronous, so what you get usually is just an id (called activation id) to retrieve the result after the action completed. We discuss activations in detail in the next paragraph.
If we instead we want to see the result immediately, we can provide the flag -r or --result. It blocks until we get an answer. So:
$ wsk action invoke basics/now -r
{
    "body": "Thu Mar 15 2018 14:24:39 GMT+0000 (UTC)"
}
Great. However, what is if want to access that action from the web? We can retrieve an URL with get and --url.
If we leave out the --url we get a complete description of the action in JSON format:
$ wsk action get basics/now --url
https://openwhisk.eu-gb.bluemix.net/api/v1/namespaces/openwhisk%40sciabarra.com_dev/actions/basics/now
$ wsk action get basics/now
{
    "namespace": "openwhisk@sciabarra.com_dev/basics",
    "name": "now",
    "version": "0.0.1",
    "exec": {
        "kind": "nodejs:6",
        "code": "function main(args) {\n  return { body: Date() }\n}\n\n",
        "binary": false
    },
    "annotations": [
        {
            "key": "exec",
            "value": "nodejs:6"
        }
    ],
    "limits": {
        "timeout": 60000,
        "memory": 256,
        "logs": 10
    },
    "publish": false
}
However, if we try to use the URL to run the action we may have a nasty surprise:
$ curl https://openwhisk.eu-gb.bluemix.net/api/v1/namespaces/openwhisk%40sciabarra.com_dev\
    /actions/basics/now
{"error":"The resource requires authentication, which was not supplied with the request",\
    "code":9814}
The fact is: all the actions (and everything else) in OpenWhisk is accessible with a REST API. However, by default, the actions are protected and not accessible without authentication.
However, it is possible to mark an action as publicly accessible with the flag --web true flag when creating or updating it. We call them web actions.
A web action is supposed to produce web output so that you can view with a web browser. There are some other constraints on Web action we discuss later. For now, focus on the fact the answer must have a body property that is rendered as the body of an HTML page.
Now, since our action was not a web one, we must change it. This case is an opportunity to demonstrate how the update command that can change an action. Then we can immediately retrieve its URL and invoke it directly.
$ wsk action update basics/now --web true
ok: updated action basics/now
$ curl $(wsk action get basics/now --url | tail -1)
Thu Mar 15 2018 14:46:56 GMT+0000 (UTC)
We saw the create and update commands for managing actions. We now complete the demonstration of the CRUD commands also showing the list and the delete command:
$ wsk action list basics
actions
/openwhisk@sciabarra.com_dev/basics/now                               private nodejs:6
$ wsk action delete basics/now
ok: deleted action basics/now
$ wsk action list basics
actions
An essential feature of OpenWhisk is the ability to chain action in sequences, creating actions that use, as an input, the output of another action, as shown in Figure Figure 3-1.
Let’s do a practical example of a similar action sequence. We implement a word count application, separating it in two actions, put in a sequence. The first action splits the input, that is supposed to be a text file, in “words”, while the second retrieves the words and produce a map as a result. In the map, each word is then shown with its frequency.
Let’s start with the first action, split.js, as follows:
function main(args) {
    let words = args.text.split(' ')
    return {
        "words": words
    }
}
You can deploy and test it, feeding a simple string:
$ wsk action update basics/split basics/split.js
ok: updated action basics/split
$ wsk action invoke basics/split \
  -p text "the pen is on the table" -r \
  | tee save.json
{
    "words": [
        "the",
        "pen",
        "is",
        "on",
        "the",
        "table"
    ]
}
note here we are saving the output in a file save.json
Now it is time to do the second step, with this count.js actions:
function main(args) {
    let words = args.words
    let map = {}
    let n = 0
    for(word of words) {
       n = map[word]
       map[word] = n ? n+1 : 1
    }
    return map
}
We can now deploy it and check the result, feeding the output of the first action as input:
$ wsk action update basics/count count.js
ok: updated action basics/count
$ wsk action invoke basics/count -P save.json -r
{
    "is": 1,
    "on": 1,
    "pen": 1,
    "table": 1,
    "the": 2
}
Now we have two actions, the second able to take the output of the first as input, we can create a sequence:
wsk action update basics/wordcount \
  --sequence basics/split,basics/count
note here we are specifying a comma-separated list of existing action names
The sequence can be now invoked as a single action, so we can feed the text input and see the result:
$ wsk action invoke basics/wordcount -r -p text  \
"can you can a can as a canner can can a can"
{
    "a": 3,
    "as": 1,
    "can": 6,
    "canner": 1,
    "you": 1
}
In the simplest case, your action is just a single javascript file. However, as we are going to see, very often commonly you have some code you want to share and reuse between actions.
The best way to handle this situation is to have a library of code that you can include for every action and that you deploy with your actions.
Let’s consider this example: a couple of utility functions that format a date in a standard format “YYYY/MM/DD” and time in the standard format “HH:MM:SS”.
function fmtDate(d) {
    let month = '' + (d.getMonth() + 1),
        day = '' + d.getDate(),
        year = d.getFullYear();
    if (month.length < 2) month = '0' + month;
    if (day.length < 2) day = '0' + day;
    return year + "/" + month + "/" + day
}

function fmtTime(d) {
    let hour =  ''+ d.getHours(),
        minute = '' + d.getMinutes()
        second = '' + d.getSeconds()

    if(hour.length < 2) hour = "0"+hour
    if(minute.length < 2) minute = "0"+minute
    if(second.length <2 ) second = "0"+second

    return hour + ":" + minute + ":" + second
}
You may, of course, copy this code in each action file, although it is pretty awkward to maintain. Just consider that when you change the function, you have to change it in all the copies of the functions across multiple files. Of course, there is a better way.
Since actions are executed using NodeJs, you have the standard export/require mechanism available for writing your actions.
As a convention, we are going to place our shared code in a subdirectory named lib, and we treat them as modules.
So you should place the format date-time listing above in a file lib/datetime.js and add at the end the following code:
module.exports = {
    fmtTime: fmtTime,
    fmtDate: fmtDate
}
Now you can use the two functions in one action. For example let consider an action named clock that returns the date if invoked with date=true, the time if invoked with time=true, or both if the date and time parameters are specified.
Our action will starts requiring the library with:
var dt = require("./lib/datetime.js")
This way you can access the two functions as dt.fmtDate and dt.fmtTime. Using those functions, we can easily write the main body, called clock.js:
function main(args) {
  let now = args.millis ? new Date(args.millis) : new Date()
  let res = " "
  if(args.date)
    res = dt.fmtDate(now) + res
  if(args.time)
    res = res + dt.fmtTime(now)
  return {
    body: res
  }
}
exports.main = main
Now, we have to deploy the action, but we also need to include the library. How can we do this in OpenWhisk?
The solution is to deploy not a single file but a zip file that includes all the files we want to run as a single action.
When deploying multiple files, you need either to put your code in a file index.js or to provide a package.json saying which one is the main file.
Let’s perform this procedure with the following commands:
$ cd basics
$ echo '{"main":"clock.js"}' >package.json
$ zip -r clock.zip clock.js package.json lib
  adding: clock.js (deflated 40%)
  adding: package.json (stored 0%)
  adding: lib/ (stored 0%)
  adding: lib/datetime.js (deflated 57%)
$ wsk action update basics/clock clock.zip \
  --kind nodejs:6
ok: updated action basics/clock
creating a zip file with subdirectories, so the -r switch is required
specifying the runtime we want to use is nodejs:6
When we deploy an action as a zip file, we have to specify the runtime to use with --kind nodejs:6, because the system is unable to figure out by itself just from the file name.
Let’s test it:
$ wsk action invoke basics/clock -p date true -r
{
    "body": "2018/03/18 "
}
$ wsk action invoke basics/clock -p time true -r
{
    "body": " 15:40:42"
}
In the preceding paragraph, we saw when we invoke an action without waiting for the result; we receive as an answer just an invocation id.
This fact brings us to the argument of this paragraph: the subcommand wsk activation to manage the results of invocations.
To explore it, let’s create a simple echo.js file:
function main(args) {
 console.log(args)
 return args
}
Now, let’s deploy and invoke it (with a parameter hello=world) to get the activation id:
$ wsk action create basics/echo echo.js
ok: created action basics/echo
$ wsk action invoke basics/echo -p hello world
ok: invoked /_/basics/echo with id 82deb0ec37524a9e9eb0ec37525a9ef1
As we explained in Chapter 1, when actions are invoked, they are identified by an activation id, used to save and retrieve results and logs from the database.
Now, the long alphanumeric (actually, hexadecimal) identifier displayed is the activation id. We can now use with it the option result to get the result, and logs to get the logs.
$ ID=$(wsk action invoke basics/echo -p hello world \
  | awk '{ print $6}')
$ wsk activation result $ID
{
    "hello": "world"
}
$ wsk activation logs $ID
2018-03-15T18:17:36.551486467Z stdout: { hello: 'world' }
The activation subcommand has another two useful options.
One is list. It will return a list of all the activations in chronological order. Since the list can be very long, it is useful always to use the option --limit <n> to see only the latest <n>:
$ wsk activation list --limit 4
activations
82deb0ec37524a9e9eb0ec37525a9ef1 echo
219bacbdb838449d9bacbdb838149de2 echo
1b75cd02fd1f4782b5cd02fd1f078284 echo
6fa117115aa74f90a117115aa7cf90e0 now
Another useful option (and probably the most useful) is poll. With this option, you can continuously display logs for actions as they happen. It is a handy option for debugging because let you to monitor what is going on in the remote serverless system.
you can poll for just an action or for all the actions at the same time.
An example of what you can see when you type wsk activation logs basics/echo is shown in Figure [IMAGE TO COME]. We split the terminal into two panels. You can notice in the panel of the terminal that we invoked the action echo twice. The first one was without parameters, while the second one with one parameter. In the other panel, you can see the results.
Now let’s see how to create a trigger.
A trigger is merely a name for an arbitrary event. A trigger by itself does nothing. However with the help of rules, it becomes useful, because when a trigger is activated, it invokes all the associated rules, as shown in Figure Figure 3-2.
Let’s build now an example to see what triggers do. We use a simple action that does nothing except logging its activation. We use it to trace what is happening when you activate triggers. Note we start to construct the example now, but we complete it after we introduced rules, in the next paragraph.
So, let’s prepare our example, deploying first a simple log.js actions, that just logs its name:
function main(args) {
 console.log(args.name)
 return {}
}
Then, we deploy it twice, with two different names:
$ wsk action update basics/log-alpha -p name alpha basics/log.js
ok: updated action basics/log-alpha
$ wsk action update basics/log-beta -p name beta basics/log.js
ok: updated action basics/log-alpha
By themselves, those actions do nothing except leaving a trace of their activation in the logs:
$ wsk action invoke basics/log-alpha
invoking the action log-alpha
invoking the action log-beta
showing a list of activations
poll the activations (since 60 seconds, for 20 seconds) to see which activations happened and what they logged
Now we are ready to create a trigger, using the command wsk trigger create as in the listing below.
Of course, there is not only create but also update and delete, and they work as expected, updating and deleting triggers. In the next paragraph, we see also the fire command, that needs you first create rules to do something useful.
$ wsk trigger create basics-alert
ok: created trigger alert
$ wsk trigger list
triggers
/openwhisk@sciabarra.com_dev/basics-alert                                     private
$ wsk trigger get basics-alert
ok: got trigger alert
{
    "namespace": "openwhisk@sciabarra.com_dev",
    "name": "basics-alert",
    "version": "0.0.1",
    "limits": {},
    "publish": false
}
Triggers are a “namespace level” entity, and you cannot put them in a package.
Once we have a trigger and some actions we can create rules for the trigger. A rule connects the trigger with an action, so if you fire the trigger, it will invoke the action. Let’s see in practice in the next listing.
As for all the other commands, you can execute list, `update and delete by name.
$ wsk rule create basics-alert-alpha \
       basics-alert basics/log-alpha
ok: created rule basics-alert-alpha
$ wsk trigger fire basics-alert
ok: triggered /_/alert with id 86b8d33f64b845f8b8d33f64b8f5f887
$ wsk activation logs 86b8d33f64b845f8b8d33f64b8f5f887 \
   | jq
{
  "statusCode": 0,
  "success": true,
  "activationId": "b57a1f1dc3414b06ba1f1dc341ab0626",
  "rule": "openwhisk@sciabarra.com_dev/alert-alpha",
  "action": "openwhisk@sciabarra.com_dev/basics/alpha"
}

$ wsk activation logs b57a1f1dc3414b06ba1f1dc341ab0626
2018-03-17T18:10:48.471777977Z stdout: alpha
creating a rule to activate the action alpha
we can now fire the rule, it returns an activation id
let’s inspect the activation id
we piped the output in the jq utility to make the output more readable
in turn the rule enabled an action with this activation id
let’s see what the rule did
A trigger can enable multiple rules, so firing one trigger actually activates multiple actions.
Let’s try this feature in the next listing. However, before starting, let’s open another terminal window and enable polling (with the command wsk activation poll) to see what happens.
$ wsk rule create basics-alert-beta basics-alert basics/log-beta
ok: created rule basics-alert-beta
$ wsk trigger fire basics-alert
ok: triggered /_/basics-alert with id a731a03603bb4183b1a03603bb8183ce
If we check the logs we should see something like this:
$ wsk activation poll Enter Ctrl-c to exit. Polling for activation logs Activation: 'alert' (a731a03603bb4183b1a03603bb8183ce)
The trigger activation invoked 2 actions
This is the log of the first action
This is the log of the second action
Rules can also be enabled and disabled without removing them. As the last example, we try to disable the first rule and fire the trigger again to see what happens. As before, first, we start the log polling to see what happened.
$ wsk rule disable basics-alert-alpha
disabling rule alert-alpha
enabling rule alert-beta (just to be sure)
a quick listing confirms only one active rule
firing the trigger again
Moreover, if we go and check the result, we see this time only the action log-beta was invoked.
$ wsk activation poll
Enter Ctrl-c to exit.
Polling for activation logs

Activation: 'basics-alert' (0f4fa69d910f4c738fa69d910f9c73af)
[
    "{\"statusCode\":0,\"success\":true,\"activationId\":\"a8221c7d7fe94e22a21c7d7fe9ce223c\",\"rule\":\"openwhisk@sciabarra.com_dev/alert-beta\",\"action\":\"openwhisk@sciabarra.com_dev/basics/log-beta\"}",
    "{\"statusCode\":1,\"success\":false,\"rule\":\"openwhisk@sciabarra.com_dev/basics-alert-alpha\",\"error\":\"Rule 'openwhisk@sciabarra.com_dev/basics-alert-alpha' is inactive, action 'openwhisk@sciabarra.com_dev/basics/log-alpha' was not activated.\",\"action\":\"openwhisk@sciabarra.com_dev/basics/log-alpha\"}"
]

Activation: 'log-beta' (a8221c7d7fe94e22a21c7d7fe9ce223c)
[
    "2018-03-18T07:27:14.01530577Z  stdout: beta"
]
Triggers are useful if someone can enable them. You can fire your triggers in code, as we will see when we examine the API.
However triggers are really there to be invoked by third parties and hook them to our code. This feature is provided by the feed concept.
A feed is actually a pattern, not an API. We will see how to implement it in the example describing the “Observer” pattern.
For now, we see how to hook an existing feed on the command line, creating a trigger invoked periodically.
For this purpose we use the /whisk.system/alarm package. If we inspect it, we see it offers a few actions that can be used as a periodical event source:
$ wsk action list /whisk.system/alarms
actions
/whisk.system/alarms/interval                                          private nodejs:6
/whisk.system/alarms/once                                              private nodejs:6
/whisk.system/alarms/alarm                                             private nodejs:6
The once feed will trigger an event only once, while the interval can provide it based on a fixed schedule. The alarm trigger is the more complex since it uses a cron like expression (that we do not discuss here).
Let’s create a trigger to be executed every minute using interval and associate it to the rule log-alpha. As before, we start first the polling of the logs to see what happens.
$ wsk trigger create basics-interval \ --feed /whisk.system/alarms/interval \
the parameter --feed connects the trigger to the feed
we pass a parameter to the feed, saying we want the trigger to be activated every minute
the trigger does nothing until we associate it to action with a rule
If we now wait a couple of minutes this is what we will see in the activation log:
Polling for activation logs:

Activation: 'log-alpha' (0ca4ade11e73498fa4ade11e73a98ff0)
[
    "2018-03-18T08:01:03.046752324Z stdout: alpha"
]

Activation: 'basics-interval' (065c363456b440489c363456b4c04864)
[
    "{\"statusCode\":0,\"success\":true,\"activationId\":\"0ca4ade11e73498fa4ade11e73a98ff0\",\"rule\":\"openwhisk@sciabarra.com_dev/basics-interval-alpha\",\"action\":\"openwhisk@sciabarra.com_dev/basics/log-alpha\"}"
]
After you do this test, do not forget to remove the trigger or it will stay there forever, consuming actions. You may even end up getting a bill for it!
To remove the trigger and the rule:
$ wsk rule delete basics-interval-alpha
ok: deleted rule interval-alpha
$ wsk trigger delete basics-interval
ok: deleted trigger interval
We start now exploring the JavaScript API, that most resembles the Command Line Interface. We do not go into the details of the JavaScript language, as there are plenty of sources to learn it in depth.
However, before discussing the API, we need to cover in some detail JavaScript Promises, as the OpenWhisk API is heavily based on them. We do not assume you know them, and they are essential to make easier the use of asynchronous invocation.
A promise is a way to wrap an asynchronous computation in an object that can be returned as a result for a function invocation.
To understand why we need to do that, let’s consider as an example a simple script that generates a new UUID using the website httpbin.org. We are using here the https NodeJS standard API.
The following code opens a connection to the website, and then define a couple of callbacks to handle the data and error events. In Javascript, providing callbacks is the standard way of handling events that do not happen immediately, but later in the future, the so-called “asynchronous” computations.
var http = require("https")
function uuid(callback) {
http.get("https://httpbin.org/uuid",
function(res) {
res.on('data', (data) =>
callback(undefined, JSON.parse(data).uuid))
}).on("error", function(err) {
callback(err)
})
}
You can note that this function does not return anything. The user of the function, to retrieve the result and do something with it (for example, print it on the console) have to pass a function, like this:
uuid(function(err, data) {
if(err) console.log("ERROR:" +err)
else console.log(data)
})
We can use this code locally with NodeJS, but we cannot deploy it as an action, for the simple reason it does not return anything, while the main action must always expect you return “something”.
In OpenWhisk, the “something” expected for asynchronous computation is a “Promise” object. However, what is a Promise? How you build it? Let’s see the details in the next paragraph.
We have just seen an example of an asynchronous computation. This code in the latest listing does not return anything, because the computation is asynchronous. Instead of waiting for the result, we provide a function as a parameter. It will perform our work later, only when the computation finally completes.
In OpenWhisk instead, we cannot do this. We need a way to return the asynchronous computation as a result. So the computation must be wrapped in some object we can return as an answer to the action. The solution for this requirement is called Promise, and the OpenWhisk API is heavily based on it.
A Promise is an object that is returned by a function requiring asynchronous computations. It provides the methods to retrieve the result of this computation when it completes.
Using promises (we are going to see how to create one in the next paragraph) we can keep the advantage of being asynchronous while encapsulating this fact in an object that can be passed around and returned as the result of a function invocation.
It is essential to understand that even with a Promise, the computation is still asynchronous, so the result can be retrieved only when ready because we do not know in advance when the result is going to be available. Furthermore, an asynchronous computation can also fail with an error.
Promises combine a nice way to retrieve result and error management. With the promise-based genuuid that we will see next, extracting the value and managing the erros will be peformed with the following code:
var p = uuid()
p.then(data => console.log(data))
.catch(err => console.log("ERROR:"+err))
Let’s translate the genuuid example to make it Promise based.
Instead of requiring a callback we wrap out asynchronous code in a function block like this:
return new Promise(function(resolve, reject) {
// ok
resolve(success)
// K.O.
reject(error)
})
wrapper function to create an isolated environment
what to do when you got the result successfully
what to do when you catch an error
It can look a bit twisted, but it makes sense. A function wraps asynchronous code for 3 reasons:
create an isolated scope
be invoked only when the Promise resolution is required
use the arguments to pass to the code block two functions for returning the result and catching errors
So the real work of wrapping the asynchronous behavior is performed by the function. We could at this point return the function, but we still need some work:
starting the invocation when needed (then)
catching errors (catch)
provide our implementation of the resolve
provide our implementation of the reject.
Hence, we further wrap the function in a Promise object and return it as a result. Finally, we have created the standard Promise we described before.
Using a Promise we can now implement our genuuid function. Translating the callback is straightforward:
var http = require("https")
function uuid() {
return new Promise(function(resolve, reject){
http.get("https://httpbin.org/uuid",
function(res) {
res.on('data', (data) =>
resolve(JSON.parse(data).uuid))
}).on("error", function(err) {
reject(err)
})
})
}
wrap the asynchronous code in a Promise
success, we can return the result with resolve
failure, returning the error with reject
As you can see the code is similar to the standard way using a callback, except we wrap everything in a function that provides the resolve and reject actions. The function is then used to build a Promise. Most of the implementation of the Promise is standard; only the function must be defined to implement the specific behavior.
Now, using the Promise, we are now able to create an action for OpenWhisk, providing the following main:
function main() {
return uuid()
.then( data => ({"uuid": data}))
.catch(err => ({"error": err}))
}
Let’s try the code:
$ wsk action update apidemo/promise-genuuid \
apidemo/promise-genuuid.js
ok: updated action apidemo/promise-genuuid
$ wsk action invoke apidemo/promise-genuuid -r
{
"uuid": "52a188a9-ff9b-4f3a-b72d-301c26aac2cf"
}
To access the OpenWhisk API you use the standard NodeJS require mechanism.
Every action that needs to interact with the system must start with:
var openwhisk = require("openwhisk")
However, the openwhisk object is just a constructor to access the API. You need to construct the actual instances to access the methods of the OpenWhisk API.
var ow = openwhisk()
Hidden in this call there is the actual work of connecting to the API server and starting a dialogue with it. This call is the shortened form of the connection; the long form is actually:
var ow = openwhisk({
apihost: <your-api-server-host>,
api_key: <your-api-key>
})
If you use the shortened format, the apihost and apikey are retrieved from two environment variables:
__OW_API_HOST
__OW_API_KEY
When an action is running inside OpenWhisk those environment variables are already set for you, so you can use the initialization without passing them explicitly.
While you usually require the API in the body of your action, outside of any function, you need to perform this second step inside the main function or any function called by it. It is a knows issue OpenWhisk: environment variables are not yet set when you load the code. They are only when you invoke the main. Hence if you perform the initialization outside of the main is going to fail.
If you want to connect to OpenWhisk from the outside (for example from a client application), you can still use the OpenWhisk API, but you have to either set the environment variables or pass the API host and key explicitly.
If you are using, for example, the IBM Cloud, you can retrieve your current values with wsk property get.
The OpenWhisk API provides the same functions available on the command line interface.
Some features are more useful than others for actually writing action code. The most important is, of course:
ow.actions
ow.triggers
ow.activations
We are going to cover those API in details.
There are available many other features that are useful for deploying code. We will not discuss those features here since are needed when you develop your deployment tools. Those other available features are:
ow.rules
ow.packages
ow.feeds
You can find detailed coverage of those other APIs on http://github.com/apache/incubator-openwhisk-client-js in case you may need them.
Probably the most critical API function available is invoke. It is used from an action to execute other actions. So it essential to build interaction between various actions and it the backbone of complex applications.
In the simplest case you just do:
var ow = openwhisk()
var pr = ow.actions.invoke("action")
Note however that by default the action invocation is asynchronous. It just returns an activation id, so if you need the results, you have to retrieve them by yourself (if needed - frequently, you do not).
If instead, you have to wait for the execution to complete, you add blocking: true. If you also results, and not just the activations id, you have to add result: true.
So for example you can invoke the promise-genuuid.js action we implemented before from a web action, so that an UUID can be shown from a web page, as follows :
var openwhisk = require("openwhisk")
function main(args) {
let ow = openwhisk()
return ow.actions.invoke({
name: "apidemo/promise-genuuid",
result: true,
blocking: true
}).then(res => ({
body: "<h1>UUID</h1>\n<pre>"+
res.uuid+"</pre>"
})).catch(err => {statusCode: 500})
}
requiring the API
instantiating the API access object
actual action invocation - note we want to use immediately the result
here we get the value returned by the other action
The web action invokes the other action, waits for the result, extract it and builds a simple HTML page. For example:
$ wsk action update apidemo/invoke-genuuid \
we are deploying the action as a web action
we extract the url of the action then use curl to invoke the url
the generated uuid, presented as HTML markup
In this example, you have built the ow object without parameters. Actually, this object is a holder of authentication, but it gets them from environment variables. In this way, an action can invoke another action that belongs to the same users.
However it is possible to use this API also to invoke actions that belong to other users, or you can use it from NodeJS applications running outside of OpenWhisk. In those cases, you have to provide the authentication information explicitly. The general format of the API constructor is
let ow = openwhisk({
apihost: host,
api_key: key
}
In the cases you are running from the outside of an action, you have to get apihost and api_key and use them in the API constructor to be able to invoke other actions or triggers. That information can be either retrieved using the wsk property get command or can be read from the environment variables __OW_API_HOST and __OW_API_KEY with an action.
We learned how to create Promises, and we have seen how to use them for chaining asynchronous operations.
Another important use case to consider, however, is when you have multiple promises. In such a case you may want to wait for all of them to complete.
We could wait for multiple actions with some complex code involving then. Since this use case is frequent enough, it is worth the availability of a standard method: Promise.all(promises).
Within this method call, the promises are an array of Promises (actually, anything satisfying the “iterable” Javascript protocol). As a result, it returns a Promise that completes when all the other promises complete.
You can then retrieve the combined result of all the Promises with a then function, receiving, as a result, an array of the results of the many Promises.
We can now construct an example to demonstrate this feature. We are going to create a Web action consisting in multiple promises (actually multiple invocations). Then we wait for all of them to complete, and finally, we construct a web page concatenating the results. You may notice in the example the use of map, that is probably idiomatic in those cases.
var openwhisk = require("openwhisk")
function main(args) {
let ow = openwhisk()
let count = args.n ? args.n : 3;
let inv = { name: "apidemo/promise-genuuid",
blocking: true,
result: true
}
let promises = []
for(let i=0; i< count; i++)
promises.push(ow.actions.invoke(inv));
return Promise.all(promises)
.then(res => ({
body: "<h1>UUIDs</h1><ul><li>"+
res.map(x=>x.uuid).join("</li><li>")+
"</li></ul>"
}))
}
we are reading a parameter from the URL, if not specified it defaults to 3
we are looping, constructing an array of invocations, each one asking for a different uuid
this is the key call: we are waiting for all the promises to complete
the final result is built here, in the form of an array of results, each one being a different UUID. We join them to create a dotted list in HTML.
Now, we can test the invocation and check the results.
$ wsk action update apidemo/invoke-genuuid-list \
Deployment of the action wrapping multiple promises as a web action
Invocation of the new action using curl and extracting the url
The result is now the combination of multiple invocation of the promise-genuuid action
Now we are going to check discuss how to fire triggers with the API. It is especially useful for implementing feeds, as we show in Chapter 5.
It works pretty much like the actions invocation, except you have to use triggers instead of actions. Also, firing a trigger cannot be blocking, because it can always start multiple actions. Instead, it always returns a list of activation-ids.
An important thing to keep in mind is you may need to fire triggers belonging to other users. Generally, you fire triggers as part of the implementation of a feed. We will see the details in Chapter 5. When you create a trigger and hook it in a feed, you receive from the system, among other parameters, an “api-key”. You have to use this key to invoke those external triggers.
Here is an example of how a proper invocation of how a third party trigger invocation is going to work:
const openwhisk = require('openwhisk')
function fire(trigger, key, args) {
let ow = openwhisk({ api_key: key })
return ow.triggers.invoke({
name: trigger,
params: args
})
}
construct an instance of the API passing the api_key
here you can perform the invocation
you have always for specify the trigger name
and here some parameters that will be forwarded to the triggered actions
The result of an invocation is a promise that returns a JSON object like this:
{
"activationId": "a75b8008ad2641189b8008ad26f11835"
}
You can then use the activation id to retrieve the results as explained in the next paragraph.
Now let’s try to deploy and run this code. We need to set up an action activated by a trigger to test it:
$ wsk trigger create apidemo-trigger
Create a trigger
Create an action that the trigger will invoke
Create a rule that connects the trigger to the action
Finally we deploy the action dependent on the trigger
Now everything it is setup: invoking the action apidemo/trigger will activate the action apidemo/clock via a trigger and a rule. You can test opening the poll with wsk activation poll and then invoking:
$ wsk action invoke apidemo/trigger -p time 1 ok: invoked /sciabarra_cloud/apidemo/trigger with id 1c453cc7142c4e19853cc7142c3e1998 $ wsk action invoke apidemo/trigger -p date 1 ok: invoked /sciabarra_cloud/apidemo/trigger with id 3d157c76dfa244ce957c76dfa294cea3
In the activation log, you should see (among other things) the logs emitted by the clock action that was activated in code by trigger example.
Activation: 'clock' (bdc6438e11b34bb686438e11b3cbb67c)
[
"2018-09-25T17:13:24.584124671Z stdout: 17:13:24"
]
Activation: 'clock' (4fc0889664ad4e1880889664ad5e18e0)
[
"2018-09-25T17:13:40.667002422Z stdout: 2018/09/25"
]
Now, let’s use the API to inspect activations. An activation id is returned by invoking an action or firing a trigger. Once you have this id, you can retrieve the entire record using the ow.activations.get as in the following example (named activation.js:
const openwhisk = require('openwhisk')
function main (args) {
let ow = openwhisk()
return ow.activations.get({ name: args.id })
}
As you can see you need to pass the id (as the parameter named name by convention, but also the parameter named id works) to retrieve results, logs or the entire record activation. Let’s try it, first deploying the example and creating an activation id:
$ wsk action create activation activation.js
deploying the activation action
executing a system action to produce the activation id
Now we can use that id to retrieve the activation, that is a pretty complex (and interesting) data structure. Let’s see the results (shortened for clarity):
$ wsk action invoke activation -p id a6d34e7165024c26934e716502fc26cf -r
{
"activationId": "a6d34e7165024c26934e716502fc26cf",
"annotations": [
// annotations removed...
],
"duration": 4,
"end": 1522237060018,
"logs": [
"2018-03-28T11:37:40.016763747Z stdout: hello Mike!"
],
"name": "helloWorld",
"namespace": "openwhisk@sciabarra.com_dev",
"publish": false,
"response": {
"result": {},
"status": "success",
"success": true
},
"start": 1522237060014,
"subject": "openwhisk@sciabarra.com",
"version": "0.0.62"
}
those are the logs of the action
this is the result of the action
We used here ow.activations.get to get the entire activation record. You can use the same parameters but specify ow.activations.result to get just the result, or ow.activations.logs to retrieve just the logs.
Walked through the intricacies of the OpenWhisk command line interface.
Larned the hierarchical structure of the command line, with commands, subcommands, and options.
Described naming conventions of Entities in OpenWhisk
For actions, saw how to create single file actions, action sequences, and actions comprised of many files collected in a zip file.
To ease debugging, saw how to manage activations, to retrieve results and logs
Learned about Triggers that can be fired by Feeds, and Rules to associate Triggers to Actions.
Introduced asynchronous processing, exploring Javascript Promises in OpenWhisk
Learned about action invocations API
Learned how to fire a trigger via the API
Discussed activations and how to retrieve results in the API
Thank you for investing in the Early Release version of this book! Note that “Unit Testing OpenWhisk Applications” is going to be Chapter 6 in the final book.
For newcomers, probably one of the most challenging parts, when it comes to developing with a Serverless environment, is to learn how to test and debug it properly.
Indeed, you develop by deploying your code continuously in the cloud. So, you generally do not have the luxury to be able to debug executing the code step by step with a debugger.
There is an ongoing project to implement a debugger for OpenWhisk, that is a stripped down local environment.
While a debugger can be in some cases useful, we do not feel that having “the whole thing” locally to run tests is the easiest way to debug your code, nor the more advisable. Instead, developers need to learn how to split their application into small pieces and test it locally before sending the code to the cloud.
OpenWhisk has a complex and large architecture, designed to be run in the Cloud, and developers need to live with the fact that in the long run, they will never have the luxury to have a complete cloud in their laptop.
Developers instead have to learn to test their code locally in small pieces, simulating “just enough” of the cloud environment.
Once they tested the application in small pieces, they can assemble it and deploy as a whole. Then you can run some tests against the final result, generally simulating user interaction, to ensure the pieces are working together correctly.
The name for “testing in small parts” is unit testing, while simulating the interaction against the application assembled is called integration testing. In this chapter, we will focus on how to do Unit Testing of OpenWhisk applications.
Luckily there is plenty of unit testing tools. You can use them to run your code in small parts in your local machine, then deploy only when it is tested. Let’s see how in practice.
OpenWhisk applications generally run in the Cloud. You write your code, you deploy it, and then you can run it. However, to run unit tests, you need to be able to run it in your local machine, without deploying in the cloud.
Luckily it is not so hard to make your code run also locally, but you need to prepare the environment carefully to resemble “enough” the execution environment in the cloud.
We are then going to learn how to run those actions locally, to test them. But before all, we will pick a test tool and learn how to writes tests with it.
Our test tool of choice is Jest. First, we download and install it; then we use it to write some tests. We will also learn how to reduce the amount of test code we have to write using Snapshot Testing.
As we already pointed out, there are a lot of test tools available for Javascript and NodeJS. So many that is difficult to make a choice. But since we need to pick one to write our tests, we selected one that we believe it is a right balance between ease of use and completeness.
We ultimately picked Jest, the test tool developed by Facebook as a complement to testing React applications. We are not going to use React in this book, but Jest is independent of React, and it is a good fit for our purposes.
Some Jest features I cannot live without are:
it is straightforward to install
it is pretty fast
it supports snapshot testing
it provides extensive support for “mocking.”
Of course, this does not mean other tools does not have similar features. But we have to settle on someone.
So, assuming you agree with this choice, let’s start installing it. It is not difficult:
$ npm install -g jest
install Jest as a global command
check if jest is now available as a command
Since now we have Jest, we can write a test.
Our first test will check a modified version of the word count action (count.js) we used in chapter 2.
The action we are going to test receives its input as a property text of an object args, split the text in words by itself, then it counts words, returning a table with all the words and a count of the occurrences.
Here is the updated version wordcount.js:
function main(args) {
let words = args.text.split(" ")
let map = {}
let n = 0
for(word of words) {
n = map[word]
map[word] = n ? n+1 : 1
}
return map
}
module.exports.main = main
add an export of the function
In OpenWhisk, you can deploy a simple function. It works as long as it as a main function. When you want to use it locally in a test, however, it must be a proper module so a test can import it. So here is an important suggestion:
Always add the line module.exports.main = main at the end of all the actions. Even if it is not necessary in most cases, it is required when you run a test or when you have to deploy the action in a zip file.
We can now write a test for wordcount that we can run with Jest. A test is composed of 3 important parts:
import of the module we want to test with require
declare a test with the function test(<description>, <test-body>) where <description> is a string and <test-body> is a function performing the test
in the body of the test you perform some assertions in the form expect(<expression>).toBe(<value>) or similar (there are many different toXXX methods; we will see next)
We have to write now a wordcount.test.js with the following code:
const wordcount =
require("./wordcount").main
test('wordcount simple', () => {
res = wordcount({text: "a b a"})
expect(res["a"]).toBe(2)
expect(res["b"]).toBe(1)
})
import the module wordcount.js under test
declare a test
invoke the function
ensure it found two ``a``s
ensure it found one ``b``s
We are ready to run the tests, but before we go on, we need to create a file package.json, as simple as this:
{ "name": "jest-samples" }
If you don’t create a package.json, jest will walk up the directory hierarchy searching for one and will give an error if it cannot find it. Once found, it will assume it is the root directory containing a javascript application and it will look in all the subdirectories searching for files ending in .test.js to search tests in it.
Now you can run the test. You can do it directly using the jest command line from the directory containing all our files:
$ ls package.json wordcount.js wordcount.test.js $ jest PASS ./wordcount.test.js ✓ wordcount simple (3ms) Test Suites: 1 passed, 1 total Tests: 1 passed, 1 total Snapshots: 0 total Time: 1.341s Ran all test suites matching /wordcount/i.
Jest started to search for tests, found our wordcount.test.js, loaded it and executed all the test in it, then showed the results.
You usually you do not run jest directly. A best practice is to configure a test command in the package.json, as in the next listing and run it with npm test.
{
"name": "jest-samples",
"scripts": {
"test": "jest"
}
}
So far we have seen how to run tests in general. Now we focus on actually being able to execute tests locally to unit test them.
In general, actions in OpenWhisk runs under NodeJS, so the same code you can execute in your computer with NodeJS should also work in OpenWhisk, as long as the environment is the same.
You need however to match the environment, so you may need to install locally the same libraries and the same version of NodeJS in use in OpenWhisk.
To match the environment, when you run your tests you need to: * run your tests with the same version of Node * have the same Node Packages installed locally * load code in the same way as OpenWhisk load it * provide the same environment variables that are available in OpenWhisk
Let’s discuss those needs in order.
At the time of this writing, OpenWhisk provides 2 runtimes, one based on NodeJS version 6.14.1 and another based on NodeJS version 8.11.1. In the runtime for 6.14.1 are preinstalled the following packages:
apn@2.1.2 |
async@2.1.4 |
body-parser@1.15.2 |
btoa@1.1.2 |
cheerio@0.22.0 |
cloudant@1.6.2 |
commander@2.9.0 |
consul@0.27.0 |
cookie-parser@1.4.3 |
cradle@0.7.1 |
errorhandler@1.5.0 |
express@4.14.0 |
express-session@1.14.2 |
glob@7.1.1 |
gm@1.23.0 |
lodash@4.17.2 |
log4js@0.6.38 |
iconv-lite@0.4.15 |
marked@0.3.6 |
merge@1.2.0 |
moment@2.17.0 |
mongodb@2.2.11 |
mustache@2.3.0 |
nano@6.2.0 |
node-uuid@1.4.7 |
nodemailer@2.6.4 |
oauth2-server@2.4.1 |
openwhisk@3.14.0 |
pkgcloud@1.4.0 |
process@0.11.9 |
pug@">=2.0.0-beta6 <2.0.1” |
redis@2.6.3 |
request@2.79.0 |
request-promise@4.1.1 |
rimraf@2.5.4 |
semver@5.3.0 |
sendgrid@4.7.1 |
serve-favicon@2.3.2 |
socket.io@1.6.0 |
socket.io-client@1.6.0 |
superagent@3.0.0 |
swagger-tools@0.10.1 |
tmp@0.0.31 |
twilio@2.11.1 |
underscore@1.8.3 |
uuid@3.0.0 |
validator@6.1.0 |
watson-developer-cloud@2.29.0 |
when@3.7.7 |
winston@2.3.0 |
ws@1.1.1 |
xml2js@0.4.17 |
xmlhttprequest@1.8.0 |
yauzl@2.7.0 |
In the environment with the NodeJS 8.11.1 are installed only openwhisk@3.15.0, body-parser@1.18.2 and express@4.16.2.
The best way to prepare the same environment for local testing is to install the same version of NodeJS using the tool nvm , then install locally the same packages that are available in OpenWhisk.
For example, let’s assume you have an application to be run under the NodeJS 6 runtime using the library cheerio for processing HTML. You can recreate the same environment locally using the Node Version Manager NVM as described in https://github.com/creationix/nvm.
Actual installation instructions differ according to your operating system, so we do not provide them here.
Once you have NVM installed, the right version of NodeJS installer, you can install the right environment for testing with the following commands (I redacted the output for simplicity):
$ nvm install v6.14.1
install the version of NodeJS used in OpenWhisk
create a pacakge.json to store package configuration
install locally the cheerio library v0.22.0
An action sent to OpenWhisk is a module, and you can load it with require. In general, OpenWhisk allows to create an action without having to export it if it is a single file, but in this case, you cannot test it locally because require wants that you export the module. Furthermore, if you’re going to test also functions internal to the module, you have to export them, too.
So, for example, let’s reconsider the module for validation of an email in Chapter 3, Strategy Pattern, and let’s rewrite the file email.js it in a form that you can test locally. Also, we make the error messages parametric (we will use this feature in another test later).
const Validator = require("./lib/validator.js")
function checkEmail(input) {
var re = /\S+@\S+\.\S+/;
return re.test(input)
}
var errmsg = " does not look like an email"
class EmailValidator extends Validator {
validator(value) {
let error = super.validator(value);
if (error) return error;
if(checkEmail(value))
return "";
return value+errmsg
}
}
function main(args) {
if(args.errmsg) {
errmsg = args.errmsg
delete args.errmsg
}
return new EmailValidator("email").validate(args)
}
module.exports = {
main: main,
checkEmail: checkEmail
}
validation logic for the email isolated in a function
here we use the function to validate email
parametric error message
the main function must be exported always
also we want to test the checkEmail
Let’s write the email.test.js, step by step. At the beginning we have to import the two functions we want to test from the module:
const main = require("./email").main
const checkEmail = require("./email").checkEmail
We can then write a test for the checkEmail function:
test("checkEmail", () => {
expect(
checkEmail("michele@sciabara.com"))
.toBe(true)
expect(
checkEmail("http://michele.sciabarra.com"))
.toBe(false)
})
Now we add another test, testing instead the main function, the one we wanted to test in the first place:
test("validate email", () => {
expect(main({email: "michele@sciabarra.com"})
.message[0])
.toBe('email: michele@sciabarra.com')
expect(main({email:"michele.sciabarra.com"})
.errors[0])
.toBe('michele.sciabarra.com does not look like an email')
})
In OpenWhisk you use the OpenWhisk API to interact with other actions. We already discussed in Chapter 3 how you invoke actions, fire triggers, read activations and so on.
When you want to invoke other actions running in the same namespace as the main action, you need to use require("openwhisk") and then you can access the API. At least, this is what happens your application is running inside OpenWhisk.
It is worth to remind that when an action runs inside OpenWhisk, it has access to environment variables containing authentication information that the API use as credentials to execute the invocation.
When your code is running outside OpenWhisk, as it happens when you are running unit tests it, the OpenWhisk API cannot talk with other actions because every request needs authentication. Hence, if you try to run your code outside of OpenWhisk, you will get an error.
We can demonstrate this fact considering a simple action dbread.js, able to read a single record we put in the database with the Contact Form:
const openwhisk = require("openwhisk")
function main(args) {
let ow = openwhisk()
return ow.actions.invoke({
name: "patterndb/read",
result: true,
blocking: true,
params: {
docid: "michele@sciabarra.com"
}
})
}
module.exports.main = main
If we deploy and run the action in OpenWhisk there are no problems:
$ wsk action update dbread dbread.js
ok: updated action dbread
$ wsk action invoke dbread -r
{
"_id": "michele@sciabarra.com",
"_rev": "5-011e075095301fcfc350cac66fd17c7e",
"type": "contact",
"value": {
"name": "Michele",
"phone": "1234567890"
}
}
However, let’s try to write and run a test dbread.test.js for this simple action:
const main = require("./dbread").main
test("read record", () => {
main().then(r => expect(r.value.name).toBe("Michele"))
})
If we run the test, the story is a bit different:
$ jest dbread
FAIL ./dbread.test.js
✕ read record (8ms)
● read record
Invalid constructor options. Missing api_key parameter.
1 | const openwhisk = require("openwhisk")
2 | function main(args) {
> 3 | let ow = openwhisk()
4 | return ow.actions.invoke({
5 | name: "patterndb/read",
6 | result: true,
at Client.parse_options (node_modules/openwhisk/lib/client.js:80:13)
at new Client (node_modules/openwhisk/lib/client.js:60:25)
at OpenWhisk (node_modules/openwhisk/lib/main.js:15:18)
at main (dbread.js:3:12)
at Object.<anonymous>.test (dbread.test.js:5:4)
Test Suites: 1 failed, 1 total
Tests: 1 failed, 1 total
Snapshots: 0 total
Time: 1.021s
Ran all test suites matching /dbread/i.
As we discussed in Chapter 3 when we introduced the API, the OpenWhisk library needs to know the host to contact to perform requests (the API host) and must provide an authentication key to be able to interact with it.
When your application is running in the cloud in OpenWhisk, those keys are available through two environment variables \\__OW_API_HOST and \\__OW_API_KEY. It is the OpenWhisk environment that sets them before executing the code.
When your code is running locally, those variables are not available, unless your test code takes care of setting them. Luckily, it is it pretty easy to provide them locally. Indeed, if you are using the tool wsk and you have configured properly, it stores credentials in a file named .wskprops in the home directory.
Because the format of this is compatible with the syntax of the shell, if you are using bash (as we always assumed you are doing in this book) you can load those environment variables with the following commands:
$ source ~/.wskprops $ export __OW_API_HOST=$APIHOST $ export __OW_API_KEY=$APIKEY
Now, with those environment variables set, you can try again to run the test, and this time you will be successful:
$ jest dbread PASS ./dbread.test.js ✓ read record (22ms) Test Suites: 1 passed, 1 total Tests: 1 passed, 1 total Snapshots: 0 total Time: 0.951s, estimated 1s Ran all test suites matching /dbread/i.
Your local code is using credentials and can contact and interact with the real server to run the test.
This test is not a unit test. It does not run entirely on your local machine. Contacting a real OpenWhisk is a good idea for running integration tests. However, when you write unit tests, you should provide a local implementation that simulates the real servers. We will discuss in detail how to simulate OpenWhisk in the paragraph in this chapter when we introduce mocking.
For simplicity, if you want your enviroment to be properly set when you run the test, we recommend probably to leverage the npm test command to run tests and initialize them properly. You can add the entry in the following listing into your package.json. This way you will be able to run tests with just npm test without having to worry to setup manually the environment variables.
"scripts": {
"test": "source $HOME/.wskprops;
__OW_API_HOST=$APIHOST
__OW_API_KEY=$AUTH jest"
},
this is actually one long line split in three lines for typesetting purposes
A common problem, in the test phase, is the burden of having to check results. You may end up to writing a lot of code that the result against the expected values. Luckily, there are techniques (that we are going to see) to reduce the amount of repetitive and pointless code you have to write.
When you test, you decide on a set of data corresponding to the various scenarios you want to verify. Then you write your test, invoking your code against the test data, and check the results. While defining the test data is generally an exciting experience, because you have to think about your code and what it does, verifying that the results are the expected one is typically not an exciting activity.
Jest provides a large number of “matchers” to make easy result verification. Matchers work well when results are small. But sometimes test results are pretty large; hence the code to check the result can be not only dull but also substantial.
There is an alternative to automate this activity, to focus more on checking the results and less on writing repetitive and naive code: snapshot testing.
The idea of snapshot testings is pretty simple: when you run a test the first time, you save the test results in a file. This file is called a “snapshot.” You can then check the result is correct. You do not have to write code, only verify the expected result checking the snapshot.
If the result is correct, you can commit the snapshot into the version control system. When you rerun a test, if there is already a snapshot in place, the test tool will automatically compare the new result of the test with the snapshot. If it is the same, the test passes, otherwise, it fails.
Let’s see snapshot testing in Jest with an example. You implement snapshot testing using the simple matcher called toMatchSnapshot().
We now modify the two tests in the preceding paragraph to use snapshot testing. While the test for checkEmail simply checks if the result is true or false (so there is not any significant advantage in using snapshot testing), the test for validateEmail is a bit more complicated.
Indeed, we wrote a test expressions like this:
expect(main({email: "michele@sciabarra.com"})
.message[0])
.toBe('email: michele@sciabarra.com')
expect(main({email: "michele.sciabarra.com"})
.errors[0])
.toBe('michele.sciabarra.com does not look like an email')
Here we are taking the test output, extracting some pieces (.message[0] or .errors[0]) to verify only a part of the result.
We could save yourself from the burden of thinking which parts to inspect just writing:
test("validate email with snapshot", () => {
expect(main({email: "michele@sciabarra.com"})
.toMatchSnapshot()
expect(main({email: "michele.sciabarra.com"})
.toMatchSnapshot()
})
Now, if you run the test, Jest will save the results of the tests. Of course, we should always check that the snapshot is correct. Here is the first execution of the tests, when you create the snapshots:
$ jest email-snap PASS ./email-snap.test.js ✓ validate email with snapshot (7ms) › 2 snapshots written.
running the test creates two snapshots
summary of the snapshots in the test
Jest creates a folder named __snapshots__ to store snapshots; then, for each test, it writes a file named after the filename containing the snapshots:
__snapshots__/email-snap.test.js.snap
This file is human readable, and it was designed e expecting that a human can reads it to be sure the result of the snapshot are as expected.
For example, this is the content of the snapshot file just created:
// Jest Snapshot v1, https://goo.gl/fbAQLP exports[`validate email with snapshot 1`] = `
result of the first test, with a correct email
we produce an array of messages
result of the second test, with a wrong email
we produce an array of errors
Now, once we have verified the snapshot to be correct, all we have to do is to keep it, saving in the version control system. If the snapshot is already present, running again the tests will compare the test execution against the snapshot, as follows:
$ jest email-snap.test.js PASS ./email-snap.test.js ✓ validate email with snapshot (7ms) Test Suites: 1 passed, 1 total Tests: 1 passed, 1 total Snapshots: 2 passed, 2 total Time: 0.876s, estimated 1s
Once a snapshot is in place, Jest will verify the tests always returns the same result. But of course, snapshots cannot be set on stone. It may happen that something change and we will have to update the snapshot. So let’s make now an example of a failed test verified comparing a snapshot, then update that snapshot.
For example, assume we decide that from now we want to consider acceptable only emails having a dot in the username. This example is, of course, non-realistic, made only to add another constraints to fail on purpose some snapshot tests and act as a consequence.
So, we change the regular epression to validate the emails:
before: var re = /\S+@\S+\.\S+/; after : var re = /\S+\.\S+@\S+\.\S+/;
If we now run the tests, we see they are now failing:
FAIL ./email-snap.test.js
✕ validate email with snapshot (17ms)
● validate email with snapshot
expect(value).toMatchSnapshot()
Received value does not match stored snapshot 1.
- Snapshot
+ Received
Object {
"email": "michele@sciabarra.com",
- "errors": Array [],
- "message": Array [
- "email: michele@sciabarra.com",
+ "errors": Array [
+ "michele@sciabarra.com does not look like an email",
],
+ "message": Array [],
}
2 |
3 | test("validate email with snapshot", () => {
> 4 | expect(main({email: "michele@sciabarra.com"})).toMatchSnapshot()
5 | expect(main({email: "michele.sciabarra.com"})).toMatchSnapshot()
6 | })
7 |
at Object.<anonymous>.test (testing/strategy/email-snap.test.js:4:52)
› 1 snapshot test failed.
Snapshot Summary
› 1 snapshot test failed in 1 test suite. Inspect your code changes or re-run \
jest with `-u` to update them.
Test Suites: 1 failed, 1 total
Tests: 1 failed, 1 total
Snapshots: 1 failed, 1 passed, 2 total
Time: 0.967s, estimated 1s
Ran all test suites matching /email-snap.test.js/i.
We can fix the test replacing the first email:
expect(main({email: "michele.sciabarra@gmail.com"}))
.toMatchSnapshot()
However, if we run the test again, it will still be failing because the snapshot expects a michele@sciabarra.com somewhere.
We need to update the tests using jest -u. The flag -u tells to Jest to discard the current content of the snapshot cache and recreate them.
After updating tests of course, you should check that the new snapshot is correct. Indeed we have now:
"message": Array [
"email: michele.sciabarra@gmail.com",
],
and the new snapshot is ready to be used for further tests.
For a surprisingly large part of many applications, you can run tests in isolation. However, at some point, while testing your code, you will have to interface with some external entities.
For example, in OpenWhisk development, two commons occurrences are the interaction with other services in http, or invoking the OpenWhisk API, for example, to invoke other actions or activate triggers. It is here where the boundaries of unit testing and integration test starts to blur.
An inexperienced developer would say that is impossible to locally test code that uses external APIs: you need to deploy your code in the real environment actually to see what happens.
This idea is not real. Indeed it is possible to simulate “just enough” of the behavior of an external environment (or of any other system) implementing a local “work-alike” of the remote system. We call this a mock.
In a mock, you generally do not have to provide all the complexities of the remote service: you only deliver some results in response to specific requests.
Simulating external environments by Mocking them is another fundamental testing technique. In our case, Jest explicitly supports mocking providing features to replace libraries with mocks we define.
We will see first how mocking generically works, starting with a simple example simulating an http call.
Afterward, we are going to see in detail how to mock a significant part of the OpenWhisk API, to be able to simulate complex interaction between actions.
The concept behind mocking is pretty simple: you run your code replacing a system you interface with, using a simulation that you can execute locally. The simulation generally runs without connecting to any real system and providing dummy data.
To better understand how it works, and which problem mocking solves, let’s consider a common problem: testing code that executes a remote HTTP call. We are going for this purpose to write a simple action httptime.js, that just return the current time.
However, to make it a case of an action “hard” to test it, the implementation is going to use another action, invoked via http, that will return the date and time in full format, from where our action will extract the time.
We will have to use the NodeJS https module, that is a bit low level; also we need to wrap the call in a Promise, to conform to OpenWhisk requirements. For those reasons the code is a bit more convoluted than we would like it to be. However, since mocking https call is a frequent and important case, it is worth to follow this example in full.
The code in the following listing, implementing an action that returns current time via another action providing date and time, works this way:
wraps everything in a promise, providing a resolve function
opens an http request to an url, provide as a parameter
define event handlers for two events: data and end
collect data as they are received
at the end extract the time with a regular expression
const https = require("https")
function main(args) {
return new Promise(resolve => {
let time = ""
https.get(args.url, (resp) => {
resp.on('data', (data) => {
time += data
})
resp.on('end', () => {
var a = /(\d\d:\d\d:\d\d)/.exec(time)
resolve({body:a[0]})
})
})
})
}
wrap everything in a promise
this variable collects the input
use the https module
handle the data event, new data received
collect the data
handle the end event, all data received
this regexp extract the time from the date
return the value extracted
For convenience, let’s test first the real thing, deploying it in OpenWhisk. We need to create also the action service that returns the current time and date.
Note the following commands, that create on the fly an action on the command line and pass its url to our action:
$ CODE="function main() {\
> return { body: new Date() } }"
$ wsk action update testing/now <(echo $CODE) \
--kind nodejs:6 --web true
$ URL=$(wsk action get testing/now --url | tail -1)
$ curl $URL
2018-05-02T19:42:34.289Z
store some code in a variable
use a bash feature to create a temporary file
get the url of the newly created action
invoke the action in http
We can now deploy and invoke the action to see if it works:
$ wsk action update testing/httptime httptime.js \ -p url "$URL" --web true $ TIMEURL=$(wsk action get testing/httptime --url | tail -1) $ curl $TIMEURL 20:06:55
The example action we just wrote is a typical example of an action difficult to unit test, for many common reasons:
it invokes a remote service, so to run tests you need to be connected to the internet
you also need to be sure the invoked service is readily available
data returned changes every time, so you cannot compare results with fixed values
Hence we have a is a perfect candidate for testing by mocking the remote service. We need to replace the https call with a mock that will not perform any remote call. Let see how to do it with Jest.
To replace the https module with a mock the following steps are required:
put code that replaces the https modules with your code in a directory called __mocks__
use jest.mock('https') in your test code before importing the module to test
write your test code as if you were using the real service
The location of the __mocks__ folder must be in the same of your packages.json, sibling to the node_modules folder.
The jest.mock call is required only to replace built-in NodeJS modules. In general, modules in the __mocks__ directory will be used automatically as a mock before importing any module from node_modules and will have the priority.
When you perform a require in a jest test, it will load your mocking code instead of the regular code. Since we want to replace the https module, we need to write a __mocks__\https.js mock code.
Now it is time to write the mock code that should replace the https call.
To better understand it, let’s split the description into two steps. At the top level, it works mostly in this way:
https.get(URL, (resp) =>
resp.on('data', (data) => {
// COLLECT_DATA
}
resp.on('end', () => {
// COMPLETE_REQUEST
}
}
The “real” https module receives an object (resp) as a gatherer of event handling functions, that mimic how https works. The protocol https, when performing a request, opens a connection to an URL, then read and return results in multiple chunks. For this reason, you can have multiple calls to the data event executing the code marked as COLLECT_DATA. Hence you need to collect data before analyzing them. When all the data are collected, you get one (and only one) invocation to execute the code marked as COMPLETE_REQUEST.
If we want to emulate this code with a mock, we need to do the following steps:
first create an object that store the event handler
invoke once (or more) the data event handler
invoke once the end event handler
So, the code to gather the events is:
var observer = {
on(event, fun) {
observer[event] = fun
}
}
create an object
define an on function
assign to a field named as the event a function
This code is simple, but is it not so obvious. It defines an object that can register event handlers, and then can invoke them by name, as follows:
observer.on('something', doSomething)
observer.something(1)
So if you pass the observer to the https.get function, you will get being able to invoke the two handlers registered. Code will register resp.on('data', dataFunc) and resp.on('end', endFunc). Afterwards you will invoke just resp.data("some data") and resp.end().
Now that we have our observer, the full mock is much simpler to write.
// observer here, omitted for brevity
function get(url, handler) {
handler(observer)
observer.data(url)
observer.end()
}
module.exports.get = get
it will be invoked as https.get(url, handler)
to fully understand this, review the first listing in this section
important: we are using the URL itself as the value returned by the mocked https call
invoke the end handler
Pay attention to the trick of using the URL as the data returned itself. In short, our mock for an URL https://something will return something! Since the only parameter we are passing to our mock is the url, whose meaning is in our case irrelevant because we are not executing any remote call, it makes sense to use the URL itself as a result.
Now, we can use the our __mock__/https.js to write a test https.test.js:
jest.mock('https')
const main = require('./httptime').main
test('https', () => {
main({
url: '2000-01-01T00:00:00.000Z'
}).then(res => {
expect(res.body).toBe('00:00:00')
})
})
enable the mock
import the action locally for test
declare a test
invoke the main, remember we use the URL as the data!
the action returns a promise, so we have to handle it
check the handler extracts the time from the date
To be sure, we try to rerun the test with different data:
test('https2', () => {
main({ url: '2018-05-02T19:42:34.289Z' })
.then(res => {
expect(res.body).toBe('19:42:34')
})
})
The final result:
$ jest httptime PASS ./httptime.test.js ✓ https (5ms) ✓ https2 (1ms) Test Suites: 1 passed, 1 total Tests: 2 passed, 2 total Snapshots: 0 total Time: 1.222s Ran all test suites matching /httptime/i.
Now that we learned about testing with mocking, we can use it to test OpenWhisk actions using the OpenWhisk API without deploying them. In this paragraph, we are going to see precisely this: how to perform unit testing of actions that are invoking other actions without deploying them.
The OpenWhisk API was covered in Chapter 4. We developed a mocking library that can mock the more frequently used features of OpenWhisk: action invocation and sequences.
The library is not very large, but explaining all the details can take a lot of space, and it is not useful in advancing our knowledge of OpenWhisk. It is mostly an exercise in JavaScript and NodeJS programming.
So we are not going to describe in details its implementation, we only explain how to use it.
The library itself, together with the examples of this book is available on GitHub at this address:
Repo: http://github.com/openwhisk-in-action/chapter7-debug Path: __mocks__/openwhisk.js
To use it in your tests, you need to install Jest then download and place the file openwhisk.js in your __mocks__ folder.
You can then use this mocking library to write and run local unit tests that include action invocations and action sequences.
To use our library, we have to follow some conventions in the layout of our code.
When your application runs in OpenWhisk, you do not have the problem of locating the code when invoking an action. You deploy them with the name you choose, then use this name in the action invocation. It is the OpenWhisk runtime that resolves the names.
When you test your code locally and simulate invocations by mocking, you do not deploy your action code, but you still invoke it by name. So our mocking library must be to locate the actual code locally. It does following some conventions.
To illustrate the conventions it follows, let’s see an example. We write a test that will invoke an action using the OpenWhisk API.
const ow = require('openwhisk')
test("invoke email validation", () => {
ow()
.actions.invoke({
name: "testing/strategy-email",
params: {
email: "michele.sciabarra.com"
}
}).then(res =>
expect(res).toMatchSnapshot())
})
initialization of the OpenWhisk library
create the actual invocation instance
perform the invocation
action name
parameters
You must translate the testing/strategy-email name in a file name located in the local filesystem. We use, as the base in the filesystem, the folder with our package.json and node_modules, that is the project root.
By convention, we name our actions according to this structure:
<package>/<prefix>-<action>
Then we expect actions code to be placed in a file named:
<package>/<prefix>/<file>.js
So, when you test locally code invoking the testing/strategy-email action, the mocking library works in this way:
the require("openwhisk") will actually load the __mocks__/openwhisk.js library
the mocking library can locate its position from the __dirname variable, hence find the project root (that is, the parent directory)
using the name of the action, it can now locate the code of the action to invoke: in our case <project-root>/testing/strategy/email.js
There is another essential feature required to complete our simulation for testing.
In OpenWhisk, actions can have additional parameters. Those parameters can be specified when you deploy the action or can be inherited from the package to which the action belongs. When we use our library mocking library, we can simulate those parameters by adding a file with the same name as the action and extension .json.
For example, in our case we have the file testing/strategy/email.json, in the same folder as the email.js with the content:
{
"errmsg": " is not an email address"
}
The mocking library uses this file, preloading the parameters and passing them as args. Indeed we can check the test has used the parameter errmsg. We need to check the snapshot to see:
$ cat __snapshots__/invoke.test.js.snap
dump on the terminal the snapshot file
the error message produced is the one specified in the email.json file
We can now complete our analysis of the mocking library by describing how to mock a sequence.
In Chapter 5 we saw the pattern “Chain of Responsibility” implemented as a sequence.
A sequence does not have a corresponding action, but it does exist as a deployment declaration only. We can simulate an action sequence with a particular value in the JSON file we use to pass parameters.
For example, let consider a test to a sequence:
test('validate4', () =>
ow().actions.invoke({
name: 'testing/chainresp-validate',
params: {
name: 'Michele',
email: 'michele.sciabarra.com',
phone: '1234567890'
}
}).then(res => expect(res).toMatchSnapshot()))
There is not a testing/chainresp/validate.js file, but there is a testing/chainresp/validate.json with this content:
{
"__sequence__": [
"testing/strategy-name",
"testing/strategy-email",
"testing/strategy-phone"
]
}
You can now write a test for example as follows:
const ow = require('openwhisk')
test('validate', () =>
ow().actions
.invoke({
name: 'testing/chainresp-validate',
params: {
name: 'Michele',
email: 'michele.sciabarra.com',
phone: '1234567890'
}
})
.then(res => expect(res).toMatchSnapshot()))
The mocking library then read the __sequence__ property from the validate.json and translate in a sequence of invocations (as it would happen in the real OpenWhisk) allowing to test the result of a chained invocation locally.
We can see that the mocking of the sequence works inspecting the snapshot.
// Jest Snapshot v1, https://goo.gl/fbAQLP
exports[`validate 1`] = `
Object {
"email": "michele.sciabarra.com",
"errors": Array [
"michele.sciabarra.com is not an email address",
],
"message": Array [
"name: Michele",
"phone: 1234567890",
],
"name": "Michele",
"phone": "1234567890",
}
`;
error message defined as a parameter
In this chapter we have seen:
How to use Jest for Testing OpenWhisk Action
How to configure a local OpenWhisk work-alike environment for NodeJS
How to use Snapshot Testing
How to mocking a generic library
How to use an OpenWhisk mocking library