Table of Contents for
Continuous Delivery in Java
 Continuous Delivery in Java
Published by
O'Reilly Media, Inc., 2018
Continuous Delivery in Java
Published by
O'Reilly Media, Inc., 2018
- Cover
- nav
- Continuous Delivery in Java
- Continuous Delivery in Java
- Forewords
- Preface
- 1. Continuous Delivery: Why and What
- 2. Evolution of Java Development
- 3. Designing Architecture for Continuous Delivery
- 4. Deployment Platforms, Infrastructure, and Continuous Delivery of Java Apps
- 5. Building Java Applications
- 6. Additional Build Tooling and Skills
- 7. Packaging Applications for Deployment
- 8. Working Locally (Like It Was Production)
- 9. Continuous Integration: The First Steps in Creating a Build Pipeline
- 10. Deploying and Releasing from the Pipeline
- 11. Functional Testing: Correctness and Acceptance
- 12. System-Quality Attributes Testing: Validating Nonfunctional Requirements
- 13. Observability: Monitoring, Logging, and Tracing
- 14. Migrating to Continuous Delivery
- 15. Continuous Delivery and Continuous Improvement
- Index
- About the Author
- Colophon
Chapter 8. Working Locally (Like It Was Production)
Before you can begin to construct a continuous delivery pipeline, you must first ensure that you can work efficiently and effectively with code and systems on a local development machine. In this chapter, you will explore several of the inherent challenges with this—particularly when working with modern distributed systems and service-based architectures—and then discusses techniques like mocking, service virtualization, infrastructure virtualization (both VM and container-based), and local development of FaaS applications.
Challenges with Local Development
As a Java developer, you will typically be used to configuring a simple local work environment for working with a traditional monolithic web application. This often involves installing an operating system, a Java Development Kit (JDK), a build tool (Maven or Gradle), and an integrated development environment (IDE), like IntelliJ IDEA or Eclipse. Sometimes you may also need to install middleware or a database, and perhaps an application server. This local development configuration works fine for a single Java application, but what happens when you are developing a system with multiple services that will be deployed into a cloud environment, a container orchestration framework, or a serverless platform?
When you start working with an application with multiple services, the most logical initial approach is to simply attempt to replicate your local development practices for each new service. However, as with many things within computing—manual replication gets you only so far. The biggest problem with this style of working is the integration costs of testing. Even if each service has integration/component-level testing, it can be difficult to coordinate test configuration and initialization once you develop more than a few services. You’ll often find yourself spinning up an external service locally (by cloning the code repository from VCS, building, and running), fiddling around with the state, running tests on the service code in which you are developing, and finally verifying the state of the external service.
The Dangers of Custom Local Development Config Scripts
In the past, we have seen many developers attempt to overcome the local initialization problem by creating simple scripts (bash, Groovy, etc.) that wire everything together and initialize data for tests. In our experience, these scripts quickly become a nightmare to maintain, and therefore this isn’t a recommended approach. We include a mention of this here only as a start for the discussion.
Mocking, Stubbing, and Service Virtualization
The first approach that you can use to scale the local working environment is a technique familiar to many—mocking. In this section, you will explore how best to use this approach, and you will also examine a technique that is not so widely used but nonetheless is useful when working with a large number of services or external APIs: service virtualization.
Pattern #1: Profiles, Mocks, and Stubs
If you are familiar with developing code using the JVM-based Spring framework (or the Maven build tool), you will instantly recognize the concept of profiles. Essentially, profiles allow multiple configurations to be developed and switched at build or runtime. This will allow you to develop mock or stub implementations of external service interfaces for a local development profile and switch this version to the actual production implementation as required. For example, this technique could be used when developing a Java-based e-commerce shop-front service that is dependent on a product-search service. The interface for the product-service is well-defined, and therefore you can develop several profiles for use when running automated tests via Maven:
- no-search
-
This profile can simply mock the product-search service as a no-op (using Mockito) and return empty results. This is useful when the locally developed code is interacting with the product-search service, but you don’t care about the results coming back from a call.
- parameterized-search
-
This profile can contain a stub implementation of the product-search service that you can parametrize in your tests to return various search results (e.g., one product, two products, a product with a specific property, an invalid product, etc.). The stub implementation can simply be created as a Java class, and the precanned search results can be loaded from an external JSON data file. This is a useful pattern, but if the stub begins to become complex (with lots of conditionals), it may be time to look at the service virtualization pattern.
- production
-
This is the production implementation of the product-search interface that will communicate to a real instance of the service and undertake appropriate object marshalling and error-handling, etc.
Although not exactly stubbing or mocking, you can also include the use of embedded or in-process data stores and middleware within this pattern. Running an embedded process will typically allow you to interact with this component as if you were running a full out-of-process instance, but with much less initialization overhead or the need to externally configure the process.
Mocking with Mockito
One of the most popular mocking libraries within the Java ecosystem is Mockito. The latest version of the library, version 2.0+, provides a flexible framework to allow the verification of interactions with dependencies, or the stubbing of method calls.
Verifying interactions
Often when you are developing against a third-party dependency, you want to verify that the application you are developing interacts correctly with this external system, particularly when given certain use cases (either happy path or edge/problem cases). An example of this is shown in Example 8-1.
Example 8-1. Verifying interactions with the mocked List class, using Mockito
import static org.mockito.Mockito.*;

// mock creation
List mockedList = mock(List.class);

// using mock object - it does not throw any "unexpected interaction" exception
mockedList.add("one");
mockedList.clear();

// selective, explicit, highly readable verification
verify(mockedList).add("one");
verify(mockedList).clear();
The assertions within your test are focused on the behavior of your application (i.e., did it behave correctly given a certain use case or precondition).
Stubbing method calls
In addition to verifying the behavior of your application, you may often want to verify output or state, or return precanned data from an external service during the execution of a method under development or test. Often, this is the case when you have created a complicated algorithm, or you are interacting with several external services and the individual interactions are not as important as the end result. Example 8-2 illustrates.
Example 8-2. Stubbing the mocked LinkedList class to return a value
// you can mock concrete classes, not only interfaces
LinkedList mockedList = mock(LinkedList.class);

// stubbing appears before the actual execution
when(mockedList.get(0)).thenReturn("first");

// the following is true
assertThat(mockedList.get(0), is("first");

// the following prints "null" because get(999) was not stubbed
System.out.println(mockedList.get(999));
This simple test shows how you can assert on the value (which happens to come directly from the mock in this trivial example), rather than on the interactions.
Watch for Mock Complexity
If you find that your mocks are continually drifting from the real application or service that you are mocking/stubbing, or you find yourself spending a large amount of time maintaining the mocks, then this may be a sign that your mocks contain too much complexity, and you should use another tool or technique. Always remember that your tools should work for you, not the other way around!
The Mockito framework is a powerful library, and we have presented only a limited demonstration of functionality within this chapter.
Pattern #2: Service Virtualization and API Simulation
When mocking or stubbing external (third-party) services becomes complex, this can be the signal that it would be more appropriate to virtualize the service. If your stubs start to contain lots of conditional logic, are becoming a point of contention with people changing precanned data and breaking lots of tests, or are becoming a maintenance issue, this can be a sign of too much complexity. Service virtualization is a technique that allows you to create an application that will emulate the behavior of an external service without actually running or connecting to the service. This differs from running an actual service in an embedded or in-process mode, as a virtual service is typically not the real thing, and can behave only in ways that you have either defined or recorded from previous interactions with the real thing.
The service virtualization technique allows for the more manageable implementation of complex service behavior than mocking or stubbing alone. You can use this technique successfully in multiple scenarios; for example, when a dependent service returns complex (or large amounts of) data, when you don’t have access to the external service (for example, it may be owned by a third-party or is run as a SaaS), or when many additional services will interact with this dependency and it will be easier to share the virtual service than a mock or stub code.
Tooling in this area includes the following:
- Mountebank
-
This tool is a JavaScript/Node.js application that provides “cross-platform, multiprotocol test doubles over the wire,” and can be used to virtualize services that speak HTTP/HTTPS and TCP (it also supports SMTP). The API is easy to use, and although some of the code you may write may look verbose, it is easy to craft complicated virtualized responses.
- WireMock
-
This tool is similar to Mountebank in that it works by creating an actual server (HTTP in this case) that can be configured to respond with a range of virtualized responses. WireMock is written in Java and is well supported by its creator, Tom Akehurst.
- Stubby4j
-
This is a Java-focused tool that shares a lot of similarity with Mountebank and WireMock. This is an older service virtualization tool, but it can be used to emulate complicated SOAP and WSDL messages when interacting with external legacy service.
- VCR/Betamax
-
These are both useful implementations of applications that allow you to record and replay network traffic. These tools can be particularly useful when you don’t have access to the code of the external dependent services (and therefore can only observe a response from a request), when the service returns a large amount of data (which can be captured in an external “cassette”), or when making a call to the service is restricted or expensive.
- Hoverfly
-
This is a new service virtualization tool that provides additional configuration options over WireMock and VCR, and you can emulate responses for complicated legacy applications, as well as complex microservice architectures with many interdependent services. You can also use Hoverfly when performing load testing that interacts with third-party services. For example, where an external SaaS-based application test sandbox is on the critical path and it won’t allow you to ramp up the number of test requests without becoming the bottleneck itself. The fact that Hoverfly is written in Go means that it is lightweight and highly performant: you can easily get thousands of request/responses per second when running on a small AWS EC2 node.
Service virtualization is not that common to many Java developers, so let’s explore the uses and configuration a little more.
Virtualizing Services with Hoverfly
In this section, you will explore how to virtualize services for your local development environment by using the Hoverfly API simulation tool.
Installing Hoverfly
Hoverfly can be installed via the macOS brew package manager, and can also be downloaded and installed for Windows and Linux systems by following the instructions on the Hoverfly website.
You can also download the simple Spring Boot–powered flight service API that we will use to explore the concept of service virtualization from here.
Capturing and simulating a request with Hoverfly
First, start an instance of Hoverfly, as shown in Example 8-3.
Example 8-3. Start Hoverfly
$ hoverctl start
Hoverfly is now running

+------------+------+
| admin-port | 8888 |
| proxy-port | 8500 |
+------------+------+
At any time, you can check whether Hoverfly is running and which ports it is listening on by issuing the hoverctl status command, as shown in Example 8-4.
Example 8-4. Hoverctl
$ hoverctl status

+------------+----------+
| Hoverfly   | running  |
| Admin port |     8888 |
| Proxy port |     8500 |
| Mode       | capture  |
| Middleware | disabled |
+------------+----------+
Start the flights service, and make a request to it to validate that it is running. Here we are just searching for all the flights that are available tomorrow (note that your results from the curl may appear different from the results shown in Example 8-5, as the flight service returns a random set of flight data!):
Example 8-5. Running the sample flight service
$ ./run-flights-service.sh
waiting for service to start
waiting for service to start
waiting for service to start
service started

$ curl localhost:8081/api/v1/flights?plusDays=1 | jq
[
  {
    "origin": "Berlin",
    "destination": "New York",
    "cost": "617.31",
    "when": "03:45"
  },
  {
    "origin": "Amsterdam",
    "destination": "Dubai",
    "cost": "3895.49",
    "when": "21:20"
  },
  {
    "origin": "Milan",
    "destination": "New York",
    "cost": "4950.31",
    "when": "08:49"
  }
]
Now move Hoverfly into capture mode, as shown in Example 8-6. During this mode, any request that is intercepted by Hoverfly will be captured.
Example 8-6. Hoverctl capture
$ hoverctl mode capture
Hoverfly has been set to capture mode
Once in capture mode, make a request to the flights API, but this time specify Hoverfly as a proxy, as shown in Example 8-7 (note that your curled flight results may look different from those shown here).
Example 8-7. Capturing API responses with Hoverfly
$ curl localhost:8081/api/v1/flights?plusDays=1 --proxy localhost:8500 | jq
[
  {
    "origin": "Berlin",
    "destination": "Dubai",
    "cost": "3103.56",
    "when": "20:53"
  },
  {
    "origin": "Amsterdam",
    "destination": "Boston",
    "cost": "2999.69",
    "when": "19:45"
  }
]
By specifying the proxy flag, the request will first go to the proxy (Hoverfly) and then be forwarded onto the real flights API afterward. The reverse is true for the response, and this is how Hoverfly is able intercept network traffic. The Hoverfly logs can be consulted at any time that you are unsure of what has occurred (e.g., was a request/response proxied), an example of which can be seen in Example 8-8.
Example 8-8. Viewing Hoverfly logs
$ hoverctl logs
INFO[2017-09-20T11:38:48+01:00] Mode has been changed
mode=capture
INFO[2017-09-20T11:40:28+01:00] request and response captured↵
mode=capture request=&map[headers:map[Accept:[*/*]↵
Proxy-Connection:[Keep-Alive] User-Agent:[curl/7.54.0]]↵
body: method:GET scheme:http destination:localhost:8081↵
path:/api/v1/flights query:map[plusDays:[1]]]↵
response=&map[error:nil response]
...
Now, let’s take a look at the simulation that we have produced, by exporting it and then opening it in a text editor. In Example 8-9, we use atom, but feel free to substitute your favorite (like vim or emacs) in the command.
Example 8-9. Exporting Hoverfly simulation data
$ hoverctl export module-two-simulation.json
Successfully exported simulation to module-two-simulation.json
$ atom module-two-simulation.json
Take a look at the simulation file, and see if you recognize your recorded data. The request you captured should correspond to a single element in the pairs array. Now, we can use our simulation to simulate the flights API. First, stop the flights service to make sure we are unable to communicate with it, as shown in Example 8-10.
Example 8-10. Stop the flight service
$ ./stop-flights-service.sh
service successfully shut down
$ curl localhost:8081/api/v1/flights?plusDays=1
curl: (7) Failed to connect to localhost port 8081: Connection refused
Now, put Hoverfly into simulate mode, as shown in Example 8-11.
Example 8-11. Putting Hoverfly into simulate mode
$ hoverctl mode simulate
Hoverfly has been set to simulate mode with a matching strategy of 'strongest'
During simulate mode, instead of forwarding the traffic to the real API, Hoverfly will immediately respond to the client with our recorded request. Now we can repeat our request, only this time using Hoverfly as a proxy. We should now receive our recorded response rather than an error, as shown in Example 8-12.
Example 8-12. Making a request against Hoverfly as a proxy
$ curl localhost:8081/api/v1/flights?plusDays=1 --proxy localhost:8500 | jq
[
  {
    "origin": "Berlin",
    "destination": "Dubai",
    "cost": "3103.56",
    "when": "20:53"
  },
  {
    "origin": "Amsterdam",
    "destination": "Boston",
    "cost": "2999.69",
    "when": "19:45"
  }
]
That’s it: we have successfully simulated our first API endpoint! Although you used curl for this demonstration, in a real test, this would typically be the application under test making these requests against Hoverfly. Once request and response data have been stored within Hoverfly, we no longer need access to the service we recorded the data from, and we can also control the exact response given by Hoverfly. One of the major benefits of using a service virtualization tool like Hoverfly is that the tool has a lightweight resource footprint and initializes fast. Therefore, you can virtualize many more services on your laptop than you could run real services, and you can also include the use of Hoverfly within fast integration tests.
Don’t Reimplement Your Service “Virtually”
If you find that your virtual services are continually drifting from the functionality of the real application, you may be tempted to add more logic or conditional responses; this can be an antipattern! Although tempting at times, you should definitely not reimplement a service as a virtual copy. Service virtualization is ideal for acting like an intelligent mock or stub for a service that has complex internal logic but a well-defined interface and relatively simple data output (i.e., you should aim to virtualize [encapsulate] behavior, not state, within a virtual service).
If you find yourself modifying virtual services with lots of conditional logic for determining what state should be returned from interactions, or your virtual service logic begins to look similar to the real service workflow, this is an antipattern, and the user of another technique could be more appropriate.
VMs: Vagrant and Packer
Often when working with or deploying to cloud platforms, you will want to package your Java applications within VM images. If you have a small number of services (and a reasonably powerful development machine), this may also allow you to spin up several dependent services when building and testing an application. You will now explore how to use the HashiCorp Vagrant tool for building and initalizing VMs on your local development machine.
Installing Vagrant
Vagrant can be downloaded and installed from the Vagrant website, and there are installers for macOS, Linux, and Windows. You will also need to install a VM hypervisor application such as Oracle’s VirtualBox or VMware Fusion, upon which the Vagrant VMs will run.
Creating a Vagrantfile
All VMs that will be part of your local Vagrant development environment will be defined in a Vagrantfile. This file allows you to specify the number of VMs, their allotted compute resources, and networking configuration. You can also specify installation and provisioning scripts that will configure the VM and install the required OS dependencies. An example Vagrantfile is shown in Example 8-13.
Example 8-13. Vagrantfile that configures a single VM with Ubuntu and installs the Jenkins build server via a simple sets of Bash CLI commands
# -*- mode: ruby -*-
# vi: set ft=ruby :

# All Vagrant configuration is done below. The "2" in Vagrant.configure
# configures the configuration version (we support older styles for
# backward compatibility). Please don't change it unless you know what
# you're doing.
Vagrant.configure("2") do |config|
  # The most common configuration options are documented and commented below.
  # For a complete reference, please see the online documentation at
  # https://docs.vagrantup.com.

  # Every Vagrant development environment requires a box. You can search for
  # boxes at https://atlas.hashicorp.com/search.
  config.vm.box = "ubuntu/xenial64"
  config.vm.box_version = "20170922.0.0"

  config.vm.network "forwarded_port", guest: 8080, host: 8080
  config.vm.provider "virtualbox" do |v|
    v.memory = 2048
  end

  # Enable provisioning with a shell script. Additional provisioners such as
  # Puppet, Chef, Ansible, Salt, and Docker are also available. Please see the
  # documentation for more information about their specific syntax and use.
  config.vm.provision "shell", inline: <<-SHELL
    apt-get update

    # Install OpenJDK Java JDK and Maven
    apt-get install -y openjdk-8-jdk
    apt-get install -y maven

    # Install sbt
    echo "deb https://dl.bintray.com/sbt/debian /" |
    tee -a /etc/apt/sources.list.d/sbt.list
    apt-key adv --keyserver hkp://keyserver.ubuntu.com:80
    --recv 2EE0EA64E40A89B84B2DF73499E82A75642AC823
    apt-get update
    apt-get install sbt

    # Install Docker (made slightly more complex by the need
    # to use specific Docker package repos)
    apt-get install -y apt-transport-https ca-certificates
    apt-key adv --keyserver hkp://p80.pool.sks-keyservers.net:80
    --recv-keys 58118E89F3A912897C070ADBF76221572C52609D
    echo deb https://apt.dockerproject.org/repo ubuntu-xenial main >>
    /etc/apt/sources.list.d/docker.list
    apt-get update
    apt-get purge lxc-docker
    apt-get install -y linux-image-extra-$(uname -r) linux-image-extra-virtual
    apt-get install -y docker-engine

    # Install Jenkins
    wget -q -O - https://pkg.jenkins.io/debian/jenkins-ci.org.key | apt-key add -
    echo deb http://pkg.jenkins-ci.org/debian binary/ >
    /etc/apt/sources.list.d/jenkins.list
    apt-get update
    apt-get install -y jenkins
    # Echo the Jenkins security key that is required upon initialization
    printf "\n\nJENKINS KEY\n*********************************"
    # Add the Jenkins user to the Docker group
    usermod -aG docker jenkins
    # Wait until the initialAdminPassword file is generated via Jenkins startup
    while [ ! -f /var/lib/jenkins/secrets/initialAdminPassword ]
    do
        sleep 2
    done
    cat /var/lib/jenkins/secrets/initialAdminPassword
    printf "*********************************"
    # restart the Jenkins service so that the usermod command above takes effect
    service jenkins restart

    # Install Docker Compose
    curl -s -L https://github.com/docker/compose/releases/
    download/1.10.0/docker-compose-`uname -s`-`uname -m` >↵
    /usr/local/bin/docker-compose
    chmod +x /usr/local/bin/docker-compose
  SHELL
end
The VMs defined in the Vagrantfile can be initialized with the vagrant up command, as shown in Example 8-14, and stopped and deleted with vagrant halt and vagrant destroy, respectively.
Example 8-14. Vagrant booting a VM
$ vagrant up
Bringing machine 'default' up with 'virtualbox' provider...
==> default: Checking if box 'ubuntu/xenial64' is up-to-date...
==> default: Clearing any previously set forwarded ports...
==> default: Clearing any previously set network interfaces...
==> default: Preparing network interfaces based on configuration...
    default: Adapter 1: nat
==> default: Forwarding ports...
    default: 8080 (guest) => 8080 (host) (adapter 1)
    default: 22 (guest) => 2222 (host) (adapter 1)
==> default: Running 'pre-boot' VM customizations...
==> default: Booting VM...
==> default: Waiting for machine to boot. This may take a few minutes...
    default: SSH address: 127.0.0.1:2222
    default: SSH username: ubuntu
    default: SSH auth method: password
==> default: Machine booted and ready!
If you examine the preceding Vagrantfile, you will notice the line config.vm.network "forwarded_port", guest: 8080, host: 8080, which maps port 8080 in the VM to port 8080 on the localhost development machine. This means that we can view http://localhost:8080 in a web browser and view our Jenkins installation running on the VM provisioned via Vagrant.
You have learned about Packer in “Creating Machine Images for Multiple Clouds with Packer”, and you can use this tool to create images that can be initialized via Vagrant using the config.vm.box property in the Vagrant box configuration.
Pattern #3: Production-in-a-Box
The use of environment virtualization tools like HashiCorp’s Vagrant enables you to download precanned images of services to a local machine that can be easily executed when developing an application or running automated tests. This technology also allows you to build a production-in-a-box—a replicated (smaller version) of your production environment that can be shared around a team for a consistent development experience. To implement this, you create (for example) a preconfigured VBox image that contains an application’s code/binaries alongside an OS, configuration, and associated data stores.
Is the “Production-in-a-Box” an Antipattern?
The production-in-a-box is most useful for teams with a small number of services operating in a relatively simple and stable production environment. As soon as an application grows to involve more than three to five services or involves complicated infrastructure or configuration, it can become impractical to attempt to replicate a production environment locally or it can become too time-consuming to maintain parity between production and development. If you notice that the local production replica is not behaving as the real production environment, or you are spending large amounts of effort and resources to maintain this, then it may be that this pattern is becoming an antipattern for you.
The arrival of HashiCorp Packer has made the image creation process even easier, and it gives you the ability to specify application packaging once and reuse this across environments (e.g., Azure in production, OpenStack for QA, and VirtualBox for local development). Arguably, the arrival of Docker (explored next) pushed this style of application packaging and sharing into the mainstream, and the Fig composition tool was the icing on the cake. Fig has since evolved into Docker Compose, and now allows the declarative specification of applications/services and associated dependencies and data stores. This pattern does allow for the flexible execution of a collection of dependent services on a local development machine, and the main limiting factor in our experience is machine resources (particularly when running on hypervisor-based virtual platforms).
The production-in-box pattern can allow you to keep a much cleaner local developer environment and remove potential configuration clashes by encapsulating a service and its dependencies and configuration (e.g., different requirements of Java versions). You can also parametrize the images (through initialization params or environment variables), much as you saw with the profiles pattern previously, and it allows services to behave as you require. You can also use Docker plugins for Maven, which enable the integration of container life cycles with test runs. A potential extension to this pattern is developing within the actual images themselves; for example, by mounting local source code into the running instance of an image. If done correctly, this can remove the need for the installation of practically all tooling on the local development machine (except perhaps your favorite editor or IDE), and it greatly simplifies the build toolchain.
Containers: Kubernetes, minikube, and Telepresence
In this section, you will explore working locally with Docker containers and the Kubernetes orchestration platform.
Introducing the “Docker Java Shop” Sample App
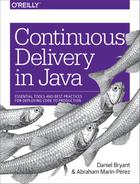
Running containers at any real-world scale requires a container orchestration and scheduling platform, and although many exist (i.e., Docker Swarm, Apache Mesos, and AWS ECS), the most popular is Kubernetes. Kubernetes is used in production at many organizations, and is now hosted by the Cloud Native Computing Foundation (CNCF). Here you will take a simple Java-based, e-commerce shop and package this within Docker containers and run this on Kubernetes.
The architecture of the Docker Java Shopfront application that we will package into containers and deploy onto Kubernetes is shown in Figure 8-1.
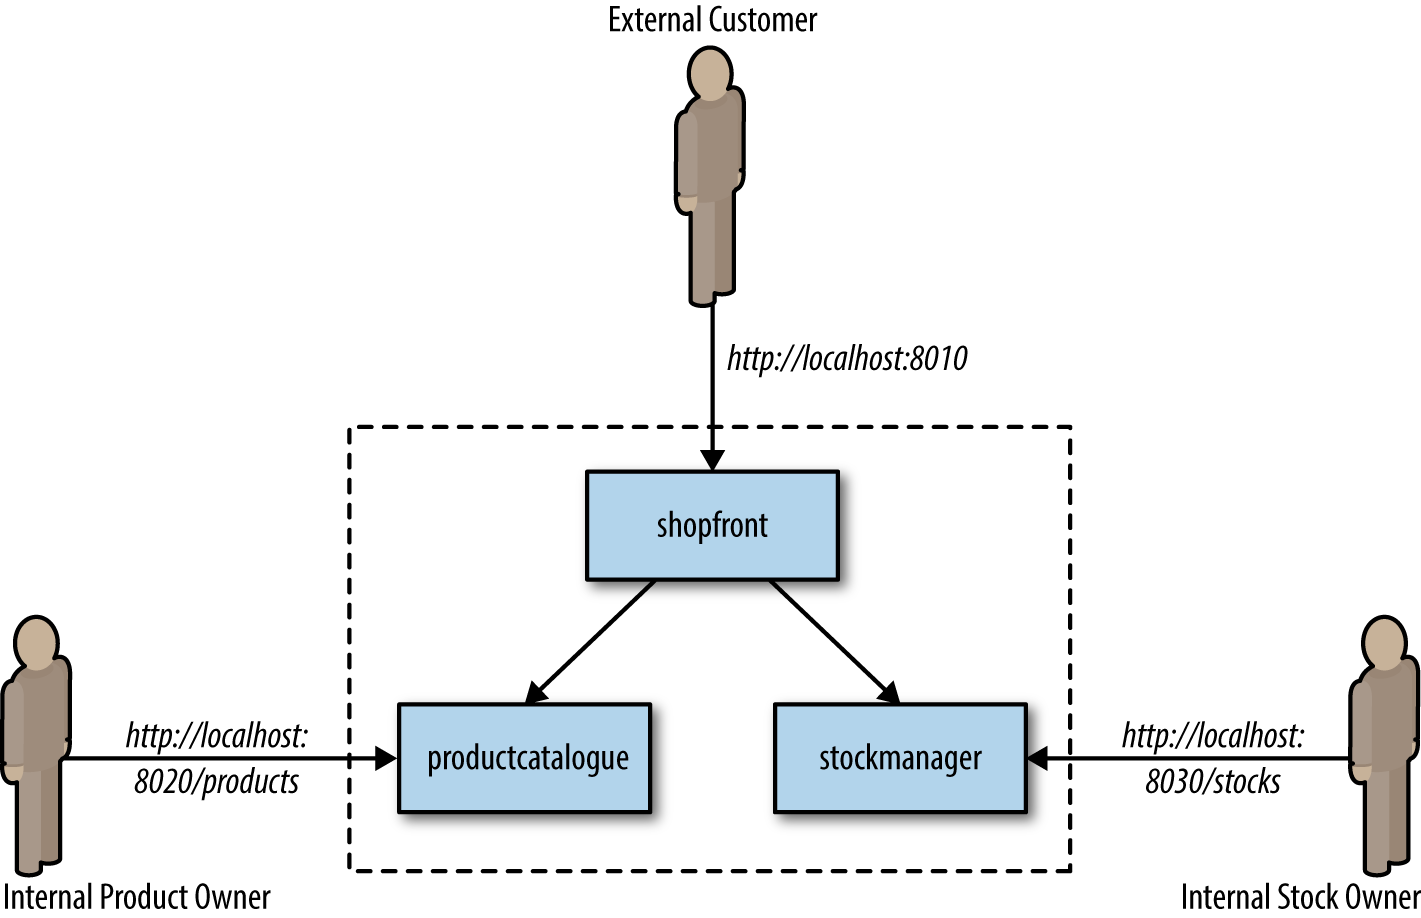
Figure 8-1. Docker Java Shopfront application architecture
Building Java Applications and Container Images
Before we create a container and the associated Kubernetes deployment configuration, we must ensure that we have installed the following prerequisites:
- Docker for Mac/Windows/Linux
-
This allows us to build, run, and test Docker containers outside Kubernetes on our local development machine.
- minikube
-
This is a tool that makes it easy to run a single-node Kubernetes test cluster on our local development machine via a virtual machine.
- A GitHub account and Git installed locally
-
The code examples are stored on GitHub, and by using Git locally, you can fork the repository and commit changes to your own personal copy of the application.
- Docker Hub account
-
If you would like to follow along with this tutorial, you will need a Docker Hub account in order to push and store your copies of the container images that we will build next.
- Java 8 (or 9) SDK and Maven
-
We will be building code with the Maven build and dependency tool that uses Java 8 features.
Clone the project repository from GitHub (optionally, you can fork this repository and clone your personal copy), as shown in Example 8-15. Locate the Shopfront microservice application.
Example 8-15. Clone the example repository
$ git clone git@github.com:danielbryantuk/oreilly-docker-java-shopping.git
$ cd oreilly-docker-java-shopping/shopfront
Feel free to load the Shopfront code into your editor of choice, such as IntelliJ IDEA or Eclipse, and have a look around. Let’s build the application using Maven, as shown in Example 8-16. The resulting runnable JAR file that contains the application will be located in the ./target directory.
Example 8-16. Building the Spring Boot application
$ mvn clean install
…
[INFO] ------------------------------------------------------------------------
[INFO] BUILD SUCCESS
[INFO] ------------------------------------------------------------------------
[INFO] Total time: 17.210 s
[INFO] Finished at: 2017-09-30T11:28:37+01:00
[INFO] Final Memory: 41M/328M
[INFO] ------------------------------------------------------------------------
Now you will build the Docker container image. The operating system choice, configuration, and build steps for a Docker image are typically specified via a Dockerfile. Let’s look at the example Dockerfile that is located in the shopfront directory; see Example 8-17.
Example 8-17. Sample Dockerfile for Spring Boot Java application
FROM openjdk:8-jre
ADD target/shopfront-0.0.1-SNAPSHOT.jar app.jar
EXPOSE 8010
ENTRYPOINT ["java","-Djava.security.egd=file:/dev/./urandom","-jar","/app.jar"]
The first line specifies that your container image should be created from the openjdk:8-jre base image. The openjdk:8-jre image is maintained by the OpenJDK team, and contains everything we need to run a Java 8 application within a Docker container (such as an operating system with the OpenJDK 8 JRE installed and configured). The second line takes the runnable JAR and adds this to the image. The third line specifies that port 8010, which your application will listen on, must be exposed as externally accessible, and the fourth line specifies the entrypoint, or command to run, when the container is initialized. Let’s build the container; see Example 8-18.
Example 8-18. Docker build
$ docker build -t danielbryantuk/djshopfront:1.0 .
Successfully built 87b8c5aa5260
Successfully tagged danielbryantuk/djshopfront:1.0
Now let’s push this to Docker Hub, as shown in Example 8-19. If you haven’t logged into the Docker Hub via your command line, you must do this now and enter your username and password.
Example 8-19. Pushing to Docker Hub
$ docker login
Login with your Docker ID to push and pull images from Docker Hub.
If you don't have a Docker ID, head over to https://hub.docker.com to create one.
Username:
Password:
Login Succeeded
$
$ docker push danielbryantuk/djshopfront:1.0
The push refers to a repository [docker.io/danielbryantuk/djshopfront]
9b19f75e8748: Pushed
...
cf4ecb492384: Pushed
1.0: digest: sha256:8a6b459b0210409e67bee29d25bb512344045bd84a262ede80777edfcff3d9a0
size: 2210
Deploying into Kubernetes
Now let’s run this container within Kubernetes. First, change the kubernetes directory in the root of the project:
$ cd ../kubernetes
Open the shopfront-service.yaml Kubernetes deployment file and have a look at the contents, shown in Example 8-20.
Example 8-20. Sample Kubernetes deployment.yaml file for the Shopfront service
---
apiVersion: v1
kind: Service
metadata:
  name: shopfront
  labels:
    app: shopfront
spec:
  type: ClusterIP
  selector:
    app: shopfront
  ports:
  - protocol: TCP
    port: 8010
    name: http

---
apiVersion: apps/v1beta2
kind: Deployment
metadata:
  name: shopfront
  labels:
    app: shopfront
spec:
  replicas: 1
  selector:
    matchLabels:
      app: shopfront
  template:
    metadata:
      labels:
        app: shopfront
    spec:
      containers:
      - name: djshopfront
        image: danielbryantuk/djshopfront:1.0
        ports:
        - containerPort: 8010
        livenessProbe:
          httpGet:
            path: /health
            port: 8010
          initialDelaySeconds: 30
          timeoutSeconds: 1
The first section of the YAML file creates a Service named shopfront that will route TCP traffic targeting this service on port 8010 to pods with the label app: shopfront. The second section of the configuration file creates a Deployment that specifies Kubernetes should run one replica (instance) of your Shopfront container, which you have declared as part of the spec (specification) labeled as app: shopfront. You will also specify that the 8010 application traffic port we exposed in your Docker container is open and declared a livenessProbe, or healthcheck, that Kubernetes can use to determine whether your containerized application is running correctly and is ready to accept traffic. Let’s start minikube and deploy this service (note that you may need to change the specified minikube CPU and memory requirements depending on the resources available on your development machine); see Example 8-21.
Example 8-21. Starting minikube
$ minikube start --cpus 2 --memory 4096
Starting local Kubernetes v1.7.5 cluster...
Starting VM...
Getting VM IP address...
Moving files into cluster...
Setting up certs...
Connecting to cluster...
Setting up kubeconfig...
Starting cluster components...
Kubectl is now configured to use the cluster.
$ kubectl apply -f shopfront-service.yaml
service "shopfront" created
deployment "shopfront" created
You can view all services within Kubernetes by using the kubectl get svc command, as shown in Example 8-22. You can also view all associated pods by using the kubectl get pods command. (Note that the first time you issue the get pods command, the container may not have finished creating, and is marked as not yet ready).
Example 8-22. kubectl get svc
$ kubectl get svc
NAME         CLUSTER-IP   EXTERNAL-IP   PORT(S)          AGE
kubernetes   10.0.0.1     <none>        443/TCP          18h
shopfront    10.0.0.216   <nodes>       8010:31208/TCP   12s
$ kubectl get pods
NAME              READY     STATUS              RESTARTS   AGE
shopfront-0w1js   0/1       ContainerCreating   0          18s
$ kubectl get pods
NAME              READY     STATUS    RESTARTS   AGE
shopfront-0w1js   1/1       Running   0          2m
You have now successfully deployed our first service into Kubernetes!
Simple Smoke Test
You can use curl to attempt to get data from the shopfront application’s healthcheck endpoint, as shown in Example 8-23. This is a simple way to check whether everything is working as it should be.
Example 8-23. Simple smoke test in minikube
$ curl $(minikube service shopfront --url)/health
{"status":"UP"}
You can see from the results of the curl against the application/health endpoint that the application is up and running, but you will need to deploy the remaining microservice application containers before the application will function as required.
Building the Remaining Applications
Now that you have one container up and running, let’s build the remaining two supporting microservice applications and containers, as shown in Example 8-24.
Example 8-24. Building the remaining applications
$ cd ..
$ cd productcatalogue/
$ mvn clean install
…
$ docker build -t danielbryantuk/djproductcatalogue:1.0 .
...
$ docker push danielbryantuk/djproductcatalogue:1.0
...
$ cd ..
$ cd stockmanager/
$ mvn clean install
...
$ docker build -t danielbryantuk/djstockmanager:1.0 .
...
$ docker push danielbryantuk/djstockmanager:1.0
At this point, you have built all of your microservices and the associated Docker images, and pushed the images to Docker Hub. Let’s now deploy the productcatalogue and stockmanager services to Kubernetes.
Deploying the Entire Java Application in Kubernetes
In a similar fashion to the process you used previously to deploy the Shopfront service, you can now deploy the remaining two microservices within your application to Kubernetes; see Example 8-25.
Example 8-25. Deploying the entire Java application in Kubernetes
$ cd ..
$ cd kubernetes/
$ kubectl apply -f productcatalogue-service.yaml
service "productcatalogue" created
deployment "productcatalogue" created
$ kubectl apply -f stockmanager-service.yaml
service "stockmanager" created
deployment "stockmanager" created
$ kubectl get svc
NAME               CLUSTER-IP   EXTERNAL-IP   PORT(S)          AGE
kubernetes         10.0.0.1     <none>        443/TCP          19h
productcatalogue   10.0.0.37    <nodes>       8020:31803/TCP   42s
shopfront          10.0.0.216   <nodes>       8010:31208/TCP   13m
stockmanager       10.0.0.149   <nodes>       8030:30723/TCP   16s
$ kubectl get pods
NAME                     READY     STATUS    RESTARTS   AGE
productcatalogue-79qn4   1/1       Running   0          55s
shopfront-0w1js          1/1       Running   0          13m
stockmanager-lmgj9       1/1       Running   0          29s
Depending on how quickly you issue the kubectl get pods command, you may see that all the pods are not yet running. Before moving on to the next section, wait until the command shows that all of the pods are running (maybe this is a good time to brew a cup of tea!)
Viewing the Deployed Application
With all services deployed and all associated pods running, you now should be able to access your completed application via the Shopfront service GUI. You can open the service in your default browser by issuing the following command in minikube:
$ minikube service shopfront
If everything is working correctly, you should see the page shown in Figure 8-2 in your browser.
In addition to running minikube locally, it is also possible to provision a remote Kubernetes cluster and develop locally against this by using tooling like Datawire’s Telepresence. Let’s explore this pattern now.
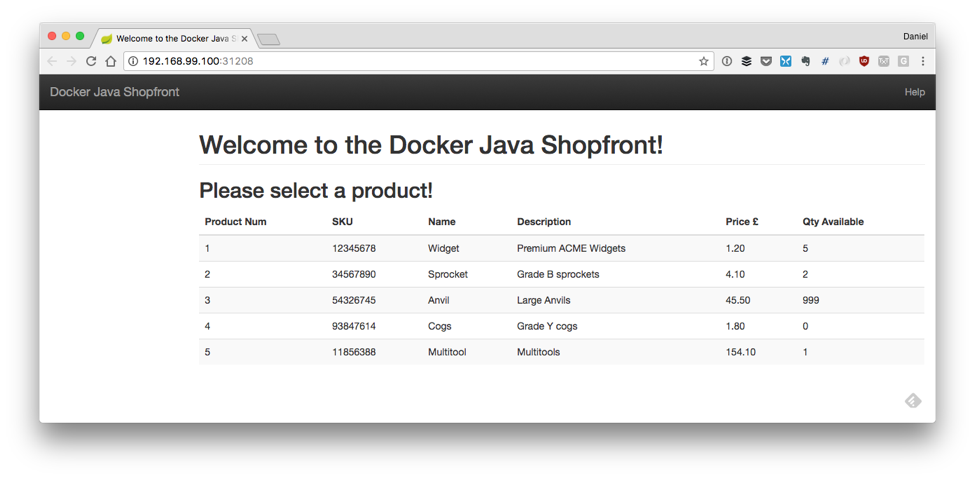
Figure 8-2. Simple UI of Docker Java Shopfront
Telepresence: Working Remotely, Locally
Telepresence is an open source tool that lets you run a single service locally, while connecting that service to a remote Kubernetes cluster. This lets developers working on multiservice applications do the following:
-
Do fast local development of a single service, even if that service depends on other services in your cluster. Make a change to your service and save, and you can immediately see the new service in action.
-
Use any tool installed locally to test/debug/edit your service. For example, you can use a debugger or IDE!
-
Make your local development machine operate as if it’s part of your Kubernetes cluster. If you have an application on your machine that you want to run against a service in the cluster, it’s easy to do.
First, you need to install Telepresence. This is easy if you are using a Mac or Linux machine to develop software locally, and full instructions for all platforms can be found on the Telepresence website. Example 8-26 details installation on a Mac.
Example 8-26. Installing Telepresence on a Mac local development machine
$ brew cask install osxfuse
$ brew install socat datawire/blackbird/telepresence
...
$ telepresence --version
0.77
Now you can create a remote Kubernetes cluster. Example 8-27 uses the Google Cloud Platform (GCP) GKE service to deploy a fully managed cluster. If you want to follow along, you need to sign up for a GCP account and install the gclouds command-line tool. Don’t forget that after you have installed the gclouds tool locally, you must configure the tool to use the credentials of the account you have just created (full details can be found on the Google Cloud SDK web page). At the time of writing, you will also need to install the beta components of the gcloud tool. (Instructions can be found on the gcloud install web page.)
The cluster will be created with slightly bigger compute instances than the default, n1-standard-2, as some of the Java applications’ memory requirements can be too large for the smaller instances. To keep costs low, you can also specify that the Kubernetes cluster is created using preemptible instances. These instances are a lot less expensive than the standard instances, but the risk is they might be preempted, or reclaimed, if Google needs the extra compute capacity. Typically, this doesn’t happen often, and if it does, then Kubernetes self-heals and redeploys the affected applications.
Example 8-27. Creating a preemptible Kubernetes cluster on GCP GKE
 $ gcloud container clusters create telepresence-demo
--machine-type n1-standard-2 --preemptible
Creating cluster telepresence-demo...done.
Created [https://container.googleapis.com/v1beta1/projects/↵
k8s-leap-forward/zones/us-central1-a/clusters/telepresence-demo].

To inspect the contents of your cluster, go to:
https://console.cloud.google.com/kubernetes/workload_/gcloud/↵
us-central1-a/telepresence-demo?project=k8s-leap-forward

kubeconfig entry generated for telepresence-demo.
NAME  LOCATION  MASTER_VERSION  MASTER_IP  MACHINE_TYPE  NUM_NODES  STATUS
telepresence-demo  us-central1-a 1.8.8-gke.0 35.193.55.23 n1-standard-2  3 RUNNING
With your cluster built, you can now deploy the example services onto this remote cluster. You’ll notice that once Telepresence has initialized, you can curl the shopfront healthendpoint as if you were located in the cluster; you don’t need to use the external IP address (or even expose this service to the internet).
Example 8-28. Curling a remote service healthcheck endpoint as if it were local
$ cd oreilly-docker-java-shopping/kubernetes
$ kubectl apply -f .
service "productcatalogue" created
deployment "productcatalogue" created
service "shopfront" created
deployment "shopfront" created
service "stockmanager" created
deployment "stockmanager" created
$
$ telepresence
Starting proxy with method 'vpn-tcp', which has the following limitations:
All processes are affected, only one telepresence can run per machine,↵
 and you can't use other VPNs. You may need to add cloud hosts with↵
 --also-proxy. For a full list of method limitations↵
 see https://telepresence.io/reference/methods.html
Volumes are rooted at $TELEPRESENCE_ROOT.↵
 See https://telepresence.io/howto/volumes.html for details.

No traffic is being forwarded from the remote Deployment to your local machine.
You can use the --expose option to specify which ports you want to forward.

Password:
Guessing that Services IP range is 10.63.240.0/20. Services started after
this point will be inaccessible if are outside this range; restart↵
 telepresence if you can't access a new Service.

@gke_k8s-leap-forward_us-central1-a_demo| $ curl shopfront:8010/health
{"status":"UP"}
@gke_k8s-leap-forward_us-central1-a_demo| kubernetes $ exit
This is only scratching the surface with what Telepresence can do, and the most exciting thing is debugging a local service that is communicating with other services located in the remote cluster. The Telepresence website has full details on how to do this.
Pattern #4: Environment Leasing
In a nutshell, the environment leasing pattern is implemented by allowing each developer to create and automatically provision their own remote environment that can contain an arbitrary configuration of services and data. This pattern is somewhat similar to the production-in-a-box pattern, but instead of running a replica of production locally, you are running this in the cloud. The services and data (and associated infrastructure components and glue) must be specified programmatically via an infrastructure as code (IaC) tool (like Terraform) or one of the automated provisioning and configuration management tools (like Ansible). The configuration and operational knowledge must also be shared across the team for this approach to be viable, and therefore you must be embracing a DevOps mindset.
After an environment is specified and initialized, it is then “leased” by an individual developer. Each developer’s local machine is then configured to communicate with services and dependencies installed into the remote environment as if all the services were running locally. You can use this pattern when deploying applications to cloud-based platforms, as it allows you to spin up and shut down environments on demand and rapidly.
Platform Leasing Requires Programmable Infra and DevOps
The platform-leasing pattern is an advanced pattern, and does rely on both the ability to provision platform environments on demand (e.g., private/public cloud with elastic scaling) and that the development team has a reasonable awareness of operational characteristics of the production platform. The pattern also requires that a developer’s machine has a stable network connection to this environment. Running a local proxy, such as Datawire’s Telepresence, NGINX, or HAProxy in combination with HashiCorp’s Consul and consul-template, or a framework such as Spring Cloud in combination with Netflix’s Eureka, is useful in order to automate the storage and updating of each developer’s environment location.
FaaS: AWS Lamba and SAM Local
AWS introduced Serverless Application Model (SAM) in 2016 in order to make it easier for developers to deploy FaaS serverless applications. At its core, SAM is an open source specification built on AWS CloudFormation that makes it easy to specify and maintain your serverless infrastructure as code.
SAM Local takes all the useful parts of SAM and brings them to your local machine:
-
It lets you develop and test your AWS Lambda functions locally with SAM Local and Docker.
-
It lets you simulate function invocations from known event sources like Amazon Simple Storage Service (S3), Amazon DynamoDB, Amazon Kinesis, Amazon Simple Notification Service (SNS), and nearly all of the other Amazon services offered.
-
It lets you start a local Amazon API Gateway from a SAM template, and quickly iterate on your functions with hot-reloading.
-
It lets you quickly validate your SAM template and even integrate that validation with linters or IDEs.
-
It provides interactive debugging support for your Lambda functions.
Let’s take AWS SAM Local for a spin.
Installing SAM Local
There are several ways to install SAM Local, but the easiest is through the pip Python package management tool. A discussion of installing pip and Python is outside the scope of this book, but both the SAM Local and pip websites provide more information.
Once pip is installed locally, SAM Local can be installed using the command shown in Example 8-29 in the terminal.
Example 8-29. Installing SAM Local
$ pip install aws-sam-cli
The latest version can also be installed from the source if you have Go installed on your local development machine: go get github.com/awslabs/aws-sam-local.
AWS Lambda Scaffolding
You can use the simple Java function in Example 8-30 that is a basic implementation of the Product Catalogue service you explored earlier in the Shopping demonstration application. The full code can be found in the book’s GitHub repo. The main handler function class can be seen in Example 8-30.
Example 8-30. Simple Java “Hello World” AWS Lambda function
package uk.co.danielbryant.djshoppingserverless.productcatalogue;

import com.amazonaws.services.lambda.runtime.Context;
import com.amazonaws.services.lambda.runtime.RequestHandler;
import com.google.gson.Gson;
import uk.co.danielbryant.djshoppingserverless.productcatalogue.↵
services.ProductService;

import java.util.HashMap;
import java.util.Map;

/**
* Handler for requests to Lambda function.
*/
public class ProductCatalogueFunction implements RequestHandler<Map<String, Object>,
GatewayResponse> {

    private static final int HTTP_OK = 200;
    private static final int HTTP_INTERNAL_SERVER_ERROR = 500;

    private ProductService productService = new ProductService();
    private Gson gson = new Gson();

    public GatewayResponse handleRequest(final Map<String, Object> input,
    final Context context) {
        Map<String, String> headers = new HashMap<>();
        headers.put("Content-Type", "application/json");

        String output = gson.toJson(productService.getAllProducts());
        return new GatewayResponse(output, headers, HTTP_OK);
    }
}
The handleRequest method will be called by the AWS Lambda framework when you run the function locally or remotely (in production). Several predefined RequestHandler interfaces and associated handleRequest methods are available in the aws-lambda-java-core library that you can import via Maven. This example uses RequestHandler<Map<String, Object>, GatewayResponse> that allows you to capture the JSON map of data that is passed to the function (and contains details such as the HTTP method, headers, and request param/body) and return a GatewayResponse object, which ultimately gets sent to the requesting service or user.
The project’s pom.xml can be seen in Example 8-31, and notice also that the function JAR is being packaged for deployment using the Maven Shade plugin that you learned about earlier.
Example 8-31. ProductCatalogue AWS Lambda pom.xml
<projectxmlns="http://maven.apache.org/POM/4.0.0"xmlns:xsi="http://www.w3.org/2001/XMLSchema-instance"xsi:schemaLocation="http://maven.apache.org/POM/4.0.0http://maven.apache.org/maven-v4_0_0.xsd"><modelVersion>4.0.0</modelVersion><groupId>uk.co.danielbryant.djshoppingserverless</groupId><artifactId>ProductCatalogue</artifactId><version>1.0</version><packaging>jar</packaging><name>A simple Product Catalogue demo created by the SAM CLI sam-init.</name><properties><maven.compiler.source>1.8</maven.compiler.source><maven.compiler.target>1.8</maven.compiler.target></properties><dependencies><dependency><groupId>com.amazonaws</groupId><artifactId>aws-lambda-java-core</artifactId><version>1.1.0</version></dependency><dependency><groupId>com.google.code.gson</groupId><artifactId>gson</artifactId><version>2.8.5</version></dependency><dependency><groupId>junit</groupId><artifactId>junit</artifactId><version>4.12</version><scope>test</scope></dependency></dependencies><build><plugins><plugin><groupId>org.apache.maven.plugins</groupId><artifactId>maven-shade-plugin</artifactId><version>3.1.1</version><configuration></configuration><executions><execution><phase>package</phase><goals><goal>shade</goal></goals></execution></executions></plugin></plugins></build></project>
To build and test this locally, you also need a template.yaml manifest file, which specifies the Lambda configuration and wires up a simple API Gateway to allow us to test our function; see Example 8-32.
Example 8-32. AWS Lambda template.yaml
AWSTemplateFormatVersion: '2010-09-09'
Transform: AWS::Serverless-2016-10-31
Description: >
    Product Catalogue Lambda Function

    (based on the sample SAM Template for sam-app)

Globals:
    Function:
        Timeout: 20


Resources:

    ProductCatalogueFunction:
        Type: AWS::Serverless::Function
        Properties:
            CodeUri: target/ProductCatalogue-1.0.jar
            Handler: uk.co.danielbryant.djshoppingserverless.↵
            productcatalogue.ProductCatalogueFunction::handleRequest
            Runtime: java8
            Environment: # More info about Env Vars: https://github.com/awslabs/↵
             serverless-application-model/blob/master/versions/↵
             2016-10-31.md#environment-object
                Variables:
                    PARAM1: VALUE
            Events:
                HelloWorld:
                    Type: Api # More info about API Event Source:
                    https://github.com/awslabs/serverless-application-model/↵
                     blob/master/versions/2016-10-31.md#api
                    Properties:
                        Path: /products
                        Method: get

Outputs:

    HelloWorldApi:
      Description: "API Gateway endpoint URL for Prod stage for
      Product Catalogue Lambda "
      Value: !Sub "https://${ServerlessRestApi}.execute-api
      .${AWS::Region}.amazonaws.com/prod/products/"

    HelloWorldFunction:
      Description: "Product Catalogue Lambda Function ARN"
      Value: !GetAtt ProductCatalogueFunction.Arn

    HelloWorldFunctionIamRole:
      Description: "Implicit IAM Role created for Product Catalogue Lambda function"
      Value: !GetAtt ProductCatalogueFunction.Arn
Testing AWS Lambda Event Handling
The SAM Local tooling allows you to generate test events through the sam local generate-event command. You can learn more about the event generation options available to you by using the --help argument at various locations within the CLI commands. In this example, you need to generate an example API gateway event. This is effectively a synthetic version of the JSON object that will be sent when a service or user makes a request against the Amazon API Gateway that is fronting your function. Let’s explore in Example 8-33.
Example 8-33. Generating test events using SAM Local
$ sam local generate-event --help
Usage: sam local generate-event [OPTIONS] COMMAND [ARGS]...

  Generate an event

Options:
  --help  Show this message and exit.

Commands:
  api       Generates a sample Amazon API Gateway event
  dynamodb  Generates a sample Amazon DynamoDB event
  kinesis   Generates a sample Amazon Kinesis event
  s3        Generates a sample Amazon S3 event
  schedule  Generates a sample scheduled event
  sns       Generates a sample Amazon SNS event
$
$ sam local generate-event api --help
Usage: sam local generate-event api [OPTIONS]

Options:
  -m, --method TEXT    HTTP method (default: "POST")
  -b, --body TEXT      HTTP body (default: "{ "test": "body"}")
  -r, --resource TEXT  API Gateway resource name (default: "/{proxy+}")
  -p, --path TEXT      HTTP path (default: "/examplepath")
  --debug              Turn on debug logging
  --help               Show this message and exit.
$
$ sam local generate-event api -m GET -b "" -p "/products"
{
    "body": null,
    "httpMethod": "GET",
    "resource": "/{proxy+}",
    "queryStringParameters": {
        "foo": "bar"
    },
    "requestContext": {
        "httpMethod": "GET",
        "requestId": "c6af9ac6-7b61-11e6-9a41-93e8deadbeef",
        "path": "/{proxy+}",
        "extendedRequestId": null,
        "resourceId": "123456",
        "apiId": "1234567890",
        "stage": "prod",
        "resourcePath": "/{proxy+}",
        "identity": {
            "accountId": null,
            "apiKey": null,
            "userArn": null,
            "cognitoAuthenticationProvider": null,
            "cognitoIdentityPoolId": null,
            "userAgent": "Custom User Agent String",
            "caller": null,
            "cognitoAuthenticationType": null,
            "sourceIp": "127.0.0.1",
            "user": null
        },
        "accountId": "123456789012"
    },
    "headers": {
        "Accept-Language": "en-US,en;q=0.8",
        "Accept-Encoding": "gzip, deflate, sdch",
        "X-Forwarded-Port": "443",
        "CloudFront-Viewer-Country": "US",
        "X-Amz-Cf-Id": "aaaaaaaaaae3VYQb9jd-nvCd-de396Uhbp027Y2JvkCPNLmGJHqlaA==",
        "CloudFront-Is-Tablet-Viewer": "false",
        "User-Agent": "Custom User Agent String",
        "Via": "1.1 08f323deadbeefa7af34d5feb414ce27.cloudfront.net (CloudFront)",
        "CloudFront-Is-Desktop-Viewer": "true",
        "CloudFront-Is-SmartTV-Viewer": "false",
        "CloudFront-Is-Mobile-Viewer": "false",
        "X-Forwarded-For": "127.0.0.1, 127.0.0.2",
        "Accept": "text/html,application/xhtml+xml,application/xml;q=0.9,
        image/webp,*/*;q=0.8",
        "Upgrade-Insecure-Requests": "1",
        "Host": "1234567890.execute-api.us-east-1.amazonaws.com",
        "X-Forwarded-Proto": "https",
        "Cache-Control": "max-age=0",
        "CloudFront-Forwarded-Proto": "https"
    },
    "stageVariables": null,
    "path": "/products",
    "pathParameters": {
        "proxy": "/products"
    },
    "isBase64Encoded": false
}
You can use this generated event to test your function in several ways. The simplest method is to simply pipe the results of the event generation through a local invocation of your function, which is triggered via sam local invoke <function_name>; see Example 8-34.
Example 8-34. Generating an Amazon API Gateway event and sending this to a local invocation of a Lambda function
$ sam local generate-event api -m GET -b "" -p "/products" | ↵
 sam local invoke ProductCatalogueFunction
2018-06-10 14:06:04 Reading invoke payload from stdin (you can also↵
 pass it from file with --event)
2018-06-10 14:06:05 Invoking uk.co.danielbryant.djshoppingserverless.↵
productcatalogue.ProductCatalogueFunction::handleRequest (java8)
2018-06-10 14:06:05 Found credentials in shared credentials file:↵
 ~/.aws/credentials
2018-06-10 14:06:05 Decompressing /Users/danielbryant/Documents/↵
dev/daniel-bryant-uk/tmp/aws-sam-java/sam-app/target/↵
ProductCatalogue-1.0.jar


Fetching lambci/lambda:java8 Docker container image......
2018-06-10 14:06:06 Mounting /private/var/folders/1x/↵
81f0qg_50vl6c4gntmt008w40000gn/T/tmp1kC9fo as↵
 /var/task:ro inside runtime container
START RequestId: 054d0a81-1fa9-41b9-870c-18394e6f6ea9↵
 Version: $LATEST
END RequestId: 054d0a81-1fa9-41b9-870c-18394e6f6ea9
REPORT RequestId: 054d0a81-1fa9-41b9-870c-18394e6f6ea9↵
 Duration: 82.60 ms Billed Duration: 100 ms↵
 Memory Size: 128 MB Max Memory Used: 19 MB


{"body":"[{\"id\":\"1\",\"name\":\"Widget\",↵
\"description\":\"Premium ACME Widgets\",↵
\"price\":1.19},{\"id\":\"2\",\"name\":\"Sprocket\",↵
\"description\":\"Grade B sprockets\",↵
\"price\":4.09},{\"id\":\"3\",\"name\":\"Anvil\",↵
\"description\":\"Large Anvils\",\"price\":45.5},↵
{\"id\":\"4\",\"name\":\"Cogs\",↵
\"description\":\"Grade Y cogs\",\"price\":1.80},↵
{\"id\":\"5\",\"name\":\"Multitool\",↵
\"description\":\"Multitools\",\"price\":154.09}]",↵
"headers":{"Content-Type":"application/json"},"statusCode":200}
If you want to customize the generated event in more detail, you can pipe the generated results to a file, modify the contents or the file, and then cat this into an invocation, as shown in Example 8-35.
Example 8-35. Piping a generated event to a file, modifying it, and then using cat to pipe the file content to SAM Local
$ sam local generate-event api -m GET -b "" -p "/products" > api_event.json
$ # modify the api_event.json file with your favourite editor and then save
$ cat api_event.json | sam local invoke ProductCatalogueFunction
...
You can also debug the function that is being invoking via Docker by specifying the --debug-port <port_number> and attaching a remote debugger to the specified port (for example, using an IDE like IntelliJ). You can then invoke the function, and the SAM Local framework will pause until you attach a debugging process. You can then set breakpoints and variable watches as you would typically when debugging, and simply allow the Lambda function call to complete in order to see the data returned via the terminal invocation.
Smoke Testing with SAM Local
SAM Local also allows you to simulate the running of an Amazon API Gateway locally, which can integrate with your function. The gateway and function can be started via SAM Local by typing sam local start-api in the directory with the template.yaml file. You can now curl the local endpoints to smoke test the Lambda function, as shown in Example 8-36.
Example 8-36. Using SAM Local to start the function and API gateway, and then curling the API
$ sam local start-api
2018-06-10 14:56:03 Mounting ProductCatalogueFunction
at http://127.0.0.1:3000/products [GET]
2018-06-10 14:56:03 You can now browse to the above
endpoints to invoke your functions. You do not need to restart/reload SAM CLI↵
 while working on your functions changes will be reflected↵
 instantly/automatically. You only need to restart SAM CLI if you update your↵
 AWS SAM template
2018-06-10 14:56:03  * Running on http://127.0.0.1:3000/ (Press CTRL+C to quit)

[Open new terminal]

$ curl http://127.0.0.1:3000/products
[{"id":"1","name":"Widget","description":"Premium ACME Widgets","price":1.19},↵
...]
If you switch back to the first terminal session in which you started the API, you will notice that additional information is echoed to the screen, which can be useful for viewing not only all of your logging statements, but also data on how long the function ran and how much memory it consumed. Although this data is unique to the configuration (and CPU and RAM) of your machine, it can be useful to attempt an approximate calculation of how much running your function will cost in production.
Example 8-37. Viewing the terminal output of SAM Local running a simulated local Amazon API Gateway
$ sam local start-api
2018-06-10 14:56:03 Mounting ProductCatalogueFunction
at http://127.0.0.1:3000/products [GET]
2018-06-10 14:56:03 You can now browse to the above
endpoints to invoke your functions. You do not need to restart/reload SAM CLI↵
 while working on your functions changes will be reflected↵
 instantly/automatically. You only need to restart SAM CLI if you update↵
 your AWS SAM template
2018-06-10 14:56:03  * Running on http://127.0.0.1:3000/ (Press CTRL+C to quit)
2018-06-10 14:56:37 Invoking uk.co.danielbryant.djshoppingserverless.
productcatalogue.ProductCatalogueFunction::handleRequest (java8)
2018-06-10 14:56:37 Found credentials in shared credentials file:↵
 ~/.aws/credentials
2018-06-10 14:56:37 Decompressing /Users/danielbryant/Documents/
dev/daniel-bryant-uk/tmp/aws-sam-java/sam-app/target/ProductCatalogue-1.0.jar


Fetching lambci/lambda:java8 Docker container image......
2018-06-10 14:56:38 Mounting /private/var/folders/↵
1x/81f0qg_50vl6c4gntmt008w40000gn/
T/tmp9BwMmf as /var/task:ro inside runtime container
START RequestId: b5afd403-2fb9-4b95-a887-9a8ea5874641 Version: $LATEST
END RequestId: b5afd403-2fb9-4b95-a887-9a8ea5874641
REPORT RequestId: b5afd403-2fb9-4b95-a887-9a8ea5874641 Duration: 94.77 ms
Billed Duration: 100 ms Memory Size: 128 MB Max Memory Used: 19 MB
2018-06-10 14:56:40 127.0.0.1 - - [10/Jun/2018 14:56:40]↵
 "GET /products HTTP/1.1" 200 -
Often when testing Lambda functions locally, your code will integrate with another service within Amazon, such as S3 or DynamoDB. This can cause difficulties with testing, and the solution is often to mock or virtualize dependencies by using the techniques presented within this chapter. Rather than creating your own solutions, it is wise to explore current community options (although care must be taken when downloading and executing any code or application locally, particularly if this will ultimately be run as root or within a build pipeline with access to staging or production). One particular community solution within the domain of AWS is LocalStack—a fully functional local AWS cloud stack.
FaaS: Azure Functions and VS Code
In 2016 Azure introduced Azure Functions, with support for Java applications being added to the FaaS platform in 2017. There isn’t a direct analogy to AWS SAM for specifying the infrastructure associated with Azure Functions, but the Microsoft team have focused on creating an effective set of configuration files and associated tooling in order to make it easy to build and test functions both locally and remotely. You can perform all of the necessary tasks via the command line, although in general we have found it much easier to use the excellent integrations with Microsoft’s VS Code editor.
Installing Azure Function Core Tools
In order to develop Azure Function-based applications with Java, you must have the following installed on your local development machine:
-
Java Developer Kit, version 8
-
Apache Maven, version 3.0 or above
-
Azure Functions Core Tools (which also requires the .NET Core 2.1 SDK)
-
VS Code (optional)
You can easily create Java functions using the Maven archetype generator. Example 8-38 demonstrates the initial parameters required for the mvn archetype:generate command and also the questions asked as part of the generation process:
Example 8-38. Creating a Java Azure Function using Maven
$ mvn archetype:generate -DarchetypeGroupId=com.microsoft.azure ↵
    -DarchetypeArtifactId=azure-functions-archetype
[INFO] Scanning for projects...
Downloading from central: https://repo.maven.apache.org/maven2/org/apache/↵
maven/plugins/maven-release-plugin/2.5.3/maven-release-plugin-2.5.3.pom
Downloaded from central: https://repo.maven.apache.org/maven2/org/apache/↵
maven/plugins/maven-release-plugin/2.5.3/maven-release-plugin-2.5.3.pom↵
 (11 kB at 24 kB/s)
...
Define value for property 'groupId'↵
 (should match expression '[A-Za-z0-9_\-\.]+'): helloworld
[INFO] Using property: groupId = helloworld
Define value for property 'artifactId'↵
 (should match expression '[A-Za-z0-9_\-\.]+'): ProductCatalogue
[INFO] Using property: artifactId = ProductCatalogue
Define value for property 'version' 1.0-SNAPSHOT: :
Define value for property 'package' helloworld: :↵
 uk.co.danielbryant.helloworldserverless.productcatalogue
Define value for property 'appName' productcatalogue-20180923111807725: :
Define value for property 'appRegion' westus: :
Define value for property 'resourceGroup' java-functions-group: :
Confirm properties configuration:
groupId: helloworld
groupId: helloworld
artifactId: ProductCatalogue
artifactId: ProductCatalogue
version: 1.0-SNAPSHOT
package: uk.co.danielbryant.helloworldserverless.productcatalogue
appName: productcatalogue-20180923111807725
appRegion: westus
resourceGroup: java-functions-group
 Y: : Y
...
[INFO] Project created from Archetype in dir: /Users/danielbryant/Documents/dev/↵
daniel-bryant-uk/tmp/ProductCatalogue
[INFO] ------------------------------------------------------------------------
[INFO] BUILD SUCCESS
[INFO] ------------------------------------------------------------------------
[INFO] Total time: 03:25 min
[INFO] Finished at: 2018-09-23T11:19:12+01:00
[INFO] ------------------------------------------------------------------------
As part of the generation process, a simple Java Function class is created, which contains an HttpTriggerJava function method that can be invoked with an HTTP GET request. Example 8-39 shows the contents of this class, and you can use this sample to learn how to work locally and debug an Azure Function.
Example 8-39. The sample Function class generated by the Maven archetype
publicclassFunction{@FunctionName("HttpTrigger-Java")publicHttpResponseMessageHttpTriggerJava(@HttpTrigger(name="req",methods={HttpMethod.GET,HttpMethod.POST},authLevel=AuthorizationLevel.ANONYMOUS)↵HttpRequestMessage<Optional<String>>request,finalExecutionContextcontext){context.getLogger().info("Java HTTP trigger processed a request.");// Parse query parameterStringquery=request.getQueryParameters().get("name");Stringname=request.getBody().orElse(query);if(name==null){returnrequest.createResponseBuilder(HttpStatus.BAD_REQUEST).body("Please pass a name on the query string↵or in the request body").build();}else{returnrequest.createResponseBuilder(HttpStatus.OK).body("Hello, "+name).build();}}}
In the root of the generated Java project you can see the configuration files local.settings.json and host.json. The file local.settings.json stores application settings, connection strings, and settings for the Azure Functions Core Tools. The host.json metadata file contains global configuration options that affect all functions for a function app. The default host.json is typically simple, but as Example 8-40 shows, you can configure HTTP API and endpoint properties, health checks, and logging for more advanced use cases.
Example 8-40. A more complicated host.json Azure Function configuration file
{"version":"2.0","extensions":{"http":{"routePrefix":"api","maxConcurrentRequests":5,"maxOutstandingRequests":30"dynamicThrottlesEnabled":false}},"healthMonitor":{"enabled":true,"healthCheckInterval":"00:00:10","healthCheckWindow":"00:02:00","healthCheckThreshold":6,"counterThreshold":0.80},"id":"9f4ea53c5136457d883d685e57164f08","logging":{"fileLoggingMode":"debugOnly","logLevel":{"Function.MyFunction":"Information","default":"None"},"applicationInsights":{"sampling":{"isEnabled":true,"maxTelemetryItemsPerSecond":5}}},"watchDirectories":["Shared","Test"]}
You can treat the project like any other Maven project, and you can build the artifact ready for upload to the Azure Function service via the mvn clean package command.
Building and Testing Locally
You can use Azure Function Core Tools to initialize your function ready for local testing by running the Azure-Function Maven plugin using the mvn azure-functions:run command, as demonstrated in Example 8-41.
Example 8-41. Using the Azure Maven plugin to run a Java function locally
$ mvn azure-functions:run
[INFO] Scanning for projects...
[INFO]
[INFO] --------------------< helloworld:ProductCatalogue >---------------------
[INFO] Building Azure Java Functions 1.0-SNAPSHOT
[INFO] --------------------------------[ jar ]---------------------------------
[INFO]
[INFO] --- azure-functions-maven-plugin:1.0.0-beta-6:run↵
 (default-cli) @ ProductCatalogue ---
AI: INFO 1: Configuration file has been successfully found as resource
AI: INFO 1: Configuration file has been successfully found as resource
[INFO] Azure Function App's staging directory found at:↵
 /Users/danielbryant/Documents/dev/daniel-bryant-uk/↵
tmp/ProductCatalogue/target/azure-functions/↵
productcatalogue-20180923111807725
[INFO] Azure Functions Core Tools found.


                  %%%%%%
                 %%%%%%
            @   %%%%%%    @
          @@   %%%%%%      @@
       @@@    %%%%%%%%%%%    @@@
     @@      %%%%%%%%%%        @@
       @@         %%%%       @@
         @@      %%%       @@
           @@    %%      @@
                %%
                %


Azure Functions Core Tools (2.0.3)
Function Runtime Version: 2.0.12115.0


...


Now listening on: http://0.0.0.0:7071
Application started. Press Ctrl+C to shut down.
Listening on http://0.0.0.0:7071/
Hit CTRL-C to exit...


Http Functions:


HttpTrigger-Java: http://localhost:7071/api/HttpTrigger-Java


[23/09/2018 10:25:24] [INFO] {MessageHandler.handle}:↵
 Message generated by "StartStream.Builder"
[23/09/2018 10:25:24] Worker initialized
[23/09/2018 10:25:25] "HttpTrigger-Java" loaded
 (ID: 7115f6e7-f5de-475c-b196-089e6a6a2a89,
 Reflection: "/Users/danielbryant/Documents/dev/
 daniel-bryant-uk/tmp/ProductCatalogue/target/
 azure-functions/productcatalogue-20180923111807725/
 ProductCatalogue-1.0-SNAPSHOT.jar"::
 "uk.co.danielbryant.helloworldserverless.productcatalogue.Function.run")
[23/09/2018 10:25:28] Host lock lease acquired by
 instance ID '000000000000000000000000826B7EEE'.
All of the HTTP functions that are available to call are displayed in the final stages of the mvn azure-functions:run output, along with the associated URL, e.g., "HttpTrigger-Java: http://localhost:7071/api/HttpTrigger-Java". You can call the locally running function using another terminal session and a tool like curl, as shown in Example 8-42. Note how the function accepts the data payload of LocalFunctionTest as a parameter the HttpTriggerJava function, and returns this prefixed with the string Hello.
Example 8-42. Using curl to call the local Azure Function endpoint
$ curl -w '\n' -d LocalFunctionTest http://localhost:7071/api/HttpTrigger-Java
Hello, LocalFunctionTest
You can press Ctrl-C in the terminal session that is running the local function in order to stop the function executing.
If you have installed the VS Code editor you can also install the Azure Functions Extension and Java Extension Pack, and run functions directly from the editor by pressing F5, as shown in Figure 8-3.
If you chose to run your functions using VS Code, you can also take advantage of the integrated debugging functionality. You do this by simply specifying break points in the margin of the appropriate line of Java code and calling the function endpoint via curl or another testing tool.
Figure 8-3. Running a Java Azure Function using the VS Code editor
Testing Remotely, Locally Using VS Code
In certain situations it can be very difficult to test your function locally. For example, you may have a dependency on a service running within the cloud that is challenging to stub or mock in a realistic way. Azure Functions make it relatively easy to debug a Java function running remotely in a cloud deployment.
To follow along with this guide you will need to have signed up for an Azure account, and also have a valid subscription, free or otherwise. To log into Azure from VS Code you will have select “Sign In” from the Command Palette, and follow the device login flow (which is typically achieved by opening your default browser and directing you to the the Azure login page).
After signing in, click the “Deploy to Function App” button on the Azure panel or select this option from the Command Palette. After this, select the folder of the project you would like to deploy, and follow the prompts to configure your function project. Once the function is deployed you will see the associated endpoint displayed in the output window. You can then curl this endpoint as you did with the locally running function, as shown in Example 8-43.
Example 8-43. Curling an Azure Function deployed into the Azure cloud
$ curl -w '\n' https://product-catalogue-5438231.azurewebsites.net/↵
api/httptrigger-java -d AzureFunctionsRemote
Hello, AzureFunctionsRemote
In order to debug this function running remotely you will need to install the cloud-debug-tools utility via the Node Package Manager (NPM), as shown in Example 8-44.
Example 8-44. Installing the cloud-debug-tools via NPM
$ npm install -g cloud-debug-tools
Once this tool is installed, you can run the debug proxy tool in order to attach to the running Function on Azure, specifying the remote base URL for the function. Example 8-45 shows an example of this.
Example 8-45. Using the cloud-debug-tools dbgproxy
$ dbgproxy product-catalogue-5438231.azurewebsites.net
Function App:                 "product-catalogue-5438231.azurewebsites.net"
Subscription:                 "Pay-As-You-Go" (ID = "xxxx")
Resource Group:               "new-java-function-group"
Fetch debug settings:         done
done
done
Set JAVA_OPTS:                done
Set HTTP_PLATFORM_DEBUG_PORT: done
Remote debugging is enabled on "product-catalogue-5438231.azurewebsites.net"
[Server] listening on 127.0.0.1:8898

Now you should be able to debug using "jdb -connect com.sun.jdi.SocketAttach:↵
hostname=127.0.0.1,port=8898"
Once the proxy is connected to the running function, you can add a new debugging configuration in VS Code (specified within the .vscode/launch.json file) to attach to the local port opened by it.
Example 8-46. Example debug launch configuration for VS Code
{"name":"Attach to Azure Functions on Cloud","type":"java","request":"attach","hostName":"localhost","port":8898}
Now you can set a break point within VS Code and attach to your cloud function using the editor’s debug panel functionality. When you call the remote function with the debugger attached you will be able to debug locally as is you were working in the cloud.
Summary
This chapter has explored how to best configure a local development environment for building and testing systems locally. You have explored the following techniques:
Mocking, stubbing, and service virtualization to simulate dependencies that you may not have access to (e.g., for connectivity or resource reasons).
The use of tooling like Vagrant to instantiate consistent and re-creatable VMs for local development.
The use of container-focused tooling like minikube and Telepresence for creating consistent and easily debuggable environments for local and remote development.
The use of support utilities included within AWS SAM Local to facilitate developing FaaS code and support infrastructure locally.
Using the Azure cloud-debug-tools to run locally debug a remotely executing Azure Function Java application.
In the next chapter, you will learn about continuous integration and the first stages of creating a continuous delivery pipeline.