Table of Contents for
Learning React
 Learning React
Published by
O'Reilly Media, Inc., 2017
Learning React
Published by
O'Reilly Media, Inc., 2017
- Cover
- nav
- Learning React
- Learning React
- Preface
- 1. Welcome to React
- 2. Emerging JavaScript
- 3. Functional Programming with JavaScript
- 4. Pure React
- 5. React with JSX
- 6. Props, State, and the Component Tree
- 7. Enhancing Components
- 8. Redux
- 9. React Redux
- 10. Testing
- 11. React Router
- 12. React and the Server
- Index
- About the Authors
- Colophon
Chapter 11. React Router
When the web started, most websites consisted of a series of pages that users could navigate through by requesting and opening separate files. The location of the current file or resource was listed in the browser’s location bar. The browser’s forward and back buttons would work as expected. Bookmarking content deep within a website would allow users to save a reference to a specific file that could be reloaded at the user’s request. On a page-based, or server-rendered, website, the browser’s navigation and history features simply work as expected.
In a single-page app, all of these features become problematic. Remember, in a single-page app, everything is happening on the same page. JavaScript is loading information and changing the UI. Features like browser history, bookmarks, and forward and back buttons will not work without a routing solution. Routing is the process of defining endpoints for your client’s requests.1 These endpoints work in conjunction with the browser’s location and history objects. They are used to identify requested content so that JavaScript can load and render the appropriate user interface.
Unlike Angular, Ember, or Backbone, React doesn’t come with a standard router. Recognizing the importance of a routing solution, engineers Michael Jackson and Ryan Florence created one named simply React Router. The React Router has been adopted by the community as a popular routing solution for React apps.2 It is used by companies including Uber, Zendesk, PayPal, and Vimeo.3
In this chapter, we will introduce the React Router and review how to leverage the HashRouter component to handle routing on the client.
Incorporating the Router
To demonstrate the capabilities of the React Router, we will build a classic starter website complete with About, Events, Products, and Contact Us sections (Figure 11-1). Although this website will feel as though it has multiple pages, there is only one: it is an SPA.
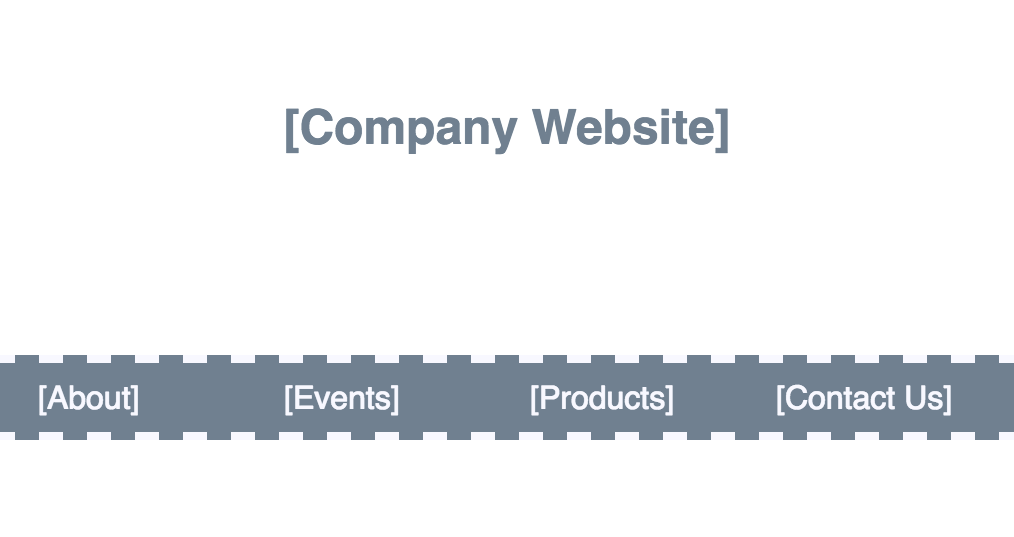
Figure 11-1. Company website home page
The sitemap for this website consists of a home page, a page for each section, and an error page to handle 404 Not Found errors (see Figure 11-2).
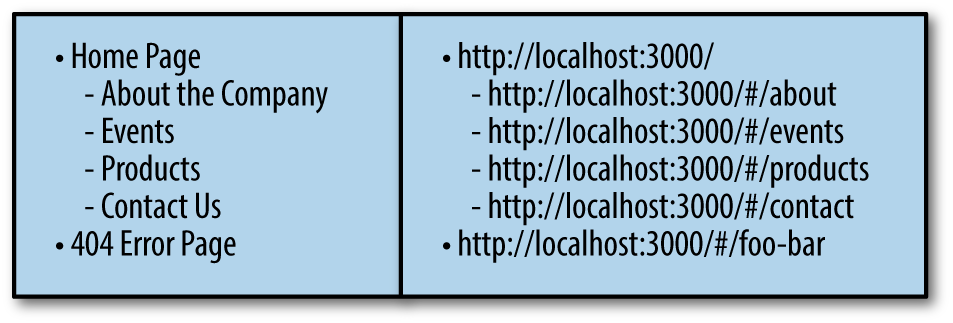
Figure 11-2. Page titles and routes
The router will allow us to set up routes for each section of the website. Each route is an endpoint that can be entered into the browser’s location bar. When a route is requested, we can render the appropriate content.
HashRouter
react-router-dom provides a couple of options for managing the navigation history in single-page applications. The HashRouter was designed for the client. Traditionally, hashes in the location bar were used to define anchor links. When the # is used in the location bar, the browser does not make a server request. When using the HashRouter, the # is always required before all routes.
The HashRouter is a nice tool to use for new projects or for small client sites that do not require a backend. The BrowserRouter is a preferred solution for most production-ready applications. We will discuss the BrowserRouter in Chapter 12, when we cover universal applications.
Let’s install react-router-dom, the package that we need to incorporate the router into our browser-based application:
npm install react-router-dom --save
We’ll also need a few placeholder components for each section or page in the sitemap. We can export these components from a single file:
exportconstHome=()=><sectionclassName="home"><h1>[HomePage]</h1></section>exportconstAbout=()=><sectionclassName="events"><h1>[AbouttheCompany]</h1></section>exportconstEvents=()=><sectionclassName="events"><h1>[EventsCalendar]</h1></section>exportconstProducts=()=><sectionclassName="products"><h1>[ProductsCatalog]</h1></section>exportconstContact=()=><sectionclassName="contact"><h1>[ContactUs]</h1></section>
When the application starts, instead of rendering a single App component, we will render the HashRouter component:
importReactfrom'react'import{render}from'react-dom'import{HashRouter,Route}from'react-router-dom'import{Home,About,Events,Products,Contact}from'./pages'window.React=Reactrender(<HashRouter><divclassName="main"><Routeexactpath="/"component={Home}/><Routepath="/about"component={About}/><Routepath="/events"component={Events}/><Routepath="/products"component={Products}/><Routepath="/contact"component={Contact}/></div></HashRouter>,document.getElementById('react-container'))
The HashRouter component is rendered as the root component for our application. Each route can be defined within the HashRouter using the Route component.
These routes tell the router which component to render when the window’s location changes. Each Route component has path and component properties. When the browser’s location matches the path, the component will be displayed. When the location is /, the router will render the Home component. When the location is /products, the router will render the Products component.
The first route, the one that displays the Home component, has an exact property. This means that the Home component will only be displayed when the location exactly matches the root /.
At this point, we can run the app and physically type the routes into the browser’s location bar to watch the content change. For example, type http://localhost:3000/#/about into the location bar and watch the About component render.
We do not expect our users to navigate the website by typing routes into the location bar. The react-router-dom provides a Link component that we can use to create browser links.
Let’s modify the home page to contain a navigation menu with a link for each route:
import{Link}from'react-router-dom'exportconstHome=()=><divclassName="home"><h1>[CompanyWebsite]</h1><nav><Linkto="about">[About]</Link><Linkto="events">[Events]</Link><Linkto="products">[Products]</Link><Linkto="contact">[ContactUs]</Link></nav></div>
Now users can access every internal page from the home page by clicking on a link. The browser’s back button will take them back to the home page.
Router Properties
The React Router passes properties to the components that it renders. For instance, we can obtain the current location via a property. Let’s use the current location to help us create a 404 Not Found component:
exportconstWhoops404=({location})=><divclassName="whoops-404"><h1>Resourcenotfoundat'{location.pathname}'</h1></div>
The Whoops404 component will be rendered by the router when users enter routes that have not been defined. Once rendered, the router will pass a location object to this component as a property. We can obtain and use this object to get the current pathname for the requested route. We will use this pathname to notify the user that we cannot find the resource that they have requested.
Now let’s add the Whoops404 component to the application using a Route:
import{HashRouter,Route,Switch}from'react-router-dom'...render(<HashRouter><divclassName="main"><Switch><Routeexactpath="/"component={Home}/><Routepath="/about"component={About}/><Routepath="/events"component={Events}/><Routepath="/products"component={Products}/><Routepath="/contact"component={Contact}/><Routecomponent={Whoops404}/></Switch></div></HashRouter>,document.getElementById('react-container'))
Since we only want to display the Whoops404 component when no other Route matches, we need to use the Switch component. The Switch component only displays the first route that matches. This assures that only one of these routes will be rendered. If none of the locations match a Route, the last route—the one that does not contain a path property—will be displayed. If you were to enter the route http://localhost:3000/#/profits, you would see Figure 11-3.

Figure 11-3. 404 error page
This section introduced the basics of implementing and working with the React Router. All Route components need to be wrapped with a router, in this case the HashRouter, which selects the component to render based on the window’s present location. Link components can be used to facilitate navigation. These basics can get you pretty far, but they just scratch the surface of the router’s capabilities.
Nesting Routes
Route components are used with content that should be displayed only when specific URLs are matched. This feature allows us to organize our web apps into eloquent hierarchies that promote content reuse.
In this section, we will also look at how content can be organized into subsections that contain submenus.
Using a Page Template
Sometimes, as users navigate our apps, we want some of the UI to stay in place. In the past, solutions such as page templates and master pages have helped web developers reuse UI elements. React components can naturally be composed into templates using the children property.
Let’s consider the simple starter website. Once inside, each section should display the same main menu. The content on the right side of the screen should change as the user navigates the website, but the content on the left side of the screen should remain intact (see Figure 11-4).
Let’s create a reusable PageTemplate component that we can use as a template for these inside pages. This component will always display the main menu, but it will render nested content as users navigate the website.
First, we’ll need the MainMenu component:
importHomeIconfrom'react-icons/lib/fa/home'import{NavLink}from'react-router-dom'import'./stylesheets/menus.scss'constselectedStyle={backgroundColor:"white",color:"slategray"}exportconstMainMenu=()=><navclassName="main-menu"><NavLinkto="/"><HomeIcon/></NavLink><NavLinkto="/about"activeStyle={selectedStyle}>[About]</NavLink><NavLinkto="/events"activeStyle={selectedStyle}>[Events]</NavLink><NavLinkto="/products"activeStyle={selectedStyle}>[Products]</NavLink><NavLinkto="/contact"activeStyle={selectedStyle}>[ContactUs]</NavLink></nav>
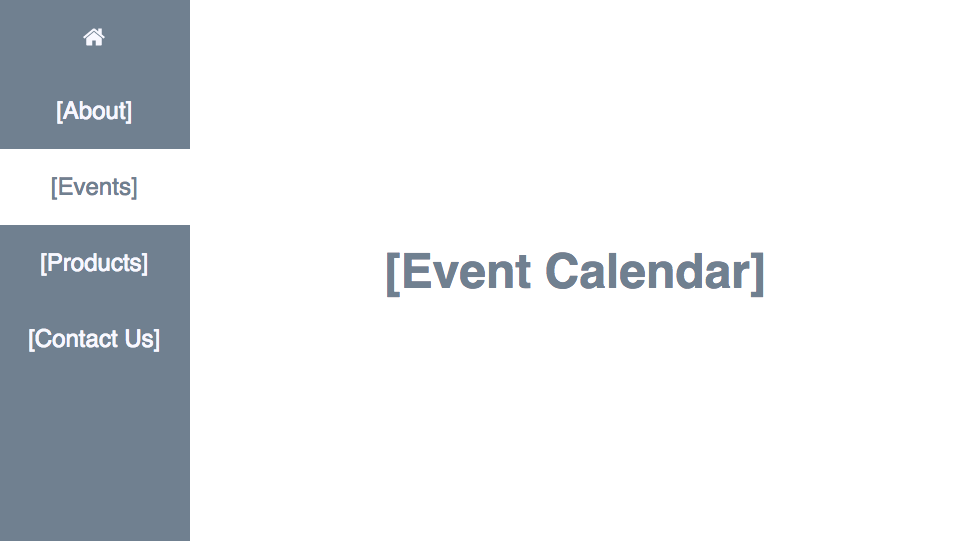
Figure 11-4. Inside Page: Events
The MainMenu component uses the NavLink component. The NavLink component can be used to create links that can be styled when they are active. The activeStyle property can be used to set the CSS to indicate which link is active or currently selected.
The MainMenu component will be used in the PageTemplate component:
import{MainMenu}from'./ui/menus'...constPageTemplate=({children})=><divclassName="page"><MainMenu/>{children}</div>
The children of the PageTemplate component are where each section will be rendered. Here, we are adding the children just after the MainMenu. Now we can compose our sections using the PageTemplate:
exportconstEvents=()=><PageTemplate><sectionclassName="events"><h1>[EventCalendar]</h1></section></PageTemplate>exportconstProducts=()=><PageTemplate><sectionclassName="products"><h1>[ProductCatalog]</h1></section></PageTemplate>exportconstContact=()=><PageTemplate><sectionclassName="contact"><h1>[ContactUs]</h1></section></PageTemplate>exportconstAbout=({match})=><PageTemplate><sectionclassName="about"><h1>About</h1></section></PageTemplate>
If you run the application, you will see that each section now displays the same MainMenu. The content on the right side of the screen changes as you navigate through the interior pages of the website.
Subsections and Submenus
Next, we will nest four components under the About section using the Route component (see Figure 11-5).
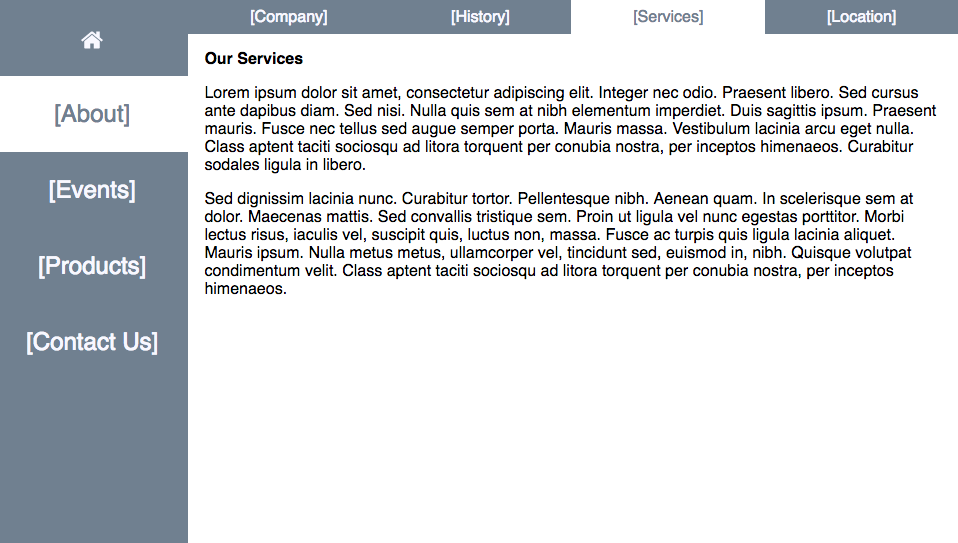
Figure 11-5. Subpages in the About section
We need to add pages for Company, History, Services, and Location. When the user selects the About section, they should be defaulted to the Company page under that section. The outline looks like this:
-
Home Page
-
About the Company
-
Company (default)
-
History
-
Services
-
Location
-
-
Events
-
Products
-
Contact Us
-
-
404 Error Page
The new routes that we need to create will reflect this hierarchy:
-
http://localhost:3000/
-
http://localhost:3000/#/about
-
http://localhost:3000/#/about
-
http://localhost:3000/#/about/history
-
http://localhost:3000/#/about/services
-
http://localhost:3000/#/about/location
-
-
http://localhost:3000/#/events
-
http://localhost:3000/#/products
-
http://localhost:3000/#/contact
-
-
http://localhost:3000/#/foo-bar
Let’s create a submenu for the About section. We will use NavLink components and set the activeStyle to the same activeStyle used in the MainMenu:
exportconstAboutMenu=({match})=><divclassName="about-menu"><li><NavLinkto="/about"style={match.isExact&&selectedStyle}>[Company]</NavLink></li><li><NavLinkto="/about/history"activeStyle={selectedStyle}>[History]</NavLink></li><li><NavLinkto="/about/services"activeStyle={selectedStyle}>[Services]</NavLink></li><li><NavLinkto="/about/location"activeStyle={selectedStyle}>[Location]</NavLink></li></div>
The AboutMenu component uses NavLink components to direct users to interior content under the About section. This component will be rendered using a Route which means that it receives routing properties. We will need to use the match property that is sent to this component from the Route.
All of the NavLink components use the activeStyle property except for the first one. The activeStyle will set the style property for the link when the location matches to the link’s route. For instance, when the user navigates to http://localhost:3000/about/services, the Services NavLink will render a white background.
The first NavLink component does not use activeStyle. Instead, the style property is set to the selectedStyle only when the route matches exactly /about. The match.isExact property is true when the location is /about and false when the location is /about/services. Technically the /about route matches for both locations, but it is only an exact match when the location is /about.
Placeholder Components
We also need to remember to stub placeholder components for our new sections: Company, Services, History, and Location. Here is an example of the Services placeholder. It simply displays some Lorem Ipsum text:
exportconstServices=()=><sectionclassName="services"><h2>OurServices</h2><p>Loremipsumdolorsitamet,consecteturadipiscingelit.Integernecodio.Praesentlibero.Sedcursusantedapibusdiam.Sednisi.Nullaquissematnibhelementumimperdiet.Duissagittisipsum.Praesentmauris.Fuscenectellussedauguesemperporta.Maurismassa.Vestibulumlaciniaarcuegetnulla.Classaptenttacitisociosquadlitoratorquentperconubianostra,perinceptoshimenaeos.Curabitursodalesligulainlibero.</p><p>Seddignissimlacinianunc.Curabiturtortor.Pellentesquenibh.Aeneanquam.Inscelerisquesematdolor.Maecenasmattis.Sedconvallistristiquesem.Proinutligulavelnuncegestasporttitor.Morbilectusrisus,iaculisvel,suscipitquis,luctusnon,massa.Fusceacturpisquisligulalaciniaaliquet.Maurisipsum.Nullametusmetus,ullamcorpervel,tinciduntsed,euismodin,nibh.Quisquevolutpatcondimentumvelit.Classaptenttacitisociosquadlitoratorquentperconubianostra,perinceptoshimenaeos.</p></section>
Now we are ready to add routes to the About component:
exportconstAbout=({match})=><PageTemplate><sectionclassName="about"><Routecomponent={AboutMenu}/><Routeexactpath="/about"component={Company}/><Routepath="/about/history"component={History}/><Routepath="/about/services"component={Services}/><Routepath="/about/location"component={Location}/></section></PageTemplate>
This About component will be reused across the entire section. The location will tell the app which subsection to render. For example, when the location is http://localhost:3000/about/history, the History component will be rendered inside of the About component.
This time, we are not using a Switch component. Any Route that matches the location will render its associated component. The first Route will always display the AboutMenu. Additionally, any other Routes that match will render their components as well.
Using redirects
Sometimes you want to redirect users from one route to another. For instance, we can make sure that if users try to access content via http://localhost:3000/services, they get redirected to the correct route: http://localhost:3000/about/services.
Let’s modify our application to include redirects to ensure that our users can access the correct content:
import{HashRouter,Route,Switch,Redirect}from'react-router-dom'...render(<HashRouter><divclassName="main"><Switch><Routeexactpath="/"component={Home}/><Routepath="/about"component={About}/><Redirectfrom="/history"to="/about/history"/><Redirectfrom="/services"to="/about/services"/><Redirectfrom="/location"to="/about/location"/><Routepath="/events"component={Events}/><Routepath="/products"component={Products}/><Routepath="/contact"component={Contact}/><Routecomponent={Whoops404}/></Switch></div></HashRouter>,document.getElementById('react-container'))
The Redirect component allows us to redirect the user to a specific route.
Note
When routes are changed in a production application, users will still try to access old content via old routes. This typically happens because of bookmarks. The Redirect component provides us with a way to load the appropriate content for users, even if they are accessing your site via an old bookmark.
The React Router allows us to compose Route components anywhere within our application because the HashRouter is our root component. We can now organize our content in hierarchies that are easy to navigate.
Router Parameters
Another useful feature of the React Router is the ability to set up routing parameters. Routing parameters are variables that obtain their values from the URL. They are extremely useful in data-driven web applications for filtering content or managing display preferences.
Adding Color Details Page
Let’s improve the color organizer by adding the ability to select and display one color at a time using the React Router. When a user selects a color by clicking on it, the app should render that color and display its title and hex value (see Figure 11-6).

Figure 11-6. Color Details screen
Every color has a unique ID. This ID can be used to find specific colors that are saved in state. For example, we can create a findById function that will find an object in an array by the id field:
import{compose}from'redux'exportconstgetFirstArrayItem=array=>array[0]exportconstfilterArrayById=(array,id)=>array.filter(item=>item.id===id)exportconstfindById=compose(getFirstArrayItem,filterArrayById)
This findById function follows the functional programming techniques discussed in Chapter 2. We can see that the findById method first filters the array by the ID and then returns the first item found in that filtered array. We can use the findById function to locate colors in state by their unique IDs.
Using the router, we can obtain the color ID via the URL. For example, this is the URL that we will use to display the color “Lawn” because the ID for the color lawn is being passed within the URL:
http://localhost:3000/#/58d9caee-6ea6-4d7b-9984-65b145031979
Router parameters allow us to capture this value. They can be defined in routes using a colon. For example, we could capture the unique id and save it in a parameter named id with the Route:
<Routeexactpath="/:id"component={UniqueIDHeader}/>
The UniqueIDHeader component can obtain the id from the match.params object:
constUniqueIDHeader=({match})=><h1>{match.params.id}</h1>
We can create parameters any time we want to collect data from the URL.
Lets create a ColorDetails component that will be rendered when the user selects a single color:
constColorDetails=({title,color})=><divclassName="color-details"style={{backgroundColor:color}}><h1>{title}</h1><h1>{color}</h1></div>
The ColorDetails component is a presentation component—it expects properties for the color’s details. Since we are using Redux, we will need to add a new container that can find the selected color in state using a routing parameter:
exportconstColor=connect((state,props)=>findById(state.colors,props.match.params.id))(ColorDetails)
The Color container is created using the connect HOC. The first argument is a function that is used to set the properties of the ColorDetails based on a single color from state. Using the findById function that we defined earlier in this section, we will locate an individual color object in state with an id parameter that is obtained from the URL. The connect HOC will map the data from the located color object to the properties of the ColorDetails component.
The connect HOC also maps any properties sent to the Color container to the ColorDetails component. This means that all of the router properties will be passed to ColorDetails as well.
Let’s add some navigation to the ColorDetails component using the router’s history property:
constColorDetails=({title,color,history})=><divclassName="color-details"style={{backgroundColor:color}}onClick={()=>history.goBack()}><h1>{title}</h1><h1>{color}</h1></div>
When users click the div.color-details element, the history.goBack() method will be invoked. The user will be navigated back to the previous location.
Now that we have a Color container, we need to add it to our app. First, we will need to wrap the App component with a HashRouter when it is initially rendered:
import{HashRouter}from'react-router-dom'...render(<Providerstore={store}><HashRouter><App/></HashRouter></Provider>,document.getElementById('react-container'))
Now we are ready to configure routes anywhere within our application. Let’s add some routes to the App component:
import{Route,Switch}from'react-router-dom'importMenufrom'./ui/Menu'import{Colors,Color,NewColor}from'./containers'import'../stylesheets/APP.scss'constApp=()=><Switch><Routeexactpath="/:id"component={Color}/><Routepath="/"component={()=>(<divclassName="app"><Menu/><NewColor/><Colors/></div>)}/></Switch>exportdefaultApp
The Switch component is used to render one of two routes: an individual color, or the main app components. The first Route renders the Color component when an id is passed in a URL. For instance, this route will match when the location is:
http://localhost:3000/#/58d9caee-6ea6-4d7b-9984-65b145031979
Any other location will match / and display the main application components. The second Route groups several components under a new anonymous stateless functional component. As a result, users will either see an individual color or a list of colors, depending upon the URL.
At present, we can test our application by adding the id parameter directly to the browser’s location bar. However, users will need a way to navigate to the details view as well.
This time, the NavLink component will not be used to handle the navigation from the list of colors to a color’s details. Instead, we will navigate by directly using the router’s history object.
Let’s add navigation to the Color component found in the ./ui folder. This component is rendered by the ColorList. It does not receive routing properties from the Route. You could explicitly pass those properties all the way down the tree to the Color component, but it’s easier to use the withRouter function. This ships with react-router-dom. withRouter can be used to add routing properties to any component that is rendered somewhere under a Route.
Using withRouter, we can obtain the router’s history object as a property. We can use it to navigate from within the Color component:
import{withRouter}from'react-router'...classColorextendsComponent{render(){const{id,title,color,rating,timestamp,onRemove,onRate,history}=this.propsreturn(<sectionclassName="color"style={this.style}><h1ref="title"onClick={()=>history.push(`/${id}`)}>{title}</h1><buttononClick={onRemove}><FaTrash/></button><divclassName="color"onClick={()=>history.push(`/${id}`)}style={{backgroundColor:color}}></div><TimeAgotimestamp={timestamp}/><div><StarRatingstarsSelected={rating}onRate={onRate}/></div></section>)}}exportdefaultwithRouter(Color)
withRouter is an HOC. When we export the Color component, we send it to withRouter which wraps it with a component that passes the router properties: match, history, and location.
Navigation is obtained by using the history object directly. When a user clicks the color title or the color itself, a new route is pushed into the history object. This new route is a string that contains the color’s id. Pushing this route into history will cause the navigation to occur.
Moving Color Sort State to Router
You do not have to limit the use of Router parameters. They can be more than filters for looking up specific data in state. They can also be used to obtain information necessary for rendering the UI.
The Redux store presently contains the information about how the colors should be sorted in state via the sort property. Would it make sense to move this variable from the Redux store to a route parameter? The variable itself is not data; it provides info about how the data should be presented. The sort variable is a string, which also makes it an ideal candidate for a route parameter. Finally, we want our users to be able to send the sort state to other users in a link. If they prefer to have the colors sorted by rating, they can send that info to other users in a link, or bookmark that content as is in the browser.
Let’s move the sort state of the color wall to a route parameter. These are the routes that we will use to sort our colors:
- /#/ default
-
Sort by date
- /#/sort/title
-
Sort by title
- /#/sort/rating
-
Sort by rating
First, we need to remove the sort reducer from the ./store/index.js file; we no longer need it. As a result:
combineReducers({colors,sort})
becomes:
combineReducers({colors})
Removing the reducer means that the state variable will no longer be managed by Redux.
Next, we can also remove the container for the Menu component from ./src/components/containers.js. The container is used to link the state of the Redux store to the Menu presentation component. Sort is no longer stored in state, so we no longer need a container.
Additionally, in the containers.js file, we need to change the Colors container. It will no longer receive the sort value from state. Instead, it will receive sorting instructions as a route parameter that is passed to the Color component inside of the match property:
exportconstColors=connect(({colors},{match})=>({colors:sortColors(colors,match.params.sort)}),dispatch=>({onRemove(id){dispatch(removeColor(id))},onRate(id,rating){dispatch(rateColor(id,rating))}}))(ColorList)
Now the colors are being sorted via a routing parameter before they are passed to the ColorList as a property.
Next, we need to replace the Menu component with one that contains links to our new routes. Much like the About menu that we created earlier in this chapter, the visual state of the menu will be controlled by setting the activeStyle property of the NavLink:
import{NavLink}from'react-router'constselectedStyle={color:'red'}constMenu=({match})=><navclassName="menu"><NavLinkto="/"style={match.isExact&&selectedStyle}>date</NavLink><NavLinkto="/sort/title"activeStyle={selectedStyle}>title</NavLink><NavLinkto="/sort/rating"activeStyle={selectedStyle}>rating</NavLink></nav>exportdefaultMenu
Now users can sort the colors via the URL. When there is not a sort parameter available, the colors will be sorted by date. This menu will change the color of the link to indicate to the user how the data has been sorted.
We need to modify the App component. We need to handle sorting the colors via routes:
constApp=()=><Switch><Routeexactpath="/:id"component={Color}/><Routepath="/"component={()=>(<divclassName="app"><Routecomponent={Menu}/><NewColor/><Switch><Routeexactpath="/"component={Colors}/><Routepath="/sort/:sort"component={Colors}/></Switch></div>)}/></Switch>
First, the Menu needs the match property, so we will render the Menu with a Route. The Menu will always render alongside the NewColor form and the list of colors because the Route does not have a path.
After the NewColor component, we want to display either the default list of colors, sorted by default, or the list of colors sorted by a parameter. These routes are wrapped in the Switch component to ensure that we only render one Colors container.
When users navigate to the home route, http://localhost:3000, the App component is rendered. By default, the Colors container is rendered within the App. The value of the sort parameter is undefined, so the colors are sorted by default.
If the user navigates to http://localhost:3000/sort/rating, the Colors container will also be rendered, but this time the sort parameter should have a value, and the colors should be sorted by that value.
Routing parameters are an ideal tool to obtain data that affects the presentation of your user interface. However, they should only be used when you want users to capture these details in a URL. For example, in the case of the color organizer, users can send other users links to specific colors or all the colors sorted by a specific field. Users can also bookmark those links to return specific data. If you want your users to save information about the presentation in a URL, then a routing parameter is your solution.
In this chapter, we reviewed the basic usage of the React Router. All of the examples in this chapter incorporated the HashRouter. In the next chapter, we will continue to use the router both on the client and the server with the BrowserRouter, and we’ll use the StaticRouter to render the current routing context on the server.
1 Express.js documentation, “Basic Routing”.