Table of Contents for
Learning React
 Learning React
Published by
O'Reilly Media, Inc., 2017
Learning React
Published by
O'Reilly Media, Inc., 2017
- Cover
- nav
- Learning React
- Learning React
- Preface
- 1. Welcome to React
- 2. Emerging JavaScript
- 3. Functional Programming with JavaScript
- 4. Pure React
- 5. React with JSX
- 6. Props, State, and the Component Tree
- 7. Enhancing Components
- 8. Redux
- 9. React Redux
- 10. Testing
- 11. React Router
- 12. React and the Server
- Index
- About the Authors
- Colophon
Chapter 10. Testing
In order to keep up with our competitors, we must move quickly while ensuring quality. One vital tool that allows us to do this is unit testing. Unit testing makes it possible to verify that every piece, or unit, of our application functions as intended.1
One benefit of practicing functional techniques is that they lend themselves to writing testable code. Pure functions are naturally testable. Immutability is easily testable. Composing applications out of small functions designed for specific tasks produces testable functions or units of code.
In this section, we will demonstrate techniques that can be used to unit test React Redux applications. This chapter will not only cover testing, but also tools that can be used to help evaluate and improve your code and your tests.
ESLint
In most programming languages, code needs to be compiled before you can run anything. Programming languages have pretty strict rules about coding style and will not compile until the code is formatted appropriately. JavaScript does not have those rules and does not come with a compiler. We write code, cross our fingers, and run it in the browser to see if it works or not. The good news is that there are tools that we can use to analyze our code and make us stick to specific formatting guidelines.
The process of analyzing JavaScript code is called hinting or linting. JSHint and JSLint are the original tools used to analyze JavaScript and provide feedback about formatting. ESLint is the latest code linter that supports emerging JavaScript syntax. Additionally, ESLint is pluggable. This means that we can create and share plugins that can be added to ESLint configurations to extend its capabilities.
We will be working with a plugin called eslint-plugin-react. This plugin will analyze our JSX and React syntax in addition to our JavaScript.
Let’s install eslint globally. You can install eslint with npm:
sudonpminstall-geslint
Before we use ESLint, we’ll need to define some configuration rules that we can agree to follow. We’ll define these in a configuration file that is located in our project root. This file can be formatted as JSON or YAML. YAML is a data serialization formation like JSON but with less syntax, making it a little easier for humans to read.
ESLint comes with a tool that helps us set up configuration. There are several companies that have created ESLint config files that we can use as a starting point, or we can create our own.
We can create an ESLint configuration by running eslint --init and answering some questions about our coding style:
$ eslint --init

? How would you like to configure ESLint?
Answer questions about your style

? Are you using ECMAScript 6 features? Yes
? Are you using ES6 modules? Yes
? Where will your code run? Browser
? Do you use CommonJS? Yes
? Do you use JSX? Yes
? Do you use React? Yes
? What style of indentation do you use? Spaces
? What quotes do you use for strings? Single
? What line endings do you use? Unix
? Do you require semicolons? No
? What format do you want your config file to be in? YAML

Local ESLint installation not found.
Installing eslint, eslint-plugin-react
After eslint --init runs, three things happen:
-
ESLint and
eslint-plugin-reactare installed locally to the ./node_modules folder. -
These dependencies are automatically added to the package.json file.
-
A configuration file, .eslintrc.yml, is created and added to the root of our project.
Let’s test our ESLint configuration out by creating a sample.js file:
constgnar="gnarly";constinfo=({file=__filename,dir=__dirname})=><p>{dir}:{file}</p>switch(gnar){default:console.log('gnarley')break}
This file has some issues, but nothing that would cause errors in the browser. Technically, this code works just fine. Let’s run ESLint on this file and see what feedback we get based upon our customized rules:
$ ./node_modules/.bin/eslint sample.js

/Users/alexbanks/Desktop/eslint-learn/sample.js
  1:20  error  Strings must use singlequote           quotes
  1:28  error  Extra semicolon                        semi
  3:7   error  'info' is defined but never used       no-unused-vars
  3:28  error  '__filename' is not defined            no-undef
  3:44  error  '__dirname' is not defined             no-undef
  7:5   error  Expected indentation of 0 space ch...  indent
  8:9   error  Expected indentation of 4 space ch...  indent
  8:9   error  Unexpected console statement           no-console
  9:9   error  Expected indentation of 4 space ch...  indent

✖ 9 problems (9 errors, 0 warnings)
ESLint has analyzed our sample and is reporting some issues based upon our configuration choices. We see here that ESLint is complaining about the use of double quotes and a semicolon on line 1 because we have specified single quotes only and no semicolons in our .eslintrc.yml configuration file. Next, ESLint complains about the info function being defined but never used; ESLint hates that. ESLint also complains about __filename and __dirname because it does not automatically include Node.js globals. And finally, ESLint does not like the indentation of our switch statement or the use of a console statement.
We can modify our ESLint configuration, .eslintrc.yml, to make it less strict:
env:
  browser: true
  commonjs: true
  es6: true
extends: 'eslint:recommended'
parserOptions:
  ecmaFeatures:
    experimentalObjectRestSpread: true
    jsx: true
  sourceType: module
plugins:
  - react
rules:
  indent:
    - error
    - 4
    - SwitchCase: 1
  quotes:
    - error
    - single
  semi:
    - error
    - never
  linebreak-style:
    - error
    - unix
  no-console: 0
globals:
    __filename: true
    __dirname: true
Upon opening .eslintrc.yml, you’ll first notice that the file is readable and approachable—that is the goal of YAML. Here, we’ve modified the indentation rules to allow for the indentation of switch statements. Next we’ve added a no-console rule, which will prevent ESLint from complaining about the console.log statement. Finally, we’ve added a couple of global variables for ESLint to ignore.
We’ll still need to make a couple of changes to our file in order to follow our style guide:
constgnar='gnarly'exportconstinfo=({file=__filename,dir=__dirname})=><p>{dir}:{file}</p>switch(gnar){default:console.log('gnarly')break}
We’ve removed the semicolon and double quotes from line 1. Also, exporting the info function means ESLint will no longer complain about it being unused. Between modifying the ESLint configuration and making some changes to our code, we have a file that passes the code-formatting test.
The command eslint . will lint your entire directory. In order to do this, you will most likely require that ESLint ignore some JavaScript files. The .eslintignore file is where you can add files or directories for ESLint to ignore:
dist/assets/
sample.js
This .eslintignore file tells ESLint to ignore our new sample.js file, as well as anything in the dist/assets folder. If we do not ignore the assets folder, ESLint will analyze the client bundle.js file and it will find a lot to complain about in that file.
Let’s add a script to our package.json file for running lint:
"scripts":{"lint":"./node_modules/.bin/eslint ."}
Now ESLint can be run any time we want with npm run lint, and it will analyze all of the files in our project except the ones we have ignored.
Testing Redux
Testing is essential for Redux because it only works with data—it does not have a UI. Redux is naturally testable because its reducers are pure functions, and it is easy to inject state into a store. Writing a reducer test first makes it easy to understand how the reducer is supposed to work. And writing tests for your store and your action creators will give you confidence that your client data layer is working as intended.
In this section, we will write some unit tests for the Redux components of the color organizer.
Test-Driven Development
Test-driven development, or TDD, is a practice—not a technology. It does not mean that you simply have tests for your application. Rather, it is the practice of letting the tests drive the development process. In order to practice TDD, you must follow these steps:
- Write the tests first
-
This is the most critical step. You declare what you are building and how it should work first in a test.
- Run the tests and watch them fail (red)
-
Run your tests and watch them fail before you write the code.
- Write the minimal amount of code required to make the tests pass (green)
-
Now all you have to do is make the tests pass. Focus specifically on making each test pass; do not add any functionality beyond the scope of the test.
- Refactor both the code and the tests (gold)
-
Once the tests pass, it is time to take a closer look at your code and your tests. Try to express your code as simply and as beautifully as possible.2
TDD is an excellent way to approach a Redux application. It is typically easier to reason about how a reducer should work before actually writing the reducer. Practicing TDD will allow you to build and certify the entire data structure for a feature or application independent of the UI.
TDD and Learning
If you are new to TDD, or new to the language that you are testing, you may find it challenging to write a test before writing code. This is to be expected, and it is OK to write the code before the test until you get the hang of it. Try to work in small batches: a little bit of code, a few tests, and so on. Once you get the hang of how to write a test, it will be easier to write the tests first.
For the remainder of this chapter, we will be writing tests for code that already exists. Technically, we are not practicing TDD. However, in the next section we will pretend that our code does not already exist so we can get a feel for the TDD workflow.
Testing Reducers
Reducers are pure functions that calculate and return results based upon the input arguments. In a test, we get to control the input, the current state, and the action. Given a current state and an action, we should be able to predict a reducer’s output.
Before we can get started writing tests, we will need to install a testing framework. You can write tests for React and Redux with any JavaScript testing framework. We’ll use Jest, a JavaScript testing framework that was designed with React in mind:
sudo npm install -g jest
This command installs Jest and the Jest CLI globally. You can now run the jest command from any folder to run the tests.
Since we are using emerging JavaScript and React, we will need to transpile our code and our tests before they can run. Just install the babel-jest package to make that possible:
npm install --save-dev babel-jest
With babel-jest installed, all of your code and tests will be transpiled with Babel before the tests run. A .babelrc file is required for this to work, but we should already have one in the root of our project.
create-react-app
Projects that were initialized with create-react-app already come with the jest and babel-jest packages installed. They also create a __tests__ directory in the root of the project.
Jest has two important functions for setting up tests: describe and it. describe is used to create a suite of tests, and it is used for each test. Both functions expect the name of the test or suite and a callback function that contains the test or suite of tests.
Let’s create a test file and stub our tests. Create a folder called ./__tests__/store/reducers, and in it create a new JavaScript file called color.test.js:
describe("color Reducer",()=>{it("ADD_COLOR success")it("RATE_COLOR success")})
In this example, we create a suite of tests for the color reducer by stubbing a test for each action that affects the reducer. Each test is defined with the it function. You can set up a pending test by only sending a single argument to the it function.
Run this test with the jest command. Jest will run and report that it has skipped our two pending tests:
$ jest

Test Suites: 1 skipped, 0 of 1 total
Tests:       2 skipped, 2 total
Snapshots:   0 total
Time:        0.863s

Ran all test suites.
Test Files
Jest will run any tests found in the __tests__ directory, and any JavaScript files in your project whose names end with .test.js. Some developers prefer to place their tests directly next to the files they are testing, while others prefer to group their tests in a single folder.
It is now time to write both of these tests. Since we are testing the color reducer, we will import that function specifically. The color reducer function is referred to as our system under test (SUT). We will import this function, send it an action, and verify the results.
Jest “matchers” are returned by the expect function and used to verify results. To test the color reducer we will use the .toEqual matcher. This verifies that the resulting object matches the argument sent to .toEqual:
importCfrom'../../../src/constants'import{color}from'../../../src/store/reducers'describe("color Reducer",()=>{it("ADD_COLOR success",()=>{conststate={}constaction={type:C.ADD_COLOR,id:0,title:'Test Teal',color:'#90C3D4',timestamp:newDate().toString()}constresults=color(state,action)expect(results).toEqual({id:0,title:'Test Teal',color:'#90C3D4',timestamp:action.timestamp,rating:0})})it("RATE_COLOR success",()=>{conststate={id:0,title:'Test Teal',color:'#90C3D4',timestamp:'Sat Mar 12 2016 16:12:09 GMT-0800 (PST)',rating:undefined}constaction={type:C.RATE_COLOR,id:0,rating:3}constresults=color(state,action)expect(results).toEqual({id:0,title:'Test Teal',color:'#90C3D4',timestamp:'Sat Mar 12 2016 16:12:09 GMT-0800 (PST)',rating:3})})})
To test a reducer, we need a state and a sample action. We obtain the result by invoking our SUT, the color function, with these sample objects. Finally, we check the result to make sure the appropriate state was returned using the .toEqual matcher.
To test ADD_COLOR, the initial state doesn’t matter much. However, when we send the color reducer an ADD_COLOR action, it should return a new color object.
To test RATE_COLOR, we’ll provide an initial color object with a rating of 0 for the assumed state. Sending this state object along with a RATE_COLOR action should result in a color object that has our new rating.
Now that we have written our tests, if we are pretending that we do not already have the code for the color reducer, we need to stub that function. We can stub the color reducer by adding a function called color to our /src/store/reducers.js file. This will allow our tests to find the empty reducer and import it:
importCfrom'../constants'exportconstcolor=(state={},action=)=>{returnstate}
Why Stub the Reducer First?
Without a SUT in place, we would get an error in the test:
TypeError: (0 , _reducers.color) is not a function
This error occurs when the function that we are testing, color, is not defined. Simply adding the definition for the function that you wish to test will provide more detailed test failure feedback.
Let’s run the tests and watch them fail. Jest will provide specific details on each failure, including a stack trace:
$ jest

 FAIL  __tests__/store/reducers/color.test.js
  ● color Reducer › ADD_COLOR success

    expect(received).toEqual(expected)

    Expected value to equal:
      {"color": "#90C3D4", "id": 0, "rating": 0, "timestamp":
      "Mon Mar 13 2017 12:29:12 GMT-0700 (PDT)", "title": "Test Teal"}

    Received:
      {}

    Difference:

    - Expected
    + Received

    @@ -1,7 +1,1 @@
    -Object {
    -  "color": "#90C3D4",
    -  "id": 0,
    -  "rating": 0,
    -  "timestamp": "Mon Mar 13 2017 12:29:12 GMT-0700 (PDT)",
    -  "title": "Test Teal",
    -}

    +Object {}

      at Object.<anonymous> (__tests__/store/reducers/color.test.js:19:9)
      at process._tickCallback (internal/process/next_tick.js:103:7)

  ● color Reducer › RATE_COLOR success

    expect(received).toEqual(expected)

    Expected value to equal:
      {"color": "#90C3D4", "id": 0, "rating": 3, "timestamp":
      "Sat Mar 12 2016 16:12:09 GMT-0800 (PST)", "title": "Test Teal"}

    Received:
      {"color": "#90C3D4", "id": 0, "rating": undefined, "timestamp":
      "Sat Mar 12 2016 16:12:09 GMT-0800 (PST)", "title": "Test Teal"}

    Difference:

    - Expected
    + Received

    @@ -1,7 +1,7 @@
     Object {
       "color": "#90C3D4",
       "id": 0,
    -  "rating": 3,
    +  "rating": undefined,
       "timestamp": "Sat Mar 12 2016 16:12:09 GMT-0800 (PST)",
       "title": "Test Teal",
     }

      at Object.<anonymous> (__tests__/store/reducers/color.test.js:44:9)
      at process._tickCallback (internal/process/next_tick.js:103:7)

  color Reducer

    ✕ ADD_COLOR success (8ms)
    ✕ RATE_COLOR success (1ms)

Test Suites: 1 failed, 1 total
Tests:       2 failed, 2 total
Snapshots:   0 total
Time:        0.861s, estimated 1s
Ran all test suites.
Taking the time to write the tests and run them to watch them fail shows us that our tests are working as intended. This failure feedback represents our to-do list. It is our job to make both of these tests pass.
It’s time to open the /src/store/reducers.js file and write the minimal code required to make our tests pass:
importCfrom'../constants'exportconstcolor=(state={},action=)=>{switch(action.type){caseC.ADD_COLOR:return{id:action.id,title:action.title,color:action.color,timestamp:action.timestamp,rating:0}caseC.RATE_COLOR:state.rating=action.ratingreturnstatedefault:returnstate}}
The next time we run the jest command our tests should pass:
$ jest

 PASS  __tests__/store/reducers/color.test.js
  color Reducer

    ✓ ADD_COLOR success (4ms)
    ✓ RATE_COLOR success

Test Suites: 1 passed, 1 total
Tests:       2 passed, 2 total
Snapshots:   0 total
Time:        0.513s, estimated 1s

Ran all test suites.
The tests passed, but we are not finished. It is time to refactor both our tests and the code. Take a look at the RATE_COLOR case in the reducer:
case'RATE_COLOR':state.rating=action.ratingreturnstate
If you look closely, this code should seem a little off. State is supposed to be immutable, yet here we are clearly mutating the state by changing the value for rating in the state object. Our tests still pass because we are not making sure that our state object is immutable.
deep-freeze can help us make sure our state and action objects stay immutable by preventing them from changing:
npm install deep-freeze --save-dev
When invoking the color reducer, we will deep-freeze both the state and the action object. Both objects should be immutable, and deep-freezing them will cause an error if any code does try to mutate these objects:
importCfrom'../../../src/constants'import{color}from'../../../src/store/reducers'importdeepFreezefrom'deep-freeze'describe("color Reducer",()=>{it("ADD_COLOR success",()=>{conststate={}constaction={type:C.ADD_COLOR,id:0,title:'Test Teal',color:'#90C3D4',timestamp:newDate().toString()}deepFreeze(state)deepFreeze(action)expect(color(state,action)).toEqual({id:0,title:'Test Teal',color:'#90C3D4',timestamp:action.timestamp,rating:0})})it("RATE_COLOR success",()=>{conststate={id:0,title:'Test Teal',color:'#90C3D4',timestamp:'Sat Mar 12 2016 16:12:09 GMT-0800 (PST)',rating:undefined}constaction={type:C.RATE_COLOR,id:0,rating:3}deepFreeze(state)deepFreeze(action)expect(color(state,action)).toEqual({id:0,title:'Test Teal',color:'#90C3D4',timestamp:'Sat Mar 12 2016 16:12:09 GMT-0800 (PST)',rating:3})})})
Now we can run our modified test on our current color reducer and watch it fail, because rating a color mutates the incoming state:
$ jest

 FAIL  __tests__/store/reducers/color.test.js
  ● color Reducer › RATE_COLOR success

    TypeError: Cannot assign to read only property 'rating' of object '#<Object>'
      at color (src/store/reducers.js:14:26)
      at Object.<anonymous> (__tests__/store/reducers/color.test.js:43:36)
      at process._tickCallback (internal/process/next_tick.js:103:7)

  color Reducer

    ✓ ADD_COLOR success (3ms)
    ✕ RATE_COLOR success (3ms)

Test Suites: 1 failed, 1 total
Tests:       1 failed, 1 passed, 2 total
Snapshots:   0 total
Time:        0.513s, estimated 1s

Ran all test suites.
Let’s change the color reducer so that this test will pass. We will use the spread operator to make a copy of the state object before we overwrite the rating:
case'RATE_COLOR':return{...state,rating:action.rating}
Now that we are not mutating state, both tests should pass:
$ jest

 PASS  __tests__/store/reducers/color.test.js

  color Reducer

    ✓ ADD_COLOR success (3ms)
    ✓ RATE_COLOR success

Test Suites: 1 passed, 1 total
Tests:       2 passed, 2 total
Snapshots:   0 total
Time:        0.782s, estimated 1s

Ran all test suites.
This process represents a typical TDD cycle. We wrote the tests first, wrote code to make the tests pass, and refactored both the code and the tests. This approach is very effective when working with JavaScript, and especially Redux.
Testing the Store
If the store works, there is a good chance that your app is going to work. The process for testing the store involves creating a store with your reducers, injecting an assumed state, dispatching actions, and verifying the results.
While testing the store you can integrate your action creators and kill two birds with one stone, testing the store and the action creators together.
In Chapter 8, we created a storeFactory, a function that we can use to manage the store creation process in the color organizer app:
import{createStore,combineReducers,applyMiddleware}from'redux'import{colors,sort}from'./reducers'importstateDatafrom'../../data/initialState'constlogger=store=>next=>action=>{letresultconsole.groupCollapsed("dispatching",action.type)console.log('prev state',store.getState())console.log('action',action)result=next(action)console.log('next state',store.getState())console.groupEnd()returnresult}constsaver=store=>next=>action=>{letresult=next(action)localStorage['redux-store']=JSON.stringify(store.getState())returnresult}conststoreFactory=(initialState=stateData)=>applyMiddleware(logger,saver)(createStore)(combineReducers({colors,sort}),(localStorage['redux-store'])?JSON.parse(localStorage['redux-store']):initialState)exportdefaultstoreFactory
This module exports a function that we can use to create stores. It abstracts away the details of creating a store for the color organizer. This file contains the reducers, middleware, and default state necessary to create a store for our app. When creating a store with the storeFactory, we can optionally pass in an initial state for our new store, which will help us when it is time to test this store.
Jest has setup and teardown features that allow you to execute some code before and after executing each test or suite. beforeAll and afterAll are invoked before and after each test suite is executed, respectively. beforeEach and afterEach are invoked before or after each it statement is executed.
Setup and Teardown
A good practice to follow when writing tests is to allow only one assertion for each test.3 This means that you want to avoid calling expect multiple times within a single it statement. This way, each assertion can be independently verified, making it easier to figure out what went wrong when tests fail.
Jest’s setup and teardown features can be used to help you follow this practice. Execute your test code in a beforeAll statement and verify the results with multiple it statements.
Let’s see how we can test the store while testing the addColor action creator in the file ./__tests__/actions-spec.js. The following example will test our store by dispatching an addColor action creator and verifying the results:
importCfrom'../src/constants'importstoreFactoryfrom'../src/store'import{addColor}from'../src/actions'describe("addColor",()=>{letstoreconstcolors=[{id:"8658c1d0-9eda-4a90-95e1-8001e8eb6036",title:"lawn",color:"#44ef37",timestamp:"Mon Apr 11 2016 12:54:19 GMT-0700 (PDT)",rating:4},{id:"f9005b4e-975e-433d-a646-79df172e1dbb",title:"ocean blue",color:"#0061ff",timestamp:"Mon Apr 11 2016 12:54:31 GMT-0700 (PDT)",rating:2},{id:"58d9caee-6ea6-4d7b-9984-65b145031979",title:"tomato",color:"#ff4b47",timestamp:"Mon Apr 11 2016 12:54:43 GMT-0700 (PDT)",rating:0}]beforeAll(()=>{store=storeFactory({colors})store.dispatch(addColor("Dark Blue","#000033"))})it("should add a new color",()=>expect(store.getState().colors.length).toBe(4))it("should add a unique guid id",()=>expect(store.getState().colors[3].id.length).toBe(36))it("should set the rating to 0",()=>expect(store.getState().colors[3].rating).toBe(0))it("should set timestamp",()=>expect(store.getState().colors[3].timestamp).toBeDefined())})
We set up the test by using the storeFactory to create a new store instance that contains three sample colors in the state. Next, we dispatch our addColor action creator to add a fourth color to the state: Dark Blue.
Each test now verifies the results of the dispatched action. They each contain one expect statement. If any of these tests were to fail, we would know exactly what field of the new action was causing issues.
This time we used two new matchers: .toBe and .toBeDefined. The .toBe matcher compares the results using the === operator. This matcher can be used to compare primitives like numbers or strings, whereas the .toEqual matcher is used to deeply compare objects. The .toBeDefined matcher can be used to check for the existence of a variable or a function. In this test, we check for the existence of the timestamp.
These tests verify that our store can successfully add new colors using the action creator. This should give us some confidence in our store code: it’s working.
Testing React Components
React components provide instructions for React to follow when creating and managing updates to the DOM. We can test these components by rendering them and checking the resulting DOM.
We are not running our tests in a browser; we are running them in the terminal with Node.js. Node.js does not have the DOM API that comes standard with each browser. Jest incorporates an npm package called jsdom that is used to simulate a browser environment in Node.js, which is essential for testing React components.
Setting Up the Jest Environment
Jest provides us with the ability to run a script before any tests are run where we can set up additional global variables that can be used in any of our tests.
For example, let’s say we wanted to add React to the global scope along with some sample colors that can be accessed by any of our tests. We could create a file called /__tests__/global.js:
importReactfrom'react'importdeepFreezefrom'deep-freeze'global.React=Reactglobal._testColors=deepFreeze([{id:"8658c1d0-9eda-4a90-95e1-8001e8eb6036",title:"lawn",color:"#44ef37",timestamp:"Sun Apr 10 2016 12:54:19 GMT-0700 (PDT)",rating:4},{id:"f9005b4e-975e-433d-a646-79df172e1dbb",title:"ocean blue",color:"#0061ff",timestamp:"Mon Apr 11 2016 12:54:31 GMT-0700 (PDT)",rating:2},{id:"58d9caee-6ea6-4d7b-9984-65b145031979",title:"tomato",color:"#ff4b47",timestamp:"Fri Apr 15 2016 12:54:43 GMT-0700 (PDT)",rating:0}])
This file adds React and some immutable test colors to the global scope. Next, we have to tell Jest to run this file before running our tests. We can do this by adding a setupFiles field to the jest node in package.json:
"jest": {
  "setupFiles": ["./__tests__/global.js"],
  "modulePathIgnorePatterns": ["global.js"]
}
The setupFiles field is used to provide an array of files that Jest should run to set up the global environment before our tests. The modulePathIgnorePatterns field tells Jest to ignore the global.js file when running the tests because it does not contain a test suite; it is a setup file. This field is necessary because we’d prefer to add the global.js file to the __tests__ folder even though it does not contain any tests.
Ignoring SCSS imports
If you import SCSS (or CSS or SASS) files directly into your components, you will need to ignore these imports while testing. If you do not ignore them, they will cause the tests to fail.
These files can be ignored by incorporating a module mapper that returns an empty string when .css, .scss, or .less files are imported. Let’s install jest-css-modules:
npm install jest-css-modules --save-dev
Now that we have this package installed, we need to tell Jest to use this module in place of any .scss import. We need to add a moduleNameMapper field to the jest node in our package.json file:
"jest":{"setupFiles":["./__tests__/global.js"],"modulePathIgnorePatterns":["global.js"],"moduleNameMapper":{"\\.(scss)$":"<rootDir>/node_modules/jest-css-modules"}}
This tells Jest to use the jest-css-modules module in place of any import that ends with .scss. Adding these lines of code to your package.json file will prevent your tests from failing due to .scss imports.
Enzyme
We are almost ready to begin testing our React components. We only have two more npm modules to install before we begin writing our first component test:
npm install enzyme react-addons-test-utils --save-dev
Enzyme is a testing utility for React components designed at Airbnb. Enzyme requires react-addons-test-utils, a set of tools that can be used to render and interact with components during a test. Additionally, react-dom is required, but we’ll assume that you already have react-dom installed.
Enzyme makes it easier to render a component and traverse the rendered output. Enzyme is not a testing or assertion framework. It handles the task of rendering React components for testing and provides the necessary tools for traversing child elements, verifying props, verifying state, simulating events, and querying the DOM.
Enzyme has three main methods for rendering:
shallow-
shallowrenders components one level deep for unit testing. mount-
mountrenders components using the browser DOM and is necessary when you need to test the full component lifecycle and the properties or state of child elements. render-
renderis used to render static HTML markup with a component. Withrender, you can verify that your component returns the appropriate HTML.
constStar=({selected=false,onClick=f=>f})=><divclassName={(selected)?"star selected":"star"}onClick={onClick}></div>
It should render a div element with a className that depends upon the selected property. It should also respond to click events.
Let’s write a test for the Star component with Enzyme. We will use Enzyme to render the component and find specific DOM elements within the rendered Star. We can use the shallow method to render our component one level deep:
import{shallow}from'enzyme'importStarfrom'../../../src/components/ui/Star'describe("<Star /> UI Component",()=>{it("renders default star",()=>expect(shallow(<Star/>).find('div.star').length).toBe(1))it("renders selected stars",()=>expect(shallow(<Starselected={true}/>).find('div.selected.star').length).toBe(1))})
Enzyme comes with functions that somewhat resemble jQuery’s. We can use the find method to query the resulting DOM using selector syntax.
In the first test, a sample Star is rendered and we verify that it results in a DOM that contains a div element that has the star class. In the second test, a sample selected Star is rendered and we verify that the resulting DOM contains a div element with both the star class and the selected class. Checking the length assures us that only one div was rendered in each test.
Next, we’ll need to test the click event. Enzyme comes with tools that allow us to simulate events and verify that those events have occurred. For this test, we need a function that we can use to verify that the onClick property is working. We need a mock function, and Jest has us covered:
it("invokes onClick",()=>{const_click=jest.fn()shallow(<StaronClick={_click}/>).find('div.star').simulate('click')expect(_click).toBeCalled()})
In this test a mock function, _click, is created using jest.fn. When we render the Star, we send our mock function as the onClick property. Next, we locate the rendered div element and simulate a click event on that element using Enzyme’s simulate method. Clicking the Star should invoke the onClick property and, in turn, invoke our mock function. The .toBeCalled matcher can be used to verify that a mock function was invoked.
Enzyme can be used to help us render components, find rendered DOM elements or other components, and interact with them.
Mocking Components
The last test introduced the concept of mocking: we used a mock function to test the Star component. Jest is full of tools to help us create and inject all sorts of different mocks that can help us write better tests. Mocking is an important testing technique that can help focus unit tests. Mocks are objects that are used in place of real objects for the purposes of testing.4
Mocks are to the test world what stunt doubles are to Hollywood. Both mocks and stunt doubles are used in place of the real deal (component or movie star). In a film, the stunt double looks like the real actor. In a test, a mocked object looks like the real object.
The purpose of mocking is to allow you to focus your tests on the one component or object that you are trying to test, the SUT. Mocks are used in the place of objects, components, or functions that your SUT depends on. This allows you to certify that your SUT is working appropriately without any interference from its dependencies. Mocking allows you to isolate, build, and test functionality independently of other components.
Testing HOCs
One place where we will need to use mocks is when we are testing higher-order components. HOCs are responsible for adding functionality to injected components via properties. We can create a mock component and send it to an HOC to certify that the HOC adds the appropriate properties to our mock.
Let’s take a look at a test for Expandable, the HOC that we developed back in Chapter 7. In order to set up a test for the HOC, we must first create a mock component and send it to the HOC. The MockComponent will be the stunt double that is used in place of a real component:
import{mount}from'enzyme'importExpandablefrom'../../../src/components/HOC/Expandable'describe("Expandable Higher-Order Component",()=>{letprops,wrapper,ComposedComponent,MockComponent=({collapsed,expandCollapse})=><divonClick={expandCollapse}>{(collapsed)?'collapsed':'expanded'}</div>describe("Rendering UI",...)describe("Expand Collapse Functionality",...)})
The MockComponent is simply a stateless functional component that we developed on the fly. It returns a div with an onClick handler that will be used to test the expandCollapse function. The state, expanded or collapsed, is displayed in the mock component as well. This component will not be used anywhere else but in this test.
The SUT is the Expandable HOC. Before our test, we will invoke the HOC using our mock and check the returned component to verify that the appropriate properties have been applied.
The mount function will be used instead of the shallow function so that we can check the properties and state of the returned component:
describe("Rendering UI",()=>{beforeAll(()=>{ComposedComponent=Expandable(MockComponent)wrapper=mount(<ComposedComponentfoo="foo"gnar="gnar"/>)props=wrapper.find(MockComponent).props()})it("starts off collapsed",()=>expect(props.collapsed).toBe(true))it("passes the expandCollapse function to composed component",()=>expect(typeofprops.expandCollapse).toBe("function"))it("passes additional foo prop to composed component",()=>expect(props.foo).toBe("foo"))it("passes additional gnar prop to composed component",()=>expect(props.gnar).toBe("gnar"))})
Once we create a composed component using our HOC, we can verify that the composed component has added the appropriate properties to our mock component by mounting it and checking the properties object directly. This test makes sure that the HOC has added the collapsed property and the method for changing that property, expandCollapse. It also verifies that any properties added to the composed component, foo and gnar, make their way to the mock.
Next, let’s verify that we can change the collapsed property of our composed component:
describe("Expand Collapse Functionality",()=>{letinstancebeforeAll(()=>{ComposedComponent=Expandable(MockComponent)wrapper=mount(<ComposedComponentcollapsed={false}/>)instance=wrapper.instance()})it("renders the MockComponent as the root element",()=>{expect(wrapper.first().is(MockComponent))})it("starts off expanded",()=>{expect(instance.state.collapsed).toBe(false)})it("toggles the collapsed state",()=>{instance.expandCollapse()expect(instance.state.collapsed).toBe(true)})})
Once we mount a component, we can gather information about the rendered instance with wrapper.instance. In this case, we want the component to start off as collapsed. We can check both the properties and state of the instance to assure ourselves that it has in fact started off collapsed.
The wrapper also has some methods for traversing the DOM. In the first test case, we select the first child element using wrapper.first and verify that the element is an instance of our MockComponent.
HOCs are a great place to get introduced to mocks because the process of injecting the mock is easy: simply send it to the HOC as an argument. The concept of mocking private components is the same, but the injection process is a little bit trickier.
Jest mocks
Jest allows us to inject mocks into any of our components, not just HOCs. With Jest, you can mock any module that your SUT imports. Mocking allows us to focus testing on the SUT and not other modules that could potentially cause issues.
For example, let’s take a look at the ColorList component, which imports the Color component:
import{PropTypes}from'react'importColorfrom'./Color'import'../../../stylesheets/ColorList.scss'constColorList=({colors=[],onRate=f=>f,onRemove=f=>f})=><divclassName="color-list">{(colors.length===0)?<p>NoColorsListed.(AddaColor)</p>:colors.map(color=><Colorkey={color.id}{...color}onRate={(rating)=>onRate(color.id,rating)}onRemove={()=>onRemove(color.id)}/>)}</div>ColorList.propTypes={colors:PropTypes.array,onRate:PropTypes.func,onRemove:PropTypes.func}exportdefaultColorList
We want to make sure the ColorList component functions appropriately. We are not concerned with the Color component; it should have its own unit test. We can write a test for ColorList that replaces the Color component with a mock:
import{mount}from'enzyme'importColorListfrom'../../../src/components/ui/ColorList'jest.mock('../../../src/components/ui/Color',()=>({rating,onRate=f=>f})=><divclassName="mock-color"><buttonclassName="rate"onClick={()=>onRate(rating)}/></div>)describe("<ColorList /> UI Component",()=>{describe("Rating a Color",()=>{let_rate=jest.fn()beforeAll(()=>mount(<ColorListcolors={_testColors}onRate={_rate}/>).find('button.rate').first().simulate('click'))it("invokes onRate Handler",()=>expect(_rate).toBeCalled())it("rates the correct color",()=>expect(_rate).toBeCalledWith("8658c1d0-9eda-4a90-95e1-8001e8eb6036",4))})})
In this test, we used jest.mock to inject a mock in place of the actual Color component. The first argument sent to jest.mock is the module that we wish to mock, and the second argument is a function that returns the mocked component. In this case, the Color mock is a scaled-back version of the Color component. This test is only concerned with rating the color, so the mock only handles the properties related to rating a color.
When this test runs, Jest will replace the Color component with our mock. We are sending the global _testColors that we set up earlier in this chapter when we render the ColorList. When the ColorList renders each color, our mock will be rendered instead. When we simulate a click event on the first button, that event will happen on our first mock.
The rendered DOM for this component would look something like:
<ColorList><divclassName="color-list"><MockColoronRate={[Function]}rating={4}><divclassName="mock-color"><buttonid="rate"onClick={[Function]}/></div></MockColor><MockColoronRate={[Function]}rating={2}><divclassName="mock-color"><buttonid="rate"onClick={[Function]}/></div></MockColor><MockColoronRate={[Function]}rating={0}><divclassName="mock-color"><buttonid="rate"onClick={[Function]}/></div></MockColor></div></ColorList>
The real Color component would pass the selected rating to the ColorList, but our mock does not use the StarRating component. It doesn’t rate colors; instead, it pretends to rate the color simply by passing the current rating back to the ColorList. We do not care about the Color component in this test; we only care about the ColorList. The ColorList behaves as expected. Clicking on the first color passes the correct rating to the onRate property.
Manual mocks
Jest allows us to create modules to use for our mocks. Instead of adding the code for mocks directly to the test, place each mock in its own file in a __mocks__ folder where Jest will look for them.
Let’s take a look at the /src/components/containers.js file that we created in Chapter 9. This file contains three containers. For this next test, we will focus on the Colors container:
importColorListfrom'./ui/ColorList'exportconstColors=connect(state=>({colors:[...state.colors].sort(sortFunction(state.sort))}),dispatch=>({onRemove(id){dispatch(removeColor(id))},onRate(id,rating){dispatch(rateColor(id,rating))}}))(ColorList)
The Colors container is used to connect data from the store to the ColorList component. It sorts the colors found in state and sends them to the ColorList as a property. It also handles the onRate and onRemove function properties found in the ColorList. Finally, this container depends on the ColorList module.
You create a manual mock by adding a <Module>.js file to a folder called __mocks__. The __mocks__ folder contains the mocked modules that are used in place of the real modules during testing.
For example, we will add a ColorList mock to our current project by creating a __mocks__ folder in the /src/components/ui folder, at the same level as the ColorList component. We will then place our mock, ColorList.js, in that folder.
Our mock will simply render an empty div element. Take a look at the code for the ColorList.js mock:
constColorListMock=()=><divclassName="color-list-mock"></div>ColorListMock.displayName="ColorListMock"exportdefaultColorListMock
Now, whenever we mock the /src/components/ui/ColorList component with jest.mock, Jest will obtain the appropriate mock from the __mocks__ folder. We do not have to define the mock directly in our test.
In addition to manually mocking the ColorList, we will also create a mock for the store. Stores have three important functions: dispatch, subscribe, and getState. Our mock store will also have these functions. The getState function provides an implementation for that mock function that returns a sample state using our global test colors.
We will use this mock store to test the container. We will render a Provider component with our mock store as the store property. Our container should obtain the colors from the store, sort them, and send them to our mock:
import{mount,shallow}from'enzyme'import{Provider}from'react-redux'import{Colors}from'../../../src/components/containers'jest.mock('../../../src/components/ui/ColorList')describe("<Colors /> Container ",()=>{letwrapperconst_store={dispatch:jest.fn(),subscribe:jest.fn(),getState:jest.fn(()=>({sort:"SORTED_BY_DATE",colors:_testColors}))}beforeAll(()=>wrapper=mount(<Providerstore={_store}><Colors/></Provider>))it("renders three colors",()=>{expect(wrapper.find('ColorListMock').props().colors.length).toBe(3)})it("sorts the colors by date",()=>{expect(wrapper.find('ColorListMock').props().colors[0].title).toBe("tomato")})})
In this test we invoke jest.mock to mock the ColorList component, but we only send it one argument: the path to the module to mock. Jest knows to look in the __mocks__ folder to find the implementation for that mock. We are no longer using the real ColorList; we are using our bare-bones mock component. Once rendered, our DOM should look something like this:
<Provider><Connect(ColorListMock)><ColorListMockcolors={[...]}onRate={[Function]}onRemove={[Function]}><divclassName="color-list-mock"/></ColorListMock></Connect(ColorListMock)></Provider>
If our container works, it will have sent three colors to our mock. The container should have sorted those colors by date. We can verify this by checking that “tomato” is the first color, because of the three colors in _testColors, it has the most recent timestamp.
Let’s add a few more tests to make sure that onRate and onRemove are working appropriately:
afterEach(()=>jest.resetAllMocks())it("dispatches a REMOVE_COLOR action",()=>{wrapper.find('ColorListMock').props().onRemove('f9005b4e-975e-433d-a646-79df172e1dbb')expect(_store.dispatch.mock.calls[0][0]).toEqual({id:'f9005b4e-975e-433d-a646-79df172e1dbb',type:'REMOVE_COLOR'})})it("dispatches a RATE_COLOR action",()=>{wrapper.find('ColorListMock').props().onRate('58d9caee-6ea6-4d7b-9984-65b145031979',5)expect(_store.dispatch.mock.calls[0][0]).toEqual({id:"58d9caee-6ea6-4d7b-9984-65b145031979",type:"RATE_COLOR",rating:5})})
To test onRate and onRemove, we do not have to actually simulate clicks. All we need to do is invoke those function properties with some information and verify that the store’s dispatch method was called with the correct data. Invoking the onRemove property should cause the store to dispatch a REMOVE_COLOR action. Invoking the onRate property should cause the store to dispatch a RATE_COLOR action. Additionally, we need to make sure the dispatch mock has been reset after each test is complete.
The ability to easily inject mocks into the modules that we want to test is one of Jest’s most powerful features. Mocking is a very effective technique for focusing your tests on the SUT.
Snapshot Testing
Test-driven development is a great way to approach testing helper functions, custom classes, and datasets. However, when it comes to testing the UI, TDD can be tricky and often impractical. The UI frequently changes, which makes maintaining UI tests a time-consuming practice. It is also pretty common to be tasked with the job of writing tests for UI components that already exist in production.
Snapshot testing provides us with a way to quickly test UI components to make sure that we have not caused any unexpected changes. Jest can save a snapshot of the rendered UI and compare it to the rendered output of future tests. This allows us to verify that our updates have not had any unexpected effects while still allowing us to move quickly and not get too bogged down with the practicalities of testing the UI. Additionally, snapshots can easily be updated when UI changes are expected.
Let’s see how we can test the Color component with snapshot testing. First, let’s take a look at the existing code for the Color component:
import{PropTypes,Component}from'react'importStarRatingfrom'./StarRating'importTimeAgofrom'./TimeAgo'importFaTrashfrom'react-icons/lib/fa/trash-o'import'../../../stylesheets/Color.scss'classColorextendsComponent{render(){const{title,color,rating,timestamp,onRemove,onRate}=this.propsreturn(<sectionclassName="color"style={this.style}><h1ref="title">{title}</h1><buttononClick={onRemove}><FaTrash/></button><divclassName="color"style={{backgroundColor:color}}></div><TimeAgotimestamp={timestamp}/><div><StarRatingstarsSelected={rating}onRate={onRate}/></div></section>)}}exportdefaultColor
If we render this component with specific properties, we would expect a DOM that contains specific components based on the properties that we have sent:
shallow(<Colortitle="Test Color"color="#F0F0F0"rating={3}timestamp="Mon Apr 11 2016 12:54:19 GMT-0700 (PDT)"/>).html()
The resulting DOM should look something like:
<sectionclass=\"color\"><h1>Test Color</h1><button><svg/></button><divclass=\"color\"style=\"background-color:#F0F0F0;\"></div><divclass=\"time-ago\">4/11/2016</div><div><divclass=\"star-rating\"><divclass=\"starselected\"></div><divclass=\"starselected\"></div><divclass=\"starselected\"></div><divclass=\"star\"></div><divclass=\"star\"></div><p>3 of 5 stars</p></div></div></section>
Snapshot testing will allow us to save a snapshot of this DOM the very first time we run the test. Then, we’ll be able to compare future tests to that snapshot to make sure the resulting output is always the same.
Let’s go ahead and write a snapshot test for the Color component:
import{shallow}from'enzyme'importColorfrom'../../../src/components/ui/Color'describe("<Color /> UI Component",()=>{it("Renders correct properties",()=>letoutput=shallow(<Colortitle="Test Color"color="#F0F0F0"rating={3}timestamp="Mon Apr 11 2016 12:54:19 GMT-0700 (PDT)"/>).html()expect(output).toMatchSnapshot())})
In this test, we use Enzyme to render the component and collect the resulting output as a string of HTML. .toMatchSnapshot is the Jest matcher used for snapshot testing. The first time this test is run, Jest will save a copy of the resulting HTML in a snapshot file. This file will be added to a __snapshots__ folder in the same directory as the test. Currently, the snapshot file would look like:
exports[`<Color /> UI Component Renders correct properties 1`]=`"<section class=\"color\"><h1>Test Color</h1><button><svg ...
Every other time the test is run, Jest will compare the output to the same snapshot. If anything at all is different about the resulting HTML, the test will fail.
Snapshot testing allows us to move quickly, but if we move too fast, we could end up writing flaky tests, or tests that pass when they should fail. Taking snapshots of HTML strings will work for testing, but it is hard for us to verify that the snapshot is actually correct. Let’s improve our snapshot by saving the output as JSX.
For this, we’ll need to install the enzyme-to-json module:
npm install enzyme-to-json --save-dev
This module provides a function that we can use to render Enzyme wrappers as JSX, which makes it easier to review the snapshot output for correctness.
To render our snapshot using enzyme-to-json, we would first shallow-render the Color component with Enzyme, then send that result to the toJSON function and the result of toJSON to the expect function. We may be tempted to write code that looks like:
expect(toJSON(shallow(<Colortitle="Test Color"color="#F0F0F0"rating={3}timestamp="Mon Apr 11 2016 12:54:19 GMT-0700 (PDT)"/>))).toMatchSnapshot()
But this is a perfect place to use a little composition to improve our code. Remember composition? Smaller functions can be put together to make larger functions. We can use the compose function from Redux to make a single larger function out of shallow, toJSON, and expect:
import{shallow}from'enzyme'importtoJSONfrom'enzyme-to-json'import{compose}from'redux'importColorfrom'../../../src/components/ui/Color'describe("<Color /> UI Component",()=>{constshallowExpect=compose(expect,toJSON,shallow)it("Renders correct properties",()=>shallowExpect(<Colortitle="Test Color"color="#F0F0F0"rating={3}timestamp="Mon Apr 11 2016 12:54:19 GMT-0700 (PDT)"/>).toMatchSnapshot())})
The shallowExpect function takes a component and shallow-renders it, converts the result to JSON, and then sends it to the expect method that returns all of the Jest matchers.
If we run this test, it should fail because the output is now JSX and not an HTML string. Our test no longer matches the snapshot. However, snapshots are easy to update. We can update the snapshot by running the test again with the updateSnapshot flag:
jest --updateSnapshot
If we run Jest with the watch flag:
jest --watch
Jest will continue to run in the terminal and listen for changes to our source code and tests. If we make any changes, Jest will rerun our tests. When you are watching tests, you can easily update the snapshot by pressing the u key:
Snapshot Summary
 › 1 snapshot test failed in 1 test suite. Inspect your code changes or press
 `u` to update them.

Test Suites: 1 failed, 6 passed, 7 total
Tests:       1 failed, 28 passed, 29 total
Snapshots:   1 failed, 1 total
Time:        1.407s
Ran all test suites.

Watch Usage
 › Press u to update failing snapshots.
 › Press p to filter by a filename regex pattern.
 › Press q to quit watch mode.
 › Press Enter to trigger a test run.
Once you update the snapshot, the test will pass. The snapshot file has now changed. Instead of one long HTML string, the snapshot now looks like:
exports[`<Color /> UI Component Renders correct properties 1`]=`<sectionclassName="color"><h1>Test Color</h1><buttononClick={[Function]}><FaTrashO /></button><divclassName="color"style={Object {"backgroundColor": "#F0F0F0",}} /><TimeAgotimestamp="Mon Apr 11 2016 12:54:19 GMT-0700 (PDT)" /><div><StarRatingonRate={[Function]}starsSelected={3} /></div></section>';
This snapshot is much more readable. We can take a quick look at it to verify the results are correct before moving on to our next test. Snapshot testing can be a very effective way to quickly add testing to your applications.
Using Code Coverage
Code coverage is the process of reporting on how many lines of code have actually been tested. It provides a metric that can help you decide when you have written enough tests.
Jest ships with Istanbul, a JavaScript tool used to review your tests and to generate a report that describes how many statements, branches, functions, and lines have been covered.
To run Jest with code coverage, simply add the coverage flag when you run the jest command:
jest --coverage
A report on current code coverage will be generated and displayed in the terminal:
 PASS  __tests__/components/ui/ColorList.test.js
 PASS  __tests__/components/containers/Colors.test.js
 PASS  __tests__/components/ui/Color.test.js
 PASS  __tests__/components/ui/Star.test.js
 PASS  __tests__/components/HOC/Expandable.test.js
 PASS  __tests__/actions.test.js
 PASS  __tests__/store/reducers/color.test.js

--------------------|--------|----------|----------|----------|----------------|
File                |% Stmts | % Branch |  % Funcs |  % Lines |Uncov'd Lines   |
--------------------|--------|----------|----------|----------|----------------|
All files           |  68.42 |    43.33 |    45.59 |    72.39 |                |
 src                |    100 |      100 |      100 |      100 |                |
  actions.js        |    100 |      100 |      100 |      100 |                |
  constants.js      |    100 |      100 |      100 |      100 |                |
 src/components     |  58.33 |      100 |       40 |    58.33 |                |
  containers.js     |  58.33 |      100 |       40 |    58.33 | 11,13,20,24,26 |
 src/components/HOC |    100 |      100 |      100 |      100 |                |
  Expandable.js     |    100 |      100 |      100 |      100 |                |
 src/components/ui  |  45.65 |    35.29 |       24 |       50 |                |
  AddColorForm.js   |  16.67 |        0 |        0 |    18.18 |... 13,16,18,21 |
  Color.js          |  66.67 |      100 |    33.33 |    66.67 |          40,41 |
  ColorList.js      |   62.5 |       40 |       50 |    83.33 |             13 |
  SortMenu.js       |   37.5 |        0 |        0 |    42.86 |    11,14,18,19 |
  Star.js           |    100 |      100 |      100 |      100 |                |
  StarRating.js     |  33.33 |        0 |        0 |       40 |          5,7,9 |
  TimeAgo.js        |     50 |      100 |        0 |       50 |              4 |
 src/lib            |  58.54 |       15 |    16.67 |    67.65 |                |
  array-helpers.js  |     60 |    33.33 |       60 |    71.43 |            6,8 |
  time-helpers.js   |  58.06 |        0 |        0 |    66.67 |... 43,45,49,54 |
 src/store          |  97.14 |       70 |      100 |    96.77 |                |
  index.js          |    100 |      100 |      100 |      100 |                |
  reducers.js       |  94.12 |    64.71 |      100 |    94.12 |             21 |
--------------------|--------|----------|----------|----------|----------------|

Test Suites: 7 passed, 7 total
Tests:       29 passed, 29 total
Snapshots:   1 passed, 1 total
Time:        1.691s, estimated 2s

Ran all test suites.

Watch Usage
 › Press p to filter by a filename regex pattern.
 › Press q to quit watch mode.
 › Press Enter to trigger a test run.
This report tells us how much of our code in each file has been executed during the testing process and reports on all files that have been imported into tests.
Jest also generates a report that you can run in your browser, which provides more details about what code has been covered by tests. After running Jest with coverage reporting, you will notice that a coverage folder has been added to the root. In a web browser, open this file: /coverage/lcov-report/index.html. It will show you your code coverage in an interactive report (Figure 10-1).
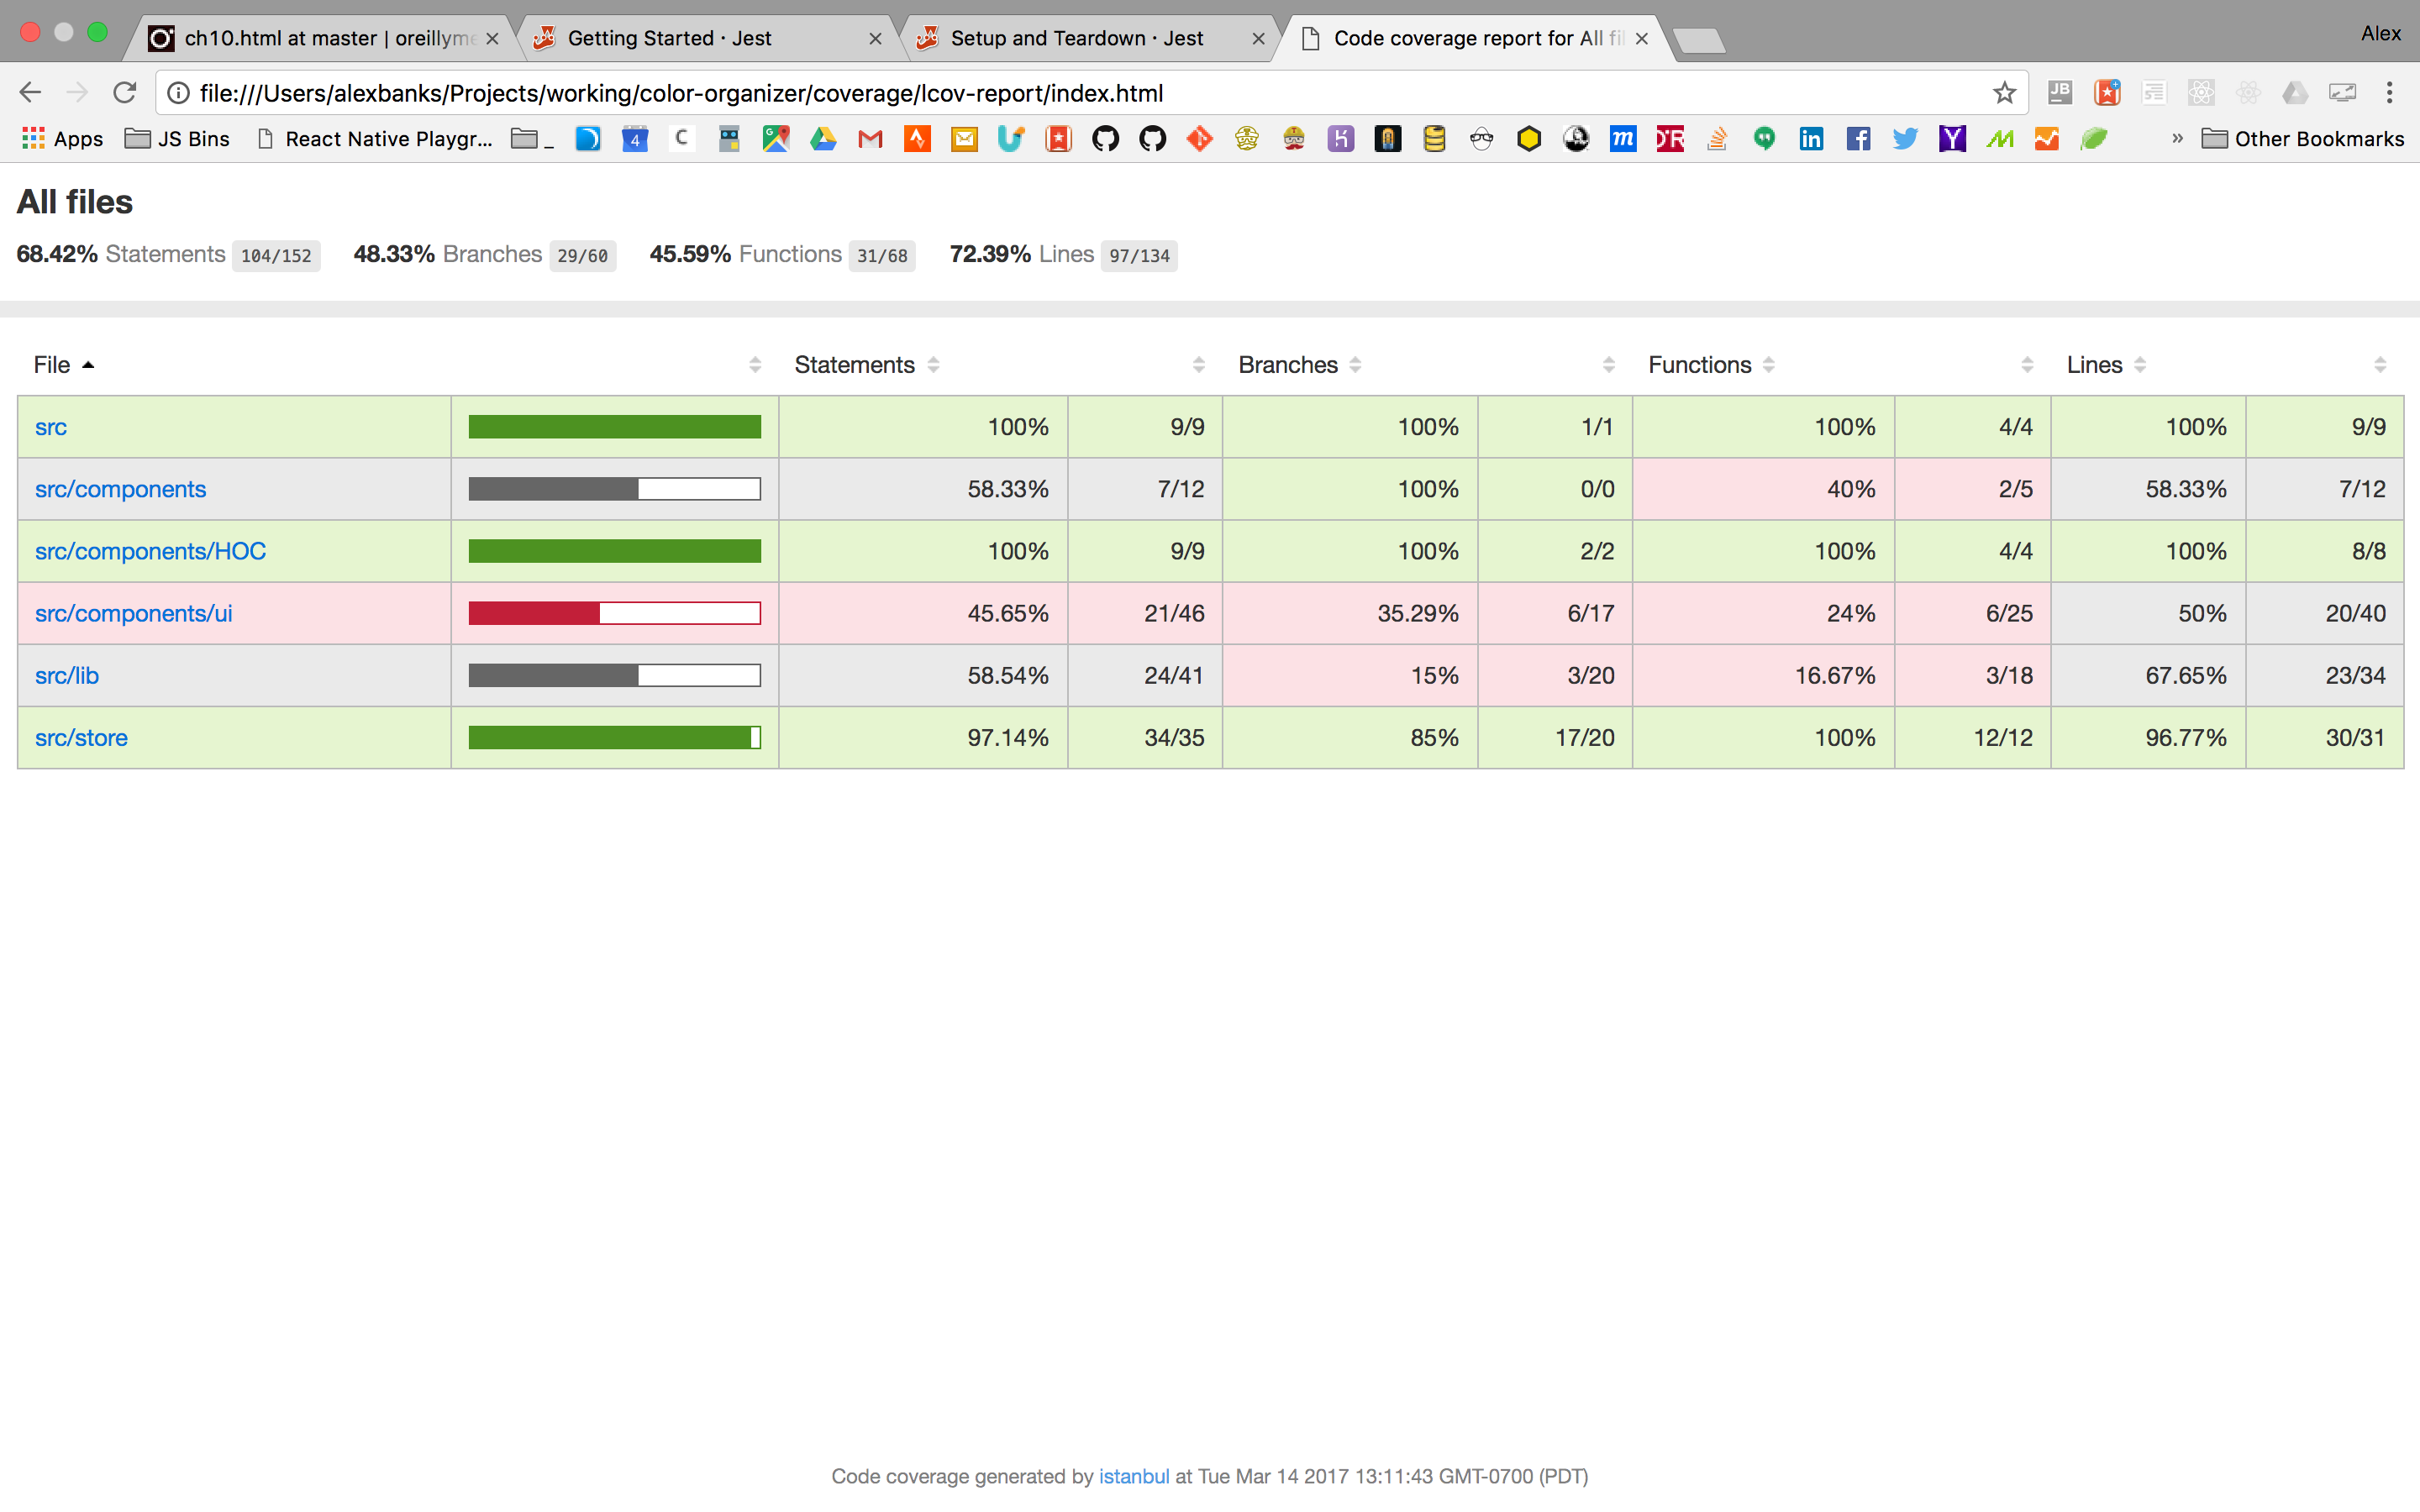
Figure 10-1. Code coverage report
This report tells you how much of the code has been covered, as well as the individual coverage based upon each subfolder. You can drill down into a subfolder to see how well the individual files within have been covered. If you select the components/ui folder, you will see how well your user interface components are covered by testing (Figure 10-2).
You can see what lines have been covered in an individual file by clicking on the filename. Figure 10-3 shows the lines that have been covered in the ColorList component.
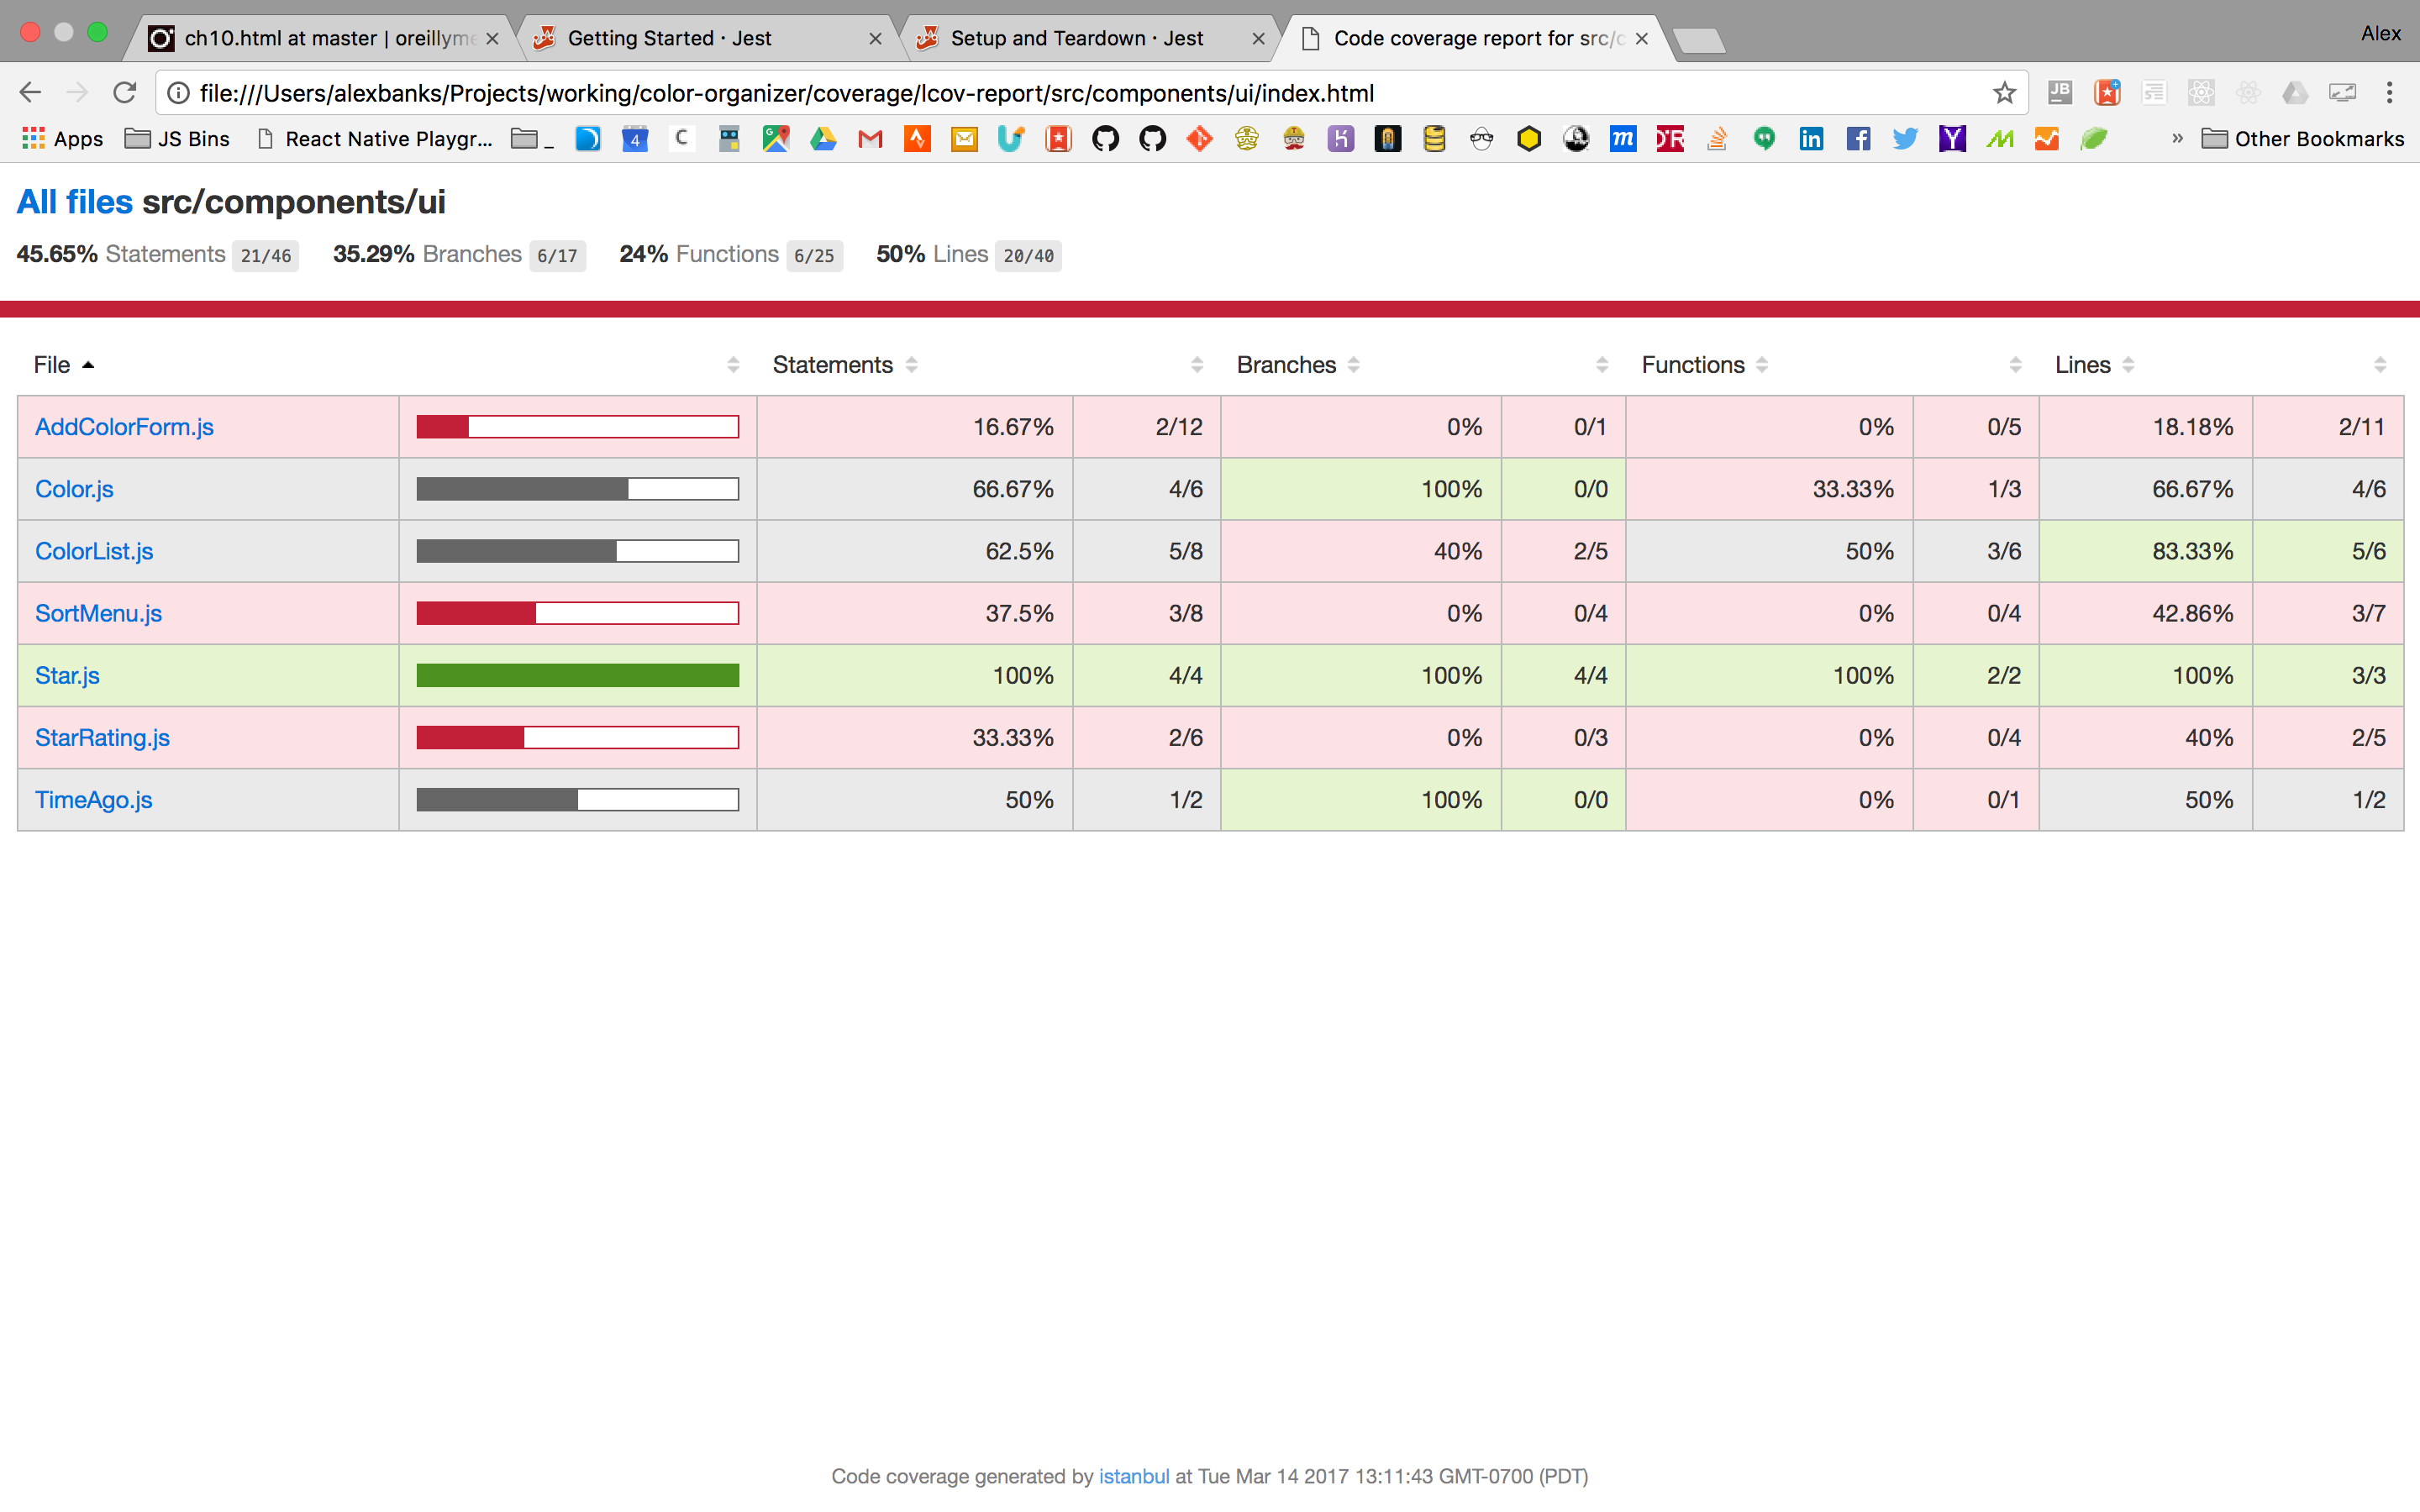
Figure 10-2. UI component test coverage

Figure 10-3. ColorList coverage
The ColorList component has been tested pretty well. In the column on the left of the screen, you can see how many times each line has been executed in a test. The lines that are highlighted yellow and red have not been executed. In this case, it looks like we have yet to test the onRemove property. Let’s add a suite to ColorList.test.js to test the onRemove property and get line 13 covered:
jest.mock('../../../src/components/ui/Color',()=>({rating,onRate=f=>f,onRemove=f=>f})=><divclassName="mockColor"><buttonclassName="rate"onClick={()=>onRate(rating)}/><buttonclassName="remove"onClick={onRemove}/></div>)..describe("Removing a Color",()=>{let_remove=jest.fn()beforeAll(()=>mount(<ColorListcolors={_testColors}onRemove={_remove}/>).find('button.remove').last().simulate('click'))it("invokes onRemove Handler",()=>expect(_remove).toBeCalled())it("removes the correct color",()=>expect(_remove).toBeCalledWith("58d9caee-6ea6-4d7b-9984-65b145031979"))})
The onRemove property has been added to the Color mock, as well as a button for triggering that property. When we render the ColorList, we will test the onRemove property the exact same way we tested the onRate property. We will render a ColorList with our three test colors, click the last remove button, and make sure the correct ID is being passed to the mock function, _remove.
The next time we generate the coverage report we will see an improvement—line 13 is now covered (Figure 10-4).
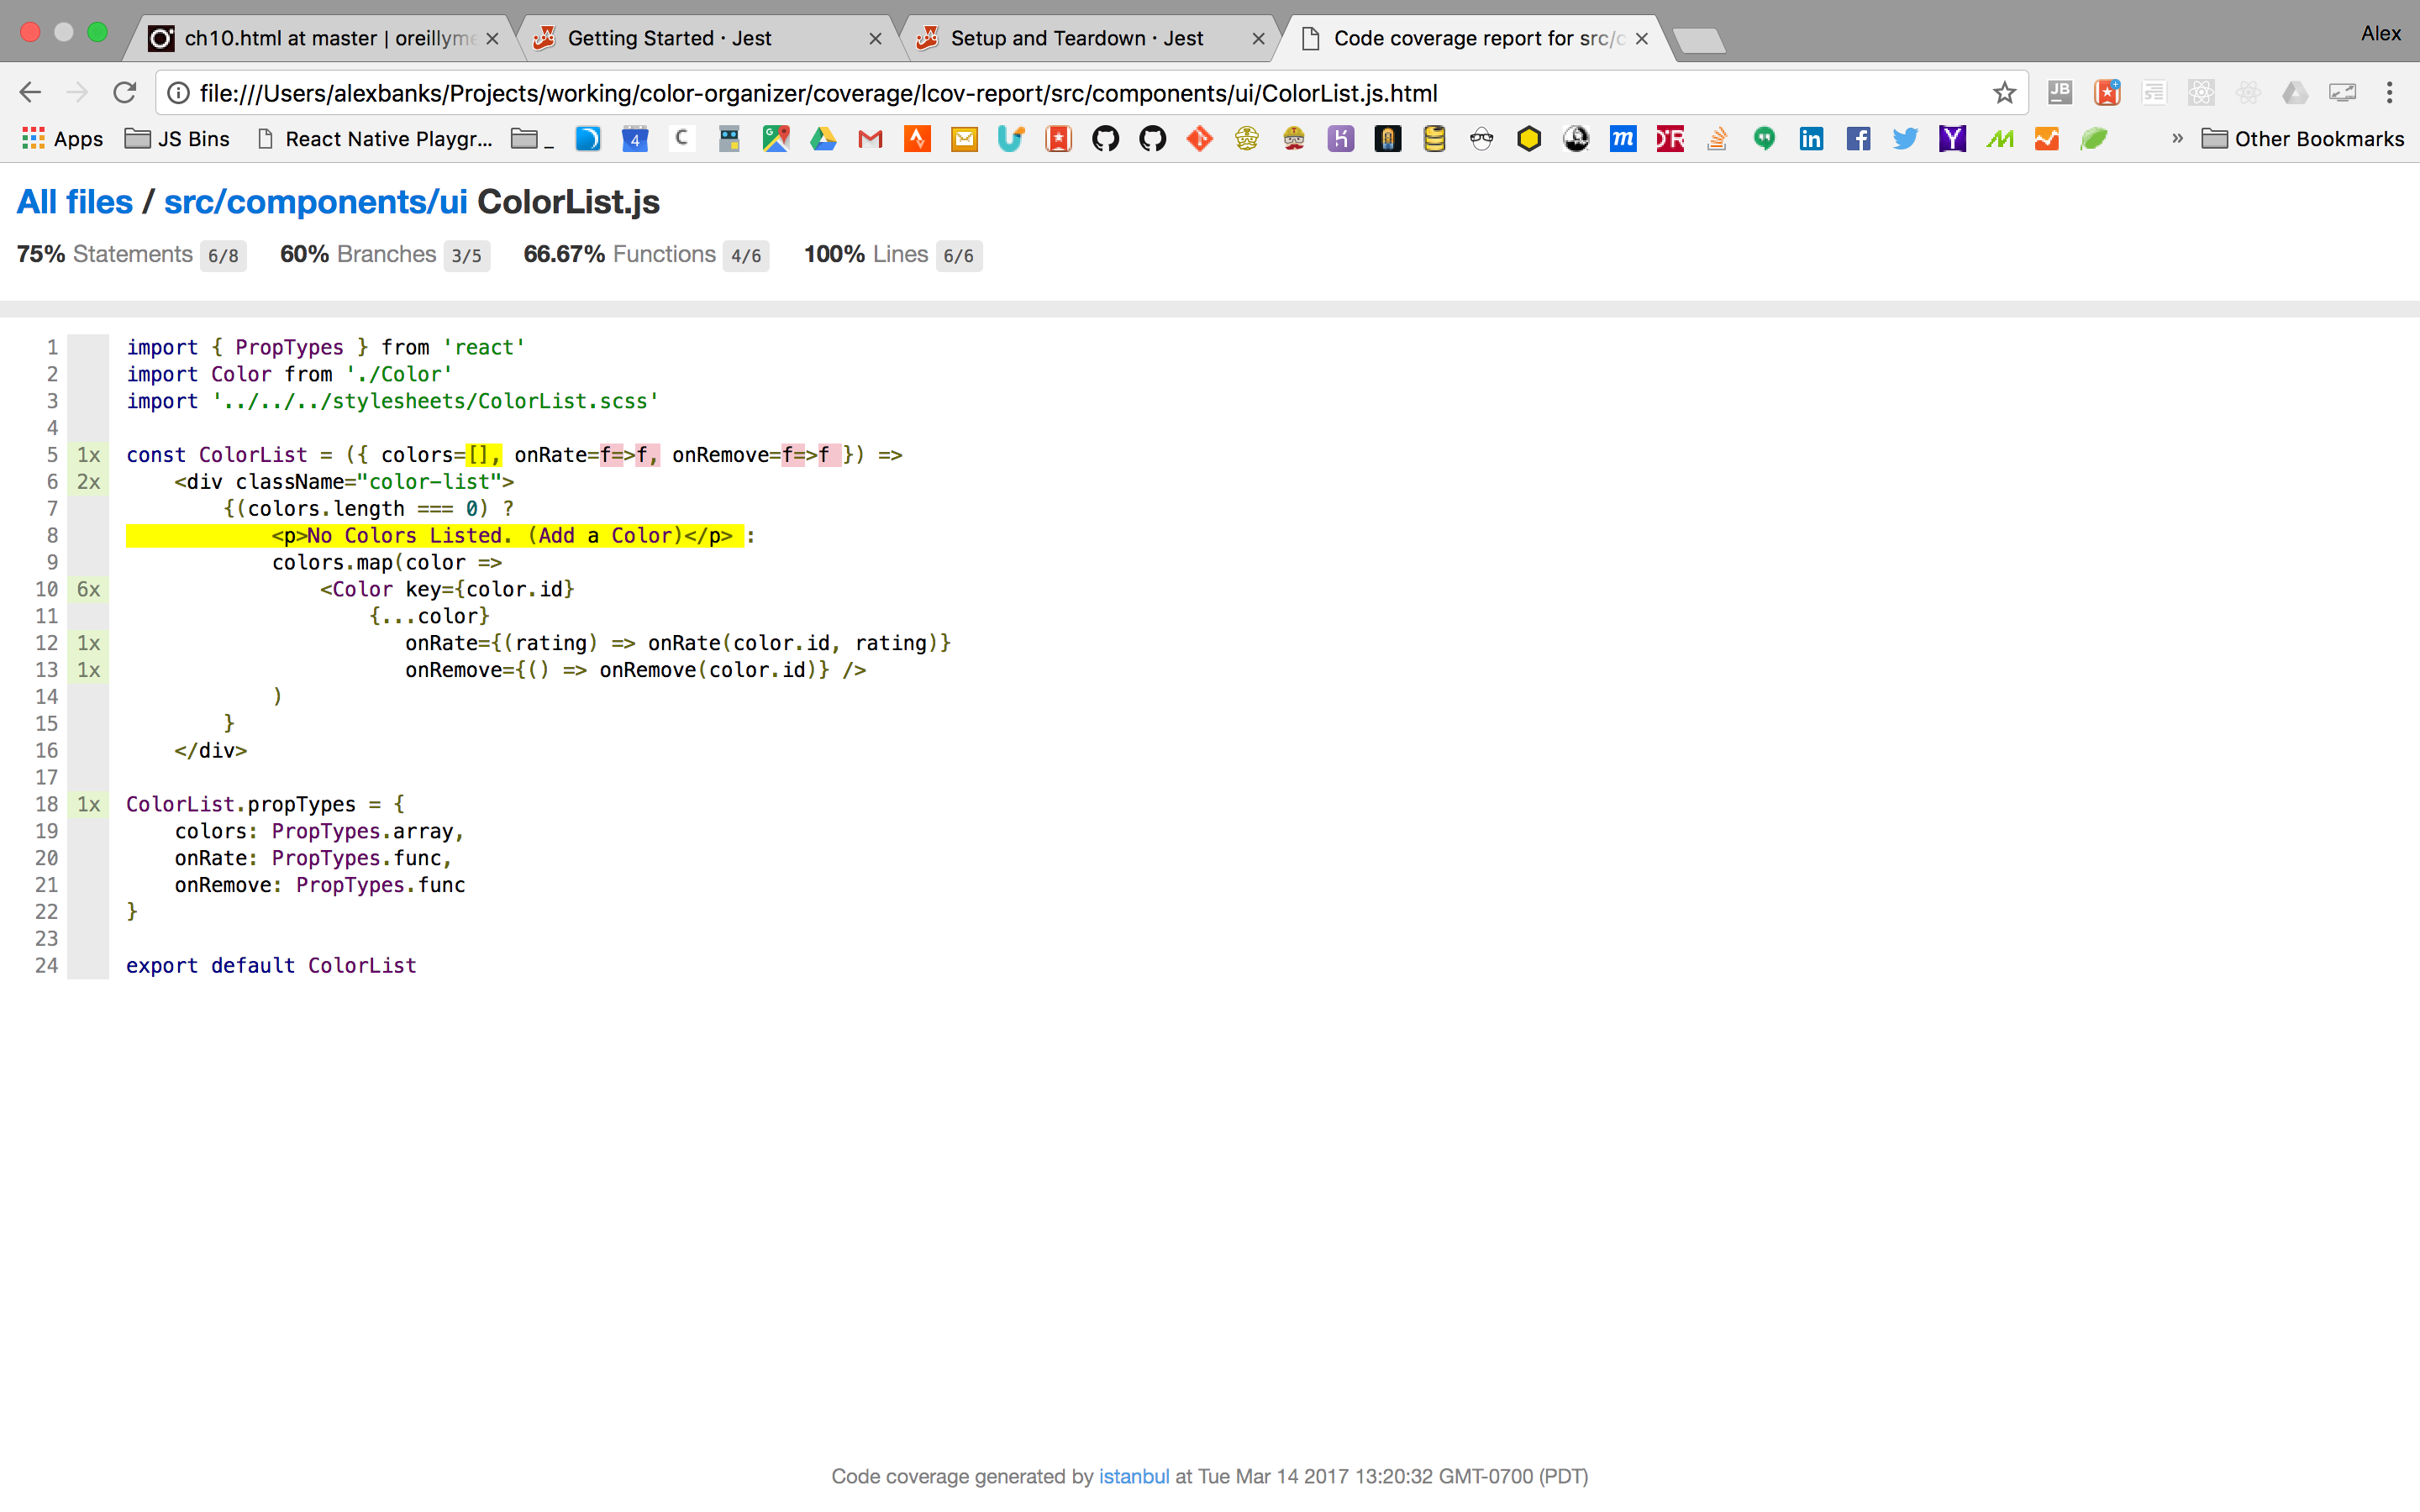
Figure 10-4. Improved coverage by testing onRemove
It looks like line 8 is not being covered either. This is because we’ve never rendered the ColorList with an empty array of colors. Let’s get line 8 covered by a test:
describe("Rendering UI",()=>{it("Defaults properties correctly",()=>expect(shallow(<ColorList/>).find('p').text()).toBe('No Colors Listed. (Add a Color)'))})
Rendering the Color component without any properties not only covers line 8, it covers the default property value that is set in line 1 too (Figure 10-5).
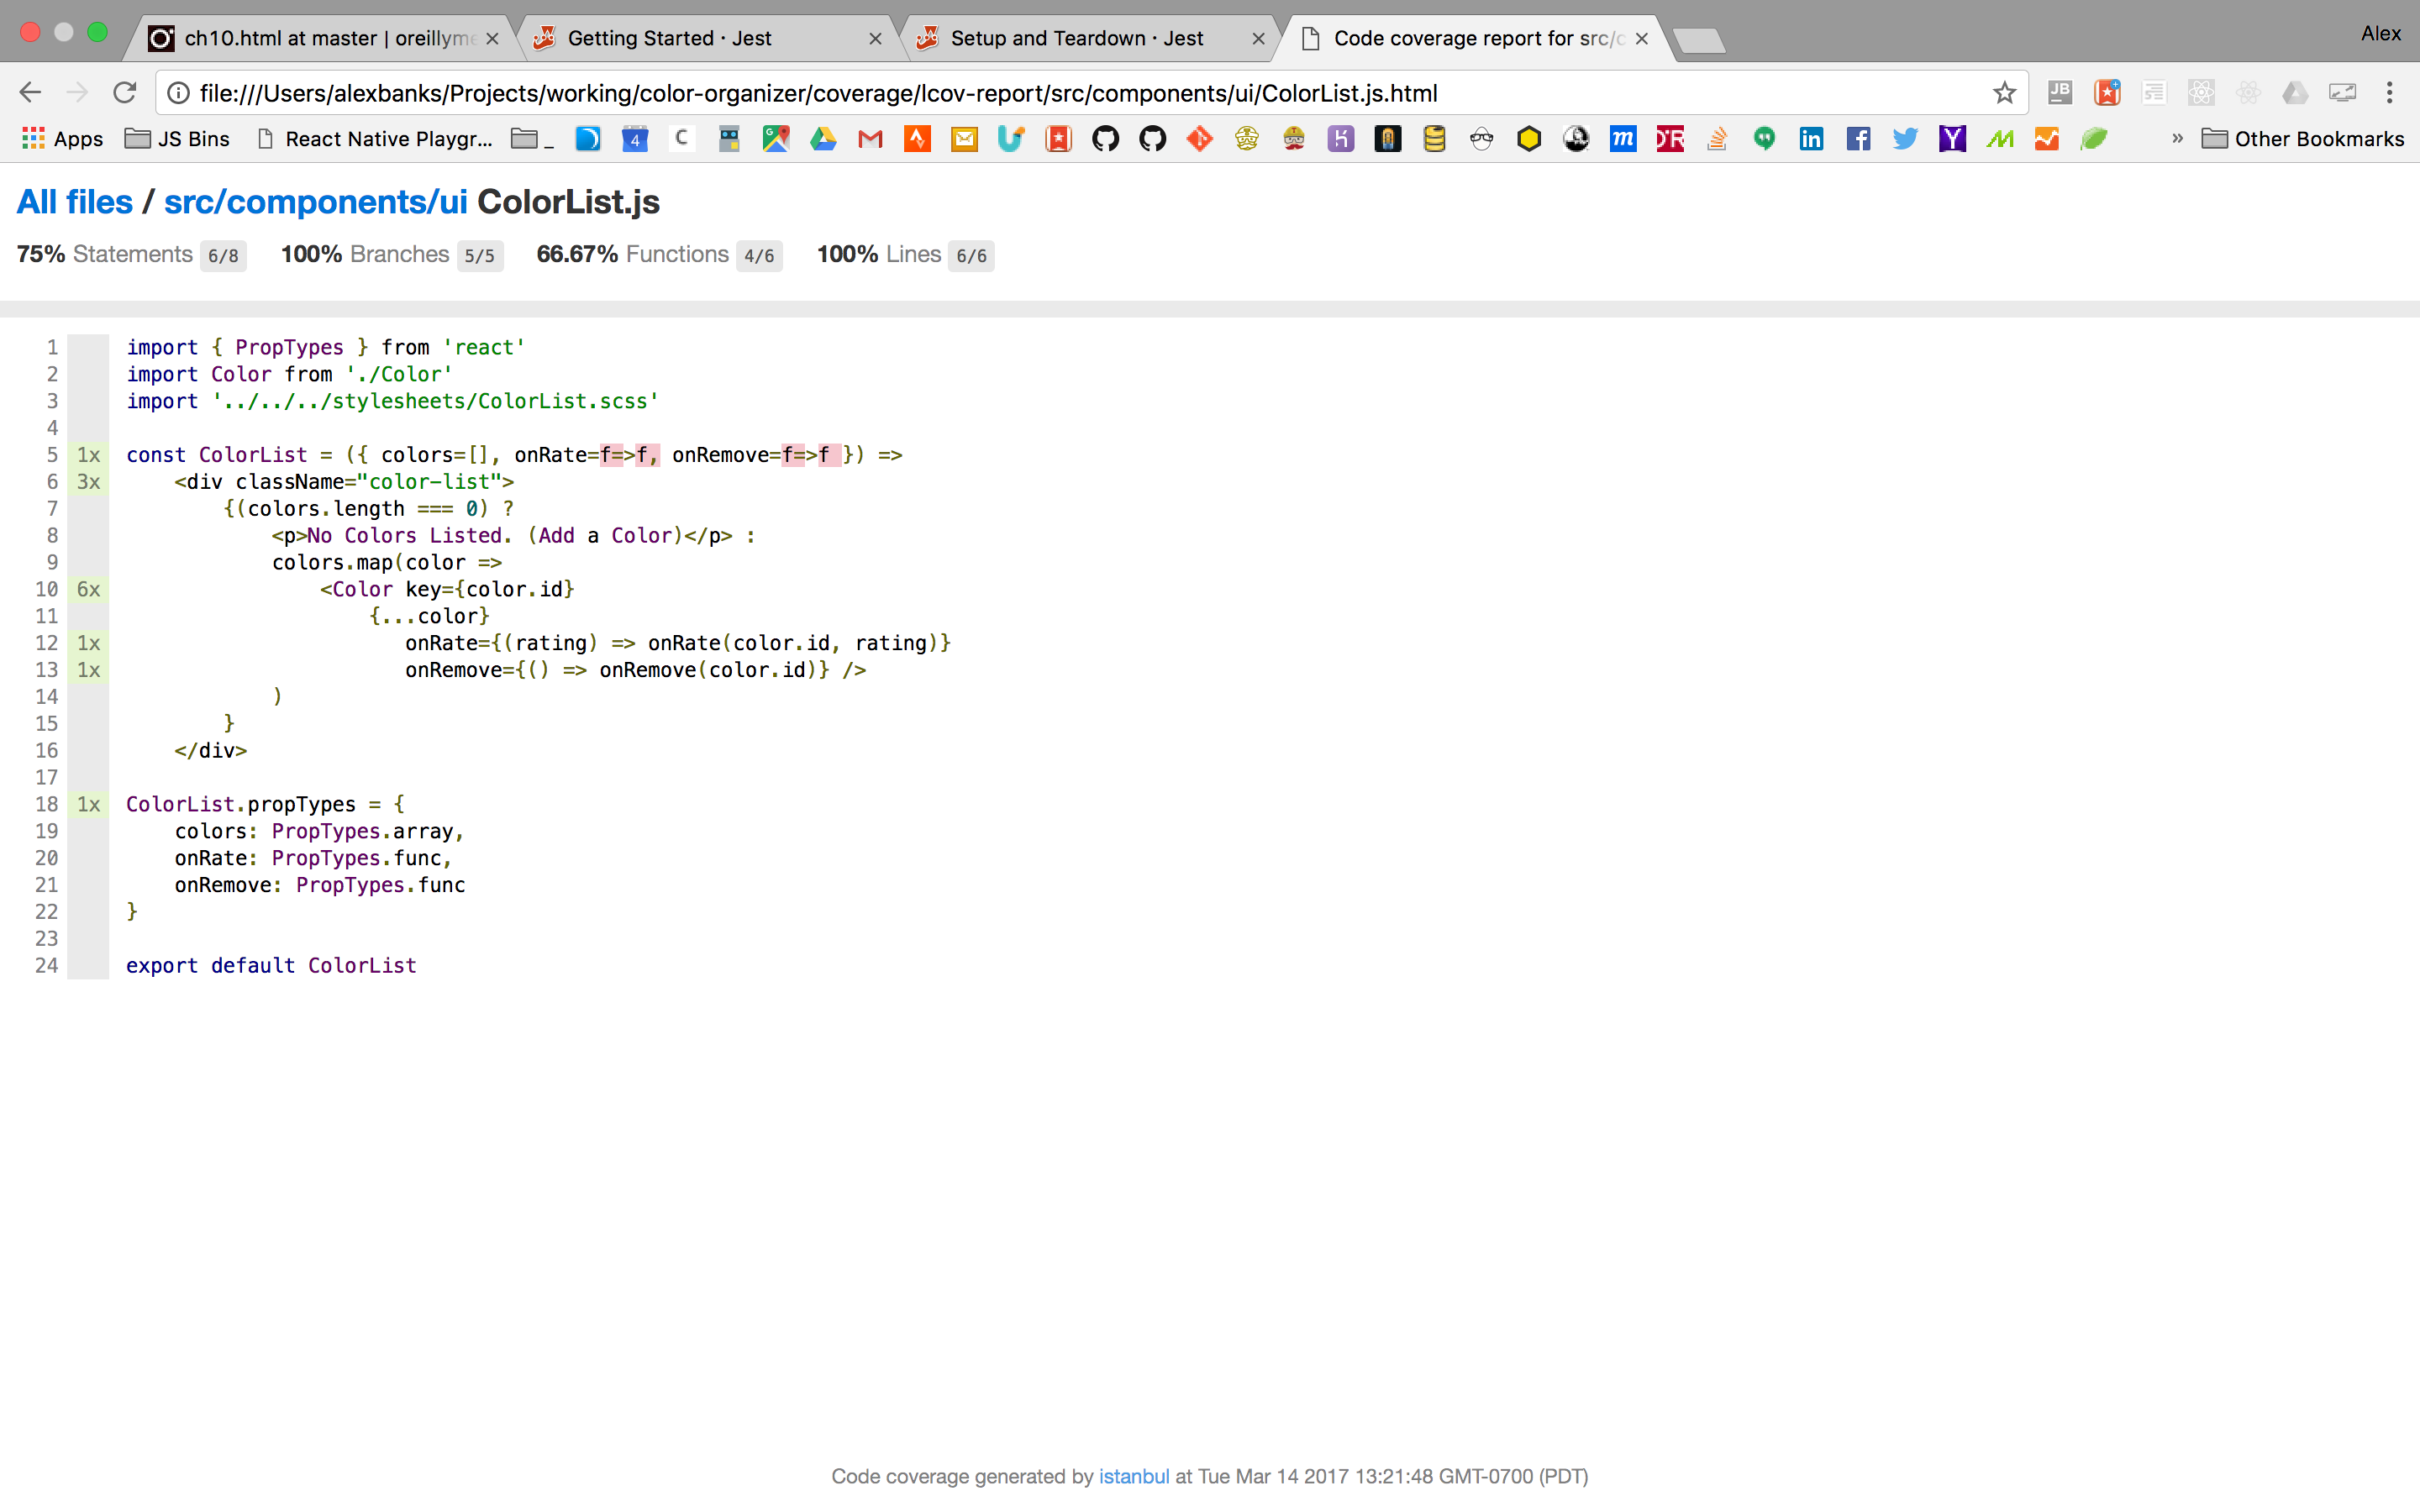
Figure 10-5. Improved code coverage by testing empty colors
We are pretty close to having 100% of the ColorList component tested. The only things that we have not tested are the default functions for onRate and onRemove. If we did not provide these functions, these properties would be required. We can improve our test by rending the ColorList component without properties. We also want to simulate clicks on the first rating button and the last remove button:
describe("Rendering UI",()=>{it("Defaults properties correctly",()=>expect(shallow(<ColorList/>).find('p').text()).toBe('No Colors Listed. (Add a Color)'))it("Clicking default rate button does not cause Error",()=>{mount(<ColorListcolors={_testColors}/>).find('button.rate').first().simulate('click')})it("Clicking default remove button does not cause Error",()=>{mount(<ColorListcolors={_testColors}/>).find('button.remove').first().simulate('click')})})
The next time we run Jest with coverage reporting, we will see that we are now covering 100% of the code in the ColorList component (Figure 10-6).
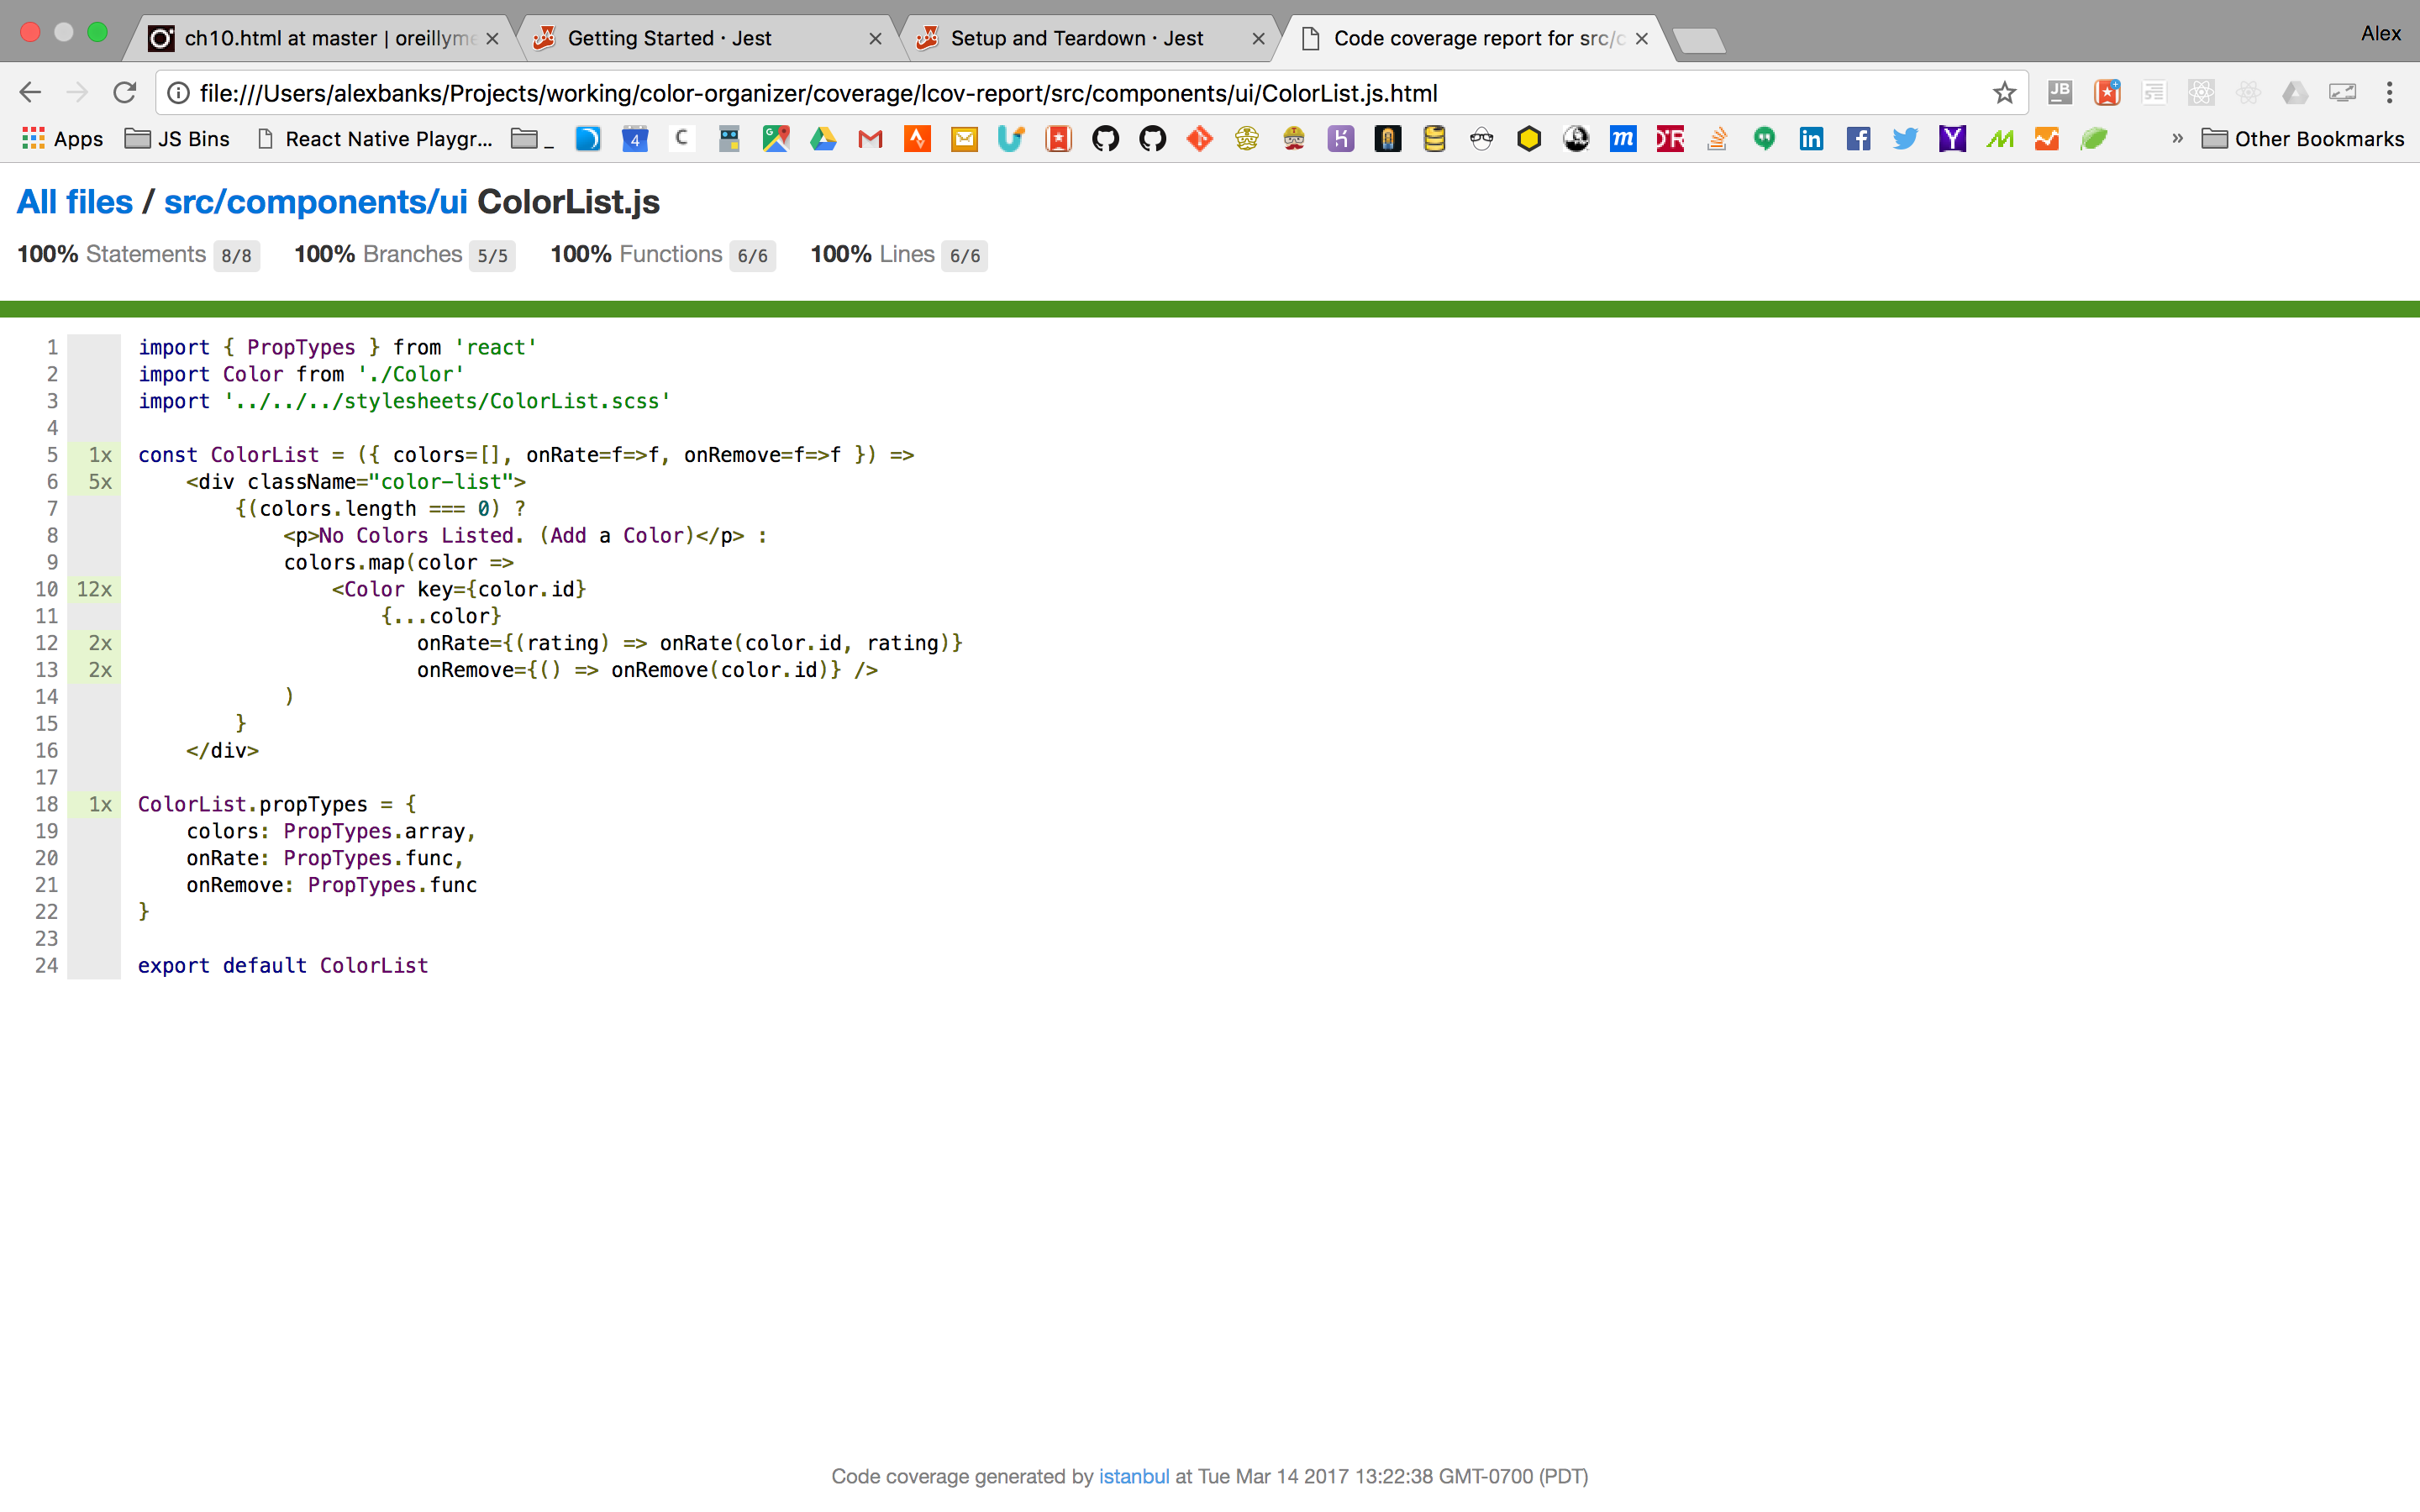
Figure 10-6. 100% coverage for ColorList
But we still have a lot of work to do with the rest of the components in our project, as we can see in Figure 10-7.
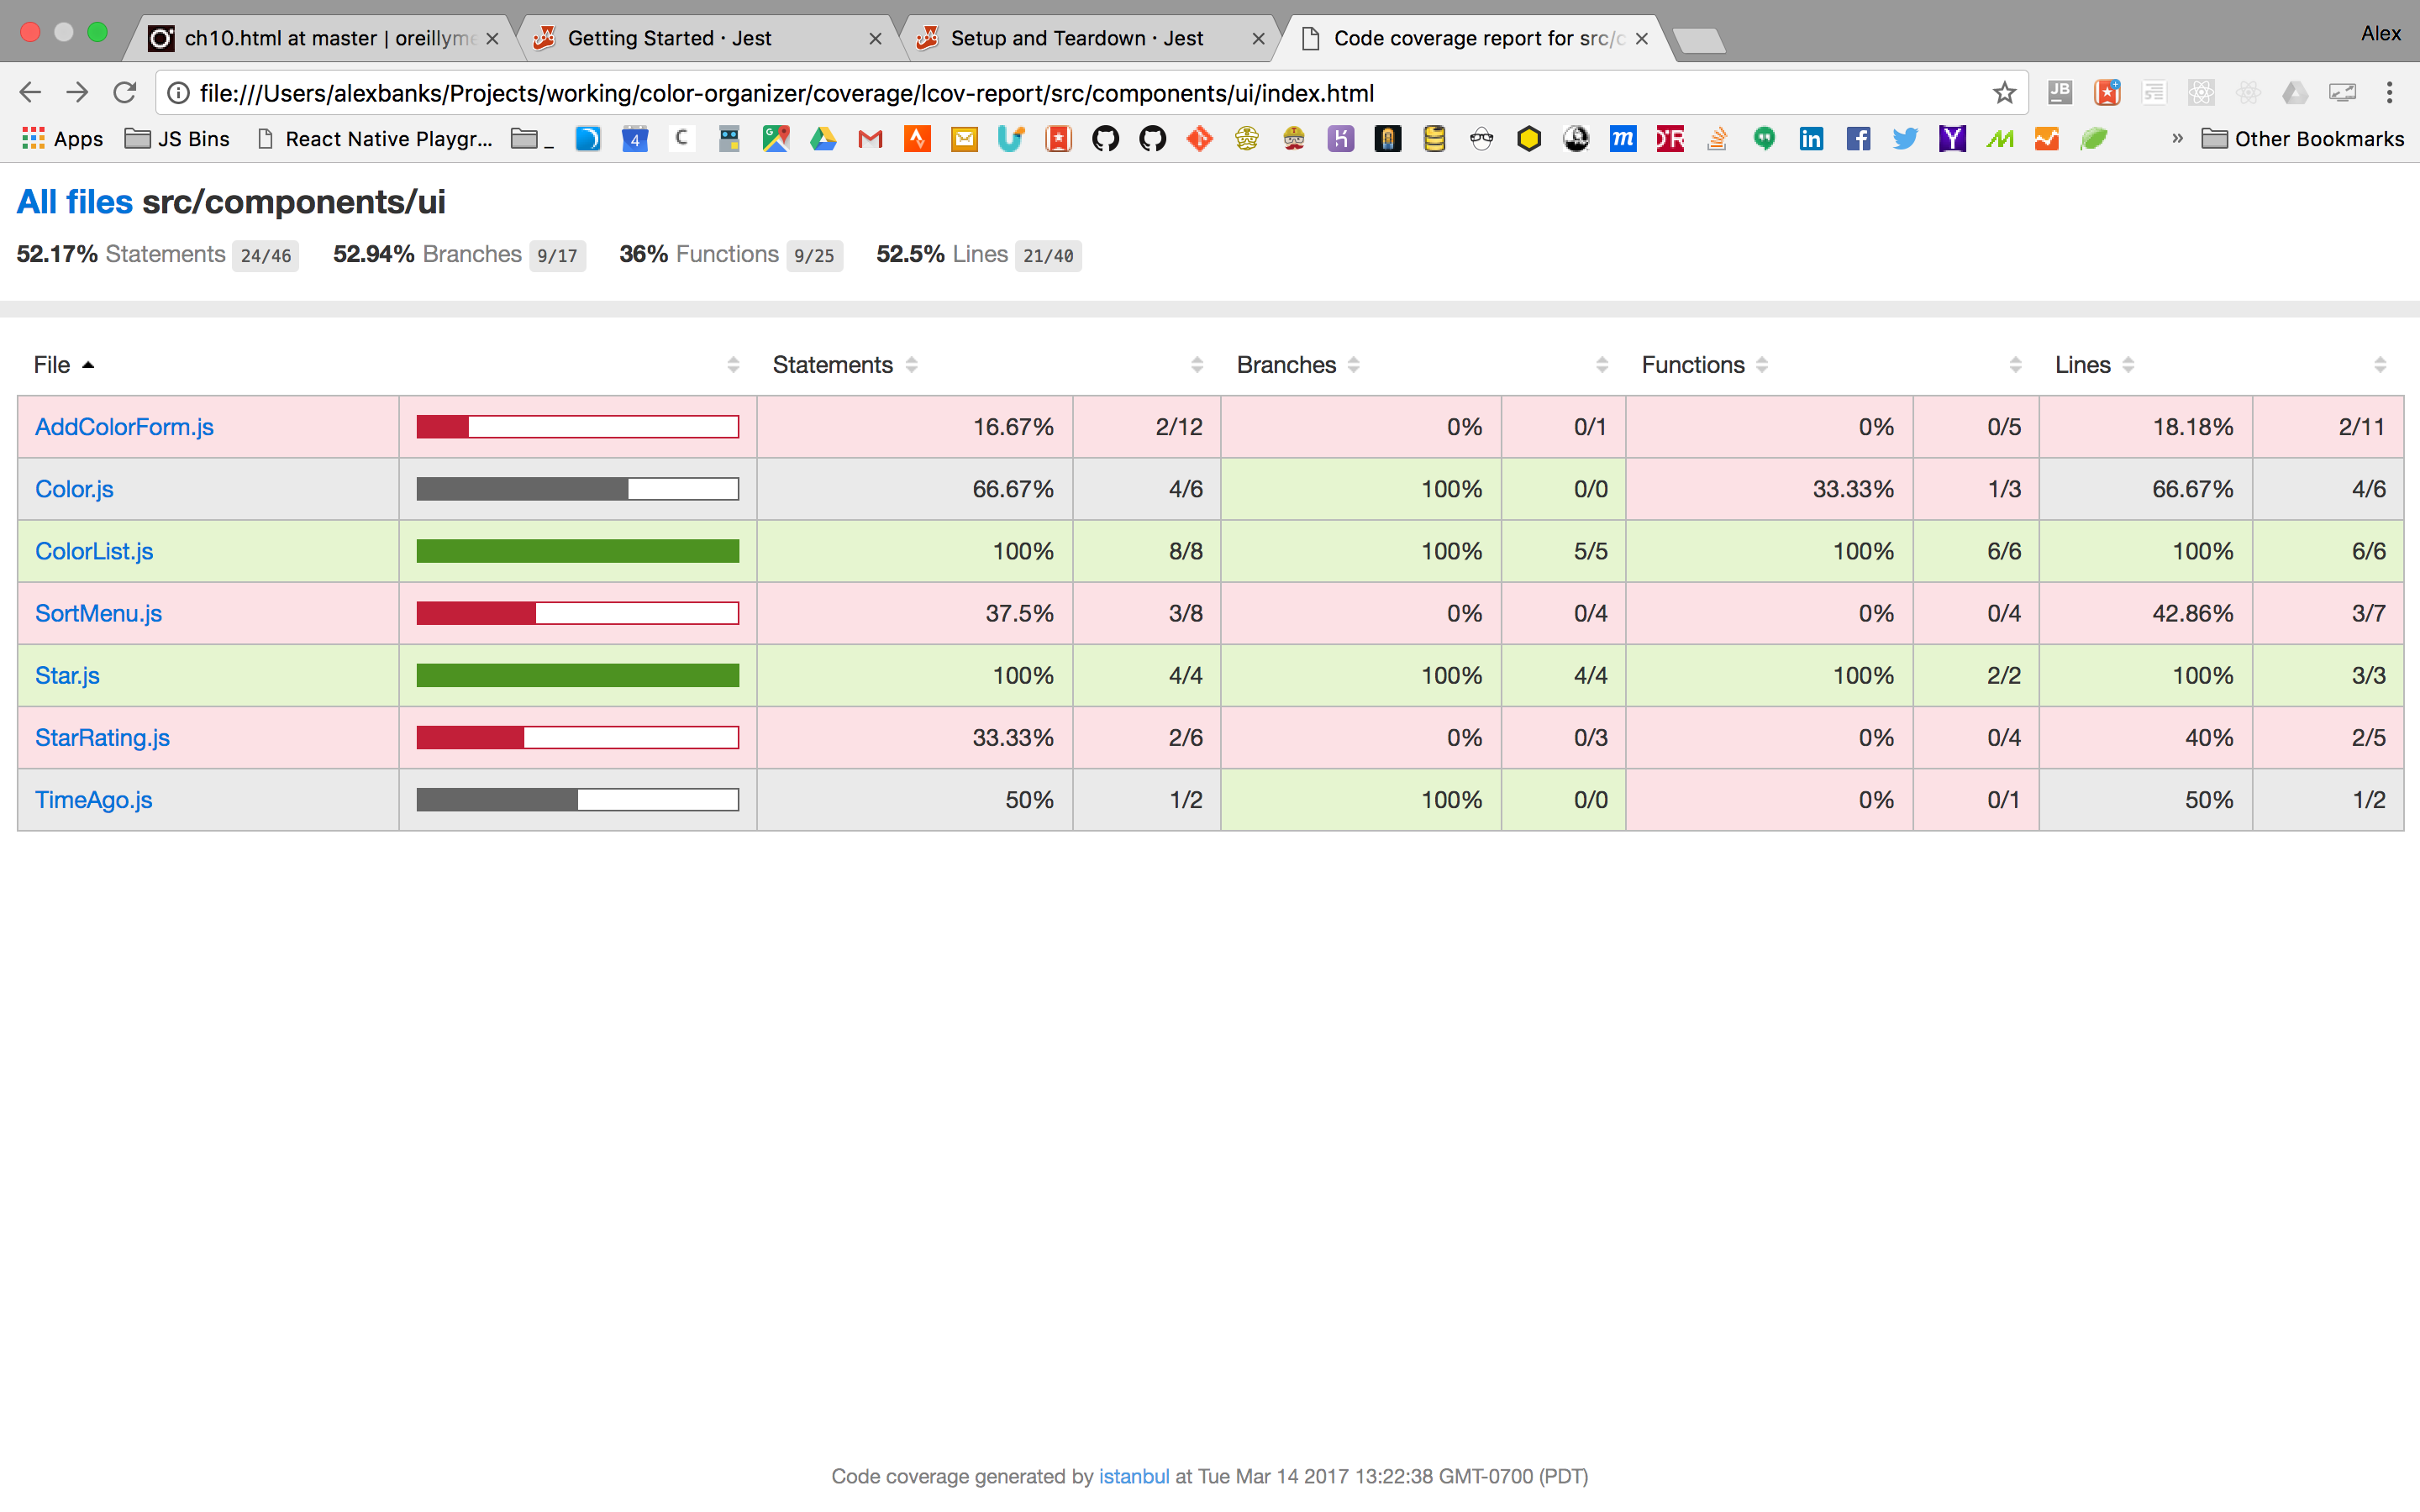
Figure 10-7. UI component test coverage after writing new tests for ColorList
You can use this report to help guide you through the process of improving your tests by improving the amount of code that is covered by testing.
You can also include coverage options in your package.json file:
"jest":{"setupFiles":["./__tests__/global.js"],"modulePathIgnorePatterns":["global.js"],"moduleNameMapper":{"\\.(scss)$":"<rootDir>/node_modules/jest-css-modules"},"verbose":true,"collectCoverage":true,"notify":true,"collectCoverageFrom":["src/**"],"coverageThreshold":{"global":{"branches":80,"functions":80,"lines":80,"statements":80}}}
The coverageThreshold field defines how much code should be covered before your testing passes. We have specified that 80% of all branches, functions, lines, and statements must be covered.
The collectCoverageFrom field is where you can specify which files should be covered. It takes an array of glob patterns. We have specified that all of the files in the src directory and any subdirectory should be covered.
Setting the collectCoverage option to true means that coverage data will be collected every time we run the jest command on this project. The notify field displays a notification box using your operating system. Finally, the verbose option displays a detailed report of each test every time you run Jest. The verbose report for the “<ColorList /> UI Component” suite looks like:
PASS  __tests__/components/ui/ColorList.test.js
  <ColorList /> UI Component
    Rendering UI
      ✓ Defaults Properties correctly (2ms)
      ✓ Clicking default rate button do not cause Error (6ms)
      ✓ Clicking default remove button do not cause Error (4ms)
    Rating a Color
      ✓ invokes onRate Handler
      ✓ rates the correct color (1ms)
    Removing a Color
      ✓ invokes onRemove Handler
      ✓ removes the correct color
It will take more testing to achieve 100% code coverage for the color organizer. The code found in the GitHub repository for this chapter does achieve 100% code coverage (Figure 10-8).
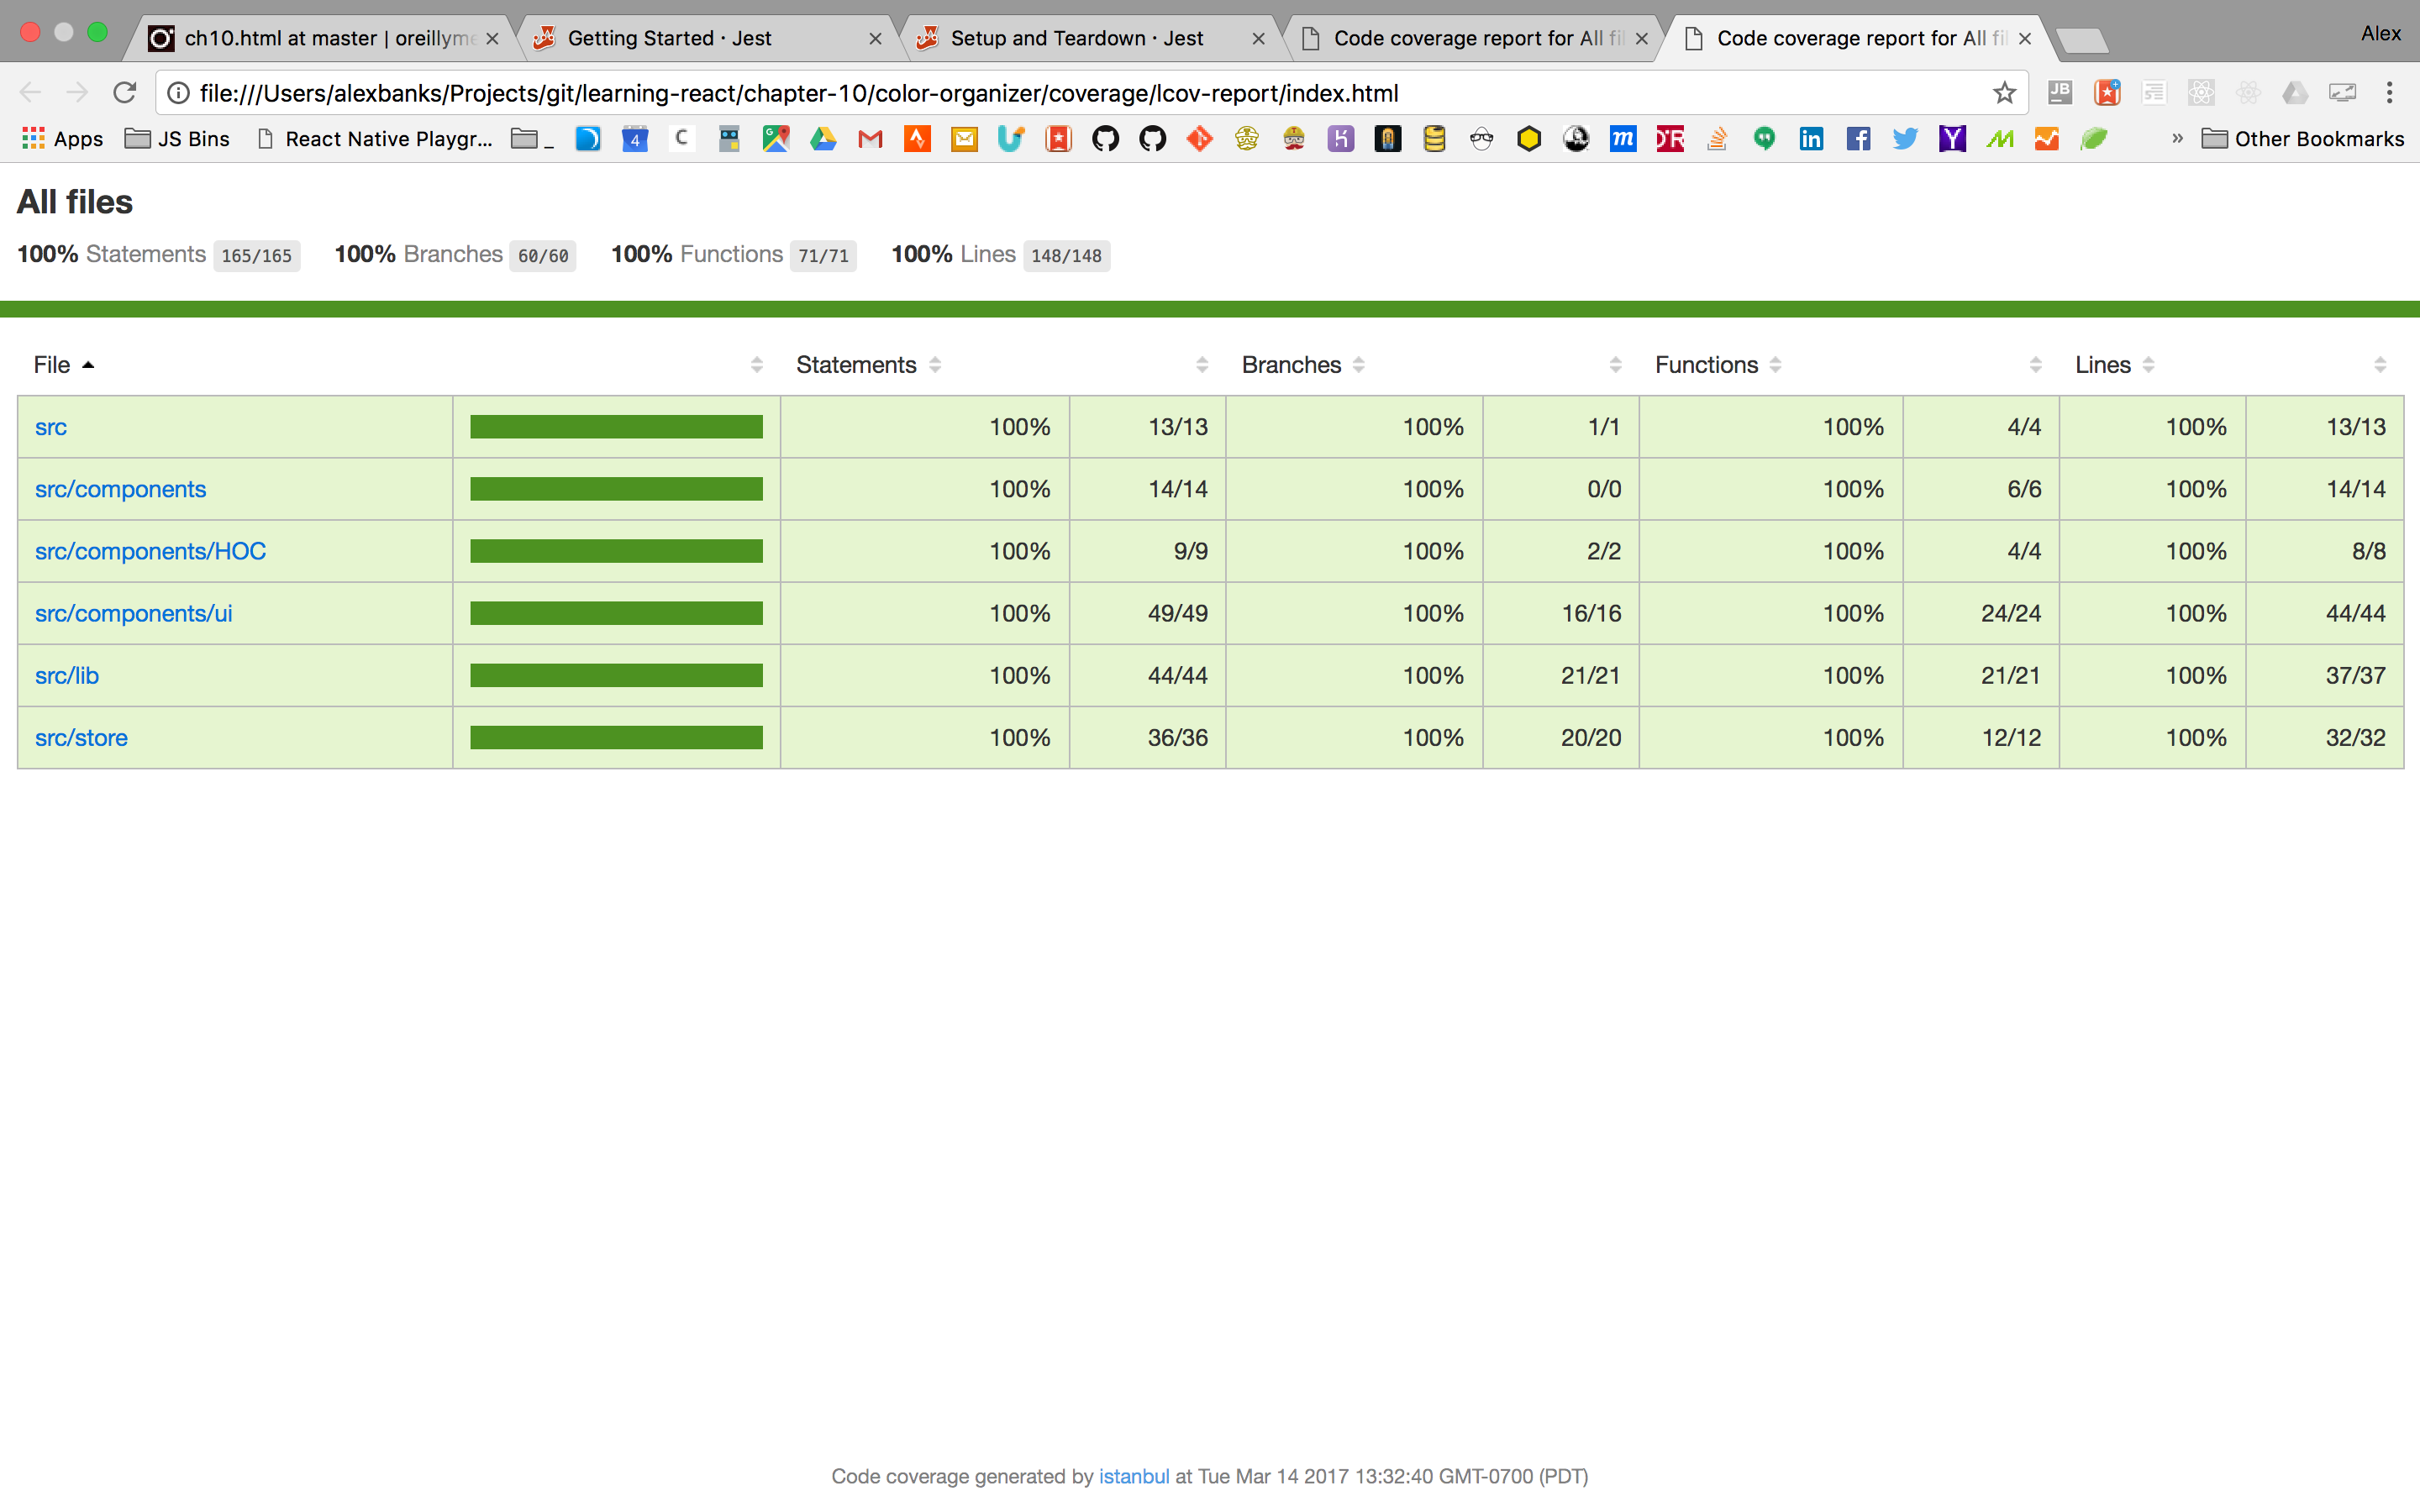
Figure 10-8. 100% code coverage
Code coverage is a great tool to measure the reach of your tests. It is one benchmark to help you understand when you have written enough unit tests for your code. It is not typical to have 100% code coverage in every project. Shooting for anything above 85% is a good target.5
1 For a brief introduction to unit testing, see Martin Fowler’s article, “Unit Testing”.
2 For more on this development pattern, see Jeff McWherter and James Bender, “Red, Green, Refactor”.
3 See Jay Fields, “Testing: One Assertion per Test”, June 6, 2007.
4 For a more in-depth look at mocks, see Martin Fowler’s article, “Mocks Aren’t Stubs”.
5 See Martin Fowler’s article “Test-Coverage”.