Table of Contents for
Data Wrangling with Python
 Data Wrangling with Python
Published by
O'Reilly Media, Inc., 2016
Data Wrangling with Python
Published by
O'Reilly Media, Inc., 2016
- Cover
- nav
- Praise for Data Wrangling with Python
- Data Wrangling with Python
- Data Wrangling with Python
- Preface
- 1. Introduction to Python
- 2. Python Basics
- 3. Data Meant to Be Read by Machines
- 4. Working with Excel Files
- 5. PDFs and Problem Solving in Python
- 6. Acquiring and Storing Data
- 7. Data Cleanup: Investigation, Matching, and Formatting
- 8. Data Cleanup: Standardizing and Scripting
- 9. Data Exploration and Analysis
- 10. Presenting Your Data
- 11. Web Scraping: Acquiring and Storing Data from the Web
- 12. Advanced Web Scraping: Screen Scrapers and Spiders
- 13. APIs
- 14. Automation and Scaling
- 15. Conclusion
- A. Comparison of Languages Mentioned
- B. Python Resources for Beginners
- C. Learning the Command Line
- D. Advanced Python Setup
- E. Python Gotchas
- F. IPython Hints
- G. Using Amazon Web Services
- Index
- About the Authors
- Colophon
Chapter 12. Advanced Web Scraping: Screen Scrapers and Spiders
You’ve begun your web scraping skills development, learning how to decipher what, how, and where to scrape in Chapter 11. In this chapter, we’ll take a look at more advanced scrapers, like browser-based scrapers and spiders to gather content.
We’ll also learn about debugging common problems with advanced web scraping and cover some of the ethical questions presented when scraping the Web. To begin, we’ll investigate browser-based web scraping: using a browser directly with Python to scrape content from the Web.
Browser-Based Parsing
Sometimes a site uses a lot of JavaScript or other post-page-load code to populate the pages with content. In these cases, it’s almost impossible to use a normal web scraper to analyze the site. What you’ll end up with is a very empty-looking page. You’ll have the same problem if you want to interact with pages (i.e., if you need to click on a button or enter some search text). In either situation, you’ll want to figure out how to screen read the page. Screen readers work by using a browser, opening the page, and reading and interacting with the page after it loads in the browser.
Tip
Screen readers are great for tasks performed by walking through a series of actions to get information. For this very reason, screen reader scripts are also an easy way to automate routine web tasks.
The most commonly used screen reading library in Python is Selenium. Selenium is a Java program used to open up a browser and interact with web pages through screen reading. If you already know Java, you can use the Java IDE to interact with your browser. We will be using the Python bindings to interact with Selenium using Python.
Screen Reading with Selenium
Selenium is a powerful Java-based engine to interact directly with a website through any of the Selenium-supported browsers. It’s a very popular framework for user testing, allowing companies to build tests for their sites. For our purposes, we will use Selenium to scrape a site we need to interact with or one where not all content is loaded on the first request (refer to our Figure 11-6 example, where most content is loaded after the initial request is complete). Let’s take a look at that page and see if we can read it with Selenium.
First, we need to install Selenium using pip install:
pip install selenium
Now, let’s get started writing Selenium code. First, we need to open the browser. Selenium supports many different browsers, but ships with a built-in driver for Firefox. If you don’t have Firefox installed, you can either install it, or install the Selenium driver for Chrome, Internet Explorer, or Safari. Let’s see if we can open a web page using Selenium (in our examples, we’ll be using Firefox, but it’s very easy to switch and use a different driver):
fromseleniumimportwebdriverbrowser=webdriver.Firefox()browser.get('http://www.fairphone.com/we-are-fairphone/')browser.maximize_window()

Imports the
webdrivermodule from Selenium. This module is used to call any installed drivers.
Instantiates a Firefox browser object by using the
Firefoxclass from thewebdrivermodule. This should open a new Firefox window on your computer.
Accesses the URL we want to scrape by using the
getmethod and passing a URL. The open browser should now start to load the page.
Maximizes the open browser by using the
maximize_browsermethod. This helps Selenium “see” more of the content.
We now have a browser object (variable browser) with a page loaded and ready. Let’s see if we can interact with the elements on the page. If you use your browser’s Inspection tab, you’ll see the social media content bubbles are div elements with a class of content. Let’s see if we can see them all using our new browser object:
content=browser.find_element_by_css_selector('div.content')content.textall_bubbles=browser.find_elements_by_css_selector('div.content')len(all_bubbles)forbubbleinall_bubbles:bubble.text
The
browserobject has a functionfind_element_by_css_selectorthat uses CSS selectors to select HTML elements. This line of code selects the firstdivwith classcontent, which returns the first match (anHTMLElementobject).This line will print the text in that first match element. We expect to see the first chat bubble.
This line uses the
find_elements_by_css_selectormethod to pass a CSS selector and find all matches. This method returns a list ofHTMLElementobjects.We iterate over the list and print out the content for each.
Hmm, that’s odd. It looks like there are only two matches for the elements we want to find (because we saw an output of 2 when we printed the length of all_bubbles), and yet we see plenty of content bubbles on the page. Let’s take a deeper look at the HTML elements on the page and see if we can figure out why we aren’t matching more elements (see Figure 12-1).
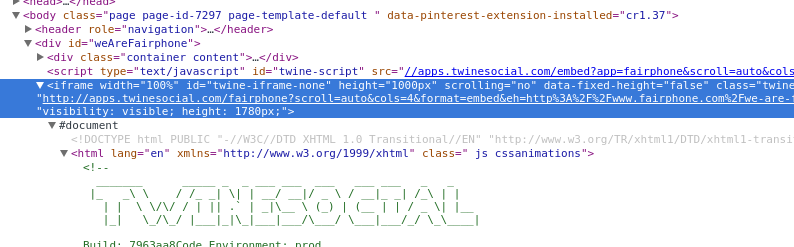
Figure 12-1. iframe
Aha! When we look at the parent element for our content, we see it is an iframe in the middle of our page. An iframe (inline frame) is an HTML tag that embeds another DOM structure into the page, essentially allowing a page to load to another page inside itself. Our code will likely not be able to parse it, because parsers expect to traverse only one DOM. Let’s see if we can get the iframe loaded into a new window, so we don’t
have to go through the pain of traversing two DOMs:
iframe=browser.find_element_by_xpath('//iframe')new_url=iframe.get_attribute('src')browser.get(new_url)
Uses the
find_element_by_xpathmethod, which returns the first element that matches aniframetagGets the
srcattribute, which should contain the URL to the page in theiframeLoads the
iframe’s URL in our browser
We figured out how to load the content we wanted. Now we can see if we can load all of the content bubbles:
all_bubbles=browser.find_elements_by_css_selector('div.content')foreleminall_bubbles:elem.text
Now we have the bubble content—excellent! Let’s collect some information: we’ll want to retrieve the person’s name, what content they shared, the photo if there is one, and the links to the original content.
In looking through the HTML on the page, it looks like for each content element we have fullname and name elements to identify the person, and a twine-description element with the text. We see there’s a picture element, and a when element with the time data. The when element also has the original link. Let’s break it down:
fromselenium.common.exceptionsimportNoSuchElementExceptionall_data=[]foreleminall_bubbles:elem_dict={}elem_dict['full_name']=\elem.find_element_by_css_selector('div.fullname').textelem_dict['short_name']=\elem.find_element_by_css_selector('div.name').textelem_dict['text_content']=\elem.find_element_by_css_selector('div.twine-description').textelem_dict['timestamp']=elem.find_element_by_css_selector('div.when').textelem_dict['original_link']=\elem.find_element_by_css_selector('div.when a').get_attribute('href')try:elem_dict['picture']=elem.find_element_by_css_selector('div.picture img').get_attribute('src')exceptNoSuchElementException:elem_dict['picture']=Noneall_data.append(elem_dict)
This line imports
NoSuchElementExceptionfrom Selenium’s exception classes. When using exception classes in atry...exceptblock, make sure you import and use the library’s exceptions to properly handle expected errors. We know not every item has a photo, and Selenium will throw this exception if it can’t find thepictureHTML element we are looking for, so we can use this exception to differentiate the bubbles with photos and those without.In our
forloop, we iterate over the content bubbles. For each of theseelemobjects, we can find elements within them by traversing further down the tree.For each of our text elements, this line calls the
HTMLElement’stextattribute, which strips away tags in the text and returns just the text content of that element.The
HTMLElement’sget_attributemethod expects a nested attribute and returns the value of that attribute. This line passes thehrefattribute to get the URL, using nested CSS to look for an anchor tag in adivelement with a class ofwhen.
In a
tryblock, this code looks for a photo in thediv. If there isn’t a photo, the next line catches theNoSuchElementExceptionSelenium throws since there is no matching element.
If we don’t find a matching element, this line adds a
Nonevalue. This ensures all items in our new list have apicturekey.
We’re running into a problem pretty early in our script. You should see an exception containing the following text:
Message: Unable to locate element:
  {"method":"css selector","selector":"div.when"}
This tells us there are some issues finding the when element. Let’s take a closer look in our Inspection tab and see what’s going on (see Figure 12-2).
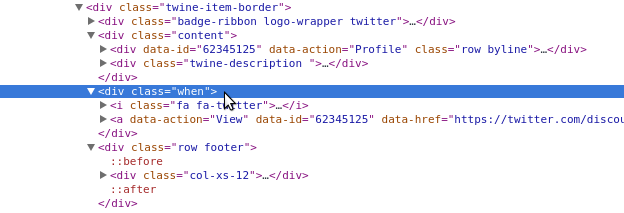
Figure 12-2. Sibling divs
Upon closer inspection, we can see the content divs and when divs are actually siblings, not parent and child in the DOM structure. This presents a problem because we are iterating over only the content divs, not the parent div. If we take a closer look, we can see that the twine-item-border element is the parent of both the content and when elements. Using the code we have written, we can see if iterating over the parent works. You will need to change what we use for all_bubbles by loading the parent element, like so:
all_bubbles=browser.find_elements_by_css_selector('div.twine-item-border')
Rerun the previous code with that change. What happens? You will see more NoSuchElementException errors. Because we aren’t sure every single element has the same attributes, let’s assume they are all different and rewrite the code to account for exceptions:
fromselenium.common.exceptionsimportNoSuchElementExceptionall_data=[]all_bubbles=browser.find_elements_by_css_selector('div.twine-item-border')foreleminall_bubbles:elem_dict={'full_name':None,'short_name':None,'text_content':None,'picture':None,'timestamp':None,'original_link':None,}content=elem.find_element_by_css_selector('div.content')try:elem_dict['full_name']=\content.find_element_by_css_selector('div.fullname').textexceptNoSuchElementException:passtry:elem_dict['short_name']=\content.find_element_by_css_selector('div.name').textexceptNoSuchElementException:passtry:elem_dict['text_content']=\content.find_element_by_css_selector('div.twine-description').textexceptNoSuchElementException:passtry:elem_dict['timestamp']=elem.find_element_by_css_selector('div.when').textexceptNoSuchElementException:passtry:elem_dict['original_link']=\elem.find_element_by_css_selector('div.when a').get_attribute('href')exceptNoSuchElementException:passtry:elem_dict['picture']=elem.find_element_by_css_selector('div.picture img').get_attribute('src')exceptNoSuchElementException:passall_data.append(elem_dict)
For each iteration through our items, this line adds a new dictionary and sets all of the keys to
None. This gives us a clean dictionary setup so every item has the same keys and we can add data to the keys as we discover it.We pull out the
content divso we can select from thatdiv. This makes our code more specific in case there are otherdivs with similar names.We use Python’s
passto move past exceptions. Because all of our keys are already set toNone, we don’t need to do anything here. Python’spasskeeps the code moving through the exception so execution continues with the following code block.
Once you’ve collected the data in all_data, you can print it to have a look at what you’ve collected. Here is some example output (it’s a social media timeline, so yours will look different than what’s shown here):
[{'full_name':u'Stefan Brand','original_link':None,'picture':u'https://pbs.twimg.com/media/COZlle9WoAE5pVL.jpg:large','short_name':u'','text_content':u'Simply @Fairphone :) #WeAreFairphone http://t.co/vUvKzjX2Bw','timestamp':u'POSTED ABOUT 14 HOURS AGO'},{'full_name':None,'original_link':None,'picture':None,'short_name':u'','text_content':None,'timestamp':None},{'full_name':u'Sietse/MFR/Orphax','original_link':None,'picture':None,'short_name':u'','text_content':u'Me with my (temporary) Fairphone 2 test phone.# happytester #wearefairphone @ Fairphone instagram.com/p/7X-KXDQzXG/','timestamp':u'POSTED ABOUT 17 HOURS AGO'},...]
The data looks to be in varied states of disarray. Our for loop is messy and hard to read and understand. Also, it seems like we could improve some of the ways we go about our data collection—our date objects are just strings, when they should probably be dates. We should play around with Selenium’s ability to interact with the page, too, which may allow us to load more content.
We also need to debug errors we are seeing. We can’t find the short name properly; our code seems to be returning an empty string. After some page investigation, it appears the name div is hidden. With Selenium, hidden elements often can’t be read, so we’ll need to use the innerHTML attribute of that element, which will return content inside the tags. We also notice the timestamp data is stored in the title attribute and the URL is actually stored in data-href, not the href attribute.
Note
Over time, it becomes easier to write scraper code that works on the first try. It also becomes easier to anticipate what might be troublesome. Investigating with your browser’s developer tools and debugging with IPython lets you play around with the variables and test what might work.
On top of finding all of the data, we want to make sure our script is formed properly. We want to create functions and better abstract our data extraction. Instead of parsing the URL from the initial page, we should simplify our code and load the page directly. Through trial and error in our browser, we find we can remove the long query strings for the iframe URL (i.e., ?scroll=auto&cols=4&format=embed&eh=…) and still load the whole page with the embedded content from social media. Let’s take a look at the cleaned-up and simplified script:
fromselenium.common.exceptionsimportNoSuchElementException,\WebDriverExceptionfromseleniumimportwebdriverdeffind_text_element(html_element,element_css):try:returnhtml_element.find_element_by_css_selector(element_css).textexceptNoSuchElementException:passreturnNonedeffind_attr_element(html_element,element_css,attr):try:returnhtml_element.find_element_by_css_selector(element_css).get_attribute(attr)exceptNoSuchElementException:passreturnNonedefget_browser():browser=webdriver.Firefox()returnbrowserdefmain():browser=get_browser()browser.get('http://apps.twinesocial.com/fairphone')all_data=[]browser.implicitly_wait(10)try:all_bubbles=browser.find_elements_by_css_selector('div.twine-item-border')exceptWebDriverException:browser.implicitly_wait(5)all_bubbles=browser.find_elements_by_css_selector('div.twine-item-border')foreleminall_bubbles:elem_dict={}content=elem.find_element_by_css_selector('div.content')elem_dict['full_name']=find_text_element(content,'div.fullname')elem_dict['short_name']=find_attr_element(content,'div.name','innerHTML')elem_dict['text_content']=find_text_element(content,'div.twine-description')elem_dict['timestamp']=find_attr_element(elem,'div.when a abbr.timeago','title')elem_dict['original_link']=find_attr_element(elem,'div.when a','data-href')elem_dict['picture']=find_attr_element(content,'div.picture img','src')all_data.append(elem_dict)browser.quit()returnall_dataif__name__=='__main__':all_data=main()all_data
Creates a function to take an HTML element and CSS selector and return the text element. In our last code example, we had to repeat our code again and again; now we want to create a function so we can reuse it without needing to rewrite code throughout our script.
Uses the abstracted function variables to return the text of the HTML element. If we don’t find a match, returns
None.Creates a function to find and return attributes, similar to our text element function. It requires the HTML element, the CSS selector, and the attribute we want to pull from the selector and returns the value for that selector or
None.Uses the abstracted function variables to find the HTML element and return the attribute.
Uses the Selenium
browserclass’simplicitly_waitmethod, which takes as an argument the number of seconds you want the browser to implicitly wait before moving to the next line of code. This is a great method to use if you aren’t sure the page will load immediately. There is a lot of great Selenium documentation on using implicit and explicit waits.Passes CSS selectors to grab the
titleattribute of theabbrelement located in an anchor tag inside thewhen div, in order to capture the timestamp data.
Closes the browser using the
quitmethod when we are done scraping our data.
Returns the collected data. The
__name__ == '__main__'block allows us to print the data when running from command line, or we can import the function into IPython and runmainto return our data.
Try running the script from the command line or importing it into IPython and then running the main function. Did your data look more complete this time? You’ll also notice we added another try...except block. We noticed that sometimes the interactions Selenium uses were interfering with the JavaScript on the page and made Selenium throw a WebDriverException. Allowing the page more time to load and trying again fixed the problem.
If you visit the URL in your browser, you can see you’re able to load more data as you scroll down the page. With Selenium, we can do those things as well! Let’s take a look at some of the other neat things Selenium can do. We can try searching Google for Python web scraping libraries and use Selenium to interact with the search results:
fromseleniumimportwebdriverfromtimeimportsleepbrowser=webdriver.Firefox()browser.get('http://google.com')inputs=browser.find_elements_by_css_selector('form input')foriininputs:ifi.is_displayed():search_bar=ibreaksearch_bar.send_keys('web scraping with python')search_button=browser.find_element_by_css_selector('form button')search_button.click()browser.implicitly_wait(10)results=browser.find_elements_by_css_selector('div h3 a')forrinresults:action=webdriver.ActionChains(browser)action.move_to_element(r)action.perform()sleep(2)browser.quit()
We need to find an input. Google, like many sites, has inputs all over the place, but usually only one big search bar visible. This line locates all form inputs so we have a good starting batch.
This line iterates over the inputs to see if they are hidden or displayed. If
is_displayedreturnsTrue, we have a visible element. Otherwise, this loop will keep iterating.When a displayed input is found, we assign the value to the
search_barvariable and break out of the loop. This will find the first visible input, which is probably the one we want.This line sends keys and strings to the selected element using the
send_keysmethod (in this case, it sends keys to the search bar). It’s like typing on your keyboard, but with Python!Selenium can also
clickon visible elements on the page. This line tells Selenium to click on the search form submit button to view our search results.To view all the search results, this line selects header elements in
divs with a link, which is how Google result pages are structured.This code loops over each result, utilizing Selenium’s ActionChains to formulate a series of actions, and tells the browser to perform those actions.
This line uses the
move_to_elementmethod of the ActionChain, passing the element we want the browser to move to.
This line calls
perform, meaning the browser will move to highlight each search result. We used asleep, which tells Python to wait a certain number of seconds (here, 2) before the next line executes, so your browser doesn’t move so fast you miss the fun.
Voilà! We can now go to a site, fill out a form, submit it, and use Selenium ActionChains to scroll through the results. As you have seen, ActionChains are a powerful way to perform a series of actions in the browser. There are more great features you can explore in Selenium’s Python bindings documentation, including explicit waits (where the browser can wait until a particular element is loaded, not just for the page to be complete), handling alerts, and saving screenshots, which is great for debugging purposes.
Now that you’ve seen some of the power of Selenium, can you rewrite the code we have for the #WeAreFairphone site and scroll through the first 100 entries? (Hint: if you don’t want to use ActionChains to scroll through each element, you can always use JavaScript! The Selenium driver’s execute_script method allows you to execute JS just like in your browser console. You can
use JavaScript’s scroll method. Selenium element objects also have a location attribute, which returns the x and y values for the element on the page.)
We have learned how to manipulate and use our browser for web scraping with Selenium, but we aren’t done yet! Let’s take a look at using Selenium with a headless browser.
Selenium and headless browsers
One of the most popular headless browser kits is PhantomJS. If you are a proficient JavaScript developer, you can build your scrapers directly in PhantomJS. If, however, you’d like to give it a try using Python, you can use Selenium with PhantomJS. PhantomJS works with GhostDriver to open pages and navigate across the Web.
Why use a headless browser? Headless browsers can be run on servers. They also run and parse pages faster than normal browsers and can be used on more platforms than normal browsers. If you eventually want to run your browser-based web scraping script on a server, you’ll likely use a headless browser. You can install one and be running in 10 minutes or less, as opposed to most other browsers, which take time to load and get running properly (depending on the stack you are using and how you intend to deploy).
Screen Reading with Ghost.Py
Ghost.py is a WebKit implementation for screen reading implemented to interact directly with Qt WebKit. This is a WebKit implementation on top of Qt, a cross-platform application development framework built in C++.
To begin working with Ghost.py, you’re going to need to install some pretty hefty libraries. It works best if you are able to install PySide, which allows Python to connect with Qt and gives Python access to a wider range of programs and interactions. The process can take a while, so feel free to go make yourself a sandwich after you begin running this installation:1
pip install pyside
pip install ghost.py --pre
Let’s use Ghost.py to search the Python home page for new scraping documentation. You start a new Ghost.py instance very simply:
fromghostimportGhostghost=Ghost()withghost.start()assession:page,extra_resources=session.open('http://python.org')pagepage.urlpage.headerspage.http_statuspage.contentextra_resourcesforrinextra_resources:r.url
This line calls the
Ghostclass’s session object and instantiates a Ghost object to interact with pages.The
openmethod for theGhostclass returns two objects, so this line captures those objects in two separate variables. The first object is the page object used to interact with the HTML elements. The second is a list of other resources the page loads (the same list you’d see in your Network tab).Our page object has many attributes, such as headers, content, URLs, and content from the page. This line looks at the content.
This code loops through the page’s extra resources and prints them to see if these are useful. Sometimes these URLs are API calls we can use to get easier access to data.
Ghost.py gives us insight into the resources the page uses (given in a tuple, as we can see when we first open the page using the open method) and numerous features of the actual page. We can also load the content of the page by using the .content attribute, so if we wanted to parse it using one of our page parsers, like LXML, we could do so and still proceed to interact with the page using Ghost.py.
Note
Currently, much of Ghost.py’s power lies in executing JavaScript (not jQuery) on the page, so you might want to have the Mozilla Developer Network’s JavaScript guide open. This will help you easily search for and find JavaScript to use with Ghost.py.
As we are interested in searching the Python home page for scraping libraries, let’s see if we can locate the input box:
page.content.contains('input')result,resources=session.evaluate('document.getElementsByTagName("input");')result.keys()result.get('length')resources
Tests whether an
inputtag exists on the page (most search boxes are simply input elements). This returns a Boolean.Uses some simple JavaScript to find all the elements on the page with “input” as a tag name.
Prints to see the length of the JavaScript array in the response.
According to the JavaScript results, we only have two inputs on the page. To determine which one to use, let’s take a look at the first one’s and see if it looks appropriate:
result,resources=session.evaluate('document.getElementsByTagName("input")[0].getAttribute("id");')result
Indexes our list of results and asks for the
idattribute. JavaScript gives us CSS attributes directly from elements, so this is a useful way to see the CSS related to the elements you have selected.
Similar to how we can index results in Python, we can index them in JavaScript. We want the first input element. Then, we need to grab the CSS id of the input.
Note
We could even write a JavaScript for loop to iterate over the list returned by the getElementsByTagName function and evaluate the attributes that way. If you’d like to try out the JavaScript in your browser, you can do so using the console (see Figure 11-12).
By the name of the id (id-search-field) we can tell we’ve located our search field element, so now let’s send some data to it:
result,resources=ghost.set_field_value("input","scraping")
This code uses the set_field_value method, which takes a selector (here simply "input") and sends it a string ("scraping"). Ghost.py also has a fill method which allows you to send a dictionary of values to fill out a series of matching form fields. This is useful if you have more than one field to fill. Now we have our search term filled in; let’s see if we can submit our query. We see it’s in a form, so we can try a simple form submit:
page,resources=session.fire("form","submit",expect_loading=True)page.url
This line calls Ghost.py’s
firemethod, which fires a JavaScript event. We want to send the form element a signal for the submit event, so it submits our search and navigates to the next page. We also setexpect_loadingequal toTrueso Ghost.py knows we are waiting for a page to load.
Did it work? In our testing, we received timeouts when we ran this code. We’ll be talking about timeouts a bit later in this chapter, but this means Ghost.py stopped waiting for a response because it was taking too long. When you are dealing with scrapers submitting data, finding the right timeout is essential to keeping your script going. Let’s try a different way to submit. Ghost.py can interact with and click on page elements, so let’s try that:
result,resources=session.click('button[id=submit]')resultforrinresources:r.url
Ghost.py’s
clickmethod clicks on an object using a JavaScript selector. This code clicks on the button withid="submit".With most interactions via Ghost.py, you will receive a result and a list of resources. This line looks at the resources returned from the code interactions.
Hmm—when we click on the submit button, we get a URL that looks like a console. Let’s see if we can see what Qt WebKit is seeing. Similar to Selenium’s save_screenshot method, Ghost.py allows us to take a look at the page.
Note
With headless or WebKit browsers we can’t use without code, the page sometimes appears different than it does in a normal browser. When using Ghost.py or PhantomJS, you’ll want to utilize screenshots to “see” the page the headless or kit browser is using.
We can use Ghost.py’s show method to “see” the page:
session.show()
You should see a new window open showing you the site as the scraper sees it. It should look similar to Figure 12-3.
Figure 12-3. Ghost page
Whoops! We are in the middle of the page. Let’s try scrolling up and having another look:
session.evaluate('window.scrollTo(0, 0);')session.show()
Now it should look like Figure 12-4.
This view helps us understand our error. The page has not opened as wide as it did in our normal browser, and the search and submit inputs are not readily available. One solution would be to reopen the page using a larger viewport; or we could set a longer timeout for our submit.
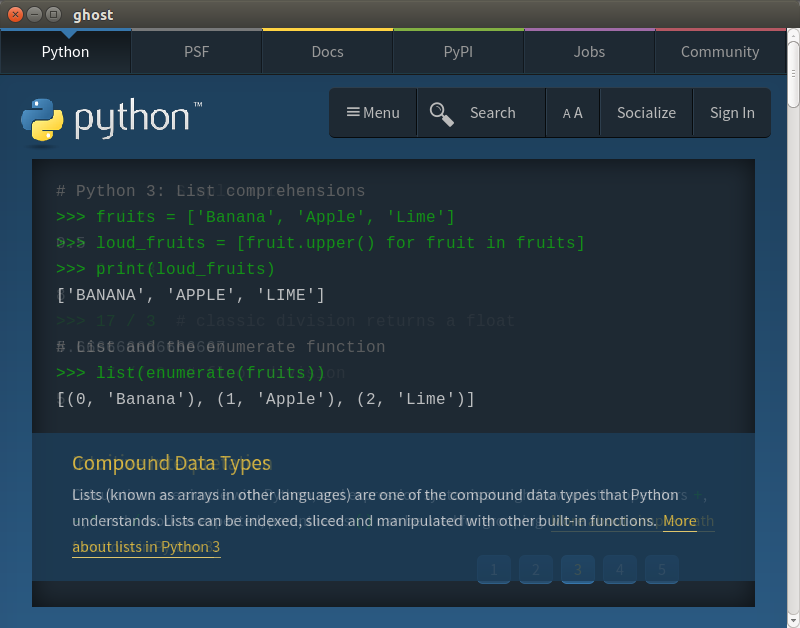
Figure 12-4. Ghost top of page
Tip
As you can see from the documentation, the first Ghost object we create can take arguments like
viewport_size and wait_timeout. If you’d like to restart the browser and set a larger viewport or a longer timeout, those are valid fixes.
For now, though, we’ll see if we can use some JavaScript to get it to submit:
result,resources=session.evaluate('document.getElementsByTagName("input")[0].value ="scraping";')result,resources=session.evaluate('document.getElementsByTagName("form")[0].submit.click()')
Sets the input value equal to “scraping” using pure JavaScript.
Calls the submit element of the form and actively clicks on it using the JavaScript function.
Now if you run show again, you should see something like Figure 12-5.
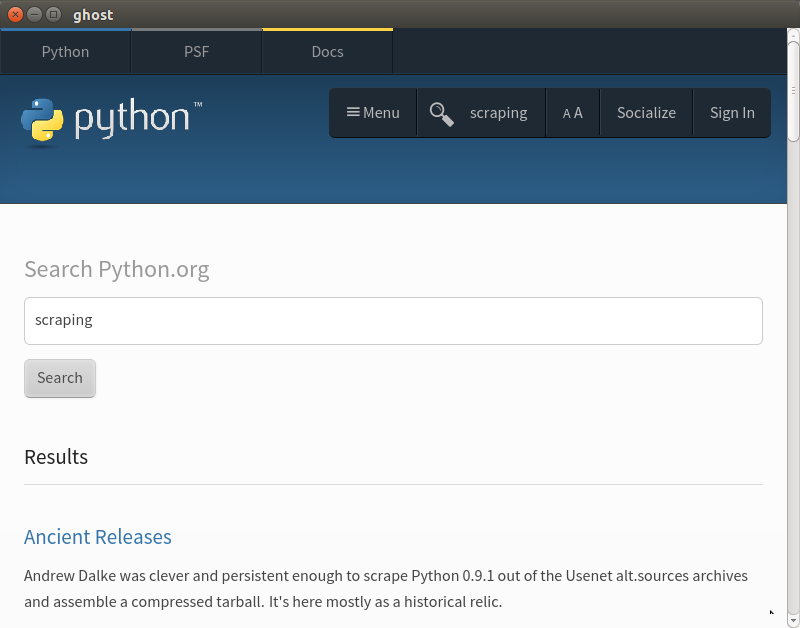
Figure 12-5. Ghost search
We have successfully searched using a Qt browser. Some of the functions are not yet as smooth as with Selenium, but Ghost.py is still a fairly young project.
Tip
You can see how old a project is by evaluating its version numbers. Ghost.py, as of the writing of this book, is still below 1.0 (in fact, this book is likely only compatible with 0.2 releases). It will probably change a lot in the next few years, but it’s a very interesting project. We encourage you to help it by submitting ideas to the creators and by investigating and fixing bugs!
Now that we’ve taken a look at several ways to interact with a browser in Python, let’s do some spidering!
Spidering the Web
If you need to capture data from more than one page on a site, a spider likely is the best solution. Web spiders (or robots) are great for finding information across an entire domain or site (or series of domains or sites).
Note
You can think of a spider as an advanced scraper, where you can utilize the power of page-reader scrapers (like the ones we learned about in Chapter 11) and apply rules allowing you to match URL patterns to follow across the entire site.
Spiders give you power to learn how a site is structured. For example, a site could contain an entire subsection you weren’t aware of that contains interesting data. With a spider traversing the domain, you can find subdomains or other useful linked content for your reporting.
When building a spider, you first investigate the site you’re interested in and then build the page-reader piece to identify and read content. Once that is built, you can set a list of follow rules the spider will use to find other interesting pages and content, and your parser will collect and save content using the page-reader scraper you built.
Tip
With a spider, you should either have a clear definition of what you want to find up front, or use a broad approach to first explore the site and then rewrite it to be more specific. If you choose the broad approach, you might need to do a lot of data cleanup afterward to narrow down what you have found into a usable dataset.
We’ll start building our first spider with Scrapy.
Building a Spider with Scrapy
Scrapy is the most powerful Python web spider. It lets you use the power of LXML (see “Reading a Web Page with LXML”) with the power of Python’s asynchronous network engine, Twisted. If you need an exceptionally fast scraper which also handles a large amount of tasks, we highly recommend Scrapy.
Scrapy comes with some nice built-in features, including the ability to export results in several formats (CSV, JSON, etc.), an easy-to-use server deployment structure to run multiple on-demand scrapers, and a bunch of other neat features like using middleware to handle proxy requests or retry bad status codes. Scrapy logs errors it encounters so you can update and modify your code.
To use Scrapy appropriately, you need to learn the Scrapy class system. Scrapy uses several different Python classes to parse the Web and return good content. When you define a spider class, you also define rules and other class attributes. These rules and attributes are used by the spider when it begins to crawl the Web. When you define a new spider, you are using something called inheritance.
Scrapy uses inheritance to define content to scrape on the page. For each Scrapy project you have, you will collect a series of items and likely create a few different spiders. The spiders will scrape the page and return items (i.e., data) in whatever format you define in your settings.
Using Scrapy spiders requires more organization than the other libraries we have used to scrape the Web, but it’s fairly intuitive. The scraper organization makes your projects easy to reuse, share, and update.
There are a few different types of Scrapy spiders, so let’s investigate the major similarities and differences. Table 12-1 provides a summary.
| Spider name | Main purpose | Documentation |
|---|---|---|
|
Used to parse a particular list number of sites and pages |
http://doc.scrapy.org/en/latest/topics/spiders.html#scrapy.spider.Spider |
|
Used to parse a domain given a set of regex rules on how to follow links and identify good pages |
http://doc.scrapy.org/en/latest/topics/spiders.html#crawlspider |
|
Used to parse XML feeds (like RSS) and pull content from nodes |
http://doc.scrapy.org/en/latest/topics/spiders.html#xmlfeedspider |
|
Used to parse CSV feeds (or URLs) and pull content from rows |
http://doc.scrapy.org/en/latest/topics/spiders.html#csvfeedspider |
|
Used to parse site maps for a given list of domains |
http://doc.scrapy.org/en/latest/topics/spiders.html#sitemapspider |
For normal web scraping, you can use the Spider class. For more advanced scraping to traverse the whole domain, use the CrawlSpider class. If you have feeds or files in XML and CSV format, especially if they are quite large, use the XMLFeedSpider and CSVFeedSpider to parse them. If you need to take a look at site maps (for your own sites or elsewhere), use the SiteMapSpider.
To become more acquainted with the two major classes (Spider and CrawlSpider), let’s build a few different crawlers. First, we’ll create a scraper to crawl our same emoji page using a Scrapy spider. For this we will want to use the normal Spider class. Let’s begin by installing Scrapy using pip:
pip install scrapy
It’s also recommended to install the service_identity module, which provides some nice features for security integration as you crawl the Web:
pip install service_identity
To start a project with Scrapy, you use a simple command. You want to make sure you are in the directory you’d like to use for your spider, as this command will create a bunch of folders and subfolders for the spider:
scrapy startproject scrapyspider
If you list the files in your current folder, you should see a new parent folder with numerous subfolders and files. As documented on the Scrapy site, there are a few different files for configuration (scrapy.cfg in the main folder and settings.py in the project folder, as well as a folder to put your spider files in and a file used to define your items).
Before we build our scraper, we need to define the items we want to collect with the page’s data. Let’s open up our items.py file (located inside the nested project folder) and modify it to store the page data:
# -*- coding: utf-8 -*-# Define here the models for your scraped items## See documentation in:# http://doc.scrapy.org/en/latest/topics/items.htmlimportscrapyclassEmojiSpiderItem(scrapy.Item):emoji_handle=scrapy.Field()emoji_image=scrapy.Field()section=scrapy.Field()
We create our new class via inheritance from the
scrapy.Itemclass. This means we have the built-in methods and attributes of that class.To define each field or data value, we add a new line to our class, set the attribute name, and initialize it by setting it as a
scrapy.Field()object. These fields support any normal Python data structure, including dictionaries, tuples, lists, floats, decimals, and strings.
You probably noticed your items.py file was mainly prebuilt. This is a really great feature to quickstart your development and ensure you have the project structured the right way. The startproject command supplies all of this tooling and is the best way to begin new Scrapy projects. You can also see how easy it is to set up a new class to collect data. With only a few lines of Python, we are able to define the fields we care about and have our items ready to use with our spider.
To get started on your spider class, you’ll want to create a new file in the spiders folder in your new project directory structure. Let’s call it emo_spider.py:
importscrapyfromscrapyspider.itemsimportEmojiSpiderItemclassEmoSpider(scrapy.Spider):name='emo'allowed_domains=['emoji-cheat-sheet.com']start_urls=['http://www.emoji-cheat-sheet.com/',]defparse(self,response):self.log('A response from%sjust arrived!'%response.url)
All Scrapy imports use the root project folder as the starting module point, so you’ll want to include the parent folder in the import. This line imports the
EmojiSpiderItemclass from theemojispider.itemsmodule.We define our
EmoSpiderclass using inheritance, basing the new class on the simplescrapy.Spiderclass. This means our spider will need certain initialization attributes, so it knows which URLs to scrape and what to do with scraped content. We define these attributes on the next few lines (start_urls,name, andallowed_domains).The spider name is what we will use when we want to identify the spider in command-line tasks.
allowed_domainstells the spider what domains to scrape. If it comes across a link to a domain not included in this list, it will ignore it. This attribute is useful when writing a crawl scraper so your scraper doesn’t end up attempting to scrape all of Twitter or Facebook if it follows a link there. You can also pass subdomains.The
Spiderclass uses thestart_urlsattribute to iterate through a listing of URLs to scrape. With aCrawlSpider, these are used as a jumping-off point for finding more matching URLs.This line redefines the spider’s
parsemethod to do something by defining a method within the class usingdefand the method name. When you are defining methods for classes, you will almost always begin by passingself. This is because the object calling the method is the first argument (i.e.,list.append()first passes the list object itself, then passes the argument within the parenthesis). The next argument forparseis the response. As covered in the documentation, theparsemethod will be passed a response object. We end the line with a colon, just as we would when defining any function.To begin testing our spider, this line from the Scrapy tutorial uses the spider’s
logmethod to send a message to our log. We use the response’s URL attribute to show the response’s location.
To run this Scrapy spider, we need to ensure we are in the proper directory (scrapyspider with the scrapy.cfg file in it), and then run the command-line argument to parse the page:
scrapy crawl emo
The log should show your spider opening and show what middleware it’s running. Then, near the end, you should see something like this:
2015-06-03 15:47:48+0200 [emo] DEBUG: A resp from www.emoji-cheat-sheet.com
    arrived!
2015-06-03 15:47:48+0200 [emo] INFO: Closing spider (finished)
2015-06-03 15:47:48+0200 [emo] INFO: Dumping Scrapy stats:
    {'downloader/request_bytes': 224,
     'downloader/request_count': 1,
     'downloader/request_method_count/GET': 1,
     'downloader/response_bytes': 143742,
     'downloader/response_count': 1,
     'downloader/response_status_count/200': 1,
     'finish_reason': 'finished',
     'finish_time': datetime.datetime(2015, 6, 3, 13, 47, 48, 274872),
     'log_count/DEBUG': 4,
     'log_count/INFO': 7,
     'response_received_count': 1,
     'scheduler/dequeued': 1,
     'scheduler/dequeued/memory': 1,
     'scheduler/enqueued': 1,
     'scheduler/enqueued/memory': 1,
     'start_time': datetime.datetime(2015, 6, 3, 13, 47, 47, 817479)}
Our scraper parsed one page in about a second. We can also see the logging from our parse method. Cool! We successfully defined our first item and class and were able to set them up and run them.
Our next step is actually parsing the page and pulling out the content. Let’s try out another built-in feature, the Scrapy shell. It is similar to our Python or command-line shell, but with all the available spider commands. With the shell, it’s very easy to investigate the page and determine how to get to page content. To launch a Scrapy shell, simply run:
scrapy shell
You should see a listing of available options or functions you can call. One of them should be fetch. Let’s test it out:
fetch('http://www.emoji-cheat-sheet.com/')
You now should see some output similar to your scraping output. It will have some message indicating that the URL was crawled, then give you a new listing with objects available to you. One of them is the response object from the request. The response is the same response object your parse method will use. Let’s see if we can determine some of the ways to interact with the response object:
response.urlresponse.statusresponse.headers
Each of these should return some data. The url is the same URL we used to write our log message. The status tells us the HTTP status code of the response. The headers should give us a dictionary of the headers the server returned with the response.
Tip
If you type response. and hit Tab, you should see the full list of methods and attributes available with your response object. You can also do this with any other Python object in your IPython terminal.2
Each response object will also have an xpath and a css method. These are similar to the selectors we have been working with throughout this chapter and in Chapter 11. As you may have already guessed, xpath expects you to send an XPath string and css expects a CSS selector. Let’s have a look at selecting using the XPath we’ve already written for this page:
response.xpath('//h2|//h3')
When you run that command, you should see a list similar to this:
[<Selectorxpath='//h2|//h3'data=u'<h2>People</h2>'>,<Selectorxpath='//h2|//h3'data=u'<h2>Nature</h2>'>,<Selectorxpath='//h2|//h3'data=u'<h2>Objects</h2>'>,<Selectorxpath='//h2|//h3'data=u'<h2>Places</h2>'>,<Selectorxpath='//h2|//h3'data=u'<h2>Symbols</h2>'>,<Selectorxpath='//h2|//h3'data=u'<h3>Campfire also supports a few sounds<'>]
Now let’s see if we can read just the text content from those headers. When using Scrapy, you’ll want to extract the exact element you are looking for; there are (as of the writing of this book) no get or text_content methods. Let’s see if we can use our XPath knowledge to select the text from the headers:
forheaderinresponse.xpath('//h2|//h3'):header.xpath('text()').extract()
You should get output similar to this:
[u'People'][u'Nature'][u'Objects'][u'Places'][u'Symbols'][u'Campfire also supports a few sounds']
We can see our extract method will return a list of the matching elements. We can use the @ symbol to represent attributes and text() to pull out text. We’ll need to rewrite some of the code, but we should now be able to use a lot of the same LXML logic we wrote in “A Case for XPath”:
importscrapyfromscrapyspider.itemsimportEmojiSpiderItemclassEmoSpider(scrapy.Spider):name='emo'allowed_domains=['emoji-cheat-sheet.com']start_urls=['http://www.emoji-cheat-sheet.com/',]defparse(self,response):headers=response.xpath('//h2|//h3')lists=response.xpath('//ul')all_items=[]forheader,list_continzip(headers,lists):section=header.xpath('text()').extract()[0]forliinlist_cont.xpath('li'):item=EmojiSpiderItem()item['section']=sectionspans=li.xpath('div/span')iflen(spans):link=spans[0].xpath('@data-src').extract()iflink:item['emoji_link']=response.url+link[0]handle_code=spans[1].xpath('text()').extract()else:handle_code=li.xpath('div/text()').extract()ifhandle_code:item['emoji_handle']=handle_code[0]all_items.append(item)returnall_items
Because we know we are going to have more than one item per page, this line starts a list at the beginning of the
parsemethod to keep a list of found items as we go through the page.Instead of calling
header.textas we do in the LXML script, this line locates the text section (.xpath("text()")) and extracts it using theextractfunction. Because we know that method will return a list, this code selects the first and only item for each list and sets it equal tosection.This line defines the item. For each list item, we create a new
EmojiSpiderItemobject by calling the class name with empty parentheses.To extract data attributes, this line uses the XPath
@selector. This code selects the first span and extracts the@data-srcattribute, which will return a list.To create our full path
emoji_linkattribute, this line takes the response URL and adds the first list item from the@data-srcattribute. To set item fields, we use dictionary syntax, setting the keys (i.e., field names) equal to the values. This line will not execute if there is no@data-srcfrom the previous code.To combine some code and not repeat ourselves, this code finds the handle strings for the emojis and sounds, and sets the
emoji_handlefield.At the end of each loop for the list elements, this line appends the new item to our
all_itemslist.At the end of our
parsemethod, this line returns the list of all found items. Scrapy will use a returned item or list of items to proceed with the scraping (usually by saving, cleaning, or outputting the data in a format we can read and use).
We have now added in our Scrapy extract calls and identified more specifically the text and attributes to pull from the page. We removed some of the None logic, as our Scrapy item will automatically know which fields it has and doesn’t have. For this reason, if we export the output to CSV or JSON, it will show both null and found values. Now that we’ve updated the code to work with Scrapy, let’s run it by calling our crawl method again:
scrapy crawl emo
You should see some output similar to our first scrape, except this time with quite a few more lines! Scrapy will log every item it finds as it parses the Web. At the end, you’ll see the same summary output showing errors, debugging, and how many items were scraped:
2015-06-03 18:13:51+0200 [emo] DEBUG: Scraped from
    <200 http://www.emoji-cheat-sheet.com/>
    {'emoji_handle': u'/play butts',
     'section': u'Campfire also supports a few sounds'}
2015-06-03 18:13:51+0200 [emo] INFO: Closing spider (finished)
2015-06-03 18:13:51+0200 [emo] INFO: Dumping Scrapy stats:
    {'downloader/request_bytes': 224,
     'downloader/request_count': 1,
     'downloader/request_method_count/GET': 1,
     'downloader/response_bytes': 143742,
     'downloader/response_count': 1,
     'downloader/response_status_count/200': 1,
     'finish_reason': 'finished',
     'finish_time': datetime.datetime(2015, 6, 3, 16, 13, 51, 803765),
     'item_scraped_count': 924,
     'log_count/DEBUG': 927,
     'log_count/INFO': 7,
     'response_received_count': 1,
     'scheduler/dequeued': 1,
     'scheduler/dequeued/memory': 1,
     'scheduler/enqueued': 1,
     'scheduler/enqueued/memory': 1,
     'start_time': datetime.datetime(2015, 6, 3, 16, 13, 50, 857193)}
2015-06-03 18:13:51+0200 [emo] INFO: Spider closed (finished)
Scrapy helped us parse more than 900 items in about a second—impressive! As we look through our logs, we see all of our items have been parsed and added. We did not experience any errors; if there were any, we would see a count for them in the final output similar to the DEBUG and INFO output lines.
We don’t yet have an actual file or output from our script. We can set one using a built-in command-line argument. Try rerunning the crawl with some extra options:
scrapy crawl emo -o items.csv
At the end of the scrape you should have an items.csv file in your project root directory. If you open it, you should see all of your data has been exported into CSV format. You can also export .json and .xml files, so feel free to try those out by simply changing the filename.
Congratulations, you’ve built your first web spider! With only a few files and less than 50 lines of code you’re able to parse an entire page—more than 900 items—in less than a minute and output those findings to a simple-to-read and easy-to-share format. Scrapy, as you can see, is a truly powerful and incredibly useful tool.
Crawling Whole Websites with Scrapy
We’ve explored using the Scrapy shell and crawl for a normal page, but how can we use the power and speed of Scrapy to crawl an entire website? To investigate the CrawlSpider’s capabilities, we must first determine what to crawl. Let’s try finding Python packages related to scraping on the PyPI home page. To begin, take a look at the page and figure out what data we want. Performing a quick search for the term “scrape” shows a whole list of results and each of those pages has more information, including documentation, a link to the related package, a list of what Python versions are supported, and the number of recent downloads.
We can build an item model around that data. Normally, we would start a new project for each scraper if it is not related to the same data; but for ease of use, we’ll use the same folder as for our emoji scraper. Begin by modifying the items.py file:
# -*- coding: utf-8 -*-# Define here the models for your scraped items## See documentation in:# http://doc.scrapy.org/en/latest/topics/items.htmlimportscrapyclassEmojiSpiderItem(scrapy.Item):emoji_handle=scrapy.Field()emoji_link=scrapy.Field()section=scrapy.Field()classPythonPackageItem(scrapy.Item):package_name=scrapy.Field()version_number=scrapy.Field()package_downloads=scrapy.Field()package_page=scrapy.Field()package_short_description=scrapy.Field()home_page=scrapy.Field()python_versions=scrapy.Field()last_month_downloads=scrapy.Field()
We define our new item class directly underneath our old class. You should keep a few lines of space in between the classes so it’s easy to read the file and see class distinctions. Here, we added some fields we are interested in from the Python package pages, including how many downloads there have been in the last month, the package home page, what Python versions it supports, and the version number.
With our items defined, we can use the Scrapy shell to investigate content on the Scrapely page. Scrapely is a project from the authors of Scrapy that uses Python to screen-read HTML. If you haven’t already, we also recommend installing IPython, which will ensure your input and output looks like ours and give you some extra shell tools. In the shell (started using scrapy shell), we need to first fetch content using the following command:
fetch('https://pypi.python.org/pypi/scrapely/0.12.0')
We can try fetching the version number from the breadcrumbs at the top of the page. We see they are in a div with the ID "breadcrumb". We can write some XPath to find that:
In[2]:response.xpath('//div[@id="breadcrumb"]')Out[2]:[<Selectorxpath='//div[@id="breadcrumb"]'data=u'<div id="breadcrumb">\n<a h'>]
The IPython Out message shows we have properly found the breadcrumb div. By inspecting the element in the browser’s inspection tab, we see the text is located in an anchor tag in that div. We need to be specific with XPath, so we tell it to find the text inside the child anchor tag with the following line of code:
In[3]:response.xpath('//div[@id="breadcrumb"]/a/text()')Out[3]:[<Selectorxpath='//div[@id="breadcrumb"]/a/text()'data=u'Package Index'>,<Selectorxpath='//div[@id="breadcrumb"]/a/text()'data=u'scrapely'>,<Selectorxpath='//div[@id="breadcrumb"]/a/text()'data=u'0.12.0'>]
We can now see the version number is in the last of those divs, and we can grab the last one when we extract. We can also do some testing and ensure the version data is a number using regex (see “RegEx Matching”) or testing with Python’s is_digit (like we did back in “Finding Outliers and Bad Data”).
Now let’s take a look at how to grab a slightly more complex part of the page: last month’s downloads. If you inspect the element in your browser, you’ll see it’s in an unordered list in a list item in a span. You’ll notice none of those elements have a CSS ID or class. You’ll also notice the span does not include the actual word “month” (for easy searching). Let’s see if we can get a selector that works:
In[4]:response.xpath('//li[contains(text(), "month")]')Out[4]:[]
Bummer, no dice on finding it easily using an XPath text search. However, one nice trick you’ll notice with XPath is sometimes it behaves differently if you change the query slightly and parse something similar. Try running this command:
In[5]:response.xpath('//li/text()[contains(., "month")]')Out[5]:[<Selectorxpath='//li/text()[contains(., "month")]'data=u' downloads in the last month\n'>]
See? How come one works and not the other? Because the element is a span inside an li element and the other text sits after the span, it’s confusing the hierarchy of the XPath pattern search. The messier the page structure, the more difficult it is to write a perfect selector. What we asked for in the second pattern is a bit different—we said “show me text residing in an li that has the word month somewhere in it,” rather than “show me an li that has the text month in it.” It’s a small difference, but when dealing with messy HTML, it can be useful to work around difficult sections of content by trying several selectors.
But what we really want is the span containing the download number. We can use the beauty of XPath relationships to navigate up the chain and locate that span. Try out this code:
In[6]:response.xpath('//li/text()[contains(., "month")]/..')Out[6]:[<Selectorxpath='//li/text()[contains(., "month")]/..'data=u'<li>\n<span>668</span>downloadsint'>]
By using the .. operator, we have essentially moved back up to the parent node, so now we have both the text after the span and the span itself. Our final step will be selecting the span, so we don’t have to worry about stripping text:
In[7]:response.xpath('//li/text()[contains(., "month")]/../span/text()')Out[7]:[<Selectorxpath='//li/text()[contains(., "month")]/../span/text()'data=u'668'>]
Super! Now we have the number we were looking for, and it should work across all of our pages as we’ve based it on page hierarchy and not on attempting to “guess” where the content might lie.
Tip
Use the shell to debug and locate the elements you want using your XPath skills. As you gain experience, it will become easier to write selectors that work on the first try, so we encourage you to write more web scrapers and experiment by testing many different selectors.
We’ll begin with a scraper we know properly parses the Scrapely page using the Spider class and then transform it to use the CrawlSpider class. It’s always good to approach two- or three-factor problems step by step, successfully completing one part of the task before moving on to the next one. Because we have to debug two parts with a CrawlSpider (the crawl rules to find matching pages and scraping the page itself), it’s good to test it by first ensuring one of the parts works. We recommend starting by building a scraper which works on one or two of the matching pages and then writing the crawl rules to test the crawling logic.
Here’s a look at our completed Spider for the Python package pages. You will want to include it as a new file in your spiders folder, alongside your emo_spider.py file. We have called it package_spider.py:
importscrapyfromscrapyspider.itemsimportPythonPackageItemclassPackageSpider(scrapy.Spider):name='package'allowed_domains=['pypi.python.org']start_urls=['https://pypi.python.org/pypi/scrapely/0.12.0','https://pypi.python.org/pypi/dc-campaign-finance-scrapers/0.5.1',]defparse(self,response):item=PythonPackageItem()item['package_page']=response.urlitem['package_name']=response.xpath('//div[@class="section"]/h1/text()').extract()item['package_short_description']=response.xpath('//meta[@name="description"]/@content').extract()item['home_page']=response.xpath('//li[contains(strong,"Home Page:")]/a/@href').extract()item['python_versions']=[]versions=response.xpath('//li/a[contains(text(),":: Python ::")]/text()').extract()forvinversions:version_number=v.split("::")[-1]item['python_versions'].append(version_number.strip())item['last_month_downloads']=response.xpath('//li/text()[contains(.,"month")]/../span/text()').extract()item['package_downloads']=response.xpath('//table/tr/td/span/a[contains(@href,"pypi.python.org")]/@href').extract()returnitem
This line adds an extra URL we haven’t investigated. Using more than one URL is a great way to quickly see if you have clean and reusable code as you move from a
Spiderto aCrawlSpider.For this scraper, we only have one item per page. This line creates the item at the beginning of our
parsemethod.One great way to get easy-to-read descriptions of pages while you are parsing is to learn a bit about search engine optimization (SEO). Most sites will create short descriptions, keywords, titles, and other meta tags for Facebook, Pinterest, and other sharing sites. This line pulls in that description for our data collection.
The package’s “Home Page” URL is located in a
strongtag in anli. Once we find that element, this line selects just the link from the anchor element.If we take a look at the version number links, we see they come in a list item that uses
::to separate Python and the version number. The version numbers always come last, so this line splits our string using::as the delimiter and takes the last element.This line appends the version text (stripped of extra spaces) to the Python version array. The item’s
python_versionskey will now hold all Python versions.We can see in the table that links to package downloads rather than their MD5 checksums use the pypi.python.org domain. This line tests to make sure the link has the proper domain and grabs only those links that do.
At the end of our
parsemethod, Scrapy expects us to return an item (or a list of items). This line returns the item.
When you ran the code (scrapy crawl package) you should have gotten two items and no errors. You will notice, however, we have varying data. For example, our package data has no good listing of supported Python versions for each download. If we wanted to, we could parse from the PyVersion field in the table and match it with each download. How might you go about doing that? (Hint: it’s in the third column of each table row, and XPath allows you to pass element indexes.) We also notice the data is a bit messy, as the following output (formatted to fit the page; your output will look a little different!) shows:
2015-09-10 08:19:34+0200 [package_test] DEBUG: Scraped from
    <200 https://pypi.python.org/pypi/scrapely/0.12.0>
    {'home_page': [u'http://github.com/scrapy/scrapely'],
     'last_month_downloads': [u'668'],
     'package_downloads':
     [u'https://pypi.python.org/packages/2.7/s/' + \
       'scrapely/scrapely-0.12.0-py2-none-any.whl',
      u'https://pypi.python.org/packages/source/s/' + \
       'scrapely/scrapely-0.12.0.tar.gz'],
     'package_name': [u'scrapely 0.12.0'],
     'package_page': 'https://pypi.python.org/pypi/scrapely/0.12.0',
     'package_short_description':
     [u'A pure-python HTML screen-scraping library'],
     'python_versions': [u'2.6', u'2.7']}
We have a few fields where we might expect a string or integer, but instead we have an array of strings. Let’s build a helper method to clean up our data before we define our crawl spider rules:
importscrapyfromscrapyspider.itemsimportPythonPackageItemclassPackageSpider(scrapy.Spider):name='package'allowed_domains=['pypi.python.org']start_urls=['https://pypi.python.org/pypi/scrapely/0.12.0','https://pypi.python.org/pypi/dc-campaign-finance-scrapers/0.5.1',]defgrab_data(self,response,xpath_sel):data=response.xpath(xpath_sel).extract()iflen(data)>1:returndataeliflen(data)==1:ifdata[0].isdigit():returnint(data[0])returndata[0]return[]defparse(self,response):item=PythonPackageItem()item['package_page']=response.urlitem['package_name']=self.grab_data(response,'//div[@class="section"]/h1/text()')item['package_short_description']=self.grab_data(response,'//meta[@name="description"]/@content')item['home_page']=self.grab_data(response,'//li[contains(strong,"Home Page:")]/a/@href')item['python_versions']=[]versions=self.grab_data(response,'//li/a[contains(text(),":: Python ::")]/text()')forvinversions:item['python_versions'].append(v.split("::")[-1].strip())item['last_month_downloads']=self.grab_data(response,'//li/text()[contains(.,"month")]/../span/text()')item['package_downloads']=self.grab_data(response,'//table/tr/td/span/a[contains(@href,"pypi.python.org")]/@href')returnitem
This line defines a new method to take our
selfobject (so the spider can then call it like a normal method), our response object, and the long XPath selector to find the content.This line uses the new function variables to extract the data.
If the length of the data is greater than 1, this line returns the list. We probably want all of the data, so we return it as is.
If the length of the data is equal to 1 and the data is a digit, this line returns the integer. This would be the case for our downloads number.
If the length of the data is equal to 1 and is not a digit, this line returns just the data. This will match strings containing links and simple text.
If this function hasn’t returned yet, this line returns an empty list. We use a list here because you would expect
extractto return empty lists if no data was found. If you usedNonetypes or empty strings, you might have to modify other code to save it to a CSV.This line calls our new function and invokes
self.grab_datawith the arguments: the response object and the XPath selection string. r use the other built-in export features.
Now we have pretty clean data and code and are repeating ourselves less often. We could further improve it, but for the sake of your eyes not rolling to the back of your head, let’s move on to defining our crawling rules. Crawling rules, denoted by regular expressions, tell your spider where to go by defining what types of URLs to follow from what parts of the page. (Isn’t it great that we covered regexes in Chapter 7? You’re a pro now!) If we take a look at the package links (https://pypi.python.org/pypi/dc-campaign-finance-scrapers/0.5.1 and https://pypi.python.org/pypi/scrapely/0.12.0), we can see some similarities:
-
They both have the same domain, pypi.python.org, and they both use https.
-
They both have the same pattern for the path in the URL: /pypi/<name_of_the_library>/<version_number>.
-
The name of the library uses lowercase letters and dashes, and the version number is digits and periods.
We can use these similarities to define regex rules. Before we write them in our spider, let’s try them in our Python console:
importreurls=['https://pypi.python.org/pypi/scrapely/0.12.0','https://pypi.python.org/pypi/dc-campaign-finance-scrapers/0.5.1',]to_match='https://pypi.python.org/pypi/[\w-]+/[\d\.]+'foruinurls:ifre.match(to_match,u):re.match(to_match,u).group()
This line finds a link with https, the pypi.python.org domain, and the path from our investigation. The first block is pypi, the next block is lowercase word-like text with - symbols (matched easily with
[\w-]+), and the last part looks for numbers with or without periods ([\d\.]+).This line prints out the matching group. We are using the regex
matchmethod, because that is the regex Scrapy crawl spiders use.
We have a match (two, to be exact!). Now, let’s have one last look at where we need to start. What the Scrapy crawl spider will do is look at a list of start URLs and use those pages to find URLs to follow. If we take another look at our search results page, we notice the page uses relative URLs, so we only need to match the URL path. We also see the links are all in a table, so we can restrict where Scrapy looks to find links to crawl. With this knowledge, let’s update the file by adding the crawl rules:
fromscrapy.contrib.spidersimportCrawlSpider,Rulefromscrapy.contrib.linkextractorsimportLinkExtractorfromscrapyspider.itemsimportPythonPackageItemclassPackageSpider(CrawlSpider):name='package'allowed_domains=['pypi.python.org']start_urls=['https://pypi.python.org/pypi?%3A'+\'action=search&term=scrape&submit=search','https://pypi.python.org/pypi?%3A'+\'action=search&term=scraping&submit=search',]rules=(Rule(LinkExtractor(allow=['/pypi/[\w-]+/[\d\.]+',],restrict_xpaths=['//table/tr/td',],),follow=True,callback='parse_package',),)defgrab_data(self,response,xpath_sel):data=response.xpath(xpath_sel).extract()iflen(data)>1:returndataeliflen(data)==1:ifdata[0].isdigit():returnint(data[0])returndata[0]return[]defparse_package(self,response):item=PythonPackageItem()item['package_page']=response.urlitem['package_name']=self.grab_data(response,'//div[@class="section"]/h1/text()')item['package_short_description']=self.grab_data(response,'//meta[@name="description"]/@content')item['home_page']=self.grab_data(response,'//li[contains(strong,"Home Page:")]/a/@href')item['python_versions']=[]versions=self.grab_data(response,'//li/a[contains(text(),":: Python ::")]/text()')forvinversions:version=v.split("::")[-1]item['python_versions'].append(version.strip())item['last_month_downloads']=self.grab_data(response,'//li/text()[contains(.,"month")]/../span/text()')item['package_downloads']=self.grab_data(response,'//table/tr/td/span/a[contains(@href,"pypi.python.org")]/@href')returnitem
This line imports both our
CrawlSpiderclass and ourRuleclass, as we need them both for our first crawl spider.This line imports our
LinkExtractor. The default link extractor uses LXML (we know how to write for that!).This line redefines our
Spiderso it inherits from theCrawlSpiderclass. Because we’re changing this inheritance, we must define arulesattribute.We include search pages for the terms scrape and scraping to see if we can find even more Python packages. You can add a long list here if you have different starting points where you’d like your spider to begin searching.
This line sets
allowto match the regex for the links on the page. Because we only need relative links, we start with just the path.allowaccepts a list, so you could add more than oneallowrule here if you have more than one type of URL you are looking to match.This line restricts our crawl spider to the results table. This means it is only going to look for matching links in columns inside rows of a table.
This tells the rule to follow (i.e., load) the matching links. Sometimes you might have pages you want to parse to give you content but whose links you don’t need to follow. If you want the spider to follow the page links and open them, you need to use
follow=True.Gives the rule a callback and renames the
parsemethod to ensure we don’t mess with the normal parsing methods ScrapyCrawlSpiders use that are different from the ScrapySpiders. Now our parse method is calledparse_package, and the spider will call this method once it has followed a matching URL to a page we want to scrape.
You can run the crawl spider the same way you would a normal spider:
scrapy crawl package
You’ve officially built your first crawl spider! Are there things that can be improved? There is one easy-to-fix bug we’ve left in this code. Can you spot what it is, and how to fix it? (Hint: look at your Python versions and see what’s going on, then take a look at the way versions are expected to be returned (i.e., always in a list) compared to how we might return some of them with grab_data.) See if you can fix this issue in the crawl spider script. If you get stuck, you can check the book’s repository for the completely fixed code.
Scrapy is a powerful, fast, and easy-to-configure tool. There is a lot more to explore, which you can do by reading the library’s excellent documentation. It’s fairly easy to configure your scripts to use databases and special feed extractors, and have them all running on your own server using Scrapyd. We hope this was the first of many Scrapy projects to come!
You now understand screen readers, browser readers, and spiders. Let’s review some other things you should know as you build more complex web scrapers.
Networks: How the Internet Works and Why It’s Breaking Your Script
Depending on how often your scraping script runs and how essential it is that every scrape works, you will probably run into network problems. Yes, the Internet is trying to break your script. Why? Because it assumes if you actually care, you will retry. Dropped connections, proxy problems, and timeout issues are rife within the web scraping world. However, there are a few things you can do to mitigate these issues.
In your browser, if something doesn’t load properly, you merely hit refresh, sending another request immediately. For your scraper, you can mimic this type of behavior. If you are using Selenium, it’s incredibly simple to refresh your content. The Selenium webdriver object has a refresh function just like your browser. If you’ve just filled out a form, you might need to resubmit the form to move to the next page (this is similar to how your browser behaves at times). If you need to interact with an alert or pop-up, Selenium
gives you the tools necessary to accept or decline the message.
If you are using Scrapy, it has built-in retry middleware. To enable it, you merely need to add it to the list of middleware in your project’s settings.py file. The middleware expects you to set some default values in your settings so it knows what HTTP response codes to retry (e.g., should it retry only 500s?) as well as how many retries to pursue.
Note
If you don’t specify those values, it will still work with the default options listed in the documentation. We recommend starting with 10 retries if you are seeing network errors and then either increasing the download wait time (another global settings variable) or checking the error codes you are receiving to see if you are overloading the site with your script.
If you are using your own Python script with LXML or BeautifulSoup, it’s a good idea to catch those errors and determine a good method to deal with them. Most of the time, you’ll notice a preponderance of urllib2.HTTPError exceptions or, if you are using requests, your code will not load content and fail. Using a try...except block in Python, your code could look something like this:
importrequestsimporturllib2resp=requests.get('http://sisinmaru.blog17.fc2.com/')ifresp.status_code==404:'Oh no!!! We cannot find Maru!!'elifresp.status_code==500:'Oh no!!! It seems Maru might be overloaded.'elifresp.status_codein[403,401]:'Oh no!! You cannot have any Maru!'try:resp=urllib2.urlopen('http://sisinmaru.blog17.fc2.com/')excepturllib2.URLError:'Oh no!!! We cannot find Maru!!'excepturllib2.HTTPError,err:iferr.code==500:'Oh no!!! It seems Maru might be overloaded.'eliferr.codein[403,401]:'Oh no!! You cannot have any Maru!'else:'No Maru for you!%s'%err.codeexceptExceptionase:e
When using the
requestslibrary to find network errors, check thestatus_codeof your response. This attribute returns an integer representing the code received in the HTTP response. This line tests for 404 errors.If using
urllib2, put your request in atrystatement (as on this line).One of the exceptions we might see from
urllib2is theURLError. Writing a catch is a good idea. If it can’t resolve the domain, it will probably throw this error.One of the other exceptions we might see is an
HTTPError. Any bad response linked to HTTP request errors will raise this error. By adding the comma anderrhere, we catch the error and put it in the variableerrso we can log our errors.Now that we have caught the error and set it equal to
errin the previous line of code, this line tests thecodeattribute to see the HTTP error code.For all other HTTP errors, this line uses an
elseto show the code of the error by formatting it into a string.This line catches any other errors we might run into and shows the error. Here we again assign the exception to
eand print it so we can read the exception messages.
Intelligently designing your scripts to be as failure-resistant as possible is an important step we’ll talk more about in Chapter 14, and ensuring you have proper try... except blocks throughout your code to account for errors is one important part of that process. Other than HTTP errors, sometimes the page takes too long to load. For our scraper, we might adjust the timeout if we find we are getting slow responses or experiencing latency problems.
Note
What is latency? In a networking sense, it’s the amount of time it takes for data to be sent from one place to another. Round-trip latency is the time it takes to send a request from your computer to the server and get a response. Latency happens because data has to be transferred, sometimes thousands of miles, to complete your request.
It’s good to think about latency when writing and scaling your script. If you have a script connecting to a site hosted in another country, you are going to experience network latency. You will likely want to adjust your timeouts accordingly, or set up a server closer to your desired endpoint. If you need to add timeouts to your Selenium and Ghost.py scripts, you can do so directly when starting your scraping. For Selenium, use the set_page_load_timeout method or use implicit or explicit waits, where the browser will wait for particular sections of code to load. For Ghost.py, you may pass the wait_timeout argument as defined in the Ghost class documentation.
For Scrapy, the asynchronous nature of the scrapers and ability to retry a particular URL numerous times makes timeouts a somewhat trivial issue. You can, of course, alter the timeout directly in Scrapy settings using the DOWNLOAD_TIMEOUT setting.
If you are writing your own Python script and using LXML or BeautifulSoup to parse the page, adding a timeout to your calls will be your responsibility. If you use requests or urllib2, you can do so directly as you call the page. In requests, you simply add it as an argument to your get request. For urllib2, you’ll want to pass the timeout as an argument in your
urlopen method.
If you are experiencing continuous network-related issues, and it’s essential that your script run on a steady schedule, we recommend setting up some logging, attempting to run it on another network (i.e., not your home network, to see if these are issues with your home Internet connection), and testing whether running it at non-peak hours helps.
Tip
Does it matter whether the script updates every day at 5 p.m. or at 5 a.m.? It’s likely 5 p.m. will be pretty busy on your local ISP’s network, while 5 a.m. will probably be quiet. If you notice it’s hard to do anything on your home network at those peak times, it’s highly unlikely your script will be able to do anything then either!
Aside from network problems, you’ll probably find other issues that break your scraping script—like the fact that the Internet is a changing thing.
The Changing Web (or Why Your Script Broke)
As you know, web redesigns, updated content management systems, and changes in page structure (a new ad system, a new referral network, etc.) are a normal part of the Internet landscape. The Web grows and changes. For that reason, your web scraping scripts will break. The good news is, there are a lot of sites that only change annually, or once every few years. There are also some changes that may not even affect page structure (sometimes style updates or ad updates don’t change the content and structure of the code). Don’t lose all hope; it’s possible your script will work for quite some time!
However, we don’t want to give you false hope. Your script will break eventually. One day, you’ll go to run it and you will realize it no longer works. When this happens, give yourself a big hug, pour yourself some tea or coffee, and begin again.
Now you know more about how to examine the content on a site and figure out the most useful bits for your reporting. You already have quite a lot of code written which will still mainly work. You are in a good debugging stage, and you now have tons of tools at your disposal to find that new div or table with the data you seek.
A (Few) Word(s) of Caution
When scraping the Web, it’s important to be conscientious. You should also inform yourself about laws in your country pertaining to content on the Web. Generally, how to be conscientious is pretty clear. Don’t take someone else’s content and use it as your own. Don’t take content that says it’s not supposed to be shared. Don’t spam people or websites. Don’t hack websites or maliciously scrape sites. Basically, don’t be a jerk! If you couldn’t share with your mom or a close friend what you are doing and feel good about yourself, don’t do it.
There are a few ways to be clear about what you are doing on the Internet. Many of the scraping libraries allow you to send User-Agent strings. You can put your information or your company’s information in those strings so it’s clear who is scraping the site. You also want to make sure to take a look at the site’s robots.txt file, which tells web spiders what parts of the site are off-limits.
Tip
Before building a spider to traverse a site, see if the parts of the site you are interested in are included in the Disallow section of the robots.txt file. If they are, you should find another way to get the data, or contact the site owner and see if they can get it to you in a different way.
Be a force of good on the Internet and do the right thing when you build scrapers. This means you can be proud of your work; stay out of trouble with lawyers, companies, and the government; and freely use the information you gather.
Summary
You should now feel comfortable writing a scraper for difficult-to-parse content. You can use Selenium or Ghost.py to open a browser, read a web page, interact with the page, and extract data. You can use Scrapy to crawl and spider an entire domain (or series of domains) and extract large quantities of data. You also practiced regex syntax and wrote your own Python class (with the help of Scrapy).
On top of that, your Python code is coming along. You have explored some bash commands. You are gaining some great experience interacting with shell scripts, and you are well on your way to being a professional data wrangler. Table 12-2 lists the new concepts and tools introduced in this chapter.
| Concept/Library | Purpose |
|---|---|
Selenium library |
Library used to interact directly with web pages and their elements using a browser of your choice, as well as with headless browsers. Great if you need to click on elements, enter information in forms, and interact with pages that require quite a few requests to load the content. |
PhatomJS library |
JavaScript library used as a headless browser for web scraping on a server or other browserless machine. Can also be used to write a web scraper using only JavaScript. |
Ghost.py library |
Library used to interact with web pages through Qt WebKit, rather than a traditional browser. Can be used in similar situations to where one would use a browser, with the ability to write native JavaScript. |
Scrapy library |
Library used to spider or crawl many pages across a domain or several domains. Great if you need to investigate more than one domain or more than one type of page to collect your data. |
Scrapy crawl rules |
Crawl rules instruct your spider to match URL structures and identify parts of the page where the spider might find such links. This enables your spider to navigate and find more content. |
Finally, for scrapers, make sure you follow some basic logic (see Table 12-3).
| Scraper type | Libraries | Use case |
|---|---|---|
Page-reader scraper |
BeautifulSoup, LXML |
Simple page scraping where all the data you want exists on one page loaded in one request. |
Browser-based scraper |
Selenium, PhantomJS, Ghost.py |
Browser-based scraping where you need to interact with elements on the page or the page requires many different requests to load. |
Web spider/crawler |
Scrapy |
Following links across many pages or parsing similar pages in a fast and asynchronous way. Great for if you know you need many matches across an entire domain or series of domains. |
In the next few chapters, we’ll look at expanding your web skills using APIs, as well as scaling and automating your data. These are the final stages in bringing all of your learning together into a series of repeatable, executable scripts—some of which run without you having to do anything. Remember all those rote tasks you thought about when you first started this book? Well, they are soon to be rote no more—read on!
1 If you have trouble installing PySide, take a look at the project’s documentation specific to your operating system. You can alternatively install PyQt. You can also check for updates in the Installation documentation on GitHub.
2 If you have IPython installed, you should also be seeing this tab completion on most Python shells you use. If you aren’t seeing this, you can add a .pythonrc file to your computer and set it as your PYTHONSTARTUP environment.