Table of Contents for
Data Wrangling with Python
 Data Wrangling with Python
Published by
O'Reilly Media, Inc., 2016
Data Wrangling with Python
Published by
O'Reilly Media, Inc., 2016
- Cover
- nav
- Praise for Data Wrangling with Python
- Data Wrangling with Python
- Data Wrangling with Python
- Preface
- 1. Introduction to Python
- 2. Python Basics
- 3. Data Meant to Be Read by Machines
- 4. Working with Excel Files
- 5. PDFs and Problem Solving in Python
- 6. Acquiring and Storing Data
- 7. Data Cleanup: Investigation, Matching, and Formatting
- 8. Data Cleanup: Standardizing and Scripting
- 9. Data Exploration and Analysis
- 10. Presenting Your Data
- 11. Web Scraping: Acquiring and Storing Data from the Web
- 12. Advanced Web Scraping: Screen Scrapers and Spiders
- 13. APIs
- 14. Automation and Scaling
- 15. Conclusion
- A. Comparison of Languages Mentioned
- B. Python Resources for Beginners
- C. Learning the Command Line
- D. Advanced Python Setup
- E. Python Gotchas
- F. IPython Hints
- G. Using Amazon Web Services
- Index
- About the Authors
- Colophon
Chapter 11. Web Scraping: Acquiring and Storing Data from the Web
Web scraping is an essential part of data mining in today’s world, as you can find nearly everything on the Web. With web scraping, you can use Python libraries to explore web pages, search for information, and collect it for your reporting. Web scraping lets you crawl sites and find information not easily accessible without robotic assistance.
This technique gives you access to data not contained in an API or a file. Imagine a script to log into your email account, download files, run analysis, and send an aggregated report. Imagine testing your site to make sure it’s fully functional without ever touching a browser. Imagine grabbing data from a series of tables on a regularly updated website. These examples show how web scraping can assist with your data wrangling needs.
Depending on what you need to scrape—local or public websites, XML documents—you can use many of the same tools to accomplish these tasks. Most websites contain data in HTML code on the site. HTML is a markup language, and uses brackets (like our XML example in Chapter 3) to hold data. In this chapter, we will use libraries that understand how to parse and read markup languages like HTML and XML.
There are many sites that use internal APIs and embedded JavaScript to control the content on their pages. Because of these new ways to build the Web, not all of the information can be found using page-reading scrapers. We’ll also learn how to use some screen-reading web scrapers for sites with multiple data sources. Depending on the makeup of the site, you might also be able to connect to an API, which you’ll learn more about in Chapter 13.
What to Scrape and How
Web scraping opens up a wide world of possibilities for data collection. There are millions of websites on the Internet with a huge variety of content and data you might use for your projects. Being a conscientious web scraper, you’ll want to inform yourself about each site and what content you can scrape.
Tip
For most web scraping, it makes sense to scrape text rather than links, images, or charts. If you also need to save links, images, or files, most of these can be downloaded using simple bash commands (like wget or curl), which require no Python. You could simply save a list of the file URLS and write a script with to download your files.
We will start with simple text scraping. Most web pages are built with a similar structure defined in proper HTML standards. Most sites have a head where most of the JavaScript and styles for the page are defined along with other extra information, like meta tags for services like Facebook and Pinterest and descriptions for search engine usage.
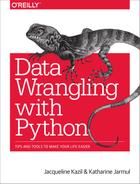
After the head comes the body. The body is the main section of the site. Most sites use containers (which are markup nodes similar to our XML nodes) to organize the site and allow the site’s content management system to load content into the page. Figure 11-1 shows how a typical web page is organized.
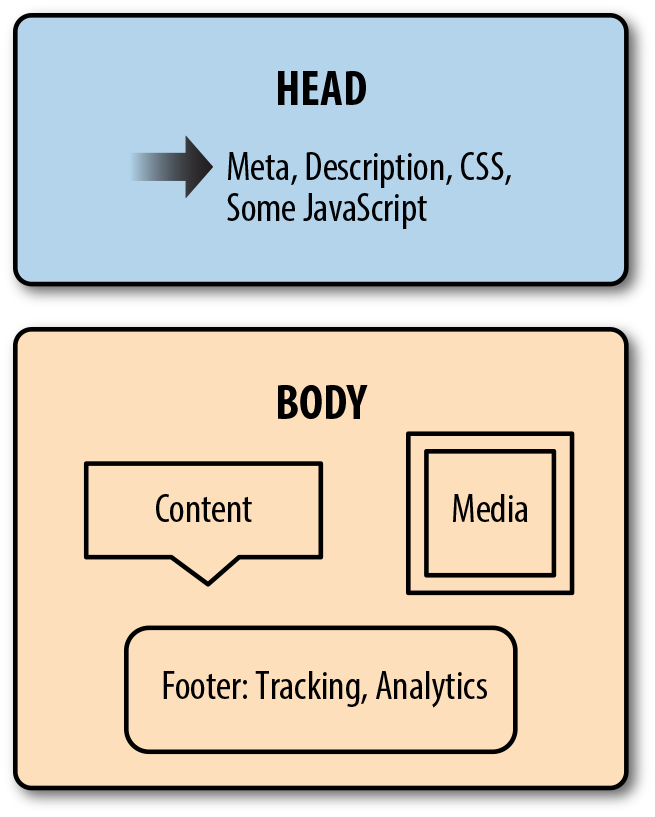
Figure 11-1. Anatomy of a web page
For many sites, the top section of the page contains navigation and links to the major site sections or related topics. Links or ads often appear down the sides of the page. The middle of the page usually contains the content you want to scrape.
Tip
Becoming familiar with the structure of most web pages (in terms of where the elements are visually and where they exist in the markup of the page) will help you scrape data from the Internet. If you can spot where to look for the data, you’ll be able to quickly build scrapers.
Once you know what you are looking for on the page, and you’ve analyzed the markup by studying the construction of the page source, you can determine how you’d like to gather the important parts of the page. Many web pages offer content on first page load, or serve a cached page with the content already loaded. For these pages, we can use a simple XML or HTML parser (which we’ll learn about in this chapter) and read directly from the first HTTP response (what your browser loads when you request a URL). It’s similar to reading documents, just with an initial page request.
If you need to first interact with the page to get the data (i.e., enter some data and push a button) and it’s not just a simple URL change, you will need to use a browser-based scraper to open the page in a browser and interact with it.
If you need to traverse an entire site looking for data, you’ll want a spider: a robot that crawls pages and follows rules to identify good content or more pages to follow. The library we will work with for spidering is incredibly fast and flexible, and makes writing these types of scripts much easier.
Before we start writing our scraper code, we’ll take a look at a few websites and get used to analyzing which scraper type to use (page reader, browser reader, or spider) and how difficult or easy scraping the data will be. There will be times when it’s important to determine what level of effort the data is worth. We’ll give you some tools to determine how much effort will be needed to scrape the data and how much time it’s worth putting into that work.
Analyzing a Web Page
Most of your time web scraping will be spent staring at markup in your browser and figuring out how to interact with it. Getting used to your favorite browser’s debugging or development tools is an essential part of becoming an advanced web scraper.
Depending on what browser you use, the tools might have different names and functionality, but the concepts are the same. You’ll want to educate yourself on your favorite browser’s tools, be it Internet Explorer, Safari, Chrome, or Firefox.
The basics of every browser debugger are similar. You’ll have an area where you can see the requests and page load data (usually called Network or something similar). You’ll have another area where you can analyze the markup of the page and see the styles and content in each tag (usually called Inspection or Elements or DOM). You’ll have a third area where you can see JavaScript errors and interact with the JavaScript on the page, usually called Console.
Your browser’s developer tools may have other tabs, but we really only need these three to get a good idea of how the page is built and how to easily scrape the content.
Inspection: Markup Structure
When you want to scrape a site, first analyze the site structure and markup. As we learned in Chapter 3, XML has a structure of nodes and content, keys and values. HTML is quite similar. If you open your browser’s developer tools and navigate to the Inspection, Elements, or DOM tab, you’ll notice you can see a series of nodes and their values. The nodes and data contained therein are a bit different from what we saw in our XML examples—they are HTML tags (some basics are outlined in Table 11-1). The HTML tag
used tells you about the content. If you were trying to find all the photos on a page, you would look for img tags.
| Tag | Description | Example |
|---|---|---|
|
Used to hold metadata and other essential information for the document |
|
|
Used to hold the majority of the content on the page |
|
|
Used to hold metadata such as a short description of the site or keywords |
|
|
Used to hold header information; the smaller the number, the larger the header |
|
|
Used to hold text paragraphs |
|
|
Used to hold both unordered lists ( |
|
|
Used to hold list items; should always be inside a list ( |
|
|
Used to section or divide content |
|
|
Used to link content; called “anchor tags” |
|
|
Used to insert an image |
|
For a more robust and complete introduction to HTML tags and their uses, take a look at the Mozilla Developer Network’s HTML reference, guide, and introduction.
Aside from tags used and content structure, the placement of tags in relation to one another is important. Similar to XML, HTML has parents and children. There is a hierarchy of relationships in the structure. The parent nodes have child nodes, and learning how to traverse the family tree structure will help you get the content you want. Knowing the relationship of the elements to one another, whether they are parents or children or siblings, will help you write more efficient, fast, and easy-to-update scrapers.
Let’s take a closer look at what these relationships mean in an HTML page. Here is a mock-up of a basic HTML site:
<!DOCTYPE HTML><html><head><title>My Awesome Site</title><linkrel="stylesheet"href="css/main.css"/></head><body><header><divid="header">I'm ahead!</div></header><sectionclass="main"><divid="main_content"><p>This site is super awesome! Here are some reasons it's so awesome:</p><h3>List of Awesome:</h3><ul><li>Reason one: see title</li><li>Reason two: see reason one</li></ul></div></section><footer><divid="bottom_nav"><ul><li><ahref="/about">About</a></li><li><ahref="/blog">Blog</a></li><li><ahref="/careers">Careers</a></li></ul></div><scriptsrc="js/myjs.js"></script></footer></body></html>
If we start with the very first tag of this page (below the document type declaration), we can see all of the content of the entire page lives in the html tag. The html tag is the root tag for the entire page.
Inside the html tag, we have the head and the body. The vast majority of the page is in the body, but the head has some content as well. The head and body tags are the children of the html element. In turn, those tags contain their respective children and descendants. The head and body tags are siblings.
Looking inside the main body tag, we can see other sets of familial relationships. All of our list items (li tags) are children of unordered lists (ul tags). The header, section, and footer tags are all siblings. The script tag is a child of the footer tag and a sibling of the div tag in the footer that holds links. There are many complex relationships, and this is just one simple page!
To further investigate, the following code shows a page with slightly more complicated relationships (when we are dealing with web scraping we will rarely have a perfect page with everything properly organized and the relationships always intact):
<!DOCTYPE html><html><head><title>test</title><linkref="stylesheet"href="/style.css"></head><body><divid="container"><divid="content"class="clearfix"><divid="header"><h1>Header</h1></div><divid="nav"><divclass="navblock"><h2>Our Philosophy</h2><ul><li>foo</li><li>bar</li></ul></div><divclass="navblock"><h2>About Us</h2><ul><li>more foo</li><li>more bar</li></ul></div></div><divid="maincontent"><divclass="contentblock"><p>Lorem ipsum dolor sit amet...</p></div><divclass="contentblock"><p>Nunc porttitor ut ipsum quis facilisis.</p></div></div></div></div><style>...</style></body></html>

First child of previous sibling of the current element’s parent

Parent/ancestor of current element

Sibling of current element

Current element

First child/descendant of current element

Child/descendant of current element

Next sibling of current element’s parent
For the purpose of our discussion, the “current element” is the second div with the navblock class. We can see it has two children, a heading (h2), and an unordered list (ul), and there are list items (li) inside that list. They are descendants (and depending on what library you use could be included in “all children”). The current element has one sibling, the first div with the navblock class.
The div with ID nav is the parent of our current element, but our element has other ancestors. How could we navigate from our current element to the div with ID header? Our parent element is a sibling of that header element. To get the header element content, we could find the previous sibling of our parent element. The parent element also has another sibling, the div with ID maincontent.
Note
All together these relationships are described as the Document Object Model (DOM) structure. HTML has rules and standards for organizing the content on a page (also known as a document). The HTML element nodes are “objects,” and they have a particular model/standard they must follow to be displayed properly.
The more time you spend understanding the relationships between nodes, the easier it will be to traverse the DOM quickly and efficiently with code. Later in this chapter, we’ll cover XPath, which uses familial relationships to select content. For now, with our improved understanding of HTML structure and the relationships between DOM elements, we can take a closer look at locating and analyzing the content we wish to scrape on our selected site(s).
Tip
Depending on your browser, you might be able to search the markup using the developer tools. This is a great way to see the element structure. For example, if we are looking for a particular section of content, we can search for those words and find their location. Many browsers also allow you to right-click on an element on the page and select “Inspect.” This usually opens your developer tools to the selected element.
We’ll use Chrome for our examples, but follow along using your favorite browser. When researching child labor in Africa, we came across data connecting child labor practices with conflicts. This led us to organizations working to stop conflict zones and conflict mining across Africa. Open up a page for one of those organizations: the Enough Project’s Take Action page.
When we first open our developer tools—select Tools→Developer Tools in Chrome, press F12 in Internet Explorer, choose Tools→Web Developer→Inspector in Firefox, or enable the Develop menu in Safari’s advanced preferences—we will see markup in one panel, CSS rules and styles in another small panel, and the actual page in a panel above the tools. Depending on your browser, the layout might be different, but the tools should be similar enough to see these features (displayed in Figure 11-2).
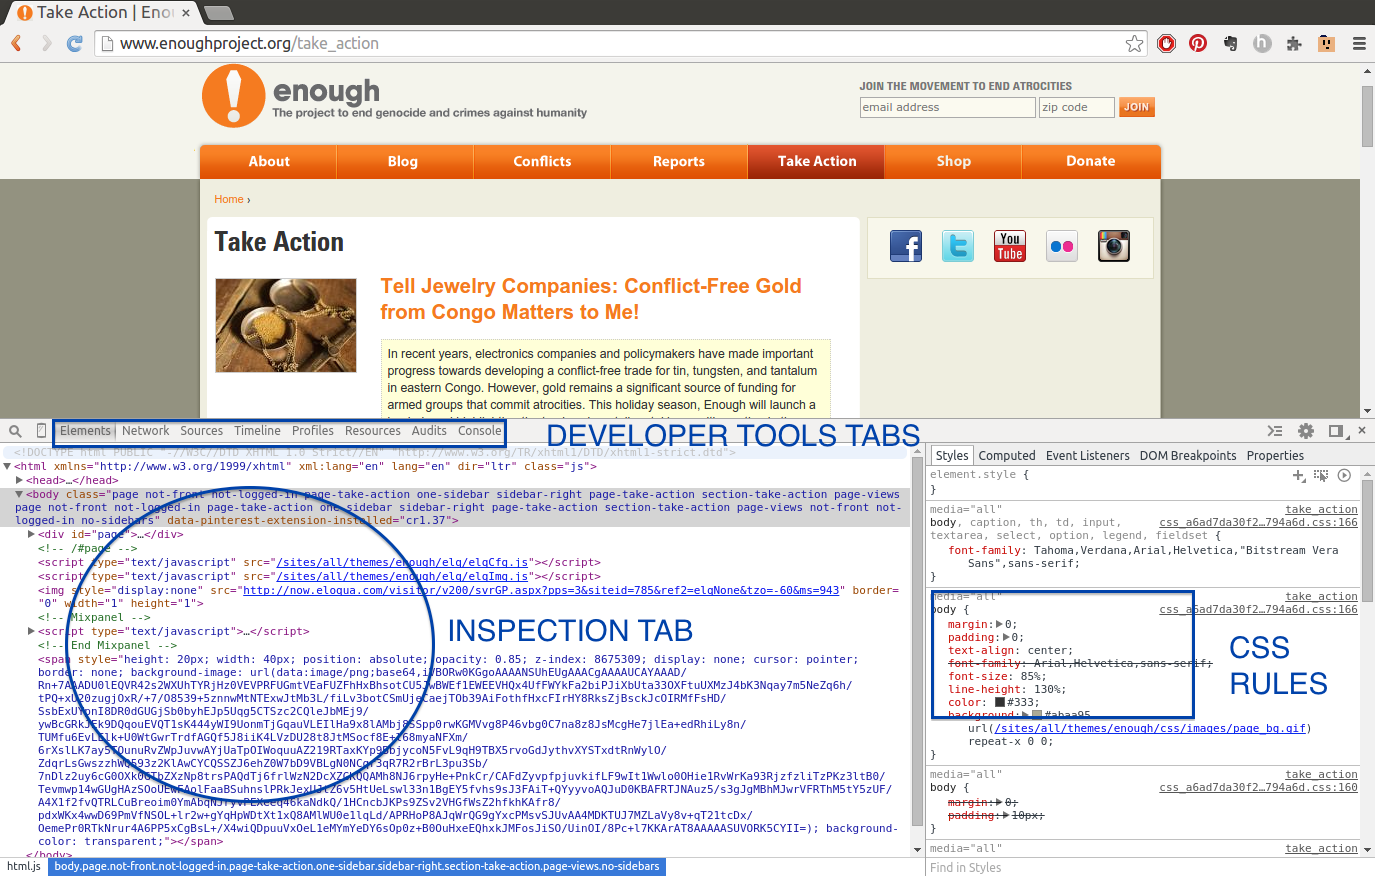
Figure 11-2. Enough Project Take Action page
Note
If you move your cursor over an element in the markup section (Inspection tab) of the developer tools, you will probably see different areas of the page highlight. This is a great feature to help you see the different elements in the markup and page structure.
If you click on the arrows next to the div’s and main elements of the page, you can see elements located within them (child elements). For example, on the Enough Project’s page, we can investigate the right sidebar (circled in Figure 11-3) by clicking to open the main-inner-tse div and other internal div’s.
Figure 11-3. Exploring the sidebar
We can see the sidebar’s images are located inside links, which are inside a paragraph, inside a div—the list goes on and on. Understanding when images are inside links (or vice versa), determining which content is located in paragraph tags, and figuring out other page structure elements are essential to locating and scraping page content.
Another great use of developer tools is to investigate elements. If you right-click on a part of the page, you should see a menu including some useful tools for web scraping. Figure 11-4 shows an example of such a menu.
If we click the “Inspect element” option, the developer tools should open to that element in the source markup. This is a tremendously useful feature for interacting with the content and seeing where it’s located in the code.
In addition to being able to interact with elements in the browser portion of the window, you can also interact with elements in the source code portion. Figure 11-5 shows the type of menu you get by right-clicking on an element in the markup area. We can see options to copy CSS selectors or XPath selectors (both of which we will use in this chapter to locate and extract content from websites).
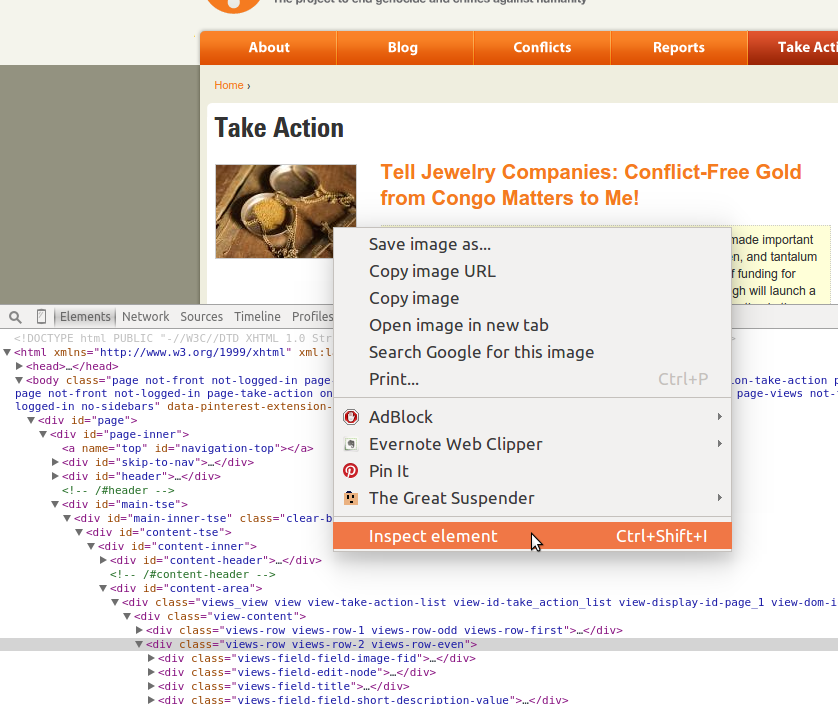
Figure 11-4. Inspect element
Note
Depending on your browser, the language and interaction of your tools might vary, but the menu options should be similar to the ones described here, and this should give you some idea of how to access this data and these interactions.
In addition to finding elements and content, your developer tools show you quite a lot about the node structure and family relationships on the page. There will often be a section of the Inspection tab in your developer tools showing you a list of the parent elements of your current element. The elements in this list can usually be clicked on or selected, so you can traverse the DOM with a single click. In Chrome, this list is in the gray section between the developer tools and the page above.
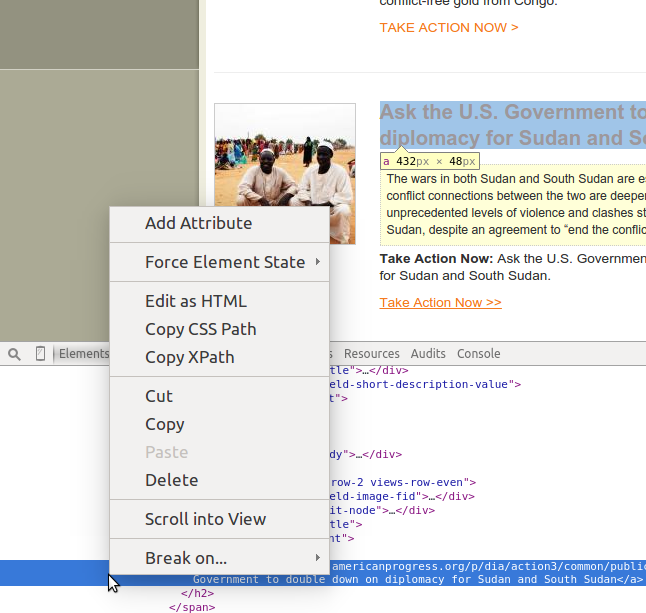
Figure 11-5. Element options
We’ve taken a look at how web pages are structured and how we can interact with them to better understand where our content lies. We will now investigate the other powerful tools in our web browser that make our web scraping easier.
Network/Timeline: How the Page Loads
Analyzing the Timeline and/or Network tabs in your developer tools will give you great insights into how the content on the page loads, and in what order. The timing and way a page loads can greatly influence how you decide to scrape the page. Understanding where the content comes from can sometimes give you a “shortcut” to the content you wish to scrape.
The Network or Timeline tab shows you what URLs were loaded, in what order, and how long each of them took to load. Figure 11-6 shows what the Network tab looks like in Chrome for the Enough Project page. Depending on your browser, you may need to reload the page to see the Network tab’s page assets.
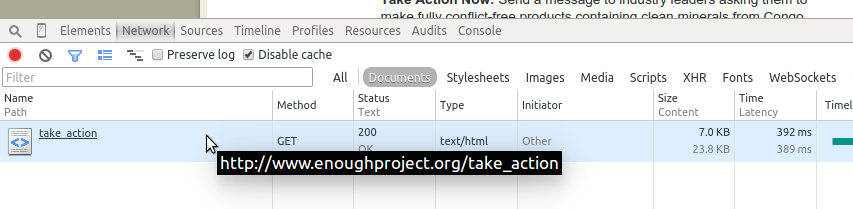
Figure 11-6. Network tab with one page
We can see the entire page is loaded in one call since we only have one request in our Network tab. This is great news as a web scraper, because it means everything is available in only one request.
If we click on the request, we can see more options, including the source code of the response (Figure 11-7). Viewing each request’s content will be essential to locating the content you need when pages are loaded via many different requests. You can investigate headers and cookies by clicking on the Headers tab of your Network tab, in case you need extra data to load the site.
Let’s take a look at a similar organization’s page with a complex Network tab. Open your Network tab and navigate your browser to the #WeAreFairphone page on the Fair phone initiative’s site (Figure 11-8).
You can immediately see this page is processing more requests. By clicking on each request, you can see the content each request loads. The request order is indicated in the timeline on your Network tab. This can help you understand how to scrape and process the page to get to your desired content.
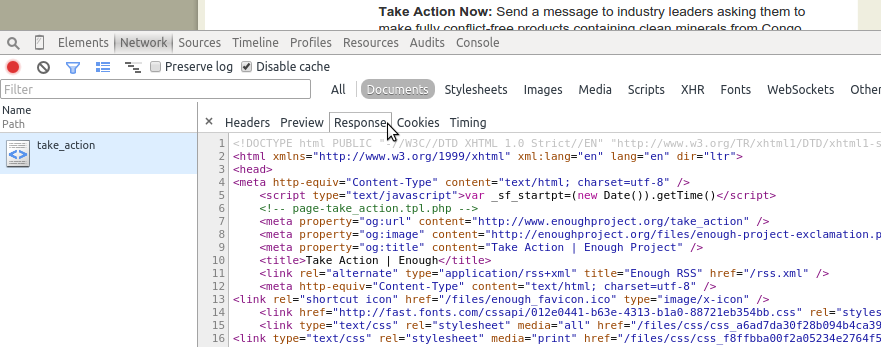
Figure 11-7. Network response
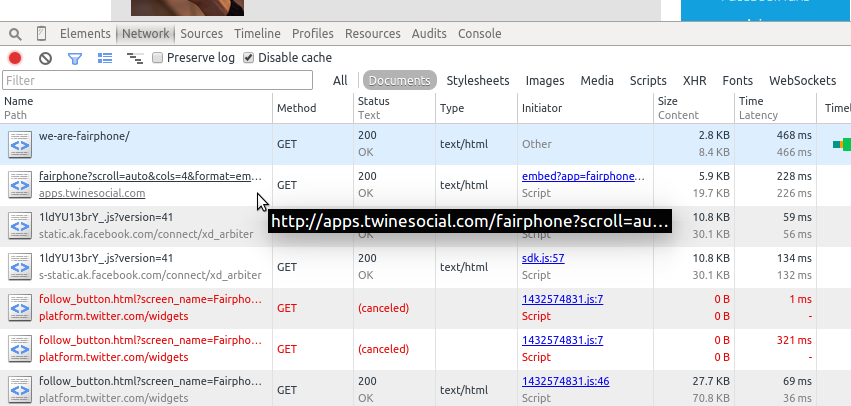
Figure 11-8. Network tab with lots of pages
By clicking on each of the requests, we can see most of the content is loaded after the initial page load. When we click on the initial page request, it is quite empty. The first question we want to ask is, is there a JavaScript call or some other call loading the content using JSON? If so, this might be an apt “shortcut” for our script.
Tip
You know how to parse and read JSON (Chapter 3), so if you find a URL in your Network tab with a JSON response holding the data you need, you can use that URL to get the data and then parse the data directly from the response. You should be aware of any headers (shown in the Headers section of your Network tab) you might need to send with your request in order to get the proper response.
If there is no easy JSON URL matching the information you need, or if the information is scattered over several different requests and would require maneuvering to put it together, you can now be certain you should use a browser-based approach to scrape the site. Browser-based web scraping allows you to read from the page you see, not each request. This can also be useful if you need to interact with a drop-down or perform a series of browser-based actions before you can scrape the content properly.
The Network tab helps you figure out what requests hold your desired content and if there are any good alternative data sources. We’ll look at JavaScript next, to see if that can give us some ideas for our scraper as well.
Console: Interacting with JavaScript
You’ve now analyzed the markup and structure of the page and the timing of the page load and network requests, so let’s move on to the JavaScript console to see what we can learn from interacting with the JavaScript running on the page.
If you’re already familiar with JavaScript, this is fairly easy to use; if you’ve never interacted with JavaScript, it might be useful to take a look at an easy introduction to JavaScript course. You only need to understand JavaScript’s basic syntax, giving you the ability to interact with elements of the page via the console. We’ll begin by reviewing JavaScript and style basics to see how to use the console view.
Style basics
Every web page uses some style elements to help organize, size, color, and visually modify its content. When browsers began developing HTML standards, style standards also came into existence. The result was Cascading Style Sheets, or CSS, which gives us a standard way of styling pages. For example, if you want all titles to use a different font or all photos to be centered on the page, you would write those rules in CSS.
CSS allows styles to cascade, or inherit from parent styles and style sheets. If we define one set of styles for the entire site, it’s quite easy for our content management system to make one page look like every other page. Even if we have a complex site with many different page types, we can define a major CSS document and several minor ones, which are loaded if the page requires extra styles.
CSS works because it defines rules that allow DOM elements to be grouped together (or separately defined) by attributes within the tags. Remember when we explored XML in Chapter 3 and looked at nested attributes? CSS also uses these nested attributes. Let’s take a look using our element inspection tools. Because you are likely still on the Fairphone site, let’s take a look at some of the CSS on the page. When we highlight an element in our bottom toolbar, we see some text displayed next to the corresponding element on the page (Figure 11-9).

Figure 11-9. Introduction to CSS
In this case, we already know what div means, but what is content-block? Let’s take a look at the HTML, using our inspection techniques (right-click on the element on the page and select “Inspect element”).
We see content-block is the CSS class (as shown in Figure 11-10 in the nested attribute class="content-block"). It’s defined in the opening div tag, and that div holds all of the other child tags. Speaking of CSS classes, how many classes can you see just on this section of the page? There are plenty!
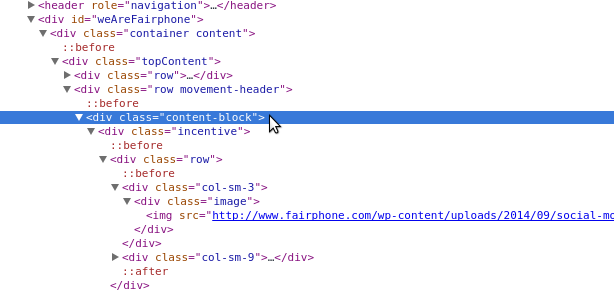
Figure 11-10. CSS class
Similar to classes, there are also CSS IDs. Let’s find one (shown in Figure 11-11) and see how it looks different from classes.
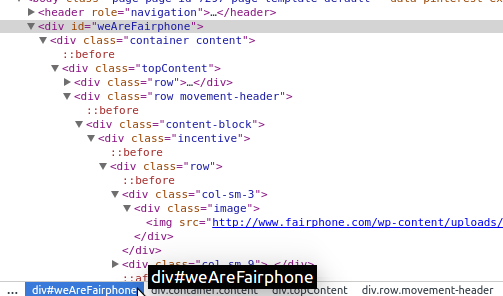
Figure 11-11. CSS ID
The HTML looks very similar, but the notation in our navigation uses a hash or pound sign. The # is a proper CSS selector for IDs. With classes, we use . (as shown in div.content-block).
Note
CSS structure and syntax state that ids should be unique, but you can have many elements with the same class. Pages don’t always follow this structure, but it’s noteworthy. A CSS id has a greater specificity than a class. Some elements have more than one class so they can have many styles applied to them.
Using our right-click menu, it’s fairly easy to copy CSS selectors from the page. If you already know CSS, this knowledge will help with your web scraping. If you don’t know much about CSS but would like to explore it further, take a look at Codecademy’s introduction to CSS course or walk through the Mozilla Developer Network’s reference and tutorial.
Now we have a better grip on CSS and how it styles the page; but what, you may ask, does CSS have to do with the browser console? Good question! Let’s review some jQuery and JavaScript basics so we can see how CSS relates to interacting with content on the web page.
jQuery and JavaScript
The evolution of JavaScript and jQuery is a much longer story than HTML and CSS, in part because JavaScript developed without a whole lot of standards for quite a long time. In one sense, JavaScript was (and on some level still is) the Wild West of the website landscape.
Note
Although JavaScript has changed quite a bit in the past 10 years, decade-old scripts can often still run on quite a few browsers, meaning the push to standardize exactly how to write JavaScript and what things are disallowed has been a bit slower than for HTML and CSS.
JavaScript is not markup; it’s a scripting language. Because Python is also a scripting language, you can apply some of the things you’ve learned—functions, objects and classes, methods—to your understanding of JavaScript. As with Python, there are extra libraries and packages to help you write clean, simple, and efficient JavaScript code that can be understood by browsers and humans.
jQuery is a JavaScript library used by many large websites to make JavaScript easier to read and simpler to write, while still allowing browsers (and their varied JavaScript engines) to parse the scripts.
Note
Started back in 2005–2006, jQuery introduced ideas to simplify and standardize JavaScript and give JavaScript developers tools so they don’t have to write all their code from scratch. jQuery really pushed JavaScript development forward, creating a more object-oriented approach with powerful and easy-to-interpret methods and a closer link to CSS rules when selecting page elements.
Since jQuery was developed, JavaScript and CSS have had a much closer relationship, and many newer JavaScript frameworks build on this object-oriented approach. If a site is running jQuery, it’s easy to interact with elements on the page using their CSS identifiers. Say we want to grab content from the content-block class we were taking a look at on the #WeAreFairphone page (Figure 11-12). How can we do that using our JavaScript console?
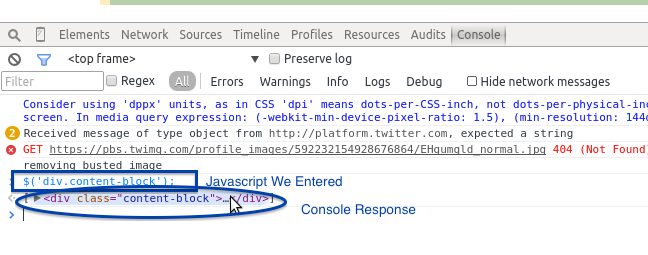
Figure 11-12. jQuery console
Since the site is running JQuery, we simply type the following code onto our first line in the Console tab:
$('div.content-block');
When we hit Enter, the console responds with the element. Click on the response in the console and you will see subelements and children of that element. We can use our CSS selectors with some jQuery basics (e.g., $(elem);) to select other elements on the page. Using the $ and parentheses tells jQuery we are looking for an element that matches the selector we pass in a string inside the parentheses.
Can you use the console to select the div with the ID weAreFairphone? Can you select only the anchor (a) tags on the page? Try it out in your console. The console and jQuery give us an easy way to use CSS selectors or tag names to interact with the actual elements on the page and pull content from those elements. But what does this have to do with Python?
Because jQuery changed the way people view the usefulness of CSS selectors, Python scraping libraries now use these same selectors to traverse and find elements in web pages. In the same way you can use a simple jQuery selector in your browser console, you can use it in your Python scraper code. If you are interested in learning more jQuery, we recommend visting the jQuery Learning Center or taking the courses at Codecademy or Code School.
If you come across a site that doesn’t use jQuery, then jQuery won’t work in your console. To select elements by class using only JavaScript, run:
document.getElementsByClassName('content-block');
You should see the same div and be able to navigate the same way in your console. Now you know a little about the tools at our disposal, so let’s take a closer look at how to determine the best way to scrape the page for interesting content. First, we will take a look at how to investigate all parts of the page.
In-Depth Analysis of a Page
One great way to go about developing a web scraper is to first play around with the content in your browser. Begin by selecting the content you are most interested in and viewing it in your browser’s Inspection or DOM tab. How is the content formed? Where are the parent nodes? Is the content wrapped in many elements, or just a few?
Warning
Before scraping a page, always check if you can scrape the page by looking at restrictions on the content and the site’s robots.txt file. You can find the file by typing the domain name and then /robots.txt (e.g., http://oreilly.com/robots.txt).
Then, move on to the Network and/or Timeline tab (see Figure 11-6). What does the first page load look like? Is JSON used in the page load, and if so what do those files look like? Is most of the content loaded after the initial request? All of these answers can help you determine what type of scraper to use and how challenging it will be to scrape the page.
Next, open up your Console tab. Try using some of the information from your inspection to interact with the elements containing important content. How easy is it to write a jQuery selector for that content? How reliably does your selector perform across the entire domain? Can you open a similar page, use that selector, and get similar results?
Note
If your content is easy to interact with in a JavaScript console using jQuery or JavaScript, it’s likely going to be just as easy with Python. If it’s difficult to select an element with jQuery or if what works on one page doesn’t work on another similar page, it’s likely going to be more difficult in Python as well.
There is rarely a page on the Web that can’t be properly parsed using the Python tools at your disposal. We’ll teach you some tricks for messy pages, inline JavaScript, poorly formatted selectors, and all of the awful choices you can find in code across the World Wide Web, and outline some best practices along the way. To begin, we’ll take a look at loading and reading a web page.
Getting Pages: How to Request on the Internet
The first step of any web scraper is…(drumroll)…connecting to the Web. Let’s go over some basics of how this works.
When you open up a browser and type in a site name or search term(s) and hit Enter, you are making a request. Most often, this is an HTTP (HyperText Transfer Protocol) request (or HTTPS—the secure version). You are likely making a GET request, which is one of many request methods used on the Internet. Your browser handles all of this for you, along with parsing what you typed to determine whether you are requesting a website or a search term. Depending on what it determines, it will send you to either the search results or the website you were requesting.
Let’s take a look at the built-in Python libraries for URL requests: urllib and urllib2. These are Python’s two standard libraries for URL requests. Using urllib2 is a good idea, but there are a few useful methods in urllib. Take a look:
importurllibimporturllib2=urllib2.urlopen('http://google.com')=.read()[:200]url='http://google.com?q='url_with_query=url+urllib.quote_plus('python web scraping')web_search=urllib2.urlopen(url_with_query)web_search=web_search.read()web_search[:200]
Uses the
urlopenmethod to open the request. This returns a buffer, where you can read the contents of the web page.Reads the contents of the entire page into the
googlevariable.Prints the first 200 characters so we can see the beginning of the web page.
Uses the
quote_plusmethod to escape strings with plus signs. This is useful when crafting website query strings—we want to search Google for web results, and we know Google expects a query string with plus signs between the words.
See? It’s pretty easy to reach out to a URL, or a service (e.g., Google Search), receive a response, and read that response. urllib and urllib2 both have some extra request methods and the ability to add headers, send basic authentication, and assemble more complicated requests.
Depending on the complexities of your request, you can also use the requests library. requests uses urllib and urllib2 and makes the complex requests easier to format and send. If you need to format a complicated post of a file or see what cookies you have in
your session or check the response status code, requests is a great option.
Note
As we reviewed in our Network (or Timeline) tab, you will sometimes find pages utilizing specific HTTP headers, cookies or other authentication methods. You can send these along with your request using urllib2, urllib, or the requests library.
Let’s take a look at some of the requests tools in action:
importrequests=requests.get('http://google.com').status_code.content[:200].headers.cookies.items()
Calls the
requestslibrary’sgetmethod to send aGETrequest to the URL.Calls the
status_codeattribute to make sure we have a 200 response (properly completed request). If we don’t have a 200, we could decide to operate our script logic differently.Checks the response’s
headersattribute to see what headers Google sends back. We can see theheadersattribute is a dictionary.Reads the cookies Google sends in a response using the
cookiesattribute and calls theitemsmethod on that dictionary to show the key/value pairs.
Using the requests library, we can make different code decisions based on the response and its attributes. It’s easy to use and has great documentation. Whether you use urllib or requests, you can make simple and complex requests with only a few lines of Python. We now know the basics of requesting a web page, so we can start parsing responses. We’ll first learn about Beautiful Soup, a simple Python web page parser.
Reading a Web Page with Beautiful Soup
Beautiful Soup is one of the most popular and simple libraries for Python web scraping. Depending on your needs, it may provide everything you’re looking for in a web scraper. It is simple, straightforward, and fairly easy to learn. Let’s take a look at parsing a page using Beautiful Soup. First, install the library using pip (we use beautifulsoup4 as the previous version is no longer being supported and developed):
pip install beautifulsoup4
Let’s take another look at one of the simple pages we inspected earlier, the Enough Project’s Take Action page. We want to see if we can properly parse all of the calls to action on the page and save them. Here’s how to import the page into Beautiful Soup so we can start reading it:
frombs4importBeautifulSoupimportrequestspage=requests.get('http://www.enoughproject.org/take_action')bs=BeautifulSoup(page.content)bs.titlebs.find_all('a')bs.find_all('p')
First, we import the parser directly from the
beautifulsoup4library.Using the
requestslibrary to grab the content of the page, this line assigns the response (and its content) to thepagevariable.To start parsing with Beautiful Soup, this line passes the HTML of the page into the
BeautifulSoupclass. We can grab the response’s page source using thecontentattribute.Once we have parsed the page object, we can use its attributes and methods. This line asks Beautiful Soup to find all
atags (or links) on the page.
We can open a page, read the response into a Beautiful Soup object, and use the attributes of that object to see the title, all of the paragraphs on the page, and all of the links on the page.
Because we’ve learned about family relationships in HTML, let’s take a look at some relationships on the page:
header_children=[cforcinbs.head.children]header_childrennavigation_bar=bs.find(id="globalNavigation")fordinnavigation_bar.descendants:dforsind.previous_siblings:s
We use a list comprehension to create a list of all of the children from the header of the page. By stringing together the Beautiful Soup page object along with
.head, which calls the head of the page, and then.children, we can view all of the nodes contained in the header. If we wanted to, we could use this to parse the header’s meta content, including the page description.If you inspect the page using the developer tools, you’ll see the navigation bar is defined by using a CSS selector ID of
globalNavigation. This line uses the page object’sfindmethod, passes an ID, and locates the navigation bar.We iterate over the descendants of the navigation bar using the navigation bar’s
descendantsmethod.With the final descendant from our navigation bar, this line uses
.previous_siblingsto iterate over the siblings of our navigation elements.
The family trees let us navigate using the built-in attributes and methods in the Beautiful Soup library’s page class. As we can see from our header and navigation bar examples, it’s easy to select an area of the page and navigate the children, descendants, or siblings. Beautiful Soup’s syntax is very simple and chains together elements and their attributes (like .head.children). With this in mind, let’s focus on the main sections of the page and see if we can pull out some of the content we may be interested in viewing.
If we inspect the page using our developer tools, we notice a few things. First, it looks like each of the action items are located in a views-row div. These divs have many different classes, but they all have the views-row class. It’s a good place to start parsing them. The headline is located in an h2 tag and the link is also in that h2 tag, inside an anchor tag. The calls to action are in paragraphs in divs that are children of the views-row div. We can now parse the content using Beautiful Soup.
First, we want to find the pieces of content using what we know about Beautiful Soup and what we understand about the page structure and how to navigate it. Here’s how to do that:
frombs4importBeautifulSoupimportrequestspage=requests.get('http://www.enoughproject.org/take_action')bs=BeautifulSoup(page.content)ta_divs=bs.find_all("div",class_="views-row")len(ta_divs)fortainta_divs:title=ta.h2link=ta.aabout=ta.find_all('p')title,link,about
Uses Beautiful Soup to find and return all of the
divswith a class containing the stringviews-row.Prints to check if we have the same number here as the number of rows of stories we can see on the website, indicating we’ve properly matched our rows.
Iterates over the rows and grabs the tags we want based on our page investigation. The title is in an
h2tag, and it’s the onlyh2tag in the row. The link is the first anchor tag.Matches all paragraph tags to get the text, as we’re not sure how many there are per row. Because we use the
.find_allmethod, Beautiful Soup returns a list rather than the first matching element.
You should see something similar to:
<h2><a href="https://ssl1.americanprogress.org/o/507/p/dia/action3/common/public/
?action_KEY=391">South Sudan: On August 17th, Implement "Plan B" </a></h2> <a
href="https://ssl1.americanprogress.org/o/507/p/dia/action3/common/public/
?action_KEY=391">South Sudan: On August 17th, Implement "Plan B" </a>
[<p>During President Obama's recent trip to Africa, the international community
set a deadline of August 17 for a peace deal to be signed by South Sudan's
warring parties.....]
The content may change as the site is updated, but you should see an h2 element, then an anchor (a) element, and then a list of paragraphs for each node.The current output is messy—not only because we are using a print, but also because Beautiful Soup prints out the entire element and its contents. Instead of the entire element, we’d like to hone in on the essential parts, namely the title text, link hrefs, and paragraph text. We can use Beautiful Soup to take a closer look at these pieces of data:
all_data=[]fortainta_divs:data_dict={}data_dict['title']=ta.h2.get_text()data_dict['link']=ta.a.get('href')data_dict['about']=[p.get_text()forpinta.find_all('p')]all_data.append(data_dict)all_data
We use the
get_textmethod to extract all strings from the HTML element. This gives us the title text.To get an attribute of an element, we use the
getmethod. When we see<a href="http://foo.com">Foo</a>and we want to extract the link, we can call.get("href")to return thehrefvalue (i.e.,foo.com).To extract the paragraph text, we use the
get_textmethod and iterate over the paragraphs returned by thefind_allmethod. This line uses list comprehension to compile a list of strings with the call to action content.
Now the data and output show a more organized format. We have a list of all the data in our all_data variable. Each of our data entries is now in its own dictionary with matching keys. We have scraped the data from the page in a cleaner way using some new methods (get and get_text), and the data now resides in data dictionaries. Our code is more clear and precise, and we can make it clearer by adding helper functions (like we covered in Chapter 8).
In addition, we could automate the script to check if there are new calls to action. If we saved our data to SQLite and used it for a monthly review of labor practices in the Congo, we could automate our reporting. With each new report, we could extract this data and raise more interest in fighting conflict mining and child labor.
Beautiful Soup is an easy-to-use tool, and the documentation is rife with examples of how to use the many other methods available. The library is great for beginners and has many simple functions; however, compared with some other Python libraries, it’s oversimplified.
Because Beautiful Soup’s parsing is regex-based, it’s great to use with really broken pages lacking proper tag structure. But if you’re going to traverse more complicated pages, or you’d like your scraper to run faster and navigate pages quickly, there
are far more advanced Python libraries you can use. Let’s take a look at a favorite library for many talented web scraper developers: lxml.
Reading a Web Page with LXML
One of the more advanced web scrapers (and one that other advanced tools use as a parser) is lxml. It’s incredibly powerful and fast, with a lot of great features, including the ability to generate HTML and XML and clean up poorly written pages. Additionally, it has a variety of tools for traversing the DOM and family relationships.
Let’s take a quick look at the main lxml features we’ll use for web scraping by rewriting the Beautiful Soup code to use lxml:
fromlxmlimporthtmlpage=html.parse('http://www.enoughproject.org/take_action')root=page.getroot()ta_divs=root.cssselect('div.views-row')ta_divsall_data=[]fortainta_divs:data_dict={}title=ta.cssselect('h2')[0]data_dict['title']=title.text_content()data_dict['link']=title.find('a').get('href')data_dict['about']=[p.text_content()forpinta.cssselect('p')]all_data.append(data_dict)all_data
Here we use
lxml’s parsing method, which can parse from a filename, an open buffer, or a valid URL. It returns anetreeobject.Because
etreeobjects have far fewer possible methods and attributes than HTML element objects, this line accesses the root (top of the page and HTML) element. The root contains all of the possible branches (children) and twigs (descendants) within reach. From this root we can parse down to each link or paragraph and back up to theheadorbodytags of the entire page.Using the root element, this line finds all of the
divswith classviews-row. It uses thecssselectmethod with a CSS selector string and returns a list of matching elements.To grab the titles, we use
cssselectto find theh2tag. This line selects the first element of that list.cssselectreturns a list of all matches, but we only want the first match.Similar to Beautiful Soup’s
get_textmethod,text_contentreturns text from within the tag (and any child tags) forlxmlHTML element objects.Here we use chained methods to get the anchor tag from the
titleelement and pull thehrefattribute from the anchor tag. This returns only the value of that attribute, similar to Beautiful Soup’sgetmethod.We use list comprehension to pull out text content from each paragraph in the Take Action
divin order to get the full text.
You should see the same data extracted as before, when we were using Beautiful Soup. What looks different is the syntax and the way the page is loaded. While Beautiful Soup uses regex to parse the document as a large string, lxml uses Python and C libraries to recognize page structure and traverse it in a more object-oriented way. lxml looks at the structure of all of the tags and (depending on your computer and how you installed it) uses the fastest method to parse the tree and return data in an etree object.
We can use the etree object itself, or we can call getroot, which will return the highest element of the tree—normally html. With this element, we can use many different methods and attributes to read and parse the rest of the page. Our solution highlights one way: using the cssselect method. This method takes CSS selector strings (similar to our jQuery examples) and uses those strings to identify DOM elements.
lxml also has find and findall methods. What are the main differences between find and cssselect? Let’s take a look at some examples:
root.find('div')root.find('head')root.find('head').findall('script')root.cssselect('div')root.cssselect('head script')
Uses
findon the root element to finddivs, which returns empty. From inspecting with our browser, we know the page is full ofdivs!Uses the
findmethod to look at the header tag and thefindallmethod to locate the script elements in the header section.Uses
cssselectinstead offindand properly locates alldivscontained in the document. They are returned as a large list.Using
cssselect, locates the script tags within the header section by nesting CSS selectors. Usinghead scriptreturns the same list as chaining together ourfindcommands from the root.
So, find and cssselect operate very differently. find utilizes the DOM to traverse the elements and find them based on ancestry and familial relationships, whereas the cssselect method employs CSS selectors to find all possible matches within the page or the element’s descendants, much like jQuery.
Tip
Depending on your needs, find or cssselect may be more useful. If the page is well organized with CSS classes, IDs and other identifiers, cssselect is a great choice. But if the page is disorganized or doesn’t use many of those identifiers, traversing the DOM can help you identify the location of the content via ancestry.
We want to explore other useful lxml methods. As you learn and grow as a developer, you might feel the need to express your progress through emojis. For that reason, let’s write a quick parser of an emoji cheat sheet to keep an up-to-date list of emojis you can use on Basecamp, GitHub and many other tech-related sites. Here’s how to do that:
fromlxmlimporthtmlimportrequestsresp=requests.get('http://www.emoji-cheat-sheet.com/')page=html.document_fromstring(resp.content)body=page.find('body')top_header=body.find('h2')top_header.textheaders_and_lists=[sibforsibintop_header.itersiblings()]headers_and_listsproper_headers_and_lists=[sforsintop_header.itersiblings()ifs.tagin['ul','h2','h3']]proper_headers_and_lists
This code pulls in the body of the HTML document using the
requestslibrary and then uses thehtmlmodule’sdocument_fromstringmethod to parse the data into an HTML element.By viewing the page structure, we see it’s a series of headers with matching lists. This line locates the first header so we can use familial relationships to find the other useful sections.
This line uses list comprehension along with the
itersiblingsmethod, which returns an iterator, to view all of the siblings.The previous
printshows our initialitersiblingslist comprehension returned more data than we needed, including some of the lower sections on the page withdivandscriptelements. Using page inspection, we determined the only tags we want areul,h2, andh3. This line uses list comprehension with anifto ensure we return only our target content.
The itersiblings method and tag attributes help us easily locate the content we want to select and parse. In this example, we haven’t used any CSS selectors. We know our code won’t break if a new section is added, as long as the page keeps the content in the header and list tags.
Note
Why would we want to build a parser using only HTML elements? What are the advantages of not relying on CSS classes? If a site’s developers change its design or make mobile-friendly updates, it’s likely they will use CSS and JavaScript to do so, rather than rewriting the page structure. If you can use basic page structure to power your scrapers, they will likely have longer lives and greater long-term success than those using CSS.
In addition to itersiblings, lxml objects can iterate over children, descendants, and ancestors. Using these methods to traverse the DOM is a great way to get acquainted with how the page is organized and write longer-lasting code. You can also use family relationships to write meaningful XPath—a structured pattern for XML-based documents (like HTML). Although XPath is not the easiest way to parse a web page, it’s a fast, efficient, and nearly foolproof way to do so.
A Case for XPath
Although using CSS selectors is an easy way to find elements and content on the page, we would also recommend you learn and use XPath. XPath is a markup pattern selector combining the power of CSS selectors with the ability to traverse the DOM. Understanding XPath is a great way to learn web scraping and website structure. With XPath, you can access content that is not easily read using only CSS selectors.
Note
XPath can be used with all of the major web scraping libraries and is much faster than most other ways to identify and interact with content on the page. In fact, most of the selector methods you use to interact with the page are translated into XPath within the libraries themselves.
To practice XPath, you need not look further than your browser’s tools. Many browsers come with the ability to see and copy XPath elements in the DOM. Microsoft also has a great writeup on XPath, and there are many great tools and examples on the Mozilla Developer Network for furthering your XPath education.
XPath follows a specific syntax to define the type of element, where it might be found in the DOM, and what attributes it might have. Table 11-2 reviews some of the XPath syntax patterns we can use in our web-scraping code.
| Expression | Description | Example |
|---|---|---|
|
Selects all nodes with matching |
|
|
Selects all nodes with matching |
|
|
Selects an attribute of an element |
|
|
Selects the parent element |
|
|
Selects elements with specific attributes |
|
|
Selects text from a node or element |
|
|
Selects elements with attributes containing particular values |
|
|
Wildcard character |
|
|
Selects elements by the order that they appear in the node |
|
There are many more expressions, but these should get us started. Let’s investigate how to parse familial relationships between HTML elements using XPath with our super-awesome HTML page we created earlier in this chapter. To follow along, you might want to pull it up in your browser from the book’s code repository (file: awesome_page.html).
OK, say we want to select the links in our footer section. We can see by using our “Inspect element” option (Figure 11-13) that the bottom bar shows a list of the elements and their ancestors. The anchor links are inside li tags inside a ul inside a div with a CSS id inside the footer inside the body inside the html tag (whew! thought I was going to run out of breath there!).
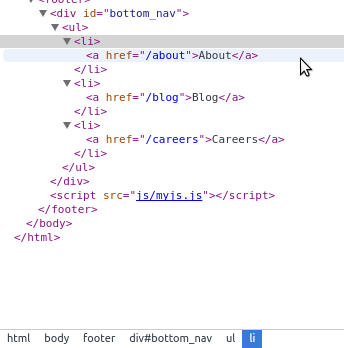
Figure 11-13. Finding elements on the page
How could we write the XPath to select this? Well, there are many ways. Let’s start with a fairly obvious path, and use the div with the CSS id to write the XPath. We could select that div by using the XPath syntax we already know:
'//div[@id="bottom_nav"]'
We can test this using our browser’s JavaScript console. To test XPath in your console, simply put it inside $x();, which is a jQuery console implementation for browsing the page with XPath. Let’s take a look in our console (see Figure 11-14).1
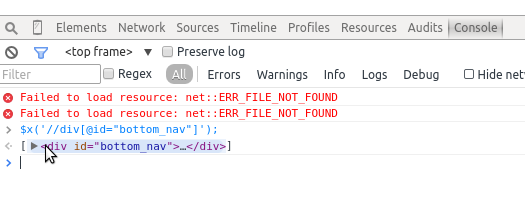
Figure 11-14. Using the console to write XPath
We know we have valid XPath for selecting the navigation because our console returned an object (similar to our jQuery selectors). But what we really want are the links. Let’s take a look at how we might navigate to them from this div. We know they are descendants, so let’s write out the family relationship:
'//div[@id="bottom_nav"]/ul/li/a'
Here we are saying we want any divs with id bottom_nav, with an unordered list inside of them, and then the list items inside of those matches, and then the anchor tags inside of those matches. Let’s try this again in our console (Figure 11-15).
We can see from the output in our console that we have selected those three links. Now, we want to grab just the web addresses themselves. We know every anchor tag has an href attribute. Let’s use our XPath to write a selector for just those attributes:
'//div[@id="bottom_nav"]/ul/li/a/@href'
When we run that selector in our console, we see we’ve properly selected only the web addresses of our footer links (see Figure 11-16).
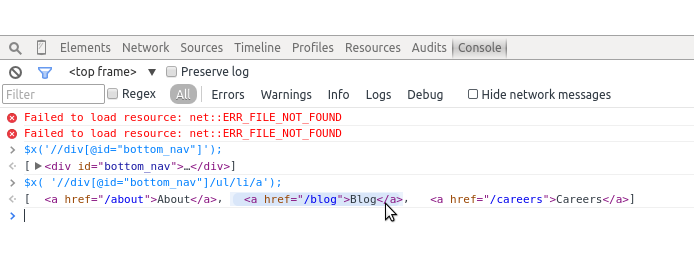
Figure 11-15. XPath subelements
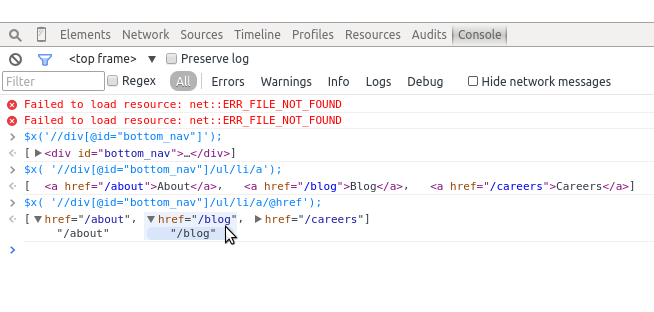
Figure 11-16. Finding XPath attributes
Knowing the page structure can help us get at content we might have trouble accessing otherwise by using XPath expressions instead.
Tip
With the power and speed of XPath comes a learning curve. For one, if there are spaces in the classes or IDs for the page you are interacting with, you should use the contains pattern rather than =. Elements can have more than one class, and XPath assumes you are including the entire class string; using contains helps you find any element with that substring.
Finding parent elements of elements you are interested in can also be useful. Say you are interested in a list of items on the page. Let’s also say you can easily locate one or more of the list items using a CSS class or a piece of text contained in the list. You can use that information to build an XPath selector locating that element and then find the parent element, giving you access to the entire list. We’ll be exploring these types of XPath selectors in “Building a Spider with Scrapy”, as Scrapy utilizes XPath for speedy parsing.
One reason to utilize XPath is you will find the CSS classes via CSS selectors might not always properly select your element, especially when you are using several different drivers to process the page (e.g., Selenium with many browsers). XPath is inherently more specific, making it a more trustworthy way to parse pages properly.
If you are scraping a site for a long period of time and want to reuse the same code, XPath will be less prone to break over time due to small code changes and development on the site. It’s a lot more common for someone to rewrite a few CSS classes or styles than the entire site and page structure. For this reason, XPath is a safer bet than using CSS (although not foolproof!).
Now that you’ve learned some XPath, we can try rewriting the emoji processor using XPath syntax to properly store all of the emojis and headers for each section. Here’s what that looks like:
fromlxmlimporthtmlpage=html.parse('http://www.emoji-cheat-sheet.com/')proper_headers=page.xpath('//h2|//h3')proper_lists=page.xpath('//ul')all_emoji=[]forheader,list_continzip(proper_headers,proper_lists):section=header.textforliinlist_cont.getchildren():emoji_dict={}spans=li.xpath('div/span')iflen(spans):link=spans[0].get('data-src')iflink:emoji_dict['emoji_link']=li.base_url+linkelse:emoji_dict['emoji_link']=Noneemoji_dict['emoji_handle']=spans[1].text_content()else:emoji_dict['emoji_link']=Noneemoji_dict['emoji_handle']=li.xpath('div')[0].text_content()emoji_dict['section']=sectionall_emoji.append(emoji_dict)all_emoji
This line finds the headers related to the emoji content. It uses XPath to grab all of the
h2andh3elements.Each of the headers located has a
ulelement to match. This line gathers all theulelements in the entire document.We use the
zipmethod to zip headers with their appropriate lists, which returns a list of tuples. This line then unpacks those tuples, using aforloop to pull each part (header and list content) into separate variables to use in theforloop.This code iterates through the
ulelement’s children (lielements holding the emoji information).From page inspection, we know most
lielements have adivcontaining twospanelements. Thesespanscontain the image links for the emojis and the text needed to evoke the emojis on the service. This line uses the XPathdiv/spanto return anyspanelements in a childdivelement.To find a link for each element, this line calls the
data-srcattribute of the firstspan. If thelinkvariable isNone, the code sets theemoji_linkattribute in our data dictionary toNone.Because
data-srcholds a relative URL, this line uses thebase_urlattribute to make a full absolute URL.
In order to get the handle, or what text is needed to evoke the emoji, this line grabs the second
span’s text. Unlike with the logic for links, we don’t need to test whether this exists or not, because every emoji has a handle.
For the part of the site including Basecamp sounds, there is one
divfor each list item (you can easily see this by inspecting the page using your browser’s developer tools). This code selects thedivand grabs the text content from it. Because this code is in theelseblock, we know these are only the sound files because they do not usespans.
By rewriting our emoji code to use XPath relationships, we found the last block of tags are sounds and the data in them is stored differently. Instead of having a link in a span, there is only a div with the text to evoke the sound. If we only wanted emoji links, we could skip adding them to our list item iteration. Depending on what data you are interested in, your code will vary greatly, but you can always easily utilize if...else logic to specify what content you’re after.
In less than 30 lines of code we have created a scraper to request the page, parse it by traversing the DOM relationships with XPath, and grab the necessary content using the appropriate attribute or text content. It’s a fairly resilient block of code, and if the authors of the page add more sections of data, as long as the structure doesn’t change drastically, our parser will continue to pull content from the page and we’ll have tons of emojis at our fingertips!
There are many other useful lxml functions. We’ve summarized a few and their uses in Table 11-3.
| Method or attribute name | Description | Documentation |
|---|---|---|
|
A function used to attempt to clean up poorly formed pages so they can be properly parsed |
|
|
An iterator to access every anchor tag on a page |
|
|
All |
|
|
Provides easy access to namespaces, should you ever have the pleasure of working with them |
You should now feel pretty confident investigating markup on web pages and deciphering how to extract content from a page using lxml, Beautiful Soup, and XPath. In the next chapter, we’ll be moving on to other libraries you can use for different types of scraping, such as browser-based parsing and spidering.
Summary
You’ve learned a lot about web scraping. You should now feel comfortable writing a scraper in many formats. You know how to write jQuery, CSS, and XPath selectors and how to easily match content using your browser and Python.
You should also feel comfortable analyzing how a web page is built using your developer tools. You’ve sharpened your CSS and JavaScript skills, and you’ve learned how to write valid XPath to interact directly with the DOM tree.
Table 11-4 outlines the new concepts and libraries introduced in this chapter.
| Concept/Library | Purpose |
|---|---|
robots.txt file usage, copyright and trademark investigation |
From a site’s robots.txt file as well as Terms of Service or other published legal warnings on the page, you can determine whether you can legally and ethically scrape site content. |
Developer tools usage: Inspection/DOM |
Used to investigate where on the page the content lies and how to best find it using your knowledge of page hierarchy and/or CSS rules. |
Developer tools usage: Network |
Used to investigate what calls the page makes to fully load. Some of these requests may point to APIs or other resources so you can easily ingest the data. Knowledge of how the page loads can help you determine whether to use a simple scraper or a browser-based one. |
Developer tools usage: JavaScript Console |
Used to investigate how to interact with the elements on the page using their CSS or XPath selectors. |
|
Help you make simple HTTP requests to visit a web page and get the content via the Python standard library. |
|
Helps you more easily make complex requests for pages, particularly those requiring extra headers, complex |
|
Allows you to easily read and parse web pages. Great for exceptionally broken pages and initial web scraping. |
|
Allows you to parse pages easily, using DOM hierarchy and tools like XPath syntax. |
XPath usage |
Gives you the ability to write patterns and matches using regex and XPath syntax to quickly find and parse web page content. |
In the next chapter, you’ll be learning even more ways to scrape data from the Web.
1 If you want to use XPath on a site that doesn’t use JQuery, you’ll need to use different syntax as documented by Mozilla. The syntax for this element would be document.evaluate('//div[@id="bottom_nav"]', document);.