Table of Contents for
Nest.js: A Progressive Node.js Framework
 Nest.js: A Progressive Node.js Framework
Published by
Bleeding Edge Press, 2018
Nest.js: A Progressive Node.js Framework
Published by
Bleeding Edge Press, 2018
- nav
- Cover
- Nest.js: A Progressive Node.js Framework
- Nest.js: A Progressive Node.js Framework
- Preface
- 1. Introduction
- 2. Overview
- 3. Nest.js authentication
- 4. Dependency Injection system of Nest.js
- 5. TypeORM
- 6. Sequelize
- 7. Mongoose
- 8. Web sockets
- 9. Microservices
- 10. Routing and request handling in Nest.js
- 11. OpenAPI (Swagger) Specification
- 12. Command Query Responsibility Separation (CQRS)
- 13. Architecture
- 14. Testing
- 15. Server-side Rendering with Angular Universal
Chapter 12. Command Query Responsibility Separation (CQRS)
Up to this point in this book, we have worked to put together a simple blog application using the CRUD pattern: Create, Retrieve, Update, and Delete. We have done an excellent job of ensuring services are handling our business logic and our controllers are simply gateways into those services. The controllers take care of validating the request and then pass the request to the service for processing. In a small application like this, CRUD works wonderfully.
But what happens when we are dealing with a large scale application that may have unique and complex business logic for saving data? Or maybe we would like to initiate some logic in the background so the UI is able to call APIs without having to wait for all the business logic to finish. These are areas where CQRS makes sense. CQRS can be used to isolate and break apart complex business logic, initiate that business logic synchronously or asynchronously, and compose the isolated pieces to solve new business problems.
Nest.js implements this pattern by providing two separate streams for processing the command aspect of CQRS: a command and an event bus, with some sugar in the form of sagas. In this chapter, we will tackle the problem of adding keyword metadata to our blog entries. We could certainly do this using the CRUD pattern, but having the UI make multiple API calls to store a blog entry and all it’s keywords, or even having our blog entry module perform this, would complicate the business logic of the UI and our application.
Instead, we will convert the blog entry module to use CQRS commands, and the command bus to perform all data persistance, removing it from the service in the blog entry module. A new entity and module will be created for our keywords. The keyword entity will maintain a last updated timestamp and a reference to all associated entries. Two new APIs will be created: one to provide a list of “hot keywords” and one to provide a list of all entries associated with a keyword.
To ensure the UI does not suffer any performance loss, all keyword entity operations will be done asynchronously. Keywords will be stored on the blog entry entity as a string to provide the UI a quick reference without having to query the keyword table in the database. Before getting started, be sure you ran npm install @nestjs/cqrs in your project. To see a working example, remember you can clone the accompanying Git repository for this book:
git clone https://github.com/backstopmedia/nest-book-example.git
Entry module commands
To make the business logic around changes to entry models easier to extend, we will first need to extract out the methods in the module’s services that update the database as individual commands. Let’s start with converting the blog entry create method to a command in Nest.js CQRS fashion.
exportclassCreateEntryCommandimplementsICommand{constructor(publicreadonlytitle:string,publicreadonlycontent:string,publicreadonlyuserId:number){}}
Our command is a simple object that implemented the ICommand interface. The ICommand interface is used internally by Nest.js to indicate an object is a command. This file is typically created in a sub-directory of our module with a pattern similar to commands/impl/. Now that we have one example done, let’s finish up the remaining commands for the comment module.
exportclassUpdateEntryCommandimplementsICommand{constructor(publicreadonlyid:number,publicreadonlytitle:string,publicreadonlycontent:string){}}exportclassDeleteEntryCommandimplementsICommand{constructor(publicreadonlyid:number){}}
Notice some differences with the update and delete commands? For the update command, we need to know which database model we are updating. Likewise, for the delete command, we only need to know the id of the database model we are deleting. In both cases, having the userId does not make sense since a blog entry can never be moved to another user and the userId has no influence on the deletion of a blog entry.
Command handlers
Now that we have commands for our database write operations, we need some command handlers. Each command should have an accompanying handler in a one-to-one fashion. The command handler is much like our current blog entry service. It will take care of all the database operations. Typically, the command handlers are placed in a sub-directory of the module similar to commands/handlers.
@CommandHandler(CreateEntryCommand)exportclassCreateEntryCommandHandlerimplementsICommandHandler<CreateEntryCommand>{constructor(@Inject('EntryRepository')privatereadonlyentryRepository:typeofEntry,@Inject('SequelizeInstance')privatereadonlysequelizeInstance){}asyncexecute(command:CreateEntryCommand,resolve:()=>void){}}
Command handlers are simple classes with a single method, execute, that is responsible for handling the command. Implementing the ICommandHandler<CreateEntryCommand> interface helps ensure we write our command handler correctly. Nest.js uses the @CommandHandler annotation in our example to know this class is meant to handle our new CreateEntryCommand command.
Since the command handler is going to be a drop-in replacement for our module’s service, the command handler will also need access to our database. This may differ depending on what ORM you are using and how your application is configured. Our command handler doesn’t actually do anything at this point. In fact, using it would break the application since we have not implemented the details of the execute method.
asyncexecute(command:CreateEntryCommand,resolve:()=>void){awaitthis.sequelizeInstance.transaction(asynctransaction=>{returnawaitthis.entryRepository.create<Entry>(command,{returning:true,transaction});});resolve();}
If you are following along with the example project, you may notice our execute method looks almost like the create method of the blog entry service. In fact, almost all of the code for the command handler is a direct copy from the blog entry service. The big difference is that we do not return a value. Instead, the execute method of all command handlers takes a callback method as their second argument.
Nest.js allows us to do a couple of different things with the callback it provides to the execute method. In our example, we use the ORM to create and persist a new blog entry. Once the transaction resolves, we call the resolve callback to let Nest.js know our command is done executing. If this looks familiar, it is because behind the scenes Nest.js is wrapping our execute in a Promise and passing in the promise’s own resolve callback as the second argument to our execute method.
Notice that we do not get a reject callback passed to our command handler. Nest.js does not perform any type of error handling when invoking command handlers. Since our command handler is invoking our ORM to store data in a database, it is very possible that an exception could be thrown. If this happens with the way our command handler is currently wrote, depending on the version of NodeJS being used, an UnhandledPromiseRejectionWarning warning being logged to the console and the UI will be stuck waiting for the API to return until it times out. To prevent this, we should wrap our command handler logic in a try...catch block.
asyncexecute(command:CreateEntryCommand,resolve:()=>void){try{awaitthis.sequelizeInstance.transaction(asynctransaction=>{returnawaitthis.entryRepository.create<Entry>(command,{returning:true,transaction});});}catch(error){}finally{resolve();}}
Notice we invoke the resolve callback in the finally block. This is done to ensure that, no matter the outcome, the command handler will complete execution and the API will finish processing. But what happens when an exception is thrown from our ORM. The blog entry wasn’t saved to the database, but since the API controller did not know an error occurred, it will return a 200 HTTP status to the UI. To prevent this, we can catch the error and pass that as an argument to the resolve method. This might break with the CQRS pattern but it is better to let the UI know something went wrong than assume the blog entry was saved.
asyncexecute(command:CreateEntryCommand,resolve:(error?:Error)=>void){letcaught:Error;try{awaitthis.sequelizeInstance.transaction(asynctransaction=>{returnawaitthis.entryRepository.create<Entry>(command,{returning:true,transaction});});}catch(error){caught=error}finally{resolve(caught);}}
Note: Nest.js does not provide any stipulation for when the callback method must be invoked. We could invoke the callback at the beginning of the execute method. Nest.js would return processing back to the controller so the UI is immediately updated and process the remaining pieces of the execute method afterwards.
Let’s finish converting our blog entry module to CQRS by creating commands to handle updating and deleting blog entries from the database.
@CommandHandler(UpdateEntryCommand)exportclassUpdateEntryCommandHandlerimplementsICommandHandler<UpdateEntryCommand>{constructor(@Inject('EntryRepository')privatereadonlyentryRepository:typeofEntry,@Inject('SequelizeInstance')privatereadonlysequelizeInstance:Sequelize,privatereadonlydatabaseUtilitiesService:DatabaseUtilitiesService){}asyncexecute(command:UpdateEntryCommand,resolve:(error?:Error)=>void){letcaught:Error;try{awaitthis.sequelizeInstance.transaction(asynctransaction=>{letentry=awaitthis.entryRepository.findById<Entry>(command.id,{transaction});if(!entry)thrownewError('The blog entry was not found.');entry=this.databaseUtilitiesService.assign(entry,{...command,id:undefined});returnawaitentry.save({returning:true,transaction,});});}catch(error){caught=error}finally{resolve(caught);}}}
The command handler for our UpdateEntryCommand command needs a couple changes from what we have in the blog entry service. Since our command contains all of the data for the blog entry being updated, including the id, we need to strip out the id and apply the remaining values in the command to the entity before saving it back to the database. Just like our last command handler, we use a try...catch to handle errors and pass any thrown exceptions back as an argument to the resolve callback.
@CommandHandler(DeleteEntryCommand)exportclassDeleteEntryCommandHandlerimplementsICommandHandler<DeleteEntryCommand>{constructor(@Inject('EntryRepository')privatereadonlyentryRepository:typeofEntry,@Inject('SequelizeInstance')privatereadonlysequelizeInstance:Sequelize){}asyncexecute(command:DeleteEntryCommand,resolve:(error?:Error)=>void){letcaught:Error;try{awaitthis.sequelizeInstance.transaction(asynctransaction=>{returnawaitthis.entryRepository.destroy({where:{id:command.id},transaction,});});}catch(error){caught=error}finally{resolve(caught);}resolve();}}
The command handler for our DeleteEntryCommand is pretty much a copy of the delete method in the blog entry service. We now have three new commands and their accompanying handlers. All that’s left is to hook them up and begin using them. Before we can do that, we must decide on where we are going to invoke these new commands.
Invoking command handlers
Documentation and the general consensus around separation of concerns within NodeJS applications would probably dictate that we invoke our commands from the blog entry service. Doing so would leave the controller as simple as it is now but would not simplify the service at all. Alternatively, the approach we will be taking is to reduce the complexity of our service so it is used strictly for data retrieval and invoke our commands from the controller. No matter the route taken, the first step in making use of the new commands is to inject the Nest.js CommandBus.
Note: Where you plan to use your commands, whether it be the controller or service, makes no difference for the implementation. Feel free to experiment.
@Controller()exportclassEntryController{constructor(privatereadonlyentryService:EntryService,privatereadonlycommandBus:CommandBus){}@Post('entries')publicasynccreate(@User()user:IUser,@Body()body:any,@Res()res){if(!body||(body&&Object.keys(body).length===0))returnres.status(HttpStatus.BAD_REQUEST).send('Missing some information.');consterror=awaitthis.commandBus.execute(newCreateEntryCommand(body.title,body.content,user.id));if(error){returnres.status(HttpStatus.INTERNAL_SERVER_ERROR).send(result);}else{returnres.set('location',`/entries/${result.id}`).status(HttpStatus.CREATED).send();}}
The above example incorporates two key changes. First, we have added commandBus to the constructor. Nest.js will take care of injecting an instance of the CommandBus into this variable for us. The last change is to the create controller method. Instead of invoking the create method in the blog entry service, we create and execute a new CreateEntryCommand using the command bus. The remaining implementation details for the blog entry controller follow almost the same pattern as the create method.
@Controller()exportclassEntryController{constructor(privatereadonlyentryService:EntryService,privatereadonlycommandBus:CommandBus){}@Get('entries')publicasyncindex(@User()user:IUser,@Res()res){constentries=awaitthis.entryService.findAll();returnres.status(HttpStatus.OK).json(entries);}@Post('entries')publicasynccreate(@User()user:IUser,@Body()body:any,@Res()res){if(!body||(body&&Object.keys(body).length===0))returnres.status(HttpStatus.BAD_REQUEST).send('Missing some information.');consterror=awaitthis.commandBus.execute(newCreateEntryCommand(body.title,body.content,user.id));if(error){returnres.status(HttpStatus.INTERNAL_SERVER_ERROR).send(result);}else{returnres.set('location',`/entries/${result.id}`).status(HttpStatus.CREATED).send();}}@Get('entries/:entryId')publicasyncshow(@User()user:IUser,@Entry()entry:IEntry,@Res()res){returnres.status(HttpStatus.OK).json(entry);}@Put('entries/:entryId')publicasyncupdate(@User()user:IUser,@Entry()entry:IEntry,@Param('entryId')entryId:number,@Body()body:any,@Res()res){if(user.id!==entry.userId)returnres.status(HttpStatus.NOT_FOUND).send('Unable to find the entry.');consterror=awaitthis.commandBus.execute(newUpdateEntryCommand(entryId,body.title,body.content,user.id));if(error){returnres.status(HttpStatus.INTERNAL_SERVER_ERROR).send(error);}else{returnres.status(HttpStatus.OK).send();}}@Delete('entries/:entryId')publicasyncdelete(@User()user:IUser,@Entry()entry:IEntry,@Param('entryId')entryId:number,@Res()res){if(user.id!==entry.userId)returnres.status(HttpStatus.NOT_FOUND).send('Unable to find the entry.');consterror=awaitthis.commandBus.execute(newDeleteEntryCommand(entryId));if(error){returnres.status(HttpStatus.INTERNAL_SERVER_ERROR).send(error);}else{returnres.status(HttpStatus.OK).send();}}}
You can see from the example that the controller has been updated so the blog entry service is only used for retrievals and all modification methods now dispatch commands on the command bus. The last thing we need to configure is the blog entry module. To make this easier, let’s first setup a Typescript barrel to export all our handlers as a single variable.
exportconstentryCommandHandlers=[CreateEntryCommandHandler,UpdateEntryCommandHandler,DeleteEntryCommandHandler];
Import the barrel into the blog entry module and hook up the module to the command bus.
@Module({imports:[CQRSModule,EntryModule],controllers:[CommentController],components:[commentProvider,CommentService,...CommentCommandHandlers],exports:[CommentService]})exportclassEntryModuleimplementsNestModule,OnModuleInit{publicconstructor(privatereadonlymoduleRef:ModuleRef,privatereadonlycommandBus:CommandBus){}publiconModuleInit() {this.commandBus.setModuleRef(this.moduleRef);this.commandBus.register(CommentCommandHandlers);}}
To hook up our module to the command bus, we import CQRSModule into our module definition and inject the ModuleRef and CommandBus into the module class constructor. The module class also needs to implement the OnModuleInit interface. Finally, the magic happens in the onModuleInit lifecycle hook. Nest.js will execute this method immediately after instantiating our module class. Inside the method, we use setModuleRef and register to register the blog entry command handlers to the command bus that was created for this module.
Note: If you followed along and implemented the invocation of the commands in the controller, you can remove the create, update, and delete methods from the comment service.
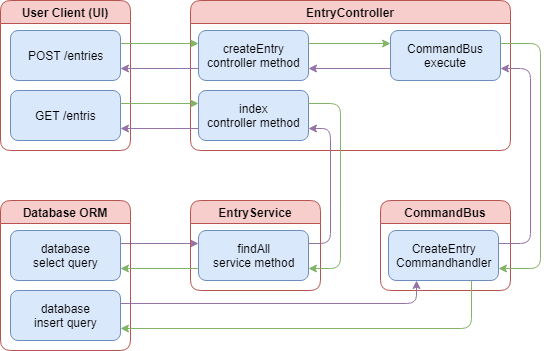
The above diagram provides a visual representation of how the command and query aspects of the entry controller have been divided. When a user sends a request to the create controller method, processing is executed through the CQRS command bus, but still uses the ORM to update the database. When the users wishes to retrieve all the entries, the entry controller makes use of the EntryService that then uses the ORM to query the database. All commands, the C in CQRS, are now processed through the command bus while all queries, the Q in CQRS, are continue to be processed through the entry service.
Linking keywords with events
Now that we have shown the basics of creating commands and using the command bus in Nest.js CQRS, we need to tackle storing keywords that are associated with a blog entry. Keywords can be added when a blog entry is created and removed later. We could create a new entity for our keywords and have the entry entity maintain a one-to-many relationship with the keyword entity. This would, however, require our database lookups to pull in more data from more tables and the response sent back to the UI would become larger. Instead, let’s start off with just storing the keywords as a JSON string on the blog entry entity. To do this, we will need to update the blog entry entity and add a new field.
@Table(tableOptions)exportclassEntryextendsModel<Entry>{@Column({type:DataType.TEXT,allowNull:true,})publickeywords:string;}
The ORM definition for the new database column will depend on the ORM and database server you are using. Here, we are using the TEXT data type. This data type is widely supported in many different database servers and offers a large limit to the amount of data we can store. For example, Microsoft SQL Server limits this field to a maximum of 2^30 - 1 characters, while Postgres does not impose a limit. Since we are using an ORM with migrations, we will also need to create a migration script. If you are unsure of how to do this, reference back to the TypeORM or Sequelize chapters.
exportasyncfunctionup(sequelize){// language=PostgreSQLawaitsequelize.query(`ALTERTABLEentriesADDCOLUMNkeywordsTEXT;`);console.log('*keywords column added to entries table*');}exportasyncfunctiondown(sequelize){// language=PostgreSQLawaitsequelize.query(`ALTERTABLEentriesDROPCOLUMNkeywords;`);}
If you are following along, your entries database table should now have a keywords column. Testing the index API in the blog entries controller should now return objects with a keywords value. We still need to update the blog entry commands, command handlers, and controller to process keywords for new and updated blog entries.
@Controller()exportclassEntryController{@Post('entries')publicasynccreate(@User()user:IUser,@Body()body:any,@Res()res){if(!body||(body&&Object.keys(body).length===0))returnres.status(HttpStatus.BAD_REQUEST).send('Missing some information.');consterror=awaitthis.commandBus.execute(newCreateEntryCommand(body.title,body.content,body.keywords,user.id));if(error){returnres.status(HttpStatus.INTERNAL_SERVER_ERROR).send(result);}else{returnres.set('location',`/entries/${result.id}`).status(HttpStatus.CREATED).send();}}@Put('entries/:entryId')publicasyncupdate(@User()user:IUser,@Entry()entry:IEntry,@Param('entryId')entryId:number,@Body()body:any,@Res()res){if(user.id!==entry.userId)returnres.status(HttpStatus.NOT_FOUND).send('Unable to find the entry.');consterror=awaitthis.commandBus.execute(newUpdateEntryCommand(entryId,body.title,body.content,body.keywords,user.id));if(error){returnres.status(HttpStatus.INTERNAL_SERVER_ERROR).send(error);}else{returnres.status(HttpStatus.OK).send();}}}
The blog entry controller will accept the keywords as an array of strings. This will help keep the UI simple and prevent the UI from having to perform arbitrary string parsing.
exportclassCreateEntryCommandimplementsICommand,IEntry{constructor(publicreadonlytitle:string,publicreadonlycontent:string,publicreadonlykeywords:string[],publicreadonlyuserId:number){}}exportclassUpdateEntryCommandimplementsICommand,IEntry{constructor(publicreadonlyid:number,publicreadonlytitle:string,publicreadonlycontent:string,publicreadonlykeywords:string[],publicreadonlyuserId:number){}}
The CreateEntryCommand and UpdateEntryCommand commands are updated to accept a new property keywords. We maintain the string array type so the processing of the commands is offloaded to the command handler.
@CommandHandler(CreateEntryCommand)exportclassCreateEntryCommandHandlerimplementsICommandHandler<CreateEntryCommand>{asyncexecute(command:CreateEntryCommand,resolve:(error?:Error)=>void){letcaught:Error;try{awaitthis.sequelizeInstance.transaction(asynctransaction=>{returnawaitthis.EntryRepository.create<Entry>({...command,keywords:JSON.stringify(command.keywords)},{returning:true,transaction});});}catch(error){caught=error;}finally{resolve(caught);}}}@CommandHandler(UpdateEntryCommand)exportclassUpdateEntryCommandHandlerimplementsICommandHandler<UpdateEntryCommand>{asyncexecute(command:UpdateEntryCommand,resolve:(error?:Error)=>void){letcaught:Error;try{awaitthis.sequelizeInstance.transaction(asynctransaction=>{letcomment=awaitthis.EntryRepository.findById<Entry>(command.id,{transaction});if(!comment)thrownewError('The comment was not found.');comment=this.databaseUtilitiesService.assign(comment,{...command,id:undefined,keywords:JSON.stringify(command.keywords)});returnawaitcomment.save({returning:true,transaction,});});}catch(error){caught=error;}finally{resolve(caught);}}}
Both the CreateEntryCommandHandler and UpdateEntryCommandHandler command handlers have been updated to convert the keywords string array into a JSON string. Keywords also need to be stored individually in their own table with a list of blog entries they apply to and the last updated date. To do this, we will need to make a new Nest.js module with an entity. We will come back later to add more functionality. First, create the new entity.
consttableOptions:IDefineOptions={timestamp:true,tableName:'keywords'}asIDefineOptions;@DefaultScope({include:[()=>Entry]})@Table(tableOptions)exportclassKeywordextendsModel<Keyword>{@PrimaryKey@AutoIncrement@Column(DataType.BIGINT)publicid:number;@Column({type:DataType.STRING,allowNull:false,validate:{isUnique:async(value:string,next:any):Promise<any>=>{constisExist=awaitKeyword.findOne({where:{keyword:value}});if(isExist){consterror=newError('The keyword already exists.');next(error);}next();},},})publickeyword:string;@CreatedAtpubliccreatedAt:Date;@UpdatedAtpublicupdatedAt:Date;@DeletedAtpublicdeletedAt:Date;@BelongsToMany(()=>Entry,()=>KeywordEntry)publicentries:Entry[];@BeforeValidatepublicstaticvalidateData(entry:Entry,options:any){if(!options.transaction)thrownewError('Missing transaction.');}}
The BelongsToMany decorator is used to connect keywords to many different blog entries. We will not be placing a BelongsToMany column in the blog entry table since we are using a string column to keep lookups fast. The () => KeywordEntry parameter tells the ORM that we will be using the KeywordEntry entity to store the association. We will need to create the entity as well.
consttableOptions:IDefineOptions={timestamp:true,tableName:'keywords_entries',deletedAt:false,updatedAt:false}asIDefineOptions;@Table(tableOptions)exportclassKeywordEntryextendsModel<KeywordEntry>{@ForeignKey(()=>Keyword)@Column({type:DataType.BIGINT,allowNull:false})publickeywordId:number;@ForeignKey(()=>Entry)@Column({type:DataType.BIGINT,allowNull:false})publicentryId:number;@CreatedAtpubliccreatedAt:Date;}
Our ORM will use the @ForeignKey decorators to link entries in this database table to the keywords and entries tables. We are also adding a createdAt column to help us find the latest keywords that have been linked to a blog entry. We will use this to create our list of “hot keywords.” Next, create the migration script to add the new tables to the database.
exportasyncfunctionup(sequelize){// language=PostgreSQLawaitsequelize.query(`CREATETABLE"keywords"("id"SERIALUNIQUEPRIMARYKEYNOTNULL,"keyword"VARCHAR(30)UNIQUENOTNULL,"createdAt"TIMESTAMPNOTNULL,"updatedAt"TIMESTAMPNOTNULL,"deletedAt"TIMESTAMP);CREATETABLE"keywords_entries"("keywordId"INTEGERNOTNULLCONSTRAINT"keywords_entries_keywordId_fkey"REFERENCESkeywordsONUPDATECASCADEONDELETECASCADE,"entryId"INTEGERNOTNULLCONSTRAINT"keywords_entries_entryId_fkey"REFERENCESentriesONUPDATECASCADEONDELETECASCADE,"createdAt"TIMESTAMPNOTNULL,UNIQUE("keywordId","entryId"));`);console.log('*Table keywords created!*');}exportasyncfunctiondown(sequelize){// language=PostgreSQLawaitsequelize.query(`DROPTABLEkeywords_entries`);awaitsequelize.query(`DROPTABLEkeywords`);}
Our migration script includes a unique constraint in the keywords_entries table to ensure we do not link the same keyword and blog entry more than once. The ON DELETE CASCADE portion of the entryId column definition will ensure that when we delete a blog entry, the keyword links will also be deleted. This means we do not have to create any code to handle unlinking keywords when blog entries are deleted. Be sure to add the new database entities to the database provider.
exportconstdatabaseProvider={provide:'SequelizeInstance',useFactory:async()=>{letconfig;switch(process.env.NODE_ENV){case'prod':case'production':case'dev':case'development':default:config=databaseConfig.development;}constsequelize=newSequelize(config);sequelize.addModels([User,Entry,Comment,Keyword,KeywordEntry]);/* await sequelize.sync(); */returnsequelize;},};
Finally, create the keyword provider and module.
exportconstkeywordProvider={provide:'KeywordRepository',useValue:Keyword,};exportconstkeywordEntryProvider={provide:'KeywordEntryRepository',useValue:KeywordEntry};@Module({imports:[],controllers:[],components:[keywordProvider,keywordEntryProvider],exports:[]})exportclassKeywordModule{}
Now that we have a working keyword module, we can begin to think about how we want to construct the the application logic for storing keywords. To stay within the CQRS pattern, we could create new commands and command handlers in the keyword module. However, Nest.js imposes module isolation on all instances of the command bus. This means that the command handlers must be registered within the same module where the commands are executed. For example, if we attempted to execute a keyword command from the blog entry controller, Nest.js would throw an exception indicating there is no handler registered for the command. This is where events within Nest.js CQRS come to the rescue. The event bus is not isolated. In fact, the event bus allows events to be executed from any module, whether there is a handler registered for them or not.
Keyword events
Events can be thought of as commands with a few differences. Outside of not being module scoped, they are also asynchronous, they are typically dispatched by models or entities, and each event can have any number of event handlers. This makes them perfect for handling background updates to the keywords database table when blog entries are created and updated.
Before we start writing code, let’s give some thought to how we want our application to work. When a new blog entry is created, the application needs to inform the keyword module that a blog entry has been associated with a keyword. We should leave it up to the keyword module to determine if the keyword is new and needs to be created or already exists and simply needs to be updated. The same logic should apply to updates made to blog entries but we can make our blog entry update process simpler if we do not try to determine which keywords are new and which have been removed. To support both scenarios, we should create a generic event to update all keyword links for the blog entry.
Now that we have a basic understanding of the logic we are trying to accomplish, we can build the event classes. Just like commands, the CQRS events feature requires basic classes for the events. Event files are typically created in a sub-directory of our module with a pattern similar to events/impl/.
exportclassUpdateKeywordLinksEventimplementsIEvent{constructor(publicreadonlyentryId:number,publicreadonlykeywords:string[]){}}
The event classes should look pretty similar to the command classes we wrote earlier in this chapter. The difference is the event classes implement the IEvent interface to let Nest.js know instances of these classes are CQRS events. We also need to setup handlers for these events. Just like command handlers, our event handlers will take care of all the database operations. Typically, the event handlers are placed in a sub-directory of the module similar to events/handlers.
@EventsHandler(UpdateKeywordLinksEvent)exportclassUpdateKeywordLinksEventHandlerimplementsIEventHandler<UpdateKeywordLinksEvent>{constructor(@Inject('KeywordRepository')privatereadonlykeywordRepository:typeofKeyword,@Inject('SequelizeInstance')privatereadonlysequelizeInstance:Sequelize,){}asynchandle(event:UpdateKeywordLinksEvent){}}
Event handlers are simple classes with a single method, handle, that is responsible for handling the event. Implementing the IEventHandler<UpdateKeywordLinksEvent> interface helps ensure we write our event handler correctly. Nest.js uses the @EventsHandler annotation in our example to know this class is meant to handle our new UpdateKeywordLinksEvent event.
One of the key differences in our event handlers compared to command handlers is that the event handler do not get a callback method as a second argument. Nest.js will invoke the handle method asynchronously. It will not wait for it to finish, it will not attempt to capture any return values, and it will not catch or handle any errors that may result from invoking our handle method. That’s not to say we shouldn’t still use a try...catch to prevent any kind of errors causing issues iss with NodeJS.
For the update links event handler, we should split out the logic into separate methods to make the class a little easier to read and manage. Let’s write the handle method so it loops through all the keywords and ensures the keyword exists and the blog entry is associated with the keyword. Finally, we should ensure the blog entry is not associated with any keywords that are not in the event keywords array.
@EventsHandler(UpdateKeywordLinksEvent)exportclassUpdateKeywordLinksEventHandlerimplementsIEventHandler<UpdateKeywordLinksEvent>{constructor(@Inject('KeywordRepository')privatereadonlykeywordRepository:typeofKeyword,@Inject('SequelizeInstance')privatereadonlysequelizeInstance:Sequelize,){}asynchandle(event:UpdateKeywordLinksEvent){try{awaitthis.sequelizeInstance.transaction(asynctransaction=>{letnewKeywords:string[]=[];letremovedKeywords:Keyword[]=[];constkeywordEntities=awaitthis.keywordRepository.findAll({include:[{model:Entry,where:{id:event.entryId}}],transaction});keywordEntities.forEach(keywordEntity=>{if(event.keywords.indexOf(keywordEntity.keyword)===-1){removedKeywords.push(keywordEntity);}});event.keywords.forEach(keyword=>{if(keywordEntities.findIndex(keywordEntity=>keywordEntity.keyword===keyword)===-1){newKeywords.push(keyword)}});awaitPromise.all(newKeywords.map(keyword=>this.ensureKeywordLinkExists(transaction,keyword,event.entryId)));awaitPromise.all(removedKeywords.map(keyword=>keyword.$remove('entries',event.entryId,{transaction})));});}catch(error){console.log(error);}}asyncensureKeywordLinkExists(transaction:Transaction,keyword:string,entryId:number){constkeywordEntity=awaitthis.ensureKeywordExists(transaction,keyword);awaitkeywordEntity.$add('entries',entryId,{transaction});}asyncensureKeywordExists(transaction:Transaction,keyword:string):Promise<Keyword>{constresult=awaitthis.keywordRepository.findOrCreate<Keyword>({where:{keyword},transaction});returnresult[0];}}
The event handler logic starts with finding all keywords the blog entry is currently linked to. We loop through those and pull out any that are not in the new keywords array. To find all new keywords, we loop trough the keywords array in the event to find those that are not in the keywordEntities array. The new keywords are processing through the ensureKeywordLinkExists method. The ensureKeywordLinkExists uses ensureKeywordExists to create or find the keyword in the keywords database table and adds the blog entry to the keywords entries array. The $add and $remove methods are provided by sequelize-typescript and are used to quickly add and remove blog entries without having to query for the blog entry. All processing is done using transactions to ensure any errors will cancel all database updates. If an error does happen, the database will become out of sync, but since we are dealing with metadata, it’s not a big deal. We log the error out so application admins will know they need to re-sync the metadata.
Even though we only have one event handler, we should still create a Typescript barrel to export it in an array. This will ensure adding new events later is a simple process.
exportconstkeywordEventHandlers=[UpdateKeywordLinksEventHandler,RemoveKeywordLinksEventHandler];
Import the barrel in the keyword module and connect the event bus.
@Module({imports:[CQRSModule],controllers:[],components:[keywordProvider,...keywordEventHandlers],exports:[]})exportclassKeywordModuleimplementsOnModuleInit{publicconstructor(privatereadonlymoduleRef:ModuleRef,privatereadonlyeventBus:EventBus){}publiconModuleInit() {this.eventBus.setModuleRef(this.moduleRef);this.eventBus.register(keywordEventHandlers);}}
In the module, import the CQRSModule and add ModuleRef and EventBus as constructor params. Implement the OnModuleInit interface and create the onModuleInit method. In the onModuleInit method, we set the module reference of event bus to the current module using setModuleRef and use register to register all of the event handlers. Remember to also add the event handlers to the components array or Nest.js will not be able to instantiate the event handlers. Now that we have our event and event handler written and linked in our keyword module, we are ready to start invoking the event to store and update keyword links in the database.
Invoking event handlers
Event handlers are invoked from data models. Data models are typically simple classes that represent data stored in a database. The one stipulation Nest.js places on data models is they must extend the AggregateRoot abstract class. Depending on which ORM you are using and how it is configured, you may or may not be able to re-use your existing data models for this purpose. Since our example is using Sequelize, the sequelize-typescript package requires our data models extend the Model class. In Typescript, classes can only extend one other class. We will need to create a separate data model for invoking our event handlers.
exportclassEntryModelextendsAggregateRoot{constructor(privatereadonlyid:number){super();}updateKeywordLinks(keywords:string[]){this.apply(newUpdateKeywordLinksEvent(this.id,keywords));}}
We create our data model in the blog entry module since we will be invoking our events when blog entries are created and updated. The data model contains a single method, updateKeywordLinks, for refreshing blog entry keyword links when a blog entry is created or updated. If new events are needed, we will add more methods to the model to handle invoking those events. The updateKeywordLinks method instantiates the event we created and call the apply method found in the AggregateRoot abstract class with the event instance.
With commands, we used the command bus directly to execute our commands. With events, we take a less direct approach and use the EventPublisher to link our data model to the event bus and then call the method we created in our data model to apply an event. Let’s update the CreateEntryCommandHandler to get a better idea of what’s going on.
@CommandHandler(CreateEntryCommand)exportclassCreateEntryCommandHandlerimplementsICommandHandler<CreateEntryCommand>{constructor(@Inject('EntryRepository')privatereadonlyEntryRepository:typeofEntry,@Inject('SequelizeInstance')privatereadonlysequelizeInstance:Sequelize,privatereadonlyeventPublisher:EventPublisher){}asyncexecute(command:CreateEntryCommand,resolve:(error?:Error)=>void){letcaught:Error;try{constentry=awaitthis.sequelizeInstance.transaction(asynctransaction=>{returnawaitthis.EntryRepository.create<Entry>({...command,keywords:JSON.stringify(command.keywords)},{returning:true,transaction});});constentryModel=this.eventPublisher.mergeObjectContext(newEntryModel(entry.id));entryModel.updateKeywordLinks(command.keywords);entryModel.commit();}catch(error){caught=error;}finally{resolve(caught);}}}
The command handler constructor has been updated to have an instance of the Nest.js EventPublisher injected. The EventPublisher has two methods that we care about: mergeClassContext and mergeObjectContext. Both methods can be used to achieve the same outcome, just in different ways. In our example, we are using mergeObjectContext to merge a new instance of our data model with the event bus. This provides the data model instance with a publish method that is used inside the abstract AggregateRoot class to publish new events on the event bus.
Events are never dispatched immediately. When we call updateKeywordLinks, the event that is created is placed in a queue. The event queue gets flushed when we call the commit method on our data model. If you ever find that your event handlers are not firing, check to make sure you have called the commit method on your data model.
We could have accomplished the same functionality using mergeClassContext method on the event publisher.
constModel=this.eventPublisher.mergeClassContext(EntryModel);constentryModel=newModel(entry.id);entryModel.updateKeywordLinks(command.keywords);entryModel.commit();
The same updates need to be made to the UpdateEntryCommandHandler command handler so keyword links are updated when blog entries are updated.
@CommandHandler(UpdateEntryCommand)exportclassUpdateEntryCommandHandlerimplementsICommandHandler<UpdateEntryCommand>{constructor(@Inject('EntryRepository')privatereadonlyEntryRepository:typeofEntry,@Inject('SequelizeInstance')privatereadonlysequelizeInstance:Sequelize,privatereadonlydatabaseUtilitiesService:DatabaseUtilitiesService,privatereadonlyeventPublisher:EventPublisher){}asyncexecute(command:UpdateEntryCommand,resolve:(error?:Error)=>void){letcaught:Error;try{awaitthis.sequelizeInstance.transaction(asynctransaction=>{letentry=awaitthis.EntryRepository.findById<Entry>(command.id,{transaction});if(!entry)thrownewError('The comment was not found.');entry=this.databaseUtilitiesService.assign(entry,{...command,id:undefined,keywords:JSON.stringify(command.keywords)});returnawaitentry.save({returning:true,transaction,});});constentryModel=this.eventPublisher.mergeObjectContext(newEntryModel(command.id));entryModel.updateKeywordLinks(command.keywords);entryModel.commit();}catch(error){caught=error;}finally{resolve(caught);}}}
If you have followed along in your own project, you should now be able to create or update a blog entry with new or existing keywords and see the keyword links being created, updated, and deleted in the database. Of course, we could make these changes easier to view by adding a new API to return all the keywords and blog entries they are linked to.
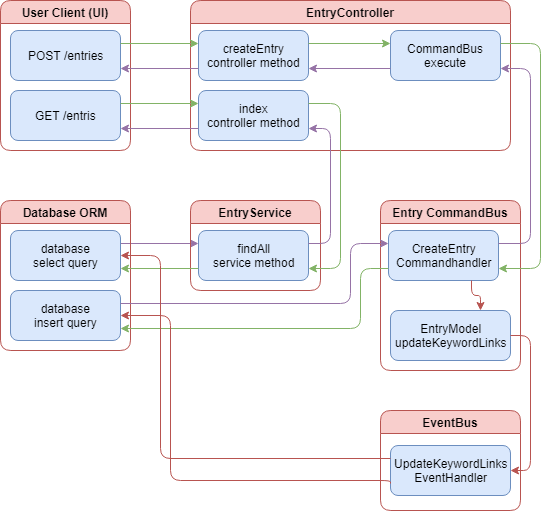
The above diagram provides a visual representation of how the entry command handlers work to keep the keywords updated. Notice how the flow of control is unidirectional. The command handler invokes the event using the entry model and then forgets about it. This is the asynchronous nature of the event bus in Nest.js CQRS.
Retrieving keywords APIs
We will need to create a new controller and service in the keyword module to support retrieving keywords. We want to allow the UI to list all keywords, get a specific keyword, and get a list of “hot keywords.” Let’s create the service first.
@Component()exportclassKeywordServiceimplementsIKeywordService{constructor(@Inject('KeywordRepository')privatereadonlykeywordRepository:typeofKeyword,@Inject('KeywordEntryRepository')privatereadonlykeywordEntryRepository:typeofKeywordEntry){}publicasyncfindAll(search?:string,limit?:number):Promise<Array<Keyword>>{letoptions:IFindOptions<Keyword>={};if(search){if(!limit||limit<1||limit===NaN){limit=10;}options={where:{keyword:{[Op.like]:`%${search}%`}},limit}}returnawaitthis.keywordRepository.findAll<Keyword>(options);}publicasyncfindById(id:number):Promise<Keyword|null>{returnawaitthis.keywordRepository.findById<Keyword>(id);}publicasyncfindHotLinks():Promise<Array<Keyword>>{// Find the latest 5 keyword linksconstlatest5=awaitthis.keywordEntryRepository.findAll<KeywordEntry>({attributes:{exclude:['entryId','createdAt']},group:['keywordId'],order:[[fn('max',col('createdAt')),'DESC']],limit:5}asIFindOptions<any>);// Find the 5 keywords with the most linksconstbiggest5=awaitthis.keywordEntryRepository.findAll<KeywordEntry>({attributes:{exclude:['entryId','createdAt']},group:'keywordId',order:[[fn('count','entryId'),'DESC']],limit:5,where:{keywordId:{// Filter out keywords that already exist in the latest5[Op.notIn]:latest5.map(keywordEntry=>keywordEntry.keywordId)}}}asIFindOptions<any>);// Load the keyword table dataconstresult=awaitPromise.all([...latest5,...biggest5].map(keywordEntry=>this.findById(keywordEntry.keywordId)));returnresult;}}
The findAll method takes an optional search string and limit that can be used to filter the keywords. The UI can use this to support keyword search autocomplete. If the limit is not specified when searching, the service will automatically limit the results to 10 items. The findById method will support loading all information for a single keyword, including the associated entries. The methods are relatively basic and mimic methods in the services of the other modules. The findHotLinks method, however, is a bit more complex.
The findHotLinks method is responsible for returning the latest used keywords and the keywords with the most linked blog entries. To do this, we need to incorporate the ORM provider for the joining table, the KeywordEntry data model. The joining table contains the actual link between keywords and blog entries as well as the date they we joined. For the latest5, we order the list by the maximum createdAt date to get a list of keywords with the newest first. The biggest5 is ordered by the count of entryId to produce a list containing the keywords with the most linked blog entries first. In both lists, we group by the keywordId to produce a list of unique keywords and limit the results to the top five. To ensure we do not produce a list with overlaps, the biggest5 also contains a where clause to not include any keywords that were already included in the latest5 list.
Once we have the two lists, we reuse the service’s findById method to load the complete data record for all the found keywords. This list is then returned with the keywords that have the newest links first, ordered newest to oldest, followed by the keywords with the most links, order most to least. All that remains is to create a controller so the UI can take advantage of our new query methods.
Note: Take note of the as IFindOptions<any>. This was required to resolve a linting error caused by sequelize-typescript. You may or may not need this in your application.
@Controller()exportclassKeywordController{constructor(privatereadonlykeywordService:KeywordService){}@Get('keywords')publicasyncindex(@Query('search')search:string,@Query('limit')limit:string,@Res()res){constkeywords=awaitthis.keywordService.findAll(search,Number(limit));returnres.status(HttpStatus.OK).json(keywords);}@Get('keywords/hot')publicasynchot(@Res()res){constkeywords=awaitthis.keywordService.findHotLinks();returnres.status(HttpStatus.OK).json(keywords);}@Get('keywords/:keywordId')publicasyncshow(@Param('keywordId')keywordId:string,@Res()res){constkeyword=awaitthis.keywordService.findById(Number(keywordId));returnres.status(HttpStatus.OK).json(keyword);}}
The controller contains three methods that correspond to the three query methods in the service. In all three, we call the appropriate method in the service and return the results as JSON. Take note that the hot method is listed before the show method. If this order was reversed, calling the /keywords/hot API would result in the show method executing. Since Nest.js is running on top of ExpressJS, the order in which we declare our controller methods matter. ExpressJS will always execute the first route controller that matches the path requested by the UI.
We now have an application that is using Nest.js CQRS to break apart business logic and implements pieces of it in an asynchronous manor. The application is capable of reacting to blog entry creations and updates to alter the keyword metadata. This is all made possible through the use of events. But there is another way to accomplish the same goal using sagas instead of the event handler we created.
Linking keywords with sagas
A saga can be thought of as a special event handler that returns commands. Sagas do this by leveraging RxJS to receive and react to all events published to the event bus. Using the UpdateKeywordLinksEvent event handler, we can logically partition the work into two separate commands: one to create keyword links and one to remove them. Since sagas return commands, the saga and command must be created in the same module. Otherwise, command module scoping will become a problem and Nest.js will throw an exception when our saga attempts to return a command found in a different module. To get started, we will need setup the commands and command handlers that will be replacing our single event handler.
Keyword saga commands
Just because we are using sagas to execute our new commands does not change how we write those commands and command handlers. We will split the UpdateKeywordLinksEvent into two separate commands within the keyword module.
exportclassLinkKeywordEntryCommandimplementsICommand{constructor(publicreadonlykeyword:string,publicreadonlyentryId:number){}}exportclassUnlinkKeywordEntryCommandimplementsICommand{constructor(publicreadonlykeyword:string,publicreadonlyentryId:number){}}
The commands take two properties: a keyword and an entryId. The commands take a simple keyword string because the command handler should not assume the keyword already exists in the database. The entryId is already known to exist since it is a parameter of the UpdateKeywordLinksEvent event.
@CommandHandler(LinkKeywordEntryCommand)exportclassLinkKeywordEntryCommandHandlerimplementsICommandHandler<LinkKeywordEntryCommand>{constructor(@Inject('KeywordRepository')privatereadonlykeywordRepository:typeofKeyword,@Inject('SequelizeInstance')privatereadonlysequelizeInstance:Sequelize){}asyncexecute(command:LinkKeywordEntryCommand,resolve:(error?:Error)=>void){letcaught:Error;try{awaitthis.sequelizeInstance.transaction(asynctransaction=>{constkeyword=awaitthis.keywordRepository.findOrCreate({where:{keyword:command.keyword},transaction});awaitkeyword[0].$add('entries',command.entryId,{transaction});});}catch(error){caught=error;}finally{resolve(caught);}}}
The LinkKeywordEntryCommandHandler command handler takes care of ensuring the keyword exists in the database and then uses the $add method provided by sequelize-typescript to link a blog entry to the keyword by it’s id.
@CommandHandler(UnlinkKeywordEntryCommand)exportclassUnlinkKeywordEntryCommandHandlerimplementsICommandHandler<UnlinkKeywordEntryCommand>{constructor(@Inject('KeywordRepository')privatereadonlykeywordRepository:typeofKeyword,@Inject('SequelizeInstance')privatereadonlysequelizeInstance:Sequelize){}asyncexecute(command:UnlinkKeywordEntryCommand,resolve:(error?:Error)=>void){letcaught:Error;try{awaitthis.sequelizeInstance.transaction(asynctransaction=>{constkeyword=awaitthis.keywordRepository.findOrCreate<Keyword>({where:{keyword:command.keyword},transaction});awaitkeyword[0].$remove('entries',command.entryId,{transaction});});}catch(error){caught=error;}finally{resolve(caught);}}}
The UnlinkKeywordEntryCommandHandler command handler takes care of ensuring the keyword exists in the database and then uses the $remove method provided by sequelize-typescript to remove the link of a blog entry to the keyword by its id. These commands are substantially simpler than UpdateKeywordLinksEventHandler event handler was. They have a single purpose, link or unlink a keyword and blog entry. The heavy lifting of determining which keywords to link and unlink is reserved for the saga. Don’t forget to hook up the command handlers in the keyword module.
exportconstkeywordCommandHandlers=[LinkKeywordEntryCommandHandler,UnlinkKeywordEntryCommandHandler];@Module({imports:[CQRSModule],controllers:[KeywordController],components:[keywordProvider,keywordEntryProvider,...keywordEventHandlers,KeywordService,...keywordCommandHandlers],exports:[]})exportclassKeywordModuleimplementsOnModuleInit{publicconstructor(privatereadonlymoduleRef:ModuleRef,privatereadonlyeventBus:EventBus,privatereadonlycommandBus:CommandBus){}publiconModuleInit() {this.commandBus.setModuleRef(this.moduleRef);this.commandBus.register(keywordCommandHandlers);this.eventBus.setModuleRef(this.moduleRef);this.eventBus.register(keywordEventHandlers);}}
Just like the entry module, we created a Typescript barrel to export the command handlers as an array. That gets imported into the module definition and registered to the command bus using the register method.
Keyword saga
Sagas are always written as public methods inside component classes to allow for Dependency Injection. Typically, you would create a single saga class for each module you wish to implement sagas in, but multiple classes would make sense when breaking up complex business logic. For the update keyword saga, we will need a single saga method that accepts the UpdateKeywordLinksEvent event and outputs multiple LinkKeywordEntryCommand and UnlinkKeywordEntryCommand commands.
@Component()exportclassKeywordSagas{constructor(@Inject('KeywordRepository')privatereadonlykeywordRepository:typeofKeyword,@Inject('SequelizeInstance')privatereadonlysequelizeInstance:Sequelize,){}publicupdateKeywordLinks(events$:EventObservable<any>){returnevents$.ofType(UpdateKeywordLinksEvent).pipe(mergeMap(event=>merge(// From the rxjs packagethis.getUnlinkCommands(event),this.getLinkCommands(event))));}}
The KeywordSagas class contains a single saga updateKeywordLinks and uses Dependency Injection to get a reference to the keyword repository and Sequelize instance. The parameter passed to the updateKeywordLinks saga is provided by the Nest.js CQRS event bus. EventObservable is a special observable provided by Nest.js CQRS that contains the ofType method. We use this method to filter the events$ observable so our saga will only handle the UpdateKeywordLinksEvent event. If you forget to use the ofType method, your saga will be fired for every event published in your application.
The remaining pieces to our saga is strictly RxJS functionality. You are free to use any RxJS operator, as long as the saga emits one or more CQRS commands. For our saga, we will be using mergeMap to flatten an inner observable stream of commands. Do not use switchMap here or commands could be lost if the API is under heavy load due to how switchMap is cancelled when the outer observable fires multiple times. The inner observable is a merging of two different observable streams: this.getUnlinkCommands(event) is a stream of UnlinkKeywordEntryCommand commands and this.getLinkCommands(event) is a stream of LinkKeywordEntryCommand commands.
privategetUnlinkCommands(event:UpdateKeywordLinksEvent){returnfrom(this.keywordRepository.findAll({include:[{model:Entry,where:{id:event.entryId}}]})).pipe(// Filter keywordEntities so only those being removed are leftmap(keywordEntities=>keywordEntities.filter(keywordEntity=>event.keywords.indexOf(keywordEntity.keyword)===-1)),// Create new commands for each keywordEntitymap(keywordEntities=>keywordEntities.map(keywordEntity=>newUnlinkKeywordEntryCommand(keywordEntity.keyword,event.entryId))),switchMap(commands=>Observable.of(...commands)));}privategetLinkCommands(event:UpdateKeywordLinksEvent){returnfrom(this.keywordRepository.findAll({include:[{model:Entry,where:{id:event.entryId}}]})).pipe(// Filter keywordEntities so only those being add are leftmap(keywordEntities=>event.keywords.filter(keyword=>keywordEntities.findIndex(keywordEntity=>keywordEntity.keyword===keyword)===-1)),// Create new commands for each keywordmap(keywords=>keywords.map(keyword=>newLinkKeywordEntryCommand(keyword,event.entryId))),switchMap(commands=>Observable.of(...commands)));}
The getUnlinkCommands and getLinkCommands methods start off with getting a list of existing keyword blog entry links. We use Observable.fromPromise since we need to return an observable from these methods. The difference between the two commands is how the filtering works. In getUnlinkCommands, we need to filter the list of existing keyword blog entry links to find those that do not exist in the keywords array of the event. We reverse the logic in getLinkCommands and filter the list of keywords in the event to find those that are not already linked to the blog entry. Finally, we map the arrays to commands and use switchMap(commands => Observable.of(...commands)) so our observable stream emits all the commands instead of an array of commands. Since the only difference is the filtering, we could clean this up so the database is not queried as much.
publicupdateKeywordLinks(events$:EventObservable<any>){returnevents$.ofType(UpdateKeywordLinksEvent).pipe(mergeMap(event=>this.compileKeywordLinkCommands(event)));}privatecompileKeywordLinkCommands(event:UpdateKeywordLinksEvent){returnfrom(this.keywordRepository.findAll({include:[{model:Entry,where:{id:event.entryId}}]})).pipe(switchMap(keywordEntities=>of(...this.getUnlinkCommands(event,keywordEntities),...this.getLinkCommands(event,keywordEntities))));}privategetUnlinkCommands(event:UpdateKeywordLinksEvent,keywordEntities:Keyword[]){returnkeywordEntities.filter(keywordEntity=>event.keywords.indexOf(keywordEntity.keyword)===-1).map(keywordEntity=>newUnlinkKeywordEntryCommand(keywordEntity.keyword,event.entryId));}privategetLinkCommands(event:UpdateKeywordLinksEvent,keywordEntities:Keyword[]){returnevent.keywords.filter(keyword=>keywordEntities.findIndex(keywordEntity=>keywordEntity.keyword===keyword)===-1).map(keyword=>newLinkKeywordEntryCommand(keyword,event.entryId));}
Now our saga only queries the database for the existing keyword blog entry links once and the getUnlinkCommands and getLinkCommands methods have been drastically simplified. These methods now take the event and list of existing keyword blog entry links and returns an array of commands that need to be executed. The heavy lifting of retrieving the existing keyword blog entry links has been offloaded to compileKeywordLinkCommands method. This method uses switchMap to project the results from the database into getUnlinkCommands and getLinkCommands. Observable.of is still used to take the array of commands and emit them one at a time. Creating and updating blog entries will now process all keyword linking and unlinked through the saga and keyword commands.
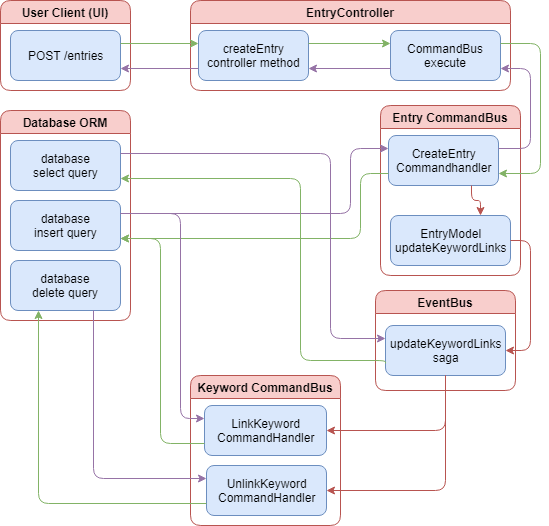
The above diagram provides a visual representation of how our new sagas hand off processing of database updates back to the command bus in the keyword module. Once an event to update keyword links is executed, the saga queries the database to determine the keywords to be linked and unlinked and finally returns the appropriate commands. Remember command handlers contain a callback method so it is not explicitly asynchronous. However, since they are called from the event bus, any response is never passed back to the sage or the entry command bus.
Summary
CQRS is not just a Nest.js package. It is a pattern for designing and laying out your application. It requires that you split the command, creation and update of data, from the query, the retrieving of data, and aspects of your application. For small applications, CQRS can add a lot of unnecessary complexity so it’s not for every application. For medium and large applications, CQRS can help break apart complex business logic into more manageable pieces.
Nest.js provides two means of implementing the CQRS pattern, the command and event bus, and with some sugar in the form of sagas. The command bus isolates command execution to each module meaning a command can only be executed in the same module it is registered. Command handlers are not always asynchronous and limits other parts of the application from reacting to change. For this, Nest.js provides the event bus. The event bus is not isolated to a single module and provides a way for different modules of the same application to react to events published by other modules. In fact, events can have any number of handlers allowing business logic to easily scale without changing the existing code.
Sagas are a different way of reacting to events within a module. Sagas are simple function that listen for events on the event bus and react by returning a command to execute. While seemingly simple, sagas allow you to use the power of RxJS to determine if and how your application should react to events. As we did with our example application, sagas are not limited to returning just one or even one type of command.
The next time you find yourself writing complex code to perform some business logic based on how the user is interacting with your application, consider giving the CQRS pattern a try. The complexity of the pattern may be offset by the complexity or eventual complexity of your applications business logic.
In the next chapter we examine the architecture for two different types of projects: A server application, and an app using Angular universal with Nest.js and Angular 6.