Table of Contents for
Nest.js: A Progressive Node.js Framework
 Nest.js: A Progressive Node.js Framework
Published by
Bleeding Edge Press, 2018
Nest.js: A Progressive Node.js Framework
Published by
Bleeding Edge Press, 2018
- nav
- Cover
- Nest.js: A Progressive Node.js Framework
- Nest.js: A Progressive Node.js Framework
- Preface
- 1. Introduction
- 2. Overview
- 3. Nest.js authentication
- 4. Dependency Injection system of Nest.js
- 5. TypeORM
- 6. Sequelize
- 7. Mongoose
- 8. Web sockets
- 9. Microservices
- 10. Routing and request handling in Nest.js
- 11. OpenAPI (Swagger) Specification
- 12. Command Query Responsibility Separation (CQRS)
- 13. Architecture
- 14. Testing
- 15. Server-side Rendering with Angular Universal
Chapter 9. Microservices
Using Nest.js microservices, we are able to extract out part of our application’s business logic and execute it within a separate Nest.js context. By default, this new Nest.js context does not execute in a new thread or even a new process. For this reason, the name “microservices” is a bit misleading. In fact, if you stick with the default TCP transport, users may find that requests take longer to complete. However, there are benefits to offloading some pieces of your application to this new microservice context. To cover the basics, we will stick with the TCP transport, but look for some real-world strategies where Nest.js microservices can improve application performance in the Advanced Architecture section of this chapter. To see a working example, remember you can clone the accompanying Git repository for this book:
git clone https://github.com/backstopmedia/nest-book-example.git
Server bootstrap
To get started, make sure @nestjs/microservices is installed within your project. This module provides the client, server, and accompanying utilities needed to convert a Nest.js API application into a microservices application. Finally, we will modify our blog application’s bootstrap to enable microservices.
asyncfunctionbootstrap() {constapp=awaitNestFactory.create(AppModule);app.connectMicroservice({transport:Transport.TCP,options:{port:5667}});awaitapp.startAllMicroservicesAsync();awaitapp.listen(3001);}
The connectMicroservice method instructs the NestApplication to setup a new NestMicroservice context. The object provides the options for setting up the NestMicroservice context. Here, we are keeping things simple and using the standard TCP transport provided with Nest.js. A call to startAllMicroservicesAsync starts up the NestMicroservice context. Be sure to do this before calling listen on the NestApplication.
Configuration
The configuration parameters passed to connectMicroservice depends on the transport we use. A transport is a combination of a client and server that work in unison to transmit microservice requests and responses between the NestApplication and NestMicroservice contexts. Nest.js comes with a number of built-in transports and provides the ability to create custom transports. The available parameters depend on the transport we use. For now, we will use the TCP transport, but will cover other transports later. The possible options for the TCP transport are:
- host: The host that is running the NestMicroservice context. The default is to assume
localhostbut this can be used if the NestMicroservice is running as a separate project on a different host such as a different Kubernetes pod. - port: The port that the NestMicroservice context is listening on. The default is to assume
3000, but we will use a different port to run our NestMicroservice context. - retryAttempts: In the context of the TCP transport, this is the number of times the server will attempt to re-establish itself after it has received a
CLOSEevent. - retryDelay: Works in conjunction with
retryAttemptsand delays the transports retry process by a set amount of time in milliseconds.
First microservice handler
For our first microservice handler, let’s convert the UserController index method into a microservice handler. To do this, we copy the method and make a few simple modifications. Instead of annotating the method with Get, we will use MessagePattern.
@Controller()exportclassUserController{@Get('users')publicasyncindex(@Res()res){constusers=awaitthis.userService.findAll();returnres.status(HttpStatus.OK).json(users);}@MessagePattern({cmd:'users.index'})publicasyncrpcIndex() {constusers=awaitthis.userService.findAll();returnusers;}}
A message pattern provides Nest.js the means for determining which microservice handler to execute. The pattern can be a simple string or a complex object. When a new microservice message is sent, Nest.js will search through all registered microservice handlers to find the handler that matches the message pattern exactly.
The microservice method itself can perform the same business logic that a normal controller handler can to respond in almost the same manor. Unlike a normal controller handler, a microservice handler has no HTTP context. In fact, decorators like @Get, @Body, and @Req make no sense and should not be used in a microservice controller. To complete the processing of a message, a simple value, promise, or RxJS Observable can be returned from the handler.
Sending data
The previous microservice handler was very contrived. It is more likely that microservice handlers will be implemented to perform some processing on data and return some value. In a normal HTTP handler, we would use @Req or @Body to extract the data from the HTTP request’s body. Since microservice handlers have no HTTP context, they take input data as a method parameter.
@Controller()exportclassUserController{@Client({transport:Transport.TCP,options:{port:5667}})client:ClientProxy@Post('users')publicasynccreate(@Req()req,@Res()res){this.client.send({cmd:'users.index'},{}).subscribe({next:users=>{res.status(HttpStatus.OK).json(users);},error:error=>{res.status(HttpStatus.INTERNAL_SERVER_ERROR).json(error);}});}@MessagePattern({cmd:'users.create'})publicasyncrpcCreate(data:any){if(!data||(data&&Object.keys(data).length===0))thrownewError('Missing some information.');awaitthis.userService.create(data);}}
In this example, we used the @Client decorator to provide Nest.js Dependency Injection a place to inject an instance of the microservice client. The client decorator takes the same configuration object passed to connectMicroservice when bootstrapping the application. The client is how the NestApplication context communicates with the NestMicroservice context. Using the client, we modified the original @Post('users') API to offload processing of creating a new user to NestMicroservice context.
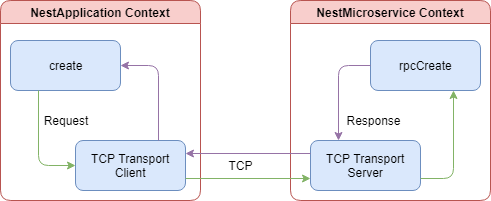
This diagram shows a simplified view of the data flow when a new user is created. The client makes a TCP connection with the microservice context and offloads the processing of the database operations. The rpcCreate method will return a successful response with some data or an exception. While the microservice message is being processed, the normal controller handler will wait for the response.
Take note that the microservice client send method returns an Observable. If you want to wait for the response from the microservice, simply subscribe to the Observable and use the response object to send the results. Alternatively, Nest.js treats Observables as first class citizens and can they can be returned from the handler. Nest.js will take care of subscribing to the Observable. Keep in mind, you lose a little control over the response status code and body. However, you can regain some of that control with exceptions and exception filters.
Exception filters
Exception filters provide a means to transform exceptions thrown from microservice handlers into meaningful objects. For example, our rpcCreate method currently throws an error with a string but what happens when the UserService throws an error or possibly the ORM. This method could throw a number of different errors and the only means that calling method knows what happened is to parse the error string. That’s simply unacceptable, so let’s fix it.
Start with creating a new exception class. Notice that our microservice exception extends RpcException and does not pass a HTTP status code in the constructor. These are the only differences between microservice exceptions and normal Nest.js API exceptions.
exportclassRpcValidationExceptionextendsRpcException{constructor(publicreadonlyvalidationErrors:ValidationError[]){super('Validation failed');}}
We can now change the rpcCreate method to throw this exception when the data is not valid.
@MessagePattern({cmd:'users.create'})publicasyncrpcCreate(data:any){if(!data||(data&&Object.keys(data).length===0))thrownewRpcValidationException();awaitthis.userService.create(data);}
Finally, create an exception filter. Microservice exception filters differ from their normal API counterparts by extending RpcExceptionFilter and returning an ErrorObservable. This filter will catch the RpcValidationException we created and throw an object containing a specific error code.
Note the throwError method is from the RxJS version 6 package. If you are still using RxJS version 5, use Observable.throw.
@Catch(RpcValidationException)exportclassRpcValidationFilterimplementsRpcExceptionFilter{publiccatch(exception:RpcValidationException):ErrorObservable{returnthrowError({error_code:'VALIDATION_FAILED',error_message:exception.getError(),errors:exception.validationErrors});}}
All we have left is to act on our new exception when it occurs. Modify the create method to catch any exceptions thrown from the microservice client. In the catch, check if the error_code field has a value of VALIDATION_FAILED. When it does, we can return a 400 HTTP status code back to the user. This will allow the user’s client, the browser, to treat the error differently, possibly showing the user some messaging and allowing them to fix the data entered. This provides a much better user experience compared to throwing all errors back to the client as 500 HTTP status code.
@Post('users')publicasynccreate(@Req()req,@Res()res){this.client.send({cmd:'users.create'},body).subscribe({next:()=>{res.status(HttpStatus.CREATED).send();},error:error=>{if(error.error_code==='VALIDATION_FAILED'){res.status(HttpStatus.BAD_REQUEST).send(error);}else{res.status(HttpStatus.INTERNAL_SERVER_ERROR).send(error);}}});}
Pipes
The most common pipe used with and provided by Nest.js is the ValidationPipe. This pipe, however, cannot be used with microservice handlers because it throws exceptions extending HttpException. All exceptions thrown in a microservice must extend RpcException. To fix this, we can extend the ValidationPipe, catch the HttpException, and throw an RpcException.
@Injectable()exportclassRpcValidationPipeextendsValidationPipeimplementsPipeTransform<any>{publicasynctransform(value:any,metadata:ArgumentMetadata){try{awaitsuper.transform(value,metadata);}catch(error){if(errorinstanceofBadRequestException){thrownewRpcValidationException();}throwerror;}returnvalue;}}
Before we can use the ValidationPipe, we have to create a class that describes the format of the data our microservice method expects.
classCreateUserRequest{@IsEmail()@IsNotEmpty()@IsDefined()@IsString()publicstring;@Length(8)@Matches(/^(?=.*[a-z])(?=.*[A-Z])(?=.*\d)\S+$/)@IsDefined()@IsString()publicpassword:string;@IsNotEmpty()@IsDefined()@IsString()publicfirstName:string;@IsNotEmpty()@IsDefined()@IsString()publiclastName:string;}
The new request class uses the class-validator NPM package to validate the object being passed to our microservice method from the Nest.js microservice module. The class contains all the properties with specific decorators to describe what those properties should contain. For example, the email property should be an email address, cannot be empty, must be defined, and must be a string. Now we just need to hook it up to our rpcCreate method.
@MessagePattern({cmd:'users.create'})@UsePipes(newRpcValidationPipe())@UseFilters(newRpcValidationFilter())publicasyncrpcCreate(data:CreateUserRequest){awaitthis.userService.create(data);}
Since microservice handlers do not make use of the @Body decorator, we will need to use @UsePipes to make use of our new RpcValidationPipe. This will instruct Nest.js to validation the input data against it’s class type. Just like you would for APIs, use validation classes and the RpcValidationPipe to offload input validation out of your controller or microservice method.
Guards
Guards in microservices serve the same purpose as they do in normal APIs. They determine if a specific microservice handler should handle a request. Up to now, we have used guards to protect API handlers from unauthorized access. We should do the same thing to our microservice handlers. Although in our application, our microservice handler is only called from our already protected API handler, we should never assume that will always be the case.
@Injectable()exportclassRpcCheckLoggedInUserGuardimplementsCanActivate{canActivate(context:ExecutionContext):boolean|Promise<boolean>|Observable<boolean>{constdata=context.switchToRpc().getData();returnNumber(data.userId)===data.user.id;}}
The new guard looks exactly like the API CheckLoggedInUserGuard guard. The difference is in the parameters that are passed to the canActivate method. Since this guard is being executed in the context of a microservice, it will be given a microservice data object instead of the API request object.
We use the new microservice guard the same way we did our API guard. Simply decorate out microservice handler with @UseGuards and our guard will now protect our microservice from misuse. Let’s make a new microservice for retrieving the current user’s information.
@Get('users/:userId')@UseGuards(CheckLoggedInUserGuard)publicasyncshow(@Param('userId')userId:number,@Req()req,@Res()res){this.client.send({cmd:'users.show'},{userId,user:req.user}).subscribe({next:user=>{res.status(HttpStatus.OK).json(user);},error:error=>{res.status(HttpStatus.INTERNAL_SERVER_ERROR).send(error);}});}@MessagePattern({cmd:'users.show'})@UseGuards(RpcCheckLoggedInUserGuard)publicasyncrpcShow(data:any){returnawaitthis.userService.findById(data.userId);}
The show API handler now offloads the heavy lifting of accessing the database to the NestMicroservice context. The guard on the microservice handler ensures, if the handler is somehow invoked outside of the show API handler, it will still protect the user data from being exposed to unauthorized requests. But there is still a problem. This example returns the entire user object from the database, including the hashed password. This is a security vulnerability best solved by interceptors.
Interceptors
Microservice interceptors function no differently from normal API interceptors. The only difference is that the interceptor is passed the data object sent to the microservice handler instead of an API request object. This means you can actually write interceptors once and use them in both contexts. Just like API interceptors, microservice interceptors are executed before the microservice handler and must return an Observable. To secure our rpcShow microservice endpoint, we will create a new interceptor that will expect a User database object and remove the password field.
@Injectable()exportclassCleanUserInterceptorimplementsNestInterceptor{intercept(context:ExecutionContext,stream$:Observable<any>):Observable<any>{returnstream$.pipe(map(user=>JSON.parse(JSON.stringify(user))),map(user=>{return{...user,password:undefined};}));}}
@MessagePattern({cmd:'users.show'})@UseGuards(RpcCheckLoggedInUserGuard)@UseInterceptors(CleanUserInterceptor)publicasyncrpcShow(data:any){returnawaitthis.userService.findById(data.userId);}
The response from the rpcShow microservice handler will now have the password field removed. Notice in the interceptor we had to convert the User database object to and from JSON. This may differ depending on the ORM you make use of. With Sequelize, we need to get the raw data from the database response. This is because the response from the ORM is actually a class containing many different ORM methods and properties. By converting it to JSON and back, we can use the spread operator with password: undefined to delete the password field.
Built-in transports
The TCP transport is only one of several transports Nest.js has built-in. Using the TCP transport, we had to bind our NestMicroservice context to an additional port, taking up yet another port on the server, and ensuring our NestMicroservice context was running before starting the NestApplication context. Other built-in transports can overcome these limitations and add additional benefits.
Redis
Redis is a simple in-memory data store that can be used as a pub-sub message broker. The Redis transport makes use of the redis NPM package and a Redis server to pass messages between the NestApplication and NestMicroservice contexts. To use the Redis transport, we need to update our bootstrap method to use the correct NestMicroservice configuration.
asyncfunctionbootstrap() {constapp=awaitNestFactory.create(AppModule);app.connectMicroservice({transport:Transport.REDIS,options:{url:process.env.REDIS_URL}});awaitapp.startAllMicroservicesAsync();awaitapp.listen(3001);}
You would also have to update all locations where you have use the @Client decorator to the same settings. Instead, let’s centralize this configuration so we are not duplicating code and we can switch out the transport easier.
exportconstmicroserviceConfig:RedisOptions={transport:Transport.REDIS,options:{url:process.env.REDIS_URL}};
The Redis transport can take the following options:
- url: The url of the Redis server. The default is
redis://localhost:6379. - retryAttempts: The number of times the microservice server and client will attempt to reconnect to the Redis server when the connection is lost. This is used to create a
retry_strategyfor theredisNPM package. - retryDelay: Works in conjunction with
retryAttemptsand delays the transports retry process by a set amount of time in milliseconds.
Now we can update the applications bootstrap to use the microserviceConfig object we have created.
asyncfunctionbootstrap() {constapp=awaitNestFactory.create(AppModule);app.connectMicroservice(microserviceConfig);awaitapp.startAllMicroservicesAsync();awaitapp.listen(3001);}
Finally, update the @Client decorator in the UserController.
@Controller()exportclassUserController{@Client(microserviceConfig)client:ClientProxy}
Start up a Redis server, such as the redis docker image and the application and all our microservice transaction will now be processing through the Redis server. The below diagram shows a simplified view of the data flow when a new user is created and we are using the Redis transport.

Both the client and the server make a connection with the Redis server. When client.send is called, the client alters the message pattern on the fly to create pub and sub channels. The server consumes the message and removes the message pattern modification to find the correct microservice handler. Once processing is complete in the microservice handler, the pattern is modified again to match the sub channel. The client consumes this new message, unsubscribes from the sub channel, and passes the response back to the caller.
MQTT
MQTT is a simple message protocol designed to be used when network bandwidth is a premium. The MQTT transport make use of the mqtt NPM package and a remote MQTT server to pass messages between the NestApplication and NestMicroservice contexts. The data flow and how the microservice client and server operate are almost identical to the Redis transport. To make use of the MQTT transport, let’s update the microserviceConfig configuration object.
exportconstmicroserviceConfig:MqttOptions={transport:Transport.MQTT,options:{url:process.env.MQTT_URL}};
The MQTT transport can take several options, all of which are detailed in the Github repository for the mqtt NPM package. Most notably, the transport defaults the url option to mqtt://localhost:1883 and there is no connection retrying. If the connection to the MQTT server is lost, microservice messages will no longer be passed.
Start up a MQTT server, such as the eclipse-mosquitto docker image, and the application and all our microservice transaction will now be processing through the MQTT server.
NATS
NATS is an open source message broker server that touts extremely high throughput. The NATS transport make use of the nats NPM package and a remote NATS server to pass messages between the NestApplication and NestMicroservice contexts.
exportconstmicroserviceConfig:MqttOptions={transport:Transport.NATS,options:{url:process.env.NATS_URL}};
The NATS transport can take the following options:
- url: The url of the NATS server. The default is
nats://localhost:4222. - name/pass: The username and password used to authenticate the Nest.js application with the NATS server.
- maxReconnectAttempts: The number of times the server and client will attempt to reconnect to the NATS server when the connection is lost. The default is to attempt to reconnect 10 times.
- reconnectTimeWait: Works in conjunction with
maxReconnectAttemptsand delays the transports retry process by a set amount of time in milliseconds. - servers: An array of
urlstrings all of which are NATS servers. This allows the transport to take advantage of a cluster of NATS servers. - tls: A boolean indicating if TLS should be used when connecting to the NATS server. Note this defaults to false meaning all messages are passed in clear text. An object can also be provided instead of a boolean, and can contain the standard Node TLS settings like the client certificate.
Start up a NATS server, such as the nats docker image, and the application and all our microservice transaction will now be processing through the NATS server. The below diagram shows a simplified view of the data flow when a new user is created and we are using the NATS transport.
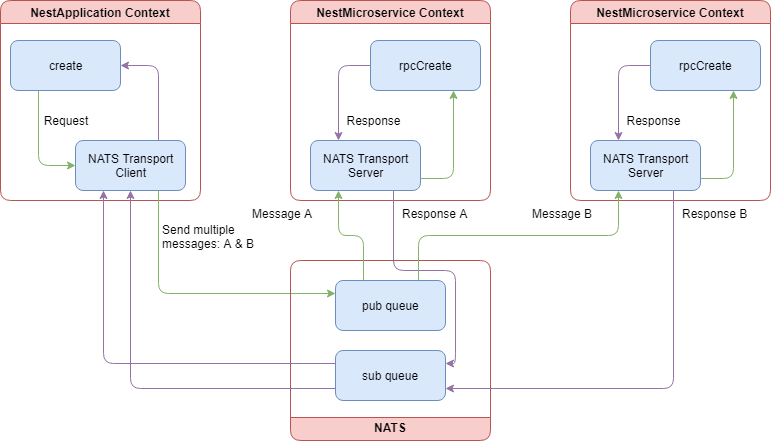
Both the client and the server make a connection with the NATS server. When client.send is called, the client alters the message pattern on the fly to create pub and sub queues. One of the most notable differences between the Redis transport and the NATS transport is that the NATS transport makes use of queue groups. This means we can now have multiple NestMicroservice contexts and the NATS server will load balance messages between them. The server consumes the message and removes the message pattern modification to find the correct microservice handler. Once processing is complete in the microservice handler, the pattern is modified again to match the sub channel. The client consumes this new message, unsubscribes from the sub channel, and passes the response back to the caller.
gRPC
gRPC is a remote procedural call client and server designed to be used with Googles Protocol Buffers. gRPC and protocol buffers are extensive subjects worthy of their own books. For that reason, we will stick to discussing the setup and use of gRPC within a Nest.js application. To get started, we will need the grpc NPM package. Before we can write any code for our Nest.js application, we must write a Protocol Buffer file.
syntax = "proto3";

package example.nestBook;

message User {
    string firstName = 1;
    string lastName = 2;
    string email = 3;
}

message ShowUserRequest {
    double userId = 1;
}

message ShowUserResponse {
    User user = 1;
}

service UserService {
    rpc show (ShowUserRequest) returns (ShowUserResponse);
}
The above code snippet describes a single gRPC service called UserService. This will typically map to a service or controller within your own project. The service contains a single method, show, that takes in an object with a userId and returns an object with a user property. The syntax value indicates to the gRPC package which format of the protocol buffers language we are using. The package declaration acts as a namespace for everything we define in our proto file. This is most useful when importing and extending other proto files.
Note: We kept the proto file pretty simple so we can focus on configuring Nest.js to use gRPC microservices.
Like all other transports, we now need to configure the NestMicroservice context and the microservice client in our controller.
exportconstmicroserviceConfig:GrpcOptions={transport:Transport.GRPC,options:{url:'0.0.0.0:5667',protoPath:join(__dirname,'./nest-book-example.proto'),package:'example.nestBook'}};
The gRPC transport can take the following options:
- url: The url of the gRPC server. The default is
localhost:5000. - credentials: A
ServerCedentialsobject from thegrpcNPM package. The default is to use thegrpc.getInsecuremethod to retrieve a default credential object. This will disable TLS encryption. In order to setup a secure communication channel, usegrpc.createSsland provide the root CA, private, and public certificates. More information about credentials can be found here. - protoPath: The absolute path to the proto file.
- root: An absolute path to the root of where all your proto files are found. This is an optional option and is most likely not necessary if you are not importing other proto files within your own. If this option is defined, it will be prepended to the
protoPathoption. - package: The name of the package to be used with the client and server. This should match the package name givin in the proto file.
We will need to make some changes to our controller before we can really use the gRPC transport.
@Controller()exportclassUserControllerimplementsOnModuleInit{@Client(microserviceConfig)privateclient:ClientGrpc;privateprotoUserService:IProtoUserService;constructor(privatereadonlyuserService:UserService){}publiconModuleInit() {this.protoUserService=this.client.getService<IProtoUserService>('UserService');}}
Notice that we still have the client property decorated with @Client, but we have a new type ClientGrpc and a new property protoUserService. The client injected when using the gRPC transport no longer contains a send method. Instead, it has a getService method that we must use to retrieve the service we defined in our proto file. We use the onModuleInit lifecycle hook so the gRPC service is retrieved immediately after Nest.js has instantiated our modules and before any clients try to use the controller APIs. The getService method is a generic and doesn’t actually contain any method definitions. Instead, we need to provide our own.
import{Observable}from'rxjs';exportinterfaceIProtoUserService{show(data:any):Observable<any>;}
We could be a little more explicit with our interface but this gets the point across. Now the protoUserService property in our controller will have a show method allowing us to call the show gRPC service method.
@Get('users/:userId')@UseGuards(CheckLoggedInUserGuard)publicasyncshow(@Param('userId')userId:number,@Req()req,@Res()res){this.protoUserService.show({userId:parseInt(userId.toString(),10)}).subscribe({next:user=>{res.status(HttpStatus.OK).json(user);},error:error=>{res.status(HttpStatus.INTERNAL_SERVER_ERROR).json(error);}});}@GrpcMethod('UserService','show')publicasyncrpcShow(data:any){constuser=awaitthis.userService.findById(data.userId);return{user:{firstName:user.firstName,lastName:user.lastName,user.email}};}
The controller’s show API method gets updated to use the protoUserService.show. This will call the rpcShow method, but through the gRPC microservice transport. The rpcShow method contains a different decorator, @GrpcMethod, instead of @MessagePattern. This is required for all gRPC microservice handlers since the microservice is no longer matching a pattern, but instead is calling a defined gRPC service method. In fact, that is the mapping for the two optional parameters to the @GrpcMethod decorator: service name and service method.
exportclassUserControllerimplementsOnModuleInit{@GrpcMethod()publicasyncrpcShow(data:any){}}
In the above example, we did not defined the service name and service method when calling the @GrpcMethod decorator. Nest.js will automatically map these values to the method and class name. In this example, this is equivalent to @GrpcMethod('UserController', 'rpcShow').
You may have noticed that we are using 0.0.0.0:5667 as the URL of our gRPC server. When we start up the Nest.js application, it will create a gRPC server on the localhost and listen on port 5667. On the surface, this may look like a more complex version of the TCP transport. However, the power of the gRPC transport is directly derived from the language and platform agnostic nature of protocol buffers. This means we can create a Nest.js application that exposes microservices using gRPC that may be used by any other language or platform as long is it also uses protocol buffers to connect to our microservices. We can also create Nest.js applications that connect to microservices that may be exposed in another language like Go.
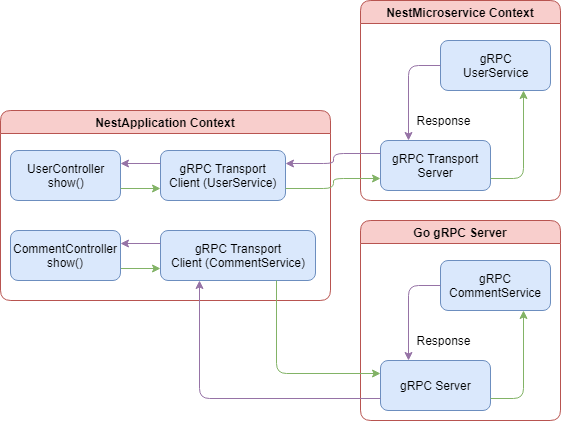
When using the gRPC transport to connect to services at two or more different URLs, we need to create an equal number of gRPC client connections, one for each server. The above diagram shows how processing would look if we offloaded the crud operations for comments in our example blog application to a Go server. We use a gRPC client to connect to the user microservices hosted in our Nest.js application and a separate one to connect to the comment microservices hosted in the Go application.
The same setup can be obtained by using any of the other transports. However, you would have to write the extra code to serialize and deserialize the messages between the Nest.js application and the Go application hosting the microservice. By using the gRPC transport, protocol buffers take care of that for you.
Custom transport
A custom transport allows you to define a new microservice client and server for communicating between the NestApplication and NestMicroservice contexts. You may want to create a custom transport strategy for a number of reasons: you or your company already have a message broker service that is does not have a built-in Nest.js transport, or you need to customize how one of the built-in transports works. For the purpose of our example, we will work through implementing a new RabbitMQ transport.
exportclassRabbitMQTransportServerextendsServerimplementsCustomTransportStrategy{privateserver:amqp.Connection=null;privatechannel:amqp.Channel=null;constructor(privatereadonlyurl:string,privatereadonlyqueue:string){super();}}
Nest.js requires all custom transports to implement the CustomTransportStrategy interface. This forces us to define our own listen and close methods. In our example, we connect to the RabbitMQ server and listen on a specific channel. Closing the server is as simple as disconnecting from the RabbitMQ server.
publicasynclisten(callback:()=>void){awaitthis.init();callback();}publicclose() {this.channel&&this.channel.close();this.server&&this.server.close();}privateasyncinit() {this.server=awaitamqp.connect(this.url);this.channel=awaitthis.server.createChannel();this.channel.assertQueue(`${this.queue}_sub`,{durable:false});this.channel.assertQueue(`${this.queue}_pub`,{durable:false});}
By extending the Nest.js Server class, our custom transport comes pre-equipped with the RxJS handling of messages that makes Nest.js so great. However, our custom transport isn’t really handling messages at this point. We need to add the logic for how messages will be sent and received through RabbitMQ to our custom transport.
publicasynclisten(callback:()=>void){awaitthis.init();this.channel.consume(`${this.queue}_sub`,this.handleMessage.bind(this),{noAck:true,});callback();}privateasynchandleMessage(message:amqp.Message){const{content}=message;constpacket=JSON.parse(content.toString())asReadPacket&PacketId;consthandler=this.messageHandlers[JSON.stringify(packet.pattern)];if(!handler){returnthis.sendMessage({id:packet.id,err:NO_PATTERN_MESSAGE});}constresponse$=this.transformToObservable(awaithandler(packet.data))asObservable<any>;response$&&this.send(response$,data=>this.sendMessage({id:packet.id,...data}));}privatesendMessage(packet:WritePacket&PacketId){constbuffer=Buffer.from(JSON.stringify(packet));this.channel.sendToQueue(`${this.queue}_pub`,buffer);}
The custom transport will now listen for incoming messages on the sub channel and send responses on the pub channel. The handleMessage method decodes the message’s content byte array and uses the embedded pattern object to find the correct microservice handler to service the message. For example, the {cmd: 'users.create'} will be handled by the rpcCreate handler. Finally, we call the handler, transform the response into an Observable, and pass that back into the Nest.js Server class. Once a response is provided, it will be passed on to our sendMessage method and out through the pub channel.
Since a server is useless without a client, we will need to create one of those too. The RabbitMQ client must extend the Nest.js ClientProxy class and provide an override for the close, connect, and publish methods.
exportclassRabbitMQTransportClientextendsClientProxy{privateserver:amqp.Connection;privatechannel:amqp.Channel;privateresponsesSubject:Subject<amqp.Message>;constructor(privatereadonlyurl:string,privatereadonlyqueue:string){super();}publicasyncclose() {this.channel&&awaitthis.channel.close();this.server&&awaitthis.server.close();}publicconnect():Promise<void>{returnnewPromise(async(resolve,reject)=>{try{this.server=awaitamqp.connect(this.url);this.channel=awaitthis.server.createChannel();const{sub,pub}=this.getQueues();awaitthis.channel.assertQueue(sub,{durable:false});awaitthis.channel.assertQueue(pub,{durable:false});this.responsesSubject=newSubject();this.channel.consume(pub,(message)=>{this.responsesSubject.next(message);},{noAck:true});resolve();}catch(error){reject(error);}});}protectedasyncpublish(partialPacket:ReadPacket,callback:(packet:WritePacket)=>void){}privategetQueues() {return{pub:`${this.queue}_pub`,sub:`${this.queue}_sub`};}}
In our example, we created a new connection to the RabbitMQ server and the specified pub and sub channels. The client uses the channels in an opposite configuration compared to the server. The client sends messages through the sub channel and listens for responses on the pub channel. We also make use of the power of RxJS by piping all responses into a Subject to make processing simpler in the publish method. Let’s implement the publish method.
protectedasyncpublish(partialPacket:ReadPacket,callback:(packet:WritePacket)=>void){if(!this.server||!this.channel){awaitthis.connect();}constpacket=this.assignPacketId(partialPacket);const{sub}=this.getQueues();this.responsesSubject.asObservable().pipe(pluck('content'),map(content=>JSON.parse(content.toString())asWritePacket&PacketId),filter(message=>message.id===packet.id),take(1)).subscribe(({err,response,isDisposed})=>{if(isDisposed||err){callback({err,response:null,isDisposed:true});}callback({err,response});});this.channel.sendToQueue(sub,Buffer.from(JSON.stringify(packet)));}
The publish method starts off with assigning a unique ID to the message and subscribes to the response subject for sending the response back to the microservice caller. Finally, sendToQueue is called to send the message as a byte array to the sub channel. Once a response is received, the subscription to the response subject is fired. The first thing the subscription stream does is extract the content of the response and verify that the message ID matches the one that was assigned when publish was initially called. This keeps the client from processing a message response that does not belong to the specific publish execution context. Put simply, the client will receive every microservice response, even those that might be for a different microservice or a different execution of the same microservice. If the IDs match, the client checks fir errors and uses the callback to send the response back to the microservice caller.
Before we can use our new transport, we will need to update the microservice configuration object we created earlier.
exportconstmicroserviceConfig={url:process.env.AMQP_URL};exportconstmicroserviceServerConfig:(channel:string)=>CustomStrategy=channel=>{return{strategy:newRabbitMQTransportServer(microserviceConfig.url,channel)}};
We now have a method that will instantiate our custom transport server. This is used in the bootstrap of our application to connect our NestMicroservice context to the RabbitMQ server.
asyncfunctionbootstrap() {constapp=awaitNestFactory.create(AppModule);app.connectMicroservice(microserviceServerConfig('nestjs_book'));awaitapp.startAllMicroservicesAsync();awaitapp.listen(3001);}
The last piece of our custom transport is in our controller. Since we are using a custom transport, we can no longer use the @ClientProxy decorator. Instead, we have to instantiate our custom transport our selves. You could do this in the constructor as so:
@Controller()exportclassUserController{client:ClientProxy;constructor(privatereadonlyuserService:UserService){this.client=newRabbitMQTransportClient(microserviceConfig.url,'nestjs_book');}}
Wait! You have now created a hard binding between the controller and the custom transport client. This makes it more difficult to migrate to a different strategy in the future and very difficult to test. Instead, let’s make use of Nest.js’s fabulous Dependency Injection to create our client. Start off with creating a new module to house and expose our custom transport client.
constClientProxy={provide:'ClientProxy',useFactory:()=>newRabbitMQTransportClient(microserviceConfig.url,'nestjs_book')};@Module({imports:[],controllers:[],components:[ClientProxy],exports:[ClientProxy]})exportclassRabbitMQTransportModule{}
In our example, we gave our component the injection token 'ClientProxy'. This was just to keep things simple, and you can call it whatever you like. The import part is to make sure the injection token used to register the component is also the one used in the @Inject decorator we place in our controller’s constructor.
@Controller()exportclassUserController{constructor(privatereadonlyuserService:UserService,@Inject('ClientProxy')privatereadonlyclient:ClientProxy){}
Our controller will now have a microservice client injected in at run time allowing the API handlers to communicate with the microservice handlers. Even better, the client can now be overridden in tests with a mock. Startup a RabbitMQ server, such as the rabbitmq docker image , and setup the AMQP_URL environment variable, ie amqp://guest:guest@localhost:5672, and all microservice requests will be processed through the RabbitMQ server.
The data flow and how the microservice client and server operate in our RabbitMQ example are almost identical to the NATS transport. Just like with NATS, RabbitMQ provides the ability to have multiple NestMicroservice contexts consuming messages. RabbitMQ will work to load balance between all the consumers.
Hybrid application
When we first started our microservice implementation in this chapter, we modified the bootstrap method to call connectMicroservice. This is a special method that converts our Nest.js application into a hybrid application. This simply means our application now contains multiple context types. Simple enough but this has some implications that you should be aware of. Specifically, using the hybrid application approach, you will no longer be able to attach global filters, pipes, guards, and interceptors for the NestMicroservice context. This is because the NestMicroservice context is immediately bootstrapped, but not connected, in a hybrid application. To get around this limitation, we can create our two contexts independently.
asyncfunctionbootstrap() {constapp=awaitNestFactory.create(AppModule);constrpcApp=awaitNestFactory.createMicroservice(AppModule,microserviceServerConfig('nestjs_book'));rpcApp.useGlobalFilters(newRpcValidationFilter());awaitrpcApp.listenAsync();awaitapp.listen(process.env.PORT||3000);}
Now that we are creating the two application contexts independently, we can make use of globals for the NestMicroservice context. To test this, we can update the rpcCreate handler to remove the RpcValidationFilter. Executing the application at this point should still result in validation errors being returned when the request to the create API does not contain required fields.
@MessagePattern({cmd:'users.create'})publicasyncrpcCreate(data:CreateUserRequest){if(!data||(data&&Object.keys(data).length===0))thrownewRpcValidationException();awaitthis.userService.create(data);}
We can extend this approach of bootstrapping our application to split even more of our application into separate contexts. This still does not make use of multiple processes or threads, but employing some more advanced architecture design, we can gain those benefits.
Advanced architecture design
So far we have covered everything needed to setup and start writing and using microservices in Nest.js. Along the way we describe some of the drawbacks Nest.js’ implementation of microservices has. Most notably, since the microservices does not run in a separate thread or process, you may not be gaining much in the way of performance when using Nest.js microservices.
However, that is not to say you can’t get these benefits. Nest.js just doesn’t provide the tools out of the box. In most material found on the subject of running a NodeJS application in production, the one thing that is typically always covered and recommended is the use of the NodeJS cluster module. We can do the same thing with our Nest.js application.
asyncfunctionbootstrapApp() {constapp=awaitNestFactory.create(AppModule);awaitapp.listen(process.env.PORT||3000);}asyncfunctionbootstrapRpc() {constrpcApp=awaitNestFactory.createMicroservice(AppModule,microserviceServerConfig('nestjs_book'));rpcApp.useGlobalFilters(newRpcValidationFilter());awaitrpcApp.listenAsync();}if(cluster.isMaster){constappWorkers=[];constrpcWorkers=[];for(leti=0;i<os.cpus().length;i++){constapp=cluster.fork({APP_TYPE:'NestApplication'});constrpc=cluster.fork({APP_TYPE:'NestMicroservice'});appWorkers.push(app);rpcWorkers.push(rpc);}cluster.on('exit',function(worker,code,signal){if(appWorkers.indexOf(worker)>-1){constindex=appWorkers.indexOf(worker);constapp=cluster.fork({APP_TYPE:'NestApplication'});appWorkers.splice(index,1,app);}elseif(rpcWorkers.indexOf(worker)>-1){constindex=rpcWorkers.indexOf(worker);constrpc=cluster.fork({APP_TYPE:'NestMicroservice'});rpcWorkers.splice(index,1,rpc);}});}else{if(process.env.APP_TYPE==='NestApplication'){bootstrapApp();}elseif(process.env.APP_TYPE==='NestMicroservice'){bootstrapRpc();}}
Now, not only does our NestApplication and NestMicroservice contexts run on their own threads, they are also clustered according to the number of CPUs available on the server. For each CPU, a separate NestApplication and NestMicroservice context will be created. The NestApplication context threads will share the main application port. Finally, since we are using RabbitMQ, having multiple NestMicroservice contexts running, we have multiple subscribers waiting for microservice messages. RabbitMQ will take care of load balancing message distribution between all of our NestMicroservice instances. We have made our application more resilient and better equipped to handle a heavier load of users than what it was at the beginning of this chapter.
Summary
At the beginning of this chapter, we stated “microservice” was a misleading name for this part of Nest.js. In fact, that could still be the case, but it really depends on a number of factors. Our initial example using the TCP transport could hardly qualify as a microservice by all conventional definitions. Both the NestApplication and NestMicroservice context were executing from the same process, meaning a catastrophic failure in one could bring both down.
After highlighting all the transports, Nest.js comes with out-of-the-box, and we re-implemented our microservices in the example blog application using a custom RabbitMQ transport. We even went as far as running the NestApplication and NestMicroservice contexts in their own thread. This was a major step in the right direction for fulfilling the “microservice” name.
Although we didn’t cover specifics in this book, it should now be apparent that you’re not limited to using microservices defined in the same Nest.js project or repository. Using transports like Redis and RabbitMQ, we could create and use multiple Nest.js projects for the sole purpose of executing a NestMicroservice context. All of these projects can be running independently inside a Kubernetes cluster and accessed by passing messages via Redis or RabbitMQ. Even better, we can use the built-in gRPC transport to communicate with microservices wrote in other languages and deployed to other platforms.
In the next chapter we will learn about routing and request handling in Nest.js.