Table of Contents for
Nest.js: A Progressive Node.js Framework
 Nest.js: A Progressive Node.js Framework
Published by
Bleeding Edge Press, 2018
Nest.js: A Progressive Node.js Framework
Published by
Bleeding Edge Press, 2018
- nav
- Cover
- Nest.js: A Progressive Node.js Framework
- Nest.js: A Progressive Node.js Framework
- Preface
- 1. Introduction
- 2. Overview
- 3. Nest.js authentication
- 4. Dependency Injection system of Nest.js
- 5. TypeORM
- 6. Sequelize
- 7. Mongoose
- 8. Web sockets
- 9. Microservices
- 10. Routing and request handling in Nest.js
- 11. OpenAPI (Swagger) Specification
- 12. Command Query Responsibility Separation (CQRS)
- 13. Architecture
- 14. Testing
- 15. Server-side Rendering with Angular Universal
Chapter 11. OpenAPI (Swagger) Specification
The OpenAPI specification, most notably known by it’s former name Swagger, is a JSON schema that can be used to construct a JSON or YAML definition of a set of restful APIs. OpenAPI itself is language agnostic, meaning the underlying APIs can be constructed in any language with any tool or framework the developer would like. The sole concern of an OpenAPI document is to describe the inputs and outputs, among other things, of API endpoints. In this respect, an OpenAPI document acts as a documentation tool allowing developers to easily describe their public APIs in a format that is widely known, understood, and supported.
The OpenAPI document, however, is not just limited to being documentation. Many tools have been developed that are capable of using an OpenAPI document to auto-generate client projects, server stubs, an API explorer UI for visually inspecting the OpenAPI document, and even server generators. Developers can find such tools as the Swagger Editor, Codegen, and UI at https://swagger.io.
While some tools exist to generate an OpenAPI document, a number of developers maintain such documents either as individual JSON or YAML files. They can break their document up into smaller pieces using OpenAPI reference mechanics. In Nest.js, a separate module is available for developers to use to generate an OpenAPI document for their application. Instead of writing your OpenAPI document by hand, Nest.js will use the decorators you provide in your controllers to generate as much information that it can about the APIs within your project. Of course, it won’t get everything out of the box. For that, the Nest.js swagger module provides additional decorators that you can use to fill in the gaps.
In this chapter, we will explore using the Nest.js Swagger module to generate a swagger version 2 document. We will begin with configuring the Nest.js Swagger module. We will setup our blog example application to expose the swagger document using the Swagger UI and begin exploring how the Nest.js decorators you are used to using already affect the swagger document. We will also explore the new decorators the swagger module provides. By the end of this chapter, you will have a complete understanding of how Nest.js produces a swagger document. Before getting started, be sure you run npm install @nestjs/swagger in your project. To see a working example, remember you can clone the accompanying Git repository for this book:
git clone https://github.com/backstopmedia/nest-book-example.git
Document Settings
Each swagger document can contain a basic set of properties such as the title of the application. This information can be configured using the various public methods found on the DocumentBuilder class. These methods all return the document instance allowing you to chain as many of the methods as you need. Be sure to finish your configuration before calling the build method. Once the build method has been called, the document settings are no longer modifiable.
constswaggerOptions=newDocumentBuilder().setTitle('Blog Application').setDescription('APIs for the example blog application.').setVersion('1.0.0').setTermsOfService('http://swagger.io/terms/').setContactEmail('admin@example.com').setLicense('Apache 2.0','http://www.apache.org/licenses/LICENSE-2.0.html').build();
These methods are used to configure the info section of the swagger document. The swagger specification requires the title and version fields to be provided, but Nest.js will default these values to an empty string and "1.0.0", respectively. If your project has terms of service and a license, you can use setTermsOfService and setLicense to provide a URL to those resources within your application.
Swagger documents can also contain server information. Users, developers, and the UI can use this information to understand how to access the APIs described by the document.
constswaggerOptions=newDocumentBuilder().setHost('localhost:3000').setBasePath('/').setSchemes('http').build();
The setHost should contain only the server and port to access the APIs. If, in your application, you use setGlobalPrefix to configure a base path for the Nest.js application, set the same value in the swagger document using setBasePath. The swagger specification uses a schemes array to describe the transfer protocol used by the APIs. While the swagger specification supports the ws and wss protocols as well as multiple values, Nest.js limits the value to either http or https. Metadata and external documentation can also be added to provide users of the swagger document additional details regarding how the APIs work.
constswaggerOptions=newDocumentBuilder().setExternalDoc('For more information','http://swagger.io').addTag('blog','application purpose').addTag('nestjs','framework').build();
Use the first parameter of setExternalDoc to describe the external documentation and a URL to the documentation as the second parameter. An endless number of tags can be added to the document using addTag. The only requirement is the first parameter to addTag be unique. The second parameter should describe the tag. The last document setting is how user’s authenticate with the APIs.
Documenting authentication
The swagger specification supports three types of authentication: basic, API key, and Oauth2. Nest.js provides two different methods that can be used to auto-configure the swagger document authentication information with the possibility for some settings to be overridden. Keep in mind, this is describing how users will authenticate with your application.
constswaggerOptions=newDocumentBuilder().addBearerAuth('Authorization','header','apiKey').build();
If your application is using basic authentication, the username and password as a base64 encoded string, or JSON web tokens (JWT), you will make use of the addBearerAuth configuration method. The example above uses the defaults Nest.js will use if no parameters are passed and establishes that the APIs use an API key like a JWT in the authorization header. The first parameter should contain the key/header where the authentication key should be provided. This same configuration should be used if users will be using an application key to access the APIs. Application keys are typically used by public API provides like Google Maps to limit access to APIs and associate an API call to a specific billing account.
constswaggerOptions=newDocumentBuilder().addBearerAuth('token','query','apiKey').addBearerAuth('appId','query','apiKey').build();
This example describes two query parameters that must be included when calling APIs that require authentication. The second parameter describes where the authentication key should be provided, either as a header, query, or body parameter. The third parameter is the type of authentication. When using addBearerAuth, use apiKey or basic. In addition to basic and API key authentication, swagger also supports documenting an Oauth2 authentication flow.
constswaggerOptions=newDocumentBuilder().addOAuth2('password','https://example.com/oauth/authorize','https://example.com/oauth/token',{read:'Grants read access',write:'Grants write access',admin:'Grants delete access'}).build();
The first parameter to the addOAuth2 method is the OAuth2 flow the APIs use for authentication. In this example, we use the password flow to indicate the user should send a username and password to the API. You can also use implicit, application, and accessCode flow. The second and third parameters are the URLs where the user will authorize access to the APIs and request a refresh token, respectively. The last parameter is an object of all the scopes with descriptions that are available in the application.
For the blog application, we will keep the configuration simple and store the configuration in a new file in the shared/config directory. Having a central location will let us write the configuration once and implement multiple times.
exportconstswaggerOptions=newDocumentBuilder().setTitle('Blog Application').setDescription('APIs for the example blog application.').setVersion('1.0.0').setHost('localhost:3000').setBasePath('/').setSchemes('http').setExternalDoc('For more information','http://swagger.io').addTag('blog','application purpose').addTag('nestjs','framework').addBearerAuth('Authorization','header','apiKey').build();
Our first implementation will use the configuration and the Nest.js swagger module to produce two new endpoints in our application: one to serve the swagger UI application and one to serve the swagger document as raw JSON.
Swagger UI
The swagger module is unlike most other Nest.js modules. Instead of being imported into your application’s primary app module, the swagger module is configured within the main bootstrap of your application.
asyncfunctionbootstrap() {constapp=awaitNestFactory.create(AppModule);constdocument=SwaggerModule.createDocument(app,swaggerOptions);SwaggerModule.setup('/swagger',app,document);awaitapp.listen(process.env.PORT||3000);}
After declaring the Nest application and before calling the listen method, we use the swagger document options configured in the last section and SwaggerModule.createDocument to create the swagger document. The swagger module will inspect all controllers within the application and use decorators to construct the swagger document in memory.
Once we have created the swagger document, we setup and instruct the swagger module to serve the swagger UI at a specified path, SwaggerModule.setup('/swagger', app, document). Under the hood, the swagger module makes use of the swagger-ui-express NodeJS module to turn the swagger document into a full web UI application.
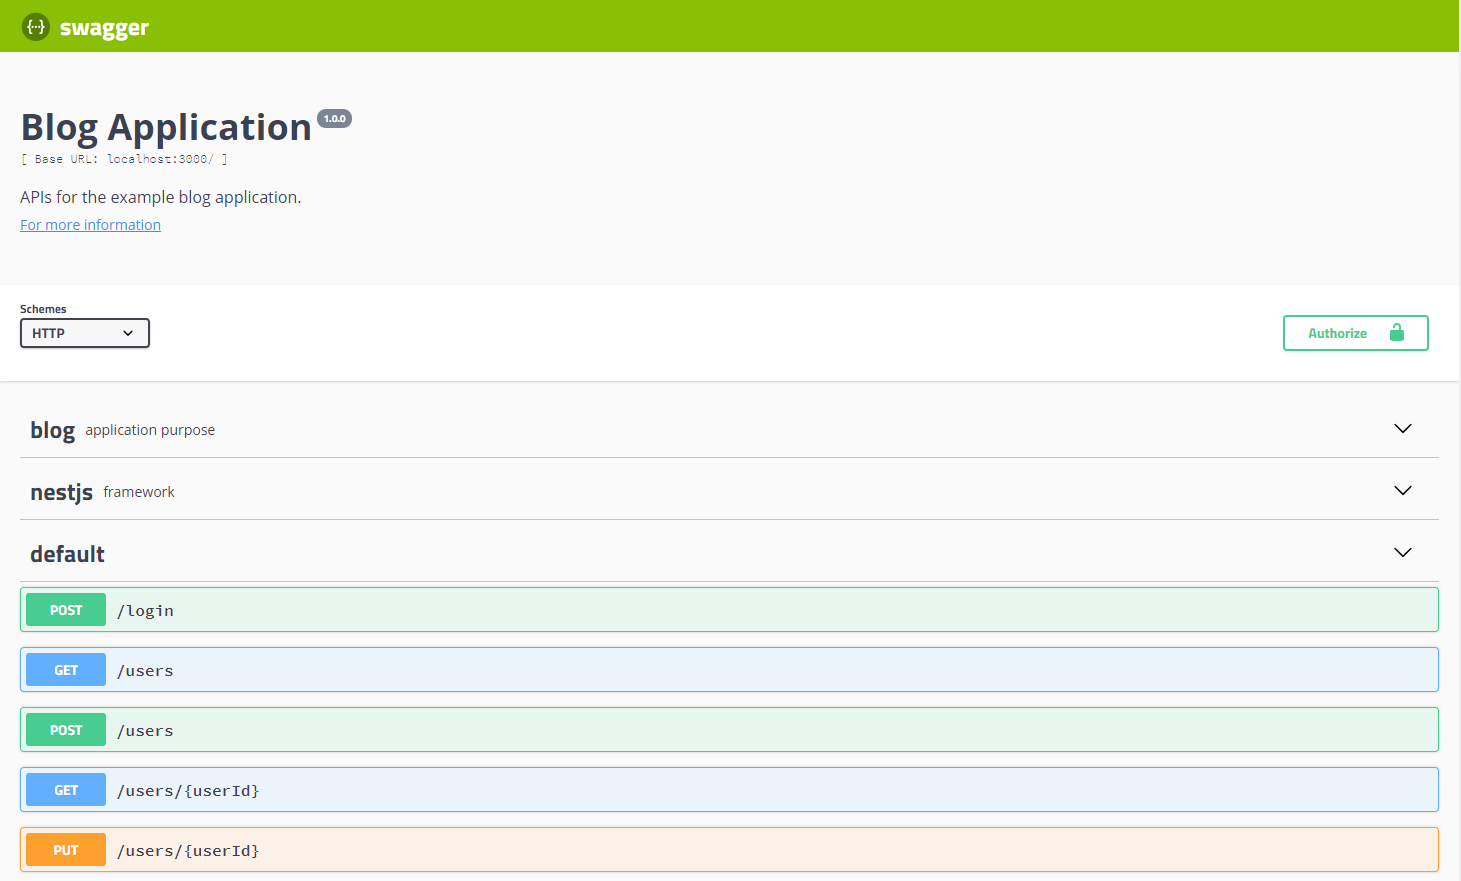
The above figure shows a basic Swagger UI application using our example blog application. The JSON used to produce the UI is also available by appending -json to the path we configured for the UI. In our example, accessing /swagger-json will return the swagger document. This can be used with code generators like Swagger Codegen. For more information about Swagger UI and Swagger Codegen, refer to https://swagger.io.
If you have followed along with the book and created the blog application, you may find that the Swagger UI produced does not contain a lot of information about the APIs in the application. Since the swagger document is built using Typescript decorator metadata, you may need to alter your types or make use of the additional decorators found in the Nest.js swagger module.
API input decorators
The Nest.js swagger module can produce a swagger document using the @Body, @Param, @Query, and @Headers decorators. However, depending on how you write your API controllers, the swagger document can contain very little information. The swagger module will use the types associated with the decorated parameters to describe the parameters an API expects within the swagger document. To depict this, we will modify the comment PUT API to use all four decorators and show how that affects the swagger document by reviewing the swagger UI application.
@Controller('entries/:entryId')exportclassCommentController{@Put('comments/:commentId')publicasyncupdate(@Body()body:UpdateCommentRequest,@Param('commentId')comment:string,@Query('testQuery')testQuery:string,@Headers('testHeader')testHeader:string){}}
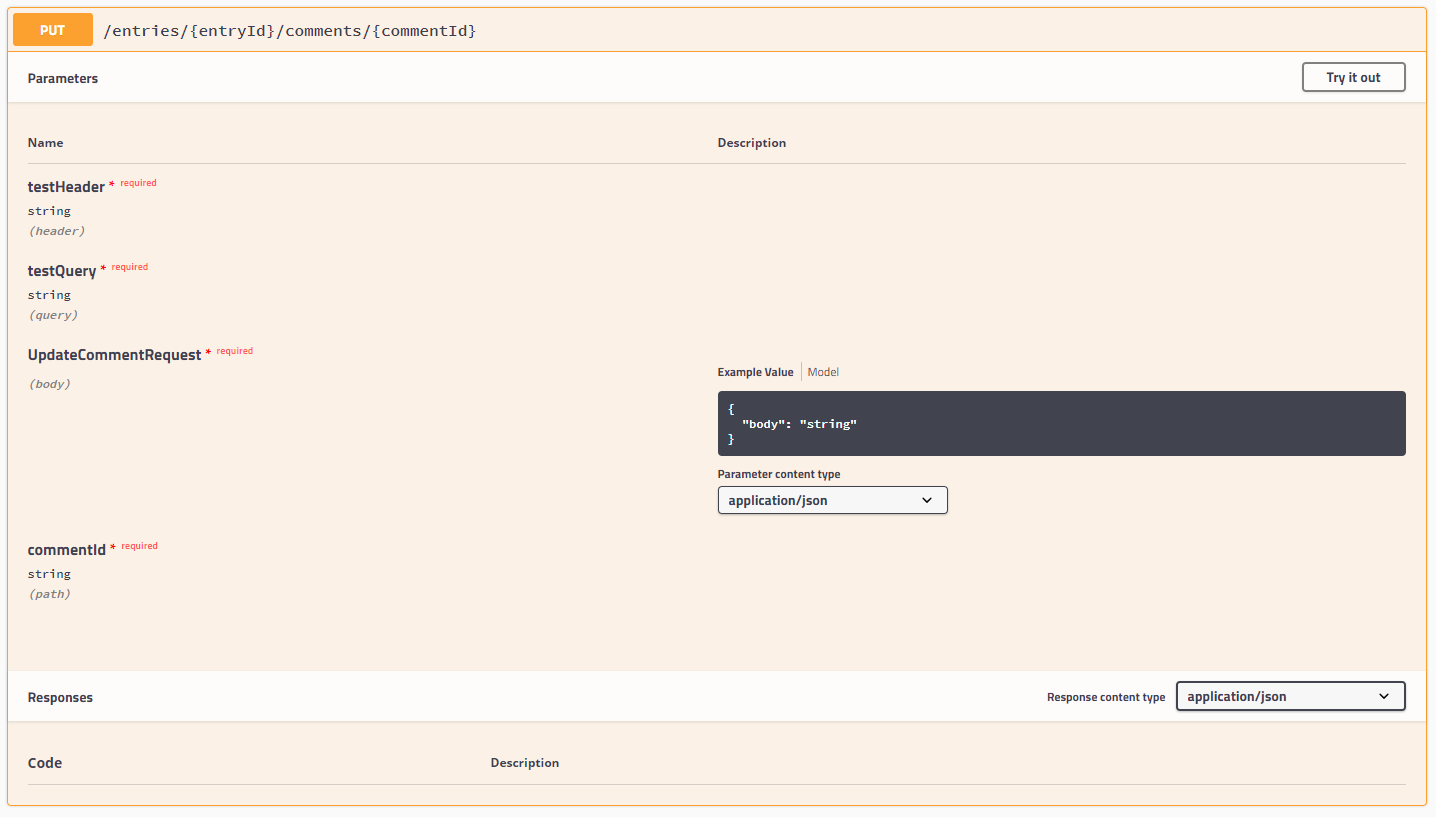
From the example, we can see the header of this API card uses a combination of the @Controller and @Put decorators to construct the path to the API. The parameters section is built using the @Body, @Param, @Query, and @Headers query params. The types we provide to the decorated parameters is used in the Swagger UI as a hint to the user regarding what is expected in the parameter.
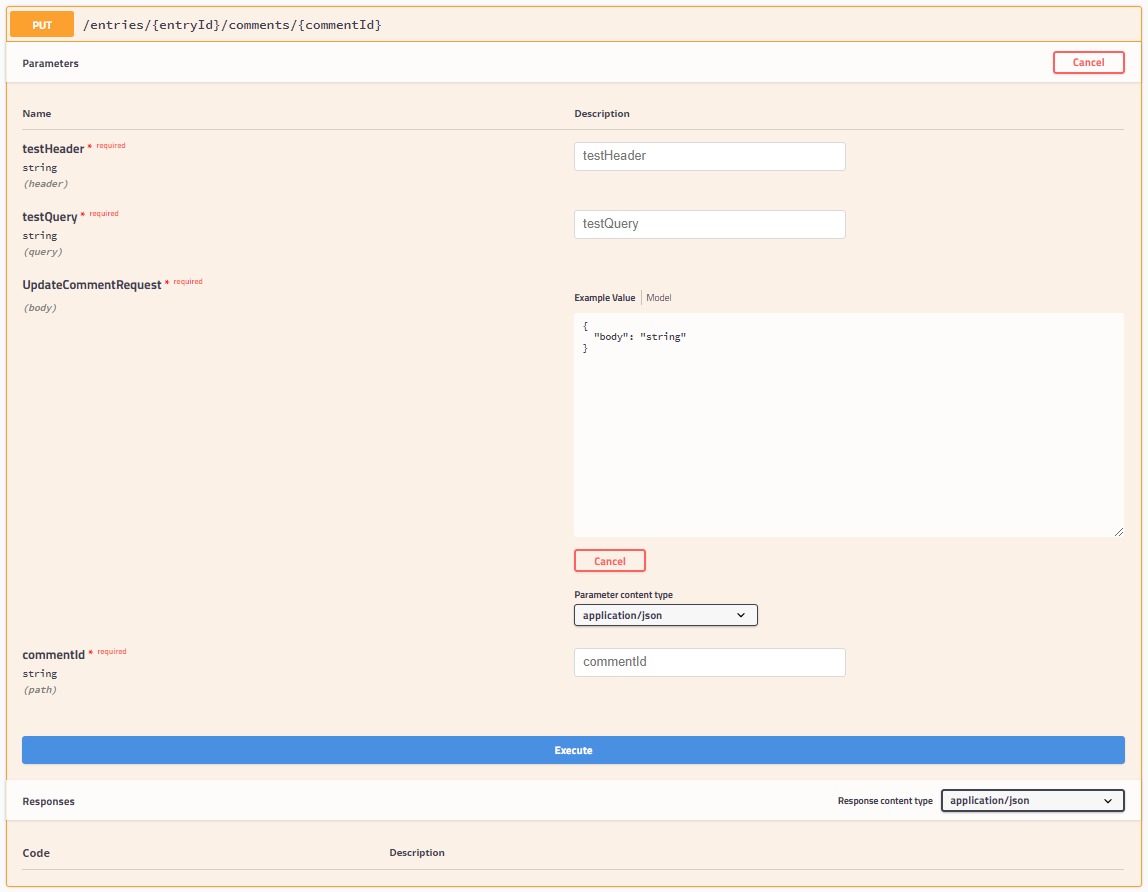
Clicking the Try it out button in the header of the API card changes the card into a set of inputs. This allows the user to fill in the required and optional parameters of the API and execute the API call. We will cover the remaining sections of the API card later. For now, let’s review the basic parameter decorators in more detail.
@Body
You may have noticed in our example, the parameter we decorated with @Body had a type of UpdateCommentRequest. Your application may or may not have this class already. If not, let’s write it now.
exportclassUpdateCommentRequest{@ApiModelPropertyOptional()publicbody:string;}
The request class is very basic and makes use of the first decorator we will cover from the Nest.js swagger module, @ApiModelPropertyOptional. This decorator informs the swagger module that the body property of the request class is an optional property that can be included in the request body when calling the API. This decorator is actually a shortcut for the @ApiModelProperty decorator. We could write our request class as:
exportclassUpdateCommentRequest{@ApiModelProperty({required:false})publicbody:string;}
However, if a property is optional, use the @ApiModelPropertyOptional decorator to save yourself some typing. Both decorators can take several additional properties in an object passed to the decorator that will further define the data model for the request body.
- description: A string that can be used to describe what the model property should contain or what it is used for.
- required: A boolean indicating if the model property is required. This only applies to the
@ApiModelPropertydecorator. - type: The Nest.js swagger module will use the type associated with the model property or you can pass the type as any string or class value. If you use the isArray property, the type property should also be used. This property can also be used to pass any of the data types defined in the swagger specification.
- isArray: A boolean indicating if the model property should take an array of values. If the model does take an array of values, be sure to include this value in the decorator or the Nest.js swagger module will not know to represent the model property as an array.
- collectionFormat: Maps to the swagger specification collectionFormat setting. This is used to depict how a model properties array values should be formatted. For the request body, this property should probably not be used. Possible values are:
- csv: comma separated values
foo,bar - ssv: space separated values
foo bar - tsv: tab separated values
foo\tbar - pipes: pipe separated values
foo|bar - multi: corresponds to multiple parameter instances instead of multiple values for a single instance foo=bar&foo=baz. This is valid only for parameters in “query” or “formData”.
- csv: comma separated values
- default: The default value to be used for the model property in the swagger document. This value will also be used in the example provided in the Swagger UI. The type of this value will depend on the type of the model property but could be a string, number, or even an object.
- enum: If your model properties type is an enum, pass the same enum to the decorator using this property so the Nest.js swagger module can inject those enum values into the swagger document.
- format: If you use the type property with a data type described in the swagger specification, you may also need to pass the format for that data type. For example, a field that takes a number with multiple precision points, values after the decimal, the type would be
integerbut the format may be eitherfloatordouble. - multipleOf: A number indicating that the value passed in the model property should have a remainder of zero using the modulus operator. Setting this property in the decorator is only valid if the model properties type is
numberor the type provided to the decorator isinteger. - maximum: A number indicating that the value passed in the model property should be less than or equal to the given value to be valid. Setting this property in the decorator is only valid if the model properties type is
numberor the type provided to the decorator isinteger. This property should not be used with exclusiveMaximum. - exclusiveMaximum: A number indicating that the value passed in the model property should be less than the given value to be valid. Setting this property in the decorator is only valid if the model properties type is
numberor the type provided to the decorator isinteger. This property should not be used with maximum. - minimum: A number indicating that the value passed in the model property should be greater than or equal to the given value to be valid. Setting this property in the decorator is only valid if the model properties type is
numberor the type provided to the decorator isinteger. This property should not be used with exclusiveMinimum. - exclusiveMinimum: A number indicating that the value passed in the model property should be less than the given value to be valid. Setting this property in the decorator is only valid if the model properties type is
numberor the type provided to the decorator isinteger. This property should not be used with minimum. - maxLength: A number indicating that the value passed in the model property should a character length less than or equal to the given value to be valid. Setting this property in the decorator is only valid if the model properties type is
stringor the type provided to the decorator isstring. - minLength: A number indicating that the value passed in the model property should a character length more than or equal to the given value to be valid. Setting this property in the decorator is only valid if the model properties type is
stringor the type provided to the decorator isstring. - pattern: A string containing a JavaScript compatible regular expression. The value passed in the model property should match the regular expression to be valid. Setting this property in the decorator is only valid if the model properties type is
stringor the type provided to the decorator isstring. - maxItems: A number indicating that the value passed in the model property should an array length less than or equal to the given value to be valid. Setting this property in the decorator is only valid if the the isArray is also provided with a value of
true. - minItems: A number indicating that the value passed in the model property should an array length more than or equal to the given value to be valid. Setting this property in the decorator is only valid if the the isArray is also provided with a value of
true. - uniqueItems: A number indicating that the value passed in the model property should contain a set of unique array values. Setting this property in the decorator is only valid if the the isArray is also provided with a value of
true. - maxProperties: A number indicating that the value passed in the model property should contain a number of properties less than or equal to the given value to be valid. Setting this property in the decorator is only valid if the model property type is a class or object.
- minProperties: A number indicating that the value passed in the model property should contain a number of properties more than or equal to the given value to be valid. Setting this property in the decorator is only valid if the model property type is a class or object.
- readOnly: A boolean indicating the model property MAY be sent in the API response body, but should not be provided in the request body. Use this if you will be using the same data model class to represent the request and response bodies of an API.
- xml: A string containing XML that represent the format of the model property. Only use if the model property will contain XML.
- example: An example value to place in the swagger document. This value will also be used in the example provided in the Swagger UI and takes precedence over the default decorator property value.
The property that has been decorated with the @Body decorator should always have a type that is a class. Typescript interfaces cannot be decorated and do not provide the same metadata that a class with decorators can. If, in your application, any of your APIs have a property with the @Body decorator and an interface type, the Nest.js swagger module will not be able to correctly create the swagger document. In fact, the Swagger UI will most likely note display the body parameter at all.
@Param
The @Param decorator in our example contained a string value indicating which URL parameter to use for the comment parameter of our controller method. When the Nest.js swagger module encounters this decorator with the provided string, it is able to determine the name of the URL parameter and includes it in the swagger document along with the type provided for the method parameter. However, we could have also written the controller method without passing a string to the @Param decorator to get an object containing all of the URL parameters. If we do this, Nest.js will only be able to determine the names and types of the URL parameters if we use a class as the type for the comment parameter or use the @ApiImplicitParam decorator provided by the Nest.js swagger module on the controller method. Let’s create a new class to describe our URL params and see how it affects the swagger UI.
exportclassUpdateCommentParams{@ApiModelProperty()publicentryId:string;@ApiModelProperty()publiccommentId:string;}
In the UpdateCommentParams class, we have created a single property and used the @ApiModelProperty decorator so the Nest.js swagger module knows to include the properties with their types in the swagger document. Do not try to split the entryId out into it’s own class and extend it because the Nest.js swagger module will not be able to pickup the properties of the extended class. It is also important that the names of the properties used in the class matches the names used in the @Controller and @Put decorators. We can change our comment to use the new class.
@Put('comments/:commentId')publicasyncupdate(@Body()body:UpdateCommentRequest,@Param()params:UpdateCommentParams,@Query('testQuery')testQuery:string,@Headers('testHeader')testHeader:string){}
We have changed the controller so that all path parameters are provided to the controller method’s params parameter as an object.
The swagger UI has been updated to show the comment put API takes two required URL parameters: entryId and commentId. If you will be writing APIs that use a single parameter in your method controller to hold all of the URL parameters, your preferred method of informing the Nest.js swagger module is what you should expect as URL parameters. Using a class as the type for your URL parameters not only informs the Nest.js swagger module of the URL parameters, it also helps in writing your application by providing type checking and code auto-completion.
If, however, you don’t want to make a new class to use as the type for your URL parameters, use an interface, or one or more of the URL parameters are in a Nest.js guard, or middleware, or in a custom decorator, but not in the controller method. You can still inform the Nest.js swagger module about the URL parameters using the @ApiImplicitParam decorator.
@Put('comments/:commentId')@ApiImplicitParam({name:'entryId'})publicasyncupdate(@Body()body:UpdateCommentRequest,@Param('commentId')comment:string,@Query('testQuery')testQuery:string,@Headers('testHeader')testHeader:string){}
If a path param is required to reach the controller method, but the controller method does not use the param specifically, the Nest.js swagger module will not include it in the swagger document unless the controller method is decorated with the @ApiImplicitParam decorator. Use the decorator once for each path parameter that is necessary to reach the controller method, but it isn’t used in the controller itself.
@Put('comments/:commentId')@ApiImplicitParam({name:'entryId'})@ApiImplicitParam({name:'commentId'})publicasyncupdate(@Body()body:UpdateCommentRequest,@Query('testQuery')testQuery:string,@Headers('testHeader')testHeader:string){}
For example, the above controller, being a part of the comment controller, requires two path parameters: entryId and commentId. Since the controller does not contain any @Param decorators in the method parameters, @ApiImplicitParam is used to describe both path params.
The @ApiImplicitParam decorator can take several additional properties in an object passed to the decorator that will further define the URL parameter in the swagger document.
- name: A string containing the name of the URL parameter. This decorator property is the only one required.
- description: A string that can be used to describe what the URL parameter should contain or what it is used for.
- required: A boolean indicating if the URL parameter is required.
- type: A string containing one of the types defined in the swagger specification. Classes and objects should not be used.
@Query
The @Query decorator in our example contained a string value indicating which query parameter to use for the testQuery parameter of our controller method. When the Nest.js swagger module encounters this decorator with the provided string, it is able to determine the name of the query parameter and includes it in the swagger document along with the type provided for the method parameter. However, we could have also wrote the controller method without passing a string to the @Query decorator to get an object containing all the query parameters. If we do this, Nest.js will only be able to determine the names and types of the query parameters if we use a class as the type for the testQuery parameter or use the @ApiImplicitQuery decorator provided by the Nest.js swagger module on the controller method. Let’s create a new class to describe our query params and see how it affects the Swagger UI.
exportclassUpdateCommentQuery{@ApiModelPropertyOptional()publictestQueryA:string;@ApiModelPropertyOptional()publictestQueryB:string;}
In the UpdateCommentQuery class, we have created two properties and used the @ApiModelPropertyOptional decorator so the Nest.js swagger module knows to include these properties with their types in the swagger document. We can change our comment and put the controller method to use the new class.
@Put('comments/:commentId')publicasyncupdate(@Body()body:UpdateCommentRequest,@Param('commentId')comment:string,@Query()queryParameters:UpdateCommentQuery,@Headers('testHeader')testHeader:string){}
We have changed the controller so that all query parameters are provided to the controller method’s queryParameters parameter as an object.
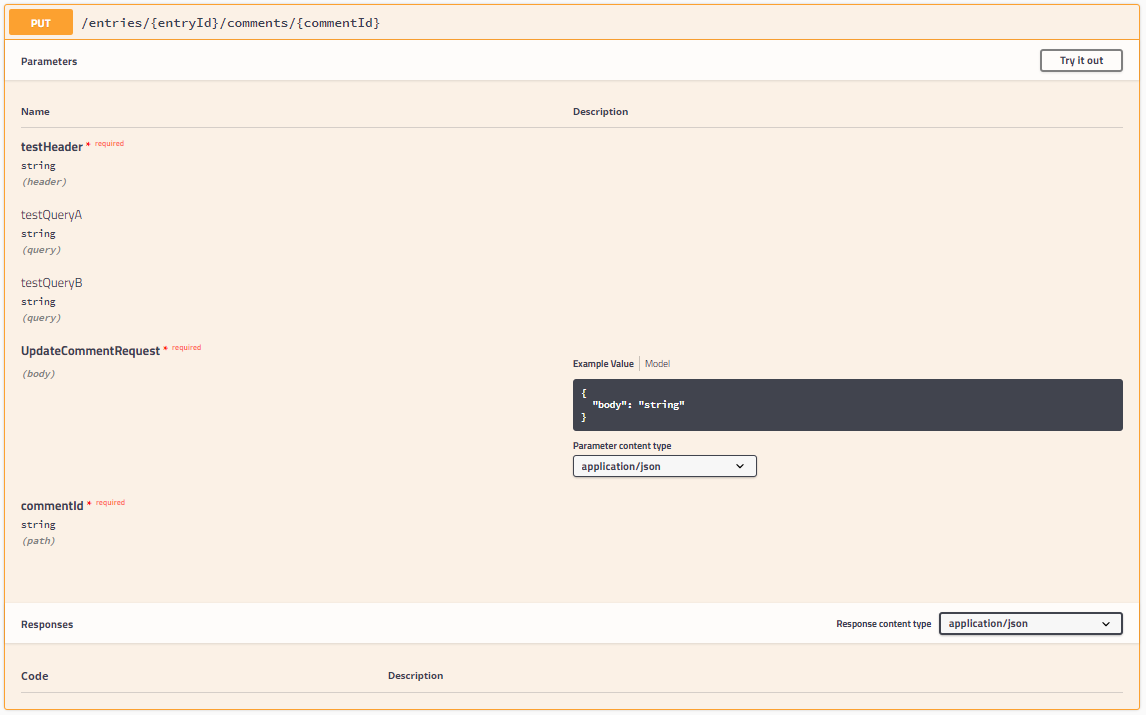
The swagger UI has been updated to show the comment, and the put API takes two optional query parameters: testQueryA and testQueryB. If you will be writing APIs that will use a single parameter in your method controller to hold all of the query parameters, this should be your preferred method of informing the Nest.js swagger module you are expecting as query parameters. Using a class as the type for your query parameters not only informs the Nest.js swagger module of the query parameters, it also helps in writing your application by providing type checking and code auto-completion.
However, if you do not wish to make a new class to use as the type for your query parameters, you use an interface, or the query parameters are used in a Nest.js guard or middleware in a custom decorator, but not in the controller method. You can still inform the Nest.js swagger module about the query parameters using the @ApiImplicitQuery decorator.
@Put('comments/:commentId')@ApiImplicitQuery({name:'testQueryA'})@ApiImplicitQuery({name:'testQueryB'})publicasyncupdate(@Param('commentId')comment:string,@Body()body:UpdateCommentRequest,@Query()testQuery:any,@Headers('testHeader')testHeader:string){}
If a query param is required to reach the controller method, but the controller method does not use the query param specifically, the Nest.js swagger module will not include it in the swagger document unless the controller method is decorated with the @ApiImplicitQuery decorator. Use the decorator once for each query parameter that is necessary to reach the controller method, but is not not used in the controller itself.
@Put('comments/:commentId')@ApiImplicitQuery({name:'testQueryA'})@ApiImplicitQuery({name:'testQueryB'})publicasyncupdate(@Param('commentId')comment:string,@Body()body:UpdateCommentRequest,@Headers('testHeader')testHeader:string){}
For example, the above controller requires two query parameters: testQueryA and testQueryB. Since the controller does not contain any @Query decorators in the method parameters, @ApiImplicitQuery is used to describe both query params.
The @ApiImplicitQuery decorator can take several additional properties in an object passed to the decorator that will further define the query parameter in the swagger document.
- name: A string containing the name of the query parameter. This decorator property is the only one required.
- description: A string that can be used to describe what the query parameter should contain or what it is used for.
- required: A boolean indicating if the query parameter is required.
- type: A string containing one of the types defined in the swagger specification. Classes and objects should not be used.
- isArray: A boolean indicating if the model property should take an array of values. If the model does take an array of values, be sure to include this value in the decorator or the Nest.js swagger module will not know to represent the model property as an array.
- collectionFormat: Maps to the swagger specification collectionFormat setting. This is used to depict how a model properties array values should be formatted. Possible values are:
- csv: comma separated values
foo,bar - ssv: space separated values
foo bar - tsv: tab separated values
foo\tbar - pipes: pipe separated values
foo|bar - multi: corresponds to multiple parameter instances instead of multiple values for a single instance foo=bar&foo=baz. This is valid only for parameters in “query” or “formData”.
- csv: comma separated values
@Headers
The @Headers decorator in our example contained a string value indicating which request header value to use for the testHeader parameter of our controller method. When the Nest.js swagger module encounters this decorator with the provided string, it is able to determine the name of the request header and includes it in the swagger document along with the type provided for the method parameter. However, we could have also written the controller method without passing a string to the @Headers decorator to get an object containing all the request headers. If we do this, Nest.js will only be able to determine the names and types of the request headers if we use a class as the type for the testHeader parameter or use the @ApiImplicitHeader decorator provided by the Nest.js swagger module on the controller method. Let’s create a new class to describe our query params and see how it affects the swagger UI.
exportclassUpdateCommentHeaders{@ApiModelPropertyOptional()publictestHeaderA:string;@ApiModelPropertyOptional()publictestHeaderB:string;}
In the UpdateCommentHeaders class, we have created two properties and used the @ApiModelPropertyOptional decorator so the Nest.js swagger module knows to include these properties with their types in the swagger document. We can change our comment put controller method to use the new class.
@Put('comments/:commentId')publicasyncupdate(@Body()body:UpdateCommentRequest,@Param('commentId')comment:string,@Query('testQuery')testQuery:string,@Headers()headers:UpdateCommentHeaders){}
We have changed the controller so that all request parameters the controller expects are provided to the controller method’s queryParameters parameter as an object.
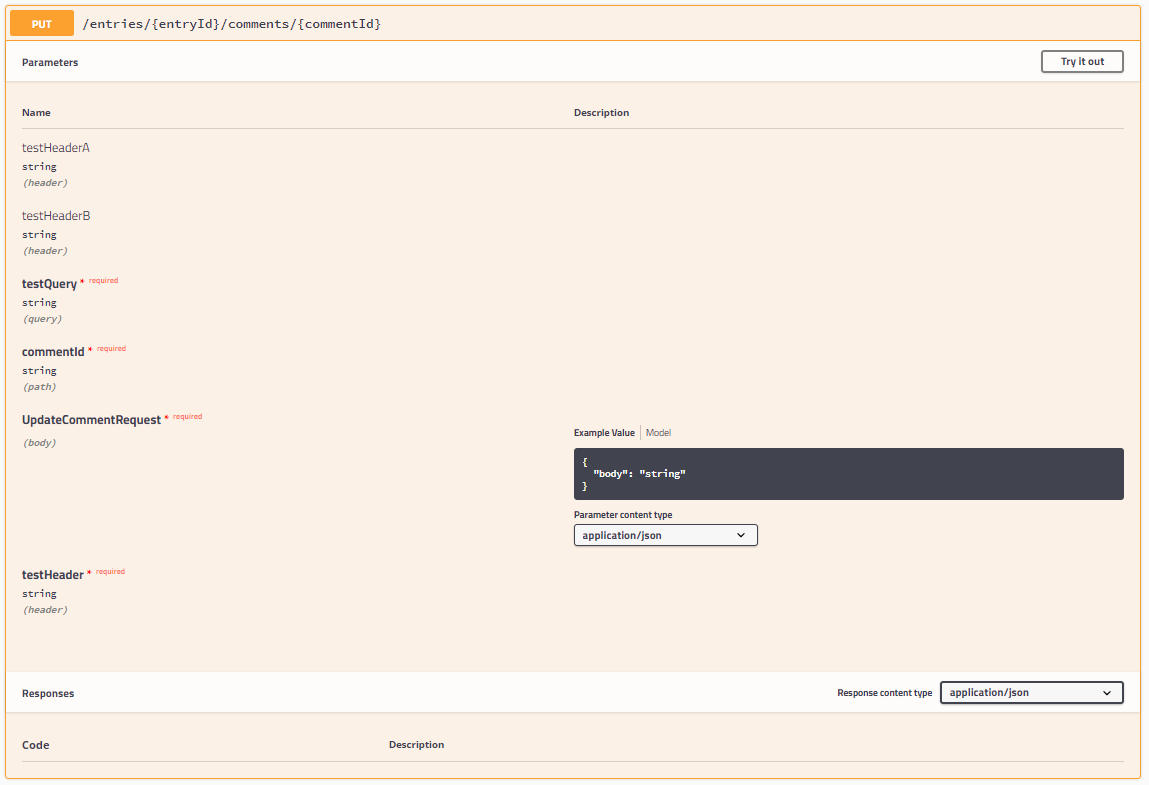
The swagger UI has been updated to show the comment put API expects two headers: testHeaderA and testHeaderB. If you will be writing APIs that will use a single parameter in your method controller to hold all of the expected headers, and this should be your preferred method of informing the Nest.js swagger module that you are expecting as query parameters. Using a class as the type for your expected headers not only informs the Nest.js swagger module of the headers, it also helps in writing your application by providing type checking and code auto-completion.
If, however, you do not wish to make a new class to use as the type for your expected headers, you use an interface, or the headers are used in a Nest.js guard or middleware or in a custom decorator, but not in the controller method. You can still inform the Nest.js swagger module about the query parameters using the @ApiImplicitHeader or the @ApiImplicitHeaders decorators.
@Put('comments/:commentId')@ApiImplicitHeader({name:'testHeader'})publicasyncupdate(@Body()body:UpdateCommentRequest,@Param('commentId')comment:string,@Query('testQuery')testQuery:string,@Headers()headers:any){}
If a header is required to reach the controller method, but the controller method does not use the header specifically. The Nest.js swagger module will not include it in the swagger document unless the controller method is decorated with the @ApiImplicitHeader or @ApiImplicitHeaders decorators. Use the @ApiImplicitHeader decorator once for each header, or the @ApiImplicitHeaders decorator once to describe all the headers. This is necessary to reach the controller method but it isn’t used in the controller itself.
@Put('comments/:commentId')@ApiImplicitHeader({name:'testHeaderA'})@ApiImplicitHeader({name:'testHeaderB'})publicasyncupdate(@Body()body:UpdateCommentRequest,@Param('commentId')comment:string,@Query('testQuery')testQuery:string,){}@Put('comments/:commentId')@ApiImplicitHeader([{name:'testHeaderA'},{name:'testHeaderB'}])publicasyncupdate(@Body()body:UpdateCommentRequest,@Param('commentId')comment:string,@Query('testQuery')testQuery:string,){}
For example, the above controllers requires two headers: testHeaderA and testHeaderB. Since the controller does not contain and @Headers decorators in the method parameters, @ApiImplicitHeader, and @ApiImplicitHeaders that is used to describe both headers.
The @ApiImplicitHeader and @ApiImplicitHeaders decorators can take several additional properties in an object or array of objects, respectively, passed to the decorator that will further define the query parameter in the swagger document.
- name: A string containing the name of the header. This decorator property is the only one required.
- description: A string that can be used to describe what the header should contain or what it is used for.
- required: A boolean indicating if the header is required.
Note: the @ApiImplicitHeaders decorator is just a shortcut for using the @ApiImplicitHeader decorator multiple times. If you need to describe multiple headers, use @ApiImplicitHeaders. Also, you should not use these headers to describe authentication mechanics. There are other decorators for that.
Authentication
It is very likely that you will need to have some form of authentication in your application at some point. The blog example application uses a username and password combination to authenticate a user and provides a JSON web token to allow the user to access the APIs. However you decide to setup authentication, one thing is for sure: you will require either query parameters or headers to maintain an authentication state and you will most likely use Nest.js middleware or guards to check a user’s authentication state. You do this because writing that code in every controller method creates a lot of code duplication and would complicate every controller method.
If your application does require authentication, first, be sure your document settings are properly configured using the addOAuth2 or the addBearerAuth method. Refer back to the Document Settings section if you are unsure of what those methods do.
In addition to setting the authentication scheme for the swagger document, you should also use the ApiBearerAuth and/or the ApiOAuth2Auth decorators on the controller class or controller methods. When used on an entire controller class, these decorators inform the Nest.js swagger module that all controller methods require authentication. If not all controller methods require authentication, you will need to decorate the individual controller methods that do.
@Put('comments/:commentId')@ApiBearerAuth()publicasyncupdate(@Body()body:UpdateCommentRequest,@Param('commentId')comment:string,@Query('testQuery')testQuery:string,@Headers('testHeader')testHeader:string){}
This example depicts a single controller method, API, that requires a bearer token to be able to use the API.
@Put('comments/:commentId')@ApiOAuth2Auth(['test'])publicasyncupdate(@Body()body:UpdateCommentRequest,@Param('commentId')comment:string,@Query('testQuery')testQuery:string,@Headers('testHeader')testHeader:string){}
This example depicts a single controller method, API, that requires a specific set of OAuth2 roles to be able to use the API. The @ApiOAuth2Auth decorator takes an array of all the roles the user should have in order to have access to the API.
These decorators are used in conjunction with the ApiBearerAuth and ApiOAuth2Auth document settings to build a form the user can enter their credentials, either an API key or an Oauth key, and select their roles, if OAuth2 is being used, inside the swagger UI. These values are then passed in the appropriate places, either as query params or header values, when the user executes a specific API.
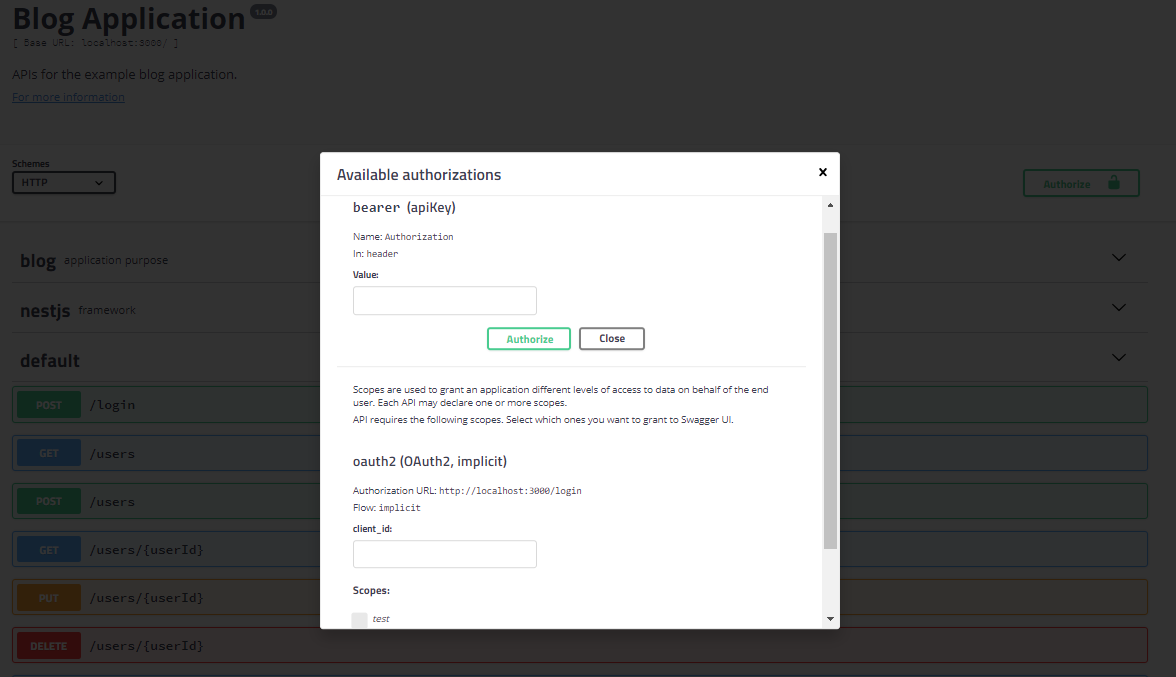
Clicking the Authorize button at the top of the swagger UI page will open the authorizations form. For a bearer token, log into the application and copy the auth token returned into the space provided in the swagger UI authorization. The token should be in the form of Bearer <TOKEN VALUE>. For OAuth2 authentication, enter your credentials and select the roles you are requesting. Clicking the Authorize button will save the credentials for use when executing the APIs in the swagger UI.
API request and response decorators
So far we have been primarily focused on decorating controllers, so the Nest.js swagger module can build a swagger document containing all of the inputs our APIs expect or could use. The Nest.js swagger module also contains decorators that can be used to describe with what and how APIs respond and the format of the content it expects to receive and send. These decorators help form a complete picture of how a specific API works when looking at the swagger document or when using the swagger UI.
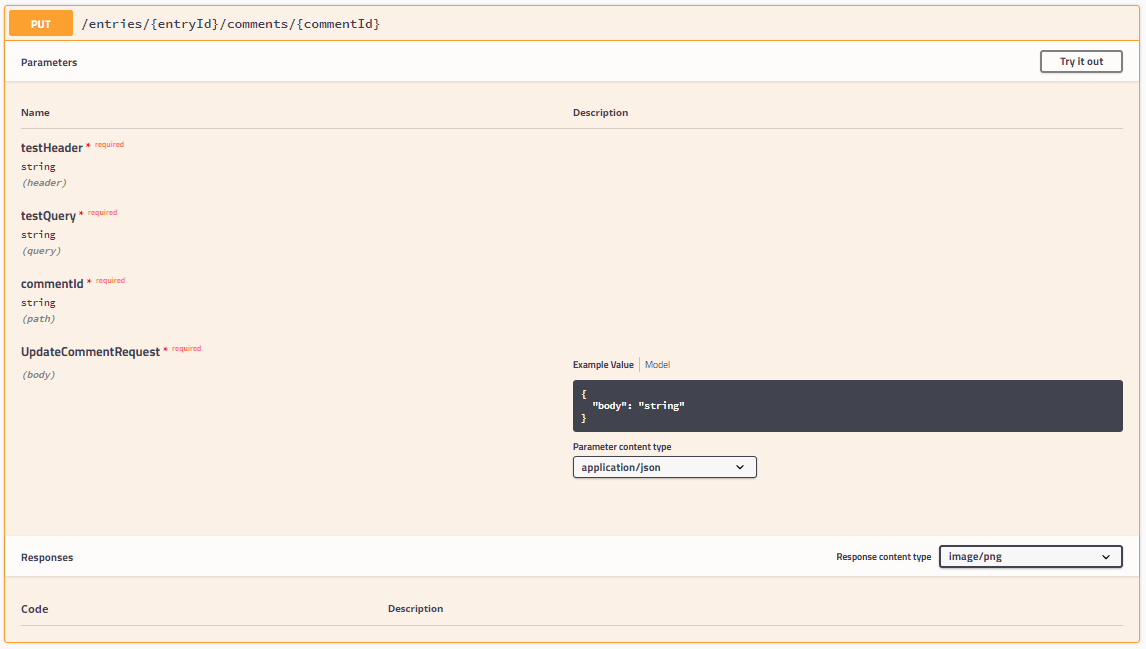
All of the APIs we have covered in our example blog application follow a typical modal of accepting inputs in the form of JSON. However, it is possible that an application may need to take a different input type, often referred to as a MIME type. For example, we could allow users of our example blog application to upload an avatar image. An image cannot easily be represented as JSON so we would need to build an API that takes an input MIME type of image/png. We can ensure this information is present in our application’s swagger document by using the @ApiConsumes decorator.
@Put('comments/:commentId')@ApiConsumes('image/png')publicasyncupdate(@Body()body:UpdateCommentRequest,@Param('commentId')comment:string,@Query('testQuery')testQuery:string,@Headers('testHeader')testHeader:string){}
In this example, we have used the @ApiConsumes decorator to inform the Nest.js swagger module that the comment put API expects to receive a png image.
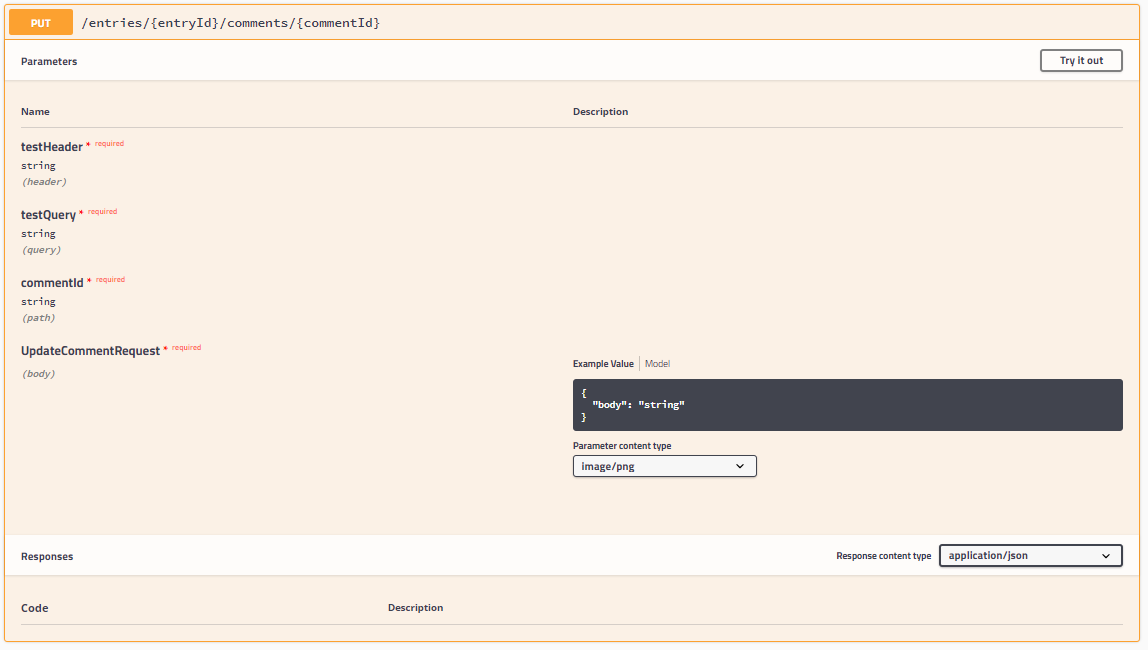
The Swagger UI now shows the Parameter content type drop down as image/png. The @ApiConsumes decorator can take any number of MIME types as parameters. Multiple values in the decorator will result in the Parameter content type drop down containing multiple values with the first value always being the default. If a controller is dedicated to handling a specific MIME type, like application/json, the @ApiConsumes decorator can be placed on the controller class instead of on every single controller method. However, if your APIs will be consuming JSON, the decorator can be left off and the Nest.js swagger module will default the APIs to application/json.
In addition to consuming various MIME data types, APIs can also respond with various MIME data types. For example, our fictitious avatar upload API may store the images in a database or cloud storage provider. Such storage locations may not be directly accessible to users so an API can be created to lookup and return the avatar image for any user. We can use the @ApiProduces decorator to let the Nest.js swagger module know the API returns data using the image/png MIME type.
@Put('comments/:commentId')@ApiProduces('image/png')publicasyncupdate(@Body()body:UpdateCommentRequest,@Param('commentId')comment:string,@Query('testQuery')testQuery:string,@Headers('testHeader')testHeader:string){}
In this example, we have used the @ApiProduces decorator to inform the Nest.js swagger module that the comment put API expects to return a png image.
The Swagger UI now shows the Response content type drop down as image/png. The @ApiProduces decorator can take any number of MIME types as parameters. Multiple values in the decorator will result in the Response content type drop down containing multiple values with the first value always being the default. If a controller is dedicated to handling a specific MIME type, like application/json, the @ApiConsumes decorator can be placed on the controller class instead of on every single controller method. However, if your APIs will be consuming JSON, the decorator can be left off and the Nest.js swagger module will default the APIs to application/json.
Request and response MIME type information goes a long way to informing the end use of the swagger document, and how to use an API and how an API works. However, we have not fully documented everything an API can respond with. For example, what data values are contained in the APIs response body and what are the potential HTTP status codes it could return? Such information can be provided using the @ApiResponse decorator.
The @ApiResponse decorator can be placed on individual controller methods or on the controller class. The Nest.js swagger module will collect the controller class level decorator data and pair it with the controller method decorator data to produce a list of possible responses each individual API could produce.
@Controller('entries/:entryId')@ApiResponse({status:500,description:'An unknown internal server error occurred'})exportclassCommentController{@Put('comments/:commentId')@ApiResponse({status:200,description:'The comment was successfully updated',type:UpdateCommentResponse})publicasyncupdate(@Body()body:UpdateCommentRequest,@Param('commentId')comment:string,@Query('testQuery')testQuery:string,@Headers('testHeader')testHeader:string){}}
In this example, we decorated the comment controller so that all the APIs will contain a generic response for internal server errors. The update controller method has been decorated so that responses with a status code of 200 indicate the comment was successfully updated. The type is another data model created to provide the Nest.js swagger module with information regarding the individual properties in the response body.
exportclassUpdateCommentResponse{@ApiModelPropertyOptional()publicsuccess?:boolean;}
The UpdateCommentResponse data model contains one optional property, success, that could be used to further relay to the UI that the comment was updated successfully.

The swagger UI now lists both possible responses in the Responses section of the API card. Use the @ApiResponse decorator to inform user’s of your APIs about the different success and error scenarios they may need to deal with when using the APIs. The @ApiResponse decorator can take additional properties in the object passed to it.
- status: A number containing the HTTP status code the API will respond with. This decorator property is the only one required.
- description: A string that can be used to describe what the response indicates or how the user should react when the response is encountered.
- type: Use a data model class any of the data types defined in the swagger specification to inform users of the API what they can expect in the response body. If you use the isArray property, it indicated the response will be an array of values with the provided type.
- isArray: A boolean indicating if the response body will contain an array of values. If the response body will contain an array of values, be sure to include this value in the decorator or the Nest.js swagger module will not know to represent the response body an array.
API metadata decorators
If you work through any Nest.js project and properly decorate all the controllers and controller methods with the decorators we have covered so far, the swagger document the Nest.js swagger module produces will have every technical detail a user of the APIs would need to understand and use the APIs. The last two decorators we will cover in this chapter simply provide more metadata for the swagger document. The swagger UI will use this metadata to produce a cleaner UI, but functionality will not change.
The first decorator we will cover is @ApiOperation. Don’t confuse this decorator with the HTTP method decorators like @Put. This decorator is used to provide a title, description, and unique identifier called an operationId for individual controller methods.
@Put('comments/:commentId')@ApiOperation({title:'Comment Update',description:'Updates a specific comment with new content',operationId:'commentUpdate'})publicasyncupdate(@Body()body:UpdateCommentRequest,@Param('commentId')comment:string,@Query('testQuery')testQuery:string,@Headers('testHeader')testHeader:string){}
In this example, we have provided a brief title and a much longer description of the comment put API. The title should be kept short, less than 240 character, and is used to populate the summary portion of the swagger specification. While the description in the example is short, use verbose descriptions in your own projects. This should convey why a user would use the API or what they accomplish through the use of the API. The operationId must be kept unique per the swagger documentation. The value could be used in various swagger codegen projects to reference the specific API.
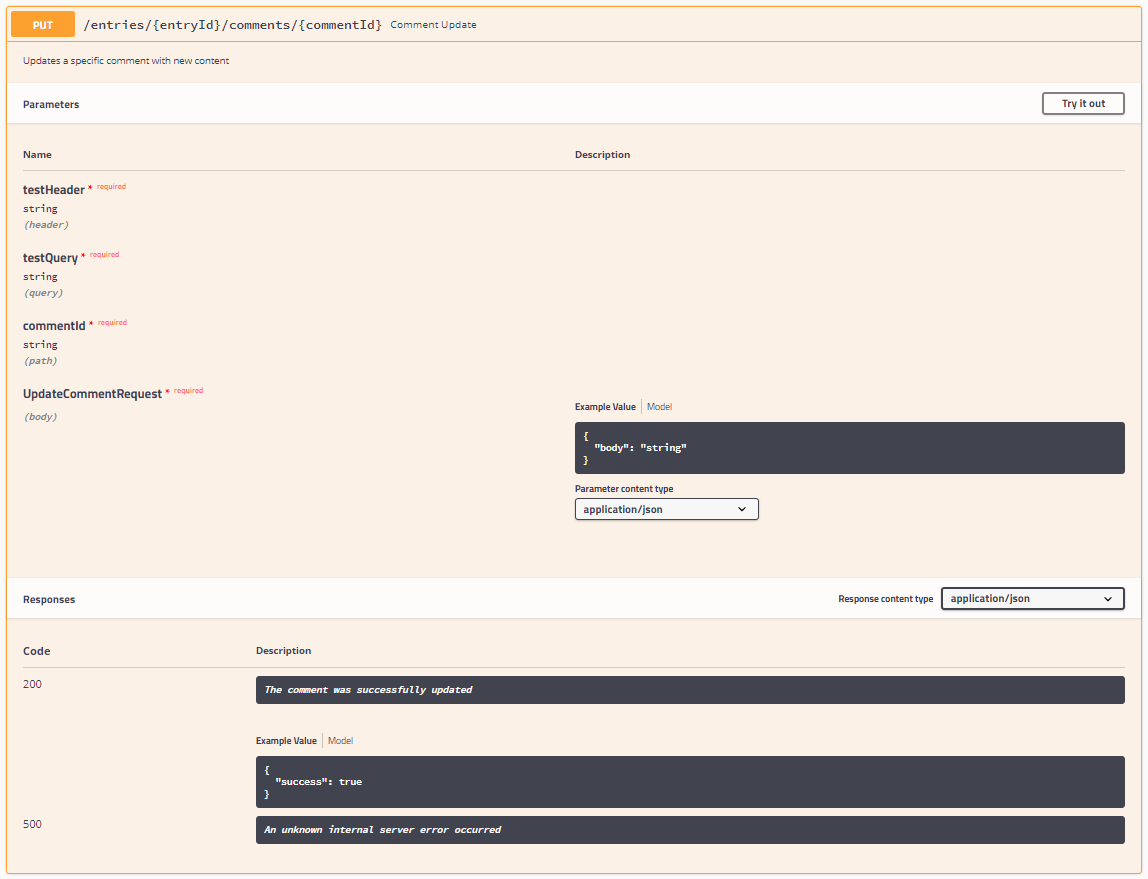
In the swagger UI, we can see the values we have passed to the @ApiOperation decorator, and how they are used to fill in additional details of the API card. The title is placed in the header next to the API path. The description is the first bit of information in the API card following the header. We can see how using a long title and description negatively impacts the API card header, but works very well in the API card body.
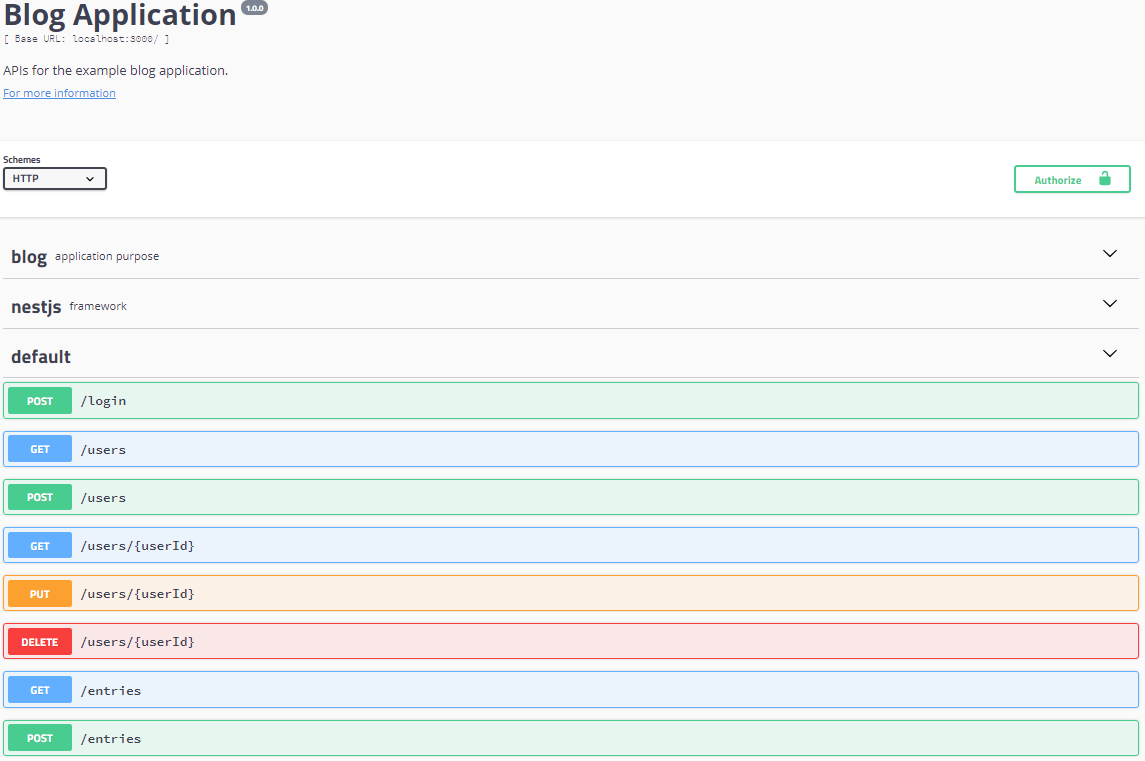
Looking at the overall swagger UI application, we can see that all of the APIs for the example blog application are grouped together. While this works, it would be nicer to group the APIs based on the operations they perform or the resources, comment, entry, or keyword that they act upon. This is what the @ApiUseTags decorator is used for.
The @ApiUseTags decorator can be placed on a controller class or individual controller methods and can take any number of string parameters. These values will be placed in the swagger document for each individual API.
@Controller('entries/:entryId')@ApiUseTags('comments')exportclassCommentController{}
In this example, we decorated the comment controller class so that all of the controller methods will be given the comments tag.
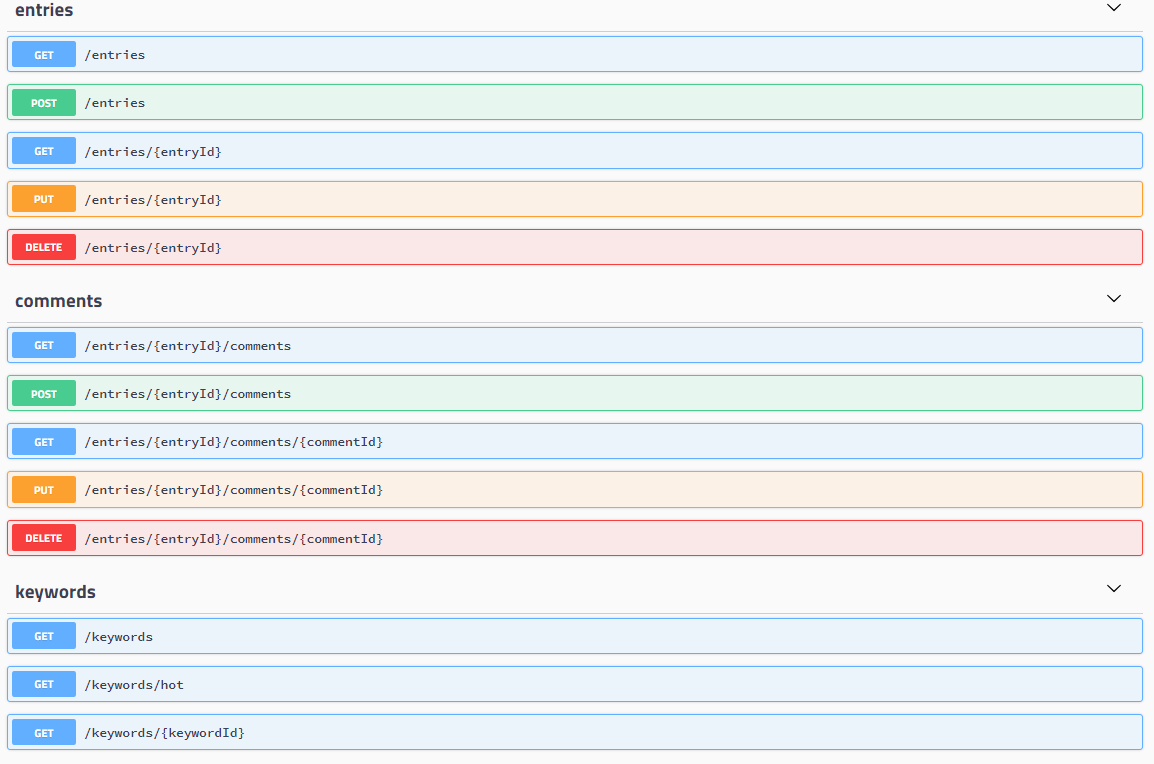
The swagger UI now groups the APIs using the tags. This ensures like APIs are grouped and provides a little spacing between each group to produce a nicer UI. The groups are also expandable and collapsible giving users the option of hiding APIs they may not be interested in.
Saving the swagger document
We have covered all of the available decorators in the Nest.js swagger module and the decorators already available in Nest.js to produce a swagger document and expose the swagger UI. This works great when your APIs are primarily used by developers in their own projects or when testing the APIs on a local development server or in a staging environment. For APIs that are primarily used for a specific front-end application, you may not wish to expose the swagger UI for the general public to be able to use. In such a case, you can still produce a swagger document for storage and use it on your own or your teams other projects.
To accomplish this, we will write a new Typescript file that can be executed as part of a build chain. We will use the fs-extras NodeJS module to make writing our file to disk much simpler.
import*asfsfrom'fs-extra';asyncfunctionwriteDoc() {constapp=awaitNestFactory.create(AppModule);constdocument=SwaggerModule.createDocument(app,swaggerOptions);fs.ensureDirSync(path.join(process.cwd(),'dist'));fs.writeJsonSync(path.join(process.cwd(),'dist','api-doc.json'),document,{spaces:2});}writeDoc();
You can place this file in the root of your project or in the source directory and use an NPM script entry to execute it or run it using NodeJS. The example code will use the Nest.js swagger module to build a swagger document and fs-extras to write the document to the dist directory as a JSON file.
Summary
In this chapter, we covered how the Nest.js swagger module makes use of the existing decorators you use in your application to create a swagger v2 specification document. We also covered all the additional decorators the Nest.js swagger module provides to enhance the information in the swagger document. We also setup the example blog application to expose the swagger UI.
Use the Nest.js swagger module to not only document your application’s controllers, but to also provide UI for testing your application. If you fully document your application, the swagger UI can be an excellent replacement UI or provide an easy testing area that you or your users can use instead of having to watch for network calls in your applications real UI. The swagger UI can also be a great substitute for tools like Postman.
If you don’t wish to use the Swagger UI or expose your swagger document with you application in a production environment, remember you can always write the file to disk as a separate build job of your application. This allows you to store and use the document in a number of ways, most notably with Swagger Codegen.
The next chapter will bring you up to speed on Command Query Responsibility Separation (CQRS).