Table of Contents for
JavaScript Security
 JavaScript Security
Published by
Packt Publishing, 2014
JavaScript Security
Published by
Packt Publishing, 2014
- Cover
- Table of Contents
- JavaScript Security
- JavaScript Security
- Credits
- About the Author
- About the Reviewers
- www.PacktPub.com
- Preface
- What you need for this book
- Who this book is for
- Conventions
- Reader feedback
- Customer support
- 1. JavaScript and the Web
- JavaScript beyond the client
- JavaScript security issues
- Summary
- 2. Secure Ajax RESTful APIs
- Basic defense against similar attacks
- Summary
- 3. Cross-site Scripting
- Examples of cross-site scripting
- Defending against cross-site scripting
- Summary
- 4. Cross-site Request Forgery
- Other examples of CSRF
- Other forms of protection
- Summary
- 5. Misplaced Trust in the Client
- Summary
- 6. JavaScript Phishing
- Examples of JavaScript phishing
- Defending against JavaScript phishing
- Summary
- Index
Welcome back to the book! In this chapter, we will walk through some code where we build a RESTful server, and write some frontend code on top of it so that we can create a simple to-do list app. The app is extremely simple: add and delete to-do items, after which we'll demonstrate one or two ways in which RESTful APIs can be laden with security flaws. So here we go!
As mentioned in Chapter 1, JavaScript and the Web, JavaScript is used in the server side as well. In this example, we'll use Node.js and Express.js to build a simple RESTful server before we touch upon how we can secure our RESTful APIs.
Note
For the remainder of this book, you will require Node.js Version 0.10.2x or above, MongoDB Version 2.2 or above, and Express.js 4.x. To install them, feel free to refer to their respective installation instructions. For Node.js, refer to http://nodejs.org/, MongoDB at http://docs.mongodb.org/manual/installation/, and Express.js at http://expressjs.com/. To keep things simple, all modules installed will be installed globally.
We'll build a RESTful server using Node.js and Express.js 4.x. This RESTful server contains a few endpoints:
/api/todos:GET: This endpoint gets a full list of to-do itemsPOST: This creates a new to-do item
/api/todos/:id:POST: This deletes a to-do item
The source code for this section can be found at chapter2/node/server.js and its related content as well. Now open up your text editor and create a new file. We'll name this file server.js.
Before you start to code, make sure that you install the required packages mentioned in the previous information box.
Let's start by initializing the code:
var express    = require('express');
var bodyParser = require('body-parser');
var app        = express();

app.use(bodyParser());

var port     = process.env.PORT || 8080; // set our port

var mongoose   = require('mongoose');
mongoose.connect('mongodb://127.0.0.1/todos'); // connect to our database
var Todos     = require('./app/models/todo');

var router = express.Router();

// middleware to use for all requests
router.use(function(req, res, next) {
  // do logging
  console.log('Something is happening.');
  next();
});
What we did here is that we first imported the required libraries. We then set our port at 8080, following which we connect to MongoDB via Mongoose and its associated database name.
Next, we defined a router using express.Router().
After this piece of code, include the following:
router.get('/', function(req, res) {
  res.sendfile('todos.html')
});
router.route('/todos')

  .post(function(req, res) {
    var todo = new Todos();
    todo.text = req.body.text;
    todo.details = req.body.details;
    todo.done = true;
    todo.save(function(err) {
      if (err)
        res.send(err);

      res.json(todo);
    });


  })

  .get(function(req, res) {
    Todos.find(function(err, _todos) {
      if (err)
        res.send(err);
      var todos = {
        'todos':_todos
      }
      res.json(todos);
    });
  });

router.route('/todos/:_id')
  .post(function(req, res) {
    Todos.remove({
      _id: req.params._id
    }, function(err, _todo) {
      if (err)
        res.send(err);
      var todo = {
        _id: req.params._id
      }
      console.log("--- todo");
      console.log(todo);
      res.json(todo);
    });
  });
What we have here are the major API endpoints to get a list of to-do items, delete a single item, and create a single to-do item. Take note of the highlighted lines though: they return a HTML file, which basically contains the frontend code for your to-do list app. Let's now work on that file.
Let's return to your text editor and create a new file called todos.html. This is a fairly large file with quite a bit of code compared to the rest of the code samples in this book. So, you can refer to chapter2/node/todos.html to see the full source code. In this section, I'll highlight the most important pieces of code so that you have a good idea of how this piece of code works:
<!DOCTYPE html>
<html lang="en">
<head>
<title>Sample To do</title>
<!-- Bootstrap core CSS -->
<link href="//netdna.bootstrapcdn.com/bootstrap/3.1.1/css/bootstrap.min.css" rel="stylesheet">
<style>
/* css code omitted */
</style>
<!-- HTML5 shim and Respond.js IE8 support of HTML5 elements and media queries -->
<!--[if lt IE 9]>
<script src="https://oss.maxcdn.com/libs/html5shiv/3.7.0/html5shiv.js"></script>
<script src="https://oss.maxcdn.com/libs/respond.js/1.4.2/respond.min.js"></script>
<![endif]-->
</head>
<body>
<div class="container">
<div class="header">
<ul class="nav nav-pills pull-right">
<li class="active"><a href="#">Home</a></li>
<li><a href="#">About</a></li>
<li><a href="#">Contact</a></li>
</ul>
<h3 class="text-muted">Sample To do Node.js Version</h3>
</div>
<div class="jumbotron">
<h1>Sample To Do</h1>
<p class="lead">So here, we learn about RESTful APIs</p>
<p><button id="toggleTodoForm" class="btn btn-lg btn-success" href="#" role="button">Add To Do</button></p>
<div id="todo-form" role="form">
<div class="form-group">
<label>Title</label>
<input type="text" class="form-control" id="todo_title" placeholder="Enter Title">
</div>
<div class="form-group">
<label>Details</label>
<input type="text" class="form-control" id="todo_text" placeholder="Details">
</div>
<p><button id="addTodo" class="btn btn-lg">Submit</button></p>
</div>
</div>
<div class="row marketing">
<div id="todos" class="col-lg-12">
</div>
</div>
<div class="footer">
<p>© Company 2014</p>
</div>
</div> <!-- /container -->
<!-- Bootstrap core JavaScript
================================================== -->
<!-- Placed at the end of the document so the pages load faster -->
<script src="//ajax.googleapis.com/ajax/libs/jquery/1.11.1/jquery.min.js"></script>
<script src="//netdna.bootstrapcdn.com/bootstrap/3.1.1/js/bootstrap.min.js"></script>
<script>
// javascript code omitted
</script>
</body>
</html>The preceding code is basically the HTML template that gives a structure and layout to our app. If you have not noticed already, this template is based on Bootstrap 3's basic examples. Some of the CSS code is omitted due to space constraints; feel free to check the source code for it.
Next, you will see that a block of JavaScript code is being omitted; this is the meat of this file:
    function todoTemplate(title, body, id) {
      var snippet = "<div id=\"todo_"+id+"\"" + "<h2>"+title+"</h2>"+"<p>"+body+"</p>";
      var deleteButton = "<a class='delete_item'  href='#' id="+id+">delete</a></div><hr>";
      snippet += deleteButton;

      return snippet;
    }
    function getTodos() {
      // simply get list of to-dos when called
      $.get("/api/todos", function(data, status) {

        var todos = data['todos'];
        var htmlString = "";
        for(var i = 0; i<todos.length;i++) {

          htmlString += todoTemplate(todos[i].text, todos[i].details, todos[i]._id);
}
        $('#todos').html(htmlString);

      })
    }
    function toggleForm() {
      $("#toggleTodoForm").click(function() {
        $("#todo-form").toggle();
      })
    }

    function addTodo() {
      var data = {
        text: $('#todo_title').val(),
        details:$('#todo_text').val()
      }
      $.post('/api/todos', data, function(result) {
        var item = todoTemplate(result.text, result.details, result._id);
        $('#todos').prepend(item);
        $("#todo-form").slideUp();
      })
    }


    $(document).ready(function() {
      toggleForm();
      getTodos();
      //deleteTodo();
      $('#addTodo').click(addTodo);

      $(document).on("click", '.delete_item', function(event) {

        var id = event.currentTarget.id;
      var data = {
          id:id
        }
        $.post('/api/todos/'+id, data, function(result) {

          var item_to_slide = "#todo_"+result._id;

          $(item_to_slide).slideUp();
        });
      });

    })
These JavaScript functions make use of the basic jQuery functionality that we saw in the previous section. Here's what each of the functions does:
todoTemplate(): This function simply returns the HTML that builds the appearance and content of a to-do item.toggleForm(): This makes use of jQuery'stoggle()function to show and hide the form that adds the to-do item.addToDo(): This is the function that adds a new to-do item to our backend. It makes use of jQuery'spost()method.- Finally, we have the
$(document).ready()line, where we initialize our code.
Save the file. Now, fire up your Express.js server by issuing the following command:
node server.js
Now, you can check out your app at http://localhost:8080/api, and you should see the following screen:
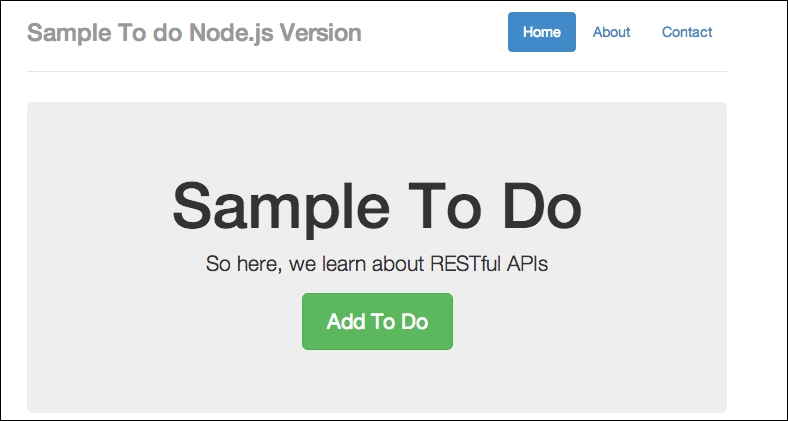
A sample to-do Node.js version
If you are getting this output, great. In my case, I already have some test data, so you can simply add new to-do items. We can do so by simply clicking on the Add To Do button. Have a look at the following screenshot:
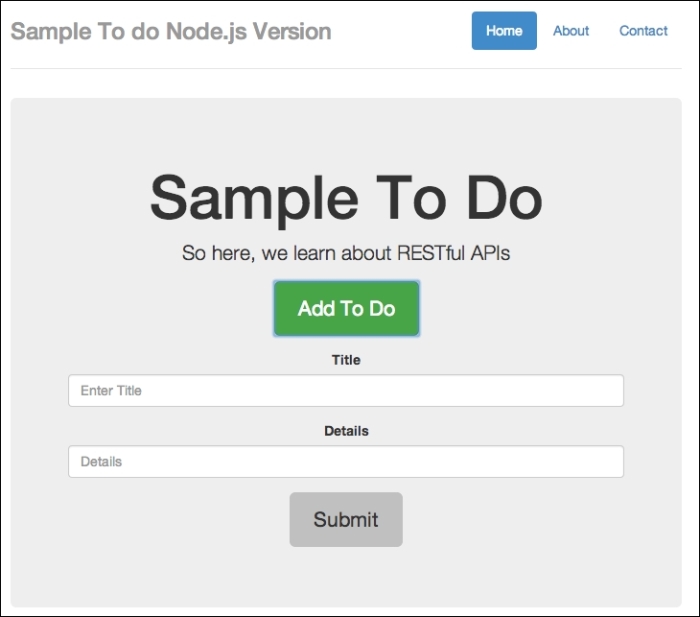
A sample to-do form
Add in some details, as follows:
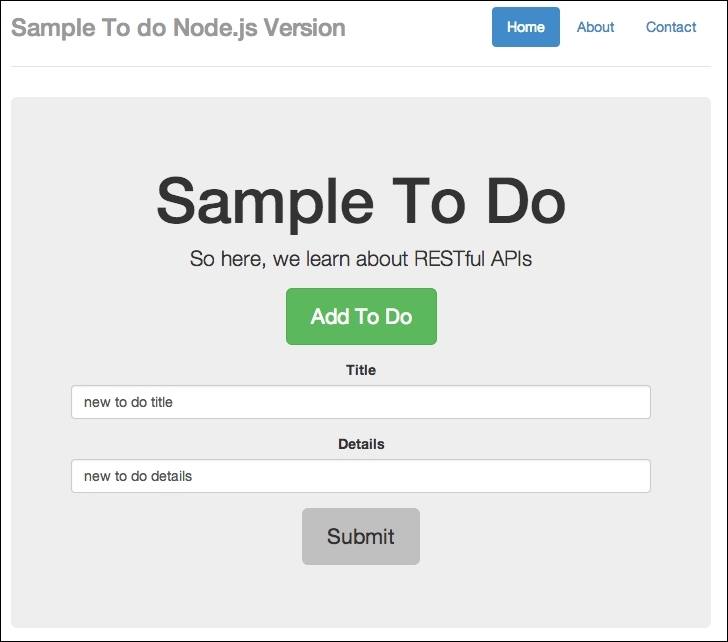
Adding in some details
Finally, click on Submit. Have a look at the following screenshot:
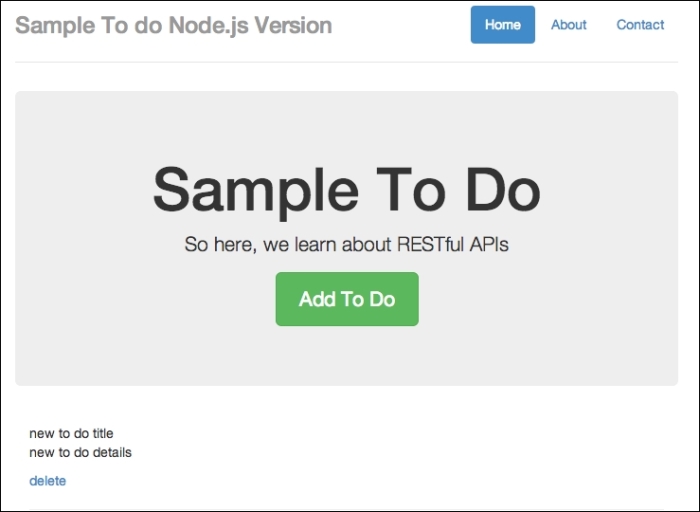
New item added
You should see that the added to-do form slides up, and a new to-do item is added.
You can also delete the to-do items just to make sure that things are working all right.
Now to the fun part. I'm not sure if you've noticed, but there's at least one major security flaw in our app: our endpoints are exposed to cross-domain name operations. I want you to go back to your text editor, create a new file called external_node.html, and copy the following code in to it:
<!DOCTYPE html>
<html lang="en">
<head>
<title>Sample To do</title>
<!-- Bootstrap core CSS -->
<link href="//netdna.bootstrapcdn.com/bootstrap/3.1.1/css/bootstrap.min.css" rel="stylesheet">
<!-- Custom styles for this template -->
<link href="/static/css/custom.css" rel="stylesheet">
<style>
#todo-form {
display:none;
}
</style>
<!-- HTML5 shim and Respond.js IE8 support of HTML5 elements and media queries -->
<!--[if lt IE 9]>
<script src="https://oss.maxcdn.com/libs/html5shiv/3.7.0/html5shiv.js"></script>
<script src="https://oss.maxcdn.com/libs/respond.js/1.4.2/respond.min.js"></script>
<![endif]-->
</head>
<body>
<div class="container">
<div class="header">
<ul class="nav nav-pills pull-right">
<li class="active"><a href="#">Home</a></li>
<li><a href="#">About</a></li>
<li><a href="#">Contact</a></li>
</ul>
<h3 class="text-muted">Sample To do</h3>
</div>
<div class="jumbotron">
<h1>External Post FORM</h1>
<p class="lead">So here, we learn about RESTful APIs</p>
<p><button id="toggleTodoForm" class="btn btn-lg btn-success" href="#" role="button">Add To Do</button></p>
<div id="todo-form" role="form">
<!-- <script>alert("you suck");</script> -->
<div class="form-group">
<label>Title</label>
<input type="text" class="form-control" id="todo_title" placeholder="Enter Title">
</div>
<div class="form-group">
<label>Details</label>
<input type="text" class="form-control" id="todo_text" placeholder="Details">
</div>
<p><button id="addTodo" class="btn btn-lg">Submit</button></p>
</div>
</div>
<div class="row marketing">
<div id="todos" class="col-lg-12">
</div>
</div>
<div class="footer">
<p>© Company 2014</p>
</div>
</div> <!-- /container -->
<!-- Bootstrap core JavaScript
================================================== -->
<!-- Placed at the end of the document so the pages load faster -->
<script src="//ajax.googleapis.com/ajax/libs/jquery/1.11.1/jquery.min.js"></script>
<script src="//netdna.bootstrapcdn.com/bootstrap/3.1.1/js/bootstrap.min.js"></script>
<script>
function todoTemplate(title, body) {
var snippet = "<h2>"+title+"</h2>"+"<p>"+body+"</p><hr>";
return snippet;
}
function getTodos() {
// simply get list of to-dos when called
$.get("/api/todos", function(data, status) {
var todos = data['todos'];
var htmlString = "";
for(var i = 0; i<todos.length;i++) {
htmlString += todoTemplate(todos[i].text, todos[i].details);
}
$('#todos').html(htmlString);
})
}
function toggleForm() {
$("#toggleTodoForm").click(function() {
$("#todo-form").toggle();
})
}
function addTodo() {
var data = {
text: $('#todo_title').val(),
details:$('#todo_text').val()
}
$.post('http://localhost:8080/api/todos', data, function(result) {
var item = todoTemplate(result.text, result.details);
$('#todos').prepend(item);
$("#todo-form").slideUp();
})
}
$(document).ready(function() {
toggleForm();
getTodos();
$('#addTodo').click(addTodo);
})
</script>
</body>
</html>This file is very similar to our frontend code for our to-do app, but we are going to host it elsewhere. Bear in mind that the $.post() endpoint is now pointing to http://localhost:8080/api/todos.
Next, I want you to host the file in another domain in your own localhost. Since we are using http://localhost:8080 for our Node.js server, you can try other ports. In my case, I'll serve external_node.html at http://localhost:8888/external_node.html. Open external_node.html on another port, and you should see the following:
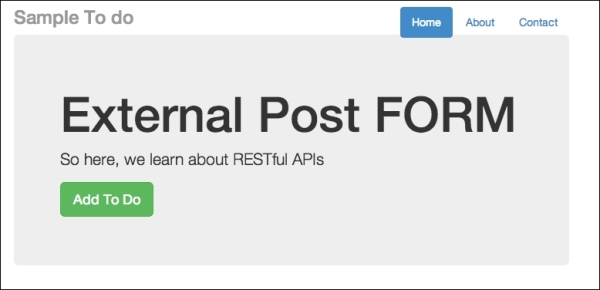
External post form for cross-domain injection
Note
You can open the external_node.html file by starting another instance of Node.js on another port, or you can simply place external_node.html on a local web server, such as Apache. If you are a Windows user, you can use http://www.wampserver.com/en/. If you are a Mac user, you can try using MAMP: http://www.mamp.info/en/.
As usual, click on the Add To Do button, and add in some text. Here's what I did:
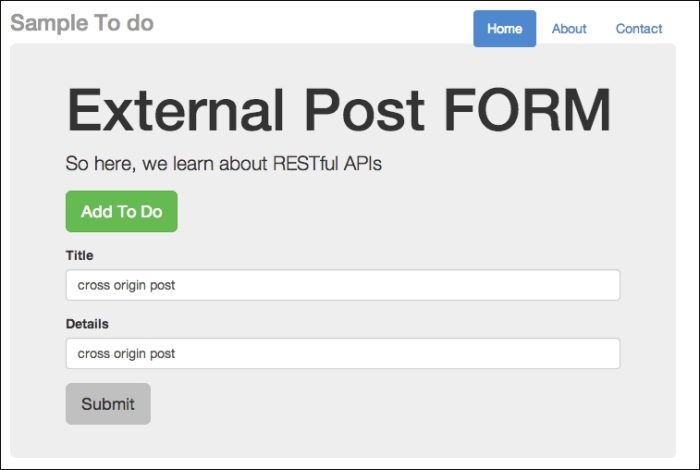
External post form for cross-domain injection
Now, click on Submit. There are no animations in this form. Go back to http://localhost:8080/api and refresh it. You should see the to-do item displayed at the bottom of your to-do list, as follows:
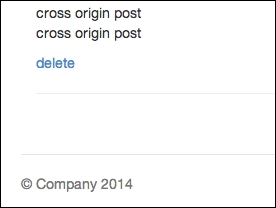
Item posted from another domain. This is dangerous!
Since I have quite a few to-do items, I need to scroll all the way down. But the key thing is to see that without any security precautions, any external-facing APIs can be easily accessed and new content can be posted without your permission. This can cause huge problems for you, as attackers can choose not to play by your rules and inject something sneaky, such as a malicious JavaScript.
What makes a cross-origin post effective is that the attacker uses the end user's logged-in status to gain access to parts of an API on the target site that are behind a login wall.
So now, let's try to inject some JavaScript code via our external form. Going back to external_node.html, try typing in some code. Have a look at the following screenshot:
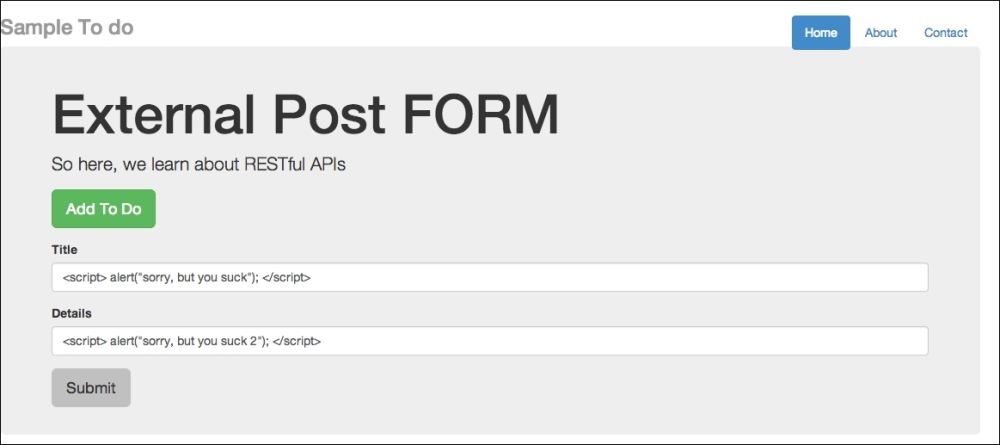
External post form for cross-domain injection using JavaScript
So, I intend to inject alert("sorry, but you suck"). Once submitted, go back to your to-do list app and refresh it. You should see the message shown in the following screenshot:

Injection successful, but this is bad for security
Next, you'll see the following screen:
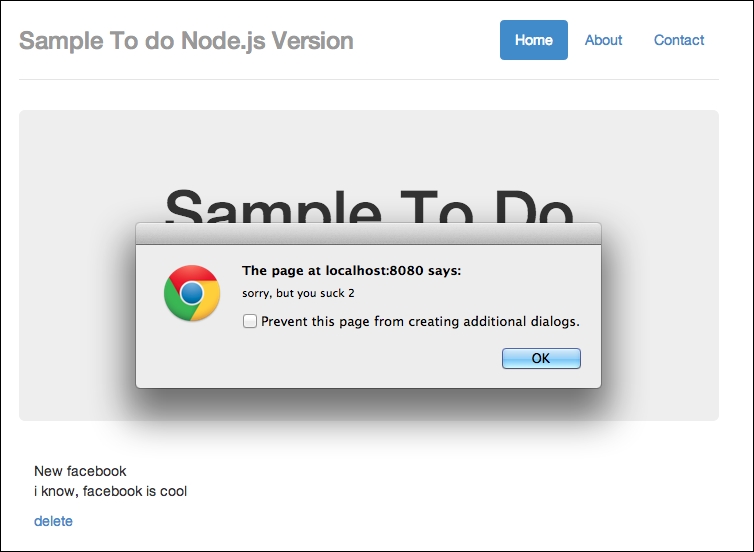
Injection success part 2. Bad security.
Effectively, we've just injected malicious code. We could have injected other stuff, such as links to weird sites and so on, but you get the idea.
You might think that the preceding result cannot be achieved easily; how can an attacker know which endpoints to POST to? This can be done fairly easily. For instance, you can make use of Google Chrome Developer Tools and observe endpoints being used.
Let's try this out: go back to http://localhost:8080/api and open your Chrome Developer Tools (assuming you are using Google Chrome). Once you open the Developer Tools, click on Network. Refresh your to-do app. And finally, make a post. This is what you should see:
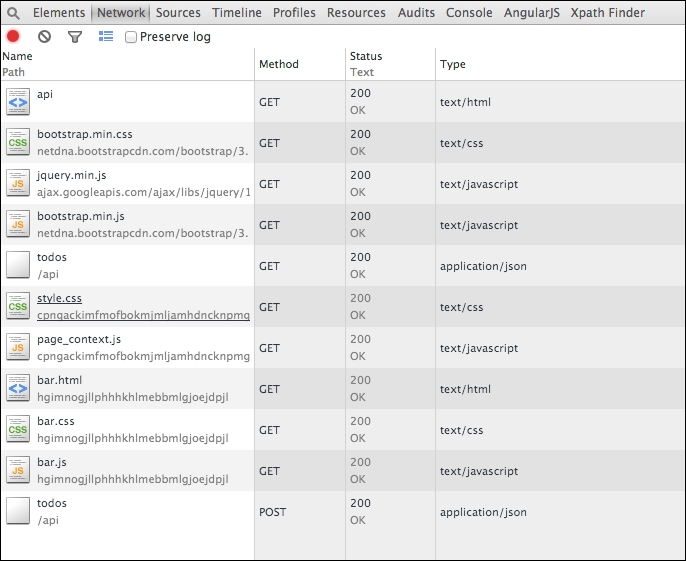
Observing URL endpoints made by code
You should notice that we have made a few GET api calls and the final POST call to our endpoint. The final POST call, todos, followed by /api means that we are posting to /api/todos.
If we are the attacker, the final step would be to derive the required parameters for the posting to go through; this should be easy as well since we can simply observe our source code to check for the parameter's name.