Table of Contents for
Node.js in Action, Second Edition
 Node.js in Action, Second Edition
Published by
Manning Publications, 2017
Node.js in Action, Second Edition
Published by
Manning Publications, 2017
- Cover
- Node.js in Action, Second Edition
- Copyright
- Brief Table of Contents
- Table of Contents
- Praise for the First Edition
- Preface
- Acknowledgments
- About this Book
- About the Author
- About the Cover Illustration
- Part 1. Welcome to Node
- Chapter 1. Welcome to Node.js
- Chapter 2. Node programming fundamentals
- Chapter 3. What is a Node web application?
- Part 2. Web development with Node
- Chapter 4. Front-end build systems
- Chapter 5. Server-side frameworks
- Chapter 6. Connect and Express in depth
- Chapter 7. Web application templating
- Chapter 8. Storing application data
- Chapter 9. Testing Node applications
- Chapter 10. Deploying Node applications and maintaining uptime
- Part 3. Beyond web development
- Chapter 11. Writing command-line applications
- Chapter 12. Conquering the desktop with Electron
- Appendix A. Installing Node
- Appendix B. Automating the web with scraping
- Appendix C. Connect’s officially supported middleware
- Glossary
- Index
- List of Figures
- List of Tables
- List of Listings
Chapter 6. Connect and Express in depth
This chapter covers
- Understanding what Connect and Express are for
- Using and creating middleware
- Creating and configuring an Express application
- Using key Express techniques for error handling, rendering views, and forms
- Using Express architectural techniques for routes, REST APIs, and authentication
In chapter 3, you saw how to build a simple Express application. This chapter provides a more in-depth study of Express and Connect. These two popular Node modules are used by many web developers. This chapter shows you how to build web apps and REST APIs with the most commonly used patterns.
The concepts discussed in the following section are directly applicable to the higher-level framework Express because it extends and builds upon Connect with additional higher-level sugar. After reading this section, you’ll have a firm understanding of how Connect middleware works and how to compose components together to create an application. Other Node web frameworks work in a similar way, so learning Connect will give you a head start when learning new frameworks.
To start, let’s see how to create a basic Connect application. Later in the chapter, you’ll see how to build a more complex Express application by using popular Express techniques.
6.1. Connect
In this section, you’ll learn about Connect. You’ll see how its middleware can be used to build simple web applications, and how middleware ordering matters. This will help you to build more-modular Express applications later.
6.1.1. Setting up a Connect application
Express is built with Connect, but do you know you can make a fully functionally web app with Connect alone? You can download and install Connect from the npm registry by using the command shown here:
$ npm install connect@3.4.0
Here’s what a minimal Connect application looks like:
const app = require('connect')();
app.use((req, res, next) => {
  res.end('Hello, world!');
});
app.listen(3000);
This simple application (found under ch06-connect-and-express/hello-world in the sample code) will respond with Hello, world! The function passed to app.use is a middleware component that ends the request by sending back the Hello, world! text as a response. Middleware components form the basis of all Connect and Express apps. Let’s look at them in more detail.
6.1.2. Understanding how Connect middleware works
In Connect, a middleware component is a JavaScript function that by convention accepts three arguments: a request object, a response object, and an argument commonly named next, which is a callback function indicating that the component is done and the subsequent middleware component can be executed.
Before your middleware runs, Connect uses a dispatcher that takes in requests and then hands them off to the first middleware component that you’ve added to your application. Figure 6.1 shows a typical Connect application, which is composed of the dispatcher as well as an arrangement of middleware including a logger, a body parser, a static file server, and custom middleware.
Figure 6.1. The life cycle of two HTTP requests making their way through a Connect server
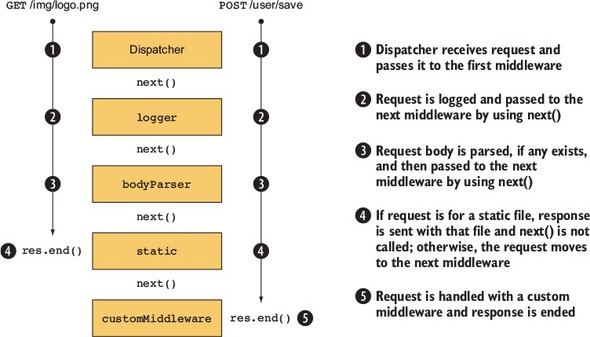
As you can see, the design of the middleware API means that more-complex behavior can be composed of smaller building blocks. In the next section, you’ll see how to do this by combining components.
6.1.3. Combining middleware
Connect provides a method called use for combining middleware components. Let’s define two middleware functions and add them both to the application. One is the simple Hello World function from earlier, and the other is a logger.
Listing 6.1. Using multiple Connect middleware components
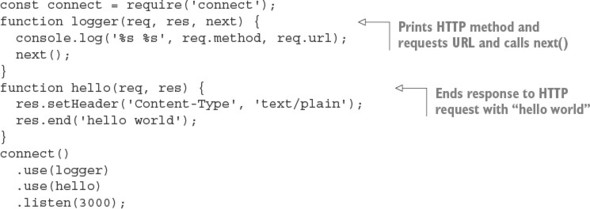
This middleware has two signatures: one with next, and one without. That’s because this component finishes the HTTP response and never needs to give control back to the dispatcher.
The use() function returns an instance of a Connect application to support method chaining, as shown previously. Note that chaining the .use() calls isn’t required, as shown in the following snippet:
const app = connect();
app.use(logger);
app.use(hello);
app.listen(3000);
Now that you have a simple Hello World application working, we’ll look at why the ordering of middleware .use() calls is important, and how to strategically use that ordering to alter the way your application works.
6.1.4. Ordering middleware
The ordering of middleware in your application can dramatically affect the way it behaves. Execution can be stopped by omitting next(), and middleware can be combined to implement features such as authentication.
What happens when middleware components don’t call next? Consider the previous Hello World example, where the logger middleware component is used first, followed by the hello component. In that example, Connect logs to stdout and then responds to the HTTP request. But consider what would happen if the ordering were switched, as follows.
Listing 6.2. Wrong: hello middleware component before logger component
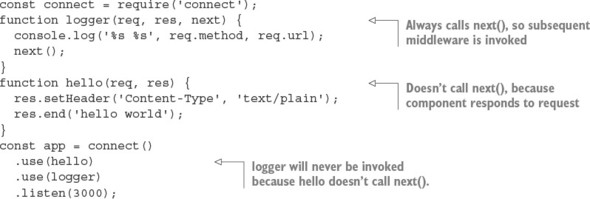
In this example, the hello middleware component is called first and responds to the HTTP request as expected. But logger is never called because hello never calls next(), so control is never passed back to the dispatcher to invoke the next middleware component. The moral here is that when a component doesn’t call next(), no remaining middleware in the chain of command will be invoked.
Figure 6.2 shows how this example would skip the logger, and how to correct it.
Figure 6.2. Middleware ordering is important.
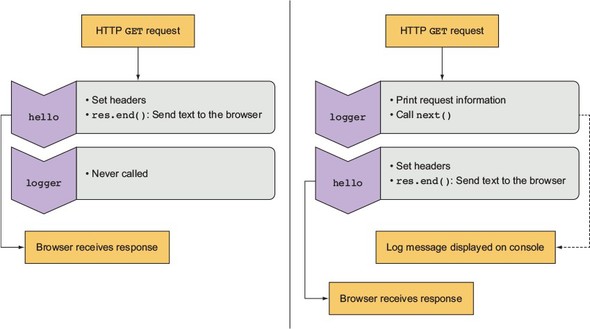
As you can see, placing hello in front of logger is rather useless, but when used properly, ordering can be to your benefit.
6.1.5. Creating configurable middleware
You’ve learned some middleware basics; now we’ll go into detail and look at how to create more-generic and reusable middleware.
Middleware commonly follows a simple convention in order to provide configuration capabilities to developers: using a function that returns another function (a closure). The basic structure for configurable middleware of this kind looks like this:

This type of middleware is used as follows:
app.use(setup({ some: 'options' }));
Notice that the setup function is invoked in the app.use line, whereas in previous examples you were just passing a reference to the function.
In this section, you’ll apply this technique to build three reusable, configurable middleware components:
- A logger component with a configurable printing format
- A router component that invokes functions based on the requested URL
- A URL rewriter component that converts URL slugs to IDs
You’ll start by expanding your logger component to make it more configurable. The logger middleware component you created earlier in this chapter wasn’t configurable. It was hardcoded to print out the request’s req.method and req.url when invoked. But what if you want to change what the logger displays at some point in the future?
In practice, using configurable middleware is just like using any of the middleware you’ve created so far, except that you can pass additional arguments to the middleware component to alter its behavior. Using the configurable component in your application might look a little like the following example, where logger can accept a string that describes the format that it should print out:
const app = connect()
  .use(logger(':method :url'))
  .use(hello);
To implement the configurable logger component, you first need to define a setup function that accepts a single string argument (in this example, you’ll name it format). When setup is invoked, a function is returned, and it’s the middleware component Connect will use. The returned component retains access to the format variable, even after the setup function has returned, because it’s defined within the same JavaScript closure. The logger then replaces the tokens in the format string with the associated request properties on the req object, logs to stdout, and calls next(), as shown in the following listing.
Listing 6.3. A configurable logger middleware component for Connect
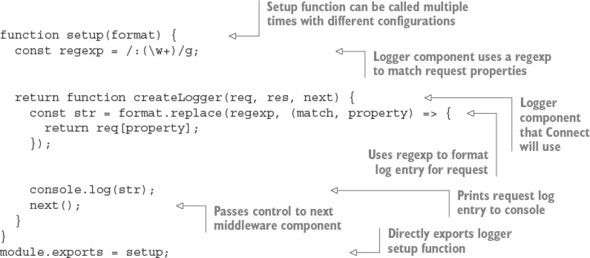
Because you’ve created this logger middleware component as configurable middleware, you can .use() the logger multiple times in a single application with different configurations or reuse this logger code in any number of future applications you might develop. This simple concept of configurable middleware is used throughout the Connect community, and it’s used for all core Connect middleware to maintain consistency.
To use the logger middleware in listing 6.3, you need to pass it a string that includes some of the properties found on the request object. For example, .use(setup(':method :url')) prints the HTTP method (GET, POST, and so forth) and URL of each request.
Before moving on to Express, let’s look at how Connect supports error handling.
6.1.6. Using error-handling middleware
All applications have errors, whether at the system level or the user level, and being well prepared for error situations—even ones you aren’t anticipating—is a smart thing to do. Connect implements an error-handling variant of middleware that follows the same rules as regular middleware but accepts an error object along with the request and response objects.
Connect’s error handling is intentionally minimal, allowing the developer to specify the way errors should be handled. For example, you could pass only system and application errors through the middleware (for example, foo is undefined) or user errors (password is invalid) or a combination of both. Connect lets you choose which is best for your application.
In this section, you’ll use both types, and you’ll learn how error-handling middleware works. You’ll also learn some useful patterns that can be applied while we look at the following:
- Using Connect’s default error handler
- Handing application errors yourself
- Using multiple error-handling middleware components
Let’s jump in with a look at how Connect handles errors without any configuration.
Using Connect’s default error handler
Consider the following middleware component, which will throw a ReferenceError error because the function foo() isn’t defined by the application:
const connect = require('connect')
connect()
  .use((req, res) => {
    foo();
    res.setHeader('Content-Type', 'text/plain');
    res.end('hello world');
  })
.listen(3000)
By default, Connect will respond with a 500 status code, a response body containing the text Internal Server Error, and more information about the error itself. This is fine, but in any kind of real application, you’d probably want to do more-specialized things with those errors, such as send them off to a logging daemon.
Handling application errors yourself
Connect also offers a way for you to handle application errors yourself, using error-handling middleware. For instance, in development you might want to respond to the client with a JSON representation of the error for quick and easy reporting, whereas in production you’d want to respond with a simple Server error, so as not to expose sensitive internal information (such as stack traces, filenames, and line numbers) to a potential attacker.
An error-handling middleware function must be defined to accept four arguments—err, req, res, and next—as shown in listing 6.4, whereas regular middleware takes the arguments req, res, and next. The following listing shows an example error middleware. For a full example with a server, look at ch06-connect-and-express/listing6_4 in the book’s source code.
Listing 6.4. Error-handling middleware in Connect

Use NODE_ENV to set the application’s mode
A common Connect convention is to use the NODE_ENV environment variable (process.env.NODE_ENV) to toggle the behavior between server environments, such as production and development.
When Connect encounters an error, it’ll switch to invoking only error-handling middleware, as you can see in figure 6.3.
Figure 6.3. The life cycle of an HTTP request causing an error in a Connect server
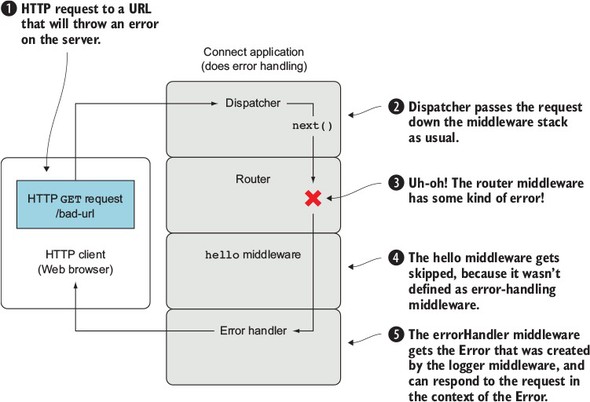
Imagine you have an application that allows people to authenticate to an administration area for a blog. If the routing middleware component for the user routes causes an error, both the blog and admin middleware components will be skipped, because they don’t act as error-handling middleware—they only define three arguments. Connect will then see that errorHandler accepts the error argument and will invoke it. The middleware components could look something like this:
connect()
  .use(router(require('./routes/user')))
  .use(router(require('./routes/blog'))) // Skipped
  .use(router(require('./routes/admin'))) // Skipped
  .use(errorHandler);
Short-circuiting functionality based on middleware execution is a fundamental concept used to organize Express applications. Now that you’ve learned the basics of Connect, it’s time to go into more detail about Express.
6.2. Express
Express is a popular web framework formerly built on Connect but still compatible with Connect middleware. Although Express comes with basic functionality, such as serving static files, URL routing, and application configuration, it’s still minimal. It provides enough structure so you can compose reusable chunks without being too restrictive of your development practices.
Over the next few sections, you’ll implement a new Express application by using the Express skeleton app generator. This process is more detailed than the brief overview in chapter 3, so by the end of this chapter you should have enough knowledge of Express to build your own Express web apps and RESTful APIs. As the chapter continues, you’ll keep adding functionality to the skeleton to produce a full app by the end.
6.2.1. Generating the application skeleton
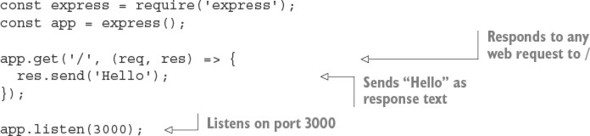
Express doesn’t force application structure on the developer. You can place routes in as many files as you want, public assets in any directory you want, and so on. A minimal Express application can be as small as the following listing, which implements a fully functional HTTP server.
Listing 6.5. A minimal Express application
The express(1) command-line tool available in the express-generator package (www.npmjs.com/package/express-generator) can set up an application skeleton for you. Using the generated application is a good way to get started if you’re new to Express, as it sets up an application complete with templates, public assets, configuration, and more.
The default application skeleton that express(1) generates consists of only a few directories and files, as shown in figure 6.4. This structure is designed to get developers up and running with Express in seconds, but the application’s structure is entirely up to you and your team to create.
Figure 6.4. Default application skeleton structure using EJS templates
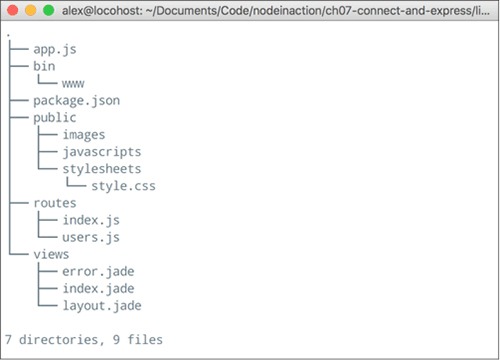
This chapter’s example uses Embedded JavaScript (EJS) templates, which are similar in structure to HTML. EJS is similar to PHP, JSP (for Java), and ERB (for Ruby), because server-side JavaScript is embedded in an HTML document and executed prior to being sent to the client. You’ll look at EJS more closely in chapter 7.
In this section, you’ll do the following:
- Install Express globally with npm
- Generate the application
- Explore the application and install dependencies
Let’s get started.
Installing the Express executable
First, install express-generator globally with npm:
$ npm install -g express-generator
Next, you can use the --help flag to see the options available, as shown in figure 6.5.
Figure 6.5. Express help
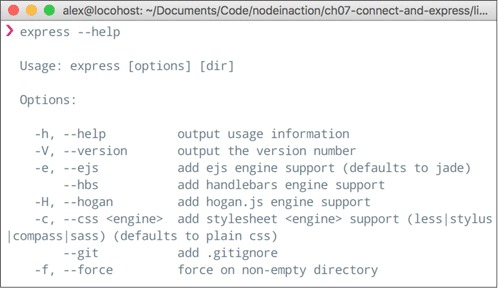
Some of these options will generate small portions of the application for you. For example, you can specify a template engine to generate a dummy template file for the chosen template engine. Similarly, if you specify a CSS preprocessor by using the --css option, a dummy template file will be generated for it.
Now that the executable is installed, let’s see how to generate what will become the photo application.
Generating the application
For this application, you use the -e (or --ejs) flag to use the EJS templating engine. Execute express -e shoutbox. If you want to duplicate the code samples in our GitHub repository, use express -e listing6_6.
A fully functional application is created in the shoutbox directory. It contains a package.json file to describe the project and dependencies, the application file itself, the public file directories, and a directory for route handlers.
Exploring the application
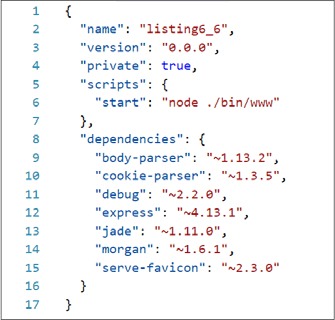
Let’s take a closer look at what was generated. Open the package.json file in your editor to see the application’s dependencies, as shown in figure 6.6. Express can’t guess which version of the dependencies you’ll want, so it’s good practice to supply the major, minor, and patch levels of the module so you don’t introduce any surprise bugs. For example, "express": "~4.13.1" is explicit and will provide you with identical code on each installation.
Figure 6.6. Generated package.json contents
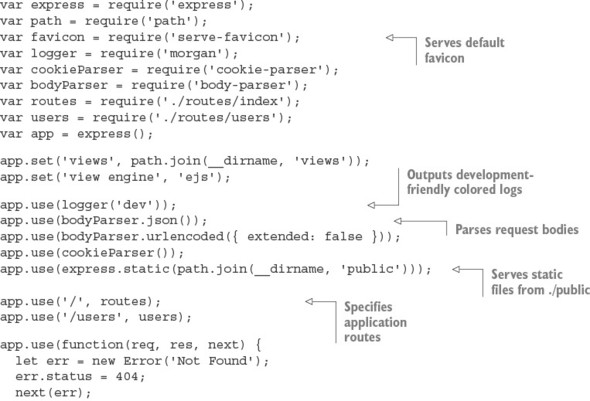
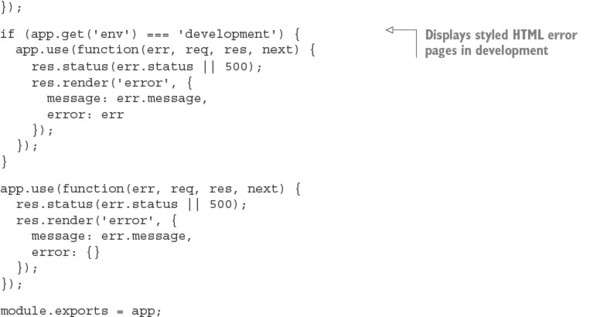
Now look at the application file generated by express(1), shown in the following listing. For now, you’ll leave this file as is. You should be familiar with these middleware components from the Connect sections earlier in this chapter, but it’s worth taking a look at how the default middleware configuration is set up.
Listing 6.6. Generated Express application skeleton
You have the package.json and app.js files, but the application won’t run yet because the dependencies haven’t been installed. Whenever you generate a package.json file from express(1), you need to install the dependencies. Execute npm install to do this, and then execute npm start to run the application.
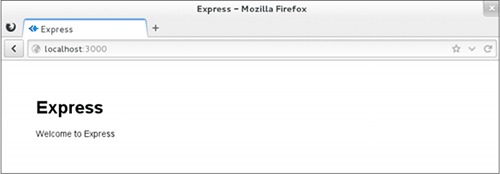
Check out the application by visiting http://localhost:3000 in your browser. The default application looks like the one in figure 6.7.
Figure 6.7. Default Express application
Now that you’ve seen the generated skeleton, you can start building a real Express application. The application will be a shoutbox that allows people to post messages. When building applications like this, most seasoned Express developers start by planning their API and hence the required routes and resources that will be required.
Planning the shoutbox application
Here are the requirements for the shoutbox application:
- It should allow users to register accounts, sign in, and sign out.
- Users should be able to post messages (entries).
- Site visitors should be able to paginate through entries.
- There should be a simple REST API that supports authentication.
You need to store data and handle authentication. You also need to validate user input. The necessary routes look something like this:
- API routes
- GET /api/entries: Get a list of entries
- GET /api/entries/page: Get a single page of entries
- POST /api/entry: Create a new shoutbox entry
- Web UI routes
- GET /post: The form for a new entry
- POST /post: Post a new entry
- GET /register: Show the registration form
- POST /register: Create a new account
- GET /login: Show the sign-in form
- POST /login: Sign in
- GET /logout: Sign out
This layout is similar to that of most web applications. Hopefully, you’ll be able to use the example from this chapter as a template for your own applications in the future.
In the previous listing, you may have noticed some calls to app.set:
app.set('views', path.join(__dirname, 'views'));
app.set('view engine', 'ejs');
This is how Express applications are configured. The next section explains Express configuration in more detail.
6.2.2. Configuring Express and your application
Your application’s requirements will depend on the environment in which it’s running. For example, you may want verbose logging when your product is in development, but a leaner set of logs and gzip compression when it’s in production. In addition to configuring environment-specific functionality, you may want to define some application-level settings so Express knows what template engine you’re using and where it can find the templates. Express also lets you define custom configuration key/value pairs.
To set an environment variable in UNIX systems, you can use this command:
$ NODE_ENV=production node app
In Windows, you can use this code:
$ set NODE_ENV=production
$ node app
These environment variables will be available in your application on the process.env object.
Express has a minimal environment-driven configuration system, consisting of several methods, all driven by the NODE_ENV environment variable:
- app.set()
- app.get()
- app.enable()
- app.disable()
- app.enabled()
- app.disabled()
In this section, you’ll see how to use the configuration system to customize the way Express behaves, as well as how to use this system for your own purposes throughout development.
Let’s take a closer look at what environment-based configuration means. Although the NODE_ENV environment variable originated in Express, many other Node frameworks have adopted it as a means to notify the Node application which environment it’s operating within, defaulting to development.
The app.configure() method accepts optional strings representing the environment, and a function. When the environment matches the string passed, the callback is immediately invoked; when only a function is given, it’s invoked for all environments. These environment names are completely arbitrary. For example, you may have development, stage, test, and production, or prod for short:
if (app.get('env') === 'development') {
  app.use(express.errorHandler());
}
Express uses the configuration system internally, allowing you to customize the way Express behaves, but it’s also available for your own use.
Express also provides Boolean variants of app.set() and app.get(). For example, app.enable(setting) is equivalent to app.set(setting, true), and app.enabled (setting) can be used to check whether the value was enabled. The methods app.disable (setting) and app.disabled(setting) complement the truthful variants.
A useful setting for developing APIs with Express is the json spaces option. If you add it to your app.js file, your JSON will be printed in a more readable format:
app.set('json spaces', 2);
Now that you’ve seen how to take advantage of the configuration system for your own use, let’s look at rendering views in Express.
6.2.3. Rendering views
In this chapter’s application, you’ll use EJS templates, though as previously mentioned, almost any template engine in the Node community can be used. If you’re not familiar with EJS, don’t worry. It’s similar to templating languages found in other web development platforms (PHP, JSP, ERB). We cover some basics of EJS in this chapter, but we discuss EJS and several other template engines in greater detail in chapter 7.
Whether it’s rendering an entire HTML page, an HTML fragment, or an RSS feed, rendering views is crucial for nearly every application. The concept is simple: you pass data to a view, and that data is transformed, typically to HTML for web applications. You’re likely familiar with the idea of views, because most frameworks provide similar functionality; figure 6.8 illustrates how a view forms a new representation for the data.
Figure 6.8. HTML template plus data = HTML view of data
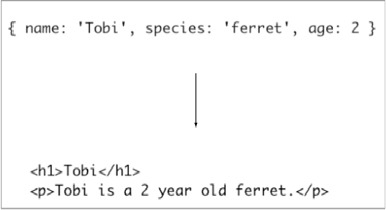
The template that generates template 6.8 can be found in the following snippet:
<h1><%= name %></h1>
<p><%= name %> is a 2 year old <%= species %>.</p>
Express provides two ways to render views: at the application level with app.render(), and at the response with res.render(), which uses the former internally. In this chapter, you’ll use only res.render(). If you look in ./routes/index.js, a function is defined that invokes res.render('index') in order to render the ./views/index.ejs template, as shown in the following code (found in listing6_8):
router.get('/', (req, res, next) => {
  res.render('index', { title: 'Express' });
});
Before looking at res.render() more closely, let’s see how to configure the view system.
Configuring the view system
Configuring the Express view system is simple. But even though express(1) generated the configuration for you, it’s still useful to know what’s going on behind the scenes so you can make changes. We’ll focus on three areas:
- Adjusting the view lookup
- Configuring the default template engine
- Enabling view caching to reduce file I/O
First up is the views setting.
Changing the lookup directory
The following snippet shows the views setting that the Express executable created:
app.set('views', __dirname + '/views');
This specifies the directory that Express will use during view lookup. It’s a good idea to use __dirname so that your application isn’t dependent on the current working directory being the application’s root.
__dirname (with two leading underscores) is a global variable in Node that identifies the directory in which the currently running file exists. Often in development this directory will be the same as your current working directory (CWD), but in production the Node executable may run from another directory. Using __dirname helps keep paths consistent across environments.
The next setting is view engine.
Using the default template engine
When express(1) generated the application, the view engine setting was assigned ejs because EJS was the template engine selected by the -e command-line option. This setting enables you to render index rather than index.ejs. Otherwise, Express requires the extension in order to determine which template engine is to be used.
You might be wondering why Express even considers extensions. The use of extensions allows you to use multiple template engines within a single Express application, while providing a clean API for common use cases, because most applications will use one template engine.
Suppose, for example, you find writing RSS feeds easier with another template engine, or perhaps you’re migrating from one template engine to another. You might use Pug as the default, and EJS for the /feed route, as indicated in the following code by the .ejs extension:
app.set('view engine', 'pug');
app.get('/', function(){
  res.render('index');
 });
app.get('/feed', function(){
  res.render('rss.ejs')
;
});
Keeping package.json in sync
Keep in mind that any additional template engines you wish to use should be added to your package.json dependencies object. Try to remember to install packages with npm install --save package-name. Remove them with npm uninstall --save package-name to delete them from node_modules and package.json. This makes experimenting with different template engines easier when you’re still trying to figure out which one you want to use.
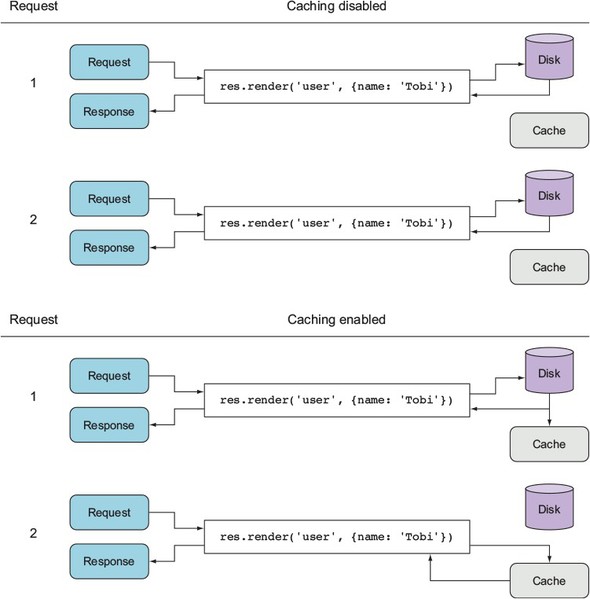
View caching
The view cache setting is enabled by default in the production environment and prevents subsequent render() calls from performing disk I/O. The contents of the templates are saved in memory, greatly improving performance. The side effect of enabling this setting is that you can no longer edit the template files without restarting the server, which is why it’s disabled in development. If you’re running a staging environment, you’ll likely want to enable this option.
As illustrated in figure 6.9, when view cache is disabled, the template is read from disk on every request. This is what allows you to make changes to a template without restarting the application. When view cache is enabled, the disk is hit only once per template.
Figure 6.9. The view cache setting
You’ve seen how the view-caching mechanism helps improve performance in a nondevelopment environment. Now let’s see how Express locates views in order to render them.
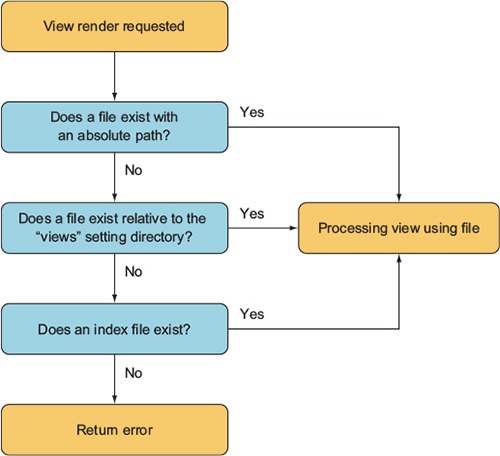
View lookup
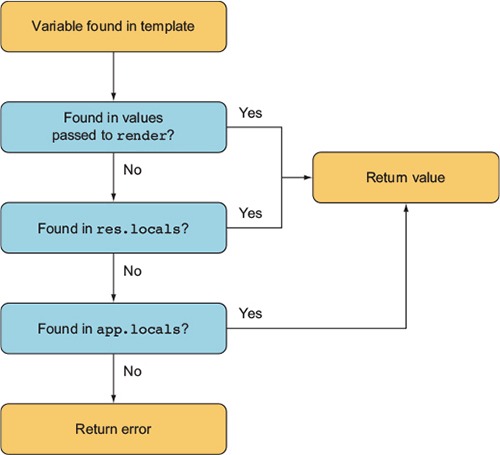
The process of looking up a view is similar to the way Node’s require() works. When res.render() or app.render() is invoked, Express first checks whether a file exists at an absolute path. Next, Express looks relative to the views directory. Finally, Express tries an index file. This process is represented as a flowchart in figure 6.10.
Figure 6.10. Express view lookup process
Because ejs is set as the default engine, the render call omits the .ejs extension, and the template file will still be resolved correctly.
As the application evolves, you’ll need more views, and sometimes several for a single resource. Using view lookup can help with organization—for example, you can use subdirectories related to the resource and create views within them.
Adding subdirectories allows you to eliminate redundant parts of names (such as edit-entry.ejs and show-entry.ejs). Express then adds the view engine extension and resolves res.render('entries/edit') to ./views/entries/edit.ejs.
Express checks to see whether a file named index resides in subdirectories of the view directory. When files are named with a pluralized resource, such as entries, this typically implies a resource listing. This means you can use res.render('entries') to render the file in views/entries/index.ejs.
Methods of exposing data to views
You’ve seen how to pass local variables directly to res.render() calls, but you can also use a few other mechanisms for this. For example, you can use app.locals for application-level variables, and res.locals for request-level local variables that are typically set by middleware components prior to the final route-handling method where views are rendered.
The values passed directly to res.render() take precedence over values set in res.locals and app.locals, as figure 6.11 shows.
Figure 6.11. Values passed directly to the render function take precedence when rendering a template.
By default, Express exposes only one application-level variable, settings, to views, which is the object containing all of the values set with app.set(). For example, using app.set('title', 'My Application') would expose settings.title in the template, as shown in the following EJS snippet:
<html>
  <head>
     <title><%= settings.title %></title>
  </head>
  <body>
    <h1><%= settings.title %></h1>
    <p>Welcome to <%= settings.title %>.</p>
  </body>
Internally, Express exposes this object with the following JavaScript:
app.locals.settings = app.settings;
That’s all there is to it! Now that you’ve seen how to render views and send data to them, let’s look at how routes are defined and see how to write route handlers that can render views for the shoutbox application. You’ll also set up database models to persist data.
6.2.4. Express routing 101
The primary function of Express routes is to pair a URL pattern with response logic. But routes also can pair a URL pattern with middleware. This allows you to use middleware to provide reusable functionality to certain routes.
In this section, you’ll do the following:
- Validate user-submitted content by using route-specific middleware
- Implement route-specific validation
- Implement pagination
Let’s explore some of the ways to use route-specific middleware.
Validating user content submission
To give you something to apply validation to, you’re going to finally add the ability to post to the shoutbox application. To add the ability to post, you need to do a few things:
- Create an entry model
- Add entry-related routes
- Create an entry form
- Add logic to create entries using submitted form data
You’ll start by creating an entry model.
Creating an entry model
Before moving on, you need to install the Node redis module into the project. Install it with npm install --save redis. If you don’t have Redis installed, go to http://redis.io/ to learn how to install it; if you’re using macOS, you can easily install it with Homebrew (http://brew.sh/), and Windows has a Redis Chocolatey package (https://chocolatey.org/).
We’re using Redis to cheat a little bit: the features of Redis and ES6 make creating lightweight models without a complex database library easy. If you’re feeling ambitious, you could use another database library (see chapter 8 for more about databases in Node).
Let’s see how to create a lightweight model to store your shoutbox entries. Create a file to contain the entry model definition at models/entry.js. Add the code contained in the following listing to this file. The entry model will be a simple ES6 class that saves data in a Redis list.
Listing 6.7. A model for entries

With the basic model fleshed out, you now need to add a function called getRange, using the contents of the following listing. This function will allow you to retrieve entries.
Listing 6.8. Logic to retrieve a range of entries

With a model created, you can now add routes to create and list entries.
Creating an entry form
The app has the ability to list entries, but no way to add them. You’ll add this capability next, starting by adding the following lines to the routing section of app.js:
app.get('/post', entries.form);
app.post('/post', entries.submit);
Next, add the following route to routes/entries.js. This route logic will render a template containing a form:
exports.form = (req, res) => {
  res.render('post', { title: 'Post' });
};
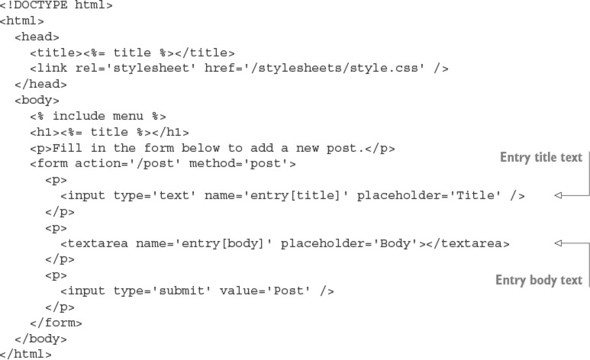
Next, use the EJS template in the following listing to create a template for the form and save it to views/post.ejs.
Listing 6.9. A form for entering post data
This form uses input names such as entry[title], so extended body parsing is required. To change the body parser, open app.js, and move to the line that reads
app.use(bodyParser.urlencoded({ extended: false }));
Change this to use extended parsing:
app.use(bodyParser.urlencoded({ extended: true }));
With form display taken care of, let’s move on to creating entries from the submitted form data.
Implementing entry creation
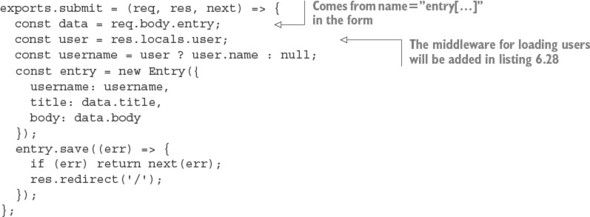
To add the capability to create entries from submitted form data, add the logic in the next listing to the file routes/entries.js. This logic will add entries when form data is submitted.
Listing 6.10. Add an entry using submitted form data
Now when you use a browser to access /post on your application, you’ll be able to add entries. You’ll take care of forcing the user to sign in first in listing 6.21.
With posting content taken care of, it’s time to render lists of entries.
Adding front-page display of entries
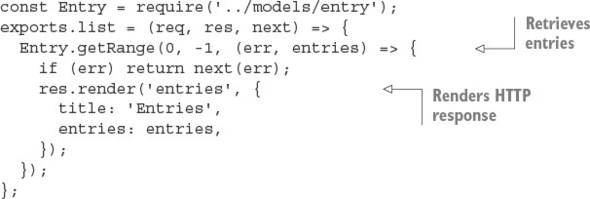
Start by creating the file routes/entries.js. Then add the code in the following listing to require the entry model and export a function for rendering a list of entries.
Listing 6.11. Listing entries
With route logic defined for listing entries, you now need to add an EJS template to display them. In the views directory, create a file named entries.ejs and put the following EJS in it.
Listing 6.12. The entries.ejs view
<!DOCTYPE html>
<html>
  <head>
    <title><%= title %></title>
    <link rel='stylesheet' href='/stylesheets/style.css' />
  </head>
  <body>
    <% include menu %>
    <% entries.forEach((entry) => { %>
      <div class='entry'>
        <h3><%= entry.title %></h3>
        <p><%= entry.body %></p>
        <p>Posted by <%= entry.username %></p>
      </div>
    <% }) %>
  </body>
</html>
Before running the application, run touch views/menu.ejs to create a temporary file that will hold the menu at a later stage. When the views and routes are ready, you need to tell the application where to find the routes.
Adding entry-related routes
Before you add entry-related routes to the application, you need to make modifications to app.js. First, add the following require statement to the top of your app.js file:
const entries = require('./routes/entries');
Next, also in app.js, change the line containing the text app.get('/' to the following to make any requests to the path / to return the entry listing:
app.get('/', entries.list);
When you run the application, the front page will display a list of entries. Now that entries can be created and listed, let’s move on to using route-specific middleware to validate form data.
Using route-specific middleware
Suppose you want the entry text field in the post entry form to be required. The first way you might think of to address this problem is to add it straight in your route callback, as shown in the following snippet. This approach isn’t ideal, however, because it tightly ties the validation logic to this particular form. In many cases, validation logic can be abstracted into reusable components, making development easier, faster, and more declarative:
...
exports.submit = (req, res, next) => {
  let data = req.body.entry;
  if (!data.title) {
    res.error('Title is required.');
    res.redirect('back');
    return;
  }
  if (data.title.length < 4) {
    res.error('Title must be longer than 4 characters.');
    res.redirect('back');
    return;
  }
...
Express routes can optionally accept middleware of their own, applied only when that route is matched, before the final route callback. The route callbacks themselves that you’ve been using throughout the chapter aren’t treated specially. These are the same as any other middleware, even the ones you’re about to create for validation!
Let’s get started with route-specific middleware by looking at a simple, but inflexible, way to implement validation as route-specific middleware.
Performing form validation with route-specific middleware
The first possibility is to write a few simple, yet specific, middleware components to perform validation. Extending the POST /post route with this middleware might look something like the following:
app.post('/post',
  requireEntryTitle,
  requireEntryTitleLengthAbove(4),
  entries.submit
);
Note that this route definition, which normally has only a path and routing logic as arguments, has two additional arguments specifying validation middleware.
The two example middleware components in the following listing illustrate how the original validations can be abstracted out. But they’re still not modular and work only for the single field entry[title].
Listing 6.13. Two more potential, but imperfect, attempts at validation middleware
function requireEntryTitle(req, res, next) {
  const title = req.body.entry.title;
  if (title) {
    next();
  } else {
    res.error('Title is required.');
    res.redirect('back');
  }
}
function requireEntryTitleLengthAbove(len) {
  return (req, res, next) => {
    const title = req.body.entry.title;
    if (title.length > len) {
      next();
    } else {
      res.error(`Title must be longer than ${len}.`);
      res.redirect('back');
    }
  };
}
A more viable solution is to abstract the validators and pass the target field name. Let’s take a look at approaching it this way.
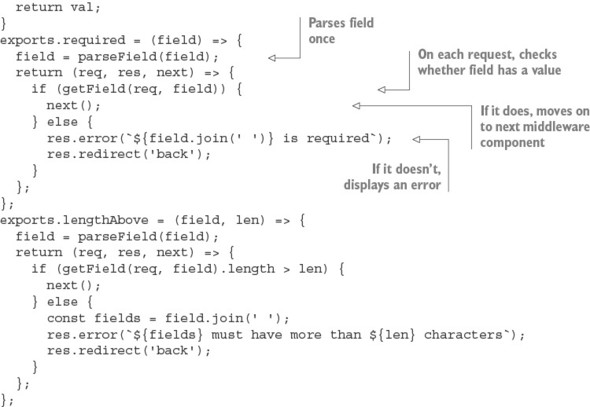
Building flexible validation middleware
You can pass the field name, as shown in the following snippet. This allows you to reuse validation logic, lessening the amount of code you need to write:
app.post('/post',
          validate.required('entry[title]'),
          validate.lengthAbove('entry[title]', 4),
          entries.submit);
Swap the line app.post('/post', entries.submit); in the routing section of app.js with this snippet. It’s worth noting that the Express community has created many similar libraries for public consumption, but understanding how validation middleware works, and how to author your own, is invaluable.
Let’s get on with it. Create a file named ./middleware/validate.js by using the program code in listing 6.14. In validate.js, you’ll export several middleware components—in this case, validate.required() and validate.lengthAbove(). The implementation details aren’t important; the point of this example is that a small amount of effort can go a long way if the code is common within the application.
Listing 6.14. Validation middleware implementation

To make this middleware available to your application, add the following line at the top of app.js:
const validate = require('./middleware/validate');
If you try the application now, you’ll find that the validation will be in effect. This validation API could be made even more fluent, but we’ll leave that for you to investigate.
6.2.5. Authenticating users
In this section, you’ll create an authentication system for the application from scratch. You’ll go through the following steps:
- Implement logic to store and authenticate registered users
- Add account registration functionality
- Allow people to sign in
- Create and use middleware to load users
You’ll continue using Redis to implement user accounts. Now let’s see how to create a user model to make working with Redis easier in our Node code.
Saving and loading user records
In this section, you’ll implement user loading, saving, and authentication. You’ll do the following:
- Define application dependencies by using a package.json file
- Create a user model
- Add logic to load and save user data by using Redis
- Secure user passwords by using bcrypt
- Add logic to authenticate attempts to log in
Bcrypt is a salted hashing function that’s available as a third-party module designed specifically for hashing passwords. Bcrypt is great for passwords because it incorporates an iteration count argument to make it slower over time.
Before continuing, add bcrypt to your shoutbox project:
npm install --save redis bcrypt
Creating a user model
You now need to create a user model. Add a file named user.js to the models/ directory.
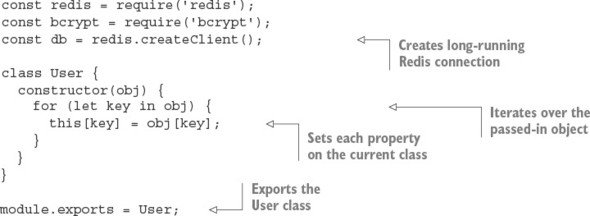
Listing 6.15 is the user model. In this code, the redis and bcrypt dependencies are required, and then a Redis connection is opened with redis.createClient(). The User function accepts an object and merges this object’s properties into its own. For example, new User({ name: 'tobi' }) creates an object and sets the object’s name property to Tobi.
Listing 6.15. Starting to create a user model
At the moment, the user mode is just a stub. You’ll need to add methods for creating and updating user records as well.
Saving a user into Redis
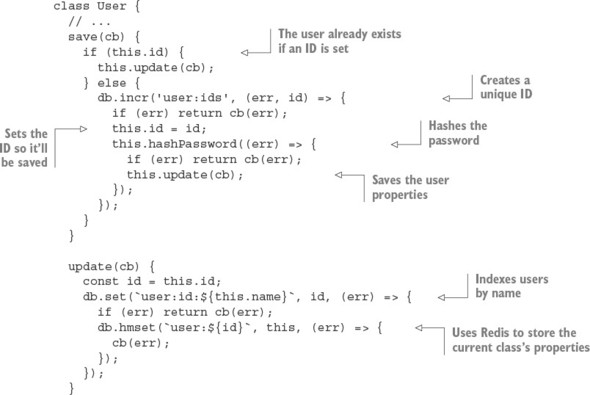
The next functionality you need is the ability to save a user, storing the user’s data with Redis. The save method shown in listing 6.16 checks whether the user already has an ID, and if so, save invokes the update method, indexing the user ID by name, and populating a Redis hash with the object’s properties. Otherwise, a user who doesn’t have an ID is considered a new user; the user:ids value is then incremented, which gives the user a unique ID, and the password is hashed before saving into Redis with the same update method.
Add the code in the following listing to models/user.js.
Listing 6.16. Updating user records
Securing user passwords
When the user is first created, you need to set a .pass property to the user’s password. The user-saving logic then replaces the .pass property with a hash generated by using the password.
The hash is salted. Per-user salting helps to protect against rainbow table attacks: the salt acts as a private key for the hashing mechanism. You can use bcrypt to generate a 12-character salt for the hash with genSalt().
Rainbow table attacks
Rainbow table attacks use precomputed tables to break hashed passwords. You can read more about this topic in Wikipedia: http://en.wikipedia.org/wiki/Rainbow_table.
After the salt is generated, bcrypt.hash() is called, which hashes the.pass property and the salt. This final hash value then replaces the .pass property before .update() stores it in Redis, ensuring that plain-text passwords aren’t saved, only the hash.
The following listing, which you’ll add to models/user.js, defines a function that creates the salted hash and stores it in the user’s .pass property.
Listing 6.17. Adding bcrypt encryption to the user model

That’s all there is to it.
Testing the user-saving logic
To try out saving users, start the Redis server by entering redis-server on the command line. Then add the code in the following listing, which creates an example user, to the bottom of models/user.js. You can then run node models/user.js on the command line to execute the creation of the example user.
Listing 6.18. Testing the user model

You should see output indicating that the user has been created: user id 1, for example. After testing the user model, remove the code in listing 6.18 from models/user.js.
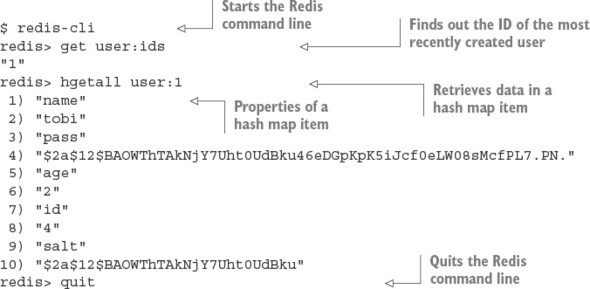
When you use the redis-cli tool that comes with Redis, you can use the HGETALL command to fetch each key and value of the hash, as the following command-line session demonstrates.
Listing 6.19. Querying with the Redis command-line tool
Having defined logic to save a user, you now need to add logic to retrieve user information.
Other Redis commands you can run in the redis-cli tool
For more information about Redis commands, see the Redis command reference at http://redis.io/commands.
Retrieving user data
When a user attempts to log in to a web application, the user usually enters a username and password into a form, and this data is then submitted to the application for authentication. Once the login form is submitted, you need a method for fetching the user via name.
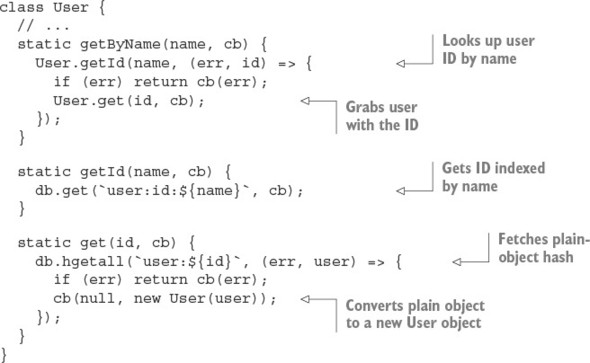
This logic is defined in the following listing as User.getByName(). The function first performs an ID lookup with User.getId() and then passes the ID that it finds to User.get(), which gets the Redis hash data for that user. Add the following methods to models/user.js.
Listing 6.20. Fetching a user from Redis
If you want to try fetching a user, you can try code like this:
User.getByName('tobi', (err, user) => {
  console.log(user);
});
Having retrieved the hashed password, you can now proceed with authenticating the user.
Authenticating user logins
The final component needed for user authentication is a method, defined in the following listing, that takes advantage of the functions defined earlier for user data retrieval. Add this logic to models/user.js.
Listing 6.21. Authenticating a user’s name and password
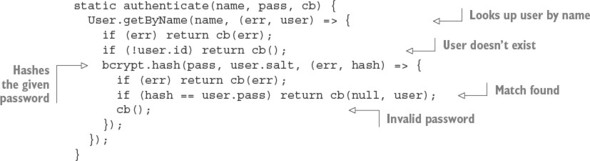
The authentication logic begins by fetching the user by name. If the user isn’t found, the callback function is immediately invoked. Otherwise, the user’s stored salt and the password submitted are hashed to produce what should be identical to the stored user.pass hash. If the submitted and stored hashes don’t match, the user has entered invalid credentials. When looking up a key that doesn’t exist, Redis will give you an empty hash, which is why the check for !user.id is used instead of !user.
Now that you’re able to authenticate users, you need a way for users to register.
6.2.6. Registering new users
To allow users to create new accounts and then sign in, you need both registration and login capabilities.
In this section, you’ll do the following to implement registration:
- Map registration and login routes to URL paths
- Add route logic to display a registration form
- Add logic to store user data submitted from the form
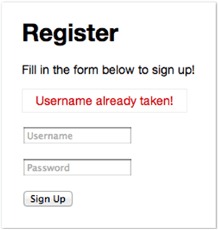
The form will look like figure 6.12.
Figure 6.12. User registration form
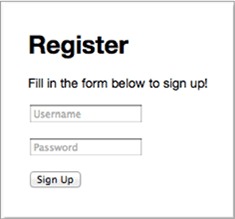
This form is displayed when a user visits /register with a web browser. Later you’ll create a similar form that allows users to log in.
Adding registration routes
To get the registration form to show up, you first want to create a route to render the form and return it to the user’s browser for display.
Listing 6.22 shows how you should alter app.js, using Node’s module system to import a module defining registration route behavior from the routes directory, and associating HTTP methods and URL paths to route functions. This forms a sort of “front controller.” As you can see, there are both GET and POST register routes.
Listing 6.22. Adding registration routes

Next, to define the route logic, create an empty file in the routes directory called register.js. Start defining registration route behavior by exporting the following function from routes/register.js—a route that renders the registration template:
exports.form = (req, res) => {
  res.render('register', { title: 'Register' });
};
This route uses an EJS template, which you’ll create next, to define the registration form’s HTML.
Creating a registration form
To define the registration form’s HTML, create a file in the views directory called register.ejs. You can define this form by using the HTML/EJS detailed in the following listing.
Listing 6.23. A view template that provides a registration form
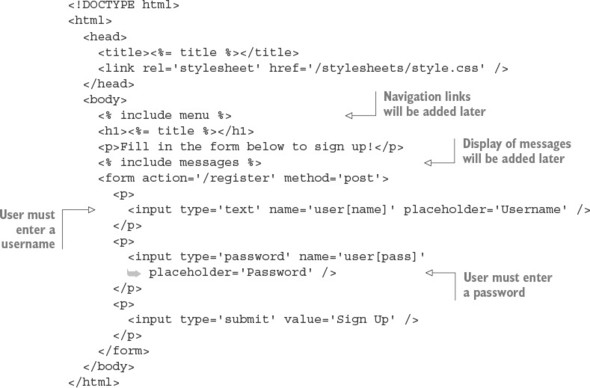
Note the use of include messages, which includes another template: messages.ejs. This template, which you’ll define next, is used to communicate with the user.
Relaying feedback to users
During user registration, and in many other parts of a typical application, it can be necessary to relay feedback to the user. A user, for example, may attempt to register with a username that someone else is already using. In this case, you need to tell the user to choose another name.
In your application, the messages.ejs template will be used to display errors. Numerous templates throughout the application will include the messages.ejs template.
To create the messages template, create a file in the views directory called messages.ejs and put the logic in the following snippet into that file. The template logic checks whether the locals.messages variable is set. If so, the template cycles through the variable, displaying message objects. Each message object has a type property (allowing you to use messages for nonerror notifications if need be) and a string property (the message text). Application logic can queue an error for display by adding to the res.locals.messages array. After messages are displayed, removeMessages is called to empty the messages queue:
<% if (locals.messages) { %>
  <% messages.forEach((message) => { %>
    <p class='<%= message.type %>'><%= message.string %></p>
  <% }) %>
  <% removeMessages() %>
<% } %>
Figure 6.13 shows the registration form when displaying an error message.
Figure 6.13. Registration form error reporting
Adding a message to res.locals.messages is a simple way to communicate with the user, but because res.locals doesn’t persist across redirects, you need to make it more robust by using sessions to store messages between requests.
Storing transient messages in sessions
A common web application design pattern is the Post/Redirect/Get (PRG) pattern. In this pattern, a user requests a form, the form data is submitted as an HTTP POST request, and the user is then redirected to another web page. Where the user is redirected to depends on whether the form data was considered valid by the application. If the form data isn’t considered valid, the application redirects the user back to the form page. If the form data is valid, the user is redirected to a new web page. The PRG pattern is primarily used to prevent duplicate form submissions.
In Express, when a user is redirected, the content of res.locals is reset. If you’re storing messages to the user in res.locals, the messages are lost before they can be displayed. By storing messages in a session variable, however, you can work around this. Messages can then be displayed on the final redirect page.
To accommodate the ability to queue messages to the user in a session variable, you need to add a module to your application. Create a file named ./middleware/messages.js, and add the following code:
const express = require('express');

function message(req) {
  return (msg, type) => {
    type = type || 'info';
    let sess = req.session;
    sess.messages = sess.messages || [];
    sess.messages.push({ type: type, string: msg });
  };
};
The res.message function provides a way to add messages to a session variable from any Express request. The express.response object is the prototype that Express uses for the response objects. Adding properties to this object means they’ll then be available to all middleware and routes alike. In the preceding snippet, express.response is assigned to a variable named res to make it easier to add properties on the object and to improve readability.
This feature requires session support. To add support for sessions, you need an Express-compatible middleware module. There’s an officially supported package called express-session. Install it with npm install --save express-session, and then add the middleware to app.js, like this:
const session = require('express-session');
...
app.use(session({
  secret: 'secret',
  resave: false, saveUninitialized: true
}));
It’s best to place the middleware after the cookie middleware is inserted (it should be around line 26).
To make it even easier to add messages, add the code in the following snippet. The res.error function allows you to easily add a message of type error to the message queue. Use the res.message function you previously defined in the module:
res.error = msg => this.message(msg, 'error');
The last step is to expose these messages to the templates for output. If you don’t do this, you have to pass req.session.messages to every res.render() call in the application, which isn’t exactly ideal.
To address this, you’ll create middleware that populates res.locals.messages with the contents of res.session.messages on each request, effectively exposing the messages to any templates that are rendered. So far, ./middleware/messages.js extends the response prototype, but it doesn’t export anything. But adding the following snippet to this file exports the middleware you need:
module.exports = (req, res, next) => {
  res.message = message(req);
  res.error = (msg) => {
    return res.message(msg, 'error');
  };
  res.locals.messages = req.session.messages || [];
  res.locals.removeMessages = () => {
    req.session.messages = [];
  };
  next();
};
First, a messages template variable is defined to store the session’s messages; it’s an array that may or may not exist from the previous request (remember that these are session-persisted messages). Next, you need a way to remove the messages from the session; otherwise, they’ll build up, because nothing is clearing them.
Now, all you need to do to integrate this new feature is to require() the file in app.js. You should mount this middleware below the session middleware because it depends on req.session being defined. Note that because this middleware was designed not to accept options and doesn’t return a second function, you can call app.use(messages) instead of app.use(messages()). For future-proofing, it’s typically best for third-party middleware to use app.use(messages()), regardless of whether it accepts options:
...
const register = require('./routes/register');
const messages = require('./middleware/messages');
...
app.use(express.methodOverride());
app.use(express.cookieParser());
   app.use(session({
     secret: 'secret',
     resave: false,
     saveUninitialized: true
   }));
app.use(messages);
...
Now you’re able to access messages and removeMessages() within any view, so messages.ejs should work perfectly when included in any template.
With the display of the registration form completed and a way to relay any necessary feedback to the user worked out, let’s move on to handling registration submissions.
Implementing user registration
You need to create the route function to handle HTTP POST requests to /register. This function is called submit.
When form data is submitted, the bodyParser() middleware populates req.body with the submitted data. The registration form uses the object notation user[name], which translates to req.body.user.name after parsing by the body parser. Likewise, req.body.user.pass is used for the password field.
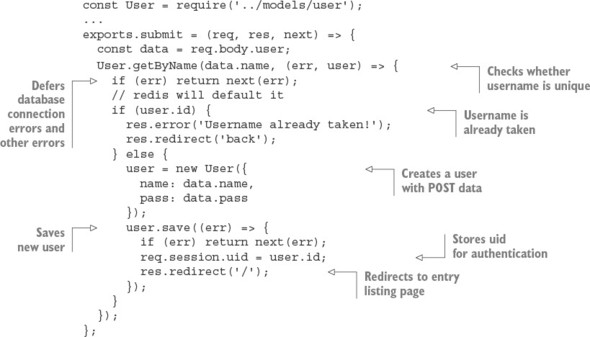
You need only a small amount of code in the submission route to handle validation, such as ensuring that the username isn’t already taken, and to save the new user, as listing 6.24 shows.
Once registration is complete, the user.id is assigned to the user’s session, which you’ll later check to verify that the user is authenticated. If validation fails, a message is exposed to templates as the messages variable, via res.locals.messages, and the user is redirected back to the registration form.
To add this functionality, add the contents of the following listing to routes/register.js.
Listing 6.24. Creating a user with submitted data
You can now fire up the application, visit /register, and register a user. The next thing you need is a way for returning registered users to authenticate, via the /login form.
6.2.7. Logging in registered users
Adding login functionality is even simpler than registration, because the bulk of the necessary logic is already in User.authenticate(), the general-purpose authentication method defined earlier. In this section, you’ll add the following:
- Route logic to display a login form
- Logic to authenticate user data submitted from the form
The form will look like figure 6.14.
Figure 6.14. User login form

You’ll start by modifying app.js so login routes are required and the route paths are established:
...
const login = require('./routes/login');
...
app.get('/login', login.form);
app.post('/login', login.submit);
app.get('/logout', login.logout);
...
Next, you’ll add functionality to display a login form.
Displaying a login form
The first step in implementing a login form is creating a file for login- and logout-related routes: routes/login.js. The route logic you need to add to display the login form is nearly identical to the logic used earlier to display the registration form; the only differences are the name of the template displayed and the page title:
exports.form = (req, res) => {
  res.render('login', { title: 'Login' });
};
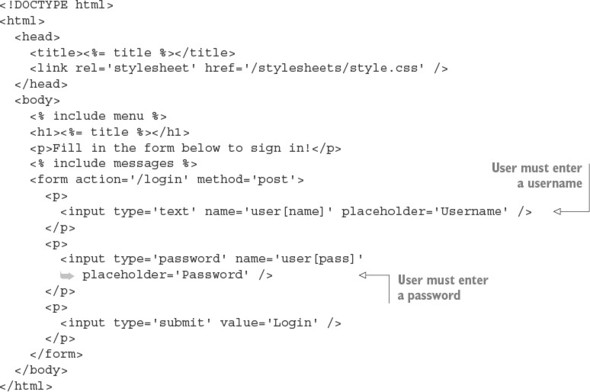
The EJS login form that you’ll define in ./views/login.ejs, shown in the following listing, is extremely similar to register.ejs as well; the only differences are the instruction text and the route that data is submitted to.
Listing 6.25. A view template for a login form
Now that you’ve added the route and template needed to display the login form, the next step is to add logic to handle login attempts.
Authenticating logins
To handle login attempts, you need to add route logic that will check the submitted username and password and, if they’re correct, set a session variable to the user’s ID and redirect the user to the home page. The following listing contains this logic, which you should add to routes/login.js.
Listing 6.26. A route to handle logins
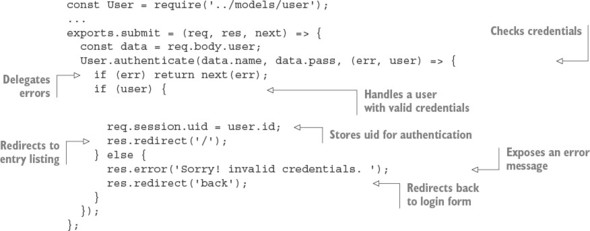
Here, if the user is authenticated by using User.authenticate(), req.session.uid is assigned in the same way as in the POST /register route: the session will persist this value, which you can use later to retrieve the User or other associated user data. If a match isn’t found, an error is set and the form is redisplayed.
Users may also prefer to explicitly log out, so you should provide a link for this somewhere in the application. In app.js, set up the route with this:
const login = require('./routes/login');
...
app.get('/logout', login.logout);
Then in ./routes/login.js, the following function will remove the session, which is detected by the session() middleware, causing the session to be assigned for subsequent requests:
exports.logout = (req, res) => {
  req.session.destroy((err) => {
    if (err) throw err;
    res.redirect('/');
  })
};
Now that the registration and login pages have been created, the next thing you need to add is a menu so users can reach them. Let’s see how to create one.
Creating a menu for authenticated and anonymous users
In this section, you’ll create a menu for both anonymous and authenticated users, allowing them to sign in, register, submit entries, and log out. Figure 6.15 shows the menu for an anonymous user.
Figure 6.15. User login and registration menu used to access the forms you created

When the user is authenticated, you’ll display a different menu showing that user’s username, as well as a link to a page for posting messages to the shoutbox and a link allowing the user to log out. Figure 6.16 shows this menu.
Figure 6.16. Menu when the user is authenticated

Each EJS template you’ve created, representing an application page, has contained the code <% include menu %> after the <body> tag. This includes the ./views/menu.ejs template, which you’ll create next with the contents of the following listing.
Listing 6.27. Anonymous and authenticated user menu template
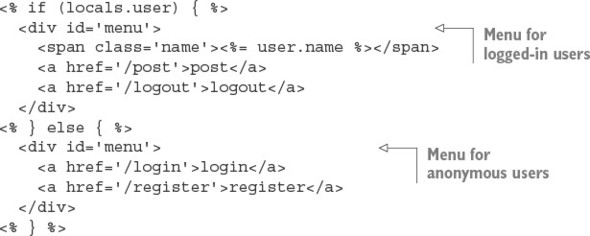
In this application, you can assume that if a user variable is exposed to the template, a user is authenticated, because you won’t be exposing the variable otherwise; you’ll see this next. When this variable is present, you can display the username along with the entry submission and logout links. When an anonymous user is visiting, the site login and register links are displayed.
You may be wondering where this user local variable comes from—you haven’t written it yet. Next you’ll write some code to load the logged-in user’s data for each request and make this data available to templates.
6.2.8. Working with user-loading middleware
A common task when you work with a web application is loading user information from a database, typically represented as a JavaScript object. Having this data readily available makes interacting with the user simpler. For this chapter’s application, you’ll load the user data on every request, using middleware.
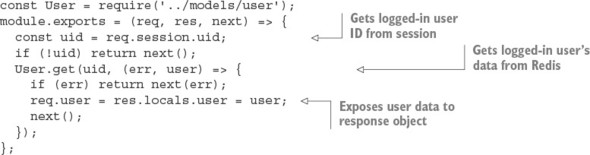
You’ll place this middleware script in ./middleware/user.js, requiring the User model from the directory above (../models). The middleware function is first exported, and then it checks the session for the user ID. When the user ID is present, a user is authenticated, so it’s safe to fetch the user data from Redis.
Because Node is single-threaded, there’s no thread-local storage. In the case of an HTTP server, the request and response variables are the only contextual objects available. High-level frameworks could build upon Node to provide additional objects to store the authenticated user, but Express made the choice to stick with the original objects that Node provides. As a result, contextual data is typically stored on the request object, as shown in listing 6.28, where the user is stored as req.user; subsequent middleware and routes can access the user object by using the same property.
You may wonder what the assignment to res.locals.user is for. res.locals is the request-level object that Express provides to expose data to templates, much like app.locals. It’s also a function that can be used to merge existing objects into itself.
Listing 6.28. Middleware that loads a logged-in user’s data
To use this new middleware, first delete all lines in app.js containing the text user. You can then require the module as usual and pass it to app.use(). In this application, user is used above the router, so only the routes and middleware following user have access to req.user. If you’re using middleware that loads data, as this middleware does, you may want to move the express.static middleware above it; otherwise, each time a static file is served, a needless round-trip to the database takes place to fetch the user.
The following listing shows how to enable this middleware in app.js.
Listing 6.29. Enabling user-loading middleware

If you fire up the application again and visit either the /login or /register pages in your browser, you should see the menu. If you want to style the menu, add the following lines of CSS to public/stylesheets/style.css.
Listing 6.30. CSS that can be added to style.css to style application menus
#menu {
  position: absolute;
  top: 15px;
  right: 20px;
  font-size: 12px;
  color: #888;
}
#menu .name:after {
  content: ' -';
}
#menu a {
  text-decoration: none;
  margin-left: 5px;
  color: black;
}
With the menu in place, you should be able to register yourself as a user. Then you should see the authenticated user menu with the Post link.
In the next section, you’ll learn how to create a public REST API for the application.
6.2.9. Creating a public REST API
In this section, you’ll implement a RESTful public API for the shoutbox application, so that third-party applications can access and add to publication data. REST enables application data to be queried and changed using verbs and nouns, represented by HTTP methods and URLs, respectively. A REST request typically returns data in a machine-readable form, such as JSON or XML.
To implement an API, you’ll do the following:
- Design an API that allows users to show, list, remove, and post entries
- Add Basic authentication
- Implement routing
- Provide JSON and XML responses
Various techniques can be used to authenticate and sign API requests, but implementing the more complex solutions are beyond the scope of this book. To illustrate how to integrate authentication, you’ll use the basic-auth package.
Designing the API
Before proceeding with the implementation, it’s a good idea to rough out the routes involved. For this application, you’ll prefix the RESTful API with the /api path, but this is a design choice you can alter. For example, you may wish to use a subdomain such as http://api.myapplication.com.
The following snippet illustrates why it can be a good choice to move the callback functions into separate Node modules, versus defining them inline with the app.VERB() calls. A single list of routes gives you a clear picture of what you and the rest of your team have implemented, and where the implementation callback lives:
app.get('/api/user/:id', api.user);
app.get('/api/entries/:page?', api.entries);
app.post('/api/entry', api.add);
Adding Basic authentication
As previously mentioned, there are many ways to approach API security and restrictions that fall outside the scope of this book. But it’s worth illustrating the process with Basic authentication.
The api.auth middleware will abstract this process, because the implementation will live in the soon-to-be-created ./routes/api.js module. The app.use() method can be passed a pathname, which is known in Express as a mount point. With this mount point, pathnames beginning with /api and any HTTP verb will cause this middleware to be invoked.
The line app.use('/api', api.auth), as shown in the following snippet, should be placed before the middleware that loads user data. This is so that you can later modify the user-loading middleware to load data for authenticated API users:
...
const api = require('./routes/api');
...
app.use('/api', api.auth);
app.use(user);
...
To perform Basic authentication, install the basic-auth module: npm install --save basic-auth. Next, create the ./routes/api.js file, and require both Express and the user model, as shown in the following snippet. The basic-auth package accepts a function to perform the authentication, taking the function signature (username, password, callback). Your User.authenticate method is a perfect fit:
const auth = require('basic-auth');
const express = require('express');
const User = require('../models/user');

exports.auth = (req, res, next) => {
  const { name, pass } = auth(req);
  User.authenticate(name, pass, (err, user) => {
    if (user) req.remoteUser = user;
    next(err);
  });
};
Authentication is ready to roll. Let’s move on to implementing the API routes.
Implementing routing
The first route you’ll implement is GET /api/user/:id. The logic for this route has to first fetch the user by ID, responding with a 404 Not Found code if the user doesn’t exist. If the user exists, the user data will be passed to res.send() to be serialized, and the application will respond with a JSON representation of this data. Add the logic in the following snippet to routes/api.js:
exports.user = (req, res, next) => {
  User.get(req.params.id, (err, user) => {
    if (err) return next(err);
    if (!user.id) return res.sendStatus(404);
    res.json(user);
  });
};
Next, add the following route path to app.js:
app.get('/api/user/:id', api.user);
You’re now ready to test it.
Testing user data retrieval
Fire up the application and test it with the cURL command-line tool. The following snippet shows how to test the application’s REST authentication. Credentials are provided in the URL tobi:ferret, which cURL uses to produce the Authorization header field:
$ curl http://tobi:ferret@127.0.0.1:3000/api/user/1 -v
The following listing shows the result of a successful test. To perform a similar test, you need to make sure you know the ID of a user. Try using redis-cli and GET user:ids if 1 doesn’t work and you’ve registered a user.
Listing 6.31. Test output
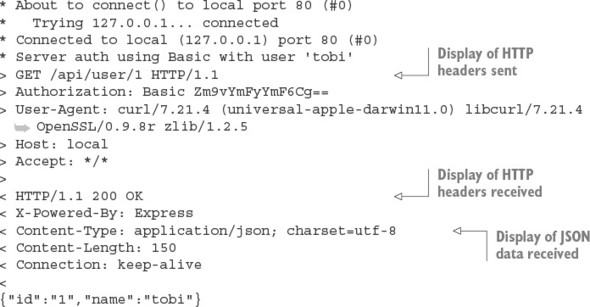
Removing sensitive user data
As you can see by the JSON response, both the user’s password and salt are provided in the response. To alter this, you can implement.toJSON() on the User in models/user.js:
class User {
  // ...
  toJSON() {
    return {
      id: this.id,
      name: this.name
    };
  }
If .toJSON exists on an object, it will be used by JSON.stringify calls to get the JSON format. If the cURL request shown earlier was to be issued again, you’d now receive only the ID and name properties:
{
  "id": "1",
  "name": "tobi"
}
The next thing you’ll add to the API is the ability to create entries.
Adding entries
The processes for adding an entry via the HTML form and through an API are nearly identical, so you’ll likely want to reuse the previously implemented entries.submit() route logic.
When adding entries, however, the route logic stores the name of the user, adding the entry in addition to the other details. For this reason, you need to modify the user-loading middleware to populate res.locals.user with the user data loaded by the basic-auth middleware. The basic-auth middleware returns this data, and you set it to req.remoteUser. Adding a check for this in the user-loading middleware is straightforward; change the module.exports definition in middleware/user.js as follows to make the user-loading middleware work with the API:
...
module.exports = (req, res, next) => {
  if (req.remoteUser) {
    res.locals.user = req.remoteUser;
  }
  const uid = req.session.uid;
  if (!uid) return next();
  User.get(uid, (err, user) => {
    if (err) return next(err);
    req.user = res.locals.user = user;
    next();
  });
};
With this change made, you’re now able to add entries via the API.
One more change to implement, however, is an API-friendly response, rather than redirection to the application’s home page. To add this functionality, change the entry.save call in routes/entries.js to the following:
...
  entry.save(err => {
    if (err) return next(err);
    if (req.remoteUser) {
      res.json({ message: 'Entry added.' });
    } else {
      res.redirect('/');
    }
  });
...
Finally, to activate the entry-adding API in your application, add the contents of the following snippet to the routing section of app.js:
app.post('/api/entry', entries.submit);
By using the following cURL command, you can test adding an entry via the API. Here the title and body data is sent using the same field names that are in the HTML form:
$ curl -X POST -d "entry[title]='Ho ho ho'&entry[body]='Santa loves you'"
      http://tobi:ferret@127.0.0.1:3000/api/entry
Now that you’ve added the ability to create entries, you need to add the ability to retrieve entry data.
Adding entry listing support
The next API route to implement is GET /api/entries/:page?. The route implementation is nearly identical to the existing entry list route in ./routes/entries.js. You also need to add pagination middleware, which is page() in the following snippets. You’ll add page() shortly.
Because the routing logic will be accessing entries, you require the Entry model at the top of routes/api.js by using the following line:
const Entry = require('../models/entry');
Next, add the lines in the following snippet to app.js:
const Entry = require('./models/entry');
...
app.get('/api/entries/:page?', page(Entry.count), api.entries);
Now add the routing logic in the following snippet to routes/api.js. The difference between this route logic and the similar logic in routes/entries.js reflects the fact that you’re no longer rendering a template, but JSON instead:
exports.entries = (req, res, next) => {
  const page = req.page;
  Entry.getRange(page.from, page.to, (err, entries) => {
    if (err) return next(err);
    res.json(entries);
  });
};
Implementing pagination middleware
For pagination, you use the query-string ?page=N value to determine the current page. Add the following middleware function to ./middleware/page.js.
Listing 6.32. Pagination middleware
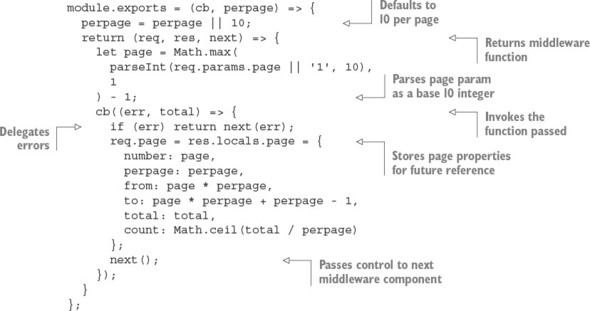
This middleware grabs the value assigned to ?page=N; for example, ?page=1. It then fetches the total number of results and exposes the page object with precomputed values to any views that may later be rendered. These values are computed outside the template to allow for a cleaner template containing less logic.
Testing the entries route
The following cURL command requests entry data from the API:
$ curl http://tobi:ferret@127.0.0.1:3000/api/entries
This cURL command should result in output similar to the following JSON:
[
  {
    "username": "rick",
    "title": "Cats can't read minds",
    "body": "I think you're wrong about the cat thing."
  },
  {
    "username": "mike",
    "title": "I think my cat can read my mind",
    "body": "I think cat can hear my thoughts."
  },
...
With basic API implementation covered, let’s move on to how APIs can support multiple response formats.
6.2.10. Enabling content negotiation
Content negotiation enables a client to specify the formats that it’s willing to accept, and which it prefers. In this section, you’ll provide JSON and XML representations of the API content so that the API consumers can decide what they want.
HTTP provides the content negotiation mechanism via the Accept header field. For example, a client who prefers HTML but is willing to accept plain text could set the following request header:
Accept: text/plain; q=0.5, text/html
The qvalue, or quality value (q=0.5 in this example), indicates that even though text/html is specified second, it’s favored by 50% over text/plain. Express parses this information and provides a normalized req.accepted array:
[{ value: 'text/html', quality: 1 },
 { value: 'text/plain', quality: 0.5 }]
Express also provides the res.format() method, which accepts an array of MIME types and callbacks. Express will determine what the client is willing to accept and what you’re willing to provide, and it’ll invoke the appropriate callback.
Implementing content negotiation
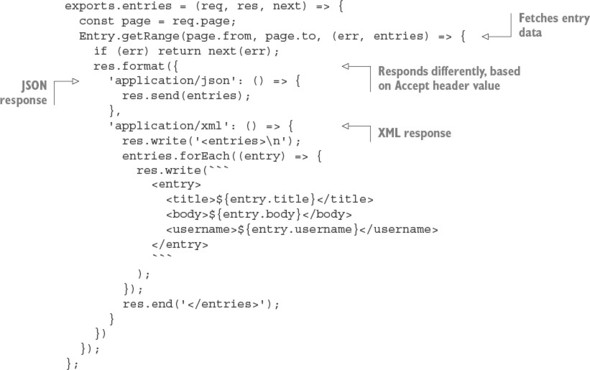
Implementing content negotiation for the GET /api/entries route, in routes/api.js, might look something like listing 6.33. JSON is supported as it was before—you serialize the entries as JSON with res.send(). The XML callback iterates the entries and writes to the socket as it does so. Note that there’s no need to set the Content-Type explicitly; res.format() sets it to the associated type automatically.
Listing 6.33. Implementing content negotiation
If you set a default response format callback, this will execute if a user hasn’t requested a format you’ve explicitly handled.
The res.format() method also accepts an extension name that maps to an associated MIME type. For example, json and xml can be used in place of application/json and application/xml, as the following snippet shows:
...
res.format({
  json: () => {
    res.send(entries);
  },
  xml: () => {
    res.write('<entries>\n');
    entries.forEach((entry) => {
      res.write(```
        <entry>
             <title>${entry.title}</title>
          <body>${entry.body}</body>
          <username>${entry.username}</username>
        </entry>
        ```
      );
    });
    res.end('</entries>');
  }
})
...
Responding with XML
Writing a bunch of custom logic in the route in order to respond with XML may not be the cleanest way to go, so let’s see how to use the view system to clean this up.
Create a template named ./views/entries/xml.ejs with the following EJS iterating the entries to generate <entry> tags.
Listing 6.34. Using an EJS template to generate XML

The XML callback can now be replaced with a single res.render() call, passing the entries array, as shown in the following code:
...
  xml: () => {
    res.render('entries/xml', { entries: entries });
  }
})
...
You’re now ready to test the XML version of the API. Enter the following in the command line to see the XML output:
curl -i -H 'Accept: application/xml'http://tobi:ferret@127.0.0.1:3000/api/entries
6.3. Summary
- Connect is an HTTP framework that lets you stack middleware components before and after requests are processed.
- Connect middleware components are functions that accept Node’s request and response objects, as well as a function that calls the next middleware and an optional error object.
- Express web applications are also built with middleware components.
- You can build REST APIs with Express by using HTTP verbs to define routes.
- Express routes can respond with JSON, HTML, or other data formats.
- Express has a simple template engine API that supports many engines.