Table of Contents for
Node.js in Action, Second Edition
 Node.js in Action, Second Edition
Published by
Manning Publications, 2017
Node.js in Action, Second Edition
Published by
Manning Publications, 2017
- Cover
- Node.js in Action, Second Edition
- Copyright
- Brief Table of Contents
- Table of Contents
- Praise for the First Edition
- Preface
- Acknowledgments
- About this Book
- About the Author
- About the Cover Illustration
- Part 1. Welcome to Node
- Chapter 1. Welcome to Node.js
- Chapter 2. Node programming fundamentals
- Chapter 3. What is a Node web application?
- Part 2. Web development with Node
- Chapter 4. Front-end build systems
- Chapter 5. Server-side frameworks
- Chapter 6. Connect and Express in depth
- Chapter 7. Web application templating
- Chapter 8. Storing application data
- Chapter 9. Testing Node applications
- Chapter 10. Deploying Node applications and maintaining uptime
- Part 3. Beyond web development
- Chapter 11. Writing command-line applications
- Chapter 12. Conquering the desktop with Electron
- Appendix A. Installing Node
- Appendix B. Automating the web with scraping
- Appendix C. Connect’s officially supported middleware
- Glossary
- Index
- List of Figures
- List of Tables
- List of Listings
Chapter 5. Server-side frameworks
- Working with popular Node web frameworks
- Choosing the right framework
- Building web apps with web frameworks
This chapter is all about server-side web development. It answers questions including how do I choose the perfect framework for a given project, and what are the advantages and disadvantages of each framework?
Deciding on the right framework is difficult because it’s hard to compare them on a level playing field. Most people don’t have time to learn all of them, so we tend to make superficial decisions about the frameworks we have experience with. In some cases, you might use different frameworks together. Express, for instance, could be used for larger applications, whereas microservices that support larger applications could be written in hapi.
Imagine you’re building a content management system (CMS). It’s used to manage legal documents collected by a research firm. It can output PDFs and has an e-commerce component. Such a system could be built with separate frameworks as follows:
- Document upload, download, and reading— Express
- PDF generator microservice—hapi
- E-commerce component— Sails.js
The perfect framework for a given project is dependent on the needs of the project and the team working on it. In this chapter, we use personas—hypothetical people—as a way of exploring which framework is right for a specific type of project. You’ll learn about Koa, hapi, Sails.js, DerbyJS, Flatiron, and LoopBack through these imaginary programmers. The personas are defined in the next section.
5.1. Personas
We want to avoid selling a single framework that you’ll use for every project. It’s much better to be eclectic and use a mix of tools that suit each problem. Using personas to think about design is a widespread practice, in part because it helps designers to empathize with users.
In this chapter, personas are used to help you to think about frameworks in the third person, to see how different classes of projects suit different solutions. The personas are defined in terms of professional situation and development tools. You should be able to identify with at least one of the three people we’ve invented here.
5.1.1. Phil: agency developer
Phil has been working for three years as a full-stack web developer. He’s done a little Ruby, Python, and client-side JavaScript:
- Job situation— Employee, full-stack developer
- Work type— Front-end engineering, server-side development
- Computer— MacBook Pro
- Tools— Sublime Text, Dash, xScope, Pixelmator, Sketch, GitHub
- Background— High school education; started as a hobbyist programmer
A typical day for Phil involves working with designers and user-experience experts in agile-style meetings to develop or review new features, as well as maintenance and bug fixes.
5.1.2. Nadine: open source developer
Nadine moved to contracting after a successful early career working as a corporate web developer:
- Job situation— Contractor, JavaScript specialist
- Work type— Server-side programming, occasional high-performance programming in Go and Erlang. Also writes a popular open source, web-based movie catalog app
- Computer— High-end PC, Linux
- Tools— Vim, tmux, Mercurial, anything in the shell
- Background—Computer science degree
Nadine’s day usually involves balancing clocking enough hours for her two major clients with working on her open source projects. Her client work is test-driven, but her open source projects are more feature-driven.
5.1.3. Alice: product developer
Alice works on a successful iOS app but also helps with her company’s web APIs:
- Job situation— Employee, programmer
- Work type— iOS development; also responsible for web apps and web services
- Computer— MacBook Pro, iPad Pro
- Tools— Xcode, Atom, Babel, Perforce
- Background— Science degree; one of the first five employees at her current startup
Alice grudgingly works with Xcode, Objective-C, and Swift, but secretly prefers Java-Script and is excited by ES2015 and Babel. She relishes developing new web services to support her company’s iOS and desktop apps, and wants to work on React-based web apps more often.
Now that the personas have been defined, let’s define the term framework.
5.2. What is a framework?
Some of the server-side frameworks discussed in this chapter are technically not frameworks at all. The term framework is unfortunately overloaded and means different things to different programmers. In the Node community, it’s more accurate to call most of these projects modules, but a more nuanced definition is useful when directly comparing this family of libraries.
The LoopBack project (http://loopback.io/resources/#compare) uses the following definitions:
- API framework— A library for building web APIs, backed by a framework that helps to structure the application. LoopBack itself is defined as this type of framework.
- HTTP server library— Anything based on Express falls into this category, including Koa and Kraken.js. These libraries help you build applications that are based around HTTP verbs and routes.
- HTTP server framework— A framework for building modular servers that speak HTTP. hapi is an example of this type of framework.
- Web MVC framework— Model-View-Controller frameworks including Sails.js fall into this category.
- Full-stack framework— These frameworks use JavaScript on the server and browser, and are able to share code between both ends. This is known as isomorphic code. DerbyJS is a full-stack MVC framework.
Most Node developers understand framework to mean the second term: HTTP server library. The next section introduces Koa, a server library that uses the innovative ES2015 syntax known as generators to offer a unique way to handle HTTP middleware.
5.3. Koa
Koa (http://koajs.com/)is based on Express, but uses the ES2015 generator syntax to define middleware. That means you can write middleware in an almost synchronous fashion. This partly solves the problem of middleware that depends highly on callbacks. With Koa, you can use the yield keyword to exit and then reenter middleware. Table 5.1 is an overview of Koa’s main features.
Table 5.1. Koa’s main features
| Library type | HTTP server library |
| Features | Generator-based middleware, request/response model |
| Suggested uses | Lightweight web apps, nonstrict HTTP APIs, serving single-page web app |
| Plugin architecture | Middleware |
| Documentation | http://koajs.com/ |
| Popularity | 10,000 GitHub stars |
| License | MIT |
The following listing shows how to use Koa to benchmark requests by yielding to the next middleware component and then continuing execution in the callee when it’s finished.
Listing 5.1. Koa’s middleware ordering
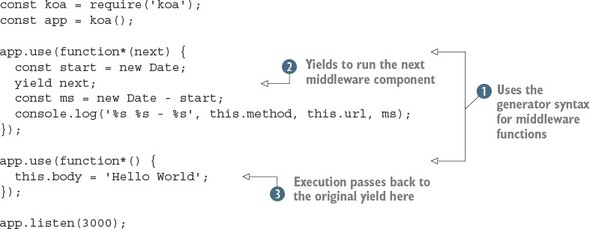
Listing 5.1 uses generators  to switch context between two middleware components. Notice that we use the keyword function*—it’s not possible to use an arrow function here. By using the yield keyword
  , execution steps down the middleware stack, then back again when the next middleware component returns
  . An added benefit of using generator functions is you can just set this.body. In contrast, Express uses a function to send responses: res.send(response). In Koa middleware, this is known as a context. A context is created for every request, and it’s used to encapsulate Node’s HTTP request and response objects (https://nodejs.org/api/http.html). Whenever you need to access something from the request, such as the GET parameters or cookies, you can use the context.
The same is true for the response: as you saw in listing 5.1, you can control what gets sent to the browser by setting values on this.body.
. An added benefit of using generator functions is you can just set this.body. In contrast, Express uses a function to send responses: res.send(response). In Koa middleware, this is known as a context. A context is created for every request, and it’s used to encapsulate Node’s HTTP request and response objects (https://nodejs.org/api/http.html). Whenever you need to access something from the request, such as the GET parameters or cookies, you can use the context.
The same is true for the response: as you saw in listing 5.1, you can control what gets sent to the browser by setting values on this.body.
If you’ve used both Express middleware and generator syntax before, Koa should be easy to learn. If either of these things is new to you, Koa might be hard to follow—or at least it might be hard to see why this style is beneficial. Figure 5.1 shows in more detail how yield hands off execution between middleware components.
Figure 5.1. Koa middleware execution order
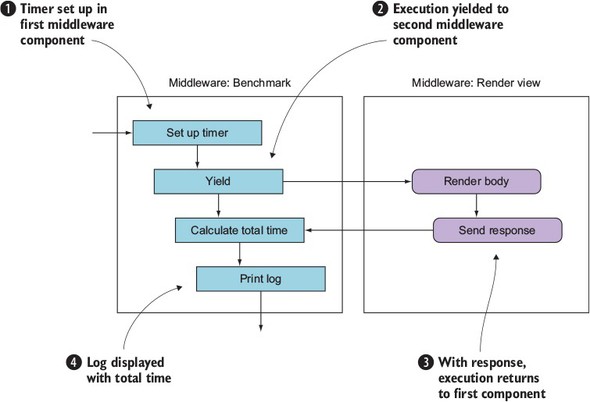
Each of the stages in figure 5.1 corresponds to the numbers in listing 5.1. First, the timer is set up in the first middleware component , and then execution is yielded to the second middleware component that renders the body . After the response has been sent, execution returns to the first middleware component, and the time is calculated . This is displayed in the terminal with console.log, and the request is then finished  . Note that stage isn’t visible in listing 5.1; it’s handled by Koa and Node’s HTTP server.
5.3.1. Setting up
Setting up a project with Koa requires installing the module and then defining middleware. If you want more functionality, such as a routing API that makes it easier to define and respond to various types of HTTP request, then you’ll need to install router middleware. That means a typical workflow requires planning the middleware your project will use beforehand, so you need to research popular modules first.
Alice: “As a product developer, I like Koa’s minimal feature set—because our project has unique requirements, and we really want to shape the entire stack according to our needs.”
Phil: “As an agency developer, I find dealing with the middleware research stage too much trouble. I’d prefer this to be handled for me, because many of my projects have similar requirements, and I don’t want to keep installing the same modules to do basic things.”
The next section demonstrates a third-party module that implements a powerful routing library for Koa.
5.3.2. Defining routes
A popular router middleware component is koa-router (https://www.npmjs.com/package/koa-router). Like Express, it’s based on HTTP verbs, but unlike Express, it has a chainable API. The next snippet shows how groups of routes are defined:
router
 .post('/pages', function*(next) {
   // Create a page
 })
 .get('/pages/:id', function*(next) {
   // Render the page
 })
 .put('pages-update', '/pages/:id', function*(next) {
   // Update a page
 });
Routes can be named by using an additional argument. This is great because you can generate URLs, which not all Node web frameworks support. Here’s an example:
router.url('pages-update', '99');
This module has a unique blend of features from Express and other web frameworks.
Phil: “This routing library reminds me of some of the things I liked about Ruby on Rails, so Koa could win me over after all!”
Nadine: “I can see opportunities for modularizing my existing projects with Koa, and then sharing this code with the community.”
5.3.3. REST APIs
Koa doesn’t come with the tools necessary to make RESTful APIs without implementing some kind of route-handling middleware. The previous example can be extended to implement a RESTful API in Koa.
5.3.4. Strengths
It would be easy to say that Koa’s strengths come from its early adoption of generator syntax, but now that ES2015 is widespread in the Node community, this is no longer as unique as it once was. Currently, Koa’s main advantage is that it’s streamlined yet has some excellent third-party modules; check out the Koa wiki for more information (https://github.com/koajs/koa/wiki#middleware). Product developers love it, because it has elegant syntax and can be tailored for projects with specific requirements.
5.3.5. Weaknesses
Koa’s level of configurability alienates some developers. Creating many small projects with Koa can lead to low levels of code reuse, unless you already have code-sharing strategies in place.
5.4. Kraken
Kraken is based on Express, but adds new functionality through custom modules developed by PayPal. One useful module in particular is Lusca (https://github.com/krakenjs/lusca), which provides an application security layer. Although it’s possible to use Lusca without Kraken, one of Kraken’s benefits is its predefined project structure. Express and Koa applications don’t require any specific project structure, so if you’re looking for help with starting new projects, Kraken can help get things going. Table 5.2 shows an overview of Kraken’s main features.
Table 5.2. Kraken’s main features
| Library type | HTTP server library |
| Features | Strict project structure, models, templates (Dust), security hardening (Lusca), configuration management, internationalization |
| Suggested uses | Corporate web apps |
| Plugin architecture | Express middleware |
| Documentation | https://www.kraken.com/help/api |
| Popularity | 4,000 GitHub stars |
| License | Apache 2.0 |
5.4.1. Setting up
If you already have an Express project, you can add Kraken as a middleware component:
const express = require('express'),
const kraken = require('kraken-js');

const app = express();
app.use(kraken());
app.listen(3000);
But if you want to start a new project, you should try Kraken’s Yeoman generator. Yeoman is a tool that helps you to generate new projects. By using Yeoman generators, you can create bootstrapped projects for a variety of frameworks. Here are the steps to create a tailored Kraken project using Yeoman, with Kraken’s preferred filesystem layout:
$ npm install -g yo generator-kraken bower grunt-cli
$ yo kraken

     ,'""`.
hh  / _  _ \
    |(@)(@)|   Release the Kraken!
    )  __  (
   /,'))((`.\
  (( ((  )) ))
   `\ `)(' /'

Tell me a bit about your application:

[?] Name: kraken-test
[?] Description: A Kraken application
[?] Author: Alex R. Young
...
The generator creates a new directory, so you don’t need to do this yourself. After the generator finishes, you should be able to start a server and visit http://localhost:8000 to try it out.
5.4.2. Defining routes
In Kraken, routes are defined alongside the controller. Rather than separating out route definitions and route handlers as Express does, Kraken uses an MVC-inspired approach, which is lightweight thanks to the use of ES6 arrow functions:
module.exports = (router) => {
  router.get('/', (req, res) => {
    res.render('index');
  });
};
Routes can include parameters in the URL:
module.exports = (router) => {
  router.get('/people/:id', (req, res) => {
    const people = { alex: { name: 'Alex' } };
    res.render('people/edit', people[req.param.id]);
  });
};
Kraken’s routing API is express-enrouten (https://github.com/krakenjs/express-enrouten), and it partly infers the route from the directory the file is in. Say you have a file layout like this:
controllers
 |-user
     |-create.js
     |-list.js
Then Kraken will generate routes such as /user/create and /user/list.
5.4.3. REST APIs
Kraken can be used to make REST APIs but doesn’t provide specific support for them. The capabilities of express-enrouten combined with middleware for parsing JSON means you can use Kraken to implement REST APIs.
Kraken’s router has HTTP verbs for DELETE, GET, POST, PUT, and so on, which makes implementing REST similar to Express.
5.4.4. Strengths
Because Kraken comes with a generator, Kraken projects look similar from a high level. Although Express projects can vary wildly in their layout, Kraken projects typically put files and directories in the same places.
Because Kraken provides both a templating library (Dust) and internationalization (Makara), the two are seamlessly integrated. To write Dust templates with internationalization, you need to specify a key:
<h1>{@pre type="content" key="greeting"/}</h1>
Then add a .properties file to locales/language-code/view-name.properties. These properties files are simple key/value pairs, so if the previous example was in a view file called public/templates/profile.dust, the .profile file would be locales/US/en/profile.properties.
Phil: “The fact that Kraken has a filesystem layout and uses controllers for routes appeals to me a lot. Some of my team know Django and Ruby on Rails, so this will be an easy transition for them. Kraken’s documentation also seems really good; there’s lots of useful stuff on the blog.”
Alice: “I like the idea of getting better application security with Lusca, but Kraken provides things I don’t really need. I’m going to try just using Lusca by itself.”
5.4.5. Weaknesses
It takes more effort to learn Kraken than Koa or Express. Some tasks that are done programmatically in Express are done through JSON configuration files, and it’s sometimes hard to figure out exactly what JSON properties are needed to get things to work the desired way.
5.5. hapi
hapi (http://hapijs.com/) is a server framework that focuses on web API development. It has its own hapi plugin API, and doesn’t come with any client-side support or database model layer. It comes with a routing API and has its own HTTP server wrapper. In hapi, you design APIs by thinking about the server as the main abstraction. The built-in server features for connections and logging make hapi good at scaling and management from a DevOps point of view. Table 5.3 contains an overview of hapi’s main features.
Table 5.3. hapi’s main features
| Library type | HTTP server framework |
| Features | High-level server container abstraction, security headers |
| Suggested uses | Single-page web apps, HTTP APIs |
| Plugin architecture | hapi plugins |
| Documentation | http://hapijs.com/api |
| Popularity | 6,000 GitHub stars |
| License | BSD 3 Clause |
5.5.1. Setting up
First, create a new Node project and install hapi:
mkdir listing5_2
cd listing5_2
npm init –y
npm install --save hapi
Then create a new file called server.js. Add the code from the following listing.
Listing 5.2. Basic hapi server
const Hapi = require('hapi');
const server = new Hapi.Server();

server.connection({
  host: 'localhost',
  port: 8000
});

server.start((err) => {
  if (err) {
    throw err;
  }
  console.log('Server running at:', server.info.uri);
});
You could run this example as it is, but it won’t do much without any routes. Read on to learn about how hapi handles routes.
5.5.2. Defining routes
hapi has a built-in API for creating routes. You must provide an object that includes properties for the request method, a URL, and a callback to run, which is known as a handler. The next listing shows how to define a route with a handler method.
Listing 5.3. hapi hello world server
const Hapi = require('hapi');
const server = new Hapi.Server();

server.connection({
  host: 'localhost',
  port: 8000
});

server.route({
  method: 'GET',
  path:'/hello',
  handler: (request, reply) => {
    return reply('hello world');
  }
});

server.start((err) => {
  if (err) {
    throw err;
  }
  console.log('Server running at:', server.info.uri);
});
Add this code to the previous listing to define a route and handler that will respond with the text hello world. You can run this example by typing npm start. Open http://localhost:8000/hello to see the response.
hapi doesn’t come with a predefined folder structure or any MVC features; it’s entirely based around servers. In this regard, it’s similar to Express. Notice, however, a key difference: the request, reply route handler signature is different from Express’s req, res. hapi’s request and reply objects are different from Express’s equivalents as well: you must call reply rather than manipulate Express’s res object. Express is more similar to Node’s built-in HTTP server.
To go beyond this simple example and get more functionality, such as serving static files, you need plugins.
5.5.3. Plugins
hapi has its own plugin architecture, and most projects require several plugins to provide features such as authentication and user input validation. A simple plugin that most projects need is inert (https://github.com/hapijs/inert), which adds static file and directory handlers.
To add inert to a hapi project, you need to first register the plugin with the server.register method. This adds the reply.file method for sending single files, and a built-in directory handler. Let’s look at the directory handler.
Make sure you have a project set up based on listing 5.2. Next, install inert:
npm install --save inert
Now the plugin can be loaded and registered. Open the server.js file and add the following lines.
Listing 5.4. Adding a plugin with hapi
const Inert = require('inert');

server.register(Inert, () => {});

server.route({
  method: 'GET',
  path: '/{param*}',
  handler: {
    directory: {
      path: '.',
      redirectToSlash: true,
      index: true
    }
  }
});
Instead of accepting only functions, hapi routes can also accept configuration objects for plugins. In this listing, the directory object includes the inert settings to serve files in the current path and show an index of the files in that directory. This is different from Express middleware, and shows how plugins extend the server’s behavior in hapi applications.
5.5.4. REST APIs
hapi supports HTTP verbs and URL parameterization, allowing REST APIs to be implemented by using the standard hapi route API. The following snippet is the route required for a generalized delete method:
server.route({
  method: 'DELETE',
  path: '/items/{id}',
  handler: (req, reply) => {
    // Delete "item" here, based on req.params.id
    reply(true);
  }
});
In addition, plugins make creating RESTful APIs easier. For example, hapi-sequelize-crud (https://www.npmjs.com/package/hapi-sequelize-crud) automatically generates a RESTful API based on Sequelize models (http://docs.sequelizejs.com/en/latest/).
Phil: “I would definitely like to try hapi-sequelize-crud because we already have apps that use PostgreSQL and MySQL, so Sequelize might be a good fit. But, because hapi doesn’t come with features like this out of the box, I’m worried that this plugin might become unsupported, so I’m not sure if hapi will work well in an agency scenario.”
Alice: “As a product developer, I think hapi is interesting because like Express, it’s minimal, yet the plugin API is more formal and expressive.”
Nadine: “I can see several opportunities for making open source plugins for hapi, and the existing plugins mostly seem well written. hapi seems to have a technically competent audience, which appeals to me.”
5.5.5. Strengths
hapi’s plugin API is one of the biggest advantages of using hapi. Plugins can extend hapi’s server but also add all kinds of other behavior, from data validation to templating. Also, because hapi is based around HTTP servers, it suits certain types of deployment scenarios. If you’re deploying many servers that need to be connected together or load balanced, you might prefer hapi’s server-based API to Express or Koa.
5.5.6. Weaknesses
hapi has similar weaknesses to Express: it’s minimal, so there’s no guidance on project structure. You can never be sure whether development on a plugin might cease, so relying on lots of plugins could cause maintenance issues in the future.
5.6. Sails.js
The frameworks you’ve seen so far have been minimal server libraries. Sails (http://sailsjs.org/) is a Model-View-Controller (MVC) framework, which is fundamentally different from a server library. It comes with an object-relational mapping (ORM) library for working with databases, and it can automatically generate REST APIs. It has modern features as well, including built-in WebSocket support. And if you’re a fan of React or Angular, you’ll be glad to know it’s front-end agnostic: it’s not a full-stack framework, so you can use it with practically any front-end library or framework. Table 5.4 shows the main features of Sails.
Table 5.4. The main features of Sails
| Library type | MVC framework |
| Features | Database support with an ORM, REST API generation, WebSocket |
| Suggested uses | Rails-style MVC apps |
| Plugin architecture | Express middleware |
| Documentation | http://sailsjs.org/documentation/concepts/ |
| Popularity | 6,000 GitHub stars |
| License | BSD 3 Clause |
Phil: “This sounds exactly what I’m looking for—what’s the catch?!”
Alice: “I thought this wouldn’t be for me because we’ve already invested development time in a React app, but because it’s focused on the server, it may work for our product.”
5.6.1. Setting up
Sails comes with a project generator, so it’s best if you install it globally to make creating new projects easier. Install it with npm and then use sails new to make a project:
npm install -g sails
sails new example-project
This creates a new directory with a package.json for the basic Sails dependencies. The new project includes Sails itself, EJS, and Grunt. You can run npm start to start the server, or type sails lift. When the server is running, you’ll be able to see the built-in Getting Started page by visiting http://localhost:1337.
5.6.2. Defining routes
To add routes, known as custom routes in Sails, open config/routes.js and add a property to the exported routes. This property is the HTTP verb and partial URL. For example, these are some valid Sails routes:
module.exports.routes = {
  'get /example': { view: 'example' },
  'post /items': 'ItemController.create
};
The first route expects a file called views/example.ejs. The second route expects a file called api/controllers/ItemController with a method called create. You can generate this controller with a method called create by running sails generate controller item create. A similar command can be used to quickly create RESTful APIs.
5.6.3. REST APIs
Sails combines database models and controllers into APIs, so to quickly stub RESTful APIs, use sails generate api resource-name. To use a database, you first need to install a database adapter. Adding MySQL involves finding the name of the Waterline MySQL package (https://github.com/balderdashy/waterline) and then adding it to the project:
npm install --save waterline sails-mysql
Next, open config/connections.js and fill out the connection details for your MySQL server. Sails model files allow you to specify the database connection, so you can use different models with different databases. That allows situations like a user session database in Redis and other, more permanent resources in a relational database such as MySQL.
Waterline is the database library for Sails, and it has its own documentation repository (https://github.com/balderdashy/waterline-docs). Other than supporting multiple databases, Waterline has useful features: you can define table and column names to support legacy schemas, and the query API supports promises so queries look like modern JavaScript.
Phil: “The ease of creating APIs and the fact that Waterline models can support existing database schemas means Sails sounds ideal for us. We have clients that we want to slowly move from MySQL to PostgreSQL, so we may be able to do this with Waterline. Some of our developers and designers have already worked with Ruby on Rails, so I think they’ll pick up Sails with Node’s modern ES2015 syntax in no time.”
Alice: “This framework provides things that I don’t need for our product. I feel like Koa or hapi would be a better fit.”
5.6.4. Strengths
The built-in project creation and API generation means that setting up projects and adding typical REST APIs is fast. It works well for quickly creating new projects and collaborating, because Sails projects have the same filesystem layout. The creators of Sails, Mike McNeil and Irl Nathan, have written a book called Sails.js in Action (Manning Publications, 2017), which shows how Sails welcomes to Node beginners as well.
5.6.5. Weaknesses
Sails has some of the weaknesses shared by other server-side MVC frameworks: the routing API means you have to design your application with the Sails routing features in mind, and you may find it hard to adapt your schema to suit the Waterline way of handling things.
5.7. DerbyJS
DerbyJS is a full-stack framework that supports data synchronization and server rendering of views. It depends on MongoDB and Redis. The data synchronization layer is provided by ShareJS, and it supports automatic conflict resolution. Table 5.5 summarizes DerbyJS’ main features.
Table 5.5. DerbyJS features
| Library type | Full-stack framework |
| Features | Database support with an ORM (Racer), isomorphic |
| Suggested uses | Single-page web apps with server-side support |
| Plugin architecture | DerbyJS plugins |
| Documentation | http://derbyjs.com/docs/derby-0.6 |
| Popularity | 4,000 GitHub stars |
| License | MIT |
5.7.1. Setting up
If you don’t have MongoDB or Redis, you need to install both of them to run the DerbyJS examples. The DerbyJS documentation explains how to do this for Mac OS, Linux, and Windows (http://derbyjs.com/started#environment).
To create a new DerbyJS project quickly, install derby and derby-starter. The derby-starter package is used to bootstrap a Derby application:
mkdir example-derby-app
cd example-derby-app
npm init -f
npm install --save derby derby-starter derby-debug
Derby applications are split into several smaller applications, so create a new app directory with three files: index.js, server.js, and index.html. The following listing shows a simple Derby app that renders a template.
Listing 5.5. Derby app/index.js file
const app = module.exports = require('derby')
  .createApp('hello', __filename);
app.loadViews(__dirname);

app.get('/', (page, model) => {
  const message = model.at('hello.message');
  message.subscribe(err => {
    if (err) return next(err);
    message.createNull('');
    page.render();
  });
});
The server file needs to load only the derby-starter module, as shown in the following snippet. Save this as app/server.js:
require('derby-starter').run(__dirname, { port: 8005 });
The app/index.html file renders an input field and the message that the user types:
<Body:>
  Holler: <input value="{{hello.message}}">
  <h2>{{hello.message}}</h2>
You should be able to run the application from the example-derby-app directory by typing node derby/server.js. Once it’s running, editing the app/index.html file will cause the application to restart; you automatically get real-time updates when editing code and templates.
5.7.2. Defining routes
DerbyJS uses derby-router for routing. Because DerbyJS is powered by Express, the routing API is similar for server-side routes, and the same routing module is used in the browser. When clicking a link in a DerbyJS app, it’ll attempt to render the response in the client.
DerbyJS is a full-stack framework, so adding routes isn’t quite the same as with the other libraries that you’ve looked at in this chapter. The most idiomatic way to add a basic route is by adding a view. Open apps/app/index.js and add a route by using app.get:
app.get('hello', '/hello');
Next, open apps/app/views/hello.pug and add a simple Pug template:
index:
  h2 Hello
  p Hello world
Now open apps/app/views/index.pug and import the template:
import:(src="./hello")
The project should constantly update if you’ve run npm start, so opening http://localhost:3000/hello will now show the new view.
The line that reads index: is the namespace for the view. In DerbyJS, view names have colon-separated namespaces, so you just created hello:index. The idea behind this is to encapsulate views so they don’t clash in larger projects.
5.7.3. REST APIs
In DerbyJS projects, you need to create RESTful APIs by adding routes and route handlers with Express. Your DerbyJS project will have a server.js file that uses Express to create a server. If you open server/routes.js, you’ll find an example route, defined by using the standard Express routing API.
In the server routes file, you could use app.use to mount another Express application, so you could model a REST API as a completely separate Express app that the main DerbyJS app mounts.
5.7.4. Strengths
DerbyJS has a database model API and a data synchronization API. You can use it to build single-page web apps, and modern real-time applications. Because it comes with WebSocket and synchronization built in, you don’t have to worry about which WebSocket library to use, or how to sync data between the client and server.
Phil: “We had a client asking about building a data visualization project based on real-time data, so I think DerbyJS could be good for that. But the learning curve seems steep, so I’m not sure I can convince our developers to use it.”
Alice: “As a product developer, I find it hard to see how to fit our product’s needs to DerbyJS’ architecture, so I don’t think it’s a good fit for my project.”
5.7.5. Weaknesses
It’s hard to convince people who are already experienced with either server-side or client-side libraries to use DerbyJS. Client-side developers who love React, for example, don’t typically want to use DerbyJS. Server-side developers who love making REST APIs or MVC projects and who are comfortable with WebSocket also fail to be motivated to learn DerbyJS.
5.8. Flatiron.js
Flatiron is a web framework that includes features for URL routing, data management, middleware, plugins, and logging. Unlike most web frameworks, Flatiron’s modules are designed to be decoupled, so you don’t have to use all of them. You could even use one or more in your own projects—if you like the logging module, for example, you could drop it into an Express project. Unlike many Node frameworks, Flatiron’s URL routing and middleware layers aren’t written using Express or Connect, although the middleware is backward-compatible with Connect. Table 5.6 summarizes Flatiron’s features.
Table 5.6. Flatiron’s features
| Library type | Modular MVC framework |
| Features | Database management layer (Resourceful), decoupled reusable modules |
| Suggested uses | Lightweight MVC apps, use Flatiron modules in other frameworks |
| Plugin architecture | Broadway plugin API |
| Documentation | https://github.com/flatiron |
| Popularity | 1,500 GitHub stars |
| License | MIT |
5.8.1. Setting up
Installing Flatiron requires globally installing the command-line tool to create new Flatiron projects:
npm install -g flatiron
flatiron create example-flatiron-app
After running these commands, you’ll find a new directory that contains a package.json file with the necessary dependencies. Run npm install to install the dependencies, and then npm start to run the app.
The main app.js file looks a lot like a typical Express app:
const flatiron = require('flatiron');
const path = require('path');
const app = flatiron.app;

app.config.file({ file: path.join(__dirname, 'config', 'config.json') });

app.use(flatiron.plugins.http);

app.router.get('/', () => {
  this.res.json({ 'hello': 'world' })
});

app.start(3000);
Notice, however, that the router is different from both Express and Koa. Responses are returned by using this.res, instead of an argument to the responder callback. Let’s look at Flatiron’s routes in more detail.
5.8.2. Defining routes
Flatiron’s routing library is called Director. Although it can be used for server routes, it also supports routes in browsers, so it can be used to make single-page apps as well. Director calls Express-style HTTP verb routes ad hoc:
router.get('/example', example);
router.post('/example', examplePost);
Routes can have parameters, and parameters can be defined with a regular expression:
router.param('id', /([\\w\\-]+)/);
router.on('/pages/:id', pageId => {});
To generate a response, use res.writeHead to send headers, and res.end to send the response body:
router.get('/',  () => {
  this.res.writeHead(200, { 'content-type': 'text/plain' });
  this.res.end('Hello, World');
});
The routing API can also be used as a class, with a routing table object. To use it, instantiate a new router and then use the dispatch method when HTTP requests arrive:
const http = require('http');
const director = require('director');
const router = new director.http.Router({
  '/example': {
    get: () => {
      this.res.writeHead(200, { 'Content-Type': 'text/plain' })
      this.res.end('hello world');
    }
  }
});
const server = http.createServer((req, res) =>
  router.dispatch(req, res);
});
Using the routing API as a class also means you can hook into the streaming API. This makes dealing with large requests possible in a quick and easy way, which is good for doing things such as parsing uploaded data and exiting early:
const director = require('director');
const router = new director.http.Router();

router.get('/', { stream: true }, () => {
  this.req.on('data', (chunk) => {
    console.log(chunk);
  });
});
Director has a scoped routing API, which can be useful for creating REST APIs.
5.8.3. REST APIs
REST APIs can be created with the standard Express HTTP verb style methods, or Director’s scoped routing feature. This allows routes to be grouped together based on URL fragments and URL parameters:
 router.path(/\/users\/(\w+)/, () => {
  this.get((id) => {});
  this.delete((id) => {});
  this.put((id) => {});
});
Flatiron also provides a high-level REST wrapper called Resourceful (https://github.com/flatiron/resourceful), which supports CouchDB, MongoDB, Socket.IO, and data validation.
5.8.4. Strengths
It’s hard for frameworks to gain traction, which is why Flatiron’s decoupled design is a major strength. You can use some of its modules without using the entire framework. For example, the Winston logging module (https://github.com/winstonjs/winston) is used by many projects that don’t use the rest of Flatiron. This means some parts of Flatiron receive a good level of open source contributions.
The Director URL-routing API is isomorphic, so you can use it as a solution for both client- and server-side development. Director’s API differs from the Express-style routing APIs as well: Director has a simplified streaming API, and the routing object emits events before and after routes are executed.
Unlike most Node web frameworks, Flatiron has a plugin manager. Therefore, it's easier to extend Flatiron projects with community-supported plugins.
Nadine: “I love Flatiron’s modular design, and the plugin manager is great. I can already think of some plugins that I’d like to make.”
Alice: “I don't like the sound of all of Flatiron’s modules, so I’d like to try it with a different ORM and template library.”
5.8.5. Weaknesses
Flatiron isn’t as easy to use for larger MVC-style projects as some other frameworks. For example, Sails is easier to set up. If you’re creating several medium-sized traditional web apps, Flatiron may work well. The ability to configure Flatiron is an added bonus, but make sure you evaluate it next to other options first.
One strong competitor is LoopBack, which is the last framework that features in this chapter.
5.9. LoopBack
LoopBack was created by StrongLoop, a company offering several commercial services that support the development of Node web apps. It’s billed as an API framework, but has features that make it work well with databases and for MVC apps. It even comes with a web interface for exploring and managing REST APIs. If you’re looking for something that will help create web APIs for mobile and desktop clients, LoopBack’s features are ideal. See table 5.7 for details about LoopBack.
Table 5.7. LoopBack’s features
| Library type | API framework |
| Features | ORM, API user interface, WebSocket, client SDKs (including iOS) |
| Suggested uses | APIs that support multiple clients (mobile, desktop, web) |
| Plugin architecture | Express middleware |
| Documentation | http://loopback.io/doc/ |
| Popularity | 6,500 GitHub stars |
| License | Dual license: MIT and StrongLoop Subscription Agreement |
LoopBack is open source, and since StrongLoop’s acquisition by IBM, the framework now has major commercial endorsement. That makes it a unique offering in the Node community. It comes with Yeoman generators for quickly setting up application scaffolds. In the next section, you’ll see how to create a fresh LoopBack application.
5.9.1. Setting up
To set up a new LoopBack project, you need to use the StrongLoop command-line tools (www.npmjs.com/package/strongloop). Globally installing the strongloop package makes the command-line tools available through the slc command. This package includes features for process management, but what we’re interested in is the LoopBack project generator:
npm install -g strongloop
slc loopback
The StrongLoop command-line tool walks you through the steps necessary to set up a new project. Type in a name for the project and then select the api-server application skeleton. When the generator has finished installing the project’s dependencies, it will display some handy tips for working with the new project. Figure 5.2 shows what this should look like.
Figure 5.2. LoopBack’s project generator
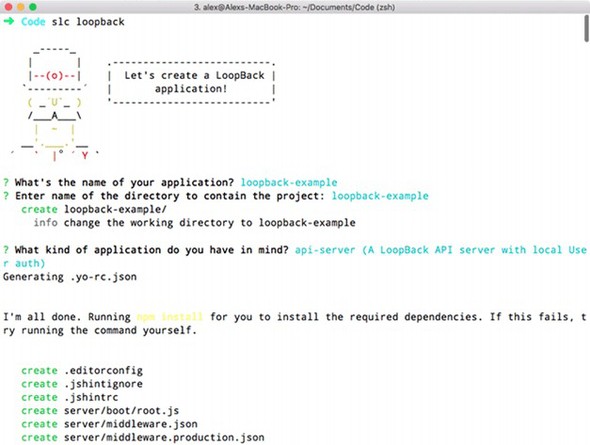
To run the project, type node ., and to create a model, use slc loopback:model. You’ll use the slc command regularly as you set up a new LoopBack project.
When the project is running, you should be able to access the API explorer at http://0.0.0.0:3000/explorer/. Click User to expand the User endpoint. You should see a large list of available API methods, including standard RESTful routes such as PUT /Users and DELETE /Users/{id}. Figure 5.3 shows the API explorer.
Figure 5.3. The StrongLoop API explorer showing User routes

5.9.2. Defining routes
In LoopBack, you can add routes at the Express level. Add a new file called server/boot/routes.js, and add a route by accessing the LoopBack Router instance:
module.exports = (app) => {
  const router = app.loopback.Router();
  router.get('/hello', (req, res) => {
    res.send('Hello, world');
  });
  app.use(router);
};
Visiting http://localhost:3000/hello will now respond with Hello, world. Adding routes this way, however, isn’t typical in a LoopBack project. It may be required for certain unusual API endpoints, but in general, routes are added automatically when models are generated.
5.9.3. REST APIs
The easiest way to create REST APIs in a LoopBack project is by using the model generator. This is part of the slc command’s features. If you want to add a new model called product, for example, run slc loopback:model:
slc loopback:model product
The slc command walks you through the steps to create a model, allowing you to select whether the model is server-only, and set up some properties and validators. After you add a model, take a look at the corresponding JSON file—it should be in common/models/product.json. This JSON file is a lightweight way of defining how models behave, including all of the properties you specified in the previous step.
If you want to add more properties, type slc loopback:property. You can add properties to models at any time.
Phil: “Our teams love the sound of LoopBack, mainly because of the ability to quickly add RESTful resources and browse them with the API explorer. But I like it because it looks like it’s flexible enough to support our legacy MVC web apps. We could hook into the older database and move these projects over to Node.”
Alice: “This is the only framework that really targets iOS and Android, as well as rich web clients. LoopBack has client libraries for iOS and Android, so this is a big deal for us as product developers who depend on mobile apps.”
5.9.4. Strengths
Even from this short introduction, it should be clear that one of the strengths of LoopBack is it removes the need to write boilerplate code. The command-line tool generates almost everything you need for lightweight RESTful web APIs, even database models and validation. At the same time, LoopBack doesn’t dictate too much about the front-end code. It also enables you to think about which models should be accessible to the browser and which are server-side only. Some frameworks get this wrong and push everything to the browser.
If you have mobile apps that need to talk to your web APIs, take a look at LoopBack’s client SDKs (http://loopback.io/doc/en/lb2/Client-SDKs.html). LoopBack supports API integration and push messages for both iOS and Android.
5.9.5. Weaknesses
LoopBack’s JSON-based model API is different from most JavaScript database APIs. It can take a while to learn how to map it to an existing project’s database schema. And because the HTTP layer is based on Express, it’s partly limited to what Express supports. Although Express is a solid HTTP server library, newer libraries are available for Node with more-modern APIs. LoopBack doesn’t have a specific plugin API. You can use Express middleware, but this isn’t as convenient as Flatiron or hapi’s plugin APIs.
This concludes the frameworks that are covered in this chapter. Before moving on to the next chapter, let’s compare the frameworks to help you decide which is the right choice for your next project.
5.10. Comparison
If you’ve been following the persona thoughts throughout this chapter, you may already have decided which framework to use. If not, the rest of this chapter compares the benefits of each framework. And, if you’re still lost, figure 5.4 will help you pick the right framework by answering some questions.
Figure 5.4. Choosing a Node framework
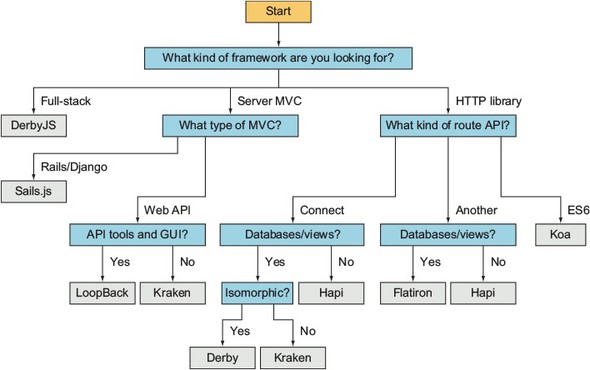
If you glance through Node’s popular server-side frameworks, they all sound similar. They offer lightweight HTTP APIs, and they use the server model instead of PHP’s page model. But the differences in their design have big implications for projects made with them, so to compare these frameworks, we’ll start at the HTTP level.
5.10.1. HTTP servers and routes
The majority of Node frameworks are based on Connect or Express. In this chapter, you’ve seen three that aren’t based on Express at all, and have their own solutions to HTTP APIs: Koa, hapi, and Flatiron.
Koa was created by the same author as Express, but offers a fresh approach by using more-modern JavaScript features. If you like Express but want to use ES2015 generator syntax, Koa may work for you.
hapi’s server and routing APIs are highly modular and feel different from those of Express. If you find Express’s syntax awkward, you should give hapi a try. hapi makes it easier to reason about HTTP servers, so if you need to do things such as connect servers or cluster them, you may prefer hapi to Express descendants.
Flatiron’s router is backward-compatible with Express but has extra features. The router emits events and uses a routing table. That’s different from the Express-style stack of middleware components. You can pass an object literal to Flatiron’s router. The router also works in browsers, so if you have server-side developers trying to tackle modern client-side development, they might be more at home with Flatiron than going all out with something like React Router.
5.11. Writing modular code
Not all of the frameworks covered here directly support plugins, but they’re all extensible in some way. The Express-based frameworks can use Connect middleware, but hapi and Flatiron have their own plugin APIs. Well-defined plugin APIs are useful because they make it easier for new users of a framework to extend it.
If you’re using a larger MVC framework such as Sails.js or LoopBack, a plugin API makes it much easier to set up a new project. LoopBack partly sidesteps needing a plugin API by providing a highly capable project management tool. If you look at StrongLoop’s npm account (www.npmjs.com/~strongloop), you’ll see lots of loopback-related projects that add support for things like Angular and several databases.
5.12. Persona choices
The personas in this chapter now have enough background to make the right choice for their next project:
Phil: “In the end I decided to go with LoopBack. It was a difficult choice because Sails and Kraken both have excellent features that my team liked, but we felt like LoopBack has stronger long-term support and reduces so much effort on server-side development.”
Nadine: “As an open source developer, I’ve opted for Flatiron. It’ll adapt to the various projects that I’m working on. For example, some projects will just use Winston and Director, but others will use the whole stack.”
Alice: “I’ve chosen hapi for my next project. It’s minimal, so I can adapt it to the project’s unique requirements. Most of the code will be Node and not rely on any specific framework, so I feel this works well with hapi.”
5.13. Summary
- Koa is lightweight, minimal, and uses ES2015 generator syntax for middleware. It’s good for hosting single-page web apps that depend on external web APIs.
- hapi is focused on HTTP servers and routes. It’s good for lightweight back ends composed of lots of small services.
- Flatiron is a set of decoupled modules that can be used like either a web MVC framework or a more lightweight Express library. Flatiron is compatible with Connect middleware.
- Kraken is based on Express, with added security features. It can be used for MVC.
- Sails.js is a Rails/Django-inspired MVC framework. It has an ORM and a template system.
- DerbyJS is an isomorphic framework that’s good for real-time applications.
- LoopBack removes the need to write boilerplate code for quickly generating REST APIs complete with database support and an API explorer.