Table of Contents for
Laravel: Up & Running, 2nd Edition
 Laravel: Up & Running, 2nd Edition
Published by
O'Reilly Media, Inc., 2019
Laravel: Up & Running, 2nd Edition
Published by
O'Reilly Media, Inc., 2019
- nav
- Cover
- Laravel: Up & Running
- Laravel: Up & Running
- Dedication
- Preface
- 1. Why Laravel?
- 2. Setting Up a Laravel Development Environment
- 3. Routing and Controllers
- 4. Blade Templating
- 5. Database and Eloquent
- 6. Frontend Components
- 7. Collecting and Handling User Data
- 8. Artisan and Tinker
- 9. User Authentication and Authorization
- 10. Requests, Responses, and Middleware
- 11. The Container
- 12. Testing
- 13. Writing APIs
- 14. Storage and Retrieval
- 15. Mail and Notifications
- 16. Queues, Jobs, Events, Broadcasting, and the Scheduler
- 17. Helpers and Collections
- 18. The Laravel Ecosystem
- Glossary
- Index
- About the Author
- Colophon
Chapter 16. Queues, Jobs, Events, Broadcasting, and the Scheduler
So far we’ve covered some of the most common structures that power web applications: databases, mail, filesystems, and more. Each of these are common across a majority of applications and frameworks.
Laravel also provides facilities for some less common architecture patterns and application structures. In this chapter we’ll cover Laravel’s tools for implementing queues, queued jobs, events, and WebSocket event publishing. We’ll also cover Laravel’s scheduler, which makes manually-edited cron schedules a thing of the past.
Queues
To understand what a queue is, just think about the idea of “queueing up” in a line at the bank. Even if there are multiple lines—queues—only one person is being served at a time from each queue, and each person will eventually reach the front and be served. In some banks, it’s a strict first-in-first-out sort of policy, but in other banks, there’s not an exact guarantee that someone won’t cut ahead of you in line at some point. Essentially, someone can get added to the queue, be removed from the queue prematurely, or be successfully “processed” and then removed. Someone might even hit the front of the queue, not be able to be served correctly, return to the queue for a time, and then be processed again.
Queues in programming are very similar. Your application adds a “job” to a queue, which is a chunk of code that tells the application how to perform a particular behavior. Then some other separate application structure, usually a “queue worker,” takes the responsibility for pulling jobs off of the queue one at a time and performing the appropriate behavior. Queue workers can delete the jobs, return them to the queue with a delay, or mark them as successfully processed.
Laravel makes it easy to serve your queues using Redis, beanstalkd, Amazon’s SQS (Simple Queue Service), or a database table. You can also choose the sync driver to have the jobs run right in your application without actually being queued, or the null driver for jobs to just be discarded; these two are usually used in local development or testing environments.
Why Queues?
Queues make it easy to remove a costly or slow process from any synchronous call. The most common example is sending mail—doing so can be slow, and you don’t want your users to have to wait for mail to send in response to their actions. Instead, trigger a “send mail” queued job and let the users get on with their day. Sometimes you may not just want to save your users time, but you might have a process like a cron job or a webhook that has a lot of work to process; rather than letting it all run at once (and potentially time out), you may choose to queue its individual pieces and let the queue worker process them one at a time.
Additionally, if you have some heavy processing that’s more than your server can handle, you can spin up more than one queue worker to work through your queue faster than your normal application server could on its own.
Basic Queue Configuration
Like many other Laravel features that abstract multiple providers, queues have their own dedicated config file (config/queue.php) that allows you to set up multiple drivers and define which will be the default. This is also where you’ll store your SQS, Redis, or beanstalkd authentication information.
Simple redis queues on Laravel Forge
We haven’t covered Laravel Forge in much depth, but it’s a hosting-management service provided by Taylor Otwell, the creator of Laravel. Every server you create has Redis configured automatically, so if you visit any site’s Forge console, you can just go to the Queue tab and hit Start Worker and you’re ready to use Redis as your queue driver; you can leave all the default settings, and no other work is necessary.
Queued Jobs
Remember our bank analogy? Each person in the bank “queue” (line) is, in programming terms, a job. This job could be shaped any way; it could just be a string, or an array, or an object. In Laravel, it’s a collection of information containing the job name, the data payload, the number of attempts that have been made so far to process this job, and some other simple metadata.
But you don’t need to worry about that in your interactions with Laravel. Laravel provides a structure called a Job, which is intended to encapsulate a single task—a behavior that your application can be commanded to do—and allow it to be added to and pulled from a queue. There are also simple helpers to make it easy to queue Artisan commands and mail.
Let’s start with an example where, every time a user changes his plan with your SaaS app, you want to rerun some calculations about your overall profit.
Creating a job
As always, there’s an Artisan command for that:
phpartisanmake:jobCrunchReports
Take a look at Example 16-1 to see what you’ll get.
Example 16-1. The default template for jobs in Laravel
<?phpnamespaceApp\Jobs;useIlluminate\Bus\Queueable;useIlluminate\Queue\SerializesModels;useIlluminate\Queue\InteractsWithQueue;useIlluminate\Contracts\Queue\ShouldQueue;useIlluminate\Foundation\Bus\Dispatchable;classCrunchReportsimplementsShouldQueue{useDispatchable,InteractsWithQueue,Queueable,SerializesModels;/*** Create a new job instance.** @return void*/publicfunction__construct(){//}/*** Execute the job.** @return void*/publicfunctionhandle(){//}}
As you can see, this template imports the Dispatchable, Queueable, InteractsWithQueue, and SerializesModels traits, and implements the ShouldQueue interface. Prior to Laravel 5.3, some of this functionality came in through the parent App\Jobs class.
We also get two methods from this template: the constructor, which you’ll want to use to attach data to the job, and the handle() method, which is where the job’s logic should reside (and is also the method signature you’ll use to inject dependencies).
The traits and interface provide the class with the ability to be added to, and interact with, the queue. Dispatchable gives it methods to dispatch itself; Queueable allows you to specify how Laravel should push this job to the queue; InteractsWithQueue allows each job, while being handled, to control its relationship with the queue, including deleting or requeueing itself; and SerializesModels gives the job the ability to serialize and deserialize Eloquent models.
Serializing models
The SerializesModels trait gives the jobs the ability to serialize (convert to a flatter format that can be stored in a data store like a database or queue system) injected models so that your job’s handle() method will have access to them. However, because it’s too difficult to reliably serialize an entire Eloquent object, the trait ensures that just the primary keys of any attached Eloquent objects are serialized when the job is pushed onto the queue. When the job is deserialized and handled, the trait pulls those Eloquent models fresh from the database by their primary key. This means that when your job runs it will be pulling a fresh instance of this model, not whatever state it was in when you queued the job.
Let’s fill out the methods for our sample class, as in Example 16-2.
Example 16-2. An example job
...useApp\ReportGenerator;classCrunchReportsimplementsShouldQueue{useDispatchable,InteractsWithQueue,Queueable,SerializesModels;protected$user;publicfunction__construct($user){$this->user=$user;}publicfunctionhandle(ReportGenerator$generator){$generator->generateReportsForUser($this->user);Log::info('Generated reports.');}}
We’re expecting the User instance to be injected when we create the job, and then when it’s handled we’re typehinting a ReportGenerator class (which we presumably wrote) and a Logger (which Laravel provides). Laravel will read both typehints and inject those dependencies automatically.
Pushing a job onto a queue
There are multiple methods by which you can dispatch a job, including some methods available to every controller and a global dispatch() helper. But since Laravel 5.5, we’ve had a simpler and preferred method: calling the dispatch() method on the job itself. So, if you’re running Laravel 5.5+, just ignore the other options, as we’ll do for the rest of this chapter.
So, in order to dispatch your job, you can just create an instance of it and then call its dispatch() method, passing any necessary data directly into the dispatch() method. Take a look at Example 16-3 for an example.
Example 16-3. Dispatching jobs
$user=auth()->user();$daysToCrunch=7;\App\Jobs\CrunchReports::dispatch($user,$daysToCrunch);
There are three settings you can control in order to customize exactly how you dispatch a job: the connection, the queue, and the delay.
Customizing the connection
If you ever have multiple queue connections in place at once, you can customize the connection by chaining onConnection() after the dispatch() method:
DoThingJob::dispatch()->onConnection('redis');
Customizing the queue
Within queue servers, you can specify which named queue you’re pushing a job onto. For example, you may differentiate your queues based on their importance, naming one low and one high.
You can customize which queue you’re pushing a job onto with the onQueue() method:
DoThingJob::dispatch()->onQueue('high');
Customizing the delay
You can customize the amount of time your queue workers should wait before processing a job with the delay() method, which accepts either an integer representing the number of seconds to delay a job or a DateTime/Carbon instance:
// Delays five minutes before releasing the job to queue workers$delay=now()->addMinutes(5);DoThingJob::dispatch()->delay($delay);
Note that Amazon SQS doesn’t allow delays longer than 15 minutes.
Running a Queue Worker
So what is a queue worker, and how does it work? In Laravel, it’s an Artisan command that stays running forever (until it’s stopped manually) and takes the responsibility for pulling down jobs from your queue and running them:
phpartisanqueue:work
This command starts a daemon “listening” to your queue; every time there are jobs on the queue, it will pull down the first job, handle it, delete it, and move on to the next. If at any point there are no jobs, it “sleeps” for a configurable amount of time before checking again to see if there are any more jobs.
You can define how many seconds a job should be able to run before the queue listener stops it (--timeout), how many seconds the listener should “sleep” when there are no jobs left (--sleep), how many tries each job should be allowed before being deleted (--tries), which connection the worker should listen to (the first parameter after queue:work), and which queues it should listen to (--queue=):
phpartisanqueue:workredis--timeout=60--sleep=15--tries=3--queue=high,medium
You can also process just a single job with php artisan queue:work.
Handling Errors
So, what happens when something goes wrong with your job when it’s in the middle of processing?
Exceptions in handling
If an exception is thrown, the queue listener will release that job back onto the queue. That job will be rereleased to be processed again and again until it is able to finish successfully or until it has been attempted the maximum number of times allowed by your queue listener.
Limiting the number of tries
The maximum number of tries is defined by the --tries switch passed to the queue:listen or queue:work Artisan commands.
The danger of infinite retries
If you don’t set --tries, or if you set it to 0, the queue listener will allow for infinite retries. That means if there are any circumstances in which a job could just never be satisfied—for example, if it relies on a tweet that has since been deleted—your app will slowly crawl to a halt as it forever retries uncompletable jobs.
The documentation and Laravel Forge both show 3 as the recommended starting point for the maximum number of retries. So, in case of confusion, start there and adjust:
php artisan queue:work --tries=3
If at any point you’d like to check how many times a job has been attempted already, use the attempts() method on the job itself, as in Example 16-4.
Example 16-4. Checking how many times a job has already been tried
publicfunctionhandle(){...if($this->attempts()>3){//}}
Handling failed jobs
Once a job has exceeded its allowable number of retries, it’s considered a “failed” job. Before you do anything else—even if all you want to do is limit the number of times a job can be tried—you’ll need to create the “failed jobs” database table.
There’s an Artisan command to create the migration (and you’ll then want to migrate):
phpartisanqueue:failed-tablephpartisanmigrate
Any job that has surpassed its maximum number of allowed attempts will be dumped there. But there are quite a few things you can do with your failed jobs.
First, you can define a failed() method on the job itself, which will run when that job fails (see Example 16-5).
Example 16-5. Defining a method to run when a job fails
...classCrunchReportsimplementsShouldQueue{...publicfunctionfailed(){// Do whatever you want, like notify an admin}}
Next, you can register a global handler for failed jobs. Somewhere in the application’s bootstrap—if you don’t know where to put it, just put it in the boot() method of AppServiceProvider—place the code in Example 16-6 code to define a listener.
Example 16-6. Registering a global handler to handle failed jobs
// Some service provideruseIlluminate\Support\Facades\Queue;useIlluminate\Queue\Events\JobFailed;...publicfunctionboot(){Queue::failing(function(JobFailed$event){// $event->connectionName// $event->job// $event->exception});}
There is also a suite of Artisan tools for interacting with the failed jobs table.
queue:failed shows you a list of your failed jobs:
php artisan queue:failed
The list will look something like this:
+----+------------+---------+----------------------+---------------------+
| ID | Connection | Queue   | Class                | Failed At           |
+----+------------+---------+----------------------+---------------------+
| 9  | database   | default | App\Jobs\AlwaysFails | 2018-08-26 03:42:55 |
+----+------------+---------+----------------------+---------------------+
From there, you can grab the ID of any individual failed job and retry it with queue:retry:
php artisan queue:retry 9
If you’d rather retry all of the jobs, pass all instead of an ID:
php artisan queue:retry all
You can delete an individual failed job with queue:forget:
php artisan queue:forget 5
And you can delete all of your failed jobs with queue:flush:
phpartisanqueue:flush
Controlling the Queue
Sometimes, from within the handling of a job, you’ll want to add conditions that will potentially either release the job to be restarted later or delete the job forever.
To release a job back into the queue, use the release() command, as in Example 16-7.
Example 16-7. Releasing a job back onto the queue
publicfunctionhandle(){...if(condition){$this->release($numberOfSecondsToDelayBeforeRetrying);}}
If you want to delete a job during its handling, you can just return at any point, as seen in Example 16-8; that’s the signal to the queue that the job was handled appropriately and should not be returned to the queue.
Example 16-8. Deleting a job
publicfunctionhandle(){...if($jobShouldBeDeleted){return;}}
Laravel Horizon
Laravel Horizon, like some of the other tools we’ve covered (Scout, Passport, etc.) is a tool provided by Laravel that doesn’t come bundled with the core.
Horizon provides insight into the status of your Redis queued jobs. You can see which jobs have failed, how many are queued and how fast they’re working, and you can even get notifications when any of your queues are overloaded or failing.
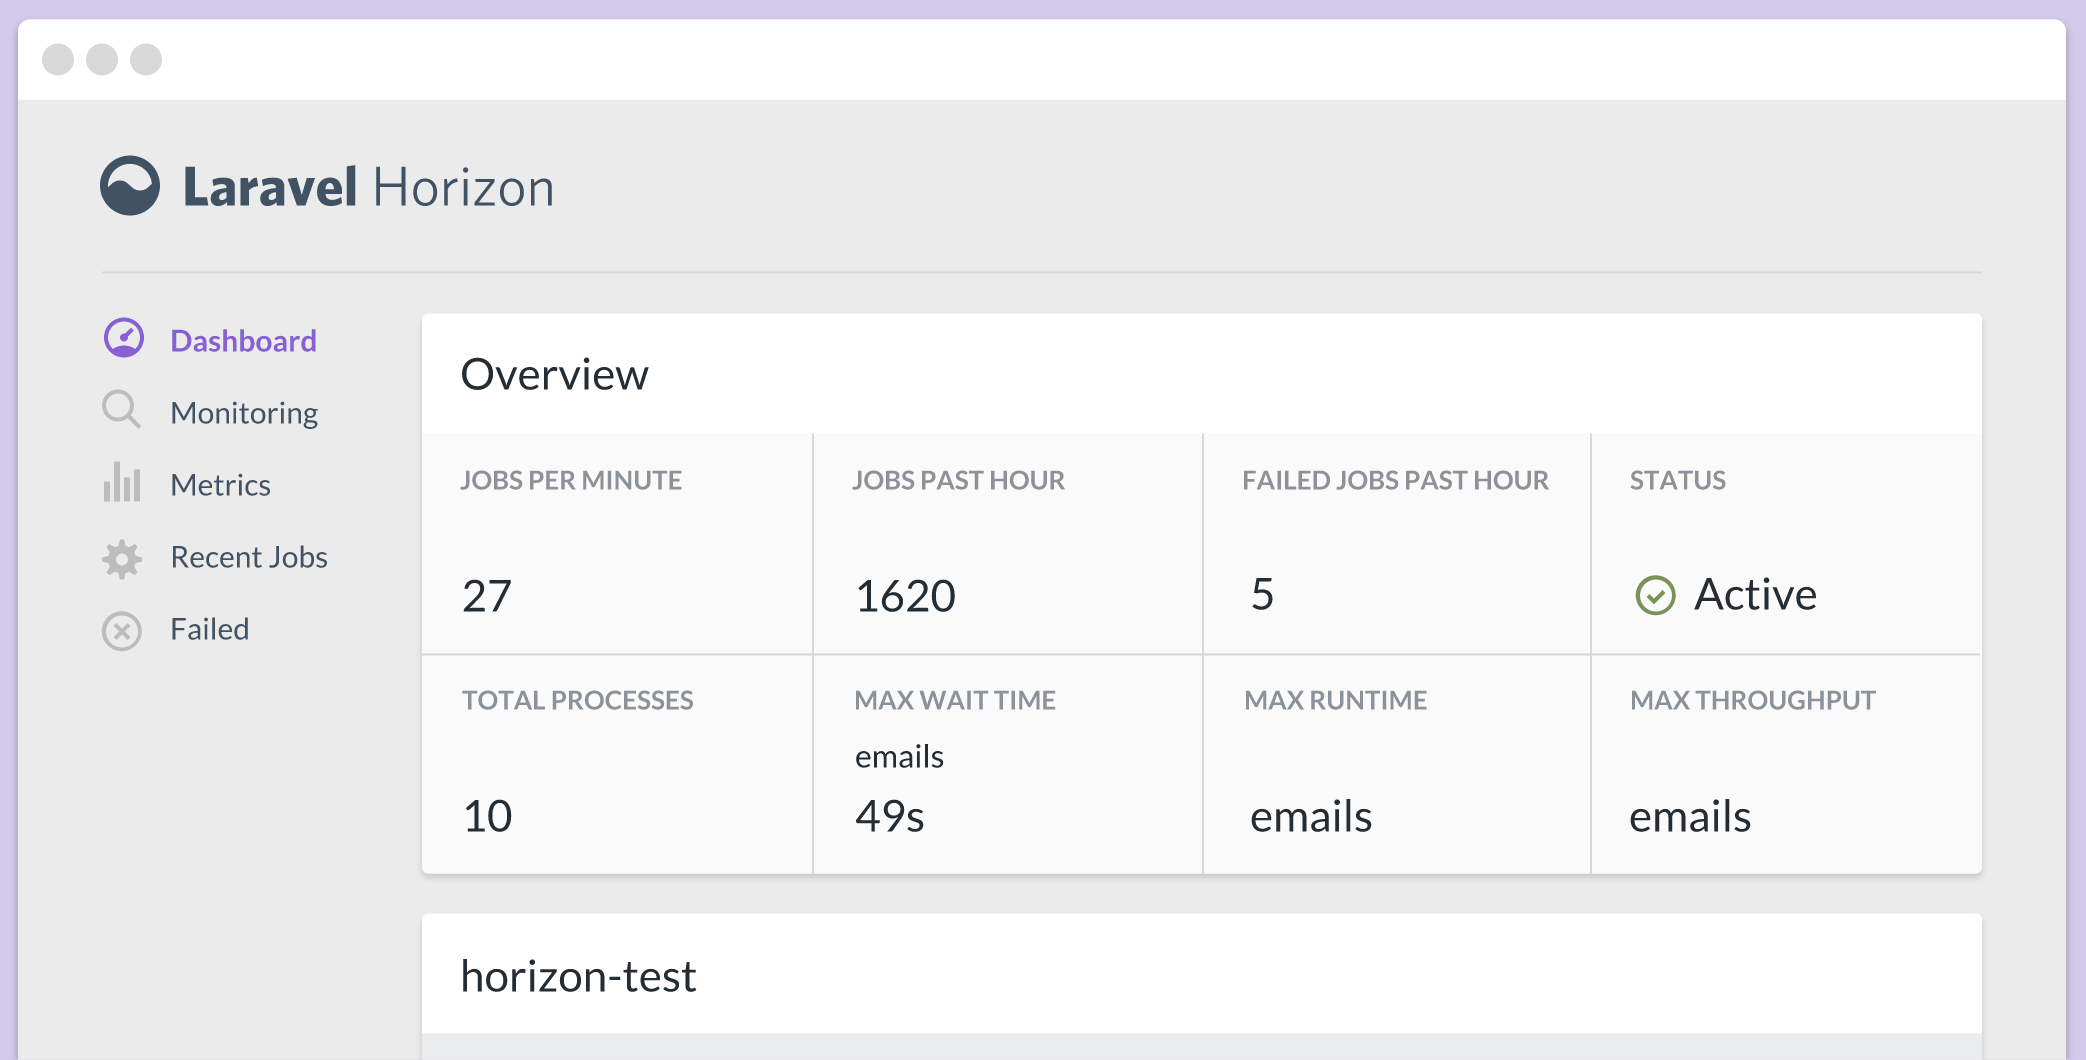
Figure 16-1. A preview of the Horizon dashboard
Installing and running Horizon is pretty straightforward, and the docs are thorough, so if you’re interested, take a look at the Horizon docs to learn how to install, configure, and deploy Horizon.
Please note that you will need to have Laravel 5.5+ and PHP 7.1+ in order to run Horizon.
Events
With jobs, the calling code informs the application that it should do something: CrunchReports, or NotifyAdminOfNewSignup.
With an event, the calling code instead informs the application that something happened: UserSubscribed, or UserSignedUp, or ContactWasAdded. Events are notifications that something has taken place.
Some of these events may be “fired” by the framework itself. For example, Eloquent models fire events when they are saved, or created, or deleted. But some events can also be manually triggered by the application’s code.
An event being fired doesn’t do anything on its own. However, you can bind event listeners, whose sole purpose is to listen for the broadcasting of specific events and to act in response. Any event can have anywhere from zero to many event listeners.
Laravel’s events are structured like the observer, or “pub/sub,” pattern. Many events are fired out into the application; some may never be listened for, and others may have a dozen listeners. The events don’t know or care.
Firing an Event
There are three ways to fire an event. You can use the Event facade, inject the Dispatcher, or use the event() global helper:
Event::fire(newUserSubscribed($user,$plan));// or$dispatcher=app(Illuminate\Contracts\Events\Dispatcher::class);$dispatcher->fire(newUserSubscribed($user,$plan));// orevent(newUserSubscribed($user,$plan));
If in doubt, I’d recommend using the global helper function.
To create an event to fire, use the make:event Artisan command:
phpartisanmake:eventUserSubscribed
That’ll make a file that looks something like Example 16-9.
Example 16-9. The default template for a Laravel event
<?phpnamespaceApp\Events;useIlluminate\Broadcasting\Channel;useIlluminate\Queue\SerializesModels;useIlluminate\Broadcasting\PrivateChannel;useIlluminate\Broadcasting\PresenceChannel;useIlluminate\Foundation\Events\Dispatchable;useIlluminate\Broadcasting\InteractsWithSockets;useIlluminate\Contracts\Broadcasting\ShouldBroadcast;classUserSubscribed{useDispatchable,InteractsWithSockets,SerializesModels;/*** Create a new event instance.** @return void*/publicfunction__construct(){//}/*** Get the channels the event should be broadcast on.** @return \Illuminate\Broadcasting\Channel|array*/publicfunctionbroadcastOn(){returnnewPrivateChannel('channel-name');}}
Let’s take a look at what we get here. SerializesModels works just like with jobs; it allows you to accept Eloquent models as parameters. InteractsWithSockets, ShouldBroadcast, and the broadcastOn() method provide the backing functionality for broadcasting events using WebSockets, which we’ll cover in a bit.
It might seem strange that there’s no handle() or fire() method here. But remember, this object exists not to determine a particular action, but just to encapsulate some data. The first piece of data is its name; UserSubscribed tells us that a particular event happened (a user subscribed). The rest of the data is any data we pass into the constructor and associate with this entity.
Example 16-10 shows what we might want to do with our UserSubscribed event.
Example 16-10. Injecting data into an event
...classUserSubscribed{useInteractsWithSockets,SerializesModels;public$user;public$plan;publicfunction__construct($user,$plan){$this->user=$user;$this->plan=$plan;}}
Now we have an object that appropriately represents the event that happened: $event->user subscribed to the $event->plan plan. Remember, firing this event is as simple as event(new UserSubscribed($user, $plan)).
Listening for an Event
We have an event, and the ability to fire it. Now let’s look at how to listen for it.
First, we’ll create an event listener. Let’s say we want to email the app’s owner every time a new user subscribes:
phpartisanmake:listenerEmailOwnerAboutSubscription--event=UserSubscribed
That gives us the file in Example 16-11.
Example 16-11. The default template for a Laravel event listener
<?phpnamespaceApp\Listeners;useApp\Events\UserSubscribed;useIlluminate\Queue\InteractsWithQueue;useIlluminate\Contracts\Queue\ShouldQueue;classEmailOwnerAboutSubscription{/*** Create the event listener.** @return void*/publicfunction__construct(){//}/*** Handle the event.** @param UserSubscribed $event* @return void*/publicfunctionhandle(UserSubscribed$event){//}}
This is where the action happens—where the handle() method lives. This method expects to be passed an event of type UserSubscribed and act in response to it.
So, let’s make it send an email (Example 16-12).
Example 16-12. A sample event listener
...useApp\Mail\UserSubscribedasUserSubscribedMessage;classEmailOwnerAboutSubscription{publicfunctionhandle(UserSubscribed$event){Log::info('Emailed owner about new user: '.$event->user->);::to(config('app.owner-email'))->send(newUserSubscribedMessage($event->user,$event->plan);}}
Great! Now, one last task: we need to set this listener up to listen to the UserSubscribed event. We’ll set that up in the $listen property of the EventServiceProvider class (see Example 16-13).
Example 16-13. Binding listeners to events in EventServiceProvider
classEventServiceProviderextendsServiceProvider{protected$listen=[\App\Events\UserSubscribed::class=>[\App\Listeners\EmailOwnerAboutSubscription::class,],];
As you can see, the key of each array entry is the class name of the event, and the value is an array of listener class names. We can add as many class names as we want under the UserSubscribed key and they will all listen and respond to each UserSubscribed event.
Event subscribers
There’s one more structure you can use to define the relationship between your events and their listeners. Laravel has a concept called an event subscriber, which is a class that contains a collection of methods that act as separate listeners to unique events, and also contains the mapping of which method should handle which event. In this case, it’s easier to show than to tell; take a look at Example 16-14. Note that event subscribers are not a particularly commonly-used tool.
Example 16-14. A sample event subscriber
<?phpnamespaceApp\Listeners;classUserEventSubscriber{publicfunctiononUserSubscription($event){// Handles the UserSubscribed event}publicfunctiononUserCancellation($event){// Handles the UserCancelled event}publicfunctionsubscribe($events){$events->listen(\App\Events\UserSubscribed::class,'App\Listeners\UserEventSubscriber@onUserSubscription');$events->listen(\App\Events\UserCancelled::class,'App\Listeners\UserEventSubscriber@onUserCancellation');}}
Subscribers need to define a subscribe() method, which is passed an instance of the event dispatcher. We’ll use that to pair events with their listeners, but in this case, those are methods on this class, instead of entire classes. As a refresher, any time you see an @ inline like this means the class name is to the left of the @ and the method name is to the right.
So, in Example 16-14, we’re defining that the onUserSubscription() method of this subscriber will listen to any UserSubscribed events.
There’s one last thing we need to do: in App\Providers\EventServiceProvider, we need to add our subscriber’s class name to the $subscribe property, as seen in Example 16-15.
Example 16-15. Registering an event subscriber
...classEventServiceProviderextendsServiceProvider{...protected$subscribe=[\App\Listeners\UserEventSubscriber::class];}
Broadcasting Events over WebSockets, and Laravel Echo
WebSocket (often called WebSockets) is a protocol, popularized by Pusher (a hosted WebSocket SaaS), that makes it simple to provide near-real-time communication between web devices. Rather than relying on information passing via HTTP requests, WebSockets libraries open a direct connection between the client and the server. WebSockets are behind tools like the chat boxes in Gmail and Facebook, where you don’t have to wait for the page to reload or for AJAX requests to receive or send data; instead, data is both sent and received in realtime.
WebSockets work best with small pieces of data passed in a pub/sub structure—just like Laravel’s events. Laravel has a built-in set of tools that make it easy to define that one or more of your events should be broadcast to a WebSocket server; this makes it easy, for example, to have a MessageWasReceived event that is published to the notifications box of a certain user or set of users, the instant a message arrives at your application.
Configuration and Setup
Take a look at config/broadcasting.php to find the configuration settings for your event broadcasting. Laravel supports three drivers for broadcasting: Pusher, a paid SaaS offering; Redis, for locally running WebSocket servers; and log, for local development and debugging.
Queue listeners
In order for event broadcasting to move quickly, Laravel pushes the instruction to broadcast them onto a queue. That means you’ll need to have a queue worker running (or use the sync queue driver for local development). See “Running a Queue Worker” to learn how to run a queue worker.
Laravel suggests a default delay of three seconds before the queue worker looks for new jobs. However, with event broadcasting, you may notice some events take a second or two to broadcast. To speed this up, update your queue settings to only wait one second before looking for new jobs.
Broadcasting an Event
To broadcast an event, you need to mark that event as a broadcast event by having it implement the Illuminate\Contracts\Broadcasting\ShouldBroadcast interface. This interface requires you to add the broadcastOn() method, which will return an array of either strings or Channel objects, each representing a WebSocket channel.
Example 16-16 shows our UserSubscribed event, modified to broadcast on two channels: one for the user (to confirm the user’s subscription) and one for admins (to notify them of a new subscription).
Example 16-16. An event broadcasting on multiple channels
...useIlluminate\Contracts\Broadcasting\ShouldBroadcast;classUserSubscribedimplementsShouldBroadcast{useDispatchable,InteractsWithSockets,SerializesModels;public$user;public$plan;publicfunction__construct($user,$plan){$this->user=$user;$this->plan=$plan;}publicfunctionbroadcastOn(){// String syntaxreturn['users.'.$this->user->id,'admins'];// Channel object syntaxreturn[newChannel('users.'.$this->user->id),newChannel('admins'),// If it were a private channel: new PrivateChannel('admins'),// If it were a presence channel: new PresenceChannel('admins'),];}}
By default, any public properties of your event will be serialized as JSON and sent along as the data of your broadcast event. That means the data of one of our broadcast UserSubscribed events might look like Example 16-17.
Example 16-17. Sample broadcast event data
{'user':{'id':5,'name':'Fred McFeely',...},'plan':'silver'}
You can override this by returning an array of data from the broadcastWith() method on your event, as in Example 16-18.
Example 16-18. Customizing the broadcast event data
publicfunctionbroadcastWith(){return['userId'=>$this->user->id,'plan'=>$this->plan];}
You can customize which queue your event is pushed onto with its broadcastQueue() method, as in Example 16-19. You may choose to do this so you can keep other queue items from slowing down your event broadcast; real-time WebSockets aren’t much fun if a long-running job that’s higher in the queue keeps the events from going out in time.
Example 16-19. Specifying the queue a job should run on
public$broadcastQueue='websockets-for-faster-processing';
You can also force a given event to skip the queue entirely (using the “sync” queue driver, which is processed by the current PHP thread), by having it implement the ShouldBroadcastNow contract.
useIlluminate\Contracts\Broadcasting\ShouldBroadcastNow;classUserSubscribedimplementsShouldBroadcastNow{//}
And, finally, you can choose to customize whether a given event should be broadcast at all by giving it a broadcastWhen() method:
publicfunctionbroadcastWhen(){// Notify me only when users sign up from the White Housereturnstr_contains($this->user->,'whitehouse.gov');}
Receiving the Message
If you choose to host your own Redis WebSockets server, the Laravel docs have a great walkthrough on how to set that up using socket.io and ioredis.
As of this book’s publication, the most common solution Laravel developers use is Pusher. Plans over a certain size cost money, but there’s a generous free plan. Pusher makes it incredibly simple to set up a simple WebSocket server, and its JavaScript SDK handles all of the authentication and channel management with almost no work on your part. SDKs are available for iOS, Android, and many more platforms, languages, and frameworks.
There’s also a new tool announced just before the publication of this book called Laravel WebSockets that lets you host your own Laravel-based Pusher-compatible WebSockets server. You can install the package into your current Laravel app (the same app you’re broadcasting from) or into a separate microservice.
If you choose to work with a Laravel WebSockets server, you’ll follow all of the directions in this book as if you were working with Pusher, but your configuration settings will be a bit different.
Simple WebSockets listening with Pusher JS
It’s helpful to understand how to listen to Laravel’s broadcast events without Echo even if you choose to use Echo in the end, but because much of the code here is not necessary if you use Echo, I’d recommend reading this section, then the Echo section, “Laravel Echo (the JavaScript Side)”, before you start implementing any of it; you can decide which way you prefer and then write your code from there.
To get started, pull in Pusher’s library, get an API key from your Pusher account, and subscribe to any events on any channels with code like that in Example 16-20.
Example 16-20. Basic usage of Pusher JS
...<scriptsrc="https://js.pusher.com/4.3/pusher.min.js"></script><script>// Enable pusher logging - don't include this in productionPusher.logToConsole=true;// Globally, perhaps; just a sample of how to get data invarApp={'userId':{{auth()->id()}},'pusherKey':'{{ config('broadcasting.connections.pusher.key') }}'};// Locallyvarpusher=newPusher(App.pusherKey,{cluster:'{{ config('broadcasting.connections.pusher.options.cluster') }}',encrypted:{{config('broadcasting.connections.pusher.options.encrypted')}}});varpusherChannel=pusher.subscribe('users.'+App.userId);pusherChannel.bind('App\\Events\\UserSubscribed',(data)=>{console.log(data.user,data.plan);});</script>
Escaping backslashes in JavaScript
Since \ is a control character in JavaScript, you need to write \\ to represent a backslash in your strings, which is why there are two backslashes between each namespace segment in Example 16-20.
To publish to Pusher from Laravel, get your Pusher key, secret, cluster, and app ID from your Pusher account dashboard, and then set them in your .env file under the keys PUSHER_KEY, PUSHER_SECRET, PUSHER_APP_CLUSTER and PUSHER_APP_ID.
If you serve your app, visit a page with the JavaScript from Example 16-20 embedded in it in one window, push a broadcast event in another window or from your terminal, have a queue listener running or are using the sync driver, and all of your authentication information is set up correctly, you should see event logs popping up in your JavaScript window’s console in near real time.
With this power, it’s now easy for you to keep your users up-to-date with what’s happening with their data any time they’re in your app. You can notify users of the actions of other users, of long-running processes that have just finished, or of your application’s responses to external actions like incoming emails or webhooks. The possibilities are endless.
Requirements
If you want to broadcast with Pusher or Redis, you’ll need to bring in these dependencies:
-
Pusher:
pusher/pusher-php-server "~3.0" -
Redis:
predis/predis
Advanced Broadcasting Tools
Laravel has a few more tools to make it possible to perform more complex interactions in event broadcasting. These tools, a combination of framework features and a JavaScript library, are called Laravel Echo.
These framework features work best when you use Laravel Echo in your JavaScript frontend (which we’ll cover in “Laravel Echo (the JavaScript Side)”), but you can still enjoy some of the benefits of Echo without using the JavaScript components. Echo will work with both Pusher and Redis, but I’m going to use Pusher for any examples.
Excluding the current user from broadcast events
Every connection to Pusher is assigned a unique “socket ID” identifying that socket connection. And it’s easy to define that any given socket (user) should be excluded from receiving a specified broadcast event.
This feature makes it possible to define that certain events should not be broadcast to the user who fired them. Let’s say every user in a team gets notified when other users create a task; would you want to be notified of a task you just created? No, and that’s why we have the toOthers() method.
To implement this, there are two steps to follow. First, you need to set up your JavaScript to send a certain POST to /broadcasting/socket when your WebSocket connection is initialized. This attaches your socket_id to your Laravel session. Echo does this for you, but you can also do it manually—take a look at the Echo source to see how it works.
Note
Your event must use the Illuminate\Broadcasting\InteractsWithSockets trait in order to call the toOthers() method.
Next, you’ll want to update every request that your JavaScript makes to have an X-Socket-ID header that contains that socket_id. Example 16-21 shows how to do that with Axios or in jQuery.
Example 16-21. Sending the socket ID along with each Ajax request with Axios or in jQuery
// Run this right after you initialize echo// With Axioswindow.axios.defaults.headers.common['X-Socket-Id']=Echo.socketId();// jQuery$.ajaxSetup({headers:{'X-Socket-Id':Echo.socketId()}});
Once you’ve handled this, you can exclude any event from being broadcast to the user who triggered it by using the broadcast() global helper instead of the event() global helper and then chaining toOthers() after it:
broadcast(newUserSubscribed($user,$plan))->toOthers();
The broadcast service provider
All of the other features that Echo provides require your JavaScript to authenticate with the server. Take a look at App\Providers\BroadcastServiceProvider, where you’ll define how to authorize users’ access to your private and presence channels.
The two primary actions you can take are to define the middleware that will be used on your broadcasting auth routes, and to define the authorization settings for your channels.
If you’re going to use these features, you’ll need to uncomment the App\Providers\BroadcastServiceProvider::class line in config/app.php.
And if you’ll be using these features without Laravel Echo, you’ll either need to manually handle sending CSRF tokens along with your authentication requests, or exclude /broadcasting/auth and /broadcasting/socket from CSRF protection by adding them to the $except property of the VerifyCsrfToken middleware.
Binding authorization definitions for WebSocket channels
Private and presence WebSocket channels need to be able to ping your application to learn whether the current user is authorized for that channel. You’ll use the Broadcast::channel() method to define the rules for this authorization in your routes/channels.php file.
Public, private, and presence channels
There are three types of channels in WebSockets: public, private, and presence.
Public channels can be subscribed to by any user, authenticated or not.
Private channels require the end user’s JavaScript to authenticate against the application to prove that the user is both authenticated and authorized to join this channel.
Presence channels are a type of private channel, but instead of allowing for message passing, they simply keep track of which users join and leave the channel, and make this information available to the application’s frontend.
Broadcast::channel() takes two parameters: first, a string representing the channel(s) you want it to match, and second, a closure that defines how to authorize users for any channel matching that string. The closure will be passed an Eloquent model of the current user as its first parameter, and any matched {variableNameHere} segments as additional parameters. For example, a channel authorization definition with a string of teams.{teamId}, when matched against the channel teams.5, will pass its closure $user as the first parameter and 5 as the second parameter.
If you’re defining the rules for a private channel, your Broadcast::channel() closure will need to return a boolean: is this user authorized for this channel or not? If you’re defining the rules for a presence channel, your closure should return an array of data you want available to the presence channel for any users that you want to show up in the channel. Example 16-22 illustrates defining rules for both kinds of channel.
You might be wondering how this information gets from your Laravel application to your JavaScript frontend. Pusher’s JavaScript library sends a POST to your application; by default it will hit /pusher/auth, but you can customize that (and Echo customizes it for you) to hit Laravel’s authentication route, /broadcasting/auth:
varpusher=newPusher(App.pusherKey,{authEndpoint:'/broadcasting/auth'});
Example 16-23 shows how we can tweak Example 16-20 for private and presence channels, without Echo’s frontend components.
Example 16-23. Basic usage of Pusher JS for private and presence channels
...<scriptsrc="https://js.pusher.com/4.3/pusher.min.js"></script><script>// Enable pusher logging - don't include this in productionPusher.logToConsole=true;// Globally, perhaps; just a sample of how to get data invarApp={'userId':{{auth()->id()}},'pusherKey':'{{ config('broadcasting.connections.pusher.key') }}'};// Locallyvarpusher=newPusher(App.pusherKey,{cluster:'{{ config('broadcasting.connections.pusher.options.cluster') }}',encrypted:{{config('broadcasting.connections.pusher.options.encrypted')}},authEndpoint:'/broadcasting/auth'});// Private channelvarprivateChannel=pusher.subscribe('private-teams.1');privateChannel.bind('App\\Events\\UserSubscribed',(data)=>{console.log(data.user,data.plan);});// Presence channelvarpresenceChannel=pusher.subscribe('presence-rooms.5');console.log(presenceChannel.members);</script>
We now have the ability to send WebSocket messages to users depending on whether they pass a given channel’s authorization rules. We can also keep track of which users are active in a particular group or section of the site, and display relevant information to each user about other users in the same group.
Laravel Echo (the JavaScript Side)
Laravel Echo is comprised of two pieces: the advanced framework features we just covered, and a JavaScript package that takes advantage of those features and drastically reduces the amount of boilerplate code you need to write powerful WebSocket-based frontends. The Echo JavaScript package makes it easy to handle authentication, authorization, and subscribing to private and presence channels. Echo can be used with the SDKs for either Pusher JS (for Pusher or a custom Pusher-compatible server) or socket.io (for Redis).
Bringing Echo into your project
To use Echo in your project’s JavaScript, add it to package.json using npm install --save (be sure to bring in the appropriate Pusher or socket.io SDK as well):
npm install pusher-js laravel-echo --save
Let’s assume you have a basic Laravel Mix file compiling your app.js file with Webpack, like in Example 16-24.
Example 16-24. Compiling app.js with Laravel Mix
letmix=require('laravel-mix');mix.js('resources/assets/js/app.js','public/js');
Laravel’s default resources/js/app.js structure has a great example of how best to initialize your Echo install. Take a look at Example 16-25 to see how that works between that file and resources/js/bootstrap.js.
Example 16-25. Initializing Echo in app.js and bootstrap.js
// app.jsrequire('./bootstrap');// ... lots of Vue stuff ...// Add your Echo bindings here
// bootstrap.jsimportEchofrom"laravel-echo";window.Echo=newEcho({broadcaster:'pusher',key:process.env.MIX_PUSHER_APP_KEY,cluster:process.env.MIX_PUSHER_APP_CLUSTER});
For CSRF protection, you’ll also need to add a csrf-token <meta> tag to your HTML template:
<metaname="csrf-token"content="{{ csrf_token() }}">
And, of course, remember to link to your compiled app.js in your HTML template:
<scriptsrc="{{ asset('js/app.js') }}"></script>
Now we’re ready to get started.
Note
If you’re working with a Laravel WebSockets server (using the package discussed earlier in “Receiving the Message”), the configuration details in Example 16-25 will be a little bit different. See the Laravel WebSockets package docs for more info.
Using Echo for basic event broadcasting
This is nothing different from what we’ve already used Pusher JS for, but Example 16-26 is a simple code sample to show how to use Echo to listen to public channels for basic event information.
Example 16-26. Listening to a public channel with Echo
varcurrentTeamId=5;// Likely set elsewhereEcho.channel(`teams.${currentTeamId}`).listen('UserSubscribed',(data)=>{console.log(data);});
Echo provides a few methods for subscribing to various types of channels; channel() will subscribe you to a public channel. Note that when you listen to an event with Echo, you can ignore the full event namespace and just listen for the unique class name of this event. And now we now have access to the public data that’s passed along with our event, represented in the data object.
We can also chain listen() handlers, as in Example 16-27.
Example 16-27. Chaining event listeners in Echo
Echo.channel(`teams.${currentTeamId}`).listen('UserSubscribed',(data)=>{console.log(data);}).listen('UserCanceled',(data)=>{console.log(data);});
Remember to compile and include!
Did you try these code samples and not see anything change in your browser? Make sure to run npm run dev (if you’re running it once) or npm run watch (to run a listener) to compile your code. And, if you haven’t yet, be sure to actually include app.js in your template somewhere.
Private channels and basic authentication
Echo also has a method for subscribing to private channels: private(). It works the same as channel(), but it requires you to have set up channel authorization definitions in routes/channel.php, like we covered earlier. Additionally, unlike with the SDKs, you don’t need to put private- in front of your channel name.
Example 16-28 shows what it looks like to listen to a private channel named private-teams.5.
Example 16-28. Listening to a private channel with Echo
varcurrentTeamId=5;// Likely set elsewhereEcho.private(`teams.${currentTeamId}`).listen('UserSubscribed',(data)=>{console.log(data);});
Presence channels
Echo makes it much simpler to join and listen to events in presence channels. This time you’ll want to use the join() method to bind to this channel, as in Example 16-29.
Example 16-29. Joining a presence of channel
varcurrentTeamId=5;// Likely set elsewhereEcho.join(`teams.${currentTeamId}`).here((members)=>{console.log(members);});
join() subscribes to the presence channel, and here() allows you to define the behavior when the user joins and also when any other users join or leave the presence channel.
You can think of a presence channel like a “who’s online” sidebar in a chat room. When you first join a presence channel, your here() callback will be called and provided a list of all the members at that time. And any time any members join or leave, that callback will be called again with the updated list. There’s no messaging happening here, but you can play sounds, update the on-page list of members, or do whatever else you want in response to these actions.
There are also specific methods for individual events, which you can use individually or chained (see Example 16-30).
Example 16-30. Listening for specific presence events
varcurrentTeamId=5;// Likely set elsewhereEcho.join('teams.'+currentTeamId).here((members)=>{// runs when you joinconsole.table(members);}).joining((joiningMember,members)=>{// runs when another member joinsconsole.table(joiningMember);}).leaving((leavingMember,members)=>{// runs when another member leavesconsole.table(leavingMember);});
Excluding the current user
We covered this previously in the chapter, but if you want to exclude the current user, use the broadcast() global helper instead of the event() global helper and then chain the toOthers() method after your broadcast call. But with Echo, the JavaScript side of this is already handled for you. It’ll just work.
As you can see, the Echo JavaScript library doesn’t do anything you couldn’t do on your own—but it makes a lot of common tasks much simpler, and provides a cleaner, more expressive syntax for common WebSocket tasks.
Subscribing to notifications with Echo
Laravel’s notifications come with a broadcast driver out of the box that pushes notifications out as broadcast events. You can subscribe to these notifications with Echo using Echo.notification, as in Example 16-31.
Example 16-31. Subscribing to a notification with Echo
Echo.private(`App.User.${userId}`).notification((notification)=>{console.log(notification.type);});
Client Events
If you’d like to send quick, performant messages between your users without the messages even hitting your Laravel application—for example, to send “typing…” notifications—you can use Echo’s whisper() method:
Echo.private('room').whisper('typing',{name:this.user.name});
And then listenForWhisper() to listen:
Echo.private('room').listenForWhisper('typing',(e)=>{console.log(e.name);});
Scheduler
If you’ve ever written a cron job before, you likely already wish for a better tool. Not only is the syntax onerous and frustratingly difficult to remember, but it’s one significant aspect of your application that can’t be stored in version control.
Laravel’s scheduler makes handling scheduled tasks simple. You’ll write your scheduled tasks in code, and then point one cron job at your app: once per minute, run php artisan schedule:run. Every time this Artisan command is run, Laravel checks your schedule definitions to find out if any scheduled tasks should run.
Here’s the cron job to define that command:
* * * * *cd/home/myapp.com&&php artisan schedule:run >> /dev/null 2>&1
There are many task types you can schedule and many time frames you can use to schedule them.
app/Console/Kernel.php has a method named $schedule, which is where you’ll define any tasks you’d like to schedule.
Available Task Types
First, let’s take a look at the simplest option: a closure, run every minute (Example 16-32). That means that, every time the cron job hits the schedule:run command, it will call this closure.
Example 16-32. Scheduling a closure to run once every minute
// app/Consoles/Kernel.phppublicfunctionschedule(Schedule$schedule){$schedule->call(function(){CalculateTotals::dispatch();})->everyMinute();}
There are two other types of tasks you can schedule: Artisan and shell commands.
You can schedule Artisan commands by passing their syntax exactly as you would call them from the command line:
$schedule->command('scores:tally --reset-cache')->everyMinute();
And you can run any shell commands that you could run with PHP’s exec() method:
$schedule->exec('/home/myapp.com/bin/build.sh')->everyMinute();
Available Time Frames
The beauty of the scheduler isn’t just that you can define your tasks in code; it’s that you can schedule them in code, too. Laravel keeps track of time passing and evaluates whether it’s time for any given task to run. That’s easy with everyMinute() because the answer is always simple: run the task. But Laravel keeps the rest simple for you, too, even for the most complex of requests.
Let’s take a look at your options by starting with a monstrous definition that’s simple in Laravel:
$schedule->call(function(){// Runs once a week on Sunday at 23:50})->weekly()->sundays()->at('23:50');
Notice that we can chain times together: we can define frequency and specify the day of the week and the time, and of course we can do so much more.
Table 16-1 shows a list of potential date/time modifiers for use when scheduling a job.
| Command | Description |
|---|---|
|
Set the time zone for schedules |
|
Define the schedule using the traditional cron notation |
|
Run every minute |
|
Run every 5 minutes |
|
Run every 10 minutes |
|
Run every 30 minutes |
|
Run every hour |
|
Run every day at midnight |
|
Run every day at 14:00 |
|
Run every day at 1:00 and 14:00 |
|
Run every week (midnight on Sunday) |
|
Run every week on Friday at 10:00 |
|
Run every month (midnight on the 1st) |
|
Run every month on the 15th at 23:00 |
|
Run every quarter (midnight on the 1st of January, April, July, and October) |
|
Run every year (midnight on the 1st of January) |
|
Limit the task to when closure returns |
|
Limit the task to when closure returns |
|
Limit the task to between the given times |
|
Limit the task to any time except between the given times |
|
Limit to weekdays |
|
Limit to Sundays |
|
Limit to Mondays |
|
Limit to Tuesdays |
|
Limit to Wednesdays |
|
Limit to Thursdays |
|
Limit to Fridays |
|
Limit to Saturdays |
Most of these can be chained one after another, but of course, any combinations that don’t make sense chained can’t be chained.
Example 16-33 shows a few combinations you could consider.
Example 16-33. Some sample scheduled events
// Both run weekly on Sunday at 23:50$schedule->command('do:thing')->weeklyOn(0,'23:50');$schedule->command('do:thing')->weekly()->sundays()->at('23:50');// Run once per hour, weekdays, 8am-5pm$schedule->command('do:thing')->weekdays()->hourly()->when(function(){returndate('H')>=8&&date('H')<=17;});// Run once per hour, weekdays, 8am-5pm using the "between" method$schedule->command('do:thing')->weekdays()->hourly()->between('8:00','17:00');// Run every thirty minutes except when directed to by the SkipDetector$schedule->command('do:thing')->everyThirtyMinutes()->skip(function(){returnapp('SkipDetector')->shouldSkip();});
Blocking and Overlap
If you want to avoid your tasks overlapping each other—for example, if you have a task running every minute that may sometimes take longer than a minute to run—end the schedule chain with the withoutOverlapping() method. This method skips a task if the previous instance of that task is still running:
$schedule->command('do:thing')->everyMinute()->withoutOverlapping();
Handling Task Output
Sometimes the output from your scheduled task is important, whether for logging, notifications, or just ensuring that the task ran.
If you want to write the returned output of a task to a file, use sendOutputTo():
$schedule->command('do:thing')->daily()->sendOutputTo($filePath);
If you want to append it to a file instead, use appendOutputTo():
$schedule->command('do:thing')->daily()->appendOutputTo($filePath);
And if you want to email the output to a designated recipient, write it to a file first and then add emailOutputTo():
$schedule->command('do:thing')->daily()->sendOutputTo($filePath)->emailOutputTo('me@myapp.com');
Make sure that your email settings are configured correctly in Laravel’s basic email configuration.
Closure scheduled events can’t send output
The sendOutputTo(), appendOutputTo(), and emailOutputTo() methods only work for command scheduled tasks. You can’t use them for closures, unfortunately.
You may also want to send some output to a webhook to verify that your tasks ran correctly. There are a few services that provide this sort of uptime monitoring, most significantly Laravel Envoyer (a zero-downtime deployment service that also provides cron uptime monitoring) and Dead Man’s Snitch, a tool designed purely for monitoring cron job uptime.
These services don’t expect something to be emailed to them, but rather expect an HTTP “ping,” so Laravel makes that easy with pingBefore() and thenPing():
$schedule->command('do:thing')->daily()->pingBefore($beforeUrl)->thenPing($afterUrl);
If you want to use the ping features, you’ll need to pull in Guzzle using Composer: composer require guzzlehttp/guzzle.
Task Hooks
Speaking of running something before and after your task, there are hooks for that, with before() and after():
$schedule->command('do_thing')->daily()->before(function(){// Prepare})->after(function(){// Cleanup});
Testing
Testing queued jobs (or anything else in the queue) is easy. In phpunit.xml, which is the configuration file for your tests, the QUEUE_DRIVER environment variable is set to sync by default. That means your tests will run your jobs or other queued tasks synchronously, directly in your code, without relying on a queue system of any sort. You can test them just like any other code.
However, if you’d just like to check that a job was fired, you can do that with the expectsJobs() method, as in Example 16-34.
Example 16-34. Asserting that a job of the specified class was dispatched
publicfunctiontest_changing_number_of_subscriptions_crunches_reports(){$this->expectsJobs(\App\Jobs\CrunchReports::class);...}
Or, in projects in Laravel 5.3 and above you can assert against the specific job itself, as in Example 16-35.
Example 16-35. Using a closure to verify that a dispatched job meets given criteria
useIlluminate\Support\Facades\Bus;...publicfunctiontest_changing_subscriptions_triggers_crunch_job(){...Bus::fake();Bus::assertDispatched(CrunchReports::class,function($job){return$job->subscriptions->contains(5);});// Also can use assertNotDispatched}
To test that an event fired, you have three options. First, you can just test that the behavior you expected happened, without concerning yourself with the event itself.
Second, you can explicitly assert that the event fired, as in Example 16-36, which is available in Laravel 5.2 and above.
Example 16-36. Asserting that an event of the specified class was fired
publicfunctiontest_usersubscribed_event_fires(){$this->expectsEvents(\App\Events\UserSubscribed::class);...}
Finally, you can run a test against the event that was fired, as in Example 16-37. This is available in Laravel 5.3 and above.
Example 16-37. Using a closure to verify that a fired event meets given criteria
useIlluminate\Support\Facades\Event;...publicfunctiontest_usersubscribed_event_fires(){Event::fake();...Event::assertDispatched(UserSubscribed::class,function($e){return$e->user->='user-who-subscribed@mail.com';});// Also can use assertNotDispatched()}
Another common scenario is that you’re testing code that incidentally fires events, and you want to disable the event listeners during that test. You can disable the event system with the withoutEvents() method, as in Example 16-38.
Example 16-38. Disabling event listeners during a test
publicfunctiontest_something_subscription_related(){$this->withoutEvents();...}
TL;DR
Queues allow you to separate chunks of your application’s code from the synchronous flow of user interactions out to a list of commands to be processed by a “queue worker.” This allows your users to resume interactions with your application while slower processes are handled asychronously in the background.
Jobs are classes that are structured with the intention of encapsulating a chunk of application behavior so that it can be pushed onto a queue.
Laravel’s event system follows the pub/sub or observer pattern, allowing you to send out notifications of an event from one part of your application, and elsewhere bind listeners to those notifications to define what behavior should happen in response to them. Using WebSockets, events can also be broadcast to frontend clients.
Laravel’s scheduler simplifies scheduling tasks. Point an every-minute cron job to php artisan schedule:run and then schedule your tasks with even the most complex of time requirements using the scheduler, and Laravel will handle all the timings for you.