Second Edition
A Framework for Building Modern PHP Apps
Copyright © 2019 Matt Stauffer. All rights reserved.
Printed in the United States of America.
Published by O’Reilly Media, Inc., 1005 Gravenstein Highway North, Sebastopol, CA 95472.
O’Reilly books may be purchased for educational, business, or sales promotional use. Online editions are also available for most titles (http://oreilly.com/safari). For more information, contact our corporate/institutional sales department: 800-998-9938 or corporate@oreilly.com .
See http://oreilly.com/catalog/errata.csp?isbn=9781492041214 for release details.
The O’Reilly logo is a registered trademark of O’Reilly Media, Inc. Laravel: Up & Running, the cover image, and related trade dress are trademarks of O’Reilly Media, Inc.
The views expressed in this work are those of the author(s), and do not represent the publisher’s views. While the publisher and the author(s) have used good faith efforts to ensure that the information and instructions contained in this work are accurate, the publisher and the author(s) disclaim all responsibility for errors or omissions, including without limitation responsibility for damages resulting from the use of or reliance on this work. Use of the information and instructions contained in this work is at your own risk. If any code samples or other technology this work contains or describes is subject to open source licenses or the intellectual property rights of others, it is your responsibility to ensure that your use thereof complies with such licenses and/or rights.
978-1-492-04114-6
This book is dedicated to my family. Mia, my little princess and bundle of joy and energy. Malachi, my little prince and adventurer and empath. Tereva, my inspiration, encourager, upgrader, pusher, rib.
The story of how I got started with Laravel is a common one: I had written PHP for years, but I was on my way out the door, pursuing the power of Rails and other modern web frameworks. Rails in particular had a lively community, a perfect combination of opinionated defaults and flexibility, and the power of Ruby Gems to leverage prepackaged common code.
Something kept me from jumping ship, and I was glad for that when I found Laravel. It offered everything I was drawn to in Rails, but it wasn’t just a Rails clone; this was an innovative framework with incredible documentation, a welcoming community, and clear influences from many languages and frameworks.
Since that day I’ve been able to share my journey of learning Laravel through blogging, podcasting, and speaking at conferences; I’ve written dozens of apps in Laravel for side and work projects; and I’ve met thousands of Laravel developers online and in person. I have plenty of tools in my development toolkit, but I am honestly happiest when I sit down in front of a command line and type laravel new projectName.
This is not the first book about Laravel, and it won’t be the last. I don’t intend for this to be a book that covers every line of code or every implementation pattern. I don’t want this to be the sort of book that goes out of date when a new version of Laravel is released. Instead, its primary purpose is to provide developers with a high-level overview and concrete examples to learn what they need to work in any Laravel code base with any and every Laravel feature and subsystem. Rather than mirroring the docs, I want to help you understand the foundational concepts behind Laravel.
Laravel is a powerful and flexible PHP framework. It has a thriving community and a wide ecosystem of tools, and as a result it’s growing in appeal and reach. This book is for developers who already know how to make websites and applications and want to learn how to do so well in Laravel.
Laravel’s documentation is thorough and excellent. If you find that I don’t cover any particular topic deeply enough for your liking, I encourage you to visit the online documentation and dig deeper into that particular topic.
I think you will find the book a comfortable balance between high-level introduction and concrete application, and by the end you should feel comfortable writing an entire application in Laravel, from scratch. And, if I did my job well, you’ll be excited to try.
This book assumes knowledge of basic object-oriented programming practices, PHP (or at least the general syntax of C-family languages), and the basic concepts of the Model–View–Controller (MVC) pattern and templating. If you’ve never made a website before, you may find yourself in over your head. But as long as you have some programming experience, you don’t have to know anything about Laravel before you read this book—we’ll cover everything you need to know, from the simplest “Hello, world!”
Laravel can run on any operating system, but there will be some Bash (shell) commands in the book that are easiest to run on Linux/Mac OS. Windows users may have a harder time with these commands and with modern PHP development, but if you follow the instructions to get Homestead (a Linux virtual machine) running, you’ll be able to run all of the commands from there.
This book is structured in what I imagine to be a chronological order: if you’re building your first web app with Laravel, the early chapters cover the foundational components you’ll need to get started, and the later chapters cover less foundational or more esoteric features.
Each section of the book can be read on its own, but for someone new to the framework, I’ve tried to structure the chapters so that it’s actually very reasonable to start from the beginning and read until the end.
Where applicable, each chapter will end with two sections: “Testing” and “TL;DR.” If you’re not familiar, TL;DR means “too long; didn’t read.” These final sections will show you how to write tests for the features covered in each chapter and give a high-level overview of what was covered.
The book is written for Laravel 5.7, but will cover features and syntax changes back to Laravel 5.1.
The first edition of Laravel: Up and Running came out in November 2016 and covered Laravel versions 5.1 to 5.3. This second edition adds coverage for 5.4 to 5.7, adds coverage for Laravel Dusk and Horizon, and adds an 18th chapter about community resources and other non-core Laravel packages that weren’t covered in the first 17 chapters.
The following typographical conventions are used in this book:
Indicates new terms, URLs, email addresses, filenames, and file extensions.
Constant widthUsed for program listings, as well as within paragraphs to refer to program elements such as variable or function names, databases, data types, environment variables, statements, and keywords.
Constant width boldShows commands or other text that should be typed literally by the user.
Constant width italicShows text that should be replaced with user-supplied values or by values determined by context.
This element signifies a tip or suggestion.
This element signifies a general note.
This element indicates a warning or caution.
Safari (formerly Safari Books Online) is membership-based training and reference platform for enterprise, government, educators, and individuals.
Members have access to thousands of books, training videos, Learning Paths, interactive tutorials, and curated playlists from over 250 publishers, including O’Reilly Media, Harvard Business Review, Prentice Hall Professional, Addison-Wesley Professional, Microsoft Press, Sams, Que, Peachpit Press, Adobe, Focal Press, Cisco Press, John Wiley & Sons, Syngress, Morgan Kaufmann, IBM Redbooks, Packt, Adobe Press, FT Press, Apress, Manning, New Riders, McGraw-Hill, Jones & Bartlett, and Course Technology, among others.
For more information, please visit http://oreilly.com/safari.
Please address comments and questions concerning this book to the publisher:
We have a web page for this book, where we list errata, examples, and any additional information. You can access this page at http://bit.ly/laravel-up-and-running.
To comment or ask technical questions about this book, send email to bookquestions@oreilly.com.
For more information about our books, courses, conferences, and news, see our website at http://www.oreilly.com.
Find us on Facebook: http://facebook.com/oreilly
Follow us on Twitter: http://twitter.com/oreillymedia
Watch us on YouTube: http://www.youtube.com/oreillymedia
This book would not have happened without the gracious support of my amazing wife Tereva or the understanding (“Daddy’s writing, buddy!”) of my son Malachi. And while she wasn’t explicitly aware of it, my daughter Mia was around for almost the entire creation of the book, so this book is dedicated to the whole family. There were many, many long evening hours and weekend Starbucks trips that took me away from my family, and I couldn’t be more grateful for their support and also their presence just making my life awesome.
Additionally, the entire Tighten family has supported and encouraged me through the writing of the book, several even editing (Keith Damiani, editor extraordinaire) and helping me with challenging code samples (Adam Wathan, King of the Collection Pipeline). Dan Sheetz, my partner in Tighten crime, has been gracious enough to watch me while away many a work hour cranking on this book and was nothing but supportive and encouraging; and Dave Hicking, our operations manager, helped me arrange my schedule and work responsibilities around writing time.
Taylor Otwell deserves thanks and honor for creating Laravel—and therefore creating so many jobs and helping so many developers love our lives that much more. He deserves appreciation for how he’s focused on developer happiness and how hard he’s worked to have empathy for developers and to build a positive and encouraging community. But I also want to thank him for being a kind, encouraging, and challenging friend. Taylor, you’re a boss.
Thanks to Jeffrey Way, who I still contend to be one of the best teachers on the Internet. He originally introduced me to Laravel and still introduces more people every day. He’s also, unsurprisingly, a fantastic human being whom I’m glad to call a friend.
Thank you to Jess D’Amico, Shawn McCool, Ian Landsman, and Taylor for seeing value in me as a conference speaker early on and giving me a platform to teach from. Thanks to Dayle Rees for making it so easy for so many to learn Laravel in the early days.
Thanks to every person who put their time and effort into writing blog posts about Laravel, especially early on: Eric Barnes, Chris Fidao, Matt Machuga, Jason Lewis, Ryan Tablada, Dries Vints, Maks Surguy, and so many more.
And thanks to the entire community of friends on Twitter, IRC, and Slack who’ve interacted with me over the years. I wish I could name every name, but I would miss some and then feel awful about missing them. You all are brilliant, and I’m honored to get to interact with you on a regular basis.
Thanks to my O’Reilly editor, Ally MacDonald, and all of my technical editors: Keith Damiani, Michael Dyrynda, Adam Fairholm, and Myles Hyson.
And, of course, thanks to the rest of my family and friends, who supported me directly or indirectly through this process—my parents and siblings, the Gainesville community, other business owners and authors, other conference speakers, and the inimitable DCB. I need to stop writing because by the time I run out of space here I’ll be thanking my Starbucks baristas.
The second edition is very similar to the first, so all of the acknowledgements above are still valid. But I’ve gotten help from a few new people this time around. My technical proofreaders have been Tate Peñaranda, Andy Swick, Mohamed Said, Samantha Geitz, and my new O’Reilly editor has been Alicia Young, who’s kept me on task through a lot of changes in my life and the Laravel community over the last year. Matt Hacker on the Atlas team answered all my stupid AsciiDoc formatting questions, including the surprisingly-difficult formatting for the __() method.
And I couldn’t have made it through the process of making a second edition without the help of my research assistant, Wilbur Powery. Wilbur was willing to sift through the last several years of changelogs and pull requests and announcements and match each feature up with the current structure of the book, and he even tested every single code example in the book in Laravel 5.7 so that I could focus my limited time and energy on writing the new and updated segments.
Also, my daughter Mia is out of her mama’s belly now. So, let’s just add her joy and energy and love and cuteness and adventurous spirit to my list of sources of inspiration.
In the early days of the dynamic web, writing a web application looked a lot different than it does today. Developers then were responsible for writing the code for not just the unique business logic of our applications, but also each of the components that are so common across sites—user authentication, input validation, database access, templating, and more.
Today, programmers have dozens of application development frameworks and thousands of components and libraries easily accessible. It’s a common refrain among programmers that, by the time you learn one framework, three newer (and purportedly better) frameworks have popped up intending to replace it.
“Just because it’s there” might be a valid justification for climbing a mountain, but there are better reasons to choose to use a specific framework—or to use a framework at all. It’s worth asking the question: why frameworks? More specifically, why Laravel?
It’s easy to see why it’s beneficial to use the individual components, or packages, that are available to PHP developers. With packages, someone else is responsible for developing and maintaining an isolated piece of code that has a well-defined job, and in theory that person has a deeper understanding of this single component than you have time to have.
Frameworks like Laravel—and Symfony, Lumen, and Slim—prepackage a collection of third-party components together with custom framework “glue” like configuration files, service providers, prescribed directory structures, and application bootstraps. So, the benefit of using a framework in general is that someone has made decisions not just about individual components for you, but also about how those components should fit together.
Let’s say you start a new web app without the benefit of a framework. Where do you begin? Well, it should probably route HTTP requests, so you now need to evaluate all of the HTTP request and response libraries available and pick one. Then you’ll have to pick a router. Oh, and you’ll probably need to set up some form of routes configuration file. What syntax should it use? Where should it go? What about controllers? Where do they live, and how are they loaded? Well, you probably need a dependency injection container to resolve the controllers and their dependencies. But which one?
Furthermore, what if you do take the time to answer all those questions and successfully create your application—what’s the impact on the next developer? What about when you have four such custom-framework–based applications, or a dozen, and you have to remember where the controllers live in each, or what the routing syntax is?
Frameworks address this issue by providing a carefully considered answer to the question “Which component should we use here?” and ensuring that the particular components chosen work well together. Additionally, frameworks provide conventions that reduce the amount of code a developer new to the project has to understand—if you understand how routing works in one Laravel project, for example, you understand how it works in all Laravel projects.
When someone prescribes rolling your own framework for each new project, what they’re really advocating is the ability to control what does and doesn’t go into your application’s foundation. That means the best frameworks will not only provide you with a solid foundation, but also give you the freedom to customize to your heart’s content. And this, as I’ll show you in the rest of this book, is part of what makes Laravel so special.
An important part of being able to answer the question “Why Laravel?” is understanding Laravel’s history—and understanding what came before it. Prior to Laravel’s rise in popularity, there were a variety of frameworks and other movements in PHP and other web development spaces.
David Heinemeier Hansson released the first version of Ruby on Rails in 2004, and it’s been hard to find a web application framework since then that hasn’t been influenced by Rails in some way.
Rails popularized MVC, RESTful JSON APIs, convention over configuration, ActiveRecord, and many more tools and conventions that had a profound influence on the way web developers approached their applications—especially with regard to rapid application development.
It was clear to most developers that Rails, and similar web application frameworks, were the wave of the future, and PHP frameworks, including those admittedly imitating Rails, starting popping up quickly.
CakePHP was the first in 2005, and it was soon followed by Symfony, CodeIgniter, Zend Framework, and Kohana (a CodeIgniter fork). Yii arrived in 2008, and Aura and Slim in 2010. 2011 brought FuelPHP and Laravel, both of which were not quite CodeIgniter offshoots, but instead proposed as alternatives.
Some of these frameworks were more Rails-y, focusing on database object-relational mappers (ORMs), MVC structures, and other tools targeting rapid development. Others, like Symfony and Zend, focused more on enterprise design patterns and ecommerce.
CakePHP and CodeIgniter were the two early PHP frameworks that were most open about how much their inspiration was drawn from Rails. CodeIgniter quickly rose to fame and by 2010 was arguably the most popular of the independent PHP frameworks.
CodeIgniter was simple, easy to use, and boasted amazing documentation and a strong community. But its use of modern technology and patterns advanced slowly, and as the framework world grew and PHP’s tooling advanced, CodeIgniter started falling behind in terms of both technological advances and out-of-the-box features. Unlike many other frameworks, CodeIgniter was managed by a company, and they were slow to catch up with PHP 5.3’s newer features like namespaces and the moves to GitHub and later Composer. It was in 2010 that Taylor Otwell, Laravel’s creator, became dissatisfied enough with CodeIgniter that he set off to write his own framework.
The first beta of Laravel 1 was released in June 2011, and it was written completely from scratch. It featured a custom ORM (Eloquent); closure-based routing (inspired by Ruby Sinatra); a module system for extension; and helpers for forms, validation, authentication, and more.
Early Laravel development moved quickly, and Laravel 2 and 3 were released in November 2011 and February 2012, respectively. They introduced controllers, unit testing, a command-line tool, an inversion of control (IoC) container, Eloquent relationships, and migrations.
With Laravel 4, Taylor rewrote the entire framework from the ground up. By this point Composer, PHP’s now-ubiquitous package manager, was showing signs of becoming an industry standard and Taylor saw the value of rewriting the framework as a collection of components, distributed and bundled together by Composer.
Taylor developed a set of components under the code name Illuminate and, in May 2013, released Laravel 4 with an entirely new structure. Instead of bundling the majority of its code as a download, Laravel now pulled in the majority of its components from Symfony (another framework that released its components for use by others) and the Illuminate components through Composer.
Laravel 4 also introduced queues, a mail component, facades, and database seeding. And because Laravel was now relying on Symfony components, it was announced that Laravel would be mirroring (not exactly, but soon after) the six-monthly release schedule Symfony follows.
Laravel 4.3 was scheduled to release in November 2014, but as development progressed, it became clear that the significance of its changes merited a major release, and Laravel 5 was released in February 2015.
Laravel 5 featured a revamped directory structure, removal of the form and HTML helpers, the introduction of the contract interfaces, a spate of new views, Socialite for social media authentication, Elixir for asset compilation, Scheduler to simplify cron, dotenv for simplified environment management, form requests, and a brand new REPL (read–evaluate–print loop). Since then it’s grown in features and maturity, but there have been no major changes like in previous versions.
So what is it that sets Laravel apart? Why is it worth having more than one PHP framework at any time? They all use components from Symfony anyway, right? Let’s talk a bit about what makes Laravel “tick.”
You only need to read through the Laravel marketing materials and READMEs to start seeing its values. Taylor uses light-related words like “Illuminate” and “Spark.” And then there are these: “Artisans.” “Elegant.” Also, these: “Breath of fresh air.” “Fresh start.” And finally: “Rapid.” “Warp speed.”
The two most strongly communicated values of the framework are to increase developer speed and developer happiness. Taylor has described the “Artisan” language as intentionally contrasting against more utilitarian values. You can see the genesis of this sort of thinking in his 2011 question on StackExchange in which he stated, “Sometimes I spend ridiculous amounts of time (hours) agonizing over making code look pretty”—just for the sake of a better experience of looking at the code itself. And he’s often talked about the value of making it easier and quicker for developers to take their ideas to fruition, getting rid of unnecessary barriers to creating great products.
Laravel is, at its core, about equipping and enabling developers. Its goal is to provide clear, simple, and beautiful code and features that help developers quickly learn, start, and develop, and write code that’s simple, clear, and will last.
The concept of targeting developers is clear across Laravel materials. “Happy developers make the best code” is written in the documentation. “Developer happiness from download to deploy” was the unofficial slogan for a while. Of course, any tool or framework will say it wants developers to be happy. But having developer happiness as a primary concern, rather than secondary, has had a huge impact on Laravel’s style and decision-making progress. Where other frameworks may target architectural purity as their primary goal, or compatibility with the goals and values of enterprise development teams, Laravel’s primary focus is on serving the individual developer. That doesn’t mean you can’t write architecturally pure or enterprise-ready applications in Laravel, but it won’t have to be at the expense of the readability and comprehensibility of your codebase.
Just saying you want to make developers happy is one thing. Doing it is another, and it requires you to question what in a framework is most likely to make developers unhappy and what is most likely to make them happy. There are a few ways Laravel tries to make developers’ lives easier.
First, Laravel is a rapid application development framework. That means it focuses on a shallow (easy) learning curve and on minimizing the steps between starting a new app and publishing it. All of the most common tasks in building web applications, from database interactions to authentication to queues to email to caching, are made simpler by the components Laravel provides. But Laravel’s components aren’t just great on their own; they provide a consistent API and predictable structures across the entire framework. That means that, when you’re trying something new in Laravel, you’re more than likely going to end up saying, “… and it just works.”
This doesn’t end at the framework itself, either. Laravel provides an entire ecosystem of tools for building and launching applications. You have Homestead and Valet for local development, Forge for server management, and Envoyer for advanced deployment. And there’s a suite of add-on packages: Cashier for payments and subscriptions, Echo for WebSockets, Scout for search, Passport for API authentication, Dusk for frontend testing, Socialite for social login, Horizon for monitoring queues, Nova for building admin panels, and Spark to bootstrap your SaaS. Laravel is trying to take the repetitive work out of developers’ jobs so they can do something unique.
Next, Laravel focuses on “convention over configuration”—meaning that if you’re willing to use Laravel’s defaults, you’ll have to do much less work than with other frameworks that require you to declare all of your settings even if you’re using the recommended configuration. Projects built on Laravel take less time than those built on most other PHP frameworks.
Laravel also focuses deeply on simplicity. It’s possible to use dependency injection and mocking and the Data Mapper pattern and repositories and Command Query Responsibility Segregation and all sorts of other more complex architectural patterns with Laravel, if you want. But while other frameworks might suggest using those tools and structures on every project, Laravel and its documentation and community lean toward starting with the simplest possible implementation—a global function here, a facade there, ActiveRecord over there. This allows developers to create the simplest possible application to solve for their needs, without limiting its usefulness in complex environments.
An interesting source of how Laravel is different from other PHP frameworks is that its creator and its community are more connected to and inspired by Ruby and Rails and functional programming languages than by Java. There’s a strong current in modern PHP to lean toward verbosity and complexity, embracing the more Java-esque aspects of PHP. But Laravel tends to be on the other side, embracing expressive, dynamic, and simple coding practices and language features.
If this book is your first exposure to the Laravel community, you have something special to look forward to. One of the distinguishing elements of Laravel, which has contributed to its growth and success, is the welcoming, teaching community that surrounds it. From Jeffrey Way’s Laracasts video tutorials to Laravel News to Slack and IRC and Discord channels, from Twitter friends to bloggers to podcasts to the Laracon conferences, Laravel has a rich and vibrant community full of folks who’ve been around since day one and folks who are just starting their own “day one.” And this isn’t an accident:
From the very beginning of Laravel, I’ve had this idea that all people want to feel like they are part of something. It’s a natural human instinct to want to belong and be accepted into a group of other like-minded people. So, by injecting personality into a web framework and being really active with the community, that type of feeling can grow in the community.
Taylor Otwell, Product and Support interview
Taylor understood from the early days of Laravel that a successful open source project needed two things: good documentation and a welcoming community. And those two things are now hallmarks of Laravel.
Up until now, everything I’ve shared here has been entirely abstract. What about the code, you ask? Let’s dig into a simple application (Example 1-1) so you can see what working with Laravel day-to-day is actually like.
<?phpRoute::get('/',function(){return'Hello, World!';});
The simplest possible action you can take in a Laravel application is to define a route and return a result any time someone visits that route. If you initialize a brand new Laravel application on your machine, define the route in Example 1-1, and then serve the site from the public directory, you’ll have a fully functioning “Hello, World” example (see Figure 1-1).

It looks very similar with controllers, as you can see in Example 1-2.
// File: routes/web.php<?phpRoute::get('/','WelcomeController@index');
// File: app/Http/Controllers/WelcomeController.php<?phpnamespaceApp\Http\Controllers;classWelcomeControllerextendsController{publicfunctionindex(){return'Hello, World!';}}
And if we’re storing our greetings in the database, it’ll also look pretty similar (see Example 1-3).
// File: routes/web.php<?phpuseApp\Greeting;Route::get('create-greeting',function(){$greeting=newGreeting;$greeting->body='Hello, World!';$greeting->save();});Route::get('first-greeting',function(){returnGreeting::first()->body;});
// File: app/Greeting.php<?phpnamespaceApp;useIlluminate\Database\Eloquent\Model;classGreetingextendsModel{//}
// File: database/migrations/2015_07_19_010000_create_greetings_table.php<?phpuseIlluminate\Database\Schema\Blueprint;useIlluminate\Database\Migrations\Migration;classCreateGreetingsTableextendsMigration{publicfunctionup(){Schema::create('greetings',function(Blueprint$table){$table->increments('id');$table->string('body');$table->timestamps();});}publicfunctiondown(){Schema::dropIfExists('greetings');}}
Example 1-3 might be a bit overwhelming, and if so, just skip over it. You’ll learn about everything that’s happening here in later chapters, but you can already see that with just a few lines of code, we’ve set up database migrations and models and pulled records out. It’s just that simple.
So—why Laravel?
Because Laravel helps you bring your ideas to reality with no wasted code, using modern coding standards, surrounded by a vibrant community, with an empowering ecosystem of tools.
And because you, dear developer, deserve to be happy.
Part of PHP’s success has been because it’s hard to find a web server that can’t serve PHP. However, modern PHP tools have stricter requirements than those of the past. The best way to develop for Laravel is to ensure a consistent local and remote server environment for your code, and thankfully, the Laravel ecosystem has a few tools for this.
Everything we’ll cover in this chapter is possible with Windows machines, but you’ll need dozens of pages of custom instructions and caveats. I’ll leave those instructions and caveats to actual Windows users, so the examples here and in the rest of the book will focus on Unix/Linux/macOS developers.
Whether you choose to serve your website by installing PHP and other tools on your local machine, serve your development environment from a virtual machine via Vagrant or Docker, or rely on a tool like MAMP/WAMP/XAMPP, your development environment will need to have all of the following installed in order to serve Laravel sites:
PHP >= 7.1.3 for Laravel versions 5.6 and 5.7, PHP >= 7.0.0 for version 5.5, PHP >= 5.6.4 for version 5.4, PHP between 5.6.4 and 7.1.* for version 5.3 and PHP >= 5.5.9 for versions 5.2 and 5.1
OpenSSL PHP extension
PDO PHP extension
Mbstring PHP extension
Tokenizer PHP extension
XML PHP Extension (Laravel 5.3 and higher)
Ctype PHP Extension (Laravel 5.6 and higher)
JSON PHP Extension (Laravel 5.6 and higher)
Whatever machine you’re developing on will need to have Composer installed globally. If you’re not familiar with Composer, it’s a tool that’s at the foundation of most modern PHP development. Composer is a dependency manager for PHP, much like NPM for Node or RubyGems for Ruby. But like NPM, Composer is also the foundation of much of our testing, local script loading, installation scripts, and much more. You’ll need Composer to install Laravel, update Laravel, and bring in external dependencies.
For many projects, hosting your development environment using a simpler tool set will be enough. If you already have MAMP or WAMP or XAMPP installed on your system, that will likely be fine to run Laravel. You can also just run Laravel with PHP’s built-in web server, assuming your system PHP is the right version.
All you really need to get started is the ability to run PHP. Everything past that is up to you.
However, Laravel offers two tools for local development, Valet and Homestead, and we’ll cover both briefly. If you’re unsure of which to use, I’d recommend using Valet and just becoming briefly familiar with Homestead; however, both tools are valuable and worth understanding.
If you want to use PHP’s built-in web server, your simplest option is to serve every site from a localhost URL. If you run php -S localhost:8000 -t public from your Laravel site’s root folder, PHP’s built-in web server will serve your site at http://localhost:8000/. You can also run php artisan serve once you have your application set up to easily spin up an equivalent server.
But if you’re interested in tying each of your sites to a specific development domain, you’ll need to get comfortable with your operating system’s hosts file and use a tool like dnsmasq. Let’s instead try something simpler.
If you’re a Mac user (there are also unofficial forks for Windows and Linux), Laravel Valet takes away the need to connect your domains to your application folders. Valet installs dnsmasq and a series of PHP scripts that make it possible to type laravel new myapp && open myapp.test and for it to just work. You’ll need to install a few tools using Homebrew, which the documentation will walk you through, but the steps from initial installation to serving your apps are few and simple.
Install Valet (see the docs for the latest installation instructions), and point it at one or more directories where your sites will live. I ran valet park from my ~/Sites directory, which is where I put all of my under-development apps. Now, you can just add .test to the end of the directory name and visit it in your browser.
Valet makes it easy to serve all folders in a given folder as “FOLDERNAME.test” using valet park, to serve just a single folder using valet link, to open the Valet-served domain for a folder using valet open, to serve the Valet site with HTTPS using valet secure, and to open an ngrok tunnel so you can share your site with others with valet share.
Homestead is another tool you might want to use to set up your local development environment. It’s a configuration tool that sits on top of Vagrant (which is a tool for managing for virtual machines) and provides a pre-configured virtual machine image that is perfectly set up for Laravel development, and mirrors the most common production environment that many Laravel sites run on. Homestead is also likely the best local development environment for developers running Windows machines.
The Homestead docs are robust and kept constantly up-to-date, so I’ll just refer you to them if you want to learn how it works and how to get it set up.
It’s not an official Laravel project, but Chris Fidao of Servers for Hackers and Shipping Docker created a simple tool for creating Docker environments for Laravel development called Vessel. Take a look at the Vessel documentation to learn more.
There are two ways to create a new Laravel project, but both are run from the command line. The first option is to globally install the Laravel installer tool (using Composer); the second is to use Composer’s create-project feature.
You can learn about both options in greater detail on the Installation documentation page, but I’d recommend the Laravel installer tool.
If you have Composer installed globally, installing the Laravel installer tool is as simple as running the following command:
composer global require "laravel/installer"
Once you have the Laravel installer tool installed, spinning up a new Laravel project is simple. Just run this command from your command line:
laravel new projectName
This will create a new subdirectory of your current directory named projectName and install a bare Laravel project in it.
Composer also offers a feature called create-project for creating new projects with a particular skeleton. To use this tool to create a new Laravel project, issue the following command:
composer create-project laravel/laravel projectName
Just like the installer tool, this will create a subdirectory of your current directory named projectName that contains a skeleton Laravel install, ready for you to develop.
Because I often take the same series of steps after creating a new Laravel project, I made a simple script called Lambo that automates those steps every time I create a new project.
Lambo runs laravel new, and then commits your code to Git, sets up your .env credentials with reasonable defaults, opens the project in a browser, and (optionally) opens it in your editor and takes a few other helpful build steps.
You can install Lambo using Composer’s global require:
composer global require tightenco/lambo
And you can use it just like laravel new:
cd Sites
lambo my-new-projectWhen you open up a directory that contains a skeleton Laravel application, you’ll see the following files and directories:
app/
bootstrap/
config/
database/
public/
resources/
routes/
storage/
tests/
vendor/
.editorconfig
.env
.env.example
.gitattributes
.gitignore
artisan
composer.json
composer.lock
package.json
phpunit.xml
readme.md
server.php
webpack.mix.js
In projects created prior to Laravel 5.4, you’ll likely see a gulpfile.js instead of webpack.mix.js; this shows the project is running Laravel Elixir instead of Laravel Mix.
Let’s walk through them one by one to get familiar.
The root directory contains the following folders by default:
app is where the bulk of your actual application will go. Models, controllers, commands, and your PHP domain code all go in here.
bootstrap contains the files that the Laravel framework uses to boot every time it runs.
config is where all the configuration files live.
database is where database migrations, seeds, and factories live.
public is the directory the server points to when it’s serving the website. This contains index.php, which is the front controller that kicks off the bootstrapping process and routes all requests appropriately. It’s also where any public-facing files like images, stylesheets, scripts, or downloads go.
resources is where files that are needed for other scripts live. Views, language files, and (optionally) Sass/Less/source CSS and source JavaScript files live here.
routes is where all of the route definitions live, both for HTTP routes and “console routes,” or Artisan commands.
storage is where caches, logs, and compiled system files live.
tests is where unit and integration tests live.
vendor is where Composer installs its dependencies. It’s Git-ignored (marked to be excluded from your version control system), as Composer is expected to run as a part of your deploy process on any remote servers.
The root directory also contains the following files:
.editorconfig gives your IDE/text editor instructions about Laravel’s coding standars (e.g. the size of indents, the charset, and whether to trim trailing whitespace). You’ll see in this in all versions of Laravel but only in projects created more recently.
.env and .env.example are the files that dictate the environment variables (variables that are expected to be different in each environment and are therefore not committed to version control). .env.example is a template that each environment should duplicate to create its own .env file, which is Git-ignored.
.gitignore and .gitattributes are Git configuration files.
artisan is the file that allows you to run Artisan commands (see Chapter 8) from the command line.
composer.json and composer.lock are the configuration files for Composer; composer.json is user-editable and composer.lock is not. These files share some basic information about this project and also define its PHP dependencies.
package.json is like composer.json but for frontend assets and dependencies of the build system; it instructs NPM on which JavaScript-based dependencies to pull in.
phpunit.xml is a configuration file for PHPUnit, the tool Laravel uses for testing out of the box.
readme.md is a Markdown file giving a basic introduction to Laravel. You won’t see this file if you use the Laravel installer.
server.php is a backup server that tries to allow less-capable servers to still preview the Laravel application.
webpack.mix.js or gulpfile.js is the (optional) configuration file for Mix (webpack.mix.js) or Elixir (gulpfile.js). These files are for giving your build system directions on how to compile and process your frontend assets.
The core settings of your Laravel application—database connection, queue and mail settings, etc.—live in files in the config folder. Each of these files returns a PHP array, and each value in the array will be accessible by a config key that is comprised of the filename and all descendant keys, separated by dots (.)
So, if you create a file at config/services.php that looks like this:
<?phpreturn['sparkpost'=>['secret'=>'abcdefg',],];
You will now have access to that config variable using config('services.sparkpost.secret').
Any configuration variables that should be distinct for each environment (and therefore not committed to source control) will instead live in your .env files. Let’s say you want to use a different Bugsnag API key for each environment. You’d set the config file to pull it from .env:
// config/services.php<?phpreturn['bugsnag'=>['api_key'=>env('BUGSNAG_API_KEY'),],];
This env() helper function pulls a value from your .env file with that same key. So now, add that key to your .env (settings for this environment) and .env.example (template for all environments) files:
# In .env
BUGSNAG_API_KEY=oinfp9813410942
# In .env.example
BUGSNAG_API_KEY=
Your .env file already contains quite a few environment-specific variables needed by the framework, like which mail driver you’ll be using and what your basic database settings are.
Certain features in Laravel, including some caching and optimization features, aren’t available if you use env() calls anywhere outside of config files.
The best way to pull in environment variables is to set up config items for anything you want to be environment-specific. Have those config items read the environment variables, and then reference the config variables anywhere within your app:
// config/services.phpreturn['bugsnag'=>['key'=>env('BUGSNAG_API_KEY')]];// in controller, or whatever$bugsnag=newBugsnag(config('services.bugsnag.key'));
Let’s take a quick look at the default contents of the .env file. The exact keys will vary depending on which version of Laravel you’re using, but take a look at Example 2-1 to see what they look like in 5.7.
APP_NAME=LaravelAPP_ENV=localAPP_KEY=APP_DEBUG=trueAPP_URL=http://localhostLOG_CHANNEL=stackDB_CONNECTION=mysqlDB_HOST=127.0.0.1DB_PORT=3306DB_DATABASE=homesteadDB_USERNAME=homesteadDB_PASSWORD=secretBROADCAST_DRIVER=logCACHE_DRIVER=fileQUEUE_CONNECTION=syncSESSION_DRIVER=fileSESSION_LIFETIME=120REDIS_HOST=127.0.0.1REDIS_PASSWORD=nullREDIS_PORT=6379MAIL_DRIVER=smtpMAIL_HOST=smtp.mailtrap.ioMAIL_PORT=2525MAIL_USERNAME=nullMAIL_PASSWORD=nullMAIL_ENCRYPTION=nullPUSHER_APP_ID=PUSHER_APP_KEY=PUSHER_APP_SECRET=PUSHER_APP_CLUSTER=mt1MIX_PUSHER_APP_KEY="${PUSHER_APP_KEY}"MIX_PUSHER_APP_CLUSTER="${PUSHER_APP_CLUSTER}"
I won’t go into all of them, because quite a few (Pusher, Redis, DB, Mail) are just groups of authentication information for various services. Here are two important environment variables you should know, though:
APP_KEY is a randomly-generated string that’s used to encrypt data. If this is ever empty, you may run into the error “No application encryption key has been specified”. If so, just run php artisan key:generate and Laravel will generate one for you.
APP_DEBUG is a boolean determining whether the users of this instance of your application should see debug errors. Great for local and staging; terrible for production.
The rest of the non-authentication settings (BROADCAST_DRIVER, QUEUE_CONNECTION, etc.) are given default values that work with as little reliance on external services as possible, which is perfect for when you’re getting started.
When you start your first Laravel app, the only change you’ll likely want to make on most projects is to the database configuration settings. Since I use Laravel Valet, I change DB_DATABASE to the name of my project, DB_USERNAME to root, and DB_PASSWORD to an empty string. And then, I go create a database with the same name as my project in my favorite MySQL client. Ready to go.
DB_DATABASE=myProject
DB_USERNAME=root
DB_PASSWORD=
You’re now up and running with a bare Laravel install. Run git init, commit the bare files with git add . and git commit, and you’re ready to start coding. That’s it! And if you’re using Valet, you can run the following commands and instantly see your site live in your browser:
laravel new myProject && cd myProject && valet open
Every time I start a new project, these are the steps I take:
laravel new myProject
cd myProject
git init
git add .
git commit -m "Initial commit"
I keep all of my sites in a ~/Sites folder, which I have set up as my primary Valet directory, so in this case I’d instantly have myProject.test accessible in my browser with no added work. I can edit .env and point it to a particular database, add that database in my MySQL app, and I’m ready to start coding. And remember, if you use Lambo, all of these steps are already taken for you.
In every chapter after this, the “Testing” section at the end of the chapter will show you how to write tests for the feature or features that were covered. Since this chapter doesn’t cover a testable feature, let’s talk tests quickly. (To learn more about writing and running tests in Laravel, head over to Chapter 12.)
Out of the box, Laravel brings in PHPUnit as a dependency and is configured to run the tests in any file in the tests directory whose name ends with Test.php (for example, tests/UserTest.php).
So, the simplest way to write tests is to create a file in the tests directory with a name that ends with Test.php. And the easiest way to run them is to run ./vendor/bin/phpunit from the command line (in the project root).
If any tests require database access, be sure to run your tests from the machine where your database is hosted—so if you’re hosting your database in Vagrant, make sure to ssh into your Vagrant box to run your tests from there. Again, you can learn about this and much more in Chapter 12.
Also, some of the testing sections will use testing syntax and features that you will not be familiar with yet if you’re just reading the book for the first time. If code in any of the testings section is confusing, just skip it and come back to it after you’ve had a chance to read the testing chapter.
Since Laravel is a PHP framework, it’s very simple to serve it locally. Laravel also provides two tools for managing your local development: a simpler tool called Valet that uses your local machine to provide your dependencies, and a preconfigured Vagrant setup named Homestead. Laravel relies on, and can be installed by, Composer, and comes out of the box with a series of folders and files that reflect both its conventions and its relationship with other open source tools.
The essential function of any web application framework is to take requests from a user and deliver responses, usually via HTTP(S). This means defining an application’s routes is the first and most important project to tackle when learning a web framework; without routes, you have little to no ability to interact with the end user.
In this chapter we will examine routes in Laravel and show how to define them, how to point them to the code they should execute, and how to use Laravel’s routing tools to handle a diverse array of routing needs.
Most of what we’ll talk about in this chapter references how MVC (Model-View-Controller) applications are structured, and many of the examples we’ll be looking at use REST-ish route names and verbs, so let’s take a quick look at both.
In MVC, you have three primary concepts: Model, View, and Controller.
The model represents an individual database table (or a record from that table)--think “Company” or “Dog”.
The view represents the template that outputs your data to the end user—think “the login page template with this given set of HTML and CSS and JavaScript”.
The controller is like a traffic cop, taking HTTP requests from the browser, getting the right data out of the database and other storage mechanisms, validating user input, and eventually sending a response back to the user.
In Figure 3-1, you can see that our end user will first interact with the controller by sending an HTTP request using their browser. The controller, in response to that request, may write data to and/or pull data from the model (database). The controller will then likely send data to a view, and then the view will be returned to the end user to display in their browser.
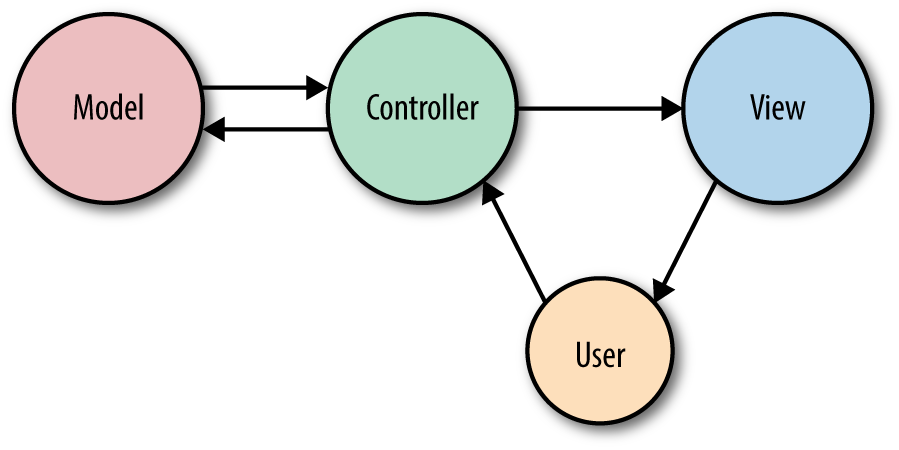
We’ll cover some use cases for Laravel that don’t fit this relatively simplistic way of looking at application architecture, so don’t get hung up on MVC, but this will at least get you ready to approach the rest of this chapter as we talk about views and controllers.
The most common HTTP verbs are GET and POST, followed by PUT and DELETE. There’s also HEAD, OPTIONS, PATCH, and two others that are pretty much never used in normal web development, TRACE and CONNECT.
Here’s the quick rundown:
GET requests a resource (or a list of resources)
HEAD asks for a headers-only version of the GET
POST creates a resource
PUT overwrites a resource
PATCH modifies a resource
DELETE deletes a resource
OPTIONS asks the server which verbs are allowed at this URL
In Table 3-1 you can see a diagram generated by Laravel to show the actions available on a “resource controller” (more on that in “Resource Controllers”). Each action expects you to call a specific URL pattern using a specific verb, so you can get a sense for what each verb is used for.
| Verb | URL | Controller method | Name | Description |
|---|---|---|---|---|
|
|
|
|
Show all tasks |
|
|
|
|
Show the create task form |
|
|
|
|
Accept form submission from the create task form |
|
|
|
|
Show one task |
|
|
|
|
Edit one task |
|
|
|
|
Accept form submission from the edit task form |
|
|
|
|
Delete one task |
We’ll cover REST in greater detail in “The Basics of REST-Like JSON APIs”, but as a brief introduction, it’s an architectural sstyle for building APIs. When we talk about REST in this book we’ll mainly be referencing a few characteristics:
Structured around one primary resource at a time (e.g. tasks)
Consisting of interactions using HTTP verbs to predictable URL structures (as seen in Table 3-1)
Returning JSON and often requested with JSON
There’s more to it, but usually “RESTful” as it’ll be used in this book will mean “patterned after these URL-based structures so we can predict to make calls like GET /tasks/14/edit for the edit page”. This is relevant because much of Laravel’s routing structures are based around a REST-like structure, even when not building APIs—as you can see in Table 3-1.
REST-based APIs follow mainly this same structure , except they don’t have a create route or an edit route, since APIs just represent actions, not pages the prep for the actions.
In a Laravel application, you will define your “web” routes in routes/web.php and your “API” routes in routes/api.php. Web routes are those that will be visited by your end users; API routes are those for your API, if you have one. For now, we’ll primarily focus on the routes in routes/web.php.
In projects running versions of Laravel prior to 5.3, there will be only one routes file, located at app/Http/routes.php.
The simplest way to define a route is to match a path (e.g., /) with a closure, as seen in Example 3-1.
// routes/web.phpRoute::get('/',function(){return'Hello, World!';});
You’ve now defined that, if anyone visits / (the root of your domain), Laravel’s router should run the closure defined there and return the result. Note that we return our content and don’t echo or print it.
You might be wondering, “Why am I returning ‘Hello, World!’ instead of echoing it?”
There are quite a few answers, but the simplest is that there are a lot of wrappers around Laravel’s request and response cycle, including something called middleware. When your route closure or controller method is done, it’s not time to send the output to the browser yet; returning the content allows it to continue flowing through the response stack and the middleware before it is returned back to the user.
Many simple websites could be defined entirely within the web routes file. With a few simple GET routes combined with some templates as illustrated in Example 3-2, you can can serve a classic website easily.
Route::get('/',function(){returnview('welcome');});Route::get('about',function(){returnview('about');});Route::get('products',function(){returnview('products');});Route::get('services',function(){returnview('services');});
If you have much experience developing PHP, you might be surprised to see static calls on the Route class. This is not actually a static method per se, but rather service location using Laravel’s facades, which we’ll cover in Chapter 11.
If you prefer to avoid facades, you can accomplish these same definitions like this:
$router->get('/',function(){return'Hello, World!';});
You might’ve noticed that we’ve been using Route::get in our route definitions. This means we’re telling Laravel to only match for these routes when the HTTP request uses the GET action. But what if it’s a form POST, or maybe some JavaScript sending PUT or DELETE requests? There are a few other options for methods to call on a route definition, as illustrated in Example 3-3.
Route::get('/',function(){return'Hello, World!';});Route::post('/',function(){// Handle someone sending a POST request to this route});Route::put('/',function(){// Handle someone sending a PUT request to this route});Route::delete('/',function(){// Handle someone sending a DELETE request to this route});Route::any('/',function(){// Handle any verb request to this route});Route::match(['get','post'],'/',function(){// Handle GET or POST requests to this route});
As you’ve probably guessed, passing a closure to the route definition is not the only way to teach it how to resolve a route. Closures are quick and simple, but the larger your application gets, the clumsier it becomes to put all of your routing logic in one file. Additionally, applications using route closures can’t take advantage of Laravel’s route caching (more on that later), which can shave up to hundreds of milliseconds off of each request.
The other common option is to pass a controller name and method as a string in place of the closure, as in Example 3-4.
Route::get('/','WelcomeController@index');
This is telling Laravel to pass requests to that path to the index() method of the App\Http\Controllers\WelcomeController controller. This method will be passed the same parameters and treated the same way as a closure you might’ve alternatively put in its place.
If the route you’re defining has parameters—segments in the URL structure that are variable—it’s simple to define them in your route and pass them to your closure (see Example 3-5).
Route::get('users/{id}/friends',function($id){//});
You can also make your route parameters optional by including a question mark (?) after the parameter name, as illustrated in Example 3-6. In this case, you should also provide a default value for the route’s corresponding variable.
Route::get('users/{id?}',function($id='fallbackId'){//});
And you can use regular expressions (regexes) to define that a route should only match if a parameter meets particular requirements, as in Example 3-7.
g]
Route::get('users/{id}', function ($id) {
    //
})->where('id', '[0-9]+');

Route::get('users/{username}', function ($username) {
    //
})->where('username', '[A-Za-z]+');

Route::get('posts/{id}/{slug}', function ($id, $slug) {
    //
})->where(['id' => '[0-9]+', 'slug' => '[A-Za-z]+']);
As you’ve probably guessed, if you visit a path that matches a route string, but the regex doesn’t match the parameter, it won’t be matched. Since routes are matched top to bottom, users/abc would skip the first closure in Example 3-7, but it would be matched by the second closure, so it would get routed there. On the other hand, posts/abc/123 wouldn’t match any of the closures, so it would return a 404 Not Found error.
The simplest way to refer to these routes elsewhere in your application is just by their path. There’s a url() global helper to simplify that linking in your views, if you need it; see Example 3-8 for an example. The helper will prefix your route with the full domain of your site.
<ahref="<?php echo url('/'); ?>">// outputs <a href="http://myapp.com/">
However, Laravel also allows you to name each route, which enables you to refer to it without explicitly referencing the URL. This is helpful because it means you can give simple nicknames to complex routes, and also because linking them by name means you don’t have to rewrite your frontend links if the paths change (see Example 3-9).
// Defining a route with name() in routes/web.php:Route::get('members/{id}','MembersController@show')->name('members.show');// Linking the route in a view using the route() helper<ahref="<?php echo route('members.show', ['id' => 14]); ?>">
This example illustrates a few new concepts. First, we’re using fluent route definition to add the name, by chaining the name() method after the get() method. This method allows us to name the route, giving it a short alias to make it easier to reference elsewhere.
Fluent route definitions don’t exist in Laravel 5.1. You’ll need to instead pass an array to the second parameter of your route definition; check the Laravel docs to see more about how this works. Here’s Example 3-9 in Laravel 5.1:
Route::get('members/{id}',['as'=>'members.show','uses'=>'MembersController@show',]);
In our example, we’ve named this route members.show; resourcePlural.action is a common convention within Laravel for route and view names.
We also introduced the route() helper. Just like url(), it’s intended to be used in views to simplify linking to a named route. If the route has no parameters, you can simply pass the route name: (route('members.index')) and receive a route string (http://myapp.com/members). If it has parameters, pass them in as an array as the second parameter like we did in this example.
In general, I recommend using route names instead of paths to refer to your routes, and therefore using the route() helper instead of the url() helper. Sometimes it can get a bit clumsy—for example, if you’re working with multiple subdomains—but it provides an incredible level of flexibility to later change the application’s routing structure without major penalty.
Often a group of routes share a particular characteristic—a certain authentication requirement, a path prefix, or perhaps a controller namespace. Defining these shared characteristics again and again on each route not only seems tedious but also can muddy up the shape of your routes file and obscure some of the structures of your application.
Route groups allow you to group several routes together, and apply any shared configuration settings once to the entire group, to reduce this duplication. Additionally, route groups are visual cues to future developers (and to your own brain) that these routes are grouped together.
To group two or more routes together, you “surround” the route definitions with a route group, as shown in Example 3-10. In reality, you’re actually passing a closure to the group definition, and defining the grouped routes within that closure.
Route::group(function(){Route::get('hello',function(){return'Hello';});Route::get('world',function(){return'World';});});
By default, a route group doesn’t actually do anything. There’s no difference between the group in Example 3-10 and separating a segment of your routes with code comments.
Probably the most common use for route groups is to apply middleware to a group of routes. You’ll learn more about middleware in Chapter 10, but, among other things, they’re what Laravel uses for authenticating users and restricting guest users from using certain parts of a site.
In Example 3-11, we’re creating a route group around the dashboard and account views and applying the auth middleware to both. In this example, it means users have to be logged in to the application to view the dashboard or the account page.
Route::middleware('auth')->group(function(){Route::get('dashboard',function(){returnview('dashboard');});Route::get('account',function(){returnview('account');});});
Just like fluent route definition didn’t exist in Laravel prior to 5.2, applying modifiers like middleware, prefixes, domains, and more fluently to route groups wasn’t possible prior to 5.4.
Here’s Example Example 3-11 in Laravel 5.3 and prior:
Route::group(['middleware'=>'auth'],function(){Route::get('dashboard',function(){returnview('dashboard');});Route::get('account',function(){returnview('account');});});
Often it’s clearer and more direct to attach middleware to your routes in the controller instead of at the route definition. You can do this by calling the middleware() method in the constructor of your controller. The string you pass to the middleware() method is the name of the middleware, and you can optionally chain modifier methods (only() and except()) to define which methods will receive that middleware:
classDashboardControllerextendsController{publicfunction__construct(){$this->middleware('auth');$this->middleware('admin-auth')->only('editUsers');$this->middleware('team-member')->except('editUsers');}}
Note that, if you’re doing a lot of “only” and “except” customizations, that’s often a sign that you should break out a new controller for the exceptional routes.
If you need to limit users to only access any give route(s) a certain number of times in a given time frame (called rate limiting, and most common with APIs), there’s an out-of-the-box middleware for that. Apply the throttle middleware, which takes two parameters: the first is the number of tries a user is permitted and the second is the number of minutes to wait before resetting the attempt count.
Route::middleware('auth:api','throttle:60,1')->group(function(){Route::get('/profile',function(){//});});
If you’d like to differentiate one user’s rate limit from anothers, you can instruct the throttle middleware to pull the “tries” count (its first parameter) from the user’s Eloquent model. Instead of passing a “tries” count to the first parameter of throttle, instead pass the name of an attribute on the Eloquent model, and that attribute will be used to calculate whether the user has passed their rate limit.
So, if your user model has a plan_rate_limit attribute on it, then you could use the middleware with throttle:plan_rate_limit,1.
If you have a group of routes that share a segment of their path—for example, if your site’s dashboard is prefixed with /dashboard—you can use route groups to simplify this structure (see Example 3-13).
Route::prefix('dashboard')->group(function(){Route::get('/',function(){// Handles the path /dashboard});Route::get('users',function(){// Handles the path /dashboard/users});});
Note that each prefixed group also has a / route that represents the root of the prefix—in Example 3-13 that’s /dashboard.
In Laravel prior to 5.6, you could define a “fallback route” (which you need to define at the end of your routes file) to catch all un-matched paths:
Route::any('{anything}','CatchAllController')->where('anything','*');
In Laravel 5.6+, you can use the Route::fallback() method instead:
Route::fallback(function(){//});
Subdomain routing is the same as route prefixing, but it’s scoped by subdomain instead of route prefix. There are two primary uses for this. First, you may want to present different sections of the application (or entirely different applications) to different subdomains. Example 3-14 shows how you can achieve this.
Route::domain('api.myapp.com')->group(function(){Route::get('/',function(){//});});
Second, you might want to set part of the subdomain as a parameter, as illustrated in Example 3-15. This is most often done in cases of multitenancy (think Slack or Harvest, where each company gets its own subdomain, like tighten.slack.co).
Route::domain('{account}.myapp.com')->group(function(){Route::get('/',function($account){//});Route::get('users/{id}',function($account,$id){//});});
Note that any parameters for the group get passed into the grouped routes’ methods as the first parameter(s).
When you’re grouping routes by subdomain or route prefix, it’s likely their controllers have a similar PHP namespace. In the dashboard example, all of the dashboard routes’ controllers might be under an Dashboard namespace. By using the route group namespace prefix, as shown in Example 3-16, you can avoid long controller references in groups like "Dashboard/UsersController@index" and "Dashboard/PurchasesController@index".
// App\Http\Controllers\UsersControllerRoute::get('/','UsersController@index');Route::namespace('Dashboard')->group(function(){// App\Http\Controllers\Dashboard\PurchasesControllerRoute::get('dashboard/purchases','PurchasesController@index');});
The prefixes don’t stop there. It’s common that route names will reflect the inheritance chain of path elements, so users/comments/5 will be served by a route named users.comments.show. In this case, it’s common to use a route group around all of the routes that are beneath the users.comments resource.
Just like we can prefix URL segments and controller namespaces, we can also prefix strings to the route name. With route group name prefixes, we can define that every route within this group should have a given string prefixed to its name. In this context, we’re prefixing "users. to each route name, then "comments." (see Example 3-17).
Route::name('users.')->prefix('users')->group(function(){Route::name('comments.')->prefix('comments')->group(function(){Route::get('{id}',function(){})->name('show');});});
Many applications regularly send notifications about one-off actions (resetting a password, accepting an invitation, etc.) and provide simple links to take those actions. Let’s imagine sending an email confirming the recipient was willing to be added to a mailing list.
There are three ways to send that link:
Make that URL public and hope no one else discovers the approval URL or modifies their own approval URL to approve someone else.
Put the action behind authentication, link to the action, and require the user to log in if they’re not logged in yet (which, in this case, may be impossible, as many mailing list recipients likely won’t be users).
“Sign” the link so that it uniquely proves that the user received the link from your email, without them having to log in; something like http://myapp.com/invitations/5816/yes?signature=030ab0ef6a8237bd86a8b8.
Laravel 5.6.12 introduced a featured called “Signed URLs”, which make it simple to build a signature-authentication system for sending out authenticated links. These links are the normal route link, with a “signature” appended that proves that the URL has not been changed since it was sent (and therefore that no one has modified the URL to access someone else’s information).
In order to build a signed URL to access a given route, the route must have a name:
Route::get('invitations/{invitation}/{answer}','InvitationController')->name('invitations');
To generate a normal link to this route, you would use the route() helper, as we’ve already covered, but you could also use the URL facade to do the same thing: URL::route('invitations', ['invitation' => 12345, 'answer' => 'yes']). To generate a signed link to this route, simply use the signedRoute() method instead. And if you want to generate a signed route with an expiration, used temporarySignedRoute():
// Generate normal linkURL::route('invitations',['invitation'=>12345,'answer'=>'yes']);// Generate a signed linkURL::signedRoute('invitations',['invitation'=>12345,'answer'=>'yes']);// Generate an expiring (temporary) signed linkURL::temporarySignedRoute('invitations',now()->addHours(4),['invitation'=>12345,'answer'=>'yes']);
Since version 5.5 Laravel has offered a now() helper that’s the equivalent of Carbon::now(); it returns a Carbon object representative of today, right at this second. If you’re working with Laravel prior to 5.5, you can replace any instance of now() in this book with Carbon::now().
Carbon, if you’re not familiar with it, is a datetime library that’s included with Laravel.
Now that we’ve generated a link to our signed route, we need to protect against any non-signed access. The easiest option is to apply the signed middleware (which, if it’s not in your $routeMiddleware array in app/Http/Kernel.php, should be, backed by Illuminate\Routing\Middleware\ValidateSignature).
Route::get('invitations/{invitation}/{answer}','InvitationController')->name('invitations')->middleware('signed');
If you’d prefer, you can manually validate using the hasValidSignature() method on the request object instead of using the signed middleware:
classInvitationController{publicfunction__invoke(Invitation$invitation,$answer,Request$request){if(!$request->hasValidSignature()){abort(403);}//}}
In a few of the route closures we’ve looked at so far, we’ve seen something along the lines of return view('account'). What’s going on here?
If you’re not familiar with the Model–View–Controller (MVC) pattern, views (or templates) are files that describe what some particular output should look like. You might have views for JSON or XML or emails, but the most common views in a web framework output HTML.
In Laravel, there are two formats of view you can use out of the box: plain PHP, or Blade templates (see Chapter 4). The difference is in the filename: about.php will be rendered with the PHP engine, and about.blade.php will be rendered with the Blade engine.
There are three different ways to return a view. For now, just concern yourself with view(), but if you ever see View::make(), it’s the same thing, and you could also inject the Illuminate\View\ViewFactory if you prefer.
Once you’ve “loaded” a view with the view() helper, you have the option to simply return it (as in Example 3-18), which will work fine if the view doesn’t rely on any variables from the controller.
Route::get('/',function(){returnview('home');});
This code looks for a view in resources/views/home.blade.php or resources/views/home.php, and loads its contents and parses any inline PHP or control structures until you have just the view’s output. Once you return it, it’s passed on to the rest of the response stack and eventually returned to the user.
But what if you need to pass in variables? Take a look at Example 3-19.
Route::get('tasks',function(){returnview('tasks.index')->with('tasks',Task::all());});
This closure loads the resources/views/tasks/index.blade.php or resources/views/tasks/index.php view and passes it a single variable named tasks, which contains the result of the Task::all() method. Task::all() is an Eloquent database query you’ll learn about in Chapter 5.
Because it’s so common for a route to just return a view with no custom data, Laravel 5.5+ allows you to define a route as a “view” route without even passing the route definition a closure or a controller/method reference, as you can see in Example 3-20.
// Returns resources/views/welcome.blade.phpRoute::view('/','welcome');// Passing simple data to Route::viewRoute::view('/','welcome',['User'=>'Michael']);
Sometimes it can become a hassle to pass the same variables over and over. There may be a variable that you want accessible to every view in the site, or to a certain class of views or a certain included subview—for example, all views related to tasks, or the header partial.
It’s possible to share certain variables with every template or just certain templates, like in the following code:
view()->share('variableName','variableValue');
To learn more, check out “View Composers and Service Injection”.
I’ve mentioned controllers a few times, but until now most of the examples have shown route closures. If you’re not familiar with the MVC pattern (Figure 3-1), controllers are essentially classes that organize the logic of one or more routes together in one place. Controllers tend to group similar routes together, especially if your application is structured along a traditionally CRUD-like format; in this case, a controller might handle all the actions that can be performed on a particular resource.
CRUD stands for create, read, update, delete, which are the four primary operations that web applications most commonly provide on a resource. For example, you can create a new blog post, you can read that post, you can update it, or you can delete it.
It may be tempting to cram all of the application’s logic into the controllers, but it’s better to think of controllers as the traffic cops that route HTTP requests around your application. Since there are other ways requests can come into your application—cron jobs, Artisan command-line calls, queue jobs, etc.—it’s wise to not rely on controllers for much behavior. This means a controller’s primary job is to capture the intent of an HTTP request and pass it on to the rest of the application.
So, let’s create a controller. One easy way to do this is with an Artisan command, so from the command line run the following:
php artisan make:controller TasksController
Laravel comes bundled with a command-line tool called Artisan. Artisan can be used to run migrations, create users and other database records manually, and perform many other manual, one-time tasks.
Under the make namespace, Artisan provides tools for generating skeleton files for a variety of system files. That’s what allows us to run php artisan make:controller.
To learn more about this and other Artisan features, see Chapter 8.
This will create a new file named TasksController.php in app/Http/Controllers, with the contents shown in Example 3-21.
<?phpnamespaceApp\Http\Controllers;useIlluminate\Http\Request;classTasksControllerextendsController{//}
Modify this file as shown in Example 3-22, creating a new public method called index(). We’ll just return some text there.
<?phpnamespaceApp\Http\Controllers;classTasksControllerextendsController{publicfunctionindex(){return'Hello, World!';}}
Then like we learned before, we’ll hook up a route to it, as shown in Example 3-23.
// routes/web.php<?phpRoute::get('/','TasksController@index');
That’s it. Visit the / route and you’ll see the words “Hello, World!”
The most common use of a controller method, then, will be something like Example 3-24, which provides the same functionality as our route closure in Example 3-19.
// TasksController.php...publicfunctionindex(){returnview('tasks.index')->with('tasks',Task::all());}
This controller method loads the resources/views/tasks/index.blade.php or resources/views/tasks/index.php view and passes it a single variable named tasks, which contains the result of the Task::all() Eloquent method.
If you ever used php artisan make:controller in Laravel prior to 5.3, you might be expecting it to autogenerate methods for all of the basic resource routes like create() and update(). You can bring this behavior back in Laravel 5.3+ by passing the --resource flag when you create the controller:
php artisan make:controller TasksController --resource
The second most common action to perform in a controller method is to take input from the user and act on it. That introduces a few new concepts, so let’s take a look at a bit of sample code and walk through the new pieces.
First, let’s bind our route quickly; see Example 3-25.
// routes/web.phpRoute::get('tasks/create','TasksController@create');Route::post('tasks','TasksController@store');
Notice that we’re binding the GET action of tasks/create (which shows a form for creating a new task) and the POST action of tasks/ (which is where our form will POST to when we’re creating a new task). We can assume the create() method in our controller just shows a form, so let’s look at the store() method in Example 3-26.
// TasksController.php...publicfunctionstore(){Task::create(request()->only(['title','description']));returnredirect('tasks');}
This example makes use of Eloquent models and the redirect() functionality, and we’ll talk about them more later, but let’s talk quickly about how you’re getting your data here.
We’re using the request() helper to represent the HTTP request (more on that later) and using its only() method to pull just the title and description fields the user submitted.
We’re then passing that data into the create method of our Task model, which creates a new instance of the Task with “title” set to the passed-in title and “description” set to the passed-in description. Finally, we redirect back to the page that shows all tasks.
There are a few layers of abstraction at work here, which we’ll cover in a second, but know that the data coming from the only() method comes from the same pool of data as would come from the all() method or the get() method, all common methods used on the request objects. The set of data each of these methods is pulling from represents all user-provided data, whether from query parameters or POST values. So our user filled out two fields on the “add task” page: “title” and “description.”
To break down the abstraction a bit, request()->only() takes an associative array of input names and returns them:
request()->only(['title','description']);// returns:['title'=>'Whatever title the user typed on the previous page','description'=>'Whatever description the user typed on the previous page',]
And Task::create() takes an associative array and creates a new task from it:
Task::create(['title'=>'Buy milk','description'=>'Remember to check the expiration date this time, Norbert!',]);
Combining them together creates a task with just the user-provided “title” and “description” fields.
Laravel’s facades and global helpers present a simple interface to the most useful classes in Laravel’s codebase. You can get information about the current request and user input, the session, caches, and much more.
But if you prefer to inject your dependencies, or if you want to use a service that doesn’t have a facade or a helper, you’ll need to find some way to bring instances of these classes into your controller.
This is our first exposure to Laravel’s service container. For now, if this is unfamiliar, you can think about it as a little bit of Laravel magic; or, if you want to know more about how it’s actually functioning, you can skip ahead to Chapter 11.
All controller methods (including the constructors) are resolved out of Laravel’s container, which means anything you typehint that the container knows how to resolve will be automatically injected.
“Typehinting” in PHP means putting the name of a class or interface in front of a variable in a method signature:
publicfunction__construct(Logger$logger){}
This typehint is telling PHP that whatever is passed into the method must be of type Logger, which could be either an interface or a class.
As a nice example, what if you’d prefer having an instance of the Request object instead of using the global helper? Just typehint Illuminate\Http\Request in your method parameters, like in Example 3-27.
// TasksController.php...publicfunctionstore(\Illuminate\Http\Request$request){Task::create($request->only(['title','description']));returnredirect('tasks');}
So, you’ve defined a parameter that must be passed into the store() method. And since you typehinted it, and since Laravel knows how to resolve that class name, you’re going to have the Request object ready for you to use in your method with no work on your part. No explicit binding, no anything else—it’s just there as the $request variable.
And, as you can tell from comparing Example 3-26 and Example 3-27, the request() helper and the Request object behave exactly the same.
Sometimes naming the methods in your controllers can be the hardest part of writing a controller. Thankfully, Laravel has some conventions for all of the routes of a traditional REST/CRUD controller (called a “resource controller” in Laravel); additionally, it comes with a generator out of the box and a convenience route definition that allows you to bind an entire resource controller at once.
To see the methods that Laravel expects for a resource controller, let’s generate a new controller from the command line:
php artisan make:controller MySampleResourceController --resource
Now open app/Http/Controllers/MySampleResourceController.php. You’ll see it comes prefilled with quite a few methods. Let’s walk over what each represents. We’ll use a Task as an example.
Remember the table from earlier? Table 3-1 shows the HTTP verb, the URL, the controller method name, and the “name” for each of these default methods that are generated in Laravel’s resource controllers.
So, we’ve seen that these are the conventional route names to use in Laravel, and also that it’s easy to generate a resource controller with methods for each of these default routes. Thankfully, you don’t have to generate routes for each of these controller methods by hand, if you don’t want to. Instead, there’s a trick for that, and it’s called “resource controller binding.” Take a look at Example 3-28.
// routes/web.phpRoute::resource('tasks','TasksController');
This will automatically bind all of the routes listed in Table 3-1 for this resource to the appropriate method names on the specified controller. It’ll also name these routes appropriately; for example, the index() method on the tasks resource controller will be named tasks.index.
If you ever find yourself in a situation where you’re wondering what routes your current application has available, there’s a tool for that: from the command line, run php artisan route:list and you’ll get a listing of all of the available routes (see Figure 3-2).
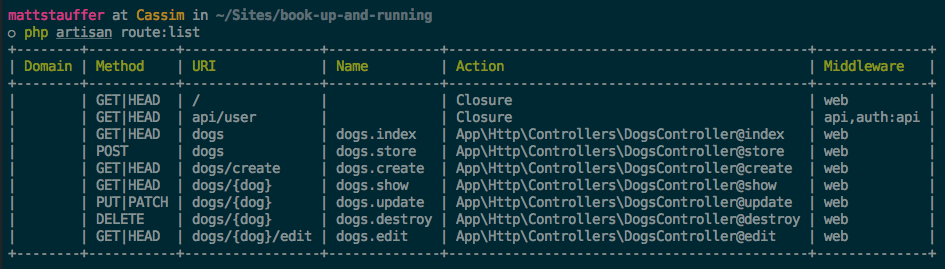
When you’re working with RESTful APIs, the list of potential actions on a resource is not the same as it is with an HTML resource controller. For example, you can send a POST request to an API to create a resource, but you can’t really “show a create form” in an API.
Laravel 5.6 introduced a new way to generate an “API resource controller”, which has the same structure as a resource controller except it excludes the create and edit actions. We can generate API resource controllers by passing the --api flag when creating a controller.
php artisan make:controller MySampleResourceController --api
To bind an API resource controller, use the apiResource() method instead of the resource() method, as you can see in Example 3-29.
// routes/web.phpRoute::apiResource('tasks','TasksController');
There will be times in your applications that a controller appropriately should only service a single route. You may likely find yourself wondering how to name the controller method for that route. Thankfully, you can point a single route at a single controller without concerning yourself with naming the one method.
As you may already know, the __invoke method is a PHP magic method that allows you to “invoke” an instance of a class, treating it like a function and calling it. This is the tool Laravel’s Single Action Controllers use to allow you to point a route to a single controller, as you can see in Example 3-30.
// \App\Http\Controllers\UpdateUserAvatar.phppublicfunction__invoke(User$user){// Update the user's avatar image}// routes/web.phpRoute::post('users/{user}/update-avatar','UpdateUserAvatar');
One of the most common routing patterns is that the first line of any controller method tries to find the resource with the given ID, like in Example 3-31.
Route::get('conferences/{id}',function($id){$conference=Conference::findOrFail($id);});
Laravel provides a feature that simplifies this pattern called “route model binding.” This allows you to define that a particular parameter name (e.g., {conference}) will indicate to the route resolver that it should look up an Eloquent database record with that ID and then pass it in as the parameter instead of just passing the ID.
There are two kinds of route model binding: implicit and custom (or explicit).
The simplest way to use route model binding is to name your route parameter something unique to that model (e.g., name it $conference instead of $id), then typehint that parameter in the closure/controller method and use the same variable name there. It’s easier to show than to describe, so take a look at Example 3-32.
Route::get('conferences/{conference}',function(Conference$conference){returnview('conferences.show')->with('conference',$conference);});
Because the route parameter ({conference}) is the same as the method parameter ($conference), and the method parameter is typehinted with a Conference model (Conference $conference), Laravel sees this as a route model binding. Every time this route is visited, the application will assume that whatever is passed into the URL in place of {conference} is an ID that should be used to look up a Conference, and then that resulting model instance will be passed in to your closure or controller method.
Any time an Eloquent model is looked up via a URL segment (usually because of route model binding), the default column Eloquent will look it up by is its primary key (ID).
To change the column your Eloquent model uses for URL lookups, add a method to your model named getRouteKeyName():
publicfunctiongetRouteKeyName(){return'slug';}
Now, a URL like conferences/{conference} will expect to get the slug instead of the ID, and will perform its lookups accordingly.
Implicit route model binding was added in Laravel 5.2, so you won’t have access to it in 5.1.
To manually configure route model bindings, add a line like the one in Example 3-30 to the boot() method in App\Providers\RouteServiceProvider.
publicfunctionboot(){// Just allows the parent's boot() method to still runparent::boot();// Perform the bindingRoute::model('event',Conference::class);}
You’ve now defined that whenever a route has a parameter in its definition named {event}, as demonstrated in Example 3-31, the route resolver will return an instance of the Conference class with the ID of that URL parameter.
Route::get('events/{event}',function(Conference$event){returnview('events.show')->with('event',$event);});
If you’re looking to squeeze every millisecond out of your load time, you may want to take a look at route caching. One of the pieces of Laravel’s bootstrap that can take anywhere from a few dozen to a few hundred milliseconds is parsing the routes/* files, and route caching speeds up this process dramatically.
To cache your routes file, you need to be using all controller, redirect, view, and resource routes (no route closures). If your app isn’t using any route closures, you can run php artisan route:cache, Laravel will serialize the results of your routes/* files. If you want to delete the cache, run php artisan route:clear.
Here’s the drawback: Laravel will now match routes against that cached file instead of your actual routes/* files. You can make endless changes to your routes files, and they won’t take effect until you run route:cache again. This means you’ll have to recache every time you make a change, which introduces a lot of potential for confusion.
Here’s what I would recommend instead: since Git ignores the route cache file by default anyway, consider only using route caching on your production server, and run the php artisan route:cache command every time you deploy new code (whether via a Git post-deploy hook, a Forge deploy command, or as a part of whatever other deploy system you use). This way you won’t have confusing local development issues, but your remote environment will still benefit from route caching.
Sometimes, you need to manually define which HTTP verb a form should send as. HTML forms only allow for GET or POST, so if you want any other sort of verb, you’ll need to specify that yourself.
As we’ve shown already, you can define which verbs a route will match in the route definition using Route::get(), Route::post(), Route::any(), or Route::match(). You can also match with Route::patch(), Route::put(), and Route::delete().
But how does one send a request other than GET with a web browser? First, the method attribute in an HTML form determines its HTTP verb: if your form has a method of "GET", it will submit via query parameters and a GET method; if the form has a method of "POST", it will submit via the post body and a POST method.
JavaScript frameworks make it easy to send other requests, like DELETE and PATCH. But if you find yourself needing to submit HTML forms in Laravel with verbs other than GET or POST, you’ll need to use form method spoofing, which is spoofing the HTTP method in an HTML form.
To inform Laravel that the form you’re currently submitting should be treated as something other than POST, add a hidden variable named _method with the value of either "PUT", "PATCH", or "DELETE", and Laravel will match and route that form submission as if it were actually a request with that verb.
The form in Example 3-35, since it’s passing Laravel the method of "DELETE", will match routes defined with Route::delete() but not those with Route::post().
<formaction="/tasks/5"method="POST"><inputtype="hidden"name="_method"value="DELETE"><!-- or: -->@method('DELETE')</form>
If you’ve tried to create and submit a form in a Laravel application already—including the form in Example 3-35—you’ve likely run into the dreaded TokenMismatchException.
By default, all routes in Laravel except “read-only” routes (those using GET, HEAD, or OPTIONS) are protected against cross-site request forgery (CSRF) attacks by requiring a token, in the form of an input named _token, to be passed along with each request. This token is generated at the start of every session, and every non–read-only route compares the submitted _token against the session token.
A cross-site request forgery is when one website pretends to be another. The goal is for someone to hijack your users’ access to your website, by submitting forms from their website to your website via the logged-in user’s browser.
The best way around CSRF attacks is to protect all inbound routes—POST, DELETE, etc.—with a token, which Laravel does out of the box.
You have two options for getting around this CSRF error. The first, and preferred, method is to add the _token input to each of your submissions. In HTML forms, that’s simple; look at Example 3-36.
<formaction="/tasks/5"method="POST"><?php echo csrf_field(); ?><!-- or: --><inputtype="hidden"name="_token"value="<?php echo csrf_token(); ?>"><!-- or: -->@csrf</form>
The @csrf Blade directive is not available in projects running versions of Laravel prior to 5.6. Instead, you’ll need to use the csrf_field() helper function.
In JavaScript applications, it’s a bit more work, but not much. The most common solution for sites using JavaScript frameworks is to store the token on every page in a <meta> tag like this one:
<metaname="csrf-token"content="<?php echo csrf_token(); ?>"id="token">
Storing the token in a <meta> tag makes it easy to bind it to the correct HTTP header, which you can do once globally for all requests from your JavaScript framework, like in Example 3-37.
// in jQuery:$.ajaxSetup({headers:{'X-CSRF-TOKEN':$('meta[name="csrf-token"]').attr('content')}});// with Axios:window.axios.defaults.headers.common['X-CSRF-TOKEN']=document.head.querySelector('meta[name="csrf-token"]');
Laravel will check the X-CSRF-TOKEN on every request, and valid tokens passed there will mark the CSRF protection as satisfied.
Note that the Vue syntax for CSRF in this example is not necessary if you’re working with the default Vue bootstrap in a Laravel installation; it already does this work for you.
In projects using older versions of Laravel and Vue, you may be relying on a library called Vue Resource to make AJAX calls. Bootstrapping the CSRF token into Vue Resource looks a bit different than it does for Laravel; see the Vue Resource docs for examples.
So far the only things we’ve explicitly talked about returning from a controller method or route definition have been views. But there are a few other structures we can return to give the browser instructions on how to behave.
First, let’s cover the redirect; you’ve already seen a few of those in other examples. There are two common ways to generate a redirect; we’ll use the redirect global helper here, but you may prefer the facade. Both create an instance of Illuminate\Http\RedirectResponse, perform some convenience methods on it, and then return it. You can also do this manually, but you’ll have to do a little more work yourself. Take a look at Example 3-38 to see a few ways you can return a redirect.
// Using the global helper to generate a redirect responseRoute::get('redirect-with-helper',function(){returnredirect()->to('login');});// Using the global helper shortcutRoute::get('redirect-with-helper-shortcut',function(){returnredirect('login');});// Using the facade to generate a redirect responseRoute::get('redirect-with-facade',function(){returnRedirect::to('login');});// Using the Route::redirect shortcut in Laravel 5.5+Route::redirect('redirect-by-route','login');
Note that the redirect() helper exposes the same methods as the Redirect facade, but it also has a shortcut; if you pass parameters directly to the helper, instead of chaining methods after it, it’s a shortcut to the to() redirect method.
Also note that the (optional) third parameter for the Route::redirect() route helper can be the status code (e.g. 302) for your redirect.
The method signature for the to() method for redirects looks like this:
functionto($to=null,$status=302,$headers=[],$secure=null)
$to is a valid internal path; $status is the HTTP status (defaulting to 302 FOUND); $headers allows you to define which HTTP headers to send along with your redirect; and $secure allows you to override the default choice of http versus https (which is normally set based on your current request URL). Example 3-39 shows an example of its use.
Route::get('redirect',function(){returnredirect()->to('home');// or same, using the shortcut:returnredirect('home');});
The route() method is the same as the to() method, but rather than pointing to a particular path, it points to a particular route name (see Example 3-40).
Route::get('redirect',function(){returnredirect()->route('conferences.index');});
Note that, since some route names require parameters, its parameter order is a little different. route() has an optional second parameter for the route parameters:
functionroute($to=null,$parameters=[],$status=302,$headers=[])
So, using it might look a little like Example 3-40.
Route::get('redirect',function(){returnredirect()->route('conferences.show',['conference'=>99]);});
Because of some of the built-in conveniences of Laravel’s session implementation, your application will always have knowledge of what the user’s previously visited page was. That opens up the opportunity for a redirect()->back() redirect, which simply redirects the user to whatever page she came from. There’s also a global shortcut for this: back().
The redirect service provides other methods that are less commonly used, but still available:
home() redirects to a route named home.
refresh() redirects to the same page the user is currently on.
away() allows for redirecting to an external URL without the default URL validation.
secure() is like to() with the secure parameter set to "true".
action() allows you to link to a controller and method in one of two ways: first, as a string: redirect()->action('MyController@myMethod'), or second, as a tuple: redirect()->action([MyController::class, 'myMethod’])
guest() is used internally by the auth system (discussed in Chapter 9); when a user visits a route he’s not authenticated for, this captures the “intended” route and then redirects the user (usually to a login page).
intended() is also used internally by the auth system; after a successful authentication, this grabs the “intended” URL stored by the guest() method and redirects the user there.
When you’re redirecting users to different pages, you often want to pass certain data along with them. You could manually flash the data to the session, but Laravel has some convenience methods to help you with that.
Most commonly, you can pass along either an array of keys and values or a single key and value using with(), like in Example 3-42. This saves your with() data to the session just for the next page load.
Route::get('redirect-with-key-value',function(){returnredirect('dashboard')->with('error',true);});Route::get('redirect-with-array',function(){returnredirect('dashboard')->with(['error'=>true,'message'=>'Whoops!']);});
As with many other facades, most calls to the Redirect facade can accept fluent method chains, like the with() calls in Example 3-42. Learn more about fluency in “What Is a Fluent Interface?”.
You can also use withInput(), as in Example 3-43, to redirect with the user’s form input flashed; this is most common in the case of a validation error, where you want to send the user back to the form she just came from.
Route::get('form',function(){returnview('form');});Route::post('form',function(){returnredirect('form')->withInput()->with(['error'=>true,'message'=>'Whoops!']);});
The easiest way to get the flashed input that was passed with withInput() is using the old() helper, which can be used to get all old input (old()) or just the value for a particular key (old('username'), with the second parameter as the default if there is no old value). You’ll commonly see this in views, which allows this HTML to be used both on the “create” and the “edit” view for this form:
<inputname="username"value="<?=old('username', 'Default username instructions here');?>">
Speaking of validation, there is also a useful method for passing errors along with a redirect response: withErrors(). You can pass it any “provider” of errors, which may be an error string, an array of errors, or, most commonly, an instance of the Illuminate Validator, which we’ll cover in Chapter 10. Example 3-44 shows an example of its use.
Route::post('form',function(){$validator=Validator::make($request->all()),$this->validationRules);if($validator->fails()){returnback()->withErrors($validator)->withInput();}});
withErrors() automatically shares an $errors variable with the views of the page it’s redirecting to, for you to handle however you’d like.
Don’t like how Example 3-44 looks? There’s a simple and powerful tool that will make it easy for you to clean up that code. Read more in “validate() on the Request object”.
Aside from returning views and redirects, the most common way to exit a route is to abort. There are a few globally available methods (abort(), abort_if(), and abort_unless()), which optionally take HTTP status codes, a message, and a headers array as parameters.
As Example 3-45 shows, abort_if() and abort_unless() take a first parameter that is evaluated for its truthiness, and perform the abort depending on the result.
Route::post('something-you-cant-do',function(Illuminate\Http\Request$request){abort(403,'You cannot do that!');abort_unless($request->has('magicToken'),403);abort_if($request->user()->isBanned,403);});
There are a few other options available for us to return, so let’s go over the most common responses after views, redirects, and aborts. Just like with redirects, you can either use the response() helper or the Response facade to run these methods on.
If you want to create an HTTP response manually, just pass your data into the first parameter of response()->make(): e.g., return response()->make('Hello, World!'). Once again, the second parameter is the HTTP status code and the third is your headers.
To create a JSON-encoded HTTP response manually, pass your JSON-able content (arrays, collections, or whatever else) to the json() method: e.g., return response()->json(User::all());. It’s just like make(), except it json_encodes your content and sets the appropriate headers.
To send a file for the end user to download, pass either an SplFileInfo instance or a string filename to download(), with an optional second parameter of the download filename: e.g., return response()->download('file501751.pdf', 'myFile.pdf'), which would send a file that’s at file501751.pdf and name it, as it’s sent, as myFile.pdf.
To display the same file in the browser (if it’s a PDF or an image or something else the browser can handle), use response()->file() instead, which takes the same parameters as response->download().
If you want to make some content from an external service available as a download without having to write it directly to your server’s disk, you can stream the download using response()->streamDownload(). This method expects parameters of a closure which echoes a string, a filename, and an optional third parameter of an array of headers. Take at look at Example 3-46:
returnresponse()->streamDownload(function(){echoDocumentService::file('myFile')->getContent();},'myFile.pdf');
In some other communities, the idea of unit testing controller methods is common, but within Laravel (and most of the PHP community), it’s most common to rely on application testing to test the functionality of routes.
For example, to verify that a POST route works correctly, we can write a test like Example 3-47.
// tests/Feature/AssignmentTest.phppublicfunctiontest_post_creates_new_assignment(){$this->post('/assignments',['title'=>'My great assignment']);$this->assertDatabaseHas('assignments',['title'=>'My great assignment']);}
Did we directly call the controller methods? No. But we ensured that the goal of this route—to receive a POST and save its important information to the database—was met.
You can also use similar syntax to visit a route and verify that certain text shows up on the page, or that clicking certain buttons does certain things (see Example 3-48).
// AssignmentTest.phppublicfunctiontest_list_page_shows_all_assignments(){$assignment=Assignment::create(['title'=>'My great assignment']);$this->get('/assignments')->assertSee('My great assignment');}
In projects running versions of Laravel prior to 5.4 assertDatabaseHas should be replaced by seeInDatabase, and get and assertSee should be replaced by visit and see.
Laravel’s routes are defined in routes/web.php and routes/api.php, where you can define the expected path for each route, which segments are static and which are parameters, which HTTP verbs can access the route, and how to resolve it. You can also attach middleware to routes, group them, and give them names.
What is returned from the route closure or controller method dictates how Laravel responds to the user. If it’s a string or a view, it’s presented to the user; if it’s other sorts of data, it’s converted to JSON and presented to the user; and if it’s a redirect, it forces a redirect.
Laravel provides a series of tools and conveniences to simplify common routing-related tasks and structures. These include resource controllers, route model binding, and form method spoofing.
Compared to most other backend languages, PHP actually functions relatively well as a templating language. But it has its shortcomings, and it’s also just ugly to be using <?php inline all over the place, so you can expect most modern frameworks to offer a templating language.
Laravel offers a custom templating engine called Blade, which is inspired by .NET’s Razor engine. It boasts a concise syntax, a shallow learning curve, a powerful and intuitive inheritance model, and easy extensibility.
For a quick look at what writing Blade looks like, check out Example 4-1.
<h1>{{$group->title}}</h1>{!!$group->heroImageHtml()!!}@forelse($usersas$user)•{{$user->first_name}}{{$user->last_name}}<br>@emptyNousersinthisgroup.@endforelse
As you can see, Blade uses curly braces for its “echo” and introduces a convention in which its custom tags, called “directives,” are prefixed with an @. You’ll use directives for all of your control structures and also for inheritance and any custom functionality you want to add.
Blade’s syntax is clean and concise, so at its core it’s just more pleasant and tidy to work with than the alternatives. But the moment you need anything of any complexity in your templates—nested inheritance, complex conditionals, or recursion—Blade starts to really shine. Just like the best Laravel components, it takes complex application requirements and makes them easy and accessible.
Additionally, since all Blade syntax is compiled into normal PHP code and then cached, it’s fast and it allows you to use native PHP in your Blade files if you want. However, I’d recommmend avoiding usage of PHP if at all possible—usually if you need to do anything that you can’t do with Blade or a custom Blade directive, it doesn’t belong in the template.
Unlike many other Symfony-based frameworks, Laravel doesn’t use Twig by default. But if you’re just in love with Twig, there’s a Twig Bridge package that makes it easy to use Twig instead of Blade.
As you can see in Example 4-1, {{ and }} are used to wrap sections of PHP that you’d like to echo. {{ is similar to $variable }}<?= $variable ?> in plain PHP.
It’s different in one way, however, and you might’ve guessed this already: Blade escapes all echoes by default using PHP’s htmlentities() to protect your users from malicious script insertion. That means {{ is functionally equivalent to $variable }}<?= htmlentities( $variable)?>. If you want to echo without the escaping, use {!! and !!} instead.
Most of the control structures in Blade will be very familiar. Many directly echo the name and structure of the same tag in PHP.
There are a few convenience helpers, but in general, the control structures just look cleaner than they would in PHP.
First, let’s take a look at the control structures that allow for logic.
Blade’s @if ($condition) compiles to <?php if ($condition): ?>. @else, @elseif, and @endif also compile to the exact same style of syntax in PHP. Take a look at Example 4-2 for some examples.
@if(count($talks)===1)Thereisonetalkatthistimeperiod.@elseif(count($talks)===0)Therearenotalksatthistimeperiod.@elseThereare{{count($talks)}}talksatthistimeperiod.@endif
Just like with the native PHP conditionals, you can mix and match these how you want. They don’t have any special logic; there’s literally a parser looking for something with the shape of @if ( and replacing it with the appropriate PHP code.$condition)
@unless, on the other hand, is a new syntax that doesn’t have a direct equivalent in PHP. It’s the direct inverse of @if. @unless ($condition) is the same as <?php if (! $condition). See it in use in Example 4-3.
@unless($user->hasPaid())Youcancompleteyourpaymentbyswitchingtothepaymenttab.@endunless
Next, let’s take a look at the loops.
@for, @foreach, and @while work the same in Blade as they do in PHP; see Examples 4-4, 4-5, and 4-6.
@for($i=0;$i<$talk->slotsCount();$i++)Thenumberis{{$i}}<br>@endfor
@foreach($talksas$talk)•{{$talk->title}}({{$talk->length}}minutes)<br>@endforeach
@while($item=array_pop($items)){{$item->orSomething()}}<br>@endwhile
@forelse is a @foreach that also allows you to program in a fallback if the object you’re iterating over is empty. We saw it in action at the start of this chapter; Example 4-7 shows another example.
@forelse($talksas$talk)•{{$talk->title}}({{$talk->length}}minutes)<br>@emptyNotalksthisday.@endforelse
The @foreach and @forelse directives (introduced in Laravel 5.3) add one feature that’s not available in PHP foreach loops: the $loop variable. Used within a @foreach or @forelse loop, this variable will return a stdClass object with these properties:
indexThe 0-based index of the current item in the loop; 0 would mean “first item”
iterationThe 1-based index of the current item in the loop; 1 would mean “first item”
remainingHow many items remain in the loop; if the current item is the first of three, this will be 2
countThe count of items in the loop
firstA boolean indicating whether this is the first item in the loop
lastA boolean indicating whether this is the last item in the loop
depthHow many “levels” deep this loop is: 1 for a loop, 2 for a loop within a loop, etc.
parentA reference to the $loop variable for the parent loop item; if this loop is within another @foreach loop otherwise, null
Here’s an example of how to use it:
<ul>@foreach($pagesas$page)<li>{{$loop->iteration}}:{{$page->title}}@if($page->hasChildren())<ul>@foreach($page->children()as$child)<li>{{$loop->parent->iteration}}.{{$loop->iteration}}:{{$child->title}}</li>@endforeach</ul>@endif</li>@endforeach</ul>
Blade provides a structure for template inheritance that allows views to extend, modify, and include other views.
Here’s how inheritance is structured with Blade.
Let’s start with a top-level Blade layout, like in Example 4-8. This is the definition of a generic page wrapper that we’ll later place page-specific content into.
<!-- resources/views/layouts/master.blade.php --><html><head><title>My Site | @yield('title', 'Home Page')</title></head><body><divclass="container">@yield('content')</div>@section('footerScripts')<scriptsrc="app.js"></script>@show</body></html>
This looks a bit like a normal HTML page, but you can see we’ve yielded in two places (title and content), and we’ve defined a section in a third (footerScripts).
We have three Blade directives here that each look a little different: @yield('content') alone, @yield('title', 'Home Page') with a defined default, and @section ... @show with actual content in it.
All three function essentially the same. All three are defining that there’s a section with a given name (which is the first parameter). All three are defining that the section can be extended later. And all three are defining what to do if the section isn’t extended, either by providing a string fallback ('Home Page'), no fallback (which will just not show anything if it’s not extended), or an entire block fallback (in this case, <script src="app.js"></script>).
What’s different? Well, clearly, @yield('content') has no default content. But additionally, the default content in @yield('title') only will be shown if it’s never extended. If it is extended, its child sections will not have programmatic access to the default value. @section ... @show, on the other hand, is both defining a default and doing so in a way that its default contents will be available to its children, through @parent.
Once you have a parent layout like this, you can extend it in a new template file like in Example 4-9.
<!-- resources/views/dashboard.blade.php -->@extends('layouts.master') @section('title', 'Dashboard') @section('content') Welcome to your application dashboard! @endsection @section('footerScripts') @parent<scriptsrc="dashboard.js"></script>@endsection
You may have noticed that Example 4-8 uses @section ... @show, but Example 4-9 uses @section ... @endsection. What’s the difference?
Use @show when you’re defining the place for a section, in the parent template. Use @endsection when you’re defining the content for a template in a child template.
This child view will actually allow us to cover a few new concepts in Blade inheritance.
First, with @extends('layouts.master'), we define that this view should not be rendered on its own, but that it instead extends another view. That means its role is to define the content of various sections, but not to stand alone. It’s almost more like a series of buckets of content, rather than an HTML page. This line also defines that the view it’s extending lives at resources/views/layouts/master.blade.php.
Each file should only extend one other file, and the @extends call should be the first line of the file.
Second, with @section('title', 'Dashboard'), we provide our content for the first section, title. Since the content is so short, instead of using @section and @endsection we’re just using a shortcut. This allows us to pass the content in as the second parameter of @section and then move on. If it’s a bit disconcerting to see @section without @endsection, you could just use the normal syntax.
Third, with @section('content') and on, we use the normal syntax to define the contents of the content section. We’ll just throw a little greeting in for now. Note, however, that when you’re using @section in a child view, you end it with @endsection (or its alias @stop), instead of @show, which is reserved for defining sections in parent views.
Fourth, with @section('footerScripts') and on, we use the normal syntax to define the contents of the footerScripts section.
But remember, we actually defined that content (or, at least, its “default”) already in the master layout. So this time, we have two options: we can either overwrite the content from the parent view, or we can add to it.
You can see that we have the option to include the content from the parent by using the @parent directive within the section. If we didn’t, the content of this section would entirely overwrite anything defined in the parent for this section.
Now that we’ve established the basics of inheritance, there are a few more tricks we can perform.
What if we’re in a view and want to pull in another view? Maybe we have a call-to-action “Sign up” button that we want to re-use around the site. And maybe we want to customize its button text every time we use it. Take a look at Example 4-10.
<!-- resources/views/home.blade.php --><divclass="content"data-page-name="{{ $pageName }}"><p>Here's why you should sign up for our app:<strong>It's Great.</strong></p>@include('sign-up-button', ['text' => 'See just how great it is'])</div><!-- resources/views/sign-up-button.blade.php --><aclass="button button--callout"data-page-name="{{ $pageName }}"><iclass="exclamation-icon"></i>{{ $text }}</a>
@include pulls in the partial and, optionally, passes data into it. Note that not only can you explicitly pass data to an include via the second parameter of @include, but you can also reference any variables within the included file that are available to the including view ($pageName, in this example). Once again, you can do whatever you want, but I would recommend you consider always explicitly passing every variable that you intend to use, just for clarity.
You also use the @includeIf, includeWhen and includeFirst directives.
{{--Includeaviewifitexists--}}@includeIf('sidebars.admin',['some'=>'data']){{--Includeaviewifapassedvariableistruth-y--}}@includeWhen($user->isAdmin(),'sidebars.admin',['some'=>'data']){{--Includethefirstviewthatexistsfromagivenarrayofviews--}}@includeFirst(['customs.header','header'],['some'=>'data'])
You can probably imagine some circumstances in which you’d need to loop over an array or collection and @include a partial for each item. There’s a directive for that: @each.
Let’s say we have a sidebar composed of modules, and we want to include multiple modules, each with a different title. Take a look at Example 4-12.
<!-- resources/views/sidebar.blade.php --><divclass="sidebar">@each('partials.module', $modules, 'module', 'partials.empty-module')</div><!-- resources/views/partials/module.blade.php --><divclass="sidebar-module"><h1>{{ $module->title }}</h1></div><!-- resources/views/partials/empty-module.blade.php --><divclass="sidebar-module">No modules :(</div>
Consider that @each syntax. The first parameter is the name of the view partial. The second is the array or collection to iterate over. The third is the variable name that each item (in this case, each element in the $modules array) will be passed to the view as. And the optional fourth parameter is the view to show if the array or collection is empty (or, optionally, you can pass a string in here that will be used as your template).
One common pattern that can be difficult to manage using basic Blade includes is when each view in a Blade include hierarchy needs to add something to a certain section—almost like adding an entry onto an array.
The most common situation for this is when certain pages (and sometimes, more broadly, certain sections of a website) have specific unique CSS and JavaScript files they need to load. Imagine you have a site-wide “global” CSS file, a “jobs section” CSS file, and an “apply for a job” page CSS file.
Blade’s “stacks” are built for exactly this situation. In your parent template, you’ll define a “stack”, which is just a placeholder; then in each child template you can “push” entries onto that stack with @push/@endpush, which just add them to the bottom of the stack in the final render. You can also use @prepend/@endprepend to add them to the top of the stack.
<!--resources/views/layouts/app.blade.php--><html><head><!--thehead--></head><body><!--therestofthepage..--><scriptsrc="/css/global.css"></script><!--theplaceholderwherestackcontentwillbeplaced-->@stack('scripts')</body></html><!--resources/views/jobs.blade.php-->@extends('layouts.app')@push('scripts')<!--pushsomethingtothebottomofthestack--><scriptsrc="/css/jobs.css"></script>@endpush<!--resources/views/jobs/apply.blade.php-->@extends('jobs')@prepend('scripts')<!--pushsomethingtothetopofthestack--><scriptsrc="/css/jobs--apply.css"></script>@endprepend
These would generate this:
<html><head><!-- the head --></head><body><!-- the rest of the page.. --><scriptsrc="/css/global.css"></script><!-- the placeholder where stack content will be placed --><scriptsrc="/css/jobs--apply.css"></script><scriptsrc="/css/jobs.css"></script></body></html>
Laravel offers another pattern for including content between views, which was introduced in 5.4: components and slots. Components make the most sense in contexts when you find yourself using view partials and passing large chunks of content into the partial as variables. Take a look at Example 4-14 for an example.
<!-- resources/views/partials/modal.blade.php --><divclass="modal"><div>{{ $content }}</div><divclass="close button etc">...</div></div><!-- in another template -->@include('partials.modal', [ 'body' => '<p>The password you have provided is not valid. Here are the rules for valid passwords: [...]</p><p><ahref="#">...</a></p>' ])
This is too much for this variable, and it’s the perfect fit for a component.
Components with slots are view partials that are explicitly designed to have big chunks (“slots”) that are meant to get content from the including template. Take a look at Example 4-15 to see how to refactor Example 4-14 with components and slots.
<!-- resources/views/partials/modal.blade.php --><divclass="modal"><div>{{ $slot }}</div><divclass="close button etc">...</div></div><!-- in another template -->@component('partials.modal')<p>The password you have provided is not valid. Here are the rulesfor valid passwords: [...]</p><p><ahref="#">...</a></p>@endcomponent
As you can see in Example 4-15, the @component directive allows us to pull our HTML out of a cramped variable string and back into the template space. The $slot variable in our component template receives whatever content is passed between the @component and @endcomponent directives.
The method we used in Example 4-15 is called the “default” slot; whatever you pass in between @component and @endcomponent is passed to the $slot variable. But you can also have more than just the default slot. Let’s imagine a modal with a title, like in Example 4-16.
<!-- resources/views/partials/modal.blade.php --><divclass="modal"><divclass="modal-header">{{ $title }}</div><div>{{ $slot }}</div><divclass="close button etc">...</div></div>
You can use the @slot directive in your @component calls to pass content to slots other than the default, as you can see in Example 4-17.
@component('partials.modal')
    @slot('title')
        Password validation failure
    @endslot

    <p>The password you have provided is not valid. Here are the rules for valid passwords: [...]</p>

    <p><a href="#">...</a></p>
@endcomponent
And if you have other variables in your view that don’t make sense as a slot, you can still pass an array of content as the second parameter to @component, just like you can with @include. Take a look at Example 4-18.
@component('partials.modal', ['class' => 'danger'])
    <!-- ... -->
@endcomponentThere’s a clever trick you can use to make your components even easier to call: aliasing. Simple call Blade::component() on the Blade facade—the most common location is the boot() method of the AppServiceProvider—and pass it first the location of the component and second the name of your desired directive:
// AppServiceProvider@bootBlade::component('partials.modal','modal')
<!-- in a template -->
@modal
    Modal content here
@endmodalThis is our first time working with a facade in a namespaced class. We’ll cover them in more depth later, but just know that if you use facades in namespaced classes, which is most classes in recent versions of Laravel, you might find errors showing that the facade cannot be found. This is because facades are just normal classes with normal namespaces, but Laravel does a bit of trickery to make them available at the root namespace.
So, in Example 4-19, we’d need to import the Illuminate\Support\Facades\Blade facade at the top of the file.
As we covered in Chapter 3, it’s simple to pass data to our views from the route definition (see Example 4-20).
Route::get('passing-data-to-views',function(){returnview('dashboard')->with('key','value');});
There are times, however, when you will find yourself passing the same data over and over to multiple views. Or, you might find yourself using a header partial or something similar that requires some data; will you now have to pass that data in from every route definition that might ever load that header partial?
Thankfully, there’s a simpler way. The solution is called a view composer, and it allows you to define that any time a particular view loads, it should have certain data passed to it—without the route definition having to pass that data in explicitly.
Let’s say you have a sidebar on every page, which is defined in a partial named partials.sidebar (resources/views/partials/sidebar.blade.php) and then included on every page. This sidebar shows a list of the last seven posts that were published on your site. If it’s on every page, every route definition would normally have to grab that list and pass it in, like in Example 4-21.
Route::get('home',function(){returnview('home')->with('posts',Post::recent());});Route::get('about',function(){returnview('about')->with('posts',Post::recent());});
That could get annoying quickly. Instead, we’re going to use view composers to “share” that variable with a prescribed set of views. We can do this a few ways, so let’s start simple and move up.
First, the simplest option: just globally “share” a variable with every view in your application like in Example 4-22.
// Some service providerpublicfunctionboot(){...view()->share('recentPosts',Post::recent());}
If you want to use view()->share(), the best place would be the boot() method of a service provider so that the binding runs on every page load. You can create a custom ViewComposerServiceProvider (see Chapter 11 for more about service providers), but for now just put it in App\Providers\AppServiceProvider in the boot() method.
Using view()->share() makes the variable accessible to every view in the entire application, however, so it might be overkill.
The next option is to use a closure-based view composer to share variables with a single view, like in Example 4-23.
view()->composer('partials.sidebar',function($view){$view->with('recentPosts',Post::recent());});
As you can see, we’ve defined the name of the view we want it shared with in the first parameter (partials.sidebar) and then passed a closure to the second parameter; in the closure, we’ve used $view->with() to share a variable, but now only with a specific view.
Anywhere a view composer is binding to a particular view (like in Example 4-23, which binds to partials.sidebar), you can pass an array of view names instead to bind to multiple views.
You can also use an asterisk in the view path, as in partials.*, or tasks.*.
view()->composer(['partials.header','partials.footer'],function(){$view->with('recentPosts',Post::recent());});view()->composer('partials.*',function(){$view->with('recentPosts',Post::recent());});
Finally, the most flexible but also most complex option is to create a dedicated class for your view composer.
First, let’s create the view composer class. There’s no formally defined place for view composers to live, but the docs recommend App\Http\ViewComposers. So, let’s create App\Http\ViewComposers\RecentPostsComposer like in Example 4-24.
<?phpnamespaceApp\Http\ViewComposers;useApp\Post;useIlluminate\Contracts\View\View;classRecentPostsComposer{publicfunctioncompose(View$view){$view->with('recentPosts',Post::recent());}}
As you can see, when this composer is called, it runs the compose() method, in which we bind the posts variable to the result of running the Post model’s recent() method.
Like the other methods of sharing variables, this view composer needs to have a binding somewhere. Again, you’d likely create a custom ViewComposerServiceProvider, but for now, as seen in Example 4-25, we’ll just put it in the boot() method of App\Providers\AppServiceProvider.
publicfunctionboot(){view()->composer('partials.sidebar',\App\Http\ViewComposers\RecentPostsComposer::class);}
Note that this binding is the same as a closure-based view composer, but instead of passing a closure, we’re passing the class name of our view composer. Now, every time Blade renders the partials.sidebar view, it’ll automatically run our provider and pass the view a recentPosts variable set to the results of the recent() method on our Post model.
There are three primary types of data we’re most likely to inject into a view: collections of data to iterate over, single objects that we’re displaying on the page, and services that generate data or views.
With a service, the pattern will most likely look like Example 4-26, where we inject an instance of our analytics service into the route definition by typehinting it in the route’s method signature, and then pass it into the view.
Route::get('backend/sales',function(AnalyticsService$analytics){returnview('backend.sales-graphs')->with('analytics',$analytics);});
Just as with view composers, Blade’s service injection offers a convenient shortcut to reduce duplication in your route definitions. Normally, the content of a view using our analytics service might look like Example 4-27.
<divclass="finances-display">{{$analytics->getBalance()}}/{{$analytics->getBudget()}}</div>
Blade service injection makes it easy to inject an instance of a class from the container directly from the view, like in Example 4-28.
@inject('analytics','App\Services\Analytics')<divclass="finances-display">{{$analytics->getBalance()}}/{{$analytics->getBudget()}}</div>
As you can see, this @inject directive has actually made an $analytics variable available, which we’re using later in our view.
The first parameter of @inject is the name of the variable you’re injecting, and the second parameter is the class or interface that you want to inject an instance of. This is resolved just like when you type hint a dependency in a constructor elsewhere in Laravel; if you’re unfamiliar with how that works, check out Chapter 11 to learn more.
Just like view composers, Blade service injection makes it easy to make certain data or functionality available to every instance of a view, without having to inject it via the route definition every time.
All of the built-in syntax of Blade that we’ve covered so far—@if, @unless, and so on—are called directives. Each Blade directive is a mapping between a pattern (e.g., @if ($condition)) and a PHP output (e.g., <?php if ($condition): ?>).
Directives aren’t just for the core; you can actually create your own. You might think directives are good for making little shortcuts to bigger pieces of code—for example, using @button('buttonName') and having it expand to a larger set of button HTML. This isn’t a terrible idea, but for simple code expansion like this you might be better off including a view partial.
I’ve found custom directives to be the most useful when they simplify some form of repeated logic. Say we’re tired of having to wrap our code with @if (auth()->guest()) (to check if a user is logged in or not) and we want a custom @ifGuest directive. As with view composers, it might be worth having a custom service provider to register these, but for now let’s just put it in the boot() method of App\Providers\AppServiceProvider. Take a look at Example 4-29 to see what this binding will look like.
publicfunctionboot(){Blade::directive('ifGuest',function(){return"<?php if (auth()->guest()): ?>";});}
We’ve now registered a custom directive, @ifGuest, which will be replaced with the PHP code <?php if (auth()->guest()): ?>.
This might feel strange. You’re writing a string that will be returned and then executed as PHP. But what this means is that you can now take the complex, or ugly, or unclear, or repetitive aspects of your PHP templating code and hide them behind clear, simple, and expressive syntax.
You might be tempted to do some logic to make your custom directive faster by performing an operation in the binding and then embedding the result within the returned string:
Blade::directive('ifGuest',function(){// Antipattern! Do not copy.$ifGuest=auth()->guest();return"<?php if ({$ifGuest}): ?>";});
The problem with this idea is that it assumes this directive will be re-created on every page load. However, Blade caches aggressively, so you’re going to find yourself in a bad spot if you try this.
What if you want to accept parameters in your custom logic? Check out Example 4-30.
// BindingBlade::directive('newlinesToBr',function($expression){return"<?php echo nl2br({$expression}); ?>";});// In use<p>@newlinesToBr($message->body)</p>
The $expression parameter received by the closure represents whatever’s within the parentheses. As you can see, we then generate a valid PHP code snippet and return it.
Before Laravel 5.3, the $expression parameter also included the parentheses themselves. So, in Example 4-30, $expression (which is $message->body in Laravel 5.3 and later) would have instead been ($message->body), and we would’ve had to write <?php echo nl2br{$expression}; ?>.
If you find yourself constantly writing the same conditional logic over and over, you should consider a Blade directive.
So, let’s imagine we’re building an application that supports multitenancy, which means users might be visiting the site from www.myapp.com, client1.myapp.com, client2.myapp.com, or elsewhere.
Suppose we have written a class to encapsulate some of our multitenancy logic and named it Context. This class will capture information and logic about the context of the current visit, such as who the authenticated user is and whether the user is visiting the public website or a client subdomain.
We’ll probably frequently resolve that Context class in our views and perform conditionals on it, like in Example 4-31. The app('context') is a shortcut to get an instance of a class from the container, which we’ll learn more about in Chapter 11.
@if(app('context')->isPublic())©CopyrightMyAppLLC@else©Copyright{{app('context')->client->name}}@endif
What if we could simplify @if (app('context')->isPublic()) to just @ifPublic? Let’s do it. Check out Example 4-32.
// BindingBlade::directive('ifPublic',function(){return"<?php if (app('context')->isPublic()): ?>";});// In use@ifPublic©CopyrightMyAppLLC@else©Copyright{{app('context')->client->name}}@endif
Since this resolves to a simple if statement, we can still rely on the native @else and @endif conditionals. But if we wanted, we could also create a custom @elseIfClient directive, or a separate @ifClient directive, or really whatever else we want.
While custom Blade directives are powerful, the most common use for them are if statements. So there’s a simpler way to create custom “if” directives: Blade::if. Let’s take a look at refactoring Example 4-32 using the Blade::if method:
// BindingBlade::if('ifPublic',function(){return(app('context'))->isPublic();});
You’ll use the directives exactly the same, but as you can see, defining them is just a bit simpler. Instead of having to manually type out PHP braces, you can just write a closure that returns a boolean.
The most common method of testing views is through application testing, meaning that you’re actually calling the route that displays the views and ensuring the views have certain content (see Example 4-34). You can also click buttons or submit forms and ensure that you are redirected to a certain page, or that you see a certain error. (You’ll learn more about testing in Chapter 12.)
// EventsTest.phppublicfunctiontest_list_page_shows_all_events(){$event1=factory(Event::class)->create();$event2=factory(Event::class)->create();$this->get('events')->assertSee($event1->title)->assertSee($event2->title);}
You can also test that a certain view has been passed a particular set of data, which, if it accomplishes your testing goals, is less fragile than checking for certain text on the page. Example 4-35 demonstrates this approach.
// EventsTest.phppublicfunctiontest_list_page_shows_all_events(){$event1=factory(Event::class)->create();$event2=factory(Event::class)->create();$response=$this->get('events');$response->assertViewHas('events',Event::all());$response->assertViewHasAll(['events'=>Event::all(),'title'=>'Events Page']);$response->assertViewMissing('dogs');}
In projects running versions of Laravel prior to 5.4 get and assertSee should be replaced by visit and see.
In 5.3, we gained the ability to pass a closure to $assertViewHas(), meaning we can customize how we want to check more complex data structures. Example 4-36 illustrates how we might use this.
// EventsTest.phppublicfunctiontest_list_page_shows_all_events(){$event1=factory(Event::class)->create();$response=$this->get("events/{$event->id}");$response->assertViewHas('event',function($event)use($event1){return$event->id===$event1->id;});}
Blade is Laravel’s templating engine. Its primary focus is a clear, concise, and expressive syntax with powerful inheritance and extensibility. Its “safe echo” brackets are {{ and }}, its unprotected echo brackets are {!! and !!}, and it has a series of custom tags called directives that all begin with @ (@if and @unless, for example).
You can define a parent template and leave “holes” in it for content using @yield and @section/@show. You can then teach its child views to extend it using @extends('parent.view.name'), and define their sections using @section/@endsection. You use @parent to reference the content of the block’s parent.
View composers make it easy to define that, every time a particular view or subview loads, it should have certain information available to it. And service injection allows the view itself to request data straight from the application container.
Laravel provides a suite of tools for interacting with your application’s databases, but the most notable is Eloquent, Laravel’s ActiveRecord ORM (object-relational mapper).
Eloquent is one of Laravel’s most popular and influential features. It’s a great example of how Laravel is different from the majority of PHP frameworks; in a world of DataMapper ORMs that are powerful but complex, Eloquent stands out for its simplicity. There’s one class per table, which is responsible for retrieving, representing, and persisting data in that table.
Whether or not you choose to use Eloquent, however, you’ll still get a ton of benefit from the other database tools Laravel provides. So, before we dig into Eloquent, we’ll start by covering the basics of Laravel’s database functionality: migrations, seeders, and the query builder.
Then we’ll cover Eloquent: defining your models; inserting, updating, and deleting; customizing your responses with accessors, mutators, and attribute casting; and finally relationships. There’s a lot going on here, and it’s easy to get overwhelmed, but just take it one step at a time and we’ll make it through.
Before we get into how to use Laravel’s database tools, let’s pause for a second and go over how to configure your database credentials and connections.
The configuration for database access lives in config/database.php and .env. Like many other configuration areas in Laravel, you can define multiple “connections” and then decide which the code will use by default.
By default, there’s one connection for each of the drivers, as you can see in Example 5-1.
'connections'=>['sqlite'=>['driver'=>'sqlite','database'=>env('DB_DATABASE',database_path('database.sqlite')),'prefix'=>'',],'mysql'=>['driver'=>'mysql','host'=>env('DB_HOST','127.0.0.1'),'port'=>env('DB_PORT','3306'),'database'=>env('DB_DATABASE','forge'),'username'=>env('DB_USERNAME','forge'),'password'=>env('DB_PASSWORD',''),'unix_socket'=>env('DB_SOCKET',''),'charset'=>'utf8','collation'=>'utf8_unicode_ci','prefix'=>'','strict'=>false,'engine'=>null,],'pgsql'=>['driver'=>'pgsql','host'=>env('DB_HOST','127.0.0.1'),'port'=>env('DB_PORT','5432'),'database'=>env('DB_DATABASE','forge'),'username'=>env('DB_USERNAME','forge'),'password'=>env('DB_PASSWORD',''),'charset'=>'utf8','prefix'=>'','schema'=>'public','sslmode'=>'prefer',],'sqlsrv'=>['driver'=>'sqlsrv','host'=>env('DB_HOST','localhost'),'port'=>env('DB_PORT','1433'),'database'=>env('DB_DATABASE','forge'),'username'=>env('DB_USERNAME','forge'),'password'=>env('DB_PASSWORD',''),'charset'=>'utf8','prefix'=>'',],]
You could create new named connections, and still be able to set the drivers (MySQL, Postgres, etc.) in those new named connections. So, while there’s one connection per driver by default, that’s not a constraint.
Nothing is stopping you from deleting or modifying these named connections or creating your own. You could have five different connections, all with the mysql driver, if you want.
Each connection allows you to define the properties necessary for connecting to and customizing each connection type.
There are a few reasons for the idea of multiple drivers. To start with, the “connections” section as it comes out of the box is a simple template that makes it easy to start apps that use any of the supported database connection types. In many apps, you can pick the database connection you’ll be using, fill out its information, and even delete the others if you’d like. I usually just keep them all there, in case I might eventually use them.
But there are also some cases where you might need multiple connections within the same application. For example, you might use different database connections for two different types of data, or you might read from one and write to another. Support for multiple connections makes this possible.
The config/database.php configuration section has quite a few other configuration settings. You can configure Redis access, customize the table name used for migrations, determine the default connection, and toggle whether non-Eloquent calls return stdClass or array instances.
With any service in Laravel that allows multiple “connections”—sessions can be backed by the database or file storage, the cache can use Redis or Memcached, databases can use MySQL or PostgreSQL—you can define multiple connections and also choose that a particular connection will be the “default,” meaning it will be used any time you don’t explicitly ask for a particular connection. Here’s how you ask for a specific connection, if you want to:
$users=DB::connection('secondary')->select('select * from users');
Modern frameworks like Laravel make it easy to define your database structure with code-driven migrations. Every new table, column, index, and key can be defined in code, and any new environment can be brought from bare database to your app’s perfect schema in seconds.
A migration is a single file that defines two things: the modifications desired when running this migration up and, optionally, the modifications desired when running this migration down.
Example 5-2 shows what the default “create users table” migration that comes with Laravel looks like.
<?phpuseIlluminate\Database\Schema\Blueprint;useIlluminate\Database\Migrations\Migration;classCreateUsersTableextendsMigration{/*** Run the migrations.** @return void*/publicfunctionup(){Schema::create('users',function(Blueprint$table){$table->increments('id');$table->string('name');$table->string('email')->unique();$table->timestamp('email_verified_at')->nullable();$table->string('password');$table->rememberToken();$table->timestamps();});}/*** Reverse the migrations.** @return void*/publicfunctiondown(){Schema::dropIfExists('users');}}
The email_verified_at column is only present in apps built in Laravel 5.7 and later.
As you can see, we have an up() method and a down() method. up() tells the migration to create a new table named users with a few fields, and down() tells it to drop the users table.
As you will learn more about in Chapter 8, Laravel provides a series of command-line tools you can use to interact with your app and generate boilerplate files. One of these commands allows you to create a migration file. You can run it using php artisan make:migration, and it has a single parameter, which is the name of the migration. For example, to create the table we just covered, you would run php artisan make:migration create_users_table.
There are two flags you can optionally pass to this command. --create=table_name prefills the migration with code designed to create a table named table_name, and --table=table_name just prefills the migration for modifications to an existing table. Here are a few examples:
phpartisanmake:migrationcreate_users_tablephpartisanmake:migrationadd_votes_to_users_table--table=usersphpartisanmake:migrationcreate_users_table--create=users
We already saw in the default create_users_table migration that our migrations depend on the Schema facade and its methods. Everything we can do in these migrations will rely on the methods of Schema.
To create a new table in a migration, use the create() method—the first parameter is the table name, and the second is a closure that defines its columns:
Schema::create('users',function(Blueprint$table){// Create columns here});
To create new columns in a table, whether in a create table call or a modify table call, use the instance of Blueprint that’s passed into your closure:
Schema::create('users',function(Blueprint$table){$table->string('name');});
Let’s look at the various methods available on Blueprint instances for creating columns. I’ll describe how they work in MySQL, but if you’re using another database, Laravel will just use the closest equivalent.
The following are the simple field Blueprint methods:
integer(colName), tinyInteger(colName), smallInteger(colName), mediumInteger(colName), bigInteger(colName)Adds an INTEGER type column, or one of its many variations
string(colName, OPTIONAL length)Adds a VARCHAR type column
binary(colName)Adds a BLOB type column
boolean(colName)Adds a BOOLEAN type column (a TINYINT(1) in MySQL)
char(colName, length)Adds a CHAR column
datetime(colName)Adds a DATETIME column
decimal(colName, precision, scale)Adds a DECIMAL column, with precision and scale—e.g., decimal('amount', 5, 2) specifies a precision of 5 and a scale of 2
double(colName, total digits, digits after decimal)Adds a DOUBLE column—e.g., double('tolerance', 12, 8) specifies 12 digits long, with 8 of those digits to the right of the decimal place, as in 7204.05691739
enum(colName, [choiceOne, choiceTwo])Adds an ENUM column, with provided choices
float(colName, precision, scale)Adds a FLOAT column (same as double in MySQL)
json(colName) and jsonb(colName)Adds a JSON or JSONB column (or a TEXT column in Laravel 5.1)
text(colName), mediumText(colName), longText(colName)Adds a TEXT column (or its various sizes)
time(colName)Adds a TIME column
timestamp(colName)Adds a TIMESTAMP column
uuid(colName)Adds a UUID column (CHAR(36) in MySQL)
And these are the special (joined) Blueprint methods:
increments(colName) and bigIncrements(colName)Add an unsigned incrementing INTEGER or BIG INTEGER primary key ID
timestamps() and nullableTimestamps()Adds created_at and updated_at timestamp columns
rememberToken()Adds a remember_token column (VARCHAR(100)) for user “remember me” tokens
softDeletes()Adds a deleted_at timestamp for use with soft deletes
morphs(colName)For a provided colName, adds an integer colName_id and a string colName_type (e.g., morphs('tag') adds integer tag_id and string tag_type); for use in polymorphic relationships
Most of the properties of a field definition—its length, for example—are set as the second parameter of the field creation method we looked at in the previous section. But there are a few other properties that we’ll set by chaining more method calls after the creation of the column. For example, this email field is nullable and will be placed (in MySQL) right after the last_name field:
Schema::table('users',function(Blueprint$table){$table->string('email')->nullable()->after('last_name');});
The following methods are used to set additional properties of a field:
nullable()Allows NULL values to be inserted into this column
default('default content')Specifies the default content for this column if no value is provided
unsigned()Marks integer columns as unsigned (not negative or positive, but just an integer)
first() (MySQL only)Places the column first in the column order
after(colName) (MySQL only)Places the column after another column in the column order
unique()Adds a UNIQUE index
primary()Adds a primary key index
index()Adds a basic index
Note that unique(), primary(), and index() can also be used outside of the fluent column building context, which we’ll cover later.
If you want to drop a table, there’s a dropIfExists method on Schema that takes one parameter, the table name:
Schema::dropIfExists('contacts');
To modify a column, just write the code you would write to create the column as if it were new, and then append a call to the change() method after it.
Before you modify any columns (or drop any columns in SQLite), you’ll need to run composer require doctrine/dbal.
So, if we have a string column named name that has a length of 255 and we want to change its length to 100, this is how we would write it:
Schema::table('users',function(Blueprint$table){$table->string('name',100)->change();});
The same is true if we want to adjust any of its properties that aren’t defined in the method name. To make a field nullable, we do this:
Schema::table('contacts',function(Blueprint$table){$table->string('deleted_at')->nullable()->change();});
Here’s how we rename a column:
Schema::table('contacts',function(Blueprint$table){$table->renameColumn('promoted','is_promoted');});
And this is how we drop a column:
Schema::table('contacts',function(Blueprint$table){$table->dropColumn('votes');});
If you try to drop or modify multiple columns within a single migration closure and you are using SQLite, you’ll run into errors.
In Chapter 12 I’ll recommend that you use SQLite for your testing database, so even if you’re using a more traditional database, you may want to consider this a limitation for testing purposes.
However, you don’t have to create a new migration for each. Instead, just create multiple calls to Schema::table() within the up() method of your migration:
publicfunctionup(){Schema::table('contacts',function(Blueprint$table){$table->dropColumn('is_promoted');});Schema::table('contacts',function(Blueprint$table){$table->dropColumn('alternate_email');});}
We’ve covered how to create, modify, and delete columns. Let’s move on to indexing and relating them.
If you’re not familiar with indexes, your databases can survive if you just never use them, but they’re pretty important for performance optimization and for some data integrity controls with regard to related tables. I’d recommend learning up on them but if you absolutely must, you can skip this section for now.
Check out Example 5-3 for examples of how to add indexes to your column.
// after columns are created...$table->primary('primary_id');// Primary key; unnecessary if used increments()$table->primary(['first_name','last_name']);// Composite keys$table->unique('email');// Unique index$table->unique('email','optional_custom_index_name');// Unique index$table->index('amount');// Basic index$table->index('amount','optional_custom_index_name');// Basic index
Note that the first example, primary(), is not necessary if you’re using the increments() method to create your index; this will automatically add a primary key index for you.
We can remove indexes as shown in Example 5-4.
$table->dropPrimary('contacts_id_primary');$table->dropUnique('contacts_email_unique');$table->dropIndex('optional_custom_index_name');// If you pass an array of column names to dropIndex, it will// guess the index names for you based on the generation rules$table->dropIndex(['email','amount']);
To add a foreign key that defines that a particular column references a column on another table, Laravel’s syntax is simple and clear:
$table->foreign('user_id')->references('id')->on('users');
Here we’re adding a foreign index on the user_id column, showing that it references the id column on the users table. Couldn’t get much simpler.
If we want to specify foreign key constraints, we can do that too, with onDelete() and onUpdate(). For example:
$table->foreign('user_id')->references('id')->on('users')->onDelete('cascade');
To drop a foreign key, we can either delete it by referencing its index name (which is automatically generated by combining the names of the columns and tables being referenced):
$table->dropForeign('contacts_user_id_foreign');
or by passing it an array of the fields that it’s referencing on the local table:
$table->dropForeign(['user_id']);
Once you have your migrations defined, how do you run them? There’s an Artisan command for that:
php artisan migrate
This command runs all “outstanding” migrations (by running the up() method on each). Laravel keeps track of which migrations you have run and which you haven’t. Every time you run this command, it checks whether you’ve run all available migrations, and if you haven’t, it’ll run any that remain.
There are a few options in this namespace that you can work with. First, you can run your migrations and your seeds (which we’ll cover next):
php artisan migrate --seed
You can also run any of the following commands:
migrate:install creates the database table that keeps track of which migrations you have and haven’t run; this is run automatically when you run your migrations, so you can basically ignore it.
migrate:reset rolls back every database migration you’ve run on this instance.
migrate:refresh rolls back every database migration you’ve run on this instance, and then runs every migration available. It’s the same as running migrate:reset and then migrate, one after the other.
migrate:fresh drops all of your tables and runs every migration again. It’s the same as refresh but doesn’t bother with the “down” migrations—it just deletes the tables and then runs the “up” migrations again.
migrate:rollback rolls back just the migrations that ran the last time you ran migrate, or, with the added option --step=1, rolls back the number of migrations you specify.
migrate:status shows a table listing every migration, with a Y or N next to each showing whether or not it has run yet in this environment.
If you’re running migrations on your local machine and your .env file points to a database in a Vagrant box, your migrations will fail. You’ll need to ssh into your Vagrant box and then run the migrations from there. The same is true for seeds and any other Artisan commands that affect or read from the database.
Seeding with Laravel is so simple, it has gained widespread adoption as a part of normal development workflows in a way it hasn’t in previous PHP frameworks. There’s a database/seeds folder that comes with a DatabaseSeeder class, which has a run() method that is called when you call the seeder.
There are two primary ways to run the seeders: along with a migration, or separately.
To run a seeder along with a migration, just add --seed to any migration call:
phpartisanmigrate--seedphpartisanmigrate:refresh--seed
And to run it independently:
phpartisandb:seedphpartisandb:seed--class=VotesTableSeeder
This will call the run() method of the DatabaseSeeder by default, or the seeder class specified by --class.
To create a seeder, use the make:seeder Artisan command:
phpartisanmake:seederContactsTableSeeder
You’ll now see a ContactsTableSeeder class show up in the database/seeds directory. Before we edit it, let’s add it to the DatabaseSeeder class so it will run when we run our seeders:
// database/seeds/DatabaseSeeder.php...publicfunctionrun(){$this->call(ContactsTableSeeder::class);}
Now let’s edit the seeder itself. The simplest thing we can do there is manually insert a record using the DB facade:
<?phpuseIlluminate\Database\Seeder;useIlluminate\Database\Eloquent\Model;classContactsTableSeederextendsSeeder{publicfunctionrun(){DB::table('contacts')->insert(['name'=>'Lupita Smith','email'=>'lupita@gmail.com',]);}}
This will get us a single record, which is a good start. But for truly functional seeds, you’ll likely want to loop over some sort of random generator and run this insert() many times, right? Laravel has a feature for that.
Model factories define one (or more) patterns for creating fake entries for your database tables. By default each factory is named after an Eloquent class, but you can also just name them after the table if you’re not going to work with Eloquent. Here’s the same factory set up both ways:
$factory->define(User::class,function(Faker\Generator$faker){return['name'=>$faker->name,];});$factory->define('users',function(Faker\Generator$faker){return['name'=>$faker->name,];});
Theoretically you can name these factories anything you like, but naming the factory after your Eloquent class is the most idiomatic approach.
Model factories are located in database/factories. Each factory is usually defined in its own class, with a key (name) and a closure defining how to create a new instance of the defined class. The $factory->define() method takes the factory name as the first parameter and a closure that’s run for each generation as the second parameter.
To generate a new factory class, use the Artisan make:factory command; just like with naming the factory keys, it’s also most common to name factory classes after the Eloquent models they’re meant to generate instances of:
phpartisanmake:factoryContactFactory
This will generate a new file within the database/factories directory called ContactFactory.php The simplest factory we could define for a contact might look something like this:
$factory->define(Contact::class,function(Faker\Generator$faker){return['name'=>'Lupita Smith','email'=>'lupita@gmail.com',];});
In Laravel prior to 5.5, all factories should be defined in database/factories/ModelFactory.php. There are no separate classes for each factory until 5.5.
Now we can use the factory() global helper to create an instance of Contact in our seeding and testing:
// Create one$contact=factory(Contact::class)->create();// Create manyfactory(Contact::class,20)->create();
However, if we used that factory to create 20 contacts, all 20 would have the same information. That’s less useful.
We will get even more benefit from model factories when we take advantage of the instance of Faker that’s passed into the closure; Faker makes it easy to randomize the creation of structured fake data. The previous example now turns into this:
$factory->define(Contact::class,function(Faker\Generator$faker){return['name'=>$faker->name,'email'=>$faker->,];});
Now, every time we create a fake contact using this model factory, all of our properties will be randomly generated.
If you want to guarantee that the randomly generated values of any given entry are unique against the other randomly generated values during that PHP process, you can use Faker’s unique() method:
return['email'=>$faker->unique()->];
There are two primary contexts in which we’ll use model factories: testing (which we’ll cover in Chapter 12) and seeding, which we’ll cover here. Let’s write a seeder using a model factory; take a look at Example 5-7.
factory(Post::class)->create(['title'=>'My greatest post ever']);// Pro-level factory; but don't get overwhelmed!factory(User::class,20)->create()->each(function($u)use($post){$post->comments()->save(factory(Comment::class)->make(['user_id'=>$u->id]));});
To create an object, we use the factory() global helper, and pass it the name of the factory—which, as we just saw, is the name of the Eloquent class we’re generating an instance of. That returns the factory, and then we can run one of two methods on it: make() or create().
Both methods generate an instance of this specified model, using the definition in the factory file. The difference is that make() creates the instance but doesn’t (yet) save it to the database, whereas create() saves it to the database instantly. You can see both in use in the two examples in Example 5-7.
The second example will make more sense once we cover relationships in Eloquent later in this chapter.
If you pass an array to either make() or create(), you can override specific keys from the factory, like we did in Example 5-7 to set the user_id on the comment and to manually set the title of our post.
If you pass a number as the second parameter to the factory() helper, you can specify that you’re creating more than one instance. Instead of returning a single instance, it’ll return a collection of instances. This means you can treat the result like an array, you can associate each of its instances with another entity, or you can use other entity methods on each instance—like we used each() in Example 5-7 to add a comment from each newly created user.
Now that we’ve covered the most common uses for and arrangements of model factories, let’s dive into some of the more complicate ways we can use them.
Sometimes you need to create a related item along with the item you’re creating. You can use a closure on that property to create a related item and pull its ID:
$factory->define(Contact::class,function(Faker\Generator$faker){return['name'=>'Lupita Smith','email'=>'lupita@gmail.com','company_id'=>function(){returnfactory(App\Company::class)->create()->id;}];});
Each closure is passed a single parameter, which contains the array form of the generated item up until that point, which can be used in other ways:
$factory->define(Contact::class,function(Faker\Generator$faker){return['name'=>'Lupita Smith','email'=>'lupita@gmail.com','company_id'=>function(){returnfactory(App\Company::class)->create()->id;},'company_size'=>function($contact){// Uses the "company_id" property generated abovereturnApp\Company::find($contact['company_id'])->size;}];});
Let’s go back to ContactFactory.php (from Example 5-5 and Example 5-6) for a second. We have a base Contact factory defined:
$factory->define(Contact::class,function(Faker\Generator$faker){return['name'=>$faker->name,'email'=>$faker->,];});
But sometimes you need more than one factory for a class of object. What if we need to be able to add some contacts who are Very Important People (VIPs)? We can use the state() method to define a second factory state for this, as seen in Example 5-8. Your first parameter to state() is still the name of the entity you’re generating; the second is the name of your state; and the third is an array of any attributes you want to specifically set for this state.
$factory->define(Contact::class,function(Faker\Generator$faker){return['name'=>$faker->name,'email'=>$faker->,];});$factory->state(Contact::class,'vip',['vip'=>true,]);
If the modified attributes require more than a simple static value, you can pass a closure instead of an array as the second parameter, and then return an array of the attributes you want to modify, like in Example 5-9.
$factory->state(Contact::class,'vip',function(Faker\Generator$faker){return['vip'=>true,'company'=>$faker->company,];});
Now, let’s make an instance of a specific state:
$vip=factory(Contact::class,'vip')->create();$vips=factory(Contact::class,'vip',3)->create();
In projects running versions of Laravel prior to 5.3, factory states were called factory types, and you’ll want to use $factory->defineAs() instead of $factory->state(). Learn more in the 5.2 docs: https://laravel.com/docs/5.2/testing#model-factories
Whew. That was a lot. Don’t worry if that was tough to follow—the last bit was definitely higher level stuff. Let’s get back down to the basics and talk about the core of Laravel’s database tooling: the query builder.
Now that you’re connected and you’ve migrated and seeded your tables, let’s get started with how to use the database tools. At the core of every piece of Laravel’s database functionality is the query builder, a fluent interface for interacting with several different types of databases with a single clear API.
Laravel’s database architecture can connect to MySQL, Postgres, SQLite, and SQL Server through a single interface, with just the change of a few configuration settings.
If you’ve ever used a PHP framework, you’ve likely used a tool that allows you to run “raw” SQL queries with basic escaping for security. The query builder is that, with a lot of convenience layers and helpers on top, so let’s start with some simple calls.
Before we get into building complex queries with fluent method chaining, let’s take a look at a few sample query builder commands. The DB facade is used both for query builder chaining and for simpler raw queries, as illustrated in Example 5-10.
// basic statementDB::statement('drop table users');// raw select, and parameter bindingDB::select('select * from contacts where validated = ?',[true]);// select using the fluent builder$users=DB::table('users')->get();// joins and other complex callsDB::table('users')->join('contacts',function($join){$join->on('users.id','=','contacts.user_id')->where('contacts.type','donor');})->get();
As you saw in Example 5-10, it’s possible to make any raw call to the database using the DB facade and the statement() method: DB::statement('SQL statement here').
But there are also specific methods for various common actions: select(), insert(), update(), and delete(). These are still raw calls, but there are differences. First, using update() and delete() will return the number of rows affected, whereas statement() won’t; second, with these methods it’s clearer to future developers exactly what sort of statement you’re making.
The simplest of the specific DB methods is select(). You can run it without any additional parameters:
$users=DB::select('select * from users');
This will return a collection of stdClass objects.
Laravel’s database architecture allows for the use of PDO parameter binding, which protects your queries from potential SQL attacks. Passing a parameter to a statement is as simple as replacing the value in your statement with a ?, then adding the value to the second parameter of your call:
$usersOfType=DB::select('select * from users where type = ?',[$type]);
You can also name those parameters for clarity:
$usersOfType=DB::select('select * from users where type = :type',['type'=>$userType]);
From here, the raw commands all look pretty much the same. Raw inserts look like this:
DB::insert('insert into contacts (name, email) values (?, ?)',['sally','sally@me.com']);
Updates look like this:
$countUpdated=DB::update('update contacts set status = ? where id = ?',['donor',$id]);
And deletes look like this:
$countDeleted=DB::delete('delete from contacts where archived = ?',[true]);
Up until now, we haven’t actually used the query builder, per se. We’ve just used simple method calls on the DB facade. Let’s actually build some queries.
The query builder makes it possible to chain methods together to, you guessed it, build a query. At the end of your chain you’ll use some method—likely get()—to trigger the actual execution of the query you’ve just built.
Let’s take a look at a quick example:
$usersOfType=DB::table('users')->where('type',$type)->get();
Here, we built our query—users table, $type type—and then we executed the query and got our result.
Let’s take a look at what methods the query builder allows you to chain. The methods can be split up into what I’ll call constraining methods, modifying methods, conditional methods, and ending/returning methods.
These methods take the query as it is and constrain it to return a smaller subset of possible data:
select()Allows you to choose which columns you’re selecting:
$emails=DB::table('contacts')->select('email','email2 as second_email')->get();// Or$emails=DB::table('contacts')->select('email')->addSelect('email2 as second_email')->get();
where()Allows you to limit the scope of what’s being returned using WHERE. By default, the signature of the where() method is that it takes three parameters—the column, the comparison operator, and the value:
$newContacts=DB::table('contact')->where('created_at','>',now()->subDay())->get();
However, if your comparison is =, which is the most common comparison, you can drop the second operator: $vipContacts = DB::table('contacts')->where('vip',true)->get();.
If you want to combine where() statements, you can either chain them after each other, or pass an array of arrays:
$newVips=DB::table('contacts')->where('vip',true)->where('created_at','>',now()->subDay());// Or$newVips=DB::table('contacts')->where([['vip',true],['created_at','>',now()->subDay()],]);
orWhere()Creates simple OR WHERE statements:
$priorityContacts=DB::table('contacts')->where('vip',true)->orWhere('created_at','>',now()->subDay())->get();
To create a more complex OR WHERE statement with multiple conditions, pass orWhere() a closure:
$contacts=DB::table('contacts')->where('vip',true)->orWhere(function($query){$query->where('created_at','>',now()->subDay())->where('trial',false);})->get();
If you are using orWhere() calls in conjunction with multiple where() calls, you need to be very careful to ensure the query is doing what you think it is. This isn’t because of any fault with Laravel, but because a query like the following might not do what you expect:
$canEdit=DB::table('users')->where('admin',true)->orWhere('plan','premium')->where('is_plan_owner',true)->get();
SELECT*FROMusersWHEREadmin=1ORplan='premium'ANDis_plan_owner=1;
If you want to write SQL that says “if this OR (this and this),” which is clearly the intention in the previous example, you’ll want to pass a closure into the orWhere() call:
$canEdit=DB::table('users')->where('admin',true)->orWhere(function($query){$query->where('plan','premium')->where('is_plan_owner',true);})->get();
SELECT*FROMusersWHEREadmin=1OR(plan='premium'ANDis_plan_owner=1);
whereBetween(colName, [low, high])Allows you to scope a query to return only rows where a column is between two values (inclusive of the two values):
$mediumDrinks=DB::table('drinks')->whereBetween('size',[6,12])->get();
The same works for whereNotBetween(), but it will select the inverse.
whereIn(colName, [1, 2, 3])Allows you to scope a query to return only rows where a column value is in an explicitly provided list of options:
$closeBy=DB::table('contacts')->whereIn('state',['FL','GA','AL'])->get();
sThe same works for whereNotIn(), but it will select the inverse.
whereNull(colName) and whereNotNull(colName)Allow you to select only rows where a given column is NULL or is NOT NULL, respectively.
whereRaw()Allows you to pass in a raw, unescaped string to be added after the WHERE statement: $goofs = DB::table('contacts')->whereRaw('id = 12345')->get().
Any SQL queries passed to whereRaw() will not be escaped. Use this method carefully and infrequently; this is the prime opportunity for SQL injection attacks in your app.
whereExists()Allows you to select only rows that, when passed into a provided subquery, return at least one row. Imagine you only want to get those users who have left at least one comment:
$commenters=DB::table('users')->whereExists(function($query){$query->select('id')->from('comments')->whereRaw('comments.user_id = users.id');})->get();
distinct()Selects only rows where the selected data is unique when compared to the other rows in the returned data. Usually this is paired with select(), because if you use a primary key, there will be no duplicated rows: $lastNames = DB::table('contacts')->select('last_name')->distinct()->get().
These methods change the way the query’s results will be output, rather than just limiting its results:
orderBy(colName, direction)Orders the results. The second parameter may be either asc (the default, ascending order) or desc (descending order):
$contacts=DB::table('contacts')->orderBy('last_name','asc')->get();
groupBy() and having() or havingRaw()Groups your results by a column. Optionally, having() and havingRaw() allow you to filter your results based on properties of the groups. For example, you could look for only cities with at least 30 people in them:
$populousCities=DB::table('contacts')->groupBy('city')->havingRaw('count(contact_id) > 30')->get();
skip() and take()Most often used for pagination, these allow you to define how many rows to return and how many to skip before starting the return—like a page number and a page size in a pagination system:
// returns rows 31-40$page4=DB::table('contacts')->skip(30)->take(10)->get();
latest(colName) and oldest(colName)Sort by the passed column (or created_at if no column name is passed) in descending (latest()) or ascending (oldest()) order.
inRandomOrder()Sorts the result randomly.
These methods allow you to conditionally apply their “contents” (a closure you pass to them) based on the boolean state of a value you pass in.
when() and unless()Given a truthy first parameter, apply the query modification contained in the closure; given a falsy first parameter, do nothing. Note that that first parameter could be a boolean (e.g. $ignoreDrafts, set to true or false), an optional value which defaults to null ($status, pulled from user input and defaulting to null), or a closure that returns either; what matters is that it evaluates truthy or falsy.
$status=request('status');// Defaults to null if not set$posts=DB::table('posts')->when($status,function($query)use($status){return$query->where('status',$status);})->get();// Or:$posts=DB::table('posts')->when($ignoreDrafts,function($query){return$query->where('draft',false);})->get();
You can also pass a third parameter, another closure, which will only be applied if the first parameter is falsy.
unless() is the exact inverse; if the first parameter is falsy, it will run the second closure.
when() and unless() are only available in Laravel 5.2 and later.
These methods stop the query chain and trigger the execution of the SQL query. Without one of these at the end of the query chain, your return will always just be an instance of the query builder; chain one of these on to a query builder and you’ll actually get a result.
get()Gets all results for the built query:
$contacts=DB::table('contacts')->get();$vipContacts=DB::table('contacts')->where('vip',true)->get();
first() and firstOrFail()Get only the first result—like get(), but with a LIMIT 1 added:
$newestContact=DB::table('contacts')->orderBy('created_at','desc')->first();
first() fails silently if there are no results, whereas firstOrFail() will throw an exception.
If you pass an array of column names to either method, they’ll return the data for just those columns instead of all columns.
find(id) and findOrFail(id)Like first(), but you pass in an ID value that corresponds to the primary key to look up. find() fails silently if a row with that ID doesn’t exist, while findOrFail() will throw an exception:
$contactFive=DB::table('contacts')->find(5);
value()Plucks just the value from a single field from the first row. Like first(), but if you only want a single column:
$newestContactEmail=DB::table('contacts')->orderBy('created_at','desc')->value('email');
count()Returns an integer count of all of the matching results:
$countVips=DB::table('contacts')->where('vip',true)->count();
min() and max()Return the minimum or maximum value of a particular column:
$highestCost=DB::table('orders')->max('amount');
sum() and avg()Return the sum or average of all of the values in a particular column:
$averageCost=DB::table('orders')->where('status','completed')->avg('amount');
You’ve already seen a few custom methods for raw statements—for example, select() has a selectRaw() counterpart that allows you to pass in a string for the query builder to place after the WHERE statement.
You can also, however, pass in the result of a DB::raw() call to almost any method in the query builder to achieve the same result:
$contacts=DB::table('contacts')->select(DB::raw('*, (score * 100) AS integer_score'))->get();
Joins can sometimes be a pain to define, and there’s only so much a framework can do to make them simpler, but the query builder does its best. Let’s look at a sample:
$users=DB::table('users')->join('contacts','users.id','=','contacts.user_id')->select('users.*','contacts.name','contacts.status')->get();
The join() method creates an inner join. You can also chain together multiple joins one after another, or use leftJoin() to get a left join.
Finally, you can create more complex joins by passing a closure into the join() method:
DB::table('users')->join('contacts',function($join){$join->on('users.id','=','contacts.user_id')->orOn('users.id','=','contacts.proxy_user_id');})->get();
You can union two queries together by creating them first and then using the union() or unionAll() method to union them:
$first=DB::table('contacts')->whereNull('first_name');$contacts=DB::table('contacts')->whereNull('last_name')->union($first)->get();
The insert() method is pretty simple. Pass it an array to insert a single row or an array of arrays to insert multiple rows, and use insertGetId() instead of insert() to get the autoincrementing primary key ID back as a return:
$id=DB::table('contacts')->insertGetId(['name'=>'Abe Thomas','email'=>'athomas1987@gmail.com',]);DB::table('contacts')->insert([['name'=>'Tamika Johnson','email'=>'tamikaj@gmail.com'],['name'=>'Jim Patterson','email'=>'james.patterson@hotmail.com'],]);
Updates are also simple. Create your update query and, instead of get() or first(), just use update() and pass it an array of parameters:
DB::table('contacts')->where('points','>',100)->update(['status'=>'vip']);
You can also quickly increment and decrement columns using the increment() and decrement() methods. The first parameter of each is the column name, and the second is (optionally) the number to increment/decrement by:
DB::table('contacts')->increment('tokens',5);DB::table('contacts')->decrement('tokens');
Deletes are even simpler. Build your query and then end it with delete():
DB::table('users')->where('last_login','<',now()->subYear())->delete();
You can also truncate the table, which both deletes every row and also resets the autoincrementing ID:
DB::table('contacts')->truncate();
If you have JSON columns, you can update or select rows based on aspects of the JSON structure by using the arrow syntax to traverse children:
// Select all records where the "isAdmin" property of the "options"// JSON column is set to trueDB::table('users')->where('options->isAdmin',true)->get();// Update all records, setting the "verified" property// of the "options" JSON column to trueDB::table('users')->update(['options->isVerified',true]);
This is a new feature since Laravel 5.3.
If you’re not familiar with database transactions, they’re a tool that allows you to wrap up a series of database queries to be performed in a batch, which you can choose to roll back, undoing the entire series of queries. Transactions are often used to ensure that all or none, but not some, of a series of related queries are performed—if one fails, the ORM will roll back the entire series of queries.
With the Laravel query builder’s transaction feature, if any exceptions are thrown at any point within the transaction closure, all the queries in the transaction will be rolled back. If the transaction closure finishes successfully, all the queries will be committed and not rolled back.
Let’s take a look at a sample transaction in Example 5-11.
DB::transaction(function()use($userId,$numVotes){// Possibly failing DB queryDB::table('users')->where('id',$userId)->update(['votes'=>$numVotes]);// Caching query that we don't want to run if the above query failsDB::table('votes')->where('user_id',$userId)->delete();});
In this example, we can assume we had some previous process that summarized the number of votes from the votes table for a given user. We want to cache that number on the users table and then wipe those votes from the votes table. But, of course, we don’t want to wipe the votes until the update to the users table has run successfully. And we don’t want to keep the updated number of votes on the users table if the votes table deletion fails.
If anything goes wrong with either query, the other won’t be applied. That’s the magic of database transactions.
Note that you can also manually begin and end transactions—and this applies both for query builder queries and for Eloquent queries. Start with DB::beginTransaction(), end with DB::commit(), and abort with DB::rollBack().
DB::beginTransaction();// Take database actionsif($badThingsHappened{DB::rollBack();}// Take other database actionsDB::commit();
Now that we’ve covered the query builder, let’s talk about Eloquent, Laravel’s flagship database tool that’s built on the query builder.
Eloquent is an ActiveRecord ORM, which means it’s a database abstraction layer that provides a single interface to interact with multiple database types. “ActiveRecord” means that a single Eloquent class is responsible for not only providing the ability to interact with the table as a whole (e.g., User::all() gets all users), but also representing an individual table row (e.g., $sharon = new User). Additionally, each instance is capable of managing its own persistence; you can call $sharon->save() or $sharon->delete().
Eloquent has a primary focus on simplicity, and like the rest of the framework, it relies on “convention over configuration” to allow you to build powerful models with minimal code.
For example, you can perform all of the operations in Example 5-13 with the model defined in Example 5-12.
<?phpuseIlluminate\Database\Eloquent\Model;classContactextendsModel{}
// In a controllerpublicfunctionsave(Request$request){// Create and save a new contact from user input$contact=newContact();$contact->first_name=$request->input('first_name');$contact->last_name=$request->input('last_name');$conatct->=$request->input('email');$contact->save();returnredirect('contacts');}publicfunctionshow($contactId){// Return a JSON representation of a Contact based on a URL segment;// if the contact doesn't exist, throw an exceptionreturnContact::findOrFail($contactId);}publicfunctionvips(){// Unnecessarily complex example, but still possible with basic Eloquent// class; adds a "formalName" property to every VIP entryreturnContact::where('vip',true)->get()->map(function($contact){$contact->formalName="The exalted{$contact->first_name}of the{$contact->last_name}s";return$contact;});}
How? Convention. Eloquent assumes the table name (Contact becomes contacts), and with that you have a fully functional Eloquent model.
Let’s cover how we work with Eloquent models.
First, let’s create a model. There’s an Artisan command for that:
php artisan make:model Contact
This is what we’ll get, in app/Contact.php:
<?phpnamespaceApp;useIlluminate\Database\Eloquent\Model;classContactextendsModel{//}
If you want to automatically create a migration when you create your model, pass the -m or --migration flag:
phpartisanmake:modelContact--migration
The default behavior for table names is that Laravel “snake cases” and pluralizes your class name, so SecondaryContact would access a table named secondary_contacts. If you’d like to customize the name, set the $table property explicitly on the model:
protected$table='contacts_secondary';
Laravel assumes, by default, that each table will have an autoincrementing integer primary key, and it will be named id.
If you want to change the name of your primary key, change the $primaryKey property:
protected$primaryKey='contact_id';
And if you want to set it to be nonincrementing, use:
public$incrementing=false;
Eloquent expects every table to have created_at and updated_at timestamp columns. If your table won’t have them, disable the $timestamps functionality:
public$timestamps=false;
You can customize the format Eloquent uses to store your timestamps to the database by setting the $dateFormat class property to a custom string. The string will be parsed using PHP’s date() syntax, so the following example will store the date as seconds since the Unix epoch:
protected$dateFormat='U';
Most of the time you pull data from your database with Eloquent, you’ll use static calls on your Eloquent model.
Let’s start by getting everything:
$allContacts=Contact::all();
That was easy. Let’s filter it a bit:
$vipContacts=Contact::where('vip',true)->get();
We can see that the Eloquent facade gives us the ability to chain constraints, and from there the constraints get very familiar:
$newestContacts=Contact::orderBy('created_at','desc')->take(10)->get();
It turns out that once you move past the initial facade name, you’re just working with Laravel’s query builder. You can do a lot more—we’ll cover that soon—but everything you can do with the query builder on the DB facade you can do on your Eloquent objects.
Like we covered earlier in the chapter, you can use first() to return only the first record from a query, or find() to pull just the record with the provided ID. For either, if you append “orFail” to the method name, it will throw an exception if there are no matching results. This makes findOrFail() a common tool in looking up an entity by a URL segment (or throwing an exception if a matching entity doesn’t exist) like you can see in Example 5-14.
// ContactControllerpublicfunctionshow($contactId){returnview('contacts.show')->with('contact',Contact::findOrFail($contactId));}
Any single return (first(), firstOrFail(), find(), or findOrFail()) will return an instance of the Eloquent class. So, Contact::first() will return an instance of the class Contact with the data from row 1 filling it out.
As you can see in Example 5-14, we don’t need to catch Eloquent’s model not found exception (Illuminate\Database\Eloquent\ModelNotFoundException) in our controllers; Laravel’s routing system will catch them and throw a 404 for us.
You could, of course, catch that particular exception and handle it, if you’d like.
get() works with Eloquent just like it does in normal query builder calls—build a query and call get() at the end to get the results:
$vipContacts=Contact::where('vip',true)->get();
However, there is an Eloquent-only method, all(), which you’ll often see people use when they want to get an unfiltered list of all data in the table:
$contacts=Contact::all();
Any time you can use all(), you could use get(). Contact::get() has the same response as Contact::all(). However, the moment you start modifying your query—adding a where() filter, for example—all() will no longer work, but get() will continue working.
So, even though all() is very common, I’d recommend using get() for everything, and ignoring the fact that all() even exists.
The other thing that’s different about Eloquent’s get() method (vs. all()) is that, prior to Laravel 5.3, it returned an array of models instead of a collection. In 5.3 and later, they both return collections.
If you’ve ever needed to process a large amount (thousands or more) of records at a time, you may have run into memory or locking issues. Laravel makes it possible to break your requests into smaller pieces (chunks) and process them in batches, keeping the memory load of your large request smaller. Example 5-15 illustrates the use of chunk() to split a query into “chunks” of 100 each.
Contact::chunk(100,function($contacts){foreach($contactsas$contact){// Do something with $contact}});
The aggregates that are available on the query builder are available on Eloquent queries as well. For example:
$countVips=Contact::where('vip',true)->count();$sumVotes=Contact::sum('votes');$averageSkill=User::avg('skill_level');
Inserting and updating values is one of the places where Eloquent starts to diverge from normal query builder syntax.
There are two primary ways to insert a new record using Eloquent.
First, you can create a new instance of your Eloquent class, set your properties manually, and call save() on that instance, like in Example 5-16.
$contact=newContact;$contact->name='Ken Hirata';$contact->='ken@hirata.com';$contact->save();// or$contact=newContact(['name'=>'Ken Hirata','email'=>'ken@hirata.com',]);$contact->save();// or$contact=Contact::make(['name'=>'Ken Hirata','email'=>'ken@hirata.com',]);$contact->save();
Until you save(), this instance of Contact represents the contact fully—except it has never been saved to the database. That means it doesn’t have an id, if the application quits it won’t persist, and it doesn’t have its created_at and updated_at values set.
You can also pass an array to Model::create(), as shown in Example 5-17. Unlike make(), create() saves the instance to the databsae as soon as it’s called.
$contact=Contact::create(['name'=>'Keahi Hale','email'=>'halek481@yahoo.com',]);
Also be aware that in any context where you are passing an array (to new Model(), Model::make(), Model::create(), or Model::update()), every property you set via Model::create() has to be approved for “mass assignment,” which we’ll cover shortly. This is not necessary with the first example in Example 5-16, where you assign each property individually.
Note that if you’re using Model::create(), you don’t need to save() the instance—that’s handled as a part of the model’s create() method.
Updating records looks very similar to inserting. You can get a specific instance, change its properties, and then save, or you can make a single call and pass an array of updated properties. Example 5-18 illustrates the first approach.
$contact=Contact::find(1);$contact->='natalie@parkfamily.com';$contact->save();
Since this record already exists, it will already have a created_at timestamp and an id, which will stay the same, but the updated_at field will be changed to the current date and time. Example 5-19 illustrates the second approach.
Contact::where('created_at','<',now()->subYear())->update(['longevity'=>'ancient']);// or$contact=Contact::find(1);$contact->update(['longevity'=>'ancient']);
This method expects an array where each key is the column name and each value is the column value.
We’ve looked at a few examples of how to pass arrays of values into Eloquent class methods. However, none of these will actually work until you define which fields are “fillable” on the model.
The goal of this is to protect you from (possibly malicious) user input accidentally setting new values on fields you don’t want changed. Consider the common scenario in Example 5-20.
// ContactControllerpublicfunctionupdate(Contact$contact,Request$request){$contact->update($request->all());}
If you’re not familiar with the Illuminate Request object, Example 5-20 will take every piece of user input and pass it to the update() method. That all() method includes things like URL parameters and form inputs, so a malicious user could easily add some things in there, like id and owner_id, that you likely don’t want updated.
Thankfully, that won’t actually work until you define your model’s fillable fields. You can either whitelist the fillable fields, or blacklist the “guarded” fields to determine which fields can or cannot be edited via “mass assignment”—i.e., by passing an array of values into either create() or update(). Note that nonfillable properties can still be changed by direct assignment (e.g., $contact->password = 'abc';). Example 5-21 shows both approaches.
classContact{protected$fillable=['name','email'];// orprotected$guarded=['id','created_at','updated_at','owner_id'];}
In Example 5-20, we needed Eloquent’s mass assignment guard because we were using the all() method on the request object to pass the entirety of the user input into our Eloquent object.
Eloquent’s mass assignment protection is a great tool here, but there’s also a helpful trick to keep you from accepting just any input from the user.
The Request class has an only() method that allows you to pluck only a few keys from the user input. So now you can do this:
Contact::create($request->only('name','email'));
Sometimes you want to to tell your application, “Get me an instance with these properties, or if it doesn’t exist, create it.” This is where the firstOr*() methods come in.
The firstOrCreate() and firstOrNew() methods take an array of keys and values as their first parameter:
$contact=Contact::firstOrCreate(['email'=>'luis.ramos@myacme.com']);
They’ll both look for and retrieve the first record matching those parameters, and if there are no matching records, they’ll create an instance with those properties; firstOrCreate() will persist that instance to the database and then return it, while firstOrNew() will return it without saving it.
If you pass an array of values as the second parameter, those values will be added to the created entry (if it’s created), but won’t be used to look up whether the entry exists.
Deleting with Eloquent is very similar to updating with Eloquent, but with (optional) soft deletes, you can archive your deleted items for later inspection or even recovery.
The simplest way to delete a model record is to call the delete() method on the instance itself:
$contact=Contact::find(5);$contact->delete();
However, if you only have the ID, there’s no reason to look up an instance just to delete it; you can pass an ID or an array of IDs to the model’s destroy() method to delete them directly:
Contact::destroy(1);// orContact::destroy([1,5,7]);
Finally, you can delete all of the results of a query:
Contact::where('updated_at','<',now()->subYear())->delete();
Soft deletes mark database rows as deleted without actually deleting them from the database. This gives you the ability to inspect them later; to have records that show more than “no information, deleted” when displaying historic information; and to allow your users (or admins) to restore some or all data.
The hard part about handcoding an application with soft deletes is that every query you ever write will need to exclude the soft-deleted data. Thankfully, if you use Eloquent’s soft deletes, every query you ever make will be scoped to ignore soft deletes by default, unless you explicitly ask to bring them back.
Eloquent’s soft delete functionality requires a deleted_at column to be added to the table. Once you enable soft deletes on that Eloquent model, every query you ever write (unless you explicitly include soft-deleted records) will be scoped to ignore soft-deleted rows.
You enable soft deletes by doing three things: adding the deleted_at column in a migration, importing the SoftDeletes trait in the model, and adding the deleted_at column to your $dates property. There’s a softDeletes() method available on the schema builder to add the deleted_at column to a table, as you can see in Example 5-22. And Example 5-23 shows an Eloquent model with soft deletes enabled.
Schema::table('contacts',function(Blueprint$table){$table->softDeletes();});
<?phpuseIlluminate\Database\Eloquent\Model;useIlluminate\Database\Eloquent\SoftDeletes;classContactextendsModel{useSoftDeletes;// use the traitprotected$dates=['deleted_at'];// mark this column as a date}
Once you make these changes, every delete() and destroy() call will now set the deleted_at column on your row to be the current date and time instead of deleting that row. And all future queries will exclude that row as a result.
So, how do we get soft-deleted items?
First, you can add soft-deleted items to a query:
$allHistoricContacts=Contact::withTrashed()->get();
Next, you can use the trashed() method to see if a particular instance has been soft deleted:
if($contact->trashed()){// do something}
Finally, you can get only soft-deleted items:
$deletedContacts=Contact::onlyTrashed()->get();
If you want to restore a soft-deleted item, you can run restore() on an instance or a query:
$contact->restore();// orContact::onlyTrashed()->where('vip',true)->restore();
You can delete a soft-deleted entity by calling forceDelete() on an entity or query:
$contact->forceDelete();// orContact::onlyTrashed()->forceDelete();
We’ve covered “filtered” queries, meaning any query where we’re not just returning every result for a table. But every time we’ve written them so far in this chapter, it’s been a manual process using the query builder.
Local and global scopes in Eloquent allow you to define prebuilt “scopes” (filters) that you can use either every time a model is queried (“global”) or every time you query it with a particular method chain (“local”).
Local scopes are the simplest to understand. Let’s take this example:
$activeVips=Contact::where('vip',true)->where('trial',false)->get();
First of all, if we write this combination of query methods over and over, it will get tedious. But additionally, the knowledge of how to define someone being an “active VIP” is now spread around our application. We want to centralize that knowledge. What if we could just write this?
$activeVips=Contact::activeVips()->get();
We can—it’s called a local scope. And it’s easy to define on the Contact class:
classContact{publicfunctionscopeActiveVips($query){return$query->where('vip',true)->where('trial',false);}
To define a local scope, we add a method to the Eloquent class that begins with “scope” and then contains the title-cased version of the scope name. This method is passed a query builder and needs to return a query builder, but of course you can modify the query before returning—that’s the whole point.
You can also define scopes that accept parameters:
classContact{publicfunctionscopeStatus($query,$status){return$query->where('status',$status);}
And you use them in the same way, just passing the parameter to the scope:
$friends=Contact::status('friend')->get();
Remember how we talked about soft deletes only working if you scope every query on the model to ignore the soft-deleted items? That’s a global scope. And we can define our own global scopes, which will be applied on every query made from a given model.
There are two ways to define a global scope: using a closure or using an entire class. In each, you’ll register the defined scope in the model’s boot() method. Let’s start with the closure method, illustrated in Example 5-24.
...classContactextendsModel{protectedstaticfunctionboot(){parent::boot();static::addGlobalScope('active',function(Builder$builder){$builder->where('active',true);});}
That’s it. We just added a global scope, named active, and every query on this model will be scoped to only rows with active set to true.
Next, let’s try the longer way, as shown in Example 5-25. Create a class that implements Illuminate\Database\Eloquent\Scope, which means it will have an apply() method that takes an instance of a query builder and an instance of the model.
<?phpnamespaceApp\Scopes;useIlluminate\Database\Eloquent\Scope;useIlluminate\Database\Eloquent\Model;useIlluminate\Database\Eloquent\Builder;classActiveScopeimplementsScope{publicfunctionapply(Builder$builder,Model$model){return$builder->where('active',true);}}
To apply this scope to a model, once again override the parent’s boot() method and call addGlobalScope() on the class using static, as shown in Example 5-26.
<?phpuseApp\Scopes\ActiveScope;useIlluminate\Database\Eloquent\Model;classContactextendsModel{protectedstaticfunctionboot(){parent::boot();static::addGlobalScope(newActiveScope);}}
You may have noticed that several of these examples have used the class Contact, with no namespace. This is abnormal, and I’ve only done this to save space in the book. Normally even your top-level models would live at something like App\Contact.
There are three ways to remove a global scope, and all three use the withoutGlobalScope() or withoutGlobalScopes() methods. If you’re removing a closure-based scope, the first parameter of that scope’s addGlobalScope() registration will be the key you used to enable it:
$allContacts=Contact::withoutGlobalScope('active')->get();
If you’re removing a single class-based global scope, you can pass the class name to withoutGlobalScope() or withoutGlobalScopes():
Contact::withoutGlobalScope(ActiveScope::class)->get();Contact::withoutGlobalScopes([ActiveScope::class,VipScope::class])->get();
Or, you can just disable all global scopes for a query:
Contact::withoutGlobalScopes()->get();
Now that we’ve covered how to get records into and out of the database with Eloquent, let’s talk about decorating and manipulating the individual attributes on your Eloquent models.
Accessors, mutators, and attribute casting all allow you to customize the way individual attributes of Eloquent instances are input or output. Without using any of these, each attribute of your Eloquent instance is treated like a string, and you can’t have any attributes on your models that don’t exist on the database. But we can change that.
Accessors allow you to define custom attributes on your Eloquent models for when you are reading data from the model instance. This may be because you want to change how a particular column is output, or because you want to create a custom attribute that doesn’t exist in the database table at all.
You define an accessor by writing a method on your model with the following structure: get{PascalCasedPropertyName}Attribute. So, if your property name is first_name, the accessor method would be named getFirstNameAttribute.
Let’s try it out. First, we’ll decorate a preexisting column (Example 5-27).
// Model definition:classContactextendsModel{publicfunctiongetNameAttribute($value){return$value?:'(No name provided)';}}// Accessor usage:$name=$contact->name;
But we can also use accessors to define attributes that never existed in the database, as seen in Example 5-28.
// Model definition:classContactextendsModel{publicfunctiongetFullNameAttribute(){return$this->first_name.' '.$this->last_name;}}// Accessor usage:$fullName=$contact->full_name;
Mutators work the same way as accessors, except they’re for determining how to process setting the data instead of getting it. Just like with accessors, you can use it to modify the process of writing data to existing columns, or to allow for setting columns that don’t exist in the database.
You define a mutator by writing a method on your model with the following structure: set{PascalCasedPropertyName}Attribute. So, if your property name is first_name, the mutator method would be named setFirstNameAttribute.
Let’s try it out. First, we’ll add a constraint to updating a preexisting column (Example 5-29).
// Defining the mutatorclassOrderextendsModel{publicfunctionsetAmountAttribute($value){$this->attributes['amount']=$value>0?$value:0;}}// Using the mutator$order->amount='15';
This reveals that the way mutators are expected to “set” data on the model is by setting it in $this->attributes with the column name as the key.
Now, let’s add a proxy column for setting, as shown in Example 5-30.
// Defining the mutatorclassOrderextendsModel{publicfunctionsetWorkgroupNameAttribute($workgroupName){$this->attributes['email']="{$workgroupName}@ourcompany.com";}}// Using the mutator$order->workgroup_name='jstott';
As you can probably guess, it’s relatively uncommon to create a mutator for a non-existent column, because it can be confusing to set one property and have it change a different column—but it is possible.
You can probably imagine writing accessors to cast all of your integer-type fields as integers, encode and decode JSON to store in TEXT column, or convert TINYINT 0 and 1 to and from boolean values.
Thankfully, there’s a system for that in Eloquent already. It’s called attribute casting, and it allows you to define that any of your columns should always be treated, both on read and on write, as if they are of a particular data type. The options are listed in Table 5-1.
| Type | Description |
|---|---|
|
Casts with PHP |
|
Casts with PHP |
|
Casts with PHP |
|
Casts with PHP |
|
Parses to/from JSON, as a |
|
Parses to/from JSON, as an array |
|
Parses to/from JSON, as a collection |
|
Parses from database |
|
Parses from database |
Example 5-31 shows how you use attribute casting in your model.
classContact{protected$casts=['vip'=>'boolean','children_names'=>'array','birthday'=>'date',];}
You can choose for particular columns to be mutated as timestamp columns by adding them to the dates array, as seen in Example 5-32.
classContact{protected$dates=['met_at'];}
By default, this array contains created_at and updated_at, so adding entries to dates just adds them to the list.
However, there’s no difference between adding columns to this list and adding them to $this->casts as timestamp, so this is becoming a bit of an unnecessary feature now that attribute casting can cast timestamps (new since Laravel 5.2).
When you make any query call in Eloquent that has the potential to return multiple rows, instead of an array they’ll come packaged in an Eloquent collection, which is a specialized type of collection. Let’s take a look at collections and Eloquent collections, and what makes them better than plain arrays.
Laravel’s Collection objects (Illuminate\Support\Collection) are a little bit like arrays on steroids. The methods they expose on array-like objects are so helpful that, once you’ve been using them for a while, you’ll likely want to pull them into non-Laravel projects—which you can, with the Tightenco/Collect package.
The simplest way to create a collection is to use the collect() helper. Either pass an array in, or use it without arguments to create an empty collection and then push items into it later. Let’s try it:
$collection=collect([1,2,3]);
Now let’s say we want to filter out any even numbers:
$odds=$collection->reject(function($item){return$item%2===0;});
Or what if we want to get a version of the collection where each item is multiplied by 10? We can do that as follows:
$multiplied=$collection->map(function($item){return$item*10;});
We can even get only the evens, multiply them all by 10, and reduce them to a single number by sum:
$sum=$collection->filter(function($item){return$item%2==0;})->map(function($item){return$item*10;})->sum();
As you can see, collections provide a series of methods, which can optionally be chained, to perform functional operations on your arrays. They provide the same functionality as native PHP methods like array_map() and array_reduce(), but you don’t have to memorize PHP’s unpredictable parameter order, and the method chaining syntax is endlessly more readable.
There are more than 60 methods available on the Collection class, including methods like max() and whereIn(), flatten(), and flip(), and there’s not enough space to cover them all here. We’ll cover more in Chapter 17, or you can check out the Laravel docs on Collections to see all of the methods.
Collections can also be used in any context (except typehinting) where you can use arrays; they allow for iteration, so you can pass them to foreach, and they allow for array access, so if they’re keyed you can try $a = $collection['a'].
Each Eloquent collection is a normal collection, but extended for the particular needs of a collection of Eloquent results.
Once again, there’s not enough room here to cover all of the additions, but they’re centered around the unique aspects of interacting with a collection not just of generic objects, but objects meant to represent database rows.
For example, every Eloquent collection has a method called modelKeys() that returns an array of the primary keys of every instance in the collection. find($id) looks for an instance that has the primary key of $id.
One additional feature available here is the ability to define that any given model should return its results wrapped in a specific class of collection. So, if you want to add specific methods to any collection of objects of your Order model—possibly related to summarizing the financial details of your orders—you could create a custom OrderCollection that extends the Illuminate\Database\Eloquent\Collection class, and then register it in your model, as shown in Example 5-33.
...classOrderCollectionextendsCollection{publicfunctionsumBillableAmount(){return$this->reduce(function($carry,$order){return$carry+($order->billable?$order->amount:0);},0);}}...classOrderextendsModel{publicfunctionnewCollection(array$models=[]){returnnewOrderCollection($models);}
Now, any time you get back a collection of Orders (e.g., from Order::all()) it’ll actually be an instance of the OrderCollection class:
$orders=Order::all();$billableAmount=$orders->sumBillableAmount();
Serialization is what happens when you take something complex—an array, or an object—and convert it to a string. In a web-based context, that string is often JSON, but it could take other forms as well.
Serializing complex database records can be, well, complex, and this is one of the places many ORMs fall short. Thankfully, you get two powerful methods for free with Eloquent: toArray() and toJson(). Collections also have toArray() and toJson(), so all of these are valid:
$contactArray=Contact::first()->toArray();$contactJson=Contact::first()->toJson();$contactsArray=Contact::all()->toArray();$contactsJson=Contact::all()->toJson();
You can also cast an Eloquent instance or collection to a string ($string = (string) $contact;), but both models and collections will just run toJson() and return the result.
Laravel’s router eventually converts everything routes return to a string, so there’s a clever trick you can use. If you return the result of an Eloquent call in a controller, it will be automatically cast to a string, and therefore returned as JSON. That means a JSON-returning route can be as simple as either of the ones in Example 5-34.
// routes/web.phpRoute::get('api/contacts',function(){returnContact::all();});Route::get('api/contacts/{id}',function($id){returnContact::findOrFail($id);});
It’s very common to use JSON returns in APIs, and it’s very common to want to hide certain attributes in these contexts, so Eloquent makes it easy to hide any attributes every time you cast to JSON.
You can either blacklist attributes, hiding the ones you list:
classContactextendsModel{public$hidden=['password','remember_token'];
or whitelist attributes, showing only the ones you list:
classContactextendsModel{public$visible=['name','email','status'];
This also works for relationships:
classUserextendsModel{public$hidden=['contacts'];publicfunctioncontacts(){return$this->hasMany(Contact::class);}
By default, the contents of a relationship are not loaded when you get a database record, so it doesn’t matter whether you hide them or not. But, as you’ll learn shortly, it’s possible to get a record with its related items, and in this context, those items will not be included in a serialized copy of that record if you choose to hide that relationship.
In case you’re curious now, you can get a User with all contacts—assuming you’ve set up the relationship correctly—with the following call:
$user=User::with('contacts')->first();
There might be times when you want to make an attribute visible just for a single call. That’s possible, with the Eloquent method makeVisible():
$array=$user->makeVisible('remember_token')->toArray();
If you have created an accessor for a column that doesn’t exist—for example, our full_name column from Example 5-28—add it to the $appends array on the model to add it to the array and JSON output:
classContactextendsModel{protected$appends=['full_name'];publicfunctiongetFullNameAttribute(){return"{$this->first_name}{$this->last_name}";}}
In a relational database model, it’s expected that you will have tables that are related to each other—hence the name. Eloquent provides simple and powerful tools to make the process of relating your database tables easier than ever before.
Many of our examples in this chapter have been centered around a user who has many contacts, a relatively common situation.
In an ORM like Eloquent, you would call this a one-to-many relationship: the one user has many contacts.
If it was a CRM where a contact could be assigned to many users, then this would be a many-to-many relationship: many users can be related to one contact, and each user can be related to many contacts. A user has and belongs to many contacts.
If each contact can have many phone numbers, and a user wanted a database of every phone number for their CRM, you would say the user has many phone numbers through contacts—that is, a user has many contacts, and the contact has many phone numbers, so the contact is sort of an intermediary.
And what if each contact has an address, but you’re only interested in tracking one address? You could have all the address fields on the Contact, but you might also create an Address model—meaning the contact has one address.
Finally, what if you want to be able to star (favorite) contacts, but also events? This would be a polymorphic relationship, where a user has many stars, but some may be contacts and some may be events.
So, let’s dig into how to define and access these relationships.
Let’s start simple: a Contact has one PhoneNumber. This relationship is defined in Example 5-35.
classContactextendsModel{publicfunctionphoneNumber(){return$this->hasOne(PhoneNumber::class);}
As you can tell, the methods defining relationships are on the Eloquent model itself ($this->hasOne()) and take, at least in this instance, the fully qualified class name of the class that you’re relating them to.
How should this be defined in your database? Since we’ve defined that the Contact has one PhoneNumber, Eloquent expects that the table supporting the PhoneNumber class (likely phone_numbers) has a contact_id column on it. If you named it something different (for instance, owner_id), you’ll need to change your definition:
return$this->hasOne(PhoneNumber::class,'owner_id');
Here’s how we access the phone number on a contact:
$contact=Contact::first();$contactPhone=$contact->phoneNumber;
Notice that we define the method in Example 5-35 with phoneNumber(), but we access it with ->phoneNumber. That’s the magic. You could also access it with ->phone_number. This will return a full Eloquent instance of the related PhoneNumber record.
But what if we want to access the Contact from the PhoneNumber? There’s a method for that, too (see Example 5-36).
classPhoneNumberextendsModel{publicfunctioncontact(){return$this->belongsTo(Contact::class);}
Then we access it the same way:
$contact=$phoneNumber->contact;
Each relationship type has its own quirks for how to relate models, but here’s the core of how it works: pass an instance to save(), or an array of instances to saveMany(). You can also pass properties to create() or createMany() and they’ll make new instances for you:
$contact=Contact::first();$phoneNumber=newPhoneNumber;$phoneNumber->number=8008675309;$contact->phoneNumbers()->save($phoneNumber);// or$contact->phoneNumbers()->saveMany([PhoneNumber::find(1),PhoneNumber::find(2),]);// or$contact->phoneNumbers()->create(['number'=>'+13138675309']);// or$contact->phoneNumbers()->createMany([['number'=>'+13138675309'],['number'=>'+15556060842'],]);
The createMany() method is only available in Laravel 5.4 and later.
The one-to-many relationship is by far the most common. Let’s take a look at how to define that our User has many Contacts (Example 5-37).
classUserextendsModel{publicfunctioncontacts(){return$this->hasMany(Contact::class);}
Once again, this expects that the Contact model’s backing table (likely contacts) has a user_id column on it. If it doesn’t, override it by passing the correct column name as the second parameter of hasMany().
We can get a user’s contacts as follows:
$user=User::first();$usersContacts=$user->contacts;
Just like with one to one, we use the name of the relationship method and call it as if it were a property instead of a method. However, this method returns a collection instead of a model instance. And this is a normal Eloquent collection, so you can have all sorts of fun with it:
$donors=$user->contacts->filter(function($contact){return$contact->status=='donor';});$lifetimeValue=$contact->orders->reduce(function($carry,$order){return$carry+$order->amount;},0);
Just like with one to one, we can also define the inverse (Example 5-38).
classContactextendsModel{publicfunctionuser(){return$this->belongsTo(User::class);}
And just like one to one, we can access the User from the Contact:
$userName=$contact->user->name;
Most of the time we attach related items by running save() on the parent and passing in the related item, as in $user->contacts()->save($contact). But if you want to perform the behaviors on the attached (“child”) item, you can use associate() and dissociate() on the method that returns the belongsTo():
$contact=Contact::first();$contact->user()->associate(User::first());$contact->save();// and later$contact->user()->dissociate();$contact->save();
Until now, we’ve taken the method name (e.g., contacts()) and called it as if were a property (e.g., $user->contacts). What happens if we call it as a method? Instead of processing the relationship, it will return a pre-scoped query builder.
So if you have User 1, and you call its contacts() method, you will now have a query builder prescoped to “all contacts that have a field user_id with the value of 1.” You can then build out a functional query from there:
$donors=$user->contacts()->where('status','donor')->get();
You can also choose to select only records that meet particular criteria with regard to their related items using has():
$postsWithComments=Post::has('comments')->get();
You can also adjust the criteria further:
$postsWithManyComments=Post::has('comments','>=',5)->get();
You can nest the criteria:
$usersWithPhoneBooks=User::has('contacts.phoneNumbers')->get();
And finally, you can write custom queries on the related items:
// Gets all contacts with a phone number containing the string "867-5309"$jennyIGotYourNumber=Contact::whereHas('phoneNumbers',function($query){$query->where('number','like','%867-5309%');});
“Has many through” is really a convenience method for pulling in relationships of a relationship. This is the example I gave earlier where a User has many Contacts and each Contact has many PhoneNumbers. What if you want to get a user’s list of contact phone numbers? That’s hasManyThrough.
This structure assumes that your contacts table has a user_id to relate the contacts to the users, and the phone_numbers table has a contact_id to relate it to the contacts. Then, we define the relationship on the User as in Example 5-39.
classUserextendsModel{publicfunctionphoneNumbers(){return$this->hasManyThrough(PhoneNumber::class,Contact::class);}
You’d access this relationship using $user->phone_numbers, and as always you can customize the relationship key on the intermediate model (with the third parameter of hasManyThrough()) and the relationship key on the distant model (with the fourth parameter).
This is where things start to get complex. Let’s take our example of a CRM that allows a User to have many Contacts, and each Contact to be related to multiple users.
First, we define the relationship on the User as in Example 5-40.
classUserextendsModel{publicfunctioncontacts(){return$this->belongsToMany(Contact::class);}}
And since this is many to many, the inverse looks exactly the same (Example 5-41).
classContactextendsModel{publicfunctionusers(){return$this->belongsToMany(User::class);}}
Since a single Contact can’t have a user_id column and a single User can’t have a contact_id column, many-to-many relationships rely on a pivot table that connects the two. The conventional naming of this table is done by placing the two singular table names together, ordered alphabetically, and separating them by an underscore.
So, since we’re linking users and contacts, our pivot table should be named contacts_users (if you’d like to customize the table name, pass it as the second parameter to the belongsToMany() methods). It needs two columns: contact_id and user_id.
Just like with hasMany(), we get access to a collection of the related items, but this time it’s from both sides (Example 5-42).
$user=User::first();$user->contacts->each(function($contact){// do something});$contact=Contact::first();$contact->users->each(function($user){// do something});$donors=$user->contacts()->where('status','donor')->get();
One thing that’s unique about many to many is that it’s our first relationship that has a pivot table. The less data you have on a pivot table, the better, but there are some cases where it’s valuable to store information on your pivot table—for example, you might want to store a created_at field to see when this relationship was created.
In order to store these fields, you have to add them to the relationship definition, like in Example 5-43. You can define specific fields using withPivot() or add created_at and updated_at timestamps using withTimestamps().
publicfunctioncontacts(){return$this->belongsToMany(Contact::class)->withTimestamps()->withPivot('status','preferred_greeting');}
When you get a model instance through a relationship, it will have a pivot property on it, which will represent its place in the pivot table you just pulled it from. So, you can do something like Example 5-44.
$user=User::first();$user->contacts->each(function($contact){echosprintf('Contact associated with this user at: %s',$contact->pivot->created_at);});
If you’d like, you can customize the pivot key to have a different name, using the as() method:
// User modelpublicfunctiongroups(){return$this->belongsToMany(Group::class)->withTimestamps()->as('membership');}
// Using this relationship:User::first()->groups->each(function($group){echosprintf('User joined this group at: %s',$group->membership->created_at);});
Remember, our polymorphic relationship is where we have multiple Eloquent classes corresponding to the same relationship. We’re going to use Stars (like favorites) right now. A user can star both Contacts and Events, and that’s where the name polymorphic comes from: a single interface to objects of multiple types.
So, we’ll need three tables, and three models: Star, Contact, and Event (four of each, technically, because we’ll need users and User, but we’ll get there in a second). The contacts and events tables will just be as they normally are, and the stars table will contain an id field, a starrable_id, and a starrable_type. For each Star, you’ll be defining which “type” (e.g., Contact or Event) and which ID of that type (e.g., 1) it is.
Let’s create our models, as seen in Example 5-46.
classStarextendsModel{publicfunctionstarrable(){return$this->morphTo();}}classContactextendsModel{publicfunctionstars(){return$this->morphMany(Star::class,'starrable');}}classEventextendsModel{publicfunctionstars(){return$this->morphMany(Star::class,'starrable');}}
So, how do we create a Star?
$contact=Contact::first();$contact->stars()->create();
It’s that easy. The Contact is now starred.
In order to find all of the Stars on a given Contact, we call the stars() method like in Example 5-47.
$contact=Contact::first();$contact->stars->each(function($star){// Do stuff});
If we have an instance of Star, we can get its target by calling the method we used to define its morphTo(), which in this context is starrable(). Take a look at Example 5-48.
$stars=Star::all();$stars->each(function($star){var_dump($star->starrable);// An instance of Contact or Event});
Finally, you might be wondering, “What if I care who starred this contact?” That’s a great question; of course you do. It’s as simple as adding user_id to your stars table, and then setting up that a User has many Stars and a Star belongs to one User—a one-to-many relationship (Example 5-49). The stars table becomes almost a pivot table between your User and your Contacts and Events.
classStarextendsModel{publicfunctionstarrable(){return$this->morphsTo;}publicfunctionuser(){return$this->belongsTo(User::class);}}classUserextendsModel{publicfunctionstars(){return$this->hasMany(Star::class);}}
That’s it! You can now run $star->user or $user->stars to find a list of a User’s Stars or to find the starring User from a Star. Also, when you create a new Star, you’ll now want to pass the User:
$user=User::first();$event=Event::first();$event->stars()->create(['user_id'=>$user->id]);
The most complex and least common of the relationship types, many-to-many polymorphic relationships are like polymorphic relationships, except instead of being one to many they’re many to many.
The most common example for this relationship type is the tag, so I’ll keep it safe and use that as our example. Let’s imagine you want to be able to tag Contacts and Events. The uniqueness of many-to-many polymorphism is that it’s many to many: each tag may be applied to multiple items, and each tagged item might have multiple tags. And to add to that, it’s polymorphic: tags can be related to items of several different types. For the database, we’ll start with the normal structure of the polymorphic relationship but also add a pivot table.
This means we’ll need a contacts table, an events table, and a tags table, all shaped like normal with an ID and whatever properties you want, and a new taggables table, which will have a tag_id, a taggable_id, and a taggable_type. Each entry into the taggables table will relate a tag with one of the taggable content types.
Now let’s define this relationship on our models, as seen in Example 5-50.
classContactextendsModel{publicfunctiontags(){return$this->morphToMany(Tag::class,'taggable');}}classEventextendsModel{publicfunctiontags(){return$this->morphToMany(Tag::class,'taggable');}}classTagextendsModel{publicfunctioncontacts(){return$this->morphedByMany(Contact::class,'taggable');}publicfunctionevents(){return$this->morphedByMany(Event::class,'taggable');}}
Here’s how to create your first tag:
$tag=Tag::firstOrCreate(['name'=>'likes-cheese']);$contact=Contact::first();$contact->tags()->attach($tag->id);
We get the results of this relationship like normal, as seen in Example 5-51.
$contact=Contact::first();$contact->tags->each(function($tag){// Do stuff});$tag=Tag::first();$tag->contacts->each(function($contact){// Do stuff});
Remember, any Eloquent models by default will have created_at and updated_at timestamps. Eloquent will set the updated_at timestamp automatically any time you make any changes to a record.
When a related item either belongsTo() or belongsToMany() another item, it might be valuable to mark the other item as updated any time the related item is updated. For example, if a PhoneNumber is updated, maybe the Contact it’s connected to should be marked as having been updated as well.
We can accomplish this by adding the method name for that relationship to a $touches array property on the child class, as in Example 5-52.
classPhoneNumberextendsModel{protected$touches=['contact'];publicfunctioncontact(){return$this->belongsTo(Contact::class);}}
By default, Eloquent loads relationships using “lazy loading.” This means when you first load a model instance, its related models will not be loaded along with it. Rather, they’ll only be loaded once you access them on the model; they’re “lazy” and don’t do any work until called upon.
This can become a problem if you’re iterating over a list of model instances and each has a related item (or items) that you’re working on. The problem with lazy loading is that it can introduce significant database load (often the N+1 problem, if you’re familiar with the term; if not, just ignore this parenthetical remark). For instance, every time the loop in Example 5-53 runs, it executes a new database query to look up the phone numbers for that Contact.
$contacts=Contact::all();foreach($contactsas$contact){foreach($contact->phone_numbersas$phone_number){echo$phone_number->number;}}
If you are loading a model instance and you know you’ll be working with its relationships, you can instead choose to “eager-load” one or many of its sets of related items:
$contacts=Contact::with('phoneNumbers')->get();
Using the with() method with a retrieval gets all of the items related to the pulled item(s), and as you can see in this example, you pass it the name of the method the relationship is defined by.
When we use eager loading, instead of pulling the related items one at a time when they’re requested (selecting one contact’s phone numbers each time a foreach loop runs), we have a single query to pull the initial items (selecting all contacts) and a second query to pull all their related items (selecting all phone numbers owned by the contacts we just pulled).
You can eager-load multiple relationships by passing multiple parameters to the with() call:
$contacts=Contact::with('phoneNumbers','addresses')->get();
And you can nest eager loading to eager-load the relationships of relationships:
$authors=Author::with('posts.comments')->get();
If you want to eager-load a relationship, but not all of the items, you can pass a closure to with() to define exactly which related items to eager-load:
$contacts=Contact::with(['addresses'=>function($query){$query->where('mailable',true);}])->get();
I know it sounds crazy, because we just defined eager loading as sort of the opposite of lazy loading, but sometimes you don’t know you want to perform an eager-load query until after the initial instances have been pulled. In this context, you’re still able to make a single query to look up all of the related items, avoiding N+1. We call this “lazy eager loading”:
$contacts=Contact::all();if($showPhoneNumbers){$contacts->load('phoneNumbers');}
To load a relationship only when it has not already been loaded, use the loadMissing() method, only available since Laravel 5.5:
$contacts=Contact::all();if($showPhoneNumbers){$contacts->loadMissing('phoneNumbers');}
If you want to eager-load relationships but only so you can have access to the count of items in each relationship, you can try withCount():
$authors=Author::withCount('posts')->get();// adds a "posts_count" integer to each Author with a count of that// Author's related posts
Eloquent models fire events out into the void of your application every time certain actions happen, regardless of whether you’re listening. If you’re familiar with pub/sub, it’s this same model (and you can learn more about Laravel’s entire event system in Chapter 16).
Here’s a quick rundown of binding a listener to when a new Contact is created. We’re going to bind it in the boot() method of AppServiceProvider, and let’s imagine we’re notifying a third-party service every time we create a new Contact.
classAppServiceProviderextendsServiceProvider{publicfunctionboot(){$thirdPartyService=newSomeThirdPartyService;Contact::creating(function($contact)use($thirdPartyService){try{$thirdPartyService->addContact($contact);}catch(Exception$e){Log::error('Failed adding contact to ThirdPartyService; cancelled.');returnfalse;// cancels Eloquent create()}});}
We can see a few things in Example 5-54. First, we use Modelname as the method, and pass it a closure. The closure gets access to the model instance that is being operated on. Second, we’re going to need to define this listener in a service provider somewhere. And third, if we return ::eventName()false, the operation will cancel and the save() or update() will be cancelled.
Here are the events that every Eloquent model fires:
retrieved
creating
created
updating
updated
saving
saved
deleting
deleted
restoring
restored
The retrieved event is available in Laravel 5.5 and later.
Most of these should be pretty clear, except possibly restoring and restored, which fire when you’re restoring a soft-deleted row. Also, saving is fired for both creating and updating and saved is fired for both created and updated. Finally, retrieved is fired when an existing model is retrieved from the database.
Laravel’s entire application testing framework makes it easy to test your database—not by writing unit tests against Eloquent, but by just being willing to test your entire application.
Take this scenario. You want to test to ensure that a particular page shows one contact but not another. Some of that logic has to do with the interplay between the URL and the controller and the database, so the best way to test it is an application test. You might be thinking about mocking Eloquent calls and trying to avoid the system hitting the database. Don’t do it. Try Example 5-55 instead.
publicfunctiontest_active_page_shows_active_and_not_inactive_contacts(){$activeContact=factory(Contact::class)->create();$inactiveContact=factory(Contact::class)->states('inactive')->create();$this->get('active-contacts')->assertSee($activeContact->name)->assertDontSee($inactiveContact->name);}
As you can see, model factories and Laravel’s application testing features are great for testing database calls.
Alternatively, you can look for that record directly in the database, as in Example 5-56.
publicfunctiontest_contact_creation_works(){$this->post('contacts',['email'=>'jim@bo.com']);$this->assertDatabaseHas('contacts',['email'=>'jim@bo.com']);}
Eloquent and Laravel’s database framework are tested extensively. You don’t need to test them. You don’t need to mock them. If you really want to avoid hitting the database, you can use a repository and then return unsaved instances of your Eloquent models. But the most important message is, test the way your application uses your database logic.
If you have custom accessors, mutators, scopes, or whatever else, you can also test them directly, as in Example 5-57.
publicfunctiontest_full_name_accessor_works(){$contact=factory(Contact::class)->make(['first_name'=>'Alphonse','last_name'=>'Cumberbund']);$this->assertEquals('Alphonse Cumberbund',$contact->fullName);}publicfunctiontest_vip_scope_filters_out_non_vips(){$vip=factory(Contact::class)->states('vip')->create();$nonVip=factory(Contact::class)->create();$vips=Contact::vips()->get();$this->assertTrue($vips->contains('id',$vip->id));$this->assertFalse($vips->contains('id',$nonVip->id));}
Just avoid writing tests that leave you creating complex “Demeter chains” to assert that a particular fluent stack was called on some database mock. If your testing starts to get overwhelming and complex around the database layer, it’s because you’re allowing preconceived notions to force you into unnecessarily complex systems. Keep it simple.
In projects running versions of Laravel prior to 5.4 assertDatabaseHas should be replaced by seeInDatabase, get should be replaced by visit, assertSee should be replaced by see, and assertDontSee should be replaced by dontSee.
Laravel comes with a suite of powerful database tools, including migrations, seeding, an elegant query builder, and Eloquent, a powerful ActiveRecord ORM. Laravel’s database tools don’t require you to use Eloquent at all—you can access and manipulate the database with a thin layer of convenience without having to write SQL directly. But adding an ORM, whether it’s Eloquent or Doctrine or whatever else, is easy and can work neatly with Laravel’s core database tools.
Eloquent follows the Active Record pattern, which makes it simple to define a class of database-backed objects, including which table they’re stored in, the shape of their columns, accessors and mutators, and much more. Eloquent can handle every sort of normal SQL action and also complex relationships, up to and including polymorphic many-to-many relationships.
Laravel also has a robust system for testing databases, including model factories.
Laravel is primarily a PHP framework, but it also has a series of components focused on generating frontend code. Some of these, like pagination and message bags, are PHP helpers that target the frontend, but Laravel also provides a Webpack-based build system called Mix and some conventions around non-PHP assets.
Since Mix is at the core of the non-PHP frontend components, let’s start there.
Mix is a build tool that provides a simple user interface and a series of conventions on top of Webpack. Mix’s core value proposition is simplifying the most common build and compilation Webpack tasks by means of a cleaner API and a series of naming and application structure conventions.
At its core, Mix is just a tool in your Webpack toolbox. The “Mix file” you’ll use to set your configurations is simply a Webpack configuration file which lives at the root of your project, named webpack.mix.js. However, the configuration you have to set there is a lot simpler than most Webpack configuration is out of the box, and you’ll have to do a lot less work to get most common asset compilation tasks working.
Let’s look at a common example: running Sass to preprocess your CSS styles. In a normal Webpack environment, that might look a little bit like Example 6-1.
varpath=require('path');varMiniCssExtractPlugin=require("mini-css-extract-plugin");module.exports={entry:'./src/sass/app.scss',module:{rules:[{test:/\.s[ac]ss$/,use:[MiniCssExtractPlugin.loader,"css-loader","sass-loader"]}]},plugins:[newMiniCssExtractPlugin({path:path.resolve(__dirname,'./dist'),filename:'app.css'})]}
Now, I’ve seen worse. There aren’t an unimaginable number of configuration properties, and it’s relatively clear what’s going on. But this is the sort of code that you copy from project to project, not code you feel comfortable writing yourself or even modifying to any significant degree. Working like this can get confusing and repetitive.
Let’s try that same task in Mix (Example 6-2).
letmix=require('laravel-mix');mix.sass('resources/sass/app.scss','public/css');
That’s it. And not only is that endlessly simpler; it also covers file watching, browser sync, notification, prescribed folder structures, autoprefixing, url processing, and much more.
Much of Mix’s simplicity comes from the assumed directory structure. Why make the decision fresh in every new application about where the source and compiled assets live? Just stick with Mix’s conventions, and you won’t have to think about it ever again.
Every new Laravel app comes with a resources folder, which is where Mix will expect your frontend assets to live. Your Sass will live in resources/sass, or your Less in resources/less, or your source CSS in resources/css, and your JavaScript will live in resources/js. These will export to public/css and public/js.
In versions of Laravel prior to 5.7, the sass, less, and js directories were nested under the resources/assets directory instead of directly underneath the resources directory.
Since Mix runs on Webpack, you’ll need to set up a few tools before using it:
First, you’ll need Node.js installed. Visit the Node website to learn how to get it running.
Once Node (and NPM with it) is installed once, you will not have to do this again for each project. Now you’re ready to install this project’s dependencies.
Open the project root in your terminal, and run npm install to install the required packages (Laravel ships with a Mix-ready package.json file to direct NPM).
You’re now set up! You can run npm run dev to run Webpack/Mix once, npm run watch to listen for relevant file changes and run in response, or npm run prod to run Mix once with production settings (such as minifying the output). You can also run npm run watch-poll if npm run watch doesn’t work in your environment, or npm run hot for hot module replacement (if that phrase is unfamiliar to you, just ignore it for now).
We’ve already covered that Mix can preprocess your CSS using Sass, Less, and/or PostCSS. It can also concatenate any sort of files, minify them, rename them, and copy them, and it can copy entire directories or individual files.
Mix can also process all flavors of modern JavaScript and provide auto-prefixing, concatenation, and minification specifically as a part of the JavaScript build stack. It makes it easy to set up BrowserSync, Hot Module Replacement, and versioning, and there are plugins available for many other common build scenarios.
The Mix documentation covers all of these options and more, but we’ll cover a few specific use cases in the following sections.
If you’re not familiar with source maps, they work with any sort of preprocessor to teach your browser’s web inspector which files generated the compiled source you’re inspecting.
By default, Mix will not generate source maps for your files. But you can enable them by chaining the sourceMaps() method after your Mix calls, as you can see in Example 6-3.
letmix=require('laravel-mix');mix.js('resources/js/app.js','public/js').sourceMaps();
Once you configure Mix this way, you’ll see the source maps appear as a .{filename}.map file next to each generated file.
Without source maps, if you use your browser’s development tools to inspect a particular CSS rule or JavaScript action, you’ll just see a big mess of compiled code. With source maps, your browser can pinpoint the exact line of the source file, whether it be Sass or JavaScript or whatever else, that generated the rule you’re inspecting.
We’ve already covered Sass and Less, but Mix can also handle Stylus (Example 6-4), and you can chain PostCSS on to any other style calls (Example 6-5).
mix.stylus('resources/stylus/app.styl','public/css');
mix.sass('resources/sass/app.scss','public/css').options({postCss:[require('postcss-css-variables')()]});
If you don’t want to deal with a preprocessor, there’s a command for that—it will grab all of your CSS files, concatenate them, and output them to the public/css directory, just as if they had been run through a preprocessor. There are a few options, which you can see in Example 6-6.
// Combines all files from resources/cssmix.styles('resources/css','public/css/all.css');// Combines files from resources/cssmix.styles(['resources/css/normalize.css','resources/css/app.css'],'public/css/all.css');
The options available for working with normal JavaScript files are very similar to those available for normal CSS files. Take a look at Example 6-7.
letmix=require('laravel-mix');// Combines all files from resources/jsmix.scripts('resources/js','public/js/all.js');// Combines files from resources/jsmix.scripts(['resources/js/normalize.js','resources/js/app.js'],'public/js/all.js');
If you want to process your JavaScript—for example, to compile your ES6 code into plain JavaScript—Mix makes it easy to use Webpack for this purpose (see Example 6-8).
letmix=require('laravel-mix');mix.js('resources/js/app.js','public/js');
These scripts look for the provided filename in resources/js and output to public/js/app.js.
You can use more complicated aspects of Webpack’s feature set by creating a webpack.config.js file in your project root.
To move either a single file or an entire directory, use the copy() method or the copyDirectory() method.
mix.copy('node_modules/packagename/dist/style.css','public/css/packagename.css');mix.copyDirectory('source/images','public/images');
Most of the tips from Steve Souders’ Even Faster Web Sites (O’Reilly) have made their way into our everyday development practices. We move scripts to the footer, reduce the number of HTTP requests, and more, often without even realizing where those ideas originated.
One of Steve’s tips is still very rarely implemented, though, and that is setting a very long cache life on assets (scripts, styles, and images). Doing this means there will be fewer requests to your server to get the latest version of your assets. But it also means that users are extremely likely to have a cached version of your assets, which will make things get outdated, and therefore break, quickly.
The solution to this is versioning. Append a unique hash to each asset’s filename every time you run your build script, and then that unique file will be cached indefinitely—or at least until the next build.
What’s the problem? Well, first you need to get the unique hashes generated and appended to your filenames. But you also will need to update your views on every build to reference the new filenames.
As you can probably guess, Mix handles that for you, and it’s incredibly simple. There are two components: the versioning task in Mix, and the mix() PHP helper. First, you can version your assets by running mix.version() like in Example 6-9.
letmix=require('laravel-mix');mix.sass('resources/sass/app.scss','public/css').version();
The version of the file that’s generated is no different—it’s just named app.css and lives in public/css.
The way versioning is handled in Laravel is a little different than traditional versioning, in that the versioning is happening as a query parameter instead of by modifying file names. It still functions the same way, because browsers read it as a “new” file”, but it handles a few edge cases with caches and load balancers.
Next, use the PHP mix() helper in your views to refer to that file like in Example 6-10.
<linkrel="stylesheet"href="{{ mix("css/app.css") }}">// will output something like:<linkrel="stylesheet"href="/css/app.css?id=5ee7141a759a5fb7377a">
Mix can handle building both Vue (with single-file components) and React components. Mix’s default js() call handles Vue, and you can replace it with a react() call if you want to build React components:
mix.react('resources/js/app.js','public/js');
You can take a look at the default Laravel sample app.js and the components it imports, and see that you don’t have to do anything special to work with Vue components; a simple mix.js() call makes this possible in your app.js:
window.Vue=require('vue');Vue.component('example-component',require('./components/ExampleComponent.vue'));constapp=newVue({el:'#app'});
And if you switch to react(), this is all you’re going to run in your app.js file for your first component:
require('./components/Example');
Both presets also bring in Axios, Lodash, and Popper.js, so you don’t have to spend any time getting your Vue or React ecosystems set up.
When you’re writing single components with Vue or React, you’re likely used to either refreshing the page every time your build tool re-compiles your components, or if you’re using something like Mix, you rely on BrowserSync to reload it for you.
That’s great, but if you’re working with single-page apps (SPAs), that means you’re booted back to the beginning of the app; that refresh wipes any state you had built up as you navigated through the app.
HMR, or Hot Module Replacement (sometimes called Hot Reloading) is the answer. It’s not always easy to set up, but Mix comes with it enabled out of the box. HMR is essentially as if you taught BrowserSync to not re-load the entire file that was re-compiled, but instead to just re-load the bits of code you changed. That means you can get the updated code injected into your browser, but still retain the state you had built up as you got your SPA into just the right spot for testing.
In order to use HMR, you’ll want to run npm run hot instead of npm run watch. And, in order for it to work correctly, all of your <script> references have to be pulling the right version of your JavaScript files. Essentially, Mix is booting up a small Node server at localhost:8080, so if your script tag points to a different version of the script, HMR won’t work.
The easiest way to achieve this is to just use the mix() helper to reference your scripts. This helper will handle prepending either localhost:8080 if in HMR mode or your domain if you’re in a normal development mode. Here’s what it looks like inline:
<body><divid="app"></div><scriptsrc="{{ mix('js/app.js') }}"></script></body>
If you develop your applications on an HTTPS connection—for example, if you run valet secure—all your assets must also be served via an HTTPS connection. This is a little bit trickier, so it’s best to take a look at the HMR docs here: https://github.com/JeffreyWay/laravel-mix/blob/master/docs/hot-module-replacement.md
The most common frontend bundling pattern, which Mix also encourages, ends up generating a single CSS file and a single JavaScript file which encompasses both the app-specific code for your project and also the code for all its dependencies.
However, this means that vendor file updates require the entire file to be rebuilt and re-cached, which might introduce an undesireable load time.
Mix makes it easy to extract all of the JavaScript from your app’s dependencies into a separate vendor.js file. Simply supply a list of the vendor’s library names to the extract() method, chained after your js() call. Take a look at Example 6-11 to see how it looks.
mix.js('resources/js/app.js','public/js').extract(['vue'])
This outputs three files: Your existing app.js, and then two new files: manifest.js, which gives instructions to your browser about how to load the dependencies and app code, and vendor.js, which contains the vendor-specific code.
It’s important to load these files in the correct order in your frontend code. First, manifest.js; then vendor.js; and finally app.js.
<scriptsrc="{{ mix('js/manifest.js') }}"></script><scriptsrc="{{ mix('js/vendor.js') }}"></script><scriptsrc="{{ mix('js/app.js') }}"></script>
If you prefix an environment variable (in your .env file) with MIX_, it will become available in your Mix-compiled files as process.env.ENV_VAR_NAME.
# In your .env fileMIX_BUGSNAG_KEY=lj12389g08bq1234MIX_APP_NAME="Your Best App Now"
// In Mix-compiled files:process.env.MIX_BUGSNAG_KEY// For example, this code:console.log("Welcome to "+process.env.MIX_APP_NAME);// Will compile down to this:console.log("Welcome to "+"Your Best App Now");
You can also access those variables in your Webpack configuration files using Node’s dotenv package:
// webpack.mix.jsletmix=require('laravel-mix');require('dotenv').config();letisProduction=process.env.MIX_ENV==="production";
As a full-stack framework, Laravel has more connection to and opinions about frontend tooling than your average backend framework. Out of the box it provides an entire build system, which we’ve already covered, but it also builds and has components for Vue, and also includes Bootstrap, Axios, Lodash, and much more.
You can get a sense for the frontend tools that come along with each new Laravel install in package.json, webpack.mix.js (or gulpfile.js in older versions of Laravel), and the views, JavaScript files, and CSS files in the resources directory. This default set of components and files is called the Vue preset, and every new Laravel project comes stocked with it.
But what if you’d rather work in React? What if you want Bootstrap but not all that JavaScript? And what if you want to just rip it all out? Enter frontend presets, pre-baked scripts that modify or remove part or all of the Vue- and Bootstrap-loaded default presets. You can use the presets that are provided out of the box or you can pull in third party presets from GitHub.
To use a built-in preset, simply run php artisan present preset_name:
phpartisanpresetreactphpartisanpresetbootstrapphpartisanpresetnone
There’s also a php artisan preset vue which is what each new application has applied on a fresh install.
Frontend presets are only available in Laravel 5.5 and above.
If you’re interested in creating your own preset, or using one created by another community member, that’s also possible with the frontend preset system. There’s a GitHub organization designed to make it easy to find great third-party frontend presets, which you can find at https://github.com/laravel-frontend-presets/.
These packages all make it easy to install them; for most, the steps are as follows:
Install the package. E.g. composer require laravel-frontend-presets/tailwindcss
Install the preset. E.g. php artisan preset tailwindcss
Just like the built-in presets, npm install and npm run dev
If you want to create a preset of your own, the laravel-frontend-presets organization has a skeleton repository you can for to make it easier, which you can find at https://github.com/laravel-frontend-presets/skeleton.
Although they’re technically not a part of the frontend presets, Laravel has a series of routes and views called the “auth scaffold” that are, essentially, frontend presets. If you run php artisan make:auth, you’ll get a login page, a sign up page, a new master template for the “app” view of your app, routes to serve these pages, and more. Take a look at Chapter 9 to learn more.
For something that is so common across web applications, pagination still can be wildly complicated to implement. Thankfully, Laravel has a built-in concept of pagination, and it’s also hooked into Eloquent results and the router by default.
The most common place you’ll see pagination is when you are displaying the results of a database query and there are too many results for a single page. Eloquent and the query builder both read the page query parameter from the current page request and use it to provide a paginate() method on any result sets; the single parameter you should pass paginate() is how many results you want per page. Take a look at Example 6-12 to see how this works.
// PostsControllerpublicfunctionindex(){returnview('posts.index',['posts'=>DB::table('posts')->paginate(20)]);}
Example 6-12 defines that this route should return 20 posts per page, and will define which “page” of results the current user is on based on the URL’s page query parameter, if it has one. Eloquent models all have the same paginate() method.
When you display the results in your view, your collection will now have a links() method on it (or render() for Laravel 5.1) that will output the pagination controls, with class names from the Bootstrap component libnrary assigned to them by default (see Example 6-13).
// posts/index.blade.php<table>@foreach($postsas$post)<tr><td>{{$post->title}}</td></tr>@endforeach</table>{{$posts->links()}}// By default, $posts->links() will output something like this:<ulclass="pagination"><liclass="page-item disabled"><span>«</span></li><liclass="page-item active"><span>1</span></li><liclass="page-item"><aclass="page-link"href="http://myapp.com/posts?page=2">2</a></li><liclass="page-item"><aclass="page-link"href="http://myapp.com/posts?page=3">3</a></li><liclass="page-item"><aclass="page-link"href="http://myapp.com/posts?page=2"rel="next">»</a></li></ul>
If you’d like to customize how many links show on either side of the current page, projects running Laravel 5.7 and later can customize this number easily with the onEachSide() method.
DB::table('posts')->paginate(10)->onEachSide(3);// Outputs:// 5 6 7 [8] 9 10 11
If you’re not working with Eloquent or the query builder, or if you’re working with a complex query (e.g., those using groupBy), you might find yourself needing to create a paginator manually. Thankfully, you can do that with the Illuminate\Pagination\Paginator or Illuminate\Pagination\LengthAwarePaginator classes.
The difference between the two classes is that Paginator will only provide previous and next buttons, but no links to each page; LengthAwarePaginator needs to know the length of the full result, so that it can generate links for each individual page. You may find yourself wanting to use the Paginator on large result sets, so your paginator doesn’t have to be aware of a massive count of results that might be costly to run.
Both the Paginator and the LengthAwarePaginator require you to manually extract the subset of content that you want to pass to the view. Take a look at Example 6-14 for an example.
useIlluminate\Http\Request;useIlluminate\Pagination\Paginator;Route::get('people',function(Request$request){$people=[...];// huge list of people$perPage=15;$offsetPages=$request->input('page',1)-1;// The Paginator will not slice your array for you$people=array_slice($people,$offsetPages*$perPage,$perPage);returnnewPaginator($people,$perPage);});
The Paginator syntax has changed over the last few versions of Laravel, so if you’re using 5.1, take a look at the docs to find the correct syntax.
Another common but painful feature in web applications is passing messages between various components of the app, when the end goal is to share them with the user. Your controller, for example, might want to send a validation message: “The email field must be a valid email address.” However, that particular message doesn’t just need to make it to the view layer; it actually needs to survive a redirect and then end up in the view layer of a different page. How do we structure this messaging logic?
Illuminate\Support\MessageBag is a class tasked with storing, categorizing, and returning messages that are intended for the end user. It groups all messages by key, where the keys are likely to be something like errors and messages, and provides convenience methods for getting all its stored messages or only those for a particular key, and for outputting these messages in various formats.
You can spin up a new instance of MessageBag manually like in Example 6-15. To be honest, you likely won’t ever do this manually—this is just a thought exercise to show how it works.
$messages=['errors'=>['Something went wrong with edit 1!',],'messages'=>['Edit 2 was successful.',],];$messagebag=new\Illuminate\Support\MessageBag($messages);// Check for errors; if there are any, decorate and echoif($messagebag->has('errors')){echo'<ul id="errors">';foreach($messagebag->get('errors','<li><b>:message</b></li>')as$error){echo$error;}echo'</ul>';}
Message bags are also closely connected to Laravel’s validators (learn more in “Validation”): when validators return errors, they actually return an instance of MessageBag, which you can then pass to your view or attach to a redirect using redirect('route')->withErrors($messagebag).
Laravel passes an empty instance of MessageBag to every view, assigned to the variable $errors, and if you’ve flashed a message bag using withErrors() on a redirect, it will get assigned to that $errors variable instead. That means every view can always assume it has an $errors MessageBag it can check wherever it handles validation, which leads to Example 6-16 as a common snippet developers place on every page.
// partials/errors.blade.php@if($errors->any())<divclass="alert alert-danger"><ul>@foreach($errorsas$error)<li>{{$error}}</li>@endforeach</ul></div>@endif
If you have any routes that aren’t under the web middleware group, they won’t have the session middleware, which means they won’t have this $errors variable available.
Sometimes you need to differentiate message bags not just by key (notices versus errors) but also by component. Maybe you have a login form and a signup form on the same page; how do you differentiate them?
When you send errors along with a redirect using withErrors(), the second parameter is the name of the bag: redirect('dashboard')->withErrors($validator, 'login'). Then, on the dashboard, you can use $errors->login to call all of the methods you saw before: any(), count(), and more.
As developers, we tend to look at blocks of text as big placeholder divs, waiting for the client to put real content into them. Seldom are we involved in any logic inside these blocks.
But there are a few circumstances where you’ll be grateful for the tools Laravel provides for string manipulation.
Laravel has a series of helpers for manipulating strings. They’re available as methods on the Str class (e.g., Str::plural()), but most also have a global helper function (e.g., str_plural()).
The Laravel documentation covers all of the string helpers in detail, but here are a few of the most commonly used helpers:
eA shortcut for html_entities; encodes all HTML entities for safety
starts_with, ends_with, str_containsCheck a string (first parameter) to see if it starts with, ends with, or contains another string (second parameter)
str_isChecks whether a string (second parameter) matches a particular pattern (first parameter)—for example, foo* will match foobar and foobaz
str_slugConverts a string to a URL-type slug with hyphens
str_plural (word, count), str_singularPluralizes a word or singularizes it; English-only (e.g., str_plural('dog') returns dogs; str_plural('dog', 1')) returns dog)
camel_case, kebab_case, snake_case, studly_case, title_caseConvert a provided string to a different capitalization “case”
str_after, str_before, str_limitTrim a string and provide a substring; str_after returns everything after a given string and str_before everything before the given string (both accept the first parameter of the full string and the second as the string you’re using to cut), and str_limit truncates a string (first parameter) to a given number of characters (second parameter)
Localization allows you to define multiple languages and mark any strings as targets for translation. You can set a fallback language, and even handle pluralization variations.
In Laravel, you’ll need to set an “application locale” at some point during the page load so the localization helpers know which bucket of translations to pull from. Each “locale” is usually connected to a translation, and will often look like “en” (for English). You’ll do this with App::setLocale($localeName), and you’ll likely put it in a service provider. For now you can just put it in the boot() method of AppServiceProvider, but you may want to create a LocaleServiceProvider if you end up with more than just this one locale-related binding.
You can define your fallback locale in config/app.php, where you should find a fallback_locale key. This allows you to define a default language for your application, which Laravel will use if it can’t find a translation for the requested locale.
So, how do we call for a translated string? There’s a helper function, __($key), that will pull the string for the current locale for the passed key or, if it doesn’t exist, grab it from the default locale. In Blade you can also use the @lang() directive. Example 6-17 demonstrates how a basic translation works. We’ll use the example of a “back to the dashboard” link at the top of a detail page.
// Normal PHP
<?php echo __('navigation.back'); ?>
// Blade
{{ __('navigation.back') }}
// Blade directive
@lang('navigation.back')Let’s assume we are using the es locale right now. Laravel will look for a file in resources/lang/es/navigation.php, which it will expect to return an array. It’ll look for a back key on that array, and if it exists, it’ll return its value. Take a look at Example 6-18 for a sample.
// resources/lang/es/navigation.phpreturn['back'=>'Volver al panel',];// routes/web.phpRoute::get('/es/contacts/show/{id}',function(){// Setting it manually, for this example, instead of in a service providerApp::setLocale('es');returnview('contacts.show');});// resources/views/contacts/show.blade.php<ahref="/contacts">{{__('navigation.back')}}</a>
In projects running versions of Laravel prior to 5.4, the __() helper isn’t available. You will instead have to use the trans() helper, which accesses an older translation system that works similarly to what we’re describing here, but can’t access the JSON translation system.
The preceding example was relatively simple. Let’s dig into some that are more complex. What if we want to define which dashboard we’re returning to? Take a look at Example 6-19.
// resources/lang/en/navigation.phpreturn['back'=>'Back to :section dashboard',];// resources/views/contacts/show.blade.php{{__('navigation.back',['section'=>'contacts'])}}
As you can see, prepending a word with a colon (:section) marks it as a placeholder that can be replaced. The second, optional, parameter of __() is an array of values to replace the placeholders with.
We already covered pluralization, so now just imagine you’re defining your own pluralization rules. There are two ways to do it; we’ll start with the simplest, in Example 6-20.
// resources/lang/en/messages.phpreturn['task-deletion'=>'You have deleted a task|You have successfully deleted tasks'];// resources/views/dashboard.blade.php@if($numTasksDeleted>0){{trans_choice('messages.task-deletion',$numTasksDeleted)}}@endif
As you can see, we have a trans_choice() method, which takes the count of items affected as its second parameter; and from this it will determine which string to use.
You can also use any translation definitions that are compatible with Symfony’s much more complex Translation component; see Example 6-21 for an example.
// resources/lang/es/messages.phpreturn['task-deletion'=>"{0} You didn't manage to delete any tasks.|"."[1,4] You deleted a few tasks.|"."[5,Inf] You deleted a whole ton of tasks.",];
One common difficulty with localization is that it’s hard to ensure there’s a good system for defining key namespacing—for example, remembering a key nested three or four levels deep or being unsure which key a phrase used twice in the site should use.
An alternative to the slug key/string value pair system is to store your translations using your primary language string as the key, instead of a made-up slug. You can indicate to Laravel that you’re working this way by storing your translation files as JSON in the resources/lang directory, with the filename reflecting the locale. For example:
// In Blade{{__('View friends list')}}
// resources/lang/es.json{'View friends list':'Ver lista de amigos'}
This is taking advantage of the fact that the __() translation helper, if it can’t find a matching key for the current language, will just display the key. If your key is the string in your app’s default language, that’s a much more reasonable fallback than, for example, widgets.friends.title.
The JSON string translation format is only available in Laravel 5.4 and later.
In this chapter we focused primarily on Laravel’s frontend components. These are less likely the objects of unit tests, but they may at times be used in your integration tests.
There are two primary ways of testing messages passed along with message and error bags. First, you can perform a behavior in your application tests that sets a message that will eventually be displayed somewhere, then redirect to that page and assert that the appropriate message is shown.
Second, for errors (which is the most common use case), you can assert the session has errors with $this->assertSessionHasErrors($bindings = []). Take a look at Example 6-22 to see what this might look like.
publicfunctiontest_missing_email_field_errors(){$this->post('person/create',['name'=>'Japheth']);$this->assertSessionHasErrors(['email']);}
In order for Example 6-22 to pass, you’ll need to add input validation to that route, which we’ll cover in Chapter 7.
The simplest way to test localization is with application tests. Set the appropriate context (whether by URL or session), “visit” the page with get(), and assert that you see the appropriate content.
As a full-stack framework, Laravel provides tools and components for the frontend as well as the backend.
Mix is a layer in front of Webpack that makes common tasks and configurations much simpler. Mix makes it easy to use popular CSS pre- and post-processors, common JavaScript processing steps, and much more.
Laravel also offers other internal tools that target the frontend, including pagination, message and error bags, and localization.
Websites that benefit from a framework like Laravel often don’t just serve static content. Many deal with complex and mixed data sources, and one of the most common (and most complex) of these sources is user input in its myriad forms: URL paths, query parameters, POST data, and file uploads.
Laravel provides a collection of tools for gathering, validating, normalizing, and filtering user-provided data. We’ll look at those here.
The most common tool for accessing user data in Laravel is injecting an instance of the Illuminate\Http\Request object. It provides easy access to all of the ways users can provide input to your site: POST form data, posted JSON, GET (query parameters), and URL segments.
There’s also a request() global helper and a Request facade, both of which expose the same methods. Each of these options exposes the entire Illuminate Request object, but for now we’re only going to cover the methods that specifically relate to user data.
Since we’re planning on injecting a Request object, let’s take a quick look at how to get the $request object we’ll be calling all these methods on:
Route::post('form',function(Illuminate\Http\Request$request){// $request->etc()});
Just like the name suggests, $request->all() gives you an array containing all of the input the user has provided, from every source. Let’s say, for some reason, you decided to have a form POST to a URL with a query parameter—e.g., sending a POST to http://myapp.com/signup?utm=12345. Take a look at Example 7-1 to see what you’d get from $request->all(). (Note that $request->all() also contains information about any files that were uploaded, but we’ll cover that later in the chapter.)
<!-- GET route form view at /get-route --><formmethod="post"action="/signup?utm=12345">@csrf<inputtype="text"name="first_name"><inputtype="submit"></form>
// routes/web.phpRoute::post('signup',function(Request$request){var_dump($request->all());});// Outputs:/*** [* '_token' => 'CSRF token here',* 'first_name' => 'value',* 'utm' => 12345,* ]*/
$request->except() provides the same output as $request->all, but you can choose one or more fields to exclude—for example, _token. You can pass it either a string or an array of strings.
Example 7-2 shows what it looks like when we use $request->except() on the same form as in Example 7-1.
Route::post('post-route',function(Request$request){var_dump($request->except('_token'));});// Outputs:/*** [* 'firstName' => 'value',* 'utm' => 12345,* ]*/
$request->only() is the inverse of $request->except(), as you can see in Example 7-3.
Route::post('post-route',function(Request$request){var_dump($request->only(['firstName','utm']));});// Outputs:/*** [* 'firstName' => 'value',* 'utm' => 12345,* ]*/
With $request->has() you can detect whether a particular piece of user input is available to you. Check out Example 7-4 for an analytics example with our utm query string parameter from the previous examples.
// POST route at /post-routeif($request->has('utm')){// Do some analytics work}
Whereas $request->all(), $request->except(), and $request->only() operate on the full array of input provided by the user, $request->input() allows you to get the value of just a single field. Example 7-5 provides an example. Note that the second parameter is the default value, so if the user hasn’t passed in a value, you can have a sensible (and nonbreaking) fallback.
Route::post('post-route',function(Request$request){$userName=$request->input('name','Matt');});
Returns the HTTP verb, or checks against it, for the request.
$method=$request->method();if($request->isMethod('patch')){// do something if request method is PATCH}
Laravel also provides convenience helpers for accessing data from array input. Just use the “dot” notation to indicate the steps of digging into the array structure, like in Example 7-7.
<!-- GET route form view at /employees/create --><formmethod="post"action="/employees/">@csrf<inputtype="text"name="employees[0][firstName]"><inputtype="text"name="employees[0][lastName]"><inputtype="text"name="employees[1][firstName]"><inputtype="text"name="employees[1][lastName]"><inputtype="submit"></form>
// POST route at /employeesRoute::post('employees',function(Request$request){$employeeZeroFirstName=$request->input('employees.0.firstName');$allLastNames=$request->input('employees.*.lastName');$employeeOne=$request->input('employees.1');var_dump($employeeZeroFirstname,$allLastNames,$employeeOne);});// If forms filled out as "Jim" "Smith" "Bob" "Jones":// $employeeZeroFirstName = 'Jim';// $allLastNames = ['Smith', 'Jones'];// $employeeOne = ['firstName' => 'Bob', 'lastName' => 'Jones'];
So far we’ve covered input from query strings (GET) and form submissions (POST). But there’s another form of user input that’s becoming more common with the advent of JavaScript single-page apps (SPAs): the JSON request. It’s essentially just a POST request with the body set to JSON instead of a traditional form POST.
Let’s take a look at what it might look like to submit some JSON to a Laravel route, and how to use $request->input() to pull out that data (Example 7-8).
POST/post-routeHTTP/1.1Content-Type:application/json{"firstName":"Joe","lastName":"Schmoe","spouse":{"firstName":"Jill","lastName":"Schmoe"}}
// post-routeRoute::post('post-route',function(Request$request){$firstName=$request->input('firstName');$spouseFirstname=$request->input('spouse.firstName');});
Since $request->input() is smart enough to pull user data from GET, POST, or JSON, you may wonder why Laravel even offers $request->json(). There are two reasons you might prefer $request->json(). First, you might want to just be more explicit to other programmers on your project about where you’re expecting the data to come from. And second, if the POST doesn’t have the correct application/json headers, $request->input() won’t pick it up as JSON, but $request->json() will.
It might not be the first thing you think of when you imagine “user data,” but the URL is just as much user data as anything else in this chapter.
There are two primary ways you’ll get data from the URL: via Request objects an via route parameters.
Injected Request objects (and the Request facade and the request() helper) have several methods available to represent the state of the current page’s URL, but right now let’s look primarily at getting information about the URL segments.
If you’re not familiar with the idea of URL segments, each group of characters after the domain is called a segment. So, http://www.myapp.com/users/15/ has two segments: users and 15.
As you can probably guess, we have two methods available to us: $request->segments() returns an array of all segments, and $request->segment($segmentId) allows us to get the value of a single segment. Note that segments are returned on a 1-based index, so in the preceding example, $request->segment(1) would return users.
Request objects, the Request facade, and the request() global helper provide quite a few more methods to help us get data out of the URL. To learn more, check out Chapter 10.
The other primary way we get data about the URL is from route parameters, which are injected into the controller method or closure that is serving a current route as shown in Example 7-9.
// routes/web.phpRoute::get('users/{id}',function($id){// If the user visits myapp.com/users/15/, $id will equal 15});
To learn more about routes and route binding, check out Chapter 3.
We’ve talked about different ways to interact with users’ text input, but there’s also the matter of file uploads to consider. Request objects provide access to any uploaded files using the $request->file() method, which takes the file’s input name as a parameter and returns an instance of Symfony\Component\HttpFoundation\File\UploadedFile.
Let’s walk through an example. First, our form, in Example 7-10.
<formmethod="post"enctype="multipart/form-data">@csrf<inputtype="text"name="name"><inputtype="file"name="profile_picture"><inputtype="submit"></form>
Now, let’s take a look at what we get from running $request->all(), in Example 7-11. Note that $request->input('profile_picture') will return null; we need to use $request->file('profile_picture') instead.
Route::post('form',function(Request$request){var_dump($request->all());});// Output:// [// "_token" => "token here"// "name" => "asdf"// "profile_picture" => UploadedFile {}// ]Route::post('form',function(Request$request){if($request->hasFile('profile_picture')){var_dump($request->file('profile_picture'));}});// Output:// UploadedFile (details)
Symfony’s UploadedFile class extends PHP’s native SplFileInfo with methods allowing you to easily inspect and manipulate the file. This list isn’t exhaustive, but it gives you a taste of what you can do:
guessExtension()
getMimeType()
store($path, $storageDisk = default disk)
storeAs($path, $newName, $storageDisk = default disk)
storePublicly($path, $storageDisk = default disk)
storePubliclyAs($path, $newName, $storageDisk = default disk)
move($directory, $newName = null)
getClientOriginalName()
getClientOriginalExtension()
getClientMimeType()
guessClientExtension()
getClientSize()
getError()
isValid()
As you can see, most of the methods have to do with getting information about the uploaded file, but there’s one that you’ll likely use more than all the others: store() (available since Laravel 5.3), which takes the file that was uploaded with the request and stores it in a specified directory on your server. Its first parameter is the destination directory, and the optional second parameter will be the storage disk (s3, local, etc.) to use to store the file.
You can see a common workflow in Example 7-12.
if($request->hasFile('profile_picture')){$path=$request->profile_picture->store('profiles','s3');auth()->user()->profile_picture=$path;auth()->user()->save();}
If you need to specify the filename, you can use storeAs() instead of store(). The first parameter is still the path; the second is the filename, and the optional third parameter is the storage disk to use.
If you get null when you try to get the contents of a file from your request, you might’ve forgotten to set the encoding type on your form. Make sure to add the attribute enctype="multipart/form-data" on your form:
<formmethod="post"enctype="multipart/form-data">
Laravel has quite a few ways you can validate incoming data. We’ll cover form requests in the next section, so that leaves us with two primary options: validating manually or using the validate() method on the Request object. Let’s start with the simpler, and more common, validate().
The Request object has a validate() method that provides a convenient shortcut for the most common validation workflow. Let’s take a look in Example 7-13.
// routes/web.phpRoute::get('recipes/create','RecipesController@create');Route::post('recipes','RecipesController@store');
classRecipesControllerextendsController{publicfunctioncreate(){returnview('recipes.create');}publicfunctionstore(Request$request){$request->validate(['title'=>'required|unique:recipes|max:125','body'=>'required']);// Recipe is valid; proceed to save it}}
We only have four lines of code running our validation here, but they’re doing a lot.
First, we’re explicitly defining the fields we expect and applying rules (here separated by the pipe character, |) to each individually.
Next, the validate() method checks the incoming data from the $request and determines whether or not it is valid.
If the data is valid, the validate method ends and we can move on with the controller method, saving the data or whatever else.
But if the data isn’t valid, it throws a ValidationException. This contains instructions to the router about how to handle this exception. If the request is from JavaScript (or if it’s requesting JSON as a response), the exception will create a JSON response containing the validation errors. If not, the exception will return a redirect to the previous page, together with all of the user input and the validation errors—perfect for repopulating a failed form and showing some errors.
In projects running versions of Laravel prior to 5.5, this validation shortcut is on the controller (running $this->validate()) instead of on the request.
If you are not working in a controller, or if for some other reason the previously described flow is not a good fit, you can manually create a Validator instance using the Validator facade and check for success or failure like in Example 7-14.
Route::get('recipes/create',function(){returnview('recipes.create');});Route::post('recipes',function(Illuminate\Http\Request$request){$validator=Validator::make($request->all(),['title'=>'required|unique:recipes|max:125','body'=>'required']);if($validator->fails()){returnredirect('recipes/create')->withErrors($validator)->withInput();}// Recipe is valid; proceed to save it});
As you can see, we create an instance of a validator by passing it our input as the first parameter and the validation rules as the second parameter. The validator exposes a fails() method that we can check against and can be passed into the withErrors() method of the redirect.
If the validation rule you need doesn’t exist in Laravel, you can create your own. To create a custom rule, run php artisan make:rule RuleName and then edit that file in app/Rules/RuleName.php.
You’ll get two methods in your rule out of the box: passes() and message(). passes() should accept an attribute name as the first parameter and the user-provided value as the second, and then return a boolean of whether or not this input passes this validation rule. message() should return the validation error message; you can use :attribute as a placeholder in your message for the attribute name.
Take a look at Example 7-15 as an example.
classWhitelistedEmailDomainimplementsRule{publicfunctionpasses($attribute,$value){returnin_array(str_after($value,'@'),['tighten.co']);}publicfunctionmessage(){return'The :attribute field is not from a whitelisted email provider.';}}
To use this rule, just pass an instance of the rule object to your validator:
$request->validate(['email'=>newWhitelistedEmailDomain]);
In projects running versions of Laravel prior to 5.5, custom validation rules have to be written using Validator::extend. You can learn more about how in the docs: https://laravel.com/docs/5.4/validation#custom-validation-rules
We’ve already covered much of this in Chapter 6, but here’s a quick refresher on how to display errors from validation.
The validate() method on requests (and the withErrors() method on redirects that it relies on) flashes any errors to the session. These errors are made available to the view you’re being redirected to in the $errors variable. And remember that as a part of Laravel’s magic, that $errors variable will be available every time you load the view, even if it’s just empty, so you don’t have to check if it exists with isset().
That means you can do something like Example 7-16 on every page.
@if ($errors->any())
<ul id="errors">
@foreach ($errors->all() as $error)
<li>{{ $error }}</li>
@endforeach
</ul>
@endifAs you build out your applications, you might start noticing some patterns in your controller methods. There are certain patterns that are repeated—for example, input validation, user authentication and authorization, and possible redirects. If you find yourself wanting a structure to normalize and extract these common behaviors out of your controller methods, you may be interested in Laravel’s form requests.
A form request is a custom request class that is intended to map to the submission of a form, and the request takes the responsilibity for validating the request, authorizing the user, and optionally redirecting the user upon a failed validation. Each form request will usually, but not always, explicitly map to a single HTTP request—e.g., “Create Comment.”
You can create a new form request from the command line:
php artisan make:request CreateCommentRequest
You now have a form request object available at app/Http/Requests/CreateCommentRequest.php.
Every form request class provides either one or two public methods. The first is rules(), which needs to return an array of validation rules for this request. The second (optional) method is authorize(); if this returns true, the user is authorized to perform this request, and if false, the user is rejected. Take a look at Example 7-17 to see a sample form request.
<?phpnamespaceApp\Http\Requests;useApp\BlogPost;useIlluminate\Foundation\Http\FormRequest;classCreateCommentRequestextendsFormRequest{publicfunctionauthorize(){$blogPostId=$this->route('blogPost');returnauth()->check()&&BlogPost::where('id',$blogPostId)->where('user_id',auth()->id())->exists();}publicfunctionrules(){return['body'=>'required|max:1000'];}}
The rules() section of Example 7-17 is pretty self-explanatory, but let’s look at authorize() briefly.
We’re grabbing the segment from the route named blogPost. That’s implying the route definition for this route probably looks a bit like this: Route::post('blogPosts/{blogPost}', function () { // Do stuff }). As you can see, we named the route parameter blogPost, which makes it accessible in our Request using $this->route('blogPost').
We then look at whether the user is logged in and, if so, whether any blog posts exist with that identifier that are owned by the currently logged-in user. You’ve already learned some easier ways to check ownership in Chapter 5, but we’ll keep it more explicit here to keep it clean. We’ll cover what implications this has shortly, but the important thing to know is that returning true means the user is authorized to perform the specified action (in this case, creating a comment), and false means the user is not authorized.
In projects running versions of Laravel prior to 5.3, form requests extended App\Http\Requests\Request instead of Illuminate\Foundation\Http\FormRequest.
Now that we’ve created a form request object, how do we use it? It’s a little bit of Laravel magic. Any route (closure or controller method) that typehints a form request as one of its parameters will benefit from the definitions of that form request.
Let’s try it out, in Example 7-18.
Route::post('comments',function(App\Http\Requests\CreateCommentRequest$request){// Store comment});
You might be wondering where we call the form request, but Laravel does it for us. It validates the user input and authorizes the request. If the input is invalid, it’ll act just like the request object validate() method works, redirecting the user to the previous page with their input preserved and with the appropriate error messages passed along. And if the user is not authorized, Laravel will return a 403 Forbidden error and not execute the route code.
Until now, we’ve been looking at validating at the controller level, which is absolutely the best place to start. But you can also filter the incoming data at the model level.
It’s a common (but not recommended) pattern to pass the entirety of a form’s input directly to a database model. In Laravel, that might look like Example 7-19.
Route::post('posts',function(Request$request){$newPost=Post::create($request->all());});
We’re assuming here that the end user is kind and not malicious, and has kept only the fields we want him to edit—maybe the post title or body.
But what if our end user can guess, or discern, that we have an author_id field on that posts table? What if he used his browser tools to add an author_id field and set the ID to be someone else’s ID, and the other person impersonated the other person by creating fake blog posts attributed to her?
Eloquent has a concept called “mass assignment” that allows you to either whitelist fields that should be fillable by being passed as a part of an array to create() or update() methods (using the model’s $fillable property) or blacklist fields that shouldn’t be fillable (using the model’s $guarded property). Check out Chapter 5 to learn more.
In our example, we might want to fill out the model like Example 7-20 to keep our app safe.
<?phpnamespaceApp;useIlluminate\Database\Eloquent\Model;classPostextendsModel{// Disable mass assignment on the author_id fieldprotected$guarded=['author_id'];}
By setting author_id to guarded, we ensure that malicious users will no longer be able to override the value of this field by manually adding it to the contents of a form that they’re sending to our app.
While it’s important to do a good job of protecting our models from mass assignment, it’s also worth being careful on the assigning end. Rather than using $request->all(), consider $request->only() so you can specify which fields you’d like to pass into your model:
Route::post('posts',function(Request$request){$newPost=Post::create($request->only(['title','body',]));});
Any time you display content on a web page that was created by a user, you need to guard against malicious input, such as script injection.
Let’s say you allow your users to write blog posts on your site. You probably don’t want them to be able to inject malicious JavaScript that will run in your unsuspecting visitors’ browsers, right? So, you’ll want to escape any user input that you show on the page to avoid this.
Thankfully, this is almost entirely covered for you. If you use Laravel’s Blade templating engine, the default “echo” syntax ({{ $stuffToEcho }}) runs the output through htmlentities() (PHP’s best way of making user content safe to echo) automatically. You actually have to do extra work to avoid escaping the output, by using the {!! $stuffToEcho !!} syntax.
If you’re interested in testing your interactions with user input, you’re probably most interested in simulating valid and invalid user input and ensuring that if the input is invalid the user is redirected, and if the input is valid, it ends up in the proper place (e.g., the database).
Laravel’s end-to-end application testing makes this simple.
If you want to work with testing specific user interactions on the page and with your forms, and you’re working in a project with Laravel 5.4 or later, you’ll want to pull in Laravel’s BrowserKit testing package. Simply require the package:
composer require laravel/browser-kit-testing --dev
And modify your application’s base TestCase class to extend Laravel\BrowserKitTesting\TestCase instead of Illuminate\Foundation\Testing\TestCase.
Let’s start with an invalid route that we expect to be rejected, in Example 7-21.
publicfunctiontest_input_missing_a_title_is_rejected(){$response=$this->post('posts',['body'=>'This is the body of my post']);$response->assertRedirect();$response->assertSessionHasErrors();}
Here we assert that after invalid input the user is redirected, with errors attached. You can see we’re using a few custom PHPUnit assertions that Laravel adds here.
The assertRedirect assertion was named assertRedirectedTo prior to Laravel 5.4.
So, how do we test our route’s success? Check out Example 7-22.
publicfunctiontest_valid_input_should_create_a_post_in_the_database(){$this->post('posts',['title'=>'Post Title','body'=>'This is the body']);$this->assertDatabaseHas('posts',['title'=>'Post Title']);}
Note that, if you’re testing something using the database, you’ll need to learn more about database migrations and transactions. More on that in Chapter 12.
In projects running versions of Laravel prior to 5.4 assertDatabaseHas should be replaced by seeInDatabase.
There are a lot of ways to get the same data: the Request facade, the request() global helper, and injecting an instance of Illuminate\Http\Request. Each exposes the ability to get all input, some input, or specific pieces of data, and files and JSON input can have some special considerations at times.
URI path segments are also a possible source of user input, and they’re also accessible via the request tools.
Validation can be performed manually with Validator::make(), or automatically using the validate() request method or form requests. Each automatic tool, upon failed validation, redirects the user to the previous page with all old input stored and errors passed along.
Views and Eloquent models also need to be protected from nefarious user input. Protect Blade views using the double curly brace syntax ({{ }}), which escapes user input, and protect models by only passing specific fields into bulk methods using $request->only() and by defining the mass assignment rules on the model itself.
From installation onward, modern PHP frameworks expect many interactions to take place on the command line. Laravel provides three primary tools for command-line interaction: Artisan, a suite of built-in command-line actions with the ability to add more; Tinker, a REPL or interactive shell for your application; and the installer, which we’ve already covered in Chapter 2.
If you’ve been reading through this book chapter by chapter, you’ve already learned how to use Artisan commands. They look something like this:
php artisan make:controller PostsController
If you look in the root folder of your application, you’ll see that artisan is actually just a PHP file. That’s why you’re starting your call with php artisan; you’re passing that file into PHP to be parsed. Everything after that is just passed into Artisan as arguments.
Artisan is actually a layer on top of the Symfony Console component, so if you’re familiar with writing Symfony Console commands you should feel right at home.
Since the list of Artisan commands for an application can be changed by a package or by the specific code of the application, it’s worth checking every new application you encounter to see what commands are available.
To get a list of all available Artisan commands, you can run php artisan list from the project root (although if you just run php artisan with no parameters, it will do the same thing).
There’s not enough space here to cover all of the Artisan commands, but we’ll cover many of them. Let’s get started with the basic commands:
clear-compiled removes Laravel’s compiled class file, which is like an internal Laravel cache; run this as a first resort when things are going wrong and you don’t know why.
down puts your application in “maintenance mode” in order for you to fix an error, run migrations, or whatever else; up restores an application from maintenance mode.
dump-server (5.7+) starts the dump server (“Laravel Dump Server”) to collect and output dumped variables.
env displays which environment Laravel is running at the moment; it’s the equivalent of echoing app()->environment() in-app.
help provides help for a command; e.g., php artisan help commandName.
migrate runs all database migrations.
optimize clears and refreshes the configuration and route files.
preset changes out the frontend scaffolding for another.
serve spins up a PHP server at localhost:8000 (you can customize the host and/or port with --host and --port).
tinker brings up the Tinker REPL, which we’ll cover later in this chapter.
The list of Artisan commands, and their names, has changed in small ways over the lifetime of Laravel. I’ll try to note any time they’ve changed, but everything here is listed out for Laravel 5.7. If you’re not working in 5.7, the best way to see what’s available to you is to run php artisan from your application.
Before we cover the rest of the Artisan commands, let’s look at a few notable options you can pass any time you run an Artisan command:
-q suppresses all output.
-v, -vv, and -vvv are the three levels of output verbosity (normal, verbose, and debug).
--no-interaction does not ask any interactive questions, so it won’t interrupt automated processes running it.
--env allows you to define which environment the Artisan command should operate in (e.g., local, production, etc.).
--version shows you which version of Laravel your application is running on.
You’ve probably guessed from looking at these options that Artisan commands are intended to be used much like basic shell commands: you might run them manually, but they can also function as a part of some automated process at some point.
For example, there are many automated deploy processes that might benefit from certain Artisan commands. You might want to run php artisan config:cache every time you deploy an application. Flags like -q and --no-interaction ensure that your deploy scripts, not attended by a human being, can keep running smoothly.
The rest of the commands available out of the box are grouped by context. We won’t cover them all here, but we’ll cover each context broadly:
appThis just contains app:name, which allows you to replace every instance of the default top-level App\ namespace with a namespace of your choosing. For example: php artisan app:name MyApplication. I recommend avoiding this feature and keeping your app’s root namespace as “App”.
authAll we have here is auth:clear-resets, which flushes all of the expired password reset tokens from the database.
cachecache:clear clears the caches, cache:forget removes an individual item from the cache, and cache:table creates a database migration if you plan to use the database cache driver.
configconfig:cache caches your configuration settings for faster lookup; to clear the cache, use config:clear.
dbdb:seed seeds your database, if you have configured database seeders.
eventevent:generate builds missing event and event listener files based on the definitions in EventServiceProvider. You’ll learn more about events in Chapter 16.
keykey:generate creates a random application encryption key in your .env file.
If you run php artisan key:generate more than once on your application, every currently-logged-in user will be logged out when you run it additional times. Additionally, any data you have manually encrypted will no longer be decrypt-able. To learn more, check out this article from fellow Tightenite Jake Bathman: APP_KEY and You.
makemake:auth scaffolds out the views and corresponding routes for a landing page, a user dashboard, and login and register pages.
All the rest of the make: actions create a single item, and have parameters that vary accordingly. To learn more about any individual command’s parameters, use help to read its documentation.
For example, you could run php artisan help make:migration and learn that you can pass --create=tableNameHere to create a migration that already has the create table syntax in the file, as shown here: php artisan make:migration create_posts_table --create=posts.
migrateYou saw a migrate command earlier to run our migrations, but here we can run all the other migration-related commands. Create the migrations table (to keep track of the migrations that are executed) with migrate:install, reset your migrations and start from scratch with migrate:reset, reset your migrations and run them all again with migrate:refresh, roll back just one migration with migrate:rollback, drop all tables and re-run all the migrations with migrate:fresh, or check the status of your migrations with migrate:status.
notificationsnotifications:table generates a migration that creates the table for database notifications.
packageIn Laravel prior to 5.5 including a new Laravel-specific package in your app requires registering it manually in config/app.php. However, in 5.5 it’s possible for Laravel to “auto-discover” those packages so you don’t have to manually register them. package:discover rebuilds Laravel’s “discovered” manifest of the service providers from your external packages.
queueWe’ll cover Laravel’s queues in Chapter 16, but the basic idea is that you can push jobs up into remote queues to be executed one after another by a worker. This command group provides all the tools you need to interact with your queues, like queue:listen to start listening to a queue, queue:table to create a migration for database-backed queues, and queue:flush to flush all failed queue jobs. There are quite a few more, which you’ll learn about in Chapter 16.
routeIf you run route:list, you’ll see the definitions of every route defined in the application, including each route’s verb(s), path, name, controller/closure action, and middleware. You can cache the route definitions for faster lookups with route:cache and clear your cache with route:clear.
scheduleWe’ll cover Laravel’s cron-like scheduler in Chapter 16, but in order for it to work, you need to set the system cron to run schedule:run once a minute:
* * * * * php /home/myapp.com/artisan schedule:run >> /dev/null 2>&1
As you can see, this Artisan command is intended to be run regularly in order to power a core Laravel service.
sessionsession:table creates a migration for applications using database-backed sessions.
storagestorage:link creates a symbolic link from public/storage to storage/app/public. This is a common convention in Laravel apps, to make it easy to put user uploads (or other files that commonly end up in storage/app) somewhere where they’ll be accessible at a public URL.
vendorSome Laravel-specific packages need to “publish” some of their assets, either so that they can be served from your public directory or so that you can modify them. Either way, these packages register these “publishable assets” with Laravel, and when you run vendor:publish, it publishes them to their specified locations.
viewLaravel’s view rendering engine automatically caches your views. It usually does a good job of handling its own cache invalidation, but if you ever notice it’s gotten stuck, run view:clear to clear the cache.
Now that we’ve covered the Artisan commands that come with Laravel out of the box, let’s talk about writing your own.
First, you should know: there’s an Artisan command for that! Running php artisan make:command YourCommandName generates a new Artisan command in app/Console/Commands /{YourCommandName}.php.
The command signature for make:command has changed a few times. It was originally command:make, but for a while in 5.2 it was console:make and then make:console.
Finally, in 5.3, it was settled: all of the generators are under the make: namespace, and the command to generate new Artisan commands is now make:command.
Your first argument should be the class name of the command, and you can optionally pass a --command parameter to define what the terminal command will be (e.g., appname:action).
So, let’s do it:
php artisan make:command WelcomeNewUsers --command=email:newusers
Take a look at Example 8-1 to see what you’ll get.
<?phpnamespaceApp\Console\Commands;useIlluminate\Console\Command;classWelcomeNewUsersextendsCommand{/*** The name and signature of the console command.** @var string*/protected$signature='email:newusers';/*** The console command description.** @var string*/protected$description='Command description';/*** Create a new command instance.** @return void*/publicfunction__construct(){parent::__construct();}/*** Execute the console command.** @return mixed*/publicfunctionhandle(){//}}
As you can see, it’s very easy to define the command signature, the help text it shows in command lists, and the command’s behavior on instantiation (__construct()) and on execution (handle()).
In projects running versions of Laravel prior to 5.5, commands had to be manually bound into app\Console\Kernel.php. If your app is running an older version of Laravel, just add the fully-qualified class name for your Command to the $commands array in that file and it’ll be registered:
protected$commands=[\App\Console\Commands\WelcomeNewUsers::class,];
We haven’t covered mail or Eloquent yet (see Chapter 15 for mail and Chapter 5 for Eloquent), but the sample handle() method in Example 8-2 should read pretty clearly.
...classWelcomeNewUsersextendsCommand{publicfunctionhandle(){User::signedUpThisWeek()->each(function($user){::to($user)->send(newWelcomeEmail);});}
Now every time you run php artisan email:newusers, this command will grab every user that signed up this week and send them the welcome email.
If you would prefer injecting your mail and user dependencies instead of using facades, you can typehint them in the command constructor, and Laravel’s container will inject them for you when the command is instantiated.
Take a look at Example 8-3 to see what Example 8-2 might look like using dependency injection and extracting its behavior out to a service class.
...classWelcomeNewUsersextendsCommand{publicfunction__construct(UserMailer$userMailer){parent::__construct();$this->userMailer=$userMailer}publicfunctionhandle(){$this->userMailer->welcomeNewUsers();}
The $signature property of the new command looks like it might just contain the command name. But this property is also where you’ll define any arguments and options for the command. There’s a specific, simple syntax you can use to add arguments and options to your Artisan commands.
Before we dig into that syntax, take a look at an example for some context:
protected$signature='password:reset {userId} {--sendEmail}';
To define a required argument, surround it with braces:
password:reset {userId}
To make the argument optional, add a question mark:
password:reset {userId?}
To make it optional and provide a default, use:
password:reset {userId=1}
Options are similar to arguments, but they’re prefixed with -- and can be used with no value. To add a basic option, surround it with braces:
password:reset {userId} {--sendEmail}
If your option requires a value, add an = to its signature:
password:reset {userId} {--password=}
And if you want to pass a default value, add it after the =:
password:reset {userId} {--queue=default}
Both for arguments and for options, if you want to accept an array as input, use the * character:
password:reset {userIds*}
password:reset {--ids=*}
Using array arguments and parameters looks a bit like Example 8-4.
// Argument php artisan password:reset 1 2 3 // Option php artisan password:reset --ids=1 --ids=2 --ids=3
Since an array argument captures every parameter after its definition and adds them as array items, an array argument has to be the last argument within an Artisan command’s signature.
Remember how the built-in Artisan commands can give us more information about their parameters if we use artisan help? We can provide that same information about our custom commands. Just add a colon and the description text within the curly braces, like in Example 8-5.
protected$signature='password:reset{userId : The ID of the user}{--sendEmail : Whether to send user an email}';
Now that we’ve prompted for this input, how do we use it in our command’s handle() method? We have two sets of methods for retrieving the values of arguments and options.
$this->arguments() returns an array of all arguments (the first array item will be the command name). $this->argument() called with no parameters returns the same response; the plural method, which I prefer, is just available for better readability, and is only available after Laravel 5.3.
To get just the value of a single argument, pass the argument name as a parameter to $this->argument():
// with definition "password:reset {userId}":phpartisanpassword:reset5// $this->arguments() returns this array["command":"password:reset","userId":"5",]// $this->argument('userId') returns this string"5"
$this->options() returns an array of all options, including some that will by default be false or null. $this->option() called with no parameters returns the same response; the plural method, which I prefer, is just available for better readability, and is only available after Laravel 5.3.
To get just the value of a single option, pass the argument name as a parameter to $this->option():
// with definition "password:reset {--userId=}":phpartisanpassword:reset--userId=5// $this->options() returns this array["userId"=>"5""help"=>false"quiet"=>false"verbose"=>false"version"=>false"ansi"=>false"no-ansi"=>false"no-interaction"=>false"env"=>null]// $this->option('userId') returns this string"5"
Example 8-6 shows an Artisan command using argument() and option() in its handle() method.
publicfunctionhandle(){// All arguments, including the command name$arguments=$this->arguments();// Just the 'userId' argument$userid=$this->argument('userId');// All options, including some defaults like 'no-interaction' and 'env'$options=$this->options();// Just the 'sendEmail' option$sendEmail=$this->option('sendEmail');}
There are a few more ways to get user input from within your handle() code, and they all involve prompting the user to enter information during the execution of your command:
ask()Prompts the user to enter freeform text:
=$this->ask('What is your email address?');
secret()Prompts the user to enter freeform text, but hides the typing with asterisks:
$password=$this->secret('What is the DB password?');
confirm()Prompts the user for a yes/no answer, and returns a boolean:
if($this->confirm('Do you want to truncate the tables?')){//}
All answers except y or Y will be treated as a “no.”
anticipate()Prompts the user to enter freeform text, and provides autocomplete suggestions. Still allows the user to type whatever she wants:
$album=$this->anticipate('What is the best album ever?',["The Joshua Tree","Pet Sounds","What's Going On"]);
choice()Prompts the user to choose one of the provided options. The last parameter is the default if the user doesn’t choose:
$winner=$this->choice('Who is the best football team?',['Gators','Wolverines'],0);
Note that the final parameter, the default, should be the array key. Since we passed a nonassociative array, the key for “Gators” is 0. You could also key your array, if you’d prefer:
$winner=$this->choice('Who is the best football team?',['gators'=>'Gators','wolverines'=>'Wolverines'],'gators');
During the execution of your command, you might want to write messages to the user. The most basic way to do this is to use $this->info() to output basic green text:
$this->info('Your command has run successfully.');
You also have available the comment() (orange), question() (highlighted teal), error() (highlighted red), and line() (uncolored) methods to echo to the command line.
Please note that the exact colors may vary from machine to machine, but they try to be in line with the local machine’s standards for communicating to the end user.
The table component makes it simple to create ASCII tables full of your data. Take a look at Example 8-7.
$headers=['Name','Email'];$data=[['Dhriti','dhriti@amrit.com'],['Moses','moses@gutierez.com'],];// Or, you could get similar data from the database:$data=App\User::all(['name','email'])->toArray();$this->table($headers,$data);
Note that Example 8-7 has two sets of data: the headers, and the data itself. Both contain two “cells” per “row”; the first cell in each row is the name, and the second is the email. That way the data from the Eloquent call (which is constrained to pull only name and email) matches up with the headers.
Take a look at Example 8-8 to see what the table output looks like.
+---------+--------------------+ | Name | Email | +---------+--------------------+ | Dhriti | dhriti@amrit.com | | Moses | moses@gutierez.com | +---------+--------------------+
If you’ve ever run npm install, you’ve seen a command-line progress bar before. Let’s build one in Example 8-9.
$totalUnits=10;$this->output->progressStart($totalUnits);for($i=0;$i<$totalUnits;$i++){sleep(1);$this->output->progressAdvance();}$this->output->progressFinish();
What did we do here? First, we informed the system how many “units” we needed to work through. Maybe a unit is a user, and you have 350 users. The bar will then divide the entire width it has available on your screen by 350, and increment it by 1/350th every time you run progressAdvance(). Once you’re done, run progressFinish() so it knows it’s done displaying the progress bar.
If you’d prefer to keep your command definition process simpler, you can write commands as closures instead of classes by defining them in routes/console.php. Everything we discuss in this chapter will apply the same way, but you will just define and register the commands in a single step in that file:
// routes/console.phpArtisan::command('password:reset {userId} {--sendEmail}',function($userId,$sendEmail){$userId=$this->argument('userId');// do something...});
While Artisan commands are designed to be run from the command line, you can also call them from other code.
The easiest way is to use the Artisan facade. You can either call a command using Artisan::call() (which will return the command’s exit code), or queue a command using Artisan::queue().
Both take two parameters: first, the terminal command (password:reset); and second, an array of parameters to pass it. Take a look at Example 8-10 to see how it works with arguments and options.
Route::get('test-artisan',function(){$exitCode=Artisan::call('password:reset',['userId'=>15,'--sendEmail'=>true]);});
As you can see, arguments are passed by keying to the argument name, and options with no value can be passed true or false.
You can also call Artisan commands from other commands, using $this->call, (which is the same as Artisan::call(), or $this->callSilent, which is the same but suppresses all output). See Example 8-11 for an example.
publicfunctionhandle(){$this->callSilent('password:reset',['userId'=>15,]);}
Finally, you can inject an instance of the Illuminate\Contracts\Console\Kernel contract, and use its call() method.
Tinker is a REPL, or read–eval–print loop. If you’ve ever used IRB in Ruby, you’ll be familiar with how a REPL works.
REPLs give you a prompt, similar to the command-line prompt, that mimics a “waiting” state of your application. You type your commands into the REPL, hit Return, and then expect what you typed to be evaluated and the response printed out.
Example 8-12 provides a quick sample to give you a sense of how it works and how it might be useful. We start the REPL with php artisan tinker and are then presented with a blank prompt (>>>); every response to our commands is printed on a line prefaced with =>.
php artisan tinker
>>> $user = new App\User;
=> App\User: {}
>>> $user->email = 'matt@mattstauffer.com';
=> "matt@mattstauffer.com"
>>> $user->password = bcrypt('superSecret');
=> "$2y$10$TWPGBC7e8d1bvJ1q5kv.VDUGfYDnE9gANl4mleuB3htIY2dxcQfQ5"
>>> $user->save();
=> trueAs you can see, we created a new user, set some data, and saved it to the database. And this is real. If this were a production application, we would’ve just created a brand new user in our system.
This makes Tinker a great tool for simple database interactions, for trying out new ideas, and for running snippets of code when it’d be a pain to find a place to put them in the application source files.
Tinker is powered by Psy Shell, so check that out to see what else you can do with Tinker.
One common method of debugging the state of your data during development is to use Laravel’s dump() helper, which runs a decorated var_dump() on anything you pass to it. This is fine, but it can often run into view issues.
In projects running Laravel 5.7 and later, you can now enable the Laravel Dump Server, which catches those dump() statements and displays them in your console instead of rendering them to the page.
To run the Dump server in your local console, navigate to your project’s root directory and run php artisan dump-server.
$php artisan dump-server Laravel Var DumpServer=======================[OK]Server listening on tcp://127.0.0.1:9912 // Quit the server with CONTROL-C.
Now, try using the dump() helper function in your code somewhere. To test it out, try this code in your routes/web.php file:
Route::get('/',function(){dump('Dumped Value');return'Hello World';});
Without the dump server, you’d see both the dump and your “Hello World”. But with the dump server running, you’ll only see “Hello World” in the browser. In your console, you’ll see that the dump server caught that dump() and you can inspect it there.
GET http://myapp.test/ -------------------- ------------ --------------------------------- date Tue,18Sep201822:43:10 +0000 controller"Closure"sourceweb.php on line 20 file routes/web.php ------------ ---------------------------------"Dumped Value"
Since you know how to call Artisan commands from code, it’s easy to do that in a test and ensure that whatever behavior you expected to be performed has been performed correctly, as in Example 8-13.
In our tests, we use $this->artisan() instead of Artisan::call() because it has the same syntax but adds a few testing-related assertions.
publicfunctiontest_empty_log_command_empties_logs_table(){DB::table('logs')->insert(['message'=>'Did something']);$this->assertCount(1,DB::table('logs')->get());$this->artisan('logs:empty');// Same as Artisan::call('logs:empty');$this->assertCount(0,DB::table('logs')->get());}
In projects running Laravel 5.7 and later, you can chain on a few new assertions to your $this->artisan() calls that make it even easier to test Artisan commands—not just the impact they have on the rest of your app, but also how they actually operate. Take a look at Example 8-14 to see an example of this syntax.
publicfunctiontestItCreatesANewUser(){$this->artisan('myapp:create-user')->expectsQuestion("What's the name of the new user?","Wilbur Powery")->expectsQuestion("What's the email of the new user?","wilbur@thisbook.co")->expectsQuestion("What's the password of the new user?","secret")->expectsOutput("User Wilbur Powery created!");$this->assertDatabaseHas('users',['email'=>'wilbur@thisbook.co']);}
Artisan commands are Laravel’s command-line tools. Laravel comes with quite a few out of the box, but it’s also easy to create your own Artisan commands and call them from the command line or your own code.
Tinker is a REPL that makes it simple to get into your application environment and interact with real code and real data, and the dump server lets you debug your code without stopping the code’s execution.
Setting up a basic user authentication system—including registration, login, sessions, password resets, and access permissions—can often be one of the more time-consuming pieces of creating the foundation of an application. It’s a prime candidate for extracting functionality out to a library, and there are quite a few such libraries.
But because of how much authentication needs vary across projects, most authentication systems grow bulky and unusable quickly. Thankfully, Laravel has found a way to make an authentication system that’s easy to use and understand, but flexible enough to fit in a variety of settings.
Every new install of Laravel has a create_users_table migration and a User model built in out of the box. Laravel offers an Artisan make:auth command that seeds a collection of authentication-related views and routes. And every install comes with a RegisterController, a LoginController, a ForgotPasswordController, and a ResetPasswordController. The APIs are clean and clear, and the conventions all work together to provide a simple—and seamless—authentication and authorization system.
Note that in Laravel 5.1 and 5.2, most of this functionality lived in the AuthController; in 5.3 and higher, this functionality has been split out into multiple controllers. Many of the specifics we’ll cover here about how to customize redirect routes, auth guards, and such are different in 5.1 and 5.2 (though all the core functionality is the same). So, if you’re on 5.1 or 5.2 and want to change some of the default authentication behaviors, you’ll likely need to dig a bit into your AuthController to see how exactly you should customize it.
When you create a new Laravel application, the first migration and model you’ll see are the create_users_table migration and the App\User model. Example 9-1 shows, straight from the migration, the fields you’ll get in your users table.
Schema::create('users',function(Blueprint$table){$table->increments('id');$table->string('name');$table->string('email')->unique();$table->string('password');$table->rememberToken();$table->timestamps();});
We have an autoincrementing primary key ID, a name, a unique email, a password, a “remember me” token, and created and modified timestamps. This covers everything you need to handle basic user authentication in most apps.
Authentication means verifying who someone is, and allowing them to act as that person in your system. This includes the login and logout processes, and any tools that allow the users to identify themselves during their time using the application.
Authorization means determining whether the authenticated user is allowed (authorized) to perform a specific behavior. For example, an authorization system allows us to forbid any non-administrators from viewing the site’s earnings.
The User model is a bit more complex, as you can see in Example 9-2. The App\User class itself is simple, but it extends the Illuminate\Foundation\Auth\User class, which pulls in several traits.
<?php// App\UsernamespaceApp;useIlluminate\Notifications\Notifiable;useIlluminate\Foundation\Auth\UserasAuthenticatable;classUserextendsAuthenticatable{useNotifiable;/*** The attributes that are mass assignable.** @var array*/protected$fillable=['name','email','password',];/*** The attributes that should be hidden for arrays.** @var array*/protected$hidden=['password','remember_token',];}
<?php// Illuminate\Foundation\Auth\UsernamespaceIlluminate\Foundation\Auth;useIlluminate\Auth\Authenticatable;useIlluminate\Database\Eloquent\Model;useIlluminate\Auth\Passwords\CanResetPassword;useIlluminate\Foundation\Auth\Access\Authorizable;useIlluminate\Contracts\Auth\AuthenticatableasAuthenticatableContract;useIlluminate\Contracts\Auth\Access\AuthorizableasAuthorizableContract;useIlluminate\Contracts\Auth\CanResetPasswordasCanResetPasswordContract;classUserextendsModelimplementsAuthenticatableContract,AuthorizableContract,CanResetPasswordContract{useAuthenticatable,Authorizable,CanResetPassword;}
If this is entirely unfamiliar, consider reading Chapter 5 before continuing to learn how Eloquent models work.
So, what can we learn from this model? First, users live in the users table; Laravel will infer this from the class name. We are able to fill out the name, email, and password properties when creating a new user, and the password and remember_token properties are excluded when outputting the user as JSON. Looking good so far.
We also can see from the contracts and the traits in the Illuminate\Foundation\Auth verison of User that there are some features in the framework (the ability to authenticate, to authorize, and to reset passwords) that theoretically could be applied to other models, not just the User model, and that could be applied individually or together.
The Authenticatable contract requires methods (getAuthIdentifier(), etc.) that allow the framework to authenticate instances of this model to the auth system; the Authenticatable trait includes the methods necessary to satisfy that contract with an average Eloquent model.
The Authorizable contract requires a method (can()) that allows the framework to authorize instances of this model for their access permissions in different contexts. Unsurprisingly, the Authorizable trait provides methods that will satisfy the Authorizable contract for an average Eloquent model.
And finally, the CanResetPassword contract requires methods (getEmailForPasswordReset(), sendPasswordResetNotification()) that allow the framework to, you guessed it, reset the password of any entity that satisfies this contract. The CanResetPassword trait provides methods to satisfy that contract for an average Eloquent model.
At this point, we have the ability to easily represent an individual user in the database (with the migration), and to pull them out with a model instance that can be authenticated (logged in and out), authorized (checked for access permissions to a particular resource), and sent a password reset email.
The auth() global helper is the easiest way to interact with the status of the authenticated user throughout your app. You can also inject an instance of Illuminate\Auth\AuthManager and get the same functionality, or use the Auth facade.
The most common usages are to check whether a user is logged in (auth()->check() returns true if the current user is logged in; auth()->guest() returns true if the user is not logged in) and to get the currently logged-in user (use auth()->user(), or auth()->id() for just the ID; both return null if no user is logged in).
Take a look at Example 9-3 for a sample usage of the global helper in a controller.
publicfunctiondashboard(){if(auth()->guest()){returnredirect('sign-up');}returnview('dashboard')->with('user',auth()->user());}
The next section is going to go into a little bit of depth of how the auth system works behind the scenes. It’s useful information but not vital, so if you want to skip it now, check out the next section, “The Auth Scaffold”.
So, how do we actually log users in? And how do we trigger those password resets?
It all happens in the Auth-namespaced controllers: RegisterController, LoginController, ResetPasswordController, and ForgotPasswordController.
The RegisterController, in combination with the RegistersUsers trait, contains sensible defaults for how to show new users a registration form, how to validate their input, how to create new users once their input is validated, and where to redirect them afterward.
The controller itself just contains a few hooks that the traits will call at given points. That makes it easy to customize a few common behaviors without having to dig deeply into the code that makes it all work.
The $redirectTo property defines where users will be redirected after registration. The validator() method defines how to validate registrations. And the create() method defines how to create a new user based on an incoming registration. Take a look at Example 9-4 to see the default RegisterController.
...classRegisterControllerextendsController{useRegistersUsers;protected$redirectTo='/home';...protectedfunctionvalidator(array$data){returnValidator::make($data,['name'=>'required|string|max:255','email'=>'required|string|email|max:255|unique:users','password'=>'required|string|min:6|confirmed',]);}protectedfunctioncreate(array$data){returnUser::create(['name'=>$data['name'],'email'=>$data['email'],'password'=>Hash::make($data['password']),]);}}
The RegistersUsers trait, which the RegisterController imports, handles a few primary functions for the registration process. First, it shows users the registration form view, with the showRegistrationForm() method. If you want new users to register with a view other than auth.register you can override the showRegistrationForm() method in your RegisterController.
Next, it handles the POST of the registration form with the register() method. This method passes the user’s registration input to the validator from the validator() method of your RegisterController, and then on to the create() method.
And finally, the redirectPath() method (pulled in via the RedirectsUsers trait) defines where users should be redirected after a successful registration. You can define this URI with the redirectTo property on your controller, or you can override the redirectPath() method and return whatever you want.
If you want this trait to use a different auth guard than the default (you’ll learn more about guards in “Guards”), you can override the guard() method and have it return whichever guard you’d like.
The LoginController, unsurprisingly, allows the user to log in. It brings in the AuthenticatesUsers trait, which brings in the RedirectsUsers and ThrottlesLogins traits.
Like the RegistrationController, the LoginController has a $redirectTo property that allows you to customize the path the user will be redirected to after a successful login. Everything else lives behind the AuthenticatesUsers trait.
The AuthenticatesUsers trait is responsible for showing users the login form, validating their logins, throttling failed logins, handling logouts, and redirecting users after a successful login.
The showLoginForm() method defaults to showing the user the auth.login view, but you can override it if you’d like it to use a different view.
The login() method accepts the POST from the login form. It validates the request using the validateLogin() method, which you can override if you’d like to customize the validation. It then hooks into the functionality of the ThrottlesLogins trait, which we’ll cover shortly, to reject users with too many failed logins. And finally, it redirects the user, either to her intended path (if the user was redirected to the login page when attempting to visit a page within the app) or to the path defined by the redirectPath() method, which returns your $redirectTo property.
The trait calls the empty authenticated() method after a successful login, so if you’d like to perform any sort of behavior in response to a successful login, just override this method in your LoginController.
There’s a username() method that defines which of your users columns is the “username”; this defaults to email but you can change that by overwriting the username() method in your controller to return the name of your username column.
And, like in the RegistersUsers trait, you can override the guard() method to define which auth guard (more on that in “Guards”) this controller should use.
The ThrottlesLogins trait is an interface to Laravel’s Illuminate\Cache\RateLimiter class, which is a utility to rate-limit any event using the cache. This trait applies rate limiting to user logins, limiting users from using the login form if they’ve had too many failed logins within a certain amount of time. This functionality does not exist in Laravel 5.1.
If you import the ThrottlesLogins trait, all of its methods are protected, which means they can’t actually be accessed as routes. Instead, the AuthenticatesUsers trait looks to see whether you’ve imported the ThrottlesLogins trait, and if so, it’ll attach its functionality to your logins without any work on your part. Since the default LoginController imports both, you’ll get this functionality for free if you use the auth scaffold.
ThrottlesLogins limits any given combination of username and IP address to 5 attempts per 60 seconds. Using the cache, it increments the “failed login” count of a given username/IP address combination, and if any user reaches 5 failed login attempts within 60 seconds, it redirects that user back to the login page with an appropriate error until the 60 seconds is over.
The ResetPasswordController simply pulls in the ResetsPasswords trait. This trait provides validation and access to basic password reset views, and then uses an instance of Laravel’s PasswordBroker class (or anything else implementing the PasswordBroker interface, if you choose to write your own) to handle sending password reset emails and actually resetting the passwords.
Just like the other traits we’ve covered, it handles showing the reset password view (showResetForm() shows the auth.passwords.reset view), and the POST request that is sent from that view (reset() validates and sends the appropriate response). The resetPassword() method actually resets the password, and you can customize the broker with broker() and the auth guard with guard().
If you’re interested in customizing any of this behavior, just override the specific method you want to customize in your controller.
The ForgotPasswordController simply pulls in the SendsPasswordResetEmails trait. It shows the auth.passwords.email form with the showLinkRequestForm() method, and handles the POST of that form with the sendResetLinkEmail() method. You can customize the broker with the broker() method.
The VerificationController pulls in the VerifiesEmails trait, which handles verifying the email address of newly-signed-up users. You can customize the path to send users to after validation.
Now that we have the auth controllers providing some methods for a series of pre-defined routes, we’ll want our users to actually be able to hit those routes. We could add all these routes manually to routes/web.php, but there’s already a convenience tool for that, called Auth::routes():
// routes/web.phpAuth::routes();
As you can probably guess, Auth::routes() brings in a bundle of predefined routes to your routes file. In Example 9-5 you can see the routes that are actually being defined there.
// Authentication Routes...$this->get('login','Auth\LoginController@showLoginForm')->name('login');$this->post('login','Auth\LoginController@login');$this->post('logout','Auth\LoginController@logout')->name('logout');// Registration Routes...$this->get('register','Auth\RegisterController@showRegistrationForm')->name('register');$this->post('register','Auth\RegisterController@register');// Password Reset Routes...$this->get('password/reset','Auth\ForgotPasswordController@showLinkRequestForm')->name('password.request');$this->post('password/email','Auth\ForgotPasswordController@sendResetLinkEmail')->name('password.email');$this->get('password/reset/{token}','Auth\ResetPasswordController@showResetForm')->name('password.reset');$this->post('password/reset','Auth\ResetPasswordController@reset');// If email verification is enabled$this->get('email/verify','Auth\VerificationController@show')->name('verification.notice');$this->get('email/verify/{id}','Auth\VerificationController@verify')->name('verification.verify');$this->get('email/resend','Auth\VerificationController@resend')->name('verification.resend');
Basically, Auth::routes() includes the routes for authentication, registration, and password resets. As you can see, there are also optional routes for email verification, which was introduced in Laravel 5.7.
To enable Laravel’s email verification service, which requires new users to verify they have access to the email address they signed up with, update your Auth::routes call to enable it:
Auth::routes(['verify'=>true]);
At this point you have a migration, a model, controllers, and routes for your authentication system. But what about your views?
Laravel handles that by providing an auth scaffold (available since Laravel 5.2), which is intended to be run on a new application and provide you with even more skeleton code to get your auth system running quickly.
The auth scaffold takes care of adding Auth::routes() to your routes file, adds a view for each route, and creates a HomeController to serve as the landing page for logged-in users; it also routes to the index() method of HomeController at the /home URI.
Just run php artisan make:auth, and the following files will be made available to you:
app/Http/Controllers/HomeController.php resources/views/auth/login.blade.php resources/views/auth/register.blade.php resources/views/auth/verify.blade.php resources/views/auth/passwords/email.blade.php resources/views/auth/passwords/reset.blade.php resources/views/layouts/app.blade.php resources/views/home.blade.php
At this point, you have / returning the welcome view, /home returning the home view, and a series of auth routes for login, logout, registration, and password reset pointing to the auth controllers. Each of the seeded views has Bootstrap-based layouts and form fields for all necessary fields for login, registration, and password reset, and they already point to the correct routes.
At this point, you have all of the pieces in place for every step of the normal user registration and authentication flow. You can tweak all you want, but you’re entirely ready to register and authenticate users.
Let’s review quickly the steps from new site to full authentication system:
laravel new MyApp cd MyApp # edit your .env file to specify the correct database connection details php artisan make:auth php artisan migrate
That’s it. Run those commands, and you will have a landing page and a bootstrap-based user registration, login, logout, and password reset system, with a basic landing page for all authenticated users.
The auth scaffold has this implemented out of the box, but it’s still worth learning how it works and how to use it on your own. If you want to implement a “remember me”–style long-lived access token, make sure you have a remember_token column on your users table (which you will if you used the default migration).
When you’re normally logging in a user (and this is how the LoginController does it, with the AuthenticatesUsers trait), you’ll “attempt” an authentication with the user-provided information, like in Example 9-6.
if(auth()->attempt(['email'=>request()->input('email'),'password'=>request()->input('password'),])){// Handle the successful login}
This provides you with a user login that lasts as long as the user’s session. If you want Laravel to extend the login indefinitely using cookies (as long as the user is on the same computer and doesn’t log out), you can pass a boolean true as the second parameter of the auth()->attempt() method. Take a look at Example 9-7 to see what that request looks like.
if(auth()->attempt(['email'=>request()->input('email'),'password'=>request()->input('password'),]),request()->filled('remember')){// Handle the successful login}
You can see that we checked whether the input has a non-empty (“filled”) remember property, which will return a boolean. This allows our users to decide if they want to be remembered with a checkbox in the login form.
And later, if you need to manually check whether the current user was authenticated by a remember token, there’s a method for that: auth()->viaRemember() returns a boolean indicating whether or not the current user authenticated via a remember token. This will allow you to prevent certain higher-sensitivity features from being accessible by remember token, and you can require users to reenter their passwords.
The most common case for user authentication is that you’ll allow the users to provide their credentials, and then use auth()->attempt() to see whether the provided credentials match any real users. If so, you log them in.
But sometimes there are contexts where it’s valuable for you to be able to choose to log a user in on your own. For example, you may want to allow admin users to switch users.
There are four methods that make this possible. First, you can just pass a user ID:
auth()->loginUsingId(5);
Second, you can pass a User object (or any other object that implements the Illuminate\Contracts\Auth\Authenticatable contract):
auth()->login($user);
And third and fourth, you can choose to authenticate the given user for only the current request, which won’t impact your session or cookies at all, using once and onceUsingId:
auth()->once(['username'=>'mattstauffer']);// orauth()->onceUsingId(5);
Note that the array you pass to the once() method can contain any key/value pairs to uniquely identify the user you’d like to authenticate as. You can even pass multiple keys and values, if it’s what is appropriate for your project. For example:
auth()->once(['last_name'=>'Stauffer','zip_code'=>90210,])
If you ever need to log out a user manually, just call logout():
auth()->logout();
If you’d like to log out not just a user’s current session, but also those on any other devices, you’ll need to prompt the user for their password and pass it to the logoutOtherDevices method. In order to do this, you’ll have to add the (commented-out-by-default) AuthenticateSession middleware to your web group in app\Http\Kernel.php:
'web'=>[// ...\Illuminate\Session\Middleware\AuthenticateSession::class,],
And then you can use it inline anywhere you need:
auth()->logoutOtherDevices($password);
The logoutOtherDevices() method is only available in Laravel 5.6 and later.
In Example 9-3, you saw how to check whether visitors are logged in and redirect them if not. You could perform these sorts of checks on every route in your application, but it would very quickly get tedious. It turns out that route middleware (see Chapter 10 to learn more about how they work) are a perfect fit for restricting certain routes to guests or to authenticated users.
Once again, Laravel comes with the middleware we need to do this out of the box. You can see which route middleware you have defined in App\Http\Kernel:
protected$routeMiddleware=['auth'=>\Illuminate\Auth\Middleware\Authenticate::class,'auth.basic'=>\Illuminate\Auth\Middleware\AuthenticateWithBasicAuth::class,'bindings'=>\Illuminate\Routing\Middleware\SubstituteBindings::class,'cache.headers'=>\Illuminate\Http\Middleware\SetCacheHeaders::class,'can'=>\Illuminate\Auth\Middleware\Authorize::class,'guest'=>\App\Http\Middleware\RedirectIfAuthenticated::class,'signed'=>\Illuminate\Routing\Middleware\ValidateSignature::class,'throttle'=>\Illuminate\Routing\Middleware\ThrottleRequests::class,'verified'=>\Illuminate\Auth\Middleware\EnsureEmailIsVerified::class,];
Four of the default route middleware are authentication-related:
auth restricts route access to authenticated users
auth.basic restricts access to authenticated users using HTTP Basic Authentication
guest restricts access to unauthenticated users
can is used for authorizing user access to given routes
It’s most common to use auth for your authenticated-user-only sections and guest for any routes you don’t want authenticated users to see (like the login form). auth.basic is a much less commonly used middleware for authenticating via request headers.
Example 9-8 shows an example of a few routes protected by the auth middleware.
Route::middleware('auth')->group(function(){Route::get('account','AccountController@dashboard');});Route::get('login','Auth\LoginController@getLogin')->middleware('guest');
Laravel 5.7 introduced a new feature that makes it possible to require a user to verify that they have access to the email address they registered with.
In order to enable email verification, update your App\User and make it implement the Illuminate\Contracts\Auth\MustVerifyEmail contract.
classUserextendsAuthenticatableimplementsMustVerifyEmail{useNotifiable;// ...}
The user table must also contain a nullable timestamp column named email_verified_at, which the new default CreateUsersTable migration will have already provided for you in apps created in 5.7 or later.
You’ll also need to do one more thing: enable the email verification routes in your controller. The easiest method is to use Auth::routes in your routes file with the verify parameter set to true:
Auth::routes(['verify'=>true]);
Now, you can protect any routes you’d like from being accessed by any users who haven’t verified their email address:
Route::get('posts/create',function(){// Only verified users may enter...})->middleware('verified');
You can customize the route where users are redirected after verifying in your VerificationController:
protected$redirectTo='/profile';
If you want to check against a user’s authentication, not at the route level but in your views, you can, with @auth and @guest:
@auth// The user is authenticated@endauth@guest// The user is not authenticated@endguest
You can also specify which guard you’d like to use with both methods by passing the guard name as a parameter:
@auth('trainees')// The user is authenticated...@endauth@guest('trainees')// The user is not authenticated...@endguest
Every aspect of Laravel’s authentication system is routed through something called a guard. Each guard is a combination of two pieces: a driver that defines how it persists and retrieves the authentication state (for example, session), and a provider that allows you to get a user by certain criteria (for example, users).
Out of the box Laravel has two guards: web and api. web is the more traditional authentication style, using the session driver and the basic user provider. api also uses the same user provider, but it uses the token driver instead of the session to authenticate each request.
You’d change drivers if you wanted to handle the identification and persistence of a user’s identity differently (for example, changing from a long-running session to a provided-every-page-load token), and you’d change providers if you wanted to change the storage type or retrieval methods for your users (for example, moving to storing your users in Mongo instead of MySQL).
The guards are defined in config/auth.php, and you can change them, add new guards, and also define which guard will be the default there. For what it’s worth, this is a relatively uncommon configuration; most Laravel apps just use one guard.
The “default” guard defines which will be used any time you use any auth features without specifying a guard. For example, auth()->user() will pull the currently authenticated user using the default guard. You can change this guard by changing the auth.defaults.guard setting in config/auth.php:
'defaults'=>['guard'=>'web',// Change the default here'passwords'=>'users',],
If you’re using Laravel 5.1, you’ll notice that the structure of the authentication information is a little different from this. Don’t worry; the features all still work the same, they’re just structured differently.
You may have noticed that I refer to configuration sections with references like auth.defaults.guard. What that translates to is: in config/auth.php, in the array section keyed defaults, there should be a property keyed guard. That one is auth.defaults.guard.
If you want to use another guard, but not change the default, you can start your Auth calls with guard():
$apiUser=auth()->guard('api')->user();
This will, just for this call, get the current user using the api guard.
You can add a new guard at any time in config/auth.php, in the auth.guards setting:
'guards'=>['trainees'=>['driver'=>'session','provider'=>'trainees',],],
As you can see here, we’ve created a new guard (in addition to web and api) named trainees. Let’s imagine, for the rest of this section, that we’re building an app where our users are physical trainers and they each have their own users—trainees—who can log in to their subdomains. So, we need a separate guard for them.
The only two options for driver are token and session. Out of the box, the only option for provider is users, which supports authentication against your default users table, but you can create your own provider easily.
If you want to define a custom guard and your guard conditions (how to look up a given user against the request) can be described simply enough in response to any given HTTP request, you might just want to throw the user lookup code into a closure and not deal with creating a new custom guard class.
The viaRequest() auth method makes it possible to define a guard (named in the first parameter) using just a closure (defined in the second parameter) that takes the HTTP request and returns the appropriate user. To register a closure request guard, call viaRequest() in the boot() method of your AuthServiceProvider:
publicfunctionboot(){$this->registerPolicies();Auth::viaRequest('token-hash',function($request){returnUser::where('token-hash',$request->token)->first();});}
Just below where the guards are defined in config/auth.php, there’s an auth.providers section that defines the available providers. Let’s create a new provider named trainees:
'providers'=>['users'=>['driver'=>'eloquent','model'=>App\User::class,],'trainees'=>['driver'=>'eloquent','model'=>App\Trainee::class,],],
The two options for driver are eloquent and database; if you use eloquent, you’ll need a model property that contains an Eloquent class name (the model to use for your User class), and if you use database, you’ll need a table property to define which table it should authenticate against.
In our example, you can see that this application has a User and a Trainee, and they need to be authenticated separately. This way, the code can differentiate between auth()->guard('users’) and auth()->guard('trainees’).
One last note: the auth route middleware can take a parameter that is the guard name. So, you can guard certain routes with a specific guard:
Route::middleware('auth:trainees')->group(function(){// Trainee-only routes here});
The user provider creation flow just described still relies on the same UserProvider class, which means it’s expecting to pull the identifying information out of a relational database. But if you’re using Mongo or Riak or something similar, you’ll actually need to create your own class.
To do this, create a new class that implements the Illuminate\Contracts\Auth\UserProvider interface, and then bind it in AuthServiceProvider@boot:
auth()->provider('riak',function($app,array$config){// Return an instance of Illuminate\Contracts\Auth\UserProvider...returnnewRiakUserProvider($app['riak.connection']);});
We’ll talk more about events in Chapter 16, but Laravel’s event system is a basic pub/sub framework. There are system- and user-generated events that are broadcast, and the user has the ability to create event listeners that do certain things in response to certain events.
So, what if you wanted to send a ping to a particular security service every time a user was locked out after too many failed login attempts? Maybe this service watches out for a certain number of failed logins from certain geographic regions, or something else. You could, of course, inject a call in the appropriate controller. But with events, you can just create an event listener that listens to the “user locked out” event, and register that.
Take a look at Example 9-9 to see all of the events that the authentication system emits.
protected$listen=['Illuminate\Auth\Events\Registered'=>[],'Illuminate\Auth\Events\Attempting'=>[],'Illuminate\Auth\Events\Authenticated'=>[],'Illuminate\Auth\Events\Login'=>[],'Illuminate\Auth\Events\Failed'=>[],'Illuminate\Auth\Events\Logout'=>[],'Illuminate\Auth\Events\Lockout'=>[],'Illuminate\Auth\Events\PasswordReset'=>[],];
As you can see, there are listeners for “user registered”, “user attempting login,” “user authenticated,” “successful login,” “failed login”, “logout,” “lockout,” and “password reset.” To learn more about how to build event listeners for these events, check out Chapter 16.
Finally, let’s cover Laravel’s authorization system. It enables you to determine whether a user is authorized to do a particular thing, which you’ll check using a few primary verbs: can, cannot, allows, and denies. The access control list (ACL) system was introduced in Laravel 5.2.
Most of this authorization control will be performed using the Gate facade, but there are also convenience helpers in your controllers, on the User model, as middleware, and available as Blade directives. Take a look at this example to get a taste of what we’ll be able to do:
if(Gate::denies('edit-contact',$contact)){abort(403);}if(!Gate::allows('create-contact',Contact::class)){abort(403);}
The default place to define authorization rules is the boot() method of the AuthServiceProvider, where you’ll be calling methods on the Auth facade.
An authorization rule is called an ability, and is comprised of two things: a string key (e.g., update-contact) and a closure that returns a boolean. Example 9-10 shows an ability for updating a contact.
classAuthServiceProviderextendsServiceProvider{publicfunctionboot(){$this->registerPolicies();Gate::define('update-contact',function($user,$contact){return$user->id==$contact->user_id;});}}
Let’s walk through the steps for defining an ability.
First, you want to define a key. In naming this key, you should consider what string makes sense in your code’s flow to refer to the ability you’re providing the user. You can see the code sample uses the convention {verb}-{modelName}: create-contact, update-contact, etc.
Second, you define the closure. The first parameter will be the currently authenticated user, and all parameters after that will be the object(s) you’re checking for access to—in this instance, the contact.
So, given those two objects, we can check whether the user is authorized to update this contact. You can write this logic however you want, but in the app we’re looking at at the moment, authorization depends on being the creator of the contact row. The closure will return true (authorized) if the current user created the contact, and false (unauthorized) if not.
Just like with route definitions, you could also use a class and method instead of a closure to resolve this definition:
$gate->define('update-contact','ContactACLChecker@updateContact');
Now that you’ve defined an ability, it’s time to test against it. The simplest way is to use the Gate facade, as in Example 9-11 (or you can inject an instance of Illuminate\Contracts\Auth\Access\Gate).
if(Gate::allows('update-contact',$contact)){// Update contact}// or...if(Gate::denies('update-contact',$contact)){abort(403);}
You might also define an ability with multiple parameters—maybe a contact can be in groups, and you want to authorize whether the user has access to add a contact to a group. Example 9-12 shows how to do this.
// DefinitionGate::define('add-contact-to-group',function($user,$contact,$group){return$user->id==$contact->user_id&&$user->id==$group->user_id;});// Usageif(Gate::denies('add-contact-to-group',[$contact,$group])){abort(403);}
And if you need to check authorization for a user other than the currently authenticated user, try forUser(), like in Example 9-13.
if(Gate::forUser($user)->denies('create-contact')){abort(403);}
The most common use for ACL is to define access to individual “resources” (think an Eloquent model, or something you’re allowing users to administer from their admin panel).
The resource() method makes it possible to apply the four most common gates, view, create, update, and delete, to a single resource at once:
Gate::resource('photos','App\Policies\PhotoPolicy');
This is equivalent to defining the following:
Gate::define('photos.view','App\Policies\PhotoPolicy@view');Gate::define('photos.create','App\Policies\PhotoPolicy@create');Gate::define('photos.update','App\Policies\PhotoPolicy@update');Gate::define('photos.delete','App\Policies\PhotoPolicy@delete');
If you want to authorize entire routes, you can use the Authorize middleware (which has a shortcut of can), like in Example 9-14.
Route::get('people/create',function(){// Create person...})->middleware('can:create-person');Route::get('people/{person}/edit',function(){// Edit a person...})->middleware('can:edit,person');
Here, the {person} parameter (whether it’s defined as a string or as a bound route model) will be passed to the ability method as an additional parameter.
The first check in Example 9-14 is a normal ability, but the second is a policy, which we’ll talk about in “Policies”.
If you need to check for an action that doesn’t require a model instance (for example, create, unlike edit, doesn’t get passed an actual route-model-bound instance), you can just pass the classname:
Route::post('people',function(){// Create a person...})->middleware('can:create,App\Person');
The parent App\Http\Controllers\Controller class in Laravel imports the AuthorizesRequests trait, which provides three methods for authorization: authorize(), authorizeForUser(), and authorizeResource().
authorize() takes an ability key and an object (or array of objects) as parameters, and if the authorization fails, it’ll quit the application with a 403 (Unauthorized) status code. That means this feature can turn three lines of authorization code into just one, as you can see in Example 9-15.
// From this:publicfunctionedit(Contact$contact){if(Gate::cannot('update-contact',$contact)){abort(403);}returnview('contacts.edit',['contact'=>$contact]);}// To this:publicfunctionedit(Contact$contact){$this->authorize('update-contact',$contact);returnview('contacts.edit',['contact'=>$contact]);}
authorizeForUser() is the same, but allows you to pass in a User object instead of defaulting to the currently authenticated user:
$this->authorizeForUser($user,'update-contact',$contact);
authorizeResource(), called once in the controller constructor, maps a predefined set of authorization rules to each of the RESTful controller methods in that controller—something like Example 9-16.
...classContactsControllerextendsController{publicfunction__construct(){// This call does everything you see in the methods below.// If you put this here, you can remove all authorize// calls in the individual resource methods here.$this->authorizeResource(Contact::class);}publicfunctionindex(){$this->authorize('view',Contact::class);}publicfunctioncreate(){$this->authorize('create',Contact::class);}publicfunctionstore(Request$request){$this->authorize('create',Contact::class);}publicfunctionshow(Contact$contact){$this->authorize('view',$contact);}publicfunctionedit(Contact$contact){$this->authorize('update',$contact);}publicfunctionupdate(Request$request,Contact$contact){$this->authorize('update',$contact);}publicfunctiondestroy(Contact$contact){$this->authorize('delete',$contact);}}
If you’re not in a controller, you’re more likely to be checking the capabilities of a specific user than the currently authenticated user. That’s already possible with the Gate facade using the forUser() method, but sometimes the syntax can feel a little off.
Thankfully, the Authorizable trait on the User class provides three methods to make a more readable authorization feature: $user->can(), $user->cant(), and $user->cannot(). As you can probably guess, cant() and cannot() do the same thing, and can() is their exact inverse.
That means you can do something like Example 9-17.
$user=User::find(1);if($user->can('create-contact')){// do something}
Behind the scenes, these methods are just passing your params to Gate; in the preceding example, Gate::forUser($user)->check('create-contact').
Blade also has a little convenience helper: a @can directive. Example 9-18 illustrates its usage.
<nav><ahref="/">Home</a>@can('edit-contact', $contact)<ahref="{{ route('contacts.edit', [$contact->id]) }}">Edit This Contact</a>@endcan</nav>
You can also use @else in between @can and @endcan, and you can use @cannot and @endcannot as in Example 9-19.
<h1>{{ $contact->name }}</h1>@cannot('edit-contact', $contact) LOCKED @endcannot
If you’ve ever built an app with an admin user class, you’ve probably looked at all of the simple authorization closures so far in this chapter and thought about how you could add a superuser class that overrides these checks in every case. Thankfully, there’s already a tool for that.
In AuthServiceProvider, where you’re already defining your abilities, you can also add a before() check that runs before all the others and can optionally override them, like in Example 9-20.
Gate::before(function($user,$ability){if($user->isOwner()){returntrue;}});
Note that the string name for the ability is also passed in, so you can differentiate your before hooks based on your ability naming scheme.
Up until this point, all of the access controls have required you to manually associate Eloquent models with the ability names. You could have created an ability named something like visit-dashboard that’s not related to a specific Eloquent model, but you’ll probably have noticed that most of our examples have had to do with doing something to something—and in most of these cases, the something that’s the recipient of the action is an Eloquent model.
Authorization policies are organizational structures that help you group your authorization logic based on the resource you’re controlling access to. They make it easy to manage defining authorization rules for behavior toward a particular Eloquent model (or other PHP class), all together in a single location.
Policies are PHP classes, which can be generated with an Artisan command:
php artisan make:policy ContactPolicy
Once they’re generated, they need to be registered. The AuthServiceProvider has a $policies property, which is an array. The key of each item is the class name of the protected resource (usually, but not always, an Eloquent class), and the value is the policy class name:
classAuthServiceProviderextendsServiceProvider{protected$policies=[Contact::class=>ContactPolicy::class,];
A policy class that’s generated by Artisan doesn’t have any special properties or methods. But every method that you add is now mapped as an ability key for this object.
Let’s define an update() method to take a look at how it works (Example 9-21).
<?phpnamespaceApp\Policies;classContactPolicy{publicfunctionupdate($user,$contact){return$user->id==$contact->user_id;}}
Notice that the contents of this method look exactly like they would in a Gate definition.
In Laravel 5.2, if you want to define a policy method that relates to the class but not a specific instance—for example, “can this user create contacts at all?” rather than just “can this user view this specific contact?”—create that method and add “Any” at the end of its name:
...classContactPolicy{publicfunctioncreateAny($user){return$user->canCreateContacts();}
In Laravel 5.3, you can drop the Any suffix and treat this just like a normal method.
If there’s a policy defined for a resource type, the Gate will use the first parameter to figure out which method to check on your policy. If you run Gate::allows('update', $contact), it will check the ContactPolicy@update method for authorization.
This also works for the Authorize middleware and for User model checking and Blade checking, as seen in Example 9-22.
// Gateif(Gate::denies('update',$contact)){abort(403);}// Gate if you don't have an explicit instanceif(!Gate::check('create',Contact::class)){abort(403);}// Userif($user->can('update',$contact)){// Do stuff}// Blade@can('update',$contact)<!--showstuff-->@endcan
Additionally, there’s a policy() helper that allows you to retrieve a policy class and run its methods:
if(policy($contact)->update($user,$contact)){// Do stuff}
Just like with normal ability definitions, policies can define a before() method that allows you to override any call before it’s even processed (see Example 9-23).
publicfunctionbefore($user,$ability){if($user->isAdmin()){returntrue;}}
Application tests often need to perform a particular behavior on behalf of a particular user. We therefore need to be able to authenticate as a user in application tests, and we need to test authorization rules and authentication routes.
Of course, it’s possible to write an application test that manually visits the login page and then fills out the form and submits it, but that’s not necessary. Instead, the simplest option is to use the ->be() method to simulate being logged in as a user. Take a look at Example 9-24.
publicfunctiontest_it_creates_a_new_contact(){$user=factory(User::class)->create();$this->be($user);$this->post('contacts',['email'=>'my@email.com']);$this->assertDatabaseHas('contacts',['email'=>'my@email.com','user_id'=>$user->id,]);}
You can also use, and chain, the actingAs() method instead of be(), if you prefer how it reads:
publicfunctiontest_it_creates_a_new_contact(){$user=factory(User::class)->create();$this->actingAs($user)->post('contacts',['email'=>'my@email.com']);$this->assertDatabaseHas('contacts',['email'=>'my@email.com','user_id'=>$user->id,]);}
We can also test authorization like in Example 9-25.
publicfunctiontest_non_admins_cant_create_users(){$user=factory(User::class)->create(['admin'=>false]);$this->be($user);$this->post('users',['email'=>'my@email.com']);$this->assertDatabaseMissing('users',['email'=>'my@email.com']);}
Or we can test for a 403 response like in Example 9-26.
publicfunctiontest_non_admins_cant_create_users(){$user=factory(User::class)->create(['admin'=>false]);$this->be($user);$response=$this->post('users',['email'=>'my@email.com']);$response->assertStatus(403);}
We need to test that our authentication (sign up and sign in) routes work too, as illustrated in Example 9-27.
publicfunctiontest_users_can_register(){$this->post('register',['name'=>'Sal Leibowitz','email'=>'sal@leibs.net','password'=>'abcdefg123','password_confirmation'=>'abcdefg123',]);$this->assertDatabaseHas('users',['name'=>'Sal Leibowitz','email'=>'sal@leibs.net',]);}publicfunctiontest_users_can_log_in(){$user=factory(User::class)->create(['password'=>Hash::make('abcdefg123')]);$this->post('login',['email'=>$user->,'password'=>'abcdefg123',]);$this->assertTrue(auth()->check());$this->assertTrue($user->is(auth()->user()));}
You could also use the integration test features to direct the test to “click” your authentication fields and “submit” the fields to test the entire flow. We’ll talk about that more in Chapter 12.
In projects running versions of Laravel prior to 5.4, assertDatabaseHas should be replaced by seeInDatabase, assertDatabaseMissing should be replaced by dontSeeInDatabase, assertDatabaseHas should be replaced by seeInDatabase, and assertStatus should be called on $this instead of $response.
Between the default User model, the create_users_table migration, the auth controllers, and the auth scaffold, Laravel comes with a full user authentication system out of the box. The RegisterController handles user registration, the LoginController handles user authentication, and the ResetPasswordController and the ForgotPasswordController handle password resets. Each has certain properties and methods that can be used to override some of the default behavior.
The Auth facade and the auth() global helper provide access to the current user (auth()->user()) and makes it easy to check whether a user is logged in (auth()->check() and auth()->guest()).
Laravel also has an authorization system built in that allows you to define specific abilities (create-contact, visit-secret-page) or define policies for user interaction with entire models.
You can check for authorization with the Gate facade, the ->can() and ->cannot() methods on the User class, the @can and @cannot directives in Blade, the ->authorize() methods on the controller, or the can middleware.
We’ve already covered the Illuminate Request object a bit—how you can typehint it in constructors to get an instance or use the request() helper to retrieve it, and then use that to get information about the user’s input. In Chapter 3, for example, you saw how you can typehint it in constructors to get an instance, and in Chapter 7 we looked at how you can use it to get information about the user’s input.
In this chapter, you’ll learn more about what that Request object is, how it’s generated and what it represents, and what part it plays in your application’s lifecycle. We’ll also talk about the Response object and Laravel’s implementation of the middleware pattern.
Every request coming into a Laravel application, whether generated by an HTTP request or a command-line interaction, is immediately converted into an Illuminate Request object, which then crosses many layers and ends up being parsed by the application itself. The application then generates an Illuminate Response object, which is sent back out across those layers and finally returned to the end user.
This request/response lifecycle is illustrated in Figure 10-1.
Let’s take a look at what it takes to make each of these steps happen, from the first line of code to the last.
Every Laravel application has some form of configuration set up at the web server level, in an Apache .htaccess file or an Nginx configuration setting or something similar, that captures every web request regardless of URL and routes it to public/index.php in the Laravel application directory (app).
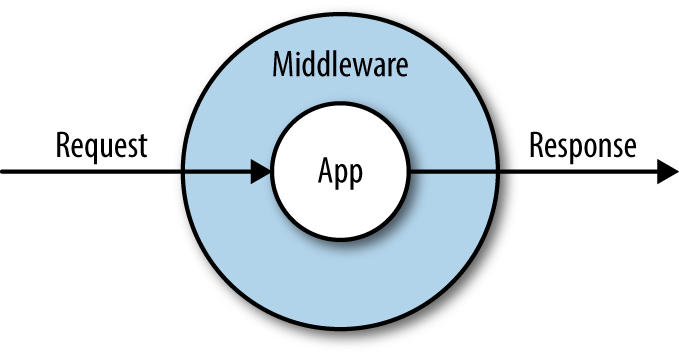
index.php doesn’t actually have that much code in it. It has three primary functions.
First, it loads Composer’s autoload file, which registers all of the Composer-loaded dependencies.
Next, it kicks off Laravel’s bootstrap, creating the application container (you’ll learn more about the container in Chapter 11) and registering a few core services (including the kernel, which we’ll talk about in just a bit).
Finally, it creates an instance of the kernel, creates a request representing the current user’s web request, and passes the request to the kernel to handle. The kernel responds with an Illuminate Response object, which index.php then returns to the end user, and terminates the page request.
The kernel is the core router of every Laravel application, responsible for taking in a user request, processing it through middleware and handling exceptions and passing it to the page router, and then returning the final response. There are actually two kernels, but only one is used for each page request. One of the routers handles web requests (the HTTP kernel) and the other handles console, cron, and Artisan requests (the console kernel). Each has a handle() method that’s responsible for taking in an Illuminate Request object and returning an Illuminate Response object.
The kernel runs all of the bootstraps that need to run before every request, including determining which environment the current request is running in (staging, local, production, etc.) and running all of the service providers. The HTTP kernel additionally defines the list of middleware that will wrap each request, including the core middleware responsible for sessions and CSRF protection.
While there’s a bit of procedural code in these bootstraps, almost all of Laravel’s bootstrap code is separated into something Laravel calls service providers. A service provider is a class that encapsulates logic that various parts of your application need to run in order to bootstrap their core functionality.
For example, there’s an AuthServiceProvider that bootstraps all of the registrations necessary for Laravel’s authentication system and a RouteServiceProvider that bootstraps the routing system.
The concept of service providers can be a little hard to understand at first, so think about it this way: many components of your application have bootstrap code that needs to run when the application initializes. Service providers are a tool for grouping that bootstrap code into related classes. If you have any code that needs to run in preparation for your application code to work, it’s a strong candidate for a service provider.
For example, if you ever find that the feature you’re working on requires some classes registered in the container (you’ll learn more about this in Chapter 11), you would create a service provider just for that piece of functionality. You might have a GitHubServiceProvider or a MailerServiceProvider.
Service providers have two important methods: boot() and register(). There’s also a $defer property that you might choose to use. Here’s how they work.
First, all of the service providers’ register() methods are called. This is where we want to bind classes and aliases to the container. You don’t want to do anything in register() that relies on the entire application being bootstrapped.
Second, all of the service providers’ boot() methods are called. You can now do any other bootstrapping here, like binding event listeners or defining routes—anything that may rely on the entire Laravel application having been bootstrapped.
If your service provider is only going to register bindings in the container (i.e., teach the container how to resolve a given class or interface), but not perform any other bootstrapping, you can “defer” its registrations, which means they won’t run unless one of their bindings is explicitly requested from the container. This can speed up your application’s average time to bootstrap.
If you want to defer your service provider’s registrations, first give it a protected $defer property and set it to true, and then give it a provides() method that returns a list of bindings the provider provides, as shown in Example 10-1.
...classGitHubServiceProviderextendsServiceProvider{protected$defer=true;publicfunctionprovides(){return[GitHubClient::class,];}
Service providers also have a suite of methods and configuration options that can provide advanced functionality to the end user when the provider is published as part of a Composer package. Take a look at the service provider definition in the Laravel source to learn more about how this can work.
Now that we’ve covered the application bootstrap, let’s take a look at the Request object, the most important output of the bootstrap.
The Illuminate Request class is a Laravel-specific extension of Symfony’s HttpFoundation\Request object.
Each Request object is intended to represent every relevant piece of information you could care to know about a user’s HTTP request.
In native PHP code, you might find yourself looking to $_SERVER, $_GET, $_POST, and other combinations of globals and processing logic to get information about the current user’s request. What files has the user uploaded? What’s his IP address? What fields did he post? All of this is sprinkled around the language—and your code—in a way that’s hard to understand and harder to mock.
Symfony’s Request object instead collects all of the information necessary to represent a single HTTP request into a single object, and then tacks on convenience methods to make it easy to get useful information from it. The Illuminate Request object adds even more convenience methods to get information about the request it’s representing.
You’ll very likely never need to do this in a Laravel app, but if you ever need to capture your own Illuminate Request directly from PHP’s globals, you can use the capture() method:
$request=Illuminate\Http\Request::capture();
Laravel creates an internal request object for each request, and there are a few ways you can get access to it.
First—and again, we’ll cover this more in Chapter 11—you can typehint the class in any constructor or method that’s resolved by the container. That means you can typehint it in a controller method or a service provider, as seen in Example 10-2.
...useIlluminate\Http\Request;classPeopleControllerextendsController{publicfunctionindex(Request$request){$allInput=$request->all();}
You can also use the request() global helper, which allows you to call methods on it (e.g., request()->input()) and also allows you to call it on its own to get an instance of $request:
$request=request();$allInput=$request->all();// or:$allInput=request()->all();
And you can also use the app() global method to get an instance of Request. You can pass either the fully qualified class name or the shortcut, request:
$request=app(Illuminate\Http\Request::class);$request=app('request');
Now that you know how to get an instance of Request, what can you do with it? The primary purpose of the Request object is to represent the current HTTP request, so the primary functionality the Request class offers is to make it easy to get useful information about the current request.
I’ve categorized the methods described here, but note that there’s certainly overlap between the categories, and the categories are a bit arbitrary—for example, query parameters could just as easily be in “User and request state” as they are in “Basic user input.” Hopefully these categories will make it easy for you to learn, and then you can throw away the categories.
Also, be aware that there are many more methods available on the Request object; these are just the most commonly used methods.
The basic user input methods make it simple to get information that the users themselves explicitly provide—likely through submitting a form or an Ajax component. When I reference “user-provided input” here, I’m talking about input from query strings (GET), form submissions (POST), or JSON:
all() returns an array of all user-provided input.
input(fieldName) returns the value of a single user-provided input field.
only(fieldName|[array,of,field,names]) returns an array of all user-provided input for the specified field name(s).
except(fieldName|[array,of,field,names]) returns an array of all user-provided input except for the specified field name(s).
exists(fieldName) returns a boolean of whether the field exists in the input. has() is an alias.
filled(fieldName) returns a boolean of whether the field exists in the input and is not empty (that is, has a value).
json() returns a ParameterBag if the page had JSON sent to it.
json(keyName) returns the value of the given key from JSON sent to the page.
Example 10-3 gives a few quick examples of how to use the user-provided information methods from a request.
// form<formmethod="POST"action="/form">@csrf<inputname="name">Name<br><inputtype="submit"></form>
// route receiving the formRoute::post('form',function(Request$request){echo'name is '.$request->input('name').'<br>';echo'all input is '.print_r($request->all()).'<br>';echo'user provided email address: '.$request->has('email')?'true':'false';});
The user and request state methods include input that wasn’t explicitly provided by the user through a form:
method() returns the method (GET, POST, PATCH, etc.) used to access this route.
path() returns the path (without the domain) used to access this page; e.g., for http://www.myapp.com/abc/def it would return abc/def.
url() returns the URL (with the domain) used to access this page; e.g., for http://www.myapp.com/abc it would return http://www.myapp.com/abc.
is() returns a boolean of whether or not the current page request fuzzy-matches a provided string (e.g., /a/b/c would be matched by $request->is('*b*'), where * stands for any characters). It uses a custom regex parser found in Str::is.
ip() returns the user’s IP address.
header() returns an array of headers (e.g., ['accept-language' => ['en-US,en;q=0.8']]), or, if passed a header name as a parameter, returns just that header.
server() returns an array of the variables traditionally stored in $_SERVER (e.g., REMOTE_ADDR), or, if passed a $_SERVER variable name, returns just that value.
secure() returns a boolean of whether this page was loaded using HTTPS.
pjax() returns a boolean of whether this page request was loaded using Pjax.
wantsJson() returns a boolean of whether this request has any /json content types in its Accept headers.
isJson() returns a boolean of whether this page request has any /json content types in its Content-Type header.
accepts() returns a boolean of whether this page request accepts a given content type.
So far, all of the input we’ve covered is either explicit (retrieved by methods like all(), input(), etc.) or defined by the browser or referring site (retrieved by methods like pjax()). File inputs are similar to explicit user input, but they’re handled much differently:
file() returns an array of all uploaded files, or, if a key is passed (the file upload field name), returns just the one file.
allFiles() also returns an array of all uploaded files; useful as opposed to file() because of clearer naming.
hasFile() returns a boolean of whether a file was uploaded at the specified key.
Every file that’s uploaded will be an instance of Symfony\Component\HttpFoundation\File\UploadedFile, which provides a suite of tools for validating, processing, and storing uploaded files.
Take a look at Chapter 14 for more examples of how to handle uploaded files.
The request can also provide functionality for interacting with the session. Most session functionality lives elsewhere, but there are a few methods that are particularly relevant to the current page request:
flash() flashes the current request’s user input to the session to be retrieved later, which means it’s saved to the session but disappears after the next request.
flashOnly() flashes the current request’s user input for any keys in the provided array.
flashExcept() flashes the current requests’s user input, except for any keys in the provided array.
old() returns an array of all previously flashed user input, or, if passed a key, returns the value for that key if it was previously flashed.
flush() wipes all previously flashed user input.
cookie() retrieves all cookies from the request, or, if a key is provided, retrieves just that cookie.
hasCookie() returns a boolean of whether the request has a cookie for the given key.
The flash*() and old() methods are used for storing user input and retrieving it later, often after the input is validated and rejected.
Similar to the Request object, there’s an Illuminate Response object that represents the response your application is sending to the end user, complete with headers, cookies, content, and anything else used for sending the end user’s browser instructions on rendering a page.
Just like Request, the Illuminate\Http\Response object extends a Symfony class: Symfony\Component\HttpFoundation\Response. This is a base class with a series of properties and methods that make it possible to represent and render a response; Illuminate’s Response class decorates it with a few helpful shortcuts.
Before we talk about how you can customize your response objects, let’s step back and see how we most commonly work with response objects.
In the end, any response object returned from a route definition will be converted into an HTTP response. It may define specific headers or specific content, set cookies, or whatever else, but eventually it will be converted into a response your users’ browsers can parse.
Let’s take a look at the simplest possible response, in Example 10-4.
Route::get('route',function(){returnnewIlluminate\Http\Response('Hello!');});// Same, using global function:Route::get('route',function(){returnresponse('Hello!');});
We create a response, give it some core data, and then return it. We can also customize the HTTP status, headers, cookies, and more, like in Example 10-5.
Route::get('route',function(){returnresponse('Error!',400)->header('X-Header-Name','header-value')->cookie('cookie-name','cookie-value');});
We define a header on a response by using the header() fluent method, like in Example 10-5. The first parameter is the header name and the second is the header value.
We can also set cookies directly on the response object if we’d like. We’ll cover Laravel’s cookie handling a bit more in Chapter 14, but take a look at Example 10-6 for a simple use case for attaching cookies to a response.
returnresponse($content)->cookie('signup_dismissed',true);
There are also a few special response types for views, downloads, files, and JSON. Each is a predefined macro that makes it easy to reuse particular templates for headers or content structure.
In Chapter 4, I used the global view() helper to show how to return a template—for example, view('view.name.here’) or something similar. But if you need to customize headers, HTTP status, or anything else when returning a view, you can use the view() response type as shown in Example 10-7.
Route::get('/',function(XmlGetterService$xml){$data=$xml->get();returnresponse()->view('xml-structure',$data)->header('Content-Type','text/xml');});
Sometimes you want your application to force the user’s browser to download a file, whether you’re creating the file in Laravel or serving it from a database or a protected location. The download() response type makes this simple.
The required first parameter is the path for the file you want the browser to download. If it’s a generated file, you’ll need to save it somewhere temporarily.
The optional second parameter is the filename for the downloaded file (e.g., export.csv). If you don’t pass a string here, it will be generated automatically. The optional third parameter allows you to pass an array of headers. Example 10-8 illustrates the use of the download() response type.
publicfunctionexport(){returnresponse()->download('file.csv','export.csv',['header'=>'value']);}publicfunctionotherExport(){returnresponse()->download('file.pdf');}
If you wish to delete the original file from the disk after returning a download response you can chain on the deleteFileAfterSend() method after your download() method:
publicfunctionexport(){returnresponse()->download('file.csv','export.csv')->deleteFileAfterSend();}
The file response is similar to the download response, except it allows the browser to display the file instead of forcing a download. This is most common with images and PDFs.
The required first parameter is the filename, and the optional second parameter can be an array of headers (see Example 10-9).
publicfunctioninvoice($id){returnresponse()->file("./invoices/{$id}.pdf",['header'=>'value']);}
JSON responses are so common that, even though they’re not really particularly complex to program, there’s a custom response for them as well.
JSON responses convert the passed data to JSON (with json_encode()) and set the Content-Type to application/json. You can also optionally use the setCallback() method to create a JSONP response instead of JSON, as seen in Example 10-10.
publicfunctioncontacts(){returnresponse()->json(Contact::all());}publicfunctionjsonpContacts(Request$request){returnresponse()->json(Contact::all())->setCallback($request->input('callback'));}publicfunctionnonEloquentContacts(){returnresponse()->json(['Tom','Jerry']);}
Redirects aren’t commonly called on the response() helper, so they’re a bit different from the other custom response types we discussed already, but they’re still just a different sort of response. Redirects, returned from a Laravel route, send the user a redirect (often a 301) to another page or back to the previous page.
You technically can call a redirect from response(), as in return response()->redirectTo('/'). But more commonly you’ll use the redirect-specific global helpers.
There is a global redirect() function that can be used to create redirect responses, and a global back() function that is a shortcut to redirect()->back().
Just like most global helpers, the redirect() global function can either be passed parameters or can be used to get an instance of its class that you then chain method calls onto. If you don’t chain, but just pass parameters, redirect() performs the same as redirect()->to(); it takes a string and redirects to that string URL. Example 10-11 shows some examples of its use.
returnredirect('account/payment');returnredirect()->to('account/payment');returnredirect()->route('account.payment');returnredirect()->action('AccountController@showPayment');// If redirecting to an external domainreturnredirect()->away('https://tighten.co');// If named route or controller needs parameters:returnredirect()->route('contacts.edit',['id'=>15]);returnredirect()->action('ContactsController@edit',['id'=>15]);
You can also redirect “back” to the previous page, which is especially useful when handling and validating user input. Example 10-12 shows a common pattern in validation contexts.
publicfunctionstore(){// If validation fails...returnback()->withInput();}
Finally, you can redirect and flash data to the session at the same time. This is common with error and success messages, like in Example 10-13.
Route::post('contacts',function(){// store the contact...returnredirect('dashboard')->with('message','Contact created!');});Route::get('dashboard',function(){// Get the flashed data from session--usually handled in Blade templateechosession('message');});
You can also create your own custom response types using “macros”. This allows you to define a series of modifications to make to the response and its provided content.
Let’s re-create the json() custom response type, just to see how it works. As always, you should probably create a custom service provider for these sorts of bindings, but for now we’ll just put it in AppServiceProvider, as seen in Example 10-14.
...classAppServiceProvider{publicfunctionboot(){Response::macro('myJson',function($content){returnresponse(json_encode($content))->withHeaders(['Content-Type'=>'application/json']);});}
Then, we can use it just like we would use the predefined json macro:
returnresponse()->myJson(['name'=>'Sangeetha']);
This will return a response with the body of that array encoded for JSON, with the JSON-appropriate Content-Type header.
If you’d like to customize how you’re sending responses and a macro isn’t enough space or enough organization, or if you want any of your objects to be capable of being returned as a “response” with their own logic of how to be displayed, the Responsable interface is for you.
The Responsable interface, Illuminate\Contracts\Support\Responsable, dictates its implementors must have a toResponse() method. This needs to return an Illuminate Response object. Let’s take a look at an example, in Example 10-15.
...useIlluminate\Contracts\Support\Responsable;classMyJsonimplementsResponsable{publicfunction__construct($content){$this->content=$content;}publicfunctiontoResponse(){returnresponse(json_encode($this->content))->withHeaders(['Content-Type'=>'application/json']);}
Then, we can use it just like with our custom macro:
returnnewMyJson(['name'=>'Sangeetha']);
Unsurprisingly, this looks like a lot of work relative to the response macros we covered earlier. But responsables really shine when you’re working with more complicated controller manipulations. One common example is to use responsables to create view models (or view objects), like in Example 10-16.
...useIlluminate\Contracts\Support\Responsable;classGroupDonationDashboardimplementsResponsable{publicfunction__construct($group){$this->group=$group;}publicfunctionbudgetThisYear(){// ...}publicfunctiongiftsThisYear(){// ...}publicfunctiontoResponse(){returnview('groups.dashboard')->with('annual_budget',$this->budgetThisYear())->with('annual_gifts_received',$this->giftsThisYear());}
It starts to make a little bit more sense in this context. Move your complex view preparation into a dedicated, testable object. Keep your controllers clean. Here’s a controller that uses that responsable object:
...classGroupController{publicfunctionindex(Group$group){returnnewGroupDonationsDashboard($group);}
The Responsable interface was introduced in Laravel 5.5.
Take a look back at Figure 10-1, at the start of this chapter.
We’ve covered the requests and responses, but we haven’t actually looked into what middleware is. You may already be familiar with middleware; it’s not unique to Laravel, but rather a widely-used architecture pattern.
The idea of middleware is that there is a series of layers wrapping around your application, like a multilayer cake or an onion 1. Just as shown in Example 10-1, every request passes through every middleware layer on its way into the application, and then the resulting response passes back through the middleware layers on its way out to the end user.
Middleware is most often considered separate from your application logic, and usually is constructed in a way that should theoretically be applicable to any application, not just the one you’re working on at the moment.
Middleware can inspect a request and decorate it, or reject it, based on what it finds. That means middleware is great for something like rate limiting: it can inspect the IP address, check how many times it’s accessed this resource in the last minute, and send back a 429 (Too Many Requests) status if a threshold is passed.
Because middleware also gets access to the response on its way out of the application, it’s great for decorating responses. For example, Laravel uses a middleware to add all of the queued cookies from a given request/response cycle to the response right before it is sent to the end user.
But some of the most powerful uses of middleware come from the fact that it can be nearly the first and the last thing to interact with the request/response cycle. That makes it perfect for something like enabling sessions—PHP needs you to open the session very early and close it very late, and middleware is also great for this.
Let’s imagine we want to have a middleware that rejects every request that uses the DELETE HTTP method, and also sends a cookie back for every request.
There’s an Artisan command to create custom middleware. Let’s try it out:
php artisan make:middleware BanDeleteMethod
You can now open up the file at app/Http/Middleware/BanDeleteMethod.php. The default contents are shown in Example 10-17.
...classBanDeleteMethod{publicfunctionhandle($request,Closure$next){return$next($request);}}
How this handle() method represents the processing of both the incoming request and the outgoing response is the most difficult thing to understand about middleware, so let’s walk through it.
First, remember that middleware are layered one on top of another, and then finally on top of the app. The first middleware that’s registered gets first access to a request when it comes in, then that request is passed to every other middleware in turn, then to the app; then the resulting response is passed outward through the middleware, and finally this first middleware gets last access to the response when it goes out.
Let’s imagine we’ve registered BanDeleteMethod as the first middleware to run. That means the $request coming into it is the raw request, unadulterated by any other middleware. Now what?
Passing that request to $next() means handing it off to the rest of the middleware. The $next() closure just takes that $request and passes it to the handle() method of the next middleware in the stack. It then gets passed on down the line until there are no more middleware to hand it to, and it finally ends up at the application.
Next, how does the response come out? This is where it might be hard to follow. The application returns a response, which is passed back up the chain of middleware—because each middleware returns its response. So, within that same handle() method, the middleware can decorate a $request and pass it to the $next() closure, and can then choose to do something with the output it receives before finally returning that output to the end user. Let’s look at some pseudocode to make this clearer (Example 10-18).
...classBanDeleteMethod{publicfunctionhandle($request,Closure$next){// At this point, $request is the raw request from the user.// Let's do something with it, just for fun.if($request->ip()==='192.168.1.1'){returnresponse('BANNED IP ADDRESS!',403);}// Now we've decided to accept it. Let's pass it on to the next// middleware in the stack. We pass it to $next(), and what is// returned is the response after the $request has been passed// down the stack of middleware to the application and the// application's response has been passed back up the stack.$response=$next($request);// At this point, we can once again interact with the response// just before it is returned to the user$response->cookie('visited-our-site',true);// Finally, we can release this response to the end userreturn$response;}}
Finally, let’s make the middleware do what we actually promised (Example 10-19).
...classBanDeleteMethod{publicfunctionhandle($request,Closure$next){// Test for the DELETE methodif($request->method()==='DELETE'){returnresponse("Get out of here with that delete method",405);}$response=$next($request);// Assign cookie$response->cookie('visited-our-site',true);// Return responsereturn$response;}}
We’re not quite done yet. We need to register this middleware in one of two ways: globally or for specific routes.
Global middleware are applied to every route; route middleware are applied on a route-by-route basis.
Both bindings happen in app/Http/Kernel.php. To add a middleware as global, add its class name to the $middleware property, as in Example 10-20.
// app/Http/Kernel.phpprotected$middleware=[\Illuminate\Foundation\Http\Middleware\CheckForMaintenanceMode::class,\App\Http\Middleware\BanDeleteMethod::class,];
Middleware intended for specific routes can be added as a route middleware or as part of a middleware group. Let’s start with the former.
Route middleware are added to the $routeMiddleware array in app/Http/Kernel.php. It’s similar to adding them to $middleware, except we have to give one a key that will be used when applying this middleware to a particular route, as seen in Example 10-21.
// app/Http/Kernel.phpprotected$routeMiddleware=['auth'=>\App\Http\Middleware\Authenticate::class,...'ban-delete'=>\App\Http\Middleware\BanDeleteMethod::class,];
We can now use this middleware in our route definitions, like in Example 10-22.
// Doesn't make much sense for our current example...Route::get('contacts','ContactsController@index')->middleware('ban-delete');// Makes more sense for our current example...Route::prefix('api')->middleware('ban-delete')->group(function(){// All routes related to an API});
Laravel 5.2 introduced the concept of middleware groups. They’re essentially pre-packaged bundles of middleware that make sense to be together in specific contexts.
The default routes file in earlier releases of 5.2, routes.php, had three distinct sections: the root route (/) wasn’t under any middleware group, and then there was a web middleware group and an api middleware group. It was a bit confusing for new users, and that meant the root route didn’t have access to the session or anything else that’s kicked off in the middleware.
In later versions of 5.2 everything’s simplified: every route in routes.php is in the web middleware group. In 5.3 and later, you get a routes/web.php file for web routes and a routes/api.php file for API routes. If you want to add routes in other groups, read on.
Out of the box there are two groups: web and api. web has all the middleware that will be useful on almost every Laravel page request, including middleware for cookies, sessions, CSRF protection, and more. api has none of those—it has a throttle middleware and a route model binding middleware, and that’s it. These are all defined in app/Http/Kernel.php.
You can apply middleware groups to routes just like you apply route middleware to routes, with the middleware() fluent method:
Route::get('/','HomeController@index')->middleware('web');
You can also create your own middleware groups and add and remove route middleware to and from preexisting middleware groups. It works just like adding route middleware normally, but you’re instead adding them to keyed groups in the $middlewareGroups array.
You might be wondering how these middleware groups match up with the two default routes files. Unsurprisingly, the routes/web.php file is wrapped with the web middleware group, and the routes/api.php file is wrapped with the api middleware group.
The routes/* files are loaded in the RouteServiceProvider. Take a look at the map() method there (Example 10-23) and you’ll find a mapWebRoutes() and a mapApiRoutes() method, each of which loads its respective files already wrapped in the appropriate middleware group.
// App\Providers\RouteServiceProviderpublicfunctionmap(){$this->mapApiRoutes();$this->mapWebRoutes();}protectedfunctionmapApiRoutes(){Route::prefix('api')->middleware('api')->namespace($this->namespace)->group(base_path('routes/api.php'));}protectedfunctionmapWebRoutes(){Route::middleware('web')->namespace($this->namespace)->group(base_path('routes/web.php'));}
As you can see in Example 10-23, we’re using the router to load a route group under the default namespace (App\Http\Controllers) and with the web middleware group, and another under the api middleware group.
It’s not common, but there are times when you need to pass parameters to a route middleware. For example, you might have an authentication middleware that will act differently depending on whether you’re guarding for the member user type or the owner user type:
Route::get('company',function(){returnview('company.admin');})->middleware('auth:owner');
To make this work, you’ll need to add one or more parameters to the middleware’s handle() method, and update that method’s logic accordingly:
publicfunctionhandle($request,$next,$role){if(auth()->check()&&auth()->user()->hasRole($role)){return$next($request);}returnredirect('login');}
Note that you can also add more than one parameter to the handle() method, and pass multiple parameters to the route definition by separating them with commas:
Route::get('company',function(){returnview('company.admin');})->middleware('auth:owner,view');
If you use any Laravel tools to generate URLs within the app, you’ll notice that Laravel detects whether the current request was via http or https and will generate any links using the appropriate protocol.
However, this doesn’t always work when you have a proxy (e.g. a load balancer, or other web-based proxy) in front of your app. Many proxies send non-standard headers like X_FORWARDED_PORT and X_FORWARDED_PROTO to your app, and expect your app to “trust” those, interpret them, and use them as a part of the process of interpreting the HTTP request. In order to make Laravel correctly treat proxied https calls like secure calls, and in order for Laravel to process other headers from proxied requests, you need to define how it should do so.
You likely don’t just want to allow any proxy to send traffic to your app; rather, you want to lock your app to only trust only certain proxies, and even from those proxies you may only want to trust certain forwarded headers.
Since Laravel 5.6, the package TrustedProxy is included by default with every installation of Laravel, but if you’re using an older version you can still pull it into your package. TrustedProxy makes it possible for you to whitelist certain sources of traffic and mark them as “trusted”, and also mark which forwarded headers you want to trust from those sources and how to map them to normal headers.
To configure which proxies your app will trust, you can edit the App\Http\Middleware\TrustProxies middleware and add the IP address for your load balancer or proxy to the $proxies array:
/*** The trusted proxies for this application.** @var array*/protected$proxies=['192.168.1.1','192.168.1.2',];/*** The headers that should be used to detect proxies.** @var string*/protected$headers=Request::HEADER_X_FORWARDED_ALL;
As you can see, the $headers array defaults to trusting all forwarded headers from the trusted proxies; if you want to customize this list, take a look at the Symfony docs on trusting proxies.
Outside of the context of you as a developer using requests, responses, and middleware in your own testing, Laravel itself actually uses each quite a bit.
When you’re doing application testing with calls like $this->get('/'), you’re instructing Laravel’s application testing framework to generate request objects that represent the interactions that you’re describing. Then those request objects are passed to your application as if it were an actual visit. That’s why the application tests are so accurate: your application doesn’t actually “know” that it’s not a real user that’s interacting with it.
In this context, many of the assertions you’re making—say, assertResponseOk()—are assertions against the response object generated by the application testing framework. The assertResponseOk() method just looks at the response object and asserts that its isOk() method returns true—which is just checking that its status code is 200. In the end, everything in application testing is acting as if this were a real page request.
Find yourself in a context where you need a request to work with in your tests? You can always pull one from the container with $request = request(). Or you could create your own—the constructor parameters for the Request class, all optional, are as follows:
$request=newIlluminate\Http\Request($query,// GET array$request,// POST array$attributes,// "attributes" array; empty is fine$cookies,// cookies array$files,// files array$server,// servers array$content// raw body data);
If you’re really interested in an example, check out the method Symfony uses to create a new Request from the globals PHP provides: Symfony\Component\HttpFoundation\Request@createFromGlobals().
Responses are even simpler to create manually, if you need to. Here are the (optional) parameters:
$response=newIlluminate\Http\Response($content,// response content$status,// HTTP status, default 200$headers// array headers array);
Finally, if you need to disable your middleware during an application test, import the WithoutMiddleware trait into that test. You can also use the $this->withoutMiddleware() method to disable middleware just for a single test method.
Every request coming into a Laravel application is converted into an Illuminate Request object, which then passes through all middleware, and is processed by the application. The application generates a response object, which is then passed back through all of the middleware (in reverse order) and returned to the end user.
Request and response objects are responsible for encapsulating and representing every relevant piece of information about the incoming user request and the outgoing server response.
Service providers collect together related behavior for binding and registering classes for use by the application.
Middleware wrap the application and can reject or decorate any request and response.
1 or an ogre
Laravel’s service container, or dependency injection container, sits at the core of almost every other feature. The container is a simple tool you can use to bind and resolve concrete instances of classes and interfaces, and at the same time it’s a powerful and nuanced manager of a network of interrelated dependencies. In this chapter, you’ll learn more about what it is, how it works, and how you can use it.
You’ll notice in this book, in the documentation, and in other educational sources that there are quite a few names folks use for the container. These include:
Application container
IoC (inversion of control) container
Service container
DI (dependency injection) container
All are useful and valid, but just know they’re all talking about the same thing. They’re all referring to the service container.
Dependency injection means that, rather than being instantiated (“newed up”) within a class, each class’s dependencies will be injected in from the outside. This most commonly occurs with constructor injection, which means an object’s dependencies are injected when it’s created. But there’s also setter injection, where the class exposes a method specifically for injecting a given dependency, and method injection, where one or more methods expect their dependencies to be injected when they’re called.
Take a look at Example 11-1 for a quick example of constructor injection, the most common type of dependency injection.
<?phpclassUserMailer{protected$mailer;publicfunction__construct(Mailer$mailer){$this->mailer=$mailer;}publicfunctionwelcome($user){return$this->mailer->($user->,'Welcome!');}}
As you can see, this UserMailer class expects an object of type Mailer to be injected when it’s instantiated, and its methods then refer to that instance.
The primary benefits of dependency injection are that it gives us the freedom to change what we’re injecting, mock dependencies for testing, and instantiate shared dependencies just once for shared use.
As you saw in Example 11-1, the most common pattern for dependency injection is constructor injection, or injecting the dependencies of an object when it’s instantiated (“constructed”).
Let’s take our UserMailer class from Example 11-1. Example 11-2 shows what it might look like to create and use an instance of it.
$mailer=newMailgunMailer($mailgunKey,$mailgunSecret,$mailgunOptions);$userMailer=newUserMailer($mailer);$userMailer->welcome($user);
Now let’s imagine we want our UserMailer class to be able to log messages, as well as sending a notification to a Slack channel every time it sends a message. Example 11-3 shows what this would look like. As you can see, it would start to get pretty unwieldy if we had to do all this work every time we wanted to create a new instance—especially when you consider that we’ll have to get all these parameters from somewhere.
$mailer=newMailgunMailer($mailgunKey,$mailgunSecret,$mailgunOptions);$logger=newLogger($logPath,$minimumLogLevel);$slack=newSlack($slackKey,$slackSecret,$channelName,$channelIcon);$userMailer=newUserMailer($mailer,$logger,$slack);$userMailer->welcome($user);
Imagine having to write that code every time you wanted a UserMailer. Dependency injection is great, but this is a mess.
Before we go too far into how the container actually works, let’s take a quick look at the simplest way to get an object out of the container: the app() helper.
Pass any string to that helper, whether it’s a fully qualified class name (FQCN, like App\ThingDoer) or a Laravel shortcut (we’ll talk about those more in a second), and it’ll return an instance of that class:
$logger=app(Logger::class);
This is the absolute simplest way to interact with the container. It creates an instance of this class and returns it for you. Nice and easy. Like new Logger but, as we’ll cover shortly, much better.
Creating the Logger instance as shown here seems simple enough, but you might’ve noticed that our $logger class in Example 11-3 has two parameters: $logPath and $minimumLogLevel. How does the container know what to pass here?
Short answer: it doesn’t. You can use the app() global helper to create an instance of a class that has no parameters in its constructor, but at that point you could’ve just run new Logger yourself. The container shines when there’s some complexity in the constructor, and that’s when we need to look at how exactly the container can figure out how to construct classes with constructor parameters.
Before we dig further into the Logger class, take a look at Example 11-4.
classBar{publicfunction__construct(){}}classBaz{publicfunction__construct(){}}classFoo{publicfunction__construct(Bar$bar,Baz$baz){}}$foo=app(Foo::class);
This looks similar to our mailer example in Example 11-3. What’s different is that these dependencies (Bar and Baz) are both so simple that the container can resolve them without any further information. The container reads the typehints in the Foo constructor, resolves an instance of both Bar and Baz, and then injects them into the new Foo instance when it’s creating it. This is called autowiring: resolving instances based on type-hints without the developer needing to explicitly bind those classes in the container.
Autowiring means that, if a class has not been explicitly bound to the container (like Foo, Bar, or Baz in this context) but the container can figure out how to resolve it anyway, the container will resolve it. This means any class with no constructor dependencies (like Bar and Baz) and any class with constructor dependencies that the container can resolve (like Foo) can be resolved out of the container.
That leaves us only needing to bind classes that have unresolvable constructor parameters—for example, our $logger class in Example 11-3, which has parameters related to our log path and log level.
For those, we’ll need to learn how to explicitly bind something to the container.
Binding a class to Laravel’s container is essentially telling the container, “If a developer asks for an instance of Logger, here’s the code to run in order to instantiate one with the correct parameters and dependencies and then return it correctly.”
We’re teaching the container that, when someone asks for this particular string (which is usually the FQCN of a class), it should resolve it this way.
So, let’s look at how to bind to the container. Note that the appropriate place to bind to the container is in a service provider’s register() method (see Example 11-5).
// In any service provider (maybe LoggerServiceProvider)publicfunctionregister(){$this->app->bind(Logger::class,function($app){returnnewLogger('\log\path\here','error');});}
There are a few important things to note in this example. First, we’re running $this->app->bind(). $this->app is an instance of the container that’s always available on every service provider. The container’s bind() method is what we use to bind to the container.
The first parameter of bind() is the “key” we’re binding to. Here we’ve used the FQCN of the class. The second parameter differs depending on what you’re doing, but essentially it should be something that shows the container what to do to resolve an instance of that bound key.
So, in this example, we’re passing a closure. And now, any time someone runs app(Logger::class), they’ll get the result of this closure. The closure is passed an instance of the container itself ($app), so if the class you’re resolving has a dependency you want resolved out of the container, you can use it in your definition:
// Note that this binding is not doing anything technically useful, since this// could all be provided by the container's auto-wiring already$this->app->bind(UserMailer::class,function($app){returnnewUserMailer($app->make(Mailer::class),$app->make(Logger::class),$app->make(Slack::class));});
Note that every time you ask for a new instance of your class, this closure will be run again and the new output returned.
If you want the output of the binding closure to be cached so that this closure isn’t re-run every time you ask for an instance, that’s the Singleton pattern, and you can run $this->app->singleton() to do that:
publicfunctionregister(){$this->app->singleton(Logger::class,function(){returnnewLogger('\log\path\here','error');});}
You can also get similar behavior if you already have an instance of the object you want the singleton to return:
publicfunctionregister(){$logger=newLogger('\log\path\here','error');$this->app->instance(Logger::class,$logger);}
Finally, if you want to alias one class to another, bind a class to a shortcut, or bind a shortcut to a class, you can just pass two strings:
// Asked for Logger, give FirstLogger$this->app->bind(Logger::class,FirstLogger::class);// Asked for log, give FirstLogger$this->app->bind('log',FirstLogger::class);// Ask for log, give FirstLogger$this->app->alias(FirstLogger::class,'log');
Note that these shortcuts are common in Laravel’s core; it provides a system of shortcuts to classes that provide core functionality, using easy-to-remember keys like log.
Just like we can bind a class to another class, or a class to a shortcut, we can also bind to an interface. This is extremely powerful, because we can now typehint interfaces instead of class names, like in Example 11-6.
...useInterfaces\MailerasMailerInterface;classUserMailer{protected$mailer;publicfunction__construct(MailerInterface$mailer){$this->mailer=$mailer;}}
// service providerpublicfunctionregister(){$this->app->bind(\Interfaces\Mailer::class,function(){returnnewMailgunMailer(...);});}
You can now typehint Mailer or Logger interfaces all across your code, and then choose once in a service provider which specific mailer or logger you want to use everywhere. That’s inversion of control.
One of the key benefits we get from using this pattern is that later, if you choose to use a different mail provider than Mailgun, as long as you have a mailer class for that new provider that implements the Mailer interface, you can swap it once in your service provider and everything in the rest of your code will just work.
Sometimes you need to change how to resolve an interface depending on the context. You might want to log events from one place to a local syslog and from others out to an external service. So, let’s tell the container to differentiate—check out Example 11-7.
// In a service providerpublicfunctionregister(){$this->app->when(FileWrangler::class)->needs(Interfaces\Logger::class)->give(Loggers\Syslog::class);$this->app->when(Jobs\SendWelcomeEmail::class)->needs(Interfaces\Logger::class)->give(Loggers\PaperTrail::class);}
We’ve covered the concept of constructor injection, and we’ve looked at how the container makes it easy to resolve instances of a class or interface out of the container. You saw how easy it is to use the app() helper to make instances, and also how the container will resolve the constructor dependencies of a class when it’s creating it.
What we haven’t covered yet is how the container is also responsible for resolving many of the core operating classes of your application. For example, every controller is instantiated by the container. That means if you want an instance of a logger in your controller, you can simply typehint the logger class in your controller’s constructor, and when Laravel creates the controller, it will resolve it out of the container and that logger instance will be available to your controller. Take a look at Example 11-8 for an example.
...classMyControllerextendsController{protected$logger;publicfunction__construct(Logger$logger){$this->logger=$logger;}publicfunctionindex(){// Do something$this->logger->error('Something happened');}}
The container is responsible for resolving controllers, middleware, queue jobs, event listeners, and any other classes that are automatically generated by Laravel in the process of your application’s lifecycle—so any of those classes can typehint dependencies in their constructors and expect them to be automatically injected.
There are a few places in your application where Laravel doesn’t just read the constructor signature: it also reads the method signature and will inject dependencies for you there as well.
The most common place to use method injection is in controller methods. If you have a dependency you only want to use for a single controller method, you can inject it into just that method like in Example 11-9.
...classMyControllerextendsController{// Method dependencies can come after or before route parameterspublicfunctionshow(Logger$logger,$id){// Do something$logger->error('Something happened');}}
This is also available on the boot() method of service providers, and you can also arbitrarily call a method on any class using the container, which will allow for method injection there (see Example 11-10).
classFoo{publicfunctionbar($parameter1){}}// Calls the 'bar' method on Foo with a first parameter of "value"app()->call('Foo@bar',['parameter1'=>'value']);
makeWithAll of the primary tools for resolving a concrete instance of a class--app(), $container->make(), etc.--assume that all of the class’ dependencies can be resolved without passing anything in. But what if your class accepts a value in its constructor, instead of a dependency the container can resolve for you? Use the makeWith method:
classFoo{publicfunction__construct($bar){// ...}}$foo=$this->app->makeWith(Foo::class,['bar'=>'value']);
This is a bit of an edge case. Most classes that you’ll be resolving out of the container should only have dependencies injected into their constructors.
We’ve covered facades quite a bit so far in the book, but we haven’t actually talked about how they work.
Laravel’s facades are classes that provide simple access to core pieces of Laravel’s functionality. There are two trademark features of facades: first, they’re all available in the global namespace (\Log is an alias to \Illuminate\Support\Facades\Log), and second, they use static methods to access nonstatic resources.
Let’s take a look at the Log facade, since we’ve been looking at logging already in this chapter. In your controller or views you could use this call:
Log::alert('Something has gone wrong!');
Here’s what it would look like to make that same call without the facade:
$logger=app('log');$logger->alert('Something has gone wrong!');
As you can see, facades translate static calls (any method call that you make on a class itself, using ::, instead of on an instance) to normal method calls on instances.
If you’re in a namespaced class, you’ll want to be sure to import the facade at the top:
...useIlluminate\Support\Facades\Log;classControllerextendsController{publicfunctionindex(){// ...Log::error('Something went wrong!');}
So, let’s take a look at the Cache facade and see how it actually works.
First, open up the class Illuminate\Support\Facades\Cache. You’ll see something like Example 11-11.
<?phpnamespaceIlluminate\Support\Facades;classCacheextendsFacade{protectedstaticfunctiongetFacadeAccessor(){return'cache';}}
Every facade has a single method: getFacadeAccessor(). This defines the key that Laravel should use to look up this facade’s backing instance from the container.
In this instance, we can see that every call to the Cache facade is proxied to be a call to an instance of the cache shortcut from the container. Of course, that’s not a real class or interface name, so we know it’s one of those shortcuts I mentioned earlier.
So, here’s what’s really happening:
Cache::get('key');// is the same as...app('cache')->get('key');
There are a few ways to look up exactly what class each facade accessor points to, but checking the documentation is the easiest. There’s a table on the facades documentation page that shows you, for each facade, which container binding (shortcut, like cache) it’s connected to, and which class that returns. It looks like this:
| Facade | Class | Service Container Binding |
|---|---|---|
|
|
|
… |
… |
… |
|
|
|
Now that you have this reference, you can do three things.
First, you can always figure out what methods are available on a facade. Just find its backing class and look at the definition of that class, and you’ll know that any of its public methods are callable on the facade.
Second, you can figure out how to inject a facade’s backing class using dependency injection. If you ever want the functionality of a facade but prefer to use dependency injection, just typehint the facade’s backing class or get an instance of it with app() and call the same methods you would’ve called on the facade.
Third, you can see how to create your own facades. Create a class for the facade that extends Illuminate\Support\Facades\Facade, and give it a getFacadeAccessor() method, which returns a string. Make that string something that can be used to resolve your backing class out of the container—maybe just the FQCN of the class. Finally, you have to register the facade by adding it to the aliases array in config/app.php. Done! You just made your own facade.
Laravel 5.4 introduced a new concept called “Real-time facades”. Rather than creating a new class to make your class’ instance methods available as static methods, you can prefix your class’ fully-qualified class name with “Facades\”, and you can now use it as if it were a facade.
namespaceApp;classCharts{publicfunctionburndown(){// ...}}
<h2>Burndown Chart</h2>{{ Facades\App\Charts::burndown() }}
As you can see in Example 11-12, the non-static method burndown() becomes accessible as a static method on the real-time facade, which we create by prepending the class’ full name with “Facades”.
We’ve covered the basics of service providers in the previous chapter (see “Service Providers”). What’s most important with regard to the container is that you remember to register your bindings in the register() method of some service provider somewhere.
You can just dump loose bindings into App\Providers\AppServiceProvider, which is a bit of a catchall, but it’s generally better practice to create a unique service provider for each group of functionality you’re developing, and bind its classes in its unique register() method.
The ability to use inversion of control and dependency injection makes testing in Laravel extremely versatile. You can bind a different logger, for instance, depending on whether the app is live or under testing. Or you can change the transactional email service from Mailgun to a local email logger for easy inspection. Both of these swaps are actually so common that it’s even easier to make them using Laravel’s .env configuration files, but you can make similar swaps with any interfaces or classes you’d like.
The easiest way to do this is to explicitly re-bind classes and interfaces when you need them rebound, directly in the test. Example 11-13 shows how.
publicfunctiontest_it_does_something(){app()->bind(Interfaces\Logger,function(){returnnewDevNullLogger;});// do stuff}
If you need certain classes or interfaces re-bound globally for your tests (which is not a particularly common occurrence), you can do this either in the test class’s setUp() method or in Laravel’s TestCase base test’s setUp() method, as in Example 11-14.
classTestCaseextends\Illuminate\Foundation\Testing\TestCase{publicfunctionsetUp(){parent::setUp();app()->bind('whatever','whatever else');}}
When using something like Mockery, it’s common to create a mock or spy or stub of a class, and then re-bind that to the container in place of its referent.
Laravel’s service container has many names, but in the end its goal is to make it easy to define how to resolve certain string names as concrete instances. These string names are going to be the fully qualified class names of classes or interfaces, or shortcuts like log.
Each binding teaches the application, given a string key (e.g., app('log')), how to resolve a concrete instance.
The container is smart enough to do recursive dependency resolution, so if you try to resolve an instance of something that has constructor dependencies, the container will try to resolve those dependencies based on their typehints, then pass them into your class, and finally return an instance.
There are a few ways to bind to the container, but in the end they all define what to return given a particular string.
Facades are simple shortcuts that make it easy to use static calls on a root-namespace-aliased class to call nonstatic methods on classes resolved out of the container. Real-time facades allow you to treat any class like a facade by prepending its fully-qualified class name with “Facades\”.
Most developers know that testing your code is A Good Thing. We’re supposed to do it. We likely have an idea of why it’s good, and we might’ve even read some tutorials about how it’s supposed to work.
But the gap between knowing why you should test and knowing how to test is wide. Thankfully, tools like PHPUnit, Mockery, and PHPSpec have provided an incredible number of options for testing in PHP—but it can still be pretty overwhelming to get everything set up.
Out of the box, Laravel comes with baked-in integrations to PHPUnit (unit testing), Mockery (mocking), and Faker (creating fake data for seeding and testing). It also provides its own simple and powerful suite of application testing tools, which allow you to “crawl” your site’s URIs, submit forms, check HTTP status codes, and validate and assert against JSON. It also provides a robust frontend testing framework called Dusk that can even interact with your JavaScript applications and test against them. In case this hasn’t made it clear, we’re going to cover a lot of ground in this chapter.
To make it easy for you to get started, Laravel’s testing setup comes with sample application test that can run successfully the moment you create a new app. That means you don’t have to spend any time configuring your testing environment, and that’s one less barrier to writing your tests.
Tests in Laravel live in the tests folder. There are two files in the root: TestCase.php, which is the base root test which all of your tests will extend, and CreatesApplication.php, a trait (imported by TestCase.php) which allows any class to boot a sample Laravel application for testing.
You also have a folder for “Feature tests,” or tests which cover the broader interaction of multiple units, and “Unit tests”, which are intended to cover just one unit (class, module, function, etc.). Each of these folders contains an ExampleTest.php file, each of which have a single sample test inside them, ready to run.
In projects running versions of Laravel prior to 5.4, there will be only two files in the tests directory: ExampleTest.php, your sample test, and TestCase.php, your base test.
Additionally, if your app is pre-5.4, the syntax in all of the examples below will not be quite right. All the ideas are the same, but the syntax will be just a bit different across the board. You can learn more at the Laravel Docs for testing in 5.3 and before. Here are the four biggest changes:
In 5.3 and before, you’re not creating response objects; instead, you’re just calling methods on $this, and the test class stores the responses. So $response = $this->get('people’) in 5.4+ would look like $this->get('people’) in 5.3-.
Many of the assertions have been renamed in small ways in 5.4+ to make them look more like PHPUnit’s normal assertion names; e.g. assertSee instead of see.
Some of the “crawling” methods that in 5.4+ have been extracted out to browser-kit-testing were built into the core in 5.3-.
Dusk didn’t exist prior to 5.4.
Because testing prior to 5.4 was so different, I’ve made the testing chapter for the first edition of this book available as a free PDF. If you’re working with 5.3 or earlier, I’d recommend skipping this chapter in the book and using this PDF of the testing chapter from the first edition instead.
The ExampleTest in your Unit directory just has a simple assertion: $this->assertTrue(true). Anything in your unit tests is likely to be relatively simple PHPUnit syntax (asserting that values are equal or different, looking for entries in arrays, checking booleans, etc.), so there’s not much to learn there.
If you’re not yet familiar with PHPUnit, most of our assertions will be run on the $this object with this syntax:
$this->assertWHATEVER($expected,$real);
So, for example, if we’re asserting that two variables should be equal, we’ll pass it first our expected result, and second the actual outcome of the object or system we’re testing.
$multiplicationResult=$myCalculator->multiply(5,3);$this->assertEqual(15,$multiplicationResult);
As you can see in Example 12-1, the ExampleTest in the Feature directory makes a simulated HTTP request to the page at the root path of your application and checks that its HTTP status is 200 (successful). If it is, it’ll pass; if not, it’ll fail. Unlike your average PHPUnit test, we’re running these assertions on the TestResponse object that’s returned when we make test HTTP calls.
<?phpnamespaceTests\Feature;useTests\TestCase;useIlluminate\Foundation\Testing\RefreshDatabase;classExampleTestextendsTestCase{/*** A basic test example.** @return void*/publicfunctiontestBasicTest(){$response=$this->get('/');$response->assertStatus(200);}}
To run the tests, run ./vendor/bin/phpunit on the command line from the root folder of your application. You should see something like the output in Example 12-2.
PHPUnit 7.3.5 by Sebastian Bergmann and contributors. ..2/2(100%)Time:139ms, Memory: 12.00MB OK(2test,2assertions)
You just ran your first Laravel application test! As you can see, you’re set up out of the box not only with a functioning PHPUnit instance, but also a full-fledged application testing suite that can make mock HTTP calls and test your application’s responses. Further, you’ll soon learn that you have easy access to a fully-featured DOM crawler (“A quick intro to BrowserKit Testing”) and a regression testing tool with full JavaScript support (“Testing with Dusk”).
In case you’re not familiar with PHPUnit, let’s take a look at what it’s like to have a test fail. Instead of modifying that test, we’ll make our own. Run php artisan make:test FailingTest. This will create a file in tests/Feature/FailingTest.php; you can modify its testExample() method to the following:
publicfunctiontestExample(){$response=$this->get('/');$response->assertStatus(301);}
As you can see, it’s the exact same as our example test, but we’re now testing against the wrong status. Let’s run PHPUnit again.
If you want your test to be generated in the Unit directory instead of the Feature directory, pass the --unit flag:
php artisan make:test SubscriptionTest --unit
Whoops! This time the output will probably look a bit like Example 12-4.
PHPUnit 7.3.5 by Sebastian Bergmann and contributors. .F. 3 / 3 (100%) Time: 237 ms, Memory: 12.00MB There was 1 failure: 1) Tests\Feature\FailingTest::testExample Expected status code 301 but received 200. Failed asserting that false is true. /path-to-your-app/vendor/.../Foundation/Testing/TestResponse.php:124 /path-to-your-app/tests/Feature/FailingTest.php:20 FAILURES! Tests: 3, Assertions: 3, Failures: 1.
Let’s break this down. First, we now see a new “result” in the shortcut results (which were, last time, just two dots.) But this new result is an F instead of a ..
Then, for each error, it shows us the test name (here, FailingTest::testExample), the error message (Expected status code...), and a full stack trace of our error, so we can see what was called. Since this was an application test, the stack trace just shows us that it was called via the TestResponse class, but if this were a unit or feature test, we’d see the entire call stack of the test.
Now that we’ve run both a passing test and a failing test, it’s time for you to learn more about Laravel’s testing environment.
By default, Laravel’s testing system will run any files in the tests directory whose names end with the word Test. That’s why tests/ExampleTest.php was run by default.
If you’re not familiar with PHPUnit, you might not know that only the methods in your tests with names that start with the word test will be run—or methods with a @test docblock. See Example 12-5 for which methods will and won’t run.
classNamingTest{publicfunctiontest_it_names_things_well(){// Runs as "It names things well"}publicfunctiontestItNamesThingsWell(){// Runs as "It names things well"}/** @test */publicfunctionit_names_things_well(){// Runs as "It names things well"}publicfunctionit_names_things_well(){// Doesn't run}}
Any time a Laravel application is running, it has a current “environment” name that represents the environment it’s running in. This name may be set to local, staging, production, or anything else you want. You can retrieve this by running app()->environment(), or you can run something like if (app()->environment('local')) to test whether the current environment matches the passed name.
When you run tests, Laravel automatically sets the environment to testing. This means you can test for if (app()->environment('testing')) to enable or disable certain behaviors in the testing environment.
Additionally, Laravel doesn’t load the normal environment variables from .env for testing. If you want to set any environment variables for your tests, edit phpunit.xml and, in the <php> section, add a new <env> for each environment variable you want to pass in—for example, <env name="DB_CONNECTION" value="sqlite"/>.
Before we get into the methods you can use for testing, you need to know about the four testing traits you can pull into any test class.
Illuminate\Foundation\Testing\RefreshDatabase is imported at the top of every newly-generated test file, and it’s the most commonly-used database migration trait (we’ll cover the two less-common options later).
The point of this, and the other database traits, is to ensure your database tables are correctly migrated at the start of each test.
RefreshDatabase takes two steps to do this. First, it runs your migrations on your test database once at the beginning of each test run (not the individual test methods, but just when you’re running phpunit). And second, it wraps each individual test method in a database transaction, and rolls back the transaction at the end of the test.
That means you have your database migrated for your tests, cleared out fresh after each test runs, and all this without having to run your migrations again before every test, making it the fastest possible option. When in doubt, stick with this.
If you import Illuminate\Foundation\Testing\WithoutMiddleware into your test class, it will disable all middleware for any test in that class. This means you won’t have to worry about the authentication middleware, or CSRF protection, or anything else that might be useful in the real application but distracting in a test.
If you’d like to disable middleware for just a single method, instead of the entire test class, call $this->withoutMiddleware() at the top of the method for that test.
If you import the Illuminate\Foundation\Testing\DatabaseMigrations trait instead of the RefreshDatabase trait, it will run your entire set of database migrations fresh before each test. Laravel makes this happen by running php artisan migrate:fresh in the setUp() method before every test runs.
Illuminate\Foundation\Testing\DatabaseTransactions, on the other hand, expects your database to be properly migrated before your tests start. Then, it wraps every test in a database transaction, which it rolls back at the end of each test. This means that, at the end of each test, your database will be returned to the exact same state it was in prior to the test.
RefreshDatabase is only available in projects running Laravel 5.5 and later.
With simple unit tests, you almost don’t need any of these traits. You may reach for database access or inject something out of the container, but it’s very likely that unit tests in your applications won’t rely on the framework very much. Take a look at Example 12-6 for an example.
classGeometryTestextendsTestCase{publicfunctiontest_it_calculates_area(){$square=newSquare;$square->sideLength=4;$calculator=newGeometryCalculator;$this->assertEquals(16,$calculator->area($square));}
Obviously, this is a bit of a contrived example. But you can see here that we’re testing a single class (GeometryCalculator) and its single method (area()), and we’re doing so without worrying about the entire Laravel application.
Some unit tests might be testing something that technically is connected to the framework—for example, Eloquent models—but you can still test them without worrying about the framework. For example, in Example 12-7, we’ll use Package::make() instead of Package::create() so the object is created and evaluated in memory without ever hitting the database.
classPopularityTestextendsTestCase{useRefreshDatabase;publicfunctiontest_votes_matter_more_than_views(){$package1=Package::make(['votes'=>1,'views'=>0]);$package2=Package::make(['votes'=>0,'views'=>1]);$this->assertTrue($package1->popularity>$package2->popularity);}
Some people may call this an integration or feature test, since this “unit” will likely touch the database in actual usage and it’s connected to the entire Eloquent codebase. The most important point is that you can have simple tests that test a single class or method, even when the objects under test are framework-connected.
All of this said, it’s still going to be more likely that your tests—especially as you first get started—are broader and more at the “application” level. Accordingly, for the rest of the chapter we’re going to dig deeper into application testing.
In Laravel’s default ExampleTest (tests/Feature/ExampleTest.php) you can see that, with a few lines of code, we can “request” URIs in our application and actually check the status of the the response. But how can PHPUnit request pages as if it were a browser?
Any application tests should extend the TestCase class (tests/TestCase.php) that’s included with Laravel by default. Your application’s TestCase class will extend the abstract Illuminate\Foundation\Testing\TestCase class, which brings in quite a few goodies.
The first thing the two TestCase classes (yours and its abstract parent) do is handle booting the Illuminate application instance for you, so you have a fully bootstrapped application available. They also “refresh” the application between each test, which means they’re not entirely re-creating the application between tests, but rather making sure you don’t have any data lingering.
The parent TestCase also sets up a system of hooks that allow callbacks to be run before and after the application is created, and imports a series of traits that provide you with methods for interacting with every aspect of your application. These traits include InteractsWithContainer, MakesHttpRequests, InteractsWithConsole, and more, and they bring in a broad variety of custom assertions and testing methods.
As a result, your application tests have access to a fully bootstrapped application instance, application-test-minded custom assertions, with a series of simple and powerful wrappers around each to make them easy to use.
That means you can write $this->get('/')->assertStatus(200) and know that your application is actually behaving as if it were responding to a normal HTTP request, and that the response is being fully generated and then checked as a browser would check it. It’s pretty powerful stuff, considering how little work you had to do to get it running.
Let’s take a look at our options for writing HTTP-based tests. You’ve already seen $this->get('/'), but let’s dive deeper into how you can use that call, how you can assert against its results, and what other HTTP calls you can make.
At the very basic level, Laravel’s HTTP testing allows you to make simple HTTP requests (GET, POST, etc.) and then make simple assertions about their impact or response.
There are more tools we’ll cover later (BrowserKit Testing in “A quick intro to BrowserKit Testing” and Dusk in “Testing with Dusk”) that allow for more complex page interactions and assertions, but let’s start at the base level. Here are the calls you can make:
$this->get($uri, $headers = [])
$this->post($uri, $data = [], $headers = [])
$this->put($uri, $data = [], $headers = [])
$this->patch($uri, $data = [], $headers = [])
$this->delete($uri, $data = [], $headers = [])
These methods are all the basis of the HTTP testing framework. Each takes a least a URI (usually relative) and headers, and all but get() also allow for passing data along with the request.
And, importantly, each returns a $response object that represents the HTTP response. This response object is almost exactly the same as an Illuminate response object, the same thing we return out of our controllers. However, it’s actually an instance of Illuminate\Foundation\Testing\TestResponse, which wraps a normal Response with some assertions for testing.
Take a look at Example 12-8 to see a common usage of post() and a common response assertion.
publicfunctiontest_it_stores_new_packages(){$response=$this->post(route('packages.store'),['name'=>'The greatest package',]);$response->assertOk();}
In most examples like Example 12-8, you’ll also test that the record exists in the database and shows up on the index page and maybe that it doesn’t test successfully unless you define the package author and also if you’re logged in. But don’t worry, we’ll get to all of that. For now, you can make calls to your application routes with many different verbs and make assertions against both the response and the state of your application afterward. Great!
You can also make all of the same sort of HTTP tests with your JSON APIs. There are convenience methods for that, too:
$this->getJson($uri, $headers = [])
$this->postJson($uri, $data = [], $headers = [])
$this->putJson($uri, $data = [], $headers = [])
$this->patchJson($uri, $data = [], $headers = [])
$this->deleteJson($uri, $data = [], $headers = [])
These methods work just the same as the normal HTTP call methods, except they also add JSON-specific Accept, CONTENT_LENGTH, and CONTENT_TYPE headers. Take a look at Example 12-9 to see an example.
publicfunctiontest_the_api_route_stores_new_packages(){$response=$this->postJSON(route('api.packages.store'),['name'=>'The greatest package',],['X-API-Version'=>'17']);$response->assertOk();}
There are 38 assertions available on the $response object, so I recommend you take a look at all of them in the testing docs. Let’s look at a few of the most important and most common.
$response->assertOk()Asserts that the response’s status code is 200.
$response=$this->get('terms');$response->assertOk();
$response->assertStatus($status)Asserts that the response’s status code is equal to the provided $status.
$response=$this->get('admin');$response->assertStatus(401);// Un-authorized
$response->assertSee($text) and $response->assertDontSee($text)Asserts that the response contains (or doesn’t contain) the provided text.
$package=factory(Package::class)->create();$response=$this->get(route('packages.index'));$response->assertSee($package->name);
$response->assertJson(array $json, $strict = false)Asserts that the passed array is represented (in JSON format) in the returned JSON. The $strict parameter makes for a === comparison instead of a == comparison, which, to be honest, I have never used.
$this->postJson(route('packages.store'),['name'=>'GreatPackage2000']);$response=$this->getJson(route('packages.index'));$response->assertJson(['name'=>'GreatPackage2000']);
$response->assertViewHas($key, $value = null)Asserts that the view on the visited page had a piece of data available at ${$key}, and optionally it checks that the value of that variable was $value.
$package=factory(Package::class)->create();$response=$this->get(route('packages.show'));$response->assertViewHas('name',$package->name);
$response->assertSessionHas($key, $value = null)Asserts that the session has data set at $key, and it optionally checks that the value of that data is $value.
$response=$this->get('beta/enable');$response->assertSessionHas('beta-enabled',true);
$response->assertSessionHasErrors()With no parameters, asserts that there’s at least one error set in Laravel’s special errors session container. Its first parameter can be an array of key/value pairs that define the errors that should be set and its second parameter can be the string format that the checked errors should be formatted against, as demonstrated here:
// assuming the "/form" route requires an email field, and we're// posting an empty submission to it to trigger the error$response=$this->post('form',[]);$response->assertSessionHasErrors();$response->assertSessionHasErrors(['email'=>'The email field is required.']);$response->assertSessionHasErrors(['email'=>'<p>The email field is required.</p>'],'<p>:message</p>');
If you’re working with named error bags, you can pass the error bag name as the third parameter.
$response->assertCookie($name, $value = null)Asserts that the browser has been sent a cookie with name $name and, optionally, checks that its value is $value.
$response=$this->post('settings',['dismiss-warning']);$response->assertCookie('warning-dismiss',true);
$response->assertRedirect($uri)Asserts that the requested route returns a redirect to the given URI.
$response=$this->post(route('packages.store'),['email'=>'invalid']);$response->assertRedirect(route('packages.create'));
For each of these assertions, you can assume that there are many related assertions I haven’t listed here. For assertSessionHasErrors there’s also assertSessionHasNoErrors, and assertSessionHasErrorsIn. For assertJson there’s also assertJsonCount, assertJsonFragment, assertJsonMissing, assertJsonMissingExact, assertJsonStructure, and assertJsonValidationErrors. So, again, take a look at the docs and make yourself familiar with the whole list.
One piece of your application it’s common to test with application tests is authentication and authorization. Most of the time your needs will be met with the actingAs() chainable method, which takes a user (or other Authenticatable object, depending on how your system is set up), as you can see in Example 12-10.
publicfunctiontest_guests_cant_view_dashboard(){$user=factory(User::class)->states('guest')->create();$response=$this->actingAs($user)->get('dashboard');$response->assertStatus(401);// Unauthorized}publicfunctiontest_members_can_view_dashboard(){$user=factory(User::class)->states('member')->create();$response=$this->actingAs($user)->get('dashboard');$response->assertOk();}publicfunctiontest_members_and_guests_cant_view_statistics(){$guest=factory(User::class)->states('guest')->create();$response=$this->actingAs($guest)->get('statistics');$response->assertStatus(401);// Unauthorized$member=factory(User::class)->states('member')->create();$response=$this->actingAs($member)->get('statistics');$response->assertStatus(401);// Unauthorized}publicfunctiontest_admins_can_view_statistics(){$user=factory(User::class)->states('admin')->create();$response=$this->actingAs($user)->get('statistics');$response->assertOk();}
It’s common to use model factories in testing (learn more in “Model Factories”), and model factory states make tasks like creating users with different access levels simple.
If you’d like to set session variables on your requests, you can also chain withSession():
$response=$this->withSession(['alert-dismissed'=>true,])->get('dashboard');
If you’d prefer to set your request headers fluently, you can chain withHeaders():
$response=$this->withHeaders(['X-THE-ANSWER'=>'42'])->get('the-restaurant-at-the-end-of-the-universe');
Usually, an exception that’s thrown inside your application when you’re making HTTP calls will be captured by Laravel’s exception handler and processed as it would be in normal application. So, the test and route in Example 12-11 would still pass, since the exception would never bubble up the whole way to our test.
// routes/web.phpRoute::get('has-exceptions',function(){thrownewException('Stop!');});// tests/Feature/ExceptionsTest.phppublicfunctiontest_exception_in_route(){$this->get('/has-exceptions');$this->assertTrue(true);}
In a lot of cases, this might make sense; maybe you’re expecting a validation exception and you want it to be caught like it would normally be by the framework.
But if you want to temporarily disable the exception handler, that’s an option; just run $this->withoutExceptionHandling():
// tests/Feature/ExceptionsTest.phppublicfunctiontest_exception_in_route(){// Now throws an error$this->withoutExceptionHandling();$this->get('/has-exceptions');$this->assertTrue(true);}
And if, for some reason, you need to turn it back on (maybe you turned it off in setUp() but want it back on for just one test) you can run $this->withExceptionHandling().
Often, the effect we want to test for after our tests have run in is in the database. Imagine you’re wanting to test that the “create package” page works correctly. What’s the best way? Make an HTTP call the “store package” endpoint and then assert that that package exists in the database. It’s easier and safer than inspecting the resulting “list packages” page.
We have two primary assertions for the database: $this->assertDatabaseHas() and $this->assertDatabaseMissing(). For both, pass the table name as the first parameter, the data you’re looking for as the second, and, optionally, the specific database connection you want to test as the third.
Take a look at Example 12-12 to see how you might use them.
publicfunctiontest_create_package_page_stores_package(){$this->post(route('packages.store'),['name'=>'Package-a-tron',]);$this->assertDatabaseHas('packages',['name'=>'Package-a-tron']);}
As you can see, the second “data” parameter of assertDatabaseHas() is structured like a SQL WHERE statement—you pass a key and a value (or multiple keys and values), and then Laravel looks for any records in the specified database table that match your key(s) and value(s).
As always, assertDatabaseMissing() is the inverse.
Model factories are amazing tools that make it easy to seed randomized, well-structured database data for testing (or other purposes). You’ve already seen them in use in several examples in this chapter.
We’ve already covered them in depth, so check out “Model Factories” to learn more.
If you use seeds in your application, you can run the equivalent of php artisan db:seed by running $this->seed() in your test.
You can also pass a seeder class name to just seed that one class:
$this->seed();// Seeds all$this->seed(UserSeeder::class);// Seeds users
We’ll cover what fakes are in “Mocking”, but for now just know that there are a good number of Laravel systems that allow you to pause their true function for a test and instead write tests against what has happened to those systems.
Imagine you have an event that’s being dispatched (“user signed up”) and it has a listener that notifies a Slack channel that a user signed up. First, you don’t want those notifications to go to Slack every time you run your tests. But second, you might want to assert that the event was sent, or the listener was triggered, or something else. This, and much more, is why we’ll want to fake many aspects of Laravel in our tests; to pause the default behavior and instead make assertions against those systems.
Let’s use event fakes as our first example of how Laravel makes it possible to mock its internal systems.
First, there are likely going to be times where you want to fake your events just for the sake of suppressing their actions. For example, if you have your app pushing notifications to Slack every time a new user signed up, and that’s happening in an event listener, you might want all of your events to stop working in your tests.
Let’s take a look at how to suppress these events by calling the fake() method on use Illuminate\Support\Facades\Event in Example 12-13.
publicfunctiontest_controller_does_some_thing(){Event::fake();// Call controller and assert it does whatever you want without// worrying about it pinging Slack}
But once we’ve run the fake() method, we can also call special assertions on the Event facade; namely, assertDispatched() and assertNotDispatched(). Take a look at Example 12-14 to see them in use.
publicfunctiontest_signing_up_users_notifies_slack(){Event::fake();// Sign user up...Event::assertDispatched(UserJoined::class,function($event)use($user){return$event->user->id===$user->id;});// Or sign multiple users up and assert it was dispatched twice...Event::assertDispatched(UserJoined::class,2);// Or sign up with validation failures and assert it wasn't dispatched...Event::assertNotDispatched(UserJoined::class);}
Note that the (optional) closure we’re passing to assertDispatched() makes it so we’re not just asserting that the event was dispatched, but we’re also asserting that the dispatched event contains certain data.
Event::fake() also disables Eloquent model events. So if you have any important code, for example, in a models’ creating event, make sure to create your models (through your factories or however else) before calling Event::fake().
Each of the following features in Laravel have their own set of assertions you can make after faking them, but you can also just choose to fake them to restrict their effects.
The bus facade, which represents how Laravel dispatches jobs, works just like events. You can run fake() on it to disable the impact of your jobs, and after faking it you can run assertDispatched() or assertNotDispatched().
The queue facade also represents how Laravel dispatches jobs, but for when they’re pushed up to queues. Its available methods are assertedPushed(), assertPushedOn(), and assertNotPushed().
Take a look at Example 12-15 to see how to use both.
publicfunctiontest_popularity_is_calculated(){Bus::fake();// Synchronize package data...// Assert a job was dispatchedBus::assertDispatched(CalculatePopularity::class,function($job)use($package){return$job->package->id===$package->id;});// Assert a job was not dispatchedBus::assertNotDispatched(DestroyPopularityMaybe::class);}publicfunctiontest_popularity_calculation_is_queued(){Queue::fake();// Synchronize package data...// Assert a job was pushed to any queueQueue::assertPushed(CalculatePopularity::class,function($job)use($package){return$job->package->id===$package->id;});// Assert a job was pushed to a given queue named "popularity"Queue::assertPushedOn('popularity',CalculatePopularity::class);// Assert a job was pushed twice...Queue::assertPushed(CalculatePopularity::class,2);// Assert a job was not pushed...Queue::assertNotPushed(DestroyPopularityMaybe::class);}
The mail facade, when faked, offers four methods: assertSent(), assertNotSent(), assertQueued(), and assertNotQueued(). Use the Queued methods when your mail is queued and the Sent methods when it’s not.
Just like with assertDispatched, the first parameter will be the name of the mailable and the second parameter can be empty, the number of times the mailable has been sent, or a closure testing that the mailable has the right data in it. Take a look at Example 12-16 to see it in action.
publicfunctiontest_package_authors_receive_launch_emails(){::fake();// Make a package public for the first time...// Assert a message was sent to a given email address::assertSent(PackageLaunched::class,function()use($package){return->package->id===$package->id;});// Assert a message was sent to given email addresses::assertSent(PackageLaunched::class,function()use($package){return->hasTo($package->author->)&&->hasCc($package->collaborators)&&->hasBcc('admin@novapackages.com');});// Or, launch two packages...// Assert a mailable was sent twice::assertSent(PackageLaunched::class,2);// Assert a mailable was not sent...::assertNotSent(PackageLaunchFailed::class);}
All of the messages checking for recipients (hasTo(), hasCc(), and hasBcc()) can take either a single email address or an array or collection of addresses.
The notification facade, when faked, offers two methods: assertSentTo() and assertNothingSent().
Unlike the mail facade, you’re not going to test who it was sent to manually in a closure. Rather, the assertion itself requires the first parameter be either a single notifiable object or an array or collection of them. Only after you’ve passed in the desired notification target can you test anything about the notification itself.
The second parameter is the class name for the notification, and the (optional) third parameter can be a closure defining more expectations about the notification. Take a look at Example 12-17 to learn more.
publicfunctiontest_users_are_notified_of_new_package_ratings(){Notification::fake();// Perform package rating...// Assert author was notifiedNotification::assertSentTo($package->author,PackageRatingReceived::class,function($notification,$channels)use($package){return$notification->package->id===$package->id;});// Assert a notification was sent to the given usersNotification::assertSentTo([$package->collaborators],PackageRatingReceived::class);// Or, perform a duplicate package rating...// Assert a notification was not sentNotification::assertNotSentTo([$package->author],PackageRatingReceived::class);}
You may also find yourself wanting to assert that your channel selection is working—that notifications are sent via the right channels. You can test that as well, as you can see in Example 12-18.
publicfunctiontest_users_are_notified_by_their_preferred_channel(){Notification::fake();$user=factory(User::class)->create(['slack_preferred'=>true]);// Perform package rating...// Assert author was notified via SlackNotification::assertSentTo($user,PackageRatingReceived::class,function($notification,$channels)use($package){return$notification->package->id===$package->id&&in_array('slack',$channels);});
Testing files can be extraordinarily complex. Many traditional methods require you to actually move files around in your test directories, and formatting the form input and output can be very complicated.
Thankfully, if you use Laravel’s Storage facade, it’s endlessly simpler to test file uploads and other storage-related items.
publicfunctiontest_package_screenshot_upload(){Storage::fake('screenshots');// Upload a fake image$response=$this->postJson('screenshots',['screenshot'=>UploadedFile::fake()->image('screenshot.jpg')]);// Assert the file was storedStorage::disk('screenshots')->assertExists('screenshot.jpg');// Or, assert a file does not existStorage::disk('screenshots')->assertMissing('missing.jpg');}
Mocks (and their brethren, spies and stubs and dummies and fakes and any number of other tools) are common tools in testing. We’ve taken a look at fakes a bit here, but mainly from a surface level. I won’t go into great detail here, but it’s unlikely you can thoroughly test an application of any size without mocking at least one thing or another.
So here we will take a quick look at mocking in Laravel and how to use Mockery, a mocking library included in Laravel.
Essentially, mocks and other similar tools make it possible to create an object that in some way mimics a real class, but for testing purposes isn’t the real class. Sometimes this is done because the real class is too difficult to instantiate just to inject it into a test, or maybe the real class communicates with an external service.
As you can probably tell from the examples that follow, Laravel encourages working with the real application as much as possible—which means avoiding too great of a dependence on mocks. But they have their place, which is why Laravel includes Mockery, a mocking library, out of the box, and is why many of its core services offer faking utilities.
Mockery allows you to quickly and easily create mocks from any PHP class in your application. Imagine you have a class that depends on a Slack client, but you don’t want the calls to actually go out to Slack. Mockery makes it simple to create a fake Slack client to use in your tests, like you can see in Example 12-20.
// app/SlackClient.phpclassSlackClient{// ...publicfunctionsend($message,$channel){// Actually sends a message to Slack}}// app/Notifier.phpclassNotifier{private$slack;publicfunction__construct(SlackClient$slack){$this->slack=$slack;}publicfunctionnotifyAdmins($message){$this->slack->send($message,'admins');}}// tests/Unit/NotifierTest.phppublicfunctiontest_notifier_notifies_admins(){$slackMock=Mockery::mock(SlackClient::class)->shouldIgnoreMissing();$notifier=newNotifier($slackMock);$notifier->notifyAdmins('Test message');}
There are a lot of elements at work here, but if you look at them one by one, they make sense. We have a class named Notifier that we’re testing. It has a dependency named SlackClient that does something that we don’t want it to do when we’re running our tests: it sends actual Slack notifications. So we’re going to mock it.
We use Mockery to get a mock of our SlackClient class. If we don’t care about what happens to that class—if it should simply exist to keep our tests from throwing errors—we can just use shouldIgnoreMissing():
$slackMock=Mockery::mock(SlackClient::class)-shouldIgnoreMissing();
No matter what Notifier calls on $slackMock, it’ll just accept it and return null.
But take a look at test_notifier_notifies_admins(). At this point, it doesn’t actually test anything.
We could just keep shouldIgnoreMissing() and then write some assertions below it. That’s usually what we do with shouldIgnoreMissing(), which makes this object a “fake” or a “stub.”
But what if we want to actually assert that a call was made to the send() method of SlackClient? That’s when we drop shouldIgnoreMissing() and reach for the other should* methods (Example 12-21).
publicfunctiontest_notifier_notifies_admins(){$slackMock=Mockery::mock(SlackClient::class);$slackMock->shouldReceive('send')->once();$notifier=newNotifier($slackMock);$notifier->notifyAdmins('Test message');}
shouldReceive('send')->once() is the same as saying “assert that $slackMock will have its send() method called once and only once.” So, we’re now asserting that Notifier, when we call notifyAdmins(), must make a single call to the send method on SlackClient.
We could also use something like shouldReceive('send')->times(3) or shouldReceive('send')->never(). We can define what parameter we expect to be passed along with that send() call using with(), and we can define what to return with andReturn():
$slackMock->shouldReceive('send')->with('Hello, world!')->andReturn(true);
What if we wanted to use the IoC container to resolve our instance of the Notifier? This might be useful if Notifier had several other dependencies that we didn’t need to mock.
We can do that! We just use the instance() method on the container, as in Example 12-22, to tell Laravel to provide an instance of our mock to any classes that request it (which, in this example, will be Notifier).
publicfunctiontest_notifier_notifies_admins(){$slackMock=Mockery::mock(SlackClient::class);$slackMock->shouldReceive('send')->once();app()->instance(SlackClient::class,$slackMock);$notifier=app(Notifier::class);$notifier->notifyAdmins('Test message');}
There’s a lot more you can do with Mockery: you can use spies, and partial spies, and much more. Going deeper into how to use Mockery is out of the scope of this book, but I encourage you to learn more about the library and how it works at the Mockery docs.
There’s one other clever thing you can do with Mockery: you can use Mockery methods (e.g. shouldReceive()) on any facades in your app.
Imagine we have a controller method that uses a facade that’s not one of the fake-able systems we’ve already covered; we want to test that controller method and assert that a certain facade call was made.
Thankfully, it’s simple: we can run our Mockery-style methods on the facade, as you can see in Example 12-23.
// PeopleControllerpublicfunctionindex(){returnCache::remember('people',function(){returnPerson::all();});}// PeopleTestpublicfunctiontest_all_people_route_should_be_cached(){$person=factory(Person::class)->create();Cache::shouldReceive('remember')->once()->andReturn(collect([$person]));$this->get('people')->assertJsonFragment(['name'=>$person->name]);}
As you can see, you can use methods like shouldReceive() on the facades, just like you do on a Mockery object.
You can also use your facades as spies, which means you can set your assertions at the end and use shouldHaveReceived() instead of shouldReceive(). Example 12-24 illustrates this.
publicfunctiontest_package_should_be_cached_after_visit(){Cache::spy();$package=factory(Package::class)->create();$this->get(route('packages.show',[$package->id]));Cache::shouldHaveReceived('put')->once()->with('packages.'.$package->id,$package->toArray());}
We’ve covered a lot in this chapter, but we’re almost done! We have just two more pieces of Laravel’s testing arsenal to cover: Artisan and the browser.
If you’re working in Laravel prior to 5.7, the best way to test Artisan commands is to call them with $this->artisan($commandName, $parameters) and then test their impact, like in Example 12-25.
publicfunctiontest_promote_console_command_promotes_user(){$user=factory(User::class)->create();$this->artisan('user:promote',['userId'=>$user->id]);$this->assertTrue($user->isPromoted());}
You can also make assertions against the response code you are getting from Artisan, as you can see in Example 12-26.
$code=$this->artisan('do:thing',['--flagOfSomeSort'=>true]);$this->assertEquals(0,$code);// 0 means "no errors were returned"
If you’re working with Laravel 5.7 and later, you can also chain on three new methods to your $this->artisan() call: expectsQuestion(), expectsOutput(), and assertExitCode(). The expects methods will work on any of the interactive prompts, including confirm(), anticipate(), and more, and the assertExitCode() method is a shortcut to what we looked at in Example 12-26.
Take a look at Example 12-27 to see how it works.
// routes/console.phpArtisan::command('make:post {--expanded}',function(){$title=$this->ask('What is the post title?');$this->comment('Creating at '.str_slug($title).'.md');$category=$this->choice('What category?',['technology','construction'],0);// Create post here$this->comment('Post created');});
// Test filepublicfunctiontest_make_post_console_commands_performs_as_expected(){$this->artisan('make:post',['--expanded'=>true])->expectsQuestion('What is the post title?','My Best Post Now')->expectsOutput('Creating at my-best-post-now.md')->expectsQuestion('What category?','construction')->expectsOutput('Post created')->assertExitCode(0);}
As you can see, the first parameter of expectsQuestion() is the text we’re expecting to see from the question, and the second parameter is the text we’re answering with. expectsOutput() just tests that the passed string is returned.
We’ve made it to browser tests! With browser tests, you can actually interact with the DOM of your pages: click buttons, fill out and submit forms, and, with Dusk, even interact with JavaScript.
Laravel actually has two separate browser testing tools: BrowserKit Testing and Dusk. Dusk is actively maintained; BrowserKit Testing seems to have become a bit of a second class citizen, but it’s still available on GitHub and still works at the time of this writing.
When choosing a tool for browser testing, I suggest you use the core application testing tools whenever possible (those which we’ve covered up until this point). If your app is not JavaScript-based and you need to test actual DOM manipulation or form UI elements, use BrowserKit. If you’re developing a JavaScript-heavy app, you’ll likely want to use Dusk, which we’ll cover next.
However, there are many instances where you’ll want to use a JavaScript-based test stack (which is out of scope for this book) based on something like Jest and vue-test-utils. This toolset can be very useful for Vue component testing and Jest’s snapshot functionality simplifies the process of keeping API and frontend test data in sync. To learn more, check out this blog post from Caleb Porzio and this Laracon talk from Samantha Geitz.
If you’re working with a JavaScript framework other than Vue, there are no currently preferred frontend testing solutions in the Laravel world. However, the broad React world seems to have settled on Jest and Enzyme.
Dusk is a Laravel tool (installable as a Composer package) which makes it easy to write Selenium-style directions for a ChromeDriver-based browser to interact with your app. Unlike most other Selenium-based tools, Dusk’s API is simple and easy to write by hand. Take a look:
$this->browse(function($browser){$browser->visit('/register')->type('email','test@example.com')->type('password','secret')->press('Sign Up')->assertPathIs('/dashboard');});
With Dusk, there’s an actual browser spinning up your entire application and interacting with it. That means you can have complex interactions with your JavaScript and get screenshots of failure states; but it also means everything’s a bit slower and more prone to failure than Laravel’s base application testing suite.
Personally, I’ve found the greatest use in Dusk as a regression testing suite, to replace something like Selenium. Rather than using it for any sort of test-driven development, I’d use it to assert that the user experience hasn’t broken (“regressed”) as the app continues to develop. Think of this more like writing tests about your user interface after the interface is built.
The Dusk docs are robust, so I’m not going to go into great depth here, but I want to show you the basics of working with Dusk.
To install Dusk, run these two commands:
composer require --dev laravel/dusk php artisan dusk:install
Then edit your .env file to set your APP_URL variable to the same URL you use to view your site in your local browser; something like http://mysite.test.
To run your Dusk tests, just run php artisan dusk, and you can pass all the same parameters you’re used to from PHPUnit (e.g. php artisan dusk --filter=my_best_test).
To generate a new Dusk test, use the following command:
php artisan dusk:make RatingTest
This test will be placed in tests/Browser/RatingTest.php.
You can customize the environment variables for Dusk by creating a new file named .env.dusk.local (and you can replace .local if you’re working in a different environment, like “staging”).
To write your Dusk Tests, imagine that you’re directing one or more web browsers to go visit your application and take certain actions. That’s what the syntax will look like, as you can see in Example 12-28.
publicfunctiontestBasicExample(){$user=factory(User::class)->create();$this->browse(function($browser)use($user){$browser->visit('login')->type('email',$user->)->type('password','secret')->press('Login')->assertPathIs('/home');});}
$this->browse() creates a browser, which you pass into a closure, and then within the closure you instruct the browser which actions to take.
It’s important to note that, unlike Laravel’s other application testing tools, which mimic the behavior of your forms, Dusk is actually spinning up a browser, sending events to the browser to type those words, and then sending an event to the browser to press that button. This is a real browser and Dusk is fully driving it.
You can also “ask” for more than one browser by adding parameters to the closure, which allows you to test how multiple users might interact with the web site (for example, with a chat system). Take a look at this example from the docs:
$this->browse(function($first,$second){$first->loginAs(User::find(1))->visit('home')->waitForText('Message');$second->loginAs(User::find(2))->visit('home')->waitForText('Message')->type('message','Hey Taylor')->press('Send');$first->waitForText('Hey Taylor')->assertSee('Jeffrey Way');});
There’s a huge suite of actions and assertions available that we won’t cover here (check the docs), but let’s look at a few of the other tools Dusk provides.
As you can see in Example 12-29, the syntax for authentication is a little different from the rest of the Laravel application testing: $browser->loginAs($user).
Don’t use the RefreshDatabase trait with Dusk! Use the DatabaseMigrations trait; transactions, which RefreshDatabase uses, don’t last across requests.
If you’ve ever written jQuery, interacting with the page using Dusk will come naturally. Take a look at Example 12-30 to see the common patterns for selecting items with Dusk.
// Template<divclass="search"><input><buttonid="search-button"></button></div><buttondusk="expand-nav"></button>
// Dusk tests// Option 1: jQuery-style syntax$browser->click('.search button');$browser->click('#search-button');// Option 2: dusk="selector-here" syntax; recommended$browser->click('@expand-nav');
As you can see, adding the dusk attribute to your page elements allows you to reference them directly in a way that won’t change when the display or layout of the page changes later; when any method asks for a selector, pass in the @ sign and then the content of your dusk attribute.
Let’s take a look at a few of the methods you can call on $browser.
value($selector, $value = null)Returns the value of any text input if only one parameter is passed; sets the value of an input if a second parameter was passed.
text($selector)Gets the text content of a non-fillable item like a div or a span.
attribute($selector, $attributeName)Returns the value of a particular attribute on the element matching $selector.
type($selector, $valueToType)Similar to value(), but actually types the characters rather than directly setting the value.
With methods like type() that target inputs, Dusk will start by trying to match a Dusk or CSS selector, and then will try to look for an input with the provided name, and finally will try to find a textarea with the provided name.
select($selector, $optionValue)Selects the option with the value of $optionValue in a dropdown selectable by $selector.
check($selector) and uncheck($selector)Checks or unchecks a checkbox selectable by $selector.
radio($selector, $optionValue)Selects the option with the value of $optionValue in a radio group selectable by $selector.
attach($selector, $filePath)Attaches a file at $filePath to the file input selectable by $selector.
clickLink($selector)Follows a text link to its target.
click($selector) and mouseover($selector)Triggers a mouse click or a mouseover event on $selector.
drag($selectorToDrag, $selectorToDragTo)Drags an item to another item.
dragLeft(), dragRight(), dragUp(), and dragDown()Given a first parameter of a selector and a second parameter of a number of pixels, drags the selected item that many pixels in the given direction.
keys($selector, $instructions…)Sends keypress events within the context of $selector according to the instructions in $instructions. Take a look at Example 12-31 to see how to combine modifiers with your typing.
$browser->keys('selector','this is ',['{shift}','great']);
This would type “this is GREAT”; as you can tell, adding an array to the list of items to type allows you to combine modifiers (wrapped with {}) with typing. You can see a full list of the possible modifiers at the Facebook WebDriver source.
If you’d like to just send your key sequence to the page (for example, to trigger a “keyboard shortcut”), you can just target the top level of your app or page as your selector. For example, if it’s a Vue app and the top level is a div with an ID of app:
$browser->keys('#app',['{command}','/']);
Because Dusk interacts with JavaScript and is directing an actual browser, the concept of time and timeouts and “waiting” needs to be addressed. Dusk offers a few methods you can use to ensure your tests handle timing issues correctly. Some of these methods are useful for interacting with intentionally slow or delayed elements of the page, but some of them are also just useful for getting around initialization times on your components.
pause($milliseconds)Pauses the execution of Dusk tests for the given number of milliseconds. The simplest “wait” option; makes any future commands you send to the browser wait that amount of time before operating.
Take a look at Example 12-32 to see how to use this and other waiting methods in the midst of an assertion chain.
$browser->click('chat')->pause(500)->assertSee('How can we help?');
waitFor($selector, $maxSeconds = null) and waitForMissing($selector, $maxSeconds = null)Waits until the given element exists on the page (waitFor()) or disappears from the page (waitForMissing()), or times out after the optional second parameter’s second count.
$browser->waitFor('@chat',5);$browser->waitUntilMissing('@loading',5);
whenAvailable($selector, $callback)Similar to waitFor(), but accepts a closure as the second parameter which will define what action to take when the specified element becomes available.
$browser->whenAvailable('@chat',function($chat){$chat->assertSee('How can we help you?');});
waitForText($text, $maxSeconds = null)Waits for text to show up on the page, or times out after the optional second parameter’s second count.
$browser->waitForText('Your purchase has been completed.',5);
waitForLink($linkText, $maxSeconds = null)Waits for a link to exist with the given link text, or times out after the optional second parameter’s second count.
$browser->waitForLink('Clear these results',2);
waitForLocation($path)Waits until the page URL matches the provided path.
$browser->waitForLocation('auth/login');
waitForRoute($routeName)Waits until the page URL matches the URL for the provided route.
$browser->waitForRoute('packages.show',[$package->id]);
waitForReload()Waits until the page reloads.
waitUntil($expression)Waits until the provided JavaScript expression evaluates as true:
$browser->waitUntil('App.packages.length > 0',7);
As I’ve mentioned, there’s a huge list of assertions you can make against your app with Dusk. Here are a few that I use most commonly, and you can see the full list in the Dusk docs.
assertTitleContains($text)
assertQueryStringHas($keyName)
assertHasCookie($cookieName)
assertSourceHas($htmlSourceCode)
assertChecked($selector)
assertSelectHasOption($selectorForSelect, $optionValue)
assertVisible($selector)
assertFocused()
assertVue($dataLocation, $dataValue, $selector)
So far, everything we’ve covered makes it possible for you to test individual elements on your pages. But Dusk will often be used to test more complex applications and single-page apps, which means we’re going to need organizational structures around our assertions.
The first organizational structures we have encountered have been the Dusk attribute (<div dusk="abc"> creating a selector named @abc you can refer to later) and the closures we can use towrap certain portions of our code (for example, with whenAvailable()).
Dusk offers two more organizational tools: Pages and Components. Let’s start with pages.
A page is a class that you’ll generate which contains two pieces of functionality: first, a URL and assertions to define which page in your app should be attached to this Dusk page, and second, shorthand like we used inline (@abc generated by the dusk="abc" attribute in our HTML) but just for this page, and without needing to edit our HTML.
To generate your first Dusk page, let’s imagine we have a “create package” page of our app. Generate a Dusk page for it:
phpartisandusk:pageCreatePackage
Take a look at Example 12-33 to see what our generated class will look like.
<?phpnamespaceTests\Browser\Pages;useLaravel\Dusk\Browser;classCreatePackageextendsPage{/*** Get the URL for the page.** @return string*/publicfunctionurl(){return'/';}/*** Assert that the browser is on the page.** @param Browser $browser* @return void*/publicfunctionassert(Browser$browser){$browser->assertPathIs($this->url());}/*** Get the element shortcuts for the page.** @return array*/publicfunctionelements(){return['@element'=>'#selector',];}}
The url() method defines where Dusk should expect the location to be for this page; assert() lets you run additional assertions to verify you’re on the right page; and elements() provides shortcuts for @dusk-style selectors.
Let’s make a few quick modifications for our “create package” page, to make it look like Example 12-34.
classCreatePackageextendsPage{publicfunctionurl(){return'/packages/create';}publicfunctionassert(Browser$browser){$browser->assertTitleContains('Create Package');$browser->assertPathIs($this->url());}publicfunctionelements(){return['@title'=>'input[name=title]','@instructions'=>'textarea[name=instructions]',];}}
Now that we have a functional page, we can navigate to it, and access its defined elements:
// In a test$browser->visit(newTests\Browser\Pages\CreatePackage)->type('@title','My package title');
One common use for pages is to define a common action you want to take in your tests; consider these almost like macros for Dusk. You can define a method on your page and then call it from your code, as you can see in Example 12-35.
classCreatePackageextendsPage{// ... url(), assert(), elements()publicfunctionfillBasicFields(Browser$browser,$packageTitle='Best package'){$browser->type('@title',$packageTitle)->type('@instructions','Do this stuff and then that stuff');}}
$browser->visit(newCreatePackage)->fillBasicFields('Greatest Package Ever')->press('Create Package')->assertSee('Greatest Package Ever');
If you want the same functionality as Dusk pages offer, but without the constraint to a specific URL, you’ll likely want to reach for Dusk components. These classes are shaped very similarly to pages, but instead of being bound to a URL, they’re each bound to a selector.
In NovaPackages.com, we have a little Vue component for rating packages and displaying ratings. Let’s make a Dusk component for it.
php artisan dusk:component RatingWidget
Take a look at Example 12-36 to see what that will generate.
<?phpnamespaceTests\Browser\Components;useLaravel\Dusk\Browser;useLaravel\Dusk\ComponentasBaseComponent;classRatingWidgetextendsBaseComponent{/*** Get the root selector for the component.** @return string*/publicfunctionselector(){return'#selector';}/*** Assert that the browser page contains the component.** @param Browser $browser* @return void*/publicfunctionassert(Browser$browser){$browser->assertVisible($this->selector());}/*** Get the element shortcuts for the component.** @return array*/publicfunctionelements(){return['@element'=>'#selector',];}}
As you can see, this is basically the same as a Dusk page, but we’re encapsulating our work to an HTML element instead of a URL. Everything else is basically the same. Take a look at Example 12-37 to see our rating widget example in Dusk component form.
classRatingWidgetextendsBaseComponent{publicfunctionselector(){return'.rating-widget';}publicfunctionassert(Browser$browser){$browser->assertVisible($this->selector());}publicfunctionelements(){return['@5-star'=>'.five-star-rating','@4-star'=>'.four-star-rating','@3-star'=>'.three-star-rating','@2-star'=>'.two-star-rating','@1-star'=>'.one-star-rating','@average'=>'.average-rating','@mine'=>'.current-user-rating',];}publicfunctionratePackage(Browser$browser,$rating){$browser->click("@{$rating}-star")->assertSeeIn('@mine',$rating);}}
Using components works just like using pages, as you can see in Example 12-38.
$browser->visit('/packages/tightenco/nova-stock-picker')->within(newRatingWidget,function($browser){$browser->ratePackage(2);$browser->assertSeeIn('@average',2);});
That’s a good, brief overview of what Dusk can do. There’s a lot more—more assertions, more edge cases, more gotcha’s, more examples—in the Dusk docs, so I’d recommend a read through there if you plan to work with Dusk.
Laravel can work with any modern PHP testing framework, but it’s optimized for PHPUnit, especially if your tests extend Laravel’s TestCase. Laravel’s application testing framework makes it simple to send fake HTTP and console requests through your application and inspect the results.
Tests in Laravel can easily and powerfully interact and assert against the database, cache, session, filesystem, mail, and much more. Quite a few of these systems have fakes built-in to make them even easier to test. You can test DOM and browser-like interactions with BrowserKit Testing or Dusk.
Laravel brings in Mockery in case you need mocks, stubs, spies, dummies, or anything else, but the testing philosophy of Laravel is to use real collaborators as much as possible. Don’t fake it unless you have to.
One of the most common tasks Laravel developers are given is to create an API, usually JSON and REST or REST-like, that allows third parties to interact with the Laravel application’s data.
Laravel makes it incredibly easy to work with JSON, and its resource controllers are already structured around REST verbs and patterns. In this chapter you’ll learn about some basic API-writing concepts, the tools Laravel provides for writing APIs, and some external tools and organizational systems you’ll want to consider when writing your first Laravel API.
Representational State Transfer (REST) is an architectural style for building APIs. Technically, REST is either a broad definition that could apply to almost the entirety of the Internet or something so specific that no one actually uses it, so don’t let yourself get overwhelmed by the definition or caught in an argument with a pedant. When we talk about RESTful or REST-like APIs in the Laravel world, we’re generally talking about APIs with a few common characteristics:
Structured around “resources” that can be uniquely represented by URIs, like /cats for all cats, /cats/15 for a single cat with the ID of 15, etc.
Interactions with resources primarily take place using HTTP verbs (GET /cats/15 versus DELETE /cats/15)
Stateless, meaning there’s no persistent session authentication between requests; each request must uniquely authenticate itself
Cacheable and consistent, meaning each request (except for a few authenticated-user-specific requests) should return the same result regardless of who the requester is
Return JSON
The most common API pattern is to have a unique URL structure for each of your Eloquent models that’s exposed as an API resource, and allow for users to interact with that resource with specific verbs and get JSON back. Example 13-1 shows a few possible examples.
GET/api/cats[{id:1,name:'Fluffy'},{id:2,name:'Killer'}]GET/api/cats/2{id:2,name:'Killer'}DELETE/api/cats/2(deletescat)POST/api/catswithbody:{name:'Mr Bigglesworth'}(createsnewcat)PATCH/api/cats/3withbody:{name:'Mr. Bigglesworth'}(updatescat)
You can see the basic set of interactions we are likely to have with our APIs. Let’s dig into how to make them happen with Laravel.
Laravel’s API Resource controllers are like Resource Controllers (“Resource Controllers”) but modified to align with RESTful API routes, so let’s get started there. First we’ll create a new controller for our resource, which we’ll route at /api/dogs:
php artisan make:controller Api/DogsController --api
API Resource Controllers are just like Resource Controllers except that they exclude the create and edit methods, both of which are irrelevant in an API.
Note that in projects running versions of Laravel prior to 5.5, the concept of the “API resource controller” and the “API resource route” don’t exist. But you can still just use resource controllers and resource routes, which are almost exactly the same, but just have a few “view"-related routes that aren’t used in APIs.
Note that in versions of Laravel prior to 5.3, you need to escape the \ in namespace separators with a forward slash in Artisan commands. For example:
php artisan make:controller Api/\DogsController --api
Example 13-2 shows what that API resource controller will look like.
<?phpnamespaceApp\Http\Controllers\Api;useIlluminate\Http\Request;useApp\Http\Controllers\Controller;classDogsControllerextendsController{/*** Display a listing of the resource.** @return \Illuminate\Http\Response*/publicfunctionindex(){//}/*** Store a newly created resource in storage.** @param \Illuminate\Http\Request $request* @return \Illuminate\Http\Response*/publicfunctionstore(Request$request){//}/*** Display the specified resource.** @param int $id* @return \Illuminate\Http\Response*/publicfunctionshow($id){//}/*** Update the specified resource in storage.** @param \Illuminate\Http\Request $request* @param int $id* @return \Illuminate\Http\Response*/publicfunctionupdate(Request$request,$id){//}/*** Remove the specified resource from storage.** @param int $id* @return \Illuminate\Http\Response*/publicfunctiondestroy($id){//}}
The docblocks pretty much tell the story. index() lists all of the dogs, show() lists a single dog, store() stores a new dog, update() updates a dog, and destroy() removes a dog.
Let’s quickly make a model and a migration so we can work with it:
phpartisanmake:modelDog--migrationphpartisanmigrate
Great! Now we can fill out our controller methods.
If you want the code we’re writing below to actually work, you’ll want to add a string() column to the migration named “name” and another named “breed”, and either add those columns to the Eloquent model’s fillable property or just set the guarded property of that model equal to an empty array ([]).
We can take advantage of a great feature of Eloquent here: if you echo an Eloquent results collection, it’ll automatically convert itself to JSON (using the __toString() magic method, if you’re curious). That means if you return a collection of results from a route, you’ll in effect be returning JSON.
So, as Example 13-3 demonstrates, this will be some of the simplest code you’ll ever write.
...classDogsControllerextendsController{publicfunctionindex(){returnDog::all();}publicfunctionstore(Request$request){returnDog::create($request->only(['name','breed']));}publicfunctionshow($id){returnDog::findOrFail($id);}publicfunctionupdate(Request$request,$id){$dog=Dog::findOrFail($id);$dog->update($request->only(['name','breed']));return$dog;}publicfunctiondestroy($id){Dog::findOrFail($id)->delete();}}
Example 13-4 shows how we can link this up in our routes file. As you can see, we can use Route::apiResource() to automatically map all of these default methods to their appropriate routes and HTTP verbs.
// routes/api.phpRoute::namespace('Api')->group(function(){Route::apiResource('dogs','DogsController');});
There you have it! Your first RESTful API in Laravel.
Of course, you’ll need much more nuance: pagination, sorting, authentication, more defined response headers. But this is the foundation of everything else.
REST APIs often read, and send, non-content information using headers. For example, any request to GitHub’s API will return headers detailing the current user’s rate limiting status:
X-RateLimit-Limit: 5000 X-RateLimit-Remaining: 4987 X-RateLimit-Reset: 1350085394
You might be wondering why the GitHub rate limiting headers are prefixed with X-, especially if you see them in the context of other headers returned with the same request:
HTTP/1.1 200 OK Server: nginx Date: Fri, 12 Oct 2012 23:33:14 GMT Content-Type: application/json; charset=utf-8 Connection: keep-alive Status: 200 OK ETag: "a00049ba79152d03380c34652f2cb612" X-GitHub-Media-Type: github.v3 X-RateLimit-Limit: 5000 X-RateLimit-Remaining: 4987 X-RateLimit-Reset: 1350085394 Content-Length: 5 Cache-Control: max-age=0, private, must-revalidate X-Content-Type-Options: nosniff
Any header whose name starts with X- is a header that’s not in the HTTP spec. It might be entirely made up (e.g., X-How-Much-Matt-Loves-This-Page), or part of a common convention that hasn’t made it into the spec yet (e.g., X-Requested-With).
Similarly, many APIs allow developers to customize their requests using request headers. For example, GitHub’s API makes it easy to define which version of the API you’d like to use with the Accept header:
Accept: application/vnd.github.v3+json
If you were to change v3 to v2, GitHub would pass your request to version 2 of its API instead.
Let’s learn quickly how to do both in Laravel.
We already covered this topic quite a bit in Chapter 10, but here’s a quick refresher. Once you have a response object, you can add a header using header($headerName, $headerValue), as seen in Example 13-5.
Route::get('dogs',function(){returnresponse(Dog::all())->header('X-Greatness-Index',12);});
Nice and easy.
If we have an incoming request, it’s also simple to read any given header. Example 13-6 illustrates this.
Route::get('dogs',function(Request$request){var_dump($request->header('Accept'));});
Now that you can read incoming request headers and set headers on your API responses, let’s take a look at how you might want to customize your API.
Pagination is one of the first places where most APIs need to consider special instructions. Eloquent comes out of the box with a pagination system that hooks directly into the query parameters of any page request. We already covered the paginator component a bit in Chapter 6, but here’s a quick refresher.
Any Eloquent call provides a paginate() method, to which you can pass the number of items you’d like to return per page. Eloquent then checks the URL for a page query parameter and, if it’s set, treats that as an indicator of how many pages the user is into a paginated list.
To make your API route ready for automated Laravel pagination, use paginate() instead of all() or get() to call your Eloquent queries in your route; something like Example 13-7.
Route::get('dogs',function(){returnDog::paginate(20);});
We’ve defined that Eloquent should get 20 results from the database. Depending on what the page query parameter is set to, Laravel will know exactly which 20 results to pull for us:
GET/dogs-Returnresults1-20GET/dogs?page=1-Returnresults1-20GET/dogs?page=2-Returnresults21-40
Note that the paginate() method is also available on query builder calls, as seen in Example 13-8.
Route::get('dogs',function(){returnDB::table('dogs')->paginate(20);});
Here’s something interesting, though: this isn’t just going to return 20 results when you convert it to JSON. Instead, it’s going to build a response object that automatically passes some useful pagination-related details to the end user, along with the paginated data. Example 13-9 shows a possible response from our call, truncated to only three records to save space.
{"current_page":1,"data":[{'name':'Fido'},{'name':'Pickles'},{'name':'Spot'}]"first_page_url":"http://myapp.com/api/dogs?page=1","from":1,"last_page":2,"last_page_url":"http://myapp.com/api/dogs?page=2","next_page_url":"http://myapp.com/api/dogs?page=2","path":"http://myapp.com/api/dogs","per_page":2,"prev_page_url":null,"to":2,"total":4}
While there is a convention and some built-in tooling for pagination in Laravel, there isn’t any for sorting, so you have to figure that out on your own. I’ll give a quick code sample here, and I’ll style our query parameters similarly to the JSON API spec (described in the following sidebar).
First, let’s set up the ability to sort our results. We start in Example 13-10 with the ability to sort by only a single column, and in only a single direction.
// Handles /dogs?sort=nameRoute::get('dogs',function(Request$request){// Get the sort query parameter (or fall back to default sort "name")$sortColumn=$request->input('sort','name');returnDog::orderBy($sortColumn)->paginate(20);});
We add the ability to invert it (e.g., ?sort=-weight) in Example 13-11.
// Handles /dogs?sort=name and /dogs?sort=-nameRoute::get('dogs',function(Request$request){// Get the sort query parameter (or fall back to default sort "name")$sortColumn=$request->input('sort','name');// Set the sort direction based on whether the key starts with -// using Laravel's starts_with() helper function$sortDirection=starts_with($sortColumn,'-')?'desc':'asc';$sortColumn=ltrim($sortColumn,'-');returnDog::orderBy($sortColumn,$sortDirection)->paginate(20);});
Finally, we do the same for multiple columns (e.g., ?sort=name,-weight) in Example 13-12.
// Handles ?sort=name,-weightRoute::get('dogs',function(Request$request){// Grab the query parameter and turn it into an array exploded by ,$sorts=explode(',',$request->input('sort',''));// Create a query$query=Dog::query();// Add the sorts one by oneforeach($sortsas$sortColumn){$sortDirection=starts_with($sortColumn,'-')?'desc':'asc';$sortColumn=ltrim($sortColumn,'-');$query->orderBy($sortColumn,$sortDirection);}// Returnreturn$query->paginate(20);});
As you can see, it’s not the simplest process ever, and you’ll likely want to build some helper tooling around the repetitive processes, but we’re building up the customizability of our API piece by piece using logical and simple features.
Another common task in building APIs is filtering out all but a certain subset of data. For example, the client might ask for a list of the dogs that are Chihuahuas.
The JSON API doesn’t give us any great ideas for syntax here, other than that we should use the filter query parameter. Let’s think along the lines of the sort syntax, where we’re putting everything into a single key—maybe ?filter=breed:chihuahua. You can see how to do this in Example 13-13.
Route::get('dogs',function(){$query=Dog::query();$query->when(request()->filled('filter'),function($query){[$criteria,$value]=explode(':',request('filter'));return$query->where($criteria,$value);});return$query->paginate(20);});
Note that in Example 13-13 we’re using the request() helper instead of injecting an instance of the $request. Both work the same, but sometimes the request() helper can be easier when you’re working inside of a closure so you don’t have to pass variables in manually.
In projects running versions of Laravel prior to 5.2, you’ll have to replace use of $query->when() with a regular PHP if statement.
And, just for kicks, in Example 13-14 we allow for multiple filters, like ?filter=breed:chihuahua,color:brown.
Route::get('dogs',function(Request$request){$query=Dog::query();$query->when(request()->filled('filter'),function($query){$filters=explode(',',request('filter'));foreach($filtersas$filter){[$criteria,$value]=explode(':',$filter);$query->where($criteria,$value);}return$query;});return$query->paginate(20);});
We’ve covered how to sort and filter our result sets. But right now, we’re relying on Eloquent’s JSON serialization, which means we return every field on every model.
Eloquent provides a few convenience tools for defining which fields to show when you’re serializing an array. You can read more in Chapter 5, but the gist is that if you set a $hidden array property on your Eloquent class, any field listed in that array will not be shown in the serialized model output. You can alternatively set a $visible array that defines the fields that are allowed to be shown. You could also either overwrite or mimic the toArray() function on your model, crafting a custom output format.
Another common pattern is to create a transformer for each data type. Transformers are helpful because they give you more control, isolate API-specific logic away from the model itself, and allow you to provide a more consistent API even when the models and their relationships change down the road.
There’s a fantastic but complicated package for this, Fractal, that sets up a series of convenience structures and classes for transforming your data.
Laravel 5.5 introduced a concept called API Resources that cover the needs of the majority of APIs for transforming and collecting results, so if you’re working with 5.5 or later, skip the next section and move on to “API Resources”. If you’re working with 5.4 or earlier, read on.
The general concept of a transformer is that we are going to run every instance of our model through another class that transforms its data to a different state. It might add fields, rename fields, delete fields, manipulate fields, add nested children, or whatever else. Let’s start with a simple example (Example 13-15).
Route::get('users/{id}',function($userId){return(newUserTransformer(User::findOrFail($userId)));});classUserTransformer{protected$user;publicfunction__construct($user){$this->user=$user;}publicfunctiontoArray(){return['id'=>$this->user->id,'name'=>sprintf("%s %s",$this->user->first_name,$this->user->last_name),'friendsCount'=>$this->user->friends->count()];}publicfunctiontoJson(){returnjson_encode($this->toArray());}publicfunction__toString(){return$this->toJson();}}
A more classic transformer would probably offer a transform() method that takes a $user parameter. This would likely spit out an array or JSON directly.
However, I’ve been using this pattern, which we sometimes call “API objects,” for a few years and really love how much more power and flexibility it provides.
As you can see in Example 13-15, transformers accept the model they’re transforming as a parameter and then manipulate that model—and its relationships—to create the final output that you want to send to the API.
Whether, and how, to nest relationships in APIs is an issue of much debate. Thankfully, people more experienced than me have written on this at length; I’d recommend reading Phil Sturgeon’s Build APIs You Won’t Hate (Leanpub) to learn more about this and about REST APIs in general.
There are a few primary ways to approach nesting relationships. These examples will assume your primary resource is a user and your related resource is a friend:
Include related resources directly in the primary resource (e.g., the users/5 resource has its friends nested in it).
Include just the foreign keys in the primary resource (e.g., the users/5 resource has an array of friend IDs nested in it).
Allow the user to query the related resource filtered by the originating resource (e.g., /friends?user=5, or “give me all friends who are related to user #5”).
Create a subresource (e.g., /users/5/friends).
Allow optional including (e.g., /users/5 does not include, but /users/5?include=friends does include; so does /users/5?include=friends,dogs).
Let’s assume for a minute that we want to (optionally) include related items. How would we do that? Our transformer example in Example 13-15 gives us a great head start. Let’s adjust it in Example 13-16 to add optional sub-resource including.
// E.g. myapp.com/api/users/15?include=friends,bookmarksRoute::get('users/{id}',function($userId,Request$request){// Get the include query parameter and split by commas$includes=explode(',',$request->input('include',''));// Pass both user and includes to the user transformerreturn(newUserTransformer(User::findOrFail($userId),$includes));});classUserTransformer{protected$user;protected$includes;publicfunction__construct($user,$includes=[]){$this->user=$user;$this->includes=$includes;}publicfunctiontoArray(){$append=[];if(in_array('friends',$this->includes)){// If you have more than one include, you'll want to generalize this$append['friends']=$this->user->friends->map(function($friend){return(newFriendTransformer($friend))->toArray();});}returnarray_merge(['id'=>$this->user->id,'name'=>sprintf("%s %s",$this->user->first_name,$this->user->last_name)],$append);}...
We’ll learn more about the map() functionality when we look at collections in Chapter 17, but everything else in here should be pretty familiar.
In the route, we’re splitting the include query parameter by commas and passing it into our transformer. Currently our transformer can just handle the friends include, but it could be abstracted to handle others. If the user has requested the friends include, the transformer maps over each friend (using the hasMany friends relationship on the user model), passes that friend to the FriendTransformer, and includes the array of all transformed friends in the user response.
If you’re working with Laravel prior to 5.5, you can skip this section and move on to “API Authentication with Laravel Passport”.
In the past, one of the first challenges we’d run into when developing APIs in Laravel was how to transform our data. The simplest APIs can just return Eloquent objects as JSON, but very quickly the needs of most APIs outgrow that structure. How should we convert our Eloquent results into the right format? What if we want to embed other resources, or do so but only optionally, or add a computed field, or hide some fields from APIs but not other JSON output? An API-specific transformer is the solution.
In Laravel 5.5 and later we have access to a feature called Eloquent API resources, which is a structure of classes that define how to transform an Eloquent object (or a collection of Eloquent objects) of a given class to API results. For example, your Dog Eloquent model now has a Dog Resource whose responsibility it is to translate each instance of Dog to the appropriate Dog-shaped API response object.
Let’s walk through this Dog example to see what it looks like to transform our API output. First, use the Artisan command make:resource to create your first resource.
php artisan make:resource Dog
This will create a new class in app/Http/Resources/Dog.php, which contains one method: toArray. You can see what the file looks like in Example 13-17.
<?phpnamespaceApp\Http\Resources;useIlluminate\Http\Resources\Json\JsonResource;classDogextendsJsonResource{/*** Transform the resource into an array.** @param \Illuminate\Http\Request $request* @return array*/publicfunctiontoArray($request){returnparent::toArray($request);}}
The toArray method we’re working with here has access to two important pieces of data. First, it has access to the Illuminate Request object, so we can customize our response based on query parameters and headers and anything else important. And second, it has access to the entire Eloquent object being transformed by calling its properties and methods on $this, as you can see in Example 13-18.
classDogextendsJsonResource{publicfunctiontoArray($request){return['id'=>$this->id,'name'=>$this->name,'breed'=>$this->breed,];}}
To use this new resource, you’d want to update any API endpoint that returns a single Dog to wrap the response in your new Resource, like in Example 13-19.
useApp\Dog;useApp\Http\Resources\DogasDogResource;Route::get('dogs/{dogId}',function($dogId){returnnewDogResource(Dog::find($dogId));});
Now, let’s talk about what happens if you have more than one of your entity returning from a given API endpoint. API resources can do that with the collection() method, as you can see in Example 13-20.
useApp\Dog;useApp\Http\Resources\DogasDogResource;Route::get('dogs',function(){returnDogResource::collection(Dog::all());});
This method iterates over every entry that’s passed to it, transforms it with the DogResource API resource, and then returns the collection.
This will likely be enough for many APIs, but if you need to customize any of the structure or add metadata to your collection responses, you’ll want to instead create a custom API resource collection.
In order to do so, let’s reach for the make:resource Artisan command again, but this time we’ll name it DogCollection, which signals to Laravel this is an API resource collection, not just an API resource.
php artisan make:resource DogCollection
This will generate a new file very similar to the API resource, living at app/Http/Resources/DogCollection.php, which contains one method: toArray. You can see what the file looks like in Example 13-21.
<?phpnamespaceApp\Http\Resources;useIlluminate\Http\Resources\Json\ResourceCollection;classDogCollectionextendsResourceCollection{/*** Transform the resource collection into an array.** @param \Illuminate\Http\Request $request* @return array*/publicfunctiontoArray($request){returnparent::toArray($request);}}
Just like the API resource, we have access to the request and the underlying data. But unlike the API resource, we’re dealing with a collection of items instead of just one, so we will access that (already-transformed) collection as $this->collection. Take a look at Example 13-22 for an example.
classDogCollectionextendsResourceCollection{publicfunctiontoArray($request){return['data'=>$this->collection,'links'=>['self'=>route('dogs.index'),],];}}
One of the more complicated aspects of any API is how relationships are nested. The simplest way with API resources is to add a key to your returned array that’s set to an API resource collection, like in Example 13-23.
publicfunctiontoArray(){return['name'=>$this->name,'breed'=>$this->breed,'friends'=>DogResource::collection($this->friends),];}
You may also want this to be a conditional property; you can choose to only nest it if it’s asked for in the request, or only if it’s already been eager loaded on the Eloquent object that’s passed in. Take a look at Example 13-24.
publicfunctiontoArray(){return['name'=>$this->name,'breed'=>$this->breed,// Only load this relationship if it's been eager loaded'bones'=>BoneResource::collection($this->whenLoaded('bones')),// Or, only load this relationship if the URL asks for it'bones'=>$this->when($request->get('include')=='bones',BoneResource::collection($this->bones)),];}
Just like you can pass a collection of Eloquent models to a resource, you can also pass a paginator instance as well. Take a look at Example 13-25.
Route::get('dogs',function(){returnnewDogCollection(Dog::paginate(20));});
If you pass a paginator instance, the transformed result will have additional links containing pagination information (first page, last page, prev page, and next page) and meta information about the entire collection.
You can take a look at Example 13-26 to see what this information looks like. In this example, I’ve set the items-per-page to 2 by calling Dog::paginate(2) so you can more easily see how the links work.
{"data":[{"name":"Pickles","breed":"Chorkie",},{"name":"Gandalf","breed":"Golden Retriever Mix",}],"links":{"first":"http://gooddogbrant.com/api/dogs?page=1","last":"http://gooddogbrant.com/api/dogs?page=3","prev":null,"next":"http://gooddogbrant.com/api/dogs?page=2"},"meta":{"current_page":1,"from":1,"last_page":3,"path":"http://gooddogbrant.com/api/dogs","per_page":2,"to":2,"total":5}}
You can also specify that certain attributes in your response should only be applied when a particular test is satisfied.
publicfunctiontoArray($request){return['name'=>$this->name,'breed'=>$this->breed,'rating'=>$this->when(Auth::user()->canSeeRatings(),12),];}
The default shape of how the data property is wrapped might not be how you like it, or you may find yourself needing to add or customize metadata for the responses. Take a look at the docs for how to customize every aspect of your API responses.
Most APIs require some form of authentication to access some or all of the data. Laravel 5.2 introduced a simple “token” authentication scheme, which we’ll cover shortly, but in Laravel 5.3 and later we got a new tool called Passport (by way of a separate package, brought in via Composer) that makes it easy to set up a full-featured OAuth 2.0 server in your application, complete with an API and UI components for managing clients and tokens.
OAuth is by far the most common auth system used in RESTful APIs. Unfortunately, it’s far too complex a topic for us to cover here in depth. For further reading, Matt Frost has written a great book on OAuth and PHP titled Integrating Web Services with OAuth and PHP (php[architect]).
Here’s the simplest concept behind OAuth: because APIs are stateless, we can’t rely on the same session-bassed authentication that we do in normal browser-based viewing sessions, where the user logs in and their authenticated state is saved to the session for subsequent views. Instead, the API client needs to make a single call to an authentication endpoint, perform some form of handshake to prove themselves, and then get back a token. Then, the client must send this token along with every future request (via the Authorization header, usually) to prove their identity.
There are a few different types of OAuth “grant”, which basically means that there are several different scenarios and types of interaction that can define that authentication “handshake”. Different projects and different sorts of end consumer will necessitate different grants.
If you’re working with Laravel 5.1 or 5.2, there’s a Laravel package called OAuth 2.0 Server for Laravel that makes it relatively easy to add a basic OAuth 2.0 authentication server to your Laravel application. It’s a Laravel convenience bridge to a PHP package called PHP OAuth 2.0 Server.
However, if you’re on Laravel 5.3 and higher, Passport gives you everything provided by that package and much more, with a simpler and more powerful API and interface.
Passport is a separate package, so your first step is to install it. I’ll sum up the steps here, but you can get more in-depth installation instructions in the docs.
First, bring it in with Composer:
composer require laravel/passport
If you’re working with Laravel below 5.5, add Laravel\Passport\PassportServiceProvider::class to the providers array of config/app.php.
Passport imports a series of migrations, so run those with php artisan migrate to create the tables necessary for OAuth clients, scopes, and tokens.
Next, run the installer with php artisan passport:install. This is going to create encryption keys for the OAuth server (storage/oauth-private.key and storage/oauth-public.key) and insert OAuth clients into the database for our personal and password grant type tokens (which we’ll cover later).
You’ll need to import the Laravel\Passport\HasApiTokens trait into your User model; this will add OAuth client- and token-related relationships to each User, as well as a few token-related helper methods. Next, add a call to Laravel\Passport\Passport::routes() in the boot() method of the AuthServiceProvider. This will add the following routes:
oauth/authorize
oauth/clients
oauth/clients/{client_id}
oauth/personal-access-tokens
oauth/personal-access-tokens/{token_id}
oauth/scopes
oauth/token
oauth/token/refresh
oauth/tokens
oauth/tokens/{token_id}
Finally, look for the api guard in config/auth.php. By default this guard will use the token driver (which we’ll cover shortly), but we’ll change that to be the passport driver instead.
You now have a fully functional OAuth 2.0 server! You can create new clients with php artisan passport:client, and you have an API for managing your clients and tokens available under the /oauth route prefix.
To protect a route behind your Passport auth system, add the auth:api middleware to the route or route group, as shown in Example 13-27.
// routes/api.phpRoute::get('/user',function(Request$request){return$request->user();})->middleware('auth:api');
In order to authenticate to these protected routes, your client apps will need to pass a token (we’ll cover how to get one next) as a Bearer token in the Authorization header. Example 13-28 shows what this would look like if you were making a request using the Guzzle HTTP library.
$http=newGuzzleHttp\Client;$response=$http->request('GET','http://tweeter.test/api/user',['headers'=>['Accept'=>'application/json','Authorization'=>'Bearer '.$accessToken,],]);
Now, let’s take a closer look at how it all works.
Passport exposes an API in your application under the /oauth route prefix. The API provides two primary functions: first, to authorize users with OAuth 2.0 authorization flows (/oauth/authorize and /oauth/token), and second, to allow users to manage their clients and tokens (the rest of the routes).
This is an important distinction, especially if you’re unfamiliar with OAuth. Every OAuth server needs to expose the ability for consumers to authenticate with your server; that’s the entire point of the service. But Passport also exposes an API for managing the state of your OAuth server’s clients and tokens. This means you can easily build a frontend to let your users manage their information in your OAuth application, and Passport actually comes with Vue-based manager components that you can either use or use for inspiration.
We’ll cover the API routes that allow you to manage clients and tokens, and the Vue components that Passport ships with to make it easy, but first let’s dig into the various ways your users can authenticate with your Passport-protected API.
Passport makes it possible for you to authenticate users in four different ways. Two are traditional OAuth 2.0 grants (the password grant and authorization code grant) and two are convenience methods that are unique to Passport (the personal token and synchronizer token).
The password grant, while less common than the authorization code grant, is much simpler. If you want users to be able to authenticate directly with your API using their username and password—for example, if you have a mobile app for your company consuming your own API—you can use the password grant.
In order to use the password grant flow, you need a “password grant client” in your database. This is because every request to an OAuth server needs to be made by a “client.” Usually, the “client” identifies which app or site the user is authenticating against—for example, if you use Facebook to log in to a third party web site, that web site would be the “client”.
With the password grant flow, however, there is no client coming along with the request, so you have to make one, and that’s the “password grant client.” One will have been added when you ran php artisan passport:install, but if you ever need to generate a new password grant client for any reason, you can:
phpartisanpassport:client--passwordWhatshouldwenamethepasswordgrantclient?[MyApplicationPasswordGrantClient]:>SpaceBook_internalPasswordgrantclientcreatedsuccessfully.ClientID:3ClientSecret:Pg1EEzt18JAnFoUIM9n38Nqewg1aekB4rvFk2Pma
With the password grant type, there is just one step to getting a token: sending the user’s credentials to the /oauth/token route, like in Example 13-29.
// Routes/web.php in the *consuming application*Route::get('tweeter/password-grant-auth',function(){$http=newGuzzleHttp\Client;// Make call to "Tweeter", our Passport-powered OAuth server$response=$http->post('http://tweeter.test/oauth/token',['form_params'=>['grant_type'=>'password','client_id'=>config('tweeter.id'),'client_secret'=>config('tweeter.secret'),'username'=>'matt@mattstauffer.co','password'=>'my-tweeter-password','scope'=>'',],]);$thisUsersTokens=json_decode((string)$response->getBody(),true);// do stuff with the tokens});
This route will return an access_token and a refresh_token. You can now save those tokens to use to authenticate with the API (access token) and to request more tokens later (refresh token).
Note that the ID and secret we’d use for the password grant type would be those in the oauth_clients database table of our Passport app in the row with the name SpaceBook_internal.
The most common OAuth 2.0 auth workflow is also the most complex one Passport supports. Let’s imagine we’re developing an application that’s like Twitter but for sound clips; we’ll call it Tweeter. And we’ll imagine another website, a social network for science fiction fans, called SpaceBook. SpaceBook’s developer wants to let people embed their Tweeter data into their SpaceBook newsfeeds. We’re going to install Passport in our app Tweeter so that other apps—SpaceBook, for example—can allow their mutual users to authenticate with their Tweeter information.
In the authorization code grant type, each consuming website—SpaceBook, in this example—needs to create a “client” in our Passport-enabled app. In most scenarios, the other sites’ admins will have user accounts at Tweeter, and we’ll build tools for them to create clients there. But for starters, we can just manually create a client for the SpaceBook admins:
php artisan passport:client
Which user ID should the client be assigned to?:
> 1  What should we name the client?:
> SpaceBook
Where should we redirect the request after authorization?
[http://tweeter.test/auth/callback]:
> http://spacebook.test/tweeter/callback
New client created successfully.
Client ID: 4
Client secret: 5rzqKpeCjIgz3MXpi3tjQ37HBnLLykrgWgmc18uH
What should we name the client?:
> SpaceBook
Where should we redirect the request after authorization?
[http://tweeter.test/auth/callback]:
> http://spacebook.test/tweeter/callback
New client created successfully.
Client ID: 4
Client secret: 5rzqKpeCjIgz3MXpi3tjQ37HBnLLykrgWgmc18uH
Every client needs to be assigned to a user in your app. Imagine Jill, user #1, is writing SpaceBook; she’ll be the “owner” of this client we’re creating.
Now we have the ID and secret for the SpaceBook client. At this point, SpaceBook can use this ID and secret to build tooling allowing an individual SpaceBook user (who is also a Tweeter user) to get an auth token from Tweeter for use when SpaceBook wants to make API calls to Tweeter on that user’s behalf. Example 13-30 illustrates this. (This and the following examples assume SpaceBook is a Laravel app, too; they also assume the Spacebook developers created a file at config/tweeter.php that returns the ID and secret we just created.)
// In SpaceBook's routes/web.php:Route::get('tweeter/redirect',function(){$query=http_build_query(['client_id'=>config('tweeter.id'),'redirect_uri'=>url('tweeter/callback'),'response_type'=>'code','scope'=>'',]);// Builds a string like:// client_id={$client_id}&redirect_uri={$redirect_uri}&response_type=codereturnredirect('http://tweeter.test/oauth/authorize?'.$query);});
When users hit that route in SpaceBook, they’ll now be redirected to the /oauth/authorize Passport route on our Tweeter app. At this point they’ll see a confirmation page; you can use the default Passport confirmation page by running this command:
php artisan vendor:publish --tag=passport-views
This will publish the view to resources/views/vendor/passport/authorize.blade.php, and your users will see the page shown in Figure 13-1.
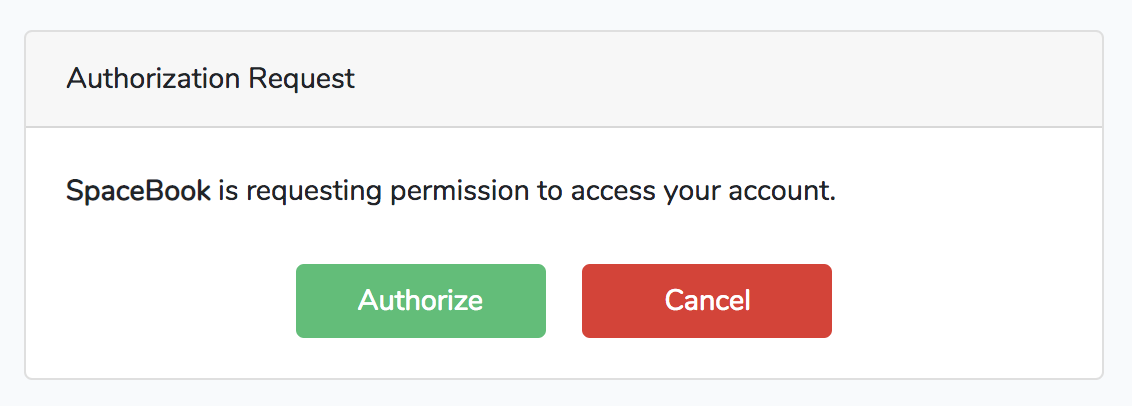
Once a user chooses to accept or reject the authorization, Passport will redirect that user back to the provided redirect_uri. In Example 13-30 we set a redirect_uri of url('tweeter/callback'), so the user will be redirected back to http://spacebook.test/tweeter/callback.
An approval request will contain a code that our consumer app’s callback route can now use to get a token back from our Passport-enabled app, Tweeter. A rejection request will contain an error. SpaceBook’s callback route might look something like Example 13-31.
What the Spacebook developer doing here is building a Guzzle HTTP request to the /oauth/token Passport route on Tweeter. They then send a POST request containing the authorization code they received when the user approved access, and Tweeter will return a JSON response containing a few keys:
access_token is the token SpaceBook will want to save for this user. This token is what the user will use to authenticate in future requests to Tweeter (using the Authorization header).
refresh_token is a token SpaceBook will need if you decide to set your tokens to expire. By default, Passport’s access tokens last for one year.
expires_in is the number of seconds until an access_token expires (needs to be refreshed).
token_type is the type of token you’re getting back, which will be “Bearer”; this means you pass a header with all future requests with the name of “Authorization” and the value of “Bearer YOURTOKENHERE”.
You now have all the tools you need to perform basic authorization code flows. We’ll cover how to build an admin panel for your clients and tokens later, but first, let’s take a quick look at the other grant types.
The authorization code grant is great for your users’ apps and the password code grant is great for your own apps, but what if your users want to create tokens for themselves to test out your API or to use when they’re developing their apps? That’s what personal tokens are for.
In order to create personal tokens, you need a personal access client in your database. Running php artisan passport:install will have added one already, but if you ever need to generate a new personal access client for any reason, you can run php artisan passport:client --personal:
phpartisanpassport:client--personalWhatshouldwenamethepersonalaccessclient?[MyApplicationPersonalAccessClient]:>MyApplicationPersonalAccessClientPersonalaccessclientcreatedsuccessfully.
Personal access tokens are not quite a “grant” type; there’s no OAuth-prescribed flow here. Rather, they’re a convenience method that Passport adds to make it easy to have a single client registered in your system that exists solely for the easy creation of convenience tokens for your users who are developers.
For example, maybe you have a user who’s developing a competitor to SpaceBook named RaceBook (it’s for marathon runners), and he wants to toy around with the Tweeter API a bit to figure out how it works before starting to code. Does this developer have the facility to create tokens using the authorization code flow? Not yet—he hasn’t even written any code yet! That’s what personal access tokens are for.
You can create personal access tokens through the JSON API, which I’ll cover shortly, but you can also create one for your user directly in code:
// Creating a token without scopes$token=$user->createToken('Token Name')->accessToken;// Creating a token with scopes...$token=$user->createToken('My Token',['place-orders'])->accessToken;
Your users can use these tokens just as if they were tokens created with the authorization code grant flow. We’ll cover more about scopes in “Passport Scopes”.
There’s one final way for your users to get tokens to access your API, and it’s another convenience method that Passport adds but which normal OAuth servers don’t provide. This method is for when your users are already authenticated because they’ve logged in to your Laravel app like normal, and you want the JavaScript on your Laravel app to be able to access the API. It’d be a pain to have to reauthenticate the users with the authorization code or password grant flow, so Laravel provides a helper for that.
If you add the Laravel\Passport\Http\Middleware\CreateFreshApiToken middleware to your web middleware group (in app/Http/Kernel.php), every response Laravel sends to your authenticated users will have a cookie named laravel_token attached to it. This cookie is a JSON Web Token (JWT) that contains encoded information about the CSRF token. Now, if you send the normal CSRF token with your JavaScript and send it along in the X-CSRF-TOKEN and also send the X-Requested-With header on any API requests you make, the API will compare your CSRF token with this cookie and this will authenticate your users to the API just like any other token.
The default JavaScript bootstrap setup that Laravel comes bundled with sets up this header for you, but if you’re using a different framework, you’ll need to set it up manually. Example 13-32 shows how to do it with jQuery.
X-Requested-With with all Ajax requests$.ajaxSetup({headers:{'X-CSRF-TOKEN':"{{ csrf_token() }}",'X-Requested-With':'XMLHttpRequest'}});
If you add the CreateFreshApiTokens middleware to your web middleware group and pass that header with every JavaScript request, your JavaScript requests will be able to hit your Passport-protected API routes without worrying about any of the complexity of the authorization code or password grants.
Now that we’ve covered how to manually create clients and tokens and how to authorize as a consumer, let’s take a look at the aspects of the Passport API that make it possible to build user interface elements allowing your users to manage their clients and tokens.
The easiest way to dig into the API routes is by looking at how the sample provided Vue components work and which routes they rely on, so I’ll just give a brief overview:
/oauth/clients(GET,POST)/oauth/clients/{id}(DELETE,PUT)/oauth/personal-access-tokens(GET,POST)/oauth/personal-access-tokens/{id}(DELETE)/oauth/scopes(GET)/oauth/tokens(GET)/oauth/tokens/{id}(DELETE)
As you can see, we have a few entities here (clients, personal access tokens, scopes, and tokens). We can list all of them; we can create some (you can’t create scopes, since they’re defined in code, and you can’t create tokens, because they’re created in the authorization flow); and we can delete and update some.
Passport comes with a set of Vue components out of the box that make it easy to allow your users to administer their clients (those they’ve created), authorized clients (those they’ve allowed access to their account), and personal access tokens (for their own testing purposes).
To publish these components into your application, run this command:
php artisan vendor:publish --tag=passport-components
You’ll now have three new Vue components in resources/js/components/passport. To add them to your Vue bootstrap so they’re accessible in your templates, register them in your resources/js/app.js file as shown in Example 13-33.
require('./bootstrap');Vue.component('passport-clients',require('./components/passport/Clients.vue'));Vue.component('passport-authorized-clients',require('./components/passport/AuthorizedClients.vue'));Vue.component('passport-personal-access-tokens',require('./components/passport/PersonalAccessTokens.vue'));constapp=newVue({el:'#app'});
You now get three components that you can use anywhere in your application:
<passport-clients></passport-clients> <passport-authorized-clients></passport-authorized-clients> <passport-personal-access-tokens></passport-personal-access-tokens>
<passport-clients> shows your users all of the clients they’ve created. This means SpaceBook’s creator will see the SpaceBook client listed here when she logs in to Tweeter.
<passport-authorized-clients> shows your users all of the clients they’ve authorized to have access to their accounts. This means any users of both SpaceBook and Tweeter who have given SpaceBook access to their Tweeter account will see SpaceBook listed here.
<passport-personal-access-tokens> shows your users any personal access tokens they’ve created here. This means the creator of RaceBook, the SpaceBook competitor, will see his personal access token here that he’s been using to test out the Tweeter API.
If you are on a fresh install of Laravel and want to test these out, there are a few steps to take to get it working:
Follow the instructions given earlier in this chapter to get Passport installed.
In your terminal, run the following commands:
php artisan vendor:publish --tag=passport-components
npm install
npm run dev
php artisan make:auth
Open resources/views/home.blade.php and add the Vue component references (e.g., <passport-clients></passport-clients>) just below the <div class="card-body">.
If you’d like, you can just use those components as they are. But you can also use them as reference points to understand how to use the API and create your own frontend components in whatever format you’d like.
A few of these commands and directions will look different if you’re using Laravel Elixir. Check the Passport and Elixir docs to learn more.
If you’re familiar with OAuth, you probably noticed we haven’t talked about scopes. Everything we’ve covered so far can be customized by scope, but first let’s quickly cover what scopes are.
In OAuth, scopes are defined sets of privileges that are something other than “can do everything.” If you’ve ever gotten a GitHub API token before, for example, you might’ve noticed that some apps want access just to your name and email address, some want access to all of your repos, and some want access to your gists. Each of these is a “scope,” which allows both the user and the consumer app to define what access the consumer app needs to perform its job.
As shown in Example 13-34, you can define the scopes for your application in the boot() method of your AuthServiceProvider.
// AuthServiceProvideruseLaravel\Passport\Passport;...publicfunctionboot(){...Passport::tokensCan(['list-clips'=>'List sound clips','add-delete-clips'=>'Add new and delete old sound clips','admin-account'=>'Administer account details',]);}
Once you have your scopes defined, the consumer app can define which scopes it’s asking for access to. Just add a space-separated list of tokens in the “token” field to the initial redirect, in the scope field, as shown in Example 13-35.
When the user tries to authorize with this app, it’ll present the list of requested scopes. This way, the user will see the difference between “SpaceBook is requesting to see your email address” and “SpaceBook is requesting access to post as you and delete your posts and message your friends.”
You can check for scope using middleware or on the User instance.
Example 13-36 shows how to check on the User.
Route::get('/events',function(){if(auth()->user()->tokenCan('add-delete-clips')){//}});
There are two middleware you can use for this too, scope and scopes. To use these in your app, add them to $routeMiddleware in your app/Http/Kernel.php file:
'scopes'=>\Laravel\Passport\Http\Middleware\CheckScopes::class,'scope'=>\Laravel\Passport\Http\Middleware\CheckForAnyScope::class,
You can now use the middleware as illustrated in Example 13-37. scopes requires all of the defined scopes to be on the user’s token in order for the user to access the route, while scope requires at least one of the defined scopes to be on the user’s token.
// routes/api.phpRoute::get('clips',function(){// Access token has both the "list-clips" and "add-delete-clips" scopes})->middleware('scopes:list-clips,add-delete-clips');// orRoute::get('clips',function(){// Access token has at least one of the listed scopes})->middleware('scope:list-clips,add-delete-clips')
If you haven’t defined any scopes, the app will just work as if they don’t exist. The moment you use scopes, however, your consumer apps will have to explicitly define which scopes they’re requesting access with. The one exception to this rule is that if you’re using the password grant type your consumer app can request the * scope, which gives the token access to everything.
The first time you deploy your Passport-powered app, the Passport API won’t function until you generate keys for the app. This can be accomplished by running php artisan passport:keys on your production server, which will generate the encryption keys Passport uses to generate tokens.
Laravel offers a simple API token authentication mechanism. It’s not much different from a username and password: there’s a single token assigned to each user that clients can pass along with a request to authenticate that request for that user.
This API token mechanism is not nearly as secure as OAuth 2.0, so make sure you know it’s the right fit for your application before deciding to use it. Because there’s just a single token, it’s almost like a password—if someone gets that token, they have access to your whole system. It’s more secure, though, because you can force the tokens to be more un-guessable, and you can wipe and reset tokens at the slightest hint of a breach, which you can’t do with passwords.
So, token API authentication might not be the best fit for your app; but if it is, it couldn’t be much simpler to implement.
First, add a 60-character unique api_token column to your users table:
$table->string('api_token',60)->unique();
Next, update whatever method creates your new users and ensure it sets a value for this field for each new user. Laravel has a helper for generating random strings, so if you want to use that, just set the field to str_random(60) for each. You’ll also need to do this for preexisting users if you’re adding this to a live application.
To wrap any routes with this authentication method, use the auth:api route middleware, as in Example 13-38.
Route::prefix('api')->middleware('auth:api')->group(function(){//});
Note that, since you’re using an authentication guard other than the standard guard, you’ll need to specify that guard any time you use any auth() methods:
$user=auth()->guard('api')->user();
Laravel offers customizable error message pages for normal HTML views, but you can also customize the default 404 fallback response for calls with a JSON content type. To do so, add a Route::fallback call to your API.
// routes/api.phpRoute::fallback(function(){returnresponse()->json(['message'=>'Route Not Found'],404);})->name('api.fallback.404');
If you want to customize which route is returned when Laravel catches “not found” exceptions, you can update the exception handler using the respondWithRoute method.
// App\Exceptions\Handler.phppublicfunctionrender($request,Exception$exception){if($exceptioninstanceofModelNotFoundException&&$request->isJson()){returnRoute::respondWithRoute('api.fallback.404');}returnparent::render($request,$exception);}
Fortunately, testing APIs is actually simpler than testing almost anything else in Laravel.
We cover this in more depth in Chapter 12, but there are a series of methods for making assertions against JSON. Combine that capability with the simplicity of full-stack application tests and you can put together your API tests quickly and easily. Take a look at the common API testing pattern in Example 13-39.
...classDogsApiTestextendsTestCase{useWithoutMiddleware,RefreshDatabase;publicfunctiontest_it_gets_all_dogs(){$dog1=factory(Dog::class)->create();$dog2=factory(Dog::class)->create();$response=$this->getJson('api/dogs');$response->assertJsonFragment(['name'=>$dog1->name]);$response->assertJsonFragment(['name'=>$dog2->name]);}}
Note that we’re using WithoutMiddleware to avoid worrying about the authentication. You’ll want to test that separately, if at all (for more on authentication, see Chapter 9).
In this test we insert two dogs into the database, then visit the API route for listing all dogs and make sure both are present in the output.
You can cover all of your API routes simply and easily here, including modifying actions like POST and PATCH.
You can also use the actingAs method on the Passport Facade to test your scopes. Take a look at Example 13-40 to see a common pattern for testing scopes in Passport.
publicfunctiontest_it_lists_all_clips_for_those_with_list_clips_scope(){Passport::actingAs(factory(User::class)->create(),['list-clips']);$response=$this->getJson('api/clips');$response->assertStatus(200);}
Laravel is geared toward building APIs and makes it simple to work with JSON and RESTful APIs. There are some conventions, like for pagination, but much of the definition of exactly how your API will be sorted, or authenticated, or whatever else is up to you.
Laravel provides tools for authentication and testing, easy manipulation and reading of headers, and working with JSON, even automatically encoding all Eloquent results to JSON if they’re returned directly from a route.
Laravel Passport is a separate package that makes it simple to create and manage an OAuth server in your Laravel apps.
We covered how to store data in relational databases in Chapter 5, but there’s a lot more that can be stored, both locally and remotely. In this chapter we’ll cover filesystem and in-memory storage, file uploads and manipulation, nonrelational data stores, sessions, the cache, logging, cookies, and full-text search.
Laravel provides a series of file manipulation tools through the Storage facade, and a few helper functions.
Laravel’s filesystem access tools can connect to the local filesystem as well as S3, Rackspace, and FTP. The S3 and Rackspace file drivers are provided by Flysystem, and it’s simple to add additional Flysystem providers to your Laravel app—for example, Dropbox or WebDAV.
The definitions for Laravel’s file manager live in config/filesystems.php. Each connection is called a “disk,” and Example 14-1 lists the disks that are available out of the box.
...'disks'=>['local'=>['driver'=>'local','root'=>storage_path('app'),],'public'=>['driver'=>'local','root'=>storage_path('app/public'),'url'=>env('APP_URL').'/storage','visibility'=>'public',],'s3'=>['driver'=>'s3','key'=>env('AWS_ACCESS_KEY_ID'),'secret'=>env('AWS_SECRET_ACCESS_KEY'),'region'=>env('AWS_DEFAULT_REGION'),'bucket'=>env('AWS_BUCKET'),'url'=>env('AWS_URL'),],],
The storage_path() helper used in Example 14-1 links to Laravel’s configured storage directory, storage/. Anything you pass to it is added to the end of the directory name, so storage_path('public') will return the string storage/public.
The local disk connects to your local storage system and presumes it will be interacting with the app directory of the storage path, which is storage/app.
The public disk is also a local disk (although you can change it if you’d like), which is intended for use with any files you intend to be served by your application. It defaults to the storage/app/public directory, and if you want to use this directory to serve files to the public, you’ll need to add a symbolic link (symlink) to somewhere within the public/ directory. Thankfully, there’s an Artisan command for that:
# Maps public/storage to serve the files from storage/app/public
php artisan storage:linkThe s3 disk shows how Laravel connects to cloud-based file storage systems. If you’ve ever connected to S3 or any other cloud storage provider, this will be familiar; pass it your key and secret and some information defining the “folder” you’re working with, which in S3 is the region and the bucket.
In config/filesystem.php you can set the default disk, which is what will be used any time you call the Storage facade without specifying a disk. To specify a disk, call disk('diskname') on the facade:
Storage::disk('s3')->get('file.jpg');
The filesystems each provide the following methods:
get('file.jpg')Retrieves the file at file.jpg
put('file.jpg', $contentsOrStream)Puts the given file contents to file.jpg
putFile('myDir', $file)Puts the contents of a provided file (in the form of an instance of either Illuminate\Http\File or Illuminate\Http\UploadedFile) to the myDir directory, but with Laravel managing the entire streaming process and naming the file
exists('file.jpg')Returns a boolean of whether file.jpg exists
getVisibility('myPath')Gets the visibility for the given path (“public” or “private”)
setVisibility('myPath')Sets the visibility for the given path (“public” or “private”)
copy('file.jpg', 'newfile.jpg')Copies file.jpg to newfile.jpg
move('file.jpg', 'newfile.jpg')Moves file.jpg to newfile.jpg
prepend('my.log', 'log text')Adds content at the beginning of my.log
append('my.log', 'log text')Adds content to the end of my.log
delete('file.jpg')Deletes file.jpg
size('file.jpg')Returns the size in bytes of file.jpg
lastModified('file.jpg')Returns the Unix timestamp of when file.jpg was last modified
files('myDir')Returns an array of filenames in the directory myDir
allFiles('myDir')Returns an array of filenames in the directory myDir and all subdirectories
directories('myDir')Returns an array of directory names in the directory myDir
allDirectories('myDir')Returns an array of directory names in the directory myDir and all subdirectories
makeDirectory('myDir')Creates a new directory
deleteDirectory('myDir')Deletes myDir
If you’d prefer injecting an instance instead of using the File facade, typehint or inject Illuminate\Filesystem\Filesystem and you’ll get all the same methods available to you.
If you want to add an additional Flysystem provider, you’ll need to “extend” Laravel’s native storage system. In a service provider somewhere—it could be the boot() method of AppServiceProvider, but it’d be more appropriate to create a unique service provider for each new binding—use the Storage facade to add new storage systems, as seen in Example 14-2.
// Some service providerpublicfunctionboot(){Storage::extend('dropbox',function($app,$config){$client=newDropboxClient($config['accessToken'],$config['clientIdentifier']);returnnewFilesystem(newDropboxAdapter($client));});}
One of the more common usages for the Storage facade is accepting file uploads from your application’s users. Let’s look at a common workflow for that, in Example 14-3.
...classDogsController{publicfunctionupdatePicture(Request$request,Dog$dog){Storage::put("dogs/{$dog->id}",file_get_contents($request->file('picture')->getRealPath()));}}
We put() to a file named dogs/{id}, and we grab our contents from the uploaded file. Every uploaded file is a descendant of the SplFileInfo class, which provides a getRealPath() method that returns the path to the file’s location. So, we get the temporary upload path for the user’s uploaded file, read it with file_get_contents(), and pass it into Storage::put().
Since we have this file available to us here, we can do anything we want to the file before we store it—use an image manipulation package to resize it if it’s an image, validate it and reject it if it doesn’t meet our criteria, or whatever else we like.
If we wanted to upload this same file to S3 and we had our credentials stored in config/filesystems.php, we could just adjust Example 14-3 to call Storage::disk('s3')->put(); we’ll now be uploading to S3. Take a look at Example 14-4 to see a more complex upload example.
...classDogsController{publicfunctionupdatePicture(Request$request,Dog$dog){$original=$request->file('picture');// Resize image to max width 150$image=Image::make($original)->resize(150,null,function($constraint){$constraint->aspectRatio();})->encode('jpg',75);Storage::put("dogs/thumbs/{$dog->id}",$image->getEncoded());}
I used an image library called Intervention in Example 14-4 just as an example; you can use any library you want. The important point is that you have the freedom to manipulate the files however you want before you store them.
Laravel 5.3 introduced the ability to store an uploaded file using the file itself. Learn more in Example 7-12.
Just like Storage makes it easy to accept uploads from users, it also simplifies the task of returning files to them. Take a look at Example 14-5 for the simplest example.
publicfunctiondownloadMyFile(){returnStorage::download('my-file.pdf');}
Session storage is the primary tool we use in web applications to store state between page requests. Laravel’s session manager supports session drivers using files, cookies, a database, Memcached or Redis, or in-memory arrays (which expire after the page request and are only good for tests).
You can configure all of your session settings and drivers in config/session.php. You can choose whether or not to encrypt your session data, select which driver to use (file is the default), and specify more connection-specific details like the length of session storage and which files or database tables to use. Take a look at the session docs to learn about specific dependencies and settings you need to prepare for whichever driver you choose to use.
The general API of the session tools allows you to save and retrieve data based on individual keys: session()->put('user_id') and session()->get('user_id'), for example. Make sure to avoid saving anything to a flash session key, since Laravel uses that internally for flash (only available for the next page request) session storage.
The most common way to access the session is using the Session facade:
session()->get('user_id');
But you can also use the session() method on any given Illuminate Request object, as in Example 14-6.
Route::get('dashboard',function(Request$request){$request->session()->get('user_id');});
Or you can inject an instance of Illuminate\Session\Store, as in Example 14-7.
Route::get('dashboard',function(Illuminate\Session\Store$session){return$session->get('user_id');});
Finally, you can use the global session() helper. Use it with no parameters to get a session instance, with a single string parameter to “get” from the session, or with an array to “put” to the session, as demonstrated in Example 14-8.
// get$value=session()->get('key');$value=session('key');// putsession()->put('key','value');session(['key','value']);
If you’re new to Laravel and not sure which to use, I’d recommend using the global helper.
The two most common methods are get() and put(), but let’s take a look at each of the available methods and their parameters:
session()->get($key, $fallbackValue)get() pulls the value of the provided key out of the session. If there is no value attached to that key, it will return the fallback value instead (and if you don’t provide a fallback, it will return null). The fallback value can be a string or a closure, as you can see in the following examples.
$points=session()->get('points');$points=session()->get('points',0);$points=session()->get('points',function(){return(newPointGetterService)->getPoints();});
session()->put($key, $value)put() stores the provided value in the session at the provided key:
session()->put('points',45);$points=session()->get('points');
session()->push($key, $value)If any of your session values are arrays, you can use push() to add a value onto the array:
session()->put('friends',['Saúl','Quang','Mechteld']);session()->push('friends','Javier');
session()->has($key)has() checks whether there’s a value set at the provided key:
if(session()->has('points')){// do something}
You can also pass an array of keys, and it only returns true if all of the keys exist.
If a session value is set, but the value is null, session()->has() will return false.
session()->exists($key)exists() checks whether there’s a value set at the provided key, like has(), but unlike has(), will return true even if the set value is null.
if(session()->exists('points')){// returns true even if 'points' is set to null}
session()->all()all() returns an array of everything that’s in the session, including those values set by the framework. You’ll likely see values under keys like _token (CSRF tokens), _previous (previous page, for back() redirects), and flash (for flash storage).
session()->forget($key) and session()->flush()forget() removes a previously set session value. flush() removes every session value, even those set by the framework:
session()->put('a','awesome');session()->put('b','bodacious');session()->forget('a');// a is no longer set, b is still setsession()->flush();// session is now empty
session()->pull($key, $fallbackValue)pull() is the same as get(), except that it deletes the value from the session after pulling it.
session()->regenerate()It’s not common, but if you need to regenerate your session ID, regenerate() is there for you.
There are three more methods we haven’t covered yet, and they all have to do with something called “flash” session storage.
One very common pattern for session storage is to set a value that you only want available for the next page load. For example, you might want to store a message like “Updated post successfully.” You could manually get that message and then wipe it on the next page load, but if you use this pattern a lot it can get wasteful. Enter flash session storage: keys that are expected to only last for a single page request.
Laravel handles the work for you, and all you need to do is use flash() instead of put(). The useful methods here are:
session()->flash($key, $value)flash() sets the session key to the provided value for just the next page request.
session()->reflash() and session()->keep($key)If you need the previous page’s flash() session data to stick around for one more request, you can use reflash() to restore the entire flash contents for the next request or keep($key) to just restore a single flash value for the next request. keep() can also accept an array of keys to reflash.
Caches are structured very similarly to sessions. You provide a key and Laravel stores it for you. The biggest difference is that the data in a cache is cached per application and the data in a session is cached per user. That means caches are more commonly used for storing large database results, API calls, or other slow queries that can stand to get a little bit “stale.”
The cache configuration settings are available at config/cache.php. Just like with a session, you can set the specific configuration details for any of your drivers, and also choose which will be your default. Laravel uses the file cache driver by default, but you can also use Memcached or Redis, APC, or a database, or write your own cache driver. Take a look at the cache docs to learn about specific dependencies and settings you need to prepare for whichever driver you choose to use.
Just like with sessions, there are a few different ways to access a cache. You can use the facade:
$users=Cache::get('users');
You can get an instance from the container, as in Example 14-9.
Route::get('users',function(Illuminate\Contracts\Cache\Repository$cache){return$cache->get('users');});
Or you can use the global cache() helper (introduced in Laravel 5.3), as in Example 14-10.
// get from cache$users=cache('key','default value');$users=cache()->get('key','default value');// put for $minutes duration$users=cache(['key'=>'value'],$minutes);$users=cache()->put('key','value',$minutes);
If you’re new to Laravel and not sure which to use, I’d recommend using the global helper.
Let’s take a look at the methods you can call on a Cache instance:
cache()->get($key, $fallbackValue) and cache()->pull($key, $fallbackValue)get() makes it easy to retrieve the value for any given key. pull() is the same as get() except it removes the cached value after retrieving it.
cache()->put($key, $value, $minutesOrExpiration)put() sets the value of the specified key for a given number of minutes.
If you’d prefer setting an expiration date/time instead of a number of minutes, you can pass a Carbon object as the third parameter:
cache()->put('key','value',now()->addDay());
cache()->add($key, $value)add() is similar to put(), except if the value already exists, it won’t set it. Also, the method returns a boolean of whether or not the value was actually added:
$someDate=now();cache()->add('someDate',$someDate);// returns true$someOtherDate=now()->addHour();cache()->add('someDate',$someOtherDate);// returns false
cache()->forever($key, $value)forever() saves a value to the cache for a specific key; it’s the same as put(), except the values will never expire (until they’re removed with forget()).
cache()->has($key)has() returns a boolean of whether or not there’s a value at the provided key.
cache()->remember($key, $minutes, $closure) and cache()->rememberForever($key, $closure)remember() provides a single method to handle a very common flow: look up whether a value exists in the cache for a certain key, and if it doesn’t, get that value somehow, save it to the cache, and return it.
remember() lets you provide a key to look up, the number of minutes it should be saved for, and a closure to define how to look it up, in case the key has no value set. rememberForever() is the same, except it doesn’t need you to set the number of minutes it should expire after. Take a look at the following example to see a common user scenario for remember():
// Either returns the value cached at "users" or gets "User::all()",// caches it at "users", and returns it$users=cache()->remember('users',120,function(){returnUser::all();});
cache()->increment($key, $amount) and cache()->decrement($key, $amount)increment() and decrement() allow you to increment and decrement integer values in the cache. If there is no value at the given key, it’ll be treated as if it were 0, and if you pass a second parameter to increment or decrement, it’ll increment or decrement by that amount instead of by 1.
cache()->forget($key) and cache()->flush()forget() works just like Session’s forget() method: pass it a key and it’ll wipe that key’s value. flush() wipes the entire cache.
You might expect cookies to work the same as the session and the cache. A facade and a global helper are available for these too, and our mental models of all three are similar: you can get or set their values in the same way.
But because cookies are inherently attached to the requests and responses, you’ll need to interact with cookies differently. Let’s look really briefly at what makes cookies different.
Cookies can exist in three places in Laravel. They can come in via the request, which means the user had the cookie when she visited the page. You can read that with the Cookie facade, or you can read it off of the request object.
They can also be sent out with a response, which means the response will instruct the user’s browser to save the cookie for future visits. You can do this by adding the cookie to your response object before returning it.
And lastly, a cookie can be queued. If you use the Cookie facade to set a cookie, you have put it into a “CookieJar” queue, and it will be removed and added to the response object by the AddQueuedCookiesToResponse middleware.
You can get and set cookies in three places: the Cookie facade, the cookie() global helper, and the request and response objects.
The Cookie facade is the most full-featured option, allowing you to not only read and make cookies, but also to queue them to be added to the response. It provides the following methods:
Cookie::get($key)To pull the value of a cookie that came in with the request, you can just run Cookie::get('cookie-name'). This is the simplest option.
Cookie::has($key)You can check whether a cookie came in with the request using Cookie::has('cookie-name'), which returns a boolean.
Cookie::make(...params)If you want to make a cookie without queueing it anywhere, you can use Cookie::make(). The most likely use for this would be to make a cookie and then manually attach it to the response object, which we’ll cover in a bit.
Here are the parameters for make(), in order:
$name is the name of the cookie
$value is the content of the cookie
$minutes specifies how many minutes the cookie should live
$path is the path under which your cookie should be valid
$domain lists the domains for which your cookie should work
$secure indicates whether the cookie should only be transmitted over a secure (HTTPS) connection
$httpOnly indicates whether the cookie will be made accessible only through the HTTP protocol
$raw indicates whether the cookie should be sent without URL encoding
$sameSite indicates whether the cookie should be available for cross-site requests; options are “lax”, “strict”, or null
Cookie::make()Returns an instance of Symfony\Component\HttpFoundation\Cookie.
The CookieJar that the Cookie facade instance uses reads its defaults from the session config. So, if you change any of the configuration values for the session cookie in config/session.php, those same defaults will be applied to all of your cookies that you create using the Cookie facade.
Cookie::queue(Cookie || ...params)If you use Cookie::make(), you’ll still need to attach the cookie to your response, which we’ll cover shortly. Cookie::queue() has the same syntax as Cookie::make(), but it enqueues the created cookie to be automatically attached to the response by middleware.
If you’d like, you can also just pass a cookie you’ve created yourself into Cookie::queue().
Here’s the simplest possible way to add a cookie to the response in Laravel:
Cookie::queue('dismissed-popup',true,15);
Cookies can only be returned as a part of a response. So, if you enqueue cookies with the Cookie facade and then your response isn’t returned correctly—for example, if you use PHP’s exit() or something halts the execution of your script—your cookies won’t be set.
The cookie() global helper will return a CookieJar instance if you call it with no parameters. However, two of the most convenient methods on the Cookie facade—has() and get()—exist only on the facade, not on the CookieJar. So, in this context, I think the global helper is actually less useful than the other options.
The one task for which the cookie() global helper is useful is creating a cookie. If you pass parameters to cookie(), they’ll be passed directly to the equivalent of Cookie::make(), so this is the fastest way to create a cookie:
$cookie=cookie('dismissed-popup',true,15);
You can also inject an instance of Illuminate\Cookie\CookieJar anywhere in the app, but you’ll have the same limitations discussed here.
Since cookies come in as a part of the request and are set as a part of the response, those Illuminate objects are the places they actually live. The Cookie facade’s get(), has(), and queue() methods are just proxies to interact with the request and response objects.
So, the simplest way to interact with cookies is to pull cookies from the request and set them on the response.
Once you have a copy of your request object—if you don’t know how to get one, just try app('request')—you can use the request object’s cookie() method to read its cookies, as shown in Example 14-11.
As you can see in this example, the cookie() method has two parameters: the cookie’s name and, optionally, the fallback value.
Whenever you have your response object ready, you can use the cookie() method (or the withCookie() method in Laravel prior to 5.3) on it to add a cookie to the response, like in Example 14-12.
If you’re new to Laravel and not sure which option to use, I’d recommend setting cookies on the request and response objects. It’s a bit more work, but will lead to fewer surprises if future developers don’t understand the CookieJar queue.
We’ve seen a few really brief examples of logging so far in this book when we were talking about other concepts like the container and facades, but let’s briefly look at what options you have with logging beyond just Log::info('Message').
The purpose of logs are to increase “discoverability”, or your ability to understand what’s going in at any given moment in your application.
Logs are short messages, sometimes with some data embedded in a human-readable form, that your code will generate for the sake of understanding what was happening during the execution of the app. Each log must be captured at a specific “level”, which can vary from emergency (something very bad happened) to debug (something of almost no significance happened).
Without any modifications, your app will write any log statements to a file located at storage/logs/laravel.log, and each log statement will look a little bit like this:
[2018-09-22 21:34:38] local.ERROR: Something went wrong.
You can see we have the date, time, environment, error level, and message, all on one line. However, Laravel also (by default) logs any un-caught exceptions, and in that case you’ll see the entire stack trace inline.
We’ll cover how to log, why to log, and how to log elsewhere (for example, Slack) in the following section.
The most common use cases for logs are to act as a semi-disposable record of things that happened that you may care about later, but to which you don’t definitively need programmatic access. The logs are more about learning what’s going on in the app and less about creating structured data your app can consume.
For example, if you want to have code that consumes a record of every user login and does something interesting with it, that’s a use case for a “logins” database table. However, if you have a casual interest in those logins but you’re not entirely certain whether you care or whether you need that information programmatically, you may just throw a debug or info level log on it and forget about it.
Logs are also common when you need to see the value of something at the moment it goes wrong, or at a certain time of day, or something else that means you want the data at a time when you’re not around. Throw a log statement in the code, get the data you need out of the logs, and either keep it in the code for later usage or just delete it again.
The simplest way to write a log entry in Laravel is to use the Log facade, and use the method on that facade that’s for the level of log you’d like to record. The levels are the same levels defined in RFC 5424:
Log::emergency($message);Log::alert($message);Log::critical($message);Log::error($message);Log::warning($message);Log::notice($message);Log::info($message);Log::debug($message);
You can also, optionally, pass a second parameter that’s an array of connected data.
Log::error('Failed to upload user image.',['user'=>$user]);
This additional information may be captured differently by different log destinations, but here’s how this looks in the default local log (although it will be just a single line in the log):
[2018-09-27 20:53:31] local.ERROR: Failed to upload user image. {
"user":"[object] (App\\User: {
\"id\":1,
\"name\":\"Matt\",
\"email\":\"matt@tighten.co\",
\"email_verified_at\":null,
\"api_token\":\"long-token-here\",
\"created_at\":\"2018-09-22 21:39:55\",
\"updated_at\":\"2018-09-22 21:40:08\"
})"
}
In Laravel 5.6, the way we configure and capture logs was changed pretty significantly to introduce the idea of multiple “channels” and “drivers”. If you’re working in 5.5 or earlier, you can skip on to “Full-Text Search with Laravel Scout”.
Like many other aspects of Laravel (file storage, database, mail, etc.) you can configure your logs to use one or more predefined log types, which you define in the config file, and each “type” involves passing various configuration details to a specific log driver.
With logs, these log types are called “channels”, and out of the box you’ll have options for “stack”, “single”, “daily”, “slack”, “stderr”, “syslog”, and “errorlog”.
Each channel is connected to a single driver; the available drivers are “single”, “daily”, “slack”, “syslog”, “errorlog”, “monolog”, “custom”, or “stack”. To learn more about these drivers and the full list of channels available, take a look at the Logging Docs.
Let’s cover the most common channels, though: stack, single, daily, and slack.
The single channel writes every log entry to a single file, which you’ll define in the path key. You can see its default configuration here:
'single'=>['driver'=>'single','path'=>storage_path('logs/laravel.log'),'level'=>'debug',],
This means it’ll only log events at the debug level or higher, and it will write them all to a single file, storage/logs/laravel.log..
The daily channel is just like the single channel, but it splits out a new file for each day. You can see its default config here:
'daily'=>['driver'=>'daily','path'=>storage_path('logs/laravel.log'),'level'=>'debug','days'=>7,],
Its config is similar to single, but we now can set how many days of logs to keep before they’re cleaned up, and the date will now be appended to the filename we specify. For example, the config above will generate a file named storage/logs/laravel-2018-09-28.log.
The Slack channel provides two things. First, it makes it easy to send your logs (or, more likely, only certain logs) over to Slack.
But second, it shows us that you’re not limited to just the handlers that come out of the box with Laravel. We’ll cover this in a second, but this isn’t a custom Slack implementation; it’s just Laravel building a log driver that connects to the Monolog “Slack” handler, and if you can use any Monolog handler, you have a lot of options available to you.
'slack'=>['driver'=>'slack','url'=>env('LOG_SLACK_WEBHOOK_URL'),'username'=>'Laravel Log','emoji'=>':boom:','level'=>'critical',],
Finally, the stack channel. This is the channel that’s enabled by default on your application.
'stack'=>['driver'=>'stack','channels'=>['single'],],
The stack channel simply sends all your logs to more than one channel. That’s it! So while the stack channel is configured by default on your Laravel apps, its “channels” array is set to “single” by default, so in reality, your app is just using the “single” log channel.
But, what if you wanted everything of the level “info” and above to go to the daily files, but you wanted “critical” and higher log messages to go to Slack? It’s easy, with the stack driver:
'channels'=>['stack'=>['driver'=>'stack','channels'=>['daily','slack'],],'daily'=>['driver'=>'daily','path'=>storage_path('logs/laravel.log'),'level'=>'info','days'=>7,],'slack'=>['driver'=>'slack','url'=>env('LOG_SLACK_WEBHOOK_URL'),'username'=>'Laravel Log','emoji'=>':boom:','level'=>'critical',],
However, they may also just be times that you want to control exactly which log messages go where. You can do that, too. Just specify the channel when you call on the Log facade:
Log::channel('slack')->info("This message will go to Slack.");
If you’d like to customize how each log is sent to each channel, or implement custom Monolog handlers, check out the Logs docs to learn more.
Laravel Scout is a separate package that you can bring into your Laravel apps to add full-text search to your Eloquent models. Scout makes it easy to index and search the contents of your Eloquent models; it ships with an Algolia driver, but there are also community packages for other providers. I’ll assume you’re using Algolia.
First, pull in the package in any Laravel 5.3+ app:
composer require laravel/scout
If you’re using a version of Laravel prior to 5.5, you will need to manually register the service provider by add Laravel\Scout\ScoutServiceProvider::class, to the providers section of config/app.php.
You’ll want to set up your Scout configuration. Run php artisan vendor:publish --provider="Laravel\Scout\ScoutServiceProvider" and paste your Algolia credentials in config/scout.php.
Finally, install the Algolia SDK:
composer require algolia/algoliasearch-client-php
In your model (we’ll use Review, for a book review, for this example), import the Laravel\Scout\Searchable trait.
You can define which properties are searchable using the toSearchableArray() method (it defaults to mirroring toArray()), and define the name of the model’s index using the searchableAs() method (it defaults to the table name).
Scout subscribes to the create/delete/update events on your marked models. When you create, update, or delete any rows, Scout will sync those changes up to Algolia. It’ll either make those changes synchronously with your updates or, if you configure Scout to use a queue, queue the updates.
Scout’s syntax is simple. For example, to find any Review with the word Llew in it:
Review::search('Llew')->get();
You can also modify your queries as you would with regular Eloquent calls:
// Get all records from the Review that match the term "Llew",// limited to 20 per page and reading the page query parameter,// just like Eloquent paginationReview::search('Llew')->paginate(20);// Get all records from the Review that match the term "Llew"// and have the account_id field set to 2Review::search('Llew')->where('account_id',2)->get();
What comes back from these searches? A collection of Eloquent models, rehydrated from your database. The IDs are stored in Algolia, which returns a list of matched IDs; Scout then pulls the database records for those and returns them as Eloquent objects.
You don’t have full access to the complexity of SQL WHERE commands, but it provides a basic framework for comparison checks like you can see in the code samples here.
At this point your app will be making HTTP requests to Algolia on every request that modifies any database records. This can slow down your application quickly, which is why Scout makes it easy to push all of its actions onto a queue.
In config/scout.php, set queue to true so that these updates are set to be indexed asynchronously. Your full-text index is now operating under “eventual consistency”; your database records will receive the updates immediately, and the updates to your search indexes will be queued and updated as fast as your queue worker allows.
If you need to perform a set of operations and avoid triggering the indexing in response, wrap the operations in the withoutSyncingToSearch() method on your model:
Review::withoutSyncingToSearch(function(){// make a bunch of reviews, e.g.factory(Review::class,10)->create();});
Sometimes you might only want to index records if they meet a certain condition. You may use the shouldBeSearchable() method on the model class to achieve this.
publicfunctionshouldBeSearchable(){return$this->isApproved();}
If you want to manually trigger indexing your model, you can do it using code in your app or via the command line.
To manually trigger indexing from your code, add searchable() to the end of any Eloquent query and it will index all of the records that were found in that query:
Review::all()->searchable();
You can also choose to scope the query to only those you want to index. However, Scout is smart enough to insert new records and update old records, so you may choose to just reindex the entire contents of the model’s database table.
You can also run searchable() on relationship methods:
$user->reviews()->searchable();
If you want to unindex any records with the same sort of query chaining, just use unsearchable() instead:
Review::where('sucky',true)->unsearchable();
You can also trigger indexing with an Artisan command:
php artisan scout:import "App\Review"
This will chunk all of the Review models and index them all.
Testing most of these features is as simple as just using them in your tests; no need to mock or stub. The default configuration will already work—for example, take a look at phpunit.xml to see that your session driver and cache driver have been set to values appropriate for tests.
However, there are a few convenience methods and a few gotcha’s that you should know about before you attempt to test them all.
Testing file uploads can be a bit of a pain, but follow these steps and it will be clear.
First, let’s look at how to manually create a Illuminate\Http\UploadedFile object for use in our application testing (Example 14-13).
publicfunctiontest_file_should_be_stored(){Storage::fake('public');$file=UploadedFile::fake()->image('avatar.jpg');$response=$this->postJson('/avatar',['avatar'=>$file,]);// Assert the file was stored...Storage::disk('public')->assertExists("avatars/{$file->hashName()}");// Assert a file does not exist...Storage::disk('public')->assertMissing('missing.jpg');}
We’ve created a new instance of UploadedFile that refers to our testing file, and we can now use it to test our routes.
If your route is expecting a real file to exist, sometimes the best way to make it testable is to make that real file actually exist. Let’s say every user must have a profile picture.
First, let’s set up the model factory for the user to use Faker to make a copy of the picture, as in Example 14-14.
$factory->define(User::class,function(Faker\Generator$faker){return['picture'=>$faker->file(storage_path('tests'),// source directorystorage_path('app'),// target directoryfalse// return just filename, not full path),'name'=>$faker->name,];});
Faker’s file() method picks a random file from the source directory and copies it to the target directory, and then returns the filename. So we’ve just picked a random file from the storage/tests directory, copied it to the storage/app directory, and set its filename as the picture property on our User. At this point we can use a User in tests on routes that expect the User to have a picture, as seen in Example 14-15.
publicfunctiontest_user_profile_picture_echoes_correctly(){$user=factory(User::class)->create();$response=$this->get(route('users.show',$user->id));$response->assertSee($user->picture);}
Of course, in many contexts you can just generate a random string there without even copying a file. But if your routes check for the file’s existence or run any operations on the file, this is your best option.
If you need to assert something has been set in the session, you can use some convenience methods Laravel makes available in every test. All of these methods are available in your tests on the Illuminate\Foundation\Testing\TestResponse object:
assertSessionHas($key, $value = null)Asserts that the session has a value for a particular key, and, if the second parameter is passed, that that key is a particular value:
publicfunctiontest_some_thing(){// do stuff that ends up with a $response object...$response->assertSessionHas('key','value');}
assertSessionHasAll(array $bindings)If passed an array of key/value pairs, asserts that all of the keys are equal to all of the values. If one or more of the array entries is just a value (with PHP’s default numeric key), it will just be checked for existence in the session:
$check=['has','hasWithThisValue'=>'thisValue',]$response->assertSessionHasAll($check);
assertSessionMissing($key)Asserts that the session does not have a value for a particular key.
assertSessionHasErrors($bindings = [], $format = null)Asserts that the session has an errors value. This is the key Laravel uses to send errors back from validation failures.
If the array contains just keys, it will check that errors are set with those keys:
$response=$this->post('test-route',['failing'=>'data']);$response->assertSessionHasErrors(['name','email']);
You can also pass values for those keys, and optionally a $format, to check that the messages for those errors came back the way you expected:
$response=$this->post('test-route',['failing'=>'data']);$response->assertSessionHasErrors(['email'=>'<strong>The email field is required.</strong>'],'<strong>:message</strong>');
There’s nothing special about testing your features that use cache—just do it:
Cache::put('key','value',15);$this->assertEquals('value',Cache::get('key'));
Laravel uses the “array” cache driver by default in your testing environment, which just stores your cache values in memory.
If you need to set a cookie before testing a route in your application tests, you can manually pass cookies to one of the parameters of the call() method. To learn more about call(), check out Chapter 12.
Your cookies won’t work in your tests unless you exclude them from Laravel’s cookie encryption middleware. You can do this by teaching the EncryptCookies middleware to temporarily disable itself for that cookie:
useIlluminate\Cookie\Middleware\EncryptCookies;...$this->app->resolving(EncryptCookies::class,function($object){$object->disableFor('cookie-name');});// ...run test
That means you can set and check against a cookie with something like Example 14-16.
If you want to test that a response has a cookie set, you can use either seeCookie() to test for the cookie:
$response=$this->get('cookie-setting-route');$response->assertCookie('cookie-name');
Or you could use assertPlainCookie() to test for the cookie and to assert that it’s not encrypted.
The simplest way to test that a certain log was written is by making assertions against the Log facade (learn more in “Faking other Facades”).
Here’s a quick example:
// Test filepublicfunctiontest_new_accounts_generate_log_entries(){Log::shouldReceive('info')->once()->with('New account created!');// Create a new account$this->post(route('accounts.store'),['email'=>'matt@mattstauffer.com']);}// AccountsControllerpublicfunctionstore(){// Create account...Log::info('New account created!');}
There’s also a package called Log Fake that expands on what you can do with the facade testing shown above and allows you to write more customized assertions against your logs.
If you need to test code that uses Scout data, you’re probably not going to want your tests triggering indexing actions or reading from Scout. Simply add an environment variable to your phpunit.xml to disable Scout’s connection to Algolia:
<envname="SCOUT_DRIVER"value="null"/>
Laravel provides simple interfaces to many common storage operations: filesystem access, sessions, cookies, the cache, and search. Each of these APIs is the same regardless of which provider you use, which Laravel enables by allowing multiple “drivers” to serve the same public interface. This makes it simple to switch providers depending on the environment, or as the needs of the application change.
Sending an application’s users notifications via email, Slack, SMS, or another notification system is a common but surprisingly complex requirement. Laravel’s mail and notification features provide consistent APIs that abstract away the need to pay too close attention to any particular provider. Just like in Chapter 14, you’ll write your code once and choose at the configuration level which provider you’ll use to send your email or notifications.
Laravel’s mail functionality is a convenience layer on top of SwiftMailer, and out of the box Laravel comes with drivers for Mailgun, Mandrill, Sparkpost, SES, SMTP, PHP Mail, and Sendmail.
For all of the cloud services, you’ll set your authentication information in config/services.php. However, if you take a look you’ll see there are already keys there—and in config/mail.php—that allow you to customize your application’s mail functionality in .env using variables like MAIL_DRIVER and MAILGUN_SECRET.
If you’re using any of the cloud-based API drivers, you’ll need to bring Guzzle in with Composer. You can run the following command to add it:
composer require guzzlehttp/guzzle
If you use the SES driver, you’ll need to run the following command:
composer require aws/aws-sdk-php:~3.0
There are two different syntaxes in Laravel for sending mail: classic and mailable. The mailable syntax is the preferred syntax since 5.3, so we’re going to focus on that in this book. But for those who are working in 5.1 or 5.2, here’s a quick look at how the classic syntax (Example 15-1) works.
::send('emails.assignment-created',['trainer'=>$trainer,'trainee'=>$trainee],function($m)use($trainer,$trainee){$m->from($trainer->,$trainer->name);$m->to($trainee->,$trainee->name)->subject('A New Assignment!');});
The first parameter of Mail::send() is the name of the view. Remember, emails.assignment means resources/views/emails/assignment-created.blade.php or resources/views/emails/assignment-created.php.
The second parameter is an array of data that you want to pass to the view.
The third parameter is a closure, in which you define how and where to send the email: from, to, CC, BCC, subject, and any other metadata. Make sure to use any variables you want access to within the closure. And note that the closure is passed one parameter, which we’ve named $m; this is the message object.
Take a look at the old docs to learn about the classic mail syntax.
Laravel 5.3 introduced a new mail syntax called the “mailable.” It works the same as the classic mail syntax, but instead of defining your mail messages in a closure, you instead create a specific PHP class to represent each mail.
To make a mailable, use the make:mail Artisan command:
php artisan make:mail AssignmentCreated
Example 15-2 shows what that class looks like.
<?phpnamespaceApp\Mail;useIlluminate\Bus\Queueable;useIlluminate\Mail\Mailable;useIlluminate\Queue\SerializesModels;useIlluminate\Contracts\Queue\ShouldQueue;classAssignmentCreatedextendsMailable{useQueueable,SerializesModels;/*** Create a new message instance.** @return void*/publicfunction__construct(){//}/*** Build the message.** @return $this*/publicfunctionbuild(){return$this->view('view.name');}}
This class probably looks familiar—it’s shaped almost the same as a Job. It even imports the Queuable trait for queuing your mail and the SerializesModels trait so any Eloquent models you pass to the constructor will be serialized correctly.
So, how does this work? The build() method on a mailable is where you’re going to define which view to use, what the subject is, and anything else you want to tweak about the mail except who it’s going to. The constructor is the place where you’ll pass in any data, and any public properties on your mailable class will be available to the template.
Take a look at Example 15-3 to see how we might update the autogenerated mailable for our assignment example.
<?phpnamespaceApp\Mail;useIlluminate\Bus\Queueable;useIlluminate\Mail\Mailable;useIlluminate\Queue\SerializesModels;useIlluminate\Contracts\Queue\ShouldQueue;classAssignmentCreatedextendsMailable{useQueueable,SerializesModels;public$trainer;public$trainee;publicfunction__construct($trainer,$trainee){$this->trainer=$trainer;$this->trainee=$trainee;}publicfunctionbuild(){return$this->subject('New assignment from '.$this->trainer->name)->view('emails.assignment-created');}}
Example 15-4 shows how to send a mailable.
// Simple send::to($user)->send(newAssignmentCreated($trainer,$trainee));// With CC/BCC/etc.::to($user1))->cc($user2)->bcc($user3)->send(newAssignmentCreated($trainer,$trainee));// With collections::to('me@app.com')->bcc(User::all())->send(newAssignmentCreated($trainer,$trainee))
Mail templates are just like any other template. They can extend other templates, use sections, parse variables, contain conditional or looping directives, and do anything else you can do in a normal Blade view.
Take a look at Example 15-5 to see a possible emails.assignment-created template for Example 15-3.
<!-- resources/views/emails/assignment-created.blade.php --><p>Hey {{ $trainee->name }}!</p><p>You have received a new training assignment from<b>{{ $trainer->name }}</b>. Check out your<ahref="{{ route('training-dashboard') }}">training dashboard</a>now!</p>
In Example 15-3, both $trainer and $trainee are public properties on your mailable, which makes them available to the template.
If you want to explicitly define which variables are passed to the template, you can chain the with() method onto your build() call as in Example 15-6.
publicfunctionbuild(){return$this->subject('You have a new assignment!')->view('emails.assignment')->with(['assignment'=>$this->event->name]);}
So far we’ve used the view() method in our build() call stacks. This expects the template we’re referencing to pass back HTML. If you’d like to pass a plain-text version, the text() method defines your plain-text view:
publicfunctionbuild(){return$this->view('emails.reminder')->text('emails.reminder_plain');}
Here are a few of the methods available to you to customize your message in the build() method of your mailable:
from($address, $name = null)Sets the “from” name and address—represents the author
subject($subject)Sets the email subject
attach($file, array $options = [])Attaches a file; valid options are mime for MIME type and as for display name
attachData($data, $name, array $options = [])Attaches a file from a raw string; same options as attach()
attachFromStorage($path, $name = null, array $options = [])Attaches a file stored in any of your filesystem disks
priority($level = 3)Set the email’s priority, where 1 is the highest and 5 is the lowest
Finally, if you want to perform any manual modifications on the underlying Swift message, you can do that using withSwiftMessage(), as shown in Example 15-7.
publicfunctionbuild(){return$this->subject('Howdy!')->withSwiftMessage(function($swift){$swift->setReplyTo('noreply@email.com');})->view('emails.howdy');}
Example 15-8 shows three options for how to attach files or raw data to your email.
// Attach a file using the local filenamepublicfunctionbuild(){return$this->subject('Your whitepaper download')->attach(storage_path('pdfs/whitepaper.pdf'),['mime'=>'application/pdf',// Optional'as'=>'whitepaper-barasa.pdf'// Optional])->view('emails.whitepaper');}// Attach a file passing the raw datapublicfunctionbuild(){return$this->subject('Your whitepaper download')->attachData(file_get_contents(storage_path('pdfs/whitepaper.pdf')),'whitepaper-barasa.pdf',['mime'=>'application/pdf'// Optional])->view('emails.whitepaper');}// Attach a file stored in one of your filesystem disk, like S3publicfunctionbuild(){return$this->subject('Your whitepaper download')->view('emails.whitepaper')->attachFromStorage('/pdfs/whitepaper.pdf');}
And you can see how to embed images directly into your email in Example 15-9.
<!--emails/image.blade.php--!>Hereisanimage:<imgsrc="{{$message->embed(storage_path('embed.jpg')) }}">Or,thesameimageembeddingthedata:<imgsrc="{{$message->embedData(file_get_contents(storage_path('embed.jpg')), 'embed.jpg') }}">
Markdown mail messages allow you to write your email content in Markdown, after which it will be converted into full HTML (and plain text) emails with Laravel’s built-in, responsive HTML templates. You can also tweak these templates to make a customized email template that’s still simple for your developers and non-developers to create content for.
First, run the make:mail Artisan command with the markdown flag:
php artisan make:mail AssignmentCreated --markdown=emails.assignment-created
You can see an example what the mail file it’ll generate looks like in Example 15-10.
source,php
class AssignmentCreated extends Mailable
{
// ...
public function build()
{
return $this->markdown('emails.assignment-created');
}
}As you can see, this is almost exactly the same as a normal mailable file in Laravel. The main difference is that you’re calling the markdown() method instead of the view() method. Also note that the template you’re referencing should represent a “Markdown template”, not a normal Blade template.
What this means is that, where a normal email template may be expected—with the use of includes and inheritance like any Blade file—to generate a full HTML email, Markdown templates simply pass Markdown content to a few pre-defined “components”. Framework and package-level components in Laravel are often nested with a “package::component” naming style, and as such the main body of your Markdown email should be passed into a component named “mail::message”. Take a look at Example 15-11 to see an example of a simple Markdown mail template.
<!--resources/views/emails/assignment-created.blade.php-->@component('mail::message')# Hey {{ $trainee->name }}!Youhavereceivedanewtrainingassignmentfrom**{{$trainer->name}}**@component('mail::button',['url'=>route('training-dashboard')])ViewYourAssigment@endcomponentThanks,<br>{{config('app.name')}}@endcomponent
As you can see in Example 15-11, there’s a parent “mail::message” component to which you want to pass the body of your email, but you’re also provided with other smaller components you can sprinkle into your emails. We used the “mail::button” component here, which takes a body (“View Your Assignment”) but also requires parameters to be passed, via an array passed to the second parameter of the @component directive.
Button ComponentGenerages a centered button link and requires a “url” attributes and allows an optional “color” attribute, to which you can pass “primary”, “success”, or “error”.
Panel ComponentRenders the provided text with a slightly lighter background than the rest of the message.
Table ComponentConverts the content passed into it via the Markdown table syntax.
These Markdown components are built into the core of the Laravel framework, but if you need to customize how they work, you can publish their files and edit them.
php artisan vendor:publish --tag=laravel-mail
You can learn more about customizing these files and their themes in the Laravel docs.
When you’re developing emails in your applications, it’s helpful to be able to preview how they’ll render. You can rely on a tool like Mailtrap for this, and that is a useful tool, but it can also be helpful to render the mails directly in your browser and see your changes made immediately.
Take a look at Example 15-12 to see a sample route you can add to your application to render a given Mailable.
Route::get('preview-assignment-created-mailable',function(){$trainer=Trainer::first();$trainee=Trainee::first();returnnew\App\Mail\AssignmentCreated($trainer,$trainee);});
Sending email is a time-consuming task that can cause applications to slow down, so it’s common to move sending email to a background queue. It’s so common, in fact, that Laravel has a set of built-in tools to make it easier to queue your messages without writing queue jobs for each email.
Everything we’ll cover here requires your queues to be configured correctly. Take a look at Chapter 16 to learn more about how queues work and how to get them running in your application.
To queue a mail object instead of sending it immediately, simply pass your mailable object to Mail::queue() instead of Mail::send():
::queue(newAssignmentCreated($trainer,$trainee));
Mail::later() works the same as Mail::queue(), but it allows you to add a delay—either in minutes, or at a specific time by passing an instance of DateTime or Carbon—to when the email will be pulled from the queue and sent:
$when=now()->addMinutes(30);::later($when,newAssignmentCreated($trainer,$trainee));
For both queue() and later(), if you’d like to specify which queue or queue connection your mail is added to, use the onConnection() and onQueue() methods on your mailable object:
$message=(newAssignmentCreated($trainer,$trainee))->onConnection('sqs')->onQueue('emails');::to($user)->queue($message);
If you’d like to direct that a given mailable should always be queued, you can make the mailable implement the Illuminate\Contracts\Queue\ShouldQueue interface.
This is all well and good for sending mail in your production environments. But how do you test this all out? There are three primary tools you’ll want to consider: Laravel’s log driver, a Software as a Service (SaaS) app named Mailtrap, and the “universal to” configuration option.
Laravel provides a log driver that logs every email you try to send to your local laravel.log file (which is, by default, in storage/logs).
If you want to use this, edit .env and set MAIL_DRIVER to log. Now open up or tail storage/logs/laravel.log and send an email from your app. You’ll see something like this:
Message-ID: <04ee2e97289c68f0c9191f4b04fc0de1@localhost> Date: Tue, 17 May 2016 02:52:46 +0000 Subject: Welcome to our app! From: Matt Stauffer <matt@mattstauffer.com> To: freja@jensen.no MIME-Version: 1.0 Content-Type: text/html; charset=utf-8 Content-Transfer-Encoding: quoted-printable Welcome to our app!
Mailtrap is a service for capturing and inspecting emails in development environments. You send your mail to the Mailtrap servers via SMTP, but instead of sending those emails off to the intended recipients, Mailtrap captures them all and provides you with a web-based email client for inspecting them, regardless of which email address is in the to field.
To set up Mailtrap, sign up for a free Mailtrap account and visit the base dashboard for your demo. Copy your username and password from the SMTP column.
Now edit your app’s .env file and set the following values in the mail section:
MAIL_DRIVER=smtp MAIL_HOST=mailtrap.io MAIL_PORT=2525 MAIL_USERNAME=your_username_from_mailtrap_here MAIL_PASSWORD=your_password_from_mailtrap_here MAIL_ENCRYPTION=null
Now, any email you send from your app will show up in your Mailtrap inbox.
If you’d like to inspect the emails in your preferred client, you can override the to field on each message with the “universal to” configuration setting. To set this up, add a “to” key to your config/mail.php file that looks something like this:
'to'=>['address'=>'matt@mattstauffer.com','name'=>'Matt Testing My Application'],
Note that you’ll need to actually set up a real email driver with something like Mailgun or Sendmail in order to use this.
Most of the mail that’s sent from web apps really has the purpose of notifying users that a particular action has happened or needs to happen. As users’ communication preferences grow more and more diverse, we gather ever more—and more disparate—packages to communicate via Slack, SMS, and other means.
Laravel 5.3 introduced a new concept in Laravel called, fittingly, notifications. Just like mailables, a notification is a PHP class that represents a single communication that you might want to send to your users. For now, let’s imagine we’re notifying users of our physical training app that they have a new workout available on our app.
Each class represents all of the information necessary to send notifications to your users using one or many notification channels. A single notification could send an email, send an SMS via Nexmo, send a WebSockets ping, add a record to a database, send a message to a Slack channel, and much more.
So, let’s create our notification:
php artisan make:notification WorkoutAvailable
Example 15-13 shows what that gives us.
<?phpnamespaceApp\Notifications;useIlluminate\Bus\Queueable;useIlluminate\Notifications\Notification;useIlluminate\Contracts\Queue\ShouldQueue;useIlluminate\Notifications\Messages\MailMessage;classWorkoutAvailableextendsNotification{useQueueable;/*** Create a new notification instance.** @return void*/publicfunction__construct(){//}/*** Get the notification's delivery channels.** @param mixed $notifiable* @return array*/publicfunctionvia($notifiable){return['mail'];}/*** Get the mail representation of the notification.** @param mixed $notifiable* @return \Illuminate\Notifications\Messages\MailMessage*/publicfunctiontoMail($notifiable){return(newMailMessage)->line('The introduction to the notification.')->action('Notification Action',url('/'))->line('Thank you for using our application!');}/*** Get the array representation of the notification.** @param mixed $notifiable* @return array*/publicfunctiontoArray($notifiable){return[//];}}
We can learn a few things here. First, we’re going to pass in relevant data to the constructor. Second, there’s a via() method that allows us to define, for a given user, which notification channels to use ($notifiable represents whatever entities you want to notify in your system; for most apps, it’ll be a user, but that’s not always the case). And third, there are individual methods for each notification channel that allow you to specifically define how to send one of these notifications through that channel.
While the most common notification targets will be users, it’s possible you may want to notify something else. This may simply be because your application has multiple user types—so, you might want to be able to notify both “trainers” and “trainees.” But you also might find yourself wanting to notify a “group,” a “company,” or a “server.”
So, let’s modify this class for our WorkoutAvailable example. Take a look at Example 15-14.
...classWorkoutAvailableextendsNotification{useQueueable;public$workout;publicfunction__construct($workout){$this->workout=$workout;}publicfunctionvia($notifiable){// This method doesn't exist on the User... we're going to make it upreturn$notifiable->preferredNotificationChannels();}publicfunctiontoMail($notifiable){return(newMailMessage)->line('You have a new workout available!')->action('Check it out now',route('workout.show',[$this->workout]))->line('Thank you for training with us!');}publicfunctiontoArray($notifiable){return[];}}
As you can see in Example 15-14, we’re somehow responsible for deciding, for each notification and each notifiable, which notification channels we’re going to use.
You could just send everything as mail or just send everything as SMS (Example 15-15).
publicfunctionvia($notifiable){return'nexmo';}
You could also let each user choose their one preferred method and save that on the User itself (Example 15-16).
publicfunctionvia($notifiable){return$notifiable->preferred_notification_channel;}
Or, as we imagined in Example 15-14, you could create a method on each notifiable that allows for some complex notification logic. For example, you could notify the user over certain channels during work hours and other channels in the evening. What is important is that via() is a PHP class method, so you can do whatever complex logic you want there.
There are two ways to send a notification: using the Notification facade, or adding the Notifiable trait to an Eloquent class (likely your User class).
Any model that imports the Laravel\Notifications\Notifiable trait (which the App\User class does by default) has a notify() method that can be passed a notification, which will look like Example 15-17.
useApp\Notifications\WorkoutAvailable;...$user->notify(newWorkoutAvailable($workout));
The Notification facade is the clumsier of the two methods, since you have to pass both the notifiable and the notification. However, it’s helpful because you can choose to pass more than one notifiable in at the same time, like you can see in Example 15-18.
useApp\Notifications\WorkoutAvailable;...Notification::send($users,newWorkoutAvailable($workout));
Most of the notification drivers need to send HTTP requests to send their notifications, which could slow down your user experience, so you probably want to queue your notifications. All notifications import the Queuable trait by default, so all you need to do is add implements ShouldQueue to your notification and Laravel will instantly move it to a queue.
As with any other queued features, you’ll need to make sure you have your queue settings configured correctly and a queue worker running.
If you’d like to delay the delivery of your notification, you can run the delay() method on the notification:
$delayUntil=now()->addMinutes(15);$user->notify((newWorkoutAvailable($workout))->delay($delayUntil));
Out of the box, Laravel comes with notification drivers for email, database, broadcast, Nexmo SMS, and Slack. I’ll cover each briefly, but I’d recommend referring to the docs for more thorough introductions to each.
It’s also easy to create your own notification drivers, and dozens of people already have; you can find them at Laravel Notification Channels website.
Let’s take a look at how the email from our earlier example, Example 15-14, is built:
publicfunctiontoMail($notifiable){return(newMailMessage)->line('You have a new workout available!')->action('Check it out now',route('workouts.show',[$this->workout]))->line('Thank you for training with us!');}
The result is shown in Figure 15-1. The email notification system puts your application’s name in the header of the email; you can customize that app name in the name key of config/app.php.
This email is automatically sent to the email property on the notifiable, but you can customize this behavior by adding a method to your notifiable class named routeNotificationForMail() that returns the email address you’d like email notifications sent to.
The email’s subject is set by parsing the notification class name and converting it to words. So, our WorkoutAvailable notification would have the default subject of Workout Available. We can also customize this by chaining the subject() method on our MailMessage in the toMail() method.
If you want to modify the templates, publish them and edit to your heart’s content:
php artisan vendor:publish --tag=laravel-notifications
If you like working with Markdown emails (see “Markdown Mailables”), you can also use the same markdown() method in your notifications:
publicfunctiontoMail($notifiable){return(newMailMessage)->subject('Workout Available')->markdown('emails.workout-available',['workout'=>$this->workout]);}
You can also change the style of the default template to be an “error” message, which uses a bit of different language and changes the primary button color to red. Just add a call to the error() method to your MailMessage call chain in the toMail() method.
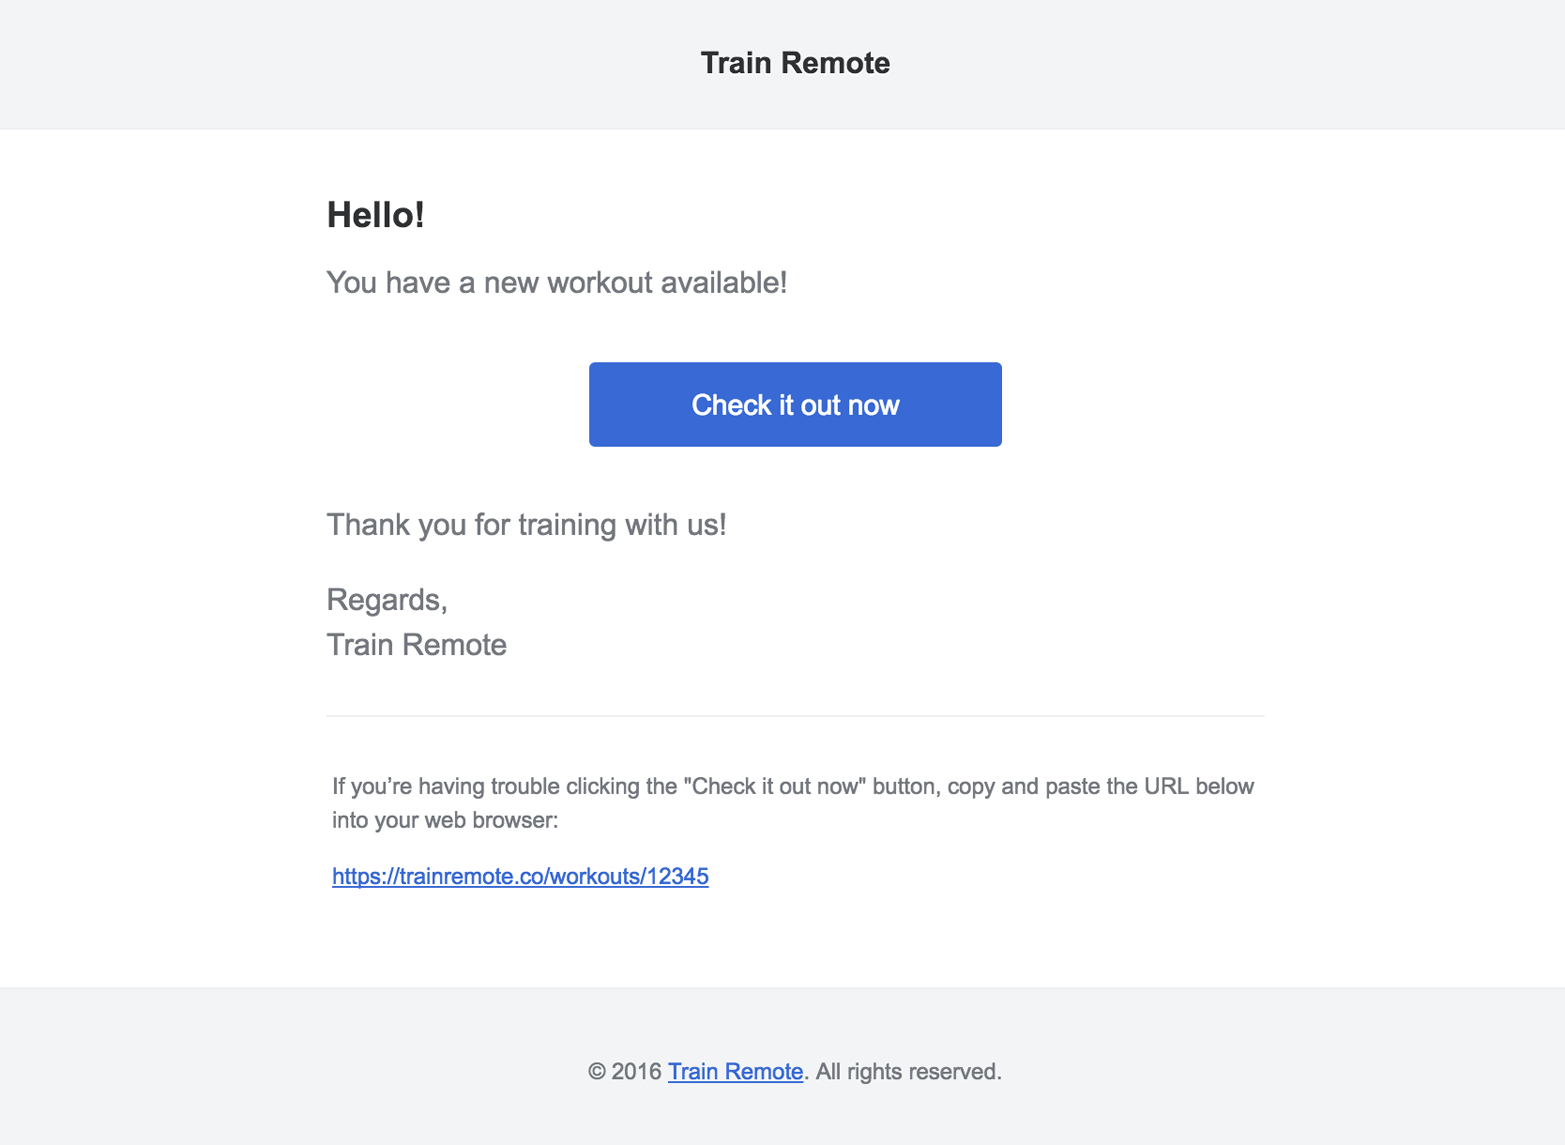
You can send notifications to a database table using the database notification channel. First, create your table with php artisan notifications:table. Next, create a toDatabase() method on your notification and return an array of data there. This data will be encoded as JSON and stored in the database table’s data column.
The Notifiable trait adds a notifications relationship to any model it’s imported in, allowing you to easily access records in the notifications table. So if you’re using database notifications, you could so something like this:
User::first()->notifications->each(function($notification){// do something});
The database notification channel also has the concept of whether or not a notification is “read.” You can scope to only the “unread” notifications:
User::first()->unreadNotifications->each(function($notification){// do something});
And you can mark one or all notifications as read:
// IndividualUser::first()->unreadNotifications->each(function($notification){if($condition){$notification->markAsRead();}});// AllUser::first()->unreadNotifications->markAsRead();
The broadcast channel sends notifications out using Laravel’s event broadcasting features, which are powered by Websockets and we’ll learn more about in “Broadcasting Events over WebSockets, and Laravel Echo”.
Create a toBroadcast() method on your notification and return array of data, and if your app is correctly configured for event broadcasting, that data will be broadcast on a private channel named {notifiable}.{id}. The {id} will be the ID of the notifiable, and {notifiable} will be the notifiable’s fully qualified class name, with the slashes replaced by periods—for example, the private channel for the App\User with the ID of 1 will be App.User.1.
SMS notifications are sent via Nexmo, so if you want to send SMS notifications, sign up for a Nexmo account and follow the instructions in the docs. Like with the other channels, you’ll be setting up a toNexmo() method and customizing the SMS message there.
The slack notification channel allows you to customize the appearance of your notifications and even attach files to your notifications. Like with the other channels, you’ll set up a toSlack() method and customize the message there.
Looking to send your notifications through other channels than those that come out of the box? There’s a robust community effor to provide an incredible variety of notification channels that you can find at http://laravel-notification-channels.com/.
Let’s take a look at how to test mail and notifications.
There are two options for testing mail in Laravel. If you’re using the traditional mail syntax (which is, by the way, not the preferred method in Laravel 5.3 and later), I’d recommend using a tool called MailThief, which Adam Wathan wrote for Tighten. Once you bring MailThief into your application with Composer, you can use MailThief::hijack() in your tests to make MailThief capture any calls to the Mail facade or any mailer classes.
MailThief then makes it possible to make assertions against the senders, recipients, CC and BCC values, and even content and attachments of your mail. Take a look at the GitHub repo to learn more, or bring it into your app:
composer require tightenco/mailthief --dev
If you are using mailables, there’s a simple syntax for writing assertions against your sent mail (Example 15-19).
publicfunctiontest_signup_triggers_welcome_email(){::fake();::assertSent(WelcomeEmail::class,function(){return->subject=='Welcome!';});// You can also use assertSentTo() to explicitly test the recipients// You can also use assertNotSent() to test that a specific mail wasn't sent.}
Laravel provides a built-in set of assertions for testing your notifications. Example 15-20 demonstrates.
publicfunctiontest_new_signups_triggers_admin_notification(){Notification::fake();Notification::assertSentTo($user,NewUsersSignedup::class,function($notification,$channels){return$notification->user->=='user-who-signed-up@gmail.com'&&$channels==['mail'];});// Assert that the email was sent to a given userNotification::assertSentTo([$user],NewUsersSignedup::class);// You can also use assertNotSentTo()Notification::assertNotSentTo(['user-that-did-not-sign-up@gmail.com'],NewUsersSignedup::class);}
Laravel’s mail and notification features provide simple, consistent interfaces to a variety of messaging systems. Laravel’s mail system uses “mailables,” PHP classes that represent emails, to provide a consistent syntax to different mail drivers. The notification system makes it easy to build a single notification that can be delivered in many different media—from emails to SMS messages to physical postcards.
So far we’ve covered some of the most common structures that power web applications: databases, mail, filesystems, and more. Each of these are common across a majority of applications and frameworks.
Laravel also provides facilities for some less common architecture patterns and application structures. In this chapter we’ll cover Laravel’s tools for implementing queues, queued jobs, events, and WebSocket event publishing. We’ll also cover Laravel’s scheduler, which makes manually-edited cron schedules a thing of the past.
To understand what a queue is, just think about the idea of “queueing up” in a line at the bank. Even if there are multiple lines—queues—only one person is being served at a time from each queue, and each person will eventually reach the front and be served. In some banks, it’s a strict first-in-first-out sort of policy, but in other banks, there’s not an exact guarantee that someone won’t cut ahead of you in line at some point. Essentially, someone can get added to the queue, be removed from the queue prematurely, or be successfully “processed” and then removed. Someone might even hit the front of the queue, not be able to be served correctly, return to the queue for a time, and then be processed again.
Queues in programming are very similar. Your application adds a “job” to a queue, which is a chunk of code that tells the application how to perform a particular behavior. Then some other separate application structure, usually a “queue worker,” takes the responsibility for pulling jobs off of the queue one at a time and performing the appropriate behavior. Queue workers can delete the jobs, return them to the queue with a delay, or mark them as successfully processed.
Laravel makes it easy to serve your queues using Redis, beanstalkd, Amazon’s SQS (Simple Queue Service), or a database table. You can also choose the sync driver to have the jobs run right in your application without actually being queued, or the null driver for jobs to just be discarded; these two are usually used in local development or testing environments.
Queues make it easy to remove a costly or slow process from any synchronous call. The most common example is sending mail—doing so can be slow, and you don’t want your users to have to wait for mail to send in response to their actions. Instead, trigger a “send mail” queued job and let the users get on with their day. Sometimes you may not just want to save your users time, but you might have a process like a cron job or a webhook that has a lot of work to process; rather than letting it all run at once (and potentially time out), you may choose to queue its individual pieces and let the queue worker process them one at a time.
Additionally, if you have some heavy processing that’s more than your server can handle, you can spin up more than one queue worker to work through your queue faster than your normal application server could on its own.
Like many other Laravel features that abstract multiple providers, queues have their own dedicated config file (config/queue.php) that allows you to set up multiple drivers and define which will be the default. This is also where you’ll store your SQS, Redis, or beanstalkd authentication information.
We haven’t covered Laravel Forge in much depth, but it’s a hosting-management service provided by Taylor Otwell, the creator of Laravel. Every server you create has Redis configured automatically, so if you visit any site’s Forge console, you can just go to the Queue tab and hit Start Worker and you’re ready to use Redis as your queue driver; you can leave all the default settings, and no other work is necessary.
Remember our bank analogy? Each person in the bank “queue” (line) is, in programming terms, a job. This job could be shaped any way; it could just be a string, or an array, or an object. In Laravel, it’s a collection of information containing the job name, the data payload, the number of attempts that have been made so far to process this job, and some other simple metadata.
But you don’t need to worry about that in your interactions with Laravel. Laravel provides a structure called a Job, which is intended to encapsulate a single task—a behavior that your application can be commanded to do—and allow it to be added to and pulled from a queue. There are also simple helpers to make it easy to queue Artisan commands and mail.
Let’s start with an example where, every time a user changes his plan with your SaaS app, you want to rerun some calculations about your overall profit.
As always, there’s an Artisan command for that:
phpartisanmake:jobCrunchReports
Take a look at Example 16-1 to see what you’ll get.
<?phpnamespaceApp\Jobs;useIlluminate\Bus\Queueable;useIlluminate\Queue\SerializesModels;useIlluminate\Queue\InteractsWithQueue;useIlluminate\Contracts\Queue\ShouldQueue;useIlluminate\Foundation\Bus\Dispatchable;classCrunchReportsimplementsShouldQueue{useDispatchable,InteractsWithQueue,Queueable,SerializesModels;/*** Create a new job instance.** @return void*/publicfunction__construct(){//}/*** Execute the job.** @return void*/publicfunctionhandle(){//}}
As you can see, this template imports the Dispatchable, Queueable, InteractsWithQueue, and SerializesModels traits, and implements the ShouldQueue interface. Prior to Laravel 5.3, some of this functionality came in through the parent App\Jobs class.
We also get two methods from this template: the constructor, which you’ll want to use to attach data to the job, and the handle() method, which is where the job’s logic should reside (and is also the method signature you’ll use to inject dependencies).
The traits and interface provide the class with the ability to be added to, and interact with, the queue. Dispatchable gives it methods to dispatch itself; Queueable allows you to specify how Laravel should push this job to the queue; InteractsWithQueue allows each job, while being handled, to control its relationship with the queue, including deleting or requeueing itself; and SerializesModels gives the job the ability to serialize and deserialize Eloquent models.
The SerializesModels trait gives the jobs the ability to serialize (convert to a flatter format that can be stored in a data store like a database or queue system) injected models so that your job’s handle() method will have access to them. However, because it’s too difficult to reliably serialize an entire Eloquent object, the trait ensures that just the primary keys of any attached Eloquent objects are serialized when the job is pushed onto the queue. When the job is deserialized and handled, the trait pulls those Eloquent models fresh from the database by their primary key. This means that when your job runs it will be pulling a fresh instance of this model, not whatever state it was in when you queued the job.
Let’s fill out the methods for our sample class, as in Example 16-2.
...useApp\ReportGenerator;classCrunchReportsimplementsShouldQueue{useDispatchable,InteractsWithQueue,Queueable,SerializesModels;protected$user;publicfunction__construct($user){$this->user=$user;}publicfunctionhandle(ReportGenerator$generator){$generator->generateReportsForUser($this->user);Log::info('Generated reports.');}}
We’re expecting the User instance to be injected when we create the job, and then when it’s handled we’re typehinting a ReportGenerator class (which we presumably wrote) and a Logger (which Laravel provides). Laravel will read both typehints and inject those dependencies automatically.
There are multiple methods by which you can dispatch a job, including some methods available to every controller and a global dispatch() helper. But since Laravel 5.5, we’ve had a simpler and preferred method: calling the dispatch() method on the job itself. So, if you’re running Laravel 5.5+, just ignore the other options, as we’ll do for the rest of this chapter.
So, in order to dispatch your job, you can just create an instance of it and then call its dispatch() method, passing any necessary data directly into the dispatch() method. Take a look at Example 16-3 for an example.
$user=auth()->user();$daysToCrunch=7;\App\Jobs\CrunchReports::dispatch($user,$daysToCrunch);
There are three settings you can control in order to customize exactly how you dispatch a job: the connection, the queue, and the delay.
If you ever have multiple queue connections in place at once, you can customize the connection by chaining onConnection() after the dispatch() method:
DoThingJob::dispatch()->onConnection('redis');
Within queue servers, you can specify which named queue you’re pushing a job onto. For example, you may differentiate your queues based on their importance, naming one low and one high.
You can customize which queue you’re pushing a job onto with the onQueue() method:
DoThingJob::dispatch()->onQueue('high');
You can customize the amount of time your queue workers should wait before processing a job with the delay() method, which accepts either an integer representing the number of seconds to delay a job or a DateTime/Carbon instance:
// Delays five minutes before releasing the job to queue workers$delay=now()->addMinutes(5);DoThingJob::dispatch()->delay($delay);
Note that Amazon SQS doesn’t allow delays longer than 15 minutes.
So what is a queue worker, and how does it work? In Laravel, it’s an Artisan command that stays running forever (until it’s stopped manually) and takes the responsibility for pulling down jobs from your queue and running them:
phpartisanqueue:work
This command starts a daemon “listening” to your queue; every time there are jobs on the queue, it will pull down the first job, handle it, delete it, and move on to the next. If at any point there are no jobs, it “sleeps” for a configurable amount of time before checking again to see if there are any more jobs.
You can define how many seconds a job should be able to run before the queue listener stops it (--timeout), how many seconds the listener should “sleep” when there are no jobs left (--sleep), how many tries each job should be allowed before being deleted (--tries), which connection the worker should listen to (the first parameter after queue:work), and which queues it should listen to (--queue=):
phpartisanqueue:workredis--timeout=60--sleep=15--tries=3--queue=high,medium
You can also process just a single job with php artisan queue:work.
So, what happens when something goes wrong with your job when it’s in the middle of processing?
If an exception is thrown, the queue listener will release that job back onto the queue. That job will be rereleased to be processed again and again until it is able to finish successfully or until it has been attempted the maximum number of times allowed by your queue listener.
The maximum number of tries is defined by the --tries switch passed to the queue:listen or queue:work Artisan commands.
If you don’t set --tries, or if you set it to 0, the queue listener will allow for infinite retries. That means if there are any circumstances in which a job could just never be satisfied—for example, if it relies on a tweet that has since been deleted—your app will slowly crawl to a halt as it forever retries uncompletable jobs.
The documentation and Laravel Forge both show 3 as the recommended starting point for the maximum number of retries. So, in case of confusion, start there and adjust:
php artisan queue:work --tries=3
If at any point you’d like to check how many times a job has been attempted already, use the attempts() method on the job itself, as in Example 16-4.
publicfunctionhandle(){...if($this->attempts()>3){//}}
Once a job has exceeded its allowable number of retries, it’s considered a “failed” job. Before you do anything else—even if all you want to do is limit the number of times a job can be tried—you’ll need to create the “failed jobs” database table.
There’s an Artisan command to create the migration (and you’ll then want to migrate):
phpartisanqueue:failed-tablephpartisanmigrate
Any job that has surpassed its maximum number of allowed attempts will be dumped there. But there are quite a few things you can do with your failed jobs.
First, you can define a failed() method on the job itself, which will run when that job fails (see Example 16-5).
...classCrunchReportsimplementsShouldQueue{...publicfunctionfailed(){// Do whatever you want, like notify an admin}}
Next, you can register a global handler for failed jobs. Somewhere in the application’s bootstrap—if you don’t know where to put it, just put it in the boot() method of AppServiceProvider—place the code in Example 16-6 code to define a listener.
// Some service provideruseIlluminate\Support\Facades\Queue;useIlluminate\Queue\Events\JobFailed;...publicfunctionboot(){Queue::failing(function(JobFailed$event){// $event->connectionName// $event->job// $event->exception});}
There is also a suite of Artisan tools for interacting with the failed jobs table.
queue:failed shows you a list of your failed jobs:
php artisan queue:failed
The list will look something like this:
+----+------------+---------+----------------------+---------------------+ | ID | Connection | Queue | Class | Failed At | +----+------------+---------+----------------------+---------------------+ | 9 | database | default | App\Jobs\AlwaysFails | 2018-08-26 03:42:55 | +----+------------+---------+----------------------+---------------------+
From there, you can grab the ID of any individual failed job and retry it with queue:retry:
php artisan queue:retry 9
If you’d rather retry all of the jobs, pass all instead of an ID:
php artisan queue:retry all
You can delete an individual failed job with queue:forget:
php artisan queue:forget 5
And you can delete all of your failed jobs with queue:flush:
phpartisanqueue:flush
Sometimes, from within the handling of a job, you’ll want to add conditions that will potentially either release the job to be restarted later or delete the job forever.
To release a job back into the queue, use the release() command, as in Example 16-7.
publicfunctionhandle(){...if(condition){$this->release($numberOfSecondsToDelayBeforeRetrying);}}
If you want to delete a job during its handling, you can just return at any point, as seen in Example 16-8; that’s the signal to the queue that the job was handled appropriately and should not be returned to the queue.
publicfunctionhandle(){...if($jobShouldBeDeleted){return;}}
Laravel Horizon, like some of the other tools we’ve covered (Scout, Passport, etc.) is a tool provided by Laravel that doesn’t come bundled with the core.
Horizon provides insight into the status of your Redis queued jobs. You can see which jobs have failed, how many are queued and how fast they’re working, and you can even get notifications when any of your queues are overloaded or failing.
Installing and running Horizon is pretty straightforward, and the docs are thorough, so if you’re interested, take a look at the Horizon docs to learn how to install, configure, and deploy Horizon.
Please note that you will need to have Laravel 5.5+ and PHP 7.1+ in order to run Horizon.
With jobs, the calling code informs the application that it should do something: CrunchReports, or NotifyAdminOfNewSignup.
With an event, the calling code instead informs the application that something happened: UserSubscribed, or UserSignedUp, or ContactWasAdded. Events are notifications that something has taken place.
Some of these events may be “fired” by the framework itself. For example, Eloquent models fire events when they are saved, or created, or deleted. But some events can also be manually triggered by the application’s code.
An event being fired doesn’t do anything on its own. However, you can bind event listeners, whose sole purpose is to listen for the broadcasting of specific events and to act in response. Any event can have anywhere from zero to many event listeners.
Laravel’s events are structured like the observer, or “pub/sub,” pattern. Many events are fired out into the application; some may never be listened for, and others may have a dozen listeners. The events don’t know or care.
There are three ways to fire an event. You can use the Event facade, inject the Dispatcher, or use the event() global helper:
Event::fire(newUserSubscribed($user,$plan));// or$dispatcher=app(Illuminate\Contracts\Events\Dispatcher::class);$dispatcher->fire(newUserSubscribed($user,$plan));// orevent(newUserSubscribed($user,$plan));
If in doubt, I’d recommend using the global helper function.
To create an event to fire, use the make:event Artisan command:
phpartisanmake:eventUserSubscribed
That’ll make a file that looks something like Example 16-9.
<?phpnamespaceApp\Events;useIlluminate\Broadcasting\Channel;useIlluminate\Queue\SerializesModels;useIlluminate\Broadcasting\PrivateChannel;useIlluminate\Broadcasting\PresenceChannel;useIlluminate\Foundation\Events\Dispatchable;useIlluminate\Broadcasting\InteractsWithSockets;useIlluminate\Contracts\Broadcasting\ShouldBroadcast;classUserSubscribed{useDispatchable,InteractsWithSockets,SerializesModels;/*** Create a new event instance.** @return void*/publicfunction__construct(){//}/*** Get the channels the event should be broadcast on.** @return \Illuminate\Broadcasting\Channel|array*/publicfunctionbroadcastOn(){returnnewPrivateChannel('channel-name');}}
Let’s take a look at what we get here. SerializesModels works just like with jobs; it allows you to accept Eloquent models as parameters. InteractsWithSockets, ShouldBroadcast, and the broadcastOn() method provide the backing functionality for broadcasting events using WebSockets, which we’ll cover in a bit.
It might seem strange that there’s no handle() or fire() method here. But remember, this object exists not to determine a particular action, but just to encapsulate some data. The first piece of data is its name; UserSubscribed tells us that a particular event happened (a user subscribed). The rest of the data is any data we pass into the constructor and associate with this entity.
Example 16-10 shows what we might want to do with our UserSubscribed event.
...classUserSubscribed{useInteractsWithSockets,SerializesModels;public$user;public$plan;publicfunction__construct($user,$plan){$this->user=$user;$this->plan=$plan;}}
Now we have an object that appropriately represents the event that happened: $event->user subscribed to the $event->plan plan. Remember, firing this event is as simple as event(new UserSubscribed($user, $plan)).
We have an event, and the ability to fire it. Now let’s look at how to listen for it.
First, we’ll create an event listener. Let’s say we want to email the app’s owner every time a new user subscribes:
phpartisanmake:listenerEmailOwnerAboutSubscription--event=UserSubscribed
That gives us the file in Example 16-11.
<?phpnamespaceApp\Listeners;useApp\Events\UserSubscribed;useIlluminate\Queue\InteractsWithQueue;useIlluminate\Contracts\Queue\ShouldQueue;classEmailOwnerAboutSubscription{/*** Create the event listener.** @return void*/publicfunction__construct(){//}/*** Handle the event.** @param UserSubscribed $event* @return void*/publicfunctionhandle(UserSubscribed$event){//}}
This is where the action happens—where the handle() method lives. This method expects to be passed an event of type UserSubscribed and act in response to it.
So, let’s make it send an email (Example 16-12).
...useApp\Mail\UserSubscribedasUserSubscribedMessage;classEmailOwnerAboutSubscription{publicfunctionhandle(UserSubscribed$event){Log::info('Emailed owner about new user: '.$event->user->);::to(config('app.owner-email'))->send(newUserSubscribedMessage($event->user,$event->plan);}}
Great! Now, one last task: we need to set this listener up to listen to the UserSubscribed event. We’ll set that up in the $listen property of the EventServiceProvider class (see Example 16-13).
classEventServiceProviderextendsServiceProvider{protected$listen=[\App\Events\UserSubscribed::class=>[\App\Listeners\EmailOwnerAboutSubscription::class,],];
As you can see, the key of each array entry is the class name of the event, and the value is an array of listener class names. We can add as many class names as we want under the UserSubscribed key and they will all listen and respond to each UserSubscribed event.
There’s one more structure you can use to define the relationship between your events and their listeners. Laravel has a concept called an event subscriber, which is a class that contains a collection of methods that act as separate listeners to unique events, and also contains the mapping of which method should handle which event. In this case, it’s easier to show than to tell; take a look at Example 16-14. Note that event subscribers are not a particularly commonly-used tool.
<?phpnamespaceApp\Listeners;classUserEventSubscriber{publicfunctiononUserSubscription($event){// Handles the UserSubscribed event}publicfunctiononUserCancellation($event){// Handles the UserCancelled event}publicfunctionsubscribe($events){$events->listen(\App\Events\UserSubscribed::class,'App\Listeners\UserEventSubscriber@onUserSubscription');$events->listen(\App\Events\UserCancelled::class,'App\Listeners\UserEventSubscriber@onUserCancellation');}}
Subscribers need to define a subscribe() method, which is passed an instance of the event dispatcher. We’ll use that to pair events with their listeners, but in this case, those are methods on this class, instead of entire classes. As a refresher, any time you see an @ inline like this means the class name is to the left of the @ and the method name is to the right.
So, in Example 16-14, we’re defining that the onUserSubscription() method of this subscriber will listen to any UserSubscribed events.
There’s one last thing we need to do: in App\Providers\EventServiceProvider, we need to add our subscriber’s class name to the $subscribe property, as seen in Example 16-15.
...classEventServiceProviderextendsServiceProvider{...protected$subscribe=[\App\Listeners\UserEventSubscriber::class];}
WebSocket (often called WebSockets) is a protocol, popularized by Pusher (a hosted WebSocket SaaS), that makes it simple to provide near-real-time communication between web devices. Rather than relying on information passing via HTTP requests, WebSockets libraries open a direct connection between the client and the server. WebSockets are behind tools like the chat boxes in Gmail and Facebook, where you don’t have to wait for the page to reload or for AJAX requests to receive or send data; instead, data is both sent and received in realtime.
WebSockets work best with small pieces of data passed in a pub/sub structure—just like Laravel’s events. Laravel has a built-in set of tools that make it easy to define that one or more of your events should be broadcast to a WebSocket server; this makes it easy, for example, to have a MessageWasReceived event that is published to the notifications box of a certain user or set of users, the instant a message arrives at your application.
Take a look at config/broadcasting.php to find the configuration settings for your event broadcasting. Laravel supports three drivers for broadcasting: Pusher, a paid SaaS offering; Redis, for locally running WebSocket servers; and log, for local development and debugging.
In order for event broadcasting to move quickly, Laravel pushes the instruction to broadcast them onto a queue. That means you’ll need to have a queue worker running (or use the sync queue driver for local development). See “Running a Queue Worker” to learn how to run a queue worker.
Laravel suggests a default delay of three seconds before the queue worker looks for new jobs. However, with event broadcasting, you may notice some events take a second or two to broadcast. To speed this up, update your queue settings to only wait one second before looking for new jobs.
To broadcast an event, you need to mark that event as a broadcast event by having it implement the Illuminate\Contracts\Broadcasting\ShouldBroadcast interface. This interface requires you to add the broadcastOn() method, which will return an array of either strings or Channel objects, each representing a WebSocket channel.
Example 16-16 shows our UserSubscribed event, modified to broadcast on two channels: one for the user (to confirm the user’s subscription) and one for admins (to notify them of a new subscription).
...useIlluminate\Contracts\Broadcasting\ShouldBroadcast;classUserSubscribedimplementsShouldBroadcast{useDispatchable,InteractsWithSockets,SerializesModels;public$user;public$plan;publicfunction__construct($user,$plan){$this->user=$user;$this->plan=$plan;}publicfunctionbroadcastOn(){// String syntaxreturn['users.'.$this->user->id,'admins'];// Channel object syntaxreturn[newChannel('users.'.$this->user->id),newChannel('admins'),// If it were a private channel: new PrivateChannel('admins'),// If it were a presence channel: new PresenceChannel('admins'),];}}
By default, any public properties of your event will be serialized as JSON and sent along as the data of your broadcast event. That means the data of one of our broadcast UserSubscribed events might look like Example 16-17.
{'user':{'id':5,'name':'Fred McFeely',...},'plan':'silver'}
You can override this by returning an array of data from the broadcastWith() method on your event, as in Example 16-18.
publicfunctionbroadcastWith(){return['userId'=>$this->user->id,'plan'=>$this->plan];}
You can customize which queue your event is pushed onto with its broadcastQueue() method, as in Example 16-19. You may choose to do this so you can keep other queue items from slowing down your event broadcast; real-time WebSockets aren’t much fun if a long-running job that’s higher in the queue keeps the events from going out in time.
public$broadcastQueue='websockets-for-faster-processing';
You can also force a given event to skip the queue entirely (using the “sync” queue driver, which is processed by the current PHP thread), by having it implement the ShouldBroadcastNow contract.
useIlluminate\Contracts\Broadcasting\ShouldBroadcastNow;classUserSubscribedimplementsShouldBroadcastNow{//}
And, finally, you can choose to customize whether a given event should be broadcast at all by giving it a broadcastWhen() method:
publicfunctionbroadcastWhen(){// Notify me only when users sign up from the White Housereturnstr_contains($this->user->,'whitehouse.gov');}
If you choose to host your own Redis WebSockets server, the Laravel docs have a great walkthrough on how to set that up using socket.io and ioredis.
As of this book’s publication, the most common solution Laravel developers use is Pusher. Plans over a certain size cost money, but there’s a generous free plan. Pusher makes it incredibly simple to set up a simple WebSocket server, and its JavaScript SDK handles all of the authentication and channel management with almost no work on your part. SDKs are available for iOS, Android, and many more platforms, languages, and frameworks.
There’s also a new tool announced just before the publication of this book called Laravel WebSockets that lets you host your own Laravel-based Pusher-compatible WebSockets server. You can install the package into your current Laravel app (the same app you’re broadcasting from) or into a separate microservice.
If you choose to work with a Laravel WebSockets server, you’ll follow all of the directions in this book as if you were working with Pusher, but your configuration settings will be a bit different.
It’s helpful to understand how to listen to Laravel’s broadcast events without Echo even if you choose to use Echo in the end, but because much of the code here is not necessary if you use Echo, I’d recommend reading this section, then the Echo section, “Laravel Echo (the JavaScript Side)”, before you start implementing any of it; you can decide which way you prefer and then write your code from there.
To get started, pull in Pusher’s library, get an API key from your Pusher account, and subscribe to any events on any channels with code like that in Example 16-20.
...<scriptsrc="https://js.pusher.com/4.3/pusher.min.js"></script><script>// Enable pusher logging - don't include this in productionPusher.logToConsole=true;// Globally, perhaps; just a sample of how to get data invarApp={'userId':{{auth()->id()}},'pusherKey':'{{ config('broadcasting.connections.pusher.key') }}'};// Locallyvarpusher=newPusher(App.pusherKey,{cluster:'{{ config('broadcasting.connections.pusher.options.cluster') }}',encrypted:{{config('broadcasting.connections.pusher.options.encrypted')}}});varpusherChannel=pusher.subscribe('users.'+App.userId);pusherChannel.bind('App\\Events\\UserSubscribed',(data)=>{console.log(data.user,data.plan);});</script>
Since \ is a control character in JavaScript, you need to write \\ to represent a backslash in your strings, which is why there are two backslashes between each namespace segment in Example 16-20.
To publish to Pusher from Laravel, get your Pusher key, secret, cluster, and app ID from your Pusher account dashboard, and then set them in your .env file under the keys PUSHER_KEY, PUSHER_SECRET, PUSHER_APP_CLUSTER and PUSHER_APP_ID.
If you serve your app, visit a page with the JavaScript from Example 16-20 embedded in it in one window, push a broadcast event in another window or from your terminal, have a queue listener running or are using the sync driver, and all of your authentication information is set up correctly, you should see event logs popping up in your JavaScript window’s console in near real time.
With this power, it’s now easy for you to keep your users up-to-date with what’s happening with their data any time they’re in your app. You can notify users of the actions of other users, of long-running processes that have just finished, or of your application’s responses to external actions like incoming emails or webhooks. The possibilities are endless.
If you want to broadcast with Pusher or Redis, you’ll need to bring in these dependencies:
Pusher: pusher/pusher-php-server "~3.0"
Redis: predis/predis
Laravel has a few more tools to make it possible to perform more complex interactions in event broadcasting. These tools, a combination of framework features and a JavaScript library, are called Laravel Echo.
These framework features work best when you use Laravel Echo in your JavaScript frontend (which we’ll cover in “Laravel Echo (the JavaScript Side)”), but you can still enjoy some of the benefits of Echo without using the JavaScript components. Echo will work with both Pusher and Redis, but I’m going to use Pusher for any examples.
Every connection to Pusher is assigned a unique “socket ID” identifying that socket connection. And it’s easy to define that any given socket (user) should be excluded from receiving a specified broadcast event.
This feature makes it possible to define that certain events should not be broadcast to the user who fired them. Let’s say every user in a team gets notified when other users create a task; would you want to be notified of a task you just created? No, and that’s why we have the toOthers() method.
To implement this, there are two steps to follow. First, you need to set up your JavaScript to send a certain POST to /broadcasting/socket when your WebSocket connection is initialized. This attaches your socket_id to your Laravel session. Echo does this for you, but you can also do it manually—take a look at the Echo source to see how it works.
Your event must use the Illuminate\Broadcasting\InteractsWithSockets trait in order to call the toOthers() method.
Next, you’ll want to update every request that your JavaScript makes to have an X-Socket-ID header that contains that socket_id. Example 16-21 shows how to do that with Axios or in jQuery.
// Run this right after you initialize echo// With Axioswindow.axios.defaults.headers.common['X-Socket-Id']=Echo.socketId();// jQuery$.ajaxSetup({headers:{'X-Socket-Id':Echo.socketId()}});
Once you’ve handled this, you can exclude any event from being broadcast to the user who triggered it by using the broadcast() global helper instead of the event() global helper and then chaining toOthers() after it:
broadcast(newUserSubscribed($user,$plan))->toOthers();
All of the other features that Echo provides require your JavaScript to authenticate with the server. Take a look at App\Providers\BroadcastServiceProvider, where you’ll define how to authorize users’ access to your private and presence channels.
The two primary actions you can take are to define the middleware that will be used on your broadcasting auth routes, and to define the authorization settings for your channels.
If you’re going to use these features, you’ll need to uncomment the App\Providers\BroadcastServiceProvider::class line in config/app.php.
And if you’ll be using these features without Laravel Echo, you’ll either need to manually handle sending CSRF tokens along with your authentication requests, or exclude /broadcasting/auth and /broadcasting/socket from CSRF protection by adding them to the $except property of the VerifyCsrfToken middleware.
Private and presence WebSocket channels need to be able to ping your application to learn whether the current user is authorized for that channel. You’ll use the Broadcast::channel() method to define the rules for this authorization in your routes/channels.php file.
There are three types of channels in WebSockets: public, private, and presence.
Public channels can be subscribed to by any user, authenticated or not.
Private channels require the end user’s JavaScript to authenticate against the application to prove that the user is both authenticated and authorized to join this channel.
Presence channels are a type of private channel, but instead of allowing for message passing, they simply keep track of which users join and leave the channel, and make this information available to the application’s frontend.
Broadcast::channel() takes two parameters: first, a string representing the channel(s) you want it to match, and second, a closure that defines how to authorize users for any channel matching that string. The closure will be passed an Eloquent model of the current user as its first parameter, and any matched {variableNameHere} segments as additional parameters. For example, a channel authorization definition with a string of teams.{teamId}, when matched against the channel teams.5, will pass its closure $user as the first parameter and 5 as the second parameter.
If you’re defining the rules for a private channel, your Broadcast::channel() closure will need to return a boolean: is this user authorized for this channel or not? If you’re defining the rules for a presence channel, your closure should return an array of data you want available to the presence channel for any users that you want to show up in the channel. Example 16-22 illustrates defining rules for both kinds of channel.
You might be wondering how this information gets from your Laravel application to your JavaScript frontend. Pusher’s JavaScript library sends a POST to your application; by default it will hit /pusher/auth, but you can customize that (and Echo customizes it for you) to hit Laravel’s authentication route, /broadcasting/auth:
varpusher=newPusher(App.pusherKey,{authEndpoint:'/broadcasting/auth'});
Example 16-23 shows how we can tweak Example 16-20 for private and presence channels, without Echo’s frontend components.
...<scriptsrc="https://js.pusher.com/4.3/pusher.min.js"></script><script>// Enable pusher logging - don't include this in productionPusher.logToConsole=true;// Globally, perhaps; just a sample of how to get data invarApp={'userId':{{auth()->id()}},'pusherKey':'{{ config('broadcasting.connections.pusher.key') }}'};// Locallyvarpusher=newPusher(App.pusherKey,{cluster:'{{ config('broadcasting.connections.pusher.options.cluster') }}',encrypted:{{config('broadcasting.connections.pusher.options.encrypted')}},authEndpoint:'/broadcasting/auth'});// Private channelvarprivateChannel=pusher.subscribe('private-teams.1');privateChannel.bind('App\\Events\\UserSubscribed',(data)=>{console.log(data.user,data.plan);});// Presence channelvarpresenceChannel=pusher.subscribe('presence-rooms.5');console.log(presenceChannel.members);</script>
We now have the ability to send WebSocket messages to users depending on whether they pass a given channel’s authorization rules. We can also keep track of which users are active in a particular group or section of the site, and display relevant information to each user about other users in the same group.
Laravel Echo is comprised of two pieces: the advanced framework features we just covered, and a JavaScript package that takes advantage of those features and drastically reduces the amount of boilerplate code you need to write powerful WebSocket-based frontends. The Echo JavaScript package makes it easy to handle authentication, authorization, and subscribing to private and presence channels. Echo can be used with the SDKs for either Pusher JS (for Pusher or a custom Pusher-compatible server) or socket.io (for Redis).
To use Echo in your project’s JavaScript, add it to package.json using npm install --save (be sure to bring in the appropriate Pusher or socket.io SDK as well):
npm install pusher-js laravel-echo --save
Let’s assume you have a basic Laravel Mix file compiling your app.js file with Webpack, like in Example 16-24.
letmix=require('laravel-mix');mix.js('resources/assets/js/app.js','public/js');
Laravel’s default resources/js/app.js structure has a great example of how best to initialize your Echo install. Take a look at Example 16-25 to see how that works between that file and resources/js/bootstrap.js.
// app.jsrequire('./bootstrap');// ... lots of Vue stuff ...// Add your Echo bindings here
// bootstrap.jsimportEchofrom"laravel-echo";window.Echo=newEcho({broadcaster:'pusher',key:process.env.MIX_PUSHER_APP_KEY,cluster:process.env.MIX_PUSHER_APP_CLUSTER});
For CSRF protection, you’ll also need to add a csrf-token <meta> tag to your HTML template:
<metaname="csrf-token"content="{{ csrf_token() }}">
And, of course, remember to link to your compiled app.js in your HTML template:
<scriptsrc="{{ asset('js/app.js') }}"></script>
Now we’re ready to get started.
If you’re working with a Laravel WebSockets server (using the package discussed earlier in “Receiving the Message”), the configuration details in Example 16-25 will be a little bit different. See the Laravel WebSockets package docs for more info.
This is nothing different from what we’ve already used Pusher JS for, but Example 16-26 is a simple code sample to show how to use Echo to listen to public channels for basic event information.
varcurrentTeamId=5;// Likely set elsewhereEcho.channel(`teams.${currentTeamId}`).listen('UserSubscribed',(data)=>{console.log(data);});
Echo provides a few methods for subscribing to various types of channels; channel() will subscribe you to a public channel. Note that when you listen to an event with Echo, you can ignore the full event namespace and just listen for the unique class name of this event. And now we now have access to the public data that’s passed along with our event, represented in the data object.
We can also chain listen() handlers, as in Example 16-27.
Echo.channel(`teams.${currentTeamId}`).listen('UserSubscribed',(data)=>{console.log(data);}).listen('UserCanceled',(data)=>{console.log(data);});
Did you try these code samples and not see anything change in your browser? Make sure to run npm run dev (if you’re running it once) or npm run watch (to run a listener) to compile your code. And, if you haven’t yet, be sure to actually include app.js in your template somewhere.
Echo also has a method for subscribing to private channels: private(). It works the same as channel(), but it requires you to have set up channel authorization definitions in routes/channel.php, like we covered earlier. Additionally, unlike with the SDKs, you don’t need to put private- in front of your channel name.
Example 16-28 shows what it looks like to listen to a private channel named private-teams.5.
varcurrentTeamId=5;// Likely set elsewhereEcho.private(`teams.${currentTeamId}`).listen('UserSubscribed',(data)=>{console.log(data);});
Echo makes it much simpler to join and listen to events in presence channels. This time you’ll want to use the join() method to bind to this channel, as in Example 16-29.
varcurrentTeamId=5;// Likely set elsewhereEcho.join(`teams.${currentTeamId}`).here((members)=>{console.log(members);});
join() subscribes to the presence channel, and here() allows you to define the behavior when the user joins and also when any other users join or leave the presence channel.
You can think of a presence channel like a “who’s online” sidebar in a chat room. When you first join a presence channel, your here() callback will be called and provided a list of all the members at that time. And any time any members join or leave, that callback will be called again with the updated list. There’s no messaging happening here, but you can play sounds, update the on-page list of members, or do whatever else you want in response to these actions.
There are also specific methods for individual events, which you can use individually or chained (see Example 16-30).
varcurrentTeamId=5;// Likely set elsewhereEcho.join('teams.'+currentTeamId).here((members)=>{// runs when you joinconsole.table(members);}).joining((joiningMember,members)=>{// runs when another member joinsconsole.table(joiningMember);}).leaving((leavingMember,members)=>{// runs when another member leavesconsole.table(leavingMember);});
We covered this previously in the chapter, but if you want to exclude the current user, use the broadcast() global helper instead of the event() global helper and then chain the toOthers() method after your broadcast call. But with Echo, the JavaScript side of this is already handled for you. It’ll just work.
As you can see, the Echo JavaScript library doesn’t do anything you couldn’t do on your own—but it makes a lot of common tasks much simpler, and provides a cleaner, more expressive syntax for common WebSocket tasks.
Laravel’s notifications come with a broadcast driver out of the box that pushes notifications out as broadcast events. You can subscribe to these notifications with Echo using Echo.notification, as in Example 16-31.
Echo.private(`App.User.${userId}`).notification((notification)=>{console.log(notification.type);});
If you’d like to send quick, performant messages between your users without the messages even hitting your Laravel application—for example, to send “typing…” notifications—you can use Echo’s whisper() method:
Echo.private('room').whisper('typing',{name:this.user.name});
And then listenForWhisper() to listen:
Echo.private('room').listenForWhisper('typing',(e)=>{console.log(e.name);});
If you’ve ever written a cron job before, you likely already wish for a better tool. Not only is the syntax onerous and frustratingly difficult to remember, but it’s one significant aspect of your application that can’t be stored in version control.
Laravel’s scheduler makes handling scheduled tasks simple. You’ll write your scheduled tasks in code, and then point one cron job at your app: once per minute, run php artisan schedule:run. Every time this Artisan command is run, Laravel checks your schedule definitions to find out if any scheduled tasks should run.
Here’s the cron job to define that command:
* * * * *cd/home/myapp.com&&php artisan schedule:run >> /dev/null 2>&1
There are many task types you can schedule and many time frames you can use to schedule them.
app/Console/Kernel.php has a method named $schedule, which is where you’ll define any tasks you’d like to schedule.
First, let’s take a look at the simplest option: a closure, run every minute (Example 16-32). That means that, every time the cron job hits the schedule:run command, it will call this closure.
// app/Consoles/Kernel.phppublicfunctionschedule(Schedule$schedule){$schedule->call(function(){CalculateTotals::dispatch();})->everyMinute();}
There are two other types of tasks you can schedule: Artisan and shell commands.
You can schedule Artisan commands by passing their syntax exactly as you would call them from the command line:
$schedule->command('scores:tally --reset-cache')->everyMinute();
And you can run any shell commands that you could run with PHP’s exec() method:
$schedule->exec('/home/myapp.com/bin/build.sh')->everyMinute();
The beauty of the scheduler isn’t just that you can define your tasks in code; it’s that you can schedule them in code, too. Laravel keeps track of time passing and evaluates whether it’s time for any given task to run. That’s easy with everyMinute() because the answer is always simple: run the task. But Laravel keeps the rest simple for you, too, even for the most complex of requests.
Let’s take a look at your options by starting with a monstrous definition that’s simple in Laravel:
$schedule->call(function(){// Runs once a week on Sunday at 23:50})->weekly()->sundays()->at('23:50');
Notice that we can chain times together: we can define frequency and specify the day of the week and the time, and of course we can do so much more.
Table 16-1 shows a list of potential date/time modifiers for use when scheduling a job.
| Command | Description |
|---|---|
|
Set the time zone for schedules |
|
Define the schedule using the traditional cron notation |
|
Run every minute |
|
Run every 5 minutes |
|
Run every 10 minutes |
|
Run every 30 minutes |
|
Run every hour |
|
Run every day at midnight |
|
Run every day at 14:00 |
|
Run every day at 1:00 and 14:00 |
|
Run every week (midnight on Sunday) |
|
Run every week on Friday at 10:00 |
|
Run every month (midnight on the 1st) |
|
Run every month on the 15th at 23:00 |
|
Run every quarter (midnight on the 1st of January, April, July, and October) |
|
Run every year (midnight on the 1st of January) |
|
Limit the task to when closure returns |
|
Limit the task to when closure returns |
|
Limit the task to between the given times |
|
Limit the task to any time except between the given times |
|
Limit to weekdays |
|
Limit to Sundays |
|
Limit to Mondays |
|
Limit to Tuesdays |
|
Limit to Wednesdays |
|
Limit to Thursdays |
|
Limit to Fridays |
|
Limit to Saturdays |
Most of these can be chained one after another, but of course, any combinations that don’t make sense chained can’t be chained.
Example 16-33 shows a few combinations you could consider.
// Both run weekly on Sunday at 23:50$schedule->command('do:thing')->weeklyOn(0,'23:50');$schedule->command('do:thing')->weekly()->sundays()->at('23:50');// Run once per hour, weekdays, 8am-5pm$schedule->command('do:thing')->weekdays()->hourly()->when(function(){returndate('H')>=8&&date('H')<=17;});// Run once per hour, weekdays, 8am-5pm using the "between" method$schedule->command('do:thing')->weekdays()->hourly()->between('8:00','17:00');// Run every thirty minutes except when directed to by the SkipDetector$schedule->command('do:thing')->everyThirtyMinutes()->skip(function(){returnapp('SkipDetector')->shouldSkip();});
If you want to avoid your tasks overlapping each other—for example, if you have a task running every minute that may sometimes take longer than a minute to run—end the schedule chain with the withoutOverlapping() method. This method skips a task if the previous instance of that task is still running:
$schedule->command('do:thing')->everyMinute()->withoutOverlapping();
Sometimes the output from your scheduled task is important, whether for logging, notifications, or just ensuring that the task ran.
If you want to write the returned output of a task to a file, use sendOutputTo():
$schedule->command('do:thing')->daily()->sendOutputTo($filePath);
If you want to append it to a file instead, use appendOutputTo():
$schedule->command('do:thing')->daily()->appendOutputTo($filePath);
And if you want to email the output to a designated recipient, write it to a file first and then add emailOutputTo():
$schedule->command('do:thing')->daily()->sendOutputTo($filePath)->emailOutputTo('me@myapp.com');
Make sure that your email settings are configured correctly in Laravel’s basic email configuration.
The sendOutputTo(), appendOutputTo(), and emailOutputTo() methods only work for command scheduled tasks. You can’t use them for closures, unfortunately.
You may also want to send some output to a webhook to verify that your tasks ran correctly. There are a few services that provide this sort of uptime monitoring, most significantly Laravel Envoyer (a zero-downtime deployment service that also provides cron uptime monitoring) and Dead Man’s Snitch, a tool designed purely for monitoring cron job uptime.
These services don’t expect something to be emailed to them, but rather expect an HTTP “ping,” so Laravel makes that easy with pingBefore() and thenPing():
$schedule->command('do:thing')->daily()->pingBefore($beforeUrl)->thenPing($afterUrl);
If you want to use the ping features, you’ll need to pull in Guzzle using Composer: composer require guzzlehttp/guzzle.
Speaking of running something before and after your task, there are hooks for that, with before() and after():
$schedule->command('do_thing')->daily()->before(function(){// Prepare})->after(function(){// Cleanup});
Testing queued jobs (or anything else in the queue) is easy. In phpunit.xml, which is the configuration file for your tests, the QUEUE_DRIVER environment variable is set to sync by default. That means your tests will run your jobs or other queued tasks synchronously, directly in your code, without relying on a queue system of any sort. You can test them just like any other code.
However, if you’d just like to check that a job was fired, you can do that with the expectsJobs() method, as in Example 16-34.
publicfunctiontest_changing_number_of_subscriptions_crunches_reports(){$this->expectsJobs(\App\Jobs\CrunchReports::class);...}
Or, in projects in Laravel 5.3 and above you can assert against the specific job itself, as in Example 16-35.
useIlluminate\Support\Facades\Bus;...publicfunctiontest_changing_subscriptions_triggers_crunch_job(){...Bus::fake();Bus::assertDispatched(CrunchReports::class,function($job){return$job->subscriptions->contains(5);});// Also can use assertNotDispatched}
To test that an event fired, you have three options. First, you can just test that the behavior you expected happened, without concerning yourself with the event itself.
Second, you can explicitly assert that the event fired, as in Example 16-36, which is available in Laravel 5.2 and above.
publicfunctiontest_usersubscribed_event_fires(){$this->expectsEvents(\App\Events\UserSubscribed::class);...}
Finally, you can run a test against the event that was fired, as in Example 16-37. This is available in Laravel 5.3 and above.
useIlluminate\Support\Facades\Event;...publicfunctiontest_usersubscribed_event_fires(){Event::fake();...Event::assertDispatched(UserSubscribed::class,function($e){return$e->user->='user-who-subscribed@mail.com';});// Also can use assertNotDispatched()}
Another common scenario is that you’re testing code that incidentally fires events, and you want to disable the event listeners during that test. You can disable the event system with the withoutEvents() method, as in Example 16-38.
publicfunctiontest_something_subscription_related(){$this->withoutEvents();...}
Queues allow you to separate chunks of your application’s code from the synchronous flow of user interactions out to a list of commands to be processed by a “queue worker.” This allows your users to resume interactions with your application while slower processes are handled asychronously in the background.
Jobs are classes that are structured with the intention of encapsulating a chunk of application behavior so that it can be pushed onto a queue.
Laravel’s event system follows the pub/sub or observer pattern, allowing you to send out notifications of an event from one part of your application, and elsewhere bind listeners to those notifications to define what behavior should happen in response to them. Using WebSockets, events can also be broadcast to frontend clients.
Laravel’s scheduler simplifies scheduling tasks. Point an every-minute cron job to php artisan schedule:run and then schedule your tasks with even the most complex of time requirements using the scheduler, and Laravel will handle all the timings for you.
We’ve already covered many global functions throughout the book: little helpers that make it easier to perform common tasks, like dispatch() for Jobs, event() for Events, app() for dependency resolution, and many more. We also talked a bit about Laravel’s collections, or arrays on steroids, in Chapter 5.
In this chapter we’ll cover some of the more common and powerful helpers and some of the basics of programming with collections.
You can find a full list of the helpers Laravel offers in the helpers docs, but we’re going to cover a few of the most useful functions here.
PHP’s native array manipulation functions give you a lot of power, but sometimes there are common manipulations we want to make that require unwieldy loops and logic checks. Laravel’s array helpers make a few common array manipulations much simpler:
array_first($array, $callback, $default = null)Returns the first array value that passes a test, defined in a callback closure. You can optionally set the default value as the third parameter.
$people=[['email'=>'m@me.com','name'=>'Malcolm Me'],['email'=>'j@jo.com','name'=>'James Jo']];$value=array_first($people,function($person,$key){return$person['email']=='j@jo.com';});
array_get($array, $key, $default = null)Makes it easy to get values out of an array, with two added benefits: it won’t throw an error if you ask for a key that doesn’t exist (and you can provide defaults with the third parameter), and you can use dot notation to traverse nested arrays. For example:
$array=['owner'=>['address'=>['line1'=>'123 Main St.']]];$line1=array_get($array,'owner.address.line1','No address');$line2=array_get($array,'owner.address.line2');
array_has($array, $keys)Makes it easy to check whether an array has a particular value set using dot notation for traversing nested arrays. The $keys parameter can be a single entry or an array of entries, which will check whether every entry in the array exists.
$array=['owner'=>['address'=>['line1'=>'123 Main St.']]];if(array_has($array,'owner.address.line2')){// Do stuff}
array_pluck($array, $value, $key = null)Returns an array of the values corresponding to the provided key:
$array=[['owner'=>['id'=>4,'name'=>'Tricia']],['owner'=>['id'=>7,'name'=>'Kimberly']],];$array=array_pluck($array,'owner.name');// Returns ['Tricia', 'Kimberly'];
If you want the returned array to be keyed by another value from the source array, you can pass that value’s dot-notated reference as the third parameter:
$array=array_pluck($array,'owner.name','owner.id');// Returns [4 => 'Tricia', 7 => 'Kimberly'];
array_random($array, $num = null)Returns a random item from the provided array. If you provide a $num parameter, it will pull an array of that many results, randomly selected.
$array=[['owner'=>['id'=>4,'name'=>'Tricia']],['owner'=>['id'=>7,'name'=>'Kimberly']],];$randomOwner=array_random($array);
Just like with arrays, there are some string manipulations and checks that are possible with native PHP functions, but can be cumbersome. Laravel’s helpers make a few common string operations faster and simpler:
e($string)An alias to htmlentities(); prepares a (often user-provided) string for safe echoing on an HTML page. For example:
e('<script>do something nefarious</script>');// Returns <script>do something nefarious</script>
starts_with($haystack, $needle), ends_with($haystack, $needle), and str_contains($haystack, $needle)Return a boolean of whether the provided “haystack” string starts with, ends with, or contains the provided “needle” string:
if(starts_with($url,'https')){// Do something}if(ends_with($abstract,'...')){// Do something}if(str_contains($description,'1337 h4x0r')){// Run away}
str_limit($value, $limit = 100, $end = '...')Limits a string to the provided number of characters. If the string is less than the limit, just returns the string; if it’s greater, trims to the number of characters provided and then appends either ... or the provided
“end” string. For example:
$abstract=str_limit($loremIpsum,30);// Returns "Lorem ipsum dolor sit amet, co..."$abstract=str_limit($loremIpsum,30,"…");// Returns "Lorem ipsum dolor sit amet, co…"
str_is($pattern, $value)Returns a boolean of whether or not a given string matches a given pattern. The pattern can be a regex pattern, or you can use asterisks to indicate wildcard positions:
str_is('*.dev','myapp.dev');// truestr_is('*.dev','myapp.dev.co.uk');// falsestr_is('*dev*','myapp.dev');// truestr_is('*myapp*','www.myapp.dev');// truestr_is('my*app','myfantasticapp');// truestr_is('my*app','myapp');// true
If you’re curious about what regex patterns are acceptable to pass to str_is(), check out the function definition here (shortened for space) to see how it works. Note that it’s an alias of Illuminate\Support\Str::is:
publicfunctionis($pattern,$value){if($pattern==$value)returntrue;$pattern=preg_quote($pattern,'#');$pattern=str_replace('\*','.*',$pattern);if(preg_match('#^'.$pattern.'\z#u',$value)===1){returntrue;}returnfalse;}
str_random($length = 16)Returns a random string of alphanumeric mixed-case characters of the length specified:
$hash=str_random(64);// Sample: J40uNWAvY60wE4BPEWxu7BZFQEmxEHmGiLmQncj0ThMGJK7O5Kfgptyb9ulwspmh
str_slug($title, $separator = '-', $language = 'en')Returns a URL-friendly slug from a string—often used for creating a URL segment for a name or title:
str_slug('How to Win Friends and Influence People');// Returns 'how-to-win-friends-and-influence-people'
str_plural($value, $count = 2)Converts a string to its plural form. This function currently only supports the English language.
str_plural('book');// Returns booksstr_plural('person');// Returns peoplestr_plural('person',1);// Returns person
__($key, $replace = [], $locale = null)The __() function translates the given translation string or translation key using your localization files.
echo__('Welcome to your dashboard');echo__('messages.welcome');
When you’re dealing with the filesystem, it can often be tedious to make links to certain directories for getting and saving files. These helpers give you quick access to find the fully qualified paths to some of the most important directories in your app.
Note that each of these can be called with no parameters, but if a parameter is passed, it will be appended to the normal directory string and returned as a whole:
app_path($append = '')Returns the path for the app directory:
app_path();// Returns /home/forge/myapp.com/app
base_path($path = '')Returns the path for the root directory of your app:
base_path();// Returns /home/forge/myapp.com
config_path($path = '')Returns the path for configuration files in your app:
config_path();// Returns /home/forge/myapp.com/config
database_path($path = '')Returns the path for database files in your app:
database_path();// Returns /home/forge/myapp.com/database
storage_path($path = '')Returns the path for the storage directory in your app:
storage_path();// Returns /home/forge/myapp.com/storage
Some frontend file paths are consistent but at times annoying to type—for example, paths to assets—and it’s helpful to have convenient shortcuts to them, which we’ll cover here. But some can actually vary as route definitions move or new files are versioned with Mix, so some of these helpers are vital in making sure all of your links and assets work correctly:
action($action, $parameters = [], $absolute = true)Assuming a controller method has a single URL mapped to it, returns the correct URL given a controller and method name pair (separated by @) or using tuple notation:
<ahref="{{ action('PeopleController@index') }}">SeeallPeople</a>// or, using tuple notation:<ahref="{{ action([App\Http\Controllers\PeopleController::class, 'index']) }}">SeeallPeople</a>// Returns <a href="http://myapp.com/people">See all People</a>
If the controller method requires parameters, you can pass them in as the second parameter (as an array, if there’s more than one required parameter). You can key them if you want for clarity, but what matters is just that they’re in the right order:
<ahref="{{ action('PeopleController@show', ['id' => 3] }}">SeePerson#3</a>// or<ahref="{{ action('PeopleController@show', [3] }}">SeePerson#3</a>// Returns <a href="http://myapp.com/people/3">See Person #3</a>
If you pass false to the third parameter, your links will generate as relative (/people/3) instead of absolute (http://myapp.com/people/3).
route($name, $parameters = [], $absolute = true)If a route has a name, returns the URL for that route:
// routes/web.phpRoute::get('people','PeopleController@index')->name('people.index');// a view somewhere<ahref="{{ route('people.index') }}">SeeallPeople</a>// Returns <a href="http://myapp.com/people">See all People</a>
If the route definition requires parameters, you can pass them in as the second parameter (as an array if more than one parameter is required). Again, you can key them if you want for clarity, but what matters is just that they’re in the right order:
<ahref="{{ route('people.show', ['id' => 3]) }}">SeePerson#3</a>// or<ahref="{{ route('people.show', [3]) }}">SeePerson#3</a>// Returns <a href="http://myapp.com/people/3">See Person #3</a>
If you pass false to the third parameter, your links will generate as relative instead of absolute.
url($string) and secure_url($string)Given any path string, converts to a fully qualified URL. secure_url() is the same as url() but forces HTTPS.
url('people/3');// Returns http://myapp.com/people/3
If no parameters are passed, this instead gives an instance of Illuminate\Routing\UrlGenerator, which makes method chaining possible:
url()->current();// Returns http://myapp.com/abcurl()->full();// Returns http://myapp.com/abc?order=reverseurl()->previous();// Returns http://myapp.com/login// And many more methods available on the UrlGenerator...
mix($path, $manifestDirectory = '')If assets are versioned with Elixir’s versioning system, given the nonversioned path name, returns the fully qualified URL for the versioned file:
<linkrel="stylesheet"href="{{ mix('css/app.css') }}">// Returns something like /build/css/app-eb555e38.css
In projects running versions of Laravel prior to 5.4, you’ll want to use the elixir() helper instead of the mix() helper. Check the docs for more info.
There are a few other global helpers that I’d recommend getting familiar with. Of course, you should check out the whole list, but the ones mentioned here are definitely worth taking a look at:
abort($code, $message, $headers), abort_unless($boolean, $code, $message, $headers), and abort_if($boolean, $code, $message, $headers)Throws HTTP exceptions. abort() throws the exception defined, abort_unless() throws it if the first parameter is false, and abort_if() throws it if the first parameter is true:
publicfunctioncontrollerMethod(Request$request){abort(403,'You shall not pass');abort_unless(request()->filled('magicToken'),403);abort_if(request()->user()->isBanned,403);}
auth()Returns an instance of the Laravel authenticator. Like the Auth facade, you can use this to get the current user, to check for login state, and more:
$user=auth()->user();$userId=auth()->id();if(auth()->check()){// Do something}
back()Generates a “redirect back” response, sending the user to the previous location:
Route::get('post',function(){...if($condition){returnback();}});
collect($array)Takes an array and returns the same data, converted to a collection:
$collection=collect(['Rachel','Hototo']);
We’ll cover collections in just a bit.
config($key)Returns the value for any dot-notated configuration item:
$defaultDbConnection=config('database.default');
csrf_field() and csrf_token()Return a full HTML hidden input (csrf_field()) or just the appropriate token value (csrf_token()) for adding CSRF verification to your form submission:
<form>{{ csrf_field() }}</form>// or<form><inputtype="hidden"name="_token"value="{{ csrf_token() }}"></form>
dd($variable...)Short for “dump and die,” runs var_dump() on all provided parameters and then exit() to quit the application (this is used for debugging):
...dd($var1,$var2,$state);// Why is this not working???
env($key, $default = null)Returns the environment variable for the given key:
$key=env('API_KEY','');
Remember not to ever use env() outside of config files.
dispatch($job)Dispatches a job:
dispatch(newEmailAdminAboutNewUser($user));
event($event)Fires an event:
event(newContactAdded($contact));
factory($entityClass)Returns an instance of the factory builder for the given class:
$contact=factory(App\Contact::class)->make();
old($key = null, $default = null)Returns the old value (from the last user form submission) for this form key, if it exists:
<inputname="name"value="{{ old('value', 'Your name here') }}"
redirect($path)Returns a redirect response to the given path:
Route::get('post',function(){...returnredirect('home');});
Without parameters, generates an instance of the Illuminate\Routing\Redirector class.
response($content, $status = 200, $headers)If passed with parameters, returns a prebuilt instance of Response. If passed with no response, returns an instance of the Response factory:
returnresponse('OK',200,['X-Header-Greatness'=>'Super great']);returnresponse()->json(['status'=>'success']);
view($viewPath)Returns a view instance:
Route::get('home',function(){returnview('home');// Gets /resources/views/home.blade.php});
Collections are one of the most powerful and yet underappreciated tools Laravel provides. We covered them a bit in “Eloquent Collections”, but here’s a quick recap.
Collections are essentially arrays with superpowers. The array-traversing methods you normally have to pass arrays into (array_walk(), array_map(), array_reduce(), etc.), all of which have confusingly inconsistent method signatures, are available as consistent, clean, chainable methods on every collection. You can get a taste of functional programming and map, reduce, and filter your way to cleaner code.
We’ll cover some of the basics of Laravel’s collections and collection pipeline programming here, but for a much deeper overview, check out Adam Wathan’s book Refactoring to Collections (Gumroad).
Collections are not a new idea within Laravel. Many languages make collection-style programming available on arrays out of the box, but with PHP we’re not quite so lucky.
Using PHP’s array*() functions, we can take the monstrosity shown in Example 17-1, and turn it into the slightly less monstrous monstrosity shown in Example 17-2.
$users=[...];$admins=[];foreach($usersas$user){if($user['status']=='admin'){$user['name']=$user['first'].' '.$user['last'];$admins[]=$user;}}return$admins;
$users=[...];returnarray_map(function($user){$user['name']=$user['first'].' '.$user['last'];return$user;},array_filter($users,function($user){return$user['status']=='admin';}));
Here, we’ve gotten rid of a temporary variable ($admins) and converted one confusing foreach loop into two distinct actions: map and filter.
The problem is, PHP’s array manipulation functions are awful and confusing. Just look at this example; array_map() takes the closure first and the array second, but array_filter() takes the array first and the closure second. In addition, if we added any complexity to this, we’d have functions wrapping functions wrapping functions. It’s a mess.
Laravel’s collections take the power of PHP’s array manipulation methods and give them a clean, fluent syntax—and they add many methods that don’t even exist in PHP’s array manipulation toolbox. Now, using the collect() helper method that turns an array into a Laravel collection, we can do what’s shown in Example 17-3:
$users=collect([...]);return$users->filter(function($user){return$user['status']=='admin';})->map(function($user){$user['name']=$user['first'].' '.$user['last'];return$user;});
This isn’t the most extreme of examples. There are plenty where the reduction in lines of code and the increased simplicity would make an even stronger case. But this right here is so common.
Look at the original example and how muddy it is. It’s not entirely clear until you understand the entire code sample what any given piece is there for.
The biggest benefit collections provide, over anything else, is breaking the actions you’re taking to manipulate an array into simple, discrete, understandable tasks. You can now do something like this:
$users=[...]$countAdmins=collect($users)->filter(function($user){return$user['status']=='admin';})->count();
Or something like this:
$users=[...];$greenTeamPoints=collect($users)->filter(function($user){return$user['team']=='green';})->sum('points');
Many of the examples we’ll look at in the rest of this chapter operate on this mythical $users collection we’ve started imagining here. Each entry in this $users array will represent a single human; they’ll likely all be array-accessible. The specific properties each user will have may vary a bit depending on the example. But any time you see this $users variable, know that that’s what we’re working with.
There’s much more you can do than what we’ve covered here. Take a look at the Laravel Collection docs to learn more about all the methods you can use, but to get you started, here are just a few of the core methods:
all() and toArray()If you’d like to convert your collection to an array, you can do so with either all() or toArray(). toArray() flattens not just the collection, but also any Eloquent objects underneath it, to arrays. all() only converts the collection to an array; any Eloquent objects contained within the collection will be preserved as Eloquent objects. Here are a few examples:
$users=User::all();$users->toArray();/* Returns[['id' => '1', 'name' => 'Agouhanna'],...]*/$users->all();/* Returns[Eloquent Object { id : 1, name: 'Agouhanna' },...]*/
filter() and reject()When you want to get a subset of your original collection by checking each item against a closure, you’ll use filter() (which keeps an item if the closure returns true) or reject() (which keeps an item if the closure returns false):
$users=collect([...]);$admins=$users->filter(function($user){return$user->isAdmin;});$paidUsers=$user->reject(function($user){return$user->isTrial;});
where()where() makes it easy to provide a subset of your original collection where a given key is equal to a given value. Anything you can do with where() you can also do with filter(), but it’s a shortcut for a common scenario:
$users=collect([...]);$admins=$users->where('role','admin');
first() and last()If you want just a single item from your collection, you can use first() to pull from the beginning of the list or last() to pull from the end.
If you call first() or last() with no parameters, they’ll just give you the first or last item in the collection. But if you pass either a closure, they’ll instead give you the first or last item in the collection that returns true when passed to that closure.
Sometimes you’ll do this because you want the actual first or last item. But sometimes it’s the easiest way to get one item even if you only expect there to be one:
$users=collect([...]);$owner=$users->first(function($user){return$user->isOwner;});$firstUser=$users->first();$lastUser=$users->last();
You can also pass a second parameter to each method, which is the default value and will be provided as a fallback if the closure doesn’t provide any results.
each()If you’d like to do something with each item of a collection, but it doesn’t include modifying the items or the collection itself, you can use each():
$users=collect([...]);$users->each(function($user){EmailUserAThing::dispatch($user);});
map()If you’d like to iterate over all the items in a collection, make changes to them, and return a new collection with all of your changes, you’ll want to use map():
$users=collect([...]);$users=$users->map(function($user){return['name'=>$user['first'].' '.$user['last'],'email'=>$user['email']];});
reduce()If you’d like to get a single result from your collection, like a count or a string, you’ll probably want to use reduce(). Reduce works by taking an initial value (called the “carry”) and then allowing each item in the collection to change that value some how. You can define an initial value for the “carry,” and a closure that accepts the current state of the “carry” and then each item as parameters:
$users=collect([...]);$points=$users->reduce(function($carry,$user){return$carry+$user['points'];},0);// Start with a carry of 0
pluck()If you want to pull out just the values for a given key under each item in a collection, you can use pluck() (formerly lists()):
$users=collect([...]);$emails=$users->pluck('email')->toArray();
chunk() and take()chunk() makes it easy to split your collection into groups of a predefined size, and take() pulls just the provided number of items:
$users=collect([...]);$rowsOfUsers=$users->chunk(3);// Separates into groups of 3$topThree=$users->take(3);// Pulls the first 3
groupBy()If you want to group all of the items in your collection by the value of one of their properties, you can use groupBy():
$users=collect([...]);$usersByRole=$users->groupBy('role');/* Returns:['member' => [...],'admin' => [...]]*/
You can also pass a closure, and whatever you return from the closure will be what’s used to group the records:
$heroes=collect([...]);$heroesByAbilityType=$heroes->groupBy(function($hero){if($hero->canFly()&&$hero->isInvulnerable()){return'Kryptonian';}if($hero->bitByARadioactiveSpider()){return'Spidermanesque';}if($hero->color==='green'&&$hero->likesSmashing()){return'Hulk-like';}return'Generic';});
reverse() and shuffle()reverse() reverses the order of the items in your collection, and shuffle() randomizes them:
$numbers=collect([1,2,3]);$numbers->reverse()->toArray();// [3, 2, 1]$numbers->shuffle()->toArray();// [2, 3, 1]
sort(), sortBy(), and sortByDesc()If your items are simple strings or integers, you can use sort() to sort them:
$sortedNumbers=collect([1,7,6,4])->sort()->toArray();// [1, 4, 6, 7]
If they’re more complex, you can pass a string (representing the property) or a closure to sortBy() or sortByDesc() to define your sorting behavior:
$users=collect([...]);// Sort an array of users by their 'email' property$users->sort('email');// Sort an array of users by their 'email' property$users->sortBy(function($user,$key){return$user['email'];});
count(), isEmpty(), and isNotEmpty()You can see how many items there are in your collection using count(), isEmpty(), or isNotEmpty():
$numbers=collect([1,2,3]);$numbers->count();// 3$numbers->isEmpty();// false$numbers->isNotEmpty()// true
avg() and sum()If you’re working with a collection of numbers, avg() and sum() do what their method names say, and don’t require any parameters:
collect([1,2,3])->sum();// 6collect([1,2,3])->avg();// 2
But if you’re working with arrays, you can pass the key of the property you’d like to pull from each array to operate on:
$users=collect([...]);$sumPoints=$users->sum('points');$avgPoints=$users->avg('points');
Have you fallen in love with collections, and do you want to use them on your non-Laravel projects? With Taylor’s blessing, I split out just the collections functionality from Laravel into a separate project called Collect, and developers at my company keep it up-to-date with Laravel’s releases.
Just use the composer require tightenco/collect command and you’ll have the Illuminate\Support\Collection class ready to use in your code—along with the collect() helper.
Laravel provides a suite of global helper functions that make it simpler to do all sorts of tasks. They make it easier to manipulate and inspect arrays and strings, they make it easier to generate paths and URLs, and they provide simple access to some consistent and vital functionality.
Laravel’s collections are powerful tools that bring the possibility of collection pipelines to PHP.
As Laravel has grown, Taylor has built a suite of tools to support and simplify the lives and workflows of Laravel developers. Much of the new work has gone straight into the core, but there are quite a few packages and SaaS (software-as-a-service) offerings that aren’t a part of the core, but are still very much a part of the Laravel experience.
We’re already covered quite a few in this book, so I’ll link to each; but for those we haven’t covered, I’ll give each a quick description and a link to the relevant website.
We’ve already taken a look at these, but here are links to where you can find them in the book.
The Laravel installer is a package installed globally on your local development machine (via Composer) that makes it easy and quick to set up a new Laravel project.
Covered in “Installing Laravel with the Laravel Installer Tool”.
Valet is a local development server (for Mac, but with forks for Windows and Linux) that makes it quick and easy to serve all of your projects to your browser with almost no effort. You’ll install Valet globally on your local development machine via Composer.
With a few commands you can have Nginx, MySQL, Redis, and more serving every Laravel app on your machine at a .test domain.
Covered in “Laravel Valet”.
Passport is a powerful, simple-to-set-up OAuth2 server for authenticating clients to your APIs. You’ll install it in each application as a Composer package, and with very little work you can have a full OAuth2 flow accessible to your users.
Covered in “API Authentication with Laravel Passport”.
Horizon is a queue monitoring package you can install into each application via Composer. It exposes a full user interface for monitoring the health, performance, failures, and history of your Redis queued jobs.
Introduced briefly in “Laravel Horizon”.
Mix is a Webpack-based frontend build system. It can run Babel, Browsersync, your favorite CSS pre- and post-processors, and provides hot module replacement, code splitting, versioning, and much more. Mix replaced Elixir, a Gulp-based tool used for the same purposes.
Covered in “Mix”.
Echo is a JavaScript library (introduced along with a series of improvements to Laravel’s notification system) that makes it simple to subscribe to events and channels broadcast from your Laravel app via Websockets.
Covered in “Laravel Echo (the JavaScript Side)”.
Dusk is a frontend testing framework built for testing your entire application, JavaScript and all. It’s a powerful package you can pull into your application via Composer and that drives actual browsers with ChromeDriver.
Covered in “Testing with Dusk”.
Homestead is a configuration layer on top of Vagrant that makes it simple to serve multiple Laravel applications from a Laravel-friendly Vagrant setup.
Introduced briefly in “Laravel Homestead”.
These are a few tools that I did not cover because they are beyond the scope of this book. Some of these are just for use in special circumstances (Cashier for taking payments, Socialite for social login, etc.) but some I use every day (Forge, especially).
Forge is a paid SaaS tool for creating and managing virtual servers on hosts like DigitalOcean, Linode, AWS, and more. It provisions Laravel-ready servers (and individual sites on those servers) with all the tools you need to run your servers, from queues and queue workers to Let’s Encrypt SSL certs. It can also set up simple shell scripts to auto-deploy your sites when you push up new code to GitHub or Bitbucket.
Forge is incredibly useful for spinning up sites quickly and easily, but it’s not so minimal that you can’t also run your apps on it longer term or at larger scale. You can scale up your server sizes, add load balancers, and manage private networking between your servers, all within Forge.
Envoyer is paid SaaS that’s branded as “Zero downtime PHP deployment”. Unlike Forge, Envoyer doesn’t spin up your servers or manage them. Its primary job is to listen to triggers—usually when you push new code, but you can also manually trigger deploys or trigger them with webhooks—and perform your deploy steps in response.
There are three ways that Envoyer does this much better than Forge’s push-to-deploy tool and most other push-to-deploy solutions.
It has a robust toolset for building out your deploy pipeline as a simple but powerful multi-stage process.
It deploys your app using Capistrano-style zero downtime deploys; each new deploy is built into its own folder, and only once the build process has completed successfully is that deploy folder symlinked to your actual web root. Because of this, there’s no moment when your server is broken while Composer installs or NPM builds.
Because of this folder-based system, it’s easy and quick to roll back any breaking changes to a previous release; Envoyer just updates the symlink back to a previous deploy folder and it’s immediately serving an older build.
You can also set up regular health checks (pings against your servers that report errors to you if the pings don’t get back a 200 HTTP response), expectations that your cron jobs will ping Envoyer on a regular schedule, and chat-based notifications of any significant events.
Envoyer is more of a niche tool than Forge. I don’t know many Laravel developers who don’t use Forge; but those who pay for Envoyer are more likely to have websites that will suffer if they can’t immediately roll back a problematic commit, or who get enough traffic (or important enough traffic) that 10 seconds of downtime here and there can be a big issue. If your site is in that category, Envoyer will feel like magic.
Nova is a paid package for building admin panels. If you imagine your average complex Laravel app, it may have a few parts: the public-facing web site or customer view, the administration section for making changes to the core data or customer list, and maybe an API.
Nova drastically simplifies the process of building the admin panel aspect of the site using Vue and a Laravel API. It makes it easy to generate CRUD (Create, Read, Update, Delete) pages for all of your resources, together with more complex custom views for your data, custom actions and relationships on each of your resources, and even custom tools for adding non-CRUD tooling to the same general admin space.
Spark is a paid package for generating a SaaS that accepts payments and makes it easy to manage users, teams, and subscriptions. It provides Stripe integration, invoices, two-factor auth, profile photos for your users, team management and billing, password resets, announcements, API token authentication, and more.
Spark is both a series of routes and a series of Vue components. You’ll use Spark to scaffold the basis of a new project, so don’t plan to add it to your existing apps after-the-fact.
Lumen is a free API-focused micro-framework built from Laravel parts. Because it’s for APIs, many of the conveniences Laravel offers that target non-API calls (for example, Blade templating) have been stripped out.
That makes a leaner framework with a few less of the niceties, with the benefit of speed improvements.
My general approach to Lumen is that, unless you have built APIs in Laravel and found them too slow, or unless you’re definitely building a microservice-style API that will absolutely never have need for any views or any of the other niceties Laravel offers, you should stick with Laravel.
But when you find yourself developing microservice-style APIs in Laravel and you need to eke out more speed at the millisecond level, that’s the right time to look at Lumen.
Cashier is a free package that provides a simple interface in front of Stripe’s and Braintree’s subscription billing offerings. Cashier handles much of the basic functionality of subscribing users, changing their plans, giving them access to invoices, handling webhook callbacks from the billing service, cancellation grace periods, and more.
If you want to allow your users to sign up for subscriptions using Stripe or Braintree, Cashier will make your life a lot easier.
Socialite is a free package that makes it incredibly simple to add social login (for example, GitHub or Facebook) to your apps.
Envoy is a local task runner that makes it easy to define common tasks that will run on your remote servers, commit those tasks’ definitions to version control, and run them simply and predictably.
Take a look at Example 18-1 to get a sense for what a common Envoy task looks like.
@servers(['web-1'=>'192.168.1.1','web-2'=>'192.168.1.2'])@task('deploy',['on'=>['web-1','web-2']])cdmysite.comgitpullorigin{{$branch}}phpartisanmigratephpartisanroute:cache@endtask
To run Example 18-1, you’d run the following command from your local terminal:
envoyrundeploy--branch=master
Telescope is a free debugging tool, installable as a package, for Laravel applications running Laravel 5.7.7+. It generates a dashboard where you can dig into the current status of jobs, queue workers, HTTP requests, database queries, and much more.
I’ve mentioned these resources already, but here’s a non-exhaustive list of resources folks often turn to to learn Laravel.
@TaylorOtwell and @LaravelPHP on Twitter
The many Laravel chats; at the time of writing this book, the Laravel Discord server is the primary location where Taylor and other contributors are accessible, but there’s also unofficial chats in Slack and IRC (#laravel on Freenode)
There are many blogs (I have one at mattstauffer.com and Tighten has one at tighten.co, and there are plenty of others that are incredibly useful), many excellent Twitter-ers, many excellent package authors, and far too many Laravel practitioners who I respect to fit into a list here. This is a rich, diverse, and giving community, full of developers who love to share everything they’re learning; the hard part is not finding good content but finding the time to consume it all.
Like I wrote above, I can’t list every person or resource you should look to in your journey as a Laravel developer. But if you start with the resources and folks listed above, you will be off to a great start in getting up and running with Laravel.
A method defined on an Eloquent model that customizes how a given property will be returned. Accessors make it possible to define that getting a given property from a model will return a different (or, more likely, differently formatted) value than what is stored in the database for that property.
A common database ORM pattern, and also the pattern that Laravel’s Eloquent uses. In ActiveRecord the same model class defines both how to retrieve and persist database records and how to represent them. Additionally, each database record is represented by a single entity in the application, and each entity in the application is mapped to a single database record.
Technically “Application Programming Interface”, but most commonly used to refer to a series of endpoints (and instructions on how to use them) that can be used to make HTTP-based calls to read and modify data from outside of a system. Sometimes API is also used to describe the set of interfaces, or affordances, any given package or library or class exposes to its consumers.
Often called acceptance or functional tests, application tests test the entire behavior of the application, usually at an outer boundary, by employing something like a DOM crawler—which is exactly what Laravel’s application test suite offers.
Arguments are parameters that can be passed to Artisan console commands. Arguments aren’t prefaced with -- or followed by =, but instead just accept a single value.
The tool that makes it possible to interact with Laravel applications from the command line.
In testing, an assertion is the core of the test: you are asserting that something should be equal to (or less than or greater than) something else, or that it should have a given count, or whatever else you like. Assertions are the things that can either pass or fail.
Correctly identifying oneself as a member/user of an application is the act of authentication. Authentication doesn’t define what you may do, but simply who you are (or aren’t).
Assuming you’ve either succeeded or failed at authenticating yourself, authorization defines what you’re allowed to do given your particular identification. Authorization is about access and control.
When a dependency injection container will inject an instance of a resolvable class without a developer having explicitly taught it how to resolve that class, that’s called autowiring. With a container that doesn’t have autowiring, you can’t even inject a plain PHP object with no dependencies until you have explicitly bound it to the container. With autowiring, you only have to explicitly bind something to the container if its dependencies are too complex or vague for the container to figure out on its own.
Beanstalk is a work queue. It’s simple and excels at running multiple asynchronous tasks—which makes it a common driver for Laravel’s queues. beanstalkd is its daemon.
A password hashing function.
Laravel’s templating engine.
Laravel’s pre-5.4 testing facilities for DOM-based interactions, available as a Composer package for 5.4+ apps.
A PHP package that makes working with dates much easier and more expressive.
A Laravel package that makes billing with Stripe or Braintree, especially in subscription contexts, easier and more consistent and powerful.
Closures are PHP’s version of anonymous functions. A closure is a function that you can pass around as an object, assign to a variable, pass as a parameter to other functions and methods, or even serialize.
An older PHP framework that Laravel was inspired by.
The name of a development pattern and also Laravel’s tool that implements it. Like arrays on steroids, collections provide map, reduce, filter, and many more powerful operations that PHP’s native arrays don’t.
The name for a custom Artisan console task.
PHP’s dependency manager. Like Ruby Gems or NPM.
Somewhat of a catchall word, in Laravel “container” refers to the application container that’s responsible for dependency injection. Accessible via app() and also responsible for resolving calls to controllers, events, jobs, and commands, the container is the glue that holds each Laravel app together.
Another name for an interface.
A class that is responsible for routing user requests through to the application’s services and data, and returning some form of useful response back to the user.
A malicious attack where an external site makes requests against your application by hijacking your users’ browsers (with JavaScript, likely) while they’re still logged in to your site. Protected against by adding a token (and a check for that token on the POST side) to every form on the site.
Instead of instantiating dependencies in a class, expect them to be injected in from the outside—usually through the constructor.
Blade syntax options like @if, @unless, etc.
Navigating down inheritance trees using . to reference a jump down to a new level. If you have an array like: ['owner' => ['address' => ['line1' => '123 Main St.']]], you have three levels of nesting. Using dot notation, you would represent “123 Main St.” as "owner.address.line1".
Laravel’s frontend testing package that can test JavaScript (primarily Vue) and DOM interactions by spinning up Chrome driver to run the tests.
Avoiding N+1 problems by adding a second smart query to your first query to get a set of related items. Usually you have a first query that gets a collection of thing A. But each A has many B, and so every time you get the B from an A, you need a new query. Eager loading means doing two queries: first you get all the A’s, and second you get all the B’s related to all those A’s, in a single query. Two queries, and you’re done.
A Laravel product that makes WebSocket authentication and syncing of data simple.
Laravel’s old build tool, since replaced by Mix; a wrapper around Gulp.
Laravel’s ActiveRecord ORM. The tool you’ll use to define and query something like a User model.
Variables that are defined in an .env file that is expected to be excluded from version control. This means they don’t sync between environments and they’re also kept safe.
A Laravel package for writing scripts to run common tasks on remote servers. Envoy provides a syntax for defining tasks and servers and a command-line utility for running the tasks.
A Laravel SaaS product for zero-down-time deployment, multi-server deploys, and server and cron health checks.
Laravel’s tool for implementing a pub/sub or observer pattern. Each event represents that an event happened: the name of the event describes what happened (e.g., UserSubscribed) and the payload allows for attaching relevant information. Designed to be “fired” and then “listened” for (or published and subscribed, if you prefer the pub/sub concept).
A tool in Laravel for simplifying access to complex tools. Facades provide static access to core services in Laravel. Since every facade is backed by a class in the container, you could replace any call to something like Cache::put(); with a two-line call to something like $cache = app('cache'); $cache->put();.
A parameter anywhere that is on or off (boolean).
Methods that can be chained one after another are said to be fluent. In order to provide a fluent syntax, each method must return the instance, preparing it to be chained again. This allows for something like People::where('age', '>', 14)->orderBy('name')->get().
The package that Laravel uses to facilitate its local and cloud file access.
A Laravel product that makes it easy to spin up and manage virtual servers on major cloud providers like DigitalOcean and AWS.
The full namespaced name of any given class, trait, or interface. Controller is the class name; Illuminate\Routing\Controller is the FQCN.
A JavaScript-based build tool.
A globally accessible PHP function that makes some other functionality easier—for example, array_get() simplifies the logic of looking up results from arrays.
A technology that makes it possible to reload just pieces of an active web site’s frontend dependencies without reloading;
A Laravel tool that wraps Vagrant and makes it easier to spin up Forge-parallel virtual servers for local Laravel development.
A Laravel package that provides tooling for managing queues with greater nuance than Laravel’s defaults, and also provides insight into the current and historic operating state of the queue workers and their jobs.
The top-level namespace of all Laravel components.
Integration tests test the way individual units work together and pass messages.
The concept of giving “control” over how to make a concrete instance of an interface to the higher-level code of the package instead of the lower-level code. Without IoC, each individual controller and class might decide what instance of Mailer it wanted to create. IoC makes it so that the low-level code—those controllers and classes—just get to ask for a Mailer, and some high-level configuration code defines once per application which instance should be provided to satisfy that request.
A class that intends to encapsulate a single task. Jobs are intended to be able to be pushed onto a queue and run asynchronously.
JavaScript Object Notation. A syntax for data representation.
A JSON object containing all of the information necessary to determine a user’s authentication state and access permissions. This JSON object is digitally signed, which is what makes it trustworthy, using HMAC or RSA. Usually delivered in the header.
An architectural pattern designed to encompass the functionality of sending mail into a single “sendable” class.
A formatting language designed for formatting plain text and outputting to multiple output formats. Commonly used for formatting text that has a good chance of being processed by a script or read by humans in its raw form—for example, git readmes.
The ability to pass many parameters at once to create or update an Eloquent model, using a keyed array.
An in-memory data store designed to provide simple but fast data storage. Memcached only supports a basic key/value store.
A series of wrappers around an application that filter and decorate its inputs and outputs.
A manipulation to the state of the database, stored in and run from code.
A frontend build tool based on Webpack. Replaced Elixir and can be used to concatenate, minify, and pre-process your frontend assets, and much more.
A library included with Laravel that makes it easy to mock PHP classes in your tests.
A class used to represent a given database table in your system. In ActiveRecord ORMs like Laravel’s eloquent, this class is used both to represent a single record from the system, but also to interact with the database table broadly.
A tool for defining how the application can generate an instance of your model if needed for testing or seeding. Usually paired with a fake data generator like Faker.
A single app serving multiple clients, each of which has its customers. Multitenancy often suggests that each client of your application gets its own theming and domain name, with which to differentiate its service to its customers vis-à-vis your other clients’ potential services.
A tool in Eloquent that allows you to manipulate the data being saved to a model property before it is saved to the database.
A Laravel framework tool allowing a single message to be send via myriad notification channels (e.g. email, Slack, SMS) to one or more recipients.
A paid Laravel package for building admin panels for your Laravel apps.
A web server similar to Apache.
“Node Package Manager”; a central web-based repository for node packages, at npmjs.org; also a utility used on your local machine to install a project’s frontend depedencies into the node_modules directory based on the specifications of package.json.
Like arguments, options are parameters that can be passed to Artisan commands. They’re prefaced with -- and can be used as a flag (--force) or to provide data (--userId=5).
A design pattern that is centered around using objects in a programming language to represent data, and its relationships, in a relational database.
A Laravel package that can be used to easily add an OAuth authentication server to your Laravel app.
A PHP testing framework.
A PHP testing framework. The most common and connected to the most of Laravel’s custom testing code.
In database terms, able to interact with multiple database tables with similar characteristics. A polymorphic relationship will allow entities of multiple models to be attached in the same way.
A build tool that takes in a special form of a language (for CSS, one special form is Less) and generates code with just the normal language (CSS). Preprocessors build in tools and features that are not in the core language.
Most database tables have a single column that is intended to represent each row. This is called the primary key and is commonly named id.
A stack onto which jobs can be added. Usually associated with a queue worker, which pulls jobs one at a time from a queue, works on them, and then discards them.
A JavaScript framework. Created and maintained by Facebook.
Similar to façades, but without requiring a separate class. Real-time facades can be used to make any class’ methods callable as static methods by importing that class with Facades\ in front of its namespace.
Like Memcached, a data store simpler than most relational databases but powerful and fast. Redis supports a very limited set of structures and data types but makes up for it in speed and scalability.
Representational State Transfer, the most common format for APIs these days. Usually suggests that interactions with an API should each authenticate separately and should be “stateless”; also usually suggests that they use the HTTP verbs for basic differentiation of requests.
A definition of a way or ways the user might visit a web application. A route is a pattern definition; it can be something like /users/5, or /users, or /users/{id}.
Amazon’s “object storage” service, which makes it easy to use AWS’ incredible computing power to store and serve files.
Software as a Service. Web-based applications that you pay money to use.
In Eloquent, a tool for defining how to consistently and simply narrow down a query.
A Laravel package for full-text search on Eloquent models.
The process of converting more complex data (usually an Eloquent model) to something simpler (in Laravel, usually an array or JSON).
A structure in Laravel that registers and boots classes and container bindings.
A Laravel package making it simple to add social authentication (e.g. log in via Facebook) to Laravel apps.
Marking a database row as “deleted” without actually deleting it, usually paired with an ORM that by default hides all “deleted” rows.
A Laravel tool that makes it easy to spin up a new subscription-based SaaS app.
A PHP framework that focuses on building excellent components and making them accessible to others. Symfony’s HTTP Foundation is at the core of Laravel and every other modern PHP framework.
A Laravel package for adding a debugging assitant to Laravel apps.
Laravel’s REPL, or read–evaluate–print loop. It’s a tool that allows you to perform complex PHP operations within the full context of your app from the command line.
Too long; didn’t read. “Summary.”
Prefacing a variable name in a method signature with a class or interface name. Tells PHP (and Laravel, and other developers) that the only thing that’s allowed to be passed in that parameter is an object with the given class or interface.
Unit tests target small, relatively isolated units—a class or method, usually.
A command-line tool that makes it easy to build virtual machines on your local computer using predefined images.
A Laravel package (for Mac OS users, but there are forks for Linux and Windows) that makes it easy to serve your applications from your development folder of choice, without worrying about Vagrant or virtual machines.
Ensuring that user input matches expected patterns.
An individual file that takes data from the backend system or framework and converts it into HTML.
A tool that defines that, every time a given view is loaded, it will be provided a certain set of data.
A template file that defines HTML to be sent to the end user; often includes accepting data from a controller and formatting it as part of the HTML.
A JavaScript framework. Preferred by Laravel. Written by Evan You.
Technically a “module bundler”, Webpack is a tool commonly used to run frontend build tasks, especially those which involve processing CSS and JavaScript and other frontend source files and outputting them in a more-production-ready format.
The animal on the cover of Laravel: Up and Running is a gemsbok (oryx gazella). This large antelope is native to the deserts of South Africa, Botswana, Zimbabwe, and Namibia, where it is featured on the country’s coat of arms.
Gemsbok measure about 5 feet 7 inches tall at the shoulder and can weigh from 250 to 390 pounds. They are typically pale gray or brown, with black and white facial markings and long black tails. A black stripe extends from the chin to the lower edge of the neck. The gemsbok’s impressive straight horns, used in defensive maneuvers, average 33 inches in length and are regarded as charms in many cultures. In medieval England, they were often marketed as unicorn horns.
Although these horns make the gemsbok a highly-sought trophy animal, the population remains stable throughout Southern Africa. In 1969, gemsbok were introduced to southern New Mexico, where their current population is around 3,000.
Gemsbok are well-suited to such desert environments, with the ability to survive without drinking water for most of the year. To achieve this, they do not pant or sweat, allowing their body temperature to rise several degrees above normal on hot days. Their lifespan is approximately 18 years in the wild.
Many of the animals on O’Reilly covers are endangered; all of them are important to the world. To learn more about how you can help, go to animals.oreilly.com.
The cover image is from Riverside Natural History. The cover fonts are URW Typewriter and Guardian Sans. The text font is Adobe Minion Pro; the heading font is Adobe Myriad Condensed; and the code font is Dalton Maag’s Ubuntu Mono.
Second Edition
A Framework for Building Modern PHP Apps
Copyright © 2019 Matt Stauffer. All rights reserved.
Printed in the United States of America.
Published by O’Reilly Media, Inc., 1005 Gravenstein Highway North, Sebastopol, CA 95472.
O’Reilly books may be purchased for educational, business, or sales promotional use. Online editions are also available for most titles (http://oreilly.com/safari). For more information, contact our corporate/institutional sales department: 800-998-9938 or corporate@oreilly.com .
See http://oreilly.com/catalog/errata.csp?isbn=9781492041214 for release details.
The O’Reilly logo is a registered trademark of O’Reilly Media, Inc. Laravel: Up & Running, the cover image, and related trade dress are trademarks of O’Reilly Media, Inc.
The views expressed in this work are those of the author(s), and do not represent the publisher’s views. While the publisher and the author(s) have used good faith efforts to ensure that the information and instructions contained in this work are accurate, the publisher and the author(s) disclaim all responsibility for errors or omissions, including without limitation responsibility for damages resulting from the use of or reliance on this work. Use of the information and instructions contained in this work is at your own risk. If any code samples or other technology this work contains or describes is subject to open source licenses or the intellectual property rights of others, it is your responsibility to ensure that your use thereof complies with such licenses and/or rights.
978-1-492-04114-6
This book is dedicated to my family. Mia, my little princess and bundle of joy and energy. Malachi, my little prince and adventurer and empath. Tereva, my inspiration, encourager, upgrader, pusher, rib.
The story of how I got started with Laravel is a common one: I had written PHP for years, but I was on my way out the door, pursuing the power of Rails and other modern web frameworks. Rails in particular had a lively community, a perfect combination of opinionated defaults and flexibility, and the power of Ruby Gems to leverage prepackaged common code.
Something kept me from jumping ship, and I was glad for that when I found Laravel. It offered everything I was drawn to in Rails, but it wasn’t just a Rails clone; this was an innovative framework with incredible documentation, a welcoming community, and clear influences from many languages and frameworks.
Since that day I’ve been able to share my journey of learning Laravel through blogging, podcasting, and speaking at conferences; I’ve written dozens of apps in Laravel for side and work projects; and I’ve met thousands of Laravel developers online and in person. I have plenty of tools in my development toolkit, but I am honestly happiest when I sit down in front of a command line and type laravel new projectName.
This is not the first book about Laravel, and it won’t be the last. I don’t intend for this to be a book that covers every line of code or every implementation pattern. I don’t want this to be the sort of book that goes out of date when a new version of Laravel is released. Instead, its primary purpose is to provide developers with a high-level overview and concrete examples to learn what they need to work in any Laravel code base with any and every Laravel feature and subsystem. Rather than mirroring the docs, I want to help you understand the foundational concepts behind Laravel.
Laravel is a powerful and flexible PHP framework. It has a thriving community and a wide ecosystem of tools, and as a result it’s growing in appeal and reach. This book is for developers who already know how to make websites and applications and want to learn how to do so well in Laravel.
Laravel’s documentation is thorough and excellent. If you find that I don’t cover any particular topic deeply enough for your liking, I encourage you to visit the online documentation and dig deeper into that particular topic.
I think you will find the book a comfortable balance between high-level introduction and concrete application, and by the end you should feel comfortable writing an entire application in Laravel, from scratch. And, if I did my job well, you’ll be excited to try.
This book assumes knowledge of basic object-oriented programming practices, PHP (or at least the general syntax of C-family languages), and the basic concepts of the Model–View–Controller (MVC) pattern and templating. If you’ve never made a website before, you may find yourself in over your head. But as long as you have some programming experience, you don’t have to know anything about Laravel before you read this book—we’ll cover everything you need to know, from the simplest “Hello, world!”
Laravel can run on any operating system, but there will be some Bash (shell) commands in the book that are easiest to run on Linux/Mac OS. Windows users may have a harder time with these commands and with modern PHP development, but if you follow the instructions to get Homestead (a Linux virtual machine) running, you’ll be able to run all of the commands from there.
This book is structured in what I imagine to be a chronological order: if you’re building your first web app with Laravel, the early chapters cover the foundational components you’ll need to get started, and the later chapters cover less foundational or more esoteric features.
Each section of the book can be read on its own, but for someone new to the framework, I’ve tried to structure the chapters so that it’s actually very reasonable to start from the beginning and read until the end.
Where applicable, each chapter will end with two sections: “Testing” and “TL;DR.” If you’re not familiar, TL;DR means “too long; didn’t read.” These final sections will show you how to write tests for the features covered in each chapter and give a high-level overview of what was covered.
The book is written for Laravel 5.7, but will cover features and syntax changes back to Laravel 5.1.
The first edition of Laravel: Up and Running came out in November 2016 and covered Laravel versions 5.1 to 5.3. This second edition adds coverage for 5.4 to 5.7, adds coverage for Laravel Dusk and Horizon, and adds an 18th chapter about community resources and other non-core Laravel packages that weren’t covered in the first 17 chapters.
The following typographical conventions are used in this book:
Indicates new terms, URLs, email addresses, filenames, and file extensions.
Constant widthUsed for program listings, as well as within paragraphs to refer to program elements such as variable or function names, databases, data types, environment variables, statements, and keywords.
Constant width boldShows commands or other text that should be typed literally by the user.
Constant width italicShows text that should be replaced with user-supplied values or by values determined by context.
This element signifies a tip or suggestion.
This element signifies a general note.
This element indicates a warning or caution.
Safari (formerly Safari Books Online) is membership-based training and reference platform for enterprise, government, educators, and individuals.
Members have access to thousands of books, training videos, Learning Paths, interactive tutorials, and curated playlists from over 250 publishers, including O’Reilly Media, Harvard Business Review, Prentice Hall Professional, Addison-Wesley Professional, Microsoft Press, Sams, Que, Peachpit Press, Adobe, Focal Press, Cisco Press, John Wiley & Sons, Syngress, Morgan Kaufmann, IBM Redbooks, Packt, Adobe Press, FT Press, Apress, Manning, New Riders, McGraw-Hill, Jones & Bartlett, and Course Technology, among others.
For more information, please visit http://oreilly.com/safari.
Please address comments and questions concerning this book to the publisher:
We have a web page for this book, where we list errata, examples, and any additional information. You can access this page at http://bit.ly/laravel-up-and-running.
To comment or ask technical questions about this book, send email to bookquestions@oreilly.com.
For more information about our books, courses, conferences, and news, see our website at http://www.oreilly.com.
Find us on Facebook: http://facebook.com/oreilly
Follow us on Twitter: http://twitter.com/oreillymedia
Watch us on YouTube: http://www.youtube.com/oreillymedia
This book would not have happened without the gracious support of my amazing wife Tereva or the understanding (“Daddy’s writing, buddy!”) of my son Malachi. And while she wasn’t explicitly aware of it, my daughter Mia was around for almost the entire creation of the book, so this book is dedicated to the whole family. There were many, many long evening hours and weekend Starbucks trips that took me away from my family, and I couldn’t be more grateful for their support and also their presence just making my life awesome.
Additionally, the entire Tighten family has supported and encouraged me through the writing of the book, several even editing (Keith Damiani, editor extraordinaire) and helping me with challenging code samples (Adam Wathan, King of the Collection Pipeline). Dan Sheetz, my partner in Tighten crime, has been gracious enough to watch me while away many a work hour cranking on this book and was nothing but supportive and encouraging; and Dave Hicking, our operations manager, helped me arrange my schedule and work responsibilities around writing time.
Taylor Otwell deserves thanks and honor for creating Laravel—and therefore creating so many jobs and helping so many developers love our lives that much more. He deserves appreciation for how he’s focused on developer happiness and how hard he’s worked to have empathy for developers and to build a positive and encouraging community. But I also want to thank him for being a kind, encouraging, and challenging friend. Taylor, you’re a boss.
Thanks to Jeffrey Way, who I still contend to be one of the best teachers on the Internet. He originally introduced me to Laravel and still introduces more people every day. He’s also, unsurprisingly, a fantastic human being whom I’m glad to call a friend.
Thank you to Jess D’Amico, Shawn McCool, Ian Landsman, and Taylor for seeing value in me as a conference speaker early on and giving me a platform to teach from. Thanks to Dayle Rees for making it so easy for so many to learn Laravel in the early days.
Thanks to every person who put their time and effort into writing blog posts about Laravel, especially early on: Eric Barnes, Chris Fidao, Matt Machuga, Jason Lewis, Ryan Tablada, Dries Vints, Maks Surguy, and so many more.
And thanks to the entire community of friends on Twitter, IRC, and Slack who’ve interacted with me over the years. I wish I could name every name, but I would miss some and then feel awful about missing them. You all are brilliant, and I’m honored to get to interact with you on a regular basis.
Thanks to my O’Reilly editor, Ally MacDonald, and all of my technical editors: Keith Damiani, Michael Dyrynda, Adam Fairholm, and Myles Hyson.
And, of course, thanks to the rest of my family and friends, who supported me directly or indirectly through this process—my parents and siblings, the Gainesville community, other business owners and authors, other conference speakers, and the inimitable DCB. I need to stop writing because by the time I run out of space here I’ll be thanking my Starbucks baristas.
The second edition is very similar to the first, so all of the acknowledgements above are still valid. But I’ve gotten help from a few new people this time around. My technical proofreaders have been Tate Peñaranda, Andy Swick, Mohamed Said, Samantha Geitz, and my new O’Reilly editor has been Alicia Young, who’s kept me on task through a lot of changes in my life and the Laravel community over the last year. Matt Hacker on the Atlas team answered all my stupid AsciiDoc formatting questions, including the surprisingly-difficult formatting for the __() method.
And I couldn’t have made it through the process of making a second edition without the help of my research assistant, Wilbur Powery. Wilbur was willing to sift through the last several years of changelogs and pull requests and announcements and match each feature up with the current structure of the book, and he even tested every single code example in the book in Laravel 5.7 so that I could focus my limited time and energy on writing the new and updated segments.
Also, my daughter Mia is out of her mama’s belly now. So, let’s just add her joy and energy and love and cuteness and adventurous spirit to my list of sources of inspiration.
In the early days of the dynamic web, writing a web application looked a lot different than it does today. Developers then were responsible for writing the code for not just the unique business logic of our applications, but also each of the components that are so common across sites—user authentication, input validation, database access, templating, and more.
Today, programmers have dozens of application development frameworks and thousands of components and libraries easily accessible. It’s a common refrain among programmers that, by the time you learn one framework, three newer (and purportedly better) frameworks have popped up intending to replace it.
“Just because it’s there” might be a valid justification for climbing a mountain, but there are better reasons to choose to use a specific framework—or to use a framework at all. It’s worth asking the question: why frameworks? More specifically, why Laravel?
It’s easy to see why it’s beneficial to use the individual components, or packages, that are available to PHP developers. With packages, someone else is responsible for developing and maintaining an isolated piece of code that has a well-defined job, and in theory that person has a deeper understanding of this single component than you have time to have.
Frameworks like Laravel—and Symfony, Lumen, and Slim—prepackage a collection of third-party components together with custom framework “glue” like configuration files, service providers, prescribed directory structures, and application bootstraps. So, the benefit of using a framework in general is that someone has made decisions not just about individual components for you, but also about how those components should fit together.
Let’s say you start a new web app without the benefit of a framework. Where do you begin? Well, it should probably route HTTP requests, so you now need to evaluate all of the HTTP request and response libraries available and pick one. Then you’ll have to pick a router. Oh, and you’ll probably need to set up some form of routes configuration file. What syntax should it use? Where should it go? What about controllers? Where do they live, and how are they loaded? Well, you probably need a dependency injection container to resolve the controllers and their dependencies. But which one?
Furthermore, what if you do take the time to answer all those questions and successfully create your application—what’s the impact on the next developer? What about when you have four such custom-framework–based applications, or a dozen, and you have to remember where the controllers live in each, or what the routing syntax is?
Frameworks address this issue by providing a carefully considered answer to the question “Which component should we use here?” and ensuring that the particular components chosen work well together. Additionally, frameworks provide conventions that reduce the amount of code a developer new to the project has to understand—if you understand how routing works in one Laravel project, for example, you understand how it works in all Laravel projects.
When someone prescribes rolling your own framework for each new project, what they’re really advocating is the ability to control what does and doesn’t go into your application’s foundation. That means the best frameworks will not only provide you with a solid foundation, but also give you the freedom to customize to your heart’s content. And this, as I’ll show you in the rest of this book, is part of what makes Laravel so special.
An important part of being able to answer the question “Why Laravel?” is understanding Laravel’s history—and understanding what came before it. Prior to Laravel’s rise in popularity, there were a variety of frameworks and other movements in PHP and other web development spaces.
David Heinemeier Hansson released the first version of Ruby on Rails in 2004, and it’s been hard to find a web application framework since then that hasn’t been influenced by Rails in some way.
Rails popularized MVC, RESTful JSON APIs, convention over configuration, ActiveRecord, and many more tools and conventions that had a profound influence on the way web developers approached their applications—especially with regard to rapid application development.
It was clear to most developers that Rails, and similar web application frameworks, were the wave of the future, and PHP frameworks, including those admittedly imitating Rails, starting popping up quickly.
CakePHP was the first in 2005, and it was soon followed by Symfony, CodeIgniter, Zend Framework, and Kohana (a CodeIgniter fork). Yii arrived in 2008, and Aura and Slim in 2010. 2011 brought FuelPHP and Laravel, both of which were not quite CodeIgniter offshoots, but instead proposed as alternatives.
Some of these frameworks were more Rails-y, focusing on database object-relational mappers (ORMs), MVC structures, and other tools targeting rapid development. Others, like Symfony and Zend, focused more on enterprise design patterns and ecommerce.
CakePHP and CodeIgniter were the two early PHP frameworks that were most open about how much their inspiration was drawn from Rails. CodeIgniter quickly rose to fame and by 2010 was arguably the most popular of the independent PHP frameworks.
CodeIgniter was simple, easy to use, and boasted amazing documentation and a strong community. But its use of modern technology and patterns advanced slowly, and as the framework world grew and PHP’s tooling advanced, CodeIgniter started falling behind in terms of both technological advances and out-of-the-box features. Unlike many other frameworks, CodeIgniter was managed by a company, and they were slow to catch up with PHP 5.3’s newer features like namespaces and the moves to GitHub and later Composer. It was in 2010 that Taylor Otwell, Laravel’s creator, became dissatisfied enough with CodeIgniter that he set off to write his own framework.
The first beta of Laravel 1 was released in June 2011, and it was written completely from scratch. It featured a custom ORM (Eloquent); closure-based routing (inspired by Ruby Sinatra); a module system for extension; and helpers for forms, validation, authentication, and more.
Early Laravel development moved quickly, and Laravel 2 and 3 were released in November 2011 and February 2012, respectively. They introduced controllers, unit testing, a command-line tool, an inversion of control (IoC) container, Eloquent relationships, and migrations.
With Laravel 4, Taylor rewrote the entire framework from the ground up. By this point Composer, PHP’s now-ubiquitous package manager, was showing signs of becoming an industry standard and Taylor saw the value of rewriting the framework as a collection of components, distributed and bundled together by Composer.
Taylor developed a set of components under the code name Illuminate and, in May 2013, released Laravel 4 with an entirely new structure. Instead of bundling the majority of its code as a download, Laravel now pulled in the majority of its components from Symfony (another framework that released its components for use by others) and the Illuminate components through Composer.
Laravel 4 also introduced queues, a mail component, facades, and database seeding. And because Laravel was now relying on Symfony components, it was announced that Laravel would be mirroring (not exactly, but soon after) the six-monthly release schedule Symfony follows.
Laravel 4.3 was scheduled to release in November 2014, but as development progressed, it became clear that the significance of its changes merited a major release, and Laravel 5 was released in February 2015.
Laravel 5 featured a revamped directory structure, removal of the form and HTML helpers, the introduction of the contract interfaces, a spate of new views, Socialite for social media authentication, Elixir for asset compilation, Scheduler to simplify cron, dotenv for simplified environment management, form requests, and a brand new REPL (read–evaluate–print loop). Since then it’s grown in features and maturity, but there have been no major changes like in previous versions.
So what is it that sets Laravel apart? Why is it worth having more than one PHP framework at any time? They all use components from Symfony anyway, right? Let’s talk a bit about what makes Laravel “tick.”
You only need to read through the Laravel marketing materials and READMEs to start seeing its values. Taylor uses light-related words like “Illuminate” and “Spark.” And then there are these: “Artisans.” “Elegant.” Also, these: “Breath of fresh air.” “Fresh start.” And finally: “Rapid.” “Warp speed.”
The two most strongly communicated values of the framework are to increase developer speed and developer happiness. Taylor has described the “Artisan” language as intentionally contrasting against more utilitarian values. You can see the genesis of this sort of thinking in his 2011 question on StackExchange in which he stated, “Sometimes I spend ridiculous amounts of time (hours) agonizing over making code look pretty”—just for the sake of a better experience of looking at the code itself. And he’s often talked about the value of making it easier and quicker for developers to take their ideas to fruition, getting rid of unnecessary barriers to creating great products.
Laravel is, at its core, about equipping and enabling developers. Its goal is to provide clear, simple, and beautiful code and features that help developers quickly learn, start, and develop, and write code that’s simple, clear, and will last.
The concept of targeting developers is clear across Laravel materials. “Happy developers make the best code” is written in the documentation. “Developer happiness from download to deploy” was the unofficial slogan for a while. Of course, any tool or framework will say it wants developers to be happy. But having developer happiness as a primary concern, rather than secondary, has had a huge impact on Laravel’s style and decision-making progress. Where other frameworks may target architectural purity as their primary goal, or compatibility with the goals and values of enterprise development teams, Laravel’s primary focus is on serving the individual developer. That doesn’t mean you can’t write architecturally pure or enterprise-ready applications in Laravel, but it won’t have to be at the expense of the readability and comprehensibility of your codebase.
Just saying you want to make developers happy is one thing. Doing it is another, and it requires you to question what in a framework is most likely to make developers unhappy and what is most likely to make them happy. There are a few ways Laravel tries to make developers’ lives easier.
First, Laravel is a rapid application development framework. That means it focuses on a shallow (easy) learning curve and on minimizing the steps between starting a new app and publishing it. All of the most common tasks in building web applications, from database interactions to authentication to queues to email to caching, are made simpler by the components Laravel provides. But Laravel’s components aren’t just great on their own; they provide a consistent API and predictable structures across the entire framework. That means that, when you’re trying something new in Laravel, you’re more than likely going to end up saying, “… and it just works.”
This doesn’t end at the framework itself, either. Laravel provides an entire ecosystem of tools for building and launching applications. You have Homestead and Valet for local development, Forge for server management, and Envoyer for advanced deployment. And there’s a suite of add-on packages: Cashier for payments and subscriptions, Echo for WebSockets, Scout for search, Passport for API authentication, Dusk for frontend testing, Socialite for social login, Horizon for monitoring queues, Nova for building admin panels, and Spark to bootstrap your SaaS. Laravel is trying to take the repetitive work out of developers’ jobs so they can do something unique.
Next, Laravel focuses on “convention over configuration”—meaning that if you’re willing to use Laravel’s defaults, you’ll have to do much less work than with other frameworks that require you to declare all of your settings even if you’re using the recommended configuration. Projects built on Laravel take less time than those built on most other PHP frameworks.
Laravel also focuses deeply on simplicity. It’s possible to use dependency injection and mocking and the Data Mapper pattern and repositories and Command Query Responsibility Segregation and all sorts of other more complex architectural patterns with Laravel, if you want. But while other frameworks might suggest using those tools and structures on every project, Laravel and its documentation and community lean toward starting with the simplest possible implementation—a global function here, a facade there, ActiveRecord over there. This allows developers to create the simplest possible application to solve for their needs, without limiting its usefulness in complex environments.
An interesting source of how Laravel is different from other PHP frameworks is that its creator and its community are more connected to and inspired by Ruby and Rails and functional programming languages than by Java. There’s a strong current in modern PHP to lean toward verbosity and complexity, embracing the more Java-esque aspects of PHP. But Laravel tends to be on the other side, embracing expressive, dynamic, and simple coding practices and language features.
If this book is your first exposure to the Laravel community, you have something special to look forward to. One of the distinguishing elements of Laravel, which has contributed to its growth and success, is the welcoming, teaching community that surrounds it. From Jeffrey Way’s Laracasts video tutorials to Laravel News to Slack and IRC and Discord channels, from Twitter friends to bloggers to podcasts to the Laracon conferences, Laravel has a rich and vibrant community full of folks who’ve been around since day one and folks who are just starting their own “day one.” And this isn’t an accident:
From the very beginning of Laravel, I’ve had this idea that all people want to feel like they are part of something. It’s a natural human instinct to want to belong and be accepted into a group of other like-minded people. So, by injecting personality into a web framework and being really active with the community, that type of feeling can grow in the community.
Taylor Otwell, Product and Support interview
Taylor understood from the early days of Laravel that a successful open source project needed two things: good documentation and a welcoming community. And those two things are now hallmarks of Laravel.
Up until now, everything I’ve shared here has been entirely abstract. What about the code, you ask? Let’s dig into a simple application (Example 1-1) so you can see what working with Laravel day-to-day is actually like.
<?phpRoute::get('/',function(){return'Hello, World!';});
The simplest possible action you can take in a Laravel application is to define a route and return a result any time someone visits that route. If you initialize a brand new Laravel application on your machine, define the route in Example 1-1, and then serve the site from the public directory, you’ll have a fully functioning “Hello, World” example (see Figure 1-1).
It looks very similar with controllers, as you can see in Example 1-2.
// File: routes/web.php<?phpRoute::get('/','WelcomeController@index');
// File: app/Http/Controllers/WelcomeController.php<?phpnamespaceApp\Http\Controllers;classWelcomeControllerextendsController{publicfunctionindex(){return'Hello, World!';}}
And if we’re storing our greetings in the database, it’ll also look pretty similar (see Example 1-3).
// File: routes/web.php<?phpuseApp\Greeting;Route::get('create-greeting',function(){$greeting=newGreeting;$greeting->body='Hello, World!';$greeting->save();});Route::get('first-greeting',function(){returnGreeting::first()->body;});
// File: app/Greeting.php<?phpnamespaceApp;useIlluminate\Database\Eloquent\Model;classGreetingextendsModel{//}
// File: database/migrations/2015_07_19_010000_create_greetings_table.php<?phpuseIlluminate\Database\Schema\Blueprint;useIlluminate\Database\Migrations\Migration;classCreateGreetingsTableextendsMigration{publicfunctionup(){Schema::create('greetings',function(Blueprint$table){$table->increments('id');$table->string('body');$table->timestamps();});}publicfunctiondown(){Schema::dropIfExists('greetings');}}
Example 1-3 might be a bit overwhelming, and if so, just skip over it. You’ll learn about everything that’s happening here in later chapters, but you can already see that with just a few lines of code, we’ve set up database migrations and models and pulled records out. It’s just that simple.
So—why Laravel?
Because Laravel helps you bring your ideas to reality with no wasted code, using modern coding standards, surrounded by a vibrant community, with an empowering ecosystem of tools.
And because you, dear developer, deserve to be happy.
Part of PHP’s success has been because it’s hard to find a web server that can’t serve PHP. However, modern PHP tools have stricter requirements than those of the past. The best way to develop for Laravel is to ensure a consistent local and remote server environment for your code, and thankfully, the Laravel ecosystem has a few tools for this.
Everything we’ll cover in this chapter is possible with Windows machines, but you’ll need dozens of pages of custom instructions and caveats. I’ll leave those instructions and caveats to actual Windows users, so the examples here and in the rest of the book will focus on Unix/Linux/macOS developers.
Whether you choose to serve your website by installing PHP and other tools on your local machine, serve your development environment from a virtual machine via Vagrant or Docker, or rely on a tool like MAMP/WAMP/XAMPP, your development environment will need to have all of the following installed in order to serve Laravel sites:
PHP >= 7.1.3 for Laravel versions 5.6 and 5.7, PHP >= 7.0.0 for version 5.5, PHP >= 5.6.4 for version 5.4, PHP between 5.6.4 and 7.1.* for version 5.3 and PHP >= 5.5.9 for versions 5.2 and 5.1
OpenSSL PHP extension
PDO PHP extension
Mbstring PHP extension
Tokenizer PHP extension
XML PHP Extension (Laravel 5.3 and higher)
Ctype PHP Extension (Laravel 5.6 and higher)
JSON PHP Extension (Laravel 5.6 and higher)
Whatever machine you’re developing on will need to have Composer installed globally. If you’re not familiar with Composer, it’s a tool that’s at the foundation of most modern PHP development. Composer is a dependency manager for PHP, much like NPM for Node or RubyGems for Ruby. But like NPM, Composer is also the foundation of much of our testing, local script loading, installation scripts, and much more. You’ll need Composer to install Laravel, update Laravel, and bring in external dependencies.
For many projects, hosting your development environment using a simpler tool set will be enough. If you already have MAMP or WAMP or XAMPP installed on your system, that will likely be fine to run Laravel. You can also just run Laravel with PHP’s built-in web server, assuming your system PHP is the right version.
All you really need to get started is the ability to run PHP. Everything past that is up to you.
However, Laravel offers two tools for local development, Valet and Homestead, and we’ll cover both briefly. If you’re unsure of which to use, I’d recommend using Valet and just becoming briefly familiar with Homestead; however, both tools are valuable and worth understanding.
If you want to use PHP’s built-in web server, your simplest option is to serve every site from a localhost URL. If you run php -S localhost:8000 -t public from your Laravel site’s root folder, PHP’s built-in web server will serve your site at http://localhost:8000/. You can also run php artisan serve once you have your application set up to easily spin up an equivalent server.
But if you’re interested in tying each of your sites to a specific development domain, you’ll need to get comfortable with your operating system’s hosts file and use a tool like dnsmasq. Let’s instead try something simpler.
If you’re a Mac user (there are also unofficial forks for Windows and Linux), Laravel Valet takes away the need to connect your domains to your application folders. Valet installs dnsmasq and a series of PHP scripts that make it possible to type laravel new myapp && open myapp.test and for it to just work. You’ll need to install a few tools using Homebrew, which the documentation will walk you through, but the steps from initial installation to serving your apps are few and simple.
Install Valet (see the docs for the latest installation instructions), and point it at one or more directories where your sites will live. I ran valet park from my ~/Sites directory, which is where I put all of my under-development apps. Now, you can just add .test to the end of the directory name and visit it in your browser.
Valet makes it easy to serve all folders in a given folder as “FOLDERNAME.test” using valet park, to serve just a single folder using valet link, to open the Valet-served domain for a folder using valet open, to serve the Valet site with HTTPS using valet secure, and to open an ngrok tunnel so you can share your site with others with valet share.
Homestead is another tool you might want to use to set up your local development environment. It’s a configuration tool that sits on top of Vagrant (which is a tool for managing for virtual machines) and provides a pre-configured virtual machine image that is perfectly set up for Laravel development, and mirrors the most common production environment that many Laravel sites run on. Homestead is also likely the best local development environment for developers running Windows machines.
The Homestead docs are robust and kept constantly up-to-date, so I’ll just refer you to them if you want to learn how it works and how to get it set up.
It’s not an official Laravel project, but Chris Fidao of Servers for Hackers and Shipping Docker created a simple tool for creating Docker environments for Laravel development called Vessel. Take a look at the Vessel documentation to learn more.
There are two ways to create a new Laravel project, but both are run from the command line. The first option is to globally install the Laravel installer tool (using Composer); the second is to use Composer’s create-project feature.
You can learn about both options in greater detail on the Installation documentation page, but I’d recommend the Laravel installer tool.
If you have Composer installed globally, installing the Laravel installer tool is as simple as running the following command:
composer global require "laravel/installer"
Once you have the Laravel installer tool installed, spinning up a new Laravel project is simple. Just run this command from your command line:
laravel new projectName
This will create a new subdirectory of your current directory named projectName and install a bare Laravel project in it.
Composer also offers a feature called create-project for creating new projects with a particular skeleton. To use this tool to create a new Laravel project, issue the following command:
composer create-project laravel/laravel projectName
Just like the installer tool, this will create a subdirectory of your current directory named projectName that contains a skeleton Laravel install, ready for you to develop.
Because I often take the same series of steps after creating a new Laravel project, I made a simple script called Lambo that automates those steps every time I create a new project.
Lambo runs laravel new, and then commits your code to Git, sets up your .env credentials with reasonable defaults, opens the project in a browser, and (optionally) opens it in your editor and takes a few other helpful build steps.
You can install Lambo using Composer’s global require:
composer global require tightenco/lambo
And you can use it just like laravel new:
cd Sites
lambo my-new-projectWhen you open up a directory that contains a skeleton Laravel application, you’ll see the following files and directories:
app/ bootstrap/ config/ database/ public/ resources/ routes/ storage/ tests/ vendor/ .editorconfig .env .env.example .gitattributes .gitignore artisan composer.json composer.lock package.json phpunit.xml readme.md server.php webpack.mix.js
In projects created prior to Laravel 5.4, you’ll likely see a gulpfile.js instead of webpack.mix.js; this shows the project is running Laravel Elixir instead of Laravel Mix.
Let’s walk through them one by one to get familiar.
The root directory contains the following folders by default:
app is where the bulk of your actual application will go. Models, controllers, commands, and your PHP domain code all go in here.
bootstrap contains the files that the Laravel framework uses to boot every time it runs.
config is where all the configuration files live.
database is where database migrations, seeds, and factories live.
public is the directory the server points to when it’s serving the website. This contains index.php, which is the front controller that kicks off the bootstrapping process and routes all requests appropriately. It’s also where any public-facing files like images, stylesheets, scripts, or downloads go.
resources is where files that are needed for other scripts live. Views, language files, and (optionally) Sass/Less/source CSS and source JavaScript files live here.
routes is where all of the route definitions live, both for HTTP routes and “console routes,” or Artisan commands.
storage is where caches, logs, and compiled system files live.
tests is where unit and integration tests live.
vendor is where Composer installs its dependencies. It’s Git-ignored (marked to be excluded from your version control system), as Composer is expected to run as a part of your deploy process on any remote servers.
The root directory also contains the following files:
.editorconfig gives your IDE/text editor instructions about Laravel’s coding standars (e.g. the size of indents, the charset, and whether to trim trailing whitespace). You’ll see in this in all versions of Laravel but only in projects created more recently.
.env and .env.example are the files that dictate the environment variables (variables that are expected to be different in each environment and are therefore not committed to version control). .env.example is a template that each environment should duplicate to create its own .env file, which is Git-ignored.
.gitignore and .gitattributes are Git configuration files.
artisan is the file that allows you to run Artisan commands (see Chapter 8) from the command line.
composer.json and composer.lock are the configuration files for Composer; composer.json is user-editable and composer.lock is not. These files share some basic information about this project and also define its PHP dependencies.
package.json is like composer.json but for frontend assets and dependencies of the build system; it instructs NPM on which JavaScript-based dependencies to pull in.
phpunit.xml is a configuration file for PHPUnit, the tool Laravel uses for testing out of the box.
readme.md is a Markdown file giving a basic introduction to Laravel. You won’t see this file if you use the Laravel installer.
server.php is a backup server that tries to allow less-capable servers to still preview the Laravel application.
webpack.mix.js or gulpfile.js is the (optional) configuration file for Mix (webpack.mix.js) or Elixir (gulpfile.js). These files are for giving your build system directions on how to compile and process your frontend assets.
The core settings of your Laravel application—database connection, queue and mail settings, etc.—live in files in the config folder. Each of these files returns a PHP array, and each value in the array will be accessible by a config key that is comprised of the filename and all descendant keys, separated by dots (.)
So, if you create a file at config/services.php that looks like this:
<?phpreturn['sparkpost'=>['secret'=>'abcdefg',],];
You will now have access to that config variable using config('services.sparkpost.secret').
Any configuration variables that should be distinct for each environment (and therefore not committed to source control) will instead live in your .env files. Let’s say you want to use a different Bugsnag API key for each environment. You’d set the config file to pull it from .env:
// config/services.php<?phpreturn['bugsnag'=>['api_key'=>env('BUGSNAG_API_KEY'),],];
This env() helper function pulls a value from your .env file with that same key. So now, add that key to your .env (settings for this environment) and .env.example (template for all environments) files:
# In .env BUGSNAG_API_KEY=oinfp9813410942
# In .env.example BUGSNAG_API_KEY=
Your .env file already contains quite a few environment-specific variables needed by the framework, like which mail driver you’ll be using and what your basic database settings are.
Certain features in Laravel, including some caching and optimization features, aren’t available if you use env() calls anywhere outside of config files.
The best way to pull in environment variables is to set up config items for anything you want to be environment-specific. Have those config items read the environment variables, and then reference the config variables anywhere within your app:
// config/services.phpreturn['bugsnag'=>['key'=>env('BUGSNAG_API_KEY')]];// in controller, or whatever$bugsnag=newBugsnag(config('services.bugsnag.key'));
Let’s take a quick look at the default contents of the .env file. The exact keys will vary depending on which version of Laravel you’re using, but take a look at Example 2-1 to see what they look like in 5.7.
APP_NAME=LaravelAPP_ENV=localAPP_KEY=APP_DEBUG=trueAPP_URL=http://localhostLOG_CHANNEL=stackDB_CONNECTION=mysqlDB_HOST=127.0.0.1DB_PORT=3306DB_DATABASE=homesteadDB_USERNAME=homesteadDB_PASSWORD=secretBROADCAST_DRIVER=logCACHE_DRIVER=fileQUEUE_CONNECTION=syncSESSION_DRIVER=fileSESSION_LIFETIME=120REDIS_HOST=127.0.0.1REDIS_PASSWORD=nullREDIS_PORT=6379MAIL_DRIVER=smtpMAIL_HOST=smtp.mailtrap.ioMAIL_PORT=2525MAIL_USERNAME=nullMAIL_PASSWORD=nullMAIL_ENCRYPTION=nullPUSHER_APP_ID=PUSHER_APP_KEY=PUSHER_APP_SECRET=PUSHER_APP_CLUSTER=mt1MIX_PUSHER_APP_KEY="${PUSHER_APP_KEY}"MIX_PUSHER_APP_CLUSTER="${PUSHER_APP_CLUSTER}"
I won’t go into all of them, because quite a few (Pusher, Redis, DB, Mail) are just groups of authentication information for various services. Here are two important environment variables you should know, though:
APP_KEY is a randomly-generated string that’s used to encrypt data. If this is ever empty, you may run into the error “No application encryption key has been specified”. If so, just run php artisan key:generate and Laravel will generate one for you.
APP_DEBUG is a boolean determining whether the users of this instance of your application should see debug errors. Great for local and staging; terrible for production.
The rest of the non-authentication settings (BROADCAST_DRIVER, QUEUE_CONNECTION, etc.) are given default values that work with as little reliance on external services as possible, which is perfect for when you’re getting started.
When you start your first Laravel app, the only change you’ll likely want to make on most projects is to the database configuration settings. Since I use Laravel Valet, I change DB_DATABASE to the name of my project, DB_USERNAME to root, and DB_PASSWORD to an empty string. And then, I go create a database with the same name as my project in my favorite MySQL client. Ready to go.
DB_DATABASE=myProject DB_USERNAME=root DB_PASSWORD=
You’re now up and running with a bare Laravel install. Run git init, commit the bare files with git add . and git commit, and you’re ready to start coding. That’s it! And if you’re using Valet, you can run the following commands and instantly see your site live in your browser:
laravel new myProject && cd myProject && valet open
Every time I start a new project, these are the steps I take:
laravel new myProject cd myProject git init git add . git commit -m "Initial commit"
I keep all of my sites in a ~/Sites folder, which I have set up as my primary Valet directory, so in this case I’d instantly have myProject.test accessible in my browser with no added work. I can edit .env and point it to a particular database, add that database in my MySQL app, and I’m ready to start coding. And remember, if you use Lambo, all of these steps are already taken for you.
In every chapter after this, the “Testing” section at the end of the chapter will show you how to write tests for the feature or features that were covered. Since this chapter doesn’t cover a testable feature, let’s talk tests quickly. (To learn more about writing and running tests in Laravel, head over to Chapter 12.)
Out of the box, Laravel brings in PHPUnit as a dependency and is configured to run the tests in any file in the tests directory whose name ends with Test.php (for example, tests/UserTest.php).
So, the simplest way to write tests is to create a file in the tests directory with a name that ends with Test.php. And the easiest way to run them is to run ./vendor/bin/phpunit from the command line (in the project root).
If any tests require database access, be sure to run your tests from the machine where your database is hosted—so if you’re hosting your database in Vagrant, make sure to ssh into your Vagrant box to run your tests from there. Again, you can learn about this and much more in Chapter 12.
Also, some of the testing sections will use testing syntax and features that you will not be familiar with yet if you’re just reading the book for the first time. If code in any of the testings section is confusing, just skip it and come back to it after you’ve had a chance to read the testing chapter.
Since Laravel is a PHP framework, it’s very simple to serve it locally. Laravel also provides two tools for managing your local development: a simpler tool called Valet that uses your local machine to provide your dependencies, and a preconfigured Vagrant setup named Homestead. Laravel relies on, and can be installed by, Composer, and comes out of the box with a series of folders and files that reflect both its conventions and its relationship with other open source tools.
The essential function of any web application framework is to take requests from a user and deliver responses, usually via HTTP(S). This means defining an application’s routes is the first and most important project to tackle when learning a web framework; without routes, you have little to no ability to interact with the end user.
In this chapter we will examine routes in Laravel and show how to define them, how to point them to the code they should execute, and how to use Laravel’s routing tools to handle a diverse array of routing needs.
Most of what we’ll talk about in this chapter references how MVC (Model-View-Controller) applications are structured, and many of the examples we’ll be looking at use REST-ish route names and verbs, so let’s take a quick look at both.
In MVC, you have three primary concepts: Model, View, and Controller.
The model represents an individual database table (or a record from that table)--think “Company” or “Dog”.
The view represents the template that outputs your data to the end user—think “the login page template with this given set of HTML and CSS and JavaScript”.
The controller is like a traffic cop, taking HTTP requests from the browser, getting the right data out of the database and other storage mechanisms, validating user input, and eventually sending a response back to the user.
In Figure 3-1, you can see that our end user will first interact with the controller by sending an HTTP request using their browser. The controller, in response to that request, may write data to and/or pull data from the model (database). The controller will then likely send data to a view, and then the view will be returned to the end user to display in their browser.
We’ll cover some use cases for Laravel that don’t fit this relatively simplistic way of looking at application architecture, so don’t get hung up on MVC, but this will at least get you ready to approach the rest of this chapter as we talk about views and controllers.
The most common HTTP verbs are GET and POST, followed by PUT and DELETE. There’s also HEAD, OPTIONS, PATCH, and two others that are pretty much never used in normal web development, TRACE and CONNECT.
Here’s the quick rundown:
GET requests a resource (or a list of resources)
HEAD asks for a headers-only version of the GET
POST creates a resource
PUT overwrites a resource
PATCH modifies a resource
DELETE deletes a resource
OPTIONS asks the server which verbs are allowed at this URL
In Table 3-1 you can see a diagram generated by Laravel to show the actions available on a “resource controller” (more on that in “Resource Controllers”). Each action expects you to call a specific URL pattern using a specific verb, so you can get a sense for what each verb is used for.
| Verb | URL | Controller method | Name | Description |
|---|---|---|---|---|
|
|
|
|
Show all tasks |
|
|
|
|
Show the create task form |
|
|
|
|
Accept form submission from the create task form |
|
|
|
|
Show one task |
|
|
|
|
Edit one task |
|
|
|
|
Accept form submission from the edit task form |
|
|
|
|
Delete one task |
We’ll cover REST in greater detail in “The Basics of REST-Like JSON APIs”, but as a brief introduction, it’s an architectural sstyle for building APIs. When we talk about REST in this book we’ll mainly be referencing a few characteristics:
Structured around one primary resource at a time (e.g. tasks)
Consisting of interactions using HTTP verbs to predictable URL structures (as seen in Table 3-1)
Returning JSON and often requested with JSON
There’s more to it, but usually “RESTful” as it’ll be used in this book will mean “patterned after these URL-based structures so we can predict to make calls like GET /tasks/14/edit for the edit page”. This is relevant because much of Laravel’s routing structures are based around a REST-like structure, even when not building APIs—as you can see in Table 3-1.
REST-based APIs follow mainly this same structure , except they don’t have a create route or an edit route, since APIs just represent actions, not pages the prep for the actions.
In a Laravel application, you will define your “web” routes in routes/web.php and your “API” routes in routes/api.php. Web routes are those that will be visited by your end users; API routes are those for your API, if you have one. For now, we’ll primarily focus on the routes in routes/web.php.
In projects running versions of Laravel prior to 5.3, there will be only one routes file, located at app/Http/routes.php.
The simplest way to define a route is to match a path (e.g., /) with a closure, as seen in Example 3-1.
// routes/web.phpRoute::get('/',function(){return'Hello, World!';});
You’ve now defined that, if anyone visits / (the root of your domain), Laravel’s router should run the closure defined there and return the result. Note that we return our content and don’t echo or print it.
You might be wondering, “Why am I returning ‘Hello, World!’ instead of echoing it?”
There are quite a few answers, but the simplest is that there are a lot of wrappers around Laravel’s request and response cycle, including something called middleware. When your route closure or controller method is done, it’s not time to send the output to the browser yet; returning the content allows it to continue flowing through the response stack and the middleware before it is returned back to the user.
Many simple websites could be defined entirely within the web routes file. With a few simple GET routes combined with some templates as illustrated in Example 3-2, you can can serve a classic website easily.
Route::get('/',function(){returnview('welcome');});Route::get('about',function(){returnview('about');});Route::get('products',function(){returnview('products');});Route::get('services',function(){returnview('services');});
If you have much experience developing PHP, you might be surprised to see static calls on the Route class. This is not actually a static method per se, but rather service location using Laravel’s facades, which we’ll cover in Chapter 11.
If you prefer to avoid facades, you can accomplish these same definitions like this:
$router->get('/',function(){return'Hello, World!';});
You might’ve noticed that we’ve been using Route::get in our route definitions. This means we’re telling Laravel to only match for these routes when the HTTP request uses the GET action. But what if it’s a form POST, or maybe some JavaScript sending PUT or DELETE requests? There are a few other options for methods to call on a route definition, as illustrated in Example 3-3.
Route::get('/',function(){return'Hello, World!';});Route::post('/',function(){// Handle someone sending a POST request to this route});Route::put('/',function(){// Handle someone sending a PUT request to this route});Route::delete('/',function(){// Handle someone sending a DELETE request to this route});Route::any('/',function(){// Handle any verb request to this route});Route::match(['get','post'],'/',function(){// Handle GET or POST requests to this route});
As you’ve probably guessed, passing a closure to the route definition is not the only way to teach it how to resolve a route. Closures are quick and simple, but the larger your application gets, the clumsier it becomes to put all of your routing logic in one file. Additionally, applications using route closures can’t take advantage of Laravel’s route caching (more on that later), which can shave up to hundreds of milliseconds off of each request.
The other common option is to pass a controller name and method as a string in place of the closure, as in Example 3-4.
Route::get('/','WelcomeController@index');
This is telling Laravel to pass requests to that path to the index() method of the App\Http\Controllers\WelcomeController controller. This method will be passed the same parameters and treated the same way as a closure you might’ve alternatively put in its place.
If the route you’re defining has parameters—segments in the URL structure that are variable—it’s simple to define them in your route and pass them to your closure (see Example 3-5).
Route::get('users/{id}/friends',function($id){//});
You can also make your route parameters optional by including a question mark (?) after the parameter name, as illustrated in Example 3-6. In this case, you should also provide a default value for the route’s corresponding variable.
Route::get('users/{id?}',function($id='fallbackId'){//});
And you can use regular expressions (regexes) to define that a route should only match if a parameter meets particular requirements, as in Example 3-7.
g]
Route::get('users/{id}', function ($id) {
//
})->where('id', '[0-9]+');
Route::get('users/{username}', function ($username) {
//
})->where('username', '[A-Za-z]+');
Route::get('posts/{id}/{slug}', function ($id, $slug) {
//
})->where(['id' => '[0-9]+', 'slug' => '[A-Za-z]+']);As you’ve probably guessed, if you visit a path that matches a route string, but the regex doesn’t match the parameter, it won’t be matched. Since routes are matched top to bottom, users/abc would skip the first closure in Example 3-7, but it would be matched by the second closure, so it would get routed there. On the other hand, posts/abc/123 wouldn’t match any of the closures, so it would return a 404 Not Found error.
The simplest way to refer to these routes elsewhere in your application is just by their path. There’s a url() global helper to simplify that linking in your views, if you need it; see Example 3-8 for an example. The helper will prefix your route with the full domain of your site.
<ahref="<?php echo url('/'); ?>">// outputs <a href="http://myapp.com/">
However, Laravel also allows you to name each route, which enables you to refer to it without explicitly referencing the URL. This is helpful because it means you can give simple nicknames to complex routes, and also because linking them by name means you don’t have to rewrite your frontend links if the paths change (see Example 3-9).
// Defining a route with name() in routes/web.php:Route::get('members/{id}','MembersController@show')->name('members.show');// Linking the route in a view using the route() helper<ahref="<?php echo route('members.show', ['id' => 14]); ?>">
This example illustrates a few new concepts. First, we’re using fluent route definition to add the name, by chaining the name() method after the get() method. This method allows us to name the route, giving it a short alias to make it easier to reference elsewhere.
Fluent route definitions don’t exist in Laravel 5.1. You’ll need to instead pass an array to the second parameter of your route definition; check the Laravel docs to see more about how this works. Here’s Example 3-9 in Laravel 5.1:
Route::get('members/{id}',['as'=>'members.show','uses'=>'MembersController@show',]);
In our example, we’ve named this route members.show; resourcePlural.action is a common convention within Laravel for route and view names.
We also introduced the route() helper. Just like url(), it’s intended to be used in views to simplify linking to a named route. If the route has no parameters, you can simply pass the route name: (route('members.index')) and receive a route string (http://myapp.com/members). If it has parameters, pass them in as an array as the second parameter like we did in this example.
In general, I recommend using route names instead of paths to refer to your routes, and therefore using the route() helper instead of the url() helper. Sometimes it can get a bit clumsy—for example, if you’re working with multiple subdomains—but it provides an incredible level of flexibility to later change the application’s routing structure without major penalty.
Often a group of routes share a particular characteristic—a certain authentication requirement, a path prefix, or perhaps a controller namespace. Defining these shared characteristics again and again on each route not only seems tedious but also can muddy up the shape of your routes file and obscure some of the structures of your application.
Route groups allow you to group several routes together, and apply any shared configuration settings once to the entire group, to reduce this duplication. Additionally, route groups are visual cues to future developers (and to your own brain) that these routes are grouped together.
To group two or more routes together, you “surround” the route definitions with a route group, as shown in Example 3-10. In reality, you’re actually passing a closure to the group definition, and defining the grouped routes within that closure.
Route::group(function(){Route::get('hello',function(){return'Hello';});Route::get('world',function(){return'World';});});
By default, a route group doesn’t actually do anything. There’s no difference between the group in Example 3-10 and separating a segment of your routes with code comments.
Probably the most common use for route groups is to apply middleware to a group of routes. You’ll learn more about middleware in Chapter 10, but, among other things, they’re what Laravel uses for authenticating users and restricting guest users from using certain parts of a site.
In Example 3-11, we’re creating a route group around the dashboard and account views and applying the auth middleware to both. In this example, it means users have to be logged in to the application to view the dashboard or the account page.
Route::middleware('auth')->group(function(){Route::get('dashboard',function(){returnview('dashboard');});Route::get('account',function(){returnview('account');});});
Just like fluent route definition didn’t exist in Laravel prior to 5.2, applying modifiers like middleware, prefixes, domains, and more fluently to route groups wasn’t possible prior to 5.4.
Here’s Example Example 3-11 in Laravel 5.3 and prior:
Route::group(['middleware'=>'auth'],function(){Route::get('dashboard',function(){returnview('dashboard');});Route::get('account',function(){returnview('account');});});
Often it’s clearer and more direct to attach middleware to your routes in the controller instead of at the route definition. You can do this by calling the middleware() method in the constructor of your controller. The string you pass to the middleware() method is the name of the middleware, and you can optionally chain modifier methods (only() and except()) to define which methods will receive that middleware:
classDashboardControllerextendsController{publicfunction__construct(){$this->middleware('auth');$this->middleware('admin-auth')->only('editUsers');$this->middleware('team-member')->except('editUsers');}}
Note that, if you’re doing a lot of “only” and “except” customizations, that’s often a sign that you should break out a new controller for the exceptional routes.
If you need to limit users to only access any give route(s) a certain number of times in a given time frame (called rate limiting, and most common with APIs), there’s an out-of-the-box middleware for that. Apply the throttle middleware, which takes two parameters: the first is the number of tries a user is permitted and the second is the number of minutes to wait before resetting the attempt count.
Route::middleware('auth:api','throttle:60,1')->group(function(){Route::get('/profile',function(){//});});
If you’d like to differentiate one user’s rate limit from anothers, you can instruct the throttle middleware to pull the “tries” count (its first parameter) from the user’s Eloquent model. Instead of passing a “tries” count to the first parameter of throttle, instead pass the name of an attribute on the Eloquent model, and that attribute will be used to calculate whether the user has passed their rate limit.
So, if your user model has a plan_rate_limit attribute on it, then you could use the middleware with throttle:plan_rate_limit,1.
If you have a group of routes that share a segment of their path—for example, if your site’s dashboard is prefixed with /dashboard—you can use route groups to simplify this structure (see Example 3-13).
Route::prefix('dashboard')->group(function(){Route::get('/',function(){// Handles the path /dashboard});Route::get('users',function(){// Handles the path /dashboard/users});});
Note that each prefixed group also has a / route that represents the root of the prefix—in Example 3-13 that’s /dashboard.
In Laravel prior to 5.6, you could define a “fallback route” (which you need to define at the end of your routes file) to catch all un-matched paths:
Route::any('{anything}','CatchAllController')->where('anything','*');
In Laravel 5.6+, you can use the Route::fallback() method instead:
Route::fallback(function(){//});
Subdomain routing is the same as route prefixing, but it’s scoped by subdomain instead of route prefix. There are two primary uses for this. First, you may want to present different sections of the application (or entirely different applications) to different subdomains. Example 3-14 shows how you can achieve this.
Route::domain('api.myapp.com')->group(function(){Route::get('/',function(){//});});
Second, you might want to set part of the subdomain as a parameter, as illustrated in Example 3-15. This is most often done in cases of multitenancy (think Slack or Harvest, where each company gets its own subdomain, like tighten.slack.co).
Route::domain('{account}.myapp.com')->group(function(){Route::get('/',function($account){//});Route::get('users/{id}',function($account,$id){//});});
Note that any parameters for the group get passed into the grouped routes’ methods as the first parameter(s).
When you’re grouping routes by subdomain or route prefix, it’s likely their controllers have a similar PHP namespace. In the dashboard example, all of the dashboard routes’ controllers might be under an Dashboard namespace. By using the route group namespace prefix, as shown in Example 3-16, you can avoid long controller references in groups like "Dashboard/UsersController@index" and "Dashboard/PurchasesController@index".
// App\Http\Controllers\UsersControllerRoute::get('/','UsersController@index');Route::namespace('Dashboard')->group(function(){// App\Http\Controllers\Dashboard\PurchasesControllerRoute::get('dashboard/purchases','PurchasesController@index');});
The prefixes don’t stop there. It’s common that route names will reflect the inheritance chain of path elements, so users/comments/5 will be served by a route named users.comments.show. In this case, it’s common to use a route group around all of the routes that are beneath the users.comments resource.
Just like we can prefix URL segments and controller namespaces, we can also prefix strings to the route name. With route group name prefixes, we can define that every route within this group should have a given string prefixed to its name. In this context, we’re prefixing "users. to each route name, then "comments." (see Example 3-17).
Route::name('users.')->prefix('users')->group(function(){Route::name('comments.')->prefix('comments')->group(function(){Route::get('{id}',function(){})->name('show');});});
Many applications regularly send notifications about one-off actions (resetting a password, accepting an invitation, etc.) and provide simple links to take those actions. Let’s imagine sending an email confirming the recipient was willing to be added to a mailing list.
There are three ways to send that link:
Make that URL public and hope no one else discovers the approval URL or modifies their own approval URL to approve someone else.
Put the action behind authentication, link to the action, and require the user to log in if they’re not logged in yet (which, in this case, may be impossible, as many mailing list recipients likely won’t be users).
“Sign” the link so that it uniquely proves that the user received the link from your email, without them having to log in; something like http://myapp.com/invitations/5816/yes?signature=030ab0ef6a8237bd86a8b8.
Laravel 5.6.12 introduced a featured called “Signed URLs”, which make it simple to build a signature-authentication system for sending out authenticated links. These links are the normal route link, with a “signature” appended that proves that the URL has not been changed since it was sent (and therefore that no one has modified the URL to access someone else’s information).
In order to build a signed URL to access a given route, the route must have a name:
Route::get('invitations/{invitation}/{answer}','InvitationController')->name('invitations');
To generate a normal link to this route, you would use the route() helper, as we’ve already covered, but you could also use the URL facade to do the same thing: URL::route('invitations', ['invitation' => 12345, 'answer' => 'yes']). To generate a signed link to this route, simply use the signedRoute() method instead. And if you want to generate a signed route with an expiration, used temporarySignedRoute():
// Generate normal linkURL::route('invitations',['invitation'=>12345,'answer'=>'yes']);// Generate a signed linkURL::signedRoute('invitations',['invitation'=>12345,'answer'=>'yes']);// Generate an expiring (temporary) signed linkURL::temporarySignedRoute('invitations',now()->addHours(4),['invitation'=>12345,'answer'=>'yes']);
Since version 5.5 Laravel has offered a now() helper that’s the equivalent of Carbon::now(); it returns a Carbon object representative of today, right at this second. If you’re working with Laravel prior to 5.5, you can replace any instance of now() in this book with Carbon::now().
Carbon, if you’re not familiar with it, is a datetime library that’s included with Laravel.
Now that we’ve generated a link to our signed route, we need to protect against any non-signed access. The easiest option is to apply the signed middleware (which, if it’s not in your $routeMiddleware array in app/Http/Kernel.php, should be, backed by Illuminate\Routing\Middleware\ValidateSignature).
Route::get('invitations/{invitation}/{answer}','InvitationController')->name('invitations')->middleware('signed');
If you’d prefer, you can manually validate using the hasValidSignature() method on the request object instead of using the signed middleware:
classInvitationController{publicfunction__invoke(Invitation$invitation,$answer,Request$request){if(!$request->hasValidSignature()){abort(403);}//}}
In a few of the route closures we’ve looked at so far, we’ve seen something along the lines of return view('account'). What’s going on here?
If you’re not familiar with the Model–View–Controller (MVC) pattern, views (or templates) are files that describe what some particular output should look like. You might have views for JSON or XML or emails, but the most common views in a web framework output HTML.
In Laravel, there are two formats of view you can use out of the box: plain PHP, or Blade templates (see Chapter 4). The difference is in the filename: about.php will be rendered with the PHP engine, and about.blade.php will be rendered with the Blade engine.
There are three different ways to return a view. For now, just concern yourself with view(), but if you ever see View::make(), it’s the same thing, and you could also inject the Illuminate\View\ViewFactory if you prefer.
Once you’ve “loaded” a view with the view() helper, you have the option to simply return it (as in Example 3-18), which will work fine if the view doesn’t rely on any variables from the controller.
Route::get('/',function(){returnview('home');});
This code looks for a view in resources/views/home.blade.php or resources/views/home.php, and loads its contents and parses any inline PHP or control structures until you have just the view’s output. Once you return it, it’s passed on to the rest of the response stack and eventually returned to the user.
But what if you need to pass in variables? Take a look at Example 3-19.
Route::get('tasks',function(){returnview('tasks.index')->with('tasks',Task::all());});
This closure loads the resources/views/tasks/index.blade.php or resources/views/tasks/index.php view and passes it a single variable named tasks, which contains the result of the Task::all() method. Task::all() is an Eloquent database query you’ll learn about in Chapter 5.
Because it’s so common for a route to just return a view with no custom data, Laravel 5.5+ allows you to define a route as a “view” route without even passing the route definition a closure or a controller/method reference, as you can see in Example 3-20.
// Returns resources/views/welcome.blade.phpRoute::view('/','welcome');// Passing simple data to Route::viewRoute::view('/','welcome',['User'=>'Michael']);
Sometimes it can become a hassle to pass the same variables over and over. There may be a variable that you want accessible to every view in the site, or to a certain class of views or a certain included subview—for example, all views related to tasks, or the header partial.
It’s possible to share certain variables with every template or just certain templates, like in the following code:
view()->share('variableName','variableValue');
To learn more, check out “View Composers and Service Injection”.
I’ve mentioned controllers a few times, but until now most of the examples have shown route closures. If you’re not familiar with the MVC pattern (Figure 3-1), controllers are essentially classes that organize the logic of one or more routes together in one place. Controllers tend to group similar routes together, especially if your application is structured along a traditionally CRUD-like format; in this case, a controller might handle all the actions that can be performed on a particular resource.
CRUD stands for create, read, update, delete, which are the four primary operations that web applications most commonly provide on a resource. For example, you can create a new blog post, you can read that post, you can update it, or you can delete it.
It may be tempting to cram all of the application’s logic into the controllers, but it’s better to think of controllers as the traffic cops that route HTTP requests around your application. Since there are other ways requests can come into your application—cron jobs, Artisan command-line calls, queue jobs, etc.—it’s wise to not rely on controllers for much behavior. This means a controller’s primary job is to capture the intent of an HTTP request and pass it on to the rest of the application.
So, let’s create a controller. One easy way to do this is with an Artisan command, so from the command line run the following:
php artisan make:controller TasksController
Laravel comes bundled with a command-line tool called Artisan. Artisan can be used to run migrations, create users and other database records manually, and perform many other manual, one-time tasks.
Under the make namespace, Artisan provides tools for generating skeleton files for a variety of system files. That’s what allows us to run php artisan make:controller.
To learn more about this and other Artisan features, see Chapter 8.
This will create a new file named TasksController.php in app/Http/Controllers, with the contents shown in Example 3-21.
<?phpnamespaceApp\Http\Controllers;useIlluminate\Http\Request;classTasksControllerextendsController{//}
Modify this file as shown in Example 3-22, creating a new public method called index(). We’ll just return some text there.
<?phpnamespaceApp\Http\Controllers;classTasksControllerextendsController{publicfunctionindex(){return'Hello, World!';}}
Then like we learned before, we’ll hook up a route to it, as shown in Example 3-23.
// routes/web.php<?phpRoute::get('/','TasksController@index');
That’s it. Visit the / route and you’ll see the words “Hello, World!”
The most common use of a controller method, then, will be something like Example 3-24, which provides the same functionality as our route closure in Example 3-19.
// TasksController.php...publicfunctionindex(){returnview('tasks.index')->with('tasks',Task::all());}
This controller method loads the resources/views/tasks/index.blade.php or resources/views/tasks/index.php view and passes it a single variable named tasks, which contains the result of the Task::all() Eloquent method.
If you ever used php artisan make:controller in Laravel prior to 5.3, you might be expecting it to autogenerate methods for all of the basic resource routes like create() and update(). You can bring this behavior back in Laravel 5.3+ by passing the --resource flag when you create the controller:
php artisan make:controller TasksController --resource
The second most common action to perform in a controller method is to take input from the user and act on it. That introduces a few new concepts, so let’s take a look at a bit of sample code and walk through the new pieces.
First, let’s bind our route quickly; see Example 3-25.
// routes/web.phpRoute::get('tasks/create','TasksController@create');Route::post('tasks','TasksController@store');
Notice that we’re binding the GET action of tasks/create (which shows a form for creating a new task) and the POST action of tasks/ (which is where our form will POST to when we’re creating a new task). We can assume the create() method in our controller just shows a form, so let’s look at the store() method in Example 3-26.
// TasksController.php...publicfunctionstore(){Task::create(request()->only(['title','description']));returnredirect('tasks');}
This example makes use of Eloquent models and the redirect() functionality, and we’ll talk about them more later, but let’s talk quickly about how you’re getting your data here.
We’re using the request() helper to represent the HTTP request (more on that later) and using its only() method to pull just the title and description fields the user submitted.
We’re then passing that data into the create method of our Task model, which creates a new instance of the Task with “title” set to the passed-in title and “description” set to the passed-in description. Finally, we redirect back to the page that shows all tasks.
There are a few layers of abstraction at work here, which we’ll cover in a second, but know that the data coming from the only() method comes from the same pool of data as would come from the all() method or the get() method, all common methods used on the request objects. The set of data each of these methods is pulling from represents all user-provided data, whether from query parameters or POST values. So our user filled out two fields on the “add task” page: “title” and “description.”
To break down the abstraction a bit, request()->only() takes an associative array of input names and returns them:
request()->only(['title','description']);// returns:['title'=>'Whatever title the user typed on the previous page','description'=>'Whatever description the user typed on the previous page',]
And Task::create() takes an associative array and creates a new task from it:
Task::create(['title'=>'Buy milk','description'=>'Remember to check the expiration date this time, Norbert!',]);
Combining them together creates a task with just the user-provided “title” and “description” fields.
Laravel’s facades and global helpers present a simple interface to the most useful classes in Laravel’s codebase. You can get information about the current request and user input, the session, caches, and much more.
But if you prefer to inject your dependencies, or if you want to use a service that doesn’t have a facade or a helper, you’ll need to find some way to bring instances of these classes into your controller.
This is our first exposure to Laravel’s service container. For now, if this is unfamiliar, you can think about it as a little bit of Laravel magic; or, if you want to know more about how it’s actually functioning, you can skip ahead to Chapter 11.
All controller methods (including the constructors) are resolved out of Laravel’s container, which means anything you typehint that the container knows how to resolve will be automatically injected.
“Typehinting” in PHP means putting the name of a class or interface in front of a variable in a method signature:
publicfunction__construct(Logger$logger){}
This typehint is telling PHP that whatever is passed into the method must be of type Logger, which could be either an interface or a class.
As a nice example, what if you’d prefer having an instance of the Request object instead of using the global helper? Just typehint Illuminate\Http\Request in your method parameters, like in Example 3-27.
// TasksController.php...publicfunctionstore(\Illuminate\Http\Request$request){Task::create($request->only(['title','description']));returnredirect('tasks');}
So, you’ve defined a parameter that must be passed into the store() method. And since you typehinted it, and since Laravel knows how to resolve that class name, you’re going to have the Request object ready for you to use in your method with no work on your part. No explicit binding, no anything else—it’s just there as the $request variable.
And, as you can tell from comparing Example 3-26 and Example 3-27, the request() helper and the Request object behave exactly the same.
Sometimes naming the methods in your controllers can be the hardest part of writing a controller. Thankfully, Laravel has some conventions for all of the routes of a traditional REST/CRUD controller (called a “resource controller” in Laravel); additionally, it comes with a generator out of the box and a convenience route definition that allows you to bind an entire resource controller at once.
To see the methods that Laravel expects for a resource controller, let’s generate a new controller from the command line:
php artisan make:controller MySampleResourceController --resource
Now open app/Http/Controllers/MySampleResourceController.php. You’ll see it comes prefilled with quite a few methods. Let’s walk over what each represents. We’ll use a Task as an example.
Remember the table from earlier? Table 3-1 shows the HTTP verb, the URL, the controller method name, and the “name” for each of these default methods that are generated in Laravel’s resource controllers.
So, we’ve seen that these are the conventional route names to use in Laravel, and also that it’s easy to generate a resource controller with methods for each of these default routes. Thankfully, you don’t have to generate routes for each of these controller methods by hand, if you don’t want to. Instead, there’s a trick for that, and it’s called “resource controller binding.” Take a look at Example 3-28.
// routes/web.phpRoute::resource('tasks','TasksController');
This will automatically bind all of the routes listed in Table 3-1 for this resource to the appropriate method names on the specified controller. It’ll also name these routes appropriately; for example, the index() method on the tasks resource controller will be named tasks.index.
If you ever find yourself in a situation where you’re wondering what routes your current application has available, there’s a tool for that: from the command line, run php artisan route:list and you’ll get a listing of all of the available routes (see Figure 3-2).
When you’re working with RESTful APIs, the list of potential actions on a resource is not the same as it is with an HTML resource controller. For example, you can send a POST request to an API to create a resource, but you can’t really “show a create form” in an API.
Laravel 5.6 introduced a new way to generate an “API resource controller”, which has the same structure as a resource controller except it excludes the create and edit actions. We can generate API resource controllers by passing the --api flag when creating a controller.
php artisan make:controller MySampleResourceController --api
To bind an API resource controller, use the apiResource() method instead of the resource() method, as you can see in Example 3-29.
// routes/web.phpRoute::apiResource('tasks','TasksController');
There will be times in your applications that a controller appropriately should only service a single route. You may likely find yourself wondering how to name the controller method for that route. Thankfully, you can point a single route at a single controller without concerning yourself with naming the one method.
As you may already know, the __invoke method is a PHP magic method that allows you to “invoke” an instance of a class, treating it like a function and calling it. This is the tool Laravel’s Single Action Controllers use to allow you to point a route to a single controller, as you can see in Example 3-30.
// \App\Http\Controllers\UpdateUserAvatar.phppublicfunction__invoke(User$user){// Update the user's avatar image}// routes/web.phpRoute::post('users/{user}/update-avatar','UpdateUserAvatar');
One of the most common routing patterns is that the first line of any controller method tries to find the resource with the given ID, like in Example 3-31.
Route::get('conferences/{id}',function($id){$conference=Conference::findOrFail($id);});
Laravel provides a feature that simplifies this pattern called “route model binding.” This allows you to define that a particular parameter name (e.g., {conference}) will indicate to the route resolver that it should look up an Eloquent database record with that ID and then pass it in as the parameter instead of just passing the ID.
There are two kinds of route model binding: implicit and custom (or explicit).
The simplest way to use route model binding is to name your route parameter something unique to that model (e.g., name it $conference instead of $id), then typehint that parameter in the closure/controller method and use the same variable name there. It’s easier to show than to describe, so take a look at Example 3-32.
Route::get('conferences/{conference}',function(Conference$conference){returnview('conferences.show')->with('conference',$conference);});
Because the route parameter ({conference}) is the same as the method parameter ($conference), and the method parameter is typehinted with a Conference model (Conference $conference), Laravel sees this as a route model binding. Every time this route is visited, the application will assume that whatever is passed into the URL in place of {conference} is an ID that should be used to look up a Conference, and then that resulting model instance will be passed in to your closure or controller method.
Any time an Eloquent model is looked up via a URL segment (usually because of route model binding), the default column Eloquent will look it up by is its primary key (ID).
To change the column your Eloquent model uses for URL lookups, add a method to your model named getRouteKeyName():
publicfunctiongetRouteKeyName(){return'slug';}
Now, a URL like conferences/{conference} will expect to get the slug instead of the ID, and will perform its lookups accordingly.
Implicit route model binding was added in Laravel 5.2, so you won’t have access to it in 5.1.
To manually configure route model bindings, add a line like the one in Example 3-30 to the boot() method in App\Providers\RouteServiceProvider.
publicfunctionboot(){// Just allows the parent's boot() method to still runparent::boot();// Perform the bindingRoute::model('event',Conference::class);}
You’ve now defined that whenever a route has a parameter in its definition named {event}, as demonstrated in Example 3-31, the route resolver will return an instance of the Conference class with the ID of that URL parameter.
Route::get('events/{event}',function(Conference$event){returnview('events.show')->with('event',$event);});
If you’re looking to squeeze every millisecond out of your load time, you may want to take a look at route caching. One of the pieces of Laravel’s bootstrap that can take anywhere from a few dozen to a few hundred milliseconds is parsing the routes/* files, and route caching speeds up this process dramatically.
To cache your routes file, you need to be using all controller, redirect, view, and resource routes (no route closures). If your app isn’t using any route closures, you can run php artisan route:cache, Laravel will serialize the results of your routes/* files. If you want to delete the cache, run php artisan route:clear.
Here’s the drawback: Laravel will now match routes against that cached file instead of your actual routes/* files. You can make endless changes to your routes files, and they won’t take effect until you run route:cache again. This means you’ll have to recache every time you make a change, which introduces a lot of potential for confusion.
Here’s what I would recommend instead: since Git ignores the route cache file by default anyway, consider only using route caching on your production server, and run the php artisan route:cache command every time you deploy new code (whether via a Git post-deploy hook, a Forge deploy command, or as a part of whatever other deploy system you use). This way you won’t have confusing local development issues, but your remote environment will still benefit from route caching.
Sometimes, you need to manually define which HTTP verb a form should send as. HTML forms only allow for GET or POST, so if you want any other sort of verb, you’ll need to specify that yourself.
As we’ve shown already, you can define which verbs a route will match in the route definition using Route::get(), Route::post(), Route::any(), or Route::match(). You can also match with Route::patch(), Route::put(), and Route::delete().
But how does one send a request other than GET with a web browser? First, the method attribute in an HTML form determines its HTTP verb: if your form has a method of "GET", it will submit via query parameters and a GET method; if the form has a method of "POST", it will submit via the post body and a POST method.
JavaScript frameworks make it easy to send other requests, like DELETE and PATCH. But if you find yourself needing to submit HTML forms in Laravel with verbs other than GET or POST, you’ll need to use form method spoofing, which is spoofing the HTTP method in an HTML form.
To inform Laravel that the form you’re currently submitting should be treated as something other than POST, add a hidden variable named _method with the value of either "PUT", "PATCH", or "DELETE", and Laravel will match and route that form submission as if it were actually a request with that verb.
The form in Example 3-35, since it’s passing Laravel the method of "DELETE", will match routes defined with Route::delete() but not those with Route::post().
<formaction="/tasks/5"method="POST"><inputtype="hidden"name="_method"value="DELETE"><!-- or: -->@method('DELETE')</form>
If you’ve tried to create and submit a form in a Laravel application already—including the form in Example 3-35—you’ve likely run into the dreaded TokenMismatchException.
By default, all routes in Laravel except “read-only” routes (those using GET, HEAD, or OPTIONS) are protected against cross-site request forgery (CSRF) attacks by requiring a token, in the form of an input named _token, to be passed along with each request. This token is generated at the start of every session, and every non–read-only route compares the submitted _token against the session token.
A cross-site request forgery is when one website pretends to be another. The goal is for someone to hijack your users’ access to your website, by submitting forms from their website to your website via the logged-in user’s browser.
The best way around CSRF attacks is to protect all inbound routes—POST, DELETE, etc.—with a token, which Laravel does out of the box.
You have two options for getting around this CSRF error. The first, and preferred, method is to add the _token input to each of your submissions. In HTML forms, that’s simple; look at Example 3-36.
<formaction="/tasks/5"method="POST"><?php echo csrf_field(); ?><!-- or: --><inputtype="hidden"name="_token"value="<?php echo csrf_token(); ?>"><!-- or: -->@csrf</form>
The @csrf Blade directive is not available in projects running versions of Laravel prior to 5.6. Instead, you’ll need to use the csrf_field() helper function.
In JavaScript applications, it’s a bit more work, but not much. The most common solution for sites using JavaScript frameworks is to store the token on every page in a <meta> tag like this one:
<metaname="csrf-token"content="<?php echo csrf_token(); ?>"id="token">
Storing the token in a <meta> tag makes it easy to bind it to the correct HTTP header, which you can do once globally for all requests from your JavaScript framework, like in Example 3-37.
// in jQuery:$.ajaxSetup({headers:{'X-CSRF-TOKEN':$('meta[name="csrf-token"]').attr('content')}});// with Axios:window.axios.defaults.headers.common['X-CSRF-TOKEN']=document.head.querySelector('meta[name="csrf-token"]');
Laravel will check the X-CSRF-TOKEN on every request, and valid tokens passed there will mark the CSRF protection as satisfied.
Note that the Vue syntax for CSRF in this example is not necessary if you’re working with the default Vue bootstrap in a Laravel installation; it already does this work for you.
In projects using older versions of Laravel and Vue, you may be relying on a library called Vue Resource to make AJAX calls. Bootstrapping the CSRF token into Vue Resource looks a bit different than it does for Laravel; see the Vue Resource docs for examples.
So far the only things we’ve explicitly talked about returning from a controller method or route definition have been views. But there are a few other structures we can return to give the browser instructions on how to behave.
First, let’s cover the redirect; you’ve already seen a few of those in other examples. There are two common ways to generate a redirect; we’ll use the redirect global helper here, but you may prefer the facade. Both create an instance of Illuminate\Http\RedirectResponse, perform some convenience methods on it, and then return it. You can also do this manually, but you’ll have to do a little more work yourself. Take a look at Example 3-38 to see a few ways you can return a redirect.
// Using the global helper to generate a redirect responseRoute::get('redirect-with-helper',function(){returnredirect()->to('login');});// Using the global helper shortcutRoute::get('redirect-with-helper-shortcut',function(){returnredirect('login');});// Using the facade to generate a redirect responseRoute::get('redirect-with-facade',function(){returnRedirect::to('login');});// Using the Route::redirect shortcut in Laravel 5.5+Route::redirect('redirect-by-route','login');
Note that the redirect() helper exposes the same methods as the Redirect facade, but it also has a shortcut; if you pass parameters directly to the helper, instead of chaining methods after it, it’s a shortcut to the to() redirect method.
Also note that the (optional) third parameter for the Route::redirect() route helper can be the status code (e.g. 302) for your redirect.
The method signature for the to() method for redirects looks like this:
functionto($to=null,$status=302,$headers=[],$secure=null)
$to is a valid internal path; $status is the HTTP status (defaulting to 302 FOUND); $headers allows you to define which HTTP headers to send along with your redirect; and $secure allows you to override the default choice of http versus https (which is normally set based on your current request URL). Example 3-39 shows an example of its use.
Route::get('redirect',function(){returnredirect()->to('home');// or same, using the shortcut:returnredirect('home');});
The route() method is the same as the to() method, but rather than pointing to a particular path, it points to a particular route name (see Example 3-40).
Route::get('redirect',function(){returnredirect()->route('conferences.index');});
Note that, since some route names require parameters, its parameter order is a little different. route() has an optional second parameter for the route parameters:
functionroute($to=null,$parameters=[],$status=302,$headers=[])
So, using it might look a little like Example 3-40.
Route::get('redirect',function(){returnredirect()->route('conferences.show',['conference'=>99]);});
Because of some of the built-in conveniences of Laravel’s session implementation, your application will always have knowledge of what the user’s previously visited page was. That opens up the opportunity for a redirect()->back() redirect, which simply redirects the user to whatever page she came from. There’s also a global shortcut for this: back().
The redirect service provides other methods that are less commonly used, but still available:
home() redirects to a route named home.
refresh() redirects to the same page the user is currently on.
away() allows for redirecting to an external URL without the default URL validation.
secure() is like to() with the secure parameter set to "true".
action() allows you to link to a controller and method in one of two ways: first, as a string: redirect()->action('MyController@myMethod'), or second, as a tuple: redirect()->action([MyController::class, 'myMethod’])
guest() is used internally by the auth system (discussed in Chapter 9); when a user visits a route he’s not authenticated for, this captures the “intended” route and then redirects the user (usually to a login page).
intended() is also used internally by the auth system; after a successful authentication, this grabs the “intended” URL stored by the guest() method and redirects the user there.
When you’re redirecting users to different pages, you often want to pass certain data along with them. You could manually flash the data to the session, but Laravel has some convenience methods to help you with that.
Most commonly, you can pass along either an array of keys and values or a single key and value using with(), like in Example 3-42. This saves your with() data to the session just for the next page load.
Route::get('redirect-with-key-value',function(){returnredirect('dashboard')->with('error',true);});Route::get('redirect-with-array',function(){returnredirect('dashboard')->with(['error'=>true,'message'=>'Whoops!']);});
As with many other facades, most calls to the Redirect facade can accept fluent method chains, like the with() calls in Example 3-42. Learn more about fluency in “What Is a Fluent Interface?”.
You can also use withInput(), as in Example 3-43, to redirect with the user’s form input flashed; this is most common in the case of a validation error, where you want to send the user back to the form she just came from.
Route::get('form',function(){returnview('form');});Route::post('form',function(){returnredirect('form')->withInput()->with(['error'=>true,'message'=>'Whoops!']);});
The easiest way to get the flashed input that was passed with withInput() is using the old() helper, which can be used to get all old input (old()) or just the value for a particular key (old('username'), with the second parameter as the default if there is no old value). You’ll commonly see this in views, which allows this HTML to be used both on the “create” and the “edit” view for this form:
<inputname="username"value="<?=old('username', 'Default username instructions here');?>">
Speaking of validation, there is also a useful method for passing errors along with a redirect response: withErrors(). You can pass it any “provider” of errors, which may be an error string, an array of errors, or, most commonly, an instance of the Illuminate Validator, which we’ll cover in Chapter 10. Example 3-44 shows an example of its use.
Route::post('form',function(){$validator=Validator::make($request->all()),$this->validationRules);if($validator->fails()){returnback()->withErrors($validator)->withInput();}});
withErrors() automatically shares an $errors variable with the views of the page it’s redirecting to, for you to handle however you’d like.
Don’t like how Example 3-44 looks? There’s a simple and powerful tool that will make it easy for you to clean up that code. Read more in “validate() on the Request object”.
Aside from returning views and redirects, the most common way to exit a route is to abort. There are a few globally available methods (abort(), abort_if(), and abort_unless()), which optionally take HTTP status codes, a message, and a headers array as parameters.
As Example 3-45 shows, abort_if() and abort_unless() take a first parameter that is evaluated for its truthiness, and perform the abort depending on the result.
Route::post('something-you-cant-do',function(Illuminate\Http\Request$request){abort(403,'You cannot do that!');abort_unless($request->has('magicToken'),403);abort_if($request->user()->isBanned,403);});
There are a few other options available for us to return, so let’s go over the most common responses after views, redirects, and aborts. Just like with redirects, you can either use the response() helper or the Response facade to run these methods on.
If you want to create an HTTP response manually, just pass your data into the first parameter of response()->make(): e.g., return response()->make('Hello, World!'). Once again, the second parameter is the HTTP status code and the third is your headers.
To create a JSON-encoded HTTP response manually, pass your JSON-able content (arrays, collections, or whatever else) to the json() method: e.g., return response()->json(User::all());. It’s just like make(), except it json_encodes your content and sets the appropriate headers.
To send a file for the end user to download, pass either an SplFileInfo instance or a string filename to download(), with an optional second parameter of the download filename: e.g., return response()->download('file501751.pdf', 'myFile.pdf'), which would send a file that’s at file501751.pdf and name it, as it’s sent, as myFile.pdf.
To display the same file in the browser (if it’s a PDF or an image or something else the browser can handle), use response()->file() instead, which takes the same parameters as response->download().
If you want to make some content from an external service available as a download without having to write it directly to your server’s disk, you can stream the download using response()->streamDownload(). This method expects parameters of a closure which echoes a string, a filename, and an optional third parameter of an array of headers. Take at look at Example 3-46:
returnresponse()->streamDownload(function(){echoDocumentService::file('myFile')->getContent();},'myFile.pdf');
In some other communities, the idea of unit testing controller methods is common, but within Laravel (and most of the PHP community), it’s most common to rely on application testing to test the functionality of routes.
For example, to verify that a POST route works correctly, we can write a test like Example 3-47.
// tests/Feature/AssignmentTest.phppublicfunctiontest_post_creates_new_assignment(){$this->post('/assignments',['title'=>'My great assignment']);$this->assertDatabaseHas('assignments',['title'=>'My great assignment']);}
Did we directly call the controller methods? No. But we ensured that the goal of this route—to receive a POST and save its important information to the database—was met.
You can also use similar syntax to visit a route and verify that certain text shows up on the page, or that clicking certain buttons does certain things (see Example 3-48).
// AssignmentTest.phppublicfunctiontest_list_page_shows_all_assignments(){$assignment=Assignment::create(['title'=>'My great assignment']);$this->get('/assignments')->assertSee('My great assignment');}
In projects running versions of Laravel prior to 5.4 assertDatabaseHas should be replaced by seeInDatabase, and get and assertSee should be replaced by visit and see.
Laravel’s routes are defined in routes/web.php and routes/api.php, where you can define the expected path for each route, which segments are static and which are parameters, which HTTP verbs can access the route, and how to resolve it. You can also attach middleware to routes, group them, and give them names.
What is returned from the route closure or controller method dictates how Laravel responds to the user. If it’s a string or a view, it’s presented to the user; if it’s other sorts of data, it’s converted to JSON and presented to the user; and if it’s a redirect, it forces a redirect.
Laravel provides a series of tools and conveniences to simplify common routing-related tasks and structures. These include resource controllers, route model binding, and form method spoofing.
Compared to most other backend languages, PHP actually functions relatively well as a templating language. But it has its shortcomings, and it’s also just ugly to be using <?php inline all over the place, so you can expect most modern frameworks to offer a templating language.
Laravel offers a custom templating engine called Blade, which is inspired by .NET’s Razor engine. It boasts a concise syntax, a shallow learning curve, a powerful and intuitive inheritance model, and easy extensibility.
For a quick look at what writing Blade looks like, check out Example 4-1.
<h1>{{$group->title}}</h1>{!!$group->heroImageHtml()!!}@forelse($usersas$user)•{{$user->first_name}}{{$user->last_name}}<br>@emptyNousersinthisgroup.@endforelse
As you can see, Blade uses curly braces for its “echo” and introduces a convention in which its custom tags, called “directives,” are prefixed with an @. You’ll use directives for all of your control structures and also for inheritance and any custom functionality you want to add.
Blade’s syntax is clean and concise, so at its core it’s just more pleasant and tidy to work with than the alternatives. But the moment you need anything of any complexity in your templates—nested inheritance, complex conditionals, or recursion—Blade starts to really shine. Just like the best Laravel components, it takes complex application requirements and makes them easy and accessible.
Additionally, since all Blade syntax is compiled into normal PHP code and then cached, it’s fast and it allows you to use native PHP in your Blade files if you want. However, I’d recommmend avoiding usage of PHP if at all possible—usually if you need to do anything that you can’t do with Blade or a custom Blade directive, it doesn’t belong in the template.
Unlike many other Symfony-based frameworks, Laravel doesn’t use Twig by default. But if you’re just in love with Twig, there’s a Twig Bridge package that makes it easy to use Twig instead of Blade.
As you can see in Example 4-1, {{ and }} are used to wrap sections of PHP that you’d like to echo. {{ is similar to $variable }}<?= $variable ?> in plain PHP.
It’s different in one way, however, and you might’ve guessed this already: Blade escapes all echoes by default using PHP’s htmlentities() to protect your users from malicious script insertion. That means {{ is functionally equivalent to $variable }}<?= htmlentities( $variable)?>. If you want to echo without the escaping, use {!! and !!} instead.
Most of the control structures in Blade will be very familiar. Many directly echo the name and structure of the same tag in PHP.
There are a few convenience helpers, but in general, the control structures just look cleaner than they would in PHP.
First, let’s take a look at the control structures that allow for logic.
Blade’s @if ($condition) compiles to <?php if ($condition): ?>. @else, @elseif, and @endif also compile to the exact same style of syntax in PHP. Take a look at Example 4-2 for some examples.
@if(count($talks)===1)Thereisonetalkatthistimeperiod.@elseif(count($talks)===0)Therearenotalksatthistimeperiod.@elseThereare{{count($talks)}}talksatthistimeperiod.@endif
Just like with the native PHP conditionals, you can mix and match these how you want. They don’t have any special logic; there’s literally a parser looking for something with the shape of @if ( and replacing it with the appropriate PHP code.$condition)
@unless, on the other hand, is a new syntax that doesn’t have a direct equivalent in PHP. It’s the direct inverse of @if. @unless ($condition) is the same as <?php if (! $condition). See it in use in Example 4-3.
@unless($user->hasPaid())Youcancompleteyourpaymentbyswitchingtothepaymenttab.@endunless
Next, let’s take a look at the loops.
@for, @foreach, and @while work the same in Blade as they do in PHP; see Examples 4-4, 4-5, and 4-6.
@for($i=0;$i<$talk->slotsCount();$i++)Thenumberis{{$i}}<br>@endfor
@foreach($talksas$talk)•{{$talk->title}}({{$talk->length}}minutes)<br>@endforeach
@while($item=array_pop($items)){{$item->orSomething()}}<br>@endwhile
@forelse is a @foreach that also allows you to program in a fallback if the object you’re iterating over is empty. We saw it in action at the start of this chapter; Example 4-7 shows another example.
@forelse($talksas$talk)•{{$talk->title}}({{$talk->length}}minutes)<br>@emptyNotalksthisday.@endforelse
The @foreach and @forelse directives (introduced in Laravel 5.3) add one feature that’s not available in PHP foreach loops: the $loop variable. Used within a @foreach or @forelse loop, this variable will return a stdClass object with these properties:
indexThe 0-based index of the current item in the loop; 0 would mean “first item”
iterationThe 1-based index of the current item in the loop; 1 would mean “first item”
remainingHow many items remain in the loop; if the current item is the first of three, this will be 2
countThe count of items in the loop
firstA boolean indicating whether this is the first item in the loop
lastA boolean indicating whether this is the last item in the loop
depthHow many “levels” deep this loop is: 1 for a loop, 2 for a loop within a loop, etc.
parentA reference to the $loop variable for the parent loop item; if this loop is within another @foreach loop otherwise, null
Here’s an example of how to use it:
<ul>@foreach($pagesas$page)<li>{{$loop->iteration}}:{{$page->title}}@if($page->hasChildren())<ul>@foreach($page->children()as$child)<li>{{$loop->parent->iteration}}.{{$loop->iteration}}:{{$child->title}}</li>@endforeach</ul>@endif</li>@endforeach</ul>
Blade provides a structure for template inheritance that allows views to extend, modify, and include other views.
Here’s how inheritance is structured with Blade.
Let’s start with a top-level Blade layout, like in Example 4-8. This is the definition of a generic page wrapper that we’ll later place page-specific content into.
<!-- resources/views/layouts/master.blade.php --><html><head><title>My Site | @yield('title', 'Home Page')</title></head><body><divclass="container">@yield('content')</div>@section('footerScripts')<scriptsrc="app.js"></script>@show</body></html>
This looks a bit like a normal HTML page, but you can see we’ve yielded in two places (title and content), and we’ve defined a section in a third (footerScripts).
We have three Blade directives here that each look a little different: @yield('content') alone, @yield('title', 'Home Page') with a defined default, and @section ... @show with actual content in it.
All three function essentially the same. All three are defining that there’s a section with a given name (which is the first parameter). All three are defining that the section can be extended later. And all three are defining what to do if the section isn’t extended, either by providing a string fallback ('Home Page'), no fallback (which will just not show anything if it’s not extended), or an entire block fallback (in this case, <script src="app.js"></script>).
What’s different? Well, clearly, @yield('content') has no default content. But additionally, the default content in @yield('title') only will be shown if it’s never extended. If it is extended, its child sections will not have programmatic access to the default value. @section ... @show, on the other hand, is both defining a default and doing so in a way that its default contents will be available to its children, through @parent.
Once you have a parent layout like this, you can extend it in a new template file like in Example 4-9.
<!-- resources/views/dashboard.blade.php -->@extends('layouts.master') @section('title', 'Dashboard') @section('content') Welcome to your application dashboard! @endsection @section('footerScripts') @parent<scriptsrc="dashboard.js"></script>@endsection
You may have noticed that Example 4-8 uses @section ... @show, but Example 4-9 uses @section ... @endsection. What’s the difference?
Use @show when you’re defining the place for a section, in the parent template. Use @endsection when you’re defining the content for a template in a child template.
This child view will actually allow us to cover a few new concepts in Blade inheritance.
First, with @extends('layouts.master'), we define that this view should not be rendered on its own, but that it instead extends another view. That means its role is to define the content of various sections, but not to stand alone. It’s almost more like a series of buckets of content, rather than an HTML page. This line also defines that the view it’s extending lives at resources/views/layouts/master.blade.php.
Each file should only extend one other file, and the @extends call should be the first line of the file.
Second, with @section('title', 'Dashboard'), we provide our content for the first section, title. Since the content is so short, instead of using @section and @endsection we’re just using a shortcut. This allows us to pass the content in as the second parameter of @section and then move on. If it’s a bit disconcerting to see @section without @endsection, you could just use the normal syntax.
Third, with @section('content') and on, we use the normal syntax to define the contents of the content section. We’ll just throw a little greeting in for now. Note, however, that when you’re using @section in a child view, you end it with @endsection (or its alias @stop), instead of @show, which is reserved for defining sections in parent views.
Fourth, with @section('footerScripts') and on, we use the normal syntax to define the contents of the footerScripts section.
But remember, we actually defined that content (or, at least, its “default”) already in the master layout. So this time, we have two options: we can either overwrite the content from the parent view, or we can add to it.
You can see that we have the option to include the content from the parent by using the @parent directive within the section. If we didn’t, the content of this section would entirely overwrite anything defined in the parent for this section.
Now that we’ve established the basics of inheritance, there are a few more tricks we can perform.
What if we’re in a view and want to pull in another view? Maybe we have a call-to-action “Sign up” button that we want to re-use around the site. And maybe we want to customize its button text every time we use it. Take a look at Example 4-10.
<!-- resources/views/home.blade.php --><divclass="content"data-page-name="{{ $pageName }}"><p>Here's why you should sign up for our app:<strong>It's Great.</strong></p>@include('sign-up-button', ['text' => 'See just how great it is'])</div><!-- resources/views/sign-up-button.blade.php --><aclass="button button--callout"data-page-name="{{ $pageName }}"><iclass="exclamation-icon"></i>{{ $text }}</a>
@include pulls in the partial and, optionally, passes data into it. Note that not only can you explicitly pass data to an include via the second parameter of @include, but you can also reference any variables within the included file that are available to the including view ($pageName, in this example). Once again, you can do whatever you want, but I would recommend you consider always explicitly passing every variable that you intend to use, just for clarity.
You also use the @includeIf, includeWhen and includeFirst directives.
{{--Includeaviewifitexists--}}@includeIf('sidebars.admin',['some'=>'data']){{--Includeaviewifapassedvariableistruth-y--}}@includeWhen($user->isAdmin(),'sidebars.admin',['some'=>'data']){{--Includethefirstviewthatexistsfromagivenarrayofviews--}}@includeFirst(['customs.header','header'],['some'=>'data'])
You can probably imagine some circumstances in which you’d need to loop over an array or collection and @include a partial for each item. There’s a directive for that: @each.
Let’s say we have a sidebar composed of modules, and we want to include multiple modules, each with a different title. Take a look at Example 4-12.
<!-- resources/views/sidebar.blade.php --><divclass="sidebar">@each('partials.module', $modules, 'module', 'partials.empty-module')</div><!-- resources/views/partials/module.blade.php --><divclass="sidebar-module"><h1>{{ $module->title }}</h1></div><!-- resources/views/partials/empty-module.blade.php --><divclass="sidebar-module">No modules :(</div>
Consider that @each syntax. The first parameter is the name of the view partial. The second is the array or collection to iterate over. The third is the variable name that each item (in this case, each element in the $modules array) will be passed to the view as. And the optional fourth parameter is the view to show if the array or collection is empty (or, optionally, you can pass a string in here that will be used as your template).
One common pattern that can be difficult to manage using basic Blade includes is when each view in a Blade include hierarchy needs to add something to a certain section—almost like adding an entry onto an array.
The most common situation for this is when certain pages (and sometimes, more broadly, certain sections of a website) have specific unique CSS and JavaScript files they need to load. Imagine you have a site-wide “global” CSS file, a “jobs section” CSS file, and an “apply for a job” page CSS file.
Blade’s “stacks” are built for exactly this situation. In your parent template, you’ll define a “stack”, which is just a placeholder; then in each child template you can “push” entries onto that stack with @push/@endpush, which just add them to the bottom of the stack in the final render. You can also use @prepend/@endprepend to add them to the top of the stack.
<!--resources/views/layouts/app.blade.php--><html><head><!--thehead--></head><body><!--therestofthepage..--><scriptsrc="/css/global.css"></script><!--theplaceholderwherestackcontentwillbeplaced-->@stack('scripts')</body></html><!--resources/views/jobs.blade.php-->@extends('layouts.app')@push('scripts')<!--pushsomethingtothebottomofthestack--><scriptsrc="/css/jobs.css"></script>@endpush<!--resources/views/jobs/apply.blade.php-->@extends('jobs')@prepend('scripts')<!--pushsomethingtothetopofthestack--><scriptsrc="/css/jobs--apply.css"></script>@endprepend
These would generate this:
<html><head><!-- the head --></head><body><!-- the rest of the page.. --><scriptsrc="/css/global.css"></script><!-- the placeholder where stack content will be placed --><scriptsrc="/css/jobs--apply.css"></script><scriptsrc="/css/jobs.css"></script></body></html>
Laravel offers another pattern for including content between views, which was introduced in 5.4: components and slots. Components make the most sense in contexts when you find yourself using view partials and passing large chunks of content into the partial as variables. Take a look at Example 4-14 for an example.
<!-- resources/views/partials/modal.blade.php --><divclass="modal"><div>{{ $content }}</div><divclass="close button etc">...</div></div><!-- in another template -->@include('partials.modal', [ 'body' => '<p>The password you have provided is not valid. Here are the rules for valid passwords: [...]</p><p><ahref="#">...</a></p>' ])
This is too much for this variable, and it’s the perfect fit for a component.
Components with slots are view partials that are explicitly designed to have big chunks (“slots”) that are meant to get content from the including template. Take a look at Example 4-15 to see how to refactor Example 4-14 with components and slots.
<!-- resources/views/partials/modal.blade.php --><divclass="modal"><div>{{ $slot }}</div><divclass="close button etc">...</div></div><!-- in another template -->@component('partials.modal')<p>The password you have provided is not valid. Here are the rulesfor valid passwords: [...]</p><p><ahref="#">...</a></p>@endcomponent
As you can see in Example 4-15, the @component directive allows us to pull our HTML out of a cramped variable string and back into the template space. The $slot variable in our component template receives whatever content is passed between the @component and @endcomponent directives.
The method we used in Example 4-15 is called the “default” slot; whatever you pass in between @component and @endcomponent is passed to the $slot variable. But you can also have more than just the default slot. Let’s imagine a modal with a title, like in Example 4-16.
<!-- resources/views/partials/modal.blade.php --><divclass="modal"><divclass="modal-header">{{ $title }}</div><div>{{ $slot }}</div><divclass="close button etc">...</div></div>
You can use the @slot directive in your @component calls to pass content to slots other than the default, as you can see in Example 4-17.
@component('partials.modal')
@slot('title')
Password validation failure
@endslot
<p>The password you have provided is not valid. Here are the rules for valid passwords: [...]</p>
<p><a href="#">...</a></p>
@endcomponentAnd if you have other variables in your view that don’t make sense as a slot, you can still pass an array of content as the second parameter to @component, just like you can with @include. Take a look at Example 4-18.
@component('partials.modal', ['class' => 'danger'])
<!-- ... -->
@endcomponentThere’s a clever trick you can use to make your components even easier to call: aliasing. Simple call Blade::component() on the Blade facade—the most common location is the boot() method of the AppServiceProvider—and pass it first the location of the component and second the name of your desired directive:
// AppServiceProvider@bootBlade::component('partials.modal','modal')
<!-- in a template -->
@modal
Modal content here
@endmodalThis is our first time working with a facade in a namespaced class. We’ll cover them in more depth later, but just know that if you use facades in namespaced classes, which is most classes in recent versions of Laravel, you might find errors showing that the facade cannot be found. This is because facades are just normal classes with normal namespaces, but Laravel does a bit of trickery to make them available at the root namespace.
So, in Example 4-19, we’d need to import the Illuminate\Support\Facades\Blade facade at the top of the file.
As we covered in Chapter 3, it’s simple to pass data to our views from the route definition (see Example 4-20).
Route::get('passing-data-to-views',function(){returnview('dashboard')->with('key','value');});
There are times, however, when you will find yourself passing the same data over and over to multiple views. Or, you might find yourself using a header partial or something similar that requires some data; will you now have to pass that data in from every route definition that might ever load that header partial?
Thankfully, there’s a simpler way. The solution is called a view composer, and it allows you to define that any time a particular view loads, it should have certain data passed to it—without the route definition having to pass that data in explicitly.
Let’s say you have a sidebar on every page, which is defined in a partial named partials.sidebar (resources/views/partials/sidebar.blade.php) and then included on every page. This sidebar shows a list of the last seven posts that were published on your site. If it’s on every page, every route definition would normally have to grab that list and pass it in, like in Example 4-21.
Route::get('home',function(){returnview('home')->with('posts',Post::recent());});Route::get('about',function(){returnview('about')->with('posts',Post::recent());});
That could get annoying quickly. Instead, we’re going to use view composers to “share” that variable with a prescribed set of views. We can do this a few ways, so let’s start simple and move up.
First, the simplest option: just globally “share” a variable with every view in your application like in Example 4-22.
// Some service providerpublicfunctionboot(){...view()->share('recentPosts',Post::recent());}
If you want to use view()->share(), the best place would be the boot() method of a service provider so that the binding runs on every page load. You can create a custom ViewComposerServiceProvider (see Chapter 11 for more about service providers), but for now just put it in App\Providers\AppServiceProvider in the boot() method.
Using view()->share() makes the variable accessible to every view in the entire application, however, so it might be overkill.
The next option is to use a closure-based view composer to share variables with a single view, like in Example 4-23.
view()->composer('partials.sidebar',function($view){$view->with('recentPosts',Post::recent());});
As you can see, we’ve defined the name of the view we want it shared with in the first parameter (partials.sidebar) and then passed a closure to the second parameter; in the closure, we’ve used $view->with() to share a variable, but now only with a specific view.
Anywhere a view composer is binding to a particular view (like in Example 4-23, which binds to partials.sidebar), you can pass an array of view names instead to bind to multiple views.
You can also use an asterisk in the view path, as in partials.*, or tasks.*.
view()->composer(['partials.header','partials.footer'],function(){$view->with('recentPosts',Post::recent());});view()->composer('partials.*',function(){$view->with('recentPosts',Post::recent());});
Finally, the most flexible but also most complex option is to create a dedicated class for your view composer.
First, let’s create the view composer class. There’s no formally defined place for view composers to live, but the docs recommend App\Http\ViewComposers. So, let’s create App\Http\ViewComposers\RecentPostsComposer like in Example 4-24.
<?phpnamespaceApp\Http\ViewComposers;useApp\Post;useIlluminate\Contracts\View\View;classRecentPostsComposer{publicfunctioncompose(View$view){$view->with('recentPosts',Post::recent());}}
As you can see, when this composer is called, it runs the compose() method, in which we bind the posts variable to the result of running the Post model’s recent() method.
Like the other methods of sharing variables, this view composer needs to have a binding somewhere. Again, you’d likely create a custom ViewComposerServiceProvider, but for now, as seen in Example 4-25, we’ll just put it in the boot() method of App\Providers\AppServiceProvider.
publicfunctionboot(){view()->composer('partials.sidebar',\App\Http\ViewComposers\RecentPostsComposer::class);}
Note that this binding is the same as a closure-based view composer, but instead of passing a closure, we’re passing the class name of our view composer. Now, every time Blade renders the partials.sidebar view, it’ll automatically run our provider and pass the view a recentPosts variable set to the results of the recent() method on our Post model.
There are three primary types of data we’re most likely to inject into a view: collections of data to iterate over, single objects that we’re displaying on the page, and services that generate data or views.
With a service, the pattern will most likely look like Example 4-26, where we inject an instance of our analytics service into the route definition by typehinting it in the route’s method signature, and then pass it into the view.
Route::get('backend/sales',function(AnalyticsService$analytics){returnview('backend.sales-graphs')->with('analytics',$analytics);});
Just as with view composers, Blade’s service injection offers a convenient shortcut to reduce duplication in your route definitions. Normally, the content of a view using our analytics service might look like Example 4-27.
<divclass="finances-display">{{$analytics->getBalance()}}/{{$analytics->getBudget()}}</div>
Blade service injection makes it easy to inject an instance of a class from the container directly from the view, like in Example 4-28.
@inject('analytics','App\Services\Analytics')<divclass="finances-display">{{$analytics->getBalance()}}/{{$analytics->getBudget()}}</div>
As you can see, this @inject directive has actually made an $analytics variable available, which we’re using later in our view.
The first parameter of @inject is the name of the variable you’re injecting, and the second parameter is the class or interface that you want to inject an instance of. This is resolved just like when you type hint a dependency in a constructor elsewhere in Laravel; if you’re unfamiliar with how that works, check out Chapter 11 to learn more.
Just like view composers, Blade service injection makes it easy to make certain data or functionality available to every instance of a view, without having to inject it via the route definition every time.
All of the built-in syntax of Blade that we’ve covered so far—@if, @unless, and so on—are called directives. Each Blade directive is a mapping between a pattern (e.g., @if ($condition)) and a PHP output (e.g., <?php if ($condition): ?>).
Directives aren’t just for the core; you can actually create your own. You might think directives are good for making little shortcuts to bigger pieces of code—for example, using @button('buttonName') and having it expand to a larger set of button HTML. This isn’t a terrible idea, but for simple code expansion like this you might be better off including a view partial.
I’ve found custom directives to be the most useful when they simplify some form of repeated logic. Say we’re tired of having to wrap our code with @if (auth()->guest()) (to check if a user is logged in or not) and we want a custom @ifGuest directive. As with view composers, it might be worth having a custom service provider to register these, but for now let’s just put it in the boot() method of App\Providers\AppServiceProvider. Take a look at Example 4-29 to see what this binding will look like.
publicfunctionboot(){Blade::directive('ifGuest',function(){return"<?php if (auth()->guest()): ?>";});}
We’ve now registered a custom directive, @ifGuest, which will be replaced with the PHP code <?php if (auth()->guest()): ?>.
This might feel strange. You’re writing a string that will be returned and then executed as PHP. But what this means is that you can now take the complex, or ugly, or unclear, or repetitive aspects of your PHP templating code and hide them behind clear, simple, and expressive syntax.
You might be tempted to do some logic to make your custom directive faster by performing an operation in the binding and then embedding the result within the returned string:
Blade::directive('ifGuest',function(){// Antipattern! Do not copy.$ifGuest=auth()->guest();return"<?php if ({$ifGuest}): ?>";});
The problem with this idea is that it assumes this directive will be re-created on every page load. However, Blade caches aggressively, so you’re going to find yourself in a bad spot if you try this.
What if you want to accept parameters in your custom logic? Check out Example 4-30.
// BindingBlade::directive('newlinesToBr',function($expression){return"<?php echo nl2br({$expression}); ?>";});// In use<p>@newlinesToBr($message->body)</p>
The $expression parameter received by the closure represents whatever’s within the parentheses. As you can see, we then generate a valid PHP code snippet and return it.
Before Laravel 5.3, the $expression parameter also included the parentheses themselves. So, in Example 4-30, $expression (which is $message->body in Laravel 5.3 and later) would have instead been ($message->body), and we would’ve had to write <?php echo nl2br{$expression}; ?>.
If you find yourself constantly writing the same conditional logic over and over, you should consider a Blade directive.
So, let’s imagine we’re building an application that supports multitenancy, which means users might be visiting the site from www.myapp.com, client1.myapp.com, client2.myapp.com, or elsewhere.
Suppose we have written a class to encapsulate some of our multitenancy logic and named it Context. This class will capture information and logic about the context of the current visit, such as who the authenticated user is and whether the user is visiting the public website or a client subdomain.
We’ll probably frequently resolve that Context class in our views and perform conditionals on it, like in Example 4-31. The app('context') is a shortcut to get an instance of a class from the container, which we’ll learn more about in Chapter 11.
@if(app('context')->isPublic())©CopyrightMyAppLLC@else©Copyright{{app('context')->client->name}}@endif
What if we could simplify @if (app('context')->isPublic()) to just @ifPublic? Let’s do it. Check out Example 4-32.
// BindingBlade::directive('ifPublic',function(){return"<?php if (app('context')->isPublic()): ?>";});// In use@ifPublic©CopyrightMyAppLLC@else©Copyright{{app('context')->client->name}}@endif
Since this resolves to a simple if statement, we can still rely on the native @else and @endif conditionals. But if we wanted, we could also create a custom @elseIfClient directive, or a separate @ifClient directive, or really whatever else we want.
While custom Blade directives are powerful, the most common use for them are if statements. So there’s a simpler way to create custom “if” directives: Blade::if. Let’s take a look at refactoring Example 4-32 using the Blade::if method:
// BindingBlade::if('ifPublic',function(){return(app('context'))->isPublic();});
You’ll use the directives exactly the same, but as you can see, defining them is just a bit simpler. Instead of having to manually type out PHP braces, you can just write a closure that returns a boolean.
The most common method of testing views is through application testing, meaning that you’re actually calling the route that displays the views and ensuring the views have certain content (see Example 4-34). You can also click buttons or submit forms and ensure that you are redirected to a certain page, or that you see a certain error. (You’ll learn more about testing in Chapter 12.)
// EventsTest.phppublicfunctiontest_list_page_shows_all_events(){$event1=factory(Event::class)->create();$event2=factory(Event::class)->create();$this->get('events')->assertSee($event1->title)->assertSee($event2->title);}
You can also test that a certain view has been passed a particular set of data, which, if it accomplishes your testing goals, is less fragile than checking for certain text on the page. Example 4-35 demonstrates this approach.
// EventsTest.phppublicfunctiontest_list_page_shows_all_events(){$event1=factory(Event::class)->create();$event2=factory(Event::class)->create();$response=$this->get('events');$response->assertViewHas('events',Event::all());$response->assertViewHasAll(['events'=>Event::all(),'title'=>'Events Page']);$response->assertViewMissing('dogs');}
In projects running versions of Laravel prior to 5.4 get and assertSee should be replaced by visit and see.
In 5.3, we gained the ability to pass a closure to $assertViewHas(), meaning we can customize how we want to check more complex data structures. Example 4-36 illustrates how we might use this.
// EventsTest.phppublicfunctiontest_list_page_shows_all_events(){$event1=factory(Event::class)->create();$response=$this->get("events/{$event->id}");$response->assertViewHas('event',function($event)use($event1){return$event->id===$event1->id;});}
Blade is Laravel’s templating engine. Its primary focus is a clear, concise, and expressive syntax with powerful inheritance and extensibility. Its “safe echo” brackets are {{ and }}, its unprotected echo brackets are {!! and !!}, and it has a series of custom tags called directives that all begin with @ (@if and @unless, for example).
You can define a parent template and leave “holes” in it for content using @yield and @section/@show. You can then teach its child views to extend it using @extends('parent.view.name'), and define their sections using @section/@endsection. You use @parent to reference the content of the block’s parent.
View composers make it easy to define that, every time a particular view or subview loads, it should have certain information available to it. And service injection allows the view itself to request data straight from the application container.
Laravel provides a suite of tools for interacting with your application’s databases, but the most notable is Eloquent, Laravel’s ActiveRecord ORM (object-relational mapper).
Eloquent is one of Laravel’s most popular and influential features. It’s a great example of how Laravel is different from the majority of PHP frameworks; in a world of DataMapper ORMs that are powerful but complex, Eloquent stands out for its simplicity. There’s one class per table, which is responsible for retrieving, representing, and persisting data in that table.
Whether or not you choose to use Eloquent, however, you’ll still get a ton of benefit from the other database tools Laravel provides. So, before we dig into Eloquent, we’ll start by covering the basics of Laravel’s database functionality: migrations, seeders, and the query builder.
Then we’ll cover Eloquent: defining your models; inserting, updating, and deleting; customizing your responses with accessors, mutators, and attribute casting; and finally relationships. There’s a lot going on here, and it’s easy to get overwhelmed, but just take it one step at a time and we’ll make it through.
Before we get into how to use Laravel’s database tools, let’s pause for a second and go over how to configure your database credentials and connections.
The configuration for database access lives in config/database.php and .env. Like many other configuration areas in Laravel, you can define multiple “connections” and then decide which the code will use by default.
By default, there’s one connection for each of the drivers, as you can see in Example 5-1.
'connections'=>['sqlite'=>['driver'=>'sqlite','database'=>env('DB_DATABASE',database_path('database.sqlite')),'prefix'=>'',],'mysql'=>['driver'=>'mysql','host'=>env('DB_HOST','127.0.0.1'),'port'=>env('DB_PORT','3306'),'database'=>env('DB_DATABASE','forge'),'username'=>env('DB_USERNAME','forge'),'password'=>env('DB_PASSWORD',''),'unix_socket'=>env('DB_SOCKET',''),'charset'=>'utf8','collation'=>'utf8_unicode_ci','prefix'=>'','strict'=>false,'engine'=>null,],'pgsql'=>['driver'=>'pgsql','host'=>env('DB_HOST','127.0.0.1'),'port'=>env('DB_PORT','5432'),'database'=>env('DB_DATABASE','forge'),'username'=>env('DB_USERNAME','forge'),'password'=>env('DB_PASSWORD',''),'charset'=>'utf8','prefix'=>'','schema'=>'public','sslmode'=>'prefer',],'sqlsrv'=>['driver'=>'sqlsrv','host'=>env('DB_HOST','localhost'),'port'=>env('DB_PORT','1433'),'database'=>env('DB_DATABASE','forge'),'username'=>env('DB_USERNAME','forge'),'password'=>env('DB_PASSWORD',''),'charset'=>'utf8','prefix'=>'',],]
You could create new named connections, and still be able to set the drivers (MySQL, Postgres, etc.) in those new named connections. So, while there’s one connection per driver by default, that’s not a constraint.
Nothing is stopping you from deleting or modifying these named connections or creating your own. You could have five different connections, all with the mysql driver, if you want.
Each connection allows you to define the properties necessary for connecting to and customizing each connection type.
There are a few reasons for the idea of multiple drivers. To start with, the “connections” section as it comes out of the box is a simple template that makes it easy to start apps that use any of the supported database connection types. In many apps, you can pick the database connection you’ll be using, fill out its information, and even delete the others if you’d like. I usually just keep them all there, in case I might eventually use them.
But there are also some cases where you might need multiple connections within the same application. For example, you might use different database connections for two different types of data, or you might read from one and write to another. Support for multiple connections makes this possible.
The config/database.php configuration section has quite a few other configuration settings. You can configure Redis access, customize the table name used for migrations, determine the default connection, and toggle whether non-Eloquent calls return stdClass or array instances.
With any service in Laravel that allows multiple “connections”—sessions can be backed by the database or file storage, the cache can use Redis or Memcached, databases can use MySQL or PostgreSQL—you can define multiple connections and also choose that a particular connection will be the “default,” meaning it will be used any time you don’t explicitly ask for a particular connection. Here’s how you ask for a specific connection, if you want to:
$users=DB::connection('secondary')->select('select * from users');
Modern frameworks like Laravel make it easy to define your database structure with code-driven migrations. Every new table, column, index, and key can be defined in code, and any new environment can be brought from bare database to your app’s perfect schema in seconds.
A migration is a single file that defines two things: the modifications desired when running this migration up and, optionally, the modifications desired when running this migration down.
Example 5-2 shows what the default “create users table” migration that comes with Laravel looks like.
<?phpuseIlluminate\Database\Schema\Blueprint;useIlluminate\Database\Migrations\Migration;classCreateUsersTableextendsMigration{/*** Run the migrations.** @return void*/publicfunctionup(){Schema::create('users',function(Blueprint$table){$table->increments('id');$table->string('name');$table->string('email')->unique();$table->timestamp('email_verified_at')->nullable();$table->string('password');$table->rememberToken();$table->timestamps();});}/*** Reverse the migrations.** @return void*/publicfunctiondown(){Schema::dropIfExists('users');}}
The email_verified_at column is only present in apps built in Laravel 5.7 and later.
As you can see, we have an up() method and a down() method. up() tells the migration to create a new table named users with a few fields, and down() tells it to drop the users table.
As you will learn more about in Chapter 8, Laravel provides a series of command-line tools you can use to interact with your app and generate boilerplate files. One of these commands allows you to create a migration file. You can run it using php artisan make:migration, and it has a single parameter, which is the name of the migration. For example, to create the table we just covered, you would run php artisan make:migration create_users_table.
There are two flags you can optionally pass to this command. --create=table_name prefills the migration with code designed to create a table named table_name, and --table=table_name just prefills the migration for modifications to an existing table. Here are a few examples:
phpartisanmake:migrationcreate_users_tablephpartisanmake:migrationadd_votes_to_users_table--table=usersphpartisanmake:migrationcreate_users_table--create=users
We already saw in the default create_users_table migration that our migrations depend on the Schema facade and its methods. Everything we can do in these migrations will rely on the methods of Schema.
To create a new table in a migration, use the create() method—the first parameter is the table name, and the second is a closure that defines its columns:
Schema::create('users',function(Blueprint$table){// Create columns here});
To create new columns in a table, whether in a create table call or a modify table call, use the instance of Blueprint that’s passed into your closure:
Schema::create('users',function(Blueprint$table){$table->string('name');});
Let’s look at the various methods available on Blueprint instances for creating columns. I’ll describe how they work in MySQL, but if you’re using another database, Laravel will just use the closest equivalent.
The following are the simple field Blueprint methods:
integer(colName), tinyInteger(colName), smallInteger(colName), mediumInteger(colName), bigInteger(colName)Adds an INTEGER type column, or one of its many variations
string(colName, OPTIONAL length)Adds a VARCHAR type column
binary(colName)Adds a BLOB type column
boolean(colName)Adds a BOOLEAN type column (a TINYINT(1) in MySQL)
char(colName, length)Adds a CHAR column
datetime(colName)Adds a DATETIME column
decimal(colName, precision, scale)Adds a DECIMAL column, with precision and scale—e.g., decimal('amount', 5, 2) specifies a precision of 5 and a scale of 2
double(colName, total digits, digits after decimal)Adds a DOUBLE column—e.g., double('tolerance', 12, 8) specifies 12 digits long, with 8 of those digits to the right of the decimal place, as in 7204.05691739
enum(colName, [choiceOne, choiceTwo])Adds an ENUM column, with provided choices
float(colName, precision, scale)Adds a FLOAT column (same as double in MySQL)
json(colName) and jsonb(colName)Adds a JSON or JSONB column (or a TEXT column in Laravel 5.1)
text(colName), mediumText(colName), longText(colName)Adds a TEXT column (or its various sizes)
time(colName)Adds a TIME column
timestamp(colName)Adds a TIMESTAMP column
uuid(colName)Adds a UUID column (CHAR(36) in MySQL)
And these are the special (joined) Blueprint methods:
increments(colName) and bigIncrements(colName)Add an unsigned incrementing INTEGER or BIG INTEGER primary key ID
timestamps() and nullableTimestamps()Adds created_at and updated_at timestamp columns
rememberToken()Adds a remember_token column (VARCHAR(100)) for user “remember me” tokens
softDeletes()Adds a deleted_at timestamp for use with soft deletes
morphs(colName)For a provided colName, adds an integer colName_id and a string colName_type (e.g., morphs('tag') adds integer tag_id and string tag_type); for use in polymorphic relationships
Most of the properties of a field definition—its length, for example—are set as the second parameter of the field creation method we looked at in the previous section. But there are a few other properties that we’ll set by chaining more method calls after the creation of the column. For example, this email field is nullable and will be placed (in MySQL) right after the last_name field:
Schema::table('users',function(Blueprint$table){$table->string('email')->nullable()->after('last_name');});
The following methods are used to set additional properties of a field:
nullable()Allows NULL values to be inserted into this column
default('default content')Specifies the default content for this column if no value is provided
unsigned()Marks integer columns as unsigned (not negative or positive, but just an integer)
first() (MySQL only)Places the column first in the column order
after(colName) (MySQL only)Places the column after another column in the column order
unique()Adds a UNIQUE index
primary()Adds a primary key index
index()Adds a basic index
Note that unique(), primary(), and index() can also be used outside of the fluent column building context, which we’ll cover later.
If you want to drop a table, there’s a dropIfExists method on Schema that takes one parameter, the table name:
Schema::dropIfExists('contacts');
To modify a column, just write the code you would write to create the column as if it were new, and then append a call to the change() method after it.
Before you modify any columns (or drop any columns in SQLite), you’ll need to run composer require doctrine/dbal.
So, if we have a string column named name that has a length of 255 and we want to change its length to 100, this is how we would write it:
Schema::table('users',function(Blueprint$table){$table->string('name',100)->change();});
The same is true if we want to adjust any of its properties that aren’t defined in the method name. To make a field nullable, we do this:
Schema::table('contacts',function(Blueprint$table){$table->string('deleted_at')->nullable()->change();});
Here’s how we rename a column:
Schema::table('contacts',function(Blueprint$table){$table->renameColumn('promoted','is_promoted');});
And this is how we drop a column:
Schema::table('contacts',function(Blueprint$table){$table->dropColumn('votes');});
If you try to drop or modify multiple columns within a single migration closure and you are using SQLite, you’ll run into errors.
In Chapter 12 I’ll recommend that you use SQLite for your testing database, so even if you’re using a more traditional database, you may want to consider this a limitation for testing purposes.
However, you don’t have to create a new migration for each. Instead, just create multiple calls to Schema::table() within the up() method of your migration:
publicfunctionup(){Schema::table('contacts',function(Blueprint$table){$table->dropColumn('is_promoted');});Schema::table('contacts',function(Blueprint$table){$table->dropColumn('alternate_email');});}
We’ve covered how to create, modify, and delete columns. Let’s move on to indexing and relating them.
If you’re not familiar with indexes, your databases can survive if you just never use them, but they’re pretty important for performance optimization and for some data integrity controls with regard to related tables. I’d recommend learning up on them but if you absolutely must, you can skip this section for now.
Check out Example 5-3 for examples of how to add indexes to your column.
// after columns are created...$table->primary('primary_id');// Primary key; unnecessary if used increments()$table->primary(['first_name','last_name']);// Composite keys$table->unique('email');// Unique index$table->unique('email','optional_custom_index_name');// Unique index$table->index('amount');// Basic index$table->index('amount','optional_custom_index_name');// Basic index
Note that the first example, primary(), is not necessary if you’re using the increments() method to create your index; this will automatically add a primary key index for you.
We can remove indexes as shown in Example 5-4.
$table->dropPrimary('contacts_id_primary');$table->dropUnique('contacts_email_unique');$table->dropIndex('optional_custom_index_name');// If you pass an array of column names to dropIndex, it will// guess the index names for you based on the generation rules$table->dropIndex(['email','amount']);
To add a foreign key that defines that a particular column references a column on another table, Laravel’s syntax is simple and clear:
$table->foreign('user_id')->references('id')->on('users');
Here we’re adding a foreign index on the user_id column, showing that it references the id column on the users table. Couldn’t get much simpler.
If we want to specify foreign key constraints, we can do that too, with onDelete() and onUpdate(). For example:
$table->foreign('user_id')->references('id')->on('users')->onDelete('cascade');
To drop a foreign key, we can either delete it by referencing its index name (which is automatically generated by combining the names of the columns and tables being referenced):
$table->dropForeign('contacts_user_id_foreign');
or by passing it an array of the fields that it’s referencing on the local table:
$table->dropForeign(['user_id']);
Once you have your migrations defined, how do you run them? There’s an Artisan command for that:
php artisan migrate
This command runs all “outstanding” migrations (by running the up() method on each). Laravel keeps track of which migrations you have run and which you haven’t. Every time you run this command, it checks whether you’ve run all available migrations, and if you haven’t, it’ll run any that remain.
There are a few options in this namespace that you can work with. First, you can run your migrations and your seeds (which we’ll cover next):
php artisan migrate --seed
You can also run any of the following commands:
migrate:install creates the database table that keeps track of which migrations you have and haven’t run; this is run automatically when you run your migrations, so you can basically ignore it.
migrate:reset rolls back every database migration you’ve run on this instance.
migrate:refresh rolls back every database migration you’ve run on this instance, and then runs every migration available. It’s the same as running migrate:reset and then migrate, one after the other.
migrate:fresh drops all of your tables and runs every migration again. It’s the same as refresh but doesn’t bother with the “down” migrations—it just deletes the tables and then runs the “up” migrations again.
migrate:rollback rolls back just the migrations that ran the last time you ran migrate, or, with the added option --step=1, rolls back the number of migrations you specify.
migrate:status shows a table listing every migration, with a Y or N next to each showing whether or not it has run yet in this environment.
If you’re running migrations on your local machine and your .env file points to a database in a Vagrant box, your migrations will fail. You’ll need to ssh into your Vagrant box and then run the migrations from there. The same is true for seeds and any other Artisan commands that affect or read from the database.
Seeding with Laravel is so simple, it has gained widespread adoption as a part of normal development workflows in a way it hasn’t in previous PHP frameworks. There’s a database/seeds folder that comes with a DatabaseSeeder class, which has a run() method that is called when you call the seeder.
There are two primary ways to run the seeders: along with a migration, or separately.
To run a seeder along with a migration, just add --seed to any migration call:
phpartisanmigrate--seedphpartisanmigrate:refresh--seed
And to run it independently:
phpartisandb:seedphpartisandb:seed--class=VotesTableSeeder
This will call the run() method of the DatabaseSeeder by default, or the seeder class specified by --class.
To create a seeder, use the make:seeder Artisan command:
phpartisanmake:seederContactsTableSeeder
You’ll now see a ContactsTableSeeder class show up in the database/seeds directory. Before we edit it, let’s add it to the DatabaseSeeder class so it will run when we run our seeders:
// database/seeds/DatabaseSeeder.php...publicfunctionrun(){$this->call(ContactsTableSeeder::class);}
Now let’s edit the seeder itself. The simplest thing we can do there is manually insert a record using the DB facade:
<?phpuseIlluminate\Database\Seeder;useIlluminate\Database\Eloquent\Model;classContactsTableSeederextendsSeeder{publicfunctionrun(){DB::table('contacts')->insert(['name'=>'Lupita Smith','email'=>'lupita@gmail.com',]);}}
This will get us a single record, which is a good start. But for truly functional seeds, you’ll likely want to loop over some sort of random generator and run this insert() many times, right? Laravel has a feature for that.
Model factories define one (or more) patterns for creating fake entries for your database tables. By default each factory is named after an Eloquent class, but you can also just name them after the table if you’re not going to work with Eloquent. Here’s the same factory set up both ways:
$factory->define(User::class,function(Faker\Generator$faker){return['name'=>$faker->name,];});$factory->define('users',function(Faker\Generator$faker){return['name'=>$faker->name,];});
Theoretically you can name these factories anything you like, but naming the factory after your Eloquent class is the most idiomatic approach.
Model factories are located in database/factories. Each factory is usually defined in its own class, with a key (name) and a closure defining how to create a new instance of the defined class. The $factory->define() method takes the factory name as the first parameter and a closure that’s run for each generation as the second parameter.
To generate a new factory class, use the Artisan make:factory command; just like with naming the factory keys, it’s also most common to name factory classes after the Eloquent models they’re meant to generate instances of:
phpartisanmake:factoryContactFactory
This will generate a new file within the database/factories directory called ContactFactory.php The simplest factory we could define for a contact might look something like this:
$factory->define(Contact::class,function(Faker\Generator$faker){return['name'=>'Lupita Smith','email'=>'lupita@gmail.com',];});
In Laravel prior to 5.5, all factories should be defined in database/factories/ModelFactory.php. There are no separate classes for each factory until 5.5.
Now we can use the factory() global helper to create an instance of Contact in our seeding and testing:
// Create one$contact=factory(Contact::class)->create();// Create manyfactory(Contact::class,20)->create();
However, if we used that factory to create 20 contacts, all 20 would have the same information. That’s less useful.
We will get even more benefit from model factories when we take advantage of the instance of Faker that’s passed into the closure; Faker makes it easy to randomize the creation of structured fake data. The previous example now turns into this:
$factory->define(Contact::class,function(Faker\Generator$faker){return['name'=>$faker->name,'email'=>$faker->,];});
Now, every time we create a fake contact using this model factory, all of our properties will be randomly generated.
If you want to guarantee that the randomly generated values of any given entry are unique against the other randomly generated values during that PHP process, you can use Faker’s unique() method:
return['email'=>$faker->unique()->];
There are two primary contexts in which we’ll use model factories: testing (which we’ll cover in Chapter 12) and seeding, which we’ll cover here. Let’s write a seeder using a model factory; take a look at Example 5-7.
factory(Post::class)->create(['title'=>'My greatest post ever']);// Pro-level factory; but don't get overwhelmed!factory(User::class,20)->create()->each(function($u)use($post){$post->comments()->save(factory(Comment::class)->make(['user_id'=>$u->id]));});
To create an object, we use the factory() global helper, and pass it the name of the factory—which, as we just saw, is the name of the Eloquent class we’re generating an instance of. That returns the factory, and then we can run one of two methods on it: make() or create().
Both methods generate an instance of this specified model, using the definition in the factory file. The difference is that make() creates the instance but doesn’t (yet) save it to the database, whereas create() saves it to the database instantly. You can see both in use in the two examples in Example 5-7.
The second example will make more sense once we cover relationships in Eloquent later in this chapter.
If you pass an array to either make() or create(), you can override specific keys from the factory, like we did in Example 5-7 to set the user_id on the comment and to manually set the title of our post.
If you pass a number as the second parameter to the factory() helper, you can specify that you’re creating more than one instance. Instead of returning a single instance, it’ll return a collection of instances. This means you can treat the result like an array, you can associate each of its instances with another entity, or you can use other entity methods on each instance—like we used each() in Example 5-7 to add a comment from each newly created user.
Now that we’ve covered the most common uses for and arrangements of model factories, let’s dive into some of the more complicate ways we can use them.
Sometimes you need to create a related item along with the item you’re creating. You can use a closure on that property to create a related item and pull its ID:
$factory->define(Contact::class,function(Faker\Generator$faker){return['name'=>'Lupita Smith','email'=>'lupita@gmail.com','company_id'=>function(){returnfactory(App\Company::class)->create()->id;}];});
Each closure is passed a single parameter, which contains the array form of the generated item up until that point, which can be used in other ways:
$factory->define(Contact::class,function(Faker\Generator$faker){return['name'=>'Lupita Smith','email'=>'lupita@gmail.com','company_id'=>function(){returnfactory(App\Company::class)->create()->id;},'company_size'=>function($contact){// Uses the "company_id" property generated abovereturnApp\Company::find($contact['company_id'])->size;}];});
Let’s go back to ContactFactory.php (from Example 5-5 and Example 5-6) for a second. We have a base Contact factory defined:
$factory->define(Contact::class,function(Faker\Generator$faker){return['name'=>$faker->name,'email'=>$faker->,];});
But sometimes you need more than one factory for a class of object. What if we need to be able to add some contacts who are Very Important People (VIPs)? We can use the state() method to define a second factory state for this, as seen in Example 5-8. Your first parameter to state() is still the name of the entity you’re generating; the second is the name of your state; and the third is an array of any attributes you want to specifically set for this state.
$factory->define(Contact::class,function(Faker\Generator$faker){return['name'=>$faker->name,'email'=>$faker->,];});$factory->state(Contact::class,'vip',['vip'=>true,]);
If the modified attributes require more than a simple static value, you can pass a closure instead of an array as the second parameter, and then return an array of the attributes you want to modify, like in Example 5-9.
$factory->state(Contact::class,'vip',function(Faker\Generator$faker){return['vip'=>true,'company'=>$faker->company,];});
Now, let’s make an instance of a specific state:
$vip=factory(Contact::class,'vip')->create();$vips=factory(Contact::class,'vip',3)->create();
In projects running versions of Laravel prior to 5.3, factory states were called factory types, and you’ll want to use $factory->defineAs() instead of $factory->state(). Learn more in the 5.2 docs: https://laravel.com/docs/5.2/testing#model-factories
Whew. That was a lot. Don’t worry if that was tough to follow—the last bit was definitely higher level stuff. Let’s get back down to the basics and talk about the core of Laravel’s database tooling: the query builder.
Now that you’re connected and you’ve migrated and seeded your tables, let’s get started with how to use the database tools. At the core of every piece of Laravel’s database functionality is the query builder, a fluent interface for interacting with several different types of databases with a single clear API.
Laravel’s database architecture can connect to MySQL, Postgres, SQLite, and SQL Server through a single interface, with just the change of a few configuration settings.
If you’ve ever used a PHP framework, you’ve likely used a tool that allows you to run “raw” SQL queries with basic escaping for security. The query builder is that, with a lot of convenience layers and helpers on top, so let’s start with some simple calls.
Before we get into building complex queries with fluent method chaining, let’s take a look at a few sample query builder commands. The DB facade is used both for query builder chaining and for simpler raw queries, as illustrated in Example 5-10.
// basic statementDB::statement('drop table users');// raw select, and parameter bindingDB::select('select * from contacts where validated = ?',[true]);// select using the fluent builder$users=DB::table('users')->get();// joins and other complex callsDB::table('users')->join('contacts',function($join){$join->on('users.id','=','contacts.user_id')->where('contacts.type','donor');})->get();
As you saw in Example 5-10, it’s possible to make any raw call to the database using the DB facade and the statement() method: DB::statement('SQL statement here').
But there are also specific methods for various common actions: select(), insert(), update(), and delete(). These are still raw calls, but there are differences. First, using update() and delete() will return the number of rows affected, whereas statement() won’t; second, with these methods it’s clearer to future developers exactly what sort of statement you’re making.
The simplest of the specific DB methods is select(). You can run it without any additional parameters:
$users=DB::select('select * from users');
This will return a collection of stdClass objects.
Laravel’s database architecture allows for the use of PDO parameter binding, which protects your queries from potential SQL attacks. Passing a parameter to a statement is as simple as replacing the value in your statement with a ?, then adding the value to the second parameter of your call:
$usersOfType=DB::select('select * from users where type = ?',[$type]);
You can also name those parameters for clarity:
$usersOfType=DB::select('select * from users where type = :type',['type'=>$userType]);
From here, the raw commands all look pretty much the same. Raw inserts look like this:
DB::insert('insert into contacts (name, email) values (?, ?)',['sally','sally@me.com']);
Updates look like this:
$countUpdated=DB::update('update contacts set status = ? where id = ?',['donor',$id]);
And deletes look like this:
$countDeleted=DB::delete('delete from contacts where archived = ?',[true]);
Up until now, we haven’t actually used the query builder, per se. We’ve just used simple method calls on the DB facade. Let’s actually build some queries.
The query builder makes it possible to chain methods together to, you guessed it, build a query. At the end of your chain you’ll use some method—likely get()—to trigger the actual execution of the query you’ve just built.
Let’s take a look at a quick example:
$usersOfType=DB::table('users')->where('type',$type)->get();
Here, we built our query—users table, $type type—and then we executed the query and got our result.
Let’s take a look at what methods the query builder allows you to chain. The methods can be split up into what I’ll call constraining methods, modifying methods, conditional methods, and ending/returning methods.
These methods take the query as it is and constrain it to return a smaller subset of possible data:
select()Allows you to choose which columns you’re selecting:
$emails=DB::table('contacts')->select('email','email2 as second_email')->get();// Or$emails=DB::table('contacts')->select('email')->addSelect('email2 as second_email')->get();
where()Allows you to limit the scope of what’s being returned using WHERE. By default, the signature of the where() method is that it takes three parameters—the column, the comparison operator, and the value:
$newContacts=DB::table('contact')->where('created_at','>',now()->subDay())->get();
However, if your comparison is =, which is the most common comparison, you can drop the second operator: $vipContacts = DB::table('contacts')->where('vip',true)->get();.
If you want to combine where() statements, you can either chain them after each other, or pass an array of arrays:
$newVips=DB::table('contacts')->where('vip',true)->where('created_at','>',now()->subDay());// Or$newVips=DB::table('contacts')->where([['vip',true],['created_at','>',now()->subDay()],]);
orWhere()Creates simple OR WHERE statements:
$priorityContacts=DB::table('contacts')->where('vip',true)->orWhere('created_at','>',now()->subDay())->get();
To create a more complex OR WHERE statement with multiple conditions, pass orWhere() a closure:
$contacts=DB::table('contacts')->where('vip',true)->orWhere(function($query){$query->where('created_at','>',now()->subDay())->where('trial',false);})->get();
If you are using orWhere() calls in conjunction with multiple where() calls, you need to be very careful to ensure the query is doing what you think it is. This isn’t because of any fault with Laravel, but because a query like the following might not do what you expect:
$canEdit=DB::table('users')->where('admin',true)->orWhere('plan','premium')->where('is_plan_owner',true)->get();
SELECT*FROMusersWHEREadmin=1ORplan='premium'ANDis_plan_owner=1;
If you want to write SQL that says “if this OR (this and this),” which is clearly the intention in the previous example, you’ll want to pass a closure into the orWhere() call:
$canEdit=DB::table('users')->where('admin',true)->orWhere(function($query){$query->where('plan','premium')->where('is_plan_owner',true);})->get();
SELECT*FROMusersWHEREadmin=1OR(plan='premium'ANDis_plan_owner=1);
whereBetween(colName, [low, high])Allows you to scope a query to return only rows where a column is between two values (inclusive of the two values):
$mediumDrinks=DB::table('drinks')->whereBetween('size',[6,12])->get();
The same works for whereNotBetween(), but it will select the inverse.
whereIn(colName, [1, 2, 3])Allows you to scope a query to return only rows where a column value is in an explicitly provided list of options:
$closeBy=DB::table('contacts')->whereIn('state',['FL','GA','AL'])->get();
sThe same works for whereNotIn(), but it will select the inverse.
whereNull(colName) and whereNotNull(colName)Allow you to select only rows where a given column is NULL or is NOT NULL, respectively.
whereRaw()Allows you to pass in a raw, unescaped string to be added after the WHERE statement: $goofs = DB::table('contacts')->whereRaw('id = 12345')->get().
Any SQL queries passed to whereRaw() will not be escaped. Use this method carefully and infrequently; this is the prime opportunity for SQL injection attacks in your app.
whereExists()Allows you to select only rows that, when passed into a provided subquery, return at least one row. Imagine you only want to get those users who have left at least one comment:
$commenters=DB::table('users')->whereExists(function($query){$query->select('id')->from('comments')->whereRaw('comments.user_id = users.id');})->get();
distinct()Selects only rows where the selected data is unique when compared to the other rows in the returned data. Usually this is paired with select(), because if you use a primary key, there will be no duplicated rows: $lastNames = DB::table('contacts')->select('last_name')->distinct()->get().
These methods change the way the query’s results will be output, rather than just limiting its results:
orderBy(colName, direction)Orders the results. The second parameter may be either asc (the default, ascending order) or desc (descending order):
$contacts=DB::table('contacts')->orderBy('last_name','asc')->get();
groupBy() and having() or havingRaw()Groups your results by a column. Optionally, having() and havingRaw() allow you to filter your results based on properties of the groups. For example, you could look for only cities with at least 30 people in them:
$populousCities=DB::table('contacts')->groupBy('city')->havingRaw('count(contact_id) > 30')->get();
skip() and take()Most often used for pagination, these allow you to define how many rows to return and how many to skip before starting the return—like a page number and a page size in a pagination system:
// returns rows 31-40$page4=DB::table('contacts')->skip(30)->take(10)->get();
latest(colName) and oldest(colName)Sort by the passed column (or created_at if no column name is passed) in descending (latest()) or ascending (oldest()) order.
inRandomOrder()Sorts the result randomly.
These methods allow you to conditionally apply their “contents” (a closure you pass to them) based on the boolean state of a value you pass in.
when() and unless()Given a truthy first parameter, apply the query modification contained in the closure; given a falsy first parameter, do nothing. Note that that first parameter could be a boolean (e.g. $ignoreDrafts, set to true or false), an optional value which defaults to null ($status, pulled from user input and defaulting to null), or a closure that returns either; what matters is that it evaluates truthy or falsy.
$status=request('status');// Defaults to null if not set$posts=DB::table('posts')->when($status,function($query)use($status){return$query->where('status',$status);})->get();// Or:$posts=DB::table('posts')->when($ignoreDrafts,function($query){return$query->where('draft',false);})->get();
You can also pass a third parameter, another closure, which will only be applied if the first parameter is falsy.
unless() is the exact inverse; if the first parameter is falsy, it will run the second closure.
when() and unless() are only available in Laravel 5.2 and later.
These methods stop the query chain and trigger the execution of the SQL query. Without one of these at the end of the query chain, your return will always just be an instance of the query builder; chain one of these on to a query builder and you’ll actually get a result.
get()Gets all results for the built query:
$contacts=DB::table('contacts')->get();$vipContacts=DB::table('contacts')->where('vip',true)->get();
first() and firstOrFail()Get only the first result—like get(), but with a LIMIT 1 added:
$newestContact=DB::table('contacts')->orderBy('created_at','desc')->first();
first() fails silently if there are no results, whereas firstOrFail() will throw an exception.
If you pass an array of column names to either method, they’ll return the data for just those columns instead of all columns.
find(id) and findOrFail(id)Like first(), but you pass in an ID value that corresponds to the primary key to look up. find() fails silently if a row with that ID doesn’t exist, while findOrFail() will throw an exception:
$contactFive=DB::table('contacts')->find(5);
value()Plucks just the value from a single field from the first row. Like first(), but if you only want a single column:
$newestContactEmail=DB::table('contacts')->orderBy('created_at','desc')->value('email');
count()Returns an integer count of all of the matching results:
$countVips=DB::table('contacts')->where('vip',true)->count();
min() and max()Return the minimum or maximum value of a particular column:
$highestCost=DB::table('orders')->max('amount');
sum() and avg()Return the sum or average of all of the values in a particular column:
$averageCost=DB::table('orders')->where('status','completed')->avg('amount');
You’ve already seen a few custom methods for raw statements—for example, select() has a selectRaw() counterpart that allows you to pass in a string for the query builder to place after the WHERE statement.
You can also, however, pass in the result of a DB::raw() call to almost any method in the query builder to achieve the same result:
$contacts=DB::table('contacts')->select(DB::raw('*, (score * 100) AS integer_score'))->get();
Joins can sometimes be a pain to define, and there’s only so much a framework can do to make them simpler, but the query builder does its best. Let’s look at a sample:
$users=DB::table('users')->join('contacts','users.id','=','contacts.user_id')->select('users.*','contacts.name','contacts.status')->get();
The join() method creates an inner join. You can also chain together multiple joins one after another, or use leftJoin() to get a left join.
Finally, you can create more complex joins by passing a closure into the join() method:
DB::table('users')->join('contacts',function($join){$join->on('users.id','=','contacts.user_id')->orOn('users.id','=','contacts.proxy_user_id');})->get();
You can union two queries together by creating them first and then using the union() or unionAll() method to union them:
$first=DB::table('contacts')->whereNull('first_name');$contacts=DB::table('contacts')->whereNull('last_name')->union($first)->get();
The insert() method is pretty simple. Pass it an array to insert a single row or an array of arrays to insert multiple rows, and use insertGetId() instead of insert() to get the autoincrementing primary key ID back as a return:
$id=DB::table('contacts')->insertGetId(['name'=>'Abe Thomas','email'=>'athomas1987@gmail.com',]);DB::table('contacts')->insert([['name'=>'Tamika Johnson','email'=>'tamikaj@gmail.com'],['name'=>'Jim Patterson','email'=>'james.patterson@hotmail.com'],]);
Updates are also simple. Create your update query and, instead of get() or first(), just use update() and pass it an array of parameters:
DB::table('contacts')->where('points','>',100)->update(['status'=>'vip']);
You can also quickly increment and decrement columns using the increment() and decrement() methods. The first parameter of each is the column name, and the second is (optionally) the number to increment/decrement by:
DB::table('contacts')->increment('tokens',5);DB::table('contacts')->decrement('tokens');
Deletes are even simpler. Build your query and then end it with delete():
DB::table('users')->where('last_login','<',now()->subYear())->delete();
You can also truncate the table, which both deletes every row and also resets the autoincrementing ID:
DB::table('contacts')->truncate();
If you have JSON columns, you can update or select rows based on aspects of the JSON structure by using the arrow syntax to traverse children:
// Select all records where the "isAdmin" property of the "options"// JSON column is set to trueDB::table('users')->where('options->isAdmin',true)->get();// Update all records, setting the "verified" property// of the "options" JSON column to trueDB::table('users')->update(['options->isVerified',true]);
This is a new feature since Laravel 5.3.
If you’re not familiar with database transactions, they’re a tool that allows you to wrap up a series of database queries to be performed in a batch, which you can choose to roll back, undoing the entire series of queries. Transactions are often used to ensure that all or none, but not some, of a series of related queries are performed—if one fails, the ORM will roll back the entire series of queries.
With the Laravel query builder’s transaction feature, if any exceptions are thrown at any point within the transaction closure, all the queries in the transaction will be rolled back. If the transaction closure finishes successfully, all the queries will be committed and not rolled back.
Let’s take a look at a sample transaction in Example 5-11.
DB::transaction(function()use($userId,$numVotes){// Possibly failing DB queryDB::table('users')->where('id',$userId)->update(['votes'=>$numVotes]);// Caching query that we don't want to run if the above query failsDB::table('votes')->where('user_id',$userId)->delete();});
In this example, we can assume we had some previous process that summarized the number of votes from the votes table for a given user. We want to cache that number on the users table and then wipe those votes from the votes table. But, of course, we don’t want to wipe the votes until the update to the users table has run successfully. And we don’t want to keep the updated number of votes on the users table if the votes table deletion fails.
If anything goes wrong with either query, the other won’t be applied. That’s the magic of database transactions.
Note that you can also manually begin and end transactions—and this applies both for query builder queries and for Eloquent queries. Start with DB::beginTransaction(), end with DB::commit(), and abort with DB::rollBack().
DB::beginTransaction();// Take database actionsif($badThingsHappened{DB::rollBack();}// Take other database actionsDB::commit();
Now that we’ve covered the query builder, let’s talk about Eloquent, Laravel’s flagship database tool that’s built on the query builder.
Eloquent is an ActiveRecord ORM, which means it’s a database abstraction layer that provides a single interface to interact with multiple database types. “ActiveRecord” means that a single Eloquent class is responsible for not only providing the ability to interact with the table as a whole (e.g., User::all() gets all users), but also representing an individual table row (e.g., $sharon = new User). Additionally, each instance is capable of managing its own persistence; you can call $sharon->save() or $sharon->delete().
Eloquent has a primary focus on simplicity, and like the rest of the framework, it relies on “convention over configuration” to allow you to build powerful models with minimal code.
For example, you can perform all of the operations in Example 5-13 with the model defined in Example 5-12.
<?phpuseIlluminate\Database\Eloquent\Model;classContactextendsModel{}
// In a controllerpublicfunctionsave(Request$request){// Create and save a new contact from user input$contact=newContact();$contact->first_name=$request->input('first_name');$contact->last_name=$request->input('last_name');$conatct->=$request->input('email');$contact->save();returnredirect('contacts');}publicfunctionshow($contactId){// Return a JSON representation of a Contact based on a URL segment;// if the contact doesn't exist, throw an exceptionreturnContact::findOrFail($contactId);}publicfunctionvips(){// Unnecessarily complex example, but still possible with basic Eloquent// class; adds a "formalName" property to every VIP entryreturnContact::where('vip',true)->get()->map(function($contact){$contact->formalName="The exalted{$contact->first_name}of the{$contact->last_name}s";return$contact;});}
How? Convention. Eloquent assumes the table name (Contact becomes contacts), and with that you have a fully functional Eloquent model.
Let’s cover how we work with Eloquent models.
First, let’s create a model. There’s an Artisan command for that:
php artisan make:model Contact
This is what we’ll get, in app/Contact.php:
<?phpnamespaceApp;useIlluminate\Database\Eloquent\Model;classContactextendsModel{//}
If you want to automatically create a migration when you create your model, pass the -m or --migration flag:
phpartisanmake:modelContact--migration
The default behavior for table names is that Laravel “snake cases” and pluralizes your class name, so SecondaryContact would access a table named secondary_contacts. If you’d like to customize the name, set the $table property explicitly on the model:
protected$table='contacts_secondary';
Laravel assumes, by default, that each table will have an autoincrementing integer primary key, and it will be named id.
If you want to change the name of your primary key, change the $primaryKey property:
protected$primaryKey='contact_id';
And if you want to set it to be nonincrementing, use:
public$incrementing=false;
Eloquent expects every table to have created_at and updated_at timestamp columns. If your table won’t have them, disable the $timestamps functionality:
public$timestamps=false;
You can customize the format Eloquent uses to store your timestamps to the database by setting the $dateFormat class property to a custom string. The string will be parsed using PHP’s date() syntax, so the following example will store the date as seconds since the Unix epoch:
protected$dateFormat='U';
Most of the time you pull data from your database with Eloquent, you’ll use static calls on your Eloquent model.
Let’s start by getting everything:
$allContacts=Contact::all();
That was easy. Let’s filter it a bit:
$vipContacts=Contact::where('vip',true)->get();
We can see that the Eloquent facade gives us the ability to chain constraints, and from there the constraints get very familiar:
$newestContacts=Contact::orderBy('created_at','desc')->take(10)->get();
It turns out that once you move past the initial facade name, you’re just working with Laravel’s query builder. You can do a lot more—we’ll cover that soon—but everything you can do with the query builder on the DB facade you can do on your Eloquent objects.
Like we covered earlier in the chapter, you can use first() to return only the first record from a query, or find() to pull just the record with the provided ID. For either, if you append “orFail” to the method name, it will throw an exception if there are no matching results. This makes findOrFail() a common tool in looking up an entity by a URL segment (or throwing an exception if a matching entity doesn’t exist) like you can see in Example 5-14.
// ContactControllerpublicfunctionshow($contactId){returnview('contacts.show')->with('contact',Contact::findOrFail($contactId));}
Any single return (first(), firstOrFail(), find(), or findOrFail()) will return an instance of the Eloquent class. So, Contact::first() will return an instance of the class Contact with the data from row 1 filling it out.
As you can see in Example 5-14, we don’t need to catch Eloquent’s model not found exception (Illuminate\Database\Eloquent\ModelNotFoundException) in our controllers; Laravel’s routing system will catch them and throw a 404 for us.
You could, of course, catch that particular exception and handle it, if you’d like.
get() works with Eloquent just like it does in normal query builder calls—build a query and call get() at the end to get the results:
$vipContacts=Contact::where('vip',true)->get();
However, there is an Eloquent-only method, all(), which you’ll often see people use when they want to get an unfiltered list of all data in the table:
$contacts=Contact::all();
Any time you can use all(), you could use get(). Contact::get() has the same response as Contact::all(). However, the moment you start modifying your query—adding a where() filter, for example—all() will no longer work, but get() will continue working.
So, even though all() is very common, I’d recommend using get() for everything, and ignoring the fact that all() even exists.
The other thing that’s different about Eloquent’s get() method (vs. all()) is that, prior to Laravel 5.3, it returned an array of models instead of a collection. In 5.3 and later, they both return collections.
If you’ve ever needed to process a large amount (thousands or more) of records at a time, you may have run into memory or locking issues. Laravel makes it possible to break your requests into smaller pieces (chunks) and process them in batches, keeping the memory load of your large request smaller. Example 5-15 illustrates the use of chunk() to split a query into “chunks” of 100 each.
Contact::chunk(100,function($contacts){foreach($contactsas$contact){// Do something with $contact}});
The aggregates that are available on the query builder are available on Eloquent queries as well. For example:
$countVips=Contact::where('vip',true)->count();$sumVotes=Contact::sum('votes');$averageSkill=User::avg('skill_level');
Inserting and updating values is one of the places where Eloquent starts to diverge from normal query builder syntax.
There are two primary ways to insert a new record using Eloquent.
First, you can create a new instance of your Eloquent class, set your properties manually, and call save() on that instance, like in Example 5-16.
$contact=newContact;$contact->name='Ken Hirata';$contact->='ken@hirata.com';$contact->save();// or$contact=newContact(['name'=>'Ken Hirata','email'=>'ken@hirata.com',]);$contact->save();// or$contact=Contact::make(['name'=>'Ken Hirata','email'=>'ken@hirata.com',]);$contact->save();
Until you save(), this instance of Contact represents the contact fully—except it has never been saved to the database. That means it doesn’t have an id, if the application quits it won’t persist, and it doesn’t have its created_at and updated_at values set.
You can also pass an array to Model::create(), as shown in Example 5-17. Unlike make(), create() saves the instance to the databsae as soon as it’s called.
$contact=Contact::create(['name'=>'Keahi Hale','email'=>'halek481@yahoo.com',]);
Also be aware that in any context where you are passing an array (to new Model(), Model::make(), Model::create(), or Model::update()), every property you set via Model::create() has to be approved for “mass assignment,” which we’ll cover shortly. This is not necessary with the first example in Example 5-16, where you assign each property individually.
Note that if you’re using Model::create(), you don’t need to save() the instance—that’s handled as a part of the model’s create() method.
Updating records looks very similar to inserting. You can get a specific instance, change its properties, and then save, or you can make a single call and pass an array of updated properties. Example 5-18 illustrates the first approach.
$contact=Contact::find(1);$contact->='natalie@parkfamily.com';$contact->save();
Since this record already exists, it will already have a created_at timestamp and an id, which will stay the same, but the updated_at field will be changed to the current date and time. Example 5-19 illustrates the second approach.
Contact::where('created_at','<',now()->subYear())->update(['longevity'=>'ancient']);// or$contact=Contact::find(1);$contact->update(['longevity'=>'ancient']);
This method expects an array where each key is the column name and each value is the column value.
We’ve looked at a few examples of how to pass arrays of values into Eloquent class methods. However, none of these will actually work until you define which fields are “fillable” on the model.
The goal of this is to protect you from (possibly malicious) user input accidentally setting new values on fields you don’t want changed. Consider the common scenario in Example 5-20.
// ContactControllerpublicfunctionupdate(Contact$contact,Request$request){$contact->update($request->all());}
If you’re not familiar with the Illuminate Request object, Example 5-20 will take every piece of user input and pass it to the update() method. That all() method includes things like URL parameters and form inputs, so a malicious user could easily add some things in there, like id and owner_id, that you likely don’t want updated.
Thankfully, that won’t actually work until you define your model’s fillable fields. You can either whitelist the fillable fields, or blacklist the “guarded” fields to determine which fields can or cannot be edited via “mass assignment”—i.e., by passing an array of values into either create() or update(). Note that nonfillable properties can still be changed by direct assignment (e.g., $contact->password = 'abc';). Example 5-21 shows both approaches.
classContact{protected$fillable=['name','email'];// orprotected$guarded=['id','created_at','updated_at','owner_id'];}
In Example 5-20, we needed Eloquent’s mass assignment guard because we were using the all() method on the request object to pass the entirety of the user input into our Eloquent object.
Eloquent’s mass assignment protection is a great tool here, but there’s also a helpful trick to keep you from accepting just any input from the user.
The Request class has an only() method that allows you to pluck only a few keys from the user input. So now you can do this:
Contact::create($request->only('name','email'));
Sometimes you want to to tell your application, “Get me an instance with these properties, or if it doesn’t exist, create it.” This is where the firstOr*() methods come in.
The firstOrCreate() and firstOrNew() methods take an array of keys and values as their first parameter:
$contact=Contact::firstOrCreate(['email'=>'luis.ramos@myacme.com']);
They’ll both look for and retrieve the first record matching those parameters, and if there are no matching records, they’ll create an instance with those properties; firstOrCreate() will persist that instance to the database and then return it, while firstOrNew() will return it without saving it.
If you pass an array of values as the second parameter, those values will be added to the created entry (if it’s created), but won’t be used to look up whether the entry exists.
Deleting with Eloquent is very similar to updating with Eloquent, but with (optional) soft deletes, you can archive your deleted items for later inspection or even recovery.
The simplest way to delete a model record is to call the delete() method on the instance itself:
$contact=Contact::find(5);$contact->delete();
However, if you only have the ID, there’s no reason to look up an instance just to delete it; you can pass an ID or an array of IDs to the model’s destroy() method to delete them directly:
Contact::destroy(1);// orContact::destroy([1,5,7]);
Finally, you can delete all of the results of a query:
Contact::where('updated_at','<',now()->subYear())->delete();
Soft deletes mark database rows as deleted without actually deleting them from the database. This gives you the ability to inspect them later; to have records that show more than “no information, deleted” when displaying historic information; and to allow your users (or admins) to restore some or all data.
The hard part about handcoding an application with soft deletes is that every query you ever write will need to exclude the soft-deleted data. Thankfully, if you use Eloquent’s soft deletes, every query you ever make will be scoped to ignore soft deletes by default, unless you explicitly ask to bring them back.
Eloquent’s soft delete functionality requires a deleted_at column to be added to the table. Once you enable soft deletes on that Eloquent model, every query you ever write (unless you explicitly include soft-deleted records) will be scoped to ignore soft-deleted rows.
You enable soft deletes by doing three things: adding the deleted_at column in a migration, importing the SoftDeletes trait in the model, and adding the deleted_at column to your $dates property. There’s a softDeletes() method available on the schema builder to add the deleted_at column to a table, as you can see in Example 5-22. And Example 5-23 shows an Eloquent model with soft deletes enabled.
Schema::table('contacts',function(Blueprint$table){$table->softDeletes();});
<?phpuseIlluminate\Database\Eloquent\Model;useIlluminate\Database\Eloquent\SoftDeletes;classContactextendsModel{useSoftDeletes;// use the traitprotected$dates=['deleted_at'];// mark this column as a date}
Once you make these changes, every delete() and destroy() call will now set the deleted_at column on your row to be the current date and time instead of deleting that row. And all future queries will exclude that row as a result.
So, how do we get soft-deleted items?
First, you can add soft-deleted items to a query:
$allHistoricContacts=Contact::withTrashed()->get();
Next, you can use the trashed() method to see if a particular instance has been soft deleted:
if($contact->trashed()){// do something}
Finally, you can get only soft-deleted items:
$deletedContacts=Contact::onlyTrashed()->get();
If you want to restore a soft-deleted item, you can run restore() on an instance or a query:
$contact->restore();// orContact::onlyTrashed()->where('vip',true)->restore();
You can delete a soft-deleted entity by calling forceDelete() on an entity or query:
$contact->forceDelete();// orContact::onlyTrashed()->forceDelete();
We’ve covered “filtered” queries, meaning any query where we’re not just returning every result for a table. But every time we’ve written them so far in this chapter, it’s been a manual process using the query builder.
Local and global scopes in Eloquent allow you to define prebuilt “scopes” (filters) that you can use either every time a model is queried (“global”) or every time you query it with a particular method chain (“local”).
Local scopes are the simplest to understand. Let’s take this example:
$activeVips=Contact::where('vip',true)->where('trial',false)->get();
First of all, if we write this combination of query methods over and over, it will get tedious. But additionally, the knowledge of how to define someone being an “active VIP” is now spread around our application. We want to centralize that knowledge. What if we could just write this?
$activeVips=Contact::activeVips()->get();
We can—it’s called a local scope. And it’s easy to define on the Contact class:
classContact{publicfunctionscopeActiveVips($query){return$query->where('vip',true)->where('trial',false);}
To define a local scope, we add a method to the Eloquent class that begins with “scope” and then contains the title-cased version of the scope name. This method is passed a query builder and needs to return a query builder, but of course you can modify the query before returning—that’s the whole point.
You can also define scopes that accept parameters:
classContact{publicfunctionscopeStatus($query,$status){return$query->where('status',$status);}
And you use them in the same way, just passing the parameter to the scope:
$friends=Contact::status('friend')->get();
Remember how we talked about soft deletes only working if you scope every query on the model to ignore the soft-deleted items? That’s a global scope. And we can define our own global scopes, which will be applied on every query made from a given model.
There are two ways to define a global scope: using a closure or using an entire class. In each, you’ll register the defined scope in the model’s boot() method. Let’s start with the closure method, illustrated in Example 5-24.
...classContactextendsModel{protectedstaticfunctionboot(){parent::boot();static::addGlobalScope('active',function(Builder$builder){$builder->where('active',true);});}
That’s it. We just added a global scope, named active, and every query on this model will be scoped to only rows with active set to true.
Next, let’s try the longer way, as shown in Example 5-25. Create a class that implements Illuminate\Database\Eloquent\Scope, which means it will have an apply() method that takes an instance of a query builder and an instance of the model.
<?phpnamespaceApp\Scopes;useIlluminate\Database\Eloquent\Scope;useIlluminate\Database\Eloquent\Model;useIlluminate\Database\Eloquent\Builder;classActiveScopeimplementsScope{publicfunctionapply(Builder$builder,Model$model){return$builder->where('active',true);}}
To apply this scope to a model, once again override the parent’s boot() method and call addGlobalScope() on the class using static, as shown in Example 5-26.
<?phpuseApp\Scopes\ActiveScope;useIlluminate\Database\Eloquent\Model;classContactextendsModel{protectedstaticfunctionboot(){parent::boot();static::addGlobalScope(newActiveScope);}}
You may have noticed that several of these examples have used the class Contact, with no namespace. This is abnormal, and I’ve only done this to save space in the book. Normally even your top-level models would live at something like App\Contact.
There are three ways to remove a global scope, and all three use the withoutGlobalScope() or withoutGlobalScopes() methods. If you’re removing a closure-based scope, the first parameter of that scope’s addGlobalScope() registration will be the key you used to enable it:
$allContacts=Contact::withoutGlobalScope('active')->get();
If you’re removing a single class-based global scope, you can pass the class name to withoutGlobalScope() or withoutGlobalScopes():
Contact::withoutGlobalScope(ActiveScope::class)->get();Contact::withoutGlobalScopes([ActiveScope::class,VipScope::class])->get();
Or, you can just disable all global scopes for a query:
Contact::withoutGlobalScopes()->get();
Now that we’ve covered how to get records into and out of the database with Eloquent, let’s talk about decorating and manipulating the individual attributes on your Eloquent models.
Accessors, mutators, and attribute casting all allow you to customize the way individual attributes of Eloquent instances are input or output. Without using any of these, each attribute of your Eloquent instance is treated like a string, and you can’t have any attributes on your models that don’t exist on the database. But we can change that.
Accessors allow you to define custom attributes on your Eloquent models for when you are reading data from the model instance. This may be because you want to change how a particular column is output, or because you want to create a custom attribute that doesn’t exist in the database table at all.
You define an accessor by writing a method on your model with the following structure: get{PascalCasedPropertyName}Attribute. So, if your property name is first_name, the accessor method would be named getFirstNameAttribute.
Let’s try it out. First, we’ll decorate a preexisting column (Example 5-27).
// Model definition:classContactextendsModel{publicfunctiongetNameAttribute($value){return$value?:'(No name provided)';}}// Accessor usage:$name=$contact->name;
But we can also use accessors to define attributes that never existed in the database, as seen in Example 5-28.
// Model definition:classContactextendsModel{publicfunctiongetFullNameAttribute(){return$this->first_name.' '.$this->last_name;}}// Accessor usage:$fullName=$contact->full_name;
Mutators work the same way as accessors, except they’re for determining how to process setting the data instead of getting it. Just like with accessors, you can use it to modify the process of writing data to existing columns, or to allow for setting columns that don’t exist in the database.
You define a mutator by writing a method on your model with the following structure: set{PascalCasedPropertyName}Attribute. So, if your property name is first_name, the mutator method would be named setFirstNameAttribute.
Let’s try it out. First, we’ll add a constraint to updating a preexisting column (Example 5-29).
// Defining the mutatorclassOrderextendsModel{publicfunctionsetAmountAttribute($value){$this->attributes['amount']=$value>0?$value:0;}}// Using the mutator$order->amount='15';
This reveals that the way mutators are expected to “set” data on the model is by setting it in $this->attributes with the column name as the key.
Now, let’s add a proxy column for setting, as shown in Example 5-30.
// Defining the mutatorclassOrderextendsModel{publicfunctionsetWorkgroupNameAttribute($workgroupName){$this->attributes['email']="{$workgroupName}@ourcompany.com";}}// Using the mutator$order->workgroup_name='jstott';
As you can probably guess, it’s relatively uncommon to create a mutator for a non-existent column, because it can be confusing to set one property and have it change a different column—but it is possible.
You can probably imagine writing accessors to cast all of your integer-type fields as integers, encode and decode JSON to store in TEXT column, or convert TINYINT 0 and 1 to and from boolean values.
Thankfully, there’s a system for that in Eloquent already. It’s called attribute casting, and it allows you to define that any of your columns should always be treated, both on read and on write, as if they are of a particular data type. The options are listed in Table 5-1.
| Type | Description |
|---|---|
|
Casts with PHP |
|
Casts with PHP |
|
Casts with PHP |
|
Casts with PHP |
|
Parses to/from JSON, as a |
|
Parses to/from JSON, as an array |
|
Parses to/from JSON, as a collection |
|
Parses from database |
|
Parses from database |
Example 5-31 shows how you use attribute casting in your model.
classContact{protected$casts=['vip'=>'boolean','children_names'=>'array','birthday'=>'date',];}
You can choose for particular columns to be mutated as timestamp columns by adding them to the dates array, as seen in Example 5-32.
classContact{protected$dates=['met_at'];}
By default, this array contains created_at and updated_at, so adding entries to dates just adds them to the list.
However, there’s no difference between adding columns to this list and adding them to $this->casts as timestamp, so this is becoming a bit of an unnecessary feature now that attribute casting can cast timestamps (new since Laravel 5.2).
When you make any query call in Eloquent that has the potential to return multiple rows, instead of an array they’ll come packaged in an Eloquent collection, which is a specialized type of collection. Let’s take a look at collections and Eloquent collections, and what makes them better than plain arrays.
Laravel’s Collection objects (Illuminate\Support\Collection) are a little bit like arrays on steroids. The methods they expose on array-like objects are so helpful that, once you’ve been using them for a while, you’ll likely want to pull them into non-Laravel projects—which you can, with the Tightenco/Collect package.
The simplest way to create a collection is to use the collect() helper. Either pass an array in, or use it without arguments to create an empty collection and then push items into it later. Let’s try it:
$collection=collect([1,2,3]);
Now let’s say we want to filter out any even numbers:
$odds=$collection->reject(function($item){return$item%2===0;});
Or what if we want to get a version of the collection where each item is multiplied by 10? We can do that as follows:
$multiplied=$collection->map(function($item){return$item*10;});
We can even get only the evens, multiply them all by 10, and reduce them to a single number by sum:
$sum=$collection->filter(function($item){return$item%2==0;})->map(function($item){return$item*10;})->sum();
As you can see, collections provide a series of methods, which can optionally be chained, to perform functional operations on your arrays. They provide the same functionality as native PHP methods like array_map() and array_reduce(), but you don’t have to memorize PHP’s unpredictable parameter order, and the method chaining syntax is endlessly more readable.
There are more than 60 methods available on the Collection class, including methods like max() and whereIn(), flatten(), and flip(), and there’s not enough space to cover them all here. We’ll cover more in Chapter 17, or you can check out the Laravel docs on Collections to see all of the methods.
Collections can also be used in any context (except typehinting) where you can use arrays; they allow for iteration, so you can pass them to foreach, and they allow for array access, so if they’re keyed you can try $a = $collection['a'].
Each Eloquent collection is a normal collection, but extended for the particular needs of a collection of Eloquent results.
Once again, there’s not enough room here to cover all of the additions, but they’re centered around the unique aspects of interacting with a collection not just of generic objects, but objects meant to represent database rows.
For example, every Eloquent collection has a method called modelKeys() that returns an array of the primary keys of every instance in the collection. find($id) looks for an instance that has the primary key of $id.
One additional feature available here is the ability to define that any given model should return its results wrapped in a specific class of collection. So, if you want to add specific methods to any collection of objects of your Order model—possibly related to summarizing the financial details of your orders—you could create a custom OrderCollection that extends the Illuminate\Database\Eloquent\Collection class, and then register it in your model, as shown in Example 5-33.
...classOrderCollectionextendsCollection{publicfunctionsumBillableAmount(){return$this->reduce(function($carry,$order){return$carry+($order->billable?$order->amount:0);},0);}}...classOrderextendsModel{publicfunctionnewCollection(array$models=[]){returnnewOrderCollection($models);}
Now, any time you get back a collection of Orders (e.g., from Order::all()) it’ll actually be an instance of the OrderCollection class:
$orders=Order::all();$billableAmount=$orders->sumBillableAmount();
Serialization is what happens when you take something complex—an array, or an object—and convert it to a string. In a web-based context, that string is often JSON, but it could take other forms as well.
Serializing complex database records can be, well, complex, and this is one of the places many ORMs fall short. Thankfully, you get two powerful methods for free with Eloquent: toArray() and toJson(). Collections also have toArray() and toJson(), so all of these are valid:
$contactArray=Contact::first()->toArray();$contactJson=Contact::first()->toJson();$contactsArray=Contact::all()->toArray();$contactsJson=Contact::all()->toJson();
You can also cast an Eloquent instance or collection to a string ($string = (string) $contact;), but both models and collections will just run toJson() and return the result.
Laravel’s router eventually converts everything routes return to a string, so there’s a clever trick you can use. If you return the result of an Eloquent call in a controller, it will be automatically cast to a string, and therefore returned as JSON. That means a JSON-returning route can be as simple as either of the ones in Example 5-34.
// routes/web.phpRoute::get('api/contacts',function(){returnContact::all();});Route::get('api/contacts/{id}',function($id){returnContact::findOrFail($id);});
It’s very common to use JSON returns in APIs, and it’s very common to want to hide certain attributes in these contexts, so Eloquent makes it easy to hide any attributes every time you cast to JSON.
You can either blacklist attributes, hiding the ones you list:
classContactextendsModel{public$hidden=['password','remember_token'];
or whitelist attributes, showing only the ones you list:
classContactextendsModel{public$visible=['name','email','status'];
This also works for relationships:
classUserextendsModel{public$hidden=['contacts'];publicfunctioncontacts(){return$this->hasMany(Contact::class);}
By default, the contents of a relationship are not loaded when you get a database record, so it doesn’t matter whether you hide them or not. But, as you’ll learn shortly, it’s possible to get a record with its related items, and in this context, those items will not be included in a serialized copy of that record if you choose to hide that relationship.
In case you’re curious now, you can get a User with all contacts—assuming you’ve set up the relationship correctly—with the following call:
$user=User::with('contacts')->first();
There might be times when you want to make an attribute visible just for a single call. That’s possible, with the Eloquent method makeVisible():
$array=$user->makeVisible('remember_token')->toArray();
If you have created an accessor for a column that doesn’t exist—for example, our full_name column from Example 5-28—add it to the $appends array on the model to add it to the array and JSON output:
classContactextendsModel{protected$appends=['full_name'];publicfunctiongetFullNameAttribute(){return"{$this->first_name}{$this->last_name}";}}
In a relational database model, it’s expected that you will have tables that are related to each other—hence the name. Eloquent provides simple and powerful tools to make the process of relating your database tables easier than ever before.
Many of our examples in this chapter have been centered around a user who has many contacts, a relatively common situation.
In an ORM like Eloquent, you would call this a one-to-many relationship: the one user has many contacts.
If it was a CRM where a contact could be assigned to many users, then this would be a many-to-many relationship: many users can be related to one contact, and each user can be related to many contacts. A user has and belongs to many contacts.
If each contact can have many phone numbers, and a user wanted a database of every phone number for their CRM, you would say the user has many phone numbers through contacts—that is, a user has many contacts, and the contact has many phone numbers, so the contact is sort of an intermediary.
And what if each contact has an address, but you’re only interested in tracking one address? You could have all the address fields on the Contact, but you might also create an Address model—meaning the contact has one address.
Finally, what if you want to be able to star (favorite) contacts, but also events? This would be a polymorphic relationship, where a user has many stars, but some may be contacts and some may be events.
So, let’s dig into how to define and access these relationships.
Let’s start simple: a Contact has one PhoneNumber. This relationship is defined in Example 5-35.
classContactextendsModel{publicfunctionphoneNumber(){return$this->hasOne(PhoneNumber::class);}
As you can tell, the methods defining relationships are on the Eloquent model itself ($this->hasOne()) and take, at least in this instance, the fully qualified class name of the class that you’re relating them to.
How should this be defined in your database? Since we’ve defined that the Contact has one PhoneNumber, Eloquent expects that the table supporting the PhoneNumber class (likely phone_numbers) has a contact_id column on it. If you named it something different (for instance, owner_id), you’ll need to change your definition:
return$this->hasOne(PhoneNumber::class,'owner_id');
Here’s how we access the phone number on a contact:
$contact=Contact::first();$contactPhone=$contact->phoneNumber;
Notice that we define the method in Example 5-35 with phoneNumber(), but we access it with ->phoneNumber. That’s the magic. You could also access it with ->phone_number. This will return a full Eloquent instance of the related PhoneNumber record.
But what if we want to access the Contact from the PhoneNumber? There’s a method for that, too (see Example 5-36).
classPhoneNumberextendsModel{publicfunctioncontact(){return$this->belongsTo(Contact::class);}
Then we access it the same way:
$contact=$phoneNumber->contact;
Each relationship type has its own quirks for how to relate models, but here’s the core of how it works: pass an instance to save(), or an array of instances to saveMany(). You can also pass properties to create() or createMany() and they’ll make new instances for you:
$contact=Contact::first();$phoneNumber=newPhoneNumber;$phoneNumber->number=8008675309;$contact->phoneNumbers()->save($phoneNumber);// or$contact->phoneNumbers()->saveMany([PhoneNumber::find(1),PhoneNumber::find(2),]);// or$contact->phoneNumbers()->create(['number'=>'+13138675309']);// or$contact->phoneNumbers()->createMany([['number'=>'+13138675309'],['number'=>'+15556060842'],]);
The createMany() method is only available in Laravel 5.4 and later.
The one-to-many relationship is by far the most common. Let’s take a look at how to define that our User has many Contacts (Example 5-37).
classUserextendsModel{publicfunctioncontacts(){return$this->hasMany(Contact::class);}
Once again, this expects that the Contact model’s backing table (likely contacts) has a user_id column on it. If it doesn’t, override it by passing the correct column name as the second parameter of hasMany().
We can get a user’s contacts as follows:
$user=User::first();$usersContacts=$user->contacts;
Just like with one to one, we use the name of the relationship method and call it as if it were a property instead of a method. However, this method returns a collection instead of a model instance. And this is a normal Eloquent collection, so you can have all sorts of fun with it:
$donors=$user->contacts->filter(function($contact){return$contact->status=='donor';});$lifetimeValue=$contact->orders->reduce(function($carry,$order){return$carry+$order->amount;},0);
Just like with one to one, we can also define the inverse (Example 5-38).
classContactextendsModel{publicfunctionuser(){return$this->belongsTo(User::class);}
And just like one to one, we can access the User from the Contact:
$userName=$contact->user->name;
Most of the time we attach related items by running save() on the parent and passing in the related item, as in $user->contacts()->save($contact). But if you want to perform the behaviors on the attached (“child”) item, you can use associate() and dissociate() on the method that returns the belongsTo():
$contact=Contact::first();$contact->user()->associate(User::first());$contact->save();// and later$contact->user()->dissociate();$contact->save();
Until now, we’ve taken the method name (e.g., contacts()) and called it as if were a property (e.g., $user->contacts). What happens if we call it as a method? Instead of processing the relationship, it will return a pre-scoped query builder.
So if you have User 1, and you call its contacts() method, you will now have a query builder prescoped to “all contacts that have a field user_id with the value of 1.” You can then build out a functional query from there:
$donors=$user->contacts()->where('status','donor')->get();
You can also choose to select only records that meet particular criteria with regard to their related items using has():
$postsWithComments=Post::has('comments')->get();
You can also adjust the criteria further:
$postsWithManyComments=Post::has('comments','>=',5)->get();
You can nest the criteria:
$usersWithPhoneBooks=User::has('contacts.phoneNumbers')->get();
And finally, you can write custom queries on the related items:
// Gets all contacts with a phone number containing the string "867-5309"$jennyIGotYourNumber=Contact::whereHas('phoneNumbers',function($query){$query->where('number','like','%867-5309%');});
“Has many through” is really a convenience method for pulling in relationships of a relationship. This is the example I gave earlier where a User has many Contacts and each Contact has many PhoneNumbers. What if you want to get a user’s list of contact phone numbers? That’s hasManyThrough.
This structure assumes that your contacts table has a user_id to relate the contacts to the users, and the phone_numbers table has a contact_id to relate it to the contacts. Then, we define the relationship on the User as in Example 5-39.
classUserextendsModel{publicfunctionphoneNumbers(){return$this->hasManyThrough(PhoneNumber::class,Contact::class);}
You’d access this relationship using $user->phone_numbers, and as always you can customize the relationship key on the intermediate model (with the third parameter of hasManyThrough()) and the relationship key on the distant model (with the fourth parameter).
This is where things start to get complex. Let’s take our example of a CRM that allows a User to have many Contacts, and each Contact to be related to multiple users.
First, we define the relationship on the User as in Example 5-40.
classUserextendsModel{publicfunctioncontacts(){return$this->belongsToMany(Contact::class);}}
And since this is many to many, the inverse looks exactly the same (Example 5-41).
classContactextendsModel{publicfunctionusers(){return$this->belongsToMany(User::class);}}
Since a single Contact can’t have a user_id column and a single User can’t have a contact_id column, many-to-many relationships rely on a pivot table that connects the two. The conventional naming of this table is done by placing the two singular table names together, ordered alphabetically, and separating them by an underscore.
So, since we’re linking users and contacts, our pivot table should be named contacts_users (if you’d like to customize the table name, pass it as the second parameter to the belongsToMany() methods). It needs two columns: contact_id and user_id.
Just like with hasMany(), we get access to a collection of the related items, but this time it’s from both sides (Example 5-42).
$user=User::first();$user->contacts->each(function($contact){// do something});$contact=Contact::first();$contact->users->each(function($user){// do something});$donors=$user->contacts()->where('status','donor')->get();
One thing that’s unique about many to many is that it’s our first relationship that has a pivot table. The less data you have on a pivot table, the better, but there are some cases where it’s valuable to store information on your pivot table—for example, you might want to store a created_at field to see when this relationship was created.
In order to store these fields, you have to add them to the relationship definition, like in Example 5-43. You can define specific fields using withPivot() or add created_at and updated_at timestamps using withTimestamps().
publicfunctioncontacts(){return$this->belongsToMany(Contact::class)->withTimestamps()->withPivot('status','preferred_greeting');}
When you get a model instance through a relationship, it will have a pivot property on it, which will represent its place in the pivot table you just pulled it from. So, you can do something like Example 5-44.
$user=User::first();$user->contacts->each(function($contact){echosprintf('Contact associated with this user at: %s',$contact->pivot->created_at);});
If you’d like, you can customize the pivot key to have a different name, using the as() method:
// User modelpublicfunctiongroups(){return$this->belongsToMany(Group::class)->withTimestamps()->as('membership');}
// Using this relationship:User::first()->groups->each(function($group){echosprintf('User joined this group at: %s',$group->membership->created_at);});
Remember, our polymorphic relationship is where we have multiple Eloquent classes corresponding to the same relationship. We’re going to use Stars (like favorites) right now. A user can star both Contacts and Events, and that’s where the name polymorphic comes from: a single interface to objects of multiple types.
So, we’ll need three tables, and three models: Star, Contact, and Event (four of each, technically, because we’ll need users and User, but we’ll get there in a second). The contacts and events tables will just be as they normally are, and the stars table will contain an id field, a starrable_id, and a starrable_type. For each Star, you’ll be defining which “type” (e.g., Contact or Event) and which ID of that type (e.g., 1) it is.
Let’s create our models, as seen in Example 5-46.
classStarextendsModel{publicfunctionstarrable(){return$this->morphTo();}}classContactextendsModel{publicfunctionstars(){return$this->morphMany(Star::class,'starrable');}}classEventextendsModel{publicfunctionstars(){return$this->morphMany(Star::class,'starrable');}}
So, how do we create a Star?
$contact=Contact::first();$contact->stars()->create();
It’s that easy. The Contact is now starred.
In order to find all of the Stars on a given Contact, we call the stars() method like in Example 5-47.
$contact=Contact::first();$contact->stars->each(function($star){// Do stuff});
If we have an instance of Star, we can get its target by calling the method we used to define its morphTo(), which in this context is starrable(). Take a look at Example 5-48.
$stars=Star::all();$stars->each(function($star){var_dump($star->starrable);// An instance of Contact or Event});
Finally, you might be wondering, “What if I care who starred this contact?” That’s a great question; of course you do. It’s as simple as adding user_id to your stars table, and then setting up that a User has many Stars and a Star belongs to one User—a one-to-many relationship (Example 5-49). The stars table becomes almost a pivot table between your User and your Contacts and Events.
classStarextendsModel{publicfunctionstarrable(){return$this->morphsTo;}publicfunctionuser(){return$this->belongsTo(User::class);}}classUserextendsModel{publicfunctionstars(){return$this->hasMany(Star::class);}}
That’s it! You can now run $star->user or $user->stars to find a list of a User’s Stars or to find the starring User from a Star. Also, when you create a new Star, you’ll now want to pass the User:
$user=User::first();$event=Event::first();$event->stars()->create(['user_id'=>$user->id]);
The most complex and least common of the relationship types, many-to-many polymorphic relationships are like polymorphic relationships, except instead of being one to many they’re many to many.
The most common example for this relationship type is the tag, so I’ll keep it safe and use that as our example. Let’s imagine you want to be able to tag Contacts and Events. The uniqueness of many-to-many polymorphism is that it’s many to many: each tag may be applied to multiple items, and each tagged item might have multiple tags. And to add to that, it’s polymorphic: tags can be related to items of several different types. For the database, we’ll start with the normal structure of the polymorphic relationship but also add a pivot table.
This means we’ll need a contacts table, an events table, and a tags table, all shaped like normal with an ID and whatever properties you want, and a new taggables table, which will have a tag_id, a taggable_id, and a taggable_type. Each entry into the taggables table will relate a tag with one of the taggable content types.
Now let’s define this relationship on our models, as seen in Example 5-50.
classContactextendsModel{publicfunctiontags(){return$this->morphToMany(Tag::class,'taggable');}}classEventextendsModel{publicfunctiontags(){return$this->morphToMany(Tag::class,'taggable');}}classTagextendsModel{publicfunctioncontacts(){return$this->morphedByMany(Contact::class,'taggable');}publicfunctionevents(){return$this->morphedByMany(Event::class,'taggable');}}
Here’s how to create your first tag:
$tag=Tag::firstOrCreate(['name'=>'likes-cheese']);$contact=Contact::first();$contact->tags()->attach($tag->id);
We get the results of this relationship like normal, as seen in Example 5-51.
$contact=Contact::first();$contact->tags->each(function($tag){// Do stuff});$tag=Tag::first();$tag->contacts->each(function($contact){// Do stuff});
Remember, any Eloquent models by default will have created_at and updated_at timestamps. Eloquent will set the updated_at timestamp automatically any time you make any changes to a record.
When a related item either belongsTo() or belongsToMany() another item, it might be valuable to mark the other item as updated any time the related item is updated. For example, if a PhoneNumber is updated, maybe the Contact it’s connected to should be marked as having been updated as well.
We can accomplish this by adding the method name for that relationship to a $touches array property on the child class, as in Example 5-52.
classPhoneNumberextendsModel{protected$touches=['contact'];publicfunctioncontact(){return$this->belongsTo(Contact::class);}}
By default, Eloquent loads relationships using “lazy loading.” This means when you first load a model instance, its related models will not be loaded along with it. Rather, they’ll only be loaded once you access them on the model; they’re “lazy” and don’t do any work until called upon.
This can become a problem if you’re iterating over a list of model instances and each has a related item (or items) that you’re working on. The problem with lazy loading is that it can introduce significant database load (often the N+1 problem, if you’re familiar with the term; if not, just ignore this parenthetical remark). For instance, every time the loop in Example 5-53 runs, it executes a new database query to look up the phone numbers for that Contact.
$contacts=Contact::all();foreach($contactsas$contact){foreach($contact->phone_numbersas$phone_number){echo$phone_number->number;}}
If you are loading a model instance and you know you’ll be working with its relationships, you can instead choose to “eager-load” one or many of its sets of related items:
$contacts=Contact::with('phoneNumbers')->get();
Using the with() method with a retrieval gets all of the items related to the pulled item(s), and as you can see in this example, you pass it the name of the method the relationship is defined by.
When we use eager loading, instead of pulling the related items one at a time when they’re requested (selecting one contact’s phone numbers each time a foreach loop runs), we have a single query to pull the initial items (selecting all contacts) and a second query to pull all their related items (selecting all phone numbers owned by the contacts we just pulled).
You can eager-load multiple relationships by passing multiple parameters to the with() call:
$contacts=Contact::with('phoneNumbers','addresses')->get();
And you can nest eager loading to eager-load the relationships of relationships:
$authors=Author::with('posts.comments')->get();
If you want to eager-load a relationship, but not all of the items, you can pass a closure to with() to define exactly which related items to eager-load:
$contacts=Contact::with(['addresses'=>function($query){$query->where('mailable',true);}])->get();
I know it sounds crazy, because we just defined eager loading as sort of the opposite of lazy loading, but sometimes you don’t know you want to perform an eager-load query until after the initial instances have been pulled. In this context, you’re still able to make a single query to look up all of the related items, avoiding N+1. We call this “lazy eager loading”:
$contacts=Contact::all();if($showPhoneNumbers){$contacts->load('phoneNumbers');}
To load a relationship only when it has not already been loaded, use the loadMissing() method, only available since Laravel 5.5:
$contacts=Contact::all();if($showPhoneNumbers){$contacts->loadMissing('phoneNumbers');}
If you want to eager-load relationships but only so you can have access to the count of items in each relationship, you can try withCount():
$authors=Author::withCount('posts')->get();// adds a "posts_count" integer to each Author with a count of that// Author's related posts
Eloquent models fire events out into the void of your application every time certain actions happen, regardless of whether you’re listening. If you’re familiar with pub/sub, it’s this same model (and you can learn more about Laravel’s entire event system in Chapter 16).
Here’s a quick rundown of binding a listener to when a new Contact is created. We’re going to bind it in the boot() method of AppServiceProvider, and let’s imagine we’re notifying a third-party service every time we create a new Contact.
classAppServiceProviderextendsServiceProvider{publicfunctionboot(){$thirdPartyService=newSomeThirdPartyService;Contact::creating(function($contact)use($thirdPartyService){try{$thirdPartyService->addContact($contact);}catch(Exception$e){Log::error('Failed adding contact to ThirdPartyService; cancelled.');returnfalse;// cancels Eloquent create()}});}
We can see a few things in Example 5-54. First, we use Modelname as the method, and pass it a closure. The closure gets access to the model instance that is being operated on. Second, we’re going to need to define this listener in a service provider somewhere. And third, if we return ::eventName()false, the operation will cancel and the save() or update() will be cancelled.
Here are the events that every Eloquent model fires:
retrieved
creating
created
updating
updated
saving
saved
deleting
deleted
restoring
restored
The retrieved event is available in Laravel 5.5 and later.
Most of these should be pretty clear, except possibly restoring and restored, which fire when you’re restoring a soft-deleted row. Also, saving is fired for both creating and updating and saved is fired for both created and updated. Finally, retrieved is fired when an existing model is retrieved from the database.
Laravel’s entire application testing framework makes it easy to test your database—not by writing unit tests against Eloquent, but by just being willing to test your entire application.
Take this scenario. You want to test to ensure that a particular page shows one contact but not another. Some of that logic has to do with the interplay between the URL and the controller and the database, so the best way to test it is an application test. You might be thinking about mocking Eloquent calls and trying to avoid the system hitting the database. Don’t do it. Try Example 5-55 instead.
publicfunctiontest_active_page_shows_active_and_not_inactive_contacts(){$activeContact=factory(Contact::class)->create();$inactiveContact=factory(Contact::class)->states('inactive')->create();$this->get('active-contacts')->assertSee($activeContact->name)->assertDontSee($inactiveContact->name);}
As you can see, model factories and Laravel’s application testing features are great for testing database calls.
Alternatively, you can look for that record directly in the database, as in Example 5-56.
publicfunctiontest_contact_creation_works(){$this->post('contacts',['email'=>'jim@bo.com']);$this->assertDatabaseHas('contacts',['email'=>'jim@bo.com']);}
Eloquent and Laravel’s database framework are tested extensively. You don’t need to test them. You don’t need to mock them. If you really want to avoid hitting the database, you can use a repository and then return unsaved instances of your Eloquent models. But the most important message is, test the way your application uses your database logic.
If you have custom accessors, mutators, scopes, or whatever else, you can also test them directly, as in Example 5-57.
publicfunctiontest_full_name_accessor_works(){$contact=factory(Contact::class)->make(['first_name'=>'Alphonse','last_name'=>'Cumberbund']);$this->assertEquals('Alphonse Cumberbund',$contact->fullName);}publicfunctiontest_vip_scope_filters_out_non_vips(){$vip=factory(Contact::class)->states('vip')->create();$nonVip=factory(Contact::class)->create();$vips=Contact::vips()->get();$this->assertTrue($vips->contains('id',$vip->id));$this->assertFalse($vips->contains('id',$nonVip->id));}
Just avoid writing tests that leave you creating complex “Demeter chains” to assert that a particular fluent stack was called on some database mock. If your testing starts to get overwhelming and complex around the database layer, it’s because you’re allowing preconceived notions to force you into unnecessarily complex systems. Keep it simple.
In projects running versions of Laravel prior to 5.4 assertDatabaseHas should be replaced by seeInDatabase, get should be replaced by visit, assertSee should be replaced by see, and assertDontSee should be replaced by dontSee.
Laravel comes with a suite of powerful database tools, including migrations, seeding, an elegant query builder, and Eloquent, a powerful ActiveRecord ORM. Laravel’s database tools don’t require you to use Eloquent at all—you can access and manipulate the database with a thin layer of convenience without having to write SQL directly. But adding an ORM, whether it’s Eloquent or Doctrine or whatever else, is easy and can work neatly with Laravel’s core database tools.
Eloquent follows the Active Record pattern, which makes it simple to define a class of database-backed objects, including which table they’re stored in, the shape of their columns, accessors and mutators, and much more. Eloquent can handle every sort of normal SQL action and also complex relationships, up to and including polymorphic many-to-many relationships.
Laravel also has a robust system for testing databases, including model factories.
Laravel is primarily a PHP framework, but it also has a series of components focused on generating frontend code. Some of these, like pagination and message bags, are PHP helpers that target the frontend, but Laravel also provides a Webpack-based build system called Mix and some conventions around non-PHP assets.
Since Mix is at the core of the non-PHP frontend components, let’s start there.
Mix is a build tool that provides a simple user interface and a series of conventions on top of Webpack. Mix’s core value proposition is simplifying the most common build and compilation Webpack tasks by means of a cleaner API and a series of naming and application structure conventions.
At its core, Mix is just a tool in your Webpack toolbox. The “Mix file” you’ll use to set your configurations is simply a Webpack configuration file which lives at the root of your project, named webpack.mix.js. However, the configuration you have to set there is a lot simpler than most Webpack configuration is out of the box, and you’ll have to do a lot less work to get most common asset compilation tasks working.
Let’s look at a common example: running Sass to preprocess your CSS styles. In a normal Webpack environment, that might look a little bit like Example 6-1.
varpath=require('path');varMiniCssExtractPlugin=require("mini-css-extract-plugin");module.exports={entry:'./src/sass/app.scss',module:{rules:[{test:/\.s[ac]ss$/,use:[MiniCssExtractPlugin.loader,"css-loader","sass-loader"]}]},plugins:[newMiniCssExtractPlugin({path:path.resolve(__dirname,'./dist'),filename:'app.css'})]}
Now, I’ve seen worse. There aren’t an unimaginable number of configuration properties, and it’s relatively clear what’s going on. But this is the sort of code that you copy from project to project, not code you feel comfortable writing yourself or even modifying to any significant degree. Working like this can get confusing and repetitive.
Let’s try that same task in Mix (Example 6-2).
letmix=require('laravel-mix');mix.sass('resources/sass/app.scss','public/css');
That’s it. And not only is that endlessly simpler; it also covers file watching, browser sync, notification, prescribed folder structures, autoprefixing, url processing, and much more.
Much of Mix’s simplicity comes from the assumed directory structure. Why make the decision fresh in every new application about where the source and compiled assets live? Just stick with Mix’s conventions, and you won’t have to think about it ever again.
Every new Laravel app comes with a resources folder, which is where Mix will expect your frontend assets to live. Your Sass will live in resources/sass, or your Less in resources/less, or your source CSS in resources/css, and your JavaScript will live in resources/js. These will export to public/css and public/js.
In versions of Laravel prior to 5.7, the sass, less, and js directories were nested under the resources/assets directory instead of directly underneath the resources directory.
Since Mix runs on Webpack, you’ll need to set up a few tools before using it:
First, you’ll need Node.js installed. Visit the Node website to learn how to get it running.
Once Node (and NPM with it) is installed once, you will not have to do this again for each project. Now you’re ready to install this project’s dependencies.
Open the project root in your terminal, and run npm install to install the required packages (Laravel ships with a Mix-ready package.json file to direct NPM).
You’re now set up! You can run npm run dev to run Webpack/Mix once, npm run watch to listen for relevant file changes and run in response, or npm run prod to run Mix once with production settings (such as minifying the output). You can also run npm run watch-poll if npm run watch doesn’t work in your environment, or npm run hot for hot module replacement (if that phrase is unfamiliar to you, just ignore it for now).
We’ve already covered that Mix can preprocess your CSS using Sass, Less, and/or PostCSS. It can also concatenate any sort of files, minify them, rename them, and copy them, and it can copy entire directories or individual files.
Mix can also process all flavors of modern JavaScript and provide auto-prefixing, concatenation, and minification specifically as a part of the JavaScript build stack. It makes it easy to set up BrowserSync, Hot Module Replacement, and versioning, and there are plugins available for many other common build scenarios.
The Mix documentation covers all of these options and more, but we’ll cover a few specific use cases in the following sections.
If you’re not familiar with source maps, they work with any sort of preprocessor to teach your browser’s web inspector which files generated the compiled source you’re inspecting.
By default, Mix will not generate source maps for your files. But you can enable them by chaining the sourceMaps() method after your Mix calls, as you can see in Example 6-3.
letmix=require('laravel-mix');mix.js('resources/js/app.js','public/js').sourceMaps();
Once you configure Mix this way, you’ll see the source maps appear as a .{filename}.map file next to each generated file.
Without source maps, if you use your browser’s development tools to inspect a particular CSS rule or JavaScript action, you’ll just see a big mess of compiled code. With source maps, your browser can pinpoint the exact line of the source file, whether it be Sass or JavaScript or whatever else, that generated the rule you’re inspecting.
We’ve already covered Sass and Less, but Mix can also handle Stylus (Example 6-4), and you can chain PostCSS on to any other style calls (Example 6-5).
mix.stylus('resources/stylus/app.styl','public/css');
mix.sass('resources/sass/app.scss','public/css').options({postCss:[require('postcss-css-variables')()]});
If you don’t want to deal with a preprocessor, there’s a command for that—it will grab all of your CSS files, concatenate them, and output them to the public/css directory, just as if they had been run through a preprocessor. There are a few options, which you can see in Example 6-6.
// Combines all files from resources/cssmix.styles('resources/css','public/css/all.css');// Combines files from resources/cssmix.styles(['resources/css/normalize.css','resources/css/app.css'],'public/css/all.css');
The options available for working with normal JavaScript files are very similar to those available for normal CSS files. Take a look at Example 6-7.
letmix=require('laravel-mix');// Combines all files from resources/jsmix.scripts('resources/js','public/js/all.js');// Combines files from resources/jsmix.scripts(['resources/js/normalize.js','resources/js/app.js'],'public/js/all.js');
If you want to process your JavaScript—for example, to compile your ES6 code into plain JavaScript—Mix makes it easy to use Webpack for this purpose (see Example 6-8).
letmix=require('laravel-mix');mix.js('resources/js/app.js','public/js');
These scripts look for the provided filename in resources/js and output to public/js/app.js.
You can use more complicated aspects of Webpack’s feature set by creating a webpack.config.js file in your project root.
To move either a single file or an entire directory, use the copy() method or the copyDirectory() method.
mix.copy('node_modules/packagename/dist/style.css','public/css/packagename.css');mix.copyDirectory('source/images','public/images');
Most of the tips from Steve Souders’ Even Faster Web Sites (O’Reilly) have made their way into our everyday development practices. We move scripts to the footer, reduce the number of HTTP requests, and more, often without even realizing where those ideas originated.
One of Steve’s tips is still very rarely implemented, though, and that is setting a very long cache life on assets (scripts, styles, and images). Doing this means there will be fewer requests to your server to get the latest version of your assets. But it also means that users are extremely likely to have a cached version of your assets, which will make things get outdated, and therefore break, quickly.
The solution to this is versioning. Append a unique hash to each asset’s filename every time you run your build script, and then that unique file will be cached indefinitely—or at least until the next build.
What’s the problem? Well, first you need to get the unique hashes generated and appended to your filenames. But you also will need to update your views on every build to reference the new filenames.
As you can probably guess, Mix handles that for you, and it’s incredibly simple. There are two components: the versioning task in Mix, and the mix() PHP helper. First, you can version your assets by running mix.version() like in Example 6-9.
letmix=require('laravel-mix');mix.sass('resources/sass/app.scss','public/css').version();
The version of the file that’s generated is no different—it’s just named app.css and lives in public/css.
The way versioning is handled in Laravel is a little different than traditional versioning, in that the versioning is happening as a query parameter instead of by modifying file names. It still functions the same way, because browsers read it as a “new” file”, but it handles a few edge cases with caches and load balancers.
Next, use the PHP mix() helper in your views to refer to that file like in Example 6-10.
<linkrel="stylesheet"href="{{ mix("css/app.css") }}">// will output something like:<linkrel="stylesheet"href="/css/app.css?id=5ee7141a759a5fb7377a">
Mix can handle building both Vue (with single-file components) and React components. Mix’s default js() call handles Vue, and you can replace it with a react() call if you want to build React components:
mix.react('resources/js/app.js','public/js');
You can take a look at the default Laravel sample app.js and the components it imports, and see that you don’t have to do anything special to work with Vue components; a simple mix.js() call makes this possible in your app.js:
window.Vue=require('vue');Vue.component('example-component',require('./components/ExampleComponent.vue'));constapp=newVue({el:'#app'});
And if you switch to react(), this is all you’re going to run in your app.js file for your first component:
require('./components/Example');
Both presets also bring in Axios, Lodash, and Popper.js, so you don’t have to spend any time getting your Vue or React ecosystems set up.
When you’re writing single components with Vue or React, you’re likely used to either refreshing the page every time your build tool re-compiles your components, or if you’re using something like Mix, you rely on BrowserSync to reload it for you.
That’s great, but if you’re working with single-page apps (SPAs), that means you’re booted back to the beginning of the app; that refresh wipes any state you had built up as you navigated through the app.
HMR, or Hot Module Replacement (sometimes called Hot Reloading) is the answer. It’s not always easy to set up, but Mix comes with it enabled out of the box. HMR is essentially as if you taught BrowserSync to not re-load the entire file that was re-compiled, but instead to just re-load the bits of code you changed. That means you can get the updated code injected into your browser, but still retain the state you had built up as you got your SPA into just the right spot for testing.
In order to use HMR, you’ll want to run npm run hot instead of npm run watch. And, in order for it to work correctly, all of your <script> references have to be pulling the right version of your JavaScript files. Essentially, Mix is booting up a small Node server at localhost:8080, so if your script tag points to a different version of the script, HMR won’t work.
The easiest way to achieve this is to just use the mix() helper to reference your scripts. This helper will handle prepending either localhost:8080 if in HMR mode or your domain if you’re in a normal development mode. Here’s what it looks like inline:
<body><divid="app"></div><scriptsrc="{{ mix('js/app.js') }}"></script></body>
If you develop your applications on an HTTPS connection—for example, if you run valet secure—all your assets must also be served via an HTTPS connection. This is a little bit trickier, so it’s best to take a look at the HMR docs here: https://github.com/JeffreyWay/laravel-mix/blob/master/docs/hot-module-replacement.md
The most common frontend bundling pattern, which Mix also encourages, ends up generating a single CSS file and a single JavaScript file which encompasses both the app-specific code for your project and also the code for all its dependencies.
However, this means that vendor file updates require the entire file to be rebuilt and re-cached, which might introduce an undesireable load time.
Mix makes it easy to extract all of the JavaScript from your app’s dependencies into a separate vendor.js file. Simply supply a list of the vendor’s library names to the extract() method, chained after your js() call. Take a look at Example 6-11 to see how it looks.
mix.js('resources/js/app.js','public/js').extract(['vue'])
This outputs three files: Your existing app.js, and then two new files: manifest.js, which gives instructions to your browser about how to load the dependencies and app code, and vendor.js, which contains the vendor-specific code.
It’s important to load these files in the correct order in your frontend code. First, manifest.js; then vendor.js; and finally app.js.
<scriptsrc="{{ mix('js/manifest.js') }}"></script><scriptsrc="{{ mix('js/vendor.js') }}"></script><scriptsrc="{{ mix('js/app.js') }}"></script>
If you prefix an environment variable (in your .env file) with MIX_, it will become available in your Mix-compiled files as process.env.ENV_VAR_NAME.
# In your .env fileMIX_BUGSNAG_KEY=lj12389g08bq1234MIX_APP_NAME="Your Best App Now"
// In Mix-compiled files:process.env.MIX_BUGSNAG_KEY// For example, this code:console.log("Welcome to "+process.env.MIX_APP_NAME);// Will compile down to this:console.log("Welcome to "+"Your Best App Now");
You can also access those variables in your Webpack configuration files using Node’s dotenv package:
// webpack.mix.jsletmix=require('laravel-mix');require('dotenv').config();letisProduction=process.env.MIX_ENV==="production";
As a full-stack framework, Laravel has more connection to and opinions about frontend tooling than your average backend framework. Out of the box it provides an entire build system, which we’ve already covered, but it also builds and has components for Vue, and also includes Bootstrap, Axios, Lodash, and much more.
You can get a sense for the frontend tools that come along with each new Laravel install in package.json, webpack.mix.js (or gulpfile.js in older versions of Laravel), and the views, JavaScript files, and CSS files in the resources directory. This default set of components and files is called the Vue preset, and every new Laravel project comes stocked with it.
But what if you’d rather work in React? What if you want Bootstrap but not all that JavaScript? And what if you want to just rip it all out? Enter frontend presets, pre-baked scripts that modify or remove part or all of the Vue- and Bootstrap-loaded default presets. You can use the presets that are provided out of the box or you can pull in third party presets from GitHub.
To use a built-in preset, simply run php artisan present preset_name:
phpartisanpresetreactphpartisanpresetbootstrapphpartisanpresetnone
There’s also a php artisan preset vue which is what each new application has applied on a fresh install.
Frontend presets are only available in Laravel 5.5 and above.
If you’re interested in creating your own preset, or using one created by another community member, that’s also possible with the frontend preset system. There’s a GitHub organization designed to make it easy to find great third-party frontend presets, which you can find at https://github.com/laravel-frontend-presets/.
These packages all make it easy to install them; for most, the steps are as follows:
Install the package. E.g. composer require laravel-frontend-presets/tailwindcss
Install the preset. E.g. php artisan preset tailwindcss
Just like the built-in presets, npm install and npm run dev
If you want to create a preset of your own, the laravel-frontend-presets organization has a skeleton repository you can for to make it easier, which you can find at https://github.com/laravel-frontend-presets/skeleton.
Although they’re technically not a part of the frontend presets, Laravel has a series of routes and views called the “auth scaffold” that are, essentially, frontend presets. If you run php artisan make:auth, you’ll get a login page, a sign up page, a new master template for the “app” view of your app, routes to serve these pages, and more. Take a look at Chapter 9 to learn more.
For something that is so common across web applications, pagination still can be wildly complicated to implement. Thankfully, Laravel has a built-in concept of pagination, and it’s also hooked into Eloquent results and the router by default.
The most common place you’ll see pagination is when you are displaying the results of a database query and there are too many results for a single page. Eloquent and the query builder both read the page query parameter from the current page request and use it to provide a paginate() method on any result sets; the single parameter you should pass paginate() is how many results you want per page. Take a look at Example 6-12 to see how this works.
// PostsControllerpublicfunctionindex(){returnview('posts.index',['posts'=>DB::table('posts')->paginate(20)]);}
Example 6-12 defines that this route should return 20 posts per page, and will define which “page” of results the current user is on based on the URL’s page query parameter, if it has one. Eloquent models all have the same paginate() method.
When you display the results in your view, your collection will now have a links() method on it (or render() for Laravel 5.1) that will output the pagination controls, with class names from the Bootstrap component libnrary assigned to them by default (see Example 6-13).
// posts/index.blade.php<table>@foreach($postsas$post)<tr><td>{{$post->title}}</td></tr>@endforeach</table>{{$posts->links()}}// By default, $posts->links() will output something like this:<ulclass="pagination"><liclass="page-item disabled"><span>«</span></li><liclass="page-item active"><span>1</span></li><liclass="page-item"><aclass="page-link"href="http://myapp.com/posts?page=2">2</a></li><liclass="page-item"><aclass="page-link"href="http://myapp.com/posts?page=3">3</a></li><liclass="page-item"><aclass="page-link"href="http://myapp.com/posts?page=2"rel="next">»</a></li></ul>
If you’d like to customize how many links show on either side of the current page, projects running Laravel 5.7 and later can customize this number easily with the onEachSide() method.
DB::table('posts')->paginate(10)->onEachSide(3);// Outputs:// 5 6 7 [8] 9 10 11
If you’re not working with Eloquent or the query builder, or if you’re working with a complex query (e.g., those using groupBy), you might find yourself needing to create a paginator manually. Thankfully, you can do that with the Illuminate\Pagination\Paginator or Illuminate\Pagination\LengthAwarePaginator classes.
The difference between the two classes is that Paginator will only provide previous and next buttons, but no links to each page; LengthAwarePaginator needs to know the length of the full result, so that it can generate links for each individual page. You may find yourself wanting to use the Paginator on large result sets, so your paginator doesn’t have to be aware of a massive count of results that might be costly to run.
Both the Paginator and the LengthAwarePaginator require you to manually extract the subset of content that you want to pass to the view. Take a look at Example 6-14 for an example.
useIlluminate\Http\Request;useIlluminate\Pagination\Paginator;Route::get('people',function(Request$request){$people=[...];// huge list of people$perPage=15;$offsetPages=$request->input('page',1)-1;// The Paginator will not slice your array for you$people=array_slice($people,$offsetPages*$perPage,$perPage);returnnewPaginator($people,$perPage);});
The Paginator syntax has changed over the last few versions of Laravel, so if you’re using 5.1, take a look at the docs to find the correct syntax.
Another common but painful feature in web applications is passing messages between various components of the app, when the end goal is to share them with the user. Your controller, for example, might want to send a validation message: “The email field must be a valid email address.” However, that particular message doesn’t just need to make it to the view layer; it actually needs to survive a redirect and then end up in the view layer of a different page. How do we structure this messaging logic?
Illuminate\Support\MessageBag is a class tasked with storing, categorizing, and returning messages that are intended for the end user. It groups all messages by key, where the keys are likely to be something like errors and messages, and provides convenience methods for getting all its stored messages or only those for a particular key, and for outputting these messages in various formats.
You can spin up a new instance of MessageBag manually like in Example 6-15. To be honest, you likely won’t ever do this manually—this is just a thought exercise to show how it works.
$messages=['errors'=>['Something went wrong with edit 1!',],'messages'=>['Edit 2 was successful.',],];$messagebag=new\Illuminate\Support\MessageBag($messages);// Check for errors; if there are any, decorate and echoif($messagebag->has('errors')){echo'<ul id="errors">';foreach($messagebag->get('errors','<li><b>:message</b></li>')as$error){echo$error;}echo'</ul>';}
Message bags are also closely connected to Laravel’s validators (learn more in “Validation”): when validators return errors, they actually return an instance of MessageBag, which you can then pass to your view or attach to a redirect using redirect('route')->withErrors($messagebag).
Laravel passes an empty instance of MessageBag to every view, assigned to the variable $errors, and if you’ve flashed a message bag using withErrors() on a redirect, it will get assigned to that $errors variable instead. That means every view can always assume it has an $errors MessageBag it can check wherever it handles validation, which leads to Example 6-16 as a common snippet developers place on every page.
// partials/errors.blade.php@if($errors->any())<divclass="alert alert-danger"><ul>@foreach($errorsas$error)<li>{{$error}}</li>@endforeach</ul></div>@endif
If you have any routes that aren’t under the web middleware group, they won’t have the session middleware, which means they won’t have this $errors variable available.
Sometimes you need to differentiate message bags not just by key (notices versus errors) but also by component. Maybe you have a login form and a signup form on the same page; how do you differentiate them?
When you send errors along with a redirect using withErrors(), the second parameter is the name of the bag: redirect('dashboard')->withErrors($validator, 'login'). Then, on the dashboard, you can use $errors->login to call all of the methods you saw before: any(), count(), and more.
As developers, we tend to look at blocks of text as big placeholder divs, waiting for the client to put real content into them. Seldom are we involved in any logic inside these blocks.
But there are a few circumstances where you’ll be grateful for the tools Laravel provides for string manipulation.
Laravel has a series of helpers for manipulating strings. They’re available as methods on the Str class (e.g., Str::plural()), but most also have a global helper function (e.g., str_plural()).
The Laravel documentation covers all of the string helpers in detail, but here are a few of the most commonly used helpers:
eA shortcut for html_entities; encodes all HTML entities for safety
starts_with, ends_with, str_containsCheck a string (first parameter) to see if it starts with, ends with, or contains another string (second parameter)
str_isChecks whether a string (second parameter) matches a particular pattern (first parameter)—for example, foo* will match foobar and foobaz
str_slugConverts a string to a URL-type slug with hyphens
str_plural (word, count), str_singularPluralizes a word or singularizes it; English-only (e.g., str_plural('dog') returns dogs; str_plural('dog', 1')) returns dog)
camel_case, kebab_case, snake_case, studly_case, title_caseConvert a provided string to a different capitalization “case”
str_after, str_before, str_limitTrim a string and provide a substring; str_after returns everything after a given string and str_before everything before the given string (both accept the first parameter of the full string and the second as the string you’re using to cut), and str_limit truncates a string (first parameter) to a given number of characters (second parameter)
Localization allows you to define multiple languages and mark any strings as targets for translation. You can set a fallback language, and even handle pluralization variations.
In Laravel, you’ll need to set an “application locale” at some point during the page load so the localization helpers know which bucket of translations to pull from. Each “locale” is usually connected to a translation, and will often look like “en” (for English). You’ll do this with App::setLocale($localeName), and you’ll likely put it in a service provider. For now you can just put it in the boot() method of AppServiceProvider, but you may want to create a LocaleServiceProvider if you end up with more than just this one locale-related binding.
You can define your fallback locale in config/app.php, where you should find a fallback_locale key. This allows you to define a default language for your application, which Laravel will use if it can’t find a translation for the requested locale.
So, how do we call for a translated string? There’s a helper function, __($key), that will pull the string for the current locale for the passed key or, if it doesn’t exist, grab it from the default locale. In Blade you can also use the @lang() directive. Example 6-17 demonstrates how a basic translation works. We’ll use the example of a “back to the dashboard” link at the top of a detail page.
// Normal PHP
<?php echo __('navigation.back'); ?>
// Blade
{{ __('navigation.back') }}
// Blade directive
@lang('navigation.back')Let’s assume we are using the es locale right now. Laravel will look for a file in resources/lang/es/navigation.php, which it will expect to return an array. It’ll look for a back key on that array, and if it exists, it’ll return its value. Take a look at Example 6-18 for a sample.
// resources/lang/es/navigation.phpreturn['back'=>'Volver al panel',];// routes/web.phpRoute::get('/es/contacts/show/{id}',function(){// Setting it manually, for this example, instead of in a service providerApp::setLocale('es');returnview('contacts.show');});// resources/views/contacts/show.blade.php<ahref="/contacts">{{__('navigation.back')}}</a>
In projects running versions of Laravel prior to 5.4, the __() helper isn’t available. You will instead have to use the trans() helper, which accesses an older translation system that works similarly to what we’re describing here, but can’t access the JSON translation system.
The preceding example was relatively simple. Let’s dig into some that are more complex. What if we want to define which dashboard we’re returning to? Take a look at Example 6-19.
// resources/lang/en/navigation.phpreturn['back'=>'Back to :section dashboard',];// resources/views/contacts/show.blade.php{{__('navigation.back',['section'=>'contacts'])}}
As you can see, prepending a word with a colon (:section) marks it as a placeholder that can be replaced. The second, optional, parameter of __() is an array of values to replace the placeholders with.
We already covered pluralization, so now just imagine you’re defining your own pluralization rules. There are two ways to do it; we’ll start with the simplest, in Example 6-20.
// resources/lang/en/messages.phpreturn['task-deletion'=>'You have deleted a task|You have successfully deleted tasks'];// resources/views/dashboard.blade.php@if($numTasksDeleted>0){{trans_choice('messages.task-deletion',$numTasksDeleted)}}@endif
As you can see, we have a trans_choice() method, which takes the count of items affected as its second parameter; and from this it will determine which string to use.
You can also use any translation definitions that are compatible with Symfony’s much more complex Translation component; see Example 6-21 for an example.
// resources/lang/es/messages.phpreturn['task-deletion'=>"{0} You didn't manage to delete any tasks.|"."[1,4] You deleted a few tasks.|"."[5,Inf] You deleted a whole ton of tasks.",];
One common difficulty with localization is that it’s hard to ensure there’s a good system for defining key namespacing—for example, remembering a key nested three or four levels deep or being unsure which key a phrase used twice in the site should use.
An alternative to the slug key/string value pair system is to store your translations using your primary language string as the key, instead of a made-up slug. You can indicate to Laravel that you’re working this way by storing your translation files as JSON in the resources/lang directory, with the filename reflecting the locale. For example:
// In Blade{{__('View friends list')}}
// resources/lang/es.json{'View friends list':'Ver lista de amigos'}
This is taking advantage of the fact that the __() translation helper, if it can’t find a matching key for the current language, will just display the key. If your key is the string in your app’s default language, that’s a much more reasonable fallback than, for example, widgets.friends.title.
The JSON string translation format is only available in Laravel 5.4 and later.
In this chapter we focused primarily on Laravel’s frontend components. These are less likely the objects of unit tests, but they may at times be used in your integration tests.
There are two primary ways of testing messages passed along with message and error bags. First, you can perform a behavior in your application tests that sets a message that will eventually be displayed somewhere, then redirect to that page and assert that the appropriate message is shown.
Second, for errors (which is the most common use case), you can assert the session has errors with $this->assertSessionHasErrors($bindings = []). Take a look at Example 6-22 to see what this might look like.
publicfunctiontest_missing_email_field_errors(){$this->post('person/create',['name'=>'Japheth']);$this->assertSessionHasErrors(['email']);}
In order for Example 6-22 to pass, you’ll need to add input validation to that route, which we’ll cover in Chapter 7.
The simplest way to test localization is with application tests. Set the appropriate context (whether by URL or session), “visit” the page with get(), and assert that you see the appropriate content.
As a full-stack framework, Laravel provides tools and components for the frontend as well as the backend.
Mix is a layer in front of Webpack that makes common tasks and configurations much simpler. Mix makes it easy to use popular CSS pre- and post-processors, common JavaScript processing steps, and much more.
Laravel also offers other internal tools that target the frontend, including pagination, message and error bags, and localization.
Websites that benefit from a framework like Laravel often don’t just serve static content. Many deal with complex and mixed data sources, and one of the most common (and most complex) of these sources is user input in its myriad forms: URL paths, query parameters, POST data, and file uploads.
Laravel provides a collection of tools for gathering, validating, normalizing, and filtering user-provided data. We’ll look at those here.
The most common tool for accessing user data in Laravel is injecting an instance of the Illuminate\Http\Request object. It provides easy access to all of the ways users can provide input to your site: POST form data, posted JSON, GET (query parameters), and URL segments.
There’s also a request() global helper and a Request facade, both of which expose the same methods. Each of these options exposes the entire Illuminate Request object, but for now we’re only going to cover the methods that specifically relate to user data.
Since we’re planning on injecting a Request object, let’s take a quick look at how to get the $request object we’ll be calling all these methods on:
Route::post('form',function(Illuminate\Http\Request$request){// $request->etc()});
Just like the name suggests, $request->all() gives you an array containing all of the input the user has provided, from every source. Let’s say, for some reason, you decided to have a form POST to a URL with a query parameter—e.g., sending a POST to http://myapp.com/signup?utm=12345. Take a look at Example 7-1 to see what you’d get from $request->all(). (Note that $request->all() also contains information about any files that were uploaded, but we’ll cover that later in the chapter.)
<!-- GET route form view at /get-route --><formmethod="post"action="/signup?utm=12345">@csrf<inputtype="text"name="first_name"><inputtype="submit"></form>
// routes/web.phpRoute::post('signup',function(Request$request){var_dump($request->all());});// Outputs:/*** [* '_token' => 'CSRF token here',* 'first_name' => 'value',* 'utm' => 12345,* ]*/
$request->except() provides the same output as $request->all, but you can choose one or more fields to exclude—for example, _token. You can pass it either a string or an array of strings.
Example 7-2 shows what it looks like when we use $request->except() on the same form as in Example 7-1.
Route::post('post-route',function(Request$request){var_dump($request->except('_token'));});// Outputs:/*** [* 'firstName' => 'value',* 'utm' => 12345,* ]*/
$request->only() is the inverse of $request->except(), as you can see in Example 7-3.
Route::post('post-route',function(Request$request){var_dump($request->only(['firstName','utm']));});// Outputs:/*** [* 'firstName' => 'value',* 'utm' => 12345,* ]*/
With $request->has() you can detect whether a particular piece of user input is available to you. Check out Example 7-4 for an analytics example with our utm query string parameter from the previous examples.
// POST route at /post-routeif($request->has('utm')){// Do some analytics work}
Whereas $request->all(), $request->except(), and $request->only() operate on the full array of input provided by the user, $request->input() allows you to get the value of just a single field. Example 7-5 provides an example. Note that the second parameter is the default value, so if the user hasn’t passed in a value, you can have a sensible (and nonbreaking) fallback.
Route::post('post-route',function(Request$request){$userName=$request->input('name','Matt');});
Returns the HTTP verb, or checks against it, for the request.
$method=$request->method();if($request->isMethod('patch')){// do something if request method is PATCH}
Laravel also provides convenience helpers for accessing data from array input. Just use the “dot” notation to indicate the steps of digging into the array structure, like in Example 7-7.
<!-- GET route form view at /employees/create --><formmethod="post"action="/employees/">@csrf<inputtype="text"name="employees[0][firstName]"><inputtype="text"name="employees[0][lastName]"><inputtype="text"name="employees[1][firstName]"><inputtype="text"name="employees[1][lastName]"><inputtype="submit"></form>
// POST route at /employeesRoute::post('employees',function(Request$request){$employeeZeroFirstName=$request->input('employees.0.firstName');$allLastNames=$request->input('employees.*.lastName');$employeeOne=$request->input('employees.1');var_dump($employeeZeroFirstname,$allLastNames,$employeeOne);});// If forms filled out as "Jim" "Smith" "Bob" "Jones":// $employeeZeroFirstName = 'Jim';// $allLastNames = ['Smith', 'Jones'];// $employeeOne = ['firstName' => 'Bob', 'lastName' => 'Jones'];
So far we’ve covered input from query strings (GET) and form submissions (POST). But there’s another form of user input that’s becoming more common with the advent of JavaScript single-page apps (SPAs): the JSON request. It’s essentially just a POST request with the body set to JSON instead of a traditional form POST.
Let’s take a look at what it might look like to submit some JSON to a Laravel route, and how to use $request->input() to pull out that data (Example 7-8).
POST/post-routeHTTP/1.1Content-Type:application/json{"firstName":"Joe","lastName":"Schmoe","spouse":{"firstName":"Jill","lastName":"Schmoe"}}
// post-routeRoute::post('post-route',function(Request$request){$firstName=$request->input('firstName');$spouseFirstname=$request->input('spouse.firstName');});
Since $request->input() is smart enough to pull user data from GET, POST, or JSON, you may wonder why Laravel even offers $request->json(). There are two reasons you might prefer $request->json(). First, you might want to just be more explicit to other programmers on your project about where you’re expecting the data to come from. And second, if the POST doesn’t have the correct application/json headers, $request->input() won’t pick it up as JSON, but $request->json() will.
It might not be the first thing you think of when you imagine “user data,” but the URL is just as much user data as anything else in this chapter.
There are two primary ways you’ll get data from the URL: via Request objects an via route parameters.
Injected Request objects (and the Request facade and the request() helper) have several methods available to represent the state of the current page’s URL, but right now let’s look primarily at getting information about the URL segments.
If you’re not familiar with the idea of URL segments, each group of characters after the domain is called a segment. So, http://www.myapp.com/users/15/ has two segments: users and 15.
As you can probably guess, we have two methods available to us: $request->segments() returns an array of all segments, and $request->segment($segmentId) allows us to get the value of a single segment. Note that segments are returned on a 1-based index, so in the preceding example, $request->segment(1) would return users.
Request objects, the Request facade, and the request() global helper provide quite a few more methods to help us get data out of the URL. To learn more, check out Chapter 10.
The other primary way we get data about the URL is from route parameters, which are injected into the controller method or closure that is serving a current route as shown in Example 7-9.
// routes/web.phpRoute::get('users/{id}',function($id){// If the user visits myapp.com/users/15/, $id will equal 15});
To learn more about routes and route binding, check out Chapter 3.
We’ve talked about different ways to interact with users’ text input, but there’s also the matter of file uploads to consider. Request objects provide access to any uploaded files using the $request->file() method, which takes the file’s input name as a parameter and returns an instance of Symfony\Component\HttpFoundation\File\UploadedFile.
Let’s walk through an example. First, our form, in Example 7-10.
<formmethod="post"enctype="multipart/form-data">@csrf<inputtype="text"name="name"><inputtype="file"name="profile_picture"><inputtype="submit"></form>
Now, let’s take a look at what we get from running $request->all(), in Example 7-11. Note that $request->input('profile_picture') will return null; we need to use $request->file('profile_picture') instead.
Route::post('form',function(Request$request){var_dump($request->all());});// Output:// [// "_token" => "token here"// "name" => "asdf"// "profile_picture" => UploadedFile {}// ]Route::post('form',function(Request$request){if($request->hasFile('profile_picture')){var_dump($request->file('profile_picture'));}});// Output:// UploadedFile (details)
Symfony’s UploadedFile class extends PHP’s native SplFileInfo with methods allowing you to easily inspect and manipulate the file. This list isn’t exhaustive, but it gives you a taste of what you can do:
guessExtension()
getMimeType()
store($path, $storageDisk = default disk)
storeAs($path, $newName, $storageDisk = default disk)
storePublicly($path, $storageDisk = default disk)
storePubliclyAs($path, $newName, $storageDisk = default disk)
move($directory, $newName = null)
getClientOriginalName()
getClientOriginalExtension()
getClientMimeType()
guessClientExtension()
getClientSize()
getError()
isValid()
As you can see, most of the methods have to do with getting information about the uploaded file, but there’s one that you’ll likely use more than all the others: store() (available since Laravel 5.3), which takes the file that was uploaded with the request and stores it in a specified directory on your server. Its first parameter is the destination directory, and the optional second parameter will be the storage disk (s3, local, etc.) to use to store the file.
You can see a common workflow in Example 7-12.
if($request->hasFile('profile_picture')){$path=$request->profile_picture->store('profiles','s3');auth()->user()->profile_picture=$path;auth()->user()->save();}
If you need to specify the filename, you can use storeAs() instead of store(). The first parameter is still the path; the second is the filename, and the optional third parameter is the storage disk to use.
If you get null when you try to get the contents of a file from your request, you might’ve forgotten to set the encoding type on your form. Make sure to add the attribute enctype="multipart/form-data" on your form:
<formmethod="post"enctype="multipart/form-data">
Laravel has quite a few ways you can validate incoming data. We’ll cover form requests in the next section, so that leaves us with two primary options: validating manually or using the validate() method on the Request object. Let’s start with the simpler, and more common, validate().
The Request object has a validate() method that provides a convenient shortcut for the most common validation workflow. Let’s take a look in Example 7-13.
// routes/web.phpRoute::get('recipes/create','RecipesController@create');Route::post('recipes','RecipesController@store');
classRecipesControllerextendsController{publicfunctioncreate(){returnview('recipes.create');}publicfunctionstore(Request$request){$request->validate(['title'=>'required|unique:recipes|max:125','body'=>'required']);// Recipe is valid; proceed to save it}}
We only have four lines of code running our validation here, but they’re doing a lot.
First, we’re explicitly defining the fields we expect and applying rules (here separated by the pipe character, |) to each individually.
Next, the validate() method checks the incoming data from the $request and determines whether or not it is valid.
If the data is valid, the validate method ends and we can move on with the controller method, saving the data or whatever else.
But if the data isn’t valid, it throws a ValidationException. This contains instructions to the router about how to handle this exception. If the request is from JavaScript (or if it’s requesting JSON as a response), the exception will create a JSON response containing the validation errors. If not, the exception will return a redirect to the previous page, together with all of the user input and the validation errors—perfect for repopulating a failed form and showing some errors.
In projects running versions of Laravel prior to 5.5, this validation shortcut is on the controller (running $this->validate()) instead of on the request.
If you are not working in a controller, or if for some other reason the previously described flow is not a good fit, you can manually create a Validator instance using the Validator facade and check for success or failure like in Example 7-14.
Route::get('recipes/create',function(){returnview('recipes.create');});Route::post('recipes',function(Illuminate\Http\Request$request){$validator=Validator::make($request->all(),['title'=>'required|unique:recipes|max:125','body'=>'required']);if($validator->fails()){returnredirect('recipes/create')->withErrors($validator)->withInput();}// Recipe is valid; proceed to save it});
As you can see, we create an instance of a validator by passing it our input as the first parameter and the validation rules as the second parameter. The validator exposes a fails() method that we can check against and can be passed into the withErrors() method of the redirect.
If the validation rule you need doesn’t exist in Laravel, you can create your own. To create a custom rule, run php artisan make:rule RuleName and then edit that file in app/Rules/RuleName.php.
You’ll get two methods in your rule out of the box: passes() and message(). passes() should accept an attribute name as the first parameter and the user-provided value as the second, and then return a boolean of whether or not this input passes this validation rule. message() should return the validation error message; you can use :attribute as a placeholder in your message for the attribute name.
Take a look at Example 7-15 as an example.
classWhitelistedEmailDomainimplementsRule{publicfunctionpasses($attribute,$value){returnin_array(str_after($value,'@'),['tighten.co']);}publicfunctionmessage(){return'The :attribute field is not from a whitelisted email provider.';}}
To use this rule, just pass an instance of the rule object to your validator:
$request->validate(['email'=>newWhitelistedEmailDomain]);
In projects running versions of Laravel prior to 5.5, custom validation rules have to be written using Validator::extend. You can learn more about how in the docs: https://laravel.com/docs/5.4/validation#custom-validation-rules
We’ve already covered much of this in Chapter 6, but here’s a quick refresher on how to display errors from validation.
The validate() method on requests (and the withErrors() method on redirects that it relies on) flashes any errors to the session. These errors are made available to the view you’re being redirected to in the $errors variable. And remember that as a part of Laravel’s magic, that $errors variable will be available every time you load the view, even if it’s just empty, so you don’t have to check if it exists with isset().
That means you can do something like Example 7-16 on every page.
@if ($errors->any())
<ul id="errors">
@foreach ($errors->all() as $error)
<li>{{ $error }}</li>
@endforeach
</ul>
@endifAs you build out your applications, you might start noticing some patterns in your controller methods. There are certain patterns that are repeated—for example, input validation, user authentication and authorization, and possible redirects. If you find yourself wanting a structure to normalize and extract these common behaviors out of your controller methods, you may be interested in Laravel’s form requests.
A form request is a custom request class that is intended to map to the submission of a form, and the request takes the responsilibity for validating the request, authorizing the user, and optionally redirecting the user upon a failed validation. Each form request will usually, but not always, explicitly map to a single HTTP request—e.g., “Create Comment.”
You can create a new form request from the command line:
php artisan make:request CreateCommentRequest
You now have a form request object available at app/Http/Requests/CreateCommentRequest.php.
Every form request class provides either one or two public methods. The first is rules(), which needs to return an array of validation rules for this request. The second (optional) method is authorize(); if this returns true, the user is authorized to perform this request, and if false, the user is rejected. Take a look at Example 7-17 to see a sample form request.
<?phpnamespaceApp\Http\Requests;useApp\BlogPost;useIlluminate\Foundation\Http\FormRequest;classCreateCommentRequestextendsFormRequest{publicfunctionauthorize(){$blogPostId=$this->route('blogPost');returnauth()->check()&&BlogPost::where('id',$blogPostId)->where('user_id',auth()->id())->exists();}publicfunctionrules(){return['body'=>'required|max:1000'];}}
The rules() section of Example 7-17 is pretty self-explanatory, but let’s look at authorize() briefly.
We’re grabbing the segment from the route named blogPost. That’s implying the route definition for this route probably looks a bit like this: Route::post('blogPosts/{blogPost}', function () { // Do stuff }). As you can see, we named the route parameter blogPost, which makes it accessible in our Request using $this->route('blogPost').
We then look at whether the user is logged in and, if so, whether any blog posts exist with that identifier that are owned by the currently logged-in user. You’ve already learned some easier ways to check ownership in Chapter 5, but we’ll keep it more explicit here to keep it clean. We’ll cover what implications this has shortly, but the important thing to know is that returning true means the user is authorized to perform the specified action (in this case, creating a comment), and false means the user is not authorized.
In projects running versions of Laravel prior to 5.3, form requests extended App\Http\Requests\Request instead of Illuminate\Foundation\Http\FormRequest.
Now that we’ve created a form request object, how do we use it? It’s a little bit of Laravel magic. Any route (closure or controller method) that typehints a form request as one of its parameters will benefit from the definitions of that form request.
Let’s try it out, in Example 7-18.
Route::post('comments',function(App\Http\Requests\CreateCommentRequest$request){// Store comment});
You might be wondering where we call the form request, but Laravel does it for us. It validates the user input and authorizes the request. If the input is invalid, it’ll act just like the request object validate() method works, redirecting the user to the previous page with their input preserved and with the appropriate error messages passed along. And if the user is not authorized, Laravel will return a 403 Forbidden error and not execute the route code.
Until now, we’ve been looking at validating at the controller level, which is absolutely the best place to start. But you can also filter the incoming data at the model level.
It’s a common (but not recommended) pattern to pass the entirety of a form’s input directly to a database model. In Laravel, that might look like Example 7-19.
Route::post('posts',function(Request$request){$newPost=Post::create($request->all());});
We’re assuming here that the end user is kind and not malicious, and has kept only the fields we want him to edit—maybe the post title or body.
But what if our end user can guess, or discern, that we have an author_id field on that posts table? What if he used his browser tools to add an author_id field and set the ID to be someone else’s ID, and the other person impersonated the other person by creating fake blog posts attributed to her?
Eloquent has a concept called “mass assignment” that allows you to either whitelist fields that should be fillable by being passed as a part of an array to create() or update() methods (using the model’s $fillable property) or blacklist fields that shouldn’t be fillable (using the model’s $guarded property). Check out Chapter 5 to learn more.
In our example, we might want to fill out the model like Example 7-20 to keep our app safe.
<?phpnamespaceApp;useIlluminate\Database\Eloquent\Model;classPostextendsModel{// Disable mass assignment on the author_id fieldprotected$guarded=['author_id'];}
By setting author_id to guarded, we ensure that malicious users will no longer be able to override the value of this field by manually adding it to the contents of a form that they’re sending to our app.
While it’s important to do a good job of protecting our models from mass assignment, it’s also worth being careful on the assigning end. Rather than using $request->all(), consider $request->only() so you can specify which fields you’d like to pass into your model:
Route::post('posts',function(Request$request){$newPost=Post::create($request->only(['title','body',]));});
Any time you display content on a web page that was created by a user, you need to guard against malicious input, such as script injection.
Let’s say you allow your users to write blog posts on your site. You probably don’t want them to be able to inject malicious JavaScript that will run in your unsuspecting visitors’ browsers, right? So, you’ll want to escape any user input that you show on the page to avoid this.
Thankfully, this is almost entirely covered for you. If you use Laravel’s Blade templating engine, the default “echo” syntax ({{ $stuffToEcho }}) runs the output through htmlentities() (PHP’s best way of making user content safe to echo) automatically. You actually have to do extra work to avoid escaping the output, by using the {!! $stuffToEcho !!} syntax.
If you’re interested in testing your interactions with user input, you’re probably most interested in simulating valid and invalid user input and ensuring that if the input is invalid the user is redirected, and if the input is valid, it ends up in the proper place (e.g., the database).
Laravel’s end-to-end application testing makes this simple.
If you want to work with testing specific user interactions on the page and with your forms, and you’re working in a project with Laravel 5.4 or later, you’ll want to pull in Laravel’s BrowserKit testing package. Simply require the package:
composer require laravel/browser-kit-testing --dev
And modify your application’s base TestCase class to extend Laravel\BrowserKitTesting\TestCase instead of Illuminate\Foundation\Testing\TestCase.
Let’s start with an invalid route that we expect to be rejected, in Example 7-21.
publicfunctiontest_input_missing_a_title_is_rejected(){$response=$this->post('posts',['body'=>'This is the body of my post']);$response->assertRedirect();$response->assertSessionHasErrors();}
Here we assert that after invalid input the user is redirected, with errors attached. You can see we’re using a few custom PHPUnit assertions that Laravel adds here.
The assertRedirect assertion was named assertRedirectedTo prior to Laravel 5.4.
So, how do we test our route’s success? Check out Example 7-22.
publicfunctiontest_valid_input_should_create_a_post_in_the_database(){$this->post('posts',['title'=>'Post Title','body'=>'This is the body']);$this->assertDatabaseHas('posts',['title'=>'Post Title']);}
Note that, if you’re testing something using the database, you’ll need to learn more about database migrations and transactions. More on that in Chapter 12.
In projects running versions of Laravel prior to 5.4 assertDatabaseHas should be replaced by seeInDatabase.
There are a lot of ways to get the same data: the Request facade, the request() global helper, and injecting an instance of Illuminate\Http\Request. Each exposes the ability to get all input, some input, or specific pieces of data, and files and JSON input can have some special considerations at times.
URI path segments are also a possible source of user input, and they’re also accessible via the request tools.
Validation can be performed manually with Validator::make(), or automatically using the validate() request method or form requests. Each automatic tool, upon failed validation, redirects the user to the previous page with all old input stored and errors passed along.
Views and Eloquent models also need to be protected from nefarious user input. Protect Blade views using the double curly brace syntax ({{ }}), which escapes user input, and protect models by only passing specific fields into bulk methods using $request->only() and by defining the mass assignment rules on the model itself.
From installation onward, modern PHP frameworks expect many interactions to take place on the command line. Laravel provides three primary tools for command-line interaction: Artisan, a suite of built-in command-line actions with the ability to add more; Tinker, a REPL or interactive shell for your application; and the installer, which we’ve already covered in Chapter 2.
If you’ve been reading through this book chapter by chapter, you’ve already learned how to use Artisan commands. They look something like this:
php artisan make:controller PostsController
If you look in the root folder of your application, you’ll see that artisan is actually just a PHP file. That’s why you’re starting your call with php artisan; you’re passing that file into PHP to be parsed. Everything after that is just passed into Artisan as arguments.
Artisan is actually a layer on top of the Symfony Console component, so if you’re familiar with writing Symfony Console commands you should feel right at home.
Since the list of Artisan commands for an application can be changed by a package or by the specific code of the application, it’s worth checking every new application you encounter to see what commands are available.
To get a list of all available Artisan commands, you can run php artisan list from the project root (although if you just run php artisan with no parameters, it will do the same thing).
There’s not enough space here to cover all of the Artisan commands, but we’ll cover many of them. Let’s get started with the basic commands:
clear-compiled removes Laravel’s compiled class file, which is like an internal Laravel cache; run this as a first resort when things are going wrong and you don’t know why.
down puts your application in “maintenance mode” in order for you to fix an error, run migrations, or whatever else; up restores an application from maintenance mode.
dump-server (5.7+) starts the dump server (“Laravel Dump Server”) to collect and output dumped variables.
env displays which environment Laravel is running at the moment; it’s the equivalent of echoing app()->environment() in-app.
help provides help for a command; e.g., php artisan help commandName.
migrate runs all database migrations.
optimize clears and refreshes the configuration and route files.
preset changes out the frontend scaffolding for another.
serve spins up a PHP server at localhost:8000 (you can customize the host and/or port with --host and --port).
tinker brings up the Tinker REPL, which we’ll cover later in this chapter.
The list of Artisan commands, and their names, has changed in small ways over the lifetime of Laravel. I’ll try to note any time they’ve changed, but everything here is listed out for Laravel 5.7. If you’re not working in 5.7, the best way to see what’s available to you is to run php artisan from your application.
Before we cover the rest of the Artisan commands, let’s look at a few notable options you can pass any time you run an Artisan command:
-q suppresses all output.
-v, -vv, and -vvv are the three levels of output verbosity (normal, verbose, and debug).
--no-interaction does not ask any interactive questions, so it won’t interrupt automated processes running it.
--env allows you to define which environment the Artisan command should operate in (e.g., local, production, etc.).
--version shows you which version of Laravel your application is running on.
You’ve probably guessed from looking at these options that Artisan commands are intended to be used much like basic shell commands: you might run them manually, but they can also function as a part of some automated process at some point.
For example, there are many automated deploy processes that might benefit from certain Artisan commands. You might want to run php artisan config:cache every time you deploy an application. Flags like -q and --no-interaction ensure that your deploy scripts, not attended by a human being, can keep running smoothly.
The rest of the commands available out of the box are grouped by context. We won’t cover them all here, but we’ll cover each context broadly:
appThis just contains app:name, which allows you to replace every instance of the default top-level App\ namespace with a namespace of your choosing. For example: php artisan app:name MyApplication. I recommend avoiding this feature and keeping your app’s root namespace as “App”.
authAll we have here is auth:clear-resets, which flushes all of the expired password reset tokens from the database.
cachecache:clear clears the caches, cache:forget removes an individual item from the cache, and cache:table creates a database migration if you plan to use the database cache driver.
configconfig:cache caches your configuration settings for faster lookup; to clear the cache, use config:clear.
dbdb:seed seeds your database, if you have configured database seeders.
eventevent:generate builds missing event and event listener files based on the definitions in EventServiceProvider. You’ll learn more about events in Chapter 16.
keykey:generate creates a random application encryption key in your .env file.
If you run php artisan key:generate more than once on your application, every currently-logged-in user will be logged out when you run it additional times. Additionally, any data you have manually encrypted will no longer be decrypt-able. To learn more, check out this article from fellow Tightenite Jake Bathman: APP_KEY and You.
makemake:auth scaffolds out the views and corresponding routes for a landing page, a user dashboard, and login and register pages.
All the rest of the make: actions create a single item, and have parameters that vary accordingly. To learn more about any individual command’s parameters, use help to read its documentation.
For example, you could run php artisan help make:migration and learn that you can pass --create=tableNameHere to create a migration that already has the create table syntax in the file, as shown here: php artisan make:migration create_posts_table --create=posts.
migrateYou saw a migrate command earlier to run our migrations, but here we can run all the other migration-related commands. Create the migrations table (to keep track of the migrations that are executed) with migrate:install, reset your migrations and start from scratch with migrate:reset, reset your migrations and run them all again with migrate:refresh, roll back just one migration with migrate:rollback, drop all tables and re-run all the migrations with migrate:fresh, or check the status of your migrations with migrate:status.
notificationsnotifications:table generates a migration that creates the table for database notifications.
packageIn Laravel prior to 5.5 including a new Laravel-specific package in your app requires registering it manually in config/app.php. However, in 5.5 it’s possible for Laravel to “auto-discover” those packages so you don’t have to manually register them. package:discover rebuilds Laravel’s “discovered” manifest of the service providers from your external packages.
queueWe’ll cover Laravel’s queues in Chapter 16, but the basic idea is that you can push jobs up into remote queues to be executed one after another by a worker. This command group provides all the tools you need to interact with your queues, like queue:listen to start listening to a queue, queue:table to create a migration for database-backed queues, and queue:flush to flush all failed queue jobs. There are quite a few more, which you’ll learn about in Chapter 16.
routeIf you run route:list, you’ll see the definitions of every route defined in the application, including each route’s verb(s), path, name, controller/closure action, and middleware. You can cache the route definitions for faster lookups with route:cache and clear your cache with route:clear.
scheduleWe’ll cover Laravel’s cron-like scheduler in Chapter 16, but in order for it to work, you need to set the system cron to run schedule:run once a minute:
* * * * * php /home/myapp.com/artisan schedule:run >> /dev/null 2>&1
As you can see, this Artisan command is intended to be run regularly in order to power a core Laravel service.
sessionsession:table creates a migration for applications using database-backed sessions.
storagestorage:link creates a symbolic link from public/storage to storage/app/public. This is a common convention in Laravel apps, to make it easy to put user uploads (or other files that commonly end up in storage/app) somewhere where they’ll be accessible at a public URL.
vendorSome Laravel-specific packages need to “publish” some of their assets, either so that they can be served from your public directory or so that you can modify them. Either way, these packages register these “publishable assets” with Laravel, and when you run vendor:publish, it publishes them to their specified locations.
viewLaravel’s view rendering engine automatically caches your views. It usually does a good job of handling its own cache invalidation, but if you ever notice it’s gotten stuck, run view:clear to clear the cache.
Now that we’ve covered the Artisan commands that come with Laravel out of the box, let’s talk about writing your own.
First, you should know: there’s an Artisan command for that! Running php artisan make:command YourCommandName generates a new Artisan command in app/Console/Commands /{YourCommandName}.php.
The command signature for make:command has changed a few times. It was originally command:make, but for a while in 5.2 it was console:make and then make:console.
Finally, in 5.3, it was settled: all of the generators are under the make: namespace, and the command to generate new Artisan commands is now make:command.
Your first argument should be the class name of the command, and you can optionally pass a --command parameter to define what the terminal command will be (e.g., appname:action).
So, let’s do it:
php artisan make:command WelcomeNewUsers --command=email:newusers
Take a look at Example 8-1 to see what you’ll get.
<?phpnamespaceApp\Console\Commands;useIlluminate\Console\Command;classWelcomeNewUsersextendsCommand{/*** The name and signature of the console command.** @var string*/protected$signature='email:newusers';/*** The console command description.** @var string*/protected$description='Command description';/*** Create a new command instance.** @return void*/publicfunction__construct(){parent::__construct();}/*** Execute the console command.** @return mixed*/publicfunctionhandle(){//}}
As you can see, it’s very easy to define the command signature, the help text it shows in command lists, and the command’s behavior on instantiation (__construct()) and on execution (handle()).
In projects running versions of Laravel prior to 5.5, commands had to be manually bound into app\Console\Kernel.php. If your app is running an older version of Laravel, just add the fully-qualified class name for your Command to the $commands array in that file and it’ll be registered:
protected$commands=[\App\Console\Commands\WelcomeNewUsers::class,];
We haven’t covered mail or Eloquent yet (see Chapter 15 for mail and Chapter 5 for Eloquent), but the sample handle() method in Example 8-2 should read pretty clearly.
...classWelcomeNewUsersextendsCommand{publicfunctionhandle(){User::signedUpThisWeek()->each(function($user){::to($user)->send(newWelcomeEmail);});}
Now every time you run php artisan email:newusers, this command will grab every user that signed up this week and send them the welcome email.
If you would prefer injecting your mail and user dependencies instead of using facades, you can typehint them in the command constructor, and Laravel’s container will inject them for you when the command is instantiated.
Take a look at Example 8-3 to see what Example 8-2 might look like using dependency injection and extracting its behavior out to a service class.
...classWelcomeNewUsersextendsCommand{publicfunction__construct(UserMailer$userMailer){parent::__construct();$this->userMailer=$userMailer}publicfunctionhandle(){$this->userMailer->welcomeNewUsers();}
The $signature property of the new command looks like it might just contain the command name. But this property is also where you’ll define any arguments and options for the command. There’s a specific, simple syntax you can use to add arguments and options to your Artisan commands.
Before we dig into that syntax, take a look at an example for some context:
protected$signature='password:reset {userId} {--sendEmail}';
To define a required argument, surround it with braces:
password:reset {userId}
To make the argument optional, add a question mark:
password:reset {userId?}
To make it optional and provide a default, use:
password:reset {userId=1}
Options are similar to arguments, but they’re prefixed with -- and can be used with no value. To add a basic option, surround it with braces:
password:reset {userId} {--sendEmail}
If your option requires a value, add an = to its signature:
password:reset {userId} {--password=}
And if you want to pass a default value, add it after the =:
password:reset {userId} {--queue=default}
Both for arguments and for options, if you want to accept an array as input, use the * character:
password:reset {userIds*}
password:reset {--ids=*}
Using array arguments and parameters looks a bit like Example 8-4.
// Argument php artisan password:reset 1 2 3 // Option php artisan password:reset --ids=1 --ids=2 --ids=3
Since an array argument captures every parameter after its definition and adds them as array items, an array argument has to be the last argument within an Artisan command’s signature.
Remember how the built-in Artisan commands can give us more information about their parameters if we use artisan help? We can provide that same information about our custom commands. Just add a colon and the description text within the curly braces, like in Example 8-5.
protected$signature='password:reset{userId : The ID of the user}{--sendEmail : Whether to send user an email}';
Now that we’ve prompted for this input, how do we use it in our command’s handle() method? We have two sets of methods for retrieving the values of arguments and options.
$this->arguments() returns an array of all arguments (the first array item will be the command name). $this->argument() called with no parameters returns the same response; the plural method, which I prefer, is just available for better readability, and is only available after Laravel 5.3.
To get just the value of a single argument, pass the argument name as a parameter to $this->argument():
// with definition "password:reset {userId}":phpartisanpassword:reset5// $this->arguments() returns this array["command":"password:reset","userId":"5",]// $this->argument('userId') returns this string"5"
$this->options() returns an array of all options, including some that will by default be false or null. $this->option() called with no parameters returns the same response; the plural method, which I prefer, is just available for better readability, and is only available after Laravel 5.3.
To get just the value of a single option, pass the argument name as a parameter to $this->option():
// with definition "password:reset {--userId=}":phpartisanpassword:reset--userId=5// $this->options() returns this array["userId"=>"5""help"=>false"quiet"=>false"verbose"=>false"version"=>false"ansi"=>false"no-ansi"=>false"no-interaction"=>false"env"=>null]// $this->option('userId') returns this string"5"
Example 8-6 shows an Artisan command using argument() and option() in its handle() method.
publicfunctionhandle(){// All arguments, including the command name$arguments=$this->arguments();// Just the 'userId' argument$userid=$this->argument('userId');// All options, including some defaults like 'no-interaction' and 'env'$options=$this->options();// Just the 'sendEmail' option$sendEmail=$this->option('sendEmail');}
There are a few more ways to get user input from within your handle() code, and they all involve prompting the user to enter information during the execution of your command:
ask()Prompts the user to enter freeform text:
=$this->ask('What is your email address?');
secret()Prompts the user to enter freeform text, but hides the typing with asterisks:
$password=$this->secret('What is the DB password?');
confirm()Prompts the user for a yes/no answer, and returns a boolean:
if($this->confirm('Do you want to truncate the tables?')){//}
All answers except y or Y will be treated as a “no.”
anticipate()Prompts the user to enter freeform text, and provides autocomplete suggestions. Still allows the user to type whatever she wants:
$album=$this->anticipate('What is the best album ever?',["The Joshua Tree","Pet Sounds","What's Going On"]);
choice()Prompts the user to choose one of the provided options. The last parameter is the default if the user doesn’t choose:
$winner=$this->choice('Who is the best football team?',['Gators','Wolverines'],0);
Note that the final parameter, the default, should be the array key. Since we passed a nonassociative array, the key for “Gators” is 0. You could also key your array, if you’d prefer:
$winner=$this->choice('Who is the best football team?',['gators'=>'Gators','wolverines'=>'Wolverines'],'gators');
During the execution of your command, you might want to write messages to the user. The most basic way to do this is to use $this->info() to output basic green text:
$this->info('Your command has run successfully.');
You also have available the comment() (orange), question() (highlighted teal), error() (highlighted red), and line() (uncolored) methods to echo to the command line.
Please note that the exact colors may vary from machine to machine, but they try to be in line with the local machine’s standards for communicating to the end user.
The table component makes it simple to create ASCII tables full of your data. Take a look at Example 8-7.
$headers=['Name','Email'];$data=[['Dhriti','dhriti@amrit.com'],['Moses','moses@gutierez.com'],];// Or, you could get similar data from the database:$data=App\User::all(['name','email'])->toArray();$this->table($headers,$data);
Note that Example 8-7 has two sets of data: the headers, and the data itself. Both contain two “cells” per “row”; the first cell in each row is the name, and the second is the email. That way the data from the Eloquent call (which is constrained to pull only name and email) matches up with the headers.
Take a look at Example 8-8 to see what the table output looks like.
+---------+--------------------+ | Name | Email | +---------+--------------------+ | Dhriti | dhriti@amrit.com | | Moses | moses@gutierez.com | +---------+--------------------+
If you’ve ever run npm install, you’ve seen a command-line progress bar before. Let’s build one in Example 8-9.
$totalUnits=10;$this->output->progressStart($totalUnits);for($i=0;$i<$totalUnits;$i++){sleep(1);$this->output->progressAdvance();}$this->output->progressFinish();
What did we do here? First, we informed the system how many “units” we needed to work through. Maybe a unit is a user, and you have 350 users. The bar will then divide the entire width it has available on your screen by 350, and increment it by 1/350th every time you run progressAdvance(). Once you’re done, run progressFinish() so it knows it’s done displaying the progress bar.
If you’d prefer to keep your command definition process simpler, you can write commands as closures instead of classes by defining them in routes/console.php. Everything we discuss in this chapter will apply the same way, but you will just define and register the commands in a single step in that file:
// routes/console.phpArtisan::command('password:reset {userId} {--sendEmail}',function($userId,$sendEmail){$userId=$this->argument('userId');// do something...});
While Artisan commands are designed to be run from the command line, you can also call them from other code.
The easiest way is to use the Artisan facade. You can either call a command using Artisan::call() (which will return the command’s exit code), or queue a command using Artisan::queue().
Both take two parameters: first, the terminal command (password:reset); and second, an array of parameters to pass it. Take a look at Example 8-10 to see how it works with arguments and options.
Route::get('test-artisan',function(){$exitCode=Artisan::call('password:reset',['userId'=>15,'--sendEmail'=>true]);});
As you can see, arguments are passed by keying to the argument name, and options with no value can be passed true or false.
You can also call Artisan commands from other commands, using $this->call, (which is the same as Artisan::call(), or $this->callSilent, which is the same but suppresses all output). See Example 8-11 for an example.
publicfunctionhandle(){$this->callSilent('password:reset',['userId'=>15,]);}
Finally, you can inject an instance of the Illuminate\Contracts\Console\Kernel contract, and use its call() method.
Tinker is a REPL, or read–eval–print loop. If you’ve ever used IRB in Ruby, you’ll be familiar with how a REPL works.
REPLs give you a prompt, similar to the command-line prompt, that mimics a “waiting” state of your application. You type your commands into the REPL, hit Return, and then expect what you typed to be evaluated and the response printed out.
Example 8-12 provides a quick sample to give you a sense of how it works and how it might be useful. We start the REPL with php artisan tinker and are then presented with a blank prompt (>>>); every response to our commands is printed on a line prefaced with =>.
php artisan tinker
>>> $user = new App\User;
=> App\User: {}
>>> $user->email = 'matt@mattstauffer.com';
=> "matt@mattstauffer.com"
>>> $user->password = bcrypt('superSecret');
=> "$2y$10$TWPGBC7e8d1bvJ1q5kv.VDUGfYDnE9gANl4mleuB3htIY2dxcQfQ5"
>>> $user->save();
=> trueAs you can see, we created a new user, set some data, and saved it to the database. And this is real. If this were a production application, we would’ve just created a brand new user in our system.
This makes Tinker a great tool for simple database interactions, for trying out new ideas, and for running snippets of code when it’d be a pain to find a place to put them in the application source files.
Tinker is powered by Psy Shell, so check that out to see what else you can do with Tinker.
One common method of debugging the state of your data during development is to use Laravel’s dump() helper, which runs a decorated var_dump() on anything you pass to it. This is fine, but it can often run into view issues.
In projects running Laravel 5.7 and later, you can now enable the Laravel Dump Server, which catches those dump() statements and displays them in your console instead of rendering them to the page.
To run the Dump server in your local console, navigate to your project’s root directory and run php artisan dump-server.
$php artisan dump-server Laravel Var DumpServer=======================[OK]Server listening on tcp://127.0.0.1:9912 // Quit the server with CONTROL-C.
Now, try using the dump() helper function in your code somewhere. To test it out, try this code in your routes/web.php file:
Route::get('/',function(){dump('Dumped Value');return'Hello World';});
Without the dump server, you’d see both the dump and your “Hello World”. But with the dump server running, you’ll only see “Hello World” in the browser. In your console, you’ll see that the dump server caught that dump() and you can inspect it there.
GET http://myapp.test/ -------------------- ------------ --------------------------------- date Tue,18Sep201822:43:10 +0000 controller"Closure"sourceweb.php on line 20 file routes/web.php ------------ ---------------------------------"Dumped Value"
Since you know how to call Artisan commands from code, it’s easy to do that in a test and ensure that whatever behavior you expected to be performed has been performed correctly, as in Example 8-13.
In our tests, we use $this->artisan() instead of Artisan::call() because it has the same syntax but adds a few testing-related assertions.
publicfunctiontest_empty_log_command_empties_logs_table(){DB::table('logs')->insert(['message'=>'Did something']);$this->assertCount(1,DB::table('logs')->get());$this->artisan('logs:empty');// Same as Artisan::call('logs:empty');$this->assertCount(0,DB::table('logs')->get());}
In projects running Laravel 5.7 and later, you can chain on a few new assertions to your $this->artisan() calls that make it even easier to test Artisan commands—not just the impact they have on the rest of your app, but also how they actually operate. Take a look at Example 8-14 to see an example of this syntax.
publicfunctiontestItCreatesANewUser(){$this->artisan('myapp:create-user')->expectsQuestion("What's the name of the new user?","Wilbur Powery")->expectsQuestion("What's the email of the new user?","wilbur@thisbook.co")->expectsQuestion("What's the password of the new user?","secret")->expectsOutput("User Wilbur Powery created!");$this->assertDatabaseHas('users',['email'=>'wilbur@thisbook.co']);}
Artisan commands are Laravel’s command-line tools. Laravel comes with quite a few out of the box, but it’s also easy to create your own Artisan commands and call them from the command line or your own code.
Tinker is a REPL that makes it simple to get into your application environment and interact with real code and real data, and the dump server lets you debug your code without stopping the code’s execution.
Setting up a basic user authentication system—including registration, login, sessions, password resets, and access permissions—can often be one of the more time-consuming pieces of creating the foundation of an application. It’s a prime candidate for extracting functionality out to a library, and there are quite a few such libraries.
But because of how much authentication needs vary across projects, most authentication systems grow bulky and unusable quickly. Thankfully, Laravel has found a way to make an authentication system that’s easy to use and understand, but flexible enough to fit in a variety of settings.
Every new install of Laravel has a create_users_table migration and a User model built in out of the box. Laravel offers an Artisan make:auth command that seeds a collection of authentication-related views and routes. And every install comes with a RegisterController, a LoginController, a ForgotPasswordController, and a ResetPasswordController. The APIs are clean and clear, and the conventions all work together to provide a simple—and seamless—authentication and authorization system.
Note that in Laravel 5.1 and 5.2, most of this functionality lived in the AuthController; in 5.3 and higher, this functionality has been split out into multiple controllers. Many of the specifics we’ll cover here about how to customize redirect routes, auth guards, and such are different in 5.1 and 5.2 (though all the core functionality is the same). So, if you’re on 5.1 or 5.2 and want to change some of the default authentication behaviors, you’ll likely need to dig a bit into your AuthController to see how exactly you should customize it.
When you create a new Laravel application, the first migration and model you’ll see are the create_users_table migration and the App\User model. Example 9-1 shows, straight from the migration, the fields you’ll get in your users table.
Schema::create('users',function(Blueprint$table){$table->increments('id');$table->string('name');$table->string('email')->unique();$table->string('password');$table->rememberToken();$table->timestamps();});
We have an autoincrementing primary key ID, a name, a unique email, a password, a “remember me” token, and created and modified timestamps. This covers everything you need to handle basic user authentication in most apps.
Authentication means verifying who someone is, and allowing them to act as that person in your system. This includes the login and logout processes, and any tools that allow the users to identify themselves during their time using the application.
Authorization means determining whether the authenticated user is allowed (authorized) to perform a specific behavior. For example, an authorization system allows us to forbid any non-administrators from viewing the site’s earnings.
The User model is a bit more complex, as you can see in Example 9-2. The App\User class itself is simple, but it extends the Illuminate\Foundation\Auth\User class, which pulls in several traits.
<?php// App\UsernamespaceApp;useIlluminate\Notifications\Notifiable;useIlluminate\Foundation\Auth\UserasAuthenticatable;classUserextendsAuthenticatable{useNotifiable;/*** The attributes that are mass assignable.** @var array*/protected$fillable=['name','email','password',];/*** The attributes that should be hidden for arrays.** @var array*/protected$hidden=['password','remember_token',];}
<?php// Illuminate\Foundation\Auth\UsernamespaceIlluminate\Foundation\Auth;useIlluminate\Auth\Authenticatable;useIlluminate\Database\Eloquent\Model;useIlluminate\Auth\Passwords\CanResetPassword;useIlluminate\Foundation\Auth\Access\Authorizable;useIlluminate\Contracts\Auth\AuthenticatableasAuthenticatableContract;useIlluminate\Contracts\Auth\Access\AuthorizableasAuthorizableContract;useIlluminate\Contracts\Auth\CanResetPasswordasCanResetPasswordContract;classUserextendsModelimplementsAuthenticatableContract,AuthorizableContract,CanResetPasswordContract{useAuthenticatable,Authorizable,CanResetPassword;}
If this is entirely unfamiliar, consider reading Chapter 5 before continuing to learn how Eloquent models work.
So, what can we learn from this model? First, users live in the users table; Laravel will infer this from the class name. We are able to fill out the name, email, and password properties when creating a new user, and the password and remember_token properties are excluded when outputting the user as JSON. Looking good so far.
We also can see from the contracts and the traits in the Illuminate\Foundation\Auth verison of User that there are some features in the framework (the ability to authenticate, to authorize, and to reset passwords) that theoretically could be applied to other models, not just the User model, and that could be applied individually or together.
The Authenticatable contract requires methods (getAuthIdentifier(), etc.) that allow the framework to authenticate instances of this model to the auth system; the Authenticatable trait includes the methods necessary to satisfy that contract with an average Eloquent model.
The Authorizable contract requires a method (can()) that allows the framework to authorize instances of this model for their access permissions in different contexts. Unsurprisingly, the Authorizable trait provides methods that will satisfy the Authorizable contract for an average Eloquent model.
And finally, the CanResetPassword contract requires methods (getEmailForPasswordReset(), sendPasswordResetNotification()) that allow the framework to, you guessed it, reset the password of any entity that satisfies this contract. The CanResetPassword trait provides methods to satisfy that contract for an average Eloquent model.
At this point, we have the ability to easily represent an individual user in the database (with the migration), and to pull them out with a model instance that can be authenticated (logged in and out), authorized (checked for access permissions to a particular resource), and sent a password reset email.
The auth() global helper is the easiest way to interact with the status of the authenticated user throughout your app. You can also inject an instance of Illuminate\Auth\AuthManager and get the same functionality, or use the Auth facade.
The most common usages are to check whether a user is logged in (auth()->check() returns true if the current user is logged in; auth()->guest() returns true if the user is not logged in) and to get the currently logged-in user (use auth()->user(), or auth()->id() for just the ID; both return null if no user is logged in).
Take a look at Example 9-3 for a sample usage of the global helper in a controller.
publicfunctiondashboard(){if(auth()->guest()){returnredirect('sign-up');}returnview('dashboard')->with('user',auth()->user());}
The next section is going to go into a little bit of depth of how the auth system works behind the scenes. It’s useful information but not vital, so if you want to skip it now, check out the next section, “The Auth Scaffold”.
So, how do we actually log users in? And how do we trigger those password resets?
It all happens in the Auth-namespaced controllers: RegisterController, LoginController, ResetPasswordController, and ForgotPasswordController.
The RegisterController, in combination with the RegistersUsers trait, contains sensible defaults for how to show new users a registration form, how to validate their input, how to create new users once their input is validated, and where to redirect them afterward.
The controller itself just contains a few hooks that the traits will call at given points. That makes it easy to customize a few common behaviors without having to dig deeply into the code that makes it all work.
The $redirectTo property defines where users will be redirected after registration. The validator() method defines how to validate registrations. And the create() method defines how to create a new user based on an incoming registration. Take a look at Example 9-4 to see the default RegisterController.
...classRegisterControllerextendsController{useRegistersUsers;protected$redirectTo='/home';...protectedfunctionvalidator(array$data){returnValidator::make($data,['name'=>'required|string|max:255','email'=>'required|string|email|max:255|unique:users','password'=>'required|string|min:6|confirmed',]);}protectedfunctioncreate(array$data){returnUser::create(['name'=>$data['name'],'email'=>$data['email'],'password'=>Hash::make($data['password']),]);}}
The RegistersUsers trait, which the RegisterController imports, handles a few primary functions for the registration process. First, it shows users the registration form view, with the showRegistrationForm() method. If you want new users to register with a view other than auth.register you can override the showRegistrationForm() method in your RegisterController.
Next, it handles the POST of the registration form with the register() method. This method passes the user’s registration input to the validator from the validator() method of your RegisterController, and then on to the create() method.
And finally, the redirectPath() method (pulled in via the RedirectsUsers trait) defines where users should be redirected after a successful registration. You can define this URI with the redirectTo property on your controller, or you can override the redirectPath() method and return whatever you want.
If you want this trait to use a different auth guard than the default (you’ll learn more about guards in “Guards”), you can override the guard() method and have it return whichever guard you’d like.
The LoginController, unsurprisingly, allows the user to log in. It brings in the AuthenticatesUsers trait, which brings in the RedirectsUsers and ThrottlesLogins traits.
Like the RegistrationController, the LoginController has a $redirectTo property that allows you to customize the path the user will be redirected to after a successful login. Everything else lives behind the AuthenticatesUsers trait.
The AuthenticatesUsers trait is responsible for showing users the login form, validating their logins, throttling failed logins, handling logouts, and redirecting users after a successful login.
The showLoginForm() method defaults to showing the user the auth.login view, but you can override it if you’d like it to use a different view.
The login() method accepts the POST from the login form. It validates the request using the validateLogin() method, which you can override if you’d like to customize the validation. It then hooks into the functionality of the ThrottlesLogins trait, which we’ll cover shortly, to reject users with too many failed logins. And finally, it redirects the user, either to her intended path (if the user was redirected to the login page when attempting to visit a page within the app) or to the path defined by the redirectPath() method, which returns your $redirectTo property.
The trait calls the empty authenticated() method after a successful login, so if you’d like to perform any sort of behavior in response to a successful login, just override this method in your LoginController.
There’s a username() method that defines which of your users columns is the “username”; this defaults to email but you can change that by overwriting the username() method in your controller to return the name of your username column.
And, like in the RegistersUsers trait, you can override the guard() method to define which auth guard (more on that in “Guards”) this controller should use.
The ThrottlesLogins trait is an interface to Laravel’s Illuminate\Cache\RateLimiter class, which is a utility to rate-limit any event using the cache. This trait applies rate limiting to user logins, limiting users from using the login form if they’ve had too many failed logins within a certain amount of time. This functionality does not exist in Laravel 5.1.
If you import the ThrottlesLogins trait, all of its methods are protected, which means they can’t actually be accessed as routes. Instead, the AuthenticatesUsers trait looks to see whether you’ve imported the ThrottlesLogins trait, and if so, it’ll attach its functionality to your logins without any work on your part. Since the default LoginController imports both, you’ll get this functionality for free if you use the auth scaffold.
ThrottlesLogins limits any given combination of username and IP address to 5 attempts per 60 seconds. Using the cache, it increments the “failed login” count of a given username/IP address combination, and if any user reaches 5 failed login attempts within 60 seconds, it redirects that user back to the login page with an appropriate error until the 60 seconds is over.
The ResetPasswordController simply pulls in the ResetsPasswords trait. This trait provides validation and access to basic password reset views, and then uses an instance of Laravel’s PasswordBroker class (or anything else implementing the PasswordBroker interface, if you choose to write your own) to handle sending password reset emails and actually resetting the passwords.
Just like the other traits we’ve covered, it handles showing the reset password view (showResetForm() shows the auth.passwords.reset view), and the POST request that is sent from that view (reset() validates and sends the appropriate response). The resetPassword() method actually resets the password, and you can customize the broker with broker() and the auth guard with guard().
If you’re interested in customizing any of this behavior, just override the specific method you want to customize in your controller.
The ForgotPasswordController simply pulls in the SendsPasswordResetEmails trait. It shows the auth.passwords.email form with the showLinkRequestForm() method, and handles the POST of that form with the sendResetLinkEmail() method. You can customize the broker with the broker() method.
The VerificationController pulls in the VerifiesEmails trait, which handles verifying the email address of newly-signed-up users. You can customize the path to send users to after validation.
Now that we have the auth controllers providing some methods for a series of pre-defined routes, we’ll want our users to actually be able to hit those routes. We could add all these routes manually to routes/web.php, but there’s already a convenience tool for that, called Auth::routes():
// routes/web.phpAuth::routes();
As you can probably guess, Auth::routes() brings in a bundle of predefined routes to your routes file. In Example 9-5 you can see the routes that are actually being defined there.
// Authentication Routes...$this->get('login','Auth\LoginController@showLoginForm')->name('login');$this->post('login','Auth\LoginController@login');$this->post('logout','Auth\LoginController@logout')->name('logout');// Registration Routes...$this->get('register','Auth\RegisterController@showRegistrationForm')->name('register');$this->post('register','Auth\RegisterController@register');// Password Reset Routes...$this->get('password/reset','Auth\ForgotPasswordController@showLinkRequestForm')->name('password.request');$this->post('password/email','Auth\ForgotPasswordController@sendResetLinkEmail')->name('password.email');$this->get('password/reset/{token}','Auth\ResetPasswordController@showResetForm')->name('password.reset');$this->post('password/reset','Auth\ResetPasswordController@reset');// If email verification is enabled$this->get('email/verify','Auth\VerificationController@show')->name('verification.notice');$this->get('email/verify/{id}','Auth\VerificationController@verify')->name('verification.verify');$this->get('email/resend','Auth\VerificationController@resend')->name('verification.resend');
Basically, Auth::routes() includes the routes for authentication, registration, and password resets. As you can see, there are also optional routes for email verification, which was introduced in Laravel 5.7.
To enable Laravel’s email verification service, which requires new users to verify they have access to the email address they signed up with, update your Auth::routes call to enable it:
Auth::routes(['verify'=>true]);
At this point you have a migration, a model, controllers, and routes for your authentication system. But what about your views?
Laravel handles that by providing an auth scaffold (available since Laravel 5.2), which is intended to be run on a new application and provide you with even more skeleton code to get your auth system running quickly.
The auth scaffold takes care of adding Auth::routes() to your routes file, adds a view for each route, and creates a HomeController to serve as the landing page for logged-in users; it also routes to the index() method of HomeController at the /home URI.
Just run php artisan make:auth, and the following files will be made available to you:
app/Http/Controllers/HomeController.php resources/views/auth/login.blade.php resources/views/auth/register.blade.php resources/views/auth/verify.blade.php resources/views/auth/passwords/email.blade.php resources/views/auth/passwords/reset.blade.php resources/views/layouts/app.blade.php resources/views/home.blade.php
At this point, you have / returning the welcome view, /home returning the home view, and a series of auth routes for login, logout, registration, and password reset pointing to the auth controllers. Each of the seeded views has Bootstrap-based layouts and form fields for all necessary fields for login, registration, and password reset, and they already point to the correct routes.
At this point, you have all of the pieces in place for every step of the normal user registration and authentication flow. You can tweak all you want, but you’re entirely ready to register and authenticate users.
Let’s review quickly the steps from new site to full authentication system:
laravel new MyApp cd MyApp # edit your .env file to specify the correct database connection details php artisan make:auth php artisan migrate
That’s it. Run those commands, and you will have a landing page and a bootstrap-based user registration, login, logout, and password reset system, with a basic landing page for all authenticated users.
The auth scaffold has this implemented out of the box, but it’s still worth learning how it works and how to use it on your own. If you want to implement a “remember me”–style long-lived access token, make sure you have a remember_token column on your users table (which you will if you used the default migration).
When you’re normally logging in a user (and this is how the LoginController does it, with the AuthenticatesUsers trait), you’ll “attempt” an authentication with the user-provided information, like in Example 9-6.
if(auth()->attempt(['email'=>request()->input('email'),'password'=>request()->input('password'),])){// Handle the successful login}
This provides you with a user login that lasts as long as the user’s session. If you want Laravel to extend the login indefinitely using cookies (as long as the user is on the same computer and doesn’t log out), you can pass a boolean true as the second parameter of the auth()->attempt() method. Take a look at Example 9-7 to see what that request looks like.
if(auth()->attempt(['email'=>request()->input('email'),'password'=>request()->input('password'),]),request()->filled('remember')){// Handle the successful login}
You can see that we checked whether the input has a non-empty (“filled”) remember property, which will return a boolean. This allows our users to decide if they want to be remembered with a checkbox in the login form.
And later, if you need to manually check whether the current user was authenticated by a remember token, there’s a method for that: auth()->viaRemember() returns a boolean indicating whether or not the current user authenticated via a remember token. This will allow you to prevent certain higher-sensitivity features from being accessible by remember token, and you can require users to reenter their passwords.
The most common case for user authentication is that you’ll allow the users to provide their credentials, and then use auth()->attempt() to see whether the provided credentials match any real users. If so, you log them in.
But sometimes there are contexts where it’s valuable for you to be able to choose to log a user in on your own. For example, you may want to allow admin users to switch users.
There are four methods that make this possible. First, you can just pass a user ID:
auth()->loginUsingId(5);
Second, you can pass a User object (or any other object that implements the Illuminate\Contracts\Auth\Authenticatable contract):
auth()->login($user);
And third and fourth, you can choose to authenticate the given user for only the current request, which won’t impact your session or cookies at all, using once and onceUsingId:
auth()->once(['username'=>'mattstauffer']);// orauth()->onceUsingId(5);
Note that the array you pass to the once() method can contain any key/value pairs to uniquely identify the user you’d like to authenticate as. You can even pass multiple keys and values, if it’s what is appropriate for your project. For example:
auth()->once(['last_name'=>'Stauffer','zip_code'=>90210,])
If you ever need to log out a user manually, just call logout():
auth()->logout();
If you’d like to log out not just a user’s current session, but also those on any other devices, you’ll need to prompt the user for their password and pass it to the logoutOtherDevices method. In order to do this, you’ll have to add the (commented-out-by-default) AuthenticateSession middleware to your web group in app\Http\Kernel.php:
'web'=>[// ...\Illuminate\Session\Middleware\AuthenticateSession::class,],
And then you can use it inline anywhere you need:
auth()->logoutOtherDevices($password);
The logoutOtherDevices() method is only available in Laravel 5.6 and later.
In Example 9-3, you saw how to check whether visitors are logged in and redirect them if not. You could perform these sorts of checks on every route in your application, but it would very quickly get tedious. It turns out that route middleware (see Chapter 10 to learn more about how they work) are a perfect fit for restricting certain routes to guests or to authenticated users.
Once again, Laravel comes with the middleware we need to do this out of the box. You can see which route middleware you have defined in App\Http\Kernel:
protected$routeMiddleware=['auth'=>\Illuminate\Auth\Middleware\Authenticate::class,'auth.basic'=>\Illuminate\Auth\Middleware\AuthenticateWithBasicAuth::class,'bindings'=>\Illuminate\Routing\Middleware\SubstituteBindings::class,'cache.headers'=>\Illuminate\Http\Middleware\SetCacheHeaders::class,'can'=>\Illuminate\Auth\Middleware\Authorize::class,'guest'=>\App\Http\Middleware\RedirectIfAuthenticated::class,'signed'=>\Illuminate\Routing\Middleware\ValidateSignature::class,'throttle'=>\Illuminate\Routing\Middleware\ThrottleRequests::class,'verified'=>\Illuminate\Auth\Middleware\EnsureEmailIsVerified::class,];
Four of the default route middleware are authentication-related:
auth restricts route access to authenticated users
auth.basic restricts access to authenticated users using HTTP Basic Authentication
guest restricts access to unauthenticated users
can is used for authorizing user access to given routes
It’s most common to use auth for your authenticated-user-only sections and guest for any routes you don’t want authenticated users to see (like the login form). auth.basic is a much less commonly used middleware for authenticating via request headers.
Example 9-8 shows an example of a few routes protected by the auth middleware.
Route::middleware('auth')->group(function(){Route::get('account','AccountController@dashboard');});Route::get('login','Auth\LoginController@getLogin')->middleware('guest');
Laravel 5.7 introduced a new feature that makes it possible to require a user to verify that they have access to the email address they registered with.
In order to enable email verification, update your App\User and make it implement the Illuminate\Contracts\Auth\MustVerifyEmail contract.
classUserextendsAuthenticatableimplementsMustVerifyEmail{useNotifiable;// ...}
The user table must also contain a nullable timestamp column named email_verified_at, which the new default CreateUsersTable migration will have already provided for you in apps created in 5.7 or later.
You’ll also need to do one more thing: enable the email verification routes in your controller. The easiest method is to use Auth::routes in your routes file with the verify parameter set to true:
Auth::routes(['verify'=>true]);
Now, you can protect any routes you’d like from being accessed by any users who haven’t verified their email address:
Route::get('posts/create',function(){// Only verified users may enter...})->middleware('verified');
You can customize the route where users are redirected after verifying in your VerificationController:
protected$redirectTo='/profile';
If you want to check against a user’s authentication, not at the route level but in your views, you can, with @auth and @guest:
@auth// The user is authenticated@endauth@guest// The user is not authenticated@endguest
You can also specify which guard you’d like to use with both methods by passing the guard name as a parameter:
@auth('trainees')// The user is authenticated...@endauth@guest('trainees')// The user is not authenticated...@endguest
Every aspect of Laravel’s authentication system is routed through something called a guard. Each guard is a combination of two pieces: a driver that defines how it persists and retrieves the authentication state (for example, session), and a provider that allows you to get a user by certain criteria (for example, users).
Out of the box Laravel has two guards: web and api. web is the more traditional authentication style, using the session driver and the basic user provider. api also uses the same user provider, but it uses the token driver instead of the session to authenticate each request.
You’d change drivers if you wanted to handle the identification and persistence of a user’s identity differently (for example, changing from a long-running session to a provided-every-page-load token), and you’d change providers if you wanted to change the storage type or retrieval methods for your users (for example, moving to storing your users in Mongo instead of MySQL).
The guards are defined in config/auth.php, and you can change them, add new guards, and also define which guard will be the default there. For what it’s worth, this is a relatively uncommon configuration; most Laravel apps just use one guard.
The “default” guard defines which will be used any time you use any auth features without specifying a guard. For example, auth()->user() will pull the currently authenticated user using the default guard. You can change this guard by changing the auth.defaults.guard setting in config/auth.php:
'defaults'=>['guard'=>'web',// Change the default here'passwords'=>'users',],
If you’re using Laravel 5.1, you’ll notice that the structure of the authentication information is a little different from this. Don’t worry; the features all still work the same, they’re just structured differently.
You may have noticed that I refer to configuration sections with references like auth.defaults.guard. What that translates to is: in config/auth.php, in the array section keyed defaults, there should be a property keyed guard. That one is auth.defaults.guard.
If you want to use another guard, but not change the default, you can start your Auth calls with guard():
$apiUser=auth()->guard('api')->user();
This will, just for this call, get the current user using the api guard.
You can add a new guard at any time in config/auth.php, in the auth.guards setting:
'guards'=>['trainees'=>['driver'=>'session','provider'=>'trainees',],],
As you can see here, we’ve created a new guard (in addition to web and api) named trainees. Let’s imagine, for the rest of this section, that we’re building an app where our users are physical trainers and they each have their own users—trainees—who can log in to their subdomains. So, we need a separate guard for them.
The only two options for driver are token and session. Out of the box, the only option for provider is users, which supports authentication against your default users table, but you can create your own provider easily.
If you want to define a custom guard and your guard conditions (how to look up a given user against the request) can be described simply enough in response to any given HTTP request, you might just want to throw the user lookup code into a closure and not deal with creating a new custom guard class.
The viaRequest() auth method makes it possible to define a guard (named in the first parameter) using just a closure (defined in the second parameter) that takes the HTTP request and returns the appropriate user. To register a closure request guard, call viaRequest() in the boot() method of your AuthServiceProvider:
publicfunctionboot(){$this->registerPolicies();Auth::viaRequest('token-hash',function($request){returnUser::where('token-hash',$request->token)->first();});}
Just below where the guards are defined in config/auth.php, there’s an auth.providers section that defines the available providers. Let’s create a new provider named trainees:
'providers'=>['users'=>['driver'=>'eloquent','model'=>App\User::class,],'trainees'=>['driver'=>'eloquent','model'=>App\Trainee::class,],],
The two options for driver are eloquent and database; if you use eloquent, you’ll need a model property that contains an Eloquent class name (the model to use for your User class), and if you use database, you’ll need a table property to define which table it should authenticate against.
In our example, you can see that this application has a User and a Trainee, and they need to be authenticated separately. This way, the code can differentiate between auth()->guard('users’) and auth()->guard('trainees’).
One last note: the auth route middleware can take a parameter that is the guard name. So, you can guard certain routes with a specific guard:
Route::middleware('auth:trainees')->group(function(){// Trainee-only routes here});
The user provider creation flow just described still relies on the same UserProvider class, which means it’s expecting to pull the identifying information out of a relational database. But if you’re using Mongo or Riak or something similar, you’ll actually need to create your own class.
To do this, create a new class that implements the Illuminate\Contracts\Auth\UserProvider interface, and then bind it in AuthServiceProvider@boot:
auth()->provider('riak',function($app,array$config){// Return an instance of Illuminate\Contracts\Auth\UserProvider...returnnewRiakUserProvider($app['riak.connection']);});
We’ll talk more about events in Chapter 16, but Laravel’s event system is a basic pub/sub framework. There are system- and user-generated events that are broadcast, and the user has the ability to create event listeners that do certain things in response to certain events.
So, what if you wanted to send a ping to a particular security service every time a user was locked out after too many failed login attempts? Maybe this service watches out for a certain number of failed logins from certain geographic regions, or something else. You could, of course, inject a call in the appropriate controller. But with events, you can just create an event listener that listens to the “user locked out” event, and register that.
Take a look at Example 9-9 to see all of the events that the authentication system emits.
protected$listen=['Illuminate\Auth\Events\Registered'=>[],'Illuminate\Auth\Events\Attempting'=>[],'Illuminate\Auth\Events\Authenticated'=>[],'Illuminate\Auth\Events\Login'=>[],'Illuminate\Auth\Events\Failed'=>[],'Illuminate\Auth\Events\Logout'=>[],'Illuminate\Auth\Events\Lockout'=>[],'Illuminate\Auth\Events\PasswordReset'=>[],];
As you can see, there are listeners for “user registered”, “user attempting login,” “user authenticated,” “successful login,” “failed login”, “logout,” “lockout,” and “password reset.” To learn more about how to build event listeners for these events, check out Chapter 16.
Finally, let’s cover Laravel’s authorization system. It enables you to determine whether a user is authorized to do a particular thing, which you’ll check using a few primary verbs: can, cannot, allows, and denies. The access control list (ACL) system was introduced in Laravel 5.2.
Most of this authorization control will be performed using the Gate facade, but there are also convenience helpers in your controllers, on the User model, as middleware, and available as Blade directives. Take a look at this example to get a taste of what we’ll be able to do:
if(Gate::denies('edit-contact',$contact)){abort(403);}if(!Gate::allows('create-contact',Contact::class)){abort(403);}
The default place to define authorization rules is the boot() method of the AuthServiceProvider, where you’ll be calling methods on the Auth facade.
An authorization rule is called an ability, and is comprised of two things: a string key (e.g., update-contact) and a closure that returns a boolean. Example 9-10 shows an ability for updating a contact.
classAuthServiceProviderextendsServiceProvider{publicfunctionboot(){$this->registerPolicies();Gate::define('update-contact',function($user,$contact){return$user->id==$contact->user_id;});}}
Let’s walk through the steps for defining an ability.
First, you want to define a key. In naming this key, you should consider what string makes sense in your code’s flow to refer to the ability you’re providing the user. You can see the code sample uses the convention {verb}-{modelName}: create-contact, update-contact, etc.
Second, you define the closure. The first parameter will be the currently authenticated user, and all parameters after that will be the object(s) you’re checking for access to—in this instance, the contact.
So, given those two objects, we can check whether the user is authorized to update this contact. You can write this logic however you want, but in the app we’re looking at at the moment, authorization depends on being the creator of the contact row. The closure will return true (authorized) if the current user created the contact, and false (unauthorized) if not.
Just like with route definitions, you could also use a class and method instead of a closure to resolve this definition:
$gate->define('update-contact','ContactACLChecker@updateContact');
Now that you’ve defined an ability, it’s time to test against it. The simplest way is to use the Gate facade, as in Example 9-11 (or you can inject an instance of Illuminate\Contracts\Auth\Access\Gate).
if(Gate::allows('update-contact',$contact)){// Update contact}// or...if(Gate::denies('update-contact',$contact)){abort(403);}
You might also define an ability with multiple parameters—maybe a contact can be in groups, and you want to authorize whether the user has access to add a contact to a group. Example 9-12 shows how to do this.
// DefinitionGate::define('add-contact-to-group',function($user,$contact,$group){return$user->id==$contact->user_id&&$user->id==$group->user_id;});// Usageif(Gate::denies('add-contact-to-group',[$contact,$group])){abort(403);}
And if you need to check authorization for a user other than the currently authenticated user, try forUser(), like in Example 9-13.
if(Gate::forUser($user)->denies('create-contact')){abort(403);}
The most common use for ACL is to define access to individual “resources” (think an Eloquent model, or something you’re allowing users to administer from their admin panel).
The resource() method makes it possible to apply the four most common gates, view, create, update, and delete, to a single resource at once:
Gate::resource('photos','App\Policies\PhotoPolicy');
This is equivalent to defining the following:
Gate::define('photos.view','App\Policies\PhotoPolicy@view');Gate::define('photos.create','App\Policies\PhotoPolicy@create');Gate::define('photos.update','App\Policies\PhotoPolicy@update');Gate::define('photos.delete','App\Policies\PhotoPolicy@delete');
If you want to authorize entire routes, you can use the Authorize middleware (which has a shortcut of can), like in Example 9-14.
Route::get('people/create',function(){// Create person...})->middleware('can:create-person');Route::get('people/{person}/edit',function(){// Edit a person...})->middleware('can:edit,person');
Here, the {person} parameter (whether it’s defined as a string or as a bound route model) will be passed to the ability method as an additional parameter.
The first check in Example 9-14 is a normal ability, but the second is a policy, which we’ll talk about in “Policies”.
If you need to check for an action that doesn’t require a model instance (for example, create, unlike edit, doesn’t get passed an actual route-model-bound instance), you can just pass the classname:
Route::post('people',function(){// Create a person...})->middleware('can:create,App\Person');
The parent App\Http\Controllers\Controller class in Laravel imports the AuthorizesRequests trait, which provides three methods for authorization: authorize(), authorizeForUser(), and authorizeResource().
authorize() takes an ability key and an object (or array of objects) as parameters, and if the authorization fails, it’ll quit the application with a 403 (Unauthorized) status code. That means this feature can turn three lines of authorization code into just one, as you can see in Example 9-15.
// From this:publicfunctionedit(Contact$contact){if(Gate::cannot('update-contact',$contact)){abort(403);}returnview('contacts.edit',['contact'=>$contact]);}// To this:publicfunctionedit(Contact$contact){$this->authorize('update-contact',$contact);returnview('contacts.edit',['contact'=>$contact]);}
authorizeForUser() is the same, but allows you to pass in a User object instead of defaulting to the currently authenticated user:
$this->authorizeForUser($user,'update-contact',$contact);
authorizeResource(), called once in the controller constructor, maps a predefined set of authorization rules to each of the RESTful controller methods in that controller—something like Example 9-16.
...classContactsControllerextendsController{publicfunction__construct(){// This call does everything you see in the methods below.// If you put this here, you can remove all authorize// calls in the individual resource methods here.$this->authorizeResource(Contact::class);}publicfunctionindex(){$this->authorize('view',Contact::class);}publicfunctioncreate(){$this->authorize('create',Contact::class);}publicfunctionstore(Request$request){$this->authorize('create',Contact::class);}publicfunctionshow(Contact$contact){$this->authorize('view',$contact);}publicfunctionedit(Contact$contact){$this->authorize('update',$contact);}publicfunctionupdate(Request$request,Contact$contact){$this->authorize('update',$contact);}publicfunctiondestroy(Contact$contact){$this->authorize('delete',$contact);}}
If you’re not in a controller, you’re more likely to be checking the capabilities of a specific user than the currently authenticated user. That’s already possible with the Gate facade using the forUser() method, but sometimes the syntax can feel a little off.
Thankfully, the Authorizable trait on the User class provides three methods to make a more readable authorization feature: $user->can(), $user->cant(), and $user->cannot(). As you can probably guess, cant() and cannot() do the same thing, and can() is their exact inverse.
That means you can do something like Example 9-17.
$user=User::find(1);if($user->can('create-contact')){// do something}
Behind the scenes, these methods are just passing your params to Gate; in the preceding example, Gate::forUser($user)->check('create-contact').
Blade also has a little convenience helper: a @can directive. Example 9-18 illustrates its usage.
<nav><ahref="/">Home</a>@can('edit-contact', $contact)<ahref="{{ route('contacts.edit', [$contact->id]) }}">Edit This Contact</a>@endcan</nav>
You can also use @else in between @can and @endcan, and you can use @cannot and @endcannot as in Example 9-19.
<h1>{{ $contact->name }}</h1>@cannot('edit-contact', $contact) LOCKED @endcannot
If you’ve ever built an app with an admin user class, you’ve probably looked at all of the simple authorization closures so far in this chapter and thought about how you could add a superuser class that overrides these checks in every case. Thankfully, there’s already a tool for that.
In AuthServiceProvider, where you’re already defining your abilities, you can also add a before() check that runs before all the others and can optionally override them, like in Example 9-20.
Gate::before(function($user,$ability){if($user->isOwner()){returntrue;}});
Note that the string name for the ability is also passed in, so you can differentiate your before hooks based on your ability naming scheme.
Up until this point, all of the access controls have required you to manually associate Eloquent models with the ability names. You could have created an ability named something like visit-dashboard that’s not related to a specific Eloquent model, but you’ll probably have noticed that most of our examples have had to do with doing something to something—and in most of these cases, the something that’s the recipient of the action is an Eloquent model.
Authorization policies are organizational structures that help you group your authorization logic based on the resource you’re controlling access to. They make it easy to manage defining authorization rules for behavior toward a particular Eloquent model (or other PHP class), all together in a single location.
Policies are PHP classes, which can be generated with an Artisan command:
php artisan make:policy ContactPolicy
Once they’re generated, they need to be registered. The AuthServiceProvider has a $policies property, which is an array. The key of each item is the class name of the protected resource (usually, but not always, an Eloquent class), and the value is the policy class name:
classAuthServiceProviderextendsServiceProvider{protected$policies=[Contact::class=>ContactPolicy::class,];
A policy class that’s generated by Artisan doesn’t have any special properties or methods. But every method that you add is now mapped as an ability key for this object.
Let’s define an update() method to take a look at how it works (Example 9-21).
<?phpnamespaceApp\Policies;classContactPolicy{publicfunctionupdate($user,$contact){return$user->id==$contact->user_id;}}
Notice that the contents of this method look exactly like they would in a Gate definition.
In Laravel 5.2, if you want to define a policy method that relates to the class but not a specific instance—for example, “can this user create contacts at all?” rather than just “can this user view this specific contact?”—create that method and add “Any” at the end of its name:
...classContactPolicy{publicfunctioncreateAny($user){return$user->canCreateContacts();}
In Laravel 5.3, you can drop the Any suffix and treat this just like a normal method.
If there’s a policy defined for a resource type, the Gate will use the first parameter to figure out which method to check on your policy. If you run Gate::allows('update', $contact), it will check the ContactPolicy@update method for authorization.
This also works for the Authorize middleware and for User model checking and Blade checking, as seen in Example 9-22.
// Gateif(Gate::denies('update',$contact)){abort(403);}// Gate if you don't have an explicit instanceif(!Gate::check('create',Contact::class)){abort(403);}// Userif($user->can('update',$contact)){// Do stuff}// Blade@can('update',$contact)<!--showstuff-->@endcan
Additionally, there’s a policy() helper that allows you to retrieve a policy class and run its methods:
if(policy($contact)->update($user,$contact)){// Do stuff}
Just like with normal ability definitions, policies can define a before() method that allows you to override any call before it’s even processed (see Example 9-23).
publicfunctionbefore($user,$ability){if($user->isAdmin()){returntrue;}}
Application tests often need to perform a particular behavior on behalf of a particular user. We therefore need to be able to authenticate as a user in application tests, and we need to test authorization rules and authentication routes.
Of course, it’s possible to write an application test that manually visits the login page and then fills out the form and submits it, but that’s not necessary. Instead, the simplest option is to use the ->be() method to simulate being logged in as a user. Take a look at Example 9-24.
publicfunctiontest_it_creates_a_new_contact(){$user=factory(User::class)->create();$this->be($user);$this->post('contacts',['email'=>'my@email.com']);$this->assertDatabaseHas('contacts',['email'=>'my@email.com','user_id'=>$user->id,]);}
You can also use, and chain, the actingAs() method instead of be(), if you prefer how it reads:
publicfunctiontest_it_creates_a_new_contact(){$user=factory(User::class)->create();$this->actingAs($user)->post('contacts',['email'=>'my@email.com']);$this->assertDatabaseHas('contacts',['email'=>'my@email.com','user_id'=>$user->id,]);}
We can also test authorization like in Example 9-25.
publicfunctiontest_non_admins_cant_create_users(){$user=factory(User::class)->create(['admin'=>false]);$this->be($user);$this->post('users',['email'=>'my@email.com']);$this->assertDatabaseMissing('users',['email'=>'my@email.com']);}
Or we can test for a 403 response like in Example 9-26.
publicfunctiontest_non_admins_cant_create_users(){$user=factory(User::class)->create(['admin'=>false]);$this->be($user);$response=$this->post('users',['email'=>'my@email.com']);$response->assertStatus(403);}
We need to test that our authentication (sign up and sign in) routes work too, as illustrated in Example 9-27.
publicfunctiontest_users_can_register(){$this->post('register',['name'=>'Sal Leibowitz','email'=>'sal@leibs.net','password'=>'abcdefg123','password_confirmation'=>'abcdefg123',]);$this->assertDatabaseHas('users',['name'=>'Sal Leibowitz','email'=>'sal@leibs.net',]);}publicfunctiontest_users_can_log_in(){$user=factory(User::class)->create(['password'=>Hash::make('abcdefg123')]);$this->post('login',['email'=>$user->,'password'=>'abcdefg123',]);$this->assertTrue(auth()->check());$this->assertTrue($user->is(auth()->user()));}
You could also use the integration test features to direct the test to “click” your authentication fields and “submit” the fields to test the entire flow. We’ll talk about that more in Chapter 12.
In projects running versions of Laravel prior to 5.4, assertDatabaseHas should be replaced by seeInDatabase, assertDatabaseMissing should be replaced by dontSeeInDatabase, assertDatabaseHas should be replaced by seeInDatabase, and assertStatus should be called on $this instead of $response.
Between the default User model, the create_users_table migration, the auth controllers, and the auth scaffold, Laravel comes with a full user authentication system out of the box. The RegisterController handles user registration, the LoginController handles user authentication, and the ResetPasswordController and the ForgotPasswordController handle password resets. Each has certain properties and methods that can be used to override some of the default behavior.
The Auth facade and the auth() global helper provide access to the current user (auth()->user()) and makes it easy to check whether a user is logged in (auth()->check() and auth()->guest()).
Laravel also has an authorization system built in that allows you to define specific abilities (create-contact, visit-secret-page) or define policies for user interaction with entire models.
You can check for authorization with the Gate facade, the ->can() and ->cannot() methods on the User class, the @can and @cannot directives in Blade, the ->authorize() methods on the controller, or the can middleware.
We’ve already covered the Illuminate Request object a bit—how you can typehint it in constructors to get an instance or use the request() helper to retrieve it, and then use that to get information about the user’s input. In Chapter 3, for example, you saw how you can typehint it in constructors to get an instance, and in Chapter 7 we looked at how you can use it to get information about the user’s input.
In this chapter, you’ll learn more about what that Request object is, how it’s generated and what it represents, and what part it plays in your application’s lifecycle. We’ll also talk about the Response object and Laravel’s implementation of the middleware pattern.
Every request coming into a Laravel application, whether generated by an HTTP request or a command-line interaction, is immediately converted into an Illuminate Request object, which then crosses many layers and ends up being parsed by the application itself. The application then generates an Illuminate Response object, which is sent back out across those layers and finally returned to the end user.
This request/response lifecycle is illustrated in Figure 10-1.
Let’s take a look at what it takes to make each of these steps happen, from the first line of code to the last.
Every Laravel application has some form of configuration set up at the web server level, in an Apache .htaccess file or an Nginx configuration setting or something similar, that captures every web request regardless of URL and routes it to public/index.php in the Laravel application directory (app).
index.php doesn’t actually have that much code in it. It has three primary functions.
First, it loads Composer’s autoload file, which registers all of the Composer-loaded dependencies.
Next, it kicks off Laravel’s bootstrap, creating the application container (you’ll learn more about the container in Chapter 11) and registering a few core services (including the kernel, which we’ll talk about in just a bit).
Finally, it creates an instance of the kernel, creates a request representing the current user’s web request, and passes the request to the kernel to handle. The kernel responds with an Illuminate Response object, which index.php then returns to the end user, and terminates the page request.
The kernel is the core router of every Laravel application, responsible for taking in a user request, processing it through middleware and handling exceptions and passing it to the page router, and then returning the final response. There are actually two kernels, but only one is used for each page request. One of the routers handles web requests (the HTTP kernel) and the other handles console, cron, and Artisan requests (the console kernel). Each has a handle() method that’s responsible for taking in an Illuminate Request object and returning an Illuminate Response object.
The kernel runs all of the bootstraps that need to run before every request, including determining which environment the current request is running in (staging, local, production, etc.) and running all of the service providers. The HTTP kernel additionally defines the list of middleware that will wrap each request, including the core middleware responsible for sessions and CSRF protection.
While there’s a bit of procedural code in these bootstraps, almost all of Laravel’s bootstrap code is separated into something Laravel calls service providers. A service provider is a class that encapsulates logic that various parts of your application need to run in order to bootstrap their core functionality.
For example, there’s an AuthServiceProvider that bootstraps all of the registrations necessary for Laravel’s authentication system and a RouteServiceProvider that bootstraps the routing system.
The concept of service providers can be a little hard to understand at first, so think about it this way: many components of your application have bootstrap code that needs to run when the application initializes. Service providers are a tool for grouping that bootstrap code into related classes. If you have any code that needs to run in preparation for your application code to work, it’s a strong candidate for a service provider.
For example, if you ever find that the feature you’re working on requires some classes registered in the container (you’ll learn more about this in Chapter 11), you would create a service provider just for that piece of functionality. You might have a GitHubServiceProvider or a MailerServiceProvider.
Service providers have two important methods: boot() and register(). There’s also a $defer property that you might choose to use. Here’s how they work.
First, all of the service providers’ register() methods are called. This is where we want to bind classes and aliases to the container. You don’t want to do anything in register() that relies on the entire application being bootstrapped.
Second, all of the service providers’ boot() methods are called. You can now do any other bootstrapping here, like binding event listeners or defining routes—anything that may rely on the entire Laravel application having been bootstrapped.
If your service provider is only going to register bindings in the container (i.e., teach the container how to resolve a given class or interface), but not perform any other bootstrapping, you can “defer” its registrations, which means they won’t run unless one of their bindings is explicitly requested from the container. This can speed up your application’s average time to bootstrap.
If you want to defer your service provider’s registrations, first give it a protected $defer property and set it to true, and then give it a provides() method that returns a list of bindings the provider provides, as shown in Example 10-1.
...classGitHubServiceProviderextendsServiceProvider{protected$defer=true;publicfunctionprovides(){return[GitHubClient::class,];}
Service providers also have a suite of methods and configuration options that can provide advanced functionality to the end user when the provider is published as part of a Composer package. Take a look at the service provider definition in the Laravel source to learn more about how this can work.
Now that we’ve covered the application bootstrap, let’s take a look at the Request object, the most important output of the bootstrap.
The Illuminate Request class is a Laravel-specific extension of Symfony’s HttpFoundation\Request object.
Each Request object is intended to represent every relevant piece of information you could care to know about a user’s HTTP request.
In native PHP code, you might find yourself looking to $_SERVER, $_GET, $_POST, and other combinations of globals and processing logic to get information about the current user’s request. What files has the user uploaded? What’s his IP address? What fields did he post? All of this is sprinkled around the language—and your code—in a way that’s hard to understand and harder to mock.
Symfony’s Request object instead collects all of the information necessary to represent a single HTTP request into a single object, and then tacks on convenience methods to make it easy to get useful information from it. The Illuminate Request object adds even more convenience methods to get information about the request it’s representing.
You’ll very likely never need to do this in a Laravel app, but if you ever need to capture your own Illuminate Request directly from PHP’s globals, you can use the capture() method:
$request=Illuminate\Http\Request::capture();
Laravel creates an internal request object for each request, and there are a few ways you can get access to it.
First—and again, we’ll cover this more in Chapter 11—you can typehint the class in any constructor or method that’s resolved by the container. That means you can typehint it in a controller method or a service provider, as seen in Example 10-2.
...useIlluminate\Http\Request;classPeopleControllerextendsController{publicfunctionindex(Request$request){$allInput=$request->all();}
You can also use the request() global helper, which allows you to call methods on it (e.g., request()->input()) and also allows you to call it on its own to get an instance of $request:
$request=request();$allInput=$request->all();// or:$allInput=request()->all();
And you can also use the app() global method to get an instance of Request. You can pass either the fully qualified class name or the shortcut, request:
$request=app(Illuminate\Http\Request::class);$request=app('request');
Now that you know how to get an instance of Request, what can you do with it? The primary purpose of the Request object is to represent the current HTTP request, so the primary functionality the Request class offers is to make it easy to get useful information about the current request.
I’ve categorized the methods described here, but note that there’s certainly overlap between the categories, and the categories are a bit arbitrary—for example, query parameters could just as easily be in “User and request state” as they are in “Basic user input.” Hopefully these categories will make it easy for you to learn, and then you can throw away the categories.
Also, be aware that there are many more methods available on the Request object; these are just the most commonly used methods.
The basic user input methods make it simple to get information that the users themselves explicitly provide—likely through submitting a form or an Ajax component. When I reference “user-provided input” here, I’m talking about input from query strings (GET), form submissions (POST), or JSON:
all() returns an array of all user-provided input.
input(fieldName) returns the value of a single user-provided input field.
only(fieldName|[array,of,field,names]) returns an array of all user-provided input for the specified field name(s).
except(fieldName|[array,of,field,names]) returns an array of all user-provided input except for the specified field name(s).
exists(fieldName) returns a boolean of whether the field exists in the input. has() is an alias.
filled(fieldName) returns a boolean of whether the field exists in the input and is not empty (that is, has a value).
json() returns a ParameterBag if the page had JSON sent to it.
json(keyName) returns the value of the given key from JSON sent to the page.
Example 10-3 gives a few quick examples of how to use the user-provided information methods from a request.
// form<formmethod="POST"action="/form">@csrf<inputname="name">Name<br><inputtype="submit"></form>
// route receiving the formRoute::post('form',function(Request$request){echo'name is '.$request->input('name').'<br>';echo'all input is '.print_r($request->all()).'<br>';echo'user provided email address: '.$request->has('email')?'true':'false';});
The user and request state methods include input that wasn’t explicitly provided by the user through a form:
method() returns the method (GET, POST, PATCH, etc.) used to access this route.
path() returns the path (without the domain) used to access this page; e.g., for http://www.myapp.com/abc/def it would return abc/def.
url() returns the URL (with the domain) used to access this page; e.g., for http://www.myapp.com/abc it would return http://www.myapp.com/abc.
is() returns a boolean of whether or not the current page request fuzzy-matches a provided string (e.g., /a/b/c would be matched by $request->is('*b*'), where * stands for any characters). It uses a custom regex parser found in Str::is.
ip() returns the user’s IP address.
header() returns an array of headers (e.g., ['accept-language' => ['en-US,en;q=0.8']]), or, if passed a header name as a parameter, returns just that header.
server() returns an array of the variables traditionally stored in $_SERVER (e.g., REMOTE_ADDR), or, if passed a $_SERVER variable name, returns just that value.
secure() returns a boolean of whether this page was loaded using HTTPS.
pjax() returns a boolean of whether this page request was loaded using Pjax.
wantsJson() returns a boolean of whether this request has any /json content types in its Accept headers.
isJson() returns a boolean of whether this page request has any /json content types in its Content-Type header.
accepts() returns a boolean of whether this page request accepts a given content type.
So far, all of the input we’ve covered is either explicit (retrieved by methods like all(), input(), etc.) or defined by the browser or referring site (retrieved by methods like pjax()). File inputs are similar to explicit user input, but they’re handled much differently:
file() returns an array of all uploaded files, or, if a key is passed (the file upload field name), returns just the one file.
allFiles() also returns an array of all uploaded files; useful as opposed to file() because of clearer naming.
hasFile() returns a boolean of whether a file was uploaded at the specified key.
Every file that’s uploaded will be an instance of Symfony\Component\HttpFoundation\File\UploadedFile, which provides a suite of tools for validating, processing, and storing uploaded files.
Take a look at Chapter 14 for more examples of how to handle uploaded files.
The request can also provide functionality for interacting with the session. Most session functionality lives elsewhere, but there are a few methods that are particularly relevant to the current page request:
flash() flashes the current request’s user input to the session to be retrieved later, which means it’s saved to the session but disappears after the next request.
flashOnly() flashes the current request’s user input for any keys in the provided array.
flashExcept() flashes the current requests’s user input, except for any keys in the provided array.
old() returns an array of all previously flashed user input, or, if passed a key, returns the value for that key if it was previously flashed.
flush() wipes all previously flashed user input.
cookie() retrieves all cookies from the request, or, if a key is provided, retrieves just that cookie.
hasCookie() returns a boolean of whether the request has a cookie for the given key.
The flash*() and old() methods are used for storing user input and retrieving it later, often after the input is validated and rejected.
Similar to the Request object, there’s an Illuminate Response object that represents the response your application is sending to the end user, complete with headers, cookies, content, and anything else used for sending the end user’s browser instructions on rendering a page.
Just like Request, the Illuminate\Http\Response object extends a Symfony class: Symfony\Component\HttpFoundation\Response. This is a base class with a series of properties and methods that make it possible to represent and render a response; Illuminate’s Response class decorates it with a few helpful shortcuts.
Before we talk about how you can customize your response objects, let’s step back and see how we most commonly work with response objects.
In the end, any response object returned from a route definition will be converted into an HTTP response. It may define specific headers or specific content, set cookies, or whatever else, but eventually it will be converted into a response your users’ browsers can parse.
Let’s take a look at the simplest possible response, in Example 10-4.
Route::get('route',function(){returnnewIlluminate\Http\Response('Hello!');});// Same, using global function:Route::get('route',function(){returnresponse('Hello!');});
We create a response, give it some core data, and then return it. We can also customize the HTTP status, headers, cookies, and more, like in Example 10-5.
Route::get('route',function(){returnresponse('Error!',400)->header('X-Header-Name','header-value')->cookie('cookie-name','cookie-value');});
We define a header on a response by using the header() fluent method, like in Example 10-5. The first parameter is the header name and the second is the header value.
We can also set cookies directly on the response object if we’d like. We’ll cover Laravel’s cookie handling a bit more in Chapter 14, but take a look at Example 10-6 for a simple use case for attaching cookies to a response.
returnresponse($content)->cookie('signup_dismissed',true);
There are also a few special response types for views, downloads, files, and JSON. Each is a predefined macro that makes it easy to reuse particular templates for headers or content structure.
In Chapter 4, I used the global view() helper to show how to return a template—for example, view('view.name.here’) or something similar. But if you need to customize headers, HTTP status, or anything else when returning a view, you can use the view() response type as shown in Example 10-7.
Route::get('/',function(XmlGetterService$xml){$data=$xml->get();returnresponse()->view('xml-structure',$data)->header('Content-Type','text/xml');});
Sometimes you want your application to force the user’s browser to download a file, whether you’re creating the file in Laravel or serving it from a database or a protected location. The download() response type makes this simple.
The required first parameter is the path for the file you want the browser to download. If it’s a generated file, you’ll need to save it somewhere temporarily.
The optional second parameter is the filename for the downloaded file (e.g., export.csv). If you don’t pass a string here, it will be generated automatically. The optional third parameter allows you to pass an array of headers. Example 10-8 illustrates the use of the download() response type.
publicfunctionexport(){returnresponse()->download('file.csv','export.csv',['header'=>'value']);}publicfunctionotherExport(){returnresponse()->download('file.pdf');}
If you wish to delete the original file from the disk after returning a download response you can chain on the deleteFileAfterSend() method after your download() method:
publicfunctionexport(){returnresponse()->download('file.csv','export.csv')->deleteFileAfterSend();}
The file response is similar to the download response, except it allows the browser to display the file instead of forcing a download. This is most common with images and PDFs.
The required first parameter is the filename, and the optional second parameter can be an array of headers (see Example 10-9).
publicfunctioninvoice($id){returnresponse()->file("./invoices/{$id}.pdf",['header'=>'value']);}
JSON responses are so common that, even though they’re not really particularly complex to program, there’s a custom response for them as well.
JSON responses convert the passed data to JSON (with json_encode()) and set the Content-Type to application/json. You can also optionally use the setCallback() method to create a JSONP response instead of JSON, as seen in Example 10-10.
publicfunctioncontacts(){returnresponse()->json(Contact::all());}publicfunctionjsonpContacts(Request$request){returnresponse()->json(Contact::all())->setCallback($request->input('callback'));}publicfunctionnonEloquentContacts(){returnresponse()->json(['Tom','Jerry']);}
Redirects aren’t commonly called on the response() helper, so they’re a bit different from the other custom response types we discussed already, but they’re still just a different sort of response. Redirects, returned from a Laravel route, send the user a redirect (often a 301) to another page or back to the previous page.
You technically can call a redirect from response(), as in return response()->redirectTo('/'). But more commonly you’ll use the redirect-specific global helpers.
There is a global redirect() function that can be used to create redirect responses, and a global back() function that is a shortcut to redirect()->back().
Just like most global helpers, the redirect() global function can either be passed parameters or can be used to get an instance of its class that you then chain method calls onto. If you don’t chain, but just pass parameters, redirect() performs the same as redirect()->to(); it takes a string and redirects to that string URL. Example 10-11 shows some examples of its use.
returnredirect('account/payment');returnredirect()->to('account/payment');returnredirect()->route('account.payment');returnredirect()->action('AccountController@showPayment');// If redirecting to an external domainreturnredirect()->away('https://tighten.co');// If named route or controller needs parameters:returnredirect()->route('contacts.edit',['id'=>15]);returnredirect()->action('ContactsController@edit',['id'=>15]);
You can also redirect “back” to the previous page, which is especially useful when handling and validating user input. Example 10-12 shows a common pattern in validation contexts.
publicfunctionstore(){// If validation fails...returnback()->withInput();}
Finally, you can redirect and flash data to the session at the same time. This is common with error and success messages, like in Example 10-13.
Route::post('contacts',function(){// store the contact...returnredirect('dashboard')->with('message','Contact created!');});Route::get('dashboard',function(){// Get the flashed data from session--usually handled in Blade templateechosession('message');});
You can also create your own custom response types using “macros”. This allows you to define a series of modifications to make to the response and its provided content.
Let’s re-create the json() custom response type, just to see how it works. As always, you should probably create a custom service provider for these sorts of bindings, but for now we’ll just put it in AppServiceProvider, as seen in Example 10-14.
...classAppServiceProvider{publicfunctionboot(){Response::macro('myJson',function($content){returnresponse(json_encode($content))->withHeaders(['Content-Type'=>'application/json']);});}
Then, we can use it just like we would use the predefined json macro:
returnresponse()->myJson(['name'=>'Sangeetha']);
This will return a response with the body of that array encoded for JSON, with the JSON-appropriate Content-Type header.
If you’d like to customize how you’re sending responses and a macro isn’t enough space or enough organization, or if you want any of your objects to be capable of being returned as a “response” with their own logic of how to be displayed, the Responsable interface is for you.
The Responsable interface, Illuminate\Contracts\Support\Responsable, dictates its implementors must have a toResponse() method. This needs to return an Illuminate Response object. Let’s take a look at an example, in Example 10-15.
...useIlluminate\Contracts\Support\Responsable;classMyJsonimplementsResponsable{publicfunction__construct($content){$this->content=$content;}publicfunctiontoResponse(){returnresponse(json_encode($this->content))->withHeaders(['Content-Type'=>'application/json']);}
Then, we can use it just like with our custom macro:
returnnewMyJson(['name'=>'Sangeetha']);
Unsurprisingly, this looks like a lot of work relative to the response macros we covered earlier. But responsables really shine when you’re working with more complicated controller manipulations. One common example is to use responsables to create view models (or view objects), like in Example 10-16.
...useIlluminate\Contracts\Support\Responsable;classGroupDonationDashboardimplementsResponsable{publicfunction__construct($group){$this->group=$group;}publicfunctionbudgetThisYear(){// ...}publicfunctiongiftsThisYear(){// ...}publicfunctiontoResponse(){returnview('groups.dashboard')->with('annual_budget',$this->budgetThisYear())->with('annual_gifts_received',$this->giftsThisYear());}
It starts to make a little bit more sense in this context. Move your complex view preparation into a dedicated, testable object. Keep your controllers clean. Here’s a controller that uses that responsable object:
...classGroupController{publicfunctionindex(Group$group){returnnewGroupDonationsDashboard($group);}
The Responsable interface was introduced in Laravel 5.5.
Take a look back at Figure 10-1, at the start of this chapter.
We’ve covered the requests and responses, but we haven’t actually looked into what middleware is. You may already be familiar with middleware; it’s not unique to Laravel, but rather a widely-used architecture pattern.
The idea of middleware is that there is a series of layers wrapping around your application, like a multilayer cake or an onion 1. Just as shown in Example 10-1, every request passes through every middleware layer on its way into the application, and then the resulting response passes back through the middleware layers on its way out to the end user.
Middleware is most often considered separate from your application logic, and usually is constructed in a way that should theoretically be applicable to any application, not just the one you’re working on at the moment.
Middleware can inspect a request and decorate it, or reject it, based on what it finds. That means middleware is great for something like rate limiting: it can inspect the IP address, check how many times it’s accessed this resource in the last minute, and send back a 429 (Too Many Requests) status if a threshold is passed.
Because middleware also gets access to the response on its way out of the application, it’s great for decorating responses. For example, Laravel uses a middleware to add all of the queued cookies from a given request/response cycle to the response right before it is sent to the end user.
But some of the most powerful uses of middleware come from the fact that it can be nearly the first and the last thing to interact with the request/response cycle. That makes it perfect for something like enabling sessions—PHP needs you to open the session very early and close it very late, and middleware is also great for this.
Let’s imagine we want to have a middleware that rejects every request that uses the DELETE HTTP method, and also sends a cookie back for every request.
There’s an Artisan command to create custom middleware. Let’s try it out:
php artisan make:middleware BanDeleteMethod
You can now open up the file at app/Http/Middleware/BanDeleteMethod.php. The default contents are shown in Example 10-17.
...classBanDeleteMethod{publicfunctionhandle($request,Closure$next){return$next($request);}}
How this handle() method represents the processing of both the incoming request and the outgoing response is the most difficult thing to understand about middleware, so let’s walk through it.
First, remember that middleware are layered one on top of another, and then finally on top of the app. The first middleware that’s registered gets first access to a request when it comes in, then that request is passed to every other middleware in turn, then to the app; then the resulting response is passed outward through the middleware, and finally this first middleware gets last access to the response when it goes out.
Let’s imagine we’ve registered BanDeleteMethod as the first middleware to run. That means the $request coming into it is the raw request, unadulterated by any other middleware. Now what?
Passing that request to $next() means handing it off to the rest of the middleware. The $next() closure just takes that $request and passes it to the handle() method of the next middleware in the stack. It then gets passed on down the line until there are no more middleware to hand it to, and it finally ends up at the application.
Next, how does the response come out? This is where it might be hard to follow. The application returns a response, which is passed back up the chain of middleware—because each middleware returns its response. So, within that same handle() method, the middleware can decorate a $request and pass it to the $next() closure, and can then choose to do something with the output it receives before finally returning that output to the end user. Let’s look at some pseudocode to make this clearer (Example 10-18).
...classBanDeleteMethod{publicfunctionhandle($request,Closure$next){// At this point, $request is the raw request from the user.// Let's do something with it, just for fun.if($request->ip()==='192.168.1.1'){returnresponse('BANNED IP ADDRESS!',403);}// Now we've decided to accept it. Let's pass it on to the next// middleware in the stack. We pass it to $next(), and what is// returned is the response after the $request has been passed// down the stack of middleware to the application and the// application's response has been passed back up the stack.$response=$next($request);// At this point, we can once again interact with the response// just before it is returned to the user$response->cookie('visited-our-site',true);// Finally, we can release this response to the end userreturn$response;}}
Finally, let’s make the middleware do what we actually promised (Example 10-19).
...classBanDeleteMethod{publicfunctionhandle($request,Closure$next){// Test for the DELETE methodif($request->method()==='DELETE'){returnresponse("Get out of here with that delete method",405);}$response=$next($request);// Assign cookie$response->cookie('visited-our-site',true);// Return responsereturn$response;}}
We’re not quite done yet. We need to register this middleware in one of two ways: globally or for specific routes.
Global middleware are applied to every route; route middleware are applied on a route-by-route basis.
Both bindings happen in app/Http/Kernel.php. To add a middleware as global, add its class name to the $middleware property, as in Example 10-20.
// app/Http/Kernel.phpprotected$middleware=[\Illuminate\Foundation\Http\Middleware\CheckForMaintenanceMode::class,\App\Http\Middleware\BanDeleteMethod::class,];
Middleware intended for specific routes can be added as a route middleware or as part of a middleware group. Let’s start with the former.
Route middleware are added to the $routeMiddleware array in app/Http/Kernel.php. It’s similar to adding them to $middleware, except we have to give one a key that will be used when applying this middleware to a particular route, as seen in Example 10-21.
// app/Http/Kernel.phpprotected$routeMiddleware=['auth'=>\App\Http\Middleware\Authenticate::class,...'ban-delete'=>\App\Http\Middleware\BanDeleteMethod::class,];
We can now use this middleware in our route definitions, like in Example 10-22.
// Doesn't make much sense for our current example...Route::get('contacts','ContactsController@index')->middleware('ban-delete');// Makes more sense for our current example...Route::prefix('api')->middleware('ban-delete')->group(function(){// All routes related to an API});
Laravel 5.2 introduced the concept of middleware groups. They’re essentially pre-packaged bundles of middleware that make sense to be together in specific contexts.
The default routes file in earlier releases of 5.2, routes.php, had three distinct sections: the root route (/) wasn’t under any middleware group, and then there was a web middleware group and an api middleware group. It was a bit confusing for new users, and that meant the root route didn’t have access to the session or anything else that’s kicked off in the middleware.
In later versions of 5.2 everything’s simplified: every route in routes.php is in the web middleware group. In 5.3 and later, you get a routes/web.php file for web routes and a routes/api.php file for API routes. If you want to add routes in other groups, read on.
Out of the box there are two groups: web and api. web has all the middleware that will be useful on almost every Laravel page request, including middleware for cookies, sessions, CSRF protection, and more. api has none of those—it has a throttle middleware and a route model binding middleware, and that’s it. These are all defined in app/Http/Kernel.php.
You can apply middleware groups to routes just like you apply route middleware to routes, with the middleware() fluent method:
Route::get('/','HomeController@index')->middleware('web');
You can also create your own middleware groups and add and remove route middleware to and from preexisting middleware groups. It works just like adding route middleware normally, but you’re instead adding them to keyed groups in the $middlewareGroups array.
You might be wondering how these middleware groups match up with the two default routes files. Unsurprisingly, the routes/web.php file is wrapped with the web middleware group, and the routes/api.php file is wrapped with the api middleware group.
The routes/* files are loaded in the RouteServiceProvider. Take a look at the map() method there (Example 10-23) and you’ll find a mapWebRoutes() and a mapApiRoutes() method, each of which loads its respective files already wrapped in the appropriate middleware group.
// App\Providers\RouteServiceProviderpublicfunctionmap(){$this->mapApiRoutes();$this->mapWebRoutes();}protectedfunctionmapApiRoutes(){Route::prefix('api')->middleware('api')->namespace($this->namespace)->group(base_path('routes/api.php'));}protectedfunctionmapWebRoutes(){Route::middleware('web')->namespace($this->namespace)->group(base_path('routes/web.php'));}
As you can see in Example 10-23, we’re using the router to load a route group under the default namespace (App\Http\Controllers) and with the web middleware group, and another under the api middleware group.
It’s not common, but there are times when you need to pass parameters to a route middleware. For example, you might have an authentication middleware that will act differently depending on whether you’re guarding for the member user type or the owner user type:
Route::get('company',function(){returnview('company.admin');})->middleware('auth:owner');
To make this work, you’ll need to add one or more parameters to the middleware’s handle() method, and update that method’s logic accordingly:
publicfunctionhandle($request,$next,$role){if(auth()->check()&&auth()->user()->hasRole($role)){return$next($request);}returnredirect('login');}
Note that you can also add more than one parameter to the handle() method, and pass multiple parameters to the route definition by separating them with commas:
Route::get('company',function(){returnview('company.admin');})->middleware('auth:owner,view');
If you use any Laravel tools to generate URLs within the app, you’ll notice that Laravel detects whether the current request was via http or https and will generate any links using the appropriate protocol.
However, this doesn’t always work when you have a proxy (e.g. a load balancer, or other web-based proxy) in front of your app. Many proxies send non-standard headers like X_FORWARDED_PORT and X_FORWARDED_PROTO to your app, and expect your app to “trust” those, interpret them, and use them as a part of the process of interpreting the HTTP request. In order to make Laravel correctly treat proxied https calls like secure calls, and in order for Laravel to process other headers from proxied requests, you need to define how it should do so.
You likely don’t just want to allow any proxy to send traffic to your app; rather, you want to lock your app to only trust only certain proxies, and even from those proxies you may only want to trust certain forwarded headers.
Since Laravel 5.6, the package TrustedProxy is included by default with every installation of Laravel, but if you’re using an older version you can still pull it into your package. TrustedProxy makes it possible for you to whitelist certain sources of traffic and mark them as “trusted”, and also mark which forwarded headers you want to trust from those sources and how to map them to normal headers.
To configure which proxies your app will trust, you can edit the App\Http\Middleware\TrustProxies middleware and add the IP address for your load balancer or proxy to the $proxies array:
/*** The trusted proxies for this application.** @var array*/protected$proxies=['192.168.1.1','192.168.1.2',];/*** The headers that should be used to detect proxies.** @var string*/protected$headers=Request::HEADER_X_FORWARDED_ALL;
As you can see, the $headers array defaults to trusting all forwarded headers from the trusted proxies; if you want to customize this list, take a look at the Symfony docs on trusting proxies.
Outside of the context of you as a developer using requests, responses, and middleware in your own testing, Laravel itself actually uses each quite a bit.
When you’re doing application testing with calls like $this->get('/'), you’re instructing Laravel’s application testing framework to generate request objects that represent the interactions that you’re describing. Then those request objects are passed to your application as if it were an actual visit. That’s why the application tests are so accurate: your application doesn’t actually “know” that it’s not a real user that’s interacting with it.
In this context, many of the assertions you’re making—say, assertResponseOk()—are assertions against the response object generated by the application testing framework. The assertResponseOk() method just looks at the response object and asserts that its isOk() method returns true—which is just checking that its status code is 200. In the end, everything in application testing is acting as if this were a real page request.
Find yourself in a context where you need a request to work with in your tests? You can always pull one from the container with $request = request(). Or you could create your own—the constructor parameters for the Request class, all optional, are as follows:
$request=newIlluminate\Http\Request($query,// GET array$request,// POST array$attributes,// "attributes" array; empty is fine$cookies,// cookies array$files,// files array$server,// servers array$content// raw body data);
If you’re really interested in an example, check out the method Symfony uses to create a new Request from the globals PHP provides: Symfony\Component\HttpFoundation\Request@createFromGlobals().
Responses are even simpler to create manually, if you need to. Here are the (optional) parameters:
$response=newIlluminate\Http\Response($content,// response content$status,// HTTP status, default 200$headers// array headers array);
Finally, if you need to disable your middleware during an application test, import the WithoutMiddleware trait into that test. You can also use the $this->withoutMiddleware() method to disable middleware just for a single test method.
Every request coming into a Laravel application is converted into an Illuminate Request object, which then passes through all middleware, and is processed by the application. The application generates a response object, which is then passed back through all of the middleware (in reverse order) and returned to the end user.
Request and response objects are responsible for encapsulating and representing every relevant piece of information about the incoming user request and the outgoing server response.
Service providers collect together related behavior for binding and registering classes for use by the application.
Middleware wrap the application and can reject or decorate any request and response.
1 or an ogre
Laravel’s service container, or dependency injection container, sits at the core of almost every other feature. The container is a simple tool you can use to bind and resolve concrete instances of classes and interfaces, and at the same time it’s a powerful and nuanced manager of a network of interrelated dependencies. In this chapter, you’ll learn more about what it is, how it works, and how you can use it.
You’ll notice in this book, in the documentation, and in other educational sources that there are quite a few names folks use for the container. These include:
Application container
IoC (inversion of control) container
Service container
DI (dependency injection) container
All are useful and valid, but just know they’re all talking about the same thing. They’re all referring to the service container.
Dependency injection means that, rather than being instantiated (“newed up”) within a class, each class’s dependencies will be injected in from the outside. This most commonly occurs with constructor injection, which means an object’s dependencies are injected when it’s created. But there’s also setter injection, where the class exposes a method specifically for injecting a given dependency, and method injection, where one or more methods expect their dependencies to be injected when they’re called.
Take a look at Example 11-1 for a quick example of constructor injection, the most common type of dependency injection.
<?phpclassUserMailer{protected$mailer;publicfunction__construct(Mailer$mailer){$this->mailer=$mailer;}publicfunctionwelcome($user){return$this->mailer->($user->,'Welcome!');}}
As you can see, this UserMailer class expects an object of type Mailer to be injected when it’s instantiated, and its methods then refer to that instance.
The primary benefits of dependency injection are that it gives us the freedom to change what we’re injecting, mock dependencies for testing, and instantiate shared dependencies just once for shared use.
As you saw in Example 11-1, the most common pattern for dependency injection is constructor injection, or injecting the dependencies of an object when it’s instantiated (“constructed”).
Let’s take our UserMailer class from Example 11-1. Example 11-2 shows what it might look like to create and use an instance of it.
$mailer=newMailgunMailer($mailgunKey,$mailgunSecret,$mailgunOptions);$userMailer=newUserMailer($mailer);$userMailer->welcome($user);
Now let’s imagine we want our UserMailer class to be able to log messages, as well as sending a notification to a Slack channel every time it sends a message. Example 11-3 shows what this would look like. As you can see, it would start to get pretty unwieldy if we had to do all this work every time we wanted to create a new instance—especially when you consider that we’ll have to get all these parameters from somewhere.
$mailer=newMailgunMailer($mailgunKey,$mailgunSecret,$mailgunOptions);$logger=newLogger($logPath,$minimumLogLevel);$slack=newSlack($slackKey,$slackSecret,$channelName,$channelIcon);$userMailer=newUserMailer($mailer,$logger,$slack);$userMailer->welcome($user);
Imagine having to write that code every time you wanted a UserMailer. Dependency injection is great, but this is a mess.
Before we go too far into how the container actually works, let’s take a quick look at the simplest way to get an object out of the container: the app() helper.
Pass any string to that helper, whether it’s a fully qualified class name (FQCN, like App\ThingDoer) or a Laravel shortcut (we’ll talk about those more in a second), and it’ll return an instance of that class:
$logger=app(Logger::class);
This is the absolute simplest way to interact with the container. It creates an instance of this class and returns it for you. Nice and easy. Like new Logger but, as we’ll cover shortly, much better.
Creating the Logger instance as shown here seems simple enough, but you might’ve noticed that our $logger class in Example 11-3 has two parameters: $logPath and $minimumLogLevel. How does the container know what to pass here?
Short answer: it doesn’t. You can use the app() global helper to create an instance of a class that has no parameters in its constructor, but at that point you could’ve just run new Logger yourself. The container shines when there’s some complexity in the constructor, and that’s when we need to look at how exactly the container can figure out how to construct classes with constructor parameters.
Before we dig further into the Logger class, take a look at Example 11-4.
classBar{publicfunction__construct(){}}classBaz{publicfunction__construct(){}}classFoo{publicfunction__construct(Bar$bar,Baz$baz){}}$foo=app(Foo::class);
This looks similar to our mailer example in Example 11-3. What’s different is that these dependencies (Bar and Baz) are both so simple that the container can resolve them without any further information. The container reads the typehints in the Foo constructor, resolves an instance of both Bar and Baz, and then injects them into the new Foo instance when it’s creating it. This is called autowiring: resolving instances based on type-hints without the developer needing to explicitly bind those classes in the container.
Autowiring means that, if a class has not been explicitly bound to the container (like Foo, Bar, or Baz in this context) but the container can figure out how to resolve it anyway, the container will resolve it. This means any class with no constructor dependencies (like Bar and Baz) and any class with constructor dependencies that the container can resolve (like Foo) can be resolved out of the container.
That leaves us only needing to bind classes that have unresolvable constructor parameters—for example, our $logger class in Example 11-3, which has parameters related to our log path and log level.
For those, we’ll need to learn how to explicitly bind something to the container.
Binding a class to Laravel’s container is essentially telling the container, “If a developer asks for an instance of Logger, here’s the code to run in order to instantiate one with the correct parameters and dependencies and then return it correctly.”
We’re teaching the container that, when someone asks for this particular string (which is usually the FQCN of a class), it should resolve it this way.
So, let’s look at how to bind to the container. Note that the appropriate place to bind to the container is in a service provider’s register() method (see Example 11-5).
// In any service provider (maybe LoggerServiceProvider)publicfunctionregister(){$this->app->bind(Logger::class,function($app){returnnewLogger('\log\path\here','error');});}
There are a few important things to note in this example. First, we’re running $this->app->bind(). $this->app is an instance of the container that’s always available on every service provider. The container’s bind() method is what we use to bind to the container.
The first parameter of bind() is the “key” we’re binding to. Here we’ve used the FQCN of the class. The second parameter differs depending on what you’re doing, but essentially it should be something that shows the container what to do to resolve an instance of that bound key.
So, in this example, we’re passing a closure. And now, any time someone runs app(Logger::class), they’ll get the result of this closure. The closure is passed an instance of the container itself ($app), so if the class you’re resolving has a dependency you want resolved out of the container, you can use it in your definition:
// Note that this binding is not doing anything technically useful, since this// could all be provided by the container's auto-wiring already$this->app->bind(UserMailer::class,function($app){returnnewUserMailer($app->make(Mailer::class),$app->make(Logger::class),$app->make(Slack::class));});
Note that every time you ask for a new instance of your class, this closure will be run again and the new output returned.
If you want the output of the binding closure to be cached so that this closure isn’t re-run every time you ask for an instance, that’s the Singleton pattern, and you can run $this->app->singleton() to do that:
publicfunctionregister(){$this->app->singleton(Logger::class,function(){returnnewLogger('\log\path\here','error');});}
You can also get similar behavior if you already have an instance of the object you want the singleton to return:
publicfunctionregister(){$logger=newLogger('\log\path\here','error');$this->app->instance(Logger::class,$logger);}
Finally, if you want to alias one class to another, bind a class to a shortcut, or bind a shortcut to a class, you can just pass two strings:
// Asked for Logger, give FirstLogger$this->app->bind(Logger::class,FirstLogger::class);// Asked for log, give FirstLogger$this->app->bind('log',FirstLogger::class);// Ask for log, give FirstLogger$this->app->alias(FirstLogger::class,'log');
Note that these shortcuts are common in Laravel’s core; it provides a system of shortcuts to classes that provide core functionality, using easy-to-remember keys like log.
Just like we can bind a class to another class, or a class to a shortcut, we can also bind to an interface. This is extremely powerful, because we can now typehint interfaces instead of class names, like in Example 11-6.
...useInterfaces\MailerasMailerInterface;classUserMailer{protected$mailer;publicfunction__construct(MailerInterface$mailer){$this->mailer=$mailer;}}
// service providerpublicfunctionregister(){$this->app->bind(\Interfaces\Mailer::class,function(){returnnewMailgunMailer(...);});}
You can now typehint Mailer or Logger interfaces all across your code, and then choose once in a service provider which specific mailer or logger you want to use everywhere. That’s inversion of control.
One of the key benefits we get from using this pattern is that later, if you choose to use a different mail provider than Mailgun, as long as you have a mailer class for that new provider that implements the Mailer interface, you can swap it once in your service provider and everything in the rest of your code will just work.
Sometimes you need to change how to resolve an interface depending on the context. You might want to log events from one place to a local syslog and from others out to an external service. So, let’s tell the container to differentiate—check out Example 11-7.
// In a service providerpublicfunctionregister(){$this->app->when(FileWrangler::class)->needs(Interfaces\Logger::class)->give(Loggers\Syslog::class);$this->app->when(Jobs\SendWelcomeEmail::class)->needs(Interfaces\Logger::class)->give(Loggers\PaperTrail::class);}
We’ve covered the concept of constructor injection, and we’ve looked at how the container makes it easy to resolve instances of a class or interface out of the container. You saw how easy it is to use the app() helper to make instances, and also how the container will resolve the constructor dependencies of a class when it’s creating it.
What we haven’t covered yet is how the container is also responsible for resolving many of the core operating classes of your application. For example, every controller is instantiated by the container. That means if you want an instance of a logger in your controller, you can simply typehint the logger class in your controller’s constructor, and when Laravel creates the controller, it will resolve it out of the container and that logger instance will be available to your controller. Take a look at Example 11-8 for an example.
...classMyControllerextendsController{protected$logger;publicfunction__construct(Logger$logger){$this->logger=$logger;}publicfunctionindex(){// Do something$this->logger->error('Something happened');}}
The container is responsible for resolving controllers, middleware, queue jobs, event listeners, and any other classes that are automatically generated by Laravel in the process of your application’s lifecycle—so any of those classes can typehint dependencies in their constructors and expect them to be automatically injected.
There are a few places in your application where Laravel doesn’t just read the constructor signature: it also reads the method signature and will inject dependencies for you there as well.
The most common place to use method injection is in controller methods. If you have a dependency you only want to use for a single controller method, you can inject it into just that method like in Example 11-9.
...classMyControllerextendsController{// Method dependencies can come after or before route parameterspublicfunctionshow(Logger$logger,$id){// Do something$logger->error('Something happened');}}
This is also available on the boot() method of service providers, and you can also arbitrarily call a method on any class using the container, which will allow for method injection there (see Example 11-10).
classFoo{publicfunctionbar($parameter1){}}// Calls the 'bar' method on Foo with a first parameter of "value"app()->call('Foo@bar',['parameter1'=>'value']);
makeWithAll of the primary tools for resolving a concrete instance of a class--app(), $container->make(), etc.--assume that all of the class’ dependencies can be resolved without passing anything in. But what if your class accepts a value in its constructor, instead of a dependency the container can resolve for you? Use the makeWith method:
classFoo{publicfunction__construct($bar){// ...}}$foo=$this->app->makeWith(Foo::class,['bar'=>'value']);
This is a bit of an edge case. Most classes that you’ll be resolving out of the container should only have dependencies injected into their constructors.
We’ve covered facades quite a bit so far in the book, but we haven’t actually talked about how they work.
Laravel’s facades are classes that provide simple access to core pieces of Laravel’s functionality. There are two trademark features of facades: first, they’re all available in the global namespace (\Log is an alias to \Illuminate\Support\Facades\Log), and second, they use static methods to access nonstatic resources.
Let’s take a look at the Log facade, since we’ve been looking at logging already in this chapter. In your controller or views you could use this call:
Log::alert('Something has gone wrong!');
Here’s what it would look like to make that same call without the facade:
$logger=app('log');$logger->alert('Something has gone wrong!');
As you can see, facades translate static calls (any method call that you make on a class itself, using ::, instead of on an instance) to normal method calls on instances.
If you’re in a namespaced class, you’ll want to be sure to import the facade at the top:
...useIlluminate\Support\Facades\Log;classControllerextendsController{publicfunctionindex(){// ...Log::error('Something went wrong!');}
So, let’s take a look at the Cache facade and see how it actually works.
First, open up the class Illuminate\Support\Facades\Cache. You’ll see something like Example 11-11.
<?phpnamespaceIlluminate\Support\Facades;classCacheextendsFacade{protectedstaticfunctiongetFacadeAccessor(){return'cache';}}
Every facade has a single method: getFacadeAccessor(). This defines the key that Laravel should use to look up this facade’s backing instance from the container.
In this instance, we can see that every call to the Cache facade is proxied to be a call to an instance of the cache shortcut from the container. Of course, that’s not a real class or interface name, so we know it’s one of those shortcuts I mentioned earlier.
So, here’s what’s really happening:
Cache::get('key');// is the same as...app('cache')->get('key');
There are a few ways to look up exactly what class each facade accessor points to, but checking the documentation is the easiest. There’s a table on the facades documentation page that shows you, for each facade, which container binding (shortcut, like cache) it’s connected to, and which class that returns. It looks like this:
| Facade | Class | Service Container Binding |
|---|---|---|
|
|
|
… |
… |
… |
|
|
|
Now that you have this reference, you can do three things.
First, you can always figure out what methods are available on a facade. Just find its backing class and look at the definition of that class, and you’ll know that any of its public methods are callable on the facade.
Second, you can figure out how to inject a facade’s backing class using dependency injection. If you ever want the functionality of a facade but prefer to use dependency injection, just typehint the facade’s backing class or get an instance of it with app() and call the same methods you would’ve called on the facade.
Third, you can see how to create your own facades. Create a class for the facade that extends Illuminate\Support\Facades\Facade, and give it a getFacadeAccessor() method, which returns a string. Make that string something that can be used to resolve your backing class out of the container—maybe just the FQCN of the class. Finally, you have to register the facade by adding it to the aliases array in config/app.php. Done! You just made your own facade.
Laravel 5.4 introduced a new concept called “Real-time facades”. Rather than creating a new class to make your class’ instance methods available as static methods, you can prefix your class’ fully-qualified class name with “Facades\”, and you can now use it as if it were a facade.
namespaceApp;classCharts{publicfunctionburndown(){// ...}}
<h2>Burndown Chart</h2>{{ Facades\App\Charts::burndown() }}
As you can see in Example 11-12, the non-static method burndown() becomes accessible as a static method on the real-time facade, which we create by prepending the class’ full name with “Facades”.
We’ve covered the basics of service providers in the previous chapter (see “Service Providers”). What’s most important with regard to the container is that you remember to register your bindings in the register() method of some service provider somewhere.
You can just dump loose bindings into App\Providers\AppServiceProvider, which is a bit of a catchall, but it’s generally better practice to create a unique service provider for each group of functionality you’re developing, and bind its classes in its unique register() method.
The ability to use inversion of control and dependency injection makes testing in Laravel extremely versatile. You can bind a different logger, for instance, depending on whether the app is live or under testing. Or you can change the transactional email service from Mailgun to a local email logger for easy inspection. Both of these swaps are actually so common that it’s even easier to make them using Laravel’s .env configuration files, but you can make similar swaps with any interfaces or classes you’d like.
The easiest way to do this is to explicitly re-bind classes and interfaces when you need them rebound, directly in the test. Example 11-13 shows how.
publicfunctiontest_it_does_something(){app()->bind(Interfaces\Logger,function(){returnnewDevNullLogger;});// do stuff}
If you need certain classes or interfaces re-bound globally for your tests (which is not a particularly common occurrence), you can do this either in the test class’s setUp() method or in Laravel’s TestCase base test’s setUp() method, as in Example 11-14.
classTestCaseextends\Illuminate\Foundation\Testing\TestCase{publicfunctionsetUp(){parent::setUp();app()->bind('whatever','whatever else');}}
When using something like Mockery, it’s common to create a mock or spy or stub of a class, and then re-bind that to the container in place of its referent.
Laravel’s service container has many names, but in the end its goal is to make it easy to define how to resolve certain string names as concrete instances. These string names are going to be the fully qualified class names of classes or interfaces, or shortcuts like log.
Each binding teaches the application, given a string key (e.g., app('log')), how to resolve a concrete instance.
The container is smart enough to do recursive dependency resolution, so if you try to resolve an instance of something that has constructor dependencies, the container will try to resolve those dependencies based on their typehints, then pass them into your class, and finally return an instance.
There are a few ways to bind to the container, but in the end they all define what to return given a particular string.
Facades are simple shortcuts that make it easy to use static calls on a root-namespace-aliased class to call nonstatic methods on classes resolved out of the container. Real-time facades allow you to treat any class like a facade by prepending its fully-qualified class name with “Facades\”.
Most developers know that testing your code is A Good Thing. We’re supposed to do it. We likely have an idea of why it’s good, and we might’ve even read some tutorials about how it’s supposed to work.
But the gap between knowing why you should test and knowing how to test is wide. Thankfully, tools like PHPUnit, Mockery, and PHPSpec have provided an incredible number of options for testing in PHP—but it can still be pretty overwhelming to get everything set up.
Out of the box, Laravel comes with baked-in integrations to PHPUnit (unit testing), Mockery (mocking), and Faker (creating fake data for seeding and testing). It also provides its own simple and powerful suite of application testing tools, which allow you to “crawl” your site’s URIs, submit forms, check HTTP status codes, and validate and assert against JSON. It also provides a robust frontend testing framework called Dusk that can even interact with your JavaScript applications and test against them. In case this hasn’t made it clear, we’re going to cover a lot of ground in this chapter.
To make it easy for you to get started, Laravel’s testing setup comes with sample application test that can run successfully the moment you create a new app. That means you don’t have to spend any time configuring your testing environment, and that’s one less barrier to writing your tests.
Tests in Laravel live in the tests folder. There are two files in the root: TestCase.php, which is the base root test which all of your tests will extend, and CreatesApplication.php, a trait (imported by TestCase.php) which allows any class to boot a sample Laravel application for testing.
You also have a folder for “Feature tests,” or tests which cover the broader interaction of multiple units, and “Unit tests”, which are intended to cover just one unit (class, module, function, etc.). Each of these folders contains an ExampleTest.php file, each of which have a single sample test inside them, ready to run.
In projects running versions of Laravel prior to 5.4, there will be only two files in the tests directory: ExampleTest.php, your sample test, and TestCase.php, your base test.
Additionally, if your app is pre-5.4, the syntax in all of the examples below will not be quite right. All the ideas are the same, but the syntax will be just a bit different across the board. You can learn more at the Laravel Docs for testing in 5.3 and before. Here are the four biggest changes:
In 5.3 and before, you’re not creating response objects; instead, you’re just calling methods on $this, and the test class stores the responses. So $response = $this->get('people’) in 5.4+ would look like $this->get('people’) in 5.3-.
Many of the assertions have been renamed in small ways in 5.4+ to make them look more like PHPUnit’s normal assertion names; e.g. assertSee instead of see.
Some of the “crawling” methods that in 5.4+ have been extracted out to browser-kit-testing were built into the core in 5.3-.
Dusk didn’t exist prior to 5.4.
Because testing prior to 5.4 was so different, I’ve made the testing chapter for the first edition of this book available as a free PDF. If you’re working with 5.3 or earlier, I’d recommend skipping this chapter in the book and using this PDF of the testing chapter from the first edition instead.
The ExampleTest in your Unit directory just has a simple assertion: $this->assertTrue(true). Anything in your unit tests is likely to be relatively simple PHPUnit syntax (asserting that values are equal or different, looking for entries in arrays, checking booleans, etc.), so there’s not much to learn there.
If you’re not yet familiar with PHPUnit, most of our assertions will be run on the $this object with this syntax:
$this->assertWHATEVER($expected,$real);
So, for example, if we’re asserting that two variables should be equal, we’ll pass it first our expected result, and second the actual outcome of the object or system we’re testing.
$multiplicationResult=$myCalculator->multiply(5,3);$this->assertEqual(15,$multiplicationResult);
As you can see in Example 12-1, the ExampleTest in the Feature directory makes a simulated HTTP request to the page at the root path of your application and checks that its HTTP status is 200 (successful). If it is, it’ll pass; if not, it’ll fail. Unlike your average PHPUnit test, we’re running these assertions on the TestResponse object that’s returned when we make test HTTP calls.
<?phpnamespaceTests\Feature;useTests\TestCase;useIlluminate\Foundation\Testing\RefreshDatabase;classExampleTestextendsTestCase{/*** A basic test example.** @return void*/publicfunctiontestBasicTest(){$response=$this->get('/');$response->assertStatus(200);}}
To run the tests, run ./vendor/bin/phpunit on the command line from the root folder of your application. You should see something like the output in Example 12-2.
PHPUnit 7.3.5 by Sebastian Bergmann and contributors. ..2/2(100%)Time:139ms, Memory: 12.00MB OK(2test,2assertions)
You just ran your first Laravel application test! As you can see, you’re set up out of the box not only with a functioning PHPUnit instance, but also a full-fledged application testing suite that can make mock HTTP calls and test your application’s responses. Further, you’ll soon learn that you have easy access to a fully-featured DOM crawler (“A quick intro to BrowserKit Testing”) and a regression testing tool with full JavaScript support (“Testing with Dusk”).
In case you’re not familiar with PHPUnit, let’s take a look at what it’s like to have a test fail. Instead of modifying that test, we’ll make our own. Run php artisan make:test FailingTest. This will create a file in tests/Feature/FailingTest.php; you can modify its testExample() method to the following:
publicfunctiontestExample(){$response=$this->get('/');$response->assertStatus(301);}
As you can see, it’s the exact same as our example test, but we’re now testing against the wrong status. Let’s run PHPUnit again.
If you want your test to be generated in the Unit directory instead of the Feature directory, pass the --unit flag:
php artisan make:test SubscriptionTest --unit
Whoops! This time the output will probably look a bit like Example 12-4.
PHPUnit 7.3.5 by Sebastian Bergmann and contributors. .F. 3 / 3 (100%) Time: 237 ms, Memory: 12.00MB There was 1 failure: 1) Tests\Feature\FailingTest::testExample Expected status code 301 but received 200. Failed asserting that false is true. /path-to-your-app/vendor/.../Foundation/Testing/TestResponse.php:124 /path-to-your-app/tests/Feature/FailingTest.php:20 FAILURES! Tests: 3, Assertions: 3, Failures: 1.
Let’s break this down. First, we now see a new “result” in the shortcut results (which were, last time, just two dots.) But this new result is an F instead of a ..
Then, for each error, it shows us the test name (here, FailingTest::testExample), the error message (Expected status code...), and a full stack trace of our error, so we can see what was called. Since this was an application test, the stack trace just shows us that it was called via the TestResponse class, but if this were a unit or feature test, we’d see the entire call stack of the test.
Now that we’ve run both a passing test and a failing test, it’s time for you to learn more about Laravel’s testing environment.
By default, Laravel’s testing system will run any files in the tests directory whose names end with the word Test. That’s why tests/ExampleTest.php was run by default.
If you’re not familiar with PHPUnit, you might not know that only the methods in your tests with names that start with the word test will be run—or methods with a @test docblock. See Example 12-5 for which methods will and won’t run.
classNamingTest{publicfunctiontest_it_names_things_well(){// Runs as "It names things well"}publicfunctiontestItNamesThingsWell(){// Runs as "It names things well"}/** @test */publicfunctionit_names_things_well(){// Runs as "It names things well"}publicfunctionit_names_things_well(){// Doesn't run}}
Any time a Laravel application is running, it has a current “environment” name that represents the environment it’s running in. This name may be set to local, staging, production, or anything else you want. You can retrieve this by running app()->environment(), or you can run something like if (app()->environment('local')) to test whether the current environment matches the passed name.
When you run tests, Laravel automatically sets the environment to testing. This means you can test for if (app()->environment('testing')) to enable or disable certain behaviors in the testing environment.
Additionally, Laravel doesn’t load the normal environment variables from .env for testing. If you want to set any environment variables for your tests, edit phpunit.xml and, in the <php> section, add a new <env> for each environment variable you want to pass in—for example, <env name="DB_CONNECTION" value="sqlite"/>.
Before we get into the methods you can use for testing, you need to know about the four testing traits you can pull into any test class.
Illuminate\Foundation\Testing\RefreshDatabase is imported at the top of every newly-generated test file, and it’s the most commonly-used database migration trait (we’ll cover the two less-common options later).
The point of this, and the other database traits, is to ensure your database tables are correctly migrated at the start of each test.
RefreshDatabase takes two steps to do this. First, it runs your migrations on your test database once at the beginning of each test run (not the individual test methods, but just when you’re running phpunit). And second, it wraps each individual test method in a database transaction, and rolls back the transaction at the end of the test.
That means you have your database migrated for your tests, cleared out fresh after each test runs, and all this without having to run your migrations again before every test, making it the fastest possible option. When in doubt, stick with this.
If you import Illuminate\Foundation\Testing\WithoutMiddleware into your test class, it will disable all middleware for any test in that class. This means you won’t have to worry about the authentication middleware, or CSRF protection, or anything else that might be useful in the real application but distracting in a test.
If you’d like to disable middleware for just a single method, instead of the entire test class, call $this->withoutMiddleware() at the top of the method for that test.
If you import the Illuminate\Foundation\Testing\DatabaseMigrations trait instead of the RefreshDatabase trait, it will run your entire set of database migrations fresh before each test. Laravel makes this happen by running php artisan migrate:fresh in the setUp() method before every test runs.
Illuminate\Foundation\Testing\DatabaseTransactions, on the other hand, expects your database to be properly migrated before your tests start. Then, it wraps every test in a database transaction, which it rolls back at the end of each test. This means that, at the end of each test, your database will be returned to the exact same state it was in prior to the test.
RefreshDatabase is only available in projects running Laravel 5.5 and later.
With simple unit tests, you almost don’t need any of these traits. You may reach for database access or inject something out of the container, but it’s very likely that unit tests in your applications won’t rely on the framework very much. Take a look at Example 12-6 for an example.
classGeometryTestextendsTestCase{publicfunctiontest_it_calculates_area(){$square=newSquare;$square->sideLength=4;$calculator=newGeometryCalculator;$this->assertEquals(16,$calculator->area($square));}
Obviously, this is a bit of a contrived example. But you can see here that we’re testing a single class (GeometryCalculator) and its single method (area()), and we’re doing so without worrying about the entire Laravel application.
Some unit tests might be testing something that technically is connected to the framework—for example, Eloquent models—but you can still test them without worrying about the framework. For example, in Example 12-7, we’ll use Package::make() instead of Package::create() so the object is created and evaluated in memory without ever hitting the database.
classPopularityTestextendsTestCase{useRefreshDatabase;publicfunctiontest_votes_matter_more_than_views(){$package1=Package::make(['votes'=>1,'views'=>0]);$package2=Package::make(['votes'=>0,'views'=>1]);$this->assertTrue($package1->popularity>$package2->popularity);}
Some people may call this an integration or feature test, since this “unit” will likely touch the database in actual usage and it’s connected to the entire Eloquent codebase. The most important point is that you can have simple tests that test a single class or method, even when the objects under test are framework-connected.
All of this said, it’s still going to be more likely that your tests—especially as you first get started—are broader and more at the “application” level. Accordingly, for the rest of the chapter we’re going to dig deeper into application testing.
In Laravel’s default ExampleTest (tests/Feature/ExampleTest.php) you can see that, with a few lines of code, we can “request” URIs in our application and actually check the status of the the response. But how can PHPUnit request pages as if it were a browser?
Any application tests should extend the TestCase class (tests/TestCase.php) that’s included with Laravel by default. Your application’s TestCase class will extend the abstract Illuminate\Foundation\Testing\TestCase class, which brings in quite a few goodies.
The first thing the two TestCase classes (yours and its abstract parent) do is handle booting the Illuminate application instance for you, so you have a fully bootstrapped application available. They also “refresh” the application between each test, which means they’re not entirely re-creating the application between tests, but rather making sure you don’t have any data lingering.
The parent TestCase also sets up a system of hooks that allow callbacks to be run before and after the application is created, and imports a series of traits that provide you with methods for interacting with every aspect of your application. These traits include InteractsWithContainer, MakesHttpRequests, InteractsWithConsole, and more, and they bring in a broad variety of custom assertions and testing methods.
As a result, your application tests have access to a fully bootstrapped application instance, application-test-minded custom assertions, with a series of simple and powerful wrappers around each to make them easy to use.
That means you can write $this->get('/')->assertStatus(200) and know that your application is actually behaving as if it were responding to a normal HTTP request, and that the response is being fully generated and then checked as a browser would check it. It’s pretty powerful stuff, considering how little work you had to do to get it running.
Let’s take a look at our options for writing HTTP-based tests. You’ve already seen $this->get('/'), but let’s dive deeper into how you can use that call, how you can assert against its results, and what other HTTP calls you can make.
At the very basic level, Laravel’s HTTP testing allows you to make simple HTTP requests (GET, POST, etc.) and then make simple assertions about their impact or response.
There are more tools we’ll cover later (BrowserKit Testing in “A quick intro to BrowserKit Testing” and Dusk in “Testing with Dusk”) that allow for more complex page interactions and assertions, but let’s start at the base level. Here are the calls you can make:
$this->get($uri, $headers = [])
$this->post($uri, $data = [], $headers = [])
$this->put($uri, $data = [], $headers = [])
$this->patch($uri, $data = [], $headers = [])
$this->delete($uri, $data = [], $headers = [])
These methods are all the basis of the HTTP testing framework. Each takes a least a URI (usually relative) and headers, and all but get() also allow for passing data along with the request.
And, importantly, each returns a $response object that represents the HTTP response. This response object is almost exactly the same as an Illuminate response object, the same thing we return out of our controllers. However, it’s actually an instance of Illuminate\Foundation\Testing\TestResponse, which wraps a normal Response with some assertions for testing.
Take a look at Example 12-8 to see a common usage of post() and a common response assertion.
publicfunctiontest_it_stores_new_packages(){$response=$this->post(route('packages.store'),['name'=>'The greatest package',]);$response->assertOk();}
In most examples like Example 12-8, you’ll also test that the record exists in the database and shows up on the index page and maybe that it doesn’t test successfully unless you define the package author and also if you’re logged in. But don’t worry, we’ll get to all of that. For now, you can make calls to your application routes with many different verbs and make assertions against both the response and the state of your application afterward. Great!
You can also make all of the same sort of HTTP tests with your JSON APIs. There are convenience methods for that, too:
$this->getJson($uri, $headers = [])
$this->postJson($uri, $data = [], $headers = [])
$this->putJson($uri, $data = [], $headers = [])
$this->patchJson($uri, $data = [], $headers = [])
$this->deleteJson($uri, $data = [], $headers = [])
These methods work just the same as the normal HTTP call methods, except they also add JSON-specific Accept, CONTENT_LENGTH, and CONTENT_TYPE headers. Take a look at Example 12-9 to see an example.
publicfunctiontest_the_api_route_stores_new_packages(){$response=$this->postJSON(route('api.packages.store'),['name'=>'The greatest package',],['X-API-Version'=>'17']);$response->assertOk();}
There are 38 assertions available on the $response object, so I recommend you take a look at all of them in the testing docs. Let’s look at a few of the most important and most common.
$response->assertOk()Asserts that the response’s status code is 200.
$response=$this->get('terms');$response->assertOk();
$response->assertStatus($status)Asserts that the response’s status code is equal to the provided $status.
$response=$this->get('admin');$response->assertStatus(401);// Un-authorized
$response->assertSee($text) and $response->assertDontSee($text)Asserts that the response contains (or doesn’t contain) the provided text.
$package=factory(Package::class)->create();$response=$this->get(route('packages.index'));$response->assertSee($package->name);
$response->assertJson(array $json, $strict = false)Asserts that the passed array is represented (in JSON format) in the returned JSON. The $strict parameter makes for a === comparison instead of a == comparison, which, to be honest, I have never used.
$this->postJson(route('packages.store'),['name'=>'GreatPackage2000']);$response=$this->getJson(route('packages.index'));$response->assertJson(['name'=>'GreatPackage2000']);
$response->assertViewHas($key, $value = null)Asserts that the view on the visited page had a piece of data available at ${$key}, and optionally it checks that the value of that variable was $value.
$package=factory(Package::class)->create();$response=$this->get(route('packages.show'));$response->assertViewHas('name',$package->name);
$response->assertSessionHas($key, $value = null)Asserts that the session has data set at $key, and it optionally checks that the value of that data is $value.
$response=$this->get('beta/enable');$response->assertSessionHas('beta-enabled',true);
$response->assertSessionHasErrors()With no parameters, asserts that there’s at least one error set in Laravel’s special errors session container. Its first parameter can be an array of key/value pairs that define the errors that should be set and its second parameter can be the string format that the checked errors should be formatted against, as demonstrated here:
// assuming the "/form" route requires an email field, and we're// posting an empty submission to it to trigger the error$response=$this->post('form',[]);$response->assertSessionHasErrors();$response->assertSessionHasErrors(['email'=>'The email field is required.']);$response->assertSessionHasErrors(['email'=>'<p>The email field is required.</p>'],'<p>:message</p>');
If you’re working with named error bags, you can pass the error bag name as the third parameter.
$response->assertCookie($name, $value = null)Asserts that the browser has been sent a cookie with name $name and, optionally, checks that its value is $value.
$response=$this->post('settings',['dismiss-warning']);$response->assertCookie('warning-dismiss',true);
$response->assertRedirect($uri)Asserts that the requested route returns a redirect to the given URI.
$response=$this->post(route('packages.store'),['email'=>'invalid']);$response->assertRedirect(route('packages.create'));
For each of these assertions, you can assume that there are many related assertions I haven’t listed here. For assertSessionHasErrors there’s also assertSessionHasNoErrors, and assertSessionHasErrorsIn. For assertJson there’s also assertJsonCount, assertJsonFragment, assertJsonMissing, assertJsonMissingExact, assertJsonStructure, and assertJsonValidationErrors. So, again, take a look at the docs and make yourself familiar with the whole list.
One piece of your application it’s common to test with application tests is authentication and authorization. Most of the time your needs will be met with the actingAs() chainable method, which takes a user (or other Authenticatable object, depending on how your system is set up), as you can see in Example 12-10.
publicfunctiontest_guests_cant_view_dashboard(){$user=factory(User::class)->states('guest')->create();$response=$this->actingAs($user)->get('dashboard');$response->assertStatus(401);// Unauthorized}publicfunctiontest_members_can_view_dashboard(){$user=factory(User::class)->states('member')->create();$response=$this->actingAs($user)->get('dashboard');$response->assertOk();}publicfunctiontest_members_and_guests_cant_view_statistics(){$guest=factory(User::class)->states('guest')->create();$response=$this->actingAs($guest)->get('statistics');$response->assertStatus(401);// Unauthorized$member=factory(User::class)->states('member')->create();$response=$this->actingAs($member)->get('statistics');$response->assertStatus(401);// Unauthorized}publicfunctiontest_admins_can_view_statistics(){$user=factory(User::class)->states('admin')->create();$response=$this->actingAs($user)->get('statistics');$response->assertOk();}
It’s common to use model factories in testing (learn more in “Model Factories”), and model factory states make tasks like creating users with different access levels simple.
If you’d like to set session variables on your requests, you can also chain withSession():
$response=$this->withSession(['alert-dismissed'=>true,])->get('dashboard');
If you’d prefer to set your request headers fluently, you can chain withHeaders():
$response=$this->withHeaders(['X-THE-ANSWER'=>'42'])->get('the-restaurant-at-the-end-of-the-universe');
Usually, an exception that’s thrown inside your application when you’re making HTTP calls will be captured by Laravel’s exception handler and processed as it would be in normal application. So, the test and route in Example 12-11 would still pass, since the exception would never bubble up the whole way to our test.
// routes/web.phpRoute::get('has-exceptions',function(){thrownewException('Stop!');});// tests/Feature/ExceptionsTest.phppublicfunctiontest_exception_in_route(){$this->get('/has-exceptions');$this->assertTrue(true);}
In a lot of cases, this might make sense; maybe you’re expecting a validation exception and you want it to be caught like it would normally be by the framework.
But if you want to temporarily disable the exception handler, that’s an option; just run $this->withoutExceptionHandling():
// tests/Feature/ExceptionsTest.phppublicfunctiontest_exception_in_route(){// Now throws an error$this->withoutExceptionHandling();$this->get('/has-exceptions');$this->assertTrue(true);}
And if, for some reason, you need to turn it back on (maybe you turned it off in setUp() but want it back on for just one test) you can run $this->withExceptionHandling().
Often, the effect we want to test for after our tests have run in is in the database. Imagine you’re wanting to test that the “create package” page works correctly. What’s the best way? Make an HTTP call the “store package” endpoint and then assert that that package exists in the database. It’s easier and safer than inspecting the resulting “list packages” page.
We have two primary assertions for the database: $this->assertDatabaseHas() and $this->assertDatabaseMissing(). For both, pass the table name as the first parameter, the data you’re looking for as the second, and, optionally, the specific database connection you want to test as the third.
Take a look at Example 12-12 to see how you might use them.
publicfunctiontest_create_package_page_stores_package(){$this->post(route('packages.store'),['name'=>'Package-a-tron',]);$this->assertDatabaseHas('packages',['name'=>'Package-a-tron']);}
As you can see, the second “data” parameter of assertDatabaseHas() is structured like a SQL WHERE statement—you pass a key and a value (or multiple keys and values), and then Laravel looks for any records in the specified database table that match your key(s) and value(s).
As always, assertDatabaseMissing() is the inverse.
Model factories are amazing tools that make it easy to seed randomized, well-structured database data for testing (or other purposes). You’ve already seen them in use in several examples in this chapter.
We’ve already covered them in depth, so check out “Model Factories” to learn more.
If you use seeds in your application, you can run the equivalent of php artisan db:seed by running $this->seed() in your test.
You can also pass a seeder class name to just seed that one class:
$this->seed();// Seeds all$this->seed(UserSeeder::class);// Seeds users
We’ll cover what fakes are in “Mocking”, but for now just know that there are a good number of Laravel systems that allow you to pause their true function for a test and instead write tests against what has happened to those systems.
Imagine you have an event that’s being dispatched (“user signed up”) and it has a listener that notifies a Slack channel that a user signed up. First, you don’t want those notifications to go to Slack every time you run your tests. But second, you might want to assert that the event was sent, or the listener was triggered, or something else. This, and much more, is why we’ll want to fake many aspects of Laravel in our tests; to pause the default behavior and instead make assertions against those systems.
Let’s use event fakes as our first example of how Laravel makes it possible to mock its internal systems.
First, there are likely going to be times where you want to fake your events just for the sake of suppressing their actions. For example, if you have your app pushing notifications to Slack every time a new user signed up, and that’s happening in an event listener, you might want all of your events to stop working in your tests.
Let’s take a look at how to suppress these events by calling the fake() method on use Illuminate\Support\Facades\Event in Example 12-13.
publicfunctiontest_controller_does_some_thing(){Event::fake();// Call controller and assert it does whatever you want without// worrying about it pinging Slack}
But once we’ve run the fake() method, we can also call special assertions on the Event facade; namely, assertDispatched() and assertNotDispatched(). Take a look at Example 12-14 to see them in use.
publicfunctiontest_signing_up_users_notifies_slack(){Event::fake();// Sign user up...Event::assertDispatched(UserJoined::class,function($event)use($user){return$event->user->id===$user->id;});// Or sign multiple users up and assert it was dispatched twice...Event::assertDispatched(UserJoined::class,2);// Or sign up with validation failures and assert it wasn't dispatched...Event::assertNotDispatched(UserJoined::class);}
Note that the (optional) closure we’re passing to assertDispatched() makes it so we’re not just asserting that the event was dispatched, but we’re also asserting that the dispatched event contains certain data.
Event::fake() also disables Eloquent model events. So if you have any important code, for example, in a models’ creating event, make sure to create your models (through your factories or however else) before calling Event::fake().
Each of the following features in Laravel have their own set of assertions you can make after faking them, but you can also just choose to fake them to restrict their effects.
The bus facade, which represents how Laravel dispatches jobs, works just like events. You can run fake() on it to disable the impact of your jobs, and after faking it you can run assertDispatched() or assertNotDispatched().
The queue facade also represents how Laravel dispatches jobs, but for when they’re pushed up to queues. Its available methods are assertedPushed(), assertPushedOn(), and assertNotPushed().
Take a look at Example 12-15 to see how to use both.
publicfunctiontest_popularity_is_calculated(){Bus::fake();// Synchronize package data...// Assert a job was dispatchedBus::assertDispatched(CalculatePopularity::class,function($job)use($package){return$job->package->id===$package->id;});// Assert a job was not dispatchedBus::assertNotDispatched(DestroyPopularityMaybe::class);}publicfunctiontest_popularity_calculation_is_queued(){Queue::fake();// Synchronize package data...// Assert a job was pushed to any queueQueue::assertPushed(CalculatePopularity::class,function($job)use($package){return$job->package->id===$package->id;});// Assert a job was pushed to a given queue named "popularity"Queue::assertPushedOn('popularity',CalculatePopularity::class);// Assert a job was pushed twice...Queue::assertPushed(CalculatePopularity::class,2);// Assert a job was not pushed...Queue::assertNotPushed(DestroyPopularityMaybe::class);}
The mail facade, when faked, offers four methods: assertSent(), assertNotSent(), assertQueued(), and assertNotQueued(). Use the Queued methods when your mail is queued and the Sent methods when it’s not.
Just like with assertDispatched, the first parameter will be the name of the mailable and the second parameter can be empty, the number of times the mailable has been sent, or a closure testing that the mailable has the right data in it. Take a look at Example 12-16 to see it in action.
publicfunctiontest_package_authors_receive_launch_emails(){::fake();// Make a package public for the first time...// Assert a message was sent to a given email address::assertSent(PackageLaunched::class,function()use($package){return->package->id===$package->id;});// Assert a message was sent to given email addresses::assertSent(PackageLaunched::class,function()use($package){return->hasTo($package->author->)&&->hasCc($package->collaborators)&&->hasBcc('admin@novapackages.com');});// Or, launch two packages...// Assert a mailable was sent twice::assertSent(PackageLaunched::class,2);// Assert a mailable was not sent...::assertNotSent(PackageLaunchFailed::class);}
All of the messages checking for recipients (hasTo(), hasCc(), and hasBcc()) can take either a single email address or an array or collection of addresses.
The notification facade, when faked, offers two methods: assertSentTo() and assertNothingSent().
Unlike the mail facade, you’re not going to test who it was sent to manually in a closure. Rather, the assertion itself requires the first parameter be either a single notifiable object or an array or collection of them. Only after you’ve passed in the desired notification target can you test anything about the notification itself.
The second parameter is the class name for the notification, and the (optional) third parameter can be a closure defining more expectations about the notification. Take a look at Example 12-17 to learn more.
publicfunctiontest_users_are_notified_of_new_package_ratings(){Notification::fake();// Perform package rating...// Assert author was notifiedNotification::assertSentTo($package->author,PackageRatingReceived::class,function($notification,$channels)use($package){return$notification->package->id===$package->id;});// Assert a notification was sent to the given usersNotification::assertSentTo([$package->collaborators],PackageRatingReceived::class);// Or, perform a duplicate package rating...// Assert a notification was not sentNotification::assertNotSentTo([$package->author],PackageRatingReceived::class);}
You may also find yourself wanting to assert that your channel selection is working—that notifications are sent via the right channels. You can test that as well, as you can see in Example 12-18.
publicfunctiontest_users_are_notified_by_their_preferred_channel(){Notification::fake();$user=factory(User::class)->create(['slack_preferred'=>true]);// Perform package rating...// Assert author was notified via SlackNotification::assertSentTo($user,PackageRatingReceived::class,function($notification,$channels)use($package){return$notification->package->id===$package->id&&in_array('slack',$channels);});
Testing files can be extraordinarily complex. Many traditional methods require you to actually move files around in your test directories, and formatting the form input and output can be very complicated.
Thankfully, if you use Laravel’s Storage facade, it’s endlessly simpler to test file uploads and other storage-related items.
publicfunctiontest_package_screenshot_upload(){Storage::fake('screenshots');// Upload a fake image$response=$this->postJson('screenshots',['screenshot'=>UploadedFile::fake()->image('screenshot.jpg')]);// Assert the file was storedStorage::disk('screenshots')->assertExists('screenshot.jpg');// Or, assert a file does not existStorage::disk('screenshots')->assertMissing('missing.jpg');}
Mocks (and their brethren, spies and stubs and dummies and fakes and any number of other tools) are common tools in testing. We’ve taken a look at fakes a bit here, but mainly from a surface level. I won’t go into great detail here, but it’s unlikely you can thoroughly test an application of any size without mocking at least one thing or another.
So here we will take a quick look at mocking in Laravel and how to use Mockery, a mocking library included in Laravel.
Essentially, mocks and other similar tools make it possible to create an object that in some way mimics a real class, but for testing purposes isn’t the real class. Sometimes this is done because the real class is too difficult to instantiate just to inject it into a test, or maybe the real class communicates with an external service.
As you can probably tell from the examples that follow, Laravel encourages working with the real application as much as possible—which means avoiding too great of a dependence on mocks. But they have their place, which is why Laravel includes Mockery, a mocking library, out of the box, and is why many of its core services offer faking utilities.
Mockery allows you to quickly and easily create mocks from any PHP class in your application. Imagine you have a class that depends on a Slack client, but you don’t want the calls to actually go out to Slack. Mockery makes it simple to create a fake Slack client to use in your tests, like you can see in Example 12-20.
// app/SlackClient.phpclassSlackClient{// ...publicfunctionsend($message,$channel){// Actually sends a message to Slack}}// app/Notifier.phpclassNotifier{private$slack;publicfunction__construct(SlackClient$slack){$this->slack=$slack;}publicfunctionnotifyAdmins($message){$this->slack->send($message,'admins');}}// tests/Unit/NotifierTest.phppublicfunctiontest_notifier_notifies_admins(){$slackMock=Mockery::mock(SlackClient::class)->shouldIgnoreMissing();$notifier=newNotifier($slackMock);$notifier->notifyAdmins('Test message');}
There are a lot of elements at work here, but if you look at them one by one, they make sense. We have a class named Notifier that we’re testing. It has a dependency named SlackClient that does something that we don’t want it to do when we’re running our tests: it sends actual Slack notifications. So we’re going to mock it.
We use Mockery to get a mock of our SlackClient class. If we don’t care about what happens to that class—if it should simply exist to keep our tests from throwing errors—we can just use shouldIgnoreMissing():
$slackMock=Mockery::mock(SlackClient::class)-shouldIgnoreMissing();
No matter what Notifier calls on $slackMock, it’ll just accept it and return null.
But take a look at test_notifier_notifies_admins(). At this point, it doesn’t actually test anything.
We could just keep shouldIgnoreMissing() and then write some assertions below it. That’s usually what we do with shouldIgnoreMissing(), which makes this object a “fake” or a “stub.”
But what if we want to actually assert that a call was made to the send() method of SlackClient? That’s when we drop shouldIgnoreMissing() and reach for the other should* methods (Example 12-21).
publicfunctiontest_notifier_notifies_admins(){$slackMock=Mockery::mock(SlackClient::class);$slackMock->shouldReceive('send')->once();$notifier=newNotifier($slackMock);$notifier->notifyAdmins('Test message');}
shouldReceive('send')->once() is the same as saying “assert that $slackMock will have its send() method called once and only once.” So, we’re now asserting that Notifier, when we call notifyAdmins(), must make a single call to the send method on SlackClient.
We could also use something like shouldReceive('send')->times(3) or shouldReceive('send')->never(). We can define what parameter we expect to be passed along with that send() call using with(), and we can define what to return with andReturn():
$slackMock->shouldReceive('send')->with('Hello, world!')->andReturn(true);
What if we wanted to use the IoC container to resolve our instance of the Notifier? This might be useful if Notifier had several other dependencies that we didn’t need to mock.
We can do that! We just use the instance() method on the container, as in Example 12-22, to tell Laravel to provide an instance of our mock to any classes that request it (which, in this example, will be Notifier).
publicfunctiontest_notifier_notifies_admins(){$slackMock=Mockery::mock(SlackClient::class);$slackMock->shouldReceive('send')->once();app()->instance(SlackClient::class,$slackMock);$notifier=app(Notifier::class);$notifier->notifyAdmins('Test message');}
There’s a lot more you can do with Mockery: you can use spies, and partial spies, and much more. Going deeper into how to use Mockery is out of the scope of this book, but I encourage you to learn more about the library and how it works at the Mockery docs.
There’s one other clever thing you can do with Mockery: you can use Mockery methods (e.g. shouldReceive()) on any facades in your app.
Imagine we have a controller method that uses a facade that’s not one of the fake-able systems we’ve already covered; we want to test that controller method and assert that a certain facade call was made.
Thankfully, it’s simple: we can run our Mockery-style methods on the facade, as you can see in Example 12-23.
// PeopleControllerpublicfunctionindex(){returnCache::remember('people',function(){returnPerson::all();});}// PeopleTestpublicfunctiontest_all_people_route_should_be_cached(){$person=factory(Person::class)->create();Cache::shouldReceive('remember')->once()->andReturn(collect([$person]));$this->get('people')->assertJsonFragment(['name'=>$person->name]);}
As you can see, you can use methods like shouldReceive() on the facades, just like you do on a Mockery object.
You can also use your facades as spies, which means you can set your assertions at the end and use shouldHaveReceived() instead of shouldReceive(). Example 12-24 illustrates this.
publicfunctiontest_package_should_be_cached_after_visit(){Cache::spy();$package=factory(Package::class)->create();$this->get(route('packages.show',[$package->id]));Cache::shouldHaveReceived('put')->once()->with('packages.'.$package->id,$package->toArray());}
We’ve covered a lot in this chapter, but we’re almost done! We have just two more pieces of Laravel’s testing arsenal to cover: Artisan and the browser.
If you’re working in Laravel prior to 5.7, the best way to test Artisan commands is to call them with $this->artisan($commandName, $parameters) and then test their impact, like in Example 12-25.
publicfunctiontest_promote_console_command_promotes_user(){$user=factory(User::class)->create();$this->artisan('user:promote',['userId'=>$user->id]);$this->assertTrue($user->isPromoted());}
You can also make assertions against the response code you are getting from Artisan, as you can see in Example 12-26.
$code=$this->artisan('do:thing',['--flagOfSomeSort'=>true]);$this->assertEquals(0,$code);// 0 means "no errors were returned"
If you’re working with Laravel 5.7 and later, you can also chain on three new methods to your $this->artisan() call: expectsQuestion(), expectsOutput(), and assertExitCode(). The expects methods will work on any of the interactive prompts, including confirm(), anticipate(), and more, and the assertExitCode() method is a shortcut to what we looked at in Example 12-26.
Take a look at Example 12-27 to see how it works.
// routes/console.phpArtisan::command('make:post {--expanded}',function(){$title=$this->ask('What is the post title?');$this->comment('Creating at '.str_slug($title).'.md');$category=$this->choice('What category?',['technology','construction'],0);// Create post here$this->comment('Post created');});
// Test filepublicfunctiontest_make_post_console_commands_performs_as_expected(){$this->artisan('make:post',['--expanded'=>true])->expectsQuestion('What is the post title?','My Best Post Now')->expectsOutput('Creating at my-best-post-now.md')->expectsQuestion('What category?','construction')->expectsOutput('Post created')->assertExitCode(0);}
As you can see, the first parameter of expectsQuestion() is the text we’re expecting to see from the question, and the second parameter is the text we’re answering with. expectsOutput() just tests that the passed string is returned.
We’ve made it to browser tests! With browser tests, you can actually interact with the DOM of your pages: click buttons, fill out and submit forms, and, with Dusk, even interact with JavaScript.
Laravel actually has two separate browser testing tools: BrowserKit Testing and Dusk. Dusk is actively maintained; BrowserKit Testing seems to have become a bit of a second class citizen, but it’s still available on GitHub and still works at the time of this writing.
When choosing a tool for browser testing, I suggest you use the core application testing tools whenever possible (those which we’ve covered up until this point). If your app is not JavaScript-based and you need to test actual DOM manipulation or form UI elements, use BrowserKit. If you’re developing a JavaScript-heavy app, you’ll likely want to use Dusk, which we’ll cover next.
However, there are many instances where you’ll want to use a JavaScript-based test stack (which is out of scope for this book) based on something like Jest and vue-test-utils. This toolset can be very useful for Vue component testing and Jest’s snapshot functionality simplifies the process of keeping API and frontend test data in sync. To learn more, check out this blog post from Caleb Porzio and this Laracon talk from Samantha Geitz.
If you’re working with a JavaScript framework other than Vue, there are no currently preferred frontend testing solutions in the Laravel world. However, the broad React world seems to have settled on Jest and Enzyme.
Dusk is a Laravel tool (installable as a Composer package) which makes it easy to write Selenium-style directions for a ChromeDriver-based browser to interact with your app. Unlike most other Selenium-based tools, Dusk’s API is simple and easy to write by hand. Take a look:
$this->browse(function($browser){$browser->visit('/register')->type('email','test@example.com')->type('password','secret')->press('Sign Up')->assertPathIs('/dashboard');});
With Dusk, there’s an actual browser spinning up your entire application and interacting with it. That means you can have complex interactions with your JavaScript and get screenshots of failure states; but it also means everything’s a bit slower and more prone to failure than Laravel’s base application testing suite.
Personally, I’ve found the greatest use in Dusk as a regression testing suite, to replace something like Selenium. Rather than using it for any sort of test-driven development, I’d use it to assert that the user experience hasn’t broken (“regressed”) as the app continues to develop. Think of this more like writing tests about your user interface after the interface is built.
The Dusk docs are robust, so I’m not going to go into great depth here, but I want to show you the basics of working with Dusk.
To install Dusk, run these two commands:
composer require --dev laravel/dusk php artisan dusk:install
Then edit your .env file to set your APP_URL variable to the same URL you use to view your site in your local browser; something like http://mysite.test.
To run your Dusk tests, just run php artisan dusk, and you can pass all the same parameters you’re used to from PHPUnit (e.g. php artisan dusk --filter=my_best_test).
To generate a new Dusk test, use the following command:
php artisan dusk:make RatingTest
This test will be placed in tests/Browser/RatingTest.php.
You can customize the environment variables for Dusk by creating a new file named .env.dusk.local (and you can replace .local if you’re working in a different environment, like “staging”).
To write your Dusk Tests, imagine that you’re directing one or more web browsers to go visit your application and take certain actions. That’s what the syntax will look like, as you can see in Example 12-28.
publicfunctiontestBasicExample(){$user=factory(User::class)->create();$this->browse(function($browser)use($user){$browser->visit('login')->type('email',$user->)->type('password','secret')->press('Login')->assertPathIs('/home');});}
$this->browse() creates a browser, which you pass into a closure, and then within the closure you instruct the browser which actions to take.
It’s important to note that, unlike Laravel’s other application testing tools, which mimic the behavior of your forms, Dusk is actually spinning up a browser, sending events to the browser to type those words, and then sending an event to the browser to press that button. This is a real browser and Dusk is fully driving it.
You can also “ask” for more than one browser by adding parameters to the closure, which allows you to test how multiple users might interact with the web site (for example, with a chat system). Take a look at this example from the docs:
$this->browse(function($first,$second){$first->loginAs(User::find(1))->visit('home')->waitForText('Message');$second->loginAs(User::find(2))->visit('home')->waitForText('Message')->type('message','Hey Taylor')->press('Send');$first->waitForText('Hey Taylor')->assertSee('Jeffrey Way');});
There’s a huge suite of actions and assertions available that we won’t cover here (check the docs), but let’s look at a few of the other tools Dusk provides.
As you can see in Example 12-29, the syntax for authentication is a little different from the rest of the Laravel application testing: $browser->loginAs($user).
Don’t use the RefreshDatabase trait with Dusk! Use the DatabaseMigrations trait; transactions, which RefreshDatabase uses, don’t last across requests.
If you’ve ever written jQuery, interacting with the page using Dusk will come naturally. Take a look at Example 12-30 to see the common patterns for selecting items with Dusk.
// Template<divclass="search"><input><buttonid="search-button"></button></div><buttondusk="expand-nav"></button>
// Dusk tests// Option 1: jQuery-style syntax$browser->click('.search button');$browser->click('#search-button');// Option 2: dusk="selector-here" syntax; recommended$browser->click('@expand-nav');
As you can see, adding the dusk attribute to your page elements allows you to reference them directly in a way that won’t change when the display or layout of the page changes later; when any method asks for a selector, pass in the @ sign and then the content of your dusk attribute.
Let’s take a look at a few of the methods you can call on $browser.
value($selector, $value = null)Returns the value of any text input if only one parameter is passed; sets the value of an input if a second parameter was passed.
text($selector)Gets the text content of a non-fillable item like a div or a span.
attribute($selector, $attributeName)Returns the value of a particular attribute on the element matching $selector.
type($selector, $valueToType)Similar to value(), but actually types the characters rather than directly setting the value.
With methods like type() that target inputs, Dusk will start by trying to match a Dusk or CSS selector, and then will try to look for an input with the provided name, and finally will try to find a textarea with the provided name.
select($selector, $optionValue)Selects the option with the value of $optionValue in a dropdown selectable by $selector.
check($selector) and uncheck($selector)Checks or unchecks a checkbox selectable by $selector.
radio($selector, $optionValue)Selects the option with the value of $optionValue in a radio group selectable by $selector.
attach($selector, $filePath)Attaches a file at $filePath to the file input selectable by $selector.
clickLink($selector)Follows a text link to its target.
click($selector) and mouseover($selector)Triggers a mouse click or a mouseover event on $selector.
drag($selectorToDrag, $selectorToDragTo)Drags an item to another item.
dragLeft(), dragRight(), dragUp(), and dragDown()Given a first parameter of a selector and a second parameter of a number of pixels, drags the selected item that many pixels in the given direction.
keys($selector, $instructions…)Sends keypress events within the context of $selector according to the instructions in $instructions. Take a look at Example 12-31 to see how to combine modifiers with your typing.
$browser->keys('selector','this is ',['{shift}','great']);
This would type “this is GREAT”; as you can tell, adding an array to the list of items to type allows you to combine modifiers (wrapped with {}) with typing. You can see a full list of the possible modifiers at the Facebook WebDriver source.
If you’d like to just send your key sequence to the page (for example, to trigger a “keyboard shortcut”), you can just target the top level of your app or page as your selector. For example, if it’s a Vue app and the top level is a div with an ID of app:
$browser->keys('#app',['{command}','/']);
Because Dusk interacts with JavaScript and is directing an actual browser, the concept of time and timeouts and “waiting” needs to be addressed. Dusk offers a few methods you can use to ensure your tests handle timing issues correctly. Some of these methods are useful for interacting with intentionally slow or delayed elements of the page, but some of them are also just useful for getting around initialization times on your components.
pause($milliseconds)Pauses the execution of Dusk tests for the given number of milliseconds. The simplest “wait” option; makes any future commands you send to the browser wait that amount of time before operating.
Take a look at Example 12-32 to see how to use this and other waiting methods in the midst of an assertion chain.
$browser->click('chat')->pause(500)->assertSee('How can we help?');
waitFor($selector, $maxSeconds = null) and waitForMissing($selector, $maxSeconds = null)Waits until the given element exists on the page (waitFor()) or disappears from the page (waitForMissing()), or times out after the optional second parameter’s second count.
$browser->waitFor('@chat',5);$browser->waitUntilMissing('@loading',5);
whenAvailable($selector, $callback)Similar to waitFor(), but accepts a closure as the second parameter which will define what action to take when the specified element becomes available.
$browser->whenAvailable('@chat',function($chat){$chat->assertSee('How can we help you?');});
waitForText($text, $maxSeconds = null)Waits for text to show up on the page, or times out after the optional second parameter’s second count.
$browser->waitForText('Your purchase has been completed.',5);
waitForLink($linkText, $maxSeconds = null)Waits for a link to exist with the given link text, or times out after the optional second parameter’s second count.
$browser->waitForLink('Clear these results',2);
waitForLocation($path)Waits until the page URL matches the provided path.
$browser->waitForLocation('auth/login');
waitForRoute($routeName)Waits until the page URL matches the URL for the provided route.
$browser->waitForRoute('packages.show',[$package->id]);
waitForReload()Waits until the page reloads.
waitUntil($expression)Waits until the provided JavaScript expression evaluates as true:
$browser->waitUntil('App.packages.length > 0',7);
As I’ve mentioned, there’s a huge list of assertions you can make against your app with Dusk. Here are a few that I use most commonly, and you can see the full list in the Dusk docs.
assertTitleContains($text)
assertQueryStringHas($keyName)
assertHasCookie($cookieName)
assertSourceHas($htmlSourceCode)
assertChecked($selector)
assertSelectHasOption($selectorForSelect, $optionValue)
assertVisible($selector)
assertFocused()
assertVue($dataLocation, $dataValue, $selector)
So far, everything we’ve covered makes it possible for you to test individual elements on your pages. But Dusk will often be used to test more complex applications and single-page apps, which means we’re going to need organizational structures around our assertions.
The first organizational structures we have encountered have been the Dusk attribute (<div dusk="abc"> creating a selector named @abc you can refer to later) and the closures we can use towrap certain portions of our code (for example, with whenAvailable()).
Dusk offers two more organizational tools: Pages and Components. Let’s start with pages.
A page is a class that you’ll generate which contains two pieces of functionality: first, a URL and assertions to define which page in your app should be attached to this Dusk page, and second, shorthand like we used inline (@abc generated by the dusk="abc" attribute in our HTML) but just for this page, and without needing to edit our HTML.
To generate your first Dusk page, let’s imagine we have a “create package” page of our app. Generate a Dusk page for it:
phpartisandusk:pageCreatePackage
Take a look at Example 12-33 to see what our generated class will look like.
<?phpnamespaceTests\Browser\Pages;useLaravel\Dusk\Browser;classCreatePackageextendsPage{/*** Get the URL for the page.** @return string*/publicfunctionurl(){return'/';}/*** Assert that the browser is on the page.** @param Browser $browser* @return void*/publicfunctionassert(Browser$browser){$browser->assertPathIs($this->url());}/*** Get the element shortcuts for the page.** @return array*/publicfunctionelements(){return['@element'=>'#selector',];}}
The url() method defines where Dusk should expect the location to be for this page; assert() lets you run additional assertions to verify you’re on the right page; and elements() provides shortcuts for @dusk-style selectors.
Let’s make a few quick modifications for our “create package” page, to make it look like Example 12-34.
classCreatePackageextendsPage{publicfunctionurl(){return'/packages/create';}publicfunctionassert(Browser$browser){$browser->assertTitleContains('Create Package');$browser->assertPathIs($this->url());}publicfunctionelements(){return['@title'=>'input[name=title]','@instructions'=>'textarea[name=instructions]',];}}
Now that we have a functional page, we can navigate to it, and access its defined elements:
// In a test$browser->visit(newTests\Browser\Pages\CreatePackage)->type('@title','My package title');
One common use for pages is to define a common action you want to take in your tests; consider these almost like macros for Dusk. You can define a method on your page and then call it from your code, as you can see in Example 12-35.
classCreatePackageextendsPage{// ... url(), assert(), elements()publicfunctionfillBasicFields(Browser$browser,$packageTitle='Best package'){$browser->type('@title',$packageTitle)->type('@instructions','Do this stuff and then that stuff');}}
$browser->visit(newCreatePackage)->fillBasicFields('Greatest Package Ever')->press('Create Package')->assertSee('Greatest Package Ever');
If you want the same functionality as Dusk pages offer, but without the constraint to a specific URL, you’ll likely want to reach for Dusk components. These classes are shaped very similarly to pages, but instead of being bound to a URL, they’re each bound to a selector.
In NovaPackages.com, we have a little Vue component for rating packages and displaying ratings. Let’s make a Dusk component for it.
php artisan dusk:component RatingWidget
Take a look at Example 12-36 to see what that will generate.
<?phpnamespaceTests\Browser\Components;useLaravel\Dusk\Browser;useLaravel\Dusk\ComponentasBaseComponent;classRatingWidgetextendsBaseComponent{/*** Get the root selector for the component.** @return string*/publicfunctionselector(){return'#selector';}/*** Assert that the browser page contains the component.** @param Browser $browser* @return void*/publicfunctionassert(Browser$browser){$browser->assertVisible($this->selector());}/*** Get the element shortcuts for the component.** @return array*/publicfunctionelements(){return['@element'=>'#selector',];}}
As you can see, this is basically the same as a Dusk page, but we’re encapsulating our work to an HTML element instead of a URL. Everything else is basically the same. Take a look at Example 12-37 to see our rating widget example in Dusk component form.
classRatingWidgetextendsBaseComponent{publicfunctionselector(){return'.rating-widget';}publicfunctionassert(Browser$browser){$browser->assertVisible($this->selector());}publicfunctionelements(){return['@5-star'=>'.five-star-rating','@4-star'=>'.four-star-rating','@3-star'=>'.three-star-rating','@2-star'=>'.two-star-rating','@1-star'=>'.one-star-rating','@average'=>'.average-rating','@mine'=>'.current-user-rating',];}publicfunctionratePackage(Browser$browser,$rating){$browser->click("@{$rating}-star")->assertSeeIn('@mine',$rating);}}
Using components works just like using pages, as you can see in Example 12-38.
$browser->visit('/packages/tightenco/nova-stock-picker')->within(newRatingWidget,function($browser){$browser->ratePackage(2);$browser->assertSeeIn('@average',2);});
That’s a good, brief overview of what Dusk can do. There’s a lot more—more assertions, more edge cases, more gotcha’s, more examples—in the Dusk docs, so I’d recommend a read through there if you plan to work with Dusk.
Laravel can work with any modern PHP testing framework, but it’s optimized for PHPUnit, especially if your tests extend Laravel’s TestCase. Laravel’s application testing framework makes it simple to send fake HTTP and console requests through your application and inspect the results.
Tests in Laravel can easily and powerfully interact and assert against the database, cache, session, filesystem, mail, and much more. Quite a few of these systems have fakes built-in to make them even easier to test. You can test DOM and browser-like interactions with BrowserKit Testing or Dusk.
Laravel brings in Mockery in case you need mocks, stubs, spies, dummies, or anything else, but the testing philosophy of Laravel is to use real collaborators as much as possible. Don’t fake it unless you have to.
One of the most common tasks Laravel developers are given is to create an API, usually JSON and REST or REST-like, that allows third parties to interact with the Laravel application’s data.
Laravel makes it incredibly easy to work with JSON, and its resource controllers are already structured around REST verbs and patterns. In this chapter you’ll learn about some basic API-writing concepts, the tools Laravel provides for writing APIs, and some external tools and organizational systems you’ll want to consider when writing your first Laravel API.
Representational State Transfer (REST) is an architectural style for building APIs. Technically, REST is either a broad definition that could apply to almost the entirety of the Internet or something so specific that no one actually uses it, so don’t let yourself get overwhelmed by the definition or caught in an argument with a pedant. When we talk about RESTful or REST-like APIs in the Laravel world, we’re generally talking about APIs with a few common characteristics:
Structured around “resources” that can be uniquely represented by URIs, like /cats for all cats, /cats/15 for a single cat with the ID of 15, etc.
Interactions with resources primarily take place using HTTP verbs (GET /cats/15 versus DELETE /cats/15)
Stateless, meaning there’s no persistent session authentication between requests; each request must uniquely authenticate itself
Cacheable and consistent, meaning each request (except for a few authenticated-user-specific requests) should return the same result regardless of who the requester is
Return JSON
The most common API pattern is to have a unique URL structure for each of your Eloquent models that’s exposed as an API resource, and allow for users to interact with that resource with specific verbs and get JSON back. Example 13-1 shows a few possible examples.
GET/api/cats[{id:1,name:'Fluffy'},{id:2,name:'Killer'}]GET/api/cats/2{id:2,name:'Killer'}DELETE/api/cats/2(deletescat)POST/api/catswithbody:{name:'Mr Bigglesworth'}(createsnewcat)PATCH/api/cats/3withbody:{name:'Mr. Bigglesworth'}(updatescat)
You can see the basic set of interactions we are likely to have with our APIs. Let’s dig into how to make them happen with Laravel.
Laravel’s API Resource controllers are like Resource Controllers (“Resource Controllers”) but modified to align with RESTful API routes, so let’s get started there. First we’ll create a new controller for our resource, which we’ll route at /api/dogs:
php artisan make:controller Api/DogsController --api
API Resource Controllers are just like Resource Controllers except that they exclude the create and edit methods, both of which are irrelevant in an API.
Note that in projects running versions of Laravel prior to 5.5, the concept of the “API resource controller” and the “API resource route” don’t exist. But you can still just use resource controllers and resource routes, which are almost exactly the same, but just have a few “view"-related routes that aren’t used in APIs.
Note that in versions of Laravel prior to 5.3, you need to escape the \ in namespace separators with a forward slash in Artisan commands. For example:
php artisan make:controller Api/\DogsController --api
Example 13-2 shows what that API resource controller will look like.
<?phpnamespaceApp\Http\Controllers\Api;useIlluminate\Http\Request;useApp\Http\Controllers\Controller;classDogsControllerextendsController{/*** Display a listing of the resource.** @return \Illuminate\Http\Response*/publicfunctionindex(){//}/*** Store a newly created resource in storage.** @param \Illuminate\Http\Request $request* @return \Illuminate\Http\Response*/publicfunctionstore(Request$request){//}/*** Display the specified resource.** @param int $id* @return \Illuminate\Http\Response*/publicfunctionshow($id){//}/*** Update the specified resource in storage.** @param \Illuminate\Http\Request $request* @param int $id* @return \Illuminate\Http\Response*/publicfunctionupdate(Request$request,$id){//}/*** Remove the specified resource from storage.** @param int $id* @return \Illuminate\Http\Response*/publicfunctiondestroy($id){//}}
The docblocks pretty much tell the story. index() lists all of the dogs, show() lists a single dog, store() stores a new dog, update() updates a dog, and destroy() removes a dog.
Let’s quickly make a model and a migration so we can work with it:
phpartisanmake:modelDog--migrationphpartisanmigrate
Great! Now we can fill out our controller methods.
If you want the code we’re writing below to actually work, you’ll want to add a string() column to the migration named “name” and another named “breed”, and either add those columns to the Eloquent model’s fillable property or just set the guarded property of that model equal to an empty array ([]).
We can take advantage of a great feature of Eloquent here: if you echo an Eloquent results collection, it’ll automatically convert itself to JSON (using the __toString() magic method, if you’re curious). That means if you return a collection of results from a route, you’ll in effect be returning JSON.
So, as Example 13-3 demonstrates, this will be some of the simplest code you’ll ever write.
...classDogsControllerextendsController{publicfunctionindex(){returnDog::all();}publicfunctionstore(Request$request){returnDog::create($request->only(['name','breed']));}publicfunctionshow($id){returnDog::findOrFail($id);}publicfunctionupdate(Request$request,$id){$dog=Dog::findOrFail($id);$dog->update($request->only(['name','breed']));return$dog;}publicfunctiondestroy($id){Dog::findOrFail($id)->delete();}}
Example 13-4 shows how we can link this up in our routes file. As you can see, we can use Route::apiResource() to automatically map all of these default methods to their appropriate routes and HTTP verbs.
// routes/api.phpRoute::namespace('Api')->group(function(){Route::apiResource('dogs','DogsController');});
There you have it! Your first RESTful API in Laravel.
Of course, you’ll need much more nuance: pagination, sorting, authentication, more defined response headers. But this is the foundation of everything else.
REST APIs often read, and send, non-content information using headers. For example, any request to GitHub’s API will return headers detailing the current user’s rate limiting status:
X-RateLimit-Limit: 5000 X-RateLimit-Remaining: 4987 X-RateLimit-Reset: 1350085394
You might be wondering why the GitHub rate limiting headers are prefixed with X-, especially if you see them in the context of other headers returned with the same request:
HTTP/1.1 200 OK Server: nginx Date: Fri, 12 Oct 2012 23:33:14 GMT Content-Type: application/json; charset=utf-8 Connection: keep-alive Status: 200 OK ETag: "a00049ba79152d03380c34652f2cb612" X-GitHub-Media-Type: github.v3 X-RateLimit-Limit: 5000 X-RateLimit-Remaining: 4987 X-RateLimit-Reset: 1350085394 Content-Length: 5 Cache-Control: max-age=0, private, must-revalidate X-Content-Type-Options: nosniff
Any header whose name starts with X- is a header that’s not in the HTTP spec. It might be entirely made up (e.g., X-How-Much-Matt-Loves-This-Page), or part of a common convention that hasn’t made it into the spec yet (e.g., X-Requested-With).
Similarly, many APIs allow developers to customize their requests using request headers. For example, GitHub’s API makes it easy to define which version of the API you’d like to use with the Accept header:
Accept: application/vnd.github.v3+json
If you were to change v3 to v2, GitHub would pass your request to version 2 of its API instead.
Let’s learn quickly how to do both in Laravel.
We already covered this topic quite a bit in Chapter 10, but here’s a quick refresher. Once you have a response object, you can add a header using header($headerName, $headerValue), as seen in Example 13-5.
Route::get('dogs',function(){returnresponse(Dog::all())->header('X-Greatness-Index',12);});
Nice and easy.
If we have an incoming request, it’s also simple to read any given header. Example 13-6 illustrates this.
Route::get('dogs',function(Request$request){var_dump($request->header('Accept'));});
Now that you can read incoming request headers and set headers on your API responses, let’s take a look at how you might want to customize your API.
Pagination is one of the first places where most APIs need to consider special instructions. Eloquent comes out of the box with a pagination system that hooks directly into the query parameters of any page request. We already covered the paginator component a bit in Chapter 6, but here’s a quick refresher.
Any Eloquent call provides a paginate() method, to which you can pass the number of items you’d like to return per page. Eloquent then checks the URL for a page query parameter and, if it’s set, treats that as an indicator of how many pages the user is into a paginated list.
To make your API route ready for automated Laravel pagination, use paginate() instead of all() or get() to call your Eloquent queries in your route; something like Example 13-7.
Route::get('dogs',function(){returnDog::paginate(20);});
We’ve defined that Eloquent should get 20 results from the database. Depending on what the page query parameter is set to, Laravel will know exactly which 20 results to pull for us:
GET/dogs-Returnresults1-20GET/dogs?page=1-Returnresults1-20GET/dogs?page=2-Returnresults21-40
Note that the paginate() method is also available on query builder calls, as seen in Example 13-8.
Route::get('dogs',function(){returnDB::table('dogs')->paginate(20);});
Here’s something interesting, though: this isn’t just going to return 20 results when you convert it to JSON. Instead, it’s going to build a response object that automatically passes some useful pagination-related details to the end user, along with the paginated data. Example 13-9 shows a possible response from our call, truncated to only three records to save space.
{"current_page":1,"data":[{'name':'Fido'},{'name':'Pickles'},{'name':'Spot'}]"first_page_url":"http://myapp.com/api/dogs?page=1","from":1,"last_page":2,"last_page_url":"http://myapp.com/api/dogs?page=2","next_page_url":"http://myapp.com/api/dogs?page=2","path":"http://myapp.com/api/dogs","per_page":2,"prev_page_url":null,"to":2,"total":4}
While there is a convention and some built-in tooling for pagination in Laravel, there isn’t any for sorting, so you have to figure that out on your own. I’ll give a quick code sample here, and I’ll style our query parameters similarly to the JSON API spec (described in the following sidebar).
First, let’s set up the ability to sort our results. We start in Example 13-10 with the ability to sort by only a single column, and in only a single direction.
// Handles /dogs?sort=nameRoute::get('dogs',function(Request$request){// Get the sort query parameter (or fall back to default sort "name")$sortColumn=$request->input('sort','name');returnDog::orderBy($sortColumn)->paginate(20);});
We add the ability to invert it (e.g., ?sort=-weight) in Example 13-11.
// Handles /dogs?sort=name and /dogs?sort=-nameRoute::get('dogs',function(Request$request){// Get the sort query parameter (or fall back to default sort "name")$sortColumn=$request->input('sort','name');// Set the sort direction based on whether the key starts with -// using Laravel's starts_with() helper function$sortDirection=starts_with($sortColumn,'-')?'desc':'asc';$sortColumn=ltrim($sortColumn,'-');returnDog::orderBy($sortColumn,$sortDirection)->paginate(20);});
Finally, we do the same for multiple columns (e.g., ?sort=name,-weight) in Example 13-12.
// Handles ?sort=name,-weightRoute::get('dogs',function(Request$request){// Grab the query parameter and turn it into an array exploded by ,$sorts=explode(',',$request->input('sort',''));// Create a query$query=Dog::query();// Add the sorts one by oneforeach($sortsas$sortColumn){$sortDirection=starts_with($sortColumn,'-')?'desc':'asc';$sortColumn=ltrim($sortColumn,'-');$query->orderBy($sortColumn,$sortDirection);}// Returnreturn$query->paginate(20);});
As you can see, it’s not the simplest process ever, and you’ll likely want to build some helper tooling around the repetitive processes, but we’re building up the customizability of our API piece by piece using logical and simple features.
Another common task in building APIs is filtering out all but a certain subset of data. For example, the client might ask for a list of the dogs that are Chihuahuas.
The JSON API doesn’t give us any great ideas for syntax here, other than that we should use the filter query parameter. Let’s think along the lines of the sort syntax, where we’re putting everything into a single key—maybe ?filter=breed:chihuahua. You can see how to do this in Example 13-13.
Route::get('dogs',function(){$query=Dog::query();$query->when(request()->filled('filter'),function($query){[$criteria,$value]=explode(':',request('filter'));return$query->where($criteria,$value);});return$query->paginate(20);});
Note that in Example 13-13 we’re using the request() helper instead of injecting an instance of the $request. Both work the same, but sometimes the request() helper can be easier when you’re working inside of a closure so you don’t have to pass variables in manually.
In projects running versions of Laravel prior to 5.2, you’ll have to replace use of $query->when() with a regular PHP if statement.
And, just for kicks, in Example 13-14 we allow for multiple filters, like ?filter=breed:chihuahua,color:brown.
Route::get('dogs',function(Request$request){$query=Dog::query();$query->when(request()->filled('filter'),function($query){$filters=explode(',',request('filter'));foreach($filtersas$filter){[$criteria,$value]=explode(':',$filter);$query->where($criteria,$value);}return$query;});return$query->paginate(20);});
We’ve covered how to sort and filter our result sets. But right now, we’re relying on Eloquent’s JSON serialization, which means we return every field on every model.
Eloquent provides a few convenience tools for defining which fields to show when you’re serializing an array. You can read more in Chapter 5, but the gist is that if you set a $hidden array property on your Eloquent class, any field listed in that array will not be shown in the serialized model output. You can alternatively set a $visible array that defines the fields that are allowed to be shown. You could also either overwrite or mimic the toArray() function on your model, crafting a custom output format.
Another common pattern is to create a transformer for each data type. Transformers are helpful because they give you more control, isolate API-specific logic away from the model itself, and allow you to provide a more consistent API even when the models and their relationships change down the road.
There’s a fantastic but complicated package for this, Fractal, that sets up a series of convenience structures and classes for transforming your data.
Laravel 5.5 introduced a concept called API Resources that cover the needs of the majority of APIs for transforming and collecting results, so if you’re working with 5.5 or later, skip the next section and move on to “API Resources”. If you’re working with 5.4 or earlier, read on.
The general concept of a transformer is that we are going to run every instance of our model through another class that transforms its data to a different state. It might add fields, rename fields, delete fields, manipulate fields, add nested children, or whatever else. Let’s start with a simple example (Example 13-15).
Route::get('users/{id}',function($userId){return(newUserTransformer(User::findOrFail($userId)));});classUserTransformer{protected$user;publicfunction__construct($user){$this->user=$user;}publicfunctiontoArray(){return['id'=>$this->user->id,'name'=>sprintf("%s %s",$this->user->first_name,$this->user->last_name),'friendsCount'=>$this->user->friends->count()];}publicfunctiontoJson(){returnjson_encode($this->toArray());}publicfunction__toString(){return$this->toJson();}}
A more classic transformer would probably offer a transform() method that takes a $user parameter. This would likely spit out an array or JSON directly.
However, I’ve been using this pattern, which we sometimes call “API objects,” for a few years and really love how much more power and flexibility it provides.
As you can see in Example 13-15, transformers accept the model they’re transforming as a parameter and then manipulate that model—and its relationships—to create the final output that you want to send to the API.
Whether, and how, to nest relationships in APIs is an issue of much debate. Thankfully, people more experienced than me have written on this at length; I’d recommend reading Phil Sturgeon’s Build APIs You Won’t Hate (Leanpub) to learn more about this and about REST APIs in general.
There are a few primary ways to approach nesting relationships. These examples will assume your primary resource is a user and your related resource is a friend:
Include related resources directly in the primary resource (e.g., the users/5 resource has its friends nested in it).
Include just the foreign keys in the primary resource (e.g., the users/5 resource has an array of friend IDs nested in it).
Allow the user to query the related resource filtered by the originating resource (e.g., /friends?user=5, or “give me all friends who are related to user #5”).
Create a subresource (e.g., /users/5/friends).
Allow optional including (e.g., /users/5 does not include, but /users/5?include=friends does include; so does /users/5?include=friends,dogs).
Let’s assume for a minute that we want to (optionally) include related items. How would we do that? Our transformer example in Example 13-15 gives us a great head start. Let’s adjust it in Example 13-16 to add optional sub-resource including.
// E.g. myapp.com/api/users/15?include=friends,bookmarksRoute::get('users/{id}',function($userId,Request$request){// Get the include query parameter and split by commas$includes=explode(',',$request->input('include',''));// Pass both user and includes to the user transformerreturn(newUserTransformer(User::findOrFail($userId),$includes));});classUserTransformer{protected$user;protected$includes;publicfunction__construct($user,$includes=[]){$this->user=$user;$this->includes=$includes;}publicfunctiontoArray(){$append=[];if(in_array('friends',$this->includes)){// If you have more than one include, you'll want to generalize this$append['friends']=$this->user->friends->map(function($friend){return(newFriendTransformer($friend))->toArray();});}returnarray_merge(['id'=>$this->user->id,'name'=>sprintf("%s %s",$this->user->first_name,$this->user->last_name)],$append);}...
We’ll learn more about the map() functionality when we look at collections in Chapter 17, but everything else in here should be pretty familiar.
In the route, we’re splitting the include query parameter by commas and passing it into our transformer. Currently our transformer can just handle the friends include, but it could be abstracted to handle others. If the user has requested the friends include, the transformer maps over each friend (using the hasMany friends relationship on the user model), passes that friend to the FriendTransformer, and includes the array of all transformed friends in the user response.
If you’re working with Laravel prior to 5.5, you can skip this section and move on to “API Authentication with Laravel Passport”.
In the past, one of the first challenges we’d run into when developing APIs in Laravel was how to transform our data. The simplest APIs can just return Eloquent objects as JSON, but very quickly the needs of most APIs outgrow that structure. How should we convert our Eloquent results into the right format? What if we want to embed other resources, or do so but only optionally, or add a computed field, or hide some fields from APIs but not other JSON output? An API-specific transformer is the solution.
In Laravel 5.5 and later we have access to a feature called Eloquent API resources, which is a structure of classes that define how to transform an Eloquent object (or a collection of Eloquent objects) of a given class to API results. For example, your Dog Eloquent model now has a Dog Resource whose responsibility it is to translate each instance of Dog to the appropriate Dog-shaped API response object.
Let’s walk through this Dog example to see what it looks like to transform our API output. First, use the Artisan command make:resource to create your first resource.
php artisan make:resource Dog
This will create a new class in app/Http/Resources/Dog.php, which contains one method: toArray. You can see what the file looks like in Example 13-17.
<?phpnamespaceApp\Http\Resources;useIlluminate\Http\Resources\Json\JsonResource;classDogextendsJsonResource{/*** Transform the resource into an array.** @param \Illuminate\Http\Request $request* @return array*/publicfunctiontoArray($request){returnparent::toArray($request);}}
The toArray method we’re working with here has access to two important pieces of data. First, it has access to the Illuminate Request object, so we can customize our response based on query parameters and headers and anything else important. And second, it has access to the entire Eloquent object being transformed by calling its properties and methods on $this, as you can see in Example 13-18.
classDogextendsJsonResource{publicfunctiontoArray($request){return['id'=>$this->id,'name'=>$this->name,'breed'=>$this->breed,];}}
To use this new resource, you’d want to update any API endpoint that returns a single Dog to wrap the response in your new Resource, like in Example 13-19.
useApp\Dog;useApp\Http\Resources\DogasDogResource;Route::get('dogs/{dogId}',function($dogId){returnnewDogResource(Dog::find($dogId));});
Now, let’s talk about what happens if you have more than one of your entity returning from a given API endpoint. API resources can do that with the collection() method, as you can see in Example 13-20.
useApp\Dog;useApp\Http\Resources\DogasDogResource;Route::get('dogs',function(){returnDogResource::collection(Dog::all());});
This method iterates over every entry that’s passed to it, transforms it with the DogResource API resource, and then returns the collection.
This will likely be enough for many APIs, but if you need to customize any of the structure or add metadata to your collection responses, you’ll want to instead create a custom API resource collection.
In order to do so, let’s reach for the make:resource Artisan command again, but this time we’ll name it DogCollection, which signals to Laravel this is an API resource collection, not just an API resource.
php artisan make:resource DogCollection
This will generate a new file very similar to the API resource, living at app/Http/Resources/DogCollection.php, which contains one method: toArray. You can see what the file looks like in Example 13-21.
<?phpnamespaceApp\Http\Resources;useIlluminate\Http\Resources\Json\ResourceCollection;classDogCollectionextendsResourceCollection{/*** Transform the resource collection into an array.** @param \Illuminate\Http\Request $request* @return array*/publicfunctiontoArray($request){returnparent::toArray($request);}}
Just like the API resource, we have access to the request and the underlying data. But unlike the API resource, we’re dealing with a collection of items instead of just one, so we will access that (already-transformed) collection as $this->collection. Take a look at Example 13-22 for an example.
classDogCollectionextendsResourceCollection{publicfunctiontoArray($request){return['data'=>$this->collection,'links'=>['self'=>route('dogs.index'),],];}}
One of the more complicated aspects of any API is how relationships are nested. The simplest way with API resources is to add a key to your returned array that’s set to an API resource collection, like in Example 13-23.
publicfunctiontoArray(){return['name'=>$this->name,'breed'=>$this->breed,'friends'=>DogResource::collection($this->friends),];}
You may also want this to be a conditional property; you can choose to only nest it if it’s asked for in the request, or only if it’s already been eager loaded on the Eloquent object that’s passed in. Take a look at Example 13-24.
publicfunctiontoArray(){return['name'=>$this->name,'breed'=>$this->breed,// Only load this relationship if it's been eager loaded'bones'=>BoneResource::collection($this->whenLoaded('bones')),// Or, only load this relationship if the URL asks for it'bones'=>$this->when($request->get('include')=='bones',BoneResource::collection($this->bones)),];}
Just like you can pass a collection of Eloquent models to a resource, you can also pass a paginator instance as well. Take a look at Example 13-25.
Route::get('dogs',function(){returnnewDogCollection(Dog::paginate(20));});
If you pass a paginator instance, the transformed result will have additional links containing pagination information (first page, last page, prev page, and next page) and meta information about the entire collection.
You can take a look at Example 13-26 to see what this information looks like. In this example, I’ve set the items-per-page to 2 by calling Dog::paginate(2) so you can more easily see how the links work.
{"data":[{"name":"Pickles","breed":"Chorkie",},{"name":"Gandalf","breed":"Golden Retriever Mix",}],"links":{"first":"http://gooddogbrant.com/api/dogs?page=1","last":"http://gooddogbrant.com/api/dogs?page=3","prev":null,"next":"http://gooddogbrant.com/api/dogs?page=2"},"meta":{"current_page":1,"from":1,"last_page":3,"path":"http://gooddogbrant.com/api/dogs","per_page":2,"to":2,"total":5}}
You can also specify that certain attributes in your response should only be applied when a particular test is satisfied.
publicfunctiontoArray($request){return['name'=>$this->name,'breed'=>$this->breed,'rating'=>$this->when(Auth::user()->canSeeRatings(),12),];}
The default shape of how the data property is wrapped might not be how you like it, or you may find yourself needing to add or customize metadata for the responses. Take a look at the docs for how to customize every aspect of your API responses.
Most APIs require some form of authentication to access some or all of the data. Laravel 5.2 introduced a simple “token” authentication scheme, which we’ll cover shortly, but in Laravel 5.3 and later we got a new tool called Passport (by way of a separate package, brought in via Composer) that makes it easy to set up a full-featured OAuth 2.0 server in your application, complete with an API and UI components for managing clients and tokens.
OAuth is by far the most common auth system used in RESTful APIs. Unfortunately, it’s far too complex a topic for us to cover here in depth. For further reading, Matt Frost has written a great book on OAuth and PHP titled Integrating Web Services with OAuth and PHP (php[architect]).
Here’s the simplest concept behind OAuth: because APIs are stateless, we can’t rely on the same session-bassed authentication that we do in normal browser-based viewing sessions, where the user logs in and their authenticated state is saved to the session for subsequent views. Instead, the API client needs to make a single call to an authentication endpoint, perform some form of handshake to prove themselves, and then get back a token. Then, the client must send this token along with every future request (via the Authorization header, usually) to prove their identity.
There are a few different types of OAuth “grant”, which basically means that there are several different scenarios and types of interaction that can define that authentication “handshake”. Different projects and different sorts of end consumer will necessitate different grants.
If you’re working with Laravel 5.1 or 5.2, there’s a Laravel package called OAuth 2.0 Server for Laravel that makes it relatively easy to add a basic OAuth 2.0 authentication server to your Laravel application. It’s a Laravel convenience bridge to a PHP package called PHP OAuth 2.0 Server.
However, if you’re on Laravel 5.3 and higher, Passport gives you everything provided by that package and much more, with a simpler and more powerful API and interface.
Passport is a separate package, so your first step is to install it. I’ll sum up the steps here, but you can get more in-depth installation instructions in the docs.
First, bring it in with Composer:
composer require laravel/passport
If you’re working with Laravel below 5.5, add Laravel\Passport\PassportServiceProvider::class to the providers array of config/app.php.
Passport imports a series of migrations, so run those with php artisan migrate to create the tables necessary for OAuth clients, scopes, and tokens.
Next, run the installer with php artisan passport:install. This is going to create encryption keys for the OAuth server (storage/oauth-private.key and storage/oauth-public.key) and insert OAuth clients into the database for our personal and password grant type tokens (which we’ll cover later).
You’ll need to import the Laravel\Passport\HasApiTokens trait into your User model; this will add OAuth client- and token-related relationships to each User, as well as a few token-related helper methods. Next, add a call to Laravel\Passport\Passport::routes() in the boot() method of the AuthServiceProvider. This will add the following routes:
oauth/authorize
oauth/clients
oauth/clients/{client_id}
oauth/personal-access-tokens
oauth/personal-access-tokens/{token_id}
oauth/scopes
oauth/token
oauth/token/refresh
oauth/tokens
oauth/tokens/{token_id}
Finally, look for the api guard in config/auth.php. By default this guard will use the token driver (which we’ll cover shortly), but we’ll change that to be the passport driver instead.
You now have a fully functional OAuth 2.0 server! You can create new clients with php artisan passport:client, and you have an API for managing your clients and tokens available under the /oauth route prefix.
To protect a route behind your Passport auth system, add the auth:api middleware to the route or route group, as shown in Example 13-27.
// routes/api.phpRoute::get('/user',function(Request$request){return$request->user();})->middleware('auth:api');
In order to authenticate to these protected routes, your client apps will need to pass a token (we’ll cover how to get one next) as a Bearer token in the Authorization header. Example 13-28 shows what this would look like if you were making a request using the Guzzle HTTP library.
$http=newGuzzleHttp\Client;$response=$http->request('GET','http://tweeter.test/api/user',['headers'=>['Accept'=>'application/json','Authorization'=>'Bearer '.$accessToken,],]);
Now, let’s take a closer look at how it all works.
Passport exposes an API in your application under the /oauth route prefix. The API provides two primary functions: first, to authorize users with OAuth 2.0 authorization flows (/oauth/authorize and /oauth/token), and second, to allow users to manage their clients and tokens (the rest of the routes).
This is an important distinction, especially if you’re unfamiliar with OAuth. Every OAuth server needs to expose the ability for consumers to authenticate with your server; that’s the entire point of the service. But Passport also exposes an API for managing the state of your OAuth server’s clients and tokens. This means you can easily build a frontend to let your users manage their information in your OAuth application, and Passport actually comes with Vue-based manager components that you can either use or use for inspiration.
We’ll cover the API routes that allow you to manage clients and tokens, and the Vue components that Passport ships with to make it easy, but first let’s dig into the various ways your users can authenticate with your Passport-protected API.
Passport makes it possible for you to authenticate users in four different ways. Two are traditional OAuth 2.0 grants (the password grant and authorization code grant) and two are convenience methods that are unique to Passport (the personal token and synchronizer token).
The password grant, while less common than the authorization code grant, is much simpler. If you want users to be able to authenticate directly with your API using their username and password—for example, if you have a mobile app for your company consuming your own API—you can use the password grant.
In order to use the password grant flow, you need a “password grant client” in your database. This is because every request to an OAuth server needs to be made by a “client.” Usually, the “client” identifies which app or site the user is authenticating against—for example, if you use Facebook to log in to a third party web site, that web site would be the “client”.
With the password grant flow, however, there is no client coming along with the request, so you have to make one, and that’s the “password grant client.” One will have been added when you ran php artisan passport:install, but if you ever need to generate a new password grant client for any reason, you can:
phpartisanpassport:client--passwordWhatshouldwenamethepasswordgrantclient?[MyApplicationPasswordGrantClient]:>SpaceBook_internalPasswordgrantclientcreatedsuccessfully.ClientID:3ClientSecret:Pg1EEzt18JAnFoUIM9n38Nqewg1aekB4rvFk2Pma
With the password grant type, there is just one step to getting a token: sending the user’s credentials to the /oauth/token route, like in Example 13-29.
// Routes/web.php in the *consuming application*Route::get('tweeter/password-grant-auth',function(){$http=newGuzzleHttp\Client;// Make call to "Tweeter", our Passport-powered OAuth server$response=$http->post('http://tweeter.test/oauth/token',['form_params'=>['grant_type'=>'password','client_id'=>config('tweeter.id'),'client_secret'=>config('tweeter.secret'),'username'=>'matt@mattstauffer.co','password'=>'my-tweeter-password','scope'=>'',],]);$thisUsersTokens=json_decode((string)$response->getBody(),true);// do stuff with the tokens});
This route will return an access_token and a refresh_token. You can now save those tokens to use to authenticate with the API (access token) and to request more tokens later (refresh token).
Note that the ID and secret we’d use for the password grant type would be those in the oauth_clients database table of our Passport app in the row with the name SpaceBook_internal.
The most common OAuth 2.0 auth workflow is also the most complex one Passport supports. Let’s imagine we’re developing an application that’s like Twitter but for sound clips; we’ll call it Tweeter. And we’ll imagine another website, a social network for science fiction fans, called SpaceBook. SpaceBook’s developer wants to let people embed their Tweeter data into their SpaceBook newsfeeds. We’re going to install Passport in our app Tweeter so that other apps—SpaceBook, for example—can allow their mutual users to authenticate with their Tweeter information.
In the authorization code grant type, each consuming website—SpaceBook, in this example—needs to create a “client” in our Passport-enabled app. In most scenarios, the other sites’ admins will have user accounts at Tweeter, and we’ll build tools for them to create clients there. But for starters, we can just manually create a client for the SpaceBook admins:
php artisan passport:client
Which user ID should the client be assigned to?:
> 1
What should we name the client?:
> SpaceBook
Where should we redirect the request after authorization?
[http://tweeter.test/auth/callback]:
> http://spacebook.test/tweeter/callback
New client created successfully.
Client ID: 4
Client secret: 5rzqKpeCjIgz3MXpi3tjQ37HBnLLykrgWgmc18uH
Every client needs to be assigned to a user in your app. Imagine Jill, user #1, is writing SpaceBook; she’ll be the “owner” of this client we’re creating.
Now we have the ID and secret for the SpaceBook client. At this point, SpaceBook can use this ID and secret to build tooling allowing an individual SpaceBook user (who is also a Tweeter user) to get an auth token from Tweeter for use when SpaceBook wants to make API calls to Tweeter on that user’s behalf. Example 13-30 illustrates this. (This and the following examples assume SpaceBook is a Laravel app, too; they also assume the Spacebook developers created a file at config/tweeter.php that returns the ID and secret we just created.)
// In SpaceBook's routes/web.php:Route::get('tweeter/redirect',function(){$query=http_build_query(['client_id'=>config('tweeter.id'),'redirect_uri'=>url('tweeter/callback'),'response_type'=>'code','scope'=>'',]);// Builds a string like:// client_id={$client_id}&redirect_uri={$redirect_uri}&response_type=codereturnredirect('http://tweeter.test/oauth/authorize?'.$query);});
When users hit that route in SpaceBook, they’ll now be redirected to the /oauth/authorize Passport route on our Tweeter app. At this point they’ll see a confirmation page; you can use the default Passport confirmation page by running this command:
php artisan vendor:publish --tag=passport-views
This will publish the view to resources/views/vendor/passport/authorize.blade.php, and your users will see the page shown in Figure 13-1.
Once a user chooses to accept or reject the authorization, Passport will redirect that user back to the provided redirect_uri. In Example 13-30 we set a redirect_uri of url('tweeter/callback'), so the user will be redirected back to http://spacebook.test/tweeter/callback.
An approval request will contain a code that our consumer app’s callback route can now use to get a token back from our Passport-enabled app, Tweeter. A rejection request will contain an error. SpaceBook’s callback route might look something like Example 13-31.
What the Spacebook developer doing here is building a Guzzle HTTP request to the /oauth/token Passport route on Tweeter. They then send a POST request containing the authorization code they received when the user approved access, and Tweeter will return a JSON response containing a few keys:
access_token is the token SpaceBook will want to save for this user. This token is what the user will use to authenticate in future requests to Tweeter (using the Authorization header).
refresh_token is a token SpaceBook will need if you decide to set your tokens to expire. By default, Passport’s access tokens last for one year.
expires_in is the number of seconds until an access_token expires (needs to be refreshed).
token_type is the type of token you’re getting back, which will be “Bearer”; this means you pass a header with all future requests with the name of “Authorization” and the value of “Bearer YOURTOKENHERE”.
You now have all the tools you need to perform basic authorization code flows. We’ll cover how to build an admin panel for your clients and tokens later, but first, let’s take a quick look at the other grant types.
The authorization code grant is great for your users’ apps and the password code grant is great for your own apps, but what if your users want to create tokens for themselves to test out your API or to use when they’re developing their apps? That’s what personal tokens are for.
In order to create personal tokens, you need a personal access client in your database. Running php artisan passport:install will have added one already, but if you ever need to generate a new personal access client for any reason, you can run php artisan passport:client --personal:
phpartisanpassport:client--personalWhatshouldwenamethepersonalaccessclient?[MyApplicationPersonalAccessClient]:>MyApplicationPersonalAccessClientPersonalaccessclientcreatedsuccessfully.
Personal access tokens are not quite a “grant” type; there’s no OAuth-prescribed flow here. Rather, they’re a convenience method that Passport adds to make it easy to have a single client registered in your system that exists solely for the easy creation of convenience tokens for your users who are developers.
For example, maybe you have a user who’s developing a competitor to SpaceBook named RaceBook (it’s for marathon runners), and he wants to toy around with the Tweeter API a bit to figure out how it works before starting to code. Does this developer have the facility to create tokens using the authorization code flow? Not yet—he hasn’t even written any code yet! That’s what personal access tokens are for.
You can create personal access tokens through the JSON API, which I’ll cover shortly, but you can also create one for your user directly in code:
// Creating a token without scopes$token=$user->createToken('Token Name')->accessToken;// Creating a token with scopes...$token=$user->createToken('My Token',['place-orders'])->accessToken;
Your users can use these tokens just as if they were tokens created with the authorization code grant flow. We’ll cover more about scopes in “Passport Scopes”.
There’s one final way for your users to get tokens to access your API, and it’s another convenience method that Passport adds but which normal OAuth servers don’t provide. This method is for when your users are already authenticated because they’ve logged in to your Laravel app like normal, and you want the JavaScript on your Laravel app to be able to access the API. It’d be a pain to have to reauthenticate the users with the authorization code or password grant flow, so Laravel provides a helper for that.
If you add the Laravel\Passport\Http\Middleware\CreateFreshApiToken middleware to your web middleware group (in app/Http/Kernel.php), every response Laravel sends to your authenticated users will have a cookie named laravel_token attached to it. This cookie is a JSON Web Token (JWT) that contains encoded information about the CSRF token. Now, if you send the normal CSRF token with your JavaScript and send it along in the X-CSRF-TOKEN and also send the X-Requested-With header on any API requests you make, the API will compare your CSRF token with this cookie and this will authenticate your users to the API just like any other token.
The default JavaScript bootstrap setup that Laravel comes bundled with sets up this header for you, but if you’re using a different framework, you’ll need to set it up manually. Example 13-32 shows how to do it with jQuery.
X-Requested-With with all Ajax requests$.ajaxSetup({headers:{'X-CSRF-TOKEN':"{{ csrf_token() }}",'X-Requested-With':'XMLHttpRequest'}});
If you add the CreateFreshApiTokens middleware to your web middleware group and pass that header with every JavaScript request, your JavaScript requests will be able to hit your Passport-protected API routes without worrying about any of the complexity of the authorization code or password grants.
Now that we’ve covered how to manually create clients and tokens and how to authorize as a consumer, let’s take a look at the aspects of the Passport API that make it possible to build user interface elements allowing your users to manage their clients and tokens.
The easiest way to dig into the API routes is by looking at how the sample provided Vue components work and which routes they rely on, so I’ll just give a brief overview:
/oauth/clients(GET,POST)/oauth/clients/{id}(DELETE,PUT)/oauth/personal-access-tokens(GET,POST)/oauth/personal-access-tokens/{id}(DELETE)/oauth/scopes(GET)/oauth/tokens(GET)/oauth/tokens/{id}(DELETE)
As you can see, we have a few entities here (clients, personal access tokens, scopes, and tokens). We can list all of them; we can create some (you can’t create scopes, since they’re defined in code, and you can’t create tokens, because they’re created in the authorization flow); and we can delete and update some.
Passport comes with a set of Vue components out of the box that make it easy to allow your users to administer their clients (those they’ve created), authorized clients (those they’ve allowed access to their account), and personal access tokens (for their own testing purposes).
To publish these components into your application, run this command:
php artisan vendor:publish --tag=passport-components
You’ll now have three new Vue components in resources/js/components/passport. To add them to your Vue bootstrap so they’re accessible in your templates, register them in your resources/js/app.js file as shown in Example 13-33.
require('./bootstrap');Vue.component('passport-clients',require('./components/passport/Clients.vue'));Vue.component('passport-authorized-clients',require('./components/passport/AuthorizedClients.vue'));Vue.component('passport-personal-access-tokens',require('./components/passport/PersonalAccessTokens.vue'));constapp=newVue({el:'#app'});
You now get three components that you can use anywhere in your application:
<passport-clients></passport-clients> <passport-authorized-clients></passport-authorized-clients> <passport-personal-access-tokens></passport-personal-access-tokens>
<passport-clients> shows your users all of the clients they’ve created. This means SpaceBook’s creator will see the SpaceBook client listed here when she logs in to Tweeter.
<passport-authorized-clients> shows your users all of the clients they’ve authorized to have access to their accounts. This means any users of both SpaceBook and Tweeter who have given SpaceBook access to their Tweeter account will see SpaceBook listed here.
<passport-personal-access-tokens> shows your users any personal access tokens they’ve created here. This means the creator of RaceBook, the SpaceBook competitor, will see his personal access token here that he’s been using to test out the Tweeter API.
If you are on a fresh install of Laravel and want to test these out, there are a few steps to take to get it working:
Follow the instructions given earlier in this chapter to get Passport installed.
In your terminal, run the following commands:
php artisan vendor:publish --tag=passport-components
npm install
npm run dev
php artisan make:auth
Open resources/views/home.blade.php and add the Vue component references (e.g., <passport-clients></passport-clients>) just below the <div class="card-body">.
If you’d like, you can just use those components as they are. But you can also use them as reference points to understand how to use the API and create your own frontend components in whatever format you’d like.
A few of these commands and directions will look different if you’re using Laravel Elixir. Check the Passport and Elixir docs to learn more.
If you’re familiar with OAuth, you probably noticed we haven’t talked about scopes. Everything we’ve covered so far can be customized by scope, but first let’s quickly cover what scopes are.
In OAuth, scopes are defined sets of privileges that are something other than “can do everything.” If you’ve ever gotten a GitHub API token before, for example, you might’ve noticed that some apps want access just to your name and email address, some want access to all of your repos, and some want access to your gists. Each of these is a “scope,” which allows both the user and the consumer app to define what access the consumer app needs to perform its job.
As shown in Example 13-34, you can define the scopes for your application in the boot() method of your AuthServiceProvider.
// AuthServiceProvideruseLaravel\Passport\Passport;...publicfunctionboot(){...Passport::tokensCan(['list-clips'=>'List sound clips','add-delete-clips'=>'Add new and delete old sound clips','admin-account'=>'Administer account details',]);}
Once you have your scopes defined, the consumer app can define which scopes it’s asking for access to. Just add a space-separated list of tokens in the “token” field to the initial redirect, in the scope field, as shown in Example 13-35.
When the user tries to authorize with this app, it’ll present the list of requested scopes. This way, the user will see the difference between “SpaceBook is requesting to see your email address” and “SpaceBook is requesting access to post as you and delete your posts and message your friends.”
You can check for scope using middleware or on the User instance.
Example 13-36 shows how to check on the User.
Route::get('/events',function(){if(auth()->user()->tokenCan('add-delete-clips')){//}});
There are two middleware you can use for this too, scope and scopes. To use these in your app, add them to $routeMiddleware in your app/Http/Kernel.php file:
'scopes'=>\Laravel\Passport\Http\Middleware\CheckScopes::class,'scope'=>\Laravel\Passport\Http\Middleware\CheckForAnyScope::class,
You can now use the middleware as illustrated in Example 13-37. scopes requires all of the defined scopes to be on the user’s token in order for the user to access the route, while scope requires at least one of the defined scopes to be on the user’s token.
// routes/api.phpRoute::get('clips',function(){// Access token has both the "list-clips" and "add-delete-clips" scopes})->middleware('scopes:list-clips,add-delete-clips');// orRoute::get('clips',function(){// Access token has at least one of the listed scopes})->middleware('scope:list-clips,add-delete-clips')
If you haven’t defined any scopes, the app will just work as if they don’t exist. The moment you use scopes, however, your consumer apps will have to explicitly define which scopes they’re requesting access with. The one exception to this rule is that if you’re using the password grant type your consumer app can request the * scope, which gives the token access to everything.
The first time you deploy your Passport-powered app, the Passport API won’t function until you generate keys for the app. This can be accomplished by running php artisan passport:keys on your production server, which will generate the encryption keys Passport uses to generate tokens.
Laravel offers a simple API token authentication mechanism. It’s not much different from a username and password: there’s a single token assigned to each user that clients can pass along with a request to authenticate that request for that user.
This API token mechanism is not nearly as secure as OAuth 2.0, so make sure you know it’s the right fit for your application before deciding to use it. Because there’s just a single token, it’s almost like a password—if someone gets that token, they have access to your whole system. It’s more secure, though, because you can force the tokens to be more un-guessable, and you can wipe and reset tokens at the slightest hint of a breach, which you can’t do with passwords.
So, token API authentication might not be the best fit for your app; but if it is, it couldn’t be much simpler to implement.
First, add a 60-character unique api_token column to your users table:
$table->string('api_token',60)->unique();
Next, update whatever method creates your new users and ensure it sets a value for this field for each new user. Laravel has a helper for generating random strings, so if you want to use that, just set the field to str_random(60) for each. You’ll also need to do this for preexisting users if you’re adding this to a live application.
To wrap any routes with this authentication method, use the auth:api route middleware, as in Example 13-38.
Route::prefix('api')->middleware('auth:api')->group(function(){//});
Note that, since you’re using an authentication guard other than the standard guard, you’ll need to specify that guard any time you use any auth() methods:
$user=auth()->guard('api')->user();
Laravel offers customizable error message pages for normal HTML views, but you can also customize the default 404 fallback response for calls with a JSON content type. To do so, add a Route::fallback call to your API.
// routes/api.phpRoute::fallback(function(){returnresponse()->json(['message'=>'Route Not Found'],404);})->name('api.fallback.404');
If you want to customize which route is returned when Laravel catches “not found” exceptions, you can update the exception handler using the respondWithRoute method.
// App\Exceptions\Handler.phppublicfunctionrender($request,Exception$exception){if($exceptioninstanceofModelNotFoundException&&$request->isJson()){returnRoute::respondWithRoute('api.fallback.404');}returnparent::render($request,$exception);}
Fortunately, testing APIs is actually simpler than testing almost anything else in Laravel.
We cover this in more depth in Chapter 12, but there are a series of methods for making assertions against JSON. Combine that capability with the simplicity of full-stack application tests and you can put together your API tests quickly and easily. Take a look at the common API testing pattern in Example 13-39.
...classDogsApiTestextendsTestCase{useWithoutMiddleware,RefreshDatabase;publicfunctiontest_it_gets_all_dogs(){$dog1=factory(Dog::class)->create();$dog2=factory(Dog::class)->create();$response=$this->getJson('api/dogs');$response->assertJsonFragment(['name'=>$dog1->name]);$response->assertJsonFragment(['name'=>$dog2->name]);}}
Note that we’re using WithoutMiddleware to avoid worrying about the authentication. You’ll want to test that separately, if at all (for more on authentication, see Chapter 9).
In this test we insert two dogs into the database, then visit the API route for listing all dogs and make sure both are present in the output.
You can cover all of your API routes simply and easily here, including modifying actions like POST and PATCH.
You can also use the actingAs method on the Passport Facade to test your scopes. Take a look at Example 13-40 to see a common pattern for testing scopes in Passport.
publicfunctiontest_it_lists_all_clips_for_those_with_list_clips_scope(){Passport::actingAs(factory(User::class)->create(),['list-clips']);$response=$this->getJson('api/clips');$response->assertStatus(200);}
Laravel is geared toward building APIs and makes it simple to work with JSON and RESTful APIs. There are some conventions, like for pagination, but much of the definition of exactly how your API will be sorted, or authenticated, or whatever else is up to you.
Laravel provides tools for authentication and testing, easy manipulation and reading of headers, and working with JSON, even automatically encoding all Eloquent results to JSON if they’re returned directly from a route.
Laravel Passport is a separate package that makes it simple to create and manage an OAuth server in your Laravel apps.
We covered how to store data in relational databases in Chapter 5, but there’s a lot more that can be stored, both locally and remotely. In this chapter we’ll cover filesystem and in-memory storage, file uploads and manipulation, nonrelational data stores, sessions, the cache, logging, cookies, and full-text search.
Laravel provides a series of file manipulation tools through the Storage facade, and a few helper functions.
Laravel’s filesystem access tools can connect to the local filesystem as well as S3, Rackspace, and FTP. The S3 and Rackspace file drivers are provided by Flysystem, and it’s simple to add additional Flysystem providers to your Laravel app—for example, Dropbox or WebDAV.
The definitions for Laravel’s file manager live in config/filesystems.php. Each connection is called a “disk,” and Example 14-1 lists the disks that are available out of the box.
...'disks'=>['local'=>['driver'=>'local','root'=>storage_path('app'),],'public'=>['driver'=>'local','root'=>storage_path('app/public'),'url'=>env('APP_URL').'/storage','visibility'=>'public',],'s3'=>['driver'=>'s3','key'=>env('AWS_ACCESS_KEY_ID'),'secret'=>env('AWS_SECRET_ACCESS_KEY'),'region'=>env('AWS_DEFAULT_REGION'),'bucket'=>env('AWS_BUCKET'),'url'=>env('AWS_URL'),],],
The storage_path() helper used in Example 14-1 links to Laravel’s configured storage directory, storage/. Anything you pass to it is added to the end of the directory name, so storage_path('public') will return the string storage/public.
The local disk connects to your local storage system and presumes it will be interacting with the app directory of the storage path, which is storage/app.
The public disk is also a local disk (although you can change it if you’d like), which is intended for use with any files you intend to be served by your application. It defaults to the storage/app/public directory, and if you want to use this directory to serve files to the public, you’ll need to add a symbolic link (symlink) to somewhere within the public/ directory. Thankfully, there’s an Artisan command for that:
# Maps public/storage to serve the files from storage/app/public
php artisan storage:linkThe s3 disk shows how Laravel connects to cloud-based file storage systems. If you’ve ever connected to S3 or any other cloud storage provider, this will be familiar; pass it your key and secret and some information defining the “folder” you’re working with, which in S3 is the region and the bucket.
In config/filesystem.php you can set the default disk, which is what will be used any time you call the Storage facade without specifying a disk. To specify a disk, call disk('diskname') on the facade:
Storage::disk('s3')->get('file.jpg');
The filesystems each provide the following methods:
get('file.jpg')Retrieves the file at file.jpg
put('file.jpg', $contentsOrStream)Puts the given file contents to file.jpg
putFile('myDir', $file)Puts the contents of a provided file (in the form of an instance of either Illuminate\Http\File or Illuminate\Http\UploadedFile) to the myDir directory, but with Laravel managing the entire streaming process and naming the file
exists('file.jpg')Returns a boolean of whether file.jpg exists
getVisibility('myPath')Gets the visibility for the given path (“public” or “private”)
setVisibility('myPath')Sets the visibility for the given path (“public” or “private”)
copy('file.jpg', 'newfile.jpg')Copies file.jpg to newfile.jpg
move('file.jpg', 'newfile.jpg')Moves file.jpg to newfile.jpg
prepend('my.log', 'log text')Adds content at the beginning of my.log
append('my.log', 'log text')Adds content to the end of my.log
delete('file.jpg')Deletes file.jpg
size('file.jpg')Returns the size in bytes of file.jpg
lastModified('file.jpg')Returns the Unix timestamp of when file.jpg was last modified
files('myDir')Returns an array of filenames in the directory myDir
allFiles('myDir')Returns an array of filenames in the directory myDir and all subdirectories
directories('myDir')Returns an array of directory names in the directory myDir
allDirectories('myDir')Returns an array of directory names in the directory myDir and all subdirectories
makeDirectory('myDir')Creates a new directory
deleteDirectory('myDir')Deletes myDir
If you’d prefer injecting an instance instead of using the File facade, typehint or inject Illuminate\Filesystem\Filesystem and you’ll get all the same methods available to you.
If you want to add an additional Flysystem provider, you’ll need to “extend” Laravel’s native storage system. In a service provider somewhere—it could be the boot() method of AppServiceProvider, but it’d be more appropriate to create a unique service provider for each new binding—use the Storage facade to add new storage systems, as seen in Example 14-2.
// Some service providerpublicfunctionboot(){Storage::extend('dropbox',function($app,$config){$client=newDropboxClient($config['accessToken'],$config['clientIdentifier']);returnnewFilesystem(newDropboxAdapter($client));});}
One of the more common usages for the Storage facade is accepting file uploads from your application’s users. Let’s look at a common workflow for that, in Example 14-3.
...classDogsController{publicfunctionupdatePicture(Request$request,Dog$dog){Storage::put("dogs/{$dog->id}",file_get_contents($request->file('picture')->getRealPath()));}}
We put() to a file named dogs/{id}, and we grab our contents from the uploaded file. Every uploaded file is a descendant of the SplFileInfo class, which provides a getRealPath() method that returns the path to the file’s location. So, we get the temporary upload path for the user’s uploaded file, read it with file_get_contents(), and pass it into Storage::put().
Since we have this file available to us here, we can do anything we want to the file before we store it—use an image manipulation package to resize it if it’s an image, validate it and reject it if it doesn’t meet our criteria, or whatever else we like.
If we wanted to upload this same file to S3 and we had our credentials stored in config/filesystems.php, we could just adjust Example 14-3 to call Storage::disk('s3')->put(); we’ll now be uploading to S3. Take a look at Example 14-4 to see a more complex upload example.
...classDogsController{publicfunctionupdatePicture(Request$request,Dog$dog){$original=$request->file('picture');// Resize image to max width 150$image=Image::make($original)->resize(150,null,function($constraint){$constraint->aspectRatio();})->encode('jpg',75);Storage::put("dogs/thumbs/{$dog->id}",$image->getEncoded());}
I used an image library called Intervention in Example 14-4 just as an example; you can use any library you want. The important point is that you have the freedom to manipulate the files however you want before you store them.
Laravel 5.3 introduced the ability to store an uploaded file using the file itself. Learn more in Example 7-12.
Just like Storage makes it easy to accept uploads from users, it also simplifies the task of returning files to them. Take a look at Example 14-5 for the simplest example.
publicfunctiondownloadMyFile(){returnStorage::download('my-file.pdf');}
Session storage is the primary tool we use in web applications to store state between page requests. Laravel’s session manager supports session drivers using files, cookies, a database, Memcached or Redis, or in-memory arrays (which expire after the page request and are only good for tests).
You can configure all of your session settings and drivers in config/session.php. You can choose whether or not to encrypt your session data, select which driver to use (file is the default), and specify more connection-specific details like the length of session storage and which files or database tables to use. Take a look at the session docs to learn about specific dependencies and settings you need to prepare for whichever driver you choose to use.
The general API of the session tools allows you to save and retrieve data based on individual keys: session()->put('user_id') and session()->get('user_id'), for example. Make sure to avoid saving anything to a flash session key, since Laravel uses that internally for flash (only available for the next page request) session storage.
The most common way to access the session is using the Session facade:
session()->get('user_id');
But you can also use the session() method on any given Illuminate Request object, as in Example 14-6.
Route::get('dashboard',function(Request$request){$request->session()->get('user_id');});
Or you can inject an instance of Illuminate\Session\Store, as in Example 14-7.
Route::get('dashboard',function(Illuminate\Session\Store$session){return$session->get('user_id');});
Finally, you can use the global session() helper. Use it with no parameters to get a session instance, with a single string parameter to “get” from the session, or with an array to “put” to the session, as demonstrated in Example 14-8.
// get$value=session()->get('key');$value=session('key');// putsession()->put('key','value');session(['key','value']);
If you’re new to Laravel and not sure which to use, I’d recommend using the global helper.
The two most common methods are get() and put(), but let’s take a look at each of the available methods and their parameters:
session()->get($key, $fallbackValue)get() pulls the value of the provided key out of the session. If there is no value attached to that key, it will return the fallback value instead (and if you don’t provide a fallback, it will return null). The fallback value can be a string or a closure, as you can see in the following examples.
$points=session()->get('points');$points=session()->get('points',0);$points=session()->get('points',function(){return(newPointGetterService)->getPoints();});
session()->put($key, $value)put() stores the provided value in the session at the provided key:
session()->put('points',45);$points=session()->get('points');
session()->push($key, $value)If any of your session values are arrays, you can use push() to add a value onto the array:
session()->put('friends',['Saúl','Quang','Mechteld']);session()->push('friends','Javier');
session()->has($key)has() checks whether there’s a value set at the provided key:
if(session()->has('points')){// do something}
You can also pass an array of keys, and it only returns true if all of the keys exist.
If a session value is set, but the value is null, session()->has() will return false.
session()->exists($key)exists() checks whether there’s a value set at the provided key, like has(), but unlike has(), will return true even if the set value is null.
if(session()->exists('points')){// returns true even if 'points' is set to null}
session()->all()all() returns an array of everything that’s in the session, including those values set by the framework. You’ll likely see values under keys like _token (CSRF tokens), _previous (previous page, for back() redirects), and flash (for flash storage).
session()->forget($key) and session()->flush()forget() removes a previously set session value. flush() removes every session value, even those set by the framework:
session()->put('a','awesome');session()->put('b','bodacious');session()->forget('a');// a is no longer set, b is still setsession()->flush();// session is now empty
session()->pull($key, $fallbackValue)pull() is the same as get(), except that it deletes the value from the session after pulling it.
session()->regenerate()It’s not common, but if you need to regenerate your session ID, regenerate() is there for you.
There are three more methods we haven’t covered yet, and they all have to do with something called “flash” session storage.
One very common pattern for session storage is to set a value that you only want available for the next page load. For example, you might want to store a message like “Updated post successfully.” You could manually get that message and then wipe it on the next page load, but if you use this pattern a lot it can get wasteful. Enter flash session storage: keys that are expected to only last for a single page request.
Laravel handles the work for you, and all you need to do is use flash() instead of put(). The useful methods here are:
session()->flash($key, $value)flash() sets the session key to the provided value for just the next page request.
session()->reflash() and session()->keep($key)If you need the previous page’s flash() session data to stick around for one more request, you can use reflash() to restore the entire flash contents for the next request or keep($key) to just restore a single flash value for the next request. keep() can also accept an array of keys to reflash.
Caches are structured very similarly to sessions. You provide a key and Laravel stores it for you. The biggest difference is that the data in a cache is cached per application and the data in a session is cached per user. That means caches are more commonly used for storing large database results, API calls, or other slow queries that can stand to get a little bit “stale.”
The cache configuration settings are available at config/cache.php. Just like with a session, you can set the specific configuration details for any of your drivers, and also choose which will be your default. Laravel uses the file cache driver by default, but you can also use Memcached or Redis, APC, or a database, or write your own cache driver. Take a look at the cache docs to learn about specific dependencies and settings you need to prepare for whichever driver you choose to use.
Just like with sessions, there are a few different ways to access a cache. You can use the facade:
$users=Cache::get('users');
You can get an instance from the container, as in Example 14-9.
Route::get('users',function(Illuminate\Contracts\Cache\Repository$cache){return$cache->get('users');});
Or you can use the global cache() helper (introduced in Laravel 5.3), as in Example 14-10.
// get from cache$users=cache('key','default value');$users=cache()->get('key','default value');// put for $minutes duration$users=cache(['key'=>'value'],$minutes);$users=cache()->put('key','value',$minutes);
If you’re new to Laravel and not sure which to use, I’d recommend using the global helper.
Let’s take a look at the methods you can call on a Cache instance:
cache()->get($key, $fallbackValue) and cache()->pull($key, $fallbackValue)get() makes it easy to retrieve the value for any given key. pull() is the same as get() except it removes the cached value after retrieving it.
cache()->put($key, $value, $minutesOrExpiration)put() sets the value of the specified key for a given number of minutes.
If you’d prefer setting an expiration date/time instead of a number of minutes, you can pass a Carbon object as the third parameter:
cache()->put('key','value',now()->addDay());
cache()->add($key, $value)add() is similar to put(), except if the value already exists, it won’t set it. Also, the method returns a boolean of whether or not the value was actually added:
$someDate=now();cache()->add('someDate',$someDate);// returns true$someOtherDate=now()->addHour();cache()->add('someDate',$someOtherDate);// returns false
cache()->forever($key, $value)forever() saves a value to the cache for a specific key; it’s the same as put(), except the values will never expire (until they’re removed with forget()).
cache()->has($key)has() returns a boolean of whether or not there’s a value at the provided key.
cache()->remember($key, $minutes, $closure) and cache()->rememberForever($key, $closure)remember() provides a single method to handle a very common flow: look up whether a value exists in the cache for a certain key, and if it doesn’t, get that value somehow, save it to the cache, and return it.
remember() lets you provide a key to look up, the number of minutes it should be saved for, and a closure to define how to look it up, in case the key has no value set. rememberForever() is the same, except it doesn’t need you to set the number of minutes it should expire after. Take a look at the following example to see a common user scenario for remember():
// Either returns the value cached at "users" or gets "User::all()",// caches it at "users", and returns it$users=cache()->remember('users',120,function(){returnUser::all();});
cache()->increment($key, $amount) and cache()->decrement($key, $amount)increment() and decrement() allow you to increment and decrement integer values in the cache. If there is no value at the given key, it’ll be treated as if it were 0, and if you pass a second parameter to increment or decrement, it’ll increment or decrement by that amount instead of by 1.
cache()->forget($key) and cache()->flush()forget() works just like Session’s forget() method: pass it a key and it’ll wipe that key’s value. flush() wipes the entire cache.
You might expect cookies to work the same as the session and the cache. A facade and a global helper are available for these too, and our mental models of all three are similar: you can get or set their values in the same way.
But because cookies are inherently attached to the requests and responses, you’ll need to interact with cookies differently. Let’s look really briefly at what makes cookies different.
Cookies can exist in three places in Laravel. They can come in via the request, which means the user had the cookie when she visited the page. You can read that with the Cookie facade, or you can read it off of the request object.
They can also be sent out with a response, which means the response will instruct the user’s browser to save the cookie for future visits. You can do this by adding the cookie to your response object before returning it.
And lastly, a cookie can be queued. If you use the Cookie facade to set a cookie, you have put it into a “CookieJar” queue, and it will be removed and added to the response object by the AddQueuedCookiesToResponse middleware.
You can get and set cookies in three places: the Cookie facade, the cookie() global helper, and the request and response objects.
The Cookie facade is the most full-featured option, allowing you to not only read and make cookies, but also to queue them to be added to the response. It provides the following methods:
Cookie::get($key)To pull the value of a cookie that came in with the request, you can just run Cookie::get('cookie-name'). This is the simplest option.
Cookie::has($key)You can check whether a cookie came in with the request using Cookie::has('cookie-name'), which returns a boolean.
Cookie::make(...params)If you want to make a cookie without queueing it anywhere, you can use Cookie::make(). The most likely use for this would be to make a cookie and then manually attach it to the response object, which we’ll cover in a bit.
Here are the parameters for make(), in order:
$name is the name of the cookie
$value is the content of the cookie
$minutes specifies how many minutes the cookie should live
$path is the path under which your cookie should be valid
$domain lists the domains for which your cookie should work
$secure indicates whether the cookie should only be transmitted over a secure (HTTPS) connection
$httpOnly indicates whether the cookie will be made accessible only through the HTTP protocol
$raw indicates whether the cookie should be sent without URL encoding
$sameSite indicates whether the cookie should be available for cross-site requests; options are “lax”, “strict”, or null
Cookie::make()Returns an instance of Symfony\Component\HttpFoundation\Cookie.
The CookieJar that the Cookie facade instance uses reads its defaults from the session config. So, if you change any of the configuration values for the session cookie in config/session.php, those same defaults will be applied to all of your cookies that you create using the Cookie facade.
Cookie::queue(Cookie || ...params)If you use Cookie::make(), you’ll still need to attach the cookie to your response, which we’ll cover shortly. Cookie::queue() has the same syntax as Cookie::make(), but it enqueues the created cookie to be automatically attached to the response by middleware.
If you’d like, you can also just pass a cookie you’ve created yourself into Cookie::queue().
Here’s the simplest possible way to add a cookie to the response in Laravel:
Cookie::queue('dismissed-popup',true,15);
Cookies can only be returned as a part of a response. So, if you enqueue cookies with the Cookie facade and then your response isn’t returned correctly—for example, if you use PHP’s exit() or something halts the execution of your script—your cookies won’t be set.
The cookie() global helper will return a CookieJar instance if you call it with no parameters. However, two of the most convenient methods on the Cookie facade—has() and get()—exist only on the facade, not on the CookieJar. So, in this context, I think the global helper is actually less useful than the other options.
The one task for which the cookie() global helper is useful is creating a cookie. If you pass parameters to cookie(), they’ll be passed directly to the equivalent of Cookie::make(), so this is the fastest way to create a cookie:
$cookie=cookie('dismissed-popup',true,15);
You can also inject an instance of Illuminate\Cookie\CookieJar anywhere in the app, but you’ll have the same limitations discussed here.
Since cookies come in as a part of the request and are set as a part of the response, those Illuminate objects are the places they actually live. The Cookie facade’s get(), has(), and queue() methods are just proxies to interact with the request and response objects.
So, the simplest way to interact with cookies is to pull cookies from the request and set them on the response.
Once you have a copy of your request object—if you don’t know how to get one, just try app('request')—you can use the request object’s cookie() method to read its cookies, as shown in Example 14-11.
As you can see in this example, the cookie() method has two parameters: the cookie’s name and, optionally, the fallback value.
Whenever you have your response object ready, you can use the cookie() method (or the withCookie() method in Laravel prior to 5.3) on it to add a cookie to the response, like in Example 14-12.
If you’re new to Laravel and not sure which option to use, I’d recommend setting cookies on the request and response objects. It’s a bit more work, but will lead to fewer surprises if future developers don’t understand the CookieJar queue.
We’ve seen a few really brief examples of logging so far in this book when we were talking about other concepts like the container and facades, but let’s briefly look at what options you have with logging beyond just Log::info('Message').
The purpose of logs are to increase “discoverability”, or your ability to understand what’s going in at any given moment in your application.
Logs are short messages, sometimes with some data embedded in a human-readable form, that your code will generate for the sake of understanding what was happening during the execution of the app. Each log must be captured at a specific “level”, which can vary from emergency (something very bad happened) to debug (something of almost no significance happened).
Without any modifications, your app will write any log statements to a file located at storage/logs/laravel.log, and each log statement will look a little bit like this:
[2018-09-22 21:34:38] local.ERROR: Something went wrong.
You can see we have the date, time, environment, error level, and message, all on one line. However, Laravel also (by default) logs any un-caught exceptions, and in that case you’ll see the entire stack trace inline.
We’ll cover how to log, why to log, and how to log elsewhere (for example, Slack) in the following section.
The most common use cases for logs are to act as a semi-disposable record of things that happened that you may care about later, but to which you don’t definitively need programmatic access. The logs are more about learning what’s going on in the app and less about creating structured data your app can consume.
For example, if you want to have code that consumes a record of every user login and does something interesting with it, that’s a use case for a “logins” database table. However, if you have a casual interest in those logins but you’re not entirely certain whether you care or whether you need that information programmatically, you may just throw a debug or info level log on it and forget about it.
Logs are also common when you need to see the value of something at the moment it goes wrong, or at a certain time of day, or something else that means you want the data at a time when you’re not around. Throw a log statement in the code, get the data you need out of the logs, and either keep it in the code for later usage or just delete it again.
The simplest way to write a log entry in Laravel is to use the Log facade, and use the method on that facade that’s for the level of log you’d like to record. The levels are the same levels defined in RFC 5424:
Log::emergency($message);Log::alert($message);Log::critical($message);Log::error($message);Log::warning($message);Log::notice($message);Log::info($message);Log::debug($message);
You can also, optionally, pass a second parameter that’s an array of connected data.
Log::error('Failed to upload user image.',['user'=>$user]);
This additional information may be captured differently by different log destinations, but here’s how this looks in the default local log (although it will be just a single line in the log):
[2018-09-27 20:53:31] local.ERROR: Failed to upload user image. {
"user":"[object] (App\\User: {
\"id\":1,
\"name\":\"Matt\",
\"email\":\"matt@tighten.co\",
\"email_verified_at\":null,
\"api_token\":\"long-token-here\",
\"created_at\":\"2018-09-22 21:39:55\",
\"updated_at\":\"2018-09-22 21:40:08\"
})"
}
In Laravel 5.6, the way we configure and capture logs was changed pretty significantly to introduce the idea of multiple “channels” and “drivers”. If you’re working in 5.5 or earlier, you can skip on to “Full-Text Search with Laravel Scout”.
Like many other aspects of Laravel (file storage, database, mail, etc.) you can configure your logs to use one or more predefined log types, which you define in the config file, and each “type” involves passing various configuration details to a specific log driver.
With logs, these log types are called “channels”, and out of the box you’ll have options for “stack”, “single”, “daily”, “slack”, “stderr”, “syslog”, and “errorlog”.
Each channel is connected to a single driver; the available drivers are “single”, “daily”, “slack”, “syslog”, “errorlog”, “monolog”, “custom”, or “stack”. To learn more about these drivers and the full list of channels available, take a look at the Logging Docs.
Let’s cover the most common channels, though: stack, single, daily, and slack.
The single channel writes every log entry to a single file, which you’ll define in the path key. You can see its default configuration here:
'single'=>['driver'=>'single','path'=>storage_path('logs/laravel.log'),'level'=>'debug',],
This means it’ll only log events at the debug level or higher, and it will write them all to a single file, storage/logs/laravel.log..
The daily channel is just like the single channel, but it splits out a new file for each day. You can see its default config here:
'daily'=>['driver'=>'daily','path'=>storage_path('logs/laravel.log'),'level'=>'debug','days'=>7,],
Its config is similar to single, but we now can set how many days of logs to keep before they’re cleaned up, and the date will now be appended to the filename we specify. For example, the config above will generate a file named storage/logs/laravel-2018-09-28.log.
The Slack channel provides two things. First, it makes it easy to send your logs (or, more likely, only certain logs) over to Slack.
But second, it shows us that you’re not limited to just the handlers that come out of the box with Laravel. We’ll cover this in a second, but this isn’t a custom Slack implementation; it’s just Laravel building a log driver that connects to the Monolog “Slack” handler, and if you can use any Monolog handler, you have a lot of options available to you.
'slack'=>['driver'=>'slack','url'=>env('LOG_SLACK_WEBHOOK_URL'),'username'=>'Laravel Log','emoji'=>':boom:','level'=>'critical',],
Finally, the stack channel. This is the channel that’s enabled by default on your application.
'stack'=>['driver'=>'stack','channels'=>['single'],],
The stack channel simply sends all your logs to more than one channel. That’s it! So while the stack channel is configured by default on your Laravel apps, its “channels” array is set to “single” by default, so in reality, your app is just using the “single” log channel.
But, what if you wanted everything of the level “info” and above to go to the daily files, but you wanted “critical” and higher log messages to go to Slack? It’s easy, with the stack driver:
'channels'=>['stack'=>['driver'=>'stack','channels'=>['daily','slack'],],'daily'=>['driver'=>'daily','path'=>storage_path('logs/laravel.log'),'level'=>'info','days'=>7,],'slack'=>['driver'=>'slack','url'=>env('LOG_SLACK_WEBHOOK_URL'),'username'=>'Laravel Log','emoji'=>':boom:','level'=>'critical',],
However, they may also just be times that you want to control exactly which log messages go where. You can do that, too. Just specify the channel when you call on the Log facade:
Log::channel('slack')->info("This message will go to Slack.");
If you’d like to customize how each log is sent to each channel, or implement custom Monolog handlers, check out the Logs docs to learn more.
Laravel Scout is a separate package that you can bring into your Laravel apps to add full-text search to your Eloquent models. Scout makes it easy to index and search the contents of your Eloquent models; it ships with an Algolia driver, but there are also community packages for other providers. I’ll assume you’re using Algolia.
First, pull in the package in any Laravel 5.3+ app:
composer require laravel/scout
If you’re using a version of Laravel prior to 5.5, you will need to manually register the service provider by add Laravel\Scout\ScoutServiceProvider::class, to the providers section of config/app.php.
You’ll want to set up your Scout configuration. Run php artisan vendor:publish --provider="Laravel\Scout\ScoutServiceProvider" and paste your Algolia credentials in config/scout.php.
Finally, install the Algolia SDK:
composer require algolia/algoliasearch-client-php
In your model (we’ll use Review, for a book review, for this example), import the Laravel\Scout\Searchable trait.
You can define which properties are searchable using the toSearchableArray() method (it defaults to mirroring toArray()), and define the name of the model’s index using the searchableAs() method (it defaults to the table name).
Scout subscribes to the create/delete/update events on your marked models. When you create, update, or delete any rows, Scout will sync those changes up to Algolia. It’ll either make those changes synchronously with your updates or, if you configure Scout to use a queue, queue the updates.
Scout’s syntax is simple. For example, to find any Review with the word Llew in it:
Review::search('Llew')->get();
You can also modify your queries as you would with regular Eloquent calls:
// Get all records from the Review that match the term "Llew",// limited to 20 per page and reading the page query parameter,// just like Eloquent paginationReview::search('Llew')->paginate(20);// Get all records from the Review that match the term "Llew"// and have the account_id field set to 2Review::search('Llew')->where('account_id',2)->get();
What comes back from these searches? A collection of Eloquent models, rehydrated from your database. The IDs are stored in Algolia, which returns a list of matched IDs; Scout then pulls the database records for those and returns them as Eloquent objects.
You don’t have full access to the complexity of SQL WHERE commands, but it provides a basic framework for comparison checks like you can see in the code samples here.
At this point your app will be making HTTP requests to Algolia on every request that modifies any database records. This can slow down your application quickly, which is why Scout makes it easy to push all of its actions onto a queue.
In config/scout.php, set queue to true so that these updates are set to be indexed asynchronously. Your full-text index is now operating under “eventual consistency”; your database records will receive the updates immediately, and the updates to your search indexes will be queued and updated as fast as your queue worker allows.
If you need to perform a set of operations and avoid triggering the indexing in response, wrap the operations in the withoutSyncingToSearch() method on your model:
Review::withoutSyncingToSearch(function(){// make a bunch of reviews, e.g.factory(Review::class,10)->create();});
Sometimes you might only want to index records if they meet a certain condition. You may use the shouldBeSearchable() method on the model class to achieve this.
publicfunctionshouldBeSearchable(){return$this->isApproved();}
If you want to manually trigger indexing your model, you can do it using code in your app or via the command line.
To manually trigger indexing from your code, add searchable() to the end of any Eloquent query and it will index all of the records that were found in that query:
Review::all()->searchable();
You can also choose to scope the query to only those you want to index. However, Scout is smart enough to insert new records and update old records, so you may choose to just reindex the entire contents of the model’s database table.
You can also run searchable() on relationship methods:
$user->reviews()->searchable();
If you want to unindex any records with the same sort of query chaining, just use unsearchable() instead:
Review::where('sucky',true)->unsearchable();
You can also trigger indexing with an Artisan command:
php artisan scout:import "App\Review"
This will chunk all of the Review models and index them all.
Testing most of these features is as simple as just using them in your tests; no need to mock or stub. The default configuration will already work—for example, take a look at phpunit.xml to see that your session driver and cache driver have been set to values appropriate for tests.
However, there are a few convenience methods and a few gotcha’s that you should know about before you attempt to test them all.
Testing file uploads can be a bit of a pain, but follow these steps and it will be clear.
First, let’s look at how to manually create a Illuminate\Http\UploadedFile object for use in our application testing (Example 14-13).
publicfunctiontest_file_should_be_stored(){Storage::fake('public');$file=UploadedFile::fake()->image('avatar.jpg');$response=$this->postJson('/avatar',['avatar'=>$file,]);// Assert the file was stored...Storage::disk('public')->assertExists("avatars/{$file->hashName()}");// Assert a file does not exist...Storage::disk('public')->assertMissing('missing.jpg');}
We’ve created a new instance of UploadedFile that refers to our testing file, and we can now use it to test our routes.
If your route is expecting a real file to exist, sometimes the best way to make it testable is to make that real file actually exist. Let’s say every user must have a profile picture.
First, let’s set up the model factory for the user to use Faker to make a copy of the picture, as in Example 14-14.
$factory->define(User::class,function(Faker\Generator$faker){return['picture'=>$faker->file(storage_path('tests'),// source directorystorage_path('app'),// target directoryfalse// return just filename, not full path),'name'=>$faker->name,];});
Faker’s file() method picks a random file from the source directory and copies it to the target directory, and then returns the filename. So we’ve just picked a random file from the storage/tests directory, copied it to the storage/app directory, and set its filename as the picture property on our User. At this point we can use a User in tests on routes that expect the User to have a picture, as seen in Example 14-15.
publicfunctiontest_user_profile_picture_echoes_correctly(){$user=factory(User::class)->create();$response=$this->get(route('users.show',$user->id));$response->assertSee($user->picture);}
Of course, in many contexts you can just generate a random string there without even copying a file. But if your routes check for the file’s existence or run any operations on the file, this is your best option.
If you need to assert something has been set in the session, you can use some convenience methods Laravel makes available in every test. All of these methods are available in your tests on the Illuminate\Foundation\Testing\TestResponse object:
assertSessionHas($key, $value = null)Asserts that the session has a value for a particular key, and, if the second parameter is passed, that that key is a particular value:
publicfunctiontest_some_thing(){// do stuff that ends up with a $response object...$response->assertSessionHas('key','value');}
assertSessionHasAll(array $bindings)If passed an array of key/value pairs, asserts that all of the keys are equal to all of the values. If one or more of the array entries is just a value (with PHP’s default numeric key), it will just be checked for existence in the session:
$check=['has','hasWithThisValue'=>'thisValue',]$response->assertSessionHasAll($check);
assertSessionMissing($key)Asserts that the session does not have a value for a particular key.
assertSessionHasErrors($bindings = [], $format = null)Asserts that the session has an errors value. This is the key Laravel uses to send errors back from validation failures.
If the array contains just keys, it will check that errors are set with those keys:
$response=$this->post('test-route',['failing'=>'data']);$response->assertSessionHasErrors(['name','email']);
You can also pass values for those keys, and optionally a $format, to check that the messages for those errors came back the way you expected:
$response=$this->post('test-route',['failing'=>'data']);$response->assertSessionHasErrors(['email'=>'<strong>The email field is required.</strong>'],'<strong>:message</strong>');
There’s nothing special about testing your features that use cache—just do it:
Cache::put('key','value',15);$this->assertEquals('value',Cache::get('key'));
Laravel uses the “array” cache driver by default in your testing environment, which just stores your cache values in memory.
If you need to set a cookie before testing a route in your application tests, you can manually pass cookies to one of the parameters of the call() method. To learn more about call(), check out Chapter 12.
Your cookies won’t work in your tests unless you exclude them from Laravel’s cookie encryption middleware. You can do this by teaching the EncryptCookies middleware to temporarily disable itself for that cookie:
useIlluminate\Cookie\Middleware\EncryptCookies;...$this->app->resolving(EncryptCookies::class,function($object){$object->disableFor('cookie-name');});// ...run test
That means you can set and check against a cookie with something like Example 14-16.
If you want to test that a response has a cookie set, you can use either seeCookie() to test for the cookie:
$response=$this->get('cookie-setting-route');$response->assertCookie('cookie-name');
Or you could use assertPlainCookie() to test for the cookie and to assert that it’s not encrypted.
The simplest way to test that a certain log was written is by making assertions against the Log facade (learn more in “Faking other Facades”).
Here’s a quick example:
// Test filepublicfunctiontest_new_accounts_generate_log_entries(){Log::shouldReceive('info')->once()->with('New account created!');// Create a new account$this->post(route('accounts.store'),['email'=>'matt@mattstauffer.com']);}// AccountsControllerpublicfunctionstore(){// Create account...Log::info('New account created!');}
There’s also a package called Log Fake that expands on what you can do with the facade testing shown above and allows you to write more customized assertions against your logs.
If you need to test code that uses Scout data, you’re probably not going to want your tests triggering indexing actions or reading from Scout. Simply add an environment variable to your phpunit.xml to disable Scout’s connection to Algolia:
<envname="SCOUT_DRIVER"value="null"/>
Laravel provides simple interfaces to many common storage operations: filesystem access, sessions, cookies, the cache, and search. Each of these APIs is the same regardless of which provider you use, which Laravel enables by allowing multiple “drivers” to serve the same public interface. This makes it simple to switch providers depending on the environment, or as the needs of the application change.
Sending an application’s users notifications via email, Slack, SMS, or another notification system is a common but surprisingly complex requirement. Laravel’s mail and notification features provide consistent APIs that abstract away the need to pay too close attention to any particular provider. Just like in Chapter 14, you’ll write your code once and choose at the configuration level which provider you’ll use to send your email or notifications.
Laravel’s mail functionality is a convenience layer on top of SwiftMailer, and out of the box Laravel comes with drivers for Mailgun, Mandrill, Sparkpost, SES, SMTP, PHP Mail, and Sendmail.
For all of the cloud services, you’ll set your authentication information in config/services.php. However, if you take a look you’ll see there are already keys there—and in config/mail.php—that allow you to customize your application’s mail functionality in .env using variables like MAIL_DRIVER and MAILGUN_SECRET.
If you’re using any of the cloud-based API drivers, you’ll need to bring Guzzle in with Composer. You can run the following command to add it:
composer require guzzlehttp/guzzle
If you use the SES driver, you’ll need to run the following command:
composer require aws/aws-sdk-php:~3.0
There are two different syntaxes in Laravel for sending mail: classic and mailable. The mailable syntax is the preferred syntax since 5.3, so we’re going to focus on that in this book. But for those who are working in 5.1 or 5.2, here’s a quick look at how the classic syntax (Example 15-1) works.
::send('emails.assignment-created',['trainer'=>$trainer,'trainee'=>$trainee],function($m)use($trainer,$trainee){$m->from($trainer->,$trainer->name);$m->to($trainee->,$trainee->name)->subject('A New Assignment!');});
The first parameter of Mail::send() is the name of the view. Remember, emails.assignment means resources/views/emails/assignment-created.blade.php or resources/views/emails/assignment-created.php.
The second parameter is an array of data that you want to pass to the view.
The third parameter is a closure, in which you define how and where to send the email: from, to, CC, BCC, subject, and any other metadata. Make sure to use any variables you want access to within the closure. And note that the closure is passed one parameter, which we’ve named $m; this is the message object.
Take a look at the old docs to learn about the classic mail syntax.
Laravel 5.3 introduced a new mail syntax called the “mailable.” It works the same as the classic mail syntax, but instead of defining your mail messages in a closure, you instead create a specific PHP class to represent each mail.
To make a mailable, use the make:mail Artisan command:
php artisan make:mail AssignmentCreated
Example 15-2 shows what that class looks like.
<?phpnamespaceApp\Mail;useIlluminate\Bus\Queueable;useIlluminate\Mail\Mailable;useIlluminate\Queue\SerializesModels;useIlluminate\Contracts\Queue\ShouldQueue;classAssignmentCreatedextendsMailable{useQueueable,SerializesModels;/*** Create a new message instance.** @return void*/publicfunction__construct(){//}/*** Build the message.** @return $this*/publicfunctionbuild(){return$this->view('view.name');}}
This class probably looks familiar—it’s shaped almost the same as a Job. It even imports the Queuable trait for queuing your mail and the SerializesModels trait so any Eloquent models you pass to the constructor will be serialized correctly.
So, how does this work? The build() method on a mailable is where you’re going to define which view to use, what the subject is, and anything else you want to tweak about the mail except who it’s going to. The constructor is the place where you’ll pass in any data, and any public properties on your mailable class will be available to the template.
Take a look at Example 15-3 to see how we might update the autogenerated mailable for our assignment example.
<?phpnamespaceApp\Mail;useIlluminate\Bus\Queueable;useIlluminate\Mail\Mailable;useIlluminate\Queue\SerializesModels;useIlluminate\Contracts\Queue\ShouldQueue;classAssignmentCreatedextendsMailable{useQueueable,SerializesModels;public$trainer;public$trainee;publicfunction__construct($trainer,$trainee){$this->trainer=$trainer;$this->trainee=$trainee;}publicfunctionbuild(){return$this->subject('New assignment from '.$this->trainer->name)->view('emails.assignment-created');}}
Example 15-4 shows how to send a mailable.
// Simple send::to($user)->send(newAssignmentCreated($trainer,$trainee));// With CC/BCC/etc.::to($user1))->cc($user2)->bcc($user3)->send(newAssignmentCreated($trainer,$trainee));// With collections::to('me@app.com')->bcc(User::all())->send(newAssignmentCreated($trainer,$trainee))
Mail templates are just like any other template. They can extend other templates, use sections, parse variables, contain conditional or looping directives, and do anything else you can do in a normal Blade view.
Take a look at Example 15-5 to see a possible emails.assignment-created template for Example 15-3.
<!-- resources/views/emails/assignment-created.blade.php --><p>Hey {{ $trainee->name }}!</p><p>You have received a new training assignment from<b>{{ $trainer->name }}</b>. Check out your<ahref="{{ route('training-dashboard') }}">training dashboard</a>now!</p>
In Example 15-3, both $trainer and $trainee are public properties on your mailable, which makes them available to the template.
If you want to explicitly define which variables are passed to the template, you can chain the with() method onto your build() call as in Example 15-6.
publicfunctionbuild(){return$this->subject('You have a new assignment!')->view('emails.assignment')->with(['assignment'=>$this->event->name]);}
So far we’ve used the view() method in our build() call stacks. This expects the template we’re referencing to pass back HTML. If you’d like to pass a plain-text version, the text() method defines your plain-text view:
publicfunctionbuild(){return$this->view('emails.reminder')->text('emails.reminder_plain');}
Here are a few of the methods available to you to customize your message in the build() method of your mailable:
from($address, $name = null)Sets the “from” name and address—represents the author
subject($subject)Sets the email subject
attach($file, array $options = [])Attaches a file; valid options are mime for MIME type and as for display name
attachData($data, $name, array $options = [])Attaches a file from a raw string; same options as attach()
attachFromStorage($path, $name = null, array $options = [])Attaches a file stored in any of your filesystem disks
priority($level = 3)Set the email’s priority, where 1 is the highest and 5 is the lowest
Finally, if you want to perform any manual modifications on the underlying Swift message, you can do that using withSwiftMessage(), as shown in Example 15-7.
publicfunctionbuild(){return$this->subject('Howdy!')->withSwiftMessage(function($swift){$swift->setReplyTo('noreply@email.com');})->view('emails.howdy');}
Example 15-8 shows three options for how to attach files or raw data to your email.
// Attach a file using the local filenamepublicfunctionbuild(){return$this->subject('Your whitepaper download')->attach(storage_path('pdfs/whitepaper.pdf'),['mime'=>'application/pdf',// Optional'as'=>'whitepaper-barasa.pdf'// Optional])->view('emails.whitepaper');}// Attach a file passing the raw datapublicfunctionbuild(){return$this->subject('Your whitepaper download')->attachData(file_get_contents(storage_path('pdfs/whitepaper.pdf')),'whitepaper-barasa.pdf',['mime'=>'application/pdf'// Optional])->view('emails.whitepaper');}// Attach a file stored in one of your filesystem disk, like S3publicfunctionbuild(){return$this->subject('Your whitepaper download')->view('emails.whitepaper')->attachFromStorage('/pdfs/whitepaper.pdf');}
And you can see how to embed images directly into your email in Example 15-9.
<!--emails/image.blade.php--!>Hereisanimage:<imgsrc="{{$message->embed(storage_path('embed.jpg')) }}">Or,thesameimageembeddingthedata:<imgsrc="{{$message->embedData(file_get_contents(storage_path('embed.jpg')), 'embed.jpg') }}">
Markdown mail messages allow you to write your email content in Markdown, after which it will be converted into full HTML (and plain text) emails with Laravel’s built-in, responsive HTML templates. You can also tweak these templates to make a customized email template that’s still simple for your developers and non-developers to create content for.
First, run the make:mail Artisan command with the markdown flag:
php artisan make:mail AssignmentCreated --markdown=emails.assignment-created
You can see an example what the mail file it’ll generate looks like in Example 15-10.
source,php
class AssignmentCreated extends Mailable
{
// ...
public function build()
{
return $this->markdown('emails.assignment-created');
}
}As you can see, this is almost exactly the same as a normal mailable file in Laravel. The main difference is that you’re calling the markdown() method instead of the view() method. Also note that the template you’re referencing should represent a “Markdown template”, not a normal Blade template.
What this means is that, where a normal email template may be expected—with the use of includes and inheritance like any Blade file—to generate a full HTML email, Markdown templates simply pass Markdown content to a few pre-defined “components”. Framework and package-level components in Laravel are often nested with a “package::component” naming style, and as such the main body of your Markdown email should be passed into a component named “mail::message”. Take a look at Example 15-11 to see an example of a simple Markdown mail template.
<!--resources/views/emails/assignment-created.blade.php-->@component('mail::message')# Hey {{ $trainee->name }}!Youhavereceivedanewtrainingassignmentfrom**{{$trainer->name}}**@component('mail::button',['url'=>route('training-dashboard')])ViewYourAssigment@endcomponentThanks,<br>{{config('app.name')}}@endcomponent
As you can see in Example 15-11, there’s a parent “mail::message” component to which you want to pass the body of your email, but you’re also provided with other smaller components you can sprinkle into your emails. We used the “mail::button” component here, which takes a body (“View Your Assignment”) but also requires parameters to be passed, via an array passed to the second parameter of the @component directive.
Button ComponentGenerages a centered button link and requires a “url” attributes and allows an optional “color” attribute, to which you can pass “primary”, “success”, or “error”.
Panel ComponentRenders the provided text with a slightly lighter background than the rest of the message.
Table ComponentConverts the content passed into it via the Markdown table syntax.
These Markdown components are built into the core of the Laravel framework, but if you need to customize how they work, you can publish their files and edit them.
php artisan vendor:publish --tag=laravel-mail
You can learn more about customizing these files and their themes in the Laravel docs.
When you’re developing emails in your applications, it’s helpful to be able to preview how they’ll render. You can rely on a tool like Mailtrap for this, and that is a useful tool, but it can also be helpful to render the mails directly in your browser and see your changes made immediately.
Take a look at Example 15-12 to see a sample route you can add to your application to render a given Mailable.
Route::get('preview-assignment-created-mailable',function(){$trainer=Trainer::first();$trainee=Trainee::first();returnnew\App\Mail\AssignmentCreated($trainer,$trainee);});
Sending email is a time-consuming task that can cause applications to slow down, so it’s common to move sending email to a background queue. It’s so common, in fact, that Laravel has a set of built-in tools to make it easier to queue your messages without writing queue jobs for each email.
Everything we’ll cover here requires your queues to be configured correctly. Take a look at Chapter 16 to learn more about how queues work and how to get them running in your application.
To queue a mail object instead of sending it immediately, simply pass your mailable object to Mail::queue() instead of Mail::send():
::queue(newAssignmentCreated($trainer,$trainee));
Mail::later() works the same as Mail::queue(), but it allows you to add a delay—either in minutes, or at a specific time by passing an instance of DateTime or Carbon—to when the email will be pulled from the queue and sent:
$when=now()->addMinutes(30);::later($when,newAssignmentCreated($trainer,$trainee));
For both queue() and later(), if you’d like to specify which queue or queue connection your mail is added to, use the onConnection() and onQueue() methods on your mailable object:
$message=(newAssignmentCreated($trainer,$trainee))->onConnection('sqs')->onQueue('emails');::to($user)->queue($message);
If you’d like to direct that a given mailable should always be queued, you can make the mailable implement the Illuminate\Contracts\Queue\ShouldQueue interface.
This is all well and good for sending mail in your production environments. But how do you test this all out? There are three primary tools you’ll want to consider: Laravel’s log driver, a Software as a Service (SaaS) app named Mailtrap, and the “universal to” configuration option.
Laravel provides a log driver that logs every email you try to send to your local laravel.log file (which is, by default, in storage/logs).
If you want to use this, edit .env and set MAIL_DRIVER to log. Now open up or tail storage/logs/laravel.log and send an email from your app. You’ll see something like this:
Message-ID: <04ee2e97289c68f0c9191f4b04fc0de1@localhost> Date: Tue, 17 May 2016 02:52:46 +0000 Subject: Welcome to our app! From: Matt Stauffer <matt@mattstauffer.com> To: freja@jensen.no MIME-Version: 1.0 Content-Type: text/html; charset=utf-8 Content-Transfer-Encoding: quoted-printable Welcome to our app!
Mailtrap is a service for capturing and inspecting emails in development environments. You send your mail to the Mailtrap servers via SMTP, but instead of sending those emails off to the intended recipients, Mailtrap captures them all and provides you with a web-based email client for inspecting them, regardless of which email address is in the to field.
To set up Mailtrap, sign up for a free Mailtrap account and visit the base dashboard for your demo. Copy your username and password from the SMTP column.
Now edit your app’s .env file and set the following values in the mail section:
MAIL_DRIVER=smtp MAIL_HOST=mailtrap.io MAIL_PORT=2525 MAIL_USERNAME=your_username_from_mailtrap_here MAIL_PASSWORD=your_password_from_mailtrap_here MAIL_ENCRYPTION=null
Now, any email you send from your app will show up in your Mailtrap inbox.
If you’d like to inspect the emails in your preferred client, you can override the to field on each message with the “universal to” configuration setting. To set this up, add a “to” key to your config/mail.php file that looks something like this:
'to'=>['address'=>'matt@mattstauffer.com','name'=>'Matt Testing My Application'],
Note that you’ll need to actually set up a real email driver with something like Mailgun or Sendmail in order to use this.
Most of the mail that’s sent from web apps really has the purpose of notifying users that a particular action has happened or needs to happen. As users’ communication preferences grow more and more diverse, we gather ever more—and more disparate—packages to communicate via Slack, SMS, and other means.
Laravel 5.3 introduced a new concept in Laravel called, fittingly, notifications. Just like mailables, a notification is a PHP class that represents a single communication that you might want to send to your users. For now, let’s imagine we’re notifying users of our physical training app that they have a new workout available on our app.
Each class represents all of the information necessary to send notifications to your users using one or many notification channels. A single notification could send an email, send an SMS via Nexmo, send a WebSockets ping, add a record to a database, send a message to a Slack channel, and much more.
So, let’s create our notification:
php artisan make:notification WorkoutAvailable
Example 15-13 shows what that gives us.
<?phpnamespaceApp\Notifications;useIlluminate\Bus\Queueable;useIlluminate\Notifications\Notification;useIlluminate\Contracts\Queue\ShouldQueue;useIlluminate\Notifications\Messages\MailMessage;classWorkoutAvailableextendsNotification{useQueueable;/*** Create a new notification instance.** @return void*/publicfunction__construct(){//}/*** Get the notification's delivery channels.** @param mixed $notifiable* @return array*/publicfunctionvia($notifiable){return['mail'];}/*** Get the mail representation of the notification.** @param mixed $notifiable* @return \Illuminate\Notifications\Messages\MailMessage*/publicfunctiontoMail($notifiable){return(newMailMessage)->line('The introduction to the notification.')->action('Notification Action',url('/'))->line('Thank you for using our application!');}/*** Get the array representation of the notification.** @param mixed $notifiable* @return array*/publicfunctiontoArray($notifiable){return[//];}}
We can learn a few things here. First, we’re going to pass in relevant data to the constructor. Second, there’s a via() method that allows us to define, for a given user, which notification channels to use ($notifiable represents whatever entities you want to notify in your system; for most apps, it’ll be a user, but that’s not always the case). And third, there are individual methods for each notification channel that allow you to specifically define how to send one of these notifications through that channel.
While the most common notification targets will be users, it’s possible you may want to notify something else. This may simply be because your application has multiple user types—so, you might want to be able to notify both “trainers” and “trainees.” But you also might find yourself wanting to notify a “group,” a “company,” or a “server.”
So, let’s modify this class for our WorkoutAvailable example. Take a look at Example 15-14.
...classWorkoutAvailableextendsNotification{useQueueable;public$workout;publicfunction__construct($workout){$this->workout=$workout;}publicfunctionvia($notifiable){// This method doesn't exist on the User... we're going to make it upreturn$notifiable->preferredNotificationChannels();}publicfunctiontoMail($notifiable){return(newMailMessage)->line('You have a new workout available!')->action('Check it out now',route('workout.show',[$this->workout]))->line('Thank you for training with us!');}publicfunctiontoArray($notifiable){return[];}}
As you can see in Example 15-14, we’re somehow responsible for deciding, for each notification and each notifiable, which notification channels we’re going to use.
You could just send everything as mail or just send everything as SMS (Example 15-15).
publicfunctionvia($notifiable){return'nexmo';}
You could also let each user choose their one preferred method and save that on the User itself (Example 15-16).
publicfunctionvia($notifiable){return$notifiable->preferred_notification_channel;}
Or, as we imagined in Example 15-14, you could create a method on each notifiable that allows for some complex notification logic. For example, you could notify the user over certain channels during work hours and other channels in the evening. What is important is that via() is a PHP class method, so you can do whatever complex logic you want there.
There are two ways to send a notification: using the Notification facade, or adding the Notifiable trait to an Eloquent class (likely your User class).
Any model that imports the Laravel\Notifications\Notifiable trait (which the App\User class does by default) has a notify() method that can be passed a notification, which will look like Example 15-17.
useApp\Notifications\WorkoutAvailable;...$user->notify(newWorkoutAvailable($workout));
The Notification facade is the clumsier of the two methods, since you have to pass both the notifiable and the notification. However, it’s helpful because you can choose to pass more than one notifiable in at the same time, like you can see in Example 15-18.
useApp\Notifications\WorkoutAvailable;...Notification::send($users,newWorkoutAvailable($workout));
Most of the notification drivers need to send HTTP requests to send their notifications, which could slow down your user experience, so you probably want to queue your notifications. All notifications import the Queuable trait by default, so all you need to do is add implements ShouldQueue to your notification and Laravel will instantly move it to a queue.
As with any other queued features, you’ll need to make sure you have your queue settings configured correctly and a queue worker running.
If you’d like to delay the delivery of your notification, you can run the delay() method on the notification:
$delayUntil=now()->addMinutes(15);$user->notify((newWorkoutAvailable($workout))->delay($delayUntil));
Out of the box, Laravel comes with notification drivers for email, database, broadcast, Nexmo SMS, and Slack. I’ll cover each briefly, but I’d recommend referring to the docs for more thorough introductions to each.
It’s also easy to create your own notification drivers, and dozens of people already have; you can find them at Laravel Notification Channels website.
Let’s take a look at how the email from our earlier example, Example 15-14, is built:
publicfunctiontoMail($notifiable){return(newMailMessage)->line('You have a new workout available!')->action('Check it out now',route('workouts.show',[$this->workout]))->line('Thank you for training with us!');}
The result is shown in Figure 15-1. The email notification system puts your application’s name in the header of the email; you can customize that app name in the name key of config/app.php.
This email is automatically sent to the email property on the notifiable, but you can customize this behavior by adding a method to your notifiable class named routeNotificationForMail() that returns the email address you’d like email notifications sent to.
The email’s subject is set by parsing the notification class name and converting it to words. So, our WorkoutAvailable notification would have the default subject of Workout Available. We can also customize this by chaining the subject() method on our MailMessage in the toMail() method.
If you want to modify the templates, publish them and edit to your heart’s content:
php artisan vendor:publish --tag=laravel-notifications
If you like working with Markdown emails (see “Markdown Mailables”), you can also use the same markdown() method in your notifications:
publicfunctiontoMail($notifiable){return(newMailMessage)->subject('Workout Available')->markdown('emails.workout-available',['workout'=>$this->workout]);}
You can also change the style of the default template to be an “error” message, which uses a bit of different language and changes the primary button color to red. Just add a call to the error() method to your MailMessage call chain in the toMail() method.
You can send notifications to a database table using the database notification channel. First, create your table with php artisan notifications:table. Next, create a toDatabase() method on your notification and return an array of data there. This data will be encoded as JSON and stored in the database table’s data column.
The Notifiable trait adds a notifications relationship to any model it’s imported in, allowing you to easily access records in the notifications table. So if you’re using database notifications, you could so something like this:
User::first()->notifications->each(function($notification){// do something});
The database notification channel also has the concept of whether or not a notification is “read.” You can scope to only the “unread” notifications:
User::first()->unreadNotifications->each(function($notification){// do something});
And you can mark one or all notifications as read:
// IndividualUser::first()->unreadNotifications->each(function($notification){if($condition){$notification->markAsRead();}});// AllUser::first()->unreadNotifications->markAsRead();
The broadcast channel sends notifications out using Laravel’s event broadcasting features, which are powered by Websockets and we’ll learn more about in “Broadcasting Events over WebSockets, and Laravel Echo”.
Create a toBroadcast() method on your notification and return array of data, and if your app is correctly configured for event broadcasting, that data will be broadcast on a private channel named {notifiable}.{id}. The {id} will be the ID of the notifiable, and {notifiable} will be the notifiable’s fully qualified class name, with the slashes replaced by periods—for example, the private channel for the App\User with the ID of 1 will be App.User.1.
SMS notifications are sent via Nexmo, so if you want to send SMS notifications, sign up for a Nexmo account and follow the instructions in the docs. Like with the other channels, you’ll be setting up a toNexmo() method and customizing the SMS message there.
The slack notification channel allows you to customize the appearance of your notifications and even attach files to your notifications. Like with the other channels, you’ll set up a toSlack() method and customize the message there.
Looking to send your notifications through other channels than those that come out of the box? There’s a robust community effor to provide an incredible variety of notification channels that you can find at http://laravel-notification-channels.com/.
Let’s take a look at how to test mail and notifications.
There are two options for testing mail in Laravel. If you’re using the traditional mail syntax (which is, by the way, not the preferred method in Laravel 5.3 and later), I’d recommend using a tool called MailThief, which Adam Wathan wrote for Tighten. Once you bring MailThief into your application with Composer, you can use MailThief::hijack() in your tests to make MailThief capture any calls to the Mail facade or any mailer classes.
MailThief then makes it possible to make assertions against the senders, recipients, CC and BCC values, and even content and attachments of your mail. Take a look at the GitHub repo to learn more, or bring it into your app:
composer require tightenco/mailthief --dev
If you are using mailables, there’s a simple syntax for writing assertions against your sent mail (Example 15-19).
publicfunctiontest_signup_triggers_welcome_email(){::fake();::assertSent(WelcomeEmail::class,function(){return->subject=='Welcome!';});// You can also use assertSentTo() to explicitly test the recipients// You can also use assertNotSent() to test that a specific mail wasn't sent.}
Laravel provides a built-in set of assertions for testing your notifications. Example 15-20 demonstrates.
publicfunctiontest_new_signups_triggers_admin_notification(){Notification::fake();Notification::assertSentTo($user,NewUsersSignedup::class,function($notification,$channels){return$notification->user->=='user-who-signed-up@gmail.com'&&$channels==['mail'];});// Assert that the email was sent to a given userNotification::assertSentTo([$user],NewUsersSignedup::class);// You can also use assertNotSentTo()Notification::assertNotSentTo(['user-that-did-not-sign-up@gmail.com'],NewUsersSignedup::class);}
Laravel’s mail and notification features provide simple, consistent interfaces to a variety of messaging systems. Laravel’s mail system uses “mailables,” PHP classes that represent emails, to provide a consistent syntax to different mail drivers. The notification system makes it easy to build a single notification that can be delivered in many different media—from emails to SMS messages to physical postcards.
So far we’ve covered some of the most common structures that power web applications: databases, mail, filesystems, and more. Each of these are common across a majority of applications and frameworks.
Laravel also provides facilities for some less common architecture patterns and application structures. In this chapter we’ll cover Laravel’s tools for implementing queues, queued jobs, events, and WebSocket event publishing. We’ll also cover Laravel’s scheduler, which makes manually-edited cron schedules a thing of the past.
To understand what a queue is, just think about the idea of “queueing up” in a line at the bank. Even if there are multiple lines—queues—only one person is being served at a time from each queue, and each person will eventually reach the front and be served. In some banks, it’s a strict first-in-first-out sort of policy, but in other banks, there’s not an exact guarantee that someone won’t cut ahead of you in line at some point. Essentially, someone can get added to the queue, be removed from the queue prematurely, or be successfully “processed” and then removed. Someone might even hit the front of the queue, not be able to be served correctly, return to the queue for a time, and then be processed again.
Queues in programming are very similar. Your application adds a “job” to a queue, which is a chunk of code that tells the application how to perform a particular behavior. Then some other separate application structure, usually a “queue worker,” takes the responsibility for pulling jobs off of the queue one at a time and performing the appropriate behavior. Queue workers can delete the jobs, return them to the queue with a delay, or mark them as successfully processed.
Laravel makes it easy to serve your queues using Redis, beanstalkd, Amazon’s SQS (Simple Queue Service), or a database table. You can also choose the sync driver to have the jobs run right in your application without actually being queued, or the null driver for jobs to just be discarded; these two are usually used in local development or testing environments.
Queues make it easy to remove a costly or slow process from any synchronous call. The most common example is sending mail—doing so can be slow, and you don’t want your users to have to wait for mail to send in response to their actions. Instead, trigger a “send mail” queued job and let the users get on with their day. Sometimes you may not just want to save your users time, but you might have a process like a cron job or a webhook that has a lot of work to process; rather than letting it all run at once (and potentially time out), you may choose to queue its individual pieces and let the queue worker process them one at a time.
Additionally, if you have some heavy processing that’s more than your server can handle, you can spin up more than one queue worker to work through your queue faster than your normal application server could on its own.
Like many other Laravel features that abstract multiple providers, queues have their own dedicated config file (config/queue.php) that allows you to set up multiple drivers and define which will be the default. This is also where you’ll store your SQS, Redis, or beanstalkd authentication information.
We haven’t covered Laravel Forge in much depth, but it’s a hosting-management service provided by Taylor Otwell, the creator of Laravel. Every server you create has Redis configured automatically, so if you visit any site’s Forge console, you can just go to the Queue tab and hit Start Worker and you’re ready to use Redis as your queue driver; you can leave all the default settings, and no other work is necessary.
Remember our bank analogy? Each person in the bank “queue” (line) is, in programming terms, a job. This job could be shaped any way; it could just be a string, or an array, or an object. In Laravel, it’s a collection of information containing the job name, the data payload, the number of attempts that have been made so far to process this job, and some other simple metadata.
But you don’t need to worry about that in your interactions with Laravel. Laravel provides a structure called a Job, which is intended to encapsulate a single task—a behavior that your application can be commanded to do—and allow it to be added to and pulled from a queue. There are also simple helpers to make it easy to queue Artisan commands and mail.
Let’s start with an example where, every time a user changes his plan with your SaaS app, you want to rerun some calculations about your overall profit.
As always, there’s an Artisan command for that:
phpartisanmake:jobCrunchReports
Take a look at Example 16-1 to see what you’ll get.
<?phpnamespaceApp\Jobs;useIlluminate\Bus\Queueable;useIlluminate\Queue\SerializesModels;useIlluminate\Queue\InteractsWithQueue;useIlluminate\Contracts\Queue\ShouldQueue;useIlluminate\Foundation\Bus\Dispatchable;classCrunchReportsimplementsShouldQueue{useDispatchable,InteractsWithQueue,Queueable,SerializesModels;/*** Create a new job instance.** @return void*/publicfunction__construct(){//}/*** Execute the job.** @return void*/publicfunctionhandle(){//}}
As you can see, this template imports the Dispatchable, Queueable, InteractsWithQueue, and SerializesModels traits, and implements the ShouldQueue interface. Prior to Laravel 5.3, some of this functionality came in through the parent App\Jobs class.
We also get two methods from this template: the constructor, which you’ll want to use to attach data to the job, and the handle() method, which is where the job’s logic should reside (and is also the method signature you’ll use to inject dependencies).
The traits and interface provide the class with the ability to be added to, and interact with, the queue. Dispatchable gives it methods to dispatch itself; Queueable allows you to specify how Laravel should push this job to the queue; InteractsWithQueue allows each job, while being handled, to control its relationship with the queue, including deleting or requeueing itself; and SerializesModels gives the job the ability to serialize and deserialize Eloquent models.
The SerializesModels trait gives the jobs the ability to serialize (convert to a flatter format that can be stored in a data store like a database or queue system) injected models so that your job’s handle() method will have access to them. However, because it’s too difficult to reliably serialize an entire Eloquent object, the trait ensures that just the primary keys of any attached Eloquent objects are serialized when the job is pushed onto the queue. When the job is deserialized and handled, the trait pulls those Eloquent models fresh from the database by their primary key. This means that when your job runs it will be pulling a fresh instance of this model, not whatever state it was in when you queued the job.
Let’s fill out the methods for our sample class, as in Example 16-2.
...useApp\ReportGenerator;classCrunchReportsimplementsShouldQueue{useDispatchable,InteractsWithQueue,Queueable,SerializesModels;protected$user;publicfunction__construct($user){$this->user=$user;}publicfunctionhandle(ReportGenerator$generator){$generator->generateReportsForUser($this->user);Log::info('Generated reports.');}}
We’re expecting the User instance to be injected when we create the job, and then when it’s handled we’re typehinting a ReportGenerator class (which we presumably wrote) and a Logger (which Laravel provides). Laravel will read both typehints and inject those dependencies automatically.
There are multiple methods by which you can dispatch a job, including some methods available to every controller and a global dispatch() helper. But since Laravel 5.5, we’ve had a simpler and preferred method: calling the dispatch() method on the job itself. So, if you’re running Laravel 5.5+, just ignore the other options, as we’ll do for the rest of this chapter.
So, in order to dispatch your job, you can just create an instance of it and then call its dispatch() method, passing any necessary data directly into the dispatch() method. Take a look at Example 16-3 for an example.
$user=auth()->user();$daysToCrunch=7;\App\Jobs\CrunchReports::dispatch($user,$daysToCrunch);
There are three settings you can control in order to customize exactly how you dispatch a job: the connection, the queue, and the delay.
If you ever have multiple queue connections in place at once, you can customize the connection by chaining onConnection() after the dispatch() method:
DoThingJob::dispatch()->onConnection('redis');
Within queue servers, you can specify which named queue you’re pushing a job onto. For example, you may differentiate your queues based on their importance, naming one low and one high.
You can customize which queue you’re pushing a job onto with the onQueue() method:
DoThingJob::dispatch()->onQueue('high');
You can customize the amount of time your queue workers should wait before processing a job with the delay() method, which accepts either an integer representing the number of seconds to delay a job or a DateTime/Carbon instance:
// Delays five minutes before releasing the job to queue workers$delay=now()->addMinutes(5);DoThingJob::dispatch()->delay($delay);
Note that Amazon SQS doesn’t allow delays longer than 15 minutes.
So what is a queue worker, and how does it work? In Laravel, it’s an Artisan command that stays running forever (until it’s stopped manually) and takes the responsibility for pulling down jobs from your queue and running them:
phpartisanqueue:work
This command starts a daemon “listening” to your queue; every time there are jobs on the queue, it will pull down the first job, handle it, delete it, and move on to the next. If at any point there are no jobs, it “sleeps” for a configurable amount of time before checking again to see if there are any more jobs.
You can define how many seconds a job should be able to run before the queue listener stops it (--timeout), how many seconds the listener should “sleep” when there are no jobs left (--sleep), how many tries each job should be allowed before being deleted (--tries), which connection the worker should listen to (the first parameter after queue:work), and which queues it should listen to (--queue=):
phpartisanqueue:workredis--timeout=60--sleep=15--tries=3--queue=high,medium
You can also process just a single job with php artisan queue:work.
So, what happens when something goes wrong with your job when it’s in the middle of processing?
If an exception is thrown, the queue listener will release that job back onto the queue. That job will be rereleased to be processed again and again until it is able to finish successfully or until it has been attempted the maximum number of times allowed by your queue listener.
The maximum number of tries is defined by the --tries switch passed to the queue:listen or queue:work Artisan commands.
If you don’t set --tries, or if you set it to 0, the queue listener will allow for infinite retries. That means if there are any circumstances in which a job could just never be satisfied—for example, if it relies on a tweet that has since been deleted—your app will slowly crawl to a halt as it forever retries uncompletable jobs.
The documentation and Laravel Forge both show 3 as the recommended starting point for the maximum number of retries. So, in case of confusion, start there and adjust:
php artisan queue:work --tries=3
If at any point you’d like to check how many times a job has been attempted already, use the attempts() method on the job itself, as in Example 16-4.
publicfunctionhandle(){...if($this->attempts()>3){//}}
Once a job has exceeded its allowable number of retries, it’s considered a “failed” job. Before you do anything else—even if all you want to do is limit the number of times a job can be tried—you’ll need to create the “failed jobs” database table.
There’s an Artisan command to create the migration (and you’ll then want to migrate):
phpartisanqueue:failed-tablephpartisanmigrate
Any job that has surpassed its maximum number of allowed attempts will be dumped there. But there are quite a few things you can do with your failed jobs.
First, you can define a failed() method on the job itself, which will run when that job fails (see Example 16-5).
...classCrunchReportsimplementsShouldQueue{...publicfunctionfailed(){// Do whatever you want, like notify an admin}}
Next, you can register a global handler for failed jobs. Somewhere in the application’s bootstrap—if you don’t know where to put it, just put it in the boot() method of AppServiceProvider—place the code in Example 16-6 code to define a listener.
// Some service provideruseIlluminate\Support\Facades\Queue;useIlluminate\Queue\Events\JobFailed;...publicfunctionboot(){Queue::failing(function(JobFailed$event){// $event->connectionName// $event->job// $event->exception});}
There is also a suite of Artisan tools for interacting with the failed jobs table.
queue:failed shows you a list of your failed jobs:
php artisan queue:failed
The list will look something like this:
+----+------------+---------+----------------------+---------------------+ | ID | Connection | Queue | Class | Failed At | +----+------------+---------+----------------------+---------------------+ | 9 | database | default | App\Jobs\AlwaysFails | 2018-08-26 03:42:55 | +----+------------+---------+----------------------+---------------------+
From there, you can grab the ID of any individual failed job and retry it with queue:retry:
php artisan queue:retry 9
If you’d rather retry all of the jobs, pass all instead of an ID:
php artisan queue:retry all
You can delete an individual failed job with queue:forget:
php artisan queue:forget 5
And you can delete all of your failed jobs with queue:flush:
phpartisanqueue:flush
Sometimes, from within the handling of a job, you’ll want to add conditions that will potentially either release the job to be restarted later or delete the job forever.
To release a job back into the queue, use the release() command, as in Example 16-7.
publicfunctionhandle(){...if(condition){$this->release($numberOfSecondsToDelayBeforeRetrying);}}
If you want to delete a job during its handling, you can just return at any point, as seen in Example 16-8; that’s the signal to the queue that the job was handled appropriately and should not be returned to the queue.
publicfunctionhandle(){...if($jobShouldBeDeleted){return;}}
Laravel Horizon, like some of the other tools we’ve covered (Scout, Passport, etc.) is a tool provided by Laravel that doesn’t come bundled with the core.
Horizon provides insight into the status of your Redis queued jobs. You can see which jobs have failed, how many are queued and how fast they’re working, and you can even get notifications when any of your queues are overloaded or failing.
Installing and running Horizon is pretty straightforward, and the docs are thorough, so if you’re interested, take a look at the Horizon docs to learn how to install, configure, and deploy Horizon.
Please note that you will need to have Laravel 5.5+ and PHP 7.1+ in order to run Horizon.
With jobs, the calling code informs the application that it should do something: CrunchReports, or NotifyAdminOfNewSignup.
With an event, the calling code instead informs the application that something happened: UserSubscribed, or UserSignedUp, or ContactWasAdded. Events are notifications that something has taken place.
Some of these events may be “fired” by the framework itself. For example, Eloquent models fire events when they are saved, or created, or deleted. But some events can also be manually triggered by the application’s code.
An event being fired doesn’t do anything on its own. However, you can bind event listeners, whose sole purpose is to listen for the broadcasting of specific events and to act in response. Any event can have anywhere from zero to many event listeners.
Laravel’s events are structured like the observer, or “pub/sub,” pattern. Many events are fired out into the application; some may never be listened for, and others may have a dozen listeners. The events don’t know or care.
There are three ways to fire an event. You can use the Event facade, inject the Dispatcher, or use the event() global helper:
Event::fire(newUserSubscribed($user,$plan));// or$dispatcher=app(Illuminate\Contracts\Events\Dispatcher::class);$dispatcher->fire(newUserSubscribed($user,$plan));// orevent(newUserSubscribed($user,$plan));
If in doubt, I’d recommend using the global helper function.
To create an event to fire, use the make:event Artisan command:
phpartisanmake:eventUserSubscribed
That’ll make a file that looks something like Example 16-9.
<?phpnamespaceApp\Events;useIlluminate\Broadcasting\Channel;useIlluminate\Queue\SerializesModels;useIlluminate\Broadcasting\PrivateChannel;useIlluminate\Broadcasting\PresenceChannel;useIlluminate\Foundation\Events\Dispatchable;useIlluminate\Broadcasting\InteractsWithSockets;useIlluminate\Contracts\Broadcasting\ShouldBroadcast;classUserSubscribed{useDispatchable,InteractsWithSockets,SerializesModels;/*** Create a new event instance.** @return void*/publicfunction__construct(){//}/*** Get the channels the event should be broadcast on.** @return \Illuminate\Broadcasting\Channel|array*/publicfunctionbroadcastOn(){returnnewPrivateChannel('channel-name');}}
Let’s take a look at what we get here. SerializesModels works just like with jobs; it allows you to accept Eloquent models as parameters. InteractsWithSockets, ShouldBroadcast, and the broadcastOn() method provide the backing functionality for broadcasting events using WebSockets, which we’ll cover in a bit.
It might seem strange that there’s no handle() or fire() method here. But remember, this object exists not to determine a particular action, but just to encapsulate some data. The first piece of data is its name; UserSubscribed tells us that a particular event happened (a user subscribed). The rest of the data is any data we pass into the constructor and associate with this entity.
Example 16-10 shows what we might want to do with our UserSubscribed event.
...classUserSubscribed{useInteractsWithSockets,SerializesModels;public$user;public$plan;publicfunction__construct($user,$plan){$this->user=$user;$this->plan=$plan;}}
Now we have an object that appropriately represents the event that happened: $event->user subscribed to the $event->plan plan. Remember, firing this event is as simple as event(new UserSubscribed($user, $plan)).
We have an event, and the ability to fire it. Now let’s look at how to listen for it.
First, we’ll create an event listener. Let’s say we want to email the app’s owner every time a new user subscribes:
phpartisanmake:listenerEmailOwnerAboutSubscription--event=UserSubscribed
That gives us the file in Example 16-11.
<?phpnamespaceApp\Listeners;useApp\Events\UserSubscribed;useIlluminate\Queue\InteractsWithQueue;useIlluminate\Contracts\Queue\ShouldQueue;classEmailOwnerAboutSubscription{/*** Create the event listener.** @return void*/publicfunction__construct(){//}/*** Handle the event.** @param UserSubscribed $event* @return void*/publicfunctionhandle(UserSubscribed$event){//}}
This is where the action happens—where the handle() method lives. This method expects to be passed an event of type UserSubscribed and act in response to it.
So, let’s make it send an email (Example 16-12).
...useApp\Mail\UserSubscribedasUserSubscribedMessage;classEmailOwnerAboutSubscription{publicfunctionhandle(UserSubscribed$event){Log::info('Emailed owner about new user: '.$event->user->);::to(config('app.owner-email'))->send(newUserSubscribedMessage($event->user,$event->plan);}}
Great! Now, one last task: we need to set this listener up to listen to the UserSubscribed event. We’ll set that up in the $listen property of the EventServiceProvider class (see Example 16-13).
classEventServiceProviderextendsServiceProvider{protected$listen=[\App\Events\UserSubscribed::class=>[\App\Listeners\EmailOwnerAboutSubscription::class,],];
As you can see, the key of each array entry is the class name of the event, and the value is an array of listener class names. We can add as many class names as we want under the UserSubscribed key and they will all listen and respond to each UserSubscribed event.
There’s one more structure you can use to define the relationship between your events and their listeners. Laravel has a concept called an event subscriber, which is a class that contains a collection of methods that act as separate listeners to unique events, and also contains the mapping of which method should handle which event. In this case, it’s easier to show than to tell; take a look at Example 16-14. Note that event subscribers are not a particularly commonly-used tool.
<?phpnamespaceApp\Listeners;classUserEventSubscriber{publicfunctiononUserSubscription($event){// Handles the UserSubscribed event}publicfunctiononUserCancellation($event){// Handles the UserCancelled event}publicfunctionsubscribe($events){$events->listen(\App\Events\UserSubscribed::class,'App\Listeners\UserEventSubscriber@onUserSubscription');$events->listen(\App\Events\UserCancelled::class,'App\Listeners\UserEventSubscriber@onUserCancellation');}}
Subscribers need to define a subscribe() method, which is passed an instance of the event dispatcher. We’ll use that to pair events with their listeners, but in this case, those are methods on this class, instead of entire classes. As a refresher, any time you see an @ inline like this means the class name is to the left of the @ and the method name is to the right.
So, in Example 16-14, we’re defining that the onUserSubscription() method of this subscriber will listen to any UserSubscribed events.
There’s one last thing we need to do: in App\Providers\EventServiceProvider, we need to add our subscriber’s class name to the $subscribe property, as seen in Example 16-15.
...classEventServiceProviderextendsServiceProvider{...protected$subscribe=[\App\Listeners\UserEventSubscriber::class];}
WebSocket (often called WebSockets) is a protocol, popularized by Pusher (a hosted WebSocket SaaS), that makes it simple to provide near-real-time communication between web devices. Rather than relying on information passing via HTTP requests, WebSockets libraries open a direct connection between the client and the server. WebSockets are behind tools like the chat boxes in Gmail and Facebook, where you don’t have to wait for the page to reload or for AJAX requests to receive or send data; instead, data is both sent and received in realtime.
WebSockets work best with small pieces of data passed in a pub/sub structure—just like Laravel’s events. Laravel has a built-in set of tools that make it easy to define that one or more of your events should be broadcast to a WebSocket server; this makes it easy, for example, to have a MessageWasReceived event that is published to the notifications box of a certain user or set of users, the instant a message arrives at your application.
Take a look at config/broadcasting.php to find the configuration settings for your event broadcasting. Laravel supports three drivers for broadcasting: Pusher, a paid SaaS offering; Redis, for locally running WebSocket servers; and log, for local development and debugging.
In order for event broadcasting to move quickly, Laravel pushes the instruction to broadcast them onto a queue. That means you’ll need to have a queue worker running (or use the sync queue driver for local development). See “Running a Queue Worker” to learn how to run a queue worker.
Laravel suggests a default delay of three seconds before the queue worker looks for new jobs. However, with event broadcasting, you may notice some events take a second or two to broadcast. To speed this up, update your queue settings to only wait one second before looking for new jobs.
To broadcast an event, you need to mark that event as a broadcast event by having it implement the Illuminate\Contracts\Broadcasting\ShouldBroadcast interface. This interface requires you to add the broadcastOn() method, which will return an array of either strings or Channel objects, each representing a WebSocket channel.
Example 16-16 shows our UserSubscribed event, modified to broadcast on two channels: one for the user (to confirm the user’s subscription) and one for admins (to notify them of a new subscription).
...useIlluminate\Contracts\Broadcasting\ShouldBroadcast;classUserSubscribedimplementsShouldBroadcast{useDispatchable,InteractsWithSockets,SerializesModels;public$user;public$plan;publicfunction__construct($user,$plan){$this->user=$user;$this->plan=$plan;}publicfunctionbroadcastOn(){// String syntaxreturn['users.'.$this->user->id,'admins'];// Channel object syntaxreturn[newChannel('users.'.$this->user->id),newChannel('admins'),// If it were a private channel: new PrivateChannel('admins'),// If it were a presence channel: new PresenceChannel('admins'),];}}
By default, any public properties of your event will be serialized as JSON and sent along as the data of your broadcast event. That means the data of one of our broadcast UserSubscribed events might look like Example 16-17.
{'user':{'id':5,'name':'Fred McFeely',...},'plan':'silver'}
You can override this by returning an array of data from the broadcastWith() method on your event, as in Example 16-18.
publicfunctionbroadcastWith(){return['userId'=>$this->user->id,'plan'=>$this->plan];}
You can customize which queue your event is pushed onto with its broadcastQueue() method, as in Example 16-19. You may choose to do this so you can keep other queue items from slowing down your event broadcast; real-time WebSockets aren’t much fun if a long-running job that’s higher in the queue keeps the events from going out in time.
public$broadcastQueue='websockets-for-faster-processing';
You can also force a given event to skip the queue entirely (using the “sync” queue driver, which is processed by the current PHP thread), by having it implement the ShouldBroadcastNow contract.
useIlluminate\Contracts\Broadcasting\ShouldBroadcastNow;classUserSubscribedimplementsShouldBroadcastNow{//}
And, finally, you can choose to customize whether a given event should be broadcast at all by giving it a broadcastWhen() method:
publicfunctionbroadcastWhen(){// Notify me only when users sign up from the White Housereturnstr_contains($this->user->,'whitehouse.gov');}
If you choose to host your own Redis WebSockets server, the Laravel docs have a great walkthrough on how to set that up using socket.io and ioredis.
As of this book’s publication, the most common solution Laravel developers use is Pusher. Plans over a certain size cost money, but there’s a generous free plan. Pusher makes it incredibly simple to set up a simple WebSocket server, and its JavaScript SDK handles all of the authentication and channel management with almost no work on your part. SDKs are available for iOS, Android, and many more platforms, languages, and frameworks.
There’s also a new tool announced just before the publication of this book called Laravel WebSockets that lets you host your own Laravel-based Pusher-compatible WebSockets server. You can install the package into your current Laravel app (the same app you’re broadcasting from) or into a separate microservice.
If you choose to work with a Laravel WebSockets server, you’ll follow all of the directions in this book as if you were working with Pusher, but your configuration settings will be a bit different.
It’s helpful to understand how to listen to Laravel’s broadcast events without Echo even if you choose to use Echo in the end, but because much of the code here is not necessary if you use Echo, I’d recommend reading this section, then the Echo section, “Laravel Echo (the JavaScript Side)”, before you start implementing any of it; you can decide which way you prefer and then write your code from there.
To get started, pull in Pusher’s library, get an API key from your Pusher account, and subscribe to any events on any channels with code like that in Example 16-20.
...<scriptsrc="https://js.pusher.com/4.3/pusher.min.js"></script><script>// Enable pusher logging - don't include this in productionPusher.logToConsole=true;// Globally, perhaps; just a sample of how to get data invarApp={'userId':{{auth()->id()}},'pusherKey':'{{ config('broadcasting.connections.pusher.key') }}'};// Locallyvarpusher=newPusher(App.pusherKey,{cluster:'{{ config('broadcasting.connections.pusher.options.cluster') }}',encrypted:{{config('broadcasting.connections.pusher.options.encrypted')}}});varpusherChannel=pusher.subscribe('users.'+App.userId);pusherChannel.bind('App\\Events\\UserSubscribed',(data)=>{console.log(data.user,data.plan);});</script>
Since \ is a control character in JavaScript, you need to write \\ to represent a backslash in your strings, which is why there are two backslashes between each namespace segment in Example 16-20.
To publish to Pusher from Laravel, get your Pusher key, secret, cluster, and app ID from your Pusher account dashboard, and then set them in your .env file under the keys PUSHER_KEY, PUSHER_SECRET, PUSHER_APP_CLUSTER and PUSHER_APP_ID.
If you serve your app, visit a page with the JavaScript from Example 16-20 embedded in it in one window, push a broadcast event in another window or from your terminal, have a queue listener running or are using the sync driver, and all of your authentication information is set up correctly, you should see event logs popping up in your JavaScript window’s console in near real time.
With this power, it’s now easy for you to keep your users up-to-date with what’s happening with their data any time they’re in your app. You can notify users of the actions of other users, of long-running processes that have just finished, or of your application’s responses to external actions like incoming emails or webhooks. The possibilities are endless.
If you want to broadcast with Pusher or Redis, you’ll need to bring in these dependencies:
Pusher: pusher/pusher-php-server "~3.0"
Redis: predis/predis
Laravel has a few more tools to make it possible to perform more complex interactions in event broadcasting. These tools, a combination of framework features and a JavaScript library, are called Laravel Echo.
These framework features work best when you use Laravel Echo in your JavaScript frontend (which we’ll cover in “Laravel Echo (the JavaScript Side)”), but you can still enjoy some of the benefits of Echo without using the JavaScript components. Echo will work with both Pusher and Redis, but I’m going to use Pusher for any examples.
Every connection to Pusher is assigned a unique “socket ID” identifying that socket connection. And it’s easy to define that any given socket (user) should be excluded from receiving a specified broadcast event.
This feature makes it possible to define that certain events should not be broadcast to the user who fired them. Let’s say every user in a team gets notified when other users create a task; would you want to be notified of a task you just created? No, and that’s why we have the toOthers() method.
To implement this, there are two steps to follow. First, you need to set up your JavaScript to send a certain POST to /broadcasting/socket when your WebSocket connection is initialized. This attaches your socket_id to your Laravel session. Echo does this for you, but you can also do it manually—take a look at the Echo source to see how it works.
Your event must use the Illuminate\Broadcasting\InteractsWithSockets trait in order to call the toOthers() method.
Next, you’ll want to update every request that your JavaScript makes to have an X-Socket-ID header that contains that socket_id. Example 16-21 shows how to do that with Axios or in jQuery.
// Run this right after you initialize echo// With Axioswindow.axios.defaults.headers.common['X-Socket-Id']=Echo.socketId();// jQuery$.ajaxSetup({headers:{'X-Socket-Id':Echo.socketId()}});
Once you’ve handled this, you can exclude any event from being broadcast to the user who triggered it by using the broadcast() global helper instead of the event() global helper and then chaining toOthers() after it:
broadcast(newUserSubscribed($user,$plan))->toOthers();
All of the other features that Echo provides require your JavaScript to authenticate with the server. Take a look at App\Providers\BroadcastServiceProvider, where you’ll define how to authorize users’ access to your private and presence channels.
The two primary actions you can take are to define the middleware that will be used on your broadcasting auth routes, and to define the authorization settings for your channels.
If you’re going to use these features, you’ll need to uncomment the App\Providers\BroadcastServiceProvider::class line in config/app.php.
And if you’ll be using these features without Laravel Echo, you’ll either need to manually handle sending CSRF tokens along with your authentication requests, or exclude /broadcasting/auth and /broadcasting/socket from CSRF protection by adding them to the $except property of the VerifyCsrfToken middleware.
Private and presence WebSocket channels need to be able to ping your application to learn whether the current user is authorized for that channel. You’ll use the Broadcast::channel() method to define the rules for this authorization in your routes/channels.php file.
There are three types of channels in WebSockets: public, private, and presence.
Public channels can be subscribed to by any user, authenticated or not.
Private channels require the end user’s JavaScript to authenticate against the application to prove that the user is both authenticated and authorized to join this channel.
Presence channels are a type of private channel, but instead of allowing for message passing, they simply keep track of which users join and leave the channel, and make this information available to the application’s frontend.
Broadcast::channel() takes two parameters: first, a string representing the channel(s) you want it to match, and second, a closure that defines how to authorize users for any channel matching that string. The closure will be passed an Eloquent model of the current user as its first parameter, and any matched {variableNameHere} segments as additional parameters. For example, a channel authorization definition with a string of teams.{teamId}, when matched against the channel teams.5, will pass its closure $user as the first parameter and 5 as the second parameter.
If you’re defining the rules for a private channel, your Broadcast::channel() closure will need to return a boolean: is this user authorized for this channel or not? If you’re defining the rules for a presence channel, your closure should return an array of data you want available to the presence channel for any users that you want to show up in the channel. Example 16-22 illustrates defining rules for both kinds of channel.
You might be wondering how this information gets from your Laravel application to your JavaScript frontend. Pusher’s JavaScript library sends a POST to your application; by default it will hit /pusher/auth, but you can customize that (and Echo customizes it for you) to hit Laravel’s authentication route, /broadcasting/auth:
varpusher=newPusher(App.pusherKey,{authEndpoint:'/broadcasting/auth'});
Example 16-23 shows how we can tweak Example 16-20 for private and presence channels, without Echo’s frontend components.
...<scriptsrc="https://js.pusher.com/4.3/pusher.min.js"></script><script>// Enable pusher logging - don't include this in productionPusher.logToConsole=true;// Globally, perhaps; just a sample of how to get data invarApp={'userId':{{auth()->id()}},'pusherKey':'{{ config('broadcasting.connections.pusher.key') }}'};// Locallyvarpusher=newPusher(App.pusherKey,{cluster:'{{ config('broadcasting.connections.pusher.options.cluster') }}',encrypted:{{config('broadcasting.connections.pusher.options.encrypted')}},authEndpoint:'/broadcasting/auth'});// Private channelvarprivateChannel=pusher.subscribe('private-teams.1');privateChannel.bind('App\\Events\\UserSubscribed',(data)=>{console.log(data.user,data.plan);});// Presence channelvarpresenceChannel=pusher.subscribe('presence-rooms.5');console.log(presenceChannel.members);</script>
We now have the ability to send WebSocket messages to users depending on whether they pass a given channel’s authorization rules. We can also keep track of which users are active in a particular group or section of the site, and display relevant information to each user about other users in the same group.
Laravel Echo is comprised of two pieces: the advanced framework features we just covered, and a JavaScript package that takes advantage of those features and drastically reduces the amount of boilerplate code you need to write powerful WebSocket-based frontends. The Echo JavaScript package makes it easy to handle authentication, authorization, and subscribing to private and presence channels. Echo can be used with the SDKs for either Pusher JS (for Pusher or a custom Pusher-compatible server) or socket.io (for Redis).
To use Echo in your project’s JavaScript, add it to package.json using npm install --save (be sure to bring in the appropriate Pusher or socket.io SDK as well):
npm install pusher-js laravel-echo --save
Let’s assume you have a basic Laravel Mix file compiling your app.js file with Webpack, like in Example 16-24.
letmix=require('laravel-mix');mix.js('resources/assets/js/app.js','public/js');
Laravel’s default resources/js/app.js structure has a great example of how best to initialize your Echo install. Take a look at Example 16-25 to see how that works between that file and resources/js/bootstrap.js.
// app.jsrequire('./bootstrap');// ... lots of Vue stuff ...// Add your Echo bindings here
// bootstrap.jsimportEchofrom"laravel-echo";window.Echo=newEcho({broadcaster:'pusher',key:process.env.MIX_PUSHER_APP_KEY,cluster:process.env.MIX_PUSHER_APP_CLUSTER});
For CSRF protection, you’ll also need to add a csrf-token <meta> tag to your HTML template:
<metaname="csrf-token"content="{{ csrf_token() }}">
And, of course, remember to link to your compiled app.js in your HTML template:
<scriptsrc="{{ asset('js/app.js') }}"></script>
Now we’re ready to get started.
If you’re working with a Laravel WebSockets server (using the package discussed earlier in “Receiving the Message”), the configuration details in Example 16-25 will be a little bit different. See the Laravel WebSockets package docs for more info.
This is nothing different from what we’ve already used Pusher JS for, but Example 16-26 is a simple code sample to show how to use Echo to listen to public channels for basic event information.
varcurrentTeamId=5;// Likely set elsewhereEcho.channel(`teams.${currentTeamId}`).listen('UserSubscribed',(data)=>{console.log(data);});
Echo provides a few methods for subscribing to various types of channels; channel() will subscribe you to a public channel. Note that when you listen to an event with Echo, you can ignore the full event namespace and just listen for the unique class name of this event. And now we now have access to the public data that’s passed along with our event, represented in the data object.
We can also chain listen() handlers, as in Example 16-27.
Echo.channel(`teams.${currentTeamId}`).listen('UserSubscribed',(data)=>{console.log(data);}).listen('UserCanceled',(data)=>{console.log(data);});
Did you try these code samples and not see anything change in your browser? Make sure to run npm run dev (if you’re running it once) or npm run watch (to run a listener) to compile your code. And, if you haven’t yet, be sure to actually include app.js in your template somewhere.
Echo also has a method for subscribing to private channels: private(). It works the same as channel(), but it requires you to have set up channel authorization definitions in routes/channel.php, like we covered earlier. Additionally, unlike with the SDKs, you don’t need to put private- in front of your channel name.
Example 16-28 shows what it looks like to listen to a private channel named private-teams.5.
varcurrentTeamId=5;// Likely set elsewhereEcho.private(`teams.${currentTeamId}`).listen('UserSubscribed',(data)=>{console.log(data);});
Echo makes it much simpler to join and listen to events in presence channels. This time you’ll want to use the join() method to bind to this channel, as in Example 16-29.
varcurrentTeamId=5;// Likely set elsewhereEcho.join(`teams.${currentTeamId}`).here((members)=>{console.log(members);});
join() subscribes to the presence channel, and here() allows you to define the behavior when the user joins and also when any other users join or leave the presence channel.
You can think of a presence channel like a “who’s online” sidebar in a chat room. When you first join a presence channel, your here() callback will be called and provided a list of all the members at that time. And any time any members join or leave, that callback will be called again with the updated list. There’s no messaging happening here, but you can play sounds, update the on-page list of members, or do whatever else you want in response to these actions.
There are also specific methods for individual events, which you can use individually or chained (see Example 16-30).
varcurrentTeamId=5;// Likely set elsewhereEcho.join('teams.'+currentTeamId).here((members)=>{// runs when you joinconsole.table(members);}).joining((joiningMember,members)=>{// runs when another member joinsconsole.table(joiningMember);}).leaving((leavingMember,members)=>{// runs when another member leavesconsole.table(leavingMember);});
We covered this previously in the chapter, but if you want to exclude the current user, use the broadcast() global helper instead of the event() global helper and then chain the toOthers() method after your broadcast call. But with Echo, the JavaScript side of this is already handled for you. It’ll just work.
As you can see, the Echo JavaScript library doesn’t do anything you couldn’t do on your own—but it makes a lot of common tasks much simpler, and provides a cleaner, more expressive syntax for common WebSocket tasks.
Laravel’s notifications come with a broadcast driver out of the box that pushes notifications out as broadcast events. You can subscribe to these notifications with Echo using Echo.notification, as in Example 16-31.
Echo.private(`App.User.${userId}`).notification((notification)=>{console.log(notification.type);});
If you’d like to send quick, performant messages between your users without the messages even hitting your Laravel application—for example, to send “typing…” notifications—you can use Echo’s whisper() method:
Echo.private('room').whisper('typing',{name:this.user.name});
And then listenForWhisper() to listen:
Echo.private('room').listenForWhisper('typing',(e)=>{console.log(e.name);});
If you’ve ever written a cron job before, you likely already wish for a better tool. Not only is the syntax onerous and frustratingly difficult to remember, but it’s one significant aspect of your application that can’t be stored in version control.
Laravel’s scheduler makes handling scheduled tasks simple. You’ll write your scheduled tasks in code, and then point one cron job at your app: once per minute, run php artisan schedule:run. Every time this Artisan command is run, Laravel checks your schedule definitions to find out if any scheduled tasks should run.
Here’s the cron job to define that command:
* * * * *cd/home/myapp.com&&php artisan schedule:run >> /dev/null 2>&1
There are many task types you can schedule and many time frames you can use to schedule them.
app/Console/Kernel.php has a method named $schedule, which is where you’ll define any tasks you’d like to schedule.
First, let’s take a look at the simplest option: a closure, run every minute (Example 16-32). That means that, every time the cron job hits the schedule:run command, it will call this closure.
// app/Consoles/Kernel.phppublicfunctionschedule(Schedule$schedule){$schedule->call(function(){CalculateTotals::dispatch();})->everyMinute();}
There are two other types of tasks you can schedule: Artisan and shell commands.
You can schedule Artisan commands by passing their syntax exactly as you would call them from the command line:
$schedule->command('scores:tally --reset-cache')->everyMinute();
And you can run any shell commands that you could run with PHP’s exec() method:
$schedule->exec('/home/myapp.com/bin/build.sh')->everyMinute();
The beauty of the scheduler isn’t just that you can define your tasks in code; it’s that you can schedule them in code, too. Laravel keeps track of time passing and evaluates whether it’s time for any given task to run. That’s easy with everyMinute() because the answer is always simple: run the task. But Laravel keeps the rest simple for you, too, even for the most complex of requests.
Let’s take a look at your options by starting with a monstrous definition that’s simple in Laravel:
$schedule->call(function(){// Runs once a week on Sunday at 23:50})->weekly()->sundays()->at('23:50');
Notice that we can chain times together: we can define frequency and specify the day of the week and the time, and of course we can do so much more.
Table 16-1 shows a list of potential date/time modifiers for use when scheduling a job.
| Command | Description |
|---|---|
|
Set the time zone for schedules |
|
Define the schedule using the traditional cron notation |
|
Run every minute |
|
Run every 5 minutes |
|
Run every 10 minutes |
|
Run every 30 minutes |
|
Run every hour |
|
Run every day at midnight |
|
Run every day at 14:00 |
|
Run every day at 1:00 and 14:00 |
|
Run every week (midnight on Sunday) |
|
Run every week on Friday at 10:00 |
|
Run every month (midnight on the 1st) |
|
Run every month on the 15th at 23:00 |
|
Run every quarter (midnight on the 1st of January, April, July, and October) |
|
Run every year (midnight on the 1st of January) |
|
Limit the task to when closure returns |
|
Limit the task to when closure returns |
|
Limit the task to between the given times |
|
Limit the task to any time except between the given times |
|
Limit to weekdays |
|
Limit to Sundays |
|
Limit to Mondays |
|
Limit to Tuesdays |
|
Limit to Wednesdays |
|
Limit to Thursdays |
|
Limit to Fridays |
|
Limit to Saturdays |
Most of these can be chained one after another, but of course, any combinations that don’t make sense chained can’t be chained.
Example 16-33 shows a few combinations you could consider.
// Both run weekly on Sunday at 23:50$schedule->command('do:thing')->weeklyOn(0,'23:50');$schedule->command('do:thing')->weekly()->sundays()->at('23:50');// Run once per hour, weekdays, 8am-5pm$schedule->command('do:thing')->weekdays()->hourly()->when(function(){returndate('H')>=8&&date('H')<=17;});// Run once per hour, weekdays, 8am-5pm using the "between" method$schedule->command('do:thing')->weekdays()->hourly()->between('8:00','17:00');// Run every thirty minutes except when directed to by the SkipDetector$schedule->command('do:thing')->everyThirtyMinutes()->skip(function(){returnapp('SkipDetector')->shouldSkip();});
If you want to avoid your tasks overlapping each other—for example, if you have a task running every minute that may sometimes take longer than a minute to run—end the schedule chain with the withoutOverlapping() method. This method skips a task if the previous instance of that task is still running:
$schedule->command('do:thing')->everyMinute()->withoutOverlapping();
Sometimes the output from your scheduled task is important, whether for logging, notifications, or just ensuring that the task ran.
If you want to write the returned output of a task to a file, use sendOutputTo():
$schedule->command('do:thing')->daily()->sendOutputTo($filePath);
If you want to append it to a file instead, use appendOutputTo():
$schedule->command('do:thing')->daily()->appendOutputTo($filePath);
And if you want to email the output to a designated recipient, write it to a file first and then add emailOutputTo():
$schedule->command('do:thing')->daily()->sendOutputTo($filePath)->emailOutputTo('me@myapp.com');
Make sure that your email settings are configured correctly in Laravel’s basic email configuration.
The sendOutputTo(), appendOutputTo(), and emailOutputTo() methods only work for command scheduled tasks. You can’t use them for closures, unfortunately.
You may also want to send some output to a webhook to verify that your tasks ran correctly. There are a few services that provide this sort of uptime monitoring, most significantly Laravel Envoyer (a zero-downtime deployment service that also provides cron uptime monitoring) and Dead Man’s Snitch, a tool designed purely for monitoring cron job uptime.
These services don’t expect something to be emailed to them, but rather expect an HTTP “ping,” so Laravel makes that easy with pingBefore() and thenPing():
$schedule->command('do:thing')->daily()->pingBefore($beforeUrl)->thenPing($afterUrl);
If you want to use the ping features, you’ll need to pull in Guzzle using Composer: composer require guzzlehttp/guzzle.
Speaking of running something before and after your task, there are hooks for that, with before() and after():
$schedule->command('do_thing')->daily()->before(function(){// Prepare})->after(function(){// Cleanup});
Testing queued jobs (or anything else in the queue) is easy. In phpunit.xml, which is the configuration file for your tests, the QUEUE_DRIVER environment variable is set to sync by default. That means your tests will run your jobs or other queued tasks synchronously, directly in your code, without relying on a queue system of any sort. You can test them just like any other code.
However, if you’d just like to check that a job was fired, you can do that with the expectsJobs() method, as in Example 16-34.
publicfunctiontest_changing_number_of_subscriptions_crunches_reports(){$this->expectsJobs(\App\Jobs\CrunchReports::class);...}
Or, in projects in Laravel 5.3 and above you can assert against the specific job itself, as in Example 16-35.
useIlluminate\Support\Facades\Bus;...publicfunctiontest_changing_subscriptions_triggers_crunch_job(){...Bus::fake();Bus::assertDispatched(CrunchReports::class,function($job){return$job->subscriptions->contains(5);});// Also can use assertNotDispatched}
To test that an event fired, you have three options. First, you can just test that the behavior you expected happened, without concerning yourself with the event itself.
Second, you can explicitly assert that the event fired, as in Example 16-36, which is available in Laravel 5.2 and above.
publicfunctiontest_usersubscribed_event_fires(){$this->expectsEvents(\App\Events\UserSubscribed::class);...}
Finally, you can run a test against the event that was fired, as in Example 16-37. This is available in Laravel 5.3 and above.
useIlluminate\Support\Facades\Event;...publicfunctiontest_usersubscribed_event_fires(){Event::fake();...Event::assertDispatched(UserSubscribed::class,function($e){return$e->user->='user-who-subscribed@mail.com';});// Also can use assertNotDispatched()}
Another common scenario is that you’re testing code that incidentally fires events, and you want to disable the event listeners during that test. You can disable the event system with the withoutEvents() method, as in Example 16-38.
publicfunctiontest_something_subscription_related(){$this->withoutEvents();...}
Queues allow you to separate chunks of your application’s code from the synchronous flow of user interactions out to a list of commands to be processed by a “queue worker.” This allows your users to resume interactions with your application while slower processes are handled asychronously in the background.
Jobs are classes that are structured with the intention of encapsulating a chunk of application behavior so that it can be pushed onto a queue.
Laravel’s event system follows the pub/sub or observer pattern, allowing you to send out notifications of an event from one part of your application, and elsewhere bind listeners to those notifications to define what behavior should happen in response to them. Using WebSockets, events can also be broadcast to frontend clients.
Laravel’s scheduler simplifies scheduling tasks. Point an every-minute cron job to php artisan schedule:run and then schedule your tasks with even the most complex of time requirements using the scheduler, and Laravel will handle all the timings for you.
We’ve already covered many global functions throughout the book: little helpers that make it easier to perform common tasks, like dispatch() for Jobs, event() for Events, app() for dependency resolution, and many more. We also talked a bit about Laravel’s collections, or arrays on steroids, in Chapter 5.
In this chapter we’ll cover some of the more common and powerful helpers and some of the basics of programming with collections.
You can find a full list of the helpers Laravel offers in the helpers docs, but we’re going to cover a few of the most useful functions here.
PHP’s native array manipulation functions give you a lot of power, but sometimes there are common manipulations we want to make that require unwieldy loops and logic checks. Laravel’s array helpers make a few common array manipulations much simpler:
array_first($array, $callback, $default = null)Returns the first array value that passes a test, defined in a callback closure. You can optionally set the default value as the third parameter.
$people=[['email'=>'m@me.com','name'=>'Malcolm Me'],['email'=>'j@jo.com','name'=>'James Jo']];$value=array_first($people,function($person,$key){return$person['email']=='j@jo.com';});
array_get($array, $key, $default = null)Makes it easy to get values out of an array, with two added benefits: it won’t throw an error if you ask for a key that doesn’t exist (and you can provide defaults with the third parameter), and you can use dot notation to traverse nested arrays. For example:
$array=['owner'=>['address'=>['line1'=>'123 Main St.']]];$line1=array_get($array,'owner.address.line1','No address');$line2=array_get($array,'owner.address.line2');
array_has($array, $keys)Makes it easy to check whether an array has a particular value set using dot notation for traversing nested arrays. The $keys parameter can be a single entry or an array of entries, which will check whether every entry in the array exists.
$array=['owner'=>['address'=>['line1'=>'123 Main St.']]];if(array_has($array,'owner.address.line2')){// Do stuff}
array_pluck($array, $value, $key = null)Returns an array of the values corresponding to the provided key:
$array=[['owner'=>['id'=>4,'name'=>'Tricia']],['owner'=>['id'=>7,'name'=>'Kimberly']],];$array=array_pluck($array,'owner.name');// Returns ['Tricia', 'Kimberly'];
If you want the returned array to be keyed by another value from the source array, you can pass that value’s dot-notated reference as the third parameter:
$array=array_pluck($array,'owner.name','owner.id');// Returns [4 => 'Tricia', 7 => 'Kimberly'];
array_random($array, $num = null)Returns a random item from the provided array. If you provide a $num parameter, it will pull an array of that many results, randomly selected.
$array=[['owner'=>['id'=>4,'name'=>'Tricia']],['owner'=>['id'=>7,'name'=>'Kimberly']],];$randomOwner=array_random($array);
Just like with arrays, there are some string manipulations and checks that are possible with native PHP functions, but can be cumbersome. Laravel’s helpers make a few common string operations faster and simpler:
e($string)An alias to htmlentities(); prepares a (often user-provided) string for safe echoing on an HTML page. For example:
e('<script>do something nefarious</script>');// Returns <script>do something nefarious</script>
starts_with($haystack, $needle), ends_with($haystack, $needle), and str_contains($haystack, $needle)Return a boolean of whether the provided “haystack” string starts with, ends with, or contains the provided “needle” string:
if(starts_with($url,'https')){// Do something}if(ends_with($abstract,'...')){// Do something}if(str_contains($description,'1337 h4x0r')){// Run away}
str_limit($value, $limit = 100, $end = '...')Limits a string to the provided number of characters. If the string is less than the limit, just returns the string; if it’s greater, trims to the number of characters provided and then appends either ... or the provided
“end” string. For example:
$abstract=str_limit($loremIpsum,30);// Returns "Lorem ipsum dolor sit amet, co..."$abstract=str_limit($loremIpsum,30,"…");// Returns "Lorem ipsum dolor sit amet, co…"
str_is($pattern, $value)Returns a boolean of whether or not a given string matches a given pattern. The pattern can be a regex pattern, or you can use asterisks to indicate wildcard positions:
str_is('*.dev','myapp.dev');// truestr_is('*.dev','myapp.dev.co.uk');// falsestr_is('*dev*','myapp.dev');// truestr_is('*myapp*','www.myapp.dev');// truestr_is('my*app','myfantasticapp');// truestr_is('my*app','myapp');// true
If you’re curious about what regex patterns are acceptable to pass to str_is(), check out the function definition here (shortened for space) to see how it works. Note that it’s an alias of Illuminate\Support\Str::is:
publicfunctionis($pattern,$value){if($pattern==$value)returntrue;$pattern=preg_quote($pattern,'#');$pattern=str_replace('\*','.*',$pattern);if(preg_match('#^'.$pattern.'\z#u',$value)===1){returntrue;}returnfalse;}
str_random($length = 16)Returns a random string of alphanumeric mixed-case characters of the length specified:
$hash=str_random(64);// Sample: J40uNWAvY60wE4BPEWxu7BZFQEmxEHmGiLmQncj0ThMGJK7O5Kfgptyb9ulwspmh
str_slug($title, $separator = '-', $language = 'en')Returns a URL-friendly slug from a string—often used for creating a URL segment for a name or title:
str_slug('How to Win Friends and Influence People');// Returns 'how-to-win-friends-and-influence-people'
str_plural($value, $count = 2)Converts a string to its plural form. This function currently only supports the English language.
str_plural('book');// Returns booksstr_plural('person');// Returns peoplestr_plural('person',1);// Returns person
__($key, $replace = [], $locale = null)The __() function translates the given translation string or translation key using your localization files.
echo__('Welcome to your dashboard');echo__('messages.welcome');
When you’re dealing with the filesystem, it can often be tedious to make links to certain directories for getting and saving files. These helpers give you quick access to find the fully qualified paths to some of the most important directories in your app.
Note that each of these can be called with no parameters, but if a parameter is passed, it will be appended to the normal directory string and returned as a whole:
app_path($append = '')Returns the path for the app directory:
app_path();// Returns /home/forge/myapp.com/app
base_path($path = '')Returns the path for the root directory of your app:
base_path();// Returns /home/forge/myapp.com
config_path($path = '')Returns the path for configuration files in your app:
config_path();// Returns /home/forge/myapp.com/config
database_path($path = '')Returns the path for database files in your app:
database_path();// Returns /home/forge/myapp.com/database
storage_path($path = '')Returns the path for the storage directory in your app:
storage_path();// Returns /home/forge/myapp.com/storage
Some frontend file paths are consistent but at times annoying to type—for example, paths to assets—and it’s helpful to have convenient shortcuts to them, which we’ll cover here. But some can actually vary as route definitions move or new files are versioned with Mix, so some of these helpers are vital in making sure all of your links and assets work correctly:
action($action, $parameters = [], $absolute = true)Assuming a controller method has a single URL mapped to it, returns the correct URL given a controller and method name pair (separated by @) or using tuple notation:
<ahref="{{ action('PeopleController@index') }}">SeeallPeople</a>// or, using tuple notation:<ahref="{{ action([App\Http\Controllers\PeopleController::class, 'index']) }}">SeeallPeople</a>// Returns <a href="http://myapp.com/people">See all People</a>
If the controller method requires parameters, you can pass them in as the second parameter (as an array, if there’s more than one required parameter). You can key them if you want for clarity, but what matters is just that they’re in the right order:
<ahref="{{ action('PeopleController@show', ['id' => 3] }}">SeePerson#3</a>// or<ahref="{{ action('PeopleController@show', [3] }}">SeePerson#3</a>// Returns <a href="http://myapp.com/people/3">See Person #3</a>
If you pass false to the third parameter, your links will generate as relative (/people/3) instead of absolute (http://myapp.com/people/3).
route($name, $parameters = [], $absolute = true)If a route has a name, returns the URL for that route:
// routes/web.phpRoute::get('people','PeopleController@index')->name('people.index');// a view somewhere<ahref="{{ route('people.index') }}">SeeallPeople</a>// Returns <a href="http://myapp.com/people">See all People</a>
If the route definition requires parameters, you can pass them in as the second parameter (as an array if more than one parameter is required). Again, you can key them if you want for clarity, but what matters is just that they’re in the right order:
<ahref="{{ route('people.show', ['id' => 3]) }}">SeePerson#3</a>// or<ahref="{{ route('people.show', [3]) }}">SeePerson#3</a>// Returns <a href="http://myapp.com/people/3">See Person #3</a>
If you pass false to the third parameter, your links will generate as relative instead of absolute.
url($string) and secure_url($string)Given any path string, converts to a fully qualified URL. secure_url() is the same as url() but forces HTTPS.
url('people/3');// Returns http://myapp.com/people/3
If no parameters are passed, this instead gives an instance of Illuminate\Routing\UrlGenerator, which makes method chaining possible:
url()->current();// Returns http://myapp.com/abcurl()->full();// Returns http://myapp.com/abc?order=reverseurl()->previous();// Returns http://myapp.com/login// And many more methods available on the UrlGenerator...
mix($path, $manifestDirectory = '')If assets are versioned with Elixir’s versioning system, given the nonversioned path name, returns the fully qualified URL for the versioned file:
<linkrel="stylesheet"href="{{ mix('css/app.css') }}">// Returns something like /build/css/app-eb555e38.css
In projects running versions of Laravel prior to 5.4, you’ll want to use the elixir() helper instead of the mix() helper. Check the docs for more info.
There are a few other global helpers that I’d recommend getting familiar with. Of course, you should check out the whole list, but the ones mentioned here are definitely worth taking a look at:
abort($code, $message, $headers), abort_unless($boolean, $code, $message, $headers), and abort_if($boolean, $code, $message, $headers)Throws HTTP exceptions. abort() throws the exception defined, abort_unless() throws it if the first parameter is false, and abort_if() throws it if the first parameter is true:
publicfunctioncontrollerMethod(Request$request){abort(403,'You shall not pass');abort_unless(request()->filled('magicToken'),403);abort_if(request()->user()->isBanned,403);}
auth()Returns an instance of the Laravel authenticator. Like the Auth facade, you can use this to get the current user, to check for login state, and more:
$user=auth()->user();$userId=auth()->id();if(auth()->check()){// Do something}
back()Generates a “redirect back” response, sending the user to the previous location:
Route::get('post',function(){...if($condition){returnback();}});
collect($array)Takes an array and returns the same data, converted to a collection:
$collection=collect(['Rachel','Hototo']);
We’ll cover collections in just a bit.
config($key)Returns the value for any dot-notated configuration item:
$defaultDbConnection=config('database.default');
csrf_field() and csrf_token()Return a full HTML hidden input (csrf_field()) or just the appropriate token value (csrf_token()) for adding CSRF verification to your form submission:
<form>{{ csrf_field() }}</form>// or<form><inputtype="hidden"name="_token"value="{{ csrf_token() }}"></form>
dd($variable...)Short for “dump and die,” runs var_dump() on all provided parameters and then exit() to quit the application (this is used for debugging):
...dd($var1,$var2,$state);// Why is this not working???
env($key, $default = null)Returns the environment variable for the given key:
$key=env('API_KEY','');
Remember not to ever use env() outside of config files.
dispatch($job)Dispatches a job:
dispatch(newEmailAdminAboutNewUser($user));
event($event)Fires an event:
event(newContactAdded($contact));
factory($entityClass)Returns an instance of the factory builder for the given class:
$contact=factory(App\Contact::class)->make();
old($key = null, $default = null)Returns the old value (from the last user form submission) for this form key, if it exists:
<inputname="name"value="{{ old('value', 'Your name here') }}"
redirect($path)Returns a redirect response to the given path:
Route::get('post',function(){...returnredirect('home');});
Without parameters, generates an instance of the Illuminate\Routing\Redirector class.
response($content, $status = 200, $headers)If passed with parameters, returns a prebuilt instance of Response. If passed with no response, returns an instance of the Response factory:
returnresponse('OK',200,['X-Header-Greatness'=>'Super great']);returnresponse()->json(['status'=>'success']);
view($viewPath)Returns a view instance:
Route::get('home',function(){returnview('home');// Gets /resources/views/home.blade.php});
Collections are one of the most powerful and yet underappreciated tools Laravel provides. We covered them a bit in “Eloquent Collections”, but here’s a quick recap.
Collections are essentially arrays with superpowers. The array-traversing methods you normally have to pass arrays into (array_walk(), array_map(), array_reduce(), etc.), all of which have confusingly inconsistent method signatures, are available as consistent, clean, chainable methods on every collection. You can get a taste of functional programming and map, reduce, and filter your way to cleaner code.
We’ll cover some of the basics of Laravel’s collections and collection pipeline programming here, but for a much deeper overview, check out Adam Wathan’s book Refactoring to Collections (Gumroad).
Collections are not a new idea within Laravel. Many languages make collection-style programming available on arrays out of the box, but with PHP we’re not quite so lucky.
Using PHP’s array*() functions, we can take the monstrosity shown in Example 17-1, and turn it into the slightly less monstrous monstrosity shown in Example 17-2.
$users=[...];$admins=[];foreach($usersas$user){if($user['status']=='admin'){$user['name']=$user['first'].' '.$user['last'];$admins[]=$user;}}return$admins;
$users=[...];returnarray_map(function($user){$user['name']=$user['first'].' '.$user['last'];return$user;},array_filter($users,function($user){return$user['status']=='admin';}));
Here, we’ve gotten rid of a temporary variable ($admins) and converted one confusing foreach loop into two distinct actions: map and filter.
The problem is, PHP’s array manipulation functions are awful and confusing. Just look at this example; array_map() takes the closure first and the array second, but array_filter() takes the array first and the closure second. In addition, if we added any complexity to this, we’d have functions wrapping functions wrapping functions. It’s a mess.
Laravel’s collections take the power of PHP’s array manipulation methods and give them a clean, fluent syntax—and they add many methods that don’t even exist in PHP’s array manipulation toolbox. Now, using the collect() helper method that turns an array into a Laravel collection, we can do what’s shown in Example 17-3:
$users=collect([...]);return$users->filter(function($user){return$user['status']=='admin';})->map(function($user){$user['name']=$user['first'].' '.$user['last'];return$user;});
This isn’t the most extreme of examples. There are plenty where the reduction in lines of code and the increased simplicity would make an even stronger case. But this right here is so common.
Look at the original example and how muddy it is. It’s not entirely clear until you understand the entire code sample what any given piece is there for.
The biggest benefit collections provide, over anything else, is breaking the actions you’re taking to manipulate an array into simple, discrete, understandable tasks. You can now do something like this:
$users=[...]$countAdmins=collect($users)->filter(function($user){return$user['status']=='admin';})->count();
Or something like this:
$users=[...];$greenTeamPoints=collect($users)->filter(function($user){return$user['team']=='green';})->sum('points');
Many of the examples we’ll look at in the rest of this chapter operate on this mythical $users collection we’ve started imagining here. Each entry in this $users array will represent a single human; they’ll likely all be array-accessible. The specific properties each user will have may vary a bit depending on the example. But any time you see this $users variable, know that that’s what we’re working with.
There’s much more you can do than what we’ve covered here. Take a look at the Laravel Collection docs to learn more about all the methods you can use, but to get you started, here are just a few of the core methods:
all() and toArray()If you’d like to convert your collection to an array, you can do so with either all() or toArray(). toArray() flattens not just the collection, but also any Eloquent objects underneath it, to arrays. all() only converts the collection to an array; any Eloquent objects contained within the collection will be preserved as Eloquent objects. Here are a few examples:
$users=User::all();$users->toArray();/* Returns[['id' => '1', 'name' => 'Agouhanna'],...]*/$users->all();/* Returns[Eloquent Object { id : 1, name: 'Agouhanna' },...]*/
filter() and reject()When you want to get a subset of your original collection by checking each item against a closure, you’ll use filter() (which keeps an item if the closure returns true) or reject() (which keeps an item if the closure returns false):
$users=collect([...]);$admins=$users->filter(function($user){return$user->isAdmin;});$paidUsers=$user->reject(function($user){return$user->isTrial;});
where()where() makes it easy to provide a subset of your original collection where a given key is equal to a given value. Anything you can do with where() you can also do with filter(), but it’s a shortcut for a common scenario:
$users=collect([...]);$admins=$users->where('role','admin');
first() and last()If you want just a single item from your collection, you can use first() to pull from the beginning of the list or last() to pull from the end.
If you call first() or last() with no parameters, they’ll just give you the first or last item in the collection. But if you pass either a closure, they’ll instead give you the first or last item in the collection that returns true when passed to that closure.
Sometimes you’ll do this because you want the actual first or last item. But sometimes it’s the easiest way to get one item even if you only expect there to be one:
$users=collect([...]);$owner=$users->first(function($user){return$user->isOwner;});$firstUser=$users->first();$lastUser=$users->last();
You can also pass a second parameter to each method, which is the default value and will be provided as a fallback if the closure doesn’t provide any results.
each()If you’d like to do something with each item of a collection, but it doesn’t include modifying the items or the collection itself, you can use each():
$users=collect([...]);$users->each(function($user){EmailUserAThing::dispatch($user);});
map()If you’d like to iterate over all the items in a collection, make changes to them, and return a new collection with all of your changes, you’ll want to use map():
$users=collect([...]);$users=$users->map(function($user){return['name'=>$user['first'].' '.$user['last'],'email'=>$user['email']];});
reduce()If you’d like to get a single result from your collection, like a count or a string, you’ll probably want to use reduce(). Reduce works by taking an initial value (called the “carry”) and then allowing each item in the collection to change that value some how. You can define an initial value for the “carry,” and a closure that accepts the current state of the “carry” and then each item as parameters:
$users=collect([...]);$points=$users->reduce(function($carry,$user){return$carry+$user['points'];},0);// Start with a carry of 0
pluck()If you want to pull out just the values for a given key under each item in a collection, you can use pluck() (formerly lists()):
$users=collect([...]);$emails=$users->pluck('email')->toArray();
chunk() and take()chunk() makes it easy to split your collection into groups of a predefined size, and take() pulls just the provided number of items:
$users=collect([...]);$rowsOfUsers=$users->chunk(3);// Separates into groups of 3$topThree=$users->take(3);// Pulls the first 3
groupBy()If you want to group all of the items in your collection by the value of one of their properties, you can use groupBy():
$users=collect([...]);$usersByRole=$users->groupBy('role');/* Returns:['member' => [...],'admin' => [...]]*/
You can also pass a closure, and whatever you return from the closure will be what’s used to group the records:
$heroes=collect([...]);$heroesByAbilityType=$heroes->groupBy(function($hero){if($hero->canFly()&&$hero->isInvulnerable()){return'Kryptonian';}if($hero->bitByARadioactiveSpider()){return'Spidermanesque';}if($hero->color==='green'&&$hero->likesSmashing()){return'Hulk-like';}return'Generic';});
reverse() and shuffle()reverse() reverses the order of the items in your collection, and shuffle() randomizes them:
$numbers=collect([1,2,3]);$numbers->reverse()->toArray();// [3, 2, 1]$numbers->shuffle()->toArray();// [2, 3, 1]
sort(), sortBy(), and sortByDesc()If your items are simple strings or integers, you can use sort() to sort them:
$sortedNumbers=collect([1,7,6,4])->sort()->toArray();// [1, 4, 6, 7]
If they’re more complex, you can pass a string (representing the property) or a closure to sortBy() or sortByDesc() to define your sorting behavior:
$users=collect([...]);// Sort an array of users by their 'email' property$users->sort('email');// Sort an array of users by their 'email' property$users->sortBy(function($user,$key){return$user['email'];});
count(), isEmpty(), and isNotEmpty()You can see how many items there are in your collection using count(), isEmpty(), or isNotEmpty():
$numbers=collect([1,2,3]);$numbers->count();// 3$numbers->isEmpty();// false$numbers->isNotEmpty()// true
avg() and sum()If you’re working with a collection of numbers, avg() and sum() do what their method names say, and don’t require any parameters:
collect([1,2,3])->sum();// 6collect([1,2,3])->avg();// 2
But if you’re working with arrays, you can pass the key of the property you’d like to pull from each array to operate on:
$users=collect([...]);$sumPoints=$users->sum('points');$avgPoints=$users->avg('points');
Have you fallen in love with collections, and do you want to use them on your non-Laravel projects? With Taylor’s blessing, I split out just the collections functionality from Laravel into a separate project called Collect, and developers at my company keep it up-to-date with Laravel’s releases.
Just use the composer require tightenco/collect command and you’ll have the Illuminate\Support\Collection class ready to use in your code—along with the collect() helper.
Laravel provides a suite of global helper functions that make it simpler to do all sorts of tasks. They make it easier to manipulate and inspect arrays and strings, they make it easier to generate paths and URLs, and they provide simple access to some consistent and vital functionality.
Laravel’s collections are powerful tools that bring the possibility of collection pipelines to PHP.
As Laravel has grown, Taylor has built a suite of tools to support and simplify the lives and workflows of Laravel developers. Much of the new work has gone straight into the core, but there are quite a few packages and SaaS (software-as-a-service) offerings that aren’t a part of the core, but are still very much a part of the Laravel experience.
We’re already covered quite a few in this book, so I’ll link to each; but for those we haven’t covered, I’ll give each a quick description and a link to the relevant website.
We’ve already taken a look at these, but here are links to where you can find them in the book.
The Laravel installer is a package installed globally on your local development machine (via Composer) that makes it easy and quick to set up a new Laravel project.
Covered in “Installing Laravel with the Laravel Installer Tool”.
Valet is a local development server (for Mac, but with forks for Windows and Linux) that makes it quick and easy to serve all of your projects to your browser with almost no effort. You’ll install Valet globally on your local development machine via Composer.
With a few commands you can have Nginx, MySQL, Redis, and more serving every Laravel app on your machine at a .test domain.
Covered in “Laravel Valet”.
Passport is a powerful, simple-to-set-up OAuth2 server for authenticating clients to your APIs. You’ll install it in each application as a Composer package, and with very little work you can have a full OAuth2 flow accessible to your users.
Covered in “API Authentication with Laravel Passport”.
Horizon is a queue monitoring package you can install into each application via Composer. It exposes a full user interface for monitoring the health, performance, failures, and history of your Redis queued jobs.
Introduced briefly in “Laravel Horizon”.
Mix is a Webpack-based frontend build system. It can run Babel, Browsersync, your favorite CSS pre- and post-processors, and provides hot module replacement, code splitting, versioning, and much more. Mix replaced Elixir, a Gulp-based tool used for the same purposes.
Covered in “Mix”.
Echo is a JavaScript library (introduced along with a series of improvements to Laravel’s notification system) that makes it simple to subscribe to events and channels broadcast from your Laravel app via Websockets.
Covered in “Laravel Echo (the JavaScript Side)”.
Dusk is a frontend testing framework built for testing your entire application, JavaScript and all. It’s a powerful package you can pull into your application via Composer and that drives actual browsers with ChromeDriver.
Covered in “Testing with Dusk”.
Homestead is a configuration layer on top of Vagrant that makes it simple to serve multiple Laravel applications from a Laravel-friendly Vagrant setup.
Introduced briefly in “Laravel Homestead”.
These are a few tools that I did not cover because they are beyond the scope of this book. Some of these are just for use in special circumstances (Cashier for taking payments, Socialite for social login, etc.) but some I use every day (Forge, especially).
Forge is a paid SaaS tool for creating and managing virtual servers on hosts like DigitalOcean, Linode, AWS, and more. It provisions Laravel-ready servers (and individual sites on those servers) with all the tools you need to run your servers, from queues and queue workers to Let’s Encrypt SSL certs. It can also set up simple shell scripts to auto-deploy your sites when you push up new code to GitHub or Bitbucket.
Forge is incredibly useful for spinning up sites quickly and easily, but it’s not so minimal that you can’t also run your apps on it longer term or at larger scale. You can scale up your server sizes, add load balancers, and manage private networking between your servers, all within Forge.
Envoyer is paid SaaS that’s branded as “Zero downtime PHP deployment”. Unlike Forge, Envoyer doesn’t spin up your servers or manage them. Its primary job is to listen to triggers—usually when you push new code, but you can also manually trigger deploys or trigger them with webhooks—and perform your deploy steps in response.
There are three ways that Envoyer does this much better than Forge’s push-to-deploy tool and most other push-to-deploy solutions.
It has a robust toolset for building out your deploy pipeline as a simple but powerful multi-stage process.
It deploys your app using Capistrano-style zero downtime deploys; each new deploy is built into its own folder, and only once the build process has completed successfully is that deploy folder symlinked to your actual web root. Because of this, there’s no moment when your server is broken while Composer installs or NPM builds.
Because of this folder-based system, it’s easy and quick to roll back any breaking changes to a previous release; Envoyer just updates the symlink back to a previous deploy folder and it’s immediately serving an older build.
You can also set up regular health checks (pings against your servers that report errors to you if the pings don’t get back a 200 HTTP response), expectations that your cron jobs will ping Envoyer on a regular schedule, and chat-based notifications of any significant events.
Envoyer is more of a niche tool than Forge. I don’t know many Laravel developers who don’t use Forge; but those who pay for Envoyer are more likely to have websites that will suffer if they can’t immediately roll back a problematic commit, or who get enough traffic (or important enough traffic) that 10 seconds of downtime here and there can be a big issue. If your site is in that category, Envoyer will feel like magic.
Nova is a paid package for building admin panels. If you imagine your average complex Laravel app, it may have a few parts: the public-facing web site or customer view, the administration section for making changes to the core data or customer list, and maybe an API.
Nova drastically simplifies the process of building the admin panel aspect of the site using Vue and a Laravel API. It makes it easy to generate CRUD (Create, Read, Update, Delete) pages for all of your resources, together with more complex custom views for your data, custom actions and relationships on each of your resources, and even custom tools for adding non-CRUD tooling to the same general admin space.
Spark is a paid package for generating a SaaS that accepts payments and makes it easy to manage users, teams, and subscriptions. It provides Stripe integration, invoices, two-factor auth, profile photos for your users, team management and billing, password resets, announcements, API token authentication, and more.
Spark is both a series of routes and a series of Vue components. You’ll use Spark to scaffold the basis of a new project, so don’t plan to add it to your existing apps after-the-fact.
Lumen is a free API-focused micro-framework built from Laravel parts. Because it’s for APIs, many of the conveniences Laravel offers that target non-API calls (for example, Blade templating) have been stripped out.
That makes a leaner framework with a few less of the niceties, with the benefit of speed improvements.
My general approach to Lumen is that, unless you have built APIs in Laravel and found them too slow, or unless you’re definitely building a microservice-style API that will absolutely never have need for any views or any of the other niceties Laravel offers, you should stick with Laravel.
But when you find yourself developing microservice-style APIs in Laravel and you need to eke out more speed at the millisecond level, that’s the right time to look at Lumen.
Cashier is a free package that provides a simple interface in front of Stripe’s and Braintree’s subscription billing offerings. Cashier handles much of the basic functionality of subscribing users, changing their plans, giving them access to invoices, handling webhook callbacks from the billing service, cancellation grace periods, and more.
If you want to allow your users to sign up for subscriptions using Stripe or Braintree, Cashier will make your life a lot easier.
Socialite is a free package that makes it incredibly simple to add social login (for example, GitHub or Facebook) to your apps.
Envoy is a local task runner that makes it easy to define common tasks that will run on your remote servers, commit those tasks’ definitions to version control, and run them simply and predictably.
Take a look at Example 18-1 to get a sense for what a common Envoy task looks like.
@servers(['web-1'=>'192.168.1.1','web-2'=>'192.168.1.2'])@task('deploy',['on'=>['web-1','web-2']])cdmysite.comgitpullorigin{{$branch}}phpartisanmigratephpartisanroute:cache@endtask
To run Example 18-1, you’d run the following command from your local terminal:
envoyrundeploy--branch=master
Telescope is a free debugging tool, installable as a package, for Laravel applications running Laravel 5.7.7+. It generates a dashboard where you can dig into the current status of jobs, queue workers, HTTP requests, database queries, and much more.
I’ve mentioned these resources already, but here’s a non-exhaustive list of resources folks often turn to to learn Laravel.
@TaylorOtwell and @LaravelPHP on Twitter
The many Laravel chats; at the time of writing this book, the Laravel Discord server is the primary location where Taylor and other contributors are accessible, but there’s also unofficial chats in Slack and IRC (#laravel on Freenode)
There are many blogs (I have one at mattstauffer.com and Tighten has one at tighten.co, and there are plenty of others that are incredibly useful), many excellent Twitter-ers, many excellent package authors, and far too many Laravel practitioners who I respect to fit into a list here. This is a rich, diverse, and giving community, full of developers who love to share everything they’re learning; the hard part is not finding good content but finding the time to consume it all.
Like I wrote above, I can’t list every person or resource you should look to in your journey as a Laravel developer. But if you start with the resources and folks listed above, you will be off to a great start in getting up and running with Laravel.
A method defined on an Eloquent model that customizes how a given property will be returned. Accessors make it possible to define that getting a given property from a model will return a different (or, more likely, differently formatted) value than what is stored in the database for that property.
A common database ORM pattern, and also the pattern that Laravel’s Eloquent uses. In ActiveRecord the same model class defines both how to retrieve and persist database records and how to represent them. Additionally, each database record is represented by a single entity in the application, and each entity in the application is mapped to a single database record.
Technically “Application Programming Interface”, but most commonly used to refer to a series of endpoints (and instructions on how to use them) that can be used to make HTTP-based calls to read and modify data from outside of a system. Sometimes API is also used to describe the set of interfaces, or affordances, any given package or library or class exposes to its consumers.
Often called acceptance or functional tests, application tests test the entire behavior of the application, usually at an outer boundary, by employing something like a DOM crawler—which is exactly what Laravel’s application test suite offers.
Arguments are parameters that can be passed to Artisan console commands. Arguments aren’t prefaced with -- or followed by =, but instead just accept a single value.
The tool that makes it possible to interact with Laravel applications from the command line.
In testing, an assertion is the core of the test: you are asserting that something should be equal to (or less than or greater than) something else, or that it should have a given count, or whatever else you like. Assertions are the things that can either pass or fail.
Correctly identifying oneself as a member/user of an application is the act of authentication. Authentication doesn’t define what you may do, but simply who you are (or aren’t).
Assuming you’ve either succeeded or failed at authenticating yourself, authorization defines what you’re allowed to do given your particular identification. Authorization is about access and control.
When a dependency injection container will inject an instance of a resolvable class without a developer having explicitly taught it how to resolve that class, that’s called autowiring. With a container that doesn’t have autowiring, you can’t even inject a plain PHP object with no dependencies until you have explicitly bound it to the container. With autowiring, you only have to explicitly bind something to the container if its dependencies are too complex or vague for the container to figure out on its own.
Beanstalk is a work queue. It’s simple and excels at running multiple asynchronous tasks—which makes it a common driver for Laravel’s queues. beanstalkd is its daemon.
A password hashing function.
Laravel’s templating engine.
Laravel’s pre-5.4 testing facilities for DOM-based interactions, available as a Composer package for 5.4+ apps.
A PHP package that makes working with dates much easier and more expressive.
A Laravel package that makes billing with Stripe or Braintree, especially in subscription contexts, easier and more consistent and powerful.
Closures are PHP’s version of anonymous functions. A closure is a function that you can pass around as an object, assign to a variable, pass as a parameter to other functions and methods, or even serialize.
An older PHP framework that Laravel was inspired by.
The name of a development pattern and also Laravel’s tool that implements it. Like arrays on steroids, collections provide map, reduce, filter, and many more powerful operations that PHP’s native arrays don’t.
The name for a custom Artisan console task.
PHP’s dependency manager. Like Ruby Gems or NPM.
Somewhat of a catchall word, in Laravel “container” refers to the application container that’s responsible for dependency injection. Accessible via app() and also responsible for resolving calls to controllers, events, jobs, and commands, the container is the glue that holds each Laravel app together.
Another name for an interface.
A class that is responsible for routing user requests through to the application’s services and data, and returning some form of useful response back to the user.
A malicious attack where an external site makes requests against your application by hijacking your users’ browsers (with JavaScript, likely) while they’re still logged in to your site. Protected against by adding a token (and a check for that token on the POST side) to every form on the site.
Instead of instantiating dependencies in a class, expect them to be injected in from the outside—usually through the constructor.
Blade syntax options like @if, @unless, etc.
Navigating down inheritance trees using . to reference a jump down to a new level. If you have an array like: ['owner' => ['address' => ['line1' => '123 Main St.']]], you have three levels of nesting. Using dot notation, you would represent “123 Main St.” as "owner.address.line1".
Laravel’s frontend testing package that can test JavaScript (primarily Vue) and DOM interactions by spinning up Chrome driver to run the tests.
Avoiding N+1 problems by adding a second smart query to your first query to get a set of related items. Usually you have a first query that gets a collection of thing A. But each A has many B, and so every time you get the B from an A, you need a new query. Eager loading means doing two queries: first you get all the A’s, and second you get all the B’s related to all those A’s, in a single query. Two queries, and you’re done.
A Laravel product that makes WebSocket authentication and syncing of data simple.
Laravel’s old build tool, since replaced by Mix; a wrapper around Gulp.
Laravel’s ActiveRecord ORM. The tool you’ll use to define and query something like a User model.
Variables that are defined in an .env file that is expected to be excluded from version control. This means they don’t sync between environments and they’re also kept safe.
A Laravel package for writing scripts to run common tasks on remote servers. Envoy provides a syntax for defining tasks and servers and a command-line utility for running the tasks.
A Laravel SaaS product for zero-down-time deployment, multi-server deploys, and server and cron health checks.
Laravel’s tool for implementing a pub/sub or observer pattern. Each event represents that an event happened: the name of the event describes what happened (e.g., UserSubscribed) and the payload allows for attaching relevant information. Designed to be “fired” and then “listened” for (or published and subscribed, if you prefer the pub/sub concept).
A tool in Laravel for simplifying access to complex tools. Facades provide static access to core services in Laravel. Since every facade is backed by a class in the container, you could replace any call to something like Cache::put(); with a two-line call to something like $cache = app('cache'); $cache->put();.
A parameter anywhere that is on or off (boolean).
Methods that can be chained one after another are said to be fluent. In order to provide a fluent syntax, each method must return the instance, preparing it to be chained again. This allows for something like People::where('age', '>', 14)->orderBy('name')->get().
The package that Laravel uses to facilitate its local and cloud file access.
A Laravel product that makes it easy to spin up and manage virtual servers on major cloud providers like DigitalOcean and AWS.
The full namespaced name of any given class, trait, or interface. Controller is the class name; Illuminate\Routing\Controller is the FQCN.
A JavaScript-based build tool.
A globally accessible PHP function that makes some other functionality easier—for example, array_get() simplifies the logic of looking up results from arrays.
A technology that makes it possible to reload just pieces of an active web site’s frontend dependencies without reloading;
A Laravel tool that wraps Vagrant and makes it easier to spin up Forge-parallel virtual servers for local Laravel development.
A Laravel package that provides tooling for managing queues with greater nuance than Laravel’s defaults, and also provides insight into the current and historic operating state of the queue workers and their jobs.
The top-level namespace of all Laravel components.
Integration tests test the way individual units work together and pass messages.
The concept of giving “control” over how to make a concrete instance of an interface to the higher-level code of the package instead of the lower-level code. Without IoC, each individual controller and class might decide what instance of Mailer it wanted to create. IoC makes it so that the low-level code—those controllers and classes—just get to ask for a Mailer, and some high-level configuration code defines once per application which instance should be provided to satisfy that request.
A class that intends to encapsulate a single task. Jobs are intended to be able to be pushed onto a queue and run asynchronously.
JavaScript Object Notation. A syntax for data representation.
A JSON object containing all of the information necessary to determine a user’s authentication state and access permissions. This JSON object is digitally signed, which is what makes it trustworthy, using HMAC or RSA. Usually delivered in the header.
An architectural pattern designed to encompass the functionality of sending mail into a single “sendable” class.
A formatting language designed for formatting plain text and outputting to multiple output formats. Commonly used for formatting text that has a good chance of being processed by a script or read by humans in its raw form—for example, git readmes.
The ability to pass many parameters at once to create or update an Eloquent model, using a keyed array.
An in-memory data store designed to provide simple but fast data storage. Memcached only supports a basic key/value store.
A series of wrappers around an application that filter and decorate its inputs and outputs.
A manipulation to the state of the database, stored in and run from code.
A frontend build tool based on Webpack. Replaced Elixir and can be used to concatenate, minify, and pre-process your frontend assets, and much more.
A library included with Laravel that makes it easy to mock PHP classes in your tests.
A class used to represent a given database table in your system. In ActiveRecord ORMs like Laravel’s eloquent, this class is used both to represent a single record from the system, but also to interact with the database table broadly.
A tool for defining how the application can generate an instance of your model if needed for testing or seeding. Usually paired with a fake data generator like Faker.
A single app serving multiple clients, each of which has its customers. Multitenancy often suggests that each client of your application gets its own theming and domain name, with which to differentiate its service to its customers vis-à-vis your other clients’ potential services.
A tool in Eloquent that allows you to manipulate the data being saved to a model property before it is saved to the database.
A Laravel framework tool allowing a single message to be send via myriad notification channels (e.g. email, Slack, SMS) to one or more recipients.
A paid Laravel package for building admin panels for your Laravel apps.
A web server similar to Apache.
“Node Package Manager”; a central web-based repository for node packages, at npmjs.org; also a utility used on your local machine to install a project’s frontend depedencies into the node_modules directory based on the specifications of package.json.
Like arguments, options are parameters that can be passed to Artisan commands. They’re prefaced with -- and can be used as a flag (--force) or to provide data (--userId=5).
A design pattern that is centered around using objects in a programming language to represent data, and its relationships, in a relational database.
A Laravel package that can be used to easily add an OAuth authentication server to your Laravel app.
A PHP testing framework.
A PHP testing framework. The most common and connected to the most of Laravel’s custom testing code.
In database terms, able to interact with multiple database tables with similar characteristics. A polymorphic relationship will allow entities of multiple models to be attached in the same way.
A build tool that takes in a special form of a language (for CSS, one special form is Less) and generates code with just the normal language (CSS). Preprocessors build in tools and features that are not in the core language.
Most database tables have a single column that is intended to represent each row. This is called the primary key and is commonly named id.
A stack onto which jobs can be added. Usually associated with a queue worker, which pulls jobs one at a time from a queue, works on them, and then discards them.
A JavaScript framework. Created and maintained by Facebook.
Similar to façades, but without requiring a separate class. Real-time facades can be used to make any class’ methods callable as static methods by importing that class with Facades\ in front of its namespace.
Like Memcached, a data store simpler than most relational databases but powerful and fast. Redis supports a very limited set of structures and data types but makes up for it in speed and scalability.
Representational State Transfer, the most common format for APIs these days. Usually suggests that interactions with an API should each authenticate separately and should be “stateless”; also usually suggests that they use the HTTP verbs for basic differentiation of requests.
A definition of a way or ways the user might visit a web application. A route is a pattern definition; it can be something like /users/5, or /users, or /users/{id}.
Amazon’s “object storage” service, which makes it easy to use AWS’ incredible computing power to store and serve files.
Software as a Service. Web-based applications that you pay money to use.
In Eloquent, a tool for defining how to consistently and simply narrow down a query.
A Laravel package for full-text search on Eloquent models.
The process of converting more complex data (usually an Eloquent model) to something simpler (in Laravel, usually an array or JSON).
A structure in Laravel that registers and boots classes and container bindings.
A Laravel package making it simple to add social authentication (e.g. log in via Facebook) to Laravel apps.
Marking a database row as “deleted” without actually deleting it, usually paired with an ORM that by default hides all “deleted” rows.
A Laravel tool that makes it easy to spin up a new subscription-based SaaS app.
A PHP framework that focuses on building excellent components and making them accessible to others. Symfony’s HTTP Foundation is at the core of Laravel and every other modern PHP framework.
A Laravel package for adding a debugging assitant to Laravel apps.
Laravel’s REPL, or read–evaluate–print loop. It’s a tool that allows you to perform complex PHP operations within the full context of your app from the command line.
Too long; didn’t read. “Summary.”
Prefacing a variable name in a method signature with a class or interface name. Tells PHP (and Laravel, and other developers) that the only thing that’s allowed to be passed in that parameter is an object with the given class or interface.
Unit tests target small, relatively isolated units—a class or method, usually.
A command-line tool that makes it easy to build virtual machines on your local computer using predefined images.
A Laravel package (for Mac OS users, but there are forks for Linux and Windows) that makes it easy to serve your applications from your development folder of choice, without worrying about Vagrant or virtual machines.
Ensuring that user input matches expected patterns.
An individual file that takes data from the backend system or framework and converts it into HTML.
A tool that defines that, every time a given view is loaded, it will be provided a certain set of data.
A template file that defines HTML to be sent to the end user; often includes accepting data from a controller and formatting it as part of the HTML.
A JavaScript framework. Preferred by Laravel. Written by Evan You.
Technically a “module bundler”, Webpack is a tool commonly used to run frontend build tasks, especially those which involve processing CSS and JavaScript and other frontend source files and outputting them in a more-production-ready format.
The animal on the cover of Laravel: Up and Running is a gemsbok (oryx gazella). This large antelope is native to the deserts of South Africa, Botswana, Zimbabwe, and Namibia, where it is featured on the country’s coat of arms.
Gemsbok measure about 5 feet 7 inches tall at the shoulder and can weigh from 250 to 390 pounds. They are typically pale gray or brown, with black and white facial markings and long black tails. A black stripe extends from the chin to the lower edge of the neck. The gemsbok’s impressive straight horns, used in defensive maneuvers, average 33 inches in length and are regarded as charms in many cultures. In medieval England, they were often marketed as unicorn horns.
Although these horns make the gemsbok a highly-sought trophy animal, the population remains stable throughout Southern Africa. In 1969, gemsbok were introduced to southern New Mexico, where their current population is around 3,000.
Gemsbok are well-suited to such desert environments, with the ability to survive without drinking water for most of the year. To achieve this, they do not pant or sweat, allowing their body temperature to rise several degrees above normal on hot days. Their lifespan is approximately 18 years in the wild.
Many of the animals on O’Reilly covers are endangered; all of them are important to the world. To learn more about how you can help, go to animals.oreilly.com.
The cover image is from Riverside Natural History. The cover fonts are URW Typewriter and Guardian Sans. The text font is Adobe Minion Pro; the heading font is Adobe Myriad Condensed; and the code font is Dalton Maag’s Ubuntu Mono.