Table of Contents for
Laravel: Up & Running, 2nd Edition
 Laravel: Up & Running, 2nd Edition
Published by
O'Reilly Media, Inc., 2019
Laravel: Up & Running, 2nd Edition
Published by
O'Reilly Media, Inc., 2019
- nav
- Cover
- Laravel: Up & Running
- Laravel: Up & Running
- Dedication
- Preface
- 1. Why Laravel?
- 2. Setting Up a Laravel Development Environment
- 3. Routing and Controllers
- 4. Blade Templating
- 5. Database and Eloquent
- 6. Frontend Components
- 7. Collecting and Handling User Data
- 8. Artisan and Tinker
- 9. User Authentication and Authorization
- 10. Requests, Responses, and Middleware
- 11. The Container
- 12. Testing
- 13. Writing APIs
- 14. Storage and Retrieval
- 15. Mail and Notifications
- 16. Queues, Jobs, Events, Broadcasting, and the Scheduler
- 17. Helpers and Collections
- 18. The Laravel Ecosystem
- Glossary
- Index
- About the Author
- Colophon
Chapter 13. Writing APIs
One of the most common tasks Laravel developers are given is to create an API, usually JSON and REST or REST-like, that allows third parties to interact with the Laravel application’s data.
Laravel makes it incredibly easy to work with JSON, and its resource controllers are already structured around REST verbs and patterns. In this chapter you’ll learn about some basic API-writing concepts, the tools Laravel provides for writing APIs, and some external tools and organizational systems you’ll want to consider when writing your first Laravel API.
The Basics of REST-Like JSON APIs
Representational State Transfer (REST) is an architectural style for building APIs. Technically, REST is either a broad definition that could apply to almost the entirety of the Internet or something so specific that no one actually uses it, so don’t let yourself get overwhelmed by the definition or caught in an argument with a pedant. When we talk about RESTful or REST-like APIs in the Laravel world, we’re generally talking about APIs with a few common characteristics:
-
Structured around “resources” that can be uniquely represented by URIs, like
/catsfor all cats,/cats/15for a single cat with the ID of 15, etc. -
Interactions with resources primarily take place using HTTP verbs (
GET /cats/15versusDELETE /cats/15) -
Stateless, meaning there’s no persistent session authentication between requests; each request must uniquely authenticate itself
-
Cacheable and consistent, meaning each request (except for a few authenticated-user-specific requests) should return the same result regardless of who the requester is
-
Return JSON
The most common API pattern is to have a unique URL structure for each of your Eloquent models that’s exposed as an API resource, and allow for users to interact with that resource with specific verbs and get JSON back. Example 13-1 shows a few possible examples.
Example 13-1. Common REST API endpoint structures
GET/api/cats[{id:1,name:'Fluffy'},{id:2,name:'Killer'}]GET/api/cats/2{id:2,name:'Killer'}DELETE/api/cats/2(deletescat)POST/api/catswithbody:{name:'Mr Bigglesworth'}(createsnewcat)PATCH/api/cats/3withbody:{name:'Mr. Bigglesworth'}(updatescat)
You can see the basic set of interactions we are likely to have with our APIs. Let’s dig into how to make them happen with Laravel.
Controller Organization and JSON Returns
Laravel’s API Resource controllers are like Resource Controllers (“Resource Controllers”) but modified to align with RESTful API routes, so let’s get started there. First we’ll create a new controller for our resource, which we’ll route at /api/dogs:
php artisan make:controller Api/DogsController --api
API Resource Controllers are just like Resource Controllers except that they exclude the create and edit methods, both of which are irrelevant in an API.
Note that in projects running versions of Laravel prior to 5.5, the concept of the “API resource controller” and the “API resource route” don’t exist. But you can still just use resource controllers and resource routes, which are almost exactly the same, but just have a few “view"-related routes that aren’t used in APIs.
Escaping slashes in Artisan commands
Note that in versions of Laravel prior to 5.3, you need to escape the \ in namespace separators with a forward slash in Artisan commands. For example:
php artisan make:controller Api/\DogsController --api
Example 13-2 shows what that API resource controller will look like.
Example 13-2. A generated API resource controller
<?phpnamespaceApp\Http\Controllers\Api;useIlluminate\Http\Request;useApp\Http\Controllers\Controller;classDogsControllerextendsController{/*** Display a listing of the resource.** @return \Illuminate\Http\Response*/publicfunctionindex(){//}/*** Store a newly created resource in storage.** @param \Illuminate\Http\Request $request* @return \Illuminate\Http\Response*/publicfunctionstore(Request$request){//}/*** Display the specified resource.** @param int $id* @return \Illuminate\Http\Response*/publicfunctionshow($id){//}/*** Update the specified resource in storage.** @param \Illuminate\Http\Request $request* @param int $id* @return \Illuminate\Http\Response*/publicfunctionupdate(Request$request,$id){//}/*** Remove the specified resource from storage.** @param int $id* @return \Illuminate\Http\Response*/publicfunctiondestroy($id){//}}
The docblocks pretty much tell the story. index() lists all of the dogs, show() lists a single dog, store() stores a new dog, update() updates a dog, and destroy() removes a dog.
Let’s quickly make a model and a migration so we can work with it:
phpartisanmake:modelDog--migrationphpartisanmigrate
Great! Now we can fill out our controller methods.
Note
If you want the code we’re writing below to actually work, you’ll want to add a string() column to the migration named “name” and another named “breed”, and either add those columns to the Eloquent model’s fillable property or just set the guarded property of that model equal to an empty array ([]).
We can take advantage of a great feature of Eloquent here: if you echo an Eloquent results collection, it’ll automatically convert itself to JSON (using the __toString() magic method, if you’re curious). That means if you return a collection of results from a route, you’ll in effect be returning JSON.
So, as Example 13-3 demonstrates, this will be some of the simplest code you’ll ever write.
Example 13-3. A sample API resource controller for the Dog entity
...classDogsControllerextendsController{publicfunctionindex(){returnDog::all();}publicfunctionstore(Request$request){returnDog::create($request->only(['name','breed']));}publicfunctionshow($id){returnDog::findOrFail($id);}publicfunctionupdate(Request$request,$id){$dog=Dog::findOrFail($id);$dog->update($request->only(['name','breed']));return$dog;}publicfunctiondestroy($id){Dog::findOrFail($id)->delete();}}
Example 13-4 shows how we can link this up in our routes file. As you can see, we can use Route::apiResource() to automatically map all of these default methods to their appropriate routes and HTTP verbs.
Example 13-4. Binding the routes for a resource controller
// routes/api.phpRoute::namespace('Api')->group(function(){Route::apiResource('dogs','DogsController');});
There you have it! Your first RESTful API in Laravel.
Of course, you’ll need much more nuance: pagination, sorting, authentication, more defined response headers. But this is the foundation of everything else.
Reading and Sending Headers
REST APIs often read, and send, non-content information using headers. For example, any request to GitHub’s API will return headers detailing the current user’s rate limiting status:
X-RateLimit-Limit: 5000
X-RateLimit-Remaining: 4987
X-RateLimit-Reset: 1350085394
X-* headers
You might be wondering why the GitHub rate limiting headers are prefixed with X-, especially if you see them in the context of other headers returned with the same request:
HTTP/1.1 200 OK
Server: nginx
Date: Fri, 12 Oct 2012 23:33:14 GMT
Content-Type: application/json; charset=utf-8
Connection: keep-alive
Status: 200 OK
ETag: "a00049ba79152d03380c34652f2cb612"
X-GitHub-Media-Type: github.v3
X-RateLimit-Limit: 5000
X-RateLimit-Remaining: 4987
X-RateLimit-Reset: 1350085394
Content-Length: 5
Cache-Control: max-age=0, private, must-revalidate
X-Content-Type-Options: nosniff
Any header whose name starts with X- is a header that’s not in the HTTP spec. It might be entirely made up (e.g., X-How-Much-Matt-Loves-This-Page), or part of a common convention that hasn’t made it into the spec yet (e.g., X-Requested-With).
Similarly, many APIs allow developers to customize their requests using request headers. For example, GitHub’s API makes it easy to define which version of the API you’d like to use with the Accept header:
Accept: application/vnd.github.v3+json
If you were to change v3 to v2, GitHub would pass your request to version 2 of its API instead.
Let’s learn quickly how to do both in Laravel.
Sending Response Headers in Laravel
We already covered this topic quite a bit in Chapter 10, but here’s a quick refresher. Once you have a response object, you can add a header using header($headerName, $headerValue), as seen in Example 13-5.
Example 13-5. Adding a response header in Laravel
Route::get('dogs',function(){returnresponse(Dog::all())->header('X-Greatness-Index',12);});
Nice and easy.
Reading Request Headers in Laravel
If we have an incoming request, it’s also simple to read any given header. Example 13-6 illustrates this.
Example 13-6. Reading a request header in Laravel
Route::get('dogs',function(Request$request){var_dump($request->header('Accept'));});
Now that you can read incoming request headers and set headers on your API responses, let’s take a look at how you might want to customize your API.
Eloquent Pagination
Pagination is one of the first places where most APIs need to consider special instructions. Eloquent comes out of the box with a pagination system that hooks directly into the query parameters of any page request. We already covered the paginator component a bit in Chapter 6, but here’s a quick refresher.
Any Eloquent call provides a paginate() method, to which you can pass the number of items you’d like to return per page. Eloquent then checks the URL for a page query parameter and, if it’s set, treats that as an indicator of how many pages the user is into a paginated list.
To make your API route ready for automated Laravel pagination, use paginate() instead of all() or get() to call your Eloquent queries in your route; something like Example 13-7.
Example 13-7. A paginated API route
Route::get('dogs',function(){returnDog::paginate(20);});
We’ve defined that Eloquent should get 20 results from the database. Depending on what the page query parameter is set to, Laravel will know exactly which 20 results to pull for us:
GET/dogs-Returnresults1-20GET/dogs?page=1-Returnresults1-20GET/dogs?page=2-Returnresults21-40
Note that the paginate() method is also available on query builder calls, as seen in Example 13-8.
Example 13-8. Using the paginate() method on a query builder call
Route::get('dogs',function(){returnDB::table('dogs')->paginate(20);});
Here’s something interesting, though: this isn’t just going to return 20 results when you convert it to JSON. Instead, it’s going to build a response object that automatically passes some useful pagination-related details to the end user, along with the paginated data. Example 13-9 shows a possible response from our call, truncated to only three records to save space.
Example 13-9. Sample output from a paginated database call
{"current_page":1,"data":[{'name':'Fido'},{'name':'Pickles'},{'name':'Spot'}]"first_page_url":"http://myapp.com/api/dogs?page=1","from":1,"last_page":2,"last_page_url":"http://myapp.com/api/dogs?page=2","next_page_url":"http://myapp.com/api/dogs?page=2","path":"http://myapp.com/api/dogs","per_page":2,"prev_page_url":null,"to":2,"total":4}
Sorting and Filtering
While there is a convention and some built-in tooling for pagination in Laravel, there isn’t any for sorting, so you have to figure that out on your own. I’ll give a quick code sample here, and I’ll style our query parameters similarly to the JSON API spec (described in the following sidebar).
Sorting Your API Results
First, let’s set up the ability to sort our results. We start in Example 13-10 with the ability to sort by only a single column, and in only a single direction.
Example 13-10. Simplest API sorting
// Handles /dogs?sort=nameRoute::get('dogs',function(Request$request){// Get the sort query parameter (or fall back to default sort "name")$sortColumn=$request->input('sort','name');returnDog::orderBy($sortColumn)->paginate(20);});
We add the ability to invert it (e.g., ?sort=-weight) in Example 13-11.
Example 13-11. Single-column API sorting, with direction control
// Handles /dogs?sort=name and /dogs?sort=-nameRoute::get('dogs',function(Request$request){// Get the sort query parameter (or fall back to default sort "name")$sortColumn=$request->input('sort','name');// Set the sort direction based on whether the key starts with -// using Laravel's starts_with() helper function$sortDirection=starts_with($sortColumn,'-')?'desc':'asc';$sortColumn=ltrim($sortColumn,'-');returnDog::orderBy($sortColumn,$sortDirection)->paginate(20);});
Finally, we do the same for multiple columns (e.g., ?sort=name,-weight) in Example 13-12.
Example 13-12. JSON API–style sorting
// Handles ?sort=name,-weightRoute::get('dogs',function(Request$request){// Grab the query parameter and turn it into an array exploded by ,$sorts=explode(',',$request->input('sort',''));// Create a query$query=Dog::query();// Add the sorts one by oneforeach($sortsas$sortColumn){$sortDirection=starts_with($sortColumn,'-')?'desc':'asc';$sortColumn=ltrim($sortColumn,'-');$query->orderBy($sortColumn,$sortDirection);}// Returnreturn$query->paginate(20);});
As you can see, it’s not the simplest process ever, and you’ll likely want to build some helper tooling around the repetitive processes, but we’re building up the customizability of our API piece by piece using logical and simple features.
Filtering Your API Results
Another common task in building APIs is filtering out all but a certain subset of data. For example, the client might ask for a list of the dogs that are Chihuahuas.
The JSON API doesn’t give us any great ideas for syntax here, other than that we should use the filter query parameter. Let’s think along the lines of the sort syntax, where we’re putting everything into a single key—maybe ?filter=breed:chihuahua. You can see how to do this in Example 13-13.
Example 13-13. Single filter on API results
Route::get('dogs',function(){$query=Dog::query();$query->when(request()->filled('filter'),function($query){[$criteria,$value]=explode(':',request('filter'));return$query->where($criteria,$value);});return$query->paginate(20);});
Note that in Example 13-13 we’re using the request() helper instead of injecting an instance of the $request. Both work the same, but sometimes the request() helper can be easier when you’re working inside of a closure so you don’t have to pass variables in manually.
Note
In projects running versions of Laravel prior to 5.2, you’ll have to replace use of $query->when() with a regular PHP if statement.
And, just for kicks, in Example 13-14 we allow for multiple filters, like ?filter=breed:chihuahua,color:brown.
Example 13-14. Multiple filters on API results
Route::get('dogs',function(Request$request){$query=Dog::query();$query->when(request()->filled('filter'),function($query){$filters=explode(',',request('filter'));foreach($filtersas$filter){[$criteria,$value]=explode(':',$filter);$query->where($criteria,$value);}return$query;});return$query->paginate(20);});
Transforming Results
We’ve covered how to sort and filter our result sets. But right now, we’re relying on Eloquent’s JSON serialization, which means we return every field on every model.
Eloquent provides a few convenience tools for defining which fields to show when you’re serializing an array. You can read more in Chapter 5, but the gist is that if you set a $hidden array property on your Eloquent class, any field listed in that array will not be shown in the serialized model output. You can alternatively set a $visible array that defines the fields that are allowed to be shown. You could also either overwrite or mimic the toArray() function on your model, crafting a custom output format.
Another common pattern is to create a transformer for each data type. Transformers are helpful because they give you more control, isolate API-specific logic away from the model itself, and allow you to provide a more consistent API even when the models and their relationships change down the road.
There’s a fantastic but complicated package for this, Fractal, that sets up a series of convenience structures and classes for transforming your data.
Laravel 5.5 introduced a concept called API Resources that cover the needs of the majority of APIs for transforming and collecting results, so if you’re working with 5.5 or later, skip the next section and move on to “API Resources”. If you’re working with 5.4 or earlier, read on.
Writing Your Own Transformer
The general concept of a transformer is that we are going to run every instance of our model through another class that transforms its data to a different state. It might add fields, rename fields, delete fields, manipulate fields, add nested children, or whatever else. Let’s start with a simple example (Example 13-15).
Example 13-15. A simple transformer
Route::get('users/{id}',function($userId){return(newUserTransformer(User::findOrFail($userId)));});classUserTransformer{protected$user;publicfunction__construct($user){$this->user=$user;}publicfunctiontoArray(){return['id'=>$this->user->id,'name'=>sprintf("%s %s",$this->user->first_name,$this->user->last_name),'friendsCount'=>$this->user->friends->count()];}publicfunctiontoJson(){returnjson_encode($this->toArray());}publicfunction__toString(){return$this->toJson();}}
Classic transformers
A more classic transformer would probably offer a transform() method that takes a $user parameter. This would likely spit out an array or JSON directly.
However, I’ve been using this pattern, which we sometimes call “API objects,” for a few years and really love how much more power and flexibility it provides.
As you can see in Example 13-15, transformers accept the model they’re transforming as a parameter and then manipulate that model—and its relationships—to create the final output that you want to send to the API.
Nesting and Relationships with custom transformers
Whether, and how, to nest relationships in APIs is an issue of much debate. Thankfully, people more experienced than me have written on this at length; I’d recommend reading Phil Sturgeon’s Build APIs You Won’t Hate (Leanpub) to learn more about this and about REST APIs in general.
There are a few primary ways to approach nesting relationships. These examples will assume your primary resource is a user and your related resource is a friend:
-
Include related resources directly in the primary resource (e.g., the
users/5resource has its friends nested in it). -
Include just the foreign keys in the primary resource (e.g., the
users/5resource has an array of friend IDs nested in it). -
Allow the user to query the related resource filtered by the originating resource (e.g.,
/friends?user=5, or “give me all friends who are related to user #5”). -
Create a subresource (e.g.,
/users/5/friends). -
Allow optional including (e.g.,
/users/5does not include, but/users/5?include=friendsdoes include; so does/users/5?include=friends,dogs).
Let’s assume for a minute that we want to (optionally) include related items. How would we do that? Our transformer example in Example 13-15 gives us a great head start. Let’s adjust it in Example 13-16 to add optional sub-resource including.
Example 13-16. Allowing for optional ioncluding of a sub-resource in a transformer
// E.g. myapp.com/api/users/15?include=friends,bookmarksRoute::get('users/{id}',function($userId,Request$request){// Get the include query parameter and split by commas$includes=explode(',',$request->input('include',''));// Pass both user and includes to the user transformerreturn(newUserTransformer(User::findOrFail($userId),$includes));});classUserTransformer{protected$user;protected$includes;publicfunction__construct($user,$includes=[]){$this->user=$user;$this->includes=$includes;}publicfunctiontoArray(){$append=[];if(in_array('friends',$this->includes)){// If you have more than one include, you'll want to generalize this$append['friends']=$this->user->friends->map(function($friend){return(newFriendTransformer($friend))->toArray();});}returnarray_merge(['id'=>$this->user->id,'name'=>sprintf("%s %s",$this->user->first_name,$this->user->last_name)],$append);}...
We’ll learn more about the map() functionality when we look at collections in Chapter 17, but everything else in here should be pretty familiar.
In the route, we’re splitting the include query parameter by commas and passing it into our transformer. Currently our transformer can just handle the friends include, but it could be abstracted to handle others. If the user has requested the friends include, the transformer maps over each friend (using the hasMany friends relationship on the user model), passes that friend to the FriendTransformer, and includes the array of all transformed friends in the user response.
API Resources
If you’re working with Laravel prior to 5.5, you can skip this section and move on to “API Authentication with Laravel Passport”.
In the past, one of the first challenges we’d run into when developing APIs in Laravel was how to transform our data. The simplest APIs can just return Eloquent objects as JSON, but very quickly the needs of most APIs outgrow that structure. How should we convert our Eloquent results into the right format? What if we want to embed other resources, or do so but only optionally, or add a computed field, or hide some fields from APIs but not other JSON output? An API-specific transformer is the solution.
In Laravel 5.5 and later we have access to a feature called Eloquent API resources, which is a structure of classes that define how to transform an Eloquent object (or a collection of Eloquent objects) of a given class to API results. For example, your Dog Eloquent model now has a Dog Resource whose responsibility it is to translate each instance of Dog to the appropriate Dog-shaped API response object.
Creating a Resource Class
Let’s walk through this Dog example to see what it looks like to transform our API output. First, use the Artisan command make:resource to create your first resource.
php artisan make:resource Dog
This will create a new class in app/Http/Resources/Dog.php, which contains one method: toArray. You can see what the file looks like in Example 13-17.
Example 13-17. Generated API resource
<?phpnamespaceApp\Http\Resources;useIlluminate\Http\Resources\Json\JsonResource;classDogextendsJsonResource{/*** Transform the resource into an array.** @param \Illuminate\Http\Request $request* @return array*/publicfunctiontoArray($request){returnparent::toArray($request);}}
The toArray method we’re working with here has access to two important pieces of data. First, it has access to the Illuminate Request object, so we can customize our response based on query parameters and headers and anything else important. And second, it has access to the entire Eloquent object being transformed by calling its properties and methods on $this, as you can see in Example 13-18.
Example 13-18. Simple API Resource for the Dog Model
classDogextendsJsonResource{publicfunctiontoArray($request){return['id'=>$this->id,'name'=>$this->name,'breed'=>$this->breed,];}}
To use this new resource, you’d want to update any API endpoint that returns a single Dog to wrap the response in your new Resource, like in Example 13-19.
Example 13-19. Using the simple Dog Resource
useApp\Dog;useApp\Http\Resources\DogasDogResource;Route::get('dogs/{dogId}',function($dogId){returnnewDogResource(Dog::find($dogId));});
Resource Collections
Now, let’s talk about what happens if you have more than one of your entity returning from a given API endpoint. API resources can do that with the collection() method, as you can see in Example 13-20.
Example 13-20. Using the default API resource collection method
useApp\Dog;useApp\Http\Resources\DogasDogResource;Route::get('dogs',function(){returnDogResource::collection(Dog::all());});
This method iterates over every entry that’s passed to it, transforms it with the DogResource API resource, and then returns the collection.
This will likely be enough for many APIs, but if you need to customize any of the structure or add metadata to your collection responses, you’ll want to instead create a custom API resource collection.
In order to do so, let’s reach for the make:resource Artisan command again, but this time we’ll name it DogCollection, which signals to Laravel this is an API resource collection, not just an API resource.
php artisan make:resource DogCollection
This will generate a new file very similar to the API resource, living at app/Http/Resources/DogCollection.php, which contains one method: toArray. You can see what the file looks like in Example 13-21.
Example 13-21. Generated API resource collection
<?phpnamespaceApp\Http\Resources;useIlluminate\Http\Resources\Json\ResourceCollection;classDogCollectionextendsResourceCollection{/*** Transform the resource collection into an array.** @param \Illuminate\Http\Request $request* @return array*/publicfunctiontoArray($request){returnparent::toArray($request);}}
Just like the API resource, we have access to the request and the underlying data. But unlike the API resource, we’re dealing with a collection of items instead of just one, so we will access that (already-transformed) collection as $this->collection. Take a look at Example 13-22 for an example.
Example 13-22. A simple API resource collection for the Dog model
classDogCollectionextendsResourceCollection{publicfunctiontoArray($request){return['data'=>$this->collection,'links'=>['self'=>route('dogs.index'),],];}}
Nesting Relationships
One of the more complicated aspects of any API is how relationships are nested. The simplest way with API resources is to add a key to your returned array that’s set to an API resource collection, like in Example 13-23.
Example 13-23. A simple included API relationship
publicfunctiontoArray(){return['name'=>$this->name,'breed'=>$this->breed,'friends'=>DogResource::collection($this->friends),];}
You may also want this to be a conditional property; you can choose to only nest it if it’s asked for in the request, or only if it’s already been eager loaded on the Eloquent object that’s passed in. Take a look at Example 13-24.
Example 13-24. Conditionally loading API relationship
publicfunctiontoArray(){return['name'=>$this->name,'breed'=>$this->breed,// Only load this relationship if it's been eager loaded'bones'=>BoneResource::collection($this->whenLoaded('bones')),// Or, only load this relationship if the URL asks for it'bones'=>$this->when($request->get('include')=='bones',BoneResource::collection($this->bones)),];}
Using Pagination with API Resources
Just like you can pass a collection of Eloquent models to a resource, you can also pass a paginator instance as well. Take a look at Example 13-25.
Example 13-25. Passing a paginator instance to an API Resource Collection
Route::get('dogs',function(){returnnewDogCollection(Dog::paginate(20));});
If you pass a paginator instance, the transformed result will have additional links containing pagination information (first page, last page, prev page, and next page) and meta information about the entire collection.
You can take a look at Example 13-26 to see what this information looks like. In this example, I’ve set the items-per-page to 2 by calling Dog::paginate(2) so you can more easily see how the links work.
Example 13-26. A sample paginated resource response with pagination links
{"data":[{"name":"Pickles","breed":"Chorkie",},{"name":"Gandalf","breed":"Golden Retriever Mix",}],"links":{"first":"http://gooddogbrant.com/api/dogs?page=1","last":"http://gooddogbrant.com/api/dogs?page=3","prev":null,"next":"http://gooddogbrant.com/api/dogs?page=2"},"meta":{"current_page":1,"from":1,"last_page":3,"path":"http://gooddogbrant.com/api/dogs","per_page":2,"to":2,"total":5}}
Conditionally Applying Attributes
You can also specify that certain attributes in your response should only be applied when a particular test is satisfied.
publicfunctiontoArray($request){return['name'=>$this->name,'breed'=>$this->breed,'rating'=>$this->when(Auth::user()->canSeeRatings(),12),];}
More Customizations for API Resources
The default shape of how the data property is wrapped might not be how you like it, or you may find yourself needing to add or customize metadata for the responses. Take a look at the docs for how to customize every aspect of your API responses.
API Authentication with Laravel Passport
Most APIs require some form of authentication to access some or all of the data. Laravel 5.2 introduced a simple “token” authentication scheme, which we’ll cover shortly, but in Laravel 5.3 and later we got a new tool called Passport (by way of a separate package, brought in via Composer) that makes it easy to set up a full-featured OAuth 2.0 server in your application, complete with an API and UI components for managing clients and tokens.
A Brief Introduction to OAuth 2.0
OAuth is by far the most common auth system used in RESTful APIs. Unfortunately, it’s far too complex a topic for us to cover here in depth. For further reading, Matt Frost has written a great book on OAuth and PHP titled Integrating Web Services with OAuth and PHP (php[architect]).
Here’s the simplest concept behind OAuth: because APIs are stateless, we can’t rely on the same session-bassed authentication that we do in normal browser-based viewing sessions, where the user logs in and their authenticated state is saved to the session for subsequent views. Instead, the API client needs to make a single call to an authentication endpoint, perform some form of handshake to prove themselves, and then get back a token. Then, the client must send this token along with every future request (via the Authorization header, usually) to prove their identity.
There are a few different types of OAuth “grant”, which basically means that there are several different scenarios and types of interaction that can define that authentication “handshake”. Different projects and different sorts of end consumer will necessitate different grants.
If you’re working with Laravel 5.1 or 5.2, there’s a Laravel package called OAuth 2.0 Server for Laravel that makes it relatively easy to add a basic OAuth 2.0 authentication server to your Laravel application. It’s a Laravel convenience bridge to a PHP package called PHP OAuth 2.0 Server.
However, if you’re on Laravel 5.3 and higher, Passport gives you everything provided by that package and much more, with a simpler and more powerful API and interface.
Installing Passport
Passport is a separate package, so your first step is to install it. I’ll sum up the steps here, but you can get more in-depth installation instructions in the docs.
First, bring it in with Composer:
composer require laravel/passport
If you’re working with Laravel below 5.5, add Laravel\Passport\PassportServiceProvider::class to the providers array of config/app.php.
Passport imports a series of migrations, so run those with php artisan migrate to create the tables necessary for OAuth clients, scopes, and tokens.
Next, run the installer with php artisan passport:install. This is going to create encryption keys for the OAuth server (storage/oauth-private.key and storage/oauth-public.key) and insert OAuth clients into the database for our personal and password grant type tokens (which we’ll cover later).
You’ll need to import the Laravel\Passport\HasApiTokens trait into your User model; this will add OAuth client- and token-related relationships to each User, as well as a few token-related helper methods. Next, add a call to Laravel\Passport\Passport::routes() in the boot() method of the AuthServiceProvider. This will add the following routes:
-
oauth/authorize -
oauth/clients -
oauth/clients/{client_id} -
oauth/personal-access-tokens -
oauth/personal-access-tokens/{token_id} -
oauth/scopes -
oauth/token -
oauth/token/refresh -
oauth/tokens -
oauth/tokens/{token_id}
Finally, look for the api guard in config/auth.php. By default this guard will use the token driver (which we’ll cover shortly), but we’ll change that to be the passport driver instead.
You now have a fully functional OAuth 2.0 server! You can create new clients with php artisan passport:client, and you have an API for managing your clients and tokens available under the /oauth route prefix.
To protect a route behind your Passport auth system, add the auth:api middleware to the route or route group, as shown in Example 13-27.
Example 13-27. Protecting an API route with the Passport auth middleware
// routes/api.phpRoute::get('/user',function(Request$request){return$request->user();})->middleware('auth:api');
In order to authenticate to these protected routes, your client apps will need to pass a token (we’ll cover how to get one next) as a Bearer token in the Authorization header. Example 13-28 shows what this would look like if you were making a request using the Guzzle HTTP library.
Example 13-28. Making a sample API request with a Bearer token
$http=newGuzzleHttp\Client;$response=$http->request('GET','http://tweeter.test/api/user',['headers'=>['Accept'=>'application/json','Authorization'=>'Bearer '.$accessToken,],]);
Now, let’s take a closer look at how it all works.
Passport’s API
Passport exposes an API in your application under the /oauth route prefix. The API provides two primary functions: first, to authorize users with OAuth 2.0 authorization flows (/oauth/authorize and /oauth/token), and second, to allow users to manage their clients and tokens (the rest of the routes).
This is an important distinction, especially if you’re unfamiliar with OAuth. Every OAuth server needs to expose the ability for consumers to authenticate with your server; that’s the entire point of the service. But Passport also exposes an API for managing the state of your OAuth server’s clients and tokens. This means you can easily build a frontend to let your users manage their information in your OAuth application, and Passport actually comes with Vue-based manager components that you can either use or use for inspiration.
We’ll cover the API routes that allow you to manage clients and tokens, and the Vue components that Passport ships with to make it easy, but first let’s dig into the various ways your users can authenticate with your Passport-protected API.
Passport’s Available Grant Types
Passport makes it possible for you to authenticate users in four different ways. Two are traditional OAuth 2.0 grants (the password grant and authorization code grant) and two are convenience methods that are unique to Passport (the personal token and synchronizer token).
Password grant
The password grant, while less common than the authorization code grant, is much simpler. If you want users to be able to authenticate directly with your API using their username and password—for example, if you have a mobile app for your company consuming your own API—you can use the password grant.
Creating a password grant client
In order to use the password grant flow, you need a “password grant client” in your database. This is because every request to an OAuth server needs to be made by a “client.” Usually, the “client” identifies which app or site the user is authenticating against—for example, if you use Facebook to log in to a third party web site, that web site would be the “client”.
With the password grant flow, however, there is no client coming along with the request, so you have to make one, and that’s the “password grant client.” One will have been added when you ran php artisan passport:install, but if you ever need to generate a new password grant client for any reason, you can:
phpartisanpassport:client--passwordWhatshouldwenamethepasswordgrantclient?[MyApplicationPasswordGrantClient]:>SpaceBook_internalPasswordgrantclientcreatedsuccessfully.ClientID:3ClientSecret:Pg1EEzt18JAnFoUIM9n38Nqewg1aekB4rvFk2Pma
With the password grant type, there is just one step to getting a token: sending the user’s credentials to the /oauth/token route, like in Example 13-29.
Example 13-29. Making a request with the password grant type
// Routes/web.php in the *consuming application*Route::get('tweeter/password-grant-auth',function(){$http=newGuzzleHttp\Client;// Make call to "Tweeter", our Passport-powered OAuth server$response=$http->post('http://tweeter.test/oauth/token',['form_params'=>['grant_type'=>'password','client_id'=>config('tweeter.id'),'client_secret'=>config('tweeter.secret'),'username'=>'matt@mattstauffer.co','password'=>'my-tweeter-password','scope'=>'',],]);$thisUsersTokens=json_decode((string)$response->getBody(),true);// do stuff with the tokens});
This route will return an access_token and a refresh_token. You can now save those tokens to use to authenticate with the API (access token) and to request more tokens later (refresh token).
Note that the ID and secret we’d use for the password grant type would be those in the oauth_clients database table of our Passport app in the row with the name SpaceBook_internal.
Authorization code grant
The most common OAuth 2.0 auth workflow is also the most complex one Passport supports. Let’s imagine we’re developing an application that’s like Twitter but for sound clips; we’ll call it Tweeter. And we’ll imagine another website, a social network for science fiction fans, called SpaceBook. SpaceBook’s developer wants to let people embed their Tweeter data into their SpaceBook newsfeeds. We’re going to install Passport in our app Tweeter so that other apps—SpaceBook, for example—can allow their mutual users to authenticate with their Tweeter information.
In the authorization code grant type, each consuming website—SpaceBook, in this example—needs to create a “client” in our Passport-enabled app. In most scenarios, the other sites’ admins will have user accounts at Tweeter, and we’ll build tools for them to create clients there. But for starters, we can just manually create a client for the SpaceBook admins:
php artisan passport:client
Which user ID should the client be assigned to?:
 > 1

 What should we name the client?:
 > SpaceBook
 Where should we redirect the request after authorization?
   [http://tweeter.test/auth/callback]:
 > http://spacebook.test/tweeter/callback

 New client created successfully.
 Client ID: 4
 Client secret: 5rzqKpeCjIgz3MXpi3tjQ37HBnLLykrgWgmc18uH
What should we name the client?:
> SpaceBook
Where should we redirect the request after authorization?
[http://tweeter.test/auth/callback]:
> http://spacebook.test/tweeter/callback
New client created successfully.
Client ID: 4
Client secret: 5rzqKpeCjIgz3MXpi3tjQ37HBnLLykrgWgmc18uH
Every client needs to be assigned to a user in your app. Imagine Jill, user #1, is writing SpaceBook; she’ll be the “owner” of this client we’re creating.
Now we have the ID and secret for the SpaceBook client. At this point, SpaceBook can use this ID and secret to build tooling allowing an individual SpaceBook user (who is also a Tweeter user) to get an auth token from Tweeter for use when SpaceBook wants to make API calls to Tweeter on that user’s behalf. Example 13-30 illustrates this. (This and the following examples assume SpaceBook is a Laravel app, too; they also assume the Spacebook developers created a file at config/tweeter.php that returns the ID and secret we just created.)
Example 13-30. A consumer app redirecting a user to our OAuth server
// In SpaceBook's routes/web.php:Route::get('tweeter/redirect',function(){$query=http_build_query(['client_id'=>config('tweeter.id'),'redirect_uri'=>url('tweeter/callback'),'response_type'=>'code','scope'=>'',]);// Builds a string like:// client_id={$client_id}&redirect_uri={$redirect_uri}&response_type=codereturnredirect('http://tweeter.test/oauth/authorize?'.$query);});
When users hit that route in SpaceBook, they’ll now be redirected to the /oauth/authorize Passport route on our Tweeter app. At this point they’ll see a confirmation page; you can use the default Passport confirmation page by running this command:
php artisan vendor:publish --tag=passport-views
This will publish the view to resources/views/vendor/passport/authorize.blade.php, and your users will see the page shown in Figure 13-1.
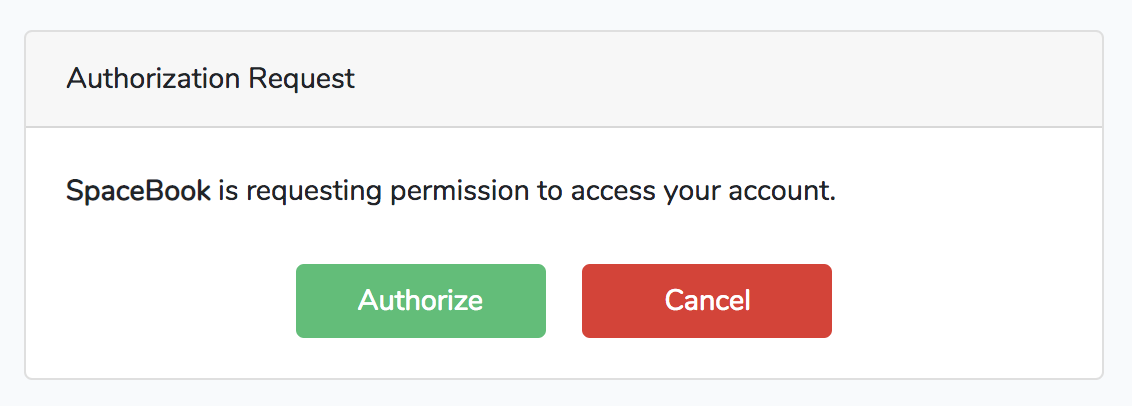
Figure 13-1. OAuth authorization code approval page
Once a user chooses to accept or reject the authorization, Passport will redirect that user back to the provided redirect_uri. In Example 13-30 we set a redirect_uri of url('tweeter/callback'), so the user will be redirected back to http://spacebook.test/tweeter/callback.
An approval request will contain a code that our consumer app’s callback route can now use to get a token back from our Passport-enabled app, Tweeter. A rejection request will contain an error. SpaceBook’s callback route might look something like Example 13-31.
What the Spacebook developer doing here is building a Guzzle HTTP request to the /oauth/token Passport route on Tweeter. They then send a POST request containing the authorization code they received when the user approved access, and Tweeter will return a JSON response containing a few keys:
-
access_tokenis the token SpaceBook will want to save for this user. This token is what the user will use to authenticate in future requests to Tweeter (using theAuthorizationheader). -
refresh_tokenis a token SpaceBook will need if you decide to set your tokens to expire. By default, Passport’s access tokens last for one year. -
expires_inis the number of seconds until anaccess_tokenexpires (needs to be refreshed). -
token_typeis the type of token you’re getting back, which will be “Bearer”; this means you pass a header with all future requests with the name of “Authorization” and the value of “Bearer YOURTOKENHERE”.
You now have all the tools you need to perform basic authorization code flows. We’ll cover how to build an admin panel for your clients and tokens later, but first, let’s take a quick look at the other grant types.
Personal access tokens
The authorization code grant is great for your users’ apps and the password code grant is great for your own apps, but what if your users want to create tokens for themselves to test out your API or to use when they’re developing their apps? That’s what personal tokens are for.
Creating a personal access client
In order to create personal tokens, you need a personal access client in your database. Running php artisan passport:install will have added one already, but if you ever need to generate a new personal access client for any reason, you can run php artisan passport:client --personal:
phpartisanpassport:client--personalWhatshouldwenamethepersonalaccessclient?[MyApplicationPersonalAccessClient]:>MyApplicationPersonalAccessClientPersonalaccessclientcreatedsuccessfully.
Personal access tokens are not quite a “grant” type; there’s no OAuth-prescribed flow here. Rather, they’re a convenience method that Passport adds to make it easy to have a single client registered in your system that exists solely for the easy creation of convenience tokens for your users who are developers.
For example, maybe you have a user who’s developing a competitor to SpaceBook named RaceBook (it’s for marathon runners), and he wants to toy around with the Tweeter API a bit to figure out how it works before starting to code. Does this developer have the facility to create tokens using the authorization code flow? Not yet—he hasn’t even written any code yet! That’s what personal access tokens are for.
You can create personal access tokens through the JSON API, which I’ll cover shortly, but you can also create one for your user directly in code:
// Creating a token without scopes$token=$user->createToken('Token Name')->accessToken;// Creating a token with scopes...$token=$user->createToken('My Token',['place-orders'])->accessToken;
Your users can use these tokens just as if they were tokens created with the authorization code grant flow. We’ll cover more about scopes in “Passport Scopes”.
Tokens from Laravel session authentication (synchronizer tokens)
There’s one final way for your users to get tokens to access your API, and it’s another convenience method that Passport adds but which normal OAuth servers don’t provide. This method is for when your users are already authenticated because they’ve logged in to your Laravel app like normal, and you want the JavaScript on your Laravel app to be able to access the API. It’d be a pain to have to reauthenticate the users with the authorization code or password grant flow, so Laravel provides a helper for that.
If you add the Laravel\Passport\Http\Middleware\CreateFreshApiToken middleware to your web middleware group (in app/Http/Kernel.php), every response Laravel sends to your authenticated users will have a cookie named laravel_token attached to it. This cookie is a JSON Web Token (JWT) that contains encoded information about the CSRF token. Now, if you send the normal CSRF token with your JavaScript and send it along in the X-CSRF-TOKEN and also send the X-Requested-With header on any API requests you make, the API will compare your CSRF token with this cookie and this will authenticate your users to the API just like any other token.
The default JavaScript bootstrap setup that Laravel comes bundled with sets up this header for you, but if you’re using a different framework, you’ll need to set it up manually. Example 13-32 shows how to do it with jQuery.
Example 13-32. Setting jQuery to pass Laravel’s CSRF tokens and the X-Requested-With with all Ajax requests
$.ajaxSetup({headers:{'X-CSRF-TOKEN':"{{ csrf_token() }}",'X-Requested-With':'XMLHttpRequest'}});
If you add the CreateFreshApiTokens middleware to your web middleware group and pass that header with every JavaScript request, your JavaScript requests will be able to hit your Passport-protected API routes without worrying about any of the complexity of the authorization code or password grants.
Managing Clients and Tokens with the Passport API and the Vue Components
Now that we’ve covered how to manually create clients and tokens and how to authorize as a consumer, let’s take a look at the aspects of the Passport API that make it possible to build user interface elements allowing your users to manage their clients and tokens.
The routes
The easiest way to dig into the API routes is by looking at how the sample provided Vue components work and which routes they rely on, so I’ll just give a brief overview:
/oauth/clients(GET,POST)/oauth/clients/{id}(DELETE,PUT)/oauth/personal-access-tokens(GET,POST)/oauth/personal-access-tokens/{id}(DELETE)/oauth/scopes(GET)/oauth/tokens(GET)/oauth/tokens/{id}(DELETE)
As you can see, we have a few entities here (clients, personal access tokens, scopes, and tokens). We can list all of them; we can create some (you can’t create scopes, since they’re defined in code, and you can’t create tokens, because they’re created in the authorization flow); and we can delete and update some.
The Vue components
Passport comes with a set of Vue components out of the box that make it easy to allow your users to administer their clients (those they’ve created), authorized clients (those they’ve allowed access to their account), and personal access tokens (for their own testing purposes).
To publish these components into your application, run this command:
php artisan vendor:publish --tag=passport-components
You’ll now have three new Vue components in resources/js/components/passport. To add them to your Vue bootstrap so they’re accessible in your templates, register them in your resources/js/app.js file as shown in Example 13-33.
Example 13-33. Importing Passport’s Vue components into app.js
require('./bootstrap');Vue.component('passport-clients',require('./components/passport/Clients.vue'));Vue.component('passport-authorized-clients',require('./components/passport/AuthorizedClients.vue'));Vue.component('passport-personal-access-tokens',require('./components/passport/PersonalAccessTokens.vue'));constapp=newVue({el:'#app'});
You now get three components that you can use anywhere in your application:
<passport-clients></passport-clients>
<passport-authorized-clients></passport-authorized-clients>
<passport-personal-access-tokens></passport-personal-access-tokens>
<passport-clients> shows your users all of the clients they’ve created. This means SpaceBook’s creator will see the SpaceBook client listed here when she logs in to Tweeter.
<passport-authorized-clients> shows your users all of the clients they’ve authorized to have access to their accounts. This means any users of both SpaceBook and Tweeter who have given SpaceBook access to their Tweeter account will see SpaceBook listed here.
<passport-personal-access-tokens> shows your users any personal access tokens they’ve created here. This means the creator of RaceBook, the SpaceBook competitor, will see his personal access token here that he’s been using to test out the Tweeter API.
If you are on a fresh install of Laravel and want to test these out, there are a few steps to take to get it working:
-
Follow the instructions given earlier in this chapter to get Passport installed.
-
In your terminal, run the following commands:
-
php artisan vendor:publish --tag=passport-components -
npm install -
npm run dev -
php artisan make:auth
-
-
Open resources/views/home.blade.php and add the Vue component references (e.g.,
<passport-clients></passport-clients>) just below the<div class="card-body">.
If you’d like, you can just use those components as they are. But you can also use them as reference points to understand how to use the API and create your own frontend components in whatever format you’d like.
Note
A few of these commands and directions will look different if you’re using Laravel Elixir. Check the Passport and Elixir docs to learn more.
Passport Scopes
If you’re familiar with OAuth, you probably noticed we haven’t talked about scopes. Everything we’ve covered so far can be customized by scope, but first let’s quickly cover what scopes are.
In OAuth, scopes are defined sets of privileges that are something other than “can do everything.” If you’ve ever gotten a GitHub API token before, for example, you might’ve noticed that some apps want access just to your name and email address, some want access to all of your repos, and some want access to your gists. Each of these is a “scope,” which allows both the user and the consumer app to define what access the consumer app needs to perform its job.
As shown in Example 13-34, you can define the scopes for your application in the boot() method of your AuthServiceProvider.
Example 13-34. Defining Passport scopes
// AuthServiceProvideruseLaravel\Passport\Passport;...publicfunctionboot(){...Passport::tokensCan(['list-clips'=>'List sound clips','add-delete-clips'=>'Add new and delete old sound clips','admin-account'=>'Administer account details',]);}
Once you have your scopes defined, the consumer app can define which scopes it’s asking for access to. Just add a space-separated list of tokens in the “token” field to the initial redirect, in the scope field, as shown in Example 13-35.
When the user tries to authorize with this app, it’ll present the list of requested scopes. This way, the user will see the difference between “SpaceBook is requesting to see your email address” and “SpaceBook is requesting access to post as you and delete your posts and message your friends.”
You can check for scope using middleware or on the User instance.
Example 13-36 shows how to check on the User.
Example 13-36. Checking whether the token a user authenticated with can perform a given action
Route::get('/events',function(){if(auth()->user()->tokenCan('add-delete-clips')){//}});
There are two middleware you can use for this too, scope and scopes. To use these in your app, add them to $routeMiddleware in your app/Http/Kernel.php file:
'scopes'=>\Laravel\Passport\Http\Middleware\CheckScopes::class,'scope'=>\Laravel\Passport\Http\Middleware\CheckForAnyScope::class,
You can now use the middleware as illustrated in Example 13-37. scopes requires all of the defined scopes to be on the user’s token in order for the user to access the route, while scope requires at least one of the defined scopes to be on the user’s token.
Example 13-37. Using middleware to restrict access based on token scopes
// routes/api.phpRoute::get('clips',function(){// Access token has both the "list-clips" and "add-delete-clips" scopes})->middleware('scopes:list-clips,add-delete-clips');// orRoute::get('clips',function(){// Access token has at least one of the listed scopes})->middleware('scope:list-clips,add-delete-clips')
If you haven’t defined any scopes, the app will just work as if they don’t exist. The moment you use scopes, however, your consumer apps will have to explicitly define which scopes they’re requesting access with. The one exception to this rule is that if you’re using the password grant type your consumer app can request the * scope, which gives the token access to everything.
Deploying Passport
The first time you deploy your Passport-powered app, the Passport API won’t function until you generate keys for the app. This can be accomplished by running php artisan passport:keys on your production server, which will generate the encryption keys Passport uses to generate tokens.
API Token Authentication
Laravel offers a simple API token authentication mechanism. It’s not much different from a username and password: there’s a single token assigned to each user that clients can pass along with a request to authenticate that request for that user.
This API token mechanism is not nearly as secure as OAuth 2.0, so make sure you know it’s the right fit for your application before deciding to use it. Because there’s just a single token, it’s almost like a password—if someone gets that token, they have access to your whole system. It’s more secure, though, because you can force the tokens to be more un-guessable, and you can wipe and reset tokens at the slightest hint of a breach, which you can’t do with passwords.
So, token API authentication might not be the best fit for your app; but if it is, it couldn’t be much simpler to implement.
First, add a 60-character unique api_token column to your users table:
$table->string('api_token',60)->unique();
Next, update whatever method creates your new users and ensure it sets a value for this field for each new user. Laravel has a helper for generating random strings, so if you want to use that, just set the field to str_random(60) for each. You’ll also need to do this for preexisting users if you’re adding this to a live application.
To wrap any routes with this authentication method, use the auth:api route middleware, as in Example 13-38.
Example 13-38. Applying the API auth middleware to a route group
Route::prefix('api')->middleware('auth:api')->group(function(){//});
Note that, since you’re using an authentication guard other than the standard guard, you’ll need to specify that guard any time you use any auth() methods:
$user=auth()->guard('api')->user();
Customizing 404 Responses
Laravel offers customizable error message pages for normal HTML views, but you can also customize the default 404 fallback response for calls with a JSON content type. To do so, add a Route::fallback call to your API.
// routes/api.phpRoute::fallback(function(){returnresponse()->json(['message'=>'Route Not Found'],404);})->name('api.fallback.404');
Triggering the Fallback Route
If you want to customize which route is returned when Laravel catches “not found” exceptions, you can update the exception handler using the respondWithRoute method.
// App\Exceptions\Handler.phppublicfunctionrender($request,Exception$exception){if($exceptioninstanceofModelNotFoundException&&$request->isJson()){returnRoute::respondWithRoute('api.fallback.404');}returnparent::render($request,$exception);}
Testing
Fortunately, testing APIs is actually simpler than testing almost anything else in Laravel.
We cover this in more depth in Chapter 12, but there are a series of methods for making assertions against JSON. Combine that capability with the simplicity of full-stack application tests and you can put together your API tests quickly and easily. Take a look at the common API testing pattern in Example 13-39.
Example 13-39. A common API testing pattern
...classDogsApiTestextendsTestCase{useWithoutMiddleware,RefreshDatabase;publicfunctiontest_it_gets_all_dogs(){$dog1=factory(Dog::class)->create();$dog2=factory(Dog::class)->create();$response=$this->getJson('api/dogs');$response->assertJsonFragment(['name'=>$dog1->name]);$response->assertJsonFragment(['name'=>$dog2->name]);}}
Note that we’re using WithoutMiddleware to avoid worrying about the authentication. You’ll want to test that separately, if at all (for more on authentication, see Chapter 9).
In this test we insert two dogs into the database, then visit the API route for listing all dogs and make sure both are present in the output.
You can cover all of your API routes simply and easily here, including modifying actions like POST and PATCH.
Testing Passport
You can also use the actingAs method on the Passport Facade to test your scopes. Take a look at Example 13-40 to see a common pattern for testing scopes in Passport.
Example 13-40. Testing scoped access
publicfunctiontest_it_lists_all_clips_for_those_with_list_clips_scope(){Passport::actingAs(factory(User::class)->create(),['list-clips']);$response=$this->getJson('api/clips');$response->assertStatus(200);}
TL;DR
Laravel is geared toward building APIs and makes it simple to work with JSON and RESTful APIs. There are some conventions, like for pagination, but much of the definition of exactly how your API will be sorted, or authenticated, or whatever else is up to you.
Laravel provides tools for authentication and testing, easy manipulation and reading of headers, and working with JSON, even automatically encoding all Eloquent results to JSON if they’re returned directly from a route.
Laravel Passport is a separate package that makes it simple to create and manage an OAuth server in your Laravel apps.