Table of Contents for
React Native Cookbook
 React Native Cookbook
Published by
O'Reilly Media, Inc., 2018
React Native Cookbook
Published by
O'Reilly Media, Inc., 2018
Chapter 4. Managing Hardware Platforms
You want the best experience for your users. With a mobile device packed with sensors, why not tap into the raw power of the machine running your code to deliver the best possible interaction? With a little bit of work, you can take advantage of the accelerometer, the GPS, the camera, and the hardware on the device. This chapter will survey some of the more common use cases and lessons learned managing the underlying hardware platform.
4.1 Asking for Permission to Use Device Hardware (iOS)
Whether you are snapping photos for a social media app or scanning a QR code in a corporate lobby, the device’s camera is one of the most powerful sensors at your disposal.
In some cases, a card or a modal screen with a button that triggers the hardware will help someone understand why they need to provide access like the two-step wireframe depicted in Figure 4-1. This permission flow is common in iOS applications, where permission requests can be delayed until they are required by the application.
Hardware Requires Hardware
The simulator can do some hardware testing; however, especially when dealing with camera data, there is no substitute for a real device.
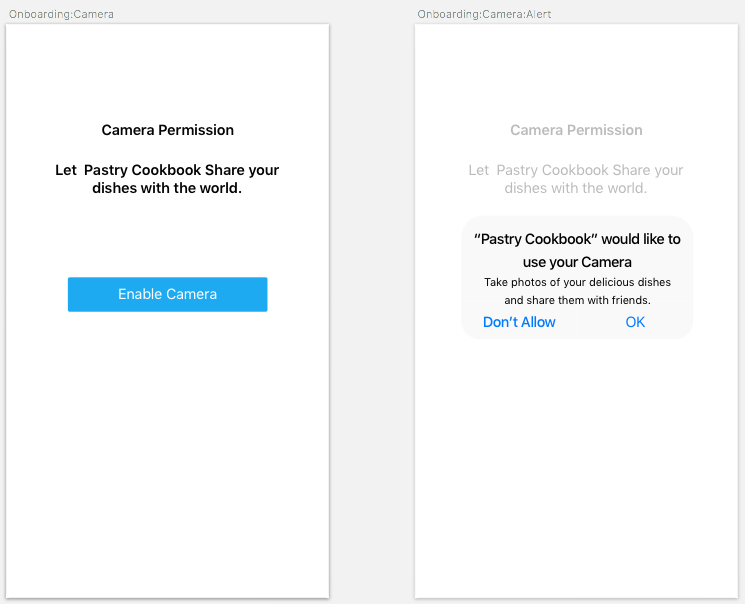
Figure 4-1. A wireframe depicting a two-step user flow for requesting camera permissions
The Apple App Store will review your application and flag any permissions that have not been explicitly declared. In some cases, such as with HealthKit, making background web requests, or using the location information when the app is not active, there may be some other capabilities that will also need to be enabled.
Variations Emerge Closer to the Metal
Most examples in this book assume cross-platform support. Some components, like
react-native-camera, try (successfully) to abstract the implementation
differences between Android and iOS. In some cases, such as Apple Pay or
HealthKit, this will not be possible. You will probably end up having to write
two implementations in React Native or writing your own React Native bridge.
Solution
Let’s use the
react-native-camera component. Another library,
react-native-permissions,
will provide us with a standard API for seeing whether we can start using the
camera. Begin by installing it from the command line:
$>npminstallreact-native-camera--save$>npminstallreact-native-permissions--save$>react-nativelink
Now add a description under “Privacy - Camera Usage Description” in the Info.plist file in Xcode as shown in Figure 4-2.
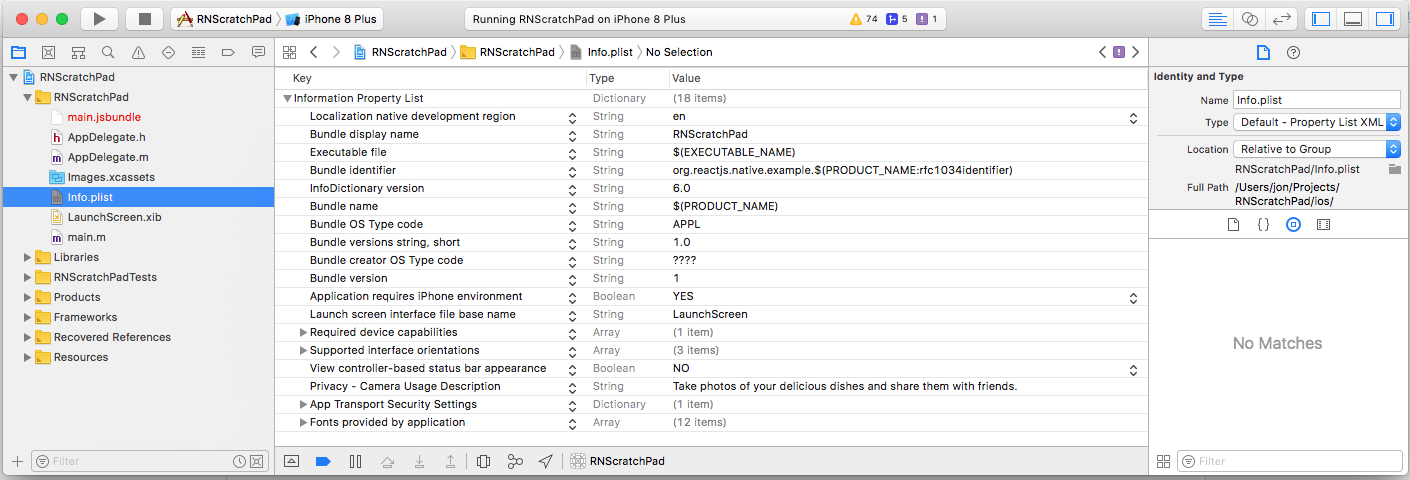
Figure 4-2. The Info.plist lists your hardware requirements
Create your own <SimpleCamera /> component that will wrap some basic functionality:
// modalCamera.jsimportReact,{Component}from'react';import{StyleSheet,Text,Image,View,TextInput,TouchableHighlight}from'react-native'importCamerafrom'react-native-camera';exportdefaultclassModalCameraextendsComponent{constructor(props){super(props)this.state={cameraType:Camera.constants.Type.back}}asynccapturePhoto(){constdata=awaitthis.camera.capture();this.props.onPhoto(data);}switchCamera=()=>{const{Type}=Camera.constants;constcameraType=this.state.cameraType===Type.back?Type.front:Type.back;this.setState({cameraType});}takePicture=()=>{this.capturePhoto();}render(){return<Viewstyle={{flex:1,backgroundColor:'blue'}}><Cameraref={(cam)=>{this.camera=cam;}}aspect={Camera.constants.Aspect.fill}captureTarget={Camera.constants.CaptureTarget.disk}captureAudio={false}style={styles.container}type={this.state.cameraType}><Viewstyle={styles.buttonRow}><TouchableHighlightstyle={styles.button}onPress={this.switchCamera}><Textstyle={styles.buttonText}>Switch</Text></TouchableHighlight><TouchableHighlightstyle={styles.button}onPress={this.takePicture}><Textstyle={styles.buttonText}>SnapDish</Text></TouchableHighlight></View></Camera></View>}}conststyles=StyleSheet.create({container:{flex:1,backgroundColor:"transparent",},buttonRow:{flexDirection:"row",position:'absolute',bottom:25,right:0,left:0,justifyContent:"center"},button:{padding:20,borderWidth:3,borderColor:"#FF0000",margin:15},buttonText:{color:"#FFF",fontWeight:'bold'},})
The App.js file will highlight some of the potential states for the camera
hardware on the device. By using react-native-permissions, we can create a
user experience where someone is alerted only when the camera request needs to
be made. This library also claims to support the latest Android permission
checks:
// App.jsimportReact,{Component}from'react';import{Alert,StyleSheet,TouchableHighlight,View,Text}from'react-native'importSimpleCamerafrom'./simpleCamera'importPermissionsfrom'react-native-permissions'exportdefaultclassAppextendsComponent{constructor(props){super(props);this.state={cameraPermission:null};}componentDidMount(){this.determinePermission();}asyncdeterminePermission(){constcameraPermission=awaitPermissions.check('camera')this.setState({cameraPermission});}asyncrequestCamera(){constcameraPermission=awaitPermissions.request('camera');this.setState({cameraPermission});}photoTaken=({path})=>{Alert.alert(`Photo Path:${path}`)}requestPermission=()=>{this.requestCamera();}renderDenied(){return<View><Textstyle={styles.textHeading}>Lookslikeyoudonotwanttotakeanyphotos.</Text><Textstyle={styles.textHeading}>Pleaseenablecamerafunctionalityinyourapplicationsettings</Text></View>}renderCameraRequest(){return<View><Textstyle={styles.textHeading}>LetPastryCookbookshareyourdisheswiththeworld!</Text><TouchableHighlightstyle={styles.button}onPress={this.requestPermission}><Textstyle={styles.buttonText}>EnableCamera</Text></TouchableHighlight></View>}render(){const{cameraPermission}=this.state;return<Viewstyle={styles.container}>{cameraPermission==="undetermined"&&this.renderCameraRequest()}{cameraPermission==="authorized"&&<SimpleCameraonPhoto={this.photoTaken}/>}{cameraPermission==="denied"&&this.renderDenied()}</View>}}conststyles=StyleSheet.create({container:{flex:1,paddingTop:30,backgroundColor:'#000',},buttonRow:{flexDirection:'row',position:'absolute',bottom:25,right:0,left:0,justifyContent:'center'},button:{padding:20,borderWidth:3,borderColor:'#FFF',borderRadius:20,backgroundColor:'#2445A2',margin:15},buttonText:{color:'#FFF',fontWeight:'bold',textAlign:'center',},textHeading:{color:'#44CAE5',fontSize:24,padding:20,fontWeight:'bold',textAlign:'center',}})
You can see the different application states in Figure 4-3 and Figure 4-4.
When a screenshot is taken, an Alert presents the user with the filepath on
the device. In Recipe 4.4 we will explore the filesystem in more depth.
Using Async/Await Instead of Promise()
Working with device hardware is rarely synchronous. In other words, the user
interface will not block to wait until data from a sensor returns correctly.
The result of this asynchronicity is often seen in a series of nested then( ()
=> {}) statements. In order to get around this, I’ve decided to present this
example using async and await. If you feel more comfortable with chaining
then() instead, the examples should work just the same.

Figure 4-3. Delaying hardware device permissions provides users with a better user experience
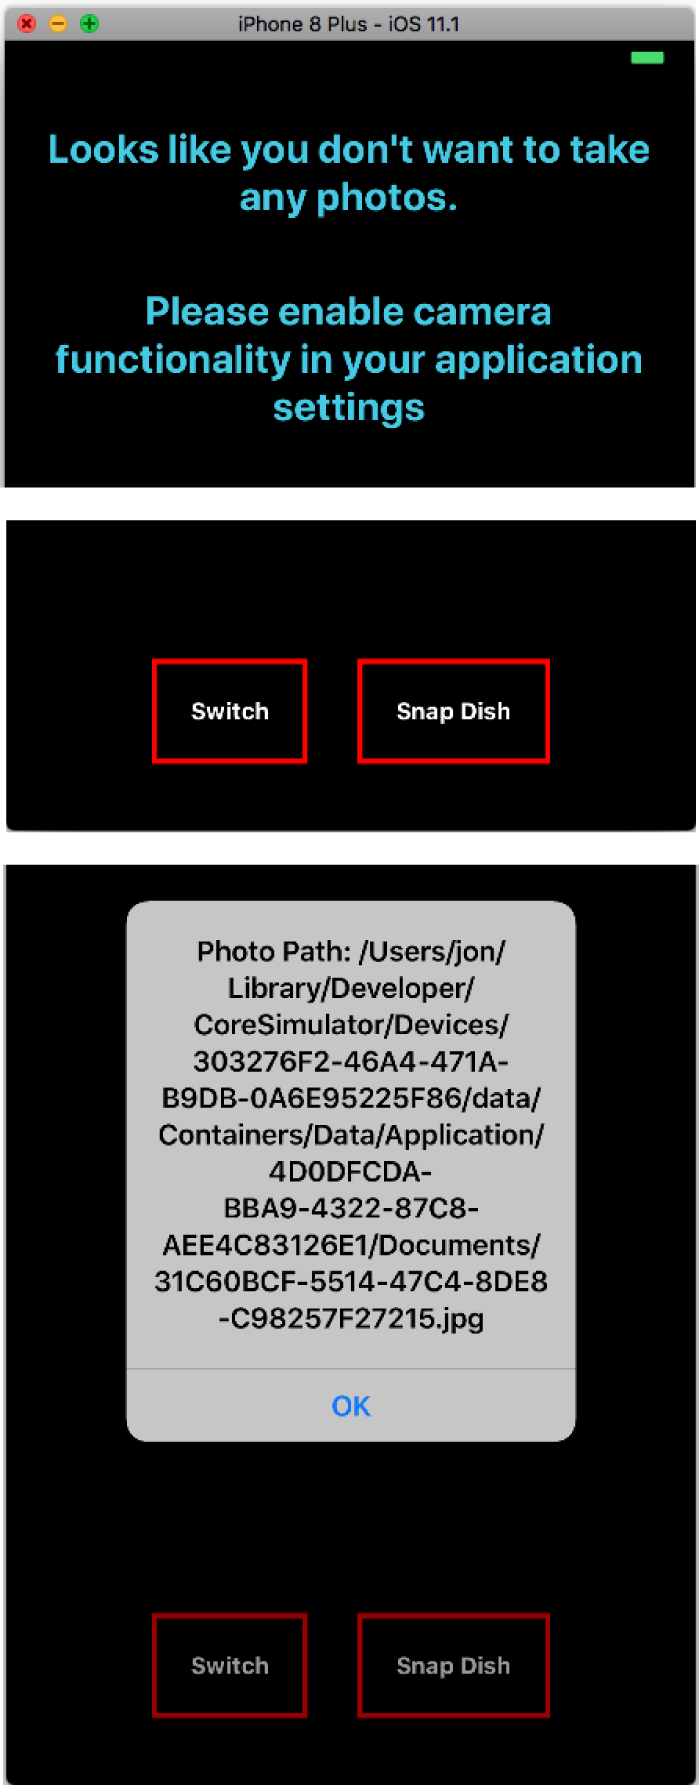
Figure 4-4. Handling a case when you don’t have permission to use the camera is critical; with permission granted, photoTaken() presents an Alert with the file path of the photo taken
See Also
This example only scratches the surface of requesting permission from users. If your application will play music in the background, enable payments, track users, or anything that can be deemed invasive, expect to spend development time informing users.
Learn more about requesting permissions from the react-native-permissions GitHub page and the PermissionsAndroid React Native guide.
4.2 Fetching Paginated Requests
The infinite scroll is an endless feast of content. Just as your palette is about to surrender, you find yourself faced with a new batch of morsels to tempt further consumption.
Most applications rely on the networking infrastructure on the mobile device to make asynchronous calls to a web server, oftentimes to get a list of records. This interaction pattern is seen in most applications that present a list of choices to a user. Whether it’s a series of photos from people you follow, or the latest restaurant choices in your area, an ever-growing list of content keeps people engaged.
Problem
How do you present a paginated list of content that can be constantly refreshed?
Solution
Before we tackle the pagination challenge, we need a data provider that we can connect to. Building a web server falls outside the scope of this book, so we will rely on the JSONPlaceholder, a REST API for prototyping and testing, instead of rolling our own.
See the FlatList in Figure 4-5, which renders a paginated set of results.
This example relies on two components as shown in Figure 4-5: <ListItem /> and the container <App
/>.

Figure 4-5. A FlatList renders a paginated result set
The <ListItem /> is just a simple function that returns JSX. The overlay
effect is achieved by relying on absolute positioning of the {title} and a
backing <View />, which is semitransparent. The React Native guides recommend
always passing height and width information for dynamic images. In this
case, we’re relying on a third-party web service called LoremPixel, and we can
dictate what format we require:
//listItem.jsimportReact,{Component}from'react';import{Image,StyleSheet,View,Text}from'react-native';exportdefaultfunction({url,title,width}){return<Viewstyle={styles.card}><ImageresizeMode='cover'source={{uri:url}}style={[styles.image,{width,height:200}]}/><Viewstyle={[styles.overlay,{width}]}/><Textstyle={styles.text}>{title}</Text></View>}conststyles=StyleSheet.create({card:{borderBottomWidth:5,borderTopWidth:2,borderBottomColor:'#222',borderTopColor:'#CACACA',borderStyle:'solid',height:207,},overlay:{...StyleSheet.absoluteFillObject,height:30,top:170,position:'absolute',backgroundColor:'rgba(2,2,2,0.8)',},text:{fontSize:14,height:30,top:170,color:'#FFF',backgroundColor:'transparent',},image:{...StyleSheet.absoluteFillObject,}});
This component illustrates the critical relationship between <RefreshControl
/> and <FlatList />. The fetchRecords() method asynchrously fetches JSON
results and appends them to this.state.list. fetchRecords() is called on
first load, componentDidMount(), when a refresh happens from a Pull to
Refresh event and when the user scrolls to the bottom of the list.
appendResults() copies the retrieved list of posts into a new array with the
existing list after performing a small set of transformations.
Note
In order for iOS to make a web request, the URL must either use SSL (begin with
https) or the domain must be explicitly set as exempt in the Info.plist file
under NSExceptionDomains. This may be required if you are running a web
development server locally without SSL.
//App.jsimportReact,{Component}from'react';import{StyleSheet,FlatList,Dimensions,RefreshControl,View,Text}from'react-native';importListItemfrom'./listItem'const{width}=Dimensions.get('window');constAPI='https://jsonplaceholder.typicode.com';exportdefaultclassAppextendsComponent<{}>{constructor(props){super(props)this.state={refreshing:false,page:1,list:[]}}resultToListItem({id,title}){const{page}=this.state;consturl=`https://lorempixel.com/${width}/200/food/${title}/`return{id:`${page}-${id}`,title:`${page}-${title}`,width,url}}appendResults(results){letlist=[];Object.keys(results).forEach((photoKey)=>{list.push(this.resultToListItem(results[photoKey]));});this.setState((prevState)=>({list:prevState.list.concat(list),refreshing:false,page:(prevState.page+1)}));}asyncfetchRecords(){this.setState({refreshing:true});constresp=awaitfetch(`${API}/posts?_limit=5`)constresults=awaitresp.json();this.appendResults(results);}onRefresh=()=>{this.setState({list:[],page:1});this.fetchRecords();}onEndReached=()=>{this.fetchRecords()}componentDidMount(){this.fetchRecords()}render(){constrefreshControl=<RefreshControlrefreshing={this.state.refreshing}onRefresh={this.onRefresh}/>return<Viewstyle={styles.container}><Viewstyle={styles.header}>{this.state.refreshing?<Textstyle={styles.headerText}>Refreshing...</Text> :<Textstyle={styles.headerText}>{this.state.list.length}Meals</Text> }</View><FlatListrenderItem={({item})=><ListItem{...item}/>}refreshControl={refreshControl}keyExtractor={({id})=>id}data={this.state.list}onEndReached={this.onEndReached}/></View>}}conststyles=StyleSheet.create({container:{flex:1,paddingTop:30,backgroundColor:'#FFF',},headerText:{color:'#144595',fontSize:16,fontWeight:'bold',textAlign:'center',},header:{borderBottomWidth:1,borderBottomColor:'#222',borderStyle:"solid",}})
Discussion
Implementing this pattern requires a little bit of care. Because the user can trigger a refresh at any point, and because the list of content is expanding, it’s best to use some native data structures for handling the content. Furthermore, the server may return the same content twice, making it necessary to handle duplicates. Page sizes may also vary and so the resulting list on the client might be a mash of slightly different queries to an API.
See Also
For lists that have a section that sticks to the top of the view, consider using
the SectionList.
The API is very similar.
Managing records inside of a component can also lead to some confusion. For example, if you wanted to tap into one of these records to retrieve further information or perform a route navigation (see Recipe 2.4), then some global state management with Flux, Mobx, Redux, Apollo, or Relay may be worth considering.
4.3 Save Application State with Redux and Local Storage
Redux is one of the most popular state management libraries in the React ecosystem. Unidirectional data flow architectures like Flux, Mobx, and Redux go with React like peanut butter and strawberry jam. But what happens when a user closes your app, taps a notification, or shifts the application from a foreground state to a background state? How do we ensure that data persists in these cases?
There are many strategies for persisting data on mobile. Each app has access to some file storage; however, for data, the AsyncStorage module provides a simple API for keeping track of important information.
This example combines one of the most popular state management libraries (Redux) with the most commonly used persistence module in React Native: AsyncStorage.
Problem
You are already using Redux and have decided to adopt it for your mobile application. You noticed that users like to have data cached locally even after they have closed the application.
Solution
The redux-persist library is an excellent starting point in resolving this
issue. This NPM mobile was conceived with support from AsyncStorage. As your
Redux architecture grows, some of the most recent design changes in version
5.x of redux-persist will come in handy. This example relies on the project
started in Recipe 2.5, but any Redux application should work.
In our case, we begin by installing redux-persist:
$> npm i redux-persist --saveBy adjusting the src/appContainer.js and the reduxStore.js files from Recipe 2.5, our appication will automatically store the username and application state in asynchronous storage.
reduxStore.js used to rely on the combineReducers() method. This has been replaced with
persistCombineReducers(), which includes a config parameter. storage will automatically
resolve to AsyncStorage with React Native:
// reduxStore.jsimport*asreducersfrom'./src/reducers';import{createStore,applyMiddleware,combineReducers,compose}from'redux';import{persistCombineReducers}from'redux-persist';importstoragefrom'redux-persist/es/storage';importloggerfrom'redux-logger';constconfig={key:'root',storage,};exportdefaultcreateStore(combineReducers(reducers),persistCombineReducers(config,reducers),applyMiddleware(logger));
redux-persist includes a <PersistGate /> component, which is intended to limit rendering of
your application until the application state has been completely hydrated:
// src/appContainer.jsimportReact,{Component}from'react';importAppContainerfrom'./src/appContainer';import{Provider}from'react-redux';importstorefrom'./reduxStore';// newly-added references to redux-persist:import{persistStore}from'redux-persist';import{PersistGate}from'redux-persist/es/integration/react';constpersistor=persistStore(store);exportdefaultclassAppextendsComponent<{}>{render(){return<Providerstore={store}><PersistGatepersistor={persistor}><AppContainer/></PersistGate></Provider>}}
When the app is terminated and restarted, any state changes should be maintained in AsyncStorage.
redux-persist is an excellent example of how the Redux design philosophy enables plugging in
libraries by extending the core Redux architecture based on your application’s use case.
See Also
As your app grows, you will undoubtedly want to selectively persist portions of your application.
redux-persist provides mechanisms for handling state changes, whitelisting, and blacklisting of
reducers and parameters. Consult the documentation for more information.
Another excellent library is redux-offline,
which depends on redux-persist and provides additional hooks for handling poor network
connectivity scenarios.
4.4 Using the Filesystem
There are a lot of common use cases for working with an application’s filesystem: dealing with binary files, downloading assets from the web, or like in Recipe 4.1, because you want to manage photos inside your app.
We’re going to extend the project started in Recipe 4.1 by adding
listing, viewing, and deleting functionality to the same application with the
react-native-fs package.
Problem
How do you tackle some of the common challenges when dealing with the filesystem, such as how to write, delete, list, and view files?
Solution
Our solution involves refactoring App.js from Recipe 4.1 into
a <CameraContainer /> component. Our updated App.js file can toggle between a
camera view (cameraContainer.js) and a list view (listContainer.js). Figure 4-6 demonstrates the addition of a button group for toggling pages in the App.js file.
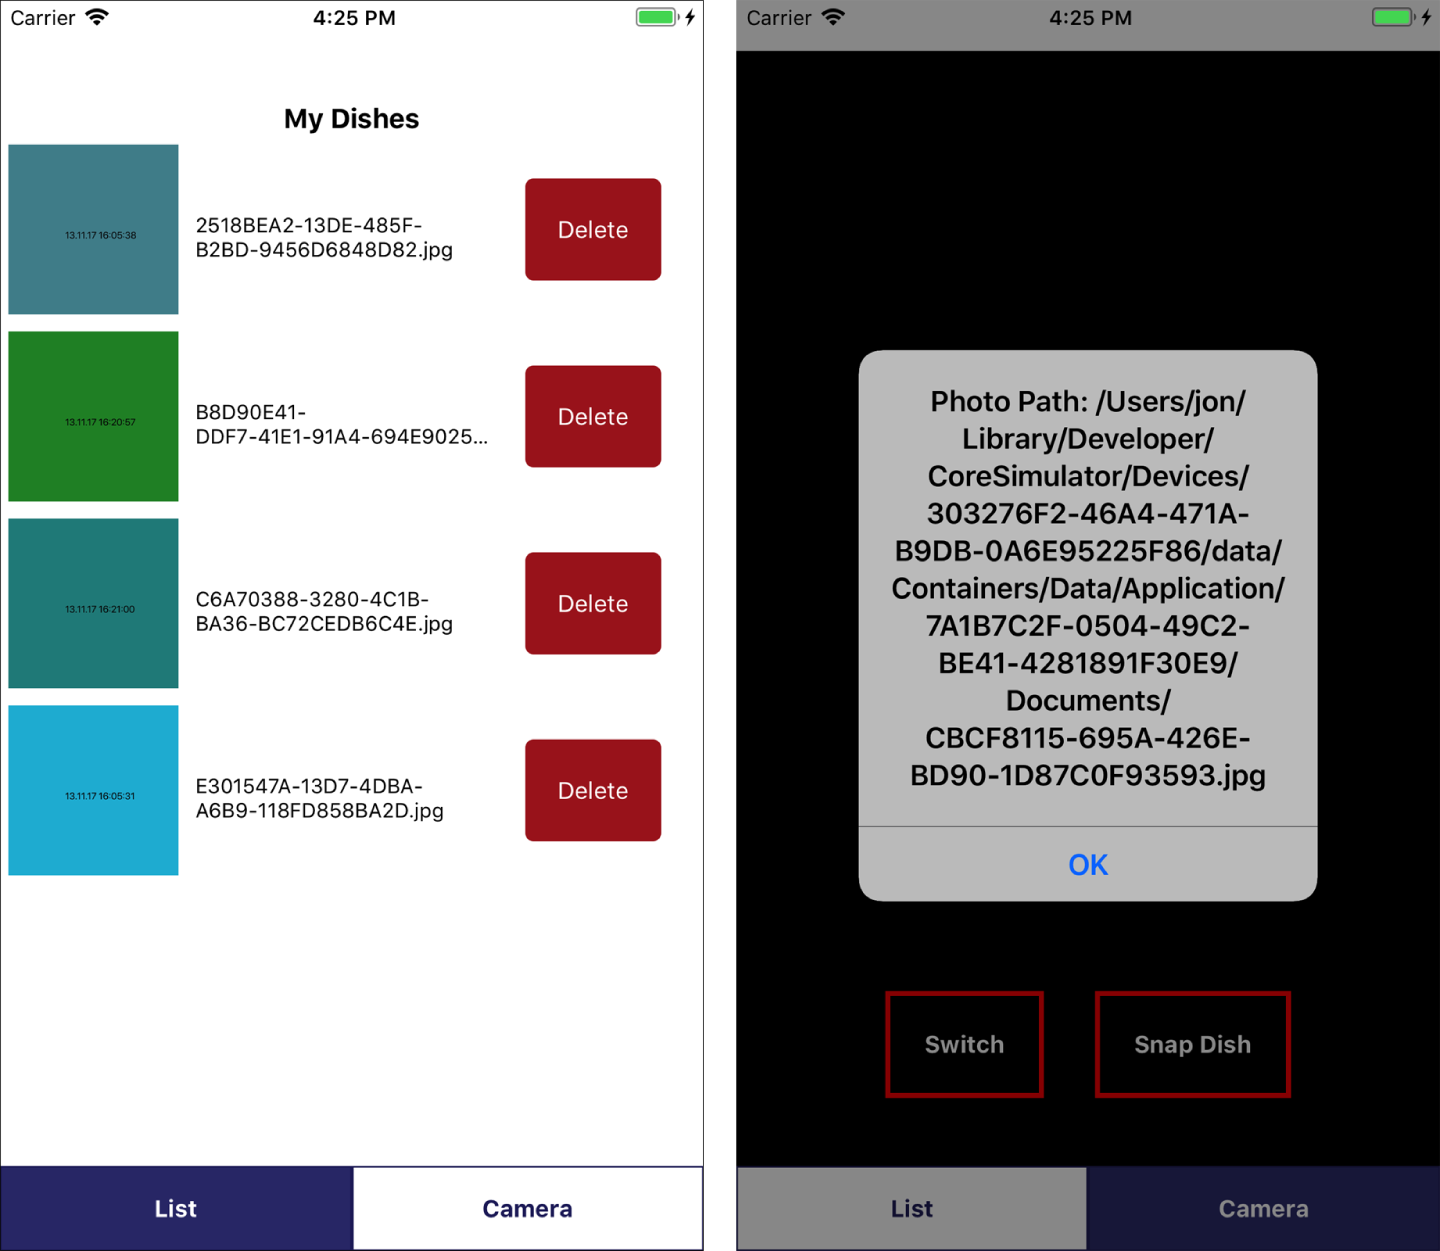
Figure 4-6. The App.js now includes a bottom toggle for page switching; CameraContainer and ListContainer are loaded interchangeably
Begin by installing the
react-native-fs package:
$>npm install react-native-fs --save$>react-native link react-native-fs
Let’s move the existing App.js file to a new cameraContainer.js file:
// cameraContainer.jsimportReact,{Component}from'react';import{Alert,StyleSheet,TouchableHighlight,View,Text}from'react-native';importSimpleCamerafrom'./simpleCamera';importPermissionsfrom'react-native-permissions';exportdefaultclassCameraContainerextendsComponent<{}>{constructor(props){super(props);this.state={cameraPermission:null};}componentDidMount(){this.determinePermission();}asyncdeterminePermission(){constcameraPermission=awaitPermissions.check('camera')this.setState({cameraPermission});}asyncrequestCamera(){constcameraPermission=awaitPermissions.request('camera');this.setState({cameraPermission});}photoTaken=({path})=>{Alert.alert(`Photo Path:${path}`)}requestPermission=()=>{this.requestCamera();}renderDenied(){return<View><Textstyle={styles.textHeading}>Lookslikeyoudonotwanttotakeanyphotos.</Text><Textstyle={styles.textHeading}>Pleaseenablecamerafunctionalityinyourapplicationsettings</Text></View>}renderCameraRequest(){return<View><Textstyle={styles.textHeading}>LetPastryCookbookshareyourdisheswiththeworld!</Text><TouchableHighlightstyle={styles.button}onPress={this.requestPermission}><Textstyle={styles.buttonText}>EnableCamera</Text></TouchableHighlight></View>}render(){const{cameraPermission}=this.state;return<Viewstyle={styles.container}>{cameraPermission==="undetermined"&&this.renderCameraRequest()}{cameraPermission==="authorized"&&<SimpleCameraonPhoto={this.photoTaken}/>}{cameraPermission==="denied"&&this.renderDenied()}</View>}}conststyles=StyleSheet.create({container:{flex:1,paddingTop:30,backgroundColor:'#000',},buttonRow:{flexDirection:'row',position:'absolute',bottom:25,right:0,left:0,justifyContent:'center'},button:{padding:20,borderWidth:3,borderColor:'#FFF',borderRadius:20,backgroundColor:'#2445A2',margin:15},buttonText:{color:'#FFF',fontWeight:'bold',textAlign:'center',},textHeading:{color:'#44CAE5',fontSize:24,padding:20,fontWeight:'bold',textAlign:'center',}});
App.js will now set the page state between the list and camera states:
// App.jsimportReact,{Component}from'react';import{StyleSheet,TouchableHighlight,View,Text}from'react-native';importCameraContainerfrom'./cameraContainer';importListContainerfrom'./listContainer';exportdefaultclassAppextendsComponent<{}>{constructor(props){super(props);this.state={page:"list"}}render(){const{page}=this.state;return<Viewstyle={styles.container}>{page==="list"&&<ListContainerstyle={styles.page}/>}{page==="camera"&&<CameraContainerstyle={styles.page}/>}<Viewstyle={styles.buttonGroup}><TouchableHighlightonPress={()=>{this.setState({page:'list'})}}style={[styles.button,(page==="list"&&styles.activeButton)]}><Textstyle={[styles.buttonText,(page==="list"&&styles.activeButtonText)]}>List</Text></TouchableHighlight><TouchableHighlightonPress={()=>{this.setState({page:'camera'})}}style={[styles.button,(page==="camera"&&styles.activeButton)]}><Textstyle={[styles.buttonText,(page==="camera"&&styles.activeButtonText)]}>Camera</Text></TouchableHighlight></View></View>}}conststyles=StyleSheet.create({container:{flex:1,paddingTop:30,backgroundColor:'#FFF',},page:{flex:1,},buttonGroup:{flexDirection:'row',},activeButton:{backgroundColor:'#343678',},activeButtonText:{color:'#FFF'},button:{borderWidth:1,borderColor:'#242668',flex:1,height:50,justifyContent:'center',},buttonText:{fontWeight:'bold',textAlign:'center',color:'#242668',}});
The new <ListContainer /> component will begin by scanning the documents directory and populating
a local this.state variable on componentDidMount():
// listContainer.jsimportReact,{Component}from'react';import{FlatList,StyleSheet,Image,TouchableHighlight,View,Text}from'react-native';import{unlink,readDir,DocumentDirectoryPath}from'react-native-fs';exportdefaultclassListContainerextendsComponent<{}>{constructor(props){super(props);this.state={photos:[]}}componentDidMount(){this.refreshPhotoList();}asyncdeletePhoto(path){awaitunlink(path)this.refreshPhotoList();}asyncrefreshPhotoList(){constallFiles=awaitreadDir(DocumentDirectoryPath);constphotos=allFiles.filter((file)=>{returnfile.path.split('.')[1]==="jpg"})this.setState({photos});}renderRow(file){return<Viewstyle={styles.row}><Imagestyle={{width:100,height:100}}resizeMode='cover'source={{uri:file.path}}/><TextnumberOfLines={2}style={styles.rowText}>{file.name}</Text><TouchableHighlightstyle={styles.deleteButton}onPress={()=>this.deletePhoto(file.path)}><Textstyle={styles.deleteButtonText}>Delete</Text></TouchableHighlight></View>}render(){return<Viewstyle={styles.container}><Textstyle={styles.titleText}>MyDishes</Text><FlatListkeyExtractor={({name})=>name}data={this.state.photos}renderItem={({item})=>this.renderRow(item)}/></View>}};conststyles=StyleSheet.create({container:{flex:1,paddingTop:30,backgroundColor:'#FFF',},row:{flexDirection:'row',margin:5,},rowText:{fontSize:12,flex:1,paddingLeft:10,paddingTop:40},titleText:{fontSize:16,textAlign:'center',fontWeight:'bold',height:20,},deleteButton:{backgroundColor:'#A22',justifyContent:'center',margin:20,width:80,borderRadius:5,},deleteButtonText:{color:'#FFF',textAlign:'center',justifyContent:'center',}});
We render the photos using a <FlatList /> component (discussed further in Recipe 4.2).
Notice that refreshPhotoList is called asynchronously: all calls to the filesystem are blocking calls and therefore do not happen synchronously. By relying on React’s
this.state variable, we can trigger a render on setState(), whenever it happens next. DocumentDirectoryPath is a global variable that
react-native-fs resolves based on the platform and the application. Any
absolute path manipulations (such as reading a directory with readDir) will
require using this constant.
See Also
This example only scratches the surface of what’s possible. Use
react-native-fs in combination with
react-native-zip-archive
to ZIP files before sending them. react-native-fs can also provide
large data storage with redux-persist on the Android platform thanks to
projects like
redux-persist-filesystem-storage.