Table of Contents for
React Native Cookbook
 React Native Cookbook
Published by
O'Reilly Media, Inc., 2018
React Native Cookbook
Published by
O'Reilly Media, Inc., 2018
Chapter 2. Living in the React Native Ecosystem
The smallest logical unit in a React application is the component: a function that transforms input into a nested set of views rendered based on a set of parameters. The React ecosystem is overflowing with these components; oftentimes we import them from external libraries.
This chapter will introduce you to the mechanics involved in importing components, building your own components, and using JavaScript libraries that support the React approach to building complex applications.
2.1 Stop Repeating Yourself: Implement Custom Components
React applications with lots of components that do one thing are easier to compose, organize, and maintain.
Solution
Cut down the repetition by implementing your own <ScreenHeader /> component.
In this example, I’m using the react-native-elements component library to
render a <Header /> component. See Recipe 2.3 for an
example of how to import a custom component.
Global Styles
You will notice in this example the references to colors and globalStyles.
These were imported from an external file at the top of the file:
import { colors, globalStyles } from '../styles';.
See Chapter 3 for more details on defining global colors and styles.
A Home screen has the following JSX inside the render() function:
<Viewstyle={globalStyles.headerContainer}><HeaderleftComponent={<Buttonicon={{name:'arrow-back'}}buttonStyle={{backgroundColor:null,padding:0,}}title=''color={colors.WHITE}onPress={this.backPressed}/>}centerComponent={<Textstyle={globalStyles.siteHeaderText}>{this.props.data.me.first_name}</Text>}rightComponent={<Buttonicon={{name:'home'}}buttonStyle={{backgroundColor:null,padding:0,}}title=''color={colors.WHITE}onPress={this.goHome}/>}/></View>
A Course screen has something that looks very similar:
<Viewstyle={globalStyles.headerContainer}><HeaderleftComponent={<Buttonicon={{name:'arrow-back'}}buttonStyle={{backgroundColor:null,padding:0,}}title=''color={colors.WHITE}onPress={this.back}/>}centerComponent={<Textstyle={globalStyles.siteHeaderText}>{this.course().name}</Text>}rightComponent={<Buttonicon={{name:'settings'}}buttonStyle={{backgroundColor:null,padding:0,}}title=''color={colors.WHITE}onPress={this.goHome}/>}/></View>
I see a lot of repetition, especially given that every single screen will have
some variation of this <Header />. Ideally, I would be able to reference a
component that emphasizes the differences and hides the complexity:
<ScreenHeaderleftComponentIcon='arrow-back'leftOnPress={this.back}centerText={this.course().name}rightIcon='settings'rightOnPress{this.goHome}/>
Create a new file in your project in a components folder—components/screenHeader.js:
importReact,{Component}from'react';import{Text,View,}from'react-native';import{Button,Header,}from'react-native-elements';import{colors,globalStyles}from'../styles';importPropTypesfrom'prop-types';classScreenHeaderextendsComponent{render(){return<Viewstyle={globalStyles.headerContainer}><HeaderleftComponent={<Buttonicon={{name:this.props.leftIcon}}buttonStyle={{backgroundColor:null,padding:0,}}title=''color={colors.WHITE}onPress={this.props.leftOnPress}/>}centerComponent={<Textstyle={globalStyles.siteHeaderText}>{this.props.centerText}</Text>}rightComponent={<Buttonicon={{name:this.props.rightIcon}}buttonStyle={{backgroundColor:null,padding:0,}}title=''color={colors.WHITE}onPress={this.props.rightOnPress}/>}/></View>}}ScreenHeader.propTypes={leftIcon:PropTypes.string,rightIcon:PropTypes.string,centerText:PropTypes.string,leftOnPress:PropTypes.func,rightOnPress:PropTypes.func,};exportdefaultScreenHeader;
We can now keep our screen code focused on the different implementations and expose an API with a
handful of PropTypes that the developer can pass to <ScreenHeader />.
2.2 Adding an Open Source Progress Bar
Almost all applications rely on activities that require the user to wait for an operation to complete. In some cases this can simply be the time required for a client to receive a message from a web server or third-party API. Another example might be waiting for an image to be processed in a background thread on the device.
Problem
How do we communicate to users that they need to wait?
Solution
Let’s add a progress bar. This is a great task to introduce the steps required
to import React Native components. Here we will import the component and discuss
linking the libART.a library to our project. In Recipe 3.4 we will
create an indeterminate progress animation.
Most open source React Native components have comprehensive README.md files that describe how to include the component and whether it’s been designed to work in iOS, Android, or both.
Discussion
Note
Make sure the development server isn’t running when you add new packages using
Yarn or Node. The React Packager may not pick up the new libraries and you will
probably need to run react-native link and rebuild the project binary.
Start by adding react-native-progress to your project:
$>npm install react-native-progress --save$>react-native link
Usually calling react-native link is all that’s required to add the necessary
iOS or Android libraries to the project build process. In this case,
react-native-progress relies on a special library for iOS called ReactART
for drawing pie charts.
Let’s link the ReactART library manually after calling react-native link. Figure 2-1
shows a project I created called RNScratchPad in Xcode.
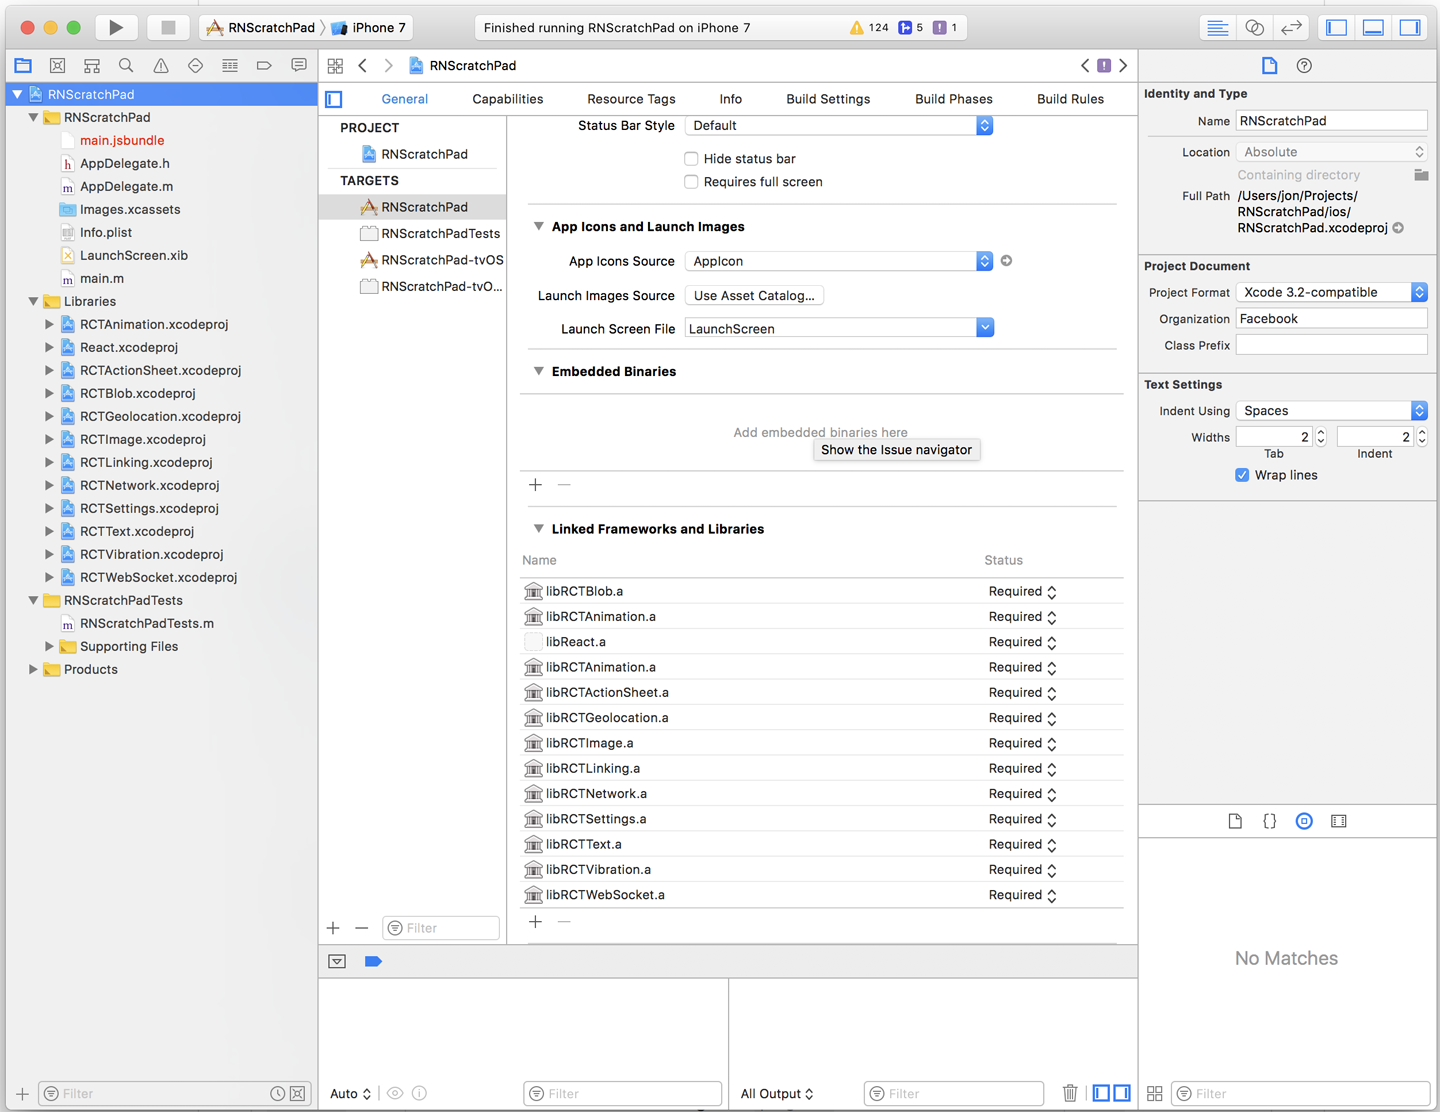
Figure 2-1. The RNScratchPad project shown in the Xcode interface
Expand the Libraries folder in the project view, as shown in Figure 2-2.
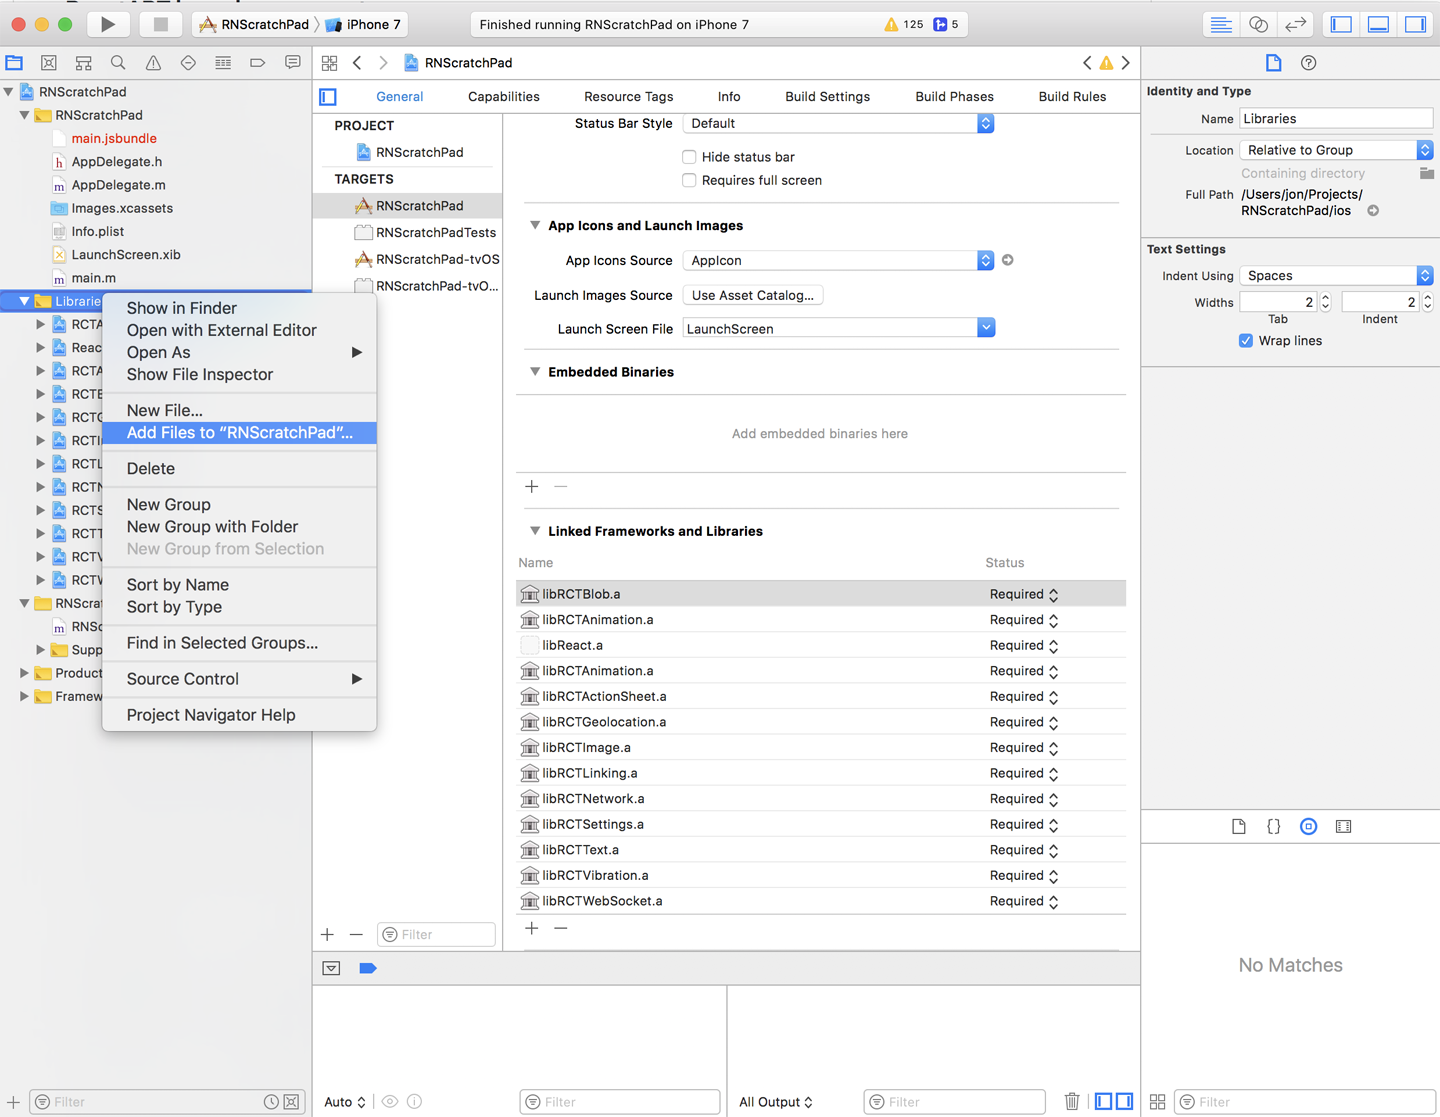
Figure 2-2. Choose Libraries → Add Files to add a new reference under Libraries
Start by adding a reference to the ART.xcodeproject file included with React Native in node_modules/react-native/Libraries/ART (Figure 2-3).
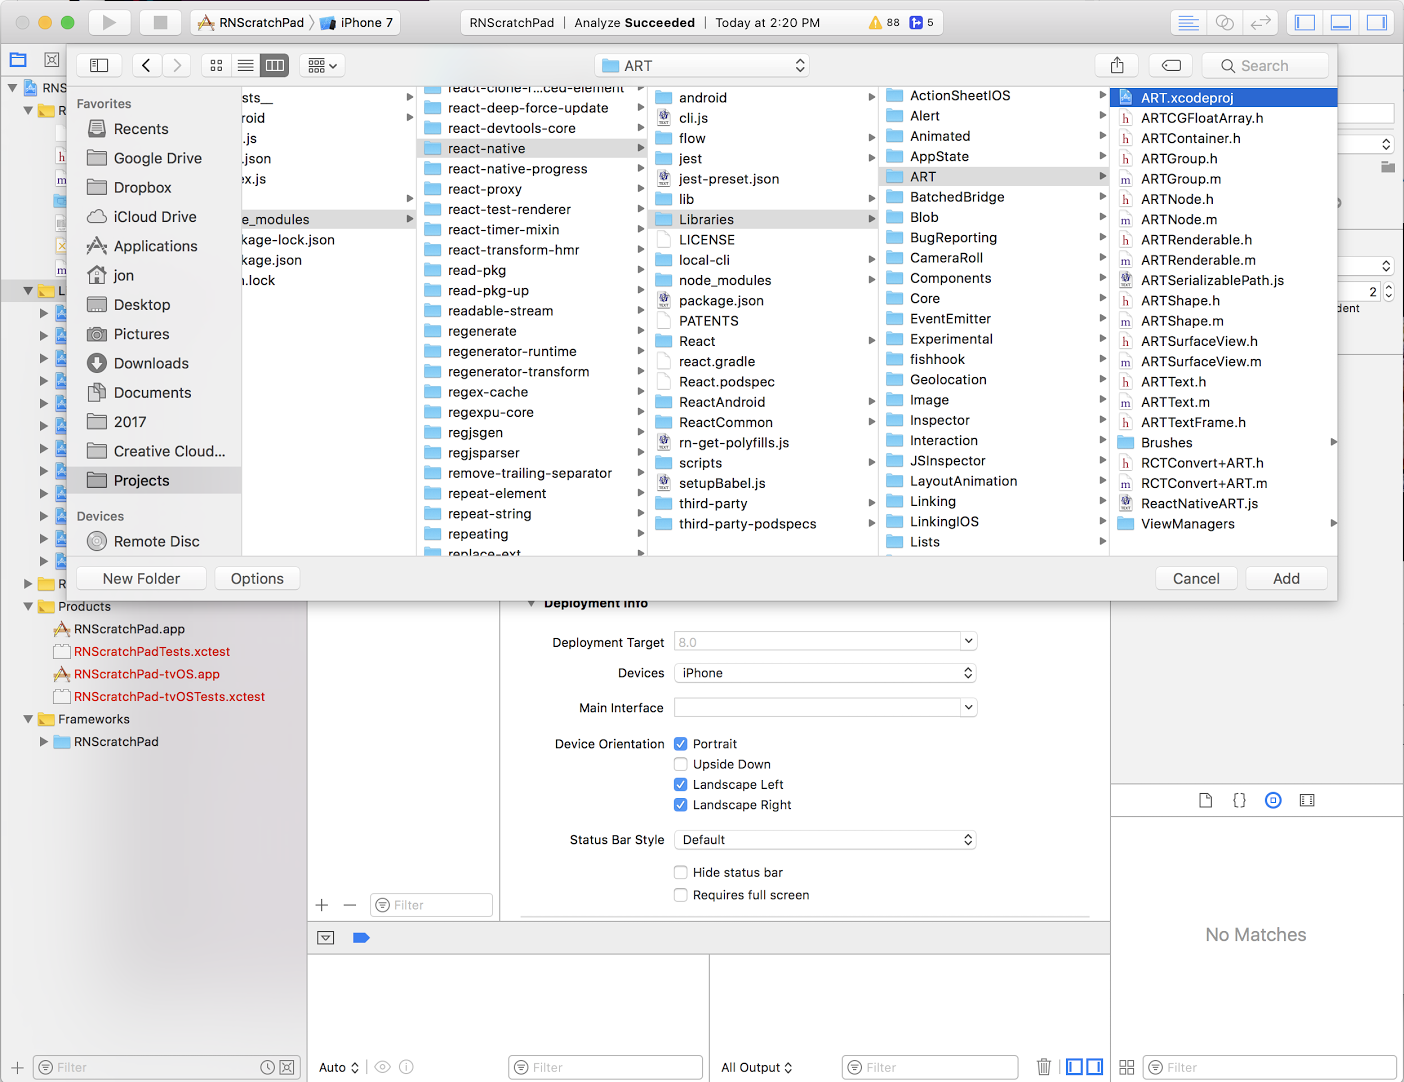
Figure 2-3. Find ART.xcodeproject in the react-native project files
Under Linked Frameworks and Libraries, find the + symbol. libART.a should be available as a library to add to your project (Figure 2-4).
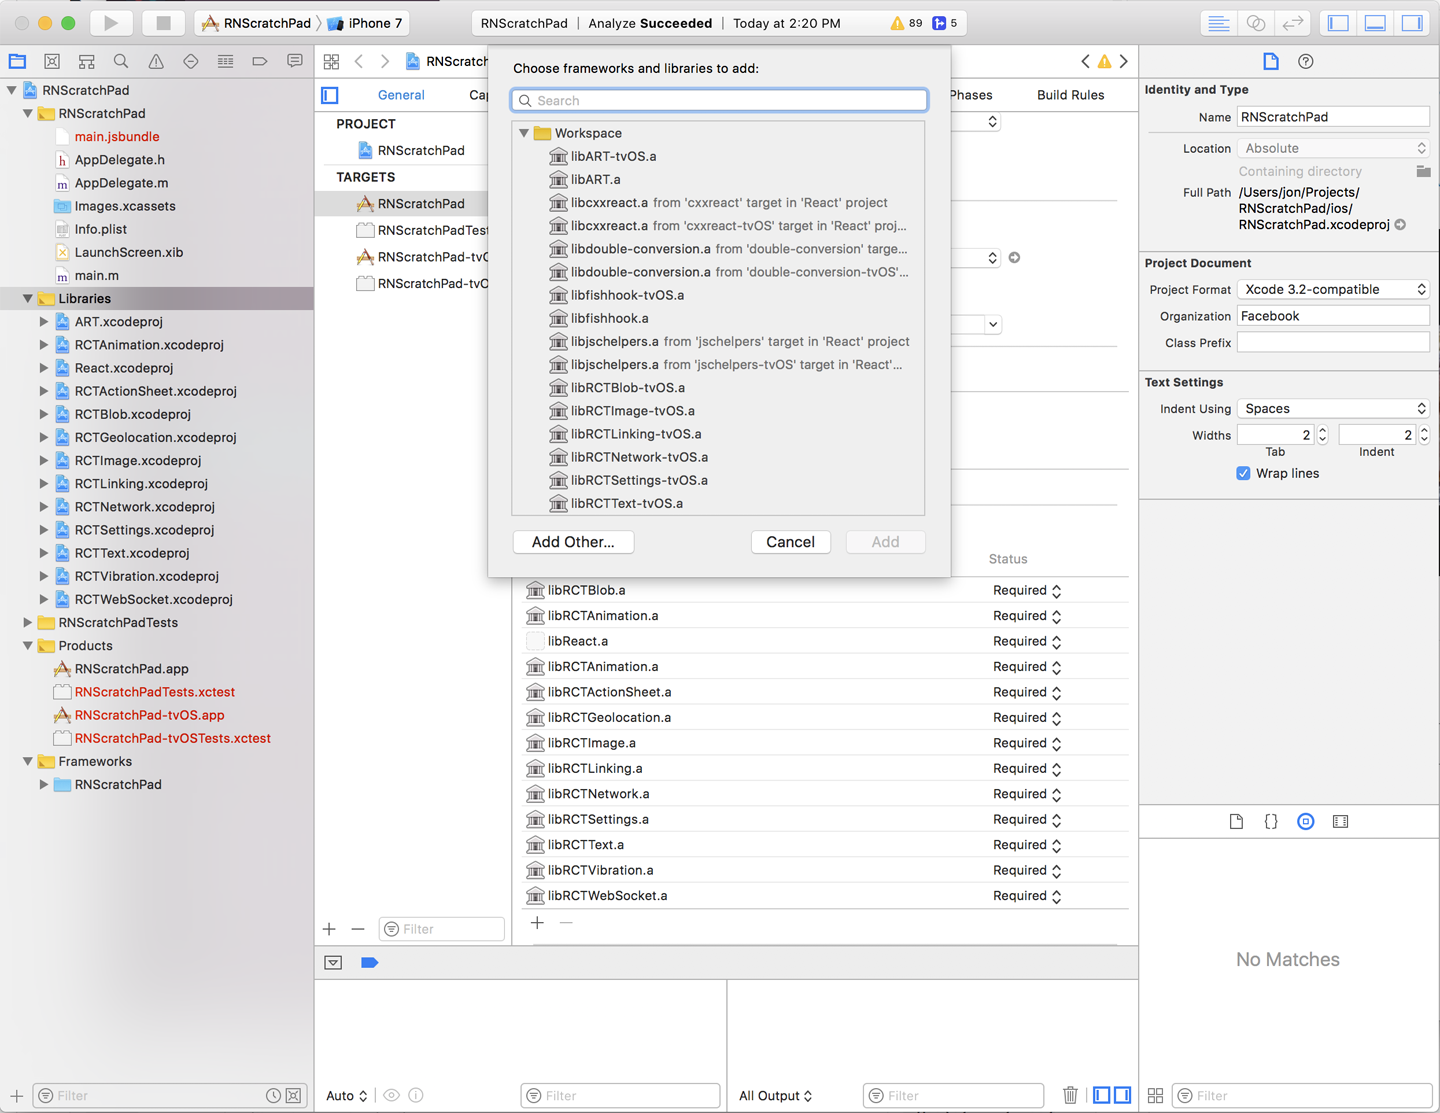
Figure 2-4. Select libART.a from the list
Your project configuration should now include this reference (Figure 2-5).
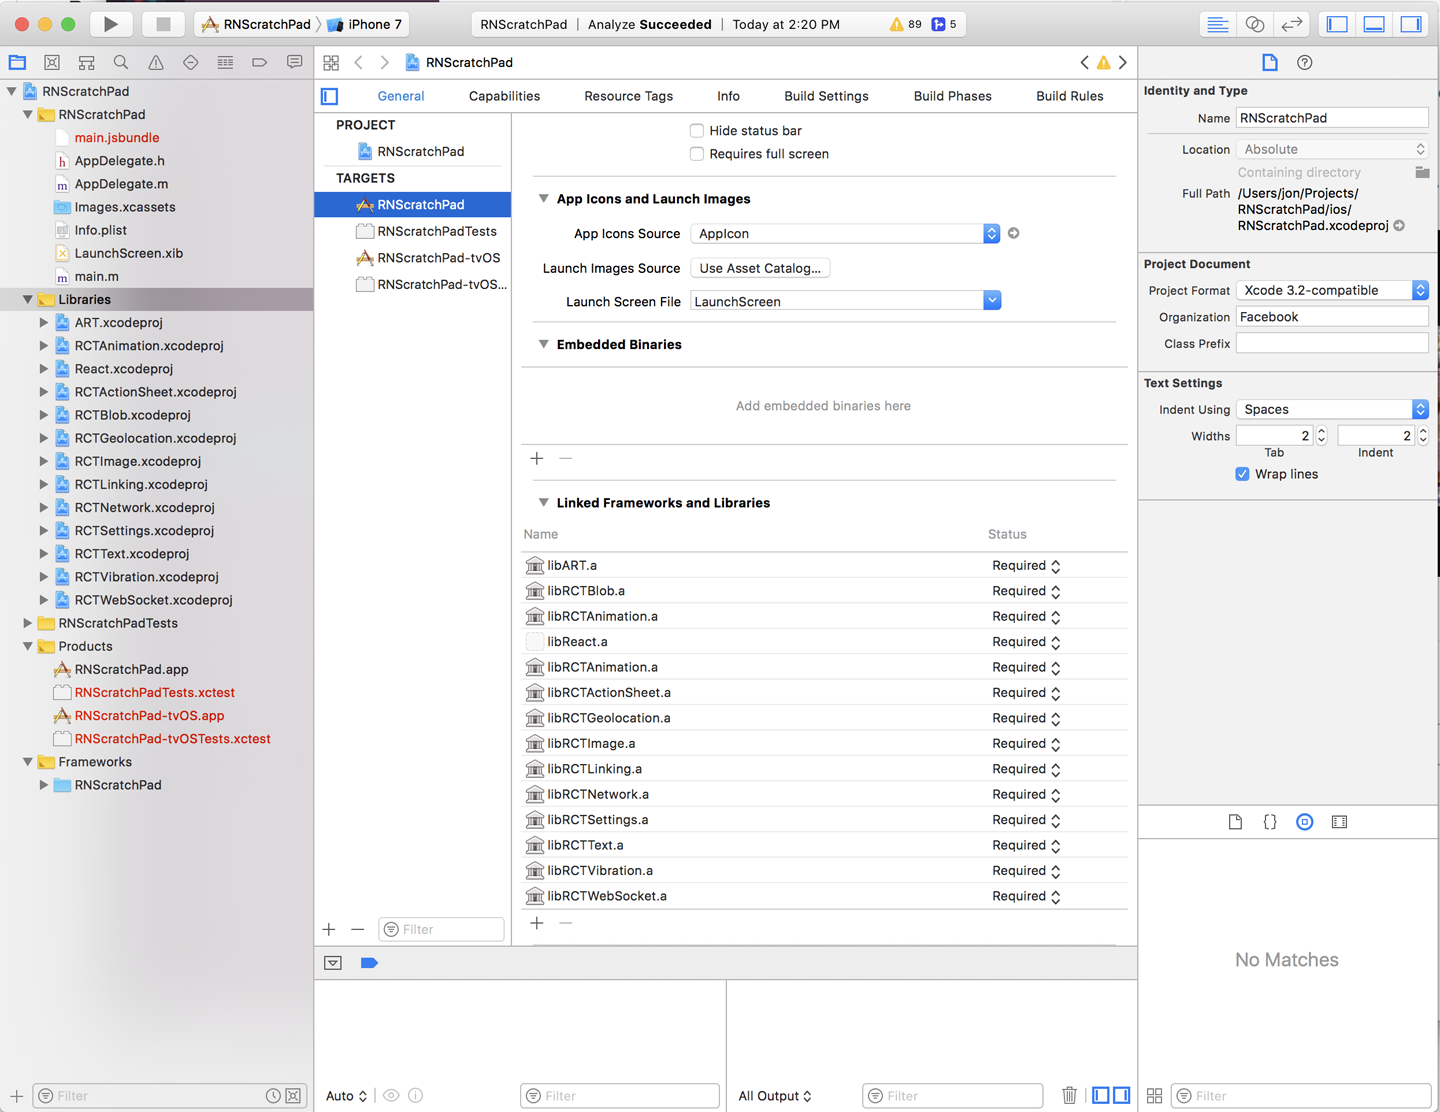
Figure 2-5. Reference the project in your configuration
Now rebuild the project and deploy the app on your Simulator or development device. Let’s add a simple progress bar to one of our components:
importReact,{Component}from'react';import{View}from'react-native';import*asProgressfrom'react-native-progress';exportdefaultclassAppextendsComponent<{}>{render(){return(<Viewstyle={{flex:1,justifyContent:'center',alignItems:'center'}}><Progress.Pieprogress={0.2}size={50}color="#2245FF"/></View>);}}
You should see something like this in the Simulator:
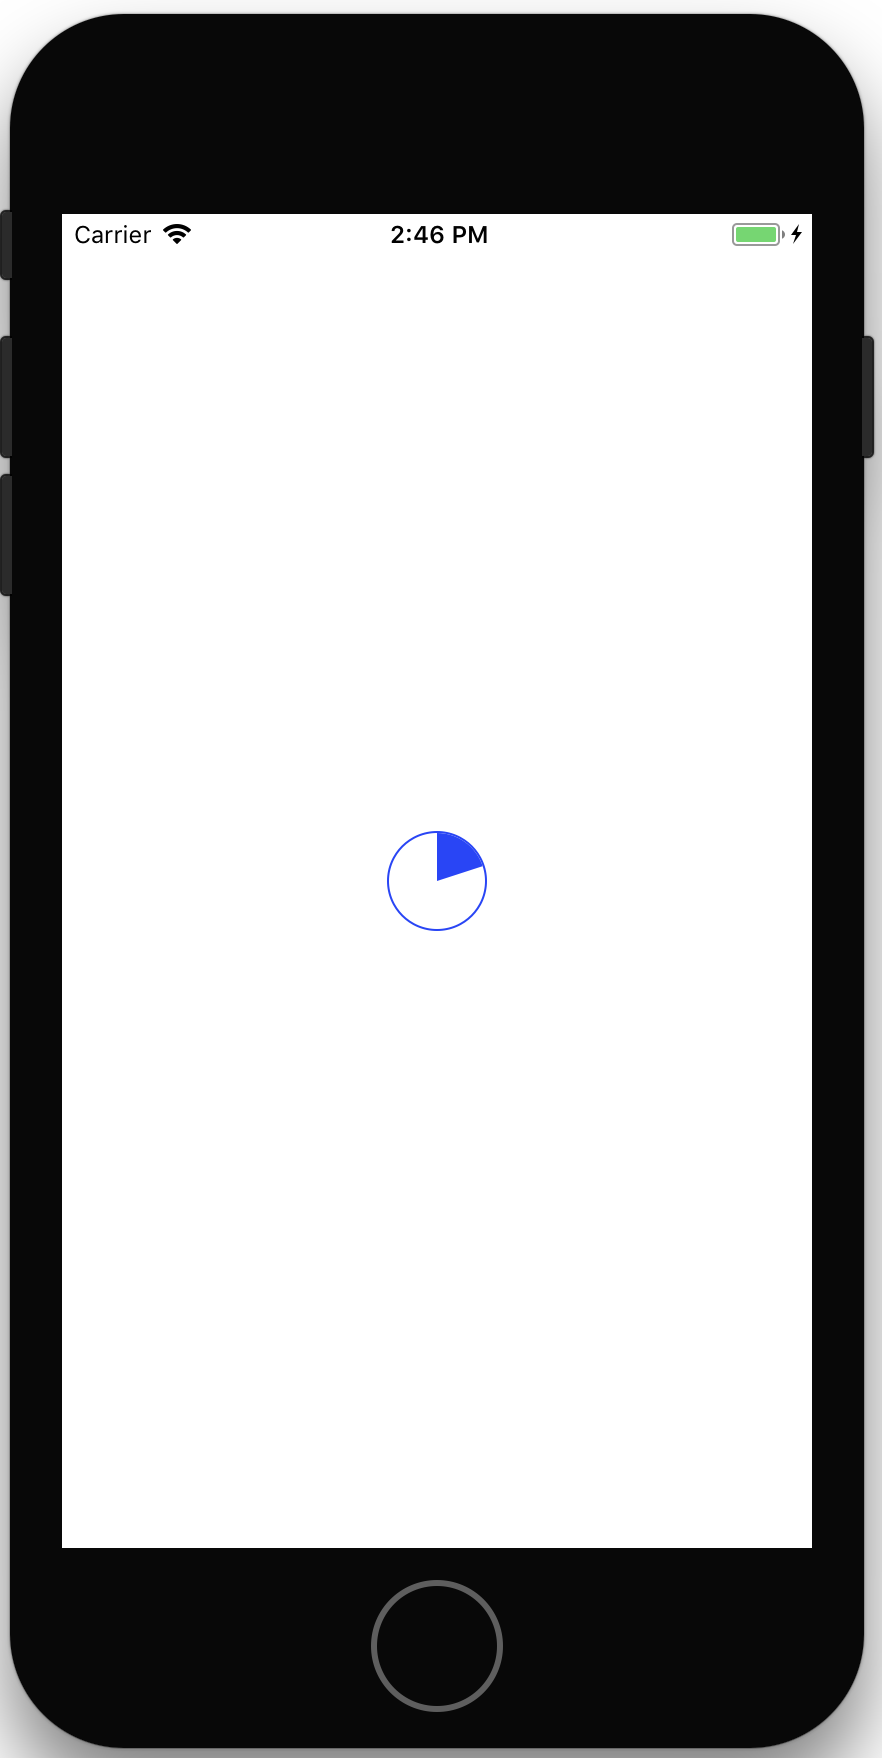
Notice that by changing the progress attribute, the progress bar changes.
We can animate progress changes by relying on a local this.state.progress
variable. Here is a more complete example:
importReact,{Component}from'react';import{Text,TouchableHighlight,View}from'react-native';import*asProgressfrom'react-native-progress';exportdefaultclassAppextendsComponent<{}>{constructor(props){super(props);this.state={progress:0.2}}randomProgress=()=>{constprogress=Math.random();this.setState({progress});}render(){return(<Viewstyle={{flex:1,justifyContent:'center',alignItems:'center'}}><Viewstyle={{marginBottom:10}}><Progress.PieborderWidth={2}borderColor='#62321B'unfilledColor='#F5F5F5'progress={this.state.progress}size={100}color='#D6C598'/></View><TouchableHighlightonPress={this.randomProgress}style={{padding:10,backgroundColor:'#CACACA',borderRadius:5}}><Textstyle={{fontSize:18,fontWeight:'bold'}}>ApplePieMe!</Text></TouchableHighlight></View>);}}
Tapping <TouchableHighlight /> will result in different pie servings!
See Also
Learn how to animate the progress bar in Recipe 3.4.
2.3 Sharing Custom Components
You have a collection of components that are worth using on multiple projects. Copying and pasting them between projects is not going to cut it.
Problem
How do you reuse a whole section of your React Native application in another
project? For example, you might have created a component library that includes
all of the visual identity requirements for your product. Naturally, you want to
share this across multiple projects and only have to make visual changes for these
components in one place. This approach enables reuse and also means that you can
version portions of your application more easily and reinforce your product’s
architectural boundaries. In my case, I’ve built a <PastryPicker /> component—critical to visualizing
the relative amount of flour, sugar, butter, and eggs across baked goods (Figure 2-6).

Figure 2-6. The PastryPicker Component
Solution
The sample project includes one component that I will separate into its own NPM package, pastryPicker.js. See Recipe 1.1 for details.
The main application, App.js, references <PastryPicker />:
// App.jsimportReact,{Component}from'react';import{Text,TouchableHighlight,View}from'react-native';import{PastryPicker}from'./pastryPicker';exportdefaultclassAppextendsComponent{render(){return(<Viewstyle={{flex:1,justifyContent:'center',alignItems:'center'}}><PastryPicker/></View>);}};
The PastryPicker component lives in one file (note that the pastry icon characters pictured in Figure 2-6 have been omitted from the code for font reasons):
// pastryPicker.jsimportReact,{Component}from'react';import{Animated,StyleSheet,Text,TouchableHighlight,View,}from'react-native';constPASTRIES={croissant:{label:'Croissants',flour:0.7,butter:0.5,sugar:0.2,eggs:0},cookie:{label:'Cookies',flour:0.5,butter:0.4,sugar:0.5,eggs:0.2},pancake:{label:'Pancakes',flour:0.7,butter:0.5,sugar:0.3,eggs:0.3},doughnut:{label:'Dougnuts',flour:0.5,butter:0.2,sugar:0.8,eggs:0.1},};exportdefaultclassPastryPickerextendsComponent{constructor(props){super(props);this.state={selectedPastry:'croissant'}}setPastry=(selectedPastry)=>{this.setState({selectedPastry});}renderIngredient(backgroundColor,flex,label){return<Viewstyle={styles.ingredientColumn}><Viewstyle={styles.bar}/><Viewstyle={{backgroundColor,flex}}/><Viewstyle={styles.label}><Text>{label}</Text></View></View>}render(){const{flour,butter,sugar,eggs}=PASTRIES[this.state.selectedPastry];return<Viewstyle={styles.pastryPicker}><Viewstyle={styles.buttons}>{Object.keys(PASTRIES).map((key)=><Viewkey={key}style={styles.buttonContainer}><TouchableHighlightstyle={[styles.button,{backgroundColor:key===this.state.selectedPastry?'#CD7734':'#54250B'}]}underlayColor='CD7734'onPress={()=>{this.setPastry(key)}}><Textstyle={styles.buttonText}>{PASTRIES[key].label}</Text></TouchableHighlight></View>)}</View><Viewstyle={styles.ingredientContainer}>{this.renderIngredient('#F2D8A6',flour,'Flour')}{this.renderIngredient('#FFC049',butter,'Butter')}{this.renderIngredient('#CACACA',sugar,'Sugar')}{this.renderIngredient('#FFDE59',eggs,'Eggs')}</View></View>}}conststyles=StyleSheet.create({pastryPicker:{flex:1,flexDirection:'column',margin:20,},ingredientContainer:{flex:1,flexDirection:'row',},ingredientColumn:{flexDirection:'column',flex:1,justifyContent:'flex-end',},buttonContainer:{margin:10,},bar:{alignSelf:'flex-start',flexGrow:0,},button:{padding:10,minWidth:140,justifyContent:'center',backgroundColor:'#5A8282',borderRadius:10,},buttonText:{fontSize:18,color:'#FFF',},buttons:{flexDirection:'column',flexWrap:'wrap',paddingRight:20,paddingLeft:20,flex:0.3,},label:{flex:0.2,},});
Discussion
Let’s go through the steps required to pull a collection of components into a separate project where they can be included in multiple React Native projects.
In Recipe 2.2 we referenced an external NPM package for rendering progress bars. Our component is much simpler: it relies entirely on existing React Native components, which means that in our case we can simply create an NPM package with the correct dependencies.
Assuming you have NPM correctly installed, you should be able to create a new
package from the command line. Create a folder for the package and run npm
init inside it:
$>mkdir react-native-pastry-picker$>cdreact-native-pastry-picker$>npm init This utility will walk you through creating a package.json file. It only covers the most common items, and tries to guess sensible defaults. See`npmhelpjson`fordefinitive documentation on these fields and exactly what theydo. Use`npm install <pkg>`afterwards to install a package and save it as a dependency in the package.json file. package name:(projects)react-native-pastry-picker ...
You will be presented with a series of questions (package name, version, main entry point, etc.). Use the defaults for now; you can change them later. Only the package name is important since that will be the package folder and the reference for the main application.
Note
An emerging convention in the React Native community is to prefix component
libraries with react-native- and host them on GitHub.
If the command is successful, a package.json file should be automatically created. Let’s add React as a development dependency—a required package for development purposes:
$> npm i --save-dev reactYou should now have a node_modules folder and a package.lock file in the project file. Your package.json file should look something like this:
{"name":"react-native-pastry-picker","version":"1.0.0","description":"","main":"index.js","scripts":{"test":"echo \"Error: no test specified\" && exit 1"},"author":"Jon Lebensold","license":"MIT","devDependencies":{"react":"^16.0.0"}}
You will notice that key main points to index.js. The index.js file should serve as a manifest for all
public components. Let’s do a sanity check of our component by creating an index.js file that wraps a simple
<Text /> component:
importReact,{Component}from'react';import{Text,View,}from'react-native';exportclassSanityCheckextendsComponent{render(){return<View><Text>Iamanexternallyreferencedcomponent!</Text></View>}}
We can now add the component to our main project with a relative reference and restart our development server. Once the package is ready to be published, we can change our package.json file to reference the published name on npmjs.com.
$>npminstall--save../react-native-pastry-picker$>yarnstart--reset-cache
Dependency Management
Referencing packages locally from package.json sometimes causes the React Native
Packager to forget to refresh the internal cache. I recommend using Yarn instead of
NPM or react-native start when relying on a locally referenced dependency.
Learn how to install Yarn at https://yarnpkg.com/en/docs/install.
We can adjust our App.js file to reference the new dependency:
importReact,{Component}from'react';import{View}from'react-native';import{SanityCheck}from'react-native-pastry-picker'exportdefaultclassAppextendsComponent<{}>{render(){return(<Viewstyle={{flex:1,justifyContent:'center',alignItems:'center'}}><SanityCheck/></View>);}}
The main application should render <SanityCheck /> as though it was part of the local library. You can now
safely move the components out of the main project and update the index.js in react-native-pastry-picker to
reference the components internally like this:
export{defaultasPastryPicker}from'./pastryPicker';
See Also
Once your component library is taking shape, make sure you update the package.json file with the appropriate metadata fields. You will probably want to publish the project to NPM so that it can be referenced like any other React Native package.
If you need to call native libraries, then more setup will be required. I recommend looking at
well-supported packages like
react-native-camera.
Remember that you can use this same approach for sharing application constants, stylesheets, and default
typography or image assets as well!
2.4 Routing Between Login Screens
Most mobile applications need to provide a mechanism for someone to travel between screens seamlessly. The classic example is a list of items, where tapping any item allows the user to drill into the list element. It’s also often the case that there is a portion of the application that is available to someone logged in.
Problem
How do we maintain all these different screens without losing track of the global state of our application? How do we ensure seamless transitions between pages? The React Navigation community project aims to address these challenges by providing a set of nesting navigator components.
Solution
Start by adding react-navigation to your project:
$> npm install --save react-navigationLet’s break out our application into three navigators:
- Root navigator
-
The top-level navigator for the application.
- Guest navigator
-
Provides screen navigation before a user is logged in.
- User navigator
-
Provides screen navigation inside the application. The root navigator is passed by reference via
screenProps.
See how the navigators deliver the Login, About, Profile, and Dashboard screens in Figure 2-7.
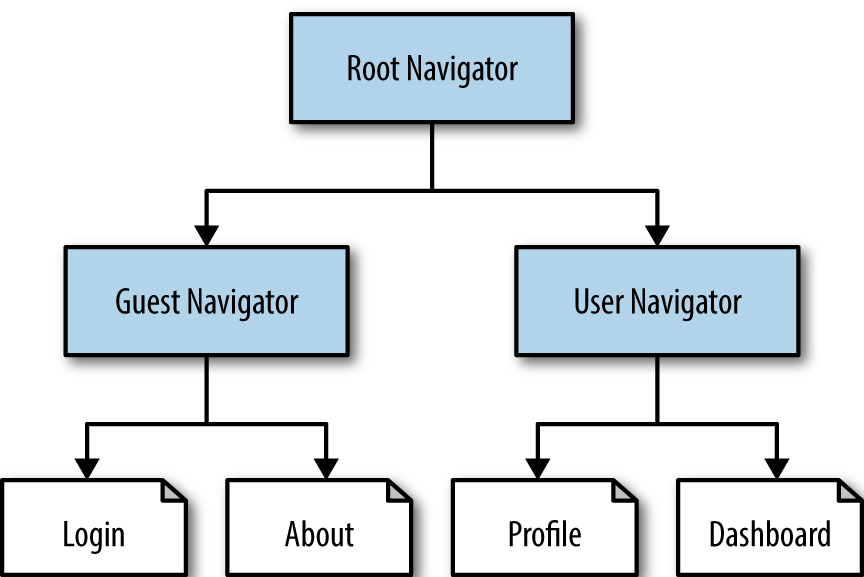
Figure 2-7. Nested navigation route structure
This example uses two navigators, one of which relies on tab navigation at the bottom of the screen in iOS. See Recipe 3.3 for more information on dealing with vector images.
The styles were pulled into a styles.js file in order to keep the navigation code focused on the problem at hand:
// styles.jsimport{StyleSheet}from'react-native';exportconststyles=StyleSheet.create({container:{paddingTop:30,flex:1},paragraphText:{fontSize:16,lineHeight:20,},titleText:{fontSize:24,lineHeight:30,},primaryButton:{padding:20,backgroundColor:'#124473'},primaryButtonText:{color:'#FFF',textAlign:'center',},altButton:{padding:20,backgroundColor:'#23CdA4'},altButtonText:{color:'#FFF',textAlign:'center',}});
There are four screens in this example: AboutScreen, LoginScreen,
DashboardScreen, and ProfileScreen. Each screen has its own file and is referenced in App.js. The flow through the different screens can be seen in Figure 2-8.
// About ScreenimportReact,{Component}from'react';import{TouchableHighlight,View,Text}from'react-native';import{styles}from'./styles';exportdefaultclassAboutScreenextendsComponent<{}>{render(){return<Viewstyle={styles.container}><Textstyle={styles.titleText}>AboutScreen</Text><TouchableHighlightstyle={styles.primaryButton}onPress={this.props.navigation.goBack}<Textstyle={styles.primaryButtonText}>GoBack</Text></TouchableHighlight></View>}}
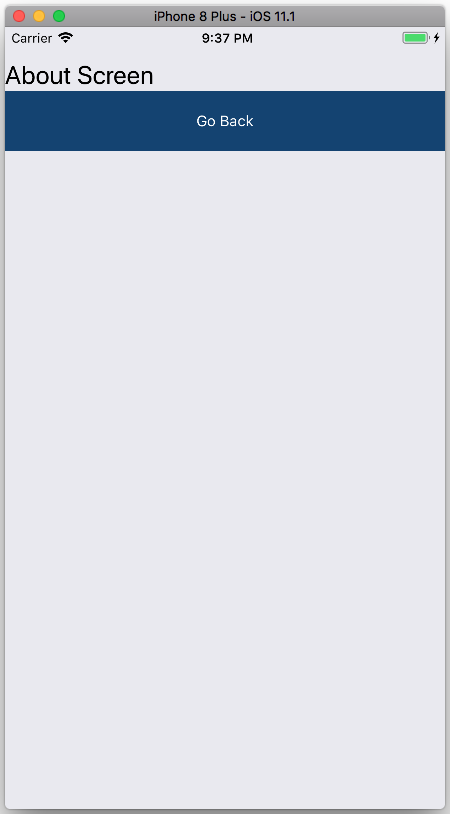
Figure 2-8. The About Screen
See Figure 2-9 for an example of the LoginScreen component.
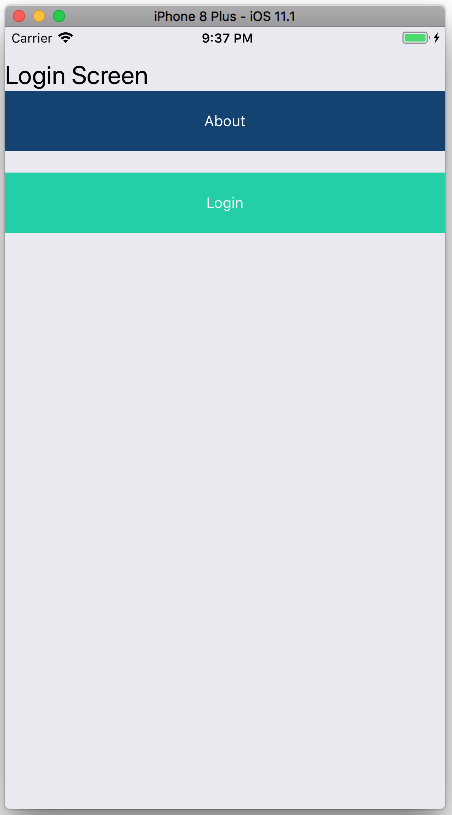
Figure 2-9. The Login Screen
// Login ScreenimportReact,{Component}from'react';import{TouchableHighlight,View,Text}from'react-native';import{styles}from'./styles';exportdefaultclassLoginScreenextendsComponent<{}>{about=()=>{const{navigate}=this.props.navigationnavigate('about');}login=()=>{const{navigate}=this.props.navigation;// some login code here...navigate('user',{user:{name:'Sam Smith',:'sam.smith@example.com'}})}render(){return<Viewstyle={styles.container}><Textstyle={styles.titleText}>LoginScreen</Text><TouchableHighlightstyle={styles.primaryButton}onPress={this.about}><Textstyle={styles.primaryButtonText}>About</Text></TouchableHighlight><TouchableHighlightstyle={[styles.altButton,{marginTop:20}]}onPress={this.login}><Textstyle={styles.altButtonText}>Login</Text></TouchableHighlight></View>}}
The Dashboard Screen component extracts user() state from the RootNavigator (Figure 2-10).
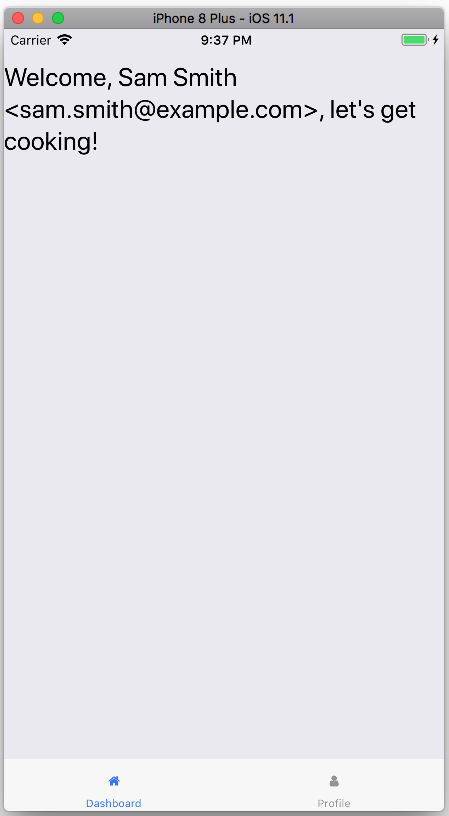
Figure 2-10. The Dashboard Screen
// Dashboard ScreenimportReact,{Component}from'react';import{View,Text}from'react-native';import{styles}from'./styles';importIconfrom'react-native-vector-icons/FontAwesome';exportdefaultclassScreenextendsComponent{staticnavigationOptions={title:'Dashboard',tabBarIcon:({tintColor})=><Iconname='home'color={tintColor}/>}user(){const{rootNavigation}=this.props.screenProps;returnrootNavigation.state.params.user;}render(){const{name,}=this.user();return<Viewstyle={styles.container}><Textstyle={styles.titleText}>{`Welcome,${name}<${}>,let's get cooking!`}</Text></View>}}
The Profile Screen (seen in Figure 2-11) demonstrates resetting the navigation state with the logout().
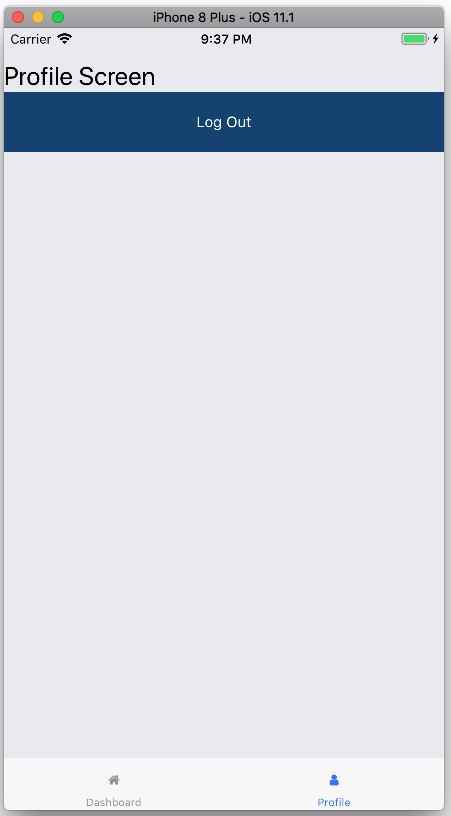
Figure 2-11. The Profile Screen
// Profile ScreenimportReact,{Component}from'react';import{TouchableHighlight,View,Text}from'react-native';importIconfrom'react-native-vector-icons/FontAwesome';import{styles}from'./styles';exportdefaultclassScreenextendsComponent<{}>{staticnavigationOptions={title:'Profile',tabBarIcon:({tintColor})=><Iconname='user'color={tintColor}/>}logout=()=>{const{rootNavigation}=this.props.screenProps;rootNavigation.goBack()}render(){return<Viewstyle={styles.container}><Textstyle={styles.titleText}>ProfileScreen</Text><TouchableHighlightstyle={styles.primaryButton}onPress={this.logout}><Textstyle={styles.primaryButtonText}>LogOut</Text></TouchableHighlight></View>}}
Finally, App.js ties the whole thing together with three navigators:
// App.jsimportReact,{Component}from'react';import{StackNavigator,TabNavigator}from'react-navigation';// ScreensimportDashboardScreenfrom'./dashboardScreen';importProfileScreenfrom'./profileScreen';importLoginScreenfrom'./loginScreen';importAboutScreenfrom'./aboutScreen';// NavigatorsconstGuestRouteConfig={login:{screen:LoginScreen},about:{screen:AboutScreen},}constGuestNavigator=StackNavigator(GuestRouteConfig,{headerMode:'none'});constUserRouteConfig={dashboard:{screen:DashboardScreen},profile:{screen:ProfileScreen},}constUserNavigator=TabNavigator(UserRouteConfig,{activeTintColor:'#125000'});// Pass the RootNavigator down to the UserNavigator:constWrappedNavigator=({navigation})=><UserNavigatorscreenProps={{rootNavigation:navigation}}/>constRootRouteConfig={guest:{screen:GuestNavigator},user:{screen:WrappedNavigator},}exportdefaultStackNavigator(RootRouteConfig,{headerMode:'none'});
Discussion
Even though this is a lengthy example, it is a very common pattern and worth
exploring. You will notice that the UserNavigator is actually wrapped in a
higher order component, which passes the RootNavigator down as an additional
screenProp called rootNavigation. This parameter is critical for
passing successful login parameters down to the UserNavigator and enables
the ProfileScreen to trigger a logout, resetting the RootNavigator to a
default state.
See Also
React Navigation works very well with libraries like Redux and the ApolloClient for handling client/server interactions. The React Navigation Redux Integration guide provides a starting point. React Navigation isn’t the only navigation library available to React Native developers. React Native Navigation is a well-maintained alternative.
2.5 Using Redux for Global State Management in Redux
The moment you find yourself with more than one screen, state management
decisions will need to be made. Whether you decide to follow a flux-inspired
architecture like Redux or to implement your own global storage
with AsyncStorage, the question of how to keep the data that matters locally
decoupled from broader state management will enter the picture.
Problem
How do you manage state components without creating bidirectional dependencies? These problems are everywhere in application design. A common case is a long-running task that can be interrupted by a user, but also must announce its completion. Enter global state management with Redux. This example app will store a password based on four word-tiles. Once logged in, users will be able to set some secret text. This app enables a user to:
-
Set a tile-based password and log in (like a pin-pad)
-
Set some secret text
-
Log out
-
Log in with the password
-
Reset the application state
-
Correct their login attempt and retry
Solution
First we need a few libraries for Redux and React to work together. I also use
redux-logger in development mode to log all state transitions in the React
remote debugger.
Install react-redux, redux, and redux-logger (optional):
$>npm i --save react-redux$>npm i --save redux$>npm i --save redux-logger
The project folder structure looks like this:
App.js
reduxStore.js
...
src
├── actions.js
├── appContainer.js
├── components
│   ├── tile.js
│   └── tileMap.js
├── constants.js
├── loginForm.js
├── myHome.js
├── reducers.js
├── setPassword.js
├── styles.js
└── types.js
Note
See Recipe 1.3 for examples on organizing your project files. Given that this example focuses on Redux, I’ve tried to limit the number of files and folders. In a larger application, screen-based (e.g., home/, login/) or type (e.g., reducers/, actions/) folders are more appropriate.
The same TileMap component can be used to set a password, as in Figure 2-12.
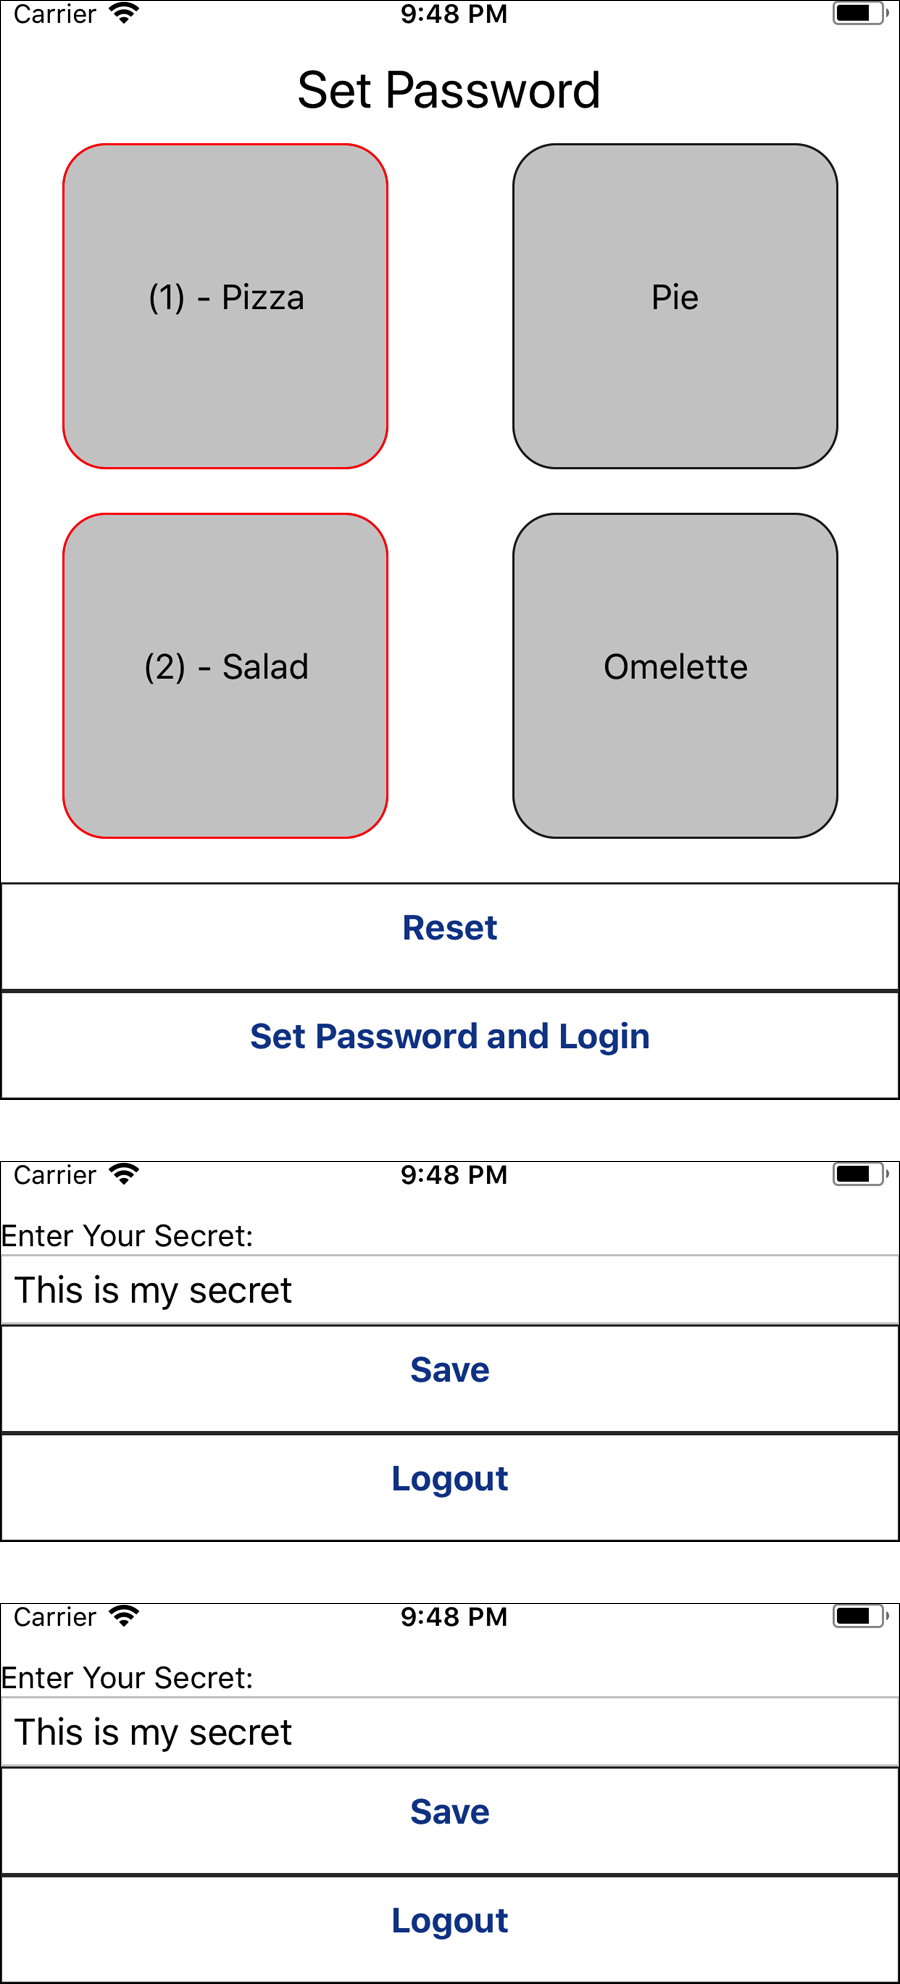
Figure 2-12. Users can access a secret message after setting a visual password by selecting a set of tiles
Redux integration
The App.js file is devoted entirely to the redux integration:
// App.jsimportReact,{Component}from'react';importAppContainerfrom'./src/appContainer';import{Provider}from'react-redux';importstorefrom'./reduxStore';exportdefaultclassAppextendsComponent<{}>{render(){return<Providerstore={store}><AppContainer/></Provider>}}
The store is defined in a separate file so that it can be referenced globally. This is not
commonly required, but in some exceptional circumstances (particularly when there is no remote
backend store), access to the state from actions can be necessary. The
redux-logger is configured as middleware in the store. This library is an optional
piece of additional functionality that will log all state and action changes to
the web browser debugger console:
// reduxStore.jsimport*asreducersfrom'./src/reducers'import{createStore,applyMiddleware,combineReducers,compose}from'redux';importloggerfrom'redux-logger';exportdefaultcreateStore(combineReducers(reducers),applyMiddleware(logger));
The AppContainer relies on the appState reducer to determine which screens to render:
// src/appContainer.jsimportActionCreatorsfrom'./actions';import{bindActionCreators}from'redux';import{connect}from'react-redux';importSetPasswordfrom'./setPassword';importLoginFormfrom'./loginForm';importMyHomefrom'./myHome';import{styles}from'./styles';classAppContainerextendsComponent{renderLoginMessage(){return<Textstyle={styles.loginMessage}>{this.props.appState.loginMessage}</Text>}render(){const{isLoggedIn,loginMessage,isPasswordSet}=this.props.appState;return<Viewstyle={styles.container}>{isLoggedIn&&<MyHome/>}{!isLoggedIn&&!isPasswordSet&&<SetPassword/>}{!isLoggedIn&&isPasswordSet&&<LoginForm/>}{loginMessage&&this.renderLoginMessage()}</View>}}exportdefaultconnect(({appState})=>{return{appState}},(dispatch)=>bindActionCreators(ActionCreators,dispatch))(AppContainer);
Actions and types
Redux applications naturally produce a listing of supported events that the application must support. There are a number of libraries that aim to reduce the amount of boilerplate, but in the interest of simplicity, I’ve decided to rely on the minimum number of external dependencies:
// src/types.jsexportconstLOGIN='LOGIN';exportconstLOGOUT='LOGOUT';exportconstRESET='RESET';exportconstSET_PASSWORD_AND_LOGIN='SET_PASSWORD_AND_LOGIN';exportconstSET_SECRET='SET_SECRET';exportconstSET_LOGIN_MESSAGE='SET_LOGIN_MESSAGE';
These actions are exposed to the entire application as ActionCreators, which can be used
to dispatch events that the reducers can choose to respond to. ActionCreators can
sometimes also handle some delegation to global business logic. Instead of relying on
a backend service for user authentication, I’ve referred to the store in order to
extract the user state and trigger the correct action. This example demonstrates how actions
don’t always map one-to-one with types and stores:
// src/actions.import*astypesfrom'./types';// Used for authenticationimportstorefrom'../reduxStore';functionsetSecret(secret){return{type:types.SET_SECRET,secret}}functionsetPasswordAndLogin(password){return{type:types.SET_PASSWORD_AND_LOGIN,password}}functionattemptLogin(password){const{user}=store.getState();return(user.password===password)?{type:types.LOGIN}:{type:types.SET_LOGIN_MESSAGE,loginMessage:"Login Incorrect"}}functionreset(){return{type:types.RESET,}}functionlogout(){return{type:types.LOGOUT,}}functionsetLoginMessage(message){return{type:types.SET_LOGIN_MESSAGE,message}}exportdefaultActionCreators={setSecret,setPasswordAndLogin,attemptLogin,reset,logout,setLoginMessage,}
Reducers
We will rely on a single store with two reducers, an appState and a user reducer. Unlike a more common TODO example, this example
demonstrates multiple reducers and how actions can be used for global state
management.
Both reducers are exported from src/reducers.js. A createReducer() function provides some
syntactic sugar for avoiding pure case statements in the reducer. Notice how the appState and
user reducers both respond to types.RESET and types.SET_PASSWORD_AND_LOGIN. Also consider
that the reducers do not determine whether the person should log in; they merely process the event
and return the appropriate state transformation to their part of the store:
// src/reducers.jsimport*astypesfrom'./types'// Helper function for avoiding switch() statements (commonly viewed// as a code smell) in reducers:functioncreateReducer(initialState,handlers){returnfunctionreducer(state=initialState,action){if(handlers.hasOwnProperty(action.type)){returnhandlers[action.type](state,action);}else{returnstate;}}}exportconstuser=createReducer({password:null,secret:null},{[types.RESET](state,{}){return{password:null,secret:null}},[types.SET_SECRET](state,{secret}){return{...state,secret}},[types.SET_PASSWORD_AND_LOGIN](state,{password}){return{...state,password};},});constinitialAppState={loginMessage:null,isLoggedIn:false,isPasswordSet:false};exportconstappState=createReducer(initialAppState,{[types.LOGOUT](state,{}){return{...state,isLoggedIn:false}},[types.LOGIN](state,{}){return{...state,isLoggedIn:true,loginMessage:null}},[types.SET_LOGIN_MESSAGE](state,{loginMessage}){return{...state,loginMessage}},[types.RESET](state,{}){return{...initialAppState};},[types.SET_PASSWORD_AND_LOGIN](state,{}){return{isLoggedIn:true,isPasswordSet:true,loginMessage:null}},});
Styles and constants
Most of the application styles have been centralized into a global src/styles.js file:
// src/styles.jsimport{StyleSheet}from'react-native';exportconststyles=StyleSheet.create({loginMessage:{margin:10,fontSize:16,padding:10},rootContainer:{flex:1,paddingTop:30,backgroundColor:'#FFF',},buttonGroup:{marginTop:10,},container:{paddingTop:30,flex:1},title:{fontSize:24,lineHeight:30,textAlign:'center',},tileRow:{flexWrap:'wrap',flexDirection:'row',justifyContent:'space-around',},button:{borderWidth:1,borderColor:'#333',borderStyle:'solid',height:50,},buttonText:{color:'#144595',fontWeight:'bold',fontSize:16,padding:10,textAlign:'center',},});
The src/constants.js file provides a central list of TILES that will be used for rendering the
<TileMap /> component, whether for setting a password or for logging in:
// src/constants.jsexportconstTILES={'Pizza':{text:'Pizza',value:'pizza',index:null,isActive:false},'Pie':{text:'Pie',value:'pie',index:null,isActive:false},'Salad':{text:'Salad',value:'salad',index:null,isActive:false},'Omelette':{text:'Omelette',value:'omelette',index:null,isActive:false},}
The Tile and TileMap components
The src/components/ folder contains a few components that were designed to function without any
knowledge of Redux. The <Tile /> component is a pure function that simply returns a JSX
transformation of the tile props:
// src/components/tile.jsimportReact,{Component}from'react';import{StyleSheet,TouchableHighlight,Text}from'react-native'exportdefaultfunctionTile({text,id,isActive,onPress}){constactiveStyle=isActive?{borderColor:'#F00'}:null;return<TouchableHighlightstyle={[styles.tile,activeStyle]}onPress={()=>onPress(id)}><Textstyle={styles.tileText}>{text}</Text></TouchableHighlight>}conststyles=StyleSheet.create({container:{flex:1,paddingTop:30,backgroundColor:'#FFF',},headerText:{color:'#144595',fontSize:16,fontWeight:'bold',textAlign:'center',},header:{borderBottomWidth:1,borderBottomColor:'#222',borderStyle:'solid',},tileText:{fontSize:16,textAlign:'center',marginTop:60,},tile:{width:150,height:150,alignItems:'center',backgroundColor:'#CCC',borderRadius:20,borderColor:'#222',borderWidth:1,borderStyle:'solid',margin:10,}})
The <TileMap /> component renders a collection of <Tile /> components and
orchestrates their state and tap events.
Each <Tile /> provides an onTileChange handler that returns a password
as a string. <Tile /> will render anything in this.props.children that the parent component
may want to include, such as special buttons.
Here’s an implementation of the <TileMap />:
// src/components/tileMap.jsimportReact,{Component}from'react';import{View,TouchableHighlight,Text}from'react-native';importTilefrom'./tile';import{TILES}from'../constants';import{styles}from'../styles';functioncomputePassword(tiles){letpassword=[]Object.keys(tiles).forEach((key)=>{consttile=tiles[key];if(tile.isActive){password[tile.index]=tile.value;}});// chop off the 0returnpassword.slice(1).join('-');}exportdefaultclassTileMapextendsComponent<{}>{constructor(props){super(props);this.state={tiles:{...TILES},index:0}}reset=()=>{this.setState({tiles:{...TILES},index:0});this.props.onTileChanged(computePassword(this.state.tiles));}setPassword=()=>{this.props.setPasswordAndLogin(this.state.tiles);}tilePressed=(id)=>{if(this.state.tiles[id].isActive){return;}this.setState((prevState)=>{consttiles=prevState.tiles;constnewIndex=prevState.index+1;constcurrentTile=tiles[id];tiles[id]={...currentTile,index:newIndex,text:`(${newIndex}) -${currentTile.text}`,isActive:true}return{...tiles,index:newIndex}});this.props.onTileChanged(computePassword(this.state.tiles));}render(){return<View><Viewstyle={styles.tileRow}>{Object.keys(this.state.tiles).map((key)=>{consttile=this.state.tiles[key];return<Tile{...tile}id={key}key={key}onPress={this.tilePressed}/>})}</View><Viewstyle={styles.buttonGroup}><TouchableHighlightstyle={styles.button}onPress={this.reset}><Textstyle={styles.buttonText}>Reset</Text></TouchableHighlight>{this.props.children}</View></View>}}
Application screens
Now that we have all the components and their Redux dependencies, we can look at the screens
that trigger state changes. These screens are considered presentational components, meaning
that they trigger actions and are accepting props from the store. These components
are imported from <AppContainer />.
The first screen the user sees is the <SetPassword /> screen. Notice that the <TileMap /> is
used and the this.state.password value is sent as a message to the setPasswordAndLogin()
action creator:
// src/setPassword.jsimportReact,{Component}from'react';import{View,TouchableHighlight,Text}from'react-native'importActionCreatorsfrom'./actions'import{bindActionCreators}from'redux'import{connect}from'react-redux'importTileMapfrom'./components/tileMap'import{styles}from'./styles'classSetPasswordextendsComponent<{}>{constructor(props){super(props);this.state={password:null}}onTileChanged=(password)=>{this.setState({password});}setPassword=()=>{this.props.setPasswordAndLogin(this.state.password);}render(){return<View><Textstyle={styles.title}>SetPassword</Text><TileMaponTileChanged={this.onTileChanged}><TouchableHighlightstyle={styles.button}onPress={this.setPassword}><Textstyle={styles.buttonText}>SetPasswordandLogin</Text></TouchableHighlight></TileMap></View>}}exportdefaultconnect(({user})=>{return{user}},(dispatch)=>bindActionCreators(ActionCreators,dispatch))(SetPassword);
When a user isLoggedIn, the <MyHome /> component is rendered. This may appear to be a
contrived example, but it demonstrates the difference between local and global state. The
user reducer is maintaining the secret, but only after setSecret() is called, triggering
a state transformation in the user reducer. Notice that the component does not know what
logout() does; it merely sends the message and relies on the appState reducer:
// src/myHome.jsimportReact,{Component}from'react';import{TextInput,TouchableHighlight,View,Text}from'react-native';import{bindActionCreators}from'redux';import{connect}from'react-redux';importTilefrom'./components/tile';import{TILES}from'./constants';import{styles}from'./styles';classMyHomeextendsComponent<{}>{constructor(props){super(props);this.state={secret:props.user.secret||''}}saveSecret=()=>{this.props.setSecret(this.state.secret);}logout=()=>{this.props.logout();}render(){return<View><Text>EnterYourSecret:</Text><TextInputvalue={this.state.secret}style={{borderWidth:1,borderColor:"#CCC",padding:5,}}onChangeText={(secret)=>{this.setState({secret})}}/><TouchableHighlightstyle={styles.button}onPress={this.saveSecret}><Textstyle={styles.buttonText}>Save</Text></TouchableHighlight><TouchableHighlightstyle={styles.button}onPress={this.logout}><Textstyle={styles.buttonText}>Logout</Text></TouchableHighlight></View>}}exportdefaultconnect(({user})=>({user}),(dispatch)=>bindActionCreators(ActionCreators,dispatch))(MyHome);
The <LoginForm /> component is almost identical to the <SetPassword /> component in structure,
but it maps components to a different set of action creators for handling account reset and
user login. This is an example of repurposing the <TileMap /> component for a completely different
use case:
importReact,{Component}from'react';import{View,TouchableHighlight,Text}from'react-native';importActionCreatorsfrom'./actions';import{bindActionCreators}from'redux';import{connect}from'react-redux';importTileMapfrom'./components/tileMap';import{styles}from'./styles';classLoginFormextendsComponent<{}>{constructor(props){super(props);this.state={password:null}}onTileChanged=(password)=>{this.setState({password});}resetAccount=()=>{this.props.reset();}login=()=>{this.props.attemptLogin(this.state.password);}render(){return<View><Textstyle={styles.title}>Login</Text><TileMaponTileChanged={this.onTileChanged}><TouchableHighlightstyle={styles.button}onPress={this.login}><Textstyle={styles.buttonText}>Login</Text></TouchableHighlight><TouchableHighlightstyle={styles.button}onPress={this.resetAccount}><Textstyle={styles.buttonText}>ResetAccount</Text></TouchableHighlight></TileMap></View>}}exportdefaultconnect(({user})=>({user}),(dispatch)=>bindActionCreators(ActionCreators,dispatch))(LoginForm);
Discussion
Redux can be intimidating if you are new to JavaScript. This is because the library is simple, but not simplistic: the programming concepts are profound and require some experience to grasp, but there are few of them and they elegantly support one another. It’s helpful to think of Redux as a software design pattern and a JavaScript library at the same time. Adopting one without the other will leave a sour taste in your mouth.
Even if you decide to use another state management library, you will probably
face a library, like react-navigation, with Redux under the hood. Understanding
the programmer attitudes around mutable state, pure functions, composition, and higher order
functions will bring state management in the React ecosystem into focus.
I would not be able to do justice to the fantastic Redux documentation and the incredible wealth of free video tutorials (including some of my own on YouTube). However, there are three principles worth keeping in mind as we implement Redux in our app:
Single source of truth: The state of your whole application is stored in an object tree within a single store. … State is read-only: The only way to change the state is to emit an action, an object describing what happened. … Changes are made with pure functions: To specify how the state tree is transformed by actions, you write pure reducers.
redux.js.org, Three Principles