Table of Contents for
Kubernetes: Up and Running
 Kubernetes: Up and Running
Published by
O'Reilly Media, Inc., 2017
Kubernetes: Up and Running
Published by
O'Reilly Media, Inc., 2017
- nav
- Cover
- Kubernetes: Up and Running
- Kubernetes: Up and Running
- section
- Preface
- 1. Introduction
- 2. Creating and Running Containers
- 3. Deploying a Kubernetes Cluster
- 4. Common kubectl Commands
- 5. Pods
- 6. Labels and Annotations
- 7. Service Discovery
- 8. ReplicaSets
- 9. DaemonSets
- 10. Jobs
- 11. ConfigMaps and Secrets
- 12. Deployments
- 13. Integrating Storage Solutions and Kubernetes
- 14. Deploying Real-World Applications
- A. Building a Raspberry Pi Kubernetes Cluster
- Index
- About the Authors
- Colophon
Chapter 12. Deployments
So far, you have seen how to package your application as a container, create a replicated set of these containers, and use services to load-balance traffic to your service. All of these objects are used to build a single instance of your application. They do little to help you manage the daily or weekly cadence of releasing new versions of your application. Indeed, both Pods and ReplicaSets are expected to be tied to specific container images that don’t change.
The Deployment object exists to manage the release of new versions. Deployments represent deployed applications in a way that transcends any particular software version of the application. Additionally, Deployments enable you to easily move from one version of your code to the next version of your code. This “rollout” process is configurable and careful. It waits for a user-configurable amount of time between upgrading individual Pods. It also uses health checks to ensure that the
new version of the application is operating correctly, and stops the deployment if too many failures occur.
Using Deployments you can simply and reliably roll out new software versions without downtime or errors. The actual mechanics of the software rollout performed by a Deployment is controlled by a Deployment controller that runs in the Kubernetes cluster itself. This means you can let a Deployment proceed unattended and it will still operate correctly and safely. This makes it easy to integrate Deployments with numerous continuous delivery tools and services. Further, running server-side makes it safe to perform a rollout from places with poor or intermittent internet connectivity. Imagine rolling out a new version of your software from your phone while riding on the subway. Deployments make this possible and safe!
Note
When Kubernetes was first released, one of the most popular demonstrations of its power was the “rolling update,” which showed how you could use a single command to seamlessly update a running application without taking any downtime or losing requests. This original demo was based on the kubectl rolling-update command, which is still available in the command-line tool, but its functionality has largely been subsumed by the Deployment object.
Your First Deployment
At the beginning of this book, you created a Pod by running kubectl run. It was something similar to:
$ kubectl run nginx --image=nginx:1.7.12
Under the hood, this was actually creating a Deployment object.
You can view this Deployment object by running:
$ kubectl get deployments nginx
NAME    DESIRED   CURRENT   UP-TO-DATE   AVAILABLE   AGE
nginx   1         1         1            1           13s
Deployment Internals
Let’s explore how Deployments actually work. Just as we learned that ReplicaSets manage Pods, Deployments manage ReplicaSets. As with
all relationships in Kubernetes, this relationship is defined by labels
and a label selector. You can see the label selector by looking at the
Deployment object:
$ kubectl get deployments nginx \
  -o jsonpath --template {.spec.selector.matchLabels}

map[run:nginx]
From this you can see that the Deployment is managing a ReplicaSet with
the labels run=nginx. We can use this in a label selector query across
ReplicaSets to find that specific ReplicaSet:
$ kubectl get replicasets --selector=run=nginx

NAME              DESIRED   CURRENT   READY     AGE
nginx-1128242161  1         1         1         13m
Now let’s see the relationship between a Deployment and a ReplicaSet in
action. We can resize the Deployment using the imperative scale command:
$ kubectl scale deployments nginx --replicas=2

deployment "nginx" scaled
Now if we list that ReplicaSet again, we should see:
$ kubectl get replicasets --selector=run=nginx

NAME              DESIRED   CURRENT   READY     AGE
nginx-1128242161  2         2         2         13m
Scaling the Deployment has also scaled the ReplicaSet it controls.
Now let’s try the opposite, scaling the ReplicaSet:
$ kubectl scale replicasets nginx-1128242161 --replicas=1

replicaset "nginx-1128242161" scaled
Now get that ReplicaSet again:
$ kubectl get replicasets --selector=run=nginx

NAME              DESIRED   CURRENT   READY     AGE
nginx-1128242161  2         2         2         13m
That’s odd. Despite our scaling the ReplicaSet to one replica, it still has two replicas as its desired state. What’s going on? Remember, Kubernetes is an online, self-healing system. The top-level Deployment object is managing this ReplicaSet. When you adjust the number of replicas to one, it no longer matches the desired state of the Deployment, which has replicas set to 2. The Deployment controller notices this and takes action to ensure the observed state matches the desired state, in this case readjusting the number of replicas back to two.
If you ever want to manage that ReplicaSet directly, you need to delete the Deployment (remember to set --cascade to false, or else it will delete the ReplicaSet and Pods as well!).
Creating Deployments
Of course, as has been stated elsewhere, you should have a preference for declarative management of your Kubernetes configurations. This means maintaining the state of your deployments in YAML or JSON files on disk.
As a starting point, download this Deployment into a YAML file:
$ kubectl get deployments nginx --export -o yaml > nginx-deployment.yaml
$ kubectl replace -f nginx-deployment.yaml --save-config
If you look in the file, you will see something like this:
apiVersion: extensions/v1beta1
kind: Deployment
metadata:
  annotations:
    deployment.kubernetes.io/revision: "1"
  labels:
    run: nginx
  name: nginx
  namespace: default
spec:
  replicas: 2
  selector:
    matchLabels:
      run: nginx
  strategy:
    rollingUpdate:
      maxSurge: 1
      maxUnavailable: 1
    type: RollingUpdate
  template:
    metadata:
      labels:
        run: nginx
    spec:
      containers:
      - image: nginx:1.7.12
        imagePullPolicy: Always
      dnsPolicy: ClusterFirst
      restartPolicy: Always
Note
A lot of read-only and default fields were removed in the preceding listing for brevity. We also need to run kubectl replace --save-config. This adds an annotation so that, when applying changes in the future, kubectl will know what the last applied configuration was for smarter merging of configs. If you always use kubectl apply, this step is only required after the first time you create a Deployment using kubectl create -f.
The Deployment spec has a very similar structure to the
ReplicaSet spec. There is a Pod template, which contains a number of containers that are created for each replica managed by the Deployment. In addition to the Pod specification, there is also a strategy object:
...
  strategy:
    rollingUpdate:
      maxSurge: 1
      maxUnavailable: 1
    type: RollingUpdate
...
The strategy object dictates the different ways in which a rollout of
new software can proceed. There are two different strategies supported by Deployments: Recreate and RollingUpdate.
Managing Deployments
As with all Kubernetes objects, you can get detailed information about
your Deployment via the kubectl describe command:
$ kubectl describe deployments nginx

Name:                   nginx
Namespace:              default
CreationTimestamp:      Sat, 31 Dec 2016 09:53:32 -0800
Labels:                 run=nginx
Selector:               run=nginx
Replicas:               2 updated | 2 total | 2 available | 0 unavailable
StrategyType:           RollingUpdate
MinReadySeconds:        0
RollingUpdateStrategy:  1 max unavailable, 1 max surge
OldReplicaSets:         <none>
NewReplicaSet:          nginx-1128242161 (2/2 replicas created)
Events:
  FirstSeen   ...   Message
  ---------   ...   -------
  5m          ...   Scaled up replica set nginx-1128242161 to 1
  4m          ...   Scaled up replica set nginx-1128242161 to 2
In the output of describe there is a great deal of important
information.
Two of the most important pieces of information in the output are OldReplicaSets and NewReplicaSet. These fields point to the ReplicaSet objects this Deployment is currently managing. If a Deployment is in the middle of a rollout, both fields will be set to a value. If a rollout is complete, OldReplicaSets will be set to <none>.
In addition to the describe command, there is also
the kubectl rollout command for deployments. We will go into this command in more detail later on, but for now, you can use kubectl rollout history to obtain the history of rollouts associated with a particular Deployment. If you have a current Deployment in progress, then you can use kubectl rollout status to obtain the current status of a rollout.
Updating Deployments
Deployments are declarative objects that describe a deployed application. The two most common operations on a Deployment are scaling and application updates.
Scaling a Deployment
Although we previously showed how you could imperatively scale a Deployment using the kubectl scale command, the best practice is to manage your Deployments declaratively via the YAML files, and then use those files to update your Deployment. To scale up a Deployment, you would edit your YAML file to increase the number of replicas:
...
spec:
  replicas: 3
...
Once you have saved and committed this change, you can update the Deployment using the kubectl apply command:
$ kubectl apply -f nginx-deployment.yaml
This will update the desired state of the Deployment, causing it to increase the size of the ReplicaSet it manages, and eventually create a new Pod managed by the Deployment:
$ kubectl get deployments nginx

NAME      DESIRED   CURRENT   UP-TO-DATE   AVAILABLE   AGE
nginx     3         3         3            3           4m
Updating a Container Image
The other common use case for updating a Deployment is to roll out a new version of the software running in one or more containers. To do this, you should likewise edit the deployment YAML file, though in this case you are updating the container image, rather than the number of replicas:
...
      containers:
      - image: nginx:1.9.10
        imagePullPolicy: Always
...
We are also going to put an annotation in the template for the Deployment to record some information about the update:
...
spec:
  ...
  template:
    metadata:
      annotations:
        kubernetes.io/change-cause: "Update nginx to 1.9.10"
...
Caution
Make sure you add this annotation to the template and not the Deployment itself, since kubectl apply ... uses this field in the Deployment object. Also, do not update the change-cause annotation when doing simple scaling operations. A modification of change-cause is a significant change to the template and will trigger a new rollout.
Again, you can use kubectl apply to update the Deployment:
$ kubectl apply -f nginx-deployment.yaml
After you update the Deployment it will trigger a rollout, which you can then monitor via
the kubectl rollout command:
$ kubectl rollout status deployments nginx
deployment nginx successfully rolled out
You can see the old and new ReplicaSets managed by the deployment along with the images being used. Both the old and new ReplicaSets are kept around in case you want to roll back:
$ kubectl get replicasets -o wide

NAME               DESIRED   CURRENT   READY   ...   IMAGE(S)       ...
nginx-1128242161   0         0         0       ...   nginx:1.7.12   ...
nginx-1128635377   3         3         3       ...   nginx:1.9.10   ...
If you are in the middle of a rollout and you want to temporarily pause it for some reason (e.g., if you start seeing weird behavior in your
system and you want to investigate), you can use
the pause command:
$ kubectl rollout pause deployments nginx
deployment "nginx" paused
If, after investigation, you believe the rollout can safely proceed,
you can use
the resume command to start up where you left off:
$ kubectl rollout resume deployments nginx
deployment "nginx" resumed
Rollout History
Kubernetes Deployments maintain a history of rollouts, which can be useful both for understanding the previous state of the Deployment and to roll back to a specific version.
You can see the deployment history by running:
$ kubectl rollout history deployment nginx

deployments "nginx"
REVISION        CHANGE-CAUSE
1               <none>
2               Update nginx to 1.9.10
The revision history is given in oldest to newest order. A unique revision number is incremented for each new rollout. So far we have two: the initial deployment, the update of the image to nginx:1.9.10.
If you are interested in more details about a particular revision,
you can add the --revision flag to view details about that specific revision:
$ kubectl rollout history deployment nginx --revision=2

deployments "nginx" with revision #2
  Labels:       pod-template-hash=2738859366
        run=nginx
  Annotations:  kubernetes.io/change-cause=Update nginx to 1.9.10
  Containers:
   nginx:
    Image:      nginx:1.9.10
    Port:
    Volume Mounts:      <none>
    Environment Variables:      <none>
  No volumes.
Let’s do one more update for this example. Update the nginx version to 1.10.2 by modifying the container version number and updating the change-cause
annotation. Apply it with kubectl apply. Our history should now have three entries:
$ kubectl rollout history deployment nginx

deployments "nginx"
REVISION        CHANGE-CAUSE
1               <none>
2               Update nginx to 1.9.10
3               Update nginx to 1.10.2
Let’s say there is an issue with the latest release and you want to roll back while you investigate. You can simply undo the last rollout:
$ kubectl rollout undo deployments nginx
deployment "nginx" rolled back
The undo command works regardless of the stage of the rollout. You can undo both partially completed and fully completed rollouts. An undo of a rollout is actually simply a rollout in reverse (e.g., from v2 to v1, instead of from v1 to v2), and all of the same policies that control the rollout strategy apply to the undo strategy as well. You can see the Deployment object simply adjusts the desired replica counts in the managed ReplicaSets:
$ kubectl get replicasets -o wide

NAME               DESIRED   CURRENT   READY   ...   IMAGE(S)       ...
nginx-1128242161   0         0         0       ...   nginx:1.7.12   ...
nginx-1570155864   0         0         0       ...   nginx:1.10.2   ...
nginx-2738859366   3         3         3       ...   nginx:1.9.10   ...
Caution
When using declarative files to control your production systems, you want to, as much as possible, ensure that the checked-in manifests match what is actually running in your cluster. When you do a kubectl rollout undo you are updating the production state in a way that isn’t reflected in your source control.
An alternate (and perhaps preferred) way to undo a rollout is to revert your YAML file and kubectl apply the previous version. In this way your “change tracked configuration” more closely tracks what is really running in your cluster.
Let’s look at our deployment history again:
$ kubectl rollout history deployment nginx

REVISION        CHANGE-CAUSE
1               <none>
3               Update nginx to 1.10.2
4               Update nginx to 1.9.10
Revision 2 is missing! It turns out that when you roll back to a previous revision, the Deployment simply reuses the template and renumbers it so that it is the latest revision. What was revision 2 before is now reordered into revision 4.
We previously saw that you can use the kubectl rollout undo command to
roll back to a previous version of a deployment. Additionally, you can roll back to a specific revision in the history using the --to-revision flag:
$ kubectl rollout undo deployments nginx --to-revision=3
deployment "nginx" rolled back
$ kubectl rollout history deployment nginx
deployments "nginx"
REVISION        CHANGE-CAUSE
1               <none>
4               Update nginx to 1.9.10
5               Update nginx to 1.10.2
Again, the undo took revision 3, applied it, and renumbered it as revision 5.
Specifying a revision of 0 is a shorthand way of specifying the previous revision. In this way, kubectl rollout undo is equivalent to kubectl rollout undo --to-revision=0.
By default, the complete revision history of a Deployment is kept attached to the Deployment object itself. Over time (e.g., years) this history can grow fairly large, so it is recommended that if you have Deployments that you expect to keep around for a long time you set a maximum history size for the Deployment revision history, to limit the total size of the Deployment object. For example, if you do a daily update you may limit your revision history to 14, to keep a maximum of 2 weeks’ worth of revisions (if you don’t expect to need to roll back beyond 2 weeks).
To accomplish this, use the revisionHistoryLimit property in the Deployment
specification:
...
spec:
  # We do daily rollouts, limit the revision history to two weeks of
  # releases as we don't expect to roll back beyond that.
  revisionHistoryLimit: 14
...
Deployment Strategies
When it comes time to change the version of software implementing your service, a Kubernetes Deployment supports two different rollout strategies:
-
Recreate -
RollingUpdate
Recreate Strategy
The recreate strategy is the simpler of the two rollout strategies. It simply updates the ReplicaSet it manages to use the new image and terminates all of the Pods associated with the Deployment. The ReplicaSet notices that it no longer has any replicas, and re-creates all Pods using the new image. Once the Pods are re-created, they are running the new version.
While this strategy is fast and simple, it has one major drawback—it is potentially catastrophic, and will almost certainly result in some site downtime. Because of this, the recreate strategy should only be used for test deployments where a service is not user-facing and a small amount of downtime is acceptable.
RollingUpdate Strategy
The RollingUpdate strategy is the generally preferable strategy for any user-facing service. While it is slower than Recreate, it is also significantly more sophisticated and robust. Using RollingUpdate, you can roll out a new version of your service while it is still receiving user traffic, without any downtime.
As you might infer from the name, the rolling update strategy works by updating a few Pods at a time, moving incrementally until all of the Pods are running the new version of your software.
Managing multiple versions of your service
Importantly, this means that for a period of time, both the new and the old version of your service will be receiving requests and serving traffic. This has important implications for how you build your software. Namely, it is critically important that each version of your software, and all of its clients, is capable of talking interchangeably with both a slightly older and a slightly newer version of your software.
As an example of why this is important, consider the following scenario:
You are in the middle of rolling out your frontend software; half of your servers are running version 1 and half are running version 2. A user makes an initial request to your service and downloads a client-side JavaScript library that implements your UI. This request is serviced by a version 1 server and thus the user receives the version 1 client library. This client library runs in the user’s browser and makes subsequent API requests to your service. These API requests happen to be routed to a version 2 server; thus, version 1 of your JavaScript client library is talking to version 2 of your API server. If you haven’t ensured compatibility between these versions, your application won’t function correctly.
At first, this might seem like an extra burden. But in truth, you always had this problem; you may just not have noticed. Concretely, a user can make a request at time t just before you initiate an update. This request is serviced by a version 1 server. At t_1 you update your service to version 2. At t_2 the version 1 client code running on the user’s browser runs and hits an API endpoint being operated by a version 2 server. No matter how you update your software, you have to maintain backward and forward compatibility for reliable updates. The nature of the rolling update strategy simply makes it more clear and explicit that this is something to think about.
Note that this doesn’t just apply to JavaScript clients—the same thing is true of client libraries that are compiled into other services that make calls to your service. Just because you updated doesn’t mean they have updated their client libraries. This sort of backward compatibility is critical to decoupling your service from systems that depend on your service. If you don’t formalize your APIs and decouple yourself, you are forced to carefully manage your rollouts with all of the other systems that call into your service. This kind of tight coupling makes it extremely hard to produce the necessary agility to be able to push out new software every week, let alone every hour or every day. In the de-coupled architecture shown in Figure 12-1, the frontend is isolated from the backend via an API contract and a load balancer, whereas in the coupled architecture, a thick client compiled into the frontend is used to connect directly to the backends.
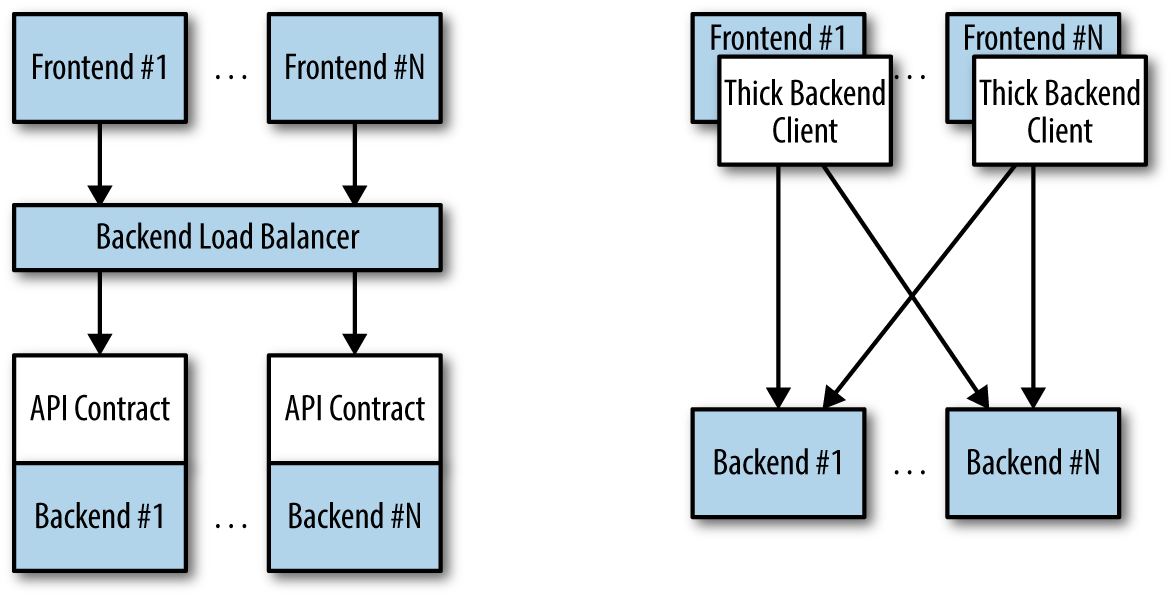
Figure 12-1. Diagrams of both de-coupled (left) and couple (right) application architectures
Configuring a rolling update
RollingUpdate is a fairly generic strategy; it can be used to update
a variety of applications in a variety of settings. Consequently, the
rolling update itself is quite configurable; you can tune its behavior
to suit your particular needs. There are two parameters you
can use to tune the rolling update behavior: maxUnavailable and maxSurge.
The maxUnavailable parameter sets the maximum number of Pods that
can be unavailable during a rolling update. It can either be set to
an absolute number (e.g., 3 meaning a maximum of three Pods can be
unavailable) or to a percentage (e.g., 20% meaning a
maximum of 20% of the desired number of replicas can be unavailable).
Generally speaking, using a percentage is a good approach for most services, since the value is correctly applicable regardless of the desired number of replicas in the Deployment. However, there are times when you may want to use an absolute number (e.g., limiting the maximum unavailable pods to one).
At its core, the maxUnavailable parameter helps tune how quickly a
rolling update proceeds. For example, if you set maxUnavailable to
50%, then the rolling update will immediately scale the old ReplicaSet
down to 50% of its original size. If you have four replicas, it will
scale it down to two replicas. The rolling update will then replace
the removed pods by scaling the new ReplicaSet up to two replicas, for
a total of four replicas (two old, two new). It will then scale
the old ReplicaSet down to zero replicas, for a total size of two new
replicas. Finally, it will scale the new ReplicaSet up to four
replicas, completing the rollout. Thus, with maxUnavailable set
to 50%, our rollout completes in four steps, but with
only 50% of our service capacity at times.
Consider instead what happens if we set maxUnavailable to 25%. In
this situation, each step is only performed with a single replica
at a time and thus it takes twice as many steps for the rollout to
complete, but availability only drops to a minimum of 75% during the
rollout. This illustrates how maxUnavailable allows us to trade
rollout speed for availability.
Note
The observant among you will note that the recreate strategy is
actually identical to the rolling update strategy with maxUnavailable
set to 100%.
Using reduced capacity to achieve a successful rollout is useful either when your service has cyclical traffic patterns (e.g., much less traffic at night) or when you have limited resources, so scaling to larger than the current maximum number of replicas isn’t possible.
However, there are situations where you don’t want to fall below
100% capacity, but you are willing to temporarily use additional
resources in order to perform a rollout. In these situations, you
can set the maxUnavailable parameter to 0%, and instead control
the rollout using the maxSurge parameter. Like maxUnavailable,
maxSurge can be specified either as a specific number or a percentage.
The maxSurge parameter controls how many extra resources can be
created to achieve a rollout. To illustrate how this works, imagine
we have a service with 10 replicas. We set maxUnavailable to 0
and maxSurge to 20%. The first thing the rollout will do is
scale the new ReplicaSet up to 2 replicas, for a total of 12 (120%) in the service. It will then scale the old ReplicaSet down
to 8 replicas, for a total of 10 (8 old, 2 new) in the service. This process proceeds until the rollout is complete. At any time, the capacity of the service is guaranteed to be at least 100% and
the maximum extra resources used for the rollout are limited to an
additional 20% of all resources.
Slowing Rollouts to Ensure Service Health
The purpose of a staged rollout is to ensure that the rollout results in a healthy, stable service running the new software version. To do this, the Deployment controller always waits until a Pod reports that it is ready before moving on to updating the next Pod.
Warning
The Deployment controller examines the Pod’s status as determined by its readiness checks. Readiness checks are part of the Pod’s health probes, and they are described in detail in Chapter 5. If you want to use Deployments to reliably roll out your software, you have to specify readiness health checks for the containers in your Pod. Without these checks the Deployment controller is running blind.
Sometimes, however, simply noticing that a Pod has become ready doesn’t give you sufficient confidence that the Pod actually is behaving correctly. Some error conditions only occur after a period of time. For example, you could have a serious memory leak that still takes a few minutes to show up, or you could have a bug that is only triggered by 1% of all requests. In most real-world scenarios, you want to wait a period of time to have high confidence that the new version is operating correctly before you move on to updating the next Pod.
For deployments, this time to wait is defined by the minReadySeconds
parameter:
...
spec:
  minReadySeconds: 60
...
Setting minReadySeconds to 60 indicates that the Deployment must
wait for 60 seconds after seeing a Pod become healthy before
moving on to updating the next Pod.
In addition to waiting a period of time for a Pod to become healthy, you also want to set a timeout that limits how long the system will wait. Suppose, for example, the new version of your service has a bug and immediately deadlocks. It will never become ready, and in the absence of a timeout, the Deployment controller will stall your roll-out forever.
The correct behavior in such a situation is to time out the rollout. This in turn marks the rollout as failed. This failure status can be used to trigger alerting that can indicate to an operator that there is a problem with the rollout.
Note
At first blush, timing out a rollout might seem like a unnecessary complication. However, increasingly, things like rollouts are being triggered by fully automated systems with little to no human involvement. In such a situation, timing out becomes a critical exception, which can either trigger an automated rollback of the release or create a ticket/event that triggers human intervention.
To set the timeout period, the Deployment parameter progressDeadlineSeconds is used:
...
spec:
  progressDeadlineSeconds: 600
...
This example sets the progress deadline to 10 minutes. If any particular stage in the rollout fails to progress in 10 minutes, then the Deployment is marked as failed, and all attempts to move the Deployment forward are halted.
It is important to note that this timeout is given in terms of Deployment progress, not the overall length of a Deployment. In this context progress is defined as any time the deployment creates or deletes a Pod. When that happens, the timeout clock is reset to zero. Figure 12-2 is an illustration of the deployment lifecycle.
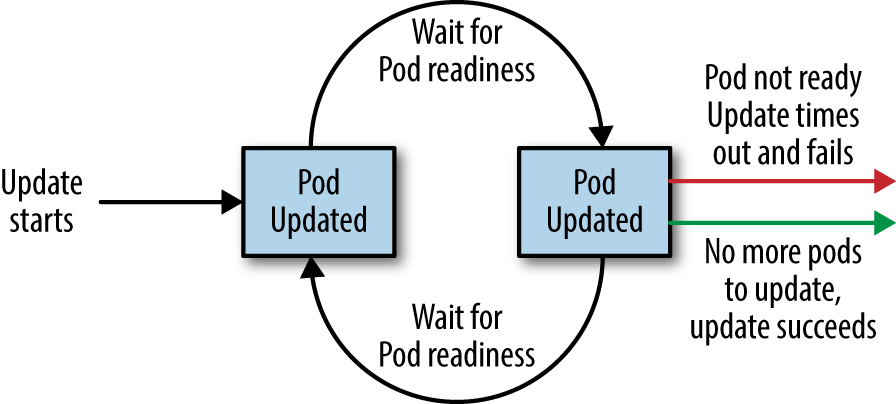
Figure 12-2. The Kubernetes Deployment lifecycle
Deleting a Deployment
If you ever want to delete a deployment, you can do it either with the imperative command:
$ kubectl delete deployments nginx
or using the declarative YAML file we created earlier:
$ kubectl delete -f nginx-deployment.yaml
In either case, by default, deleting a Deployment deletes the entire
service. It will delete not just the Deployment,
but also any ReplicaSets being managed by the Deployment, as well as
any Pods being managed by the ReplicaSets. As with ReplicaSets, if
this is not the desired behavior, you can use the --cascade=false
flag to exclusively delete the Deployment object.
Summary
At the end of the day, the primary goal of Kubernetes is to make it easy for you to build and deploy reliable distributed systems. This means not just instantiating the application once, but managing the regularly scheduled rollout of new versions of that software service. Deployments are a critical piece of reliable rollouts and rollout management for your services.