Table of Contents for
Kubernetes: Up and Running
 Kubernetes: Up and Running
Published by
O'Reilly Media, Inc., 2017
Kubernetes: Up and Running
Published by
O'Reilly Media, Inc., 2017
- nav
- Cover
- Kubernetes: Up and Running
- Kubernetes: Up and Running
- section
- Preface
- 1. Introduction
- 2. Creating and Running Containers
- 3. Deploying a Kubernetes Cluster
- 4. Common kubectl Commands
- 5. Pods
- 6. Labels and Annotations
- 7. Service Discovery
- 8. ReplicaSets
- 9. DaemonSets
- 10. Jobs
- 11. ConfigMaps and Secrets
- 12. Deployments
- 13. Integrating Storage Solutions and Kubernetes
- 14. Deploying Real-World Applications
- A. Building a Raspberry Pi Kubernetes Cluster
- Index
- About the Authors
- Colophon
Chapter 5. Pods
In earlier chapters we discussed how you might go about containerizing your application, but in real-world deployments of containerized applications you will often want to colocate multiple applications into a single atomic unit, scheduled onto a single machine.
A canonical example of such a deployment is illustrated in Figure 5-1, which consists of a container serving web requests and a container synchronizing the filesystem with a remote Git repository.
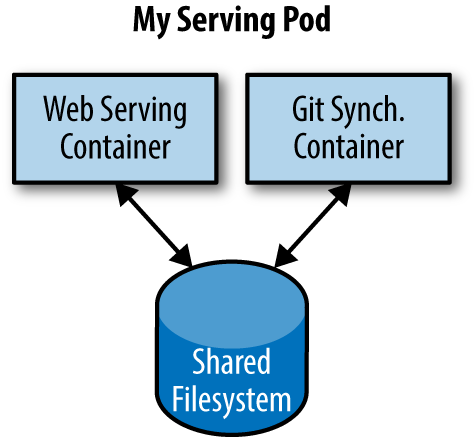
Figure 5-1. An example Pod with two containers and a shared filesystem
At first, it might seem tempting to wrap up both the web server and the Git synchronizer into a single container. After closer inspection, however, the reasons for the separation become clear. First, the two different containers have significantly different requirements in terms of resource usage. Take, for example, memory. Because the web server is serving user requests, we want to ensure that it is always available and responsive. On the other hand, the Git synchronizer isn’t really user-facing and has a “best effort” quality of service.
Suppose that our Git synchronizer has a memory leak. We need to ensure that the Git synchronizer cannot use up memory that we want to use for our web server, since this can affect web server performance or even crash the server.
This sort of resource isolation is exactly the sort of thing that containers are designed to accomplish. By separating the two applications into two separate containers we can ensure reliable web server operation.
Of course, the two containers are quite symbiotic; it makes no sense to schedule the web server on one machine and the Git synchronizer on another. Consequently, Kubernetes groups multiple containers into a single, atomic unit called a Pod. (The name goes with the whale theme of Docker containers, since a Pod is also a group of whales.)
Pods in Kubernetes
A Pod represents a collection of application containers and volumes running in the same execution environment. Pods, not containers, are the smallest deployable artifact in a Kubernetes cluster. This means all of the containers in a Pod always land on the same machine.
Each container within a Pod runs in its own cgroup, but they share a number of Linux namespaces.
Applications running in the same Pod share the same IP address and port space (network namespace), have the same hostname (UTS namespace), and can communicate using native interprocess communication channels over System V IPC or POSIX message queues (IPC namespace). However, applications in different Pods are isolated from each other; they have different IP addresses, different hostnames, and more. Containers in different Pods running on the same node might as well be on different servers.
Thinking with Pods
One of the most common questions that occurs in the adoption of Kubernetes is “What should I put in a Pod?”
Sometimes people see Pods and think, “Aha! A WordPress container and a MySQL database container should be in the same Pod.” However, this kind of Pod is actually an example of an antipattern for Pod construction. There are two reasons for this. First, Wordpress and its database are not truly symbiotic. If the WordPress container and the database container land on different machines, they still can work together quite effectively, since they communicate over a network connection. Secondly, you don’t necessarily want to scale WordPress and the database as a unit. WordPress itself is mostly stateless, and thus you may want to scale your WordPress frontends in response to frontend load by creating more WordPress Pods. Scaling a MySQL database is much trickier, and you would be much more likely to increase the resources dedicated to a single MySQL Pod. If you group the WordPress and MySQL containers together in a single Pod, you are forced to use the same scaling strategy for both containers, which doesn’t fit well.
In general, the right question to ask yourself when designing Pods is, “Will these containers work correctly if they land on different machines?” If the answer is “no,” a Pod is the correct grouping for the containers. If the answer is “yes,” multiple Pods is probably the correct solution. In the example at the beginning of this chapter, the two containers interact via a local filesystem. It would be impossible for them to operate correctly if the containers were scheduled on different machines.
In the remaining sections of this chapter, we will describe how to create, introspect, manage, and delete Pods in Kubernetes.
The Pod Manifest
Pods are described in a Pod manifest. The Pod manifest is just a text-file representation of the Kubernetes API object. Kubernetes strongly believes in declarative configuration. Declarative configuration means that you write down the desired state of the world in a configuration and then submit that configuration to a service that takes actions to ensure the desired state becomes the actual state.
Note
Declarative configuration is different from imperative configuration, where you simply take a series of actions (e.g., apt-get install foo) to modify the world. Years of production experience have taught us that maintaining a written record of the system’s desired state leads to a more manageable, reliable system. Declarative configuration enables numerous advantages, including code review for configurations as well as documenting the current state of the world for distributed teams. Additionally, it is the basis for all of the self-healing behaviors in Kubernetes that keep applications running without user action.
The Kubernetes API server accepts and processes Pod manifests before storing them in persistent storage (etcd). The scheduler also uses the Kubernetes API to find Pods that haven’t been scheduled to a node. The scheduler then places the Pods onto nodes depending on the resources and other constraints expressed in the Pod manifests. Multiple Pods can be placed on the same machine as long as there are sufficient resources. However, scheduling multiple replicas of the same application onto the same machine is worse for reliability, since the machine is a single failure domain. Consequently, the Kubernetes scheduler tries to ensure that Pods from the same application are distributed onto different machines for reliability in the presence of such failures. Once scheduled to a node, Pods don’t move and must be explicitly destroyed and rescheduled.
Multiple instances of a Pod can be deployed by repeating the workflow described here. However, ReplicaSets (Chapter 8) are better suited for running multiple instances of a Pod. (It turns out they’re also better at running a single Pod, but we’ll get into that later.)
Creating a Pod
The simplest way to create a Pod is via the imperative kubectl run command.
For example, to run our same kuard server, use:
$ kubectl run kuard --image=gcr.io/kuar-demo/kuard-amd64:1
You can see the status of this Pod by running:
$ kubectl get pods
You may initially see the container as Pending, but eventually you
will see it transition to Running, which means that the Pod and its
containers have been successfully created.
Don’t worry too much about the random strings attached to the end of the Pod name. This manner of creating a Pod actually creates it via Deployment and ReplicaSet objects, which we will cover in later chapters.
For now, you can delete this Pod by running:
$ kubectl delete deployments/kuard
We will now move on to writing a complete Pod manifest by hand.
Creating a Pod Manifest
Pod manifests can be written using YAML or JSON, but YAML is generally preferred because it is slightly more human-editable and has the ability to add comments. Pod manifests (and other Kubernetes API objects) should really be treated in the same way as source code, and things like comments help explain the Pod to new team members who are looking at them for the first time.
Pod manifests include a couple of key fields and attributes: mainly a metadata section for describing the Pod and its labels, a spec section for describing volumes, and a list of containers that will run in the Pod.
In Chapter 2 we deployed kuard using the following Docker command:
$ docker run -d --name kuard \
  --publish 8080:8080 \
  gcr.io/kuar-demo/kuard-amd64:1
A similar result can be achieved by instead writing Example 5-1 to a file named kuard-pod.yaml and then using kubectl commands to load that manifest to Kubernetes.
Example 5-1. kuard-pod.yaml
apiVersion: v1
kind: Pod
metadata:
  name: kuard
spec:
  containers:
    - image: gcr.io/kuar-demo/kuard-amd64:1
      name: kuard
      ports:
        - containerPort: 8080
          name: http
          protocol: TCP
Running Pods
In the previous section we created a Pod manifest that can be used to start a
Pod running kuard. Use the kubectl apply command to launch a single instance
of kuard:
$ kubectl apply -f kuard-pod.yaml
The Pod manifest will be submitted to the Kubernetes API server. The Kubernetes system will then schedule that Pod to run on a healthy node in the cluster, where it will be monitored by the kubelet daemon process. Don’t worry if you don’t understand all the moving parts of Kubernetes right now; we’ll get into more details throughout the book.
Listing Pods
Now that we have a Pod running, let’s go find out some more about it. Using the
kubectl command-line tool, we can list all Pods running in the cluster. For
now, this should only be the single Pod that we created in the previous step:
$ kubectl get pods
NAME       READY     STATUS    RESTARTS   AGE
kuard      1/1       Running   0          44s
You can see the name of the Pod (kuard) that we gave it in the previous YAML file. In addition to the number of ready containers (1/1), the output also shows the status, the number of times the Pod was restarted, as well as the age of the Pod.
If you ran this command immediately after the Pod was created, you might see:
NAME       READY     STATUS    RESTARTS   AGE
kuard      0/1       Pending   0          1s
The Pending state indicates that the Pod has been submitted but hasn’t been scheduled yet.
If a more significant error occurs (e.g., an attempt to create a Pod with a container image that doesn’t exist), it will also be listed in the status field.
Note
By default, the kubectl command-line tool tries to be concise in the
information it reports, but you can get more information via command-line flags. Adding -o wide to any kubectl command will print out slightly more information (while still trying to keep the information to a single line). Adding -o json or -o yaml will print out the complete objects in JSON or YAML, respectively.
Pod Details
Sometimes, the single-line view is insufficient because it is too terse. Additionally, Kubernetes maintains numerous events about Pods that are present in the event stream, not attached to the Pod object.
To find out more information about a Pod (or any Kubernetes object) you can use the kubectl describe command. For example, to describe the Pod we previously created, you can run:
$ kubectl describe pods kuard
This outputs a bunch of information about the Pod in different sections. At the top is basic information about the Pod:
Name:           kuard
Namespace:      default
Node:           node1/10.0.15.185
Start Time:     Sun, 02 Jul 2017 15:00:38 -0700
Labels:         <none>
Annotations:    <none>
Status:         Running
IP:             192.168.199.238
Controllers:    <none>
Then there is information about the containers running in the Pod:
Containers:
  kuard:
    Container ID:  docker://055095…
    Image:         gcr.io/kuar-demo/kuard-amd64:1
    Image ID:      docker-pullable://gcr.io/kuar-demo/kuard-amd64@sha256:a580…
    Port:          8080/TCP
    State:         Running
      Started:     Sun, 02 Jul 2017 15:00:41 -0700
    Ready:         True
    Restart Count: 0
    Environment:   <none>
    Mounts:
      /var/run/secrets/kubernetes.io/serviceaccount from default-token-cg5f5 (ro)
Finally, there are events related to the Pod, such as when it was scheduled, when its image was pulled, and if/when it had to be restarted because of failing health checks:
Events:
  Seen From              SubObjectPath           Type      Reason    Message
  ---- ----              -------------           --------  ------    -------
  50s  default-scheduler                         Normal    Scheduled Success…
  49s  kubelet, node1    spec.containers{kuard}  Normal    Pulling   pulling…
  47s  kubelet, node1    spec.containers{kuard}  Normal    Pulled    Success…
  47s  kubelet, node1    spec.containers{kuard}  Normal    Created   Created…
  47s  kubelet, node1    spec.containers{kuard}  Normal    Started   Started…
Deleting a Pod
When it is time to delete a Pod, you can delete it either by name:
$ kubectl delete pods/kuard
or using the same file that you used to create it:
$ kubectl delete -f kuard-pod.yaml
When a Pod is deleted, it is not immediately killed. Instead, if you run kubectl get pods you will see that the Pod is in the Terminating state. All Pods have a termination grace period. By default, this is 30 seconds. When a Pod is transitioned to Terminating it no longer receives new requests. In a serving scenario, the grace period is important for reliability because it allows the Pod to finish any active requests that it may be in the middle of processing before it is terminated.
It’s important to note that when you delete a Pod, any data stored in the containers associated with that Pod will be deleted as well. If you want to persist data across multiple instances of a Pod, you need to use PersistentVolumes, described at the end of this chapter.
Accessing Your Pod
Now that your Pod is running, you’re going to want to access it for a variety of reasons. You may want to load the web service that is running in the Pod. You may want to view its logs to debug a problem that you are seeing, or even execute other commands in the context of the Pod to help debug. The following sections detail various ways that you can interact with the code and data running inside your Pod.
Using Port Forwarding
Later in the book, we’ll show how to expose a service to the world or other containers using load balancers, but oftentimes you simply want to access a specific Pod, even if it’s not serving traffic on the internet.
To achieve this, you can use the port-forwarding support built into the Kubernetes API and command-line tools.
$ kubectl port-forward kuard 8080:8080
a secure tunnel is created from your local machine, through the Kubernetes master, to the instance of the Pod running on one of the worker nodes.
As long as the port-forward command is still running, you can access the Pod (in this case the kuard web interface) on http://localhost:8080.
Getting More Info with Logs
When your application needs debugging, it’s helpful to be able to dig deeper than describe to understand what the application is doing. Kubernetes provides two commands for debugging running containers. The kubectl logs command downloads the current logs from the running instance:
$ kubectl logs kuard
Adding the -f flag will cause you to continuously stream logs.
The kubectl logs command always tries to get logs from the currently running container. Adding the --previous flag will get logs from a previous instance of the container. This is useful, for example, if your containers are continuously restarting due to a problem at container startup.
Note
While using kubectl logs is useful for one-off debugging of containers in
production environments, it’s generally useful to use a log aggregation service. There are several open source log aggregation tools, like fluentd and elasticsearch, as well as numerous cloud logging providers. Log aggregation services provide greater capacity for storing a longer duration of logs, as well as rich log searching and filtering capabilities. Finally, they often provide the ability to aggregate logs from multiple Pods into a single view.
Running Commands in Your Container with exec
Sometimes logs are insufficient, and to truly determine what’s going on you need to execute commands in the context of the container itself. To do this you can use:
$ kubectl exec kuard date
You can also get an interactive session by adding the -it flags:
$ kubectl exec -it kuard ash
Copying Files to and from Containers
At times you may need to copy files from a remote container to a local machine for more in-depth exploration. For example, you can use a tool like Wireshark to visualize tcpdump packet captures. Suppose you had a file called /captures/capture3.txt inside a container in your Pod. You could securely copy that file to your local machine by running:
$ kubectl cp <pod-name>:/captures/capture3.txt ./capture3.txt
Other times you may need to copy files from your local machine into a container. Let’s say you want to copy $HOME/config.txt to a remote container. In this case, you can run:
$ kubectl cp $HOME/config.txt <pod-name>:/config.txt
Generally speaking, copying files into a container is an antipattern. You really should treat the contents of a container as immutable. But occasionally it’s the most immediate way to stop the bleeding and restore your service to health, since it is quicker than building, pushing, and rolling out a new image. Once the bleeding is stopped, however, it is critically important that you immediately go and do the image build and rollout, or you are guaranteed to forget the local change that you made to your container and overwrite it in the subsequent regularly scheduled rollout.
Health Checks
When you run your application as a container in Kubernetes, it is automatically kept alive for you using a process health check. This health check simply ensures that the main process of your application is always running. If it isn’t, Kubernetes restarts it.
However, in most cases, a simple process check is insufficient. For example, if your process has deadlocked and is unable to serve requests, a process health check will still believe that your application is healthy since its process is still running.
To address this, Kubernetes introduced health checks for application liveness. Liveness health checks run application-specific logic (e.g., loading a web page) to verify that the application is not just still running, but is functioning properly. Since these liveness health checks are application-specific, you have to define them in your Pod manifest.
Liveness Probe
Once the kuard process is up and running, we need a way to confirm that it is actually healthy and shouldn’t be restarted. Liveness probes are defined per container, which means each container inside a Pod is health-checked separately. In Example 5-2, we add a liveness probe to our kuard container, which runs an HTTP request against the /healthy path on our container.
Example 5-2. kuard-pod-health.yaml
apiVersion: v1
kind: Pod
metadata:
  name: kuard
spec:
  containers:
    - image: gcr.io/kuar-demo/kuard-amd64:1
      name: kuard
      livenessProbe:
        httpGet:
          path: /healthy
          port: 8080
        initialDelaySeconds: 5
        timeoutSeconds: 1
        periodSeconds: 10
        failureThreshold: 3
      ports:
        - containerPort: 8080
          name: http
          protocol: TCP
The preceding Pod manifest uses an httpGet probe to perform an HTTP GET request against the /healthy endpoint on port 8080 of the kuard container. The probe sets an initialDelaySeconds of 5, and thus will not be called until five seconds after all the containers in the Pod are created. The probe must respond within the one-second timeout, and the HTTP status code must be equal to or greater than 200 and less than 400 to be considered successful. Kubernetes will call the probe every 10 seconds. If more than three probes fail, the container will fail and restart.
You can see this in action by looking at the kuard status page. Create a Pod
using this manifest and then
port-forward to that Pod:
$ kubectl apply -f kuard-pod-health.yaml
$ kubectl port-forward kuard 8080:8080
Point your browser to http://localhost:8080. Click the “Liveness Probe” tab. You should see a table that lists all of the probes that this instance of kuard has received. If you click the “fail” link on that page, kuard will start to fail health checks. Wait long enough and Kubernetes will restart the container. At that point the display will reset and start over again. Details of the restart can be found with kubectl describe pods kuard. The “Events” section will have text similar to the following:
Killing container with id docker://2ac946...:pod "kuard_default(9ee84...)"
container "kuard" is unhealthy, it will be killed and re-created.
Readiness Probe
Of course, liveness isn’t the only kind of health check we want to perform. Kubernetes makes a distinction between liveness and readiness. Liveness determines if an application is running properly. Containers that fail liveness checks are restarted. Readiness describes when a container is ready to serve user requests. Containers that fail readiness checks are removed from service load balancers. Readiness probes are configured similarly to liveness probes. We explore Kubernetes services in detail in Chapter 7.
Combining the readiness and liveness probes helps ensure only healthy containers are running within the cluster.
Types of Health Checks
In addition to HTTP checks, Kubernetes also supports tcpSocket health checks that open a TCP socket; if the connection is successful, the probe succeeds. This style of probe is useful for non-HTTP applications; for example, databases or other non–HTTP-based APIs.
Finally, Kubernetes allows exec probes. These execute a script or program in the context of the container. Following typical convention, if this script returns a zero exit code, the probe succeeds; otherwise, it fails. exec scripts are often useful for custom application validation logic that doesn’t fit neatly into an HTTP call.
Resource Management
Most people move into containers and orchestrators like Kubernetes because of the radical improvements in image packaging and reliable deployment they provide. In addition to application-oriented primitives that simplify distributed system development, equally important is the ability to increase the overall utilization of the compute nodes that make up the cluster. The basic cost of operating a machine, either virtual or physical, is basically constant regardless of whether it is idle or fully loaded. Consequently, ensuring that these machines are maximally active increases the efficiency of every dollar spent on infrastructure.
Generally speaking, we measure this efficiency with the utilization metric. Utilization is defined as the amount of a resource actively being used divided by the amount of a resource that has been purchased. For example, if you purchase a one-core machine, and your application uses one-tenth of a core, then your utilization is 10%.
With scheduling systems like Kubernetes managing resource packing, you can drive your utilization to greater than 50%.
To achieve this, you have to tell Kubernetes about the resources your application requires, so that Kubernetes can find the optimal packing of containers onto purchased machines.
Kubernetes allows users to specify two different resource metrics. Resource requests specify the minimum amount of a resource required to run the application. Resource limits specify the maximum amount of a resource that an application can consume. Both of these resource definitions are described in greater detail in the following sections.
Resource Requests: Minimum Required Resources
With Kubernetes, a Pod requests the resources required to run its containers. Kubernetes guarantees that these resources are available to the Pod. The most commonly requested resources are CPU and memory, but Kubernetes has support for other resource types as well, such as GPUs and more.
For example, to request that the kuard container lands on a machine with half a CPU free and gets 128 MB of memory allocated to it, we define the Pod as shown in Example 5-3.
Example 5-3. kuard-pod-resreq.yaml
apiVersion: v1
kind: Pod
metadata:
  name: kuard
spec:
  containers:
    - image: gcr.io/kuar-demo/kuard-amd64:1
      name: kuard
      resources:
        requests:
          cpu: "500m"
          memory: "128Mi"
      ports:
        - containerPort: 8080
          name: http
          protocol: TCP
Note
Resources are requested per container, not per Pod. The total resources requested by the Pod is the sum of all resources requested by all containers in the Pod. The reason for this is that in many cases the different containers have very different CPU requirements. For example, in the web server and data synchronizer Pod, the web server is user-facing and likely needs a great deal of CPU, while the data synchronizer can make do with very little.
Request limit details
Requests are used when scheduling Pods to nodes. The Kubernetes scheduler will ensure that the sum of all requests of all Pods on a node does not exceed the capacity of the node. Therefore, a Pod is guaranteed to have at least the requested resources when running on the node. Importantly, “request” specifies a minimum. It does not specify a maximum cap on the resources a Pod may use. To explore what this means, let’s look at an example.
Imagine that we have container whose code attempts to use all available CPU cores. Suppose that we create a Pod with this container that requests 0.5 CPU. Kubernetes schedules this Pod onto a machine with a total of 2 CPU cores.
As long as it is the only Pod on the machine, it will consume all 2.0 of the available cores, despite only requesting 0.5 CPU.
If a second Pod with the same container and the same request of 0.5 CPU lands on the machine, then each Pod will receive 1.0 cores.
If a third identical Pod is scheduled, each Pod will receive 0.66 cores. Finally, if a fourth identical Pod is scheduled, each Pod will receive the 0.5 core it requested, and the node will be at capacity.
CPU requests are implemented using the cpu-shares functionality in the Linux
kernel.
Note
Memory requests are handled similarly to CPU, but there is an important
difference. If a container is over its memory request, the OS
can’t just remove memory from the process, because it’s been allocated.
Consequently, when the system runs out of memory, the kubelet terminates containers whose memory usage is greater than their requested memory. These containers are automatically restarted, but with less available memory on the machine for the container to consume.
Since resource requests guarantee resource availability to a Pod, they are critical to ensuring that containers have sufficient resources in high-load situations.
Capping Resource Usage with Limits
In addition to setting the resources required by a Pod, which establishes the minimum resources available to the Pod, you can also set a maximum on a Pod’s resource usage via resource limits.
In our previous example we created a kuard Pod that requested a minimum of 0.5 of a core and 128 MB of memory. In the Pod manifest in Example 5-4, we extend this configuration to add a limit of 1.0 CPU and 256 MB of memory.
Example 5-4. kuard-pod-reslim.yaml
apiVersion: v1
kind: Pod
metadata:
  name: kuard
spec:
  containers:
    - image: gcr.io/kuar-demo/kuard-amd64:1
      name: kuard
      resources:
        requests:
          cpu: "500m"
          memory: "128Mi"
        limits:
          cpu: "1000m"
          memory: "256Mi"
      ports:
        - containerPort: 8080
          name: http
          protocol: TCP
When you establish limits on a container, the kernel is configured to ensure that consumption cannot exceed these limits. A container with a CPU limit of 0.5 cores will only ever get 0.5 cores, even if the CPU is otherwise idle. A container with a memory limit of 256 MB will not be allowed additional memory (e.g., malloc will fail) if its memory usage exceeds 256 MB.
Persisting Data with Volumes
When a Pod is deleted or a container restarts, any and all data in the container’s filesystem is also deleted. This is often a good thing, since you don’t want to leave around cruft that happened to be written by your stateless web application. In other cases, having access to persistent disk is an important part of a healthy application. Kubernetes models such persistent storage.
Using Volumes with Pods
To add a volume to a Pod manifest, there are two new stanzas to add to our
configuration. The first is a new spec.volumes section. This array defines all of the volumes that may be accessed by containers in the Pod manifest. It’s important to note that not all containers are required to mount all volumes defined in the Pod. The second addition is the volumeMounts array in the container definition. This array defines the volumes that are mounted into a particular container, and the path where each volume should be mounted. Note that two different containers in a Pod can mount the same volume at different mount paths.
The manifest in Example 5-5 defines a single new volume named kuard-data, which the kuard container mounts to the /data path.
Example 5-5. kuard-pod-vol.yaml
apiVersion: v1
kind: Pod
metadata:
  name: kuard
spec:
  volumes:
    - name: "kuard-data"
      hostPath:
        path: "/var/lib/kuard"
  containers:
    - image: gcr.io/kuar-demo/kuard-amd64:1
      name: kuard
      volumeMounts:
        - mountPath: "/data"
          name: "kuard-data"
      ports:
        - containerPort: 8080
          name: http
          protocol: TCP
Different Ways of Using Volumes with Pods
There are a variety of ways you can use data in your application. The following are a few, and the recommended patterns for Kubernetes.
Communication/synchronization
In the first example of a Pod, we saw how two containers used a shared volume to serve a site while keeping it synchronized to a remote Git location. To achieve this, the Pod uses an emptyDir volume. Such a volume is scoped to the Pod’s lifespan, but it can be shared between two containers, forming the basis for communication between our Git sync and web serving containers.
Cache
An application may use a volume that is valuable for performance, but not required for correct operation of the application. For example, perhaps the application keeps prerendered thumbnails of larger images. Of course, they can be reconstructed from the original images, but that makes serving the thumbnails more expensive. You want such a cache to survive a container restart due to a health check failure, and thus emptyDir works well for the cache use case as well.
Persistent data
Sometimes you will use a volume for truly persistent data—data that is independent of the lifespan of a particular Pod, and should move between nodes in the cluster if a node fails or a Pod moves to a different machine for some reason. To achieve this, Kubernetes supports a wide variety of remote network storage volumes, including widely supported protocols like NFS or iSCSI as well as cloud provider network storage like Amazon’s Elastic Block Store, Azure’s Files and Disk Storage, as well as Google’s Persistent Disk.
Mounting the host filesystem
Other applications don’t actually need a persistent volume, but they do need some access to the underlying host filesystem. For example, they may need access to the /dev filesystem in order to perform raw block-level access to a device on the system. For these cases, Kubernetes supports the hostPath volume, which can mount arbitrary locations on the worker node into the container.
The previous example uses the hostPath volume type. The volume created is /var/lib/kuard on the host.
Persisting Data Using Remote Disks
Oftentimes, you want the data a Pod is using to stay with the Pod, even if it is restarted on a different host machine.
To achieve this, you can mount a remote network storage volume into your Pod. When using network-based storage, Kubernetes automatically mounts and unmounts the appropriate storage whenever a Pod using that volume is scheduled onto a particular machine.
There are numerous methods for mounting volumes over the network. Kubernetes includes support for standard protocols such as NFS and iSCSI as well as cloud provider–based storage APIs for the major cloud providers (both public and private). In many cases, the cloud providers will also create the disk for you if it doesn’t already exist.
Here is an example of using an NFS server:
...
# Rest of pod definition above here
volumes:
    - name: "kuard-data"
      nfs:
        server: my.nfs.server.local
        path: "/exports"
Putting It All Together
Many applications are stateful, and as such we must preserve any data and ensure access to the underlying storage volume regardless of what machine the application runs on. As we saw earlier, this can be achieved using a persistent volume backed by network-attached storage. We also want to ensure a healthy instance of the application is running at all times, which means we want to make sure the container running kuard is ready before we expose it to clients.
Through a combination of persistent volumes, readiness and liveness probes, and resource restrictions Kubernetes provides everything needed to run stateful applications reliably. Example 5-6 pulls this all together into one manifest.
Example 5-6. kuard-pod-full.yaml
apiVersion: v1
kind: Pod
metadata:
  name: kuard
spec:
  volumes:
    - name: "kuard-data"
      nfs:
        server: my.nfs.server.local
        path: "/exports"
  containers:
    - image: gcr.io/kuar-demo/kuard-amd64:1
      name: kuard
      ports:
        - containerPort: 8080
          name: http
          protocol: TCP
      resources:
        requests:
          cpu: "500m"
          memory: "128Mi"
        limits:
          cpu: "1000m"
          memory: "256Mi"
      volumeMounts:
        - mountPath: "/data"
          name: "kuard-data"
      livenessProbe:
        httpGet:
          path: /healthy
          port: 8080
        initialDelaySeconds: 5
        timeoutSeconds: 1
        periodSeconds: 10
        failureThreshold: 3
      readinessProbe:
        httpGet:
          path: /ready
          port: 8080
        initialDelaySeconds: 30
        timeoutSeconds: 1
        periodSeconds: 10
        failureThreshold: 3
Persistent volumes are a deep topic that has many different details: in particular, the manner in which persistent volumes, persistent volume claims, and dynamic volume provisioning work together. There is a more in-depth examination of the subject in Chapter 13.
Summary
Pods represent the atomic unit of work in a Kubernetes cluster. Pods are comprised of one or more containers working together symbiotically. To create a Pod, you write a Pod manifest and submit it to the Kubernetes API server by using the command-line tool or (less frequently) by making HTTP and JSON calls to the server directly.
Once you’ve submitted the manifest to the API server, the Kubernetes scheduler finds a machine where the Pod can fit and schedules the Pod to that machine. Once scheduled, the kubelet daemon on that machine is responsible for creating the containers that correspond to the Pod, as well as performing any health checks defined in the Pod manifest.
Once a Pod is scheduled to a node, no rescheduling occurs if that node fails. Additionally, to create multiple replicas of the same Pod you have to create and name them manually. In a later chapter we introduce the ReplicaSet object and show how you can automate the creation of multiple identical Pods and ensure that they are recreated in the event of a node machine failure.