Table of Contents for
Modern PHP
 Modern PHP
Published by
O'Reilly Media, Inc., 2015
Modern PHP
Published by
O'Reilly Media, Inc., 2015
- Cover
- nav
- Modern PHP
- Modern PHP
- Preface
- I. Language Features
- 1. The New PHP
- 2. Features
- II. Good Practices
- 3. Standards
- 4. Components
- 5. Good Practices
- III. Deployment, Testing, and Tuning
- 6. Hosting
- 7. Provisioning
- 8. Tuning
- 9. Deployment
- 10. Testing
- 11. Profiling
- 12. HHVM and Hack
- 13. Community
- A. Installing PHP
- B. Local Development Environments
- Index
- About the Author
- Colophon
Chapter 5. Good Practices
This chapter contains an assortment of good practices that you should apply when building PHP applications. Following good practices makes your applications faster, more secure, and more stable. The PHP language is an accumulation of tools introduced piecemeal over a long period of time, and we use these tools to apply good practices. Tools change with the passage of time as newer and better solutions are introduced in newer PHP versions. Unfortunately, the PHP language still contains outdated tools from its past, and it’s possible to build slow and insecure applications with these outmoded tools if you’re not careful. The trick is knowing which tools to use and which to ignore. That’s what this chapter is all about.
I’m not preaching “best practices” from atop an academic ivory tower. This chapter contains good and practical advice that I use every day in all of my own projects. You can immediately apply this knowledge to your own projects.
Note
Good practices demonstrated in this chapter have always been possible with past and present PHP versions. However, how you implement these practices changes as the PHP language evolves. Newer PHP versions introduce tools that make it easier to apply good practices. This chapter demonstrates how to apply good practices with the latest tools in PHP 5.3+.
Sanitize, Validate, and Escape
Fox Mulder is correct—trust no one. Never trust any data that originates from a source not under your direct control. A few external sources are:
-
$_GET -
$_POST -
$_REQUEST -
$_COOKIE -
$argv -
php://stdin -
php://input -
file_get_contents() -
Remote databases
-
Remote APIs
-
Data from your clients
All of these external data sources are potential attack vectors that can inject malicious data into your PHP scripts (intentionally or accidentally). Writing a PHP script that receives user input and renders output is easy. Doing so safely requires a bit more thought. The simplest advice I can give you is this: sanitize input, validate data, and escape output.
Sanitize Input
When you sanitize input (i.e., data from any of the sources listed previously),
you escape or remove unsafe characters. It’s important to sanitize input data
before it reaches your application’s storage layer (e.g., Redis or MySQL).
This is your first line of defense. For example, assume your website comment
form accepts HTML. By default, nothing prevents a visitor from adding a devious
<script> tag to the comment text like this:
<p>This was a helpful article!</p><script>window.location.href='http://example.com';</script>
If you don’t sanitize this comment, you’ll inject malevolent code into your database that can be rendered into your website’s markup. When your website visitors go to a page with this unsanitized comment, they’re redirected to a website that does bad things. This is one example why you must sanitize input data that you do not control. In my experience, there are several types of input data that you’ll run into most often: HTML, SQL queries, and user profile information (i.e., email addresses and phone numbers).
HTML
You sanitize HTML special characters (e.g., &, >, ″) into their
HTML entity equivalents with the htmlentities() function (Example 5-1). This function
escapes all HTML characters in a given string and renders the string safe
for your application’s storage layer.
The htmlentities() function is dumb, though. It does not validate HTML
input. It does not escape single quotes by default. And it cannot
detect the input string’s character set. Here’s how to use the
htmlentities() function correctly. The first argument is the input string.
The second argument is the ENT_QUOTES constant, which prompts the function
to encode single quotes. The third argument specifies the input string’s
character set.
Example 5-1. Sanitize input with the htmlentities() function
<?php$input='<p><script>alert("You won the Nigerian lottery!");</script></p>';echohtmlentities($input,ENT_QUOTES,'UTF-8');
If you require more finesse when sanitizing HTML input, use the HTML Purifier library. HTML Purifier is a very robust and secure PHP library that sanitizes HTML input according to rules that you provide. The HTML Purifier library’s downside is that it is slow and potentially difficult to configure.
SQL queries
There are times when you must build a SQL query based on input data.
Sometimes this input data arrives in an HTTP request query string
(e.g., ?user=1). Other times this input data arrives as an HTTP
request URI segment (e.g., /users/1). If you’re not careful, bad people can
purposefully malform your SQL queries and wreak havoc on your database.
For example, I see many beginner PHP programmers build SQL queries
by concatenating raw $_GET and $_POST input data, as in Example 5-2.
Example 5-2. Bad SQL query
$sql=sprintf('UPDATE users SET password = "%s" WHERE id = %s',$_POST['password'],$_GET['id']);
This is bad! What if someone sends this HTTP request to your PHP script?
POST/user?id=1HTTP/1.1Content-Length:17Content-Type:application/x-www-form-urlencodedpassword=abc";--
This HTTP request sets every user’s password to abc because many SQL databases
consider -- to be the beginning of a comment causing subsequent text to be ignored. Never
use unsanitized input data in a SQL query. If you need to integrate input data
in a SQL query, use a PDO prepared statement. PDO is a database abstraction layer
built into PHP that presents a single interface to multiple databases. PDO
prepared statements are a PDO tool that sanitizes and safely embeds external data
into a SQL query to avoid problems like Example 5-2. I consider PDO and PDO
statements extremely important tools, so I’ve given them their own section later
in this chapter.
User profile information
If your application has user accounts, you’ll likely encounter
email addresses, telephone numbers, zip codes, and other
profile-related information. PHP anticipates this scenario with the
filter_var() and filter_input() functions. These two functions
accept a variety of flags to sanitize different forms of input: emails,
URL-encoded strings, integers, floats, HTML characters, URLs, and
specific ASCII character ranges.
Example 5-3 demonstrates how to sanitize an email address by removing all characters except letters, digits, and !#$%&'*+-/=?^_`{|}~@.[].
Example 5-3. Sanitize user profile email address
<?php='john@example.com';$emailSafe=filter_var(,FILTER_SANITIZE_EMAIL);
Example 5-4 demonstrates how to sanitize a user’s bio by removing characters below ASCII 32 and escaping characters above ASCII 127.
Example 5-4. Sanitize user profile international characters
<?php$string="\nIñtërnâtiônàlizætiøn\t";$safeString=filter_var($string,FILTER_SANITIZE_STRING,FILTER_FLAG_STRIP_LOW|FILTER_FLAG_ENCODE_HIGH);
Note
Discover more filter_var() flags and options at http://php.net/manual/function.filter-var.php.
Validate Data
It is also important to validate data. Unlike sanitization, validation
does not remove information from input data. Validation only confirms that
input data meets your expectations. If you expect an email address, make
sure the input data is an email address. If you expect a phone number, make
sure the input data is a phone number. That’s all there is to it. Validation
ensures that you persist accurate and well-formatted information in your
application’s storage layer. If you encounter invalid data, you can abort
the data persistence operation and surface an appropriate error message
to your application’s user. Validation also prevents potential database
errors. For example, if MySQL expects a DATETIME value but is given
the string next year, MySQL will either error out or use a default
(and incorrect) value. Either way, your application’s data integrity is
compromised by invalid data.
You can validate user input with the filter_var() function with
any of the FILTER_VALIDATE_* flags. PHP provides flags to validate Booleans,
emails, floats, integers, IP addresses, regular expressions, and URLs.
Example 5-5 demonstrates how to validate an email address.
Example 5-5. Validate email address
<?php$input='john@example.com';$isEmail=filter_var($input,FILTER_VALIDATE_EMAIL);if($isEmail!==false){echo"Success";}else{echo"Fail";}
Pay close attention to the filter_var() function’s return value. If
the validation succeeds, the return value is the original validated value.
If the validation fails, the return value is false.
Although the filter_var() function provides a number of validation flags,
it cannot validate everything. I recommend these additional
validation components, too:
Tip
You should validate and sanitize input data to make sure input data is safe and what you expect.
Escape Output
When it’s time to render output to a web page or API response, it is very important that you escape your output. This is one more layer of protection that prevents malicious code from being rendered and inadvertently executed by your application’s users.
Escape output with the PHP htmlentities() function that
we mentioned earlier. Be sure you use ENT_QUOTES as the second
argument so that it escapes both single and double quotes. Specify
the appropriate character encoding (usually UTF-8) as the
third argument. Example 5-6 demonstrates how to
escape HTML output before it is rendered.
Example 5-6. Escape output with the htmlentities function
<?php$output='<p><script>alert("NSA backdoor installed");</script>';echohtmlentities($output,ENT_QUOTES,'UTF-8');
Some PHP template engines like twig/twig
(my favorite) or smarty/smarty
escape output automatically. The Twig template engine by Sensio Labs, for example,
escapes all output by default unless you tell it otherwise. This is a brilliant
default and provides a nice safety net for your PHP web applications.
Passwords
Password security is monumentally important given the growing number of online attacks. How often have you cancelled a credit card because a major retailer was hacked? Many retailers have (and will) fall victim to malicious hackers because they do not protect their systems with best security practices. Your PHP applications are no different, and they are vulnerable to the same attacks unless you use appropriate precautions.
One important precaution is password security. It is your duty to safely manage, hash, and store user passwords. It doesn’t matter if your application is a trivial game or a vault for top-secret business documents. Your users entrust you with their information and expect you to guard their information with the best security practices available. I meet many PHP developers who don’t understand how to safely manage passwords. After all, securely managing passwords is hard. Fortunately, PHP provides built-in tools that make password security fairly easy. This section demonstrates how to use these tools with modern security practices.
Never Know User Passwords
You should never know your users’ passwords. You should never be able to know your users’ passwords. If your application’s database is hacked, you don’t want plain-text or decryptable passwords sitting in your database. Leaked passwords are a serious breach of trust, and they dump a mountain of legal liability on you or your company. The less you know, the safer you are.
Never Restrict User Passwords
It frustrates me when a website requires my account password to satisfy a specific format. It makes me even angrier when my account password cannot be longer than {N} number of characters. Why!? I understand that password formats may be restricted for compatibility with legacy applications or databases, but this is not an excuse for poor security practices.
Never restrict your users’ passwords. If you require passwords to fit a particular pattern, you are effectively providing a roadmap for bad guys to hack your application. If you must restrict user passwords, I recommend you only require a minimum length. It is not unreasonable to blacklist commonly used or dictionary-based passwords, too.
Never Email User Passwords
Never send passwords via email. If you send my password via email, I know three things: you know my password; you are storing my password in plain text or in a decryptable format; and you have no qualms sending my password over the Internet in plain text.
Instead, send an email with a URL where I can choose or change my own password. Web applications often generate a unique token that can only be used once to choose or change a password. For example, suppose I forget my account password for your web application. I click the “Forgot password” link on your login form, and I am directed to a form where I enter my email address to request a new password. Your application generates a unique token, and it associates this token with the account identified by my email address. Your application sends an email to the account’s email address with a URL that includes the unique token as a URL segment or a query-string parameter. When I visit the URL, your application validates the token and, if the token is valid, allows me to choose a new password for my account. After I choose a new password, your application invalidates the token.
Hash User Passwords with bcrypt
You should hash user passwords. Do not encrypt user passwords. Encryption and hashing are not synonymous. Encryption is a two-way algorithm, meaning what is encrypted can later be decrypted by design. Hashing is a one-way algorithm. Hashed data cannot be reverted to its original form, and identical data always produces the same hash values.
When you store a user password in your database, you hash the password first and store the password hash in your database. If hackers break into your database, they see only meaningless password hashes that require a massive amount of time and NSA resources to crack.
Many hashing algorithms are available (e.g., MD5, SHA1, bcrypt, scrypt). Some are fast and designed to verify data integrity. Others are slow and designed to be safe and secure. Slow, safe, and secure are what we want when it comes to password generation and storage.
The most secure peer-reviewed hashing algorithm known today is bcrypt. Unlike MD5 and SHA1, bcrypt is designed to be very slow. The bcrypt algorithm automatically salts data to foil potential rainbow table attacks. The bcrypt algorithm also consumes a large amount of time (measured in seconds) while iteratively hashing data to generate a super-secure final hash value. The number of hash iterations is called the work factor. A higher work factor makes it exponentially more expensive for a bad guy to crack password hashes. The bcrypt algorithm is future-proof, too, because you can simply increase its work factor as computers become faster.
The bcrypt algorithm is extensively peer-reviewed. Minds far greater than my own have reviewed the bcrypt algorithm for potential exploits, and so far none has been found. It is very important that you rely on peer-reviewed hashing algorithms. Never create your own. There is safety in numbers, and odds are you are not a cryptography expert (unless you are, in which case tell Bruce Schneier I said hello).
Password Hashing API
As you can see, there are a lot of considerations to make when working with user passwords. However, Anthony Ferrara was kind enough to build the native password hashing API available in PHP 5.5.0. PHP’s native password hashing API provides easy-to-use functions that drastically simplify password hashing and verification. The password hashing API also uses the bcrypt hashing algorithm by default.
Note
Anthony Ferrara (also known as @ircmaxell on Twitter) is a Developer Advocate at Google, and he is an authoritative source for all things related to PHP performance and security. Anthony is also the author of the PHP password hashing API. I encourage you to follow Anthony on Twitter and read his blog. I want to say a big thank you to Anthony. His contributions to PHP have single-handedly improved PHP application security by making best security practices more accessible.
You’ll encounter two scenarios when building web applications: user registration and user login. Let’s explore how the PHP password hashing API simplifies both scenarios.
User registration
A web application can’t exist without users, and users need a way
to sign up for an account. Let’s assume our hypothetical application
has a PHP file available at the URL /register.php. This PHP file
receives a URL-encoded HTTP POST request with an email address and
password. We create a user account if the email address is valid
and the password contains at least eight characters. This is an example
HTTP POST request:
POST/register.phpHTTP/1.1Content-Length:43Content-Type:application/x-www-form-urlencodedemail=john@example.com&password=sekritshhh!
Example 5-7 is the register.php file that receives the HTTP POST request.
Example 5-7. User registration script
01<?php02try{03// Validate email04=filter_input(INPUT_POST,'email',FILTER_VALIDATE_EMAIL);05if(!){06thrownewException('Invalid email');07}0809// Validate password10$password=filter_input(INPUT_POST,'password');11if(!$password||mb_strlen($password)<8){12thrownewException('Password must contain 8+ characters');13}1415// Create password hash16$passwordHash=password_hash(17$password,18PASSWORD_DEFAULT,19['cost'=>12]20);21if($passwordHash===false){22thrownewException('Password hash failed');23}2425// Create user account (THIS IS PSUEDO-CODE)26$user=newUser();27$user->=;28$user->password_hash=$passwordHash;29$user->save();3031// Redirect to login page32header('HTTP/1.1 302 Redirect');33header('Location: /login.php');34}catch(Exception$e){35// Report error36header('HTTP/1.1 400 Bad request');37echo$e->getMessage();38}
In Example 5-7:
-
Lines 4–7 validate the user email address. We toss an exception if the email is invalid.
-
Lines 10–13 validate the plain-text user password pulled from the HTTP request body. We toss an exception if the plain-text user password contains fewer than eight characters.
-
Lines 16–23 create a password hash with the PHP password hashing API’s
password_hash()function. Thepassword_hash()function’s first argument is the plain-text user password. The second argument is thePASSWORD_DEFAULTconstant, which tells PHP to use the bcrypt hashing algorithm. The final argument is an array of hashing options. Thecostarray key specifies the bcrypt work factor. A work factor of10is used by default, but you should increase the cost factor for your particular hardware so that password hashing requires 0.1 to 0.5 seconds to finish. We toss an exception if the password hashing fails. -
Lines 26–29 demonstrate saving a hypothetical user account. These lines contain pseudocode; you should replace these lines with code appropriate for your own application. The point is that you persist the user record with the password hash—not the plain-text password pulled from the HTTP request body. We also persist the email address that is used to locate and log in a user account.
User login
Our hypothetical application also has a PHP file available at
URL /login.php. This file accepts an HTTP POST request that
contains an email address and password used to identify,
authenticate, and log in a user. This is an example
HTTP POST request:
POST/login.phpHTTP/1.1Content-Length:43Content-Type:application/x-www-form-urlencodedemail=john@example.com&password=sekritshhh!
The login.php file finds the user account identified by the email address, it verifies the submitted password with the user account’s password hash, and it logs in the user account. Example 5-8 shows the login.php file.
Example 5-8. User login script
01<?php02session_start();03try{04// Get email address from request body05=filter_input(INPUT_POST,'email');0607// Get password from request body08$password=filter_input(INPUT_POST,'password');0910// Find account with email address (THIS IS PSUEDO-CODE)11$user=User::findByEmail();1213// Verify password with account password hash14if(password_verify($password,$user->password_hash)===false){15thrownewException('Invalid password');16}1718// Re-hash password if necessary (see note below)19$currentHashAlgorithm=PASSWORD_DEFAULT;20$currentHashOptions=array('cost'=>15);21$passwordNeedsRehash=password_needs_rehash(22$user->password_hash,23$currentHashAlgorithm,24$currentHashOptions25);26if($passwordNeedsRehash===true){27// Save new password hash (THIS IS PSUEDO-CODE)28$user->password_hash=password_hash(29$password,30$currentHashAlgorithm,31$currentHashOptions32);33$user->save();34}3536// Save login status to session37$_SESSION['user_logged_in']='yes';38$_SESSION['user_email']=;3940// Redirect to profile page41header('HTTP/1.1 302 Redirect');42header('Location: /user-profile.php');43}catch(Exception$e){44header('HTTP/1.1 401 Unauthorized');45echo$e->getMessage();46}
In Example 5-8:
-
Line 5 and 8 retrieve the email address and password from the HTTP request body.
-
Line 11 locates the user record associated with the email address submitted in the HTTP request body. I use pseudocode in Example 5-8, and you should replace this line with code specific to your own application.
-
Lines 14–16 compare the plain-text password submitted in the HTTP request body with the password hash stored in the user record. We compare the password and password hash with the
password_verify()function. If verification fails, we toss an exception. -
Lines 19–34 make sure the user record’s password hash value is up-to-date with the most current password algorithm options by invoking the
password_needs_rehash()function. If the user record’s password hash is out of date, we create a new hash value using the most current algorithm options, and we update the user record with the new hash value.
Verify password
The password_verify() function compares the plain-text
password from the HTTP request body to the password hash stored in
the user record. This function accepts two arguments. The first argument
is the plain-text password. The second argument is the existing password hash
in the user record. If the password_verify() function returns true,
the plain-text password is valid and we log in the user. Otherwise,
the plain-text password is invalid and we abort the login process.
Rehash password
After line 17 in Example 5-8, authentication is successful and we can log in the user. Before we do, however, it is important to check if the existing password hash in the user record is outdated. If it is outdated, we create a new password hash.
Why should we create a new password hash? Pretend our application was
created two years ago when we used a bcrypt work factor of 10. Today
we use a bcrypt work factor of 20 because hackers are smarter and
computers are faster. Unfortunately, there are some user accounts
whose password hashes were generated with a bcrypt work factor of 10.
After we verify the login request’s authenticity, we check if the
existing user record’s password hash needs to be updated with the
password_needs_rehash() function. This function makes sure a given
password hash is created with the most current hashing
algorithm options. If a password hash does need to be rehashed,
rehash the plain-text password from the HTTP request body using the
current algorithm options and update the user record with the new hash value.
Tip
It’s easiest to employ the password_needs_rehash() function in
the user login script because I have access to the old password hash
and the plain-text password at the same time.
Password Hashing API for PHP < 5.5.0
If you cannot use PHP 5.5.0 or newer, fear not. You can use Anthony Ferrara’s
ircmaxell/password-compat
component. It implements all of these PHP password hashing API functions:
-
password_hash() -
password_get_info() -
password_needs_rehash() -
password_verify()
Ferrara’s ircmaxell/password-compat component is a drop-in replacement for the
modern PHP password hashing API. Include the component in your application
with Composer and you’re off and running.
Dates, Times, and Time Zones
Working with dates and times is hard. Pretty much every PHP developer
has, at one time or another, made a mistake working with dates and
times. This is precisely why I recommend you do not manage dates and
times on your own. There are too many considerations to juggle, including
date formats, time zones, daylight saving, leap years, leap seconds, and months with
variable numbers of days. It’s too easy for your own calculations to become
inaccurate. Instead, use the DateTime, DateInterval, and DateTimeZone classes
introduced in PHP 5.2.0. These helpful classes provide a simple object-oriented
interface to accurately create and manipulate dates, times, and timezones.
Set a Default Time Zone
The first thing you should do is declare a default time zone for
PHP’s date and time functions. If you don’t set a default time zone,
PHP shows an E_WARNING message. There are two ways to set the default
time zone. You can declare the default time zone in the php.ini file like this:
date.timezone='America/New_York';
You can also declare the default time zone during runtime with the
date_default_timezone_set() function (Example 5-9).
Example 5-9. Set default timezone
<?phpdate_default_timezone_set('America/New_York');
Either solution requires a valid time-zone identifier. You can find a complete list of PHP time-zone identifiers at http://php.net/manual/timezones.php.
The DateTime Class
The DateTime class provides an object-oriented interface to manage
date and time values. A single DateTime instance represents a specific
date and time. The DateTime class constructor (Example 5-10) is the simplest way to
create a new DateTime instance.
Example 5-10. The DateTime class
<?php$datetime=newDateTime();
Without arguments, the DateTime class constructor creates an instance
that represents the current date and time. You can pass a string
argument into the DateTime class constructor to specify a custom
date and time (Example 5-11). The string argument must use one of the valid date and time
formats listed at http://php.net/manual/datetime.formats.php.
Example 5-11. DateTime class with argument
<?php$datetime=newDateTime('2014-04-27 5:03 AM');
In an ideal world, you are given date and time data in a format that PHP
understands. Unfortunately, this is not always the case. Sometimes you must
work with date and time values in different and unexpected formats. I experience
this problem on a daily basis. Many of my clients send Excel spreadsheets
with data to import into an application, and each client provides date
and time values in wildly different formats. The DateTime class makes
this a nonissue.
Use the DateTime::createFromFormat() static method to create a DateTime
instance with a date and time string that uses a custom format. This method’s
first argument is the date and time string format. The second argument is
the date and time string that uses said format (Example 5-12).
Example 5-12. DateTime class with static constructor
<?php$datetime=DateTime::createFromFormat('M j, Y H:i:s','Jan 2, 2014 23:04:12');
Note
The DateTime::createFromFormat() static method accepts the same date and
time formats as the date() function. Valid date and time formats are
available at http://php.net/manual/datetime.createfromformat.php.
The DateInterval Class
The DateInterval class is pretty much prerequisite knowledge for manipulating
DateTime instances. A DateInterval instance represents a fixed
length of time (e.g., “two days”) or a relative length of time (e.g.,
“yesterday”). You use DateInterval instances to modify DateTime instances.
For example, the DateTime class provides add() and sub() methods to
manipulate a DateTime instance’s value. Both methods accept a DateInterval
argument that specifies the amount of time added to or subtracted from a
DateTime instance.
Instantiate the DateInterval class with its constructor. The DateInterval
class constructor accepts a string argument that provides an interval specification.
Interval specifications are a little tricky at first, but there’s not
much to them. First, an interval specification is a string that begins
with the letter P. Next, you append an integer. And last, you append a period designator that qualifies the preceding integer value.
Valid period designators are:
-
Y(years) -
M(months) -
D(days) -
W(weeks) -
H(hours) -
M(minutes) -
S(seconds)
An interval specification can include both date and time values. If you
include a time value, separate the date and time parts with
the letter T. For example, the interval specification P2D means two
days. The interval specification P2DT5H2M means two days, five
hours, and two minutes.
Example 5-13 demonstrates how to modify a DateTime instance by a given
interval of time using the add() method.
Example 5-13. The DateInterval class
<?php// Create DateTime instance$datetime=newDateTime('2014-01-01 14:00:00');// Create two weeks interval$interval=newDateInterval('P2W');// Modify DateTime instance$datetime->add($interval);echo$datetime->format('Y-m-d H:i:s');
You can create an inverted DateInterval, too (Example 5-14). This lets you traverse
a DatePeriod instance in reverse chronology!
Example 5-14. An inverted DateInterval class
$dateStart=new\DateTime();$dateInterval=\DateInterval::createFromDateString('-1 day');$datePeriod=new\DatePeriod($dateStart,$dateInterval,3);foreach($datePeriodas$date){echo$date->format('Y-m-d'),PHP_EOL;}
This outputs:
2014-12-08
2014-12-07
2014-12-06
2014-12-05
The DateTimeZone Class
If your application caters to an international clientele, you’ve probably wrestled with time zones. Time zones are tricky, and they are a constant source of confusion for many PHP developers.
PHP represents time zones with the DateTimeZone class. All you have
to do is pass a valid time-zone identifier into the DateTimeZone
class constructor:
<?php$timezone=newDateTimeZone('America/New_York');
Note
Find a complete list of valid time-zone identifiers at http://php.net/manual/timezones.php.
You often use DateTimeZone instances when creating DateTime instances.
The DateTime class constructor’s optional second argument is a
DateTimeZone instance. The DateTime instance’s value, and all
modifications to its value, are now relative to the specified time zone.
If you omit the constructor’s second argument, the time zone is determined
by your default time-zone setting:
<?php$timezone=newDateTimeZone('America/New_York');$datetime=newDateTime('2014-08-20',$timezone);
You can change a DateTime instance’s time zone after instantiation
with the setTimezone() method (Example 5-15).
Example 5-15. DateTimeZone usage
<?php$timezone=newDateTimeZone('America/New_York');$datetime=new\DateTime('2014-08-20',$timezone);$datetime->setTimezone(newDateTimeZone('Asia/Hong_Kong'));
I find it easiest if I always work in the UTC time zone. My server’s
time zone is UTC, and my PHP default time zone is UTC. If I persist
date and time values into a database, I save them as the UTC timezone.
I convert the UTC date and time values to the appropriate time zone
when I display the data to application users.
The DatePeriod Class
Sometimes you need to iterate a sequence of dates and times that recur
over a specific interval of time. Repeating calendar events are a
good example. The DatePeriod class solves this problem. The DatePeriod
class constructor accepts three required arguments:
-
A
DateTimeinstance that represents the date and time from which iteration begins -
A
DateIntervalinstance that represents the interval of time between subsequent dates and times -
An integer that represents the number of total iterations
A DatePeriod instance is an iterator, and each iteration yields a
DateTime instance. Example 5-16 yields three dates and times
separated by two-week intervals.
Example 5-16. DatePeriod class usage
<?php$start=newDateTime();$interval=newDateInterval('P2W');$period=newDatePeriod($start,$interval,3);foreach($periodas$nextDateTime){echo$nextDateTime->format('Y-m-d H:i:s'),PHP_EOL;}
The DatePeriod class constructor accepts an optional fourth argument that
specifies the period’s explicit end date and time. If you want to exclude the
start date from the period’s iteration, pass the DatePeriod::EXCLUDE_START_DATE
constant as the final constructor argument (Example 5-17).
Example 5-17. DatePeriod class usage with options
<?php$start=newDateTime();$interval=newDateInterval('P2W');$period=newDatePeriod($start,$interval,3,DatePeriod::EXCLUDE_START_DATE);foreach($periodas$nextDateTime){echo$nextDateTime->format('Y-m-d H:i:s'),PHP_EOL;}
The nesbot/carbon Component
If you work with dates and times more often than not, you should use
Brian Nesbitt’s nesbot/carbon PHP
component. Carbon provides a simple user interface with many useful
methods for working with date and time values.
Databases
Many PHP applications persist information in a wide assortment of
databases like MySQL, PostgreSQL, SQLite, MSSQL, and Oracle. Each
database provides its own PHP extension to establish communication
between PHP and the database. MySQL, for example, uses the mysqli
extension, which adds various mysqli_*() functions to the PHP language.
SQLite3 uses the SQLite3 extension, which adds the SQLite3, SQLite3Stmt,
and SQLite3Result classes to the PHP language. If you work with different
databases in one or more projects, you have to install and learn various PHP
database extensions and interfaces. This increases your
cognitive and technical overhead.
The PDO Extension
This is exactly why PHP provides the native PDO extension. PDO (or PHP data objects) is a collection of PHP classes that communicate with many different SQL databases via a single user interface. Database implementations are abstracted away. Instead, we can write and execute database queries with a single interface regardless of the particular database system we happen to be using at the time.
Warning
Even though the PDO extension provides a single interface to different databases, we still must write our own SQL statements. This is the downside to PDO. Each database provides proprietary features, and these features often require unique SQL syntax. I recommend you write ANSI/ISO SQL when using PDO so that your SQL doesn’t break if/when you change database systems. If you absolutely must use a proprietary database feature, keep in mind you must update your SQL statements if you change database systems.
Database Connections and DSNs
First, select the database system most appropriate for your application. Install
the database, create the schema, and optionally load an initial dataset. Next,
instantiate the PDO class in PHP. The PDO instance establishes a connection
between PHP and the database.
The PDO class constructor accepts a string argument called a DSN, or
data source name, that provides database connection details. A DSN begins with
the database driver name (e.g., mysql or sqlite), a :, and the remainder of the connection
string. The DSN connection string is different for each database, but it typically includes:
-
Hostname or IP address
-
Port number
-
Database name
-
Character set
Note
Learn more about your database’s DSN format at http://php.net/manual/pdo.drivers.php.
The PDO class constructor’s second and third arguments are a username
and password for your database. Provide these arguments if your database requires
authentication.
Example 5-18 establishes a PDO connection to a MySQL database named
acme. The database is available at IP address 127.0.0.1, and it listens
on the standard MySQL port 3306. The database username is josh, and
the database password is sekrit. The connection character set is utf8.
Example 5-18. PDO constructor
<?phptry{$pdo=newPDO('mysql:host=127.0.0.1;dbname=books;port=3306;charset=utf8','USERNAME','PASSWORD');}catch(PDOException$e){// Database connection failedecho"Database connection failed";exit;}
The PDO class constructor’s first argument is the DSN. The DSN begins with mysql:.
This instructs PDO to use the PDO MySQL driver to connect to a MySQL database.
After the : character, we specify a semicolon-delimited list of keys and values. Specifically,
we specify the host, dbname, port, and charset settings.
Tip
The PDO constructor throws a PDOException instance if the database connection fails.
It’s important that you anticipate and catch this exception when creating PDO connections.
Keep your database credentials secret
Example 5-18 is fine for demonstration purposes, but it isn’t safe. Never hard-code database credentials into PHP files, especially PHP files served to the public. If PHP exposes raw PHP code to HTTP clients due to a bug or server misconfiguration, your database credentials are naked for the world to see. Instead, move your database credentials into a configuration file above the document root and include them into your PHP files when necessary.
Tip
Do not version control your credentials, either. Protect your credentials with a .gitignore file. Otherwise, you will publish your secret credentials into your code repository for others to see. This is especially bad if you are using a public repository.
In this example, the settings.php file contains our database connection credentials. It lives beneath the project root directory but above the document root. The index.php file lives beneath the document root directory, and it is served to the public with a web server. The index.php file uses the credentials in the settings.php file:
[project_root]
    settings.php
    public_html/ <-- document root
        index.php
This is the settings.php file:
<?php$settings=['host'=>'127.0.0.1','port'=>'3306','name'=>'acme','username'=>'USERNAME','password'=>'PASSWORD','charset'=>'utf8'];
Example 5-19 shows the index.php file. It includes the settings.php file and establishes a PDO database connection.
Example 5-19. PDO constructor with external settings
<?phpinclude('../settings.php');$pdo=newPDO(sprintf('mysql:host=%s;dbname=%s;port=%s;charset=%s',$settings['host'],$settings['name'],$settings['port'],$settings['charset']),$settings['username'],$settings['password']);
This is much safer. If the index.php code leaks to the public, our database credentials remain secret.
Prepared Statements
We now have a PDO connection to a database, and we can use this connection to read from and write to the database with SQL statements. We’re not done yet. When I build PHP applications, I often need to customize SQL statements with dynamic information from the current HTTP request. For example, the URL /user?email=john@example.com shows profile information for a specific user account. The SQL statement for this URL might be:
SELECTidFROMusersWHERE="john@example.com";
A beginner PHP developer might build the SQL statement like this:
$sql=sprintf('SELECT id FROM users WHERE email = "%s"',filter_input(INPUT_GET,'email'));
This is bad because the SQL string uses raw input from the HTTP request query string. It provides a welcome mat for hackers to do bad things to your PHP application. Haven’t you heard of little Bobby Tables? It is extremely important to sanitize user input that is used in a SQL statement. Fortunately, the PDO extension makes input sanitization super-easy with prepared statements and bound parameters.
A prepared statement is a PDOStatement instance. However, I rarely
instantiate the PDOStatement class directly. Instead, I fetch a prepared
statement object with the PDO instance’s prepare() method. This method
accepts a SQL statement string as its first argument, and it returns a
PDOStatement instance:
<?php$sql='SELECT id FROM users WHERE email = :email';$statement=$pdo->prepare($sql);
Pay close attention to the SQL statement. The :email is
a named placeholder to which I can safely bind any value. In
Example 5-20, I bind the HTTP request query string to the :email
placeholder with the $statement instance’s bindValue() method.
Example 5-20. Prepared statement with email address
<?php$sql='SELECT id FROM users WHERE email = :email';$statement=$pdo->prepare($sql);=filter_input(INPUT_GET,'email');$statement->bindValue(':email',);
The prepared statement automatically sanitizes the $email
value, and it protects our database from SQL injection attacks. You can
include multiple named placeholders in a SQL statement string and invoke
the prepared statement’s bindValue() method for each placeholder.
In Example 5-20, the :email named placeholder represents
a string value. What if we change our SQL statement to find a user by
a numeric ID? In this case, we must pass a third argument to the prepared
statement’s bindValue() method to specify the type of data bound
to the placeholder. Without the third argument, a prepared statement
assumes bound data is a string.
Example 5-21 shows a modification of Example 5-20 that finds a user by numeric ID
instead of an email address. The numeric ID is pulled from the HTTP query
string parameter named id.
Example 5-21. Prepared statement with ID
<?php$sql='SELECT email FROM users WHERE id = :id';$statement=$pdo->prepare($sql);$userId=filter_input(INPUT_GET,'id');$statement->bindValue(':id',$userId,PDO::PARAM_INT);
We use the PDO::PARAM_INT constant as the third argument. This tells
PDO that the bound data is an integer. There are several PDO constants
you can use to specify various data types:
PDO::PARAM_BOOLPDO::PARAM_NULLPDO::PARAM_INTPDO::PARAM_STR(default)
Note
See all PDO constants at http://php.net/manual/pdo.constants.php.
Query Results
We now have a prepared statement, and we’re ready to execute SQL queries
against the database. The prepared statement’s execute() method executes
the statement’s SQL statement with any bound data. If you are
executing INSERT, UPDATE, or DELETE statements, invoke the execute()
method and you’re done. If you execute a SELECT statement, you probably
expect the database to return matching records. You can fetch query results
with the prepared statement’s fetch(), fetchAll(), fetchColumn(), and
fetchObject() methods.
The PDOStatement instance’s fetch() method returns the next row
from the result set. I use this method to iterate large result sets,
especially if the entire result set cannot fit in available memory (Example 5-22).
Example 5-22. Prepared statement results as associative array
<?php// Build and execute SQL query$sql='SELECT id, email FROM users WHERE email = :email';$statement=$pdo->prepare($sql);=filter_input(INPUT_GET,'email');$statement->bindValue(':email',,PDO::PARAM_INT);$statement->execute();// Iterate resultswhile(($result=$statement->fetch(PDO::FETCH_ASSOC))!==false){echo$result['email'];}
In this example, I use the PDO::FETCH_ASSOC constant as the first
argument in the statement instance’s fetch() method. This argument
determines how the fetch() and fetchAll() methods return query
results. You can use any of these constants:
PDO::FETCH_ASSOC-
Prompts the
fetch()orfetchAll()method to return an associative array. The array keys are database column names. PDO::FETCH_NUM-
Prompts the
fetch()orfetchAll()method to return a numeric array. The array keys are the numeric index of database columns in your query result. PDO::FETCH_BOTH-
Prompts the
fetch()orfetchAll()method to return an array that contains both associative and numeric array keys. This is a combination ofPDO::FETCH_ASSOCandPDO::FETCH_NUM. PDO::FETCH_OBJ-
Prompts the
fetch()orfetchAll()method to return an object whose properties are database column names.
Note
Learn more about fetching PDO statement results at http://php.net/manual/pdostatement.fetch.php.
If you are working with smaller result sets, you can fetch all query
results with the prepared statement’s fetchAll() method (Example 5-23). I typically
discourage this method unless you are absolutely sure the complete
query result is small enough to fit in available memory.
Example 5-23. Prepared statement fetch all results as associative array
<?php// Build and execute SQL query$sql='SELECT id, email FROM users WHERE email = :email';$statement=$pdo->prepare($sql);=filter_input(INPUT_GET,'email');$statement->bindValue(':email',,PDO::PARAM_INT);$statement->execute();// Iterate results$results=$statement->fetchAll(PDO::FETCH_ASSOC);foreach($resultsas$result){echo$result['email'];}
If you are concerned only with a single column in your query result, you
can use the prepared statement’s fetchColumn() method. This
method, similar to the fetch() method, returns the value of a single
column from the next row of the query result (Example 5-24). The fetchColumn() method’s
one and only argument is the index of the desired column.
Tip
The query result column order matches the column order specified in the SQL query.
Example 5-24. Prepared statement fetch one column, one row at a time as associative array
<?php// Build and execute SQL query$sql='SELECT id, email FROM users WHERE email = :email';$statement=$pdo->prepare($sql);=filter_input(INPUT_GET,'email');$statement->bindValue(':email',,PDO::PARAM_INT);$statement->execute();// Iterate resultswhile((=$statement->fetchColumn(1))!==false){echo;}
In Example 5-24, the email column is listed second in the SQL query.
It therefore becomes the second column in each query result row, and
I pass the number 1 into the fetchColumn() method (columns
are zero-indexed).
You can also use the prepared statement’s fetchObject()
method to fetch the next query result row as an object whose
property names are the SQL query result columns (Example 5-25).
Example 5-25. Prepared statement fetch row as object
<?php// Build and execute SQL query$sql='SELECT id, email FROM users WHERE email = :email';$statement=$pdo->prepare($sql);=filter_input(INPUT_GET,'email');$statement->bindValue(':email',,PDO::PARAM_INT);$statement->execute();// Iterate resultswhile(($result=$statement->fetchObject())!==false){echo$result->name;}
Transactions
The PDO extension also supports transactions. A transaction is a set of database statements that execute atomically. In other words, a transaction is a collection of SQL queries that are either all executed successfully or not executed at all. Transaction atomicity encourages data consistency, safety, and durability. A nice side effect of transactions is improved performance, because you are effectively queuing multiple queries to be executed together at one time.
Note
Not all databases support transactions. Check your database’s documentation and its associated PHP PDO driver for more information.
Transactions are simple to use with the PDO extension. You build and
execute SQL statements exactly as demonstrated in Example 5-25. There is only one difference.
You surround SQL statement executions with the PDO instance’s
beginTransaction() and commit() methods. The beginTransaction() method
causes PDO to queue subsequent SQL query executions rather than execute
them immediately. The commit() method executes queued queries in an
atomic transaction. If a single query in the transaction fails, none of
the transaction queries is applied. Remember, a transaction is all or nothing.
Atomicity is important when data integrity is paramount. Let’s explore example code that handles bank account transactions. Our code can deposit funds into an account. It can also withdraw funds from an account assuming there are sufficient funds. The code in Example 5-26 transfers $50 from one account to another account. It does not use a database transaction.
Example 5-26. Database query without transaction
<?phprequire'settings.php';// PDO connectiontry{$pdo=newPDO(sprintf('mysql:host=%s;dbname=%s;port=%s;charset=%s',$settings['host'],$settings['name'],$settings['port'],$settings['charset']),$settings['username'],$settings['password']);}catch(PDOException$e){// Database connection failedecho"Database connection failed";exit;}// Statements$stmtSubtract=$pdo->prepare('UPDATE accountsSET amount = amount - :amountWHERE name = :name');$stmtAdd=$pdo->prepare('UPDATE accountsSET amount = amount + :amountWHERE name = :name');// Withdraw funds from account 1$fromAccount='Checking';$withdrawal=50;$stmtSubtract->bindParam(':name',$fromAccount);$stmtSubtract->bindParam(':amount',$withDrawal,PDO::PARAM_INT);$stmtSubtract->execute();// Deposit funds into account 2$toAccount='Savings';$deposit=50;$stmtAdd->bindParam(':name',$toAccount);$stmtAdd->bindParam(':amount',$deposit,PDO::PARAM_INT);$stmtAdd->execute();
This seems fine, right? It’s not. What happens if our server suddenly shuts down after we withdraw $50 from account 1 and before we deposit $50 into account 2? Perhaps our hosting company had a power outage or a fire or a flood or was afflicted by some other calamity. What happens to the $50 withdrawn from account 1? The funds are not deposited into account 2. The funds disappear. We can protect data integrity with a database transaction (Example 5-27).
Example 5-27. Database query with transaction
<?phprequire'settings.php';// PDO connectiontry{$pdo=newPDO(sprintf('mysql:host=%s;dbname=%s;port=%s;charset=%s',$settings['host'],$settings['name'],$settings['port'],$settings['charset']),$settings['username'],$settings['password']);}catch(PDOException$e){// Database connection failedecho"Database connection failed";exit;}// Statements$stmtSubtract=$pdo->prepare('UPDATE accountsSET amount = amount - :amountWHERE name = :name');$stmtAdd=$pdo->prepare('UPDATE accountsSET amount = amount + :amountWHERE name = :name');// Start transaction$pdo->beginTransaction();// Withdraw funds from account 1$fromAccount='Checking';$withdrawal=50;$stmtSubtract->bindParam(':name',$fromAccount);$stmtSubtract->bindParam(':amount',$withDrawal,PDO::PARAM_INT);$stmtSubtract->execute();// Deposit funds into account 2$toAccount='Savings';$deposit=50;$stmtAdd->bindParam(':name',$toAccount);$stmtAdd->bindParam(':amount',$deposit,PDO::PARAM_INT);$stmtAdd->execute();// Commit transaction$pdo->commit();
Example 5-27 wraps the withdrawal and deposit into a single database transaction. This ensures that both execute successfully or not at all. Our data remains consistent.
Multibyte Strings
PHP assumes each character in a string is an 8-bit character that occupies a single byte of memory. Unfortunately, this is a naive assumption that breaks down as soon as you work with non-English characters. You might localize your PHP application for international users. Your blog might receive comments written in Spanish, German, or Norwegian. Your users’ names might contain accented characters. My point is that you’ll often encounter multibyte characters, and you must accommodate them correctly.
When I say multibyte character, I mean any character that is not one
of the 128 characters in the traditional ASCII character set. Some
examples are ñ, ë, â, ô, à, æ, and ø. There are many
others. PHP’s default string-manipulation functions assume all strings
use only 8-bit characters. If you manipulate a Unicode string that
contains multibyte characters with PHP’s native string functions, you
will get incorrect and unexpected results.
Note
Unicode is an international standard that assigns a number to each unique character from many different languages. It is maintained by the Unicode Consortium.
You can avoid multibyte string errors by installing the
mbstring PHP extension.
This extension introduces multibyte-aware string functions
that replace most of PHP’s native string-manipulation functions. For
example, use the multibyte-aware mb_strlen() function instead of PHP’s
native strlen() function.
To this day I’m still training myself to use the mbstring multibyte
string functions instead of PHP’s default string functions. It’s a tough
habit to form, but you must use the multibyte string functions if
you work with Unicode strings. Otherwise, it’s easy for multibyte
Unicode data to become malformed.
Tip
I use the Iñtërnâtiônàlizætiøn string when testing my PHP applications
for multibyte character support.
Character Encoding
Use UTF-8. If you leave this section with one piece of advice, this is it. All modern web browsers understand UTF-8 character encoding. A character encoding is a method of packaging Unicode data in a format that can be stored in memory or sent over the wire between a server and client. The UTF-8 character encoding is just one of many available character encodings. UTF-8, however, is the most popular character encoding and is supported by all modern web browsers.
Unicode and UTF-8 Explained
Tom Scott provides the best explanation of Unicode and UTF-8 that I’ve seen. Joel Spolsky also writes a nice explanation of character encodings on his website.
Character encoding is complex and confuses a lot of developers. When you work with multibyte strings, keep this advice in mind:
-
Always know the character encoding of your data.
-
Store data with the UTF-8 character encoding.
-
Output data with the UTF-8 character encoding.
The mbstring extension doesn’t just manipulate Unicode strings. It
also converts multibyte strings between various character encodings.
This is useful when clients export Excel spreadsheet data with a
Windows-specific character encoding when what I really want is UTF-8
encoded data. Use the mb_detect_encoding() and mb_convert_encoding()
functions to convert Unicode strings from one character encoding to
another.
Output UTF-8 Data
When you work with multibyte characters, it is important that you tell PHP you are working with the UTF-8 character encoding. It’s easiest to do this in your php.ini file like this:
default_charset = "UTF-8";
The default character set is used by many PHP functions, including
htmlentities(), html_entity_decode(), htmlspecialchars(),
and the mbstring functions. This value is also added to
the default Content-Type header returned by PHP unless
explicitly specified with the header() function like this:
<?phpheader('Content-Type: application/json;charset=utf-8');
Warning
You cannot use the header() function after any output is
returned from PHP.
I also recommend you include this meta tag in your HTML document header:
<metacharset="UTF-8"/>
Streams
Streams are probably the most amazing and least used modern PHP feature. Even though streams were introduced in PHP 4.3.0, many developers still don’t know about streams because they are rarely mentioned, and they are poorly documented.
Streams were introduced with PHP 4.3.0 as a way of generalizing file, network, data compression, and other operations which share a common set of functions and uses. In its simplest definition, a stream is a resource object which exhibits streamable behavior. That is, it can be read from or written to in a linear fashion, and may be able to fseek() to an arbitrary location within the stream.
PHP Manual
That’s a mouthful, right? Let’s reduce this into something more understandable. A stream is a transfer of data between an origin and destination. That’s it. The origin and destination can be a file, a command-line process, a network connection, a ZIP or TAR archive, temporary memory, standard input or output, or any other resource available via PHP’s stream wrappers.
If you’ve read from or written to a file, you’ve used
streams. If you’ve read from php://stdin or written to
php://stdout, you’ve used streams. Streams provide the
underlying implementation for many of PHP’s IO functions like
file_get_contents(), fopen(), fgets(), and fwrite(). PHP’s stream
functions help us manipulate different stream resources (origins
and destinations) with a single interface.
Tip
I think of streams as a pipe that carries water from one location to another. As water flows through the pipe from origin to destination, we can filter the water, we can transform the water, we can add water, and we can remove water. (Hint: The water is a metaphor for data.)
Stream Wrappers
There are different types of streamable data that require unique protocols for reading and writing data. We call these protocols stream wrappers. For example, we can read and write data to the filesystem. We can talk with remote web servers via HTTP, HTTPS, or SSH (secure shell). We can open, read, and write ZIP, RAR, or PHAR archives. All of these communication methods imply the same generic process:
-
Open communication.
-
Read data.
-
Write data.
-
Close communication.
Although the process is the same, reading and writing a filesystem file is different from sending or receiving HTTP messages. Stream wrappers, however, encapsulate these differences behind a common interface.
Every stream has a scheme and a target. We specify the scheme and target in the stream’s identifier using this familiar format:
<scheme>://<target>
The <scheme> identifies the stream’s wrapper. The <target>
identifies the stream data source. Example 5-28 creates a PHP
stream to/from the Flickr API. It uses the HTTP stream wrapper.
Example 5-28. Flickr API with HTTP stream wrapper
<?php$json=file_get_contents('http://api.flickr.com/services/feeds/photos_public.gne?format=json');
Don’t be fooled by what appears to be a traditional website URL.
The file_get_contents() function’s string argument is actually
a stream identifier. The http scheme prompts PHP to use the HTTP stream
wrapper. The argument’s remainder is the stream target. The stream target
looks like a traditional website URL only because that’s what
the HTTP stream wrapper expects. This may not be true for other
stream wrappers.
Note
Reread this paragraph several times until it becomes ingrained in your memory. Many PHP developers don’t understand that a traditional URL is actually a PHP stream wrapper identifier in disguise.
The file:// stream wrapper
We use the file_get_contents(), fopen(), fwrite(), and
fclose() methods to read from and write to the filesystem.
We rarely consider these functions as using PHP streams, because
the default PHP stream wrapper is file://. We’re using PHP
streams and we don’t even realize it! Example 5-29 creates a
stream to/from the /etc/hosts file using the file:// stream wrapper.
Example 5-29. Implicit file:// stream wrapper
<?php$handle=fopen('/etc/hosts','rb');while(feof($handle)!==true){echofgets($handle);}fclose($handle);
Example 5-30 accomplishes the same task. This
example, however, explicitly specifies the file://
stream wrapper in the stream identifier.
Example 5-30. Explicit file:// stream wrapper
<?php$handle=fopen('file:///etc/hosts','rb');while(feof($handle)!==true){echofgets($handle);}fclose($handle);
We usually omit the file:// stream wrapper because PHP assumes
this is the default value.
The php:// stream wrapper
PHP developers who write command-line scripts will appreciate the
php:// stream wrapper. This stream wrapper communicates with
the PHP script’s standard input, standard output, and standard error
file descriptors. You can open, read from, and write to these four
streams with PHP’s filesystem functions:
php://stdin-
This read-only PHP stream exposes data provided via standard input. For example, a PHP script can use this stream to receive information piped into the script on the command line.
php://stdout-
This PHP stream lets you write data to the current output buffer. This stream is write-only and cannot be read or seeked.
php://memory-
This PHP stream lets you read and write data to system memory. The downside to this PHP stream is that available memory is finite. It’s safer to use the
php://tempstream instead. php://temp-
This PHP stream acts just like
php://memory, except that when available memory is gone, PHP instead writes to a temporary file.
Other stream wrappers
PHP and PHP extensions provide many other stream wrappers. For example,
there are stream wrappers to communicate with ZIP and TAR archives,
FTP servers, data-compression libraries, Amazon APIs, and more.
A popular misconception is that the fopen(), fgets(), fputs(),
feof(), fclose(), and other PHP filesystem functions are for
filesystem files only. This is not true. PHP’s filesystem functions
work with all stream wrappers that support them. For example, we can
use fopen(), fgets(), fputs(), feof(), and fclose() to
interact with a ZIP archive, Amazon S3 (with the custom
S3 wrapper), or even Dropbox (with the custom
Dropbox wrapper).
Note
Learn more about the php:// stream wrapper at PHP.net.
Custom stream wrappers
It’s also possible to write your own custom PHP stream wrapper. PHP
provides an example streamWrapper class that demonstrates how to write
a custom stream wrapper that supports some or all of the PHP filesystem
functions. Learn more about custom PHP stream wrappers at:
Stream Context
Some PHP streams accept an optional set of parameters, or a stream
context, to customize the stream’s behavior. Different stream wrappers
expect different context parameters. You create a stream
context with the stream_context_create() function. The returned
context object can be passed into and used by most PHP filesystem
and stream functions.
For example, did you know that you can send an HTTP POST request
with the file_get_contents() function? You can with a stream
context object (Example 5-31).
Example 5-31. Stream context
<?php$requestBody='{"username":"josh"}';$context=stream_context_create(array('http'=>array('method'=>'POST','header'=>"Content-Type: application/json;charset=utf-8;\r\n"."Content-Length: ".mb_strlen($requestBody),'content'=>$requestBody)));$response=file_get_contents('https://my-api.com/users',false,$context);
The stream context is an associative array whose topmost array key is the stream wrapper name. The stream context’s array values are specific to each stream wrapper. Consult the appropriate PHP stream wrapper’s documentation for a list of valid settings.
Stream Filters
So far we’ve talked about opening, reading from, and writing to PHP streams. However, the true power of PHP streams is filtering, transforming, adding, or removing stream data in transit. Imagine opening a stream to a Markdown file and converting it into HTML automatically as you read the file into memory.
Note
PHP provides several built-in stream filters, including
string.rot13, string.toupper, string.tolower, and string.strip_tags.
These are not useful. Use custom stream filters, instead.
You attach a filter to an existing stream with the stream_filter_append()
function. Example 5-32 uses the string.toupper filter to read data from a text
file on the local filesystem and convert its content to uppercase characters.
I don’t encourage using this particular stream filter. I’m only demonstrating
how to attach a filter to a stream.
Example 5-32. Stream filter string.toupper example
<?php$handle=fopen('data.txt','rb');stream_filter_append($handle,'string.toupper');while(feof($handle)!==true){echofgets($handle);// <-- Outputs all uppercase characters}fclose($handle);
You can also attach a filter to a stream with the php://filter stream wrapper.
This only works if you attach the filter when you first open the PHP stream.
Example 5-33 accomplishes the same task as the previous example, except it
attaches the filter with php://filter strategy.
Example 5-33. Stream filter string.toupper example with php://filter
<?php$handle=fopen('php://filter/read=string.toupper/resource=data.txt','rb');while(feof($handle)!==true){echofgets($handle);// <-- Outputs all uppercase characters}fclose($handle);
Pay close attention to the fopen() function’s first argument. The
argument is a stream identifier that uses the php:// stream wrapper.
This is the stream identifier target:
filter/read=<filter_name>/resource=<scheme>://<target>
This strategy may appear superfluous compared to the stream_filter_append()
function. However, some PHP filesystem functions like file() or fpassthru()
do not give you the opportunity to attach filters after the function is called.
The php://filter stream wrapper is the only way to attach stream filters
with these functions.
Let’s look at a more realistic stream filter example. At New Media Campaigns, our in-house content management system archives nginx access logs to rsync.net. We keep one log file per day, and each log file is compressed with bzip2. Log filenames use the format YYYY-MM-DD.log.bz2. I was asked to extract access data for a specific domain for the past 30 days. This seems like a lot of work, right? I need to calculate a date range, determine log filenames, FTP into rsync.net, download files, decompress files, iterate each file line-by-line, extract appropriate lines, and write access data to an output destination. Believe it or not, PHP streams let me do all of this in fewer than 20 lines of code (Example 5-34).
Example 5-34. Iterate bzipped log files with DateTime and stream filters
01<?php02$dateStart=new\DateTime();03$dateInterval=\DateInterval::createFromDateString('-1 day');04$datePeriod=new\DatePeriod($dateStart,$dateInterval,30);05foreach($datePeriodas$date){06$file='sftp://USER:PASS@rsync.net/'.$date->format('Y-m-d').'.log.bz2';07if(file_exists($file)){08$handle=fopen($file,'rb');09stream_filter_append($handle,'bzip2.decompress');10while(feof($handle)!==true){11$line=fgets($handle);12if(strpos($line,'www.example.com')!==false){13fwrite(STDOUT,$line);14}15}16fclose($handle);17}18}
In Example 5-34:
-
Lines 2–4 create a
DatePeriodinstance that spans the past 30 days using an inverted, one-day interval. -
Line 6 creates a log filename using the
DateTimeinstance returned by eachDatePerioditeration. -
Lines 8–9 open a stream resource to the log file on rsync.net with the SFTP stream wrapper. We decompress the bzip2 log file on the fly by appending the
bzip2.decompressstream filter to the log file stream resource. -
Lines 10–15 iterate the decompressed log file contents using PHP’s standard filesystem functions.
-
Lines 12–14 inspect each line for a given domain. If the domain is present, the line is written to standard output.
The bzip2.decompress stream filter lets us automatically decompress
log files as we read them. The alternative solution is manually decompressing
log files into a temporary directory with shell_exec() or bzdecompress(),
iterating the decompressed files, and cleaning up the decompressed files
when our PHP script completes. PHP streams are a simpler, more elegant solution.
Custom Stream Filters
It’s possible to write custom stream filters, too. In fact, custom stream
filters are the primary reason you use stream filters. Custom stream filters
are PHP classes that extend the php_user_filter
built-in class. The custom stream class must implement the filter(), onCreate(),
and onClose() methods. You must register custom stream filters with the
stream_filter_register() function.
Here Comes the Bucket Brigade!
A PHP stream subdivides data into sequential buckets, and each bucket contains a fixed amount of stream data (e.g., 4,096 bytes). If we use our pipe metaphor, water is carried from origin to destination in individual buckets that float through the pipe and pass through stream filters. Each stream filter receives and manipulates one or more buckets at a time. The bucket or buckets received by a filter at any given time is called a bucket brigade.
Let’s create a custom stream filter that censors dirty words from a stream
as its data is read into memory (Example 5-35). First, we must create a PHP class that
extends php_user_filter. This class must implement a filter() method that
acts as a sieve through which stream buckets pass. It receives a bucket brigade
from upstream, it manipulates each bucket object in the brigade, and it sends
each bucket into the downstream bucket brigade toward the stream destination.
This is our DirtyWordsFilter custom stream class.
Tip
Each bucket object in a bucket brigade has two public properties: data
and datalen. These are the bucket content and content length, respectively.
Example 5-35. Custom DirtyWordsFilter stream filter
classDirtyWordsFilterextendsphp_user_filter{/*** @param resource $in Incoming bucket brigade* @param resource $out Outgoing bucket brigade* @param int $consumed Number of bytes consumed* @param bool $closing Last bucket brigade in stream?*/publicfunctionfilter($in,$out,&$consumed,$closing){$words=array('grime','dirt','grease');$wordData=array();foreach($wordsas$word){$replacement=array_fill(0,mb_strlen($word),'*');$wordData[$word]=implode('',$replacement);}$bad=array_keys($wordData);$good=array_values($wordData);// Iterate each bucket from incoming bucket brigadewhile($bucket=stream_bucket_make_writeable($in)){// Censor dirty words in bucket data$bucket->data=str_replace($bad,$good,$bucket->data);// Increment total data consumed$consumed+=$bucket->datalen;// Send bucket to downstream brigadestream_bucket_append($out,$bucket);}returnPSFS_PASS_ON;}}
The filter() method receives, manipulates, and forwards buckets of stream data.
Inside the filter() function, we iterate the buckets in the
$in bucket brigade and replace dirty words with their censored
values. This method returns the PSFS_PASS_ON constant to indicate
successful operation. This method accepts four arguments:
$in-
A brigade of one or more upstream buckets that contains stream data from the stream origin
$out-
A brigade of one or more buckets that continue downstream toward the stream destination
&$consumed-
The total number of stream bytes consumed by our custom filter
$closing-
Is the
filter()method receiving the last available bucket brigade?
We must register the DirtWordsFilter custom stream filter with the
stream_filter_register() function (Example 5-36).
Example 5-36. Register custom DirtyWordsFilter stream filter
<?phpstream_filter_register('dirty_words_filter','DirtyWordsFilter');
The first argument is the filter name that identifies our custom filter. The second argument is our custom filter’s class name. We can now use our custom stream filter (Example 5-37).
Example 5-37. Use DirtyWordsFilter stream filter
<?php$handle=fopen('data.txt','rb');stream_filter_append($handle,'dirty_words_filter');while(feof($handle)!==true){echofgets($handle);// <-- Outputs censored text}fclose($handle);
Tip
If you want to learn more about PHP streams, watch Elizabeth Smith’s Nomad PHP presentation. It’s not free, but it’s worth the admission price. You can also read more about PHP streams in the PHP documentation.
Errors and Exceptions
Things go wrong. It’s a fact of life. No matter how hard we concentrate or how much time we pour into a project, there are always bugs and errors that we overlook. For example, have you ever used a PHP application that displays only a blank white page? Have you ever visited a PHP website that spits out an indecipherable stack trace? These unfortunate situations indicate an application error or uncaught exception.
Errors and exceptions are wonderful tools that help you anticipate the unexpected.
They help you catch problems and fail gracefully. Errors and exceptions,
however, are confusingly similar. They both announce when something is wrong,
they both provide an error message, and they both have an error type.
Errors, however, are older than exceptions. They are a procedural device
that halts script execution and, if possible, delegates error handling
to a global error handler function. Some errors are unrecoverable. Today we
largely rely on exceptions instead of errors, but we must still maintain a
defensive posture; many older PHP functions (e.g., fopen()) still trigger
errors when things go wrong.
Note
It’s possible to circumvent PHP errors with the @ prefix in front of
a PHP function that might trigger an error (e.g., @fopen()). This is
an antipattern. I recommend you change your code to avoid these situations.
Exceptions are an object-oriented evolution of PHP’s error handling system.
They are instantiated, thrown, and caught. Exceptions are a more flexible
device that anticipates and handles problems in situ without halting script
execution. Exceptions are also an offensive and defensive device. We must
anticipate exceptions thrown by third-party vendor code with try {} catch {}
blocks. We can also act offensively by throwing an exception; this delegates
exception handling to other developers when we don’t know how to handle a
given situation on our own.
Exceptions
An exception is an object of class Exception that is thrown when you
encounter an irreparable situation from which you cannot recover (e.g., a remote API is unresponsive, a database query fails, or a precondition
is not satisfied). I call these exceptional situations. Exceptions are
used offensively to delegate responsibility when a problem occurs, and
they are used defensively to anticipate and mitigate potential problems.
You instantiate an Exception object with the new keyword just like
any other PHP object. An Exception object has two primary properties: a
message and a numeric code. The message describes what went wrong. The
numeric code is optional and can be used to provide context for a given
exception. You provide the message and optional numeric code when you
instantiate an Exception object like this:
<?php$exception=newException('Danger, Will Robinson!',100);
You can inspect an Exception object with its getCode() and
getMessage() public instance methods like this:
<?php$code=$exception->getCode();// 100$message=$exception->getMessage();// 'Danger...'
Throw exceptions
You can assign an exception to a variable upon instantiation, but exceptions are meant to be thrown. If you write code for other developers, you must act offensively in exceptional situations, meaning you throw exceptions when your code encounters exceptional situations or cannot otherwise operate under current conditions. PHP component and framework authors, in particular, cannot presume how to handle exceptional situations; instead, they throw an exception and delegate responsibility to the developer using their code.
When an exception is thrown, code execution is immediately halted and
subsequent PHP code is not run. To throw an exception, use the throw
keyword followed by the Exception instance:
<?phpthrownewException('Something went wrong. Time for lunch!');
You can only throw an instance of class Exception (or a subclass of
Exception). PHP provides these built-in Exception subclasses:
The Standard PHP Library (SPL) supplements
PHP’s built-in exceptions with these additional Exception subclasses:
Each subclass exists for a certain situation and provides context for
why an exception is thrown. For example, if a PHP component method
expects a string argument with at least five characters but is given a
string with only two characters, it can throw an
InvalidArgumentException instance. Because PHP provides an exception
class, you can easily extend the Exception class to create your own
custom exception subclasses with their own custom properties and
methods. Which exception subclass you use is subjective. Choose or
create the exception subclass that best answers why am I throwing this
exception?, and document your choice.
Catch exceptions
Thrown exceptions should be caught and handled gracefully. You must act defensively when using PHP components and frameworks written by other developers. Good PHP components and frameworks provide documentation that explains when and under what circumstances they throw exceptions. It is your responsibility to anticipate, catch, and handle these exceptions. Uncaught exceptions terminate your PHP application with a fatal error and, worse, can expose sensitive debugging details to your PHP application’s users. We’ve all seen this. It is very important that you catch exceptions and handle them gracefully.
Surround code that might throw an exception with a try/catch block
to intercept and handle potential exceptions. Example 5-38 demonstrates
a failed PDO database connection that throws a PDOException object.
The exception is caught by the catch block, and we show a
friendly error message instead of an ugly stack trace.
Example 5-38. Catch thrown exception
<?phptry{$pdo=newPDO('mysql://host=wrong_host;dbname=wrong_name');}catch(PDOException$e){// Inspect the exception for logging$code=$e->getCode();$message=$e->getMessage();// Display a nice message to the userecho'Something went wrong. Check back soon, please.';exit;}
You can use multiple catch blocks to intercept multiple types of
exceptions. This is useful if you need to act differently based on the
type of exception thrown. You can also use a finally block to always
run a block of code after you catch any exception (Example 5-39).
Example 5-39. Catch multiple thrown exceptions
<?phptry{thrownewException('Not a PDO exception');$pdo=newPDO('mysql://host=wrong_host;dbname=wrong_name');}catch(PDOException$e){// Handle PDO exceptionecho"Caught PDO exception";}catch(Exception$e){// Handle all other exceptionsecho"Caught generic exception";}finally{// Always do thisecho"Always do this";}
In Example 5-39, the first catch block intercepts PDOException
exceptions. All other exceptions are intercepted by the second catch
block. Only one catch block is run for each caught exception. If PHP
does not find an applicable catch block, the exception continues
to bubble upward until the PHP script ultimately terminates with a
fatal error.
Exception Handlers
You may be thinking how am I supposed to catch every possible exception? And that’s a good question. PHP lets you register a global exception handler to catch otherwise uncaught exceptions. You should always set a global exception handler. An exception handler is a final safety net that lets you show an appropriate error message to your PHP application’s users if you otherwise fail to catch and handle an exception. For my own PHP applications, I use exception handlers to show debugging information during development and a user-friendly message during production.
An exception handler is anything that is callable. I prefer to use an
anonymous function, but you can also use a class method. Whatever you
choose, it must accept one argument of class Exception. You register
your exception handler with the set_exception_handler() function like
this:
<?phpset_exception_handler(function(Exception$e){// Handle and log exception});
Tip
I strongly recommend you log exceptions inside your exception handler. Your logger can alert you when things go wrong, and it saves exception details for later review.
In some situations, you may need to replace an existing exception
handler with your own exception handler. PHP etiquette suggests you
restore the existing exception handler when your code is finished.
You can restore a previous exception handler with the
restore_exception_handler() function (Example 5-40).
Example 5-40. Set global exception handler
<?php// Register your exception handlerset_exception_handler(function(Exception$e){// Handle and log exception});// Your code goes here...// Restore previous exception handlerrestore_exception_handler();
Errors
PHP provides error-reporting functions in addition to exceptions. This confuses many PHP developers. PHP can trigger different types of errors, including fatal errors, runtime errors, compile-time errors, startup errors, and (more rarely) user-triggered errors. You’ll most often encounter PHP errors caused by syntax mistakes or uncaught exceptions.
The difference between errors and exceptions is subtle. Errors are often
triggered when a PHP script cannot fundamentally run as expected for
whatever reason (e.g., there is a syntax mistake). It is also possible
to trigger your own errors with the trigger_error() function and
handle them with a custom error handler, but it is better to use
exceptions when writing userland code. Unlike errors, PHP exceptions can
be thrown and caught at any level of your PHP application. Exceptions
provide more contextual information than PHP errors. And you can extend
the topmost Exception class with your own custom exception
subclasses. Exceptions and a good logger like Monolog are a far more
versatile solution than PHP errors. However, modern PHP developers must
anticipate and handle both PHP errors and PHP exceptions.
You can instruct PHP which errors to report, and which to ignore, with
the error_reporting() function or the error_reporting directive in
your php.ini file. Both accept named E_* constants that determine
which errors are reported and which are ignored.
Note
Learn more about PHP error reporting at http://php.net/manual/function.error-reporting.php.
PHP error reporting can be as sensitive or stoic as you tell it to be. In development, I prefer PHP to obnoxiously display and log all error messages. In production, I instruct PHP to log most error messages but not display them. Whatever you do, you should always follow these four rules:
-
Always turn on error reporting.
-
Display errors during development.
-
Do not display errors during production.
-
Log errors during development and production.
Here are my error-reporting php.ini settings for development:
; Display errorsdisplay_startup_errors=Ondisplay_errors=On; Report all errorserror_reporting=-1; Turn on error logginglog_errors=On
Here are my error-reporting php.ini settings for production:
; DO NOT display errorsdisplay_startup_errors=Offdisplay_errors=Off; Report all errors EXCEPT noticeserror_reporting=E_ALL & ~E_NOTICE; Turn on error logginglog_errors=On
The main difference is that I display errors in my PHP script output during development. I do not display errors in my PHP script output in production. However, I log errors in both environments. If I have a bug in my production PHP application (and this never happens…cough), I can review my PHP log file for details.
Error Handlers
Just as you can with exception handlers, you can set a global error handler to intercept and handle PHP errors with your own logic. The error handler lets you fail gracefully by cleaning up loose ends before terminating the PHP script.
An error handler, like an exception handler, is anything that is
callable (e.g., a function or class method). It is your responsibility
to die() or exit() inside of your error handler. If you don’t
manually terminate the PHP script inside your error handler, the PHP
script will continue executing from where the error occurred.
You register your global error handler with the set_error_handler(),
and you pass it an argument that is callable:
<?phpset_error_handler(function($errno,$errstr,$errfile,$errline){// Handle error});
Your error-handler callable receives five arguments:
$errno-
The error level (maps to a PHP
E_*constant). $errstr-
The error message.
$errfile-
The filename in which the error occurred.
$errline-
The file line number on which the error occurred.
$errcontext-
An array that points to the active symbol table when the error occurred. This is optional and is only useful for advanced debugging purposes. I usually ignore this argument.
There’s one important caveat that you absolutely must know when using a
custom error handler. PHP will send all errors to your error handler,
even those that are excluded by your current error-reporting setting. It
is your responsibility to inspect each error code (the first argument)
and act appropriately. You can instruct your error handler to only
respond to a subset of error types with a second argument to the
set_error_handler() function; this argument is a bitwise mask of E_*
constants (e.g., E_ALL | E_STRICT).
This is as good a time as any to segue into a common practice that I
and many other PHP developers use in our PHP applications. I like to
convert PHP errors into ErrorException objects. The ErrorException
class is a subclass of Exception, and it comes built into PHP. This
lets me convert PHP errors into exceptions and funnel them into my
existing exception handling workflow.
Note
Not all errors can be converted into exceptions! These errors include
E_ERROR, E_PARSE, E_CORE_ERROR, E_CORE_WARNING,
E_COMPILE_ERROR, E_COMPILE_WARNING, and most of E_STRICT.
Converting PHP errors is a bit tricky, and we must be careful to convert
only the errors that satisfy the error_reporting setting in our
php.ini file. Here’s an example error-handler function that converts
PHP errors into ErrorException objects:
<?phpset_error_handler(function($errno,$errstr,$errfile,$errline){if(!(error_reporting()&$errno)){// Error is not specified in the error_reporting// setting, so we ignore it.return;}thrownew\ErrorException($errstr,$errno,0,$errfile,$errline);});
This error-handler function converts the appropriate PHP errors into
ErrorException objects and throws them into our existing exception-handling system. It is considered good etiquette to restore the previous
error handler (if any) after your own code is done. You can restore the
previous handler with the restore_error_handler() function (Example 5-41).
Example 5-41. Set global error handler
<?php// Register error handlerset_error_handler(function($errno,$errstr,$errfile,$errline){if(!(error_reporting()&$errno)){// Error is not specified in the error_reporting// setting, so we ignore it.return;}thrownewErrorException($errstr,$errno,0,$errfile,$errline);});// Your code goes here...// Restore previous error handlerrestore_error_handler();
Errors and Exceptions During Development
We know we should display errors during development. But PHP’s default error messages are ugly and often injected into the normal PHP script output, resulting in a hard-to-read mess. Use Whoops instead. Whoops is a modern PHP component that provides a well-designed, easy-to-read diagnostics page for PHP errors and exceptions. Whoops, created and maintained by Filipe Dobreira and Denis Sokolov, looks like Figure 5-1.
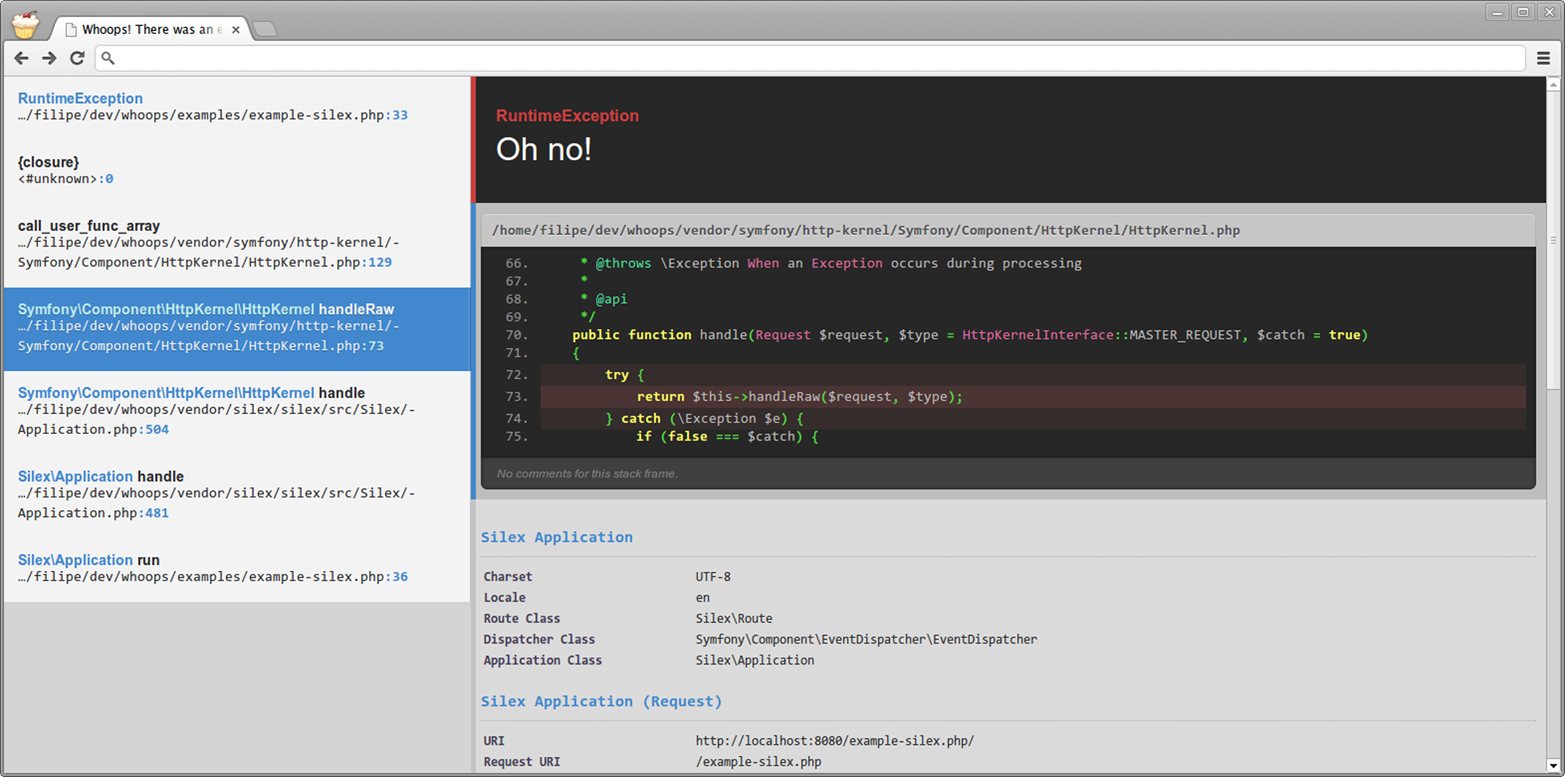
Figure 5-1. Whoops screenshot
The Whoops diagnostic screen is light years better than the default PHP error and exception output.
Whoops is easy to implement, too. Update your composer.json file
as shown below, and run either composer install or composer update:
{"require":{"filp/whoops":"~1.0"}}
Next, register the Whoops error and exception handlers in your PHP application’s bootstrap file, as shown in Example 5-42.
Example 5-42. Register the Whoops handler
<?php// Use composer autoloaderrequire'path/to/vendor/autoload.php';// Setup Whoops error and exception handlers$whoops=new\Whoops\Run;$whoops->pushHandler(new\Whoops\Handler\PrettyPageHandler);$whoops->register();
That’s it. When your script triggers a PHP error or when your application does not catch an exception, you’ll see the Whoops diagnostic screen.
Example 5-42 uses the Whoops PrettyPageHandler handler, which
creates the diagnostic screen shown in Figure 5-1. There are
other Whoops handlers, too, including a plain-text handler, a callback
handler, a JSON response handler, an XML response handler, and (if your
pointy-haired boss likes to say the word enterprise a lot) a SOAP
response handler. I use Whoops during development for each application I develop.
Production
We know we should log errors in production. PHP provides the
error_log() function to write messages to the filesystem, to syslog,
or into an email. But there’s a better option, and it’s called
Monolog. Monolog is a very good
PHP component that specializes in one thing—logging. It’s
easy to integrate into your PHP applications with Composer.
First, require the monolog/monolog package in your composer.json file:
{"require":{"monolog/monolog":"~1.11"}}
Next, install the component with either composer install or
composer update, and add the code from Example 5-43 to the top of your PHP application’s bootstrap file.
Example 5-43. Use Monolog for development logging
<?php// Use Composer autoloaderrequire'path/to/vendor/autoload.php';// Import Monolog namespacesuseMonolog\Logger;useMonolog\Handler\StreamHandler;// Setup Monolog logger$log=newLogger('my-app-name');$log->pushHandler(newStreamHandler('path/to/your.log',Logger::WARNING));
That’s it. You now have a Monolog logger that will write all logged
messages of type Logger::WARNING or higher to the path/to/your.log file.
Monolog is very extensible. You can define multiple handlers that
only handle specific log levels. For example, we can push a second Monolog
handler that emails an administrator for critical, alert, or emergency
errors. We’ll need the SwiftMailer PHP component, so let’s add
that to the composer.json file and run composer update:
{"require":{"monolog/monolog":"~1.11","swiftmailer/swiftmailer":"~5.3"}}
Next, we’ll modify our code and add a new Monolog handler that accepts a SwiftMailer instance to send email messages (Example 5-44).
Example 5-44. Use Monolog for production logging
<?php// Use Composer autoloaderrequire'vendor/autoload.php';// Import Monolog namespacesuseMonolog\Logger;useMonolog\Handler\StreamHandler;useMonolog\Handler\SwiftMailerHandler;date_default_timezone_set('America/New_York');// Setup Monolog and basic handler$log=newLogger('my-app-name');$log->pushHandler(newStreamHandler('logs/production.log',Logger::WARNING));// Add SwiftMailer handler for critical errors$transport=\Swift_SmtpTransport::newInstance('smtp.example.com',587)->setUsername('USERNAME')->setPassword('PASSWORD');$mailer=\Swift_Mailer::newInstance($transport);$message=\Swift_Message::newInstance()->setSubject('Website error!')->setFrom(array('daemon@example.com'=>'John Doe'))->setTo(array('admin@example.com'));$log->pushHandler(newSwiftMailerHandler($mailer,$message,Logger::CRITICAL));// Use logger$log->critical('The server is on fire!');
Now when a critical, alert, or emergency message is logged, Monolog
emails the logged message using the SwiftMailer $mailer and $message
objects. The email body is the logged message text.