Table of Contents for
Getting Started with OpenShift
 Getting Started with OpenShift
Published by
O'Reilly Media, Inc., 2014
Getting Started with OpenShift
Published by
O'Reilly Media, Inc., 2014
- Cover
- Getting Started With OpenShift
- Getting Started With OpenShift
- Preface
- 1. Introduction
- 2. Creating Applications
- 3. Making Code Modifications
- 4. Adding Application Components
- 5. Environment and Application Management
- 6. Library Dependencies
- 7. Networking
- 8. Disk Usage
- 9. Backup
- 10. Team Collaboration
- 11. Summary
- A. Basic Linux for Non-Linux Users
- Colophon
- Copyright
Chapter 2. Creating Applications
Since this is a guide for the impatient, we are going to dig right in and create our first application. In this chapter we are going to spin up a plain Python application without any code dependencies. Like we said in the Preface, we chose Python because it is easy to read. The goal is for you to get comfortable with the syntax for creating OpenShift applications; you do not need to know Python to understand this book. Again, we are just using Python to illustrate the patterns of working with OpenShift; this book will most definitely not make you a Python expert.
Preliminary Steps
Before you get started, you’ll need to do two things:
- Sign up for an OpenShift account.
- Install the RHC command-line tools. While you can also use the web interface or the Eclipse plug-in, we believe the command-line tools offer the best opportunity to experience the full power of developing applications on OpenShift. If you would like to know more about creating and managing your applications through the Web Console or an IDE, see the links in Online Resources.
In the next section, we will explain the rhc setup command.
Setting Up the Command-Line Tools
Once you have installed the client tools, you need to configure them to work with your OpenShift Online account. To do this, use the following command:
$ rhc setup
Executing this command sets up your command-line tools to talk to the OpenShift servers. When you run this command, the following things will happen:
- RHC will talk to the OpenShift server and make sure your OpenShift username and password are valid. All the interactions between the command-line tools and the OpenShift servers use the OpenShift REST API.
- RHC creates a token on your local machine that saves you from having to authenticate against the REST API each time. This token will expire after 30 days, forcing you to authenticate again.
- RHC will prompt you to create a namespace. Your namespace will be part of all your application URLs and has to be unique on OpenShift. Our recommendation is to make it short but somehow related to you. You can change it later, but it will change all your application URLs.
- Finally, the tool will check to see if you have an SSH key pair named id_rsa and id_rsa.pub. If you do, it will upload the public key (.pub) to the OpenShift server. If you don’t have a key pair with these names it will create a pair for you and then ask to upload the public key. You need a key uploaded so you can carry out all the day-to-day development interactions with the server. After it uploads the key, your setup is complete.
Creating Your First Application
With our RHC setup complete, we are ready to create our first application. For the purposes of this book, we are going to create a Python application. In actuality you could use any of the supported web cartridges to make an application. The list of cartridges grows pretty rapidly, so if you want to see the full list of cartridges on OpenShift, please execute the following command:
$ rhc cartridge list
You can also create your own cartridges. We are not going to cover how to create a cartridge in this book, since we consider that topic to be an advanced use case. Besides, if we talked about it here, how could you write about it when you write your OpenShift book? We cover much more about cartridges in Finding Cartridges and QuickStarts.
Before you make an application, use the command line to create or navigate into the directory where you would like your application code to be created. At the end of application creation, the command-line tools will clone the application’s Git repository to your local machine in the same directory where you executed the command.
Let’s create an app!
Here’s the syntax for creating an OpenShift application:
$ rhc app create app_name web_language
or:
rhc app create app_name web_language other cartridges
And here is how we use this command to create an application named insultapp using the Python 2.7 cartridge:
[me@localhost ~]$ rhc app create insultapp python-2.7
Application Options
--------------------
Domain:     osbeginnerbook
Cartridges: python-2.7
Gear Size:  default
Scaling:    no

Creating application 'insultapp' ... done

Waiting for your DNS name to be available ... done

Cloning into 'insultapp'...
The authenticity of host 'insultapp-osbeginnerbook.rhcloud.com (19.66.2.6)'
can't be established.
RSA key fingerprint is 4e:65:76:72:47:6f:6e:6e:61:47:69:76:65:55:55:70.
Are you sure you want to continue connecting (yes/no)? yes
Warning: Permanently added 'insultapp-osbeginnerbook.rhcloud.com' (RSA) to the
list of known hosts.

Your application 'insultapp' is now available.

  URL:        http://insultapp-osbeginnerbook.rhcloud.com/
  SSH to:     6e7672676e61676976757570@insultapp-osbeginnerbook.rhcloud.com
  Git remote: ssh://6e7672676e61676976757570@insultapp-osbeginnerbook.
  rhcloud.com/~/git/insultapp.git/
  Cloned to:  /home/me/insultapp

Run 'rhc show-app insultapp' for more details about your app.
That’s it! When the command finishes executing you will have an Apache HTTP server with mod_wsgi running in the cloud. It will have a public URL, which will have the form http://insultapp-<namespace>.rhcloud.com. It will also have a private Git repository that has been cloned to your local machine, in a directory with the same name as your application.
We could have made our app a scalable application (meaning each cartridge goes on its own gear) by passing in the -s flag. You would do this if you wanted to make sure your cartridges were not sharing resources or you wanted to enable the application server tier to scale (manually or automatically) from the database tier. We will discuss this further in the next section.
We could also pass in the -g flag to use gear sizes other than the default (small) size. On OpenShift Online’s free tier you only have access to the small gears, but if you move into the paid tiers you can get a medium or large gear, which has more RAM. Please see Reasons to Move to the Paid Tier to understand other reasons to move into the paid tier.
Finally, we could use the --from-code option to point to a publicly accessible Git repository to serve as the template for our application. We could have done that in this example, but we are going to build the example application by hand instead. One caveat with this flag is that when OpenShift tries to create the gear, the application has to download and build the Git repository within a particular time period. If the rhc create command times out before the build and deploy occurs, then OpenShift will roll back the entire application and you will be left with nothing except the bitter taste of disappointment. Use this feature with caution for now.
Tip
To delete OpenShift applications, use the command rhc app delete. This will trash all your resources in the application on the OpenShift servers and allow you to use the resources in a new application.
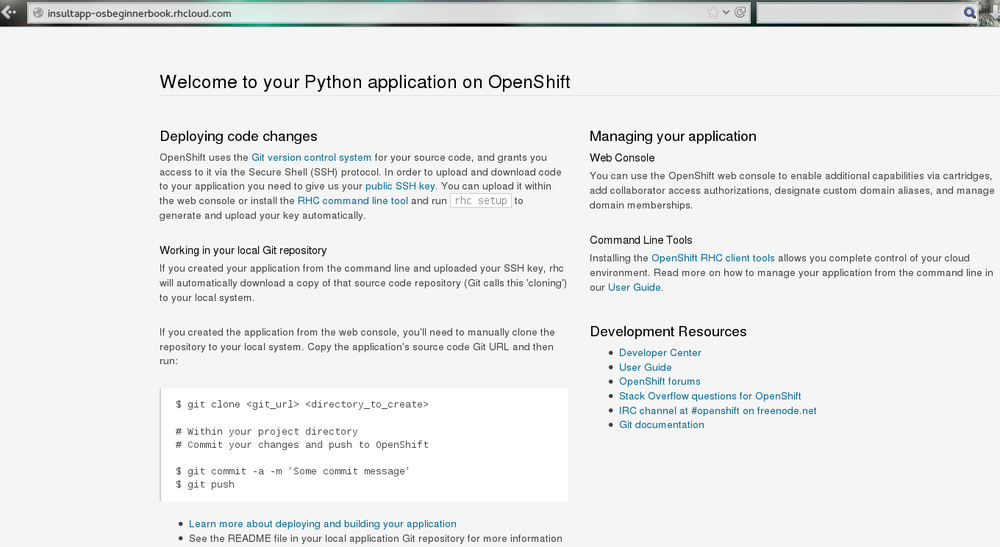
Go ahead and look at your web page. What you should see is the template page created for all OpenShift applications (Figure 2-1). This page is pretty generic. In the next chapter, we will modify the application and deploy the code changes. Take a step back and marvel at what you just did. With one command you spun up Apache with mod_wsgi, allocated disk space, configured logging, configured Linux permissions, registered an IP address with a DNS server, and made both a remote and a local Git repository. With that little bit of typing you have a fully functional application development hosting environment. This is the magic of OpenShift, and your development process may never be the same again.
Autoscaling and Why You Should Use It by Default
OpenShift is the only PaaS on the market that provides autoscaling at the application tier. We have not used it here for the sake of simplicity, but if we were going to run an app in the “real world,” we would make it scalable. When you make an application scalable, a software-based load balancer called HAProxy will be added to the same gear as the application server. All web traffic to the application will then be routed through HAProxy. Currently, if the number of active connections goes above 16—whether they are regular HTTP or WebSocket connections—HAProxy will trigger the creation of another application gear. OpenShift will spin up another app server gear, rsync the code over to the new gear, plug the gear into HAProxy, and then start using it to serve connections. If the connections later drop back below the threshold for long enough for it not to be considered random noise, HAProxy will trigger the draining of connections and OpenShift will spin down the gear.
All of this happens without any human intervention, so you do not have to wake up in the middle of the night or take time out from sailing around the world on your yacht (wouldn’t that be nice). Of course, OpenShift lets you set a maximum number of gears for application server use so you are not surprised by some large bill at the end of the month, thereby ending your yacht trip.
As we have taught more and more classes and seen more and more people using OpenShift, we have arrived at the conclusion that almost all apps should be created as scalable applications. There are several reasons for this:
- Your application server, your database server, and any other servers you put in your application will each go on their own gears and therefore not compete for disk, memory, or other resources. This will give you much better performance compared to nonscaling, where they all run in the same gear.
- It gives you more flexibility if you start to experience more load on your application. You can set the scaling limits for the application tier to accommodate the new traffic.
- It will allow you to scale up manually if you know a big event is coming up and you want to warm up the servers beforehand.
- There is no command to make a nonscalable application into a scalable application. If you want to make a nonscalable app scalable, you will need to snapshot it, spin up a new scalable application, and then restore it to the new application (see Application Snapshots with RHC for information about snapshots).
You are given enough resources in the free tier to make your application scalable, so there is really no reason why you shouldn’t do this by default.
Reasons to Move to the Paid Tier
Everything we do in this book can be carried out using the free tier of OpenShift, but there are strong reasons why you might want to move into one of the paid tiers as your application becomes more serious. We will call out some of the benefits as we discuss topics in the following chapters, such as the ability to use your own SSL certificates. However, for the sake of gathering them in one place, we have included a short list here:
- Your application will never be idled. Currently on the free tier, if there are no HTTP connections to your application for 48 hours, OpenShift idles the gear. Idling means OpenShift will serialize the entire application to disk. The next HTTP request to the application will have to wait while OpenShift deserializes the application. Please be aware that the time before idling could change; look at the OpenShift website for the latest information. If you are a paid-tier user, then your users will never experience the delay of the application coming back from idling.
- You gain the ability to buy more gears, thereby allowing you to create more applications. With more gears you can also allow your applications to scale to handle more traffic.
- You gain the ability to buy larger gears, which can be crucial for memory-hungry application servers.
- You gain the ability to purchase premium application servers for more than three gears or on larger gears, such as JBoss EAP or Zend Server. You get to use these application servers on three small gears in the free tier, but the paid tier allows you to buy more and put them on more appropriately sized gears.
- You gain the ability to get access to more disk space, beyond the 1 GB that comes with the free tier.
- You can use your own SSL certificates with your custom domain names.
- Some of the tiers provide the ability to open support tickets.
There is certainly no requirement to use the paid tier, but there are numerous reasons you may find yourself wanting to take advantage of what it has to offer.