Table of Contents for
Maintainable JavaScript
 Maintainable JavaScript
Published by
O'Reilly Media, Inc., 2012
Maintainable JavaScript
Published by
O'Reilly Media, Inc., 2012
- Cover
- Maintainable JavaScript
- Maintainable JavaScript
- Introduction
- Preface
- I. Style Guidelines
- 1. Basic Formatting
- 2. Comments
- 3. Statements and Expressions
- 4. Variables, Functions, and Operators
- II. Programming Practices
- 5. Loose Coupling of UI Layers
- 6. Avoid Globals
- 7. Event Handling
- 8. Avoid Null Comparisons
- 9. Separate Configuration Data from Code
- 10. Throw Your Own Errors
- 11. Don’t Modify Objects You Don’t Own
- 12. Browser Detection
- III. Automation
- 13. File and Directory Structure
- 14. Ant
- 15. Validation
- 16. Concatenation and Baking
- 17. Minification and Compression
- 18. Documentation
- 19. Automated Testing
- 20. Putting It Together
- A. JavaScript Style Guide
- B. JavaScript Tools
- Index
- About the Author
- Colophon
- Copyright
Chapter 20. Putting It Together
The preceding chapters about the build system focused on creating small pieces of a build system, creating a library of utilities that could easily be put together later. This chapter focuses on assembling the system into an end-to-end solution for your JavaScript. For your final system, you may have more complex functionality and may choose to use a bundled set of tasks such as Buildr, but there are still some common pieces of functionality that all build systems have.
Missing Pieces
Before putting together the build system, there are a couple of small steps that are
missing. The first is the creation of the build
directory. As this directory is transient (and won’t be checked in), the
build system is responsible for its creation. The <mkdir> Ant task handles this easily:
<target name="init">
    <mkdir dir="${build.dir}"/>
</target>
The init target just does one
thing: create the build directory so all the built files have a place to
be put. It’s possible that other tasks, such as <concat>, may end up making this directory
if it doesn’t already exist. However, it’s best to explicitly state each
step of the build process to ensure that reordering of tasks or targets
doesn’t cause errors.
The second missing piece is the cleanup of the
build directory. In between builds, you want to
remove all files and start over from scratch. The fastest way to do that
is simply to delete the build directory using
the <delete>
task:
<target name="clean">
    <delete dir="${build.dir}"/>
</target>
The clean target removes the
build directory so you’re certain to get the latest
files.
Planning the Build
To put the build system pieces together in the correct order, it helps to think about your development process and the different build types you’ll need. It’s very rare for a project to have a single build type and much more common for there to be at least three:
- Development
A development build is run by developers as they are working. This build should be as fast as possible so as not to interrupt developer productivity. Generally speaking, you want to prevent accidental errors and get the code into good testing shape so that developers can load it into the browser for hands-on testing. This build should take no more than 15 seconds, so you need to choose what you’re doing carefully. If you’re working on a web application, you may want to have a separate JavaScript development build that can be run independently of the overall web application build. This is also typically the default build.
- Integration
An automated build that is run on a regular schedule. These are sometimes run for each commit, but on large projects, they tend to be run on intervals for a few minutes. The integration build is responsible for finding problems in the entire system. Because it’s automated, this build can take longer to complete but must be as thorough as possible. In some cases, the integration build is the last line of defense before pushing changes to production.
- Release
An on-demand build that is run only prior to a production push. This build’s job is mostly to get the code into its final form so that it can be deployed. In theory, if the integration build did its job, then the release build shouldn’t have errors. In practice, that’s not always the case. The release build may be responsible for a few more tasks that could also cause errors before deployment.
Of course, your project have many more build types depending on your development process.
Your build.xml should always start out looking like this:
<project name="yourapp" default="build.dev">

    <!-- import properties -->
    <loadproperties srcfile="yourapp.properties" />

    <!-- define or import utility targets here -->

    <!-- initialization and cleanup -->
    <target name="init">
        <mkdir dir="${build.dir}"/>
    </target>

    <target name="clean">
        <delete dir="${build.dir}"/>
    </target>

    <!-- main builds -->
    <target name="build.dev">
    </target>

    <target name="build.int">
    </target>

    <target name="build.release">
    </target>

</project>
Make sure to begin by importing the properties file(s) to get all of
the data needed for the targets. Then, either include or import the
utility targets such as those created in the preceding build system
chapters. Sometimes it helps to keep the utility targets in one or more
separate XML files, but ultimately it’s up to you. After that, the
init and clean targets round out the utility targets. The
final section contains targets for each build type.
The Development Build
The development build is important to get correct because it
affects every developer’s workflow. Generally speaking, the goal of the
development build is to get the code into the development environment as
quickly as possible while still performing some sanity checks. Most
development builds do just two things: validate the code and then
concatenate the files. Because developers need the full source code for
debugging, there is no point in minifying code at this point. Here’s how
the build.dev target looks:
<project name="yourapp" default="build.dev">

    <!-- omitted for clarity -->

    <!-- main builds -->
    <target name="build.dev" depends="clean,init,validate,concatenate">
    </target>

</project>
All of the primary build targets should look this simple, as they
are simply tying together other targets in a particular order. The
build.dev target specifies that it
depends on the clean, init, validate, and concatenate targets to work. So running
ant build.dev runs those four targets
and does nothing else. As mentioned earlier, you should always ensure
that you’re starting with freshly built files, so be sure to remove old
files first. Because the concatenate
target also places the built files into the correct directory, the
build.dev target is complete and
should result in all the code being ready for use.
Note
It’s optional, but you might want to include testing in the
development build or to let developers run ant test separately on their own. Keep in
mind that testing takes more time due to the need to set up and tear
down browser instances.
The Integration Build
The integration build runs automatically as part of a continuous integration (CI) system, so it has more steps to complete. Because this build is the main defense against errors, it should include as much validation and testing as possible. At a minimum, it should do everything the development build does plus unit testing. This is also a good location to place documentation generation so that other developers can see what changes have been made to the code. Here’s a sample:
<project name="yourapp" default="build.dev">

    <!-- omitted for clarity -->

    <!-- main builds -->
    <target name="build.int depends="build.dev,minify,test,document">
    </target>

</project>
The build.int target first runs
build.dev to complete the validation
and concatenation of code. Next, the code is minified, then tested, and
then documented. If this build breaks, it should cause the CI system to
report an issue appropriately. Some systems sends out emails, others
make visual changes to a stability dashboard. In any case, breaking the
integration build is a matter that needs to be addressed quickly so that
other developers aren’t blocked.
Note
You may want to include documentation generation in its own automated build. The reason is that a failure to generate documentation doesn’t necessarily mean that the code is broken. It might be that the document generator is broken for some reason. Once again, this largely depends on your development process and what you think is important enough to stop and fix before continuing.
The Release Build
The release build is the finish line of the development process. It is this build that ensures that code is fit for production. By the time code gets to the release build, it should have been validated and tested, both automatically and manually, and should therefore mostly be ready. In some cases, the only thing a release build needs to do is bake the files, inserting copyrights, version numbers, or other associated metadata. Here’s an example:
<project name="yourapp" default="build.dev">

    <!-- omitted for clarity -->

    <!-- main builds -->
    <target name="build.release" depends="build.int,bake">
    </target>

</project>
The build.release target simply
runs an integration build and then bakes the files. You might also want
the release build to handle deploying of files to a server. In the case
of JavaScript, this is typically done as part of a larger deployment
build process for the web application or project rather than as part of
the release build. However, you can certainly include a task to upload
files to a server or perform other distribution tasks.
Note
Another option for the release build is to simply take the output from the integration build and bake it before deployment. Doing so can save time and, assuming there were no errors in the integration build, ensure that you’re deploying the exact same code that was tested. Once again, this choice is very project-specific, so be sure to discuss it with your team.
Using a CI System
Just using a build system is a good first step in creating a maintainable project. The next step is to integrate your build system into a CI system. CI systems run builds automatically based on certain actions or regular intervals. For instance, you might run a build once an hour to get all of the latest checked-in files deployed to an integration environment. If that fails, it may send emails to the developers asking them to fix any issues. Having a CI system is an important part of any good software project. Fortunately, there are some excellent free resources for CI.
Jenkins
Jenkins is one of the most widely used CI systems. It is a Java-based web application that is designed for managing multiple builds. It integrates with several source control repositories by default and can support almost any others through an extensive plugin library. Jenkins works natively with Ant as well as shell scripts, meaning that you can reuse any existing build scripts with Jenkins.
Setting up Jenkins is quite easy; just download the latest WAR file and start it:
java -jar jenkins.war
Jenkins starts up a web server accessible at http://localhost:8080/. Navigate to that location in your web browser, and you’re ready to start creating build jobs.
A job is a collection of build steps to execute. Click the “New Job” link to create your first job. The next page asks you to select which type of job you’d like to create. If you’re just using Ant for your build system, then select “Build a free-style software project.” After creating the new job, you’re taken to a configuration page.
There are some basic options on the configuration page, but the
really interesting parts start lower on the page, with the section
called “Build Triggers.” This is where you decide how frequently the
build should run. It can be triggered after another build finishes, on a
timed schedule, or based on check-ins to source control. For your
primary integration build, you’ll probably want to kick off the build
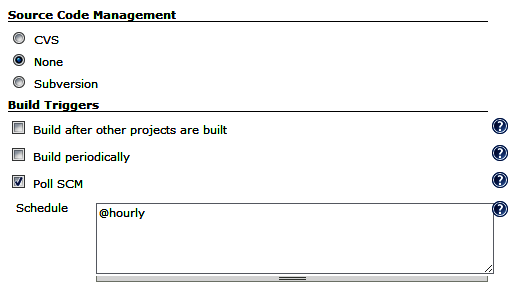
based on check-ins, so the last option works well. “Poll SCM” means that
Jenkins will poll your source control system (as specified in the
previous section). The poll format is the same as setting up a cron job
on a Linux system, so @hourly works
for checking source control each hour (see Figure 20-1).
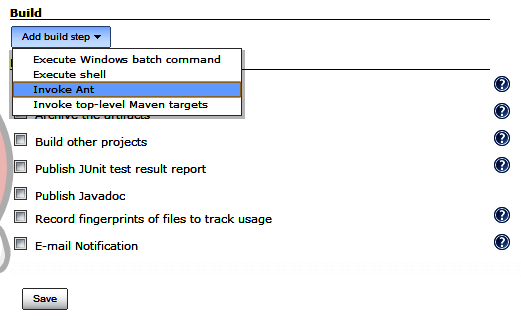
Next, you set up the job to execute one or more Ant targets. To do so, click the “Add Build Step” button to display a drop-down menu of options. Select “Invoke Ant.” A new build step appears in the page asking you to specify the Ant targets to execute (see Figure 20-2).
If you’re using Jenkins with source control, it will automatically
find the build.xml file in your root directory, so you need specify only the Ant
target name. If you’re setting up the integration build, for example,
then enter build.int
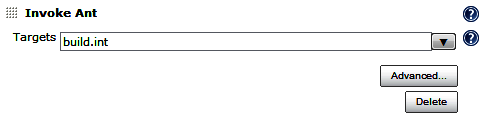
If you’re not using a build.xml file in the project root, or not using Jenkins with source control, then click on the “Advanced” button and you can specify the path to your build.xml file manually.
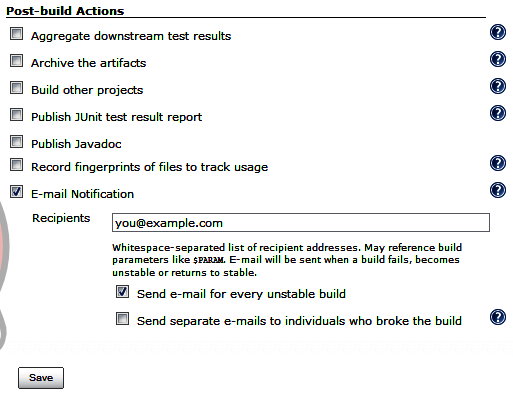
After that, you can specify to send an email when the build fails. Jenkins allows you to specify the email address that should always be used for this notification, as well as for sending emails to the committers who broke the build (using source control to retrieve the email address). It’s a good idea to always send an email when the build didn’t succeed (see Figure 20-4).
Once you’re done setting up email notifications, click “Save” at the bottom of the page to save the build job. Your build job will now execute once an hour; however, you can manually run the build at any time by going to Jenkins and clicking the “Build Now” link.
This is just a brief introduction to Jenkins and the power of continuous integration. There are many, many more things you can do with Jenkins, such as tracking the results of unit tests, publishing build logs, setting up dependent builds, and more. The Jenkins website is a great resource for learning more about the various options available.
Other CI Systems
CI is a popular area for research, so new solutions are coming out all the time. Here are some other free CI systems you may want to consider:
- Continuum
An Apache project for CI designed to work with Ant and Maven. It is available at http://continuum.apache.org.
- BuildBot
A Python-based build system targeted at engineers. It is available at http://trac.buildbot.net.
- Cruise Control
Another Java-based build system that works as a web application. Ruby and .NET ports also exist. It is available at http://cruisecontrol.sourceforge.net.
- Gradle
Uses a Groovy-based language on top of Ant and Maven for CI. A little bit difficult for nonprogrammers to work with. It is available at http://www.gradle.org.