Table of Contents for
Maintainable JavaScript
 Maintainable JavaScript
Published by
O'Reilly Media, Inc., 2012
Maintainable JavaScript
Published by
O'Reilly Media, Inc., 2012
- Cover
- Maintainable JavaScript
- Maintainable JavaScript
- Introduction
- Preface
- I. Style Guidelines
- 1. Basic Formatting
- 2. Comments
- 3. Statements and Expressions
- 4. Variables, Functions, and Operators
- II. Programming Practices
- 5. Loose Coupling of UI Layers
- 6. Avoid Globals
- 7. Event Handling
- 8. Avoid Null Comparisons
- 9. Separate Configuration Data from Code
- 10. Throw Your Own Errors
- 11. Don’t Modify Objects You Don’t Own
- 12. Browser Detection
- III. Automation
- 13. File and Directory Structure
- 14. Ant
- 15. Validation
- 16. Concatenation and Baking
- 17. Minification and Compression
- 18. Documentation
- 19. Automated Testing
- 20. Putting It Together
- A. JavaScript Style Guide
- B. JavaScript Tools
- Index
- About the Author
- Colophon
- Copyright
Chapter 5. Loose Coupling of UI Layers
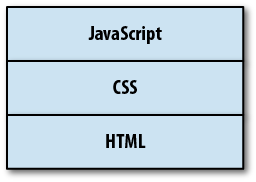
In web development, the user interface (UI) is defined by three separate layers working together:
These UI layers are usually pictured as HTML being at the base, with CSS and JavaScript layers on top, as displayed in Figure 5-1.
In reality, though, CSS and JavaScript are more like siblings rather than JavaScript having a dependency on CSS. It’s possible to have a page with just HTML and CSS without any JavaScript, and it’s possible to have a page with just HTML and JavaScript without any CSS. I prefer to think of the relationship between these three layers as displayed in Figure 5-2.
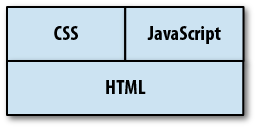
Thinking of CSS and JavaScript being of the same stature in an overall web user interface allows for more possibilities and eliminates dependencies. For example, JavaScript shouldn’t rely on CSS to function correctly—it should be able to function independently of the CSS, even if there is some interaction between the two.
Each layer of a web UI is a piece of a larger system that must be maintained. HTML, CSS, and JavaScript are often written so tightly coupled that it’s impossible to make small changes without changing one or two other layers. In a large-scale web application, this type of design is a big problem, especially on teams in which the same people aren’t responsible for the HTML, CSS, and JavaScript. In such situations, loose coupling becomes very important.
What Is Loose Coupling?
Many design patterns are actually solutions to the problem of tight coupling. If
two components are tightly coupled, it means that one component has direct
knowledge of the other in such a way that a change to one of the
components often necessitates a change to the other component. For
example, suppose you have a CSS class named error that is used throughout a website,
embedded in HTML. If one day you decide that error isn’t the right name for the class and you
want to change it to warning, you’ll
have to edit not just the CSS but also all of the HTML using that class.
The HTML is tightly coupled to the CSS. This is just a simple example.
Imagine what a nightmare it is when a system has dozens or hundreds of
components.
Loose coupling is achieved when you’re able to make changes to a single component without making changes to other components. Loose coupling is essential to the maintainability of large systems for which more than one person is responsible for the development and maintenance of code. You absolutely want developers to be able to make changes in one area of the code without breaking what other developers are doing in a different area of code.
Loose coupling is achieved by limiting each component’s knowledge of the larger system. In essence, every component needs to be as dumb as possible to ensure loose coupling. The less a component knows, the better off the entire system tends to be.
One thing to keep in mind: there is no such thing as no coupling between components that work together. In any system, there will necessarily be some knowledge shared between components in order to do their job. That’s okay. The goal is to ensure that changes in one component don’t require changes in multiple places on a regular basis.
A web UI that is loosely coupled is easier to debug. Issues with text or structure are addressed by looking just at HTML. When stylistic issues arise, you know the problem and the fix will be in the CSS. Finally, if there are behavioral issues, you can go straight to the JavaScript to address the problem. This ability is a key part of a maintainable web interface.
Keep JavaScript Out of CSS
There was a feature in Internet Explorer 8 and earlier that some loved and many hated: CSS expressions. CSS expressions allow you to insert JavaScript directly into CSS, performing calculations or other functionality directly inside CSS code. For example, the following code sets the width of an element to match the width of the browser:
/* Bad */
.box {
    width: expression(document.body.offsetWidth + "px");
}
The CSS expression is enclosed in the special expression() function,
which accepts any JavaScript code. CSS expressions are reevaluated
frequently by the browser and were considered to be bad for performance,
even making it into Steve Souders’s book High Performance Web
Sites as something to avoid (Rule 7: Avoid CSS
Expressions).
Aside from the performance issues, having JavaScript embedded inside
of CSS is a maintenance nightmare, and one with which I have firsthand
experience. In 2005, I had a JavaScript bug assigned to me that had me
baffled from the start. It occurred only in Internet Explorer and happened
only when the browser window was resized a few times. At that point in
time, the best JavaScript debugger for Internet Explorer was Visual
Studio, but it failed to locate the source of the problem. I spent an
entire day setting breakpoints and inserting alert() statements to try to figure out what was
happening.
By the end of the day, I had resigned myself to my least favorite debugging method: systematic removal of code. I removed JavaScript, file by file, and tried to reproduce the issue. I quickly became frustrated and simply removed all JavaScript from the page. The bug was still happening. I look at my computer screen in disbelief. A JavaScript error without any JavaScript on the page—how is that even possible?
To this day, I’m still not sure what led me finally to look at the CSS. I wasn’t even sure what I was looking for at that point. I just started at the top of the CSS and slowly scrolled down to see if anything would jump out at me. Finally, I saw the CSS expression that was the source of the problem. When I removed it, the JavaScript error went away.
This experience is what led me to the rules in this chapter. I spent an entire day looking for a JavaScript bug in JavaScript when it was actually in CSS. The actual error wasn’t even difficult to solve, but tracking down the error in a part of the system in which I (reasonably) didn’t expect to find it was ridiculously time consuming.
Fortunately, Internet Explorer 9 removed support for CSS expressions, but older versions of Internet Explorer are still in use around the world. Even though it’s tempting to use a CSS expression to make up for some of the missing functionality in these older browsers, resist the urge and save yourself a lot of time and effort. Keep JavaScript out of your CSS.
Keep CSS Out of JavaScript
Keeping this clean separation between CSS and JavaScript can be
challenging at times. These two languages work quite well together, so it
is tempting to manipulate style data within JavaScript. The most popular
way to script style changes is through the use of the style property on any DOM element. The style property is an
object containing properties that allow you to read and change CSS
properties. For instance, you can change the text color of an element to
red like this:
// Bad
element.style.color = "red";
It’s actually quite common to see large blocks of code using
style to change multiple properties,
such as:
// Bad
element.style.color = "red";
element.style.left = "10px";
element.style.top = "100px";
element.style.visibility = "visible";
This approach is problematic, because the style information is now located inside of JavaScript instead of CSS. When there is a style problem, you should be able to go straight to the CSS to find and resolve the issue. You wouldn’t stop to consider that the style information is in JavaScript until you’d exhausted all other possibilities.
Another way developers use the style object is to set an entire CSS string via
the cssText property, as in
the following example:
// Bad
element.style.cssText = "color: red; left: 10px; top: 100px; visibility: hidden";
Using the cssText property is
just a shortcut to set multiple CSS properties at once. This pattern has
the same problem as setting individual properties: keeping style
information inside of your JavaScript is a maintenance problem.
Keeping CSS out of JavaScript means that all style information still lives in CSS. When JavaScript needs to change the style of an element, the best way to do so is by manipulating CSS classes. For instance, to reveal a dialog box on the page, define a class in your CSS such as this:
.reveal {
    color: red;
    left: 10px;
    top: 100px;
    visibility: visible;
}
Then, in JavaScript, add the class to the element in question:
// Good - Native
element.className += " reveal";

// Good - HTML5
element.classList.add("reveal");

// Good - YUI
Y.one(element).addClass("reveal");

// Good - jQuery
$(element).addClass("reveal");

// Good - Dojo
dojo.addClass(element, "reveal");
Think of CSS class names as the communication mechanism between CSS and JavaScript. JavaScript is free to add and remove class names from elements throughout the life cycle of the page. The styles applied by the classes are defined in the CSS code. Those styles may change at any point in time in the CSS without necessitating a JavaScript update. JavaScript should not be manipulating styles directly so that it stays loosely coupled to the CSS.
Note
There is one instance in which using the style property is acceptable: when you need to
position an element on the page relative to another element or the size
of the page itself. This type of calculation can’t be done in CSS, so it
is okay to use style.top, style.left, style.bottom, and style.right to position an element correctly.
The CSS class for the element should have a logical default value that
is then overridden in script.
Keep JavaScript Out of HTML
One of the first things people do when they learn JavaScript is start
embedding it within HTML. There are any number of ways to do this. The
first is to assign event handlers by using the on attributes such as onclick:
<!-- Bad -->
<button onclick="doSomething()" id="action-btn">Click Me</button>
This is how most websites with JavaScript were coded around the year
2000. HTML was littered with onclick
and other event handlers as attributes of elements. Although this code
will work in most situations, it represents tight coupling of two UI
layers (HTML and JavaScript), so there are several problems with
it.
First, the doSomething() function
must be available when the button is clicked. Those who
developed websites around 2000 are quite familiar with this problem. The
code for doSomething() may be loaded
from an external file or may occur later in the HTML file. Either way,
it’s possible for a user to click the button before the function is
available and cause a JavaScript error. The resulting error message may
pop up to the user or cause the button to appear to do nothing. Either
case is undesirable.
The second problem is a maintenance issue. What happens if you want
to change the name of doSomething()?
What happens if the button should now call a different function when
clicked? In both cases, you’re making changes to both the JavaScript and
the HTML; this is the very essence of tightly coupled code.
Most—if not all—of your JavaScript should be contained in external
files and included on the page via a <script> element.
The on attributes should not be used
for attaching event handlers in HTML. Instead, use JavaScript methods for
adding event handlers once the external script has been loaded. For DOM
Level 2–compliant browsers, you can achieve the same behavior in the
previous example by using this code:
function doSomething() {
    // code
}

var btn = document.getElementById("action-btn");
btn.addEventListener("click", doSomething, false);
The advantage of this approach is that the function doSomething() is defined in the same file as the
code that attatches the event handler. If the function name needs to
change, there is just one file that needs editing; if the button should do
something else when clicked, there is still just one place to go to make
that change.
Internet Explorer 8 and earlier versions don’t support addEventListener(), so
you may need a function to normalize the difference:
function addListener(target, type, handler) {
    if (target.addEventListener) {
        target.addEventListener(type, handler, false);
    } else if (target.attachEvent) {
        target.attachEvent("on" + type, handler);
    } else {
        target["on" + type] = handler;
    }
}
This function is capable of adding an event handler for an element
in any browser, even falling back to the DOM Level 0 approach of assigning
a handler to the on property of an
object (this step would be necessary only for very old browsers such as
Netscape 4, but it’s always good to cover your bases). This method is used
as follows:
function doSomething() {
    // code
}

var btn = document.getElementById("action-btn");
addListener(btn, "click", doSomething);
If you’re using a JavaScript library, you should use the library’s methods for adding an event handler to an element. Here are some common examples for popular libraries:
// YUI
Y.one("#action-btn").on("click", doSomething);

// jQuery
$("#action-btn").on("click", doSomething);

// Dojo
var btn = dojo.byId("action-btn");
dojo.connect(btn, "click", doSomething);
Another way of embedding JavaScript in HTML is to use the <script> element with inline code:
<!-- Bad -->
<script>
    doSomething();
</script>
It’s best to keep all JavaScript in external files and to keep inline JavaScript code out of your HTML. Part of the reason for this approach is to aid in debugging. When a JavaScript error occurs, your first inclination is to start digging through your JavaScript files to find the issue. If the JavaScript is located in the HTML, that’s a workflow interruption. You first have to determine whether the JavaScript is in the JavaScript files (which it should be) or in the HTML. Only then can you start debugging.
This point might seem minor, especially given today’s excellent web development tools, but it is actually an important piece of the maintenance puzzle. Predictability leads to faster debugging and development, and knowing (not guessing) where to start with a bug is what leads to faster resolutions and better overall code quality.
Keep HTML Out of JavaScript
Just as it’s best to keep JavaScript out of HTML, it’s also best to keep HTML out of JavaScript. As mentioned previously, when there is a text or structural issue to debug, you want to be able to go to the HTML to start debugging. Many times in my career I’ve had trouble tracking down such an issue because I was looking at the HTML when in fact the real issue was buried deep inside JavaScript.
HTML frequently ends up in JavaScript as a consequence of using
the innerHTML property, as
in:
// Bad
var div = document.getElementById("my-div");
div.innerHTML = "<h3>Error</h3><p>Invalid e-mail address.</p>";
Embedding HTML strings inside your JavaScript is a bad practice for a number of reasons. First, as mentioned previously, it complicates tracking down text and structural issues. The typical approach for debugging perceived markup issues is to first look at the DOM tree in the browser’s inspector, then look at the HTML source of the page to find differences. Tracking down these issues becomes more problematic when JavaScript is doing more than simple DOM manipulation.
The second problem with this approach is maintainability. If you need to change text or markup, you want to be able to go to one place: the place where you manage HTML. This may be in PHP code, a JSP file, or even a template such as Mustache or Handlebars. Regardless of the mechanism used, you want all of your markup to be in one location so that it can be easily updated. Markup embedded within JavaScript isn’t as accessible for changes, because it’s unexpected. Why would you think to go into your JavaScript to make a markup change when most of the markup is located inside of a directory of template files?
It’s far less error prone to edit markup than it is to edit JavaScript. By placing HTML into JavaScript, you’ve complicated the problem. JavaScript strings require proper escaping of quote characters, meaning that the markup needs slightly different syntax than it would in templates.
Because most web applications are quite dynamic in nature and JavaScript is often used to change the UI during the life cycle of the page, it is definitely necessary to use JavaScript to insert or otherwise manipulate markup on the page. There are several ways to accomplish this in a loosely coupled manner.
Alternative #1: Load from the Server
The first is to keep the templates remote and use an XMLHttpRequest object to retrieve additional markup. This approach is more
convenient for single-page applications than for multiple-page
applications. For instance, clicking on a link that should bring up a
new dialog box might look like this:
function loadDialog(name, oncomplete) {

    var xhr = new XMLHttpRequest();
    xhr.open("get", "/js/dialog/" + name, true);

    xhr.onreadystatechange = function() {

        if (xhr.readyState == 4 && xhr.status == 200) {

            var div = document.getElementById("dlg-holder");
            div.innerHTML = xhr.responseText;
            oncomplete();

        } else {
            // handle error
        }
    };

    xhr.send(null);
}
So instead of embedding the HTML string in the JavaScript, JavaScript is used to request the string from the server, which allows the markup to be rendered in whatever way is most appropriate before being injected into the page. JavaScript libraries make this process a bit easier by allowing you to load remote markup directly into a DOM element. Both YUI and jQuery have simple APIs for accomplishing this:
// YUI
function loadDialog(name, oncomplete) {
    Y.one("#dlg-holder").load("/js/dialog/" + name, oncomplete);
}

// jQuery
function loadDialog(name, oncomplete) {
    $("#dlg-holder").load("/js/dialog/" + name, oncomplete);
}
Using remote calls to inject markup is also useful when you need to inject a large amount of HTML into the page. For performance reasons, it’s typically not a good idea to keep large amounts of unused markup in memory or in the DOM. For smaller markup chunks, you may want to consider client-side templates.
Alternative #2: Simple Client-Side Templates
Client-side templates are markup pieces with slots that must be filled by JavaScript in order to be complete. For example, a template to add an item to a list might look like this:
<li><a href="%s">%s</a></li>
This template has %s
placeholders for the area in which text should be inserted (this is the
same format as sprintf() from C). The
intent is for JavaScript to replace these placeholders with real data
before injecting the result into the DOM. Here’s the function to use
with it:
function sprintf(text) {
    var i=1, args=arguments;
    return text.replace(/%s/g, function() {
        return (i < args.length) ? args[i++] : "";
    });
}

// usage
var result = sprintf(templateText, "/item/4", "Fourth item");
Getting the template text into JavaScript is an important part of this process. Naturally, you don’t want the template text embedded inside of your JavaScript any more than you want markup embedded there. Templates are typically defined in the same area as other markup and are made accessible to JavaScript by embedding them directly in the HTML page, which is done in one of two ways. The first is to include the template as an HTML comment. Comments are DOM nodes just like elements and text, so they can be queried and their content extracted using JavaScript. For example:
<ul id="mylist"><!--<li id="item%s"><a href="%s">%s</a></li>-->
    <li><a href="/item/1">First item</a></li>
    <li><a href="/item/2">Second item</a></li>
    <li><a href="/item/3">Third item</a></li>
</ul>
The comment is placed in the proper context for its usage, as the first child of the list it will be used in. The following JavaScript retrieves the template text from the comment:
var mylist          = document.getElementById("mylist"),
    templateText    = mylist.firstChild.nodeValue;
Once the template text is retrieved, it just needs to be formatted and inserted into the DOM. All of this is accomplished with the following function:
function addItem(url, text) {
    var mylist          = document.getElementById("mylist"),
        templateText    = mylist.firstChild.nodeValue,
        result          = sprintf(templateText, url, text);

    mylist.insertAdjacentHTML("beforeend", result);
}

// usage
addItem("/item/4", "Fourth item");
This method processes the template text with the given information
and then injects the resulting HTML using insertAdjacentHTML(). This step turns the HTML string into a DOM node and appends it
as a child to the <ul>.
The second way of embedding templates into an HTML page is by
using a <script> element with a
custom type property.
Browsers assume that code in <script> elements are JavaScript by
default, but you can tell the browser that it is not JavaScript be
specifying a type that it won’t
understand. For example:
<script type="text/x-my-template" id="list-item">
    <li><a href="%s">%s</a></li>
</script>
You can then retrieve the template text by using the text property of
the <script> element:
var script          = document.getElementById("list-item"),
    templateText    = script.text;
The addItem() function would then change to:
function addItem(url, text) {
    var mylist          = document.getElementById("mylist"),
        script          = document.getElementById("list-item"),
        templateText    = script.text,
        result          = sprintf(templateText, url, text),
        div             = document.createElement("div");

    div.innerHTML = result.replace(/^\s*/, "");
    mylist.appendChild(div.firstChild);
}

// usage
addItem("/item/4", "Fourth item");
One of the changes in this version of the function is to strip any
leading white space that may be in the template. This extra white space
occurs because the template is on the line after the opening <script> tag. Injecting the template
as-is would result in a white space text node being created inside
<div>, and that text node would
end up being added to the list instead of the <li>.
Alternative #3: Complex Client-Side Templates
The templating format used in the previous section is quite simplistic and doesn’t do any escaping. For more robust templating, you may want to consider a solution such as Handlebars. Handlebars is a complete client-side templating system designed to work with JavaScript in the browser.
Handlebars templates use double braces to indicate placeholders. Here’s a Handlebars version of the template from the previous section:
<li><a href="{{url}}">{{text}}</a></li>The placeholders in Handlebars templates are named so that they
correspond to named values in JavaScript. Handlebars suggests embedding
the template in an HTML page using a <script> element with a type of
text/x-handlebars-template:
<script type="text/x-handlebars-template" id="list-item">
    <li><a href="{{url}}">{{text}}</a></li>
</script>
To use the template, you first must include the Handlebars
JavaScript library on your page, which creates a global variable called
Handlebars that is used to compile
the template text into a function:
var script          = document.getElementById("list-item"),
    templateText    = script.text,
    template        = Handlebars.compile(script.text);
The variable template now contains a function that, when
executed, returns a formatted string. All you need to do is pass in an
object containing the properties text and
url:
var result = template({
    text: "Fourth item",
    url: "/item/4"
});
As part of formatting the result, the arguments are automatically
HTML-escaped, preventing security issues and ensuring that simple text
values don’t break your markup. For example, the character “&” is
automatically escaped to &.
Putting it all together into a single function:
function addItem(url, text) {
    var mylist          = document.getElementById("mylist"),
        script          = document.getElementById("list-item"),
        templateText    = script.text,
        template        = Handlebars.compile(script.text),
        div             = document.createElement("div"),
        result;

    result = template({
        text: text,
        url: url
    });

    div.innerHTML = result;
    list.appendChild(div.firstChild);
}

// usage
addItem("/item/4", "Fourth item");
This simple example doesn’t truly show the flexibility of Handlebars. In addition to simple placeholder replacement, Handlebars allows you to put simple logic and looping into your templates.
Suppose you want to render an entire list rather than an item, but you want to do that only if there are actually items to render. You can create a Handlebars template that looks like this:
{{#if items}}
<ul>
    {{#each items}}
    <li><a href="{{url}}">{{text}}</a></li>
    {{/each}}
</ul>
{{/if}
The {{#if}} block helper
prevents the enclose markup from being rendered unless the items array has at least one item. The
{{#each}} block helper then iterates
over each item in the array. So you compile the template into a function
and then pass in an object with an items property, as in the following
example:
// return an empty string
var result = template({
    items: []
});

// return HTML for a list with two items
var result = template({
    items: [
        {
            text: "First item",
            url: "/item/1"
        },
        {
            text: "Second item",
            url: "/item/2"
        }
    ]
});
Handlebars has other block helpers as well—all designed to bring powerful templating to JavaScript.