Table of Contents for
Learning Node
 Learning Node
Published by
O'Reilly Media, Inc., 2012
Learning Node
Published by
O'Reilly Media, Inc., 2012
- Cover
- Learning Node
- Learning Node
- A Note Regarding Supplemental Files
- Preface
- 1. Node.js: Up and Running
- 2. Interactive Node with REPL
- 3. The Node Core
- 4. The Node Module System
- 5. Control Flow, Asynchronous Patterns, and Exception Handling
- 6. Routing Traffic, Serving Files, and Middleware
- 7. The Express Framework
- 8. Express, Template Systems, and CSS
- 9. Structured Data with Node and Redis
- 10. Node and MongoDB: Document-Centric Data
- 11. The Node Relational Database Bindings
- 12. Graphics and HTML5 Video
- 13. WebSockets and Socket.IO
- 14. Testing and Debugging Node Applications
- 15. Guards at the Gate
- 16. Scaling and Deploying Node Applications
- A. Node, Git, and GitHub
- Index
- About the Author
- Colophon
- Copyright
Chapter 2. Interactive Node with REPL
While you’re exploring the use of Node and figuring out the code for your custom module or Node application, you don’t have to type JavaScript into a file and run it with Node to test your code. Node also comes with an interactive component known as REPL, or read-eval-print loop, which is the subject of this chapter.
REPL (pronounced “repple”) supports a simplified Emacs style of line editing and a small set of basic commands. Whatever you type into REPL is processed no differently than if you had typed the JavaScript into a file and run the file using Node. You can actually use REPL to code your entire application—literally testing the application on the fly.
In this chapter, I’ll also cover some interesting quirks of REPL, along with some ways you can work around them. These workarounds include replacing the underlying mechanism that persists commands, as well as using some command-line editing.
Lastly, if the built-in REPL doesn’t provide exactly what you need for an interactive environment, there’s also an API to create your own custom REPL, which I’ll demonstrate in the latter part of the chapter.
Note
You’ll find a handy guide for using REPL at http://docs.nodejitsu.com/articles/REPL/how-to-use-nodejs-repl. The Nodejitsu site also provides a nice tutorial on how to create a custom REPL at http://docs.nodejitsu.com/articles/REPL/how-to-create-a-custom-repl.
REPL: First Looks and Undefined Expressions
To begin REPL, simply type node without providing any Node application
file, like so:
$ node
REPL then provides a command-line prompt—an angle bracket (>)—by default. Anything you type from this point on is processed by the underlying V8 JavaScript engine.
REPL is very simple to use. Just start typing in your JavaScript, like you’d add it to a file:
> a = 2;
2
The tool prints out the result of whatever expression you just
typed. In this session excerpt, the value of the expression is 2. In the following, the expression result is an
array with three elements:
> b = ['a','b','c'];
[ 'a', 'b', 'c' ]
To access the last expression, use the underscore/underline
character (_). In the following, a is
set to 2, and the resulting expression
is incremented by 1, and then 1 again:
> a = 2;
2
> _ ++;
3
> _ ++;
4
You can even access properties or call methods on the underscored expression:
> ['apple','orange','lime']
[ 'apple', 'orange', 'lime' ]
> _.length
3
> 3 + 4
7
> _.toString();
'7'
You can use the var keyword with REPL in
order to access an expression or value at a later time, but you might get
an unexpected result. For instance, the following line in REPL:
var a = 2;
doesn’t return the value 2, it
returns a value of undefined. The
reason is that the result of the expression is undefined, since variable
assignment doesn’t return a result when evaluated.
Consider the following instead, which is what’s happening, more or less, under the hood in REPL:
console.log(eval('a = 2'));
console.log(eval('var a = 2'));
Typing the preceding lines into a file and running that file using Node returns:
2
undefined
There is no result from the second call to eval, and hence the value returned is undefined. Remember, REPL is a read-eval-print
loop, with emphasis on the eval.
Still, you can use the variable in REPL, just as you would in a Node application:
> var a = 2;
undefined
> a++;
2
> a++;
3
The latter two command lines do have results, which are printed out by REPL.
Note
I’ll demonstrate how to create your own custom REPL—one that
doesn’t output undefined—in the
section Custom REPL.
To end the REPL session, either press Ctrl-C twice, or Ctrl-D once. We’ll cover other ways to end the session later, in REPL Commands.
Benefits of REPL: Getting a Closer Understanding of JavaScript Under the Hood
Here’s a typical demonstration of REPL:
> 3 > 2 > 1;
false
This code snippet is a good example of how REPL can be useful. At
first glance, we might expect the expression we typed to evaluate to
true, since 3 is greater than 2, which
is greater than 1. However, in JavaScript, expressions are evaluated left
to right, and each expression’s result is returned for the next
evaluation.
A better way of looking at what’s happening with the preceding code snippet is this REPL session:
> 3 > 2 > 1;
false
> 3 > 2;
true
> true > 1;
false
Now the result makes more sense. What’s happening is that the
expression 3 > 2 is evaluated, returning true. But then the value of true is compared to the numeric 1. JavaScript
provides automatic data type conversion, after which true and 1 are equivalent values. Hence,
true is not greater than 1, and the
result is false.
REPL’s helpfulness is in enabling us to discover these little
interesting quirks in JavaScript. Hopefully, after testing our code in
REPL, we don’t have unexpected side effects in our applications (such as
expecting a result of true but getting
a result of false).
Multiline and More Complex JavaScript
You can type the same JavaScript into REPL just like you’d
type it into a file, including require statements to
import modules. A session to try out the Query String (qs) module is repeated in the following
text:
$ node
> qs = require('querystring');
{ unescapeBuffer: [Function],
  unescape: [Function],
  escape: [Function],
  encode: [Function],
  stringify: [Function],
  decode: [Function],
  parse: [Function] }
> val = qs.parse('file=main&file=secondary&test=one').file;
[ 'main', 'secondary' ]
Since you didn’t use the var keyword, the
expression result is printed out—in this instance, the interface for the
querystring object. How’s
that for a bonus? Not only are you getting access to the object, but
you’re also learning more about the object’s interface while you’re at it.
However, if you want to forgo the potentially lengthy output of text, use
the var keyword:
> var qs = require('querystring');You’ll be able to access the querystring object with
the qs variable with either
approach.
In addition to being able to incorporate external modules, REPL gracefully handles multiline expressions, providing a textual indicator of code that’s nested following an opening curly brace ({):
> var test = function (x, y) {
... var val = x * y;
... return val;
... };
undefined
> test(3,4);
12
REPL provides repeating dots to indicate that everything that’s being typed follows an open curly brace and hence the command isn’t finished yet. It does the same for an open parenthesis, too:
> test(4,
... 5);
20
Increasing levels of nesting generates more dots; this is necessary in an interactive environment, where you might lose track of where you are, as you type:
> var test = function (x, y) {
... var test2 = function (x, y) {
..... return x * y;
..... }
... return test2(x,y);
... }
undefined
> test(3,4);
12
>
You can type in, or copy and paste in, an entire Node application and run it from REPL:
> var http = require('http');
undefined
> http.createServer(function (req, res) {
...
...   // content header
...   res.writeHead(200, {'Content-Type': 'text/plain'});
...
...   res.end("Hello person\n");
... }).listen(8124);
{ connections: 0,
  allowHalfOpen: true,
  _handle:
   { writeQueueSize: 0,
     onconnection: [Function: onconnection],
     socket: [Circular] },
  _events:
   { request: [Function],
     connection: [Function: connectionListener] },
  httpAllowHalfOpen: false }
>
undefined
> console.log('Server running at http://127.0.0.1:8124/');
Server running at http://127.0.0.1:8124/
Undefined
You can access this application from a browser no differently than if you had typed the text into a file and run it using Node. And again, the responses back from REPL can provide an interesting look at the code, as shown in the boldfaced text.
In fact, my favorite use of REPL is to get a quick look at objects.
For instance, the Node core object global is sparsely
documented at the Node.js website. To get a better look, I opened up a
REPL session and passed the object to the console.log method like
so:
> console.log(global)
I could have done the following, which has the same result:
> gl = global;
I’m not replicating what was displayed in REPL; I’ll leave that for
you to try on your own installation, since the interface for global is so large. The
important point to take away from this exercise is that we can, at any
time, quickly and easily get a quick look at an object’s interface. It’s a
handy way of remembering what a method is called, or what properties are
available.
Note
There’s more on global in Chapter 3.
You can use the up and down arrow keys to traverse through the commands you’ve typed into REPL. This can be a handy way of reviewing what you’ve done, as well as a way of editing what you’ve done, though in a somewhat limited capacity.
Consider the following session in REPL:
> var myFruit = function(fruitArray,pickOne) {
... return fruitArray[pickOne - 1];
... }
undefined
> fruit = ['apples','oranges','limes','cherries'];
[ 'apples',
  'oranges',
  'limes',
  'cherries' ]
> myFruit(fruit,2);
'oranges'
> myFruit(fruit,0);
undefined
> var myFruit = function(fruitArray,pickOne) {
... if (pickOne <= 0) return 'invalid number';
... return fruitArray[pickOne - 1];
... };
undefined
> myFruit(fruit,0);
'invalid number'
> myFruit(fruit,1);
'apples'
Though it’s not demonstrated in this printout, when I modified the
function to check the input value, I actually arrowed up through the
content to the beginning function declaration, and then hit Enter to
restart the function. I added the new line, and then again used the arrow
keys to repeat previously typed entries until the function was finished. I
also used the up arrow key to repeat the function call that resulted in an
undefined result.
It seems like a lot of work just to avoid retyping something so simple, but consider working with regular expressions, such as the following:
> var ssRe = /^\d{3}-\d{2}-\d{4}$/;
undefined
> ssRe.test('555-55-5555');
true
> var decRe = /^\s*(\+|-)?((\d+(\.\d+)?)|(\.\d+))\s*$/;
undefined
> decRe.test(56.5);
true
I’m absolutely useless when it comes to regular expressions, and have to tweak them several times before they’re just right. Using REPL to test regular expressions is very attractive. However, retyping long regular expressions would be a monstrous amount of work.
Luckily, all we have to do with REPL is arrow up to find the line where the regular expression was created, tweak it, hit Enter, and continue with the next test.
In addition to the arrow keys, you can also use the Tab key to
autocomplete text. As an example, type
va at the command line and then
press Tab; REPL will autocomplete var. You can also
use the Tab key to autocomplete any global or local variable. Table 2-1
offers a quick summary of keyboard commands that work with REPL.
Keyboard entry | What it does |
Ctrl-C | Terminates current command. Pressing Ctrl-C twice forces an exit. |
Ctrl-D | Exits REPL. |
Tab | Autocompletes global or local variable. |
Up arrow | Traverses up through command history. |
Down arrow | Traverses down through command history. |
Underscore (_) | References result of last expression. |
If you’re concerned about spending a lot of time coding in REPL with
nothing to show for it when you’re done, no worries: you can save the
results of the current context with the .save command. It and the
other REPL commands are covered in the next section.
REPL Commands
REPL has a simple interface with a small set of useful
commands. In the preceding section, I mentioned .save. The .save command saves
your inputs in the current object context into a file. Unless you
specifically created a new object context or used the .clear command, the
context should comprise all of the input in the current REPL
session:
> .save ./dir/session/save.js
Only your inputs are saved, as if you had typed them directly into a file using a text editor.
Here is the complete list of REPL commands and their purposes:
.breakIf you get lost during a multiline entry, typing
.breakwill start you over again. You’ll lose the multiline content, though..clearResets the context object and clears any multiline expression. This command basically starts you over again.
.exitExits REPL.
.helpDisplays all available REPL commands.
.saveSaves the current REPL session to a file.
.loadLoads a file into the current session (
.load /path/to/file.js).
If you’re working on an application using REPL as an editor,
here’s a hint: save your work often using .save. Though current
commands are persisted to history, trying to recreate your code from
history would be a painful exercise.
Speaking of persistence and history, now let’s go over how to customize both with REPL.
REPL and rlwrap
The Node.js website documentation for REPL mentions
setting up an environmental variable so you can use REPL with rlwrap. What is rlwrap, and why would you use it with
REPL?
The rlwrap utility is a wrapper
that adds GNU readline library
functionality to command lines that allow increased flexibility with
keyboard input. It intercepts keyboard input and provides additional
functionality, such as enhanced line editing, as well as a persistent
history of commands.
You’ll need to install rlwrap
and readline to use this facility
with REPL, though most flavors of Unix provide an easy package
installation. For instance, in my own Ubuntu system, installing rlwrap was this simple:
apt-get install rlwrap
Mac users should use the appropriate installer for these applications. Windows users have to use a Unix environmental emulator, such as Cygwin.
Here’s a quick and visual demonstration of using REPL with
rlwrap to change the REPL prompt to
purple:
env NODE_NO_READLINE=1 rlwrap -ppurple node
If I always want my REPL prompt to be purple, I can add an alias to my bashrc file:
alias node="env NODE_NO_READLINE=1 rlwrap -ppurple node"
To change both the prompt and the color, I’d use the following:
env NODE_NO_READLINE=1 rlwrap -ppurple -S "::>" node
Now my prompt would be:
::>
in purple.
The especially useful component of rlwrap is its ability to persist history
across REPL sessions. By default, we have access to command-line history
only within a REPL session. By using rlwrap, the next time we access REPL, not only
will we have access to a history of commands within the current session,
but also a history of commands in past sessions (and other command-line
entries). In the following session output, the commands shown were not
typed in, but were instead pulled from history with the up arrow
key:
# env NODE_NO_READLINE=1 rlwrap -ppurple -S "::>" node
::>e = ['a','b'];
[ 'a', 'b' ]
::>3 > 2 > 1;
false
As helpful as rlwrap is, we still end
up with undefined every time we type
in an expression that doesn’t return a value. However, we can adjust
this, and other functionality, just by creating our own custom REPL,
discussed next.
Custom REPL
Node provides us access to creating our own custom REPL.
To do so, first we need to include the REPL module (repl):
var repl = require("repl");To create a new REPL, we call the start method on the
repl object. The syntax
for this method is:
repl.start([prompt], [stream], [eval], [useGlobal], [ignoreUndefined]);
All of the parameters are optional. If not provided, default values will be used for each as follows:
I find the undefined expression
result in REPL to be unedifying, so I created my own REPL. It took
exactly two lines of code (not including the comment):
repl = require("repl");

// start REPL with ignoreUndefined set to true
repl.start("node via stdin> ", null, null, null, true);
I ran the file, repl.js, using Node:
node repl.js
Then I used the custom REPL just like I use the built-in version,
except now I have a different prompt and no longer get the annoying
undefined after the first variable
assignment. I do still get the
other responses that aren’t undefined:
node via stdin> var ct = 0;
node via stdin> ct++;
0
node via stdin> console.log(ct);
1
node via stdin> ++ct;
2
node via stdin> console.log(ct);
2
In my code, I wanted the defaults for all but prompt and ignoreUndefined. Setting the other parameters
to null triggers Node to use the
default values for each.
You can replace the eval function with your
custom REPL. The only requirement is that it has a specific
format:
function eval(cmd, callback) {
   callback(null, result);
}
The stream option is
interesting. You can run multiple versions of REPL, taking input from
both the standard input (the default), as well as sockets. The
documentation for REPL at the Node.js site provides an example of a REPL
listening in on a TCP socket, using code similar to the
following:
var repl = require("repl"),
net = require("net");
// start REPL with ignoreUndefined set to true
repl.start("node via stdin> ", null, null, null, true);
net.createServer(function (socket) {
repl.start("node via TCP socket> ", socket);
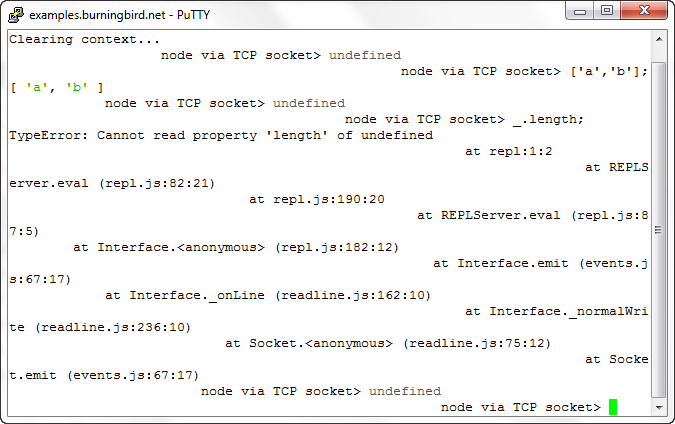
}).listen(8124);When you run the application, you get the standard input
prompt where the Node application is running. However, you can also
access REPL via TCP. I used PuTTY as a Telnet client to access this
TCP-enabled version of REPL. It does work...to a point. I had to issue a
.clear first, the
formatting is off, and when I tried to use the underscore to reference
the last expression, Node didn’t know what I was talking about, as shown
in Figure 2-1.
I also tried with the Windows 7 Telnet client, and the response was even worse. However, using my Linux Telnet client worked without a hitch.
The problem here, as you might expect, is Telnet client settings.
However, I didn’t pursue it further, because running REPL from an
exposed Telnet socket is not something I plan to implement, and not
something I would recommend, either—at least, not without heavy
security. It’s like using eval() in
your client-side code, and not scrubbing the text your users send you to
run—but worse.
You could keep a running REPL and communicate via a Unix socket with something like the GNU Netcat utility:
nc -U /tmp/node-repl-sock
You can type in commands no differently than typing them in using
stdin. Be aware, though, if you’re using either a TCP
or Unix socket, that any console.log commands
are printed out to the server console, not to the client:
console.log(someVariable); // actually printed out to server
An application option that I consider to be more useful is to
create a REPL application that preloads modules. In the application in
Example 2-1, after the
REPL is started, the http, os, and util modules are loaded
and assigned to context properties.
var repl = require('repl');
var context = repl.start(">>", null, null, null, true).context;

// preload in modules
context.http = require('http');
context.util = require('util');
context.os = require('os');
Running the application with Node brings up the REPL prompt, where we can then access the modules:
>>os.hostname();
'einstein'
>>util.log('message');
5 Feb 11:33:15 - message
>>
If you want to run the REPL application like an executable in Linux, add the following line as the first line in the application:
#!/usr/local/bin/node
Modify the file to be an executable and run it:
# chmod u+x replcontext.js
# ./replcontext.js
>>
Stuff Happens—Save Often
Node’s REPL is a handy interactive tool that can make our development tasks a little easier. REPL allows us not only to try out JavaScript before including it in our files, but also to actually create our applications interactively and then save the results when we’re finished.
Another useful REPL feature is that it enables us to create a custom
REPL so that we can eliminate the unhelpful undefined responses, preload modules, change the
prompt or the eval routine we use, and
more.
I also strongly recommend that you look into using REPL with
rlwrap in order to
persist commands across sessions. This could end up being a major time
saver. Plus, who among us doesn’t like additional editing
capability?
As you explore REPL further, there’s one very important thing to keep in mind from this chapter:
Stuff happens. Save often.
If you’ll be spending a lot of time developing in REPL, even with
the use of rlwrap to persist
history, you’re going to want to frequently save your work. Working in
REPL is no different than working in other editing environments, so I’ll
repeat: stuff happens—save often.