Table of Contents for
Wireshark for Security Professionals
 Wireshark for Security Professionals
Published by
Wiley, 2017
Wireshark for Security Professionals
Published by
Wiley, 2017
- Cover
- Contents
- Title Page
- Introduction
- Chapter 1: Introducing Wireshark
- Chapter 2: Setting Up the Lab
- Chapter 3: The Fundamentals
- Chapter 4: Capturing Packets
- Chapter 5: Diagnosing Attacks
- Chapter 6: Offensive Wireshark
- Chapter 7: Decrypting TLS, Capturing USB, Keyloggers, and Network Graphing
- Chapter 8: Scripting with Lua
- Copyright
- Dedication
- Credits
- About the Authors
- About the Technical Editor
- Acknowledgments
- End User License Agreement
Chapter 8
Scripting with Lua
Welcome to the final chapter. Prior to this point, working with Wireshark routinely meant using the graphical interface, and just the occasional mention of its command-line interface, TShark. We briefly introduced TShark in Chapter 4, “Capturing Packets,” but in this chapter we really expand our command line usage considerably.
The reason we leverage the command line so much is to employ scripting. This chapter is centered around a scripting language, Lua, which you will find uncovers a lot more potential in Wireshark. Lua allows you to perform tasks specific to capturing or analyzing packets, and to extend Wireshark, both at the command line and in the GUI.
We start with some basics about Lua to demonstrate simple functionality. We then get into writing our own dissector. (Remember those from Chapter 4?) Finally, to really show off how Lua can extend Wireshark, we write more complex scripts concerning analysis and capture.
The scripts are printed in the book for your reference. All script source is available online, so don't feel the need to manually type it. All the Lua scripts are available from the W4SP Lab GitHub repository, at https://github.com/w4sp-book/w4sp-lab/.
Why Lua?
Many software packages seem to support plug-ins of some sort, and with good reason. Tool developers can't always build functionality for every situation. Extensibility is what separates the tools you use often for a variety of reasons and those that you use only once in a while. Plug-ins and other forms of application extensibility are usually made possible with an application programming interface (API). An API provides a means for other developers to quickly leverage existing components and produce new functionality. You can use a good API to implement new functionality in a fraction of the time you would need to implement something from scratch or with the aid of regular programming libraries.
Up to only a few years ago, Wireshark users relied on such an API. What was known as the Wireshark API was the only way possible to create and add dissectors to Wireshark. This original plug-in API had to be programmed in C and thus required recompiling. And it was a constant source of security issues, as C is vulnerable to memory corruption when implemented incorrectly. Supporting a scripting language is a more flexible and modern solution, so Wireshark opted for Lua.
Lua is a scripting language in that Lua code is read from a plain text script/source file and then executed by the Lua interpreter—a compiled executable itself—dynamically at runtime. Another word for scripting language is interpreted or managed language. Because the code is interpreted at runtime, and generally all memory access is managed by the runtime, Lua, in this case, is the interpreter. Being a managed language usually (but not always) means that common security vulnerabilities such as memory corruptions are less common, as developers are not directly responsible for managing memory access themselves (which is usually the cause for buffer overflow vulnerabilities, and so on). This may be confusing at first if don't have a computer science or programming background. Ultimately, all you need to understand is that a plain text file you created can be executed immediately by Lua without having to be compiled first, as with other languages, such as C/C++.
Lua was developed by Tecgraf, a computer technology group at the Pontifical Catholic University in Rio de Janeiro, Brazil. Today, Lua is managed by LabLua, part of the Department of Computer Science at PUC-Rio. Lua originated from two languages, Sol and DEL, both also developed at Tecgraf in the early 1990s. Both Sol and DEL were known as data-descriptive languages and had limited value as scripting languages. However, both lacked the desired flow-control structures, so Lua was conceived out of necessity. Lua got international attention after the creators published a paper, and the language was featured in a programming magazine. Currently, Lua is used in everything from games to embedded systems and enterprise software.
Scripting Basics
If you've recently used one of the popular interpreted programming languages, such as Python or Perl, you should feel right at home using Lua. It is a language with runtime type checking, and variables do not need to be declared before use, like in many other scripting languages. This section describes some of the features you will use most while developing plug-ins for Wireshark and highlights cases where Lua differs from other programming languages.
To show the basics of Lua, we will show a piece of code for each of the building blocks you would regularly use, such as if statements, loops, functions, and variables. Because we are going to be scripting with Lua in Wireshark, it is imperative that you gain a foundation in the Lua language itself. In the following paragraphs, each element is highlighted to explain the quirks or pitfalls of the language. Once you have a foundation, we move into Lua and Wireshark specifics. You will use your newfound Lua skills and understanding of the Wireshark Lua API to start programming some simple scripts that demonstrate how to use the command-line TShark, as well as play with GUI elements in the Wireshark application. By the end of this chapter, you will be pulling files from network captures and writing your own custom dissector to examine a custom protocol.
If you want to try any of the basic snippets of Lua that follow in this section, it is best if you use the interactive Lua interpreter (see Figure 8-1). You can start the interactive interpreter by simply executing the Lua binary without arguments. Getting the Lua binary differs depending on what platform you are on. For Windows, you can grab them from LuaBinaries sourceforge at http://sourceforge.net/projects/luabinaries/files/. Download just the Lua binaries, which can be found under the Executables folder of the version of Lua you want to download. You should probably try to download a version of Lua that matches the version that Wireshark as well as your operating system architecture use. Refer to the section Checking for Lua Support for information on how to identify the version of Lua used by your Wireshark installation. For example, if you want to download Lua 5.3 for Windows x86, you would download the lua-5.3_Win32_bin.zip file. Once downloaded, unzip this file to a directory that will now contain various Lua binaries. The one you are interested in is the lua52.exe file, which is the Lua interpreter, and it gives you an interactive shell in which to program.
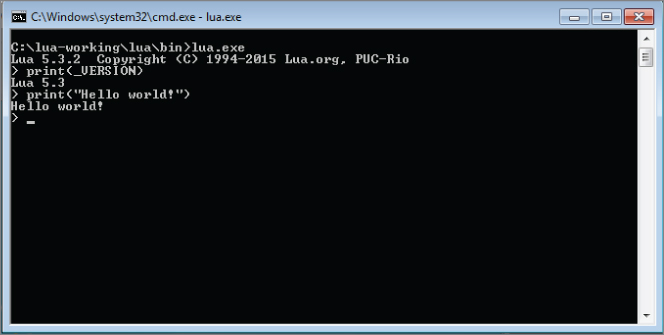
Figure 8-1: Lua Interactive Interpreter
You can use the package manager for your Linux distribution of choice to install Lua the easy way. For Debain-based operating systems, such as Kali Linux, you use the command apt-get install lua5.3 to install Lua 5.3. In the following Linux example, you can see how executing a statement immediately shows the output. Using the interactive interpreter gives immediate feedback to your input, so you can quickly test behavior in Lua if you are uncertain how to phrase something in this new language.
localhost:~$ lua
Lua 5.3.3  Copyright (C) 1994-2016 Lua.org, PUC-Rio
> print "test"
test
>
Variables
A variable can be assigned by using the = operator. It does not have to be explicitly defined before use. If you reference a variable by trying to use it in an expression, like printing a variable to the screen, before assigning it a value, it returns the special value nil. Nil is like NULL, or undefined, in other languages. Lua has seven other basic types: Boolean, number, string, userdata, function, thread, and table. Boolean values are True or False, whereas number is like an integer and floats in other languages combined into one. Both 4 and 4.5 are numbers in Lua. The string type is just what it sounds like; for example, Hello World is an example of a string. The last and probably the most important type is tables. These are incredibly flexible, and from a high-level act like an array/list as a hash/dictionary in other languages. For example, try the following in your Lua shell:
> t_table = {11,12,13,14,15,15}
> print(t_table[1])
11
> print(t_table[2])
12
>
Here you see a table that acts as an array. This table is indexed using a number that assigns to the position of the values within the table. Notice that Lua attempts to make computer science majors cringe, as it doesn't start counting an array by 0, which is common in computing, but instead starts indexing at 1. Also, if you try an out-of-bounds index number, like 0 or 20, in the previous example, Lua returns nil. This is important to remember when you check for the existence of values within the array, because some languages throw an exception instead of returning a null value.
You have seen how a table can be treated as an array, but we also mentioned it could be used as a hash/dictionary. Check out the following excerpt from the Lua interpreter to see how that is done:
> t_table = {foo = "bar", bar="baz", baz = "biz"}
> print(t_table["foo"])
bar
> print(t_table["bar"])
baz
> print(t_table.foo)
bar
> print(t_table.bar)
baz
> t_table.bar = "foo"
> print(t_table["bar"])
foo
> t_table["xxx"] = "yyy"
> print(t_table.xxx)
yyy
>
As you can see from the previous output, a table is a key value data structure and is defined using the same {} as the array example earlier. The difference is that instead of just defining values at a number index, you assign/create unique keys for each value. You then reference those values by using the keys either in between [] brackets or by using the dot notation, such as t_table .foo, which is demonstrated in the previous script. Notice that you can also just create an empty table and then assign the key value pairs, as demonstrated in the following code:
> t_table = {}
> t_table["foo"] = "bar"
> t_table.bar = "baz"
> print(t_table.foo)
bar
> print(t_table["bar"])
baz
>
Functions and Blocks
Lua does not use brackets to delimit a chunk of code like an if statement or while loop, but instead uses the word then or do to start the block, and end to close it. This might be familiar to you depending on what programming languages you have used. Some chunks, like functions, do not need an explicit statement to open but should still be ended by end. The following shows the creation of a function called testfunction and then the creating of a simple block:
> function testfunction(var1)
>> print(var1)
>> end
> testfunction("foo")
foo
> do
>> a = 1
>> b = 2
>> end
> print(a)
1
> print(b)
2
>
Where Lua differs from most other languages is in the default scope of a variable. Normally, if you define a variable inside a function, for example, the scope is lobcal to that function. This means that it is okay to use the same variable name in a different function, and they could contain different values. If you want to access the same variable in different contexts, it has to be scoped globally, usually by prefixing the variable with global. In Lua, it is the other way around. Variables in Lua are global by default, although you can change this by prefixing the variable with local on its first use. Using global variables affects performance, and in general, developers consider the use of global variables when locals would suffice to be sloppy programming, so it is good practice to use local variables wherever possible. Try the following example in an interactive Lua shell to get a feel for variable scoping in Lua, but remember to wrap it inside a do-end block, as mentioned earlier:
> function a()
>>   local vara = 1
>>   print(vara)
>>   varb = 5
>> end
>
> function b()
>>   local vara = 2
>>   print(vara)
>>   varb = 10
>> end
> a() -- this will execute function a() & variable b gets set to 5
1
> print(varb)
5
> b() -- this will execute function b() & variable b gets set to 10
2

> print(vara) -- this prints local variable a, outside of the block,
-- resulting in nil
nil
> print(varb) -- this prints global variable b, resulting in 10
10
>
The preceding code shows examples of scoping local and global variables. Again, in Lua variables are global by default. Only when you want a variable to be local do you need to specify. You see the preceding script prints to screen the values set for variable a and variable b. The values for the variables are printed at several points to demonstrate how they change, depending on the function executed and whether the variable was global or local in scope.
For example, note when function a() is executed, the local variable a is set to a value of 1 and printed. Then global variable b is set to 5. Then the script prints “variable b – with an output of 5.”
When function b() is executed, the local variable a is set to a value of 2 and printed. Then global variable b is set to 10. Then the script prints variable a, but the output is nil, because variable a was a local variable. Lastly, the script prints “variable b, with an output of 10.”
Comments in Lua start with --. This comments the rest of the line. Some examples of this are seen in the previous block of code. You can also comment out whole sections of code with --[[ and then terminated by ]].
Loops
Loops in Lua work the way you would expect (if you have prior programming experience). Parentheses around the expression are optional. If you use just a value or a function as the expression instead of a comparison, keep in mind that all values evaluate to true except for nil and false. A loop is delimited by a do-end block except for the repeat loop, which has an implicit start of the chunk and is ended by the keyword until.
Lua contains two types of for loops. The for loop that most languages implement is called the numeric for and another kind is called the generic for. The numeric for loop makes it easier to generate one of the common for loop constructs, where a variable is initialized to a number and incremented until a given other number—that is, count from 11 to 20, as shown in the following example. The numeric for makes the same loop shorter and easier to write, as demonstrated in the 21 to 30 for loop using the numeric style.
The generic for loop is especially powerful because it allows you to loop over data structures like an array very easily. It makes for more readable code and fewer off-by-one errors when dealing with array lengths. The generic for loop calls the iterator function for every iteration. There are iterator functions available for most data structures. The iterator functions you will use most are pairs and ipairs. Try the following in the Lua shell to get an idea of how loops work. Notice we don't have the > symbol from the interactive shell to make this code easier to copy and paste.
i=1
while i<=10 do
  print(i)
  i = i+1
end

for y=21,30 do
  print(y)
end

x= {11,12,13,14,15,16,17,18,19,20}
for key,value in ipairs(x) do
  print(value)
end

x= {11,12,13,14,15,16,17,18,19,20}
for key,value in pairs(x) do
  print(value)
end
The first loop (a numeric for loop) example is a while loop that says while the variable i is less than or equal to the number 10, print the value of the i variable and then increment it by one. You should see the numbers 1 through 10 printed on the screen. The next loop is a for loop that sets the y variable to the number 21. The loop runs until the y variable, which is being incremented, reaches 30. You can change the step of a for loop—that is, how much you increment your counter variable (y in this example)—by adding another number to the for loop line. For example, to make the for loop increment by two, change the first line of the for loop to for y=21,30,2 do. Now, for pairs and ipairs, do you notice anything interesting? They seem to output the same thing. Remember how we mentioned that tables can act like both an array/list and a hash/dictionary? While it is slightly subtler, the only thing you really need to remember is that ipairs will work over a table that is acting like an array, and pairs is for tables that are acting like a dictionary. While pairs can be used against arrays, ipairs cannot be used over tables, because it is looking only for number keys.
> t_table = {foo = "bar", bar = "baz", baz = "biz"}
> for key,value in ipairs(t_table) do
>> print(key .. " " .. value)
>> end
>
> for key,value in pairs(t_table) do
>> print(key .. " " .. value)
>> end

baz biz
bar baz
foo bar
The previous example is another generic for loop. Instead of cycling through numbers, the for loop is working through the keys and values.
Conditionals
A big part of programming is controlling what code runs when a certain condition is met. To control the flow of your code, you can use conditionals. In Lua, this can only be done with if statements. The following snippet is a simple example of how you can use if-else statements to control execution of your code:
if(1==1) then -- this statement is obviously true since 1
-- does equal 1
  print("yes, it is true that 1=1")
end
if (1==2) then -- this statement is false, since 1 does not
-- equal 2
  print("it is not true that 1 equals 2")
else
  print("second if is false") --(this will occur since 1 is
-- not equal to 2
end
As you work through the statements, you see the code immediately after. To make it easier to create nested if statements, you can combine an if statement with the else clause of the previous if statement into elseif:
if (1==2) then -- this is false, so the elseif statement
-- will execute
  print("second if is true") -- this is skipped since 1 does not
--  equal 2
elseif (1==1) then -- this will execute
  print("elseif is true") -- this will output to the screen
else
  print("everything is false")-- this will not execute since 1
-- does equal 1
end
The Wireshark API allows Lua scripts to access dissection data, introduce new dissectors, register post-dissectors, and save packet data to disk. The API is well documented in the Wireshark documentation. The general elements accessible by the API should be familiar if you have used Wireshark for some time or if you read Chapter 7, as they are mostly made up of filter fields or display filters.
Setup
Wireshark embeds a Lua interpreter and exposes some of the C API through Lua. In the past, Lua came as a plug-in, but it is now generally compiled directly by default. Given some installation options, however, it is possible to run Wireshark without Lua. So before continuing with this chapter, check for Lua support in your installation of Wireshark.
Checking for Lua Support
The easiest way to check for Lua support is by reviewing the About page built in to Wireshark. To open it, click Help ⇨ About Wireshark. The page should look something like Figure 8-2. In the figure, the latest installation of Wireshark (latest as of writing this chapter) was 2.2.3, with Lua support for 5.2.4, even though the Lua binaries are currently at 5.3.3.
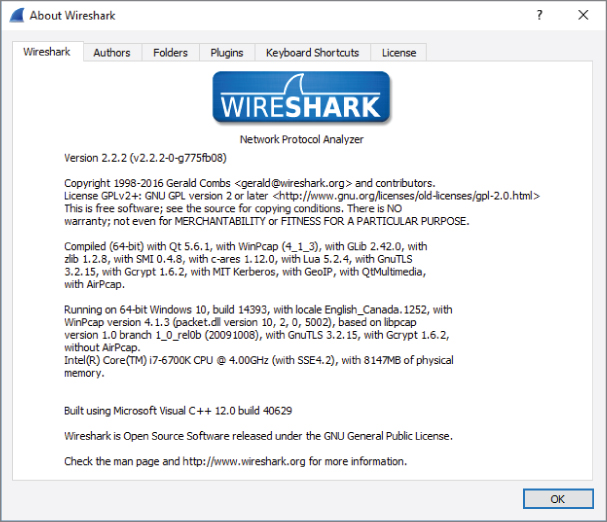
Figure 8-2: Wireshark About page
The section to look out for starts with “Compiled” and continues listing libraries this installation was built with, prefixed by “with” or “without.” If your installation states “with Lua 5.x,” then you're good to go. If your installation does not have Lua support built in, check the following sections on setting up Lua for your operating system.
The same check can be done with TShark. At the command line, you can verify you are able to run Lua scripts. Just type TShark -v at the command line. You will see whether it supports Lua scripting. See an example output in the following code snippet.
localhost:~$ tshark -v
TShark 1.10.2 (SVN Rev 51934 from /trunk-1.10)
Copyright 1998-2013 Gerald Combs gerald@wireshark.org
and contributors. This is free software; see the source
for copying conditions. There is NO warranty; not even
for MERCHANTABILITY or FITNESS FOR A PARTICULAR PURPOSE.
Compiled (32-bit) with GLib 2.32.4, with libpcap, with libz 1.2.7,
 with POSIX capabilities (Linux), without libnl, with SMI 0.4.8,
with c-ares 1.9.1, with Lua 5.1, without Python, with GnuTLS 2.12.20,
with Gcrypt 1.5.0, with MIT Kerberos, with GeoIP.
Running on Linux 3.12-kali1-686-pae, with locale en_US.UTF-8,
with libpcap version 1.3.0, with libz 1.2.7.
Built using gcc 4.7.2.
Within the version output, you see Lua support: “…with Lua 5.1.”
Lastly, on a *nix machine, if you just type the command lua, you will see the version number echoed back to you, as seen in the following code snippet:
localhost:~$ lua
Lua 5.3.3  Copyright (C) 1994-2016 Lua.org, PUC-Rio
> print "test"
test
>
Lua Initialization
Now that you have verified Lua is working, you can dig into some more detail. The first Lua script executed by Wireshark is the init.lua file located within the Wireshark global directory. If you are wondering where the global directory is, it depends on your operating system. We go into more detail about this in a minute. The init.lua file helps to set up the Lua environment within Wireshark and handles things such as enabling and disabling Lua support. The init.lua file also attempts to provide some security checks for when Wireshark is running with elevated privileges on some operating systems. Again, we delve into this with some more detail in a bit.
Once the global init.lua is run, Wireshark executes init.lua within the personal configuration directory. Once the personal init.lua script is finished running, any scripts passed in using the -X lua_script:script.lua command-line options are executed. This all happens before any packets have been handled. Within the init.lua are dofile() functions that execute additional Lua scripts. We discuss dofile() in more detail when you start learning how to build a dissector.
Windows Setup
If your Windows version of Wireshark does not have Lua support, the quickest solution is to download the newest binary version from the Wireshark website. The newest versions have Lua by default, so they should work out of the box. You can always review Chapter 2 for details on how to install Wireshark on Windows. As promised for Windows, the global directory that stores the init .lua file is at the %programfiles%/Wireshark, or whatever directory you install Wireshark to. The personal configuration directory is located at %AppData%/Wireshark. Windows generally does not have a default file handler for .lua files, but they can be easily viewed or edited in Notepad.
Linux Setup
The Linux setup procedure depends on the distribution you are using. We aren't able to cover all the different setups here, so we describe common steps that need to be taken before you can start running Lua scripts.
As mentioned in Chapter 3, it is not always a good idea to run Wireshark with root privileges due to security concerns. Because of this, the Wireshark developers disabled running Lua scripts as root altogether. This means that depending on your installation and setup, you need to check two settings in the Lua configuration file. This file is located in /etc/wireshark/init.lua by default. Open this file in your favorite editor and check the following two variables: disable_lua and run_user_scripts_when_superuser. They are both located near the beginning of the file. To enable Lua support in Wireshark, the disable_lua setting needs to be set to false. For the script line run_user_scripts_when_superuser, change the setting between true or false, according to your situation. The top of the configuration file should look like this:
-- Set disable_lua to true to disable Lua support. disable_lua =falseif disable_lua then return end -- If set and we are running with special privileges this setting -- tells whether scripts other than this one are to be run. run_user_scripts_when_superuser =true-- disable potentialy harmful lua functions when running superuser iffalsethen local hint = "has been disabled due to running Wireshark as superuser. See http://wiki.wireshark.org/CaptureSetup/CapturePrivileges for help in running Wireshark as an unprivileged user." local disabled_lib = {} setmetatable(disabled_lib,{ __index = function() error("this package ".. hint) end } );
Tools
If your init.lua is configured correctly and Lua has loaded, within the Wireshark UI under the Tools dropdown menu you should have the Lua menu item. Within this menu are options for Console, Evaluate, Manual, and Wiki, as shown in Figure 8-3.
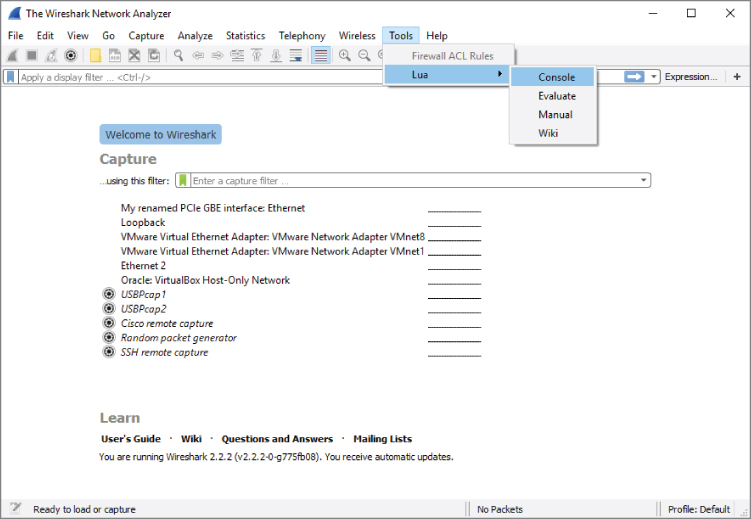
Figure 8-3: Lua in Tools menu
Choosing the Console option opens a Console window that shows output from your Lua scripts (see Figure 8-4). This is helpful for troubleshooting when you use the Wireshark GUI.
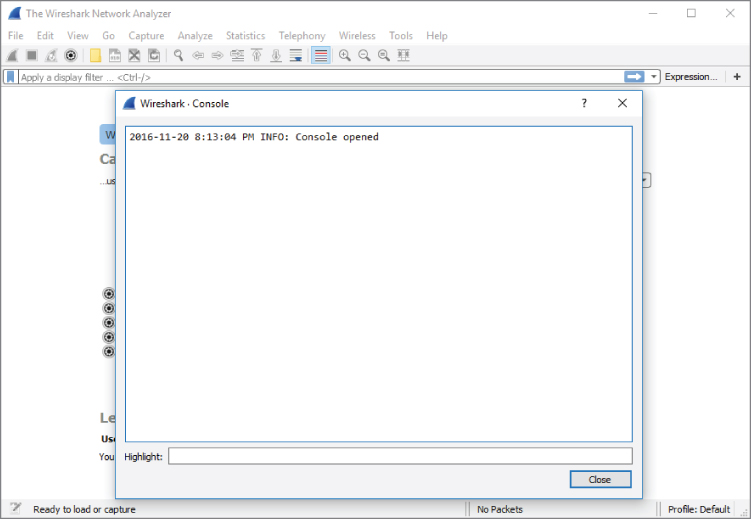
Figure 8-4: Lua Console in Wireshark
The Evaluate option is also handy for troubleshooting and debugging. It is basically a simplistic interactive shell similar to what we used in the “Lua Basics” section. You can type Lua code, and when you click Evaluate, it evaluates the code. What makes the Evaluate window special is that the Wireshark variables and libraries are loaded, unlike the regular Lua interactive shell, which has only the built-in standard library available. To demonstrate this, you can reference USER_DIR, the variable that defines the personal configuration directory. Figure 8-5 shows the Lua code needed to create another text window that will display the USER_DIR variable. In case the print is difficult to read and you want to duplicate the same in your Lua console, this is the same code evaluated:
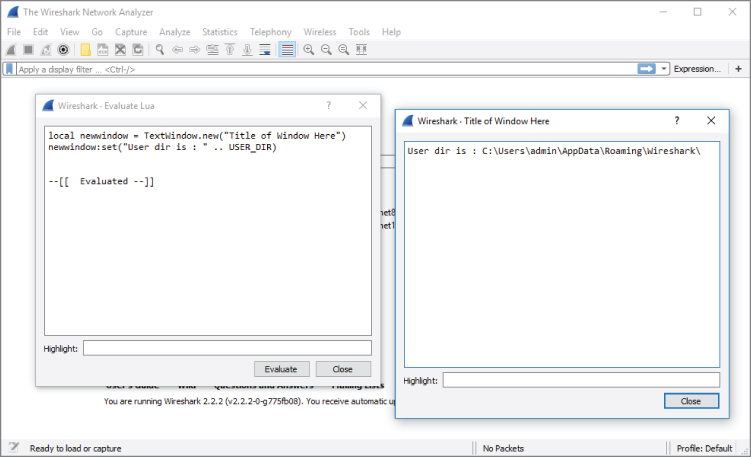
Figure 8-5: Wireshark Evaluate Lua
local newwindow = TextWindow.new("Title of Window Here")
newwindow:set("User dir is : " .. USER_DIR)
And then you click Evaluate. A new window should appear stating your Wireshark's user directory, as shown in Figure 8-5.
Don't worry too much about understanding the code now. The main point to take away is that you can use the Evaluate window to dynamically run Lua code with access to the Wireshark variables, methods, and so on. This is handy when you want to quickly test something Wireshark-specific but don't want to write a complete stand-alone script.
The Manual and Wiki options under the Lua Tools menu are simply links to the Wireshark-hosted Lua manual and Wiki section on Lua. These are really helpful and should be considered a valuable resource when exploring Lua and Wireshark.
Hello World with TShark
No tutorial about a programming language is complete without the obligatory Hello World program. To illustrate the basic structure of a Lua plug-in for Wireshark, we will show a program that prints Hello World to the screen and walk through it line by line. This example is a little different from the regular Hello World in Lua because it shows the most basic plug-in layout instead of printing to the screen without actually interacting with Wireshark.
helloworld.lua
local function HelloWorldListener()
   -- creating the listener with a filter for 'http'
   local listener = Listener.new(nil, 'http')

   function listener.packet(pinfo, tvb)

   -- this is called for every packet meeting the filter,
-- i.e. 'http' in this example

   end

   function listener.draw()
      print('Hello World')
   end

end

HelloWorldListener()
To test the program, run it with TShark, as shown in the following snippet. The plug-in is called by the -X option with the arguments lua_script: followed by the path or name of the Lua script:
localhost:~/$ tshark -q -r smbfiletest2 -X lua_script:helloworld.lua
Hello World
localhost:~/$
First, a local function called HelloWorldListener is defined. This function defines a Listener object that receives all SMB packets. This is a display filter in essence. The function continues by defining two callback functions in the listener object. The first function, packet, is called for each packet matching the display filter and does nothing in this example, but is included to show the regular layout of a plug-in. The second function, draw, is called at the end of the session. In this case, the end of the session is at the end of the pcap being analyzed. In this example, the draw function is used to print Hello World, but in a real-world plug-in it would be the place to print a summary. The final line calls the HelloWorldListener to start execution of the plug-in.
It is not necessary to explicitly call the Lua plug-in with the -X option every time you want to use it. Wireshark automatically loads Lua scripts from its Lua search path, which includes the USER_DIR variable that we examined when looking at the Evaluate menu in Wireshark. The best place to put your own Lua scripts that you want to load automatically is $HOME/.wireshark/plugins/ on Linux or %appdata%\Roaming\Wireshark\plugins\ for Windows. Do not auto load resource-intensive scripts, as this can cause Wireshark to slow down.
Counting Packets Script
To get started with processing packets, we take the structure of the Hello World plug-in and expand it to print out a summary of a packet capture. This new script keeps counters for total packets and common protocols to get a feel for working with packets in Lua scripts and presenting the information you gathered. In the previous example, you already created the scaffolding to achieve this. The listener you created has two callbacks. These two functions are going to be filled in now to count the packets received by the listener.
In order to receive all types of packets, the listener is initialized with an empty filter. Next is the definition of the packet handler that is called for each packet. This handler needs to increment each relevant global counter depending on what protocol the packet contains. Each packet has to be tested for several fields to determine the correct protocol. Before accessing these fields to test for what protocol, you have to define them. You do this using the Wireshark Field .new() function. You have to create a local variable for each field in which you are interested. The following code shows how you do this within your new counting packet script:
   local proto = Field.new('ip.proto')
   local httpfield = Field.new('http')
   local smbfield = Field.new('smb')
   local icmpfield = Field.new('icmp')
   local vrrpfield = Field.new('vrrp')
A field variable has been created for the IP protocol field with packets that are identified as HTTP, SMB, ICMP, and VRRP. SMB is the protocol that Windows uses for file sharing (among other things), and VRRP (Virtual Router Redundancy Protocol) is used to support hot failover in routers. You do not have to know much about these protocols for now; just know that they are packets that you can filter on in Wireshark, and that you want to make sure for every packet you try to see if it has one of these fields associated with it.
Once the field variables are defined you can test for their existence and create the counting logic you are looking for. The following code shows our packet-counting logic:
if(icmpfield()) then
       icmpcounter = icmpcounter+1
      end
      if(vrrpfield()) then
       vrrpcounter = vrrpcounter+1
      end

      if(protocolnumber and protocolnumber.value == 6) then
       local http = httpfield()
       local smb = smbfield()
       if http then
           httpcounter = httpcounter+1
       end
       if smb then
           smbcounter = smbcounter+1
       end
      end
This code tests the packet for various protocols. Lua returns nil if you try to use a variable that does not exist. In the first check, the icmpfield() returns a true value, which is the value of the icmpfield if the packet is an ICMP packet (as any value other than nil and false is true). You can quickly check this in the Lua interactive interpreter, as follows:
> if nil then
>> print('true')
>> end
>
> if true then
>> print('true')
>> end
true
>
> if 1 then
>> print('true')
>> end
true
>
> if false then
>> print('true')
>> end
>
We also are checking to see if the IP protocol number is 6. The IP protocol number is the IP field that tells what the lower layer protocol is. The number 6 specifies that the IP packet is encapsulating a TCP packet. We do this because we know that HTTP and SMB are going to be going over TCP. So, rather than checking all packets for those fields, we check only TCP packets for those fields.
When the entire packet capture has been analyzed, each counter will hold the summary counts of each packet type. However, this information is not shown yet. To present the counts you gathered, you can use the draw callback function used previously to print Hello World to the screen. This function is called when the capture is stopped or the entire capture file has been read in and analyzed.
To present the packet counts, just print every counter prefixed by the protocol. We use the string.format function, which formats the variables to a string based on the format specifier. In this case, we are using %i, which represents a number (i for integer). The following is the draw function to be used within the counting packets script:
   function listener.draw()
      print(string.format("HTTP: %i", httpcounter))
      print(string.format("SMB: %i", smbcounter))
      print(string.format("VRRP: %i", vrrpcounter))
      print(string.format("ICMP: %i", icmpcounter))
   end
Note that the draw function has been filled in and that there are global counters defined at the top of the file. The completed source code follows:
countpackets.lua
-- variables for our counters
local httpcounter = 0
local smbcounter = 0
local icmpcounter = 0
local vrrpcounter = 0

-- function to create our listner
local function HelloWorldListener()
   -- create our listener with no filter
   local listener = Listener.new(nil, '')
   -- create the variables which will hold our fields for each packet
   local proto = Field.new('ip.proto')
   local httpfield = Field.new('http')
   local smbfield = Field.new('smb')
   local icmpfield = Field.new('icmp')
   local vrrpfield = Field.new('vrrp')

   -- define the listener.packet function which is called for
 every packet
   function listener.packet(pinfo, tvb)
      -- local variable for out ip.proto field
      local protocolnumber = proto()

      -- check to see if the packet has an ICMP field, if so increment
the ICMP counter
      if(icmpfield()) then
       icmpcounter = icmpcounter+1
      end
      -- check to see if the packet has a VRRP field, if so increment
the VRRP counter
      if(vrrpfield()) then
       vrrpcounter = vrrpcounter+1
      end

      -- see if the IP protocol is 6, aka TCP, if so then check for
both HTTP and SMB
      if(protocolnumber and protocolnumber.value == 6) then
       local http = httpfield()
       local smb = smbfield()
       if http then
           httpcounter = httpcounter+1
       end
       if smb then
           smbcounter = smbcounter+1
       end
      end
   end

   -- create the draw function which will display our counters
   function listener.draw()
      print(string.format("HTTP: %i", httpcounter))
      print(string.format("SMB: %i", smbcounter))
      print(string.format("VRRP: %i", vrrpcounter))
      print(string.format("ICMP: %i", icmpcounter))
   end

end

-- run our listener function
HelloWorldListener()
The output should look like the following snippet:
localhost:~$ tshark -2 -q -X lua_script:countpackets.lua
Capturing on 'eth0'
82 ^C
HTTP: 18
SMB: 0
VRRP: 0
ICMP: 3
Let's count some more packets, but this time we'll mix it up a bit and do something a little more interesting than just strictly counting the number of packets.
ARP Cache Script
Chapter 3 briefly discussed how the ARP protocol resolves IP addresses to MAC addresses. Internally, your computer uses what is referred to as an ARP cache to store these records of IP addresses to MAC addresses. We are going to walk through how to replicate that with TShark and some Lua scripting. First, we decide on a filter and the fields we want to access. Because we are looking for IP traffic, we know we should probably filter on those. We are also interested in ARP traffic, as it can allow us to map MAC addesses to IP addresses. In particular, we want the arp.src.proto_ipv4 field, which is the ARP sender's IP address. We also need the MAC address source that can be found in the eth.src field and the IP source address for packets, which is available in the ip.src field. To start, we create a filter for IP or ARP traffic to access the arp.src.proto_ipv4, eth.src, and the ip.src fields:
--filter on either arp or IP packets (so all packets with a MAC
to IP mapping)
    local new_filter = "arp || ip"

    -- we want the src of the arp packet (remember arp doesn't have
an IP header)
    local arp_ip = Field.new("arp.src.proto_ipv4")
    local eth_src = Field.new("eth.src")
    local ip_src = Field.new("ip.src")
To keep track of the MAC address to IP mapping, we use a table and set the keys to the IP address and the values to the MAC addresses. To start, though, we are just going to create an empty table called arp_cache:
-- create an empty table that will become our ip to mac address mapping
    local arp_cache = {}
We create a listener passing in our filter and then define the packet function that is called for every packet. We then check to see if the packet has the arp.src.proto_ipv4 field. If it does, we will use that field as the source IP address and map it to the eth.src of the ARP packet. If the arp.src.proto_ipv4 field isn't available, then we use the ip.src and eth.src fields to create a mapping in the arp_cache table. Finally, to display the results, we iterate over the table using pairs, printing the IP address to MAC address mapping. The following is the complete code, with comments throughout:
arp_cache.lua
do

    --filter on either arp or IP packets (so all packets with a MAC
to IP mapping)
    local new_filter = "arp || ip"

    -- we want the src of the arp packet (remember arp doesn't have
an IP header)
    local arp_ip = Field.new("arp.src.proto_ipv4")
    local eth_src = Field.new("eth.src")
    local ip_src = Field.new("ip.src")

    -- create an empty table that will become our ip to
mac address mapping
    local arp_cache = {}

    -- create our function to run that creates the listener
    local function init_listener()

        -- create our listner, filtering on either ARP or IP packets
        local tap = Listener.new(nil, new_filter)

        --called for every packet
        function tap.packet(pinfo, tvb)

            -- create the local variables holding our fields
            local arpip = arp_ip()
            local ethsrc = eth_src()
            local ipsrc = ip_src()

            -- explicity checking to see arpip does not equal nil
            if tostring(arpip) ~= "nil" then

                -- if it isn't nil then we pull the ARP source IP and
 map it to the MAC address in the Ethernet Source field
                arp_cache[tostring(arpip)] = tostring(ethsrc)

            else

                -- if the ARP source IP field is nil then we get
-- access to the packet source via pinfo which is how we access columns
-- and map it to the Ethernet Source field (MAC address)
                arp_cache[tostring(ip.src)] = tostring(ethsrc)

            --end of main if block
            end

        --end of tap.packet()
        end

        -- just defining an empty tap.reset function
        function tap.reset()

        --end of tap.reset()
        end

        -- define the draw function to print out our created arp cache.
        function tap.draw()

            -- iterate over the keys/values within our arp_cache
table and print out the IP to MAC mapping
            for ip,mac in pairs(arp_cache) do
                print("[*] (" .. ip .. ") at " .. mac)

            --end of for block
            end
        --end of tap.draw()
        end

    --end of init_listener()
    end

    -- call the init_listener function
    init_listener()


--end of everything
end
The following shows the new arp_cache script being run against a packet capture:
localhost:$ tshark -q -r ../../att_sniff.pcapng -X
lua_script:arp_cache.lua
[*] (135.37.133.127) at ac:f2:c5:94:03:50
[*] (135.37.123.3) at 02:e0:52:4e:94:01
[*] (135.37.133.80) at fc:15:b4:ed:2e:ff
[*] (135.37.133.3) at 02:e0:52:c0:94:01
[*] (135.37.133.160) at 88:51:fb:55:ef:3b
[*] (135.37.133.110) at 74:46:a0:be:99:e6
[*] (135.37.133.148) at ac:f2:c5:85:87:46
[*] (135.37.133.60) at 2c:44:fd:23:7d:92
[*] (135.37.123.190) at 44:e4:d9:45:a8:d3
[*] (135.37.133.86) at 74:46:a0:be:9d:22

…
If you run this on your network, you may notice that some MAC addresses have multiple IP mappings. This usually occurs with packets destined for beyond your local gateway, as all IP addresses destined for the public Internet are destined for the gateway's MAC address.
Creating Dissectors for Wireshark
Dissectors, introduced a few times in Chapter 1, are what turn bytes on the wire into something meaningful. Dissectors are the intelligence in Wireshark that briefly analyzes the bytes and packets and interprets them as some particular protocol and its components. The dissector's analysis of each protocol is what allows Wireshark to fill in the Protocol column with “TCP” or “ARP,” and so on. And, of course, the Packet Details pane makes much more sense thanks to dissectors.
Unfortunately, Wireshark does not have a dissector for every protocol. There are protocols out there that Wireshark won't or can't understand. Fortunately, you can use Lua to build dissectors for new and unknown protocols you discover in the wild.
Dissector Types
There are also different types of dissectors that can be useful for different tasks. This section covers standard dissectors. There are dissectors that run after all the other dissectors have run, giving the programmer access to fields defined in other dissectors. These are referred to as post-dissectors. Two scripts described later in this chapter, packet-direction.lua and the mark-suspicious.lua, are examples of a post-dissector.
A chained dissector is similar to the post-dissector in that it runs after other dissectors so that you can access the fields for other dissectors. The difference is that a chained dissector doesn't run against every packet, only those packets that are handled by the dissector off of which you are chaining. Chained dissectors are handy for extending an existing dissector without having to rewrite it completely, whereas post-dissectors are useful for adding a new dissector that provides additional context based on what other fields are set.
Why a Dissector Is Needed
During product testing engagements, one of the first things to look at is what the product is doing on the network. Companies often think they are being clever by implementing some proprietary binary protocol. Usually, this just means that they are serializing C structs and sending them across the network. But because the protocol is “homegrown,” Wireshark might not be aware of it. Wireshark will not have a dissector for this proprietary protocol, and you will be stuck looking at a packet like the one shown in Figure 8-6.
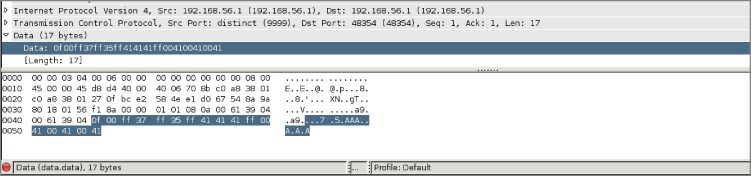
Figure 8-6: Wireshark without a dissector
Sometimes you can dig through product documentation and find information on how the protocol is built and what all the bits and bytes mean, or you can pull the header files if it is open source to check struct definitions. Other times you are stuck with the hard slog of reverse engineering the product to figure out what you need to know.
In this section, we walk through creating a dissector for an imaginary protocol. We are working under the assumption that we have some sort of protocol documentation that provides us with the protocol meaning, as well as the data type for the various protocol fields. Before we dig into what our protocol is, let's quickly refresh the basics. As you know, there are 8 bits in a byte, and your architecture is either 32 bits (4 bytes) or 64 bits (8 bytes). We also discuss how endianess plays a role when bytes are sent across the wire. As a rule, bytes being sent across the wire are going to be in big-endian, where the most significant byte is stored at the lower address. In this exercise, however, we play loose with endianess so that you can get some practice handling either type of endianess when you come across it in a packet capture.
Figure 8-7 shows our imaginary protocol.
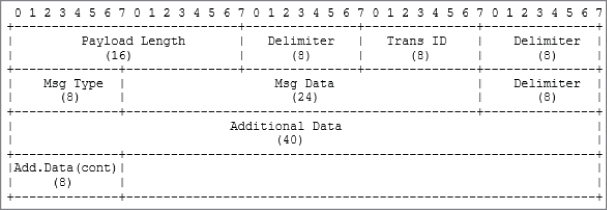
Figure 8-7: Our protocol fields
Most of these fields should be self-explanatory, but we'll walk through them nonetheless. The Payload Length is just that, the length of the payload minus the two bytes (16 bits) for the payload length field itself. The second field is a delimiter, which will be defined as 0xff. You will occasionally see delimiters used. These are often designed into protocols to make parsing easier, as you can use split-like functions to quickly break the protocol into its constituent parts. The Transaction ID is a random number ranging that is used to tie request and response messages together, a bit like the TCP sequence number. The Message Type field is a single byte that specifies what type of message the packet is.
The following are types of messages and the corresponding number for those messages:
- 1—Request message. This denotes that the message is a request message.
- 2—Response message. This means that the packet being sent is in response to a request message that has a matching Transaction ID.
- 3—Reserved. Currently this message type is reserved for future use.
The Message Data field is where application-specific data is held. For our contrived example, this is just 3 bytes (24 bits) of ASCII data. The Additional Data field contains more application data, and in our example, will just be some Unicode data that is maxed out at 48 bits in total (6 bytes). You may note that this protocol description is not incredibly accurate. That is on purpose, because we will walk through dealing with issues like endianess as we write our dissector.
At times like this, you might want to see all the packets involved in one network “stream.” Wireshark offers this feature under the Analyze menu. You will see all packets for a particular stream or session. You use it by first selecting a packet (our TCP protocol packet in this case) in the Packet List pane. Under Analyze, choose Follow, then TCP stream. Figure 8-8 shows the Follow TCP Stream window against this sample protocol within Wireshark. When Wireshark does not recognize traffic with a dissector, what you will see is a hexdump, or the data in hexadecimal form.
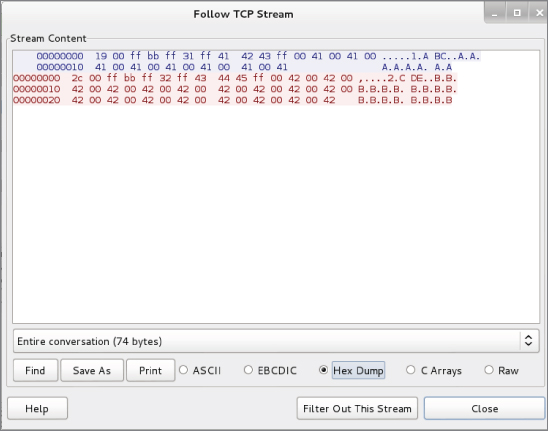
Figure 8-8: Sample protocol hexdump
With the protocol established, we can begin building the dissector. It is assumed you have enabled Lua in Wireshark. The first step in creating a dissector is to add a dofile() entry to init.lua file. The init.lua file was mentioned previously in this chapter, in the Setup and Tools sections.
On my Linux machine, my init.lua file looks like this:
localhost:~/wireshark-book$ cat /etc/wireshark/init.lua | tail
GUI_ENABLED = gui_enabled()
DATA_DIR = datafile_path()
USER_DIR = persconffile_path()

dofile("console.lua")
--dofile("dtd_gen.lua")


dofile("~/wireshark-book/sample.lua")
Note the dofile entry, referencing the sample.lua script. The sample.lua script is a fully functioning dissector. The sample.lua script, as with all scripts, is available online, linked from the W4SP Lab repo on GitHub.
The script is fully shown below for following along. While this may look intimidating at first, we break this code down so that it is easier to understand.
sample.lua
--create the protocol
sample_proto = Proto("sample", "w4sp sample protocol")

--create the fields so we can match on them in the filter box
local f_len_h = ProtoField.uint16("sample.len_h", "Length", base.HEX,
 nil, nil, "This is the Length")
local f_len_d = ProtoField.uint16("sample.len_d", "Length", base.DEC,
 nil, nil, "This is the Length")
--transid is only a single byte so uint8
local f_transid_d = ProtoField.uint8("sample.transid_d", "Trans ID",
 base.DEC, nil, nil, "This is the Transaction ID")
local f_transid_h = ProtoField.uint8("sample.transid_h", "Trans ID",
 base.HEX, nil, nil, "This is the Transaction ID")
--show both string and int
local f_msgtype_s = ProtoField.string("sample.msgtype_s", "MsgType",
 "This is the Message Type")
local f_msgtype_uh = ProtoField.uint8("sample.msgtype_uh", "MsgType",
 base.HEX, nil, nil, "This is the Message Type")
local f_msgtype_ud = ProtoField.uint8("sample.msgtype_ud", "MsgType",
 base.DEC, nil, nil, "This is the Message Type")
--create the data fields
local f_msgdata = ProtoField.string("sample.msgdata", "MsgData",
 "This is Message Data")
local f_addata = ProtoField.string("sample.addata", "AddData",
 "This is Additional Data")
local f_addata_b = ProtoField.bytes("sample.addata_b", "AddData_bytes",
 base.HEX, nil, nil, "This is Additional data as bytes")

--add fields to our protocol
sample_proto.fields = { f_len_h,
                        f_len_d,
                        f_transid_h,
                        f_transid_d,
                        f_msgtype_s,
                        f_msgtype_uh,
                        f_msgtype_ud,
                        f_msgdata,
                        f_addata,
                        f_addata_b}

--create our dissector
function sample_proto.dissector (buf, pinfo, tree)
    --set name as it shows up in the protocol column
    pinfo.cols.protocol = sample_proto.name

    --our pretty delimeter
    local delim = "===================="

    --create the subtree object so we can add off of the Sample Protocol
    local subtree = tree:add(sample_proto, buf(0))

    --create a nest for just the length field
    local ln_tree = subtree:add(buf(0, 2), "Length Fields")
    --add treeitem without using protofield
    ln_tree:add(buf(0, 2), "Length: " .. buf(0,
 2):uint()):append_text("\t[*] add without ProtoField -- uint")
    --add treeitem without specifying endianess in both
hex and int/decimal
    ln_tree:add(f_len_d, buf(0, 2)):append_text("\t[*] add with
 ProtoField base.DEC")
    ln_tree:add(f_len_h, buf(0, 2)):append_text("\t[*] add with
 ProtoField base.HEX")

    ln_tree:add_le(f_len_h, buf(0, 2)):append_text("\t[*] add_le with
 ProtoField base.HEX")
    --add treeitem without using protofield use le_uint() to specify
 little endian
    ln_tree:add(buf(0, 2), "Length: " .. buf(0, 2)
:le_uint()):append_text("\t[*] add without ProtoField -- le_uint")
    --add treeitem specifying little endian by using add_le
    ln_tree:add_le(f_len_d, buf(0, 2)):append_text("\t[*] add_le with
ProtoField base.DEC")

    --add the delim
    subtree:add(buf(2, 1), delim .. "delim" .. delim)

    --show the transid as a base.DEC
    subtree:add(f_transid_d, buf(3, 1)):append_text("\t[*]
ProtoField.uint8 base.DEC")
    subtree:add(f_transid_h, buf(3, 1)):append_text("\t[*]
ProtoField.uint8 base.HEX")

    --add the delim
    subtree:add(buf(4, 1), delim .. "delim" .. delim)

    --lets display the msgtype like a string and as a uint both hex and
 dec
    subtree:add(f_msgtype_s, buf(5, 1)):append_text("\t[*]
ProtoField.string")
    subtree:add(f_msgtype_ud, buf(5, 1)):append_text("\t[*]
ProtoField.uint8 base.DEC")
    subtree:add(f_msgtype_uh, buf(5, 1)):append_text("\t[*]
ProtoField.uint8 base.HEX")

    --add the delim
    subtree:add(buf(6, 1), delim .. "delim" .. delim)

    --add the msgdata
    subtree:add(f_msgdata, buf(7, 3)):append_text("\t[*]
ProtoField.string")

    --add the delim
    subtree:add(buf(10, 1), delim .. "delim" .. delim)

    --display the unicode addata taking into account size of the buf
    --notice we pass in the optional value argument to ensure
 it is treated as unicode
    subtree:add(f_addata, buf(11, -1), buf(11, -1):ustring())
    --add addata as bytes
    subtree:add(f_addata_b, buf(11, -1))

end

--load the tcp.port tables
tcp_table = DissectorTable.get("tcp.port")
--register our protocol to handle tcp port 9999
tcp_table:add(9999,sample_proto)
The first thing this code does is to create a new Proto object, which is where the name of the new protocol and its description is defined. In this case, we call the protocol "sample" and its description is "w4sp sample protocol". This means that we can use "sample" within the Wireshark filter window to show all packets that contain the sample protocol.
The next step in creating a dissector is to define the protocol fields. This means we need to map our various protocol fields to ProtoField objects and then register these ProtoField objects to our new protocol:
--create the fields so we can match on them in the filter box
local f_len_h = ProtoField.uint16("sample.len_h", "Length", base.HEX,
 nil, nil, "This is the Length")
local f_len_d = ProtoField.uint16("sample.len_d", "Length", base.DEC,
 nil, nil, "This is the Length")
--transid is only a single byte so uint8
local f_transid_d = ProtoField.uint8("sample.transid_d", "Trans ID",
 base.DEC, nil, nil, "This is the Transaction ID")
local f_transid_h = ProtoField.uint8("sample.transid_h", "Trans ID",
 base.HEX, nil, nil, "This is the Transaction ID")
--show both string and int
local f_msgtype_s = ProtoField.string("sample.msgtype_s", "MsgType",
 "This is the Message Type")
local f_msgtype_uh = ProtoField.uint8("sample.msgtype_uh", "MsgType",
 base.HEX, nil, nil, "This is the Message Type")
local f_msgtype_ud = ProtoField.uint8("sample.msgtype_ud", "MsgType",
 base.DEC, nil, nil, "This is the Message Type")
--create the data fields
local f_msgdata = ProtoField.string("sample.msgdata", "MsgData",
 "This is Message Data")
local f_addata = ProtoField.string("sample.addata", "AddData",
 "This is Additional Data")
local f_addata_b = ProtoField.bytes("sample.addata_b", "AddData_bytes",
 base.HEX, nil, nil, "This is Additional data as bytes")
--add fields to our protocol
sample_proto.fields = { f_len_h,
                        f_len_d,
                        f_transid_h,
                        f_transid_d,
                        f_msgtype_s,
                        f_msgtype_uh,
                        f_msgtype_ud,
                        f_msgdata,
                        f_addata,
                        f_addata_b}
The preceding code snippet shows where we define our ProtoFields, so let's break it down further. The first field we define is f_len_h, which is going to be our Length field of our sample protocol. After reviewing the protocol description, we know this will be 16 bits (or 2 bytes). We know that as this specifies the length of the packet in bytes that it should never be a negative number. Therefore, we define f_len_h as a ProtoField.uint16, which means the field is an unsigned 16-bit integer. This is important to note, because how you define these fields determines how Wireshark attempts to interpret the bytes within each field. The function prototype for ProtoField.uint16 is as follows:
ProtoField.uint16(abbr, [name], [base], [valuestring], [mask], [desc])
The first and only required parameter is the abbreviated field name, which also happens to be what you will use in the filter box for creating filters against our new protocol. The optional name parameter is what Wireshark displays within the Packet Details pane. The base parameter is what is interesting, as it further defines how the bytes are displayed by Wireshark. In the case of the f_len_h field, we are asking that Wireshark display it as hexadecimal by passing in base.HEX. The valuestring parameter is an optional table that can be used to match various values to a string automatically. We aren't using this functionality within this field so we have set it to nil, the same for the mask parameter, which is the integer mask for the field. The final parameter is the description parameter, which can be used to describe the field in more detail. You may have noticed that we have defined a few length-related fields. This was done because it serves as a really concrete way to demonstrate the various ways Wireshark can display field data. Once we define all of our fields, we then add it to our Proto by setting the field attributes to a dictionary of all the fields defined.
In the next section of code, we build the packet tree that you see within the Packet Details pane. We start by defining our protocol dissector function, which takes in a tvb, or Testy Virtual Buffer (buf), that represents the packet data handled by this dissector. You can think of this buffer as almost a tuple/list/array, with the first parameter as the offset into the packet buffer, but the second actually specifies how many bytes it is in length. The second parameter to our dissector function is a pinfo object that contains various packet information and can be used to set various column values. We use this pinfo object within our dissector function to set the protocol column to our sample protocol name (which is just “sample”). The last parameter is the treeitem, which will be how we add additional values to the Packet Details pane.
--create our dissector
function sample_proto.dissector (buf, pinfo, tree)
    --set name as it shows up in the protocol column
    pinfo.cols.protocol = sample_proto.name
Now we want to add an item to the existing tree, which will be dependent on where the dissector is used. For our example protocol dissector, this tree will be added after the TCP section within the Packet Details pane. We add these items by calling treeitem:add() by adding to the treeitem that is passed into our dissector function with a parameter of our Proto object and the first element of our tvb (buf):
    --create the subtree object so we can add off of the Sample Protocol
    local subtree = tree:add(sample_proto, buf(0))

    --create a nest for just the length field
    local ln_tree = subtree:add(buf(0, 2), "Length Fields")
    --add treeitem without using protofield
    ln_tree:add(buf(0, 2), "Length: " .. buf(0, 2):uint()):append_text
("\t[*] add without ProtoField -- uint")
    --add treeitem without specifying endianess in both hex and
int/decimal
    ln_tree:add(f_len_d, buf(0, 2)):append_text("\t[*] add with
ProtoField base.DEC")
    ln_tree:add(f_len_h, buf(0, 2)):append_text("\t[*] add with
ProtoField base.HEX")
Notice that we also create another treeitem off of the local subtree variable. This allows us to create another branch under our protocol dissectors. The new subtree is called Length Fields and allows us to add or call out several more fields. The new Length Fields subtree can be named whatever you like. Under the subtree are added several new fields, done by the ln_tree:add() function. These new fields are specifically named according to the purpose they serve. This script intentionally includes just about every way possible to add information to the Packet Details pane.
The script is well documented, and you can compare it alongside of Figure 8-9. See how each script line contributes to the details provided in the Packet Details pane.
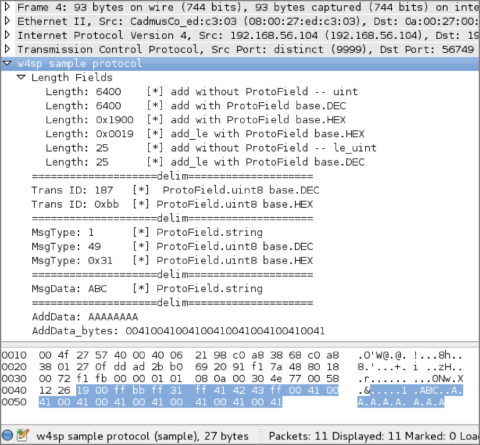
Figure 8-9: Tree items in Wireshark
Experiment
Of course, the best way to learn is to experiment. You should load this script into Wireshark with the corresponding packet capture (or make your own capture) and play around with removing some lines and explore making changes to this dissector.
Note that you can add an item with or without a ProtoField. When you add an item without a ProtoField, it means you don't have the ability to filter on that particular field. When you add an item using a ProtoField, Wireshark displays the bytes based on how you defined the ProtoField. Wireshark obviously doesn't know how to display the bytes when you aren't using a ProtoField, so you can convert the bytes manually by calling methods on the tvb (buf) object, such as in the following code:
ln_tree:add(buf(0, 2), "Length: " .. buf(0, 2):uint()):append_text
("\t[*] add without ProtoField -- uint")
Also, notice that we use the append_text() method to add additional text everywhere but our delimiter field. The reason is that append_text() is handy for adding additional text to the field without running into the issues with concatenating differing types (like a string and a uint), which Lua will complain about. You will see that the dissector also makes use of the add_le() method, which adds the ProtoField, but displays the bytes in little endian order.
One interesting gotcha that was discovered while writing this script is how Unicode is handled in dissectors. First, create your field as a string by using ProtoField.string() such as:
local f_addata = ProtoField.string("sample.addata", "AddData", "This is
Additional Data")
To get it to display properly, however, you must use the tvb:ustring() method to coerce the string to proper Unicode, such as in the following code:
subtree:add(f_addata, buf(11, -1), buf(11, -1):ustring())
It may look odd that the tvb (buf) is taking in a size of -1. This is a convenience, as it is saying that we want to display the remaining number of packets, which is particularly handy when you have a protocol like ours where the last field can be variable length, and you want to make sure your dissector picks up all the bytes regardless of the size. The final piece of code deals with how the dissector is actually registered:
             --load the tcp.port tables
             tcp_table = DissectorTable.get("tcp.port")
             --register our protocol to handle tcp port 9999
tcp_table:add(9999,sample_proto)
First, we grab the TCP Dissector Table and add our new sample protocol dissector to that table. Then, we specify that Wireshark should attempt to use the sample protocol dissector for traffic going over TCP port 9999. And there you have it: the final protocol that should show you how to create custom fields, how to display and parse that data, as well as add varying levels to your Packet Details pane.
Again, remember that we did not go over this script line by line, because the best way to get a handle on how dissectors work is not to listen to someone try to explain them but to instead go in and mess around to see what the results are in the GUI. Experiment with the script and see how the output changes.
Remember, you can reference the Wireshark Lua API at http://wiki .wireshark.org/LuaAPI.
Extending Wireshark
Besides outputting information on the command line, as in the previous section, Lua plug-ins are also able to add graphical features to Wireshark—from columns in the packet list to full-fledged GUI windows and dialog boxes. In this case, we keep it simple by adding a column to the packet list. The column shows the direction of a packet based on the configured IP address—that is, from your host or to your host. Now that you have some experience with Wireshark API and Lua scripting, we are going to just jump right into the source.
Packet Direction Script
This script is actually a post-dissector; it is called after the dissectors are done analyzing the packet. It registers a dissector called “Direction” with one field also called “direction”. These values are appended to the tree that is visible in the Packet Details pane. This tree contains all the dissectors that are relevant for a packet with the corresponding fields.
packet-direction.lua
-- IP address of our sniffing machine, change this to your IP address
hostip = "192.168.1.25"

-- define the function which determines incoming or outgoing
local function getdestination(src,dst)

   if tostring(src) == hostip then
      return "outgoing"
   end

   if tostring(dst) == hostip then
      return "incoming"
   end

end

local function register_ipdirection_postdissector()
    -- create the protocol dissector called direction
    local proto = Proto('direction', 'direction dissector')
    -- create a protofield
    local direction = ProtoField.string('direction.direction',
'direction', 'direction')
    -- assign the protofield to our protocol dissector
    proto.fields = {direction}

    -- create variables for the packet fields we are interested in
getting access to
    local source = Field.new('ip.src')
    local dest = Field.new('ip.dst')


    -- define the post-dissector, this is what we use to add new columns
    function proto.dissector(buffer, pinfo, tree)
       local ipsrc = source()
       local ipdst = dest()

       -- if we have an ip source then add our tree calling our
direction function
       if ipsrc ~= nil then
          -- create our TreeItem
          local stree = tree:add(proto, 'Direction')
          stree:add(direction, getdestination(ipsrc.value,ipdst.value))


       end

    end
    -- register the post-dissector
    register_postdissector(proto)
end

local function Main()
    register_ipdirection_postdissector()
end
Main()
Enabling this script is as simple as adding a dofile() statement to your init .lua file. In Linux, this will be at /etc/wireshark/init.lua. In Windows, it will be located at %programfiles%\Wireshark\init.lua. You will want to add the following to the end of that file:
dofile("/path/to/packet-direction.lua")
One last manual step is required to make the output of this script graphical. You need to add a column manually and make the contents of the column "direction.direction". This shows the filter field what was just added using the script visible in the packet list.
To add a column in the Wireshark packet list, follow these steps:
- Right-click an existing column and click Column Preferences.
- Click Add.
- Select a Custom field type and direction.direction as Field Name.
After you manually add the available column, you will see your new field in the Packet Details pane.
With the packet-direction script running, Figure 8-10 shows the field added in the Packet Details pane. See the bottom of Figure 8-10, showing only the full Packet List and Packet Details panes.
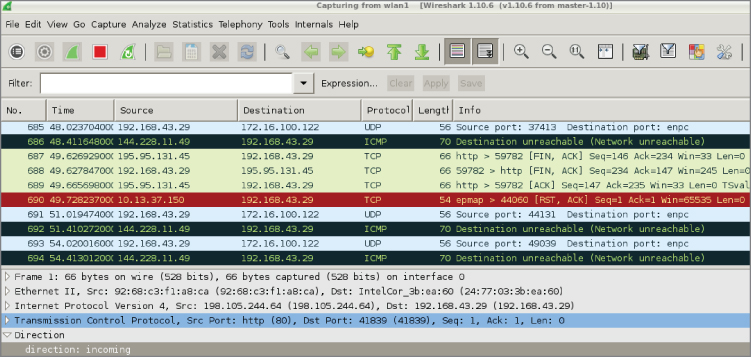
Figure 8-10: Running direction script
The post-dissector is demonstrated at the bottom of the Packet Details pane, under the highlighted TCP frame. The post-dissector provides a value of “direction: incoming” for the chosen TCP packet.
Marking Suspicious Script
While seeing the direction of a packet can certainly help analysis, it is probably not that useful for security-related activities. For an additional Wireshark dissector that can be used by someone in the security industry, we will build a small plug-in that can mark suspicious packets based on a word list. The word list can be adapted for each use case, of course, but for now we will stick with a simple website attack detector. Strings such as ' OR 1=1 -- and <script>alert(document.cookie)</script> can be used for this case. The former example would be an attempt at a SQL injection, while the latter string is an example of cross-site scripting (XSS). Either script is strong evidence of malicious behavior and would have no business traveling across your network.
Note that these example strings of code or script are provided in the beginning of the mark-suspicious script. The script is only capable of watching for code you teach it to search for. In effect, this script makes Wireshark perform as a signature-based IDS.
The next step is searching for those designated code snippets and, if discovered, marking that packet as suspicious.
The benefit of marking packets, instead of filtering in the packet list, is that you don't lose the context of the marked packets. You can manually scroll through the packet data and immediately see suspicious clusters of marked packets, for example, or an attacker checking a site out without a proxy before starting the suspicious activities over an anonymous connection. These things can be picked up by manual inspection but are almost impossible to script, similar to a gut feeling or instinct. Wireshark does the same with fragmented packets and similar protocol errors out of the box, so it is apparent while viewing the packet list that some error occurred without actively searching or filtering for it.
mark-suspicious.lua
-- url decode function
function url_decode(str)
  str = string.gsub (str, "+", " ")
  str = string.gsub (str, "%%(%x%x)",
      function(h) return string.char(tonumber(h,16)) end)
  str = string.gsub (str, "\r\n", "\n")
  return str
end


local function check(packet)
    --[[ this is a trivial (to bypass) example check for
        a query string that contains an html script
        element with an alert keyword, indicitive of xss
    --]]

   local result = url_decode(tostring(packet))
   result = string.match(result, "<script>alert.*")
   if result ~= nil then
      return true

   else
      return false
   end

end


local function register_suspicious_postdissector()
    local proto = Proto('suspicious', 'suspicious dissector')

    --create a new expert field for the proto
    exp_susp = ProtoExpert.new('suspicious.expert',
                               'Potential Refelctive XSS',
                               expert.group.SECURITY, expert.severity.WARN)

    --register the expert field
    proto.experts = {exp_susp}


    function proto.dissector(buffer, pinfo, tree)
      --[[ this just searches through all of the packet
           buffer, this could also be implemented by
           pulling the http.request.uri field and search
           on that --]]

      local range = buffer:range()

      if check(range:string()) then
        --[[ if the check returns true then add
             a suspicious field to the packet tree
             and add the expert info --]]
        local stree = tree:add(proto, 'Suspicious')
        stree:add_proto_expert_info(exp_susp)
      end

    end

    register_postdissector(proto)
end

register_suspicious_postdissector()
Like the previous Lua script, packet-direction.lua, this mark-suspicious script is a post-dissector. Again, that means the script is run after the rest of Wireshark's dissectors have analyzed the packet. This mark-suspicious script creates a new tree item, which can be seen in the Packet Details pane. The script compares packet contents with the text strings located at the script beginning. If there is a match, a message is added to the tree field.
To find any matching packets, you could filter for a “suspicious-expert” message in Wireshark. Figure 8-11 shows an example.
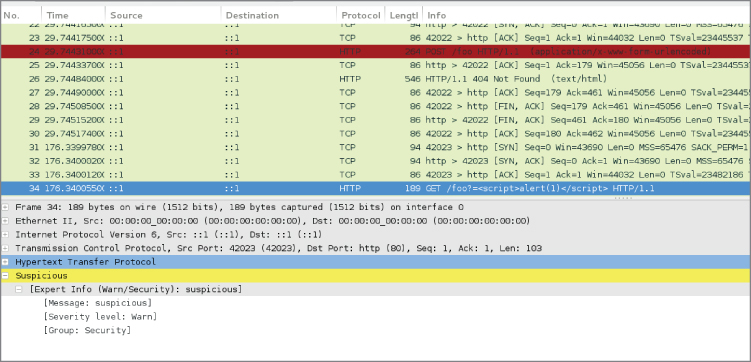
Figure 8-11: Finding a suspicious packet
Snooping SMB File Transfers
If you followed along with the exercises, you already manually reconstructed a file that was transferred through SMB in the previous chapter and probably noticed it is a tedious and error-prone process. The same workflow can be automated in a Lua plug-in to save all the files transferred in a given packet dump.
File carving is the technique of extracting a file from the stream of network traffic. This is complicated by the nature of SMB transfers being separated over several procedure calls, whereas HTTP, for example, would transfer a file within one TCP stream, spread over multiple packets if the file size is too big for one packet. The TCP stream can be reassembled by Wireshark automatically, thereby simplifying the problem. In the following code, you will find the plug-in that automatically dumps all SMB file transfers in the packet capture:
smbfilesnarf.lua
local function printfiles(table)
   for key, value in pairs(table) do
      print(key .. ': ' .. value)
   end
end

function string.unhexlify(str)
   return (str:gsub('..', function (byte)
                             if byte == "00" then
                                return "\0"
                             end
                             return string.char(tonumber(byte, 16))
                          end))
end

local function SMBFileListener()
   local oFilter = Listener.new(nil, 'smb')

   local oField_smb_file = Field.new('smb.file')
   local oField_smb_file_data = Field.new('smb.file_data')
   local oField_smb_eof = Field.new('smb.end_of_file')
   local oField_smb_cmd = Field.new('smb.cmd')
   local oField_smb_len_low = Field.new('smb.data_len_low')
   local oField_smb_offset = Field.new('smb.file.rw.offset')
   local oField_smb_response = Field.new('smb.flags.response')
   local gFiles = {}

   function oFilter.packet(pinfo, tvb)

      if(oField_smb_cmd()) then
         local cmd = oField_smb_cmd()
         local smb_response = oField_smb_response()

         if(cmd.value == 0xa2 and smb_response.value == true) then
            local sFilename = tostring(oField_smb_file())
            sFilename = string.gsub(sFilename,"\\", "_")
            local iFilesize = oField_smb_eof()

            iFilesize = tonumber(tostring(iFilesize))
            if(iFilesize > 0) then
               gFiles[sFilename] = iFilesize
            end

         end
         if(cmd.value == 0x2e and smb_response.value == true) then
            local sFilename = tostring(oField_smb_file())
            sFilename = string.gsub(sFilename,"\\", "_")
            local iOffset = tonumber(tostring(oField_smb_offset()))
          local file_len_low = tonumber(tostring(oField_smb_len_low()))
            local file = io.open(sFilename,'r+')
            if(file == nil) then
               file = io.open(sFilename,'w')
               local tempfile = string.rep("A", gFiles[sFilename])
               file:write(tempfile)
               file:close()
               file = io.open(sFilename, 'r+')
            end
            if(file_len_low > 0) then
               local file_data = tostring(oField_smb_file_data())
               file_data = string.gsub(file_data,":", "")
               file_data = file_data:unhexlify()
               file:seek("set",iOffset)
               file:write(file_data)
               file:close()
            end
         end

      end

   end
   function oFilter.draw()
      printfiles(gFiles) -- list filename and sizes
   end

end

SMBFileListener()
The program starts by defining two helper functions used for data presentation and converting between data types: printfiles and string.unhexlify(str).
The core functionality is again contained in a listener function, SMBFileListener. The packet callback of the listener can be seen in two parts. The first part populates a dictionary (named array) of filenames with their corresponding sizes. The second part only executes when the if statements match a data transfer packet and subsequently writes the bytes that are transferred to the correct offset in a dummy file that is initialized with the character “A.”
The reason it uses a dummy file is because chunks of the file are transferred at a time instead of a TCP stream, which would have been the case for an HTTP file transfer. A video file, for example, might be transferred out of order. Finally, the draw callback function prints the list of filenames captured and their sizes to the screen.
localhost:~/wireshark-book$ tshark -q -r smbfiletest2 \
                              -X lua_script:smbfilesnarf.lua
_test.txt: 256000
To check the file contents that were reconstructed, look in the directory from where the script was run. The files should be saved there, prepended by the original path. You can compare the MD5 checksums to verify if the files are identical:
localhost:~/wireshark-book$ md5sum ~/Desktop/test.txt _test.txt
ead0aaf3ef02e9fa3b852ca1a86cea71  /home/jeff/Desktop/test.txt
ead0aaf3ef02e9fa3b852ca1a86cea71  _test.txt
Apart from the fact that this script might prove useful in the field, it is included here to give an example of how to manage protocols that keep state over multiple requests, as well as to demonstrate often-used parts of the Wireshark Lua API and how to convert between data formats/types.
Summary
We covered a lot in this chapter. We started by introducing the Lua programming language. We discussed how it is designed to be easily integrated into other programs and covered the basics of the language. We then started to dive into the Wireshark Lua API support. We began by showing how to check your Wireshark installation for Lua support and described some of the integrated tools provided by Wireshark that relate to Lua, such as Evaluate. We then dove head first into scripting with Lua using Wireshark and TShark.
We explored the Lua API through practical scripts. We started out small with counting interesting packets and re-creating an ARP cache implementation. We then delved into the more advanced features of the Lua API (and Wireshark in general) by creating a dissector for the Sample protocol. We then moved on to how to leverage your newly learned Wireshark Lua API skills to build a basic intrusion-detection functionality, and even showed how you can do advanced network file carving by extracting an SMB file from a packet capture.
In closing, this chapter should have demonstrated two things. First, how easy and powerful Lua can be, especially for security professionals with any scripting experience. Second, how extensible the Wireshark GUI can be if leveraged with just a little Lua scripting. For furthering your Lua development, please consult the Lua documentation and reference manual available online for your Lua version: https://www.lua.org/docs.html.
Finally, as this is the final chapter, we hope this book has clearly shown Wireshark to be a valuable asset for security professionals. The virtual lab environment helps most when used alongside of the text and exercises. We encourage you to continue exploring Wireshark in the W4SP Lab. We expect to continually monitor the GitHub repository for issue resolution and script updates. Thank you.