Table of Contents for
Wireshark for Security Professionals
 Wireshark for Security Professionals
Published by
Wiley, 2017
Wireshark for Security Professionals
Published by
Wiley, 2017
- Cover
- Contents
- Title Page
- Introduction
- Chapter 1: Introducing Wireshark
- Chapter 2: Setting Up the Lab
- Chapter 3: The Fundamentals
- Chapter 4: Capturing Packets
- Chapter 5: Diagnosing Attacks
- Chapter 6: Offensive Wireshark
- Chapter 7: Decrypting TLS, Capturing USB, Keyloggers, and Network Graphing
- Chapter 8: Scripting with Lua
- Copyright
- Dedication
- Credits
- About the Authors
- About the Technical Editor
- Acknowledgments
- End User License Agreement
Chapter 5
Diagnosing Attacks
In this chapter, we use Wireshark to identify and diagnose attacks. At the external face of your network, attacks are happening constantly, and often internally, so you don't get a chance to let down your guard anywhere. Therefore, it is valuable to learn one more method to spot and analyze them.
Attacks vary in many ways—for example, in technique, origin, difficulty to launch, how “noisy” they are, and the intended goal, to name a few. Perhaps, for security professionals, the most important point is the impact felt (or not felt) from a successful attack.
Does this chapter sample the whole range of attacks? No, it can't. There are dozens of new attacks every day, and there will be hundreds more to come until this chapter is published. Although it's impossible to show a significant sample of what's out there, we do explain the different types in the context of Wireshark. We explore each example in terms of how Wireshark can positively identify an attack. Of course, as an analysis tool, Wireshark isn't the best tool for early detection as much as for confirmation.
Wireshark shines when it comes to confirming what's detected or suspected. Some real-world attacks will prompt you for Wireshark to confirm what an IDS suspects to decide between malicious traffic and a false flag. For other disruptive attacks, you might start Wireshark to confirm what will already be painfully obvious.
This chapter discusses man-in-the–middle (MitM), denial-of-service (DoS), and advanced persistent threat (APT) attacks. Together, these types cover the large majority of attacks while also offering a fair spectrum of how attacks vary.
We begin with introducing the attack, explaining why it is effective and at least one method of how it gets done. We then discuss how the attack might be prevented. With some of the attacks, namely the MitM attacks, we also delve more into the mechanics of the respective protocol. For most of these attacks, you will read an example as well as be able to reproduce it. We show at least one example by text, highlighting the packets and their impact.
Lastly, the W4SP Lab plays heavily into the chapter, primarily with the MitM attacks. MitM attacks were briefly mentioned in an earlier chapter, but are discussed in much greater depth in this chapter. To refresh, MitM attacks are a type of attack when the attacker intercepts traffic between systems, then masquerades as one or more of those systems. Attackers can wage a MitM attack exploiting a variety of protocols, to achieve the same end: controlling or intercepting traffic as an intermediary system. In this chapter, you will personally get to conduct these attacks first-hand in the W4SP Lab.
Attack Type: Man-in-the-Middle
The MitM attack is a special category of attack. We go over a few other attack types in this chapter, but we'll say here that, of all kinds of attacks, MitM is the one kind that conveys some sense of place or position—the middle.
The MitM attack is like a spy. The attack secretly intercepts or relays traffic between two other systems or networks. The attacker operates, unknown, between the two parties—hence, the “middle man.”
Technically, thanks to routing, a MitM attack doesn't require you to be literally in the middle, between the two systems. And when it comes to modern network topologies and technologies, there's no real physical middle to a network anyway. In fact, you could perform a MitM attack on two systems much closer to each other than you are to either one of them. So, what's the “middle” mean?
The middle means you can perform certain actions to fool one or both of those parties to believe you are one of them.
As Figure 5-1 illustrates, both parties believe they are speaking directly to each other, as expected. In reality, however, the attacker is controlling or at least monitoring the traffic between them.
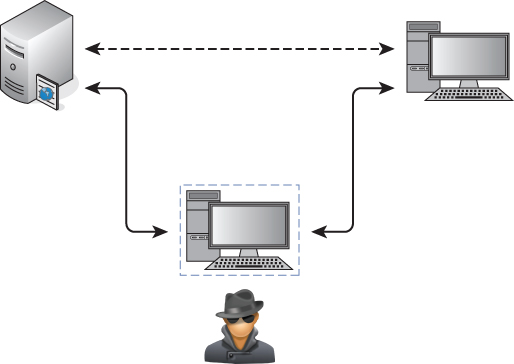
Figure 5-1: Man-in-the-middle position
Why MitM Attacks Are Effective
Man-in-the-middle attacks work well because of a lack of authentication. It is simply not feasible or practical to use authentication for every handshake, every session, and every query/response exchange. Hence, there will always be a risk of traffic being intercepted. The only mitigating condition is how far apart the server and client are for those exchanges. A query/response exchange on the same local subnet is a far safer exchange than an exchange across several hops. But even at the smallest level, at the local machine, traffic and data can be intercepted. (As security professionals, you already appreciate the risks of a rootkit.)
So, whether traffic travels across the room, across the parking lot, or across the globe, the risk of a MitM attack is present. That's in a general sense. Now let's get down to the “how” for particular protocols.
How MitM Attacks Get Done: ARP
First, a few sentences as a refresher on what ARP is and how it works normally. ARP, the Address Resolution Protocol, is how systems determine the hardware or MAC address for a given IP address. Normally, when a packet is routed to the target subnet, the incoming switch forwards the packet to the target machine. One of two things happens: either the switch already knows which port to send the packet out of, or it needs to find out. To find out, the switch broadcasts out all its ports, “Who has this IP address? And what is your layer 2 address?”
ARP Protocol Walkthrough
The ARP protocol is a simple two-step process beginning with an ARP request sent by the switch, followed by an ARP response from the target system. Given the ARP response, the switch forwards the IP packet out the correct switch port, and adds the ARP entry to its cache. The entry in the switch's cache saves time from having to broadcast a query again. That's the way ARP works normally.
Already, the vulnerability is clear. Anyone could send the response back, claiming they are the requested IP address, forwarding their own hardware address for receiving the local packets. Better still, why wait for the broadcast request? If a malicious user sends an unsolicited ARP response to the switch, to politely give the heads up about its MAC address, that is perfectly fine by ARP standard RFC 826.
Most ARP cache implementations have a timeout that determines when the machine should send an ARP request for entries already in the cache to refresh them. For example, in Windows 7 the timeout for when an ARP entry is marked stale, and therefore triggering an ARP request to update the entry, is between 15 and 45 seconds. It varies because the ARP timeout is determined per entry by multiplying a random number against a base time.
ARP Weaknesses
There are inherent weaknesses in ARP. The vulnerabilities in ARP are not necessarily flaws in how the protocol works, but they certainly leave the protocol defenseless. Because of these vulnerabilities, the ARP protocol, as it's designed, will stay exploitable.
For starters, ARP is stateless, meaning there is no sustained knowledge or some kept “session.” In short, every ARP request and response is treated independently. This trait is no different from IP or HTTP or other stateless protocols. Again, this is not a design flaw but just the nature of the protocol.
The trait that more enables attack is that ARP requires no authentication. Because ARP replies are accepted without authentication, there is no way to differentiate between those from legitimate and malicious sources. This is the case whether the malicious MAC address comes from an ARP reply or a gratuitous ARP, one sent without being prompted by ARP request.
Lastly, for some operating systems, in the case of a conflict (multiple MAC addresses for one IP address), the first ARP response—and only the first received response—will be accepted. In other words, if you can be the first, you can be legit. That conflict is expected, given the victim machine is still functional and able to respond as well. For most other operating systems, the last ARP reply is the one that sticks.
After you understand the mechanics of how ARP works and how its vulnerabilities factor into an attack, then you understand how simple it is to exploit.
Demonstrating Normal ARP
To demonstrate ARP in use, let's ping a host on the network. In this case, we are going to ping the IP address 10.0.2.2. This example and the figures captured for the book were done using the VirtualBox NAT networks created in Chapter 2. We start Wireshark to capture the ping traffic to 10.0.2.2, but the first packets are not the ICMP packet itself but rather the ARP packets to find out where our target is.
Here is what happens:
- In the first packet, the source machine sent an ARP broadcast, asking the question, “Who has the 10.0.2.2 IP address?”
- In the second packet, the gateway responds with the message, “The 10.0.2.2 IP address is at 52:54:00:12:35:02.”
- Packets 3 through 10 show ICMP ping requests and replies between the source (10.0.2.2) and target (10.0.2.15) machines.
If you notice, there is a time delay between some of the ICMP packets in Figure 5-2. What happened here is the ping request stopped and started again.
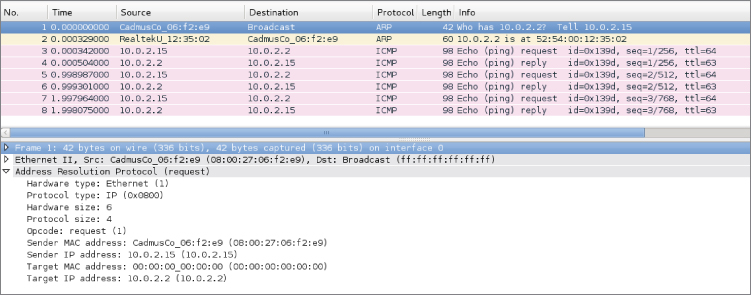
Figure 5-2: Ping and ARP transaction
If you check the ARP cache, you will see that there is an entry for the 10.0.2.2 address.
- root@ncckali:~# ip neigh show
- 10.0.2.2 dev eth0 lladdr 52:54:00:12:35:02 REACHABLE
- root@ncckali:~#
Referring back to Figure 5-2, note that for the subsequent ping requests, the machine is indeed using the ARP cache and did not have to broadcast ARP requests every time.
W4SP Lab: Performing an ARP MitM Attack
When it comes to learning, doing is far better than just reading about it. This is why the W4SP Lab was created. Most books that deal with network analysis have you loading up canned pcaps or running through hypothetical scenarios. Not in this book. We have developed an entire virtual network for you to cut your teeth on. It includes a lot of similar traffic that you will see in real-world production networks, like SMB, DHCP, FTP, HTTP, VRRP, OSPF, and the list goes on. To top it all off, we even have emulated client devices that make performing MitM attacks as realistic as possible, allowing you to steal passwords like the pros, all without breaking any laws.
One of the labs you can do in the W4SP Lab is a MitM attack using (abusing) the ARP protocol. In this lab, we want to poison the ARP cache of a local system to believe our attacker system is the target's gateway. When the target is sending packets to its gateway, the packets will instead be received by our interface. Let's walk though it here.
Lab Setup Refresher
If you've been reading this book over time, jumped to this chapter, or haven't launched the W4SP Lab in a while, here is a quick refresher on how to start the W4SP Lab:
- On your desktop/server, start Oracle VirtualBox.
- Launch your Kali Linux virtual machine.
- Log in as the user w4sp-lab. (If you don't remember the password, you can reset it when logged in as root.)
- In W4SP files directory, run the following lab script:
python w4sp_webapp.py
Once the Firefox browser comes up, you know the W4SP Lab is ready to work.
Remember: Do not close the Terminal window you ran the lab script from; if you do, the lab will stop.
After running SETUP to launch the lab environment, you may or may not see the center screen refresh with a full network, showing the devices. If only “Kali” is shown, click Refresh.
A network layout appears that resembles something like Figure 5-3.
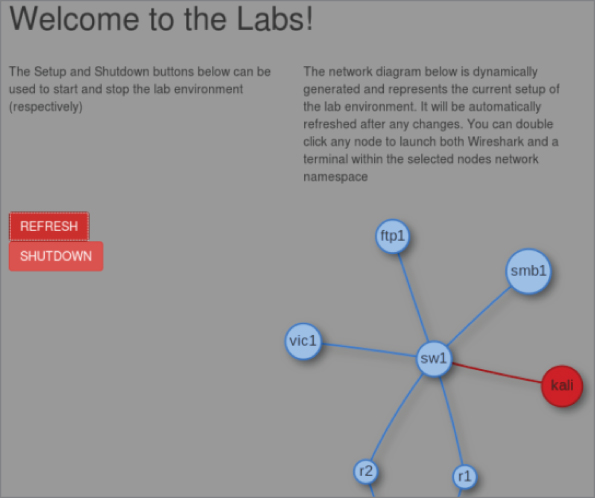
Figure 5-3: W4SP Lab network
The W4SP Lab is now ready for you, as we first set up in Chapter 2.
A quick troubleshooting note: If you find that Wireshark does not work as the user w4sp-lab, giving the error Couldn't run /usr/bin/dumpcap in child process: Permission Denied, then type this one-liner in a separate Terminal window:
sudo setcap 'CAP_NET_RAW+eip CAP_NET_ADMIN+eip' /user/bin/dumpcap
Running that setcap command lets dumpcap access raw sockets and do admin stuff to the network stack without requiring you to run as root.
Starting Metasploit
In this lab you are using Metasploit, a wonderfully powerful framework of modules to deliver payloads or perform exploits on systems in your lab environment. While this book is far from covering how versatile Metasploit is, we'll say the framework is capable enough to handle every scenario we need to demonstrate.
Normally, to launch Metasploit framework, you can either click the blue M icon on the Kali desktop sidebar or type msfconsole in a new Terminal window. For this lab, however, you are required to run as root. At a Terminal prompt, type sudo msfconsole. You should see a new prompt “msf >”, waiting for your command.
If you are familiar with Metasploit, excellent. If not, know these two things:
- The “msf >” prompt is the tool's command line interface (CLI).
- Typing ? or help at that prompt will present the help menu.
Metasploit is a tool with several modules, which, once used, will change the prompt to include that module. Using a module will enable other commands that we demonstrate in this lab walkthrough.
Starting the W4SP ARP MitM Attack
At the Metasploit CLI, type use auxiliary/spoof/arp/arp_poisoning.
Like at a Terminal prompt, you can press Tab to autofill commands you've started. For example, pressing Tab at “use aux” will autofill to “use auxiliary/”, and so on for subsequent directories or modules.
Given that module is now in use, note the msf prompt changed. The msf prompt shows that the ARP poisoning module is in play. For this module to function, several settings are required before the exploit can be used. To see a module's settings, required or not, type show options.
Note especially the settings that are required but do not yet have a current setting—namely, DHOSTS (the target IP address) and SHOSTS (the spoofed IP address). These are two settings you need to configure before you can launch the exploit. There is also a third setting, LOCALSIP (the local IP address), found under “show advanced” that also must be set. While the module doesn't require the LOCALSIP option, you need to manually set it to ensure the lab works properly.
To set all three of these settings, you need to identify the IP addresses of all involved systems.
For the gateway IP address, open another Terminal window and run sudo route -n to verify the gateway's IP address. Running sudo arp -a will provide its MAC address. (We don't need it, but it's good to know for verifying in Wireshark).
To get the local system's IP address, you can run sudo ifconfig to determine the local (w4sp_lab) interface IP.
Vic1 is a W4SP system that is intended as a victim. To get vic1's IP address, there are several ways as well. One way is to ping vic1—you'll see vic1.labs resolves to (in this case) 192.100.200.193. Another way is to check the browser's dynamic network diagram. Hovering over vic1 will present the IP address, as shown in Figure 5-4.
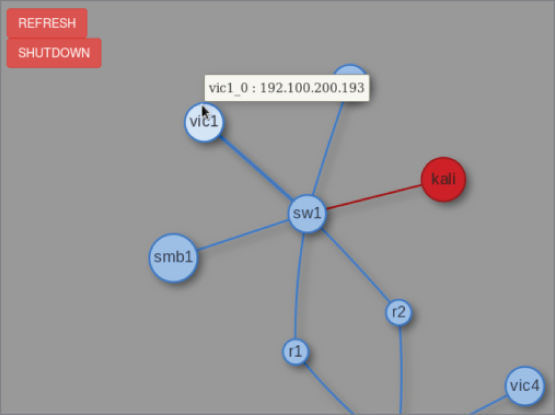
Figure 5-4: W4SP's vic1
Table 5-1 shows three options for the exploit module in Metasploit. As mentioned above, these options are required to execute the attack.
Table 5-1: Exploit Options
| SETTING | DESCRIPTION | SYSTEM | IP ADDRESS | MAC |
| DHOSTS | Target | vic1 | 192.100.200.193 | 3a:fb:e1:e8:a7:1b |
| SHOSTS | Spoofed IP address | the Gateway | 192.100.200.1 | 00:00:5e:00:01:ee |
| LOCALSIP | Local IP | Kali/Metasploit (you) | 192.100.200.192 | c6:2c:50:9c:b5:bb |
The IP addresses you see might be different in your Lab instance. Always check the IP addresses of the needed systems in your own live Lab—don't rely on this example.
At the msf console prompt, type set DHOSTS x.x.x.x, replacing x with the IP address of your target. This is the target system you are sending the ARP packets to.
Then, at the msf console prompt, type set SHOSTS x.x.x.x, replacing x with the IP address of the gateway. This is because you want the target to associate the gateway interface with your MAC address.
With the final setting, at the msf console prompt, type set LOCALSIP x.x.x.x, replacing x with our system's IP address. Without this step, the lab may fault with the error “LOCALSIP is not an ipv4 address,” as shown in Figure 5-5.
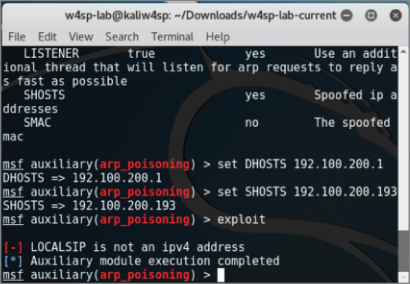
Figure 5-5: LOCALSIP
Finally, to run the exploit, type exploit at the msf console, as shown in Figure 5-6. And don't forget about starting Wireshark!
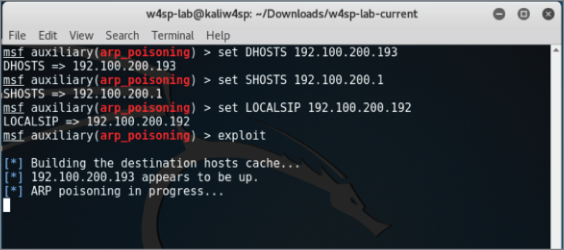
Figure 5-6: Exploit in progress
Wireshark for Capturing
Did you remember to start Wireshark? In this case, it's not a problem if you start it now. Launch Wireshark either by choosing it from the applications folder in Kali or by double-clicking on the Kali icon on the W4SP Lab network diagram. As you see the packets scrolling up, you'll want to enter a display filter to present only the ARP packets. As shown in Figure 5-7, you can see your attacking machine's MAC address.
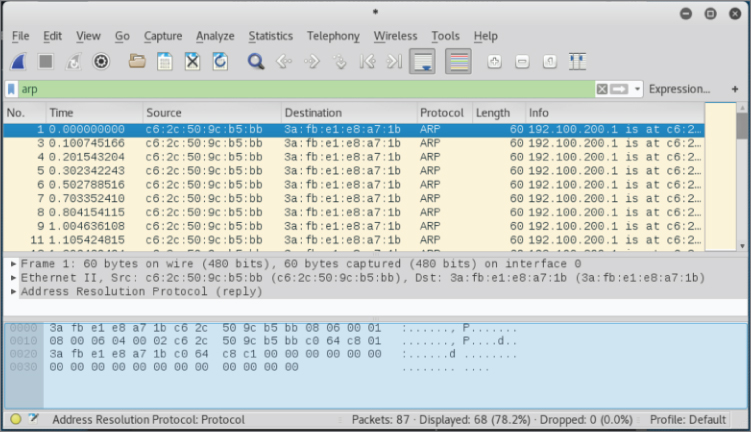
Figure 5-7: ARP packets fly
You can verify that ARP poisoning is working by sniffing from the host. If you have targeted a victim, you will eventually see traffic from it destined to the default gateway. For example, when vic1 attempts to make an FTP connection to the ftp2 machine, you will be able to capture that traffic.
Rerouted FTP Credentials
As shown in Figure 5-8, the target system (vic1) is attempting to establish a session with an FTP server on a different subnet (10.100.200.x), beginning with the FTP credentials. Normally, these packets would first route to the next hop. In Figure 5-8, however, you see it is our system's MAC address, not the gateway's MAC address, the packets are sent to. Success! The FTP username and password are sent in the clear as expected. Given our ARP poisoning attack was successful, any traffic that would be routed out of the subnet is now sent directly to your system.
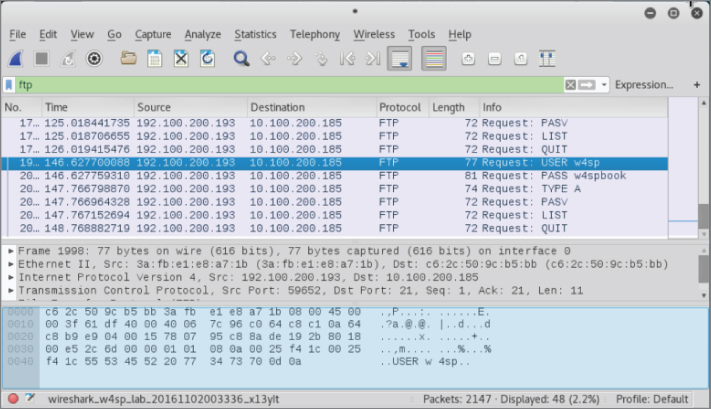
Figure 5-8: FTP credentials to attacker
At this point, as an attacker, you have options for what's next. Maybe you would route the traffic through a tunnel to its expected destination, to keep operations going. Or, because all you wanted was the credentials, you'll re-poison the target machine with the correct MAC for the gateway. Or do nothing, allowing the ARP cache to grow stale and the router will be found again.
Wireshark Detecting an ARP MitM Attack
A great feature of Wireshark, for this and most any scenario, is the Expert Information, which is found under the Analyze menu pull-down. Here Wireshark flags Errors, Warnings, Notes, and Chats (in varying severities). Each of these items can be expanded or collapsed, listing which packets contributed to the item. In our case, Wireshark warns us of a duplicate IP address. The packets listed are the gratuitous ARP announcements from our attacking machine. The listed packets show our MAC address (see Figure 5-9).
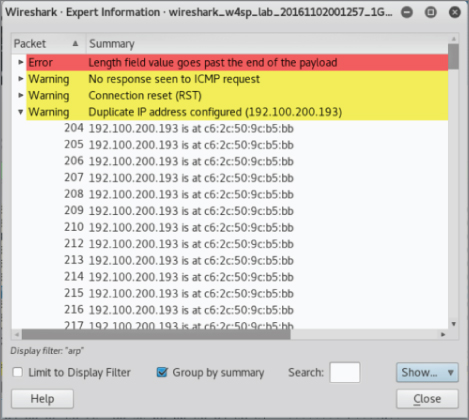
Figure 5-9: Expert information
To investigate, look at the switch tables to find out what port number the malicious ARP poison packets originated from. (Knowing the switch port number can lead to the physical machine/user.)
W4SP Lab: Performing a DNS MitM Attack
In this section, we perform a DNS MitM attack live on our W4SP Lab. In case anyone jumped right to this section, please first start your Kali VM, run your W4SP Lab script, and set up the Lab. Open a new Terminal and get ready.
As you know, and as mentioned in an earlier chapter, DNS is the protocol that translates human-readable hostnames to the numerical IP address computers can use to route traffic. DNS is a primarily UDP-based protocol, although it also uses TCP over port 53 in either case. When you type a human-readable hostname into your browser, your system resolves this via a DNS request to convert the hostname into a routable, usable IP address. There are plenty of variations on the DNS request, including different request types, but all we need here is a DNS request asking for the IP address of a specified hostname. Obviously, DNS plays a large role on the web, as most sites are accessed via their URLs or fully qualified domain names, not their IP addresses.
Note that, like ARP, there is often DNS cache present on systems. This cache is there, like it is for ARP, to provide for faster retrieval, keeping recent DNS lookups. Instead of making a DNS request for the same hostname, the system first refers to local sources, including its local cache for a quick lookup.
What Is DNS Spoofing?
DNS spoofing is where an attacker is able to manipulate the DNS traffic such that the response maps a specified hostname to the attacker's machine instead of the genuine machine using the hostname. Usually, this is accomplished by leveraging a malicious DNS server. Unlike ARP spoofing more easily performed on the local subnet, DNS spoofing works just as easily across the network. In other words, you're spoofing a server with a routable address. If you can trick a victim computer into using your malicious DNS server, that server can be anywhere, whether on the same subnet or beyond the victim's default gateway. This is because DNS is operated at layer 3 and above, while ARP is dealing with both layer 2 and layer 3. Because you're able to perform this at “arm's length” from the victim, DNS spoofing might be considered safer to perform than ARP poisoning, giving the attacker opportunity to more environments and targets.
How does every system know how to find its DNS server? Unless the system is set with a static IP address, the DNS server address is dictated by an option from the DHCP server.
How Is DHCP Involved?
Again, this is assuming the system is DHCP served, rather than set with a static IP address. An easy assumption, because DHCP is far more common, both in enterprise environments and in home networks.
Need a quick refresher on what DHCP is for and how it works? As a system boots up, it needs an IP address to connect to the network. If no IP is set already, the system requests an IP from a DHCP server using Dynamic Host Configuration Protocol (DHCP). The DHCP request and response is a straightforward four-step process, affectionately known as the DORA: Discovery, Offer, Request, Acknowledgment. The system booting up is the DHCP client.
The following is a quick primer on how this protocol works.
- Client sends a Discovery broadcast: “Any DHCP servers?”
- DHCP server sends an Offer to the client: “Want an IP?”
- Client replies with a Request for that IP address: “I'll take it.”
- DHCP server Acknowledges: “It's yours.”
Once the server acknowledges back to the client, the IP address is taken and won't be offered to another client. You can see the safeguards in the protocol, ensuring only one IP address per client, after both server and client agree to an address.
In addition to the IP address, the DHCP server provides other information, such as how long the IP address is reserved (the lease), and the offer also provides DNS server information. This is how we will deliver our spoofed DNS address—via a fake DHCP server.
Metasploit Providing a Fake DHCP Server
The action plan here is to start a fake DHCP server and employ a fake DNS server. In the DHCP offer, you will be providing the 192.100.200.x IP address of your own Kali machine as the fake DNS and DHCP servers. What is your IP address? In a new Terminal, run sudo ifconfig to find out, as shown in Figure 5-10.
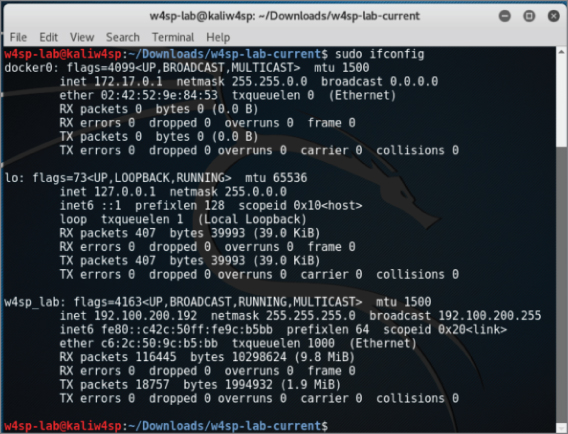
Figure 5-10: Noting your IP address
In your Terminal window, launch the Metasploit framework, typing sudo msfconsole to start. At the msf console prompt, you'll use the fake DHCP module by typing use auxiliary/server/dhcp. Then type show options to see the settings available. The module options are shown in Figure 5-11.

Figure 5-11: DHCP module options
We will be setting the options for DNSSERVER, NETMASK, and SRVHOST, which are the to-be fake DNS server, its network mask, and the IP address of this fake DHCP server, respectively.
Set both DNSSERVER and SRVHOST to be your local system's IP (starts with 192.100.200.x). Then set NETMASK as 255.255.255.0. When all is complete, run the exploit.
Type exploit and your screen output should resemble Figure 5-12.
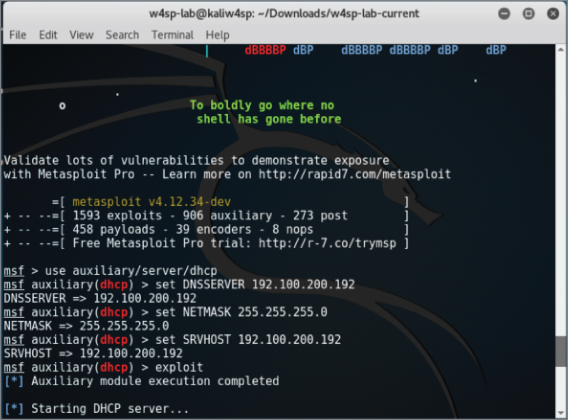
Figure 5-12: DHCP running
With the fake DHCP server running, we use Metasploit again to now configure our fake DNS server.
Metasploit Providing a Fake DNS Server
It's time to configure the fake DNS server to resolve any or all IP queries sent to it. This can be one domain or many. We need it to be just one domain, the lab's FTP server.
The Metasploit module we will use is the auxiliary/server/fakedns module. For this module, the following settings need to be set: TARGETACTION, TARGETDOMAIN, and TARGETHOST. Working backward on that list, the TARGETHOST is again your system, the server to resolve DNS queries. The TARGETDOMAIN is the domain we want to resolve. Again, for this lab, we will just resolve a query for the lab's FTP server. Lastly, the TARGETACTION is how we want the DNS server to behave. In this scenario of spoofing an address, the parameter's setting is called FAKE. For your reference, a way to test this module but not actually alter any queries is to use BYPASS here, which you would then punt any queries to a legitimate DNS server. But for this lab, we want FAKE here, which will resolve our target domain to our own machine.
Once you have those three parameters set, type exploit to start the module. Given the DNS server module is running, you should see screen output similar to Figure 5-13. Again, the IP address of your own system will likely be different.
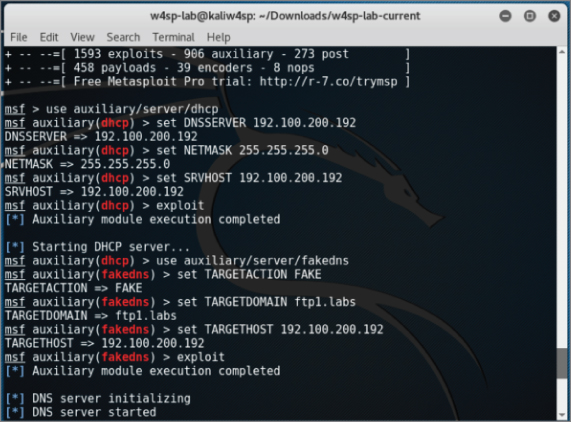
Figure 5-13: DNS settings done
You will soon be reminded that the W4SP Lab environment is humming right along, behind the scenes, as queries get echoed on the screen.
Quieting Down DNS
Soon after starting the fakedns exploit module, your Metasploit screen will be echoing every DNS query it encounters. Queries that aren't within the TARGETDOMAIN setting will be bypassed. But queries to the FTP1.labs will be resolved using our Kali machine's IP address. You can see both the bypassed and resolved queries occurring in Figure 5-14.

Figure 5-14: DNS queries
So, as you can see, the screen can get busy and fast. And this isn't even an especially busy network. It might serve you better to run the exploit job in quiet mode.
Here is how to rerun the exploit in a quieter fashion:
- Press Ctrl+C to interrupt the screen output.
- List the
msfconsolejobs. Type jobs -l (note the lowercase l). - Kill the
fakednsjob. Type jobs -k 1 (number of thefakednsjob id). - Restart the exploit module quietly by typing exploit -q.
You should have a screen similar to that in Figure 5-15.
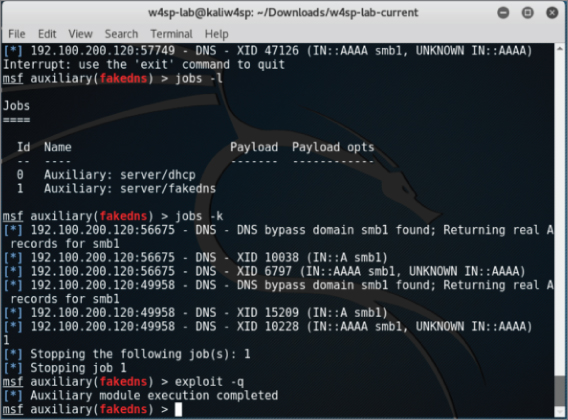
Figure 5-15: Quieter fake DNS
You've verified the setup is working. Now check it out in Wireshark and you will see that three things are occurring:
- You have responded to DHCP requests.
- You are getting DNS traffic.
- For DNS queries to the ftp1.labs host, your IP address is delivered.
Setting Up a Fake FTP Server
You now know that FTP queries are getting resolved to your system. But what would users find there? They are knocking on the door, but no one is home!
Let's set up a fake FTP server to capture credentials from our victim. We don't even need to configure this module, as the default options work immediately.
- Type use auxiliary/server/capture/ftp at the
msfconsole. - Show options as well, and you should see what is shown in Figure 5-16.
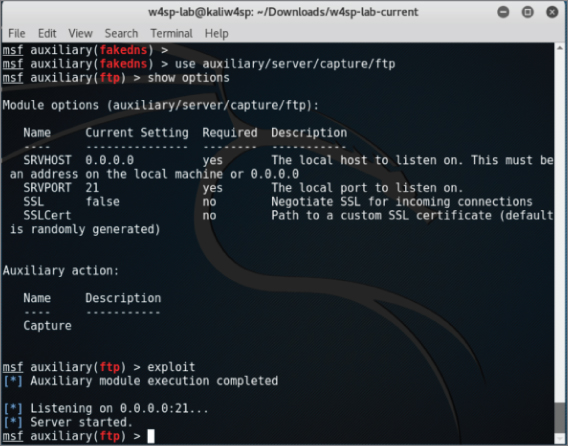
Figure 5-16: FTP capturing
Within seconds, you should see captured FTP credentials. (I had to be rather quick to capture the screenshot without them.) We will leave it to the end of chapter exercises for you to discover the credentials.
How to Prevent MitM Attacks
As mentioned earlier, this chapter just scratches the surface of the protocols that can be leveraged for MitM attacks. It may seem like open season for network hacking, but there are various mitigations that can be deployed to prevent some of the techniques described in this chapter.
For ARP poisoning, one solution is to set static ARP tables. This effectively means an administrator hardcodes the association between MAC addresses and IP address. The issue with this solution is that it does not scale well. If you manage an enterprise consisting of thousands of machines, it is unreasonable to manually configure the ARP table for every machine. There are products on the market that perform ARP inspection. These products attempt to keep track of normal ARP traffic and will flag anonymous ARP packets, a bit like how Wireshark warns us that two different MAC addresses were tied to the same IP address.
Another mitigation technique is DHCP snooping. DHCP snooping specifies a trusted DHCP server. The switch then listens to every DHCP response from this trusted DHCP server and builds a binding table of IP address-to-switch port. With this knowledge, the switch is able to tell which host is on which port, and if it sees, for example, a host sending out ARP replies for an IP that it does not possess, the switch will prevent that traffic. DHCP snooping also prevents malicious DHCP servers, as it will drop all DHCP responses that don't originate from the trusted DHCP server.
One final technology to discuss is 802.1x. This protocol is a standard for port-based Network Access Control (NAC), which can be leveraged to keep bad guys off the network in the first place to stop potential MitM attacks at the source. Basically, a switch will attempt to authenticate every host that connects to the network. If a host is unauthorized, the switch will not forward traffic. This effectively stops all attacks, as malicious hosts shouldn't be able to get access to the network. Note we said “shouldn't.” While there are all kinds of fancy 802.1x authentication mechanisms, ultimately the only uniquely identifying attribute at layer 2 is the MAC address. Remember our discussion in Chapter 4 about Linux bridges? It turns out that you can leverage these to perform a MitM attack against clients connected to an 802.1x-protected network. It relies on having physical access to the victim machine and placing your attacker machine directly between the victim and the switch port. The goal is to piggyback off the authenticated victim client to give yourself unauthorized access to an 802.1x-protected network. Check out the Note on DEFCON for a link regarding this attack.
Attack Type: Denial of Service
The denial-of-service (DoS) attack has one purpose: stop service. Compared to other attack forms, a DoS tends to be the most simple-minded, noisiest, and crudest way to attack. Performing a DoS does not require finesse. It can require gathering significant resources to launch, because the attack is purely a brute force show of strength.
The DoS attack is a screamer. While stopping service is the main goal, getting as much as attention as possible is a close second. That's a big differentiator from other attack types.
A DoS is usually performed at arm's length through some go-between system—typically a botnet of compromised systems—or at least performed in a way to not lead back to the actual attacker. To sum up, we're not sugar-coating it here to say the DoS attack is a cowardly form of bullying (as most bullying is).
In the security triad of Confidentiality, Integrity, and Availability, the DoS is an attack on availability, plain and simple. DoS attacks are the attackers' choice when they wish to stop or interrupt service and do so in the most attention-grabbing way they can. So, if so cowardly and crude, why do they work?
Why DoS Attacks Are Effective
While DoS attacks don't require finesse, the attacker still needs significant resources. Years ago, bandwidth was measured by megabytes or even kilobytes. Back then, a single script kiddie needed a reasonably good connection and his tool to launch a DoS that could disrupt a small to medium business.
Today, it's more accurate to say someone launching a DoS would be launching a distributed denial-of-service (DDoS) attack, relying on a network of compromised systems. Given a botnet, even large corporate connections capable of handling several gigabits per second are easily interrupted. To make matters worse, hiring or borrowing someone else's botnet is possible with money saved from a few pizza orders. So, yes, the same script kiddie can still disrupt a small to medium business easily and cheaply. Larger, more resilient corporate connections are more difficult, but as the media shows, it's very possible.
It's beyond this book's scope to explain the rationale why DoS attacks happen. Maybe it's enough to say attacks are driven by fame or money. Whether done for glory, revenge, or for a competitor, DoS attacks end with a company suffering loss of revenue and reputation. Let's dive into technical reasons why DoS attacks work.
DoS attacks might not deny service entirely, but might only deny the service securely. Consider a device or software that normally uses a secure connection or has options for communicating securely. Sometimes when a device experiences issues operating, it might downgrade those options in order to keep operating.
With a little reconnaissance, the attackers know what device they are up against. When a device or software is interrupted and can no longer deliver reliably, the device or application might opt to degrade a secure method for a more open, more vulnerable method. Running more vulnerably is better than not delivering at all, right?
For example, as mentioned in Chapter 4, the network switches forward traffic only out the port leading to the target device. Traffic in one port and out one port maintains some level of confidentiality, among other benefits. This traffic control is possible because the switch manages a table associating MAC addresses seen per port. But what happens if the switch is denied that service? A type of DoS attack on a switch, called MAC spoofing, can force the switch to “fail open,” resulting in traffic exiting out all ports. From the perspective of the switch engineer, at least its traffic will continue, even if with degraded performance. However, from a security perspective, all traffic is visible across all ports. In short, a switch that is failed open is a hub.
Who benefits? The person seeking to sniff all traffic out of that switch turned hub. The result of a switch failing open is that essentially every port is a mirrored port. That secondary attack might be achievable only after a device fails open. Once that's done, a secondary, more targeted attack can be carried out. For example, once the network switch fails open to act as a hub, all traffic can be sniffed, rather than just a fraction of it, helping to map out the network or locate the correct target.
The bottom line is, once security (confidentiality, integrity and/or availability) can be interrupted, the attacker reaches his or her goal, or at least is much closer to reaching it. DoS attacks aren't commonly used as stepping stones to another attack. That's because they're so noisy in the first place. But if devices aren't closely monitoring, the quieter method of interrupting security may be all it takes to move forward onto the next exploit.
How DoS Attacks Get Done
DoS attacks happens in one of two ways:
- Bury the target in traffic to the point of exhausting its resources.
- Send traffic that is crafted or malformed so the target fails.
The first is the “drinking from a fire hose” method. This is carried out by brute force. The attacker, plus a million other devices he or she controls, sends a connection request to the target. The target server is quickly overwhelmed and fails under the workload.
The second method is subtler and should require more working knowledge of the target—for example, that the target system runs a homegrown application listening only for a specific protocol or for connections from a known IP address. Another challenge is that the packets crafted to trip up that application might need additional testing.
In either case, the end result the attacker wants is to deny service. If that service is public facing, then it's easy enough to verify success once the attack is on.
Drinking from a Fire Hose
Let's dive into the first method—overwhelming the target. Sending tons of packets works well, but what protocol do you use? The answer is, whatever protocol will be heard, processed at least a little and not ignored. The target server very likely processes TCP/IP like every other system, so there are a slew of protocols the target will be listening for.
And the analogy “drinking from a fire hose” sticks well, because most DoS attacks using these protocols have names like SYN flood, ICMP flood, and UDP flood. It's a flood of traffic, and the destination can't keep its interface above water. (Okay, too far; we'll stop the analogy talk.)
Let's cover some protocols used to flood the target. The SYN flood works well because the SYN packet is the start of the three-way handshake to initiate a TCP connection. In this case, the target gets a SYN packet from anywhere (spoofing works well here). The target responds as expected with SYN-ACK and gets no ACK reply. The handshake is never completed, occupying a miniscule amount of network resources to wait patiently. After a few million handshake attempts, the target's resources are exhausted. The source IP address can be spoofed because the attacker doesn't care if the connection completes. By randomizing the source IP, blacklisting a range of IPs at an upstream router does not mitigate the problem.
The process is basically the same for ICMP and UDP floods. In an ICMP flood attack, the attacker overwhelms the target with ping requests or Type 8 ICMP packets. While seasoned security professionals might disregard ICMP flood attacks as obsolete from the 1990s, a DoS attack by ICMP flood found new life in late 2016 from Type 3 “Destination Unreachable” responses. In the case of a UDP flood, the attack is essentially similar to using ICMP ping requests. The target system is overwhelmed with UDP packets to various ports. The UDP packets likely originate from several, spoofed senders, to multiply the effect. For every UDP packet, the target will respond with an ICMP Type 3 Destination Unreachable response, draining more and more resources.
In recent years, across the many tools available, the most common protocol employed is HTTP. Naturally, the targeted server and/or open ports would determine the chosen protocol. But HTTP is by far the most shared or single protocol used to get the job done.
Table 5-2 compiles a list of the most well-known DoS tools and shows their respective attack protocol of choice.
Table 5-2: Well-Known DoS Tools
| NAME | VERSION | ATTACKS |
| Anonymous DoSer | 2.0 | HTTP |
| AnonymousDOS | 0 | HTTP |
| BanglaDOS | 0 | HTTP |
| ByteDOS | 3.2 | SYN, ICMP |
| DoS | 5.5 | TCP |
| FireFlood | 1.2 | HTTP |
| Goodbye | 3 | HTTP |
| Goodbye | 5.2 | HTTP |
| HOIC | 2.1.003 | HTTP |
| HULK | 1.0 | HTTP |
| HTTP DoS Tool | 3.6 | slow headers, slow POST |
| HTTPFlooder | 0 | HTTP |
| Janidos -Weak edition | 0 | HTTP |
| JavaLOIC | 0.0.3.7 | TCP, UDP, HTTP |
| LOIC | 1.1.1.25 | TCP, UDP, HTTP |
| LOIC | 1.1.2.0b | TCP, UDP, HTTP, ReCoil, slow LOIC |
| Longcat | 2.3 | TCP, UDP, HTTP |
| SimpleDoSTool | 0 | TCP |
| Slowloris | 0.7 | HTTP |
| Syn Flood DOS | 0 | SYN |
| TORSHAMMER | 1.0b | HTTP |
| UnknownDoser | 1.1.0.2 | HTTP GET, HTTP POST |
| XOIC | 1.3 | Normal (=TCP), TCP, UDP, ICMP |
Reference: Data for Table 5-2 came mostly from a 2014 study, “Traffic Characteristics of Common DoS Tools” by Vít Bukač, then a researcher for Masaryk University in Brno, Czech Republic. You can read this entire highly informative report at http://www.fi.muni.cz/reports/files/2014/FIMU-RS-2014-02.pdf. `
Less Is Sometimes More
Rather than slamming a network interface with traffic, there are less noisy ways to produce a denial of service. Exhausting resources slowly can just as effectively lead to service interruption as the fire hose tactic. With respect to the OSI model, instead of causing service interruption from a barrage of layer 2 or layer 3 traffic, an attacker can interrupt service from the top-most layer.
There are too many ways to list how applications can fail. Consult the OWASP's Top 10 vulnerabilities for a great start on how applications get exploited. A popular one is poor input validation. For example, the application accepts, albeit poorly, a 10MB file when it prompts for a 30-character name. And the application promptly fails.
To successfully bring down a server doesn't even need the listening application to be ill equipped to handle badly formed or specially crafted traffic. Maybe a web server dies of resource starvation because of perfectly legitimate traffic. A very popular tool exploits a server that accepts connection requests but won't proceed because the request is not entirely complete, leaving the web server waiting. That's the case with Slowloris, a patient and methodical DoS tool. Different tools relying on the same method include Low Orbit Ion Cannon (LOIC) and High Orbit Ion Cannon (HOIC). Both LOIC and HOIC utilize TCP and UDP as well as HTTP, all of which follow the same method: slowly and systematically exhaust system resources by connection request. It's a popular enough technique that you're likely already aware of the tool genre: Slow HTTP DoS.
Slowloris opens a connection to the web server but doesn't finish it, doing so many times. Similar to the SYN flood mentioned earlier, but with connecting to the web server, Slowloris can eat up more resources per connection. This allows Slowloris to avoid the obvious attention, and likely action taken to mitigate against it.
Slowloris sends a complete packet but only a partial HTTP request. Not malformed, but a legitimate, partial request. That way, the intrusion detection systems or host security monitoring doesn't flag it as malicious or even suspect.
Assuming a default timeout of 60 seconds, Slowloris will reopen its connections at 59 seconds, just before the connection would close. Throughout the time spent waiting, Slowloris just keeps sending partial connection requests.
Eventually, Slowloris reaches the maximum number of connections allowed by the web server, or at least causes the web server to reject incoming genuine connection requests.
How to Prevent DoS Attacks
For techniques used years ago, like the Smurf attack (ICMP broadcast storm), network administrators now know better how to stop or mitigate it. For techniques used more recently, like a malformed protocol or application data, system administrators can take a number of steps. For example, at a network level, the admin can employ filters or place an intrusion detection system (IDS) or intrusion prevention system (IPS). The system administrator can adjust configuration parameters of the affected application. The developer can harden code with security in mind. And, if the budget is justified, an admin could employ a third-party solution to monitor and react.
But how much of this works? Many of those examples would work well, given it's the right reaction to the DoS they had. But who is to say that DoS will happen again? And if it does but fails, will the attackers not adjust and react as well? Even the most cutting edge third-party solutions are limited this way. Whether the expensive solution reacts to a known pattern or an anomaly, attackers will tweak, randomize, and adapt their delivery.
In the case of Slowloris, there might be a sweet spot between the two web server parameters governing how long to wait before a connection is deemed inactive and how many concurrent connections it can handle. On Apache, those parameters are called KeepAliveTimeout and MaxKeepAliveRequests, while in Microsoft's IIS they are connectionTimeout and maxConnections. As you should already suspect, the more practical sweet spot is really between having the server resources and the determination of the attacker.
Is all hope lost? Of course not, but it's tough. At best, this is a cat-and-mouse game of techniques and defenses. New defense techniques get learned and new defense systems are developed. Then, the innovative attacker shifts attention to the systems and protocols still used and finds a way to exploit them instead. That is the “at best” scenario. At worst, preventing a DoS is impossible. In the big picture, whatever protocol or channel that's open for communication is a protocol and channel open to getting occupied or terminated. It's only the details in implementation that shift and adapt.
Attack Type: Advanced Persistent Threat
The APT is arguably the most capable and most feared of all threats. There's no fame or recognition for those behind an APT. In fact, if you've heard news on cyber-espionage, there is only shame and political blowback from being discovered. This all probably sounds dramatic, but APT is a generalized category of the malware behavior (not the malware code itself) that security professionals especially hate to see. APT methods, behavior, and purpose are far different from what we've seen so far. To describe the APT, maybe it is best to compare it to what we've already seen.
Compared to the man-in-the-middle attack, an APT isn't so restricted or temporary. The APT won't position itself between two systems but instead burrow into a place that offers the best access to what it seeks: information. APT seeks access to as many, not one or two, critical systems as possible.
And compared to the DoS, the APT is just the opposite. APT neither seeks attention nor wants to interrupt operations. The APT doesn't want to be found and removed. An APT seeks to get into a protected network, plant itself for large-scale reconnaissance and gathering, and do so for the long haul.
The APT is the uninvited “wallflower” at the party that, when aptly commanded, turns into a cunning spy. (Yes, “aptly” used, full pun intended.)
Why APT Attacks Are Effective
APT attacks work for two big reasons: smart stealth and people.
First, look at the keywords: advanced and persistent. Advanced alludes to the tradecraft: well-funded, not uncommon to be from nation-states or highly resourceful people accustomed to being, and staying, in power. And there are likely some pretty smart folks behind that coding. The other keyword, persistent, refers to the malware's goal: keep out of sight. Persistent doesn't mean “Get in and make as much noise as possible, so we get caught.” No, it means, get in and stay down, stay quiet.
The second main reason is because a company has users. Users allow, even enable and help APT attacks. That might sound cynical or jaded, but as security professionals, you likely agree that users are both a company's greatest asset and most reliable attack vector. Security professionals try to educate and raise security awareness. We implement policies, lock down devices, and regularly poke and probe our environments for problems. These days, users might know better than to insert a USB stick gifted from a conference. But still, people are still notoriously helpful and willing to bend rules for the sake of being a decent human being.
But we can't just blame people for allowing this malware to come in. When it comes to attack types, the APT is arguably the most capable and most feared of all. If your company has something of value (don't they all?), then your company is a target for someone.
How APT Attacks Get Done
As said earlier, APT is a category on behavior, not necessarily the code. The technical details how an APT gets into the network cannot be limited to one or two techniques. It's more telling that an APT will get in, somehow. The reasons for why are spelled out already: once a target is identified, the threat actor is determined to get in, and will find a way.
Whether it's a phishing email or through social networking, sent by malicious file or exploiting an application vulnerability, it happens. Whatever path the APT uses to get into the protected network, that's something to count on. If an environment is targeted by an APT attacker, then penetration is all but guaranteed by sheer will. The first step is dropping malware, likely a Trojan or remote access tool (RAT). But this doesn't make it a successful breach yet.
Once the malware is in, reconnaissance starts, as the attacker searches for valuable data or users. Malware might spread or replicate to facilitate the reconnaissance. Or the Trojan/RAT will work on behalf of an external actor.
The APT will gather the data or research what it needs to accomplish some early goals. First, seek multiple, and more protected footholds into the network. Second, determine what needs to be gathered (likely somewhat known prior to the infiltration) and determine how to gather that data. Lastly, the person controlling the APT needs to funnel the data amassed internally to the outside. And that labels the breach a success.
Example APT Traffic in Wireshark
We don't run Trojan backdoors or other APT malware droppers within the W4SP Lab. The risk of inadvertently releasing and propagating malware outside the lab is too great. Instead, we cover a few APT examples with screenshots of Wireshark. With each example, we point out notes from the traffic. The packet captures used for these examples were allowed for publication by Mila Parkour, the admin at Deepend research. Anyone may download the packet captures from a link on http://data.deependresearch.org/.
The goal with these examples isn't to establish a pattern as much as demonstrate diversity in these samples.
Example APT: Win32/Pingbed
Microsoft's threat encyclopedia and others rated the Trojan dropper for Pingbed with the highest possible severity. Figure 5-18 is a screenshot of Wireshark showing traffic captured from Pingbed.
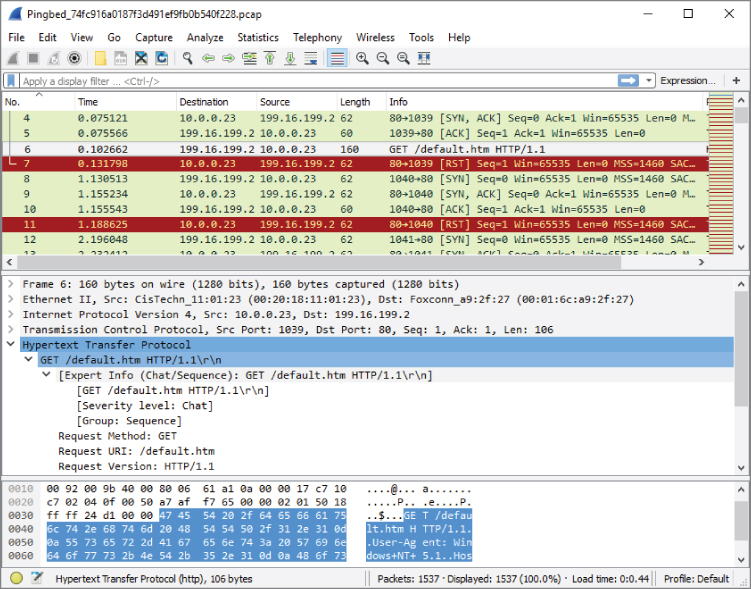
Figure 5-18: Pingbed
Note the persistent calls to the remote IP via 80/tcp from the Trojaned system (10.0.0.23), the GET method to retrieve default.htm, then the closed connection (RST flag).
Example APT: Gh0st
Figure 5-19 is a screenshot of Wireshark showing traffic captured from Gh0st.
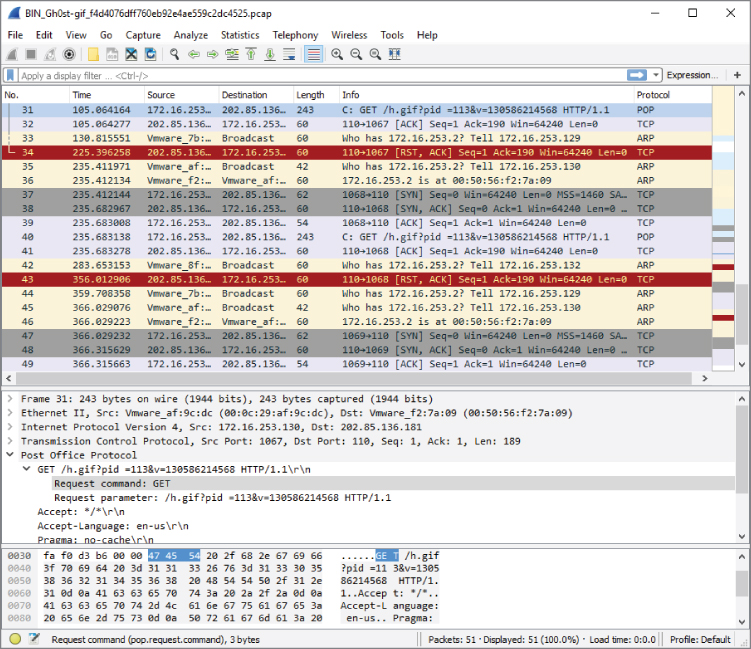
Figure 5-19: Gh0st
Note the persistent calls to the remote IP via 80/tcp from the Trojaned system (172.16.253.130), the GET method to retrieve h.gif, then the closed connection (RST flag)—each connection from SYN to RST timed to take 120 seconds.
Example APT: Xinmic
This Trojan copies itself to c:\Documents and Settings\test user\Application Data\MicNs\updata.exe, dropping only two other files. Xinmic methodically starts to connect (SYN), and acknowledges (ACK), but with no responses. What data might be sent afterward? For the answers, download the capture file and examine the trace, as shown in Figure 5-20.
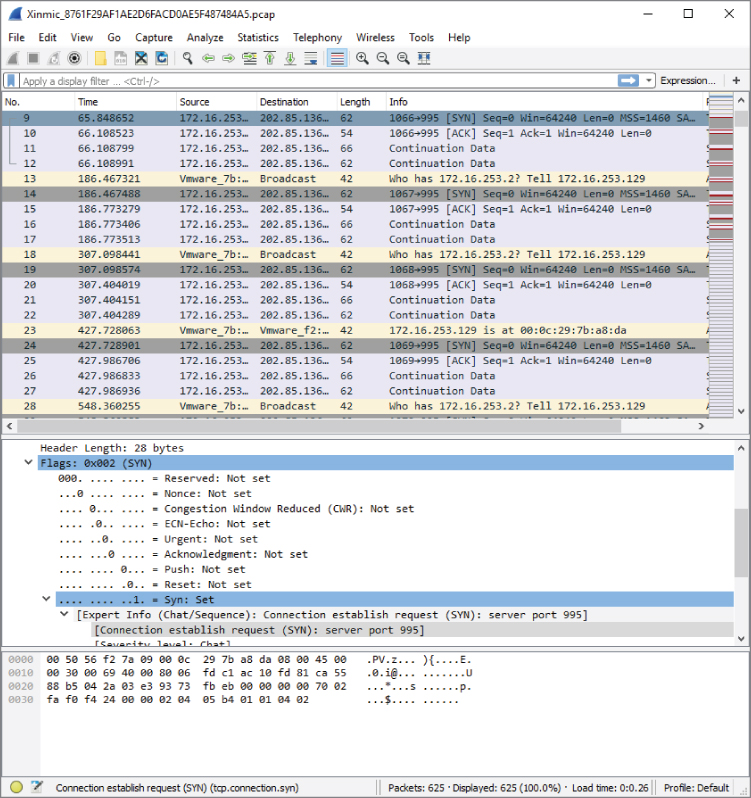
Figure 5-20: Xinmic
Note the incrementing source port (1067/tcp, 1068/tcp, 1069/tcp…).
General Advice on Wireshark Examples
Some closing words on all these examples:
- Pay attention to what Wireshark columns are used. They are not all the same, nor ordered the same.
- These are very “clean” captures. Even without display filters, there is little to no other traffic.
- Some things aren't what they seem; for example, why are ICMP requests left unreplied? Much investigating needs to be done in malware analysis.
- Much more can be gleaned from a capture; for example, trying other columns or opening Analyze ⇨ Expert Information.
How to Prevent APT Attacks
Preventing an APT attack would seem impossible, given an attacker with enough determination. As with most other attacks, however, it doesn't mean you have to let the attacker into your network easily. So, let's discuss some surprisingly simple strategies for keeping APT out of your network. Or at least you'll have a better chance of discovering it before damage is done.
- User awareness—Having people appreciate the threat and what it can mean for the company and their livelihood if the threat is successful. Providing for employees a sensible, simple, and management-supported way to raise issues or call out challenges to security protocol.
- Defense in depth—For the same reason defense in depth is encouraged against all attacks, having multiple layers of defense means multiple opportunities to identify and hopefully stop a threat from becoming a full breach.
- Security monitoring—Not only having the tools, but having the personnel and executive support to keep vigilant eyes on the company. An APT might not be the result of the first exploit. And what defines an APT is the desire to stay there. Always be hunting.
- Incident handling—Having an APT Response and Recovery plan, including testing it, means being prepared ahead of time. Incident handling for APTs should incorporate all the same steps and support or more as for responding to any other incident.
Summary
This chapter covered three primary types of attack: man-in-the-middle, denial-of-service, and advanced persistent threat. We discussed the reasons why each type seems to be effective. Some attacks work well based on weaknesses in a protocol or people. Other attacks succeed because of sheer will or strength. You used the W4SP Lab to perform first-hand some MitM attacks. To facilitate the attacks in the W4SP Lab, we made good use of the Metasploit framework. And lastly, we showed a few examples of APT attacks via Wireshark screen grabs.
In Chapter 6, we use Wireshark to take a closer look at packets with offensive tendencies by examining more attacks with Metasploit.
Exercises
- Running the ARP MitM attack in the W4SP Lab, what was the FTP password sent from vic1?
- Download and test a DDoS tool, such as HOIC or LOIC (from a VM). Use it against a web server you own (another VM). Experiment with web service parameters and monitoring performance. What are the first packets shown in Wireshark from the attacking VM?
- Design a display filter that will help you see DHCP request and response traffic for when another machine first connects to the network.
- Download and examine some of the APT packet captures from Deepend Research. Share with your peers what you've learned.