Table of Contents for
Redux in Action
 Redux in Action
Published by
Manning Publications, 2018
Redux in Action
Published by
Manning Publications, 2018
- Cover
- Redux in Action
- Copyright
- Redux in Action
- Brief Table of Contents
- Table of Contents
- Foreword
- Preface
- Acknowledgments
- About this book
- About the authors
- About the cover illustration
- Chapter 1. Introducing Redux
- Chapter 2. Your first Redux application
- Chapter 3. Debugging Redux applications
- Chapter 4. Consuming an API
- Chapter 5. Middleware
- Chapter 6. Handling complex side effects
- Chapter 7. Preparing data for components
- Chapter 8. Structuring a Redux store
- Chapter 9. Testing Redux applications
- Chapter 10. Performance
- Chapter 11. Structuring Redux code
- Chapter 12. Redux beyond React
- Appendix. Installation
- Index
- List of Figures
- List of Listings
Chapter 5. Middleware
- Defining what Redux middleware is
- Writing your own middleware
- Composing middleware
- Learning when to use middleware
We’ve covered most of the usual suspects you’d find in a React/Redux application: actions, reducers, and the store. To update a state in your application using Redux, you need all three. You have one more core actor that’s key to this whole operation: middleware. If you’ve spent any time in chapter 4, you’ve already come face-to-face with middleware and lived to tell the tale. When you added redux-thunk to the Parsnip project, you learned how to apply middleware to Redux using the applyMiddleware function, but not necessarily how to create your own. In this chapter, we’ll look more in depth at how middleware works, how to create it, and what use cases it can be a good fit for.
In the process, you’ll improve Parsnip by creating custom middleware for a few classic use cases:
- Logging actions, which give us a quick look into what’s happening in the app
- Analytics, which provide a convenient interface to track an event when an action is dispatched
- API calls, which will abstract away common tasks around making calls to the server
Let’s get started!
5.1. What’s in middleware?
What exactly is middleware? The concept isn’t unique to Redux, and if you’ve worked with frameworks like Rails, Express.js, or Koa, you’ve likely used or been exposed to middleware in a shape or form. Generally, middleware is any code that runs between two other software components, typically as part of a framework. With a web server framework such as Express or Koa, you can add middleware that runs after an incoming request is received, and before the framework handles a request. This is useful for all kinds of things, such as logging data about each request and response, handling errors in a centralized way, authenticating users, and so on.
Frameworks such as Express and Koa are great for illustrating middleware, but you’re here for Redux. If you know that middleware can be described as code that sits between two components, such as a framework receiving an HTTP request and generating a response, where does middleware in Redux live?
Redux middleware is code that sits between an action being dispatched and the store passing the action to the reducer and broadcasting the updated state. Similar to the way server middleware is useful for running code across many requests, Redux middleware lets you run code across many action dispatches.
Let’s look again at our architecture diagram (figure 5.1). The middleware section is highlighted to give you an idea of where this kind of code fits in to the normal action dispatch cycle.
Figure 5.1. Actions move through middleware, then reducers, prior to the final state being calculated.
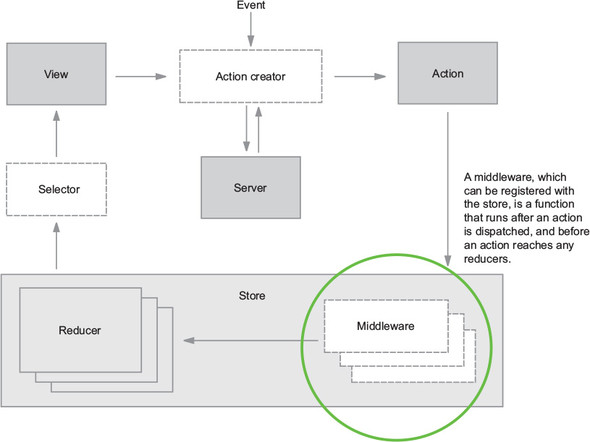
Notice that middleware in figure 5.1 exists within the store. Think of middleware as being “registered” with the store. When an action is dispatched, the store will know to pass that action through any middleware you’ve added. When the entire chain of middleware is complete, the action is finally passed to the reducers to calculate the updated state of the application.
5.2. Middleware basics
Creating middleware involves a few basic steps:
- Define the middleware using the correct function signature
- Register the middleware with the store using Redux’s applyMiddleware function
Let’s start with the function definition. Here’s the function signature for Redux middleware:
const middlewareExample = store => next => action => { ... }
Not confusing at all, right? In short, this amounts to writing three nested functions for each new middleware you write. Spelled out in a more verbose syntax, this looks like the following:
function storeWrapper(store) {
   return function middlewareWrapper(next) {
      return function handleAction(action) {
         ...
      }
   }
}
At this stage in the game, it’s most important to know the nature of the arguments provided to your middleware:
- store—The redux store. You can use the store object directly in middleware when you need to make decisions based on an existing state. store.getState has you covered.
- next—A function that you’ll call when you’re ready to pass the action to the next middleware in the chain.
- action—The action being dispatched. Generally, your middleware will do something with every action (such as logging) or watch for a specific action by checking the value of action.type.
5.2.1. Composing middleware
One of the key aspects of middleware is its ability to be chained, meaning multiple middleware can be applied to the store. Each middleware, after completing any work it may decide to do, invokes the next middleware in the chain. As a result, any middleware you create should be focused and have a single purpose, making them easier to combine and reuse in different contexts. Maybe another app in your ecosystem can use a middleware you’ve created, or maybe you can open source it! Because all Redux middleware must be created the same way, it’s perfectly fine (and expected) to combine your own middleware with third-party middleware.
Let’s kick off your custom middleware creation with maybe the most classic middleware example around: logging.
Note
If you’re coding along, pause here to start a new branch. Future chapters will require rolling back features created in this chapter.
5.3. Example: logging middleware
The goal: for every action dispatch, log the action being dispatched (including type and payload) and the new state of the store after the action is processed.
Because you need to run code for every action that’s dispatched, logging fits the use case for middleware perfectly. It’s also simple to implement, because it doesn’t affect the normal flow of control within the app. You’re not modifying the action or changing the outcome of a dispatch in any way. You want to hook into only the action lifecycle and log certain details about the action being dispatched and how it affects the state of the store.
It’s also a bonus that logging fits Redux perfectly. Actions were invented in part to provide a trail of the events and data flying around your applications. Because events are modeled as objects with descriptive names and any data they might need, it’s trivially easy for you to log an action’s type and payload to get a quick sense of exactly what’s happening at any given moment. Without a system such as Redux, where updates must pass through a central hub, it would be much more difficult to log state changes with the same kind of effort.
5.3.1. Creating the logger middleware
Given that this is the first custom middleware you’ll add, let’s take a high-level view at what it takes to go from zero to having a functioning logging middleware as part of your application:
- Create a new file for the logger in a src/middleware/ directory.
- Write the middleware.
- Import the middleware into index.js where you create the store.
- Add the middleware using Redux’s applyMiddleware function.
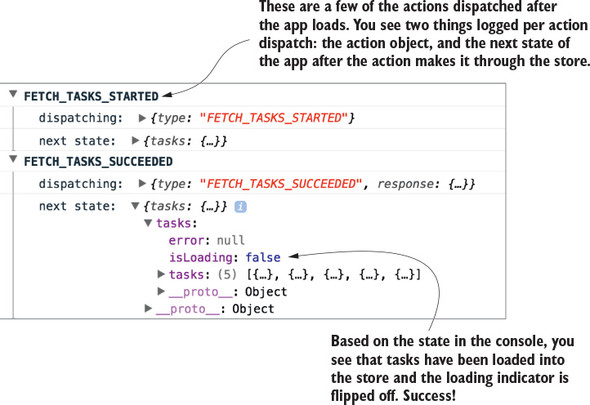
Not so bad, right? For the middleware itself, you want to log two things: the type of the action being dispatched and the state of the store after it processes the action. Figure 5.2 shows the kind of output you’ll see in the console after you’ve created the middleware and registered it with the store.
Figure 5.2. Example console output after adding the logger middleware
Start by creating a new directory, src/middleware/, and a new file named logger.js. Inside the file, add the code from listing 5.1. Here you use all three of the arguments provided to your middleware, each to perform a different task:
- Use action to log the type of the action being dispatched.
- Use store to log the state of the store after applying the action with store.getState.
- And finally, use next to pass the action to the next middleware in the chain.
Listing 5.1. Creating the logger middleware – src/middleware/logger.js
const logger = store => next => action => {                1
  console.group(action.type);                              2
  console.log('dispatching: ', action);
  const result = next(action);                             3
  console.log('next state: ', store.getState());           4
  console.groupEnd(action.type);
  return result;
};

export default logger;
- 1 Creates the middleware using the correct function signature
- 2 Uses console.group to style console output
- 3 Uses next to ensure the action gets passed to the reducers and the next state is calculated
- 4 Logs the state of the store after the action has been applied
By now you know what action objects are and that they have a required type property, and you know how to retrieve the current state from the store with store.getState, so the next function is likely the most foreign concept in play here.
The next command, provided to us by Redux, is a way to signify when this middleware has completed its work and it’s time to move on to the next middleware in the chain (if there is one). It’s effectively a wrapped version of dispatch, so it has an identical API. Ensure you’re always passing in the action argument whenever you call next within a middleware.
One curiosity here is that the middleware doesn’t end after you use next(action). You’re free to carry on and reference the Redux state after the action passes through the logger middleware.
5.3.2. Using applyMiddleware to register the middleware
At this point you have a perfectly valid logger middleware, but it’s not particularly useful on its own. To use it in Parsnip, you have to add the middleware to your store instance. If you’ve worked through chapter 4, then this should be familiar! It’s the same process you went through to add the redux-thunk middleware when you introduced async actions.
Open index.js, import the logger, and add it to the argument list for applyMiddleware alongside thunk, as shown in listing 5.2. Whenever you want to add a new middleware to your applications, you’ll follow this process. Note that you add the logger middleware last, and they run in the order that you pass them to applyMiddleware. It’s not critical in this case, that the middleware be in any particular order, but you should be aware of the significance of their order.
Listing 5.2. Adding the logger middleware to the store – src/index.js
...
   import logger from './middleware/logger';                     1
   ...

   const store = createStore(
     rootReducer,
     composeWithDevTools(applyMiddleware(thunk, logger)),      2
   );

   ...
- 1 Imports the newly created middleware
- 2 Registers the logger middleware with the store
The middleware system is designed to be flexible and composable. As long as each middleware calls next to move to the next middleware in the chain, everything will work correctly.
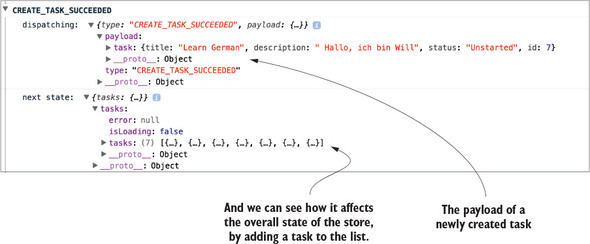
After this last step of registering the middleware when the store is created, Parsnip has its first fully functioning custom middleware. Look at the app and open the browser console, where you can see the fruits of your labor. Try creating a new task or editing an existing task. You should see output similar to figure 5.3.
Figure 5.3. Another example of console output from the logger middleware
You might ask, “Isn’t this a less powerful version of the Redux DevTools?”, and you’d be correct! The dev tools are implemented using similar concepts as the middleware you created. We decided to start with middleware for logging because of how cleanly it demonstrates one of the core use cases for Redux middleware. In your own apps, you may choose to use a middleware like this if you want to keep things simple, but most likely you’ll get the most bang for your buck with an established tool such as DevTools.
Parsnip now has its first custom middleware, but you’ve only scratched the surface. Let’s explore another common use case for middleware: sending analytics events. The analytics middleware will be similar to the logger, but we’ll introduce a new concept along the way: the meta property, which allows you to attach additional data to an action object. Then, in the middleware you can watch for the meta property on incoming actions and do work if the right conditions are satisfied.
5.4. Example: analytics middleware
Knowing what your users are doing is always preferable to not knowing, so in any real-world application, it’s a good idea to have proper event tracking. In Parsnip, you can add tracking to most of the actions currently being dispatched. After all, actions are objects that describe an event, so you can hook into an action dispatch and record an analytics event whenever users view a page, create a task, or edit a task. You won’t go as far as setting up a third-party analytics service such as Segment or Google Analytics, but you’ll implement a Redux middleware that provides a convenient API for implementers of Parsnip to send new events. Analytics is a good use case for middleware for a few reasons:
- Like the other middleware you’ve worked with so far, you need to run analytics code across many different actions.
- It allows you to abstract the specifics of event tracking, such as which service is being used (for example, Segment, Keen) and any configuration.
For something like analytics, you’re using middleware to encapsulate implementation details and provide a developer-friendly way to send analytics events. Other Parsnip developers won’t need to know the specifics of how to send an event, they only need to know the high-level interface available to them.
5.4.1. The meta property
Up to now you’ve only dealt with two top-level properties as part of an action: type, a string which declares which action is being dispatched, and payload, any data that the action needs to be completed. A third action property has gained popularity within the community: the meta property. The meta property is designed to capture any data relevant to an action that doesn’t fit within either type or payload. For your use case, you’ll use it to send along analytics data, specifically an event name and metadata.
In the yet-to-be-created analytics middleware, you’ll watch for any action that has the relevant meta property. Every analytics event has two components: an event name and any metadata that the event might require. Let’s name this event create_task and pass along the ID of the task being created.
Fire an analytics event whenever the action is dispatched by heading to src/actions/index.js and updating the createTaskSucceeded action creator to match the following listing.
Listing 5.3. Adding the meta property – src/actions/index.js
function createTaskSucceeded(task) {
  return {
    type: 'CREATE_TASK_SUCCEEDED',
    payload: {
      task,
    },
    meta: {                       1
      analytics: {                2
        event: 'create_task',
        data: {
          id: task.id,
        },
      },
    },
  };
}
- 1 Adds the meta property at the same level as type and payload
- 2 Groups analytics-related data under a namespace key
Indirection in the code is one of the potential downsides or costs of using middleware, but it isn’t too much of an issue here. As you’ll see in a moment, the action creator still gets to be explicit. Because you’ll use the meta property directly on the action object, anyone reading the action creator will know that analytics will be captured whenever the action is dispatched. However, they won’t need to know specifics about how to send events data. As users of the middleware, you can pass the right data with the right structure and let the middleware take care of the rest.
Now you have a sense of how we’ll pass analytics data along with an action, but that’s only one piece of the puzzle. You’re using the meta property in the action creator, but you also need the middleware to take care of watching for actions with said meta property. In the next section you’ll create the middleware, and you’ll update a few of your actions to send analytics events by adding meta.
5.4.2. Adding analytics middleware
Now on to the middleware itself! Your goal is to create a middleware that, when an applicable action is being dispatched, will take care of everything related to recording an event. The action is responsible for passing any event data, and the middleware is responsible for encoding the details of how to send that event. For this example, you’ll mock out an analytics API. In a production app, however, you’d likely use a third-party service, so the middleware is where you’d include any library code.
Here’s how the flow of control in the middleware might look for dispatching an action with the meta and analytics properties:
- For each incoming action, check whether the meta and analytics properties exist.
- If not, call next(action) to move on to the next middleware.
- If so, get the event name and data and send it using a fictional analytics service.
- And finally, when that’s complete, call next(action).
You already have the CREATE_TASK_SUCCEEDED action sending the meta/analytics properties; now you need to take a stab at implementing the middleware to satisfy the above criteria. Create a new file in src/middleware/ called analytics.js and add the code from listing 5.4.
Here, you introduce something that’s a common practice you’ll see with middleware. Instead of doing work for every action dispatch the way you did with the logger, you instead check for certain conditions before letting the middleware take over. In this case, if you see that the action has the meta and analytics properties, you know that the action has requested to track an event. In all other cases, you’ll call next(action) right away without doing any further processing.
Listing 5.4. Implementing the analytics middleware – src/middleware/index.js
const analytics = store => next => action => {
  if (!action || !action.meta || !action.meta.analytics) {      1
    return next(action);                                        2
  }

  const { event, data } = action.meta.analytics;                3

  fakeAnalyticsApi(event, data)
    .then(resp => {
      console.log('Recorded: ', event, data);                   4
    })
    .catch(err => {
      console.error(                                            5
        'An error occurred while sending analytics: ',
        err.toString(),
      );
    });

  return next(action);                                          6
};

function fakeAnalyticsApi(eventName, data) {
  return new Promise((resolve, reject) => {
    resolve('Success!');
  });
}

export default analytics;
- 1 Checks whether the action wants to use the analytics middleware
- 2 If the right action properties aren’t found, move on to the next middleware.
- 3 Uses destructuring to get the event name and any associated metadata
- 4 Logs the event being recorded successfully
- 5 Logs an error if necessary
- 6 Moves on to the next middleware
As with the logger middleware, you’ll also need to register the middleware with the store in src/index.js, as shown in the following listing.
Listing 5.5. Applying the analytics middleware – src/index.js
...
   import analytics from './middleware/analytics';
   ...

   const store = createStore(
     rootReducer,
     composeWithDevTools(applyMiddleware(thunk, logger, analytics)),     1
   );
   ...
- 1 Registers the analytics middleware by passing it to applyMiddleware
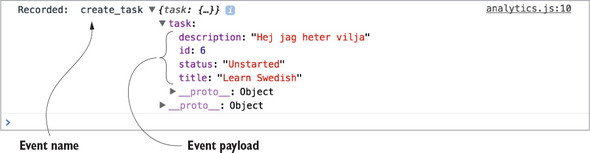
Head to the app, make sure your browser console is open, and try creating a new task. You should see output similar to figure 5.4, indicating that your analytics middleware is working properly. You’re looking specifically for the event name, create_task, and the task object that we passed to the analytics middleware.
Figure 5.4. Example output for the create_task analytics event
With logging, you did work in the middleware for every action, but not every middleware you write will want to respond in such a way. Here, you’re doing something slightly different, but also extremely common: checking if the action being dispatched is one you care about. If it’s not relevant to the middleware, you’ll bail out and send the action on to the next middleware. If it’s an action you care about, you’ll take care of sending analytics before you move on.
This pattern of using a meta property to allow actions to indicate to a middleware that it should do work is great for a few reasons:
- It allows you to be explicit at the action level. Because the analytics data is baked directly in to the action object, it’s clear that the action wants to do something analytics related.
- It lets the middleware stay generic. Instead of having the middleware watch for specific actions, letting actions specify they want additional work done using the meta property allows the middleware itself to remain relatively static.
- You now have an extremely friendly API for developers. Sending along an analytics object with an action is easier than having to import and use any analytics code directly.
Think of it as the best of both worlds. You get to abstract analytics functionality into the middleware, meaning you don’t have to duplicate it around the app, but you also get to define actions in an explicit way.
Info
Though you won’t do it here, the middleware itself is also a great way to encapsulate any data that might apply to all analytics events. Because you have access to the state of the store, it’s easy to get things like the ID of a logged-in user, or an identifier for the current build of your application.
If you want to add tracking to additional actions, follow a similar pattern to what you did with the CREATE_TASK_SUCCESS action. Using the meta property, specify an event name, any data the event might need, and let the middleware take care of the rest!
Now that you have experience creating two custom middleware, it’s a good time for a brief conceptual interlude. Let’s pause here to explore potential middleware pitfalls.
5.4.3. Interlude: when and when not to use middleware
The real benefit of middleware is the ability to centralize certain tasks that need to be applied across many actions. Again, let’s use logging as an example. Say your goal is to log the type and payload of every action being dispatched. One way to accomplish this is to add logging statements at the point of every call to store.dispatch. Sure, you’re logging action dispatches, which was your original goal, but this solution should make you cringe for at least one reason: it’s not particularly scalable. Now you’ll have to add logging for every action you create.
Middleware allows you to bypass this entirely by defining the logic for logging actions in a single place. All new actions will get logging for free, without any developer intervention.
When is it a good idea to use middleware? For us, there are two golden rules:
- Use middleware if you need to write code that applies across many, if not all, actions in the application. Logging is maybe the most classic example.
- But, use middleware only if the indirection caused by the middleware isn’t overly damaging to the readability and understandability of the code.
In that last bit, there’s a lot of nuance, and it’s a good segue into an equally important question: When should you NOT use middleware?
Redux middleware in the right scenarios is incredibly useful and powerful, but like many things in life, it’s possible to have too much of a good thing. The main tradeoff with middleware is indirection. This usually isn’t an issue with big, cross-cutting concerns like logging, but you have to be wary when using middleware for tasks that affect the overall flow of control within your apps. For example, you’ll build an API middleware later in the chapter that helps centralize tasks common to all async actions that require an AJAX request. It’s a powerful abstraction, but because it directly impacts the flow of data, it’s an added layer of complexity that’s practically impossible for developers working in that area of the code to ignore.
Usage in cases like these will, as always, depend on the current situation and factors such as the size of your team and how much code you’re dealing with. Redux is here to help you take back control of the flow of data through your applications, and responsible middleware usage is a big part of that.
5.4.4. Case study: how not to use middleware
Logging and analytics are great examples for when you should reach for middleware, but it’s not always that light and breezy of a decision. It’s worth covering the potential for misuse with middleware, and we’ll use routing as a case study. The problem we’re about to outline approximates something we dealt with in a real-world application, and highlights one of many hard lessons around best practices with middleware learned along the way.
Once upon a time, we had an application that needed a place for core routing code. Specifically, the goal was to redirect users to a dashboard after logging in. We decided to use middleware, but wrote it in a non-generic way. Instead of allowing actions to indicate they needed to perform a redirect, we watched for specific actions, such as LOGIN_SUCCESS, directly in the middleware.
From a readability perspective, we eventually lost the mental link between actions that triggered subsequent dispatches. The routing middleware became the de facto place for all routing, and the code blew up over time. In retrospect, it would have been better for us to use a more generic approach, something more along the lines of the meta property we used for analytics.
Again, the upside of the meta strategy is that it lets us keep actions explicit. Reading the action conveys everything you need to know that might affect the flow of control. The downside is that action creators become slightly larger and take on an additional responsibility. Ultimately, like everything in software, the best solution depends on your realities.
Let’s look at several of the potential solutions to the original problem statement: a successful login should redirect the user to the /dashboard route. The following listing shows how you might do it using thunks and async action creators, which you learned about in chapter 4. Note that this code won’t be part of Parsnip.
Listing 5.6. Redirecting after login
export function login(params) {
  return dispatch => {
    api.login(params).then(resp => {            1
      dispatch(loginSucceeded(resp.data));      2

      dispatch(navigate('/dashboard'));         3
    });
  };
}
- 1 Makes the call to login
- 2 Dispatches an action indicating login was successful
- 3 Performs the redirect
If you needed to interact with this login action creator, everything you need to know is contained within it. It’s more imperative; the code reads like a list of step-by-step instructions, but login is transparent about its responsibilities.
On the other hand, you can add specific routing logic in a middleware like we did, shown in listing 5.7. Instead of dispatching the navigate action directly within the login action, you’ll move that logic to a routing middleware. Middleware by default has a chance to inspect and respond to all actions, so in this case you’ll wait until you see the LOGIN_SUCCEEDED action to redirect the user.
Listing 5.7. Routing logic in a middleware
function login(params) {
  return dispatch => {
    api.login(params).then(resp => {
      dispatch(loginSucceeded(resp.data));
    });
  };
}

// within a routing middleware file
const routing = store => next => action => {
  if (action.type === 'LOGIN_SUCCEEDED') {            1
    store.dispatch(navigate('/dashboard'));           2
  }
};
- 1 Watches for the LOGIN_SUCCEEDED action
- 2 When the action being dispatched is the one you care about, redirect to the dashboard.
This code seems harmless at first, and maybe it is, assuming the routing middleware doesn’t grow too much. But it has one critical flaw: indirection. In our experience, it’s usually a mistake to use middleware in this way.
You may be familiar with the decades-old concept of “the principle of least surprise.” Liberally paraphrased, if users are consistently surprised by functionality, it might be time to re-think that experience. This user experience guideline may be extended to developers as well: if an implementation is surprising, consider an alternative. Future implementers of login need to somehow gain the unintuitive context of the middleware. If they’re new to the project or Redux, there’s a good chance they’ll miss it at first, and be confused as to what exactly is triggering the redirection.
Let’s look at this in a more visual way. Figure 5.5 illustrates the two different approaches for handling the redirect following a successful login.
Figure 5.5. Modeling different strategies for routing as part of an async action
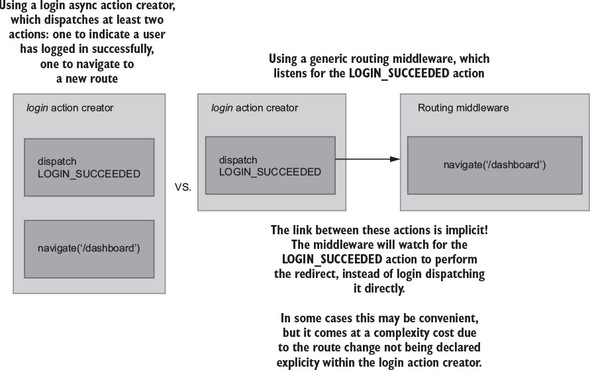
The key takeaway here is the difference between explicit versus implicit approaches. With the action creator strategy on the left, you’re explicit about the additional work taking place in the login example.
This is a small example, but picture middleware like this handling 5, 10, or 20 actions. Sure, much of the code around routing will be bundled in one place, but the flow of control for any individual action dispatch becomes more difficult to track down. Middleware can help you reduce duplication and centralize logic, but it comes at a cost, and it’s up to you to use your best judgement. Middleware are abstractions and their primary purpose is to aid the development process. Like all abstractions, there’s a point where they can go too far and negatively impact the overall design of your application.
Let’s implement one more middleware, this time for API calls to the server, which will have the highest degree of difficulty.
5.5. API middleware
You now know that middleware is meant to abstract logic that’s common to many actions. Looking at Parsnip’s existing functionality, is there any logic that we can abstract? Think about the actions in the app that make API calls to the server. Up to now, you have fetchTasks, createTask, and editTask. What do they all have in common? They all seem to
- Dispatch an action indicating that a request has started.
- Make an AJAX request.
- If the request succeeds, dispatch an action with the response body.
- If the request fails, dispatch an action with the error message.
If you recall from chapter 4, these steps relate to the three key moments in time for any server API call. You model each of these events with a standard set of action types. Using task creation as an example, you dispatch three actions:
- CREATE_TASK_STARTED
- CREATE_TASK_SUCCEEDED
- CREATE_TASK_FAILED
For any future action that you implement that requires an AJAX request, you’ll have to create these three corresponding action types. Nothing is inherently wrong with this strategy. It has its own benefits, mainly that it’s an explicit way to model the interactions in your application. But it’s heavy on the boilerplate. You’re doing the same type of work with different endpoints and different data. You can attempt to centralize much of the logic around sending requests by creating a new middleware to take care of the tasks common to all these async actions.
In our opinion, things like logging and analytics are no-brainers for middleware. They’re generic, run across many actions, and don’t interrupt the normal flow of control. The API middleware you’re about to implement is slightly different. It directly affects how you interact with one of the core pieces of functionality in any application: AJAX requests. Whether you think adding this middleware is worth it in your own projects is up to you. Ultimately, the benefits are centralization of logic, at the cost of added complexity. Parsnip is all about exploring and experimenting with new technologies, so let’s go for it and see how an API middleware like this might come together.
Note
This type of API middleware is popular both in production and as a teaching tool, because it’s a great example of extracting repeated functionality. We took plenty of inspiration from two places: the “Real World” example that’s part of the official Redux docs (https://github.com/reactjs/redux/blob/master/examples/real-world), as well as a popular open source variant (https://github.com/agraboso/redux-api-middleware/issues).
5.5.1. The desired API
What should the action creators look like? For this middleware, you’ll require all actions with API calls to have three things:
- A CALL_API field defined and exported by the middleware
- A types property, an array of the three action types for the request starting, completing successfully, and failing
- An endpoint property, to specify the relative URL of the resource you want to request
You already have an existing implementation of the fetchTasks action, but for this middleware you’ll replace it completely with a new implementation. The good news is that you’ll have to make minimal updates elsewhere in the app. The App component, which dispatches the fetchTasks action, will notably require zero changes. Under the hood, the implementation of how the app fetches and stores tasks has changed, but the view layer (React components) is safely isolated from any of this work.
Using the code in listing 5.7, do the following:
- Import a CALL_API action from the yet-to-be-created middleware. This will be how fetchTasks will indicate that it wants to use the API middleware.
- Define and export constants for each action related to fetchTasks: FETCH_TASKS_STARTED, FETCH_TASKS_SUCCEEDED, and FETCH_TASKS_FAILED.
- From fetchTasks, return an object that uses the CALL_API action, passes the three action types, and finally passes the /tasks server endpoint.
Implementing the previous actions means you’ll have the data you need when you get to the middleware itself in the next section. As you’ll see in listing 5.8, the order in which you add the three action constants within the types array matters. The middleware will assume that the first action is request start, the second is request success, and the third is request failure.
Tip
If the CALL_API syntax is new to you, the square brackets were introduced in ES6 and evaluate the variable within them to dynamically produce a key.
Listing 5.8. Updating fetchTasks – src/actions/index.js
...
import { CALL_API } from '../middleware/api';                    1

export const FETCH_TASKS_STARTED = 'FETCH_TASKS_STARTED';        2
export const FETCH_TASKS_SUCCEEDED = 'FETCH_TASKS_SUCCEEDED';    2
export const FETCH_TASKS_FAILED = 'FETCH_TASKS_FAILED';          2

export function fetchTasks() {
  return {
    [CALL_API]: {                                                3
      types: [FETCH_TASKS_STARTED, FETCH_TASKS_SUCCEEDED,        3 FETCH_TASKS_FAILED],                                        3
      endpoint: '/tasks',                                        3
    },
  };
}

// function fetchTasksSucceeded(tasks) {                         4
//   return {
//     type: 'FETCH_TASKS_SUCCEEDED',
//     payload: {
//       tasks,
//     },
//   };
// }
//
// function fetchTasksFailed(error) {
//   return {
//     type: 'FETCH_TASKS_FAILED',
//     payload: {
//       error,
//     },
//   };
// }
//
// function fetchTasksStarted() {
//   return {
//     type: 'FETCH_TASKS_STARTED',
//   };
// }
//
// export function fetchTasks() {
//   return dispatch => {
//     dispatch(fetchTasksStarted());
//
//     api
//       .fetchTasks()
//       .then(resp => {
//         dispatch(fetchTasksSucceeded(resp.data));
//       })
//       .catch(err => {
//         dispatch(fetchTasksFailed(err.message));
//       });
//   };
// }

...
- 1 Imports the CALL_API constant
- 2 Defines three constants for each action dispatched within fetchTasks
- 3 From fetchTasks, returns the data the middleware will need
- 4 Comments (or deletes) the existing implementation of fetchTasks
You removed a whole lot of functionality from the fetchTasks action, and that’s the whole point! The next step is to move request logic into a centralized place. In the next section, you’ll create the API middleware that knows how to deal with an action like the one your new version of fetchTasks returns.
5.5.2. Outlining the API middleware
Because this middleware is more complex than the logger and analytics middleware, you’ll create it in several smaller steps. Create a new file in the src/middleware/ directory named api.js. Using listing 5.9, start by creating the required middleware boilerplate: defining and exporting the main middleware function. Next, define the CALL_API action, and check if the current action includes the CALL_API type. If it doesn’t, pass the action to next to move on to the next middleware.
Note the line in listing 5.9 where you check if callApi is undefined. You followed a similar process with the analytics middleware, where you checked for the existence of a meta property. In both cases, if the current action didn’t satisfy the criteria for the middleware, you immediately called next(action) and moved on. This is a common pattern known as a guard clause. We’re huge fans of guard clauses for readability purposes. They allow you to define exceptional cases for a function up front, freeing up the function body to be a clean, un-indented block. Once you get past a guard clause, you can assume any data that the middleware might need will be available.
Listing 5.9. Sketching out the API middleware – src/middleware/api.js
export const CALL_API = 'CALL_API';                   1

const apiMiddleware = store => next => action => {
  const callApi = action[CALL_API];                   2
  if (typeof callApi === 'undefined') {               3
    return next(action);                              3
  }
}

export default apiMiddleware;
- 1 Defines the middleware-specific action constant
- 2 Gets the object with the types and endpoint properties (if it exists)
- 3 If it’s not an action meant for this middleware, continue without any further work.
Because you now have a totally functional, albeit not useful, middleware, take this opportunity to register it with the store so you can use it within Parsnip. Head to src/index.js, import the middleware, and pass it to the applyMiddleware function, as shown in the following listing.
Listing 5.10. Registering the API middleware – src/index.js
...
import apiMiddleware from './middleware/api';
...
const store = createStore(
  rootReducer,
  composeWithDevTools(applyMiddleware(thunk, apiMiddleware, logger,
     analytics)),
);
This time, the order in which you apply the middleware does matter. Because the API middleware requires a custom action shape, you want to include it first. If the logger or analytics middleware came before the API middleware, they wouldn’t know how to handle an action without a type property and would throw an exception.
Now you can get to the meat of the middleware. You need to dispatch the first of your three actions, which will indicate that a request has started. Add the code from the following listing to src/middleware/api.js.
Listing 5.11. Dispatching the request started action – src/middleware/api.js
...

const apiMiddleware = store => next => action => {
  const callApi = action[CALL_API];
  if (typeof callApi === 'undefined') {
    return next(action);
  }

  const [requestStartedType, successType, failureType] = callApi.types;   1

  next({ type: requestStartedType });                                     2
}

...
- 1 Uses array destructing to create variables with each action type
- 2 Dispatches the action which indicates the request is in progress
Because next will ultimately dispatch an action to the store, you pass it an action object the same way you would if you were using store.dispatch. The result is identical to the old strategy of dispatching FETCH_TASKS_STARTED directly within the fetchTasks action. The reducer will update the correct state in response to the action, and the app will know to render a loading indicator.
The middleware uses array destructuring to create variables for each action type, which was why it was important to add the action types in the right order when you implemented the new fetchTasks action.
Next let’s add a function for making the AJAX call. You already have an API client that lives at src/api/index.js, but for your purposes here you need a new, more generic function that accepts an endpoint as an argument. Update the code in src/middleware/api.js to match the following listing.
Listing 5.12. The makeCall function – src/middleware/api.js
import axios from 'axios';

const API_BASE_URL = 'http://localhost:3001';     1

export const CALL_API = 'CALL_API';

function makeCall(endpoint) {
  const url = `${API_BASE_URL}${endpoint}`;       2

  return axios
    .get(url)
    .then(resp => {
      return resp;                                3
    })
    .catch(err => {
      return err;                                 3
    });
}

...
- 1 Defines the base URL for the API
- 2 Uses the given endpoint to construct a final request URL
- 3 Returns the response from the promise handler
The makeCall command is generic enough to work with our middleware. You’ll pass it an endpoint defined by the action being dispatched, and then makeCall will return either a response or an error depending on the result of the request.
5.5.3. Making the AJAX call
Next let’s go ahead and use the makeCall function you created. You’ve already dispatched the action to indicate the request has started. Now you’ll make the API call and dispatch either the success action or the failure action depending on the result, as shown in the following listing.
Listing 5.13. Making the AJAX call – src/middleware/api.js
...
const apiMiddleware = store => next => action => {
  const callApi = action[CALL_API];
  if (typeof callApi === 'undefined') {
    return next(action);
  }

  const [requestStartedType, successType, failureType] = callApi.types;

  next({ type: requestStartedType });

  return makeCall(callApi.endpoint).then(       1
    response =>
      next({                                    2
        type: successType,
        payload: response.data,
      }),
    error =>
      next({                                    3
        type: failureType,
        error: error.message,
      }),
  );
};

export default apiMiddleware;
- 1 Passes the endpoint specified by the current action to makeCall
- 2 If the request succeeds, dispatches the success action type with the response.
- 3 If it fails, dispatches the failure type with an error message.
And now you’ve reached API nirvana. In this middleware, you managed to create a centralized place that implements a few of the tasks that are common across all AJAX requests you’ll need to make in the app. The main benefit here is that you can drastically reduce any future boilerplate that might come along if you add additional async actions that require a server request. Instead of creating three new action types and dispatching them all manually, you can use the API middleware to do the heavy lifting.
5.5.4. Updating the reducer
You’re finished with all the middleware-related work, but there’s one last step you need to take. Ideally, you can update the implementation of fetchTasks without updating other components, such as the reducer, but to keep the middleware generic, you have to make a small concession and update the reducer to handle a slightly less friendly action payload. Update the handler for the FETCH_TASKS_SUCCEEDED action in src/reducers/index.js to use the payload defined by the API middleware, as shown in the following listing.
Listing 5.14. Updating the tasks reducer – src/reducers/index.js
const initialState = {
  tasks: [],
  isLoading: false,
  error: null,
};

export default function tasks(state = initialState, action) {
  switch (action.type) {
    ...
    case 'FETCH_TASKS_SUCCEEDED': {
      return {
        ...state,
        tasks: action.payload,         1
        isLoading: false,
      };
    }

    ...
    default: {
      return state;
    }
  }
}
This is a change you’d rather not make, but it’s not a disaster. New tasks being available in the reducer at action.payload.tasks was more descriptive, but it’s a small price to pay in the larger picture. Libraries like normalizr can allow the API middleware to dispatch action payloads that are more specific, and we’ll cover that process in a subsequent chapter.
5.5.5. Wrapping up API middleware
And there you have it: a powerful API middleware that helps centralize the common themes around sending an AJAX request with Redux. But remember, abstractions all have a cost, and the cost here is code complexity. Consider the tradeoffs and do whatever makes the most sense given your project realities.
5.6. Exercise
Because you’ve built this nice new API middleware, it makes sense to update other async actions to use it. See if you can migrate createTask similarly to how you migrated fetchTasks in the previous section. createTask currently dispatches the three typical request actions, request start, success, and failure.
It’s not quite as simple as only implementing a new createTask that uses the API middleware. You’ll also have to update the middleware itself to support a POST request in addition to a GET request.
5.7. Solution
Here’s how you might break down this problem into manageable chunks:
- Update the API middleware to accept a request method and a request body, which it will use when it makes the AJAX request.
- Implement a new version of createTask that uses the CALL_API action constant and passes four arguments to the API middleware: an array of the three request-related actions, the endpoint, the request method, and any POST data.
- Update the reducer to handle the new action payload for CREATE_TASK_SUCCEEDED as supplied by the API middleware.
First, update the middleware to handle POST requests, as shown in the following listing.
Listing 5.15. Updating the API middleware – src/middleware/api.js
function makeCall({ endpoint, method = 'GET', body }) {      1
  const url = `${API_BASE_URL}${endpoint}`;

  const params = {
    method: method,
    url,
    data: body,
    headers: {
      'Content-Type': 'application/json',
    },
  };

  return axios(params).then(resp => resp).catch(err => err);
}

...

const apiMiddleware = store => next => action => {
  ...

  return makeCall({
    method: callApi.method,                                  2
    body: callApi.body,                                      2
    endpoint: callApi.endpoint,
  }).then(
    response =>
      next({
        type: successType,
        response,
      }),
    error =>
      next({
        type: failureType,
        error: error.message,
      }),
  );
};
- 1 Updates makeCall to accept a method/ request body
- 2 Passes the new arguments provided by the action
It required a small effort, but this is a big win for us. You only had to add a few lines, but in the process, you made the middleware much more flexible for users of your code. Next, take care of updating createTask to use the CALL_API action, making sure to also provide a request method and body. Similar to fetchTasks, you can remove a ton of boilerplate here in favor of a much more declarative strategy, as shown in the following listing.
Listing 5.16. Implementing the new createTasks – src/actions/index.js
export const CREATE_TASK_STARTED = 'CREATE_TASK_STARTED';      1
export const CREATE_TASK_SUCCEEDED = 'CREATE_TASK_SUCCEEDED';  1
export const CREATE_TASK_FAILED = 'CREATE_TASK_FAILED';        1

export function createTask({ title, description, status = 'Unstarted' }) {
  return {
    [CALL_API]: {
      types: [CREATE_TASK_STARTED, CREATE_TASK_SUCCEEDED,
     CREATE_TASK_FAILED],                                      2
      endpoint: '/tasks',                                      3
      method: 'POST',                                          3
      body: {                                                  3
        title,
        description,
        status,
      },
    },
  };
}
- 1 Creates new action constants for the request actions
- 2 Ensures that they’re passed in the correct order
- 3 Passes the required arguments, including the new method/body properties
You’re almost there, but you have one last small step. Similar to fetchTasks, you need to update the reducer to accept a new action shape for CREATE_TASKS_SUCCEEDED. Because you haven’t added any logic to have the API middleware dispatch actions with custom payloads, the best you can do is pass the entire response object into the reducer. Head to src/reducers/index.js and make the final change, as shown in the following listing.
Listing 5.17. Updating the tasks reducer – src/reducers/index.js
...
  case 'CREATE_TASK_SUCCEEDED': {
    return {
      ...state,
      tasks: state.tasks.concat(action.payload),          1
    };
  }
...
- 1 Adds the new task to the list
Nice! If you’re feeling industrious, update the editTask action to also use the API middleware. Overall, what style do you prefer? Would you rather have each action creator (fetchTasks, createTasks) explicitly dispatch multiple actions using redux-thunk? Or do you prefer the power of the API middleware? Redux isn’t a large, opinionated framework, so there’s always more than one way to peel the orange.
Middleware is fundamental to Redux and one of its most powerful features. But with great power, comes great responsibility. Middleware is a great way to centralize code and reduce duplication, and sometimes to create friendlier, more powerful APIs for yourself and for your collaborators.
In the next chapter, we’ll explore another popular abstraction for async actions. Did you heed the warning in this chapter to commit your work before implementing all the middleware? Before beginning the next chapter, rollback your code to that commit or check out the appropriate branch. You’ll need a clean slate before introducing Redux Sagas.
Summary
- Redux middleware is code that sits between an action being dispatched and the store processing the action.
- It’s best used for generic tasks like logging, that need to be applied to many, if not all, actions.
- It can produce powerful abstractions like the API middleware, but it often comes at the cost of complexity and indirection.