Table of Contents for
Building Web Apps with WordPress, 2nd Edition
 Building Web Apps with WordPress, 2nd Edition
Published by
O'Reilly Media, Inc., 2019
Building Web Apps with WordPress, 2nd Edition
Published by
O'Reilly Media, Inc., 2019
- Cover
- nav
- Building Web Apps with WordPress
- Building Web Apps with WordPress
- Preface
- Foreword
- 1. Building Web Apps with WordPress
- 2. WordPress Basics
- 3. Leveraging WordPress Plugins
- 4. Themes
- 5. Custom Post Types, Post Metadata, and Taxonomies
- 6. Users, Roles, and Capabilities
- 7. Working with WordPress APIs, Objects, and Helper Functions
- 8. Secure WordPress
- 9. JavaScript Frameworks and Workflow
- 10. WordPress REST API
- 11. WordPress Multisite Networks
- 12. Localizing WordPress Apps
- 13. WordPress Optimization and Scaling
- 14. Ecommerce
Chapter 14. Ecommerce
At some point, you may want to charge for access to your app or otherwise accept payments on your site. In this chapter, we’ll go over the best ecommerce and membership plugins available and give you a few pointers for choosing between them. We’ll also go through setting up a typical paywall in the software as a service (SaaS) model.
Choosing a Plugin
There is one ecommerce plugin for WordPress that is nearly synonymous with ecommerce: WooCommerce. Since publishing the first version of this book back in 2014, WooCommerce has gone on to dominate not only the WordPress ecommerce platform but ecommerce in general. We will give a brief introduction to WooCommerce here and go over a few of the hooks and filters app developers would be interested in.
Despite the fact that WooCommerce is a well made and maintained product, there are cases where other ecommerce plugins may be more appropriate. We also cover Paid Memberships Pro --a membership-focused ecommerce plugin-- and Easy Digital Downloads --a virtual goods-focused ecommerce plugin as well.
All of the plugins we will cover in this chapter have these features in common:
-
Integration with multiple payment gateways
-
Secure checkout forms
-
Saved order information
-
Products (or membership levels) with pricing
We will point out the unique features of each type of ecommerce plugin in the individual sections below.
WooCommerce
It is hard to calculate ecommerce platform marketshare 1, but WooCommerce probably accounts for at least 20% of all ecommerce websites 2. WordPress.org says the plugin has been downloaded over 47 million times on over 4 million active sites. Any way you calculate it, a huge number of sites are using WooCommerce. That’s why Automattic purchased WooCommerce back in 2015 and why we’ll focus on WooCommerce first.
WooCommerce, and other “shopping cart plugins”, include these features:
-
A products custom post type
-
The ability to browse products
-
The ability to search through products
-
The ability to purchase multiple products at once
-
Support for shipping address and shipping price calculations
-
Support for custom tax rules
Documentation on how to setup WooCommerce and much more can be found on their website at docs.woocommerce.com.
WooCommerce Plugin and Extensions
WooCommerce is available for free in the WordPress.org repository. The core plugin has everything needed to define products and prices and accept payment through PayPal. The Stripe Payment Gateway extension was recently made available for free and is the most popular way to accept credit cards directly on your site for WooCommerce, but extensions are available for just about any payment gateway you would want to use.
WooCommerce has dozens of free and paid extensions to enhance the core plugin, integrate with third party marketing services, introduce new product types, integrate with shipping services, or improve the store management. Two of the most popular extensions, WooCommerce Subscriptions and WooCommerce Memberships, allow you to collect recurring payments and restrict content based on membership levels respectively. The Paid Memberships Pro plugin covered below is streamlined for that exact use case, but if you are using WooCommerce already or need another feature handled well by WooCommerce, those extensions are a good way to go.
Customizing WooCommerce Through Hooks
WooCommerce (like any good WordPress plugin) has an incredible number of action and filter hooks to use to customize how the plugin is working on your site. You can find their full action and filter hooks reference online here.
Below, we will go through some examples to give you an idea of what’s possible using a few typical WooCommerce hooks.
Setting a Sitewide Sale
There are plugins you can use to set a sitewide sale for your WooCommerce store, but since you’re an awesome developer, you might like to do it yourself through custom code. The code below will apply a 10% sale to any product that doesn’t already have a sale price.
// Set sale price to 10% of regular price if not already on salefunctionmy_get_sale_price($sale_price,$product){if(empty($sale_price)){$sale_price=$product->get_regular_price()*.9;$product->set_price($sale_price);}return$sale_price;}add_filter('woocommerce_product_get_sale_price','my_get_sale_price',10,2);add_filter('woocommerce_product_variation_get_sale_price','my_get_sale_price',10,2);
WooCommerce products have both a “regular” price and a “sale” price. The final calculated price is just called “price”. The hook to set the sale price is woocommerce_product_get_sale_price, however we have to use the woocommerce_product_get_variation_sale_price hook as well to handle products with variations (e.g. Small, Medium, Large T-Shirts).
Note also the line where we call $product->set_price($sale_price). The calculated price isn’t updated automatically after the sale price is returned from this call back, so we have to do it manually. The $product parameter is passed into the callback by reference; updating the product object here updates it outside of the filter as well.
Autocompleting Orders
By default, when a new order is created at checkout, the order is put into “pending” status. A site admin then needs to process the order. For typically shipped goods, process means putting the order items into a box and shipping it out. Once that is done, the order is placed into “completed” status.
For virtual goods, you might want to automatically move the items into “completed” status. Besides saving you a click, many WooCommerce plugins fire when an order goes into completed status. The sooner an order goes into completed status, the sooner those plugins can send their emails, hit their APIs, or whatever else they are doing. The following code will loop through the cart items after checkout and automatically mark the order as completed if all of the items in the cart are virtual.
functionautocomplete_virtual_orders($order_id){//get the existing order$order=newWC_Order($order_id);//assume we will autocomplete$autocomplete=true;//get line itemsif(count($order->get_items())>0){foreach($order->get_items()as$item){if($item['type']=='line_item'){$_product=$order->get_product_from_item($item);if(!$_product->is_virtual()){//found a non-virtual product in the cart$autocomplete=false;break;}}}}//change status if neededif(!empty($autocomplete)){$order->update_status('completed','Autocompleted.');}}add_filter('woocommerce_thankyou','autocomplete_virtual_orders');
Paid Memberships Pro
Paid Memberships Pro and other membership plugins focus around accepting payment for a membership access to a WordPress site or app.
Features of membership plugins include:
-
Recurring pricing for subscriptions
-
Tools for locking down content based on membership level
Documentation on how to setup Paid Memberships Pro and much more can be found on their website at www.paidmembershipspro.com/documentation/.
Why we like Paid Memberships Pro
Besides being developed by our coauthor Jason Coleman, Paid Memberships Pro is the only WordPress membership plugin that is 100% GPL and available for free in the WordPress repository. Other plugins have either paid modules or upgraded versions that are necessary to gain access to all of the plugin’s features.
All of the Paid Memberships Pro code is managed in public repositories on GitHub and open to developer input. Like WooCommerce, there are hooks and filters available to change the default behavior of the plugin.
Nearly every membership site has a slightly different way of calculating upgrades or special offers, or exactly how and when to lock down content. Instead of offering an extra-long settings page, Paid Memberships Pro carefully designed its hooks and filters to make it easy to setup nearly any pricing or content restriction model with just a few lines of code.
Another key difference between Paid Memberships Pro and some other membership plugins is that Paid Memberships Pro uses its own table to define membership levels and their relationships to users and orders. Some membership plugins use the built-in WordPress user roles so that each membership level is also a user role. User roles are very important in some membership sites (see Chapter 6), but in general, it’s better to separate the concept of a membership level and a user role, allowing you for example to have members who are admins and members who are subscribers. If you do need to assign roles based on membership level, that is easy to do with Paid Memberships Pro, and we have an example later in this chapter.
We share a few examples using Paid Memberships Pro hooks later in this chapter. We will cover one more unique ecommerce plugin before diving into some of the general concepts in ecommerce.
Easy Digital Downloads
All of the ecommerce plugins mentioned so far can be used for digital products and downloads as well as physical goods. However, if you are only planning on selling digital goods, you should consider Easy Digital Downloads, which was developed specifically for this use case.
Features of Easy Digital Downloads include:
-
File downloads restricted to authorized customers only.
-
The ability to purchase multiple downloads at once
Documentation on how to setup Easy Digital Downloads and much more can be found on their website at docs.easydigitaldownloads.com.
Why we like Easy Digital Downloads
Easy Digital Downloads includes extensions that could be useful to app developers include the Software Licensing and Product Support add-ons. The core plugin and all of the extensions are well coded and well supported.
Like WooCommerce, the core Easy Digital Downloads plugin is available for free in the WordPress repository, while extensions are available for purchase at the plugin’s website. Extensions can be purchased individually, but most users will want to purchase one of the bundled passes that gives access to most or all of the extensions at a reduced total price.
EDD Code Examples
Below are a couple code examples showing how to use the EDD functions and hooks in your larger WordPress app.
Check if a user has purchased a specific download
The edd_has_purchased() function can be used to check if a user has purchased a specific EDD download. If you are using EDD to sell downloads on your site already, this function can be used to restrict access to other WordPress pages or features of your app.
//Restrict access to a page if a user hasn't purchased a specific download yetfunctionmy_template_redirect_check_edd(){global$current_user;//Set to slug of page to protect.$protected_page_slug='customers-only';//Set to ID of download to check for.$required_download_id=184;//Only protecting one specific page.if(!is_page($protected_page_slug))return;//Redirect if no user or missing purchase.if(!is_user_logged_in()||!edd_has_user_purchased($current_user->ID,$required_download_id)){wp_redirect(get_permalink($required_download_id));exit;}}add_action('template_redirect','my_template_redirect_check_edd');
In the example above, we use the template_redirect hook in WordPress. If users haven’t purchased the download we are checking for, they are redirected to the frontend page for that download. This is a good way to block access to an entire page. That page could contain content or could contain a shortcode for a contact form or any kind of WordPress content you want to keep non-customers from accessing.
You could do a similar check as a wrapper around any of your PHP code. If you do this often, it would help to abstract the edd_has_user_purchased() check into another function. The following examples includes a helper function to check if a user has purchased a specific download and then uses that function to add a support link to the primary menu.
//Helper function to check if a user is a plugin customerfunctionis_plugin_customer($user_id=null){$plugin_download_id=184;//update this//default to current userif(empty($user_id)){global$current_user;$user_id=$current_user->ID;}returnedd_has_user_purchased($user_id,$plugin_download_id);}//Add a support link to primary menu for users who purchasedfunctionadd_support_link_to_menu($items,$args){if($args->theme_location=='primary'&&is_plugin_customer()){$items.='<li class="menu-item menu-item-type-post_type menu-item-object-page menu-item-support">';$items.='<a href="/support/">Support</a>';$items.='</li>';}return$items;}add_filter('wp_nav_menu_items','add_support_link_to_menu',10,2);
The is_plugin_customer() function applies a handy trick with the $user_id parameter. You can pass a specific $user_id to check or optionally leave the parameter blank and the function will default to the current user’s ID. The plugin’s download ID (the post ID when editing that download in the dashboard) is hardcoded into the function and used in the edd_has_user_purchased() call that is returned.
The last bit of code uses the wp_nav_menu_items filter to add an additional link to the support page if the user is a plugin customer.
Let’s cover some genreal ecommerce concepts below before diving into more examples on how to setup a SaaS with WordPress.
Payment Gateways
A payment gateway is a service that processes and sometime stores customer credit cards and makes sure that the money winds up in your bank account.3 Popular gateways in the United States include Stripe, PayPal, Authorize.net, and Braintree Payments. There are dozens of gateways, many specializing in particular parts of the world or in particular markets.
These are the important things to look out for when choosing a gateway:
-
Does the gateway support the country and currency you do business in?
-
Does the gateway integrate with the plugin you are using for ecommerce?
-
Does the gateway work with the type of business you are in? Some gateways will not work with adult sites, gambling sites, or other “high-risk merchants.”
-
Does the gateway offer the features you need like recurring billing or stored credit cards?
-
How does the gateway handle Payment Card Industry (PCI) compliance?4
-
Will the gateway work with my merchant account? (See the merchant account section below.)
-
Finally, what are the fees? 1% of $10 million is a lot of money, and it is worth fighting for lower fees. However, in general, the fees are fairly standard across gateways, and you should first look for a gateway that will work with your business setup. As your business grows in revenue and volume, it becomes very easy to negotiate lowering your fees to the standard minimums in your industry.
Merchant Accounts
Merchant accounts are often confused with payment gateways, but are actually a separate thing you need to process payments on your website. Part of the confusion comes from the fact that some gateways use their own merchant accounts.
In any case, both a payment gateway and merchant account are required to make money online, and both kinds of providers will help you secure the other service. That is, you can shop for a payment gateway and have it help you find a merchant account, or you can shop for a merchant account and have it help you find a payment gateway. We find that younger companies typically get better fees when they start with a payment gateway and get a merchant account with their help, rather than going to their bank to open a merchant account.
Here is how the credit card information and money flows from a customer on your website into your checking account: WordPress → Ecommerce Plugin → Payment Gateway → Merchant Account → Your Checking Account.
One way to think of the difference between gateways and merchant accounts is that the payment gateway is largely technology related, and the merchant account is largely business related.
The payment gateway provides the technology to validate and charge a credit card and setup recurring payments, and some can store customer information for later billing.
The merchant account is a kind of bank account that stores incoming money until it can be moved to your bank account. Why not just put the money directly into your bank account? The delay is kind of like waiting for a check to clear. If for some reason the credit card company needs to request the money back, because of an error or a customer request, it can pull it out of your merchant account.
These are the important things to look out for when choosing a merchant account:
-
Will my gateway work with this merchant account?
-
Will this merchant account underwrite my type of business? Some merchant accounts will not work with adult sites, gambling sites, or other “high-risk merchants.”
-
Will this merchant account underwrite my size of business? Some merchant accounts will not approve new businesses that sell high-priced (thousands of dollars) goods.
-
Finally, what are the fees? Sometimes these fees are bundled into the payment gateway fees, and sometimes they are separate.
The best route to accepting credit cards online is usually to choose a plugin first, then choose a payment gateway that works with that plugin, and then work with the gateway to find a merchant account.
Setting Up Software as a Service (SaaS) with Paid Memberships Pro
The model of charging for access to a web app is called software as a service, or SaaS (pronounced “sass”) for short.
In this section, we will go through setting up Paid Memberships Pro on our SchoolPress app, with a checkout option for schools to pay $1000/year.
The Software as a Service Model
The software as a service model (of SaaS) basically means that instead of purchasing your software in a shrink-wrapped box and installing it on your computer, you pay—typically a monthly or annual fee—for access to a cloud-enabled web app.
Examples of companies using the SaaS model are GitHub, Dropbox, Evernote, and Google Apps, and now even Microsoft Office can be purchased under a SaaS plan.
SaaS is popular because it generates relatively predictable recurring revenue. But SaaS is also an important way to make money off of open source software like WordPress. Because WordPress is GPL, if you were to sell and distribute the code for your software, your customers would be entitled under the GPL to redistribute that code…potentially for free. So using the SaaS service model allows your customers to use your software without having to distribute your source code to them.
The following instructions will help you if you want to charge a one-time, monthly, or annual fee for access to your app.
Step 0: Figure Out How You Want to Charge for Your App
Is it a lifetime fee, or a monthly subscription? Is it an annual subscription? Does the subscription automatically bill every year, or does the customer have to renew?
These are questions you will want to answer as best as you can before you start integrating Paid Memberships Pro or coding up customizations. Jason has a good series for how to price your web apps and premium content sites.
For our SchoolPress app, we will be charging each school account a $1,000 annual fee. When a school signs up, we will create a WordPress network site for it (e.g., myschool.schoolpress.com) and give it admin access to that site so it can start adding teachers and other content.
We will set the membership level to automatically bill the schools each year.
Step 1: Installing and Activating Paid Memberships Pro
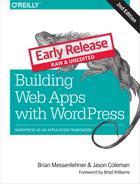
Paid Memberships Pro is available in the WordPress plugin repository, which makes installing and activating the plugin a breeze (Figure 14-1).
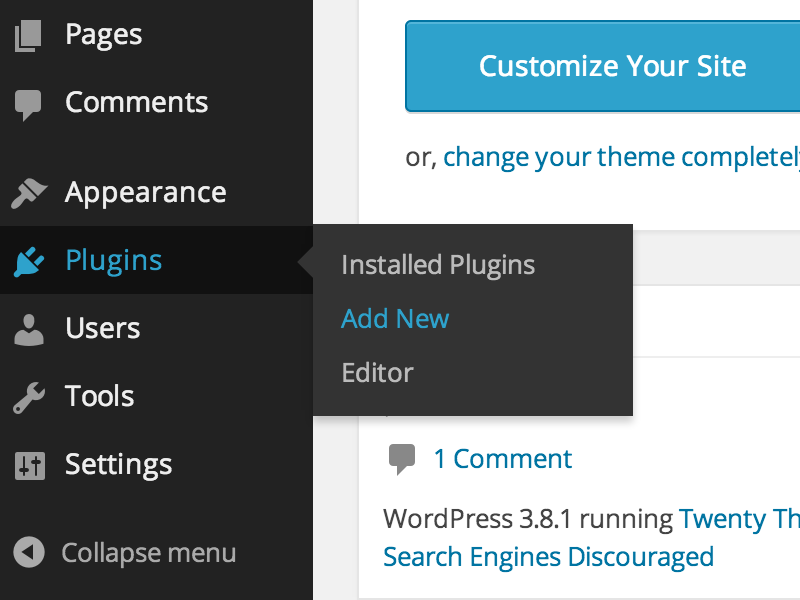
Figure 14-1. Add new plugin
-
From your WordPress dashboard, go to Plugins → Add New.
-
Search for Paid Memberships Pro.
-
Find Paid Memberships Pro and click the Install link.
-
Optionally enter your FTP information here. (Some hosting setups will not require this.)
-
When the plugin installs successfully, click the Activate link.
Step 2: Setting Up the Level
-
From your WordPress dashboard, go to the newly created Memberships page.
-
Click the “Add new level” link or button.
-
Enter the membership information in the boxes, as shown in Figure 14-2. For our level, that will be:
-
Name:
-
Description: School administrators should sign up here to create and gain access to your SchoolPress site.
-
Confirmation Message: (can leave it blank)
-
Initial Payment: 1000
-
Recurring Subscription: Checked
-
Billing Amount: 1000
-
Per: 1
-
Days/Weeks/Years: Years
-
Billing Cycle Limit: 0
-
Custom Trial: Unchecked
-
-
Disable New Signups: Unchecked
-
Membership Expiration: Unchecked
-
Categories: All Unchecked
-
-
Click Save Level.
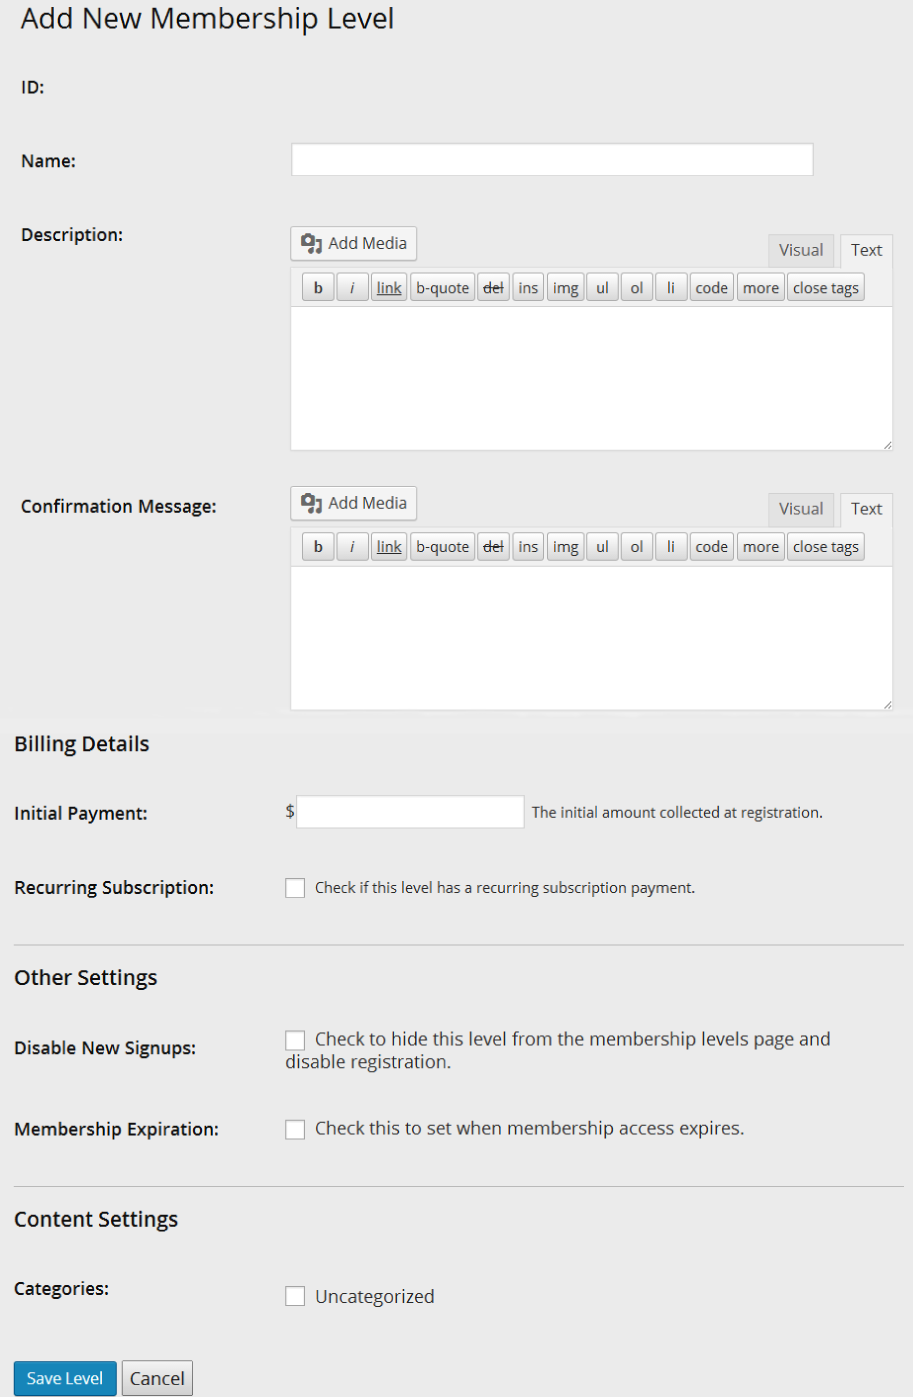
Figure 14-2. Paid Memberships Pro New Level screen
Step 3: Setting Up Pages
Paid Memberships Pro needs several pages to facilitate checkout and other member-related functions. When you click on the “Page” tab of the PMPro settings, you will see a form like the one shown in Figure 14-3.
Figure 14-3. Generate pages for Paid Memberships Pro
If you already have pages dedicated to describing your levels or for a user account, you can choose those pages through the dropdowns on the Pages tab of the Paid Memberships Pro settings. In most cases though, you will just want to click the “click here to let us generate them for you” link and pages will be created for the Account, Billing Information, Cancel, Checkout, Confirmation, Invoice, and Levels pages. Figure 14-4 shows what this page looks like once the script has generated these pages for you.
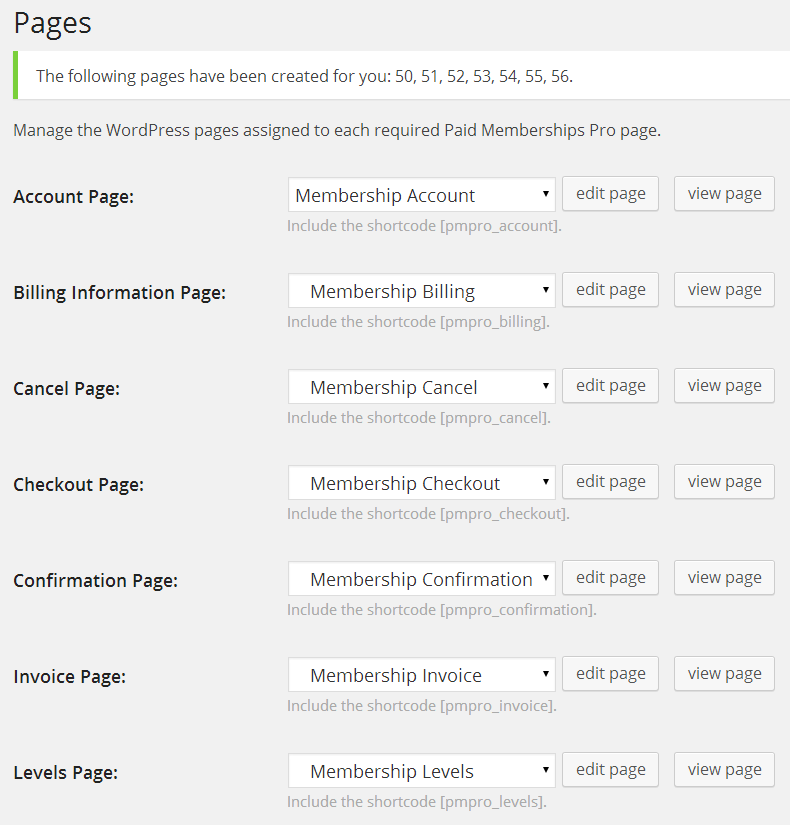
Figure 14-4. Default pages generated by Paid Memberships Pro
Step 4: Payment Settings
Figure 14-5 shows the Payment Gateway & SSL tab of the PMPro settings. Here you will choose your gateway and then fill out of corresponding user and/or API values. Depending on which gateway option you choose, this page will also allow you to change the currency used, which credit cards are available, whether to use SSL or not (remember you should always install SSL unless it is a test site), and whether to use the Nuclear Option for SSL or not.
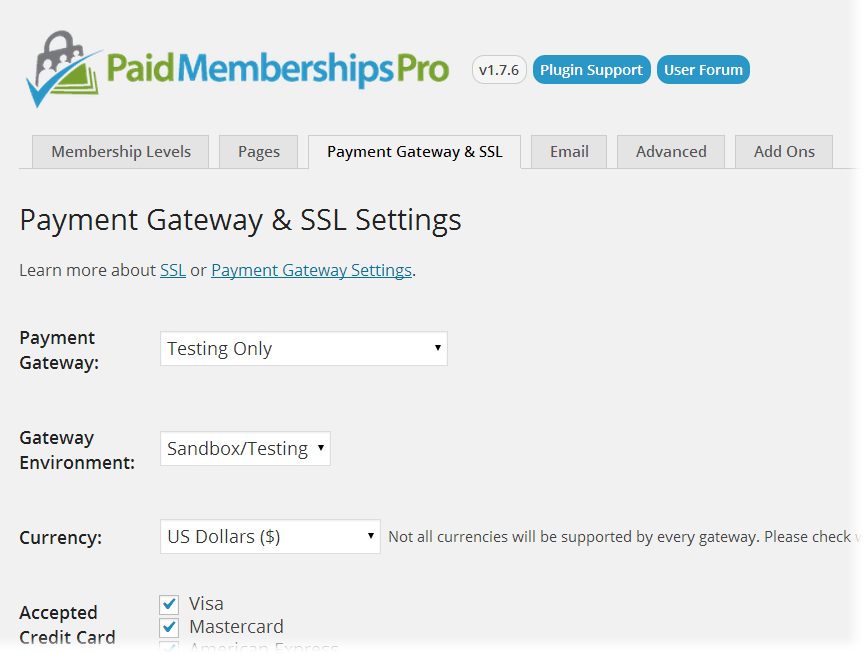
Figure 14-5. Paid Memberships Pro payment settings
The payment settings page will also give you a place to paste in your SSL Seal Code and enter a tax state and percentage. The tax calculation can also be done programmatically through the pmpro_tax filter (described below).
The payment settings page will also show you the URL you should share with your gateway to enable behind-the-scenes communication from the gateway to your site. This function has various names depending on the gateway: PayPal calls it an “IPN handler”; Authorize.net calls it a “silent post URL”; and Stripe and Braintree will call it a “webhook.”
Step 5: Email Settings
By default, WordPress will send emails from your site from “WordPress” at wordpress@yoursite.com. This doesn’t look nice and is often not a real email address. The Email tab of the Paid Memberships Pro settings, shown below in Figure 14-6, allows you to override these values and also check or uncheck which membership-related admin emails you would like to receive.
Note
Sending nicer looking emails might be something you want to do whether you are using Paid Memberships Pro or not. You can see their email-related code here to adapt for your own web
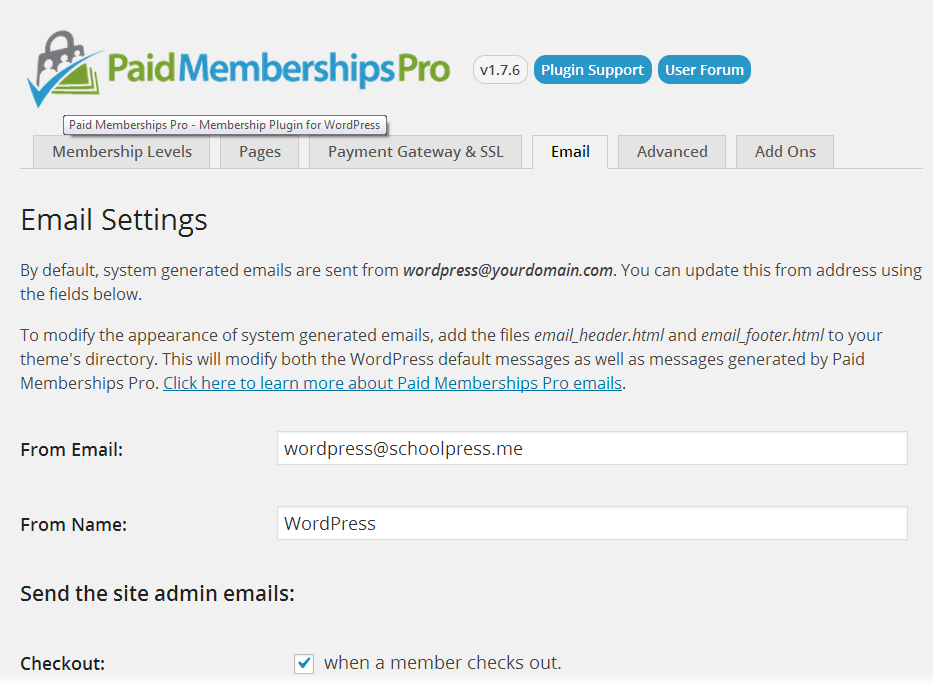
Figure 14-6. Paid Memberships Pro email settings
Step 6: Advanced Settings
Figure 14-7 shows the Advanced Settings tab, which has a few built-in options for running Paid Memberships Pro. Of particular interest may be the option to choose a Terms of Service page to show users on sign up. They will see a scrollable text box with the TOS page content shown within it and will have to check a box to agree to the Terms of Service.
Note
As of May 20018, Paid Memberships Pro also integrates with core functionality in WordPress to support the European Union’s General Data Protection Regulation (EU GDPR). If you are creating a public app that will have European Union users (or really if you care about privacy in general), you will want to consider how the GDPR relates to your web app. Jason’s post on the PMPro blog is a decent overview of how he thought about GDPR and updated PMPro to support it.
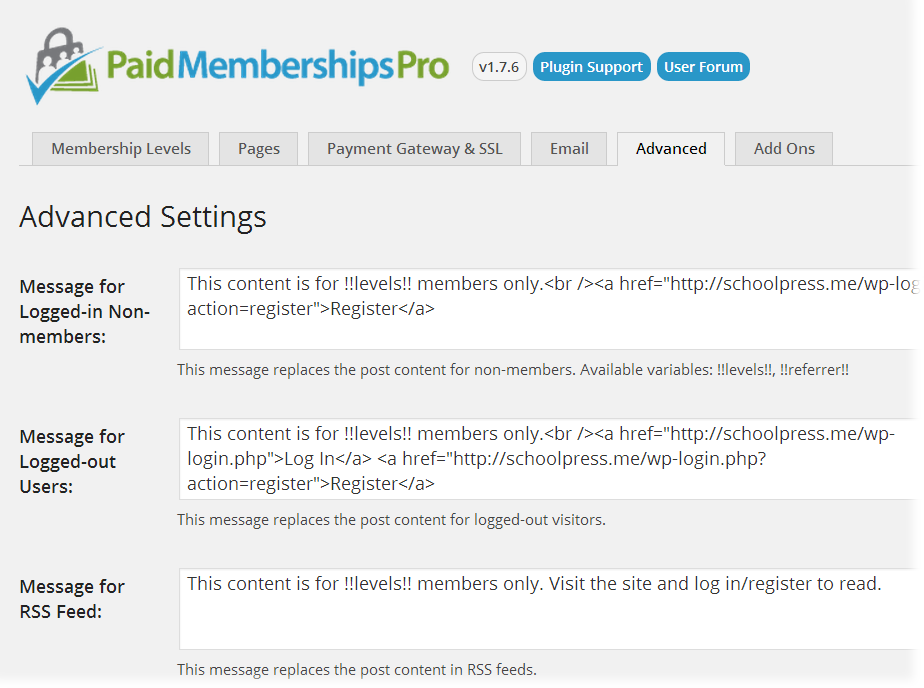
Figure 14-7. Paid Memberships Pro advanced settings
Step 7: Locking Down Pages
Besides generating a checkout page and integrating with your payment gateway, the main functionality added by Paid Memberships Pro is the ability to lock down certain pages or portions of pages based on a user’s membership level. There are a few different ways to do this.
Lock down a specific page
Paid Memberships Pro adds a Require Membership box to the sidebar of the edit post and edit page pages in the WordPress dashboard. An example of the Require Membership box is shown in Figure 14-8. To lock down a page for a certain membership level, check the box next to that level.
If more than one level is checked, members of either level will be able to view that page. If no levels are checked, anyone (including nonusers) will be able to view that page.
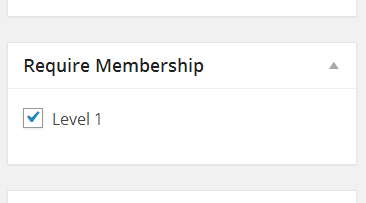
Figure 14-8. Check which levels are required to view this page
Lock down a page by URL
Sometimes it may be easier to restrict access to a page or group of pages by checking the page’s URL. For example, to keep nonmembers out of certain BuddyPress groups, you could add the following code to a custom plugin:
//lock down our members groupfunctionmy_buddy_press_members_group(){$uri=$_SERVER['REQUEST_URI'];if(strtolower(substr($uri,0,16))=="/groups/members/"){//make sure they are a memberif(!pmpro_hasMembershipLevel()){wp_redirect(pmpro_url("levels"));exit;}}}add_action("init","my_buddy_press_members_group");
Note
Since publishing the first edition of this book, Paid Memberships Pro has launched an add-on to integrate with BuddyPress. If you want to lockdown BuddyPress, you’ll want to use the PMPro BuddyPress Add-on. We kept the example above in place since it does a good job of showing how to restrict any generic URL based on a user’s membership level.
The workhorse here is the pmpro_hasMembershipLevel() function. This function can take two parameters. The first is the ID or name of a membership level to check for. The second parameter is the user ID of the user you want to check. If no parameters are set, the function will check if the current user has any membership level.
You can also do negative checks by passing, for example, “-1” as the level ID. pmpro_hasMembershipLevel(-1) will return true if the current user doesn’t have level 1. If you pass a zero specifically, the function will check that the user has no level at all. So pmpro_hasMembershipLevel(0) will return true if the current user does not have a membership level. (You could also do !pmpro_hasMembershipLevel().)
Multiple level IDs and names can be passed in an array. For example, to check for members with level 1 or 2, use this code:
if(pmpro_hasMembershipLevel(array(1,2))){//do something for level 1 and 2 members here}
Lock down a portion of a page by shortcode
Another way to restrict access to content is to use shortcodes in your post body content. The following is an example of some page content that will show different messages to different membership levels:
Welcome to SchoolPress!

[membership level="1"]Thanks for your continuing membership.[/membership]

[membership level="-1"]Sign up your school now![/membership]
The [membership] shortcode is fairly simple. It takes one parameter level that, similar to the parameter for the pmpro_hasMembershipLevel() function, can take a level ID, name, or a zero or negative level ID. Any content within the shortcode will be shown based on the stated level. Multiple level IDs can be passed separated by commas.
Lock down a portion of a page by PHP code using the pmpro_hasMembershipLevel() function
When locking down the BuddyPress members group, we used the pmpro_hasMembershipLevel() function. You can also use this function within your page templates or other code to restrict access to content or portions of code. For example, you might find code like this in your header:
<?phpif(is_user_logged_in()){?><div class="user-welcome">Welcome<?phpif(function_exists("pmpro_hasMembershipLevel")&&pmpro_hasMembershipLevel()){?><a href="<?phpechopmpro_url("account");?>"><?phpecho$current_user->display_name;?></a><?php}else{?><a href="<?phpechohome_url("/wp-admin/profile.php");?>"><?phpecho$current_user->display_name;?></a><?php}?></div> <!-- end user-welcome --><?php}?>
The preceding code will show members a link to the PMPro account page. Users without a membership level are shown a link to their WP profile page.
Step 8: Customizing Paid Memberships Pro
Below are a few common customizations for Paid Memberships Pro. The general process for customizing a plugin like Paid Memberships Pro is to:
-
Figure out what you want to change.
-
Find out where the default behavior for your change is coded.
-
Locate or add a hook to support the customization you want.
-
Write an action or filter to use the hook.
Restricting nonmembers to the homepage
By default, Paid Memberships Pro does not lock down any part of your site unless you specifically tell it to. For some sites, you will want very limited public access (just the sales, about, and contact pages). You can do this by redirecting nonmembers away from any nonapproved page. Use the following code:
functionmy_template_redirect(){$okay_pages=array(pmpro_getOption('billing_page_id'),pmpro_getOption('account_page_id'),pmpro_getOption('levels_page_id'),pmpro_getOption('checkout_page_id'),pmpro_getOption('confirmation_page_id'));//if the user doesn't have a membership, send them homeif(!is_user_logged_in()&&!is_home()&&!is_page($okay_pages)&&!strpos($_SERVER['REQUEST_URI'],"login")){wp_redirect(home_url('wp-login.php?redirect_to='.urlencode($_SERVER['REQUEST_URI'])));}elseif(is_page()&&!is_home()&&!is_page($okay_pages)&&!pmpro_hasMembershipLevel(){wp_redirect(home_url());}}add_action('template_redirect','my_template_redirect');
In the preceding code, we set up an array of post IDs for pages that nonmembers should be able to see. We use the pmpro_getOption() function to get the IDs of the pages generated by PMPro and also allow access to the home page by using the WordPress is_home() function. We also allow access to any page with the word “login” in the URL, which on our setup will just the login page.
Locking down files
Some of the pages you are locking down may have images or other files attached to them. If the page is locked down, the link or image will not show up on the site for your users. However, users who know the direct URL to the file will be able to download to the file without first being logged in as a member.
This is because when Apache processes a URL like http://schoolpress.me/wp-content/uploads/logo.png, it serves the file directly to the user without checking with PHP or WordPress first.
You can change this behavior by adding a rule to your site’s .htaccess file that will redirect any URL like the preceding one through a special script bundled with Paid Memberships Pro. Add the following code to the top of your .htaccess file, above the other rewrite rules:
RewriteEngine On
RewriteBase /
RewriteRule ^wp-content/uploads/(.*)$ \
    /wp-content/plugins/paid-memberships-pro/services/getfile.php [L]
How does this work? In WordPress, images and files can be uploaded to a post or page. These files, called attachments by WordPress, are all stored in the /wp-content/uploads/ folder, but they are also associated with the post they were attached to via an entry in the wp_posts table.
Attachments are stored in the wp_posts table with the post_status set to “attachment” and the post_parent set to the ID of the post they are attached to.
The getfile.php script will find the corresponding entry in the wp_posts table for the requested file; and if the attachment’s parent requires membership, it will check to make sure a valid member is logged in before serving the file.
Change user roles based on membership levels
For most of the examples in this section, we assume that members only have access to the frontend application of your site. However, sometimes you may want to give members access to the WordPress dashboard, give them the “author” role so they can post to the blog, or otherwise assign a role other than “subscriber” to them.
This code will add the author role to any new member of a particular level. It will also downgrade the member to a subscriber role if her membership level is removed:
functionmy_pmpro_after_change_membership_level($level_id,$user_id){if($level_id==1){//New member of level #1.//If they are a subscriber, make them an author.$wp_user_object=newWP_User($user_id);if(in_array('subscriber',$wp_user_object->roles))$wp_user_object->set_role('author');}else{//Not a member of level #1.//If they are an author, make them a subscriber.$wp_user_object=newWP_User($user_id);if(in_array('author',$wp_user_object->roles))$wp_user_object->set_role('subscriber');}}add_action('pmpro_after_change_membership_level','my_pmpro_after_change_membership_level',10,2);
More information on users and roles is in Chapter 6.
International and long-form addresses
By default, the Paid Memberships Pro checkout form will show address fields with the city, state, and postal code formatted on their own lines. A dropdown to choose the country will be shown below.
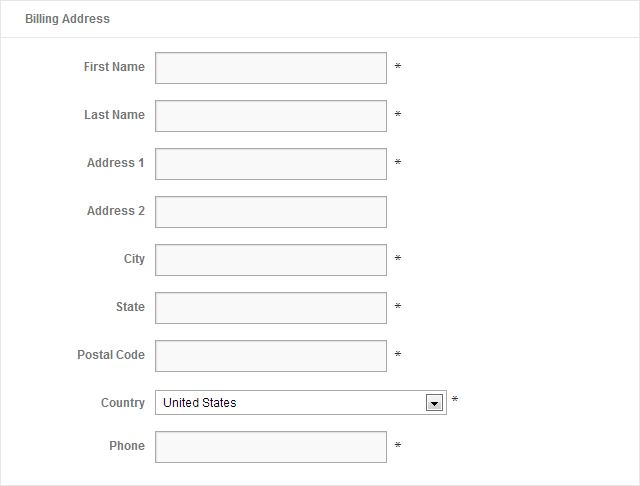
Figure 14-9. Paid Memberships Pro international billing address
You may want to change the default country, change the list of countries, or make some of the address fields not required. Here is some example code doing that:
/*Change the Default Country from US to GB (Great Britain)*/functionmy_pmpro_default_country($default){return'GB';}add_filter('pmpro_default_country','my_pmpro_default_country');/*Add/remove some countries from the default list.*/functionmy_pmpro_countries($countries){//remove the USunset($countries['US']);//add The Moon (LN short for Lunar?)$countries['LN']='The Moon';//You could also rebuild the array from scratch.//$countries = array('CA' => 'Canada', 'US' => 'United States',// 'GB' => 'United Kingdom');return$countries;}add_filter('pmpro_countries','my_pmpro_countries');/*(optional) You may want to add/remove certain countries from the list.The pmpro_countries filter allows you to do this.The array is formatted likearray('US'=>'United States', 'GB'=>'United Kingdom');with the acronym as the key and the fullcountry name as the value.*/functionmy_pmpro_countries($countries){//remove the USunset($countries['US']);//add The Moon (LN short for Lunar?)$countries['LN']='The Moon';//You could also rebuild the array from scratch.//$countries = array('CA' => 'Canada', 'US' => 'United States',// 'GB' => 'United Kingdom');return$countries;}add_filter('pmpro_countries','my_pmpro_countries');/*Change some of the billing fields to be not required.Default fields are: bfirstname, blastname, baddress1, bcity, bstate,bzipcode, bphone, bemail, bcountry, CardType, AccountNumber,ExpirationMonth, ExpirationYear, CVV*/functionmy_pmpro_required_billing_fields($fields){//remove state and zipunset($fields['bstate']);unset($fields['bzipcode']);return$fields;}add_filter('pmpro_required_billing_fields','my_pmpro_required_billing_fields');
1 What counts as an “ecommerce platform”? Should marketshare be computed based on the number of sites or the number of sales? How do you account for hosted ecommerce solutions like Shopify or Amazon?
2 At the time of writing this, the site BuiltWith estimates that 21% of ecommerce sites in the top 1 million of all sites use WooCommerce
3 Minus any fees.
4 At the high end, PCI compliance requires more expensive server setups and full-time resources to maintain and document them properly. Some gateways have technology and processes to help you avoid those costs while still keeping your customer data secure.