Table of Contents for
Building Web Apps with WordPress, 2nd Edition
 Building Web Apps with WordPress, 2nd Edition
Published by
O'Reilly Media, Inc., 2019
Building Web Apps with WordPress, 2nd Edition
Published by
O'Reilly Media, Inc., 2019
- Cover
- nav
- Building Web Apps with WordPress
- Building Web Apps with WordPress
- Preface
- Foreword
- 1. Building Web Apps with WordPress
- 2. WordPress Basics
- 3. Leveraging WordPress Plugins
- 4. Themes
- 5. Custom Post Types, Post Metadata, and Taxonomies
- 6. Users, Roles, and Capabilities
- 7. Working with WordPress APIs, Objects, and Helper Functions
- 8. Secure WordPress
- 9. JavaScript Frameworks and Workflow
- 10. WordPress REST API
- 11. WordPress Multisite Networks
- 12. Localizing WordPress Apps
- 13. WordPress Optimization and Scaling
- 14. Ecommerce
Chapter 8. Secure WordPress
Hackers beware! This chapter is packed full of tips and advice on how to make WordPress sites more secure and hopefully prevent them from falling prey to any malicious intent.
Why It’s Important
No matter what size website you are running, security is something that you do not want to overlook. Any size site can fall victim to hackers or malware. Being knowledgeable and proactive about WordPress security will help you be less vulnerable and hopefully avoid any attacks.
One of the most popular types of attacks is called a brute-force attack in which a bot or script of code tries to gain access to your site by guessing the correct username and password combination. It may not sound that dangerous, but keep in mind that these bots are huge networks of computers making hundreds or even thousands of guesses every second! Even if these bots don’t gain access to your WordPress admin, they will often take your site down anyway through the sheer amount of resources it takes your server to respond to the malicious requests. This is called a denial of service (or DoS) attack, and can be caused by a targeted attack or by automated spammers and brute-force hacks.
A standard WordPress install comes with some built-in security features that we will discuss in this chapter along with other tips that you can easily follow to make your site more secure. There are also some plugins we will highlight that can help with other issues such as spam.
Some very bad things that can happen to you if you decide to not read the rest of this chapter. Here are some pretty frequent scenarios:
-
You pull up your website and notice that it’s not there anymore. Downtime is bad! Hopefully you have a backup and can restore it quickly.
-
You notice that you start showing up in search results for Viagra and other male enhancement drugs. This can be bad for business if your website is not specifically selling these drugs.
-
Your application is sending out emails to all of your members with links to download a computer virus. Nobody wants that.
-
Your application is hacked and the personal information of your members (their names, addresses, phone numbers, and email addresses) is exposed.
-
Your website is hacked and is used to infect other websites with malware. This is the quickest way to get delisted from Google search results and other important directories.
Security Basics
These are the simplest but most important security tips to consider. Pay attention here because it could save you a lot of time, money, and upset visitors/members.
Update Frequently
The first and most important security tip is to always make sure you upgrade to the most recent version of WordPress as soon as a new version becomes available and also always update any plugins/themes that you have installed on your site. Many of the updates that are pushed out involve security updates; therefore, it is always important to upgrade your software in order to stay up to date and safe.
Don’t Use the Username “admin”
Another important item to take care of is making sure not to use “admin” as one of your user accounts. Many bots will automatically try to log in to your site with the username “admin.” Knowing that most people don’t change this account is half the battle; all they really need to focus on is guessing the password. When installing WordPress, the default username will be “admin” unless you specifically change it, and you SHOULD specifically change it! If you are already using WordPress and are using the username “admin,” you should create a new user account with an administrator role, log in with that new user, and delete the default admin account. Make sure to change any posts or pages created by your admin account to this new account.
Use a Strong Password
Choosing a secure password is also very important, especially for your administrator accounts. Don’t use one word or one name. Jumble your password up and make it not connected to you personally.
Make sure your password is a combination of upper- and lowercase letters as well as numbers and special characters. A good password should also be at least 10 characters long; the more characters you use, the stronger your password will be. If you are having trouble coming up with one yourself, just mash on your keyboard a bit or use a service like Random.org. Make sure you memorize it or copy it somewhere and secure it properly. WordPress will tell you if you are using a strong password; please take this into consideration.
Examples of Bad Passwords
-
password
-
password123
-
pa55w0rd
-
123456789
-
qwerty
-
batman
-
mustang
-
letmein
Using any variation of password or single words, numbers, or names is a bad idea:
-
usmarine (Brian was in the Marines)
-
brianmessenlehner (Brian’s first and last name)
-
jason&kim050507 (Jason’s name, his wife’s name, and their anniversary)
-
Dalya-Brian (kids’ names)
-
ThaiShortiMaxx (pets’ names)
-
IAMAWESOME! (everybody knows this, so it could be easy to guess)
Anybody that knows anything about us or our families could potentially guess passwords like these.
Examples of Good Passwords
-
U$s(#8H27@!
-
!lik32EaTF1$h&CHIp5
-
#Uk@nN0tBr3akTh1s$h1t!!!
-
[0mG-LoL-R0Fl-T0T3$CraY]!
It can be a pain in the neck and take an extra second or two entering in a good password but it’s well worth it if it can prevent your website/application from getting hacked.
Hardening Your WordPress Install
Let’s go over a few techniques for making it harder for your application to be hacked.
Don’t Allow Admins to Edit Plugins or Themes
By default, WordPress allows administrators to edit the source code of any plugin or theme directly in the web browser. You should disable this functionality so just in case a hacker is able to log in to one of your admin accounts, he can’t add any malicious code via the admin user interface for editing code. To disable this functionality, add this code to your wp-config.php file:
<?phpdefine('DISALLOW_FILE_EDIT',true);?>
Change Default Database Tables Prefix
The standard WordPress install uses wp_ as a prefix for all tables in the database. By simply changing this prefix to something else, you will make your site a lot less vulnerable to hackers who attempt SQL injections and assume that you are using the generic wp_ prefix. On a brand new WordPress install, you will have the option to use any table prefix you want; you should change the default wp_ prefix to something custom.
If you would like to do this on a WordPress site that is already up and running, you can follow these steps:
-
Make a database backup just in case you mess this up!
-
Open wp-config.php and change
$table_prefix = 'wp_';to
$table_prefix = 'anyprefix_'; -
Update the existing table names in your database to include your new prefix with the following SQL commands using phpMyAdmin or any SQL client such as MySQL Workbench:
renametablewp_commentmetatoanyprefix_commentmeta;renametablewp_commentstoanyprefix_comments;renametablewp_linkstoanyprefix_links;renametablewp_optionstoanyprefix_options;renametablewp_postmetatoanyprefix_postmeta;renametablewp_poststoanyprefix_posts;renametablewp_termstoanyprefix_terms;renametablewp_term_relationshipstoanyprefix_term_relationships;renametablewp_term_taxonomytoanyprefix_term_taxonomy;renametablewp_usermetatoanyprefix_usermeta;renametablewp_userstoanyprefix_users;
Note
You will have to run a similar rename SQL query for any custom tables added by your app or plugins you are using.
Using SQL commands or a SQL client update any instance of wp_ in the prefix_options and anyprefix_usermeta tables and change any values like wp_ to prefix_:
updateanyprefix_optionssetoption_name=replace(option_name,'wp_','anyprefix_');updateanyprefix_usermetasetmeta_key=replace(meta_key,'wp_','anyprefix_');
Test out your site and make sure everything is working as it should.
If you don’t feel comfortable manually making these changes, there are some plugins that can change your table prefix for you:
Move wp-config.php
The WordPress wp-config.php file stores valuable information like your database location, username, and password and your WordPress authentication keys. Since these values are stored in PHP variables and they are not displayed to the browser, it is not likely that anybody could gain access to this data, but it could happen. You can move wp-config.php to one level above your WordPress install, which in most cases should be a nonpublic directory. WordPress will automatically look one level up for wp-config.php if it doesn’t find it in your root directory. For example, move /username/public_html/wp-config.php to /username/wp-config.php.
You can also store wp-config.php as any filename in any directory location. To do this, make a copy of wp-config.php, name the copy whatever you want, and move it to any directory above your root install of WordPress. In your original wp-config.php file, remove all of the code and add an include to the relative path and filename of the copy you made. For example, copy /username/public_html/wp-config.php to /username/someotherfolder/stuff.php. Change the code in wp-config.php to
include(‘/username/someotherfolder/stuff.php’);
Hide Login Error Messages
Normally when trying to log in to your site, WordPress will display a message if you have entered the wrong username or password. Unfortunately this lets hackers know exactly what they are doing wrong or right when attempting to access your site.
Luckily there is a simple fix for this, which is to add a line of code into your theme functions.php file or in a custom plugin which will hide or alter those messages:
<?phpadd_filter('login_errors',create_function('$a','"Invalid username orpassword.";'));?>
Hide Your WordPress Version
A lot of bots will scour the Internet in search of WordPress sites to target specifically by the version of WordPress they are running. They are looking for sites with known vulnerabilities they can exploit. By default, WordPress displays the following code within the <head></head> of every page:
<meta name="generator" content="WordPress 3.8.1" />
You can easily hide the version of WordPress you are using by implementing the following code:
<?phpadd_filter('the_generator','__return_null');?>
Note
There are other ways to detect if a site is using WordPress and what version. For example, if no script version is specified the WordPress version is appended to the URLs of JavaScript files. There are other, even more subtle ways a determined hacker could detect the version of WordPress you are using. Still, every little bit helps to thwart largely automated attacks that are constantly floating around the internet.
Don’t Allow Logins via wp-login.php
Some bots are smarter than others. We just talked about hiding your WordPress version from some bots, but sometimes just knowing that you are using WordPress is all a bot may be looking for, and this is pretty easy if it sends a POST request to wp-login.php. Once a bot realizes wp-login.php exists, it can then begin to try to log in to your site.
We like to redirect wp-login.php to the homepage, which prevents bots from specifically trying to log in via wp-login.php. Follow these steps to make an alternative login page and hide the default wp-login.php login page:
-
Add the following rewrite rule to your .htaccess file:
RewriteRule ^new-login$ wp-login.phpNote that
new-loginwill be the URL you can use to actually log in to wp-admin; you can change this to whatever you want. -
In your theme functions.php file or in a custom plugin, add this code:
<?phpfunctionschoolpress_wp_login_filter($url,$path,$orig_scheme){$old=array("/(wp-login\.php)/");$new=array("new-login");returnpreg_replace($old,$new,$url,1);}add_filter('site_url','schoolpress_wp_login_filter',10,3);functionschoolpress_wp_login_redirect(){if(strpos($_SERVER["REQUEST_URI"],'new-login')===false){wp_redirect(site_url());exit();}}add_action('login_init','schoolpress_wp_login_redirect');?>
If you don’t want to write any custom code, you can use the following plugins to achieve similar results:
Add Custom .htaccess Rules for Locking Down wp-admin
If you are the only user that needs to log in to the backend of your application, or if you only have a handful of backend users, you can restrict access to the backend by certain IP addresses. Create a new .htaccess file in the wp-admin directory of your WordPress install and add the following code, replacing 127.0.0.1 with your actual external IP address. Go to http://ipchicken.com/ if you are not sure of your external IP address:
orderdeny,allowallowfrom127.0.0.1#(repeat this line for multiple IP addresses)denyfromall
If you suspect that certain IP addresses hitting your application are bots or malicious users, you can block them by their IP addresses with the following code:
orderallow,denydenyfrom127.0.0.1#(repeat this line for multiple IP addresses)allowfromall
If people really want to get around their banned IP address, they will use a proxy server.
If you think your IP address of you or your backend users may change often or you have way too many backend users to manage all of their IP addresses, you can add a separate username and password to access the wp-admin directory. This adds a nice second layer of authentication because all of your backend users will be required to enter an htaccess username and password and their standard WordPress username and password:
AuthTypeBasicAuthName"restricted area"AuthUserFile/path/to/protected/dir/.htpasswdrequirevalid-user
Notice the AuthUserFile line; you will need to create a .htpasswd file somewhere in a directory above or outside of your WordPress install. In this file, you will need to add a username and password. The password can’t just be plain text; use a tool like htaccess password generator to create an encrypted password.
So the username/password for:
letmein/Pr3tTyPL3a$3!
after encryption should be:
letmein:E5Dj7cUaQVcN.
Add the entire encrypted string letmein:E5Dj7cUaQVcN. to your .htpasswd file; and when users try to go to /wp-admin, they will be prompted for a username and password. Make sure to let your backend users know what this username and password is and tell them not to share it with anybody.
SSL Certificates and HTTPS
When accepting sensitive information through a web form, for example, a credit card number, you should encrypt that information by loading and submitting the form over SSL or HTTPS.
First some definitions: SSL stands for “Secure Sockets Layer” and is the technology that encrypts data that is transferred to and from a web page. HTTP stands for “Hypertext Transfer Protocol.” This is the standard protocol for serving web pages without encryption. HTTPS stands for “HTTP Secure.” This is the protocol for serving web pages with SSL encryption.
There are many options when it comes to configuring SSL on your server and installing an SSL certificate. The bottom line is that all sites (not just ecommerce sites) should be setup to serve all traffic (not just sensitive traffic) over HTTPS these days. We’ll cover a few options for doing that below.
Installing an SSL Certificate on Your Server
First make sure that you have SSL enabled on your web server. How to do that will depend on your specific host and web server. Digital Ocean has great sysadmin docs in general and a particularly good article on setting up SSL with Apache.
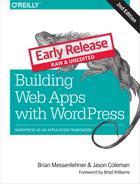
After enabling the SSL service on your host, you’ll need an SSL certificate to use with it. You can use self-signed certificates for testing purposes, but modern-day browsers will show some fairly dire warnings when browsing to a site using a self-signed certificate. Figure 8-1 shows the warning shown to Chrome users.
For production environments, you’ll want to use a public key certificate from a certificate authority or CA. Public key certificates can be purchased, and are usually bundled or offered as an add-on to your web hosting package. You can also use public key certificates (SSL certificates) purchased from third parties. A good CA certificate will be trusted by all modern web browsers, which is what gives you the green or golden padlock icon on your website instead of a broken or red padlock.
There are good options now for paid or free CA certificates. What you’re really doing when you use a CA certificate is confirming that you actually own the domain you are using the certificate on. Ownership of the domain is usually confirmed via email to an address on the domain. Or, in the case of Let’s Encrypt, the confirmation is done through automated scripts run from the server in question.
Let’s Encrypt
Since publishing the first version of this book, a new service called Let’s Encrypt has come online which offers public key certificates that are easy to install and 100% free. Let’s Encrypt certificates are installed from the command line using a tool called Certbot. Certbot is available for most web server platforms. If your web server is configured correctly and connected to the internet, Certbot will automatically validate itself with the Let’s Encrypt certificate authority, issue the certificate, and install the certificate on your server. You can then setup a cron job to renew the certificate every 3 months or so.
Even if you aren’t managing your own server, you may still be able to use a Let’s Encrypt certificate with your web host. While the paid options are likely to be more visible in your control panel, there are often Let’s Encrypt options when setting up SSL or you may be able to submit a support request to have your host setup a free Let’s Encrypt SSL for your site.
Again, every website should install an SSL certificate.
In the first version of this book, we covered methods to serve the admin and checkout pages over HTTPS while the rest of the site was served over unsecured HTTP. We no longer recommend this kind of hybrid setup. The internet has moved to a place where it is assumed all websites are served entirely over HTTPS. This is part of a larger “security by default” movement.
There are a number of reasons to setup HTTPS on your entire site.
-
Security by default. You might imagine that only your login and checkout pages really need to be secure, but what happens when your site is updated to show a login form in the sidebar? Now every page on your site needs to be secure. If your entire site is served over HTTPS, you won’t accidentally introduce an unencrypted form anywhere on the site.
-
Internet consumers are trained to look for that padlock (see Figure 8-2). Both savvy and nonsavvy users will feel better seeing it. Further, modern browsers will show some pretty scary warnings if parts of your site are not served over HTTPS.
-
Google and other search engines have started boosting sites that are served entirely over HTTPS in their search rankings.
-
There is no longer a CPU hit to your server when you use HTTPS. The web server stack has been updated to better handle HTTPS and frankly expect it, so you can no longer use page load times as an excuse to disable HTTPS on your site.
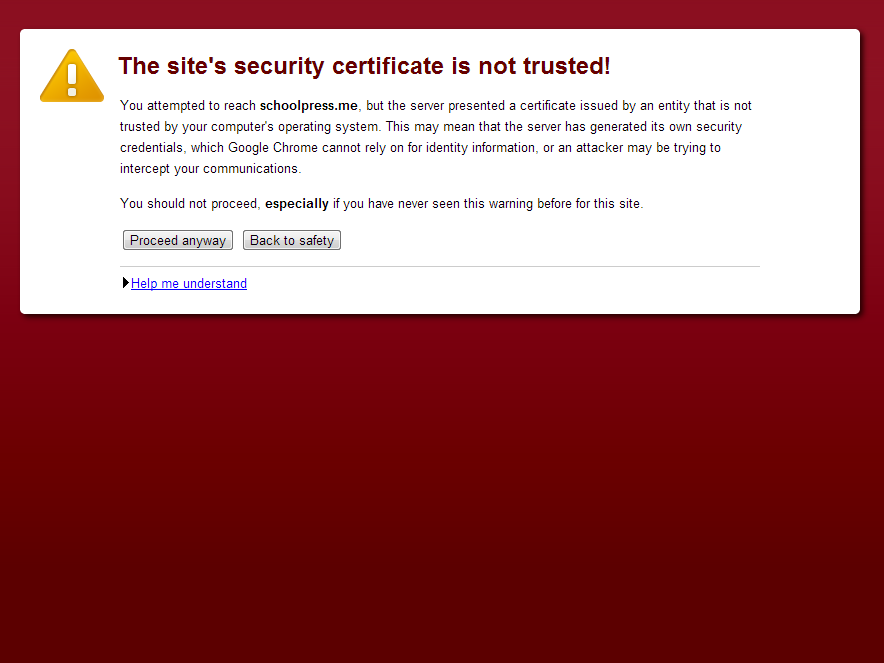
Figure 8-1. Chrome SSL warning
Using one directory for HTTPS and HTTP traffic.
Besides using a CA certificate, the other thing to do when setting up SSL is to have your HTTPS directory point to your HTTP directory through a symbolic link, or symlink for short. A symlink is like a shortcut in a Windows PC. The symlink points to another directory rather than being a directory of its own.
The end result of using a symlink for your HTTPS directory is that the same .php source files will be loaded when people visit https://yoursite.com as when they visit http://yoursite.com. Your server will make sure that the traffic through the HTTPS link is encrypted and both WordPress and any ecommerce plugin you may be using will make sure that the correct secure page is shown to the user when being served over SSL.
Assuming your HTTP directory is called “html” and you want your HTTPS directory to be called “ssl_html,” you would issue the following Linux command to create a symlink to that directory: ln -s http ssl_http.
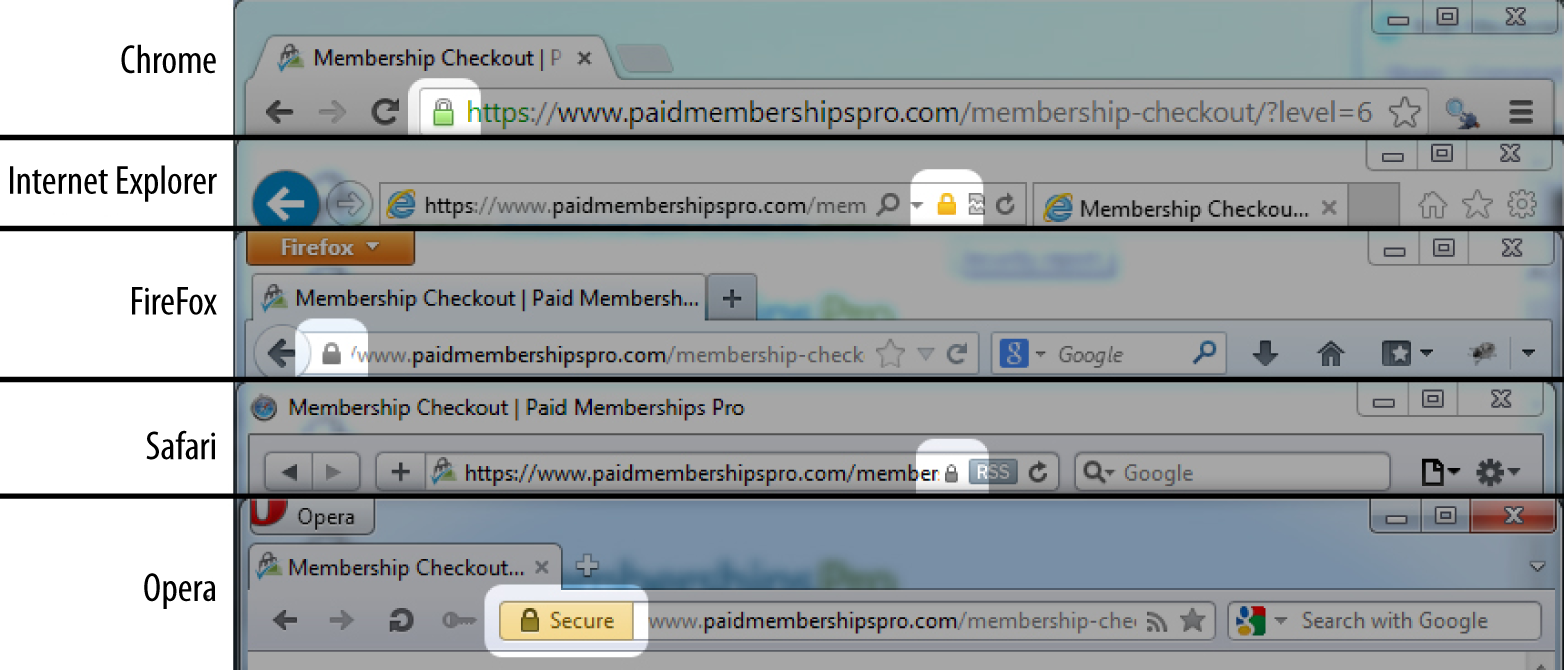
Figure 8-2. Various padlocks across browsers
WordPress Login and WordPress Admin over SSL
Serving your checkout page over SSL is the minimum you can do to secure the private data passed to and from your site. You can also set up WordPress to use SSL on the login page, in the admin dashboard, across the entire site, or only on select pages.
SSL logins in WordPress are done by setting the FORCE_SSL_LOGIN constant to true in your wp-config.php file. Place the following line of code above the “That’s all, stop editing! Happy blogging.” comment at the end of the file:
define('FORCE_SSL_LOGIN',true);
To use SSL on the login page and in the admin dashboard, use the following FORCE_SSL_ADMIN constant instead:
define('FORCE_SSL_ADMIN',true);
Note
The FORCE_SSL_ADMIN constant supersedes the FORCE_SSL_LOGIN constant. You should only set one or the other constant to true. If FORCE_SSL_LOGIN is false and FORCE_SSL_ADMIN is true, your login page will still be served over SSL.
Debugging HTTPS Issues
We’re going to write a quick little function to filter URLs generated by WordPress to use the same protocol as the current page. Remember earlier we talked about how URLs like http://yoursite.com/some-page/ (HTTP) that show up on a page like https://yoursite.com/checkout/ (HTTPS) will cause your browser to show a security warning:
functionmy_https_filter($s){if(is_ssl())returnstr_replace("http:","https:",$s);elsereturnstr_replace("https:","http:",$s);}add_filter('bloginfo_url','my_https_filter');add_filter('wp_list_pages','my_https_filter');add_filter('option_home','my_https_filter');add_filter('option_siteurl','my_https_filter');add_filter('logout_url','my_https_filter');add_filter('login_url','my_https_filter');add_filter('home_url','my_https_filter');
The is_ssl() function provided by WordPress which will return true if the current page was loaded over HTTPS. The is_ssl() function checks specifically if the $_SERVER['HTTPS'] global is set to on or 1 or if the $_SERVER['SERVER_PORT'] global is set to 443. Some server setups behind load balancers or reverse proxies will load HTTPS pages without setting those globals properly in PHP. You can fix this by adding the following code to your wp-config.php file.
---if(isset($_SERVER['HTTP_X_FORWARDED_PROTO'])&&$_SERVER['HTTP_X_FORWARDED_PROTO']=='https'){$_SERVER['HTTPS']='on';}---
Our https filter uses the str_replace function to swap “http:” for “https:” or vice versa. We set this filter to run on a number of built in WordPress hooks used at various places throughout the WordPress code base where URLs are generated.
When you output URLs in other places of your custom application code, be sure to use the home_url() function to make sure the URL is generated correctly and the my_https_filter is run on it.
Avoiding SSL Errors with the “Nuclear Option”
The my_https_filter function will make sure links that show up on a page use the correct protocol. However, sometimes raw http://… URLs may be hardcoded into your posts, or maybe a plugin you use doesn’t use the built-in WordPress functions like it should when outputting same site URLs or loading JavaScript or CSS files. Figure 8-3 shows the Chrome Developer Tools Console, which can help locate errors.
Figure 8-3. An SSL error in the Chrome Developer Tools Console. Use the Chrome Developer Tools Console to find SSL errors, or use the Nuclear Option to avoid them.
In these cases, you can try to find each case of a bad URL and fix the link in your posts or code to use a relative URL or the proper WordPress function to make sure it will output on the frontend using the proper protocol. However, it’s sometimes easier to use what we call the Nuclear Option:
constant('MY_SITE_DOMAIN','yoursite.com');functionmy_NuclearHTTPS(){ob_start("my_replaceURLsInBuffer");}add_action("init","my_NuclearHTTPS");functionmy_replaceURLsInBuffer($buffer){global$besecure;//only swap URLs if this page is secureif(is_ssl()){/*okay swap out all links like these:* http://yoursite.com* http://anysubdomain.yoursite.com* http://any.number.of.sub.domains.yoursite.com*/$buffer=preg_replace('/http\:\/\/([a-zA-Z0-9\.\-]*'.str_replace('.','\.',MY_SITE_DOMAIN).')/i','https://$1',$buffer);}return$buffer;}
First we need to make sure we define a constant MY_SITE_DOMAIN and set it to the second-level domain (SLD) for your site. Your site_url() set in WordPress may be www.yoursite.com, but we are interested here in just the yoursite.com part of that.
Then my_NuclearHTTPS() fires on the init hook and uses the PHP function ob_start() to turn on output buffering. Output buffering means that all output generated by PHP (e.g., via echo function calls or inline HTML) goes into a buffer string instead of straight to the browser. Then, when PHP is finished generating all output (or if you call the ob_end_flush() function first), the buffer string is passed to a callback function, which is my_replaceURLsInBuffer() in this case.
The my_replaceURLsInBuffer() function filters the buffer string, swapping out “http:” for “https:” on every link. The regular expression magic we’re doing in the preg_replace() call there makes sure that links to any subdomain using the same domain (why we needed to set the MY_SITE_DOMAIN constant) will also be filtered.
So you might have caught on by now why we call this the “Nuclear Option.” Instead of finding the source of bad URLs in your app and fixing them, we just fix all of the URLs at once before sending the output to the browser. There will be a small performance hit here, depending on how large your HTML output is. But this method can be useful in a pinch, especially if you are using many third-party plugins that you can’t or don’t want to fix to output site URLs properly.
Note
The Really Simple HTTPS plugin includes many of the HTTPS fixes mentioned above as well as other tools to help you get HTTPS working properly on your WordPress site.
Backup Everything!
It is important to make regularly scheduled backups of your site’s content (your database) as well as the wp-content folder. This makes it much easier to restore your site in the event that it does fall victim to a hacker. We recommend scheduling a backup at the very least once a week; but depending upon how much new content you are adding, you may feel that you need to increase or decrease the frequency. Of course a daily backup is always the best choice.
Scan Scan Scan!
Scanning or monitoring your application is essential to know if you have been attacked. If your application ever gets hacked, it is important to know right away so you can immediately address the issue.
Be proactive about protecting your web application against malware. There are several services that will scan your web applications for you so you can take a more hands-off approach. We recommend using Sucuri. Not only will Sucuri find malware and alert you if your application has been infected, but it will also clean it up for you. Tony Perez, the COO of Sucuri, is also a former US Marine and a martial arts master, so why wouldn’t you want Sucuri to have your back? Sucuri also has a great security plugin for WordPress.
Useful Security Plugins
Below are some other useful and powerful WordPress plugins that will help you increase security for your application and also help you to recover quickly if you to fall victim to a malicious attack.
Spam-Blocking Plugins
Akismet
This plugin is used to block comment spam from getting through to your site. It was developed by Automattic, also the creators of WordPress, and therefore comes standard with any new WordPress install. Although the plugin will be installed on your site, you will need to activate it by registering for an API key at Akismit.com. An API key is free if your site is for personal use; however, there is a small charge for business websites. The way Akismet works is each time a comment is posted to your site, Akismet will run it through a series of tests to ensure it is a real comment, and if it is identified as spam, it is automatically moved to the spam folder in your dashboard. This saves you tons of time from having to sort through all of your comments and determine which ones are spam or legitimate comments.
Bad Behavior
This plugin works to block link spam from your site and functions best when run in conjunction with another spam service. It works to not only look at the content of the spam, but also looks at the method through which the spam is being delivered by the spammer and the software being used, and blocks that as well.
Backup Plugins
Backups are very helpful to have in the event that your site is compromised. Here are a few popular backup plugins.
Backup Buddy
This plugin works to make backups of all of the content on your WordPress site for safekeeping, restoring, or moving your site. Backups can be scheduled on a recurring basis and the file can then be downloaded to your computer, emailed to you, or sent off to the storage location of your choice such as Dropbox or an FTP server. This plugin also features a restore option that will easily restore your themes, widgets, and plugins. Backup Buddy also allows you to easily move your site to a new server or domain right from the WordPress dashboard, which comes in handy if you work on a dev server and then move the sites over to a production environment upon launch.
VaultPress
VaultPress is another plugin created by the team at Automattic and offers users the opportunity to have all of their site content backed up in real time on cloud servers. Once installed, this plugin will automatically detect any changes to the content on your site as well as site settings and then update the backup copy with those changes. The plugin also features a one-click database restore in the event that your site ever becomes compromised. This is a premium plugin, meaning there is a fee for service, and different levels are offered. The premium version of the plugin also includes a daily security scan of your site to detect any issues as well as fixes for those issues.
Firewall/Scanner Plugins
WordFence
This plugin works as a type of firewall for your site by scanning all incoming traffic and then blocking all kinds of different malicious requests. You can also perform an on-demand scan of your site and detect any areas of vulnerability in your site’s security. Upgrade to the paid version to use some of the premium tools and use a more up-to-date database of malware and vulnerabilities.
All in One Security and Firewall
This plugin has a firewall and scanner similar to WordFence’s. It also has tools to harden your login and user security. One of the important security issues this plugin helps with is changing your database table prefix, which can be tricky if you are not that familiar with the standard database structure.
Exploit Scanner
This plugin, maintained by Automattic, will scan through all the files on your site and then alert you if it comes across anything that looks like it could be a potential threat.
Login and Password-Protection Plugins
Limit Login Attempts
This is a great plugin to fight against brute-force attacks like someone running an automated script that will try to log in to WordPress using random combinations of words. By default, WordPress will allow an unlimited amount of login attempts. This plugin limits the number of login attempts. If someone tries x times to log in and fails each time, she will be blocked from attempting to log in again for a set amount of time.
Ask Apache Password Protect
This plugin is different from other WordPress security plugins in that it works at the network level to prevent attacks rather than at the site level. You choose a unique username and password that then protect your login page and entire wp-admin folder. This plugin does require the use of an Apache web server and web host support for .htaccess files.
Writing Secure Code
You want to make sure any custom code you write is secure and isn’t hackable. If you take notice and apply the following methods, you should be in pretty good shape against attacks.
Check User Capabilities
Each of your users has unique standard or custom roles and capabilities. If you are writing some code that provides custom functionality for your application’s administrators, then make sure to give administrators and only administrators access to it. There are a few built-in WordPress functions for telling you if a user has certain roles or capabilities. All of these functions are located in wp-includes/capabilities.php and return a boolean of whether the user has the passed-in role name or capability. You can pass in any default or custom-made roles or capabilities.
user_can( $user, $capability )
Whether a particular user has a particular role or capability.
-
$user—A required integer of a user ID or an object of the user.
-
$capability—A required string of the capability or role name.
current_user_can_for_blog( $blog_id, $capability )
Whether the current user has a particular role or capability for a particular site on a multisite network.
-
$user—A required integer of a blog ID.
-
$capability—A required string of the capability or role name.
In the following code, we don’t want to let ordinary users into the backend of our application. We want them to only interact with the custom UI we created within the theme on the frontend so we will redirect anybody that is not an administrator and may wander to /wp-admin back to the frontend:
<?phpfunctionschoolpress_admin_check(){global$user_ID;if(!user_can($user_ID,'administrator'))wp_redirect(site_url());}add_action('admin_init','schoolpress_admin_check');?>
Note
For a complete reference of standard default WordPress roles and capabilities, see Chapter 6 or the WordPress codex.
Custom SQL Statements
Sometimes the built-in WordPress functions that interact with the database may not be enough for your needs, and depending on what you are building, you may want to write custom SQL statements. When writing your own SQL statements, you need to make sure they are written in a way that will not allow for any potential SQL injections. First of all, always use the $wpdb object and make sure to escape and prepare all custom SQL statements.
As we talked about in Chapter 3, the $wpdb object can be used to access any standard or custom tables in your WordPress database and provides easy-to-use methods for doing so. One very important thing to remember is that when writing custom queries with any dynamic values being passed in, you need to use the esc_sql() function or the prepare() method to sanitize and escape those dynamic values. By sanitizing and escaping dynamic values, you are making sure those values are not made up of invalid characters and are not any malicious SQL code that can hijack your query (SQL injections).
The esc_sql() and $wpdb->prepare() functions are covered in detail in Chapter 3.
Data Validation, Sanitization, and Escaping
DO NOT TRUST YOUR USERS! Again, DO NOT TRUST YOUR USERS! Don’t be that web application, website, or blog that spreads malware.
Validate, sanitize, and escape every piece of data going into and coming out of your database. You want to make sure that the data your users are submitting to your database is in the format it should be in; the database doesn’t care what the data is as long as the data being submitted is of the same datatype.
For example, let’s say you have a custom form used to collect user data with a textbox for date of birth. You plan on storing the DOB as user meta in the meta_value column of the wp_usermeta table. The meta_value column has a datatype of longtext, meaning the value can be super duper long1 and the database isn’t going to care what value you store there. It’s up to you as the developer to make sure the data being stored as DOB is a date and nothing else.
So what exactly is the difference between validation, sanitization, and escaping?
-
Validating is the process of making sure the data received from the end user is in the correct format you expect it to be in. You want to validate data before saving it into the database.
-
Sanitizing is the process of cleaning data received from the end user before saving it to the database or using it in your app.
-
Escaping is the process of cleaning data you may already have before displaying it to the end user or passing it off to an API.
Now you know!
You want to validate and sanitize data before putting it into your database. When pulling data out of your database, you want to sanitize it just to be safe in case somehow you are storing unsanitized data.
PHP has validation and sanitization functions, but WordPress has their own helper functions built-in; and this is a book about WordPress, so let’s talk about some of those functions.
Note
Most validation and sanitization helper functions are located in wp-includes/formatting.
esc_url( $url, $protocols = null, $_context = display )
Checks and cleans a URL by checking if it has the proper protocol, stripping invalid characters and encoding special characters. Use this if displaying a URL to an end user:
-
$url—A required string of the URL that needs to be cleaned.
-
$protocols—An optional array of whitelisted protocols. Defaults to
array( http, https, ftp, ftps, mailto, news, irc, gopher, nntp, feed, telnet, mms, rtsp, svn )if not specifically set. -
$context—An optional string of how the URL is being used. Defaults to
display, which sends the URL throughwp_kses_normalize_entities()and replaces&with&and‘with'.
sanitize_option( $option, $value )
This function can be used to sanitize the value of any predefined WordPress option. Depending on what option is being used, the value will be sanitized via various functions:
-
$option—A required string of the name of the option.
-
$value—A required string of the unsanitized option value you wish to sanitize.
sanitize_file_name( $filename )
Sanitizes a filename, replacing whitespace with dashes. Removes special characters that are illegal in filenames on certain operating systems and special characters requiring special escaping to manipulate at the command line. Replaces spaces and consecutive dashes with a single dash. Trims period, dash, and underscore from beginning and end of filename:
-
$filename—Required string of the file name to be sanitized.
wp_kses( $string, $allowed_html, $allowed_protocols = array () )
This function makes sure that only the allowed HTML element names, attribute names, and attribute values plus only sane HTML entities will occur in the string you provide. You have to remove any slashes from PHP’s magic quotes before you call this function:
-
$string—A required string that you want filtered through kses.
-
$allowed_html—A required array of allowed HTML elements.
-
$allowed_protocols—An optional array of allowed protocols in any URLs in the string being filtered. The default allowed protocols are
http,https,ftp,mailto,news,irc,gopher,nntp,feed,telnet,mms,rtsp, andsvn. This covers all common link protocols, except forjavascript, which should not be allowed for untrusted users.
The following code validates and sanitizes an email address:
<?php// let's pretend that a user added an email address "brian @ webdevstudios.com"$user_email='brian @ webdev$tudios.com';// we can check if this is a valid email$user_email=is_email($user_email);// we know it's not because it's set to nothing from is_email()if(!$user_email)echo'invalid email<br>';// let's try again with sanitizing the email$user_email='brian @ webdev$tudios.com';// use sanitize_email() to try to fix any invalid email$user_email=sanitize_email($user_email);$user_email=is_email($user_email);if(!$user_email)echo'invalid email<br>';elseecho'valid email: '.$user_email;?>
Nonces
Nonce stands for “number used once,” and using nonces is critical to protecting your application from CSRF (cross-site request forgery) attacks.
Normally your server-side scripts for form processing are processing forms from your own site. People visit your site, log in, and submit a form to perform some action on your site. However, if your server-side code were simply looking for $_POST values to determine what to do, those values could be submitted from any form, even forms on other websites.
The first line of defense is to check that a user is really logged in and has the capabilities to do the requested action. However, this isn’t enough to stop CSRF attacks because you might be logged in on your WordPress site (e.g., in a background tab) while some malicious code on another site/tab kicks off the form request with the correct $_POST variable to send a spammy message to your friends or initiate account deletion or something else you don’t want to do.
What’s needed is a way to make sure that the request comes from the WordPress site and not another site. This is what a nonce does. The basic outline of using a nonce is as follows:
-
Generate a nonce string every time a page is loaded.
-
Add the nonce string as a hidden element on the form.
-
When processing a submitted form, generate the nonce the same way and check that it matches the one submitted from the form.
Because the nonce is generated using a combination of the secret salt keys in your wp-config.php and the server time, it is very hard for attackers to guess the nonce string for their own forms.
Nonces are useful for nonform links and AJAX calls as well. The process is basically the same:
-
Generate a nonce string every time a page is loaded.
-
Add the nonce string as a parameter to the URL.
-
When processing the request, generate the nonce the same way and check that it matches the one submitted through the URL.
Whether protecting your forms, links, or AJAX requests, WordPress has a few helper functions to make this process very easy to implement.
wp_create_nonce( $action = -1 )
This function creates a random token that can only be used once and is located in wp-includes/pluggable.php:
$action—An optional string or int that describes what action is being taken for the nonce created. You should always set an action to be more secure:
<?phpfunctionschoolpress_footer_create_nonce(){$nonce=wp_create_nonce('random_nonce_action');$url=add_query_arg(array('sp_nonce'=>$nonce));echo'<p><a href="'.$url.'">Verify this Nonce</a></p>';}add_action('wp_footer','schoolpress_footer_create_nonce');?>
wp_verify_nonce($nonce, $action = -1)
This function is used to verify that the correct nonce was used within the allocated time limit. If the correct nonce is passed into this function and everything checks out OK, then the function will return a value that evaluates to true.2 If not, it will return false. This function is located in wp-includes/pluggable.php:
-
$nonce—A required string of the nonce value being used to verify.
-
$action—An optional string or int that should be descriptive to what is taking place and should match the action from when the nonce was created.
<?phpfunctionschoolpress_init_verify_nonce(){if(isset($_GET['sp_nonce'])&&wp_verify_nonce($_GET['sp_nonce'],'random_nonce_action')){echo'You have a valid nonce!';}else{echo'You have an invalid nonce!';}}add_action('init','schoolpress_init_verify_nonce');?>
check_admin_referer($action = -1, $query_arg = _wpnonce)
This function calls the wp_verify_nonce function, so it verifies nonces but also checks to see that the referrer or the page that got you to the current page you are on is from the same website. This function is located in wp-includes/pluggable.php:
-
$action—An optional string, but you should specify a nonce action to be verified.
-
$query_arg—An optional string of the query argument that has the nonce as its value.
<?php// checking the same nonce "sp_nonce" that was created earlierfunctionschoolpress_init_check_admin_referer(){if(isset($_GET['sp_nonce'])&&check_admin_referer('random_nonce_action','sp_nonce')){echo'<p>You have a valid nonce!</p>';}else{echo'<p>You have an invalid nonce!</p>';}}add_action('init','schoolpress_init_check_admin_referer');?>
wp_nonce_url( $actionurl, $action = -1 )
This function also utilizes the wp_create_nonce() function and adds a nonce to any URL. If you create any actions based off of a query string, you should always tie a nonce to your URL with this function:
-
$actionurl—A required string of the URL to add a nonce action to.
-
$action—An optional string for the action name. You should always set this.
This function is located in wp-includes/functions.php:
<?php// simple url with querystring examplefunctionschoolpress_footer_nonce_url(){$url=wp_nonce_url(add_query_arg(array('action'=>'get_users')),'get_users_nonce');echo'<p><a href="'.$url.'">Get Users</a></p>';}add_action('wp_footer','schoolpress_footer_nonce_url');// querystring actionfunctionschoolpress_footer_nonce_url_action(){// check if querystring action is get_users and for the nonceif(isset($_GET['action'])&&'get_users'==$_GET['action']&&check_admin_referer('get_users_nonce')){echo'Your action: '.$_GET['action'];// or get your users and display them here...}}add_action('init','schoolpress_footer_nonce_url_action');?>
wp_nonce_field( $action = -1, $name = “_wpnonce”, $referer = true , $echo = true )
This function retrieves or displays a hidden nonce field in a form. It has the wp_create_nonce() function baked into it, so you should always use this nice helper function when dealing with forms.
The nonce field is used to validate that the contents of the form came from the location on the current site and not somewhere else. The nonce does not offer absolute protection, but should protect against most cases. It is very important to use a nonce field in forms.
The $action and $name parameters are optional, but if you want to have better security, it is strongly suggested to set those two parameters. It is easier to just call the function without any parameters, because validation of the nonce doesn’t require any parameters, but since crackers know what the default is, it won’t be difficult for them to find a way around your nonce and cause damage.
The input name will be whatever $name value you gave. The input value will be the nonce creation value. This function is located in wp-includes/functions.php:
-
$action—An optional string for the action name. You should always set this.
-
$name—An optional string for the nonce name. You should always set this.
-
$referer—An optional boolean of whether to set the referer field for validation. The default value is
true. -
$echo—An optional boolean of whether to display or return a hidden form field. The default value is
true.
<?php// simple submission form examplefunctionschoolpress_footer_form(){?><form method="post"><?php// create our noncewp_nonce_field('email_list_form','email_list_form_nonce');?><h3>Join our email list</h3>Email Address: <input type="text" name="email_address"><input type="submit" name="submit_email" value="Submit"></form><?php}add_action('wp_footer','schoolpress_footer_form');// form actionfunctionschoolpress_footer_form_action(){if(isset($_POST['submit_email'])&&isset($_POST['email_address'])&&check_admin_referer('email_list_form','email_list_form_nonce')){echo'You submitted: '.$_POST['email_address'];// or process your form here...}}add_action('init','schoolpress_footer_form_action');?>
check_ajax_referer( $action = -1, $query_arg = false, $die = true )
When using AJAX, you should still be using nonces. This function allows you to do a nonce and referer check while processing an AJAX request. This function is located in wp-includes/pluggable.php:
-
$action—An optional string of the nonce action being referenced.
-
$query_arg—An optional string of where to look for nonce in
$_REQUEST. -
$die—An optional boolean of whether you want to AJAX script to die if an invalid nonce is found.
Throughout the book, you may have noticed code snippets that didn’t use nonces or sanitize data. We did this to try to keep the code examples short and sweet, but you should always use nonces and sanitize your data. Any custom form submission or URL with custom query strings should utilize nonces, and every time you write $_POST['anything'] or $_GET['anything'], they should be wrapped in a sanitization or escaping function.
1 In technical terms, “super duper long” is equal to about 4 GB of data.
2 The wp_verify_nonce() function will return 1 if the nonce is under 12 hours old. If the nonce is between 12 and 24 hours old, it will return 2. If it is older than 24 hours old, it will return false. This way you can test if the result evaluates to true or if you wanted to check for a slightly fresher nonce, you could check if it is equal to 1 exactly.