Table of Contents for
bash Cookbook, 2nd Edition
 bash Cookbook, 2nd Edition
Published by
O'Reilly Media, Inc., 2017
bash Cookbook, 2nd Edition
Published by
O'Reilly Media, Inc., 2017
- nav
- Cover
- bash Cookbook
- bash Cookbook
- Preface
- Beginning bash
- Standard Output
- Standard Input
- Executing Commands
- Basic Scripting: Shell Variables
- Shell Logic and Arithmetic
- Intermediate Shell Tools I
- Intermediate Shell Tools II
- Finding Files: find, locate, slocate
- Additional Features for Scripting
- Working with Dates and Times
- End-User Tasks as Shell Scripts
- Parsing and Similar Tasks
- Writing Secure Shell Scripts
- Advanced Scripting
- Configuring and Customizing bash
- Housekeeping and Administrative Tasks
- Working Faster by Typing Less
- Tips and Traps: Common Goofs for Novices
- Reference Lists
- Examples Included with bash
- Command-Line Processing
- Revision Control
- Building bash from Source
- Index
- About the Authors
- Colophon
Chapter 12. End-User Tasks as Shell Scripts
You have seen a lot of smaller scripts and syntax up to now. Our examples have, of necessity, been small in scale and scope. Now we would like to show you a few larger (though not large) examples. They are meant to give you useful, real-world examples of actual uses of shell scripts beyond just system administration tasks. We hope you find them useful or usable. More than that, we hope you learn something about bash by reading through them and maybe trying them yourself or even tweaking them for your own use.
12.1 Starting Simple by Printing Dashes
Solution
Printing a line of dashes with a simple command might sound easy—and it is. But as soon as you think you’ve got a simple script, it begins to grow. What about varying the length of the line of dashes? What about changing the character from a dash to a user-supplied character? Do you see how easily feature creep occurs? Can we write a simple script that takes those extensions into account without getting too complex?
Consider the script in Example 12-1.
Example 12-1. ch12/dash
#!/usr/bin/env bash# cookbook filename: dash# dash - print a line of dashes# options: # how many (default 72)# -c X use char X instead of dashes#functionusagexit(){printf"usage: %s [-c X] [#]\n"${0##*/}exit2}>&2LEN=72CHAR='-'while(($#>0))docase$1in[0-9]*)LEN=$1;;-c)shiftCHAR=$1;;*)usagexit;;esacshiftdoneif((LEN>4096))thenecho"too large">&2exit3fi# build the string to the exact lengthDASHES=""for((i=0;i<LEN;i++))doDASHES="${DASHES}${CHAR}"doneprintf"%s\n""$DASHES"
Discussion
The basic task is accomplished by building a string of the required number of dashes (or an alternate character) and then printing that string to standard output (STDOUT). That takes only the last six lines. The default values are set early in the script, before the while loop. All the other lines deal with argument parsing, error checking, user messages, and comments.
You will find that this is pretty typical for a robust end-user script. Less than 20 percent of the code does most of the “real” work—but that other 80 percent of the code is what makes the script usable and “friendly” for your users.

Here we use the
*/) to trim off any leading pathname characters when displaying this script’s name. That way no matter how the user invokes the script (for example, ./dashes, /home/username/bin/dashes, or even ../../over/there/dashes), it will still be referred to as just dashes in the usage message.
The default values are set with the two assignments here.

The argument parsing is done while there are some arguments to parse. As arguments are handled, each
shiftbuiltin will decrement the number of arguments and eventually get us out of thewhileloop.
There are only two possible allowable arguments: specifying a number for the length, and

a
-coption followed by a character, to be used instead of the dash.
Any other options will end up here and result in the usage message and an early exit.

Finally, notice that the script enforces a maximum length here, though it is completely arbitrary. Would you keep or remove such a restriction?
We could be more careful in parsing the -c and its argument. Because we don’t use more sophisticated parsing (e.g., with getopts; see Recipe 13.1), our code requires the option and its argument to be separated by whitespace. (In running the script one must type, for example, -c 25 and not -c25.) We don’t even check to see that the second argument is supplied at all. Furthermore, the user might type not just a single letter but a whole string. (Can you think of a simple way to limit this, by taking only the first character of the argument? Do you need/want to? Why not let the user specify a string instead of a single character?)
The parsing of the numerical argument could also use some more sophisticated techniques. The patterns in a case statement follow the rules of pathname expansion and are not regular expressions. It might be tempting to assume that the case pattern [0-9]* means “only digits,” but that would be the regular expression meaning. In the case statement it means any string that begins with a digit. Not catching erroneous input like 9.5 or 612more will result in errors in the script later on. The use of an if statement with =~ and its more sophisticated regular expression matching might be useful here.
You can see from this example that even simple scripts can become quite involved, mostly due to error checking, argument parsing, and the like. For scripts that you write for yourself, such techniques are often glossed over or skipped entirely—after all, as the only user of the script you know the proper usage and are willing to use it correctly or have it fail in an ugly display of error messages. For scripts that you want to share, however, such is not the case, and much care and effort will likely be put into toughening up your script.
12.2 Viewing Photos in an Album
Solution
Write a shell script that will generate a set of HTML pages so that you can view your photos with a browser. Call it mkalbum and put it somewhere like your ~/bin directory.
On the command line, cd into the directory where you want your album created (typically where your photos are located). Then run some command that will generate the list of photos that you want included in this album (e.g., ls *.jpg, but see also Recipe 9.5), and pipe this output into the mkalbum shell script in Example 12-2, which we will explain later. You need to put the name of the album (i.e., the name of a directory that will be created by the script) on the command line as the only argument to the shell script. It might look something like this:
ls *.jpg | mkalbum rugbymatch
Figure 12-1 shows a sample of the generated web page.
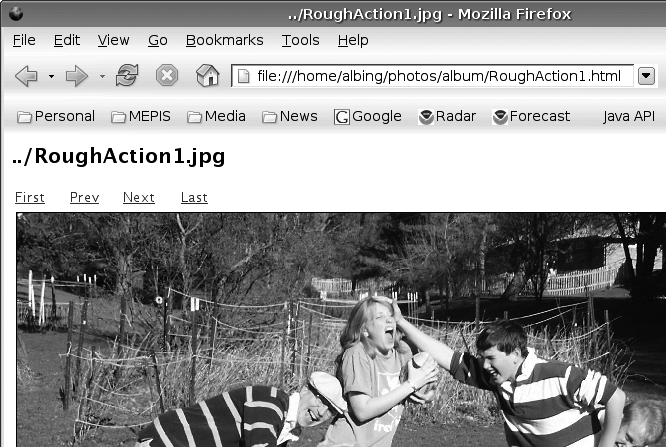
Figure 12-1. Sample mkalbum web page
The large title is the name of the photo (i.e., the filename); there are hyperlinks to other pages for the first, last, next, and previous photos in the album.
Example 12-2 is the shell script (mkalbum) that will generate the set of HTML pages for your album, one page per image (the line numbers are not part of the script, but are included to make it easier to discuss).
Example 12-2. ch12/mkalbum
#!/usr/bin/env bash# cookbook filename: mkalbum# mkalbum - make an HTML "album" of a pile of photo files.# ver. 0.2## An album is a directory of HTML pages.# It will be created in the current directory.## An album page is the HTML to display one photo, with# a title that is the filename of the photo, along with# hyperlinks to the first, previous, next, and last photos.## ERROUTERROUT(){printf"%b""$@"}>&2## USAGEUSAGE(){ERROUT"usage: %s <newdir>\n"${0##*/}}# EMIT(thisph, startph, prevph, nextph, lastph)EMIT(){THISPH="../$1"STRTPH="${2%.*}.html"PREVPH="${3%.*}.html"NEXTPH="${4%.*}.html"LASTPH="${5%.*}.html"if[-z"$3"]thenPREVLINE='<TD> Prev </TD>'elsePREVLINE='<TD> <A HREF="'$PREVPH'"> Prev </A> </TD>'fiif[-z"$4"]thenNEXTLINE='<TD> Next </TD>'elseNEXTLINE='<TD> <A HREF="'$NEXTPH'"> Next </A> </TD>'ficat<<EOF<HTML> <HEAD><TITLE>$THISPH</TITLE></HEAD> <BODY> <H2>$THISPH</H2> <TABLE WIDTH="25%"> <TR> <TD> <A HREF="$STRTPH"> First </A> </TD> $PREVLINE $NEXTLINE <TD> <A HREF="$LASTPH"> Last </A> </TD> </TR> </TABLE> <IMG SRC="$THISPH" alt="$THISPH" BORDER="1" VSPACE="4" HSPACE="4" WIDTH="800" HEIGHT="600"/> </BODY> </HTML> EOF}if(($#!=1))thenUSAGEexit-1fiALBUM="$1"if[-d"${ALBUM}"]thenERROUT"Directory [%s] already exists.\n"${ALBUM}USAGEexit-2elsemkdir"$ALBUM"ficd"$ALBUM"PREV=""FIRST=""LAST="last"whilereadPHOTOdo# prime the pumpif[-z"${CURRENT}"]thenCURRENT="$PHOTO"FIRST="$PHOTO"continuefiPHILE=${CURRENT##*/}# remove any leading pathEMIT"$CURRENT""$FIRST""$PREV""$PHOTO""$LAST">"${PHILE%.*}.html"# set up for next iterationPREV="$CURRENT"CURRENT="$PHOTO"donePHILE=${CURRENT##*/}# remove any leading pathnameEMIT"$CURRENT""$FIRST""$PREV""""$LAST">"${PHILE%.*}.html"# make the symlink for "last"ln-s"${PHILE%.*}.html"./last.html# make a link for index.htmlln-s"${FIRST%.*}.html"./index.html
Discussion
While there are plenty of free or inexpensive photo viewers, using bash to build a simple photo album helps to illustrate the power of shell programming, and gives us a meatier example to discuss.
The shell script begins with the special comment that defines which executable to use to run this script. Then follow some comments describing the script. Let’s just put in one more word encouraging you to be sure to comment your scripts. Even the sparsest comments will be worth something 3 days or 13 months from now when you wish you could remember what this script was all about.
After the comments we have put our function definitions. The
ERROUTfunction will act very much like printf (since all it does is invoke printf), but with the added twist that it redirects its output to standard error. This saves you from having to remember to redirect the output on every printf of error messages.While normally we put the redirection at the end of a command, here it is put at the end of a function definition to tell bash to redirect all output that emanates from this function.
The
USAGEfunction, while not strictly necessary as a separate function, is a handy way to document up front how you expect your script to be invoked. Rather than hardcoding the name of the script in our usage message, we like to use the$0special variable in case the script is renamed. The$0is the name of the script as it was invoked, including any pathname if specified by the user.By using the
##operator we get rid of all that path noise (specified by the*/).The
EMITfunction is a larger function. Its purpose is to emit the HTML for each page of the album. Each page is its own (static) web page, with hyperlinks to the previous and next image as well as links to the first and last image. TheEMITfunction doesn’t know much; it is given the names of all the images to which to link, and it takes those names and converts them to page names, which for our script are the same as the image name but with the file extension changed to .html. So, for example, if$2held the filename pict001.jpg, the result of${2%.*}.htmlwould be pict001.html.Since there is so much HTML to emit, rather than have
printfafterprintfstatement, we use the cat command and a here-document to allow us to type the literal HTML in the script, line after line, with shell variable expansion being applied to the lines. The cat command is simply copying (concatenating) STDIN to the STDOUT. In our script we redirect STDIN to take its input from the succeeding lines of text; i.e., a here-document. By not quoting the end-of-input word (justEOFand not'EOF'or\EOF) we ensure that bash will continue to do variable substitution on our input lines, enabling us to use variable names based on our parameters for various titles and hyperlinks.
The last two commands in the script create symbolic links as shortcuts to the first and last photos. This way the script doesn’t need to figure out the names of the first and last pages of the album; it just uses the hardcoded names index.html and last.html, respectively, when generating all the other album pages. Then, as a last step, since the last filename processed is the last photo in our album, it creates the link to it. Similarly, with the first page (although we know that name right away), we waited until the end to put it with the other symbolic link, just as a matter of style—to keep the two similar operations in proximity.
One last thought about the design of this script: we could have passed in a filename to the EMIT function and had EMIT redirect its own output to that file, but such redirection was not really logically a part of the EMIT idea (c.f. our ERROUT function, whose whole purpose is the redirection). The purpose of EMIT is to create the HTML; where we send that HTML is another matter. Because bash allows us to redirect output so easily, it is possible to make that a separate step. Besides, it was easier to debug when the method just wrote its output to STDOUT.
See Also
-
HTML & XHTML: The Definitive Guide, 6th Edition, by Chuck Musciano and Bill Kennedy (O’Reilly)
-
Recipe 16.11, “Keeping a Private Stash of Utilities by Adding ~/bin”
12.3 Loading Your MP3 Player
Solution
Use a shell script like the one in Example 12-3 to keep track of the available space as it copies files onto the MP3 player, quitting when it is full.
Example 12-3. ch12/load_mp3
#!/usr/bin/env bash# cookbook filename: load_mp3# Fill up my mp3 player with as many songs as will fit.# N.B.: This assumes that the mp3 player is mounted on /media/mp3### determine the size of a file#functionFILESIZE(){FN=${1:-/dev/null}if[[-e$FN]]then# FZ=$(stat -c '%b' "$FN")set--$(ls-s"$FN")FZ=$1fi}## compute the free space on the mp3 player#functionFREESPACE{# FREE=$(df /media/mp3 | awk '/^\/dev/ {print $4}')set--$(df/media/mp3|grep'^/dev/')FREE=$4}# subtract the (given) file size from the (global) free spacefunctionREDUCE()((FREE-=${1:-0}))# this works, but is unusual## main:#letSUM=0letCOUNT=0exportFZexportFREEFREESPACEfind.-name'*.mp3'|\(whilereadPATHNMdoFILESIZE"$PATHNM"if((FZ<=FREE))thenecholoading$PATHNMcp"$PATHNM"/media/mp3if(($?==0))thenletSUM+=FZletCOUNT++REDUCE$FZelseecho"bad copy of$PATHNMto /media/mp3"rm-f/media/mp3/"${PATHNM##*/}"# recompute because we don't know how far it gotFREESPACEfi# any reason to go on?if((FREE<=0))thenbreakfielseechoskipping$PATHNMfidoneprintf"loaded %d songs (%d blocks)"$COUNT$SUMprintf" onto /media/mp3 (%d blocks free)\n"$FREE)# end of script
Discussion
Invoke this script and it will copy any MP3 file that it finds from the current directory on down (toward the leaf nodes of the tree) onto an MP3 player (or other device) mounted on /media/mp3. The script will try to determine the free space on the device before it begins its copying, and then it will subtract the disk size of copied items so as to know when to quit (i.e., when the device is full, or as full as we can get it).
The script is simple to invoke:
load_mp3
Then you can watch as it copies files, or you can go grab a cup of coffee—it depends on how fast your disk is and how fast your MP3 memory writes go.
Let’s look at some bash features used in this script:
We’ll start after the opening comments and the function definitions. (We’ll discuss the function definitions later.) The main body of the shell script starts by initializing some variables and exporting some variables so they will be available globally.
Here we call the
FREESPACEfunction to determine how much free space is available on the MP3 player before we begin copying files.The find command will locate all the MP3 files (actually, only those files whose names end in “.mp3”). This information is piped into a
whileloop that begins on the next line.Why is the
whileloop wrapped inside of parentheses? The parentheses mean that the statements inside them will be run inside of a subshell. But what we’re concerned about here is that we group thewhilestatement with theprintfstatements that come after the loop, near the very end of the script. Since each statement in a pipeline is run in its own subshell, and since the find pipes its output into thewhileloop, none of the counting that we do inside thewhileloop will be available outside of that loop. Putting thewhileand theprintfs inside of a subshell means, they are now both executing in the same shell environment and can share variables. A similar effect can be accomplished with braces.
Note
As of bash 4.4 the parentheses are no longer needed, provided that this is run as a shell script (not interactively) and the shell option lastpipe is set, as would happen if you put shopt -s lastpipe in the script somewhere before the find command.
Let’s look inside the while loop and see what it’s doing:
 FILESIZE "$PATHNM"
      if ((FZ <= FREE))
      then
          echo loading $PATHNM
          cp "$PATHNM" /media/mp3
          if (( $? == 0 ))
          then
For each filename that it reads from the find command’s output, it will use the FILESIZE function (discussed momentarily) to determine the size of that file. Then it checks to see if the file is smaller than the remaining disk space; i.e., whether there is room for this file. If so, it will echo the filename so we can see what it’s doing and then it will invoke cp to copy the file onto the MP3 player.
It’s important to check and see if the copy command completed successfully. The $? is the result of the previous command, so it represents the result of the cp command. If the copy is successful, then we can deduct the copied file’s size from the space available on the MP3 player. But if it failed, then we need to try to remove the copy (since, if it is there at all, it will be incomplete). We use the -f option on rm so as to avoid error messages if the file never got created. Then we recalculate the free space to be sure that we have the count right. (After all, the copy might have failed because somehow our estimate was wrong and we really are out of space.)
In the main part of the script, all three of our if statements use the double parentheses around the expression. All three are numerical if statements, and we wanted to use the familiar operators (e.g., <= and ==). These same if conditions could have been checked using the square bracket ([) form of the if statement, but then the operators would be -le and -eq. We do use a different form of the if statement in the FILESIZE function. There we need to check the existence of the file (whose name is in the variable $FN). That is simple to write with the -e operator, but that is not available to the arithmetic-style if statement (i.e., when using parentheses instead of square brackets).
Speaking of arithmetic expressions, let’s take a look at the REDUCE function and see what’s going on there:
 function REDUCE ( )
 (( FREE-=${1:-0}))    # this works, but is unusual
Most people write functions using curly braces to delimit the body of the function. However, in bash, any compound statement will work. In this case we chose the double parentheses of arithmetic evaluation, since that is all we need the function to do, but this is unusual and could cause readability and maintainability confusion unless well commented. Whatever value is supplied on the command line that invokes REDUCE will be the first (positional) parameter (i.e., $1). We simply subtract that value from $FREE to get the new value for $FREE. That is why we used the arithmetic expression syntax—so that we can use the -= operator.
While we are looking at the functions, let’s look at two lines in the FILESIZE function. The comment in the script shows another simple way to do this, but we want to explain a more general technique useful for more interesting purposes than just checking file sizes. Take a close look at these lines:
    set -- $(ls -s "$FN")
    FZ=$1
There is a lot going on in those few characters. First, the ls command is run inside of a subshell (the $() construct). The -s option on ls gives us the size, in blocks, of the file along with the filename. The output of the command is returned as words on the command line for the set command. The purpose of the set command here is to parse the words of the ls output. There are lots of ways we could do that, but this approach is a useful technique to remember.
The set -- will take the remaining words on the command line and make them the new positional parameters. If you write set -- this is a test, then $1 is this and $3 is a. The previous values for $1, $2, etc. are lost, but in our script we saved into $FN the only parameter that gets passed into this function. Having done so, we are free to reuse the positional parameters, and we use them by having the shell do the parsing for us. We can then get at the file size as $1, as you see in the assignment to $FZ. (By the way, in this case, since this is inside a function, it is only the function’s positional parameters that are changed, not those from the invoking of the script.)
We use this technique of having the shell do our parsing for us again, in the other function:
       set -- $(df /media/mp3 | grep '^/dev/')
       FREE=$4
The output of the df command will report on the size, in blocks, available on the device. We pipe the output through grep, since we only want the one line with our device’s information and we don’t want the heading line that df produces. Once bash has set our arguments, we can grab the free space on the device as $4.
A comment in the script shows an alternative way to parse the output of the df command. We could just pipe the output into awk and let it parse the output from df for us:
# FREE=$(df /media/mp3 | awk '/^\/dev/ {print $4}')
In this version, by using the expression in slashes we tell awk to pay attention only to lines with a leading /dev. (The caret anchors the search to the beginning of the line and the backslash escapes the meaning of the slash, so as not to end the search expression at that point and to include a slash as the first character to find.)
So which approach to use? They both involve invoking an external program, in one case grep and in the other awk. There are usually several ways to accomplish the same thing (in bash as in life), so the choice is yours. In our experience, it usually comes down to which one you think of first.
12.4 Burning a CD
Solution
You can do it with two open source programs called mkisofs and cdrecord, and a bash script to help you keep all the options straight.
Start by putting all the files that you want to copy to CD into a directory structure. The script in Example 12-4 will take that directory, make an ISO filesystem image from those files, then burn the ISO image. All it takes is a bunch of disk space and a bit of time—but you can get up and wander while the bash script runs.
Warning
This script may not work on your system. We include it here as an example of shell scripting, not as a workable CD recording and backup mechanism.
Example 12-4. ch12/cdscript
#!/usr/bin/env bash# cookbook filename: cdscript# cdscript - prep and burn a CD from a dir.## usage: cdscript dir [ cddev ]#if(($#<1||$#>2))thenecho'usage: cdscript dir [ cddev ]'exit2fi# set the defaultsSRCDIR=$1# your device might be "ATAPI:0,0,0" or other digitsCDDEV=${2:-"ATAPI:0,0,0"}ISOIMAGE=/tmp/cd$$.isoecho"building ISO image..."## make the ISO fs image#mkisofs-A"$(cat~/.cdAnnotation)"\-p"$(hostname)"-V"${SRCDIR##*/}"\-r-o"$ISOIMAGE"$SRCDIRSTATUS=$?if((STATUS!=0))thenecho"Error. ISO image failed."echo"Investigate then remove$ISOIMAGE"exit$STATUSfiecho"ISO image built; burning to cd..."## burn the CD#SPD=8OPTS="-eject -v fs=64M driveropts=burnproof"cdrecord$OPTS-speed=$SPDdev=${CDDEV}$ISOIMAGESTATUS=$?if((STATUS!=0))thenecho"Error. CD Burn failed."echo"Investigate then remove$ISOIMAGE"exit$STATUSfirm-f$ISOIMAGEecho"Done."
Discussion
Here is a quick look at some of the odder constructs in this script
We construct a temporary filename by using the
$$variable, which gives us our process number. As long as this script is running, it will be the one and only process of that number, so this gives us a name that is unique among all other running processes. (See Recipe 14.11 for a better way.)We save the status of the mkisofs command. Well-written Unix and Linux commands (and bash shell scripts) will return
0on success (i.e., if nothing went wrong) and a nonzero value if they fail. We could have just used the$?in theifstatement on the next line, but we want to hold on to the status from the mkisofs command so that, in the event of failure, we can pass that value back out as the return value of this script.We do the same with the cdrecord command, saving its return value, so that if the command fails, the
ifstatement would therefore be true, so then theexitstatement can send back that failure code.
It may take a bit of thought to unpack these lines:
mkisofs -A"$(cat ~/.cdAnnotation)"\-p"$(hostname)"-V"${SRCDIR##*/}"\-r -o"$ISOIMAGE"$SRCDIR
All three lines are just a single line of input to bash that has been separated across lines by putting a backslash as the very last character on the line in order to escape the normal meaning of an end of line. Be sure you don’t put a space after the trailing \. But that’s just the tip of the iceberg here. There are three subshells that are invoked whose output is used in the construction of the final command line that invokes mkisofs.
First there is an invocation of the cat program to dump the contents of a file called .cdAnnotation located in the home directory (~/) of the user invoking this script. The purpose is to provide a string to the -A option, which the mkisofs manpage describes as “a text string that will be written into the volume header.” Similarly, the -p option wants another such string, this time indicating the preparer of the image. For our script it seemed like it might be handy to put the hostname where the script is run as the preparer, so we run hostname in a subshell (though using the builtin $HOSTNAME is more efficient). Finally, the volume name is specified with the -V parameter, and for that we use the name of the directory where all the files are found. That directory is specified on the command line to our script, and we use the ## operator to peel off the leading directory pathname (using the pattern */), if any (so, for example, /usr/local/stuff becomes just stuff).
12.5 Comparing Two Documents
Problem
It is easy to compare two text files (see Recipe 17.10). But what about documents produced by your suite of office applications? They are not stored as text, so how can you compare them? If you have two versions of the same document, and you need to know what the content changes are (if any) between the two versions, is there anything you can do besides printing them out and comparing page after page?
Solution
First, use an office suite such as LibreOffice that will let you save your documents in OpenDocument Format (ODF). Once you have your files in ODF, you can use a shell script to compare just the content of the files. We stress the word content here because the formatting differences are another issue, and it is (usually) the content that is the most important determinant of which version is newer or more important to the end user.
Example 12-5 is a bash script that can be used to compare two LibreOffice files, which are saved in ODF (but use the conventional suffix .odt to indicate a text-oriented document, as opposed to a spreadsheet or a presentation file).
Example 12-5. ch12/oodiff
#!/usr/bin/env bash# cookbook filename: oodiff# oodiff -- diff the CONTENTS of two OpenOffice/LibreOffice files# works only on .odt files#functionusagexit(){echo"usage:${0##*/}file1 file2"echo"where both files must be .odt files"exit$1}>&2# assure two readable arg filenames which end in .odtif(($#!=2))thenusagexit1fiif[[$1!=*.odt||$2!=*.odt]]thenusagexit2fiif[[!-r$1||!-r$2]]thenusagexit3fiBAS1=$(basename"$1".odt)BAS2=$(basename"$2".odt)# unzip them someplace privatePRIV1="/tmp/${BAS1}.$$_1"PRIV2="/tmp/${BAS2}.$$_2"# make absoluteHERE=$PWDif[[${1:0:1}=='/']]thenFULL1="${1}"elseFULL1="${HERE}/${1}"fi# make absoluteif[[${2:0:1}=='/']]thenFULL2="${2}"elseFULL2="${HERE}/${2}"fi# mkdir scratch areas and check for failure# N.B. must have whitespace around the { and } and# must have the trailing ; in the {} listsmkdir"$PRIV1"||{echo"Unable to mkdir '$PRIV1'";exit4;}mkdir"$PRIV2"||{echo"Unable to mkdir '$PRIV2'";exit5;}cd"$PRIV1"unzip-q"$FULL1"sed-e's/>/>\/g'-e's/</\ </g'content.xml>contentwnl.xmlcd"$PRIV2"unzip-q"$FULL2"sed-e's/>/>\ /g'-e's/</\ </g'content.xml>contentwnl.xmlcd"$HERE"diff"${PRIV1}/contentwnl.xml""${PRIV2}/contentwnl.xml"rm-rf"$PRIV1""$PRIV2"
Discussion
Underlying this script is the knowledge that LibreOffice files are stored like ZIP files. Unzip them and there are a collection of XML files that define your document. One of those files contains the content of your document; that is, the paragraphs of text without any formatting (but with XML tags to tie each snippet of text to its formatting). The basic idea behind the script is to unzip the two documents and compare the content pieces using diff, and then clean up the mess that we’ve made.
One other step is taken to make the diffs easier to read. Since the content is all in XML and there aren’t a lot of newlines, the script will insert a newline after every opening tag and before every end tag (tags whose contents begin with a slash, as in </ ... >). While this introduces a lot of blank lines, it also enables diff to focus on the real differences: the textual content.
As far as shell syntax goes, you have seen all this in other recipes in the book, but it may be worth explaining a few pieces of syntax just to be sure you can tell what is going on in the script.
This line redirects all the output from this shell function to STDERR. That seems appropriate since this is a help message, not the normal output of this program. Putting the redirect on the function definition means we don’t need to remember to redirect every output line separately.
This contains the terse expression
if [[ ${1:0:1} == '/' ]], which checks to see whether the first argument begins with a slash character. The${1:0:1}is the syntax for a substring of a shell variable. The variable is${1}, the first positional parameter. The:0:1syntax says to start at an offset of zero and that the substring should be one character long.The lines of this sed command may be a little hard to read because they involve escaping the newline character so that it becomes part of the sed substitution string. The substitution expression takes each
>in the first substitution and each<in the second, and replaces it with itself plus a newline. We do this to our content file in order to spread out the XML and get the content on lines by itself. That way the diff doesn’t show any XML tags, just content text.