

Accelerate Your Web Applications
Copyright © 2017 Thijs Feryn. All rights reserved.
Printed in the United States of America.
Published by O’Reilly Media, Inc., 1005 Gravenstein Highway North, Sebastopol, CA 95472.
O’Reilly books may be purchased for educational, business, or sales promotional use. Online editions are also available for most titles (http://oreilly.com/safari). For more information, contact our corporate/institutional sales department: 800-998-9938 or corporate@oreilly.com.
The O’Reilly logo is a registered trademark of O’Reilly Media, Inc. Getting Started with Varnish Cache, the cover image, and related trade dress are trademarks of O’Reilly Media, Inc.
While the publisher and the author have used good faith efforts to ensure that the information and instructions contained in this work are accurate, the publisher and the author disclaim all responsibility for errors or omissions, including without limitation responsibility for damages resulting from the use of or reliance on this work. Use of the information and instructions contained in this work is at your own risk. If any code samples or other technology this work contains or describes is subject to open source licenses or the intellectual property rights of others, it is your responsibility to ensure that your use thereof complies with such licenses and/or rights.
978-1-491-97222-9
[LSI]
This book is dedicated to all the people who support me day in and day out:
My lovely wife Lize, my son Lex, and my daughter Lia. My mom, dad, sister, mother-in-law, and brothers-in-law.
And of course my friends—you know who you are.
The following typographical conventions are used in this book:
Indicates new terms, URLs, email addresses, filenames, and file extensions.
Constant widthUsed for program listings, as well as within paragraphs to refer to program elements such as variable or function names, databases, data types, environment variables, statements, and keywords.
Constant width boldShows commands or other text that should be typed literally by the user.
Constant width italicShows text that should be replaced with user-supplied values or by values determined by context.
This element signifies a tip or suggestion.
This element signifies a general note.
This element indicates a warning or caution.
Safari (formerly Safari Books Online) is a membership-based training and reference platform for enterprise, government, educators, and individuals.
Members have access to thousands of books, training videos, Learning Paths, interactive tutorials, and curated playlists from over 250 publishers, including O’Reilly Media, Harvard Business Review, Prentice Hall Professional, Addison-Wesley Professional, Microsoft Press, Sams, Que, Peachpit Press, Adobe, Focal Press, Cisco Press, John Wiley & Sons, Syngress, Morgan Kaufmann, IBM Redbooks, Packt, Adobe Press, FT Press, Apress, Manning, New Riders, McGraw-Hill, Jones & Bartlett, and Course Technology, among others.
For more information, please visit http://oreilly.com/safari.
Please address comments and questions concerning this book to the publisher:
To comment or ask technical questions about this book, send email to bookquestions@oreilly.com.
For more information about our books, courses, conferences, and news, see our website at http://www.oreilly.com.
Find us on Facebook: http://facebook.com/oreilly
Follow us on Twitter: http://twitter.com/oreillymedia
Watch us on YouTube: http://www.youtube.com/oreillymedia
A big thank you to my employer Combell for granting me the time to write this book. More specifically, our CEO Jonas Dhaenens, my manager Frederik Poelman, and my colleagues Stijn Claerhout, Christophe Van den Bulcke, and Wesley Hof. Thanks for believing in me!
I would like to give a shout-out to Varnish Software for the opportunity to write my very first book. Thank you, Hildur Smaradottir, Per Buer, and Rubén Romero.
Varnish Cache is a so-called reverse caching proxy. It’s a piece of software that you put in front of your web server(s) to reduce the loading times of your website/application/API by caching the server’s output. We’re basically talking about web performance.
In this chapter, I’ll explain why web performance is so important and how Varnish can improve it.
Many people underestimate the importance of web performance. The common logic is that if a website performs well when 10 users are accessing it, the site will also be fine when 1 million users want to access it. It only takes one successful marketing campaign to debunk that myth.
Performance and scalability aren’t one and the same. Performance is the raw speed of your website: how many (milli)seconds does it take to load the page? Scalability, on the other hand, is keeping the performance stable when the load increases. The latter is a reason for bigger organizations to choose Varnish. The former applies to everyone, even small projects.
Let’s say your website has about 100 visitors per day. Not that many, right? And the loading time of a page is 1.5 seconds—not great, but not that bad either. Without caching, it might take some time (and money) to reduce that loading time to less than a second. You might refactor your code or optimize your infrastructure. And then you might ask yourself if all of the effort was worth it.
It’s also important to know that web performance is an essential part of the user experience. Want to please your users and ensure they stay on your site? Then make sure your pages are loading fast. Even Google knows this—did you know that Google Search takes the loading times of your website into account when calculating its page rank?
Poor performance will not only hurt your Google ranking, it will also impact your bottom line: people don’t have the patience to wait for slow content and will look for an alternative in a heartbeat. In a heavily saturated market, they’ll probably end up with one of your competitors.
With a correctly configured Varnish, you will automatically reduce the loading times of your website without much effort. Given that Varnish is open source and easy to set up, this is a no-brainer.
And if you play your cards right, who knows, maybe your site will become popular one day. The term “viral” comes to mind. If you already have a properly configured Varnish in place, you won’t need to take many more measures.
A lot of people think that Varnish is technology for big projects and large companies—the kind of sites that attract massive amounts of hits. That’s true; these companies do use Varnish. In fact, 13% of the top 10,000 websites rely on Varnish to ensure fast loading times. However, Varnish is also suitable for small and medium-sized projects. Have a look at Chapter 9 to learn about some of the success stories and business use cases.
All that being said, Varnish is not a silver bullet; it is only a part of the stack. Many more components are required to serve pages fast and reliably, even at load. These components, such as the network, server, operating system, web server, and the application runtime, can also fail on you.
Varnish Cache is an open source project written in C. The fact that it’s open source means the code is also available online and the use of Varnish is free of charge.
Varnish Cache is maintained by an active community, led by Poul-Henning Kamp. Although Varnish Cache is “free as in beer,” there’s still a company backing the project and funding most of its development. This company, called Varnish Software, is able to fund the Varnish Cache project by providing training, support, and extra features on top of Varnish.
Varnish is either installed on web servers or on separate machines. Once installed and started, Varnish will mimic the behavior of the web server that sits behind it. Usually, Varnish listens on TCP port 80, the conventional TCP port that delivers HTTP—unless, of course, Varnish itself sits behind another proxy. Varnish will have one or more backends registered and will communicate with one of these backends in case a result cannot be retrieved from cache.
Varnish will preallocate a chunk of virtual memory and use that to store its objects. The objects contain the HTTP response headers and the payload that it receives from the backend. The objects stored in memory will be served to clients requesting the corresponding HTTP resource. The objects in cache are identified by a hash that, by default, is composed of the hostname (or the IP address if no hostname was specified) and the URL of the request.
Varnish is tremendously fast and relies on pthreads to handle a massive amount of incoming requests. The threading model and the use of memory for storage will result in a significant performance boost of your application. If configured correctly, Varnish Cache can easily make your website 1,000 times faster.
Varnish uses the Varnish Configuration Language (VCL) to control the behavior of the cache. VCL is a domain-specific language that offers hooks to override and extend the behavior of the different states in the Varnish Finite State Machine. These hooks are represented by a set of subroutines that exist in VCL. The subroutines and the VCL code live inside the VCL file. At startup time, the VCL file is read, translated to C, compiled, and dynamically loaded as a shared object.
The VCL syntax is quite extensive, but limited at some point. If you want to extend the behavior even further, you can write custom Varnish modules in C. These modules can contain literally anything you can program in C. This extended behavior is presented through a set of functions. These functions are exposed to VCL and enrich the VCL syntax.
The reality of the matter is that most websites, applications, and APIs are data-driven. This means that their main purpose is to present and visualize data that comes from the database or an external resource (feed, API, etc.). The majority of the time is spent on retrieving, assembling, and visualizing data.
When you don’t cache, that process is repeated upon every client request. Imagine how many resources are wasted by recomputing, even though the data hasn’t changed.
If you decide to cache a computed result, you better have good control over the original data. If the original data does change, you will need to make sure the cache is updated. However, emptying the cache too frequently defies the purpose of the cache. It’s safe to say that caching is a balancing act between serving up-to-date data and ensuring acceptable loading times.
Caching is not a trick, and it’s not a way to compensate for poor performing systems or applications; caching is an architectural decision that, if done right, will increase efficiency and reduce infrastructure cost.
Slow websites suck. Users don’t have much patience and in a highly-saturated market, having a fast website can give you the edge over your competitors. Raw performance is important, but a stable time to first byte under heavy load is just as important. We call this scalability and it’s a tough nut to crack. There are plenty of ways to make your website scale, most of which require a considerable amount of time and money. Luckily, a decent caching strategy can reduce the impact of all that traffic. Varnish is a tool that can cache your HTTP traffic and take most of the load off your servers.
Now that you know what Varnish is all about, you’re probably eager to learn how to install, configure, and use it. This chapter will cover the basic installation procedure on the most commonly supported operating systems and the typical configuration parameters that you can tune to your liking.
Varnish is supported on the following operating systems:
Linux
FreeBSD
Solaris
You can get it to work on other UNIX-like systems (OS X, OpenBSD, NetBSD, and Windows with Cygwin), but there’s no official support for those.
In reality, you’ll probably install Varnish on a Linux system. For development purposes, you might even run it on OS X. Linux is the most commonly used operating system for production systems. Some people do local development on a Mac and want to test their code locally. Therefore, it could make sense to install Varnish on OS X, just to see how your code behaves when it gets cached by Varnish.
The supported Linux distributions are:
Ubuntu
Debian
Red Hat
CentOS
You can easily install Varnish using the package manager of your operating system, but you can also compile Varnish from source.
Compiling from source is all fun and games, but it takes a lot of time. If you get one of the dependencies wrong or you install the wrong version of a dependency, you’re going to have a bad day. Why bother doing it the hard way (unless you have your reasons) if you can easily install Varnish using the package manager of your operating system?
Here’s a list of package managers you can use according to your operating system:
Even though FreeBSD officially supports Varnish, I will skip it for the rest of this book. In reality, few people run Varnish on FreeBSD. That doesn’t mean I don’t respect the project and the operating system, but I’m writing this book for the mainstream and let’s face it: FreeBSD is not so mainstream.
In simple terms, we can say that the Ubuntu and the Debian distributions are related. Ubuntu is a Debian-based operating system. Both distributions use the APT package manager. But even though the installation of Varnish is similar on both distributions, there are subtle differences. That’s why there are different APT repository channels for Ubuntu and Debian.
Here’s how you install Varnish on Ubuntu, assuming you’re running the Ubuntu 14.04 LTS (Trusty Tahr) version:
apt-get install apt-transport-https curl https://repo.varnish-cache.org/GPG-key.txt|apt-key add -echo"deb https://repo.varnish-cache.org/ubuntu/ trusty varnish-4.1"\>> /etc/apt/sources.list.d/varnish-cache.list apt-get update apt-get install varnish
Packages are also available for other Ubuntu versions. Varnish only supports LTS versions of Ubuntu. Besides Trusty Tahr, you can also install Varnish on Ubuntu 12.04 LTS (Precise Pangolin) and Ubuntu 10.04 LTS (Lucid Lynx). You can do this by replacing the trusty keyword with either precise or lucid in the previous example.
If you’re running Debian, here’s how you can install Varnish on Debian 8 (Jessie):
apt-get install apt-transport-https curl https://repo.varnish-cache.org/GPG-key.txt|apt-key add -echo"deb https://repo.varnish-cache.org/debian/ jessie varnish-4.1"\>> /etc/apt/sources.list.d/varnish-cache.list apt-get update apt-get install varnish
If you’re running an older version of Debian, there are packages available for Debian 5 (Lenny), Debian 6 (Squeeze), and Debian 7 (Wheezy). Just replace the jessie keyword with either lenny, squeeze, or wheezy in the preceding statements.
There are three main distributions in the Red Hat family of operating systems:
Red Hat Enterprise: the paid enterprise version
CentOS: the free version
Fedora: the bleeding-edge desktop version
All three of them have the YUM package manager, but we’ll primarily focus on both Red Hat and CentOS, which have the same installation procedure.
If you’re on Red Hat or CentOS version 7, here’s how you install Varnish:
yum install epel-release
rpm --nosignature -i https://repo.varnish-cache.org/redhat/varnish-4.1.el7.rpm
yum install varnish
If you’re on Red Hat or CentOS version 6, here’s how you install Varnish:
yum install epel-release
rpm --nosignature -i https://repo.varnish-cache.org/redhat/varnish-4.1.el6.rpm
yum install varnish
Now that you have Varnish installed on your system, it’s time to configure some settings so that you can start using it.
Varnish has a bunch of startup options that allow you to configure the way you interact with it. These options are located in a configuration file and assigned to the varnishd program at startup time. Here are some examples of typical startup options:
The address and port on which Varnish processes its incoming HTTP requests
The address and port on which the Varnish CLI runs
The location of the VCL file that holds the caching policies
The location of the file that holds the secret key, used to authenticate with the Varnish CLI
The storage backend type and the size of the storage backend
Jailing options to secure Varnish
The address and port of the backend that Varnish will interact with
You can read more about the Varnish startup options on the official varnishd documentation page.
The first challenge is to find where the configuration file is located on your system. This depends on the Linux distribution, but also on the service manager your operating system is running.
If your operating system uses the systemd service manager, the Varnish configuration file will be located in a different folder than it usually would be. Systemd is enabled by default on Debian Jessie and CentOS 7. Ubuntu Trusty Tahr still uses Sysv.
If you want to know where the configuration file is located on your operating system (given that you installed Varnish via a package manager), have a look at Table 2-1.
| SysV | Systemd | |
|---|---|---|
Ubuntu/Debian |
/etc/default/varnish |
/etc/systemd/system/varnish.service |
Red Hat/CentOS |
/etc/sysconfig/varnish |
/etc/varnish/varnish.params |
If you use systemd on Ubuntu or Debian, the /etc/systemd/system/varnish.service configuration file will not yet exist. You need to copy it from /lib/systemd/system/.
If you change the content of the configuration file, you need to reload the Varnish service to effectively load these settings. Run the following command to make this happen:
sudo service varnish reload
If you’re on Ubuntu or Debian and you’re using the systemd service manager, there are several things you need to keep in mind.
First of all, you need to copy the configuration file to the right folder in order to override the default settings. Here’s how you do that:
sudo cp /lib/systemd/system/varnish.service /etc/systemd/system
If you’re planning to make changes to that file, don’t forget that the results are cached in memory. You need to reload systemd in order to have your changes loaded from the file. Here’s how you do that:
sudo systemctl daemon-reload
That doesn’t mean Varnish will be started with the right startup options, only that systemd knows the most recent settings. You will still need to reload the Varnish service to load the configuration changes, like this:
sudo service varnish reload
By now you already know that the sole purpose of the configuration file is to feed the startup options to the varnishd program. In theory, you don’t need a service manager: you can manually start Varnish by running varnishd yourself and manually assigning the startup options.
usage: varnishd[options]-a address[:port][,proto]# HTTP listen address and port (default: *:80)# address: defaults to loopback# port: port or service (default: 80)# proto: HTTP/1 (default), PROXY-b address[:port]# backend address and port# address: hostname or IP# port: port or service (default: 80)-C# print VCL code compiled to C language-d# debug-F# Run in foreground-f file# VCL script-h kind[,hashoptions]# Hash specification# -h critbit [default]# -h simple_list# -h classic# -h classic,<buckets>-i identity# Identity of varnish instance-j jail[,jailoptions]# Jail specification# -j unix[,user=<user>][,ccgroup=<group>]# -j none-l vsl[,vsm]# Size of shared memory file# vsl: space for VSL records [80m]# vsm: space for stats counters [1m]-M address:port# Reverse CLI destination-n dir# varnishd working directory-P file# PID file-pparam=value# set parameter-r param[,param...]# make parameter read-only-S secret-file# Secret file for CLI authentication-s[name=]kind[,options]# Backend storage specification# -s malloc[,<size>]# -s file,<dir_or_file># -s file,<dir_or_file>,<size># -s file,<dir_or_file>,<size>,<granularity># -s persistent (experimental)-T address:port# Telnet listen address and port-t TTL# Default TTL-V# version-W waiter# Waiter implementation# -W epoll# -W poll
The varnishd documentation page has more detailed information about all of the startup options.
Let’s take a look at some of the typical startup options you’ll encounter when setting up Varnish. The examples I use represent the ones coming from /etc/default/varnish on an Ubuntu system that uses Sysv as the service manager.
The list of configurable startup options is quite extensive, but there’s a set of common ones that are just right to get started. The following example does that:
DAEMON_OPTS="-a :80 \-a :81,PROXY \-T localhost:6082 \-f /etc/varnish/default.vcl \-S /etc/varnish/secret \-s malloc,3g \-j unix,user=www-data \"
The most essential networking option is the -a option. It defines the address, the port, and the protocol that are used to connect with Varnish. By default, its value is :6081. This means that Varnish will be bound to all available network interfaces on TCP port 6081. In most cases, you’ll immediately switch the value to 80, the conventional HTTP port.
You can also decide which protocol to use. By default, this is HTTP, but you can also set it to PROXY. The PROXY protocol adds a so-called “preamble” to your TCP connection and contains the real IP address of the client. This only works if Varnish sits behind another proxy server that supports the PROXY protocol. The PROXY protocol will be further discussed in “What About TLS/SSL?”.
You can define multiple listening addresses by using multiple -a options. Multiple listening addresses can make sense if you’re combining HTTP and PROXY support, as previously illustrated.
The second option we will discuss is the -T option. It is used to define the address and port on which the Varnish CLI listens. In “Banning from the Command Line”, we’ll need CLI access to invalidate the cache.
By default, the Varnish CLI is bound to localhost on port 6082. This means the CLI is only locally accessible.
Be careful when making the CLI remotely accessible because although access to the CLI requires authentication, it still happens over an unencrypted connection.
The -j option allows you to jail your Varnish instance and run the subprocesses under the specified user. By default, all processes will run using the varnish user.
The jailing option is especially useful if you’re running multiple Varnish instances on a single server. That way, there is a better process isolation between the instances.
The -S option is used to define the location of the file that contains the secret key. This secret key is used to authenticate with the Varnish CLI. By default, the location of this file is /etc/varnish/secret. It automatically contains a random value.
You can choose not to include the -S parameter to allow unauthenticated access to the CLI, but that’s something I would strongly advise against. If you want to change the location of the secret key value, change the value of the -S parameter. If you just want to change the secret key, edit /etc/varnish/secret and reload Varnish.
Objects in the cache need to be stored somewhere. That’s where the -s option comes into play. By default, the objects are stored in memory (~malloc) and the size of the cache is 256 MiB.
Varnish expresses the size of the cache in kibibytes, mebibytes, gibibytes, and tebibytes. These differ from the traditional kilobytes, megabytes, gigabytes, and terrabytes. The “bi” in kibibytes stands for binary, so that means a kibibyte is 1,024 bytes, whereas a kilobyte is 1,000 bytes. The same logic applies to mebibytes (1024 × 1,024 bytes), gibibytes (1024 × 1024 × 1024 bytes), and tebibytes (1024 × 1024 × 1024 × 1024 bytes).
The size of your cache and the storage type heavily depends on the number of objects you’re going to store. If all of your cacheable files fit in memory, you’ll be absolutely fine. Memory is fast and simple, but unfortunately, your memory will be limited in terms of size. If your Varnish instance runs out of memory, it will apply a so-called Least Recently Used (LRU) strategy to evict items from cache.
If you don’t specify the size of the storage and only mention malloc, the size of the cache will be unlimited. That means Varnish could potentially eat all of your server’s memory. If your server runs out of memory, it will use the operating system’s swap space. This basically stores the excess data on disk. This could cause a major slowdown of your entire system if your disks are slow.
Varnish counts the amount of hits per cached object. When it has to evict objects due to a lack of available memory, it will evict the least popular objects until it has enough space to store the next requested object.
If you have a dedicated Varnish server, it is advised to allocate about 80% of your available memory to Varnish. That means you’ll have to change the -s startup option.
File storage is also supported. Although it is slower than memory, it will still be buffered in memory. In most cases, memory storage will do the trick for you.
Let’s turn it up a notch and throw some more advanced startup options into the mix. Here’s an example:
DAEMON_OPTS="-a :80 \-a :81,PROXY \-T localhost:6082 \-f /etc/varnish/default.vcl \-S /etc/varnish/secret \-s malloc,3g \-j unix,user=www-data \-l 100m,10m \-t 60 \-p feature=_++esi_disable_xml_check \-p connect_timeout=5 \-p first_byte_timeout=10 \-p between_bytes_timeout=2"
Varnish relies on expires or cache-control headers to determine the time-to-live of an object. If no headers are present and no explicit time-to-live was specified in the VCL file, Varnish will default to a time-to-live of 120 seconds. You can modify the default time-to-live at startup time by setting the -t startup option. The value of this option is expressed in seconds.
There are a bunch of runtime parameters that can be tuned. Overriding a runtime parameter is done by setting the -p startup option. Alternatively, if you want these parameters to be read-only, you can use the -r option. Setting parameters to read-only restricts users with Varnish CLI access from overriding them at runtime.
Have a look at the full list of runtime parameters on the varnishd documentation page.
In the preceding example, we’re setting the following runtime parameters:
feature=esi_disable_xml_check
connect_timeout
first_byte_timeout
between_bytes_timeout
The first one (feature=esi_disable_xml_check) disables XML checks during the Edge Side Includes (ESI) processing. By default, Varnish requires ESI content to be valid XML. This is not always ideal, as this setting removes XML validation. ESI is a technique used by Varnish to assemble a page containing content blocks that come from multiple URLs. Each include can have its own time-to-live that is respected by Varnish. Varnish assembles content from the URLs using ESI include tags like <esi:include src="http://example.com" />. ESI allows you to still cache parts of a page that would otherwise be uncacheable (more information on ESI in “Edge Side Includes”).
The second one sets the connect_timeout to five seconds. This means that Varnish will wait up to five seconds when connecting with the backend. If the timeout is exceeded, a backend error is returned. The default value is 3.5 seconds.
The third one sets the first_byte_timeout to 10 seconds. After establishing a connection with the backend, Varnish will wait up to 10 seconds until the first byte comes in from the backend. If that doesn’t happen within 10 seconds, a backend error is returned. The default value is 60 seconds.
The fourth one sets the between_bytes_timeout to two seconds. When data is returned from the backend, Varnish expects a constant byte flow. If Varnish has to wait longer than two seconds between bytes, a backend error is returned. The default value is 60 seconds.
Transport Layer Security (TLS), also referred to as Secure Sockets Layer (SSL), is a set of cryptographic protocols that are used to encrypt data communication over the network. In a web context, TLS and SSL are the “S” in HTTPS. TLS ensures that the connection is secured by encrypting the communication and establishing a level of trust by issuing certificates.
During the last couple of years, TLS has become increasingly popular to the point that non-encrypted HTTP traffic will no longer be considered normal in a couple of years. Security is still a hot topic in the IT industry, and nearly every brand on the internet wants to show that they are secure and trustworthy by offering HTTPS on their sites. Even Google Search supposedly gives HTTPS websites a better page rank.
The Varnish project itself hasn’t included TLS support in its code base. Does that mean you cannot use Varnish in projects that require TLS? Of course not! If that were the case, Varnish’s days would be numbered in the low digits.
Varnish does not natively include TLS support because encryption is hard and it is not part of the project’s core business. Varnish is all about caching and leaves the crypto to the crypto experts.
The trick with TLS on Varnish is to terminate the secured connection before the traffic reaches Varnish. This means adding a TLS/SSL offloader to your setup that terminates the TLS connection and communicates over HTTP with Varnish.
The downside is that this also adds another layer of complexity to your setup and another system that can fail on you. Additionally, it’s a bit harder for the web server to determine the origin IP address. Under normal circumstances, Varnish should add the value of the X-Forwarded-For HTTP request header sent by the TLS offloader and store that value in its own X-Forwarded-For header. That way, the backend can still retrieve the origin IP.
In Varnish 4.1, PROXY protocol support was added. The PROXY protocol is a small protocol that was introduced by HAProxy, the leading open source load-balancing software. This PROXY protocol adds a small preamble to the TCP connection that contains the IP address of the original client. This information is transferred along and can be interpreted by Varnish. Varnish will use this value and automatically add it to the X-Forwarded-For header that it sends to the backend.
I wrote a detailed blog post about this, and it contains more information about both the HAProxy and the Varnish setup.
Additionally, the PROXY protocol implementation in Varnish uses this new origin IP information to set a couple of variables in VCL:
It sets the client.ip variable to the IP address that was sent via the PROXY protocol
It sets the server.ip variable to the IP address of the server that accepted the initial connection
It sets the local.ip variable to the IP address of the Varnish server
It sets the remote.ip variable to the IP address of the machine that sits in front of Varnish
HAProxy is not the only TLS offloader that supports PROXY. Varnish Software released Hitch, a TLS proxy that terminates the TLS connection and communicates over HTTP with Varnish. Whereas HAProxy is primarily a load balancer that offers TLS offloading, Hitch only does TLS offloading. HAProxy also wrote a blog post about the subject that lists a set of PROXY-protocol ready projects. Depending on your use case and whether you need load balancing in your setup, you can choose either HAProxy or a dedicated TLS proxy. Varnish Plus, the advanced version of Varnish, developed by Varnish Software, offers TLS/SSL support on both the server and the client side. The TLS/SSL proxy in Varnish Plus is tightly integrated with Varnish and helps improve website security without relying on third-party solutions.
Don’t let all these settings scare you—they’re just proof that Varnish is an incredibly flexible tool with lots of options and settings that can be tuned.
If you’re a sysadmin, I hope I have inspired you to try tuning some of these settings. If you’re not, just remember that Varnish can easily be installed with a package manager of your Linux distribution and hardly requires any tuning to be up and running.
At the bare minimum, have a look at the setting in “Network binding” if you want Varnish to process HTTP traffic on port 80.
Now that we have set up Varnish, it’s time to use it. In Chapter 2 we talked about the configuration settings, so by now you should have the correct networking settings that allow you to receive HTTP requests either directly on port 80 or through another proxy or load balancer.
Out-of-the-box Varnish can already do a lot for you. There is a default behavior that is expressed by the built-in VCL and there are a set of rules that Varnish follows. If your backend application complies with these rules, you’ll have a pretty decent hit rate.
Varnish uses a lot of HTTP best practices to decide what gets cached, how it gets cached, and how long it gets cached. As a web developer, I strongly advise that you apply these best practices in the day-to-day development of your backend applications. This empowers you and helps you avoid having to rely on custom Varnish configurations that suit your application. It keeps the caching logic portable.
Unlike many other proxies, Varnish is an HTTP accelerator. That means Varnish does HTTP and HTTP only. So it makes sense to know HTTP and how it behaves.
There are five ways in which Varnish respects HTTP best practices:
Idempotence
State
Expiration
Conditional requests
Cache variations
Let’s have a look at each of these and explore how Varnish deals with them.
Varnish will only cache resources that are requested through an idempotent HTTP verb, which are HTTP verbs that do not change the state of the resource. To put it simply, Varnish will only cache requests using the following methods:
GET
HEAD
And that makes perfect sense: if you issue a request using POST or PUT, the method itself implies that a change will happen. In that respect, caching wouldn’t make sense because you would be caching stale data right from the get-go.
So if Varnish sees a request coming in through, let’s say, POST, it will pass the request to the backend and will not cache the returned response.
For the sake of completeness, these are the HTTP verbs/methods that Varnish can handle:
GET (can be cached)
HEAD (can be cached)
PUT (cannot be cached)
POST (cannot be cached)
TRACE (cannot be cached)
OPTIONS (cannot be cached)
DELETE (cannot be cached)
All other HTTP methods are considered non-RFC2616 compliant and will completely bypass the cache.
Now that you know about idempotence and how HTTP request methods shouldn’t change the state of the resource, let’s look at other mechanisms in HTTP that can control state. I’m not talking about global state, but more specifically about user-specific data. There are two ways to keep track of state for users:
Authorization headers
Cookies
Whenever Varnish sees one of these, it will pass the request off to the backend and not cache the response. This happens because when an authentication header or a cookie is sent, it implies that the data will differ for each user performing that request.
If you decide to cache the response of a request that contains an authentication header or cookie, you would be serving a response tailored to the first user that requested it. Other users will see it, too, and the response could potentially contain sensitive or irrelevant information.
But let’s face it: cookies are our main instrument to keep track of state, and websites that do not uses cookies are hard to come by. Unfortunately, the internet uses too many cookies and often for the wrong reasons.
We use cookies to establish sessions in our application. We can also use cookies to keep track of language, region, and other preferences. And then there are the tracking cookies that are used by third parties to “spy” on us.
In terms of HTTP, cookies appear both in the request and the response process. It is the backend that sets one or more cookies by issuing a Set-Cookie response header. The client receives that response and stores the cookies in its local cookie store.
As you can see in the example below, a cookie is a set of key-value pairs, delimited by an ampersand.
Set-Cookie: language=en&country=us
When a client has stored cookies for a domain, it will use a Cookie request header to send the cookies back to the server upon every subsequent request. The cookies are also sent for requests that do not require a specific state (e.g., static files).
Cookie: language=en&country=us
This two-step process is how cookies are set and announced. Just remember the difference between Cookie and Set-Cookie. The first is a request header; the second is a response header.
I urge web developers to not overuse cookies. Do not initiate a session that triggers a Set-Cookie just because you can. Only set sessions and cookies when you really need to. I know it’s tempting, but consider the impact.
As mentioned, Varnish doesn’t like to cache cookies. Whenever it sees a request with a Cookie header, the request will be passed to the backend and the response will not be cached.
When a request does not contain a cookie but the response includes a Set-Cookie header, Varnish will not store the result in cache.
HTTP has a set of mechanisms in place to decide when a cached object should be removed from cache. Objects cannot live in cache forever: you might run out of cache storage (memory or disk space) and Varnish will have to evict items using an LRU strategy to clear space. Or you might run into a situation where the data you are serving is stale and the object needs to be synchronized with a new response from the backend.
Expiration is all about setting a time-to-live. HTTP has two different kinds of response headers that it uses to indicate that:
An absolute timestamp that represents the expiration time.
The amount of seconds an item can live in cache before becoming stale.
Varnish gives you a heads-up regarding the age of a cached object. The Age header is returned upon every response. The value of this Age header corresponds to the amount of time the object has been in cache. The actual time-to-live is the cache lifetime minus the age value.
For that reason, I advise you not to set an Age header yourself, as it will mess with the TTL of your objects.
The Expires header is a pretty straight forward one: you just set the date and time when an object should be considered stale. This is a response header that is sent by the backend.
Here’s an example of such a header:
Expires: Sat, 09 Sep 2017 14:30:00 GMT
Do not overlook the fact that the time of an Expires header is based on Greenwich Mean Time. If you are located in another time zone, please express the time accordingly.
The Cache-control header defines the time-to-live in a relative way: instead of stating the time of expiration, Cache-control states the amount of seconds until the object expires. In a lot of cases, this is a more intuitive approach: you can say that an object should only be cached for an hour by assigning 3,600 seconds as the time-to-live.
This HTTP header has more features than the Expires header: you can set the time to live for both clients and proxies. This allows you to define distinct behavior depending on the kind of system that processes the header; you can also decide whether to cache and whether to revalidate with the backend.
Cache-control: public, max-age=3600, s-maxage=86400
The preceding example uses three important keywords to define the time-to-live and the ability to cache:
publicIndicates that both browsers and shared caches are allowed to cache the content.
max-ageThe time-to-live in seconds that must be respected by the browser.
s-maxageThe time-to-live in seconds that must be respected by the proxy.
It’s also important to know that Varnish only respects a subset of the Cache-control syntax. It will only respect the keywords that are relevant to its role as a reverse caching proxy:
Cache-control headers sent by the browser are ignored
The time-to-live from an s-maxage statement is prioritized over a max-age statement
Must-revalidate and proxy-revalidate statements are ignored
When a Cache-control response header contains the terms private, no-cache, or no-store, the response is not cached
Although Varnish respects the public and private keywords, it doesn’t consider itself a shared cache and exempts itself from some of these rules. Varnish is more like a surrogate web server because it is under full control of the web server and does the webmaster’s bidding.
Varnish respects both Expires and Cache-control headers. In the Varnish Configuration Language, you can also decide what the time-to-live should be regardless of caching headers. And if there’s no time-to-live at all, Varnish will fall back to its hardcoded default of 120 seconds.
Here’s the list of priorities that Varnish applies when choosing a time-to-live:
If beresp.ttl is set in the VCL, use that value as the time-to-live.
Look for an s-maxage statement in the Cache-control header.
Look for a max-age statement in the Cache-control header.
Look for an expires header.
Cache for 120 seconds under all other circumstances.
Expiration is a valuable mechanism for updating the cache. It’s based on the concept of checking the freshness of an object at set intervals. These intervals are defined by the time-to-live and are processed by Varnish. The end user doesn’t really have a say in this.
After the expiration, both the headers and the payload are transmitted and stored in cache. This could be a very resource-intensive matter and a waste of bandwidth, especially if the requested data has not changed in that period of time.
Luckily, HTTP offers a way to solve this issue. Besides relying on a time-to-live, HTTP allows you to keep track of the validity of a resource. There are two separate mechanisms for that:
The Etag response header
The Last-Modified response header
Most web browsers support conditional requests based on the Etags and Last-Modified headers, but Varnish supports this as well when it communicates with the backend.
An Etag is an HTTP response header that is either set by the web server or your application. It contains a unique value that corresponds to the state of the resource.
A common strategy is to create a unique hash for that resource. That hash could be an md5 or a sha hash based on the URL and the internal modification date of the resource. It could be anything as long as it’s unique.
HTTP/1.1 200 OK
Host: localhost
Etag: 7c9d70604c6061da9bb9377d3f00eb27
Content-type: text/html; charset=UTF-8

Hello world output
As soon as a browser sees this Etag, it stores the value. Upon the next request, the value of the Etag will be sent back to the server in an If-None-Match request header.
GET /if_none_match.php HTTP/1.1
Host: localhost
User-Agent: curl/7.48.0
If-None-Match: 7c9d70604c6061da9bb9377d3f00eb27
The server receives this If-None-Match header and checks if the value differs from the Etag it’s about to send.
If the Etag value is equal to the If-None-Match value, the web server or your application can return an HTTP/1.1 304 Not Modified response header to indicate that the value hasn’t changed.
HTTP/1.0 304 Not Modified
Host: localhost
Etag: 7c9d70604c6061da9bb9377d3f00eb27
When you send a 304 status code, you don’t send any payload, which can dramatically reduce the amount of bytes sent over the wire. The browser receives the 304 and knows that it can still output the old data.
If the If-None-Match value doesn’t match the Etag, the web server or your application will return the full payload, accompanied by the HTTP/1.1 200 OK response header and, of course, the new Etag.
This is an excellent way to conserve resources. Whereas the primary goal is to reduce bandwidth, it will also help you to reduce the consumption of memory, CPU cycles, and disk I/O if you implement it the right way.
Here’s an implementation example. It’s just some dummy script that, besides proving my point, serves no real purpose. It’s written in PHP because PHP is my language of choice. The implementation is definitely not restricted to PHP. You can implement this in any server-side language you like.
<?php$etag=md5(__FILE__.filemtime(__FILE__));header('Etag: '.$etag);if(isset($_SERVER['HTTP_IF_NONE_MATCH'])&&$_SERVER['HTTP_IF_NONE_MATCH']==$etag){header('HTTP/1.0 304 Not Modified');exit;}sleep(5);?><h1>Etag example</h1><?phpechodate("Y-m-d H:i:s").'<br />';
ETags aren’t the only way to do conditional requests; there’s also an alternative technique based on the Last-Modified response header. The client will then use the If-Modified-Since request header to validate the freshness of the resource.
The approach is similar:
Let your web server or application return a Last-Modified response header
The client stores this value and uses it as an If-Modified-Since request header upon the next request
The web server or application matches this If-Modified-Since value to the modification date of the resource
Either an HTTP/1.1 304 Not Modified or a HTTP/1.1 200 OK is returned
The benefits are the same: reduce the bytes over the wire and load on the server by avoiding the full rendering of output.
The timestamps are based on the GMT time zone. Please make sure you convert your timestamps to this time zone to avoid weird behavior.
The starting point in the following example is the web server (or the application) returning a Last-Modified response header:
HTTP/1.1 200 OK
Host: localhost
Last-Modified: Fri, 22 Jul 2016 10:11:16 GMT
Content-type: text/html; charset=UTF-8

Hello world output
The browser stores the Last-Modified value and uses it as an If-Last-Modified in the next request:
GET /if_last_modified.php HTTP/1.1
Host: localhost
User-Agent: curl/7.48.0
If-Last-Modified: Fri, 22 Jul 2016 10:11:16 GMT
The resource wasn’t modified, a 304 is returned, and the Last-Modified value remains the same:
HTTP/1.0 304 Not Modified
Host: localhost
Last-Modified: Fri, 22 Jul 2016 10:11:16 GMT
The browser does yet another conditional request:
GET /if_last_modified.php HTTP/1.1
Host: localhost
User-Agent: curl/7.48.0
If-Last-Modified: Fri, 22 Jul 2016 10:11:16 GMT
The resource was modified in the meantime and a full 200 is returned, including the payload and a new Last-Modified_header.
HTTP/1.1 200 OK
Host: localhost
Last-Modified: Fri, 22 Jul 2016 11:00:23 GMT
Content-type: text/html; charset=UTF-8

Some other hello world output
Time for another implementation example for conditional requests, this time based on the Last-Modified header. Again, it’s dummy code, written in PHP:
<?phpheader('Last-Modified: '.gmdate('D, d M Y H:i:s',filemtime(__FILE__)).' GMT');if(isset($_SERVER['HTTP_IF_MODIFIED_SINCE'])&&strtotime($_SERVER['HTTP_IF_MODIFIED_SINCE'])>=filemtime(__FILE__)){header('HTTP/1.0 304 Not Modified');exit;}sleep(5);?><h1>Last-Modified example</h1><?phpechodate("Y-m-d H:i:s").'<br />';
Just like in the previous implementation example, we fake the delay caused by heavy load and use a sleep statement to make the application seem slower than it really is.
When Varnish spots an If-Modified-Since or If-None-Match header in the request, it keeps track of the Last-Modified timestamp and/or the Etag. Regardless of whether or not Varnish has the object in cache, a 304 status code will be returned if the Last-Modified or the Etag header matches.
From a client point of view, Varnish reduces the amount of bytes over the wire by returning the 304.
On the other hand, Varnish also supports conditional requests when it comes to backend communication: when an object is considered stale, Varnish will send If-Modified-Since and If-None-Match headers to the backend if the previous response from the backend contained either a Last-Modified timestamp or an Etag.
When the backend returns a 304 status code, Varnish will not receive the body of that response and will assume the content hasn’t changed. As a consequence, the stale data will have been revalidated and will no longer be stale. The Age response header will be reset to zero and the object will live in cache in accordance to the time-to-live that was set by the web server or the application.
Typically, stale data is revalidated by Varnish, but there is a VCL variable that allows you to manipulate that behavior: the beresp.keep variable decides how long stale objects will be returned while performing a conditional request. It’s basically an amount of time that is added to the time-to-live. This allows Varnish to perform the conditional requests asynchronously without the client noticing any delays. The beresp.keep variable works independently from the beresp.grace variable.
Both beresp.keep and beresp.grace, as well as many other VCL objects and variables, will be discussed in Chapter 4.
In general, an HTTP resource is public and has the same value for every consumer of the resource. If data is user-specific, it will, in theory, not be cacheable. However, there are exceptions to this rule and HTTP has a mechanism for this.
HTTP uses the Vary header to perform cache variations. The Vary header is a response header that is sent by the backend. The value of this header contains the name of a request header that should be used to vary on.
The value of the Vary header can only contain a valid request header that was set by the client. You can use the value of custom X- HTTP headers as a cache variation, but then you need to make sure that they are set by the client.
A very common example is language detection based on the Accept-Language request header. Your browser will send this header upon every request. It contains a set of languages or locales that your browser supports. Your application can then use the value of this header to determine the language of the output. If the desired language is not exposed in the URL or through a cookie, the only way to know is by using the Accept-Language header.
If no vary header is set, the cache (either the browser cache or any intermediary cache) has no way to identify the difference and stores the object based on the first request. If that first request was made in Dutch, all other users will get output in Dutch—regardless of the browser language—for the duration of the cache lifetime.
That is a genuine problem, so in this case, the application returns a Vary header containing Accept-Language as its value. Here’s an example:
The browser language is set to Dutch:
GET / HTTP/1.1
Host: localhost
Accept-Language: nl
The application sets a Vary header that instructs the cache to keep a separate version of the cached object based on the Accept-Language value of the request.
HTTP/1.1 200 OK
Host: localhost
Vary: Accept-Language

Hallo, deze pagina is in het Nederlands geschreven.
The cache knows there is a Dutch version of this resource and will store it separately, but it will still link it to the cached object of the main resource. When the next request is sent from a browser that only supports English, the cached object containing Dutch output will not be served. A new backend request will be made and the output will be stored separately.
Be careful when you perform cache variations based on request headers that can contain many different values. The User-Agent and the Cookie headers are perfect examples.
In many cases, you don’t have full control over the cookie value. Tracking cookies set by third-party services can add unique values per user to the cookie. This could result in too many variations, and the hit rate would plummet.
The same applies to the User-Agent: almost every device has its own User-Agent. When using this as a cache variation, the hit rate could drop quite rapidly.
Varnish respects the Vary header and adds variations to the cache on top of the standard identifiers. The typical identifiers for a cached object are the hostname (or the IP if no hostname was set) and the URL.
When Varnish notices a cache variation, it will create a cache object for that version. Cache variations can expire separately, but when the main object is invalidated, the variations are gone, too.
You have to find a balance between offering enough cache variations and a good hit rate. Choose the right request header to vary on and look for balance.
Now that we know how Varnish deals with HTTP, we can summarize how Varnish behaves right out of the box. Here’s a set of questions we can ask ourselves:
When is a request considered cacheable in Varnish?
When does Varnish completely bypass the cache?
How does Varnish identify an object?
When does Varnish cache an object?
What happens if an object is not stored in cache?
How long does Varnish cache an object?
Sounds mysterious, huh? Let me provide answers and allow me to explain how Varnish respects HTTP best practices.
When Varnish receives a request, it has to decide whether or not the response can be cached or even served from cache. The rules are simple and based on idempotence and state.
A request is cacheable when:
The request method is GET or HEAD
There are no cookies being sent by the client
There is no authorization header being sent
When these criteria are met, Varnish will look the resource up in cache and will decide if a backend request is needed, or if the response can be served from cache.
If a request is not cacheable, the request is passed, a backend connection is made and the result is stored in the hit-for-pass cache. An example of this is a POST request.
But all of this happens under the assumption that the request method is a valid one that complies to RFC2616. Other request methods will not be processed by Varnish and will be piped to the backend.
When Varnish goes in to pipe mode, it opens a TCP connection to the backend, transmits the original request and immediately returns the response. There’s no further processing of the request or response.
Here’s a list of valid request methods according to the built-in VCL:
GET
HEAD
PUT
POST
DELETE
TRACE
OPTIONS
All other request methods will be piped to the backend.
RFC 2616 does not support request methods like PATCH, LINK, or UNLINK. Those were introduced in RFC 2068. If you require support for either of those methods, you’ll need to customize your VCL and include those methods.
“A Real-World VCL File” offers a solution for that.
Once we decide that an object is cacheable, we need a way to identify the object in order to retrieve it from cache. A hash key is composed of several values that serve as a unique identifier.
If the request contains a Host header, the hostname will be added to the hash.
Otherwise, the IP address will be added to the hash.
The URL of the request is added to the hash.
Based on that hash, Varnish will retrieve the object from cache.
If an object is not stored in cache or when it’s considered stale, a backend connection is made. Based on the backend response, Varnish will decide if the returned object will be stored in cache or if the cache is going to be bypassed.
A response will be stored in cache when:
The time-to-live is more than zero.
The response doesn’t contain a Set-Cookie header.
The Cache-control header doesn’t contain the terms no-cache, no-store, or private.
The Vary header doesn’t contain *, meaning vary on all headers.
If after the backend response Varnish decides that an object will not be stored in cache, it puts the object on a “blacklist”—the so-called hit-for-pass cache.
For a duration of 120 seconds, the next requests will immediatly connect with the backend, directly serving the response, without attempting to store the response in cache.
After 120 seconds, upon the next request, the response can be re-evaluated and a decision can be made whether or not to store the object in cache.
Once an object is stored in cache, a decision must be made on the time-to-live. I mentioned this before, but there’s a list of priorities that Varnish uses to decide which value it will use as the TTL.
Here’s the prioritized list:
If beresp.ttl is set in the VCL, use that value as the time-to-live.
Look for an s-maxage statement in the Cache-control header.
Look for a max-age statement in the Cache-control header.
Look for an Expires header.
Cache for 120 seconds under all other circumstances.
When the object is stored in the hit-for-pass cache, it is cached for 120 seconds, unless you change the value in VCL.
When you’re up and running and sending your HTTP traffic through Varnish, there will be a certain behavior that will impact the cacheability of your website.
This behavior does not reflect arbitrary rules and policies that were defined by Varnish itself. Varnish respects conventional HTTP best practices that were defined in industry-wide, accepted RFCs.
Even if you don’t add any VCL code, the best practices will make sure that your website is properly cached, assuming that your code respects the best practices as well.
An additional advantage is that the cacheability of your website and the portability of the caching behavior can go beyond the scope of Varnish. You can swap out Varnish for another kind of reverse proxy, or even a CDN.
At this point you will know what a Cache-control header is and how it compares to an Expires header. You’ll have a pretty solid idea how to leverage those headers to control the cacheability of your pages. By now, you’re no stranger to Cache variations and conditional requests.
Finally and most importantly: you can only cache GET or HEAD requests, because they are idempotent. Nonidempotent requests like, for example, POST, PUT, and DELETE cannot be cached.
As mentioned before, Varnish is a reverse caching proxy. There are many other reverse proxies out there that do caching, even in the open source ecosystem. The main reason Varnish is so popular is, without a doubt, Varnish Configuration Language (VCL)—a domain-specific language used to control the behavior of Varnish.
The flexibility that VCL offers is unprecedented in this kind of software. It’s more a matter of expressing and controlling the behavior by programming it rather than by declaring it in a configuration file. Because of the rich API that is exposed through the objects in VCL, the level of detail with which you can tune Varnish is second to none.
The curly braces, the semicolon statement endings, and the commenting style in VCL remind you of programming languages like C, C++, and Perl. That’s maybe why VCL feels so intuitive; it sure beats defining rules in an XML file.
The Varnish Configuration Language doesn’t just feel like C, it actually gets compiled to C and dynamically loaded as a shared object when the VCL file is loaded by the Varnish runtime. We can even call it transpiling, because we convert a piece of source code to source code in another programming language.
If you’re curious what the C code looks like, just run the varnishd program with the -C option to see the output.
In this chapter you’ll learn how VCL will allow you to hook into the finite state machine of Varnish to programmatically extend its behavior. We’ll cover the various subroutines, objects, and variables that allow you to extend this behavior.
I already hinted at the built-in VCL in Chapter 3. In this chapter you’ll see the actual code of the built-in VCL.
VCL is not the kind of language where you start typing away in an empty file or within a main method; it actually restricts you and only allows you to hook into certain aspects of the Varnish execution flow. This execution flow is defined in a finite state machine.
The hooks represent specific stages of the Varnish flow. The behavior of Varnish in these stages is expressed through various built-in subroutines. You define a subroutine in your VCL file, extend the caching behavior in that subroutine, and issue a reload of that VCL file to enable that behavior.
Every subroutine has a fixed set of return statements that represent a state change in the flow.
If you don’t explicitly define a return statement, Varnish will fall back on the built-in VCL that is hardcoded in the system. This can potentially undo the extended behavior you defined in your VCL file.
This is a common mistake, one I’ve made very early on. And mind you: this is actually a good thing because the built-in VCL complies with HTTP best practices.
I actually advise you to minimize the use of custom VCL and rely on the built-in VCL as much as possible.
When you write VCL, you’ll spend about 90% of your time in vcl_recv, 9% in backend_response, and the remaining 1% in various other subroutines.
Here’s a list of client-side subroutines:
vcl_recvExecuted at the beginning of each request.
vcl_pipePass the request directly to the backend without caring about caching.
vcl_passPass the request directly to the backend. The result is not stored in cache.
vcl_hitCalled when a cache lookup is successful.
vcl_missCalled when an object was not found in cache.
vcl_hashCalled after vcl_recv to create a hash value for the request. This is used as a key to look up the object in Varnish.
vcl_purgeCalled when a purge was executed on an object and that object was successfully evicted from the cache.
vcl_deliverExecuted at the end of a request when the output is returned to the client.
vcl_synthReturn a synthetic object to the client. This object didn’t originate from a backend fetch, but was synthetically composed in VCL.
And here’s a list of backend subroutines:
vcl_backend_error_fetchCalled before sending a request to the backend server.
vcl_backend_responseCalled directly after successfully receiving a response from the backend server.
vcl_backend_errorExecuted when a backend fetch was not successful or when the maximum amount of retries has been exceeded.
You can also define your own subroutines and call them from within your VCL code. Custom subroutines can be used to organize and modularize VCL code, mostly in an attempt to reduce code duplication.
The following example consists of a remove_ga_cookies subroutine that contains find and replace logic using regular expressions. The end result is the removal of Google Analytics tracking cookies from the incoming request.
Here’s the file that contains the custom subroutine:
sub remove_ga_cookies {
    # Remove any Google Analytics based cookies
    set req.http.Cookie = regsuball(req.http.Cookie, "__utm.=[^;]+(; )?", "");
    set req.http.Cookie = regsuball(req.http.Cookie, "_ga=[^;]+(; )?", "");
    set req.http.Cookie = regsuball(req.http.Cookie, "_gat=[^;]+(; )?", "");
    set req.http.Cookie = regsuball(req.http.Cookie, "utmctr=[^;]+(; )?", "");
    set req.http.Cookie = regsuball(req.http.Cookie, "utmcmd.=[^;]+(; )?", "");
    set req.http.Cookie = regsuball(req.http.Cookie, "utmccn.=[^;]+(; )?", "");
}
Here’s how you call that subroutine:
include "custom_subroutines.vcl";

sub vcl_recv {
    call remove_ga_cookies;
}
Whereas the VCL subroutines represent the different states of the state machine, the return statement within each subroutine allows for state changes.
If you specify a valid return statement in a subroutine, the corresponding action will be executed and a transition to the corresponding state will happen. As mentioned before: when you don’t specify a return statement, the execution of the subroutine will continue and Varnish will fall back on the built-in VCL.
Here’s a list of valid return statements:
hashLook the object up in cache.
passPass the request off to the backend, but don’t cache the result.
pipePass the request off to the backend and bypass any caching logic.
synthStop the execution and immediately return synthetic output. This returns statement takes an HTTP status code and a message.
purgeEvict the object and its variants from cache. The URL of the request will be used as an identifier.
fetchPass the request off to the backend and try to cache the response.
restartRestart the transaction and increase the req.restarts counter until max_restarts is reached.
deliverSend the response back to the client.
missSynchronously refresh the object from the backend, despite a hit.
lookupUse the hash to look an object up in cache.
abandonAbandon a backend request and return a HTTP 503 (backend unavailable) error.
In Chapter 3, I talked about the built-in VCL and in the previous section I listed a set of subroutines and return statements. It’s time to put all the pieces of the puzzle together and compose the execution flow of Varnish.
In Chapter 1, I referred to the finite state machine that Varnish uses. Let’s have a look at it and see how Varnish transitions between states and what causes these transitions.
Figure 4-1 shows a simplified flowchart that explains the execution flow.
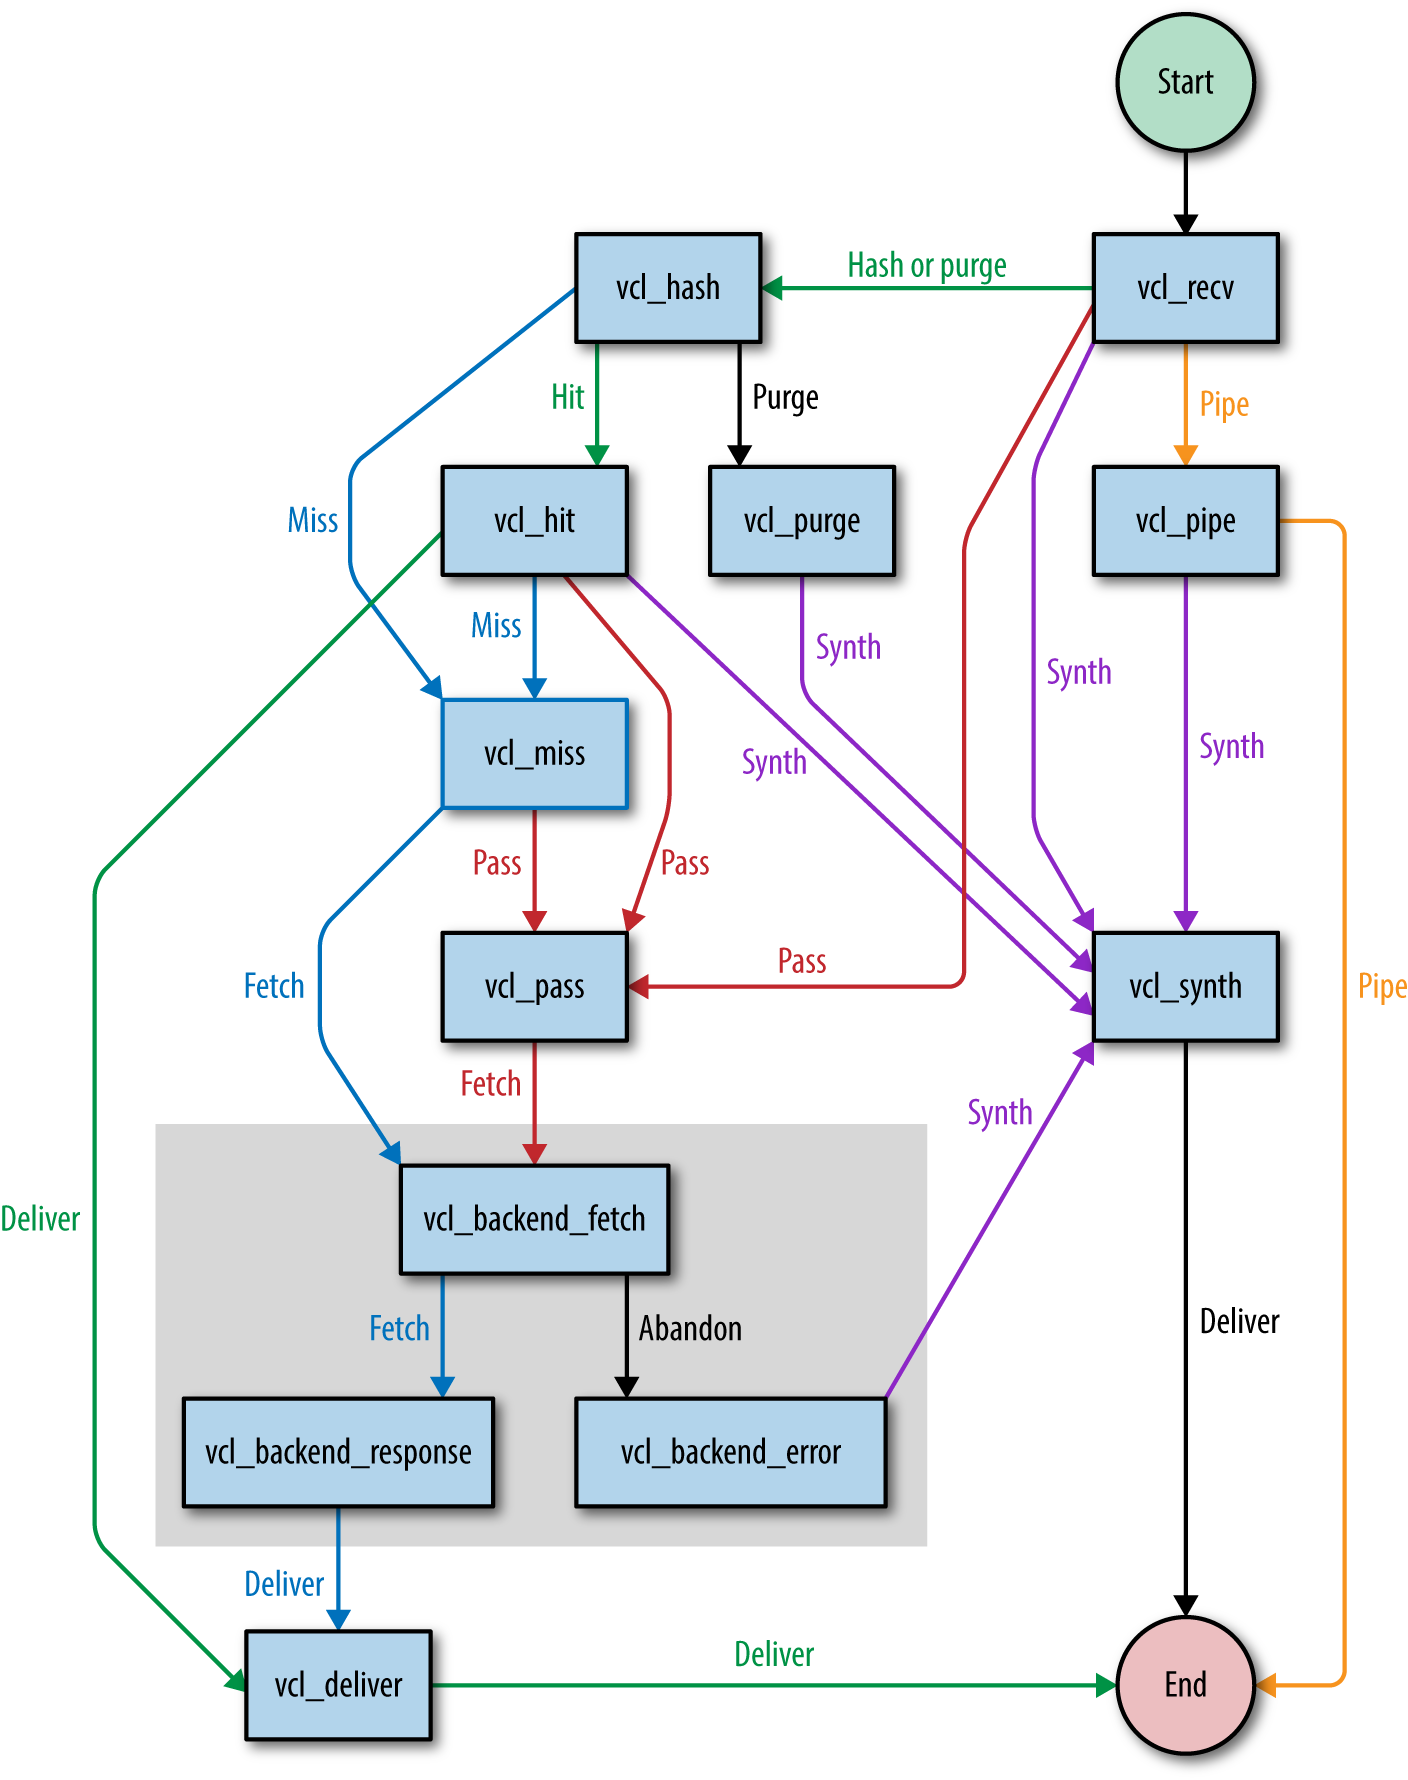
We can split up the flow into two parts:
Backend fetches (the gray box)
Request and response handling (the rest of the flowchart)
The purpose of the split is to handle backend fetches asynchronously. By doing that, Varnish can serve stale data while a new version of the cached object is being fetched. This means less request queuing when the backend is slow.
We have now reached a point where the subroutines start making sense. To summarize, let’s repeat some of the important points of the execution flow:
Every session starts in vcl_recv.
Cache lookups happen in vcl_hash.
Non-cacheable requests are directly passed to the backend in vcl_pass. Responses are not cached.
Items that were found in cache are handled by vcl_hit.
items that were not found are handled by vcl_miss.
Cache misses or passed requests are fetched from the backend via vcl_backend_fetch.
Backend responses are handled by vcl_backend_response.
When a backend fetch fails, the error is handled by vcl_backend_error.
Valid responses that were cached, passed, or missed are delivered by vcl_deliver.
At this point you know the basic vocabulary we’ll use to refer to the different stages of the finite state machine. Now it’s time to learn about the VCL syntax and the VCL objects in order to modify HTTP requests and responses and in order to transition to other stages of the flow.
If you want to hook into the Varnish execution flow and extend the subroutines, you’d better know the syntax. Well, let’s talk syntax.
Varnish version 4 features a quite significant VCL syntax change compared to version 3: every VCL file should start with vcl 4.0;.
Many of the VCL examples in this book do not begin with vcl 4.0; because I assume they’re just extracts and not the full VCL file. Please keep this in mind.
The full VCL reference manual can be found on the Varnish website.
VCL has a bunch of operators you can use to assign, compare, and match values.
Here’s an example where we combine some operators:
sub vcl_recv {
    if(req.method == "PURGE" || req.method == "BAN") {
        return(purge);
    }
    if(req.method != "GET" && req.method != "HEAD") {
        return(pass);
    }
    if(req.url ~ "^/products/[0-9]+/"){
        set req.http.x-type = "product";
    }
}
We use the assignment operator (=) to assign values to variables or objects.
We use the comparison operator (==) to compare values. It returns true if both values are equal; otherwise, false is returned.
We use the match operator (~) to perform a regular expression match. If the value matches the regular expression, true is returned; otherwise, false is returned.
The negation operator (!) returns the inverse logical state.
The logical and operator (&&) returns true if both operands return true; otherwise, false is returned.
In the preceding example, we check if:
The request method is either equal to PURGE or to BAN.
The request method is not equal to GET and to HEAD.
The request URL matches a regular expression that looks for product URLs.
There’s also the less than operator (<), the greater than operator (>), the less than or equals operator (<=), and the greater than or equals operator (>=). Go to the operator section of the Varnish documentation site to learn more.
if and else statements—you probably know what they do. Let’s skip the theory and just go for an example:
sub vcl_recv {
    if(req.url == "/"){
        return(pass);
    } elseif(req.url == "/test") {
        return(synth(200,"Test succeeded"));
    } else {
        return(pass);
    }
}
Basically, VCL supports if, else, and elseif. That’s it!
Comments are parts of the VCL that are not interpreted but used to add comments to describe your VCL.
VCL offers three ways to add comments to your VCL:
Single-line comments using a double slash //
Single-line comments using a hash #
Multiline comments in a comment block that is delimited by /* and */
Here’s a piece of VCL code that uses all three commenting styles:
sub vcl_recv {
    // Single line of out-commented VCL.
    # Another way of commenting out a single line.
    /*
        Multi-line block of commented-out VCL.
    */
}
You can use strings, integers, and booleans—your typical scalar values—in VCL. VCL also supports time and durations.
Let’s figure out what we can do with those so-called scalar values.
Strings are enclosed between double quotes and cannot contain new lines. Double quotes cannot be used either, obviously. If you’re planning to use new lines or double quotes in your strings, you’ll need to use long strings that are enclosed between double quotes and curly braces.
Let’s see some code. Here’s an example of normal and long strings:
sub vcl_recv {
    set req.http.x-test = "testing 123";
    set req.http.x-test-long = {"testing '123', or even "123" for that matter"};
    set req.http.x-test-long-newline = {"testing '123',
or even "123"
for that matter"};
}
Strings are easy—just remember that long strings allow new lines and double quotes, whereas regular strings don’t.
Nothing much to say about integers—they’re just numbers. When you use integers in a string context, they get casted to strings.
Here’s an example of a valid use of integers:
sub vcl_recv {
    return(synth(200,"All good"));
}
The first argument of the synth function requires an integer, so we gave it an integer.
sub vcl_recv {
    return(synth(200,200));
}
The preceding example is pretty meaningless; the only thing it does is prove that integers get casted to strings.
Another type that VCL supports is durations. These are used for timeouts, time-to-live, age, grace, keep, and so on.
A duration looks like a number with a string suffix. The suffix can be any of the following values:
ms: milliseconds
s: seconds
m: minutes
h: hours
d: days
w: weeks
y: years
So if we want the duration to be three weeks, we define the duration as 3w.
Here’s a VCL example where we set the time-to-live of the response to one hour:
sub vcl_backend_response {
    set beresp.ttl = 1h;
}
Durations can contain real numbers. Here’s an example in which we cache for 1.5 hours:
sub vcl_backend_response {
    set beresp.ttl = 1.5h;
}
VCL supports Perl Compatible Regular Expressions (PCRE). Regular expressions can be used for pattern matching using the ~ match operator.
Regular expressions can also be used in functions like regsub and regsuball to match and replace text.
I guess you want to see some code, right? The thing is that I already showed you an example of regular expressions when I talked about the match operator. So I’ll copy/paste the same example to prove my point:
sub vcl_recv {
    if(req.url ~ "^/products/[0-9]+/"){
        set req.http.x-type = "product";
    }
}
VCL has a set of built-in functions that perform a variety of tasks. These functions are:
regsub
regsuball
hash_data
ban
synthetic
regsub is a function that matches patterns based on regular expressions and is able to return subsets of these patterns. This function is used to perform find and replace on VCL variables. regsub only matches the first occurrence of a pattern.
Here’s a real-life example where we look for a language cookie and extract it from the cookie header to perform a cache variation:
sub vcl_hash {
    if(req.http.Cookie
    ~ "language=(nl|fr|en|de|es)"){
        hash_data(regsub(req.http.Cookie,
        "^.*;? ?language=(nl|fr|en|de|es)( ?|;| ;).*$","\1"));
    }
}
By putting parenthesis around parts of your regular expression, you group these parts. Each group can be addressed in the sub part. You address a group by its grade. In case of the previous example, group \1 represents the first group. That’s the group that contains the acutal language we want to extract.
The only difference between regsub and regsuball is the fact that the latter matches all occurences, whereas the former only matches the first occurence.
When you have to perform a find and replace on a string that has multiple occurences of the pattern you’re looking for, regsuball is the function you need!
Example? Sure! Check out Example 4-1.
You might remember this example from “Custom Subroutines”. If you use Google Analytics, there will be some tracking cookies in your cookie header. These cookies are controlled by Javascript, not by the server. They basically interfere with our hit rate and we want them gone.
The regsuball function is going to look for all occurences of these patterns and remove them.
The very first line, will be responsible for removing the following cookies:
__utma
__utmb
__utmc
__utmt
__utmv
__utmz
We really need regsuball to do this, because regsub would only remove the first cookie that is matched.
The hash_data function is used in the vcl_hash subroutine and adds data to the hash that is used to identify objects in the cache.
The following example is the same one we used in the regsub example: it adds the language cookie to the hash. Because we didn’t explicitly mention a return statement, the hostname and the URL will also be added after the execution of vcl_hash:
sub vcl_hash {
    if(req.http.Cookie ~ "language=(nl|fr|en|de|es)"){
        hash_data(regsub(req.http.Cookie,
        "^.*;? ?language=(nl|fr|en|de|es)( ?|;| ;).*$","\1"));
    }
}
The ban function is used to ban objects from the cache. All objects that match a specific pattern are invalidated by the internal ban mechanism of Varnish.
We will go into more detail on banning and purging in Chapter 5. But just for the fun of it, I’ll show you an example of a ban function:
sub vcl_recv {
    if(req.method == "BAN") {
        ban("req.http.host == " + req.http.host + " && req.url == " + req.url);
        return(synth(200, "Ban added"));
    }
}
What this example does is remove objects from the cache when they’re called via the BAN HTTP method.
I know, the BAN method isn’t an official HTTP method. Don’t worry, it’s only for internal use.
Be sure to put this piece of VCL before any other code that checks for HTTP methods. Otherwise, your request might end up getting piped to the backend. This will also happen if you don’t return the synthetic response.
The ban function takes a string argument that matches the internal metadata of the cached object with the values that were passed. If an object matches these criteria, it is added to the ban list and removed from cache upon the next request.
The synthetic function returns a synthetic HTTP response in which the body is the value of the argument that was passed to this function. The input argument for this function is a string. Both normal and long strings are supported.
Synthetic means that the response is not the result of a backend fetch. The response is 100% artificial and was composed through the synthetic function. You can execute the synthetic function multiple times and upon each execution the output will be added to the HTTP response body.
The actual status code of such a response is set by resp.status in the vcl_synth subroutine. The default value is, of course, 200.
The synthetic function is restricted to two subroutines:
vcl_synth
vcl_backend_error
These are the two contexts where no backend response is available and where a synthetic response makes sense.
Here’s a code example of synthetic responses:
sub vcl_recv {
    return(synth(201,"I created something"));
}

sub vcl_backend_error {
    set beresp.http.Content-Type = "text/html; charset=utf-8";
    synthetic("An error occured: " + beresp.reason + "<br />");
    synthetic("HTTP status code: " + beresp.status + "<br />");
    return(deliver);
}

sub vcl_synth {
    set resp.http.Content-Type = "text/html; charset=utf-8";
    synthetic("Message of the day: " + resp.reason + "<br />");
    synthetic("HTTP status code: " + resp.status + "<br />");
    return(deliver);
}
Synthetic output doesn’t just contain a string of literals. You can also parse input values. As you can see in the preceding examples, we’re using the reason and the status to get the body and the HTTP status code.
Mind you, in vcl_synth we get these variables through the resp object. This means we’re directly intercepting it from the response that will eventually be sent to the client.
In vcl_backend_error, we don’t use the resp object, but the beresp object. beresp means backend response. So an attempt has been made to fetch data from the backend, but it failed. Instead, the error message is added to the beresp.reason variable.
Although you will try to rely on the built-in VCL as much as possible, in some cases you’ll still end up with lots of VCL code.
After a while, the sheer amount of code makes it hard to maintain the overview. Includes help you organize your code. An include statement will be processed by the VCL compiler and it will load the content of included file inline.
In the example below we just load the someFile.vcl file. The contents of that file will be placed within the vcl_recv subroutine:
sub vcl_recv {
    include "someFile.vcl";
}
And this is what the someFile.vcl file could look like:
if ((req.method != "GET" && req.method != "HEAD")
|| req.http.Authorization || req.http.Cookie) {
    return (pass);
}
Imports allow you to load Varnish modules (VMODs). These modules are written in C and they extend the behavior of Varnish and enrich the VCL syntax.
Varnish ships with a couple of VMODs that you can enable by importing them.
Here’s an example where we import the std VMOD:
import std;
sub vcl_recv {
    set req.url = std.querysort(req.url);
}
The example above executes the querysort function and returns the URL with a sorted set of querystring parameters. This is important, because when a client uses the querystring parameters in different order, it will trigger a cache miss.
Go to the vmod_std documentation page to learn all about this very useful VCL extension.
All the VCL we covered so far has been restricted to the hooks that allow us to change Varnish’s behavior. But let’s not forget that Varnish is all about caching backend responses. So it’s about time we deal with the VCL aspect of backends.
In general, it looks like this:
backend name {
    .attribute = "value";
}
Varnish automatically connects to the backend that was defined first. Other backends can only be used by assigning them in VCL using the req.backend_hint variable.
Here’ a list of supported backend attributes:
hostA mandatory attribute that represents the hostname or the IP of the backend.
portThe backend port that will be used. The default is port 80.
connect_timeoutThe amount of time Varnish waits for a connection with the backend. The default value is 3.5 seconds.
first_byte_timeoutThe amount of time Varnish waits for the first byte to be returned from the backend after the initial connection. The default value is 60 seconds.
between_bytes_timeoutThe amount of time Varnish waits between each byte to ensure an even flow of data. The default value is 60 seconds.
max_connectionsThe total amount of simultaneous connections to the backend. When the limit is reached, new connections are dropped. Make sure your backend can handle this amount of connections.
probeThe backend probe that will be used to check the health of the backend. It could be defined inline, or linked to.
Let’s throw in a code example:
backend default {
    .host = "127.0.0.1";
    .port = "8080";
    .connect_timeout = 2s;
    .first_byte_timeout = 5s;
    .between_bytes_timeout = 1s;
    .max_connections = 150;
}
In the preceding example, a connection is made to the local machine on port 8080. We’re willing to wait two seconds for an initial connection. Once the connection is established, we’re going to wait up to five seconds to get the first byte. After that we want to receive bytes with a regular frequency. We’re willing to wait one second between each byte. We will allow up to 150 simultaneous connections to the backend.
If more requests to the backend are queued than what is allowed by the max_connections setting, they will fail.
If any of the criteria is not met, a backend error is thrown and the execution is passed to vcl_backend_error with an HTTP 503 status code.
Without the use of a backend probe, an unhealthy backend can only be spotted when the connection fails. A so-called backend probe will poll the backend on a regular basis and check its health based on certain assertions. Probes can be defined similarly to backends.
In general, it looks like this:
probe name {
    .attribute = "value";
}
Here’s a list of supported probe attributes:
urlThe url that is requested by the probe. This defaults to /.
requestA custom HTTP request that can be sent to the backend.
expected_responseThe expected HTTP status code that is returned by the backend. This defaults to 200.
timeoutThe amount of time the probe waits for a backend response. The default value is 2 seconds.
intervalHow often the probe is run. The default value is 5 seconds.
windowThe amount of polls that are examined to determine the backend health. The default value is 8.
thresholdThe amount of polls in the window that should succeed before a backend is considered healthy. This defaults to 3.
initialThe amount of initial backend polls it takes when Varnish starts before a backend is considered healthy. Defaults to threshold - 1.
Here’s an example of a backend probe that is defined inline:
backend default {
    .host = "127.0.0.1";
    .port = "8080";
    .probe = {
        .url = "/";
        .expected_response = 200;
        .timeout = 1s;
        .interval = 1s;
        .window = 5;
        .threshold = 3;
        .initial = 2;
    }
}
This is what happens: the backend tries to connect to the local host on port 8080. There is a backend probe available that determines the backend health. The probe polls the backend on port 8080 on the root URL. In order for a poll to succeed, an HTTP response with a 200 status code is expected, and this response should happen within a second.
Every second, the probe will poll the backend and the result of five polls is used to determine health. Of those five polls, at least three should succeed before we consider the backend to be healthy. At startup time, this should be two polls.
We can also define a probe explicitly, name it, and reuse that probe for multiple backends. Here’s a code example that does that:
probe myprobe {
    .url = "/";
    .expected_response = 200;
    .timeout = 1s;
    .interval = 1s;
    .window = 5;
    .threshold = 3;
    .initial = 2;
}

backend default {
    .host = "my.primary.backend.com";
    .probe = myprobe;
}

backend backup {
    .host = "my.backup.backend.com";
    .probe = myprobe;
}
This example has two backends, both running on port 80, but on separate machines. We use the myprobe probe to check the health of both machine, but we only define the probe once.
In Chapter 6 we’ll cover some more advanced backend and probing topics.
Access control lists, or ACLs as we like to call them, are language constructs in VCL that contain IP addresses, IP ranges, or hostnames. An ACL is named and IP addresses can be matched to them in VCL.
ACLs are mostly used to restrict access to certain parts of your content or logic based on the IP address. The match can be done by using the match operator (~) in an if-clause.
Here’s a code example:
acl allowed {
    "localhost";    # myself
    "192.0.2.0"/24; # and everyone on the local network
    ! "192.0.2.23"; # except for one specific IP
}

sub vcl_recv {
    if(!client.ip ~ allowed) {
        return(synth(403,"You are not allowed to access this page."));
    }
}
In the preceding example, only local connections are allowed, or connections that come from the 192.0.2.0/24 IP range, with one exception: connections from 192.0.2.23 aren’t allowed. No other IP addresses are allowed access, either—they will get an HTTP 403 error if they do try.
In Chapter 5, we’ll be using ACLs to restrict access to the cache invalidation mechanism.
You’re probably already familiar with req.url and client.ip. Yes, these are VCL variables, and let me tell you, there are a lot of them.
Here’s a list of the different variable objects:
bereqThe backend request data structure.
berespThe backend response variable object.
clientThe variable object that contains information about the client connection.
localInformation about the local TCP connection.
nowInformation about the current time.
objThe variable object that contains information about an object that is stored in cache.
remoteInformation about the remote TCP connection. This is either the client or a proxy that sits in front of Varnish.
reqThe request variable object.
req_topInformation about the top-level request in a tree of ESI requests.
respThe response variable object.
serverInformation about the Varnish server.
storageInformation about the storage engine.
Table 4-1 lists a couple of useful variables and explains what they do. For a full list of variables, go to the variables section in the VCL part of the Varnish documentation site.
| Variable | Returns | Meaning | Readable from | Writeable from |
|---|---|---|---|---|
beresp.do_esi |
boolean |
Process the Edge Side Includes after fetching it. Defaults to false. Set it to true to parse the object for ESI directives. Will only be honored if req.esi is true. |
vcl_backend_response, vcl_backend_error |
vcl_backend_response, vcl_backend_error |
beresp.do_stream |
boolean |
Deliver the object to the client directly without fetching the whole object into varnish. If this request is passed it will not be stored in memory. |
vcl_backend_response, vcl_backend_error |
vcl_backend_response, vcl_backend_error |
beresp.grace |
duration |
Set to a period to enable grace. |
vcl_backend_response, vcl_backend_error |
vcl_backend_response, vcl_backend_error |
beresp.http. |
header |
The corresponding HTTP header. |
vcl_backend_response, vcl_backend_error |
vcl_backend_response, vcl_backend_error |
beresp.keep |
duration |
Set to a period to enable conditional backend requests. The keep time is the cache lifetime in addition to the time-to-live. |
vcl_backend_response, vcl_backend_error |
vcl_backend_response, vcl_backend_error |
beresp.reason |
string |
The HTTP status message returned by the server. |
vcl_backend_response, vcl_backend_error |
vcl_backend_response, vcl_backend_error |
beresp.status |
integer |
The HTTP status code returned by the server. |
vcl_backend_response, vcl_backend_error |
vcl_backend_response, vcl_backend_error |
beresp.ttl |
duration |
The object’s remaining time-to-live, in seconds. |
vcl_backend_response, vcl_backend_error |
vcl_backend_response, vcl_backend_error |
beresp.uncacheable |
boolean |
Setting this variable makes the object uncacheable, which may get stored as a hit-for-pass object in the cache. |
vcl_backend_response, vcl_backend_error |
vcl_backend_response, vcl_backend_error |
client.identity |
string |
Identification of the client, used to load balance in the client director. Defaults to |
client |
client |
client.ip |
IP |
The client’s IP address. |
client |
|
local.ip |
IP |
The IP address of the local end of the TCP connection. |
client |
|
obj.age |
duration |
The age of the object. |
vcl_hit |
|
obj.grace |
duration |
The object’s remaining grace period in seconds. |
vcl_hit |
|
obj.hits |
integer |
The count of cache-hits on this object. A value of 0 indicates a cache miss. |
vcl_hit, vcl_deliver |
|
obj.ttl |
duration |
The object’s remaining time-to-live, in seconds. |
vcl_hit |
|
remote.ip |
IP |
The IP address of the other end of the TCP connection. This can either be the client’s IP or the outgoing IP of a proxy server. |
client |
|
req.backend_hint |
backend |
Sets bereq.backend to this value when a backend fetch is required. |
client |
client |
req.hash_always_miss |
boolean |
Force a cache miss for this request. If set to true, Varnish will disregard any existing objects and always (re)fetch from the backend. This allows you to update the value of an object without having to purge or ban it. |
vcl_recv |
vcl_recv |
req.http. |
header |
The corresponding HTTP header. |
client |
client |
req.method |
string |
The request type (e.g., GET, HEAD, POST, …). |
client |
client |
req.url |
string |
The requested URL. |
client |
client |
resp.reason |
string |
The HTTP status message returned. |
vcl_deliver, vcl_synth |
vcl_deliver, vcl_synth |
resp.status |
int |
The HTTP status code returned. |
vcl_deliver, vcl_synth |
vcl_deliver, vcl_synth |
server.ip |
IP |
The IP address of the server on which the client connection was received. |
client |
Remember “Varnish Built-In VCL Behavior” in which I talked about the built-in VCL behavior of Varnish? Now that we know how VCL works, we can translate that behavior into a full-blown VCL file.
Even if you don’t register a VCL file or if your VCL file only contains a backend definition, Varnish will behave as follows:1
/*-
 * Copyright (c) 2006 Verdens Gang AS
 * Copyright (c) 2006-2015 Varnish Software AS
 * All rights reserved.
 *
 * Author: Poul-Henning Kamp <phk@phk.freebsd.dk>
 *
 * Redistribution and use in source and binary forms, with or without
 * modification, are permitted provided that the following conditions
 * are met:
 * 1. Redistributions of source code must retain the above copyright
 *    notice, this list of conditions and the following disclaimer.
 * 2. Redistributions in binary form must reproduce the above copyright
 *    notice, this list of conditions and the following disclaimer in the
 *    documentation and/or other materials provided with the distribution.
 *
 * THIS SOFTWARE IS PROVIDED BY THE AUTHOR AND CONTRIBUTORS ``AS IS'' AND
 * ANY EXPRESS OR IMPLIED WARRANTIES, INCLUDING, BUT NOT LIMITED TO, THE
 * IMPLIED WARRANTIES OF MERCHANTABILITY AND FITNESS FOR A PARTICULAR PURPOSE
 * ARE DISCLAIMED.  IN NO EVENT SHALL AUTHOR OR CONTRIBUTORS BE LIABLE
 * FOR ANY DIRECT, INDIRECT, INCIDENTAL, SPECIAL, EXEMPLARY, OR CONSEQUENTIAL
 * DAMAGES (INCLUDING, BUT NOT LIMITED TO, PROCUREMENT OF SUBSTITUTE GOODS
 * OR SERVICES; LOSS OF USE, DATA, OR PROFITS; OR BUSINESS INTERRUPTION)
 * HOWEVER CAUSED AND ON ANY THEORY OF LIABILITY, WHETHER IN CONTRACT, STRICT
 * LIABILITY, OR TORT (INCLUDING NEGLIGENCE OR OTHERWISE) ARISING IN ANY WAY
 * OUT OF THE USE OF THIS SOFTWARE, EVEN IF ADVISED OF THE POSSIBILITY OF
 * SUCH DAMAGE.
 *

 *
 * The built-in (previously called default) VCL code.
 *
 * NB! You do NOT need to copy & paste all of these functions into your
 * own vcl code, if you do not provide a definition of one of these
 * functions, the compiler will automatically fall back to the default
 * code from this file.
 *
 * This code will be prefixed with a backend declaration built from the
 * -b argument.
 */

vcl 4.0;

#######################################################################
# Client side

sub vcl_recv {
    if (req.method == "PRI") {
	/* We do not support SPDY or HTTP/2.0 */
	return (synth(405));
    }
    if (req.method != "GET" &&
      req.method != "HEAD" &&
      req.method != "PUT" &&
      req.method != "POST" &&
      req.method != "TRACE" &&
      req.method != "OPTIONS" &&
      req.method != "DELETE") {
        /* Non-RFC2616 or CONNECT which is weird. */
        return (pipe);
    }

    if (req.method != "GET" && req.method != "HEAD") {
        /* We only deal with GET and HEAD by default */
        return (pass);
    }
    if (req.http.Authorization || req.http.Cookie) {
        /* Not cacheable by default */
        return (pass);
    }
    return (hash);
}

sub vcl_pipe {
    # By default Connection: close is set on all piped requests, to stop
    # connection reuse from sending future requests directly to the
    # (potentially) wrong backend. If you do want this to happen, you can undo
    # it here.
    # unset bereq.http.connection;
    return (pipe);
}

sub vcl_pass {
    return (fetch);
}

sub vcl_hash {
    hash_data(req.url);
    if (req.http.host) {
        hash_data(req.http.host);
    } else {
        hash_data(server.ip);
    }
    return (lookup);
}

sub vcl_purge {
    return (synth(200, "Purged"));
}

sub vcl_hit {
    if (obj.ttl >= 0s) {
        // A pure unadultered hit, deliver it
        return (deliver);
    }
    if (obj.ttl + obj.grace > 0s) {
        // Object is in grace, deliver it
        // Automatically triggers a background fetch
        return (deliver);
    }
    // fetch & deliver once we get the result
    return (miss);
}

sub vcl_miss {
    return (fetch);
}

sub vcl_deliver {
    return (deliver);
}

/*
 * We can come here "invisibly" with the following errors: 413, 417 & 503
 */
sub vcl_synth {
    set resp.http.Content-Type = "text/html; charset=utf-8";
    set resp.http.Retry-After = "5";
    synthetic( {"<!DOCTYPE html>
<html>
  <head>
    <title>"} + resp.status + " " + resp.reason + {"</title>
  </head>
  <body>
    <h1>Error "} + resp.status + " " + resp.reason + {"</h1>
    <p>"} + resp.reason + {"</p>
    <h3>Guru Meditation:</h3>
    <p>XID: "} + req.xid + {"</p>
    <hr>
    <p>Varnish cache server</p>
  </body>
</html>
"} );
    return (deliver);
}

#######################################################################
# Backend Fetch

sub vcl_backend_fetch {
    return (fetch);
}

sub vcl_backend_response {
    if (beresp.ttl <= 0s ||
      beresp.http.Set-Cookie ||
      beresp.http.Surrogate-control ~ "no-store" ||
      (!beresp.http.Surrogate-Control &&
        beresp.http.Cache-Control ~ "no-cache|no-store|private") ||
      beresp.http.Vary == "*") {
        /*
        * Mark as "Hit-For-Pass" for the next 2 minutes
        */
        set beresp.ttl = 120s;
        set beresp.uncacheable = true;
    }
    return (deliver);
}

sub vcl_backend_error {
    set beresp.http.Content-Type = "text/html; charset=utf-8";
    set beresp.http.Retry-After = "5";
    synthetic( {"<!DOCTYPE html>
<html>
  <head>
    <title>"} + beresp.status + " " + beresp.reason + {"</title>
  </head>
  <body>
    <h1>Error "} + beresp.status + " " + beresp.reason + {"</h1>
    <p>"} + beresp.reason + {"</p>
    <h3>Guru Meditation:</h3>
    <p>XID: "} + bereq.xid + {"</p>
    <hr>
    <p>Varnish cache server</p>
  </body>
</html>
"} );
    return (deliver);
}

#######################################################################
# Housekeeping

sub vcl_init {
}

sub vcl_fini {
    return (ok);
}
As a quick reminder, this is what the preceding code does:
It does not support the PRI method and throws an HTTP 405 error when it is used.
Request methods that differ from GET, HEAD, PUT, POST, TRACE, OPTIONS, and DELETE are not considered valid and are piped directly to the backend.
Only GET and HEAD requests can be cached, other requests are passed to the backend and will not be served from cache.
When a request contains a cookie or an authorization header, the request is passed to the backend and the response is not cached.
If at this point the request is not passed to the backend, it is considered cacheable and a cache lookup key is composed.
A cache lookup key is a hash that is composed using the URL and the hostname or IP address of the request.
Objects that aren’t stale are served from cache.
Stale objects that still have some grace time are also served from cache.
All other objects trigger a miss and are looked up in cache.
Backend responses that do not have a positive TTL are deemed uncacheable and are stored in the hit-for-pass cache.
Backend responses that send a Set-Cookie header are also considered uncacheable and are stored in the hit-for-pass cache.
Backend responses with a no-store in the Surrogate-Control header will not be stored in cache either.
Backend responses containing no-cache, no-store, or private in the Cache-control header will not be stored in cache.
Backend responses that have a Vary header that creates cache variations on every request header are not considered cacheable.
When objects are stored in the hit-for-pass cache, they remain in that blacklist for 120 seconds.
The VCL file that you see in “Varnish’s Built-In VCL” represents the desired behavior of Varnish. In an ideal world, this VCL code should suffice to make any website bulletproof. The reality is that modern day websites, applications and APIs don’t conform 100% to these rules.
The built-in VCL assumes that cacheable websites do not have cookies. Let me tell you: websites without cookies are few and far between. The following VCL file deals with these real-world cases and will dramatically increase your hit rate.
Although this real-world VCL file increases your hit rate, it is not tuned for any specific CMS or framework. If you happen to need a VCL file that caters to these specific applications, it will usually come with a CMS or framework module.
There are plenty of good VCL templates out there. I could also write one myself, but I’d just be reinventing the wheel. In the spirit of open source, I’d much rather showcase one of the most popular VCL templates out there.
The author of the VCL file is Mattias Geniar, a fellow Belgian, a fellow member of the hosting industry, a friend, and a true Varnish ambassador. Go to his GitHub repository to see the code.
This VCL template primarily sanitizes the request, optimizes backend connections, facilitates purges, adds caching stats, and adds ESI support.
Room for improvements? Just send Mattias a pull request and explain why.
By now you should know the syntax, functions, different language constructs, return types, variable objects, and execution flow of VCL. Use this chapter as a reference when in doubt.
Don’t forget that the Varnish Cache project has a pretty decent documentation site. If you don’t find the answer to your question in this book, you’ll probably find it there.
At this point, I expect you to be comfortable with the VCL syntax and be able to read and interpret pieces of VCL you come across. In Chapter 7, we’ll dive deeper into some common scenarios in which custom VCL is required.
1 This piece of VCL code is the VCL that is shipped when you install Varnish.
In this chapter I’ll highlight several cache invalidation strategies. These strategies allow you to remove certain items from cache even though their time-to-live hasn’t expired yet.
In the world of caching, there’s only one thing worse than a low hit rate, and that’s caching for too long. That statement sounds quite weird, right? Here I am trying to convince you to cache everything, all the time, yet I’m saying that caching for too long is the worst thing to do. Allow me to explain.
Throughout this book, I’ve always kept the best interests of the website owner, developer, and sysadmin in mind. The reality is that the site, API, and application are primarily services that the end user consumes. In the end, it’s all about the end user.
Why do we want to make the site fast? For the user!
Why do we want to keep the site available? For the user!
Why do we cache? So that the user has a good experience!
Caching data for too long would mess with the integrity of the data, giving the user a bad experience when up-to-date output is important. This is especially the case for news websites.
We already talked about the use of Cache-control and Expires headers. It’s important to estimate the right time-to-live and set the right values for these headers. The more accurate the time-to-live, the better the balance.
Unfortunately, in many cases the data will be out-of-date even before the object expires. Setting it to a lower value could jeopardize the health and responsiveness of your backend. Talk about being stuck between a rock and a hard place!
Worry not—Varnish has your back! Varnish offers various mechanisms to evict objects from the cache based on certain criteria. By accessing these eviction mechanisms from your code, you can actively invalidate objects, even if they haven’t expired. That way your breaking news will be correctly displayed on the front page of your website, even if the object still has two hours to live according to the time-to-live.
The Varnish documentation has a page dedicated to cache invalidation. Have a look if you’re interested.
Purging is the easiest way to invalidate the cache. In the following example, you can see that in VCL you can perform a return (purge) from within the vcl_recv subroutine. This will explicitly evict the object from cache. The object will be identified by the criteria set in vcl_hash, so by default that is the hostname and the URL. Memory is freed up immediately and cache variations are also evicted.
acl purge {
    "localhost";
    "192.168.55.0"/24;
}

sub vcl_recv {
    # allow PURGE from localhost and 192.168.55...

    if (req.method == "PURGE") {
        if (!client.ip ~ purge) {
            return(synth(403,"Not allowed."));
        }
        return (purge);
    }
}
There’s a bit more housekeeping involved when you want to do it right: the preceding example protects you from unauthorized invalidations by enforcing an ACL. Only purges from localhost or from the 192.168.55.0/24 subnet are allowed.
And then there’s the PURGE request method that is checked. By requesting the resource with PURGE instead of GET, you’re basically telling Varnish that this HTTP request is not a regular data retrieval request, but a purging request.
You probably remember “When Does Varnish Completely Bypass the Cache?”. In that section, I mentioned that only certain request methods will be considered valid by Varnish. PURGE is not one of them. That’s why it’s important to do the PURGE check before the request method validation happens. Otherwise, you’ll go into pipe mode and the request will be sent to the backend either returning a valid HTTP 200 status code or if your webserver doesn’t allow PURGE, an HTTP 405 error.
You can implement a purge call anywhere in your code and you’ll typically use an HTTP client that is supported by your programming language or framework. In many cases, that client will be cURL-based. Here’s a purging example using the cURL binary:
curl -XPURGE http://example.com/some/page
This example uses the -X parameter in cURL to set the request method. As expected, we’re setting it to PURGE and setting the URL to http://example.com/some/page. That’s the resource we’re removing from cache.
Purging is easy: it uses the object’s hash, it evicts just that one object, and it can be executed with a simple return(purge).
But when you have a large number of purges to perform or you’re not exactly sure which resources are stale, exact URL invalidations might feel restrictive to you. A pattern-based invalidation mechanism would solve that problem, and banning does just that.
Banning should not be an unknown concept to you; in “Ban”, we talked about the ban function that executes these bans.
Basically, bans use a regular expression match to mark objects that should be removed from cache. These marked objects are put on the so-called ban list. Banning does not remove items from cache immediately and hence does not free up any memory directly.
Bans are checked when an object is hit and executed accordingly based on the ban list. There’s also a so-called ban lurker background thread that checks for bans that match against any variable of the obj object.
The obj object only stores the response headers, response body, and metadata. It has no request information. The ban lurker doesn’t have any of this information either, which is why the ban lurker thread can only remove items from cache if the ban matches objects that have no request context, like obj.
All other bans are removed at request time and aren’t done in the background.
Here’s a basic BAN example. It does exactly the same thing as the PURGE example, but adds URL pattern-matching capabilities:
acl ban {
    "localhost";
    "192.168.55.0"/24;
}

sub vcl_recv {
    if (req.method == "BAN") {
        if (!client.ip ~ ban) {
            return(synth(403, "Not allowed."));
        }
        ban("req.http.host == " + req.http.host +
            " && req.url ~ " + req.url);
        return(synth(200, "Ban added"));
    }
}
When you accumulate lots of bans based on req object variables for resources that are not frequently accessed, Varnish might run into CPU performance problems.
Bans are kept on the ban list until all objects in cache have been checked against the list. If the banned objects do not get a new hit, they remain on the list. The longer the list, the more CPU time is required to check the list upon every hit.
That’s why it’s advised to use lurker-friendly bans.
The ban lurker is in charge of asynchronously checking and cleaning up the ban list. I mentioned that the ban lurker has a limited scope to invalidate objects because of its lack of request information: the ban lurker only knows the obj context.
But if we copy request information from the req object, we can actually write lurker-friendly bans. Have a look at the following VCL snippet:
acl ban {
    "localhost";
    "192.168.55.0"/24;
}

sub vcl_backend_response {
  set beresp.http.x-host = bereq.http.host;
  set beresp.http.x-url = bereq.url;
}

sub vcl_deliver {
  unset resp.http.x-host;
  unset resp.http.x-url;
}

sub vcl_recv {
    if (req.method == "BAN") {
        if (!client.ip ~ ban) {
            return(synth(403, "Not allowed."));
        }
        ban("obj.http.x-host == " + req.http.host +
            " && obj.http.x-url ~ " + req.url);
        return(synth(200, "Ban added"));
    }
}
The trick is to add the host and the URL of the request as a response header when the object is stored in cache. By doing this, the missing request context is actually there. I know—it’s trickery, but it does the job.
set beresp.http.x-host = bereq.http.host; will set a custom x-host header containing the host of the request, and set beresp.http.x-url = bereq.url; will set the URL as a custom x-url response header.
At this point, the invalidation will not just happen at request time on the next hit, but also asynchronously by the ban lurker. The ban lurker will have the necessary requestion information to process bans on the ban list that contain a URL match.
After the ban we’ll just remove these custom headers; because these are for internal purposes, the user has no business using them. That is done in vcl_deliver.
The ban lurker doesn’t remove items from the ban list immediately; there are three parameters that influence its behavior:
ban_lurker_ageBans have to be at least this old until they are removed by the ban lurker. The default value is 60 seconds.
ban_lurker_batchThe number of bans the ban lurker processes during a single run. The default value is 1000 items.
ban_lurker_sleepThe amount of seconds the ban lurker sleeps in between runs. The default value is 0.010 seconds.
If you write lurker-friendly bans and your ban list is still long, you might want to take a look at these parameters and tune them accordingly.
Let’s have one more ban example that puts it all together and gives you even more flexibility:
acl ban {
    "localhost";
    "192.168.55.0"/24;
}

sub vcl_backend_response {
  set beresp.http.x-host = bereq.http.host;
  set beresp.http.x-url = bereq.url;
}

sub vcl_deliver {
  unset resp.http.x-host;
  unset resp.http.x-url;
}

sub vcl_recv {
    if (req.method == "BAN") {
        if (!client.ip ~ ban) {
            return(synth(403, "Not allowed."));
        }
        if(req.http.x-ban-regex) {
            ban("obj.http.x-host == " + req.http.host + "
            && obj.http.x-url ~ " + req.http.x-ban-regex);
        } else {
            ban("obj.http.x-host == " + req.http.host + "
            && obj.http.x-url == " + req.url);
        }
        return(synth(200, "Ban added"));
    }
}
This example combines the benefits of the previous ban examples. It gives you the flexibility to choose between an exact URL match or a regular expression match. If you set the x-ban-regex request header when banning, the value will be used to match the URL pattern. If the header is not set, the URL itself (and nothing more) is banned. And this, of course, is a lurker-friendly ban.
Here’s an example using the cURL binary:
curl -XBAN http://example.com/ -H"x-ban-regex: ^/product/[0-9]+/details"
In this example, we’re purging all product details pages based on the ^/product/[0-9]+/details regular expression. If you only want to purge a single product detail page, the curl call could look like this:
curl -XBAN http://example.com/product/121/details
The name of the request method we’re using to ban or purge doesn’t really matter. As long as you can identify an invalidation request, you’re fine. We’re just calling it BAN or PURGE. Choose a request method name of your liking—just make sure it doesn’t clash with another method you use in your backend application.
If you’re interested in seeing the current state of the ban list, you can issue a ban.list command on the varnishadm administration program. Just execute the following command on your Varnish server:
varnishadm ban.list
And this could be the output:
Present bans:
0xb75096d0 1318329475.377475    10      obj.http.x-host == example.com
&& obj.http.x-url ~ ^/product/[0-9]+/details
0xb7509610 1318329470.785875    20C     obj.http.x-host == example.com
&& obj.http.x-url ~ ^/category
Wondering what each field means? Here we go:
The first field contains the unique identifier of the ban.
The second field is the timestamp.
The third field represents the amount of objects in cache that match this ban. Optionally, there could be a C attached to the third field—this is a completed ban match, usually for duplicate bans.
The fourth field is the ban expression itself.
The previous two sections approached the execution of cache invalidation from an HTTP perspective, meaning that your regular requests and your purge/ban requests all pass through the same channel. I mentioned the upside: it’s very easy to code in VCL and just as easy to implement in your backend.
There are also some downsides:
You have to write additional VCL code, which adds complexity.
There is no uniform way of implementing banning and purging in Varnish; your application will depend on the invalidation implementation in VCL.
Although the ACLs provide a level of security, there is no isolation from a networking perspective.
Luckily, Varnish offers an admin console that allows you to issue ban statements. This can be done locally or remotely through the varnishadm program. In “CLI address binding”, I mentioned how you can configure your Varnish to accept remote connections on the admin interface.
varnishadm is just a client that connects to the Varnish CLI socket. You can also make a TCP connection to this socket and issue ban commands directly from within your code. Have a look at the documentation page on the Varnish Command Line Interface to learn more about the commands, remote connections, and the authentication protocol.
Here’s an example of our product detail invalidation, but this time using the CLI:
varnishadm> ban obj.http.x-host == example.com && obj.http.x-url ~^/product/