Table of Contents for
Identity and Data Security for Web Development
 Identity and Data Security for Web Development
Published by
O'Reilly Media, Inc., 2016
Identity and Data Security for Web Development
Published by
O'Reilly Media, Inc., 2016
- nav
- Cover
- Identity and Data Security for Web Development
- Identity and Data Security for Web Development
- Preface
- 1. Introduction
- 2. Password Encryption, Hashing, and Salting
- 3. Identity Security Fundamentals
- 4. Securing the Login with OAuth 2 and OpenID Connect
- 5. Alternate Methods of Identification
- 6. Hardening Web Applications
- 7. Data Transmission Security
- A. GitHub Repositories
- B. Technical Preconditions and Requirements
- Glossary
- Index
- About the Authors
- Colophon
Chapter 7. Data Transmission Security
In Chapter 2, we discussed at length the protection of identification and account security through the use of proper hashing and salting techniques. Even though account security is vitally important to any system, what about security for any data that is being transmitted from one party to another, as that data might be sensitive in nature or contain privileged user information?
In this chapter, we explore numerous data-security techniques that are designed to protect data in motion, or better said, data that is moving between parties. We’ll look at a few of these techniques in depth:
-
SSL secure data transmission
-
Asymmetric key cryptography, better known as public/private key encryption
-
Symmetric key encryption, better known as shared secret encryption
Let’s start out by exploring our ideal secure scenario.
SSL/TLS
In an ideal scenario, when working with data security as web developers, Secure Sockets Layer (SSL) is the mechanism that you should be targeting as your data security standard for a user. If you’re not familiar with how it works, you’ll be familiar with seeing the effect of an SSL certificate being used on websites that you visit, Figure 7-1, for example shows the expanded certificate information for https://www.google.com.
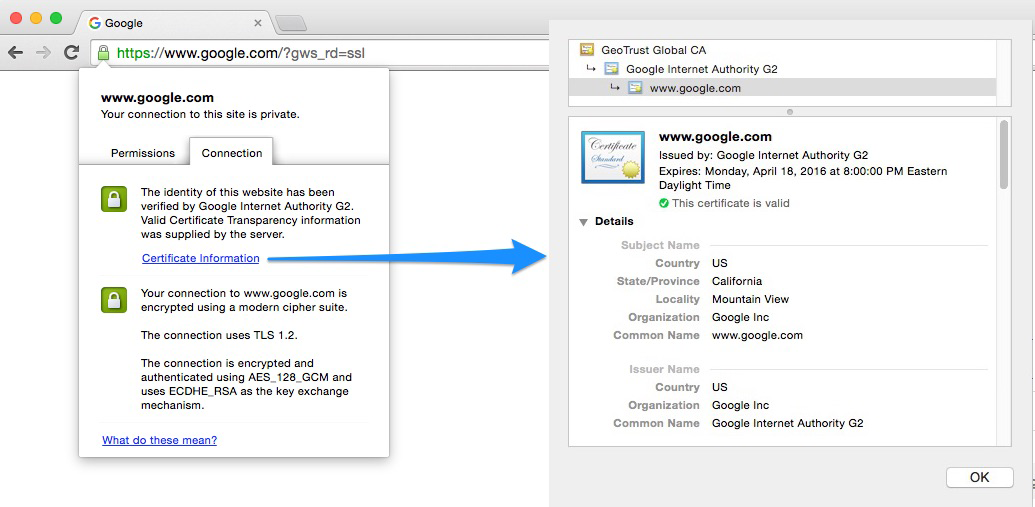
Figure 7-1. SSL certificate on Google
SSL, and its successor, Transport Layer Security (TLS), are cryptographic protocols that are typically bundled together. When creating a secure SSL connection on your website, you will be required to set up an SSL certificate provided by an SSL certificate authority (CA), which is a company that can issue these digital certificates. When doing so, you verify identification information about your site to the certificate authority, and then your web server generates two cryptographic keys: a public and a private key. This process uses the symmetric key cryptography approach to data security and data privacy, which we’ll explore in more detail later in this chapter.
These certificates usually contain some basic information about you and your website:
-
Domain name
-
Company name
-
Address
-
City
-
State/province
-
Country
Certificate Validation Types and Authorities
You can obtain various SSL certificate types when working through a certificate authority, depending on your needs.
Domain Validation (DV)
The CA validates that the applicant has the right to use the specific domain name, meaning that someone with admin rights to the domain is aware of the application. Rights are typically proven by either receiving and confirming an email that is sent to the admin email for the domain, or by configuring specific DNS records for the domain. No company information is vetted or displayed to customers visiting the website who view the certificate details.
With domain validation, you will see the green lock in the URL bar, as shown in Figure 7-2, but will not see company-specific details when the certificate is loaded.

Figure 7-2. Domain validation certificate example
Organization Validation (OV)
The domain verification in the DV step is conducted, but in addition, the company/organization information goes through some vetting, such as name, city, state, and country. This basic information will also be displayed to customers visiting the website who view the certificate details.
With sites that have this type of validation, you will be able to see company information when the certificate is loaded, as shown in Figure 7-3.
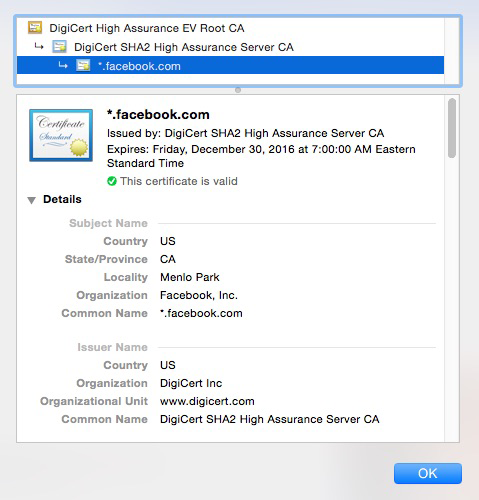
Figure 7-3. Organization validation certificate example
Extended Validation (EV)
The CA validates domain ownership (DA), organization information (OV), as well as checks the legal existence of the organization. This is the lengthiest process of the three, and also validates that the organization is aware of the SSL certificate request and approves it. The validation step requires specific documentation that certifies the identity of the company, as well as an additional set of steps and checks.
Typically, you will see an example of this type of validation in sites that have a green address bar with the lock and company name, as displayed in Figure 7-4.

Figure 7-4. Extended validation certificate example
When working with a CA, such as DigiCert, GoDaddy, Verisign, or Comodo you will typically be brought through a few steps to do the following:
-
Create a certificate signing request (CSR)
-
Purchase the certificate
Once the certificate is purchased, the CA will validate and process the CSR, and then issue you the certificate for installation (typically through email). Many CAs offer support for Wilcard certificates, which allow you to also secure all subdomains under a root domain.
Creating Your Own Self-Signed Certificate for Testing
Using in Production Will Produce an Error
Working with self-signed certificates, as you will see in this section, should never be done in a production environment where you are expecting actual traffic. The entire purpose of working with self-signed certificates is for testing only. Using them will produce a nasty browser warning explaining to all your visitors that your certificate is not trusted. You have been warned. The message looks like Figure 7-5, which will take over the entire browser window before going on to your site content.
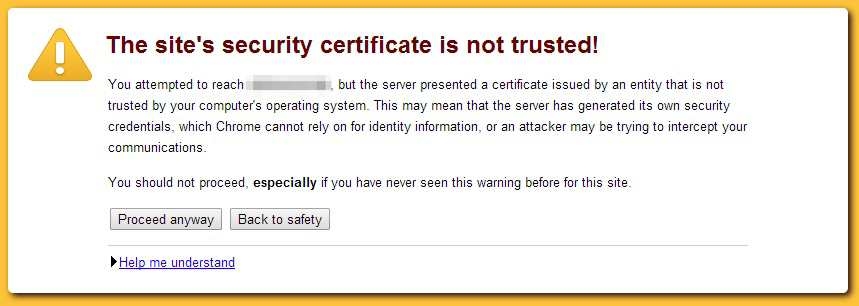
Figure 7-5. Untrusted certificate warning
Now that you have been thoroughly warned about using the following section for testing only, let’s proceed to create and sign our own certificates for testing purposes. This will allow us to build our infrastructure in a separate environment before moving to a proper production environment with a trusted certificate authority.
In the previous sections, you learned about the fundamentals of setting up a production-level certificate. Now let’s go through the steps needed for setting up our own certificate.
Certificate setup
The first step is to create our private key and the self-signed certificate that we will be using when we spin up a Node server instance.
For the sake of the example, we’re going to store our keys in the same folder as the program that we will be running. With that said, load up a terminal window and go to the folder you are using for this program.
Let’s start with the private key setup. Type in the following command:
openssl genrsa -des3 -out server.key 2048
You will be asked to enter and verify a password for the file. What you are essentially doing is creating a new 2048-bit, triple-DES-encrypted RSA key; encrypting it with a password; and then storing it to a file, server.enc.key.
The process looks like Figure 7-6.

Figure 7-6. Generating a 2048-bit RSA key
Next up, we need to create a certificate signing request (CSR). Using our previously generated key, we issue the following command:
openssl req -new -key server.key -out server.csr
This will create our certificate signing request, with the intent of outputting the CSR to server.csr. After issuing the command, you will be required to input more detailed information about yourself and your company.
-
The passphrase used for the private key (the same one used for the last command)
-
Your two digit country code
-
Your state or province
-
Your city or locality name
-
Your company or organization name
-
The group or unit that this belongs to in the company
-
Any common name to be used for the certificate request, or your name
-
An appropriate email address to contact
You will also be asked to add a few extra attributes, including these:
-
A challenge password
-
A company name (optional)
The entire process, end-to-end, looks like Figure 7-7.
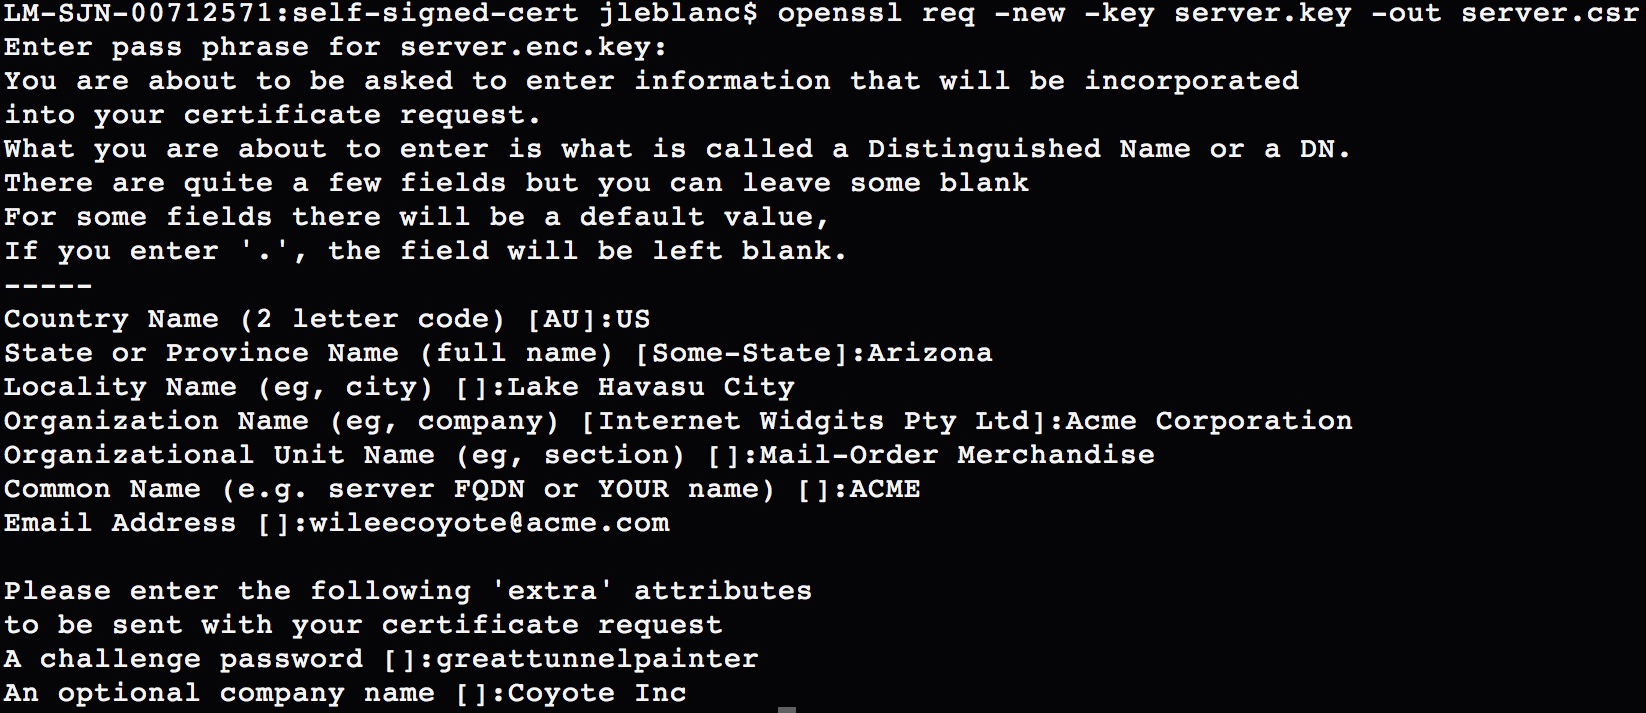
Figure 7-7. Creating a certificate signing request
Removing Key Encryption
If you are using the self-signed certificate for testing and wish to remove the password and encryption from your private key (not recommended for anything but single-user, local testing), then at this point you could use your previously generated encrypted private key (say that’s server.enc.key), and generate the new unencrypted private key (server.key) with the following command:
openssl rsa -in server.enc.key -out server.key
The list of commands to issue to get to the same point as we were in this section, using this method, are shown here:
openssl genrsa -des3 -out server.enc.key 2048
openssl req -new -key server.enc.key -out server.csr
openssl rsa -in server.enc.key -out server.key
Now that we have our CSR in place, we can self-sign the certificate to create our needed certificate file (CRT), using the following command:
openssl x509 -req -days 365 -in server.csr -signkey server.key -out server.crt
This command creates a temporary certificate for one year (specified by the -days option). If you did not remove the encryption from the original key file, then you will be required to enter the key passphrase for this step, as shown in Figure 7-8.

Figure 7-8. Creating the self-signed certificate
Our self-signed certificate is now ready for us to use in our server setup, to start creating secure HTTPS connections between the server and browser.
Server setup
Note
The server code for the following example is available in its entirety at https://github.com/iddatasecuritybook/chapter7/blob/master/self-signed-cert/server.js.
For the sake of our example server, we’re going to assume that you chose not to remove the encryption from your private key in the last section, but we’ll still go through how to adjust the code in case you no longer need the passphrase. We’re also assuming that you have Express set up as we go through the code sample.
We’re going to look at an Express server setup that will use our private key and self-signed certificate from the previous step to accept secure (HTTPS) connections from an alternate source, such as the browser or another program that we’re running locally. In this case, we will be working with JSON strings that will be sent from another program to our server, through a secure communication channel thanks to our certificate and key.
We will be working with a few modules for our server, the filesystem (fs), https, and querystring, which are all standard modules and don’t require pulling anything from npm, as well as body-parser, which will allow us to support JSON/URL-encoded bodies in Express 4.0 or beyond. We install body-parser from npm with the following command:
npm install body-parser --save
Let’s look at the server code in its entirety, and then describe what’s going on in each step:
var fs = require('fs'),
    https = require('https'),
    querystring = require('querystring'),
    bodyParser = require('body-parser')
    app = require('express')();

//support JSON & URL encoded bodies
app.use(bodyParser.json());
app.use(bodyParser.urlencoded({
    extended: true
}));

//handle all POST requests
app.post('/', function (req, res){
    var message = req.body;
    res.send('Message received:' + querystring.stringify(message));
});

//set certificate options
var options = {
   key: fs.readFileSync('server.key'),
   cert: fs.readFileSync('server.crt'),
   passphrase: 'YOUR KEY PASSWORD'
};

//create server with certificate options
https.createServer(options, app).listen(3000, function () {
   console.log('Server started: Listening on port 3000');
});
Warning
In the code example, you can see that we refer to a passphrase and your key password as the input. These values should never be hardcoded in your code. Instead, you should use environment variables, files with restricted read permissions, or the like. The Node module dotenv is a great way to handle these environment variables. A complete run through of its use is available in “Application Configuration”.
We start off by including all of our required modules, then adding in our body-parser options to Express for supporting JSON- and URL-encoded strings. Those sections comprise our first two blocks of code.
Next we need to handle all incoming POST requests that will be coming to the server. We do that by setting app.post(/, …). In the return function, we first start by extracting req.body, which will be the POST object that the browser or other program sent over. In this example, we then simply send back an acknowledgment that the message was received.
In the next block, we set up our certificate options to create that secure connection. Within the options variable, we add three pieces of data:
- key
-
Our private key, read in from our local server.key file.
- cert
-
Our self-signed certificate, read in from our local server.crt file.
- passphrase
-
The passphrase for our private key file. If you removed the encryption from this key file in the previous section, you can omit this line.
Lastly, we create our server instance, with those options, and listen on port 3000. When you’re ready to test this out, you can issue the following command on your terminal, assuming the file is saved as server.js:
node server.js
The server will spin up on port 3000 and will start listening for incoming traffic. Our next step is to set up another script to act as our client, and send it over an appropriate JSON object over our new HTTPS connection.
Making secure requests to the server
Note
The client code for the following example is available in its entirety at https://github.com/iddatasecuritybook/chapter7/blob/master/self-signed-cert/client.js.
Our client script, client.js, is a fairly standard POST request, with a few differences. We’ll look at the full code next, then describe each of the sections (and any caveats):
var querystring = require('querystring'),
    https = require('https');

//POST data to be sent to server
var postData = querystring.stringify({
    'message' : 'My secure JSON string'
});

//POST options
var postOptions = {
    hostname: 'localhost',
    port: 3000,
    path: '/',
    rejectUnauthorized: false,
    method: 'POST',
    headers: {
        'Content-Type': 'application/x-www-form-urlencoded',
        'Content-Length': postData.length
    }
};

//set up HTTPS POST request to server
var postReq = https.request(postOptions, function(res){
    res.setEncoding('utf8');
    res.on('data', function (data){
        console.log(data);
    });
});

//POST data to server
postReq.write(postData);
postReq.end();
We start things off by including the querystring and https standard Node modules.
We then create the JSON object that we will be sending through the HTTPS POST request, post_data. We add just a simple string for our needs, then stringify the entire object for POSTing.
Under the POST options, this is where we need to pay attention to slight differences from a standard POST request with a non-self-signed certificate. Within the POST options, we specify a few options:
- hostname
-
The host to send the request to. Because we’re running the server locally, this is localhost.
- port
-
The port to make the request to. The server is on port 3000, so that’s what we specify here.
- path
-
The path to make the request to. The server is accepting all POST traffic to the same handle, so this can be anything.
- rejectUnauthorized
-
This is the one to take note of. Specifying this as
falsewill allow you to make POST requests with a self-signed certificate without being blocked by a certificate error. - method
-
The HTTPS request method, in this case POST.
- headers
-
Our content headers, specifying content type and length.
Tip
Adding rejectUnauthorized: false to your POST options will allow you to work with a self-signed certificate without receiving error messages about the certificate not being trusted. The error produced, when not properly handled, will throw an error much like Figure 7-9.
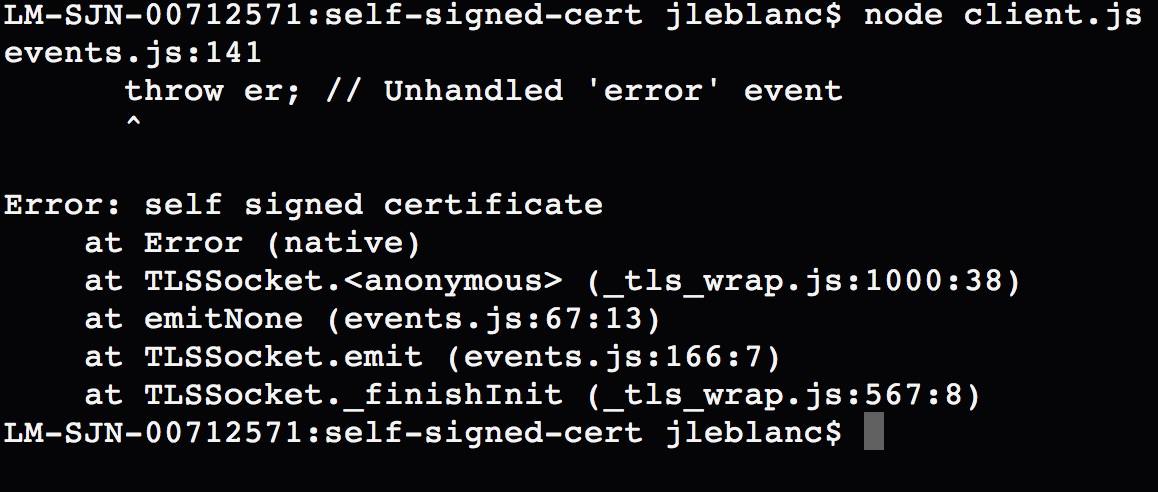
Figure 7-9. Error thrown when making POST requests with a self-signed certificate
Next we set up the HTTPS POST request object. We do this by using https.request(…), passing in the post_options variable. In the response, we set the encoding of the response, then handle the case where data is sent back from the server with res.on(…). In the case of our client, we are simply logging out the response.
Lastly, we send off the POST request to the server. If all went well, we should see the response shown in Figure 7-10 when using our client.

Figure 7-10. Response from HTTPS POST request
Asyncronous Cryptography
Asyncronous cryptography, also known as public/private key encryption, uses sets of public/private key pairs. A sender encrypts and signs, then a receiver decrypts and verifies any message that should be transmitted securely over a potentially insecure channel, such as when SSL is not available.
Some of these use cases may include multiuser environments over Internet-enabled hardware, small-scale microelectronics, or in any case where you might not be able to ensure the integrity of the connection for users.
What we have to know beforehand is how we will be working with these key sets (public/private keys) in order to secure the message being sent. The public-key part of the set can be known to anyone needing it (much like a username), while the private key must remain known only to the party it belongs to (much like a password).
Use Case
Let’s look at a practical scenario of when this will be valuable. Suppose you’re walking around a store with your mobile phone, and the store uses a series of BLE (Bluetooth low energy) devices, also known as beacons, for in-aisle purchasing. The device allows a phone to connect to it, and then it connects to a web endpoint to process the message. In this case, the messages may be to check the users in with their account, or to pay for their goods through a store credit card or PayPal account. These BLE beacons themselves are not secure devices and can be modified by a malicious party. We want to ensure that when users are sending their login information, the beacon hasn’t been modified to transmit that clear-text data to a malicious endpoint instead of the store endpoint.
This is where public/private keys come in. The person sending the message encrypts the message with the public key of the recipient (perhaps through a public keystore that verifies requests from the application asking for the public key), and then signs the message with his private key (in the case of the person walking around the store, this might be embedded within their store application). The encrypted and signed versions of the message are transmitted through the beacon, and on to the store API endpoint. That store API endpoint then decrypts the encrypted message with its private key (perhaps stored securely on its servers), and the signed version is verified using the public key of the sender (the person walking around the store).
We have now decrypted the message and verified its origins. In doing so, we’ve mitigated a number of potential attack vectors:
-
A malicious party cannot simply watch cleartext traffic through the beacon and store any sensitive information going back and forth, because we encrypt the data end-to-end.
-
A malicious party cannot send fake data through to the endpoint with hopes of gaining user account access, as the private key is known only to the user, and the message verification would fail without the public-key signing.
-
A malicious party cannot force the beacon to push data to its own endpoints and expect any valid results. The data might arrive, but without a method of decrypting the data or checking its validity, the information would not be beneficial.
Let’s break this down into a simple process, shown in Figure 7-11.
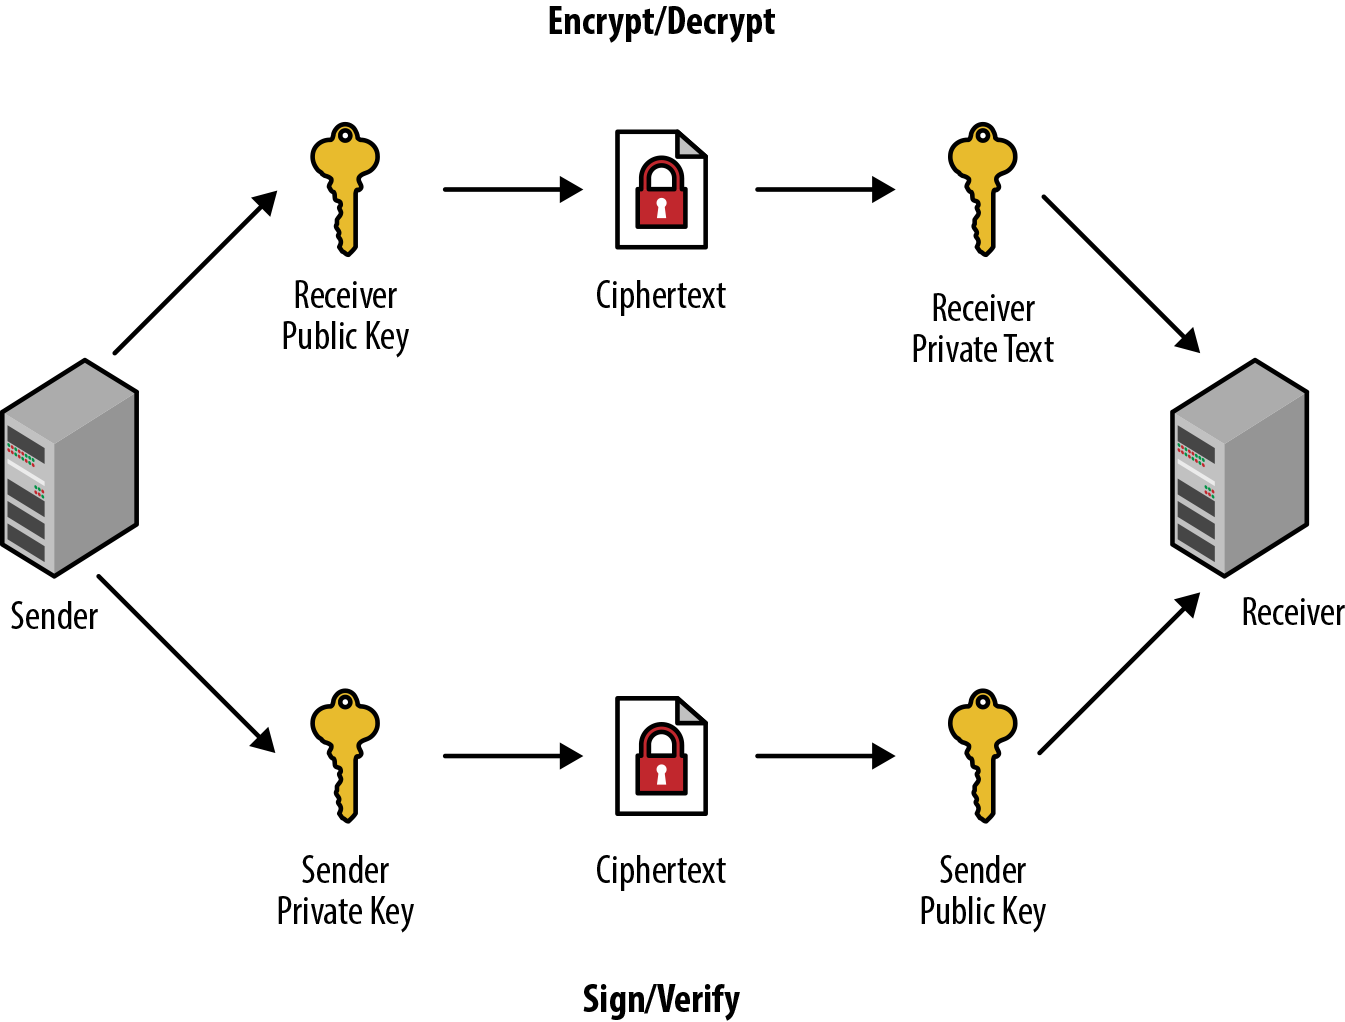
Figure 7-11. Asymmetric cryptography process
These are the steps that you follow as you transmit data:
-
You generate two sets of keys, public/private keys for the person sending the data (sender), and another public/private key set for the person receiving the data (receiver).
-
You create a small message (typically a string/JSON object or the like) that you would like to transmit.
-
From the sender side, you take that message and encrypt it with the receiver’s public key, then take the encrypted message and sign it with your private key.
-
You transmit the encrypted and signed data to the recipient, sometimes through an intermediate device or service.
-
The recipient verifies the signed payload with the public key of the sender, then (if valid) decrypts the encrypted message with their private key.
You now have a verified and decoded message that can be processed as needed.
Implementation Example
Let’s see this functionality in practice through a Node implementation of this process. We’re going to break this into a three-step process to explore the main features of the example:
-
Steps 1a/1b: Generating your two sets of public/private keys. 1a covers doing so directly in code, with no storage of the keys, while 1b takes that concept a bit further and shows you how to implement file storage for the public/private keys on top of that. For a proof of concept, 1a is an expedient way to get started, but for all production implementations, 1b is preferred. Choose one of these implementations as you are running through the examples.
-
Step 2: Encrypting and signing a piece of data from the side of the sender, to be sent through to the receiver.
-
Step 3: Decrypting and verifying the data that was sent from a sender.
When Keys Should Be Generated and Used
Even though we are showing a full end-to-end example that can be executed in a single pass, the code execution most likely shouldn’t be structured this way in a production environment. If you have a sender/receiver relationship, typically the sender device will be registered with the receiver’s service. When that device/site registration occurs, the public/private keys for that pairing (steps 1a or 1b) should be run. Only when the user begins using the service to transmit data (steps 2 and 3) should those keys then be extracted and used.
Let’s start out with generating keys.
Step 1a: Generating keys without file storage
Note
The complete sample code for the asymmetric key cryptography process without using the filesystem is available at https://github.com/iddatasecuritybook/chapter7/blob/master/asymmetric-crypto/crypto_no_fs.js.
The first thing we need to do when generating our needed public/private key pairs is to add in a Node package to help us with generating, encrypting, decrypting, signing, and verifying our keys.
There is a popular package, named ursa, for doing just that, and we install it like so:
npm install fs --save
Next, we add that package as a requirement at the top of our Node script:
var ursa = require('ursa');
Now that we have our packages defined, it’s time to generate a few public and private keys that we are going to need during the process. As mentioned earlier, in this example we are going to simply generate these into variables without any file storage component:
//generate sender private and public keys
var senderKey = ursa.generatePrivateKey(1024, 65537);
var senderPrivKey = ursa.createPrivateKey(senderKey.toPrivatePem());
var senderPubKey = ursa.createPublicKey(senderKey.toPublicPem());

//generate recipient private and public keys
var recipientKey = ursa.generatePrivateKey(1024, 65537);
var recipientPrivKey = ursa.createPrivateKey(recipientKey.toPrivatePem());
var recipientPubKey = ursa.createPublicKey(recipientKey.toPublicPem());
In this code snippet, we are running the same three lines of code to generate keys for the sender and recipient.
When generating keys, the first item on our list is to make a request to the ursa generatePrivateKey(...) method, which will produce a random key set used to extract our individual public and private key pairs.
The parameters passed to generatePrivateKey() are as follows:
-
The number of bits in the modulus (in the preceding case, 1024). Anything 1024 or over is generally considered secure, but the method defaults to 2048 if no number is specified.
-
The exponent value, which must be odd. This argument is optional as well, and defaults to 65537.
We then need to break those up into our individual matching keys, using the ursa methods createPrivateKey(…) and createPublicKey(…), which will accept our previously generated key set in the previous line as a parameter.
That parameter can be passed through as senderkey.toPrivatePem() or senderkey.toPublicPem(), depending on whether you’re attempting to generate a public or private key.
Next, let’s look at doing the same thing, but this time using file storage for the keys.
Step 1b: Generating keys with file storage
Note
The complete sample code for the asymmetric key cryptography process using the filesystem is available at https://github.com/iddatasecuritybook/chapter7/blob/master/asymmetric-crypto/crypto_fs.js.
Now, let’s look at more of a production-level deployment, where we might be working with thousands of key pairs stored in a keystore, or having individual sender keys deployed through an application on a user’s device.
As in the previous example, we’ll include the ursa package for working with our public/private key pairs, but in addition to those we’ll include a few others: fs for generating files and storing information on the filesystem, path for normalizing folder/file paths, and mkdirp for generating folder structures with some good duplicate folder handling without producing errors.
The fs and path packages are part of the core modules, so we don’t need to define those. For the other two, we install them from npm like so:
npm install ursa --save
npm install mkdirp --save
As we have done many times before, we now add those packages as requirements to the top of our Node script:
var fs = require('fs');
var ursa = require('ursa');
var path = require('path');
var mkdirp = require('mkdirp');
We’re going to streamline our key generation a bit, and instead of duplicating the code for generating just two sets of keys, we’ll put that all together into a single public/private key generation function that we can call:
function makeKeys(rootPath, subPath){
    try {
        mkdirp.sync(path.join(rootPath, subPath));
    } catch (err) {
        console.error(err);
    }

    var key = ursa.generatePrivateKey(1024, 65537);
    var privatePem = key.toPrivatePem();
    var publicPem = key.toPublicPem();

    try {
        fs.writeFileSync(path.join(rootPath, subPath, 'private.pem'),
            privatePem, 'ascii');
        fs.writeFileSync(path.join(rootPath, subPath, 'public.pem'),
            publicPem, 'ascii');
    } catch (err) {
        console.error(err);
    }
}
Working with the Filesystem
Accessing the filesystem can be unreliable. Therefore, it’s always a best practice to ensure that you are appropriately capturing and handling errors that are produced. A simplified example is displayed in the preceding code.
Our makekeys function will accept two parameters: a root path for where the keys will be stored (rootpath), and a subpath for separating out the public/private keys into individual folders (subpath). In the end, we are looking for a folder structure that looks something like this:
-
./keys/sender (which includes the public/private .pem files for the sender)
-
./keys/receiver (which includes the public/private .pem files for the sender)
We start by creating our necessary folder path with mkdirp.sync() for the path supplied. The path package will normalize the root and subpaths together for the folder locations to be created.
Working with mkdirp
Instead of producing errors when attempting to create a duplicate folder structure, mkdirp just continues with the next line of code execution. This makes mkdirp nice to work with in an environment in which someone could try to create a duplicate folder structure.
Over the next three lines, we use the ursa package to generate our key pairs, then extract the public and private keys into individual variables.
Lastly, we use the fs.writeFileSync(…) method to create our .pem files to hold the public and private keys. writeFile(…) in the preceding example will accept three parameters:
-
The path and filename to write. In this case, it’s our root and subfolders, with either private.pem or public.pem as the filename.
-
The content to write, which is obtained from our variables holding the public and private keys.
-
The content type, in this case ASCII.
Now that we have our function in place to create a public and private key where we designate, we can create both the key pairs for the sender and receiver with the following three lines:
var rootPath = './keys';
makeKeys(rootPath, 'sender');
makeKeys(rootPath, 'receiver');
We should now have the directory structure and four .pem files created. In a more realistic deployment, the content of these .pem files might be stored in a properly secured key storage lookup, or public keys separated into a public keystore that allows the lookup of keys for encryption or verification from verified sources, such as from application locations that were registered with the service.
Key Storage File Types
Numerous file-extension standards are used for public/private key storage, including (but definitely not limited to) .pem (can be used for the public key or for the entire public/private chain), .key (for just the private key), .pub (for just the public key), .cert (a .pem file with a different file extension that is recognized by Windows Explorer), as well as many others. Choose the one that works best for you. For more discussion on this topic, see this Server Fault exchange.
Now that we have our keys in place, we can follow the same type of methodology as we did in step 1a, but this time we’re going to extract the contents of the keys from the .pem files we just wrote:
var rootPath = './keys';

//generate sender private and public keys
var senderPubKey = ursa.createPrivateKey(
    fs.readFileSync(path.join(rootPath, 'sender', 'private.pem')));
var senderpubkey = ursa.createPublicKey(
    fs.readFileSync(path.join(rootPath, 'sender', 'public.pem')));

//generate recipient private and public keys
var recipientPrivKey = ursa.createPrivateKey(
    fs.readFileSync(path.join(rootPath, 'receiver', 'private.pem')));
var recipientPubKey = ursa.createPublicKey(
    fs.readFileSync(path.join(rootPath, 'receiver', 'public.pem')));
We start with a given root path (same as when we generated the keys) that we should pull the keys from. For each key, we use the ursa package to create either a public or a private key. Because it is expecting the key content from the files we wrote, we use the fs.readFileSync(…) method to pull the content in, passing along the full path to our .pem files. In a full production deployment, these files would reference back to your particular keystore, where the .pem files are stored.
Next, we’re going to see how to use these keys to encrypt and sign a message to be sent.
Step 2: Encrypting and signing a message
We’re now at the stage where the user (the sender) is ready to send some data through a potentially insecure device or third party, on the way to the receiver. To prepare this data to be sent, we need to encrypt and sign it by using the keys that we just created:
//prepare JSON message to send
var msg = { 'user':'Nikola Tesla',
            'address':'W 40th St, New York, NY 10018',
            'state':'active' };

msg = JSON.stringify(msg);

//encrypt with recipient public key, and sign with sender private key
var encrypted = recipientPubKey.encrypt(msg, 'utf8', 'base64');
var signed = senderPrivKey.hashAndSign('sha256', encrypted, 'utf8', 'base64');
Let’s say that the data that we are trying to send is a JSON structure with some privileged information, the msg variable in the code. To start out, let’s go ahead and convert that into a string to be encrypted.
Next we use the recipient’s public key (most likely obtained from a public keystore) to encrypt the data by calling recipientPubKey.encrypt(…), passing in the string to be encrypted.
After we encrypt, we need to create a signed version of the encrypted data by using the sender’s private key to hash and sign the encrypted string that we just created, which we do by calling senderPrivKey.hashAndSign(…), passing in the hashing algorithm (SHA-256) and the encrypted string.
We now have two variables: the encrypted version and the signed version. We take those two variables and transmit them through the third-party device or service.
Let’s say the device working as the transmitter between the sender and the receiver is compromised. Without the private key of the recipient, the raw JSON structure can’t be extracted. In essence, if the data is sniffed, it will be completely useless.
We’re now at the stage where the data has transferred through the third-party device or service, and has arrived safely at the recipient for decryption and verification.
Step 3: Decrypting and signing a message
With the data safely in the hands of the recipient, we need to both extract the data and ensure that the data is coming from a valid source through our matching public/private key pairs:
//verify message with sender private key
var bufferedMsg = new Buffer(encrypted);
if (!senderPubKey.hashAndVerify('sha256', bufferedMsg, signed, 'base64')) {
    throw new Error("invalid signature");
} else {
    //decrypt message with recipient private key
    var decryptedMsg = recipientPrivKey.decrypt(encrypted, 'base64', 'utf8');
    console.log('decrypted message verified:', decryptedMsg);
}
We start out by verifying the data that was sent over, to ensure that the originally signed data is from the source that we expect it to be. We create a buffer out of the encrypted message, for comparison. We then use senderPubKey.hashAndVerify(…), passing in the same hashing algorithm we used to sign the data, along with the buffer of our encrypted string, and the signed version of the data that we received from the sender. What is happening here is that we are comparing the encrypted ciphertext against the signed ciphertext that we received from the sender. If they don’t match, we have an unverified data object; but if they match, we have valid data and can then move to decrypt the data packet.
Once verified, we now decrypt the data that was transmitted over. As you may recall, we originally encrypted the data with the recipient’s public key, so now we can decrypt that data only by using the matching recipient private key by passing the encrypted message to recipientPrivKey.decrypt(…).
If we print that out, we’ll see the original JSON structure that we started with. Now that we have a verified and decrypted message, we can begin using the data however we need to.
Advantages, Disadvantages, and Uses of Aynchronous Cryptography
Aynchronous, or public key, cryptography has advantages when compared against synchronous cryptography methods. In the same light, we also have to deal with a few drawbacks with this method.
Let’s look at a few of the benefits here:
- Key convenience
-
Because each party (sender and receiver) has their own private key, and that key doesn’t need to be transmitted, we don’t have to deal with trying to find a secure method for transmitting that data as we do in a synchronous environment.
- Key nonrepudiation
-
Because each party owns their own private key, and that value is never shared, an attack case involving a piece of data with an authenticated server but a potentially compromised key is a nonissue. Each party is responsible for the secure storage of their private keys, meaning that this issue doesn’t come up.
Now, we are dealing with one pretty big negative when working with this method:
- Speed
-
Because a lot of processing needs to happen during encryption and decryption when using this method, it is quite slow when compared to a synchronous model.
With all of this said, asynchronous cryptography is not overly well suited for a single-user environment, where you might be encrypting data to be sent between two parties that you own. This is where synchronous cryptography shines. This method works well in a multiuser environment, where the channels between a sender and receiver might not be secure.
Synchronous Cryptography
With asynchronous cryptography, we’ve explored the realms of transmitting data through potentially insecure channels. The use of public and private keys in our examples is similar to the methodology behind technologies such as OAuth and OpenID Connect.
Now that you have that understanding, let’s see how to further protect data transmission between two sources that trust each other. Think of it this way: let’s say I’m writing an email through my Gmail account to be sent to another Gmail account, Google is transmitting data through a secure HTTPS connection, and we can safely assume that the email at the end of the line is from an authentic source.
One of the main uses for synchronous cryptography is in a trusted environment. Instead of using two separate public and private keys, we instead use a shared secret between two sources. Using a single key can significantly increase the encryption and decryption speed, but at the same time, if the single key is compromised, the resulting damage might be worse.
At a high level, Figure 7-12 shows how this process works end-to-end with a single shared secret key.
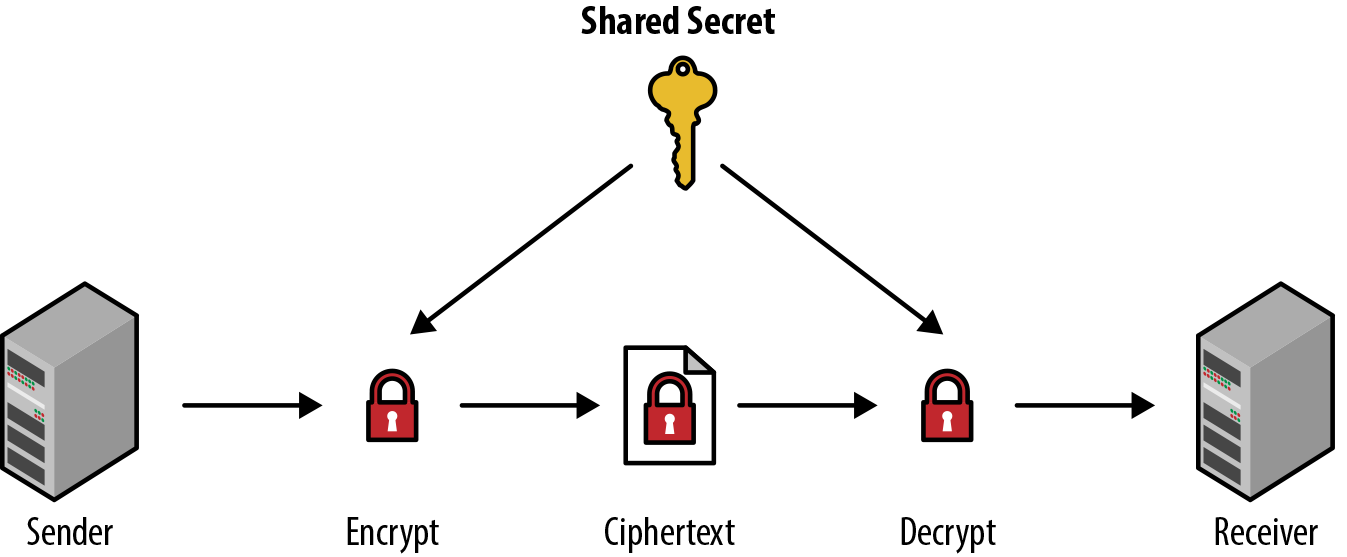
Figure 7-12. Symmetric cryptography process
In the image, we see that
-
The sender has a piece of plain-text data that they intend to send to the receiver over the channel.
-
The sender uses the shared secret to encrypt the data, giving us the ciphertext.
-
When the receiver obtains the ciphertext, they use the same shared secret to decrypt the ciphertext into its original plain text.
Next, we’ll run through a few practical examples of synchronous cryptography by using AES Block ciphering with a few different modes of operation using an initialization vector. Before we do that, though, let’s see what initialization vectors and padding are, how these modes of operation differ, and how they affect the block cipher security and performance.
Initialization Vector
Many of the cryptographic algorithms that we are likely to use are what we call iterative algorithms. When a piece of data that is to be encrypted is split into blocks for encryption, those iterative algorithms depend on the data from previously encrypted blocks in order to process the next subsequent block. In these cases, the first block of data that will be encrypted has no previous block to build, so it needs a piece of data to begin running the algorithm. This is the initialization vector.
An initialization vector is a fixed-sized piece of data that is typically required to be random, or at the least, pseudorandom. Typically, each time you are encrypting a new piece of data, you would supply a new, random, fixed-length piece of data.
Let’s look at a practical example. In the CBC encryption mode of operation (we will explore that in the next section), the way it works is by breaking the data to be encrypted into blocks. As the algorithm goes through each block, the plain-text block is XORed (exclusive or—A or B, but not A and B) against the previous encrypted block, before finally being encrypted together. Because the first block in the chain needs to have a previous block to XOR against, we need to supply that data. That data is the initialization vector.
Padding
In the case of certain block cipher algorithm modes, such as Cipher Block Chaining (CBC) described in the next section, when the data to be encrypted is split into blocks of data to be processed, the plain-text data that is to be encrypted needs to be an exact multiple of the blocks produced. This means that each block needs to be an equal size. In these cases, if we come across data that cannot be chunked up into equal blocks, we need to add some padding data to the blocks.
Several standard conventions are employed that set standards on what this dummy data should be. Let’s look at these visually. Let’s say that we want to encode the string “This is my block data.” If the cipher mode we are employing requires equal block sizes, it would split the data into three blocks of 8 bytes, represented with the hex values of each character:
+-----------------------+-----------------------+-----------------------+
|T  h  i  s  _  i  s  _ |m  y  _  b  l  o  c  k |_  d  a  t  a  ?  ?  ? |
+-----------------------+-----------------------+-----------------------+
|54 68 69 73 20 69 73 20|6d 79 20 62 6c 6f 63 6b|20 64 61 74 61 ?? ?? ??|
+-----------------------+-----------------------+-----------------------+
Those three characters at the end will be the padding that we need to add to the string. Let’s see how this looks with each convention:
- Each padded byte is the value of the total number of bytes needing to be added
-
Each byte of padding is set to the value of the total number of bytes of padding. In this case, we have 3 bytes of padding, so we set the value to 03:
+-----------------------+-----------------------+-----------------------+
|T  h  i  s  _  i  s  _ |m  y  _  b  l  o  c  k |_  d  a  t  a  _  _  _ |
+-----------------------+-----------------------+-----------------------+
|54 68 69 73 20 69 73 20|6d 79 20 62 6c 6f 63 6b|20 64 61 74 61 03 03 03|
+-----------------------+-----------------------+-----------------------+
Note
The preceding convention is the most popular method used throughout the industry, as it’s easy during decryption to read these padding bytes and know, easily, what is a padding byte and how many you should be looking for.
- The first padded byte is 0x80, followed by 0 bytes for the rest
-
For this one, we set the first byte of padding to 0x80 and all subsequent padding bytes to 0:
+-----------------------+-----------------------+-----------------------+
|T  h  i  s  _  i  s  _ |m  y  _  b  l  o  c  k |_  d  a  t  a  _  _  _ |
+-----------------------+-----------------------+-----------------------+
|54 68 69 73 20 69 73 20|6d 79 20 62 6c 6f 63 6b|20 64 61 74 61 80 00 00|
+-----------------------+-----------------------+-----------------------+
- Each byte is set to 0 except the last byte, which is the number of the total bytes of padding
-
This is a take on the first method, but we set all bytes of padding to 0, with the exception of the last byte, which should be equal to the total number of bytes of padding. In the case of our example, that will be 03:
+-----------------------+-----------------------+-----------------------+
|T  h  i  s  _  i  s  _ |m  y  _  b  l  o  c  k |_  d  a  t  a  _  _  _ |
+-----------------------+-----------------------+-----------------------+
|54 68 69 73 20 69 73 20|6d 79 20 62 6c 6f 63 6b|20 64 61 74 61 00 00 03|
+-----------------------+-----------------------+-----------------------+
- All bytes are set to 0
-
All bytes of padding should be set to 0:
+-----------------------+-----------------------+-----------------------+
|T  h  i  s  _  i  s  _ |m  y  _  b  l  o  c  k |_  d  a  t  a  _  _  _ |
+-----------------------+-----------------------+-----------------------+
|54 68 69 73 20 69 73 20|6d 79 20 62 6c 6f 63 6b|20 64 61 74 61 00 00 00|
+-----------------------+-----------------------+-----------------------+
- All bytes are set to spaces (0x20)
-
All bytes of padding should be set to spaces:
+-----------------------+-----------------------+-----------------------+
|T  h  i  s  _  i  s  _ |m  y  _  b  l  o  c  k |_  d  a  t  a  _  _  _ |
+-----------------------+-----------------------+-----------------------+
|54 68 69 73 20 69 73 20|6d 79 20 62 6c 6f 63 6b|20 64 61 74 61 20 20 20|
+-----------------------+-----------------------+-----------------------+
How padding works is something that we should understand when choosing a proper mode of operation, because it can be costly depending on the data that is to be encrypted. In each case of the padding, the decryption process needs to know how to properly determine which method was used, and how to properly disregard padding values.
In the case of the algorithms that we are going to use in the practical examples that follow, padding will be taken care of for us, so it’s not something that we need to be concerned with in our implementations.
Block Cipher Modes of Operation
Understanding the potential modes of operation is important when working with data encryption. A mode of operation is an algorithm that uses a block cipher (such as AES) to provide functionality such as confidentiality or data authentication for the block of information to be encrypted.
Within the case of our web operations, we will be working with three main categories of modes:
- Encryption
-
This means, in general terms, data privacy/confidentiality. A potential attacker who has the generated ciphertext (the encrypted data) will not be able to get any information about the plain-text data, except for the length perhaps.
- Authentication
-
Authentication mode provides a mechanism for determining data authenticity. If a receiver obtains ciphertext or cleartext from a sender, they can determine whether the data is genuine and was constructed by the sender.
- Authenticated Encryption
Now that we have an understanding of the categories, let’s look at some of the NIST-approved block cipher modes of operation1 (Table 7-1). Many of these modes range heavily in how they function, but at the end of this section we list the most popular industry-standard modes.
| Mode | Name | Description |
|---|---|---|
ECB |
Electronic Codebook |
The simplest mode of operation. The data that is supplied for encryption is divided into blocks. When encrypting/decrypting, these blocks are processed individually. The main issue with this mode is that identical plain-text blocks are encrypted into identical ciphertext blocks, which creates a pattern that a potential hacker can exploit. One of the benefits of this mode is that the blocks can be processed in parallel, speeding up encryption/decryption. |
CBC |
Cipher Block Chaining |
In this mode, each plain-text block is XORed against the previous ciphertext (encrypted) block, before then being encrypted itself. Since this is an iterative algorithm, an initialization vector needs to be supplied. In order to make each block unique, the initialization vector needs to be supplied as the first block. One of the chief drawbacks is that blocks cannot be processed in parallel, since each block needs to be run sequentially. The other issue is that plain-text input needs to be a multiple of the block size (each block the same size), meaning that the initial data may have to be padded to bring it to that length. |
OFB |
Output Feedback |
The output of OFB is what is called a stream cipher. The plain-text blocks are combined with random or pseudorandom characters to generate keystream blocks. These keystream blocks are then XORed with the plain-text blocks to get the end ciphertext. This mode also utilizes a supplied intialization vector. One of the benefits with this mode is that each block can be a different size, meaning that there is no need to pad the initial plain-text data. One of the drawbacks is that encrypting and decrypting blocks cannot be done in parallel, since encrypting each block depends on the previous blocks. |
CFB |
Cipher Feedback |
CFB mode is very similar operationally to CBC. The main difference between these two is that CBC mode creates the ciphertext after the block cipher algorithm is run, while CFB generates it after we compute the XOR. |
CTR |
Counter |
Counter mode, much like OFB, turns the block cipher into a stream cipher. The keystream that is used can be a function that produces successive values for the random data (a counter). The function producing the counter data just needs to ensure that the data does not repeat for a long period of time. The most common counter type is one that increments a number by 1 each time. Where CTR differs from OFB is that both CTR encryption and decryption can be run in parallel, since it doesn’t generate the ciphertext by XORing the plain-text block against the previous ciphertext block (as in OFB). |
If you want to protect the privacy of the data that you are sending, but don’t necessarily need to authenticate the sending source of the data, then the mode under the encryption category will fill that need.
If confidentiality is not required for the message being sent, that’s where the authentication mode will come into play. For instance, if you just need to know that the message came from an approved sender, but the message itself is not sensitive in terms of data privacy, then the mode of operation in Table 7-2 is probably best.
| Mode | Name | Description |
|---|---|---|
CMAC |
Cipher-based Message Authentication Code |
CMAC mode is used for determining the authenticity and integrity of a message. It uses a block cipher algorithm in conjunction with a secret key to generate the resulting cipher. This mode is not heavily used. |
In many cases you probably want to not only maintain the privacy of the data being transmitted, but also verify the source of the data for additional security. In this case, the combined authenticated encryption modes listed in Table 7-3 are an excellent option.
| Mode | Name | Description |
|---|---|---|
CCM |
Counter with CBC-MAC |
This is the easiest combined mode of operation. As the full name suggests, CCM is a combination of the CTR and CBC modes of operation. This mode also includes the use of an initialization vector, and message authentication is done on the plain-text data. Encryption/decryption cannot be run in parallel. |
GCM |
Galois/Counter Mode |
GCM has been widely adopted because of its efficiency and performance. Like CCM, GCM uses an initialization vector, but the message authentication is done on the ciphertext as opposed to the plain-text data. Encryption/decryption can also be run in parallel, unlike CCM. |
KW / KWP / TKW |
Key Wrapping |
Permutations of proposed key wrap algorithm modes for encrypting and authenticating data. These modes are not widely used. |
Even with a basic understanding of the preceding tables, it can be difficult to choose the best modes of operations in each category. If we break them into current industry-standard use, these are the most popular modes of operation in each category:
-
Encryption: CTR (for good parallelization/speed)
-
Authentication: CMAC (because it’s the only approved one, although it’s not widely used in the industry)
Note
Even though there are preferred modes by many in the industry, the mode that you choose to use should always come down to your needs on security, performance, scaling, and how each mode fits into those plans. Just because it’s popular doesn’t mean it’s right for you.
Now that you have an understanding of modes of operation, let’s apply these to a few examples, starting with AES using the CTR encryption mode.
Using AES with CTR Encryption Mode
Note
This sample code for using AES with CTR mode is available at https://github.com/iddatasecuritybook/chapter7/blob/master/symmetric-crypto/aes-ctr.js.
We have all the our core basics to start looking at using a cipher algorithm (AES) with a particular mode of operation (CTR encryption in this case).
We’re going to be using the standard Node crypto package for this example, so there is nothing to pull down from npm. At the top of your Node script, add the following initialization variable:
var crypto = require('crypto');
Now we need to set the variables that we are going to be working with in the example:
var text = "Encryption Testing AES";
var key = crypto.randomBytes(32);       //256 bit shared key
var iv = crypto.randomBytes(16);        //initialization vector - 16 bytes
var algorithm = 'aes-256-ctr';          //cipher and mode of operation
Going from top to bottom, these are as follows:
text-
The data to be encrypted/decrypted.
key-
A 32-byte shared key to be used by the crypto library for encryption/decryption. We use the
crypto.randomBytes(…)method to generate that string. iv-
The initialization vector, which should be a random 16-byte string. We use the
crypto.randomBytes(…)method to generate that string. algorithm-
The cipher algorithm and mode of operation to use. In this case, we’re using the AES cipher algorithm with the CTR mode of operation.
Next, we create the ciphertext by encrypting the data:
var cipher = crypto.createCipher(algorithm, key, iv);
var encrypted = cipher.update(text, 'utf8', 'hex');
encrypted += cipher.final('hex');
We first make a call to crypto.createCipher(…) to initialize the cipher that we want to use, passing in the algorithm/mode, the shared key, and the initialization vector.
Next, we use cipher.update(…) to update the cipher with data. We supply the data to be encoded, the input encoding utf8, and the output encoding hex.
cipher.update(data, input_encoding, output_encoding)
The input encoding (second parameter) should be one of utf8, ascii, or binary. If no input encoding is specified, the data (first parameter) must be a Buffer. If a Buffer is specified as the data, input encoding will be ignored.
Lastly, we make the request to cipher.final(…), passing in the output encoding type, to return the ciphertext.
Our plain-text input is now encoded. At this point, there should be a few things known about the ciphertext and decryption:
-
The ciphertext can now be transmitted to its end source (the receiver).
-
The shared key and initialization vector must be known to the receiver to decrypt. The key should be a shared secret between the app and the host (sender and receiver), and the IV can be considered as a one-time-use nonce, shared between both parties.
Now, let’s say the cipher has been transmitted to the receiver, and they also have the key and initialization vector. We can now begin deciphering the ciphertext to extract our plain-text message:
var decipher = crypto.createDecipher(algorithm, key, iv);
var decrypted = decipher.update(encrypted, 'hex', 'utf8');
decrypted += decipher.final('utf8');
We start by making a call to crypto.createDecipher(…), passing along the same values that we did for creating the cipher during encryption.
We then call decipher.update(…), passing in the ciphertext, the ciphertext encoding (in this case, hex), and the intended output encoding (in this case, utf8).
Lastly, we call decipher.final(…) with the output encoding type to retrieve our final decoded message.
Using AES with with GCM Authenticated Encryption Mode
Note
This sample code for using AES with GCM mode is available at https://github.com/iddatasecuritybook/chapter7/blob/master/symmetric-crypto/aes-gcm.js.
Now let’s look at an example that uses the GCM joint authenticated encryption mode of operation. This one is fairly similar to the previous CTR mode example, but with an additional encryption/decryption step to handle the authentication piece that we didn’t have in the CTR mode example.
We’re again going to use the standard Node crypto package, so require that at the top of your Node script:
var crypto = require('crypto');
Next, we initialize the variables that we are going to be using:
var text = "Encryption Testing AES GCM mode";
var key = crypto.randomBytes(32);       //256 bit shared key
var iv = crypto.randomBytes(16);        //initialization vector - 16 bytes
var algorithm = 'aes-256-gcm';          //cipher and mode of operation
As before, these variables are as follows:
text-
The data to be encrypted/decrypted.
key-
A 32-byte shared key to be used by the crypto library for encryption/decryption. We use the
crypto.randomBytes(…)method to generate that string. iv-
The initialization vector, which should be a random 16-byte string. We use the
crypto.randomBytes(…)method to generate that string. algorithm-
The cipher algorithm and mode of operation to use. In this case, we’re using the AES cipher algorithm with the GCM authenticated encryption mode of operation.
Now, let’s encode the data to get our ciphertext, and see the differences when we add the authentication piece:
var cipher = crypto.createCipher(algorithm, key, iv);
var encrypted = cipher.update(text, 'utf8', 'hex');
encrypted += cipher.final('hex');
var tag = cipher.getAuthTag();
We first make a call to crypto.createCipher(…) to initialize the cipher, passing in the algorithm/mode, the shared key, and the initialization vector.
Next, we use cipher.update(…) to update the cipher with data. We supply the data to be encoded, the input encoding utf8, and the output encoding hex.
We then create the ciphertext by calling cipher.final(…) with the output formatting.
This is where the authentication piece comes in; after we have the ciphertext, we have to generate a tag by calling cipher.getAuthTag(…). This will be a Buffer containing an authentication tag that has been computed from the cipher data. This will be used to authenticate the source of the ciphertext.
Warning
As of the writing of this text, getAuthTag supports only the GCM authenticated encryption mode.
As in the previous example, the ciphertext should be transmitted to the receiver. The receiver should also have knowledge of the shared key, the initialization vector, and the authentication tag:
var decipher = crypto.createDecipher(algorithm, key, iv);
decipher.setAuthTag(tag);
var decrypted = decipher.update(encrypted, 'hex', 'utf8');
decrypted += decipher.final('utf8');
We make our call to crypto.createDecipher(…), passing along the same values that we did for creating the cipher during encryption.
Following that, we need to pass in the authentication tag to validate the source of the ciphertext. We do so by calling decipher.setAuthTag(…), passing in the tag that was generated from the encryption step.
Next, we go back to the standard decipher techniques by calling decipher.update(…) to pass in the data, providing the ciphertext, ciphertext encoding (in this case, hex), and the intended output encoding (in this case, utf8).
Lastly, we call decipher.final(…) with the output encoding type to retrieve our final decoded message. The ciphertext will now be decoded and the source authenticated, allowing us to use the data at will.
Advantages, Disadvantages, and Uses of Synchronous Cryptography
As we close out our exploration of synchronous cryptography, it’s a good idea to understand what it does well, and what it doesn’t do well.
Using this method over its asymmetric counterpart has some advantages:
- Security
-
When we are using a secure algorithm, such as the US government–designated Advanced Encryption Standard (AES) that we looked at previously, the ciphertext that is produced is incredibly secure, and is considered essentially unbreakable with current computing standards.
- Speed
-
One of the main issues with asymmetric key cryptography is the complexity of the process that it needs for encryption and decryption. With symmetric cryptography, using modes of operation that allow for parallel block processing for encryption and decryption, we have a fast processing mechanism.
If we flip the coin, though, this methodology has one major drawback:
- Shared key
-
As you saw in the practical examples, we generate a single shared key that is used by the sender for encryption, as well as the receiver for decryption. You need to take great care in ensuring that this key can be shared between both parties, without being retrieved by an attacker. Should this key be obtained by an illicit third party, they now have access to all encrypted data that is using that shared key. This means that the amount of damage that may be caused by using this method is typically quite high.
With all said and done, one of the best methods for using this type of cryptography is when you’re encrypting and decrypting your own data, when you have safe, secure access to shared keys between endpoints. All in all, if you have a safe way to share the key between yourself and an unknown party, you probably don’t need to be using your own encryption in the first place.