Table of Contents for
The Hitchhiker's Guide to Python
 The Hitchhiker's Guide to Python
Published by
O'Reilly Media, Inc., 2016
The Hitchhiker's Guide to Python
Published by
O'Reilly Media, Inc., 2016
- Cover
- nav
- The Hitchhiker’s Guide to Python
- The Hitchhiker’s Guide to Python
- Dedication
- Preface
- I. Getting Started
- 1. Picking an Interpreter
- 2. Properly Installing Python
- 3. Your Development Environment
- II. Getting Down to Business
- 4. Writing Great Code
- 5. Reading Great Code
- 6. Shipping Great Code
- III. Scenario Guide
- 7. User Interaction
- 8. Code Management and Improvement
- 9. Software Interfaces
- 10. Data Manipulation
- 11. Data Persistence
- A. Additional Notes
- Index
- About the Authors
- Colophon
Chapter 5. Reading Great Code
Programmers read a lot of code. One of the core tenets behind Python’s design is readability, and one secret to becoming a great programmer is to read, understand, and comprehend excellent code. Such code typically follows the guidelines outlined in “Code Style” and does its best to express a clear and concise intent to the reader.
This chapter shows excerpts from some very readable Python projects that illustrate topics covered in Chapter 4. As we describe them, we’ll also share techniques for reading code.1
Here’s a list of projects highlighted in this chapter in the order they will appear:
-
HowDoI is a console application that searches the Internet for answers to coding questions, written in Python.
-
Diamond is a Python daemon2 that collects metrics and publishes them to Graphite or other backends. It is capable of collecting CPU, memory, network, I/O, load and disk metrics. Additionally, it features an API for implementing custom collectors to gather metrics from almost any source.
-
Tablib is a format-agnostic tabular dataset library.
-
Requests is a HyperText Transfer Protocol (HTTP) library for human beings (the 90% of us who just want an HTTP client that automatically handles password authentication and complies with the half-dozen standards to perform things like a multipart file upload with one function call).
-
Werkzeug started as a simple collection of various utilities for Web Service Gateway Interface (WSGI) applications and has become one of the most advanced WSGI utility modules.
-
Flask is a web microframework for Python based on Werkzeug and Jinja2. It’s good for getting simple web pages up quickly.
There is a lot more to all of these projects than what we’re mentioning, and we really, really hope that after this chapter you’ll be motivated to download and read at least one or two of them in depth yourself (and maybe even present what you learn to a local user group).
Common Features
Some features are common across all of the projects: details from a snapshot of each one show very few (fewer than 20, excluding whitespace and comments) lines of code on average per function, and a lot of blank lines. The larger, more complex projects use docstrings and/or comments; usually more than a fifth of the content of the code base is some sort of documentation. But we can see from HowDoI, which has no docstrings because it is not for interactive use, that comments are not necessary when the code is straightforward. Table 5-1 shows common practices in these projects.
| Package | License | Line count | Docstrings (% of lines) |
Comments (% of lines) |
Blank lines (% of lines) |
Average function length |
|---|---|---|---|---|---|---|
HowDoI |
MIT |
262 |
0% |
6% |
20% |
13 lines of code |
Diamond |
MIT |
6,021 |
21% |
9% |
16% |
11 lines of code |
Tablib |
MIT |
1,802 |
19% |
4% |
27% |
8 lines of code |
Requests |
Apache 2.0 |
4,072 |
23% |
8% |
19% |
10 lines of code |
Flask |
BSD 3-clause |
10,163 |
7% |
12% |
11% |
13 lines of code |
Werkzeug |
BSD 3-clause |
25,822 |
25% |
3% |
13% |
9 lines of code |
In each section, we use a different code-reading technique to figure out what the project is about. Next, we single out code excerpts that demonstrate ideas mentioned elsewhere in this guide. (Just because we don’t highlight things in one project doesn’t mean they don’t exist; we just want to provide good coverage of concepts across these examples.) You should finish this chapter more confident about reading code, with examples that reinforce what makes good code, and with some ideas you’d like to incorporate in your own code later.
HowDoI
With fewer than 300 lines of code, The HowDoI project, by Benjamin Gleitzman, is a great choice to start our reading odyssey.
Reading a Single-File Script
A script usually has a clear starting point, clear options, and a clear ending point. This makes it easier to follow than libraries that present an API or provide a framework.
Get the HowDoI module from GitHub:3
$git clone https://github.com/gleitz/howdoi.git$virtualenv -p python3 venv# or use mkvirtualenv, your choice...$sourcevenv/bin/activate(venv)$cdhowdoi/(venv)$pip install --editable .(venv)$python test_howdoi.py# Run the unit tests.
You should now have the howdoi executable installed in venv/bin.
(You can look at it if you want by typing cat `which howdoi` on the
command line.)
It was auto-generated when you ran pip install.
Read HowDoI’s documentation
HowDoI’s documentation is in the README.rst file in the HowDoI repository on GitHub: it’s a small command-line application that allows users to search the Internet for answers to programming questions.
From the command line in a terminal shell, we can type howdoi --help for
the usage statement:
(venv)$howdoi --help usage: howdoi[-h][-p POS][-a][-l][-c][-n NUM_ANSWERS][-C][-v][QUERY[QUERY ...]]instant coding answers via thecommandline positional arguments: QUERY the question to answer optional arguments: -h, --help show thishelpmessage andexit-p POS, --pos POSselectanswer in specified position(default: 1)-a, --all display the full text of the answer -l, --link display only the answer link -c, --colorenablecolorized output -n NUM_ANSWERS, --num-answers NUM_ANSWERS number of answers toreturn-C, --clear-cache clear the cache -v, --version displays the current version of howdoi
That’s it—from the documentation we know that HowDoI gets answers to coding questions from the Internet, and from the usage statement we know we can choose the answer in a specific position, can colorize the output, get multiple answers, and that it keeps a cache that can be cleared.
Use HowDoI
We can confirm we understand what HowDoI does by actually using it. Here’s an example:
(venv)$howdoi --num-answers2python lambdafunctionlist comprehension --- Answer1---[(lambda x: x*x)(x)forx in range(10)]--- Answer2---[x()forx in[lambdam=m: mform in[1,2,3]]]# [1, 2, 3]
We’ve installed HowDoI, read its documentation, and can use it. On to reading actual code!
Read HowDoI’s code
If you look inside the howdoi/ directory, you’ll see it contains two files: an __init__.py, which contains a single line that defines the version number, and howdoi.py, which we’ll open and read.
Skimming howdoi.py, we see each new function definition
is used in the next function, making it is easy
to follow. And each function does just one thing—the thing
its name says.
The main function, command_line_runner(),
is near the bottom of howdoi.py.
Rather than reprint HowDoI’s source here, we can illustrate its call structure using the call graph in Figure 5-1. It was created by Python Call Graph, which provides a visualization of the functions called when running a Python script. This works well with command-line applications thanks to a single start point and the relatively few paths through their code. (Note that we manually deleted functions not in the HowDoI project from the rendered image to legibly fit it on the page, and slightly recolored and reformatted it.)
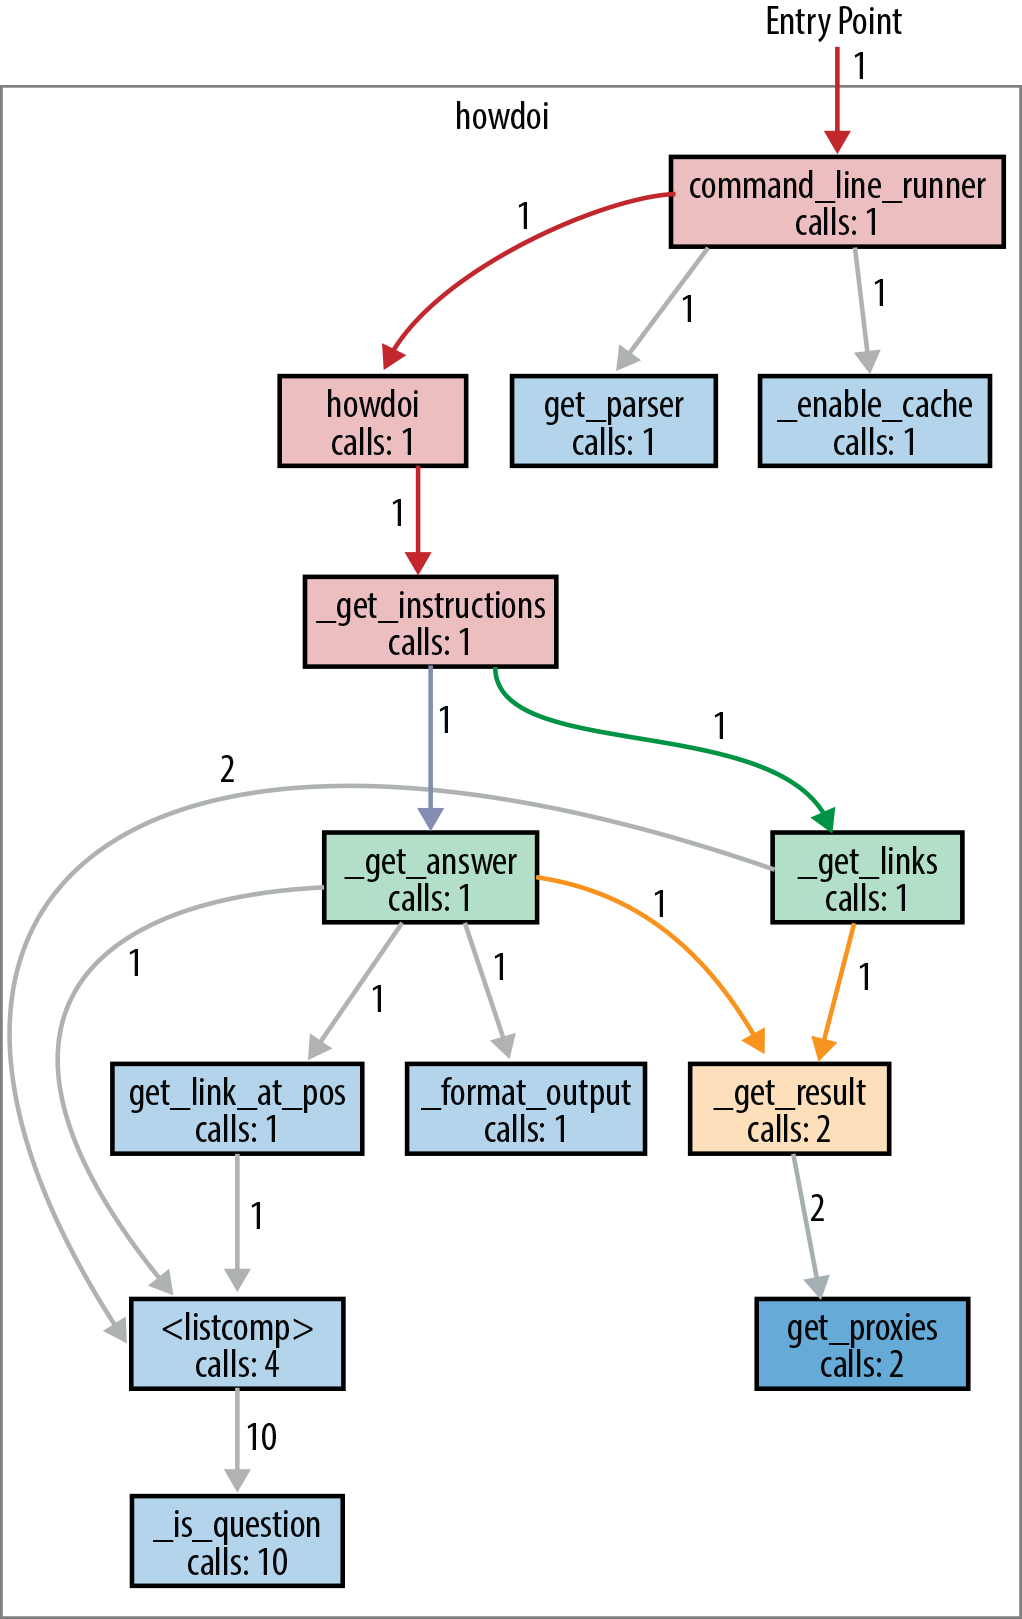
Figure 5-1. Clean paths and clear function names in this howdoi call graph
The code could have been all one large, incomprehensible spaghetti function.
Instead, intentional choices structure the code into compartmentalized functions
with straightforward names.
Here’s a brief description of the execution depicted in Figure 5-1:
command_line_runner() parses the input and passes the user flags and
the query to howdoi(). Then, howdoi() wraps _get_instructions() in a
try/except statement so that it can catch connection errors
and print a reasonable error message (because application code
should not terminate on exceptions).
The primary functionality is in _get_instructions():
it calls _get_links() to do a Google search of Stack Overflow
for links that match the query, then calls _get_answer()
once for each resulting link (up to the number of links that the user
specified on the command line—the default is just one link).
The _get_answer() function follows a link to Stack Overflow,
extracts code from the answer, colorizes it, and returns it to
_get_instructions(), which will combine all of the answers
into one string, and return it.
Both _get_links() and _get_answer() call _get_result()
to actually do the HTTP request:
_get_links() for the Google query, and
_get_answer() for the resulting links from the Google query.
All _get_result() does is wrap requests.get() with a try/except
statement so that it can catch SSL errors, print an error message,
and re-raise the exception so that the top-level try/except
can catch it and exit. Catching all exceptions before exiting is best practice
for application programs.
Structure Examples from HowDoI
HowDoI is a small library, and we’ll be highlighting structure much more elsewhere, so there are only a few notes here.
Let each function do just one thing
We can’t reiterate enough how beneficial it is for readers to
separate out HowDoI’s internal functions to each do just one thing.
Also, there are functions whose sole purpose is to wrap other
functions with a try/except statement.
(The only function with a try/except that doesn’t follow this
practice is _format_output(), which leverages try/except
clauses to identify the correct coding language for syntax
highlighting, not for exception handling.)
Leverage data available from the system
HowDoI checks and uses relevant system values, such as
urllib.request.getproxies(), to handle the use of proxy servers
(this can be the case in organizations like schools that have
an intermediary server filtering the connection to the Internet),
or in this snippet:
XDG_CACHE_DIR=os.environ.get('XDG_CACHE_HOME',os.path.join(os.path.expanduser('~'),'.cache'))
How do you know that these variables exist?
The need for urllib.request.getproxies() is evident from the
optional arguments in requests.get()—so part of this
information comes from understanding the API of libraries you call.
Environment variables are often utility-specific, so if a library
is intended for use with a particular database or other sister application,
those applications’ documentation list relevant environment variables.
For plain POSIX systems, a good place to start is
Ubuntu’s list of default environment variables,
or else the base list of environment variables in the
POSIX specification,
which links to various relevant other lists.
Style Examples from HowDoI
HowDoI mostly follows PEP 8, but not pedantically, and not
when it restricts readability. For example, import statements
are at the top of the file, but standard library and external
modules are intermixed.
And although the string constants in USER_AGENTS are much
longer than 80 characters, there is no natural place to break
the strings, so they are left intact.
These next excerpts highlight other style choices we’ve previously advocated for in Chapter 4.
Underscore-prefixed function names (we are all responsible users)
Almost every function in HowDoI is prefixed with an underscore. This identifies them as
for internal use only. For most of them, this is because if called, there is the
possibility of an uncaught exception—anything that calls _get_result()
risks this—until the howdoi() function, which handles the possible exceptions.
The rest of the internal functions (_format_output(), _is_question(),
_enable_cache(), and _clear_cache()) are identified as such because
they’re simply not intended for use outside of the package.
The testing script, howdoi/test_howdoi.py, only calls the nonprefixed
functions, checking that the formatter works by feeding a command-line argument
for colorization to the top-level howdoi.howdoi() function, rather
than by feeding code to howdoi._format_output().
Handle compatibility in just one place (readability counts)
Differences between versions of possible dependencies are handled before the main code body so the reader knows there won’t be dependency issues, and version checking doesn’t litter the code elsewhere. This is nice because HowDoI is shipped as a command-line tool, and the extra effort means users won’t be forced to change their Python environment just to accommodate the tool. Here is the snippet with the workarounds:
try:fromurllib.parseimportquoteasurl_quoteexceptImportError:fromurllibimportquoteasurl_quotetry:fromurllibimportgetproxiesexceptImportError:fromurllib.requestimportgetproxies
And the following snippet resolves the
difference between Python 2 and Python 3’s
Unicode handling in seven lines, by creating the
function u(x) to either do nothing or emulate
Python 3. Plus it follows Stack Overflow’s new citation guideline, by citing the original
source:
# Handle Unicode between Python 2 and 3# http://stackoverflow.com/a/6633040/305414ifsys.version<'3':importcodecsdefu(x):returncodecs.unicode_escape_decode(x)[0]else:defu(x):returnx
Pythonic choices (beautiful is better than ugly)
The following snippet from howdoi.py
shows thoughtful, Pythonic choices. The function
get_link_at_pos() returns False if there are
no results, or else identifies the links that are
to Stack Overflow questions, and returns the
one at the desired position (or the last one if
there aren’t enough links):
def_is_question(link):returnre.search('questions/\d+/',link)# [ ... skip a function ... ]defget_link_at_pos(links,position):links=[linkforlinkinlinksif_is_question(link)]ifnotlinks:returnFalseiflen(links)>=position:link=links[position-1]else:link=links[-1]returnlink

The first function,
_is_question(), is defined as a separate one liner, giving clear meaning to an otherwise opaque regular expression search.
The list comprehension reads like a sentence, thanks to the separate definition of
_is_question()and meaningful variable names.
The early
returnstatement flattens the code.
The additional step of assigning to the variable
linkhere…
…and here, rather than two separate
returnstatements with no named variable at all, reinforces the purpose ofget_link_at_pos()with clear variable names. The code is self-documenting.
The single
returnstatement at the highest indentation level explicitly shows that all paths through the code exit either right away—because there are no links—or at the end of the function, returning a link. Our quick rule of thumb works: we can read the first and last line of this function and understand what it does. (Given multiple links and a position,get_link_at_pos()returns one single link: the one at the given position.)
Diamond
Diamond is a daemon (an application that runs continuously as a background process) that collects system metrics and publishes them to downstream programs like MySQL, Graphite (a platform open sourced by Orbitz in 2008 that stores, retrieves, and optionally graphs numeric time-series data), and others. We’ll get to explore good package structure, as Diamond is a multifile application, much larger than HowDoI.
Reading a Larger Application
Diamond is still a command-line application, so like with HowDoI, there’s still a clear starting point and clear paths of execution, although the supporting code now spans multiple files.
Get Diamond from GitHub (the documentation says it only runs on CentOS or Ubuntu, but code in its setup.py makes it appear to support all platforms; however, some of the commands that default collectors use to monitor memory, disk space, and other system metrics are not on Windows). As of this writing, it still uses Python 2.7:
$git clone https://github.com/python-diamond/Diamond.git$virtualenv -p python2 venv# It's not Python 3 compatible yet...$sourcevenv/bin/activate(venv)$cdDiamond/(venv)$pip install --editable .(venv)$pip install mock docker-py# These are dependencies for testing.(venv)$pip install mock# This is also a dependency for testing.(venv)$python test.py# Run the unit tests.
Like with the HowDoI library, Diamond’s setup script installs
executables in venv/bin/: diamond and diamond-setup.
This time they’re not automatically generated—they’re prewritten scripts in the project’s Diamond/bin/ directory.
The documentation says that diamond starts the server,
and diamond-setup is an optional tool to walk users through interactive
modification of the collector settings in the configuration file.
There are a lot of additional directories, and the diamond package is
underneath Diamond/src in this project directory. We are going to
look at files in Diamond/src (which contains the main code), Diamond/bin
(which contains the executable diamond), and Diamond/conf (which contains
the sample configuration file). The rest of the directories and files
may be of interest to people distributing similar applications but is
not what we want to cover right now.
Read Diamond’s documentation
First, we can get a sense of what the project is and what it does by scanning the online documentation. Diamond’s goal is to make it easy to gather system metrics on clusters of machines. Originally open sourced by BrightCove, Inc., in 2011, it now has over 200 contributors.
After describing its history and purpose, the documentation tells you how to install it, and then says how to run it: just modify the example configuration file (in our download it’s in conf/diamond.conf.example), put it in the default location (/etc/diamond/diamond.conf) or a path you’ll specify on the command line, and you’re set. There’s also a helpful section on configuration in the Diamond wiki page.
From the command line, we can get the usage statement via diamond --help:
(venv)$diamond --help Usage: diamond[options]Options: -h, --help show thishelpmessage andexit-c CONFIGFILE, --configfile=CONFIGFILE config file -f, --foreground run in foreground -l, --log-stdout log to stdout -p PIDFILE, --pidfile=PIDFILE pid file -r COLLECTOR, --run=COLLECTOR run a given collector once andexit-v, --version display the version andexit--skip-pidfile Skip creating PID file -u USER, --user=USER Change to specified unprivileged user -g GROUP, --group=GROUP Change to specified unprivileged group --skip-change-user Skip changing to an unprivileged user --skip-fork Skip forking(damonizing)process
From this, we know it uses a configuration file; by default, it runs in the background; it has logging; you can specifiy a PID (process ID) file; you can test collectors; you can change the process’s user and group; and it by default will daemonize (fork) the process.4
Use Diamond
To understand it even better, we can run Diamond. We need a modified configuration file, which we can put in a directory we make called Diamond/tmp. From inside the Diamond directory, type:
(venv)$mkdir tmp(venv)$cp conf/diamond.conf.example tmp/diamond.conf
Then edit tmp/diamond.conf to look like this:
### Options for the server[server]# Handlers for published metrics.handlers=diamond.handler.archive.ArchiveHandleruser=group=# Directory to load collector modules fromcollectors_path=src/collectors/### Options for handlers[handlers][[default]][[ArchiveHandler]]log_file=/dev/stdout### Options for collectors[collectors][[default]]# Default Poll Interval (seconds)interval=20### Default enabled collectors[[CPUCollector]]enabled=True[[MemoryCollector]]enabled=True
We can tell from the example configuration file that:
There are multiple handlers, which we can select by class name.
We have control over the user and group that the daemon runs as (empty means to use the current user and group).
We can specify a path to look for collector modules. This is how Diamond will know where the custom
Collectorsubclasses are: we directly state it in the configuration file.We can also store configure handlers individually.
Next, run Diamond with options that set logging to /dev/stdout (with default formatting configurations), that keep the application in the foreground, that skip writing the PID file, and that use our new configuration file:
(venv)$diamond -l -f --skip-pidfile --configfile=tmp/diamond.conf
To end the process, type Ctrl+C until the command prompt reappears.
The log output demonstrates what collectors and handlers do:
collectors collect different metrics (such as the MemoryCollector’s
total, available, free, and swap memory sizes),
which the handlers format and send to various destinations,
such as Graphite, MySQL, or in our test case,
as log messages to /dev/stdout.
Reading Diamond’s code
IDEs can be useful when reading larger projects—they can quickly locate the original definitions of functions and classes in the source code. Or, given a definition, they can find all places in the project where it is used. For this functionality, set the IDE’s Python interpreter to the one in your virtual environment.5
Instead of following each function as we did with HowDoI,
Figure 5-2 follows the import statements;
the diagram just shows which modules in Diamond import which other modules.
Drawing sketches like these helps by providing a very high-level look
for larger projects: you hide the trees so you can see the forest.
We can start with the diamond executable file on the top left
and follow the imports through the Diamond project.
Aside from the diamond executable, every square outline denotes a
file (module) or directory (package) in the src/diamond directory.
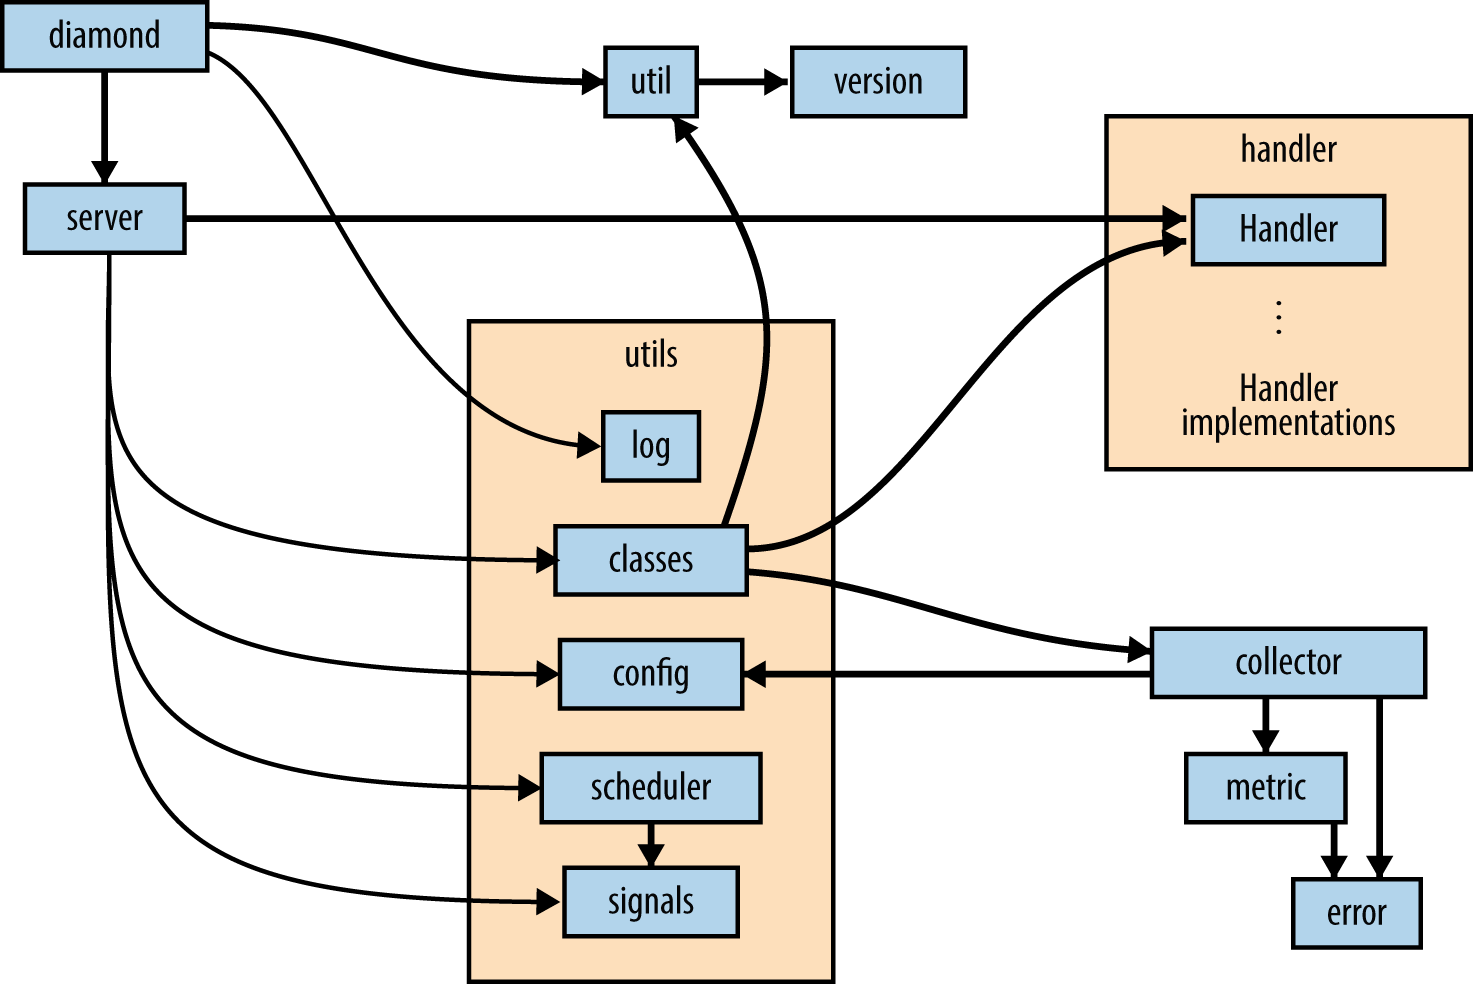
Figure 5-2. The module import structure of Diamond
Diamond’s well-organized and appropriately named modules make it possible to
get an idea of what the code is doing solely from our diagram:
diamond gets the version from util, then sets up logging using utils.log
and starts a Server instance using server. The Server imports from
almost all of the modules in the utils package, using utils.classes
to acess both the Handlers in handler and the collectors,
config to read the configuration file and obtain settings for the
collectors (and the extra paths to the user-defined collectors),
and scheduler and signals to set the polling interval for the
collectors to calculate their metrics, and to set up and start
the handlers processing the queue of metrics to send them to
their various destinations.
The diagram doesn’t include the helper modules convertor.py and
gmetric.py, which are used by specific collectors, or the over
20 handler implementations defined in the handler subpackage, or the
over 100 collector implementations defined in the project’s
Diamond/src/collectors/ directory (which is installed elsewhere
when not installed the way we did for reading—that is, using PyPI
or Linux package distributions, instead of source).
These are imported using diamond.classes.load_dynamic_class(),
which then calls the function diamond.util.load_class_from_name() to load the classes
from the string names given in the configuration file, so the import
statements do not explicitly name them.
To understand why there is both a utils package and a util
module, you have to dig into the actual code: the util module
provides functions related more to Diamond’s packaging than to
its operation—a function to get the version number from version.__VERSION__,
and two functions that parse strings that identify either
modules or classes, and import them.
Structure Examples from Diamond
Diamond is more than an executable application—it’s also a library that provides a way for users to create and use custom collectors.
We’ll highlight more things we like about the overall package structure, and then dig into how exactly Diamond makes it possible for the application to import and use externally defined collectors.
Separate different functionality into namespaces (they are one honking great idea)
The diagram in Figure 5-2 shows the server module
interacting with three other modules in the project: diamond.handler,
diamond.collector, and diamond.utils.
The utils subpackage could realistically have contained all of its
classes and functions in a single, large util.py module, but there
was an opportunity to use namespaces to separate code into related
groups, and the development team took it. Honking great!
All of the implementations of Handlers are contained in diamond/handler (which makes sense), but the structure for the Collectors is different.
There’s not a directory, only a module diamond/collector.py
that defines the Collector and ProcessCollector base classes.
All implementations of the Collectors are defined instead in
Diamond/src/collectors/ and would be installed in the
virtual environment under venv/share/diamond/collectors
when installing from PyPI (as recommended) rather than from GitHub (like we
did to read it).
This helps the user to create new implementations of Collectors: placing all of the collectors in the same location makes it
easier for the application to find them and easier for library users to
follow their example.
Finally, each Collector implementation in Diamond/src/collectors is in its own directory (rather than in a single file), which makes it possible to keep each Collector implementation’s tests separate. Also honking great.
User-extensible custom classes (complex is better than complicated)
It’s easy to add new Collector implementations: just subclass the
diamond.collector.Collector abstract base class,6
implement a Collector.collect() method,
and place the implementation in its own directory in venv/src/collectors/.
Underneath, the implementation is complex, but the user doesn’t see it. This section shows both the simple user-facing part of Diamond’s Collector API and the complex code that makes this user interface possible.
Complex versus complicated
We can boil down the user experience of working with complex code to be something like experiencing a Swiss watch—it just works, but inside there are a ton of precisely made little pieces, all interfacing with remarkable precision, in order to create the effortless user experience. Using complicated code, on the other hand, is like piloting an airplane—you really have to know what you’re doing to not crash and burn.7 We don’t want to live in a world without airplanes, but we do want our watches to work without us having to be rocket scientists. Wherever it’s possible, less complicated user interfaces are a good thing.
The simple user interface
To create a custom data collector, the user must subclass the abstract class,
Collector, and then provide, via the configuration file, the path to that new collector.
Here is an example of a new Collector definition from Diamond/src/collectors/cpu/cpu.py.
When Python searches for the collect() method, it will
look in the CPUCollector for a definition first, and then
if it doesn’t find the definition, it will use
diamond.collector.Collector.collect(), which raises
the NotImplementedError.
Minimal collector code would look like this:
# coding=utf-8importdiamond.collectorimportpsutilclassCPUCollector(diamond.collector.Collector):defcollect(self):# In Collector, this just contains raise(NotImplementedError)metric_name="cpu.percent"metric_value=psutil.cpu_percent()self.publish(metric_name,metric_value)
The default place to store the collector definitions is in the directory
venv/share/diamond/collectors/; but you can store it wherever you
define in the collectors_path value in the configuration file.
The class name, CPUCollector, is already listed in the example
configuration file.
Except for adding a hostname or a hostname_method specification either in the overall
defaults (under the text in the configuration file) or in the
individual collector’s overrides, as shown in the
following example, there need not be any other changes (the documentation lists all of the optional
collector settings):
[[CPUCollector]]enabled=Truehostname_method=smart
The more complex internal code
Behind the scenes, the Server will call utils.load_collectors() using
the path specified in collectors_path. Here is most of that function,
truncated for brevity:
defload_collectors(paths=None,filter=None):"""Scan for collectors to load from path"""# Initialize return valuecollectors={}log=logging.getLogger('diamond')ifpathsisNone:returnifisinstance(paths,basestring):paths=paths.split(',')paths=map(str.strip,paths)load_include_path(paths)forpathinpaths:##~~ Skip lines that confirm 'path' exists.forfinos.listdir(path):# Are we a directory? If so, process down the treefpath=os.path.join(path,f)ifos.path.isdir(fpath):subcollectors=load_collectors([fpath])forkeyinsubcollectors:collectors[key]=subcollectors[key]# Ignore anything that isn't a .py fileelif(os.path.isfile(fpath)##~~ ... Skip tests confirming fpath is a Python module ...):##~~ ... Skip the part that ignores filtered paths ...modname=f[:-3]try:# Import the modulemod=__import__(modname,globals(),locals(),['*'])except(KeyboardInterrupt,SystemExit),err:##~~ ... Log the exception and quit ...except:##~~ ... Log the exception and continue ...# Find all classes defined in the moduleforattrnameindir(mod):attr=getattr(mod,attrname)# Only attempt to load classes that are subclasses# of Collectors but are not the base Collector classif(inspect.isclass(attr)andissubclass(attr,Collector)andattr!=Collector):ifattrname.startswith('parent_'):continue# Get class namefqcn='.'.join([modname,attrname])try:# Load Collector classcls=load_dynamic_class(fqcn,Collector)# Add Collector classcollectors[cls.__name__]=clsexceptException:##~~ log the exception and continue ...# Return Collector classesreturncollectors
Break up the string (first function call); otherwise, the paths are lists of string paths to where the user-defined custom
Collectorsubclasses are defined.This recursively descends the paths given, inserting every directory into
sys.pathso that later the Collectors can be imported.Here’s the recursion—
load_collectors()is calling itself.8After loading the subdirectories’ collectors, update the original dictionary of custom collectors with the new ones from those subdirectories.
Since the introduction of Python 3.1, the
importlibmodule in Python’s standard library provides a preferred way to do this (via the moduleimportlib.import_module; parts ofimportlib.import_modulehave also been backported to Python 2.7). This demonstrates how to programmatically import a module given the string module name.Here’s how to programmatically access attributes in a module given just the string attribute name.

Actually,
load_dynamic_classmay not be necessary here. It re-imports the module, checks that the named class is actually a class, checks that it’s actually a Collector, and if so returns the newly loaded class. Redundancies sometimes occur in open source code written by large groups.
Here’s how they get the class name to use later when applying the configuration file options given only the string class name.
Style Examples from Diamond
There’s a great example use of a closure in Diamond that demonstrates what was said in “Late binding closures” about this behavior often being desirable.
Example use of a closure (when the gotcha isn’t a gotcha)
A closure is a function that makes use of variables available
in the local scope that would otherwise not be available when the function is called.
They can be difficult to implement and understand in other languages,
but are not hard to implement in Python, because Python treats functions just
like any other object.9
For example, functions can be passed around as arguments, or returned from other
functions.
Here’s an example excerpt from the diamond executable
that shows how to implement a closure in Python:
##~~ ... Skip the import statements ...defmain():try:##~~ ... Skip code that creates the command-line parser ...# Parse command-line Args(options,args)=parser.parse_args()##~~ ... Skip code that parses the configuration file ...##~~ ... Skip code that sets up the logger ...# Pass the exit upstream rather then handle it as an general exceptionexceptSystemExit,e:raiseSystemExit##~~ ... Skip code that handles other exceptions related to setup ...try:# PID MANAGEMENTifnotoptions.skip_pidfile:# Initialize PID fileifnotoptions.pidfile:options.pidfile=str(config['server']['pid_file'])##~~ ... Skip code to open and read the PID file if it exists, ...##~~ ... and then delete the file if there is no such PID ...##~~ ... or exits if there is already a running process. ...##~~ ... Skip the code that sets the group and user ID ...##~~ ... and the code that changes the PID file permissions. ...##~~ ... Skip the code that checks whether to run as a daemon, ...##~~ ... and if so detaches the process. ...# PID MANAGEMENTifnotoptions.skip_pidfile:# Finish initializing PID fileifnotoptions.foregroundandnotoptions.collector:# Write PID filepid=str(os.getpid())try:pf=file(options.pidfile,'w+')exceptIOError,e:log.error("Failed to write child PID file:%s"%(e))sys.exit(1)pf.write("%s\n"%pid)pf.close()# Loglog.debug("Wrote child PID file:%s"%(options.pidfile))# Initialize serverserver=Server(configfile=options.configfile)defsigint_handler(signum,frame):log.info("Signal Received:%d"%(signum))# Delete PID fileifnotoptions.skip_pidfileandos.path.exists(options.pidfile):os.remove(options.pidfile)# Loglog.debug("Removed PID file:%s"%(options.pidfile))sys.exit(0)# Set the signal handlerssignal.signal(signal.SIGINT,sigint_handler)signal.signal(signal.SIGTERM,sigint_handler)server.run()# Pass the exit upstream rather then handle it as a general exceptionexceptSystemExit,e:raiseSystemExit##~~ ... Skip code that handles any other exceptions ...##~~ ... and all of the rest of the script.
When we skip code, the missing parts will be summarized by a comment preceded by two tildes (
##~~ like this).The reason for the PID10 file is to make sure the daemon is unique (i.e., not accidentally started twice), to communicate the associated process ID quickly to other scripts, and to make it evident that an abnormal termination has occurred (because in this script, the PID file is deleted upon normal termination).
All of this code is just to provide context leading up to the closure. At this point, either the process is running as a daemon (and now has a different process ID than before) or it will skip this part because it’s already written its correct PID to the PID file.
This (
sigint_handler()) is the closure. It is defined inside ofmain(), rather than at the top level, outside of any functions, because it needs to know whether to look for a PID file, and if so where to look.It gets this information from the command-line options, which it can’t obtain until after the call to
main(). That means all of the options related to the PID file are local variables inmain’s namespace.The closure (the function
sigint_handler()) is sent to the signal handler and will be used to handleSIGINTandSIGTERM.
Tablib
Tablib is a Python library that converts between
different data formats, storing data in a Dataset object, or
multiple Datasets in a Databook.
Datasets stored in the JSON, YAML, DBF, and CSV file formats
can be imported, and datasets can be exported to XLSX, XLS,
ODS, JSON, YAML, DBF, CSV, TSV, and HTML.
Tablib was first released by Kenneth Reitz in 2010.
It has the intuitive API design typical of Reitz’s projects.
Reading a Small Library
Tablib is a library, not an application, so there isn’t a single obvious entry point like there is with HowDoI and Diamond.
Get Tablib from GitHub:
$git clone https://github.com/kennethreitz/tablib.git$virtualenv -p python3 venv$sourcevenv/bin/activate(venv)$cdtablib(venv)$pip install --editable .(venv)$python test_tablib.py# Run the unit tests.
Read Tablib’s documentation
Tablib’s documentation starts
off immediately with a use case, and then goes into describing
its capabilities in more detail: it provides a Dataset object
that has rows, headers, and columns. You can do I/O from various
formats to the Dataset object. And the advanced usage section says
you can add tags to rows, and create derived columns that are
functions of other columns.
Use Tablib
Tablib is a library, not an executable like HowDoI or Diamond,
so you can open a Python interactive session and have the expectation that you can use use the help() function to explore the API. Here’s
our example of the tablib.Dataset class, the different data
formats, and how I/O works:
>>>importtablib>>>data=tablib.Dataset()>>>names=('Black Knight','Killer Rabbit')>>>>>>fornameinnames:...fname,lname=name.split()...data.append((fname,lname))...>>>data.dict[['Black','Knight'],['Killer','Rabbit']]>>>>>>(data.csv)Black,KnightKiller,Rabbit>>>data.headers=('First name','Last name')>>>(data.yaml)-{Firstname:Black,Lastname:Knight}-{Firstname:Killer,Lastname:Rabbit}>>>withopen('tmp.csv','w')asoutfile:...outfile.write(data.csv)...64>>>newdata=tablib.Dataset()>>>newdata.csv=open('tmp.csv').read()>>>(newdata.yaml)-{Firstname:Black,Lastname:Knight}-{Firstname:Killer,Lastname:Rabbit}
Read Tablib’s code
The file structure under tablib/ looks like this:
tablib|--- __init__.py|--- compat.py|--- core.py|--- formats/|--- packages/
The two directories, tablib/formats/ and tablib/packages/, will be discussed in a few sections.
Python supports module-level docstrings as well as the docstrings we’ve already
described—a string literal that is the first statement in a function, class, or
class method. Stack Overflow has good advice on how to
document a module.
For us, this means another way to explore source code is by typing head *.py in
a terminal shell while in the directory at the top level of the package—to
show all of the module docstrings at once. Here’s what we get:
(venv)$cdtablib(venv)$head*.py==>__init__.py<==""" Tablib. """fromtablib.coreimport(Databook,Dataset,detect,import_set,import_book,InvalidDatasetType,InvalidDimensions,UnsupportedFormat,__version__)==>compat.py<==# -*- coding: utf-8 -*-""" tablib.compat ~~~~~~~~~~~~~ Tablib compatiblity module. """==>core.py<==# -*- coding: utf-8 -*-""" tablib.core ~~~~~~~~~~~ This module implements the central Tablib objects. :copyright: (c) 2014 by Kenneth Reitz. :license: MIT, see LICENSE for more details. """
We learn that:
The top-level API (the contents of __init__.py are accessible from
tablibafter animport tablibstatement) has just nine entry points: theDatabookandDatasetclasses are mentioned in the documentation,detectcould be for identifying formatting,import_setandimport_bookmust import data, and the last three classes—InvalidDatasetType,InvalidDimensions, andUnsupportedFormat—look like exceptions. (When code follows PEP 8, we can tell which objects are custom classes from their capitalization.)tablib/compat.py is a compatibility module. A quick look inside will show that it handles Python 2/Python 3 compatibility issues in a similar way to HowDoI, by resolving different locations and names to the same symbol for use in tablib/core.py.
tablib/core.py, like it says, implements the central Tablib objects like
DatasetandDatabook.
Structure Examples from Tablib
The primary thing we want to highlight form Tablib is the absence of
the use of classes in the modules in tablib/formats/—it’s a perfect
example of the statement we made earlier about not overusing classes.
Next, we show excerpts of how Tablib uses the decorator syntax and the
property class to
create derived attributes like the dataset’s height and width,
and how it dynamically registers file formats to avoid duplicating
what would be boilerplate code for each of the different format types (CSV, YAML, etc.).
The last two subsections are a little obscure—we look at how
Tablib vendorizes dependencies, and then discuss the __slots__ property
of new class objects. You can skip these sections and still lead a happy,
Pythonic life.
No needless object-oriented code in formats (use namespaces for grouping functions)
The formats directory contains all of the defined file formats for I/O. The module names,
_csv.py, _tsv.py, _json.py,
_yaml.py, _xls.py,
_xlsx.py, _ods.py, and _xls.py are prefixed with an underscore—this indicates to the library user that they are not intended for direct use.
We can change directories into formats, and search for
classes and functions. Using
grep ^class formats/*.py reveals there are no class definitions, and using
grep ^def formats/*.py shows that each module contains some or all
of the following functions:
-
detect(stream)infers the file format based on the stream content. -
dset_sheet(dataset, ws)formats the Excel spreadsheet cells. -
export_set(dataset)exports the Dataset to the given format, returning a formatted string with the new format. (Or, for Excel, returning abytesobject—or a binary-formatted string in Python 2.) -
import_set(dset, in_stream, headers=True)replaces the contents of the dataset with the contents of the input stream. -
export_book(databook)exports the Datasheets in the Databook to the given format, returning a string orbytesobject. -
import_book(dbook, in_stream, headers=True)replaces the contents of the databook with the contents of the input stream.
This is an example of using modules as namespaces
(after all, they are one honking great idea) to separate functions,
rather than using unnecessary classes.
We know each function’s purpose from its name: for example,
formats._csv.import_set(), formats._tsv.import_set(), and formats._json.import_set()
import datasets from CSV, TSV, and JSON-formatted files, respectively.
The other functions do data exporting and file format detection, when possible,
for each of Tablib’s available formats.
Descriptors and the property decorator (engineer immutability when the API would benefit)
Tablib is our first library that uses Python’s decorator syntax,
described in “Decorators”.
The syntax uses the @ symbol in front of a function name,
placed directly above another function. It modifies (or “decorates”) the
function directly below. In the following excerpt, property changes the functions
Dataset.height and Dataset.width into descriptors—classes
with at least one of the __get__(), __set__(), or __delete__()
(“getter”, “setter”, or “delete”) methods defined.
For example, the attribute lookup Dataset.height will trigger the getter, setter, or delete
function depending on the context in which that attribute is used.
This behavior is only possible for new-style classes, discussed momentarily.
See this useful Python
tutorial on descriptors
for more information.
classDataset(object):## ... omit the rest of the class definition for clarity#@propertydefheight(self):"""The number of rows currently in the :class:`Dataset`. Cannot be directly modified."""returnlen(self._data)@propertydefwidth(self):"""The number of columns currently in the :class:`Dataset`. Cannot be directly modified. """try:returnlen(self._data[0])exceptIndexError:try:returnlen(self.headers)exceptTypeError:return0
This is how to use a decorator. In this case,
propertymodifiesDataset.heightto behave as a property rather than as a bound method. It can only operate on class methods.When
propertyis applied as a decorator, theheightattribute will return the height of theDatasetbut it is not possible to assign a height to theDatasetby invokingDataset.height.
Here is what the height and width attributes look
like when used:
>>>importtablib>>>data=tablib.Dataset()>>>data.header=("amount","ingredient")>>>data.append(("2 cubes","Arcturan Mega-gin"))>>>data.width2>>>data.height1>>>>>>data.height=3Traceback(mostrecentcalllast):File"<stdin>",line1,in<module>AttributeError:can't set attribute
So, data.height can be accessed like an attribute,
but it’s not settable—it’s calculated from the
data and so is always current.
This is ergonomic API design:
data.height is easier to type than data.get_height();
it’s clear what the meaning of data.height is;
and because it is calculated from the data
(and the property is not settable—only the “getter” function is defined),
there isn’t a danger that it will be out of
sync from the correct number.
The property decorator can only be applied
to attributes of classes, and only to classes that derive from the
base object object (e.g., class MyClass(object) not class MyClass()—inheritance from object is always the case in Python 3).
This same tool is used to create Tablib’s data import and
export API in the various formats:
Tablib does not store the string value for each of
the CSV, JSON, and YAML outputs.
Rather, the Dataset attributes csv, json, and yaml are properties,
like Dataset.height and Dataset.width in the preceding example—they call a function that generates the result from the
stored data or parses the input format and then replaces the
core data. But there’s only one dataset.
When data.csv is on the left of an equals sign, the property’s
“setter” function is called, to parse the dataset from the CSV format.
And when data.yaml is on the right of an equals sign, or alone,
the “getter” is called, to create a string with the given format
from the internal dataset. Here is an example:
>>>importtablib>>>data=tablib.Dataset()>>>>>>data.csv="\n".join((..."amount,ingredient",..."1 bottle,Ol'Janx Spirit",..."1 measure,Santraginus V seawater",..."2 cubes,Arcturan Mega-gin",..."4 litres,Fallian marsh gas",..."1 measure,Qalactin Hypermint extract",..."1 tooth,Algolian Suntiger",..."a sprinkle,Zamphuor",..."1 whole,olive"))>>>>>>data[2:4][('2 cubes','Arcturan Mega-gin'),('4 litres','Fallian marsh gas')]>>>>>>(data.yaml)-{amount:1bottle,ingredient:OlJanxSpirit}-{amount:1measure,ingredient:SantraginusVseawater}-{amount:2cubes,ingredient:ArcturanMega-gin}-{amount:4litres,ingredient:Fallianmarshgas}-{amount:1measure,ingredient:QalactinHypermintextract}-{amount:1tooth,ingredient:AlgolianSuntiger}-{amount:asprinkle,ingredient:Zamphuor}-{amount:1whole,ingredient:olive}
data.csvon the lefthand side of the equals sign (assignment operator) invokesformats.csv.import_set(), withdataas the first argument, and the string of Gargle Blaster ingredients as its second argument.data.yamlalone invokesformats.yaml.export_set(), withdataas its argument, outputting the formatted YAML string for theprint()function.
The “getter”, “setter”, and also a “deleter” function can be bound to
a single attribute using property. Its
signature is property(fget=None, fset=None, fdel=None, doc=None),
in which fget identifies the “getter” function (formats.csv.import_set()),
fset identifies the “setter” function (formats.csv.export_set()),
and fdel identifies the “deleter” function, which is left as None.
We will see the code where the formatting properties are set, programmatically,
next.
Programmatically registered file formats (don’t repeat yourself)
Tablib places all of the file formatting routines in the
formats subpackage. This structure choice makes
the main core.py module cleaner and the entire
package modular; it’s easy to add new file formats.
Although it would have been possible to paste chunks of
nearly identical code and import each file format’s import and
export behaviors separately,
all of the formats are programmatically loaded into the Dataset
class to properties named after each format.
We’re printing the entire contents of formats/__init__.py in the following code example
because it’s not too large a file, and we want to show where
formats.available is defined:
# -*- coding: utf-8 -*-""" Tablib - formats """from.import_csvascsvfrom.import_jsonasjsonfrom.import_xlsasxlsfrom.import_yamlasyamlfrom.import_tsvastsvfrom.import_htmlashtmlfrom.import_xlsxasxlsxfrom.import_odsasodsavailable=(json,xls,yaml,csv,tsv,html,xlsx,ods)
This line explicitly tells the Python interpreter that the file encoding is UTF-8.11
Here’s the definition of
formats.available, right in formats/__init__.py. It’s also available viadir(tablib.formats), but this explicit list is easier to understand.
In core.py, rather than about 20 (ugly, hard to maintain) repeated
function definitions for each format option, the code imports each format
programmatically by calling self._register_formats()
at the end of the Dataset’s __init__() method.
We’ve excerpted just Dataset._register_formats() here:
classDataset(object):## ... skip documentation and some definitions ...#@classmethoddef_register_formats(cls):"""Adds format properties."""forfmtinformats.available:try:try:setattr(cls,fmt.title,property(fmt.export_set,fmt.import_set))exceptAttributeError:setattr(cls,fmt.title,property(fmt.export_set))exceptAttributeError:pass## ... skip more definitions ...#@propertydeftsv():"""A TSV representation of the :class:`Dataset` object. The top row will contain headers, if they have been set. Otherwise, the top row will contain the first row of the dataset. A dataset object can also be imported by setting the :class:`Dataset.tsv` attribute. :: data = tablib.Dataset() data.tsv = 'age\tfirst_name\tlast_name\n90\tJohn\tAdams'Import assumes (for now) that headers exist. """pass
The
@classmethodsymbol is a decorator, described more extensively in “Decorators”, that modifies the method_register_formats()so that it passes the object’s class (Dataset) rather than the object instance (self) as its first argument.The
formats.availableis defined in formats/__init__.py and contains all of the available formatting options.In this line,
setattrassigns a value to the attribute namedfmt.title(i.e.,Dataset.csvorDataset.xls). The value it assigns is a special one;property(fmt.export_set, fmt.import_set)turnsDataset.csvinto a property.There will be an
AttributeErroriffmt.import_setis not defined.If there is no import function, try to assign just the export behavior.
If there is neither an export nor an import function to assign, just don’t assign anything.
Each of the file formats is defined as a property here, with a descriptive docstring. The docstring will be retained when
property()is called at tag or
to assign the extra behaviors.The
\tand\nare string escape sequences that represent the Tab character and a newline, respectively. They’re all listed in Python’s string literals documentation.
Vendorized dependencies in packages (an example of how to vendorize)
Tablib’s dependencies are currently vendorized (meaning they are shipped bundled with the code—in this case, in the directory packages) but may be moved to a plug-in system in the future. The packages directory contains third-party packages included inside Tablib to ensure compatibility, rather than the other option, which is to specify versions in the setup.py file that will be downloaded and installed when Tablib is installed. This technique is discussed in “Vendorizing Dependencies”; the choice for Tablib was made both to reduce the number of dependencies the user would have to download, and because sometimes there are different packages for Python 2 and Python 3, which are both included. (The appropriate one is imported, and their functions set to a common name, in tablib/compat.py). That way, Tablib can have one single code base instead of two—one for each version of Python. Because each of these dependencies has its own license, a NOTICE document was added to the top level of the project directory that lists each dependency’s license.
Saving memory with __slots__ (optimize judiciously)
Python prefers readability over speed. Its entire design, its Zen aphorisms, and its early influence from educational languages like ABC are all about placing user-friendliness above performance (although we’ll talk about more optimization options in “Speed”).
The use of __slots__ in tablib is a case where optimization matters.
This is a slightly obscure reference, and it’s only available for new-style classes
(described in a few pages), but we want to show that it’s possible
to optimize Python when necessary.
This optimization is only useful when you have tons of very small objects
by reducing the footprint of each class instance by the size of one dictionary
(large objects would make this small savings irrelevant,
and fewer objects make the savings not worth it). Here is an excerpt from the
__slots__ documentation:
By default, instances of classes have a dictionary for attribute storage. This wastes space for objects having very few instance variables. The space consumption can become acute when creating large numbers of instances.
The default can be overridden by defining
__slots__in a class definition. The__slots__declaration takes a sequence of instance variables and reserves just enough space in each instance to hold a value for each variable. Space is saved because__dict__is not created for each instance.
Normally, this isn’t something to care about—notice that
__slots__ doesn’t appear in the Dataset or Databook classes,
just the Row class—but because there can be
thousands of rows of data, __slots__ is a good idea.
The Row class is not exposed in tablib/__init__.py because
it is a helper class to Dataset, instantiated once for every row.
This is how its definition looks in the beginning part of the
definition of the Row class:
classRow(object):"""Internal Row object. Mainly used for filtering."""__slots__=['_row','tags']def__init__(self,row=list(),tags=list()):self._row=list(row)self.tags=list(tags)## ... etc. ...#
The problem now is that there is no longer a __dict__ attribute in the
Row instances, but the pickle.dump() function (used for object serialization)
by default uses __dict__ to serialize the object
unless the method __getstate__() is defined.
Likewise, during unpickling (the process that reads the serialized
bytes and reconstructs the object in memory),
if __setstate__() is not defined, pickle.load() will load to the
object’s __dict__ attribute.
Here is how to get around that:
classRow(object):## ... skip the other definitions ...#def__getstate__(self):slots=dict()forslotinself.__slots__:attribute=getattr(self,slot)slots[slot]=attributereturnslotsdef__setstate__(self,state):for(k,v)inlist(state.items()):setattr(self,k,v)
For more information about __getstate__() and __setstate__() and pickling,
see the
__getstate__ documentation.
Style Examples from Tablib
We have one single style example from Tablib—operator overloading—which gets into the details of Python’s data model. Customizing the behavior of your classes makes it easier for those who use your API to write beautiful code.
Operator overloading (beautiful is better than ugly)
This code section uses Python’s operator overloading to enable
operations on either the Dataset’s rows or columns.
The following first sample code shows interactive use of the bracket operator ([ ])
for both numerical indices and column names,
and the second one shows the code that uses this behavior:
>>>data[-1]('1 whole','olive')>>>>>>data[-1]=['2 whole','olives']>>>>>>data[-1]('2 whole','olives')>>>>>>deldata[2:7]>>>>>>(data.csv)amount,ingredient1bottle,Ol'Janx Spirit1measure,SantraginusVseawater2whole,olives>>>data['ingredient']["Ol'Janx Spirit",'Santraginus V seawater','olives']
When using numbers, accessing data via the bracket operator
([])gives the row at the specified location.This is assignment using the bracket operator …
… it becomes 2 olives instead of the original one.
This is deletion using a slice—
2:7denotes all of the numbers2,3,4,5,6but not7.See how the recipe afterward is much smaller.
It is also possible to access columns by name.
The part of the Dataset code that defines the behavior of the bracket
operator shows how to handle access both by column name and by row number:
classDataset(object):## ... skip the rest of the definitions for brevity ...#def__getitem__(self,key):ifisinstance(key,str)orisinstance(key,unicode):ifkeyinself.headers:pos=self.headers.index(key)# get 'key' index from each datareturn[row[pos]forrowinself._data]else:raiseKeyErrorelse:_results=self._data[key]ifisinstance(_results,Row):return_results.tupleelse:return[result.tupleforresultin_results]def__setitem__(self,key,value):self._validate(value)self._data[key]=Row(value)def__delitem__(self,key):ifisinstance(key,str)orisinstance(key,unicode):ifkeyinself.headers:pos=self.headers.index(key)delself.headers[pos]forrowinself._data:delrow[pos]else:raiseKeyErrorelse:delself._data[key]
First, check whether we are seeking a column (
Trueifkeyis a string) or a row (Trueif thekeyis an integer or slice).Here the code checks for the key to be in
self.headers, and then……explicitly raises a
KeyErrorso that access by column name behaves as one would expect a dictionary to. The wholeif/elsepair is not necessary for the operation of the function—if it were omitted, aValueErrorwould still be raised byself.headers.index(key)ifkeywere not inself.headers. The only purpose for this check is to provide a more informative error for the library user.This is how the code determines whether
keywas a number or a slice (like2:7). If a slice, the_resultswould be a list, not aRow.Here is where the slice is processed. Because the rows are returned as tuples, the values are an immutable copy of the acual data, and the dataset’s values (actually stored as lists) won’t accidentally be corrupted by an assignment.
The
__setitem__()method can change a single row but not a column. This is intentional; there is no way provided to change the content of an entire column; and for data integrity, this is probably not a bad choice. The user can always transform the column and insert it at any position using one of the methodsinsert_col(),lpush_col(), orrpush_col().The
__delitem__()method can either delete a column or a row, using the same logic as__getitem__().
For more information about additional operator overloading and other special methods, see the Python documentation on Special method names.
Requests
On Valentine’s day in 2011, Kenneth Reitz released a love letter to the Python community: the Requests library. Its enthusiastic adoption emphatically makes the case for intuitive API design (meaning the API is so straightforward you almost don’t need documentation).
Reading a Larger Library
Requests is a larger library than Tablib, with many more modules, but we’ll still approach reading it the same way—by looking at the documentation and following the API through the code.
Get Requests from GitHub:
$git clone https://github.com/kennethreitz/requests.git$virtualenv -p python3 venv$sourcevenv/bin/activate(venv)$cdrequests(venv)$pip install --editable .(venv)$pip install -r requirements.txt# Required for unit tests(venv)$py.test tests# Run the unit tests.
Some tests may fail—for example, if your service provider intercepts
404 errors to give some advertising page, you won’t get the ConnectionError.
Read Requests’s documentation
Requests is a bigger package, so first just scan the section
titles from the
Requests documentation.
Requests extends urrlib and httplib from Python’s standard library
to provide methods that perform HTTP requests. The library includes
support for international
domains and URLs, automatic decompression, automatic content decoding,
browser style SSL verification, HTTP(S) proxy support, and
other features, which are all defined by
the Internet Engineering Task Force (IETF) standards for HTTP
in their requests for comment (RFCs) 7230 through 7235.12
Requests strives to cover all of the IETF’s HTTP specifications, using only a handful of functions, a bunch of keyword arguments, and a few featureful classes.
Use Requests
Like with Tablib, there is enough information in the docstrings to use Requests without actually reading the online documentation. Here’s a brief interaction:
>>>importrequests>>>help(requests)# Shows a usage statement and says to see `requests.api`>>>help(requests.api)# Shows a detailed API description>>>>>>result=requests.get('https://pypi.python.org/pypi/requests/json')>>>result.status_code200>>>result.okTrue>>>result.text[:42]'{\n"info": {\n"maintainer": null'>>>>>>result.json().keys()dict_keys(['info','releases','urls'])>>>>>>result.json()['info']['summary']'Python HTTP for Humans.'
Read Requests’s code
Here are the contents of the Requests package:
$ls__init__.pycacert.pemexceptions.pysessions.pyadapters.pycerts.pyhooks.pystatus_codes.pyapi.pycompat.pymodels.pystructures.pyauth.pycookies.pypackages/utils.py
cacert.pem is a default certificate bundle to use when checking SSL certificates.
Requests has a flat structure, except for a packages directory that vendorizes (contains the external libraries)
chardetandurllib3. These dependencies are imported asrequests.packages.chardetandrequests.packages.urllib3, so programmers can still accesschardetandurllib3from the standard library.
We can mostly figure out what’s happening thanks to well-chosen
module names, but if we want a little more imformation, we can again peek at the
module docstrings by typing head *.py
in the top-level directory. The following lists displays these module
docstrings, slightly truncated. (It doesn’t show compat.py. We can tell from its name,
especially because it’s named the same as in Reitz’s Tablib library,
that it takes care of Python 2 to Python 3 compatibility.)
- api.py
-
Implements the Requests API
- hooks.py
-
Provides the capabilities for the Requests hooks system
- models.py
-
Contains the primary objects that power Requests
- sessions.py
-
Provides a Session object to manage and persist settings across requests (cookies, auth, proxies)
- auth.py
-
Contains the authentication handlers for Requests
- status_codes.py
-
A lookup table mapping status titles to status codes
- cookies.py
-
Compatibility code to be able to use
cookielib.CookieJarwith requests - adapters.py
-
Contains the transport adapters Requests uses to define and maintain connections
- exceptions.py
-
All of Requests’ exceptions
- structures.py
-
Data structures that power Requests
- certs.py
-
Returns the preferred default CA certificate bundle listing trusted SSL certificates
- utils.py
-
Provides utility functions that are used within Requests that are also useful for external consumption
Insights from reading all of the headers:
-
There is a hook system (hooks.py), implying the user can modify how Requests works. We won’t discuss it in depth because it will take us too far off topic.
-
The main module is models.py, as it contains “the primary objects that power Requests.”
-
The reason
sessions.Sessionexists is to persist cookies across multiple requests (that might occur during authentication, for example). -
The actual HTTP connection is made by objects from adapters.py.
-
The rest is kind of obvious: auth.py is for authentication, status_codes.py has the status codes, cookies.py is for adding and removing cookies, exceptions.py is for exceptions, structures.py contains data structures (e.g., a case-insensitive dictionary), and utils.py contains utility functions.
The idea to put communication separately in adapters.py is innovative
(at least to this writer).
It means models.Request, models.PreparedRequest, and models.Response
don’t actually do anything—they just store data, possibly
manipulating it a bit for presentation, pickling, or encoding purposes.
Actions are handled by separate classes that exist specifically to perform an action,
like authentication or communication.
Every class does just one thing, and each module
contains classes that do similar things—a Pythonic approach most of us already adhere to with our function definitions.
Structure Examples from Requests
Everyone loves the Requests API—it is easy to remember and helps
its users to write simple, beautiful code.
This section first discusses the design preference for more comprehensible
error messages and an easy-to-memorize API that we think went into
creation of the requests.api module, and then explores the differences
between the requests.Request and urllib.request.Request object,
offering an opinion on why requests.Request exists.
Top-level API (preferably only one obvious way to do it)
The functions defined in api.py (except request()) are named after HTTP
request methods.13
Each request method is the same except for its method name and the choice of
exposed keyword parameters, so we’re truncating this exerpt from requests/api.py
after the get() function:
# -*- coding: utf-8 -*-""" requests.api ~~~~~~~~~~~~ This module implements the Requests API. :copyright: (c) 2012 by Kenneth Reitz. :license: Apache2, see LICENSE for more details. """from.importsessionsdefrequest(method,url,**kwargs):"""Constructs and sends a :class:`Request <Request>`. :param method: method for the new :class:`Request` object. :param url: URL for the new :class:`Request` object. :param params: (optional) Dictionary or bytes to be sent in the query string for the :class:`Request`. ... skip the documentation for the remaining keyword arguments ...:return: :class:`Response <Response>` object :rtype: requests.Response Usage:: >>> import requests >>> req = requests.request('GET', 'http://httpbin.org/get') <Response [200]> """# By using the 'with' statement, we are sure the session is closed, thus we# avoid leaving sockets open which can trigger a ResourceWarning in some# cases, and look like a memory leak in others.withsessions.Session()assession:returnsession.request(method=method,url=url,**kwargs)defget(url,params=None,**kwargs):"""Sends a GET request. :param url: URL for the new :class:`Request` object. :param params: (optional) Dictionary or bytes to be sent in the query string for the :class:`Request`. :param \*\*kwargs: Optional arguments that ``request`` takes. :return: :class:`Response <Response>` object :rtype: requests.Response """kwargs.setdefault('allow_redirects',True)returnrequest('get',url,params=params,**kwargs)
The
request()function contains a**kwargsin its signature. This means extraneous keyword arguments will not cause an exception, and it hides options from the user.The documentation omitted here for brevity describes every keyword argument that has an associated action. If you use
**kwargsin your function signature, this is the only way the user can tell what the contents of**kwargsshould be, short of looking at the code themselves.The
withstatement is how Python supports a runtime context. It can be used with any object that has an__enter__()and an__exit__()method defined.__enter()__will be called upon entering thewithstatement, and__exit__()will be called upon exit, regardless of whether that exit is normal or due to an exception.The
get()function specifically pulls out theparams=Nonekeyword, applying a default value ofNone. Theparamskeyword argument relevant forgetbecause it’s for terms to be used in an HTTP query string. Exposing selected keyword arguments gives flexibility to the advanced user (via the remaining**kwargs) while making usage obvious for the 99% of people who don’t need advanced options.The default for the
request()function is to not allow redirects, so this step sets it toTrueunless the user set it already.The
get()function then simply callsrequest()with its first parameter set to"get". Makinggeta function has two advantages over just using a string argument likerequest("get", ...). First, it becomes obvious, even without documentation, which HTTP methods are available with this API. Second, if the user makes a typographical error in the method name, aNameErrorwill be raised earlier, and probably with a less confusing traceback, than would happen with error checking deeper in the code.
No new functionality is added in requests/api.py; it exists to present a simple API for the user. Plus, putting the string HTTP methods directly into the API as function names means any typographical error with the method name will be caught and identified early, for example:
>>>requests.foo('http://www.python.org')Traceback(mostrecentcalllast):File"<stdin>",line1,in<module>AttributeError:'module'objecthasnoattribute'foo'>>>>>>requests.request('foo','http://www.python.org')<Response[403]>
The Request and PreparedRequest objects (we’re all responsible users)
__init__.py exposes Request, PreparedRequest, and Response from
models.py as part of the main API.
Why does models.Request even exist?
There’s already a urllib.requests.Request in the standard library,
and in cookies.py there is specifically a MockRequest object that
wraps models.Request so that it works like urllib.requests.Request for
http.cookiejar.14
That means whatever methods are needed for the Request object to
interface with the cookies library are intentionally
excluded from requests.Request.
What is the point of all this extra work?
The extra methods in MockRequest (which exists to emulate urllib.request.Request
for the cookie library) are used by the cookie
library to manage cookies. Except for the get_type()
function (which usually returns “http” or “https” when using Requests)
and the unverifiable property (True for our case),
they’re all related to the URL or the request headers:
- Related to the header
add_unredirected_header()-
Add a new key, value pair to the header.
get_header()-
Get a specific name in the header dictionary.
get_new_headers()-
Get the dictionary containing new headers (added by
cookielib). has_header()-
Check whether a name exists in the header dictionary.
- Related to the URL
get_full_url()-
Does just what it says.
hostandorigin_req_host-
Properties that are set by calling the methods
get_host()andget_origin_req_host(), respectively. get_host()-
Extract the host from the URL (e.g., www.python.org from https://www.python.org/dev/peps/pep-0008/).
get_origin_req_host()-
Call
get_host().15
They’re all access functions, except for MockRequest.add_unredirected_header().
The MockRequest docstring notes that “the original request object
is read-only.”
In requests.Request, data attributes are instead directly exposed.
This makes all of the accessor functions unnecessary: to
get or set the headers, access request-instance.headers.
It’s just a dictionary.
Likewise, the user can just get or change the string URL: request-instance.url.
The PreparedRequest object is initialized empty,
and is populated with a call to prepared-request-instance.prepare(),
filled with the relevant data (usually from the calling the Request object).
It’s at this point that things like correct capitalization and encoding are
applied. The object’s contents will, once prepared, be ready to send
to the server, but every attribute is still directly exposed.
Even PreparedRequest._cookies is exposed, although its
prepended underscore is a gentle reminder that the attribute
is not intended for use outside of the class,
without forbidding such access (we are all responsible users).
This choice exposes the objects to user modification,
but they are much more readable, and a little bit of extra
work inside of PreparedRequest corrects capitalization
issues and allows use of a dictionary in place of a CookieJar
(look for the if isinstance()/else statement):
## ... from models.py ...#classPreparedRequest():## ... skip everything else ...#defprepare_cookies(self,cookies):"""Prepares the given HTTP cookie data.This function eventually generates a ``Cookie`` header from thegiven cookies using cookielib. Due to cookielib's design, the headerwill not be regenerated if it already exists, meaning this functioncan only be called once for the life of the:class:`PreparedRequest <PreparedRequest>` object. Any subsequent callsto ``prepare_cookies`` will have no actual effect, unless the "Cookie"header is removed beforehand."""ifisinstance(cookies,cookielib.CookieJar):self._cookies=cookieselse:self._cookies=cookiejar_from_dict(cookies)cookie_header=get_cookie_header(self._cookies,self)ifcookie_headerisnotNone:self.headers['Cookie']=cookie_header
These things may not seem like a big deal, but it’s small choices like these that make an API intuitive to use.
Style Examples from Requests
The style examples from Requests are a good example use for sets
(which we think aren’t used often enough!) and a look at
the requests.status_codes module, which exists to make the style
of the rest of the code simpler by avoiding hardcoded HTTP status
codes everywhere else in the code.
Sets and set arithmetic (a nice, Pythonic idiom)
We haven’t yet shown an example use of Python sets in action. Python sets behave like sets in math—you can do subtraction, unions (the or operator), and intersections (the and operator):
>>>s1=set((7,6))>>>s2=set((8,7))>>>s1{6,7}>>>s2{8,7}>>>s1-s2# set subtraction{6}>>>s1|s2# set union{8,6,7}>>>s1&s2# set intersection{7}
Here’s one, down toward the end of this function from cookies.py
(with the label ):
## ... from cookies.py ...#defcreate_cookie(name,value,**kwargs):"""Make a cookie from underspecified parameters. By default, the pair of `name` and `value` will be set for the domain '' and sent on every request (this is sometimes called a "supercookie"). """result=dict(version=0,name=name,value=value,port=None,domain='',path='/',secure=False,expires=None,discard=True,comment=None,comment_url=None,rest={'HttpOnly':None},rfc2109=False,)badargs=set(kwargs)-set(result)ifbadargs:err='create_cookie() got unexpected keyword arguments:%s'raiseTypeError(err%list(badargs))result.update(kwargs)result['port_specified']=bool(result['port'])result['domain_specified']=bool(result['domain'])result['domain_initial_dot']=result['domain'].startswith('.')result['path_specified']=bool(result['path'])returncookielib.Cookie(**result)
The
**kwargsspecification allows the user to provide any or none of the keyword options for a cookie.Set arithmetic! Pythonic. Simple. And in the standard library. On a dictionary,
set()forms a set of the keys.This is a great example of spliting a long line into two shorter lines that make much better sense. No harm done from the extra
errvariable.The
result.update(kwargs)updates theresultdictionary with the key/value pairs in thekwargsdictionary, replacing existing pairs or creating ones that didn’t exist.Here the call to
bool()coerces the value toTrueif the object is truthy (meaning it evaluates toTrue—in this case,bool(result['port'])evaluates toTrueif it’s notNoneand it’s not an empty container).The signature to initialize
cookielib.Cookieis actually 18 positional arguments and one keyword argument (rfc2109defaults toFalse). It’s impossible for us average humans to memorize which position has which value, so here Requests takes advantage of being able to assign positional arguments by name as keyword arguments, sending the whole dictionary.
Status codes (readability counts)
The entire status_codes.py exists to create an object that can look up status codes by attribute. We’re showing the definition of the lookup dictionary in status_codes.py first, and then an excerpt of code that uses it from sessions.py:
## ... excerpted from requests/status_codes.py ...#_codes={# Informational.100:('continue',),101:('switching_protocols',),102:('processing',),103:('checkpoint',),122:('uri_too_long','request_uri_too_long'),200:('ok','okay','all_ok','all_okay','all_good','\\o/','✔'),201:('created',),202:('accepted',),## ... skipping ...## Redirection.300:('multiple_choices',),301:('moved_permanently','moved','\\o-'),302:('found',),303:('see_other','other'),304:('not_modified',),305:('use_proxy',),306:('switch_proxy',),307:('temporary_redirect','temporary_moved','temporary'),308:('permanent_redirect','resume_incomplete','resume',),# These 2 to be removed in 3.0## ... skipping the rest ...#}codes=LookupDict(name='status_codes')forcode,titlesin_codes.items():fortitleintitles:setattr(codes,title,code)ifnottitle.startswith('\\'):setattr(codes,title.upper(),code)
All of these options for an OK status will become keys in the lookup dictionary. Except for the happy person (
\\o/) and the check mark (✔).The deprecated values are on a separate line so that the future delete will be clean and obvious in version control.
The
LookupDictallows dot-access of its elements like in the next line.codes.ok == 200andcodes.okay == 200.And also
codes.OK == 200andcodes.OKAY == 200.
All of this work for the status codes
was to make the lookup dictionary codes.
Why? Instead of very typo-prone hardcoded integers all over the
code, this is easy to read, with all of the code numbers
localized in a single file.
Because it starts as a dictionary keyed on the status codes,
each status code integer only exists once.
The possibility
of typos is much, much lower than if this were just
a bunch of global variables manually embedded into a namespace.
And converting the keys into attributes instead of using them as strings in a dictionary again reduces the risk of typographical errors. Here’s the example in sessions.py that’s so much easier to read with words than numbers:
## ... from sessions.py ...# Truncated to only show relevant content.#from.status_codesimportcodesclassSessionRedirectMixin(object):defresolve_redirects(self,resp,req,stream=False,timeout=None,verify=True,cert=None,proxies=None,**adapter_kwargs):"""Receives a Response. Returns a generator of Responses."""i=0hist=[]# keep track of historywhileresp.is_redirect:prepared_request=req.copy()ifi>0:# Update history and keep track of redirects.hist.append(resp)new_hist=list(hist)resp.history=new_histtry:resp.content# Consume socket so it can be releasedexcept(ChunkedEncodingError,ContentDecodingError,RuntimeError):resp.raw.read(decode_content=False)ifi>=self.max_redirects:raiseTooManyRedirects('Exceeded%sredirects.'%self.max_redirects)# Release the connection back into the pool.resp.close()## ... skipping content ...## http://tools.ietf.org/html/rfc7231#section-6.4.4if(resp.status_code==codes.see_otherandmethod!='HEAD'):method='GET'# Do what the browsers do, despite standards...# First, turn 302s into GETs.ifresp.status_code==codes.foundandmethod!='HEAD':method='GET'# Second, if a POST is responded to with a 301, turn it into a GET.# This bizarre behavior is explained in Issue 1704.ifresp.status_code==codes.movedandmethod=='POST':method='GET'## ... etc. ...#
Here’s where the status code lookup
codesis imported.We describe mixin classes later in “Mixins (also one honking great idea)”. This mixin provides redirect methods for the main
Sessionclass, which is defined in this same file but not shown in our excerpt.We’re entering a loop that’s following the redirects for us to get at the content we want. The entire loop logic is deleted from this excerpt for brevity.
Status codes as text are so much more readable than unmemorizable integers:
codes.see_otherwould otherwise be 303 here.And
codes.foundwould be 302, andcodes.movedwould be 301. So the code is self-documenting; we can tell meaning from the variable names; and we’ve avoided the possibility of littering the code with typographical errors by using dot-notation instead of a dictionary to look up strings (e.g.,codes.foundinstead ofcodes["found"]).
Werkzeug
To read Werkzeug, we need to know a little about how web servers communicate with applications. The next paragraphs try to give as short an overview as possible.
Python’s interface for web application-to-server interaction, WSGI, is defined in PEP 333, which was written by Phillip J. Eby in 2003.16 It specifies how a web server (like Apache) communicates with a Python application or framework:
-
The server will call the application once per HTTP request (e.g., “GET” or “POST”) it receives.
-
That application will return an iterable of bytestrings that the server will use to respond to the HTTP request.
-
The specification also says the application will take two parameters—for example,
webapp(environ, start_response). Theenvironparameter will contain all of the data associated with the request, and thestart_responseparameter will be a function or other callable object that will be used to send back header (e.g.,('Content-type', 'text/plain')) and status (e.g.,200 OK) information to the server.
That summary glosses over about a half-dozen pages of additional detail. In the middle of PEP 333 is this aspirational statement about the new standard making modular web frameworks possible:
If middleware can be both simple and robust, and WSGI is widely available in servers and frameworks, it allows for the possibility of an entirely new kind of Python web application framework: one consisting of loosely-coupled WSGI middleware components. Indeed, existing framework authors may even choose to refactor their frameworks’ existing services to be provided in this way, becoming more like libraries used with WSGI, and less like monolithic frameworks. This would then allow application developers to choose “best-of-breed” components for specific functionality, rather than having to commit to all the pros and cons of a single framework.
Of course, as of this writing, that day is doubtless quite far off. In the meantime, it is a sufficient short-term goal for WSGI to enable the use of any framework with any server.
About four years after, in 2007, Armin Ronacher released Werkzeug, with the intent of filling that hopeful need for a WSGI library that can be used to make WSGI applications and middleware components.
Werkzeug is the largest package we are reading, so we’ll highlight just a few of its design choices.
Reading Code in a Toolkit
A software toolkit is a collection of compatible utilities. In Werkzeug’s case, they’re all related to WSGI applications. A good way to understand the distinct utilities and what they’re for is to look at the unit tests, and that’s how we’ll approach reading Werkzeug’s code.
Get Werkzeug from GitHub:
$git clone https://github.com/pallets/werkzeug.git$virtualenv -p python3 venv$sourcevenv/bin/activate(venv)$cdwerkzeug(venv)$pip install --editable .(venv)$py.test tests# Run the unit tests
Read Werkzeug’s documentation
Werkzeug’s documentation lists the main things it provides—an implementation of the WSGI 1.0 (PEP 333) specification, a URL routing system, the capability to parse and dump HTTP headers, objects that represent HTTP requests and HTTP responses, session and cookie support, file uploads, and other utilities and community add-ons. Plus, a full-featured debugger.
The tutorials are good, but we’re using the API documentation instead to see more of the library’s components. The next section takes from Werkzeug’s wrappers and routing documentation.
Use Werkzeug
Werkzeug provides utilities for WSGI applications, so to learn what Werkzeug provides, we can start with a WSGI application, and then use a few of Werkzeug’s utilities. This first application is a slightly changed version of what’s in PEP 333, and doesn’t use Werkzeug yet. The second one does the same thing as the first, but using Werkzeug:
defwsgi_app(environ,start_response):headers=[('Content-type','text/plain'),('charset','utf-8')]start_response('200 OK',headers)yield'Hello world.'# This app does the same thing as the one above:response_app=werkzeug.Response('Hello world!')
Werkzeug implements a werkzeug.Client class to stand in for a real web
sever when doing one-off testing like this. The client response
will have the type of the response_wrapper argument.
In this code, we create clients and use them to call the WSGI
applications we made earlier. First, the plain WSGI app
(but with the response parsed into a werkzeug.Response):
>>>importwerkzeug>>>client=werkzeug.Client(wsgi_app,response_wrapper=werkzeug.Response)>>>resp=client.get("?answer=42")>>>type(resp)<class'werkzeug.wrappers.Response'>>>>resp.status'200 OK'>>>resp.content_type'text/plain'>>>(resp.data.decode())Helloworld.
Next, using the werkzeug.Response WSGI app:
>>>client=werkzeug.Client(response_app,response_wrapper=werkzeug.Response)>>>resp=client.get("?answer=42")>>>(resp.data.decode())Helloworld!
The werkzeug.Request class provides the contents of the environment
dictionary (the environ argument above to wsgi_app()) in a form that’s
easier to use. It also provides a decorator to convert a function that takes a
a werkzeug.Request and returns a werkzeug.Response into a WSGI app:
>>>@werkzeug.Request.application...defwsgi_app_using_request(request):...msg="A WSGI app with:\nmethod: {}\npath: {}\nquery: {}\n"...returnwerkzeug.Response(...msg.format(request.method,request.path,request.query_string))...
which, when used, gives:
>>>client=werkzeug.Client(...wsgi_app_using_request,response_wrapper=werkzeug.Response)>>>resp=client.get("?answer=42")>>>(resp.data.decode())AWSGIappwith:method:GETpath:/query:b'answer=42'
So, we know how to use the werkzeug.Request and werkzeug.Response objects.
The other thing that was featured in the documentation was the routing.
Here’s an excerpt that uses it—callout numbers identify both the pattern
and its match:
>>>importwerkzeug>>>fromwerkzeug.routingimportMap,Rule>>>>>>url_map=Map([...Rule('/',endpoint='index'),...Rule('/<any("Robin","Galahad","Arthur"):person>',endpoint='ask'),...Rule('/<other>',endpoint='other')...])>>>env=werkzeug.create_environ(path='/shouldnt/match')>>>urls=url_map.bind_to_environ(env)>>>urls.match()Traceback(mostrecentcalllast):File"<stdin>",line1,in<module>File"[...path...]/werkzeug/werkzeug/routing.py",line1569,inmatchraiseNotFound()werkzeug.exceptions.NotFound:404:NotFound
The
werkzeug.Routing.Mapprovides the main routing functions. The rule matching is done in order; the first rule to match is the one selected.When there are no angle-bracket terms in the rule’s placeholder string, it only matches on an exact match, and the second result from
urls.match()is an empty dictionary:>>>env=werkzeug.create_environ(path='/')>>>urls=url_map.bind_to_environ(env)>>>urls.match()('index',{})Otherwise, the second entry is a dictionary mapping the named terms in the rule to their value—for example, mapping
'person'to the value'Galahad':>>>env=werkzeug.create_environ(path='/Galahad?favorite+color')>>>urls=url_map.bind_to_environ(env)>>>urls.match()('ask',{'person':'Galahad'})Note that
'Galahad'could have mached the route named'other', but it did not—but'Lancelot'did—because the first rule to match the pattern is chosen:>>>env=werkzeug.create_environ(path='/Lancelot')>>>urls=url_map.bind_to_environ(env)>>>urls.match()('other',{'other':'Lancelot'})And an exception is raised if there are no matches at all in the list of rules:
>>>env=werkzeug.test.create_environ(path='/shouldnt/match')>>>urls=url_map.bind_to_environ(env)>>>urls.match()Traceback(mostrecentcalllast):File"<stdin>",line1,in<module>File"[...path...]/werkzeug/werkzeug/routing.py",line1569,inmatchraiseNotFound()werkzeug.exceptions.NotFound:404:NotFound
You’d use the map to route a request to an appropriate endpoint. The following code continues on from the predceding example to do this:
@werkzeug.Request.applicationdefsend_to_endpoint(request):urls=url_map.bind_to_environ(request)try:endpoint,kwargs=urls.match()ifendpoint=='index':response=werkzeug.Response("You got the index.")elifendpoint=='ask':questions=dict(Galahad='What is your favorite color?',Robin='What is the capital of Assyria?',Arthur='What is the air-speed velocity of an unladen swallow?')response=werkzeug.Response(questions[kwargs['person']])else:response=werkzeug.Response("Other: {other}".format(**kwargs))except(KeyboardInterrupt,SystemExit):raiseexcept:response=werkzeug.Response('You may not have gone where you intended to go,\n''but I think you have ended up where you needed to be.',status=404)returnresponse
To test it, use the werkzeug.Client again:
>>>client=werkzeug.Client(send_to_endpoint,response_wrapper=werkzeug.Response)>>>(client.get("/").data.decode())Yougottheindex.>>>>>>(client.get("Arthur").data.decode())Whatistheair-speedvelocityofanunladenswallow?>>>>>>(client.get("42").data.decode())Other:42>>>>>>(client.get("time/lunchtime").data.decode())# no matchYoumaynothavegonewhereyouintendedtogo,butIthinkyouhaveendedupwhereyouneededtobe.
Read Werkzeug’s code
When test coverage is good, you can learn what a library does by looking at the unit tests. The caveat is that with unit tests, you’re intentionally looking at the “trees” and not the “forest”—exploring obscure use cases intended to ensure the code doesn’t break, rather than looking for interconnections between modules. This should be OK for a toolkit like Werkzeug, which we expect to have modular, loosely coupled components.
Because we familiarized ourselves with how the routing and the request and response wrappers work, werkzeug/test_routing.py and werkzeug/test_wrappers.py are good choices to read for now.
When we first open werkzeug/test_routing.py, we can quickly look for
interconnection between the modules by searching through the entire
file for the imported objects. Here are all of the import statements:
importpytestimportuuidfromtestsimportstrict_eqfromwerkzeugimportroutingasrfromwerkzeug.wrappersimportResponsefromwerkzeug.datastructuresimportImmutableDict,MultiDictfromwerkzeug.testimportcreate_environ
Of course,
pytestis used here for testing.The
uuidmodule is used in just one function,test_uuid_converter(), to confirm that the conversion from string to auuid.UUIDobject (the Universal Unique Identifier string uniquely identifying objects on the Internet) works.The
strict_eq()function is used often, and defined in werkzeug/tests/__init__.py. It’s for testing, and is only necessary because in Python 2 there used to be implicit type conversion between Unicode and byte strings, but relying on this breaks things in Python 3.The
werkzeug.routingmodule is the one that’s being tested.The
Reponseobject is used in just one function,test_dispatch(), to confirm thatwerkzeug.routing.MapAdapter.dispatch()passes the correct information through to the dispatched WSGI application.These dictionary objects are used only once each,
ImmutableDictto confirm that an immutable dictionary inwerkzeug.routing.Mapis indeed immutable, andMultiDictto provide multiple keyed values to the URL builder and confirm that it still builds the correct URL.The
create_environ()function is for testing—it creates a WSGI environment without having to use an actual HTTP request.
The point of doing the quick searching was to quickly see the interconnection between
modules. What we found out was that werkzeug.routing imports some special data structures,
and that’s all. The rest of the unit tests show the scope of the routing module.
For example, non-ASCII characters can be used:
deftest_environ_nonascii_pathinfo():environ=create_environ(u'/лошадь')m=r.Map([r.Rule(u'/',endpoint='index'),r.Rule(u'/лошадь',endpoint='horse')])a=m.bind_to_environ(environ)strict_eq(a.match(u'/'),('index',{}))strict_eq(a.match(u'/лошадь'),('horse',{}))pytest.raises(r.NotFound,a.match,u'/барсук')
There are tests to build and parse URLs, and even utilities to find the closest available match, when there wasn’t an actual match. You can even do all kinds of crazy custom processing when handling the type conversions/parsing from the path and the URL string:
deftest_converter_with_tuples():'''Regression test for https://github.com/pallets/werkzeug/issues/709'''classTwoValueConverter(r.BaseConverter):def__init__(self,*args,**kwargs):super(TwoValueConverter,self).__init__(*args,**kwargs)self.regex=r'(\w\w+)/(\w\w+)'defto_python(self,two_values):one,two=two_values.split('/')returnone,twodefto_url(self,values):return"%s/%s"%(values[0],values[1])map=r.Map([r.Rule('/<two:foo>/',endpoint='handler')],converters={'two':TwoValueConverter})a=map.bind('example.org','/')route,kwargs=a.match('/qwert/yuiop/')assertkwargs['foo']==('qwert','yuiop')
Similarly, werkzeug/test_wrappers.py does not import
much. Reading through the tests gives an example of the scope
of available functionality for the Request object—cookies, encoding, authentication, security, cache timeouts,
and even multilanguage encoding:
deftest_modified_url_encoding():classModifiedRequest(wrappers.Request):url_charset='euc-kr'req=ModifiedRequest.from_values(u'/?foo=정상처리'.encode('euc-kr'))strict_eq(req.args['foo'],u'정상처리')
In general, reading the tests provides a way to see the details of what the library provides. Once satisfied that we have an idea of what Werkzeug is, we can move on.
Style Examples from Werkzeug
Most of the major style points we made in Chapter 4
have already been covered. The first style example we chose
shows an elegant way to guess types from a string, and
the second one makes a case for using the VERBOSE option when
defining long regular expressions—so that other people
can tell what the expression does without having to spend
time thinking through it.
Elegant way to guess type (if the implementation is easy to explain, it may be a good idea)
If you’re like most of us, you’ve had to parse text files and convert content to various types. This solution is particularly Pythonic, so we wanted to include it:
_PYTHON_CONSTANTS={'None':None,'True':True,'False':False}def_pythonize(value):ifvaluein_PYTHON_CONSTANTS:return_PYTHON_CONSTANTS[value]forconvertinint,float:try:returnconvert(value)exceptValueError:passifvalue[:1]==value[-1:]andvalue[0]in'"\'':value=value[1:-1]returntext_type(value)
Key lookup for Python dictionaries uses hash mapping, just like set lookup. Python doesn’t have switch case statements. (They were proposed and rejected for lack of popularity in PEP 3103.) Instead, Python users use
if/elif/else, or as shown here, the very Pythonic option of a dictionary lookup.Note that the first conversion attempt is to the more restrictive type,
int, before attempting the conversion tofloat.It is also Pythonic to use
try/exceptstatements to infer type.This part is necessary because the code is in werkzeug/routing.py, and the string being parsed is part of a URL. It’s checking for quotes and unquoting the value.
text_typeconverts strings to Unicode in a way that’s both Python 2 and Python 3 compatible. It’s basically the same thing as theu()function highlighted in “HowDoI”.
Regular expressions (readability counts)
If you use lengthy regular expressions in your code, please
use the re.VERBOSE17
option and make it comprehensible to the rest of us
humans, like this snippet from werkzeug/routing.py:
importre_rule_re=re.compile(r'''(?P<static>[^<]*) # static rule data<(?:(?P<converter>[a-zA-Z_][a-zA-Z0-9_]*) # converter name(?:\((?P<args>.*?)\))? # converter arguments\: # variable delimiter)?(?P<variable>[a-zA-Z_][a-zA-Z0-9_]*) # variable name>''',re.VERBOSE)
Structure Examples from Werkzeug
The first two examples related to structure demonstrate Pythonic ways to leverage dynamic typing. We cautioned against reassigning a variable to different values in “Dynamic Typing” but didn’t mention any benefits. One of them is the ability to use any type of object that behaves in the expected way—duck typing. Duck typing approaches types with the philosophy: “If it looks like a duck18 and quacks like a duck, then it’s a duck”.
They both play in different ways on ways that objects can be callable
without being functions: cached_property.__init__() allows
initialization of a class instance to be used like an ordinary function call,
and Response.__call__() allows a Response instance to itself
be called like a function.
The last excerpt uses Werkzeug’s implementation of some
mixin classes (that each define a subset of the functionality
in Werkzeug’s Request object) to discuss why they’re a honking
great idea.
Class-based decorators (a Pythonic use of dynamic typing)
Werkzeug makes use of duck typing to make the @cached_property decorator.
When we talked about property when describing the Tablib project, we talked
about it like it’s a function.
Usually decorators are functions, but because there is no enforcement
of type, they can be any callable: property is actually a class.
(You can tell it’s intended to be used like a function because it
is not capitalized, like PEP 8 says class names should be.)
When written like a function call (property()),
property.__init__() will be called to initialize and return a property instance—a class, with an appropriately defined __init__() method, works as a callable.
Quack.
The following excerpt contains the entire definition of cached_property,
which subclasses the property class.
The documentation within cached_property speaks for itself.
When it is used to decorate BaseRequest.form in the code we just saw,
the instance.form will have the type
cached_property and will behave like a dictionary as far as the
user is concerned, because both the __get__() and __set__() methods
are defined. The first time BaseRequest.form is accessed,
it will read its form data (if it exists) once, and then store the
data in instance.form.__dict__ to be accessed in the future:
classcached_property(property):"""A decorator that converts a function into a lazy property. Thefunction wrapped is called the first time to retrieve the result,and then that calculated result is used the next time you accessthe value::class Foo(object):@cached_propertydef foo(self):# calculate something important herereturn 42The class has to have a `__dict__` in order for this property towork."""# implementation detail: A subclass of Python's built-in property# decorator, we override __get__ to check for a cached value. If one# choses to invoke __get__ by hand, the property will still work as# expected because the lookup logic is replicated in __get__ for# manual invocation.def__init__(self,func,name=None,doc=None):self.__name__=nameorfunc.__name__self.__module__=func.__module__self.__doc__=docorfunc.__doc__self.func=funcdef__set__(self,obj,value):obj.__dict__[self.__name__]=valuedef__get__(self,obj,type=None):ifobjisNone:returnselfvalue=obj.__dict__.get(self.__name__,_missing)ifvalueis_missing:value=self.func(obj)obj.__dict__[self.__name__]=valuereturnvalue
Here it is in action:
>>>fromwerkzeug.utilsimportcached_property>>>>>>classFoo(object):...@cached_property...deffoo(self):...("You have just called Foo.foo()!")...return42...>>>bar=Foo()>>>>>>bar.fooYouhavejustcalledFoo.foo()!42>>>bar.foo42>>>bar.foo# Notice it doesn't print again...42
Response.__call__
The Response class is built using features mixed into the BaseResponse class,
just like Request. We will highlight its user interface and won’t show
the actual code, just the docstring for BaseResponse, to show the usage details:
classBaseResponse(object):"""Base response class. The most important fact about a response object is that it's a regular WSGI application. It's initialized with a couple of response parameters (headers, body, status code, etc.) and will start a valid WSGI response when called with the environ and start response callable. Because it's a WSGI application itself, processing usually ends before the actual response is sent to the server. This helps debugging systems because they can catch all the exceptions before responses are started. Here is a small example WSGI application that takes advantage of the response objects:: from werkzeug.wrappers import BaseResponse as Response def index():return Response('Index page') def application(environ, start_response):path = environ.get('PATH_INFO') or '/' if path == '/': response = index()else: response = Response('Not Found', status=404)return response(environ, start_response)""""# ... etc. ...
In the example from the docstring,
index()is the function that will be called in response to the HTTP request. The response will be the string “Index page”.This is the signature required for a WSGI application, as specified in PEP 333/PEP 3333.
ResponsesubclassesBaseResponse, soresponseis an instance ofBaseResponse.See how the 404 response just requires the
statuskeyword to be set.And, voilà, the
responseinstance is itself callable, with all of the accompanying headers and details set to sensible default values (or overrides in the case where the path is not “/”).
So, how is an instance of a class callable? Because the BaseRequest.__call__ method
has been defined. We show just that method in the following code example.
classBaseResponse(object):## ... skip everything else ...#def__call__(self,environ,start_response):"""Process this response as WSGI application. :param environ: the WSGI environment. :param start_response: the response callable provided by the WSGI server. :return: an application iterator """app_iter,status,headers=self.get_wsgi_response(environ)start_response(status,headers)returnapp_iter
Here’s the signature to make
BaseResponseinstances callable.Here’s where the
start_responsefunction call requirement of WSGI apps is satisfied.And here’s where the iterable of bytes is returned.
The lesson here is this:
if it’s possible in the language, why not do it? We promise after realizing we could
add a __call__() method to any object and make it callable,
we were inspired to go back to the original documentation for a good re-read of
Python’s data model.
Mixins (also one honking great idea)
Mixins in Python are classes that are intended to add a specific functionality—a handful of related attributes—to a class. Python, unlike Java, allows for multiple inheritance. This means that the following paradigm, where a half-dozen different classes are subclassed simultaneously, is a possible way to modularize different functionality into separate classes. “Namespaces,” sort of.
Modularization like this is useful in a utility library like Werkzeug because it communicates to the user which functions are related and not related: the developer can be confident that attributes in one mixin are not going to be modified by any functions in another mixin.
Note
In Python, there isn’t anything special to identify a
mixin, other than the convention of appending Mixin to the end
of the class name. This means if you don’t want to pay attention
to the order of method resolution, all of the mixins’ methods
should have distinct names.
In Werkzeug, sometimes methods in a mixin may require certain attributes to be present. These requirements are usually documented in the mixin’s docstring:
# ... in werkzeug/wrappers.pyclassUserAgentMixin(object):"""Adds a `user_agent` attribute to the request object which contains the parsed user agent of the browser that triggered the request as a :class:`~werkzeug.useragents.UserAgent` object. """@cached_propertydefuser_agent(self):"""The current user agent."""fromwerkzeug.useragentsimportUserAgentreturnUserAgent(self.environ)classRequest(BaseRequest,AcceptMixin,ETagRequestMixin,UserAgentMixin,AuthorizationMixin,CommonRequestDescriptorsMixin):"""Full featured request object implementing the following mixins: - :class:`AcceptMixin` for accept header parsing - :class:`ETagRequestMixin` for etag and cache control handling - :class:`UserAgentMixin` for user agent introspection - :class:`AuthorizationMixin` for http auth handling - :class:`CommonRequestDescriptorsMixin` for common headers """
There is nothing special about the
UserAgentMixin; it subclassesobject, though, which is the default in Python 3, highly recommended for compatibility in Python 2, and which should be done explicitly because, well, “explicit is better than implicit.”UserAgentMixin.user_agentassumes there is aself.environattribute.When included in the list of base classes for
Request, the attribute it provides becomes accessible viaRequest(environ).user_agent.Nothing else—this is the entire body of the definition of
Request. All functionality is provided by the base class or the mixins. Modular, pluggable, and as froody as Ford Prefect.
Flask
Flask is a web microframework that combines Werkzeug and Jinja2, both by Armin Ronacher. It was created as a joke and released on April Fool’s Day, 2010, but quickly became one of Python’s most popular web frameworks. He had released Werkzeug a few years earlier in 2007 as a “Swiss Army knife of Python web development,” and (we presume) was probably a little frustrated at its slow adoption. The idea for Werkzeug was to decouple the WSGI from everything else so that developers could plug in their own choice of utilities. Little did he know how much we’d appreciate a few more “rails.”19
Reading Code in a Framework
A software framework is just like a physical framework—it provides the underlying structure to build a WSGI20 application: the library user provides components that the main Flask application will run. Our goal in reading will be to understand the framework structure and what precisely it provides.
Get Flask from GitHub:
$git clone https://github.com/pallets/flask.git$virtualenv venv# Python 3 is usable but discouraged for now$sourcevenv/bin/activate(venv)$cdflask(venv)$pip install --editable .(venv)$pip install -rtest-requirements.txt# Required for unit tests(venv)$py.test tests# Run the unit tests
Read Flask’s documentation
Flask’s online documentation starts out with a seven-line implementation of a web app, and then summarizes Flask: it’s a Unicode-based WSGI-compliant framework that uses Jinja2 for HTML templating and Werkzeug for WSGI utilities like URL routing. It also has built-in tools for development and testing. There are also tutorials, so the next step is easy.
Use Flask
We can run the flaskr example that we downloaded with the GitHub repository. The documents say it’s a small blog site. From within the top flask directory:
(venv)$cdexamples/flaskr/(venv)$py.testtest_flaskr.py# Tests should pass(venv)$exportFLASK_APP=flaskr(venv)$flaskinitdb(venv)$flaskrun
Read Flask’s code
The ultimate goal of Flask is to create a web application, so really it isn’t
so different from the command-line applications Diamond and HowDoI.
Rather than another diagram tracing the flow of function calls through the code,
this time we’ll step through Flask by running the flaskr example app with
a debugger; we’ll use pdb—the Python debugger—in the standard library.
First, add a breakpoint to flaskr.py, which will be activated when that point in the code is reached, causing the interactive session to enter the debugger:
@app.route('/')defshow_entries():importpdb;pdb.set_trace()## This line is the breakpoint.db=get_db()cur=db.execute('select title, text from entries order by id desc')entries=cur.fetchall()returnrender_template('show_entries.html',entries=entries)
Next, close the file and type python on the command line to enter
an interactive session. Rather than starting a server, use Flask’s internal
testing utilities to simulate an HTTP GET request to the / location
where we just placed the debugger:
>>>importflaskr>>>client=flaskr.app.test_client()>>>client.get('/')>/[...truncatedpath...]/flask/examples/flaskr/flaskr.py(74)show_entries()->db=get_db()(Pdb)
The last three lines are from pdb: we see the path
(to flaskr.py), the line number (74), and the method name (show_entries())
where we stopped. The line (-> db = get_db()) shows the statement that
will be executed next if we were to step forward in the debugger.
And the (Pdb) prompt reminds us that we are using the pdb debugger.
We can navigate up or down the stack21
by typing u or d, respectively, at the command prompt.
See the pdb documentation under the header
“Debugger Commands” for a complete list of the commands you can type.
We can also type variable names to see them, and any other Python command; we can
even set the variables to different values before we continue on in the code.
If we go up the stack one step, we see what called the
show_entries() function (with the breakpoint we just installed):
it’s a flask.app.Flask object with a lookup dictionary named
view_functions that maps string names (like 'show_entries')
to functions. We also see the show_entries() function was called with
**req.view_args. We can check what req.view_args is from the interactive debugger command line by just typing its name (it’s the empty dictionary — {}, meaning no arguments):
(Pdb)u>/[...truncatedpath...]/flask/flask/app.py(1610)dispatch_request()->returnself.view_functions[rule.endpoint](**req.view_args)(Pdb)type(self)<class'flask.app.Flask'>(Pdb)type(self.view_functions)<type'dict'>(Pdb)self.view_functions{'add_entry':<functionadd_entryat0x108198230>,'show_entries':<functionshow_entriesat0x1081981b8>,[...truncated...]'login':<functionloginat0x1081982a8>}(Pdb)rule.endpoint'show_entries'(Pdb)req.view_args{}
We can simultaneously follow along through the source code, if we want to, by opening the appropriate file and going to the stated line. If we keep going up the stack, we can see where the WSGI application is called:
(Pdb)u>/[...truncatedpath...]/flask/flask/app.py(1624)full_dispatch_request()->rv=self.dispatch_request()(Pdb)u>/[...truncatedpath...]/flask/flask/app.py(1973)wsgi_app()->response=self.full_dispatch_request()(Pdb)u>/[...truncatedpath...]/flask/flask/app.py(1985)__call__()->returnself.wsgi_app(environ,start_response)
If we type u any more, we end up in the testing module, which was used to
create the fake client without having to start a server—we’ve gone as far
up the stack as we want to go.
We learned that the application flaskr is dispatched
from within an instance of the flask.app.Flask class,
on line 1985 of flask/flask/app.py. Here is the function:
classFlask:## ~~ ... skip lots of definitions ...defwsgi_app(self,environ,start_response):"""The actual WSGI application. ... skip other documentation ... """ctx=self.request_context(environ)ctx.push()error=Nonetry:try:response=self.full_dispatch_request()exceptExceptionase:error=eresponse=self.make_response(self.handle_exception(e))returnresponse(environ,start_response)finally:ifself.should_ignore_error(error):error=Nonectx.auto_pop(error)def__call__(self,environ,start_response):"""Shortcut for :attr:`wsgi_app`."""returnself.wsgi_app(environ,start_response)
This is line number 1973, identified in the debugger.
This is line number 1985, also identified in the debugger. The WSGI server would receive the Flask instance as an application, and call it once for every request—by using the debugger, we’ve found the entry point for the code.
We’re using the debugger in the same way as we used the call graph with HowDoI—by following function calls—which is also the same thing as reading through code directly. The value of using the debugger is that we avoid looking at all of the additional code that may distract or confuse us. Use the approach that is most effective for you.
After going up the stack using u, we can go back down the stack using d
and will end up back at the breakpoint, labeled with the *** Newest frame:
>/[...truncatedpath...]/flask/examples/flaskr/flaskr.py(74)show_entries()->db=get_db()(Pdb)d***Newestframe
From there, we can advance through a function call with the n (next) command,
or advance in as short a step as possible with the s (step) command:
(Pdb)s--Call-->/[...truncatedpath...]/flask/examples/flaskr/flaskr.py(55)get_db()->defget_db():(Pdb)s>/[...truncatedpath...]/flask/examples/flaskr/flaskr.py(59)get_db()->ifnothasattr(g,'sqlite_db'):##~~##~~ ... do a dozen steps to create and return the database connection...##~~->returng.sqlite_db(Pdb)n>/[...truncatedpath...]/flask/examples/flaskr/flaskr.py(75)show_entries()->cur=db.execute('select title, text from entries order by id desc')(Pdb)n>/[...truncatedpath...]/flask/examples/flaskr/flaskr.py(76)show_entries()->entries=cur.fetchall()(Pdb)n>/[...truncatedpath...]/flask/examples/flaskr/flaskr.py(77)show_entries()->returnrender_template('show_entries.html',entries=entries)(Pdb)n--Return--
There’s a lot more, but it’s tedious to show. What we get out of it is:
Awareness of the
Flask.gobject. A little more digging reveals it is the global (actually local to theFlaskinstance) context. It exists to contain database connections and other persistent things like cookies that need to survive outside of the life of the methods in theFlaskclass. Using a dictionary like this keeps variables out of theFlaskapp’s namespace, avoiding possible name collisions.The
render_template()function isn’t much of a surprise, but it’s at the end of the function definition in the flaskr.py module, meaning we’re essentially done—the return value goes back to the calling function from theFlaskinstance that we saw when traversing up the stack. So we’re skipping the rest.
The debugger is useful local to the place that you’re inspecting, to find out precisely what’s happening before and after an instant, the user-selected breakpoint, in the code. One of the big features is the ability to change variables on the fly (any Python code works in the debugger) and then continue on stepping through the code.
Style Examples from Flask
Most of the style examples from Chapter 4 have already been covered, so we’ll only discuss one style example for Flask—the implementation of Flask’s elegant and simple routing decorators.
Flask’s routing decorators (beautiful is better than ugly)
The routing decorators in Flask add URL routing to target functions, like this:
@app.route('/')defindex():pass
The Flask application will, when dispatching a request, use URL routing to identify the correct function to generate the response. The decorator syntax keeps the routing code logic out of the target function, keeps the function flat, and is intuitive to use.
It’s also not necessary—it exists only to provide this
API feature to the user. Here is the source code, a method in the
main Flask class defined in flask/flask/app.py:
classFlask(_PackageBoundObject):"""The flask object implements a WSGI application ... ... skip everything else in the docstring ... """##~~ ... skip all but the routing() method.defroute(self,rule,**options):"""A decorator that is used to register a view function for a given URL rule. This does the same thing as :meth:`add_url_rule` but is intended for decorator usage:: @app.route('/') def index(): return 'Hello World' ... skip the rest of the docstring ... """defdecorator(f):endpoint=options.pop('endpoint',None)self.add_url_rule(rule,endpoint,f,**options)returnfreturndecorator
The
_PackageBoundObjectsets up the file structure to import the HTML templates, static files, and other content based on configuration values specifying their location relative to the location of the application module (e.g., app.py).Why not name it decorator? That’s what it does.
This is the actual function that adds the URL to the map containing all of the rules. The only purpose of
Flask.routeis to provide a convenient decorator for library users.
Structure Examples from Flask
The theme for both of the structure examples from Flask is modularity. Flask is intentionally structured to make it easy to extend and modify almost everything—from the way that JSON strings are encoded and decoded (Flask supplements the standard library’s JSON capability with encodings for datetime and UUID objects) to the classes used when routing URLs.
Application specific defaults (simple is better than complex)
Flask and Werkzeug both have a wrappers.py module. The reason is
to add appropriate defaults for Flask, a framework for web applications,
on top of Werkzeug’s more general utility library for WSGI applications.
Flask subclasses Werkzeug’s Request and Response objects to add
specific features related to web applications.
For example, the Response object in flask/flask/wrappers.py looks like this:
fromwerkzeug.wrappersimportRequestasRequestBase,ResponseasResponseBase##~~ ... skip everything else ...classResponse(ResponseBase):"""The response object that is used by default in Flask. Works like the response object from Werkzeug but is set to have an HTML mimetype by default. Quite often you don't have to create this object yourself because :meth:`~flask.Flask.make_response` will take care of that for you. If you want to replace the response object used you can subclass this and set :attr:`~flask.Flask.response_class` to your subclass."""default_mimetype='text/html'
Werkzeug’s
Responseclass is imported asResponseBase, a nice style detail that makes its role obvious and allows the newResponsesubclass to take its name.The ability to subclass
flask.wrappers.Response, and how to do it, is documented prominently in the docstring. When features like this are implemented, it’s important to remember the documentation, or users won’t know the possibility exists.This is it—the only change in the
Responseclass. TheRequestclass has more changes, which we’re not showing to keep the length of this chapter down.
This small interactive session shows what changed between Flask’s and
Werkzeug’s Response classes:
>>>importwerkzeug>>>importflask>>>>>>werkzeug.wrappers.Response.default_mimetype'text/plain'>>>flask.wrappers.Response.default_mimetype'text/html'>>>r1=werkzeug.wrappers.Response('hello',mimetype='text/html')>>>r1.mimetypeu'text/html'>>>r1.default_mimetype'text/plain'>>>r1=werkzeug.wrappers.Response('hello')>>>r1.mimetype'text/plain'
The point of changing the default mimetype was just to make a little less typing for Flask users when building response objects that contain HTML (the expected use with Flask). Sane defaults make your code much, much easier for the average user.
Modularity (also one honking great idea)
The docstring for flask.wrappers.Response let users know that
they could subclass the Response object and use their
newly defined class in the main Flask object.
In this excerpt from flask/flask/app.py, we highlight some of the other modularity built into Flask:
classFlask(_PackageBoundObject):""" ... skip the docstring ... """#: The class that is used for request objects. See :class:`~flask.Request`#: for more information.request_class=Request#: The class that is used for response objects. See#: :class:`~flask.Response` for more information.response_class=Response#: The class that is used for the Jinja environment.#:#: .. versionadded:: 0.11jinja_environment=Environment##~~ ... skip some other definitions ...url_rule_class=Ruletest_client_class=Nonesession_interface=SecureCookieSessionInterface()##~~ .. etc. ..
Here’s where the custom
Requestclass can be substituted.And here is the place to identify the custom
Responseclass. These are class attributes (rather than instance attributes) of theFlaskclass, and are named in a clear way that makes it obvious what their purpose is.The
Environmentclass is a subclass of Jinja2’sEnvironmentthat has the ability to understand Flask Blueprints, which make it possible to build larger, multifile Flask applications.There are other modular options that are not shown because it was getting repetitive.
If you search through the Flask class definition, you can find where these classes are instantiated and used. The point of showing it to you is that these class definitions didn’t have to be exposed to the user—this was an explicit structural choice done to give the library user more control over how Flask behaves.
When people talk about Flask’s modularity, they’re not just talking about how you can use any database backend you want, they’re also talking about this capability to plug in and use different classes.
You’ve now seen some examples of well-written, very Zen Python code.
We highly recommend you take a look at the full code of each of the programs discussed here: the best way to become a good coder is to read great code. And remember, whenever coding gets tough, use the source, Luke!
1 For a book that contains decades of experience about reading and refactoring code, we recommend Object-Oriented Reengineering Patterns (Square Bracket Associates) by Serge Demeyer, Stéphane Ducasse, and Oscar Nierstrasz.
2 A daemon is a computer program that runs as a background process.
3 If you run into trouble with lxml requiring a more recent libxml2 shared library, just install an earlier version of lxml by typing: pip uninstall lxml;pip install lxml==3.5.0. It will work fine.
4 When you daemonize a process, you fork it, detach its session ID, and fork it again, so that the process is totally disconnected from the terminal you’re running it in. (Nondaemonized programs exit when the terminal is closed—you may have seen the warning message “Are you sure you want to close this terminal? Closing it will kill the following processes:” before listing all of the currently running processes.) A daemonized process will run even after the terminal window closes. It’s named daemon after Maxwell’s daemon (a clever daemon, not a nefarious one).
5 In PyCharm, do this by navigating in the menu bar to PyCharm → Preferences → Project:Diamond → Project Interpreter, and then selecting the path to the Python interpreter in the current virtual environment.
6 In Python, an abstract base class is a class that has left certain methods undefined, with the expectation that the developer will define them in the subclass. In the abstract base class, this function raises a NotImplementedError. A more modern alternative is to use Python’s module for abstract base classes, abc, first implemented in Python 2.6, which will error when constructing an incomplete class rather than when trying to access that class’s unimplemented method. The full specification is defined in PEP 3119.
7 This is a paraphrase of a great blog post on the subject by Larry Cuban, a professor emeritus of education at Stanford, titled “The Difference Between Complicated and Complex Matters.”
8 Python has a recursion limit (a maximum number of times a function is allowed to call itself) that’s relatively restrictive by default, to discourage excessive use of recursion. Get your recursion limit by typing import sys; sys.getrecursionlimit().
9 Programming languages that can do this are said to have first-class functions—functions are treated as first-class citizens, like any other object.
10 PID stands for “process identifier.” Every process has a unique identifier that is available in Python using the os module in the standard library: os.getpid().
11 ASCII is default in Python 2, and UTF-8 is default in Python 3. There are multiple allowed ways to communicate encoding, all listed in PEP 263. You can use the one that works best with your favorite text editor.
12 If you need a vocabulary refresh, RFC 7231 is the HTTP semantics document. If you scan the table of contents and read the introduction, you’ll know enough about the scope to tell whether the definition you want is covered, and where to find it.
13 These are defined in section 4.3 of the current Hypertext Transfer Protocol request for comments.
14 The module http.cookiejar was previously cookielib in Python 2, and urllib.requests.Request was previously urllib2.Request in Python 2.
15 This method makes it possible to handle cross-origin requests (like getting a JavaScript library hosted on a third-party site). It is supposed to return the origin host of the request, defined in IETF RFC 2965.
16 Since then, PEP 333 has been superseded by a specification updated to include some Python 3–specific details, PEP 3333. For a digestible but very thorough introduction, we recommend Ian Bicking’s WSGI tutorial.
17 re.VERBOSE allows you to write more readable regular expressions by changing the way whitespace is treated, and by allowing comments. Read more in the re documentation.
18 That is, if it’s callable, or iterable, or has the correct method defined …
19 A reference to Ruby on Rails, which popularized web frameworks, and which is much more similar to Django’s style of “everything included,” rather than Flask’s style of “nearly nothing included” (until you add plug-ins). Django is a great choice when the things you want included are the things Django provides—it was made, and is fantastic for, hosting an online newspaper.
20 WSGI is a Python standard, defined in PEP 333 and PEP 3333 for how an application can communicate with a web server.
21 The Python call stack contains the instructions that are in progress, being run by the Python interpreter. So if function f() calls function g(), then function f() will go on the stack first, and g() will be pushed on top of f() when it’s called. When g() returns, it is popped off of (removed from) the stack, and then f() will continue where it left off. It is called a stack, because conceptually it works the same way a dish washer will approach a stack of plates—new ones go on the top, and you always deal with the top ones first.