Table of Contents for
Learning SQL, 2nd Edition
 Learning SQL, 2nd Edition
Published by
O'Reilly Media, Inc., 2009
Learning SQL, 2nd Edition
Published by
O'Reilly Media, Inc., 2009
- Cover
- Learning SQL
- O'Reilly Strata Conference
- Learning SQL
- A Note Regarding Supplemental Files
- Preface
- 1. A Little Background
- 2. Creating and Populating a Database
- 3. Query Primer
- 4. Filtering
- 5. Querying Multiple Tables
- 6. Working with Sets
- 7. Data Generation, Conversion, and Manipulation
- 8. Grouping and Aggregates
- 9. Subqueries
- 10. Joins Revisited
- 11. Conditional Logic
- 12. Transactions
- 13. Indexes and Constraints
- 14. Views
- 15. Metadata
- A. ER Diagram for Example Database
- B. MySQL Extensions to the SQL Language
- C. Solutions to Exercises
- Index
- About the Author
- Colophon
- Copyright
Chapter 13. Indexes and Constraints
Because the focus of this book is on programming techniques, the first 12 chapters
concentrated on elements of the SQL language that you can use to craft powerful select, insert,
update, and delete statements. However, other database features
indirectly affect the code you write. This chapter focuses on
two of those features: indexes and constraints.
Indexes
When you insert a row into a table, the database server does not attempt to put
the data in any particular location within the table. For example, if you add a row
to the department table, the server doesn’t place
the row in numeric order via the dept_id column
or in alphabetical order via the name column.
Instead, the server simply places the data in the next available location within the
file (the server maintains a list of free space for each table). When you query the
department table, therefore, the server will
need to inspect every row of the table to answer the query. For example, let’s say
that you issue the following query:
mysql>SELECT dept_id, name->FROM department->WHERE name LIKE 'A%';+---------+----------------+ | dept_id | name | +---------+----------------+ | 3 | Administration | +---------+----------------+ 1 row in set (0.03 sec)
To find all departments whose name begins with A, the server
must visit each row in the department table and
inspect the contents of the name column; if the
department name begins with A, then the row is added to the
result set. This type of access is known as a table
scan.
While this method works fine for a table with only three rows, imagine how long it
might take to answer the query if the table contains 3 million rows. At some number
of rows larger than three and smaller than 3 million, a line is crossed where the
server cannot answer the query within a reasonable amount of time without additional
help. This help comes in the form of one or more indexes on the
department table.
Even if you have never heard of a database index, you are certainly aware of what an index is (e.g., this book has one). An index is simply a mechanism for finding a specific item within a resource. Each technical publication, for example, includes an index at the end that allows you to locate a specific word or phrase within the publication. The index lists these words and phrases in alphabetical order, allowing the reader to move quickly to a particular letter within the index, find the desired entry, and then find the page or pages on which the word or phrase may be found.
In the same way that a person uses an index to find words within a publication, a database server uses indexes to locate rows in a table. Indexes are special tables that, unlike normal data tables, are kept in a specific order. Instead of containing all of the data about an entity, however, an index contains only the column (or columns) used to locate rows in the data table, along with information describing where the rows are physically located. Therefore, the role of indexes is to facilitate the retrieval of a subset of a table’s rows and columns without the need to inspect every row in the table.
Index Creation
Returning to the department table, you
might decide to add an index on the name
column to speed up any queries that specify a full or partial department name,
as well as any update or delete operations that specify a department name.
Here’s how you can add such an index to a MySQL database:
mysql>ALTER TABLE department->ADD INDEX dept_name_idx (name);Query OK, 3 rows affected (0.08 sec) Records: 3 Duplicates: 0 Warnings: 0
This statement creates an index (a B-tree index to be precise, but more on
this shortly) on the department.name column;
furthermore, the index is given the name dept_name_idx. With the index in place, the query optimizer
(which we discussed in Chapter 3) can choose to use the
index if it is deemed beneficial to do so (with only three rows in the department table, for example, the optimizer might
very well choose to ignore the index and read the entire table). If there is
more than one index on a table, the optimizer must decide which index will be
the most beneficial for a particular SQL statement.
Note
MySQL treats indexes as optional components of a table, which is why you
must use the alter table command to add
or remove an index. Other database servers, including SQL Server and Oracle
Database, treat indexes as independent schema objects. For both SQL Server
and Oracle, therefore, you would generate an index using the create index command, as in:
CREATE INDEX dept_name_idx
ON department (name);
As of MySQL version 5.0, a create index
command is available, although it is mapped to the alter table command.
All database servers allow you to look at the available indexes. MySQL users
can use the show command to see all of the
indexes on a specific table, as in:
mysql> SHOW INDEX FROM department \G *************************** 1. row
*************************** 1. row ***************************
        Table: department
   Non_unique: 0
     Key_name: PRIMARY
 Seq_in_index: 1
  Column_name: dept_id
    Collation: A
  Cardinality: 3
     Sub_part: NULL
       Packed: NULL
         Null:
   Index_type: BTREE
      Comment:
Index_Comment:
*************************** 2. row ***************************
        Table: department
   Non_unique: 1
     Key_name: dept_name_idx
 Seq_in_index: 1
  Column_name: name
    Collation: A
  Cardinality: 3
     Sub_part: NULL
       Packed: NULL
         Null:
   Index_type: BTREE
      Comment:
Index_Comment:
2 rows in set (0.01 sec)
The output shows that there are two indexes on the department table: one on the dept_id column called PRIMARY,
and the other on the name column called
dept_name_idx. Since I have created only
one index so far (dept_name_idx), you might
be wondering where the other came from; when the department table was created, the create
table statement included a constraint naming the dept_id column as the primary key for the table.
Here’s the statement used to create the table:
CREATE TABLE department
 (dept_id SMALLINT UNSIGNED NOT NULL AUTO_INCREMENT,
  name VARCHAR(20) NOT NULL,
  CONSTRAINT pk_department PRIMARY KEY (dept_id)  );
When the table was created, the MySQL server automatically generated an index
on the primary key column, which, in this case, is dept_id, and gave the index the name PRIMARY. I cover constraints later in this chapter.
If, after creating an index, you decide that the index is not proving useful, you can remove it via the following:
mysql>ALTER TABLE department->DROP INDEX dept_name_idx;Query OK, 3 rows affected (0.02 sec) Records: 3 Duplicates: 0 Warnings: 0
Note
SQL Server and Oracle Database users must use the drop index command to remove an index, as in:
DROP INDEX dept_name_idx; (Oracle)

DROP INDEX dept_name_idx ON department (SQL Server)
MySQL now also supports a drop index
command.
Unique indexes
When designing a database, it is important to consider which columns are
allowed to contain duplicate data and which are not. For example, it is
allowable to have two customers named John Smith in the individual table since each row will have a
different identifier (cust_id), birth
date, and tax number (customer.fed_id) to
help tell them apart. You would not, however, want to allow two departments
with the same name in the department
table. You can enforce a rule against duplicate department names by creating
a unique index on the department.name column.
A unique index plays multiple roles in that, along with providing all the
benefits of a regular index, it also serves as a mechanism for disallowing
duplicate values in the indexed column. Whenever a row is inserted or when
the indexed column is modified, the database server checks the unique index
to see whether the value already exists in another row in the table. Here’s
how you would create a unique index on the department.name column:
mysql>ALTER TABLE department->ADD UNIQUE dept_name_idx (name);Query OK, 3 rows affected (0.04 sec) Records: 3 Duplicates: 0 Warnings: 0
Note
SQL Server and Oracle Database users need only add the unique keyword when creating an index, as
in:
CREATE UNIQUE INDEX dept_name_idx
ON department (name);
With the index in place, you will receive an error if you try to add
another department with the name 'Operations':
mysql>INSERT INTO department (dept_id, name)->VALUES (999, 'Operations');ERROR 1062 (23000): Duplicate entry 'Operations' for key 'dept_name_idx'
You should not build unique indexes on your primary key column(s), since the server already checks uniqueness for primary key values. You may, however, create more than one unique index on the same table if you feel that it is warranted.
Multicolumn indexes
Along with the single-column indexes demonstrated thus far, you may build indexes that span multiple columns. If, for example, you find yourself searching for employees by first and last names, you can build an index on both columns together, as in:
mysql>ALTER TABLE employee->ADD INDEX emp_names_idx (lname, fname);Query OK, 18 rows affected (0.10 sec) Records: 18 Duplicates: 0 Warnings: 0
This index will be useful for queries that specify the first and last names or just the last name, but you cannot use it for queries that specify only the employee’s first name. To understand why, consider how you would find a person’s phone number; if you know the person’s first and last names, you can use a phone book to find the number quickly, since a phone book is organized by last name and then by first name. If you know only the person’s first name, you would need to scan every entry in the phone book to find all the entries with the specified first name.
When building multiple-column indexes, therefore, you should think carefully about which column to list first, which column to list second, and so on so that the index is as useful as possible. Keep in mind, however, that there is nothing stopping you from building multiple indexes using the same set of columns but in a different order if you feel that it is needed to ensure adequate response time.
Types of Indexes
Indexing is a powerful tool, but since there are many different types of data, a single indexing strategy doesn’t always do the job. The following sections illustrate the different types of indexing available from various servers.
B-tree indexes
All the indexes shown thus far are balanced-tree
indexes, which are more commonly known as B-tree
indexes. MySQL, Oracle Database, and SQL Server all default
to B-tree indexing, so you will get a B-tree index unless you explicitly ask
for another type. As you might expect, B-tree indexes are organized as
trees, with one or more levels of branch nodes leading
to a single level of leaf nodes. Branch nodes are used
for navigating the tree, while leaf nodes hold the actual values and
location information. For example, a B-tree index built on the employee.lname column might look something
like Figure 13-1.
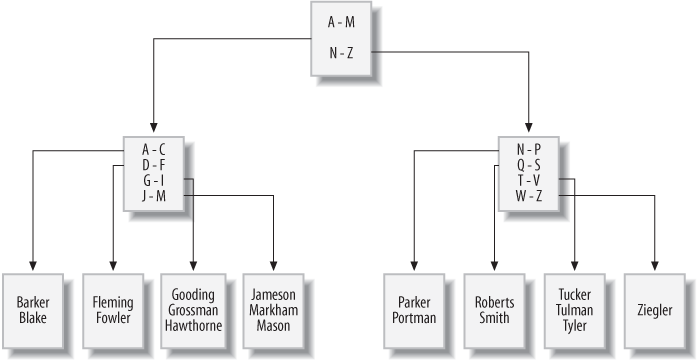
If you were to issue a query to retrieve all employees whose last name
starts with G, the server would look at the top branch
node (called the root node) and follow the link to the
branch node that handles last names beginning with A
through M. This branch node would, in turn, direct the
server to a leaf node containing last names beginning with
G through I. The server then
starts reading the values in the leaf node until it encounters a value that
doesn’t begin with G (which, in this case, is 'Hawthorne').
As rows are inserted, updated, and deleted from the employee table, the server will attempt to
keep the tree balanced so that there aren’t far more branch/leaf nodes on
one side of the root node than the other. The server can add or remove
branch nodes to redistribute the values more evenly and can even add or
remove an entire level of branch nodes. By keeping the tree balanced, the
server is able to traverse quickly to the leaf nodes to find the desired
values without having to navigate through many levels of branch
nodes.
Bitmap indexes
Although B-tree indexes are great at handling columns that contain many
different values, such as a customer’s first/last names, they can become
unwieldy when built on a column that allows only a small number of values.
For example, you may decide to generate an index on the account.product_cd column so that you can
quickly retrieve all accounts of a specific type (e.g., checking, savings).
Because there are only eight different products, however, and because some
products are far more popular than others, it can be difficult to maintain a
balanced B-tree index as the number of accounts grows.
For columns that contain only a small number of values across a large
number of rows (known as low-cardinality data), a
different indexing strategy is needed. To handle this situation more
efficiently, Oracle Database includes bitmap indexes,
which generate a bitmap for each value stored in the column. Figure 13-2 shows what a bitmap index might look like for
data in the account.product_cd
column.
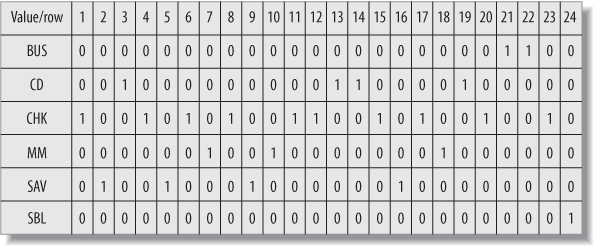
The index contains six bitmaps, one for each value in the product_cd column (two of the eight available
products are not being used), and each bitmap includes a 0/1 value
for each of the 24 rows in the account
table. Thus, if you ask the server to retrieve all money market accounts
(product_cd = 'MM'), the server
simply finds all the 1 values in the
MM bitmap and returns rows 7, 10, and
18. The server can also combine bitmaps if you are looking for multiple
values; for example, if you want to retrieve all money market
and savings accounts (product_cd = 'MM' or product_cd =
'SAV'), the server can perform an OR operation on the MM and
SAV bitmaps and return rows 2, 5, 7,
9, 10, 16, and 18.
Bitmap indexes are a nice, compact indexing solution for low-cardinality data, but this indexing strategy breaks down if the number of values stored in the column climbs too high in relation to the number of rows (known as high-cardinality data), since the server would need to maintain too many bitmaps. For example, you would never build a bitmap index on your primary key column, since this represents the highest possible cardinality (a different value for every row).
Oracle users can generate bitmap indexes by simply adding the bitmap keyword to the create index statement, as in:
CREATE BITMAP INDEX acc_prod_idx ON account (product_cd);
Bitmap indexes are commonly used in data warehousing environments, where large amounts of data are generally indexed on columns containing relatively few values (e.g., sales quarters, geographic regions, products, salespeople).
Text indexes
If your database stores documents, you may need to allow users to search for words or phrases in the documents. You certainly don’t want the server to open each document and scan for the desired text each time a search is requested, but traditional indexing strategies don’t work for this situation. To handle this situation, MySQL, SQL Server, and Oracle Database include specialized indexing and search mechanisms for documents; both SQL Server and MySQL include what they call full-text indexes (for MySQL, full-text indexes are available only with its MyISAM storage engine), and Oracle Database includes a powerful set of tools known as Oracle Text. Document searches are specialized enough that I refrain from showing an example, but I wanted you to at least know what is available.
How Indexes Are Used
Indexes are generally used by the server to quickly locate rows in a particular table, after which the server visits the associated table to extract the additional information requested by the user. Consider the following query:
mysql>SELECT emp_id, fname, lname->FROM employee->WHERE emp_id IN (1, 3, 9, 15);+--------+---------+----------+ | emp_id | fname | lname | +--------+---------+----------+ | 1 | Michael | Smith | | 3 | Robert | Tyler | | 9 | Jane | Grossman | | 15 | Frank | Portman | +--------+---------+----------+ 4 rows in set (0.00 sec)
For this query, the server can use the primary key index on the emp_id column to locate employee IDs 1, 3, 9, and
15 in the employee table, and then visit each
of the four rows to retrieve the first and last name columns.
If the index contains everything needed to satisfy the query, however, the server doesn’t need to visit the associated table. To illustrate, let’s look at how the query optimizer approaches the same query with different indexes in place.
The query, which aggregates account balances for specific customers, looks as follows:
mysql>SELECT cust_id, SUM(avail_balance) tot_bal->FROM account->WHERE cust_id IN (1, 5, 9, 11)->GROUP BY cust_id;+---------+----------+ | cust_id | tot_bal | +---------+----------+ | 1 | 4557.75 | | 5 | 2237.97 | | 9 | 10971.22 | | 11 | 9345.55 | +---------+----------+ 4 rows in set (0.00 sec)
To see how MySQL’s query optimizer decides to execute the query, I use the
explain statement to ask the server to
show the execution plan for the query rather than executing the query:
mysql>EXPLAIN SELECT cust_id, SUM(avail_balance) tot_bal->FROM account->WHERE cust_id IN (1, 5, 9, 11)->GROUP BY cust_id \G*************************** 1. row *************************** id: 1 select_type: SIMPLE table: account type: index possible_keys: fk_a_cust_id key: fk_a_cust_id key_len: 4 ref: NULL rows: 24 Extra: Using where 1 row in set (0.00 sec)
Note
Each database server includes tools to allow you to see how the query
optimizer handles your SQL statement. SQL Server allows you to see an
execution plan by issuing the statement set
showplan_text on before running your SQL statement. Oracle
Database includes the explain plan
statement, which writes the execution plan to a special table called
plan_table.
Without going into too much detail, here’s what the execution plan tells you:
The
fk_a_cust_idindex is used to find the rows in theaccounttable that satisfy thewhereclause.After reading the index, the server expects to read all 24 rows of the
accounttable to gather the available balance data, since it doesn’t know that there might be other customers besides IDs 1, 5, 9, and 11.
The fk_a_cust_id index is another index
generated automatically by the server, but this time it is because of a foreign
key constraint rather than a primary key constraint (more on this later in the
chapter). The fk_a_cust_id index is built on
the account.cust_id column, so the server is
using the index to locate customer IDs 1, 5, 9, and 11 in the account table and is then visiting those rows to
retrieve and aggregate the available balance data.
Next, I will add a new index called acc_bal_idx on both the cust_id and avail_balance columns:
mysql>ALTER TABLE account->ADD INDEX acc_bal_idx (cust_id, avail_balance);Query OK, 24 rows affected (0.03 sec) Records: 24 Duplicates: 0 Warnings: 0
With this index in place, let’s see how the query optimizer approaches the same query:
mysql>EXPLAIN SELECT cust_id, SUM(avail_balance) tot_bal->FROM account->WHERE cust_id IN (1, 5, 9, 11)->GROUP BY cust_id \G*************************** 1. row *************************** id: 1 select_type: SIMPLE table: account type: range possible_keys: acc_bal_idx key: acc_bal_idx key_len: 4 ref: NULL rows: 8 Extra: Using where; Using index 1 row in set (0.01 sec)
Comparing the two execution plans yields the following differences:
The optimizer is using the new
acc_bal_idxindex instead of thefk_a_cust_idindex.The optimizer anticipates needing only eight rows instead of 24.
The
accounttable is not needed (designated byUsing indexin theExtracolumn) to satisfy the query results.
Therefore, the server can use indexes to help locate rows in the associated table, or the server can use an index as though it were a table as long as the index contains all the columns needed by the query.
Note
The process that I just led you through is an example of query tuning. Tuning involves looking at an SQL statement and determining the resources available to the server to execute the statement. You can decide to modify the SQL statement, to adjust the database resources, or to do both in order to make a statement run more efficiently. Tuning is a detailed topic, and I strongly urge you to either read your server’s tuning guide or pick up a good tuning book so that you can see all the different approaches available for your server.
The Downside of Indexes
If indexes are so great, why not index everything? Well, the key to understanding why more indexes are not necessarily a good thing is to keep in mind that every index is a table (a special type of table, but still a table). Therefore, every time a row is added to or removed from a table, all indexes on that table must be modified. When a row is updated, any indexes on the column or columns that were affected need to be modified as well. Therefore, the more indexes you have, the more work the server needs to do to keep all schema objects up-to-date, which tends to slow things down.
Indexes also require disk space as well as some amount of care from your administrators, so the best strategy is to add an index when a clear need arises. If you need an index for only special purposes, such as a monthly maintenance routine, you can always add the index, run the routine, and then drop the index until you need it again. In the case of data warehouses, where indexes are crucial during business hours as users run reports and ad hoc queries but are problematic when data is being loaded into the warehouse overnight, it is a common practice to drop the indexes before data is loaded and then re-create them before the warehouse opens for business.
In general, you should strive to have neither too many indexes nor too few. If you aren’t sure how many indexes you should have, you can use this strategy as a default:
Make sure all primary key columns are indexed (most servers automatically create unique indexes when you create primary key constraints). For multicolumn primary keys, consider building additional indexes on a subset of the primary key columns, or on all the primary key columns but in a different order than the primary key constraint definition.
Build indexes on all columns that are referenced in foreign key constraints. Keep in mind that the server checks to make sure there are no child rows when a parent is deleted, so it must issue a query to search for a particular value in the column. If there’s no index on the column, the entire table must be scanned.
Index any columns that will frequently be used to retrieve data. Most date columns are good candidates, along with short (3- to 50-character) string columns.
After you have built your initial set of indexes, try to capture actual queries against your tables, and modify your indexing strategy to fit the most-common access paths.
Constraints
A constraint is simply a restriction placed on one or more columns of a table. There are several different types of constraints, including:
- Primary key constraints
Identify the column or columns that guarantee uniqueness within a table
- Foreign key constraints
Restrict one or more columns to contain only values found in another table’s primary key columns, and may also restrict the allowable values in other tables if
update cascadeordelete cascaderules are established- Unique constraints
Restrict one or more columns to contain unique values within a table (primary key constraints are a special type of unique constraint)
- Check constraints
Without constraints, a database’s consistency is suspect. For example, if the
server allows you to change a customer’s ID in the customer table without changing the same customer ID in the account table, then you will end up with accounts that
no longer point to valid customer records (known as orphaned
rows). With primary and foreign key constraints in place, however,
the server will either raise an error if an attempt is made to modify or delete data
that is referenced by other tables, or propagate the changes to other tables for you
(more on this shortly).
Note
If you want to use foreign key constraints with the MySQL server, you must use the InnoDB storage engine for your tables. Foreign key constraints are not supported in the Falcon engine as of version 6.0.4, but they will be supported in later versions.
Constraint Creation
Constraints are generally created at the same time as the associated table via
the create table statement. To illustrate,
here’s an example from the schema generation script for this book’s example
database:
CREATE TABLE product
 (product_cd VARCHAR(10) NOT NULL,
  name VARCHAR(50) NOT NULL,
  product_type_cd VARCHAR (10) NOT NULL,
  date_offered DATE,
  date_retired DATE,
      CONSTRAINT fk_product_type_cd FOREIGN KEY (product_type_cd)
        REFERENCES product_type (product_type_cd),
      CONSTRAINT pk_product PRIMARY KEY (product_cd)
 );
The product table includes two constraints:
one to specify that the product_cd column
serves as the primary key for the table, and another to specify that the
product_type_cd
column serves as a foreign key to the product_type table. Alternatively, you can create the product table without constraints, and add the
primary and foreign key constraints later via alter
table statements:
ALTER TABLE product ADD CONSTRAINT pk_product PRIMARY KEY (product_cd); ALTER TABLE product ADD CONSTRAINT fk_product_type_cd FOREIGN KEY (product_type_cd) REFERENCES product_type (product_type_cd);
If you want to remove a primary or foreign key constraint, you can use the
alter table statement again, except that
you specify drop instead of add, as in:
ALTER TABLE product
DROP PRIMARY KEY;

ALTER TABLE product
DROP FOREIGN KEY fk_product_type_cd;
While it is unusual to drop a primary key constraint, foreign key constraints are sometimes dropped during certain maintenance operations and then reestablished.
Constraints and Indexes
As you saw earlier in the chapter, constraint creation sometimes involves the automatic generation of an index. However, database servers behave differently regarding the relationship between constraints and indexes. Table 13-1 shows how MySQL, SQL Server, and Oracle Database handle the relationship between constraints and indexes.
|
Constraint type |
MySQL |
SQL Server |
Oracle Database |
|
Primary key constraints |
Generates unique index |
Generates unique index |
Uses existing index or creates new index |
|
Foreign key constraints |
Generates index |
Does not generate index |
Does not generate index |
|
Unique constraints |
Generates unique index |
Generates unique index |
Uses existing index or creates new index |
MySQL, therefore, generates a new index to enforce primary key, foreign key, and unique constraints, SQL Server generates a new index for primary key and unique constraints but not for foreign key constraints, and Oracle Database takes the same approach as SQL Server except that Oracle will use an existing index (if an appropriate one exists) to enforce primary key and unique constraints. Although neither SQL Server nor Oracle Database generates an index for a foreign key constraint, both servers’ documentation advises that indexes be created for every foreign key.
Cascading Constraints
With foreign key constraints in place, if a user attempts to insert a new row
or change an existing row such that a foreign key column doesn’t have a matching
value in the parent table, the server raises an error. To illustrate, here’s a
look at the data in the product and product_type tables:
mysql>SELECT product_type_cd, name->FROM product_type;+-----------------+-------------------------------+ | product_type_cd | name | +-----------------+-------------------------------+ | ACCOUNT | Customer Accounts | | INSURANCE | Insurance Offerings | | LOAN | Individual and Business Loans | +-----------------+-------------------------------+ 3 rows in set (0.00 sec) mysql>SELECT product_type_cd, product_cd, name->FROM product->ORDER BY product_type_cd;+-----------------+------------+-------------------------+ | product_type_cd | product_cd | name | +-----------------+------------+-------------------------+ | ACCOUNT | CD | certificate of deposit | | ACCOUNT | CHK | checking account | | ACCOUNT | MM | money market account | | ACCOUNT | SAV | savings account | | LOAN | AUT | auto loan | | LOAN | BUS | business line of credit | | LOAN | MRT | home mortgage | | LOAN | SBL | small business loan | +-----------------+------------+-------------------------+ 8 rows in set (0.01 sec)
There are three different values for the product_type_cd column in the product_type table (ACCOUNT,
INSURANCE, and LOAN). Of the three values, two of them (ACCOUNT and LOAN) are
referenced in the product table’s product_type_cd column.
The following statement attempts to change the product_type_cd column in the product table to a value that doesn’t exist
in the product_type table:
mysql>UPDATE product->SET product_type_cd = 'XYZ'->WHERE product_type_cd = 'LOAN';ERROR 1452 (23000): Cannot add or update a child row: a foreign key constraint fails ('bank'.'product', CONSTRAINT 'fk_product_type_cd' FOREIGN KEY ('product_type_cd') REFERENCES 'product_type' ('product_type_cd'))
Because of the foreign key constraint on the product.product_type_cd column, the server does not allow the
update to succeed, since there is no row in the product_type table with a value of XYZ in the product_type_cd column. Thus, the foreign key constraint doesn’t
let you change a child row if there is no corresponding value in the
parent.
What would happen, however, if you tried to change the
parent row in the product_type table to XYZ? Here’s an update statement that attempts to change the LOAN product type to XYZ:
mysql>UPDATE product_type->SET product_type_cd = 'XYZ'->WHERE product_type_cd = 'LOAN';ERROR 1451 (23000): Cannot delete or update a parent row: a foreign key constraint fails ('bank'.'product', CONSTRAINT 'fk_product_type_cd' FOREIGN KEY ('product_type_cd') REFERENCES 'product_type' ('product_type_cd'))
Once again, an error is raised; this time because there are child rows in the
product table whose product_type_cd column contains the value LOAN. This is the default behavior for foreign key
constraints, but it is not the only possible behavior; instead, you can instruct
the server to propagate the change to all child rows for you, thus preserving
the integrity of the data. Known as a cascading update,
this variation of the foreign key constraint can be installed by removing the
existing foreign key and adding a new one that includes the on update cascade clause:
mysql>ALTER TABLE product->DROP FOREIGN KEY fk_product_type_cd;Query OK, 8 rows affected (0.02 sec) Records: 8 Duplicates: 0 Warnings: 0 mysql>ALTER TABLE product->ADD CONSTRAINT fk_product_type_cd FOREIGN KEY (product_type_cd)->REFERENCES product_type (product_type_cd)->ON UPDATE CASCADE;Query OK, 8 rows affected (0.03 sec) Records: 8 Duplicates: 0 Warnings: 0
With this modified constraint in place, let’s see what happens when the
previous update statement is attempted
again:
mysql>UPDATE product_type->SET product_type_cd = 'XYZ'->WHERE product_type_cd = 'LOAN';Query OK, 1 row affected (0.01 sec) Rows matched: 1 Changed: 1 Warnings: 0
This time, the statement succeeds. To verify that the change was propagated to
the product table, here’s another look at the
data in both tables:
mysql>SELECT product_type_cd, name->FROM product_type;+-----------------+-------------------------------+ | product_type_cd | name | +-----------------+-------------------------------+ | ACCOUNT | Customer Accounts | | INSURANCE | Insurance Offerings | | XYZ | Individual and Business Loans | +-----------------+-------------------------------+ 3 rows in set (0.02 sec) mysql>SELECT product_type_cd, product_cd, name->FROM product->ORDER BY product_type_cd;+-----------------+------------+-------------------------+ | product_type_cd | product_cd | name | +-----------------+------------+-------------------------+ | ACCOUNT | CD | certificate of deposit | | ACCOUNT | CHK | checking account | | ACCOUNT | MM | money market account | | ACCOUNT | SAV | savings account | | XYZ | AUT | auto loan | | XYZ | BUS | business line of credit | | XYZ | MRT | home mortgage | | XYZ | SBL | small business loan | +-----------------+------------+-------------------------+ 8 rows in set (0.01 sec)
As you can see, the change to the product_type table has been propagated to the product table as well. Along
with cascading updates, you can specify cascading deletes
as well. A cascading delete removes rows from the child
table when a row is deleted from the parent table. To specify cascading deletes,
use the on delete cascade clause, as
in:
ALTER TABLE product
ADD CONSTRAINT fk_product_type_cd FOREIGN KEY (product_type_cd)
  REFERENCES product_type (product_type_cd)
  ON UPDATE CASCADE
  ON DELETE CASCADE;
With this version of the constraint in place, the server will now update child
rows in the product table when a row in the
product_type table is updated, as well as
delete child rows in the product table when a
row in the product_type table is
deleted.
Cascading constraints are one case in which constraints
do directly affect the code that you write. You need to
know which constraints in your database specify cascading updates and/or deletes
so that you know the full effect of your update and delete
statements.
Test Your Knowledge
Work through the following exercises to test your knowledge of indexes and constraints. When you’re done, compare your solutions with those in Appendix C.
Exercise 13-1
Modify the account table so that customers
may not have more than one account for each product.
Exercise 13-2
Generate a multicolumn index on the transaction table that could be used by both of the following
queries:
SELECT txn_date, account_id, txn_type_cd, amount
FROM transaction
WHERE txn_date > cast('2008-12-31 23:59:59' as datetime);

SELECT txn_date, account_id, txn_type_cd, amount
FROM transaction
WHERE txn_date > cast('2008-12-31 23:59:59' as datetime)
  AND amount < 1000;