Copyright © 2011 Packt Publishing
All rights reserved. No part of this book may be reproduced, stored in a retrieval system, or transmitted in any form or by any means, without the prior written permission of the publisher, except in the case of brief quotations embedded in critical articles or reviews.
Every effort has been made in the preparation of this book to ensure the accuracy of the information presented. However, the information contained in this book is sold without warranty, either express or implied. Neither the author, nor Packt Publishing, and its dealers and distributors will be held liable for any damages caused or alleged to be caused directly or indirectly by this book.
Packt Publishing has endeavored to provide trademark information about all of the companies and products mentioned in this book by the appropriate use of capitals. However, Packt Publishing cannot guarantee the accuracy of this information.
First published: September 2011
Production Reference: 1050811
Published by Packt Publishing Ltd. Livery Place 35 Livery Street Birmingham B3 2PB, UK.
ISBN 978-1-849517-54-6
You might want to visit www.PacktPub.com for support files and downloads related to your book.
Did you know that Packt offers eBook versions of every book published, with PDF and ePub files available? You can upgrade to the eBook version at www.PacktPub.com and as a print book customer, you are entitled to a discount on the eBook copy. Get in touch with us at<service@packtpub.com> for more details.
At www.PacktPub.com, you can also read a collection of free technical articles, sign up for a range of free newsletters and receive exclusive discounts and offers on Packt books and eBooks.
Do you need instant solutions to your IT questions? PacktLib is Packt’s online digital book library. Here, you can access, read and search across Packt’s entire library of books.
If you have an account with Packt at www.PacktPub.com, you can use this to access PacktLib today and view nine entirely free books. Simply use your login credentials for immediate access.
Welcome to the phpMyAdmin Starter. This book has been especially created to provide you with all the information that you need to get set up with phpMyAdmin. You will learn the basics of phpMyAdmin, get started with creating your own tables, and discover some tips and tricks for using phpMyAdmin.
This document contains the following sections:
So what is phpMyAdmin? — find out what phpMyAdmin actually is, what you can do with it, and why it’s so great.
Installation — learn how to download and install phpMyAdmin with the minimum fuss and then set it up so that you can use it as soon as possible.
Quick start— this section will show you how to perform one of the core tasks of phpMyAdmin, creating tables. Follow the steps to create your own tables, which will be the basis of most of your work in phpMyAdmin.
Top features you need to know about— here you will learn how to perform five tasks with the most important features in phpMyAdmin. By the end of this section you will be able to browse, search, and change data, and create relations.
People and places you should get to know — every Open Source project is centered around a community. This section provides you with many useful links to the project page and forums, as well as a number of helpful articles, tutorials, blogs, and the Twitter feeds of phpMyAdmin super-contributors.
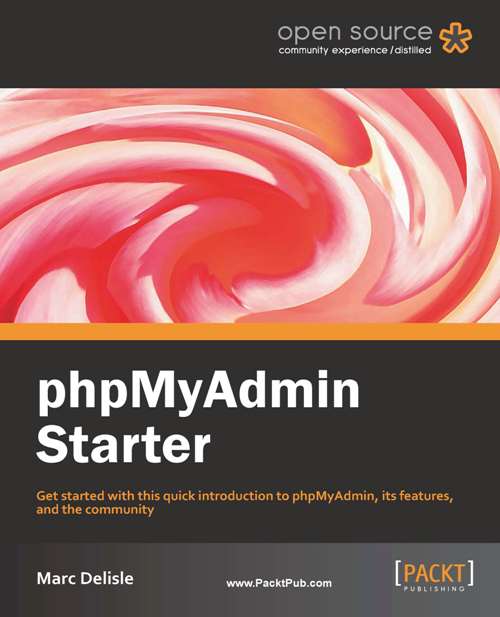
phpMyAdmin is a PHP application that provides a complete interface to manage MySQL databases over the Web. The following image depicts the product's home page; the main sections — MySQL and Web server — indicate that phpMyAdmin relies on a PHP-enabled web server to send commands to a MySQL server and receive data from the server:
As MySQL is the database of choice on the Web and PHP is a popular web scripting language, web host providers often provide phpMyAdmin for their users as the de facto mechanism to administrate their databases.
Users of phpMyAdmin can be broken down into these categories:
The authors of other web applications often advise administrators to use phpMyAdmin, either for initially populating the required database, or as a back entry in case they are locked down from their application.
phpMyAdmin offers panels to manage the structure of data: creating, editing, deleting various elements like databases, tables, columns, indexes, views, and foreign keys (relations). The software also enables you to deal with the data itself: inserting, editing, and deleting data; sorting; searching in tables or databases; importing and exporting to various file formats.
A system administrator can also use phpMyAdmin to acquire status information about the MySQL server; this information can be used to fine-tune the server. Moreover, maintenance of MySQL usernames and privileges is available.
Advanced functions include:
Volunteers all over the world help the development team by providing translations for the interface in many languages.
In four easy steps, you can install phpMyAdmin and get it set up on your system.
Before you install phpMyAdmin, you will need to check that you have all of the required elements, as listed below:
The recommended way to download phpMyAdmin is as a compressed package from http://phpmyadmin.net/. We suggest that you download the most current stable build.
Pick a file which has an extension for which you have the corresponding extractor program. Moreover, there are packages which contain only the English message files and other packages, marked all-languages, which contain all supported languages. Let's suppose you downloaded phpMyAdmin-3.4.3.1-all-languages.zip and saved it to your local workstation.
After downloading and unpacking this archive, you will be left with a directory called phpMyAdmin-3.4.3.1, containing a number of files and folders.
The main configuration file is named config.inc.php and its normal location is the top-level directory (where index.php is located). A single instance of phpMyAdmin can manage many MySQL servers; therefore, this file can contain sections for more than one MySQL server. It can also contain directives that control the behavior of the interface. All these directives are explained in Documentation.html.
If this file is not found, phpMyAdmin assumes that you want to connect to a MySQL server on localhost—the same host as the web server. This might fit your purpose.
It's recommended to use the sample configuration file, config.sample.inc.php, and copy it over config.inc.php; then, look it over and follow the examples therein.
Using the uploading mechanism available on your web server, you should now place the whole folder in your web server documents directory, in which case the tool will be located at http://yourwebserver.com/phpMyAdmin-3.4.3.1. The exact location and URL really depends on your host's policies.
You can rename the folder; however, the final name it should bear depends on a number of factors:
http://yourwebserver.com/mysql?The following examples will assume that the folder was renamed to phpMyAdmin.
By this point, you should have a working installation of phpMyAdmin and are free to play around and discover more about it.
Now that the folder is in place on the web server, you can use a web-based setup script to refine your configuration. The advantage of configuring this way is that all directives are conveniently regrouped by menus and submenus, such as Features, Navigation frame, and Import.
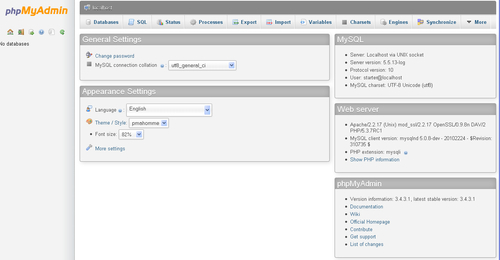
Visiting http://yourwebserver.com/phpMyAdmin/setup displays the following initial screen:
At this point, you are able to use the various menus and buttons—notably the New server button—to explore the configuration possibilities. You'll note that the setup script cannot currently load or save a configuration file. This is because a protection mechanism exists. If anyone could visit this URL and configure phpMyAdmin, your installation would be at risk. Therefore, you need to have access to the folder where you installed phpMyAdmin, to create a subfolder named config which can be used temporarily during the configuration steps. The web server itself must have the rights to write to this folder.
When this subfolder has been created, reload the page; now you can use the Save button and this creates a config.inc.php under the config subfolder.
After configuration is done, you need to do the following:
phpMyAdmin is all about managing MySQL tables, so this section guides you in creating a database to hold your new project, then creating two tables.
The theme for the sample tables is a grocery store, with departments and items. Of course an information system for a real grocery store would contain many more tables describing employees, suppliers, and sales but two tables will suffice for our purpose.
We suppose here that your MySQL username is sarah and that this account is allowed to create databases with the prefix sarah_.
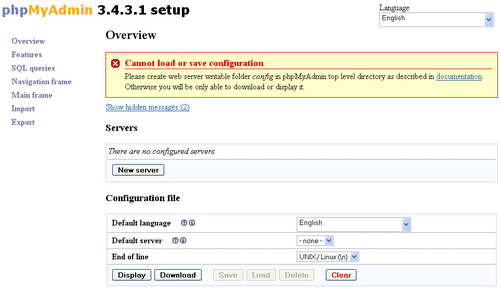
A MySQL database is a container for tables. The new database will be named sarah_grocery, assuming that the system administrator enforces the policy that all databases must have the username as a prefix. The rest of the database name consists of the project name, which here is grocery.
Currently you might be seeing one existing database, information_schema. This is not a real database but contains metadata about the whole data structure.
You must now tell phpMyAdmin to use sarah_grocery as the current database. This way, all actions will take place in the context of this database. The easiest way to open it is by clicking on the database name from the navigation panel (which is located on the left-hand side if you are using a left-to-right language like English).
Now that you have a database to play with, it's time to create a table that will hold the description of the grocery's departments. To be able to create inter-table relations in a later task without the need for installing further phpMyAdmin elements, all the tables in this exercise will use the InnoDB storage engine—see http://www.innodb.com and http://dev.mysql.com/doc/refman/5.5/en/innodb-storage-engine.html.
InnoDB is a good choice for the storage engine, as it offers solid performance, transactions, referential integrity, and crash recovery.
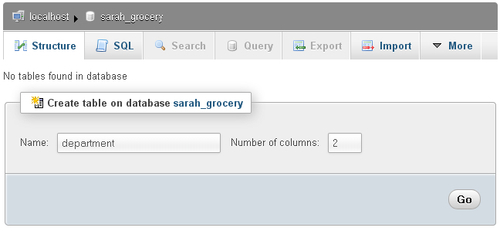
When opening a database, you are by default in its Structure page where you can see existing tables and views belonging to this database. You now use the Create table initial dialog to specify the table name and initial number of columns:
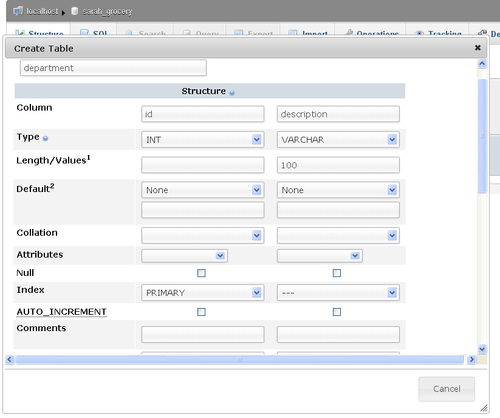
Clicking on Go brings up the columns panel where you'll create two columns, id (an integer column) and description (a variable-size character column having a maximum length of 100). The id column is marked as being the primary key.
Scrolling to the bottom of this panel and clicking Save creates the table. You now see a different Structure panel, which shows the existing table, department, on which you can apply actions, and the Create table dialog to create further tables.

You will now use your table creation skills to create the item table, containing the following columns:
You will notice that both tables have a column id as the primary key; however, there is no risk of confusion because SQL requires using the table name in queries, such as the following:
SELECT id FROM item
You need some sample data to play with these tables. There is more than one way of inserting data into a table:
In the current step you'll use the Insert menu, which can be reached from the database Structure page. Let's begin by inserting new departments; on the line for the department table, click on Insert, which brings the insertion panel. Then enter this sample data:
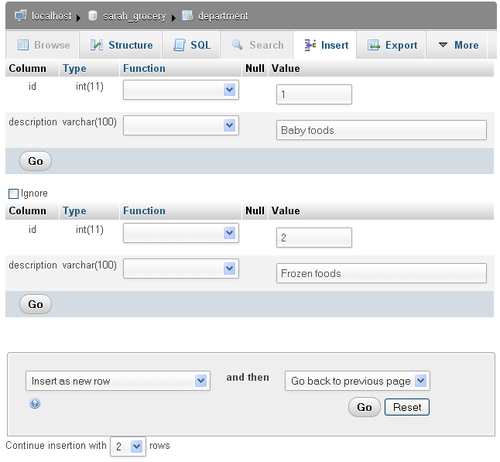
Clicking on Go generates the following query, sends it to the MySQL server and displays it on-screen—this is handy, both to reassure you about the action done and possibly to teach you SQL.
INSERT INTO `sarah_grocery`.`department` (`id` ,`description`
)
VALUES (
'1', 'Baby foods'
), (
'2', 'Frozen foods'
);
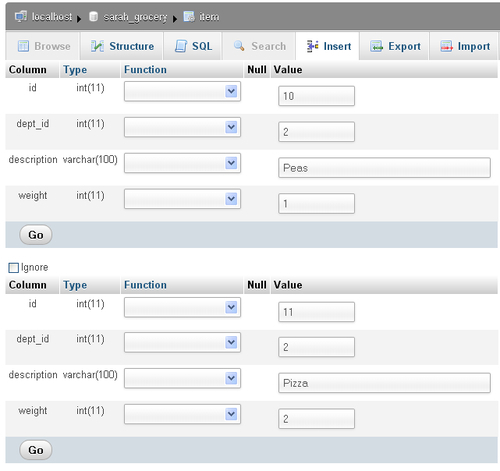
You need to also populate the item table. Here you create two items in the frozen foods department:
As you start to use phpMyAdmin, you will realize that there are a wide variety of things that you can do with it. This section will show you the most commonly performed tasks in phpMyAdmin and how to do them.
Probably the most common usage of phpMyAdmin is to look at data. In fact, this is so common that the default action when clicking on a table name in the navigation panel is to browse this table.
Let's see what appears when you click on the department table from the navigation (left) panel:

The screen in browse mode can be broken down into various sections, which are explained here, from top to bottom:
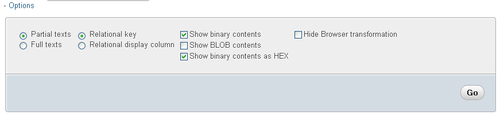
Clicking on Options opens a sliding section, offering you more ways of displaying the data for BLOB columns, binary columns, or relational information:
Browsing is not just looking at raw data; phpMyAdmin can also sort this data. Sorting can be performed on an index, using the Sort by key selector, or simply by clicking on a column header. Clicking again on the same header reverses the sort. You can experiment now by clicking twice on the description header.
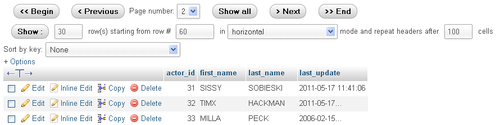
When there are numerous rows of data, they are presented by pages and you can navigate back and forth between these pages. Here is an example of navigation controls with a different table, taken from MySQL's sakila database (http://dev.mysql.com/doc/sakila/en/sakila.html):
For small tables like your department and item tables, it's often sufficient to browse them in order to grasp all their data. However, for larger projects involving many tables or many data rows, you have to rely on phpMyAdmin's search mechanisms.
You can search on a single table or on many tables at once. Let's begin by examining the single-table case, using the item table.
You can enter the table Search page with either of these methods:
sarah_grocery database on its Structure page and clicking the Search link on the line corresponding to the item tableThe initial search page looks like the following, with only the most commonly-used "query by example" section visible:
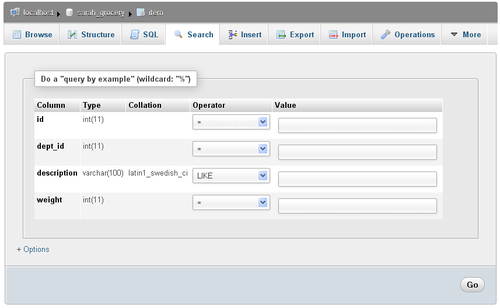
In a query by example search, you fill one or more values corresponding to what you are looking for. You can also apply an operator to a value in order to modify the search behavior.
Let's search for some pizza; for this, you simply enter pizza (with a lowercase p) in the value field next to the description; then you click on Go, which brings the following results screen:
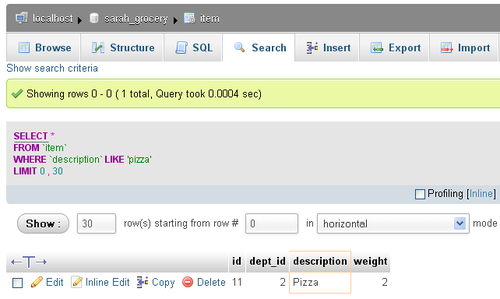
A few remarks about this screen:
description column uses one of the case-insensitive collations (latin1_swedish_ci, where ci means case-insensitive)To practice using a search operator:
No item with a description of Pizza and an id less than 10 exists, so you get the MySQL returned an empty result set (i.e. zero rows) message.
The search Options slider contains controls to restrict which columns will appear in the results, to ask for distinct results, to type in a WHERE clause, to specify the number of rows per page and to choose the display order.
Now you'll have a look at the multi-table (or database) search mechanism. This searching method is handy when you are not sure of the exact table that holds a piece of data you are looking for, or when the same piece of data (say, a city name) appears in more than one table or more than one column.
Opening your database and clicking on Search brings the database search panel. You'll first try an exact search for the number 1, in all tables. To accomplish this search:
The following image depicts the search panel just before launching the search:

The search results first give an overview of the number of matches for each table, as well as links to browse or delete these matches:
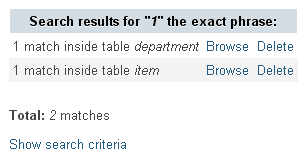
Clicking on Browse fetches the search results for a particular table, while leaving the global search results on the top of screen.
Note that the Show search criteria link is available. You now click on this link and change the search mode (in the Find dialog) from the exact phrase to at least one of the words. Clicking on Go shows different global search results with two matches inside the item table. The reason for this is the addition of the wildcard % character before and after the searched value in the generated query, which now matches the id 10 and 11 of the item table when looking for the number 1.
Heraclitus, a Greek philosopher (and probably database designer precursor) told us that "Nothing is permanent except change". In the database world, not only data values often change but also their supporting structures (column, table, view, and database definitions).
You'll first explore the three graphical methods for editing data, and then you'll go on about changing data structure.
When you have a results page (generated by either browsing a table or searching in it), you notice that for each data row, Edit and Inline Edit links are offered. Moreover, a checkbox appears for each line, permitting you to choose the rows to edit via the Change link underneath.
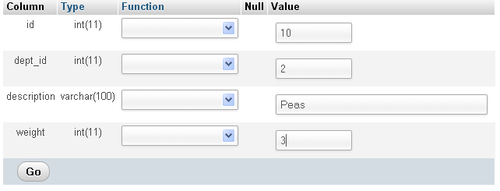
Let's try the Edit link for the item table. Browsing this table and clicking on Edit for id 10 brings this row in edit mode. Here you have changed the weight value from 1 to 3 and are about to click on Go to save the change:
This is the most traditional mechanism to edit a row. Using the checkboxes and the With selected: Change link permits you to put more than one row in the edit mode at once. Here are some reasons why you might want to do this:
More recently (in phpMyAdmin 3.4.x), inline editing was made available. Trying it for id 10 brings you this screen:
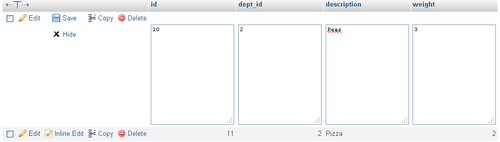
The advantage is that you did not leave the results page you were on; thus you can keep an eye on the data for the other rows, which can help you decide about the changes to make.
Directly make your changes and click on Save, or decide to Hide the inline edit view, therefore not saving any changes you made.
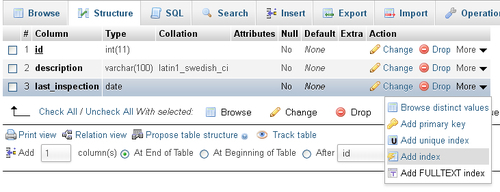
We will now explore how to modify the structure of data. You begin by opening the department table in Structure — mode this can be done either by clicking Structure for this table, or by clicking the small icon next to this table name in the navigation panel.
The Structure page shows you a great deal of information:
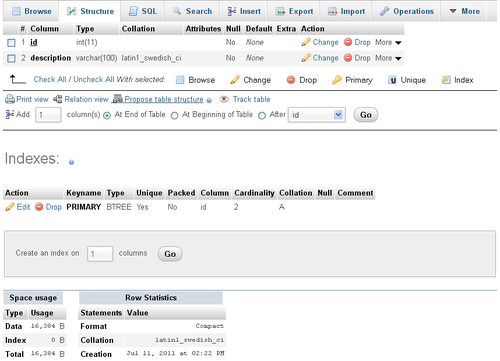
You can see three main sections:
In the next exercise you will add a column that will be used to record the date of the last inspection for this department. In the dialog Add X column(s) you see that the default is to add one column at the end of the table; then just click on Go, bringing up the following panel in which you type the new column's information:
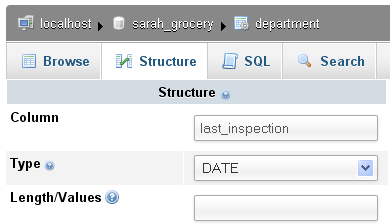
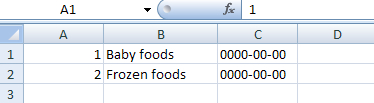
Clicking on Save adds this column to your table. You can now browse the department table and notice that there is a new column, last_inspection, with all the dates set to 0000-00-00 as we did not set any default date.
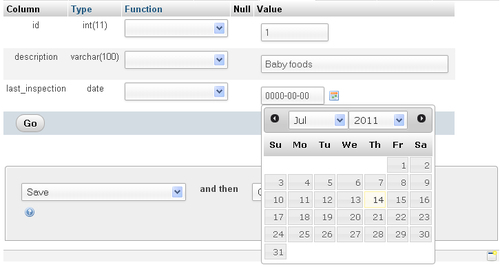
Editing an existing row shows you a new icon: a small calendar. Clicking on it gives you a standard date picker, shown as follows:
You can also change an existing column's structure—for example, the description column becoming a VARCHAR(110)—but beware of the consequences, should you change the type or size of the column. Data truncation could happen.
Adding an index on the last_inspection column can be done quickly via the More menu that is offered for each column:
Fine-tuning indexes is accomplished via the Indexes section by using the Edit link for a specific index. Here you can add or remove columns from an index, or even change the number of characters a column uses in this index.
The popularity of Excel means that many people are familiar with this tool and they prefer to do the majority of their data manipulations in it. This task will describe extracting data with the goal of reading it back into Microsoft Excel. Note that any utility that understands the CSV (comma-separated values) format can be used to read the file generated in this task.
You'll first practice exporting in quick mode, and then you'll go through the custom mode for additional options.
Start by opening the department table and clicking Export, which brings up this panel:
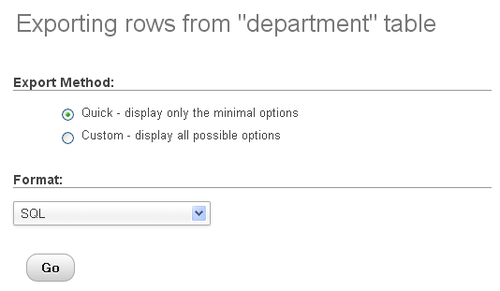
As can be seen, the default export format is SQL because it permits you to quickly produce a complete backup of the table's structure and data. However for this task, you need to change the export format to CSV for MS Excel.
A pure CSV file should use Comma-Separated Values; however as Excel uses semicolons to delineate each value, phpMyAdmin produces a file containing semicolons. You can try this format by choosing it in the Format selector and clicking Go. Your browser offers to save the file or to open it with the default program associated with .csv files (depending on your workstation's OS). Here is what you can see after opening the file with Excel:
Note that in this quick export format, the column names do not appear; you’ll use the custom format to remediate to this.
Contrary to the quick export format, the custom one offers many options. Some of these options (Rows, Output) are common for all export formats and some are adapted for each format.
Selecting CSV for MS Excel, and then choosing Custom produces the following panel:
The Rows section enables you to choose to Dump (export) just some rows (with the number of rows and starting row) or all rows.
The Output section permits you to either save output to a file (with a choice of character set and compression) or to view the output as text (which would not save anything but can be useful in case the output format can be interpreted as text — this happens to work with the CSV format).
Next, the format-specific options vary according to the chosen format. Here, the option most likely to be changed would be Put column names in the first row. This would help the person opening the CSV file in Excel to see column headers indicating the original column names.
There is also a selector to pick up which Excel edition is the target for this file (Windows, Mac).
Making relations between tables is very useful. Let's just consider the benefits of defining relations when manipulating tables via phpMyAdmin:
The native way in MySQL to define relations is via the FOREIGN KEY constraints (more details at http://dev.mysql.com/doc/refman/5.5/en/innodb-foreign-key-constraints.html). These constraints are available with the InnoDB storage engine; this is why we created our tables under this engine.
In this task, you'll begin with exploring what can be done with relations using just what MySQL offers natively; then you'll learn the additional possibilities offered by phpMyAdmin, thanks to its configuration storage mechanism.
The goal here is to make a relation between the dept_id column of the item table and the id column of the department table; this is because a department should exist before you use it in the item table. In InnoDB vocabulary, the foreign key for item.dept_id will be department.id.
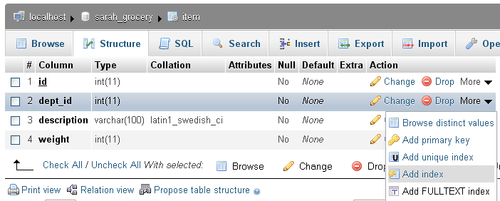
You first open the item table on its Structure page and then click on Relation view. This produces the following panel:
InnoDB requires that all columns referring to a foreign key or referred to as a foreign key, have an index defined. So you must go back to the Structure page for item and, for the dept_id column, use the More selector and choose Add index:
Going back to the Relation view, you can now choose for dept_id the appropriate column department.id. Choosing it makes other selectors appear as well:
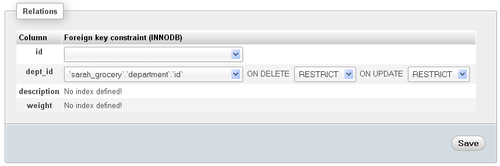
The ON DELETE and ON UPDATE are foreign key options; they are explained in the aforementioned MySQL documentation page. For now you'll just keep the default values and click on Save.
At this point, everything went fine because your data respected the constraint (department IDs existed in the department table).
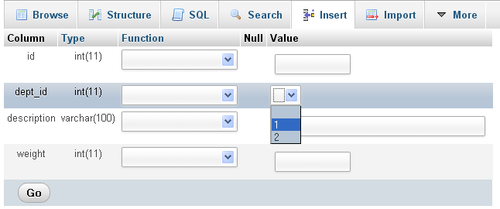
You can immediately see a benefit of the relation by trying to Insert a new item; the possible department IDs appear in a drop-down selector:
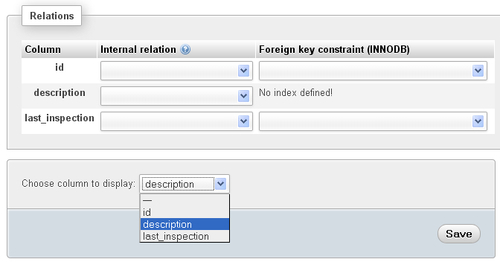
More options can be made available if your installation has the phpMyAdmin configuration storage deployed. In short, this is a special set of tables that contain metadata about various configuration elements. For example, we would like to see the department name in the drop-down selector, when we insert or edit an item. Thus, the metadata called display column is offered in the phpMyAdmin configuration storage, to hold which column best describes each row. Details about installing the configuration storage appear in Documentation.html. The remaining segments of this task assume that the configuration storage has been installed.
With this in place, you can open the department table in Structure page, click Relation view, and pick the column to display, which is description:
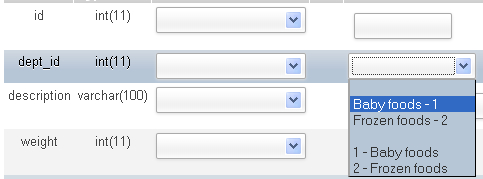
After clicking on Save, you can now open the item table in Insert mode and see the difference, shown as follows:
If too many rows were present in the referenced table, an icon would be offered instead of a drop-down. This icon would open a distinct panel to select among the values, with pagination and search capabilities.
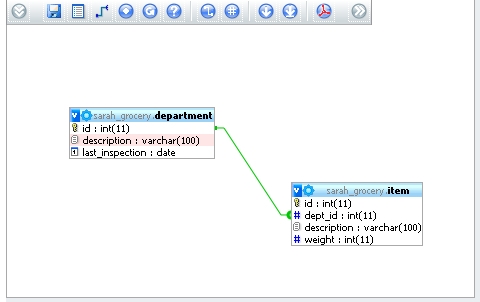
Another handy feature made available by the configuration storage is the Designer. In this panel, available from the database menu, you can define the relations graphically, move the tables around on the workspace, and save their coordinates in order to produce a PDF schema of the relations. The following is an image of the Designer's workspace:
If you need help with phpMyAdmin, here are some people and places which will prove invaluable.
Documentation.html is the current documentation for your version and is included in the downloaded kit)for developers of phpMyAdmin: https://lists.sourceforge.net/lists/listinfo/phpmyadmin-devel
https://sourceforge.net/projects/phpmyadmin/forums/forum/72909 http://www.facebook.com/pages/PhpMyAdmin/157021164334486Marc Delisle was awarded "MySQL Community Member of the year 2009" because of his involvement with phpMyAdmin. He started to contribute to the project in December 1998, when he made the multi-language version. He is still involved with phpMyAdmin as a developer and project administrator.
Marc is a system administrator at Cegep de Sherbrooke, Québec, Canada. He has been teaching networking, security, and web application development. In one of his classes, he was pleased to meet a phpMyAdmin user from Argentina. Marc lives in Sherbrooke with his wife and they enjoy spending time with their four children.
Michal Čihař was born in 1980 in Prague, the capital city of the Czech Republic, and he is still living there. He studied Software Engineering at the Czech Technical University, and during these studies he started contributing to several free software projects, with the biggest contributions being made to phpMyAdmin and Gammu, and related projects. He currently works for SUSE, mostly on the SUSE Linux Enterprise platform.
Michal has been active in the phpMyAdmin project since 2001, when he started as a translator for the Czech language, later moving to a developer role (working, for example, on index manipulation, and export and import subsystems), and since 2010 he has also acted as a secondary project manager.
Copyright © 2011 Packt Publishing
All rights reserved. No part of this book may be reproduced, stored in a retrieval system, or transmitted in any form or by any means, without the prior written permission of the publisher, except in the case of brief quotations embedded in critical articles or reviews.
Every effort has been made in the preparation of this book to ensure the accuracy of the information presented. However, the information contained in this book is sold without warranty, either express or implied. Neither the author, nor Packt Publishing, and its dealers and distributors will be held liable for any damages caused or alleged to be caused directly or indirectly by this book.
Packt Publishing has endeavored to provide trademark information about all of the companies and products mentioned in this book by the appropriate use of capitals. However, Packt Publishing cannot guarantee the accuracy of this information.
First published: September 2011
Production Reference: 1050811
Published by Packt Publishing Ltd. Livery Place 35 Livery Street Birmingham B3 2PB, UK.
ISBN 978-1-849517-54-6
You might want to visit www.PacktPub.com for support files and downloads related to your book.
Did you know that Packt offers eBook versions of every book published, with PDF and ePub files available? You can upgrade to the eBook version at www.PacktPub.com and as a print book customer, you are entitled to a discount on the eBook copy. Get in touch with us at<service@packtpub.com> for more details.
At www.PacktPub.com, you can also read a collection of free technical articles, sign up for a range of free newsletters and receive exclusive discounts and offers on Packt books and eBooks.
Do you need instant solutions to your IT questions? PacktLib is Packt’s online digital book library. Here, you can access, read and search across Packt’s entire library of books.
If you have an account with Packt at www.PacktPub.com, you can use this to access PacktLib today and view nine entirely free books. Simply use your login credentials for immediate access.
Welcome to the phpMyAdmin Starter. This book has been especially created to provide you with all the information that you need to get set up with phpMyAdmin. You will learn the basics of phpMyAdmin, get started with creating your own tables, and discover some tips and tricks for using phpMyAdmin.
This document contains the following sections:
So what is phpMyAdmin? — find out what phpMyAdmin actually is, what you can do with it, and why it’s so great.
Installation — learn how to download and install phpMyAdmin with the minimum fuss and then set it up so that you can use it as soon as possible.
Quick start— this section will show you how to perform one of the core tasks of phpMyAdmin, creating tables. Follow the steps to create your own tables, which will be the basis of most of your work in phpMyAdmin.
Top features you need to know about— here you will learn how to perform five tasks with the most important features in phpMyAdmin. By the end of this section you will be able to browse, search, and change data, and create relations.
People and places you should get to know — every Open Source project is centered around a community. This section provides you with many useful links to the project page and forums, as well as a number of helpful articles, tutorials, blogs, and the Twitter feeds of phpMyAdmin super-contributors.
phpMyAdmin is a PHP application that provides a complete interface to manage MySQL databases over the Web. The following image depicts the product's home page; the main sections — MySQL and Web server — indicate that phpMyAdmin relies on a PHP-enabled web server to send commands to a MySQL server and receive data from the server:
As MySQL is the database of choice on the Web and PHP is a popular web scripting language, web host providers often provide phpMyAdmin for their users as the de facto mechanism to administrate their databases.
Users of phpMyAdmin can be broken down into these categories:
The authors of other web applications often advise administrators to use phpMyAdmin, either for initially populating the required database, or as a back entry in case they are locked down from their application.
phpMyAdmin offers panels to manage the structure of data: creating, editing, deleting various elements like databases, tables, columns, indexes, views, and foreign keys (relations). The software also enables you to deal with the data itself: inserting, editing, and deleting data; sorting; searching in tables or databases; importing and exporting to various file formats.
A system administrator can also use phpMyAdmin to acquire status information about the MySQL server; this information can be used to fine-tune the server. Moreover, maintenance of MySQL usernames and privileges is available.
Advanced functions include:
Volunteers all over the world help the development team by providing translations for the interface in many languages.
In four easy steps, you can install phpMyAdmin and get it set up on your system.
Before you install phpMyAdmin, you will need to check that you have all of the required elements, as listed below:
The recommended way to download phpMyAdmin is as a compressed package from http://phpmyadmin.net/. We suggest that you download the most current stable build.
Pick a file which has an extension for which you have the corresponding extractor program. Moreover, there are packages which contain only the English message files and other packages, marked all-languages, which contain all supported languages. Let's suppose you downloaded phpMyAdmin-3.4.3.1-all-languages.zip and saved it to your local workstation.
After downloading and unpacking this archive, you will be left with a directory called phpMyAdmin-3.4.3.1, containing a number of files and folders.
The main configuration file is named config.inc.php and its normal location is the top-level directory (where index.php is located). A single instance of phpMyAdmin can manage many MySQL servers; therefore, this file can contain sections for more than one MySQL server. It can also contain directives that control the behavior of the interface. All these directives are explained in Documentation.html.
If this file is not found, phpMyAdmin assumes that you want to connect to a MySQL server on localhost—the same host as the web server. This might fit your purpose.
It's recommended to use the sample configuration file, config.sample.inc.php, and copy it over config.inc.php; then, look it over and follow the examples therein.
Using the uploading mechanism available on your web server, you should now place the whole folder in your web server documents directory, in which case the tool will be located at http://yourwebserver.com/phpMyAdmin-3.4.3.1. The exact location and URL really depends on your host's policies.
You can rename the folder; however, the final name it should bear depends on a number of factors:
http://yourwebserver.com/mysql?The following examples will assume that the folder was renamed to phpMyAdmin.
By this point, you should have a working installation of phpMyAdmin and are free to play around and discover more about it.
Now that the folder is in place on the web server, you can use a web-based setup script to refine your configuration. The advantage of configuring this way is that all directives are conveniently regrouped by menus and submenus, such as Features, Navigation frame, and Import.
Visiting http://yourwebserver.com/phpMyAdmin/setup displays the following initial screen:
At this point, you are able to use the various menus and buttons—notably the New server button—to explore the configuration possibilities. You'll note that the setup script cannot currently load or save a configuration file. This is because a protection mechanism exists. If anyone could visit this URL and configure phpMyAdmin, your installation would be at risk. Therefore, you need to have access to the folder where you installed phpMyAdmin, to create a subfolder named config which can be used temporarily during the configuration steps. The web server itself must have the rights to write to this folder.
When this subfolder has been created, reload the page; now you can use the Save button and this creates a config.inc.php under the config subfolder.
After configuration is done, you need to do the following:
phpMyAdmin is all about managing MySQL tables, so this section guides you in creating a database to hold your new project, then creating two tables.
The theme for the sample tables is a grocery store, with departments and items. Of course an information system for a real grocery store would contain many more tables describing employees, suppliers, and sales but two tables will suffice for our purpose.
We suppose here that your MySQL username is sarah and that this account is allowed to create databases with the prefix sarah_.
A MySQL database is a container for tables. The new database will be named sarah_grocery, assuming that the system administrator enforces the policy that all databases must have the username as a prefix. The rest of the database name consists of the project name, which here is grocery.
Currently you might be seeing one existing database, information_schema. This is not a real database but contains metadata about the whole data structure.
You must now tell phpMyAdmin to use sarah_grocery as the current database. This way, all actions will take place in the context of this database. The easiest way to open it is by clicking on the database name from the navigation panel (which is located on the left-hand side if you are using a left-to-right language like English).
Now that you have a database to play with, it's time to create a table that will hold the description of the grocery's departments. To be able to create inter-table relations in a later task without the need for installing further phpMyAdmin elements, all the tables in this exercise will use the InnoDB storage engine—see http://www.innodb.com and http://dev.mysql.com/doc/refman/5.5/en/innodb-storage-engine.html.
InnoDB is a good choice for the storage engine, as it offers solid performance, transactions, referential integrity, and crash recovery.
When opening a database, you are by default in its Structure page where you can see existing tables and views belonging to this database. You now use the Create table initial dialog to specify the table name and initial number of columns:
Clicking on Go brings up the columns panel where you'll create two columns, id (an integer column) and description (a variable-size character column having a maximum length of 100). The id column is marked as being the primary key.
Scrolling to the bottom of this panel and clicking Save creates the table. You now see a different Structure panel, which shows the existing table, department, on which you can apply actions, and the Create table dialog to create further tables.
You will now use your table creation skills to create the item table, containing the following columns:
You will notice that both tables have a column id as the primary key; however, there is no risk of confusion because SQL requires using the table name in queries, such as the following:
SELECT id FROM item
You need some sample data to play with these tables. There is more than one way of inserting data into a table:
In the current step you'll use the Insert menu, which can be reached from the database Structure page. Let's begin by inserting new departments; on the line for the department table, click on Insert, which brings the insertion panel. Then enter this sample data:
Clicking on Go generates the following query, sends it to the MySQL server and displays it on-screen—this is handy, both to reassure you about the action done and possibly to teach you SQL.
INSERT INTO `sarah_grocery`.`department` (`id` ,`description`
)
VALUES (
'1', 'Baby foods'
), (
'2', 'Frozen foods'
);
You need to also populate the item table. Here you create two items in the frozen foods department:
As you start to use phpMyAdmin, you will realize that there are a wide variety of things that you can do with it. This section will show you the most commonly performed tasks in phpMyAdmin and how to do them.
Probably the most common usage of phpMyAdmin is to look at data. In fact, this is so common that the default action when clicking on a table name in the navigation panel is to browse this table.
Let's see what appears when you click on the department table from the navigation (left) panel:
The screen in browse mode can be broken down into various sections, which are explained here, from top to bottom:
Clicking on Options opens a sliding section, offering you more ways of displaying the data for BLOB columns, binary columns, or relational information:
Browsing is not just looking at raw data; phpMyAdmin can also sort this data. Sorting can be performed on an index, using the Sort by key selector, or simply by clicking on a column header. Clicking again on the same header reverses the sort. You can experiment now by clicking twice on the description header.
When there are numerous rows of data, they are presented by pages and you can navigate back and forth between these pages. Here is an example of navigation controls with a different table, taken from MySQL's sakila database (http://dev.mysql.com/doc/sakila/en/sakila.html):
For small tables like your department and item tables, it's often sufficient to browse them in order to grasp all their data. However, for larger projects involving many tables or many data rows, you have to rely on phpMyAdmin's search mechanisms.
You can search on a single table or on many tables at once. Let's begin by examining the single-table case, using the item table.
You can enter the table Search page with either of these methods:
sarah_grocery database on its Structure page and clicking the Search link on the line corresponding to the item tableThe initial search page looks like the following, with only the most commonly-used "query by example" section visible:
In a query by example search, you fill one or more values corresponding to what you are looking for. You can also apply an operator to a value in order to modify the search behavior.
Let's search for some pizza; for this, you simply enter pizza (with a lowercase p) in the value field next to the description; then you click on Go, which brings the following results screen:
A few remarks about this screen:
description column uses one of the case-insensitive collations (latin1_swedish_ci, where ci means case-insensitive)To practice using a search operator:
No item with a description of Pizza and an id less than 10 exists, so you get the MySQL returned an empty result set (i.e. zero rows) message.
The search Options slider contains controls to restrict which columns will appear in the results, to ask for distinct results, to type in a WHERE clause, to specify the number of rows per page and to choose the display order.
Now you'll have a look at the multi-table (or database) search mechanism. This searching method is handy when you are not sure of the exact table that holds a piece of data you are looking for, or when the same piece of data (say, a city name) appears in more than one table or more than one column.
Opening your database and clicking on Search brings the database search panel. You'll first try an exact search for the number 1, in all tables. To accomplish this search:
The following image depicts the search panel just before launching the search:
The search results first give an overview of the number of matches for each table, as well as links to browse or delete these matches:
Clicking on Browse fetches the search results for a particular table, while leaving the global search results on the top of screen.
Note that the Show search criteria link is available. You now click on this link and change the search mode (in the Find dialog) from the exact phrase to at least one of the words. Clicking on Go shows different global search results with two matches inside the item table. The reason for this is the addition of the wildcard % character before and after the searched value in the generated query, which now matches the id 10 and 11 of the item table when looking for the number 1.
Heraclitus, a Greek philosopher (and probably database designer precursor) told us that "Nothing is permanent except change". In the database world, not only data values often change but also their supporting structures (column, table, view, and database definitions).
You'll first explore the three graphical methods for editing data, and then you'll go on about changing data structure.
When you have a results page (generated by either browsing a table or searching in it), you notice that for each data row, Edit and Inline Edit links are offered. Moreover, a checkbox appears for each line, permitting you to choose the rows to edit via the Change link underneath.
Let's try the Edit link for the item table. Browsing this table and clicking on Edit for id 10 brings this row in edit mode. Here you have changed the weight value from 1 to 3 and are about to click on Go to save the change:
This is the most traditional mechanism to edit a row. Using the checkboxes and the With selected: Change link permits you to put more than one row in the edit mode at once. Here are some reasons why you might want to do this:
More recently (in phpMyAdmin 3.4.x), inline editing was made available. Trying it for id 10 brings you this screen:
The advantage is that you did not leave the results page you were on; thus you can keep an eye on the data for the other rows, which can help you decide about the changes to make.
Directly make your changes and click on Save, or decide to Hide the inline edit view, therefore not saving any changes you made.
We will now explore how to modify the structure of data. You begin by opening the department table in Structure — mode this can be done either by clicking Structure for this table, or by clicking the small icon next to this table name in the navigation panel.
The Structure page shows you a great deal of information:
You can see three main sections:
In the next exercise you will add a column that will be used to record the date of the last inspection for this department. In the dialog Add X column(s) you see that the default is to add one column at the end of the table; then just click on Go, bringing up the following panel in which you type the new column's information:
Clicking on Save adds this column to your table. You can now browse the department table and notice that there is a new column, last_inspection, with all the dates set to 0000-00-00 as we did not set any default date.
Editing an existing row shows you a new icon: a small calendar. Clicking on it gives you a standard date picker, shown as follows:
You can also change an existing column's structure—for example, the description column becoming a VARCHAR(110)—but beware of the consequences, should you change the type or size of the column. Data truncation could happen.
Adding an index on the last_inspection column can be done quickly via the More menu that is offered for each column:
Fine-tuning indexes is accomplished via the Indexes section by using the Edit link for a specific index. Here you can add or remove columns from an index, or even change the number of characters a column uses in this index.
The popularity of Excel means that many people are familiar with this tool and they prefer to do the majority of their data manipulations in it. This task will describe extracting data with the goal of reading it back into Microsoft Excel. Note that any utility that understands the CSV (comma-separated values) format can be used to read the file generated in this task.
You'll first practice exporting in quick mode, and then you'll go through the custom mode for additional options.
Start by opening the department table and clicking Export, which brings up this panel:
As can be seen, the default export format is SQL because it permits you to quickly produce a complete backup of the table's structure and data. However for this task, you need to change the export format to CSV for MS Excel.
A pure CSV file should use Comma-Separated Values; however as Excel uses semicolons to delineate each value, phpMyAdmin produces a file containing semicolons. You can try this format by choosing it in the Format selector and clicking Go. Your browser offers to save the file or to open it with the default program associated with .csv files (depending on your workstation's OS). Here is what you can see after opening the file with Excel:
Note that in this quick export format, the column names do not appear; you’ll use the custom format to remediate to this.
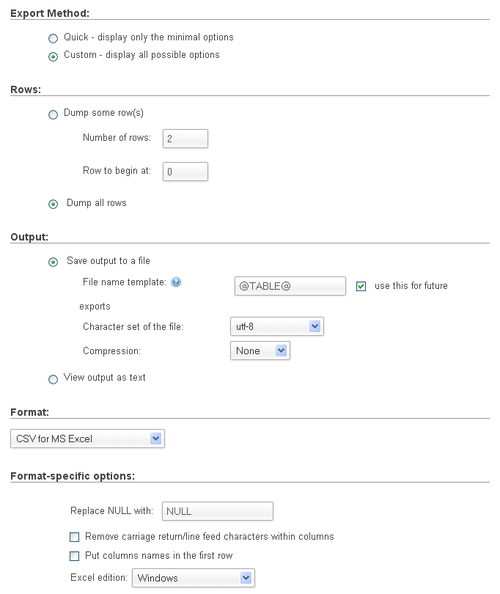
Contrary to the quick export format, the custom one offers many options. Some of these options (Rows, Output) are common for all export formats and some are adapted for each format.
Selecting CSV for MS Excel, and then choosing Custom produces the following panel:
The Rows section enables you to choose to Dump (export) just some rows (with the number of rows and starting row) or all rows.
The Output section permits you to either save output to a file (with a choice of character set and compression) or to view the output as text (which would not save anything but can be useful in case the output format can be interpreted as text — this happens to work with the CSV format).
Next, the format-specific options vary according to the chosen format. Here, the option most likely to be changed would be Put column names in the first row. This would help the person opening the CSV file in Excel to see column headers indicating the original column names.
There is also a selector to pick up which Excel edition is the target for this file (Windows, Mac).
Making relations between tables is very useful. Let's just consider the benefits of defining relations when manipulating tables via phpMyAdmin:
The native way in MySQL to define relations is via the FOREIGN KEY constraints (more details at http://dev.mysql.com/doc/refman/5.5/en/innodb-foreign-key-constraints.html). These constraints are available with the InnoDB storage engine; this is why we created our tables under this engine.
In this task, you'll begin with exploring what can be done with relations using just what MySQL offers natively; then you'll learn the additional possibilities offered by phpMyAdmin, thanks to its configuration storage mechanism.
The goal here is to make a relation between the dept_id column of the item table and the id column of the department table; this is because a department should exist before you use it in the item table. In InnoDB vocabulary, the foreign key for item.dept_id will be department.id.
You first open the item table on its Structure page and then click on Relation view. This produces the following panel:
InnoDB requires that all columns referring to a foreign key or referred to as a foreign key, have an index defined. So you must go back to the Structure page for item and, for the dept_id column, use the More selector and choose Add index:
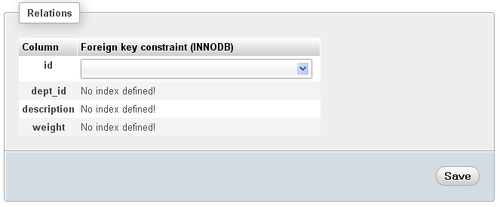
Going back to the Relation view, you can now choose for dept_id the appropriate column department.id. Choosing it makes other selectors appear as well:
The ON DELETE and ON UPDATE are foreign key options; they are explained in the aforementioned MySQL documentation page. For now you'll just keep the default values and click on Save.
At this point, everything went fine because your data respected the constraint (department IDs existed in the department table).
You can immediately see a benefit of the relation by trying to Insert a new item; the possible department IDs appear in a drop-down selector:
More options can be made available if your installation has the phpMyAdmin configuration storage deployed. In short, this is a special set of tables that contain metadata about various configuration elements. For example, we would like to see the department name in the drop-down selector, when we insert or edit an item. Thus, the metadata called display column is offered in the phpMyAdmin configuration storage, to hold which column best describes each row. Details about installing the configuration storage appear in Documentation.html. The remaining segments of this task assume that the configuration storage has been installed.
With this in place, you can open the department table in Structure page, click Relation view, and pick the column to display, which is description:
After clicking on Save, you can now open the item table in Insert mode and see the difference, shown as follows:
If too many rows were present in the referenced table, an icon would be offered instead of a drop-down. This icon would open a distinct panel to select among the values, with pagination and search capabilities.
Another handy feature made available by the configuration storage is the Designer. In this panel, available from the database menu, you can define the relations graphically, move the tables around on the workspace, and save their coordinates in order to produce a PDF schema of the relations. The following is an image of the Designer's workspace:
If you need help with phpMyAdmin, here are some people and places which will prove invaluable.
Documentation.html is the current documentation for your version and is included in the downloaded kit)for developers of phpMyAdmin: https://lists.sourceforge.net/lists/listinfo/phpmyadmin-devel
https://sourceforge.net/projects/phpmyadmin/forums/forum/72909 http://www.facebook.com/pages/PhpMyAdmin/157021164334486Marc Delisle was awarded "MySQL Community Member of the year 2009" because of his involvement with phpMyAdmin. He started to contribute to the project in December 1998, when he made the multi-language version. He is still involved with phpMyAdmin as a developer and project administrator.
Marc is a system administrator at Cegep de Sherbrooke, Québec, Canada. He has been teaching networking, security, and web application development. In one of his classes, he was pleased to meet a phpMyAdmin user from Argentina. Marc lives in Sherbrooke with his wife and they enjoy spending time with their four children.
Michal Čihař was born in 1980 in Prague, the capital city of the Czech Republic, and he is still living there. He studied Software Engineering at the Czech Technical University, and during these studies he started contributing to several free software projects, with the biggest contributions being made to phpMyAdmin and Gammu, and related projects. He currently works for SUSE, mostly on the SUSE Linux Enterprise platform.
Michal has been active in the phpMyAdmin project since 2001, when he started as a translator for the Czech language, later moving to a developer role (working, for example, on index manipulation, and export and import subsystems), and since 2010 he has also acted as a secondary project manager.